Configuring Network Settings
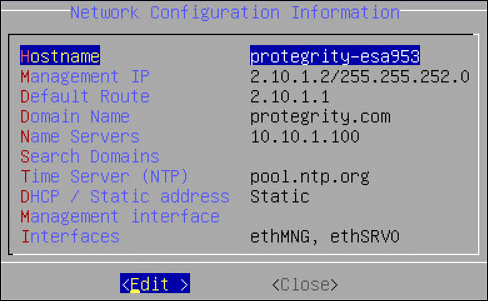
When this option is selected, network configuration details added during installation are displayed. The network connection for the appliance are displayed. You can modify the network configuration as per the requirements.

Changing Hostname
The hostname of the appliance can be changed.Ensure that the hostname does not contain the dot(.) special character.
To change the hostname:
Login to the Appliance CLI Manager.
Navigate to Networking > Network Settings.
Select Hostname and select Edit.
In the Set Hostname field, enter a new hostname.
Select OK.
The hostname is changed.
Configuring Management IP Address
You can configure the management IP address for your appliance from the networking screen.
To configure the management IP address:
Login to the Appliance CLI Manager.
Navigate to Networking > Network Settings.
Select Management IP and select Edit.
In the Enter IP field, enter the IP address for the management NIC.
In the Enter Netmask field, enter the subnet for the management NIC.
Select OK.
The management IP is configured.
Configuring Default Route
The default route is a setting that defines the packet forwarding rule for a specific route. This parameter is required only if the appliance is on a different subnet than the Web UI or for the NTP service connection. If necessary, then request the default gateway address from your network administrator and set this parameter accordingly.
The default route is a setting that defines the packet forwarding rule for a specific route. The default route is the first IP address of the subnet for the management interface.
To configure the default route:
Login to the Appliance CLI Manager.
Navigate to Networking > Network Settings.
Select Default Route and press Edit.
Enter the default route and select Apply.
Configuring Domain Name
You can configure the domain name for your appliance from the networking screen.
To configure the domain name:
Login to the Appliance CLI Manager.
Navigate to Networking > Network Settings.
Select Domain Name and select Edit.
In the Set Domain Name field, enter the domain name.
Select Apply.
The domain name is configured.
Configuring Search Domain
You can configure a domain name that is used as in the domain search list.
To configure the search domain:
Login to the Appliance CLI Manager.
Navigate to Networking > Network Settings.
Select Search Domains and select Edit.
In the Search Domains dialog box, select Edit.
In the Edit search domain field, enter the domain name and select OK.
Select Add to add another search domain.
Select Remove to remove a search domain.
Configuring Name Server
You can configure the IP addresses for your domain name.
To configure the domain IP address:
Login to the Appliance CLI Manager.
Navigate to Networking > Network Settings.
Select Name Servers and select Edit.
In the Domain Name Servers dialog box, select Edit to modify the server IP address.
Select Remove to delete the domain IP address.
Select Add to add another domain IP address.
In the Add new nameserver field, enter the domain IP address and select OK.
The IP address for the domain is configured.
Assigning a Default Gateway to the NIC
To assign a default gateway to the NIC:
Login to the Appliance CLI Manager.
Navigate to Networking > Network Settings.
Select Interfaces and select Edit.
The Network Interfaces dialog box appears.
Select the interface for which you want to add a default gateway.
Select Edit.
Select Gateway.
The Gateway Settings dialog box appears.
In the Set Default Gateway for Interface ethMNG field, enter the Gateway IP address and select Apply.
Selecting Management NIC
When you have multiple NICs, you can specify the NIC that functions as a management interface.
To select the management NIC:
Login to the Appliance CLI Manager.
Navigate to Networking > Network Settings.
Select Management interface and select Edit.
Select the required NIC.
Select Select.
The management NIC is changed.
Changing the Management IP on ethMNG
Follow these instructions to change the management IP on ethMNG. Be aware, changes to IP addresses are immediate. Any changes to the management IP, on ethMNG, while you are connected to CLI Manager or Web UI will cause the session to disconnect.
To change the management IP on ethMNG:
Login to the Appliance CLI Manager.
Navigate to Networking > Network Settings.
Select Interfaces and select Edit.
The Network Interfaces screen appears.
Select ethMNG and click Edit.
Select the network type and select Update.
In the Interface Settings dialog box, select Edit.
Enter the IP address and net mask.
Select OK.
At the prompt, press ENTER to confirm.
The IP address is updated, and the Address Management screen appears.
Identifying an Interface
To identify an interface:
Login to the Appliance CLI Manager.
Navigate to Networking > Network Settings.
Select Interfaces and select Edit.
The Network Interfaces screen appears.
Select the network interface and select Blink.
This causes an LED on the NIC to blink and the Network Interfaces screen appears.
Adding a service interface address
From ESA v9.0.0.0, the default IP addresses assigned to the docker interfaces are between 172.17.0.0/16 and 172.18.0.0/16. Ensure that the IP addresses assigned to the docker interface must not conflict with your organization’s private/internal IP addresses.
For more information about reconfiguring the docker interface addresses, refer to Configuring the IP address for the Docker Interface.
Be aware, changes to IP addresses are immediate.
To add a service interface address:
Login to the Appliance CLI Manager.
Navigate to Networking > Network Settings.
Select Interfaces and select Edit.
The Network Interfaces screen appears.
Navigate to the service interface to which you want to add an address and select Update.
Select Add.
At the prompt, type the IP address and the netmask.
Press ENTER.
The address is added, and the Address Management screen appears.