This is the multi-page printable view of this section. Click here to print.
Installation
- 1: Overview of installation
- 2: System Requirements
- 3: Partitioning of Disk on ESA
- 4: Installing the ESA On-Premise
- 5: Configuring the ESA
- 6: Installing ESA on Cloud Platforms
- 7: Initializing the Policy Information Management (PIM) Module
- 8: Configuring the ESA in a Trusted Appliances Cluster (TAC)
- 9: Creating an Audit Store Cluster
- 10: Verifying the ESA installation from the Web UI
1 - Overview of installation
Audience
The installation steps is intended for the following stakeholders:
- Security professionals like security officers who are responsible for protecting business systems in organizations. They plan and ensure execution of security arrangement for their organization.
- System administrators and other technical personnel who are responsible for implementing data security solutions in their organization.
- System Architects who are responsible for providing expert guidance in designing, development and implementation of enterprise data security solution architecture for their business requirements.
Protegrity Data Security Platform
The Protegrity Data Security Platform is a comprehensive source of enterprise data protection solutions. Its design is based on a hub and spoke deployment architecture.
The Protegrity Data Security Platform has following components:
Enterprise Security Administrator (ESA) – that handles the management of policies, keys, monitoring, auditing and reporting of protected systems in the enterprise.
Data Protectors – that protect sensitive data in the enterprise and deploy security policy for enforcement on each installed system. Policy is deployed from ESA to the Data Protectors. The Audit Logs of all activity on sensitive data are reported and stored in the Audit Store cluster on the ESA.
General Overview
The following diagram shows the general overview of various Protegrity products.

2 - System Requirements
The following table lists the supported components and their compatibility settings.
| Component | Compatibility |
|---|---|
| Application Protocols | HTTP 1.0, HTTP 1.1, SSL/TLS |
| WebServices | SOAP 1.1 and WSDL 1.1 |
| Web Browsers | Minimum supported Web Browser versions are as follows: - Google Chrome version 129.0.6668.58/59 (64-bit) - Mozilla Firefox version 130.0.1 (64-bit) or higher - Microsoft Edge version 128.0.2739.90 (64-bit) |
The following table lists the minimum hardware configurations.
| Hardware Components | Configuration |
|---|---|
| CPU | Multicore Processor, with minimum 8 CPUs |
| RAM | 32 GB |
| Hard Disk | 320 GB |
| CPU Architecture | x86 |
Certificate Requirements
Certificates are used for secure communication between the ESA and protectors. The certificate-based communication and authentication involves a client certificate, server certificate, and a certifying authority that authenticates the client and server certificates.
The various components within the Protegrity Data Security Platform that communicate with and authenticate each other through digital certificates are:
- ESA Web UI and ESA
- Insight
- ESA and Protectors
- Protegrity Appliances and external REST clients
Protegrity client and server certificates are self-signed by Protegrity. However, you can replace them by certificates signed by a trusted and commercial CA. These certificates are used for communication between various components in ESA.
Licensing Requirements
Ensure that a valid license is available before upgrading. After migration, if the license status is invalid, then contact Protegrity Support.
3 - Partitioning of Disk on ESA
BIOS is amongst the oldest systems used as a boot loader to perform the initialization of the hardware. UEFI is a comparatively newer system that defines a software interface between the operating system and the platform firmware. The UEFI is more advanced than the BIOS and most of the systems are built with support for UEFI and BIOS.
Disk Partitioning is a method of dividing the hard drive into logical partitions. When a new hard drive is installed on a system, the disk is segregated into partitions. These partitions are utilized to store data, which the operating system reads in a logical format. The information about these partitions is stored in the partition table.
There are two types of partition tables, the Master Boot Record (MBR) and the GUID Partition Table (GPT). These form a special boot section in the drive that provides information about the various disk partitions. They help in reading the partition in a logical manner.
Depending on the requirements, you can extend the size of the partitions in a physical volume to accommodate all the logs and other ESA related data. You can utilize the Logical Volume Manager (LVM) to increase the partitions in the physical volume. Using LVM, you can manage hard disk storage to allocate, mirror, or resize volumes.
In ESA, the physical volume is divided into the following three logical volume groups:
| Partition | Description |
|---|---|
| Boot | Contains the boot information. |
| PTYVG | Contains the files and information about OS and logs. |
| Data Volume Group | Contains the data that is in the /opt directory. |
4 - Installing the ESA On-Premise
1. Starting the installation
To install the ESA:
Insert the ESA installation media in the system disk drive.
Boot the system from the disk drive.
The following screen appears.
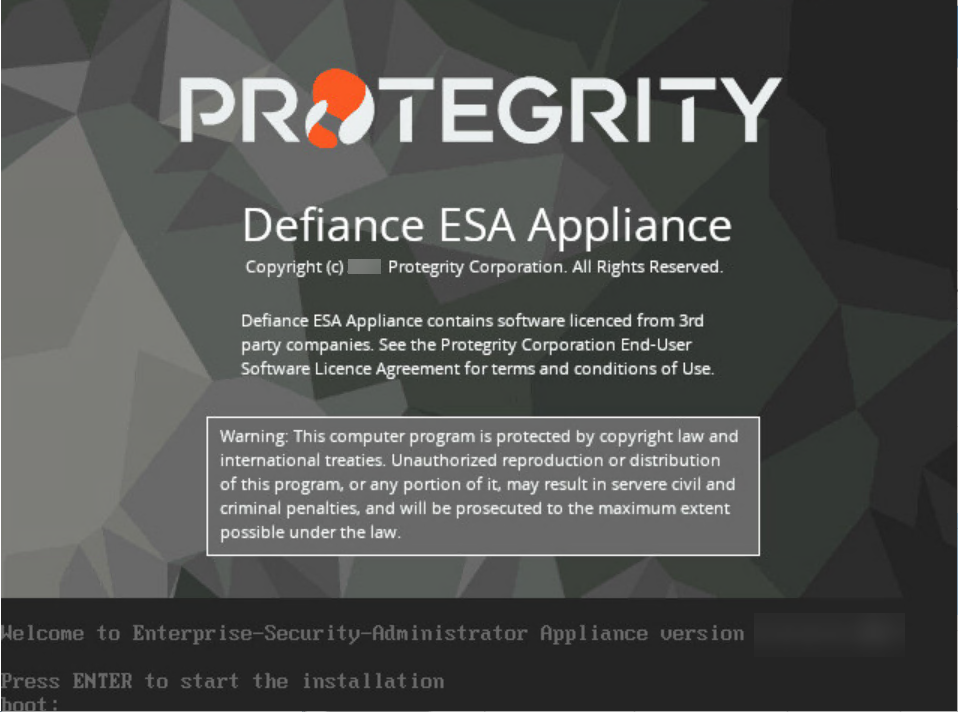
Press ENTER to start the installation.
The following screen appears.

The system will detect the number of hard drives that are present. If there are multiple hard drives, then it will allow you to choose the hard drive where you want to install the OS partition and the /opt partition.
If there are multiple hard drives, then the following screen appears.

For storing the operating system-related data, select the hard drive where you want to install the OS partition and select OK.
The following screen appears.

For storing the logs, configuration data, and so on select the hard drive where you want to install the /opt partition and select OK.
2. Selecting Network Interface Cards (NICs)
The Network Interface Card (NIC) is a device through which appliances, such as, the ESA or the DSG, connect to each other on a network. You can configure multiple network interface cards (NICs) on the appliance.
The ethMNG interface is generally used for managing the appliance and ethSRV interface is used for binding the appliances for using other services.
For example, the appliance can use the ethMNG interface for the ESA Web UI and the ethSRV interface for enabling communication with different applications in an enterprise.
The following task describes how to select management interfaces.
To select multiple NICs:
If there are multiple NICs, then the following screen appears.

Select the required NIC for management interface.
Choose Select and press ENTER.
3. Configuring Network Settings
After selecting the NIC for management, you configure the network for the ESA. During the network configuration, the system tries to connect to a DHCP server to obtain the hostname, default gateway, and IP addresses for the ESA. If the DHCP is not available, then you can configure the network information manually.
To configure the network settings:
If the DHCP server is configured, then the following screen containing the network information appears.

If the DHCP server is not available, then the following screen appears.

The Network Configuration Information screen appears.
Select Manual and press ENTER.
The following screen appears.

Select DHCP / Static address to configure the DHCP / Static address for the ESA and choose Edit.
Select Static address and choose Update.
If you want to change the hostname of the ESA, then perform the following steps.
- Select Hostname and select Edit.
- Change the Hostname and select OK.
Select Management IP to configure the management IP address for the ESA and choose Edit.

- Add the IP address assigned to the ethMNG interface. This IP address configures the ESA to use the Web UI.
- Enter the Netmask. The ethMNG interface must be connected to the LAN with this Netmask value.
- Select OK.
Select Default Route to configure the default route for the ESA and press Edit.

- Enter the IP address for the default network traffic.
- Select Apply.
Select Domain Name and press Edit.

- Enter the Domain Name. For example, protegrity.com.
- Press Apply.
Select Name Servers and press Edit.

- Add the IP address of the name server.
- Press OK.
If you want to configure the NTP, then perform the following steps.
- Select Time Server (NTP), and press Edit.
- Add NTP time server on a TCP/IP network.
- Select Apply.
Select Apply.
The network settings are configured.
4. Configuring Time Zone
After you configure the network settings, the Time Zone screen appears. This section explains how to set the time zone.
To set the Time Zone:
On the Time Zone screen, select the time zone.

Press Next.
The time zone is configured.
5. Configuring the Nearest Location
After configuring the time zone, the Nearest Location screen appears.
To Set the Nearest Location:
On the Nearest Location screen, enter the nearest location in GMT or UTC.

Press OK.
The following screen appears.

This screen also allows you to update the default settings of date and time, keyboard manufacturer, keyboard model, and keyboard layout.
6. Updating the Date and Time
To Update the Date and Time:
Press SPACE and select Update date and time.
Press ENTER.
The following screen appears.

Select the date.
Select Set Date and press ENTER.
The next screen appears.

Set the time.
Click Set Time and press ENTER.
The date and time settings are configured.
7. Updating the Keyboard Settings
To Update the Keyboard Settings:
Select Update Keyboard or Console settings.
Press ENTER.
Select the vendor and press the SPACEBAR.

Select Next.
If you select Generic, then a window with the list of generic keyboard models appears.
Select the model you use and press Next.

On the next window, select the keyboard language. The default is English (US).

Select Next.
On the next window, select the console font. The default is Lat15-Fixed16.

Press Next.
A confirmation message appears.
Press OK to confirm.

8. Configuring GRUB Settings
On the ESA, GRUB version 2 (GRUB2) is used for loading the kernel. If you want to protect the boot configurations, then you can secure it by enforcing a username and password combination for the GRUB menu.
During installation for the ESA on-premise, a screen to configure GRUB credentials appears. If you want to protect the boot configurations, then you can secure it by enforcing a username and password combination for the GRUB menu. While installing the ESA v9.2.0.0, you can secure the GRUB menu by creating a username and setting password as described in the following task.
To configure GRUB settings:
From the GRUB Credentials page, press the SPACEBAR to select Enable.

By default the Disable is selected. If you continue to choose Disable, then the security for the GRUB menu is disabled. It is recommended to enable GRUB to secure the ESA.
You can enable this feature from the CLI Manager after the installation is completed. On the CLI Manager, navigate to Administration > GRUB Credential Settings to enable the GRUB settings.
For more information about GRUB, refer to the section Securing the GRand Unified Bootloader (GRUB).
Select OK.
The following screen appears.

Enter a username in the Username text box.
Note:
The requirements for the Username are as follows:
- It should contain a minimum of three and maximum of 16 characters
- It should not contain numbers and special characters
Enter a password in the Password and Re-type Password text boxes.
Note:
The requirements for the Password are as follows:
- It must contain at least eight characters
- It must contain a combination of alphabets, numbers, and printable characters
Select OK and press ENTER.
A message
Credentials for the GRUB menu has been set successfullyappears.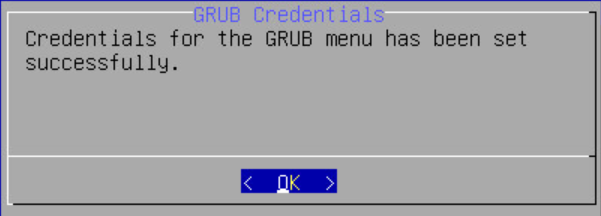
Select OK.
9. Setting up Users and Passwords
Only authorized users can access the ESA. The Protegrity Data Security Platform defines a list of roles for each user who can access the ESA. These are system users and LDAP administrative users who have specific roles and permissions. When you install the ESA, the default users configured are as follows:
- root: Super user with access to all commands and files.
- admin: User with administrative privileges to perform all operations.
- viewer: User who can view, but does not have edit permissions.
- local_admin: Local administrator that can be used when the admin user is not accessible.
After completing the server settings, the Users Passwords screen appears that allows you set the passwords for the users.

To set the LDAP Users Passwords:
Add the passwords of the users.
Note: Ensure that the passwords for the users comply with the password polices.
For more information about the password policies, refer to the section Password Policy Configuration in the Protegrity Enterprise Security Administrator Guide 9.2.0.0.
Select Apply.
The user passwords are set.
10. Licensing
After the ESA components are installed, the Temporary License screen appears. This system takes time. It is recommended to wait for few minutes before proceeding.
Note: After the ESA is installed, you must apply for a valid license within 30 days.

For more information about licenses, refer Licensing.
11. Installing Products
In the final steps of installing the ESA, you are prompted to select the components to install.
To select products to install:
Press space and select the necessary products to install the following products.

Click OK.
The selected products are installed.
After installation is completed, the following screen appears.

Select Continue to view the CLI Login screen.
5 - Configuring the ESA
Configuring authentication settings
User authentication is the process of identifying someone who wants to gain access to a resource. A server contains protected resources that are only accessible to authorized users. When you want to access any resource on the server, the server uses different authentication mechanism to confirm your identity.
You can configure the authentication using for the following methods.
Configuring accounts and passwords
You can change your current password from the CLI Manager. The CLI Manager includes options to change passwords and permissions for multiple users.
For more information on configuring accounts and passwords, refer to section Accounts and Passwords Management.
Configuring Syslog
The Appliance Logs are available for Protegrity Appliances, such as, the ESA or the DSG. The Appliance Logs tool can be differentiated into appliance common logs and appliance-specific logs. Syslog is a log type that is common for all appliances.
For more information about configuring syslog, refer the section Working with Logs.
Configuring external certificates
External certificates or digital certificates are used to encrypt online communications securely between two entities over the Internet. It is a digitally signed statement that is used to assert the online identities of individuals, computers, and other entities on the network, utilizing the security applications of Public Key Infrastructure (PKI). Public Key Infrastructure (PKI) is the standard cryptographic system that is used to facilitate the secure exchange of information between entities.
For more information on configuring certificates, refer here.
Configuring SMTP
The Simple Mail Transfer Protocol (SMTP) setting allows the system to send emails. You can set up an email server that supports the notification features in Protegrity Reports.
To configure SMTP from Web UI:
Login to the ESA.
Navigate to Settings > Network.
Click the SMTP Settings tab.
The following screen appears.

For more information about configuring SMTP, refer Email Setup.
Configuring SNMP
Using Simple Network Management Protocol (SNMP), you can query the performance data.
By default, due to security reasons, the SNMP service is disabled. To enable the service and provide its basic configuration (listening address, community string) you can use the SNMP tool available in the CLI Manager.
To initialize SNMP configuration:
Login to the CLI Manager.
Navigate to Networking > SNMP Configuration.
Enter the root password to execute the SNMP configuration and click OK.
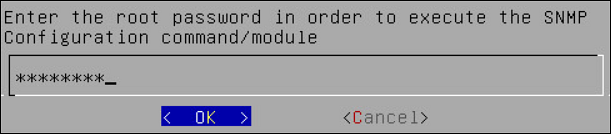
The following screen appears.

You can also start the SNMP Service from the Web UI. Navigate to System > Services to start the SNMP service.
For more information about configuring SNMP, refer Configure SNMP.
6 - Installing ESA on Cloud Platforms
This section describes installing the ESA on Cloud platforms, such as, Amazon Web Services (AWS), Azure, or Google Cloud Platform (GCP). For installing the ESA on cloud platforms, you must mount the image containing the ESA on a cloud instance or a virtual machine. After mounting the image, you must run the finalization procedure to install the ESA components.
Installing ESA on AWS
The following steps must be completed to run an ESA on AWS:
- Verifying the prerequisites.
- Obtaining the AMI.
- Creating an instance of the ESA from the AMI.
- Configuring the various inbound and outbound ports in the VPC.
- Logging to the AWS instance using the SSH Client.
- Finalizing the AWS instance.
- Logging into ESA.
Installing ESA on Azure
The following steps must be completed to run an ESA on Azure:
- Verifying the prerequisites.
- Creating a Resource Group.
- Creating a Storage Account.
- Creating a Container.
- Obtaining the Azure BLOB.
- Create an image from the BLOB.
- Create a VM from the image.
- Accessing the ESA.
- Finalizing the installation of ESA on the instance.
- Logging into ESA.
Installing ESA on GCP
The following steps must be completed to run an ESA on GCP:
7 - Initializing the Policy Information Management (PIM) Module
To initialize the PIM module:
In a web browser, enter the ESA IP address in the window task bar.
Enter the Username and Password.
Click Sign in.
The ESA dashboard appears.
Navigate to Policy Management > Dashboard.
The following screen to initialize PIM appears.

Click Initialize PIM.
A confirmation message appears.
Click OK.
The Policy management screen appears.
8 - Configuring the ESA in a Trusted Appliances Cluster (TAC)
The following figure illustrates the TAC setup.

TAC is established between the primary ESA A and the secondary ESAs, ESA B and ESA C.
For more information about TAC, refer here.
Data replication for policies, forensics, or DSG configuration takes place between all the ESAs.
For more information about replication tasks, refer here.
The Audit Store cluster is enabled for the ESAs.
For more information about enabling Audit Store Cluster, refer here.
All the ESAs are added as a part of the Audit Store Cluster.
For more information about adding an ESA to the Audit Store Cluster, refer here.
9 - Creating an Audit Store Cluster
The Audit Store cluster is a collection of nodes that process and store data. The Audit Store is installed on the ESA nodes. The logs generated by the Appliance, such as, ESA or DSG, and Protector machines are stored in this Audit Store. The logs are useful for obtaining information about the nodes and the cluster on the whole. The logs can also be monitored for any data loss, system compromise, or any other issues with the nodes in the Audit Store cluster.
An Audit Store cluster must have a minimum of three nodes with the Master-eligible role due to following scenarios:
- 1 master-eligible node: If only one node with the Master-eligible role is available, then it is elected the Master, by default. In this case, if the node becomes unavailable due to some failure, then the cluster becomes unstable as there is no additional node with the Master-eligible role.
- 2 master-eligible nodes: A cluster where only two nodes have the Master-eligible role, then both have the Master-eligible role at the minimum to be up and running for the cluster to remain functional. If any one of those nodes becomes unavailable due to some failure, then the minimum condition for the nodes with the Master-eligible role is not met and cluster becomes unstable. This setup is not recommended for a multi-node cluster.
- 3 master-eligible nodes and above: In this case, if any one node goes down, then the cluster can still remain functional because the cluster requires a minimum of two nodes with the Master-eligible role.
Completing the Prerequisites
Ensure that the following prerequisites are met before configuring the Audit Store Cluster. Protegrity recommends that the Audit Store Cluster has a minimum of three ESAs for creating a highly-available multi-node Audit Store cluster.
Prepare and set up three v10.0.x ESAs.
Create the TAC on the first ESA. This will be the Primary ESA.
Add the remaining ESAs to the TAC. These will be the secondary ESAs in the TAC. For more information about installing the ESA, refer here.
Creating the Audit Store Cluster on the ESA
Initialize the Audit Store only on the first ESA or the Primary ESA in the TAC. This also configures Insight to retrieve data from the Audit Store. Additionally, the required processes, such as, td-agent, is started and Protegrity Analytics is initialized. The Audit Store cluster is initialized on the local machine so that other nodes can join this Audit Store cluster.
Perform the following steps to initialize the Audit Store.
Log in to the ESA Web UI.
Navigate to Audit Store > Initialize Analytics.
The following screen appears.

Click Initialize Analytics.
Protegrity Analytics is now configured and retrieves data for the reports from the Audit Store. The Index Lifecycle Management screen is displayed. The data is available on the Audit Store > Dashboard tab.

Verify that the following Audit Store services are running by navigating to System > Services:
- Audit Store Management
- Audit Store Repository
- Audit Store Dashboards
- Analytics
- td-agent
Adding an ESA to the Audit Store Cluster
Add multiple ESAs to the Audit Store cluster to increase the cluster size. In this case, the current ESA is added as a node in the Audit Store cluster. After the configurations are completed, the required processes are started and the logs are read from the Audit Store cluster.
The Audit Store cluster information is updated when a node joins the Audit Store cluster. This information is updated across the Audit Store cluster. Hence, nodes must be added to an Audit Store cluster one at a time. Adding multiple nodes to the Audit Store at the same time using the ESA Web UI would make the cluster information inconsistent, make the Audit Store cluster unstable, and would lead to errors.
Ensure that the following prerequisites are met:
- Ensure that the SSH Authentication type on all the ESAs is set to Password + PublicKey. For more information about setting the authentication, refer here.
- Ensure that the Audit Store cluster is initialized on the node that must be joined.
- The health status of the target Audit Store node is green or yellow.
- The health status of the Audit Store node that must be added to the cluster is green or yellow.
To check the health status of a node, log in to ESA Web UI of the node, click Audit Store > Cluster Management > Overview, and view the Cluster Status from the upper-right corner of the screen. For more information about the health status, refer here.
Log in to the Web UI of the second ESA.
Navigate to Audit Store > Initialize Analytics.
The following screen appears.
Click Join Cluster.
The following screen appears.

Specify the IP address or the hostname of the Audit Store cluster to join. Use hostname only if the hostname is resolved between the nodes.
Ensure that Protegrity Analytics is initialized and the Audit Store cluster is already created on the target node. A node cannot join the cluster if Protegrity Analytics is not initialized on the target node.
Specify the administrator username and password for the Audit Store cluster. If required, select the Clear cluster data check box to clear the Audit Store data from the current node before joining the Audit Store cluster. The check box will only be enabled if the node is a re-purposed ESA and has data, that is, if the Audit Store was earlier installed on the ESA.
Selecting this check box will delete the existing data on the re-purposed ESA before adding it to the Audit Store.
Click Join Cluster.
A confirmation message appears as shown in the following figure.

Click Dismiss.
The Index LIfecycle Management screen appears as shown in the following figure.
Repeat the steps to add the remaining ESAs as required. Add only one ESA at a time. After adding the ESA, wait till the cluster becomes stable. The cluster is stable when the cluster status indicator turns green.
Verifying the Audit Store Cluster
View the Audit Store Management page to verify that the configurations were completed successfully using the steps provided here.
Log in to the ESA Web UI.
Navigate to the Audit Store > Cluster Management > Overview page.
Verify that the nodes are added to the cluster. The health of the nodes must be green.

Updating the Priority IP List for Signature Verification
Signature verification jobs run on the ESA and use the ESA’s processing time. Update the priority IP list for the default signature verification jobs after setting up the system. By default, the primary ESA will be used for the priority IP. If there are multiple ESAs in the priority list, then additional ESAs are available to process the signature verifications jobs. This frees up the Primary ESA’s processor to handle other important tasks.
For example, if the maximum jobs to run on an ESA is set to 4 and 10 jobs are queued to run on 2 ESAs, then 4 jobs are started on the first ESA, 4 jobs are started on the second ESA, and 2 jobs will be queued to run till an ESA job slot is free to accept and run the queued job.
For more information about scheduling jobs, refer here.
For more information about signature verification jobs, refer here.
Use the steps provided in this section to update the priority IP list.
Log in to the ESA Web UI.
Navigate to Audit Store > Analytics > Scheduler.
From the Action column, click the Edit icon (
 ) for the Signature Verification task.
Update the Priority IPs filed with the list of the ESAs available separating the IPs using commas.
Click Save.
Enter the root password, to apply the updates.
10 - Verifying the ESA installation from the Web UI
To verify the ESA installation from the Web UI:
Login to the ESA Web UI.
The ESA dashboard appears.
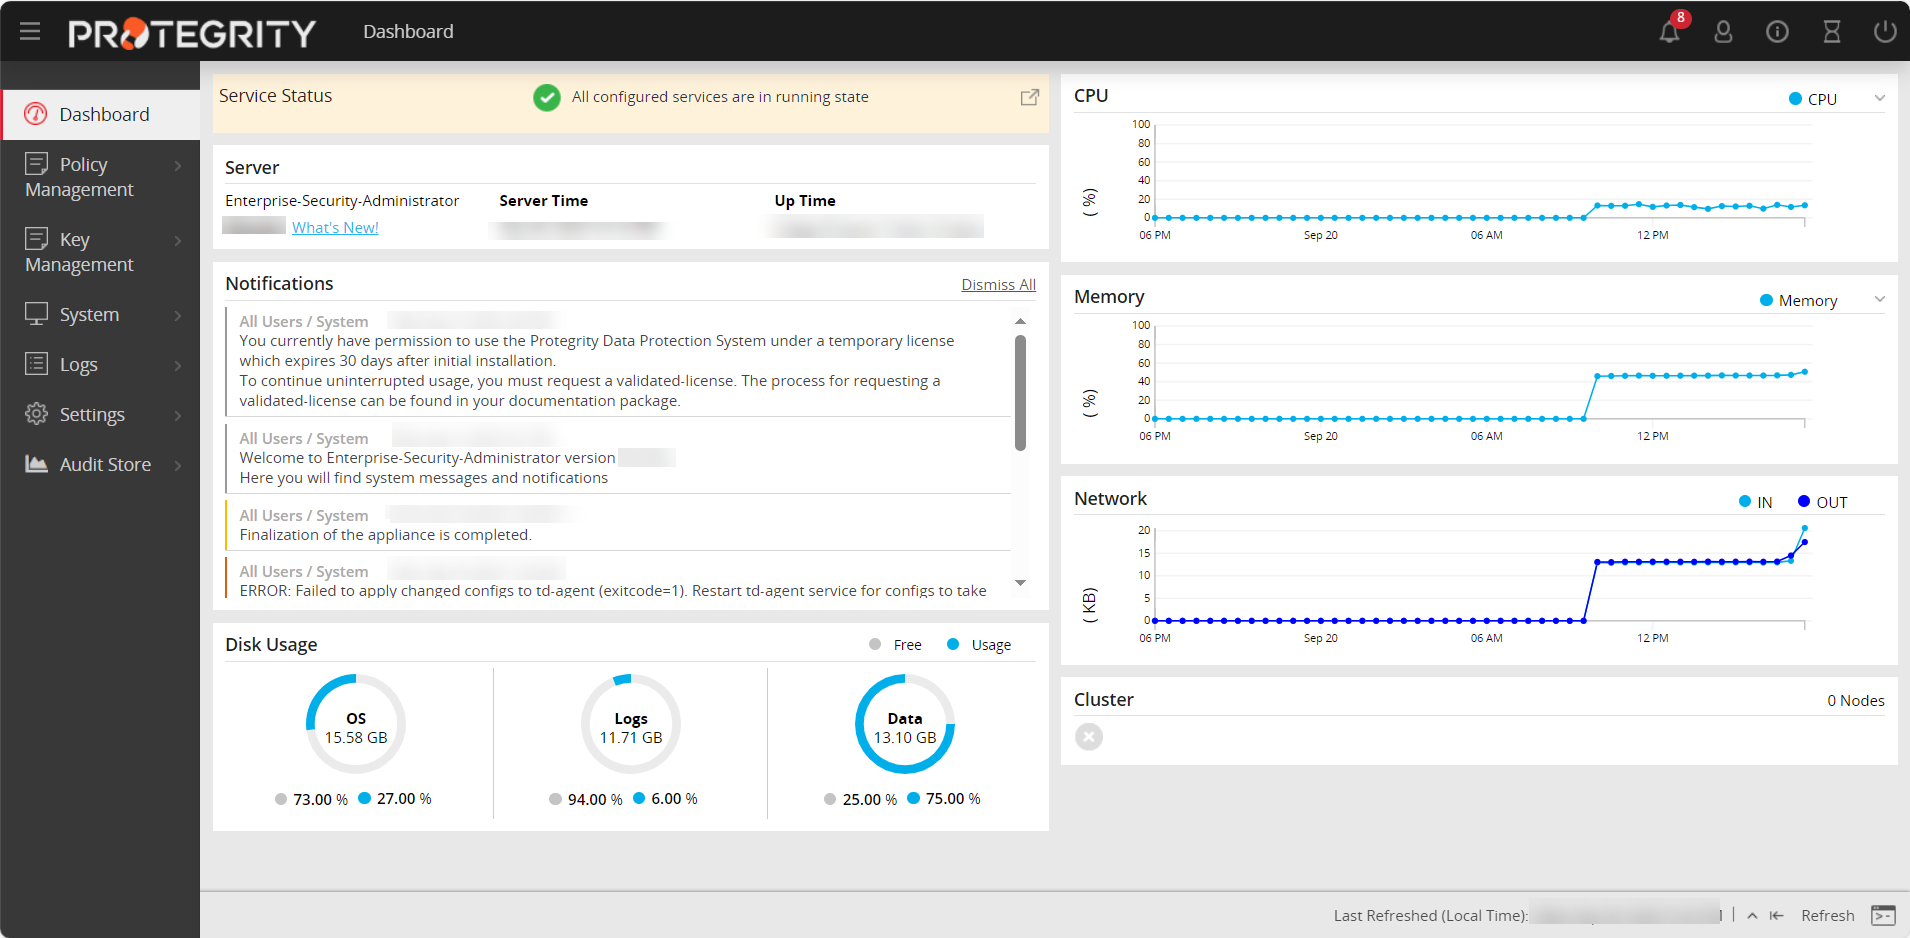
Navigate to System > Information.
The screen displaying the information of your system appears.
Under the Installed Patches area, the ESA_10.0.x entry appears.
Navigate to System > Services and ensure that all the required services are running.