This is the multi-page printable view of this section. Click here to print.
Restoring to the Previous Version of ESA
1 - Restoring to the previous version of ESA from a snapshot
In case of upgrade failure, restore it through the OS backup or by importing the backed up files.
1.1 - Restoring to the Previous Version of ESA on AWS
On AWS, data can be restored by creating a volume of a snapshot. After creating the snapshot, the EC2 instance can be attached to the volume.
Creating a Snapshot of a Volume on AWS
Perform the steps to create a snapshot of a volume:
On the EC2 Dashboard screen, click Volumes under the Elastic Block Store section.
The screen with all the volumes appears.
Right click on the required volume and select Create Snapshot.
The Create Snapshot screen for the selected volume appears.
Enter the required description for the snapshot in the Description text box.
Select click to add a Name tag to add a tag.
Enter the tag in the Key and Value text boxes.
Click Add Tag to add additional tags.
Click Create Snapshot.
A message Create Snapshot Request Succeeded along with the snapshot id appears.
- Ensure that you note the snapshot id.
- Ensure that the status of the snapshot is completed.
Restoring a Snapshot on AWS
Before you begin
- Ensure that the status of the instance is Stopped.
- Ensure that an existing volume on the instance is detached.
Perform the steps to restore a snapshot on AWS:
On the EC2 Dashboard screen, click Snapshots under the Elastic Block Store section.The screen with all the snapshots appears.
Right-click on the required snapshot and select Create Volume from snapshot.
The Create Volume screen appears.
Select the type of volume from the Volume Type drop-down list.
Enter the size of the volume in the Size (GiB) textbox.
Select the availability zone from the Availability Zone drop-down list.
Click Add Tag to add tags.
Click Create Volume.
A message Create Volume Request Succeeded along with the volume id appears. The volume with the snapshot is created.
Ensure to note the volume id.
Under the EBS section, click Volume.
The screen displaying all the volumes appears.
Right-click on the volume that is created.
The pop-up menu appears.
Select Attach Volume.
The Attach Volume dialog box appears.
Enter the Instance ID or name of the instance in the Instance text box.
Enter /dev/xvda in the Device text box.
Click the Attach to add the volume to an instance.
The snapshot is added to the EC2 instance as a volume.
1.2 - Restoring to the Previous Version of ESA on Azure
On Azure, data can be restored by creating a volume of a snapshot.
Creating a Snapshot of a Virtual Machine on Azure
Perform the steps to create a snapshot of a virtual machine:
Sign in to the Azure homepage.
On the Azure Dashboard screen, select Virtual Machine.The screen displaying the list of all the Azure virtual machines appears.
Select the required virtual machine.
The screen displaying the details of the virtual machine appears.On the left pane, under Settings, click Disks.
The details of the disk appear.
Select the disk and click Create Snapshot.
The Create Snapshot screen appears.
Enter the following information:
- Name: Name of the snapshot
- Subscription: Subscription account for Azure
Select the required resource group from the Resource group drop-down list.
Select the required account type from the Account type drop-down list.
Click Create.
The snapshot of the disk is created.
Restoring from a Snapshot on Azure
Perform the steps to restore a snapshot on Azure.
On the Azure Dashboard screen, select Virtual Machine.
The screen displaying the list of all the Azure virtual machines appears.
Select the required virtual machine.
The screen displaying the details of the virtual machine appears.
On the left pane, under Settings, click Disks.
Click Swap OS Disk.
The Swap OS Disk screen appears.
Click the Choose disk drop-down list and select the snapshot created.
Enter the confirmation text and click OK.
The machine is stopped and the disk is successfully swapped.
Restart the virtual machine to verify whether the snapshot is available.
1.3 - Restoring to the Previous Version of ESA on GCP
On GCP, data can be restored creating a volume of a snapshot.
Creating a Snapshot of a Disk on GCP
Perform the steps to create a snapshot of a disk:
On the Compute Engine dashboard, click Snapshots.
The Snapshots screen appears.
Click Create Snapshot.
The Create a snapshot screen appears.
Enter information in the following text boxes.
- Name - Name of the snapshot.
- Description – Description for the snapshot.
Select the required disk for which the snapshot is to be created from the Source Disk drop-down list.
Click Add Label to add a label to the snapshot.
Enter the label in the Key and Value text boxes.
Click Add Label to add additional tags.
Click Create.
- Ensure that the status of the snapshot is set to completed.
- Ensure that you note the snapshot id.
Restoring from a Snapshot on GCP
Perform the steps to restore a snapshot:
- Navigate to Compute Engine > VM instances.The VM instances screen appears.
- Select the required instance.
The screen with instance details appears. - Stop the instance.
- After the instance is stopped, click EDIT.
- Under the Boot Disk area, remove the existing disk.
- Click Add Item.
- Select the Name drop-down list and click Create a disk. The Create a disk screen appears.
- Under Source Type area, select the required snapshot.
- Enter the other details, such as, Name, Description, Type, and Size (GB).
- Click Create. The snapshot of the disk is added in the Boot Disk area.
- Click Save.The instance is updated with the new snapshot.
2 - Restoring to the Previous Version of ESA On-premise
To roll back the system to the previous version, perform the steps to restore the system.This helps in cases such as when an upgrade fails.
Perform the steps to restore to the previous version of the ESA on-premise.
- From the CLI Manager, navigate to Administration > Reboot And Shutdown > Reboot to restart your system.A screen to enter the reason for restart appears.
- Enter the reason and select OK.
- Enter the root password and select OK.
The appliance restarts and the following screen appears.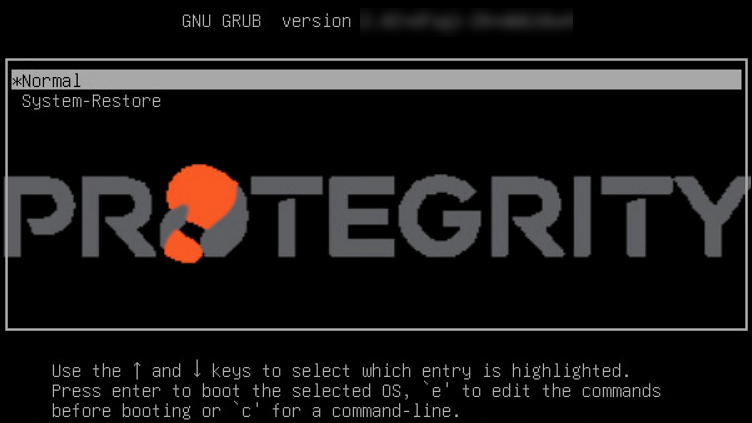
- Select System-Restore and press ENTER.
The Welcome to System Restore Mode screen appears.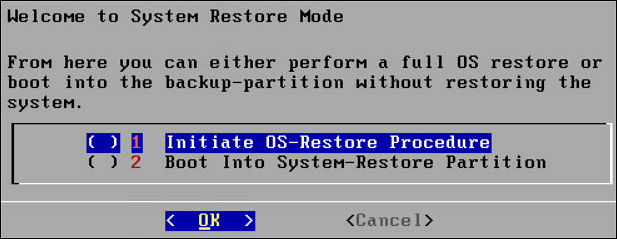
- Select Initiate OS-Restore Procedure and select OK.The restore procedure is initiated.
After the OS-Restore procedure is completed, the login screen appears.