Verifying signatures
The log entries having checksums are identified. These entries are then processed using the signature key and the checksum received in the log entry from the protector is checked. If both the checksum values match, then the log entry has not been tampered with. If a mismatch is found, then it might be possible that the log entry was tampered or there is an issue receiving logs from a protector. These can be viewed on the Discover screen by using the following search criteria.
logtype:verification
The Signature Verification screen is used to create jobs. These jobs can be run as per a schedule using the scheduler.
For more information about scheduling signature verification jobs, refer here.
To view the list of signature verification jobs created, from the Analytics screen, navigate to Signature Verification > Jobs.

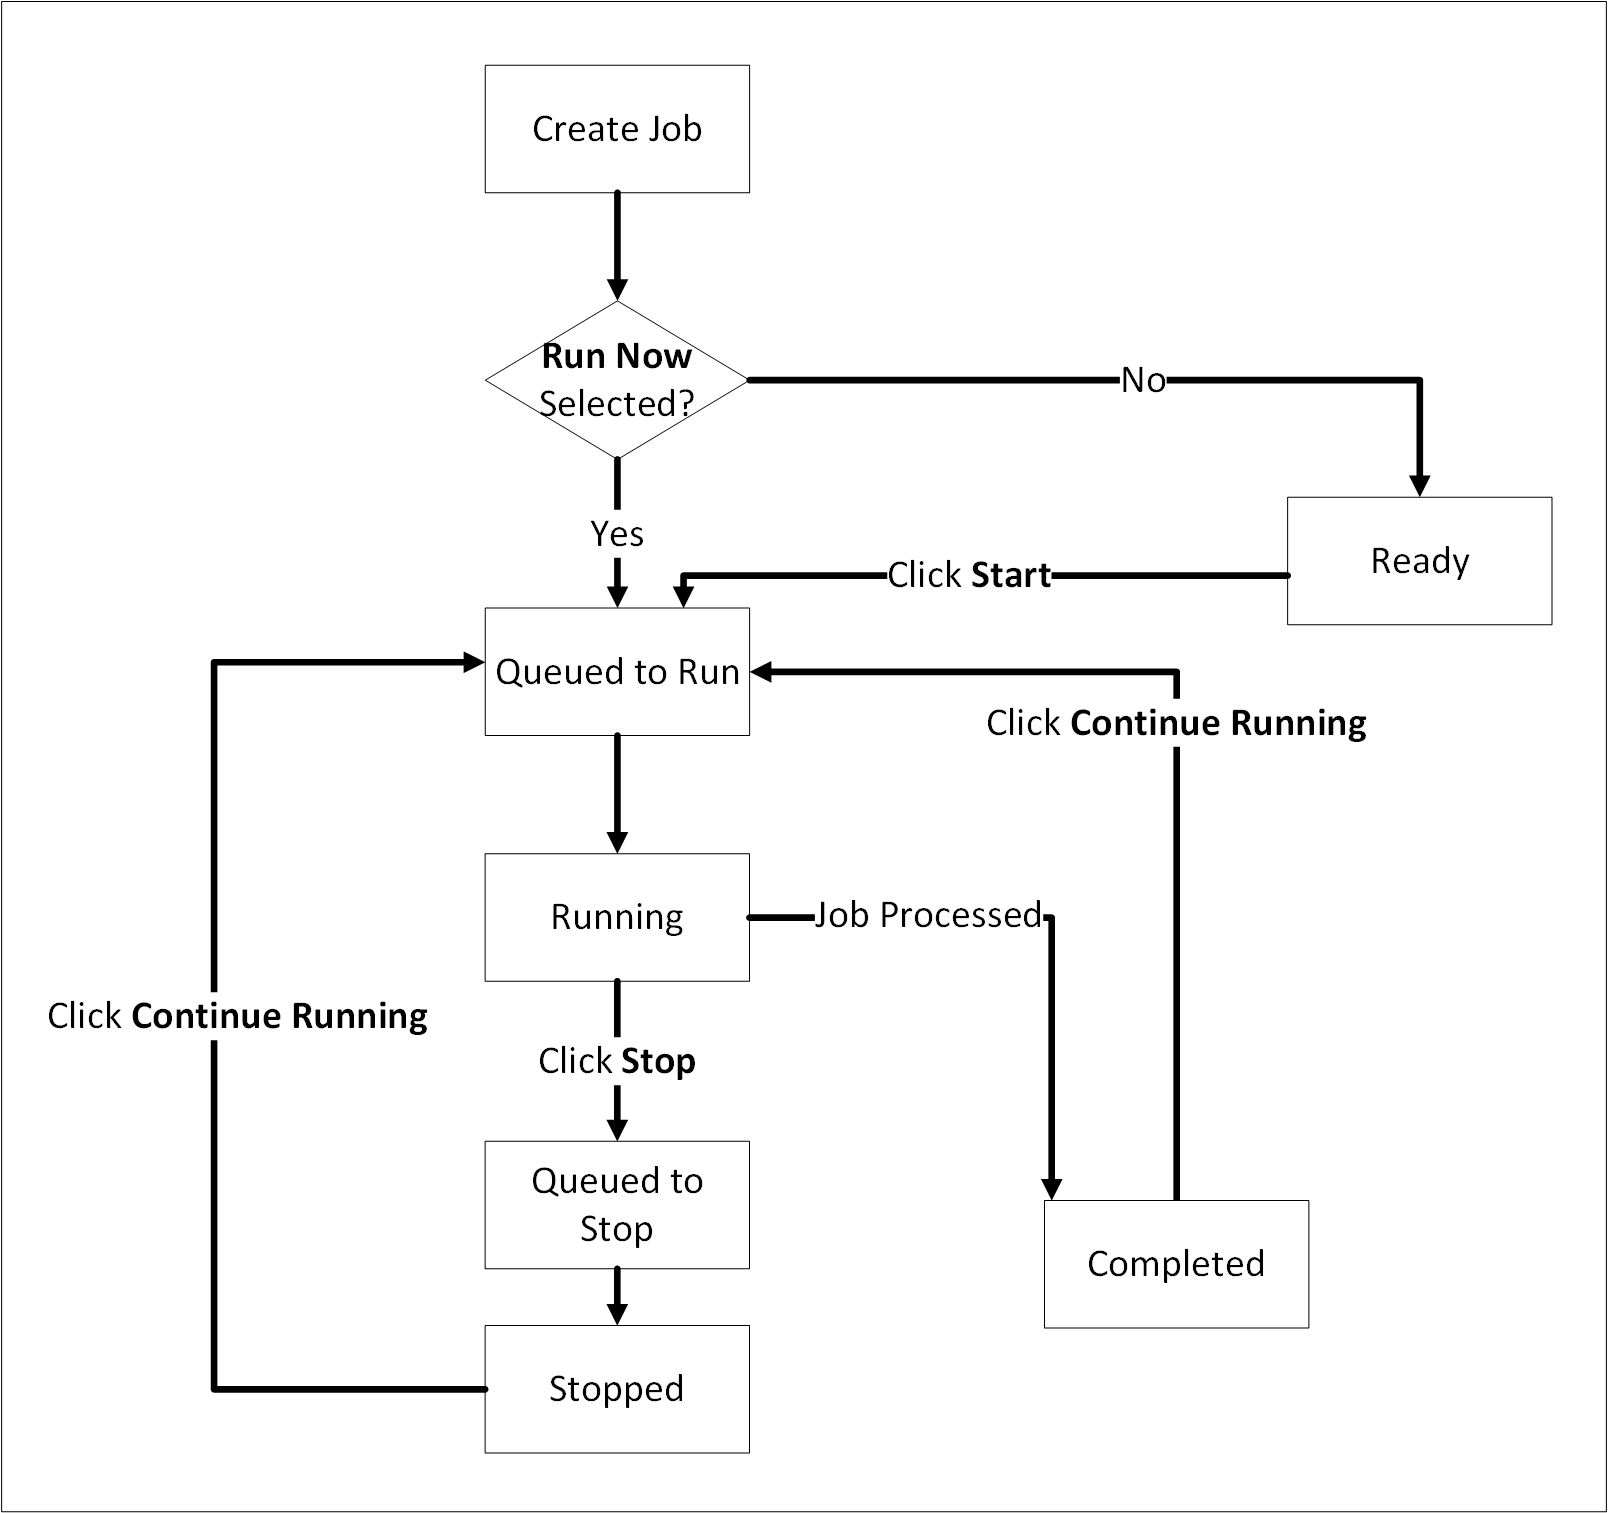
The lifecycle of an Ad-Hoc job is shown in the following figure.

The Ad-Hoc job lifecycle is described here.
A job is created.
If Run Now is selected while creating the job, then the job enters the Queued to Run state.
If Run Now is not selected while creating the job, then the job enters the Ready state. The job will only be processed and enters the Queued to Run state by clicking the Start button.
When the scheduler runs, based on the scheduler configuration, the Queued to Run jobs enter the Running state.
After the job processing completes, the job enters the Completed state. Click Continue Running to move the job to the Queued to Run state for processing any new logs generated.
If Stop is clicked while the job is running, then the job moves to the Queued to Stop state, and then moves to the Stopped state.
Click Continue Running to re-queue the job and move the job to the Queued to Run state.
A System job is created by default for verifying signatures. This job runs as per the signature verification schedule to processes the audit log signatures.
The logs that fail verification are displayed in the following locations for analysis.
- In Discover using the query logtype:verification.
- On the Signature Verification > Logs tab.
When the signature verification for an audit log fails, the failure logs are logged in Insight. Alerts can be generated by using monitors that query the failed logs.
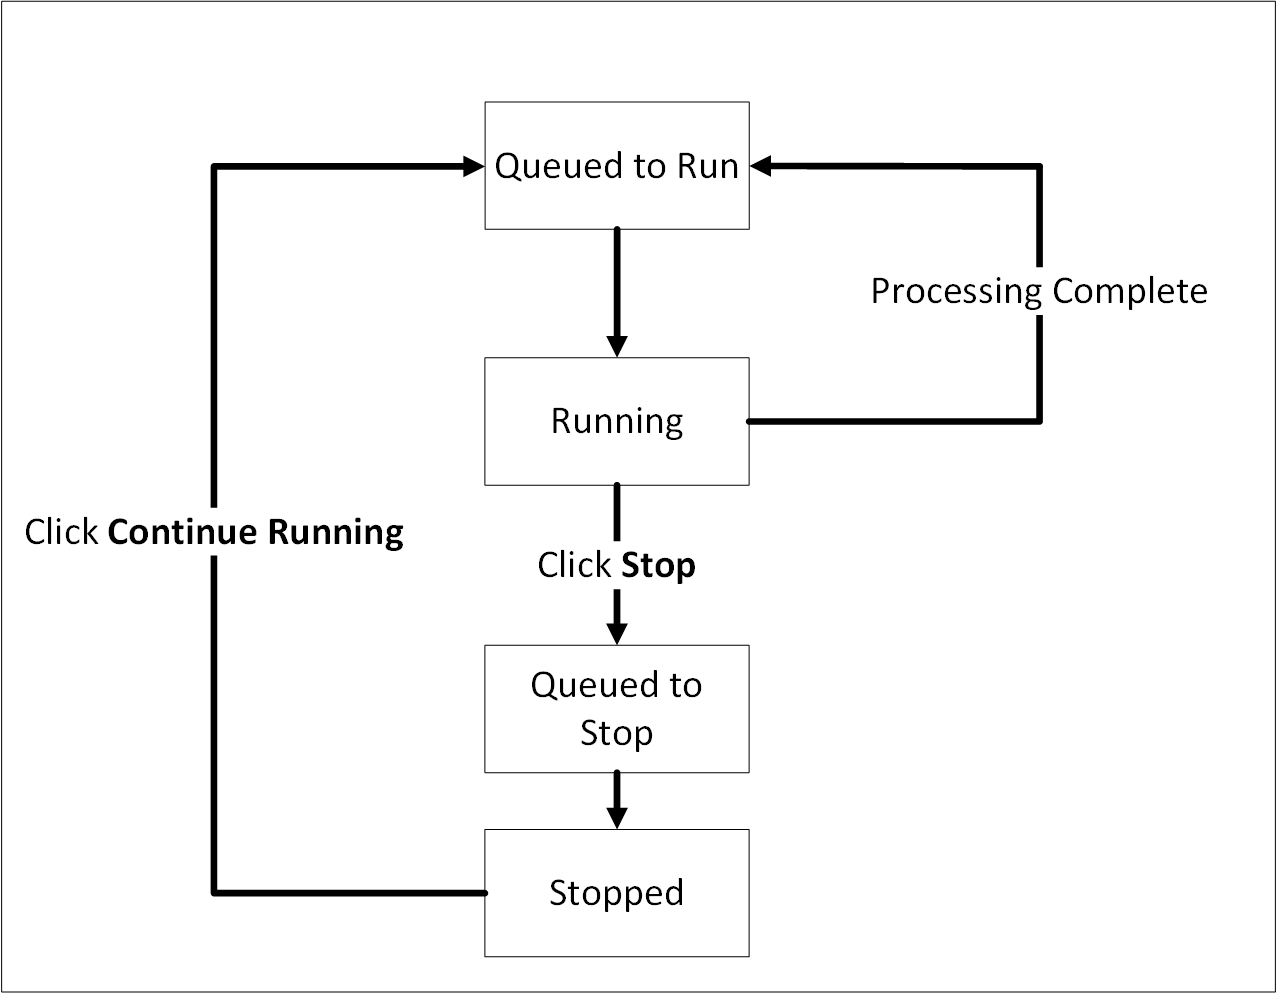
The lifecycle of a System job is shown in the following figure.

The System job lifecycle is described here.
- The System job is created when Analytics is initialized or the ESA is upgraded and enters the Queued to Run state.
- When the scheduler runs, then the job enters the Running state.
- After processing is complete, then the job returns to the Queued to Run state because it is a system job that needs to keep processing records as they arrive.
- While the job is running, clicking Stop moves the job to the Queued to Stop state followed by the Stopped state.
- If the job is in the Stopped state, then clicking Continue Running moves the job to the Queued to Run state.
Working with signatures
The list of signature verification jobs created is available on the Signature Verification tab. From this tab, view, create, edit, and execute the jobs. Jobs can also be stopped or continued from this tab.
To view the list of signature verification jobs, from the Analytics screen, navigate to Signature Verification > Jobs.
The viewer role user or a user with the viewer role can only view the signature verification jobs. The admin rights are required to create or modify signature verification jobs.
After initializing Analytics during a fresh installation, ensure that the priority IP list for the default signature verification jobs is updated. The list is updated by editing the task from Analytics > Scheduler > Signature Verification Job. During the upgrade from an earlier version of the ESA, if Analytics is initialized on an ESA, then the ESA will be used for the priority IP, else update the priority IP for the signature verification job after the upgrade is complete. If multiple ESAs are present in the priority list, then more ESAs are available to process the signature verifications jobs that must be processed.
For example, if the max jobs to run on an ESA is set to 4 and 10 jobs are queued to run on 2 ESAs, then 4 jobs are started on the first ESA, 4 jobs are started on the second ESA, and 2 jobs will be queued to run till an ESA job slot gets free to accept and run the queued job.

Use the search field to filter and find the required verification job. Click the Reset Search icon to clear the filter and view all jobs. Use the following information while using the search function:
- Type the entire word to view results containing the word.
- Use wildcard characters for searching. This is not applicable for wildcard characters used within double quotes.
- Search for a specific word by specifying the word within double quotes. This is required for words having the hyphen (-) character that the system treats as a space.
- Specify the entire word, if the word contains the underscore (_) character.
The following columns are available on this screen. Click a label to sort the items in the ascending or descending order. Sorting is available for the Name, Created, Modified, and Type columns.
| Column | Description |
|---|---|
| Name | A unique name for the signature verification job. |
| Indices | A list of indexes on which the signature verification job will run. |
| Query | The signature verification query. |
| Pending | The number of logs pending for signature verification. |
| Processed | The current number of logs processed. |
| Not-Verified | The number of logs that could not be verified. Only protector and PEP server logs for version 8.1.0.0 and higher can be verified. |
| Success | The number of verifiable logs where signature verification succeeded. |
| Failure | The number of verifiable logs where signature verification failed. |
| Created | The creation date of the signature verification job. |
| Modified | The date on which the signature verification job was modified. |
| Type | The type of the signature verification job. The available options are SYSTEM where the job is created by the system and ADHOC where the custom job is created by a user. |
| State | Shows the job status. |
| Action | The actions that can be performed on the signature verification job. |
The root or admin rights are required to create or modify signature verification jobs.
The available statuses are:
 : Queued to run. The job will run soon.
 : Ready. The job will run when the scheduler initiates the job.
 : Running. The job is running. Click Stop from Actions to stop the job.
 : Queued to stop. The job processing will stop soon.
 : Stopped. The job has been stopped. Click Continue Running from Actions to continue the job. If a signature verification scheduler job is stopped from the Scheduler > Monitor page, then the status might be updated on this page after about 5 minutes.
 : Completed. The job is complete. Click Continue Running from Actions to run the job again.
The available actions are:
- Click the Edit icon (
 ) to update the job.
 - Click the Start icon (
 ) to run the job.
 - Click the Stop icon (
 ) to stop the job.
 - Click the Continue Running icon (
 ) to resume the job.
Creating a signature verification job
Specify a query for creating the signature verification job. Additionally, select the indexes that the signature verification job needs to run on.
In Analytics, navigate to Signature Verification > Jobs.
The Signature Verification Jobs screen is displayed.
Click New Job.
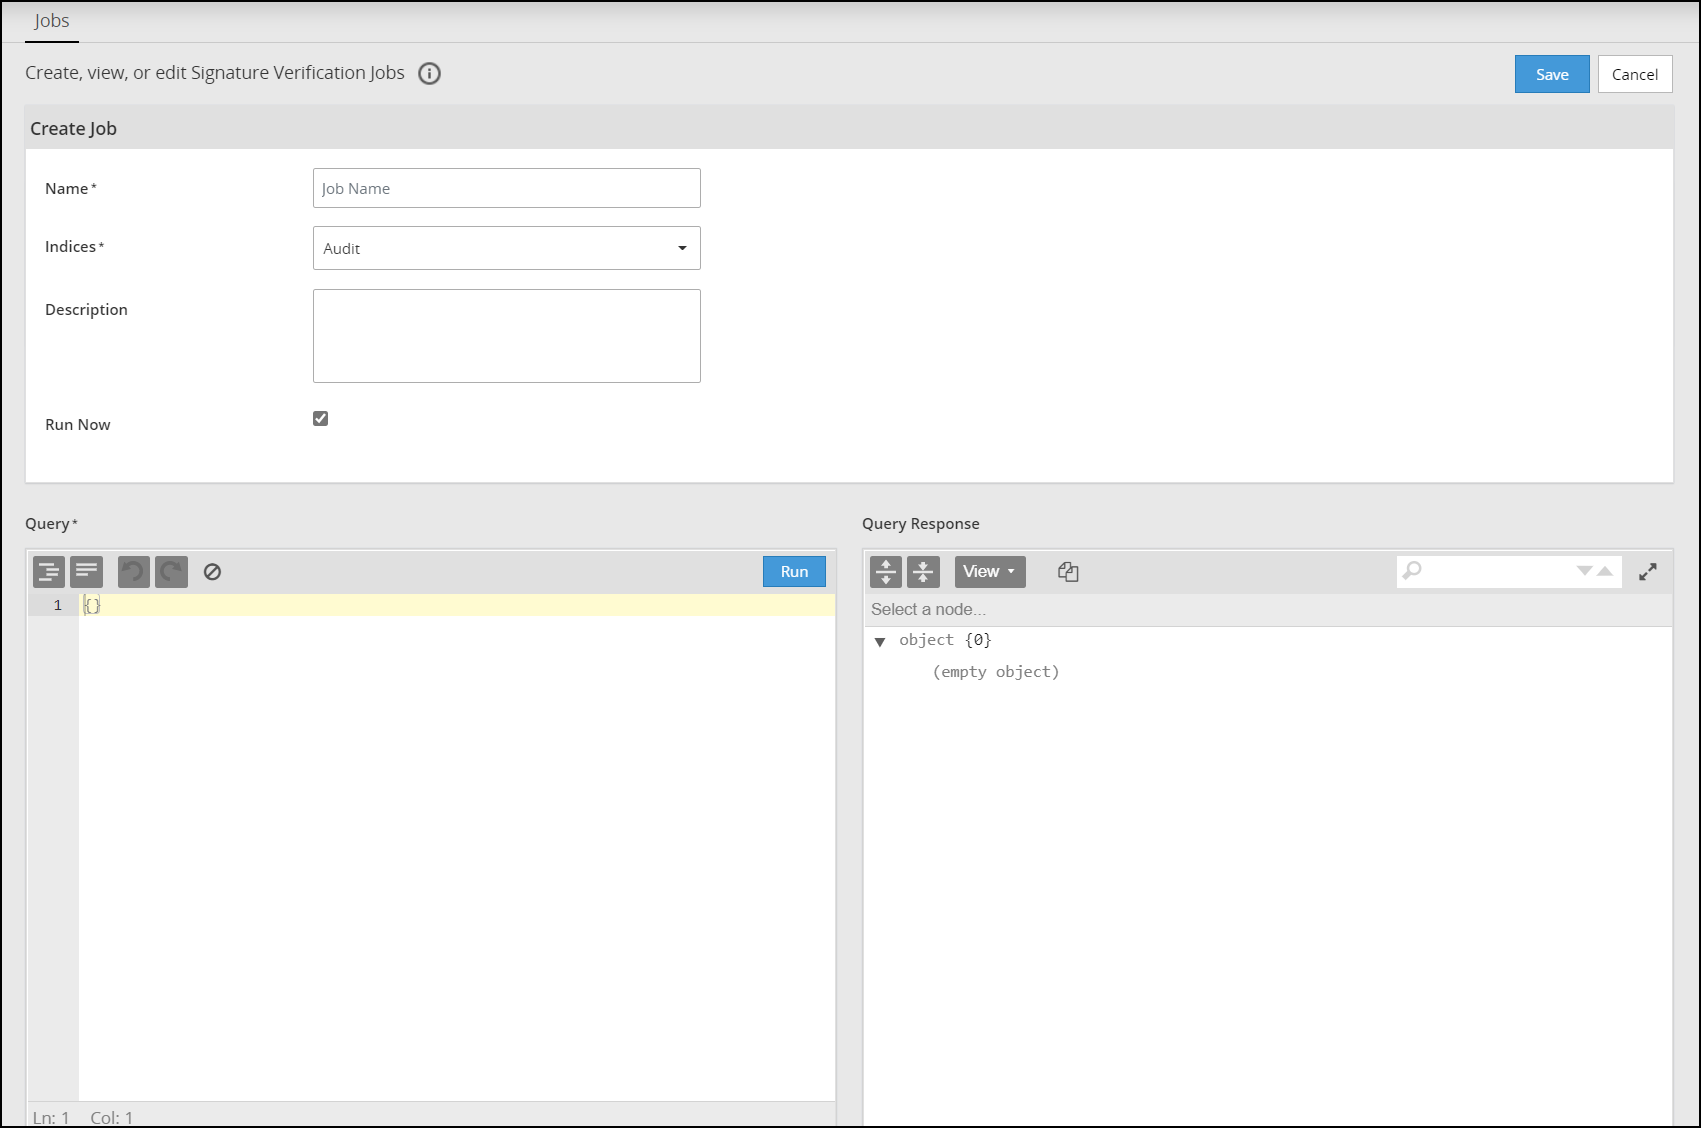
The Create Job screen is displayed.

Specify a unique name for the job in the Name field.
Select the index or alias to query from the Indices list. An alias is a reference to one or more indexes available in the Indices list. The alias is generated and managed by the system and cannot be created or deleted.
Specify a description for the job in the Description field.
Select the Run Now check box to run the job after it is created.
Use the Query field to specify a JSON query. Errors in the code, if any, are marked with a red cross before the code line.
The following options are available for working with the query:
- Indent code (
 ): Click to format the code using tab spaces.
 - Remove white space from code (
 ): Click to format the code by removing the white spaces and displaying the query in a continuous line.
 - Undo (
 ): Click to undo the last change made.
 - Redo (
 ): Click to redo the last change made.
 - Clear (
 ): Click to clear the query text.
- Indent code (
Specify the contents of the query tag for creating the JSON query. For example, specify the query
```
{
   "query":{
      "match" : {
         "*field\_name*":"*field\_value*"
      }
   }
}
```

as

```
{
      "match" : {
         "*field\_name*":"*field\_value*"
      }
   }
```
Click Run to test the query.
View the result displayed in the Query Response field.
The following options are available to work with the output:
- Expand all fields (
 ): Click to expand all fields in the result.
 - Collapse all fields (
 ): Click to collapse all fields in the result.
 - Switch Editor Mode (
 ): Click to select the editor mode. The following options are available:
- View: Switch to the tree view.
- Preview: Switch to the preview mode.
- Copy (
 ): Click to copy the contents of the output to the clipboard.
 - Search fields and values (
 ): Search for the required text in the output.
 - Maximize (
 ): Click to maximize the Query Response field. Click Minimize (
 ) to minimize the field to the original size when maximized.
- Expand all fields (
Click Save to save the job and return to the Signature Verification Jobs screen.
Editing a signature verification job
Edit an adhoc signature verification job to update the name and the description of the job.
In Analytics, navigate to Signature Verification > Jobs.
The Signature Verification Jobs screen is displayed.
Locate the job to update.
From the Actions column, click the Edit (
 ) icon.
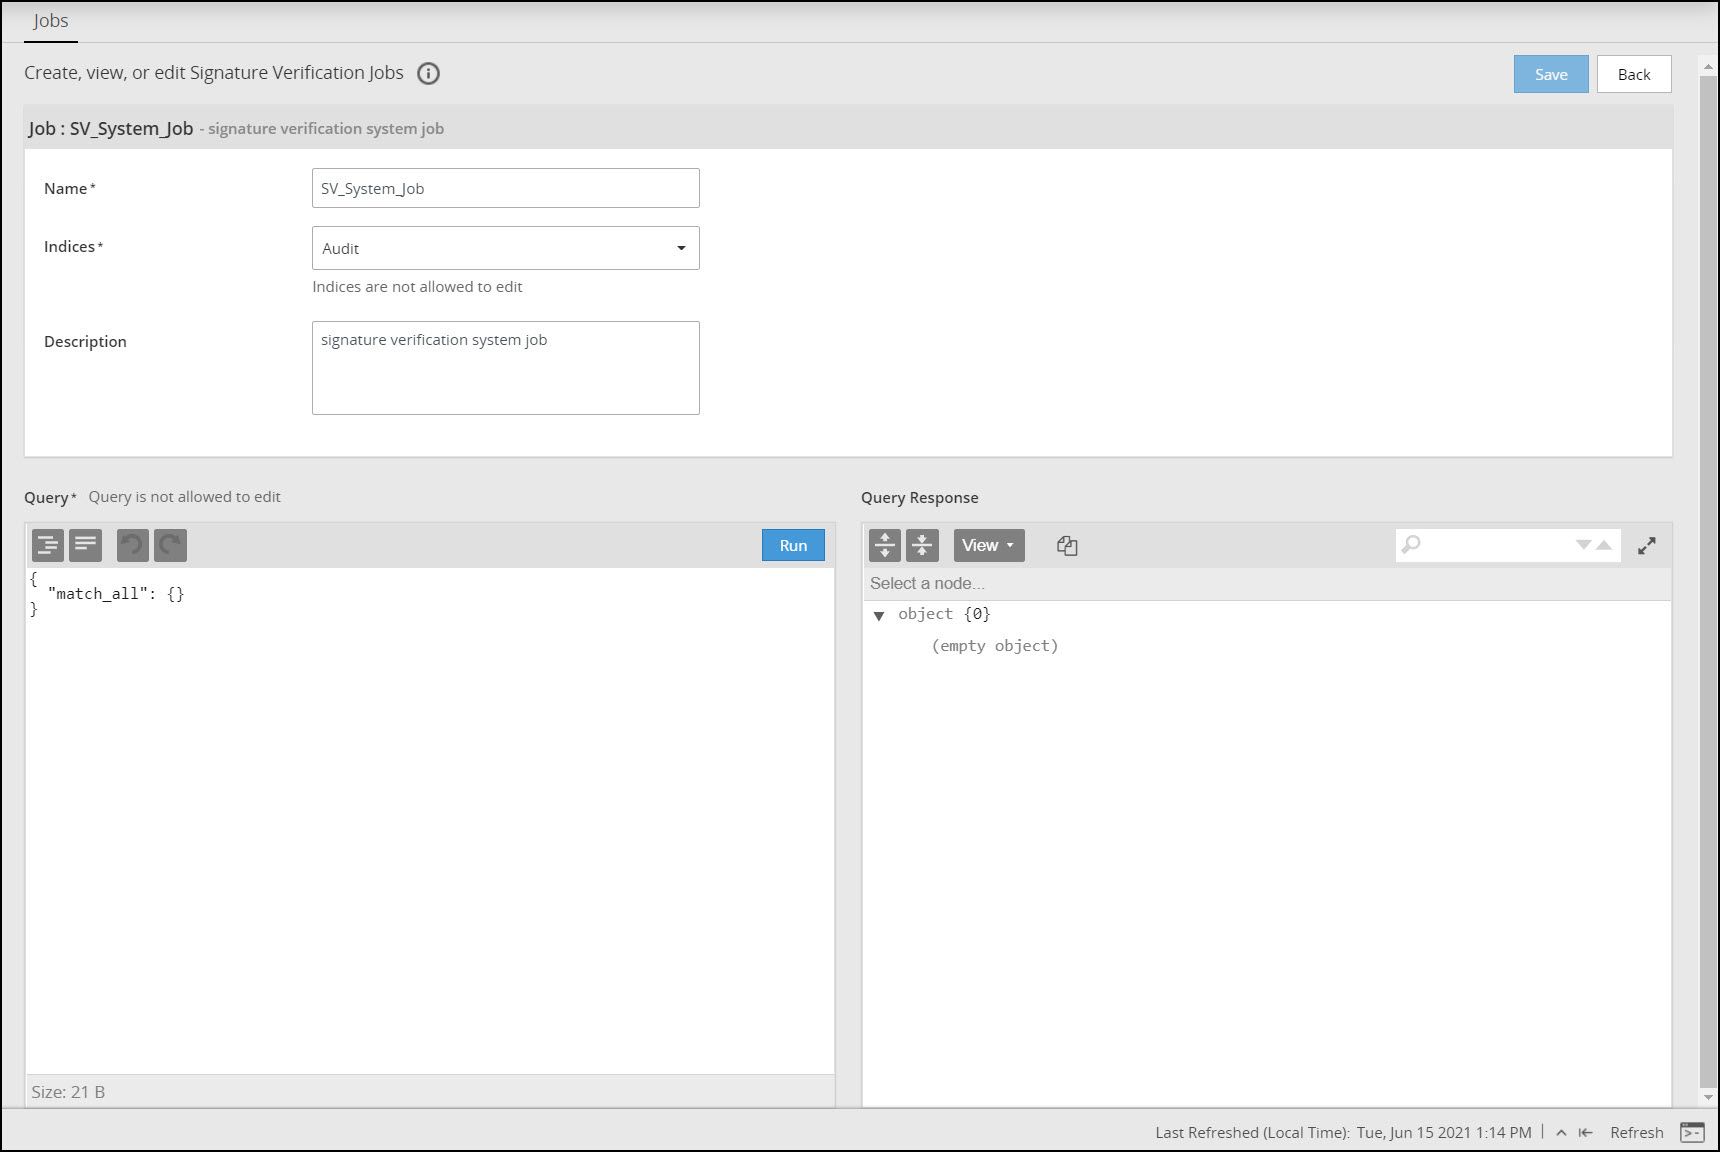
The Job screen is displayed.

Update the name and description as required.
The Indices and Query options can be edited if the job is in the Ready state, else they are available in the read-only mode.
View the JSON query in the Query field.
The following options are available for working with the query:
- Indent code (
 ): Click to format the code using tab spaces.
 - Remove white space from code (
 ): Click to format the code by removing the white spaces and displaying the query in a continuous line.
 - Undo (
 ): Click to undo the last change made.
 - Redo (
 ): Click to redo the last change made.
- Indent code (
Click Run to test the query, if required.
View the result displayed in the Query Response field.
The following options are available to work with the output:
- Expand all fields (
 ): Click to expand all fields in the result.
 - Collapse all fields (
 ): Click to collapse all fields in the result.
 - Switch Editor Mode (
 ): Click to select the editor mode. The following options are available:
- View: Switch to the tree view.
- Preview: Switch to the preview mode.
- Copy (
 ): Click to copy the contents of the output to the clipboard.
 - Search fields and values (
 ): Search for the required text in the output.
 - Maximize (
 ): Click to maximize the Query Response field. Click Minimize (
 ) to minimize the field to the original size when maximized.
- Expand all fields (
Click Save to update the job and return to the Signature Verification Jobs screen.
Feedback
Was this page helpful?