Working with Proxy Authentication
Simple Authentication and Security Layer (SASL) is a framework that provides authentication and data security for Internet protocols. The data security layer offers data integrity and confidentiality services. It provides a structured interface between protocols and authentication mechanisms.
SASL enables ESA to separate authentication and authorization of users. The implementation is such that when users are imported, a user with the same name is recreated in the internal LDAP. When the user accesses the data security platform, ESA authorizes the user and communicates with the external LDAP for authenticating the user. This implementation ensures that organizations are not forced to modify their LDAP configuration to accommodate the data security platform. SASL is referred to as Proxy authentication in ESA CLI and Web UI.
To enable proxy authentication:
Login to the Appliance CLI Manager.
Navigate to Administration > LDAP Tools > Specify LDAP Server.
Enter the root password and select OK.
Select Set Proxy Authentication.
Specify the LDAP Server settings for proxy authentication with the external LDAP as shown in the following figure.

For more information about the LDAP settings, refer to Proxy Authentication Settings.
Select Test to test the settings provided. Select Test to test the settings provided. When Test is selected, ESA verifies if the connection to the external LDAP works, as per the Proxy Authentication settings provided.
The Bind Password is required when Bind DN is provided message appears.
Select OK.
Enter the LDAP user name and password provided as the bind user.
You can provide username and password of any other user from the LDAP as long as the LDAP Filter field exists in both the bind user name and any other user.
A Testing Proxy Authentication-Completed successfully message appears.
Select OK in the following message screen.
The following confirmation message appears.

Select Apply to apply the settings. In ESA CLI, only one user is allowed to be imported. This user is granted admin privileges, such that importing users and managing users can be performed by the user in the User Management screen. The User Management Web UI is used to import users from the external LDAP.
In the Select user to grant administrative privileges screen, select a user and confirm selection.
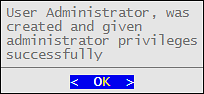
In the Setup administrator privileges screen, enter the ESA admin user name and password and select OK.
The following message appears.
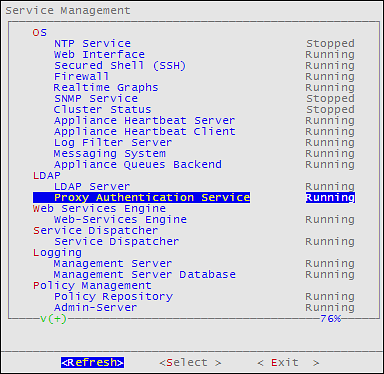
Navigate to Administration > Services to verify that the Proxy Authentication Service is running.
Feedback
Was this page helpful?