Managing Firewall Settings
Protegrity internal firewall provides a way to allow or restrict inbound access from the outside to Protegrity Appliances. Using the Network Firewall tool you can manage your Firewall settings. For example, you can allow access to the management-network interface only from a specific machine while denying access to all other machines.
To improve security in the ESA, the firewall in v9.2.0.0 is upgraded to use the nftables framework instead of the iptables framework. The nftables framework helps remedy issues, including those relating to scalability and performance.
The iptables framework allows the user to configure IP packet filter rules. The iptables framework has multiple pre-defined tables and base chains, that define the treatment of the network traffic packets. With the iptables framework, you must configure every single rule. You cannot combine the rules because they have several base chains.
The nftables framework is the successor of the iptables framework. With the nftables framework, there are no pre-defined tables or chains that define the network traffic. It uses simple syntax, combines multiple rules, and one rule can contain multiple actions. You can export the data related to the rules and chains to json or xml using the nft userspace utility.
Verifying the nftables
This section provides the steps to verify the nftables.
To verify the nftables:
Log in to the CLI Manager.
Navigate to Administration > OS Console.
Enter the root password and select OK.
Run the command
nft list ruleset.
The nftables rules appear.
Listing the Rules
Using the Rules List option, you can view the available firewall rules.
To view the details of the rule:
Log in to the CLI Manager.
Navigate to Networking > Network Firewall.
Enter the root password and select OK.
The following screen appears.

From the menu, select Rules List to view the list of rules.
A list of rules appear.
Select a rule from the list and click More.
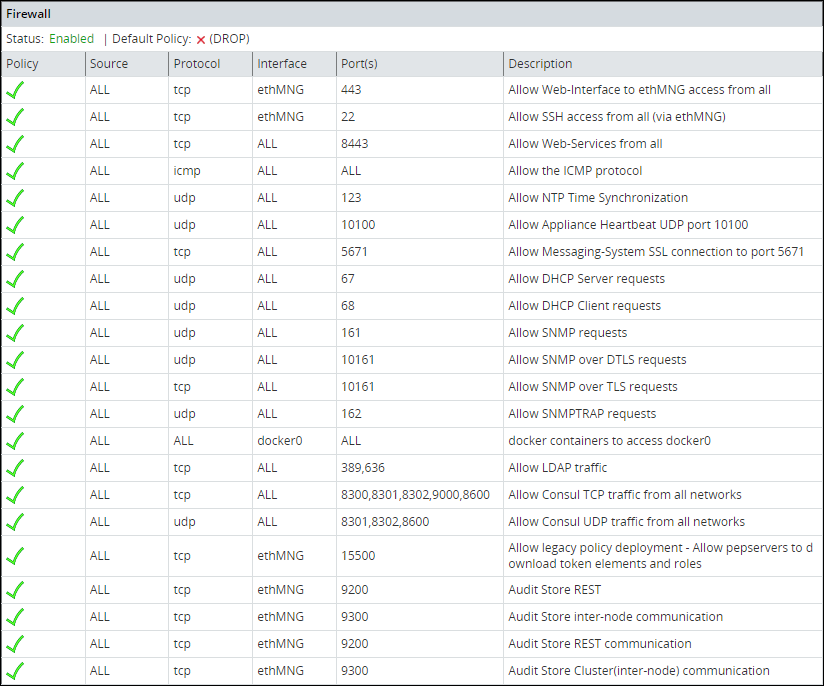
The policy, protocol, source IP address, interface, port, and description appear.
Click Delete to delete a selected rule. Once confirmed, the rule is deleted.
Log in to the Web UI.
Navigate to System > Information to view the rules.
Reordering the Rules List
Using the Reorder Rules List option, you can reorder the list of rules. With buttons Move up and Move down you can move the selected rule. When done, click Apply for the changes to take effect.
The order of the specified rules are important. When reordering the firewall rules, take into account that rules which are in the beginning of the list are of the first priority. Thus, if there are conflicting rules in the list, the one which is the first in the list is applied.
Specifying the Default Policy
The default policy determines what to do on packets that do not match any existing rule. Using the Specify Default Policy option, you can set the default policy for the input chains. You can specify one of the following options:
- Accept - Let the traffic pass through.
- Drop - Remove the packet from the wire and generate no error packet.
If not specified by any rule, then the incoming packet will be dropped as the default policy. If specified by a rule, then the incoming packet will be allowed/denied or dropped depending on the policy of the rule.
Adding a New Rule
Every new rule specifies the criteria for matching packets and the action required. You can add a new rule using the Add New Rule option. This section explains how to add a firewall rule.
Adding a new rule is a multi-stage process that includes:
- Specifying an action to be taken for matching incoming traffic:
- Accept - Allow the packets.
- Drop - Remove the packet from the wire and generate no error packet.
- Reject - Remove the packet from the wire and return an error packet.
- Specifying the local service for this rule.
- Specifying the local network interface. It can be any or selected interface..
- Specifying the remote machine criteria.
- Providing a description for the rule. This is optional.
When a Firewall rule is added, it is added to the end of the Firewall list. If there is a conflicting rule in the beginning of the list, then the new rule may be ignored by the Firewall. Thus, it is recommended to move the new rule somewhere to the beginning of the Firewall rules list.
Adding a New Rule with the Predefined List of Functionality
Follow these instructions to add a new rule with the predefined list of functionality:
Select a policy for the rule, accept, drop, or reject, which will define how a package from the specific machine will be treated by the appliance Firewall.
Click Next.
Specify what will be affected by the rule. Two options are available: to specify the affected functionality list, in this case, you do not need to specify the ports since they are already predefined, or to specify the protocol and the port.
Select the local service affected by the rule. You can select one or more items to be affected by the firewall rule.
Click Next.
If you want to have a number of similar rules, then you can specify multiple items from the functionality list. Thus, for example, if you want to allow access from a certain machine to the appliance LDAP, SNMP, High Availability, SSH Management, or Web Services Management, you can specify these items in the list.
Click Manually.
In the following dialog box, select a protocol for the rule. You can select between TCP, UDP, ICMP, or any.
In the following screen, specify the port number and click Next.
In the following screen you are prompted to specify an interface. Select between ethMNG (Ethernet management interface), ethSRV0 (Ethernet security service interface), ethSRV1, or select Any.
In the following screen you are prompted to specify the remote machine. You can specify between single/IP with subnet or domain name.
When you select Single, you will be asked to specify the IP in the following screen.
When you select IP with Subnet, you will be asked to specify the IP first, and then to specify the subnet.
When you select Domain Name, you will be asked to specify the domain name.
When you have specified the remote machine, the Summary screen appears. You can enter the description of your rule if necessary.
Click Confirm to save the changes.
Click OK in the confirmation message listing the rules that will be added to the Rules list.
Disabling/Enabling the Firewall Rules
Using the Disable/Enable Firewall option, you can start your firewall. All rules that are available in the firewall rules list will be affected by the firewall when it is enabled. All new rules added to the list will be affected by the firewall. You can also restart, start, or stop the firewall using ESA Web UI.
Resetting the Firewall Settings
Using the Reset Firewall Settings option, you can delete all firewall rules. If you use this option, then the firewall default policy becomes accept and the firewall is enabled.
If you require additional security, then change the default policy and add the necessary rules immediately after you reset the firewall.
Feedback
Was this page helpful?