Protegrity appliances are equipped with a Tools menu. The following sections list and explain the available tools and their functionalities.

This is the multi-page printable view of this section. Click here to print.
Protegrity appliances are equipped with a Tools menu. The following sections list and explain the available tools and their functionalities.
The SSH Configuration tool provides a convenient way to examine and manage the SSH configuration that would fit your needs. Changing the SSH configuration may be necessary for special needs, troubleshooting, or advanced non-standard scenarios. By default, the SSH is configured to deny any SSH communication with unknown remote servers. You can allow the authorized users with keys to communicate without passwords. Every time you add a remote host, the system obtains the SSH key for this host, and adds it to the known hosts.
Note: It is recommended to create a backup of the SSH settings/keys before you make any modifications.
For more information for Backup from CLI, refer to here.
For more information for Backup from Web UI, refer to here.
Using Tools > SSH Configuration, you can:

Using SSH Mode tool, you can set restrictions for SSH connections. The restrictions can be hardened or made slack according to your needs. Four modes are available, as described in the following table:
| Mode | SSH Server | SSH Client |
|---|---|---|
| Paranoid | Disable root access | Disable password authentication, allows to connect only using public keys. Block connections to unknown hosts. |
| Standard | Disable root access | Allow password authentication. Allow connections to new or unknown hosts, enforce SSH fingerprint of known hosts. |
| Open | Allow root access Accept connections using passwords and public keys | Allow password authentication. Allow connection to all hosts – do not check hosts fingerprints. |
A user with administrative credentials can configure the SSH idle timeout and client authentication settings. The following screen shows the Advanced SSH Configuration.

In the Idle Timeout field, enter the idle timeout period in seconds. This allows the user to set idle timeout period for the SSH server before logout.
When you are working on the OS Console using the OpenSSH session, if the session is idle for the specified time, then the OS Console session gets closed. However, you are re-directed to the Administration screen.
In the Client Authentications field, specify the order for trying the SSH authentication method. This allows you to prefer one method over another. The default for this option is publickey, password.
Using Known Hosts: Hosts I can connect to, you can manage the hosts that you can connect to using SSH. The following table explains the options in the Hosts that I connect to dialog box:
| Using… | You can… |
|---|---|
| Display List | View the list of SSH allowed hosts you can connect to. |
| Reset List | Clear the SSH allowed hosts list. Only the local host, which is the default, appears. |
| Add Host | Add a new SSH allowed host. |
| Delete Host | Delete a host from the list of SSH allowed hosts. |
| Refresh (Sync) Host | Make sure that the available key is a correct key from each IP. To do this, go to each IP/host and re-obtain its key. |
SSH Authorized keys are used to specify SSH keys that are allowed to connect to this machine without entering the password. The system administrator can create such SSH keys and import the keys to this appliance. This is a standard SSH mechanism to allow secured access to machines without a need to enter a password.
Using the Authorized Keys tool, you can display the keys and delete the list of authorized keys from the Reset List option. This would reject all incoming connections that used the authorized keys reset with this tool.
Examine and manage the users that are authorized to access this host.
Using the Identities menu, you can manage and examine which users can start SSH communication from this host using SSH keys. You can:
Using the Generate SSH Keys, you can create new SSH keys. If you recreate the SSH Keys, then the remote machines that store the current SSH key, will not be able to contact the appliance until you manually update the SSH keys on those machines.
SSH is a network protocol that ensures a secure communication over an unsecured network. It comprises of a utility suite which provides high-level authentication encryption over unsecured communication channels. SSH utility suites provide a set of default rules that ensure the security of the appliances. These rules consist of various configurations such as password authentication, log level info, port numbers info, login grace time, strict modes, and so on. These configurations are enabled by default when the SSH service starts. These rules are provided in the sshd_config.orig file under the /etc/ssh directory.
You can customize the SSH rules for your appliances as per your requirements. You can configure the rules in the sshd_config.append file under the /etc/ksa directory.
Warning: To add customised rules or configurations to the SSH configuration file, modify the sshd_config.append file only. It is recommended to use the console for modifying these settings.
For example, if you want to add a match rule for a test user, test_user with the following configurations:
You must add the following configuration for the match rule in the sshd_config.append file. Make sure to restart the SSH service to apply the updated configurations.
Match user test_user
        PasswordAuthentication yes
        MaxAuthTries    3
        HostbasedAuthentication yes
Ensure that you must enter the valid configurations in the sshd_config.append file.
If the rule added to the file is incorrect, then the SSH service reverts to the default configurations provided in the sshd_config.orig file.
Consider an example where the SSH rule is incorrectly configured by replacing PasswordAuthentication with Password—Authentication. The following code snippet describes the incorrect configuration.
Match user test_user
        Password---Authentication yes
        MaxAuthTries    3
        HostbasedAuthentication yes
Then, the following message appears on the OS Console when the SSH services restart.
root@protegrity-esa858:/var/www# /etc/init.d/ssh restart
[ ok ] Stopping OpenBSD Secure Shell server: sshd.
The configuration(s) added is incorrect. Reverting to the default configuration.
/etc/ssh/sshd_config: line 274: Bad configuration option: Password---Authentication
/etc/ssh/sshd_config line 274: Directive 'Password---Authentication' is not allowed within a Match block
[ ok ] Starting OpenBSD Secure Shell server: sshd.
If you want to configure the SSH settings for an HA environment, then you must add the rules to both the nodes individually before creating the HA.
For more information about configuring rules to SSH, refer to here.
To configure SSH rules:
Login to the CLI Manager with the root credentials.
Navigate to Administrator > OS Console.
Configure a new rule using a text editor.
/etc/ksa/sshd_config.append
Configure the required SSH rule and save the file.
Restart the SSH service through the CLI or Web UI.
The SSH services starts with the customized rules or configurations.
You can backup or restore the SSH settings. To export these configurations, select the Appliance OS configuration option while exporting the custom files.

To import the SSH configurations, select the SSH Settings option.

Warning: You can configure SSH settings and SSH identities that are server-specific. It is recommended to not export or import these SSH settings as it may break the SSH services on the appliance.
For more information on Exporting Custom Files, refer to here.
When the client communicates with the server using SSH protocol, a key exchange process occurs for encrypting and decrypting the communication. During the key exchange process, client and server decide on the cipher suites that must be used for communication. The cipher suites contain different algorithms for securing the communication. One of the algorithms that Protegrity appliances uses is SHA1, which is vulnerable to collision attacks. Thus, to secure the SSH communication, it is recommended to deprecate the SHA1 algorithm. The following steps describe how to remove the SHA1 algorithm from the SSH configuration.
To secure SSH communication:
On the CLI Manager, navigate to Administration > OS Console.
Navigate to the /etc/ssh directory.
Edit the sshd_config.orig file.
Remove the following entry:
MACs hmac-sha1,hmac-sha2-256,hmac-sha2-512
Remove the following entry:
KexAlgorithms curve25519-sha256@libssh.org,ecdh-sha2-nistp521,ecdh-sha2-nistp384,ecdh-sha2-nistp256,diffie-hellman-group-exchange-sha256,diffie-hellman-group-exchange-sha1
Save the changes and exit the editor.
Navigate to the /etc/ksa directory.
Edit the sshd_config.append file.
Append the following entries to the file.
MACs hmac-sha2-256,hmac-sha2-512
KexAlgorithms curve25519-sha256@libssh.org,ecdh-sha2-nistp521,ecdh-sha2-nistp384,ecdh-sha2-nistp256,diffie-hellman-group-exchange-sha256
Save the changes and exit the editor.
Restart the SSH service using the following command.
/etc/init.d/ssh restart
The SHA1 algorithm is removed for the SSH communication.
Using Tools > Clustering Tool, you can create the Trusted cluster. The trusted cluster can be used to synchronize data from one server to another other one.
For more information about the ports needed for the Trusted cluster, refer to Open Listening Ports.
Before creating a TAC, ensure that the SSH Authentication type is set to Public key or Password + PublicKey.
If you are using cloned machines to join a cluster, it is necessary to rotate the keys on all cloned nodes before joining the cluster.
If the cloned machines have proxy authentication, two factor authentication, or TAC enabled, it is recommended to use new machines. This avoids any limitations or conflicts, such as, inconsistent TAC, mismatched node statuses, conflicting nodes, and key rotation failures due to keys in use.
For more information about rotating the keys, refer here.
To create a cluster using the CLI Manager:
In the ESA CLI Manager, navigate to Tools > Clustering > Trusted Appliances Cluster.
The following screen appears.

Select Create: Create new cluster.
The screen to select the communication method appears.

Select Set preferred method to set the preferred communication method.
Select Done.
The Cluster Services screen appears and the cluster is created.
If you are using cloned machines to join a cluster, it is necessary to rotate the keys on all cloned nodes before joining the cluster.
If the cloned machines have proxy authentication, two factor authentication, or TAC enabled, it is recommended to use new machines. This avoids any limitations or conflicts, such as, inconsistent TAC, mismatched node statuses, conflicting nodes, and key rotation failures due to keys in use.
For more information about rotating the keys, refer here.
Important : When assigning a role to the user, ensure that the Can Create JWT Token permission is assigned to the role.If the Can Create JWT Token permission is unassigned to the role of the required user, then joining the cluster operation fails.To verify the Can Create JWT Token permission, from the ESA Web UI navigate to Settings > Users > Roles.
To join a cluster using the CLI Manager:
In the ESA CLI Manager, navigate to Tools > Clustering > Trusted Appliances Cluster.
In the Cluster Services screen, select Join: Join an existing cluster.
The following screen appears.

Enter the IP address of the target node in the Node text box.
Enter the credentials of the user of the target node in the Username and Password text boxes.
Select Join.
The node is joined to an existing cluster.
Using Cluster Operations, you can execute the standard set of commands or copy files from the local node to other nodes in the cluster. You can only execute the commands or copy files to the nodes that are directly connected to the local node.
The following figure displays the Cluster Operations screen.

This section describes the steps to execute commands using the CLI Manager.
To execute commands using the CLI Manager:
In the CLI Manager, navigate to Tools > Trusted Appliances Cluster > Cluster Operations: Execute Commands/Deploy Files.
Select Execute.
The Select command screen appears with the following list of commands:
Select the required command and select Next.
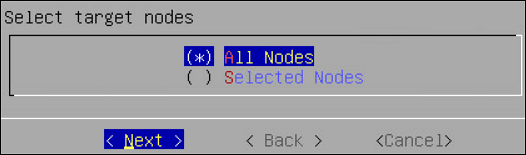
The following screen appears.

Select the target node and select Next.
The Summary screen displaying the output of the selected command appears.
This section describes the steps to copy files from local node to remote node.
To copy files from local node to remote nodes:
In the CLI Manager, navigate to Tools > Trusted Appliances Cluster > Cluster Operations: Execute Commands/Deploy Files .
The screen with the appliances connected to the cluster appears.
Select Put Files.
The list of files in the current directory appears. Select Directory to change the current directory
Select the required file and select Next.
The Target Path screen appears.

Select the required option and select Next.
The following screen appears.
Select the target node and select Next.
The Summary screen confirming the file to be deployed appears.
Select Next.
The files are deployed to the target nodes.
Using Site Management, you can perform the following operations:
The following screen shows the Site Management screen.

You can view the information for all the sites in the cluster by selecting Show sites information. When a cluster is created, a master site with site1 is created by default. The following screen displays the Site Information screen.

This section describes the steps to add multiple sites to a cluster from the CLI Manager.
To add a site to a cluster:
On the CLI Manager, navigate to Tools > Trusted Appliances Cluster > Site Management > Add Site.
The following screen appears.

Select OK.
The new site is added.
This section describes the steps to rename a site from the CLI Manager.
To rename a site:
On the CLI Manager, navigate to Tools > Trusted Appliances Cluster > Site Management > Update Cluster Site Settings.
Select the required site and select Rename.
The Rename Site screen appears.
Type the required site name and select OK.
The site is renamed.
This section describes the steps to set a master site from the CLI Manager.
To set a master site from the CLI Manager:
On the CLI Manager, navigate to Tools > Trusted Appliances Cluster > Site Management > Set Master Site.
The Set Master Site screen appears.
Select the required site and select Set Master.
A message Operation has been completed successfully appears and the new master site is set. An empty cluster site does not contain any node. You cannot set an empty cluster site as a master site.
This section describes the steps to delete a cluster site from the CLI Manager. You can only delete an empty cluster site.
To delete a cluster site:
In the CLI Manager of the node hosting the appliance cluster, navigate to Tools > Trusted Appliances Cluster > Site Management > Remove: Remove Cluster sites(s).
The Remove Site screen appears.
Select the required site and select Remove.
Select OK.
The site is deleted.
Using Node Management, you can:
The following table describes the fields that appear on the status screen.
| Field | Description |
|---|---|
| Hostname | Hostname of the node |
| Address | IP address of the node |
| Label | Label assigned to the node |
| Type | Build version of the node |
| Status | Online/Blocked/Offline |
| Node Messages | Messages that appear for the node |
| Connection | Connection setting of the node (On/Off) |
To view the status of the nodes in a cluster using the CLI Manager:
In the CLI Manager, navigate to Tools > Trusted Appliances Cluster > Node Management > List Nodes.
The screen displaying the status of the nodes appears.

Select Change View to change the view.
The list of different reports is as follows:
To add a remote node to the cluster:
In the CLI Manager of the node hosting the cluster, navigate to Tools > Trusted Appliances Cluster > Node Management > Add Node: Add a remote node to this cluster.
The Add Node screen appears.

Enter the credentials of the local node user, which must have administrative privileges, into the Username and Password text boxes.
Type the preferred communication method on the Preferred Method text box.
Type the accessible communication method of the target node in the Reachable Address text box.
Type the credentials of the target node user in the Username and Password text boxes.
Select OK.
The node is invited to the cluster.
It is recommended not to change the name of the node after you create the cluster task.
To update cluster information:
In the CLI Manager of the node hosting the cluster, navigate to Tools > Trusted Appliances Cluster > Node Management > Update Cluster Information.
The Update Cluster Information screen appears.

Type the name of the node in the Name text box.
Type the information describing the node in the Description text box.
Type the required label for the node in the Labels text box.
Select OK.
The details of the node are updated.
Every node in a network is identified using a unique identifier. A communication method is a qualifier for the remote nodes in the network to communicate with the local node.
There are two standard methods by which a node is identified:
The nodes joining a cluster use the communication method to communicate with each other. The communication between nodes in a cluster occur over one of the accessible communication methods.
This section describes the steps to add a communication method from the CLI Manager.
To add a communication method from the CLI Manager:
In the ESA CLI Manager, navigate to Tools > Clustering > Trusted Appliances Cluster.
In the Cluster Services screen, select Node Management: Add/Remove Cluster Nodes/ Information.
In the Node Management screen, select Manage node’s local communication methods.
In the Select Communication Method screen, select Add.
Type the required communication method and select OK.
The new communication method is added.
Ensure that the length of the text is less than or equal to 64 characters.
This section describes the steps to edit a communication method from the CLI Manager.
To add a communication method from the CLI Manager:
In the ESA CLI Manager, navigate to Tools > Clustering > Trusted Appliances Cluster.
In the Cluster Services screen, select Node Management: Add/Remove Cluster Nodes/ Information.
In the Node Management screen, select Manage node’s local communication methods.
In the Select Communication Method screen, select the communication method to edit and select Edit.
In the Edit method screen, enter the required changes and select OK.
The changes to the communication method are complete.
This section describes the steps to delete a communication method from the CLI Manager.
To delete a communication method from the CLI Manager:
In the ESA CLI Manager, navigate to Tools > Clustering > Trusted Appliances Cluster.
In the Cluster Services screen, select Node Management: Add/Remove Cluster Nodes/ Information.
In the Node Management screen, select Manage node’s local communication methods.
In the Select Communication Method screen, select the required communication method and select Delete.
The communication method of the node is deleted.
You can select the method that a node uses to communicate with another node in a network. The communication methods of all the nodes are visible across the cluster. You can select the specific communication mode to connect with a specific node in the cluster. In the Node Management screen, you can set the communication between a local node and remote node in a cluster.
You can also set the preferred method that a node uses to communicate with other nodes in a network. If the selected communication method is not accessible, then the other available communication methods of the target node are used for communication.
This section describes the steps to select a local to remote node communication method.
To select a local to remote node communication method:
In the ESA CLI Manager, navigate to Tools > Clustering > Trusted Appliances Cluster.
In the Cluster Services screen, select Node Management: Add/Remove Cluster Nodes/ Information.
In the Node Management screen, select Manage local to other nodes communication methods.
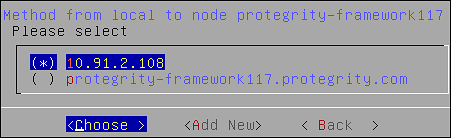
In the Manage local to other nodes communication method, select the required node for which you want to change the communication method.
Select Change.
Select the required communication method and select Choose. If a new communication must be added so it can be chosen as the required communication method, select Add New to add it.
Select Ok.
The communication method is selected to communicate with the remote node in the cluster.
This section describes the steps to change a local to remote node communication method.
To change a local to remote node communication method:
In the ESA CLI Manager, navigate to Tools > Clustering > Trusted Appliances Cluster.
In the Cluster Services screen, select Node Management: Add/Remove Cluster Nodes/ Information.
In the Node Management screen, select Manage local to other nodes communication methods.
In the Manage local to other nodes communication method screen, select a remote node and select Change.
The following screen appears.
Select the required communication method.
Select Choose.
The new local to other nodes communication methods is set.
Before attempting to remove a node, verify if it is associated with a cluster task. If a node is associated with a cluster task that is based on the hostname or IP address, then the Remove a (remote) cluster node operation will not remove node from the cluster. Ensure that you delete all such tasks before removing any node from the cluster.
To remove a node from a cluster using the CLI Manager:
In the ESA CLI Manager, navigate to Tools > Trusted Appliances Cluster.
In the Cluster Services screen, select Node Management: Add/Remove Cluster Nodes/Information.
The following screen appears.

Select Remove: Delete a (remote) cluster node and select OK.
The screen displaying the nodes in the cluster appears.
Select the required node and select OK.
The following screen appears.

Select OK.
Select REFRESH to view the updated status.
Before attempting to remove a node, verify if it is associated with a cluster task. If a node is associated with a cluster task that is based on the hostname or IP address, then the Uninstall Cluster Services operation will not uninstall the cluster services on the node. Ensure that you delete all such tasks before uninstalling the cluster services.
To remove a node from a cluster using the CLI Manager:
In the ESA CLI Manager, navigate to Tools > Trusted Appliances Cluster.
In the Cluster Services screen, select 7 Uninstall : Uninstall Cluster Services.
A confirmation message appears.
Select Yes.
The cluster services are uninstalled.
A Trusted Appliances cluster can be used to transfer data from one node to other nodes regardless of their location, as long as standard SSH access is supported. This mechanism allows you to run remote commands on remote cluster nodes, transfer files to remote nodes and export configurations to remote nodes. Trusted appliances clusters are typically used for disaster recovery. The trusted appliance cluster can be configured and controlled using the Appliance Web UI as well as the Appliance CLI.
Clustering details are fully explained in section Trusted Appliances Cluster (TAC). In that section you will find information how to:
Using the cluster maintenance, you can perform the following functions:
Ensure that all the nodes in the cluster are active, before changing the cluster key.
If a new key is deployed to a node that is unreachable, then connect the node to the cluster. In this scenario, remove the node from the cluster and re-join the cluster.
Generate a new set of the cluster SSH keys to the nodes that are directly connected to the local node. This ensures that the trusted appliance cluster is secure.
To re-generate cluster keys:
In the ESA CLI Manager, navigate to Tools > Clustering > Trusted Appliances Cluster > Maintenance: Update Cluster Settings.
The following screen appears.
Select New Cluster Keys.
A message to re-generate the cluster keys appears.
Select Yes.
The new keys are deployed to the nodes that are directly connected.
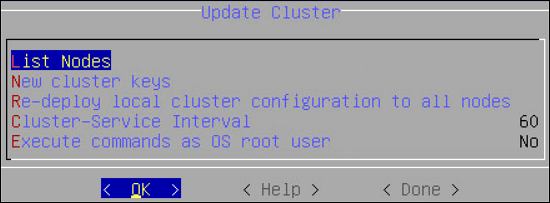
You can redeploy the local cluster configuration to force it to be applied on all connected nodes. Usually there is no need for such operation since the configurations are synchronized automatically. However, if the cluster status service is stopped or you want to force a specific configuration, then you can use this option to force the configuration.
When you select to Redeploy local cluster configuration to all nodes in the Update Cluster dialog box, the operation is performed at once with no confirmation.
The cluster provides an auto-update mechanism that runs in the background as a background service which is responsible for updating local and remote cluster configurations and cluster health checks.
You can specify the cluster service interval in the Cluster Service Interval dialog box.

The interval (in seconds) specifies the sleep time between cluster background updates/operations. For example, if the specified value is 120 seconds, then every two minutes the cluster service will update its status and synchronize its cluster configuration with the other nodes (if changes identified).
By default, the cluster user is a restricted user which means that the cluster commands will be restricted by the OS. There are scenarios where you would like to disable these restrictions and allow the cluster user to run as the OS root user.
Using the details in the table below, you can specify whether to execute the commands as root or as a restricted user.
| You can specify… | To… |
|---|---|
| Yes | Always execute commands as the OS root user. It is less secure, risky if executing the wrong command. |
| No | Always execute commands as non-root restricted user. It is more secure, but not common for many scenarios. |
| Ask | Always be asked before a command is executed. |
Using Tools > Clustering Tool, you can setup an appliance virtual environment. The default installation of a Protegrity appliance uses hardware virtualization mode (HVM). The appliance can be reconfigured to use parallel virtualization mode (PVM) to optimize the performance of virtual guest machines.
Protegrity supports these virtual servers:
XEN paravirtualization details are fully covered in section Xen Paravirtualization Setup. In that section you will find information how to:
Using Tools > File Integrity Monitor, you can make a weekly check. The content modifications can be viewed by the Security Officer since the PCI specifications require that sensitive files and folders in the Appliance are monitored. This information contains password, certificate, and configuration files. All changes made to these files can be reviewed by authorized users.
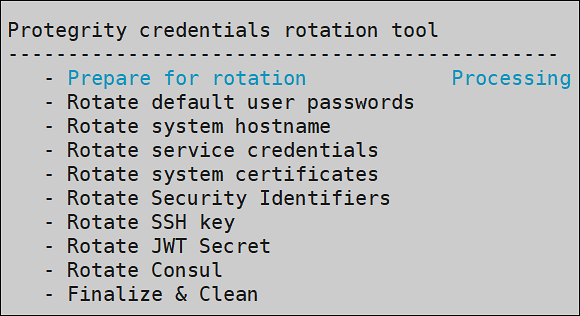
When you install the appliance, it generates multiple security identifiers such as, keys, certificates, secrets, passwords, and so on. These identifiers ensure that sensitive data is unique between two appliances in a network. When you receive a Protegrity appliance image or replicate an appliance image on-premise, the identifiers are generated with certain values. If you use the security identifiers without changing their values, then security is compromised and the system might be vulnerable to attacks. Using the Rotate Appliance OS Keys, you can randomize the values of these security identifiers on an appliance. This tool must be run only when you finalize the ESA from a cloud instance.
When an appliance, such as DSG, communicates with ESA, the Set ESA communication must be performed. Before running the Set ESA communication process, ensure appliance OS keys are rotated.
For example, if the OS keys are not rotated, then you might not be able to add the appliances to a Trusted Appliances Cluster (TAC).
To rotate appliance OS keys:
From the CLI Manager, navigate to to Tools > Rotate Appliance OS Keys.
Enter the root credentials.
The following screen appears.
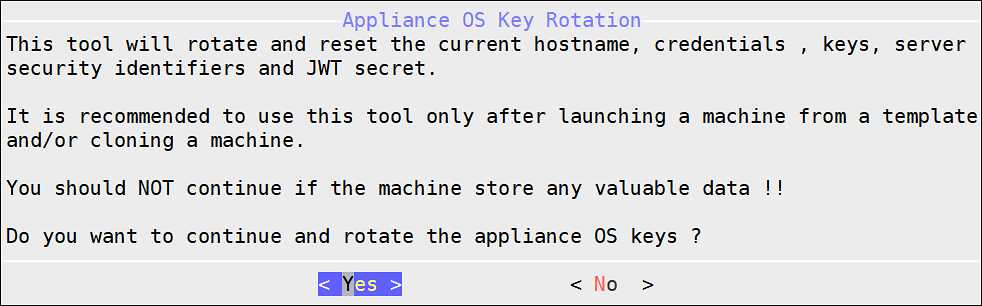
Select Yes.
The following screen appears.
If you select No, then the Rotate Appliance OS Keys operation is discarded.
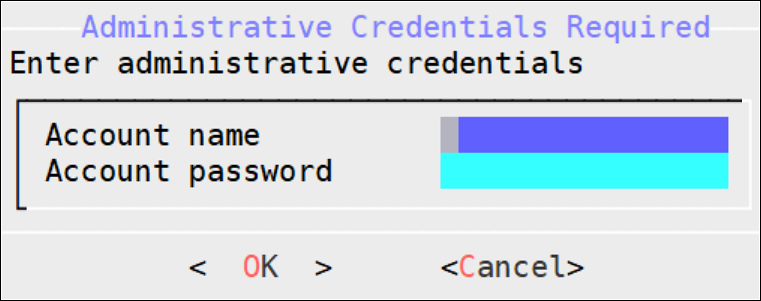
Enter the administrative credentials and select OK.
The following screen appears.
The following screen appears.
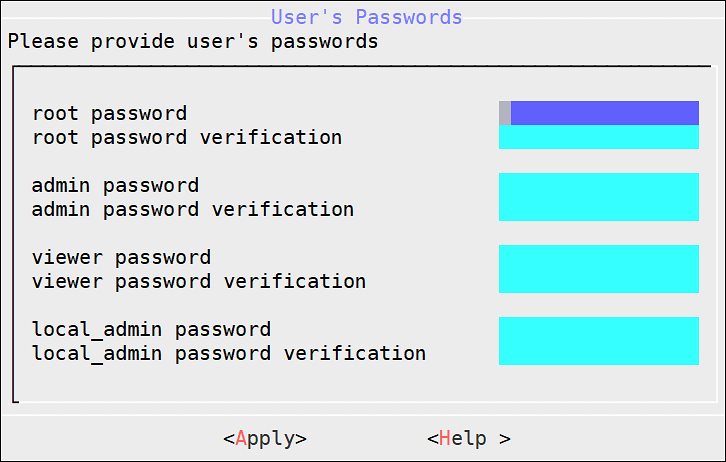
To update the user passwords, provide the credentials for the following users.
If you have deleted any of the default users, such as admin or viewer, those users will not be listed in the User’s Passwords screen.
Select Apply.
The user passwords are updated and the appliance OS keys are rotated.
After rotating appliance keys the hostname of ESA changes, update the hostname in the configuration files and rotate the Insight certificates using the steps from Updating the host name or domain name of the ESA.
As a security feature, you can restrict access to the removable drives attached to your appliances. You can enable or disable the access to the removable disks, such as, CD/DVD drive or USB Flash drives.
The access to the removable disks is enabled by default.
To disable CD or DVD drive:
On the CLI Manager, navigate to Tools > Removable Media Management > Disable CD/DVD Drives.
Press ENTER.
The following message appears.

To disable USB flash drive:
On the CLI Manager, navigate to Tools > Removable Media Management > Disable USB Flash Drives..
Press ENTER.
The following message appears.
To enable CD/DVD drive:
On the CLI Manager, navigate to Tools > Removable Media Management > Enable CD/DVD Drives.
Press ENTER.
To enable USB flash drive:
On the CLI Manager, navigate to Tools > Removable Media Management > Enable Flash Drives.
Press ENTER.
Using Tools > Web Services Tuning, you can monitor and configure the Application Protector Web Service Sessions. You can view information such as Session Shared Memory ID, maximum open sessions, open sessions, free sessions, and session timeout.
CAUTION: It is recommended to contact Protegrity Support before applying any changes for Web Services.
In the Web Services Tuning screen you can find and configure the following fields.
Start Servers: In the StartServers field, you configure the number of child servers processes created on startup. Since the number of processes is dynamically controlled depending on the load, there is usually no reason to adjust the default parameter.
Minimum Spare Servers: In the MinSpareServers field, you set the minimum number of child server processes not handling a request. If the number of such processes is less than configured in the MinSpareServers field, then the parent process creates new children at a maximum rate of 1 per second. It is recommended to change the default value only when dealing with very busy sites.
Maximum Spare Servers: In the MaxSpareServers field, you set the maximum number of child server processes not handling a request. When the number of such processes exceeds the number configured in MaxSpareServers, the parent process kills the excessive processes.
It is recommended to change the default value only when dealing with very busy sites. If you try to set the value lower than MinSpareServers, then it will automatically be adjusted to MinSpareServers value +1.
Maximum Clients: In the MaxClients field, you set the maximum number of connections to be processed simultaneously.
Maximum Requests per Child: In the MaxRequestsPerChild field, you set the limit on the number of requests that an individual child server will handle during its life. When the number of requests exceeds the value configured in the MaxRequestsPerChild field, the child process dies. If you set the MaxRequestsPerChild value to 0, then the process will never expire.
Maximum Keep Alive Requests: In the MaxKeepAliveRequest field, you can set the maximum number of requests that can be allowed during a persistent connection. If you set 0, then the number of allowed request will be unlimited. For maximum performance, leave this number high.
Keep Alive Timeout: In the KeepAliveTimeout field, you can set the number of seconds to wait for the next request from same client on the same connection.
The Service Dispatcher parameters are the Apache Multi-Processing Module (MPM) worker parameters. The Apache MPM Worker module implements a multi-threaded multi-process web server that allows it to serve higher number of requests with limited system resources. For more information about the Apache MPM Worker parameters, refer to https://httpd.apache.org/docs/2.2/mod/worker.html.

To improve service dispatcher performance, navigate to Tools > Service Dispatcher Tuning.
The following table provides information about the configurable parameters and recommendations for Service Dispatcher performance.
| Parameter | Default Value | Description |
|---|---|---|
| StartServers | 64 | The number of apache server instances that start at the beginning when you start Apache. It is recommended not to enter the StartServers value more than the value for MaxSpareThreads, as this results in processes being terminated immediately after initializing. |
| ServerLimit | 1600 | The maximum number of child processes. It is recommended to change the ServerLimit value only if the values in MaxClients and ThreadsPerChild need to be changed. |
| MinSpareThreads | 512 | The minimum number of idle threads that are available to handle requests. It is recommended to keep the MinSpareThreads value higher than the estimated requests that will come in one second. |
| MaxSpareThreads | 1600 | The maximum number of idle threads. It is recommended to reserve adequate resources to handle MaxClients. If MaxSpareThreads are insufficient, the webserver will terminate and frequently create child processes, reducing performance. |
| ThreadLimit | 512 | The upper limit of the configurable threads per child process. To avoid unused shared memory allocation, it is recommended not to set the ThreadLimit value much higher than the ThreadsPerChild value. |
| ThreadsPerChild | 288 | The number of threads created by each child process. It is recommended to keep the ThreadsPerChild value such that it can handle common load on the server. |
| MaxRequestWorkers | 40000 | The maximum number of requests that can be processed simultaneously. It is recommended to take into consideration the expected load when setting the MaxRequestWorkers values. Any connection that comes over the load, will drop, and the details can be seen in the error log. Error log file path - /var/log/apache2-service_dispatcher/errors.log |
| MaxConnectionsPerChild | 0 | The maximum number of connections that a child server process can handle in its life. If the MaxConnectionsPerChild value is reached, this process expires. It is recommended to set the MaxConnectionsPerChild value to 0, so that this process never expires. |
The AntiVirus program uses ClamAV, an open source and cross-platform antivirus engine designed to detect malicious trojan, virus, and malware threats. A single file or directory, or the whole system can be scanned. Infected file or files are logged and can be deleted or moved to a different location, as required.
The Antivirus option allows you to perform the following actions.
| Option | Description |
|---|---|
| Scan Result | Displays the list of the infected files in the system. |
| Scan now | Allows the scan to start. |
| Options | Allows access to customize the antivirus scan options. |
| View log | Displays the list of scan logs. |
To customize Antivirus scan options from the CLI:
Go to Tools > AntiVirus.
Select Options.
Press ENTER.
The following table provides a list of the choices available to you to customize scan options.
| Option | Selection | Description |
| Action | Ignore | Ignore the infected file and proceed with the scan. |
| Move to directory | Move the infected files to specific directory. In
the text box, enter the path where the infected file should
be moved. | |
| Delete infected file | Remove the infected file from the directory. | |
| Recursive | True | Scan sub-directories. |
| False | Do not scan sub-directories. | |
| Scan directory | Path of the directory to be scanned. |