Password Policy for all appliance users
Describes the password policy for all appliances users
The password policy applies to all LDAP users.
The LDAP user password should:
- Be at least 8 characters long
- Contain at least two of the following three character groups:
- Numeric [0-9]
- Alphabetic [a-z, A-Z]
- Special symbols, such as: ~ ! @ # $ % ^ & * ( ) _ + { } | : " < > ? ` - = [ ] \ ; ’ , . /
Thus, your password should look like one of the following examples:
- Protegrity123 (alphabetic and numeric)
- Protegrity!@#$ (alphabetic and special symbols)
- 123!@#$ (numeric and special symbols)
The strength of the password is validated by default. This strength validation can also be customized by creating a script file to meet the requirements of your organization.
From the CLI, press Administration > Accounts and Passwords > Manage Passwords and Local-Accounts. Select the correct Change option and update the password.
You can enforce organization rules for password validity from the Web UI, from Settings > Users > User Management, where the following can be configured:
- Minimum period for changeover
- Password expiry
- Lock on maximum failures
- Password history
For more information about configuring the password policy, refer here.
1 - Managing Users
Describes the procedure to manage users
You require users in every system to run the business application. The foremost step in any system involves setting up users that operate on different faces of the application.
In ESA, setting up a user involves operations such, as assigning roles, setting up password policies, setting up Active Directories (ADs) and so on. This section describes the various activities that constitute the user management for ESA. In ESA, you can add the following users:
- OS Users: Users for for managing and debugging OS related operations.
- Appliance users: User for performing various operations based on the roles assigned to them. Created or imported from other directory services too.
Understanding ESA Users
In any given environment, users are entities that consume services provided by a system. Only authorized users can access the system. In Protegrity appliances, users are created to manage ESA for various purposes. These users are system users and LDAP administrative users.
On ESA, the users navigate to Settings > Users > User Management to view the list of the users that are available in the appliance.
In ESA, users can be categorized as follows:
Internal Appliance Users
These are the users created by default when the ESA is installed. These users are used to perform various operations on the Web UI, such as managing cluster, managing LDAP, and so on. On ESA Web UI, navigate to Settings > Users > User Management to view the list of the users that are available in the appliance.
The following is the list of users that are created when ESA is installed.
| User Name | Description | Role |
|---|
| admin | Administrator account with access to the Web UI and CLI Manager options. | Security Administrator |
| viewer | User with view only access to the Web UI and CLI Manager options. | Security Administrator Viewer |
| ldap_bind_user | Created when local LDAP is installed | N/A |
| samba_admin_user | Access folders shared by CIFS service running on File Protector Vault. | N/A |
| PolicyUser | Perform security operations on the protector node. | Policy User |
| ProxyUser | Perform security operations on behalf of other policy users. | ProxyUser |
OS users
These are the users that contain access to all the CLI operations in the appliance. You can create local OS users from the CLI Manager. On CLI Manager, navigate to Administration > Accounts and Passwords > Manage Passwords and Local Accounts to view and manage the OS users in the appliance.
The following is the list of OS users in the appliance.
| OS Users | Description |
|---|
| alliance | Handles DSG processes |
| root | Super user with access to all commands and files |
| local_admin | Local administrator that can be used when an LDAP user is not accessible |
| www-data | Daemon that runs the Apache, Service dispatcher, and Web services as a user |
| ptycluster | Handles TAC related services and communication between TAC through SSH. |
| service_admin and service_viewer | Internal service accounts used for components that do not support LDAP |
| clamav | Handles ClamAV antivirus |
| rabbitmq | Handles the RabbitMQ messaging queues |
| epmd | Daemon that tracks the listening address of a node |
| openldap | Handles the openLDAP utility |
| dpsdbuser | Internal repository user for managing policies |
Policy Users
These users are imported from a file or an external source for managing policy operations on ESA. Policy users are used by protectors that communicate with ESA for performing security operations.
External Appliance users
These are external users that are added to the appliance for performing various operations on the Web UI. The LDAP users are imported by using the External Groups or Importing Users.You can also add new users to the appliances from the User Management screen.
Ensure that the Proxy Authentication Settings are configured before importing the users.
Managing Appliance Users
After you configure the LDAP server, you can either add users to internal LDAP or import users from the external LDAP. The users are then assigned to roles based on the permissions you want to grant them.
Default users
The default users packaged with ESA that are common across appliances are provided in the following table. You can edit each of these roles to provide additional privileges.
| User Name | Description | Role |
|---|
| admin | Administrator account with full access to the Web UI and CLI Manager options. | Security Administrator |
| viewer | User with view only access to the Web UI and CLI Manager options. | Security Administrator Viewer |
| ldap_bind_user | User who accesses the local LDAP in ESA or other appliances. | n/a |
| PolicyUser | Users who can perform security operations on the DSG Test Utility. | Policy User |
| ProxyUser | Users who can perform security operations on behalf of other policy users on the Protection Server.Note: The Protection Server is deprecated. This user should not be used. | ProxyUser |
Proxy users
The following table describes the three types of proxy users in ESA:
| Callout | Description |
|---|
| Local | Users that are authenticated using the local LDAP or created during installation. |
| Manual | Users that are manually created or imported manually from an external directory service. |
| Automatic | Users that are imported automatically from an external directory service and a part of different External Groups. For more information about External Groups, refer here. |
User Management Web UI
The user management screen allows you to add, import, and modify permissions for the users. The following screen displays the ESA User Management Web UI.

| Callout | Column | Description |
| 1 | User Name | Name of the user. This user can either be added to the
internal LDAP server or imported from an external LDAP
server. |
| 2 | Password Policy | Enable password policy for selected user. This option is
available only for local users.For more information about
defining password policy for users, refer Password Policy. |
| 3 | User Password Status | Indicates status of the user. The available states are
as follows. Valid – user is active and ready to use
ESA. Warning – user must change password to gain access to
ESA. When the user tries to login after this status is flagged, it
will be mandatory for the user to change the password to access
the appliance. Note:As the administrator sets the initial
password, it is recommended to change your password at the first
login for security reasons. |
| 4 | Lock Status | User status based on the defined password policy. The
available states are as follows: Locked – Users who are locked
after series of incorrect attempts to log in to
ESA. Unlocked – Users who can access
ESA. <value> - Number of attempts remaining for a user
after entering incorrect password. |
| 5 | Expiration Date | Indicates expiry status for a user. The available statuses
are as follows: Time left for expiry – Displays |
| 6 | User Type | Indicates if user is a local, manual or automatically
imported user. |
| 7 | Last Unsuccessful Login (UTC) | Indicates the time of the last unsuccessful login attempted
by the user. The time displayed is in UTC.Note:If a user
successfully logs in through the Web UI or the CLI manager, then
the time stamp for any previous unsuccessful attempts is
reset. |
| 8 | Roles | Linked roles to that user. |
| 9 | Add User | Add a new internal LDAP user. |
| 10 | Import User | Import users from the external LDAP server.Note: This
option is available only when Proxy Authentication is
enabled. |
| 11 | Action | The following Actions are available. - Click to
reset password for a user. When you reset password for
a user, Enter your password prompt appears.
Enter the password and click Ok. Note: If
the number of unsuccessful password attempts exceed the defined
value in the password policy, the account gets
locked. |

- Click to remove a user. When you remove a user,
Enter your password prompt appears. Enter
the password and click Ok. Note: If the
number of unsuccessful password attempts exceed the defined value
in the password policy, the account gets
locked. |
 -
Click to convert the external LDAP user to a local LDAP
user. When you convert a user to a local LDAP user,
ESA creates the user in its local LDAP server. |
| 12 | Page Navigation | Navigate through pages to view more users. |
| 13 | View Entries | Select number of users to be displayed in a single view.
You can select to view up to 50 users. |
| 14 | Search User Name | Enter the name of the user you want to filter from the list
of users. |
1.1 - Adding users to internal LDAP
Describes the procedure to add users to internal LDAP
You can create users with custom permissions and roles, and add them to the internal LDAP server.
If you are trying to add users and are not authorized to add users, then you can temporarily add users by providing credentials of a user with LDAP Manager permissions. This session remains active and lets you add users for a timeout period of 5 mins. During the active session, if you need to revoke this user and return to your session, you can click Remove.
Perform the following steps to add users to internal LDAP. In these steps, we will use the name “John Doe” as the name of the user being added to the internal LDAP.
In the Web UI, navigate to Settings > Users > User Management.
Click Add User to add new users.
- Click Cancel to exit the adding user screen.
- The & character is not supported in the Username field.
Enter John as First Name, Doe as Last Name, and provide a Description. The User Name text box is auto-populated. You can edit it, if required.
- The maximum number of characters that you can enter in the First Name, Last Name, and User Name fields is 100.
- The maximum number of characters that you can enter in the Description field is 200.
Click Continue to configure password.
Enter the password and confirm it in the consecutive text box.
Verify that the Enable Password Policy toggle button is enabled to apply password policy for the user.
The Enable Password Policy toggle button is enabled as default. For more information about password policy, refer here.
Click Continue to assign role to the user.
Select the role you want to assign to the user. You can assign the user to multiple roles.
Click Add User.
Enter your password prompt appears. Enter the password and click Ok. If the number of unsuccessful password attempts exceed the defined value in the password policy, the account gets locked.
For more information about Password Policy, refer here.
After 5 mins, the session ends, and you can no longer add users. The following figure shows this feature in the Web UI.

1.2 - Importing users to internal LDAP
Describes the procedure to import users to internal LDAP
In the User Management screen, you can import users from an external LDAP to the internal LDAP. This option gives you the flexibility to add selected users from your LDAP to the ESA.
Ensure that Proxy Authentication is enabled before importing users from an external directory service.
For more information about working with Proxy Authentication, refer to here.
The username in local LDAP is case-sensitive and the username in Active Directory is case-insensitive. It is recommended not to import users from external LDAP where the username in the local LDAP and the username in the external LDAP are same.
The users imported are not local users of the internal LDAP. You cannot apply password policy to these users. To convert the imported user to a local user, navigate to Settings > Users > User Management, select the user, and then click Convert to Local user . When you convert a user to a local LDAP user, ESA creates the user in its local LDAP server.
Perform the following steps to import users to internal LDAP.
In the Web UI, navigate to Settings> Users > User Management.
Click Import Users to add an external LDAP user to the internal LDAP.The Import Users screen appears.
Select Search by Username to search the users by username or select Search by custom filter to search the users using the LDAP filter.
Type the required number of results to display in the Display Number of Results text box.
If you want to overwrite existing user, click Overwrite Existing Users.
Click Next.The users matching the search criteria appear on the screen.
Select the required users and click Next.The screen to select the roles appears.
Select the required roles for the selected users and click Next.
The Enter your password prompt appears. Enter the password and click Ok. If the number of unsuccessful password attempts exceed the defined value in the password policy, the account gets locked.
For more information about Password Policy, refer here.
The screen displaying the roles imported appears.
The users, along with the roles, are imported to the internal LDAP.
1.3 - Password policy configuration
Describes the procedure to import users to internal LDAP
The user with administrative privileges can define password policy rules. PolicyUser and ProxyUser have the Password Policy option as disabled, by default.
Defining a Password Policy
If the number of unsuccessful password attempts exceed the defined value in the password policy, the account gets locked.
For more information about Password Policy, refer here.
Perform the following steps to define a password policy.
From the ESA Web UI, navigate to Settings > Users.
On the User Management tab under the Define Password Policy area, click Edit ( ).
).
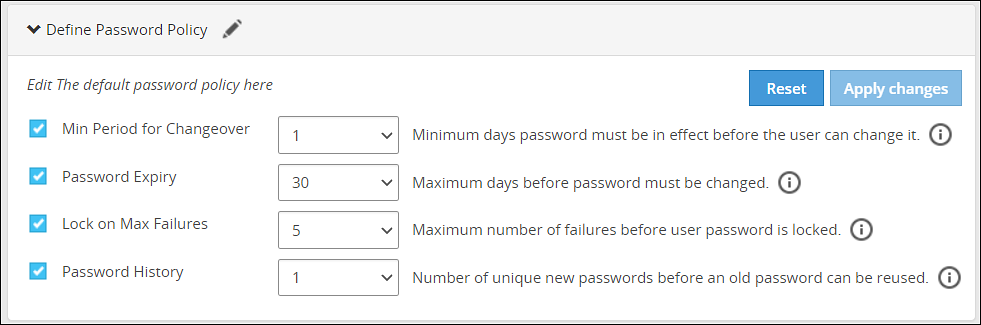
Select the password policy options for users which is described in the following table:
| Password Policy Option | Description | Default Value | Possible Values |
|---|
| Minimum period for changeover | Number of days since the last password change. | 1 | 0-29 |
| Password expiry | Number of days a password remains valid. | 30 | 0-720 |
| Lock on maximum failures | Number of attempts a user makes before the account is locked and requires Admin help for unlocking. | 5 | 0-10 |
| Password history | Number of older passwords that are retained and checked against when a password is updated. | 1 | 0-64 |
Click on Apply Changes.
Enter your password prompt appears. Enter the password and click Ok.
Resetting the password policy to default settings
If the number of unsuccessful password attempts exceed the defined value in the password policy, the account gets locked.
For more information about Password Policy, refer here.
The password policy is set to default values as mentioned in the Password Policy Configuration table.
The users imported into LDAP have Password Policy disabled, by default. This option cannot be enabled for imported users.
Perform the following steps to reset the password policy to default settings.
Click Reset.A confirmation message appears.
Click Yes.
The Enter your password prompt appears. Enter the password and click Ok.
Enabling password policy for Local LDAP users
Perform the following steps to enable password policy for Local LDAP users.
From the ESA Web UI, navigate to Settings > Users.
In the Manage Users area, click Password Policy toggle for the user.A dialog box appears requesting LDAP credentials.
The Enter your password prompt appears. Enter the password and click Ok.
After successful validation, password policy is enabled for the user.
Users locked out from too many password failures
If the number of unsuccessful password attempts exceed the defined value in the password policy, the account gets locked. Users who have been locked out receive the error message “Login Failure: Account locked” when trying to log in. To unlock the user, a user with administrative privileges must reset their password.
When an Admin user is locked, the local_admin user can be used to unlock the Admin user from the CLI Manager. Note that the local_admin is not part of LDAP, so it cannot be locked.
For more information about Password Policy, including resetting passwords, refer Password Policy.
1.4 - Edit users
Describes the procedure to edit users
For every change done for the user, the Enter your password prompt appears. Enter the password and click Ok.
Perform the following steps to edit the user.
Navigate to Settings > Users > User Management. Click on a User Name.
Under the General Info section, edit the Description.
Under the Password Policy section, toggle to enable or disable the Password Policy.
Under the Roles section, select role(s) from the list for the user.
Click Reset Password to reset password for the user.
Click the icon to delete the user.
Users locked out from too many password failures
If the number of unsuccessful password attempts exceed the defined value in the password policy, the account gets locked.
For more information about Password Policy, refer here.
2 - Managing Roles
Describes the instructions to manage roles
Roles are templates that include permissions and users can be assigned to one or more roles. Users in the appliance must be attached to a role.
The default roles packaged with ESA are as follows:
| Roles | Description | Permissions |
|---|
| Policy Proxy User | Allows a user to connect to DSG via SOAP/REST and access web services using Application Protector (AP). | Proxy-User |
| Policy User | Allows user to connect to DSG via SOAP/REST and perform security operations using Application Protector (AP). | Policy-User |
| Security Administrator Viewer | Role that can view the ESA Web UI, CLI, and reports. | Security Viewer, Appliance CLI Viewer, Appliance web viewer, Reports Viewer |
| Shell Accounts | Role who has direct SSH access to Appliance OS shell.Note: It is recommended that careful consideration is taken when assigning the Shell Accounts role and permission to a user.Ensure that if a user is assigned to the Shell Account role, no other role is linked to the same user. The user has no access to the Web UI or CLI, except when the user has password policy enabled and is required to change password through Web UI. | Shell (non-CLI) AccessNote: The user can access SSH directly if the permission is tied to this role. |
| Security Administrator | Role who is responsible for setting up data security using ESA policy management, which includes but is not limited to creating policy, managing policy, and deploying policy. | Security Officer, Reports Manager, Appliance Web Manager, Appliance CLI Administrator, Export Certificates, DPS Admin, Directory Manager, Export Keys, RLP Manager |
The capabilities of a role are defined by the permissions attached to the role. Though roles can be created, modified, or deleted from the appliance, permissions cannot be edited. The permissions that are available to map with a user and packaged with ESA as default permissions are as follows:
| Permissions | Description |
|---|
| Appliance CLI Administrator | Allows users to perform all operations available as part of ESA CLI Manager. |
| Appliance Web Manager | Allows user to perform all operations available as part of the ESA Web UI. |
| Audit Store Admin | Allows user to manage the Audit Store. |
| Can Create JWT Token | Allows user to create JWT token for communication. |
| Customer Business manager | Allows users to retrieve metering reports. |
| DPS Admin | Allows user to use the DPS admin tool on the protector node. |
| Export Certificates | Allows user to use download certificates from ESA. |
| Key Manager | Allows user to access the Key Management Web UI, rotate ERK or DSK, and modify ERK states. |
| Policy-User | Allows user to connect to Data Security Gateway (DSG) via REST and perform security operations using Application Protector (AP). |
| RLP Manager | Allows user to manage rules stored on Row-Level Security Administrator (ROLESA). Manage includes accessing, viewing, creating, etc. |
| Reports Viewer | Allows user to only view reports. |
| Security Viewer | Allows user to have read only access to policy management in the Appliance. |
| Appliance CLI Viewer | Allows user to login to the Appliance CLI as a viewer and view the appliance setup and configuration. |
| Appliance web viewer | Allows user to login to the Appliance web-interface as a viewer. |
| AWS Admin | Allows user to configure and access AWS tools if the AWS Cloud Utility product is installed. |
| Directory Manager | Allows user to manage the Appliance LDAP Directory Service. |
| Export Keys | Allows user to export keys from ESA. |
| Reports Manager | Allows user to manage reports and do functions related to reports. Manage includes accessing, viewing, creating, scheduling, etc. |
| Security Officer | Allows user to manage policy, keys, and do functions related to policy and key management. Manage includes accessing, viewing, creating, deploying, etc. |
| Shell (non-CLI) Access | Allows user to get direct access to the Appliance OS shell via SSH. It is recommended that careful consideration is taken when assigning the Shell Accounts role and permission to a user. Ensure that if a user is assigned to the Shell Account role, no other role is linked to the same user. |
| Export Resilient Package | Allows user to export package from the ESA by using the RPS API. |
| Can Create JWT Token | Allows user to create a Java Web Token (JWT) for user authentication. |
| ESA Admin | Allows user to perform operations on Audit Store Cluster Management. |
| Insight Admin | Allows to perform operations on Discover Web UI. |
| Proxy-User | Allows user to connect to DSG via REST and perform security operations using Application Protector (AP). |
| SSO Login | Allows user to login to the system using the Single Sign-On (SSO) mechanism. |
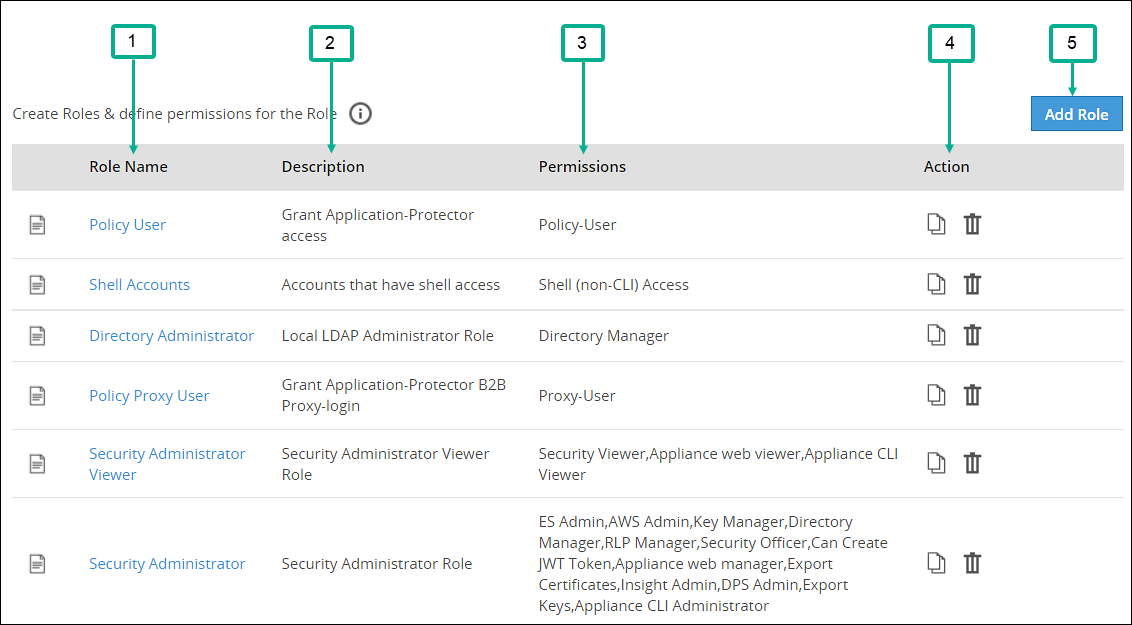
The ESA Roles web UI is as seen in the following image.
| Callout | Column | Description |
|---|
| 1 | Role Name | Name of the role available on ESA. Note: If you want to edit an existing role, click the role name from the displayed list. After making required edits, click Save to save the changes. |
| 2 | Description | Brief description about the role and its capabilities. |
| 3 | Permissions | Permission mapped to the role. The tasks that a user mapped to a role can perform is based on the permissions enabled. |
| 4 | Action | The following Actions are available. - Click to duplicate the role with mapped permissions. - Click to duplicate the role with mapped permissions.- - Click to delete a role.Note: If the number of unsuccessful password attempts exceed the defined value in the password policy, the account gets locked.
|
| 5 | Add Role | Add a custom role to ESA. |
Duplicating and deleting roles
Keep the following in mind when duplicating and deleting roles.
- It is recommended to delete a role from the Web UI only. This ensures that the updates are reflected correctly across all the users that were associated with the role.
- When you duplicate or delete a role, the Enter your password prompt appears. Enter the password and click Ok to complete the task.
Adding a Role
You can create a custom business role with permissions and privileges that you want to map with that role. Custom templates provide the flexibility to create additional roles with ease.
Perform the following steps to add a role. In those steps we will use an example role named “Security Viewer”.
In the Web UI, navigate to Settings > Users > Roles.
If you want to edit an existing role, click the role name from the displayed list. After making required edits, click Save to save the changes.
Click Add Role to add a business role.
Enter Security Viewer as the Name.
Enter a brief description in the Description text box.
Select custom as the template from the Templates drop-down.
Under Role Permissions and Privileges area, select the permissions you want to grant to the role.Click Uncheck All to clear all the check boxes. Ensure that you do not select the Shell (non-CLI) Access permission for users who require Web UI and CLI access.
Click Save to save the role.
Enter your password prompt appears. Enter the password and click Ok.
3 - Configuring the proxy authentication settings
Describes the instructions to configure proxy authentication settings
To configure the proxy authentication from the Web UI, the directory_administrator permission must be associated with the required role. It is also possible to do this through the CLI manager. For more information about configuring LDAP from the CLI manager, refer to here.
Perform the following steps to configure proxy authentication settings.
In the Web UI, navigate to Settings > Users > Proxy Authentication. The following figure shows example LDAP configuration.

Enter the LDAP IP address for the external LDAP in LDAP URI.The accepted format is ldap://host:port.
- Click the
 icon to add multiple LDAP servers.
 - Click the
 icon to remove the LDAP server from the list.
Enter data in the fields as shown in the following table:
| Fields | Description |
|---|
| Base DN | The LDAP Server Base distinguished name. For example: Base DN: dc=sherwood, dc=com. |
| Bind DN | Distinguished name of the LDAP Bind User.
It is recommended that this user is granted viewer permissions. For example: Bind DN: administrator@sherwood.com |
| Bind Password | The password of the specified LDAP Bind User. |
| StartTLS Method | Set this value based on configuration at the customer LDAP. |
| Verify Peer | Enable this setting to validate the certificate from an AD. If this setting is enabled, ensure that the following points are considered:- You must require a CA certificate to verify the server certificate from AD.For more information about certificates, refer Certificate Management.
- The LDAP Uri matches the hostname in the server and CA certificates.
- LDAP AD URI hostname is resolved in the hosts file.
|
| LDAP Filter | Provide the attribute to be used for filtering users in the external LDAP. For example, you can use the default attribute, sAMAccountName, to authenticate users in a single AD.
Note: In case of same usernames across multiple ADs, it is recommended to use LDAP filter such as UserPrincipalName to authenticate users. |
Click Test to test the provided configuration.A LDAP test connectivity passed successfully message appears.
Click Apply to apply and save the configuration settings.
The Enter your password prompt appears. Enter the password and click Ok.A Proxy Authentication was ENABLED and configuration were saved successfully message appears.
Navigate to System > Services and verify that the Proxy Authentication Service is running.

If you make any changes to the existing configuration, click Save to save and apply the changes. Click Disable to disable the proxy authentication.
After the Proxy Authentication is enabled, the user egsyncd_service_admin is enabled. It is recommended not to change the password for this user.
After enabling Proxy Authentication, you can proceed to adding users and mapping roles to the users. For more information about importing users, refer here.
4 - Working with External Groups
Describes the instructions to work with external groups
The directory service providers, such as, Active Directory (AD) or Oracle Directory Server Enterprise Edition (ODSEE), are identity management systems that contain information about the enterprise users. You can map the users in the directory service providers to the various roles defined in the Appliances. The External Groups feature enables you to associate users or groups to the roles.
You can import users from a directory service to assign roles for performing various security and administrative operations in the appliances. Using External Groups, you connect to an external source, import the required users or groups, and assign the appliance-specific roles to them. The appliances automatically synchronize with the directory service provider at regular time intervals to update user information. If any user or group in a source directory service is updated, it is reflected across the users in the external groups. The updates made to the local LDAP do not affect the source directory service provider.
If any changes occur to the roles or users in the external groups, an audit event is triggered.
Ensure that Proxy Authentication is enabled to use an external group.
The following screen displays the External Groups screen.

Only users with Directory Manager role can configure the External Groups screen.
The following table describes the actions you can perform on the External Groups screen.
| Icon | Description |
|---|
| List the users present for the external group. |
 | Synchronize with the external group to update the users. |
| Delete the external group. |
Required fields for External Groups
Listed below are the required fields for creating an External Group.
Title: Name designated to the External Group
Description: Additional text describing the External Group
Group DN: Distinguished name where groups can be found in the directory
Query by: To pull users from the directory server, query the directory server using required parameters. This can be achieved using one of the following two methods:
Query by UserQuery by User allows to add specific set of users from a directory server.
Group PropertiesIn the Group Properties, the search is based on the values entered in the Group DN and Member Attribute Name text boxes. Consider an example, where the values in the Group DN and Member Attribute Name are cn=esa,ou=groups,dc=sherwood,dc=com and memberOf respectively. In this case, the search is performed on every user that is available in the directory server. The memberOf value of the users are matched with the specified Group DN. Only those users whose memberOf value matches the Group DN values are returned.
Search FilterThis field facilitates searching multiple users using regex patterns. Consider an example, where the values in the Search Filter for the user is cn=S*. In this case all the users beginning with cn=S in the directory server are retrieved.
Query by GroupUsing this method, you can search and add users of a group in the directory server. All the users belonging to the group are retrieved in the search process.
Group PropertiesIn the Group Properties, the search is based on the values entered in the Group DN and Member Attribute Name text boxes. Consider an example, where the values in the Group DN and Member Attribute Name are cn=hr,ou=groups,dc=sherwood,dc=com and member respectively. The search is performed in the directory server for the group mentioned in the Group DN text box. If the group is available, then all the users of that group containing value of member attribute as cn=hr,ou=groups,dc=sherwood,dc=com are retrieved.
Search FilterThis field facilitates searching multiple groups across the directory server. The users are retrieved based on the values provided in the Search Filter and Member Attribute Name text boxes. A search is performed on the group mentioned in Search Filter and the value mentioned in the Member Attribute Name attribute of the group is fetched. Consider an example, where the values in the Search Filter for the group is cn=accounts and the value in the Member Attribute Name value is member. All the groups that match with cn=accounts are searched. The value that is available in the member attribute of those groups are retrieved as the search result.
Adding an External Group
You can add an external group to assign roles for a group of users. For example, consider a scenario to add an external group with data entered in the Search Filter textbox.
Perform the following steps to add an external group.
In the ESA Web UI, navigate to Settings > Users > External Groups.
Click Create.
Enter the required information in the Title and Description fields.

If you select Group Properties, then enter the Group DN and Member Attribute Name.For example,
Enter the following DN in the Group DN text box:
cn=Joe,ou=groups,dc=sherwood,dc=com
Enter the following attribute in the Member Attribute Name text box:
memberOf
This text box is not applicable for ODSEE.
If you select Search Filter, enter the search criteria in the Search Filter text box.
For example,
For AD, you can enter the search filter as follows:
(&(memberOf=cn=John,dc=Bob,dc=com))
For ODSEE, you can enter the search filter as follows:
isMemberOf=cn=Alex,ou=groups,dc=sherwood,dc=com
Click Preview Users to view the list of users for the selected search criteria.
Select the required roles from the Roles tab.
Click Save.
An external group is added.
The Users tab is visible, displaying the list of users added as a part of the external group.
Importing from ODSEE and special characters
If you are importing users from ODSEE, usernames containing special characters are not supported. Special characters include semi colon, forward slash, curly brackets, parentheses, angled brackets, or plus sign. That is: ;, /, {}, () , <>, or +, respectively.
Editing an External Group
You can edit an external group to modify fields such as Description, Mode, Roles, or Group Properties. If any updates are made to the roles of the users in the external groups, the modifications are applicable immediately to the users existing in the local LDAP.
Ensure that you synchronize with the source directory service if you update the Group DN or the search filter.
Perform the following steps to edit an external group:
In the ESA Web UI, navigate to Settings > Users > External Groups.
Select the required external group.
Edit the required fields.
Click Save.
The Enter your password prompt appears. Enter the password and click Ok.The changes to the external group are updated.
Deleting an External Group
When you delete an external group, the following scenarios are considered while removing a user from an external group:
- If the users are not part of other external groups, the users are removed from the local LDAP.
- If the users are a part of multiple external groups, only the association with the deleted external group and roles is removed.
Perform the following steps to remove an External Group:
In the ESA Web UI, navigate to Settings > Users > External Groups.
Select the required external group and click the Delete ( ) icon.
The Enter your password prompt appears. Enter the password and click Ok.The external group is deleted.
Synchronizing the External Group
When the proxy authentication is enabled, the External Groups Sync Service is started. This service is responsible for the automatic synchronization of the external groups with the directory services. The time interval for automatic synchronization is 24 hours.
You can manually synchronize the external groups with the directory services using the Synchronize () icon.
After clicking theSynchronize () icon, the Enter your password prompt appears. Enter the password and click Ok.
The following scenarios occur when synchronization is performed between the external groups and the directory services.
- Users are added to ESA and roles are assigned.
- Roles of existing users in ESA are updated.
- Users are deleted from the ESA if they are associated with any external groups.
Based on the scenarios, the messages appearing in the Web UI, when synchronization is performed, are described in the following table.
| Message | Description |
|---|
| Added | Users are added to the ESA the roles mentioned in the external groups are assigned to the user. |
| Updated | Roles pertaining to the users are updated ESA. |
| Removed | Roles corresponding to the deleted external group is removed for the users. Users are not deleted from ESA. |
| Deleted | Users are deleted from ESA as they are not associated to any external group. |
| Failed | Updates to the user fail. The reason for the failure in update appears in the Web UI. |
If a GroupDN for an external group is not available during synchronization, the users are removed or deleted. The following log appears in the Insight logs:
Appliance Warning: GroupDN is missing in external Source.
Also, in the Appliance logs, the following message appears:
External Group: <Group name>, GroupDN: <domain name> could not be found on the external source
5 - Configuring the Azure AD Settings
Describes the instructions to configure the Azure AD settings
You can configure the Azure AD settings from the Web UI. Using the Web UI, you can enable the Azure AD settings to manage user access to cloud applications, import users or groups, and assign specific roles to them.
For more information about configuring Azure AD Settings from the CLI Manager, refer here.
Before configuring Azure AD Settings on the ESA, you must have the following information that is required to connect the ESA with the Azure AD:
- Tenant ID
- Client ID
- Client Secret or Thumbprint
For more information about the Tenant ID, Client ID, Authentication Type, and Client Secret/Thumbprint, search for the text Register an app with Azure Active Directory on Microsoft’s Technical Documentation site at https://learn.microsoft.com/en-us/docs/
The following are the list of the API permissions that must be granted.
- Group.Read.All
- GroupMember.Read.All
- User.Read
- User.Read.All
To assign API permissions in Microsoft Azure, contact your Microsoft Azure administrator.
For more information about configuring the application permissions in the Azure AD, please refer https://learn.microsoft.com/en-us/graph/auth-v2-service?tabs=http.
Ensure that the Allow public client flows setting is Enabled. To enable the Allow public client flows setting, navigate to Authentication > Advanced settings, click the toggle button, and select Yes.
Perform the following steps to configure Azure AD settings:
- On the Web UI, navigate to Settings > Users > Azure AD.The following figure shows an example of Azure AD configuration.

Enter the data in the fields as shown in the following table:
| Setting | Description |
|---|
| Tenant ID | Unique identifier of the Azure AD instance. |
| Client ID | Unique identifier of an application created in Azure AD. |
| Auth Type | Select one of the Auth Type:- SECRET indicates a password-based authentication. In this authentication type, the secrets are symmetric keys, which the client and the server must know.
- CERT indicates a certificate-based authentication. In this authentication type, the certificates are the private keys, which the client uses. The server validates this certificate using the public key.
|
| Client Secret/Thumbprint | The client secret/thumbprint is the password of the Azure AD application.- If the Auth Type selected is SECRET, then enter Client Secret.
- If the Auth type selected is CERT, then enter Client Thumbprint.
|
For more information about the Tenant ID, Client ID, Authentication Type, and Client Secret/Thumbprint, search for the text Register an app with Azure Active Directory on Microsoft’s Technical Documentation site at https://learn.microsoft.com/en-us/docs/.
Click Test to test the provided configuration.The Azure AD settings are authenticated successfully. To save the changes, click ‘Apply/Save’. message appears.
Click Apply to apply and save the configuration settings.The Azure AD settings are saved successfully message appears.
5.1 - Importing Azure AD Users
Describes the instructions to import the Azure AD users
Before importing Azure users, ensure that the following prerequisites are considered:
- Ensure that the user is not present in the nested group. If the user is present in the nested group, then the nested group will not be synced on the ESA.
- Check the user status before importing them to the ESA. If a user with the Disabled status is imported, then that user will not be able to login to the ESA.
- Ensure that an external user is not added to the group. If an external user is added to the group, then that user will not be synced on the ESA.
- Ensure that the special character # (hash) is not used while creating the username. If you are importing users from the Azure AD, then the usernames containing the special character # (hash) will not be able to login to the ESA. The usernames containing the following special characters are supported in the ESA.
- ’ (single quote)
- . (period)
- ^ (caret)
- ! (exclamation)
- ~ (tilde)
- - (minus)
- _ (underscore)
- Ensure that the Azure AD settings are enabled before importing the users.
You can import users from the Azure AD to the ESA, on the User Management screen.
For more information about configuring the Azure AD settings, refer here.
Perform the following steps to import Azure AD users.
On the Web UI, navigate to Settings > Users > User Management.
Click Import Azure Users.
The Enter your password prompt appears. Enter the password and click Ok.The Import Users screen appears.
Search a user by entering the name in the Username/Filter box.
If required, toggle the Overwrite Existing Users option to ON to overwrite users that are already imported to the ESA.
Click Next.The users matching the search criteria appear on the screen.
Select the required users and click Next.The screen to select the roles appears.
Select the required roles for the selected users and click Next.The screen displaying the imported users appears.
Click Close.The users, with their roles, are imported to the ESA.
5.2 - Working with External Azure Groups
Describes the instructions to work with the external Azure groups
The Azure AD is an identity management system that contains information about the enterprise users. You can map the users in the Azure AD to the various roles defined in the ESA. The External Azure Groups feature enables you to associate users or groups to the roles.
You can import users from the Azure AD to assign roles for performing various security and administrative operations on the ESA. Using External Azure Groups, you connect to Azure AD, import the required users or groups, and assign the appliance-specific roles to them.
Ensure that Azure AD is enabled to use external Azure group.
The following screen displays the External Azure Groups screen.

Only users with the Directory Manager permissions can configure the External Groups screen.
The following table describes the actions that you can perform on the External Groups screen.
| Icon | Description |
|---|
| List the users present for the Azure External Group. |
| Synchronize with the Azure External Group to update the users. |
| Delete the Azure External Group. |
Adding an Azure External Group
You can add an Azure External Group to assign roles for a group of users.
Perform the following steps to add an External Group.
From the ESA Web UI, navigate to Settings > Users > Azure External Groups.
Click Add External Group.
Enter the group name in the Groupname/Filter field.

Click Search Groups to view the list of groups.
Select one group from the list, and click Submit.
Enter a description in the Description field.
Select the required roles from the Roles tab.
Click Save.The External Group has been created successfully message appears.
Editing an Azure External Group
You can edit an Azure external group to modify Description and Roles. If any updates are made to the roles of the users in the Azure External Groups, then the modifications are applicable immediately to the users existing on the ESA.
Perform the following steps to edit an External Group:
On the ESA Web UI, navigate to Settings > Users > Azure External Groups.
Select the required external group.
Edit the required fields.
Click Save.
The Enter your password prompt appears. Enter the password and click Ok.The changes to the external group are updated.
Synchronizing the Azure External Groups
When the Azure AD is enabled, the Azure External Groups is started. You can manually synchronize the Azure External Groups using the Synchronize () icon.
After clicking the Synchronize () icon, the Enter your password prompt appears. Enter the password and click Ok.
Note: If the number of unsuccessful password attempts exceed the defined value in the password policy, then the user account gets locked.
For more information about Password Policy, refer here.
The messages appearing on the Web UI, when synchronization is performed between Azure External Groups and the ESA, are described in the following table.
| Message | Description |
|---|
| Success | - Users are added to the ESA and roles are assigned.
- Roles of existing users in the ESA are updated.
- Users are deleted from the ESA if they are associated with any external Azure Groups.
|
| Failed | Updates to the user failed.Note: The reason for the failure in updating the user appears on the Web UI. |
Deleting Azure External Groups
When you delete an Azure External Group, the following scenarios are considered while removing a user from the Azure External Group:
- If the users are not part of other external groups, then the users are removed from the ESA.
- If the users are a part of multiple external groups, the only the association with the deleted Azure External Group and roles is removed.
Perform the following steps to remove an Azure External Group.
From the ESA Web UI, navigate to Settings > Users > Azure External Groups.
Select the required external group and click the Delete () icon.
The Enter your password prompt appears. Enter the password and click Ok.The Azure External Group is deleted.