Importing Azure AD Users
Describes the instructions to import the Azure AD users
You can configure the Azure AD settings from the Web UI. Using the Web UI, you can enable the Azure AD settings to manage user access to cloud applications, import users or groups, and assign specific roles to them.
For more information about configuring Azure AD Settings from the CLI Manager, refer here.
Before configuring Azure AD Settings on the ESA, you must have the following information that is required to connect the ESA with the Azure AD:
For more information about the Tenant ID, Client ID, Authentication Type, and Client Secret/Thumbprint, search for the text Register an app with Azure Active Directory on Microsoft’s Technical Documentation site at https://learn.microsoft.com/en-us/docs/
The following are the list of the API permissions that must be granted.
For more information about configuring the application permissions in the Azure AD, please refer https://learn.microsoft.com/en-us/graph/auth-v2-service?tabs=http.
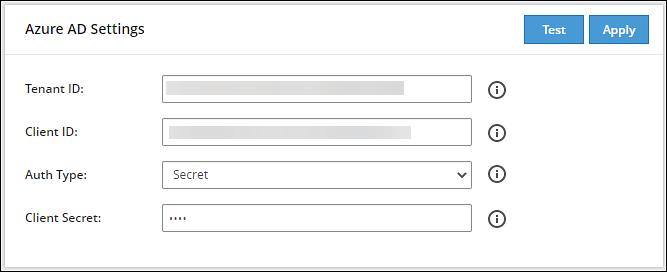
Perform the following steps to configure Azure AD settings:

Enter the data in the fields as shown in the following table:
| Setting | Description |
|---|---|
| Tenant ID | Unique identifier of the Azure AD instance. |
| Client ID | Unique identifier of an application created in Azure AD. |
| Auth Type | Select one of the Auth Type:
|
| Client Secret/Thumbprint | The client secret/thumbprint is the password of the Azure AD application.
|
For more information about the Tenant ID, Client ID, Authentication Type, and Client Secret/Thumbprint, search for the text Register an app with Azure Active Directory on Microsoft’s Technical Documentation site at https://learn.microsoft.com/en-us/docs/.
Click Test to test the provided configuration.The Azure AD settings are authenticated successfully. To save the changes, click ‘Apply/Save’. message appears.
Click Apply to apply and save the configuration settings.The Azure AD settings are saved successfully message appears.
Describes the instructions to import the Azure AD users
Describes the instructions to work with the external Azure groups
Was this page helpful?