Working with External Azure Groups
The Azure AD is an identity management system that contains information about the enterprise users. You can map the users in the Azure AD to the various roles defined in the ESA. The External Azure Groups feature enables you to associate users or groups to the roles.
You can import users from the Azure AD to assign roles for performing various security and administrative operations on the ESA. Using External Azure Groups, you connect to Azure AD, import the required users or groups, and assign the appliance-specific roles to them.
Ensure that Azure AD is enabled to use external Azure group.
The following screen displays the External Azure Groups screen.

Only users with the Directory Manager permissions can configure the External Groups screen.
The following table describes the actions that you can perform on the External Groups screen.
| Icon | Description |
|---|---|
| List the users present for the Azure External Group. | |
| Synchronize with the Azure External Group to update the users. | |
| Delete the Azure External Group. |
Adding an Azure External Group
You can add an Azure External Group to assign roles for a group of users.
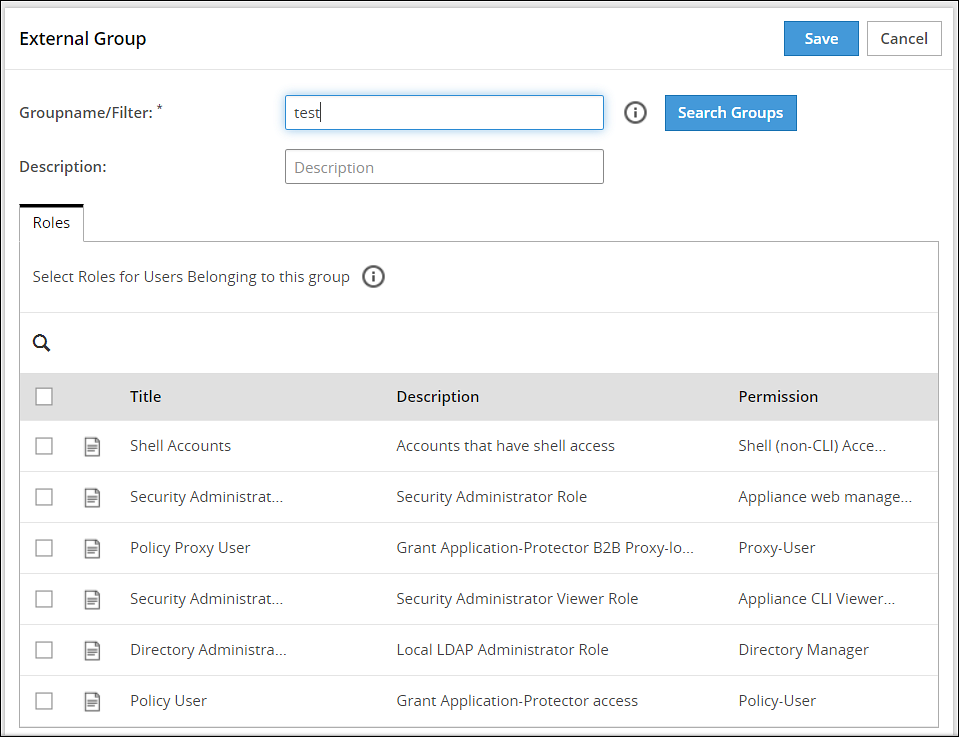
Perform the following steps to add an External Group.
From the ESA Web UI, navigate to Settings > Users > Azure External Groups.
Click Add External Group.
Enter the group name in the Groupname/Filter field.

Click Search Groups to view the list of groups.
Select one group from the list, and click Submit.
Enter a description in the Description field.
Select the required roles from the Roles tab.
Click Save.The External Group has been created successfully message appears.
Editing an Azure External Group
You can edit an Azure external group to modify Description and Roles. If any updates are made to the roles of the users in the Azure External Groups, then the modifications are applicable immediately to the users existing on the ESA.
Perform the following steps to edit an External Group:
On the ESA Web UI, navigate to Settings > Users > Azure External Groups.
Select the required external group.
Edit the required fields.
Click Save.
The Enter your password prompt appears. Enter the password and click Ok.The changes to the external group are updated.
Synchronizing the Azure External Groups
When the Azure AD is enabled, the Azure External Groups is started. You can manually synchronize the Azure External Groups using the Synchronize (![]() ) icon.
) icon.
After clicking the Synchronize (![]() ) icon, the Enter your password prompt appears. Enter the password and click Ok.
) icon, the Enter your password prompt appears. Enter the password and click Ok.
Note: If the number of unsuccessful password attempts exceed the defined value in the password policy, then the user account gets locked.
For more information about Password Policy, refer here.
The messages appearing on the Web UI, when synchronization is performed between Azure External Groups and the ESA, are described in the following table.
| Message | Description |
|---|---|
| Success |
|
| Failed | Updates to the user failed.Note: The reason for the failure in updating the user appears on the Web UI. |
Deleting Azure External Groups
When you delete an Azure External Group, the following scenarios are considered while removing a user from the Azure External Group:
- If the users are not part of other external groups, then the users are removed from the ESA.
- If the users are a part of multiple external groups, the only the association with the deleted Azure External Group and roles is removed.
Perform the following steps to remove an Azure External Group.
From the ESA Web UI, navigate to Settings > Users > Azure External Groups.
Select the required external group and click the Delete (
 ) icon.
The Enter your password prompt appears. Enter the password and click Ok.The Azure External Group is deleted.
Feedback
Was this page helpful?