Configuring the proxy authentication settings
To configure the proxy authentication from the Web UI, the directory_administrator permission must be associated with the required role. It is also possible to do this through the CLI manager. For more information about configuring LDAP from the CLI manager, refer to here.
Perform the following steps to configure proxy authentication settings.
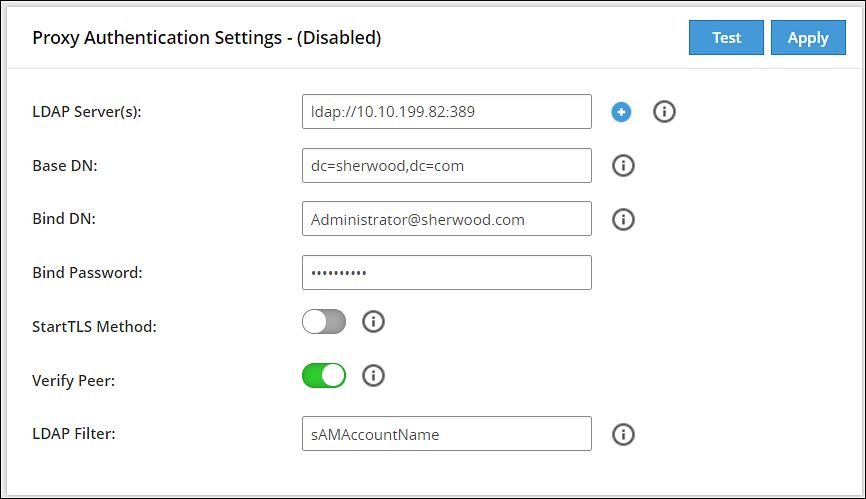
In the Web UI, navigate to Settings > Users > Proxy Authentication. The following figure shows example LDAP configuration.

Enter the LDAP IP address for the external LDAP in LDAP URI.The accepted format is ldap://host:port.
- Click the
 icon to add multiple LDAP servers.
 - Click the
 icon to remove the LDAP server from the list.
- Click the
Enter data in the fields as shown in the following table:
Fields Description Base DN The LDAP Server Base distinguished name. For example: Base DN: dc=sherwood, dc=com. Bind DN Distinguished name of the LDAP Bind User.
It is recommended that this user is granted viewer permissions. For example: Bind DN: administrator@sherwood.comBind Password The password of the specified LDAP Bind User. StartTLS Method Set this value based on configuration at the customer LDAP. Verify Peer Enable this setting to validate the certificate from an AD. If this setting is enabled, ensure that the following points are considered: - You must require a CA certificate to verify the server certificate from AD.For more information about certificates, refer Certificate Management.
- The LDAP Uri matches the hostname in the server and CA certificates.
- LDAP AD URI hostname is resolved in the hosts file.
LDAP Filter Provide the attribute to be used for filtering users in the external LDAP. For example, you can use the default attribute, sAMAccountName, to authenticate users in a single AD.
Note: In case of same usernames across multiple ADs, it is recommended to use LDAP filter such as UserPrincipalName to authenticate users.Click Test to test the provided configuration.A LDAP test connectivity passed successfully message appears.
Click Apply to apply and save the configuration settings.
The Enter your password prompt appears. Enter the password and click Ok.A Proxy Authentication was ENABLED and configuration were saved successfully message appears.
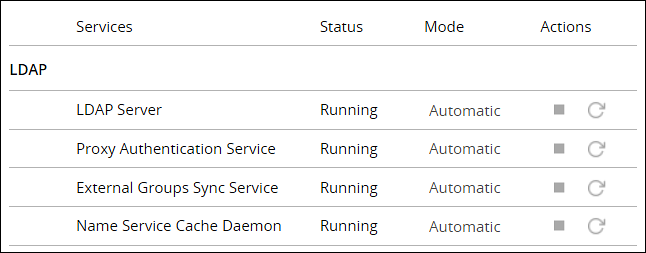
Navigate to System > Services and verify that the Proxy Authentication Service is running.

If you make any changes to the existing configuration, click Save to save and apply the changes. Click Disable to disable the proxy authentication.
After the Proxy Authentication is enabled, the user egsyncd_service_admin is enabled. It is recommended not to change the password for this user.
After enabling Proxy Authentication, you can proceed to adding users and mapping roles to the users. For more information about importing users, refer here.
Feedback
Was this page helpful?