Configuring Appliance Two Factor Authentication
Describes the procedure to configure two factor authentication settings
Two factor authentication is a verification process where two recognized factors are used to identify you before granting you access to a system or website. In addition to your password, you must correctly enter a different numeric one-time passcode or the verification code to finish the login process. This provides an extra layer of security to the traditional authentication method.
In order to provide this functionality, a trust is created between the appliance and the mobile device being used for authentication. The trust is simply a shared-secret or a graphic barcode that is generated by the system and is presented to the user upon first login.
There is an advantage of using the two-factor authentication feature. If a hacker manages to guess your password, then entry to your system is not possible. This is because a device is required to generate the verification code.
The verification code is a dynamic code that is generated by any smart device such as smartphone or tablet. The user enters the shared-secret or scans the barcode into the smart device, and from that moment onwards the smartphone generates a new verification-code every 30-60 seconds. The user is required to enter this verification code every time as part of the login process. For validating the one time password (OTP), ensure that the date and time on the ESA and your system are in sync.
Protegrity appliances and authenticators
There are a few requirements for using two factor authentication with Protegrity appliances.
- For validating one time passwords (OTP), the date and time on the ESA and the validating device must be in sync.
- Protegrity appliances only support use of the Google, Microsoft, or Radius Authenticator apps.
- Download the appropriate app on a mobile device, or any other TOTP-compatable device or application.
The Security Officer configures the Appliance Two Factor Authentication by any one of the following three methods:
Automatic per-user shared-secret is the default and recommended method. It allows having a separate shared-secret for each user, which is generated by the system for them. The shared-secret will be presented to the user upon the first login.
Radius Authentication is the authentication using the RADIUS protocol.
Host-based shared-secret allows a common shared-secret for all users, which can be specified and distributed to the users by the Security Officer. Host-based shared-secret method is useful to force the same secret code for multiple appliances in clustered environments.
1 - Working with Automatic Per-User Shared-Secret
Describes the procedure to Automatic Per-User Shared-Secret
Automatic per-user shared-secret is the default and recommended method for configuring two factor authentication. It allows having a separate shared-secret for each user, which is generated by the system for them. The shared-secret will be presented to the user upon the first login.
Configuring Two Factor Authentication with Automatic Per-User Shared-Secret
The following section describes how to configure two factor authentication using automatic per-user shared-secret.
Perform the following steps to configure two factor authentication with automatic per-user shared-secret.
From the ESA Web UI, navigate to Settings > Security > Two Factor Authentication.
Check the Enable Two-Factor-Authentication check box.
Select the Automatic per-user shared-secret option.
The following pane appears with the options to enable this authentication mode.

If required, then you can customize the message that will be presented to users upon their first login.
Check the Advanced Settings check box to display the Console Message button. By clicking Console Message, a new window appears where you can review and modify the message that will be presented to the user.

You can apply the following logging-settings in order to specify what to log:
- Log failed log-in attempts
- Log any successful log-ins
- Log only first-successful log-in
Click Apply to save the changes.
Logging in to the Web UI
Before beginning, be aware of time limits. When entering codes from the authenticator there is a time limit. Ensure codes are entered in the Enter Authentication code field within the displayed time limit.
The following section describes how to log in to the Web UI after configuring automatic per-user shared-secret.
Perform the following steps to login to the Web UI:
Navigate to the ESA Web UI login page.
In the Username and Password text boxes, enter the user credentials.
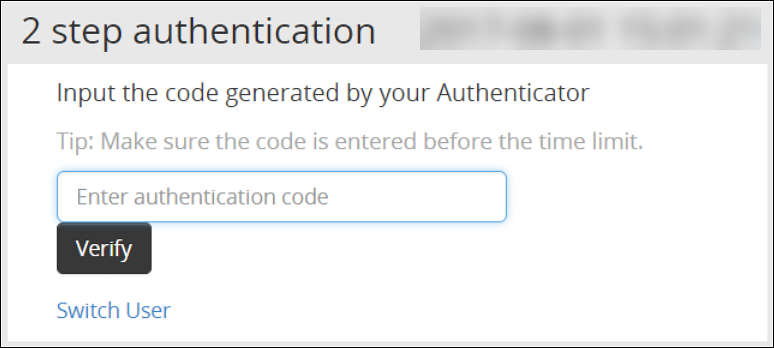
Click Sign in.The Two step authentication screen appears.

Scan the QR code using an authentication application.Alternatively, click the Can’t see QR code? link.A QR code gets generated and displayed below it as shown in the figure.

Enter the displayed code in the authentication app to generate One-time password.
In the Enter authentication code field box, enter the one-time password, and click Verify.
After the code is validated, the ESA home page appears.
2 - Working with Host-Based Shared-Secret
Describes the procedure to Host-Based Shared-Secret
Host-based shared-secret allows a common shared-secret for all users, which can be specified and distributed to the users by the Security Officer. Host-based shared-secret method is useful to force the same secret code for multiple appliances in clustered environments.
Configuring Two Factor Authentication with Host-Based Shared-Secret
The following section describes how to configure two factor authentication using host-based shared-secret.
Perform the following steps to configure Two Factor Authentication with Host-based shared-secret.
- On the ESA Web UI, navigate to Settings > Security > Two Factor Authentication.
- Check the Enable Two-Factor-Authentication check box.
- Select Host-based shared-secret from Authentication Mode.
- Click Modify.The Host-based shared-secret key appears.
If required, click Generate to modify the Host-based shared-secret key. Ensure that you note the Host-based shared-secret key to generate TOTP. - You can apply the following logging-settings in order to specify what to log:
- Log failed log-in attempts
- Log any successful log-ins
- Click Apply to save the changes.
A confirmation message appears.
Logging in to the Web UI
Before beginning, be aware of time limits. When entering codes from the authenticator there is a time limit. Ensure codes are entered in the authenticator code box within the displayed time limit
The following section describes how to log in to the Web UI after configuring host-based shared-secret.
To login to the Web UI:
Navigate to the ESA Web UI login page.
In the Username and Password text boxes, enter the user credentials.
Click Sign in.
The 2 step authentication screen appears.

Use the Host-Based Shared-Secret key obtained from the configuration process to generate authentication code.
Enter the Host-Based Shared-Secret key in the authentication app to generate authentication code.
In the authenticator code box, enter the authentication code, and click Verify.
After the code is validated, the ESA home page appears.
3 - Working with Remote Authentication Dial-up Service (RADIUS) Authentication
Describes the procedure work with RADIUS Authentication
The Remote Authentication Dial-up Service (RADIUS) is a networking protocol for managing authentication, authorization, and accounting in a network. It defines a workflow for communication of information between the resources and services in a network. The RADIUS protocol uses the UDP transport layer for communication. The RADIUS protocol consists of two components, the RADIUS server and the RADIUS client. The server receives the authentication and authorization requests of users from the RADIUS clients. The communication between the RADIUS client and RADIUS server is authenticated using a shared secret key.
You can integrate the RADIUS protocol with an ESA for two-factor authentication. The following figure describes the implementation between ESA and the RADIUS server.

- The ESA is connected to the AD that contains user information.
- The ESA is a client to the RADIUS sever that contains the network and connection policies for the AD users. It also contains a RADIUS secret key to connect to the RADIUS server. The communication between the ESA and the RADIUS sever is through the Password Authentication Protocol (PAP).
- An OTP generator is configured with the RADIUS server. An OTP is generated for each user. Based on the secret key for each user, an OTP for the user is generated.
In ESA, the following two files are created as part of the RADIUS configuration:
- The dictionary file that contains the default list of attributes for the RADIUS server.
- The custom_attributes.json file that contains the customized list of attributes that you can provide to the RADIUS server.
Important : When assigning a role to the user, ensure that the Can Create JWT Token permission is assigned to the role.If the Can Create JWT Token permission is unassigned to the role of the required user, then remote authentication fails.To verify the Can Create JWT Token permission, from the ESA Web UI navigate to Settings > Users > Roles.
Configuring Radius Two-Factor Authentication
To configure Radius two-factor authentication:
On the ESA Web UI, navigate to Settings > Security > Two Factor Authentication.
Check the Enable Two-Factor-Authentication checkbox.
Select the Radius Server option as shown in the following figure.
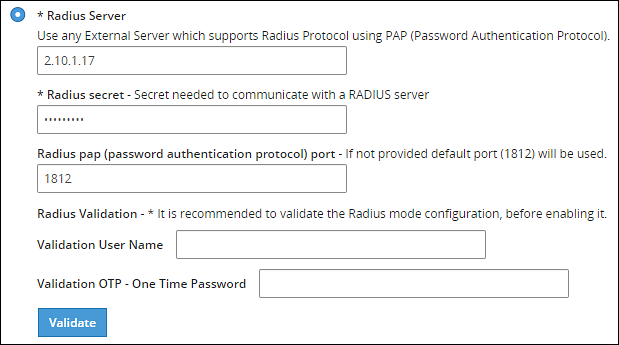
Type the IP address or the hostname of the RADIUS server in the Radius Server text box.
Type the secret key in the Radius Secret text box.
Type the port of the RADIUS server in the Radius port text box.Alternatively, the default port is 1812.
Type the username that connects to the RADIUS server in the Validation User Name text box.
Type the OTP code for the user in the Validation OTP text box.
Click Validate to validate the configuration.A message confirming the configuration appears.
Click Apply to apply the changes.
Logging in to the Web UI
Perform the following steps to login to the Web UI:
Open the ESA login page.
Type the user credentials in the Username and Password text boxes.
Click Sign-in.The following screen appears.
Type the OTP code and select Verify.After the OTP is validated, the ESA home page appears.
Editing the Radius Configuration Files
To edit the configuration files:
On the ESA Web UI, navigate to Settings > System.
Under OS-Radius Server tab, click Edit corresponding to the custom_attibutes.json or directory to edit the attributes.
If required, modify the attributes to the required values.
Click Save.The changes are saved.
Logging in to the CLI
Perform the following steps to login to CLI Manager:
Open the ESA CLI Manager.
Enter the user credentials.
Press ENTER .The following screen appears.
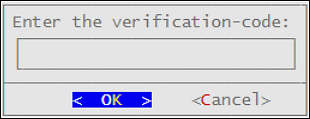
Type the verification code and select OK.After the code is validated, the main screen for the CLI Manager appears.
4 - Working with Shared-Secret Lifecycle
Describes the procedure work with shared-secret lifecycle
All users of appliance two factor authentication get a shared-secret for verification. This shared-secret for a user remains in the two factor authentication group list until it is manually deleted. Even if a user becomes ineligible to access the system, the username remains linked to the shared-secret.
This exception is valid for those users opting for per-user authentication.
If the same user or another user with the same name is again added to the system, then the user becomes eligible to use the already existing shared-secret.
To prevent this exception, ensure that an ineligible user is manually removed from the Two Factor Authentication group.
Revoking Shared-Secret for the User
The option to revoke shared-secret is useful when user needs to switch to another mobile device or the previous shared-secret cannot be retrieved from the earlier device.
Perform the following steps to revoke shared-secret for the user:
On the ESA Web UI, navigate to Settings > Security > Two Factor Authentication.
Ensure that the Enable Two-Factor-Authentication and Automatic per-user shared-secret checkbox are checked.
Inspect Users Shared Secrets area to identify user account to revoke.You can revoke users who have already logged in to the Appliance.
Click Revoke.
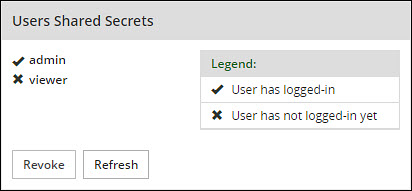
Select the user to discard by clicking the checkbox next to the username.
Click Apply to save the changes.A new shared-secret code will be created for the revoked user and is presented upon the next login.
5 - Logging in Using Appliance Two Factor Authentication
Describes the procedure to log in using the Two Factor Authentication
Perform the following steps to log in using Appliance Two Factor Authentication:
Navigate to ESA login page.
Enter your username.
Enter your password.
Click Sign in.After verification, a separate login dialog appears.

As a prerequisite, a new user must setup an account on Google Authenticator. Download the Google Authenticator app in your device and follow the instructions to create a new account.
Enter the shared-secret in your device.If the system is configured for per-user shared-secret, then this secret code is made available. If this is a web-session, then you are presented with a barcode and the applications that support it.
After you accept the shared-secret, the device displays a verification code.
Enter this verification code in the screen displayed in step 4.
Click Verify.
6 - Disabling Appliance Two Factor Authentication
Describes the procedure to disable the Two Factor Authentication
Perform the following steps to disable Two Factor Authentication:
Using the ESA Web UI, navigate to Settings > Security > Two Factor Authentication.
Clear the Enable Two-Factor-Authentication checkbox.
Click Apply to save the changes.
Disable Two Factor through local console
You can also disable two-factor authentication from the local console.You need to switch to OS console and execute the following command.
# /etc/opt/2FA/2fa.sh -–disable