The System Information navigation folder includes all information about the appliance listed below.
Services and their statuses
The hardware and software information
Performance statistics
Graphs
Real-time graphs
Appliance logs
System option available on the left pane provides the following options:
System Options
Description
Services
View and manage OS, logging and reporting, policy management and other miscellaneous services.
Information
View the health of the system.
Trusted Appliances Cluster
View the status of trusted appliances clusters and saved files.
System Statistics
View the performance of the hardware and networks.
Backup and Restore
Take backups of files and restore these, as well as take backups of full OS and log files.
Task Scheduler
Schedule tasks to run in the background such as anti-virus scans and password policy checks, among others.
Graphs
View how the system is running in a graphical form.
1 - Working with Services
Describes the services section on the Web UI
You can manually start, restart, and stop services in the appliance. You can act upon all services at once, or select specific ones.
In the System > Services page, the tabs list the available services and their statuses. The Information tab appears with the system information like the hardware information, system properties, system status, and open ports.
Although the services can be started or stopped from the Web UI, the start/stop/restart action is restricted for some services. These services can be operated from the OS Console.Run the following command to start/stop/restart a service.
/etc/init.d/<service_name> stop/start/restart
For example, to start the docker service, run the following command.
/etc/init.d/docker start
If you stop the Service Dispatcher service from the Web UI, you might not be able to access ESA from the Web browser. Hence, it recommended to stop the Service Dispatcher service from the CLI Manager only.
Web Interface Auto-Refresh Mode
You can set the auto-refresh mode to refresh the necessary information according to a set time interval. The Auto-Refresh is available in the status bar that show the dynamically changing status information, such as status and logs. Thus, for example, an Auto Refresh pane is available in System > Services, at the bottom of the page.
The Auto-Refresh pane is not shown by default. You should click the Auto-Refresh button to view the pane.
To modify the auto-refresh mode, from the Appliance Web Interface, select the necessary value in the Auto-Refresh drop-down list. The refresh is applied in accordance with the set time.
2 - Viewing information, statistics, and graphs
Describes the detailed information, statistics, and graphs
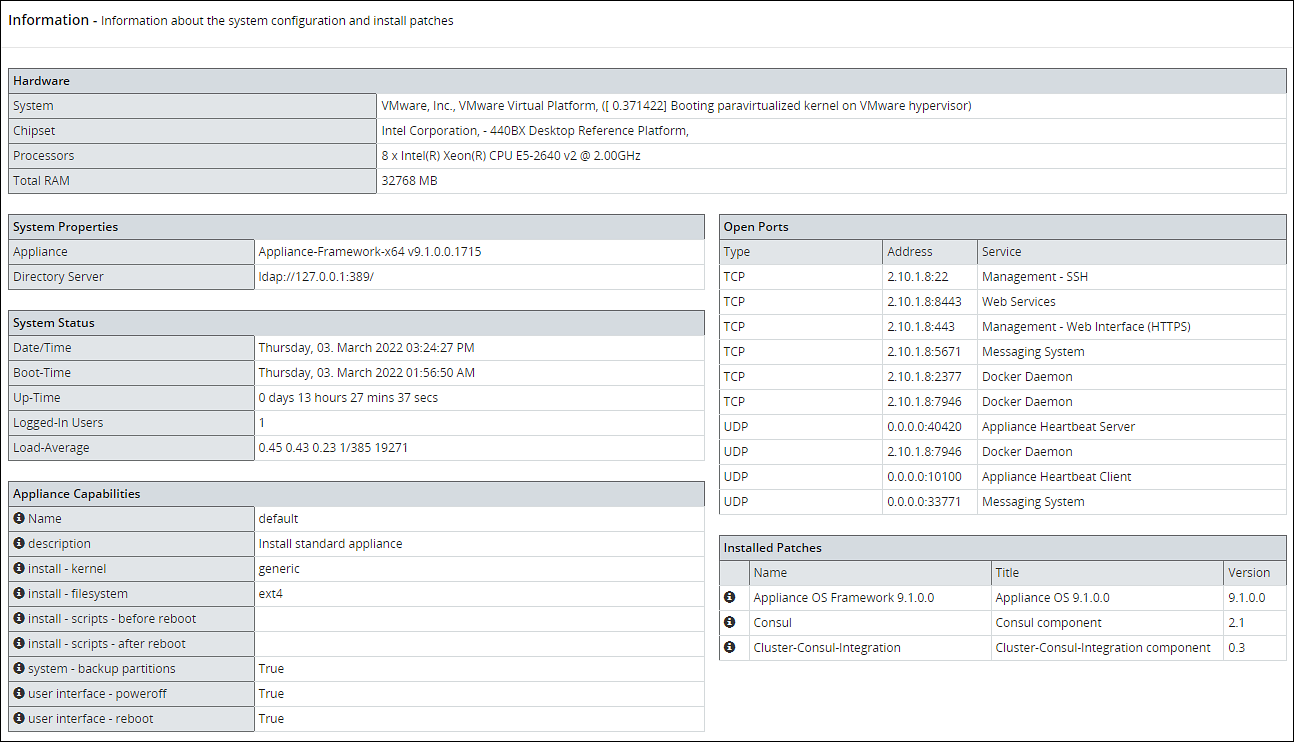
Viewing System Information
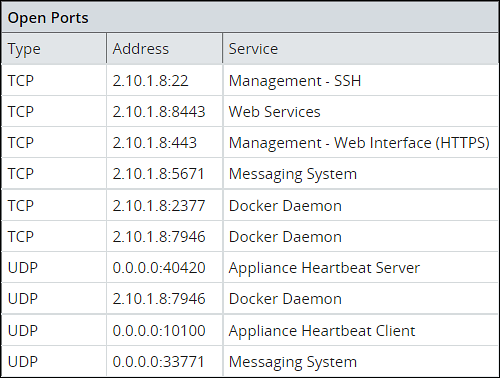
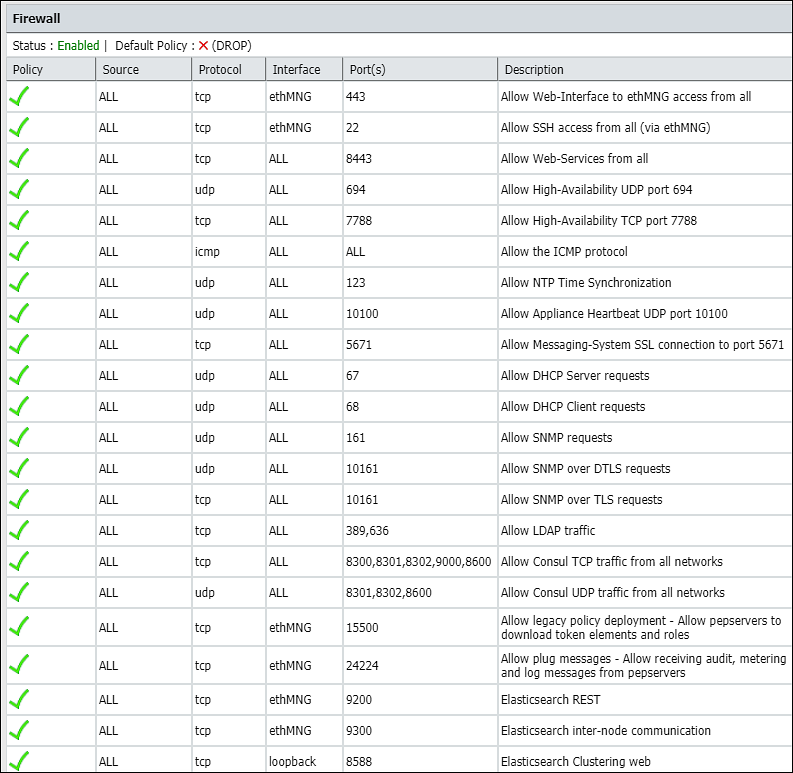
All hardware information, system properties, system statuses, open ports and firewall rules are listed in the Information tab.
The information is organized into sections called Hardware, System Properties, System Status, Open Ports, and Firewall.
Hardware section includes information on system, chipset, processors, and amount of total RAM.
System Properties section appears with information on current Appliance, logging server, and directory server.
System Status section lists such properties as data and time, boot time, up time, number of logged in users, and average load.
Open Ports section lists types, addresses, and names of services that are running.
Firewall section in System > Information lists all firewall rules, firewall status (enabled/disabled), and the default policy (drop/accept) which determines what to do on packets that do not match any existing rule.
Viewing System Statistics
Using System > System Statistics, you can view performance statistics to assess system usage and efficiency. The Performance page refreshes itself every few seconds and shows the statistics in real time.
The Performance page shows system information:
Hardware - System, chipset, processors, total RAM
System Status - Date/time, boot time, up-time, users connected, load average
Partitions - Partition name and size, used and avail
Kernel - Idle time, kernel time, I/O time, user time
Memory - Memory total, swap cached, and inactive, among others
You can customize the page refresh rate, so that you are viewing the latest information at any time.
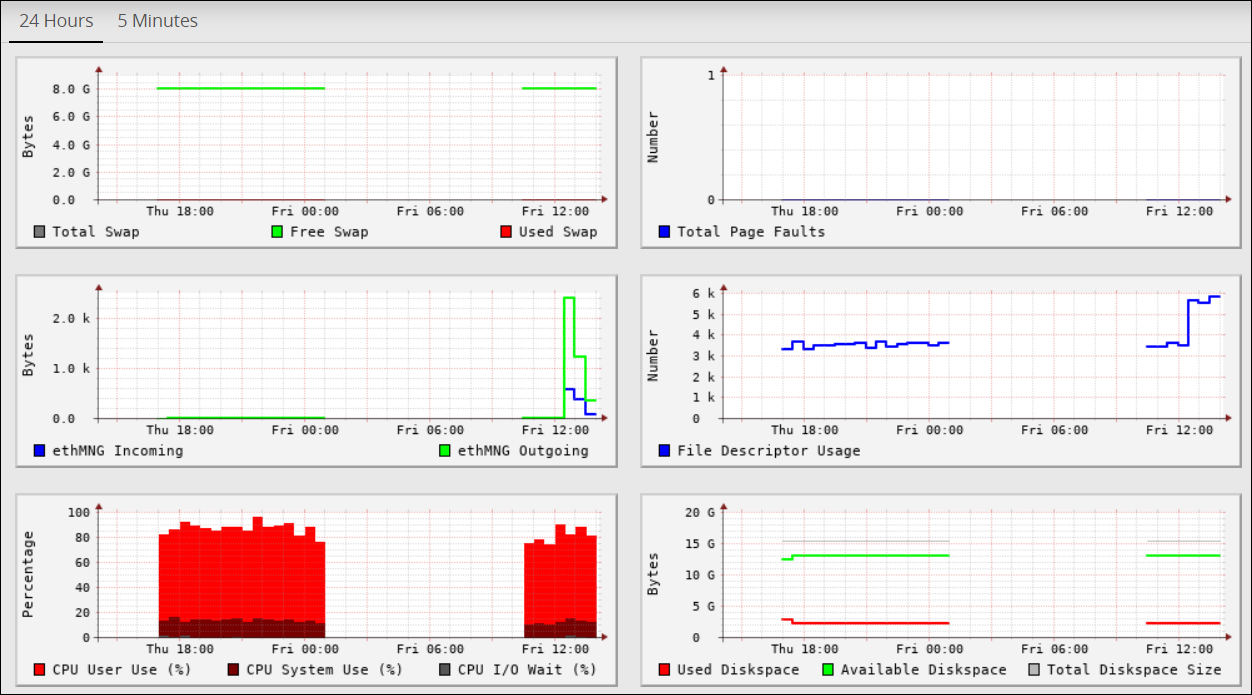
Viewing Performance Graphs
Using System > Graphs, you can view performance graphs and real-time graphs in addition to statistics. In the Performance tab you can view a graphical representation of performance statistics from the past 5 minutes or past 24 hours for these items:
CPU application use - % CPU I/O wait, CPU system use
Total RAM - Free RAM, used RAM
Total Swap - Free Swap, used Swap
Free RAM
Used RAM
System CPU usage
Application CPU use, %
Log space used - Log space available, log space total
Application data used - Application data available space, application data total size
Total page faults
File descriptor usage
ethMNG incoming/ethMNG outgoing
ethSRV0 incoming/ethSRV0 outgoing
ethSRV1 incoming/ethSRV1 outgoing
In the Realtime Graphs tab you can monitor current state of performance statistics for these items:
CPU usage
Memory Status - free and used RAM
The following figure illustrates the Realtime Graphs tab.
3 - Working with Trusted Appliances Cluster
Overview of the services for Trusted Appliances Cluster
The Clustering menu becomes available in the appliance Web Interface, System > Trusted Appliance Cluster. The status of the cluster is by default updated every minute, and it can be configured using Cluster Service Interval, available in the CLI Manager.
Status tab appears with the information on nodes which are in the cluster. In the Filter drop-down combo box, you can filter the nodes by the name, address and label.
In the Display drop-down combo box, you can select to display node summary, top 10 CPU consumers, top 10 Memory consumers, free disk report, TCP/UDP network information, system information, and display ALL.
Saved Files tab appears with the files that were saved in the CLI Manager. These files show the status of the appliance cluster node or the result of the command run on the cluster.
4 - Working with Backup and restore
Describes the procedure to back up and restore
The backup process copies or archives data. The restore process ensures that the original data is restored if data corruption occurs.
You can back up and restore configurations and the operating system from the Backup/Restore page. It is recommended to have a backup of all system configurations.
The Backup/Restore page includes Export, Import, OS Full, and Log Files tabs, which you can use to create configuration backups and restore them later.
Using Export, you can also export a configuration to a trusted appliances cluster, and schedule periodic replication of the configuration on all nodes that are in the trusted appliances cluster. Using export this way, you can periodically update the configuration on all, or just necessary nodes of the cluster.
Using Import, you can restore the created backups of the product configurations and appliance OS core configuration.
Using Full OS Backup, you can create backup of the entire appliance OS.
The Full OS Backup/Restore features of the Protegrity appliances is available only for the on-premise deployments. It is not available for virtual machines created using an OVA template and cloud-based virtual machines.
4.1 - Working with OS Full Backup and Restore
Describes the procedure to back up and restore the entire OS
It is recommended to perform the full OS back up before any important system changes, such as appliance upgrade or creating a cluster, among others.
This option is available only for the on-premise deployments. It is not available for virtual machines created using an OVA template and cloud-based virtual machines.
Backing up the appliance OS
The backup process may take several minutes to complete.
Perform the following steps to back up the appliance OS.
Log in to the Appliance Web UI.
Proceed to System > Backup > Restore.
Navigate to the OS Full tab and click Backup.
A confirmation message appears.
Press ENTER.
The Backup Center screen appears and the OS backup process is initiated.
Navigate to Appliance Dashboard.A notification O.S Backup has been initiated appears. After the backup is complete, a notification O.S Backup has been completed appears.
Restoring the appliance OS
Use caution when restoring the appliance OS. Consider a scenario where it is necessary to restore a full OS backup that includes the external Key Store data. If the external Key Store is not working, then the HubController service does not start after the restore process.
Perform the following steps to restore the appliance OS.
Login to the Appliance Web UI.
Proceed to System > Backup & Restore.
Navigate to the OS Full tab and click Restore.A message that the restore process is initiated appears.
Select OK.The restore process starts and the system restarts after the process is completed.
Log in to the appliance and navigate to Appliance Dashboard.A notification O.S Restore has been completed appears.
4.2 - Backing up the data
Describes the procedure to back up data using the export feature
Using the Export tab, you can create backups of the product configurations and/or appliance OS core configuration.
Before you begin
Starting from the Big Data Protector 7.2.0 release, the HDFS File Protector (HDFSFP) is deprecated. The HDFSFP-related sections are retained to ensure coverage for using an older version of Big Data Protector with the ESA 7.2.0.
If you plan to use ESAs in a Trusted Appliances Cluster, and you are using HDFSFP with the DFSFP patch installed on the ESA, then ensure that you clear the DFSFP_Export check box when exporting the configurations from the ESA, which will be designated as the Master ESA.
In addition, for the Slave ESAs, ensure that the HDFSFP datastore is not defined and the HDFSFP service is not added.
The HDFSFP data from the Master ESA should be backed up to a file and moved to a backup repository outside the ESA. This will help in retaining the data related to HDFSFP, in cases of any failures.
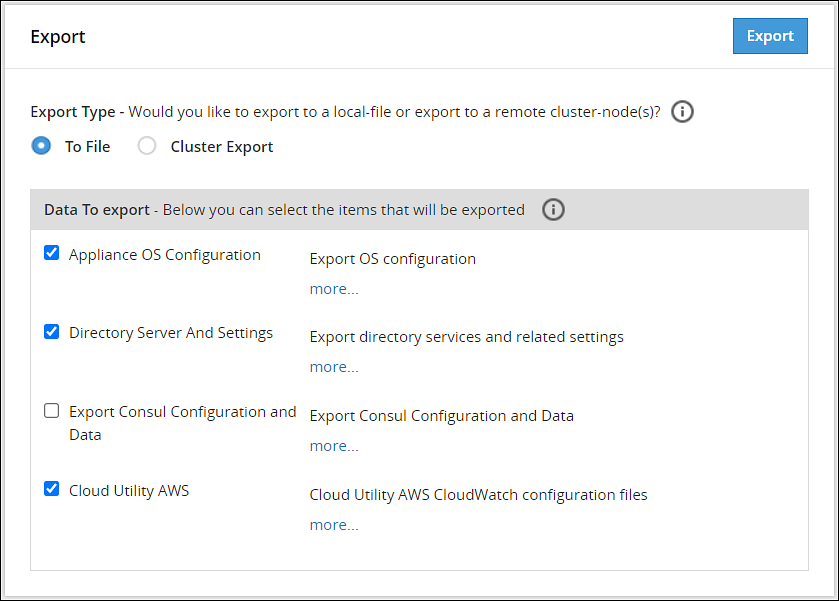
Backing up configuration to local file
Perform the following steps to backup the configuration to local file.
Navigate to System > Backup & Restore > Export.
In the Export Type area, select To File radio button.
In the Data To export area, select the items to be exported.Click more.. for the description of every item.
Click Export.The Output File screen appears.
Enter information in the following fields:
Output File: Name of the file. If you want to replace an existing file on the system with this file, click the Overwrite existing file check box.
Password: Password for the file.
Export Description: Information about the file.
Click Confirm.A message Export operation has been completed successfully appears. The created configuration is saved to your system.
Exporting Configuration to Cluster
You can export your appliance configuration to the trusted appliances cluster, which your appliance belongs to. The procedure of creating the backup is almost the same as exporting to a file.
You need to define what configurations to export, and which nodes in the cluster receive the configuration. You do not need to import the files as is required when backing up the selected configuration. The configuration will be automatically replicated on the selected nodes when you export the configuration to the cluster.
When you are exporting data from one ESA to other, ensure that you run separate tasks to export the LDAP settings first and then the OS settings.
When exporting configurations to cluster nodes (from primary ESA to secondary ESAs), ensure to not select the following options in the Data To Export section:
SSH Settings
Certificates
Management and WebService Certificates
Import All Policy-Management Configs, Keys, Certs, Data but without Key Store files for Trusted Appliance Cluster
Important: Scheduled tasks are not replicated as part of cluster export.
Perform the following steps to export a configuration to a trusted appliances cluster.
Log in to the primary ESA using the admin credentials.
Navigate to System > Backup & Restore > Export.
In the Export Type area, select the To Cluster radio button.
In the Data to Export, select the items that you want to export from your machine and import to the cluster nodes.
Click Next.
In the Source Cluster Nodes, select the nodes that will run this task.
Specify the nodes by label or select individual nodes.
Click Next.
In the Target Cluster Nodes, select the nodes where the configuration needs to be exported. Specify them by label or select individual nodes. Select to show command line, if necessary.
Click Review.
The New Task screen appears.
Enter the required information in the following sections.
Basic Properties
Frequencies
Restriction
Logging
Click Save.
A dialog box to enter the root password appears.
Enter the root password and click OK.
The scheduled task is created.
Navigate to System > Task Scheduler.
Select the created task and click Run Now! to run the scheduled task immediately.
A confirmation dialog box appears. Click Ok.
The configurations are exported to the selected cluster nodes.
4.3 - Backing up custom files
Describes the procedure to back up custom files using the export feature
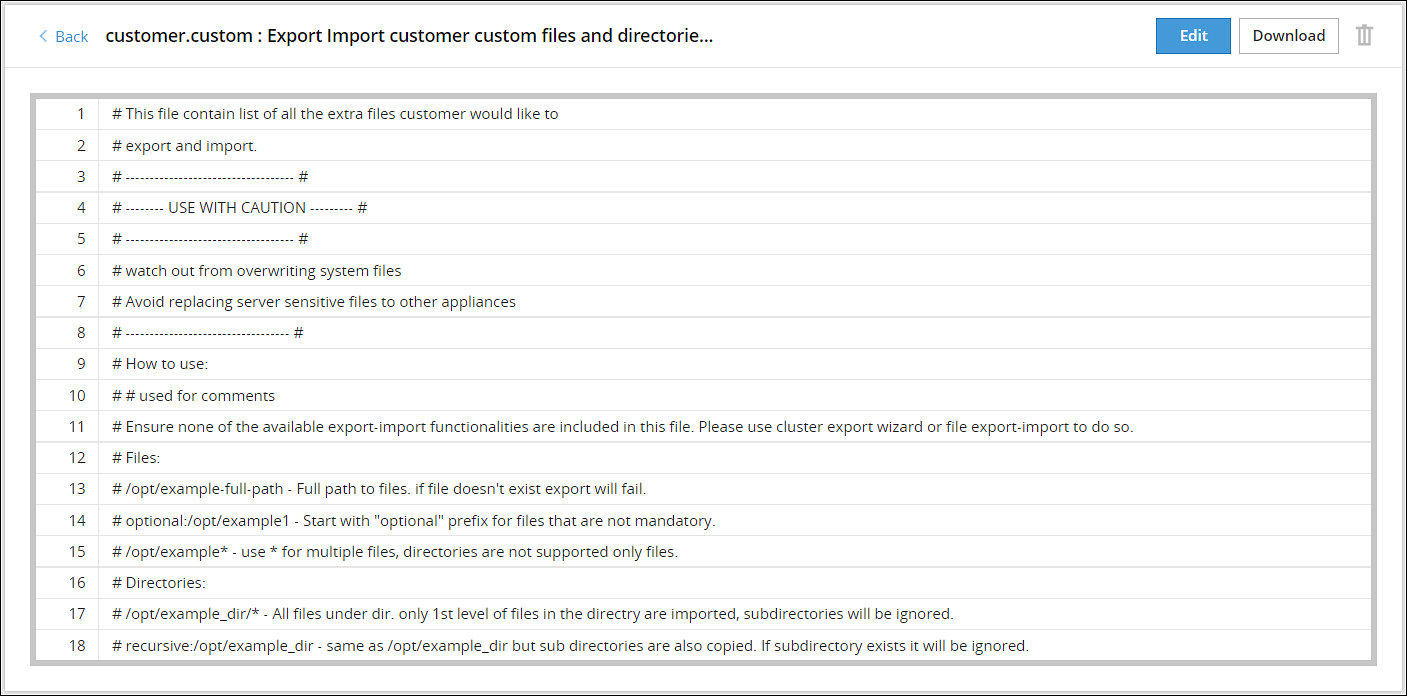
In the ESA, you can export or import the files that cannot be exported using the cluster export task. The custom set of files include configuration files, library files, directories containing files, and any other files. On the ESA Web UI, navigate to Settings > System > Files to view the customer.custom file. That file contains the list of files to include for export and import.
The following figure displays a sample snippet of the customer.custom file.
If you include a file, then you must specify the full path of the file. The following snippet explains the format for exporting a file.
/<directory path>/<filename>.<extension>
For example, to export the abc.txt file that is present in the test directory, you must add the following line in the customer.custom file.
/test/abc.txt
If the file does not exist, then an error message appears and the import export process terminates. In this case, you can add the prefix optional to the file path in the customer.custom file. This ensures that if the file does not exist, then the import export process continues without terminating abruptly.
If the file exists and the prefix optional is added, then the file is exported to the other node.For example, if the file 123.txt is present in the test directory, then it is exported to the other node. If the file does not exist, then the export of this file is skipped and the other files are exported.optional:/abc/test/123.txt
If you include a directory, then you must specify the full path for the directory. All the files present within the directory are exported. The following snippet explains the format for exporting all the files in a directory.
/<directory path>/*
For example, to export a directory test_dir that is present in the /opt directory, add the following line in the customer.custom file.
/opt/test_dir/*
You can also include all the files present under the subdirectories for export. If you prefix the directory path with the value recursive, then all the files within the subdirectories are also exported.
For example, to export all the subdirectories present in the test_dir directory, add the following line in the customer.custom file.
recursive:/opt/test_dir/
For more information about exporting directories, refer to the section Editing the customer.custom File to Include Directories.
You must export the custom files before importing them to a file or on the other nodes on a cluster.
4.4 - Exporting the custom files
Describes the procedure to export the customer.custom file to a local file or to a cluster
Perform the following steps to export the customer.custom file to a local file or to a cluster.
Exporting the customer.custom file to a local file
Navigate to System > Backup & Restore > Export.
In the Export Type area, select To File.
In the Data To Export area, select Appliance OS Configuration.
Click Export.The Output file screen appears.
Enter the name of the file in the Export Name text box.
Enter the required password in the Password text box.
Click Confirm.The message Export operation has been completed successfully appears.
Click the Done button.The file is exported and is stored in the /products/exports directory.
On the CLI Manager, navigate to Administration > Backup/Restore Center > Export data/configurations to a local file.
Select Appliance OS Configuration and select OK.A screen to enter the export information appears.
Enter the required name of the file in the Export Name text box.
Enter the required password in the Password and Confirm text boxes.
Select OK.
Select Done after the export operation completes.
Exporting the customer.custom file on a cluster
On the Web UI, navigate to System > Backup & Restore > Export.
In the Export Type area, select Cluster Export option.
If the configurations must be exported to a different ESA, then clear the Certificates check box. For information about copying Insight certificates across systems, refer to Rotating Insight certificates.
Click Start Wizard.
Select User custom list of files in the Data To Import tab.
Click Next.
Select the required options in the Source Cluster Nodes tab and click Next.
Select the required options in the Target Cluster Nodes tab and click Review.
Enter the required data in the Basic Properties, Frequency, Logging, and Restriction areas.For more information about the task details, refer Schedule Appliance Tasks.
The message Export operation has been completed successfully appears.
Click Save.A File saved message appears.
On the CLI Manager, navigate to Administration > Backup/Restore Center > Export data/configurations to remote appliance(s).
Select the required file or configuration to export and select OK.
Enter the required password for the file or configuration.
Select Custom Files and folders and select OK.
Enter the required credentials for the target appliance on the Target Appliance(s) screen.
Select OK.The custom files and configurations are exported to the target node.
Click Save.
4.5 - Importing the custom files
Describes the procedure to import the customer.custom file to a local file or to a cluster
Perform the following steps to import the customer.custom file to a local file.
Importing the customer.custom file to a local file
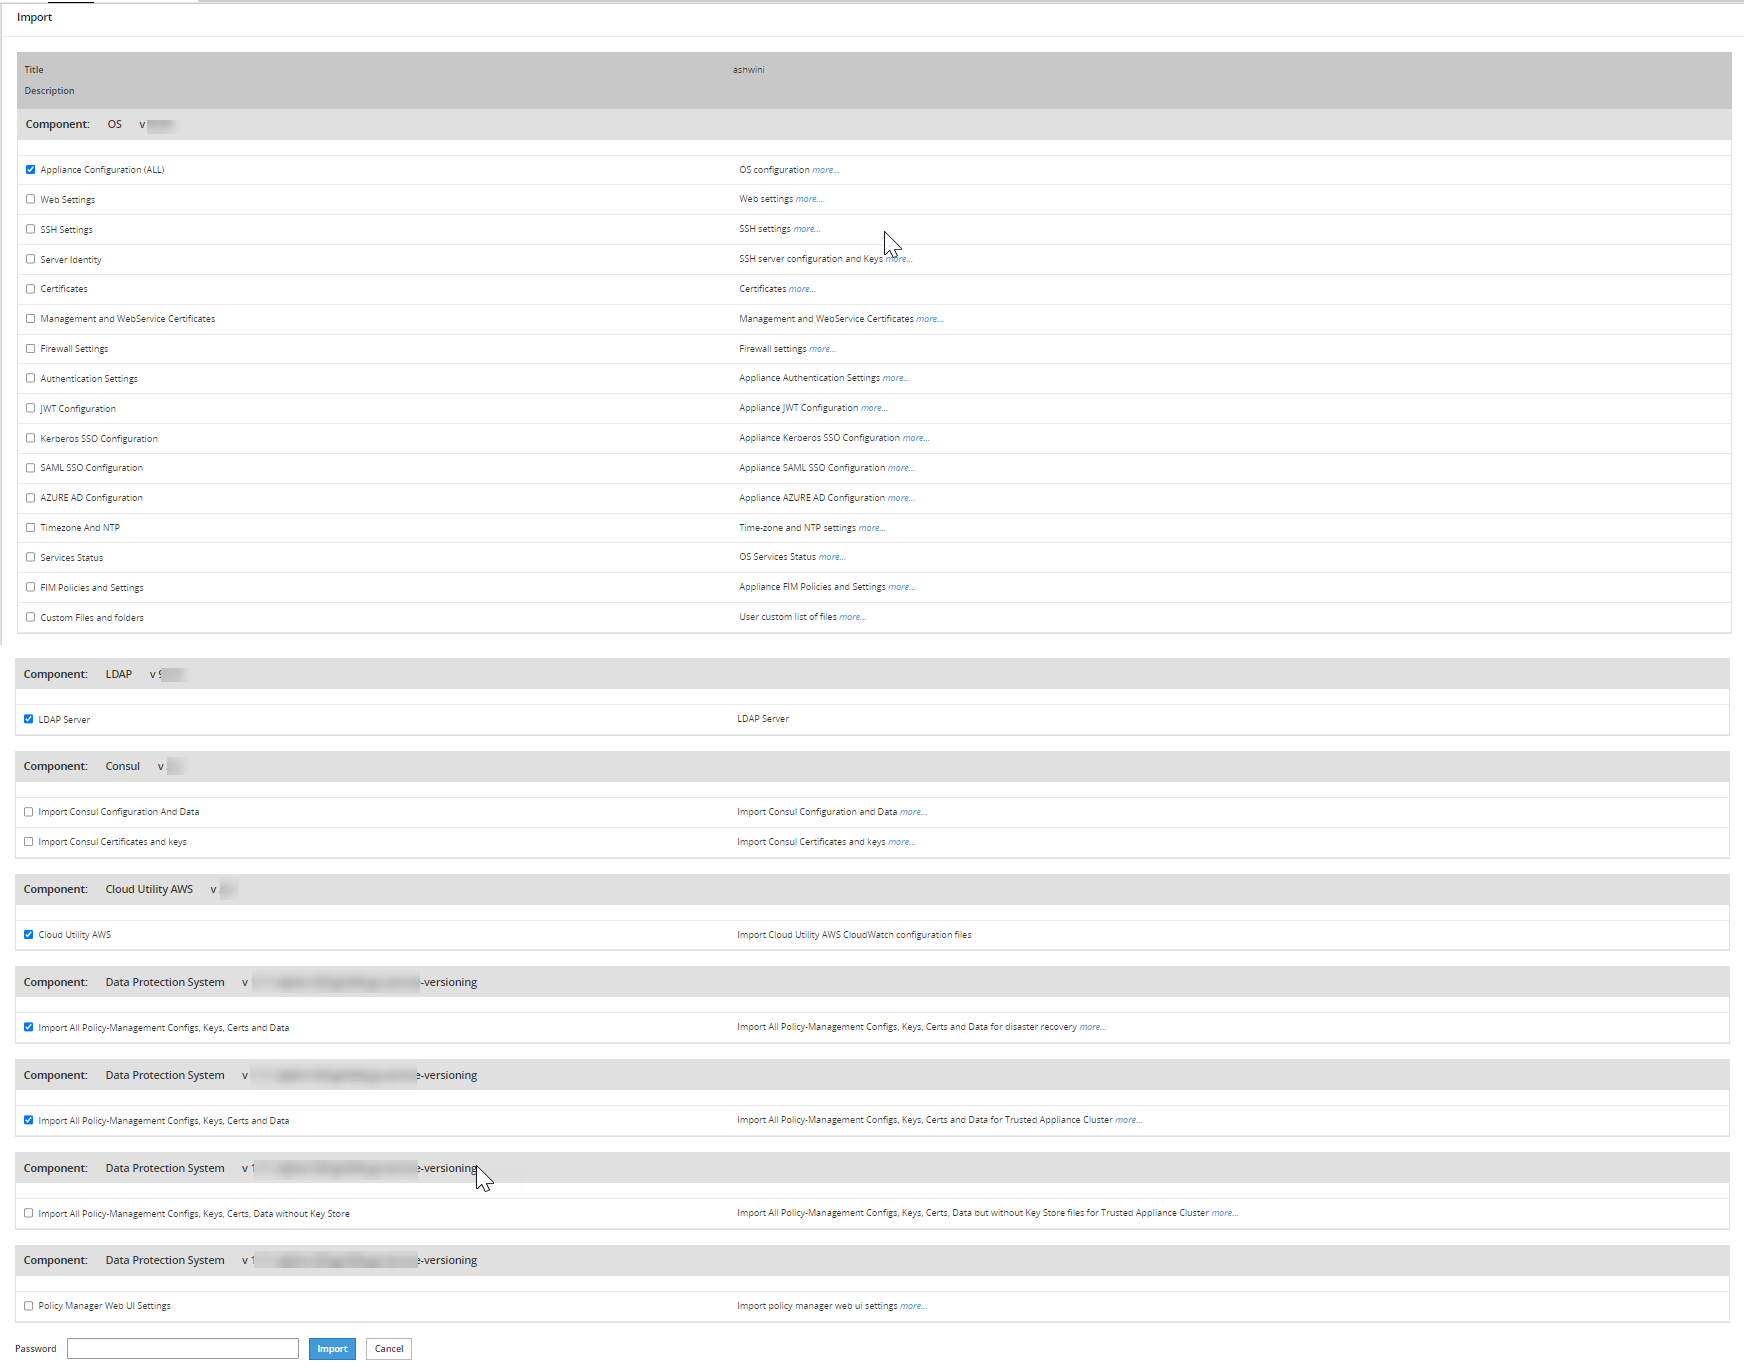
On the Web UI, navigate to System > Backup & Restore > Import.
From the dropdown menu, select the exported file.
Click Import.
On the following screen, select Custom Files and folders.
Enter the password for the file in the Password text box and click Import.
The message File has been imported successfully appears.
Click Done.
On the CLI Manager, navigate to Administration > Backup/Restore Center > Import configurations from a local file.The Select an item to import screen appears.
Select the required file or configuration to export and select OK.The contents of the file appear.
Select OK.
Enter the required password on the following screen and select OK.
Select the required components.
Warning: Ensure to select each component individually.
Select OK.The file import process starts.
Select Done after the import process completes.
4.6 - Working with the custom files
Describes the procedure to edit the customer.custom file or directory
Editing the customer.custom file
Administration privileges are required for editing the customer.custom file.
This section describes the various options that are applicable when you export a file.
Consider the following scenarios for exporting a file:
Include a file abc.txt present in the /opt/test directory.
Include all the file extensions that start with abc in the /opt/test/check directory.
Include multiple files using regular expressions.
To edit the customer.custom file from the Web UI:
On the Web UI, navigate to Settings > System > Files.
Click Edit beside the customer.custom file.
Configure the following settings to export the file.
#To include the abc.txt file/opt/test/abc.text#If the file does not exist, skip the export of the fileoptional:/opt/test/pqr.txt#To include all text files/opt/test/*.txt#To include all the files extensions for file abc present in the /opt/test/check directory/opt/test/check/abc.*#To include files file1.txt, file2.txt, file3.txt, file4.txt, and file5.txt/opt/test/file[1-5].txt
Click Save.
It is recommended to use the Cluster export task to export Appliance Configuration settings, SSH settings, Firewall settings, LDAP settings, and HA settings. Do not import Insight certificates using Certificates, rotate the Insight certificates using the steps from Rotating Insight certificates.If the files exist at the target location, then they are overwritten.
Editing the customer.custom File to Include Directories
This section describes the various options that are applicable when you export a file.
Consider the following scenarios for exporting files in a directory:
Export files is the directory abc_dir present in the /opt/test directory
Export all the files present in subdirectories under the abc_dir directory
Ensure that the files mentioned in the customer.custom file are not specified in the exclude file.For more information about the exclude file, refer to the section Editing the Exclude File.
To edit the customer.custom file from the Web UI:
On the Web UI, navigate to Settings > System > Files.
Click Edit beside to the customer.custom file.The following is a snippet listing the sample settings for exporting a directory.
#To include all the files present in the abc directory
/opt/test/abc_dir/*
#To include all the files in the subdirectories present in the abc_dir directory
recursive:/opt/test/abc_dir
If you have a Key Store configured with ESA, then you can export the Key Store libraries and files using the customer.custom file. The following is a sample snippet listing the settings for exporting a Key Store directory.
#To include all the files present in the Safeguard directory
/opt/safeguard/*
#To include all the files present in the Safenet directory
/usr/safenet/*
The following is a sample snippet listing the settings for exporting the self-signed certificates.
#To include all the files present in the Certificates directory
/etc/ksa/certificates
Click Save.
Editing the customer.custom File to include files
The library files and other settings that are not exported using the cluster export task can be addressed using the customer.custom file.
Ensure that the files mentioned in the customer.custom file are not specified in the exclude file.For more information about the exclude file, refer to the section Editing the Exclude File.
To edit the customer.custom file from the Web UI:
On the Web UI, navigate to Settings > System > Files.
Click Edit beside to the customer.custom file.If you have a Key Store configured with ESA, then you can export the Key Store libraries and files using the customer.custom file. The following is a sample snippet listing the settings for exporting a Key Store directory.
#To include all the files present in the Safeguard directory
/opt/safeguard/*
#To include all the files present in the Safenet directory
/usr/safenet/*
The following is a sample snippet listing the settings for exporting the self-signed certificates.
#To include all the files present in the Certificates directory
/etc/ksa/certificates
Click Save.
Editing the exclude files
The exclude file contains the list of system files and directories that you don’t want to export. You can access the exclude file from the CLI Manager only. The exclude file is present in the /opt/ExportImport/filelist directory.
A user which has root privileges is required to edit the exclude file, as it lists the system directories that you cannot import.
If a file or directory is present in both the exclude file and the customer.custom file, then the file or directory is not exported.
The following directories are in the exclude file:
/etc
/usr
/sys
/proc
/dev
/run
/srv
/boot
/mnt
/OS_bak
/opt_bak
The list of files mentioned in the exclude file affect only the customer.custom file and not the standard cluster export tasks.
If you want to export or import files, then ensure that these files are not listed in the exclude file.
To edit the exclude file:
On the CLI Manager, navigate to Administration > OS Console.
Navigate to the /opt/ExportImport/filelist/ directory.
Edit the exclude file using an editor.
Perform the required changes.
Save the changes.
4.7 - Restoring configurations
Describes the procedure to restore the backup configurations
Using the Import tab, you can restore the created backups of the product configurations and appliance OS core configuration. Using the Import tab, you also can upload a configuration file saved on your local machine to the appliance. You can also download a configuration file from the appliance and save it to your local machine.
Using the Import tab, you also can:
Upload a configuration file saved on your local machine to the appliance.
Download a configuration file from the appliance and save it to your local machine.
Before importing
Before importing the configuration files, ensure that the required products are installed in the appliance. For example, if you are importing files related to Consul Configuration and Data, ensure that the Consul product is installed in the appliance.
When you import files or configurations on an appliance from another appliance, different settings such as, firewall, SSH, or OS are imported. During this import, the settings on the target appliance might change. This might cause a product or component on the target appliance to stop functioning. Thus, after an import of the file or settings is completed, ensure that the settings, such as, ports, SSH, and firewall on the target machine are compatible with the latest features and components.For example, new features, such as, Consul are added to v7.1 MR2. When you import the settings from the previous versions, the settings in v7.1 MR2, such as, firewall or ports are overridden. So, you must ensure that the rules are added for the functioning of the new features.
When you import files or configurations, ensure that each component is selected individually.
Restoring configuration from backup
To restore a configuration from backup:
Navigate to the System > Backup & Restore.
Navigate to the Import tab, select a saved configuration from the list and click Import.
Choose specific components from the exported configuration if you do not want to restore the whole package.
If the configurations must be imported on a different ESA, then clear the Certificates check box. If you import the ESA Management and WebService Certificates from a different node in the cluster, then rotate the Insight certificates after the import is complete. For rotating the Insight certificates, use the steps from Rotating Insight certificates.
In the Password field, enter the password for the exported file and click Import.
4.8 - Viewing Export/Import logs
Procedure to view the saved logs
When you export or import files using the Web UI, the operation log is saved automatically. These log files are displayed in Log Files tab. You can view, delete, or download the log files.
When you export or import files using the CLI Manager, the details of the files are logged.
5 - Scheduling appliance tasks
Describes the scheduled tasks
Navigating to System > Task Scheduler you can schedule appliance tasks to run automatically. You can create or manage tasks from the ESA Web UI.
5.1 - Viewing the scheduler page
Describes the scheduler page
The following figure illustrates the default scheduled tasks that are available after you install the ESA.
The Scheduler page displays the list of available tasks.
To edit a task, click Edit. Click Save and then click Apply and enter the root password after performing the required changes.
To delete a task, select the required task and click Remove. Then, click Apply and enter the root password to remove the task.
On the ESA Web UI, navigate to Audit Store > Dashboard > Discover screen to view the logs of a scheduled task.
For creating a scheduled task, the following parameters are required.
Basic properties
Customizing frequency
Execution
Restrictions
Logging
The following tasks must be enabled on any one ESA in the Audit Store cluster. Enabling the tasks on multiple nodes will result in a loss of data. If these scheduler task jobs are enabled on an ESA that was removed, then enable these tasks on another ESA in the Audit Store cluster.
Update Policy Status Dashboard
Update Protector Status Dashboard
Basic properties
In the Basic Properties section, you must specify the basic and mandatory attributes of the new task. The following table lists the basic attributes that you need to specify.
Attribute
Description
Name
A unique numeric identifier must be assigned.
Description
The task displayed name, which should also be unique.
Frequency
You can specify the frequency of the task:
Every 10 minutes
Every 30 minutes
Every hour
Every 4 hours
Every 12 hours
Daily - every midnight
Weekly - every Sunday
Monthly - first day of the month
Custom - specify the custom frequency in the Frequency section
Customizing frequency
In the Frequency section of the new scheduled task, you can customize the frequency of the task execution. The following table lists the frequency parameters which you can additionally define.
Attribute
Description
Notes
Minutes
Defines the minutes when the task will be executed:
Every minute
Every 10 minutes
Every 30 minutes
From 0 to 59
Every minute is the default. You can select several options, or clear the selection. For example, you can select to execute the task on the first, second, and 9th minute of the hour.
Days
Defines the day of the month when the task will be executed
Every day
Every two days
Every seven days
Every 14 days
From 1 to 31
Every day is the default. You can select several options, or clear the selection.
Days of the week
Defines the day of the week when the task will be executed:
From Sun to Mon
Every DOW - day of the week
Every 2nd Sun to every 2nd Mon.
Every 4 hours
Every 12 hours
Daily - every midnight
Weekly - every Sunday
Monthly - first day of the month
Custom - specify the custom frequency in the Frequency section
Every DOW (day of week) is the default. You can select several options, or clear the selection.
Hours
Defines the hour when the task will be executed
Every hour
From 0 to 23
Every two hours
Every four hours
Every eight hours
*/6 (every six hours).
Every hour is the default. You can select several options, or clear the selection. If you select *, then the task will be executed each hour.If you select */6, then the task will be executed every six hours at 0, 6, 12, and 18.
Month
Defines the month when the task will be executed
Every month
From Jan to Dec
Every two months
Every three months
Every four months
Every six months
Every month is the default. You can select several options, or clear the selection. If you select *, then the task will be executed each month.
The Description field of Frequency section will be automatically populated with the frequency details that you specified in the fields mentioned in the following table. Task Next Run will hint when the task next run will occur.
Execution
In the Command Line section, you need to specify the command which will be executed, and the user who will execute this command. You can optionally specify the command parameters separately.
Command LineIn the Command Line edit field, specify a command that will be executed. Each command can include the following items:
The task script/executable command.
User name to execute the task is optional.
Parameters to the script as part of the command is optional, can be specified separately in the Parameters section.
ParametersUsing the Parameters section, you can specify the command parameters separately.
You can add as many parameters as you need using the Add Param button, and remove the unnecessary ones by clicking the Remove button.
For each new parameter you need to enter Name (any), Type (option), and Text (any).
Each parameter can be of text (default) and system type. If you specify system, then the parameter will be actually a script that will be executed, and its output will be given as the parameter.
UsernameIn the Username edit field, specify the user who owns the task. If not specified, then tasks run as root.
Only root, local_admin, and ptycluster users are applicable.
Restrictions
In a Trusted Appliance cluster, Restrictions allow you to choose the sites on which the scheduled tasks will be executed. The following table lists the restrictions that you can select.
Attribute
Description
On master site
The scheduled tasks are executed on the Master site
On non-master site
The scheduled tasks are executed on the non-Master site
If you select both the options, On master site and On non-master site, then the scheduled task is executed on both sites.
Logging
In the Logging section, you should specify the logging details explained in the table below:
Logging Detail
Description
Notes
Show command line in logs?
Select a check-box to show the command line in the logs.
It is advisable not to select this option if the command includes sensitive data, such as passwords.
SysLogLog Server
Define the following details:
Success severity
Success title
Fail severity
Fail title
You should configure these fields to be able to easily analyze the incoming logs. Specifies whether to send an event to the Log Server (ESA) and the severity: No event, Lowest, Low, Medium, High, Critical for failed/success task execution.
Log File
Specify the files names where the success and failed operations are logged.
Specifies whether to store the task execution details in local log files. You can specify to use the same file for successful and failed events. These files will be located in /var/log. You can also examine the success and failed logs in the Appliance Logs, in the appliance Web Interface.
5.2 - Creating a scheduled task
Describes the procedure to create a scheduled task
Perform the following steps to create a scheduled task.
On the ESA Web UI, navigate to System > Task Scheduler.
Click New Task.
The New Task screen appears.
Enter the required information in the Basic Properties section.For more information about the basic properties, refer here.
Enter the required information in the Frequencies section.For more information about customizing frequencies, refer here.
Enter the required information in the Command Line section.For more information about executing command line, refer here.
Enter the required information in the Restrictions section.For more information about restrictions, refer here.
Enter the required information in the Logging section.For more information about logging, refer here.
Click Save.A new scheduled task is created.
Click Apply to apply the modifications to the task.A dialog box to enter the root user password appears.
Enter the root password and click OK.The scheduled task is now operational.
Running the task
After completing the steps, select the required task and click Run Now to run the scheduled task immediately.
Additionally, you can create a scheduled task, for exporting a configuration to a trusted appliances cluster using System > Backup/Restore > Export.
5.3 - Scheduling Configuration Export to Cluster Tasks
Describes the procedure to schedule configuration export to a cluster task
You can schedule configuration export tasks to periodically replicate a specified configuration on the necessary cluster nodes.
The procedure of creating a configuration export task is almost the same as exporting a configuration to the cluster. The is a slight difference between these processes. In exporting a configuration to the cluster, it is a one-time procedure which the user needs to run manually. A scheduled task makes periodic updates and can be run a number of times in accordance with the schedule that the user specifies.
To schedule a configuration export to a trusted appliances cluster:
From the ESA Web UI, navigate to System > Backup & Restore > Export.
Under Export, select the Cluster Export radio button.
If the configurations must be exported on a different ESA, then clear the Certificates check box during the export. For information about copying Insight certificates across systems, refer to Rotating Insight certificates.
Click Start Wizard.
The Wizard - Export Cluster screen appears.
In the Data to import, customize the items that you need to export from this machine and imported to the cluster nodes.
Click Next.
In the Source Cluster Nodes, select the nodes that will run this task.
You can specify them by label or select individual nodes.
Click Next.
In the Target Cluster Nodes, select the nodes to import the data.
Click Review.
The New Task screen appears.
Enter the required information in the following sections.
Basic Properties
Frequencies
Command Line
Restriction
Logging
Click Save. A new scheduled task is created.
Click Apply to apply the modifications to the task. A dialog box to enter the root user password appears.
Enter the root password and click OK. The scheduled task is operational.
Click Run Now to run the scheduled task immediately.
5.4 - Deleting a scheduled task
Describes the procedure to delete a scheduled task
Perform the following steps to delete a scheduled task:
From the ESA Web UI, navigate to System > Task Scheduler.The Task Scheduler page displays the list of available tasks.
Select the required task.
Click Remove.A confirmation message to remove the scheduled task appears.
Click OK.
Click Apply to save the changes.
Enter the root password and select Ok.The task is deleted successfully.