This is the multi-page printable view of this section. Click here to print.
Upgrading ESA to v10.1.0
1 - System and License Requirements
The following table lists the supported components and their compatibility settings.
| Component | Compatibility |
|---|---|
| Application Protocols | HTTP 1.0, HTTP 1.1, SSL/TLS |
| WebServices | SOAP 1.1 and WSDL 1.1 |
| Web Browsers | Minimum supported Web Browser versions are as follows: - Google Chrome version 129.0.6668.58/59 (64-bit) - Mozilla Firefox version 130.0.1 (64-bit) or higher - Microsoft Edge version 128.0.2739.90 (64-bit) |
The following table lists the minimum hardware configurations.
| Hardware Components | Configuration |
|---|---|
| CPU | Multicore Processor, with minimum 8 CPUs |
| RAM | 32 GB |
| Hard Disk | 320 GB |
| CPU Architecture | x86 |
The following partition spaces must be available.
| Partition | Minimum Space Required |
|---|---|
| OS(/) | 40% |
| /opt | Twice the patch size |
| /var/log | 20% |
The space used in the OS(/) partition should not be more than 60%. If the space used is more than 60%, then you must clean up the OS(/) partition before proceeding with the patch installation process. For more information about cleaning up the OS(/) partition, refer here.
Software Requirements
Ensure that the software requirements are met before upgrading the appliance.
- Must have ESA on v10.0.1.
- At least three ESAs must be in a Trusted Appliance Cluster (TAC).
- At least three ESAs must be in the Audit Store Cluster.
- If logs are forwarded to an external syslog server, then ensure that the syslog server is running during the upgrade.
Important: If only two ESAs are available in the Audit Store cluster, then remove the secondary ESA from the cluster. Upgrade the primary ESA, then upgrade the secondary ESA, and add the secondary ESA back to the Audit Store cluster. However, a minimum of three ESAs are recommended for the Audit Store cluster.
Installation Requirements
The ESA_PAP-ALL-64_x86-64_10.1.0.P.2467.pty patch file is available.
Ensure to download the latest patch for the respective version from the My.Protegrity portal.
For more information about the latest build number and the patch details, refer to the Release Notes of the respective patch.
Licensing Requirements
Ensure that a valid license is available before upgrading. After migration, if the license status is invalid, then contact Protegrity Support.
2 - Upgrade Paths to ESA v10.1.0

*indicates all the available hotfixes and security patches on the platform version.
For example, to upgrade from the ESA v9.1.0.x to the ESA v10.1.0, install the patches as follows:
- ESA v9.2.0.0
- ESA v9.2.0.1
- ESA v10.0.1
- ESA v10.1.0
For more information about upgrading the ESA v10.0.1 to v10.1.0, refer Upgrading from v10.0.1.
Before installing any patch, refer to the Release Notes from the My.Protegrity portal.
The following table provides the recommended upgrade paths to the ESA v10.1.0.
| Current Version | Path to Upgrade the ESA to v10.1.0 |
|---|---|
| 10.0.1 | Install the v10.1.0 patch. |
| 9.2.0.1 | 1. Install the v10.0.1 patch. 2. Install the v10.1.0 patch. |
| 9.2.0.0 | 1. Install the v9.2.0.1 patch. 2. Install the v10.0.1 patch. 3. Install the v10.1.0 patch. |
| 9.1.0.x | 1. Install the v9.2.0.0 patch. 2. Install the v9.2.0.1 patch. 3. Install the v10.0.1 patch. 4. Install the v10.1.0 patch. |
| 9.0.0.0 | 1. Install the v9.1.0.x patch. 2. Install the v9.2.0.0 patch 3. Install the v9.2.0.1 patch. 4. Install the v10.0.1 patch. 5. Install the v10.1.0 patch. |
To check the current version of the ESA:
- On the ESA Web UI, navigate to System > Information.
You can view the current patch installed on the ESA. - Navigate to the About page to view the current version of the ESA.
For more information about:
Upgrading the previous ESA versions, refer the Protegrity Data Security Platform Upgrade Guide for the respective versions on the My.Protegrity portal.
Applying the DSG patch on the ESA, refer Extending ESA with DSG Web UI in the Protegrity Data Security Gateway User Guide for the respective version.
3 - Prerequisites
Verifying the License Status
Before upgrading the ESA, ensure that the license is not expired or invalid.
An expired or invalid license blocks policy services on the ESA and Devops API’s. A new or existing protector will not receive any policies until a valid license is applied.
For more information about the license, refer Protegrity Data Security Platform Licensing.
Verifying the GPG Public Key
The GPG Public Key used to sign Debian packages embedded in Protegrity appliances expired on April 9, 2024. The appliances installed before this date will continue to function, however issues will occur when upgrading or applying any maintenance patches to these appliances.
To avoid any potential issues, it is recommended to apply the PAP_PAP-ALL-64_x86-64_Generic.V-6.pty patch to extend the expiry date of the GPG Public Key used to sign Debian packages embedded in Protegrity appliances. This patch must be applied before applying maintenance releases or upgrading the ESA.
The following table lists the appliances and the affected versions.
| Appliance | Affected Version |
|---|---|
| Enterprise Security Administrator (ESA) | All versions from 7.2 to 9.1.0.2 |
| Data Security Gateway (DSG) | All versions from 2.4 to 3.1.0.2 |
For more information, refer the following GPG Public Key Expiration announcement on My.Protegrity.com portal.
https://my.protegrity.com/notifications/GPG-notification#_New_Installations
Configuring Keys and HSM
If the security keys, such as, master key or repository key have expired or are due to expire within 30 days, then the upgrade fails. Thus, you must rotate the keys before performing the upgrade. Additionally, ensure that the keys are active and in running state.
For more information about rotating keys, refer to Working with Keys.
If you are using an HSM, ensure that the HSM is accessible and running.
For more information about HSM, refer to the corresponding HSM vendor document.
If the prerequisites are not met, the ESA upgrade process fails. In such a case, it is required to restore the ESA to its previous stable version.
Accounts
The administrative account used for upgrading the ESA must be active.
Backup and Restore
The OS backup procedure is performed to backup files, OS settings, policy information, and user information. Ensure that the latest backup is available before upgrading to the latest version.
If the patch installation fails, then you can revert the changes to a previous version. Ensure to backup the complete OS or export the required files before initiating the patch installation process.
For more information about backup and restore, refer here.
- Ensure to perform backup on each ESA separately. The IP settings will cause an issue if the same backup is used to restore different nodes.
- Backup specific components of your appliance using the File Export option. Ensure to create a backup of the Policy Management data, Directory Server settings, Appliance OS Configuration, Export Gateway Configuration Files, and so on.
- While upgrading an ESA with the DSG installed, select the Export Gateway Configuration Files option and perform the export operation.
Full OS backup
The entire OS must be backed up to prevent data loss. This allows the OS to be reverted to a previous stable configuration in case of a patch installation failure. This option is available only for the on-premise deployments.
The Full OS Backup/Restore features of the Protegrity appliances is available only for the on-premise deployments. It is not available for virtual machines created using an OVA template and cloud-based virtual machines.
Perform the following steps to backup the full OS configuration:
- Log in to the ESA Web UI.
- Navigate to System > Backup & Restore > OS Full, to backup the full OS.
- Click Backup.
The backup process is initiated. After the OS Backup process is completed, a notification message appears on the ESA Web UI Dashboard.
Creating a snapshot for cloud-based services
A snapshot represents a state of an instance or disk at a point in time. You can use a snapshot of an instance or a disk to backup and restore information in case of failures. Ensure that you have the latest snapshot before upgrading the ESA.
You can create a snapshot of an instance or a disk on the following platforms:
Validating Custom Configuration Files
Complete the following steps if you modified any configuration files.
- Review the contents of any configuration files. Verify that the code in the configuration file is formatted properly. Ensure that there are no additional spaces, tabs, line breaks, or control characters in the configuration file.
- Validate that the backup files are created with the details appended to the extension, for example, .conf_backup or .conf_bkup123.
- Back up any custom configuration files or modified configuration files. If required, use the backup files to restore settings after the upgrade is complete.
While using protectors below version 10.x, if any changes are made to the ulimit, then the changes are retained after the ESA upgrade is completed successfully.
Trusted Appliance Cluster (TAC)
While upgrading an ESA appliance that is in a TAC setup, delete the cluster scheduled tasks and then, remove the ESA appliance from the TAC.
For more information about TAC, refer here.
Deleting a Scheduled Task
Perform the following steps to delete a scheduled task:
- From the ESA Web UI, navigate to System > Task Scheduler.The Task Scheduler page displays the list of available tasks.
- Select the required task.
- Select Remove.A confirmation message to remove the scheduled task appears.
- Click OK.
- Select Apply to save the changes.
- Enter the root password and select Ok.The task is deleted successfully.
Removing a Node from the Cluster
While upgrading an ESA appliance that is in a Trusted Appliance Cluster (TAC) setup, remove the the ESA appliance from the TAC and then apply the upgrade patch.
If a node is associated with a cluster task, then the Leave Cluster operation does not remove the node from the cluster. Ensure to delete all such tasks before removing any node from the cluster.
Perform the following steps to remove a node from a cluster:
- From the ESA Web UI of the node that you want to remove from the cluster, navigate to System > Trusted Appliances Cluster.The screen displaying the cluster nodes appears.
- Navigate to Management > Leave Cluster.A confirmation message appears.
- Select Ok.The node is removed from the cluster.
For more information about TAC, refer here.
Disabling the Audit Store Cluster Task
Perform the following steps to disable the task:
- Log in to the ESA Web UI.
- Navigate to System > Task Scheduler.
- Select the Audit Store Management - Cluster Config - Sync task.
- Click Edit.
- Clear the Enable check box.
- Click Save.
- Click Apply.
- Enter the root password and click OK.
- Repeat the steps on all the nodes in the Audit Store cluster.
Disabling Rollover Index Task
Perform the following steps to disable the Rollover Index task:
Log in to the ESA Web UI on any of the nodes in the Audit Store cluster.
Navigate to Audit Store > Analytics > Scheduler.
Click Enable for the Rollover Index task.
The slider moves to the off position that it turns grey in color.
Enter the root password and click Submit to apply the updates.
Repeat steps 1-4 on all nodes in the Audit Store cluster, if required.
Deleting patches from /products/uploads directory
The /products/uploads directory contains all the previously uploaded patches. Before upgrading the ESA, it is recommended to remove these already installed patches from this directory. Ensure that only the required patches are present.
When multiple patches exist, the Patch Manager may take longer to display them. After the available patches are listed, select the required patch to install.
Perform the following steps to delete patches from the directory:
Log in to the ESA CLI Manager with administrator credentials.
Navigate to Administration > OS Console.
Enter the root password and click OK.
Delete a patch from the /products/uploads directory using the following command:
cd /products/uploads && rm -rf <Patch name>The above command deletes one patch at a time. Repeat this step to delete any other patches that are already installed.
The patches are deleted successfully from the /products/uploads directory.
4 - Upgrading from v10.0.1
Before you begin
Ensure that you upgrade the ESA prior to upgrading the protectors.
Ensure that the ESA nodes in the Audit Store cluster are upgraded one at a time.
If only two ESAs are available in the Audit Store cluster, then remove the secondary ESA from the cluster. Upgrade the primary ESA, then upgrade the secondary ESA, and add the secondary ESA back to the Audit Store cluster. However, a minimum of three ESAs are recommended for the Audit Store cluster.
Uploading and Installing the ESA patch
The ESA patch can be uploaded using the Web UI or the CLI Manager but the patch should only be installed using the CLI Manager.
Uploading the patch using the Web UI
Perform the following steps to upload the patch from the Web UI:
Log in to the ESA Web UI with administrator credentials.
Navigate to Settings > System > File Upload.The File Upload page appears.
In the File Selection section, click Choose File.The file upload dialog box appears.
Select the patch file and click Open.
- You can only upload files with .pty and .tgz extensions.
- If the file uploaded exceeds the Max File Upload Size, then a password prompt appears. Only a user with the administrative role can perform this action. Enter the password and click Ok.
- By default, the Max File Upload Size value is set to 25 MB. To increase this value, refer here.
Click Upload.
After the file is uploaded successfully, then from the Uploaded Files area, choose the uploaded patch.The information for the selected patch appears.

Uploading the patch using the CLI Manager
Perform the following steps to upload the patch from the CLI Manager:
- Log in to the ESA CLI Manager with administrator credentials.
- Navigate to Administration > OS Console to upload the patch.
Enter the root password and click OK. - Upload the patch to the /opt/products_uploads directory using the FTP or SCP command.
The patch file is uploaded.
Installing the ESA patch from CLI Manager
Perform the following steps to install the patch from the CLI Manager:
Log in to the ESA CLI Manager with administrator credentials.
Navigate to Administration > Patch Management to install the patch.
Enter the root password and click OK.Select Install a Patch.
Select the ESA_PAP-ALL-64_x86-64_10.1.0.P.2467.pty patch file and select Install.
- For more information about the latest build number and the patch details, refer to the Release Notes of the respective patch.
After the patch is installed, select Reboot Now.

This screen has a timeout of 60 seconds. If Reboot Now is not selected manually, then the system automatically reboots after 60 seconds.
After the reboot is initiated, the message Patch has been installed successfully !! appears. Select Exit.
The patch is installed and the ESA is upgraded to v10.1.0.
Verifying the ESA Patch Installation
Perform the following steps to verify the patch installation:
- Log in to the ESA CLI Manager.
- Navigate to Administration > Patch Management.
- Enter the root password.
- Select List installed patches. The ESA_10.1.0 patch name appears.
- Log in to the ESA Web UI.
- Navigate to the System > Information page.
The ESA is upgraded to v10.1.0. The upgraded patch on the ESA is displayed in the Installed Patches section.
5 - Post upgrade steps
Before you begin
If only two ESAs are available in the Audit Store cluster, then remove the secondary ESA from the cluster, upgrade the primary ESA, upgrade the secondary ESA, and add the secondary ESA to the cluster. However, a minimum of three ESAs are recommended for the Audit Store cluster.
Upgrade each ESA to v10.1.0. After upgrading all the ESA appliances, add the ESA appliances to the TAC, and then create the scheduled tasks.
Verifying Upgrade Logs
During the upgrade process, logs describing the status of the upgrade process are generated. The logs describe the services that are initiated, restarted, or the errors generated.
To view the logs under the /var/log directory from the CLI Manager, navigate to CLI Manager > Administration > OS console.
- patch_ESA_<version>.log - Provides the logs for the upgrade.
- syslog - Provides collective information about the syslogs.
Enabling Rollover Index Task
Perform the following steps to enable Rollover Index task after upgrading all the ESA appliances:
Log in to the ESA Web UI on any of the nodes in the Audit Store cluster.
Navigate to Audit Store > Analytics > Scheduler
Click Enable for the Rollover Index task. The slider moves to the on position that is blue in color.
Enter the root password and click Submit, to apply the updates.
Repeat steps 1-4 on all nodes in the Audit Store cluster, if required.
Enabling the Audit Store Management - Cluster Config - Sync task
Enable the Audit Store Management - Cluster Config - Sync task on all nodes after upgrading all the ESAs.
Log in to the ESA Web UI.
Navigate to System > Task Scheduler.
Click the Audit Store Management - Cluster Config - Sync task and click Edit.
Select the Enable check box for the Audit Store Management - Cluster Config - Sync task.
Click Save and then click Apply after performing the required changes.
Enter the root password and select OK.
Repeat the steps on all the nodes in the Audit Store cluster.
Joining nodes in ESA cluster
Perform this step only after upgrading all the ESA appliances.
To add the ESAs in a TAC setup using the ESA Web UI:
- From the primary ESA, create a TAC.
- Join all secondary ESAs one-by-one in the TAC.
Creating a Cluster Scheduled Task
Ensure to create a cluster scheduled task, only after upgrading all the ESA appliances.
Perform the following steps to create a cluster scheduled task:
From the ESA Web UI, navigate to System > Backup & Restore > Export.
Under Export, select the Cluster Export radio button.
Click Start Wizard.
The Wizard - Export Cluster screen appears.
In the Data to import, customize the items that you need to export from this machine and imported to the cluster nodes.
If the configurations must be exported on a different ESA, then clear the Certificates check box. For information about copying Insight certificates across systems, refer to Rotating Insight certificates.
Click Next.
In the Source Cluster Nodes, select the nodes that will run this task.
You can specify them by label or select individual nodes.
Click Next.
In the Target Cluster Nodes, select the nodes to import the data.
Click Review.
The New Task screen appears.
Enter the required information in the following sections.
- Basic Properties
- Frequencies
- Restriction
- Logging
Click Save.
A new scheduled task is created.Click Apply to apply the modifications to the task.
A dialog box to enter the root user password appears.Enter the root password and click OK.
The scheduled task is operational.Click Run Now to run the scheduled task immediately.
Optional Restoring the Configuration for the External SIEM
If an external SIEM is used and logs are forwarded to the external SIEM, perform the following steps to restore the configuration:
Skip this step if you are upgrading from the ESA v10.0.x. However, this step is required when upgrading from earlier versions.
From the CLI Manager of the Primary ESA, perform the following steps.
Log in to the CLI Manager of the Primary ESA.
Navigate to Administration > OS Console.
Enter the root password and select OK.
Update the configuration files.
Navigate to the config.d directory.
cd /opt/protegrity/td-agent/config.dIdentify the hostname of the machine.
- Open the OUTPUT.conf file using a text editor.
- Locate the hosts parameter in the file.
- Make a note of the hosts configuration value.
- Close the file.
Back up the existing OUTPUT.conf file.
mv OUTPUT.conf OUTPUT.conf_from_<build_number>The system uses the .conf extension. To avoid configuration conflicts, ensure that the backup file name is appended to the file name extension, for example, .conf_backup or .conf_bkup123.
Open the backup file that is created during the upgrade using a text editor.
Obtain the build number from the readme file that is provided with the upgrade patch.
The system uses the .conf extension. To avoid configuration conflicts, ensure that the backup file name is appended to the file name extension, for example, .conf_backup or .conf_bkup123.Update hosts localhost to the hosts configuration value identified from the OUTPUT.conf file in the earlier step. This step is only required if the hosts field has the localhost value assigned.
The extract of the updated file is shown in the following example.
<existing code>
.
.
      hosts protegrity-esa123.protegrity.com
.
.
.<exising code>
Save and close the file.
Rename the configuration file to OUTPUT.conf.
mv OUTPUT.conf.before_<build_number> OUTPUT.conf
Restart the td-agent service.
Log in to the ESA Web UI.
Navigate to System > Services > Misc > td-agent,
Restart the td-agent service.
Repeat these steps on all the ESAs where the external SIEM configuration was updated before the upgrade.
Installing the DSG patch on ESA
If you install the DSG v3.3.0.0 patch on the ESA v10.1.0, then perform the following operations:
Run the Docker commands
- On the ESA CLI Manager, navigate to Administration > OS Console.
- Run the
docker pscommand. A list of all the available docker containers are displayed as shown in the following example:

Run the below commands to update the container configuration.
docker update --restart=unless-stopped --cpus 2 --memory 1g --memory-swap 1.5g dsg-ui-3.3.0.0.5-1docker update --restart=always --cpus 1 --memory .5g --memory-swap .6g gpg-agent-3.3.0.0.5-1
The values of--cpus,--memory, and--memory-swapcan be changed as per the requirements.
Update the evasive configuration file
- On the ESA CLI Manager, navigate to Administration > OS Console.
- Add new mod evasive configuration file using the following command.
nano /etc/apache2/mods-enabled/whitelist_evasive.conf - Add the following parameters to the mod evasive configuration file.
<IfModule mod_evasive20.c>
DOSWhitelist 127.0.0.1
</IfModule>
- Save the changes.
- Set the required permissions for evasive configuration file using the following command.
chmod 644 /etc/apache2/mods-enabled/whitelist_evasive.conf - Reload the apache service using the following command.
/etc/init.d/apache2 reload
6 - Restoring to the Previous Version of ESA
6.1 - Restoring to the previous version of ESA from a snapshot
In case of upgrade failure, restore it through the OS backup or by importing the backed up files.
6.1.1 - Restoring to the Previous Version of ESA on AWS
On AWS, data can be restored by creating a volume of a snapshot. After creating the snapshot, the EC2 instance can be attached to the volume.
Creating a Snapshot of a Volume on AWS
Perform the steps to create a snapshot of a volume:
On the EC2 Dashboard screen, click Volumes under the Elastic Block Store section.
The screen with all the volumes appears.
Right click on the required volume and select Create Snapshot.
The Create Snapshot screen for the selected volume appears.
Enter the required description for the snapshot in the Description text box.
Select click to add a Name tag to add a tag.
Enter the tag in the Key and Value text boxes.
Click Add Tag to add additional tags.
Click Create Snapshot.
A message Create Snapshot Request Succeeded along with the snapshot id appears.
- Ensure that you note the snapshot id.
- Ensure that the status of the snapshot is completed.
Restoring a Snapshot on AWS
Before you begin
- Ensure that the status of the instance is Stopped.
- Ensure that an existing volume on the instance is detached.
Perform the steps to restore a snapshot on AWS:
On the EC2 Dashboard screen, click Snapshots under the Elastic Block Store section.The screen with all the snapshots appears.
Right-click on the required snapshot and select Create Volume from snapshot.
The Create Volume screen appears.
Select the type of volume from the Volume Type drop-down list.
Enter the size of the volume in the Size (GiB) textbox.
Select the availability zone from the Availability Zone drop-down list.
Click Add Tag to add tags.
Click Create Volume.
A message Create Volume Request Succeeded along with the volume id appears. The volume with the snapshot is created.
Ensure to note the volume id.
Under the EBS section, click Volume.
The screen displaying all the volumes appears.
Right-click on the volume that is created.
The pop-up menu appears.
Select Attach Volume.
The Attach Volume dialog box appears.
Enter the Instance ID or name of the instance in the Instance text box.
Enter /dev/xvda in the Device text box.
Click the Attach to add the volume to an instance.
The snapshot is added to the EC2 instance as a volume.
6.1.2 - Restoring to the Previous Version of ESA on Azure
On Azure, data can be restored by creating a volume of a snapshot.
Creating a Snapshot of a Virtual Machine on Azure
Perform the steps to create a snapshot of a virtual machine:
Sign in to the Azure homepage.
On the Azure Dashboard screen, select Virtual Machine.The screen displaying the list of all the Azure virtual machines appears.
Select the required virtual machine.
The screen displaying the details of the virtual machine appears.On the left pane, under Settings, click Disks.
The details of the disk appear.
Select the disk and click Create Snapshot.
The Create Snapshot screen appears.
Enter the following information:
- Name: Name of the snapshot
- Subscription: Subscription account for Azure
Select the required resource group from the Resource group drop-down list.
Select the required account type from the Account type drop-down list.
Click Create.
The snapshot of the disk is created.
Restoring from a Snapshot on Azure
Perform the steps to restore a snapshot on Azure.
On the Azure Dashboard screen, select Virtual Machine.
The screen displaying the list of all the Azure virtual machines appears.
Select the required virtual machine.
The screen displaying the details of the virtual machine appears.
On the left pane, under Settings, click Disks.
Click Swap OS Disk.
The Swap OS Disk screen appears.
Click the Choose disk drop-down list and select the snapshot created.
Enter the confirmation text and click OK.
The machine is stopped and the disk is successfully swapped.
Restart the virtual machine to verify whether the snapshot is available.
6.1.3 - Restoring to the Previous Version of ESA on GCP
On GCP, data can be restored creating a volume of a snapshot.
Creating a Snapshot of a Disk on GCP
Perform the steps to create a snapshot of a disk:
On the Compute Engine dashboard, click Snapshots.
The Snapshots screen appears.
Click Create Snapshot.
The Create a snapshot screen appears.
Enter information in the following text boxes.
- Name - Name of the snapshot.
- Description – Description for the snapshot.
Select the required disk for which the snapshot is to be created from the Source Disk drop-down list.
Click Add Label to add a label to the snapshot.
Enter the label in the Key and Value text boxes.
Click Add Label to add additional tags.
Click Create.
- Ensure that the status of the snapshot is set to completed.
- Ensure that you note the snapshot id.
Restoring from a Snapshot on GCP
Perform the steps to restore a snapshot:
- Navigate to Compute Engine > VM instances.The VM instances screen appears.
- Select the required instance.
The screen with instance details appears. - Stop the instance.
- After the instance is stopped, click EDIT.
- Under the Boot Disk area, remove the existing disk.
- Click Add Item.
- Select the Name drop-down list and click Create a disk. The Create a disk screen appears.
- Under Source Type area, select the required snapshot.
- Enter the other details, such as, Name, Description, Type, and Size (GB).
- Click Create. The snapshot of the disk is added in the Boot Disk area.
- Click Save.The instance is updated with the new snapshot.
6.2 - Restoring to the Previous Version of ESA On-premise
To roll back the system to the previous version, perform the steps to restore the system.This helps in cases such as when an upgrade fails.
Perform the steps to restore to the previous version of the ESA on-premise.
- From the CLI Manager, navigate to Administration > Reboot And Shutdown > Reboot to restart your system.A screen to enter the reason for restart appears.
- Enter the reason and select OK.
- Enter the root password and select OK.
The appliance restarts and the following screen appears.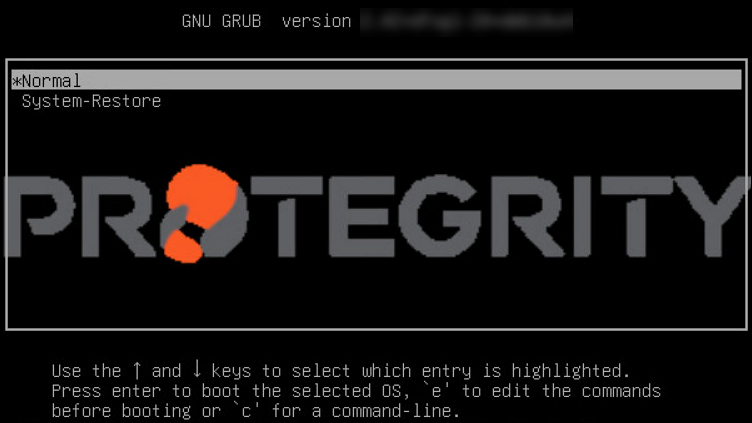
- Select System-Restore and press ENTER.
The Welcome to System Restore Mode screen appears.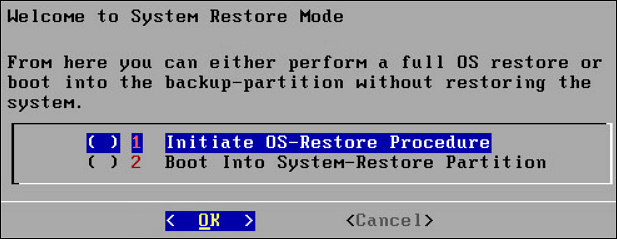
- Select Initiate OS-Restore Procedure and select OK.The restore procedure is initiated.
After the OS-Restore procedure is completed, the login screen appears.