Upgrading from v10.0.1
Before you begin
Ensure that you upgrade the ESA prior to upgrading the protectors.
Ensure that the ESA nodes in the Audit Store cluster are upgraded one at a time.
If only two ESAs are available in the Audit Store cluster, then remove the secondary ESA from the cluster. Upgrade the primary ESA, then upgrade the secondary ESA, and add the secondary ESA back to the Audit Store cluster. However, a minimum of three ESAs are recommended for the Audit Store cluster.
Uploading and Installing the ESA patch
The ESA patch can be uploaded using the Web UI or the CLI Manager but the patch should only be installed using the CLI Manager.
Uploading the patch using the Web UI
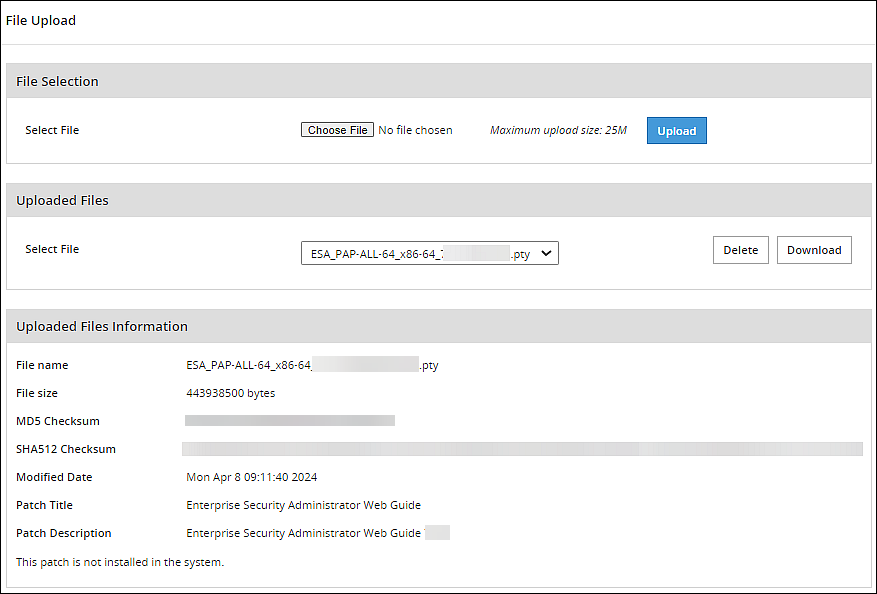
Perform the following steps to upload the patch from the Web UI:
Log in to the ESA Web UI with administrator credentials.
Navigate to Settings > System > File Upload.The File Upload page appears.
In the File Selection section, click Choose File.The file upload dialog box appears.
Select the patch file and click Open.
- You can only upload files with .pty and .tgz extensions.
- If the file uploaded exceeds the Max File Upload Size, then a password prompt appears. Only a user with the administrative role can perform this action. Enter the password and click Ok.
- By default, the Max File Upload Size value is set to 25 MB. To increase this value, refer here.
Click Upload.
After the file is uploaded successfully, then from the Uploaded Files area, choose the uploaded patch.The information for the selected patch appears.

Uploading the patch using the CLI Manager
Perform the following steps to upload the patch from the CLI Manager:
- Log in to the ESA CLI Manager with administrator credentials.
- Navigate to Administration > OS Console to upload the patch.
Enter the root password and click OK. - Upload the patch to the /opt/products_uploads directory using the FTP or SCP command.
The patch file is uploaded.
Installing the ESA patch from CLI Manager
Perform the following steps to install the patch from the CLI Manager:
Log in to the ESA CLI Manager with administrator credentials.
Navigate to Administration > Patch Management to install the patch.
Enter the root password and click OK.Select Install a Patch.
Select the ESA_PAP-ALL-64_x86-64_10.1.0.P.2467.pty patch file and select Install.
- For more information about the latest build number and the patch details, refer to the Release Notes of the respective patch.
After the patch is installed, select Reboot Now.

This screen has a timeout of 60 seconds. If Reboot Now is not selected manually, then the system automatically reboots after 60 seconds.
After the reboot is initiated, the message Patch has been installed successfully !! appears. Select Exit.
The patch is installed and the ESA is upgraded to v10.1.0.
Verifying the ESA Patch Installation
Perform the following steps to verify the patch installation:
- Log in to the ESA CLI Manager.
- Navigate to Administration > Patch Management.
- Enter the root password.
- Select List installed patches. The ESA_10.1.0 patch name appears.
- Log in to the ESA Web UI.
- Navigate to the System > Information page.
The ESA is upgraded to v10.1.0. The upgraded patch on the ESA is displayed in the Installed Patches section.
Feedback
Was this page helpful?