Enterprise Security Administrator (ESA) is the main component of the Data Security Platform. Working in combination with other Protegrity protectors, it is used to encrypt or tokenize your data.
Protegrity Data Security Platform provides policy management and data protection. It has as its main component the Enterprise Security Administrator (ESA). Working in combination with a Protegrity database protector, application protector, file protector, or big data protector it can be used for managing data security policy, key management, and auditing and reporting.
ESA: The ESA Manager provides information on how to install specific components, work with policy management tools, manage keys and key rotation and manage switching between Soft HSM and Key Store, configuring logging repositories and using logging tools. This document contains details for all these features.
Audit Store: The Audit Store is a repository for the logs generated from multiple sources, such as the kernel, policy management, member source, application logs, and protectors. The Audit Store supports clustering for scalability.
Insight: This feature displays forensics from the Audit Store on the Audit Store Dashboards. It provides options to query and display data from the Audit Store. Predefined graphs are available for analyzing the data from the Audit Store. It provides options for generating and saving customized queries and reports. An enhanced alerting system tracks the data in the Audit Store to monitor the systems and alert users if required.
Data Security Gateway: The Data Security Gateway (DSG) is a network intermediary that can be classified under Cloud Access Security Brokers (CASB) and Cloud Data Protection Gateway (CDPG). CASBs provide security administrators a central check point to ensure secure and compliant use of cloud services across multiple cloud providers. CDPG is a security policy enforcement check point that exists between cloud data consumer and cloud service provider to interject enterprise policies whenever the cloud-based resources are accessed.
1 - Protegrity Appliance Overview
There are two major components of the Protegrity appliance, ESA and DSG.
Protegrity Appliance Overview
The Protegrity Data Security Platform provides policy management and data protection and has the following appliances.
Enterprise Security Administrator (ESA) is the main component of the Data Security Platform. Working in combination with a Protegrity Protector, it can be used to encrypt or tokenize your data. Protectors include the Database Protector, Application Protector, File Protector, or Big Data Protector.
The Data Security Gateway (DSG) is a network intermediary that can be classified under Cloud Access Security Brokers (CASB) and Cloud Data Protection Gateway (CDPG). CASBs provide security administrators a central check point to ensure secure and compliant use of cloud services across multiple cloud providers. CDPG is a security policy enforcement check point that exists between cloud data consumer and cloud service provider to interject enterprise policies whenever the cloud-based resources are accessed.
Data Protectors – Protect sensitive data in the enterprise and deploy security policy for enforcement on each installed system. A policy is deployed from ESA to the Data Protectors and Audit Logs of all activity on sensitive data is forwarded to the appliances, such as, the ESA, or external logging systems.
Protegrity appliances are based on the same framework with the base operating system (OS) as hardened Linux, which provides the platform for Protegrity products. This platform includes the required OS low-level components as well as higher-level components for enhanced security manageability.
Protegrity appliances have two basic interfaces: CLI Manager and Web UI. CLI Manager is a console-based environment and Web UI is a web-based environment. Most of the management features are shared by all appliances. Some examples of the shared management features are network settings management, date and time settings management, logs management, and appliance configuration facilities, among others.
An organization can use a mix of these mandatory and may-use methods to secure data.
2 - Installing ESA
Install ESA on-premise or on a cloud platform.
You can install ESA on-premise or on a cloud platform such as AWS, GCP, or Azure. When you upgrade from a previous version, ESA is available as patch. The following are the different ways of installing ESA:
Installing ESA
ISO Installation: This installation is performed for an on-premise environment where ESA is installed on a local system using an ESA ISO is provided by Protegrity. The installation of the ISO begins by installing the hardened version of Linux on your system, setting up the network, and configuring date/time. This is then followed by updating the location, setting up OS user accounts, and installing the ESA-related components. For more information about installing ESA using ISO, refer to Installing ESA using ISO.
Cloud Platforms: On Cloud platforms such as, AWS, GCP, or Azure, ESA images for the respective cloud are generated and provided by Protegrity. In these images, ESA is installed with specific components. You must obtain the image from Protegrity and create an instance on the cloud platform. After creating the instance, you run certain steps for finalizing the installation. For more information about installing ESA on cloud platforms, refer to Installing ESA on Cloud Platforms.
A temporary license is provided by default when you first install the ESA and is valid for 30 days from the date of this installation. To continue using Protegrity features, you have to obtain a validated license before your temporary license expires.
Log in to the CLI Manager or Web UI of ESA and supported authentication mechanisms.
The Enterprise Security Administrator (ESA), contains several components such as, Insight, Audit Store, Analytics, Policy Management, Key Management, Certificate Management, Clustering, Backup/Restore, Networking, User Management, and so on. You must login to ESA to avail the services of these components. Log in to the CLI Manager or Web UI of ESA to secure your data using these components.
The login aspect of the appliance can be categorized into the following categories:
Simple Login
Log in to ESA from CLI or Web UI by providing valid user credentials. You can login to ESA as an appliance or LDAP user. For more information about users, refer to ESA users.
From your Web browser, type the domain name of the ESA HTTPS protocol, for example, https://192.168.1.x/. The Web Interface splash screen appears. The following figure displays the login page of the ESA Web UI.
You can login to the ESA CLI Manger using an SSH session.
Single Sign-On (SSO)
Single Sign-on (SSO) is a feature that enables users to authenticate multiple applications by logging in to a system only once. On the Protegrity appliances, such as ESA and DSG, you can utilize the Kerberos SSO mechanism to login to the appliance. For more information about SSO, refer to Single Sign-On. The following figure displays the login page with SSO.
Two-Factor Authentication
The two factor authentication is a verification process where two recognized factors are used to identify you before granting you access to a system or website. In addition to your password, you must correctly enter a different numeric one-time passcode or the verification code to finish the login process. This provides an extra layer of security to the traditional authentication method. For more information about two-factor authentication, refer Two-Factor Authentication.
Protegrity supports Mozilla Firefox, Chrome, and Internet Explorer browsers for Web UI login.
4 - Command-Line Interface (CLI) Manager
Command-Line Interface (CLI) Manager is a Protegrity Platform tool for managing the Protegrity appliances, such as, the ESA and DSG. CLI Manager is a text-based environment for managing status, administration, configuration, preferences, and networking of your appliance. This section describes how to login to the ESA CLI Manager, and its many features.
4.1 - Accessing the CLI Manager
You log on to the CLI Manager to manage the settings and monitor the ESA. The CLI Manager is available using any of the following text consoles:
Direct connection using local keyboard and monitor.
Serial connection using an RS232 console cable.
Network connection using a Secure Shell (SSH port 22) connection to the appliance management IP address.For more information about listening ports, refer Open listening ports.
To log on to the CLI Manager:
From the ESA Web UI pane, click the window that appears at the bottom right.
A new CLI Manager window opens.
At the prompt, type the admin login credentials set during the appliance installation.
Press ENTER.
The CLI Manager screen appears.
First time login
When you login through the CLI Manager or the Web UI for the first time, with the password policy enabled, the Update Password screen appears. It is recommended that you change the password since the administrator sets the initial password.
Shell Accounts role with Shell Access
If you are a user associated to Shell Accounts role with Shell (non-CLI) Access permissions, you cannot access the CLI or Web UI. This is an exception when the user has the password policy enabled and is required to change the password through the Web UI. For more information about configuring the password policy, refer to section Password Policy Configuration.
CLI Manager Main Screen
The CLI Manager screen appears when you successfully login to the CLI Manager. This screen appears with the messages that relate to the user who has logged in and also mentions the priority of each message. Note here that % to the bottom-right of the screen indicates the information available for viewing on the screen.
If you click Continue, then the CLI Manager main screen appears.
The following figure illustrates the CLI Manager main screen.
CLI Manager Navigation
There are many common keystrokes that help you to navigate the CLI Manager. The following table describes the navigation keys.
Key
Description
UP ARROW DOWN ARROW
Navigates up and down menu options
ENTER
Selects an option or continues process
Q
Quits the CLI Manager
T
Goes to the top of the current menu
U
Moves up one level
H
Displays key settings and instructions
TAB
Moves between multiple fields
Page Up
Scroll Up
Page Down
Scroll Down
In the following sections, the main system menus in the CLI manager are explained in detail.
4.2 - CLI Manager Structure Overview
There are five main system menus in the CLI Manager:
Status and Logs
Administration
Networking
Tools
Preferences
Status and Logs
Status and Logs menu includes four options that make the analysis of logs easier.
System Monitor tool with real-life information on the CPU, network, and disk usage.
Top Processes view having a list of 10 top memory and CPU users. The information is updated periodically.
Appliance Logs tool, divided into subcategories. These can be appliance common logs and appliance specific logs. Thus, you can view system event logs that relate to, for example, syslog, installation, kernel, and web services engine logs which are common for all Protegrity appliances.
User Notifications tool include all the messages for a user. The latest notifications are also displayed on the screen after login.
The Status and Logs screen allows you to access system monitor information, examine top memory and CPU usage, and view appliance logs. You can access it from the CLI Manager main screen. This screen shows the hostname to which you are connected, and it allows you to view and manage your audit logs.
The following figure shows the Status and Logs screen.
In addition to the existing logs, the following additional security logs are generated:
Appliance’s own LDAP when users are added and removed.
SUDO commands are issued from the shell.
There are failed attempts to log in from SSH or Web UI.
All shell commands: This is a PCI-DSS requirement.
4.3.1 - Monitoring System Statistics
Using System Monitor, you can view the following system statistics.
CPU usage
RAM
Disk space free or in use.
If more hard disks are required, and so on.
To view the system information, login to the CLI Manager, navigate to Status and Logs > System Monitor.
4.3.2 - Viewing the Top Processes
Using Top Processes, you can examine in real-time, the processes using up memory or CPU.
To view the top processes, login to the CLI Manager, navigate to Status and Logs > Top Processes.
4.3.3 - Working with System Statistics (SYSSTAT)
The System Statistics (SYSSTAT) is a tool to monitor system resources and their performance on LINUX/UNIX systems. It contains utilities that collect system information, report CPU statistics, report input-output statistics, and so on. The SYSSTAT tool provides an extensive and detailed data for all the activities in your system.
The SYSSTAT contains the following utilities for analyzing your system:
sar
iostat
mpstat
pidstat
nfsiostat
cisfsiostat
These utilities collect, report, and save system activity information. Using the reports generated, you can check the performance of your system.
The SYSSTAT tool is available when you install the appliance.
On the Web UI, navigate to System > Task Scheduler to view the SYSSTAT tasks. You must run the following tasks to collect the system information:
Sysstat Activity Report to collect information at short intervals
Sysstat Activity Summary to collect information at a specific time daily
The following figure displays the SYSSTAT tasks on the Web UI.
The logs are stored in the /var/logs/sysstat directory.
The tasks are disabled by default. You must enable the tasks from the Task Scheduler for collecting the system information.
4.3.4 - Auditing Service
The Linux Auditing System is a tool or utility that allows to monitor events occurring in a system. It is integrated with the kernel to watch the system operations. The events that must be monitored are added as rules and defined to which extent that the event must be tracked. If the event is triggered, then a detailed audit log is generated. Based on this log, you can track any violations to the system and improve security measures to prevent them.
In Protegrity appliances, the auditing tool is implemented to track certain events that can pose as a security threat. The Audit Service is installed and running in the appliance for this purpose. On the Web UI, navigate to System > Services to view the status of the service. The Audit Service runs to check the following events:
Update timezone
Update AppArmor profiles
Manage OS users and their passwords
If any of these events occur, then a low severity log is generated and stored in the logs. The logs are available in the /var/log/audit/audit.log directory. The logs that are generated by the auditing tool, contain detailed information about modifications triggered by the events that are listed in the audit rules. This helps to differentiate between a simple log and an audit log generated by the auditing tool for monitoring potential risks to the appliance.
For example, consider a scenario where an OS user is added to the appliance. If the Audit Service is stopped, then details of the user addition are not displayed and logs contain entries as illustrated in the following figure.
If the Audit Service is running, then the same event triggers a detailed audit log describing the user addition. The logs are illustrated in the following figure.
As illustrated in the figure, the following are some audits that are triggered for the event:
USER_CHAUTHOK: User attribute is modified.
EOE: Multiple record event ended.
PATH: Recorded a path file name.
Thus, based on the details provided in the type attribute, a potential threat to the system can be monitored.
For more information about the audit types, refer to the following link:
On the Web UI, an Audit Service Watchdog scheduled task is added to ensure that the Audit Service is running. This task is executed once every hour.
Caution: It is recommended to keep the Audit Service running for security purposes.
4.3.5 - Viewing Appliance Logs
Using Appliance Logs, you can view all logs that are gathered by the appliance.
To view the appliance logs, login to the CLI Manager, navigate to Status and Logs > Appliance Logs.
These logs are listed in the following table:
Table: Appliance Logs
Logs
Logs Types
Description
Appliances
Specific
ESA
DSG
System Event Logs
Syslog
All appliance logs.
✓
✓
Installation
Installation logs contain all of the information
gathered during the installation procedure. These logs include all
errors during installation and information on all the processes,
resources, and settings used for installation.
✓
✓
Patches
Patches installed on appliance
✓
✓
Patch_SASL
Proxy Authentication (SASL) related logs
Authentication
Authentication logs, such as user logins.
✓
✓
Web Services
Logs generated by the Web Services modules.
✓
✓
Web Management
Logs generated by the Appliance Web UI engine
✓
✓
Current Event
Current event logs contain all the operations performed
on the appliance. It gathers all information from different
services and appliance components.
✓
✓
Kernel
System kernel logs.
✓
✓
Web Services Server
Web Services Apache logs
✓
✓
Patch_Logging
Logging server related logs such as
installation log: logging server and so on.
✓
✓
Web Services Engine
Web Services HTTP-Server logs
Appliance Web UI related logs.
✓
✓
Service Dispatcher
Access Logs
Service Dispatcher Access Logs
✓
✓
Server Logs
Service Dispatcher Server Logs
✓
✓
PEP Server
Logs received from PEP Server that is located on the FPV
and DSG.
✓
Cluster Logs
Export Import
Cluster
✓
DSG Patch Installation
Cluster
Log all operations performed during installation of the
DSG patch
✓
You can delete the desired logs using the Purge button and view them in real-time using the Real-Time View button. When you finish viewing the logs, press Done to exit.
From v10.2.0, the following logs are visible on the Analytics dashboard.To view these logs, from the ESA Web UI, navigate to Analytics. These logs can be searched with their process name and Log Type as Application.
All the messages that display when you log in to either to the Web UI or CLI Manager can be viewed here as well.
To view the user notifications, login to the CLI Manager, navigate to Status and Logs > User Notifications.
4.4 - Working with Administration
Appliance administration is the most important part of the appliance framework. Most of the administrative tools and tasks can be performed using the Administration menu of the CLI Manager.
The following screen illustrates the Administration screen on the CLI Manager.
Some of the administration tasks, such as creating clustered environment or setting up the virtualization can be done only in the CLI Manager by selecting the Administration menu. Most of the administration tasks can be performed using the Web UI.
4.4.1 - Working with Services
You can manually start and stop appliance services.
To view all appliance services and their statuses, login to the CLI Manager, navigate to Administration > Services.
Use caution before stopping or restarting a particular service. Make sure that no important actions are being performed by other users using the service that must be stopped or restarted.
Some services, such as, LDAP Proxy auth, member source services, and so on, are available after they have been successfully configured on ESA.
In the Services dialog box, you can start, stop, or restart the following services:
For more information about
the Meteringfacade and Logfacade services, refer to the section
Services.
Reporting Server
✓
Reports repository and reporting engine
Distributed Filesystem File Protector
✓
DFS Cache Refresh
ETL Toolkit
ETL Server
Cloud Gateway
✓
Cloud Gateway Cluster
td-agent
✓
✓
td-agent
Audit Store
✓
Audit Store Repository
Audit Store Management
Analytics
✓
Analytics, Audit Store Dashboards
RPS
✓
* Heartbeat services are used to discover other appliance nodes present in the network. When Set operations, such as, set ESA communication or TAC are performed, then the available list of nodes are displayed due to this service. If these services are stopped, the available nodes are not visible while performing the above operations. However, the the IP address can be entered manually.For the appliance-heartbeat-server a fixed port is not required. This is because this service is not listening for an incoming message.Appliance-heartbeat-client allows listening the incoming messages and hence needs a fixed port, i.e., 10100.
You can change the status of any service when you select it from the list and choose Select. In the screen that follows the Service Management screen, select stop, start, or restart a service, as required.
When you apply any action on a particular service, the status message appears with the action applied. Press ENTER again to continue.
You can also use the Web UI to start or stop services. In the Web UI Services, you have additional options for stopping/starting services, such as Enable/Disable Auto-start for most of the services.
Important: Although the services can be started or stopped from the Web UI, the start/stop/restart action is restricted for some services, such as, networking, td-agent, docker, exim4, and so on. These services can be operated from the OS Console. Run the following command to start/stop/restart a service.
/etc/init.d/<service_name> stop/start/restart
For example, to start the docker service, run the following command.
/etc/init.d/docker start
4.4.2 - Setting Date and Time
You can adjust the date and time settings of ESA by navigating to Administration > Date and Time. You may need to do so if this information was entered incorrectly during initialization.
You can synchronize time with NTP Server using the Time Server (NTP) option (explained in the following paragraph), change time zone using the Set Time Zone option, change date using the Set Date option, or change time using the Set Time option. The information selected during installation is available beside each option.
Use an Up Arrow or Down Arrow key to change the values in the editable fields, such as Month/Year. Use any arrow key to navigate the calendar. Use the Tab key to navigate between the editable fields.
The first column in the calendar shows the corresponding week number
You can set the time and date using the Web UI as well.
For more information about setting the ESA time and date, refer to section Configuring Date and Time.
License, certificates, and date and time modifications
Date and time modifications may affect licenses and certificates. It is recommended to have time synchronized between Appliances and Protectors.
Configure NTP Time Server
You must enable or disable the NTP settings only from the CLI Manager or Web UI.
You can access the Configure Server NTP Time Server screen by navigating to Administration > Date and Time > Time Server option.
To enable NTP synchronization, you need to specify the NTP Server first and then enable NTP. Once the NTP Server is specified, the new time will be applied immediately.
The NTP synchronization may take some time and while it is in progress, the Synchronization Status displays In Progress. When it is over, the Synchronization Status displays Time Synchronized.
4.4.3 - Managing Accounts and Passwords
The ESA CLI Manager includes options to change password and permissions for multiple users through the CLI interface. The options available are listed as follows:
Change My Password
Manage Password and Local-Accounts
Reset directory user-password
Change OS root account password
Change OS local_admin account password
Change OS local_admin account permissions
Manage internal Service-Accounts
Manage local OS users
OS Users in Appliances
When you install an appliance, some users are installed to run specific services for the products.
When adding users, ensure that you do not add the OS users as policy users.
The following table describes the OS users that are available in your appliance.
OS Users
Description
alliance
Handles DSG processes
root
Super user with access to all commands and files
local_admin
Local administrator that can be used when an LDAP user is not accessible
www-data
Daemon that runs the Apache, Service dispatcher, and Web services as a user
ptycluster
Handles TAC related services and communication between TAC through SSH.
service_admin and service_viewer
Internal service accounts used for components that do not support LDAP
clamav
Handles ClamAV antivirus
rabbitmq
Handles the RabbitMQ messaging queues
epmd
Daemon that tracks the listening address of a node
openldap
Handles the openLDAP utility
dpsdbuser
Internal repository user for managing policies
Strengthening Password Policy
Passwords are a common way of maintaining a security of a user account. The strength and complexity of a password are some of the primary requirements of an enterprise to prevent security vulnerability. A weak password increases chances of a security breach. Thus, to ensure a strong password, different password policies are set to enhance the security of an account.
Password policies are rules that enforce validation checks to provide a strong password. You can set your password policy based on the enterprise ordinance. Some requirements of a strong password policy might include use of numerals, characters, special characters, password length, and so on.
The default requirements of a strong password policy for an appliance OS user are as follows.
The password must have at least 8 characters.
All the printable ASCII characters are allowed.
The password must contain at least one character each from any of the following two groups:
Numeric: Includes numbers from 0-9.
Alphabets: Includes capitals [A-Z] and small [a-z] alphabets.
You can enforce password policy rules for the LDAP and OS users by editing the check_password.py file. This file contains a Python function that validates a user password. The check_password.py file is run before you set a password for a user. The password for the user is applied only after it is validated using this Python function.
For more information about password policy for LDAP users, refer here.
Enforcing Password Policy
The following section describes how to enforce your policy restrictions for the OS and LDAP user accounts.
To enforce password policy:
Login to the CLI Manager.
Navigate to Administration > OS Console.
Enter the root password and select OK.
Edit the check_password.py file using a text editor.
/etc/ksa/check_password.py
Define the password rules as per your organizational requirements.
For more information about the password policy examples, refer here.
Save the file.
The password rules for the users in ESA are updated.
Examples
The following section describes a few scenarios about enforcing validation checks for the LDAP and OS users.
The check_password.py file contains the def check_password (password) Python function. In this function you can define your validations for the user password. This function returns a status code and a status message. In case of successful validation, the status code is zero and the status message is empty. In case of validation failure, the status code is non-zero and the status message contains the appropriate error message.
Scenario 1:
An enterprise wants to implement the following password rules:
Length of the password should contain atleast 15 characters
Password should contain digits
You must add the following snippet in the def check_password (password) function:
# Password length check
if len(password)<15: return (1,"Password should contain at least 15 characters")
# Password digits check
password_set=set(password)
digits=set(string.digits)
if ( password_set.intersection(digits) == set([]) ): return (2,"Password must contain digit)
Scenario 2:
An enterprise wants to implement the following password rule:
Password should not contain 1234.
You must add the following snippet in the def check_password (password) function:
if password==1234:
return (1,"Password must not contain 1234")
return (0,None)
Scenario 3:
An enterprise wants to implement the following password rules:
Password should contain a combination of uppercase, lowercase, and numbers.
You must add the following snippet in the def check_password (password) function:
digits=set(string.digits)
if ( password_set.intersection(digits) == set([]) ): return (2,"Password must contain numbers, upper, and lower case characters.")
# Force lowercase
lower_letters=set(string.ascii_lowercase)
if ( password_set.intersection(lower_letters) == set([]) ): return (2,"Password must contain numbers, upper, and lower case characters")
# Force uppercase
upper_letters=set(string.ascii_uppercase)
if ( password_set.intersection(upper_letters) == set([]) ): return (2,"Password must contain numbers, upper ,and lower case characters")
Changing Current Password
In situations where you need to change your current password due to suspicious activity or reasons other than password expiration, you can use the following steps.
For more information about appliance users, refer here.
To change the current password:
Login to the CLI Manager.
Navigate to Administration > Accounts and Passwords > Change My Password.
In the Current password field, type the current password.
In the New Password field, type the new password.
In the Retype Password field, retype the new password.
Select OK and press ENTER to save the changes.
Resetting Directory Account Passwords
You can change the password for any user existing in the internal LDAP directory. The user accounts and their security privileges as well as passwords are defined in the LDAP directory.
To be able to change the password for any LDAP user, you need to provide Administrative LDAP user credentials. You can also provide the old credentials of the LDAP user.
The LDAP Administrator is an admin user or the Directory Administrator assigned by admin. Admin can define Directory Administrators in the LDAP directory.
For more information about the internal LDAP directory, refer here.
To change a directory account password:
Login to the CLI Manager.
Navigate to Administration > Accounts and Passwords > Manage Passwords and Local-Accounts > Reset directory user-password.
In the displayed dialog box, in the Administrative LDAP user name or local_admin and Administrative user password fields, enter the Administrative LDAP user name and password. You can also use the local_admin credentials.
In the Target LDAP user field, enter the LDAP user name you wish to change the password for.
In the Old password field, enter the old password for the selected LDAP user. This step is optional.
In the New password field, enter a new password for the selected LDAP user.
In the Confirm new password field, re-enter a new password for the selected LDAP user.
Select OK and press ENTER to save the changes.
Changing the Root User Password
You may want to change the root user password due to security reasons, and this can only be done using the Appliance CLI Manager.
To change the root password:
Login to the CLI Manager.
Navigate to Administration > Accounts and Passwords > Manage Passwords and Local-Accounts > Change OS root account password.
In the Administrative user name and Administrative user password fields, enter the administrative user name and its valid password. You can also use the local_admin credentials.
In the Old root password field, enter the old password for the root user.
In the New root password field, enter the new password for the root user.
In the Confirm new password field, re-enter the new password for the root user.
Select OK and press ENTER to save the changes.
Changing the Local Admin Account Password
You can log into CLI Manager as a local_admin user if the LDAP is down or for LDAP maintenance. It is recommended that the local_admin account is not used for standard operations since it is primarily intended for maintenance tasks.
To change local_admin account password:
Login to the CLI Manager.
Navigate to Administration > Accounts and Passwords > Manage Passwords and Local-Accounts > Change OS local_admin account password.
In the Administrative user name and Administrative user password fields, enter the administrative user name and the old password for the local_admin. You can also use the Directory Server Administrator credentials.
In the New local_admin password field, enter new local_admin password.
In the Confirm new password filed, re-enter the new local_admin password.
Select OK and press ENTER to save changes.
Changing the Local Admin Account Permission
By default, the local_admin user cannot log into the Web UI. However, you can configure this access using the tool, which changes the local_admin account permissions.
For local_admin, the SSH permission is enabled, by default.
To change local_admin account permissions:
Login to the CLI Manager.
Navigate to Administration > Accounts and Passwords > Manage Passwords and Local-Accounts > Change OS local_admin account permissions.
In the dialog box displayed, in the Password field, enter the local_admin password.
Select OK.
Specify the permissions for the local_admin. You can either select SSH Access, Web-Interface Access, or both.
Select OK.
Changing Service Accounts Passwords
Service Account users are service_admin and service_viewer. They are used for internal operations of components that do not support LDAP, such as Management Server internal users, and Management Server Postgres database. You cannot log into the Appliance Web UI, Reports Management (for ESA), or CLI Manager using service accounts users. Since service accounts are internal OS accounts, they must be modified only in special cases.
To change service accounts:
Login to the CLI Manager.
Navigate to Administration > Accounts and Passwords > Manage Passwords and Local-Accounts > Manage internal ‘Service-Accounts’.
In the Account name and Account password fields, enter the Administrative user name and password.
Select OK.
In the dialog box displayed, in the Admin Service Account section, in the New password field, enter the new admin service account password.
In the Confirm field, re-enter the new admin service account password.
In the Viewer Service Account section, in the New password field, enter the new viewer service account password.
In the Confirm field, re-enter the new viewer service account password.
Select OK.
In the Service Account details dialog box, click Generate-Random to generate the new passwords randomly. Select OK.
Managing Local OS Users
Managing local OS user option provides you the ability to create users that need direct OS shell access. These users are allowed to perform non-standard functions, such as schedule remote operations, backup agents, run health monitoring, etc. This option also lets you manage passwords and permissions for the dpsdbuser, which is available by default when ESA is installed.
The password restrictions for OS users are as follows:
For all OS users, you cannot repeat the last 10 passwords used.
If an OS user signs in three times using an incorrect password, the account is locked for five minutes. You can unlock the user by providing the correct credentials after five minutes. If an incorrect password is provided in the subsequent sign-in attempt, the account is again locked for five minutes.
To manage local OS users:
Login to the CLI Manager.
Navigate to Administration > Accounts and Passwords > Manage Passwords and Local-Accounts > Manage local OS users.
Enter the root password and select OK.
In the dialog box displayed, select Add to add a new user or select an existing user as explained in following steps.
Select Add to create a new local OS user.
In the dialog box displayed, in the User name and Password fields, enter a user name and password for the new user. The & character is not supported in the Username field.
In the Confirm field, re-enter the password for the new user.
Select OK.
Select an existing user from the displayed list.
You can select one of the following options from the displayed menu.
Table: User Options
Options
Description
Procedure
Check password
Validate entered password.
In the dialog box displayed, enter the password
for the local OS user.
A Validation succeeded
message appears.
Update password
Change password for the user.
In the dialog box displayed, in the
Old password field, enter the
Old password for the local OS user.
This step is
optional.
In the New Password
field, enter the New Password for the local OS
user.
In the Confirm field,
re-enter the New Password for the local OS
user.
Update shell
Define shell access for the user.
In the dialog box displayed, select one of the
following options.
No login access
/bin/fasle
Linux Shell -
/bin/bash
Custom
Note
The default shell is set as No
login access
(/bin/false).
Toggle SSH access
Set SSH access for the user.
Select the Toggle SSH
access option and press
ENTER to set SSH access to
Yes.
Note
The default is set
as No when a user is
created.
Delete user
Delete the local OS user and related home
directory.
Select the Delete user
option and select Yes to confirm
the selection.
Select Close to exit.
4.4.4 - Working with Backup and Restore
Using the Backup/Restore Center tool, you can create backups of configuration files and settings. Use the backups to restore a stable configuration if changes have caused problems. Before the Backup Center dialog box appears you will be prompted to enter the root password. You can select from a list of packages to be backed up.
When you import files or configurations, ensure that each component is selected individually.
Select the configurations to export to a local file. When you select Administration > Backup/Restore Center > Export data/configurations to a local file in the Backup Center screen, you will be asked to specify the packages to export. Before the Backup Center dialog box appears, you will be prompted to enter the root password.
Table: List of Appliance Specific Services
Services
Description
Appliance
Specific
ESA
DSG
Appliance OS Configuration
Export the OS configuration (networking, passwords, and
others) but not the security modules data.
Note
In the OS
configuration, the certificates component is classified as
follows:
Certificates that include
Consul-related certificates, Insight certificates, and
certificates of the Protegrity products installed on the
appliance. Ensure that this option is not selected if the configurations must be imported on a different system in the cluster.
Management and Web Service
Certificates that are used by the Management and
Web Services engine for authenticating client and server.
✓
✓
Directory Server And Settings
Export the local directory server and authentication
settings.
✓
✓
Export Consul Configuration and Data
Export Consul configuration and data
✓
✓
Backup Policy-Management *2
Export policy management configurations and data, such
as, policies, data stores, data elements, roles, certificates,
keys, logs, Key Store-specific files and certificates among others
to a file.
Export policy management configurations and data, such
as, policies, data stores, data elements, roles, certificates,
keys, logs, Key Store-specific files and certificates among others
to a specific cluster node for a Trusted Appliances
Cluster.
Note
It is recommended to use this option with
cluster export only.
✓
Backup Policy-Management Trusted Appliances Cluster
without Key Store*1
Export policy management configurations and data, such
as, policies, data stores, data elements, roles, certificates,
keys, logs among others, but excluding the Key Store-specific
files and certificates to a specific cluster node for a Trusted
Appliances Cluster.
Note
This option excludes the backup of
the Key Store-specific files and certificates.
It is
recommended to use this option with cluster export
only.
✓
Policy Manager Web UI Settings
Export the Policy Management Web UI settings that
includes the Delete permissions specified for
content and audit logs.
✓
Export All PEP Server Configuration, Logs, Keys,
Certs
Export the data (.db files, license, token elements,
etc.), configuration files, keys, certificates and log
files.
✓
Export PEP Server Configuration Files
Export all PEP Server configuration files
(.cfg).
✓
Export PEP Server Log Files
Export PEP Server log files (.log and .dat).
✓
Export PEP Server Key and Certificate Files
Export PEP Server Key and Certificate files (.bin, .crt,
and .key).
✓
Export PEP Server Data Files
Export all PEP Server data files (.db), license, token
elements and log counter files.
✓
Application Protector Web Service
Export Application Protector Web Service configuration
files.
Export Storage and Share Configuration Files
Export all configuration files including NFS, CIFS, FTP,
iSCSI, Webdav.
*1 Ensure that only one backup-related option is selected among the options Backup Policy-Management, Backup Policy-Management Trusted Appliances Cluster, and Backup Policy-Management Trusted Appliances Cluster without Key Store. The Backup Policy-Management option must be used to back up the data to a file. In this case, this backup file is used to restore the data to the same machine, at a later point in time.
*2The Backup Policy-Management Trusted Appliances Cluster option must be used to replicate the data to a specific cluster node in the Trusted Appliances Cluster (TAC). This option excludes the backup of the metering data. It is recommended to use this option with cluster export only.
If you want to exclude the Key Store-specific files during the TAC replication, then the Backup Policy-Management Trusted Appliances Cluster without Key Store option must be used to replicate the data. Doing this excludes the Key Store-specific files and certificates, to a specific cluster node in the TAC.
This option excludes the backup of the metering data and the Key Store-specific files and certificates.
It is recommended to use this option with cluster export only.
For more information about the Backup Policy-Management Trusted Appliances Cluster option or the Backup Policy-Management Trusted Appliances Cluster without Key Store option, refer to the section ** TAC Replication of Key Store-specific Files and Certificates** in the Protegrity Key Management Guide 9.1.0.0.
If the OS configuration export is selected, then only the network setting and passwords, among others, are exported. The data and configuration of the security modules are not included. This data is mainly used for replication or recovery.
Before you import the data, note the OS and network settings of the target machine. Ensure that you do not import the saved OS and network settings to the target machine as this creates two machines with the same IP address in your network.
If you need to import all appliance configuration and settings, then perform a full restore for the system configuration. The following will be imported:
OS configuration and network
SSH and certificates
Firewall
Services status
Authentication settings
File Integrity Monitor Policy and settings
To export data configurations to a local file:
Login to the CLI Manager.
Navigate to Administration > Backup/Restore Center.
Enter the root password and select OK.
The Backup Center dialog box appears.
From the menu, select the Export data/configurations to a local file option.
Select the packages to export and select OK.
In the Export Name field, enter the required export name.
In the Password field, enter the password for the backup file.
In the Confirm field, re-enter the specified password.
If required, then enter description for the file.
Select OK.
You can optionally save the logs for the export operation when the export is done:
Click the More Details button.
The export operation log will display.
Click the Save button to save the export log.
In the following dialog box, enter the export log file name.
Click OK.
Click Done to exit the More Details screen.
The newly created configuration file will be saved into /products/exports. It can be accessed from the CLI Manager, the Exported Files and Logs menu, or the Import tab available in the Backup/Restore page, available in the Web UI. The export log file can be accessed from the CLI Manager, the Exported Files and Logs menu, or the Log Files tab available in the Backup/Restore page, available in the Web UI.
Exporting Data/Configuration to Remote Appliance
You can export backup configurations to a remote appliance.
Important : When assigning a role to the user, ensure that the Can Create JWT Token permission is assigned to the role.If the Can Create JWT Token permission is unassigned to the role of the required user, then exporting data/configuration to a remote appliance fails.To verify the Can Create JWT Token permission, from the ESA Web UI navigate to Settings > Users > Roles.
Follow the steps in this scenario for a successful export of the backup configuration:
Login to the CLI Manager.
Navigate to Administration > Backup/Restore Center.
Enter the root password and select OK.
The Backup Center dialog box appears.
From the menu, select the Export data/configurations to a remote appliance(s) option and select OK.
From the Select file/configuration to export dialog box, select Current (Active) Appliance Configuration package to export and select OK.
In the following dialog box, select the packages to export and select OK.
Enter the password for this backup file.
Select the Import method.
For more information on each import method, select Help.
Type the IP address or hostname for the destination appliance.
Type the admin user credentials of the remote appliance and select Add.
In the information dialog box, press OK.
The Backup Center screen appears.
Exporting Appliance OS Configuration
When you import the appliance core configuration from the other appliance, the second machine will receive all network settings, such as, IP address, and default gateway, among others.
You should not import all network settings to another machine since it will create two machines with the same IP in your network. It is recommended to restart the appliance after receiving an appliance core configuration backup.
This item shows up only when exporting to a file.
Importing Data/Configurations from a File
You can import (restore) data from a file if you need to restore a specific configuration that you have previously saved. When you import files or configurations, ensure that each component is selected individually. During data configurations import, you are asked to enter the file password set during the backup file creation. Export and import Insight certificates on the same ESA. If the configurations must be imported on a different ESA, then do not import Certificates. For copying Insight certificates across systems, refer to Rotating Insight certificates.
To import data configurations from file:
Login to the CLI Manager.
Navigate to Administration > Backup/Restore Center.
Enter the root password and select OK.
The Backup Center dialog box appears.
From the menu, select the Import data/configurations from a file option and select OK.
In the following dialog box, select a file from the list which will be used for the configuration import.
Select OK.
In the following dialog box, enter the password for this backup file.
Select Import method.
Select OK.
In the information dialog box, select OK.
The Import Operation Has Been Completed Successfully message appears.
Consider a scenario when importing a policy management backup that includes the external Key Store data. If the external Key Store is not working, then the HubController service does not start post the restore process.
Select Done.
The Backup Center screen appears.
Reviewing Exported Files and Logs
You can review the exported files and logs.
To review exported files and logs:
Login to the CLI Manager.
Navigate to Administration > Backup/Restore Center.
Enter the root password and select OK.
The Backup Center dialog box appears.
From the menu, select the Exported Files and Logs option.
In the Exported Files and Logs dialog box, select Main Logfile to view the logs.
Select Review.
To view the Operation Logs or Exported Files, select it from the list of available exported files.
Select Review.
Select Back to return to the Backup Center dialog box.
Deleting Exported Files and Logs
To delete exported files and logs:
Login to the CLI Manager.
Navigate to Administration > Backup/Restore Center.
Enter the root password and select OK.
The Backup Center dialog box appears.
From the menu, select the Exported Files and Logs option.
In the Exported Files and Logs dialog box, select the Operation Logs and Exported Files.
Select Delete.
To confirm the deletion, select Yes.
Alternatively, to cancel the deletion, select No.
Backing Up/Restoring Local Backup Partition
The backup is created on the second partition of the local machine.
Thus, for example, if you make an OS full backup in the PVM mode (both Appliance and Xen Server are set to PVM), enable HVM mode, and then reboot the Appliance, you will not be able to boot the system in system-restore mode.
XEN Virtualization
If you are using virtualization, and have backed up the OS in HVM/PVM mode, then you can to restore only in the mode you backed it up (refer here).
Backing up Appliance OS from CLI
It is recommended to perform the full OS back up before any important system changes, such as appliance upgrade or creating a cluster, among others.
To back up the appliance OS from CLI Manager:
Login to the Appliance CLI Manager.
Proceed to Administration > Backup/Restore Center.
The Backup Center screen appears.
Select Backup all to a local backup-partition.
The following screen appears.
Select OK.
The Backup Center screen appears and the OS backup process is initiated.
Login to the Appliance Web UI.
Navigate to Dashboard.
The following message appears after the OS backup completes.
CAUTION: The Restore from backup-partition option appears in the Backup Center screen, after the OS backup is complete.
Restoring Appliance OS from Backup
While performing the OS restore operation, ensure that only console is used. This operation must not be performed using the CLI Manager.
To restore the appliance OS from backup:
Login to the Appliance CLI Manager.
Navigate to the Administration > Reboot and Shutdown > Reboot.
The Reboot screen appears.
Enter the reason and select OK.
Enter the root password and select OK.
The appliance reboots and the following screen appears.
This screen has a timeout of 10 seconds. If no action is performed on this screen, then the system restarts in Normal mode and the System-Restore does not happen.
Select System-Restore.
The Welcome to System Restore Mode screen appears.
Select Initiate OS-Restore Procedure.
The OS restore procedure is initiated.
4.4.5 - Setting Up the Email Server
You can set up an email server that supports the notification features in Protegrity Reports. The Protegrity Appliance Email Setup tool guides you through the setup.
Keep the following information available before the setup process:
SMTP server details.
SMTP user credentials.
Contact email account: This email address is used by the Appliance to send user notifications.
Remember to save the email settings before you exit the Email Setup tool.
To set up the Email Server:
Login to the ESA CLI Manager.
Navigate to Administration > Email (SMTP) Settings.
The Protegrity Appliance Email Setup wizard appears.
Enter the root password and select OK.
The Protegrity Appliance Email Setup screen appears.
Select OK to continue. You can select Cancel to skip the Email Setup.
In the SMTP Server Address field, type the address to the SMTP server and the port number that the mail server uses.
For SMTP Server, the default port is 25.
In the SMTP Username field, enter the name of the user in the mail server.
Protegrity Reporting requires a full email address in the Username.
In the SMTP Password and Confirm Password fields, enter the password of the mail server user. SMTP Username/Password settings are optional. If your SMTP does not require authentication, then you can leave these fields empty.
In the Contact address field, enter the email recipient address.
In the Host identification field, enter the name of the computer hosting the mail server.
Select OK.
The tool tests the connectivity and the Secured SMTP screen appears.
Specify the encryption method. Select StartTLS or disable encryption. SSL/TLS is not supported.
Click OK.
In the SMTP Settings screen that appears, you can:
To…
Follow these steps…
Send a test email
Select Test.
At the prompt, type the recipient email
address.
Select OK.
A dialog box
appears.
To view diagnostics while testing, follow these
steps:
Select Yes.
A running
status appears until the process completes.
At the prompt, press ENTER.
A message
box appears.
Select OK to return to
the email tool.
To test without diagnostics, follow these steps:
Select No.
A message
box appears when the process completes.
Select OK to return to
the email tool.
Save the settings
Select Save.
A message box
appears.
Select EXIT.
The Tools screen
appears.
Change the settings
Select Reconfigure. The
SMTP Configuration screen
appears.
Exit the tool without saving
Select Cancel.
At the prompt, select
Yes.
The
Tools screen appears.
4.4.6 - Working with Azure AD
Azure Active Directory (Azure AD) is a cloud-based identity and access management service. It allows access to external (Azure portal) and internal resources (corporate appliances). Azure AD manages your cloud and on-premise applications and protects user identities and credentials.
When you subscribe to Azure AD, it automatically creates an Azure AD tenant. After the Azure AD tenant is created, register your application in the App Registrations module. This acts like an end-point for the appliance to connect to the tenant.
Using the Azure AD configuration tool, you can:
Enable the Azure AD Authentication and manage user access to the ESA.
Import the required users or groups to the ESA, and assign specific roles to them.
4.4.6.1 - Configuring Azure AD Settings
Before configuring Azure AD Settings on the ESA, you must have the following values that are required to connect the ESA with the Azure AD:
Tenant ID
Client ID
Client Secret or Thumbprint
For more information about the Tenant ID, Client ID, Authentication Type, and Client Secret/Thumbprint, search for the text Register an app with Azure Active Directory on Microsoft’s Technical Documentation site at:
https://learn.microsoft.com/en-us/docs/
The following are the list of the API permissions that must be granted.
Group.Read.All
GroupMember.Read.All
User.Read
User.Read.All
To assign API permissions in Microsoft Azure, contact your Microsoft Azure administrator.
Ensure that the Allow public client flows setting is Enabled. To enable the Allow public client flows setting, navigate to Authentication > Advanced settings, click the toggle button, and select Yes.
To configure Azure AD settings:
On the ESA CLI Manager, navigate to Administration > Azure AD Configuration.
Enter the root password.
The Azure AD Configuration dialog box appears.
Select Configure Azure AD Settings.
The Azure AD Configuration screen appears.
Enter the information for the following fields.
Table: Azure AD Settings
Setting
Description
Set Tenant ID
Unique identifier of the Azure AD instance
Set Client ID
Unique identifier of an application created in Azure
AD
Set Auth Type
Select one of the Auth Type:
SECRET indicates a
password-based authentication. In this authentication
type, the secrets are symmetric keys, which the client
and the server must know.
CERT indicates a
certificate-based authentication. In this authentication
type, the certificates are the private keys, which the
client uses. The server validates this certificate using
the public key.
Set Client Secret/Thumbprint
The client secret/thumbprint is the password of the
Azure AD application.
If the Auth Type selected is
SECRET, then enter
Client Secret.
If the Auth type selected is
CERT, then enter Client
Thumbprint.
Disable Password Login
Enable or disable password-based login for Azure AD Users. Select the Disable Password Login. The Disable Password Login screen appears.
Select Yes to disable password based logins for Azure AD users.
Select No to retain the password based login enabled for Azure AD users.
For more information about the Tenant ID, Client ID, Authentication Type, and Client Secret/Thumbprint, search for the text Register an app with Azure Active Directory on Microsoft’s Technical Documentation site at: https://learn.microsoft.com/en-us/docs/
Click Test to check the configuration/settings.
The message Successfully Done appears.
Click OK.
Click Apply to apply and save the changes.
The message Configuration saved successfully appears.
Click OK.
4.4.6.2 - Enabling/Disabling Azure AD
Using the Enable/Disable Azure AD option, you can enable or disable the Azure AD settings. You can import users or groups and assign roles when you enable the Azure AD settings.
4.4.7 - Accessing REST API Resources
User authentication is the process of identifying someone who wants to gain access to a resource. A server contains protected resources that are only accessible to authorized users. When you want to access any resource on the server, the server uses different authentication mechanism to confirm your identity.
There are different mechanisms for authenticating and authorizing users in a system. In the ESA, REST API services are only accessible to authorized users. You can authorize or authenticate users using one of the following authentication mechanisms:
Basic Authentication with username and password
Client Certificates
Tokens
4.4.7.1 - Using Basic Authentication
In the Basic Authentication mechanism, you provide only the user credentials to access protected resources on the server. You provide the user credentials in an authorization header to the server. If the credentials are accurate, then the server provides the required response to access the APIs.
If you want to access the REST API services on ESA, then the IP address of ESA with the username and password must be provided. The ESA matches the credentials with the LDAP or AD. On successful authentication, the roles of the users are verified. The following conditions are checked:
If the role of the user is Security Officer, then the user can run GET, POST, and DELETE operations on the REST APIs.
If the role of the user is Security Viewer, then the user can only run GET operation on the REST APIs.
When the Basic Authentication is disabled, then a list of APIs are affected.
For more information about the list of APIs, refer here.
The following Curl snippet provides an example to access an API on ESA.
curl -i -X <METHOD> "https://<ESA IP address>:8443/<path of the API>" -d "loginname=<username>&password=<password>"
This command uses an SSL connection. If the server certificates are not configured on ESA, you can append --insecure to the curl command.
For example,
curl -i -X <METHOD> "https://<ESA IP address>:8443/<path of the API>" -d "loginname=<username>&password=<password>" --insecure
You must provide the username and password every time you access the REST APIs on ESA.
4.4.7.2 - Using Client Certificates
The Client Certificate authentication mechanism is a secure way of accessing protected resources on a server. In the authorization header, you provide the details of the client certificate. The server verifies the certificate and allows you to access the resources. When you use certificates as an authentication mechanism, then the user credentials are not stored in any location.
Note: As a security feature, it is recommended to use the client certificates that are protected with a passphrase.
On ESA, the Client Certificate authentication includes the following steps:
In the authorization header, you must provide the details, such as, client certificate, client key, and CA certificate.
The ESA retrieves the name of the user from the client certificate and authenticates it with the LDAP or AD.
After authenticating the user, the role of that user is validated:
If the role of the user is Security Officer, then the user can run read and write operations on the REST APIs.
If the role of the user is Security Viewer, then the user can only run read operations on the REST APIs.
On successful authentication, you can utilize the API services.
The following Curl snippet provides an example to access an API on ESA.
curl -k https://<ESA IP Address>/<path of the API> -X <METHOD> --key <client.key> --cert <client.pem> --cacert <CA.pem> -v --insecure
You must provide your certificate every time you access the REST APIs on ESA.
4.4.7.3 - Working with JSON Web Token (JWT)
Tokens are reliable and secure mechanisms for authorizing and authenticating users. They are stateless objects created by a server that contain information to identify a user. Using a token, you can gain access to the server without having to provide the credentials for every resource. You request a token from the server by providing valid user credentials. On successive requests to the server, you provide the token as a source of authentication instead of providing the user credentials.
There are different mechanisms for authenticating and authorizing users using tokens. Authentication using JSON Web Tokens (JWT) is one of them. The JWT is an open standard that defines a secure way of transmitting data between two entities as JSON objects.
One of the common uses of JWT is as an API authentication mechanism that allows you to access the protected API resources on your server. You present the JWT generated from the server to access the protected APIs. The JWT is signed using a secret key. Using this secret key, the server verifies the token provided by the client. Any modification to the JWT results in an authentication failure. The information about tokens is not stored on the server.
Only a privileged user can create a JWT. To create a token, ensure that the Can Create JWT Token permission/privilege is assigned to the user role.
The JWT consists of the following three parts:
Header: The header contains the type of token and the signing algorithm, such as, HS512, HS384, or HS256.
Payload: The payload contains the information about the user and additional data.
Signature: Using a secret key, you create the signature to sign the encoded header and payload.
The header and payload are encoded using the Base64Url encoding. The following is the format of JWT:
<encoded header>.<encoded payload>.<signature>
4.4.7.3.1 - Using JWT
Implementing JWT
On Protegrity appliances, you must have the required authorization to access the REST API services. The following figure illustrates the flow of JWT on the appliances.
As shown in the figure, login with your credentials to access the API. The credentials are validated against a local or external LDAP. A verification is performed to check the API access for the username. After the credentials are validated, a JWT is created and sent to the user as an authentication mechanism. Using JWT, information can be verified and trusted as it is digitally signed. The JWTs can be signed using a secret with the HMAC algorithm or a private key pair using RSA. After you successfully login using your credentials, a JWT is returned from the server. When you want to access a protected resource on the server, you must send the JWT with the request in the headers.
Working with the Secret Key
The JWT is signed using a private secret key and sent to the client to ensure message is not changed during transmission. The secret key encodes that token sent to the client. The secret key is only known to the server for generating new tokens. The client presents the token to access the APIs on the server. Using the secret key, the server validates the token received by the client.
The secret key is generated when you install or upgrade your appliance. You can change the secret key from the CLI Manager. This secret key is stored in the appliance in a scrambled form.
For more information about setting the secret key, refer to section Configuring JWT
For appliances in a TAC, the secret key is shared between appliances in the cluster. Using the export-import process for a TAC, secret keys are exported and imported between the appliances.
If you want to export the JWT configuration to a file or another machine, ensure to select the Appliance OS Configuration option, on the Export screen. Similarly, if you want to import the JWT configurations between appliances in a cluster, from the Cluster Export Wizard screen, select the Appliances JWT Configuration check box, under Appliance OS Configuration.
For example, consider ESA 1 and ESA 2 in a TAC setup.
JWT is created on ESA 1 for client application using a secret key.
ESA 1 and ESA 2 are added to TAC. The secret key of ESA 1 is shared with ESA 2.
Client application requests API access from ESA 1. A JWT is generated and shared with the client application. The client accesses the APIs available in ESA 1.
To access the APIs of ESA 2, the same token generated by ESA1 is applicable for authentication.
Configuring JWT
You can configure the encoding algorithm, secret key, and JWT token expiry.
To configure the JWT settings:
On the CLI Manager, navigate to Administration > JWT Configuration.
A screen to enter the root credentials appears.
Enter the root credentials and select OK.
The JWT Settings screen appears.
Select Set JWT Algorithm to set the algorithm for validating a token.
The Set JWT Algorithm screen appears.
Select the one of the following algorithms:
HS512
HS384
HS256
Select OK.
Select Set JWT Secret to set the secret key.
The Set JWT Secret screen appears.
Enter the secret key in the New Secret and Confirm Secret fields.
Select OK.
Select Set Token Expiry to set the token expiry period.
In the Set Token Expiry field, enter the token expiry value and select OK.
Select Set Token Expiry Unit to set the unit for token expiry value.
Select second(s), minute(s), hour(s), day(s), week(s), month(s), or year(s) option and select OK.
Select Done.
Refreshing JWT
Tokens are valid for a certain period. When a token expires, you must request a new token by providing the user credentials. Instead of providing your credentials on every request, you can extend your access to the server resources by refreshing the token.
In the refresh token process, you request a new token from the server by presenting your current token instead of the username and password. The server checks the validity of the token to ensure that the current token is not expired. After the validity check is performed, a new token is issued to you for accessing the API resources.
In the Protegrity appliances, you can refresh the token by executing the REST API for token refresh.
4.4.7.3.2 - Generating JWT for REST APIs
This section provides reference information about the REST API that is used to generate JWT.
Base URL
https://{Appliance IP address}/api/v1/auth
In the base URL, Appliance IP address specifies the IP address of the specified ESA or DSG.
Path
/login/token
Method
POST
Request Body Parameters
The Request Body Parameters are used to authenticate the APIs.
Parameter
Description
Data Type
Mandatory / Optional
loginname
Specify the name of the user that has access to generate JWT
String
Mandatory
password
Specify the password of the user
String
Mandatory
Request
POST https://<Appliance IP address>/api/v1/auth/login/token
Response Definitions (Response Schema or Response Model)
Response Item
Description
Data Type
status
Status of creation of the API requests
Boolean
messages
Response messages from API, such as, error messages, warnings, or information text
List
data
Data returned by API requests
Response Headers
The generated token is available in the PTY_ACCESS_JWT_TOKEN field.
Exception
None
Sample Request
curl -X POST https://<Applaince IP address>/api/v1/auth/login/token -d "loginname=<username>&password=<password>"
Sample Response
{
"status": 0,
"messages": [],
"data": null
}
4.4.7.3.3 - Refreshing JWT for REST APIs
This section provides reference information about the REST API that is used to refresh JWT.
Base URL
https://{Appliance IP address}/api/v1/auth
In the base URL, Appliance IP address specifies the IP address of the specified ESA or DSG.
Path
/login/token/refresh
Method
POST
Request Body Parameters
None
Request
POST https://<Appliance IP address>/api/v1/auth/login/token/refresh
Request Header
Key Name: Authorization
Value:Bearer <token>
Response
HTTP Status Code
Sample Response
Description
200 OK
{"status": 0,"messages": [],"data": null}
The token is refreshed
401 Unauthorized
Invalid Token
403 Forbidden
User does not have privilege to refresh JWT
Response Definitions (Response Schema or Response Model)
Response Item
Description
Data Type
status
Status of creation of the API requests
Boolean
messages
Response messages from API, such as, error messages, warnings, or information text
List
data
Data returned by API requests
Response Header
The refreshed token is available in the PTY_ACCESS_JWT_TOKEN field.
Exception
None
Sample Request
curl -X POST https://<Appliance IP address>/api/v1/auth/login/token/refresh -H 'Authorization: Bearer <token>'
Sample Response
{
"status": 0,
"messages": [],
"data": null
}
4.4.8 - Securing the GRand Unified Bootloader
When a system is powered on, it goes through a boot process before loading the operating system, where an initial set of operations are performed for the system to function normally. The boot process consists of different stages, such as, checking the system hardware, initializing the devices, and loading the operating system.
When the system is powered on, the BIOS performs the Power-On Self-Test (POST) process to initialize the hardware devices attached to the system. It then executes the Master Boot Record (MBR) that contains information about the disks and partitions. The MBR then executes the GRand Unified Bootloader (GRUB).
The GRUB is an operation that identifies the file systems and loads boot images. The GRUB then passes control to the kernel for loading the operating system. The entries in the GRUB menu can be edited by pressing e or c to access the GRUB command-line. Some of the entries that you can modify using the GRUB are listed below:
Loading kernel images.
Switching kernel images.
Logging into single user mode.
Recovering root password.
Setting default boot entries.
Initiating boot sequences.
Viewing devices and partition, and so on.
In the Protegrity appliances, GRUB version 2 (GRUB 2) is used for loading the kernel. If the GRUB menu settings are modified by an unauthorized user with malicious intent, it can induce threat to the system. Additionally, as per CIS Benchmark, it is recommended to secure the boot settings. Thus, to enhance security of the Protegrity appliances, the GRUB menu can be protected by setting a username and password.
This feature available only for on-premise installations.
It is recommended to reset the credentials at regular intervals to secure the system.
The following sections describe about setting user credentials for accessing the GRUB menu on the appliance.
4.4.8.1 - Enabling the Credentials for the GRUB Menu
You can set a username and password for the GRUB menu from the ESA CLI Manager.
The user created for the GRUB menu is neither a policy user nor an ESA user.
Note: It is recommended you ensure a backup of the system has completed before performing the following operation.
To enable access to GRUB menu:
Login to the ESA CLI manager as an administrative user.
Navigate to Administration > GRUB Credentials Settings.
The screen to enter the root credentials appears.
Enter the root credentials and select OK.
The screen to Grub Credentials screen appears.
Select Enable and press ENTER.
The following screen appears.
Enter a username in the Username text box.
The requirements for the Username are as follows:
It should contain a minimum of three and maximum of 16 characters
It should not contain numbers and special characters
Enter a password in the Password and Re-type Password text boxes.
The requirements for the Password are as follows:
It must contain at least eight characters
It must contain a combination of alphabets, numbers, and printable characters
Select OK and press ENTER.
A message Credentials for the GRUB menu has been set successfully appears.
Restart the system.
The following screen appears.
Press e or c.
The screen to enter the credentials appears.
Enter the credentials provided in steps 4 and 5 to modify the GRUB menu.
4.4.8.2 - Disabling the GRUB Credentials
You can disable the username and password that is set for accessing the GRUB menu. When you disable access to the GRUB, then the username and password that are set get deleted. You must enable the GRUB Credentials Settings option and set new credentials to secure the GRUB again.
To disable access to the GRUB menu:
Login to the ESA CLI Manager as an administrative user.
Navigate to Administration > GRUB Credentials Settings.
The screen to enter the root credentials appears.
Enter the root credentials and select OK.
The GRUB credentials screen appears.
Select Disable and press ENTER.
A message Credentials for the GRUB menu has been disabled appears.
4.4.9 - Working with Installations and Patches
Using the Installations and Patches menu, you can install or uninstall products. You can also view and manage patches from this menu.
4.4.9.1 - Add/Remove Services
Using Add/Remove Services tool, you can install the necessary products or remove already installed ones, such as, Consul, Cloud-utility product, among others.
To install services:
Login to the ESA CLI Manager.
Navigate to Administration > Installations and Patches > Add/Remove Services.
Enter the root password to execute the install operation and select OK.
Select Install applications and select OK.
Select products to install and select OK.
If a new product is selected, the installation process starts.
If the product is already installed, then refer to step 6.
Select an already installed product to upgrade, uninstall, or reinstall, and select OK.
The Package is already installed screen appears. This step is not applicable for the DSG appliance.
Select any one of the following options:
Option
Description
Upgrade
Installs a newer version of the selected product.
Uninstall
Removes the selected product.
Reinstall
Removes and installs the product again.
Cancel
Returns to the Administration menu.
Select OK.
4.4.9.2 - Uninstalling Products
To uninstall products:
Login the ESA CLI Manager.
Proceed to Administration > Installations and Patches > Add or Remove Services.
Enter the root password to execute the uninstall operation and select OK.
Select Remove already installed applications and select OK.
The Select products to uninstall screen appears.
Select the necessary products to uninstall and select OK.
The selected products are uninstalled.
4.4.9.3 - Managing Patches
You can install and manage your patches from the Patch Management screen.
It allows you to perform the following tasks.
Option
Description
List installed patches
Displays the list of all the patches which are installed in the system.
Install a patch
Allows you to install the patches.
Display Log
Displays the list of logs for the patches.
Installing a Patch and Viewing Patch Information
To install a patch and view patch information:
Log in to the ESA CLI Manager.
Navigate to Administration > Patch Management.
Enter the root password and select OK.
The Patch Management screen appears.
Select Install a patch and select OK.
The Install Patch screen appears.
Select the required patch and select one of the following options to perform the corresponding operation.
Option
Description
More Info
Displays the information for the selected patch.
Install
Installs the selected patch.
4.4.10 - Managing LDAP
LDAP is an open industry standard application protocol that is used to access and manage directory information over IP. You can consider it as a central repository of username and passwords, thus providing applications and services the flexibility to validate users by connecting with the LDAP.
The security system of the Appliance distinguishes between two types of users:
End users with specific access or no access to sensitive data. These users are managed through the User Management screen in the Web UI. For more information about user management, refer here.
Administrative users who manage the security policies, for example, “Admin” users who grant or deny access to end users.
In this section, the focus is on managing administrative users. The Administrative users connect to the management interfaces in Web UI or CLI, while the end users connect to the specific security modules they have been allowed access to. For example, a database table may need to be accessed by the end users, while the security policies for access to the table are specified by the Administrative users.
LDAP Tools available in the Administration menu include three tools explained in the following table.
Tool
Description
Specify LDAP Server
Reconfigure all client-side components to use a specific LDAP. To authenticate users, the data security platform supports three modes for integration with directory services: Protegrity LDAP Server, Proxy Authentication, and Local LDAP Server. - Protegrity LDAP: In this mode, all administrative operations such as policy management, key management, etc. are handled by users that are part of the Protegrity LDAP. This mode can be used to configure or authenticate with either local or remote appliance product. - Proxy Authentication: In this mode, you can import users from an external LDAP to ESA. ESA is responsible for authorization of users, while the external LDAP is responsible for authentication of users. - Reset LDAP Server Settings: In this mode, an administrative user can reset the configuration to the default configuration using admin credentials.
Configure Local LDAP settings
Configure your LDAP to be accessed from the other machines.
Local LDAP Monitor
Examine how many LDAP operations per second are running.
4.4.10.1 - Working with the Protegrity LDAP Server
Every appliance includes an internal directory service. This service can be utilized by other appliances for user authentication.
For example, a DSG instance might utilize the ESA LDAP for user authentication. In such cases, you can configure the LDAP settings of the DSG in the Protegrity LDAP Server screen. In this screen, you can specify the IP address of the ESA with which you want to connect.
You can add IP addresses of multiple appliances to enable fault tolerance. In this case, if connection to the first appliance fails, connection is transferred to next appliance in the list.
If you are adding multiple appliances in the LDAP URI, ensure that the values of the Bind DN, Bind Password, and Base DN is same for all the appliances in the list.
To specify Protegrity LDAP server:
Login to the Appliance CLI Manager.
Navigate to Administration > Specify LDAP Server.
Enter the root password and select OK.
In the LDAP Server Type screen, select Protegrity LDAP Server and select OK.
The following screen appears.
Enter information for the following fields.
Table 1. LDAP Server Settings
Setting
Description
LDAP URI
Specify the IP address of the LDAP server you want to
connect to in the following format.
ldap://host:port. You can configure to
connect Protegrity Appliance LDAP. For
example,
ldap://192.168.3.179:389.
For
local LDAP, enter the following IP address:
ldap://127.0.0.1:389.
If you
specify multiple appliances, ensure that the IP addresses
are separated by the space character.
For
example,ldap://192.1.1.1 ldap://10.1.0.0
ldap://127.0.0.1:389
Base DN
The LDAP Server Base distinguished name.
For
example: ESA LDAP Base DN:
dc=esa,dc=protegrity,dc=com.
Group DN
Distinguished name of the LDAP Server group
container.
For example: ESA LDAP Group
DN:
ou=groups,dc=esa,dc=protegrity,dc=com.
Users DN
Distinguished name of the user container.
For
example: ESA LDAP Users
DN:
ou=people,dc=esa,dc=protegrity,dc=com.
Bind DN
Distinguished name of the LDAP Bind User.
For
example: ESA LDAP Bind User DN cn=admin, ou=people, dc=esa,
dc=protegrity, dc=com.
Bind Password
The password of the specified LDAP Bind User.
If
you modify the bind user password, ensure that you use the
Specify LDAP Server tool to update the changes in the
internal LDAP.
Bind User
The bind user account
password allows you to specify the user credentials used for
LDAP communication. This user should have full read access
to the LDAP entries in order to obtain
accounts/groups/permissions.
If you are using the
internal LDAP, and you change the bind username/password,
using Change a directory account option, then you must
update the actual LDAP user. Make sure that a user with the
specified username/password exists. Run Specify LDAP Server
tool with the new password to update all the products with
the new password. Refer to section Protegrity LDAP Server for details.
Click Test to test the connection.
If the connection is established, then a Successfully Done message appears.
4.4.10.2 - Changing the Bind User Password
The following section describe the steps to change the password for the ldap_bind_user using the CLI manager.
To change the ldap_bind_user password:
Login to the ESA CLI Manager.
Navigate to Administration > Specify LDAP server/s.
Enter the root password and select OK.
Select Reset LDAP Server settings and select OK.
The following screen appears.
Enter the admin username and password and select OK.
The following screen appears.
Select OK.
The following screen appears.
Select Manually enter a new password and select OK.
The following screen appears.
Enter the new password, confirm it, and select OK.
The following screen appears.
Select OK.
The password is successfully changed.
4.4.10.3 - Working with Proxy Authentication
Simple Authentication and Security Layer (SASL) is a framework that provides authentication and data security for Internet protocols. The data security layer offers data integrity and confidentiality services. It provides a structured interface between protocols and authentication mechanisms.
SASL enables ESA to separate authentication and authorization of users. The implementation is such that when users are imported, a user with the same name is recreated in the internal LDAP. When the user accesses the data security platform, ESA authorizes the user and communicates with the external LDAP for authenticating the user. This implementation ensures that organizations are not forced to modify their LDAP configuration to accommodate the data security platform. SASL is referred to as Proxy authentication in ESA CLI and Web UI.
To enable proxy authentication:
Login to the Appliance CLI Manager.
Navigate to Administration > LDAP Tools > Specify LDAP Server.
Enter the root password and select OK.
Select Set Proxy Authentication.
Specify the LDAP Server settings for proxy authentication with the external LDAP as shown in the following figure.
For more information about the LDAP settings, refer to Proxy Authentication Settings.
Select Test to test the settings provided. Select Test to test the settings provided. When Test is selected, ESA verifies if the connection to the external LDAP works, as per the Proxy Authentication settings provided.
The Bind Password is required when Bind DN is provided message appears.
Select OK.
Enter the LDAP user name and password provided as the bind user.
You can provide username and password of any other user from the LDAP as long as the LDAP Filter field exists in both the bind user name and any other user.
A Testing Proxy Authentication-Completed successfully message appears.
Select OK in the following message screen.
The following confirmation message appears.
Select Apply to apply the settings. In ESA CLI, only one user is allowed to be imported. This user is granted admin privileges, such that importing users and managing users can be performed by the user in the User Management screen. The User Management Web UI is used to import users from the external LDAP.
In the Select user to grant administrative privileges screen, select a user and confirm selection.
In the Setup administrator privileges screen, enter the ESA admin user name and password and select OK.
The following message appears.
Navigate to Administration > Services to verify that the Proxy Authentication Service is running.
4.4.10.4 - Configuring Local LDAP Settings
The local LDAP settings are enabled on port 389 by default.
To specify local LDAP server configuration:
Login to the ESA CLI Manager.
Navigate to Administration > Configure local LDAP settings.
Enter the root password and select OK.
The following screen appears.
In the LDAP listener IP address field, enter the LDAP listener IP address for local access. By default, it is 127.0.0.1.
In the LDAPS (SSL) listener IP address field, enter the LDAPS SSL listener IP address for remote access. It is 0.0.0.0 or a specific valid address for your remote LDAP directory.
Select OK.
4.4.10.5 - Monitoring Local LDAP
Local LDAP Monitor tool allows you to examine, in real time, how many LDAP operations per second are currently running, which is very useful to enhance the performance. You can use this tool to monitor the following tasks:
Check LDAP Connectivity for LDAP Bind and LDAP Search.
Modify or optimize LDAP cache, threading, and memory settings to improve performance and remove bottlenecks.
Measure “number of changes” and “last modified date and time” on the LDAP server, which can be useful, for example, for verifying export/import operations.
4.4.10.6 - Optimizing Local LDAP Settings
When the Local LDAP receives excessive requests, the requests are cached. However, if the the cache is overloaded, it causes the LDAP to become unresponsive. From v9.1.0.3, a standard set of values for the cache that is required for optimal handling of the LDAP requests is set in the system. After you upgrade to v9.1.0.3, you can tune the cache parameters for the Local LDAP configuration. The default values for the cache parameters is shown in the following list.
The slapd.conf file in the /etc/ldap directory contains the following cache values:
cachesize 10000 (10,000 entries)
idlcachesize 30000 (30,000 entries)
dbconfig set_cachesize 0 209715200 0 (200 MB)
The DB_CONFIG file in the /opt/ldap/db* directory contains the following the cache values:
set_cachesize 0 209715200 0 (200 MB)
Based on the setup and the environment in the organization, you can choose to increase the parameters.
Ensure that you back up the files before editing the parameters.
On the CLI Manager, navigate to Administration > OS Console.
Edit the values for the required parameters.
Restart the slapd service using the /etc/init.d/slapd restart command.
4.4.11 - Rebooting and Shutting down
You can reboot or shut down your appliance if necessary using Administration > Reboot and Shutdown. Make sure the Data Security Platform users are aware that the system is being rebooted or turned off and no important tasks are being performed at this time.
Cloud platforms and power off
For cloud platforms, it is recommended to shut down or power off the CLI Manager or Appliance Web UI. With cloud platforms, such as Azure, AWS, or GCP, the instances run the appliance.
4.4.12 - Accessing the OS Console
You can access OS console using Administration > OS Control. You require root user credentials to access the OS console.
If you have System Monitor settings enabled in the Preferences menu, then the OS console will display the System Monitor screen upon entering the OS console.
To enable the System Monitor setting:
Login to the ESA CLI Manager.
Navigate to Preferences.
Enter the root password and select OK.
The Preferences screen appears.
Select Show System-Monitor on OS-Console.
Press Select.
Select Yes and select OK.
Select Done.
4.5 - Working with Networking
Networking Management allows configuration of the ESA network settings such as, host name, default gateway, name servers, and so on. You can also configure SNMP settings, network bind services, and network firewall.
From the ESA CLI Manager, navigate to Networking to manage your network settings.
The following figure shows the Networking Management screen.
Option
Description
Network Settings
Customize the network configuration settings for your appliance.
SNMP Configuration
Allow a remote machine to query different performance status of the appliance, such as start the service, set listening address, show or set community string, or refresh the service.
Bind Services/ Addresses
Specify the network address or addresses for management and Web Services.
Network Troubleshooting Tools
Troubleshoot network and connectivity problems using the following Linux commands – Ping, TCPing, TraceRoute, MTR, TCPDump, SysLog, and Show MAC.
Network Firewall
Customize firewall rules for the network traffic.
4.5.1 - Configuring Network Settings
When this option is selected, network configuration details added during installation are displayed. The network connection for the appliance are displayed. You can modify the network configuration as per the requirements.
Changing Hostname
The hostname of the appliance can be changed.
In the hostname field, if special characters are to be used, then only hyphen (-) is supported.
To change the hostname:
Login to the Appliance CLI Manager.
Navigate to Networking > Network Settings.
Select Hostname and select Edit.
In the Set Hostname field, enter a new hostname.
Select OK.
The hostname is changed.
Configuring Management IP Address
You can configure the management IP address for your appliance from the networking screen.
To configure the management IP address:
Login to the Appliance CLI Manager.
Navigate to Networking > Network Settings.
Select Management IP and select Edit.
In the Enter IP field, enter the IP address for the management NIC.
In the Enter Netmask field, enter the subnet for the management NIC.
Select OK.
The management IP is configured.
Configuring Default Route
The default route is a setting that defines the packet forwarding rule for a specific route. This parameter is required only if the appliance is on a different subnet than the Web UI or for the NTP service connection. If necessary, then request the default gateway address from your network administrator and set this parameter accordingly.
The default route is a setting that defines the packet forwarding rule for a specific route. The default route is the first IP address of the subnet for the management interface.
To configure the default route:
Login to the Appliance CLI Manager.
Navigate to Networking > Network Settings.
Select Default Route and press Edit.
Enter the default route and select Apply.
Configuring Domain Name
You can configure the domain name for your appliance from the networking screen.
To configure the domain name:
Login to the Appliance CLI Manager.
Navigate to Networking > Network Settings.
Select Domain Name and select Edit.
In the Set Domain Name field, enter the domain name.
Select Apply.
The domain name is configured.
Configuring Search Domain
You can configure a domain name that is used as in the domain search list.
To configure the search domain:
Login to the Appliance CLI Manager.
Navigate to Networking > Network Settings.
Select Search Domains and select Edit.
In the Search Domains dialog box, select Edit.
In the Edit search domain field, enter the domain name and select OK.
Select Add to add another search domain.
Select Remove to remove a search domain.
Configuring Name Server
You can configure the IP addresses for your domain name.
To configure the domain IP address:
Login to the Appliance CLI Manager.
Navigate to Networking > Network Settings.
Select Name Servers and select Edit.
In the Domain Name Servers dialog box, select Edit to modify the server IP address.
Select Remove to delete the domain IP address.
Select Add to add another domain IP address.
In the Add new nameserver field, enter the domain IP address and select OK.
The IP address for the domain is configured.
Assigning a Default Gateway to the NIC
To assign a default gateway to the NIC:
Login to the Appliance CLI Manager.
Navigate to Networking > Network Settings.
Select Interfaces and select Edit.
The Network Interfaces dialog box appears.
Select the interface for which you want to add a default gateway.
Select Edit.
Select Gateway.
The Gateway Settings dialog box appears.
In the Set Default Gateway for Interface ethMNG field, enter the Gateway IP address and select Apply.
Selecting Management NIC
When you have multiple NICs, you can specify the NIC that functions as a management interface.
To select the management NIC:
Login to the Appliance CLI Manager.
Navigate to Networking > Network Settings.
Select Management interface and select Edit.
Select the required NIC.
Select Select.
The management NIC is changed.
Changing the Management IP on ethMNG
Follow these instructions to change the management IP on ethMNG. Be aware, changes to IP addresses are immediate. Any changes to the management IP, on ethMNG, while you are connected to CLI Manager or Web UI will cause the session to disconnect.
To change the management IP on ethMNG:
Login to the Appliance CLI Manager.
Navigate to Networking > Network Settings.
Select Interfaces and select Edit.
The Network Interfaces screen appears.
Select ethMNG and click Edit.
Select the network type and select Update.
In the Interface Settings dialog box, select Edit.
Enter the IP address and net mask.
Select OK.
At the prompt, press ENTER to confirm.
The IP address is updated, and the Address Management screen appears.
Identifying an Interface
To identify an interface:
Login to the Appliance CLI Manager.
Navigate to Networking > Network Settings.
Select Interfaces and select Edit.
The Network Interfaces screen appears.
Select the network interface and select Blink.
This causes an LED on the NIC to blink and the Network Interfaces screen appears.
Adding a service interface address
From ESA v9.0.0.0, the default IP addresses assigned to the docker interfaces are between 172.17.0.0/16 and 172.18.0.0/16. Ensure that the IP addresses assigned to the docker interface must not conflict with your organization’s private/internal IP addresses.
Navigate to the service interface to which you want to add an address and select Update.
Select Add.
At the prompt, type the IP address and the netmask.
Press ENTER.
The address is added, and the Address Management screen appears.
4.5.2 - Configuring SNMP
The Simple Network Management Protocol (SNMP) is used for monitoring appliances in a network. It consists of two entities, namely, an agent and a manager that work in a client-server mode. The manager performs the role of the server and agent acts as the client. Managers collect and process information about the network provided by the client. For more information about SNMP, refer to the following link.
In Protegrity appliances, you can use this protocol to query the performance figures of an appliance. Typically, the ESA acts as a manager that monitors other appliances or Linux systems on the network. In ESA, the SNMP can be used in the following two methods:
snmpd: The snmpd is an agent that waits for and responds to requests sent by the SNMP manager. The requests are processed, the necessary information is collected, the requested operation is performed, and the results are sent to the manager. You can run basic SNMP commands, such as, snmpstart, snmpget, snmpwalk, snmpsync, and so on. In a typical scenario, an ESA monitors and requests a status report from another appliance on the network, such as, DSG or ESA. By default, the snmpd requests are communicated over the UDP port 161.
In the Appliance CLI Manager, navigate to Networking > SNMP Configuration > Protegrity SNMPD Settings to configure the snmpd settings. The snmpd.conf file in the /etc/snmp directory contains the configuration settings of the SNMP service.
snmptrapd: The snmptrapd is a service that sends messages to the manager in the form of traps. The SNMP traps are alert messages that are configured in the manager in a way that an event occurring at the client immediately triggers a report to the manager. In a typical scenario, you can create a trap in ESA to cold-start a system on the network in case of a power issue. By default, the snmptrapd requests are sent over the UDP port 162. Unlike snmpd, in the snmptrapd service, the agent proactively sends reports to the manager based on the traps that are configured.
In the CLI Manager, navigate to Networking > SNMP Configuration > Protegrity SNMPTRAPD Settings to configure the snmptrapd settings. The snmptrapd.conf file in the /etc/snmp directory can be edited to configure SNMP traps on ESA.
The following table describes the different settings that you configure for snmpd and snmptrapd services.
Setting
Description
Applicable to SNMPD
Applicable to SNMPTRAPD
Notes
Managing service
Start, stop, or restart the service
✓
✓
Ensure that the SNMP service is
running. On the Web UI, navigate to System → Services tab to check the status of the service.
Set listening address
Set the port to accept SNMP requests
✓
✓
The default port for SNMPD is UDP
161
The default port for SNMPTRAPD is UDP
162
Note
You can change the listening address only
once.
Set DTLS/TLS listening port
Configure SNMP on DTLS over UDP or SNMP on TLS over
TCP
✓
The default listening port for SNMPD is set to
TCP 10161.
Set community string
String comprising of user id and password to access the
statistics of another device
✓
The SNMPv1 is used as default a protocol, but you can also configure SNMPv2 and SNMPv3 to monitor the status and collect information from network devices. The SNMPv3 protocol supports the following two security models:
User Security Model (USM)
Transport Security Model (TSM)
4.5.2.1 - Configuring SNMPv3 as a USM Model
Configuring SNMPv3 as a USM Model:
From the CLI manager navigate to Administration > OS Console.
The command prompt appears.
Perform the following steps to comment the rocommunity string.
Edit the snmpd.conf using a text editor.
/etc/snmp/snmpd.conf
Prepend a # to comment the rocommunity string.
Save the changes.
Run the following command to set the path for the snmpd.conf file.
exportdatarootdir=/usr/share
Stop the SNMP daemon using the following command:
/etc/init.d/snmpd stop
Add a user with read-only permissions using the following command:
net-snmp-create-v3-user -ro -A <authorization password> -a MD5 -X <authorization password> -x DES snmpuser
For example,
net-snmp-create-v3-user -ro -A snmpuser123 -a MD5 -X snmpuser123 -x DES snmpuser
Start the SNMP daemon using the following command:
/etc/init.d/snmpd start
Verify if SNMPv1 is disabled using the following command:
snmpwalk -v 1 -c public <hostname or IP address>
Verify if SNMPv3 is enabled using the following command:
To use fingerprint as a certificate identifier, execute the following command:
net-snmp-cert showcerts --fingerprint
11`
Restart the SNMP daemon using the following command:
/etc/init.d/snmpd restart
You can also restart the SNMP service using the ESA Web UI.
Deploy the certificates on the client side.
4.5.3 - Working with Bind Services and Addresses
The Bind Services/Addresses tool allows for separating the Web services from their management, Web UI and SSH. You can specify the network cards that will be used for Web management and Web services. For example, the DSG appliance uses the ethMNG interface for Web UI and the ethSRV interface for enabling communication with different applications in an enterprise. This article provides instructions for selecting network interfaces for management and services.
Ensure that all the NICs added to the appliance are configured in the Network Settings screen.
4.5.3.1 - Binding Interface for Management
If you have multiple NICs, you can specify the NIC that functions as a management interface.
To bind the management NIC:
Login to the CLI Manager.
Navigate to Networking > Bind Services/Address.
Enter the root password and select OK.
Select Management and choose Select.
In the interface for ethMNG, select OK.
Choose Select and press ENTER.
The NIC for Management is assigned.
Select Done.
A message Successfully done appears and the NIC for service requests are assigned.
Navigate to Administration > OS Console.
Enter the root password and select OK.
Run the netstat -tunlp command to verify the status of the NICs.
4.5.3.2 - Binding Interface for Services
If you have multiple service NICs, you can specify the NICs that will function to accept the Web service requests on port 8443.
To bind the service NIC:
Login to the CLI Manager.
Navigate to Networking > Bind Services/Address.
Enter the root password and select OK.
Select Service and choose Select.
A list of service interfaces with their IP addresses is displayed.
Select the required interface(s) and select OK.
The following message appears.
Choose Yes and press ENTER.
Select Done.
A message Successfully done appears and the NIC for service requests are assigned.
Navigate to Administration > OS Console.
Enter the root password and select OK.
Run the netstat -tunlp command to verify the status of the NICs.
4.5.4 - Using Network Troubleshooting Tools
Using the Network Troubleshooting Tools, you can check the health of your network and troubleshoot problems. This tool is composed of several utilities that allow you to test the integrity of you network. The following table describes the utilities that make up the Network Utilities tool.
Table 1. Network Utilities
Name
Using this tool you can...
How…
Ping
Tests whether a specific Host is accessible across the
network.
In the Address field, type the IP
address that you want to test.
Press
ENTER.
TCPing
Tests whether a specific TCP port on a Host is
accessible across the network.
In the Address field, type the IP
address.
In the Port field, type the
port number.
Select OK.
TraceRoute
Tests the path of a packet from one machine to another.
Returns timing information and the path of the packet.
At the prompt, type the IP address or Host name of the
destination machine.
Select
OK.
MTR
Tests the path of a packet and returns the list of
routers traversed and some statistics about each.
At the prompt, type the IP address or Host
name.
Select OK.
TCPDump
Tests network traffic, and examines all packets going
through the machine.
To filter information, by network interface, protocol,
Host, or port, type the criteria in the corresponding text
boxes.
Select OK.
SysLog
Sends syslog messages. Can be used to test syslog
connectivity.
In the Address field, enter the
IP address of the remote machine the syslogs will be sent
to.
In the Port field, enter a port
number the remote machine is listening to.
In the
Message field, enter a test message. Select
OK.
On the remote machine, check if
the syslog was successfully sent.
Note that the appliance
uses UDP syslog, so there is no way to validate whether the syslog
server is accessible.
Show MAC
Finds out the MAC address for a given IP address.
Detects IP collision.
At the prompt, type the IP address or Host
name.
Select OK.
4.5.5 - Managing Firewall Settings
Protegrity internal firewall provides a way to allow or restrict inbound access from the outside to Protegrity Appliances. Using the Network Firewall tool you can manage your Firewall settings. For example, you can allow access to the management-network interface only from a specific machine while denying access to all other machines.
To improve security in the ESA, the firewall in v9.2.0.0 is upgraded to use the nftables framework instead of the iptables framework. The nftables framework helps remedy issues, including those relating to scalability and performance.
The iptables framework allows the user to configure IP packet filter rules. The iptables framework has multiple pre-defined tables and base chains, that define the treatment of the network traffic packets. With the iptables framework, you must configure every single rule. You cannot combine the rules because they have several base chains.
The nftables framework is the successor of the iptables framework. With the nftables framework, there are no pre-defined tables or chains that define the network traffic. It uses simple syntax, combines multiple rules, and one rule can contain multiple actions. You can export the data related to the rules and chains to json or xml using the nft userspace utility.
Verifying the nftables
This section provides the steps to verify the nftables.
To verify the nftables:
Log in to the CLI Manager.
Navigate to Administration > OS Console.
Enter the root password and select OK.
Run the command nft list ruleset.
The nftables rules appear.
Listing the Rules
Using the Rules List option, you can view the available firewall rules.
To view the details of the rule:
Log in to the CLI Manager.
Navigate to Networking > Network Firewall.
Enter the root password and select OK.
The following screen appears.
From the menu, select Rules List to view the list of rules.
A list of rules appear.
Select a rule from the list and click More.
The policy, protocol, source IP address, interface, port, and description appear.
Click Delete to delete a selected rule. Once confirmed, the rule is deleted.
Log in to the Web UI.
Navigate to System > Information to view the rules.
Reordering the Rules List
Using the Reorder Rules List option, you can reorder the list of rules. With buttons Move up and Move down you can move the selected rule. When done, click Apply for the changes to take effect.
The order of the specified rules are important. When reordering the firewall rules, take into account that rules which are in the beginning of the list are of the first priority. Thus, if there are conflicting rules in the list, the one which is the first in the list is applied.
Specifying the Default Policy
The default policy determines what to do on packets that do not match any existing rule. Using the Specify Default Policy option, you can set the default policy for the input chains. You can specify one of the following options:
Accept - Let the traffic pass through.
Drop - Remove the packet from the wire and generate no error packet.
If not specified by any rule, then the incoming packet will be dropped as the default policy. If specified by a rule, then the incoming packet will be allowed/denied or dropped depending on the policy of the rule.
Adding a New Rule
Every new rule specifies the criteria for matching packets and the action required. You can add a new rule using the Add New Rule option. This section explains how to add a firewall rule.
Adding a new rule is a multi-stage process that includes:
Specifying an action to be taken for matching incoming traffic:
Accept - Allow the packets.
Drop - Remove the packet from the wire and generate no error packet.
Reject - Remove the packet from the wire and return an error packet.
Specifying the local service for this rule.
Specifying the local network interface. It can be any or selected interface..
Specifying the remote machine criteria.
Providing a description for the rule. This is optional.
When a Firewall rule is added, it is added to the end of the Firewall list. If there is a conflicting rule in the beginning of the list, then the new rule may be ignored by the Firewall. Thus, it is recommended to move the new rule somewhere to the beginning of the Firewall rules list.
Adding a New Rule with the Predefined List of Functionality
Follow these instructions to add a new rule with the predefined list of functionality:
Select a policy for the rule, accept, drop, or reject, which will define how a package from the specific machine will be treated by the appliance Firewall.
Click Next.
Specify what will be affected by the rule. Two options are available: to specify the affected functionality list, in this case, you do not need to specify the ports since they are already predefined, or to specify the protocol and the port.
Select the local service affected by the rule. You can select one or more items to be affected by the firewall rule.
Click Next.
If you want to have a number of similar rules, then you can specify multiple items from the functionality list. Thus, for example, if you want to allow access from a certain machine to the appliance LDAP, SNMP, High Availability, SSH Management, or Web Services Management, you can specify these items in the list.
Click Manually.
In the following dialog box, select a protocol for the rule. You can select between TCP, UDP, ICMP, or any.
In the following screen, specify the port number and click Next.
In the following screen you are prompted to specify an interface. Select between ethMNG (Ethernet management interface), ethSRV0 (Ethernet security service interface), ethSRV1, or select Any.
In the following screen you are prompted to specify the remote machine. You can specify between single/IP with subnet or domain name.
When you select Single, you will be asked to specify the IP in the following screen.
When you select IP with Subnet, you will be asked to specify the IP first, and then to specify the subnet.
When you select Domain Name, you will be asked to specify the domain name.
When you have specified the remote machine, the Summary screen appears. You can enter the description of your rule if necessary.
Click Confirm to save the changes.
Click OK in the confirmation message listing the rules that will be added to the Rules list.
Disabling/Enabling the Firewall Rules
Using the Disable/Enable Firewall option, you can start your firewall. All rules that are available in the firewall rules list will be affected by the firewall when it is enabled. All new rules added to the list will be affected by the firewall. You can also restart, start, or stop the firewall using ESA Web UI.
Resetting the Firewall Settings
Using the Reset Firewall Settings option, you can delete all firewall rules. If you use this option, then the firewall default policy becomes accept and the firewall is enabled.
If you require additional security, then change the default policy and add the necessary rules immediately after you reset the firewall.
4.5.6 - Using the Management Interface Settings
Using the Management Interface Settings option, you can specify the network interface that will be used for management (ethMNG). By default, the first network interface is used for management (ethMNG). The first management Ethernet is the one that is on-board.
If you change the network interface, then you are asked to reboot the ESA for the changes to take effect.
Note: The MAC address is stored in the appliance configuration. If the machine boots or reboots and this MAC address cannot be found, then the default, which is the first network card, will be applied.
4.5.7 - Ports Allowlist
On the Proxy Authentication screen of the Web UI, you can add multiple AD servers for retrieving users. The AD servers are added as URLs that contain the IP address/domain name and the listening port number. You can restrict the ports on which the LDAP listens to by maintaining a port allowlist. This ensures that only those ports that are trusted in the organization are mentioned in the URLs.
On the CLI Manager, navigate to Networking > Ports Allowlist to set a list of trusted ports. By default, port 389 is added to the allowlist.
The following figure illustrates the Ports Allowlist screen.
This setting is applicable only to the ports entered in the Proxy Authentication screen of the Web UI.
Viewing list of allowed ports
You can view the list of ports that are specified in the allowlist.
On the CLI Manager, navigate to Networking > Ports Allowlist.
Enter the root credentials.
Select List allowed ports.
The list of allowed ports appears.
Adding ports to the allowlist
Ensure that multiple port numbers are comma-delimited and do not contain space between them.
On the CLI Manager, navigate to Networking > Ports Allowlist.
Enter the root credentials.
Select Add Ports.
Enter the required ports and select OK.
A confirmation message appears.
4.6 - Working with Tools
Protegrity appliances are equipped with a Tools menu. The following sections list and explain the available tools and their functionalities.
4.6.1 - Configuring the SSH
The SSH Configuration tool provides a convenient way to examine and manage the SSH configuration that would fit your needs. Changing the SSH configuration may be necessary for special needs, troubleshooting, or advanced non-standard scenarios. By default, the SSH is configured to deny any SSH communication with unknown remote servers. You can allow the authorized users with keys to communicate without passwords. Every time you add a remote host, the system obtains the SSH key for this host, and adds it to the known hosts.
Note: It is recommended to create a backup of the SSH settings/keys before you make any modifications. For more information for Backup from CLI, refer to here. For more information for Backup from Web UI, refer to here.
Using Tools > SSH Configuration, you can:
Specify SSH Mode.
Specify SSH configuration.
Manage the hosts that the Appliance can connect to.
Set the authorized keys.
Manage the keys that belong to local accounts.
Generate new SSH server keys.
4.6.1.1 - Specifying SSH Mode
Using SSH Mode tool, you can set restrictions for SSH connections. The restrictions can be hardened or made slack according to your needs. Four modes are available, as described in the following table:
Mode
SSH Server
SSH Client
Paranoid
Disable root access
Disable password authentication, allows to connect only using public keys. Block connections to unknown hosts.
Standard
Disable root access
Allow password authentication. Allow connections to new or unknown hosts, enforce SSH fingerprint of known hosts.
Open
Allow root access Accept connections using passwords and public keys
Allow password authentication. Allow connection to all hosts – do not check hosts fingerprints.
4.6.1.2 - Setting Up Advanced SSH Configuration
A user with administrative credentials can configure the SSH idle timeout and client authentication settings. The following screen shows the Advanced SSH Configuration.
In the Idle Timeout field, enter the idle timeout period in seconds. This allows the user to set idle timeout period for the SSH server before logout.
When you are working on the OS Console using the OpenSSH session, if the session is idle for the specified time, then the OS Console session gets closed. However, you are re-directed to the Administration screen.
In the Client Authentications field, specify the order for trying the SSH authentication method. This allows you to prefer one method over another. The default for this option is publickey, password.
4.6.1.3 - Managing SSH Known Hosts
Using Known Hosts: Hosts I can connect to, you can manage the hosts that you can connect to using SSH. The following table explains the options in the Hosts that I connect to dialog box:
Using…
You can…
Display List
View the list of SSH allowed hosts you can connect to.
Reset List
Clear the SSH allowed hosts list. Only the local host, which is the default, appears.
Add Host
Add a new SSH allowed host.
Delete Host
Delete a host from the list of SSH allowed hosts.
Refresh (Sync) Host
Make sure that the available key is a correct key from each IP. To do this, go to each IP/host and re-obtain its key.
4.6.1.4 - Managing Authorized Keys
SSH Authorized keys are used to specify SSH keys that are allowed to connect to this machine without entering the password. The system administrator can create such SSH keys and import the keys to this appliance. This is a standard SSH mechanism to allow secured access to machines without a need to enter a password.
Using the Authorized Keys tool, you can display the keys and delete the list of authorized keys from the Reset List option. This would reject all incoming connections that used the authorized keys reset with this tool.
Examine and manage the users that are authorized to access this host.
4.6.1.5 - Managing Identities
Using the Identities menu, you can manage and examine which users can start SSH communication from this host using SSH keys. You can:
Display the list of such keys that already exist.
Reset the SSH keys. This means that all SSH keys used for outgoing connections are deleted.
Add an identity from the list already available by default or create one as required, using the Directory or Filter options.
Delete an identity. This should be done with extreme care.
4.6.1.6 - Generating SSH Keys
Using the Generate SSH Keys, you can create new SSH keys. If you recreate the SSH Keys, then the remote machines that store the current SSH key, will not be able to contact the appliance until you manually update the SSH keys on those machines.
4.6.1.7 - Configuring the SSH
SSH is a network protocol that ensures a secure communication over an unsecured network. It comprises of a utility suite which provides high-level authentication encryption over unsecured communication channels. SSH utility suites provide a set of default rules that ensure the security of the appliances. These rules consist of various configurations such as password authentication, log level info, port numbers info, login grace time, strict modes, and so on. These configurations are enabled by default when the SSH service starts. These rules are provided in the sshd_config.orig file under the /etc/ssh directory.
You can customize the SSH rules for your appliances as per your requirements. You can configure the rules in the sshd_config.append file under the /etc/ksa directory.
Warning: To add customised rules or configurations to the SSH configuration file, modify the sshd_config.append file only. It is recommended to use the console for modifying these settings.
For example, if you want to add a match rule for a test user, test_user with the following configurations:
User can only login with a valid password.
Only three incorrect password attempts are permitted.
Requires host-based authentication.
You must add the following configuration for the match rule in the sshd_config.append file. Make sure to restart the SSH service to apply the updated configurations.
Match user test_user
        PasswordAuthentication yes
        MaxAuthTries    3
        HostbasedAuthentication yes
Ensure that you must enter the valid configurations in the sshd_config.append file.
If the rule added to the file is incorrect, then the SSH service reverts to the default configurations provided in the sshd_config.orig file.
Consider an example where the SSH rule is incorrectly configured by replacing PasswordAuthentication with Password—Authentication. The following code snippet describes the incorrect configuration.
Match user test_user
        Password---Authentication yes
        MaxAuthTries    3
        HostbasedAuthentication yes
Then, the following message appears on the OS Console when the SSH services restart.
If you want to configure the SSH settings for an HA environment, then you must add the rules to both the nodes individually before creating the HA.
For more information about configuring rules to SSH, refer to here.
4.6.1.8 - Customizing the SSH Configurations
To configure SSH rules:
Login to the CLI Manager with the root credentials.
Navigate to Administrator > OS Console.
Configure a new rule using a text editor.
/etc/ksa/sshd_config.append
Configure the required SSH rule and save the file.
Restart the SSH service through the CLI or Web UI.
To restart the SSH service from the Web UI, navigate to System > Services > Secured Shell (SSH).
To restart the SSH service from CLI Manager, navigate to Administration > Services > Secured Shell (SSH).
The SSH services starts with the customized rules or configurations.
4.6.1.9 - Exporting/Importing the SSH Settings
You can backup or restore the SSH settings. To export these configurations, select the Appliance OS configuration option while exporting the custom files.
To import the SSH configurations, select the SSH Settings option.
Warning: You can configure SSH settings and SSH identities that are server-specific. It is recommended to not export or import these SSH settings as it may break the SSH services on the appliance.
For more information on Exporting Custom Files, refer to here.
4.6.1.10 - Securing SSH Communication
When the client communicates with the server using SSH protocol, a key exchange process occurs for encrypting and decrypting the communication. During the key exchange process, client and server decide on the cipher suites that must be used for communication. The cipher suites contain different algorithms for securing the communication. One of the algorithms that Protegrity appliances uses is SHA1, which is vulnerable to collision attacks. Thus, to secure the SSH communication, it is recommended to deprecate the SHA1 algorithm. The following steps describe how to remove the SHA1 algorithm from the SSH configuration.
To secure SSH communication:
On the CLI Manager, navigate to Administration > OS Console.
Restart the SSH service using the following command.
/etc/init.d/ssh restart
The SHA1 algorithm is removed for the SSH communication.
4.6.2 - Clustering Tool
Using Tools > Clustering Tool, you can create the Trusted cluster. The trusted cluster can be used to synchronize data from one server to another other one.
For more information about the ports needed for the Trusted cluster, refer to Open Listening Ports.
4.6.2.1 - Creating a TAC using the CLI Manager
The steps to create a TAC using the CLI Manager.
About Creating a TAC using the CLI
Before creating a TAC, ensure that the SSH Authentication type is set to Public key or Password + PublicKey.
If you are using cloned machines to join a cluster, it is necessary to rotate the keys on all cloned nodes before joining the cluster.
If the cloned machines have proxy authentication, two factor authentication, or TAC enabled, it is recommended to use new machines. This avoids any limitations or conflicts, such as, inconsistent TAC, mismatched node statuses, conflicting nodes, and key rotation failures due to keys in use.
For more information about rotating the keys, refer here.
How to create the TAC using the CLI Manager
To create a cluster using the CLI Manager:
In the ESA CLI Manager, navigate to Tools > Clustering > Trusted Appliances Cluster.
The following screen appears.
Select Create: Create new cluster.
The screen to select the communication method appears.
Select Set preferred method to set the preferred communication method.
Select Manage local methods to add, edit, or delete a communication method.
For more information about managing communication methods for local node, refer here.
Select Done.
The Cluster Services screen appears and the cluster is created.
4.6.2.2 - Joining an Existing Cluster using the CLI Manager
The steps to join a TAC using the CLI Manager.
If you are using cloned machines to join a cluster, it is necessary to rotate the keys on all cloned nodes before joining the cluster.
If the cloned machines have proxy authentication, two factor authentication, or TAC enabled, it is recommended to use new machines. This avoids any limitations or conflicts, such as, inconsistent TAC, mismatched node statuses, conflicting nodes, and key rotation failures due to keys in use.
For more information about rotating the keys, refer here.
Important : When assigning a role to the user, ensure that the Can Create JWT Token permission is assigned to the role.If the Can Create JWT Token permission is unassigned to the role of the required user, then joining the cluster operation fails.To verify the Can Create JWT Token permission, from the ESA Web UI navigate to Settings > Users > Roles.
To join a cluster using the CLI Manager:
In the ESA CLI Manager, navigate to Tools > Clustering > Trusted Appliances Cluster.
In the Cluster Services screen, select Join: Join an existing cluster.
The following screen appears.
Enter the IP address of the target node in the Node text box.
Enter the credentials of the user of the target node in the Username and Password text boxes.
Ensure that the user has administrative privileges.
Select Advanced to manage communication or set the preferred communication method. For more information about managing communication methods, refer here.
Select Join.
The node is joined to an existing cluster.
4.6.2.3 - Cluster Operations
Execute the standard set of commands or copy files from the local node to other nodes in the cluster.
Using Cluster Operations, you can execute the standard set of commands or copy files from the local node to other nodes in the cluster. You can only execute the commands or copy files to the nodes that are directly connected to the local node.
The following figure displays the Cluster Operations screen.
Executing Commands using the CLI Manager
This section describes the steps to execute commands using the CLI Manager.
To execute commands using the CLI Manager:
In the CLI Manager, navigate to Tools > Trusted Appliances Cluster > Cluster Operations: Execute Commands/Deploy Files.
Select Execute.
The Select command screen appears with the following list of commands:
Display top 10 CPU Consumers
Display top 10 memory Consumers
Report free disk space
Report free memory space
Display TCP/UDP network information
Display performance and system counters
Display cluster tasks
Manually enter a command
Select the required command and select Next.
The following screen appears.
Select the target node and select Next.
The Summary screen displaying the output of the selected command appears.
Copying Files from Local Node to Remote Node
This section describes the steps to copy files from local node to remote node.
To copy files from local node to remote nodes:
In the CLI Manager, navigate to Tools > Trusted Appliances Cluster > Cluster Operations: Execute Commands/Deploy Files .
The screen with the appliances connected to the cluster appears.
Select Put Files.
The list of files in the current directory appears. Select Directory to change the current directory
Select the required file and select Next.
The Target Path screen appears.
Select the required option and select Next.
The following screen appears.
Select the target node and select Next.
The Summary screen confirming the file to be deployed appears.
Select Next.
The files are deployed to the target nodes.
4.6.2.4 - Managing a site
In case of multiple sites, a site can be managed using the following process.
Using Site Management, you can perform the following operations:
Obtain Site Information
Add a site
Remove sites added to the cluster, if more than one site exists in the cluster
Rename a site
Set the master site
The following screen shows the Site Management screen.
View a Site
You can view the information for all the sites in the cluster by selecting Show sites information. When a cluster is created, a master site with site1 is created by default. The following screen displays the Site Information screen.
Adding Sites to a Cluster
This section describes the steps to add multiple sites to a cluster from the CLI Manager.
To add a site to a cluster:
On the CLI Manager, navigate to Tools > Trusted Appliances Cluster > Site Management > Add Site.
The following screen appears.
Select OK.
The new site is added.
Renaming a Site
This section describes the steps to rename a site from the CLI Manager.
To rename a site:
On the CLI Manager, navigate to Tools > Trusted Appliances Cluster > Site Management > Update Cluster Site Settings.
Select the required site and select Rename.
The Rename Site screen appears.
Type the required site name and select OK.
The site is renamed.
Setting a Master Site from the CLI Manager
This section describes the steps to set a master site from the CLI Manager.
To set a master site from the CLI Manager:
On the CLI Manager, navigate to Tools > Trusted Appliances Cluster > Site Management > Set Master Site.
The Set Master Site screen appears.
Select the required site and select Set Master.
A message Operation has been completed successfully appears and the new master site is set. An empty cluster site does not contain any node. You cannot set an empty cluster site as a master site.
Deleting a Cluster Site
This section describes the steps to delete a cluster site from the CLI Manager. You can only delete an empty cluster site.
To delete a cluster site:
In the CLI Manager of the node hosting the appliance cluster, navigate to Tools > Trusted Appliances Cluster > Site Management > Remove: Remove Cluster sites(s).
The Remove Site screen appears.
Select the required site and select Remove.
Select OK.
The site is deleted.
4.6.2.5 - Node Management
Details about Node Management.
Using Node Management, you can:
List the nodes - The same option as List Nodes menu, refer here.
Add a node to the cluster - If your appliance is a part of the cluster, and you want to add a remote node to this cluster.
Update cluster information - For updating the identification entries.
Manage communication method of the nodes.
Remove a remote node from the cluster.
4.6.2.5.1 - Show Cluster Nodes and Status
View the status of all the nodes in the cluster.
The following table describes the fields that appear on the status screen.
Field
Description
Hostname
Hostname of the node
Address
IP address of the node
Label
Label assigned to the node
Type
Build version of the node
Status
Online/Blocked/Offline
Node Messages
Messages that appear for the node
Connection
Connection setting of the node (On/Off)
4.6.2.5.2 - Viewing the Cluster Status using the CLI Manager
View the status of all the nodes in a cluster.
To view the status of the nodes in a cluster using the CLI Manager:
In the CLI Manager, navigate to Tools > Trusted Appliances Cluster > Node Management > List Nodes.
The screen displaying the status of the nodes appears.
Select Change View to change the view.
The list of different reports is as follows:
List View: Displays the list of all the nodes.
Labels View: Displays a grouped view of the nodes.
Status View: Displays the status of the nodes.
Report view: Displays the cluster diagnostics, network or connectivity issues, and generate error or warning messages if required.
4.6.2.5.3 - Adding a Remote Node to a Cluster
The steps to add a remote node to a cluster.
To add a remote node to the cluster:
In the CLI Manager of the node hosting the cluster, navigate to Tools > Trusted Appliances Cluster > Node Management > Add Node: Add a remote node to this cluster.
The Add Node screen appears.
Enter the credentials of the local node user, which must have administrative privileges, into the Username and Password text boxes.
Type the preferred communication method on the Preferred Method text box.
Type the accessible communication method of the target node in the Reachable Address text box.
Type the credentials of the target node user in the Username and Password text boxes.
Select OK.
The node is invited to the cluster.
4.6.2.5.4 - Updating Cluster Information using the CLI Manager
The steps to update Cluster Information.
It is recommended not to change the name of the node after you create the cluster task.
To update cluster information:
In the CLI Manager of the node hosting the cluster, navigate to Tools > Trusted Appliances Cluster > Node Management > Update Cluster Information.
The Update Cluster Information screen appears.
Type the name of the node in the Name text box.
Type the information describing the node in the Description text box.
Type the required label for the node in the Labels text box.
Select OK.
The details of the node are updated.
4.6.2.5.5 - Managing Communication Methods for Local Node
The steps to add, edit and delete a communication method.
Every node in a network is identified using a unique identifier. A communication method is a qualifier for the remote nodes in the network to communicate with the local node.
There are two standard methods by which a node is identified:
Local IP Address of the system (ethMNG)
Host name
The nodes joining a cluster use the communication method to communicate with each other. The communication between nodes in a cluster occur over one of the accessible communication methods.
Adding a Communication Method from the CLI Manager
This section describes the steps to add a communication method from the CLI Manager.
To add a communication method from the CLI Manager:
In the ESA CLI Manager, navigate to Tools > Clustering > Trusted Appliances Cluster.
In the Cluster Services screen, select Node Management: Add/Remove Cluster Nodes/ Information.
In the Node Management screen, select Manage node’s local communication methods.
In the Select Communication Method screen, select Add.
Type the required communication method and select OK.
The new communication method is added.
Ensure that the length of the text is less than or equal to 64 characters.
Editing a Communication Method from the CLI Manager
This section describes the steps to edit a communication method from the CLI Manager.
To add a communication method from the CLI Manager:
In the ESA CLI Manager, navigate to Tools > Clustering > Trusted Appliances Cluster.
In the Cluster Services screen, select Node Management: Add/Remove Cluster Nodes/ Information.
In the Node Management screen, select Manage node’s local communication methods.
In the Select Communication Method screen, select the communication method to edit and select Edit.
In the Edit method screen, enter the required changes and select OK.
The changes to the communication method are complete.
Deleting a Communication Method from the CLI Manager
This section describes the steps to delete a communication method from the CLI Manager.
To delete a communication method from the CLI Manager:
In the ESA CLI Manager, navigate to Tools > Clustering > Trusted Appliances Cluster.
In the Cluster Services screen, select Node Management: Add/Remove Cluster Nodes/ Information.
In the Node Management screen, select Manage node’s local communication methods.
In the Select Communication Method screen, select the required communication method and select Delete.
The communication method of the node is deleted.
4.6.2.5.6 - Managing Local to Remote Node Communication
You can select the method that a node uses to communicate with another node in a network. The communication methods of all the nodes are visible across the cluster. You can select the specific communication mode to connect with a specific node in the cluster. In the Node Management screen, you can set the communication between a local node and remote node in a cluster.
You can also set the preferred method that a node uses to communicate with other nodes in a network. If the selected communication method is not accessible, then the other available communication methods of the target node are used for communication.
Selecting a Local to Remote Node Communication Method
This section describes the steps to select a local to remote node communication method.
To select a local to remote node communication method:
In the ESA CLI Manager, navigate to Tools > Clustering > Trusted Appliances Cluster.
In the Cluster Services screen, select Node Management: Add/Remove Cluster Nodes/ Information.
In the Node Management screen, select Manage local to other nodes communication methods.
In the Manage local to other nodes communication method, select the required node for which you want to change the communication method.
Select Change.
Select the required communication method and select Choose. If a new communication must be added so it can be chosen as the required communication method, select Add New to add it.
Select Ok.
The communication method is selected to communicate with the remote node in the cluster.
Changing a Local to Remote Node Communication Method
This section describes the steps to change a local to remote node communication method.
To change a local to remote node communication method:
In the ESA CLI Manager, navigate to Tools > Clustering > Trusted Appliances Cluster.
In the Cluster Services screen, select Node Management: Add/Remove Cluster Nodes/ Information.
In the Node Management screen, select Manage local to other nodes communication methods.
In the Manage local to other nodes communication method screen, select a remote node and select Change.
The following screen appears.
Select the required communication method.
Select Choose.
The new local to other nodes communication methods is set.
4.6.2.5.7 - Removing a Node from a Cluster using CLI Manager
The steps to remove a remote node from a cluster.
Before attempting to remove a node, verify if it is associated with a cluster task. If a node is associated with a cluster task that is based on the hostname or IP address, then the Remove a (remote) cluster node operation will not remove node from the cluster. Ensure that you delete all such tasks before removing any node from the cluster.
To remove a node from a cluster using the CLI Manager:
In the ESA CLI Manager, navigate to Tools > Trusted Appliances Cluster.
In the Cluster Services screen, select Node Management: Add/Remove Cluster Nodes/Information.
The following screen appears.
Select Remove: Delete a (remote) cluster node and select OK.
The screen displaying the nodes in the cluster appears.
Select the required node and select OK.
The following screen appears.
Select OK.
Select REFRESH to view the updated status.
4.6.2.5.8 - Uninstalling Cluster Services
The steps to uninstall the cluster services on a node.
Before attempting to remove a node, verify if it is associated with a cluster task. If a node is associated with a cluster task that is based on the hostname or IP address, then the Uninstall Cluster Services operation will not uninstall the cluster services on the node. Ensure that you delete all such tasks before uninstalling the cluster services.
To remove a node from a cluster using the CLI Manager:
In the ESA CLI Manager, navigate to Tools > Trusted Appliances Cluster.
In the Cluster Services screen, select 7 Uninstall : Uninstall Cluster Services.
A confirmation message appears.
Select Yes.
The cluster services are uninstalled.
4.6.2.6 - Trusted Appliances Cluster
A Trusted Appliances cluster can be used to transfer data from one node to other nodes regardless of their location, as long as standard SSH access is supported. This mechanism allows you to run remote commands on remote cluster nodes, transfer files to remote nodes and export configurations to remote nodes. Trusted appliances clusters are typically used for disaster recovery. The trusted appliance cluster can be configured and controlled using the Appliance Web UI as well as the Appliance CLI.
Clustering details are fully explained in section Trusted Appliances Cluster (TAC). In that section you will find information how to:
Setup a trusted appliances cluster
Add the appliance to an existing trusted appliances cluster
Remove an appliance from the trusted appliances cluster
Manage cluster nodes
Run commands on cluster nodes
Using the cluster maintenance, you can perform the following functions:
List cluster nodes
Update cluster keys
Redeploy local cluster configuration to all nodes
Review cluster service interval
Execute commands as OS root user
4.6.2.6.1 - Updating Cluster Key
The steps to generate a new set of the cluster SSH keys.
Before you begin
Ensure that all the nodes in the cluster are active, before changing the cluster key. If a new key is deployed to a node that is unreachable, then connect the node to the cluster. In this scenario, remove the node from the cluster and re-join the cluster.
Generate a new set of the cluster SSH keys to the nodes that are directly connected to the local node. This ensures that the trusted appliance cluster is secure.
To re-generate cluster keys:
In the ESA CLI Manager, navigate to Tools > Clustering > Trusted Appliances Cluster > Maintenance: Update Cluster Settings.
The following screen appears.
Select New Cluster Keys.
A message to re-generate the cluster keys appears.
Select Yes.
The new keys are deployed to the nodes that are directly connected.
4.6.2.6.2 - Redeploy Local Cluster Configuration to All Nodes
You can redeploy the local cluster configuration to force it to be applied on all connected nodes. Usually there is no need for such operation since the configurations are synchronized automatically. However, if the cluster status service is stopped or you want to force a specific configuration, then you can use this option to force the configuration.
When you select to Redeploy local cluster configuration to all nodes in the Update Cluster dialog box, the operation is performed at once with no confirmation.
4.6.2.6.3 - Cluster Service Interval
The cluster provides an auto-update mechanism that runs in the background as a background service which is responsible for updating local and remote cluster configurations and cluster health checks.
You can specify the cluster service interval in the Cluster Service Interval dialog box.
The interval (in seconds) specifies the sleep time between cluster background updates/operations. For example, if the specified value is 120 seconds, then every two minutes the cluster service will update its status and synchronize its cluster configuration with the other nodes (if changes identified).
4.6.2.6.4 - Execute Commands as OS Root User
By default, the cluster user is a restricted user which means that the cluster commands will be restricted by the OS. There are scenarios where you would like to disable these restrictions and allow the cluster user to run as the OS root user.
Using the details in the table below, you can specify whether to execute the commands as root or as a restricted user.
You can specify…
To…
Yes
Always execute commands as the OS root user. It is less secure, risky if executing the wrong command.
No
Always execute commands as non-root restricted user. It is more secure, but not common for many scenarios.
Ask
Always be asked before a command is executed.
4.6.3 - Working with Xen Paravirtualization Tool
Using Tools > Clustering Tool, you can setup an appliance virtual environment. The default installation of a Protegrity appliance uses hardware virtualization mode (HVM). The appliance can be reconfigured to use parallel virtualization mode (PVM) to optimize the performance of virtual guest machines.
Protegrity supports these virtual servers:
Xen®
Microsoft Hyper-V™
KVM Hypervisor
XEN paravirtualization details are fully covered in section Xen Paravirtualization Setup. In that section you will find information how to:
Set up Xen paravirtualization
Follow the paravirtualization process
4.6.4 - Working with the File Integrity Monitor Tool
Using Tools > File Integrity Monitor, you can make a weekly check. The content modifications can be viewed by the Security Officer since the PCI specifications require that sensitive files and folders in the Appliance are monitored. This information contains password, certificate, and configuration files. All changes made to these files can be reviewed by authorized users.
4.6.5 - Rotating Appliance OS Keys
The steps to rotate appliance OS keys.
When you install the appliance, it generates multiple security identifiers such as, keys, certificates, secrets, passwords, and so on. These identifiers ensure that sensitive data is unique between two appliances in a network. When you receive a Protegrity appliance image or replicate an appliance image on-premise, the identifiers are generated with certain values. If you use the security identifiers without changing their values, then security is compromised and the system might be vulnerable to attacks. Using the Rotate Appliance OS Keys, you can randomize the values of these security identifiers on an appliance. This tool must be run only when you finalize the ESA from a cloud instance.
Set ESA communication and key rotations
When an appliance, such as DSG, communicates with ESA, the Set ESA communication must be performed. Before running the Set ESA communication process, ensure appliance OS keys are rotated.
For example, if the OS keys are not rotated, then you might not be able to add the appliances to a Trusted Appliances Cluster (TAC).
To rotate appliance OS keys:
From the CLI Manager, navigate to to Tools > Rotate Appliance OS Keys.
Enter the root credentials.
The following screen appears.
Select Yes.
The following screen appears.
If you select No, then the Rotate Appliance OS Keys operation is discarded.
Enter the administrative credentials and select OK.
The following screen appears.
The following screen appears.
To update the user passwords, provide the credentials for the following users.
root
admin
viewer
local_admin
If you have deleted any of the default users, such as admin or viewer, those users will not be listed in the User’s Passwords screen.
Select Apply.
The user passwords are updated and the appliance OS keys are rotated.
The steps to enable or disable the access to the removable disks.
As a security feature, you can restrict access to the removable drives attached to your appliances. You can enable or disable the access to the removable disks, such as, CD/DVD drive or USB Flash drives.
The access to the removable disks is enabled by default.
Disabling CD or DVD drive
To disable CD or DVD drive:
On the CLI Manager, navigate to Tools > Removable Media Management > Disable CD/DVD Drives.
Press ENTER.
The following message appears.
Disabling USB Flash Drive
To disable USB flash drive:
On the CLI Manager, navigate to Tools > Removable Media Management > Disable USB Flash Drives..
Press ENTER.
The following message appears.
Enabling CD or DVD Drive
To enable CD/DVD drive:
On the CLI Manager, navigate to Tools > Removable Media Management > Enable CD/DVD Drives.
Press ENTER.
Enabling USB Flash Drive
To enable USB flash drive:
On the CLI Manager, navigate to Tools > Removable Media Management > Enable Flash Drives.
Press ENTER.
4.6.7 - Tuning the Web Services
Monitor and configure the Application Protector Web Service Sessions.
Using Tools > Web Services Tuning, monitor and configure the Application Protector Web Service Sessions. View information such as Session Shared Memory ID, maximum open sessions, open sessions, free sessions, and session timeout.
CAUTION: It is recommended to contact Protegrity Support before applying any changes for Web Services.
In the Web Services Tuning screen, the following fields can be configured.
Start Servers: In the StartServers field, configure the number of child servers processes created on startup. Since the number of processes is dynamically controlled depending on the load, there is usually no reason to adjust the default parameter.
Minimum Spare Servers: In the MinSpareServers field, set the minimum number of child server processes not handling a request. If the number of such processes is less than configured in the MinSpareServers field, then the parent process creates new children at a maximum rate of 1 per second. It is recommended to change the default value only when dealing with very busy sites.
Maximum Spare Servers: In the MaxSpareServers field, set the maximum number of child server processes not handling a request. When the number of such processes exceeds the number configured in MaxSpareServers, the parent process kills the excessive processes. It is recommended to change the default value only when dealing with very busy sites. If the value is set lower than MinSpareServers, then it will automatically be adjusted to MinSpareServers value +1.
Maximum Clients: In the MaxClients field, set the maximum number of connections to be processed simultaneously.
Maximum Requests per Child: In the MaxRequestsPerChild field, set the limit on the number of requests that an individual child server will handle during its life. When the number of requests exceeds the value configured in the MaxRequestsPerChild field, the child process dies. If the MaxRequestsPerChild value is set to 0, then the process will never expire.
Maximum Keep Alive Requests: In the MaxKeepAliveRequest field, the maximum number of requests that can be allowed during a persistent connection can be set. If the value is set 0, then the number of allowed request will be unlimited. For maximum performance, leave this number high.
Keep Alive Timeout: In the KeepAliveTimeout field, the number of seconds to wait for the next request from same client on the same connection can be set.
4.6.8 - Tuning the Service Dispatcher
Configuring the parameters to improve service dispatcher performance.
The Service Dispatcher parameters are the Apache Multi-Processing Module (MPM) worker parameters. The Apache MPM Worker module implements a multi-threaded multi-process web server that allows it to serve higher number of requests with limited system resources. For more information about the Apache MPM Worker parameters, refer to https://httpd.apache.org/docs/2.2/mod/worker.html.
To improve service dispatcher performance, navigate to Tools > Service Dispatcher Tuning.
The following table provides information about the configurable parameters and recommendations for Service Dispatcher performance.
Parameter
Default Value
Description
StartServers
64
The number of apache server instances that start at the beginning when you start Apache. It is recommended not to enter the StartServers value more than the value for MaxSpareThreads, as this results in processes being terminated immediately after initializing.
ServerLimit
1600
The maximum number of child processes. It is recommended to change the ServerLimit value only if the values in MaxClients and ThreadsPerChild need to be changed.
MinSpareThreads
512
The minimum number of idle threads that are available to handle requests. It is recommended to keep the MinSpareThreads value higher than the estimated requests that will come in one second.
MaxSpareThreads
1600
The maximum number of idle threads. It is recommended to reserve adequate resources to handle MaxClients. If MaxSpareThreads are insufficient, the webserver will terminate and frequently create child processes, reducing performance.
ThreadLimit
512
The upper limit of the configurable threads per child process. To avoid unused shared memory allocation, it is recommended not to set the ThreadLimit value much higher than the ThreadsPerChild value.
ThreadsPerChild
288
The number of threads created by each child process. It is recommended to keep the ThreadsPerChild value such that it can handle common load on the server.
MaxRequestWorkers
40000
The maximum number of requests that can be processed simultaneously. It is recommended to take into consideration the expected load when setting the MaxRequestWorkers values. Any connection that comes over the load, will drop, and the details can be seen in the error log. Error log file path - /var/log/apache2-service_dispatcher/errors.log
MaxConnectionsPerChild
0
The maximum number of connections that a child server process can handle in its life. If the MaxConnectionsPerChild value is reached, this process expires. It is recommended to set the MaxConnectionsPerChild value to 0, so that this process never expires.
4.6.9 - Working with Antivirus
The AntiVirus program uses ClamAV, an open source and cross-platform antivirus engine designed to detect malicious trojan, virus, and malware threats. A single file or directory, or the whole system can be scanned. Infected file or files are logged and can be deleted or moved to a different location, as required.
The Antivirus option allows you to perform the following actions.
Option
Description
Scan Result
Displays the list of the infected files in the system.
Scan now
Allows the scan to start.
Options
Allows access to customize the antivirus scan options.
View log
Displays the list of scan logs.
Customizing Antivirus Scan Options from the CLI
To customize Antivirus scan options from the CLI:
Go to Tools > AntiVirus.
Select Options.
Press ENTER.
The following table provides a list of the choices available to you to customize scan options.
Table 1. List of all scan options
Option
Selection
Description
Action
Ignore
Ignore the infected file and proceed with the
scan.
Move to directory
Move the infected files to specific directory.
In
the text box, enter the path where the infected file should
be moved.
Delete infected file
Remove the infected file from the directory.
Recursive
True
Scan sub-directories.
False
Do not scan sub-directories.
Scan directory
Path of the directory to be scanned.
4.6.10 - Forwarding system logs to Insight
When the logging components are configured on the ESA or the appliance, system logs are sent to Insight. Insight stores the logs in the Audit Store. Configure the system to send the system logs to Insight.
Log in to the CLI Manager on the ESA or the appliance.
Navigate to Tools > PLUG - Forward logs to Audit Store.
Enter the password for the root user and select OK.
Enter the IP address of all the nodes in the Audit Store cluster with the Ingest role and select OK. Specify multiple IP addresses separated by comma.
To identify the node with the Ingest roles, log in to the ESA Web UI and navigate to Audit Store > Cluster Management > Overview > Nodes.
Enter y to fetch certificates and select OK.
Specifying y fetches td-agent certificates from target node. These certificates can then be used to validate and connect to the target node. They are required to authenticate with Insight while forwarding logs to the target node. The passphrase for the certificates are stored in the /etc/ksa/certs directory.
Specify n if the certificates are already available on the system, fetching certificates are not required, or custom certificates are to be used.
Enter the credentials for the admin user of the destination machine and select OK.
The td-agent service is configured to send logs to Insight and the CLI menu appears.
4.6.11 - Rotating Insight certificates
Rotate the Insight certificates after the the ESA certificates are rotated. This refreshes the Insight-related certificates that are required for the Audit Store nodes to communicate with the other nodes in the Audit Store cluster and the ESA.
For more information about rotating the Insight certificates, refer here.
4.6.12 - Applying Audit Store Security Configuration
The Apply Audit Store Security Configs setting is available for configuring the Audit Store security. This setting must be used after upgrading from an earlier version of the ESA when custom certificates are used. Run the following steps after the upgrade is complete and custom certificates are applied for td-agent, Audit Store, and Analytics, if installed.
From the ESA Web UI, navigate to System > Services > Audit Store.
Start the Audit Store Repository service.
Open the ESA CLI.
Navigate to Tools.
Run Apply Audit Store Security Configs.
Select Exit on the completion screen.
4.6.13 - Setting the total memory for the Audit Store Repository
The Set Audit Store Repository Total Memory tool is used to specify the total RAM allocated for the Audit Store Repository on the ESA.
The RAM allocated for the Audit Store on the appliance is set to a optimal default value. If this value is not as per the existing requirement, then use this tool to modify the RAM allocation. However, when certain operations are performed, such as, when the role for the node is modified or a node is removed from the cluster, then the value set is overwritten. Additionally, the RAM allocation reverts to the optimal default value. In this case, perform these steps again for setting the RAM allocation after modifying the role of the node or adding a node back to the Audit Store cluster.
From the ESA Web UI, navigate to System > Services > Audit Store.
Start the Audit Store Repository service.
Open the ESA CLI.
Navigate to Tools.
Run Set Audit Store Repository Total Memory.
Enter the password for the root user and select OK.
Specify the total memory that must be allocated for the Audit Store Repository and select OK.
Select Exit to return to the menu.
Repeat the steps on the remaining nodes, if required.
4.6.14 - Forwarding audit logs to Insight
The audit logs are the data security operation-related logs, such as protect, unprotect, and reprotect and the PEP server logs. The audit logs from the appliance, such as, the DSG are forwarded through the Log Forwarder service to Insight. Insight stores the logs in the Audit Store on the ESA.
The example provided here is for DSG. Refer to the specific protector documentation for the protector configuration.
Log in to the CLI Manager on the appliance.
Navigate to Tools > ESA Communication.
Enter the password of the root user of the appliance and select OK.
Select the Logforwarder configuration option, press Tab to select Set Location Now, and press Enter.
The ESA Location screen appears.
Select the ESA to connect with, then press Tab to select OK, and press ENTER.
The ESA selection screen appears.
To enter the ESA details manually, select the Enter manually option. A prompt is displayed to enter the ESA IP address or hostname.
Enter the ESA administrator username and password to establish communication between the ESA and the appliance. Press Tab to select OK and press Enter.
The Enterprise Security Administrator - Admin Credentials screen appears.
Enter the IP address or hostname for the ESA. Press Tab to select OK and press ENTER. Specify multiple IP addresses separated by comma. To add an ESA to the list, specify the IP addresses of all the existing ESAs in the comma separated list, and then specify the IP for the additional ESA.
The Forward Logs to Audit Screen screen appears.
After successfully establishing the connection with the ESA, the following summary dialog box appears. Press Tab to select OK and press Enter.
Repeat step 1 to step 8 on all the appliance nodes in the cluster.
4.6.15 - Exporting alerting configurations
Use the utility to export the alerting configuration to a file.
The configurations can be used as a backup or a template for importing on the same system or a different system. This feature is available from v10.2.0.
To export the configuration:
Open the ESA CLI.
Navigate to Tools.
Run Export Alerting Configurations.
Enter the password for the root user.
Select OK.
Specify a file name or a directory with the file name. If the directory does not exist, then it is created. If the file already exists, it is overwritten.
Select OK. The export file is created in the /opt/protegrity/insight/alerting_export directory.
Select Exit to return to the main menu.
4.6.16 - Importing alerting configurations
Use the utility to import the alerting configuration from the export file.
The file to import must be located in the /opt/protegrity/insight/alerting_export directory. This utility imports all the alerting configurations specified in the exported file. The existing alerts on the system are retained. However, any alert configuration with the same name are overwritten.
To import the configuration:
Open the ESA CLI.
Navigate to Tools.
Run Import Alerting Configurations.
Enter the password for the root user.
Select OK.
Specify the file name or the directory with the file name.
Select OK. The configurations are imported.
Select Exit on the success message screen to return to the main menu.
4.7 - Working with Preferences
Set up console preferences.
Set up the console preferences using the Preferences menu.
The following preferences can be configured:
Show system monitor on OS Console
Require password for CLI system tools
Show user Notifications on CLI load
Minimize the timing differences
Set uniform response time for failed login
Enable root credentials check limit
Enable AppArmor
Enable FIPS Mode
Basic Authentication for REST APIs
4.7.1 - Viewing System Monitor on OS Console
You can choose to show a performance monitor before switching to OS Console. If you choose to show the monitor, then the dialog delays for one second before the initialization of the OS Console. The value must be set to Yes or No.
4.7.2 - Setting Password Requirements for CLI System Tools
Many CLI tools and utilities require different credentials, such as root and admin user credentials. You can choose to require or not to require a password for CLI system tools. The value must be set to Yes or No.
Specifying No here will allow the user to execute these tools without having to enter the system passwords. This can be useful when the system administrator is the security manager as well. This setting is not recommended since it makes the Appliance less secure.
4.7.3 - Viewing user notifications on CLI load
You can choose to display notifications in the CLI home screen every time a user logs in to the ESA. These notifications are specific to the user. The value must be set to Yes or No.
4.7.4 - Minimizing the Timing Differences
Sign in to the appliance to access different features provided. If incorrect credentials are used to sign in, the request is denied and the server sends an appropriate response indicating the reason for failure to log in. The time taken to send the response varies based on the different authentication failures, such as invalid password, invalid username, expired username, and so on. This time interval is vulnerable to security attacks for obtaining valid users from the system. Thus, to mitigate such attacks, the time interval to reduce the response time between an incorrect sign-in and server response can be minimized. To enable this setting, toggle the value of the Minimize the timing differences option from the ESA CLI Manager to Yes.
The default value of the Minimize the timing differences option is No.
When trying to log in with a locked user account, a notification indicating that the user account is locked appears. This notification will not appear when the value of Minimize the timing differences option is Yes. Instead you will get a notification indicating that the username or password is incorrect.
4.7.5 - Setting a Uniform Response Time
If invalid credentials are used to login to the ESA Web UI, then the time taken to respond to various authentication scenario failures, varies. The various scenarios can be invalid username, invalid password, expired username, and so on. This variable time interval may introduce a timing attack on the system.
To reduce the risk of a timing attack, reduce the variable time interval and specify a response time to handle invalid credentials. Thus, the response time for the authentication scenarios remains the same.
The response time for the authentication scenarios are based on different factors such as, hardware configurations, network configurations, and system performance. Thus, the standard response time would differ between organizations. It is therefore recommended to set the response time based on the settings in the organization.
For example, if the response time for a valid login scenario is 5 seconds, then set the uniform response time as 5.
Enter the time interval in seconds and select OK to enable the feature. Alternatively, enter 0 in the text box to disable the feature.
4.7.6 - Limiting Incorrect root Login
If an incorrect password is used to log in to a system, the permission to access the system is denied. Multiple attempts to log in with an incorrect password opens a route to brute force attacks on the system. Brute force is an exhaustive hacking method, where a hacker guesses a user password over successive incorrect attempts. Using this method, a hacker gains access to a system for malicious purposes.
In our appliances, the root user has access to various operations in the system such as accessing OS console, uploading files, patch installation, changing network settings, and so on. A brute force attack on this user might render the system vulnerable to other security attacks. Therefore, to secure the root login, limit the number of incorrect password attempts to the appliance. On the Preferences screen, enable the Enable root credentials limit check option to limit an LDAP user from entering incorrect passwords for the root login. The default value of the Enable root credentials limit check option is Yes.
If you enable the Enable root credentials limit check, the LDAP user can login as root only with a fixed number of successive incorrect attempts. After the limit on the number of incorrect attempts is reached, the LDAP user is blocked from logging in as root, thus preventing a brute force attack. After the locking period is completed, the LDAP user can login as root with the correct password.
When you enter an incorrect password for the root login, the events are recorded in the logs.
By default, the root login is blocked for a period of five minutes after three incorrect attempts. You can configure the number of incorrect attempts and the lock period for the root login.
For more information about configuring the lock period and successive incorrect attempts, contact Protegrity Support.
4.7.7 - Enabling Mandatory Access Control
For implementing Mandatory Access Control, the AppArmor module is introduced on Protegrity appliances. Define the profiles for protecting files that are present in the appliance.
4.7.8 - FIPS Mode
The steps to enable or disable the FIPS mode.
The Federal Information Processing Standards (FIPS) defines guidelines for data processing. These guidelines outline the usage of the encryption algorithms and other data security measures before accessing the data. Only a user with administrative privileges can access this functionality.
Log in to the ESA CLI Manager and navigate to Preferences.
Enter the root password and click OK.
The Preferences screen appears.
Select the Enable FIPS Mode.
Press Select.
The Enable FIPS Mode dialog box appears.
Select Yes and click OK.
The following screen appears.
For more information on the anti-virus settings, refer here.
Click OK.
The following screen appears. Click OK.
After the FIPS mode is enabled, restart the ESA to apply the changes.
Disabling the FIPS Mode
To disable the FIPS mode:
Log in to the ESA CLI Manager and navigate to Preferences.
Enter the root password and click OK.
The Preferences screen appears.
Select the Enable FIPS Mode.
Press Select.
The Enable FIPS Mode dialog box appears.
Select No and click OK.
The following screen appears. Click OK.
After the FIPS mode is disabled, restart the ESA to apply the changes.
4.7.9 - Basic Authentication for REST APIs
The steps to enable or disable the basic authentication.
The Basic Authentication mechanism provides only the user credentials to access protected resources on the server. The user credentials are provided in an authorization header to the server. If the credentials are accurate, then the server provides the required response to access the APIs.
For more information about the Basic Authentication, refer here.
Disabling the Basic Authentication
To disable the Basic Authentication:
Log in to the ESA CLI Manager and navigate to Preferences.
Enter the root password and click OK.
The Preferences screen appears.
Select the Basic Authentication for Rest APIs.
Press Select.
The Basic Authentication for REST APIs dialog box appears.
Select No and click OK.
The message Basic Authentication for REST APIs disabled successfully appears.
Click OK.
Important: If the Basic Authentication is disabled, then the following APIs are affected:
GetCertificate REST API: Fetch certificate to protector.
The getcertificate stops working for the 9.1.x protectors when the Basic Authentication is disabled.
However, the DevOps and RPS REST APIs can also use the Certificate and JWT Authentication support.
Enabling the Basic Authentication
To enable the Basic Authentication:
Log in to the ESA CLI Manager and navigate to Preferences.
Enter the root password and click OK.
The Preferences screen appears.
Select the Basic Authentication for REST APIs.
Press Select.
The Basic Authentication for REST APIs dialog box appears.
Select Yes and click OK.
The message Basic Authentication for REST APIs enabled successfully appears.
Click OK.
5 - Web User Interface (Web UI) Management
Describes the operations performed using the Web User Interface
The Web UI is a web-based environment for managing status, policy, administration,networking, and so on. The options that are performed using the CLI manager can also be performed using the Web UI.
5.1 - Working with the Web UI
Accessing the Web User Interface
The following screen displays the ESA Web UI.
The following table describes the details of options available on the Web UI menu.
Options
Description
Dashboard
View user notifications, disk usage, alerts, server details, memory / CPU / network utilization, and cluster status
Policy Management
Manage creating and deploying policies. For more information about policies, refer Policy Management.
Key Management
Manage master data. For more information about keys, refer to the Key Management.
System
Configure Trusted Appliances Cluster, set up backup and restore, view system statistics, graphs, information, and manage services.
Logs
View logs that are generated for web services.
Settings
Configure network settings, set up certificates, manage users, roles, and licenses.
Audit Store
Manage the repository for all audit data and logs. For more information about the Audit Store, refer Audit Store. View dashboards that display information using graphs and charts for a quick understanding of the protect, unprotect, and reportect transactions performed. For more information about dashboards, refer Dashboards.
The following figure describes the icons that are visible on the ESA Web UI.
Icon
Description
Download support logs, view product documentation, and view the version information about the ESA and its components.
Extend session timeout
Notifications and alerts
Edit profile or sign out of the profile
Power off or restart the system
Logging into the ESA Web UI
Log in to the ESA Web User Interface (Web UI) to manage the appliance settings and monitor your appliance.
When you login through the CLI or the Web UI for the first time, with the password policy enabled, the Update Password screen appears. It is recommended that to change the password since the administrator sets the initial password.
It is recommended to configure the browser settings such that passwords are not saved. If the password is saved, then on the next login, it would start the session as a previously logged-in user.
The following screen displays the login screen of the Web UI.
To log in to the ESA Web UI:
From the web browser, type the Management IP address for the ESA using HTTPS protocol, for example, https://10.0.0.185/.The Web Interface splash screen appears.
Enter the user credentials.If the credentials are approved, then the ESA Dashboard appears.
Viewing user notifications
There is a message at the top of the screen with the number of notifications that appear on this page and other web pages. If you click on the notification, then it is directed to the Services and Status screen.
Alternatively, you can store the messages in the Audit Store and use Discover to view the detailed logs.
You can delete the messages after reading them.
The messages that are older than a year are automatically deleted from the User Notification list, but retained in the logs.
On the User Notifications area of the ESA, the notifications and events occurring on the appliances communicating with it are also visible.
For the notifications to appear on the ESA, ensure that same set of client key pair are present on the ESA and the appliances that communicate with the ESA.For more information about certificates, refer Certificate Management.
Scheduled tasks generate some of these messages. To view a list of scheduled tasks that generate these messages, navigate to System > Task Scheduler.
Logging out of the ESA Web UI
There are two ways to log off the ESA Web UI.
Log off as a user, while the ESA continues to run.
Restart or shut down the ESA.
In case of cloud platforms, such as, Azure, AWS or GCP, the instances run the appliance.
To log out as a user:
Click the second icon that appears on the right of the ESA Toolbar.
Click Sign Out.
The login screen appears.
Shutting down the ESA
The Reboot option shuts down the ESA and restarts it again. Users will need to login again when the authentication screen appears.
With cloud platforms such as Azure, AWS, or GCP, the instances run the appliance. Powering off the instance from the cloud console may not shut down the ESA gracefully. It is recommended to power off from the CLI Manager or Web UI.
To shut down the ESA:
Click the last icon from ESA Toolbar.
Click Shutdown.
Enter your password to confirm.
Provide the reason for the shut down and click OK.
The ESA server shuts down. The Web UI screen may continue to display on the window; however, the Web UI does not work.
5.2 - Description of ESA Web UI
Describes the Web User Interface
The ESA Web UI appears upon successful login. This page shows the Host to which you are attached, IP address, and the current user logged on.
This operation might require a few minutes to begin.
The different menu options are given in the following table.
Option
Using this navigation menu you can
Applicable to
Dashboard
A view-only window, which provides status at a glance – service, server, notifications, disk usage, and graphical representation of CPU, memory, and network usage.
All
Policy Management
Used to create data stores, data elements, masks, roles, keys, and deploy a policy.
ESA
Key Management
Used to view information, rotate, or change the key states of the Master Key, Repository Key, and Data Store Keys. View information for the active Key Store or switch the Key Store.
ESA
System
Has a mix of view-only windows and screens to add and update values.
Start/stop services and access CLI Manager.
Provide status for hardware, system, firewall, and open ports, either graphically or in values.
Add high availability systems and trusted application clusters, view the performance and take backups and restore the system.
All
Logs
Used to view logs for separate tasks such as web services engine, policy management, DFSFP, and Appliance.
ESA
Settings
Update default security settings, if required, for the inbuilt anti-virus, two-factor authentication and file integrity.
Upload/download configuration files, network settings, and SSH and SMTP settings.
Add/delete LDAP users and passwords and activate licenses.
All
Audit Store
A repository for all audit data and logs. It is used to initialize analytics, view and analyze Insight dashboards, and manage cluster.
ESA
Cloud Gateway
Used to create certificate, tunnel, service, Rules for traffic flow management, add DSG nodes to cluster, monitor cluster health, view logs.
DSG
The following graphic illustrates the different panes in the ESA Web UI.
Component
Description
Navigation Pane
The number of options in the navigation menu depends on the installed ESA. The functionality is also restricted based on the user permissions. You could have read-write or read-only permissions for certain options. Using the different options, you can create a policy, add a user, run a few security checks such as file integrity or scan for virus, review or change the network settings, among others.
Workspace
This window on the right includes either displayed information or fields where information needs to be added. When an option is selected, the resulting window appears.
Status Bar
The bar at the bottom displays the last refresh activity time. Also, if you click the rectangle a separate ESA CLI screen opens. All these options are available in the CLI screen as well.
Toolbar
This bar at the top displays the name of the currently open window on the left and icons on the right.
The details of the icons in the toolbar is as follows:
Component
Icon Name
Description
1
Notification
The number is the total number of unopened messages for you.
2
User
Change your password or log out as a user. ESA continues to run.
3
Help
Download the file(s) that are required by Protegrity Support for troubleshooting, view the product documentation, and view the version information about the ESA and its components.
4
Session
Extend the session without timing out. You have to enter your credentials again to login.
5
Power Option
Reboot or shut down the ESA, after ensuring that the ESA is not being used.
Support
The Help option on the toolbar, allows you to download information about the status of the ESA and other services that is sometimes required by Protegrity Services to troubleshoot.
Check the boxes that you require and optionally provide a prefix to the automatically generated file name. You may optionally add a description and protect the resulting zip file and all the xml files inside with a password.
Viewing Version of the Installed Components of the ESA
The > About option on the toolbar allows you to view the version information about the ESA and its components.
The following figure shows the version information of the installed components of the ESA.
For example, you can view the version of the Data Protection System (DPS) that is being used.
Extending Timeout from ESA
The following icons are available on the top right corner of the ESA Web UI page.
The hourglass icon enables you to extend the working time for the ESA.
To extend the timeout for the ESA Web UI, click on the hourglass icon.
A message appears mentioning Session timeout extended successfully.
5.3 - Working with System
Describes the system information page
The System Information navigation folder includes all information about the appliance listed below.
Services and their statuses
The hardware and software information
Performance statistics
Graphs
Real-time graphs
Appliance logs
System option available on the left pane provides the following options:
System Options
Description
Services
View and manage OS, logging and reporting, policy management and other miscellaneous services.
Information
View the health of the system.
Trusted Appliances Cluster
View the status of trusted appliances clusters and saved files.
System Statistics
View the performance of the hardware and networks.
Backup and Restore
Take backups of files and restore these, as well as take backups of full OS and log files.
Task Scheduler
Schedule tasks to run in the background such as anti-virus scans and password policy checks, among others.
Graphs
View how the system is running in a graphical form.
5.3.1 - Working with Services
Describes the services section on the Web UI
You can manually start, restart, and stop services in the appliance. You can act upon all services at once, or select specific ones.
In the System > Services page, the tabs list the available services and their statuses. The Information tab appears with the system information like the hardware information, system properties, system status, and open ports.
Although the services can be started or stopped from the Web UI, the start/stop/restart action is restricted for some services. These services can be operated from the OS Console.Run the following command to start/stop/restart a service.
/etc/init.d/<service_name> stop/start/restart
For example, to start the docker service, run the following command.
/etc/init.d/docker start
If you stop the Service Dispatcher service from the Web UI, you might not be able to access ESA from the Web browser. Hence, it recommended to stop the Service Dispatcher service from the CLI Manager only.
Web Interface Auto-Refresh Mode
You can set the auto-refresh mode to refresh the necessary information according to a set time interval. The Auto-Refresh is available in the status bar that show the dynamically changing status information, such as status and logs. Thus, for example, an Auto Refresh pane is available in System > Services, at the bottom of the page.
The Auto-Refresh pane is not shown by default. You should click the Auto-Refresh button to view the pane.
To modify the auto-refresh mode, from the Appliance Web Interface, select the necessary value in the Auto-Refresh drop-down list. The refresh is applied in accordance with the set time.
5.3.2 - Viewing information, statistics, and graphs
Describes the detailed information, statistics, and graphs
Viewing System Information
All hardware information, system properties, system statuses, open ports and firewall rules are listed in the Information tab.
The information is organized into sections called Hardware, System Properties, System Status, Open Ports, and Firewall.
Hardware section includes information on system, chipset, processors, and amount of total RAM.
System Properties section appears with information on current Appliance, logging server, and directory server.
System Status section lists such properties as data and time, boot time, up time, number of logged in users, and average load.
Open Ports section lists types, addresses, and names of services that are running.
Firewall section in System > Information lists all firewall rules, firewall status (enabled/disabled), and the default policy (drop/accept) which determines what to do on packets that do not match any existing rule.
Viewing System Statistics
Using System > System Statistics, you can view performance statistics to assess system usage and efficiency. The Performance page refreshes itself every few seconds and shows the statistics in real time.
The Performance page shows system information:
Hardware - System, chipset, processors, total RAM
System Status - Date/time, boot time, up-time, users connected, load average
Partitions - Partition name and size, used and avail
Kernel - Idle time, kernel time, I/O time, user time
Memory - Memory total, swap cached, and inactive, among others
You can customize the page refresh rate, so that you are viewing the latest information at any time.
Viewing Performance Graphs
Using System > Graphs, you can view performance graphs and real-time graphs in addition to statistics. In the Performance tab you can view a graphical representation of performance statistics from the past 5 minutes or past 24 hours for these items:
CPU application use - % CPU I/O wait, CPU system use
Total RAM - Free RAM, used RAM
Total Swap - Free Swap, used Swap
Free RAM
Used RAM
System CPU usage
Application CPU use, %
Log space used - Log space available, log space total
Application data used - Application data available space, application data total size
Total page faults
File descriptor usage
ethMNG incoming/ethMNG outgoing
ethSRV0 incoming/ethSRV0 outgoing
ethSRV1 incoming/ethSRV1 outgoing
In the Realtime Graphs tab you can monitor current state of performance statistics for these items:
CPU usage
Memory Status - free and used RAM
The following figure illustrates the Realtime Graphs tab.
5.3.3 - Working with Trusted Appliances Cluster
Overview of the services for Trusted Appliances Cluster
The Clustering menu becomes available in the appliance Web Interface, System > Trusted Appliance Cluster. The status of the cluster is by default updated every minute, and it can be configured using Cluster Service Interval, available in the CLI Manager.
Status tab appears with the information on nodes which are in the cluster. In the Filter drop-down combo box, you can filter the nodes by the name, address and label.
In the Display drop-down combo box, you can select to display node summary, top 10 CPU consumers, top 10 Memory consumers, free disk report, TCP/UDP network information, system information, and display ALL.
Saved Files tab appears with the files that were saved in the CLI Manager. These files show the status of the appliance cluster node or the result of the command run on the cluster.
5.3.4 - Working with Backup and restore
Describes the procedure to back up and restore
The backup process copies or archives data. The restore process ensures that the original data is restored if data corruption occurs.
You can back up and restore configurations and the operating system from the Backup/Restore page. It is recommended to have a backup of all system configurations.
The Backup/Restore page includes Export, Import, OS Full, and Log Files tabs, which you can use to create configuration backups and restore them later.
Using Export, you can also export a configuration to a trusted appliances cluster, and schedule periodic replication of the configuration on all nodes that are in the trusted appliances cluster. Using export this way, you can periodically update the configuration on all, or just necessary nodes of the cluster.
Using Import, you can restore the created backups of the product configurations and appliance OS core configuration.
Using Full OS Backup, you can create backup of the entire appliance OS.
The Full OS Backup/Restore features of the Protegrity appliances is available only for the on-premise deployments. It is not available for virtual machines created using an OVA template and cloud-based virtual machines.
5.3.4.1 - Working with OS Full Backup and Restore
Describes the procedure to back up and restore the entire OS
It is recommended to perform the full OS back up before any important system changes, such as appliance upgrade or creating a cluster, among others.
This option is available only for the on-premise deployments. It is not available for virtual machines created using an OVA template and cloud-based virtual machines.
Backing up the appliance OS
The backup process may take several minutes to complete.
Perform the following steps to back up the appliance OS.
Log in to the Appliance Web UI.
Proceed to System > Backup > Restore.
Navigate to the OS Full tab and click Backup.
A confirmation message appears.
Press ENTER.
The Backup Center screen appears and the OS backup process is initiated.
Navigate to Appliance Dashboard.A notification O.S Backup has been initiated appears. After the backup is complete, a notification O.S Backup has been completed appears.
Restoring the appliance OS
Use caution when restoring the appliance OS. Consider a scenario where it is necessary to restore a full OS backup that includes the external Key Store data. If the external Key Store is not working, then the HubController service does not start after the restore process.
Perform the following steps to restore the appliance OS.
Login to the Appliance Web UI.
Proceed to System > Backup & Restore.
Navigate to the OS Full tab and click Restore.A message that the restore process is initiated appears.
Select OK.The restore process starts and the system restarts after the process is completed.
Log in to the appliance and navigate to Appliance Dashboard.A notification O.S Restore has been completed appears.
5.3.4.2 - Backing up the data
Describes the procedure to back up data using the export feature
Using the Export tab, you can create backups of the product configurations and/or appliance OS core configuration.
Before you begin
Starting from the Big Data Protector 7.2.0 release, the HDFS File Protector (HDFSFP) is deprecated. The HDFSFP-related sections are retained to ensure coverage for using an older version of Big Data Protector with the ESA 7.2.0.
If you plan to use ESAs in a Trusted Appliances Cluster, and you are using HDFSFP with the DFSFP patch installed on the ESA, then ensure that you clear the DFSFP_Export check box when exporting the configurations from the ESA, which will be designated as the Master ESA.
In addition, for the Slave ESAs, ensure that the HDFSFP datastore is not defined and the HDFSFP service is not added.
The HDFSFP data from the Master ESA should be backed up to a file and moved to a backup repository outside the ESA. This will help in retaining the data related to HDFSFP, in cases of any failures.
Backing up configuration to local file
Perform the following steps to backup the configuration to local file.
Navigate to System > Backup & Restore > Export.
In the Export Type area, select To File radio button.
In the Data To export area, select the items to be exported.Click more.. for the description of every item.
Click Export.The Output File screen appears.
Enter information in the following fields:
Output File: Name of the file. If you want to replace an existing file on the system with this file, click the Overwrite existing file check box.
Password: Password for the file.
Export Description: Information about the file.
Click Confirm.A message Export operation has been completed successfully appears. The created configuration is saved to your system.
Exporting Configuration to Cluster
You can export your appliance configuration to the trusted appliances cluster, which your appliance belongs to. The procedure of creating the backup is almost the same as exporting to a file.
You need to define what configurations to export, and which nodes in the cluster receive the configuration. You do not need to import the files as is required when backing up the selected configuration. The configuration will be automatically replicated on the selected nodes when you export the configuration to the cluster.
When you are exporting data from one ESA to other, ensure that you run separate tasks to export the LDAP settings first and then the OS settings.
When exporting configurations to cluster nodes (from primary ESA to secondary ESAs), ensure to not select the following options in the Data To Export section:
SSH Settings
Certificates
Management and WebService Certificates
Import All Policy-Management Configs, Keys, Certs, Data but without Key Store files for Trusted Appliance Cluster
Important: Scheduled tasks are not replicated as part of cluster export.
Perform the following steps to export a configuration to a trusted appliances cluster.
Log in to the primary ESA using the admin credentials.
Navigate to System > Backup & Restore > Export.
In the Export Type area, select the To Cluster radio button.
In the Data to Export, select the items that you want to export from your machine and import to the cluster nodes.
Click Next.
In the Source Cluster Nodes, select the nodes that will run this task.
Specify the nodes by label or select individual nodes.
Click Next.
In the Target Cluster Nodes, select the nodes where the configuration needs to be exported. Specify them by label or select individual nodes. Select to show command line, if necessary.
Click Review.
The New Task screen appears.
Enter the required information in the following sections.
Basic Properties
Frequencies
Restriction
Logging
Click Save.
A dialog box to enter the root password appears.
Enter the root password and click OK.
The scheduled task is created.
Navigate to System > Task Scheduler.
Select the created task and click Run Now! to run the scheduled task immediately.
A confirmation dialog box appears. Click Ok.
The configurations are exported to the selected cluster nodes.
5.3.4.3 - Backing up custom files
Describes the procedure to back up custom files using the export feature
In the ESA, you can export or import the files that cannot be exported using the cluster export task. The custom set of files include configuration files, library files, directories containing files, and any other files. On the ESA Web UI, navigate to Settings > System > Files to view the customer.custom file. That file contains the list of files to include for export and import.
The following figure displays a sample snippet of the customer.custom file.
If you include a file, then you must specify the full path of the file. The following snippet explains the format for exporting a file.
/<directory path>/<filename>.<extension>
For example, to export the abc.txt file that is present in the test directory, you must add the following line in the customer.custom file.
/test/abc.txt
If the file does not exist, then an error message appears and the import export process terminates. In this case, you can add the prefix optional to the file path in the customer.custom file. This ensures that if the file does not exist, then the import export process continues without terminating abruptly.
If the file exists and the prefix optional is added, then the file is exported to the other node.For example, if the file 123.txt is present in the test directory, then it is exported to the other node. If the file does not exist, then the export of this file is skipped and the other files are exported.optional:/abc/test/123.txt
If you include a directory, then you must specify the full path for the directory. All the files present within the directory are exported. The following snippet explains the format for exporting all the files in a directory.
/<directory path>/*
For example, to export a directory test_dir that is present in the /opt directory, add the following line in the customer.custom file.
/opt/test_dir/*
You can also include all the files present under the subdirectories for export. If you prefix the directory path with the value recursive, then all the files within the subdirectories are also exported.
For example, to export all the subdirectories present in the test_dir directory, add the following line in the customer.custom file.
recursive:/opt/test_dir/
For more information about exporting directories, refer to the section Editing the customer.custom File to Include Directories.
You must export the custom files before importing them to a file or on the other nodes on a cluster.
5.3.4.4 - Exporting the custom files
Describes the procedure to export the customer.custom file to a local file or to a cluster
Perform the following steps to export the customer.custom file to a local file or to a cluster.
Exporting the customer.custom file to a local file
Navigate to System > Backup & Restore > Export.
In the Export Type area, select To File.
In the Data To Export area, select Appliance OS Configuration.
Click Export.The Output file screen appears.
Enter the name of the file in the Export Name text box.
Enter the required password in the Password text box.
Click Confirm.The message Export operation has been completed successfully appears.
Click the Done button.The file is exported and is stored in the /products/exports directory.
On the CLI Manager, navigate to Administration > Backup/Restore Center > Export data/configurations to a local file.
Select Appliance OS Configuration and select OK.A screen to enter the export information appears.
Enter the required name of the file in the Export Name text box.
Enter the required password in the Password and Confirm text boxes.
Select OK.
Select Done after the export operation completes.
Exporting the customer.custom file on a cluster
On the Web UI, navigate to System > Backup & Restore > Export.
In the Export Type area, select Cluster Export option.
If the configurations must be exported to a different ESA, then clear the Certificates check box. For information about copying Insight certificates across systems, refer to Rotating Insight certificates.
Click Start Wizard.
Select User custom list of files in the Data To Import tab.
Click Next.
Select the required options in the Source Cluster Nodes tab and click Next.
Select the required options in the Target Cluster Nodes tab and click Review.
Enter the required data in the Basic Properties, Frequency, Logging, and Restriction areas.For more information about the task details, refer Schedule Appliance Tasks.
The message Export operation has been completed successfully appears.
Click Save.A File saved message appears.
On the CLI Manager, navigate to Administration > Backup/Restore Center > Export data/configurations to remote appliance(s).
Select the required file or configuration to export and select OK.
Enter the required password for the file or configuration.
Select Custom Files and folders and select OK.
Enter the required credentials for the target appliance on the Target Appliance(s) screen.
Select OK.The custom files and configurations are exported to the target node.
Click Save.
5.3.4.5 - Importing the custom files
Describes the procedure to import the customer.custom file to a local file or to a cluster
Perform the following steps to import the customer.custom file to a local file.
Importing the customer.custom file to a local file
On the Web UI, navigate to System > Backup & Restore > Import.
From the dropdown menu, select the exported file.
Click Import.
On the following screen, select Custom Files and folders.
Enter the password for the file in the Password text box and click Import.
The message File has been imported successfully appears.
Click Done.
On the CLI Manager, navigate to Administration > Backup/Restore Center > Import configurations from a local file.The Select an item to import screen appears.
Select the required file or configuration to export and select OK.The contents of the file appear.
Select OK.
Enter the required password on the following screen and select OK.
Select the required components.
Warning: Ensure to select each component individually.
Select OK.The file import process starts.
Select Done after the import process completes.
5.3.4.6 - Working with the custom files
Describes the procedure to edit the customer.custom file or directory
Editing the customer.custom file
Administration privileges are required for editing the customer.custom file.
This section describes the various options that are applicable when you export a file.
Consider the following scenarios for exporting a file:
Include a file abc.txt present in the /opt/test directory.
Include all the file extensions that start with abc in the /opt/test/check directory.
Include multiple files using regular expressions.
To edit the customer.custom file from the Web UI:
On the Web UI, navigate to Settings > System > Files.
Click Edit beside the customer.custom file.
Configure the following settings to export the file.
#To include the abc.txt file/opt/test/abc.text#If the file does not exist, skip the export of the fileoptional:/opt/test/pqr.txt#To include all text files/opt/test/*.txt#To include all the files extensions for file abc present in the /opt/test/check directory/opt/test/check/abc.*#To include files file1.txt, file2.txt, file3.txt, file4.txt, and file5.txt/opt/test/file[1-5].txt
Click Save.
It is recommended to use the Cluster export task to export Appliance Configuration settings, SSH settings, Firewall settings, LDAP settings, and HA settings. Do not import Insight certificates using Certificates, rotate the Insight certificates using the steps from Rotating Insight certificates.If the files exist at the target location, then they are overwritten.
Editing the customer.custom File to Include Directories
This section describes the various options that are applicable when you export a file.
Consider the following scenarios for exporting files in a directory:
Export files is the directory abc_dir present in the /opt/test directory
Export all the files present in subdirectories under the abc_dir directory
Ensure that the files mentioned in the customer.custom file are not specified in the exclude file.For more information about the exclude file, refer to the section Editing the Exclude File.
To edit the customer.custom file from the Web UI:
On the Web UI, navigate to Settings > System > Files.
Click Edit beside to the customer.custom file.The following is a snippet listing the sample settings for exporting a directory.
#To include all the files present in the abc directory
/opt/test/abc_dir/*
#To include all the files in the subdirectories present in the abc_dir directory
recursive:/opt/test/abc_dir
If you have a Key Store configured with ESA, then you can export the Key Store libraries and files using the customer.custom file. The following is a sample snippet listing the settings for exporting a Key Store directory.
#To include all the files present in the Safeguard directory
/opt/safeguard/*
#To include all the files present in the Safenet directory
/usr/safenet/*
The following is a sample snippet listing the settings for exporting the self-signed certificates.
#To include all the files present in the Certificates directory
/etc/ksa/certificates
Click Save.
Editing the customer.custom File to include files
The library files and other settings that are not exported using the cluster export task can be addressed using the customer.custom file.
Ensure that the files mentioned in the customer.custom file are not specified in the exclude file.For more information about the exclude file, refer to the section Editing the Exclude File.
To edit the customer.custom file from the Web UI:
On the Web UI, navigate to Settings > System > Files.
Click Edit beside to the customer.custom file.If you have a Key Store configured with ESA, then you can export the Key Store libraries and files using the customer.custom file. The following is a sample snippet listing the settings for exporting a Key Store directory.
#To include all the files present in the Safeguard directory
/opt/safeguard/*
#To include all the files present in the Safenet directory
/usr/safenet/*
The following is a sample snippet listing the settings for exporting the self-signed certificates.
#To include all the files present in the Certificates directory
/etc/ksa/certificates
Click Save.
Editing the exclude files
The exclude file contains the list of system files and directories that you don’t want to export. You can access the exclude file from the CLI Manager only. The exclude file is present in the /opt/ExportImport/filelist directory.
A user which has root privileges is required to edit the exclude file, as it lists the system directories that you cannot import.
If a file or directory is present in both the exclude file and the customer.custom file, then the file or directory is not exported.
The following directories are in the exclude file:
/etc
/usr
/sys
/proc
/dev
/run
/srv
/boot
/mnt
/OS_bak
/opt_bak
The list of files mentioned in the exclude file affect only the customer.custom file and not the standard cluster export tasks.
If you want to export or import files, then ensure that these files are not listed in the exclude file.
To edit the exclude file:
On the CLI Manager, navigate to Administration > OS Console.
Navigate to the /opt/ExportImport/filelist/ directory.
Edit the exclude file using an editor.
Perform the required changes.
Save the changes.
5.3.4.7 - Restoring configurations
Describes the procedure to restore the backup configurations
Using the Import tab, you can restore the created backups of the product configurations and appliance OS core configuration. Using the Import tab, you also can upload a configuration file saved on your local machine to the appliance. You can also download a configuration file from the appliance and save it to your local machine.
Using the Import tab, you also can:
Upload a configuration file saved on your local machine to the appliance.
Download a configuration file from the appliance and save it to your local machine.
Before importing
Before importing the configuration files, ensure that the required products are installed in the appliance. For example, if you are importing files related to Consul Configuration and Data, ensure that the Consul product is installed in the appliance.
When you import files or configurations on an appliance from another appliance, different settings such as, firewall, SSH, or OS are imported. During this import, the settings on the target appliance might change. This might cause a product or component on the target appliance to stop functioning. Thus, after an import of the file or settings is completed, ensure that the settings, such as, ports, SSH, and firewall on the target machine are compatible with the latest features and components.For example, new features, such as, Consul are added to v7.1 MR2. When you import the settings from the previous versions, the settings in v7.1 MR2, such as, firewall or ports are overridden. So, you must ensure that the rules are added for the functioning of the new features.
When you import files or configurations, ensure that each component is selected individually.
Restoring configuration from backup
To restore a configuration from backup:
Navigate to the System > Backup & Restore.
Navigate to the Import tab, select a saved configuration from the list and click Import.
Choose specific components from the exported configuration if you do not want to restore the whole package.
If the configurations must be imported on a different ESA, then clear the Certificates check box. If you import the ESA Management and WebService Certificates from a different node in the cluster, then rotate the Insight certificates after the import is complete. For rotating the Insight certificates, use the steps from Rotating Insight certificates.
In the Password field, enter the password for the exported file and click Import.
5.3.4.8 - Viewing Export/Import logs
Procedure to view the saved logs
When you export or import files using the Web UI, the operation log is saved automatically. These log files are displayed in Log Files tab. You can view, delete, or download the log files.
When you export or import files using the CLI Manager, the details of the files are logged.
5.3.5 - Scheduling appliance tasks
Describes the scheduled tasks
Navigating to System > Task Scheduler you can schedule appliance tasks to run automatically. You can create or manage tasks from the ESA Web UI.
5.3.5.1 - Viewing the scheduler page
Describes the scheduler page
The following figure illustrates the default scheduled tasks that are available after you install the appliance.
The Scheduler page displays the list of available tasks.
To edit a task, click Edit. Click Save and then click Apply and enter the root password after performing the required changes.
To delete a task, select the required task and click Remove. Then, click Apply and enter the root password to remove the task.
On the ESA Web UI, navigate to Audit Store > Dashboard > Discover screen to view the logs of a scheduled task.
For creating a scheduled task, the following parameters are required.
Basic properties
Customizing frequency
Execution
Restrictions
Logging
The following tasks must be enabled on any one ESA in the Audit Store cluster. Enabling the tasks on multiple nodes will result in a loss of data. If these scheduler task jobs are enabled on an ESA that was removed, then enable these tasks on another ESA in the Audit Store cluster.
Update Policy Status Dashboard
Update Protector Status Dashboard
Basic properties
In the Basic Properties section, you must specify the basic and mandatory attributes of the new task. The following table lists the basic attributes that you need to specify.
Attribute
Description
Name
A unique numeric identifier must be assigned.
Description
The task displayed name, which should also be unique.
Frequency
You can specify the frequency of the task:
Every 10 minutes
Every 30 minutes
Every hour
Every 4 hours
Every 12 hours
Daily - every midnight
Weekly - every Sunday
Monthly - first day of the month
Custom - specify the custom frequency in the Frequency section
Customizing frequency
In the Frequency section of the new scheduled task, you can customize the frequency of the task execution. The following table lists the frequency parameters which you can additionally define.
Attribute
Description
Notes
Minutes
Defines the minutes when the task will be executed:
Every minute
Every 10 minutes
Every 30 minutes
From 0 to 59
Every minute is the default. You can select several options, or clear the selection. For example, you can select to execute the task on the first, second, and 9th minute of the hour.
Days
Defines the day of the month when the task will be executed
Every day
Every two days
Every seven days
Every 14 days
From 1 to 31
Every day is the default. You can select several options, or clear the selection.
Days of the week
Defines the day of the week when the task will be executed:
From Sun to Mon
Every DOW - day of the week
Every 2nd Sun to every 2nd Mon.
Every 4 hours
Every 12 hours
Daily - every midnight
Weekly - every Sunday
Monthly - first day of the month
Custom - specify the custom frequency in the Frequency section
Every DOW (day of week) is the default. You can select several options, or clear the selection.
Hours
Defines the hour when the task will be executed
Every hour
From 0 to 23
Every two hours
Every four hours
Every eight hours
*/6 (every six hours).
Every hour is the default. You can select several options, or clear the selection. If you select *, then the task will be executed each hour.If you select */6, then the task will be executed every six hours at 0, 6, 12, and 18.
Month
Defines the month when the task will be executed
Every month
From Jan to Dec
Every two months
Every three months
Every four months
Every six months
Every month is the default. You can select several options, or clear the selection. If you select *, then the task will be executed each month.
The Description field of Frequency section will be automatically populated with the frequency details that you specified in the fields mentioned in the following table. Task Next Run will hint when the task next run will occur.
Execution
In the Command Line section, you need to specify the command which will be executed, and the user who will execute this command. You can optionally specify the command parameters separately.
Command LineIn the Command Line edit field, specify a command that will be executed. Each command can include the following items:
The task script/executable command.
User name to execute the task is optional.
Parameters to the script as part of the command is optional, can be specified separately in the Parameters section.
ParametersUsing the Parameters section, you can specify the command parameters separately.
You can add as many parameters as you need using the Add Param button, and remove the unnecessary ones by clicking the Remove button.
For each new parameter you need to enter Name (any), Type (option), and Text (any).
Each parameter can be of text (default) and system type. If you specify system, then the parameter will be actually a script that will be executed, and its output will be given as the parameter.
UsernameIn the Username edit field, specify the user who owns the task. If not specified, then tasks run as root.
Only root, local_admin, and ptycluster users are applicable.
Restrictions
In a Trusted Appliance cluster, Restrictions allow you to choose the sites on which the scheduled tasks will be executed. The following table lists the restrictions that you can select.
Attribute
Description
On master site
The scheduled tasks are executed on the Master site
On non-master site
The scheduled tasks are executed on the non-Master site
If you select both the options, On master site and On non-master site, then the scheduled task is executed on both sites.
Logging
In the Logging section, you should specify the logging details explained in the table below:
Logging Detail
Description
Notes
Show command line in logs?
Select a check-box to show the command line in the logs.
It is advisable not to select this option if the command includes sensitive data, such as passwords.
SysLogLog Server
Define the following details:
Success severity
Success title
Fail severity
Fail title
You should configure these fields to be able to easily analyze the incoming logs. Specifies whether to send an event to the Log Server (ESA) and the severity: No event, Lowest, Low, Medium, High, Critical for failed/success task execution.
Log File
Specify the files names where the success and failed operations are logged.
Specifies whether to store the task execution details in local log files. You can specify to use the same file for successful and failed events. These files will be located in /var/log. You can also examine the success and failed logs in the Appliance Logs, in the appliance Web Interface.
5.3.5.2 - Creating a scheduled task
Describes the procedure to create a scheduled task
Perform the following steps to create a scheduled task.
On the ESA Web UI, navigate to System > Task Scheduler.
Click New Task.
The New Task screen appears.
Enter the required information in the Basic Properties section.For more information about the basic properties, refer here.
Enter the required information in the Frequencies section.For more information about customizing frequencies, refer here.
Enter the required information in the Command Line section.For more information about executing command line, refer here.
Enter the required information in the Restrictions section.For more information about restrictions, refer here.
Enter the required information in the Logging section.For more information about logging, refer here.
Click Save.A new scheduled task is created.
Click Apply to apply the modifications to the task.A dialog box to enter the root user password appears.
Enter the root password and click OK.The scheduled task is now operational.
Running the task
After completing the steps, select the required task and click Run Now to run the scheduled task immediately.
Additionally, you can create a scheduled task, for exporting a configuration to a trusted appliances cluster using System > Backup/Restore > Export.
5.3.5.3 - Scheduling Configuration Export to Cluster Tasks
Describes the procedure to schedule configuration export to a cluster task
You can schedule configuration export tasks to periodically replicate a specified configuration on the necessary cluster nodes.
The procedure of creating a configuration export task is almost the same as exporting a configuration to the cluster. The is a slight difference between these processes. In exporting a configuration to the cluster, it is a one-time procedure which the user needs to run manually. A scheduled task makes periodic updates and can be run a number of times in accordance with the schedule that the user specifies.
To schedule a configuration export to a trusted appliances cluster:
From the ESA Web UI, navigate to System > Backup & Restore > Export.
Under Export, select the Cluster Export radio button.
If the configurations must be exported on a different ESA, then clear the Certificates check box during the export. For information about copying Insight certificates across systems, refer to Rotating Insight certificates.
Click Start Wizard.
The Wizard - Export Cluster screen appears.
In the Data to import, customize the items that you need to export from this machine and imported to the cluster nodes.
Click Next.
In the Source Cluster Nodes, select the nodes that will run this task.
You can specify them by label or select individual nodes.
Click Next.
In the Target Cluster Nodes, select the nodes to import the data.
Click Review.
The New Task screen appears.
Enter the required information in the following sections.
Basic Properties
Frequencies
Command Line
Restriction
Logging
Click Save. A new scheduled task is created.
Click Apply to apply the modifications to the task. A dialog box to enter the root user password appears.
Enter the root password and click OK. The scheduled task is operational.
Click Run Now to run the scheduled task immediately.
5.3.5.4 - Deleting a scheduled task
Describes the procedure to delete a scheduled task
Perform the following steps to delete a scheduled task:
From the ESA Web UI, navigate to System > Task Scheduler.The Task Scheduler page displays the list of available tasks.
Select the required task.
Click Remove.A confirmation message to remove the scheduled task appears.
Click OK.
Click Apply to save the changes.
Enter the root password and select Ok.The task is deleted successfully.
5.4 - Viewing the logs
To view the logs in the Logs screen
Based on the products installed, you can view the logs in the Logs screen. Based on the components installed in ESA, the following are the logs are generated in the following screens:
Web Services Engine
Service Dispatcher
Appliance Logs
The information icon on the screen displays the order in which the new logs appear. If the new logs
appear on top, you can scroll down through the screen the view the previously generated logs.
Viewing Web Services Engine Logs
In the Web Services screen, you can view the logs for all the Web services requests on ports, such as, 443 or 8443.
The Web Services logs are classified as follows:
HTTP Server Logs
SOAP Module Logs
The following figure illustrates the HTTP Server Logs.
Navigate to Logs > Web Services Engine > Web Services HTTP Server Logs to view the HTTP Server logs.
Viewing Service Dispatcher Logs
You can view the logs for the Service Dispatcher under Logs > Service Dispatcher > Service Dispatcher Logs.
The following figure illustrates the service dispatcher logs.
Viewing Appliance Logs
You can view logs of the events occurring in the appliance under Logs > Appliance. The Appliance Logs page lists logs for each event and provides options for managing the logs. The logs files (.log extension) that are in the /var/log directory appear on the appliance logs screen. The logs can be categorized as all appliance component logs, installation logs, patch logs, kernel logs, and so on.
Current Event Logs are the most informative appliance logs and are displayed by default when you proceed to the Appliance Logs page. Depending on the logging level configuration (set in the appropriate configuration files of the appliance components), the Current Event Logs display the events in accordance with the selected level of severity (No logging, SEVERE, WARNING, INFO, CONFIG, ALL).
Based on the configuration set for the logs, they are rotated periodically.
The following figures illustrate the appliance logs.
The following table describes the actions you can perform on the appliance logs.
Action
Description
Print
Print the logs
Download
Download the logs to a specific directory
Refresh
Refresh the logs
Save a copy
Save a copy of the current log with a timestamp
Purge Log
Clear the logs
If the logs are rotated, the following message appears.Logs have been rotated. Do you want to continue with new logs?
Select OK to view the new logs generated.
For more information about configuring log rotation and log retention, refer here.
5.5 - Working with Settings
Describes the settings which can be configured using the ESA Web UI
The Settings menu on the ESA Web UI allows you to configure various features, such as, antivirus, two-factor authentication, networking, file management, user management, and licences.
5.5.1 - Working with Antivirus
Describes the operations which can be performed using the AntiVirus option
The Antivirus program uses ClamAV, an open source and cross-platform Antivirus engine designed to detect malicious Trojan, virus, and malware threats. A single file or directory, or the whole system can be scanned. Infected file or files are logged and can be deleted or moved to a different location, as required.
You can use Antivirus to perform the following functions:
Schedule the scans or run these on demand.
Update the virus data signature or database files, or run the update on demand.
View the logs generated for every virus found.
Simple user interfaces and standard configurations for both Web UI and CLI of the Appliance make viewing logs, running scans, or updating the virus signature file easy.
FIPS mode and Antivirus
If the FIPS mode is enabled, then the Antivirus is disabled on the appliance.
For more information on the FIPS Mode, refer here.
5.5.1.1 - Customizing Antivirus Scan Options
Describes the procedure to customize an Antivirus scan
In the Antivirus section, you can customize the scan by setting the following options:
Action: Ignore the scan result, move the file to a separate directory, or delete the infected files
Recursive: Implement and scan directories, sub-directories, and files
Scan Directory: Specify the directory
To customize Antivirus scan options:
Navigate to Settings > Security > Antivirus.
Click Options.
Choose the required options and click Apply.A message Option changes are accepted! appears.
5.5.1.2 - Scheduling Antivirus Scan
Describes the procedure to schedule an Antivirus scan
An Antivirus scan can be scheduled only from the Web UI.
Navigate to System > Task Scheduler.
Search Anti-Virus system scan.If it is present, then scanning is already scheduled.Verify the Frequency and update if required.
If Antivirus system scan is not present, then follow these steps:
a. Click +New Task.
b. Add the details, such as the Name, Description, and Frequency.
c. Add the command line steps, and Logging details.
Click Save at the top right of the window.
The Antivirus scanning automatically begins at the scheduled time and logs are saved.
5.5.1.3 - Updating the Antivirus Database
Describes the procedure to update the Antivirus database
You must update the Antivirus database or the signature files frequently. This ensures the Antivirus is updated so it can pick up any new threats to the appliance. The Antivirus database can either be updated from the official ClamAV website, local websites, mirrors, or using the signature files. The signature files are downloaded from the website and uploaded on the ESA Web UI. The following are the Antivirus signature database files that must be downloaded:
main.cvd
daily.cvd
bytecode.cvd
The Antivirus signature database files can be updated in one of the following two ways:
SSH/HTTP/HTTPS/FTP
Official website/mirror/local sites
It is recommended that you update the signature database files directly from the official website.
Updating the Antivirus Database Manually
Perform the following steps to update the Antivirus database.
On the ESA Web UI, navigate to Settings > Security > Antivirus.
Click Database Update > Settings.
Select one of the following settings.
Settings
Description
Local/remote mirror server
Server containing the database update. Enter the URL of the server in Input the target URL text box.
Official website through HTTP proxy server
Proxy server of ClamAV containing the database update. Enter the following information:
Username and Password: User credentials for logging in to the proxy server.
Server: IP address or URL of the proxy server.
Port Number: Port number of the proxy server. If no port number is specified, the default port is considered.
Local directory
Local directory where the updated database signature files, such as, main.cvd, daily.cvd and bytecode.cvd are stored. Enter the directory path in Input the target directory text box.
Remote host
Host containing the updated database signature files. Connect to this host using an SSH, HTTP, HTTPS, or FTP connection. Enter information in the required fields to establish a connection with the remote host.
Select Confirm.The database update is initiated.
Updating the Antivirus Signature Files Manually
In case network is not available or the Internet is disconnected, you can manually update the signature database files. The signature files are downloaded from the website and placed in a local directory. The following are the Antivirus signature database files that must be downloaded:
main.cvd
daily.cvd
bytecode.cvd
It is recommended that you update the signature database files directly from the official website.
Perform the following steps to manually update the Antivirus database signature files.
Download the Antivirus signature database files: main.cvd, daily.cvd, and bytecode.cvd.
On the CLI Manager, navigate to Administration > OS Console.
Create the following directory in the appliance:
/home/admin/clam_update/
Save the downloaded signature database files in the /home/admin/clam_update/ directory.
Scheduling Update of Antivirus Signature Files
Scheduling an update option is available only on the Web UI.
Go to System > Task Scheduler.
Select the Anti-Virus database update row.
Click Edit from the Scheduler task bar.For more information about scheduling appliance tasks, refer here.
Click Save at the top right corner of the workspace window.
5.5.1.4 - Working with Antivirus Logs
Describes the procedure to work with Antivirus logs
Log files are generated for all system and database activities. These logs are stored in the local log
file, runtime.log which is saved in the /etc/opt/Antivirus/ directory.
You can view and delete the local log files.
Viewing Antivirus Logs
The logs for the Antivirus can be viewed from the ESA Web UI. The logs consist of Antivirus database updates, scan results, infections found, and so on. These logs are also available on the Audit Store > Dashboard > Discover screen. You can view all logs, including those deleted, in the local file.
Perform the following steps to view logs.
Navigate to Settings > Security > Antivirus.
Click Log.
Deleting Logs from Local File Using the Web UI
Perform the following steps to delete logs from local file using the Web UI.
Navigate to Settings > Security > Antivirus.
Click Log.
Click Purge.All existing logs in the local log file are deleted.
Viewing Logs from the CLI Manager
Perform the following steps to delete logs from local file using the CLI Manager.
Navigate to Status and Logs > Appliance Logs.
Select System event logs.
Press View.
From the list of available installed patches, select patches.
Press Show.A detailed list of patch related logs are displayed on the ESA Server window.
Configuring Log Rotation and Log Retention
Perform the following steps to configure log rotation and log retention.
Append the following configuration to the /etc/logrotate.conf file:
5.5.2 - Configuring Appliance Two Factor Authentication
Describes the procedure to configure two factor authentication settings
Two factor authentication is a verification process where two recognized factors are used to identify you before granting you access to a system or website. In addition to your password, you must correctly enter a different numeric one-time passcode or the verification code to finish the login process. This provides an extra layer of security to the traditional authentication method.
In order to provide this functionality, a trust is created between the appliance and the mobile device being used for authentication. The trust is simply a shared-secret or a graphic barcode that is generated by the system and is presented to the user upon first login.
There is an advantage of using the two-factor authentication feature. If a hacker manages to guess your password, then entry to your system is not possible. This is because a device is required to generate the verification code.
The verification code is a dynamic code that is generated by any smart device such as smartphone or tablet. The user enters the shared-secret or scans the barcode into the smart device, and from that moment onwards the smartphone generates a new verification-code every 30-60 seconds. The user is required to enter this verification code every time as part of the login process. For validating the one time password (OTP), ensure that the date and time on the ESA and your system are in sync.
Protegrity appliances and authenticators
There are a few requirements for using two factor authentication with Protegrity appliances.
For validating one time passwords (OTP), the date and time on the ESA and the validating device must be in sync.
Protegrity appliances only support use of the Google, Microsoft, or Radius Authenticator apps.
Download the appropriate app on a mobile device, or any other TOTP-compatable device or application.
The Security Officer configures the Appliance Two Factor Authentication by any one of the following three methods:
Automatic per-user shared-secret is the default and recommended method. It allows having a separate shared-secret for each user, which is generated by the system for them. The shared-secret will be presented to the user upon the first login.
Radius Authentication is the authentication using the RADIUS protocol.
Host-based shared-secret allows a common shared-secret for all users, which can be specified and distributed to the users by the Security Officer. Host-based shared-secret method is useful to force the same secret code for multiple appliances in clustered environments.
5.5.2.1 - Working with Automatic Per-User Shared-Secret
Describes the procedure to Automatic Per-User Shared-Secret
Automatic per-user shared-secret is the default and recommended method for configuring two factor authentication. It allows having a separate shared-secret for each user, which is generated by the system for them. The shared-secret will be presented to the user upon the first login.
Configuring Two Factor Authentication with Automatic Per-User Shared-Secret
The following section describes how to configure two factor authentication using automatic per-user shared-secret.
Perform the following steps to configure two factor authentication with automatic per-user shared-secret.
From the ESA Web UI, navigate to Settings > Security > Two Factor Authentication.
Check the Enable Two-Factor-Authentication check box.
Select the Automatic per-user shared-secret option.
The following pane appears with the options to enable this authentication mode.
If required, then you can customize the message that will be presented to users upon their first login.
Check the Advanced Settings check box to display the Console Message button. By clicking Console Message, a new window appears where you can review and modify the message that will be presented to the user.
You can apply the following logging-settings in order to specify what to log:
Log failed log-in attempts
Log any successful log-ins
Log only first-successful log-in
Click Apply to save the changes.
Logging in to the Web UI
Before beginning, be aware of time limits. When entering codes from the authenticator there is a time limit. Ensure codes are entered in the Enter Authentication code field within the displayed time limit.
The following section describes how to log in to the Web UI after configuring automatic per-user shared-secret.
Perform the following steps to login to the Web UI:
Navigate to the ESA Web UI login page.
In the Username and Password text boxes, enter the user credentials.
Click Sign in.The Two step authentication screen appears.
Scan the QR code using an authentication application.Alternatively, click the Can’t see QR code? link.A QR code gets generated and displayed below it as shown in the figure.
Enter the displayed code in the authentication app to generate One-time password.
In the Enter authentication code field box, enter the one-time password, and click Verify.
After the code is validated, the ESA home page appears.
5.5.2.2 - Working with Host-Based Shared-Secret
Describes the procedure to Host-Based Shared-Secret
Host-based shared-secret allows a common shared-secret for all users, which can be specified and distributed to the users by the Security Officer. Host-based shared-secret method is useful to force the same secret code for multiple appliances in clustered environments.
Configuring Two Factor Authentication with Host-Based Shared-Secret
The following section describes how to configure two factor authentication using host-based shared-secret.
Perform the following steps to configure Two Factor Authentication with Host-based shared-secret.
On the ESA Web UI, navigate to Settings > Security > Two Factor Authentication.
Check the Enable Two-Factor-Authentication check box.
Select Host-based shared-secret from Authentication Mode.
Click Modify.The Host-based shared-secret key appears. If required, click Generate to modify the Host-based shared-secret key. Ensure that you note the Host-based shared-secret key to generate TOTP.
You can apply the following logging-settings in order to specify what to log:
Log failed log-in attempts
Log any successful log-ins
Click Apply to save the changes.
A confirmation message appears.
Logging in to the Web UI
Before beginning, be aware of time limits. When entering codes from the authenticator there is a time limit. Ensure codes are entered in the authenticator code box within the displayed time limit
The following section describes how to log in to the Web UI after configuring host-based shared-secret.
To login to the Web UI:
Navigate to the ESA Web UI login page.
In the Username and Password text boxes, enter the user credentials.
Click Sign in.
The 2 step authentication screen appears.
Use the Host-Based Shared-Secret key obtained from the configuration process to generate authentication code.
Enter the Host-Based Shared-Secret key in the authentication app to generate authentication code.
In the authenticator code box, enter the authentication code, and click Verify.
After the code is validated, the ESA home page appears.
5.5.2.3 - Working with Remote Authentication Dial-up Service (RADIUS) Authentication
Describes the procedure work with RADIUS Authentication
The Remote Authentication Dial-up Service (RADIUS) is a networking protocol for managing authentication, authorization, and accounting in a network. It defines a workflow for communication of information between the resources and services in a network. The RADIUS protocol uses the UDP transport layer for communication. The RADIUS protocol consists of two components, the RADIUS server and the RADIUS client. The server receives the authentication and authorization requests of users from the RADIUS clients. The communication between the RADIUS client and RADIUS server is authenticated using a shared secret key.
You can integrate the RADIUS protocol with an ESA for two-factor authentication. The following figure describes the implementation between ESA and the RADIUS server.
The ESA is connected to the AD that contains user information.
The ESA is a client to the RADIUS sever that contains the network and connection policies for the AD users. It also contains a RADIUS secret key to connect to the RADIUS server. The communication between the ESA and the RADIUS sever is through the Password Authentication Protocol (PAP).
An OTP generator is configured with the RADIUS server. An OTP is generated for each user. Based on the secret key for each user, an OTP for the user is generated.
In ESA, the following two files are created as part of the RADIUS configuration:
The dictionary file that contains the default list of attributes for the RADIUS server.
The custom_attributes.json file that contains the customized list of attributes that you can provide to the RADIUS server.
Important : When assigning a role to the user, ensure that the Can Create JWT Token permission is assigned to the role.If the Can Create JWT Token permission is unassigned to the role of the required user, then remote authentication fails.To verify the Can Create JWT Token permission, from the ESA Web UI navigate to Settings > Users > Roles.
Configuring Radius Two-Factor Authentication
To configure Radius two-factor authentication:
On the ESA Web UI, navigate to Settings > Security > Two Factor Authentication.
Check the Enable Two-Factor-Authentication checkbox.
Select the Radius Server option as shown in the following figure.
Type the IP address or the hostname of the RADIUS server in the Radius Server text box.
Type the secret key in the Radius Secret text box.
Type the port of the RADIUS server in the Radius port text box.Alternatively, the default port is 1812.
Type the username that connects to the RADIUS server in the Validation User Name text box.
Type the OTP code for the user in the Validation OTP text box.
Click Validate to validate the configuration.A message confirming the configuration appears.
Click Apply to apply the changes.
Logging in to the Web UI
Perform the following steps to login to the Web UI:
Open the ESA login page.
Type the user credentials in the Username and Password text boxes.
Click Sign-in.The following screen appears.
Type the OTP code and select Verify.After the OTP is validated, the ESA home page appears.
Editing the Radius Configuration Files
To edit the configuration files:
On the ESA Web UI, navigate to Settings > System.
Under OS-Radius Server tab, click Edit corresponding to the custom_attibutes.json or directory to edit the attributes.
If required, modify the attributes to the required values.
Click Save.The changes are saved.
Logging in to the CLI
Perform the following steps to login to CLI Manager:
Open the ESA CLI Manager.
Enter the user credentials.
Press ENTER .The following screen appears.
Type the verification code and select OK.After the code is validated, the main screen for the CLI Manager appears.
5.5.2.4 - Working with Shared-Secret Lifecycle
Describes the procedure work with shared-secret lifecycle
All users of appliance two factor authentication get a shared-secret for verification. This shared-secret for a user remains in the two factor authentication group list until it is manually deleted. Even if a user becomes ineligible to access the system, the username remains linked to the shared-secret.
This exception is valid for those users opting for per-user authentication.
If the same user or another user with the same name is again added to the system, then the user becomes eligible to use the already existing shared-secret.
To prevent this exception, ensure that an ineligible user is manually removed from the Two Factor Authentication group.
Revoking Shared-Secret for the User
The option to revoke shared-secret is useful when user needs to switch to another mobile device or the previous shared-secret cannot be retrieved from the earlier device.
Perform the following steps to revoke shared-secret for the user:
On the ESA Web UI, navigate to Settings > Security > Two Factor Authentication.
Ensure that the Enable Two-Factor-Authentication and Automatic per-user shared-secret checkbox are checked.
Inspect Users Shared Secrets area to identify user account to revoke.You can revoke users who have already logged in to the Appliance.
Click Revoke.
Select the user to discard by clicking the checkbox next to the username.
Click Apply to save the changes.A new shared-secret code will be created for the revoked user and is presented upon the next login.
5.5.2.5 - Logging in Using Appliance Two Factor Authentication
Describes the procedure to log in using the Two Factor Authentication
Perform the following steps to log in using Appliance Two Factor Authentication:
Navigate to ESA login page.
Enter your username.
Enter your password.
Click Sign in.After verification, a separate login dialog appears.
As a prerequisite, a new user must setup an account on Google Authenticator. Download the Google Authenticator app in your device and follow the instructions to create a new account.
Enter the shared-secret in your device.If the system is configured for per-user shared-secret, then this secret code is made available. If this is a web-session, then you are presented with a barcode and the applications that support it.
After you accept the shared-secret, the device displays a verification code.
Enter this verification code in the screen displayed in step 4.
Click Verify.
5.5.2.6 - Disabling Appliance Two Factor Authentication
Describes the procedure to disable the Two Factor Authentication
Perform the following steps to disable Two Factor Authentication:
Using the ESA Web UI, navigate to Settings > Security > Two Factor Authentication.
Clear the Enable Two-Factor-Authentication checkbox.
Click Apply to save the changes.
Disable Two Factor through local console
You can also disable two-factor authentication from the local console.You need to switch to OS console and execute the following command.
# /etc/opt/2FA/2fa.sh -–disable
5.5.3 - Working with Configuration Files
Describes the work with the configuration file
The Product Files screen displays the configuration files of all the products that are installed in ESA. You can view, modify, delete, upload, or download the configuration files from this screen. In the ESA Web UI, navigate to Settings > System > Files to view the configuration files.
The following table describes the different products and their respective configuration files that are available in ESA.
Product
Configuration Files
Description
OS – Radius Server
Dictionary
Contains the dictionary translations for analyzing requests
and generating responses for RADIUS server.
custom_attributes.json
Contains the configuration settings of the header data for
the RADIUS server.
OS –Export/Import
Customer.custom
Lists the custom files that can be exported or
imported.
For more information about exporting custom files, refer here.
Audit Store-SMTP Config Files
smtp_config.json
Contains the SMTP configuration settings for sending email alerts.
smtp_config.json.example
Contains SMTP configuration settings and example values for sending email alerts. This is a template file.
Policy Management – Member Source Service User
Files
Contains the DFSFP configuration settings such as, logging,
SSL, Security, and so on.
For more information about the
dfscacherefresh.cfg file, refer to the
Protegrity Big Data Protector Guide 9.2.0.0
.
Note
Starting
from the Big Data Protector 7.2.0 release, the HDFS File Protector
(HDFSFP) is deprecated. The HDFSFP-related sections are retained
to ensure coverage for using an older version of Big Data
Protector with the ESA 7.2.0.
Cloud Gateway –Settings
gateway.json
Lists the log level settings for Data Security Gateway.
For more information about the
gateway.json file, refer to the Protegrity Data Security Gateway User Guide
3.2.0.0.
alliance.conf
Configuration file to direct syslog events between servers
over TCP or UDP.
The following figure illustrates various actions that you can perform on the Product Files screen.
Callout
Description
Action
1
Collapse/Expand
Collapse or expand to view the configuration files.
2
Edit
Edit the configuration file.
3
Upload
Upload a configuration file.Note: When you upload a file, it replaces the existing file in the system.
4
Download
Download the file to your local system.
5
Delete
Delete the file from the system.
6
Download
Download all the files of the product to your local system.
7
Reset
Reset the configuration to the previously saved settings.
Viewing a Configuration File
You can view the contents of the configuration file from the Web UI. If the file size is greater than 5 MB, you must download the file to view the contents.
Perform the following steps to view a file:
Navigate to Settings > System > Files.The screen with the files appears.
Click on the required file.
The contents of the file appear.
You can modify, download, or delete the file using the Edit, Download and Delete icon respectively.
Uploading a Configuration File
Configuration files can be uploaded using this option.For more information about the configuration files, refer Working with Configuration Files.
Perform the following steps to upload a file.
Navigate to Settings > System > Files.The screen with the files appears.
Click on the upload icon.The file browser icon appears.
Select the configuration file and click Upload File.A confirmation message appears.
Click Ok.A message confirming the upload appears.
Modifying a Configuration File
In addition to editing the file from the Files screen, you can also modify the content of the file from the view option. If you want to modify the content of a file whose size is greater than 5 MB, you must download the file to the local machine, modify the content, and then upload the file through the Web UI.
For instructions to download a configuration file, refer here.
Perform the following steps to modify a file.
Navigate to Settings > System > Files.The screen with the files appears.
Click on the required file.The contents of the file appear.
Click the Edit to modify the file.
Perform the required changes and click Save.A message confirming the changes appears.
Deleting a Configuration File
In addition to deleting the file from the Files screen, you can also delete the file from the view option. After you delete the file, an exclamation icon appears indicating that the file does not exist on the server. Using the reset functionality, you can restore the deleted file.
Perform the following steps to delete a file.
Navigate to Settings > System > Files.The screen with the files appears.
Click on the required file.The contents of the file appear.
Click the Delete icon to modify the file.A message confirming the deletion appears.
Select Yes.
Resetting a File
The Reset functionality is used to restore the changes that are done to your file. For every configuration file, the Reset icon is disabled. This icon is enabled when you perform any of the following changes:
Modify the configuration file
Delete the configuration file
When you modify or delete a file, the original file is backed up in the /etc/configuration-files-backup directory. For every modification, the file in the directory is overwritten. When you click the Reset icon, the file is retrieved from the directory and restored on the Files screen.
Perform the following steps to restore a file.
Navigate to Settings > System > Files.The screen with the files appears.
Click the Reset icon to restore a file.The file that is edited or deleted is restored.
Limits on resetting files
Only the changes that are performed on the files through the Web UI are backed up. Changes performed on the files through the CLI Manager are not backed up and cannot be restored.
5.5.4 - Working with File Integrity
Describes working with the file integrity option
The content modifications can be viewed by the Security Officer since the PCI specifications require that sensitive files and folders in the Appliance are monitored. This information contains password, certificate, and configuration files. The File Integrity Monitor makes a weekly check and all changes made to these files can be reviewed by authorized users.
To check file modifications at any given time, click Settings > Security > File Integrity > Check. The Security Officer views and accepts the changes, writing comments as necessary, in the comment box. Accepting changes means that the changes are removed from the viewable list. Changes cannot be rejected. You must not accept deletion of system files. These files must be available.
Only the last modification made to a file appears.
All the changes can also be viewed on the Audit Store > Dashboard > Discover screen. Another report shows all accepted changes.
For more information about Discover, refer Discover.
Before applying a patch, it is recommended to check the files and accept the required changes under Settings > File Integrity > Check.
After installing the patches for appliances such as ESA or DSG, check the files and accept the required changes again under Settings > Security > File Integrity > Check.
5.5.5 - Managing File Uploads
Describes the procedure to manage file uploads
You can upload a patch file of any size from the File Upload screen in the ESA Web UI. The files uploaded from the Web UI are available in the /opt/products_uploads directory.
After the file is uploaded, in the Uploaded Files section, select the file to view the file information, download it, or delete it.
To upload a file:
Navigate to Settings > System > File Upload.The File Upload page appears.
In the File Selection section, click Choose File.The file upload dialog box appears.
Select the required file and click Open.
You can only upload files with .pty and .tgz extensions.
If the file uploaded exceeds the Max File Upload Size, then a password prompt appears. Only a user with the administrative role can perform this action. Enter the password and click Ok.
By default, the Max File Upload Size value is set to 25 MB. To increase this value, refer here.
Click Upload.The file is uploaded to the /opt/products_uploads location.
If a file contains spaces in its name, then it will be automatically replaced with underline character (_).
The files are scanned by the internal AntiVirus before they are uploaded in the ESA.
If the FIPS mode is enabled, then the anti-virus scan is skipped during the file upload.
The SHA512 checksum value is validated during the upload process.
If the network is interrupted while uploading the file, then the ESA retries to upload the file.The retry upload process is attempted ten times. Each attempt lasts for ten seconds.
After the file is uploaded successfully, then from the Uploaded Files area, choose the uploaded patch.The information for the selected patch appears.
Verifying uploaded file integrity
To verify the integrity of the uploaded file, validate the checksum values displayed on the screen with the checksum values of the downloaded patch file.You can obtain the checksum values from the My.Protegrity or contact Protegrity Support.
5.5.6 - Configuring Date and Time
Describes the procedure to configure date and time
You can use the Date/Time tab to change the date and time settings. To update the date and time, navigate to Settings > System > Date/Time.
The Date and Time screen with the Update Time Periodically option enabled is shown in the following figure.
The date and time options are described in the following table.
Setting
Details
How to configure/change
Update Time Periodically
Synchronize the time with the specified NTP Server, upon boot and once an hour.
You can enable this option using Enable button and disable it using Disable. Only enable or disable NTP settings from the CLI Manager or the Web UI.
Current Appliance Date/Time
Manually synchronize the time with the specified NTP Server. You can use NTP Server synchronization only if NTP service is running.
You can force and restart time synchronization using Reset NTP Sync. You can display NTP analysis using NTP Query button.
Set Time Zone
Specify the time zone for your appliance.
Select your local time zone from the Set Time Zone list and click Set Time Zone.
Set Manually Date/Time (mm/dd/yyyy hh:mm)
Set the time manually.
Type the date and time using the format mm/dd/yyyy hh/mm. Click Set Date/Time.Note: The Set Manually Date/Time (mm/dd/yyyy hh:mm) text box appears only if the Update Time Periodically functionality is disabled.
5.5.7 - Configuring Email
Describes the procedure to configure Email
The SMTP setting allows the system to send emails.
You can test that the email works by clicking Test. Error logs can be viewed on the Audit Store > Dashboard > Discover screen.
Some scripts run after you click Save.Ensure to save the details only when the connection is intact.
If the email address cannot be authenticated, then the Show Test Communication area displays the communication between the appliance and the SMTP server for debugging.
5.5.8 - Configuring Network Settings
Describes the procedure to configure the network settings
On the Network Settings screen, you can configure the network details for the ESA. The following table explains the different settings that can be configured.
Information in the following table is specific to the Web UI. For information on the same features and configuring them in the CLI, refer here.
Setting
Details
How to configure/change
Hostname
The hostname is a unique name for a system or a node in a network.In the hostname field, if special characters are to be used, then only hyphen (-) is supported.
Click Apply on the Web UI or change the hostname of the appliance from the Network Settings screen in the CLI Manager.
Management IP
The management IP, which is the IP address of the appliance, is defined through CLI Manager.
Select Blink to identify the interface. This will cause a LED on the NIC to blink and then click Change.
Default Route
The default route is an optional destination for all network traffic that does not belong to the LAN segment. For example, the IP address of your LAN router in the IP address format is 172.16.8.12. It is required only if the appliance is on a different subnet than the Appliance Web Interface.
Click Apply to set the default route.
Domain
The appliance domain name specified during appliance installation.
You can change it by specifying a new name and clicking Apply.
Search Domains
The appliance can belong to one domain and search an additional three domains.
You can add them using Add button.
Domain Name Servers
If your appliance uses domain names and IP addresses, then you must configure a domain name server (DNS) to help resolve Internet name addresses. The domain name should be for your local network, like Protegrity.com or math.mit.edu and the name servers should be IP addresses. The appliance can use up to three DNS servers for name resolving. Once you have configured a DNS, the system can be managed using an SSH connection.
You can add them using Add button, and remove them using Remove. You can specify them using Apply button.
5.5.8.1 - Managing Network Interfaces
Describes the procedure to manage the network interfaces
Using Settings > Network > Network Settings, you can view appliance network interfaces names and addresses and add them from the Interfaces page.
Changes to IP addresses
Changes to IP addresses are immediate. Changes to the management IP (on ethMNG), while connected via SSH or the Appliance Web Interface, causes the session to disconnect.
Assigning an Address to an Interface
Perform the following steps to assign an address to an interface.
Identify the interface on the appliance by clicking Blink for the interface you want to identify.Select a LED on the NIC that blinks to indicate that interface.
In the Interface row, type the address and Net mask of the interface, and then click Add.
Assigning an Address to an Interface Using Web UI
Perform the following steps to assign an address to an interface.
In the Web UI, navigate to Settings > Network > Network Settings.The Network Settings page appears.
In the Network Interfaces area, select Add New IP in the Gateway column. Ensure that the IP address for the NIC is added.
Enter the IP address of the default gateway and select OK.The default gateway for the interface is added.
5.5.8.2 - NIC Bonding
Describes the procedure to manage the NIC interfaces
The Network Interface Card (NIC) is a device through which appliances, such as ESA or DSG, on a network connect to each other. If the NIC stops functioning or is under maintenance, the connection is interrupted, and the appliance is unreachable. To mitigate the issues caused by the failure of a single network card,
Protegrity leverages the NIC bonding feature for network redundancy and fault tolerance. In NIC bonding, multiple NICs are configured on a single appliance. You then bind the NICs to increase network redundancy. NIC bonding ensures that if one NIC fails, the requests are routed to the other
bonded NICs. Thus, failure of a NIC does not affect the operation of the appliance. You can bond the configured NICs using different bonding modes.
Bonding Modes
The bonding modes determine how traffic is routed across the NICs. The MII monitoring (MIIMON) is a link monitoring feature that is used for inspecting the failure of NICs added to the appliance. The frequency of monitoring is 100 milliseconds. The following modes are available to bind NICs together:
Mode 0/Balance Round Robin
Mode 1/Active-backup
Mode 2/Exclusive OR
Mode 3/Broadcast
Mode 4/Dynamic Link Aggregation
Mode 5/Adaptive Transmit Load Balancing
Mode 6/Adaptive Load Balancing
The following two bonding modes are supported for appliances:
Mode 1/Active-backup policy: In this mode, multiple NICs, which are slaves, are configured on an appliance. However, only one slave is active at a time. The slave that accepts the requests is active and the other slaves are set as standby. When the active NIC stops functioning, the next available slave is set as active.
Mode 6/Adaptive load balancing: In this mode, multiple NICs are configured on an appliance. All the NICs are active simultaneously. The traffic is distributed sequentially across all the NICs in a round-robin method. If a NIC is added or removed from the appliance, the traffic is redistributed accordingly among the available NICs. The incoming and outgoing traffic is load balanced and the MAC address of the actual NIC receives the request. The throughput achieved in this mode is high as compared to Mode 1/Active-backup policy.
Prerequisites
Ensure that you complete the following pre-requisites when binding interfaces:
The IP address is assigned only to the NIC on which the bond is initiated. You must not assign an IP
address to the other NICs.
The NIC is not configured on an HA setup.
The NICs are on the same network.
Creating a Bond
The following procedure describes the steps to create a bond between NICs. For more information about the bonding nodes, refer here.
Ensure that the IP address of the slave nodes are static.
Perform the following steps to create a bond.
On the Web UI, navigate to Settings > Network > Network Settings.The Network Settings screen appears.
Under the Network Interfaces area, click Create Bond corresponding to the interface on which you want to initiate the bond.The following screen appears.
Ensure that the IP address is assigned to the interface on which you want to initiate the bond.
Select the following modes from the drop-down list:
Active-backup policy
Adaptive Load Balancing
Select the interfaces with which you want to create a bond.
Click OK.The bond is created, and the list appears on the Web UI.
Removing a Bond
Perform the following steps to remove a bond:
On the Web UI, navigate to Settings > Network > Network Settings.The Network Settings screen appears with all the created bonds as shown in the following figure.
Under the Network Interfaces area, click Remove Bond corresponding to the interface on which the bonding is created.A confirmation screen appears.
Select OK.The bond is removed and the interfaces are visible on the IP/Network list.
Viewing a Bond
Using the DSG CLI Manager, you can view the bonds that are created between all the interfaces.
Perform the following steps to view a bond:
On the DSG CLI Manager, navigate to Networking > Network Settings.The Network Configuration Information Settings screen appears.
Navigate to Interface Bonding and select Edit.The Network Teaming screen displaying all the bonded interfaces appears as shown in the following figure.
Resetting the Bond
You can reset all the bonds that are created for an appliance. When you reset the bonds, all the bonds created are disabled. The slave NICs are reset to their initial state, where you can configure the network settings for them separately.
Perform the following steps to reset all the bonds:
On the DSG CLI Manager, navigate to Networking > Network Settings.The Network Configuration Information Settings screen appears.
Navigate to Interface Bonding and select Edit.The Network Teaming screen displaying all the bonded interfaces appears.
Select Reset.The following screen appears.
Select OK.The bonding for all the interfaces is removed.
5.5.9 - Configuring Web Settings
Describes the procedure to configure the Web settings
Navigate to Settings > Network > Web settings, the Web Settings page contains the following sections:
General Settings
Session Management
Shell In A Box Settings
SSL Cipher Settings
5.5.9.1 - General Settings
Describes the General settings
The General Settings contains the following file upload configurations:
Max File Upload Size
File Upload Chunk Size
Increasing Maximum File Upload Size
By default, the maximum file upload size is set to 25 MB. You can increase the limit up to 4096 MB.
Perform the following steps to increase the maximum file upload size:
From the ESA Web UI, proceed to Settings > Network > Web Settings.The Web Settings screen appears.
Move the Max File Upload Size slider to the right to increase the limit.
Click Update.
Increasing File Upload Chunk Size
By default, the file upload chunk size is set to 100 MB. You can increase the limit up to 512 MB.
Perform the following steps to increase the file upload chunk size:
From the ESA Web UI, proceed to Settings > Network > Web Settings.The Web Settings screen appears.
Move the File Upload Chunk Size slider to the right to increase the limit.
Click Update.
5.5.9.2 - Session Management
Describes the procedure to manage the session
Only the admin user can extend the time using this option. The extended time becomes applicable to all users of the ESA.
Managing the session settings
Only the admin user can extend the time using this option. The extended time becomes applicable to all users of the ESA.
Perform the following steps to timeout using ESA Web UI option:
From the ESA Web UI, proceed to Settings > Network.
Click Web Settings.The following screen appears.
Move the Session Timeout slider to the right to increase the time, in minutes.
Click Update.
Fixing the Session Timeout
Perform the following steps to fix the session timeout.
There may be cases where the timeout session should be fixed, and the appliance logs out even if the session is an active session.
From the ESA Web UI, proceed to Settings > Network.
Click Web Settings.The following screen appears.
Move the Session Timeout slider to the right or left to increase or decrease the time, in minutes.
Select the Is hard timeout check box.
Click Update.
5.5.9.3 - Shell in a box settings
Describes the shell in a box settings
This setting allows a user with Appliance Web Manager permission to configure access to the Shell In A Box feature which is available through the Web UI. This setting applies to all the users that have access to the Web UI.
When enabled the users are able to view the CLI icon on the bottom right corner of the web page.
Perform the following steps to enable/disable Shell In A Box Settings.
From the ESA Web UI, proceed to Settings > Network.
Click Web Settings.The following screen appears.
To enable or disable the Shell In a Box Settings, select the Allow Shell In a Box check box.
Click Update.
5.5.9.4 - SSL cipher settings
Describes the SSL cipher settings
The ESA uses the OpenSSL library to encrypt and secure connections. You can configure an encrypted connection using the following two strings:
SSL Protocols
SSL Cipher Suites
The protocols and the list of ciphers supported by the ESA are included in the SSLProtocol and SSLCipherSuite strings respectively. The SSLProtocol supports TLS v1, TLS v1.1, TLS v1.2, and TLS v1.3 protocols. It is recommended to use the TLS v1.3 protocol.
To disable any protocol from the SSLProtocol string, prepend a hyphen (-) to the protocol. To disable any cipher suite from the SSLCipherSuite string, prepend an exclamation (!) to the cipher suite.
The TLS v1.3 protocol is introduced from v8.1.0.0. If you want to use this protocol, then ensure that you append the following cipher suite in the SSLCipherSuite text box.
Describes the procedure to update a protocol using the ESA Web UI
Perform the following steps to update a protocol from the ESA Web UI:
In the ESA Web UI, navigate to Settings > Network > Web Settings.The Web Settings page appears.
Under SSL Cipher Settings tab, the SSLProtocol text box contains the value ALL-SSLv2-SSLv3.
Add – to the required protocol.For example, to disable TLS1.1, type -TLSv1.1 in the SSLProtocol text box.
Click Update to save the changes.
To re-enable TLSv1.1 using the Web UI, remove –TLSv1.1 from the SSLProtocol text box.
5.5.10 - Working with Secure Shell (SSH) Keys
Describes the procedure to configure the SSH Keys
The Secure Shell (SSH) is a network protocol that ensures an secure communication over unsecured network. A user connects to the SSH server using the SSH Client. The SSH protocol is comprised of a suite of utilities which provides high-level authentication encryption over unsecured communication channels.
A typical SSH setup consists of a host machine and a remote machine. A key pair is required to connect to the host machine through any remote machine. A key pair consists of a Public key and a Private key. The key pair allows the host machine to securely connect to the remote machine without entering a password for authentication.
For enhancing security, a Private key is secured using a passphrase. This ensures that only the rightful recipient can have access to the decrypted data. You can either generate key pairs or work with existing key pairs.
If you add a Private key without a passphrase, it is encrypted with a random passphrase. This passphrase is scrambled and stored.
If you choose a Private key with a passphrase, then the Private key is stored as it is. This passphrase is scrambled and stored.
For more information about generating the SSH key pairs, refer Adding a New Key.
The SSH protocol allows an authorized user to connect to the host machines from the remote machines. Both inbound communication and outbound communication are supported using the SSH protocol. An authorized user is a combination of an appliance user associated with a valid key pair. An authorized user must be listed as a valid recipient to connect using the SSH protocol.
The SSH protocol allows the authorized users to run tasks securely on the remote machine. When the users connect to the appliance using the SSH protocol, then the communication is known as inbound communication.
For more information about inbound SSH configuration, refer here.
When the users connect to a known host using their private keys, then the communication is known as outbound communication. The authorized users are allowed to initiate the SSH communication from the host.
For more information about outbound SSH configuration, refer here.
On the ESA Web UI, you can configure all the following standard aspects of SSH:
Authorized Keys
Identities Keys
Known Hosts
SSH pane:With the SSH configuration Manager you can examine and manage the SSH configuration. The SSH keys can be configured in the Authentication Configuration pane on the ESA Web UI.
The following figure shows the SSH Configuration Manager pane.
Authentication Type:The SSH Server is configured in the following three ways:
Password
Public Key
Password + publickey
Authentication Type
Description
Password
In this authentication type, only the password is required for authentication to the SSH server. The public key is not required on the server for authentication.
Public Key
In this authentication type, the server requires only the public key for authentication. The password is not required for authentication.
Password + Public key
In this authentication type, the server can accept both, the keys and the password, for authentication.
SSH Mode:
From the Web UI, navigate to Settings > Network > SSH.
Using the SSH mode, restrictions for SSH connections can be set. The restrictions can be hardened or loosened based on the needs. There are four modes SSH mode types are shown below.
Mode
SSH Server
SSH Client
Paranoid
Disable root access
Disable password authentication, that is, allow to connect only using public keys. Block connections to unknown hosts.
Standard
Disable root access
Allow password authentication. Allow connections to new (unknown) hosts, enforce SSH fingerprint of known hosts.
Open
Allow root access Accept connections using passwords and public keys.
Allow password authentication. Allow connection to all hosts – do not check hosts fingerprints.
5.5.10.1 - Configuring the authentication type for SSH keys
Describes the procedure to configure the authentication type for SSH Keys
Perform the following steps to configure the SSH Key Authentication Type.
From the ESA Web UI, navigate to Settings > Network.The Network Settings pane appears.
Select the SSH tab.The SSH Configuration Manager pane appears.
Select the authentication type from the Authentication Type drop down menu.
Select the SSH mode from the SSH Mode drop down menu.
Describes the procedure to configure the inbound communication for SSH Keys
The users who are allowed to connect to the ESA using SSH are listed in the Authorized Keys (Inbound) tab.
The following screen shows the Authorized Keys.
Adding a New Key
An authorized key has to be created for a user or a machine to connect to an ESA on the host machine.
Perform the following steps to add a new key.
From the ESA Web UI, navigate to Settings > Network.The Network Settings pane appears
Select the SSH tab.The SSH Configuration Manager pane appears.
Select the Authorized Keys (Inbound) tab.
Click Add New Key.The Add New Authorized Key dialog box appears.
Select a user.
Select Generate new public key.
The Root password is required to create Authorized Key prompt appears. Enter the root password and click Ok.
If the private key is to be saved, then select Click To Download Private Key.The private key is saved to the local machine.
If the public key is to be saved, then select Click To Download Public Key.The public key is saved to the local machine.
Click Finish.The new authorized key is added.
Uploading a Key
You can assign a public key to a user by uploading the key from the Web UI.
Perform the following steps to upload a key.
From the ESA Web UI, navigate to Settings > Network.The Network Settings pane appears.
Select the SSH tab.The SSH Configuration Manager pane appears.
Select the Authorized Keys (Inbound) tab.
Click Add New Key.The Add New Authorized Key dialog box appears.
Select a user.
Select Upload public key.The file browser dialog box appears.
Select a public key file.
Click Open.
The Root password is required to create Authorized Key prompt appears. Enter the root password and click Ok.The key is assigned to the user.
Reusing public keys between users
The public key of one user can be assigned as a public key of another user.
Perform the following steps to upload an existing key.
From the ESA Web UI, navigate to Settings > Network.The Network Settings pane appears.
Select the SSH tab.The SSH Configuration Manager pane appears.
Select the Authorized Keys (Inbound) tab.
Click Add New Key.The Add New Authorized Key dialog box appears.
Select a user.
Select Choose from existing keys.
Select the public key.
The Root password is required to create Authorized Key prompt appears. Enter the root password and click Ok.The public key is assigned to the user.
Downloading a Public Key
From the Web UI, you can download the public of a user to the local machine.
Perform the following steps to download a key.
From the ESA Web UI, navigate to Settings > Network.The Network Settings pane appears.
Select the SSH tab.The SSH Configuration Manager pane appears.
Select the Authorized Keys (Inbound) tab.
Select a user.
Select Download Public Key.The public key is saved to the local directory.
Deleting an Authorized Key
You can remove a key from the authorized users list. Once the key is removed from the list, the remote machine will no longer be able to connect to the host machine.
Perform the following steps to delete an authorized key:
From the ESA Web UI, navigate to Settings > Network.The Network Settings pane appears
Select the SSH tab.The SSH Configuration Manager pane appears.
Select the Authorized Keys (Inbound) tab.
Select a user.
Select Delete Authorized Key.A message confirming the deletion appears.
Click Yes.
The Root password is required to delete Authorized Key prompt appears. Enter the root password and click Ok.The key is deleted from the authorized keys list.
Clearing all Authorized Keys
You can remove all the public keys from the authorized keys list.
Perform the following steps to clear all keys:
From the ESA Web UI, navigate to Settings > Network.The Network Settings pane appears.
Select the SSH tab.The SSH Configuration Manager pane appears.
Select the Authorized Keys (Inbound) tab.
Click Reset List.A message confirming the deletion of all authorized keys appears.
Click Yes.
The Root password is required to delete all Authorized Keys prompt appears. Enter the root password and click Ok.All the keys are deleted.
5.5.10.3 - Configuring outbound communications
Describes the procedure to configure the outbound communication for SSH Keys
The users who can connect to the known hosts with their private keys are listed in the Identities Keys (Outbound) tab.
The following screen shows the Identities.
Adding a New Key
A new public key can be generated for the host machine to connect with another machine.
Perform the following steps to add a new key.
From the ESA Web UI, navigate to Settings > Network.The Network Settings pane appears.
Select the SSH tab.The SSH Configuration Manager pane appears.
Select the Identities Keys (Outbound) tab.
Click Add New Key.The Add New Identity Key dialog box appears.
Select a user.
Select Generate new keys.
The Root password is required to create Identity Key prompt appears. Enter the root password and click Ok.
If the public key is to be saved, then select Click to Download Public Key .The public key is saved to the local machine.
Click Finish.The new authorized key is added.
Downloading a Public Key
You can download the host’s public key from the Web UI.
Perform the following steps to download a key.
From the ESA Web UI, navigate to Settings > Network.The Network Settings pane appears.
Select the SSH tab.The SSH Configuration Manager pane appears.
Select the Identities Keys (Outbound) tab.
Select a user.
Select Download Public Key.The public key is saved to the local machine.
Uploading Keys
Perform the following steps to upload an existing key.
From the ESA Web UI, navigate to Settings > Network.The Network Settings pane appears.
Select the SSH tab.The SSH Configuration Manager pane appears.
Select the Identities Keys (Outbound) tab.
Click Add New Key.The Add New Identity Key dialog box appears.
Select a user.
Select Upload Keys.The list of public keys with the users that they are assigned to appears.
Select Upload Public Key.The file browser dialog box appears.
Select a public key file from your local machine.
Click Open.The public key is assigned to the user.
Select a private key file from your local machine.
Click Open.
If the private key is protected by a passphrase, then the text field Private Key Passphrase appears.Enter the private key passphrase.
Click Finish.The new identity key is added.
Reusing public keys between users
The public and private key pair of one user can assigned as a public and private key pair of another user.
Perform the following steps to choose from an existing key.
From the ESA Web UI, navigate to Settings > Network.The Network Settings pane appears.
Select the SSH tab.The SSH Configuration Manager pane appears.
Select the Identities Keys (Outbound) tab.
Click Add New Key.The Add New Identity Key dialog box appears.
Select a user.
Select Choose from existing keys.
Select the public key.
The Root password is required to create Identity Key prompt appears. Enter the root password and click Ok.The public key is assigned to the user.
Deleting an Identity
You can delete an identity for a user. Once the identity is removed, the user will no longer be able to connect to another machine.
Perform the following steps to delete an identity:
From the ESA Web UI, navigate to Settings > Network.The Network Settings pane appears.
Select the SSH tab.The SSH Configuration Manager pane appears.
Select the Identities Keys (Outbound) tab.
Select a user.
Click Delete Identity.A message confirming the deletion appears.
Click Yes.
The Root password is required to delete the Identity Key prompt appears. Enter the root password and click Ok.The identity is deleted.
Clearing all Identities
You can remove all the public keys from the authorized keys list.
Perform the following steps to clear all identities.
From the ESA Web UI, navigate to Settings > Network.The Network Settings pane appears.
Select the SSH tab.The SSH Configuration Manager pane appears.
Select the Identities Keys (Outbound) tab.
Click Reset Identity List.A message confirming the deletion of all identities appears.
Click Yes.
The Root password is required to delete all Identity Keys prompt appears. Enter the root password and click Ok.All the identities are deleted.
5.5.10.4 - Configuring known hosts
Describes the procedure to configure the known hosts for SSH Keys
By default, the SSH is configured to deny all the communications to unknown remote servers. Known hosts list the machines or nodes to which the host machine can connect to. The SSH servers to which the host can communicate with are added under Known Hosts.
Adding a New Host
You can add a host to the list of known hosts that can have a connection established.
Perform the following steps to add a host.
From the ESA Web UI, navigate to Settings > Network.The Network Settings pane appears.
Select the SSH tab.The SSH Configuration Manager pane appears.
Select the Known Hosts tab.
Click Add Host.The Enter the ip/hostname dialog box appears.
Enter the IP address or hostname in the Enter the ip/hostname text box.
Click Ok.All host is added to the known hosts list.
Updating the Host Keys
You can refresh the hostnames to check for updates to host’s public keys.
Perform the following steps to updated a host key.
From the ESA Web UI, navigate to Settings > Network.The Network Settings pane appears.
Select the SSH tab.The SSH Configuration Manager pane appears.
Select the Known Hosts tab.
Select a host name.
Click Refresh Host Key.The key for the host name is updated.
Deleting a Host
If a connection to a host is no longer required, then you can delete the host from the known host list.
Perform the following steps to delete a known host.
From the ESA Web UI, navigate to Settings > Network.The Network Settings pane appears.
Select the SSH tab.The SSH Configuration Manager pane appears.
Select the Known Hosts tab.
Select a host name.
Click Delete Host.A message confirming the deletion appears.
Click Yes.The host is deleted.
Resetting the Host Keys
You can set the keys of all the hosts to a default value.
Perform the following steps to reset all the host keys:
From the ESA Web UI, navigate to Settings > Network.The Network Settings pane appears.
Select the SSH tab.The SSH Configuration Manager pane appears.
Select the Known Hosts tab.
Select Reset Host Keys.A message confirming the reset appears.
Click Yes.The host keys for all the hostnames is set to a default value.
5.6 - Managing Appliance Users
Describes the appliance users
Only authorized users can access the Appliances. These users are system users and LDAP administrative users. The roles of these users are explained in detail in the following sections.
Appliance Users
The root and local_admin users are appliance system users. These users are initialized during installation.
root and local_admin
As a root user, you can be asked to provide the root account password to log in to some CLI Manager tools. For example, Change Accounts and Passwords tool or Configure SSH tool.
The root account is used to exit the appliance command line interface and go directly into the host operating system command line. This gives the system administrator full control over the machine.
The local_admin is necessary for LDAP maintenance when the LDAP is not working or is not accessible.
The SSH permissions for local_admin are available by default.For information about SSH, refer Configuring the SSH.
LDAP Users
The admin and viewer user accounts are LDAP users that are initialized during installation.
Web UI, where these accounts are the part of the LDAP.
Policy management.
When these passwords are changed in the CLI Manager or Appliance Web UI, the change applies to all other installed components, thus synchronizing the passwords automatically.
LDAP Target Users
When you have your appliance installed and configured, you can create LDAP users and assign necessary permissions to these users. You can also create groups of users. The system users are by default predefined in the internal LDAP directory.
For more information about creating users in LDAP and defining their security permissions, refer here.
System Roles
Protegrity Data Security Platform role-based access defines a list of roles, including a list of operations that a role can perform. Each user is assigned to one or more roles. User-based access defines a user to whom the operations are granted. There are several predefined roles on ESA.
The following table describes these roles.
Role
Is used by…
root user
The OS system administrator who maintains the Appliance machine, which could be ESA or DSG.
admin user
The user who specifically manages the creation of roles and members in the LDAP directory. This user could also be the DBA, System Administrator, Programmer, and others. This user is responsible for installing, integrating, or monitoring Protegrity platform components into their corporate infrastructure for the purpose of implementing the Protegrity-based data protection solution.
viewer user
Personnel who can only view and not create or make changes.
5.7 - Password Policy for all appliance users
Describes the password policy for all appliances users
The password policy applies to all LDAP users.
The LDAP user password should:
Be at least 8 characters long
Contain at least two of the following three character groups:
Thus, your password should look like one of the following examples:
Protegrity123 (alphabetic and numeric)
Protegrity!@#$ (alphabetic and special symbols)
123!@#$ (numeric and special symbols)
The strength of the password is validated by default. This strength validation can also be customized by creating a script file to meet the requirements of your organization.
From the CLI, press Administration > Accounts and Passwords > Manage Passwords and Local-Accounts. Select the correct Change option and update the password.
You can enforce organization rules for password validity from the Web UI, from Settings > Users > User Management, where the following can be configured:
Minimum period for changeover
Password expiry
Lock on maximum failures
Password history
For more information about configuring the password policy, refer here.
5.7.1 - Managing Users
Describes the procedure to manage users
You require users in every system to run the business application. The foremost step in any system involves setting up users that operate on different faces of the application.
In ESA, setting up a user involves operations such, as assigning roles, setting up password policies, setting up Active Directories (ADs) and so on. This section describes the various activities that constitute the user management for ESA. In ESA, you can add the following users:
OS Users: Users for for managing and debugging OS related operations.
Appliance users: User for performing various operations based on the roles assigned to them. Appliances users can be imported from other directory services too.
Understanding ESA Users
In any given environment, users are entities that consume services provided by a system. Only authorized users can access the system. In Protegrity appliances, users are created to manage ESA for various purposes. These users are system users and LDAP administrative users.
On ESA, navigate to Settings > Users > User Management to view the list of the users that are available in the appliance.
In ESA, users can be categorized as follows:
Internal Appliance Users
These are the users created by default when the ESA is installed. These users are used to perform various operations on the Web UI, such as managing cluster, managing LDAP, and so on. On ESA Web UI, navigate to Settings > Users > User Management to view the list of the users that are available in the appliance.
The following is the list of users that are created when ESA is installed.
User Name
Description
Role
admin
Administrator account with access to the Web UI and CLI Manager options.
Security Administrator
viewer
User with view only access to the Web UI and CLI Manager options.
Security Administrator Viewer
PolicyUser
Perform security operations on the protector node.
Policy User
ProxyUser
Perform security operations on behalf of other policy users.
ProxyUser
OS users
These are the users that contain access to all the CLI operations in the appliance. Local OS users can be created from the CLI Manager. On CLI Manager, navigate to Administration > Accounts and Passwords > Manage Passwords and Local Accounts to view and manage the OS users in the appliance.
The following is the list of OS users in the appliance.
OS Users
Description
alliance
Handles DSG processes
root
Super user with access to all commands and files
local_admin
Local administrator that can be used when an LDAP user is not accessible
www-data
Daemon that runs the Apache, Service dispatcher, and Web services as a user
ptycluster
Handles TAC related services and communication between TAC through SSH.
service_admin and service_viewer
Internal service accounts used for components that do not support LDAP
clamav
Handles ClamAV antivirus
rabbitmq
Handles the RabbitMQ messaging queues
epmd
Daemon that tracks the listening address of a node
openldap
Handles the openLDAP utility
dpsdbuser
Internal repository user for managing policies
Policy Users
These users are imported from a file or an external source for managing policy operations on ESA. Policy users are used by protectors that communicate with ESA for performing security operations.
External Appliance users
These are external users that are added to the appliance for performing various operations on the Web UI. The LDAP users are imported by using the External Groups or Importing Users.You can also add new users to the appliances from the User Management screen.
Ensure that the Proxy Authentication Settings are configured before importing the users.
Managing Appliance Users
After you configure the LDAP server, you can either add users to internal LDAP or import users from the external LDAP. The users are then assigned to roles based on the permissions you want to grant them.
Default users
The default users packaged with ESA that are common across appliances are provided in the following table. You can edit each of these roles to provide additional privileges.
User Name
Description
Role
admin
Administrator account with full access to the Web UI and CLI Manager options.
Security Administrator
viewer
User with view only access to the Web UI and CLI Manager options.
Security Administrator Viewer
PolicyUser
Users who can perform security operations on the DSG Test Utility.
Policy User
ProxyUser
Users who can perform security operations on behalf of other policy users on the Protection Server.Note: The Protection Server is deprecated. This user should not be used.
ProxyUser
Proxy users
The following table describes the three types of proxy users in ESA:
Callout
Description
Local
Users that are authenticated using the local LDAP or created during installation.
Manual
Users that are manually created or imported manually from an external directory service.
Automatic
Users imported from an external directory service and are a part of different External Groups. For more information about External Groups, refer here.
User Management Web UI
The user management screen allows you to add, import, and modify permissions for the users. The following screen displays the ESA User Management Web UI.
Callout
Column
Description
1
Search User Name
Enter the name of the user you want to filter from the list
of users.
2
User Name
Name of the user. This user can either be added to the
internal LDAP server or imported from an external LDAP
server.
3
Password Policy
Enable password policy for selected user. This option is
available only for local users.
For more information about
defining password policy for users, refer Password Policy.
4
Block Users
Enable this option to block access to the appliance for the user. This option is available only for local users.
Only users with Directory Manager permissions can block or unblock users.
A user cannot block or unblock themselves.
When a user is blocked, all active sessions for that user are terminated.
An external user cannot be blocked.
5
User Password Status
Indicates status of the user. The available states are
as follows.
Valid – user is active and ready to use ESA.
Warning – user must change password to gain access to
ESA. When the user tries to login after this status is flagged, it
will be mandatory for the user to change the password to access
the appliance.
Note: As the administrator sets the initial
password, it is recommended to change your password at the first
login for security reasons.
Notice - Password policy is disabled for this user. User must login with the password provided by the administrator. Note: As the administrator sets the initial password, it is recommended to change the password at the first login for security reasons.
6
Lock Status
User status based on the defined password policy. The
available states are as follows:
Locked – Users who are locked
after series of incorrect attempts to log in to
ESA.
Unlocked – Users who can access
ESA.
<value> - Number of attempts remaining for a user to provide a valid password.
7
Expiration Date
Indicates expiry status for a user. The available statuses
are as follows:
Duration in days, hours and minutes
Never expires
8
User Type
Indicates if user is a local or manual (imported).
9
Additional Information
Provides information based on the defined password policy and block users. The available states are as follows:
Locked due to multiple failed attempts – User is locked after series of incorrect attempts to log in to ESA.
Locked by <username - user who performed the action>.
Not Applicable - Unlocked users
10
Last Unsuccessful Login (UTC)
Indicates the time of the last unsuccessful login attempted
by the user. The time displayed is in UTC.
Note: If a user
successfully logs in through the Web UI or the CLI manager, then
the time stamp for any previous unsuccessful attempts is
reset.
11
Roles
Linked roles to that user.
12
Add User
Add a new internal LDAP user.
13
Import Users
Import users from the external LDAP server.
Note: This option is available only when Proxy Authentication is enabled.
14
Import Azure Users
Import users from the Azure Active Directory.
Note: This option is available only when Azure Active Directory is enabled.
15
Action
The following Actions are available.
- Click to reset password for a user. When you reset password for a user, Enter your password prompt appears. Enter the password and click Ok.
Note: If the number of unsuccessful password attempts exceed the defined value in the password policy, the account gets locked.
- Click to remove a user. When you remove a user, Enter your password prompt appears. Enter the password and click Ok. Note: If the number of unsuccessful password attempts exceed the defined value in the password policy, the account gets locked.
- Click to convert the external LDAP user to a local LDAP user. When you convert a user to a local LDAP user, ESA creates the user in its local LDAP server.
16
View Entries
Select number of users to be displayed in a single view.
You can select to view up to 50 users.
17
Page Navigation
Navigate through pages to view more users.
5.7.1.1 - Adding users to internal LDAP
Describes the procedure to add users to internal LDAP
You can create users with custom permissions and roles, and add them to the internal LDAP server.
Perform the following steps to add users to internal LDAP. In these steps, we will use the name “John Doe” as the name of the user being added to the internal LDAP.
In the Web UI, navigate to Settings > Users > User Management.
Click Add User to add new users.
Click Cancel to exit the adding user screen.
The & character is not supported in the Username field.
Enter John as First Name, Doe as Last Name, and provide a Description. The User Name text box is auto-populated. You can edit it, if required.
The maximum number of characters that you can enter in the First Name, Last Name, and User Name fields is 100.
The maximum number of characters that you can enter in the Description field is 200.
Click Continue to configure password.
Enter the password and confirm it in the consecutive text box.
Verify that the Enable Password Policy toggle button is enabled to apply password policy for the user.
The Enable Password Policy toggle button is enabled as default. For more information about password policy, refer here.
Click Continue to assign role to the user.
Select the role you want to assign to the user. You can assign the user to multiple roles.
Click Add User.
Enter your password prompt appears. Enter the password and click Ok. If the number of unsuccessful password attempts exceed the defined value in the password policy, the account gets locked.
For more information about Password Policy, refer here.
After 5 mins, the session ends, and you can no longer add users. The following figure shows this feature in the Web UI.
5.7.1.2 - Importing users to internal LDAP
Describes the procedure to import users to internal LDAP
In the User Management screen, you can import users from an external LDAP to the internal LDAP. This option gives you the flexibility to add selected users from your LDAP to the ESA.
Ensure that Proxy Authentication is enabled before importing users from an external directory service.
For more information about working with Proxy Authentication, refer to here.
The username in local LDAP is case-sensitive and the username in Active Directory is case-insensitive. It is recommended not to import users from external LDAP where the username in the local LDAP and the username in the external LDAP are same.
The users imported are not local users of the internal LDAP. You cannot apply password policy to these users. To convert the imported user to a local user, navigate to Settings > Users > User Management, select the user, and then click Convert to Local user . When you convert a user to a local LDAP user, ESA creates the user in its local LDAP server.
Perform the following steps to import users to internal LDAP.
In the Web UI, navigate to Settings> Users > User Management.
Click Import Users to add an external LDAP user to the internal LDAP.The Import Users screen appears.
Select Search by Username to search the users by username or select Search by custom filter to search the users using the LDAP filter.
Type the required number of results to display in the Display Number of Results text box.
If you want to overwrite existing user, click Overwrite Existing Users.
Click Next.The users matching the search criteria appear on the screen.
Select the required users and click Next.The screen to select the roles appears.
Select the required roles for the selected users and click Next.
The Enter your password prompt appears. Enter the password and click Ok. If the number of unsuccessful password attempts exceed the defined value in the password policy, the account gets locked.
For more information about Password Policy, refer here.
The screen displaying the roles imported appears.
The users, along with the roles, are imported to the internal LDAP.
5.7.1.3 - Password policy configuration
Describes the procedure to import users to internal LDAP
The user with administrative privileges can define password policy rules. PolicyUser and ProxyUser have the Password Policy option as disabled, by default.
Defining a Password Policy
If the number of unsuccessful password attempts exceed the defined value in the password policy, the account gets locked.
For more information about Password Policy, refer here.
Perform the following steps to define a password policy.
From the ESA Web UI, navigate to Settings > Users.
On the User Management tab under the Define Password Policy area, click Edit ().
Select the password policy options for users which is described in the following table:
Password Policy Option
Description
Default Value
Possible Values
Minimum period for changeover
Number of days since the last password change.
1
0-29
Password expiry
Number of days a password remains valid.
30
0-720
Lock on maximum failures
Number of attempts a user makes before the account is locked and requires Admin help for unlocking.
5
0-10
Password history
Number of older passwords that are retained and checked against when a password is updated.
1
0-64
Click on Apply Changes.
Enter your password prompt appears. Enter the password and click Ok.
Resetting the password policy to default settings
If the number of unsuccessful password attempts exceed the defined value in the password policy, the account gets locked.
For more information about Password Policy, refer here.
The password policy is set to default values as mentioned in the Password Policy Configuration table.
The users imported into LDAP have Password Policy disabled, by default. This option cannot be enabled for imported users.
Perform the following steps to reset the password policy to default settings.
Click Reset.A confirmation message appears.
Click Yes.
The Enter your password prompt appears. Enter the password and click Ok.
Enabling password policy for Local LDAP users
Perform the following steps to enable password policy for Local LDAP users.
From the ESA Web UI, navigate to Settings > Users.
In the Manage Users area, click Password Policy toggle for the user.A dialog box appears requesting LDAP credentials.
The Enter your password prompt appears. Enter the password and click Ok.
After successful validation, password policy is enabled for the user.
Users locked out from too many password failures
If the number of unsuccessful password attempts exceed the defined value in the password policy, the account gets locked. Users who have been locked out receive the error message “Login Failure: Account locked” when trying to log in. To unlock the user, a user with administrative privileges must reset their password.
When an Admin user is locked, the local_admin user can be used to unlock the Admin user from the CLI Manager. Note that the local_admin is not part of LDAP, so it cannot be locked.
For more information about Password Policy, including resetting passwords, refer Password Policy.
5.7.1.4 - Edit users
Describes the procedure to edit users
For every change done for the user, the Enter your password prompt appears. Enter the password and click Ok.
Perform the following steps to edit the user.
Navigate to Settings > Users > User Management. Click on a User Name.
Under the General Info section, edit the Description.
Under the Password Policy section, toggle to enable or disable the Password Policy.
Under the Roles section, select role(s) from the list for the user.
Click Reset Password to reset password for the user.
Click the icon to delete the user.
Users locked out from too many password failures
If the number of unsuccessful password attempts exceed the defined value in the password policy, the account gets locked.
For more information about Password Policy, refer here.
5.7.2 - Managing Roles
Describes the instructions to manage roles
Roles are templates that include permissions and users can be assigned to one or more roles. Users in the appliance must be attached to a role.
The default roles packaged with ESA are as follows:
Roles
Description
Permissions
Policy Proxy User
Allows a user to connect to DSG via SOAP/REST and access web services using Application Protector (AP).
Proxy-User
Policy User
Allows user to connect to DSG via SOAP/REST and perform security operations using Application Protector (AP).
Policy-User
Security Administrator Viewer
Role that can view the ESA Web UI, CLI, and reports.
Security Viewer, Appliance CLI Viewer, Appliance web viewer, Reports Viewer
Shell Accounts
Role who has direct SSH access to Appliance OS shell.Note: It is recommended that careful consideration is taken when assigning the Shell Accounts role and permission to a user.Ensure that if a user is assigned to the Shell Account role, no other role is linked to the same user. The user has no access to the Web UI or CLI, except when the user has password policy enabled and is required to change password through Web UI.
Shell (non-CLI) AccessNote: The user can access SSH directly if the permission is tied to this role.
Security Administrator
Role who is responsible for setting up data security using ESA policy management, which includes but is not limited to creating policy, managing policy, and deploying policy.
The capabilities of a role are defined by the permissions attached to the role. Though roles can be created, modified, or deleted from the appliance, permissions cannot be edited. The permissions that are available to map with a user and packaged with ESA as default permissions are as follows:
Permissions
Description
Appliance CLI Administrator
Allows users to perform all operations available as part of ESA CLI Manager.
Appliance Web Manager
Allows user to perform all operations available as part of the ESA Web UI.
Audit Store Admin
Allows user to manage the Audit Store.
Can Create JWT Token
Allows user to create JWT token for communication.
Customer Business manager
Allows users to retrieve metering reports.
DPS Admin
Allows user to use the DPS admin tool on the protector node.
Export Certificates
Allows user to use download certificates from ESA.
Key Manager
Allows user to access the Key Management Web UI, rotate ERK or DSK, and modify ERK states.
Policy-User
Allows user to connect to Data Security Gateway (DSG) via REST and perform security operations using Application Protector (AP).
RLP Manager
Allows user to manage rules stored on Row-Level Security Administrator (ROLESA). Manage includes accessing, viewing, creating, etc.
Reports Viewer
Allows user to only view reports.
Security Viewer
Allows user to have read only access to policy management in the Appliance.
Appliance CLI Viewer
Allows user to login to the Appliance CLI as a viewer and view the appliance setup and configuration.
Appliance web viewer
Allows user to login to the Appliance web-interface as a viewer.
AWS Admin
Allows user to configure and access AWS tools if the AWS Cloud Utility product is installed.
Directory Manager
Allows user to manage the Appliance LDAP Directory Service.
Export Keys
Allows user to export keys from ESA.
Reports Manager
Allows user to manage reports and do functions related to reports. Manage includes accessing, viewing, creating, scheduling, etc.
Security Officer
Allows user to manage policy, keys, and do functions related to policy and key management. Manage includes accessing, viewing, creating, deploying, etc.
Shell (non-CLI) Access
Allows user to get direct access to the Appliance OS shell via SSH. It is recommended that careful consideration is taken when assigning the Shell Accounts role and permission to a user. Ensure that if a user is assigned to the Shell Account role, no other role is linked to the same user.
Export Resilient Package
Allows user to export package from the ESA by using the RPS API.
Can Create JWT Token
Allows user to create a Java Web Token (JWT) for user authentication.
ESA Admin
Allows user to perform operations on Audit Store Cluster Management.
Insight Admin
Allows to perform operations on Discover Web UI.
Proxy-User
Allows user to connect to DSG via REST and perform security operations using Application Protector (AP).
SSO Login
Allows user to login to the system using the Single Sign-On (SSO) mechanism.
The ESA Roles web UI is as seen in the following image.
Callout
Column
Description
1
Role Name
Name of the role available on ESA. Note: If you want to edit an existing role, click the role name from the displayed list. After making required edits, click Save to save the changes.
2
Description
Brief description about the role and its capabilities.
3
Permissions
Permission mapped to the role. The tasks that a user mapped to a role can perform is based on the permissions enabled.
4
Action
The following Actions are available.
- Click to duplicate the role with mapped permissions.
- Click to delete a role.Note: If the number of unsuccessful password attempts exceed the defined value in the password policy, the account gets locked.
5
Add Role
Add a custom role to ESA.
Duplicating and deleting roles
Keep the following in mind when duplicating and deleting roles.
It is recommended to delete a role from the Web UI only. This ensures that the updates are reflected correctly across all the users that were associated with the role.
When you duplicate or delete a role, the Enter your password prompt appears. Enter the password and click Ok to complete the task.
Adding a Role
You can create a custom business role with permissions and privileges that you want to map with that role. Custom templates provide the flexibility to create additional roles with ease.
Perform the following steps to add a role. In those steps we will use an example role named “Security Viewer”.
In the Web UI, navigate to Settings > Users > Roles.
If you want to edit an existing role, click the role name from the displayed list. After making required edits, click Save to save the changes.
Click Add Role to add a business role.
Enter Security Viewer as the Name.
Enter a brief description in the Description text box.
Select custom as the template from the Templates drop-down.
Under Role Permissions and Privileges area, select the permissions you want to grant to the role.Click Uncheck All to clear all the check boxes. Ensure that you do not select the Shell (non-CLI) Access permission for users who require Web UI and CLI access.
Click Save to save the role.
Enter your password prompt appears. Enter the password and click Ok.
5.7.3 - Configuring the proxy authentication settings
Describes the instructions to configure proxy authentication settings
To configure the proxy authentication from the Web UI, the directory_administrator permission must be associated with the required role. It is also possible to do this through the CLI manager. For more information about configuring LDAP from the CLI manager, refer to here.
Perform the following steps to configure proxy authentication settings.
In the Web UI, navigate to Settings > Users > Proxy Authentication. The following figure shows example LDAP configuration.
Enter the LDAP IP address for the external LDAP in LDAP URI.The accepted format is ldap://host:port.
Click the icon to add multiple LDAP servers.
Click the icon to remove the LDAP server from the list.
Enter data in the fields as shown in the following table:
Fields
Description
Base DN
The LDAP Server Base distinguished name. For example: Base DN: dc=sherwood, dc=com.
Bind DN
Distinguished name of the LDAP Bind User. It is recommended that this user is granted viewer permissions. For example: Bind DN: administrator@sherwood.com
Bind Password
The password of the specified LDAP Bind User.
StartTLS Method
Set this value based on configuration at the customer LDAP.
Verify Peer
Enable this setting to validate the certificate from an AD. If this setting is enabled, ensure that the following points are considered:
You must require a CA certificate to verify the server certificate from AD.For more information about certificates, refer Certificate Management.
The LDAP Uri matches the hostname in the server and CA certificates.
LDAP AD URI hostname is resolved in the hosts file.
LDAP Filter
Provide the attribute to be used for filtering users in the external LDAP. For example, you can use the default attribute, sAMAccountName, to authenticate users in a single AD. Note: In case of same usernames across multiple ADs, it is recommended to use LDAP filter such as UserPrincipalName to authenticate users.
Click Test to test the provided configuration.A LDAP test connectivity passed successfully message appears.
Click Apply to apply and save the configuration settings.
The Enter your password prompt appears. Enter the password and click Ok.A Proxy Authentication was ENABLED and configuration were saved successfully message appears.
Navigate to System > Services and verify that the Proxy Authentication Service is running.
If you make any changes to the existing configuration, click Save to save and apply the changes. Click Disable to disable the proxy authentication.
After the Proxy Authentication is enabled, the user egsyncd_service_admin is enabled. It is recommended not to change the password for this user.
After enabling Proxy Authentication, you can proceed to adding users and mapping roles to the users. For more information about importing users, refer here.
5.7.4 - Working with External Groups
Describes the instructions to work with external groups
The directory service providers, such as, Active Directory (AD) or Oracle Directory Server Enterprise Edition (ODSEE), are identity management systems that contain information about the enterprise users. You can map the users in the directory service providers to the various roles defined in the Appliances. The External Groups feature enables you to associate users or groups to the roles.
You can import users from a directory service to assign roles for performing various security and administrative operations in the appliances. Using External Groups, you connect to an external source, import the required users or groups, and assign the appliance-specific roles to them. The appliances automatically synchronize with the directory service provider at regular time intervals to update user information. If any user or group in a source directory service is updated, it is reflected across the users in the external groups. The updates made to the local LDAP do not affect the source directory service provider.
If any changes occur to the roles or users in the external groups, an audit event is triggered.
Ensure that Proxy Authentication is enabled to use an external group.
The following screen displays the External Groups screen.
Only users with Directory Manager role can configure the External Groups screen.
The following table describes the actions you can perform on the External Groups screen.
Icon
Description
List the users present for the external group.
Synchronize with the external group to update the users.
Delete the external group.
Required fields for External Groups
Listed below are the required fields for creating an External Group.
Title: Name designated to the External Group
Description: Additional text describing the External Group
Group DN: Distinguished name where groups can be found in the directory
Query by: To pull users from the directory server, query the directory server using required parameters. This can be achieved using one of the following two methods:
Query by UserQuery by User allows to add specific set of users from a directory server.
Group PropertiesIn the Group Properties, the search is based on the values entered in the Group DN and Member Attribute Name text boxes. Consider an example, where the values in the Group DN and Member Attribute Name are cn=esa,ou=groups,dc=sherwood,dc=com and memberOf respectively. In this case, the search is performed on every user that is available in the directory server. The memberOf value of the users are matched with the specified Group DN. Only those users whose memberOf value matches the Group DN values are returned.
Search FilterThis field facilitates searching multiple users using regex patterns. Consider an example, where the values in the Search Filter for the user is cn=S*. In this case all the users beginning with cn=S in the directory server are retrieved.
Query by GroupUsing this method, you can search and add users of a group in the directory server. All the users belonging to the group are retrieved in the search process.
Group PropertiesIn the Group Properties, the search is based on the values entered in the Group DN and Member Attribute Name text boxes. Consider an example, where the values in the Group DN and Member Attribute Name are cn=hr,ou=groups,dc=sherwood,dc=com and member respectively. The search is performed in the directory server for the group mentioned in the Group DN text box. If the group is available, then all the users of that group containing value of member attribute as cn=hr,ou=groups,dc=sherwood,dc=com are retrieved.
Search FilterThis field facilitates searching multiple groups across the directory server. The users are retrieved based on the values provided in the Search Filter and Member Attribute Name text boxes. A search is performed on the group mentioned in Search Filter and the value mentioned in the Member Attribute Name attribute of the group is fetched. Consider an example, where the values in the Search Filter for the group is cn=accounts and the value in the Member Attribute Name value is member. All the groups that match with cn=accounts are searched. The value that is available in the member attribute of those groups are retrieved as the search result.
Adding an External Group
You can add an external group to assign roles for a group of users. For example, consider a scenario to add an external group with data entered in the Search Filter textbox.
Perform the following steps to add an external group.
In the ESA Web UI, navigate to Settings > Users > External Groups.
Click Create.
Enter the required information in the Title and Description fields.
If you select Group Properties, then enter the Group DN and Member Attribute Name.For example,
Enter the following DN in the Group DN text box:
cn=Joe,ou=groups,dc=sherwood,dc=com
Enter the following attribute in the Member Attribute Name text box:
memberOf
This text box is not applicable for ODSEE.
If you select Search Filter, enter the search criteria in the Search Filter text box.
For example,
For AD, you can enter the search filter as follows:
(&(memberOf=cn=John,dc=Bob,dc=com))
For ODSEE, you can enter the search filter as follows:
isMemberOf=cn=Alex,ou=groups,dc=sherwood,dc=com
Click Preview Users to view the list of users for the selected search criteria.
Select the required roles from the Roles tab.
Click Save.
An external group is added.
The Users tab is visible, displaying the list of users added as a part of the external group.
Importing from ODSEE and special characters
If you are importing users from ODSEE, usernames containing special characters are not supported. Special characters include semi colon, forward slash, curly brackets, parentheses, angled brackets, or plus sign. That is: ;, /, {}, () , <>, or +, respectively.
Editing an External Group
You can edit an external group to modify fields such as Description, Mode, Roles, or Group Properties. If any updates are made to the roles of the users in the external groups, the modifications are applicable immediately to the users existing in the local LDAP.
Ensure that you synchronize with the source directory service if you update the Group DN or the search filter.
Perform the following steps to edit an external group:
In the ESA Web UI, navigate to Settings > Users > External Groups.
Select the required external group.
Edit the required fields.
Click Save.
The Enter your password prompt appears. Enter the password and click Ok.The changes to the external group are updated.
Deleting an External Group
When you delete an external group, the following scenarios are considered while removing a user from an external group:
If the users are not part of other external groups, the users are removed from the local LDAP.
If the users are a part of multiple external groups, only the association with the deleted external group and roles is removed.
Perform the following steps to remove an External Group:
In the ESA Web UI, navigate to Settings > Users > External Groups.
Select the required external group and click the Delete ( ) icon.
The Enter your password prompt appears. Enter the password and click Ok.The external group is deleted.
Synchronizing the External Group
When the proxy authentication is enabled, the External Groups Sync Service is started. This service is responsible for the automatic synchronization of the external groups with the directory services. The time interval for automatic synchronization is 24 hours.
You can manually synchronize the external groups with the directory services using the Synchronize () icon.
After clicking theSynchronize () icon, the Enter your password prompt appears. Enter the password and click Ok.
The following scenarios occur when synchronization is performed between the external groups and the directory services.
Users are added to ESA and roles are assigned.
Roles of existing users in ESA are updated.
Users are deleted from the ESA if they are associated with any external groups.
Based on the scenarios, the messages appearing in the Web UI, when synchronization is performed, are described in the following table.
Message
Description
Added
Users are added to the ESA the roles mentioned in the external groups are assigned to the user.
Updated
Roles pertaining to the users are updated ESA.
Removed
Roles corresponding to the deleted external group is removed for the users. Users are not deleted from ESA.
Deleted
Users are deleted from ESA as they are not associated to any external group.
Failed
Updates to the user fail. The reason for the failure in update appears in the Web UI.
If a GroupDN for an external group is not available during synchronization, the users are removed or deleted. The following log appears in the Insight logs:
Appliance Warning: GroupDN is missing in external Source.
Also, in the Appliance logs, the following message appears:
External Group: <Group name>, GroupDN: <domain name> could not be found on the external source
5.7.5 - Configuring the Azure AD Settings
Describes the instructions to configure the Azure AD settings
You can configure the Azure AD settings from the Web UI. Using the Web UI, you can enable the Azure AD settings to manage user access to cloud applications, import users or groups, and assign specific roles to them.
For more information about configuring Azure AD Settings from the CLI Manager, refer here.
Before configuring Azure AD Settings on the ESA, you must have the following information that is required to connect the ESA with the Azure AD:
Tenant ID
Client ID
Client Secret or Thumbprint
For more information about the Tenant ID, Client ID, Authentication Type, and Client Secret/Thumbprint, search for the text Register an app with Azure Active Directory on Microsoft’s Technical Documentation site at https://learn.microsoft.com/en-us/docs/
The following are the list of the API permissions that must be granted.
Group.Read.All
GroupMember.Read.All
User.Read
User.Read.All
To assign API permissions in Microsoft Azure, contact your Microsoft Azure administrator.
Ensure that the Allow public client flows setting is Enabled. To enable the Allow public client flows setting, navigate to Authentication > Advanced settings, click the toggle button, and select Yes.
Perform the following steps to configure Azure AD settings:
On the Web UI, navigate to Settings > Users > Azure AD.The following figure shows an example of Azure AD configuration.
Enter the data in the fields as shown in the following table:
Setting
Description
Tenant ID
Unique identifier of the Azure AD instance.
Client ID
Unique identifier of an application created in Azure AD.
Auth Type
Select one of the Auth Type:
SECRET indicates a password-based authentication. In this authentication type, the secrets are symmetric keys, which the client and the server must know.
CERT indicates a certificate-based authentication. In this authentication type, the certificates are the private keys, which the client uses. The server validates this certificate using the public key.
Client Secret/Thumbprint
The client secret/thumbprint is the password of the Azure AD application.
If the Auth Type selected is SECRET, then enter Client Secret.
If the Auth type selected is CERT, then enter Client Thumbprint.
Disable Password Login
Enable or disable password-based login for Azure AD Users.
When this toggle is enabled, password-based login is disabled for Azure AD users.
When this toggle is disabled, password-based login is retained for Azure AD users.
For more information about the Tenant ID, Client ID, Authentication Type, and Client Secret/Thumbprint, search for the text Register an app with Azure Active Directory on Microsoft’s Technical Documentation site at https://learn.microsoft.com/en-us/docs/.
Click Test to test the provided configuration.The Azure AD settings are authenticated successfully. To save the changes, click ‘Apply/Save’. message appears.
Click Apply to save and enable the Azure AD settings.The Azure AD settings are saved and enabled successfully message appears.
5.7.5.1 - Importing Azure AD Users
Describes the instructions to import the Azure AD users
Before importing Azure users, ensure that the following prerequisites are considered:
Ensure that the user is not present in the nested group. If the user is present in the nested group, then the nested group will not be synced on the ESA.
Check the user status before importing them to the ESA. If a user with the Disabled status is imported, then that user will not be able to login to the ESA.
Ensure that an external user is not added to the group. If an external user is added to the group, then that user will not be synced on the ESA.
Ensure that the special character # (hash) is not used while creating the username. If you are importing users from the Azure AD, then the usernames containing the special character # (hash) will not be able to login to the ESA. The usernames containing the following special characters are supported in the ESA.
’ (single quote)
. (period)
^ (caret)
! (exclamation)
~ (tilde)
- (minus)
_ (underscore)
Ensure that the Azure AD settings are enabled before importing the users.
You can import users from the Azure AD to the ESA, on the User Management screen.
For more information about configuring the Azure AD settings, refer here.
Perform the following steps to import Azure AD users.
On the Web UI, navigate to Settings > Users > User Management.
Click Import Azure Users.
The Enter your password prompt appears. Enter the password and click Ok.The Import Users screen appears.
Search a user by entering the name in the Username/Filter box.
If required, toggle the Overwrite Existing Users option to ON to overwrite users that are already imported to the ESA.
Click Next.The users matching the search criteria appear on the screen.
Select the required users and click Next.The screen to select the roles appears.
Select the required roles for the selected users and click Next.The screen displaying the imported users appears.
Click Close.The users, with their roles, are imported to the ESA.
5.7.5.2 - Working with External Azure Groups
Describes the instructions to work with the external Azure groups
The Azure AD is an identity management system that contains information about the enterprise users. You can map the users in the Azure AD to the various roles defined in the ESA. The External Azure Groups feature enables you to associate users or groups to the roles.
You can import users from the Azure AD to assign roles for performing various security and administrative operations on the ESA. Using External Azure Groups, you connect to Azure AD, import the required users or groups, and assign the appliance-specific roles to them.
Ensure that Azure AD is enabled to use external Azure group.
The following screen displays the External Azure Groups screen.
Only users with the Directory Manager permissions can configure the External Groups screen.
The following table describes the actions that you can perform on the External Groups screen.
Icon
Description
List the users present for the Azure External Group.
Synchronize with the Azure External Group to update the users.
Delete the Azure External Group.
Adding an Azure External Group
You can add an Azure External Group to assign roles for a group of users.
Perform the following steps to add an External Group.
From the ESA Web UI, navigate to Settings > Users > Azure External Groups.
Click Add External Group.
Enter the group name in the Groupname/Filter field.
Click Search Groups to view the list of groups.
Select one group from the list, and click Submit.
Enter a description in the Description field.
Select the required roles from the Roles tab.
Click Save.The External Group has been created successfully message appears.
Editing an Azure External Group
You can edit an Azure external group to modify Description and Roles. If any updates are made to the roles of the users in the Azure External Groups, then the modifications are applicable immediately to the users existing on the ESA.
Perform the following steps to edit an External Group:
On the ESA Web UI, navigate to Settings > Users > Azure External Groups.
Select the required external group.
Edit the required fields.
Click Save.
The Enter your password prompt appears. Enter the password and click Ok.The changes to the external group are updated.
Synchronizing the Azure External Groups
When the Azure AD is enabled, the Azure External Groups is started. You can manually synchronize the Azure External Groups using the Synchronize () icon.
After clicking the Synchronize () icon, the Enter your password prompt appears. Enter the password and click Ok.
Note: If the number of unsuccessful password attempts exceed the defined value in the password policy, then the user account gets locked.
For more information about Password Policy, refer here.
The messages appearing on the Web UI, when synchronization is performed between Azure External Groups and the ESA, are described in the following table.
Message
Description
Success
Users are added to the ESA and roles are assigned.
Roles of existing users in the ESA are updated.
Users are deleted from the ESA if they are associated with any external Azure Groups.
Failed
Updates to the user failed.Note: The reason for the failure in updating the user appears on the Web UI.
Deleting Azure External Groups
When you delete an Azure External Group, the following scenarios are considered while removing a user from the Azure External Group:
If the users are not part of other external groups, then the users are removed from the ESA.
If the users are a part of multiple external groups, the only the association with the deleted Azure External Group and roles is removed.
Perform the following steps to remove an Azure External Group.
From the ESA Web UI, navigate to Settings > Users > Azure External Groups.
Select the required external group and click the Delete () icon.
The Enter your password prompt appears. Enter the password and click Ok.The Azure External Group is deleted.
6 - Trusted Appliances Cluster (TAC)
Network clustering is where a group of computers are organized so they function together, providing highly available resources. Clustering is highly desirable for disaster recovery. Failure of one system will not affect business continuity and the performance of resources is maintained.
A Trusted Appliances cluster (TAC) is a tool, where appliances, such as, ESA or DSG replicate and maintain information. In a TAC, multiple appliances are connected using SSH. A trusted channel is created to transfer data between the appliances in the cluster. You can also run remote commands, backup data, synchronize files and configurations across multiple sites, or import/export configurations between appliances that are directly connected to each other.
In a TAC, all the systems in the cluster are in an active state. The request for security operations are handled across the active appliances in the cluster. Thus, in case of a failure of an appliance, the requests are balanced across other appliances in the cluster.
6.1 - TAC Topology
The TAC is a connected graph with a fully connected cluster. In a fully connected cluster, every node directly communicates with other nodes in the cluster.
The following figure shows a connected graph with four nodes A, B, C, and D that are directly connected to each other.
In a TAC, each appliance is classified either as a client or a server.
Client: A client is a stateless agent that requests information from a server.
Server: A server maintains information about all the appliances in the cluster, performs regular health checks, and responds to queries from the clients.
A server can be further classified as a leader or a follower. The leader is responsible for maintaining the status of cluster and replicating cluster-related information among other servers in the cluster. The first appliance that is added the cluster is the leader. The other appliances added to the cluster are followers.
It is important to maintain the number of servers to keep the cluster available. For a cluster to be available, the number of servers available must be (N/2) + 1, where N is the number of servers in the cluster. Thus, it is recommended to have a minimum of three servers in your cluster for fault tolerance.
6.2 - Cluster Configuration Files
In a cluster, you can deploy an appliance as a server or a client by modifying the cluster configuration files. For deploying an appliance on a cluster, the following configuration files are available for an appliance.
agent.json
The agent.json file specifies the role of an appliance in the cluster. The file is available in the /opt/cluster-consul-integration/configure directory.
The following table describes the attributes that can be configured in the agent.json file.
Attribute
Description
Values
type
The role of the appliance in the cluster.
auto (default) – Role of the appliance is determined based
on state of the TAC and the parameters of the
agent_auto.json file.
client – Appliance is added to cluster as a client
server– Appliance is added to cluster as a server
For more information about the deployment scenarios, refer
to section Deploying
Appliances in a cluster.
agent_auto.json
This file is considered only if the type attribute in the agent.json file is set to auto. The agent_auto.json file specifies the maximum number of servers allowed in a cluster. Additionally, you can also specify which appliances can be added to the cluster as servers.
The agent_auto.json file is available in the /opt/cluster-consul-integration/configure directory.
The following table describes the attributes that can be configured in the agent_auto.json file.
Attribute
Description
Values
maximum_servers
The maximum number of servers that can be deployed in a cluster.
5 (default)
Note
It is recommended to set the attribute value as 3 or 5.
If the attribute value is 0, then all the appliances are added to the cluster as servers.
PAP_eligible_servers
The list of appliances that can be deployed as servers.
ESA (default) - ESA appliance
CG – DSG appliance
config.json
This file contains the cluster-related information for an appliance, such as, data center, ports, Consul certificates, bind address, and so on. The config.json file is available in the /opt/consul/configure directory.
6.3 - Deploying Appliances in a Cluster
You can deploy the appliances in a cluster as a server or a client. The type attribute in the agent.json file and the PAP_eligible_servers and maximum_servers attributes in the agent_auto.json file determine how the appliance is deployed in the cluster.
The files agent.json and agent_auto.json are located at /opt/cluster-consul-integration/configure directory.
The following flowchart illustrates how an appliance is deployed in a cluster.
Example process for deploying appliances in a cluster
Consider an ESA appliance, ESA001, on which you create a cluster. As this is the first appliance on the cluster, ESA001 is becomes the leader of the cluster. The following are the values of the default attributes of the agent.json and agent_auto.json files on ESA001.
type: auto
maximum_servers: 5
PAP_eligible_servers: ESA
Now, you want to add another ESA appliance, ESA002, to this cluster as a server. In this case, you must ensure that the type attribute in the agent.json file of ESA002 is set as server.
If you want to add an ESA003 to the cluster as a client, you must ensure that the type attribute in the agent.json file of ESA003 is set as client.
The following figure illustrates the cluster comprising of nodes ESA001, ESA002, and ESA003.
Now, you add another ESA appliance, ESA004, to this cluster with the following attributes:
type: auto
maximum_servers: 5
PAP_eligible_servers: ESA
In this case, the following checks are performed:
Is the value of maximum_servers greater than zero? Yes.
Is the number of servers in the cluster exceeding the maximum_servers? No
Is the appliance code of ESA004 in the PAP_eligible_servers list? Yes.
The name or appliance code of appliances can be viewed in the Appliance_code file in the /etc directory.
As long as the limit of the number of servers on the cluster is not exceeded and the appliance is a part of the server list, ESA004 is added as a server as shown in the following figure.
Now add a DSG appliance named CG001 to this cluster with the following attributes:
type: auto
maximum_servers: 5
PAP_eligible_servers: CG
In this case, the following checks are performed:
Is the maximum_servers greater than zero? Yes.
Is the number of servers in the cluster exceeding the maximum_servers? No.
Is the appliance code of CG001 in the PAP_eligible_servers list? Yes.
Thus, DSG1 is added to the cluster as a server.
Now, consider a cluster with five servers, ESA001, ESA002, ESA003, ESA004, and ESA006 as shown in the following figure.
You now add another ESA appliance, ESA007 to this cluster, with the following attributes:
type: auto
maximum_servers: 5
PAP_eligible_servers: ESA
In this case, the following checks are performed:
Is the maximum_servers greater than zero? Yes.
Is the number of servers in the cluster exceeding the maximum_servers? Yes
Is the appliance code of ESA007 in the PAP_eligible_servers list? Yes
Thus, as the limit of the number of servers in a cluster is exceeded, ESA007 is added as a client.
6.4 - Cluster Security
This section describes about the Cluster Security.
Gossip Key
In the cluster, the appliances communicate using the Gossip protocol. The cluster supports encrypting the communication using the gossip key. This key is generated during the creation of the cluster. The gossip key is then shared across all the appliances in the cluster.
SSL Certificates
SSL certificates are used to authenticate the appliances on the cluster. Every appliance contains the following default cluster certificates in the certificate repository:
Server certificate and key for Consul
Certificate Authorities(CA) certificate and key for Consul
In a cluster, the server certificates of the appliances are validated by the CA certificate of the appliance that initiated the cluster. This CA certificate is shared across all the appliances on the cluster for SSL communication.
You can also upload your custom CA and server certificates to the appliances on the cluster. The CA.key file is not mandatory when you deploy custom certificates for an appliance.
Ensure that you apply a single CA certificate on all the appliances in the cluster.
If the CA.key is available, the appliances that are added to the cluster download the CA certificate and key. The new server certificate for the appliance are generated using the CA key file.
If the CA.key is not available, all the keys and certificates are shared among the appliances in the cluster.
Ensure that the custom certificates match the following requirements:
The CN attribute of the server certificate is set in the following format:
server.<datacenter name>.<domain>
The domain and datacenter name must be equal to the value mentioned in theconfig.json file. For example, server.ptydatacenter.protegrity.
The custom certificates contain the following entries:
localhost
127.0.0.1
FQDN of the local servers in the clusterFor example, an SSL Certificate with SAN extension of servers ESA1, ESA2, and ESA3 in a cluster has the following entries:
localhost
127.0.0.1
ESA1.protegrity.com
ESA2.protegrity.com
ESA3.protegrity.com
The following figure illustrates the certificates.
Ports
The following ports are used for enabling communication between appliances:
TCP port of 8300 – Used by servers to handle incoming request
TCP and UDP ports of 8301 – Used by appliances to gossip on LAN
TCP and UDP ports of 8302 – Used by appliances to gossip on WAN
Appliance Key Rotation
If you are using cloned machines to join a cluster, it is necessary to rotate the keys on all cloned nodes before joining the cluster. If the cloned machines have proxy authentication, two factor authentication, or TAC enabled, it is recommended to use new machines. This avoids any limitations or conflicts, such as, inconsistent TAC, mismatched node statuses, conflicting nodes, and key rotation failures due to keys in use.
For more information about rotating the keys, refer
here.
6.5 - Reinstalling Cluster Services
If the configuration files for TAC are corrupted, you can reinstall the consul service.
Before you begin
Ensure that Cluster-Consul-Integration service is uninstalled before reinstalling Consul service.
To reinstall the Cluster-Consul-Integration service:
In the CLI Manager, navigate to Administration > Add/Remove Services.
Press ENTER.
Enter the root password and select OK.
Select Install applications.
Select the Consul service and select OK.
Select Yes.
The Consul product is reinstalled on your appliance.
If there is cluster with a maximum of ten nodes and you do not want to continue with the integrated cluster services, then uninstall the cluster services.
To uninstall cluster services:
Remove the appliance from the TAC.
In the CLI Manager, navigate to Administration > Add/Remove Services.
Press ENTER.
Enter the root password and select OK.
Select Remove already installed applications.
Select Cluster-Consul-Integration v1.0.0 and select OK.
The integration service is uninstalled.
Select Consul v2.4.0 and select OK.
The Consul product is uninstalled from your appliance.
If the node contains scheduled tasks associated with it, then you cannot uninstall the cluster services on it. Ensure that you delete all the scheduled tasks before uninstalling the cluster services.
6.7 - FAQs on TAC
This section lists the FAQs on TAC.
Question
Answer
Can I block communication between appliances?
No. Blocking communication between appliances is disabled from release v7.1.0 MR2.
What is the recommended minimum quorum of servers required in a cluster?
The recommended minimum quorum of servers required in a cluster is three.
How to determine which appliance is the leader of the cluster?
In the OS Console of an appliance, run the following command: /usr/local/consul operator raft list-peers -http-addr https://localhost:9000 -ca-file /opt/consul/ssl/ca.pem -client-cert /opt/consul/ssl/cert.pem -client-key /opt/consul/ssl/cert.key
Can I change the certificates of an appliance that is added to a cluster?
Yes. Ensure that the certificates are valid. For more information about the validity of the certificates, refer here.
Can I remove the last server from the cluster?
No, you cannot remove the last server from the cluster. The clients depend on this server for cluster related information. If you remove this server, then you risk de-stabilizing the cluster.
How to determine the role of an appliance in a cluster?
In the Web UI, navigate to the Trusted Appliance Cluster. On the screen, the labels for the appliances appear. The label for the server is Consul Server and that of the client is Consul Client.
Can I add an appliance other than ESA as server?
Yes. Ensure that the value of the type attribute in the agent.json file under the /opt/cluster-consul-integration/configure directory is set as server.
Can I clone a machine and join it to the cluster?
Yes, you can clone a machine to join in the cluster.However, if you are using cloned machines to join a cluster, it is necessary to rotate the keys on all cloned nodes before joining the cluster. If the cloned machines have proxy authentication, two factor authentication, or TAC enabled, it is recommended to use new machines. This avoids any limitations or conflicts, such as, inconsistent TAC, mismatched node statuses, conflicting nodes, and key rotation failures due to keys in use.
For more information about rotating the keys, refer here.
6.8 - Creating a TAC using the Web UI
You can create a TAC, where you add an appliance to the cluster.
Before you begin
When setting up or adding appliances to your cluster, you may be required to request a license for new nodes from Protegrity. For more information about licensing, refer to the Protegrity Data Security Platform Licensing and your license agreement with Protegrity.
Before creating a TAC, ensure that the SSH Authentication type is set to Password + PublicKey.
If you are using cloned machines to join a cluster, it is necessary to rotate the keys on all cloned nodes before joining the cluster.
If the cloned machines have proxy authentication, two factor authentication, or TAC enabled, it is recommended to use new machines. This avoids any limitations or conflicts, such as, inconsistent TAC, mismatched node statuses, conflicting nodes, and key rotation failures due to keys in use.
For more information about rotating the keys, refer here.
Creating a TAC
In the ESA Web UI, navigate to System > Trusted Appliances Cluster.
The Join Cluster screen appears.
Select Create a new cluster.
The following screen appears.
Select the preferred communication method.
Select Add New to add, edit, or delete a communication method.
For more information about managing communication methods, refer here.
Click Save.
A cluster is created.
6.9 - Connection Settings
In a TAC, you can create a partially connected cluster using the Connecting Setting feature. In a partially connected cluster, the nodes selectively communicate with other nodes in the cluster without disconnecting the graph. If you want to avoid redundant information between certain nodes in the cluster, you can block the direct communication between them.
This feature is only supported if the Cluster-Consul-Integration and Consul components are not installed on your system.
The following figure shows a partially connected cluster connected graph with four nodes, where the nodes selectively communicate with some nodes in the cluster.
As shown in the figure, the direct communication between nodes C and D, A and D, B and C are blocked. If node B requires information about node C, it receives information from node A. The cluster is a fully connected graph where you can communicate directly or indirectly with every node in the cluster.
In a disconnected graph, there is no communication path between one node and other nodes in the cluster. You cannot create a TAC with a disconnected graph.
In a partially connected cluster, as some nodes are not connected to each other directly, there might be a delay in propagating data, depending on the path that the data needs to traverse.
Connection Settings for Nodes
This section describes the steps to set the connection settings for nodes in a cluster.
To set connection settings for nodes in the cluster:
In the CLI Manager, navigate to Tools > Trusted Appliances Cluster > Connection Management: Set connection settings for cluster nodes.
The following screen appears.
Select the required node in the cluster.
Select Choose.
The list of connection settings between the node and other nodes in the cluster appears.
Press SPACEBAR to toggle the connection setting for a particular node.
Select Apply.
The connection settings for the node are saved.
Caution: You can only create cluster export tasks between nodes that are directly connected to each other.
6.10 - Joining an Existing Cluster using the Web UI
If your appliance is not a part of any trusted appliances cluster, then you can add it to an existing cluster. This section describes the steps to join a TAC using the Web UI.
Before you begin
If you are using cloned machines to join a cluster, it is necessary to rotate the keys on all cloned nodes before joining the cluster.
If the cloned machines have proxy authentication, two factor authentication, or TAC enabled, it is recommended to use new machines. This avoids any limitations or conflicts, such as, inconsistent TAC, mismatched node statuses, conflicting nodes, and key rotation failures due to keys in use.
For more information about rotating the keys, refer
here.
Important : When assigning a role to the user, ensure that the Can Create JWT Token permission is assigned to the role.If the Can Create JWT Token permission is unassigned to the role of the required user in the target node, then joining the cluster operation fails.To verify the Can Create JWT Token permission, from the ESA Web UI navigate to Settings > Users > Roles.
Adding to an existing cluster
On the ESA Web UI, navigate to System > Trusted Appliances Cluster.
The following screen appears.
Enter the IP address of the target node in the Node text box.
Enter the credentials of the user of the target node in the Username and Password text boxes.
Click Connect.
The Site drop-down list and the Communication Methods options appear.
If you need to add a new communication method, click Add New. Otherwise, continue on to the next step.
Select the site and the preferred communication method.
Click Join.
The node is added to the cluster and the following screen appears.
Handling Consul certificates after adding an appliance to the cluster
After joining an appliance to the cluster, during replication, the Consul certificates are copied from the source to the target appliance. In this case, it is recommended to delete the Consul certificates pertaining to the target node from the Certificate Management screen. Navigate to Settings > Network > Certificate Repository. Click the delete icon next to Server certificate and key for Consul.
6.11 - Managing Communication Methods for Local Node
Every node in a network is identified using a unique identifier. A communication method is a qualifier for the remote nodes in the network to communicate with the local node.
There are two standard methods by which a node is identified:
Local IP Address of the system (ethMNG)
Host name
The nodes joining a cluster use the communication method to communicate with each other. The communication between nodes in a cluster occur over one of the accessible communication methods.
Adding a Communication Method from the Web UI
This section describes the steps to add a communication method from the Web UI.
In the Web UI, you can add a communication method only before creating a cluster. Perform the following steps to add a communication method from the Web UI.
In the Web UI, navigate to System > Trusted Appliances Cluster.
The Join Cluster Screen appears.
Click Create a new Cluster.
Click Create.
Click Add New.
The Add Communication Method text box appears.
Type the communication method and select OK.
The communication method is added.
Editing a Communication Method from the Web UI
This section describes the steps to edit a communication method from the Web UI.
In the Web UI, you can edit a communication method only before you create a cluster. Perform the following steps to edit a communication method from the Web UI.
In the Web UI, navigate to System > Trusted Appliances Cluster.
The Join Cluster Screen appears.
Click Create a new Cluster.
The Create New Cluster screen appears.
Click Create.
Click the Edit icon corresponding to the communication method to be edited.
The Edit Communication Method text box appears.
Type the communication method and select OK.
The communication method is edited.
Deleting a Communication Method from the Web UI
This section describes the steps to delete a communication method from the Web UI.
To delete a communication method from the Web UI:
In the Web UI, navigate to System > Trusted Appliances Cluster.
The Join Cluster Screen appears.
In the Web UI, you can delete a communication method before you create a cluster.
Click Create New Cluster.
The Create New Cluster screen appears.
Click Create.
Click the Delete icon corresponding to the communication method to be deleted.
A message confirming the delete operation appears.
Select OK.
The communication method is deleted.
6.12 - Viewing Cluster Information
This section describes the how to view cluster information using the Web UI.
To execute commands using Web UI:
In the Web UI, navigate to System > Trusted Appliances Cluster .
The screen with the appliances connected to the cluster appears.
Select All in the drop-down list.
The following options appear:
Node Summary
Cluster Tasks
DiskFree
MemoryFree
Network
System Info
Top 10 CPU
Top 10 Memory
All
Select the required option.
The selected information for the appliances appears in the right pane.
6.13 - Removing a Node from the Cluster using the Web UI
This section describes the steps to remove a node from a cluster using the Web UI.
Before you begin
If a node is associated with a cluster task that is based on the hostname or IP address, then the Leave Cluster operation will not remove node from the cluster. Ensure that you delete all such tasks before removing any node from the cluster.
Removing the node
On the Web UI of the node that you want to remove from the cluster, navigate to System > Trusted Appliances Cluster.
The screen displaying the cluster nodes appears.
Navigate to Management > Leave Cluster.
The following screen appears.
A confirmation message appears.
Select Ok.
The node is removed from the cluster.
Scheduled tasks and removed nodes
If the scheduled tasks are created between the nodes in a cluster, then ensure that after you remove a node from the cluster, all the scheduled tasks related to the node are disabled or deleted.
7 - Appliance Virtualization
The default installation of Protegrity appliances use hardware virtualization mode (HVM). An appliance can be reconfigured to use parallel virtualization mode (PVM) to optimize the performance of virtual guest machines. Protegrity supports the following virtual servers:
Xen
Microsoft Hyper-VP
Linux KVM Hypervisor
The information in this section will provide details on appliance virtualization. Understanding some of the instructions and details will require some Xen knowledge and technical skills. The virtual server configuration is done with its own tools. The examples shown later in this section are for using paravirtualization with Xen. Xen hypervisor is a thin software layer that is inserted between the server hardware and the operating system. This provides an abstraction layer that allows each physical server to run one or more virtual servers, effectively decoupling the operating system and its applications from the underlying physical server. Xen hypervisor changes are facilitated by the Xen Paravirtualization Tool.
For more information about Xen, and Xen hypervisor, refer http://www.xen.org/.
About switching from HVM to PVM
This section will also show how to switch from HVM to PVM. The following two main tasks are involved:
Configuration changes on the guest machine, the appliance.
Configuration changes on the virtual server.
The appliance configuration changes are facilitated by the Xen Paravirtualization tool, which is available in the appliance Tools menu, in the CLI Manager.
7.1 - Xen Paravirtualization Setup
This section describes the paravirtualization process, from preparation to running the tools and rebooting into PVM mode.
The paravirtualization tool provides an easy way to convert HVM to PVM and back again. It automates changes to configuration files and XenServer parameter.
This section describes the actual configuration changes on both the Appliance and XenServer in case you need or want to understand the low-level mechanisms involved.
Before you begin
It is recommended that you consult Protegrity Support before using the information in this Technical Reference section to manually change your configurations.
7.1.1 - Pre-Conversion Tasks
Before switching from HVM to PVM you should perform a system check, interface check, and system backup.
System Check
The Protegrity software appliance is installed with HVM. This means the appliance operating system does not know that it is running on a hypervisor.
To check the system:
Use the following Linux command to check whether the Linux kernel supports paravirtualization and examine the hypervisor.
# dmesg | grep –i boot
If the following message does not appear, then the kernel does not support paravirtualization:
Booting paravirtualized kernel
The rest of the output shows the hypervisor name, for example, Xen. If you are running on a physical hardware, or the hypervisor was not configured to use PVM, then the following output appears:
bare hardware
Interface Check
The conversion tools and tasks assume that the Protegrity Appliance virtual hard disk is using the IDE interface, which is the default interface. Check that the device name used by the Linux Operating System is hda, and not sda or other devices.
System Backup
Switching from HVM to PVM requires changes in many configuration files, so it is very important to back up the system before applying the changes. Use the XenServer snapshot functionality to back up the system.
For more information about the snapshot functionality, refer to the XenServer documentation.
It is also recommended that you back up the appliance data and configuration files using the standard appliance backup mechanisms.
For more information about backing up from CLI Manager, refer here.
Managing local OS user option provides you the ability to create users that need direct OS shell access. These users are allowed to perform non-standard functions, such as schedule remote operations, backup agents, run health monitoring, etc. This option also lets you manage passwords and permissions for the dpsdbuser, which is available by default when ESA is installed.
Managing Local OS Users
This section describes the steps to manage the local OS users.
To manage local OS users:
Navigate to Administration > Accounts and Passwords > Manage Passwords and Local-Accounts > Manage local OS users.
In the dialog displayed, enter the root password and confirm selection.
Add a new user or select an existing user as explained in following steps.
Select Add to create a new local OS user.
In the dialog box displayed, enter a User name and Password for the new user. The & character is not supported in the Username field.
Confirm the password in the required text boxes.
Select OK and press Enter to save the user.
Select an existing user from the list displayed.
You can select one of the following options from the displayed menu.
Options
Description
Procedure
Check password
Validate entered password.
In the dialog box displayed, enter the password for the local OS user.
A Validation succeeded message appears.
Update password
Change password for the user.
In the dialog box displayed, enter the Old password for the local OS user.
This step is optional.
Enter the New Password and confirm it in the required text boxes.
Update shell
Define shell access for the user.
In the dialog box displayed, select one of the following options:
No login access
Linux Shell - /bin/sh
Custom
Note: The default shell is set as No login access (/bin/false).
Toggle SSH access
Set SSH access for the user.
Select the Toggle SSH access option and press Enter to set SSH access to Yes.
Note: The default is set as No when a user is created.
Delete user
Delete the local OS user and related home directory.
Select the Delete user option and confirm the selection.
Select Close to exit the option.
Backup and Restore
If you backed up the OS in HVM/PVM mode, then you will be able to restore only in the mode in which you backed it up. For more information about backing up from the Web UI, refer to section Working with Backup and Restore.
7.1.2 - Paravirtualization Process
There are several tasks you must perform to switch from HVM to PVM.
The following figure shows the overall task flow.
The installed Appliance comes with the Appliance Paravirtualization Support Tool, which is equipped with the following:
Displays the current paravirtualization status of the appliance.
Displays Next Boot paravirtualization status of the appliance.
Converts from HVM to PVM and back again.
Connects to the XenServer and configures the Xen hypervisor for HVM or PVM.
Starting the Appliance Paravirtualization Support Tool
You can use Appliance Paravirtualization Support Tool to configure the local appliance for PVM.
To start the Appliance Paravirtualization Support Tool:
Access the ESA CLI Manager.
Navigate to Tools > Xen ParaVirtualization screen.
The root permission is required for entering the tool menu.
When you launch the tool, the main screen shows the current system status and provides options for managing virtualization.
Enabling Paravirtualization
When you convert your appliance to PVM mode, the internal configuration is modified and the Next Boot status changes to support paravirtualization. Both virtual block device and virtual console support is enabled as well.
To enable Paravirtualization:
To enable PVM on the appliance, you need to configure both XenServer and the appliance.
You can configure XenServer in two ways:
Copy the tool to the XenServer and execute it locally, not using the appliance.
Execute the commands manually using the xe command of Xen console.
To configure the local appliance for PVM from the Appliance Paravirtualization Support Tool main screen, select Enable paravirtualization settings.
The status indicators in the Next boot configuration section of the main screen change from Disabled to Enabled.
Configuring Host for PVM
To configure the Host for PVM, you need to have access to the XenServer machine.
Once the local Appliance is configured to use PVM, you connect to the XenServer to run the Xen ParaVirtualization Support Tool. This configures changes on the Xen hypervisor so that it runs in Host PVM mode. You will be asked for a root password upon launching the tool.
The following figure shows the main screen of the Xen Paravirtualization Support Tool.
To configure the Host for PVM:
From the Appliance ParaVirtualization Support Tool main screen, select Connect to XenServer hypervisor and execute tool.
Select OK.
The XenServer hypervisor interface appears.
At the prompt, type the IP or host name of the XenServer.
Press ENTER.
At the prompt, type the user name for SCP/SSH connection.
Press ENTER.
At the prompt, type the password to upload the file.
Press ENTER.
The tool is uploaded to the /tmp directory.
At the prompt, type the password to remotely run the tool.
Press ENTER.
An introduction message appears.
At the prompt, type the name of the target virtual machine.
Alternatively, press ENTER to list available virtual machines.
The Xen ParaVirtualization Support Tool Main Screen appears and shows the current virtual machine information and status.
Type 4 to enable paravirtualization settings.
Press ENTER.
The following screen appears.
At the prompt, type Y to save the configuration.
Press ENTER.
You can use option 3 to back up the entries that will be modified. The backup is stored in the /tmp directory on the XenServer machine as a rollback script that can be executed later on to revert the configuration back from PVM to HVM.
Type q to exit the Appliance Paravirtualization Support Tool.
Rebooting the Appliance for PVM
After configuring the appliance and the Host for PVM, the appliance must be restarted. When it restarts, it will come up and run in PVM mode.
Before you begin
Before rebooting the appliance:
Exit both local and remote Paravirtualization tools before rebooting the appliance.
In the PVM, the system might not boot if there are two bootable devices. Be sure to eject any bootable CD/DVD on the guest machine.
If you encounter console issues after reboot, then close the XenCenter and restart a new session.
Booting into System Restore mode
You cannot boot in the System Restore mode when in the Xen Server PVM mode, because it does not show up during appliance launching and appears only if you have previously backed up the OS. However, you can boot in the System Restore mode when in the Xen Server HVM mode.
How to reboot the appliance for PVM
To reboot appliance for PVM:
To reboot the appliance for PVM, navigate to Administration > Reboot and Shutdown > Reboot.
Restart the Appliance Paravirtualization Support Tool and check the main screen to verify the current mode.
Disabling Paravirtualization
To disable Paravirtualization:
To revert the appliance back to HVM, you need to disable paravirtualization on the guest appliance OS and on the XenServer.
To return the appliance to HVM, use the Disable Paravirtualization Settings option, available in the Appliance Paravirtualization Support Tool.
The status indicators in the Next boot configuration section on the main screen change from Enabled to Disabled.
To return the XenServer to HVM, perform one of the following tasks to revert the XenServer configuration to HVM:
If…
Then…
You backed up the XenServer configuration by creating a rollback script while switching from HVM to PVM, using option 3 on the Xen Paravirtualization Support Tool
Execute the rollback script.
You want to use the Xen Paravirtualization Support Tool
Use the Xen Paravirtualization Support Tool to connect to the XenServer, and then type 5 to select Disable paravirtualization Setting (enable HVM). For more information about connecting to the XenServer, refer to section Configure Host for PVM.
You want to perform a manual conversion
Manually convert from PVM to HVM. For more information about converting from PVM to HVM, refer to section Manual Configuration of Xen Server.
7.2 - Xen Server Configuration
This section describes about configuring the Xen Server.
Appliance Configuration Files for PVM
The following table describes the appliance configuration files that are affected by the appliance Xen Paravirtualization tool.
File Name
Description
HVM
PVM
/boot/grub/menu.lst
Boot Manager. The root partition is affected and the console parameters.
root=/dev/hda1
root=/dev/xvda1 console=hvc0 xencons=hvc0
/etc/fstab
Mounting table
Using the hda device name (/dev/hda1,/dev/hda2,…)
Using the xvda device-name (/dev/xvda1,…)
/etc/inittab
Console
tty1
hvc0
Xen Server Parameters for PVM
This section lists the Xen Server Parameters for PVM.
The following settings are affected by the Appliance Paravirtualization Support Tool.
Parameter Name
Description
HVM
PVM
HVM-boot-policy
VM parameter: boot-loader
BIOS Order
“” (empty)
PV-bootloader
VM Parameter: paravirtualization loader
“” (empty)
Pygrub
Bootable
Virtual Block Device parameter
false
“true”
Manual Configuration of Xen Server
This section describes about configuring the Xen Server manually.
It is recommended that you use the Xen Paravirtualization Support Tool to switch between HVM and PVM. However, you sometimes might need to manually configure the XenServer. This section describes the commands you use to switch between the two modes.
It is recommended that you consult Protegrity Support before manually applying the commands. Back up your data prior to configuration changes. Read the XenServer documentation to avoid errors.
Converting HVM to PVM
This section describes the steps to convert HVM to PVM.
To convert HVM to PVM use the following commands to convert from HVM to PVM, where NAME_OF_VM_MACHINE is the name of the virtual machine.
Protegrity uses Xen tools to enhance and improve the virtualization environment with better management and performance monitoring. The appliance is a hardened machine, so you must send the Xen tools (.deb) package to Protegrity. In turn, Protegrity provides you with an installable package for your Xen Server environment. You must upload the package to the appliance and install it from within the OS Console.
To install Xen tools:
Mount the Xen tools CDROM to the guest machine:
Using the XenCenter, mount the XenTools (xs-tools.iso file) as a CD to the VM.
Log in to the appliance, and then switch to OS Console.
To manually mount the device, run the following command:
# Mount /dev/xvdd /cdrom
Copy the XEN tools .deb package to your desktop machine. You can do that:
Using scp to copy the file to a Linux machine, for example:
Downloading the file from https://YOUR_IP/xentools.
When you are done, delete the soft link (/var/www/xentools).
Send the xe-guest-utilities_XXXXXX_i386.deb file to Protegrity.
Protegrity will provide you with this package in a .tgz file.
Upload the package to the appliance using the Web UI.
Extract the package and execute the installation:
# cd /products/uploads# tar xvfz xe-guest-utilities_XXXXX_i386.tgz# cd xe-guest-utilities_XXXXX_i386# ./install.sh
Unmount the /cdrom on the appliance.
Eject the mounted ISO.
Reboot the Appliance to clean up references to temporary files and processes.
7.4 - Xen Source – Xen Community Version
Unlike XenServer, which provides an integrated UI to configure the virtual machines, Xen Source® does not provide one. Therefore, the third step of switching from HVM to PVM must be done manually by changing configuration files.
This section provides examples of basic Xen configuration files that you can use to initialize Protegrity Appliance on Xen Source hypervisor.
For more information about Xen Source, refer to Protegrity Support, Xen Source documentation, and forums.
HVM Configuration
The following commands are used to manually configure the appliance for full virtualization.
After switching to PVM mode, I cannot use the
XenCenter.
Close the XenCenter and open a new instance.
8 - Appliance Hardening
The Protegrity Appliance provides the framework for its appliance-based products. The base Operating System (OS) used for Protegrity Appliances is Linux, which provides the platform for Protegrity products. This platform includes the required OS low-level components as well as higher-level components for enhanced security management. Linux is widely accepted as the preferred base OS for many customized solutions, such as in firewalls and embedded systems, among others.
Linux was selected for the following reasons:
Open Source: Linux is an Open Source solution.
Stable: The OS is a stable platform due to its R&D and QA cycles.
Customizable: The OS can be customized up to a high level.
Proven system: The OS has already been proven in many production environments and systems.
For a list of installed components, refer to the Contractual.htm document available in the Web UI under Settings > System > Files pane.
Protegrity takes several measures to harden this Linux-based system and make it more secure. For example, many non-essential packages and components are removed. If you want to install external packages on the appliances, the packages must be certified by Protegrity.
For more information about installing external packages, contact Protegrity Support.
The following additional hardening measures are described in this section:
Linux Kernel
Restricted Logins
Enhances Logging
Open Listening TCP Ports
Packages and Services
Several major components, services, or packages are disabled or removed for appliance hardening.
The following table lists the removed packages.
Removed Object
Examples
Network Services (except SSH/Apache)
telnet client/server client/server
Package Managers
apt
Additional Packages
Man Pages Documents
Appliance Hardening
The appliance kernels are optimized for hardening. The Protegrity appliances are currently equipped with a modular patched Linux Kernel version 4.9.38. These kernel are patched to enhance some capabilities as well as optimize it for server-side usage. Standard server-side features such as
scheduler and TCP settings are available.
Logging in
Restricted Log in
Every Protegrity Appliance is equipped with an internal LDAP directory service, OpenLDAP. Appliances may use this internal LDAP for authentication, or an external one.
The ESA Server provides directory services to all the other appliances. However, to avoid single point of failure you can use multiple directory services.
Four users are predefined and available after the appliance is installed. Unlike in standard Linux, the root user is blocked and cannot access the system without permission from the admin user. The admin user cannot access the Linux Shell Console without permission from the root user. This design provides extra security to ensure that in order to perform any OS-related or security-related operations, both root and admin users must cooperate. The operations include upgrade, and patches. The same design applies to SSH connectivity.
The main characteristics of the four users are described here.
root user
Local OS user.
By default, can only access machine’s console.
All other access requires additional admin user login to ensure isolation of duties.
If required, then login using SSH can be allowed, which is blocked by default.
No Web UI access.
admin user
LDAP directory management user.
Usually this user is the Chief Security Officer.
Can access and manage Web UI or CLI menu using machine’s console or SSH.
Can create additional users.
If required, then root user login for OS related activities can be allowed.
viewer user
LDAP directory user.
By default, has read-only access to Appliance features.
Can access Web UI and CLI menu using machine’s console or SSH but cannot modify settings/server.
local_admin user
Local OS user.
Emergency or maintenance user with limited admin user permission.
Handles cases where the directory server is not accessible.
By default, the Web UI is blocked and only the machine’s console is accessible.
By default, the SSH permission is enabled.
The appliance login design facilitates appliance hardening. The following two OS users are defined:
root: The standard system administrator user.
local_admin: Administrative OS user for maintenance, in case the LDAP is not accessible.
By default, the Web UI is blocked, and only machine’s console is accessible.
These are the basic login rules:
The root user will never be able to login directly.
The admin user can connect to the CLI Manager, locally or through SSH.
A root shell can be accessed from within the admin CLI Manager.
Enhanced Log in
The logging capabilities are enhanced for appliance hardening. In addition to the standard OS logs or syslogs that are available by default, many other operations are logged as well.
Logs that are considered important are sent to the Protegrity ESA logging facility, which can be local or remote. This means that in addition to the standard syslog repository, Protegrity provides a secured repository for important system logs.
You can find these events from within the logs that are escalated to the ESA logging facility:
System startup logs
Protegrity product or service is started or stopped
System backup and restore operations
High Availability events
User logins
Configuration changes
Configuring user limits
In Linux, a user utilizes the system resources to perform different operations. When a user with minimal privileges runs operations that use most system resources, it can result in the unavailability of resources for other users. This introduces a Denial-of-Service (DoS) attack on the system. To mitigate this attack, you can restrict users or groups utilizing the system resources. For Protegrity appliances,
using the ulimit functionality, you can limit the number of processes that a user can create.
The ulimit functionality cannot be applied on usernames that contain the space character.
While using protectors below version 10.x, if the number of protectors are more than 300, then the ulimit must be increased.
Warning: Increasing the ulimit might have negative consequences on the environment. In such cases, it must be handled with the load balancers.
Increasing the ulimit
Perform the following steps to increase the ulimit:
Log in to the ESA CLI Manager.
Navigate to Administration > OS Console.
Enter root password.
Navigate to /etc/security/limits.conf file.The following content appears.
#*               soft    core            0
#root            hard    core            100000
#*               hard    rss             10000
#@student        hard    nproc           20
#@faculty        soft    nproc           20
#@faculty        hard    nproc           50
#ftp             hard    nproc           0
#ftp             -       chroot          /ftp
#@student        -       maxlogins       4

# End of file
*       hard    core    0
#PTY-39608 - ulimit open files needs to be increased for apache process in appliances
*         -       nofile          16384
root soft nofile 65536
root hard nofile 65536
Navigate to the following line to change the ulimit for all users.
* - nofile 16384
Change the ulimit value from 16384 to 65536.
Save the file and exit.
To verify the updated ulimit ensure to disconnect the current session and perform the steps to verify the ulimit using a new session.
Verifying the ulimit
Perform the following steps to verify the ulimit:
Log in to the ESA CLI Manager.
Navigate to Administration > OS Console.
Enter root password.
Verify the ulimit using the following command.ulimit -a
Verify the value of the following parameter.
open files (-n) 65536
The updated ulimit appears.
8.1 - Open listening ports
Network ports serve as communication channels that allow information to flow from one system to another. This section provides a list of ports that must be configured in your environment to access the features and services on Protegrity appliances.
For more information about Protegrity products and various components, refer Glossary.
Ports for accessing ESA
The following is the list of ports that must configured for the system users to access ESA.
Port Number
Protocol
Source
Destination
NIC
Description
22
TCP
System User
ESA
Management NIC (ethMNG)
Access to CLI Manager
443
TCP
System User
ESA
Management NIC (ethMNG)
Access to Web UI for Security Officer or ESA administrator
443
TCP
DevOps User
ESA
Management NIC (ethMNG)
Initiating Protegrity REST API requests.For example,
Initiating the Policy Management APIs.
Downloading the the Policy package using the Export API.
Ports for accessing Protectors
The following is the list of ports that must be configured between the ESA and the non-appliance based protectors such as, Big Data Protector (BDP), Application Protector (AP), and so on.
Port Number
Protocol
Source
Destination
NIC
Description
8443
TCP
All Protectors
Service Dispatcher in ESA
Management NIC (ethMNG)
Downloading certificates from the ESA.
Downloading policies from the ESA. This is applicable to protectors earlier than version 10.0.x.
25400
TCP
Version 10.0.x dynamic protectors
Resilient Package Proxy (RPP) in the ESA
Management NIC (ethMNG)
Downloading certificates and packages from the ESA via the RPP service in the ESA.
9200
TCP
Log Forwarder service on the machine
Insight Nginx in ESA
Management NIC (ethMNG) of ESA
To send audit logs received from the Log Server and forward
it to Insight in the ESA.
Ports for ESA on TAC
The following is the list of ports that must be configured for the ESA appliances in a Trusted Appliances Cluster (TAC).
Port Number
Protocol
Source
Destination
NIC
Description
Notes (If any)
22
TCP
Primary ESA
Secondary ESA
Management NIC (ethMNG)
Communication in TAC
22
TCP
Secondary ESA
Primary ESA
Management NIC (ethMNG)
Communication in TAC
443
TCP
Primary ESA
Secondary ESA
Management NIC (ethMNG)
Communication in TAC
443
TCP
Secondary ESA
Primary ESA
Management NIC (ethMNG)
Communication in TAC
10100
UDP
Primary ESA
Secondary ESA
Management NIC (ethMNG)
Communication in TAC
This port is optional. If the appliance heartbeat services are stopped, this port can be disabled.
10100
UDP
Secondary ESA
Primary ESA
Management NIC (ethMNG)
Communication in TAC
This port is optional. If the appliance heartbeat services are stopped, this port can be disabled.
8300
TCP
Primary ESA
Secondary ESA
Management NIC (ethMNG)
Used by servers to handle incoming request.
This port allows internal communication between Consul server nodes.
8300
TCP
Secondary ESA
Primary ESA
Management NIC (ethMNG)
Handle incoming requests
This is used by servers to handle incoming requests from
other consul agents.
8301
TCP and UDP
Primary ESA
Secondary ESA
Management NIC (ethMNG)
Gossip on LAN.
This is used to handle gossip in the LAN. Required by all consul
agents.
8301
TCP and UDP
Secondary ESA
Primary ESA
Management NIC (ethMNG)
Gossip on LAN.
This is used to handle gossip in the LAN. Required by all consul
agents.
8302
TCP and UDP
Primary ESA
Secondary ESA
Management NIC (ethMNG)
Gossip on WAN.
This is used by consul servers to gossip over the WAN, to other
servers. As of Consul 0.8 the WAN join flooding feature requires the Serf WAN port (TCP/UDP) to be listening on both WAN and LAN
interfaces.
8302
TCP and UDP
Secondary ESA
Primary ESA
Management NIC (ethMNG)
Gossip on WAN.
This is used by consul servers to gossip over the WAN, to other
servers. As of Consul 0.8 the WAN join flooding feature requires the Serf WAN port (TCP/UDP) to be listening on both WAN and LAN interfaces.
8600
TCP and UDP
ESA
DSG
Management NIC (ethMNG)
Listens to the DNS server port.
Used to resolve DNS queries.
8600
TCP and UDP
DSG
ESA
Management NIC (ethMNG)
Listens to the DNS server port.
Used to resolve DNS queries.
Additional Ports
Based on the firewall rules and network infrastructure of your organization, you must open ports for the services listed in the following table.
Port Number
Protocol
Source
Destination
NIC
Description
Notes (If any)
25
TCP
ESA
SMTP Server
Management NIC (ethMNG) of ESA
To configure the email server.
Default port for SMTP server.
123
UDP
ESA
Time servers
Management NIC (ethMNG) of ESA
NTP Time Sync Port
This port can be configured based on the enterprise network policies or according to your use case.
389
TCP
ESA
Active Directory server
Management NIC (ethMNG) of ESA
Authentication for External AD and synchronization with External Groups.
Synchronization with External AD Groups for policy users.
This port can be configured based on the enterprise network
policies or according to your use case.
636
TCP
ESA
Active Directory server
Management NIC (ethMNG) of ESA
Authentication for External AD and synchronization with
External Groups.
Synchronization with External AD Groups for policy users.
This port is for LDAPS. It can be configured based on the
enterprise network policies or according to your use case.
1812
TCP
ESA
RADIUS server
Management NIC (ethMNG) of ESA
Authentication with RADIUS server.
This port can be configured based on the enterprise
network policies or according to your use case.
514
UDP
ESA
Syslog servers
Management NIC (ethMNG) of ESA
Storing logs
This port can be configured based on the enterprise network policies or according to your use case.
15780
TCP
AIX Protector
Machine where Log Forwarder is installed.
ManagementNIC (ethMNG)
Forwarding logs from the AIX Protector to the Log Forwarder.
FutureX (9111)
TCP
ESA
HSM server
Management NIC (ethMNG) of ESA
HSM communication
This port can be configured based on the enterprise network policies or according to your use case.
Safenet (1792)
TCP
ESA
HSM server
Management NIC (ethMNG) of ESA
HSM communication
This port must be opened and configured based on the
enterprise network policies or according to your use case.
nCipher non-privileged port (8000)
TCP
ESA
HSM sever
Management NIC (ethMNG) of ESA
HSM communication
This port must be opened and configured based on the
enterprise network policies or according to your use case.
nCipher privileged port (8001)
TCP
ESA
HSM server
Management NIC (ethMNG) of ESA
HSM communication
This port must be opened and configured based on the
enterprise network policies or according to your use case.
Utimaco (288)
TCP
ESA
HSM server
Management NIC (ethMNG) of ESA
HSM communication
This port must be opened and configured based on the
enterprise network policies or according to your use case.
443
TCP
ESA
AWS Key Management Service
Google Cloud Key Management Service
Azure Key Vault
Management NIC (ethMNG) of ESA
Key Management Service (KMS) Integration
This port must be opened and configured based on the
enterprise network policies or according to your use case.
Ports for DSG
If you are utilizing the DSG appliance, the following ports must be configured in your environment.
Port Number
Protocol
Source
Destination
NIC
Description
22
TCP
System User
DSG
Management NIC (ethMNG)
Access to CLI Manager.
443
TCP
System User
DSG
Management NIC (ethMNG)
Access to Web UI.
Ports for communication between DSG and ESA
The following is the list of ports that must be configured for communication between DSG and ESA.
Port Number
Protocol
Source
Destination
NIC
Description
Notes (If any)
22
TCP
ESA
DSG
Management NIC (ethMNG)
Deploying the Rulesets from ESA to DSG
DSG Patching from ESA
443
TCP
ESA
DSG
Management NIC (ethMNG)
Communication in TAC
443
TCP
ESA
DSG
Management NIC (ethMNG)
Synchronize SSL certificates with ESA's certificates during ESA communication
8443
TCP
DSG
ESA
Management NIC (ethMNG)
Establishing secure communication between PEP server and the ESA to download the certificates
Retrieving policy from ESA
9200
TCP
DSG
ESA
Management NIC (ethMNG)
To send audit logs received from the Log Server and forward
it to Insight in the ESA.
389
TCP
DSG
ESA
Management NIC (ethMNG)
Authentication and authorization by ESA
5671
TCP
DSG
ESA
Management NIC (ethMNG)
Notifications sent from DSG to ESA
Notifications related to OS backup.
Notifications from cron jobs are sent to the ESA dashboard.
10100
UDP
DSG
ESA
Management NIC (ethMNG)
Establishing communication with ESA
Communication in TAC
This port is optional. If the appliance heartbeat services are stopped, this port can be disabled.
DSG Ports for Communication in TAC
The following is the list of ports that must also be configured when DSG is configured in a TAC.
Port Number
Protocol
Source
Destination
NIC
Description
Notes (If any)
22
TCP
DSG
ESA
Management NIC (ethMNG)
Communication in TAC
8585
TCP
ESA
DSG
Management NIC (ethMNG)
Retrieving Cloud Gateway cluster information
443
TCP
ESA
DSG
Management NIC (ethMNG)
Communication in TAC
10100
UDP
ESA
DSG
Management NIC (ethMNG)
Communication in TAC
This port is optional. If the Appliance Heartbeat services are stopped, this port can be disabled.
10100
UDP
DSG
ESA
Management NIC (ethMNG)
Establishing communication with ESA
Communication in TAC
This port is optional. If the Appliance Heartbeat services are stopped, this port can be disabled.
10100
UDP
DSG
DSG
Management NIC (ethMNG)
Communication in TAC
This port is optional.
Additional Ports for DSG
In DSG, service NICs are not assigned a specific port number. You can configure a port number as per your requirements.
Based on the firewall rules and network infrastructure of your organization, you must open ports for the services listed in the following table.
Port Number
Protocol
Source
Destination
NIC
Description
Notes (If any)
123
UDP
DSG
Time servers
Management NIC (ethMNG) of ESA
NTP Time Sync Port
This port can be configured based on the enterprise network
policies or according to your use case.
514
UDP
DSG
Syslog servers
Management NIC (ethMNG) of ESA
Forwarding logs
This port can be configured based on the enterprise network
policies or according to your use case.
514
TCP
DSG
Syslog servers
Management NIC (ethMNG) of ESA
Forwarding logs
This port can be configured based on the enterprise network
policies or according to your use case.
Application Ports
TCP
DSG
Applications
Service NIC (ethSRV) of DSG
Enabling communication for DSG with different
applications in the organization.
This port can be configured based on the enterprise network policies or according to your use case.
Tunnel Ports
TCP
Applications
DSG
Service NIC (ethSRV) of DSG
Enabling communication for DSG with different
applications in the organization.
This port can be configured based on the enterprise network policies or according to your use case.
Ports for the Internet
The following ports must be configured on ESA for communication with the Internet.
If the FIPS mode is enabled, then the Antivirus is disabled on the appliance. If the FIPS mode is enabled, this port can be disabled.
For more information about Antivirus, refer Working with Antivirus.
Port Number
Protocol
Source
Destination
NIC
Description
80
TCP
ESA
ClamAV Database
Management NIC (ethMNG) of ESA
Updating the Antivirus database on ESA.
Additional Ports for Strengthening Firewall Rules
The following ports are recommended for strengthening the firewall configurations.
Port Number
Protocol
Source
Destination
NIC
Description
67
UDP
Appliance/System
DHCP server
Management NIC (ethMNG)
Allows to broadcast a DHCP request from client to DHCP server.
68
UDP
DHCP server
Appliance/System
Management NIC (ethMNG)
Allows to listen for DHCP responses from the server.
161
UDP
ESA/DSG
SNMP
Management NIC (ethMNG)
Allows SNMP requests.
162
UDP
ESA/DSG
SNMPTrap
Management NIC (ethMNG)
Allows SNMPTrap requests.
10161
TCP and UDP
ESA/DSG
SNMP
Management NIC (ethMNG)
Allows SNMP requests over DTLS.
Insight in ESA Ports
The following ports must be configured for communication for Insight in ESA.
Port Number
Protocol
Source
Destination
NIC
Description
Notes (If any)
9200
TCP
ESA node in Audit Store cluster
ESA node in the same Audit Store cluster
Management NIC (ethMNG) of Insight in ESA
Insight Nginx REST communication.
This port can be configured based on the enterprise network policies or according to your use case.
9300
TCP
ESA node in Audit Store cluster
ESA node in the same Audit Store cluster
Management NIC (ethMNG) of Insight in ESA
Internode communication between the Audit Store
nodes.
This port can be configured based on the enterprise network policies or according to your use case.
24284
TCP
Protector
ESA
Management NIC (ethMNG) of Insight in ESA
Communication between protector and td-agent.
This port can be configured according to your use case when forwarding logs to an external Security information and event management (SIEM) over TLS.
9 - VMware tools in appliances
VMware tools in appliances
The VMware tools are used to access the utilities that enable you to monitor and improve management of the virtual machines that are part of your environment. When you install or upgrade your appliance, the VMware tools are automatically installed.
10 - Increasing the Appliance Disk Size
The steps to increase the total disk size of the Appliance.
If you need to increase the total disk size of the Appliance, then you can add additional hard disks to the Appliance. The Appliance refers to the added hard disks as logical volumes, or partitions, which offer additional disk capacity.
As required, partitions can be added, removed, or moved from one hard disk to another. It is possible to create smaller partitions on a hard disk and combine multiple hard disks to form a single large partition.
Configuration of Appliance for Adding More Disks
Hard disks or volumes can be added to the appliance at two different times:
Add the hard disk during installation of the Appliance.
For more information about adding and configuring the hard disk, refer to the Protegrity Installation Guide.
Add the hard disks later when required.
Steps have been separately provided for a single hard disk installation and more than one hard disk installation later in this section.
Installation of Additional Hard Disks
Ensure that the Appliance is installed and working and the hard disks to be added are readily available.
To install one or more hard disks:
If the Appliance is working, then log out of the Appliance and turn it off.
Add the required hard disk.
Turn on the appliance.
Login to the CLI console with admin credentials.
Navigate to Tools > Disk Management.
Search for the new device name, for example, :/dev/sda, and note down the capacity and the partitions in the device.
Select Refresh.
The system recognizes any added hard disks.
Select Extend to add more hard disks to the existing disk size.
Select the newly added hard disk.
Click Extend again to confirm that the newly added hard disk has been added to the Appliance disk size.
A dialog appears asking for confirmation with the following message.
Warning! All data on the /dev/sda will be removed! Press YES to continue…
Select Continue.
The newly added hard disk is added to the existing disk size of the Appliance.
Navigate to Tools > Disk Management.
The following screen appears confirming addition of the hard disk to the Appliance disk size.
Rolling Back Addition of New Hard Disks
If the Appliance has been upgraded, then roll back to the setup of the previous version is possible. Roll back option is unavailable if you have upgraded your system to Appliance v8.0.0 and have not finalized the upgrade. When you finalize the upgrade, you confirm that the system is functional. Only then does the roll back feature become available.
For more information about upgrade, refer to the Protegrity Upgrade Guide.
11 - Mandatory Access Control
Mandatory Access Control (MAC) is a security approach that allows or denies an individual access to resources in a system. With MAC, you can set polices that can be enforced on the resources. The policies are defined by the administrator and cannot be overridden by other users.
Among many implementations of MAC, Application Armor (AppArmor) is a CIS recommended Linux security module that protects the operating system and its applications from threats. It implements MAC for constraining the ability of a process or user on operating system resources.
AppArmor allows you to define policies for protecting the executable files and directories present in the system. It applies these policies to the profiles. Profiles are groups, where restriction on specific actions for the files or directories are defined. The following are the two modes of applying policies on profiles:
Enforce: The profiles are monitored to either permit or deny a specific action.
Complain: The profiles are monitored, but actions are not restricted. Instead, actions are logged in the audit events.
AppArmor increases security by restricting actions on the executable files in the system. It is added as another layer of security to protect custom scripts and prevent information leaks in case of any security breach. On Protegrity appliances, such as, ESA and DSG, AppArmor is enabled to protect the different OS features, such as, antivirus, firewall, scheduled tasks, trusted appliances cluster, proxy authentication, and so on. Separate profiles are created for appliance-specific features. For more information about the list of profiles, refer to Viewing profiles. In an unprecedented case of a security breach on the appliances, any attempt to modify the protected profiles are foiled by AppArmor. The logs for the denials are generated and appear under system logs where they can be analyzed.
After AppArmor is enabled, all profiles that are defined in it are protected. Although it is enabled, if a new executable script is introduced in the appliance, AppArmor does not automatically protect this script. For every new script or file to be protected, a separate AppArmor profile must be created and permissions must be assigned to it.
The following sections describe the various tasks that you can perform on the Protegrity appliances using AppArmor.
11.1 - Working with profiles
Creating a Profile
In addition to the existing profiles in the appliances, AppArmor allows creating profiles for other executable files present in the system. Using the aa-genprof command, you can create a profile to protect a file. When this command is run, AppArmor loads that file in complain mode and provides an option to analyze all the activities that might arise. It learns about all the activities that are present in the file and suggests the permissions that can be applied on them. After the permissions are assigned to the file, the profile is created and set in the enforce mode.
As an example, consider an executable file apparmor_example.sh in your system for which you want to create a profile. The script is copied in the /etc/opt/ directory and contains the following actions:
Creating a file sample1.txt in the /etc/opt/ directory
Changing permissions for the sample1.txt file
Removing sample1.txt file
Ensure that apparmor_example.sh file has a 755 permission set to it.
Generating a profile for a file
The following steps describe how to generate a profile for the apparmor_example.sh file.
Perform the following steps to create a profile.
Login to the CLI Manager.
Navigate to Administration > OS Console.
Navigate to the /etc/opt directory.
Run the following command to view the commands in the apparmor_example.sh file.
After selecting the option for the first command, AppArmor reads each action and provides a list of permissions for each action. Type the required character that needs to be assigned for the permissions.
Type F to finish the scanning and S to save the change to the profile.
Restart the AppArmor service using the following command.
/etc/init.d/apparmor restart
Navigate to the /etc/apparmor.d directory to view the profile.
The profile appears as follows.
etc.opt.apparmor_example.sh
Setting a Profile on Complain Mode
For easing the restrictions applied to the a profile, you can apply the complain mode on it. AppArmor allows actions to be performed, but logs all the activities that occur for that profile. AppArmor provides the aa-complain command to perform this task. The following task describes the steps to set the apparmor_example.sh file in the complain mode.
Perform the following steps to set a profile in complain mode.
Navigate to the /var/log/syslog directory to view the logs.
Even though an event has a certain restriction, the logs display that AppArmor allowed it to occur and has logged it for the apparmor_example.sh script.
Setting a Profile on Enforce Mode
When the appliance is installed in your system, the enforce mode is applied on the profiles by default. If you want to add a profile in enforce mode, AppArmor provides the aa-enforce command to perform this task.The following task describes the steps to set the apparmor_example.sh file in enforce mode.
Perform the following steps to set a profile in enforce mode.
Based on the permissions that are assigned while creating the profile for the script, the following message is displayed on the screen.
The Deny permission is assigned to all the commands in this script.
Modifying an Existing Profile
Important: After upgrading the ESA to v10.2.0, AppArmor profiles must be updated due to changes in binary paths introduced in Bookworm. If the profiles are not updated, existing custom scripts created by user may fail due to change in the binary location.
For supporting binaries at /bin or /lib location, add /{usr/,} before the binaries.
When updating AppArmor profiles using the new binary paths, it is essential to use the allow keyword to explicitly define permitted operations and resource access.
For example, the profile having the entry /bin/bash ix, must be updated as shown below:
allow /{usr/,}bin/bash ix,.
In an appliance, Protegrity provides a default set of profiles for appliance-specific features. These include profiles for Two-factor authentication, Antivirus, TAC, Networking, and so on. The profiles contain appropriate permissions that require the feature to run smoothly without compromising its security. However, access-denial logs for some permissions may appear when these features are run. This calls for modifying the profile of a feature by appending the permissions to it.
Consider the usr.sbin.apache2 profile that is related to the networking services. When this feature is executed, based on the permissions that are defined, AppArmor allows the required operations to run. If it encounters a new action on this profile, it generates a Denied error and halts the task from proceeding.
For example, the following log appears for the usr.sbin.apache2 profile after the host name of the system is changed from the Networking screen on the CLI Manager.
As described in the log, AppArmor denied an execute permission for this profile. Every time you change the host name from the CLI manager, AppArmor will not permit that operation to be performed. This can be mitigated by modifying the profile from the /etc/apparmor.d/custom directory. Thus, the additional permission must be added to the usr.sbin.apache2 profile that is present in the /etc/apparmor.d/custom directory. This ensures that the new permissions to the profile are considered and existing permissions are not overwritten when the feature is executed. If you get a permission error log on the Appliance Logs screen, then perform the following steps to update the usr.sbin.apache2 profile with a new permission.
Updating profile permissions
Perform the steps in the instructions below to update profile permissions.
Those steps are also applicable for permission denial logs that appear for other default profiles provided by Protegrity. Based on the permissions that are denied, update the respective profiles with the new operations.
To update profile permissions:
On the CLI Manager, navigate to Administration > OS Console.
Navigate to the /etc/apparmor.d/custom directory.
Open the required profile on the editor.
For example, open the usr.sbin.apache2 profile in the editor.
Add the following permission.
<Value in the name parameter of the denial log> rix,
For example, the command for usr.sbin.apache2 denial log is as follows.
/sbin/ethtoolrix,
Save the changes and exit the editor.
Run the following command to update the changes to the AppArmor profile.
Now, change the host name of the system from the CLI Manager. The denial logs are not observed.
Viewing Status of Profiles
Using the aa-status command, AppArmor loads and displays all the profiles that are configured in the system. It displays all the profiles that are in enforce and complain modes.
Perform the following steps to view the status for the profiles.
Login to the CLI Manager.
Navigate to Administration > OS Console.
Run the status command as follows:
aa-status
The screen with the list of all profiles appears.
11.2 - Analyzing events
AppArmor provides an interactive tool to analyze the events occurring in the system. The aa-logprof is one such utility that scans the logs for the events in your system. The aa-logprof command scans the logs and provides a set actions for modifying a profile.
Consider the apparmor_example.sh script that is in the enforce mode. After a certain period of time, you modify the script and insert a command to list all the files in the directory. When you run the apparmor_example.sh script, a Permission denied error appears on the screen. As a new command is added to this script and permissions are not assigned to the updated entry, AppArmor does not allow the script to run. The permissions must be assigned before the script is executed. To evaluate the permissions that can be applied to the new entries, you can view the logs for details. On the ESA CLI Manager, the logs are available in the audit.log file in the /var/log/ directory. The following figure displays the logs that appear for the apparmor_example.sh script.
In the figure, the logs describe the profile for apparmor_example.sh. The logs contain the following information:
AppArmor has denied an open operation for the profile that contains a new command.
The script does not have access to a /dev/tty directory with the requested_mask=“r” permission as it is not defined for the new command.
Thus, the logs provide an insight on the different operations that occur when the script is executed. After analyzing the logs and evaluating the permissions, you can run the aa-logprof command to update the permissions for the script.
The changes that are applied on the profiles are audited and logs are generated for it. For more information about the audit logs, refer to System Auditing.
Important: It is not recommended to use the aa-logprof command for profiles defined by Protegrity. If you want to modify an existing profile, refer to Modifying an existing Profile.
Updating profile permissions
Perform the following steps to update profile permissions.
Type the required permissions. Type F to finish scanning.
After the permissions are granted, the following screen appears.
= Changed Local Profiles =
The following local profiles were changed. Would you like to save them?

 [1 - /etc/opt/apparmor_examples.sh]
(S)ave Changes / Save Selec(t)ed Profile / [(V)iew Changes] / View Changes b/w (C)lean profiles / Abo(r)t
Type S to save the changes.
Writing updated profile for /etc/opt/apparmor_examples.sh.
Navigate to the /etc/apparmor.d directory to view the profile.
11.3 - AppArmor permissions
The following table describes the different permissions that AppArmor lists when creating a profile or analyzing events.
Permission
Description
(I)nherit
Inherit the permissions from the parent profile.
(A)llow
Allow access to a path.
(I)gnore
Ignore the prompt.
(D)eny
Deny access to a path.
(N)ew
Create a new profile.
(G)lob
Select a specific path or create a general rule using wild cards that match a broader set of paths.
Glob with (E)xtension
Modify the original directory path while retaining the filename extension.
(C)hild
Creates a rule in a profile, requires a sub-profile to be created in the parent profile, and rules must be separately generated for this child.
Abo(r)t
Exit AppArmor without saving the changes.
(F)inish
Finish scanning for the profile.
(S)ave
Save the changes for the profile.
11.4 - Troubleshooting for AppArmor
The following table describes solutions to issues that you might encounter while using AppArmor .
Issue
Reason
Solution
After you run the File Export or File Import operation in the ESA, the following message appears in the logs:
On the CLI Manager, navigate to Administration → OS Console
Navigate to the
/etc/apparmor.d/custom directory.
Edit the usr.sbin.apache2
profile.
Insert the following line.
/usr/lib/sftp-server rix,
Restart the AppArmor service using the following command.
/etc/init.d/apparmor restart
If a scheduler task containing a customized script is run,
then the scheduled task is not executed and a denial message
appears in the log. For example, if a task scheduler contains the
/demo.sh script in the command line, the
following message appears in the logs.
On the CLI Manager, navigate to Administration → OS Console
Navigate to the
/etc/apparmor.d/custom directory.
Edit the
etc.opt.Cluster.cluster_helper
profile.
Insert the following line on the source
appliance
/<filename> cix,
Insert the following line on the target
appliance
/<filename> wix,
Restart the AppArmor service on the source and target
appliances using the following command.
/etc/init.d/apparmor restart
12 - Accessing Appliances using Single Sign-On (SSO)
What is SSO?
Single Sign-on (SSO) is a feature that enables users to authenticate multiple applications by logging to a system only once. It provides federated access, where a ticket or token is trusted across multiple applications in a system. Users log in using their credentials. They are authenticated through authentication servers such as Active Directory (AD) or LDAP that validate the credentials. After successful authentication, a ticket is generated for accessing different services.
Consider an enterprise user having access to multiple applications that offer a variety of services. The applications might require user authentication, where one provides usernames and passwords to access them. Each time the user accesses any of the applications, the ask to provide the credentials increases. It is required that a user remember multiple user credentials for the applications. Thus, to avoid the confusion for the users, the Single Sign-On (SSO) mechanism can be used to facilitate access to multiple applications by logging in to the system only once.
12.1 - What is Kerberos
One of the protocols that SSO uses for authentication is Kerberos. Kerberos is an authentication protocol that uses secret key cryptography for secure communication over untrusted networks. Kerberos is a protocol used in a client-server architecture, where the client and server verify each other’s identities. The messages sent between the client and server are encrypted, thus preventing attackers from snooping.
There are few key entities that are involved in a Kerberos communication.
Key Distribution Center (KDC): Third-party system or service that distributes tickets.
Authentication Server (AS): Server that validates the user logging into a system.
Ticket Granting Server (TGS): Server that grants clients a ticket to access the services.
Encrypted Keys: Symmetric keys that are shared between the entities such as, authentication server, TGS, and the main server.
Simple and Protected GSS-API Negotiation (SPNEGO): The Kerberos SPNEGO mechanism is used in a client-server architecture for negotiating an authentication protocol in an HTTP communication. This mechanism is utilized when the client and the server want to authenticate each other, but are not sure about the authentication protocols that are supported by each of them.
Service Principal Name (SPN): SPN represents a service on a network. Every service must be defined in the Kerberos database.
Keytab File: It is an entity that contains an Active Directory account and the keys for decrypting Kerberos tickets. Using the keytab file, you can authenticate remote systems without entering a password.
For implementing Kerberos SSO, ensure that the following prerequisites are considered:
The appliances, such as, the ESA, or DSG are up and running.
The AD is configured and running.
The IP addresses of the appliances are resolved to a Fully Qualified Domain Name (FQDN).
12.1.1 - Implementing Kerberos SSO for Protegrity Appliances
In Protegrity appliances, such as, the ESA or DSG you can utilize the Kerberos SSO mechanism to login to the appliance. The user logs into the system with his domain credentials for accessing the appliances. The appliance validates the user and on successful validation, allows the user access to the appliance. For utilizing the SSO mechanism, you must configure certain settings on different entities, such as, AD, Web browser, and the ESA appliance. The following sections describe a step-by-step approach for setting up SSO.
Protegrity supported directory services
For Protegrity appliances, only Microsoft AD is supported.
12.1.1.1 - Prerequisites
For implementing Kerberos SSO, ensure that the following prerequisites are considered:
The appliances, such as, the ESA or DSG are up and running.
The AD is configured and running.
The IP addresses of the appliances are resolved to a Fully Qualified Domain Name (FQDN).
12.1.1.2 - Setting up Kerberos SSO
This section describes the different tasks that an administrative user must perform for enabling the Kerberos SSO feature on the Protegrity appliances, ESA or DSG.
Order
Platform
Step
Reference
1
Appliance Web UI
On the appliance Web UI, import the domain users from the AD to the internal LDAP of the appliance. Assign SSO Login permissions to the required user role.
In the initial steps for setting up Kerberos SSO, a user with administrative privileges must import users from an AD to the appliance, ESA or DSG. After importing, assign the required permissions to the users for logging with SSO.
To import users and assign roles:
On the appliance Web UI, navigate to Settings > Users > Proxy Authentication.
Enter the required parameters for connecting to the AD.
For more information about setting AD parameters, refer here.
Navigate to the Roles tab.
Create a role or modify an existing role.
Select the SSO Login permission check box for the role and click Save.
If you are configuring SSO on the DSG, then ensure the user is also granted the required cloud gateway permissions.
Navigate to the User Management tab.
Click Import Users to import the required users to the internal LDAP.
For more information about importing users, refer here.
Assign the role with the SSO Login permissions to the required users.
Creating Service Principal Name (SPN)
A Service Principal Name (SPN) is an entity that represents a service mapped to an instance on a network. For a Kerberos-based authentication, the SPN must be configured in Active Directory (AD). For Protegrity appliances, ESA or DSG, only Microsoft AD is supported. The SPN is registered with the AD. In this configuration, a service associates itself with the AD for the purpose of authentication requests.
For Protegrity, the instance is represented by appliances, such as, the ESA or DSG. It uses the SPNEGO authentication for authenticating users for SSO. The SPNEGO uses the HTTP service for authenticating users. The SPN is configured for the appliances in the following format.
service/instance@domain
Ensure an SPN is created for every appliance involved in the Kerberos SSO implementation.
Example SPN creation
Consider an appliance with host name esa1.protegrity.com on the domain protegrity.com. The SPN must be set in the AD as HTTP/esa1.protegrity.com@protegrity.com.
The SPN of the appliance can be configured in the AD using the setspn command. Thus, to create the SPN for esa1.protegrity.com, run the following command.
setspn -A HTTP/esa1.protegrity.com@protegrity.com
Creating the Keytab File
The keytab is an encrypted file that contains the Kerberos principals and keys. It allows an entity to use a Kerberos service without being prompted for a password on every access. The keytab file decrypts every Kerberos service request and authenticates it based on the password.
For Protegrity appliances, such as, ESA or DSG, an SSO authentication request of a user from an appliance to the AD passes through the keytab file. In this file, you map the appliance user’s credentials to the SPN of the appliance. The keytab file is created using the ktpass command. The following is the syntax for this command:
ktpass -out <Location where to generate the keytab file> -princ HTTP/<SPN of the appliance> -mapUser <username> -mapOp set -pass <Password> -crypto All -pType KRB5_NT_PRINCIPAL
The following sample snippet describes the ktpass for mapping a user in the keytab file. Consider an ESA appliance with host name esa1.protegrity.com on the domain protegrity.com. The SPN for the appliance is set as HTTP/esa1.protegrity.com@protegrity.com. Thus, to create a keytab file and map a user Tom, run the following command.
ktpass -out C:\esa1.keytab -princ HTTP/esa1.protegrity.com@protegrity.com -mapUser Tom@protegrity.com -mapOp set -pass Test@1234 -crypto All -pType KRB5_NT_PRINCIPAL
Uploading Keytab File
After creating the keytab file from the AD, you must upload it on the appliance, such as, ESA or DSG. You must upload the keytab file before enabling Kerberos SSO
To upload the keytab file:
On the Appliance Web UI, navigate to Settings > Users > Single Sign-On.
The Single Sign On screen appears.
From the Keytab File field, upload the keytab file generated.
Click the Upload Keytab icon.
A confirmation message appears.
Select Ok.
Click the Delete icon to delete the keytab file. You can delete the keytab file only when the Kerberos for single sign-on (Spnego) option is disabled.
Under the Kerberos for single sign-on (Spnego) tab, click the Enable toggle switch to enable Kerberos SSO.
A confirmation message appears.
Select Ok.
A message Kerberos SSO was enabled successfully appears.
Configuring SPNEGO Authentication on the Web Browser
Before implementing Kerberos SSO for Protegrity appliances, such as, ESA or DSG, you must ensure that the Web browsers are configured to perform SPNEGO authentication. The tasks in this section describe the configurations that must be performed on the Web Browsers. The recommended Web browsers and their versions are as follows:
Google Chrome version 129.0.6668.58/59 (64-bit)
Mozilla Firefox version 130.0.1 (64-bit) or higher
Microsoft Edge version 128.0.2739.90 (64-bit)
The following sections describe the configurations on the Web browsers.
Configuring SPNEGO Authentication on Firefox
The following steps describe the configurations on Mozilla Firefox.
To configure on the Firefox Web browser:
Open Firefox on the system.
Enter about:config in the URL.
Type negotiate in the Search bar.
Double click on network.negotiate-auth.trusted-uris parameter.
Enter the FQDN of the appliance and exit the browser.
Configuring SPNEGO Authentication on Chrome
With Google Chrome, you must set the white list servers that Chrome will negotiate with. If you are using a Windows machine to log in to the appliances, such as, ESA or DSG, then the configurations entered in other browsers are shared with Chrome. You need not add a separate configuration.
12.1.1.3 - Logging to the Appliance
After configuring the required SSO settings, you can login to the appliance, ESA or DSG, using Kerberos SSO.
To login to the appliance using SSO:
Open the Web browser and enter the FQDN of the ESA or DSG in the URL.
Click Sign in with Kerberos SSO.
The Dashboard of the ESA/DSG appliance appears.
12.1.1.4 - Scenarios for Implementing Kerberos SSO
This section describes the different scenarios for implementing Kerberos SSO.
Implementing Kerberos SSO on an Appliance Connected to an AD
This section describes the process of implementing Kerberos SSO when an appliance, ESA or DSG, utilizes authentication services of the local LDAP.
You can also login to the appliance without SSO by providing valid user credentials.
Steps to configure Kerberos SSO with a Local LDAP
Consider an appliance, ESA or DSG, for which you are configuring SSO. Ensure that you perform the following steps to implement it.
Import users from an external directory and assign SSO permissions.
Configure SPN for the appliance.
Create and upload the keytab file on the appliance.
Configure the browser to support SSO.
Logging in with Kerberos SSO
After configuring the required settings, user enters the appliance domain name on the Web browser and clicks Sign in with SSO to access appliance. On successful authentication, the Dashboard of the appliance appears.
Example process
The following figure illustrates the SSO process for appliances that utilize the local LDAP.
The user logs in to the domain with their credentials.
For example, a user, Tom, logs in to the domain abc.com as tom@abc.com and password *********.
Tom is authenticated on the AD. On successful authentication, he is logged in to the system.
For accessing the appliance, the user enters the FQDN of the appliance on the Web browser.
For example, esa1.protegrity.com.
If Tom wants to access the appliance using SSO, then he clicks Sign in with SSO on the Web browser.
A message is sent to the AD requesting a token for Tom to access the appliance.
The AD generates a SPNEGO token and provides it to Tom.
This SPNEGO token is then provided to the appliance to authenticate Tom.
The appliance performs the following checks.
It receives the token and decrypts it. If the decryption is successful, then the token is valid.
Retrieves the username from the token.
Validates Tom with the internal LDAP.
Retrieves the role for Tom and verifies that the role has the SSO Login permissions.
After successfully validating the token and the role permissions, Tom can access the appliance.
Implementing Kerberos SSO on other Appliances Communicating with ESA
This section describes the process of implementing Kerberos SSO when an appliance utilizes authentication services of another appliance. Typically, the DSG depends on ESA for user management and LDAP connectivity. This section explains the steps that must be performed to implement SSO on the DSG.
Implementing Kerberos SSO on DSG
This section explains the process of SSO authentication between the ESA and the DSG. It also includes information about the order of set up to enable SSO authentication on the DSG.
The DSG depends on the ESA for user and access management. The DSG can leverage the users and user permissions that are defined in the ESA only if the DSG is set to communicate with the ESA.
The following figure illustrates the SSO process for appliances that utilize the LDAP of another appliance.
Example process
The user logs in to the system with their credentials.
For example, John logs in to the domain abc.com as john@abc.com and password *********. The user is authenticated on the AD. On successful authentication the user is logged in to the system.
For accessing the DSG Web UI John enters the FQDN of the DSG on the Web browser.
For example, dsg.protegrity.com.
If John wants to access the DSG Web UI using SSO, he clicks Sign in with SSO on the Web browser.
The username of John and the URL of the DSG is forwarded to the ESA.
The ESA sends the request to the AD for generating a SPNEGO token.
The AD generates a SPNEGO token to authenticate John and sends it to the ESA.
The ESA performs the following steps to validate John.
Receives the token and decrypts it. If the decryption is successful, then the token is valid.
Retrieves the username from the token.
Validates John with the internal LDAP.
Retrieves the role for John and verifies that the role has SSO Login .
If ESA encounters any error related to the role, username, or token, an error is displayed on the Web UI. For more information about the errors, refer Troubleshooting.
On successful authentication, the ESA generates a service JWT.
The ESA sends this service JWT and the URL of to the Web browser.
The Web browser presents this JWT to the DSG for validation.
The DSG validates the JWT based on the secret key shared with ESA. On successful validation, John can login to the DSG Web UI.
Before You Begin:
Ensure that you complete the following steps to implement SSO on the DSG.
Ensure that the Set ESA Communication process is performed on the DSG for establishing communication with the ESA.
Exporting the JWT Settings to the DSG Nodes in the Cluster
As part of SSO implementation for the DSG, the JWT settings must be exported to all the DSG nodes that will be configured to use SSO authentication.
Ensure that the ESA, where SSO is enabled, and the DSG nodes are in a cluster.
To export the JWT settings:
Log in to the ESA Web UI.
Navigate to System > Backup & Restore.
On the Export, select the Cluster Export option, and click Start Wizard.
On the Data to import tab, select only Appliance JWT Configuration. Ensure that Appliance JWT Configuration is the only check box selected, and then click Next.
On the Source Cluster Nodes tab, select Create and Run a task now, and click Next.
On the Target Cluster Nodes tab, select all the DSG nodes where you want to export the JWT settings, and click Execute.
Implementing Kerberos SSO with a Load Balancer Setup
This section describes the process of implementing SSO with a Load Balancer that is setup between the appliances.
Steps to configure SSO in a load balancer setup
Consider two appliances, L1 and L2, that are configured behind a load balancer. Ensure that you perform the following steps to implement it.
After configuring the required settings, the user enters the FQDN of load balancer on the Web browser and clicks Sign in with Kerberos SSO to access it. On successful authentication, the Dashboard of the appliance appears.
12.1.1.5 - Viewing Logs
You can view the logs that are generated for when the Kerberos SSO mechanism is utilized. The logs are are generated for the following events:
Uploading keytab file on the appliance
Deleting the keytab file on the appliance
User logging to the appliance through SSO
Enabling or disabling SSO
Navigate to Logs > Appliance Logs to view the logs.
You can also navigate on the Discover screen to view the logs.
12.1.1.6 - Feature Limitations
This section covers some known limitations of the Kerberos SSO feature.
Trusted Appliances Cluster
The keytab file is specific for an SPN. A keytab file assigned for one appliance is not applicable for another appliance. Thus, if your appliance is in a TAC, it is recommended not to replicate the keytab file between different appliances.
12.1.1.7 - Troubleshooting
This section describes the issues and their solutions while utilizing the Kerberos SSO mechanism.
Table: Kerberos SSO Troubleshooting
Issue
Reason
Solution
The following message appears while logging in with
SSO.
Login Failure: SPNEGO authentication is not supported on this client.
The browser is not configure to handle SPNEGO
authentication
Configure the browser to perform SPNEGO
authentication.
For more information about configuring the
browser settings, refer Configuring
browsers.
The following message appears while logging in with
SSO.
Login Failure: Unauthorized to SSO Login.
Username is not present in the internal LDAP.
Username does not have roles assigned to it.
Role that is assigned to the user does not have SSO Login permissions.
Ensure that the following points are considered:
The user is imported to the internal LDAP.
Role assigned to the user has SSO
Login permission enabled.
The following error appears while logging in with
SSO.
Login Failure: Please contact System Administrator
The JWT secret key is not the same between the
appliances.
If an appliance is using an LDAP of another appliance for user authentication, then ensure that the JWT secret is shared between them.
The following error appears while logging in with
SSO.
Login Failure: SSO authentication disabled
This error might occur when you are using LDAP of another appliance for authentication. If SSO in the appliance that contains the LDAP information is disabled, this error message appears.
On the ESA Web UI, navigate to System > Settings > Users > Advanced and check Enable SSO check box.
When you are using an LDAP of another appliance for
authentication and logging in using SSO, a Service not available message appears on the Web browser.
Active Directory is not reachable.
Appliance on which the LDAP services are utilized is not reachable.
Ensure the following:
Active Directory is up and running.
Appliance on which the LDAP services are utilized is up and running.
12.2 - What is SAML
About SAML
Security Assertion Markup Language (SAML) is an open standard for communication between an identity provider (IdP) and an application. It is a way to authenticate users in an IdP to access the service provider (SP)..
SAML SSO leverages SAML for seamless user authentication. It uses XML format to transfer authentication data between the IdP and the application. Once users log in to the IdP, they can access multiple applications without providing their user credentials every time. For SAML SSO to be functioning, the IdP and the application must support the SAML standard.
Key Entities in SAML
There are few key entities involved in a Kerberos communication:
Identity Provider (IdP): A service that manages user identities.
Service Provider (SP): An entity connecting to the IdP for authenticating users.
Metadata: A file containing information for connecting an SP to an IdP.
Unique User Identifier (Name ID): Unique identifier used for user authentication to login to the appliance.
Implementing SAML SSO for Protegrity Appliances
In Protegrity appliances, such as, ESA or DSG, you can utilize the SAML SSO mechanism to login to the appliance. To use this feature, you log in to an IdP, such as, AWS, Azure, or GCP. After you are logged in to the IdP, you can access appliances such as, the ESA or the DSG. The appliance validates the user and on successful validation, allows the user access to the appliance. The following sections describe a step-by-step approach for setting up SAML SSO.
12.2.1 - Setting up SAML SSO
Prerequisites
For implementing SAML SSO, ensure that the following prerequisites are met:
The Service Providers (SPs), such as, the ESA or the DSG are up and running.
The users are available in the Identity Providers (IdPs), such as, AWS, Azure, or GCP.
The IdP contains a SAML application for your appliance, such as, ESA or DSG.
The users that will leverage the SAML SSO feature are added from the User Management screen.
The IP addresses of the appliances are resolved to a Fully Qualified Domain Name (FQDN).
Setting up SAML SSO
This section describes different tasks that an administrative user must perform for enabling the SAML SSO feature on the Protegrity appliances.
As part of this process, changes may be required to be performed on a user’s roles and settings for LDAP. For more information, refer to section Adding Users to Internal LDAP and Managing Roles.
Table 1. Setting up SSO
Order
Platform
Step
Reference
1
Appliance Web UI
Add the users that require SAML SSO. Assign SSO
Login permissions to the required user role. Ensure that the password for the users are changed after the first login to the appliance.
Before enabling SAML SSO on the appliance, such as, ESA or DSG, you must provide the following values that are required to connect the appliance with the IdP.
Fully Qualified Domain Name (FQDN)
The Web UI must have a FQDN so it can be accessed from the web browser of the appliance, such as, ESA or ESA. While configuring SSO on the IdP, you are required to provide a URL that maps your application on the IdP. Ensure that the URL specified in the IdP matches the FQDN specified on the appliance Web UI. Also, ensure that the IP address of your appliance is resolved to a reachable domain name.
Entity ID
The entity ID is a unique value that identifies your SAML application on the IdP. This value is assigned/generated on the IdP after registering your SAML enterprise application on it.
The nomenclature of the entity ID might vary between IdPs.
To enter the SP settings:
On the Web UI, navigate to Settings > Users > Single Sign-On > SAML SSO.
Under the SP Settings section, enter the FQDN that is resolved to the IP address of the appliance in the FQDN text box.
Enter the unique value that is assigned to the SAML enterprise application on the IdP in the Entity ID text box.
If you want to allow access to User Management screen, enable the Access User Management screen option.
User Management screens require users to provide local user password while performing any operation on it.
Enabling this option will require users to remember and provide the password created for the user on the appliance.
Click Save.
The SP settings are configured.
Configuring IdP Settings
After configuring the the Service Provider (SP) settings, provide the Metadata and select the Unique User Identifier (Name ID).
The metadata acts as an important parameter in SAML SSO. The metadata is the chain that links the appliance to the IdP. It is an XML structure that contains information, such as, keys, certificates, and entity ID URL. This information is required for communication between the appliance and IdP.
The metadata can be provided in either of the following ways:
Metadata URL: Provide the URL of the metadata that is retrieved from the IdP.
Metadata File: Provide the metadata file that is downloaded from the IdP and stored on your system. If you edit the metadata file, then ensure that the information in the metadata is correct before uploading it on the appliance.
The Unique User Identifier (Name ID) provides two options.
Firstname.Lastname: Authentication using the firstname.lastname.
UserPrincipleName: Authentication using the email as username@domain.
To enter the metadata settings:
On the Web UI, navigate to Settings > Users > Single Sign-On > SAML SSO.
Click Enable to enable SAML SSO.
If the metadata URL is available, then under the IdP Settings section, select Metadata URL from the Metadata Settings drop-down list. Enter the URL of the metadata.
If the metadata file is downloaded, then under the IdP Settings section, select Metadata File from the Metadata Settings drop-down list. Upload the metadata file.
From the Unique User Identifier (Name ID) drop-down, select Firstname.Lastname or UserPrincipleName as the unique identifier.
If you want to allow access to the User Management screen, enable the Access User Management screen option.
User Management screens require users to provide local user password while performing any operation on it.
Enabling this option will require users to remember and provide the password created for the user on the appliance.
Click Save.
The metadata settings are configured.
If you upload a new metadata file over the existing file, the changes are overridden by the new file.
If you edit the metadata file, then ensure that the information in the metadata is correct before uploading it on the appliance.
12.2.1.1 - Workflow of SAML SSO on an Appliance
After entering all the required data, you are ready to log in with SAML SSO. Before explaining the procedure to log in, the general flow of information is illustrated in the following figure.
Follow the below process to login to the appliance. Additionally, you can login to the appliance without SSO by providing valid user credentials.
Process
Follow these steps to login with SSO:
The user provides the FQDN of the appliance on the Web browser.
For example, the user enters esa.protegrity.com and clicks SAML Single Sign-On.
Ensure that the user session on the IdP is active.
If the session is idle or inactive, then a screen to enter the IdP credentials will appear.
The browser generates an authorization request and sends it to the IdP for verification.
If the user is authorized, then the IdP generates a SAML token and returns it to the Web browser.
This SAML token is then provided to the appliance to authenticate the user.
The appliance receives the token. If the token is valid, then the permissions of the user are checked.
Once these are validated, the Web UI of the appliance appears.
12.2.1.2 - Logging on to the Appliance
After configuring the required SSO settings, you can login to the appliance using SSO. Ensure that the user session on the IdP is active. If the session is idle or inactive, then a screen to enter the IdP credentials will appear.
To login to the appliance using SSO:
Open the Web browser and enter the FQDN of the ESA or the DSG in the URL.
The following screen appears.
Click Sign in with SAML SSO.
The Dashboard of the ESA/DSG appliance appears.
12.2.1.3 - Implementing SAML SSO on Azure IdP - An Example
This section provides a step-by-step sample scenario for implementing SAML SSO on the ESA with the Azure IdP.
Prerequisites
An ESA is up and running.
Ensure that the IP address of ESA is resolved to a reachable FQDN.For example, resolve the IP address of ESA to esa.protegrity.com.
On the Azure IdP, perform the following steps to retrieve the entity ID and metadata.
Log in to the Azure Portal.
Navigate to Azure Active Directory.
Select the tenant for your organization.
Add the enterprise application in the Azure IdP.Note the value of Application Id for your enterprise application.For more information about creating an enterprise application, refer to https://docs.microsoft.com/.
Select Single sign-on > SAML.
Edit the Basic SAML configuration and enter Reply URL (Assertion Consumer Service URL). The format for this text box is https://</FQDN of the appliance>/Management/Login/SSO/SAML/ACS.For example, the value in the Reply URL (Assertion Consumer Service URL) is, https://esa.protegrity.com/Management/Login/SSO/SAML/ACS
Under the SAML Signing Certificate section, copy the Metadata URL or download the Metadata XML file.
Users leveraging the SAML SSO feature are available in the Azure IdP tenant.
Steps
Log in to ESA as an administrative user. Add all the users for which you want to enable SAML SSO. Assign the roles to the users with the SSO Login permission.
For example, import the user Sam from the User Management screen on the ESA Web UI. Assign a Security Administrator role with SSO Login permission to Sam.
Ensure that the user Sam is present in the Azure AD.
Navigate to Settings > Users > Single Sign-On > SAML Single Sign-On. In the Service Provider (SP) settings section, enter esa.protegrity.com and the Appliance ID in the FQDN and Entity ID text boxes respectively. Click Save.
If the metadata URL is available, then under the IdP Settings section, select Metadata URL from the Metadata Settings drop-down list. Enter the URL of the metadata.
If the metadata file is downloaded, then under the IdP Settings section, select Metadata File from the Metadata Settings drop-down list. Upload the metadata file.
From the Unique Name Identifier (Name ID) drop-down, select one of the following two options as the unique identifier for user authentication.
Firstname.Lastname: A local user should be manually created having first name and last name.
UserPrincipleName: This user can be created locally or imported from Azure AD, if user exists on Azure AD.
Click Save.
Select the Enable option to enable SAML SSO.
If you want to allow access to User Management screen, enable the Access User Management screen option.
Log out from the ESA.
Open another session on the Web browser and enter the FQDN of ESA. For example, esa.protegrity.com.
Ensure that the user session on the IdP is active. If the session is idle or inactive, then a screen to enter the IdP credentials will appear.
Click Sign in with SAML SSO.
The screen is redirected to Azure portal for authentication.
If the Azure user is not logged in, the login dialog appears. Provide the Azure user credentials for login.
If the multi-factor authentication is enabled, then provide the required authentication using the Authenticator application to proceed further.
After logging in successfully, the screen is automatically redirected to the ESA Dashboard.
12.2.1.4 - Implementing SSO with a Load Balancer Setup
This section describes the process of implementing SSO with a Load Balancer that is setup between the appliances.
Steps to configure SSO in a Load Balancer setup
Consider two ESA, ESA1 and ESA2, that are configured behind a load balancer. Ensure that you perform the following steps to implement it.
Add the users to the internal LDAP and assign SSO login permissions.
Ensure that the FQDN is resolved to the IP address of the load balancer.
Logging in with SSO
After configuring the required settings, the user enters the FQDN of load balancer on the Web browser and clicks Sign in with SAML SSO to access it. On successful authentication, the appliance Dashboard appears.
12.2.1.5 - Viewing Logs
You can view the logs that are generated for when the SAML SSO mechanism is utilized. The logs are generated for the following events:
Uploading the metadata
User logging to the ESA or DSG through SAML SSO
Enabling or disabling SAML SSO
Configuring the Service Provider and IdP settings
Navigate to Logs > Appliance Logs to view the logs.
You can also navigate on the Discover screen to view the logs.
12.2.1.6 - Feature Limitations
There are some known limitations of the SAML SSO feature.
After logging in to the appliance, such as, ESA or DSG, through SAML SSO, if you have the Directory Manager permissions, you can access the User Management screen. A prompt to enter the user password appears after a user management operation is performed on it. In this case, you must enter the password that you have set on the appliance. The password that is set on the IdP is not applicable here.
12.2.1.7 - Troubleshooting
This section describes the issues and their solutions while utilizing the SAML SSO mechanism.
Issue
Reason
Solution
The following message appears while logging in with SSO.
Login Failure: Unauthorized to SSO Login.
Username is not present in the internal LDAP.
Username does not have roles assigned to it.
SSO Login permission is not assigned for the user role
In appliances, the external directory servers such as, Active Directory (AD) or Oracle Directory Server Enterprise Edition (ODSEE) use the OpenLDAP protocol to authenticate users. The following sections describe the parameters that you must configure to connect with an external directory.
Sample AD configuration
The following example describes the parameters for setting up an AD connection.
FirstName.LastName: Authentication using the format firstname.lastname.
UserPrincipleName: Authentication using the format username@domain.
Sample Kerberos Configuration
The following example describes the parameters for setting up a Kerberos connection. The Kerberos for Single Sign-On uses Simple and Protected GSSAPI Negotiation Mechanism (SPNEGO).
Kerberos for Single Sign-On using (Spnego):
Enable: Yes
Service Principal Name: *HTTP/<username>.esatestad.com@ESATESTAD.*COM
Sample Keytab File:<username> 1.keytab
Sample Azure AD Configuration
The following example describes the parameters for setting up an Azure AD connection.
Azure AD Settings: Enabled
Tenant ID:3d45143b-6c92-446a-814b-ead9ab5c5e0b
Client ID:a1204385-00eb-44d4-b352-e4db25a55c52
Auth Type:Secret
Client Secret:xxxx
14 - Partitioning of Disk on an Appliance
Firmware is low-level software that is responsible for initializing the hardware components of a system during the boot process. It is required to initialize the boot process. It provides runtime services for the operating system and the programs on the system. There are two types of boot modes in the system setup, Basic Input/Output System (BIOS) and Unified Extensible Firmware Interface (UEFI).
BIOS is amongst the oldest systems used as a boot loader to perform the initialization of the hardware. UEFI is a comparatively newer system that defines a software interface between the operating system and the platform firmware. The UEFI is more advanced than the BIOS and most of the systems are built with support for UEFI and BIOS.
Disk Partitioning is a method of dividing the hard drive into logical partitions. When a new hard drive is installed on a system, the disk is segregated into partitions. These partitions are utilized to store data, which the operating system reads in a logical format. The information about these partitions is stored in the partition table.
There are two types of partition tables, the Master Boot Record (MBR) and the GUID Partition Table (GPT). These form a special boot section in the drive that provides information about the various disk partitions. They help in reading the partition in a logical manner.
Depending on the requirements, you can extend the size of the partitions in a physical volume to accommodate all the logs and other ESA related data. You can utilize the Logical Volume Manager (LVM) to increase the partitions in the physical volume. Using LVM, you can manage hard disk storage to allocate, mirror, or resize volumes.
In an ESA, the physical volume is divided into the following three logical volume groups:
Partition
Description
Boot
Contains the boot information.
PTYVG
Contains the files and information about OS and logs.
Data Volume Group
Contains the data that is in the /opt directory.
14.1 - Partitioning the OS in the UEFI Boot Option
The PTYVG volume partition is divided into three logical volumes. These are the PTYVG-OS, the PTYVG-OS_bak, and the PTYVG-LOGS volume. The PTYVG volume partition contains the OS information.
The following table illustrates the partitioning of the volumes in the PTYVG directory.
Logical Volume
Description
Default Size
PTYVG-OS
The root partition
16 GB
PTYVG-OS_bak
The backup for the root partition
16 GB
PTYVG-LOGS
The logs that are in the /var/log directory
12 GB
In the UEFI mode, the sda1 is the EFI partition which stores the UEFI executables required to perform the booting process for the system. This .efi file points to the sda3 partition where the GRUB configurations are stored. The grub.cfg file initiates the boot process.
The following table illustrates the partitioning of all the logical volume groups in a single hard disk system.
Table: Partition of Logical Volume Groups
Partition
Partition Name
Physical Volume
Volume Group
Directory
Directory Path
Size
/dev/sda
sda1
EFI Partition
400M
sda2
100M
sda3
BOOT
900M
sda4
Physical Volume 1
PTYVG
OS
/
16G
OS_bak
16G
logs
/var/log
12G
sda5
Physical Volume 2
PTYVG_DATA
opt
50% of rest
opt_bak
50% of rest
As shown in the table, the sda1 is the EFI Partition and contains information up to 400 MB. The sda2 is the Unallocated Partition which is required for supporting the GPT and occupies 100 MB. The sda3 is the Boot Partition volume group. It can contain information up to 900 MB. The sda4 is the PTYVG partition and uses 44 GB of hard disk space to store information about the OS and the logs. The remaining partition size is allotted for the data volume group.
For Cloud-based platforms, the opt_bak and the OS_bak directories are not available in the data volume group. The data in the PTYVG_DATA partition is available in the opt directory only.
If you want to use the EFI Boot Option for the ESA, then select the required option while creating the machine.
14.2 - Partitioning the OS with the BIOS Boot Option
Depending on the requirements, you can extend the size of the partitions in a physical volume to accommodate all the logs and other ESA related data. You can utilize the Logical Volume Manager (LVM) to increase the partitions in the physical volume. Using LVM, you can manage hard disk storage to allocate, mirror, or resize volumes.
In an ESA, the physical volume is divided into the following three logical volume groups:
Partition
Description
Boot
Contains the boot information
PTYVG
Contains the files and information about OS and logs
Data Volume Group
Contains the data that in the /opt directory
The PTYVG volume partition contains the OS information. You must increase the PTYVG volume group to extend the root partition. The following table describes the different logical volumes in the PTYVG volume group.
Logical Volume
Description
Default Size
OS
The root partition
8 GB for upgrading the ESA from 9.0.0.0 and 9.1.0.x to v9.2.0.0 and higher versions.
16 GB for ISO and cloud installation.
OS-bak
The backup for the root partition
8 GB for upgrading the ESA from 9.0.0.0 and 9.1.0.x to v9.2.0.0 and higher versions.
16 GB for ISO installation.
LOGS
The logs that are in the /var/log directory
6 GB for upgrading the ESA from 9.0.0.0 and 9.1.0.x to v9.2.0.0 and higher versions.
12 GB for ISO and cloud installation.
SWAP
The swap partition
By default, 2 GB for appliances products. The swap partition for ESA is 8 GB.
The following table illustrates the partitioning of all the logical volume groups in a single hard disk system.
Table: Partition of Logical Volume Groups
Partition
Partition Name
Physical Volume
Volume Group
Directory
Directory Path
Upgraded Appliances Size
ISO and Cloud Installation Size
/dev/sda
sda1
/boot
400M
sda2
100M
sda3
Physical Volume 1
PTYVG
OS
/
8G
16G
OS_bak
8G
16G
logs
/var/log
6G
12
swap
[SWAP]
By default, 2G for appliances
products.
The swap partition for ESA is 8G.
sda4
Physical Volume 2
PTYVG_DATA
opt
/opt/docker/lib
50% of rest
opt_bak
50% of rest
For Cloud-based platforms, the OS_bak directory is not available in the data volume group. The data in the PTYVG partition is available in the OS directory only.
For Cloud-based platforms, the opt_bak directory is not available in the data volume group. The data in the PTYVG_DATA partition is available in the opt directory only.
If multiple hard disks installed on an ESA, then you can select the required hard disks for configuring the OS volume and the data volume. You can also extend the OS partition or the disk partition across the hard disks that are installed on the appliance.
The following table illustrates an example of partitioning in multiple hard disks.
Table: Partitioning in Multiple Hard Drives
Partition
Partition Name
Physical Volume
Volume Group
Directory
Directory Path
Upgraded Appliances Size
ISO and Cloud Installation Size
/dev/sda
sda1
/boot
400M
sda2
100M
sda3
Physical Volume 1
PTYVG
OS
/
8G
16G
OS_bak
8G
16G
logs
/var/log
6G
12G
swap
[SWAP]
By default, 2G for appliances
products.
The swap partition for ESA is 8G.
sda4
Physical Volume 2
PTYVG_DATA
opt
/opt/docker/lib
50% of rest
opt_bak
50% of rest
Partition
Physical Volume
Volume Group
Directory
Directory Path
Size
/dev/sdb
Physical Volume 1
PTYVG_DATA
opt
/opt/docker/lib
50%
opt_bak
50%
For Cloud-based platforms, the OS_bak directory is not available in the data volume group. The data in the PTYVG partition is available in the OS directory only.
For Cloud-based platforms, the opt_bak directory is not available in the data volume group. The data in the PTYVG_DATA partition is available in the opt directory only.
The hard disk, sda, contains the partitions for the root and the PTYVG volumes. The hard disk, sdb contains the partition for the data volume group.
Extending the OS partition
The following sections describe the procedures to extend the OS partition.
Before you begin
Before extending the OS partition, it is recommended to back up your ESA. It ensures that you can roll back your changes in case of an error.
When you add a new hard disk to the partition, you should restart the system. This ensures that all the hard disks appear.
For the Cloud-based platforms, the names of the hard disks may get updated after restarting the system.
Ensure that the you verify the names of the hard disks before proceeding further.
Starting in Single User Mode
You must load in the Single User Mode to change the kernel command line.
For Cloud-based platforms, the Single User Mode is unavailable. It is recommended to perform the following operations from the OS Console. While performing these operations, ensure that the system is accessible by only a single user.
To boot into Single User Mode:
Install a new hard disk on the ESA.
For more information about installing a new hard disk, refer here.
Boot the ESA in Single User Mode.
If the GRUB Credentials are enabled, the screen to enter the GRUB credentials appears. Enter the credentials and press ENTER.
The following screen appears.
Select Normal and press E.
The following screen appears.
Select the linux/generic line and append <SPACE>S to the end of the line as shown in the following figure.
Press F10 to restart the ESA.
After the ESA is restarted, a prompt to enter the root password appears.
Enter the root password and press ENTER.
Creating a Partition
After editing the kernel command line, you must create the required partitions.
The following procedure describes how to create a partition on a new hard disk, sdb. You can add multiple hard disks to the ESA.
If you add multiple hard disks to the ESA, then the devices are created as /dev/sdb, /dev/sdc, /dev/sdd, and so on. You can select the required hard disk based on the storage space available.
For Cloud-based platforms, the names of the hard disk might differ. Based on the cloud platform, the hard disk names may appear as nvme1n1, xvdb, or so on.
To create a partition:
Run the following command to list the hard disks that are available.
lsblk
Run the following command to format the partition.
fdisk /dev/sdb
Type o to create a partition table and press ENTER.
Type n to create a new partition and press ENTER.
Type p to create a primary partition and press ENTER.
In the following prompt, assign a partition number to the new partition.
If you want to enter the default number for the partition, then press ENTER.
Type the required starting partition sector for the partition.
If you want to enter the default sector for the partition, then press ENTER.
Type the last sector for the partition and press ENTER.
If you want to enter the default sector for the partition, then press ENTER.
Type t to change the type of the new partition and press ENTER.
Type 8e to convert the disk partition to Linux LVM and press ENTER.
Type w to save the changes and press ENTER.
A message The partition table has been altered! appears.
Run the following command to initialize the disk partition that is used with LVM.
pvcreate /dev/sdb1
For Cloud-based platforms, you should use the name of the disk partition only. For instance, if the name of the hard disk on the Cloud-based platform is nvme0n1, then run the following command to initialize the disk partition that is used with LVM.
pvcreate /dev/nvme0n1
If the following confirmation message appears, then press y.
WARNING: dos signature detected on /dev/sdb1 at offset 510. Wipe it? [y/n]: y
A message Physical volume “/dev/sdb1” is successfully created appears.
Run the following command to extend the PTYVG volume.
vgextend PTYVG /dev/sdb1
A message Volume group “PTYVG” successfully extended appears.
Extending the OS and the Backup Volume
After extending the PTYVG volume you can resize the OS and the OS_bak volumes using the lvextend and resize commands.
Ensure that you consider the following points before extending the partitions in the PTYVG volume group:
Back up the OS partition before extending the partition.
Back up the policy, LDAP, and other required data to the /opt directory before extending the volume.
The following procedure describes how to extend the OS and the OS_bak volumes by 4 GB.
Ensure that there is enough free space available while extending the size of the OS, the OS_bak, and the log volumes. For instance, if you extend the hard disk by 1 GB and if the space is less than the required level, then the following error appears.
Insufficient free space: 1024 extents needed, but only 1023 available
To resolve this error, you must increase the partition size by 0.9 GB.
To create a partition:
Run the following commands to extend the OS-bak and OS volume.
# lvextend -L +4G /dev/PTYVG/OS_bak
A message Logical Volume OS_bak successfully resized appears.
Ensure that the you extend the size of the OS and the OS_bak volumes to the same value.
Run the following command to resize the file system in the OS_bak volume.
# resize2fs /dev/mapper/PTYVG-OS_bak
A message resize2fs: On-Line resizing finished successfully appears.
Run the following commands to extend the OS volume.
# lvextend -L +4G /dev/PTYVG/OS
A message Logical Volume OS successfully resized appears.
Run the following command to resize the file system in the OS volume.
# resize2fs /dev/mapper/PTYVG-OS
A message resize2fs: On-Line resizing finished successfully appears.
Restart the ESA.
Extending the Logs Volume
You can resize the logs volume using the lvextend and resize commands. This ensures that you provision the required space for the logs that are generated. You must back up the current logs to the /opt directory before extending the logs volume.
Before extending the logs volume, ensure that you start the ESA in Single User Mode and create a partition.
For more information about Single User Mode, refer here.
For more information about creating a partition, refer here.
The following procedure describes how to extend the logs volume by 4 GB.
To extend the logs volume:
Run the following commands to create a temporary folder in the /opt directory.
# mkdir /opt/tmp/logs
Run the following command to copy the files from the logs volume to the /opt directory.
While copying the logs from the /var/log/ directory to the /opt directory, ensure that the space available in the /opt directory is more than the size of the logs.
Run the following commands to extend the logs volume.
# lvextend -L +4G /dev/PTYVG/logs
A message Logical Volume logs successfully resized appears.
Run the following command to resize the file system in the logs volume.
# resize2fs /dev/mapper/PTYVG-logs
A message resize2fs: On-Line resizing finished successfully appears.
Run the following command to copy the files from /opt directory to the logs volume.
Run the following command to remove the temporary folder created in the /opt directory.
# rm -r /opt/tmp/logs
Restart the ESA.
15 - Working with Keys
Protegrity Data Security platform uses many keys to protect your sensitive data.
The Protegrity Data Security platform uses many keys to protect your sensitive data. The Protegrity Key Management solution manages these keys and this system is embedded into the fabric of the Protegrity Data Security Platform. For example, creating a cryptographic or data protection key is a part of the process of defining the way sensitive data is to be protected. There is not a specific user visible function to create a data protection key.
With key management as a part of the platform’s core infrastructure, the security team can focus on protecting data and not the low-level mechanics of key management. This platform infrastructure-based key management technique eliminates the need for any human to be a custodian of keys. This holds true for any of the functions included in key management.
The keys that are part of the Protegrity Key Management solution are:
Key Encryption Key (KEK): The cryptographic key used to protect other keys. The KEKs are categorized as follows:
Master Key - It protects the Data Store Keys and Repository Key. In the ESA, only one active Master Key is present at a time.
Repository Key - It protects policy information in the ESA. In the ESA, only one active Repository Key is present at a time.
Data Store Key - It encrypts the audit logs on the protection endpoint. In the ESA, multiple active Data Store Keys can be present at a time. This key applies only to v8.0.0.0 and earlier protector versions.
Signing Key: The protector utilizes the Signing Key to sign the audit logs for each data protection operation. The signed audit log records are then sent to the ESA, which authenticates and displays the signature details received for the log records.
For more information about the signature details for the log records, refer to the Protegrity Log Forwarding Guide 9.2.0.0.
Data Encryption Key (DEK): The cryptographic key used to encrypt the sensitive data for the customers.
Codebooks: The lookup tables used to tokenize the sensitive data.
For more information about managing keys, refer to the Protegrity Key Management Guide 9.2.0.0.
16 - Working with Certificates
Digital certificates are used to encrypt online communication and authentication between two entities. For two entities exchanging sensitive information, the one that initiates the request for exchange can be called the client and the one that receives the request and constitutes the other entity can be called the server.
The authentication of both the client and the server involves the use of digital certificates issued by the trusted Certificate Authorities (CAs). The client authenticates itself to a server using its client certificate. Similarly, the server also authenticates itself to the client using the server certificate. Thus, certificate-based communication and authentication involves a client certificate, server certificate, and a certifying authority that authenticates the client and server certificates.
Protegrity client and server certificates are self-signed by Protegrity. However, you can replace them by certificates signed by a trusted and commercial CA. These certificates are used for communication between various components in ESA.
The certificate support in Protegrity involves the following:
ESA supports the upload of certificates with strength equal to 4096 bits. You can upload a certificate with strength less than 4096 bits but the system will show you a warning message. Custom certificates for Insight must be generated using a 4096 bit key.
The ability to replace the self-signed Protegrity certificates with the CA based certificates.
The retrieval of username from client certificates for authentication of user information during policy enforcement.
The ability to download the server’s CA certificate and upload it to a certificate trust store to trust the server certificate for communication with ESA.
The various components within the Protegrity Data Security Platform that communicate with and authenticate each other through digital certificates are:
ESA Web UI and ESA
ESA and Protectors
Protegrity Appliances and external REST clients
As illustrated in the figure, the use of certificates within the Protegrity systems involves the following:
Communication between ESA Web UI and ESA
In case of a communication between the ESA Web UI and ESA, ESA provides its server certificate to the browser. In this case, it is only server authentication that takes place in which the browser ensures that ESA is the trusted server.
Communication between ESA and Protectors
In case of a communication between ESA and Protectors, certificates are used to mutually authenticate both the entities. The server and the client i.e. ESA and the Protector respectively ensure that both are trusted entities. The Protectors could be hosted on customer business systems or it could be a Protegrity Appliance.
Communication between Protegrity Appliances and external REST clients
Certificates ensure the secure communication between the customer client and Protegrity REST server or between the customer client and the customer REST server.
17 - Managing policies
Policies help to determine, specify and enforce certain data security rules
The policy each organization creates within ESA is based on requirements with relevant regulations. A policy helps to determine, specify and enforce certain data security rules. These data security rules are as shown in the following figure.
Classification
This section discusses about the classification of Policy Management in ESA.
What do you want to protect?
The data that is to be protected needs to be classified. This step determines the type of data that the organization considers sensitive. The compliance or security team will choose to meet certain standard compliance requirements with specific law or regulation, such as the Payment Card Industry Data Security Standard (PCI DSS) or the Health Information Portability and Accessibility Act (HIPAA).
In ESA, you classify the sensitive data fields by creating ‘Data Elements’ for each field or type of data.
Why do you need to protect?
The fundamental goal of all IT security measures is the protection of sensitive data. The improper disclosure of sensitive data can cause serious harm to the reputation and business of the organization. Hence, the protection of sensitive data by avoiding identity theft and protecting privacy is for everyone’s advantage.
Discovery
This section discusses about the discovery of Policy Management in ESA.
Find where the data is located in the enterprise
The data protection systems are the locations in the enterprise to focus on as the data security solution is designed. Any data security solution identifies the systems that contains the sensitive data.
How you want to protect it?
Data protection has different scenarios which require different forms of protection. For example, tokenization is preferred over encryption for credit card protection. The technology used must be understood to identify a protection method. For example, if a database is involved, Protegrity identifies a Protector to match up with the technology used to achieve protection of sensitive data.
Who is authorized to view it in the clear?
In any organization, the access to unprotected sensitive data must be given only to the authorized stakeholders to accomplish their jobs. A policy defines the authorization criteria for each user. The users are defined in the form of members of roles. A level of authorization is associated with each role which assigns data access privileges to all members in the role.
Protection
The Protegrity Data Security Platform delivers the protection through a set of Data Protectors. The Protegrity Protectors meet the governance requirements to protect sensitive data in any kind of environment. ESA delivers the centrally managed policy set and the Protectors locally enforce them. It also collects audit logs of all activity in their systems and sends back to ESA for reporting.
Enforcement
The value of any company or its business is in its data. The company or business suffers serious issues if an unauthorized user gets access to the data. Therefore, it becomes necessary for any company or business to protect its data. The policy is created to enforce the data protection rules that fulfils the requirements of the security team. It is deployed to all Protegrity Protectors that are protecting sensitive data at protection points.
Monitoring
As a policy is enforced, the Protegrity Protectors collects audit logs in their systems and reports back to ESA. Audit logs helps to capture authorized and unauthorized attempts to access sensitive data at all protection points. It also captures logs on all changes made to policies. You can specify what types of audit records are captured and sent back to ESA for analysis and reporting.
18 - Working with Insight
Insight is a comprehensive system designed to store and manage logs in the Audit Store, which is a repository for all audit data and logs on the ESA. The Audit Store cluster is scalable and supports multiple nodes, allowing for secure inter-node communication using certificates. Insight provides various functionalities, including accessing dashboards, managing nodes, viewing logs, and creating visualizations. It also offers tools for analyzing data, monitoring system health, and ensuring secure communication between components.
18.1 - Understanding the Audit Store node status
To improve your logs, set up an Audit Store cluster. This lets you collect logs from different systems, giving you a complete picture of what is happening. By gathering logs from various sources, you get a clear view of all transactions. Centralizing logs helps you monitor and analyze the health and activities of your ecosystem. You can also use the Audit Store screens to check the status of the nodes and find any issues with the cluster.
Viewing cluster status
The Overview screen shows information about the Audit Store cluster. Use this information to understand the health of the Audit Store cluster. Access the Overview screen by navigating to Audit Store > Cluster Management > Overview. The Overview screen is shown in the following figure.
The following information is shown on the Overview screen:
Join Custer: Click to add a node to the Audit Store cluster. The node can be added to only one Audit Store cluster. On a multi-node cluster, this button is disabled after the node is added to the Audit Store cluster.
Leave Cluster: Click to remove a node from the Audit Store cluster. This button is disabled after the node is removed from an Audit Store cluster.
Cluster Name: The name displays the Audit Store cluster name.
Cluster Status: The cluster status displays the index status of the worst shard in the Audit Store cluster. Accordingly, the following status information appears:
Red status indicates that the specific shard is not allocated in the Audit Store cluster.
Yellow status indicates that the primary shard is allocated but replicas are not allocated.
Green status indicates that all shards are allocated.
Number of Nodes: The count of active nodes in the Audit Store cluster.
Number of Data Nodes: The count of nodes that have a data role.
Active Primary Shards: The count of active primary shards in the Audit Store cluster.
Active Shards: The total of active primary and replica shards.
Relocating Shards: The count of shards that are being relocated.
Initializing Shards: The count of shards that are under initialization.
Unassigned Shards: The count of shards that are not allocated. The Audit Store will process and dynamically allocate these shards.
OS Version: The version number of the OpenSearch used for the Audit Store.
Current Master: The IP address of the current Audit Store node that is elected as master.
Indices Count: The count of indices in the Audit Store cluster.
Total Docs: The document count of all indices in the Audit Store cluster, excluding security index docs.
Number of Master Nodes: The count of nodes that have the master-eligible role.
Number of Ingest Nodes: The count of nodes that have the ingest role.
For more information about clusters, shards, docs, and other terms, refer to the OpenSearch documentation.
Viewing the node status
The Nodes tab on the Overview screen shows the status of the nodes in the Audit Store cluster. This tab displays important information about the node. The Nodes tab is shown in the following figure.
The following information is shown on the Nodes tab:
Node IP: The IP address of the node.
Role: The roles assigned to the node. By default, nodes are assigned all the roles. The following roles are available:
Master: This is the master-eligible role. The nodes having this role can be elected as the cluster master to control the Audit Store cluster.
Data: The nodes having the data role hold data and perform data-related operations.
Ingest: The nodes having the ingest role process the logs received before the logs are stored in the Audit Store.
Action: The button to edit the roles for the current node. For more information about roles, refer to Working with Audit Store roles.
Name: The name for the node.
Up Time: The uptime for the node.
Disk Total (Bytes): The total disk space in bytes.
Disk Used (Bytes): The disk space used in bytes.
Disk Avail (Bytes): The available disk space in bytes.
RAM Max (Bytes): The total RAM available in bytes.
RAM Current (Bytes): The current RAM used in bytes.
Viewing the index status
The Indices tab on the Overview screen shows the status of the indexes on the Audit Store cluster. This tab displays important information about the indexes. The Indices tab is shown in following figure.
The following information is shown on the Indices tab:
Index: The index name.
Doc Count: The number of documents in the index.
Health Status: The index health per index. The index level health status is controlled by the worst shard status. Accordingly, the following status information appears:
Red status indicates that the specific shard is not allocated in the Audit Store cluster.
Yellow status indicates that the primary shard is allocated but replicas are not allocated.
Green status indicates that all shards are allocated.
Pri Store Size (Bytes): The primary store size in bytes for all shards, including shard replicas of the index.
Store Size (Bytes): The total store size in bytes for all shards, including shard replicas of the index.
18.2 - Working with Audit Store nodes
View a list of all the nodes connected to the Audit Store cluster on the Nodes tab. Use the leave cluster option from the node to remove the node from the cluster. However, if a node crashes or is decommissioned, then it would not be possible to remove the node from the Nodes list. Use the register and unregister buttons to work with these nodes on the Nodes list.
Registering a node
When a node that was a part of the Audit Store cluster was down or unregistered is started again, then it would already have the Audit Store configurations. Similarly, due to issues during an upgrade, a node might not complete the Audit Store cluster registration process. In this case, the node appears with an orange icon (). Register the node using the Register button to add the node to the Audit Store cluster.
Perform the following steps to register a node:
Navigate to Audit Store > Cluster Management > Overview > Nodes.
Click Register ().
The node will be a part of the cluster and a black node icon () will appear.
Unregistering a node
When a node goes down, such as due to a crash or for maintenance, then the node is greyed out (). Additionally, if a node gets corrupted, then it is not possible to log in to the node to remove it from the Audit Store cluster. In these case, disconnect the node from the cluster using the Unregister button. A disconnected node can be added back to the cluster later, if required.
Perform the following steps to remove the disconnected node:
Navigate to Audit Store > Cluster Management > Overview > Nodes.
Click Unregister ().
The node will still be a part of the cluster, however, it will not be visible in the list.
18.3 - Working with Audit Store roles
Roles assigned to the nodes determine the functions performed by the node in the cluster. As the cluster grows, the role of the node can be modified to have nodes with dedicated roles.
A node can have one role or multiple roles. A cluster needs at least one node with each role. Hence, roles of the node in a single-node cluster cannot be removed. Similarly, if the node is the last node in the cluster with a particular role, then the role cannot be removed. By default, all the nodes must have the master-eligible, data, and ingest roles:
Master-eligible: This is the master-eligible node. It is eligible to be elected as the master node that controls the Audit Store cluster. A minimum of 3 nodes with the master-eligible role are required in the cluster to make the Audit Store cluster stable and resilient. For mor iformation about the architecture, refer to the Logging architecture.
Data: This node holds data and can perform data-related operations. A minimum of 2 nodes with the data role are required in the Audit Store cluster to provide redundancy of data. Redundancy reduces data loss when a node goes down.
Ingest: This node processes logs received before the log is indexed for further storage and processing. A minimum of 2 nodes with the ingest role are required in the Audit Store cluster.
The Audit Store uses the following formula to determine the minimum number of nodes with the Master-eligible role that should be running in the cluster:
Minimum number of running nodes with the Master-eligible role in a cluster:
(Total number of nodes with the Master-eligible role in a cluster / 2) + 1
For example, if the cluster has 5 nodes that have the Master-eligible role, then the minimum number of nodes with the Master-eligible role that needs to be running for the cluster to remain functional is 3. If there are fewer than 3 nodes available, the cluster might not be able to promote any nodes to Master if multiple Master nodes fail.
An Audit Store cluster must have a minimum of 3 nodes with the Master-eligible role due to following scenarios:
1 master-eligible node: If the only node is present with the Master-eligible role, then it is elected the Master, by default, because it is the only node with the required Master-eligible role. In this case, if the node becomes unavailable due to some failure, then the cluster becomes unstable as there is no additional node with the Master-eligible role.
2 master-eligible nodes: A cluster where only 2 nodes have the Master-eligible role will both have the Master-eligible role at the minimum to be up and running for the cluster to remain functional. If any one of those nodes becomes unavailable due to some failure, then the minimum condition for the nodes with the Master-eligible role is not met.
3 master-eligible nodes and above: In this case, if any one node goes down, then the cluster can still remain functional because this cluster requires two nodes with the Master-eligible role to be running at the minimum, as per the minimum Master-eligible role formula.
Based on the requirements, modify the roles of a node using the following steps.
Log in to the Web UI of the system to change the role.
Click Audit Store > Cluster Management > Overview to open the Audit Store clustering page.
Click Edit Roles.
Select the check box to add a role. Alternatively, clear the check box to remove a role.
Click Update Roles.
Click Dismiss in the message box that appears after the role update.
18.4 - Working with Discover
View the logs that are stored in the Audit Store using Discover. The basics of the Discover and an overview of running queries on the Discover screen is provided here.
The logs aggregated and collected are sent to Insight. Insight stores the logs in the Audit Store. The logs from the Audit Store are displayed on the Audit Store Dashboards. Here, the different fields and the data logged is visible. In addition to viewing the data, these logs serve as input for Analytics to analyze the health of the system and to monitor the system for providing security.
View the logs by logging into the ESA and navigating to Audit Store > Dashboard > Open in new tab, from the menu, select Discover, and select a time period such as Last 30 days.
Use the default index pty_insight_*audit* to view the log data. This default index pattern uses wildcard charaters for referencing all indexes. Alternatively, select an index pattern or alias for the entries to view the data from a different index. For more information about the indexes available, refer to Understanding the Insight indexes.
Run a query and customize the log details displayed. Save the query and the settings for running a query, such as, the columns, row count, tail, and indexes for the query. The saved queries created are user-specific.
From Discover, click Open to use the following saved queries to view information:
Policy: This query is available to view policy logs. A policy log is a created during the the policy creation, policy deployment, policy enforcement, and during the collection, storage, forwarding, and analysis of logs.
Security: This query is available to view security operation logs. A security log is created during various security operations performed by protectors, such as, performing protect, unprotect, and reprotect operations.
Unsuccessful Security Operations: This query is available to view unsuccessful security operation-related logs. Unsuccessful Security Operations logs are created when security operations fail due to errors, warnings, or exceptions.
In ESA, navigate to Audit Store > Dashboard > Open in new tab, select Discover from the menu, and optionally select a time period such as Last 30 days..
The viewer role user or a user with the viewer role can only view and run saved queries. Admin rights are required to create or modify query filters.
Select the index for running the query.
Enter the query in the Search field.
Optionally, select the required fields.
Click the See saved queries () icon to save the query.
The Saved Queries list appears.
Click Save current query.
The Save query dialog box appears.
Specify a name for the query.
Click Save to save the query information, including the configurations specified, such as, the columns, row count, tail, indexes, and query.
The query is saved.
Click the See saved queries () icon to view the saved queries.
18.5 - Overview of the dashboards
Use the Insight Dashboards to visualize the data present in the logs. The dashboards provide various charts and graphs for displaying data. Use the predefined graphs or customize and view graphs.
Viewing the graphs provides an easier and faster method for reading the log information. This helps understand the working of the system and also take decisions faster, such as, understanding the processing load on the ESAs and accordingly expanding the cluster by adding nodes, if required.
The Insight Dashboards appears on a separate tab from the ESA Web UI. However, it uses the same session as the ESA Web UI. Signing out from the ESA Web UI also signs out from the Insight Dashboards. Complete the steps provided here to view the Insight Dashboards.
Log in to the ESA Web UI.
Click Audit Store > Dashboard. If pop-ups are blocked in the browser, click Open in a new tab to view the Audit Store Dashboards, also known as Insight Dashboards.
The Audit Store Dashboards is displayed in a new tab of the browser.
Overview of the Insight Dashboards Interface
An overview of the various parts of the Insight Dashboards, also known as the Audit Store Dashboards, is provided here.
The Audit Store Dashboard appears as shown in the following figure.
The following components are displayed on the screen.
Callout
Element
Description
1
Navigation panel
The menu displays the different Insight applications, such as, dashboards, reports, and alerts.
2
Search bar
The search bar helps find elements and run queries. Use filters to narrow the search results. For more information about building queries, refer to https://opensearch.org/docs/2.18/dashboards/dql/.
3
Bread crumb
The menu is used to quickly navigate across screens.
4
Panel
The stage is the area to create and view visualizations and log information.
5
Toolbar
The toolbar lists the commands and shortcuts for performing tasks.
6
Time filter
The time filter specifies the time window for viewing logs. Update the filter if logs are not visible. Use the Quick Select menu to select predefined time periods.
7
Refresh button
The Refresh button refreshes the information on the page. Use this button to refresh the query results after updating the query parameters, such as, applying time filters.
8
Help
The help menu provides access to the online documentation that is provided by OpenSearch and to view the OpenSearch community forums. The Open an issue in GitHub link allows you to submit issue requests to OpenSearch.
Accessing the help
The Insight Dashboard helps visualize log data and information. Use the help documentation provided by Insight to configure and create visualizations.
To access the help:
Open the Audit Store Dashboards.
Click the Help icon from the upper-right corner of the screen.
Protegrity provides Insight Dashboards that help analyze data and operations performed. Use the graphs and heat maps to visualize the logs in the Audit Store.
The configuration of dashboards created in the earlier versions of Insight Dashboards are retained after the ESA is upgraded. Protegrity provides default dashboards with version 10.1.0. If the title of an existing dashboard matches the new dashboard provided by Protegrity, then a duplicate entry is visible. Use the date and time stamp to identify and rename the earlier dashboards. The Protector status interval is used for presenting the data on some dashboards. The information presented on the dashboard might not have the correct values if the interval is updated.
Do not clone, delete, or modify the configuration or details of the dashboards that are provided by Protegrity. To create a customized dashboard, first clone and customize the required visualizations, then create a dashboard, and place the customized visualizations on the dashboard.
To view a dashboard:
Log in to the ESA.
Navigate to Audit Store > Dashboard.
From the navigation panel, click Dashboards.
Click the dashboard.
Viewing the Security Operation Dashboard
The security operation dashboard displays the counts of individual and total number of security operations for successful and unsuccessful operations. The Security Operation Dashboard has a table and pie charts that summarizes the security operations performed by a specific data store, protector family, and protector vendor. This dashboard shows different visualizations for the Successful Security Operations, Security Operations, Reprotect Counts, Successful Security Operation Counts, Security Operation Counts, Security Operation Table, and Unsuccessful Security Operations.
This dashboard cannot be deleted. The dashboard is shown in the following figure.
The dashboard has the following panels:
Total Security Operations: Displays pie charts for for the successful and unsuccessful security operations:
Successful: Total number of security operations that succeeded.
Unsuccessful: Total number of security operations that was unsuccessful.
Successful Security Operations: Displays pie chart for the following security operation:
Protect: Total number of protect operations.
Unprotect: Total number of unprotect operations.
Reprotect: Total number of reprotect operations.
Unsuccessful Security Operations: Displays pie chart for the following security operation:
Error: Total number of operations that were unsuccessful due to an error.
Warning: Total number of operations that were unsuccessful due to a warning.
Exception: Total number of operations that were unsuccessful due to an exception.
Total Security Operation Values: Displays the following information
Successful - Count: Total number of security operations that succeeded.
Unsuccessful - Count: Total number of security operations that were unsuccessful.
Successful Security Operation Values: Displays the following information:
Protect - Count: Total number of protect operations.
Unprotect - Count: Total number of unprotect operations.
Reprotect - Count: Total number of reprotect operations.
Unsuccessful Security Operation Values: Displays the following information:
ERROR - Count: Total number of error logs.
WARNING - Count: Total number of warning logs.
EXCEPTION - Count: Total number of exception logs.
Security Operation Table: Displays the number of security operations done for a data store, protector family, protector vendor, and protector version.
Unsuccessful Security Operations: Displays a list of unsuccessful security operations with details, such as, time, data store, protector family, protector vendor, protector version, IP, hostname, level, count, description, and source.
Viewing the Protector Inventory Dashboard
The protector inventory dashboard displays protector details connected to the ESA through bar graphs and tables. This dashboard has the Protector Family, Protector Version, Protector Count, and Protector List visualizations. It is useful for understanding information about the installed Protectors.
Only protectors that perform security operations show up on the dashboard. Updating the IP address or the hostname of the Protector shows the old and new entry for the protector.
This dashboard cannot be deleted. The dashboard is shown in the following figure.
The dashboard has the following panels:
Protector Family: Displays bar charts with information for the protector family based on the installation count of the protector.
Protector Version: Displays bar charts with information of the protector version based on the installation count of the protector.
Protector Count: Displays the count of the deployed protectors for the corresponding Protector Family, Protector Vendor, and Protector Version.
Protector List: Displays the list of protectors installed with information, such as, Protector Vendor, Protector Family, Protector Version, Protector IP, Hostname, Core Version, PCC Version, and URP count. The URP shows the security operations performed, that is, the unprotect, reprotect, and protect operations.
Viewing the Protector Status Dashboard
The protector status dashboard displays the protector connectivity status through a pie chart and a table visualization. This information is available only for v10.0.0 and later protectors. Logs from earlier protector versions are not available for the dashboards due to differences between the log formats. It is useful for understanding information about the installed v10.0.0 protectors. This dashboard uses status logs sent by the protector, so the protector which performed at least one security operation shows up on this dashboard. A protector is shown in one of the following states on the dashboard:
OK: The latest logs are sent from the protector to the ESA within the last 15 minutes.
Warning: The latest logs sent from the protector to the ESA are within the last 15 and 60 minutes.
Error: The latest logs sent from the protector to the ESA are more than 60 minutes.
Updating the IP address or the hostname of the protector shows the old and new entry for the protector.
This dashboard shows the v10.0.0 protectors that are connected to the ESA. The status of earlier protectors is available by logging into the ESA and navigating to Policy Management > Nodes.
This dashboard cannot be deleted. The dashboard is shown in the following figure.
The dashboard has the following panels:
Connectivity status pie chart: Displays a pie chart of the different states with the number of protectors that are in each state.
Protector Status: Displays the list of protectors connectivity status with information, such as, Datastore, Node IP, Hostname, Protector Platform, Core Version, Protector Vendor, Protector Family, Protector Version, Status, and Last Seen.
Viewing the Policy Status Dashboard
The policy status dashboard displays the Policy and Trusted Application connectivity status with respective to a DataStore. The status information, on this dashboard, is updated every 10 minutes. It is useful to understand deployment of the DataStore on all protector nodes. This dashboard displays the Policy deploy Status, Trusted Application deploy status, Policy Deploy details, and Trusted Application details visualizations. This information is available only for v10.0.0 and later protectors. Logs from earlier protector versions are not available for the dashboards due to compatibility issues between the log formats.
The policy status logs are sent to Insight. These logs are stored in the policy status index that is pty_insight_analytics_policy. The policy status index is analyzed using the correlation ID to identify the unique policies received by the ESA. The time duration and the correlation ID are then analyzed for determining the policy status.
The dashboard uses status logs sent by the protectors about the deployed policy, so the Policy or Trusted Application used for at least one security operation shows up on this dashboard. A Policy and Trusted Application can be shown in one of the following states on the dashboard:
OK: The latest correlation value of the logs sent for the Policy or Trusted Application to the ESA are within the last 15 minutes.
Warning: The latest correlation value of the logs sent for the Policy or Trusted Application to the ESA are more than 15 minutes.
This dashboard cannot be deleted. The dashboard is shown in the following figure.
The dashboard has the following panels:
Policy Deploy Status: Displays a pie chart of the different states with the number of policies that are in each state.
Trusted Application Status: Displays a pie chart of the different states with the number of trusted applications that are in each state.
Policy Deploy Details: Displays the list of policies and details, such as, Datastore Name, Node IP, Hostname, Last Seen, Policy Status, Process Name, Process Id, Platform, Core Version, PCC Version, Vendor, Family, Version, Deployment Time, and Policy Count.
Trusted Application Details: Displays the list of policies for Trusted Applications and details, such as, Datastore Name, Node IP, Hostname, Last Seen, Policy Status, Process Name, Process Id, Platform, Core Version, PCC Version, Vendor, Family, Version, Authorize Time, and Policy Count.
Data Element Usage Dashboard
The dashboard shows the security operation performed by users according to data elements. It displays the top 10 data elements used for the top five users.
The following visualizations are displayed on the dashboard:
Data Element Usage Intensity Of Users per Protect operation
Data Element Usage Intensity Of Users per Unprotect operation
Data Element Usage Intensity Of Users per Reprotect operation
The dashboard is displayed in the following figure.
Sensitive Activity Dashboard
The dashboard shows the daily count of security events by data elements for specific time period.
The following visualization is displayed on the dashboard:
Sensitive Activity By Date
The dashboard is displayed in the following figure.
Server Activity Dashboard
The dashboard shows the daily count of all events by servers for specific time period. The older Audit index entries are not displayed on a new installation.
The following visualizations are displayed on the dashboard:
Server Activity of Troubleshooting Index By Date
Server Activity of Policy Index By Date
Server Activity of Audit Index By Date
Server Activity of Older Audit Index By Date
The dashboard is displayed in the following figure.
High & Critical Events Dashboard
The dashboard shows the daily count of system events of high and critical severity for selected time period. The older Audit index entries are not displayed on a new installation.
The following visualizations are displayed on the dashboard:
System Report - High & Critical Events of Troubleshooting Index
System Report - High & Critical Events of Policy Index
System Report - High & Critical Events of Older Audit Index
The dashboard is displayed in the following figure.
Unauthorized Access Dashboard
The dashboard shows the cumulative counts of unauthorized access and activity by users into Protegrity appliances and protectors.
The following visualization is displayed on the dashboard:
Unauthorized Access By Username
The dashboard is displayed in the following figure.
User Activity Dashboard
The dashboard shows the cumulative transactions performed by users over a date range.
The following visualization is displayed on the dashboard:
User activity across Date range
The dashboard is displayed in the following figure.
18.7 - Viewing visualizations
Protegrity provides out-of-the-box visualization for viewing the data. The configuration used for the visualization are provided here. This helps better understand and interpret the data shown on the various graphs and charts.
The configuration of visualizations created in the earlier versions of the Audit Store Dashboards are retained after the ESA is upgraded. Protegrity provides default visualizations with version 10.1.0. If the title of an existing visualization matches the new visualization provided by Protegrity, then a duplicate entry is visible. Use the date and time stamp to identify and rename the existing visualizations.
Do not delete or modify the configuration or details of the visualizations provided by Protegrity. To customize the visualization, create a copy of the visualization and perform the customization on the copy of the visualization.
To view visualizations:
Log in to the ESA.
Navigate to Audit Store > Dashboard.
The Audit Store Dashboards appear in a new window. Click Open in a new tab if the dashboard is not displayed.
From the navigation panel, click Visualize.
Create and view visualizations from here.
Click a visualization to view it.
User Activity Across Date Range
Description: The user activity during the date range specified.
Type: Heat Map
Filter: Audit Index Logtypes
Configuration:
Index: pty_insight_*audit*
Metrics:
Value: Sum
Field: cnt
Buckets:
X-axis
Aggregation: Date Histogram
Field: origin.time_utc
Minimum interval: Day
Y-axis
Sub aggregation: Terms
Field: protection.policy_user.keyword
Order by: Metric:Sum of cnt
Order: Descending
Size: 1
Custom label: Policy Users
Sensitive Activity by Date
Description: The data element usage on a daily basis.
Type: Line
Filter: Audit Index Logtypes
Configuration:
Index: pty_insight_*audit*
Metrics: Y-axis: Count
Buckets:
X-axis
Aggregation: Date Histogram
Field: origin.time_utc
Minimum interval: Day
Custom label: Date
Split series
Sub aggregation: Terms
Field: protection.dataelement.keyword
Order by: Metric:Count
Order: Descending
Size: 10
Custom label: Operation Count
Unauthorized Access By Username
Description: Top 10 Unauthorized Protect and Unprotect operation counts per user.
Type: Vertical Bar
Filter 1: Audit Index Logtypes
Filter 2: protection.audit_code: 3
Configuration:
Index: pty_insight_*audit*
Metrics: Y-axis: Count
Buckets:
X-axis
Aggregation: Terms
Field: protection.policy_user.keyword
Order by: Metric:Count
Order: Descending
Size: 10
Custom label: Top 10 Policy Users
Split series
Sub aggregation: Filters
Filter 1-Protect: level=‘Error’
Filter 2-Unprotect: level=‘WARNING’
System Report - High & Critical Events of Audit Indices
Description: The chart reporting high and critical events from the Audit index.
Type: Vertical Bar
Filter: Severity Level : (High & Critical)
Configuration:
Index: pty_insight_analytics*audits_*
Metrics: Y-axis: Count
Buckets:
X-axis
Aggregation: Date Histogram
Field: origin.time_utc
Minimum Interval: Auto
Custom label: Date
Split series
Sub aggregation: Terms
Field: level.keyword
Order by: Metric:Count
Order: Descending
Size: 20
Split series
Sub aggregation: Terms
Field: origin.hostname.keyword
Order by: Metric:Count
Order: Descending
Size: 50
Custom label: Server
System Report - High & Critical Events of Policy Logs Index
Description: The chart reporting high and critical events from the Policy index.
Type: Vertical Bar
Filter: Severity Level : (High & Critical)
Configuration:
Index: pty_insight_analytics*policy_log_*
Metrics: Y-axis: Count
Buckets:
X-axis
Aggregation: Date Histogram
Field: origin.time_utc
Minimum Interval: Auto
Custom label: Date
Split series
Sub aggregation: Terms
Field: level.keyword
Order by: Metric:Count
Order: Descending
Size: 20
Split series
Sub aggregation: Terms
Field: origin.hostname.keyword
Order by: Metric:Count
Order: Descending
Size: 50
Custom label: Server
System Report - High & Critical Events of Troubleshooting Logs Index
Description: The chart reporting high and critical events from the Troubleshooting index.
Type: Vertical Bar
Filter: Severity Level : (High & Critical)
Configuration:
Index: pty_insight_analytics*troubleshooting_*
Metrics: Y-axis: Count
Buckets:
X-axis
Aggregation: Date Histogram
Field: origin.time_utc
Minimum Interval: Auto
Custom label: Date
Split series
Sub aggregation: Terms
Field: level.keyword
Order by: Metric:Count
Order: Descending
Size: 20
Split series
Sub aggregation: Terms
Field: origin.hostname.keyword
Order by: Metric:Count
Order: Descending
Size: 50
Custom label: Server
Data Element Usage Intensity Of Users per Protect operation
Description: The chart shows the data element usage intensity of users per protect operation. It displays the top 10 data elements used by the top five users.
Type: Heat Map
Filter 1: protection.operation.keyword: Protect
Filter 2: Audit Index Logtypes
Configuration:
Index: pty_insight_*audit*
Metrics: Y-axis: Count
Buckets:
X-axis
Aggregation: Terms
Field: protection.policy_user.keyword
Order by: Metric: Count
Order: Descending
Size: 5
Y-axis
Sub aggregation: Terms
Field: protection.dataelement.keyword
Order by: Metric:Count
Order: Descending
Size: 10
Data Element Usage Intensity Of Users per Reprotect operation
Description: The chart shows the data element usage intensity of users per reprotect operation. It displays the top 10 data elements used by the top five users.
Type: Heat Map
Filter 1: protection.operation.keyword: Reprotect
Filter 2: Audit Index Logtypes
Configuration:
Index: pty_insight_*audit*
Metrics: Y-axis: Count
Buckets:
X-axis
Aggregation: Terms
Field: protection.policy_user.keyword
Order by: Metric: Count
Order: Descending
Size: 5
Y-axis
Sub aggregation: Terms
Field: protection.dataelement.keyword
Order by: Metric:Count
Order: Descending
Size: 10
Data Element Usage Intensity Of Users per Unprotect operation
Description: The chart shows the data element usage intensity of users per unprotect operation. It displays the top 10 data elements used by the top five users.
Type: Heat Map
Filter 1: protection.operation.keyword: Unprotect
Filter 2: Audit Index Logtypes
Configuration:
Index: pty_insight_*audit*
Metrics: Y-axis: Count
Buckets:
X-axis
Aggregation: Terms
Field: protection.policy_user.keyword
Order by: Metric: Count
Order: Descending
Size: 5
Y-axis
Sub aggregation: Terms
Field: protection.dataelement.keyword
Order by: Metric:Count
Order: Descending
Size: 10
Server Activity of Older Audit Indices By Date
Description: The chart shows the daily count of all events by servers for specific time period from the old audit index.
Type: Line
Configuration:
Index: pty_insight_*audit_*
Metrics: Y-axis: Count
Buckets:
X-axis
Aggregation: Date Histogram
Field: origin.time_utc
Minimum interval: Day
Split series
Sub aggregation: Terms
Field: origin.hostname.keyword
Order by: Metric:Count
Order: Descending
Size: 50
Server Activity of Audit Index By Date
Description: The chart shows the daily count of all events by servers for specific time period from the audit index.
Type: Line
Configuration:
Index: pty_insight_analytics*audits_*
Metrics: Y-axis: Count
Buckets:
X-axis
Aggregation: Date Histogram
Field: origin.time_utc
Minimum interval: Day
Split series
Sub aggregation: Terms
Field: origin.hostname.keyword
Order by: Metric:Count
Order: Descending
Size: 50
Server Activity of Policy Index By Date
Description: The chart shows the daily count of all events by servers for specific time period from the policy index.
Type: Line
Configuration:
Index: pty_insight_analytics*policy_log_*
Metrics: Y-axis: Count
Buckets:
X-axis
Aggregation: Date Histogram
Field: origin.time_utc
Minimum interval: Day
Split series
Sub aggregation: Terms
Field: origin.hostname.keyword
Order by: Metric:Count
Order: Descending
Size: 50
Server Activity of Troubleshooting Index By Date
Description: The chart shows the daily count of all events by servers for specific time period from the troubleshooting index.
Type: Line
Configuration:
Index: pty_insight_analytics*troubleshooting_*
Metrics: Y-axis: Count
Buckets:
X-axis
Aggregation: Date Histogram
Field: origin.time_utc
Minimum interval: Day
Split series
Sub aggregation: Terms
Field: origin.hostname.keyword
Order by: Metric:Count
Order: Descending
Size: 50
Connectivity status
Description: This pie chart display connectivity status for the protectors.
Description: This table displays the policy deployment status and uniquely identified information for the data store, protector, process, platform, node, and so on.
Description: The trusted application deployment status that is displayed on the dashboard. This table uniquely identifies the data store, protector, process, platform, node, and so on.
Split rows
- Aggregation: Terms
- Field: protector.datastore.keyword
- Order by: Metric: Metric:Count
- Order: Descending
- Size: 50
- Custom label: Data Store Name
Split rows
Aggregation: Terms
Field: origin.ip
Order by: Metric: Metric:Count
Order: Descending
Size: 50
Custom label: Node IP
Split rows
Aggregation: Terms
Field: origin.hostname.keyword
Order by: Metric: Metric:Count
Order: Descending
Size: 50
Custom label: Host Name
Split rows
Aggregation: Terms
Field: policystatus.status.keyword
Order by: Metric: Metric:Count
Order: Descending
Size: 50
Custom label: Status
Split rows
Aggregation: Terms
Field: origin.time_utc
Order by: Metric: Metric:Count
Order: Descending
Size: 50
Custom label: Last Seen
Split rows
Aggregation: Terms
Field: process.name.keyword
Order by: Metric: Metric:Count
Order: Descending
Size: 50
Custom label: Process Name
Split rows
Aggregation: Terms
Field: process.id.keyword
Order by: Metric: Metric:Count
Order: Descending
Size: 50
Custom label: Process Id
Split rows
Aggregation: Terms
Field: process.platform.keyword
Order by: Metric: Metric:Count
Order: Descending
Size: 50
Custom label: Platform
Split rows
Aggregation: Terms
Field: process.core_version.keyword
Order by: Metric: Metric:Count
Order: Descending
Size: 50
Custom label: Core Version
Split rows
Aggregation: Terms
Field: process.pcc_version.keyword
Order by: Metric: Metric:Count
Order: Descending
Size: 50
Custom label: PCC Version
Split rows
Aggregation: Terms
Field: protector.version.keyword
Order by: Metric: Metric:Count
Order: Descending
Size: 50
Custom label: Protector Version
Split rows
Aggregation: Terms
Field: protector.vendor.keyword
Order by: Metric: Metric:Count
Order: Descending
Size: 50
Custom label: Vendor
Split rows
Aggregation: Terms
Field: protector.family.keyword
Order by: Metric: Metric:Count
Order: Descending
Size: 50
Custom label: Family
Split rows
Aggregation: Terms
Field: policystatus.deployment_or_auth_time
Order by: Metric: Metric:Count
Order: Descending
Size: 50
Custom label: Authorize Time
Unsuccessful Security Operation Values
Description: The metric displays unsuccessful security operation counts.
Type: Metric
Filter 1: logtype: Protection
Filter 2: NOT level: success
Filter 3: NOT protection.audit_code: 28
Configuration:
Index: pty_insight_*audit*
Metrics:
Aggregation: Sum
Field: cnt
Custom label: Count
Buckets:
- Split group
- Aggregation: Terms
- Field: level.keyword
- Order by: Metric:Count
- Order: Descending
- Size: 10000
Unsuccessful Security Operations
Description: The pie chart displays unsuccessful security operations.
Type: Pie
Filter 1: logtype: protection
Filter 2: NOT level: success
Configuration:
Index: pty_insight_*audit*
Metrics:
Slice size:
Aggregation: Sum
Field: cnt
Custom label: Counts
Buckets:
Split slices
Aggregation: Terms
Field: level.keyword
Order by: Metric: Counts
Order: Descending
Size: 10000
18.8 - Viewing visualization templates
Use the visualizations provided by Protegrity to create dashboards. Alternatively, use the configuration provided here as a template to create sample visualizations for viewing the information logged.
The configuration of visualizations created in the earlier versions of the Audit Store Dashboards are retained after the ESA is upgraded. Protegrity provides default visualizations with version 10.1.0. If the title of an existing visualization matches the new visualization provided by Protegrity, then a duplicate entry is visible. Use the date and time stamp to identify and rename the existing visualizations.
Do not delete or modify the configuration or details of the new visualizations provided by Protegrity. To customize the visualization, create a copy of the visualization and perform the customization on the copy of the visualization.
Activity by data element usage count
Description: This graph displays the security operation count for each data element.
Type: Vertical Bar
Configuration:
Index: pty_insight_*audit_*
Metrics: Y-axis: Count
Buckets:
X-axis
Aggregation: Terms
Field: protection.dataelement.keyword
Order by: Metric:Count
Order: Descending
Size: 10
Custom label: Data Elements
Split series
Sub aggregation: Terms
Field: protection.operation.keyword
Order by: Metric:Count
Order: Descending
Size: 10
All activity by date
Description: This chart displays all logs trends as per the date.
Type: Line
Configuration:
Index: pty_insight_*audit_*
Metrics: Y-axis: Count
Buckets:
X-axis
Aggregation: Date Histogram
Field: origin.time_utc
Minimum interval: Auto
Application protector audit report
Description: This report uses AP python for generating the audit logs.
Type: Data Table
Configuration:
Index: pty_insight_*audit_*
Metrics: Y-axis: Count
Buckets:
Split rows
Aggregation: Terms
Field: protection.dataelement.keyword
Order by: Metric:Count
Order: Descending
Size: 50
Split rows
Sub aggregation: Terms
Field: protection.policy_user.keyword
Order by: Metric:Count
Order: Descending
Size: 50
Split rows
Sub aggregation: Terms
Field: origin.ip
Order by: Metric:Count
Order: Descending
Size: 50
Split rows
Sub aggregation: Terms
Field: protection.operation.keyword
Order by: Metric:Count
Order: Descending
Size: 50
Split rows
Sub aggregation: Terms
Field: additional_info.description.keyword
Order by: Metric:Count
Order: Descending
Size: 50
Split rows
Sub aggregation: Terms
Field: origin.time_utc
Order by: Metric:Count
Order: Descending
Size: 50
Policy report
Description: The policy report for the last 30 days.
Type: Data Table
Configuration:
Index: pty_insight_*audit_*
Metrics: Metric: Count
Buckets:
Split rows
Aggregation: Date Histogram
Field: origin.time_utc
Minimum interval: Auto
Custom label: Date & Time
Split rows
Sub aggregation: Terms
Field: client.ip.keyword
Order by: Metric:Count
Order: Descending
Size: 50
Custom label: Client IP
Split rows
Sub aggregation: Terms
Field: client.username.keyword
Order by: Metric:Count
Order: Descending
Size: 50
Custom label: Client Username
Split rows
Sub aggregation: Terms
Field: additional_info.description.keyword
Order by: Metric:Count
Order: Descending
Size: 50
Custom label: Additional Info
Split rows
Sub aggregation: Terms
Field: level.keyword
Order by: Metric:Count
Order: Descending
Size: 50
Custom label: Severity Level
Protection activity across datastore
Description: The protection activity across datastore and types of protectors used.
Type: Pie
Configuration:
Index: pty_insight_*audit_*
Metrics: Slice size: Count
Buckets:
Split chart
Aggregation: Terms
Field: protection.datastore.keyword
Order by: Metric:Count
Order: Descending
Size: 5
Split slices
Sub aggregation: Terms
Field: protection.operation.keyword
Order by: Metric:Count
Order: Descending
Size: 5
System daily activity
Description: This shows the system activity for the day.
Type: Line
Configuration:
Index: pty_insight_*audit_*
Metrics: Y-axis: Count
Buckets:
X-axis
Aggregation: Date Histogram
Field: origin.time_utc
Minimum interval: Auto
Split series
Sub aggregation: Terms
Field: logtype.keyword
Order by: Metric:Count
Order: Descending
Size: 10
Top 10 unauthorized access by data element
Description: The top 10 unauthorized access by data element for Protect and Unprotect operations for the last 30 days.
Type: Horizontal Bar
Configuration:
Index: pty_insight_*audit_*
Metrics: Y-axis: Count
Buckets:
X-axis
Aggregation: Terms
Field: protection.dataelement.keyword
Order by: Metric:Count
Order: Descending
Size: 10
Custom label: Data elements
Split series
Sub aggregation: Filters
Filter 1 - Protect: level=‘Error’
Filter 2 - Unprotect: level=‘WARNING’
Total security operations per five minutes
Description: The total security operations generated grouped using five minute intervals.
Type: Line
Configuration:
Index: pty_insight_*audit_*
Metrics: Y-axis: Count
Buckets:
X-axis
Aggregation: Date Histogram
Field: origin.time_utc
Minimum interval: Day
Split series
Sub aggregation: Terms
Field: protection.operation.keyword
Order by: Metric:Count
Order: Descending
Size: 5
Split chart
Sub aggregation: Terms
Field: protection.datastore.keyword
Order by: Alphabetical
Order: Descending
Size: 5
Custom label: operations
User activity operation count
Description: The count of total operations performed per user.
Type: Vertical Bar
Configuration:
Index: pty_insight_*audit_*
Metrics: Y-axis: Count
Buckets:
X-axis
Aggregation: Terms
Field: protection.policy_user.keyword
Order by: Metric:Count
Order: Descending
Size: 50
Split series
Sub aggregation: Terms
Field: protection.operation.keyword
Order by: Metric:Count
Order: Descending
Size: 5
19 - Maintaining Insight
Maintaining the logs and indexes in Insight includes the process for archiving and creating scheduled tasks.
Logging follows a fixed routine. The system generates logs, which are collected and then forwarded to Insight. Insight stores the logs in the Audit Store. These log records are used in various areas, such as, alerts, reports, dashboards, and so on. This section explains the logging architecture.
19.1 - Working with alerts
Use alerting to keep track of the different activities that take place on the system. The alerting ecosystem consists of the monitor, trigger, action, and channels.
Viewing alerts
Generated alerts are displayed on the Audit Store Dashboards. View and acknowledge the alerts from the alerting dashboard by navigating to OpenSearch Plugins > Alerting > Alerts. The alerting dashboard is shown in the following figure.
Destinations for alerts are moved to channels in Notifications. For more information about working with Monitors, Alerts, and Notifications, refer to the section Monitors in https://opensearch.org/docs/2.18/dashboards/.
Creating notifications
Create notification channels to receive alerts as per individual requirements. The alerts are sent to the destination specified in the channel.
Creating a custom webhook notification
A webhook notification sends the alerts generated by a monitor to a destination, such as, a web page.
Perform the following steps to configure the notification channel for generating webhook alerts:
Log in to the ESA Web UI.
Navigate to Audit Store > Dashboard.
The Audit Store Dashboards appears. If a new tab does not automatically open, click Open in a new tab.
From the menu, navigate to Management > Notifications > Channels.
Click Create channel.
Specify the following information under Name and description.
Name: Http_webhook
Description: For generating http webhook alerts.
Specify the following information under Configurations.
Webhook headers: Specify the key value pairs for the webhook.
Click Send test message to send a message to the email recipients.
Click Create to create the channel.
The webhook is set up successfully.
Proceed to create a monitor and attach the channel created using the steps from Creating the monitor.
Creating email alerts using custom webhook
An email notification sends alerts generated by a monitor to an email address. It is also possible to configure the SMTP channel for sending an email alert. It is recommended to send email alerts using custom webhooks, which offers added security. The email alerts can be encrypted or non-encrypted. Accordingly, the required SMTP settings for email notifications must be configured on the ESA.
Perform the following steps to configure the notification channel for generating email alerts using custom webhooks:
Ensure that the following is configured as per the requirement:
Configure the certificates, if not already configured.
Download the CA certificate of your SMTP server.
Log in to the ESA Web UI.
Upload the SMTP CA certificate on the ESA.
Navigate to Settings > Network > Certificate Repository.
Upload your CA certificate to the ESA.
Select and activate your certificates in Management & Web Services from Settings > Network > Manage Certificates.
For more information about ESA certificates, refer here.
Update the smtp_config.json configuration file.
Navigate to Settings > System > Files > smtp_config.json.
Click the Edit the product file () icon.
Update the following SMTP settings and the certificate information in the file. Sample values are provided in the following code, ensure that you use values as per individual requirements.
Set enabled to true to enable SMTP settings.
"enabled": true,
Specify the host address for the SMTP connection.
"host": "192.168.1.10",
Specify the port for the SMTP connection.
"port": "25",
Specify the email address of the sender for the SMTP connection.
Under Webhook headers, click Add header and specify the following information.
Key: Pty-Username
Value: %internal_scheduler;
Under Webhook headers, click Add header and specify the following information.
Key: Pty-Roles
Value: auditstore_admin
Click Create to save the channel configuration.
CAUTION: Do not click Send test message because the configuration for the channel is not complete.
The success message appears and the channel is created. The webhook for the email alerts is set up successfully.
Proceed to create a monitor and attach the channel created using the steps from Creating the monitor.
Creating an email notification
Perform the following steps to configure the notification channel for generating email alerts:
Log in to the ESA Web UI.
Navigate to Audit Store > Dashboard.
The Audit Store Dashboards appears. If a new tab does not automatically open, click Open in a new tab.
From the menu, navigate to Management > Notifications > Channels.
Click Create channel.
Specify the following information under Name and description.
Name: Email_alert
Description: For generating email alerts.
Specify the following information under Configurations.
Channel type: Email
Sender type: SMTP sender
Default recipients: Specify the list of email addresses for receiving the alerts.
Click Create SMTP sender and add the following parameters.
Sender name: Specify a descriptive name for sender.
Email address: Specify the email address that must receive the alerts.
Host: Specify the hostname of the email server.
Port: 25
Encryption method: None
Click Create.
Click Send test message to send a message to the email recipients.
Click Create to create the channel.
The email alert is set up successfully.
Proceed to create a monitor and attach the channel created using the steps from Creating the monitor.
Creating the monitor
A monitor tracks the system and sends an alert when a trigger is activated. Triggers cause actions to occur when certain criteria are met. Those criteria are set when a trigger is created. For more information about monitors, actions, and triggers, refer to Alerting.
Perform the following steps to create a monitor. The configuration specified here is just an example. For real use, create whatever configuration is needed, per individual requirements:
Click Add trigger and specify the information provided here.
Specify a trigger name.
Specify a severity level.
Specify the following code for the trigger condition:
ctx.results[0].hits.total.value > 0
Click Add action.
From the Channels list, select the required channel.
Add the following code in the Message field. The default message displayed might not be formatted properly. Update the message by replacing the Line spaces with the n escape code. The message value is a JSON value, use escape characters to structure the email properly using valid JSON syntax.
```
{
"message": "Please investigate the issue.\n  - Trigger: {{ctx.trigger.name}}\n  - Severity: {{ctx.trigger.severity}}\n  - Period start: {{ctx.periodStart}}\n  - Period end: {{ctx.periodEnd}}",
"subject": "Monitor {{ctx.monitor.name}} just entered alert status"
}
```
>   The **message** value is a JSON value. Be sure to use escape characters to structure the email properly using valid JSON syntax. The default message displayed might not be formatted properly. Update the message by replacing the Line spaces with the **\\n** escape code.
Select the Preview message check box to view the formatted email message.
Click Send test message and verify the recipient’s inbox for the message.
Click Save to update the configuration.
19.2 - Index lifecycle management (ILM)
The Protegrity Data Security Platform enforces security policies at many protection points throughout an enterprise and sends logs to Insight. The logs are stored in a log repository, in this case the Audit Store. Manage the log repository using the Index Lifecycle Management (ILM). These logs are then available for reporting.
In the earlier versions of the ESA, the UI for Index Lifecycle Management was named as Information Lifecycle Management.
The following figure shows the ILM system components and the workflow.
The ILM log repository is divided into the following parts:
Active logs that may be required for immediate reporting. These logs are accessed regularly for high frequency reporting.
Logs that are pushed to Short Term Archive (STA). These logs are accessed occasionally for moderate reporting frequency.
Logs that are pushed to Long Term Archive (LTA). These logs are accessed rarely for low reporting frequency. The logs are stored where they can be backed up by the backup mechanism used by the enterprise.
The ILM feature in Protegrity Analytics is used to archive the log entries from the index. The logs generated for the ILM operations appear on this page. Only logs generated by ILM operation on the ESA v9.2.0.0 and above appear on the page after upgrading to the latest version of the ESA. For ILM logs generated on an earlier version of the ESA, navigate to Audit Store > Dashboard > Open in new tab, select Discover from the menu, select the time period, and search for the ILM logs using keywords for the additional_info.procedure field, such as, export, process_post_export_log, or scroll_index_for_export.
Use the search bar to filter logs. Click the Reset Search () icon to clear the search filter and view all the entries. To search for the ILM logs using the origin time, specify the Origin Time(UTC) term within double quotes.
Move entries out of the index when not required and import them back into the index when required using the export and import feature. Only one operation can be run at a time for each node for exporting logs or importing logs. The ILM screen is shown in the following figure.
The Viewer role user or a user with the viewer role can only view data on the ILM screen. Admin rights are required to use the import, export, migrate, and delete features of the ILM.
Use the ILM for managing indexes, such as, the audit index, the policy log index, the protector status index, and the troubleshooting index. The Audit Store Dashboards has the ISM feature for managing the other indexes. Using the ISM feature might result in a loss of logs and it is not advised to use the ILM feature where possible.
Exporting logs
As log entries fill the Audit Store, the size of the log index increases. This slows down log operations for searching and retrieving log entries. To speed up these operations, export log entries out of the index and store them in an external file. If required, import the entries again for audit and analysis.
Moving index entries out of the index file, removes the entries from the index file and places them in a backup file. This backup file is the STA and reduces the load and processing time for the main index. The backup file is created in the /opt/protegrity/insight/archive/ directory. To store the file at a different location, mount the destination in the /opt/protegrity/insight/archive/ directory. In this case, specify the directory name, for example, /opt/protegrity/insight/archive/. Also, ensure that the specified already exists inside the archive directory.
If the location is on the same drive or volume as the main index, then the size of the index would reduce. However, this would not be an effective solution for saving space on the current volume. To save space, move the backup file to a remote system or into LTA.
Only one export operation can be run at a time. Empty indexes cannot de exported and must be manually deleted.
On the ESA, navigate to Audit Store > Analytics > Index Lifecycle Management.
Click Export.
The Export Data screen appears.
Complete the fields for exporting the log data from the default index.
The available fields are:
From Index: Select the index to export data from.
Password: Specify the password for securing the backup file.
Confirm Password: Specify the password again for reconfirmation.
Directory (optional): Specify the location to save the backup file. If a value is not specified, then the default directory /opt/protegrity/insight/archive/ is used.
Click Export.
Specify the root password.
Click Submit.
The log entries are extracted, then copied to the backup file, and protected using the password. After a successful export, the exported index will be deleted from Insight.
After the export is complete, move the backup file to a different location till the log entries are required. Import the entries in the index again for analysis or audit.
Importing logs
The exported log entires and secondary indexes are stored in a separate file. If these entries are required for analysis, then import them back into Insight. To be able to import, the archive file should be inside the archive directory or within a directory inside the archive directory.
Keep the passwords handy, in case the log entries were exported and protected using password protection. Do not rename the default index file name for this feature to work. Imported indexes are excluded and are not exported when the auto-export task is run from the scheduler.
On the ESA, navigate to Audit Store > Analytics > Index Lifecycle Management.
Click Import.
The Import Data screen appears.
Complete the fields for importing the log data to the default index or secondary index.
The available fields are:
File Name: Select the file name of the backup file.
Password: Specify the password for the backup file.
Click Import.
Data will be imported to an index that is named using the file name or the index name. When importing a file which was exported in version 8.0.0.0 or later, then the new index name will be the date range of the entries in the index file using the format pty_insight_audit_ilm_(from_date)-(to_date). For example, pty_insight_audit_ilm_20191002_113038-20191004_083900.
Deleting indexes
Use the Delete option to delete indexes that are not required. Only delete custom indexes that are created and listed in the Source list. Deleting the index will lead to a permanent loss of data in the index. If the index was not archived earlier, then the logs from the index deleted cannot be recreated or retrieved.
On the ESA, navigate to Audit Store > Analytics > Index Lifecycle Management.
Click Delete.
The Delete Index screen appears.
Select the index to delete from the Source list.
Select the Data in the selected index will be permanently deleted. This operation cannot be undone. check box.
Click Delete.
The Authentication screen appears.
Enter the root password.
Click Submit.
19.3 - Viewing policy reports
Policies control the access and rights provided to users over files and records. These access-related tasks are logged and presented to the user when required. It enables users to monitor the files and the data accessed. This report is generated by the triggering agent every time a policy or data store is added, modified, or deleted. It can be analyzed and used for an audit for ascertaining the integrity of policies.
If a report is present where policies were not modified, then a breach might have occurred. These instances can be further analyzed to find and patch security issues. A new policy report is generated when this reporting agent is first installed on the ESA. This ensures that the initial state of all the policies on all the data stores in the ESA. A user can then use the Protegrity Analytics to list all the reports that were saved over time and select the required reports.
Ensure that the required policies that must be displayed in the report are deployed. Perform the following steps to view the policies deployed.
Verify that the policies to track are deployed and have the Deploy Status as OK.
If the reporting tool is installed when a policy is being deployed, then the policy status in the report might show up as Unknown or as a warning. In this case, manually deploy the policy again so that it is displayed in the Policy Report.
Perform the following steps to view the policy report.
In the ESA, navigate to Audit Store > Analytics > Policy Report.
The Policy screen appears.
Select a time period for the reports using the From and To date picker. This is an optional step. The time period narrows the search results for the number of reports displayed for the selected data store.
Select a data store from the Deployed Datastore list.
Click Search.
The reports are filtered and listed based on the selection.
Click the link for the report to view.
For every policy deployed, the following information is displayed:
Policy details: This section displays the name, type, status, and last modified time for the policy.
List of Data Elements: This table displays the name, description, type, method, and last modified date and time for a data element in the policy.
List of Data Stores: This table lists the name, description, and last modified date and time for the data store.
List of Roles: This table lists the name, description, mode, and last modified date and time for a role.
List of Permissions: This table lists the various roles and the permissions applicable with the role.
Print the report for comparing and analyzing the different reports that are generated when policies are deployed or undeployed. Alternatively, click the Back button to go back to the search results. Print the report using the landscape mode.
19.4 - Verifying signatures
Logs are generated on the protectors. The log is then processed using the signature key and a hash value, and a checksum is generated for the log entry. The hash and the checksum is sent to Insight for storage and further processing. When the log entry is received by Insight, a check can be performed when the signature verification job is executed to verify the integrity of the logs.
The log entries having checksums are identified. These entries are then processed using the signature key and the checksum received in the log entry from the protector is checked. If both the checksum values match, then the log entry has not been tampered with. If a mismatch is found, then it might be possible that the log entry was tampered or there is an issue receiving logs from a protector. These can be viewed on the Discover screen by using the following search criteria.
logtype:verification
The Signature Verification screen is used to create jobs. These jobs can be run as per a schedule using the scheduler.
For more information about scheduling signature verification jobs, refer here.
To view the list of signature verification jobs created, from the Analytics screen, navigate to Signature Verification > Jobs.
The lifecycle of an Ad-Hoc job is shown in the following figure.
The Ad-Hoc job lifecycle is described here.
A job is created.
If Run Now is selected while creating the job, then the job enters the Queued to Run state.
If Run Now is not selected while creating the job, then the job enters the Ready state. The job will only be processed and enters the Queued to Run state by clicking the Start button.
When the scheduler runs, based on the scheduler configuration, the Queued to Run jobs enter the Running state.
After the job processing completes, the job enters the Completed state. Click Continue Running to move the job to the Queued to Run state for processing any new logs generated.
If Stop is clicked while the job is running, then the job moves to the Queued to Stop state, and then moves to the Stopped state.
Click Continue Running to re-queue the job and move the job to the Queued to Run state.
A System job is created by default for verifying signatures. This job runs as per the signature verification schedule to processes the audit log signatures.
The logs that fail verification are displayed in the following locations for analysis.
In Discover using the query logtype:verification.
On the Signature Verification > Logs tab.
When the signature verification for an audit log fails, the failure logs are logged in Insight. Alerts can be generated by using monitors that query the failed logs.
The lifecycle of a System job is shown in the following figure.
The System job lifecycle is described here.
The System job is created when Analytics is initialized or the ESA is upgraded and enters the Queued to Run state.
When the scheduler runs, then the job enters the Running state.
After processing is complete, then the job returns to the Queued to Run state because it is a system job that needs to keep processing records as they arrive.
While the job is running, clicking Stop moves the job to the Queued to Stop state followed by the Stopped state.
If the job is in the Stopped state, then clicking Continue Running moves the job to the Queued to Run state.
Working with signatures
The list of signature verification jobs created is available on the Signature Verification tab. From this tab, view, create, edit, and execute the jobs. Jobs can also be stopped or continued from this tab.
To view the list of signature verification jobs, from the Analytics screen, navigate to Signature Verification > Jobs.
The viewer role user or a user with the viewer role can only view the signature verification jobs. The admin rights are required to create or modify signature verification jobs.
After initializing Analytics during a fresh installation, ensure that the priority IP list for the default signature verification jobs is updated. The list is updated by editing the task from Analytics > Scheduler > Signature Verification Job. During the upgrade from an earlier version of the ESA, if Analytics is initialized on an ESA, then the ESA will be used for the priority IP, else update the priority IP for the signature verification job after the upgrade is complete. If multiple ESAs are present in the priority list, then more ESAs are available to process the signature verifications jobs that must be processed.
For example, if the max jobs to run on an ESA is set to 4 and 10 jobs are queued to run on 2 ESAs, then 4 jobs are started on the first ESA, 4 jobs are started on the second ESA, and 2 jobs will be queued to run till an ESA job slot gets free to accept and run the queued job.
Use the search field to filter and find the required verification job. Click the Reset Search icon to clear the filter and view all jobs. Use the following information while using the search function:
Type the entire word to view results containing the word.
Use wildcard characters for searching. This is not applicable for wildcard characters used within double quotes.
Search for a specific word by specifying the word within double quotes. This is required for words having the hyphen (-) character that the system treats as a space.
Specify the entire word, if the word contains the underscore (_) character.
The following columns are available on this screen. Click a label to sort the items in the ascending or descending order. Sorting is available for the Name, Created, Modified, and Type columns.
Column
Description
Name
A unique name for the signature verification job.
Indices
A list of indexes on which the signature verification job will run.
Query
The signature verification query.
Pending
The number of logs pending for signature verification.
Processed
The current number of logs processed.
Not-Verified
The number of logs that could not be verified. Only protector and PEP server logs for version 8.1.0.0 and higher can be verified.
Success
The number of verifiable logs where signature verification succeeded.
Failure
The number of verifiable logs where signature verification failed.
Created
The creation date of the signature verification job.
Modified
The date on which the signature verification job was modified.
Type
The type of the signature verification job. The available options are SYSTEM where the job is created by the system and ADHOC where the custom job is created by a user.
State
Shows the job status.
Action
The actions that can be performed on the signature verification job.
The root or admin rights are required to create or modify signature verification jobs.
The available statuses are:
: Queued to run. The job will run soon.
: Ready. The job will run when the scheduler initiates the job.
: Running. The job is running. Click Stop from Actions to stop the job.
: Queued to stop. The job processing will stop soon.
: Stopped. The job has been stopped. Click Continue Running from Actions to continue the job. If a signature verification scheduler job is stopped from the Scheduler > Monitor page, then the status might be updated on this page after about 5 minutes.
: Completed. The job is complete. Click Continue Running from Actions to run the job again.
The available actions are:
Click the Edit icon () to update the job.
Click the Start icon () to run the job.
Click the Stop icon () to stop the job.
Click the Continue Running icon () to resume the job.
Creating a signature verification job
Specify a query for creating the signature verification job. Additionally, select the indexes that the signature verification job needs to run on.
In Analytics, navigate to Signature Verification > Jobs.
The Signature Verification Jobs screen is displayed.
Click New Job.
The Create Job screen is displayed.
Specify a unique name for the job in the Name field.
Select the index or alias to query from the Indices list. An alias is a reference to one or more indexes available in the Indices list. The alias is generated and managed by the system and cannot be created or deleted.
Specify a description for the job in the Description field.
Select the Run Now check box to run the job after it is created.
Use the Query field to specify a JSON query. Errors in the code, if any, are marked with a red cross before the code line.
The following options are available for working with the query:
Indent code (): Click to format the code using tab spaces.
Remove white space from code (): Click to format the code by removing the white spaces and displaying the query in a continuous line.
Undo (): Click to undo the last change made.
Redo (): Click to redo the last change made.
Clear (): Click to clear the query text.
Specify the contents of the query tag for creating the JSON query. For example, specify the query
View the result displayed in the Query Response field.
The following options are available to work with the output:
Expand all fields (): Click to expand all fields in the result.
Collapse all fields (): Click to collapse all fields in the result.
Switch Editor Mode (): Click to select the editor mode. The following options are available:
View: Switch to the tree view.
Preview: Switch to the preview mode.
Copy (): Click to copy the contents of the output to the clipboard.
Search fields and values (): Search for the required text in the output.
Maximize (): Click to maximize the Query Response field. Click Minimize () to minimize the field to the original size when maximized.
Click Save to save the job and return to the Signature Verification Jobs screen.
Editing a signature verification job
Edit an adhoc signature verification job to update the name and the description of the job.
In Analytics, navigate to Signature Verification > Jobs.
The Signature Verification Jobs screen is displayed.
Locate the job to update.
From the Actions column, click the Edit () icon.
The Job screen is displayed.
Update the name and description as required.
The Indices and Query options can be edited if the job is in the Ready state, else they are available in the read-only mode.
View the JSON query in the Query field.
The following options are available for working with the query:
Indent code (): Click to format the code using tab spaces.
Remove white space from code (): Click to format the code by removing the white spaces and displaying the query in a continuous line.
Undo (): Click to undo the last change made.
Redo (): Click to redo the last change made.
Click Run to test the query, if required.
View the result displayed in the Query Response field.
The following options are available to work with the output:
Expand all fields (): Click to expand all fields in the result.
Collapse all fields (): Click to collapse all fields in the result.
Switch Editor Mode (): Click to select the editor mode. The following options are available:
View: Switch to the tree view.
Preview: Switch to the preview mode.
Copy (): Click to copy the contents of the output to the clipboard.
Search fields and values (): Search for the required text in the output.
Maximize (): Click to maximize the Query Response field. Click Minimize () to minimize the field to the original size when maximized.
Click Save to update the job and return to the Signature Verification Jobs screen.
19.5 - Using the scheduler
An administrator can execute tasks for ILM, reporting, and signature verification. These tasks that need to be executed regularly or after a fixed interval can be converted to a scheduled task. This ensures that the task is processed regularly at the set time leaving the administrator free to work on other more important tasks.
To view the list of tasks that are scheduled, from the Analytics screen, navigate to Scheduler > Tasks. The viewer role user or a user with the viewer role can only view logs and history related to the Scheduler. You need admin rights to create or modify schedules.
The following tasks are available by default:
Task
Description
Export Troubleshooting Indices
Scheduled task for exporting logs from the troubleshooting index.
Export Policy Log Indices
Scheduled task for exporting logs from the policy index.
Export Protectors Status Indices
Scheduled task for exporting logs from the protector status index.
Delete Miscellaneous Indices
Scheduled task for deleting old versions of the miscellaneous index that are rolled over.
Delete DSG Error Indices
Scheduled task for deleting old versions of the DSG error index that are rolled over.
Delete DSG Usage Indices
Scheduled task for deleting old versions of the DSG usage matrix index that are rolled over.
Delete DSG Transaction Indices
Scheduled task for deleting old versions of the DSG transaction matrix index that are rolled over.
Signature Verification
Scheduled task for performing signature verification of log entries.
Export Audit Indices
Scheduled task for exporting logs from the audit index.
Rollover Index
Scheduled task for performing an index rollover.
Ensure that the scheduled tasks are disabled on all the nodes before upgrading the ESA.
The scheduled task values on a new installation and an upgraded machine might differ. This is done to preserve any custom settings and modifications for the scheduled task. After upgrading the ESA, revisit the scheduled task parameters and modify them if required.
The list of scheduled tasks are displayed. You can create tasks, view, edit, enable or disable, and modify scheduled task properties from this screen. The following columns are available on this screen.
Column
Description
Name
A unique name for the scheduled task.
Schedule
The frequency set for executing the task.
Task Template
The task template for creating the schedule.
Priority IPs
A list of IP addresses of the machines on which the task must be run.
Params
The parameters for the task that must be executed.
Enabled
Use this toggle switch to enable or disable the task from running as per the schedule.
Action
The actions that can be performed on the scheduled task.
The available action options are:
Click the Edit icon () to update the task.
Click the Delete icon () to delete the task.
Creating a Scheduled Task
Use the repository scheduler to create scheduled tasks. You can set a scheduled task to run after a fixed interval, every day at a particular time, a fixed day every week, or a fixed day of the month. The scheduler runs only one instance of a particular task. If the task is already running, then the scheduler skips running the task again. For example, if a task is set to run every 1 minute, and the earlier instance is not complete, then the scheduler skips running the task. The scheduled task will be run again at the scheduled time after the current task is complete. Some of the fields also accept the special syntax. For the special syntax, refer here.
Complete the following steps to create a scheduled task.
From the Analytics screen, navigate to Scheduler > Tasks.
Click Add New Task.
The New Task screen appears.
Complete the fields for creating a scheduled task.
The following fields are available:
Name: Specify a unique name for the task.
Schedule: Specify the template and time for running the command using cron. The date and time when the command will be run appears in the area below the Schedule field. The following settings are available:
Select Template: Select a template from the list. If a template is selected and the date and time settings are modified, then the Custom template is used. The following templates are available:
Custom: Specify a custom schedule for executing the task.
Every Minute: Set the task to execute every minute.
Every 5 Minutes: Set the task to execute after every 5 minutes.
Every 10 Minutes: Set the task to execute after every 10 minutes.
Every Hour: Set the task to execute every hour.
Every 2 Hours: Set the task to execute every 2 hours.
Every 5 Hours: Set the task to execute every 5 hours.
Every Day: Set the task to execute every day at 12 am.
Every Alternate Day: Set the task to execute every alternate day at 12 am.
Every Week: Set the task to execute once every week on Sunday at 12 am.
Every Month: Set the task to execute at 12 am on the first day of every month.
Every Alternate Month: Set the task to execute at 12 am on the first day of every alternate month.
Every Year: Set the task to execute at 12 am on the first of January every year.
Date and time: Specify the date and the time when the command must be executed. The following fields are available:
Min: Specify the time settings in minutes for executing the command.
Hrs: Specify the time settings in hours for executing the command.
DOM: Specify the day of the month for executing the command.
Mon: Specify the month for executing the command.
DOW: Specify the day of the week for executing the command.
Task Template: Select a task template to view and specify the parameters for the scheduled task. The following task templates are available:
ILM Multi Delete
ILM Multi Export
Audit index Rollover
Signature Verification
Priority IPs: Specify a list of the ESA IP addresses in the order of priority for execution. The task is executed on the first IP address that is specified in this list. If the IP is not available to execute the task, then the job is executed on the next prioritized IP address in the list.
Use Only Priority IPs: Enable this toggle switch to only execute the task on any one node from the list of the ESA IP addresses specified in the priority field. If this toggle switch is disabled, then the task execution is first attempted on the list of IPs specified in the Priority IPs field. If a machine is not available, then the task is run on any machine that is available on the Audit Store cluster which might not be mentioned in the Priority IPs field.
Multi node Execution: If disabled, then the task is run on a single machine. Enable this toggle switch to run the task on all available machines.
Enabled: Use this toggle switch to enable or disable the task from running as per the schedule.
Specify the parameters for the scheduled task and click Save. The parameters are based on the OR condition. The task is run when any one of the conditions specified is satisfied.
The scheduled task is created and enabled. The job executes on the date and time set.
ILM Multi Delete:
This task is used for automatically deleting indexes when the criteria specified is fulfilled. It displays the required fields for specifying the criteria parameters for deleting indexes. You can use a regex expression for the index pattern.
Index Pattern: A regex pattern for specifying the indexes that must be monitored.
Max Days: The maximum number of days to retain the index after which they must be deleted. The default is 365 (365 days).
Max Docs: The maximum document limit for the index. If the number of docs exceeds this number, then the index is deleted. The default is 1000000000 (1 Billion).
Max MB(size): The maximum size of the index in MB. If the size of the index exceeds this number, then the index is deleted. The default is 150000 (150 GB).
Specify one or multiple options for the parameters.
The fields for ILM entries is shown in the following figure.
ILM Multi Export:
This task is used for automatically exporting logs when the criteria specified is fulfilled. It displays the required fields for specifying the criteria parameters for exporting indexes. This task is disabled by default after it is created. Enable the Use Only Priority IPs and specify specific ESA machines in the Priority IPs field this task is created to improve performance. Any indexes imported into ILM are not exported using this scheduled task. The Audit index export task is enhanced to support multiple indexes and is renamed to ILM Multi Export.
This task is available for processing the audit, troubleshooting, policy log, and protector status indexes.
Index Pattern: The pattern for the indexes that must be exported. Use regex to specify multiple indexes.
Max Days: The number of days to store indexes that match the index pattern. Any matched index beyond this age is exported. The default age specified is 365 days.
Max Docs: The maximum docs present over all the indexes that match the index pattern. If the number of docs exceeds this number, then the matched indexes are exported. The default is 1000000000 (1 Billion).
Max MB(size): The maximum size of all the indexes in MB that matched the index pattern. If the total size exceeds this number, then the matched indexes are exported. The default is 150000 (150 GB).
File password: The password for the exported file. The password is hidden. Keep the password safe. A lost password cannot be retrieved.
Retype File password: The password confirmation for the exported file.
Dir Path: The directory for storing the exported index in the default path. The default path specified is /opt/protegrity/insight/archive/. You can specify and create nested folders using this parameter. Also, if the directory specified does not exist, then the directory is created in the /opt/protegrity/insight/archive/ directory.
You can specify one or multiple options for the Max Days, Max Docs, and Max MB(size) parameters.
The fields for the entries is shown in the following figure.
Audit Index Rollover:
This task performs an index rollover on the index referred by the alias when any of the specified conditions are fulfilled. The conditions are index age, number of documents in the index, or the index size crosses the specified value.
This task is available for processing the audit, troubleshooting, policy log, protector status, and DSG-related indexes.
Max Age: The maximum age after which the index must be rolled over. This default is 30d, that is 30 days. The values supported are, y for years, M for months, w for weeks, d for days, h or H for hours, m for minutes, and s for seconds.
Max Docs: The maximum number of docs that an index can contain. An index rollover is performed when this limit is reached. The default is 200000000, that is 200 million.
Max Size: The maximum index size of the index that is allowed. An index rollover is performed when the size limit is reached. The default is 5gb. The units supported are, b for bytes, kb for kilobytes, mb for megabytes, gb for gigabytes, tb for terabytes, and pb for petabytes.
The fields for the Audit Index Rollover entries is shown in the following figure.
Signature Verification:
This task runs the signature verification tasks after the time interval that is set. It runs the default signature-related job and the ad-hoc jobs created on the Signature Verification tab.
Max Job Idle Time Minutes: The maximum time to keep the jobs idle. After the jobs are idle for the time specified, the idle jobs are cleared and re-queued. The default specified is 2 minutes.
Max Parallel Jobs Per Node: The maximum number of signature verification jobs to run in parallel on each system. If number of jobs specified here is reached, then new scheduled jobs are not started. This default is 4 jobs. For example, if 10 jobs are queued to run on 2 ESAs, then 4 jobs are started on the first ESA, 4 jobs are started on the second ESA, and 2 jobs will be queued to run till an ESA job slot gets free to accept and run the queued job.
The fields for the Manage Signature Verification Jobs entries is shown in the following figure.
Working with scheduled tasks
After creating a scheduled task, specify whether the task must be enabled or disabled for running. You can edit the task to modify the commands or the task schedule.
Complete the following steps to modify a task.
From the Analytics screen, navigate to Scheduler > Tasks.
The list of scheduled tasks appears.
Use the search field to search for a specific task from the list.
Click the Enabled toggle switch to enable or disable the task for running as per the schedule.
Alternatively, clear the Enabled toggle switch to prevent the task from running as per the schedule.
Click the Edit icon () to update the task.
The Edit Task page is displayed.
Update the task as required and click Save.
The task is saved and run as per the defined schedule.
Viewing the scheduler monitor
The Monitor screen shows a list of all the scheduled tasks. It also displays whether the task is running or was executed successfully. You can also stop a running task or restart a stopped task from this screen.
Complete the following steps to monitor the tasks.
From the Analytics screen, navigate to Scheduler > Monitor.
The list of scheduled tasks appears.
The Tail option can be set from the upper-right corner of the screen. Setting the Tail option to ON updates the scheduler history list with the latest scheduled tasks that are run.
You can use the search field to search for specific tasks from the list.
Scroll to view the list of scheduled tasks executed. The following information appears:
Name: This is the name of the task that was executed.
IP: This is the host IP of the system that executed the task.
Start Time: This is the time when the scheduled task started executing.
End Time: This is the end time when the scheduled task finished executing.
Elapsed Time: This is the execution time in seconds for the scheduled task.
State: This is the state displayed for the task. The available states are:
: Running. The task is running. You can click Stop from Actions to stop the task.
: Queued to stop. The task processing will stop soon.
: Stopped. The task has been stopped. The job might take about 20 seconds to stop the process.
If an ILM Multi Export job is stopped, then the next ILM Multi Export job cannot be started within 2 minutes of stopping a previous running job.
If a signature verification scheduler job is stopped from the Scheduler > Monitor page, then the status might be updated on this page after about 5 minutes.
: Completed. The task is complete.
Action: Click Stop to abort the running task. This button is only displayed for tasks that are running.
Using the Index State Management
Use the scheduler and the Analytics ILM for managing indexes. The Index State Management can be used to manage indexes not supported by the scheduler or ILM. However, it is not recommended to use the Index State Management for managing indexes. The Index State Management provides configurations and settings for rotating the index.
Perform the following steps to configure the index:
Log in to the ESA Web UI.
Navigate to Audit Store > Dashboard. The Audit Store Dashboards appears. If a new tab does not automatically open, click Open in a new tab.
Update the index definition.
From the menu, navigate to Index Management.
Click the required index entry.
Click Edit.
Select JSON editor.
Click Continue.
Update the required configuration under rollover.
Click Update.
Update the policy definition for the index.
From the menu, navigate to Index Management.
Click Policy managed indexes.
Select the check box for the index that was updated.
CLick Change Policy.
Select the index from the Managed indices list.
From the State filter, select Rollover.
Select the index from the New policy list.
Ensure that the Keep indices in their current state after the policy takes effect option is selected.
Click Change.
Special syntax
The special syntax for specifying the schedule is provided in the following table.
Character
Definition
Fields
Example
,
Specifies a list of values.
All
1, 2, 5, 6.
-
Specifies a range of values.
All
3-5 specifies 3, 4, 5.
/
Specifies the values to skip.
All
*/4 specifies 0, 4, 8, and so on.
*
Specifies all values.
All
* specifies all the values in the field where it is used.
?
Specifies no specific value.
DOM, DOW
4 in the day-of-month field and ? in the day-of-week field specifies to run on the 4th day of the month.
#
Specifies the nth day of the month.
DOW
2#4 specifies 2 for Monday and 4 for 4th week in the month.
L
Specifies the last day in the week or month.
DOM, DOW
7L specifies the last Saturday in the month.
W
Specifies the weekday closest to the specified day.
DOM
12W specifies to run on the 12th of the month. If 12 is a Saturday, then run on Friday the 11th. If 12th is a Sunday, then run on Monday the 13th.
20 - Installing Protegrity Appliances on Cloud Platforms
This section describes the procedure for installing ESA appliances on cloud platforms, such as, Amazon Web Services (AWS), Google Cloud Platform (GCP), and Microsoft Azure.
20.1 - Installing ESA on Amazon Web Services (AWS)
Amazon Web Services (AWS) is a cloud-based computing service. It provides several services, such as, computing power through Amazon Elastic Compute Cloud (EC2), storage through Amazon Simple Storage Service (S3), and so on.
The AWS stores Amazon Machine Images (AMIs), which are templates or virtual images containing an operating system, applications, and configuration settings.
Protegrity appliances offer flexibility and can run in the following environments:
On-premise: The ESA is installed and runs on dedicated hardware.
Virtualized: The ESA is installed and runs on a virtual machine.
Cloud: The ESA is installed and runs on or as part of a Cloud-based service.
Protegrity provides AMIs that contain the ESA image, running on a customized and hardened Linux distribution.
20.1.1 - Verifying Prerequisites
This section describes the prerequisites and tasks for installing Protegrity appliances on AWS. In addition, it describes some best practices for using the Protegrity ESA appliances on AWS effectively.
The Full OS Backup/Restore features of the Protegrity appliances is not available on the AWS platform.
Prerequisites
The following prerequisites are essential to install the Protegrity ESA appliances on AWS:
Login URL for the AWS account
AWS account with the authentication credentials
Access to the My.Protegrity portal
Hardware Requirements
As the Protegrity ESA appliances are hosted and run on AWS, the hardware requirements are dependent on the configurations provided by Amazon. However, these requirements can autoscale as per customer requirements and budget.
The minimum recommendation for an ESA appliance is 8 CPU cores and 32 GB memory. On AWS, this configuration is available in the t3a.2xlarge option.
For more information about the hardware requirements of the ESA, refer to the section System Requirements.
Network Requirements
Protegrity ESA appliances on AWS are provided with an Amazon Virtual Private Cloud (VPC) networking environment. Amazon VPC enables you to access other AWS resources, such as other instances of Protegrity appliances on AWS.
You can configure the Amazon VPC by specifying its usable IP address range. You can also create and configure subnets, network gateways, and the security settings.
If you are using the ESA or the DSG appliance with AWS, then ensure that the inbound and outbound ports of the appliances are configured in the Amazon Virtual Private Cloud (VPC). This ensures that they are able to interact with the other required components.
For more information about the list of inbound and outbound ports to be configured based on the ESA or the DSG, refer Open Listening Ports.
Accessing the Internet
The following points list the ways in which you can provide or limit Internet access for an ESA instance in the VPC:
If you need to connect the ESA to the Internet, then ensure that the ESA is on the default subnet so that it uses the Internet gateway that is included in the VPC.
If you need to allow the ESA to initiate outbound connections to, and prevent inbound connections from the Internet, then ensure that you use a Network Address Translation (NAT) device.
If you want to block the connection of the ESA to the Internet, then ensure that the ESA is on a private subnet.
Accessing a Corporate Network
If you need to connect the ESA to a corporate network, then ensure that you use an IPSec hardware VPN connection.
20.1.2 - Obtaining the AMI
Before creating the instance on AWS, you must obtain the image from the My.Protegrity portal. On the portal, you select the required ESA version and choose AWS as the target cloud platform. You then share the product to your cloud account. The following steps describe how to share the AMI to your cloud account.
To obtain and share the AMI:
Log in to the My.Protegrity portal with your user account.
Click Product Management > Explore Products > Data Protection.
Select the required ESA Platform Version from the drop-down.
The Product Family table will update based on the selected ESA Platform Version.
The ESA Platform Versions listed in drop-down menu reflect all versions. These include versions that were either previously downloaded or shipped within the organization along with any newer versions available thereafter. Navigate to Product Management > My Product Inventory to check the list of products previously downloaded.
The images in this section consider the ESA as a reference. Ensure that you select the required image.
Select the Product Family.
The description box will populate with the Product Family details.
Click View Products to advance to the product listing screen.
Callout
Element Name
Description
1
Target Platform Details
Shows details about the target platform.
2
Product Name
Shows the product name.
3
Product Family
Shows the product family name.
4
OS Details
Shows the operating system name.
5
Version
Shows the product version.
6
End of Support Date
Shows the final date that Protegrity will provide support for the product.
7
Action
Click the View icon () to open the Product Detail screen.
8
Export as CSV
Downloads a .csv file with the results displayed on the screen.
9
Search Criteria
Type text in the search field to specify the search filter criteria or filter the entries using the following options:- OS- Target Platform
10
Request one here
Opens the Create Certification screen for a certification request.
Select the AWS cloud target platform you require and click the View icon () from the Action column.
The Product Detail screen appears.
Callout
Element Name
Description
1
Product Detail
Shows the following information about the product:- Product name- Family name- Part number- Version- OS details- Hardware details- Target platform details- End of support date - Description
2
Product Build Number
Shows the product build number.
3
Release Type Name
Shows the type of build, such as, release, hotfix, or patch.
4
Release Date
Shows the release date for the build.
5
Build Version
Shows the build version.
6
Actions
Shows the following options for download:- Click the Share Product icon () to share the product through the cloud.- Click the Download Signature icon () to download the product signature file.- Click the Download Readme icon () to download the Release Notes.
7
Download Date
Shows the date when the file was downloaded.
8
User
Shows the user name who downloaded the build.
9
Active Deployment
Select the check box to mark the software as active. Clear the check box to mark the software as inactive.
This option is available only after you download a product.|
|10|Product Build Number|Shows the product build number.|
Click the Share Product icon () to share the desired cloud product.
If the access to the cloud products is restricted and the Customer Cloud Account details are not available, then a message appears. The message displays the information that is required and the contact information for obtaining access to cloud share.
A dialog box appears and your available cloud accounts will be displayed.
Select your required cloud account in which to share the Protegrity product.
Click Share.
A message box is displayed with the command line interface (CLI) instructions with the option to download a detailed PDF containing the cloud web interface instructions. Additionally, the instructions for sharing the cloud product are sent to your registered email address and to your notification inbox in My.Protegrity.
Click the Copy icon () to copy the command for sharing the cloud product and run the command in CLI. Alternatively, click Instructions to download the detailed PDF instructions for cloud sharing using the CLI or the web interface.
The cloud sharing instruction file is saved in a .pdf format. You need a reader, such as, Acrobat Reader to view the file.
The Cloud Product will be shared with your cloud account for seven (7) days from the original share date in the My.Protegrity portal.
After the seven (7) day time period, you need to request a new share of the cloud product through My.Protegrity.com.
20.1.3 - Loading the Protegrity Appliance from an Amazon Machine Image (AMI)
This section describes the tasks that need to be performed for loading the ESA appliance from an AMI, which is provided by Protegrity.
20.1.3.1 - Creating an ESA Instance from the AMI
Perform the following steps to create an ESA instance using an AMI.
On the AWS login screen, enter the following details:
Account Number
User Name
Password
Click the Sign in button.
After successful authentication, the AWS Management Console screen appears.
Click Services.
Navigate to Compute > EC2
The EC2 Dashboard screen appears.
Contact Protegrity Support and provide your Amazon Account Number so that the required Protegrity AMIs can be made accessible to the account.
Click on AMIs under the Images section.
The AMIs that are accessible to the user account appear in the right pane.
Select the AMI of the required ESA in the right pane.
Click the Launch instance from AMI button to launch the selected ESA appliance.
The Launch an instance screen appears.
Depending on the performance requirements, choose the required instance type.
For the ESA appliance, an instance with 32 GB RAM is recommended.
If you need to configure the details of the instance, then click the Next: Configure Instance Details button.
The Configure Instance Details screen appears.
Specify the following parameters on the Configure Instance Details screen:
Number of Instances: The number of instances that you want to launch at a time.
Purchasing option: The option to request Spot instances, which are unused EC2 instances. If you select this option, then you need to specify the maximum price that you are willing to pay for each instance on an hourly basis.
Network: The VPC to launch the ESA in. If you need to create a VPC, then click the Create new VPC link. For more information about creating a VPC, refer to the section Configuring VPC.
Subnet: The Subnet to be used to launch the ESA. A subnet resides in one Availability zone.
If you need to create a Subnet, then click the Create new subnet link.
If you need to create a key-value pair, then click the Add additional tags button.
Enter the Key and Value information and select the Resource types from the drop-down.
Select the Existing Key Pair option and choose a key from the list of available key pairs.
Alternatively, you can select the Create a new Key Pair, to create a new key pair.
If you proceed without a key pair, then the system will not be accessible.
If you need to configure the Security Group, then click the Next: Configure Security Group button.
The Configure Security Group screen appears.
You can assign a security group from the available list.
Alternatively, you can create security group with rules for the required inbound and outbound ports.
The Summary section lists all the details related to the ESA instance. You can review the required sections before you launch your instance.
Click the Launch instance button.
The ESA instance is launched and the Launch Status screen appears.
Click the View Instances button.
The Instances screen appears listing the ESA instance.
If you need to use the instance, then access the ESA CLI Manager using the IP address of the ESA.
20.1.3.2 - Configuring the Virtual Private Cloud (VPC)
If you need to connect two Protegrity appliances, or to the Internet, or a corporate network using a Private IP address, then you might need to configure the VPC.
For more information about the various inbound and outbound ports to be configured in the VPC, refer to section Open Listening Ports.
Perform the following steps to configure the VPC for the instance.
Ensure that you are logged in to AWS and at the AWS Management Console screen.
On the AWS Management Console, click VPC under the Networking section.
The VPC Dashboard screen appears.
Click on Your VPCs under the Virtual Private Cloud section.
The Create VPC screen appears listing all available VPCs in the right pane.
Click the Create VPC button.
The Create VPC dialog box appears.
Specify the following parameters on the Create VPC dialog box:
Name tag: The name of the VPC.
CIDR block: The range of the IP addresses for the VPC in x.x.x.x/y form where x.x.x.x is the IP address and y is the /16 and /28 netmask.
Tenancy: This parameter can be set to Default or Dedicated. If the value is set to Default, then it selects the tenancy attribute specified while launching the instance of the appliance for the VPC.
Click the Yes, Create button.
The VPC is created.
20.1.3.3 - Adding a Subnet to the Virtual Private Cloud (VPC)
You can add Subnets to your VPC. A subnet resides in an Availability zone. When you create a subnet, you can specify the CIDR block.
Perform the following steps to create the subnet for your VPC.
Ensure that you are logged in to AWS and at the AWS Management Console screen.
On the AWS Management Console, click VPC under the Networking section.
The VPC Dashboard screen appears.
Click Subnets under the Virtual Private Cloud section.
The create subnet screen appears listing all available subnets in the right pane.
Click the Create Subnet button.
The Create Subnet dialog box appears.
Specify the following parameters on the Create Subnet dialog box.
Name tag: The name for the Subnet.
VPC: The VPC for which you want to create a subnet.
Availability Zone: The Availability zone where the subnet resides.
CIDR block: The range of the IP addresses for the VPC in x.x.x.x/y form where x.x.x.x is the IP address and y is the /16 and /28 netmask.
Click the Yes, Create button.
The subnet is created.
20.1.3.4 - Finalizing the Installation of Protegrity Appliance on the Instance
When you install the ESA appliance, it generates multiple security identifiers such as, keys, certificates, secrets, passwords, and so on. These identifiers ensure that sensitive data is unique between two appliances in a network. When you receive a Protegrity appliance image, the identifiers are generated with certain values. If you use the security identifiers without changing their values, then security is compromised and the system might be vulnerable to attacks.
Rotating Appliance OS keys to finalize installation
Using the Rotate Appliance OS Keys tool, you can randomize the values of these security identifiers for an appliance. During the finalization process, you run the key rotation tool to secure your appliance.
If you do not complete the finalization process, then some features of the appliance may not be functional including the Web UI.
For example, if the OS keys are not rotated, then you might not be able to add appliances to a Trusted Appliances Cluster (TAC).
For information about the default passwords, refer to the section Launching the ESA instance on Amazon Web Services in the Release Notes 10.2.0 from the My.Protegrity.
20.1.3.4.1 - Logging to the AWS Instance using the SSH Client
After installing the ESA on AWS, you must log in to the AWS instance using the SSH Client.
To login to the AWS instance using the SSH Client:
Start the local SSH Client.
Perform the SSH operation on the AWS instance using the key pair utilizing the following command. Ensure that you use the local_admin user to perform the SSH operation.
ssh -i <path of the private key pair> local_admin@<IP address of the AWS instance>
Press Enter.
20.1.3.4.2 - Finalizing an AWS Instance
You can finalize the installation of the ESA after signing in to the CLI Manager.
Before you begin
“Before finalizing the AWS instance, consider the following:
The SSH Authentication Type by default, is set to Public key. Ensure that you use the Public key for accessing the CLI. You can change the authentication type from the ESA Web UI, once the finalization is completed.
Ensure that the finalization process is initiated from a single session only. If you start finalization simultaneously from a different session, then the “Finalization is already in progress.” message appears. You must wait until the finalization of the ESA instance is successfully completed.
Ensure that the session is not interrupted. If the session is interrupted, then the ESA becomes unstable and the finalization process is not completed on that instance.
Finalizing the AWS instance
Perform the following steps to finalize the AWS instance:
Sign in to the ESA CLI Manager of the instance created using the default local admin credentials.
The following screen appears.
Select Yes to initiate the finalization process.
If you select No, then the finalization process is not initiated.
To manually initiate the finalization process, navigate to Tools > Finalize Installation and press ENTER.
A confirmation screen to rotate the appliance OS keys appears. Select OK to rotate the appliance OS keys.
The following screen appears.
To update the user passwords, provide the credentials for the following users:
root
admin
viewer
local_admin
Select Apply.
The user passwords are updated and the appliance OS keys are rotated.
The finalization process is completed.
20.1.4 - Backing up and Restoring Data on AWS
A snapshot represents a state of an instance or disk at a point in time. You can use a snapshot of an instance or a disk to backup or restore information in case of failures.
Creating a Snapshot of a Volume on AWS
In AWS, you can create a snapshot of a volume.
To create a snapshot on AWS:
On the EC2 Dashboard screen, click Volumes under the Elastic Block Store section.
The screen with all the volumes appears.
Right click on the required volume and select Actions > Create Snapshot.
The Create Snapshot screen for the selected volume appears.
Enter the required description for the snapshot in the Description text box.
Select Add tag to add a tag.
Enter the tag in the Key and Value text boxes.
Click Add Tag to add additional tags.
Click Create Snapshot.
A message Create Snapshot Request Succeeded appears, along with the snapshot ID.
Ensure that you note the snapshot ID.
Ensure that the status of the snapshot is completed.
Restoring a Snapshot on AWS
On AWS, you can restore data by creating a volume of a snapshot. You then attach the volume to an EC2 instance.
Before you begin
Ensure that the status of the instance is Stopped.
Ensure that you detach an existing volume on the instance.
Restoring a Snapshot
To restore a snapshot on AWS:
On the EC2 Dashboard screen, click Snapshots under the Elastic Block Store section.
The screen with all the snapshots appears.
Right-click on the required snapshot and select Create Volume.
The Create Volume screen form appears.
Select the type of volume from the Volume Type drop-down list.
Enter the size of the volume in the Size (GiB) textbox.
Select the availability zone from the Availability Zone* drop-down list.
Click Add Tag to add tags.
Click Create Volume.
A message Create Volume Request Succeeded along with the volume id appears. The volume with the snapshot is created.
Ensure that you note the volume id.
Under the EBS section, click Volume.
The screen displaying all the volumes appears.
Right-click on the volume that is created.
The pop-up menu appears.
Select Attach Volume.
The Attach Volume dialog box appears.
Enter the Instance ID or name of the instance in the Instance text box.
Enter /dev/xvda in the Device text box.
Click Attach to add the volume to an instance.
The snapshot is added to the EC2 instance as a volume.
20.1.5 - Increasing Disk Space on the Appliance
After an ESA instance is created, you can increase the disk space on the appliance.Ensure that the instance is powered off before performing the following steps.
To increase disk space for the ESA on AWS:
On the EC2 Dashboard screen, click Volumes under the Elastic Block Store section.
The Create Volume screen appears.
Click the Create Volume button.
The Create Volume dialog box appears.
Enter the required size of the additional disk space in the Size (GiB) text box.
Enter the snapshot ID of the instance, for which the additional disk space is required in the Snapshot ID text box.
Click the Create button.
The required additional disk space is created as a volume.
Right-click on the additional disk, which is created.
The pop-up menu appears.
Select Attach Volume.
The Attach Volume dialog box appears.
Enter the Instance ID or name tag of the ESA to add the disk space in the Instance text box.
Click the Attach button to add the disk space to the required ESA instance.
The disk space is added to the ESA instance.
After the disk space on the ESA instance is added, navigate to Instances under the Instances section.
Right-click on the ESA instance in which the disk space was added.
Select Instance State > Start.
The ESA instance is started.
After the ESA instance is started, configure the additional storage using the CLI Manager.
20.1.6 - Best Practices for Using Protegrity Appliances on AWS
There are recommended best practices for using Protegrity appliances on AWS.
Force SSH Keys
Configure the ESA to enable SSH keys and disable SSH passwords for all users.
If you need to create or join a Trusted Appliance cluster, then ensure that SSH passwords are enabled when you are creating or joining the cluster, and then disabled.
After you run the Appliance-rotation tool, it is recommended that you install all the latest Protegrity updates.
Configure your VPC or Security Group
To ensure successful communication between the ESA and the other entities connected to it.
For more information about the list of inbound and outbound ports for the ESA, refer to section Open Listening Ports.
20.1.7 - Running the Appliance-Rotation-Tool
The Appliance-rotation-tool modifies the required keys, certificates, credentials, and passwords for the appliance. This helps to differentiate the sensitive data on the appliance from other similar instances.
Before you begin
If you are configuring an ESA appliance instance, then you must run the Appliance-rotation-tool after creating the instance of the appliance.
Ensure that you do not run the appliance rotation tool when the ESA appliance OS keys are in use.
For example, you must not run the appliance rotation tool when a cluster is enabled, two-factor authentication is enabled, external users are enabled, and so on.
How to run the Appliance-Rotation-Tool
Perform the following steps to rotate the required keys, certificates, credentials, and passwords for the appliance.
To use the Appliance-rotation-tool:
On the ESA, navigate to CLI Manager > Tools > Rotate Appliance OS Keys.
The root password dialog box appears.
Enter the root password.
Press ENTER.
The Appliance OS Key Rotation dialog box appears.
Select Yes.
Press ENTER.
The administrative credentials dialog box appears.
Enter the Account name and Account password on the ESA appliance.
Select OK.
To update the user passwords, provide the credentials for the users on the User’s Passwords screen. If default users such as root, admin, viewer, and local_admin have been manually deleted, they will not be listed on the User’s Passwords screen. Otherwise, to update the passwords, provide credentials for the following default users:
root
admin
viewer
local_admin
Select Apply. The user passwords are updated.
The process to rotate the required keys, certificates, credentials, and other identifiers on the ESA starts.
20.1.8 - Working with Cloud-based Applications
Cloud-based applications are products or services for storing data on the cloud. In cloud-based applications, the computing and processing of data is handled on the cloud. Local applications interact with the cloud services for various purposes, such as, data storage, data computing, and so on. Cloud-based applications are allocated resources dynamically and aim at reducing infrastructure cost, improving network performance, easing information access, and scaling of resources.
AWS offers a variety of cloud-based products for computing, storage, analytics, networking, and management. Using the Cloud Utility product, services such as, CloudWatch and AWS CLI are leveraged by the Protegrity appliances.
Prerequisites
The following prerequisites are essential for AWS Cloud Utility.
The Cloud Utility AWS v2.3.0 product must be installed.
From 8.0.0.0, if an instance is created on the AWS using the cloud image, then Cloud Utility AWS is preinstalled on this instance.
For more information about installing the Cloud Utility AWS v2.3.0, refer to the Protegrity Installation Guide.
If you are launching a Protegrity appliance on an AWS EC2 instance, then you must have a valid IAM Role.
If you are launching a Protegrity appliance on a non-AWS instance, such as on-premise, Microsoft Azure, or GCP instance, then the AWS Configure option must be set up.
For more information about configuring AWS credentials, refer to AWS Configure.
The user accessing the Cloud Utility AWS Tools must have AWS Admin permission assigned to the role.
For more information about AWS admin, refer to Managing Roles.
20.1.8.1 - Configuring Access for AWS Resources
A server might contain resources that only the authorized users can access. For accessing a protected resource, you must provide valid credentials to utilize the services of the resource. Similarly, on the AWS platform, only privileged users can access and utilize the AWS cloud applications. The Identity and Access Management (IAM) is the mechanism for securing access to your resources on AWS.
The two types of IAM mechanisms are as follows:
IAM user is an entity that represents users on AWS. To access the resources or services on AWS, the IAM user must have the privileges to access these resources. By default, you have to set up all required permissions for a user. Each IAM user can have specific defined policies. An IAM user account is beneficial as it can have special permissions or privileges associated for a user.
For more information about creating an IAM user, refer to the following link:
An IAM user can access the AWS services on the required Protegrity appliance instances with the access keys. The access keys are the authentication mechanisms that authorize AWS CLI requests. The access keys can be generated when you create the IAM user account. Similar to the username and password, the access keys consist of access key ID and the secret access key. The access keys validate a user to access the required AWS services.
For more information about setting up an IAM user to use AWS Configure, refer to AWS Configure.
IAM role is the role for your AWS account and has specific permissions associated with it. An IAM role has defined permissions and privileges which can be given to multiple IAM users. For users that need same permissions to access the AWS services, you should associate an IAM role with the given user account.
If you want a Protegrity appliance instance to utilize the AWS resources, the instance must be provided with the required privileges. This is achieved by attaching an IAM role to the instance. The IAM role must have the required privileges to access the AWS resources.
For more information about creating an IAM role, refer to the following link:
The AWS Configure operation is a process for configuring an IAM user to access the AWS services on the Protegrity appliance instance. These AWS services include CloudWatch, CloudTrail, S3 bucket, and so on.
To utilize AWS resources and services, you must set up AWS Configure if you have an IAM User.
To set up AWS Configure on a non-AWS instance, such as on-premise, Microsoft Azure, or GCP instance, you must have the following:
A valid IAM User
Secret key associated with the IAM User
Access key ID for the IAM User
The AWS Region on whose servers you want to send the default service requests
For more information about the default region name, refer to the following link.
AWS CloudWatch tool is used for monitoring applications. Using CloudWatch, you can monitor and store the metrics and logs for analyzing the resources and applications.
CloudWatch allows you to collect metrics and track them in real-time. Using this service you can configure alarms for the metrics. CloudWatch provides visibility into the various aspects of your services including the operational health of your device, performance of the applications, and resource utilization.
For more information about AWS CloudWatch, refer to the following link:
CloudWatch logs help you to monitor a cumulative list of all the logs from different applications on a single dashboard. This provides a central point to view and search the logs which are displayed in the order of the time when they were generated. Using CloudWatch you can store and access your log files from various sources. CloudWatch allows you to query your log data, monitor the logs which are originating from the instances and events, and retain and archive the logs.
For more information about CloudWatch logs, refer to the following link:
For using AWS CloudWatch console, ensure that the IAM role or IAM user that you want to integrate with the appliance must have CloudWatchAgentServerPolicy policy assigned to it.
For more information about using the policies with the IAM Role or IAM User, refer to the following link:
20.1.8.2.1 - Integrating CloudWatch with Protegrity Appliance
You must enable CloudWatch integration to use the AWS CloudWatch services. This helps you to send the metrics and the logs from the appliances to the AWS CloudWatch Console.
The following section describes the steps to enable CloudWatch integration on Protegrity appliances.
To enable AWS CloudWatch integration:
Login to the ESA CLI Manager.
To enable AWS CloudWatch integration, navigate to Tools > Cloud Utility AWS Tools > CloudWatch Integration.
Enter the root credentials.
The following screen appears.
The warning message is displayed due to the cost involved from AWS.
For more information about the cost of integrating CloudWatch, refer to the following link:
A screen listing the logs that are being sent to the CloudWatch Console appears.
Select Yes.
Wait till the following screen appears.
Select OK.
CloudWatch integration is enabled successfully. The CloudWatch service is enabled on the Web UI and CLI.
20.1.8.2.2 - Configuring Custom Logs on AWS CloudWatch Console
You can send logs from an appliance which is on-premise or launched on any of the cloud platforms, such as, AWS, GCP, or Azure. The logs are sent from the appliances and stored on the AWS CloudWatch Console. By default, the following logs are sent from the appliances:
Syslogs
Current events logs
Apache2 error logs
Service dispatcher error logs
Web services error logs
You can send custom log files to the AWS CloudWatch Console. To send custom log files to the AWS CloudWatch Console, you must create a file in the /opt/aws/pty/cloudwatch/config.d/ directory. You can add or edit the log streams in this file to generate the custom logs with the following parameters.
You must not edit the default configuration file, appliance.conf, in the /opt/aws/pty/cloudwatch/config.d/ directory.
The following table explains the parameters that you must use to configure the log streams.
Parameter
Description
Example
file_path
Location where the file or log is stored
“/var/log/appliance.log”
log_stream_name
Name of the log that will appear on the AWS CloudWatch Console
“Appliance_Logs”
log_group_name
Name under which the logs are displayed on the CloudWatch Console
- On the CloudWatch Console, the logs appear under the hostname of the ESA instance.- Ensure that you must not modify the parameter log_group_name and its value {hostname}.
Sample configuration files
Do not edit the appliance.conf configuration file in the /opt/aws/pty/cloudwatch/config.d/ directory.
If you want to configure a new log stream, then you must use the following syntax:
If you configure custom log files to send to CloudWatch Console, then you must reload the CloudWatch integration or restart the CloudWatch service. Also, ensure that the CloudWatch integration is enabled and running.
In the Protegrity appliances, the Cloudwatch service enables the transmission of logs from the appliances to the AWS CloudWatch Console. Enabling the AWS Cloudwatch Integration also enables this service with which you can start or stop the logs from being sent to the AWS CloudWatch Console. The following sections describe how to toggle the CloudWatch service for pausing or continuing log transmission. The toggling can be performed in either the CLI Manager or the Web UI.
Before you begin
Ensure that the valid AWS credentials are configured before toggling the CloudWatch service.
For more information about
Starting or Stopping the CloudWatch Service from the Web UI
If you want to temporarily stop the transmission of logs from the appliance to the AWS Console, then you can stop the CloudWatch Service.
To start or stop the AWS CloudWatch service from the Web Ui:
Login to the Appliance Web UI.
Navigate to System > Services.
Locate the CloudWatch service to start or stop. Select the appropriate icon, either Start or Stop, to perform the desired action.
Select Stop to stop the transmission of logs and metrics.
Select Start or Restart to start the CloudWatch service.
Starting or Stopping the CloudWatch Service from the CLI Manager
If you want to temporarily stop the transmission of logs from the appliance to the AWS Console, then you can stop the CloudWatch Service.
To start or stop the AWS CloudWatch service from the CLI Manager:
Login to the appliance CLI Manager.
Navigate to Administration > Services.
Locate the CloudWatch service to start or stop. Select the appropriate icon, either Start or Stop, to perform the desired action.
Select Stop to stop the transmission of logs and metrics.
Select Start to start the CloudWatch service.
20.1.8.2.4 - Reloading the AWS CloudWatch Integration
If you want to update the existing configurations in the /opt/aws/pty/cloudwatch/config.d/ directory, then you must reload the CloudWatch integration.
To reload the AWS CloudWatch integration:
Login to the ESA CLI Manager.
To reload CloudWatch, navigate to Tools > Cloud Utility AWS Tools > CloudWatch Integration.
Enter the root credentials.
The following screen appears.
Select Reload and press ENTER.
The logs are updated and sent to the AWS CloudWatch Console.
20.1.8.2.5 - Viewing Logs on AWS CloudWatch Console
After performing the required changes on the CLI Manager, the logs are visible on the CloudWatch Console.
To view the logs on the CloudWatch console:
Login to the AWS Web UI.
From the Services tab, navigate to Management & Governance > CloudWatch.
To view the logs, from the left pane navigate to Logs > Log groups.
Select the required log group. The name of the log group is the same as the hostname of the appliance.
To view the logs, select the required log stream from the following screen.
20.1.8.2.6 - Working with AWS CloudWatch Metrics
The metrics for the following entities in the appliances are sent to the AWS CloudWatch Console.
Metrics
Description
Memory Use Percent
Percentage of the memory that is consumed by the appliance.
Disk I/O
Bytes and packets read and written by the appliance.You can view the following parameters:- write_bytes- read_bytes- writes- reads
Network
Bytes and packets sent and received by the appliance.You can view the following parameters:- bytes_sent- bytes_received- packets_sent- packets_received
Disk Used Percent
Percentage of the disk space that is consumed by the appliance.
CPU Idle
Percentage of time for which the CPU is idle.
Swap Memory Use Percent
Percentage of the swap memory that is consumed by the appliance.
Unlike logs, you cannot customize the metrics that you want to send to CloudWatch. If you want to customize these metrics, then contact Protegrity Support.
20.1.8.2.7 - Viewing Metrics on AWS CloudWatch Console
To view the metrics on the CloudWatch console:
Login to the AWS Web UI.
From the Services tab, navigate to Management & Governance > CloudWatch.
To view the metrics, from the left pane navigate to Metrics > All metrics.
Navigate to AWS namespace.
The following screen appears.
Select EC2.
Select the required metrics from the following screen.
To view metrics of the Protegrity appliances that are on-premise or other cloud platforms, such as Azure or GCP, navigate to Custom namespace > CWAgent.
The configured metrics appear.
20.1.8.2.8 - Disabling AWS CloudWatch Integration
If you want stop the logs and metrics that are being sent to the AWS CloudWatch Console. To disintegrate the Cloudwatch removing the service from the appliance. Then, disable the AWS CloudWatch integration from the appliance. As a result, the CloudWatch service is removed from the Services screen of the Web UI and the CLI Manager.
To disable the AWS CloudWatch integration:
Login to the ESA CLI Manager.
To disable CloudWatch, navigate to Tools > Cloud Utility AWS Tools > CloudWatch Integration.
The following screen appears.
Select Disable and press ENTER.
The logs from the appliances are not updated in the AWS CloudWatch Console and the CloudWatch Integration is disabled.
A warning screen with message Are you sure you want to disable CLoudWatch integration? appears. Select Yes and press Enter.
The CloudWatch integration disabled successfully message appears. Click Ok.
The AWS CloudWatch integration is disabled.
After disabling CloudWatch integration, you must delete the Log groups and Log streams from the AWS CloudWatch console.
20.1.8.3 - Working with the AWS Cloud Utility
You can work with the AWS Cloud Utility in various ways. This section contains usage examples for using the AWS Cloud Utility. However, the scope of working with Cloud Utility is not limited to the scenarios covered in this section.
The following scenarios are explained in this section:
Encrypting and storing the backed up files on the AWS S3 bucket.
Setting metrics-based alarms using the AWS Management Console.
20.1.8.3.1 - Storing Backup Files on the AWS S3 Bucket
If you want to store backed up files on the AWS S3 bucket, you can use the Cloud Utility feature. You can transit these files from the Protegrity appliance to the AWS S3 bucket.
The following tasks are explained in this section:
Encrypting the backed up .tgz files using the AWS Key Management Services (KMS).
Storing the encrypted files in the AWS S3 bucket.
Retrieving the encrypted files stored in the S3 bucket.
Decrypting the retrieved files using the AWS KMS.
Importing the decrypted files on the Protegrity appliance.
About the AWS S3 bucket and usage
The AWS S3 bucket is a cloud resource which helps you to securely store your data. It enables you to keep the data backup at multiple locations, such as, on-premise and on cloud. For easy accessibility, you can backup and store data of one machine and import the same data to another machine, using the AWS S3 bucket. It also provides an additional layer of security by helping you encrypt the data before uploading it to the cloud.
Using the OS Console option in the CLI Manager, you can store your backed up files in the AWS S3 bucket. You can encrypt your files using the the AWS Key Management Services (KMS) before storing it in the AWS S3 bucket.
The following figure shows the flow for storing your data on the AWS S3 bucket.
Prerequisites
Ensure that you complete the following prerequisites for uploading the backed up files to the S3 bucket:
The Configured AWS user or the attached IAM role must have access to the S3 bucket.
Upload the encrypted file to the S3 bucket using the following command.
aws s3 cp <encrypted_output_filename> <s3Uri>
The file is uploaded in the S3 bucket.
For example, if you have an encrypted file test.enc and you want to upload it to your personal bucket, mybucket, in s3 bucket, then use the following command:
aws s3 cp test.enc s3://mybucket/test.enc
For more information about the S3 bucket, refer to the following link:
20.1.8.3.2 - Set Metrics Based Alarms Using the AWS Management Console
If you want to set alarms and alerts for your machine, using Protegrity appliances, you can send logs and metrics to the AWS Console. The AWS Management Console enables you to set alerts and configure SNS events as per your requirements.
You can create alerts based on the following metrics:
Memory Use Percent
Disk I/O
Network
Disk Used Percent
CPU Idle
Swap Memory Use Percent
Prerequisite
Ensure that the CloudWatch integration is enabled.
Enter the Topic ARN of the topic created in the above step.
From the Protocol field, select Email.
In the Endpoint, enter the required email address where you want to receive the alerts.
Enter the optional details.
Click Create subscription.
An SNS event is created and a confirmation email is sent to the subscribed email address.
To confirm the email subscription, click the Confirm Subscription link from the email received on the registered email address.
Creating Alarms
The following steps explain the procedure to set an alarm for CPU usage.
To create an alarm:
Login to the Amazon Management Console.
To create an alarm, navigate to Services > Management & Governance > CloudWatch.
From the left pane, select Alarms > In alarm.
Select Create alarm.
Click Select metric.
The Select metric window appears.
From the Custom Namespaces, select CWAgent.
Select cpu, host.
Select the required metric and click Select metric.
Configure the required metrics.
Configure the required conditions.
Click Next.
The Notification screen appears.
Select the alarm state.
From Select SNS topic, choose Select an existing SNS topic.
Enter the required email type in Send a notification to… dialog box.
Select Next.
Enter the Name and Description.
Select Next.
Preview the configuration details and click Create alarm.
An alarm is created.
20.1.8.4 - FAQs for AWS Cloud Utility
This section lists the FAQs for the AWS Cloud Utility.
Where can I install the AWS Cloud/CloudWatch/Cloud Utilities?
AWS Cloud Utility can be installed on any appliance-based product. It is compatible with the ESA and the DSG that are installed on-premise or on cloud platforms, such as, AWS, Azure, or GCP.
If an instance is created on the AWS using the cloud image, then Cloud Utility AWS is preinstalled on this instance.
Which version of AWS CLI is supported by the AWS Cloud Utility product v2.3.0?
AWS CLI 2.15.41 is supported by the Cloud Utility AWS product v2.3.0.
What is the Default Region Name while configuring AWS services?
The Default Region Name on whose servers you want to send the default service requests.
Can I provide the file path as <foldername/>* to send logs to the folder?
No, you can not provide the file path as <foldername/>*.
Regex is not allowed in the CloudWatch configuration file. You must specify the absolute file path.
Can I configure AWS from OS Console?
No, you can not. If you configure AWS from the OS Console it will change the expected behaviour of the AWS Cloud Utility.
What happens to the custom configurations if I uninstall or remove the AWS Cloud Utility product?
The custom configurations are retained.
What happens to CloudWatch if I delete AWS credentials from ESA after enabling CloudWatch integration?
You can not change the status of the CloudWatch service. You must reconfigure the ESA with valid AWS credentials to perform the CloudWatch-related operations.
Why some of the log files are world readable?
The files with the .log extension present in the /opt/aws/pty/cloudwatch/logs/state folder are not log files. These files are used by the CloudWatch utility to monitor the logs.
Why is the CloudWatch service stopped when the patch is installed? How do I restart the service?
As the CloudWatch service is stopped when the patch is installed, it remains in the stopped state after the Cloud Utility Patch (CUP) installation. So, we must restart the CloudWatch service manually.To restart the CloudWatch service manually, perform the following steps.
Login to the OS Console.
Restart the CloudWatch service using the following command.
/etc/init.d/cloudwatch_service restart
20.1.8.5 - Working with AWS Systems Manager
The AWS Systems Manager allows you to manage and operate the infrastructure on AWS. Using the Systems Manager console, you can view operational data from multiple AWS services and automate operational tasks across the AWS services.
For more information about AWS Systems Manager, refer to the following link:
Before using the AWS Systems Manager, ensure that the IAM role or IAM user to integrate with the appliance has a policy assigned to it. You can attach one or more IAM policies that define the required permissions for a particular IAM role.
You must set up AWS Systems Manager to use the Systems Manager Agent (SSM Agent).
You can set up Systems Manager for:
An AWS instance
A non-AWS instance or an on-premise platform
After the SSM Agent is installed in an instance, ensure that the auto-update option is disabled, as we do not support auto-update. If the SSM Agent gets auto updated, the service will get corrupted.
For more information about automatic updates for SSM Agent, refer to the following link:
Important: After you successfully complete the activation, an Activation Code and Activation ID appears. Copy this information and save it. If you lose this information, then you must create a new activation.
Login to the CLI as an admin user and open the OS Console.
Using the Activation Code and Activation ID obtained in Step 1, run the following command to activate and register the SSM-Agent.
On non-AWS instance, to configure the IAM user with valid credentials, navigate to Tools > CloudWatch Utility AWS Tools > AWS Configure.
I am unable to see AWS Tools section under Tools in the CLI Manager
Issue: The AWS Admin role is not assigned to the instance.
Workaround: For more information about the AWS Admin role, refer Managing Roles.
I can see one of the following error messages: CloudWatch Service started failed or CloudWatch Service stopped failed
Issue: The ESA is configured with invalid AWS credentials.
Workaround: You must reconfigure the ESA with valid AWS credentials.
20.2 - Installing ESA on Google Cloud Platform (GCP)
The Google Cloud Platform (GCP) is a cloud computing service offered by Google, which provides services for compute, storage, networking, cloud management, security, and so on. The following products are available on GCP:
Google Compute Engine provides virtual machines for instances.
Google App Engine provides a Software Developer Kit (SDK) to develop products.
Google Cloud Storage is a storage platform to store large data sets.
Google Container Engine is a cluster-oriented container to develop and manage Docker containers.
Protegrity provides the images for GCP that contain either the Enterprise Security Administrator (ESA), or the Data Security Gateway (DSG).
This section describes the prerequisites and tasks for installing Protegrity ESA appliances on GCP. In addition, it describes some best practices for using the Protegrity ESA appliances on GCP effectively.
20.2.1 - Verifying Prerequisites
This section describes the prerequisites including the hardware, software, and network requirements for installing and using ESA on GCP.
Prerequisites
The following prerequisite is essential to install the Protegrity ESA appliances on GCP:
A GCP account and the following information:
Login URL for the GCP account
Authentication credentials for the GCP account
Access to the My.Protegrity portal
Hardware Requirements
As the Protegrity ESA appliances are hosted and run on GCP, the hardware requirements are dependent on the configurations provided by GCP. The actual hardware configuration depends on the actual usage or amount of data and logs expected. However, these requirements can autoscale as per customer requirements and budget.
The minimum recommendation for an ESA is 8 CPU cores and 32 GB memory. On GCP, this configuration is available under the Machine type drop-down list in the n1-standard-8 option.
For more information about the hardware requirements of ESA, refer to section System Requirements.
Network Requirements
The Protegrity ESA appliances on GCP are provided with a Google Virtual Private Cloud (VPC) networking environment. The Google VPC enables you to access other instances of Protegrity resources in your project.
You can configure the Google VPC by specifying the IP address range. You can also create and configure subnets, network gateways, and the security settings.
If you are using the ESA or the DSG appliance with GCP, then ensure that the inbound and outbound ports of the appliances are configured in the VPC.
For more information about the list of inbound and outbound ports, refer to the section Open Listening Ports.
20.2.2 - Configuring the Virtual Private Cloud (VPC)
You must configure your Virtual Private Cloud (VPC) to connect to different Protegrity appliances,such as, ESA and DSG.
To configure a VPC:
Ensure that you are logged in to the GCP Console.
Navigate to the Home screen.
Click the navigation menu on the Home screen.
Under Networking, navigate to VPC network > VPC networks.
The VPC networks screen appears.
Click CREATE VPC NETWORK.
The Create a VPC network screen appears.
Enter the name and description of the VPC network in the Name and Description text boxes.
Under the Subnets area, click Custom to add a subnet.
Enter the name of the subnet in the Name text box.
Click Add a Description to enter a description for the subnet.
Select the region where the subnet is placed from the Region drop-down menu.
Enter the IP address range for the subnet in the IP address range text box.
For example, 10.1.0.0/99.
Select On or Off from the Private Google Access options to set access for VMs on the subnet to access Google services without assigning external IP addresses.
Click Done. Additionally, click Add Subnet to add another subnet.
Select Regional from the Dynamic routing mode option.
Click Create to create the VPC.
The VPC is added to the network.
Adding a Subnet to the Virtual Private Cloud (VPC)
You can add a subnet to your VPC.
To add a subnet:
Ensure that you are logged in to the GCP Console.
Under Networking, navigate to VPC network > VPC networks.
The VPC networks screen appears.
Select the VPC.
The VPC network details screen appears.
Click EDIT.
Under Subnets area, click Add Subnet.
The Add a subnet screen appears.
Enter the subnet details.
Click ADD.
Click Save.
The subnet is added to the VPC.
20.2.3 - Obtaining the GCP Image
Before creating the instance on GCP, you must obtain the image from the My.Protegrity portal. On the portal, you select the required ESA version and choose GCP as the target cloud platform. You then share the product to your cloud account. The following steps describe how to share the image to your cloud account.
To obtain and share the image:
Log in to the My.Protegrity portal with your user account.
Click Product Management > Explore Products > Data Protection.
Select the required ESA Platform Version from the drop-down.
The Product Family table will update based on the selected ESA Platform Version.
The ESA Platform Versions listed in drop-down menu reflect all versions. These include versions that were either previously downloaded or shipped within the organization along with any newer versions available thereafter. Navigate to Product Management > My Product Inventory to check the list of products previously downloaded.
The images in this section consider the ESA as a reference. Ensure that you select the required image.
Select the Product Family.
The description box will populate with the Product Family details.
Click View Products to advance to the product listing screen.
Callout
Element Name
Description
1
Target Platform Details
Shows details about the target platform.
2
Product Name
Shows the product name.
3
Product Family
Shows the product family name.
4
OS Details
Shows the operating system name.
5
Version
Shows the product version.
6
End of Support Date
Shows the final date that Protegrity will provide support for the product.
7
Action
Click the View icon () to open the Product Detail screen.
8
Export as CSV
Downloads a .csv file with the results displayed on the screen.
9
Search Criteria
Type text in the search field to specify the search filter criteria or filter the entries using the following options:- OS- Target Platform
10
Request one here
Opens the Create Certification screen for a certification request.
Select the GCP cloud target platform you require and click the View icon () from the Action column.
The Product Detail screen appears.
Callout
Element Name
Description
1
Product Detail
Shows the following information about the product:- Product name- Family name- Part number- Version- OS details- Hardware details- Target platform details- End of support date - Description
2
Product Build Number
Shows the product build number.
3
Release Type Name
Shows the type of build, such as, release, hotfix, or patch.
4
Release Date
Shows the release date for the build.
5
Build Version
Shows the build version.
6
Actions
Shows the following options for download:- Click the Share Product icon () to share the product through the cloud.- Click the Download Signature icon () to download the product signature file.- Click the Download Readme icon () to download the Release Notes.
7
Download Date
Shows the date when the file was downloaded.
8
User
Shows the user name who downloaded the build.
9
Active Deployment
Select the check box to mark the software as active. Clear the check box to mark the software as inactive.
This option is available only after you download a product.|
|10|Product Build Number|Shows the product build number.|
Click the Share Product icon () to share the desired cloud product.
If the access to the cloud products is restricted and the Customer Cloud Account details are not available, then a message appears. The message displays the information that is required and the contact information for obtaining access to cloud share.
A dialog box appears and your available cloud accounts will be displayed.
Select your required cloud account in which to share the Protegrity product.
Click Share.
A message box is displayed with the command line interface (CLI) instructions with the option to download a detailed PDF containing the cloud web interface instructions. Additionally, the instructions for sharing the cloud product are sent to your registered email address and to your notification inbox in My.Protegrity.
Click the Copy icon () to copy the command for sharing the cloud product and run the command in CLI. Alternatively, click Instructions to download the detailed PDF instructions for cloud sharing using the CLI or the web interface.
The cloud sharing instruction file is saved in a .pdf format. You need a reader, such as, Acrobat Reader to view the file.
The Cloud Product will be shared with your cloud account for seven (7) days from the original share date in the My.Protegrity portal.
After the seven (7) day time period, you need to request a new share of the cloud product through My.Protegrity.com.
20.2.4 - Converting the Raw Disk to a GCP Image
After obtaining the image from Protegrity, you can proceed to create a virtual image. However, the image provided is available as disk in a raw format. This must be converted to a GCP specific image before you create an instance. The following steps provide the details of converting the image in a raw format to a GCP-specific image.
To convert the image:
Login to the GCP Console.
Run the following command.
gcloud compute images create <Name for the new GCP Image > --source-uri gs://<Name of the storage location where the raw image is obtained>/<Name of the GCP image>>
The raw image is converted to a GCP-specific image. You can now create an instance using this image
20.2.5 - Loading the Protegrity ESA Appliance from a GCP Image
This section describes the tasks that you must perform to load the Protegrity ESA appliance from an image that is provided by Protegrity. You must create a VM instance using the image provided in the following two methods:
Creating a VM instance from the Protegrity ESA appliance image provided.
Creating a VM instance from a disk that is created with an image of the Protegrity ESA appliance.
20.2.5.1 - Creating a VM Instance from an Image
This section describes how to create a Virtual Machine (VM) from an ESA image provided to you.
Click CREATE INSTANCE.The Create an instance screen appears.
Enter the following information:
Name: Name of the instance
Description: Description for the instance
Select the region and zone from the Region and Zone drop-down menus respectively.
Under the Machine Type area, select the processor and memory configurations based on the requirements.
Click Customize to customize the memory, processor, and core configuration.
Under the Boot disk area, click Change to configure the boot disk.
The Boot disk screen appears.
Click Custom Images.
Under the Show images from drop-down menu, select the project where the image of the ESA is provided.
Select the image for the root partition.
Select the required disk type from the Boot disk type drop-down list.
Enter the size of the disk in the Size (GB) text box.
Click Select.
The disk is configured.
Under the Identity and API access area, select the account from the Service Account drop-down menu to access the Cloud APIs.
Depending on the selection, select the access scope from the Access Scope option.
Under the Firewall area, select the Allow HTTP traffic or Allow HTTPS traffic checkboxes to permit HTTP or HTTPS requests.
Click Networking to set the networking options.
Enter data in the Network tags text box.
Click Add network interface to add a network interface.
If you want to edit a network interface, then click the edit icon ().
Click Create to create and start the instance.
20.2.5.2 - Creating a VM Instance from a Disk
You can create disks using the image provided for your account. You must create a boot disk using the OS image. After creating the disk, you can attach it to an instance.
This section describes how to create a disk using an image. Using this disk, you then create a VM instance.
Creating a Disk from the GCP Image
Perform the following steps to create a disk using an image.
Before you begin
Ensure that you have access to the Protegrity ESA appliance images.
Select the region and zone from the Region and Zone drop-down menus respectively.
Under the Machine Type section, select the processor and memory configuration based on the requirements.
Click Customize to customize your memory, processor and core configuration.
Under Boot disk area, click Change to configure the boot disk.
The Boot disk screen appears.
Click Existing Disks.
Select the required disk created with the Protegrity ESA appliance image.
Click Select.
Under Firewall area, select the Allow HTTP traffic or Allow HTTPS traffic checkboxes to permit HTTP or HTTPS requests.
Click Create to create and start the instance.
20.2.5.3 - Accessing the Appliance
After setting up the virtual machine, you can access the ESA through the IP address that is assigned to the virtual machine. It is recommended to access the ESA with the administrative credentials.
If the number of unsuccessful password attempts exceed the defined value in the password policy, the account gets locked.
For more information on the password policy for the admin and viewer users,
refer here, and for the root and local_admin OS users, refer here.
20.2.6 - Finalizing the ESA Installation on the Instance
When you install the ESA, it generates multiple security identifiers such as, keys, certificates, secrets, passwords, and so on. These identifiers ensure that sensitive data is unique between two appliances in a network. When you receive a Protegrity ESA appliance image, the identifiers are generated with certain values. If you use the security identifiers without changing their values, then security is compromised and the system might be vulnerable to attacks.
Rotating Appliance OS keys to finalize installation
Using the Rotate Appliance OS Keys, you can randomize the values of these security identifiers for an ESA. During the finalization process, you run the key rotation tool to secure your ESA.
If you do not complete the finalization process, then some features of the ESA may not be functional including the Web UI.
For example, if the OS keys are not rotated, then you might not be able to add appliances to a Trusted Appliances Cluster (TAC).
For information about the default passwords, refer the Release Notes 10.2.0.
Finalizing ESA Installation
You can finalize the installation of the ESA after signing in to the CLI Manager.
Before you begin
Ensure that the finalization process is initiated from a single session only. If you start finalization simultaneously from a different session, then the Finalization is already in progress. message appears. You must wait until the finalization of the instance is successfully completed.
Additionally, ensure that the ESA session is not interrupted. If the session is interrupted, then the instance becomes unstable and the finalization process is not completed on that instance.
To finalize ESA installation:
Sign in to the ESA CLI Manager of the instance created using the default administrator credentials.
The following screen appears.
Select Yes to initiate the finalization process.
The screen to enter the administrative credentials appears.
If you select No, then the finalization process is not initiated.
To manually initiate the finalization process, navigate to Tools > Finalize Installation and press ENTER.
Enter the credentials for the admin user and select OK.
A confirmation screen to rotate the appliance OS keys appears.
Select OK to rotate the appliance OS keys.
The following screen appears.
To update the user passwords, provide the credentials for the following users:
root
admin
viewer
local_admin
Select Apply.
The user passwords are updated and the appliance OS keys are rotated.
The finalization process is completed.
20.2.7 - Deploying the Instance of the Protegrity Appliance with the Protectors
You can configure the various protectors that are a part of the Protegrity Data Security Platform with the instance of the ESA appliance running on AWS.
Depending on the Cloud-based environment which hosts the protectors, the protectors can be configured with the instance of the ESA appliance in one of the following ways:
If the protectors are running on the same VPC as the instance of the ESA appliance, then the protectors need to be configured using the internal IP address of the ESA appliance within the VPC.
If the protectors are running on a different VPC than that of the instance of the ESA appliance, then the VPC of the instance of the ESA needs to be configured to connect to the VPC of the protectors.
20.2.8 - Backing up and Restoring Data on GCP
You can use a snapshot of an instance or a disk to backup or restore information in case of failures. A snapshot represents a state of an instance or disk at a point in time.
Creating a Snapshot of a Disk on GCP
This section describes the steps to create a snapshot of a disk.
To create a snapshot on GCP:
On the Compute Engine dashboard, click Snapshots.
The Snapshots screen appears.
Click Create Snapshot.
The Create a snapshot screen appears.
Enter information in the following text boxes.
Name - Name of the snapshot.
Description – Description for the snapshot.
Select the required disk for which the snapshot is to be created from the Source Disk drop-down list.
Click Add Label to add a label to the snapshot.
Enter the label in the Key and Value text boxes.
Click Add Label to add additional tags.
Click Create.
Ensure that the status of the snapshot is set to completed.
Ensure that you note the snapshot id.
Restoring from a Snapshot on GCP
This section describes the steps to restore data using a snapshot.
Before you begin
Ensure that a snapshot of the disk was created before beginning this process.
How to restore data using a snapshot
To restore data using a snapshot on GCP:
Navigate to Compute Engine > VM instances.
The VM instances screen appears.
Select the required instance.
The screen with instance details appears.
Stop the instance.
After the instance is stopped, click EDIT.
Under the Boot Disk area, remove the existing disk.
Click Add Item.
Select the Name drop-down list and click Create a disk.
The Create a disk screen appears.
Under Source Type area, select the required snapshot.
Enter the other details, such as, Name, Description, Type, and Size (GB).
Click Create.
The snapshot of the disk is added in the Boot Disk area.
Click Save.
The instance is updated with the new snapshot.
20.2.9 - Increasing Disk Space on the Appliance
After creating an instance on GCP, you can add a disk to your appliance.
To add a disk to a VM instance:
Ensure that you are logged in to the GCP Console.
Click Compute Engine.
The Compute Engine screen appears.
Select the instance.
The VM instance details screen appears.
Click EDIT.
Under Additional disks, click Add new disk.
Enter the disk name in the Name field box.
Select the disk permissions from the Mode option.
If you want to delete the disk or keep the disk after the instance is created, select the required option from the Deletion rule option.
Enter the disk size in GB in the Size (GB) field box.
Click Done.
Click Save.
The disk is added to the VM instance.
20.3 - Installing Protegrity Appliances on Azure
Azure is a cloud computing service offered by Microsoft, which provides services for compute, storage, and networking. It also provides software, platform, and infrastructure services along with support for different programming languages, tools, and frameworks.
The Azure cloud platform includes the following components:
This section describes the prerequisites, including the hardware and network requirements, for installing and using Protegrity ESA appliances on Azure.
Prerequisites
The following prerequisites are essential to install the Protegrity ESA appliances on Azure:
Sign in URL for the Azure account
Authentication credentials for the Azure account
Working knowledge of Azure
Access to the My.Protegrity portal
Before you begin:
Ensure that you use the following order to create a virtual machine on Azure:
As the Protegrity ESA appliances are hosted and run on Azure, the hardware requirements are dependent on the configurations provided by Microsoft. However, these requirements can change based on the customer requirements and budget. The actual hardware configuration depends on the actual usage or amount of data and logs expected.
The minimum recommendation for an ESA appliance is 8 CPU cores and 32 GB memory. This option is available under the Standard_D8s_v3 option on Azure.
For more information about the hardware requirements of ESA, refer here.
Network Requirements
The Protegrity ESA appliances on Azure are provided with an Azure virtual networking environment. The virtual network enables you to access other instances of Protegrity resources in your project.
For more information about configuring Azure virtual network, refer here.
20.3.2 - Azure Cloud Utility
The Azure Cloud Utility is an appliance component that is available for supporting features specific to Azure Cloud Platform. For Protegrity ESA appliances, this component must be installed to utilize the services of Azure Accelerated Networking and Azure Linux VM agent. If you are utilizing the Azure Accelerated Networking or Azure Linux VM agent, then it is recommended to not uninstall this component.
When you upgrade or install the ESA from an Azure v10.2.0 blob, the Azure Cloud Utility is installed automatically in the appliance.
20.3.3 - Setting up Azure Virtual Network
The Azure virtual network is a service that provides connectivity to the virtual machine and services on Azure. You can configure the Azure virtual network by specifying usable IP addresses. You can also create and configure subnets, network gateways, and security settings.
For more information about setting up Azure virtual network, refer to the Azure virtual network documentation at:
If you are using the ESA or the DSG appliance with Azure, ensure that the inbound and outbound ports of the appliances are configured in the virtual network.
For more information about the list of inbound and outbound ports, refer to section Open Listening Ports.
20.3.4 - Creating a Resource Group
Resource Groups in Azure are a collection of multiple Azure resources, such as virtual machines, storage accounts, virtual networks, and so on. The resource groups enable managing and maintaining the resources as a single entity.
For more information about creating resource groups, refer to the Azure resource group documentation at:
Azure storage accounts contain all the Azure storage data objects, such as disks, blobs, files, queues, and tables. The data in the storage accounts are scalable, secure, and highly available.
For more information about creating storage accounts, refer to the Azure storage accounts documentation at:
The data storage objects in a storage account are stored in a container. Similar to directories in a file system, the container in Azure contain BLOBS. You add a container in Azure to store the ESA BLOB.
For more information about creating a container, refer to the following link:
In Azure, you can share files across different storage accounts. The ESA that is packaged as a BLOB, is shared across storage accounts on Azure. A BLOB is a data type that is used to store unstructured file formats. Azure supports BLOB storage to store unstructured data, such as audio, text, images, and so on. The BLOB of the ESA is shared by Protegrity to the client’s storage account.
Before creating the instance on Azure, you must obtain the BLOB from the My.Protegrity portal. On the portal, you select the required ESA version and choose Azure as the target cloud platform. You then share the product to your cloud account. The following steps describe how to share the BLOB to your cloud account.
Before creating the instance on AWS, you must obtain the image from the My.Protegrity portal. On the portal, you select the required ESA version and choose AWS as the target cloud platform. You then share the product to your cloud account. The following steps describe how to share the AMI to your cloud account.
To obtain and share the BLOB:
Log in to the My.Protegrity portal with your user account.
Click Product Management > Explore Products > Data Protection.
Select the required ESA Platform Version from the drop-down.
The Product Family table will update based on the selected ESA Platform Version.
The ESA Platform Versions listed in drop-down menu reflect all versions. These include versions that were either previously downloaded or shipped within the organization along with any newer versions available thereafter. Navigate to Product Management > My Product Inventory to check the list of products previously downloaded.
The images in this section consider the ESA as a reference. Ensure that you select the required image.
Select the Product Family.
The description box will populate with the Product Family details.
Click View Products to advance to the product listing screen.
Callout
Element Name
Description
1
Target Platform Details
Shows details about the target platform.
2
Product Name
Shows the product name.
3
Product Family
Shows the product family name.
4
OS Details
Shows the operating system name.
5
Version
Shows the product version.
6
End of Support Date
Shows the final date that Protegrity will provide support for the product.
7
Action
Click the View icon () to open the Product Detail screen.
8
Export as CSV
Downloads a .csv file with the results displayed on the screen.
9
Search Criteria
Type text in the search field to specify the search filter criteria or filter the entries using the following options:- OS- Target Platform
10
Request one here
Opens the Create Certification screen for a certification request.
Select the Azure cloud target platform you require and click the View icon () from the Action column.
The Product Detail screen appears.
Callout
Element Name
Description
1
Product Detail
Shows the following information about the product:- Product name- Family name- Part number- Version- OS details- Hardware details- Target platform details- End of support date - Description
2
Product Build Number
Shows the product build number.
3
Release Type Name
Shows the type of build, such as, release, hotfix, or patch.
4
Release Date
Shows the release date for the build.
5
Build Version
Shows the build version.
6
Actions
Shows the following options for download:- Click the Share Product icon () to share the product through the cloud.- Click the Download Signature icon () to download the product signature file.- Click the Download Readme icon () to download the Release Notes.
7
Download Date
Shows the date when the file was downloaded.
8
User
Shows the user name who downloaded the build.
9
Active Deployment
Select the check box to mark the software as active. Clear the check box to mark the software as inactive.
This option is available only after you download a product.|
|10|Product Build Number|Shows the product build number.|
Click the Share Product icon () to share the desired cloud product.
If the access to the cloud products is restricted and the Customer Cloud Account details are not available, then a message appears. The message displays the information that is required and the contact information for obtaining access to cloud share.
A dialog box appears and your available cloud accounts will be displayed.
Select your required cloud account in which to share the Protegrity product.
Click Share.
A message box is displayed with the command line interface (CLI) instructions with the option to download a detailed PDF containing the cloud web interface instructions. Additionally, the instructions for sharing the cloud product are sent to your registered email address and to your notification inbox in My.Protegrity.
Click the Copy icon () to copy the command for sharing the cloud product and run the command in CLI. Alternatively, click Instructions to download the detailed PDF instructions for cloud sharing using the CLI or the web interface.
The cloud sharing instruction file is saved in a .pdf format. You need a reader, such as, Acrobat Reader to view the file.
The Cloud Product will be shared with your cloud account for seven (7) days from the original share date in the My.Protegrity portal.
After the seven (7) day time period, you need to request a new share of the cloud product through My.Protegrity.com.
20.3.8 - Creating Image from the Azure BLOB
After you obtain the BLOB from Protegrity, you must create an image from the BLOB. The following steps describe the parameters that must be selected to create an image.
To create an image from the BLOB:
Log in to the Azure portal.
Select Images and click Create.
Enter the details in the Resource Group, Name, and Region text boxes.
In the OS disk option, select Linux.
In the VM generation option, select Gen 1.
In the Storage blob drop-down list, select the Protegrity Azure BLOB.
Enter the appropriate information in the required fields and click Review + create.
The image is created from the BLOB.
20.3.9 - Creating a VM from the Image
After obtaining the image, you can create a VM from it. For more information about creating a VM from the image, refer to the following link.
Select SSH public key in the Authentication type option. Do not select the Password based mechanism as an authentication type. Protegrity recommends not using this type as a security measure.
In the Username text box, enter the name of a user. Be aware, this user will not have SSH access to the ESA appliance. Refer to the following section Created OS user and SSH access to appliance for more details.
This user is added as an OS level user in the ESA appliance. Ensure that the following usernames are not provided in the Username text box:
Enter the required information in the Disks, Networking, Management, and Tags sections.
Click Review + Create.
The VM is created from the image.
After the VM is created, you can access the ESA from the CLI Manager or Web UI.
Created OS user and SSH access to appliance
The OS user that is created in step 7 does not have SSH access to the ESA appliance. If you want to provide SSH access to this user, login to the appliance as another administrative user and toggle SSH access. In addition, update the user to permit Linux shell access (/bin/sh).
20.3.10 - Accessing the Appliance
After setting up the virtual machine, you can access the ESA appliance through the IP address that is assigned to the virtual machine. It is recommended to access the ESA with the administrative credentials.
If the number of unsuccessful password attempts exceed the defined value in the password policy, then the account gets locked.
For more information on the password policy for the admin and viewer users,
refer here, and for the root and local_admin OS users, refer here.
20.3.11 - Finalizing the Installation of Protegrity Appliance on the Instance
When you install the ESA, it generates multiple security identifiers such as, keys, certificates, secrets, passwords, and so on. These identifiers ensure that sensitive data is unique between two appliances in a network. When you receive a Protegrity appliance image, the identifiers are generated with certain values. If you use the security identifiers without changing their values, then security is compromised and the system might be vulnerable to attacks.
Rotating Appliance OS keys to finalize installation
Using Rotate Appliance OS Keys, you can randomize the values of these security identifiers for an ESA appliance. During the finalization process, you run the key rotation tool to secure your ESA appliance.
If you do not complete the finalization process, then some features of the ESA appliance may not be functional including the Web UI.
For example, if the OS keys are not rotated, then you might not be able to add ESA appliances to a Trusted Appliances Cluster (TAC).
For information about the default passwords, refer the Release Notes 10.2.0.
Finalizing ESA Installation
You can finalize the installation of the ESA after signing in to the CLI Manager.
Before you begin
Ensure that the finalization process is initiated from a single session only. If you start finalization simultaneously from a different session, then the Finalization is already in progress. message appears. You must wait until the finalization of the instance is successfully completed.
Additionally, ensure that the ESA appliance session is not interrupted. If the session is interrupted, then the instance becomes unstable and the finalization process is not completed on that instance.
To finalize ESA installation:
Sign in to the ESA CLI Manager of the instance created using the default administrator credentials.
The following screen appears.
Select Yes to initiate the finalization process.
The screen to enter the administrative credentials appears.
If you select No, then the finalization process is not initiated.
To manually initiate the finalization process, navigate to Tools > Finalize Installation and press ENTER.
Enter the credentials for the admin user and select OK.
A confirmation screen to rotate the appliance OS keys appears.
Select OK to rotate the appliance OS keys.
The following screen appears.
To update the user passwords, provide the credentials for the following users:
root
admin
viewer
local_admin
Select Apply.
The user passwords are updated and the appliance OS keys are rotated.
The finalization process is completed.
20.3.12 - Accelerated Networking
Accelerated networking is a feature provided by Microsoft Azure which enables the user to improve the performance of the network. This is achieved by enabling Single-root input/output virtualization (SR-IOV) to a virtual machine.
In a virtual environment, SR-IOV specifies the isolation of PCIe resources to improve manageability and performance. The SR-IOV interface helps to virtualize, access, and share the PCIe resources, such as, the connection ports for graphic cards, hard drives, and so on. This successfully reduces the latency, network jitters and CPU utilization.
As shown in figure below, the virtual switch is an integral part of a network for connecting the hardware and the virtual machine. The virtual switch helps in enforcing the policies on the virtual machine. These policies include access control lists, isolation, network security controls, and so on, and are implemented on the virtual switch. The network traffic routes through the virtual switch and the policies are implemented on the virtual machine. This results in higher latency, network jitters, and higher CPU utilization.
However, in an accelerated network, the policies are applied on the hardware. The network traffic only routes through the network cards directly forwarding it to the virtual machine. The policies are applied on the hardware instead of the virtual switch. This helps the network traffic to bypass the virtual switch and the host while maintaining the policies applied at the host. Reducing the layers of communication between the hardware and the virtual machine helps to improve the network performance.
Following are the benefits of accelerated networking:
Reduced Latency: Bypassing the virtual switch from the data path increases the number of packets which are processed in the virtual machine.
Reduced Jitter: Bypassing the virtual switch and host from the network reduces the processing time for the policies. The policies are directly implemented on the virtual machine thereby reducing the network jitters caused by the virtual switch.
CPU Utilization: Applying the policies to the hardware and implementing them directly on the virtual machine reduces the workload on the CPU to process these policies.
Prerequisites
The following prerequisites are essential to enable or disable the Azure Accelerated Networking feature.
A machine with the Azure CLI should be configured. This must be a separate Windows or Linux machine.
For more information about installing the Azure CLI, refer to the following link.
Supported Instance Sizes for Accelerated Networking
There are several series of instance sizes used on the virtual machines that support the accelerated networking feature.
These include the following:
D/DSv2
D/DSv3
E/ESv3
F/FS
FSv2
Ms/Mms
The most generic and compute-optimized instance sizes for the accelerated networking feature is with 2 or more vCPUs. However, on the systems with supported hyperthreading features, the accelerated networking feature must have instance sizes with 4 or more vCPUs.
For more information about the supported instance sizes, refer to the following link.
Creating a Virtual Machine with Accelerated Networking Enabled
If you want to enable accelerated networking while creating the instance, then it is achieved only from the Azure CLI. The Azure portal does not provide the option to create an instance with accelerated networking enabled.
For more information about creating a virtual machine with accelerated networking, refer to the following link.
To create a virtual machine with the accelerated networking feature enabled:
From the machine on which the Azure CLI is installed, login to Azure using the following command.
az login
Create a virtual machine using the following command.
az vm create --image <name of the Image> --resource-group <name of the resource group> --name <name of the new instance> --size <configuration of the instance> --admin-username <administrator username> --ssh-key-values <SSH key path> --public-ip-address "" --nsg <Azure virtual network> --accelerated-networking true
For example, the table below lists values to create a virtual machine with the following parameters.
Parameter
Value
Name of the image
ProtegrityESAAzure
name-of-resource-group
MyResourcegroup
size
Standard_DS3_v2
admin-username
admin
nsg
TierpointAccessDev
ssh-key-value
./testkey.pub
The virtual machine is created with the accelerated networking feature enabled.
Enabling Accelerated Networking
Perform the following steps to enable the Azure Accelerated Networking feature on the Protegrity ESA appliance.
To enable accelerated networking:
From the machine on which the Azure CLI is installed, login to Azure using the following command.
az login
Stop the Protegrity ESA appliance using the following command.
az vm deallocate --resource-group <ResourceGroupName> --name <InstanceName>
Parameter
Description
ResourceGroupName
Name of the resource group where the instance is located.
InstanceName
Name of the instance that you want to stop.
Enable accelerated networking on your virtual machine’s network card using the following command.
az network nic update --name <nic-name> --resource-group <ResourceGroupName> --accelerated-networking true
Parameter
Description
nic-name
Name of the network interface card attached to the instance where you want to enable accelerated networking.
ResourceGroupName
Name of the resource group where the instance is located.
Start the ESA.
Disabling Accelerated Networking
Perform the following steps to disable the Azure Accelerated Networking features on the Protegrity ESA appliance.
To disable accelerated networking:
From the machine on which the Azure CLI is installed, login to Azure using the following command.
az login
Stop the ESA using the following command.
az vm deallocate --resource-group <ResourceGroupName> --name <InstanceName>
Parameter
Description
ResourceGroupName
Name of the resource group where the instance is located.
InstanceName
Name of the instance that you want to stop.
Disable accelerated networking on your virtual machine’s network card using the following command.
az network nic update --name <nic-name> --resource-group <ResourceGroupName> --accelerated-networking false
Parameter
Description
nic-name
Name of the network interface card attached to the instance where you want to enable accelerated networking.
ResourceGroupName
Name of the resource group where the instance is located.
Start the ESA.
Troubleshooting and FAQs for Azure Accelerated Networking
This section lists the Troubleshooting and FAQs for the Azure Accelerated Networking feature.
What is the recommended number of virtual machines required in the Azure virtual network?
It is recommended to have at least two or more virtual machines in the Azure virtual network.
Can I stop or deallocate my machine from the Web UI?
Yes. You can stop or deallocate your machine from the Web UI. Navigate to the Azure instance details page and click Stop from the top ribbon.
Can I uninstall the Cloud Utility Azure if the accelerated networking feature is enabled?
It is recommended to disable the accelerated networking feature before uninstalling the Cloud Utility Azure.
How do I verify that the accelerated networking is enabled on my machine?
Perform the following steps:
Login to the CLI manager.
Navigate to Administration > OS Console.
Enter the root credentials.
Verify that the Azure Accelerated Networking feature is enabled by using the following commands.
# lspci | grep “Virtual Function”
Confirm the Mellanox VF device is exposed to the VM with the lspci command.
The following is a sample output:
001:00:02.0 Ethernet controller: Mellanox Technologies MT27500/MT27520 Family [ConnectX-3/ConnectX-3 Pro Virtual Function]
# ethtool -S ethMNG | grep vf
Check for activity on the virtual function (VF) with the ethtool -S eth0 | grep vf_ command. If you receive an output similar to the following sample output, accelerated networking is enabled and working. The value of the packets and bytes should not be zero`
How do I verify from the Azure Web portal that the accelerated networking is enabled on my machine?
Perform the following steps:
From the Azure Web portal, navigate to the virtual machine’s details page.
From the left pane, navigate to Networking.
If there are multiple NICs, then select the required NIC.
Verify that the accelerated networking feature is enabled from the Accelerated Networking field.
Can I use the Cloud Shell on the Azure portal for enabling or disabling the accelerated networking feature?
Yes, you can use the Cloud Shell for enabling or disabling the accelerated networking. For more information about the pricing of the cloud shell, refer to the following link.
How can I enable the accelerated networking feature using the Cloud Shell?
Perform the following steps to enable the accelerated networking feature using the Cloud Shell:
From the Microsoft Azure portal, launch the Cloud Shell.
Stop the ESA using the following command.
az vm deallocate --resource-group <ResourceGroupName> --name <InstanceName>
Enable accelerated networking on your virtual machine’s network card using the following command.
az network nic update --name <nic-name> --resource-group <ResourceGroupName> --accelerated-networking true
Start the ESA.
How can I disable the accelerated networking feature using the Cloud Shell?
Perform the following steps to disable the accelerated networking feature using the Cloud Shell:
From the Microsoft Azure portal, launch the Cloud Shell.
Stop the ESA using the following command.
az vm deallocate --resource-group <ResourceGroupName> --name <InstanceName>
Enable accelerated networking on your virtual machine’s network card using the following command.
az network nic update --name <nic-name> --resource-group <ResourceGroupName> --accelerated-networking false
Start the ESA.
Are there any specific regions where the accelerated networking feature is supported?
The accelerated networking feature is supported in all public Azure regions and Azure government clouds. For more information about the supported regions, refer to the following link:
Is it necessary to stop (deallocate) the machine to enable or disable the accelerated networking feature?
Yes. It is necessary to stop (deallocate) the machine to enable or disable the accelerated networking feature.This is because if the machine is not in the stop (deallocate) state, then it may cause the value of the vf packets to freeze. This results in an unexpected behaviour of the machine.
Is there any additional cost for using the accelerated networking feature?
No. There is no additional cost required for using the accelerated networking feature. For more information about the costing, contact Protegrity Support.
20.3.13 - Backing up and Restoring VMs on Azure
On Azure, you can prevent unintended loss of data by backing up your virtual machines. Azure allows you to optimize your backup by providing different levels of consistency. Similarly, the data on the virtual machines can be easily restored to a stable state. You can back up a virtual machine using the following two methods:
Creating snapshots of the disk
Using recovery services vaults
This following sections describe how to create and restore backups using the two mentioned methods.
Backing up and Restoring using Snapshots of Disks
The following sections describe how to create snapshots of disks and recover them on virtual machines. This procedure of backup and recovery is applicable for virtual machines that are created from disks and custom images.
Creating a Snapshot of a Virtual Machine on Azure
To create a snapshot of a virtual machine:
Sign in to the Azure homepage.
On the left pane, select Virtual machines.
The Virtual machines screen appears.
Select the required virtual machine and click Disks.
The details of the disk appear.
Select the disk and click Create Snapshot.
The Create Snapshot screen appears.
Enter the following information:
Name: Name of the snapshot
Subscription: Subscription account for Azure
Select the required resource group from the Resource group drop-down list.
Select the required account type from the Account type drop-down list.
Click Create.
The snapshot of the disk is created.
Restoring from a Snapshot on Azure
This section describes the steps to restore a snapshot of a virtual machine on Azure.
Before you begin
Ensure that the snapshot of the machine is taken.
How to restore from a snapshot on Azure
To restore a virtual machine from a snapshot:
On the Azure Dashboard screen, select Virtual Machine.
The screen displaying the list of all the Azure virtual machines appears.
Select the required virtual machine.
The screen displaying the details of the virtual machine appears.
On the left pane, under Settings, click Disks.
Click Swap OS Disk.
The Swap OS Disk screen appears.
Click the Choose disk drop-down list and select the snapshot created.
Enter the confirmation text and click OK.
The machine is stopped and the disk is successfully swapped.
Restart the virtual machine to verify whether the snapshot is available.
Backing up and Restoring using Recovery Services Vaults
Recovery services vault is an entity that stores backup and recovery points. They enable you to copy the configuration and data from virtual machines. The benefit of using recovery services vaults is that it helps organize your backups and minimize the overhead of management. It comes with enhanced capabilities of backing up data without compromising on data security. These vaults also allow you to create backup polices for virtual machines, thus ensuring integrity and protection. Using recovery services vaults, you can retain recovery points of protected virtual machines to restore them at a later point in time.
For more information about Recovery services vaults, refer to the following link:
On the left pane, under the Operations tab, click Backup.
The Welcome to Azure Backup screen appears on the right pane.
From the Recovery Services vault option, choose Select existing and select the required vault.
In the backup policy, you specify the frequency, backup schedule, and so on. From the Choose backup policy option, select a policy from the following options:
DailyPolicy: Retain the daily backup taken at 9.00 AM UTC for 180 days.
DefaultPolicy: Retain the daily backup taken at 10.30 AM UTC for 30 days.
Create backup policy: Customize the backup policy as per your requirements.
Click Enable backup.
A notification stating that backup is initiated appears.
On the Azure Dashboard screen, search Recovery Services vaults.
The screen displaying all the services vaults appears.
Select the required services vault.
The screen displaying the details of the virtual machine appears.
On the center pane, under Protected items, click Backup items.
The screen displaying the different management types vault appears.
Select the required management type.
After the backup is completed, the list displays the virtual machine for which the backup was initiated.
Restoring a Virtual Machine using Recovery Services Vaults
In Azure, when restoring a virtual machine using Recovery Services vaults, you have the following two options:
Creating a virtual machine: Create a virtual machine with the backed up information.
Replacing an existing: Replace an existing disk on the virtual machine with the backed up information.
Restoring by Creating a Virtual Machine
This section describes how to restore a backup on a virtual machine by creating a virtual machine.
Before you begin
Ensure that the backup process for the virtual machine is completed.
How to restore by creating a virtual machine
To restore a virtual machine by creating a virtual machine:
On the Azure Dashboard screen, search Recovery Services vaults.
The screen displaying all the services vaults appears.
Select the required services vault.
The screen displaying the details of the services vault appears.
On the center pane, under Protected items, click Backup items.
The screen displaying the different management types vault appears.
Select the required management type.
The virtual machines for which backup has been initiated appears.
Select the virtual machine.
The screen displaying the backup details, and restore points appear.
Click Restore VM.
The Select Restore point screen appears.
Choose the required restore point and click OK.
The Restore Configuration screen appears.
If you want to create a virtual machine, click Create new.
Populate the following fields for the respective options:
Restore type: Create a new virtual machine without overwriting an existing backup.
Virtual machine name: Name for the virtual machine.
Resource group: Associate vault to a resource group.
Virtual network: Associate vault to a virtual network.
Storage account: Associate vault to a storage account.
Click OK.
Click Restore.
The restore process is initiated. A virtual machine is created with the backed up information.
Restoring a Virtual Machine by Restoring a Disk
This section describes how to restore a backup on a virtual machine by restoring a disk on a virtual machine.
Before you begin
Ensure that the backup process for the virtual machine is completed. Also, ensure that the VM is stopped before performing the restore process.
How to restore a virtual machine by creating a virtual machine
To restore a virtual machine by creating a virtual machine:
On the Azure Dashboard screen, search Recovery Services vaults.
The screen displaying all the services vaults appears.
Select the required services vault.
The screen displaying the details of the services vault appears.
On the center pane, under Protected items, click Backup items.
The screen displaying the different management types vault appears.
Select the required management type.
The virtual machines for which backup has been initiated appears.
Select the virtual machine.
The screen displaying the backup details, and restore points appear.
Click Restore VM.
The Select Restore point screen appears.
Choose the required restore point and click OK.
The Restore Configuration screen appears.
Click Replace existing.
Populate the following fields:
Restore type: Replace the disk from a selected restore point.
Staging location: Temporary location used during the restore process.
Click OK.
Click Restore.
The restore process is initiated. The backup is restored by replacing an existing disk on the machine with the disk containing the backed up information.
20.3.14 - Deploying the ESA Instance with the Protectors
You can configure the various protectors that are a part of the Protegrity Data Security Platform with an instance of the ESA appliance running on Azure.
Depending on the cloud-based environment that hosts the protectors, the protectors can be configured with the instance of the ESA appliance in one of the following ways:
If the protectors are running on the same virtual network as the instance of the ESA appliance, then the protectors need to be configured using the internal IP address of the ESA appliance within the virtual network.
If the protectors are running on a different virtual network than that of the ESA appliance, then the virtual network of the ESA instance needs to be configured to connect to the virtual network of the protectors.
21 - Architectures
This section describes the Logging architecture. It shows how the various components work together for processing Unprotect, Reprotect, and Protect operations, policies, and the flow of logs.
21.1 - Logging architecture
Logs store information about the system or events that take place on a system. These entries are time stamped to track when an activity occurred. In addition, logs might also store additional information for tracking, monitoring, and solving system issues.
Architecture overview
Logging follows a fixed routine. The system generates logs, which are collected and then forwarded to Insight. Insight stores the logs in the Audit Store. The Audit Store holds the logs and these log records are used in various areas, such as, forensics, alerts, reports, dashboards, and so on. This section explains the logging architecture.
ESA:
The ESA has the td-agent service installed for receiving and sending logs to Insight. Insight stores the logs in the Audit Store that is installed on the ESA. From here, the logs are analyzed by Insight and used in various areas, such as, forensics, alerts, reports, dashboards, visualizations, and so on. Additionally, logs are collected from the log files generated by the Hub Controller and Membersource services and sent to Insight. By default, all Audit Store nodes have all node roles, that is, Master-eligible, Data, and Ingest. A minimum of three ESAs are required for creating a dependable Audit Store cluster to protect it from system crashes. The architecture diagram shows three ESAs. Legacy protectors send logs to the ESA using the Log Facade.
Protectors:
The logging system is configured on the protectors to send logs to Insight on the ESA using the Log Forwarder.
DSG:
The DSG has the td-agent service installed. The td-agent forwards the appliance logs to Insight on the ESA. The Log Forwarder service forwards the data security operations-related logs, namely protect, unprotect, and reprotect, and the PEP server logs to Insight on the ESA.
Important: The gateway logs are not forwarded to Insight.
Container-based protectors
The container-based protectors are the Immutable Java Application Protector Container and REST containers. They Immutable Java Application Protector Container represents a new form factor for the Java Application Protector. The container is intended to be deployed on the Kubernetes environment.
The REST container represents a new form factor that is being developed for the Application Protector REST. The REST container is deployed on Kubernetes, residing on any of the Cloud setups.
Components of Insight
The solution for collecting and forwarding the logs to Insight composes the logging architecture. The various components of Insight are installed on an appliance or an ESA.
A brief overview of the Insight components is provided in the following figure.
Understanding Analytics
Analytics is a component that is configured when setting up the ESA. After it is installed, the tools, such as, the scheduler, reports, rollover tasks, and signature verification tasks are available. These tools are used to maintain the Insight indexes.
Understanding the Audit Store Dashboards
The logs stored in the Audit Store hold valuable data. This information is very useful when used effectively. To view the information in an effective way, Insight provides tools such as dashboards and visualization. These tools are used to view and analyze the data in the Audit Store. The ESA logs are displayed on the Discover screen of the Audit Store Dashboards.
Understanding the Audit Store
The Audit Store is the database of the logging ecosystem. The main task of the Audit Store is to receive all the logs, store them, and provide the information when log-related data is requested. It is very versatile and processes data fast.
The Audit Store is a component that is installed on the ESA during the installation. The Audit Store is scalable, hence, additional nodes can be added to the Audit Store cluster.
Understanding the td-agent
The td-agent forms an integral part of the Insight ecosystem. It is responsible for sending logs from the appliance to Insight. It is the td-agent service that is configured to send and receive logs. The service is installed, by default, on the ESA and DSG.
Based on the installation, the following configurations are performed for the td-agent:
Insight on the local system: In this case, the td-agent is configured to collect the logs and send it to Insight on the local system.
Insight on a remote system: In this case, Insight is not installed locally, such as the DSG, but it is installed on the ESA. The td-agent is configured to forward logs securely to Insight in the ESA.
Understanding the Log Forwarder
The Log Forwarder is responsible for forwarding data security operation logs to Insight in the ESA. In cases when the ESA is unreachable, the Log Forwarder handles the logs until the ESA is available.
For Linux-based protectors, such as the Oracle Database Protector for Linux, if the connection to the ESA is lost, then the Log Forwarder starts collecting the logs in the memory cache. If the ESA is still unreachable after the cache is full, then the Log Forwarder continues collecting the logs and stores in the disk. When the connection to the ESA is restored, the logs in the cache are forwarded to Insight. The default memory cache for collecting logs is 256 MB. If the filesystem for Linux protectors is not EXT4 or XFS, then the logs will not be saved to the disk after the cache is full.
The following table provides information about how the Log Forwarder handles logs in different situations.
If..
then the Log Forwarder…
Connection to ESA is lost
Starts collecting logs in the in-memory cache based on the cache limit defined.
Connection to ESA is lost and the cache is full
In case of Linux-based protectors, the Log Forwarder continues to collect the logs and stores in disk. If the disk space is full, then all the cache files are emptied and the Log Forwarder continues to run. For Windows-based protectors, the Log Forwarder starts throwing away the logs.
Connection to ESA is restored
Forwards logs to Insight on the ESA.
Understanding the log aggregation
The architecture, the configurations, and the workflow provided here describes the log aggregation feature.
Log aggregation happens within the protector.
Protector flushes all security audits once every second, by default. If a different user, data elements, or operations are involved, the number of security logs generated every second varies. The operations include protect, unprotect, or reprotect. Also, the generation rate of security logs depends on the number of users, data elements, and operations involved.
FluentBit, by default, sends one batch every 10 second and when this occurs it will take all security and application logs.
The following diagram describes the architecture and the workflow of the log aggregation.
The security logs generated by the protectors are aggregated in the protectors.
The application logs are not aggregated and they are sent directly to the Log Forwarder.
The security logs are aggregated and flushed at specific time intervals.
The aggregated security logs from the Log Forwarder are forwarded to Insight.
The following diagram illustrates how similar logs are aggregated.
The similar security logs are aggregated after the log send interval or when an application is stopped.
For example, if 30 similar protect operations are performed simultaneously, then a single log will be generated with a count of 30.
21.2 - Overview of the Protegrity logging architecture
Logs store information about the system or events that take place on a system. These entries are time stamped to track when an activity occurred. In addition, logs might also store additional information for tracking, monitoring, and solving system issues.
Overview of logging
Protegrity software generates comprehensive logs. The logging infrastructure generates a huge number of log entries that take time to read. The enhanced logging architecture consolidates logs in Insight. Insight stores the logs in the Audit Store and provides tools to make it easier to view and analyze log data.
When the user performs some operation using Protegrity software, or interact with Protegrity software directly, or indirectly using a different software or interface, a log entry is generated. This entry is stored in the Audit Store with other similar entries. A log entry contains valuable information about the interaction between the Protegrity software and a user or other systems.
A log entry might contain the following information:
Date and time of the operation.
User who initiated the operation.
Operation that was initiated.
Systems involved in the operation.
Files that were modified or accessed.
As the transactions build up, the quantum of logs generated also increases. Every day a lot of business transactions, inter-process activities, interactivity-based activities, system level activities, and other transactions take place resulting in a huge number of log entries. All these logs take up a lot of time and space to store and process.
Evolution of logging in Protegrity
Every system had its own advantages and disadvantages. Over time, the logging system evolved to reduce the disadvantages of the existing system and also improve on the existing features. This ensured that a better system was available that provided more information and at the same time reduced the processing and storage overheads.
Logging in legacy products
In legacy Protegrity platforms, that is version 8.0.0.0 and earlier, security events were collected in the form of logs. These events were a list of transactions when the protection, unprotection, and reprotection operations were performed. The logs were delivered as a part of the customer Protegrity security solution. This system allowed tracking of the operations and also provided information for troubleshooting the Protegrity software.
However, this had disadvantages due to the volume of the logs generated and the granularity of the logs. When many security operations were performed, the volume of logs kept on increasing. This made it difficult for the platform to keep track of everything. When the volume increased beyond a limit and could not be managed, then customers had to turn off receiving log operations for the successful attempts to get protected data in the clear.
The logs collected reported the security operations performed. However, the exact number of operations performed was difficult to record. This inconsistency existed across the various protectors. The SDKs could provide individual counts of the operations performed while database protectors could not provide the exact count of the operations performed.
To solve this issue of obtaining exact counts, the capability called metering was added to the Protegrity products. Metering provided a count of the total number of security events. Even in the case of Metering, storage was an issue. This is because one audit log was generated in PostgreSQL in each ESA. Cross replications of logs across ESAs was a challenge because there was no way to automatically replicate logs across ESAs.
New logging infrastructure
Protegrity continues to improve on the products and solutions provided. Starting from version 8.1.0.0, a new and robust logging architecture in introduced on the ESA. This new system improves on the way audit logs are created and processed on the protectors. The logs are processed and aggregated according to the event being performed. For example, if 40 protect operations are performed on the protector, then one log with the count 40 is created instead of 40 individual logs for each operation. This reduces the number of logs generated and at the same time retains the quality of the information generated.
The audit logs that are created provide a lot of information about the event being performed on the protector. In addition to system events and protection events, the audit log also holds information for troubleshooting the protector and the security events on the protector. This solves the issue of granularity of the logs that existed in earlier systems. An advantage of this architecture is that the logs help track the working of the system. It also allows monitoring the system for any issues, both in the working of the system and from a security perspective.
The new architecture uses software, such as, Fluent Bit and Fluentd. These allow logs to be transported from the protector to the ESA over a secure, encrypted line. This ensures the safety and security of the information. The new architecture also used Elasticsearch for replicating logs across ESAs. It made the logging system more robust and protected the data from being lost in the case of an ESA failure. Over iterations, the Elasticsearch was upgraded with additional security using Open Distro. From version 9.1.0.0, OpenSearch was introduced that improved the logging architecture further. These software provided configuration flexibility to provide a better logging system.
From version 9.2.0.0, Insight is introduced that allow the logs to be visualized and various reports to be created for monitoring the health and the security of the system. Additionally, from the ESA version 9.2.0.0 and protectors version 9.1.0.0 or 9.2.0.0 the new logging system has been improved even further. It is now possible to view how many security operations the Protegrity solution has delivered and what Protegrity protectors are being used in the solution.
The audit logs generated are important for a robust security solution and are stored in Insight in the ESA. Since the volume of logs generated have been reduced in comparison to legacy solutions, the logs are always received by the ESA. Thus, the capability to turn off logging is no longer required and has been deprecated. The new logging architecture offers a wide range of tools and features for managing logs. In the case where the volume of logs is very large, the logs can be archived using the Index Lifecycle Management (ILM) to the short term archive or long term archive. This frees up the system and resources and at the same time makes the logs available when required in the future.
The process for archiving logs can also be automated using the scheduler provided with the ESA. In addition to archiving logs, the processes for auto generating reports, rolling over the index, and performing signature verification can also be automated.
For more information about scheduling tasks, refer here.


")


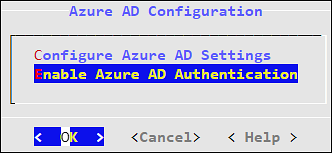
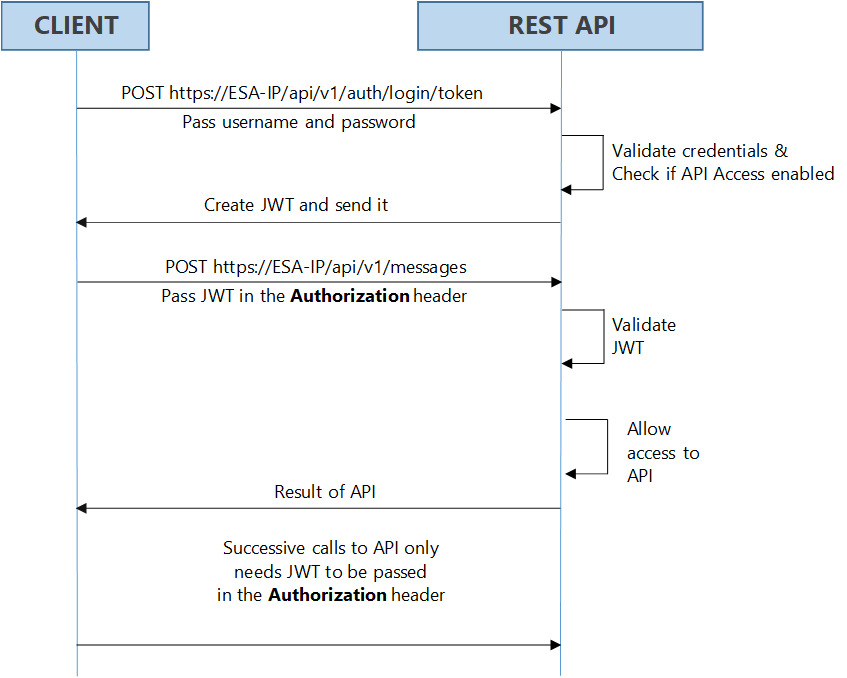
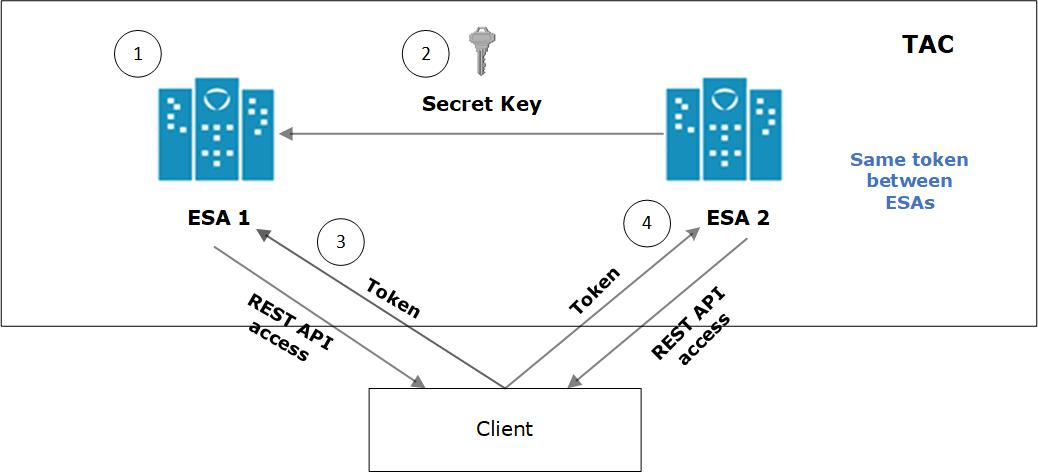


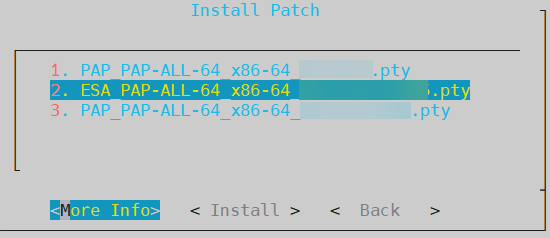

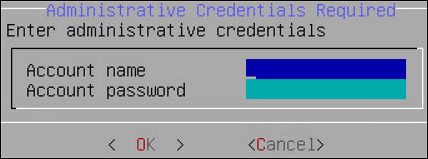
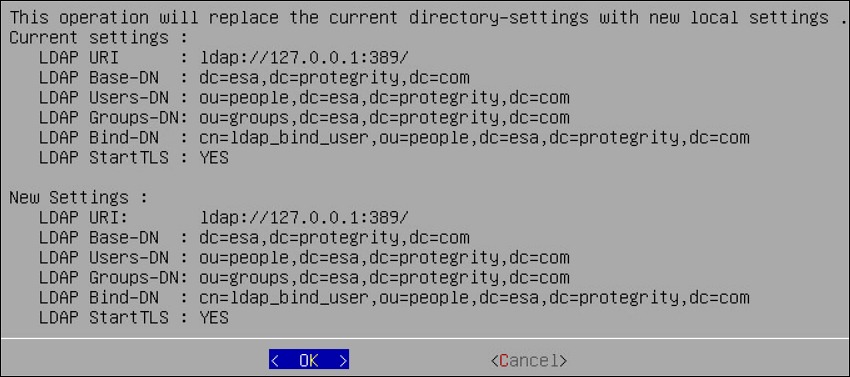
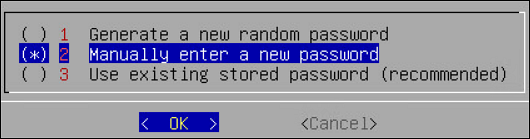
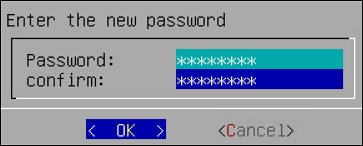


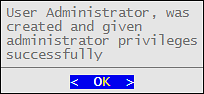
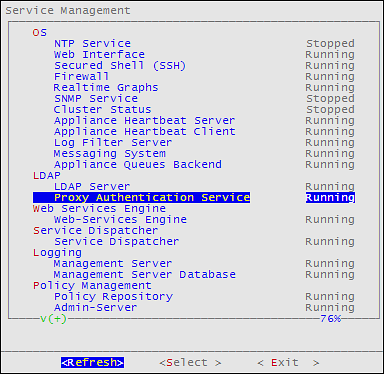


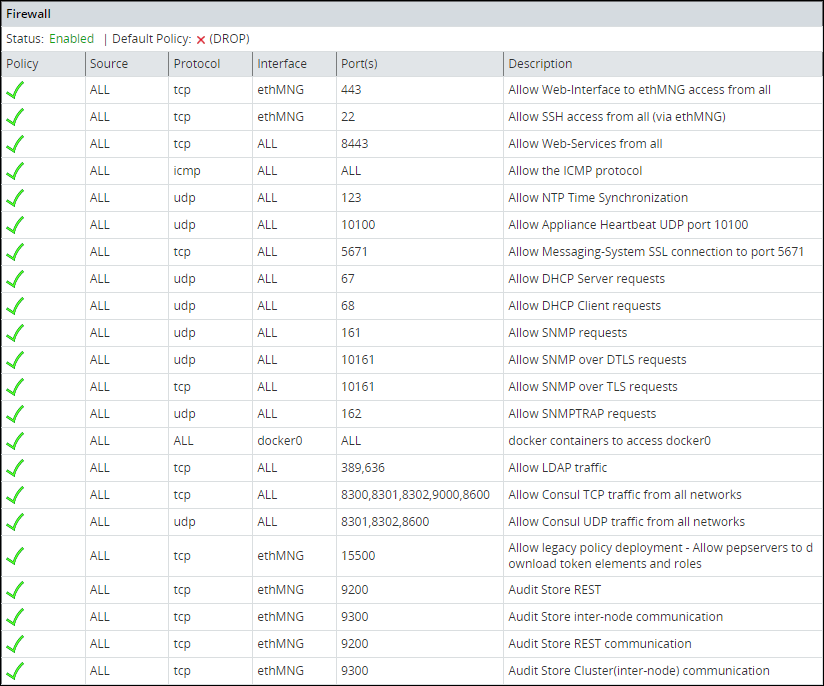


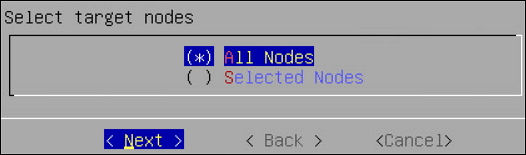


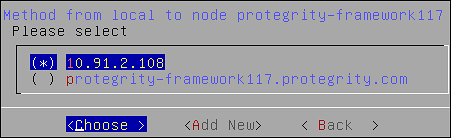


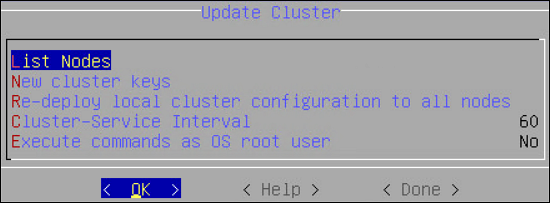

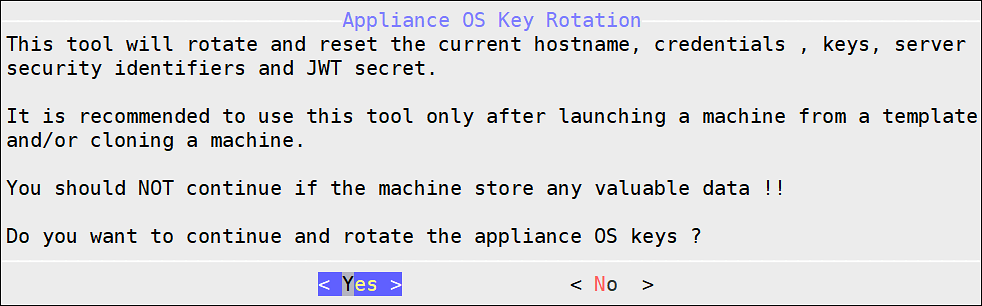
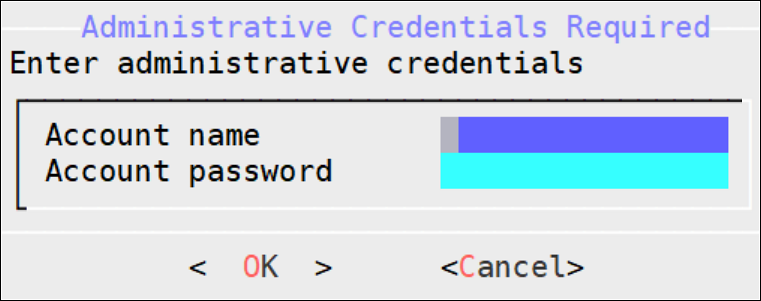
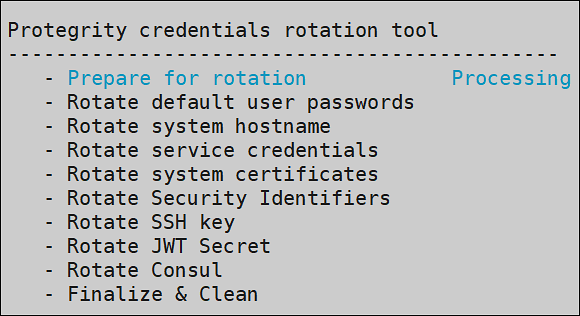
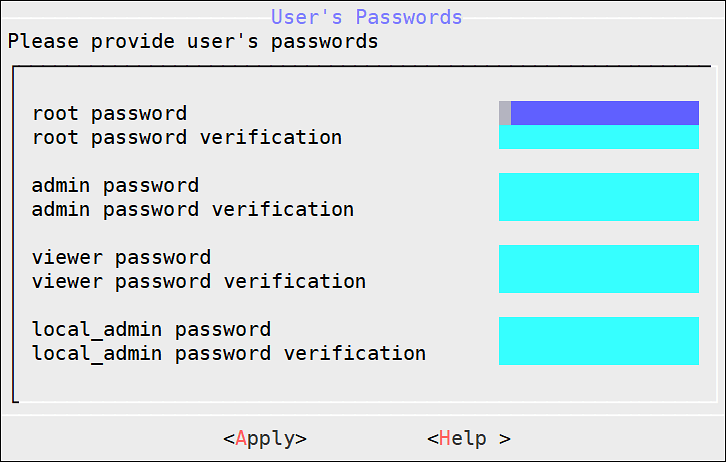
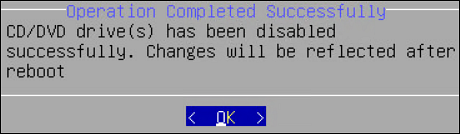


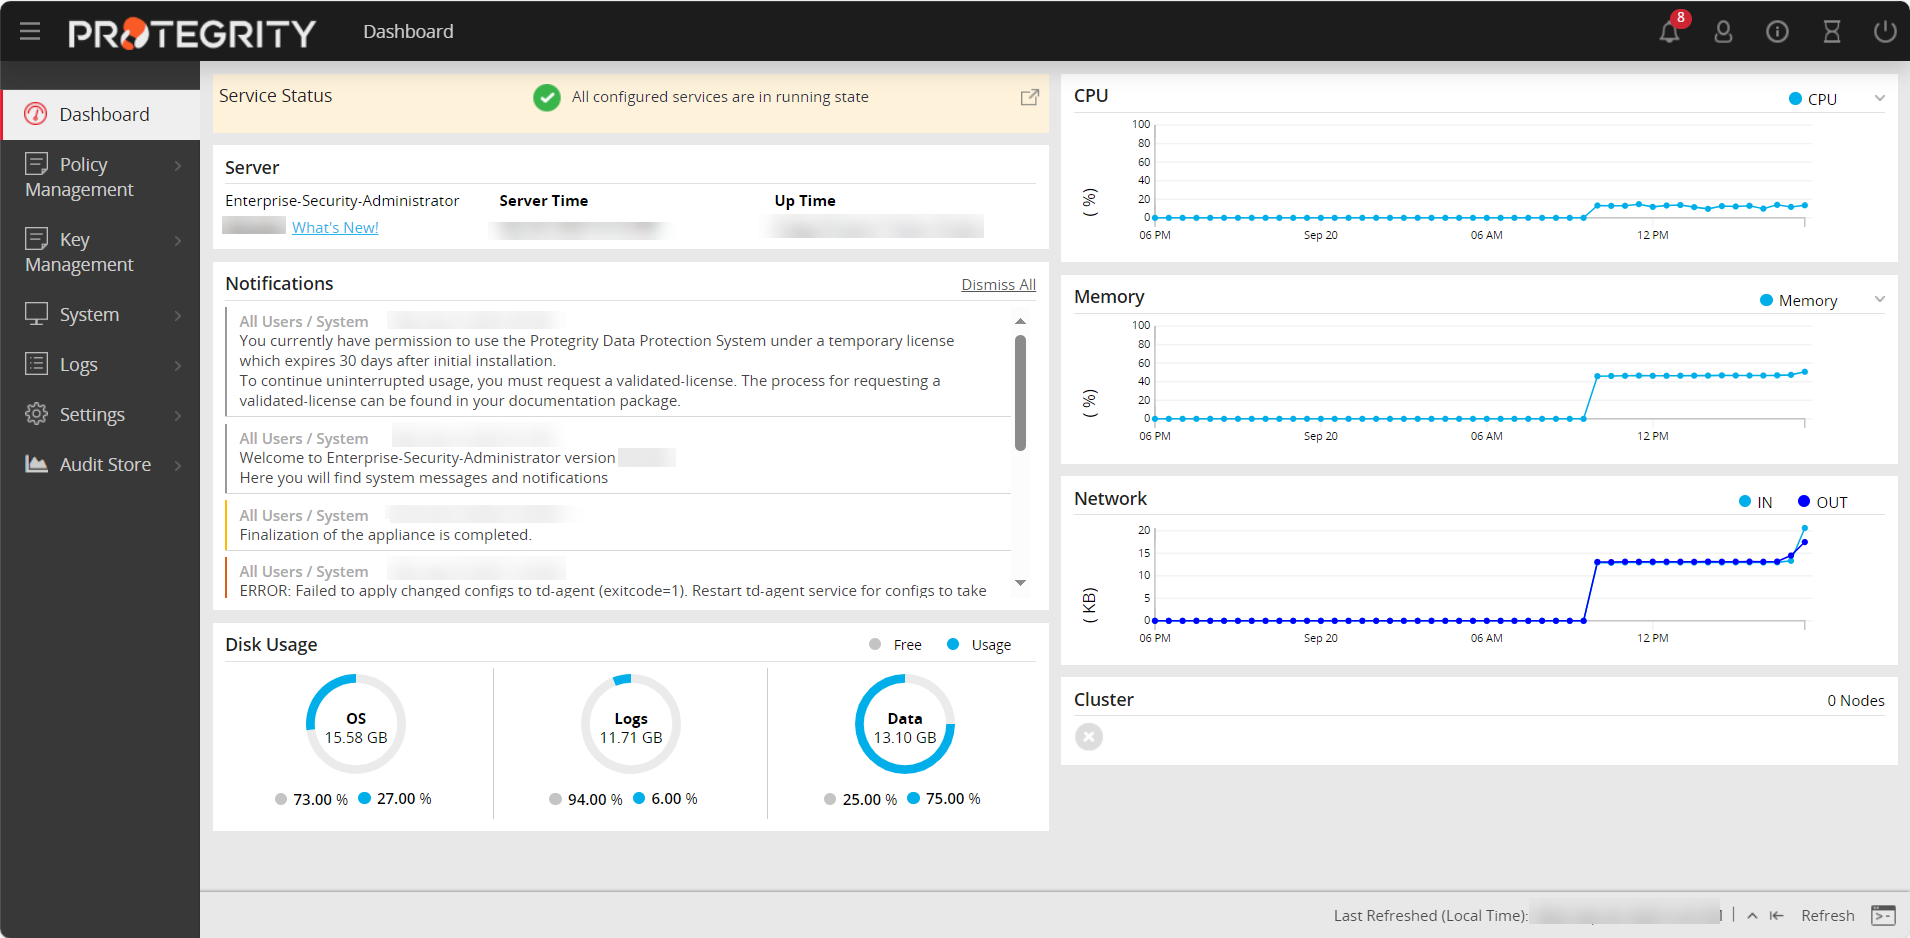


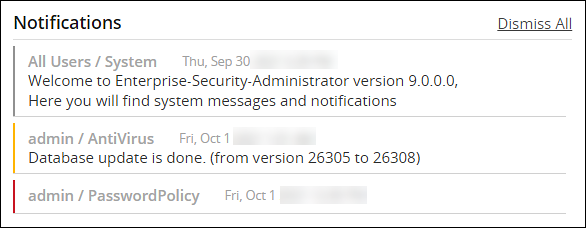
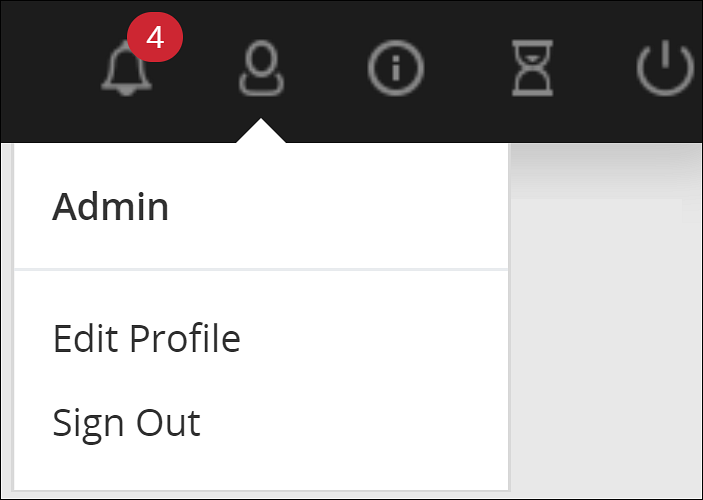
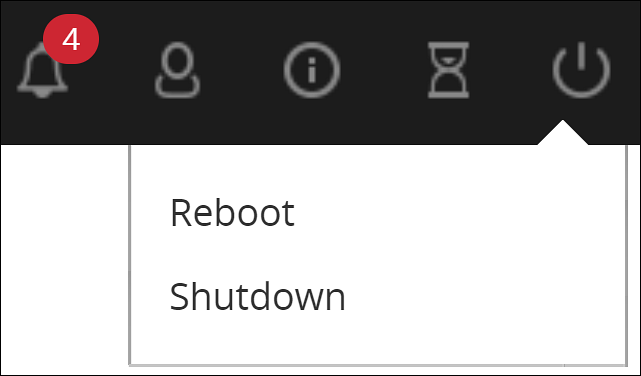
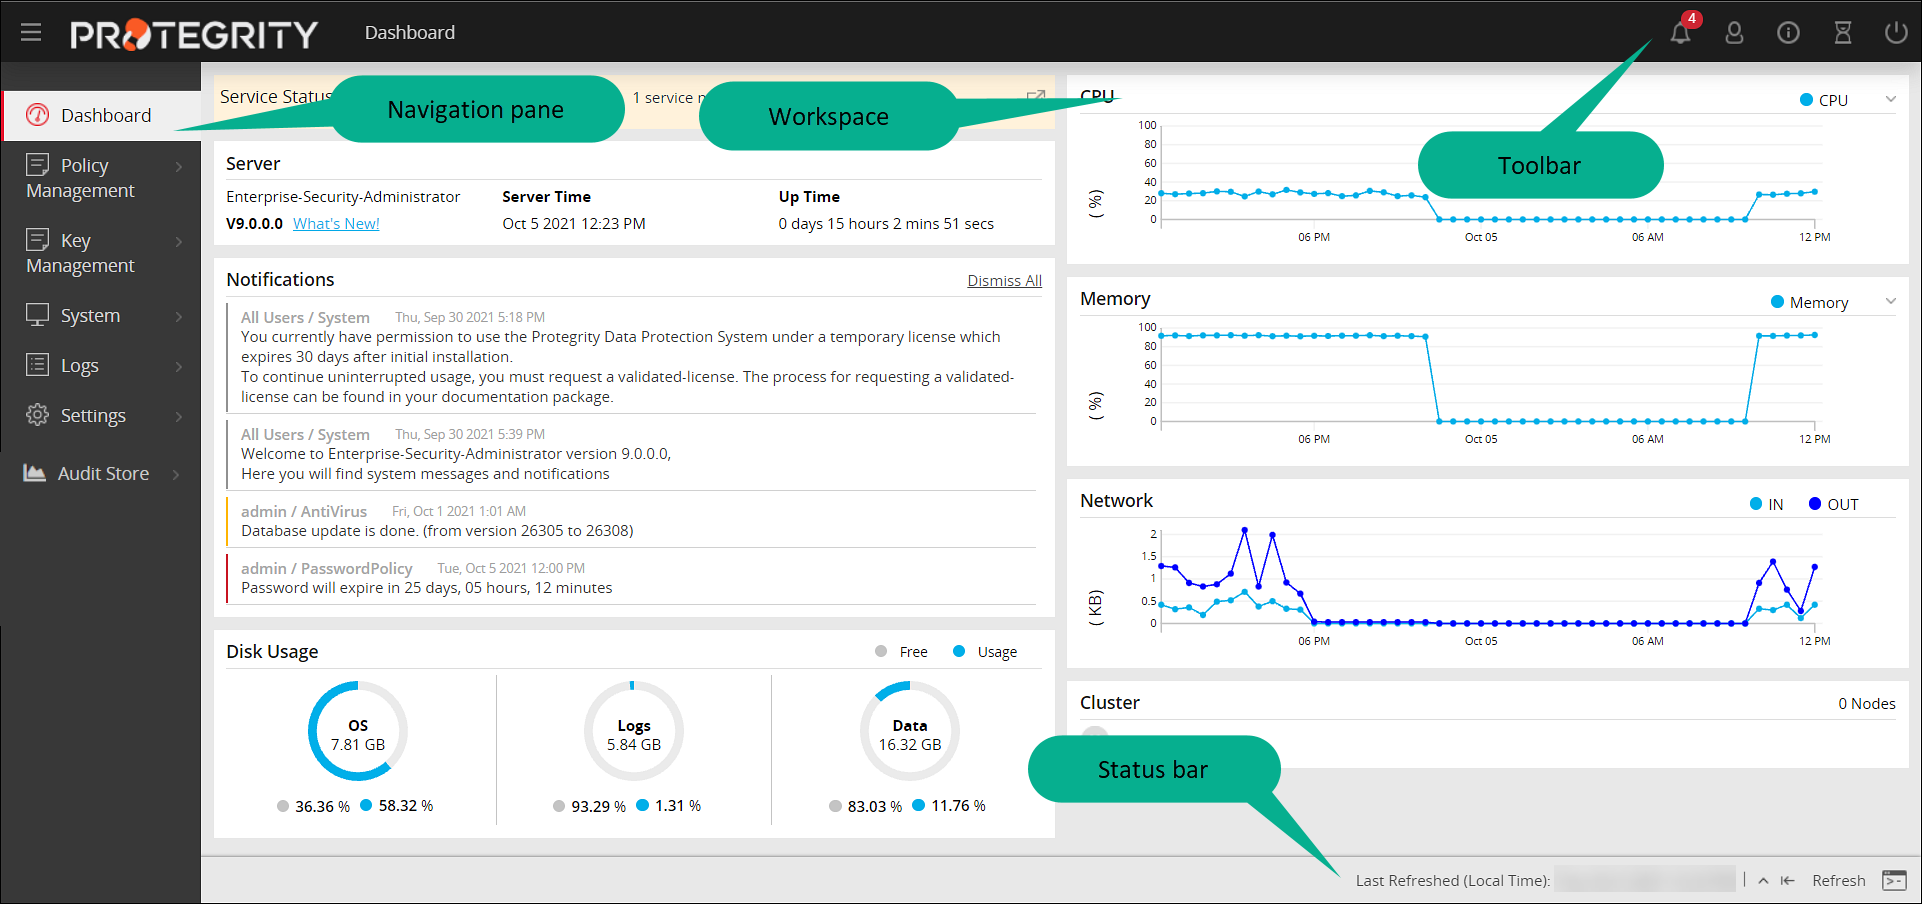
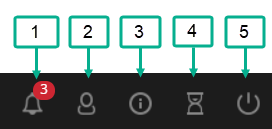
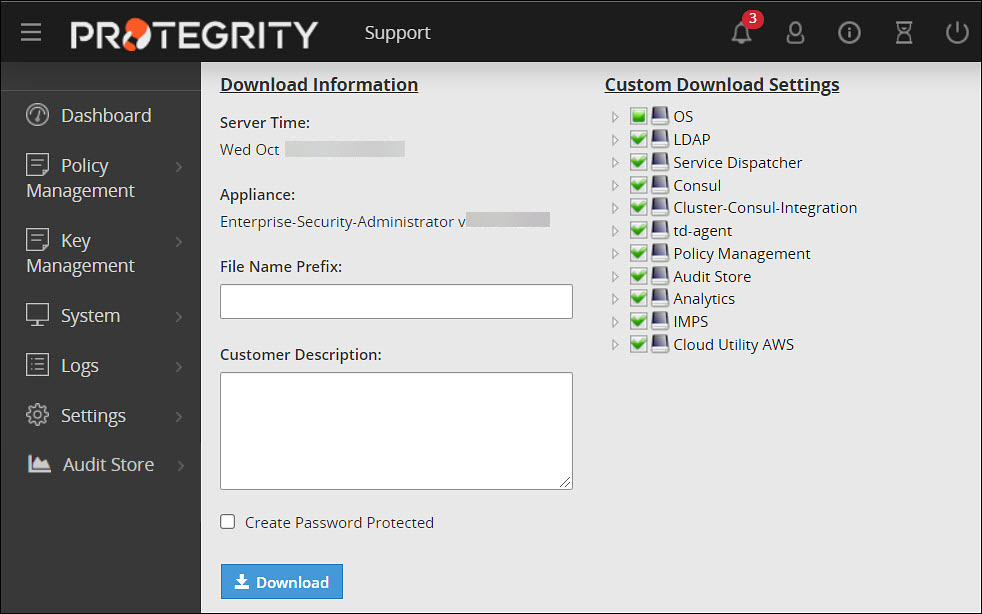
 > About option on the toolbar allows you to view the version information about the ESA and its components.
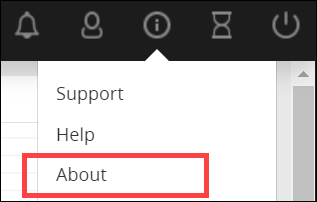


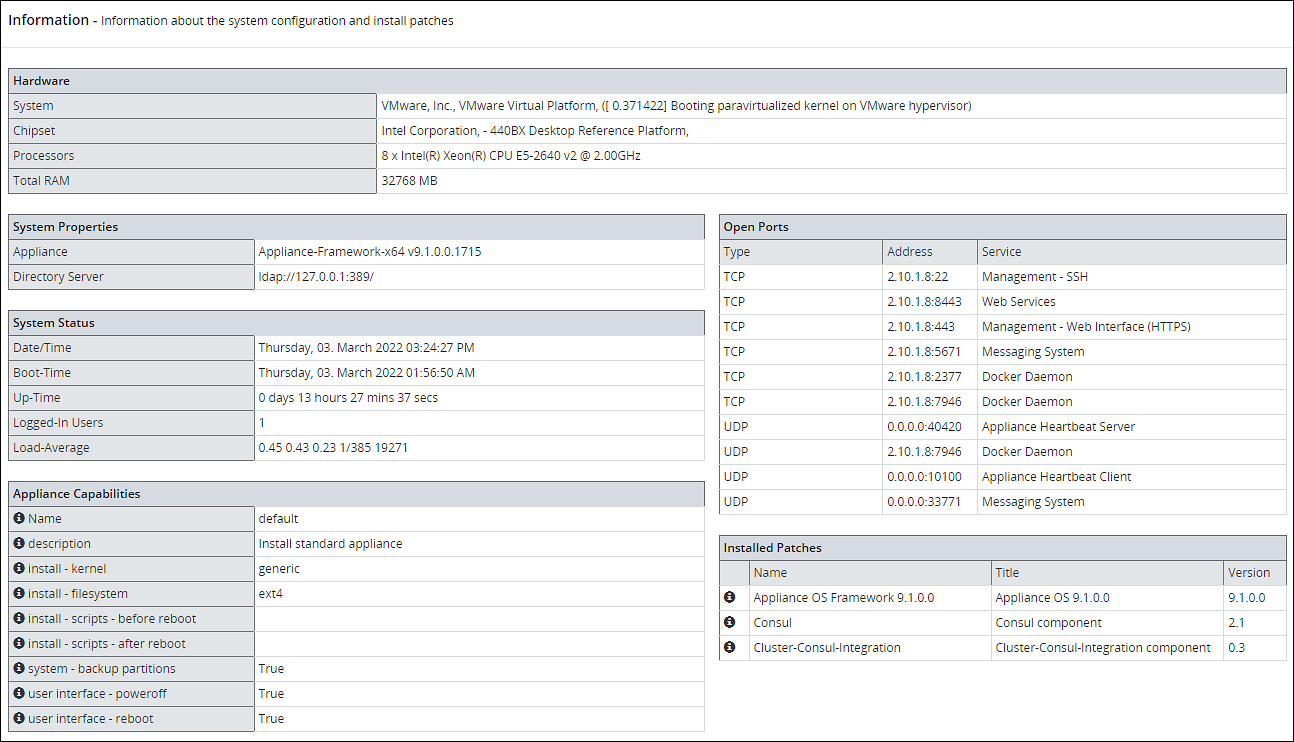
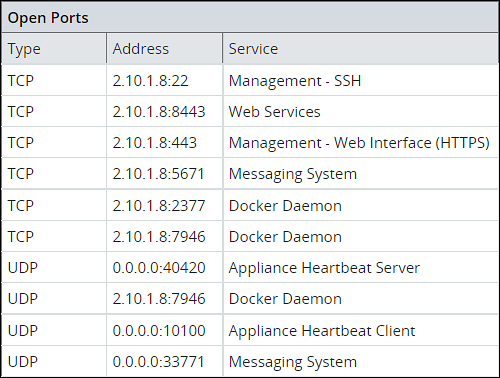
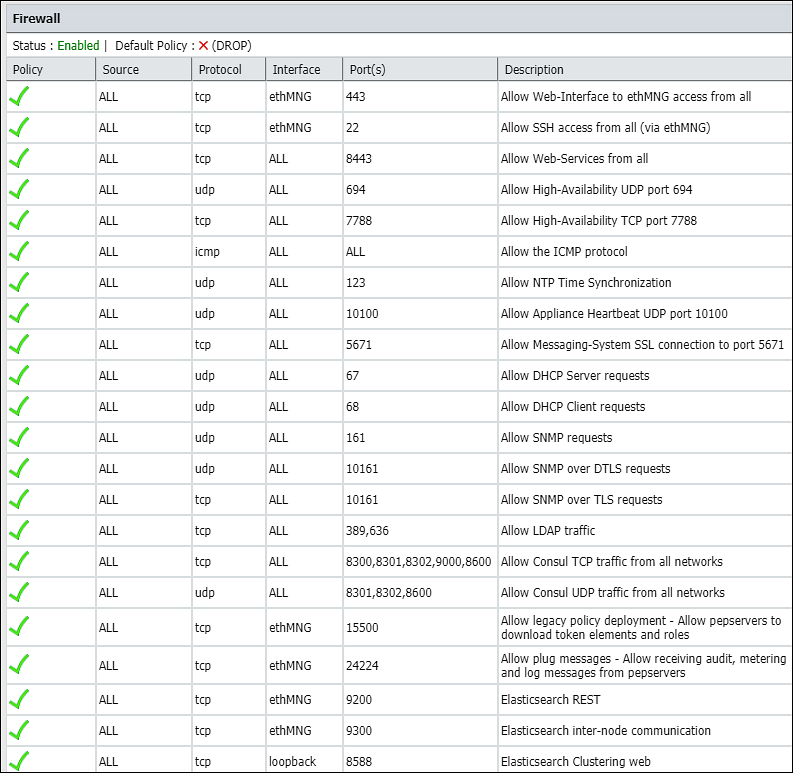
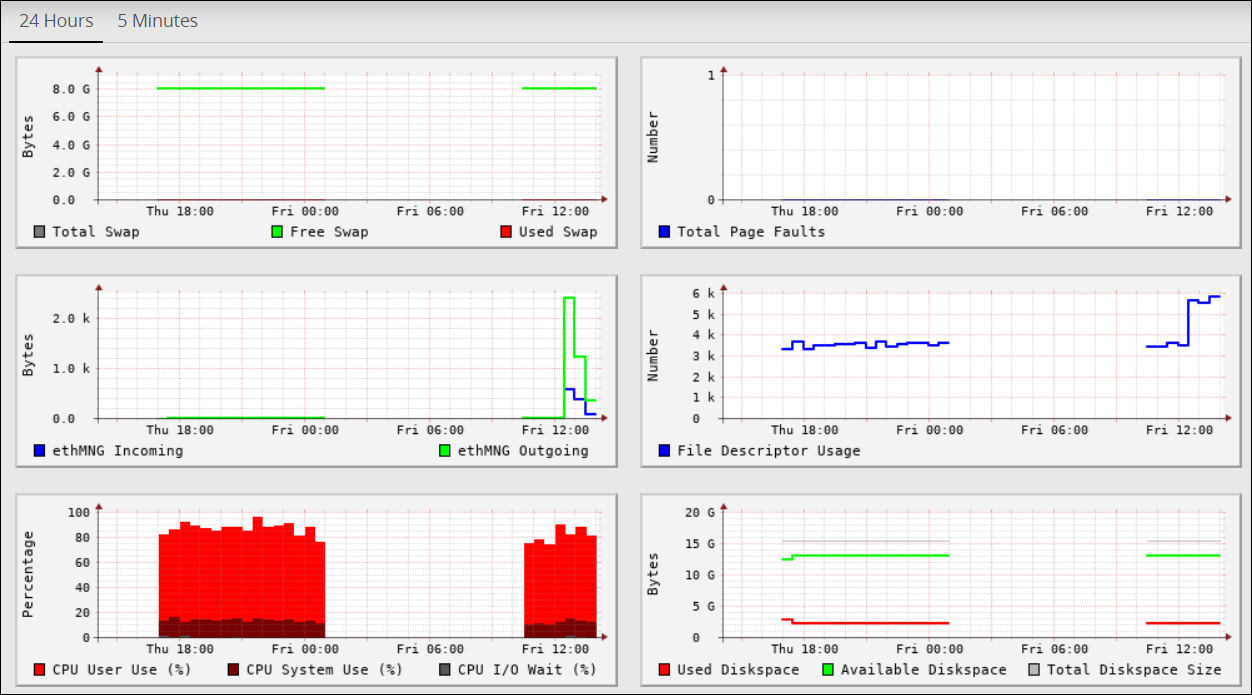
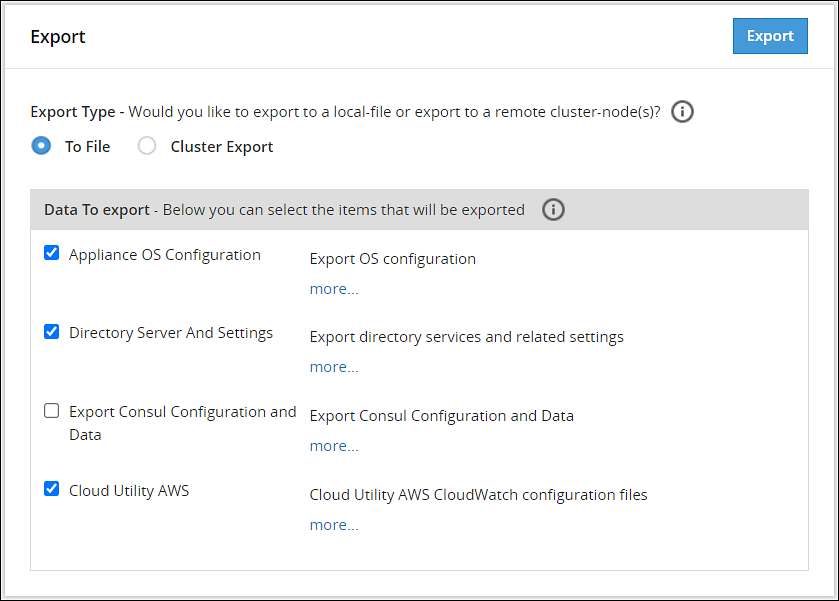
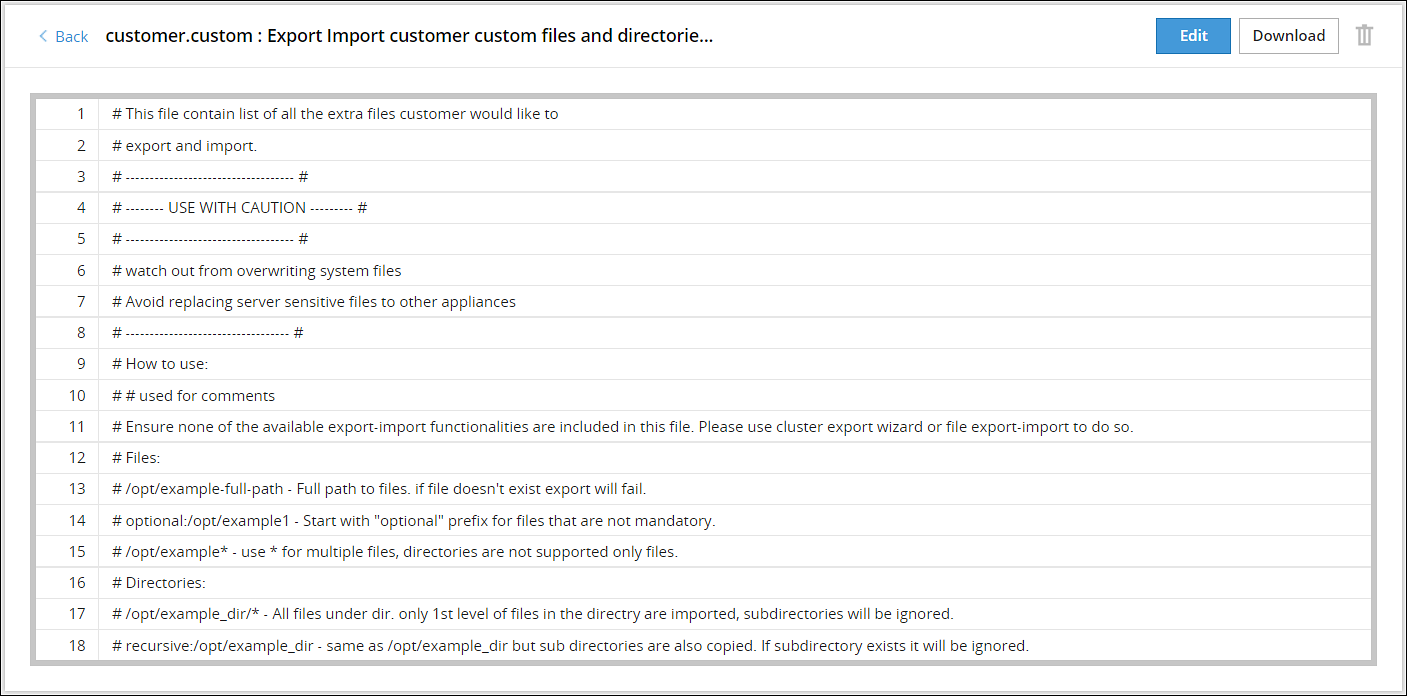
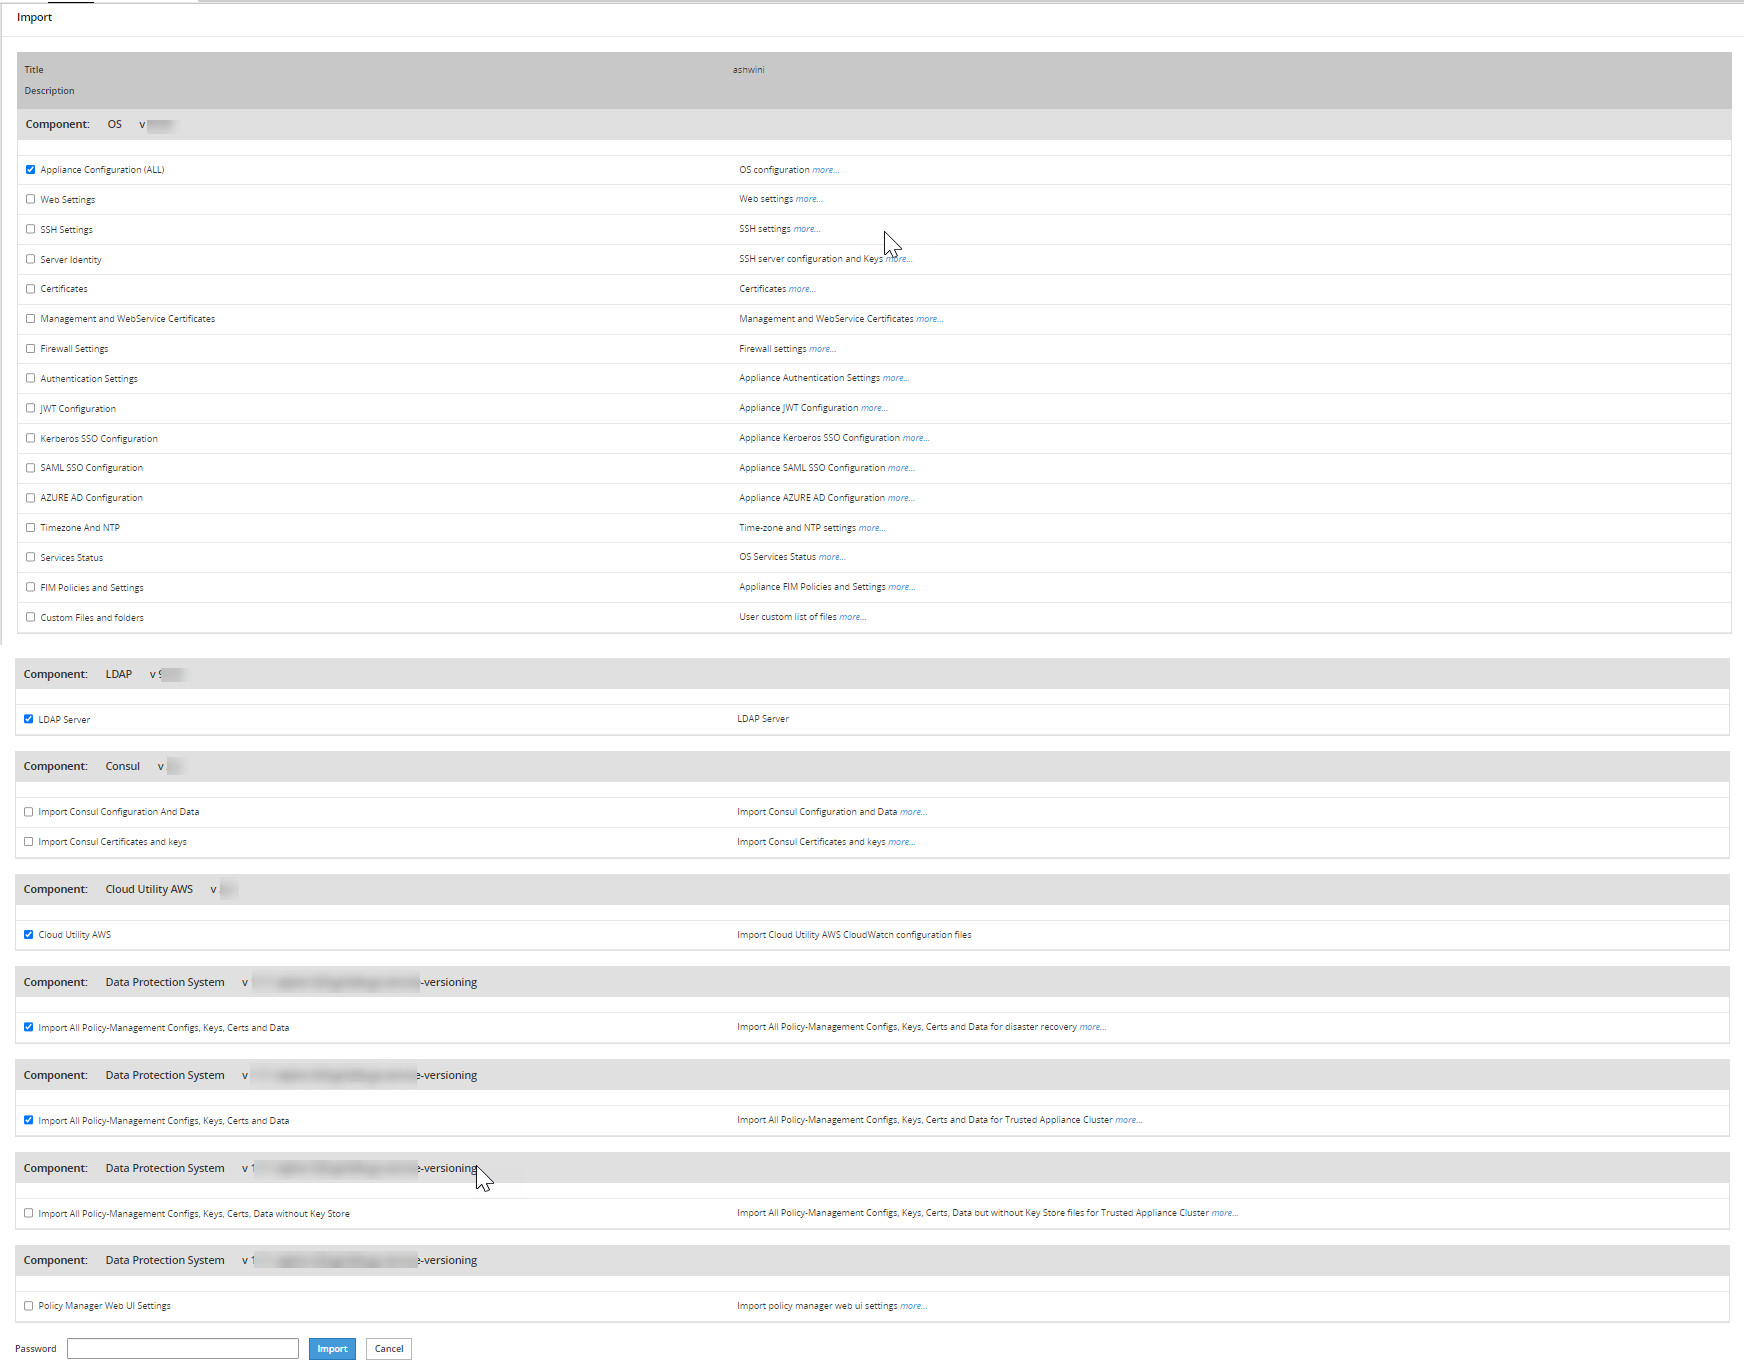


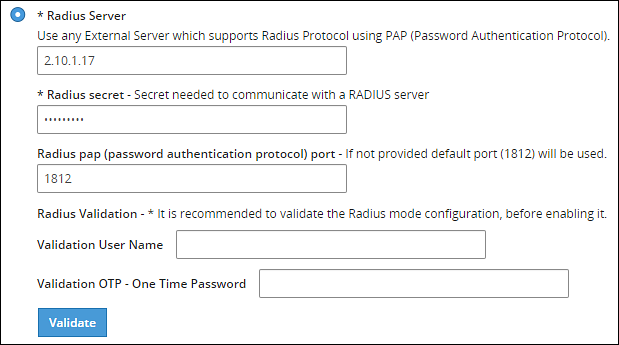
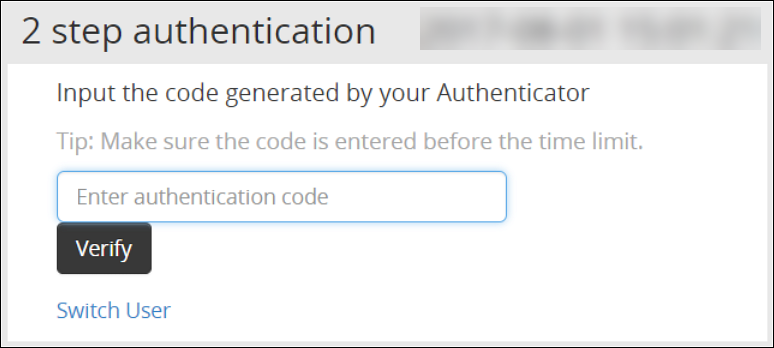
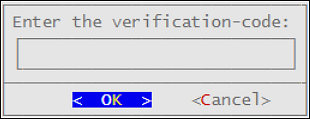
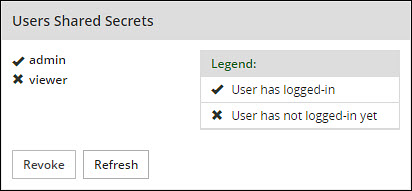

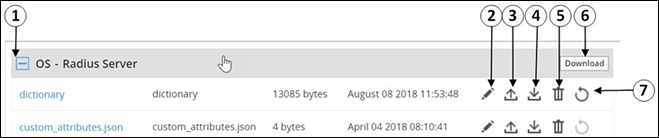


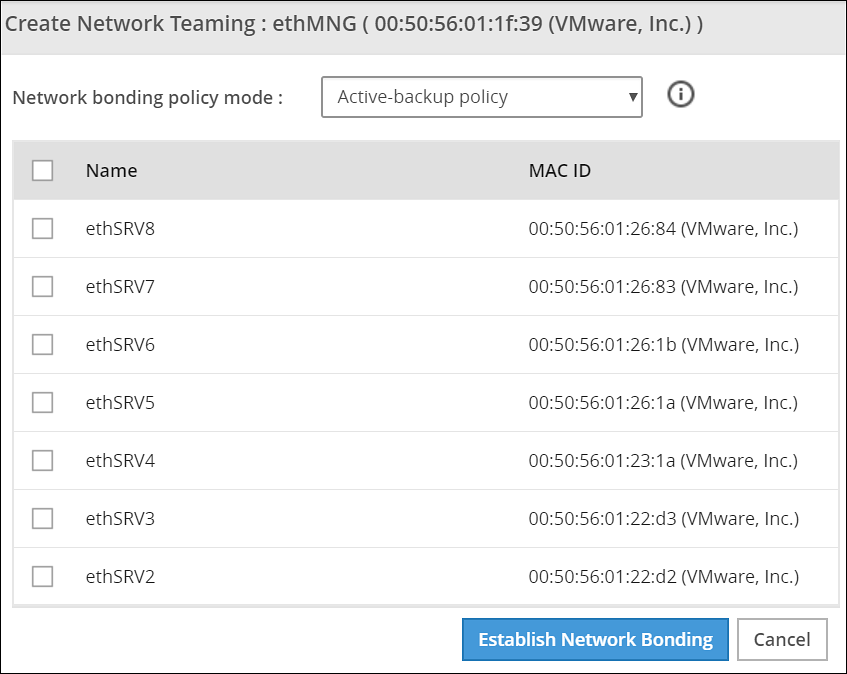
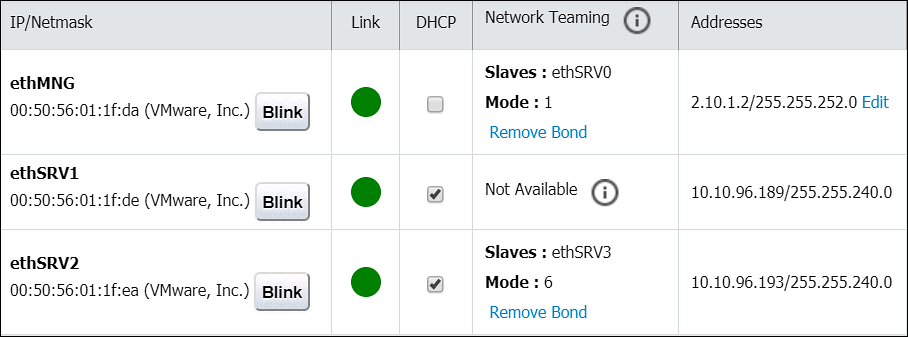
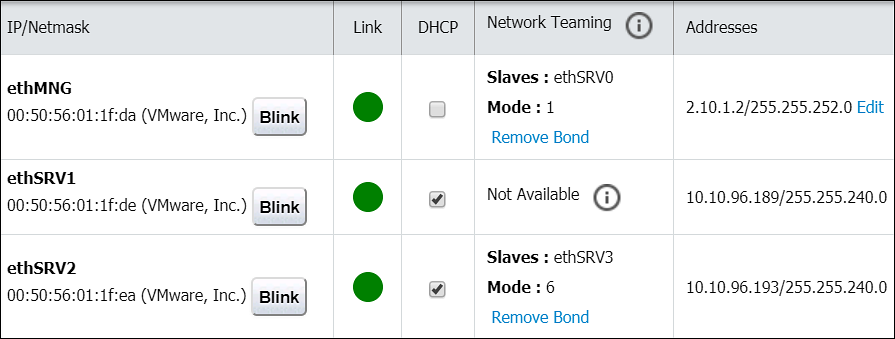
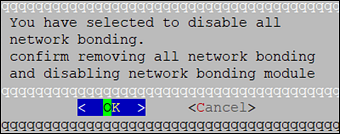


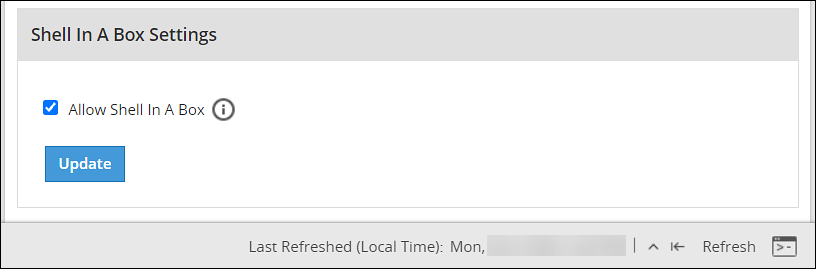


")
")


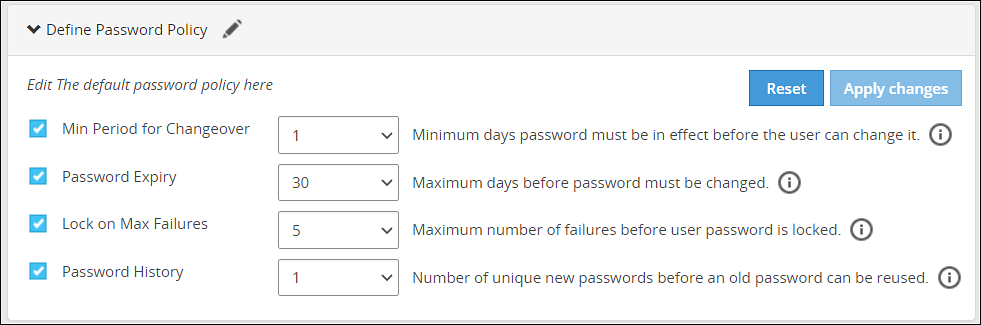
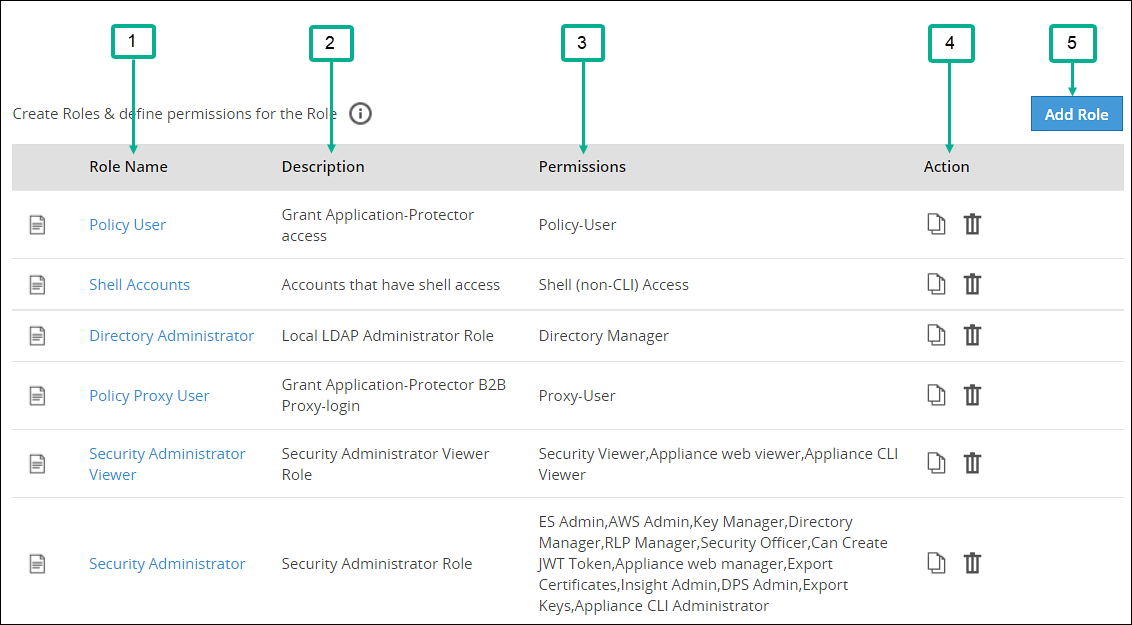


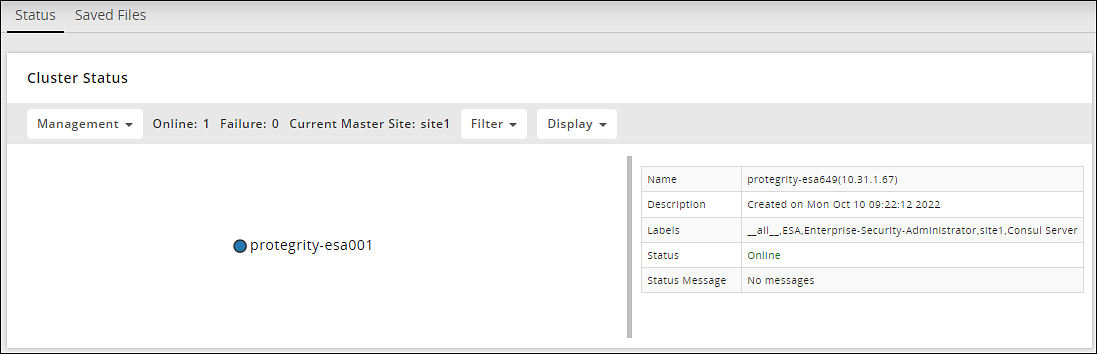
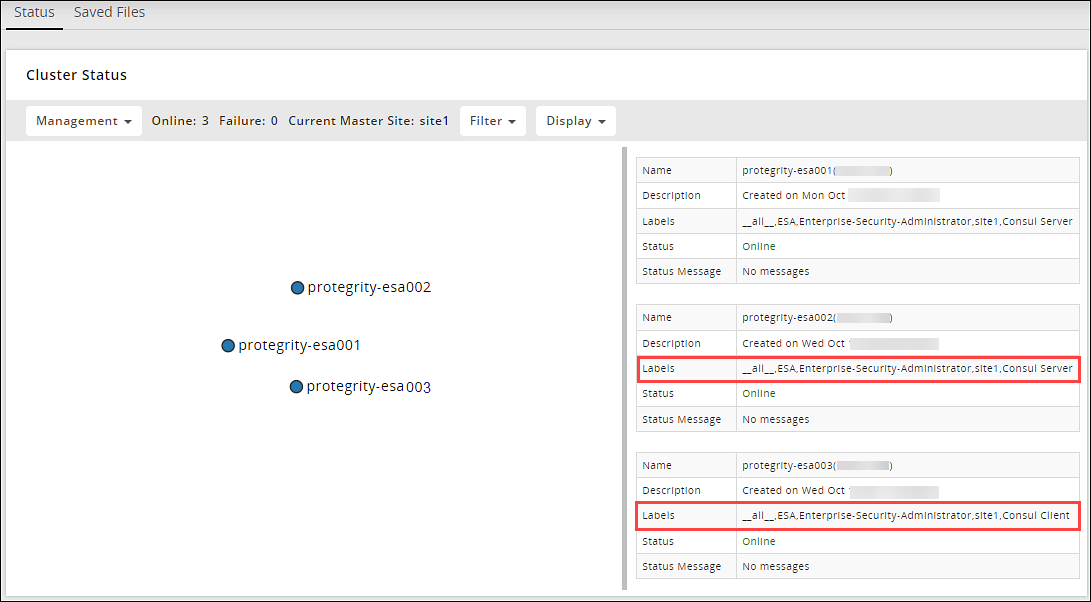
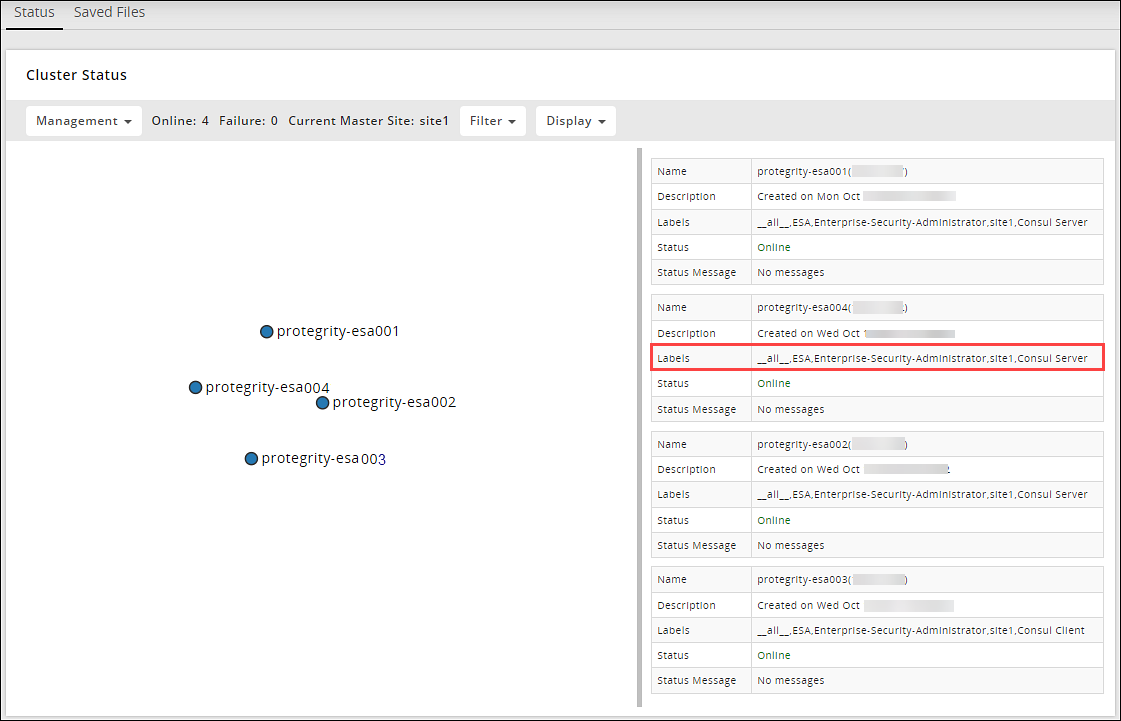
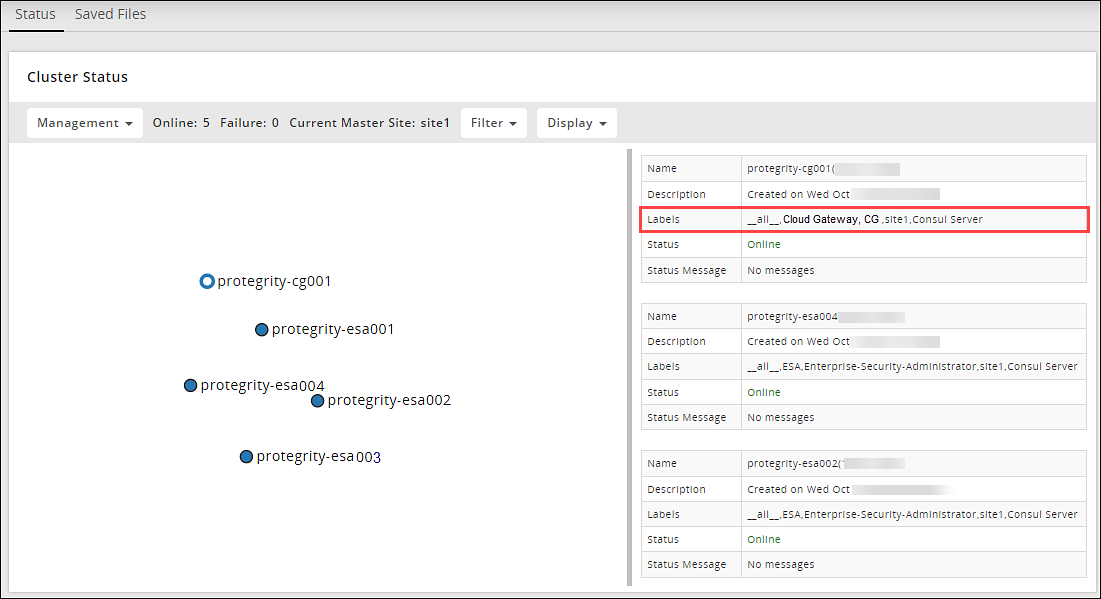

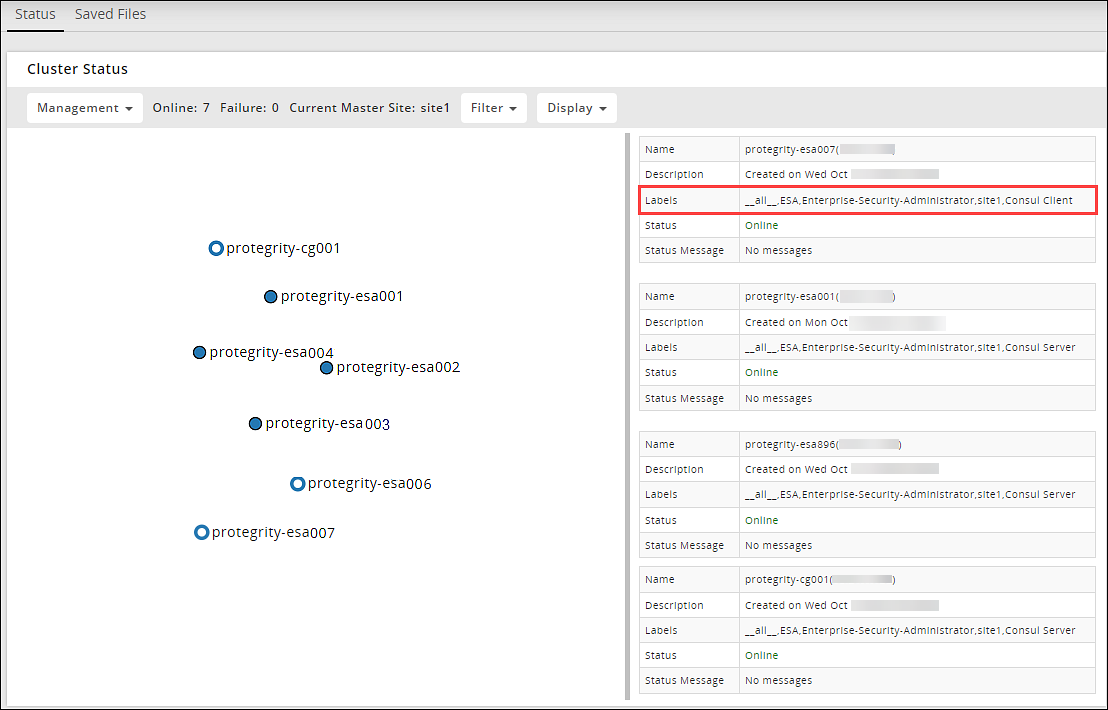


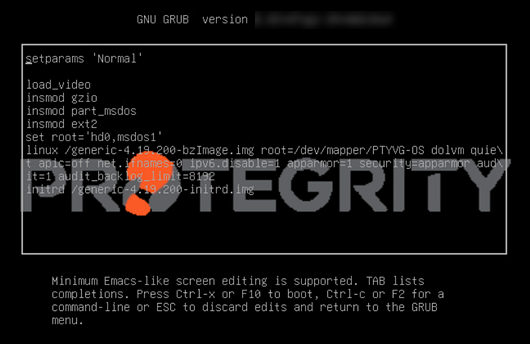
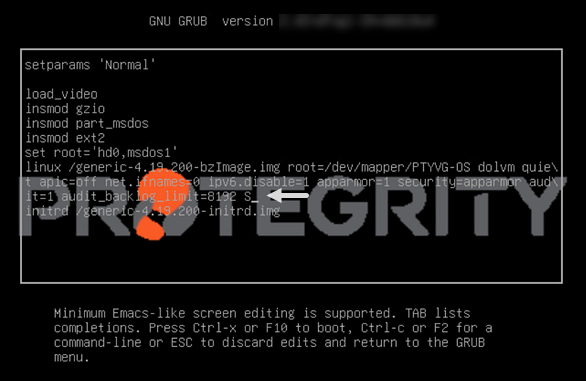

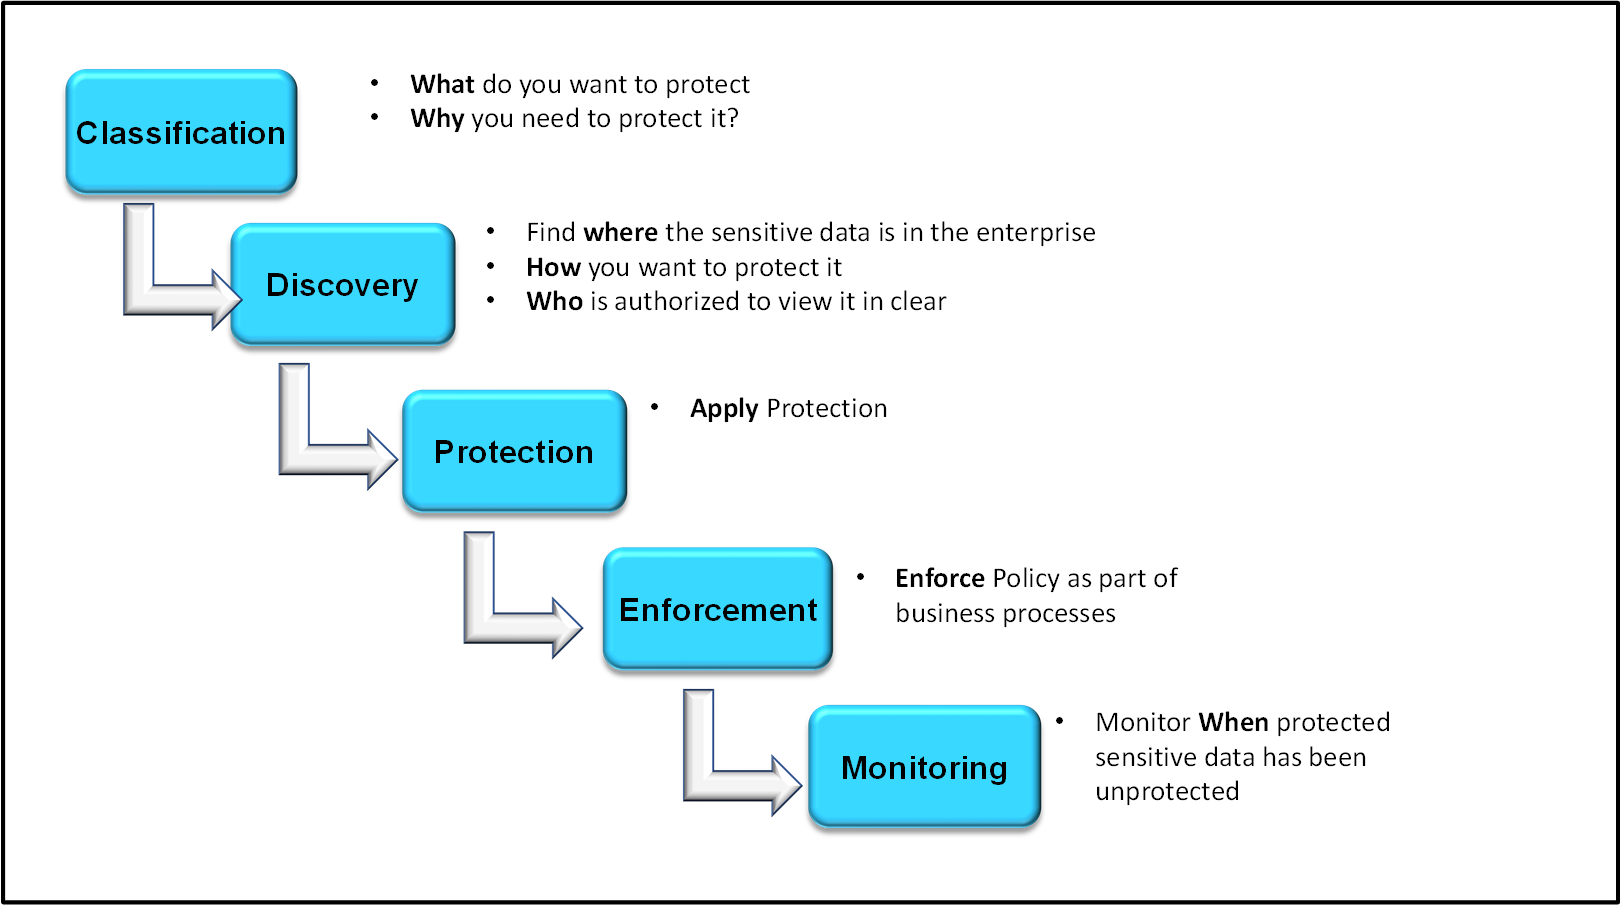


 ) icon to save the query.

 ) icon to view the saved queries.


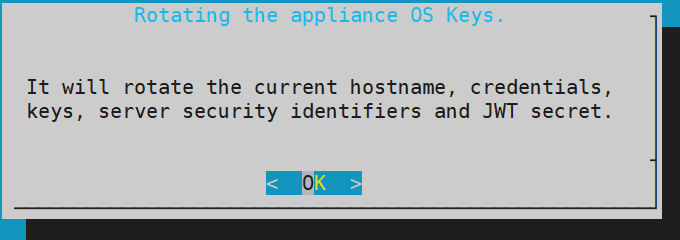


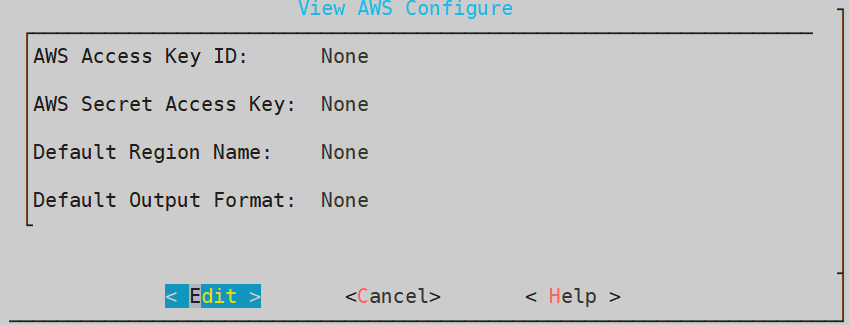
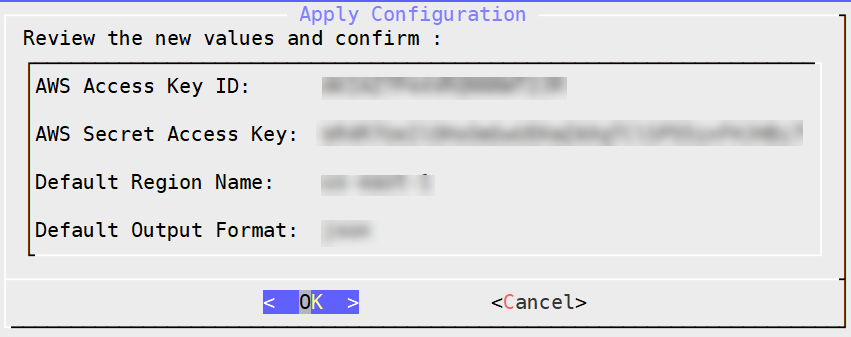
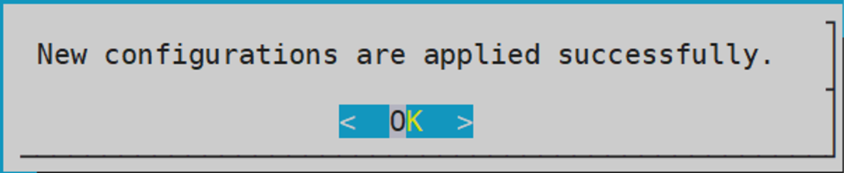
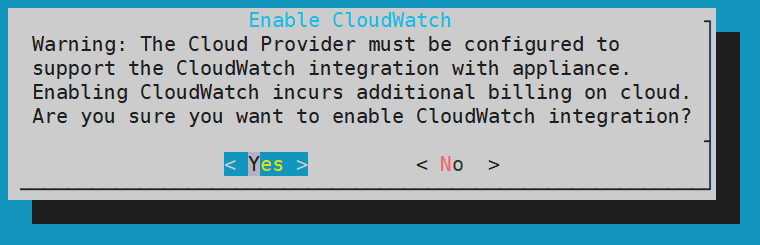
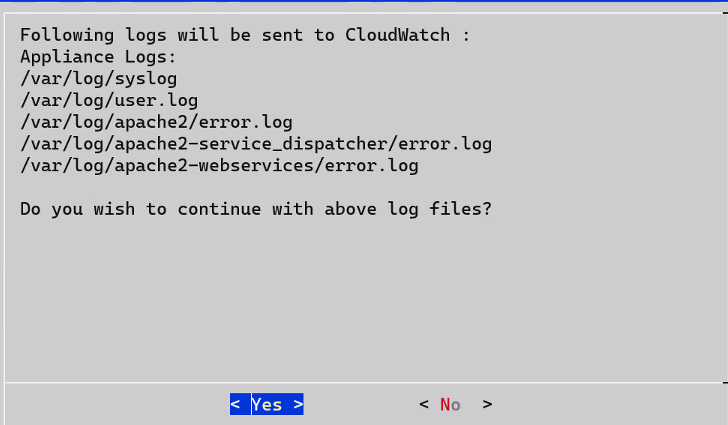
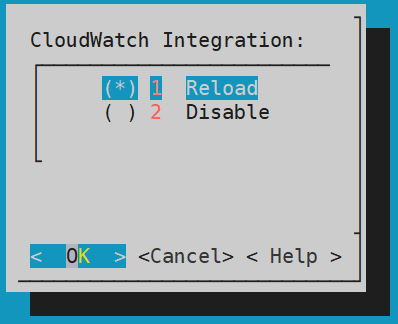
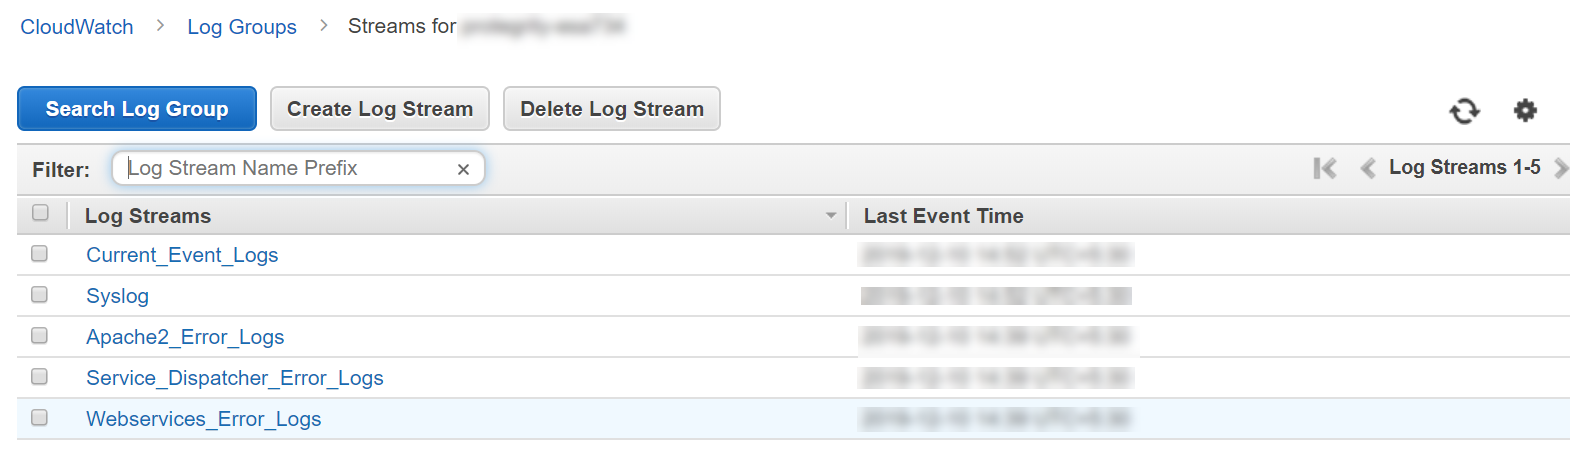
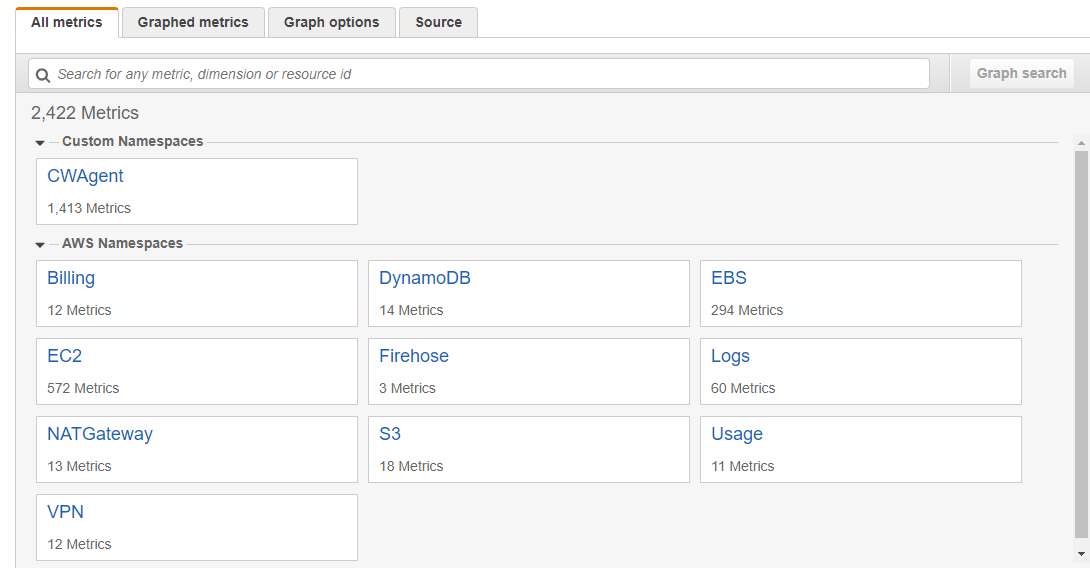
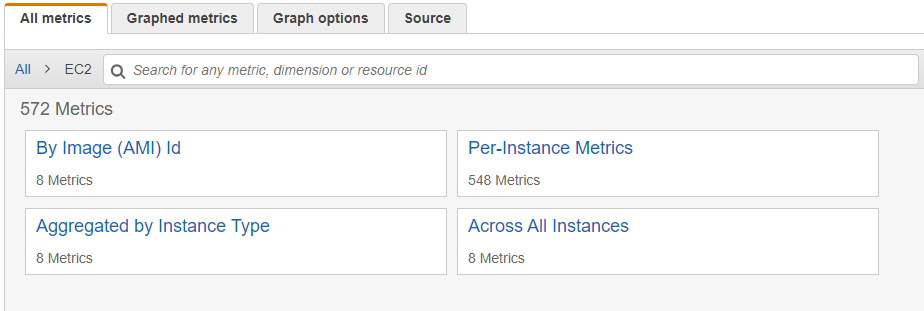
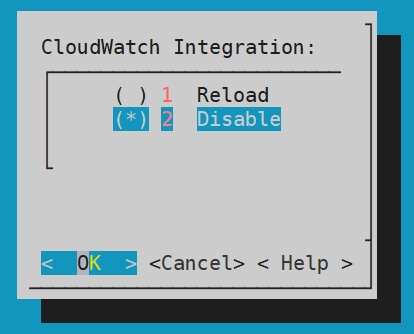
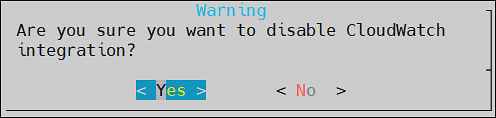


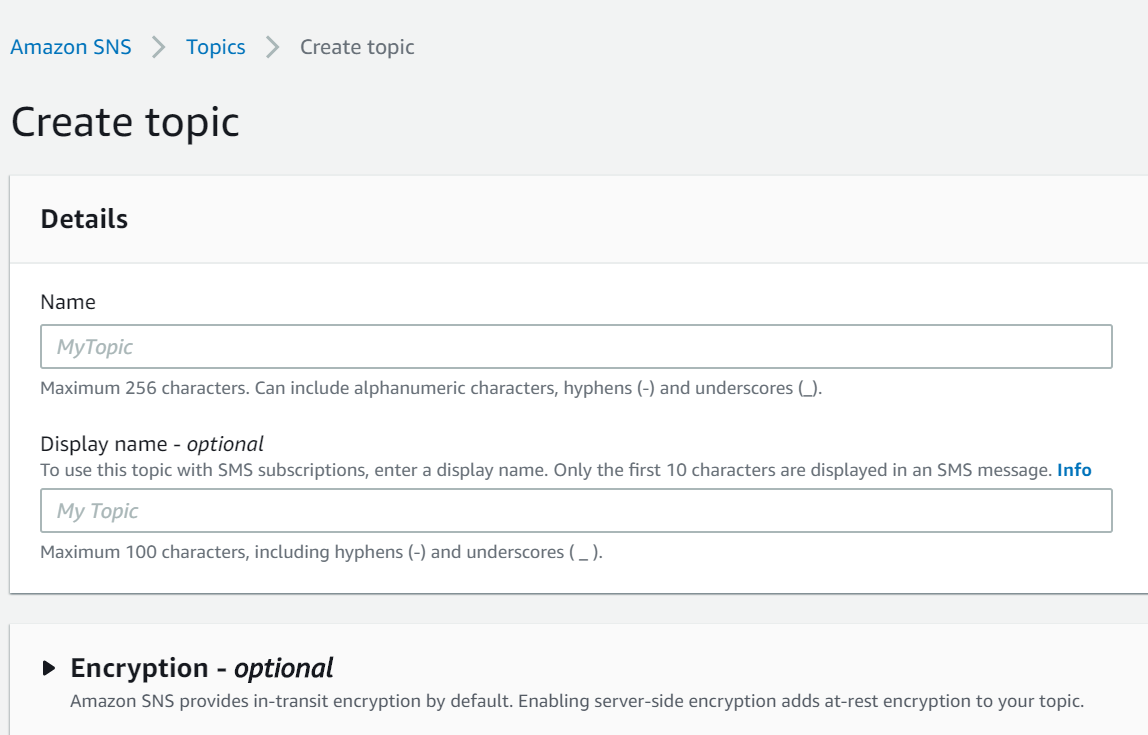
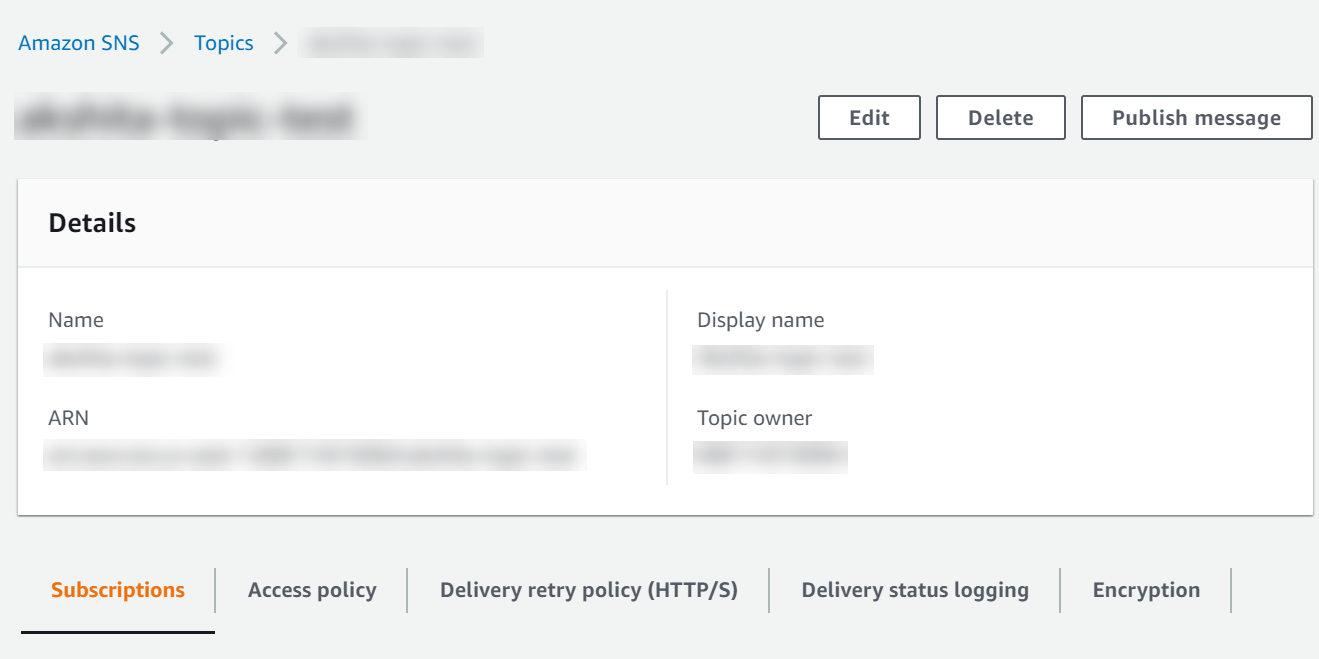
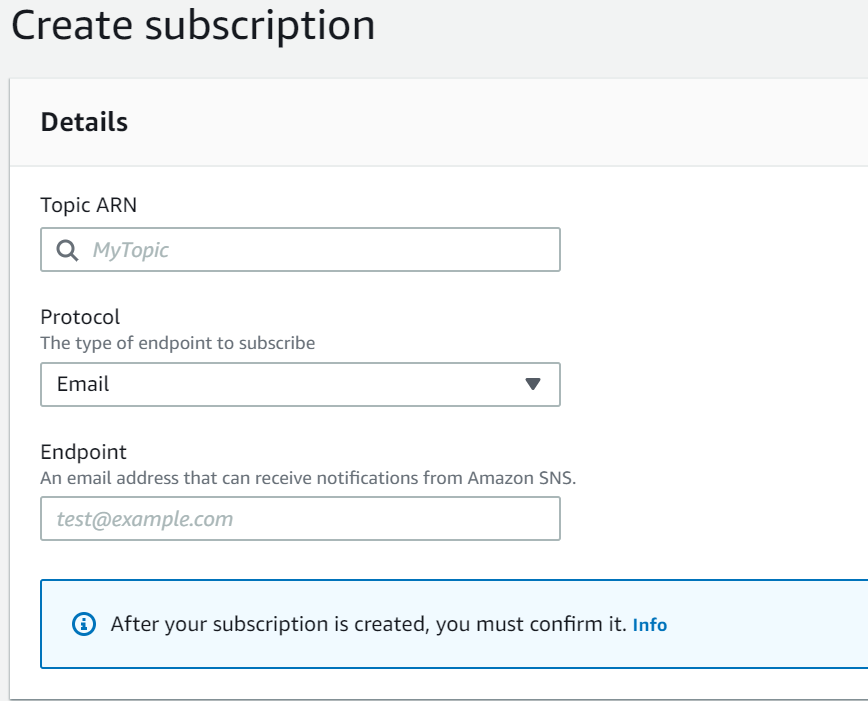
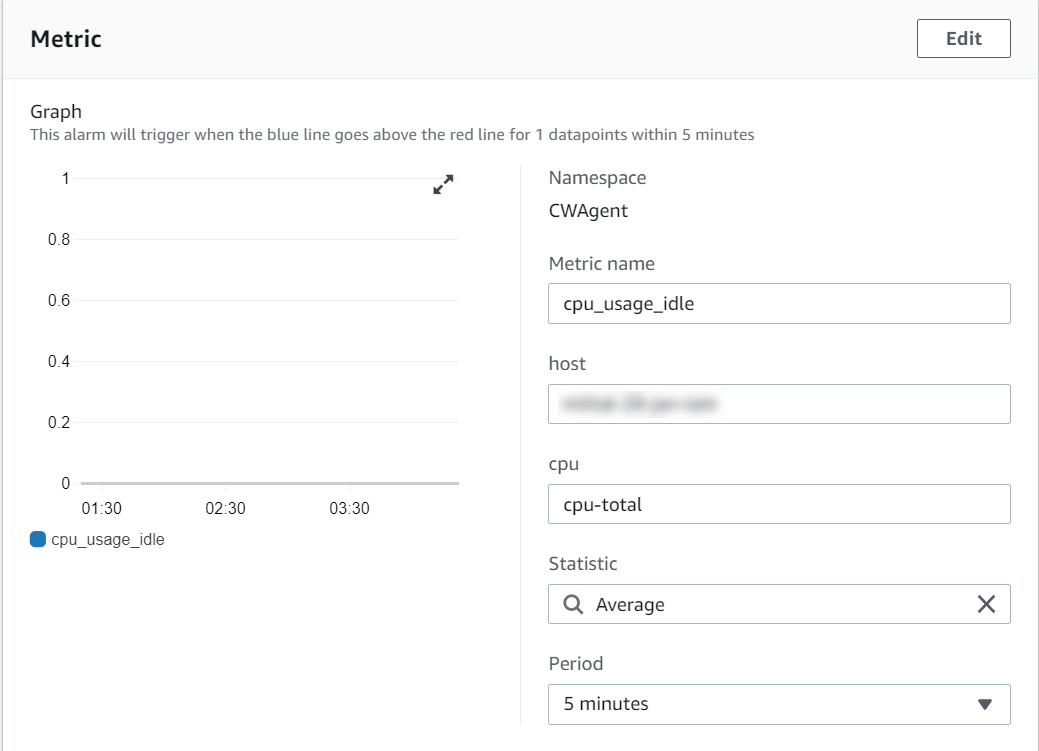
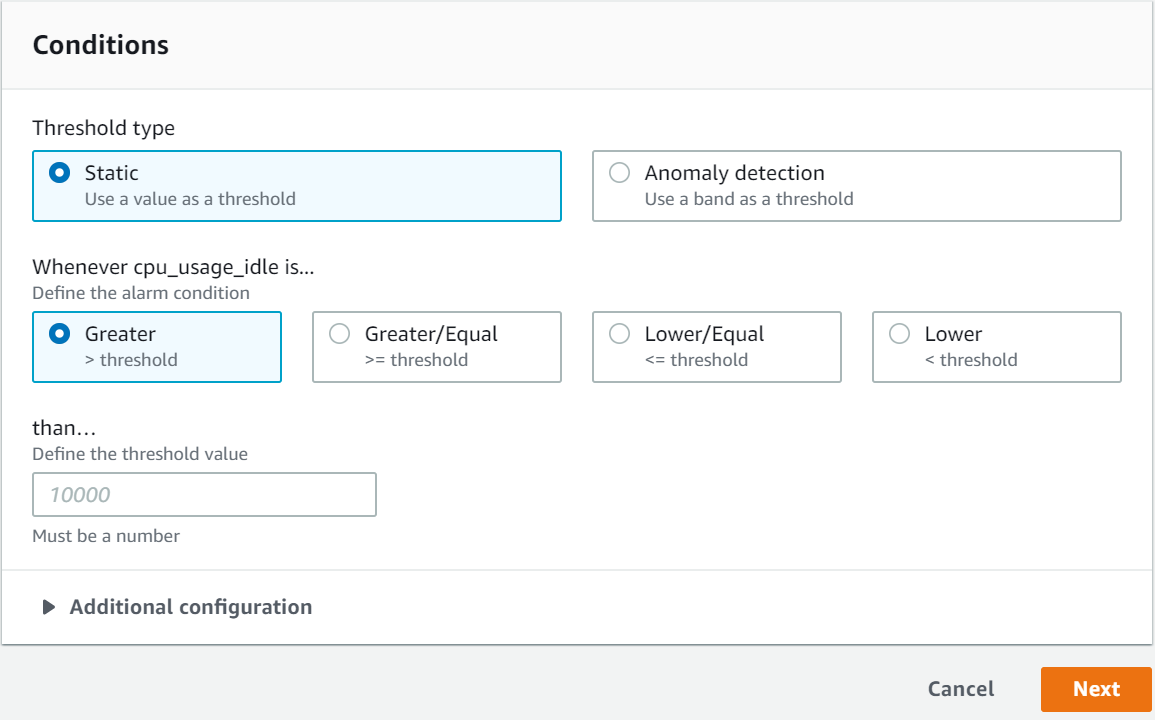
 ).
).


