Managing Roles
Roles are templates that include permissions and users can be assigned to one or more roles. Users in the appliance must be attached to a role.
The default roles packaged with ESA are as follows:
| Roles | Description | Permissions |
|---|---|---|
| Policy Proxy User | Allows a user to connect to DSG via SOAP/REST and access web services using Application Protector (AP). | Proxy-User |
| Policy User | Allows user to connect to DSG via SOAP/REST and perform security operations using Application Protector (AP). | Policy-User |
| Security Administrator Viewer | Role that can view the ESA Web UI, CLI, and reports. | Security Viewer, Appliance CLI Viewer, Appliance web viewer, Reports Viewer |
| Shell Accounts | Role who has direct SSH access to Appliance OS shell.Note: It is recommended that careful consideration is taken when assigning the Shell Accounts role and permission to a user.Ensure that if a user is assigned to the Shell Account role, no other role is linked to the same user. The user has no access to the Web UI or CLI, except when the user has password policy enabled and is required to change password through Web UI. | Shell (non-CLI) AccessNote: The user can access SSH directly if the permission is tied to this role. |
| Security Administrator | Role who is responsible for setting up data security using ESA policy management, which includes but is not limited to creating policy, managing policy, and deploying policy. | Security Officer, Reports Manager, Appliance Web Manager, Appliance CLI Administrator, Export Certificates, DPS Admin, Directory Manager, Export Keys, RLP Manager |
The capabilities of a role are defined by the permissions attached to the role. Though roles can be created, modified, or deleted from the appliance, permissions cannot be edited. The permissions that are available to map with a user and packaged with ESA as default permissions are as follows:
The ESA Roles web UI is as seen in the following image.
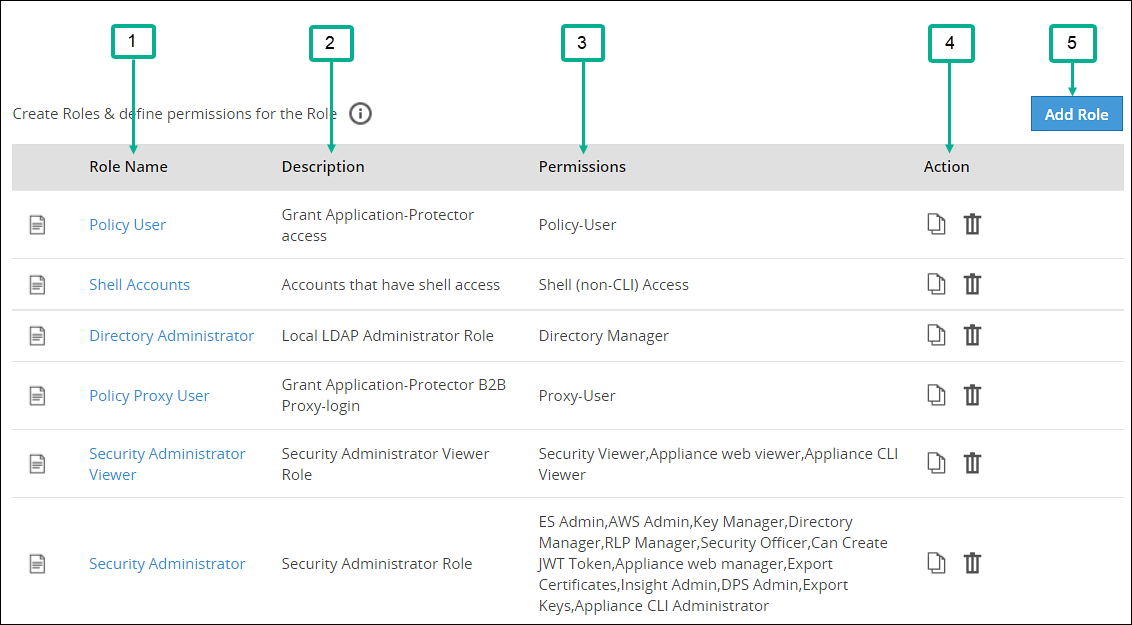
| Callout | Column | Description |
|---|---|---|
| 1 | Role Name | Name of the role available on ESA. Note: If you want to edit an existing role, click the role name from the displayed list. After making required edits, click Save to save the changes. |
| 2 | Description | Brief description about the role and its capabilities. |
| 3 | Permissions | Permission mapped to the role. The tasks that a user mapped to a role can perform is based on the permissions enabled. |
| 4 | Action | The following Actions are available.
|
| 5 | Add Role | Add a custom role to ESA. |
Duplicating and deleting roles
Keep the following in mind when duplicating and deleting roles.
- It is recommended to delete a role from the Web UI only. This ensures that the updates are reflected correctly across all the users that were associated with the role.
- When you duplicate or delete a role, the Enter your password prompt appears. Enter the password and click Ok to complete the task.
Adding a Role
You can create a custom business role with permissions and privileges that you want to map with that role. Custom templates provide the flexibility to create additional roles with ease.
Perform the following steps to add a role. In those steps we will use an example role named “Security Viewer”.
In the Web UI, navigate to Settings > Users > Roles.
If you want to edit an existing role, click the role name from the displayed list. After making required edits, click Save to save the changes.
Click Add Role to add a business role.
Enter Security Viewer as the Name.
Enter a brief description in the Description text box.
Select custom as the template from the Templates drop-down.
Under Role Permissions and Privileges area, select the permissions you want to grant to the role.Click Uncheck All to clear all the check boxes. Ensure that you do not select the Shell (non-CLI) Access permission for users who require Web UI and CLI access.
Click Save to save the role.
Enter your password prompt appears. Enter the password and click Ok.
Feedback
Was this page helpful?