This is the multi-page printable view of this section. Click here to print.
Upgrading the ESA to v10.2.2
1 - Upgrading ESA from v10.2.0
Uploading the ESA patch
The ESA patch can be uploaded using the Web UI or the CLI Manager but the patch should only be installed using the CLI Manager.
Uploading the patch using the Web UI
Perform the following steps to upload the patch from the Web UI:
Log in to the ESA Web UI with administrator credentials.
Navigate to Settings > System > File Upload.The File Upload page appears.
In the File Selection section, click Choose File.The file upload dialog box appears.
Select the patch file and click Open.
- Only the files with .pty and .tgz extensions can be uploaded.
- If the file uploaded exceeds the Max File Upload Size, then a password prompt appears. Enter the password and click Ok.
Only a user with the administrative role can perform this action.
- By default, the Max File Upload Size value is set to 25 MB. To increase this value, refer Increasing Maximum File Upload Size.
Click Upload.
After the file is uploaded successfully, then from the Uploaded Files area, choose the uploaded patch.The information for the selected patch appears.
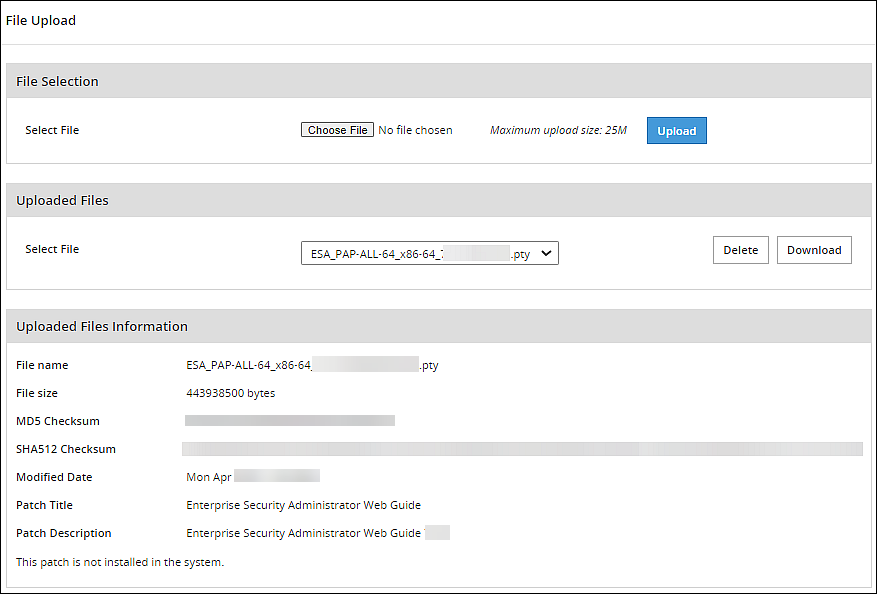
Uploading the patch using the CLI Manager
Perform the following steps to upload the patch from the CLI Manager:
- Log in to the ESA CLI Manager with administrator credentials.
- Navigate to Administration > OS Console to upload the patch.
- Enter the root password and click OK.
- Upload the patch to the /products/uploads directory using the FTP or SCP command.
The patch file is uploaded.
Installing the ESA patch from CLI Manager
Before you begin
When upgrading nodes in an Audit Store cluster, if cluster-related checks pass on one node, you can safely ignore similar errors on the other nodes.
While upgrading multiple nodes in the Audit Store cluster, the post-upgrade steps are completed successfully only after all cluster nodes are upgraded. A success message is then logged and shown to the user as a notification message, both, in the ESA UI and the CLI. Investigate post-upgrade errors only after all nodes are upgraded.
Perform the following steps to install the patch from the CLI Manager:
Log in to the ESA CLI Manager with administrator credentials.
Navigate to Administration > Patch Management to install the patch.
Enter the root password and click OK.
Select Install a Patch.
Select the ESA_PAP-ALL-64_x86-64_10.2.2+MR.2667.pty patch file and select Install.
After the patch is installed, select Reboot Now.
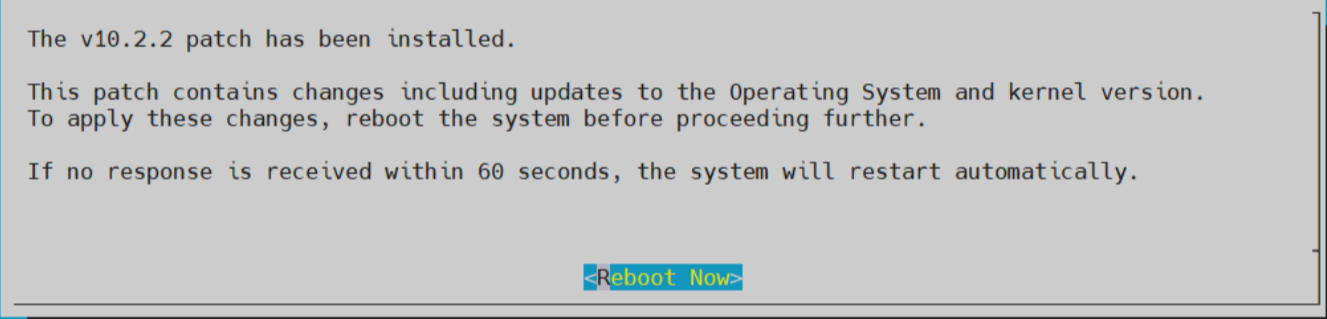
This screen has a timeout of 60 seconds. If Reboot Now is not selected manually, then the system automatically reboots after 60 seconds.
After the reboot is initiated, the message Patch has been installed successfully !! appears. Select Exit.
The patch is installed successfully and the ESA is upgraded to v10.2.2.
After upgrading the system successfully on v10.2.2, when using the SSH, it is recommended to wait for a few minutes before logging in to the ESA.
2 - Upgrading ESA from v10.2.1
Uploading the ESA patch
The ESA patch can be uploaded using the Web UI or the CLI Manager but the patch should only be installed using the CLI Manager.
Uploading the patch using the Web UI
Perform the following steps to upload the patch from the Web UI:
Log in to the ESA Web UI with administrator credentials.
Navigate to Settings > System > File Upload.The File Upload page appears.
In the File Selection section, click Choose File.The file upload dialog box appears.
Select the patch file and click Open.
- Only the files with .pty and .tgz extensions can be uploaded.
- If the file uploaded exceeds the Max File Upload Size, then a password prompt appears. Enter the password and click Ok.
Only a user with the administrative role can perform this action.
- By default, the Max File Upload Size value is set to 25 MB. To increase this value, refer Increasing Maximum File Upload Size.
Click Upload.
After the file is uploaded successfully, then from the Uploaded Files area, choose the uploaded patch.The information for the selected patch appears.
Uploading the patch using the CLI Manager
Perform the following steps to upload the patch from the CLI Manager:
- Log in to the ESA CLI Manager with administrator credentials.
- Navigate to Administration > OS Console to upload the patch.
- Enter the root password and click OK.
- Upload the patch to the /products/uploads directory using the FTP or SCP command.
The patch file is uploaded.
Installing the ESA patch from CLI Manager
Before you begin
When upgrading nodes in an Audit Store cluster, if cluster-related checks pass on one node, you can safely ignore similar errors on the other nodes.
While upgrading multiple nodes in the Audit Store cluster, the post-upgrade steps are completed successfully only after all cluster nodes are upgraded. A success message is then logged and shown to the user as a notification message, both, in the ESA UI and the CLI. Investigate post-upgrade errors only after all nodes are upgraded.
Perform the following steps to install the patch from the CLI Manager:
Log in to the ESA CLI Manager with administrator credentials.
Navigate to Administration > Patch Management to install the patch.
Enter the root password and click OK.
Select Install a Patch.
Select the ESA_PAP-ALL-64_x86-64_10.2.2+MR.2667.pty patch file and select Install.
After the patch is installed, the system reboots automatically.
“Patch has been installed successfully !!” appears.
The patch is installed successfully and the ESA is upgraded to v10.2.2.
After upgrading the system successfully on v10.2.2, when using the SSH, it is recommended to wait for a few minutes before logging in to the ESA.
3 - Verifying the ESA Patch Installation
Verifying the ESA version
Perform the following steps to verify the patch installation:
- From the ESA Web UI, navigate to System > Information.
The current patch installed on the ESA is displayed. - Navigate to the About page to view the current version of the ESA.
The ESA is upgraded to v10.2.2.
Verifying Upgrade Logs
During the upgrade process, logs describing upgrade process are generated. The logs describe the services that are initiated, restarted, or the errors generated.
To view the logs under the /var/log directory from the CLI Manager, navigate to CLI Manager > Administration > OS console.
| Log Type | Description |
|---|---|
| syslog | Provides collective information about the syslogs. |
| patches.log | Provides the summary of all patches applied during the upgrade process. |
| patch_ESA_10.2.2_MR.log | Provides the information of the ESA 10.2.2 Maintenance Release (MR) patch installation logs. |
4 - Verifying the health of Trusted Appliance Cluster
After upgrading all the ESAs in the Trusted Appliance Cluster to v10.2.0, ensure that all the nodes in the cluster are healthy.
Perform the following steps to verify health of ESAs in the TAC.
These steps must be performed individually on each ESA node in the Trusted Appliance Cluster.
- From the ESA Web UI, navigate to System > Trusted Appliance Cluster.
- Verify the details for each node in the TAC.
- In the Status field, the ESA node must be Online.
- In the Status Message field, no errors must be displayed.
- In the Labels field, each node must be labeled as Consul Server or Consul Client.If the label for any ESA node is not Consul Server or Consul Client, then refer Common ESA Errors.
5 - (Optional) Running the Analysis Script
Complete the steps provided in this section to run the analysis script. The script gathers information
from ESA and stores the data in a JSON file. This file is stored in a .zip format and can be downloaded
from the ESA Web UI.
Perform the following steps to run the analysis script.
Login to the ESA CLI Manager with administrator credentials.
Navigate to Administration > OS Console.
Navigate to
/opt/analysisdirectory.Run the analysis script using the following command.
./analysis.shThe Information required dialog box appears.
Enter the environment type for ESA and select OK.
The following message appears.
    Analysis file generated successfully.
    Navigate to Settings > System > File Upload using the ESA Web UI.
    The output file is available for download.
    File name: analysis_<timestamp>.zip
Select OK.
Login to the ESA Web UI with administrator credentials.
Navigate to Settings > System > File Upload to download the analysis report.
In the Uploaded Files section, click Select File.
Select the
analysis_<timestamp>.zipfile and click Download. The file is downloaded to the local system.