This is the multi-page printable view of this section. Click here to print.
Protegrity AI Team Edition
- 1: Introduction to Protegrity AI Team Edition
- 2: Overview of Protegrity AI Team Edition
- 2.1: Architecture and Design Principles
- 2.2: Protegrity Common Services
- 2.3: Supported Deployment Platforms
- 2.4: Compatible Features
- 3: Infrastructure
- 3.1: Preparing for Protegrity AI Team Edition
- 3.2: Configuring Authentication for Protegrity AI Team Edition
- 3.3: Installing Protegrity Provisioned Cluster
- 3.3.1: Installing PPC on Amazon Web Services (AWS)
- 3.3.1.1: Prerequisites
- 3.3.1.2: Preparing for PPC deployment
- 3.3.1.3: Deploying PPC
- 3.3.1.3.1: Configuring PPC for Non-FIPS Deployment on AWS
- 3.3.1.3.2: Automated script-based installation
- 3.3.1.3.3: Manual component-based installation
- 3.3.1.4: Installing Features and Protectors
- 3.3.1.5: Accessing the PPC CLI
- 3.3.1.5.1: Prerequisites
- 3.3.1.5.2: Accessing the PPC CLI
- 3.3.1.6: Login to PPC
- 3.3.1.6.1: Prerequisites
- 3.3.1.6.2: Log in to PPC
- 3.3.1.7: Upgrading the PPC
- 3.3.1.8: Backing up the PPC
- 3.3.1.9: Restoring the PPC
- 3.3.1.10: Deleting PPC
- 3.3.1.11: Accessing PPC using a Linux machine
- 3.3.1.12: Restoring the SSH keys and PCT from backed up Terraform state file
- 3.3.2: Installing PPC on Microsoft Azure
- 3.3.2.1: Prerequisites
- 3.3.2.2: Preparing for PPC deployment
- 3.3.2.3: Deploying PPC
- 3.3.2.3.1: Production configuration
- 3.3.2.3.2: Configuring PPC for Non-FIPS Deployment on Microsoft Azure
- 3.3.2.3.3: Automated script-based installation
- 3.3.2.3.4: Manual component-based installation
- 3.3.2.4: Installing Features and Protectors
- 3.3.2.5: Login to PPC
- 3.3.2.6: Accessing the PPC CLI
- 3.3.2.7: Deleting PPC
- 3.3.2.8: Backing up the PPC
- 3.3.2.9: Restoring the PPC
- 3.3.2.10: Troubleshooting
- 3.3.2.11: Restoring the SSH keys and PCT from backed up Terraform state file
- 3.4: Working with Insight
- 3.4.1: Overview of the dashboards
- 3.4.2: Working with Discover
- 3.4.2.1: Understanding the Insight indexes
- 3.4.2.2: Understanding the index field values
- 3.4.2.3: Index entries
- 3.4.2.4: Log return codes
- 3.4.2.5: Protectors security log codes
- 3.4.2.6: Additional log information
- 3.4.3: Viewing the dashboards
- 3.4.4: Viewing visualizations
- 3.4.5: Index State Management (ISM)
- 3.4.6: Backing up and restoring indexes
- 3.4.7: Working with alerts
- 3.5: Protegrity REST APIs
- 3.5.1: Accessing the Protegrity REST APIs
- 3.5.2: View the Protegrity REST API Specification Document
- 3.5.3: Using the Common REST API Endpoints
- 3.5.4: Using the Authentication and Token Management REST APIs
- 3.5.5: Using the Policy Management REST APIs
- 3.5.6: Using the Encrypted Resilient Package REST APIs
- 3.5.7: Roles and Permissions
- 3.6: Protegrity Command Line Interface (CLI) Reference
- 3.6.1: Administrator Command Line Interface (CLI) Reference
- 3.6.1.1: Configuring SAML SSO
- 3.6.2: Using the Insight Command Line Interface (CLI)
- 3.6.3: Policy Management Command Line Interface (CLI) Reference
- 3.7: Troubleshooting
- 3.8: Replacing the default Certificate Authority (CA) with a Custom CA in PPC
- 3.9: Updating Registry Credentials for AKS/EKS Clusters
- 4: Governance and Policy
- 4.1: Protegrity Policy Manager
- 4.1.1: Installing Policy Workbench
- 4.1.1.1: Installing Policy Workbench on PPC in Amazon Elastic Kubernetes Service (EKS)
- 4.1.1.2: Installing Policy Workbench on PPC in Azure Kubernetes Service (AKS)
- 4.1.2: Uninstalling the Protegrity Policy Manager
- 4.1.3: Backing up the Policy Workbench
- 4.1.4: Restoring the Policy Workbench
- 4.1.5: Workbench Roles and Permissions
- 4.1.6: Troubleshooting the Protegrity Policy Manager
- 4.1.7: Upgrading Policy Workbench in AWS
- 4.2: Protegrity Agent
- 4.2.1: Prerequisites
- 4.2.2: Roles and Permissions
- 4.2.2.1: Required Roles and Permissions
- 4.2.2.2: Working with Roles
- 4.2.3: Installing Protegrity Agent
- 4.2.3.1: Installing Protegrity Agent
- 4.2.4: Configuring Protegrity Agent
- 4.2.5: Using Protegrity Agent
- 4.2.5.1: Accessing Protegrity Agent UI
- 4.2.5.2: Working with Protegrity Agent
- 4.2.5.3: Samples for using Protegrity Agent
- 4.2.6: Uninstalling Protegrity Agent
- 4.2.7: Appendix - Backup and Restore
- 4.3: Sample Protection Workflows
- 4.3.1: Policy Workflow
- 4.3.1.1: Initialize Policy Management
- 4.3.1.2: Prepare Data Element
- 4.3.1.3: Create Member Source
- 4.3.1.4: Create Role
- 4.3.1.5: Assign Member Source to Role
- 4.3.1.6: Create Policy Shell
- 4.3.1.7: Define Rule with Data Element and Role
- 4.3.1.8: Create Datastore
- 4.3.1.9: Deploy Policy to a Datastore
- 4.3.1.10: Confirm Deployment
- 4.3.2: Create a policy to protect Credit Card Number (CCN)
- 4.3.2.1: Initialize Policy Management
- 4.3.2.2: Prepare Data Element
- 4.3.2.2.1: Create Mask
- 4.3.2.3: Create Member Source
- 4.3.2.3.1: Test New Member Source
- 4.3.2.4: Create Role
- 4.3.2.5: Assign Member Source to Role
- 4.3.2.5.1: Synchronize Member Source
- 4.3.2.6: Create Policy Shell
- 4.3.2.7: Define Rule with Data Element and Role
- 4.3.2.8: Create Datastore
- 4.3.2.9: Deploy Policy to a Datastore
- 4.3.2.10: Confirm Deployment
- 4.3.3: Create a policy to protect Date of Birth (DOB)
- 4.3.3.1: Initialize Policy Management
- 4.3.3.2: Prepare Data Element
- 4.3.3.3: Create Member Source
- 4.3.3.3.1: Test the Member Source
- 4.3.3.4: Create Role
- 4.3.3.5: Assign Member Source to Role
- 4.3.3.5.1: Synchronize Member Source
- 4.3.3.6: Create Policy Shell
- 4.3.3.7: Define Rule with Data Element and Role
- 4.3.3.8: Create Datastore
- 4.3.3.9: Deploy Policy to Datastore
- 4.3.3.10: Confirm Deployment
- 4.3.4: Full Script Examples
- 5: Data Discovery
- 5.1: Prerequisites
- 5.2: Installing Data Discovery
- 5.3: Configuring Data Discovery
- 5.4: Uninstalling Data Discovery
- 5.5: Troubleshooting
- 5.6: Logging usage metrics
- 6: AI Security
- 6.1: Semantic Guardrails
- 7: Data Privacy
- 7.1: Protegrity Anonymization
- 7.1.1: Prerequisites
- 7.1.2: Installing Protegrity Anonymization
- 7.1.3: Configuring Protegrity Anonymization
- 7.1.4: Protegrity Anonymization Python SDK Installation
- 7.1.5: Uninstallation and Cleanup Protegrity Anonymization
- 7.2: Protegrity Synthetic Data
- 8: Protectors
- 8.1: Cloud Protector
- 8.2: Application Protector
- 8.2.1: Application Protector
- 8.2.1.1: Application Protector Java
- 8.2.1.1.1: Installing the Application Protector Java
- 8.2.1.1.2: Uninstalling the Application Protector Java
- 8.2.1.2: Application Protector Python
- 8.2.1.2.1: Installing the Application Protector Python
- 8.2.1.2.2: Uninstalling the Application Protector Python
- 8.2.1.3: Application Protector .Net
- 8.2.1.3.1: Installing the Application Protector .Net
- 8.2.1.3.2: Uninstalling the Application Protector .Net
- 8.2.1.4: Application Protector C
- 8.2.1.4.1: Installing the Application Protector C
- 8.2.1.4.2: Uninstalling the Application Protector C
- 8.2.2: Application Protector Java Container
- 8.2.3: REST Container
- 8.2.3.1: Installing the REST Container
- 8.3: Repository Protector
- 8.3.1: AWS Protectors
- 8.3.1.1: Amazon EMR Protector
- 8.3.1.1.1: Installing the Amazon Elastic MapReduce Protector
- 8.3.1.1.2: Uninstalling the Amazon Elastic MapReduce Protector
- 8.3.1.2: AWS Databricks Protector
- 8.3.1.2.1: Installing the AWS Databricks Protector
- 8.3.1.2.2: Uninstalling the AWS Databricks Protector
- 8.3.1.3: CDP-AWS-DataHub Protector
- 8.3.1.3.1: Installing the CDP-AWS-DataHub Protector
- 8.3.1.3.2: Uninstalling the CDP-AWS-DataHub Protector
- 8.3.2: Azure Protectors
- 8.3.2.1: Azure Databricks Protector
- 8.3.2.1.1: Installing the Azure Databricks Protector
- 8.3.2.1.2: Uninstalling the Azure Databricks Protector
1 - Introduction to Protegrity AI Team Edition
Protegrity AI Team Edition is a container-based data protection solution designed for teams and mid-enterprise organizations that need to safeguard sensitive data across AI, GenAI, and analytics workloads.
It delivers core Protegrity capabilities, including governance, discovery, protection, and privacy. This is provided in a lightweight, containerized form factor that emphasizes fast deployment, simplified operations, and consistent enforcement of data security policies across environments.
Built on a modular, microservices architecture, it moves away from the legacy appliance model to align with modern DevOps practices. The result is a deployment that scales easily, integrates natively with existing CI/CD pipelines, and supports governing agents and securing departmental data.
Purpose and Audience
Protegrity AI Team Edition is intended for:
- Organizations seeking to protect data used in AI or analytics pipelines.
- Teams that require fast deployment cycles and simplified upgrades.
- Customers who need enterprise-grade data protection in a form that can start small, operate independently, and later scale into Protegrity AI Enterprise Edition.
2 - Overview of Protegrity AI Team Edition
The Protegrity AI Team Edition introduces a modern, container-based approach to data protection built on a microservices architecture. It enables organizations to evaluate how Protegrity’s methods, such as, policy management, anonymization, discovery, and semantic controls, integrate into AI and analytics pipelines.
2.1 - Architecture and Design Principles
Protegrity AI Team Edition delivers core Protegrity capabilities. This includes governance, discovery, protection, privacy, and semantic controls. It is provided in a lightweight, containerized form factor that emphasizes fast deployment, simplified operations, and consistent enforcement of data security policies across environments. It is designed around five engineering goals: ease of deployment, high availability, scalability, extensibility, and maintainability.
| Goal | Implementation Details |
|---|---|
| Ease of Deployment | - OpenTofu templates provision a Kubernetes environment (EKS) with minimal manual intervention. - Helm Charts deploy and configure all components for consistent, reproducible setups. - Because each component runs as a container image, upgrades and patches follow standard CI/CD workflows. |
| High Availability | - Kubernetes manages service health and redundancy automatically. - No Trusted Appliance Cluster (TAC) required. - No external load balancers required. - No manual replication required. |
| Scalability | - The system scales horizontally and vertically through Kubernetes-native scale-up and scale-down mechanisms. - Administrators can adjust resources dynamically as workloads grow or shrink without redeployment. |
| Extensibility | - New capabilities are introduced by adding new container images and Helm configurations. - Allows incremental feature expansion without redesign. |
| Maintainability | - Kubernetes simplifies lifecycle management. - Updating a container image replaces an older version automatically, avoiding downtime and manual patching. |
2.2 - Protegrity Common Services
All deployments include a standardized set of common services delivered by a microservices architecture that provide routing, security, and audit capabilities for all features and protectors.
| Service | Description |
|---|---|
| Authentication and Authorization | Provides user and service credential validation with role-based access enforcement. |
| Backup and Restore | Creates periodic backup of the cluster and indexes for restoration during Disaster Management. |
| Certificate Management | Manages and validates TLS certificates for inbound and inter-service communication. |
| Common Ingress Controller | The main entry point for all API and service traffic to the cluster. |
| Insight | Provides logging and auditing capabilities using OpenSearch for event storage and Insight Dashboard for visualization and reporting. |
2.3 - Supported Deployment Platforms
Protegrity AI Team Edition runs on the Protegrity Provisioned Cluster (PPC), a Kubernetes-based runtime that packages all services into a single, managed deployment target. PPC is available on the following cloud platforms.
AWS (EKS)
Protegrity AI Team Edition is generally available on Amazon Web Services using Elastic Kubernetes Service (EKS). OpenTofu templates automate cluster provisioning, and Helm charts deploy all AI Team Edition services into the EKS environment. AWS currently offers a wider choice of features and protectors for Protegrity AI Team Edition.
Microsoft Azure (AKS)
Protegrity AI Team Edition is generally available on Microsoft Azure using Azure Kubernetes Service (AKS). OpenTofu templates automate cluster provisioning, and Helm charts deploy the AI Team Edition services into the AKS environment.
Compatibility
The following table summarizes the supported deployment platforms for Protegrity AI Team Edition.
| Feature | AWS (EKS) | Microsoft Azure (AKS) |
|---|---|---|
| Protegrity Provisioned Cluster (PPC) | ✅ Supported | ✅ Supported |
| Protegrity Policy Manager (PPM) | ✅ Supported | ✅ Supported |
| Protegrity Agent | ✅ Supported | ✅ Supported |
| Data Discovery | ✅ Supported | ❌ Not Supported |
| Semantic Guardrails | ✅ Supported | ❌ Not Supported |
| Protegrity Anonymization | ✅ Supported | ❌ Not Supported |
| Protegrity Synthetic Data | ✅ Supported | ❌ Not Supported |
| Protectors | ✅ Supported AWS protectors | ✅ Supported Azure protectors |
2.4 - Compatible Features
The various features compatible with Protegrity AI Team Edition are provided here.
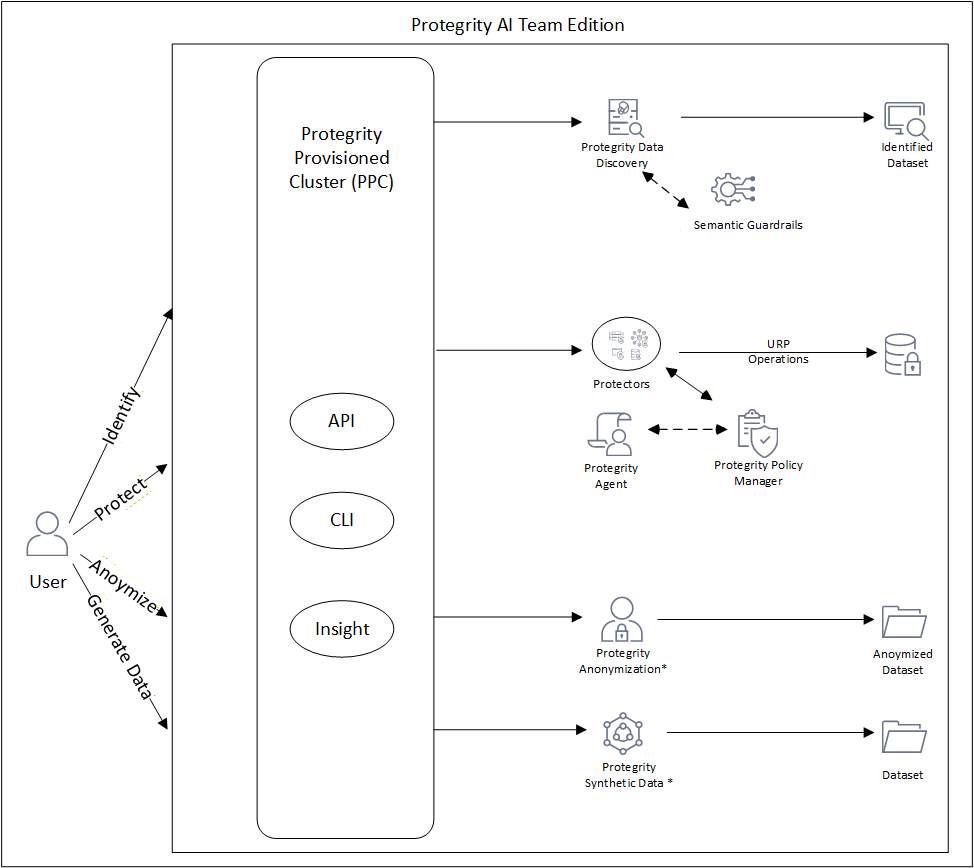
* - Available for purchase as an add-on. Can be installed as an individual product.
| Feature | Description |
|---|---|
| Anonymization | Apply statistical privacy models such as k-anonymity, l-diversity, and t-closeness to sensitive datasets. |
| Data Discovery | Automatically identify structured and unstructured sensitive data through pattern matching and machine learning classification. |
| Policy Manager | Define and manage data protection policies that govern tokenization, masking, and anonymization. |
| Protegrity Agent | Intelligent assistant for automated policy creation, data classification recommendations, and guided configuration of protection workflows. |
| Semantic Guardrails | Apply contextual and runtime safeguards to AI and analytics workflows to prevent data leakage or misuse. |
| Synthetic Data | Generate tabular synthetic datasets for development, testing, and AI model validation without exposing real sensitive data. |
Protegrity Protectors
Protegrity AI Team Edition protectors enable organizations to embed data protection directly where data is processed, inside applications, analytics engines, or cloud-native data systems. The protectors use the Workbench for obtaining the policy for processing. The Protegrity Agent is available for creating and working with policies in the Workbench.
Cloud API
The Cloud API protector extends Protegrity protection to AWS serverless and API-based workloads. It is typically used for securing transient data handled by AWS Lambda or similar function-based architectures.
| Name | Description |
|---|---|
| AWS Protectors: | |
| CloudProtect – Cloud API – AWS (x86-64) | Protegrity CloudProtect using AWS Serverless Functions. |
| CloudProtect – Cloud API – AWS (ARM64) | Protegrity CloudProtect using AWS Serverless Functions. |
| Azure Protectors: | |
| Cloud Storage Protector – Azure | Protegrity CloudProtect using Azure Serverless Functions. |
Application Protectors
Application protectors provide data protection directly within applications or runtime containers. They are suitable for teams developing secure APIs or microservices that handle sensitive data in languages such as Java, Python, or .NET.
| Name | Description |
|---|---|
| Application Protector – Java Container | Protects data within Java-based containers, such as OpenShift, AKS, and EKS. |
| Application Protector – REST Container | Provides REST-based protection services for containerized workloads. |
| Application Protector – Python (Linux AMD64) | Protegrity Application Protector for Python environments on Linux AMD64. |
| Application Protector – Python (Linux ARM64) | Protegrity Application Protector for Python environments on Linux ARM64. |
| Application Protector – Java (Linux AMD64) | Standard Java runtime protector for Linux AMD64 environments. |
| Application Protector – Java (Linux ARM64) | Standard Java runtime protector for Linux ARM64 environments. |
| Application Protector – .NET (Windows) | Protegrity Application Protector for Microsoft .NET applications. |
| Application Protector – C (Linux AMD64) | Protegrity Application Protector for C on Linux AMD64. |
Repository Protectors
Repository protectors allow you to apply data protection directly within persistent data stores, enabling sensitive data to remain protected at rest while still being used for analytics and AI workloads.
These protectors consist of Big Data Protectors for Amazon EMR, Databricks, and CDP Data Hub and Cloud-Native Data Warehouse protectors for analytics environments such as Snowflake, Redshift, and Athena.
| Name | Description |
|---|---|
| AWS Protectors: | |
| Big Data Protector – Amazon EMR (Linux x86-64) | Provides data protection within Amazon EMR clusters (both serverless and server based). |
| Big Data Protector – AWS Databricks (Linux x86-64) | Enables tokenization and masking for Databricks on AWS. |
| Big Data Protector – AWS Databricks (Linux ARM64) | Enables tokenization and masking for Databricks on AWS on ARM64. |
| Big Data Protector – CDP Data Hub | Supports Cloudera DataWorks Platform deployments on AWS. |
| Cloud Native Data Warehouse Protector – Snowflake (x86-64) | Integrates with Snowflake for secure, compliant analytics on AWS. |
| Cloud Native Data Warehouse Protector – Snowflake (ARM64) | Integrates with Snowflake for secure, compliant analytics on AWS. |
| Cloud Native Data Warehouse Protector – Redshift (x86-64) | Provides protection for Amazon Redshift queries and transformations. |
| Cloud Native Data Warehouse Protector – Redshift (ARM64) | Provides protection for Amazon Redshift queries and transformations. |
| Cloud Native Data Warehouse Protector – Athena (x86-64) | Applies protection to Amazon Athena query execution. |
| Cloud Native Data Warehouse Protector – Athena (ARM64) | Applies protection to Amazon Athena query execution. |
| Cloud Storage Protector – Amazon S3 | Applies protection for Amazon S3. |
| Azure Protectors: | |
| Big Data Protector – Azure Databricks | Enables tokenization and masking for Databricks on Azure. |
| Cloud Native Data Warehouse Protector – Snowflake | Integrates with Snowflake for secure, compliant analytics on Azure. |
3 - Infrastructure
The Infrastructure section covers the deployment and operational layer that underpins AI Team Edition. At its core is the Protegrity Provisioned Cluster (PPC), a unified runtime environment where all AI Team Edition services are packaged, delivered, and managed as a cohesive system.
PPC abstracts away the complexity of standing up interconnected security services, giving administrators a single deployment target regardless of the underlying cloud provider. Rather than configuring each service individually, teams work with a pre-integrated cluster that enforces consistent networking, access control, and observability from the start.
This section guides you through cluster provisioning, credential management, certificate lifecycle, troubleshooting, and related operational tasks.
The documentation in this section is for PPC v1.1.0. To refer to the earlier version of the documentation, refer to the PPC documentation.
3.1 - Preparing for Protegrity AI Team Edition
Ensure that the following prerequisites are met. If a feature is not required, skip the requirements in that section.
The Protegrity Provisioned Cluster (PPC) is the core framework that forms Protegrity AI Team Edition. For installing feature, ensure to install PPC before proceeding further.
Infrastructure
This section contains the procedure to deploy and work with
- Protegrity Provisioned Cluster (PPC)
Prerequisites for Protegrity Provisioned Cluster (PPC)
To install PPC on the below supported platforms, ensure that the required prerequisites are met for the required platform.
| Platform | Refer to |
|---|---|
| AWS | Prerequisites for PPC on AWS |
| Microsoft Azure | Prerequisites for PPC on Microsoft Azure |
Governance and Policy
This section contains the procedure to deploy and work with
- Protegrity Policy Manager
- Protegrity Agent
Prerequisites for Protegrity Policy Manager
To install Protegrity Policy Manager on the below supported platforms, ensure that the required prerequisites are met for the required platform.
| Platform | Refer to |
|---|---|
| AWS | Prerequisites for Protegrity Policy Manager on AWS |
| Microsoft Azure | Prerequisites for Protegrity Policy Manager on Microsoft Azure |
Prerequisites for Protegrity Agent
| Platform | Refer to |
|---|---|
| Protegrity Agent | Prerequisites for Protegrity Agent |
Data Discovery
This section contains the procedure to deploy and work with
- Data Discovery
Prerequisites for Data Discovery
| Platform | Refer to |
|---|---|
| Data Discovery | Prerequisites for Data Discovery |
AI Security
This section contains the procedure to deploy and work with
- Semantic Guardrails
Prerequisites for Semantic Guardrails
| Platform | Refer to |
|---|---|
| Semantic Guardrails | Prerequisites for Semantic Guardrails |
Data Privacy
This section contains the procedure to deploy and work with
- Protegrity Anonymization
- Protegrity Synthetic Data
Prerequisites for Protegrity Anonymization
| Platform | Refer to |
|---|---|
| Protegrity Anonymization | Prerequisites for Protegrity Anonymization |
Prerequisites for Protegrity Synthetic Data
| Platform | Refer to |
|---|---|
| Protegrity Synthetic Data | Prerequisites for Protegrity Synthetic Data |
3.2 - Configuring Authentication for Protegrity AI Team Edition
Log into My.Protegrity and obtain the necessary credentials and certificates. This portal hosts all products and features included in your Protegrity contract.
Deploy Using PCR
Use the steps provided here for deploying PPC and the features directly from the PCR.
Log in to the My.Protegrity portal.
Navigate to Product Management > Explore Products > AI Team Edition > Setup & Credentials.
Create an access token to obtain the Username and Secret. Store these credentials carefully, they are required for connecting to https://registry.protegrity.com:9443 and performing registry operations.
Click Access Tokens.
Click Create Access Token.
Click Export To File to save the credentials.
Click I Understand That I Cannot See This Again.
Deploy to Own Registry
Use the steps provided here for pulling the artifacts from PCR and deploying PPC and the features to the organization-hosted registry using standard authentication.
Prerequisites:
For ECR: Ensure that the required AWS credentials are available and set.
Ensure that the jumpbox has connectivity to the Protegrity Container Registry (PCR) and your container registry.
Ensure that the user logged in to the jumpbox is the
rootuser or hassudoeraccess.Ensure that the following tools are installed:
- docker or podman: Must be installed and running. If podman is used, identify the podman directory and create a symbolic link to docker using the following commands:
which podman ln -s /bin/podman /bin/dockerhelm: Kubernetes package manager used to pull and manage Helm charts required for deploying Protegrity AI Team Edition components from an OCI‑compliant registry. Helm v3+ must be installed.
curl: Command‑line HTTP client used by the pull scripts to interact with OCI Distribution APIs, including making authenticated requests to the Protegrity Container Registry.
jq: Lightweight JSON processor used to parse and extract information from the
artifacts_aws.jsonorartifacts_azure.jsonfile that defines the set of artifacts to be pulled and pushed.oras: OCI Registry As Storage (ORAS) client used to pull non‑container, generic OCI artifacts from the registry that are not handled by standard container tooling.
Run the following command to confirm readiness before proceeding:
docker --version && helm version && oras version && jq --version && curl --version
Steps to configure the certificates:
Log in to the My.Protegrity portal.
Navigate to Product Management > Explore Products > AI Team Edition > Setup & Credentials.
Create an access token to obtain the Username and Secret.
Note: Store these credentials carefully, they are required for performing registry operations.
Click Access Tokens.
Click Create Access Token.
Click Export To File to save the credentials.
Click I Understand That I Cannot See This Again.
Obtain the artifacts for setting up the AI Team Edition.
From the Product Management > Explore Products > AI Team Edition > Setup & Credentials page of the My.Protegrity portal, click Download Pull Script. A compressed file is downloaded.
Copy the compressed file to an empty directory on the jumpbox.
Extract the compressed file.
The following files are available:
- artifacts_aws.json: The list of artifacts that are obtained for AWS.
- artifacts_azure.json: The list of artifacts that are obtained for Azure.
- pull_all_artifacts.sh: The script to pull the artifacts from the PCR.
- tag_push_artifacts.sh: The script to tag and push the artifacts to your container registry.
Navigate to the extracted directory. Do not update the contents of the
artifacts_aws.jsonorartifacts_azure.jsonfiles.Run the
pull scriptto pull the artifacts to your jumpbox using the following command:./pull_all_artifacts.sh --url https://registry.protegrity.com:9443 --user <username_from_portal> --password <access_key_from_portal> --json artifacts_<aws/azure>.jsonEnsure that single quotes are used to specify the username and password in the command.
Run the following command to tag and push the artifacts to your container registry.
Sample command for OCI-compatible registries:
./tag_push_artifacts.sh --url <OCI-compatible registry URL> --user <registry username> --password <registry password> --json artifacts_<aws/azure>.jsonEnsure that single quotes are used to specify the username and password in the command.
Validate that all the artifacts are successfully pushed to your registry.
Deploy to Own Registry Using mTLS
This section explains how to set up mTLS authentication when using your own container registry. Perform these steps to establish secure, certificate‑based trust and prevent unauthorized access during image pulls and service communication.
Prerequisites:
For ECR: Ensure that the required AWS credentials are available and set.
Ensure that the jumpbox has connectivity to the Protegrity Container Registry (PCR) and your container registry.
Ensure that the user logged in to the jumpbox is the
rootuser or hassudoeraccess.Ensure that the following tools are installed:
- docker or podman: Must be installed and running. If podman is used, identify the podman directory and create a symbolic link to docker using the following commands:
which podman ln -s /bin/podman /bin/dockerhelm: Kubernetes package manager used to pull and manage Helm charts required for deploying Protegrity AI Team Edition components from an OCI‑compliant registry. Helm v3+ must be installed.
curl: Command‑line HTTP client used by the pull scripts to interact with OCI Distribution APIs, including making authenticated requests to the Protegrity Container Registry.
jq: Lightweight JSON processor used to parse and extract information from the
artifacts_aws.jsonorartifacts_azure.jsonfile that defines the set of artifacts to be pulled and pushed.oras: OCI Registry As Storage (ORAS) client used to pull non‑container, generic OCI artifacts from the registry that are not handled by standard container tooling.
Run the following command to confirm readiness before proceeding:
docker --version && helm version && oras version && jq --version && curl --version
Steps to configure the certificates:
Log in to the My.Protegrity portal.
Navigate to Product Management > Explore Products > AI Team Edition > Setup & Credentials.
Create an access token to obtain the Username and Secret.
Note: Store these credentials carefully, they are required for performing registry operations.
Click Access Tokens.
Click Create Access Token.
Click Export To File to save the credentials.
Click I Understand That I Cannot See This Again.
Generate a CSR file for registering the jumpbox with the Protegrity Container Registry.
Open a terminal or command prompt.
Generate a private key.
openssl genrsa -out private.key 2048Create the CSR using the private key.
openssl req -new -key private.key -out request.csrSpecify the following details for the certificate:
- Country (C): Two-letter code (for example, US)
- State/Province (ST)
- City/Locality (L)
- Organization (O): Legal company name
- Organizational Unit (OU): Department (optional)
- Common Name (CN): Domain (for example, www.example.com)
- Email Address: Email address
View the CSR file.
cat request.csr
Create the client certificate to connect to the registry. This step is required only when your security policies mandates mutual TLS (mTLS) for a two-way certificate verification between your environment and the Protegrity Container Registry.
Click Client Certificates.
Click Create Client Certificate.
Click Browse to upload your CSR. Refer to the previous step if you do not have a CSR.
Click Create Client Certificate to generate the client certificate.
From the Client Certificate tab, click Download Client Certificate from the Actions column to download a compressed file with the certificates.
Copy or upload the certificates to the jumpbox.
Warning: Ensure that the same filenames and extensions are used that are provided in the following steps.
Ensure to login to the jumpbox as the
rootuser.Navigate to the
/etc/docker/directory. For podman, navigate to/etc/containers/.Create the
certs.ddirectory.Open the
certs.ddirectory.Create the
registry.protegrity.comdirectory.Copy the compressed file with the certificate to the
/etc/docker/certs.d/registry.protegrity.comdirectory. For podman, navigate to/etc/containers/certs.d/registry.protegrity.com.Extract the compressed file.
The extracted file contains the following certificates:
- protegrityteameditioncontainerregistry_protegrity-usa-inc.crt
- TrustedRoot.crt
- DigiCertCA.crt
Navigate to the extracted directory.
Concatenate the contents of
TrustedRoot.crtandDigiCertCA.crtto a new file calledca.crt.cat TrustedRoot.crt DigiCertCA.crt > ca.crtRename the client certificate file.
mv protegrityteameditioncontainerregistry_protegrity-usa-inc.crt client.certCopy the client and CA certificates to
/etc/docker/certs.d/registry.protegrity.com. For podman, copy the certificates to/etc/containers/certs.d/registry.protegrity.com.Copy the
client.keythat was generated to the/etc/docker/certs.d/registry.protegrity.comdirectory. If the/certs.d/registry.protegrity.comdirectory does not exist, then create the directories. For podman, use the/etc/containers/certs.d/registry.protegrity.comdirectory.Copy the Docker registry’s CA certificate to the system’s trusted CA store to establish SSL/TLS trust for that registry. A sample command for RHEL 10.1 is provided here:
For docker:
sudo cp /etc/docker/certs.d/registry.protegrity.com/ca.crt /etc/pki/ca-trust/source/anchors/For podman:
sudo cp /etc/containers/certs.d/registry.protegrity.com/ca.crt /etc/pki/ca-trust/source/anchors/- Rebuild the system’s trusted CA bundle. A sample command for RHEL 10.1 is provided here.
update-ca-trust- Restart the container service.
For docker:
service docker restartFor podman:
service podman restartObtain the artifacts for setting up the AI Team Edition.
From the Product Management > Explore Products > AI Team Edition > Setup & Credentials page of the My.Protegrity portal, click Download Pull Script. A compressed file is downloaded.
Copy the compressed file to an empty directory on the jumpbox.
Extract the compressed file.
The following files are available:
- artifacts_aws.json: The list of artifacts that are obtained for AWS.
- artifacts_azure.json: The list of artifacts that are obtained for Azure.
- pull_all_artifacts.sh: The script to pull the artifacts from the PCR.
- tag_push_artifacts.sh: The script to tag and push the artifacts to your container registry.
Navigate to the extracted directory. Do not update the contents of the
artifacts_aws.jsonorartifacts_azure.jsonfiles.Run the
pull scriptto pull the artifacts to your jumpbox using the following command:For docker:
./pull_all_artifacts.sh --url https://registry.protegrity.com --user <username_from_portal> --password <access_key_from_portal> --json artifacts_<aws/azure>.json --cert-file /etc/docker/certs.d/registry.protegrity.com/client.cert --key-file /etc/docker/certs.d/registry.protegrity.com/client.keyFor podman:
./pull_all_artifacts.sh --url https://registry.protegrity.com --user <username_from_portal> --password <access_key_from_portal> --json artifacts_<aws/azure>.json --cert-file /etc/containers/certs.d/registry.protegrity.com/client.cert --key-file /etc/containers/certs.d/registry.protegrity.com/client.keyNote: mTLS uses a client certificate and the port 443 to connect to the Protegrity Container Registry. Also, ensure that the certificate files are named as ca.crt, client.cert, and client.key. Ensure that single quotes are used to specify the username and password in the command.
Run the following command to tag and push the artifacts to your container registry.
Sample command for OCI-compatible registries:
./tag_push_artifacts.sh --url <OCI-compatible registry URL> --user <registry username> --password <registry password> --json artifacts_<aws/azure>.jsonNote: Ensure that single quotes are used to specify the username and password in the command.
Validate that all the artifacts are successfully pushed to your registry.
3.3 - Installing Protegrity Provisioned Cluster
The Protegrity Provisioned Cluster (PPC) is the core framework that forms Protegrity AI Team Edition, designed to deliver a modern, cloud-native experience for data security and governance. Built on Kubernetes, PPC uses a containerized architecture that simplifies deployment and scaling. Using OpenTofu scripts and Helm charts, administrators can stand up clusters with minimal manual intervention, ensuring consistency and reducing operational overhead.
PPC introduces a suite of Protegrity Common Services (PCS) that act as the backbone for AI Team Edition features. These include ingress control for secure traffic routing, certificate management for request validation, and robust authentication and authorization services. PPC also integrates Insight for audit logging and analytics, leveraging OpenSearch and OpenDashboards for visualization and compliance reporting. Beyond this foundation, AI Team Edition delivers advanced capabilities such as policy management, anonymization, data discovery, semantic guardrails, and synthetic data generation — all orchestrated within the PPC cluster. This modular approach ensures scalability, security, and flexibility, making PPC a strategic enabler for organizations adopting cloud-first and containerized environments.
The documentation in this section is for PPC v1.1.0. To refer to the earlier version of the documentation, refer to the PPC documentation.
3.3.1 - Installing PPC on Amazon Web Services (AWS)
The Protegrity Provisioned Cluster PPC is the core framework that forms the AI Team Edition. It is designed to deliver a modern, cloud-native experience for data security and governance. Built on Kubernetes, PPC uses a containerized architecture that simplifies deployment and scaling. Using OpenTofu scripts and Helm charts, administrators can create clusters with minimal manual intervention, ensuring consistency and reducing operational overhead.
3.3.1.1 - Prerequisites
Jump box or local machine
A newly provisioned EC2 instance must be used as the jump box for PPC deployment.
The jump box must be provisioned in the same AWS region where the PPC cluster will be deployed to ensure proper connectivity and access to regional resources.
Supported operating systems: RHEL 10, Debian 13, or Debian 12.
Note: Ensure to retain the original jump box used for installation. The Terraform state files required for cleaning and upgrading the cluster are available on this jump box. A snapshot of the jump box must be maintained to prevent data loss.
Readiness check
The readiness check scripts validates if the required IAM permissions are available for installing PPC.
Run the following script.
./readiness-aws.sh
After the readiness check is completed successfully, ensure to run the following checks for the selected region and architecture.
Supported Instance Types
While installing a cluster, the nodes are provisioned in two ways, that is, a managed node group and Karpenter. Therefore, both must be validated for the selected architecture.
| Role | amd64 (x86-64) | arm64 |
|---|---|---|
| Managed node group (default) | t3.2xlarge (8 vCPU / 32 GiB) | t4g.2xlarge (8 vCPU / 32 GiB) |
| Karpenter instance families | m5, m6i, c5, r5, t3, t3a | t4g, c7a |
Availability Zones
The instance must be available in at least 2 availability zones.
To verify the number of available availability zones, run the following command.
aws ec2 describe-instance-type-offerings \
  --location-type availability-zone \
  --filters "Name=instance-type,Values=t3.2xlarge" \
  --region <region> \
  --query "InstanceTypeOfferings[].Location" --output table
Validating IAM and SCP
Access to launch nodes in the required IAM and SCP.
To verify the required IAM and SCP access, run the following command.
aws ec2 run-instances --dry-run \
  --instance-type <instance-type> \
  --image-id <ami-id> \
  --region <region> \
  --subnet-id <subnet-id> \
  --security-group-ids <security-group-id>
EC2 On-Demand vCPU service quota
The instance is within the EC2 On-Demand vCPU service quota for the required node count.
To verify the EC2 On-Demand vCPU service quota, run the following command.
aws service-quotas get-service-quota \
  --service-code ec2 \
  --quota-code L-1216C47A \
  --region <region>   # Running On-Demand Standard (A,C,D,H,I,M,R,T,Z) instances
Updating the Roles and Permissions using JSON
The roles and permissions are updated using the JSONs.
From the AWS Console, navigate to IAM > Policies > Create policy > JSON, and create the following JSONs.
Note: Before using the provided JSON, replace the
AWS_ACCOUNT_IDandREGIONvalues with those of the account and region where the resources are being deployed.
- Creating KMS key and S3 bucket.
{
	"Version": "2012-10-17",
	"Statement": [
		{
			"Sid": "ReadOnlyAccess",
			"Effect": "Allow",
			"Action": [
				"eks:DescribeClusterVersions",
				"ec2:DescribeInstances",
				"ec2:DescribeVolumes",
				"s3:ListAllMyBuckets",
				"iam:ListUsers",
				"ec2:RunInstances",
				"ec2:DescribeInstances",
				"ec2:DescribeVolumes",
				"ec2:CreateKeyPair",
				"ec2:DescribeImages"
			],
			"Resource": "*"
		},
		{
			"Sid": "ScopedS3AndKMS",
			"Effect": "Allow",
			"Action": [
				"s3:ListBucket",
				"s3:PutEncryptionConfiguration",
				"s3:GetEncryptionConfiguration",
				"kms:CreateKey",
				"kms:PutKeyPolicy",
				"kms:GetKeyPolicy"
			],
			"Resource": [
				"arn:aws:s3:::*",
				"arn:aws:kms:*:<AWS_ACCOUNT_ID>:key/*"
			]
		},
		{
			"Sid": "SelfServiceIAM",
			"Effect": "Allow",
			"Action": [
				"iam:ListSSHPublicKeys",
				"iam:ListServiceSpecificCredentials",
				"iam:GetLoginProfile",
				"iam:ListAccessKeys",
				"iam:CreateAccessKey"
			],
			"Resource": "arn:aws:iam::<AWS_ACCOUNT_ID>:user/${aws:username}"
		},
        {
			"Sid": "EC2KeyPairPermission",
			"Effect": "Allow",
			"Action": [
				"ec2:CreateKeyPair",
				"ec2:DescribeKeyPairs"
			],
			"Resource": [
				"*"
			]
		}
	]
}
- Creating EC2 Service Policy.
{
	"Version": "2012-10-17",
	"Statement": [
		{
			"Sid": "DenyEC2Instances",
			"Effect": "Deny",
			"Action": "ec2:RunInstances",
			"Resource": "arn:aws:ec2:*:*:instance/*",
			"Condition": {
				"StringLike": {
					"ec2:InstanceType": [
						"p*",
						"g*",
						"inf*",
						"trn*",
						"x*",
						"u-*",
						"z*",
						"mac*"
					]
				}
			}
		},
		{
			"Sid": "ReadOnlyDescribeListEC2RegionRestricted",
			"Effect": "Allow",
			"Action": [
				"ec2:DescribeVpcs",
				"ec2:DescribeSubnets",
				"ec2:DescribeVpcAttribute",
				"ec2:DescribeTags",
				"ec2:DescribeSecurityGroups",
				"ec2:DescribeSecurityGroupRules",
				"ec2:DescribeLaunchTemplates",
				"ec2:DescribeLaunchTemplateVersions",
				"ec2:DescribeNetworkInterfaces",
				"ec2:DescribeAccountAttributes"
			],
			"Resource": "*",
			"Condition": {
				"StringEquals": {
					"aws:RequestedRegion": [
						"<REGION>"
					]
				}
			}
		},
		{
			"Sid": "EC2LifecycleAndSecurity",
			"Effect": "Allow",
			"Action": [
				"ec2:CreateSecurityGroup",
				"ec2:DeleteSecurityGroup",
				"ec2:AuthorizeSecurityGroupIngress",
				"ec2:AuthorizeSecurityGroupEgress",
				"ec2:RevokeSecurityGroupIngress",
				"ec2:RevokeSecurityGroupEgress",
				"ec2:CreateLaunchTemplate",
				"ec2:DeleteLaunchTemplate",
				"ec2:CreateTags",
				"ec2:DeleteTags"
			],
			"Resource": [
				"arn:aws:ec2:*:*:security-group/*",
				"arn:aws:ec2:*:*:launch-template/*",
				"arn:aws:ec2:*:*:instance/*",
				"arn:aws:ec2:*:*:network-interface/*",
				"arn:aws:ec2:*:*:subnet/*",
				"arn:aws:ec2:*:*:vpc/*",
				"arn:aws:ec2:*:*:image/*",
				"arn:aws:ec2:*:*:volume/*",
				"arn:aws:ec2:*:*:snapshot/*"
			]
		}
	]
}
- Creating EKS Service Policy.
{
    "Version": "2012-10-17",
    "Statement": [
        {
            "Sid": "ReadOnlyDescribeListEKSVersionsRegionRestricted",
            "Effect": "Allow",
            "Action": [
                "eks:DescribeAddonVersions"
            ],
            "Resource": "*",
            "Condition": {
                "StringEquals": {
                    "aws:RequestedRegion": [
                        "<REGION>"
                    ]
                }
            }
        },
        {
            "Sid": "ReadOnlyDescribeListEKS",
            "Effect": "Allow",
            "Action": [
                "eks:DescribeCluster",
                "eks:DescribeAddon",
                "eks:DescribePodIdentityAssociation",
                "eks:DescribeNodegroup",
                "eks:ListAddons",
                "eks:ListPodIdentityAssociations"
            ],
            "Resource": [
                "arn:aws:eks:*:<AWS_ACCOUNT_ID>:cluster/*",
                "arn:aws:eks:*:<AWS_ACCOUNT_ID>:nodegroup/*",
                "arn:aws:eks:*:<AWS_ACCOUNT_ID>:addon/*",
                "arn:aws:eks:*:<AWS_ACCOUNT_ID>:podidentityassociation/*"
            ]
        },
        {
            "Sid": "EKSLifecycleAndTag",
            "Effect": "Allow",
            "Action": [
                "eks:CreateCluster",
                "eks:UpdateClusterVersion",
                "eks:UpdateClusterConfig",
                "eks:CreateNodegroup",
                "eks:UpdateNodegroupConfig",
                "eks:UpdateNodegroupVersion",
                "eks:DeleteNodegroup",
                "eks:CreateAddon",
                "eks:UpdateAddon",
                "eks:DeleteAddon",
                "eks:CreatePodIdentityAssociation",
                "eks:DeletePodIdentityAssociation",
                "eks:TagResource",
                "eks:ListClusters"
            ],
            "Resource": [
                "arn:aws:eks:*:<AWS_ACCOUNT_ID>:cluster/*",
                "arn:aws:eks:*:<AWS_ACCOUNT_ID>:nodegroup/*",
                "arn:aws:eks:*:<AWS_ACCOUNT_ID>:addon/*",
                "arn:aws:eks:*:<AWS_ACCOUNT_ID>:podidentityassociation/*"
            ]
        },
        {
            "Sid": "AllowEKSNodegroupSLR",
            "Effect": "Allow",
            "Action": [
                "iam:GetRole",
                "iam:CreateServiceLinkedRole"
            ],
            "Resource": "arn:aws:iam::<AWS_ACCOUNT_ID>:role/aws-service-role/eks-nodegroup.amazonaws.com/AWSServiceRoleForAmazonEKSNodegroup"
        },
        {
            "Sid": "EKSDeleteClusterV6",
            "Effect": "Allow",
            "Action": "eks:DeleteCluster",
            "Resource": "arn:aws:eks:*:<AWS_ACCOUNT_ID>:cluster/*"
        }
    ]
}
- Creating IAM Service Policy.
{
    "Version": "2012-10-17",
    "Statement": [
        {
            "Sid": "DenyAdminPolicyAttachment",
            "Effect": "Deny",
            "Action": [
                "iam:AttachRolePolicy",
                "iam:PutRolePolicy"
            ],
            "Resource": "arn:aws:iam::<AWS_ACCOUNT_ID>:role/eks-*",
            "Condition": {
                "ArnLike": {
                    "iam:PolicyARN": [
                        "arn:aws:iam::aws:policy/AdministratorAccess",
                        "arn:aws:iam::aws:policy/PowerUserAccess",
                        "arn:aws:iam::aws:policy/*FullAccess"
                    ]
                }
            }
        },
        {
            "Sid": "DenyInlinePolicyEscalation",
            "Effect": "Deny",
            "Action": [
                "iam:PutRolePolicy",
                "iam:PutUserPolicy",
                "iam:PutGroupPolicy"
            ],
            "Resource": "*"
        },
        {
            "Sid": "ReadOnlyDescribeListIAMScoped",
            "Effect": "Allow",
            "Action": [
                "iam:GetRole",
                "iam:ListRolePolicies",
                "iam:ListAttachedRolePolicies",
                "iam:ListInstanceProfilesForRole",
                "iam:GetInstanceProfile",
                "iam:GetPolicy",
                "iam:GetPolicyVersion",
                "iam:ListPolicyVersions",
                "iam:ListAccessKeys"
            ],
            "Resource": [
                "arn:aws:iam::<AWS_ACCOUNT_ID>:role/eks-*",
                "arn:aws:iam::<AWS_ACCOUNT_ID>:instance-profile/eks-*",
                "arn:aws:iam::<AWS_ACCOUNT_ID>:policy/eks-*"
            ]
        },
        {
            "Sid": "ReadOnlyDescribeListUnavoidableStar",
            "Effect": "Allow",
            "Action": "iam:ListRoles",
            "Resource": "*"
        },
        {
            "Sid": "IAMLifecycleRolesPoliciesInstanceProfiles",
            "Effect": "Allow",
            "Action": [
                "iam:CreateRole",
                "iam:TagRole",
                "iam:CreatePolicy",
                "iam:DeletePolicy",
                "iam:DeletePolicyVersion",
                "iam:TagPolicy",
                "iam:AttachRolePolicy",
                "iam:DetachRolePolicy",
                "iam:CreateInstanceProfile",
                "iam:TagInstanceProfile",
                "iam:AddRoleToInstanceProfile",
                "iam:RemoveRoleFromInstanceProfile",
                "iam:DeleteInstanceProfile"
            ],
            "Resource": [
                "arn:aws:iam::<AWS_ACCOUNT_ID>:role/eks-*",
                "arn:aws:iam::<AWS_ACCOUNT_ID>:policy/eks-*",
                "arn:aws:iam::<AWS_ACCOUNT_ID>:instance-profile/eks-*"
            ]
        },
        {
            "Sid": "EKSDeleteRoles",
            "Effect": "Allow",
            "Action": "iam:DeleteRole",
            "Resource": "arn:aws:iam::<AWS_ACCOUNT_ID>:role/eks*"
        },
        {
            "Sid": "PassRoleOnlyToEKS",
            "Effect": "Allow",
            "Action": "iam:PassRole",
            "Resource": "arn:aws:iam::<AWS_ACCOUNT_ID>:role/eks-*",
            "Condition": {
                "StringEquals": {
                    "iam:PassedToService": [
                        "eks.amazonaws.com",
                        "ec2.amazonaws.com",
                        "eks-pods.amazonaws.com",
                        "pods.eks.amazonaws.com"
                    ]
                }
            }
        },
        {
            "Sid": "PassRoleForEKSPodIdentityRoles",
            "Effect": "Allow",
            "Action": "iam:PassRole",
            "Resource": [
                "arn:aws:iam::<AWS_ACCOUNT_ID>:role/eks-*-karpenter-role",
                "arn:aws:iam::<AWS_ACCOUNT_ID>:role/eks-*-backup-recovery-utility-role"
            ]
        }
    ]
}
- Creating KMS Service Policy.
{
    "Version": "2012-10-17",
    "Statement": [
        {
            "Sid": "KMSCreateAndList",
            "Effect": "Allow",
            "Action": [
                "kms:CreateKey",
                "kms:ListAliases"
            ],
            "Resource": "*"
        },
        {
            "Sid": "KMSKeyManagementScoped",
            "Effect": "Allow",
            "Action": [
                "kms:PutKeyPolicy",
                "kms:GetKeyPolicy",
                "kms:DescribeKey",
                "kms:GenerateDataKey",
                "kms:Decrypt",
                "kms:TagResource",
                "kms:UntagResource",
                "kms:EnableKeyRotation",
                "kms:GetKeyRotationStatus",
                "kms:ListResourceTags",
                "kms:ScheduleKeyDeletion",
                "kms:CreateAlias",
                "kms:DeleteAlias"
            ],
            "Resource": [
                "arn:aws:kms:*:<AWS_ACCOUNT_ID>:key/*",
                "arn:aws:kms:*:<AWS_ACCOUNT_ID>:alias/*"
            ]
        }
    ]
}
- Creating AWS S3 Service Policy.
{
    "Version": "2012-10-17",
    "Statement": [
        {
            "Sid": "S3EncryptionConfigAndStateScoped",
            "Effect": "Allow",
            "Action": [
                "s3:ListBucket",
                "s3:GetEncryptionConfiguration",
                "s3:PutEncryptionConfiguration",
                "s3:GetObject",
                "s3:PutObject",
                "s3:DeleteObject",
                "s3:CreateBucket",
                "s3:GetBucketTagging",
                "s3:GetBucketPolicy",
                "s3:GetBucketAcl",
                "s3:GetBucketCORS",
                "s3:PutBucketTagging",
                "s3:GetBucketWebsite",
                "s3:GetBucketVersioning",
                "s3:GetAccelerateConfiguration",
                "s3:GetBucketRequestPayment",
                "s3:GetBucketLogging",
                "s3:GetLifecycleConfiguration",
                "s3:GetReplicationConfiguration",
                "s3:GetBucketObjectLockConfiguration",
                "s3:DeleteBucket",
                "s3:PutBucketVersioning",
                "s3:ListBucketVersions",
                "s3:DeleteObjectVersion",
                "s3:GetObjectTagging"
            ],
            "Resource": "arn:aws:s3:::*",
            "Condition": {
                "StringEquals": {
                    "aws:RequestedRegion": [
                        "<REGION>"
                    ],
                    "aws:PrincipalAccount": "<AWS_ACCOUNT_ID>"
                }
            }
        }
    ]
}
Description for the JSON components
This section provides information for the permissions mentioned in the JSON file.
IAM Roles
Contact the IT team to create the necessary IAM roles with the following permissions to create and manage AWS EKS resources.
| IAM Role | Required Policies |
|---|---|
| Amazon EKS cluster IAM Role Manages the Kubernetes cluster. | - AmazonEKSBlockStoragePolicy - AmazonEKSClusterPolicy - AmazonEKSComputePolicy - AmazonEKSLoadBalancingPolicy - AmazonEKSNetworkingPolicy - AmazonEKSVPCResourceController - AmazonEKSServicePolicy - AmazonEBSCSIDriverPolicy |
| Amazon EKS node IAM Role Communicates with the node. | - AmazonEBSCSIDriverPolicy - AmazonEC2ContainerRegistryReadOnly - AmazonEKS_CNI_Policy - AmazonEKSWorkerNodePolicy - AmazonSSMManagedInstanceCore |
These policies are managed by AWS. For more information about AWS managed policies, refer to AWS managed policies for Amazon Elastic Kubernetes Service in the AWS documentation.
AWS IAM Permissions
The AWS IAM user or role to install PPC must have permissions to create and manage Amazon EKS clusters and the required supporting AWS resources.
EC2 Permissions
| Category | Required Permissions |
|---|---|
| Networking & VPC | ec2:DescribeVpcs ec2:DescribeSubnets ec2:DescribeVpcAttribute ec2:DescribeTags ec2:DescribeNetworkInterfaces |
| Security Groups | ec2:DescribeSecurityGroups ec2:DescribeSecurityGroupRules ec2:CreateSecurityGroup ec2:DeleteSecurityGroup ec2:AuthorizeSecurityGroupIngress ec2:AuthorizeSecurityGroupEgress ec2:RevokeSecurityGroupIngress ec2:RevokeSecurityGroupEgress |
| Launch Templates | ec2:DescribeLaunchTemplates ec2:DescribeLaunchTemplateVersions ec2:CreateLaunchTemplate ec2:DeleteLaunchTemplate |
| Instances | ec2:RunInstances |
| Tagging | ec2:CreateTags ec2:DeleteTags |
EKS Permissions
| Category | Required Permissions |
|---|---|
| Cluster Management | eks:CreateCluster eks:DescribeCluster |
| Node Groups | eks:CreateNodegroup eks:DescribeNodegroup |
| Add-ons | eks:CreateAddon eks:DescribeAddon eks:DescribeAddonVersions eks:DeleteAddon eks:ListAddons |
| Pod Identity Associations | eks:CreatePodIdentityAssociation eks:DescribePodIdentityAssociation eks:DeletePodIdentityAssociation eks:ListPodIdentityAssociations |
| Tagging | eks:TagResource |
IAM Permissions
| Category | Required Permissions |
|---|---|
| Roles & Policies | iam:CreateRole iam:DeleteRole iam:TagRole iam:GetRole iam:ListRoles iam:AttachRolePolicy iam:DetachRolePolicy iam:ListRolePolicies iam:ListAttachedRolePolicies |
| Policies | iam:CreatePolicy iam:DeletePolicy iam:TagPolicy iam:GetPolicy iam:GetPolicyVersion iam:ListPolicyVersions |
| Instance Profiles | iam:CreateInstanceProfile iam:DeleteInstanceProfile iam:TagInstanceProfile iam:GetInstanceProfile iam:AddRoleToInstanceProfile iam:RemoveRoleFromInstanceProfile iam:ListInstanceProfilesForRole |
| Service-linked Role | iam:CreateServiceLinkedRole |
AWS S3 Permissions
| Required Permissions |
|---|
| s3:ListBucket |
| s3:PutEncryptionConfiguration |
| s3:GetEncryptionConfiguration |
| s3:PutBucketVersioning |
| s3:GetObjectTagging |
| s3:ListBucketVersions |
| s3:DeleteObjectVersion |
KMS Permissions
| Required Permissions |
|---|
| kms:CreateKey |
| kms:PutKeyPolicy |
| kms:GetKeyPolicy |
AWS Account Details
A valid AWS account where Amazon EKS is deployed.
The AWS account ID and AWS region must be identified in advance, as all resources are provisioned in the selected region.
Service Quotas
Verify that the AWS account has sufficient service quotas to support the deployment. At a minimum, ensure adequate limits for the following:
- EC2 instances based on node group size and instance types.
- VPC and networking limits, including subnets, route tables, and security groups.
- Elastic IP addresses and Load balancers.
If required, request quota increases through the AWS Service Quotas console before proceeding.
Service Control Policies (SCPs)
The AWS account must not have SCPs that restrict required permissions. In particular, SCPs must not block the following actions:
- eks:*
- ec2:*
- iam:PassRole
Restrictive SCPs may prevent successful cluster creation and resource provisioning.
Virtual Private Cloud (VPC)
- An existing VPC must be available in the target AWS region.
- The VPC should be configured to support Amazon EKS workloads.
Subnet Requirements
- At least two private subnets must be available.
- Subnets must be distributed across two or more Availability Zones (AZs).
Creating AWS KMS Key and AWS S3 Bucket
Amazon S3 Bucket: An Amazon S3 bucket is required to store critical data such as backups, configuration artifacts, and restore metadata used during installation and recovery workflows. Using a dedicated AWS S3 bucket helps ensure data durability, isolation, and controlled access during cluster operations.
AWS KMS Key: An AWS KMS customer‑managed key is required to encrypt data stored in the AWS S3 bucket. This ensures that sensitive data is protected at rest and allows customers to manage encryption policies, key rotation, and access control in accordance with their security requirements.
Note: The KMS key must allow access to the IAM roles used by the EKS cluster and related services.
The following section explains how to create AWS KMS Key and AWS S3 Bucket. This can be done from the AWS Web UI or using the script.
- Create a KMS key for backup bucket.
The KMS key created is referenced during installation and restore using its KMS ARN, and is validated by the installer.
Before you begin, ensure to have:
Access to the AWS account where the KMS key is created.
The KMS key can be in the same AWS account as the AWS S3 bucket, or in a different, cross‑account AWS account.
The user running the installer must have the permission
kms:DescribeKeyto describe the KMS key. If this permission is unavailable, then installation and restore fails.
The steps to create a KMS key are available at https://docs.aws.amazon.com/. Follow the KMS key creation steps, but ensure to select the following configurations.
On the Key configuration page:
Select Key type as Symmetric.
Select Key usage as Encrypt and decrypt.These settings are required for encrypting and decrypting AWS S3 objects used by backup and restore operations.
On the Key Administrative Permissions page, select the users or roles that can manage the key. The key administrators do not automatically get permission to encrypt or decrypt data, unless these permissions are explicitly granted.
On the Define key usage permissions page, grant permissions to the principals that will use the key.
The user or role running the installation and restore must have the permission
kms:DescribeKeyto describe the key. This permission is mandatory because the installer validates the KMS key before proceeding. Without this, the installation or restore procedure fails, especially in cross‑account KMS scenarios.On the Edit key policy - optional page, click Edit.
The KMS key policy controls the access to the encryption key and must be applied before creating the AWS S3 bucket.
If you are using AWS SSO IAM Identity Center, ensure that the IAM role ARN specified in the KMS key policy includes the full SSO path prefix:
aws-reserved/sso.amazonaws.com/.
For example:arn:aws:iam::<ACCOUNT_ID>:role/aws-reserved/sso.amazonaws.com/<SSO_ROLE_NAME>
Omitting this path results in KMS key policy creation failures with anInvalidArnException.
The following example shows a key policy that:
Allows the PPC bootstrap user to use the KMS key for cluster creation and backup operations.
Allows the IAM role to encrypt and decrypt EKS backups.
cat > kms-key-policy.json << 'EOF'
{
  "Version": "2012-10-17",
  "Id": "key-resource-policy-0",
  "Statement": [
    {
      "Sid": "Allow KMS administrative actions only, no key usage permissions.",
      "Effect": "Allow",
      "Principal": {
        "AWS": "arn:aws:iam::<<ADMIN_AWS_ACCOUNT>>:root"
      },
      "Action": [
        "kms:Create*",
        "kms:Describe*",
        "kms:Enable*",
        "kms:List*",
        "kms:Put*",
        "kms:Update*",
        "kms:Revoke*",
        "kms:Disable*",
        "kms:Get*",
        "kms:Delete*",
        "kms:ScheduleKeyDeletion",
        "kms:CancelKeyDeletion"
      ],
      "Resource": "*"
    },
    {
      "Sid": "Allow user running bootstrap.sh script of the PPC to use the KMS key.",
      "Effect": "Allow",
      "Principal": {
        "AWS": "<<SSO_OR_IAM_USER_ACCOUNT_ARN>>"
      },
      "Action": [
        "kms:DescribeKey",
        "kms:Encrypt",
        "kms:Decrypt",
        "kms:ReEncryptFrom",
        "kms:ReEncryptTo",
        "kms:GenerateDataKey",
        "kms:GenerateDataKeyWithoutPlaintext"
      ],
      "Resource": "*"
    },
    {
      "Sid": "Allow backup recovery utility and EKS Node roles KMS key usage permissions, Replace <<<<CLUSTER_NAME>>>> with the name of your EKS cluster.",
      "Effect": "Allow",
      "Principal": {
        "AWS": "arn:aws:iam::<<DEPLOYMENT_AWS_ACCOUNT>>:root"
      },
      "Action": [
        "kms:Decrypt",
        "kms:Encrypt",
        "kms:ReEncryptFrom",
        "kms:ReEncryptTo",
        "kms:GenerateDataKey",
        "kms:GenerateDataKeyWithoutPlaintext",
        "kms:GenerateDataKeyPair",
        "kms:GenerateDataKeyPairWithoutPlaintext",
        "kms:DescribeKey"
      ],
      "Resource": "*",
      "Condition": {
        "ArnLike": {
          "aws:PrincipalArn": [
            "arn:aws:iam::<<DEPLOYMENT_AWS_ACCOUNT>>:role/eks-<<CLUSTER_NAME>>-backup-recovery-utility-role",
            "arn:aws:iam::<<DEPLOYMENT_AWS_ACCOUNT>>:role/eks-<<CLUSTER_NAME>>-node-role"
          ]
        }
      }
    }
  ]
}
EOF
Update the values of the following based on the environment:
DEPLOYMENT_AWS_ACCOUNT- AWS account ID.CLUSTER_NAME- EKS cluster name.SSO_OR_IAM_USER_ACCOUNT_ARN- ARN of the IAM role used to run the bootstrap script. The ARN format depends on your authentication method:IAM role – Use the ARN returned by
aws sts get-caller-identity.AWS SSO (IAM Identity Center) – Convert the session ARN returned by
aws sts get-caller-identityto a full IAM role ARN before using it in the KMS key policy.If you are using AWS SSO (IAM Identity Center), the ARN returned by
aws sts get-caller-identityis a session ARN and cannot be used directly in an AWS KMS key policy. AWS KMS requires the full IAM role ARN, including theaws-reserved/sso.amazonaws.com/path. Without this, KMS key policy creation fails withInvalidArnException.
Retrieving the IAM role ARN for KMS key policy
To identify the role used to run the bootstrap script, run the following command:
aws sts get-caller-identity --query Arn --output text
IAM role: Use the returned ARN directly.
arn:aws:iam::<DEPLOYMENT_AWS_ACCOUNT>:role/your-role-nameAWS SSO (IAM Identity Center): The command returns a session ARN, which must be converted.
Do not use the session ARN:
arn:aws:sts::<<DEPLOYMENT_AWS_ACCOUNT>>:assumed-role/AWSReservedSSO_PermissionSetName_abc123/john.doe@company.comUse this converted IAM role ARN in KMS policy:
arn:aws:iam::<<DEPLOYMENT_AWS_ACCOUNT>>:role/aws-reserved/sso.amazonaws.com/AWSReservedSSO_PermissionSetName_abc123To convert:
- Replace
arn:aws:sts::witharn:aws:iam::. - Replace
assumed-role/withrole/aws-reserved/sso.amazonaws.com/. - Remove the session suffix (everything after the last /).
- Replace
Important: Before initiating restore operation, review and update the KMS key policy to reflect the restore
CLUSTER_NAME. Even if the policy was already configured for the source cluster, it must be updated for the new restore cluster. If the policy continues to reference the source cluster name, the IAM role created during restore cannot decrypt the backup data, causing the restore to fail.
After the KMS key is created, note the KMS key ARN. This KMS key ARN is required while creating the AWS S3 backup bucket.
- Create an AWS S3 Bucket encrypted with SSE‑KMS
The AWS S3 bucket encrypted with SSE‑KMS is used as a backup bucket during installation and restore.
Before you begin, ensure to have:
Access to the AWS account where the AWS S3 bucket will be created.
Permission to create AWS S3 bucket.
The user running the installer must have permission to describe the KMS key. Without this permission, installation and restore fails.
The steps to create an AWS S3 bucket are available at https://docs.aws.amazon.com/. Follow the AWS S3 bucket creation steps, but ensure to set the following configurations as mentioned below.
In the Default Encryption section:
Select Encryption type as Server-side encryption with AWS Key Management Service keys (SSE-KMS).
Select the AWS KMS key ARN. If the KMS key is in a different AWS account than the AWS S3 bucket, then the key will not appear in the AWS console dropdown. In this case, enter the KMS key ARN manually.
Enable Bucket Key.
Automatic AWS KMS Key and S3 Bucket Provisioning
When deploying PPC using the bootstrap script, the AWS S3 bucket and KMS key can be provisioned automatically during the installation process, without any separate pre-installation steps.
During the bootstrap script execution, at step 5, you are prompted to choose how to provide the AWS S3 bucket for cluster backups:
Do you want to use an existing AWS S3 bucket, or provision a new one (with KMS key)?
  1) Use existing
  2) Provision new via Tofu (backup-infra)
Select Option 2 - Provision new via Tofu to have the bootstrap script automatically:
- Create a new AWS KMS key.
- Create a new AWS S3 bucket encrypted with SSE-KMS.
- Associate the AWS S3 bucket with the KMS key.
At step 6, when prompted, provide a globally unique bucket name using the following naming rules:
- Lowercase letters, digits, and hyphens only.
- Between 3 and 63 characters.
- Must not already exist.
Note: The AWS S3 bucket and KMS key are created in the same AWS account using this option. For cross-account KMS configurations, follow the steps in the Using AWS Web UI tab.
Use a dedicated AWS S3 bucket per cluster for backup and restore operations to ensure data and encryption isolation. Sharing a bucket across clusters increases the risk of cross-cluster data access or decryption due to IAM misconfiguration.
Blocking Public Access to the AWS S3 Bucket
The PPC bootstrap script does not configure AWS S3 Block Public Access at the per-bucket level. This is by design because many AWS Organizations enforce AWS S3 Block Public Access through Service Control Policies (SCPs) at the account or organization level. This causes per-bucket s3:PutBucketPublicAccessBlock calls to fail with AccessDenied. AWS enabled S3 Block Public Access by default for all new accounts created after April 2023. However, verify the settings manually before proceeding.
Warning: The AWS S3 backup bucket stores highly sensitive data. Ensure that AWS S3 Block Public Access is enforced at the AWS account or organization level to prevent accidental public exposure.
Verify that AWS S3 Block Public Access is enabled at the account level before deploying PPC:
Navigate to the Amazon AWS S3 console.
Click Account and organization settings from the left navigation.
Ensure all four settings are enabled and set to On:
- Block public access to buckets and objects granted through new access control lists (ACLs)
- Block public access to buckets and objects granted through any access control lists (ACLs)
- Block public access to buckets and objects granted through new public bucket or access point policies
- Block public and cross-account access to buckets and objects through any public bucket or access point policies
If it is set to Off, then click Edit, select the check boxes, and click Save changes.
Verify that the Block Public Access settings for this account are enabled using the following command:
aws s3control get-public-access-block --account-id $(aws sts get-caller-identity --query Account --output text)All four fields
BlockPublicAcls,IgnorePublicAcls,BlockPublicPolicy,RestrictPublicBucketsshould be set totrue.
Note: To block the permissions at the bucket level, navigate to Buckets > General purpose buckets > select the bucket > Permissions > Block public access (bucket settings).
Zone Requirements
The cluster requires a minimum of two availability zones for high availability. It is required to have two zones available while deploying a PPC.
| Zones | Supported | Notes |
|---|---|---|
| 1 | No | Installation fails. |
| 2 | Yes | Minimum requirement for High Availability. |
Zones are derived from the private subnets which are provided. Each subnet maps to exactly one availability zone. During the installation, the bootstrap script validates that the selected subnets are in different Availability Zones.
Note: Zones cannot be changed after cluster creation.
Installing or upgrading PPC in region not supporting FIPS
FIPS is supported only in a few AWS regions. To use PPC in regions such as EU-WEST-2 where FIPS is not supported, refer the AWS documentation.
For installing PPC in region not supporting FIPS, refer to Configuring PPC for Non-FIPS Deployment on AWS.
For upgrading PPC in region not supporting FIPS, refer to Upgrading the PPC.
3.3.1.2 - Preparing for PPC deployment
If the jump box is already set previously, run the ./bootstrap.sh --cloud aws destroy command in the directory where the cluster is installed. This ensures that the local registry on the jump box and the clusters are cleaned up before proceeding with a new installation.
Warning: Do not install or manage multiple clusters from the same working directory. Each cluster deployment maintains its own Terraform/OpenTofu state, and reusing a directory can overwrite state files, causing loss of cluster tracking and unintended cleanup behavior.
Use a dedicated directory, and jump box, where possible, per cluster, and always verify the active kubectl context before running cleanup commands such as./bootstrap.sh --cloud aws destroy.
Log in to the My.Protegrity portal.
Navigate to Product Management > Explore Products > AI Team Edition > Platform & Features.
Navigate to Platform Installation.
From the Actions column for Protegrity Provisioned Cluster, click the Download Product icon to download the PPC 1.1 archive.
Create a
deploymentdirectory on the jumpbox.mkdir deployment && cd deploymentCopy the PCT to the
deploymentdirectory on the jump box.Extract the PCT.
tar -xvf PPC-K8S-ALL_1.1.0.97.tar
3.3.1.3 - Deploying PPC
By default, the PCT is configured to deploy a FIPS-enabled cluster using FIPS-compliant Bottlerocket AMIs.
Non-FIPS deployment: Before proceeding with the installation, complete the steps in Configuring PPC for Non-FIPS Deployment on AWS to modify the required Terraform configuration files. Then proceed with either the automated or component-based installation below.
FIPS deployment: No additional configuration is required. Proceed directly with either the automated or component-based installation below.
The PPC cluster can be deployed using one of the following methods:
Automated script-based installation: This method requires the bootstrap.sh script to deploy the PPC cluster. The script installs the required software and dependencies, prompts to provide the required information, and deploys the cluster automatically.
Manual component-based installation: This method requires to perform the deployment of each component to install the PPC cluster. The configuration files are edited to provide the required information and then deploy the cluster.
3.3.1.3.1 - Configuring PPC for Non-FIPS Deployment on AWS
Before you begin
By default, the PCT is configured to deploy a FIPS-enabled cluster using FIPS-compliant Bottlerocket AMIs. To deploy a standard, non-FIPS cluster, the following Terraform configuration files must be modified to use the standard (non-FIPS) Bottlerocket AMI types and SSM parameter paths before running the bootstrap script or the component-based installation.
Perform these steps after downloading and extracting the PCT and before proceeding with either the Script-based installation or the Component-based installation.
Configuring PPC for Non-FIPS Deployment on AWS
For a non-FIPS PPC deployment on AWS EKS, perform the following steps:
- Update the node group AMI type map in the
/03_node_group/variables.tffile.
The node_group_ami_type_map variable defines the fallback EKS AMI type used per node architecture when node_group_ami_type is not explicitly set. The FIPS-enabled defaults must be replaced with the corresponding standard Bottlerocket AMI types.
a. Navigate to /03_node_group directory.
cd iac/aws/cluster/modules/03_node_group/
b. Edit the variables.tf file to make the following changes.
Change from (FIPS defaults):
variable "node_group_ami_type_map" {
  description = "Fallback EKS AMI type per architecture, used when node_group_ami_type is empty."
  type        = map(string)
  default = {
    amd64 = "BOTTLEROCKET_x86_64_FIPS"
    arm64 = "BOTTLEROCKET_ARM_64_FIPS"
  }
}
Change to (non-FIPS values):
variable "node_group_ami_type_map" {
  description = "Fallback EKS AMI type per architecture, used when node_group_ami_type is empty."
  type        = map(string)
  default = {
    amd64 = "BOTTLEROCKET_x86_64"
    arm64 = "BOTTLEROCKET_ARM_64"
  }
}
- Update the Karpenter AMI SSM parameter path in the
/05_helm_releases/main.tffile.
The karpenter_fips_ami_ssm_parameter value specifies the AWS Systems Manager (SSM) parameter path that Karpenter uses to resolve the correct Bottlerocket AMI for worker nodes. The default path targets the FIPS AMI. For a non-FIPS cluster, remove the -fips segment from the EKS version portion of the path.
a. Navigate to /05_helm_releases directory.
cd iac/aws/cluster/modules/05_helm_releases/
b. Edit the main.tf file to make the following changes.
Change from (FIPS SSM path):
karpenter_fips_ami_ssm_parameter = "/aws/service/bottlerocket/aws-k8s-${data.aws_eks_cluster.this.version}-fips/${local.karpenter_ami_arch}/latest/image_id"
Change to (non-FIPS SSM path):
karpenter_fips_ami_ssm_parameter = "/aws/service/bottlerocket/aws-k8s-${data.aws_eks_cluster.this.version}/${local.karpenter_ami_arch}/latest/image_id"
After completing all these configuration changes, proceed with deploying the cluster using one of the following methods:
Script-based installation: Run the
bootstrap.shscript to deploy the cluster automatically.Component-based installation: Apply each Terraform module individually.
3.3.1.3.2 - Automated script-based installation
Note for non-FIPS deployments: If you completed the steps in Configuring PPC for Non-FIPS Deployment on AWS, then the required Terraform configuration files have already been updated with non-FIPS values. The bootstrap script reads these files directly. Do not modify
03_node_group/variables.tfor05_helm_releases/main.tffiles back to FIPS defaults. Reverting those changes will result in a FIPS cluster being deployed instead of a non-FIPS cluster.
Before you begin
- Before running the bootstrap or resiliency scripts as the root user on RHEL, ensure that /usr/local/bin, and the AWS CLI binary path, if applicable, is included in the $PATH. Alternatively, run the script using a non-root user, such as ec2-user, where /usr/local/bin is already part of the default PATH.
The repository provides a bootstrap script that automatically installs or updates the following software on the jump box:
- AWS CLI - Required to communicate with the AWS account.
- OpenTofu - Required to manage infrastructure as code.
- kubectl - Required to communicate with the Kubernetes cluster.
- Helm - Required to manage Kubernetes packages.
- skopeo - Required to copy and inspect container images across registries without requiring a daemon.
- jq - Required to parse JSON.
The bootstrap script also checks if you have the required permissions on AWS. It then sets up the EKS cluster and installs the microservices required for deploying the PPC.
Architecture Selection
The step [1b] Select Node Architecture in the bootstrap script prompts to select the node architecture interactively during deployment.
amd64 (x86-64-based environments such as standard Intel or AMD servers)
arm64 (ARM-based environments such as AWS Graviton)
Deploying the PPC
The bootstrap script prompts for variables to be set to complete your deployment. Follow the instructions on the screen:
./bootstrap.sh --cloud aws
The script prompts for the following variables.
Enter Cluster Name
The following characters are allowed:
- Lowercase letters:
a-z - Numbers:
0-9 - Hyphens:
-
The following characters are not allowed:
- Uppercase letters:
A-Z - Underscores:
_ - Spaces
- Any special characters such as:
/ ? * + % ! @ # $ ^ & ( ) = [ ] { } : ; , . - Leading or trailing hyphens
- Names longer than 31 characters (the cluster name must be 31 characters or fewer)
Note: Ensure that the cluster name does not exceed 31 characters. Cluster names longer than this limit can cause the bootstrap script to fail in subsequent installation steps. If the installation fails, specify a cluster name that is 31 characters or fewer and re-run the script. The script automatically applies the updated value and continues the bootstrap process.
After the cluster name is accepted, the script prompts you to select the node architecture.
[1b] Select Node Architecture
[1b] Select Node Architecture
  1) amd64 (x86_64) — e.g. t3, m5, c5 instances
  2) arm64 (Graviton) — e.g. t4g, m7g, c7g instances
Enter
1to selectamd64or2to selectarm64.Note: Select
amd64for standard Intel/AMD 64-bit environments. Selectarm64for ARM-based environments such as AWS Graviton instances.- Lowercase letters:
Enter a VPC ID from the table
The script automatically retrieves the available VPCs. Enter the VPC ID where the cluster must be created.
Querying for subnets in VPC…
The script queries for the available VPC subnets and prompts to enter two private subnet IDs. Specify two private subnet IDs from different availability zones.
The script automatically updates the VPC CIDR block based on the VPC details.Enter FQDN
This is the Fully Qualified Domain Name (FQDN) for the ingress.
Warning: Ensure that the FQDN does not exceed 50 characters and only the following characters are used:
- Lowercase letters:
a-z - Numbers:
0-9 - Special characters:
- .
- Lowercase letters:
Select S3 Backup Bucket Option
The script prompts to choose how to provide the AWS S3 bucket encrypted with SSE‑KMS used for storing cluster backups for disaster recovery.
Do you want to use an existing S3 bucket, or provision a new one (with KMS key)?
  1) Use existing
  2) Provision new via Tofu (backup-infra)
Enter S3 bucket name
- Option 1 – Use existing: Enter the name of an existing S3 bucket in your AWS account. The bucket must already be encrypted with SSE‑KMS.
- Option 2 – Provision new via Tofu: The script uses OpenTofu (
backup-infra) to create the S3 bucket and the corresponding KMS key on your behalf. Provide a globally unique bucket name when prompted:- Lowercase letters, digits, and hyphens only
- Between 3 and 63 characters
- Must not already exist
Use a dedicated S3 bucket per cluster for backup and restore operations to ensure data and encryption isolation. Sharing a bucket across clusters increases the risk of cross-cluster data access or decryption due to IAM misconfiguration. Dedicated buckets with unique IAM policies eliminate this risk.
During disaster management, OpenSearch restores only those snapshots that are created using the daily-insight-snapshots policy. For more information, refer to Backing up and restoring indexes.
Enter Image Registry Endpoint
The image repository from where the container images are retrieved. Use
registry.protegrity.com:9443for using the Protegrity Container Registry (PCR), else use the local registry endpoint for the local registry.Expected format:
<hostname>[:port].Do not include ‘https://’Note: The container registry endpoint must be a Fully Qualified Domain Name (FQDN). Sub-paths like, my-registry.com/v2/path, are not supported by the Open Container Initiative (OCI) distribution specification.
Enter Registry Username
Enter the username for the registry mentioned in the previous step. Leave this entry blank if the registry does not require authentication.
Enter Registry Password or Access Token
Enter Password or Access Token for the registry. Input is masked with
*characters. Press Enter to keep the current value. Leave this entry blank if the registry does not require authentication.Enter Owner Email (for cluster tagging)
Enter email address in the format name@domain.tld. This email is used for the cluster ‘Owner’ tag and the platform owner contact.
Note: The cluster creation process can take 10-15 minutes.
If the session is terminated during installation due to network issues, power outage, and so on, then the installation stops. To restart the installation, run the script again:
# Navigate to setup directory
./bootstrap.sh --cloud aws
Important Information
Do not install or manage multiple clusters from the same working directory. Each cluster deployment maintains its own Terraform/OpenTofu state, and reusing a directory can overwrite state files, causing loss of cluster tracking and unintended cleanup behavior.
Use a dedicated directory, and jump box, where possible, per cluster, and always verify the active kubectl context before running cleanup commands such as
./bootstrap.sh --cloud aws destroy.
To check the active kubectl context, run the following command:kubectl config current-contextDo not delete the original cluster deployment directory, as it contains the Terraform state files required for managing the deployment.
3.3.1.3.3 - Manual component-based installation
Before you begin
Ensure to have the following prerequisites before proceeding with the installation.
Jump box requirement
Ensure that the entire process is performed using the same jump box.
Parameter values
| Value | Example |
|---|---|
| AWS credentials | AWS_ACCESS_KEY_ID, AWS_SECRET_ACCESS_KEY, AWS_SESSION_TOKEN |
| Cluster name | my-cluster |
| VPC ID | vpc-0abc123 |
| Two private subnet IDs | subnet-aaa, subnet-bbb |
| Ingress FQDN | myapp.example.com |
| S3 backup bucket name | my-backup-bucket (existing) or provision one in Step 3 |
| Image registry endpoint | registry.example.com |
| Registry username and password | Provided by organization |
Deploying PPC using component-based installation
To deploy PPC using the component-based installation, perform the following steps
| Step | Action | Description |
|---|---|---|
| 1 | Exporting AWS credentials | Exports AWS_ACCESS_KEY_ID, AWS_SECRET_ACCESS_KEY, and AWS_SESSION_TOKEN as environment variables to authenticate Terraform and AWS CLI operations. |
| 2 | Installing the tools | Installs all required CLI tools (OpenTofu, AWS CLI, kubectl, Helm, and others) on the jump box, either automatically via bootstrap.sh install-tools or manually. |
| 3 | Provisioning the S3 bucket | (Skip if using an existing bucket) Provisions a new S3 bucket and KMS key for storing PPC backup data using the 00_backup_bucket Terraform module. |
| 4 | Modifying and applying terraform.tfvars files | Configures and applies five Terraform modules in sequence to provision all PPC infrastructure components. |
| 4a | 01_iam_roles module | Creates the EKS cluster IAM role, node group IAM role, and service account IAM roles required for the deployment. |
| 4b | 02_eks_cluster module | Provisions the EKS cluster, VPC security group, and networking add-ons (VPC CNI, kube-proxy). |
| 4c | 03_node_group module | Creates the EKS worker node group with the specified instance size, architecture, and subnet configuration. |
| 4d | 04_eks_addons module | Installs EKS add-ons including CoreDNS, Metrics Server, EBS CSI driver, and snapshot controller. |
| 4e | 05_helm_releases module | Deploys all PPC platform Helm charts including Karpenter, Velero, Envoy Gateway, and Insight. This step may take 15–20 minutes. |
| 5 | Verifying the installation | Confirms all cluster nodes are in Ready state and all pods are in Running state. |
1. Exporting AWS credentials
The installation process uses Terraform to provision and manage AWS resources, such as VPCs, EKS clusters, IAM roles, and S3 buckets. The AWS credentials must be exported as environment variables to authenticate these operations.
Note: While using temporary credentials, such as, using AWS STS, ensure the session token is included and that the credentials have not expired before proceeding.
If the components are installed by different users, ensure that each user must export their AWS credentials. This ensures that all the required access and permissions are available.
To export the AWS credentials, run the following commands.
export AWS_ACCESS_KEY_ID=<your-access-key-id>
export AWS_SECRET_ACCESS_KEY=<your-secret-access-key>
export AWS_SESSION_TOKEN=<your-session-token>
2. Installing the tools
The following tools and minimum versions are required for the component-based installation. Ensure they are installed on your jump box before proceeding, or use the bootstrap.sh install-tools command to install them automatically.
After downloading and extracting the PPC-K8S-ALL_1.1.0.97.tar, run the following command to install the required tools.
./bootstrap.sh install-tools --cloud aws
Alternatively, the following tools must be installed and available on the jump box before starting.
| Tools Name | Description | Updated Version |
|---|---|---|
| OpenTofu | Required to manage infrastructure as code (IaC) and provision cloud resources. | 1.11.5 |
| AWS CLI | Required to communicate with AWS and manage AWS resources. | 2.36.7 |
| kubectl | Required to communicate with and manage Kubernetes clusters. | 1.36.1 |
| Helm | Required to deploy and manage Kubernetes packages and applications. | 3.21.0 |
| skopeo | Required to inspect, copy, and transfer container images between registries. | 1.18.0 |
| jq | Required to parse, filter, and process JSON data. | 1.7 |
| bc | Required for version comparisons and resource calculations. | 1.07.1 |
| ssh-keygen | Required to generate and manage SSH keys for secure access to deployment environments. | OpenSSH_10.0p2 Debian-7+deb13u4 |
| oras | Required to pull OCI artifacts, including non-container deployment packages, from registries. | 1.3.3 |
| cmctl | Required to validate, manage, and troubleshoot cert-manager TLS certificates. | 2.5.0 |
3. Provisioning the S3 bucket
This step is required if a new S3 bucket is to be provisioned for storing the backup data. If an existing S3 bucket is to be used, note the bucket name and KMS key ARN required for the installation process and skip to the next step.
a. To navigate to 00_backup_bucket directory, run the following command.
cd iac/aws/cluster/modules/00_backup_bucket
b. Edit the terraform.tfvars file to provide the following information.
cluster_name                = "<cluster-name>"
s3_bucket_name              = "<globally-unique-bucket-name>"
kms_key_alias_name          = "alias/pty-backup-<cluster-name>-key"
aws_region                  = "<region>"
c. To apply the terraform configuration, run the following command.
tofu init
tofu plan          # review the role assignments that will be created
tofu apply         # type "yes" when prompted
After the S3 bucket is provisioned successfully, note the bucket name and KMS key ARN. These values are required during the installation process.
d. To sync the Terraform state file to the S3 bucket, run the following command.
# Navigate to the bootstrap-scripts directory
cd <package-root>/bootstrap-scripts

# Run the script to sync the backup data to the S3 bucket
./sync-backup-bucket-state-to-s3.sh
4. Modifying and applying terraform.tfvars files
The iac/aws/cluster/modules/ directory contains the Terraform modules for the PPC installation. To enter details in the terraform.tfvars file, navigate to the appropriate module directory and edit the file accordingly.
After modifying the terraform.tfvars file, apply the changes
01_iam_roles module
a. To navigate to 01_iam_roles directory, run the following command.
cd iac/aws/cluster/modules/01_iam_roles
b. Edit the terraform.tfvars file to provide the following information.
aws_region            = "<region>"
eks_cluster_name      = "<cluster-name>"
backup_bucket         = "<s3-bucket-name>"
backup_bucket_kms_arn = "<kms-key-arn>"
c. To apply the terraform configuration, run the following command.
tofu init
tofu plan          # review the role assignments that will be created
tofu apply         # type "yes" when prompted
d. After the configurations are successfully applied, verify the required resources are created.To verify if the resources are created successfully, run the following command.
aws iam list-roles --query "Roles[?contains(RoleName, '<cluster name>')].[RoleName, Arn]" --output table
The EKS cluster IAM role, Node group IAM role, and Service account IAM roles must be created.
Additionally, note the role ARNs from the Terraform output. These values are required in subsequent modules.
02_eks_cluster module
a. To navigate to 02_eks_cluster directory, run the following command.
cd iac/aws/cluster/modules/02_eks_cluster
b. Edit the terraform.tfvars file to provide the following information.
Note: The security group is created in AWS using the name specified by the
security_group_namevalue in this file.
Important: The security group name must follow the exact format
<cluster-name>_SG. TheSGmust be in uppercase. This value is used as the AWS Name tag on the worker security group. Protegrity components discover the security group by matching this tag value exactly. Tag values are case-sensitive. Any other format, for example, lowercase _sg or a custom name, will cause those components to fail. The security group name must also not start withSG.
aws_region          = "<region>"
eks_cluster_name    = "<cluster-name>"
backup_bucket       = "<s3-bucket-name>"

# --- Networking ---
vpc_id              = "<vpc-id>"
security_group_name = "<cluster-name>_SG"      # Must match this format exactly
private_subnet_ids  = [
  "<subnet-a>",
  "<subnet-b>"
]

# --- Tagging ---
owner_email = "<owner_email>"

# --- Access Entries (optional) ---
# Add IAM users/roles that need kubectl / tofu access beyond the original installer.
additional_access_entries = [
  # {
  #   principal_arn = "<principal-arn>"
  # },
]
c. To apply the terraform configuration, run the following command.
tofu init
tofu plan          # review the role assignments that will be created
tofu apply         # type "yes" when prompted
d. After the configurations are successfully applied, verify the required resources are created.To verify if the resources are created successfully, run the following command.
# Confirm the cluster is ACTIVE
aws eks describe-cluster --name <cluster-name> --region <region> \
  --query "cluster.{Name:name, Status:status, Version:version, Endpoint:endpoint}" \
  --output table

# Verify kubectl can reach the API server
kubectl get nodes          # expected: no nodes yet (node group is Stage 03)

# Verify the worker security group exists
aws ec2 describe-security-groups \
  --filters "Name=group-name,Values=<security-group-name>*" \
  --region <region> \
  --query "SecurityGroups[].{Name:GroupName, ID:GroupId}" \
  --output table

# Verify VPC CNI and kube-proxy add-ons are ACTIVE
aws eks list-addons --cluster-name <cluster-name> --region <region> --output table
03_node_group module
a. To navigate to 03_node_group directory, run the following command.
cd iac/aws/cluster/modules/03_node_group
b. Edit the terraform.tfvars file to provide the following information.
Note: Use the private subnet IDs from the VPC where the EKS cluster is provisioned while installing the
02_eks_clustermodule.
aws_region       = "<region>"
eks_cluster_name = "<cluster-name>"
backup_bucket    = "<s3-bucket-name>"

# --- System Node Group ---
node_group_name    = "<node-group-name>"
private_subnet_ids = [
  "<subnet-a>",
  "<subnet-b>"
]
architecture            = "<amd64/arm64>"
node_group_desired_size = 2
node_group_max_size     = 2
node_group_min_size     = 1
Note for non-FIPS deployments: If you completed the steps in Configuring PPC for Non-FIPS Deployment on AWS, the
node_group_ami_type_mapdefault values in variables.tf file have already been changed toBOTTLEROCKET_x86_64(amd64) orBOTTLEROCKET_ARM_64(arm64). Do not add or overridenode_group_ami_typewith a FIPS value in terraform.tfvars, as this will reintroduce FIPS AMIs.
c. To apply the terraform configuration, run the following command.
tofu init
tofu plan          # review the role assignments that will be created
tofu apply         # type "yes" when prompted
d. After the configurations are successfully applied, verify the required resources are created.To verify if the resources are created successfully, run the following command.
aws eks describe-nodegroup --cluster-name <cluster-name> --nodegroup-name <node-group-name> --query "nodegroup.status"
kubectl get nodes
Ensure that the Node group status is ACTIVE and the desired number of nodes are in Ready state.
04_eks_addons module
a. To navigate to 04_eks_addons directory, run the following command.
cd iac/aws/cluster/modules/04_eks_addons
b. Edit the terraform.tfvars file to provide the following information.
aws_region       = "<region>"
eks_cluster_name = "<cluster-name>"
backup_bucket    = "<s3-bucket-name>" #

# --- Upgrade mode only ---
# Set to "~/.kube/config" when upgrading an existing cluster;
# leave empty ("") for a fresh install.
kubeconfig_path  = ""
c. To apply the terraform configuration, run the following command.
tofu init
tofu plan          # review the role assignments that will be created
tofu apply         # type "yes" when prompted
Note: This stage waits for all nodes from Stage 03 to reach
Readystatus before installing add-ons.
d. After the configurations are successfully applied, verify the required resources are created.To verify if the resources are created successfully, run the following command.
# List all EKS add-ons and confirm they are ACTIVE
aws eks list-addons --cluster-name <cluster-name> --region <region> --output table

# Check add-on health details
for addon in coredns metrics-server aws-ebs-csi-driver snapshot-controller eks-pod-identity-agent; do
  echo "--- $addon ---"
  aws eks describe-addon --cluster-name <cluster-name> --addon-name $addon --region <region> \
    --query "addon.{Name:addonName, Status:status, Version:addonVersion}" --output table
done

# Verify the default storage class exists
kubectl get storageclass

# Confirm CoreDNS and Metrics Server pods are running
kubectl get pods -n kube-system -l k8s-app=kube-dns
kubectl get pods -n kube-system -l app.kubernetes.io/name=metrics-server
05_helm_releases module
a. To navigate to 05_helm_releases directory, run the following command.
cd iac/aws/cluster/modules/05_helm_releases
b. Edit the terraform.tfvars file to provide the following information.
The default node OS is BOTTLEROCKET_x86_64_FIPS. While providing the node_os value, ensure that the value must be the same as nnode_group_ami_type value obtained from the 03_node_group module.
For obtaining the value of node_os, run the following command.
kubectl get nodes -o jsonpath='{.items[0].status.nodeInfo.osImage}'; echo
The following fields must be updated with environment-specific values:
| Field | Description |
|---|---|
aws_region | AWS region where the cluster is deployed. |
eks_cluster_name | Name of the EKS cluster. |
backup_bucket | Name of the S3 bucket for backups. |
backup_bucket_kms_arn | ARN of the KMS key used to encrypt the backup bucket. |
architecture | Node architecture: amd64 or arm64. |
node_os | Node OS image string obtained from the kubectl command above. |
global_image_reg | Container image registry endpoint. |
ingress_fqdn | Fully qualified domain name for the ingress. |
owner_email | Email address of the cluster owner. |
vpc_cidr_block | CIDR block of the VPC, used to derive internal proxy CIDRs. |
The following fields have default values and must be left unchanged for a fresh installation:
| Field | Default value | Notes |
|---|---|---|
harbor_secret | "harbor-secret" | Fixed secret name; do not change. |
private_subnet_ids | [] | Populated automatically by bootstrap.sh from stage 02 state. |
restore | false | Set to true only when restoring from a backup. |
backup_name | "authnz-postgresql-schedule-backup" | Default backup schedule name; change only if restoring a custom backup. |
insight_backup_name | "" | Leave empty unless restoring an Insight backup. |
kubeconfig_path | "" | Leave empty for a fresh install; set to ~/.kube/config only for upgrades. |
is_upgrade | false | Set to true only when upgrading an existing cluster. |
skip_validations | false | Leave as false unless instructed otherwise. |
aws_region            = "<region>"
eks_cluster_name      = "<cluster-name>"
backup_bucket         = "<s3-bucket-name>"
backup_bucket_kms_arn = "<kms-key-arn>"
architecture          = "<amd64/arm64>"
node_os               = "<node-os>"

# --- Registry ---
global_image_reg = "<registry-endpoint>"
harbor_secret    = "harbor-secret"

# --- Ingress ---
ingress_fqdn = "<fqdn>"

# --- Owner ---
owner_email = "<owner-email>"

# --- Networking (used to derive internal proxy CIDRs) ---
vpc_cidr_block = "<cidr>"

# --- Envoy Gateway (LoadBalancer subnet discovery) ---
# Populated automatically by bootstrap.sh from stage 02 state.
private_subnet_ids = []

# --- Restore ---
restore              = false
backup_name          = "authnz-postgresql-schedule-backup"
insight_backup_name  = ""

# --- Upgrade mode only ---
# Set to "~/.kube/config" when upgrading an existing cluster;
# leave empty ("") for a fresh install.
kubeconfig_path = ""
is_upgrade      = false
skip_validations = false
c. To enter registry credentials using the environment variables, run the following commands.
export TF_VAR_username="<registry-username>"
export TF_VAR_password="<registry-password>"
d. To apply the terraform configuration, run the following command.
tofu init
tofu plan          # review the role assignments that will be created
tofu apply         # type "yes" when prompted
Note: This process may take 15–20 minutes to get completed. Karpenter nodes are provisioned on demand after the NodePool is created.
e. After the configurations are successfully applied, verify the required resources are created.To verify if the resources are created successfully, run the following command.
# Confirm all Helm releases are deployed
helm list -A

# Verify Karpenter controller is running
kubectl get pods -n karpenter

# Verify Karpenter NodePool and EC2NodeClass exist
kubectl get nodepools
kubectl get ec2nodeclasses

# Verify Velero is running
kubectl get pods -n pty-backup-recovery

# Verify PPC platform pods
kubectl get pods -A

# Verify Insight pods
kubectl get pods -n pty-insight

# Verify Envoy Gateway
kubectl get pods -n api-gateway

# Check all pods across the cluster are healthy
kubectl get pods -A --field-selector=status.phase!=Running,status.phase!=Succeeded
5. Verifying the installation
To verify the installation, run the following command.
kubectl get nodes
kubectl get pods -A
All the nodes should be in the Ready state and all the pods should be in the Running state.
3.3.1.4 - Installing Features and Protectors
Before you begin
Ensure that PPC is successfully installed before installing the features or protectors.
Installing Features
The following table lists the available features.
| Feature | Description |
|---|---|
| Data Discovery | Installing Data Discovery |
| Semantic Guardrails | Installing Semantic Guardrails |
| Protegrity Agent | Installing Protegrity Agent |
| Anonymization | Installing Anonymization |
| Synthetic Data | Installing Synthetic Data |
Installing Protectors
The following table lists the available protectors.
| Protector | Description |
|---|---|
| Application Protector | Installing Application Protector |
| Repository Protector | Installing Repository Protector |
| Application Protector Java Container | Installing Application Protector Java Container |
| Rest Container | Installing Rest Container |
| Cloud Protector | Installing Cloud Protector |
3.3.1.5 - Accessing the PPC CLI
3.3.1.5.1 - Prerequisites
The deployment includes a CLI container that provides command-line access to the Protegrity Management CLI using SSH, on both Linux and Windows.
To access the PPC CLI, ensure that the following prerequisites are met.
SSH Keys: The SSH private key that corresponds to the public key configured in the
pty-clipod is required.Network Access: Ensure to have network connectivity to the cluster.
Resolve FQDN: Use Route 53 configuration on AWS to resolve the PPC FQDN specified during the installation to the internal load balancer. For more information, refer to Prerequisites.
The private key to access the CLI pod will be in the .ssh directory.
From the .ssh/ directory:
ssh -i /home/admin/.ssh/<cluster_name>_user_svc ptyitusr@<user-provided-fqdn>
The private key to access the CLI pod will be in the .ssh directory. Copy the key file to a directory on the local Windows machine.
Using Windows SSH Client (Windows 10/11 with OpenSSH):
ssh -i C:\path\to\copied\file\.ssh -p 22 ptyitusr@<user-provided-fqdn>Using PuTTY:
- Host Name:
<user-provided-fqdn> - Port:
22 - Connection Type:
SSH - Under Connection > SSH > Auth, browse and select your private key file (.ppk format)
- Username:
ptyitusr
- Host Name:
3.3.1.5.2 - Accessing the PPC CLI
Once connected, the Protegrity CLI welcome banner is displayed. Enter the following parameters when prompted:
- Username: Application username
- Password: Application password
For more information about the default credentials, refer to the Release Notes.
The CLI supports three main command categories:
pim: Policy Information Management commands for data protection policies.admin: User, Role, Permission, and Group management commands.insight: Log forwarding to external SIEM and syslog servers.
Note: Ensure that at least one additional backup administrator user is configured with the same administrative privileges as the primary admin user.
If the primary admin account is locked or its credentials are lost, restoring the system from a backup is the only recovery option.
3.3.1.6 - Login to PPC
3.3.1.6.1 - Prerequisites
Use Route 53 configuration on AWS to resolve the PPC FQDN specified during the installation to the internal load balancer.
- Ensure that the instance is using the AWS-provided DNS server, such as, VPC CIDR + 2.
- Verify that
enableDnsHostnamesandenableDnsSupportare set to true in the VPC settings. - Verify the Security Group of the load balancer. Ensure that Inbound traffic is allowed on the required ports, such as, 80 and 443, from the client instance’s IP or Security Group.
- Keep the following information ready:
- VPC ID: The ID of the VPC for the client instances and the Load Balancer. For example, vpc-0123456789.
- Internal ELB DNS Name: The DNS name of the load balancer. For example, internal-abcdefghi123456-123456789.us-east-1.amazonaws.com.
- Target FQDN: The FQDN for PPC. For example, mysite.aws.com.
- Find the AWS Load Balancer address.
kubectl get gateway -A
The output appears similar to the following:
    NAMESPACE     NAME       CLASS   ADDRESS                                                                         PROGRAMMED   AGE
    api-gateway   pty-main   envoy   a814fae40464d462da9ca685921699c0-1ccfcf98919adf90.elb.us-east-1.amazonaws.com   True         34m
- Verify that the gateway address resolves to an internal IP, using the following command.
ping <gateway_address>
Where <gateway_address> is the ADDRESS value from the previous step.
The output confirms that the hostname resolves to a private VPC IP address (10.x.x.x range), indicating the load balancer is internal and accessible only within the AWS VPC.
The output appears similar to the following:
PING a814fae40464d462da9ca685921699c0-1ccfcf98919adf90.elb.us-east-1.amazonaws.com (10.31.4.172) 56(84) bytes of data.
- Map the PPC FQDN to the load balancer using Route 53.
For more information about configuring Route 53, refer to the AWS documentation.
3.3.1.6.2 - Log in to PPC
Access the PPC using the FQDN provided during the installation process.
Enter the following parameters to log in and view the Insight Dashboard.
- Username: Application username
- Password: Application password
For more information about the default credentials, refer to the Release Notes.
If Protegrity Agent is installed, then the Protegrity Agent dashboard appears. Click Insight to open the Insight Dashboard. For more information about Protegrity Agent, refer to Using Protegrity Agent.
3.3.1.7 - Upgrading the PPC
Before you begin
Before starting an upgrade, ensure the following conditions are met:
Access to the jump box associated with the PPC v1.0.0 cluster is required. This must be the same jump box used during the PPC v1.0.0 installation.
Maintain both, previous and current installation directories. Do not delete the original cluster deployment directory, as it contains the Terraform state files required for managing the deployment.
Create a Velero backup and an OpenSearch snapshot to ensure data recovery is possible, in case of an upgrade failure.
Maintain a backup of the state file in the AWS S3 backup bucket.
If logs are forwarded to an external SIEM, then from the PPC CLI, run the
insight delete syslogor theinsight delete fluentdas per your configuration. After the upgrade is complete, re-configure the SIEM. For more information about SIEM configuration, refer to Sending logs to a SIEM.The
contextis set to the cluster where the upgrade operation is to be performed. Run the following command.kubectl config current-contextThe cluster name in the output must match the cluster installed with PPC v1.0.0.
Note: Before running the bootstrap or resiliency scripts as the root user on RHEL, ensure that
/usr/local/bin, and the AWS CLI binary path, if applicable, is included in the $PATH. Alternatively, run the script using a non-root user, such as ec2-user where/usr/local/binis already part of the default $PATH.
Required Permissions
The IAM user performing the upgrade must have the same permissions as those required for installation.
For the full list of required IAM, S3, KMS, EC2, and EKS permissions, refer to Prerequisites.
Required Harbor Secrets
If harbor secrets are used during upgrade, then the harbor_secret parameter must be updated in the 05_helm_releases module with the following values.
export TF_VAR_username='<registry-username>'
export TF_VAR_password='<registry-password>'
export TF_VAR_harbor_secret='harbor-secret'
Note: Ensure that the value of the
harbor_secretparameter in the05_helm_releasesmodule is the same in both installation and upgradeterraform.tfvarsfiles.
For more information, refer to Step 8 in Upgrading PPC.
Configuring PPC for Non-FIPS Deployment
To deploy a standard, non-FIPS cluster, the following Terraform configuration files must be modified to use the standard (non-FIPS) Bottlerocket AMI types and SSM parameter paths before performing the upgrade process.
For a non-FIPS PPC upgrade on AWS EKS, perform the following steps:
Update the node group AMI type map in the
/03_node_group/variables.tffile.a. Navigate to
/03_node_group directory, using the following command.cd iac/aws/cluster/modules/03_node_group/b. Edit the
variables.tffile to make the following changes.Change from (FIPS defaults):
hcl variable "node_group_ami_type_map" { description = "Fallback EKS AMI type per architecture, used when node_group_ami_type is empty." type = map(string) default = { amd64 = "BOTTLEROCKET_x86_64_FIPS" arm64 = "BOTTLEROCKET_ARM_64_FIPS" } }Change to (non-FIPS values):
  ```hcl
  variable "node_group_ami_type_map" {
  description = "Fallback EKS AMI type per architecture, used when node_group_ami_type is empty."
  type        = map(string)
  default = {
     amd64 = "BOTTLEROCKET_x86_64"
     arm64 = "BOTTLEROCKET_ARM_64"
  }
  }
  ```
Update the Karpenter AMI SSM parameter path in the
/05_helm_releases/main.tffile.
The karpenter_fips_ami_ssm_parameter value specifies the AWS Systems Manager (SSM) parameter path that Karpenter uses to resolve the correct Bottlerocket AMI for worker nodes. The default path targets the FIPS AMI. For a non-FIPS cluster, remove the -fips segment from the EKS version portion of the path.
a. Navigate to /05_helm_releases directory.
cd iac/aws/cluster/modules/05_helm_releases/
b. Edit the main.tf file to make the following changes.
  **Change from (FIPS SSM path):**

     ```hcl
     karpenter_fips_ami_ssm_parameter = "/aws/service/bottlerocket/aws-k8s-${data.aws_eks_cluster.this.version}-fips/${local.karpenter_ami_arch}/latest/image_id"
     ```

  **Change to (non-FIPS SSM path):**

     ```hcl
     karpenter_fips_ami_ssm_parameter = "/aws/service/bottlerocket/aws-k8s-${data.aws_eks_cluster.this.version}/${local.karpenter_ami_arch}/latest/image_id"
     ```
Upgrading PPC
To upgrade the PPC from v1.0.0 to v1.1.0, perform the following steps:
Create a
deployment_110directory on the jump box and navigate to it.mkdir deployment_110 && cd deployment_110Log in to the My.Protegrity portal.
Navigate to Product Management > Explore Products > AI Team Edition > Platform & Features.
Navigate to Platform Installation.
From the Actions column for Protegrity Provisioned Cluster, click the Download Product icon and download the PPC 1.1 archive to the
deployment_110directory.Extract the archive contents.
tar -xvf PPC-K8S-ALL_1.1.0.97.tarCopy the Terraform state file from the v1.0.0 cluster installation to the
deployment_110directory created for upgrade.cp /<v1.0.0-cluster-dir>/deployment/iac_setup/scripts/iac/terraform.tfstate /<v1.1.0-cluster-dir>/deployment_110/terraform.tfstatewhere
<v1.0-cluster-dir>is the path to the original PPC v1.0.0 cluster installation directory on the jump box, and<v1.1.0-cluster-dir>is the path to the new directory created for upgrade.This step is required only if a private container registry that requires authentication is configured on the base cluster to retrieve images. Then, the upgrade process must recreate the Harbor pull secret.
This step is not required if the registry supports anonymous image pulls. Then the
harbor_secret = "harbor-secret"value must be empty.If harbor secrets are used for upgrading from PPC v1.0.0 to PPC v1.1.0, then navigate to
/iac/aws/cluster/modules/05_helm_releases/. Edit theterraform.tfvarsfile to update theharbor_secret = "harbor-secret"parameter with the following values.export TF_VAR_username='<registry-username>' export TF_VAR_password='<registry-password>' export TF_VAR_harbor_secret='harbor-secret'Note: Ensure that the value of the
harbor_secretparameter in the05_helm_releasesmodule is the same in both installation and upgradeterraform.tfvarsfiles.Verify the active context points to the correct cluster using the following command.
kubectl config current-context
- Initiate the upgrade from the
deployment_110directory using the following command.
bash upgrade.sh --cloud aws --v1.0-state-file /<v1.1.0-cluster-dir>/deployment_110/terraform.tfstate
where /<v1.1.0-cluster-dir>/deployment/terraform.tfstate is the path to the Terraform state file copied in Step 6.
After the upgrade is successful, a PPC upgrade completed successfully. message is displayed.
The cluster upgrade process can take 10–15 minutes approximately and may differ accordingly.
Post Upgrade Steps
Verify all nodes are Ready
To verify if all nodes are in the ready state, run the following command.
kubectl get nodes -o wide
Verify all pods are Running
To verify if all pods are in the running state, run the following command.
kubectl get pods -A
Verify Helm releases
To verify if the helm releases are in the deployed state, run the following command.
helm list -A
Password Policy After Upgrade
PPC v1.1.0 upgrade enforces the following behavior.
If the minimum password length was set to a value less than 14 characters, or was not configured, the upgrade sets it to 14 characters.
If the minimum password length was already set to 14 characters or greater, that value is preserved and remains unchanged after the upgrade.
For more information about the password policy, refer to Password Policy APIs or CLI reference for get password_policy.
Configuring SIEM
If logs were forwarded to an external SIEM before the upgrade, then SIEM log forwarding was disabled as part of the pre-upgrade prerequisites. After completing the upgrade, update the settings to resume sending logs to the external SIEM.
For more information about configuring SIEM, refer to Sending logs to an external security information and event management (SIEM).
Directory Maintenance after Upgrade
During upgrade, both the previous and the new PPC installation directories must be retained.
- The original directory contains Terraform state and deployment metadata.
- The new directory contains the updated configuration and binaries.
Both directories are required for proper management of the deployment.
Recovering from a Failed Upgrade
If the session is terminated during upgrade due to network issues, power outage, or any such issues, then the upgrade process stops. The ./upgrade.sh script resumes the upgrade.
To restart the process, run the following command:
bash upgrade.sh --cloud aws --v1.0-state-file /<v1.1.0-cluster-dir>/deployment_110/terraform.tfstate
Warning: Do not install or manage multiple clusters from the same working directory. Each cluster deployment maintains its own Terraform or OpenTofu state, and reusing a directory can overwrite state files, causing loss of cluster tracking and unintended cleanup behavior.
Use a dedicated directory, and jump box, where possible, per cluster, and always verify the active kubectl context before running cleanup commands such as./bootstrap.sh --cloud aws destroy.
To check the active kubectl context, run the following command:kubectl config current-context
Reverting to a previous version of PPC
To revert to a previous version of PPC, restore the cluster using the steps in Restoring the PPC.
3.3.1.8 - Backing up the PPC
Protegrity Provisioned Cluster (PPC) supports backup of Insight indexes and cluster configurations. Use the procedures below to update the scheduled backups of your PPC deployment.
Backing up Velero backup schedule
To take a backup at an interval of 10 minutes, the cron job must be executed before the schedule. This ensures that the latest configurations are included and are available in the Storage Account.By default, the cron job is executed after every 3 hours and schedule is executed after every 3.5 hours.
For taking the backups, the frequency of schedule and cron job can be changed, as required.
Perform the following steps to update the frequency.
To update the frequency of the
cron job, run the following command.$ kubectl patch cronjob authnz-postgresql-backup-recovery-cron-job \ -n api-gateway \' --type=merge -p '{"spec":{"schedule":"<required frequency>"}}'To update the frequency of the
schedule, run the following command.$ kubectl patch schedule authnz-postgresql-schedule-backup \ -n pty-backup-recovery \ --type=merge -p '{"spec":{"schedule":"<required frequency>"}}'
For instance, to update the frequency of the backup schedule to 10 minutes, perform the following steps.
To update the
cron jobto every 8 minutes, run the following command.$ kubectl patch cronjob authnz-postgresql-backup-recovery-cron-job \ -n api-gateway \ --type=merge -p '{"spec":{"schedule":"8-58/10 * * * *"}}'To update the
scheduleto every 10 minutes, run the following command.$ kubectl patch schedule authnz-postgresql-schedule-backup \ -n pty-backup-recovery \ --type=merge -p '{"spec":{"schedule":"*/10 * * * *"}}'
Backing up indexes
Insight indexes are backed up automatically using a scheduled job. To manually back up the indexes, perform the following steps:
- Log in to the Insight Dashboard.
- Select the main menu.
- Navigate to Management > Snapshot Management > Snapshot policies.
- Click the daily-insight-snapshots policy.
- Click Edit.
- Update the following parameters:
- Snapshot schedule
- Frequency:
Custom (Cron expression) - Cron expression:
*/15 * * * *
- Frequency:
- Snapshot schedule
- Click Update.
- Wait for the next scheduled snapshot to complete. Verify that the snapshot is created from the snapshot status.
Note: The snapshot schedule is set to run every 15 minutes for creating the manual backup. Restore the default settings after the manual backup is complete. Before upgrading, disable the scheduler job after the backup is created. Ensure that the default parameters are restored and the job is re-enabled after the upgrade.
3.3.1.9 - Restoring the PPC
Before you begin
Before starting a restore, ensure the following conditions are met:
An existing backup is available. Backups are taken automatically as part of the default installation using scheduled backup mechanisms. These backups are stored in an AWS S3 bucket configured during the original installation.
Access to the original backup AWS S3 bucket. During restore, the same S3 bucket that was used during the original installation must be specified.
Before initiating the restore, review and update the KMS key policy to reflect the restore cluster name. Even if the policy was already configured for the source cluster, it must be updated for the new restore cluster. If the policy continues to reference the source cluster name, the IAM role created during restore cannot decrypt the backup data, causing the restore to fail.
Permissions to read from the S3 bucket. The user performing the restore must have sufficient permissions to access the backup data stored in the bucket.
A Kubernetes cluster is created. Restore is performed as part of creating a cluster, not on an existing one. Restore is only supported during a fresh installation flow.
While the backup is taken from the source cluster, do not perform Create, Read, Update, or Delete (CRUD) operations on the source cluster. This ensures backup consistency and prevents data corruption during restore.
Before restoring to a new cluster, if the source cluster is accessible, disable the backup operations on the source cluster by setting the backup storage location to read‑only. This ensures that no additional backup data is written during the restore process.
To disable the backup operation on the source cluster, run the following command:
kubectl patch backupstoragelocation default -n pty-backup-recovery --type merge -p '{"spec":{"accessMode":"ReadOnly"}}'If the source cluster is not accessible, this step can be skipped.
During Disaster management, the backup data is used to restore the cluster and the OpenSearch indexes using snapshots. However, Insight restores OpenSearch data only from the most recent snapshot created by the daily-insight-snapshots policy.
For more information, refer to Backing up and restoring indexes.
Warning: Do not install or manage multiple clusters from the same working directory. Each cluster deployment maintains its own Terraform or OpenTofu state, and reusing a directory can overwrite state files, causing loss of cluster tracking and unintended cleanup behavior.
Use a dedicated directory, and jump box, where possible, per cluster, and always verify the active kubectl context before running cleanup commands such as./bootstrap.sh --cloud aws destroy.
The repository provides a bootstrap script that automatically installs or updates the following software on the jump box:
- AWS CLI - Required to communicate with your AWS account.
- bc - Required for version comparisons and resource calculations.
- cmctl - Required to validate and manage TLS certificates.
- Helm - Required to manage Kubernetes packages.
- jq - Required to parse JSON.
- kubectl - Required to communicate with the Kubernetes cluster.
- OpenTofu - Required to manage infrastructure as code.
- ORAS - Required to pull OCI artifacts such as deployment packages.
- skopeo - Required to copy container images between registries.
- ssh-keygen - Required to secure SSH access to deployment environments.
The bootstrap script also checks if you have the required permissions on AWS. It then sets up the EKS cluster and installs the microservices required for deploying the PCS on a PPC.
Note: Before running the bootstrap or resiliency scripts as the root user on RHEL, ensure that /usr/local/bin (and the AWS CLI binary path, if applicable) is included in the $PATH. Alternatively, run the script using a non-root user (such as ec2-user) where /usr/local/bin is already part of the default PATH.
Architecture Selection
- amd64 (x86-64-based environments such as standard Intel or AMD servers)
- arm64 (ARM-based environments such as AWS Graviton)
The bootstrap script prompts you to select the node architecture interactively during deployment (step 1b).
Restoring the PPC
Ensure that the PCT is downloaded and extracted on the jump box. For more information, refer to Preparing for PPC deployment.
Run the following command to initiate restore using an existing backup:
./bootstrap.sh --cloud aws --restore
To deploy PPC on ARM-based infrastructure, specify the architecture explicitly:
The bootstrap script asks for variables to be set to complete the deployment. Follow the instructions on the screen.
The --restore command enables the restore mode for the installation. It initiates restoration of data from the configured AWS S3 backup bucket. This process must be followed on a fresh jump box.
The script prompts for the following variables.
Enter Cluster Name
- Ensure that the cluster name does not match the name of the source cluster. Reusing an existing cluster name during restore can lead to discrepancies during cluster installation.
- This same cluster name must already be updated in the KMS key policy. If this update is not performed, the restore process fails because the new cluster cannot decrypt the backup data.
- Ensure that the cluster name does not exceed 31 characters. Cluster names longer than this limit can cause the bootstrap script to fail in subsequent installation steps.
If the installation fails because the cluster name exceeds the 31-character limit, correct the name and re-run the script.- Correction: Choose a cluster name with 31 characters or fewer.
- Retry: Execute the installation command again with the updated name. The script will automatically handle the update and proceed with the bootstrap process.
- Correction: Choose a cluster name with 31 characters or fewer.
The following characters are allowed:
- Lowercase letters:
a-z - Numbers:
0-9 - Hyphens:
-
The following characters are not allowed:
- Uppercase letters:
A-Z - Underscores:
_ - Spaces
- Any special characters such as:
/ ? * + % ! @ # $ ^ & ( ) = [ ] { } : ; , . - Leading or trailing hyphens
- More than 31 characters
After the cluster name is accepted, the script prompts you to select the node architecture.
[1b/10] Select Node Architecture
[1b/10] Select Node Architecture
  1) amd64 (x86_64) — e.g. t3, m5, c5 instances
  2) arm64 (Graviton) — e.g. t4g, m7g, c7g instances
Enter
1to selectamd64or2to selectarm64.Note: Select
amd64for standard Intel/AMD 64-bit environments. Selectarm64for ARM-based environments such as AWS Graviton instances.- Ensure that the cluster name does not match the name of the source cluster. Reusing an existing cluster name during restore can lead to discrepancies during cluster installation.
Enter a VPC ID from the table
The script automatically retrieves the available VPCs. Enter the VPC ID where the cluster must be created.
Querying for subnets in VPC…
The script queries for the available VPC subnets and prompts to enter two private subnet IDs. Specify two private subnet IDs from different availability zones.
The script then automatically updates the VPC CIDR block based on the VPC details.Enter FQDN
This is the Fully Qualified Domain Name (FQDN) for the ingress.
While entering the FQDN, ensure that:
- contains at least two labels separated by a dot, such as, app.example.com
- does not start or end with a dot or hyphen
- does not contain consecutive dot character
- label length must be between 1–63 characters
- each label must start and end with a letter or digit
- the last label must start only with a letter
Warning: Ensure that the FQDN does not exceed 50 characters and only the following characters are used:
- Lowercase letters:
a-z - Numbers:
0-9 - Special characters:
- .
Restore mode requires an existing S3 bucket. Proceeding to existing bucket validation in Step 6.
Select S3 Backup Bucket Option
An AWS S3 bucket encrypted with SSE‑KMS containing backup artifacts used during the restore process.
Use a dedicated S3 bucket per cluster for backup and restore operations to ensure data and encryption isolation. Sharing a bucket across clusters increases the risk of cross-cluster data access or decryption due to IAM misconfiguration. Dedicated buckets with unique IAM policies eliminate this risk.
Select backup
During restore, the script prompts to manually select a backup from the available backups stored in the S3 bucket. User input is required to either restore from the latest backup or choose a specific backup from the list.
[restore] Backup selection — schedule: authnz-postgresql-schedule-backup Restore from latest backup? [Y/n]- Enter Y to restore from the most recent backup.
- Enter n to manually select a backup.
If
nis selected, then the script displays a list of available backups (latest first) and prompts to select one by number:Available backups (latest first): [1] <timestamp> authnz-postgresql-schedule-backup-xxxxxxx [2] <timestamp> authnz-postgresql-schedule-backup-xxxxxxx Select a backup number (1-2):After entering the backup number, the chosen backup is used for the restore, and the installation continues.
Enter Insight backup
During restore, the script prompts to manually select the required insight backup from the available backups stored in the S3 bucket. User input is required to either restore from the latest backup or choose a specific backup from the list.
[restore] Insight backup selection — schedule: insight-configmaps-secrets Restore from latest backup? [Y/n]- Enter Y to restore from the most recent backup.
- Enter n to manually select a backup.
If
nis selected, then the script displays a list of available backups (latest first) and prompts to select one by number:Available backups (latest first): [1] <timestamp> insight-configmaps-secrets-xxxxxxxxx [2] <timestamp> insight-configmaps-secrets-xxxxxxxxx Select a backup number (1-2):After entering the backup number, the chosen backup is used for the restore, and the installation continues.
Enter Image Registry Endpoint
The image repository from where the container images are retrieved.
Expected format:
<hostname>[:port].Do not include ‘https://’Note: The container registry endpoint must be a FQDN (Fully Qualified Domain Name). Sub-paths like, my-registry.com/v2/path, are not supported by the OCI distribution specification.
Enter Registry Username
Enter the username for the registry mentioned in the previous step. Leave this entry blank if the registry does not require authentication.
Enter Registry Password or Access Token
Enter Password or Access Token for the registry. Input is masked with
*characters. Press Enter to keep the current value.Leave this entry blank if the registry does not require authentication.
Enter Owner Email (for cluster tagging)
Enter email address in the format name@domain.tld. This email is used for the cluster ‘Owner’ tag and the platform owner contact.
Note: The cluster creation process can take approximately 15-20 minutes.
If the session is terminated during restore due to network issues, power outage, and so on, then the restore stops. To restart the process, run the following commands:
# Navigate to deployment directory and run the following command
./bootstrap.sh --cloud aws destroy

# Restore the cluster
./bootstrap.sh --cloud aws --restore
Warning: Do not install or manage multiple clusters from the same working directory. Each cluster deployment maintains its own Terraform or OpenTofu state, and reusing a directory can overwrite state files, causing loss of cluster tracking and unintended cleanup behavior.
Use a dedicated directory, and jump box, where possible, per cluster, and always verify the active kubectl context before running cleanup commands such as./bootstrap.sh --cloud aws destroy.
To check the active kubectl context, run the following command:kubectl config current-context
After the restore to the new cluster is completed successfully and all required validation and migration activities are finished, the source cluster can be deleted.
3.3.1.10 - Deleting PPC
Prerequisites
Authentication
The deletion process uses OpenTofu to destroy AWS resources, such as EKS clusters, IAM roles, S3 buckets, and KMS keys. The AWS credentials must be exported as environment variables to authenticate these operations.
Note: While using temporary credentials, such as, using AWS STS, ensure the session token is included and that the credentials have not expired before proceeding.
To export the AWS credentials, run the following commands.
export AWS_ACCESS_KEY_ID=<your-access-key-id>
export AWS_SECRET_ACCESS_KEY=<your-secret-access-key>
export AWS_SESSION_TOKEN=<your-session-token>
To verify that the credentials are valid and the correct AWS identity is being used, run the following command.
aws sts get-caller-identity
Required Permissions
The same IAM principal (or one with equivalent permissions) that installed the cluster, can delete the cluster. The principal must have cluster-creator admin access to the EKS Kubernetes API.
The required IAM Permissions are listed in the following table:
| Category | Permissions | Used by |
|---|---|---|
| S3 (state backend) | s3:ListBucket,s3:GetObject,s3:PutObject,s3:DeleteObject | All modules (backend state read/write) |
| KMS | kms:Decrypt,kms:Encrypt,kms:GenerateDataKey,kms:DescribeKey,kms:ScheduleKeyDeletion | S3 backend (SSE-KMS), module 00 destroy |
| EKS | eks:DescribeCluster,eks:DeleteCluster,eks:DeleteNodegroup,eks:DeleteAddon,eks:DeleteAccessEntry,eks:DeletePodIdentityAssociation | Modules 02–05 |
| IAM | iam:DeleteRole,iam:DetachRolePolicy,iam:DeletePolicy,iam:DeleteInstanceProfile,iam:RemoveRoleFromInstanceProfile | Module 01 |
| EC2 | ec2:DeleteSecurityGroup,ec2:RevokeSecurityGroupIngress,ec2:RevokeSecurityGroupEgress,ec2:DeleteLaunchTemplate,ec2:DeleteTags,ec2:TerminateInstances | Modules 02, 03, Karpenter cleanup |
| EKS Kubernetes API | Cluster admin (AmazonEKSClusterAdminPolicy or equivalent) | Modules 04, 05 (Helm releases, storage classes, namespaces) |
Required tools
The following tools must be installed and available on the machine before proceeding with deletion:
tofu(OpenTofu)kubectl(configured with cluster context)awsCLIhelm
Removing Features
Ensure that the Protegrity Policy Workbench (PPW) is completely uninstalled before deleting a PPC cluster. For more information, refer to Uninstalling the Protegrity Policy Manager.
Cleaning up the EKS Resources
There are two ways to destroy all created resources, including the EKS cluster and related components.
| Method 1: Bootstrap script | Method 2: OpenTofu modules | |
|---|---|---|
| Approach | Automated, single command | Manual, module-by-module |
| Control | Fully automated; no per-stage visibility | Full control and visibility over each stage |
| Best for | Standard teardowns where speed is preferred | Troubleshooting, partial cleanup, or auditing each deletion step |
| Effort | Minimal | Higher; requires navigating each module directory |
Method 1: Using the bootstrap script
From the folder where bootstrap script is present, run the following command:
./bootstrap.sh --cloud aws destroy
Method 2: Using OpenTofu to delete all modules
This method displays how to delete a PPC cluster on AWS by destroying the OpenTofu modules in reverse order. Destroying modules one at a time gives full control and visibility over each stage.
Warning: This process is irreversible. All cluster resources, data, and backups stored in the S3 bucket will be permanently deleted.
The modules are located at:
~/iac/aws/cluster/modules/
├── 00_backup_bucket
├── 01_iam_roles
├── 02_eks_cluster
├── 03_node_group
├── 04_eks_addons
└── 05_helm_releases
These modules must be destroyed in reverse order: 05 → 04 → 03 → 02 → 01 → 00.
To delete the modules, perform the following steps:
- To delete the helm releases resource, perform the following steps:
# Navigate to 05_helm_releases directory
cd /iac/aws/cluster/modules/05_helm_releases

# Initialize providers
tofu init

# Delete the helm release
tofu destroy        # type "yes" when prompted
- To delete the EKS Addons resource, run the following command.
# Navigate to 04_eks_addons directory
cd /iac/aws/cluster/modules/04_eks_addons

# Initialize providers
tofu init

# Delete the eks addons
tofu destroy        # type "yes" when prompted
- To delete the Node Group resource, run the following command.
# Navigate to 03_node_group directory
cd /iac/aws/cluster/modules/03_node_group

# Initialize providers
tofu init

# Delete the node group
tofu destroy        # type "yes" when prompted
- To delete the EKS Cluster resource, run the following command.
# Navigate to 02_eks_cluster directory
cd /iac/aws/cluster/modules/02_eks_cluster

# Initialize providers
tofu init

# Delete the eks cluster
tofu destroy        # type "yes" when prompted
- To delete the IAM Roles resource, run the following command.
# Navigate to 01_iam_roles directory
cd /iac/aws/cluster/modules/01_iam_roles

# Initialize providers
tofu init

# Delete the iam roles
tofu destroy        # type "yes" when prompted
- To delete the Backup Bucket (S3 + KMS) resource, perform the following steps.
# 1.Navigate to 00_backup_bucket directory
cd /iac/aws/cluster/modules/00_backup_bucket
# 2. Download the state file from S3 (synced there during install)
aws s3 cp \
  s3://<bucket-name>/infrastructure-manifest/<cluster-name>/states/00_backup_bucket.tfstate \
  ./terraform.tfstate
# 3. Initialize providers
tofu init
# 4. Enable force_destroy on the bucket (updates only the flag)
tofu apply -var="force_destroy_bucket=true"
# 5. Destroy all resources
tofu destroy -var="force_destroy_bucket=true"        # type "yes" when prompted
Note: After destroying all the modules, delete the CloudWatch Logs group created by EKS control plane logging using the following command.
aws logs delete-log-group \
 --log-group-name "/aws/eks/<cluster-name>/cluster" \
 --region <region>
3.3.1.11 - Accessing PPC using a Linux machine
Access to the PPC cluster from a separate Linux machine may be required in the following situations:
- The original jump box used during installation is no longer available or has been decommissioned.
- A different team member or administrator needs cluster access without setting up a new jump box.
- Operational tasks, such as troubleshooting or monitoring, are being performed from a dedicated management machine.
- The organization requires cluster access to be restricted to specific machines for security or compliance reasons.
Before you begin
Ensure that the following prerequisites are met.
- A Linux machine is available and running.
- AWS CLI is installed and configured.
- Kubernetes command-line tool is installed.
Perform the following steps to access PPC using a separate Linux machine.
Log in to Linux machine with root credentials.
Configure AWS credentials, using the following command.
aws configureVerify that AWS credentials are working, using the following command.
aws sts get-caller-identityIf the Kubernetes command-line tool is not available, then install the Kubernetes command-line tool, using the following command.
kubectl version --client 2>/dev/null || {
 echo "Installing kubectl..."
 curl -LO "https://dl.k8s.io/release/$(curl -L -s https://dl.k8s.io/release/stable.txt)/bin/linux/amd64/kubectl"
 chmod +x kubectl
 sudo mv kubectl /usr/local/bin/
 kubectl version --client
}
Set up the Kubernetes command-line tool and access the cluster, using the following command.
aws eks update-kubeconfig --region <region_name> --name <cluster_name>Verify the access to the cluster, using the following command.
kubectl get nodes
3.3.1.12 - Restoring the SSH keys and PCT from backed up Terraform state file
This section describes the procedure to rebuild a usable PPC v1.1.0 deployment workspace on a jump box from an existing cluster and a backed up Terraform state file.
Before you Begin
Ensure the following requirements are met.
The state file from all the following modules must be available on the AWS S3 backup bucket.
00_backup_bucket01_iam_roles02_eks_cluster03_node_group04_eks_addons05_helm_releases
Access to the same AWS account and target EKS cluster.
AWS CLI credentials with required permissions.
Perform the following steps to recover PPC
Create a workspace.
To create a working directory for PCT, run the following command.
mkdir -p deployment
cd deployment
Download and extract the PCT
Download the PCT package into the
deploymentdirectory and extract it.For more information about downloading and extracting the PCT, refer to Preparing for PPC deployment.After successfully extracting the template, this directory behaves as recovered installation workspace.
Install required dev tools
Run the following script.
cd bootstrap-scripts/
./setup-devtools-aws.sh
Set
kubectlto the target EKS clusterTo set
kubectlto the target EKS cluster, run the following command.aws eks update-kubeconfig --region <aws-region> --name <cluster-name>Example:
aws eks update-kubeconfig --region us-east-1 --name <cluster-name>Verify the current cluster
Before proceeding, verify the context and cluster connectivity. Run the following command.
kubectl config current-contextInitialize OpenTofu
To initialize OpenTofu for the cluster module, run the following command,
cd deployment/iac/aws/cluster/modules/05_helm_releases
tofu init
Generate the SSH key for CLI access
To generate the SSH key for CLI access
tofu output -raw user_svc_private_key > ~/.ssh/user_svc.pem
chmod 600 ~/.ssh/user_svc.pem
3.3.2 - Installing PPC on Microsoft Azure
3.3.2.1 - Prerequisites
Microsoft Azure Resource Providers
The following Microsoft Azure resource providers are registered.
Microsoft.ContainerServiceMicrosoft.NetworkMicrosoft.ComputeMicrosoft.StorageMicrosoft.KeyVaultMicrosoft.ManagedIdentity
Creating a Storage Account in Azure
An Azure Storage Account is required to store cluster backup data. The following steps guide you through creating the storage account, configuring the required blob container, provisioning a Key Vault, and assigning the necessary permissions.
1. Creating the Storage Account
Create an Azure Storage Account to serve as the backend for cluster backup and restore operations using Velero.
To create a storage account, perform the following steps:
- Sign in to the Azure portal.
- Navigate to Home > Storage accounts, then select Create.
- On the Basics tab, provide the required details:
- Subscription: The Azure subscription to bill for this resource.
- Resource group: The logical container that groups related Azure resources.
- Storage account name: A globally unique name using only lowercase letters and numbers.
- Region: The Azure datacenter location where the storage account will be hosted.
- Primary service: The primary Azure service that will use this storage account (e.g., Blob Storage, Azure Files).
- Performance tier: Choose Standard for general-purpose workloads or Premium for low-latency requirements.
- Redundancy option: The replication strategy for your data (e.g., LRS, GRS, ZRS).
- Keep the default values for the remaining tabs unless a specific project requirement applies.
- On the Review + create tab, review the configuration, then select Create.
- After deployment completes, select Go to resource to open the newly created storage account.
Note: A blob container named
veleromust be created inside the storage account before installation. If the container does not exist, the installation will fail when the deployment attempts to access it.
2. Creating a container inside the storage account
Create a blob container named velero within the storage account. This container is used by Velero to store backup snapshots.
To create a container inside the storage account, perform the following steps:
- Navigate to Home > Storage accounts, then select the required storage account.
- In the left pane, under Data storage, select Containers.
- Select Add Container.
- In the New container pane, enter
veleroas the container name. - Set the anonymous access level to Private (no anonymous access).
- Select Create, and verify that the
velerocontainer appears in the container list.
3. Creating a Key Vault
Create an Azure Key Vault to securely store the encryption keys used during cluster deployment.
To create a Key Vault, perform the following steps:
- Navigate to Home > Key vaults, then select Create.
- Fill out the required details in the Basics section.
- Leave the Access configuration, Networking, and Tags sections at their default values.
- Select Review + create, then select Create.
4. Assigning the Key Vault Administrator role
The Key Vault Administrator role must be assigned to the identity performing the installation. This role is required to create, update, and manage secrets, certificates, and keys within the Azure Key Vault used during deployment. Without this permission, the installation may fail.
Verifying current role assignments
To verify current role assignments, perform the following steps:
- Navigate to Home > Key vaults, then select the key vault.
- In the left pane, select Access control (IAM), then select View my access.
- Confirm whether the Key Vault Administrator role is already assigned.
Adding the Key Vault Administrator role
To add the Key Vault Administrator role, perform the following steps:
- In Access control (IAM), select Add role assignment.
- Search and select Key Vault Administrator.
- Under Members, add the required members.
- Leave Conditions unchanged, then select Review + assign.
- Verify that the Key Vault Administrator role is now listed for the selected key vault.
5. Adding Keys to the Key Vault
Generate an encryption key inside the Key Vault. This key is referenced during cluster installation to encrypt storage and other sensitive resources.
To add keys to the Key Vault, perform the following steps:
- Navigate to Home > Key vaults, then select the key vault.
- In the left pane, select Objects > Keys, then select Generate/Import.
- Provide the required key details and complete key generation.
Note the values for the following. They are required during cluster installation.
- Storage account name
- Key vault
- Key name
Permissions to deploy AKS
Update the following custom role permissions.
Before you begin
- Identify the resource group where the AKS cluster will be created.
- Ensure that a custom role is already created in the subscription or resource group.
- Complete this configuration before starting the AKS installation process.
To update the permission for the custom role, perform the following steps:
Navigate to the required resource group in the Azure portal.
Open Access control (IAM) for the selected resource group.
Locate the existing custom role.
Select the custom role and click Edit.
Select JSON and click Edit.
Update the role by adding the following permissions:
  {
    "id": "/subscriptions/<SUBSCRIPTION-ID>/providers/Microsoft.Authorization/roleDefinitions/<ROLE-DEFINITION-ID>",
    "properties": {
        "roleName": "<ROLE-NAME>",
        "description": "",
        "assignableScopes": [
            "/subscriptions/<SUBSCRIPTION-ID>/resourceGroups/<RG-Name>"
        ],
        "permissions": [
            {
                "Actions": [
                    "Microsoft.Authorization/roleAssignments/read",
                    "Microsoft.Authorization/roleAssignments/write",
                    "Microsoft.Authorization/roleDefinitions/read",
                    "Microsoft.Authorization/roleDefinitions/write",
                    "Microsoft.ContainerService/managedClusters/read",
                    "Microsoft.ContainerService/managedClusters/write",
                    "Microsoft.KeyVault/vaults/read",
                    "Microsoft.KeyVault/vaults/write",
                    "Microsoft.ManagedIdentity/userAssignedIdentities/assign/action",
                    "Microsoft.ManagedIdentity/userAssignedIdentities/read",
                    "Microsoft.Network/virtualNetworks/read",
                    "Microsoft.Network/virtualNetworks/subnets/join/action",
                    "Microsoft.Network/virtualNetworks/subnets/read",
                    "Microsoft.Resources/subscriptions/resourceGroups/read",
                    "Microsoft.Storage/locations/checknameavailability/read",
                    "Microsoft.Storage/storageAccounts/blobServices/containers/read",
                    "Microsoft.Storage/storageAccounts/blobServices/containers/write",
                    "Microsoft.Storage/storageAccounts/blobServices/read",
                    "Microsoft.Storage/storageAccounts/blobServices/write",
                    "Microsoft.Storage/storageAccounts/fileServices/read",
                    "Microsoft.Storage/storageAccounts/fileServices/write",
                    "Microsoft.Storage/storageAccounts/listKeys/action",
                    "Microsoft.Storage/storageAccounts/read",
                    "Microsoft.Storage/storageAccounts/write",
                    "Microsoft.Network/privateDnsZones/read",
                    "Microsoft.Network/privateDnsZones/A/read",
                    "Microsoft.Network/privateDnsZones/A/write",
                    "Microsoft.Network/privateDnsZones/write",
                    "Microsoft.Network/privateDnsZones/join/action",
                    "Microsoft.Network/privateDnsZones/virtualNetworkLinks/read",
                    "Microsoft.Network/privateDnsZones/virtualNetworkLinks/write",
                    "Microsoft.ContainerService/managedClusters/listClusterUserCredential/action",
                    "Microsoft.ContainerService/managedClusters/agentPools/read",
                    "Microsoft.ContainerService/managedClusters/agentPools/write",
                    "Microsoft.ManagedIdentity/userAssignedIdentities/federatedIdentityCredentials/write",
                    "Microsoft.KeyVault/vaults/read"
                ],
                "notActions": [],
                "dataActions": [],
                "notDataActions": []
            }
        ]
    }
}
- Click Save after updating the permissions.
- Click Review + update to finalise the changes.
Jump Box or Local Machine
A jump box serves as a secure, controlled access point for executing installation commands and managing cluster resources. It ensures that all operations originate from a trusted environment with direct network access to the PPC cluster, avoiding connectivity issues that may arise from local machines with restricted network paths or inconsistent tooling.
Use a dedicated Debian or Red Hat jump box created in Microsoft Azure. Do not use a jump box hosted on any other cloud.
The jump box must be provisioned in the same Azure region where the PPC cluster will be deployed to ensure proper connectivity and access to regional resources.
For example, if the PPC cluster is deployed in
eastus, the jump box must also be created ineastus. Placing the jump box in a different region, such aswesteurope, may result in network access failures or latency issues when connecting to cluster endpoints.
Microsoft Azure Region
For automated installation
Identify the Azure region where the cluster is to be deployed.
The deployment region is automatically detected from the resource group’s location during the bootstrap process. Ensure that the resource group is created in the intended deployment region before running the installer.
All resources must be in the same region.For more information about Microsoft Azure resources, refer to Microsoft Azure Resource IDs from Infrastructure Team.
For component-based installation
Identify the Azure region where the cluster is to be deployed.
Region must be specified as azure_location in the terraform.tfvars file during the 00_backup_storage and 02_aks_cluster stages.
All resources must be in the same region.For more information about Microsoft Azure resources, refer to Microsoft Azure Resource IDs from Infrastructure Team.
Microsoft Azure Resource IDs from Infrastructure Team
Deployment Resource Group
Before proceeding with the installation, identify the Azure Resource Group where the cluster is to be deployed.
- For automated deployment, the value of this resource group name must be specified during the input prompt while running the
./bootstrap.shscript. - For component-based deployment, the value of this resource group name must be specified in the
resource_group_namefield in theterraform.tfvarsfiles, wherever required.
The following resources are provisioned within the resource group specified during deployment.
| Stage | Resources Created |
|---|---|
| 00_Backup Storage | Storage Account, Key Vault, Key Vault Key, Blob Container |
| 01_Identity | RBAC Role Assignments (references existing UAMIs; no new resources created) |
| 02_AKS Cluster | AKS Cluster, Federated Credentials |
| 03_Node Pool | AKS User Node Pool |
| 04_AKS Addons | Storage Classes, Cluster Add-ons |
| 05_Helm Releases | Kubernetes Namespaces, Secrets, Helm Charts |
Pre-existing Resources
The following resources must be provisioned by the IT team before installation.
They can reside in any resource group in the same region. The installer references each resource by its entire Azure resource ID.
Ensure the deploying identity, such as, service principal or managed identity, has the appropriate permissions on these resources.
| Resource | Description | Variable in terraform.tfvars | Example Resource ID |
|---|---|---|---|
| AKS User-Assigned Managed Identity | Identity used by the AKS cluster to interact with Azure resources such as Private DNS Zones and Virtual Networks. | uami_id | /subscriptions/<sub_id>/resourceGroups/<rg>/providers/Microsoft.ManagedIdentity/userAssignedIdentities/id-aks-applianceframeworkMust have Private DNS Zone and VNet custom role permissions. For more information, refer to AKS User-Assigned Managed Identity Permissions. |
| Velero User-Assigned Managed Identity | Identity used by Velero to access Azure Blob Storage for cluster backup and restore operations. | velero_uami_id | /subscriptions/<sub_id>/resourceGroups/<rg>/providers/Microsoft.ManagedIdentity/userAssignedIdentities/id-aks-velero |
| OpenSearch User-Assigned Managed Identity | Identity used by OpenSearch to access required Azure resources for log storage and indexing. | opensearch_uami_id | /subscriptions/<sub_id>/resourceGroups/<rg>/providers/Microsoft.ManagedIdentity/userAssignedIdentities/id-aks-opensearch |
| Virtual Network / Subnet | The subnet within an existing Virtual Network where all AKS cluster nodes are placed. | subnet_id | /subscriptions/<sub_id>/resourceGroups/<rg>/providers/Microsoft.Network/virtualNetworks/<vnet>/subnets/<subnet> |
| Private DNS Zone | The pre-existing private DNS zone used for resolving internal AKS API server endpoints within the Virtual Network. | private_dns_zone_id | /subscriptions/<sub_id>/resourceGroups/<rg>/providers/Microsoft.Network/privateDnsZones/privatelink.eastus.azmk8s.io |
AKS User-Assigned Managed Identity Permissions
The AKS User-Assigned Managed Identity (id-aks-applianceframework) must be granted a custom role with the following permissions on the resource group containing the Private DNS Zone and Virtual Network. These permissions enable AKS to manage private DNS records and join virtual networks during cluster operations.
To configure User-Assigned Managed Identity with a custom Azure role containing the permissions required for AKS deployment and management operations within the specified resource group, perform the following steps:
1. Creating a Custom Role
- In the Azure portal, navigate to Resource Groups.
- Select the resource group that contains the AKS resources.
- Open Access Control (IAM).
- Select Add > Add custom role.
- Provide a name and description for the custom role.
- Select JSON and add the following permissions.
{
  "Name": "<ROLE-NAME>",
  "Description": "",
  "AssignableScopes": [
    "/subscriptions/<SUBSCRIPTION-ID>/resourceGroups/<RESOURCE-GROUP>"
  ],
  "Actions": [
    "Microsoft.Network/privateDnsZones/read",
    "Microsoft.Network/privateDnsZones/A/read",
    "Microsoft.Network/privateDnsZones/A/write",
    "Microsoft.Network/privateDnsZones/A/delete",
    "Microsoft.Network/privateDnsZones/virtualNetworkLinks/read",
    "Microsoft.Network/privateDnsZones/virtualNetworkLinks/write",
    "Microsoft.Network/privateDnsZones/virtualNetworkLinks/delete",
    "Microsoft.Network/virtualNetworks/subnets/read",
    "Microsoft.Network/virtualNetworks/subnets/join/action",
    "Microsoft.Network/privateDnsZones/write",
    "Microsoft.Network/virtualNetworks/join/action"
  ],
  "NotActions": [],
  "DataActions": [],
  "NotDataActions": []
}
- Review the permissions and create the custom role.
Note: These permissions are required when using a private AKS cluster with a pre-existing Private DNS Zone (private_dns_zone_id). Without them, cluster provisioning and DNS resolution will fail.
2. Assigning the custom role to the Managed Identity
On the Azure portal, navigate to Managed Identities.
Select Create.
Specify the following:
- Subscription
- Resource group
- Managed identity name
- Region
Select Review + Create and then Create.
Wait for the User-Assigned Managed Identity (UAMI) to be provisioned.
Open the newly created User-Assigned Managed Identity.
Select Azure role assignments.
Select Add role assignment.
Set the scope to the target resource group.
Select the custom role created in the previous section.
Assign the role to the User-Assigned Managed Identity.
Verify that the role assignment appears under the managed identity’s role assignments.
Zone Requirements
The cluster requires a minimum of two availability zones for high availability. Three-zone cluster deployments are supported and recommended for production.
| No. of Zones | Supported | Notes |
|---|---|---|
| 1 | No | Installation fails. |
| 2 | Yes | Minimum requirement for High Availability. |
| 3 | Yes | Recommended for production environments. |
Ensure the following requirements are met before deploying:
| Requirement | Detail |
|---|---|
| Region support | The target Azure region must support availability zones. |
| VM SKU availability | The chosen VM size must be available in all the specified zones. |
The bootstrap script does not prompt for zone selection, it uses the default three zone configuration.
The default zone configuration is ["1", "2", "3"]. Not all Azure regions support three availability zones, and not all VM SKUs are available in every zone. Using a zone that does not support your VM SKU causes cluster creation to fail.
To verify the zone that is supported in the required region for PPC deployment, run the following command.
# List availability zones for your region
az account list-locations \
  --query "[?name=='<region>'].availabilityZoneMappings[].logicalZone" \
  -o table
Replace <region> with your Azure region, for example eastus.
| No. of Zones in the Output | Description |
|---|---|
empty or none | Select a different region. At least two zones are required for deploying PPC successfully. |
| Two | Update the value of system_node_pool_zones and node_pool_zones in the terraform.tfvars files for 02_aks_cluster and 03_node_pool modules |
| Three | No action is required |
Perform the following steps to modify the number of zones
Navigate to
iac/azure/cluster/modules.Enter the value of the supported zones in both
terraform.tfvarsfiles for02_aks_clusterand03_node_poolmodules.# 02_aks_cluster/terraform.tfvars system_node_pool_zones = ["<value of supported zone 1>", "<value of supported zone 2>"] # adjust to the zones your region supports # 03_node_pool/terraform.tfvars node_pool_zones = ["<value of supported zone 1>", "<value of supported zone 2>"] # must match system_node_pool_zones exactlywhere
<value of supported zone 1> and <value of supported zone 2>are the supported zones in the required Azure region.For more information on editing the
02_aks_cluster, and03_node_poolmodules, refer to Manual component-based installation.
Node pool sizing
The step [1b] Select Node Architecture in the bootstrap script prompts to select the node architecture interactively during deployment.
For arm64 and amd64, the following are the default system and user node pool configurations.
amd64 (x86-64)
| Node Pool | VM Size | vCPUs | Memory |
|---|---|---|---|
| System | Standard_D2as_v5 | 2 | 8 GB |
| User | Standard_D8as_v5 | 8 | 32 GB |
arm64
| Node Pool | VM Size | vCPUs | Memory |
|---|---|---|---|
| System | Standard_D2ps_v5 | 2 | 8 GB |
| User | Standard_D8ps_v5 | 8 | 32 GB |
Before creating the cluster, verify that your target Azure region provides the required availability zones and that your subscription can launch the required VM sizes in those zones.
# System node pool SKU
az vm list-skus \
  --subscription <subscription ID> \
  --location <region>\
  --size <VM Size>\
  --output table
where
subscription IDis the subscription ID for the Microsoft Azure account.<region>is the name of the region where PPC is to be deployed.<VM Size>is one of the supported amd64 or arm64 VM sizes listed above. Run the command once for each size. Ensure that the access to launch both, system and user node pool, are available.
A sample output is as follows:
ResourceType     Locations    Name              Zones    Restrictions
---------------  -----------  ----------------  -------  --------------
virtualMachines  eastus       Standard_D8as_v5  1,2,3    NotAvailableForSubscription type: Zone, locations: eastus zones: 3,1
where,
- Zones are the availability zones in which the VM size can be deployed. At least two zones must be available. If the
Zonescolumn is empty, then the region does not offer availability zones for that size. In such scenarios, select a different region. - Restrictions If the value is
None, no action is required. If any restriction is listed, take the relevant action, such as, choose a different region, or request access, increase quota, before proceeding.
AKS cluster tier
The sku_tier setting controls the AKS API server uptime SLA, available node capacity, and supported features.
| Tier | Uptime SLA | Notes |
|---|---|---|
Free | No SLA | Suitable for development and testing only |
Standard | 99.9% (99.95% with Availability Zones) | Recommended for production |
Premium | 99.9% (99.95% with Availability Zones) + LTS | Required if long-term support is needed |
Set sku_tier = "Standard" for all production deployments. Use "Premium" if your organization requires long-term support (LTS) guarantees.
In 02_aks_cluster/terraform.tfvars, edit the following value:
sku_tier = "Standard"
For more information on editing the 02_aks_cluster module, refer to Manual component-based installation.
3.3.2.2 - Preparing for PPC deployment
The Protegrity Cluster Template (PCT) is a pre-packaged deployment archive that contains the infrastructure-as-code scripts, Helm charts, and bootstrap tooling required to provision a PPC on your target cloud platform. It automates the creation of the Kubernetes cluster, networking, identity configuration, and installation of Protegrity microservices. Download and extract the PCT on your jump box before starting the deployment process.
Note: If there is an existing cluster from a previous install, clean up your local registry on the jump box and any existing clusters by running
./bootstrap.sh --cloud azure destroyfrom/deploymentbefore proceeding.
During installation, the system may prompt for the system password and require sign-in to Microsoft Azure. If the Azure CLI is not already logged in, the bootstrap script automatically runs az login --use-device-code. A device-code prompt similar to the following appears.
[YYYY-MM-DD HH:MM:SS] Azure CLI not logged in. Triggering az login...
To sign in, use a web browser to open the page https://login.microsoft.com/device and enter the code XXXXXXXX to authenticate.
To sign-in to Microsoft Azure, perform the following steps:
- Open the displayed URL in a browser, and enter the code shown in the terminal.
- Complete the SSO sign-in and follow the on-screen instructions.
- After successful authentication, the script continues automatically.
To download and extract PCT, perform the following steps:
Log in to the My.Protegrity portal.
Navigate to Product Management > Explore Products > AI Team Edition > Platform & Features.
Navigate to Platform Installation.
From the Actions column for Protegrity Provisioned Cluster, click the Download Product icon to download the PPC 1.1 archive.
Create a
deployment_110directory on the jumpbox.mkdir deployment_110 && cd deployment_110Copy the PCT to the
deployment_110directory on the jump box.Extract the PCT.
tar -xvf PPC-K8S-ALL_1.1.0.97.tar
3.3.2.3 - Deploying PPC
By default, the PCT is configured to deploy a FIPS-enabled cluster using FIPS-compliant node OS images.
Non-FIPS deployment: Before proceeding with the installation, complete the steps in Configuring PPC for Non-FIPS Deployment on Microsoft Azure to modify the required Terraform configuration files. Then proceed with either the automated or component-based installation below.
FIPS deployment: No additional configuration is required. Proceed directly with either the automated or component-based installation below.
The PPC cluster can be deployed using one of the following methods:
Automated script-based installation: This method requires the bootstrap.sh script to deploy the PPC cluster. The script installs the required software and dependencies, prompts to provide the required information, and deploys the cluster automatically.
Manual component-based installation: This method requires to perform the deployment of each component to install the PPC cluster. The configuration files are edited to provide the required information and then deploy the cluster.
Note: A PPC can be deployed in regions where minimum two zones are present.
3.3.2.3.1 - Production configuration
The default terraform.tfvars values are optimized for development and staging environments. Before deploying to production, override the settings below to ensure high availability, data safety, and security compliance.
Applying the changes
Script-based installation: After the bootstrap script generates the
terraform.tfvarsfiles, edit them before the script runstofu apply, or modify and re-apply individually using OpenTofu after installation.Component-based installation: Edit the relevant
terraform.tfvarsfor each module before runningtofu apply.
Storage redundancy
Modules: 00_backup_storage, 04_aks_addons
By default, the backup storage account uses Locally Redundant Storage (LRS), which stores data only within a single datacenter. When AKS nodes span multiple availability zones, an LRS-backed disk cannot be reattached to a node in a different zone during failover, causing pod scheduling to fail.
Recommendations:
- Use
ZRS(Zone-Redundant Storage) when nodes are spread across availability zones in the same region. - Use
GRS(Geo-Redundant Storage) if cross-region disaster recovery is required. - Use
Premium_ZRSas the storage class for Kubernetes persistent volumes.
In 00_backup_storage/terraform.tfvars:
storage_account_replication_type = "ZRS" # use "GRS" for cross-region redundancy
System node pool sizing
Module: 02_aks_cluster
The default system node pool VM size (Standard_D2ds_v4, 2 vCPU / 8 GiB RAM) can become resource-constrained under production load when Karpenter, CoreDNS, and CSI drivers run concurrently on the same node.
Recommendation: Use Standard_D4ds_v4 (4 vCPU / 16 GiB) or larger for production system node pools.
In 02_aks_cluster/terraform.tfvars, edit the following value:
system_node_pool_vm_size = "Standard_D4ds_v4" # or Standard_D8ds_v4 for heavier loads
Key Vault SKU
Module: 00_backup_storage
The default Key Vault SKU is standard, which uses software-protected keys. For organizations with compliance requirements (such as FIPS 140-2 Level 2 or Level 3), the premium SKU provides HSM-backed encryption keys.
Recommendation: Use premium when your security or compliance policy requires HSM-backed key protection.
In 00_backup_storage/terraform.tfvars:
key_vault_sku = "premium"
Note: Confirm with your compliance team whether HSM-backed keys are required before changing this setting. The
premiumSKU incurs additional Azure costs.
Availability zones
Modules: 02_aks_cluster, 03_node_pool
The default zone configuration is ["1", "2", "3"]. Not all Azure regions support three availability zones, and not all VM SKUs are available in every zone. Using a zone that does not support your VM SKU causes cluster creation to
fail.
Important: system_node_pool_zones (module 02) and node_pool_zones (module 03) must use the same set of zones. If the zones differ, disks provisioned in one zone cannot be attached to nodes rescheduled into another
zone.
Before deploying, verify zone and VM SKU availability:
# List availability zones for your region
az account list-locations \
  --query "[?name=='<region>'].{Region:name, Zones:availabilityZoneMappings}" \
  -o table

# Check which zones support your VM SKU
az vm list-skus \
  --location <region> \
  --size Standard_D4ds_v4 \
  --query "[].{Name:name, Zones:locationInfo[0].zones}" \
  -o table
Replace <region> with your Azure region, for example eastus.
In both 02_aks_cluster/terraform.tfvars and 03_node_pool/terraform.tfvars, set matching values:
# 02_aks_cluster/terraform.tfvars
system_node_pool_zones = ["1", "2"]    # adjust to the zones your region supports

# 03_node_pool/terraform.tfvars
node_pool_zones = ["1", "2"]           # must match system_node_pool_zones exactly
AKS cluster tier (sku_tier)
Module: 02_aks_cluster
The sku_tier setting controls the AKS API server uptime SLA, available node capacity, and supported features.
| Tier | Uptime SLA | Notes |
|---|---|---|
Free | No SLA | Suitable for development and testing only |
Standard | 99.9% (99.95% with Availability Zones) | Recommended for production |
Premium | 99.9% (99.95% with Availability Zones) + LTS | Required if long-term support is needed |
Recommendation: Set sku_tier = "Standard" for all production deployments. Use "Premium" if your organization requires long-term support (LTS) guarantees.
In 02_aks_cluster/terraform.tfvars:
sku_tier = "Standard"
Note:
StandardandPremiumtiers incur an additional hourly cost per cluster. See the AKS pricing page for current rates.
Storage account network access
Module: 00_backup_storage
The backup storage account is created with public network access enabled by default. In production, restrict access using your organization’s existing network controls.
Azure provides three options:
| Method | Isolation level | Typical use |
|---|---|---|
| Private Endpoints | Assigns the storage account a private IP inside your VNet. Removes it from public internet. | Recommended for most enterprise deployments. |
| VNet service endpoints | Routes traffic through the VNet without a private IP. | Lower cost alternative to Private Endpoints. |
| Azure Firewall / NSG | Network-layer traffic filtering. | Supplement to either option above. |
Apply the appropriate controls after deployment. The example below uses the service endpoint approach:
# Allow access from a specific VNet subnet
az storage account network-rule add \
  --account-name <storage-account-name> \
  --resource-group <resource-group> \
  --vnet-name <vnet-name> \
  --subnet <subnet-name>

# Deny all other public access
az storage account update \
  --name <storage-account-name> \
  --resource-group <resource-group> \
  --default-action Deny
Note: Consult your organization’s security team to select the appropriate access control method before deploying to production.
| Setting | Default | Production recommendation | Module |
|---|---|---|---|
storage_account_replication_type | LRS | ZRS or GRS | 00_backup_storage |
system_node_pool_vm_size | Standard_D2ds_v4 | Standard_D4ds_v4 or larger | 02_aks_cluster |
key_vault_sku | standard | premium (if HSM required) | 00_backup_storage |
system_node_pool_zones | ["1","2","3"] | Verify per region/SKU; match node_pool_zones | 02_aks_cluster |
node_pool_zones | ["1","2","3"] | Must match system_node_pool_zones | 03_node_pool |
sku_tier | Free | Standard or Premium | 02_aks_cluster |
| Storage account network access | Public (default) | Private Endpoints, VNet service endpoints, or Firewall | Post-deploy |
3.3.2.3.2 - Configuring PPC for Non-FIPS Deployment on Microsoft Azure
Before you begin
By default, the Azure PPC installation enables FIPS (Federal Information Processing Standards). Follow these steps only if you need to install a non-FIPS cluster. For the standard FIPS-enabled installation, refer to Installing PPC on Microsoft Azure.
Complete all prerequisites before proceeding.
Perform these steps after downloading and extracting the PCT and before proceeding with either the Script-based installation or the Component-based installation.
The following files require changes:
| File | Setting | Value |
|---|---|---|
deployment/iac/azure/cluster/modules/02_aks_cluster/terraform.tfvars | fips_enabled | false |
deployment/iac/azure/cluster/modules/03_node_pool/terraform.tfvars | fips_enabled | false |
Configuring PPC for Non-FIPS Deployment on Azure
For a non-FIPS PPC deployment on Azure AKS, perform the following steps:
- Disable FIPS in the AKS Cluster Module.
a. Navigate to the 02_aks_cluster module.
cd iac/azure/cluster/modules/02_aks_cluster/
b. Edit the terraform.tfvars file. Locate the fips_enabled parameter and set it to false.
fips_enabled = false
c. Save the file and exit the editor.
- Disable FIPS in the Node Pool Module.
a. Navigate to the 03_node_pool module.
cd iac/azure/cluster/modules/03_node_pool/
b. Edit the terraform.tfvars file. Locate the fips_enabled parameter and set it to false.
fips_enabled = false
c. Save the file and exit the editor.
After saving all these configuration changes, proceed with deploying the cluster using one of the following methods:
Script-based installation: Run the
bootstrap.shscript to deploy the cluster automatically.Component-based installation: Apply each Terraform module individually.
Note: The Script-based and Component-based installation instructions reference default FIPS-enabled settings. When following either installation method, do not revert or overwrite the values configured on this page. Keep
fips_enabledset tofalsein02_aks_clusterand03_node_pool.
3.3.2.3.3 - Automated script-based installation
Before you begin
Ensure that all the required resources are in the same resource-group. If the resources are in different resource groups, then ensure to move the resources to the same group before proceeding for PPC deployment.
The repository provides a bootstrap script that automatically installs or updates the following tools on the jump box:
- Azure CLI - Required to communicate with your Microsoft Azure account.
- Helm - Required to manage Kubernetes packages.
- jq - Required to parse JSON.
- kubectl - Required to communicate with the Kubernetes cluster.
- OpenTofu - Required to manage infrastructure as code.
- oras: Required to pull non‑container, generic OCI artifacts from the registry that are not handled by standard container tooling.
Note: If you are performing a non-FIPS deployment, ensure that you have already completed the steps in the section Configuring PPC for Non-FIPS Deployment on Microsoft Azure before proceeding. Do not revert
fips_enabledtotrueor changenode_osback to a FIPS-compliant image during the steps below.
Architecture Selection
The step [1b] Select Node Architecture in the bootstrap script prompts to select the node architecture interactively during deployment.
- amd64 (x86-64)
| Node Pool | VM Size | vCPUs | Memory |
|---|---|---|---|
| System | Standard_D2as_v5 | 2 | 8 GB |
| User | Standard_D8as_v5 | 8 | 32 GB |
- arm64
| Node Pool | VM Size | vCPUs | Memory |
|---|---|---|---|
| System | Standard_D2ps_v5 | 2 | 8 GB |
| User | Standard_D8ps_v5 | 8 | 32 GB |
The bootstrap script prompts you to select the node architecture interactively during deployment (step 1b).
Deploying the PPC
The bootstrap script prompts for variables to be set to complete the deployment. Run the following command and follow the instructions on the screen.
./bootstrap.sh --cloud azure
The script prompts for the following variables.
Enter AKS Cluster Name
The following characters are allowed:
- Lowercase letters:
a-z - Numbers:
0-9 - Hyphens:
-
The following characters are not allowed:
- Uppercase letters:
A-Z - Underscores:
_ - Spaces
- Any special characters such as:
/ ? * + % ! @ # $ ^ & ( ) = [ ] { } : ; , . - Leading or trailing hyphens
- Names longer than 10 characters (the cluster name must be 10 characters or fewer)
Note: Ensure that the cluster name does not exceed 10 characters. Cluster names longer than this limit can cause the bootstrap script to fail in subsequent installation steps. If the installation fails because the cluster name exceeds the 10-character limit, correct the name and re-run the script.
- Correction: Choose a cluster name with 31 characters or fewer.
- Retry: Execute the installation command again with the updated name. The script will automatically handle the update and proceed with the bootstrap process.
After the cluster name is accepted, the script prompts you to select the node architecture.
[1b] Select Node Architecture
[1b] Select Node Architecture
  1) amd64 (x86_64) — e.g. Standard_D8as_v5
  2) arm64 (ARM/Ampere) — e.g. Standard_D8ps_v5
Enter
1to selectamd64or2to selectarm64.Note: Select
amd64for standard Intel/AMD 64-bit environments. Selectarm64for ARM-based environments such as AWS Graviton instances.- Lowercase letters:
Querying for available Resource Groups
The script queries for the available Resource Groups.
Enter the Resource Group name from the table []
The script then automatically detects the location and subscription ID of the resource group.
Enter UAMI Resource ID
Provide the complete Azure resource ID for the UAMI used by AKS in the following format:
/subscriptions/<subscription-id>/resourceGroups/<resource-group>/providers/Microsoft.ManagedIdentity/userAssignedIdentities/<identity-name>The UAMI client ID is detected automatically.
Enter AKS Subnet Resource ID
Provide the complete resource ID of the pre-existing subnet used for AKS nodes in the following format:
/subscriptions/<subscription-id>/resourceGroups/<resource-group>/providers/Microsoft.Network/virtualNetworks/<vnet-name>/subnets/<subnet-name>Enter Private DNS Zone Resource ID
Provide the Private DNS zone ID used by the AKS private cluster in the following format:
/subscriptions/<subscription-id>/resourceGroups/<resource-group>/providers/Microsoft.Network/privateDnsZones/privatelink.<region>.azmk8s.ioThe script attempts to automatically detect network settings:
- Virtual network address space
- Service CIDR
- DNS service IP
If the detection fails, then default values configured in the
terraform.tfvarsfile are used.
Enter FQDN [name.domain.com]
This is the Fully Qualified Domain Name for the ingress.
Warning: Ensure that the FQDN does not exceed 50 characters and only the following characters are used:
- Lowercase letters:
a-z - Numbers:
0-9 - Special characters:
- .
- Lowercase letters:
Storage Account and Key Vault provisioning
Choose whether to use existing resources or create new resources:
1) Use existing
2) Provision new via Tofu
Enter 1 if an encrypted Storage Account and Key Vault are already provisioned for this cluster. The installer prompts for the Storage Account name, Key Vault name, backup container, Key Vault key name, and the Velero UAMI Resource ID.
Enter 2 to allow the installer to create a new Storage Account and Key Vault with the
velerocontainer, thepty-backup-keyencryption key, and a Velero UAMI automatically. Only the new resource names are required.
Enter Velero UAMI Resource ID (required)
Enter the resource ID of the dedicated Velero User-Assigned Managed Identity (UAMI) in the format:
/subscriptions/<subscription-id>/resourceGroups/<velero-resource-group>/providers/Microsoft.ManagedIdentity/userAssignedIdentities/<name>The script automatically validates the UAMI and detects the UAMI Client ID.
Enter OpenSearch UAMI Resource ID (required)
Enter the resource ID of the OpenSearch Velero User-Assigned Managed Identity (UAMI) in the format:
/subscriptions/<subscription-id>/resourceGroups/<opensearch-resource-group>/providers/Microsoft.ManagedIdentity/userAssignedIdentities/<name>The script automatically validates the UAMI and detects the UAMI Client ID.
Enter Image Registry Endpoint
The image repository from where the container images are retrieved.
Expected format: <hostname>[:port].
Do not include ‘https://’
- Enter Registry Username
Enter the username for the registry mentioned in the previous step. Leave this entry blank if the registry does not require authentication.
- Enter Registry Password or Access Token
Enter Password or Access Token for the registry.
Input is masked with * characters. Press Enter to keep the current value.
Leave this entry blank if the registry does not require authentication.
- Enter Owner Email (for cluster tagging)
Enter email address in the format name@domain.tld. This email is used for the cluster ‘Owner’ tag and the platform owner contact.
Note: The cluster creation process can take 10-15 minutes.
If the session is terminated during installation due to network issues, power outage, and so on, then the installation stops. To restart the installation, run the script again:
# Navigate to setup directory
./bootstrap.sh --cloud azure
After the bootstrap script is completed, verify the cluster and workloads using the following commands:
# Confirm nodes are Ready
kubectl get nodes

# Confirm NFA workloads are Running
kubectl get pods -A
3.3.2.3.4 - Manual component-based installation
This section is intended for enterprise customers who need full control over each stage of the AKS cluster deployment. Use this path when individual infrastructure stages must be reviewed or approved separately, when integration with an existing CI/CD pipeline is required, or when corporate change-management controls prevent running an all-in-one automated script. Each stage is self-contained and can be executed by different teams on the same jump box.
Before deploying to production: The default values are optimized for development and staging. Review the Production configuration section to override settings for high availability, data safety, and security compliance before running tofu apply.
Note: If you are performing a non-FIPS deployment, ensure you have already completed Configuring PPC for Non-FIPS Deployment on Microsoft Azure before proceeding. Do not revert
fips_enabledtotruewhen performing the following steps.
Deploying PPC using component-based installation
To install PPC, complete the following steps in order. Each step is described in detail in the sections below.
| Step | Action | Description |
|---|---|---|
| 1 | Installing the tools | Installs all required CLI tools (OpenTofu, Azure CLI, kubectl, Helm, and others) on the jump box, either automatically via bootstrap.sh install-tools --cloud azure or manually. |
| 2 | Authenticating with Azure CLI | Authenticates with Azure using az login and verifies access to the target subscription, resource group, managed identities, subnet, and private DNS zone. |
| 3 | Downloading and extracting the release PCT | Downloads and extracts the PPC release archive on the jump box. |
| 4 | Provisioning backup storage and key vault | (Skip if using existing resources) Provisions a new Azure Storage Account, Blob container, Key Vault, and encryption key for storing PPC backup data using the 00_backup_storage Terraform module. |
| 5 | Filling in each module’s terraform.tfvars | Configures and applies five Terraform modules in sequence to provision all PPC infrastructure components. |
| 5a | 01_identity module | Creates RBAC role assignments for the pre-existing User-Assigned Managed Identities (UAMIs) required by AKS, Velero, and OpenSearch. |
| 5b | 02_aks_cluster module | Provisions the private AKS cluster with a system node pool, configures networking (Azure CNI Overlay and Cilium), enables Workload Identity, and creates federated identity credentials for Velero and OpenSearch. |
| 5c | 03_node_pool module | Creates a user node pool for application workloads with the specified VM size, architecture, and availability zone configuration. |
| 5d | 04_aks_addons module | Creates default and backup Kubernetes storage classes using Azure Managed Disks (Premium LRS) and removes the built-in default storage class annotation. |
| 5e | 05_helm_releases module | Deploys all PPC platform Helm charts including Velero, NFA/Eclipse, Insight, Reloader, and Envoy Gateway. This step may take 15–20 minutes. |
| 6 | Verifying the installation | Confirms all cluster nodes are in Ready state and all pods are in Running state. |
Before you begin
Ensure to have the following prerequisites before proceeding with the installation.
Access and permissions
| Requirement | Details |
|---|---|
| Azure RBAC | Contributor and User Access Administrator on the target subscription or resource group. |
| Jump box | Debian or Red Hat VM in Azure with internet access to pull the release archive. |
Required Roles
The Azure principal must have AKS cluster admin access.
The required Azure RBAC Roles are listed in the following table:
| Role | Scope | Used by |
|---|---|---|
| Contributor | Resource group | Create AKS cluster, node pool, storage account, Key Vault |
| User Access Administrator | Resource group | Create role assignments (module 01) |
| Storage Blob Data Contributor | Backup storage account | Access state files in backend, upload module 00 state |
| Key Vault Administrator | Key Vault | Create Key Vault and keys (module 00) |
| AKS Cluster Admin | AKS cluster | Kubernetes API access for Helm, kubectl operations (modules 04, 05) |
Deployment Resource Group
All resources created by the installer are provisioned in a single Azure resource group specified using resource_group_name in each terraform.tfvars file. This resource group must exist before running the installer.
The following resources are created inside this resource group.
| Stage | Resources Created |
|---|---|
| 00_Backup Storage | Storage Account, Key Vault, Key Vault Key, Blob Container |
| 01_Identity | RBAC Role Assignments (references existing UAMIs; no new resources created) |
| 02_AKS Cluster | AKS Cluster, Federated Credentials |
| 03_Node Pool | AKS User Node Pool |
| 04_AKS Addons | Storage Classes, Cluster Add-ons |
| 05_Helm Releases | Kubernetes Namespaces, Secrets, Helm Charts |
Installing the tools
After downloading and extracting the PPC-K8S-ALL_1.1.0.97.tar, run the following command to install the required tools.
./bootstrap.sh install-tools --cloud azure
Alternatively, the following tools must be installed and available on the jumpbox before starting:
| Tool Name | Description | Version |
|---|---|---|
| OpenTofu | Open-source Terraform fork used to provision and manage infrastructure | OpenTofu v1.11.5 |
| Azure CLI | Command-line tool for managing Azure resources | 2.88.0 |
| kubectl | Kubernetes command-line tool for interacting with the cluster | v1.36.3 |
| Helm | Kubernetes package manager for deploying Helm charts | v3.21.3+g1ad6e68 |
| skopeo | Tool for inspecting and copying container images between registries | skopeo version 1.18.0 |
| jq | Lightweight command-line JSON processor | jq-1.7 |
| bc | Arbitrary-precision calculator used in shell scripts | bc 1.07.1 |
| ssh-keygen | Tool for generating SSH key pairs used for secure access | OpenSSH_10.0p2 Debian-7+deb13u4, OpenSSL 3.5.6 7 Apr 2026 |
| oras | OCI Registry As Storage client for pushing and pulling artifacts | 1.3.3 |
| cmctl | Command-line tool for managing cert-manager resources | v2.5.0 |
Values to collect before starting
Gather the following values before populating each stage terraform.tfvars in Step 4.
| Value | Description | Example |
|---|---|---|
| Cluster name | Name of the AKS cluster to create or manage. | my-aks-cluster |
| Resource group | Azure resource group containing the AKS cluster and related resources. | rg-aks-prod |
| Azure subscription ID | Unique identifier of the Azure subscription used for deployment. | <subscription-id> |
| Azure region | Azure region where the cluster and resources are deployed. | eastus |
| AKS UAMI resource ID | Full resource ID of the user-assigned managed identity for AKS appliance framework workloads. | /subscriptions/<sub>/resourceGroups/<rg>/providers/Microsoft.ManagedIdentity/userAssignedIdentities/id-aks-applianceframework |
| AKS subnet resource ID | Full resource ID of the virtual network subnet where AKS nodes are deployed. | /subscriptions/<sub>/resourceGroups/<rg>/providers/Microsoft.Network/virtualNetworks/<vnet>/subnets/<subnet> |
| Private DNS zone resource ID | Full resource ID of the private DNS zone used for AKS private cluster name resolution. | /subscriptions/<sub>/resourceGroups/<rg>/providers/Microsoft.Network/privateDnsZones/privatelink.eastus.azmk8s.io |
| Storage account name | Azure Storage Account used for Velero backups and Terraform remote state. | existing name or provisioned in Step 3 |
| Backup container name | Blob container within the storage account used by Velero for cluster backups. | velero |
| Key Vault name | Azure Key Vault that holds the backup encryption key. | existing name or provisioned in Step 3 |
| Key Vault key name | Name of the encryption key inside the Key Vault used by Velero. | pty-backup-key |
| Velero UAMI resource ID | Full resource ID of the user-assigned managed identity for Velero backup and restore operations. | /subscriptions/<sub>/resourceGroups/<rg>/providers/Microsoft.ManagedIdentity/userAssignedIdentities/id-aks-velero |
| OpenSearch UAMI resource ID | Full resource ID of the user-assigned managed identity for OpenSearch workload identity. | /subscriptions/<sub>/resourceGroups/<rg>/providers/Microsoft.ManagedIdentity/userAssignedIdentities/id-aks-opensearch |
| Ingress FQDN | Fully qualified domain name used by the ingress controller to expose cluster services externally. | myapp.example.com |
| Image registry endpoint | Endpoint of the container image registry from which cluster images are pulled. | registry.example.com |
| Registry username & password | Credentials for authenticating with the container image registry. | provided by the team |
Deploying the PPC
To deploy the PPC using component-based installation, perform the following steps:
1. Authenticating with Azure CLI
To authenticate with the Azure CLI on the jump box, run the following command.
az login
az account show
Ensure the target subscription, resource group, managed identities, subnet, and private DNS zone are accessible before continuing.
2. Downloading and extracting the release PCT
To download and extract the PCT, refer to Preparing for PPC deployment.
3. Provisioning backup storage and key vault
This is an optional step.
Note: Skip this step if an Azure Storage Account, backup container, Key Vault, and key already exist for this cluster. Note these values. They will be needed in next steps.
- Navigate to the
00_backup_storagedirectory.
cd iac/azure/cluster/modules/00_backup_storage
- Open
terraform.tfvarsand fill in the required values.
    resource_group_name    = "<resource-group>"
    aks_cluster_name       = "<cluster-name>"
    storage_account_name   = "<storage-account-name>"
    storage_container_name = "velero"
    key_vault_name         = "<key-vault-name>"
    key_name               = "pty-backup-key"

    azure_subscription_id = "<subscription-id>"
    azure_location        = "<region>"        # e.g. eastus
Save the file and exit the editor.
To apply the terraform configuration, run the following command.
    tofu init
    tofu plan          # review the role assignments that will be created
    tofu apply         # type "yes" when prompted
- Note the Storage Account, container, Key Vault, and key values for future steps.
4. Filling in each module’s terraform.tfvars
Each module under iac/azure/cluster/modules/ contains its own terraform.tfvars file. There is no single shared configuration file, so the terraform.tfvars file in every module must be updated before running the deployment.
Verify that the following values are the same across all modules:
resource_group_nameaks_cluster_nameazure_subscription_idstorage_account_namestorage_container_name
01_identitymodule
This stage creates RBAC role assignments for the pre-existing User-Assigned Managed Identities (UAMIs) required by AKS, Velero, and OpenSearch.
| Resource | Purpose |
|---|---|
| Managed Identity Operator role | Allows AKS to assign the UAMI to nodes |
| Virtual Machine Contributor role | Allows AKS to manage VMs in the node resource group |
| Disk Snapshot Contributor role | Allows Velero to create and manage disk snapshots |
| Storage Blob Data Contributor (Velero) | Allows Velero to read/write backup blobs |
| Key Vault Crypto User role | Allows Velero to encrypt/decrypt backups with the Key Vault key |
| Storage Blob Data Contributor (OpenSearch) | Allows OpenSearch to store snapshot data in blob storage |
To update the 01_identity module, perform the following steps.
a. Navigate to the iac/azure/cluster/modules/01_identity/ directory.
cd iac/azure/cluster/modules/01_identity/
b. Edit the terraform.tfvars file to provide the required values.
    resource_group_name    = "<resource-group>" # e.g. "aks-rg-prod"
    aks_cluster_name       = "<cluster-name>" # e.g. "prod-aks-cluster"
    azure_subscription_id  = "<subscription-id>" # e.g. "1e9ef7b6-cdc4-4a6b-98f7-a408ac1e19e0"
    storage_account_name   = "<storage-account-name>" # e.g. "myclusterstateaccount"
    storage_container_name = "velero"

    # -------------------------------------------------
    # Pre-existing managed identities (provided by IT)
    # -------------------------------------------------
    uami_id = "</subscriptions/<subscription-id>/resourceGroups/<it-resource-group>/providers/Microsoft.ManagedIdentity/userAssignedIdentities/id-aks-applianceframework>"

    velero_uami_id = "</subscriptions/<subscription-id>/resourceGroups/<velero-resource-group>/providers/Microsoft.ManagedIdentity/userAssignedIdentities/id-aks-velero>" # required

    opensearch_uami_id = "</subscriptions/<subscription-id>/resourceGroups/<opensearch-resource-group>/providers/Microsoft.ManagedIdentity/userAssignedIdentities/aks-opensearch-identity>" # required

    # -------------------------------------------------
    # Key Vault (leave empty to skip KV role assignment)
    # -------------------------------------------------
    key_vault_name = "<key-vault-name>" # e.g. "my-key-vault"
c. Save the file and exit the editor.
d. To initialise, plan, and apply the changes, run the following commands.
    tofu init
    tofu plan          # review the role assignments that will be created
    tofu apply         # type "yes" when prompted
e. To verify the resources created in this stage, run the following commands
For AKS UAMI:
# Retrieve the Principal ID of the AKS User-Assigned Managed Identity (UAMI)
az identity show \
  --ids "<uami-resource-id>" \
  --query principalId \
  --output tsv
#Use the returned Principal ID to verify the role assignments:
az role assignment list \
  --assignee "<aks-uami-principal-id>" \
  --output table
For Velero UAMI
# Retrieve the Principal ID of the Velero UAMI
az identity show \
  --ids "<velero-uami-principal-id>" \
  --query principalId \
  --output tsv
#Use the returned Principal ID to verify the role assignments:
az role assignment list \
  --assignee "<velero-uami-principal-id>" \
  --output table
For OpenSearch UAMI
# Retrieve the Principal ID of the OpenSearch UAMI
az identity show \
  --ids "<opensearch-uami-principal-id>" \
  --query principalId \
  --output tsv
#Use the returned Principal ID to verify the role assignments:
az role assignment list \
  --assignee "<opensearch-uami-principal-id>" \
  --output table
02_aks_clustermodule
This stage provisions the private AKS cluster with a system node pool, configures networking (Azure CNI Overlay and Cilium), enables Workload Identity, and creates federated identity credentials for Velero and OpenSearch.
| Resource | Purpose |
|---|---|
| AKS cluster | Private Kubernetes control plane with OIDC issuer and Workload Identity enabled |
| System node pool | 2-node pool for core Kubernetes components (CoreDNS, metrics-server, etc.) |
| Federated credential (Velero) | Allows the Velero service account to authenticate as the Velero UAMI |
| Federated credential (OpenSearch) | Allows the OpenSearch service account to authenticate as the OpenSearch UAMI |
| Kubeconfig context | Auto-configures kubectl access to the new cluster |
To update the 02_aks_cluster module, perform the following steps.
a. Navigate to the iac/azure/cluster/modules/02_aks_cluster/ directory.
cd iac/azure/cluster/modules/02_aks_cluster/
Note (Non-FIPS deployment): If you are deploying a non-FIPS cluster, ensure
fips_enabledremainsfalseas configured in the section Configuring PPC for Non-FIPS Deployment on Microsoft Azure. Do not change this value totrue.
b. Edit the terraform.tfvars file to provide the required values.
    resource_group_name    = "<resource-group>" # e.g. "aks-rg-prod"
    aks_cluster_name       = "<cluster-name>" # e.g. "prod-aks-cluster"
    azure_subscription_id  = "<subscription-id>" # e.g. "1e9ef7b6-cdc4-4a6b-98f7-a408ac1e19e0"
    storage_account_name   = "<storage-account-name>" # e.g. "myclusterstateaccount"
    storage_container_name = "velero"

    # -------------------------------------------------
    # Identity (UAMI for kubelet and federated credentials)
    # -------------------------------------------------
    uami_id            = "</subscriptions/<subscription-id>/resourceGroups/<it-resource-group>/providers/Microsoft.ManagedIdentity/userAssignedIdentities/id-aks-applianceframework>" # full UAMI resource ID (same as Stage 01)
    velero_uami_id     = "</subscriptions/<subscription-id>/resourceGroups/<velero-resource-group>/providers/Microsoft.ManagedIdentity/userAssignedIdentities/id-aks-velero>" # full Velero UAMI resource ID (for federated credential)
    opensearch_uami_id = "</subscriptions/<subscription-id>/resourceGroups/<opensearch-resource-group>/providers/Microsoft.ManagedIdentity/userAssignedIdentities/aks-opensearch-identity>" # full OpenSearch UAMI resource ID (for federated credential)

    # -------------------------------------------------
    # Cluster
    # -------------------------------------------------
    azure_location      = "<region>" # e.g. "eastus"  (auto-detected from resource group)
    subnet_id           = "</subscriptions/<sub>/resourceGroups/<rg>/providers/Microsoft.Network/virtualNetworks/<vnet>/subnets/<subnet>>" # e.g. "/subscriptions/.../subnets/snet-aks-applianceframework"
    private_dns_zone_id = "</subscriptions/<subscription-id>/resourceGroups/<dns-resource-group>/providers/Microsoft.Network/privateDnsZones/privatelink.eastus.azmk8s.io>" # e.g. "/subscriptions/.../privateDnsZones/privatelink.eastus.azmk8s.io"

    # -------------------------------------------------
    # Networking (service CIDR + DNS IP)
    # -------------------------------------------------
    service_cidr   = "<10.0.0.0/16>" # auto-derived by updatevartf.sh (non-overlapping with the VNet)
    dns_service_ip = "<10.220.0.10>" # auto-derived: the .10 host of the chosen service_cidr
    pod_cidr       = "<10.0.0.0/16>" # auto-derived: non-overlapping with the VNet and service_cidr

    # -------------------------------------------------
    # System node pool
    # -------------------------------------------------
    architecture                  = "amd64" # amd64 or arm64
    system_node_pool_vm_size      = ""      # leave empty to auto-select based on architecture
    system_node_pool_node_count   = 2
    system_node_pool_disk_size_gb = 50
    system_node_pool_os_sku       = "AzureLinux"
    system_node_pool_zones        = ["1", "2", "3"]
    fips_enabled                  = true # set false for a non-FIPS node OS image (immutable)

    # -------------------------------------------------
    # Ownership / tagging
    # -------------------------------------------------
    owner_email                   = "<name@domain.tld>" # optional; blank = auto-detect from the Azure CLI identity
c. Save the file and exit the editor.
d. To initialise, plan, and apply the changes, run the following commands.
    tofu init
    tofu plan          # review the role assignments that will be created
    tofu apply         # type "yes" when prompted
e. To verify the resources created in this stage, run the following commands.
# Confirm the AKS cluster is in Succeeded state
az aks show --name <cluster-name> --resource-group <resource-group> \
  --query "{Name:name, State:provisioningState, Version:kubernetesVersion, Fqdn:privateFqdn}" \
  --output table
A sample output is displayed below:
Name              State      Version    Fqdn
----------------  ---------  ---------  -----------------------------------------------
<cluster-name>    Succeeded  1.35       <cluster-name>.privatelink.<region>.azmk8s.io
# Verify kubectl can reach the cluster
kubectl get nodes    # expect 2 system nodes in Ready state
# Verify federated credentials exist
az identity federated-credential list \
  --identity-name <velero-uami-name> \
  --resource-group <velero-uami-resource-group> --output table
az identity federated-credential list \
  --identity-name <opensearch-uami-name> \
  --resource-group <opensearch-uami-resource-group> --output table
03_node_poolmodule
This stage creates a user-managed node pool for application workloads. Node Auto Provisioning (NAP) handles autoscaling; no cluster autoscaler is configured on this pool.
| Resource | Purpose |
|---|---|
| User node pool (userpool) | Worker nodes for NFA platform, Insight, and other application pods |
To update the 03_node_pool module, perform the following steps.
a. Navigate to the iac/azure/cluster/modules/03_node_pool/ directory.
cd iac/azure/cluster/modules/03_node_pool/
Note (Non-FIPS deployment): If you are deploying a non-FIPS cluster, ensure
fips_enabledremainsfalseas configured in Configuring PPC for Non-FIPS Deployment on Microsoft Azure. Do not change this value totrue.
b. Edit the terraform.tfvars file to provide the required values.
    resource_group_name    = "<resource-group>" # e.g. "aks-rg-prod"
    aks_cluster_name       = "<cluster-name>" # e.g. "prod-aks-cluster"
    azure_subscription_id  = "<subscription-id>" # e.g. "1e9ef7b6-cdc4-4a6b-98f7-a408ac1e19e0"
    storage_account_name   = "<storage-account-name>" # e.g. "myclusterstateaccount"
    storage_container_name = "velero"

    # -------------------------------------------------
    # Node pool
    # -------------------------------------------------
    subnet_id              = "</subscriptions/<sub>/resourceGroups/<rg>/providers/Microsoft.Network/virtualNetworks/<vnet>/subnets/<subnet>>"      # same subnet as AKS nodes (Stage 02)
    architecture           = "amd64" # amd64 or arm64
    vm_size                = ""      # leave empty for architecture default
    node_pool_disk_size_gb = 120
    node_pool_desired_size = 3
    node_pool_zones        = ["1", "2", "3"]
    fips_enabled           = true # set false for a non-FIPS node OS image (immutable)
c. Save the file and exit the editor.
d. To initialise, plan, and apply the changes, run the following commands.
    tofu init
    tofu plan          # review the role assignments that will be created
    tofu apply         # type "yes" when prompted
Expected time for this stage is approximately 5 to 10 minutes for node pool provisioning.
e. To verify the resources created in this stage, run the following commands.
# Confirm the user node pool exists and is Succeeded
az aks nodepool show --cluster-name <cluster-name> \
  --resource-group <resource-group> --name userpool \
  --query "{Name:name, State:provisioningState, Count:count, VmSize:vmSize, OsSku:osSku}" \
  --output table
A sample output is displayed below:
Name      State      Count    VmSize      OsSku
--------  ---------  -------  ----------  ----------
userpool  Succeeded  <count>  <vm-size>   AzureLinux
# Verify all nodes are Ready (system + user nodes)
kubectl get nodes -o wide
# Confirm user pool nodes have the expected label
kubectl get nodes -l agentpool=userpool
04_aks_addonsmodule
This stage creates the default and backup Kubernetes storage classes using Azure Managed Disks (Premium LRS) and removes the built-in default storage class annotation.
| Resource | Purpose |
|---|---|
| ebs-sc storage class | Default storage class (Premium LRS, WaitForFirstConsumer, expandable) |
| ebs-bkp storage class | Backup storage class used by Velero for PVC snapshots |
| Remove built-in default SC | Ensures only ebs-sc is marked as the cluster default |
To update the 04_aks_addons module, perform the following steps.
a. Navigate to the iac/azure/cluster/modules/04_aks_addons/ directory.
cd iac/azure/cluster/modules/04_aks_addons/
b. Edit the terraform.tfvars file to provide the required values.
    resource_group_name    = "<resource-group>" # e.g. "aks-rg-prod"
    aks_cluster_name       = "<cluster-name>" # e.g. "prod-aks-cluster"
    azure_subscription_id  = "<subscription-id>" # e.g. "1e9ef7b6-cdc4-4a6b-98f7-a408ac1e19e0"
    storage_account_name   = "<storage-account-name>" # e.g. "myclusterstateaccount"
    storage_container_name = "velero"
c. Save the file and exit the editor.
d. To initialise, plan, and apply the changes, run the following commands.
    tofu init
    tofu plan          # review the role assignments that will be created
    tofu apply         # type "yes" when prompted
e. To verify the resources created in this stage, run the following commands.
# List storage classes and confirm ebs-sc is the default
kubectl get storageclass
# Verify ebs-sc details
kubectl describe storageclass ebs-sc
# Confirm the built-in 'default' storage class is no longer the default
kubectl get storageclass default -o jsonpath='{.metadata.annotations.storageclass\.kubernetes\.io/is-default-class}'
# expected output: empty or "false"
A sample output is displayed below:
storage_class_names = {
  "backup" = "ebs-bkp"
  "default" = "ebs-sc"
}
05_helm_releasesmodule
This stage deploys all application Helm charts, configures Velero backup with the Azure plugin, and bootstraps the NFA platform and Insight analytics stack.
| Resource | Purpose |
|---|---|
| Velero Helm release | Backup and disaster recovery with Azure Blob Storage and disk snapshots |
| NFA / Eclipse Helm release | Main platform stack (cert-manager, Keycloak, API Gateway, services) |
| Insight Helm release | Log aggregation and analytics (OpenSearch, Dashboards, Fluentd) |
| Reloader Helm release | Auto-restarts workloads on ConfigMap or Secret changes |
| Envoy Gateway Helm release | API gateway and ingress proxy |
| VolumeSnapshotClass | CSI snapshot class (csi-azure-vsc) for Azure Disk snapshots |
| Namespaces & registry secrets | Creates namespaces with image-pull secrets for the private registry |
To update the 05_helm_releases module, perform the following steps.
a. Navigate to the iac/azure/cluster/modules/05_helm_releases/ directory.
cd iac/azure/cluster/modules/05_helm_releases/
b. Run the following commands and note the values.
# Get the Velero Client ID
az identity show \
  --name id-aks-velero \
  --resource-group aks-ppc \
  --query clientId \
  -o tsv
# Get the OpenSearch Client ID
az identity show \
  --name aks-ppc01-opensearch-identity \
  --resource-group aks-ppc \
  --query clientId \
  -o tsv
c. Edit the terraform.tfvars file to provide the required values.
    resource_group_name    = "<resource-group>" # e.g. "aks-rg-prod"
    aks_cluster_name       = "<cluster-name>" # e.g. "prod-aks-cluster"
    azure_subscription_id  = "<subscription-id>" # e.g. "1e9ef7b6-cdc4-4a6b-98f7-a408ac1e19e0"
    storage_account_name   = "<storage-account-name>" # e.g. "myclusterstateaccount"
    storage_container_name = "velero"

    # -------------------------------------------------
    # Networking
    # -------------------------------------------------
    subnet_id    = "</subscriptions/<sub>/resourceGroups/<rg>/providers/Microsoft.Network/virtualNetworks/<vnet>/subnets/<subnet>>" # same subnet as Stages 02/03 (for VNet address space lookup)
    pod_cidr     = ""  # optional override; empty = auto-detected from the live AKS network profile
    architecture = "amd64" # amd64 or arm64
    node_os      = "AzureLinux_FIPS" # should mirror stage-03 user node pool os_sku + fips_enabled

    # -------------------------------------------------
    # Registry
    # -------------------------------------------------
    global_image_reg = "<registry endpoint>" # e.g. "harbor.example.com"
    harbor_secret    = "<harbour secret>" # e.g. "harbor-pull-secret"
    ingress_fqdn     = "<FQDN>" # e.g. "apps.example.com"

    # -------------------------------------------------
    # Ownership / tagging
    # -------------------------------------------------
    owner_email = "<name@domain.tld>" # optional; blank = auto-detect from the Azure CLI identity

    # -------------------------------------------------
    # Restore / backup
    # -------------------------------------------------
    restore             = false                               # set to true to restore from a previous backup
    backup_name         = "authnz-postgresql-schedule-backup" # Velero backup name used when restore = true
    insight_backup_name = ""                                  # Insight Velero backup name (K8s resources only); leave empty to auto-resolve latest

    # -------------------------------------------------
    # Workload Identity
    # -------------------------------------------------
    velero_uami_client_id     = "<velero_uami_client_id>" # client ID of the Velero UAMI
    opensearch_uami_client_id = "<opensearch_uami_client_id>" # client ID of the OpenSearch UAMI
c. Save the file and exit the editor.
d. Export registry credentials using environment variables. Do not put them in the tfvars file.
    export TF_VAR_username="<registry-username>"
    export TF_VAR_password="<registry-password>"
e. To initialise, plan, and apply the changes, run the following commands.
    tofu init
    tofu plan          # review the role assignments that will be created
    tofu apply         # type "yes" when prompted
Expected time for this stage is approximately 15 to 20 minutes.
f. To verify the resources created in this stage, run the following commands.
# Confirm all Helm releases are deployed
helm list -A
# Verify Velero is running
kubectl get pods -n pty-backup-recovery
# Verify NFA platform pods
kubectl get pods -A
# Verify Insight pods
kubectl get pods -n pty-insight
# Verify Envoy Gateway
kubectl get pods -n api-gateway
# Verify VolumeSnapshotClass exists
kubectl get volumesnapshotclass
# Check all pods across the cluster are healthy
kubectl get pods -A --field-selector=status.phase!=Running,status.phase!=Succeeded
# Confirm the ingress gateway has an IP
kubectl get gateway -A
A sample output is displayed below:
nfa_release_status = "deployed"
user_svc_private_key = <sensitive>
velero_release_status = "deployed"
All the nodes must be in the Ready state and all the pods must be in the Running or Completed state.
Verifying the installation
To verify the installation, run the following command.
kubectl get nodes
kubectl get pods -A
3.3.2.4 - Installing Features and Protectors
Before you begin
Ensure that PPC is successfully installed before installing the features or protectors.
Installing Features
The following table lists the available features.
| Feature | Description |
|---|---|
| Data Discovery | Installing Data Discovery |
| Semantic Guardrails | Installing Semantic Guardrails |
| Protegrity Agent | Installing Protegrity Agent |
| Anonymization | Installing Anonymization |
| Synthetic Data | Installing Synthetic Data |
Installing Protectors
The following table lists the available protectors.
| Protector | Description |
|---|---|
| Application Protector | Installing Application Protector |
| Repository Protector | Installing Repository Protector |
| Application Protector Java Container | Installing Application Protector Java Container |
| Rest Container | Installing Rest Container |
| Cloud Protector | Installing Cloud Protector |
3.3.2.5 - Login to PPC
To access the Web UI, map the gateway hostname to the Microsoft Azure Load Balancer IP address in the local hosts file.
Get gateway details: Find the hostname and the Microsoft Azure Load Balancer address.
kubectl get gateway -AThe output will look similar to:
NAMESPACE     NAME       CLASS   ADDRESS       PROGRAMMED   AGE
api-gateway   pty-main   envoy   10.221.8.33   True         5h7m
Update the hosts file: Add an entry mapping the ingress FQDN to the IP.
- Linux:
/etc/hosts - Windows:
C:\Windows\System32\drivers\etc\hosts
Example entry:
10.221.8.33 <FQDN given during cluster installation>Use the same FQDN provided during the installation process..
- Linux:
Access the UI in the browser.
URL:
https://<user-provided-fqdn>Enter the following parameters to log in and view the Insight Dashboard.
- Username: Application username
- Password: Application password
For more information about the default credentials, refer to the Release Notes.
3.3.2.6 - Accessing the PPC CLI
The deployment includes a CLI container that provides command-line access to the Protegrity Management CLI using SSH, on both Linux and Windows.
Prerequisites
SSH key: The private key generated during bootstrap at
~/.ssh/<cluster_name>_user_svc, matches the public key configured in thepty-clipod.Network access: Ensure you have connectivity to the AKS cluster’s ingress Load Balancer.
Hosts file: Same as Web UI access. Map the ingress FQDN to the Load Balancer IP.
The private key is placed under ~/.ssh/<cluster_name>_user_svc after bootstrap completes, where <cluster_name> is the AKS cluster name provided during installation.
From the project root directory, run the following command:
ssh -i ~/.ssh/<cluster_name>_user_svc -p 22 ptyitusr@<your-fqdn>
To skip host-key checking on first connect, run the following command:
ssh -i ~/.ssh/<cluster_name>_user_svc \
    -o StrictHostKeyChecking=no \
    -o UserKnownHostsFile=/dev/null \
    -p 22 ptyitusr@<your-fqdn>
- OpenSSH (Windows 10/11): Copy the private key from the jump box (
~/.ssh/<cluster_name>_user_svc) to Windows machine, then run the following command:
ssh -i C:\path\to\<cluster_name>_user_svc -p 22 ptyitusr@<your-fqdn>
- PuTTY:
- Host Name:
<user-provided-fqdn> - Port:
22 - Connection Type:
SSH - Connection > SSH > Auth: Browse to your private key (
.ppkformat) - Username:
ptyitusr
- Host Name:
CLI usage
Once connected, the Protegrity CLI welcome banner is displayed. Enter the following parameters when prompted:
- Username: Application username
- Password: Application password
For more information about the default credentials, refer to the Release Notes.
The CLI supports three command categories:
pim: Policy Information Management commands for data protection policies.admin: User, role, permission, group, and email management commands.insight: Log forwarding to external SIEM and syslog servers.
Note: Ensure that at least one additional backup administrator user is configured with the same administrative privileges as the primary admin user.
If the primary admin account is locked or its credentials are lost, restoring the system from a backup is the only recovery option.
3.3.2.7 - Deleting PPC
Prerequisites
Authentication
The deletion process uses OpenTofu to destroy Azure resources, such as AKS clusters, managed identities, storage accounts, and Key Vaults. The Azure CLI must be authenticated to perform these operations.
Note: While using temporary credentials, such as service principal tokens or managed identity tokens, ensure that the credentials have not expired before proceeding.
To authenticate and set the correct subscription, run the following commands.
az login
az account set --subscription <subscription-id>
To verify that the credentials are valid and the correct Azure subscription is being used, run the following command.
az account show
Required Resource Providers
The following Azure resource providers must be registered in the subscription before deletion can proceed. If any provider is missing, the destroy operation may fail when attempting to manage the associated resources.
Microsoft.ContainerServiceMicrosoft.StorageMicrosoft.KeyVaultMicrosoft.ManagedIdentityMicrosoft.NetworkMicrosoft.Compute
Required permissions
The following permissions are required to delete the PPC cluster. Create a custom role with these permissions and assign it to the managed identity used for deletion.
{
  "Name": "<ROLE-NAME>",
  "Description": "",
  "AssignableScopes": [
    "/subscriptions/<SUBSCRIPTION-ID>/resourceGroups/<RESOURCE-GROUP>"
  ],
  "Actions": [
    "Microsoft.Storage/storageAccounts/listKeys/action",
    "Microsoft.Resources/subscriptions/resourceGroups/read",
    "Microsoft.ContainerService/managedClusters/read",
    "Microsoft.ContainerService/managedClusters/listClusterUserCredential/action",
    "Microsoft.Storage/storageAccounts/read",
    "Microsoft.ContainerService/managedClusters/agentPools/read",
    "Microsoft.ManagedIdentity/userAssignedIdentities/read",
    "Microsoft.ContainerService/managedClusters/agentPools/delete",
    "Microsoft.ContainerService/managedClusters/delete",
    "Microsoft.Storage/storageAccounts/blobServices/read",
    "Microsoft.Storage/storageAccounts/fileServices/read",
    "Microsoft.Storage/storageAccounts/blobServices/containers/read",
    "Microsoft.Storage/storageAccounts/write",
    "Microsoft.Authorization/roleAssignments/delete",
    "Microsoft.Storage/storageAccounts/blobServices/containers/delete",
    "Microsoft.KeyVault/vaults/delete",
    "Microsoft.KeyVault/vaults/read",
    "Microsoft.Storage/storageAccounts/delete"
  ],
  "NotActions": [],
  "DataActions": [],
  "NotDataActions": []
}
To create the custom role and assign it to the managed identity, follow the steps in AKS User-Assigned Managed Identity Permissions.
Required tools
The following tools must be installed and available on the machine before proceeding with deletion:
tofu(OpenTofu)kubectl(configured with cluster context)azCLI (authenticated)helm
Removing Features
Ensure that the Protegrity Policy Workbench (PPW) is completely uninstalled before deleting a PPC cluster. For more information, refer to Uninstalling the Protegrity Policy Manager.
Cleaning up the AKS Resources
There are two ways to destroy all created resources, including the AKS cluster and related components.
Method 1: Using the bootstrap script
From the folder where bootstrap script is present, run the following command:
./bootstrap.sh --cloud azure destroy
Method 2: Using OpenTofu to delete all modules
This method displays how to delete a PPC cluster on Azure by destroying the OpenTofu modules in reverse order. Destroying modules one at a time gives full control and visibility over each stage.
Warning: This process is irreversible. All cluster resources, data, and backups stored in the backup storage will be permanently deleted.
The modules are located at:
~/iac/azure/cluster/modules/
├── 00_backup_storage
├── 01_identity
├── 02_aks_cluster
├── 03_node_pool
├── 04_aks_addons
└── 05_helm_releases
These modules must be destroyed in reverse order: 05 → 04 → 03 → 02 → 01 → 00.
To delete the modules, perform the following steps:
- To delete the helm releases resource, run the following command.
# Navigate to 05_helm_releases directory
cd /iac/azure/cluster/modules/05_helm_releases

# Initialize providers
tofu init

# Delete the helm release
tofu destroy        # type "yes" when prompted
- To delete the AKS Addons resource, run the following command.
# Navigate to 04_aks_addons directory
cd /iac/azure/cluster/modules/04_aks_addons

# Initialize providers
tofu init

# Delete the aks addons
tofu destroy        # type "yes" when prompted
- To delete the Node Pool resource, run the following command.
# Navigate to 03_node_pool directory
cd /iac/azure/cluster/modules/03_node_pool

# Initialize providers
tofu init

# Delete the node pool
tofu destroy        # type "yes" when prompted
- To delete the AKS Cluster resource, run the following command.
# Navigate to 02_aks_cluster directory
cd /iac/azure/cluster/modules/02_aks_cluster

# Initialize providers
tofu init

# Delete the aks cluster
tofu destroy        # type "yes" when prompted
- To delete the Identity resource, run the following command.
# Navigate to 01_identity directory
cd /iac/azure/cluster/modules/01_identity

# Initialize providers
tofu init

# Delete the identity
tofu destroy        # type "yes" when prompted
- To delete the Backup Storage (Backup storage account + container) resource, run the following command.
# Navigate to 00_backup_storage directory
cd /iac/azure/cluster/modules/00_backup_storage

# Initialize providers
tofu init

# Destroy all resources (Storage Account, Key Vault, container, encryption key)
tofu destroy        # type "yes" when prompted
3.3.2.8 - Backing up the PPC
Protegrity Provisioned Cluster (PPC) supports backup of Insight indexes and cluster configurations. Use the procedures below to update the scheduled backups of your PPC deployment.
Backing up Velero backup schedule
To take a backup at an interval of 10 minutes, the cron job must be executed before the schedule. This ensures that the latest configurations are included and are available in the Storage Account.By default, the cron job is executed after every 3 hours and schedule is executed after every 3.5 hours.
For taking the backups, the frequency of schedule and cron job can be changed, as required.
Perform the following steps to update the frequency.
To update the frequency of the
cron job, run the following command.$ kubectl patch cronjob authnz-postgresql-backup-recovery-cron-job \ -n api-gateway \' --type=merge -p '{"spec":{"schedule":"<required frequency>"}}'To update the frequency of the
schedule, run the following command.$ kubectl patch schedule authnz-postgresql-schedule-backup \ -n pty-backup-recovery \ --type=merge -p '{"spec":{"schedule":"<required frequency>"}}'
For instance, to update the frequency of the backup schedule to 10 minutes, perform the following steps.
To update the
cron jobto every 8 minutes, run the following command.$ kubectl patch cronjob authnz-postgresql-backup-recovery-cron-job \ -n api-gateway \ --type=merge -p '{"spec":{"schedule":"8-58/10 * * * *"}}'To update the
scheduleto every 10 minutes, run the following command.$ kubectl patch schedule authnz-postgresql-schedule-backup \ -n pty-backup-recovery \ --type=merge -p '{"spec":{"schedule":"*/10 * * * *"}}'
Backing up indexes
Insight indexes are backed up automatically using a scheduled job. To manually back up the indexes, complete the following steps:
- Log in to the Insight Dashboard.
- Select the main menu.
- Navigate to Management > Snapshot Management > Snapshot policies.
- Click the daily-insight-snapshots policy.
- Click Edit.
- Update the following parameters:
- Snapshot schedule
- Frequency:
Custom (Cron expression) - Cron expression:
*/15 * * * *
- Frequency:
- Snapshot schedule
- Click Update.
- Wait for the next scheduled snapshot to complete. Verify that the snapshot is created from the snapshot status.
Note: The snapshot schedule is set to run every 15 minutes for creating the manual backup. Restore the default settings after the manual backup is complete. Before upgrading, disable the scheduler job after the backup is created. Ensure that the default parameters are restored and the job is re-enabled after the upgrade.
3.3.2.9 - Restoring the PPC
Before you begin
Before starting a restore, ensure the following conditions are met:
An existing backup is available. Backups are taken automatically as part of the default installation using scheduled backup mechanisms. These backups are stored in a Storage Account configured during the original installation.
Access to the original backup Storage Account. During restore, the same Storage Account that was used during the original installation must be specified.
Permissions to read from the Storage Account. The user performing the restore must have sufficient permissions to access the backup data stored in the account.
A new Kubernetes cluster is created. Restore is performed as part of creating a new cluster, not on an existing one. Restore is only supported during a fresh installation flow.
While the backup is taken from the source cluster, do not perform Create, Read, Update, or Delete (CRUD) operations on the source cluster. This ensures backup consistency and prevents data corruption during restore.
Before restoring to a new cluster, if the source cluster is accessible, disable the backup operations on the source cluster by setting the backup storage location to read‑only. This ensures that no additional backup data is written during the restore process.
To disable the backup operation on the source cluster, run the following command:
kubectl patch backupstoragelocation default -n pty-backup-recovery --type merge -p '{"spec":{"accessMode":"ReadOnly"}}'If the source cluster is not accessible, this step can be skipped.
During Disaster management, the backup data is used to restore the cluster and the OpenSearch indexes using snapshots. However, Insight restores OpenSearch data only from the most recent snapshot created by the daily-insight-snapshots policy.
For more information, refer to Backing up and restoring indexes.
Warning: Do not install or manage multiple clusters from the same working directory. Each cluster deployment maintains its own Terraform/OpenTofu state, and reusing a directory can overwrite state files, causing loss of cluster tracking and unintended cleanup behavior.
Use a dedicated directory, and jump box, where possible, per cluster, and always verify the active kubectl context before running cleanup commands such as./bootstrap.sh --cloud azure destroy.
The repository provides a bootstrap script that automatically installs or updates the following software on the jump box:
- Azure CLI - Required to communicate with your Microsoft Azure account.
- OpenTofu - Required to manage infrastructure as code.
- kubectl - Required to communicate with the Kubernetes cluster.
- Helm - Required to manage Kubernetes packages.
- jq - Required to parse JSON.
- skopeo - Required to copy container images between registries.
- bc - Required for version comparisons and resource calculations.
- ORAS - Required to pull OCI artifacts such as deployment packages.
- ssh-keygen - Required to secure SSH access to deployment environments.
- cmctl - Required to validate and manage TLS certificates.
The bootstrap script also checks if you have the required permissions on Azure. It then sets up the AKS cluster and installs the microservices required for deploying the PCS on a PPC.
Note: Before running the bootstrap or resiliency scripts as the root user on RHEL, ensure that /usr/local/bin (and the Azure CLI binary path, if applicable) is included in the $PATH. Alternatively, run the script using a non-root user where /usr/local/bin is already part of the default PATH.
Architecture Selection
- amd64 (x86-64-based environments such as Standard_D8as_v5)
- arm64 (ARM-based environments such as Standard_D8ps_v5)
The bootstrap script prompts you to select the node architecture interactively during deployment (step 1b).
Restoring the PPC
Ensure that the PCT is downloaded and extracted on the jump box. For more information, refer to Preparing for PPC deployment.
Run the following command to initiate restore using an existing backup:
./bootstrap.sh --cloud azure --restore
The script prompts for the following variables.
Enter AKS Cluster Name [opencluster-v1]
The following characters are allowed:
- Lowercase letters:
a-z - Numbers:
0-9 - Hyphens:
-
The following characters are not allowed:
- Uppercase letters:
A-Z - Underscores:
_ - Spaces
- Any special characters such as:
/ ? * + % ! @ # $ ^ & ( ) = [ ] { } : ; , . - Leading or trailing hyphens
- Names must only contain up to 10 characters
While creating a cluster, the cluster name must:
- Start with a lowercase letter.
- End with a letter or number.
- Not contain consecutive hyphens.
Note: Ensure that the cluster name does not exceed 10 characters. Cluster names longer than this limit can cause the bootstrap script to fail in subsequent installation steps.
After the cluster name is accepted, the script prompts you to select the node architecture.
[1b] Select Node Architecture
Select the required architecture.
[1b] Select Node Architecture
  1) amd64 (x86_64) — e.g. Standard_D8as_v5
  2) arm64 (ARM/Ampere) — e.g. Standard_D8ps_v5
Enter
1to selectamd64or2to selectarm64.Note: Select
amd64for Standard_D8as_v5 environments. Selectarm64for ARM-based environments such as Standard_D8ps_v5.- Lowercase letters:
Querying for available Resource Groups
The script queries for the available Resource Groups.
Enter the Resource Group name from the table []
The script then automatically detects the location and subscription ID of the resource group.
Enter UAMI Resource ID
Provide the complete Azure resource ID for the UAMI used by AKS in the following format:
/subscriptions/<subscription-id>/resourceGroups/<resource-group>/providers/Microsoft.ManagedIdentity/userAssignedIdentities/<identity-name>The UAMI client ID is detected automatically.
Enter AKS Subnet Resource ID
Provide the complete resource ID of the pre-existing subnet used for AKS nodes in the following format:
/subscriptions/<subscription-id>/resourceGroups/<resource-group>/providers/Microsoft.Network/virtualNetworks/<vnet-name>/subnets/<subnet-name>Enter Private DNS Zone Resource ID
Provide the Private DNS zone ID used by the AKS private cluster in the following format:
/subscriptions/<subscription-id>/resourceGroups/<resource-group>/providers/Microsoft.Network/privateDnsZones/privatelink.<region>.azmk8s.ioThe script attempts to automatically detect network settings:
- Virtual network address space
- Service CIDR
- Pod CIDR
- DNS service IP
Enter FQDN [name.domain.com]
This is the Fully Qualified Domain Name for the ingress.
While entering the FQDN, ensure that:
- contains at least two labels separated by a dot, such as, app.example.com
- does not start or end with a dot or hyphen
- does not contain consecutive dot character
- label length must be between 1–63 characters
- each label must start and end with a letter or digit
- the last label must start only with a letter
Warning: Ensure that the FQDN does not exceed 253 characters and only the following characters are used:
- Lowercase letters:
a-z - Numbers:
0-9 - Special characters:
- .
Storage Account and Key Vault provisioning
During restore, the script prompts for existing Storage Account and Key Vault configuration. Provide the existing values in this step.
Storage Account & Key Vault provisioning

Restore mode requires existing Storage Account and Key Vault configuration.
Skipping provisioning choice; provide existing values in this step.

Enter existing Storage Account Name:
<bucket-name>
Storage account '<bucket-name>' found in resource group '<resource-group>'.
Using container: velero

Enter existing Key Vault Name:
<key-vault-name>
During restore, the script prompts to manually select a backup from the available backups stored in the Storage Account. User input is required to either restore from the latest backup or choose a specific backup from the list.
[restore] Backup selection — schedule: authnz-postgresql-schedule-backup Restore from latest backup? [Y/n]- Enter Y to restore from the most recent backup.
- Enter n to manually select a backup.
If
nis selected, then the script displays a list of available backups (latest first) and prompts to select one by number:Available backups (latest first): [1] <timestamp> authnz-postgresql-schedule-backup-xxxxxxx [2] <timestamp> authnz-postgresql-schedule-backup-xxxxxxx Select a backup number (1-2):After entering the backup number, the chosen backup is used for the restore, and the installation continues.
Enter Insight backup
During restore, the script prompts to manually select the required insight backup from the available backups stored in the Storage Account. User input is required to either restore from the latest backup or choose a specific backup from the list.
[restore] Insight backup selection — schedule: insight-configmaps-secrets Restore from latest backup? [Y/n]- Enter Y to restore from the most recent backup.
- Enter n to manually select a backup.
If
nis selected, then the script displays a list of available backups (latest first) and prompts to select one by number:Available backups (latest first): [1] <timestamp> insight-configmaps-secrets-xxxxxxxxx [2] <timestamp> insight-configmaps-secrets-xxxxxxxxx Select a backup number (1-2):After entering the backup number, the chosen backup is used for the restore, and the installation continues.
Enter Velero UAMI Resource ID
Enter the resource ID of the dedicated Velero User-Assigned Managed Identity (UAMI) in the format:
/subscriptions/<subscription-id>/resourceGroups/<velero-resource-group>/providers/Microsoft.ManagedIdentity/userAssignedIdentities/<name>The script automatically validates the UAMI and detects the UAMI Client ID.
Enter OpenSearch UAMI Resource ID
Enter the resource ID of the OpenSearch Velero User-Assigned Managed Identity (UAMI) in the format:
/subscriptions/<subscription-id>/resourceGroups/<opensearch-resource-group>/providers/Microsoft.ManagedIdentity/userAssignedIdentities/<name>The script automatically validates the UAMI and detects the UAMI Client ID.
Enter Image Registry Endpoint
The image repository from where the container images are retrieved.
Expected format: <hostname>[:port].
Do not include ‘https://’
- Enter Registry Username
Enter the username for the registry mentioned in the previous step. Leave this entry blank if the registry does not require authentication.
- Enter Registry Password or Access Token
Enter Password or Access Token for the registry.
Input is masked with * characters.
Leave this entry blank if the registry does not require authentication.
- Enter Owner Email (for cluster tagging)
Enter email address in the format name@domain.tld. This email is used for the cluster ‘Owner’ tag and the platform owner contact.
Note: The cluster creation process can take approximately 15-20 minutes.
If the session is terminated during installation due to network issues, power outage, and so on, then the installation stops. To restart the installation, run the script again:
# Navigate to deployment directory and run the following command
./bootstrap.sh --cloud azure destroy

# Restore the cluster
./bootstrap.sh --cloud azure --restore
After the bootstrap script is completed, verify the cluster and workloads using the following commands:
# Confirm nodes are Ready
kubectl get nodes

# Confirm NFA workloads are Running
kubectl get pods -A
3.3.2.10 - Troubleshooting
Accessing the PPC CLI
Permission denied for publickey: Ensure the correct private key
~/.ssh/<cluster_name>_user_svcis used and matches the authorized_keys in the pod.Connection refused: Verify the load balancer IP and hosts file configuration.
Key format issues: Ensure the private key is in the correct format . For example, OpenSSH format for Linux or macOS, .ppk for PuTTY.
Component installation issues
Helm chart not found: Run
helm repo updateto refresh the repository cache.Namespace already exists: Drop the
--create-namespaceflag if the namespace is already created.CRD conflicts: If cert-manager CRDs already exist, skip the CRD installation step.
Pod not starting: Inspect logs with
kubectl logs <pod> -n <namespace>andkubectl describe pod <pod> -n <namespace>.
State lock error after interrupted installation
Issue: When an installation is interrupted mid-apply (Ctrl+C, network drop, SSH disconnect, or jump box crash), subsequent installation attempts fail with the following error:
Error: Error acquiring the state lock
Error message: state blob is already locked
Lock Info:
  ID:        9377a903-94d1-4b19-3e57-1ee92b18bed5
  Path:      https://<storage>.blob.core.windows.net/velero/infrastructure-manifest%2F<cluster>%2Fstates%2F01_identity.tfstate
  Operation: OperationTypeApply
Description: OpenTofu acquires a lease on the state blob in Azure Blob Storage before applying changes. If the process is terminated without a graceful shutdown, the lease is not released automatically. This can occur due to Ctrl+C, network disconnection, SSH session timeout, or a jump box reboot.
Resolution: Force-unlock the state using the lock ID from the error message, then re-run the installation.
cd iac/azure/cluster/modules/<failed-stage>
tofu init
tofu force-unlock <lock-id>
Replace <failed-stage> with the module directory that failed (for example, 01_identity) and <lock-id> with the ID shown in the error output.
3.3.2.11 - Restoring the SSH keys and PCT from backed up Terraform state file
This section describes the procedure to rebuild a usable PPC v1.1.0 deployment workspace on a jump box from an existing cluster and a backed up Terraform state file.
Before you Begin
Ensure the following requirements are met.
The state file from all the following modules must be available on the Storage Account.
00_backup_bucket01_iam_roles02_eks_cluster03_node_group04_eks_addons05_helm_releases
Access to the same Microsoft Azure account and target AKS cluster.
Azure CLI credentials with required permissions.
Perform the following steps to recover PPC
Create a workspace.
To create a working directory for PCT, run the following command.
mkdir -p deployment
cd deployment
Download and extract the PCT
Download the PCT package into the
deploymentdirectory and extract it.For more information about downloading and extracting the PCT, refer to Preparing for PPC deployment.After successfully extracting the template, this directory behaves as recovered installation workspace.
Login to Microsoft Azure as a Service Principal
To login to Microsoft Azure as a Service Principal, run the following command
az login -u <username> -p <password> -t <tenant-id>Install required dev tools
Run the following script.
cd deployment/bootstrap-scripts
./setup-devtools-azure.sh
Initialize OpenTofu
To initialize OpenTofu for the cluster module, run the following command,
cd deployment/iac/azure/cluster/modules/05_helm_releases
tofu init
Generate the SSH key for CLI access
To generate the SSH key for CLI access
tofu output -raw user_svc_private_key > ~/.ssh/user_svc.pem
chmod 600 ~/.ssh/user_svc.pem
Configure
kubectlto communicate with the AKS clusterTo configure
kubectlto communicate with the AKS cluster, run the following command.az aks get-credentials \ --resource-group aks-ppc \ --name base-testVerify the nodes and pods status
To verify the nodes and pods status, run the following command.
kubectl get nodes
kubectl get pods -A
3.4 - Working with Insight
Insight is a comprehensive system designed to store and manage logs in the Audit Store, which is a repository for all audit data and logs. The Audit Store cluster is scalable and supports multiple nodes. Insight provides various functionalities, including accessing dashboards, viewing logs, and creating visualizations. It also offers tools for analyzing data, monitoring system health, and ensuring secure communication between components.
3.4.1 - Overview of the dashboards
Viewing the graphs provides an easier and faster method for reading the log information. This helps understand the working of the system and also take decisions faster, such as, understanding the processing load on the cluster and accordingly expanding the cluster by adding nodes, if required.
For more information about the dashboards, refer to OpenSearch Dashboards.
Accessing the Insight Dashboard
The Insight Dashboard appears after logging in. Complete the steps provided here to view the Insight Dashboard.
Complete the steps from Login to PPC for AWS or Login to PPC for Azure.
Navigate to the PPC FQDN using a web browser.
Log in with the username and password.
The Insight Dashboard is displayed.
Note: If the Protegrity Agent is installed, then the Protegrity Agent dashboard is displayed. Click Insight to open the Insight Dashboard. For more information about the Protegrity Agent, refer to Using Protegrity Agent.
The data and time are displayed using the UTC format. To update the format, from the Menu, click Dashboards Management > Advanced settings, locate dateFormat:tz (Timezone for date formatting), click Edit, select the required format, and click Save. The appropriate format helps to set the time for scheduled tasks.
Accessing the help
The Insight Dashboard helps visualize log data and information. Use the help documentation provided by Insight to configure and create visualizations.
To access the help:
Open the Insight Dashboard.
Click the Help icon from the upper-right corner of the screen.
Click Documentation.
Alternatively, refer to OpenSearch Dashboards.
3.4.2 - Working with Discover
For more information about Discover, refer to OpenSearch Dashboards.
Viewing logs
The logs aggregated and collected are sent to Insight. Insight stores the logs in the Audit Store. The logs from the Audit Store are displayed on the Insight Dashboard. Here, the different fields and the data logged is visible. In addition to viewing the data, these logs serve as input for Analytics to analyze the health of the system and to monitor the system for providing security.
View the logs by logging into the system and from the menu, select Discover, and select a time period such as Last 30 days.
Use the default index pty_insight_analytics*audits_* to view the log data. This default index pattern uses wildcard charaters for referencing all indexes. Alternatively, select an index pattern or alias for the entries to view the data from a different index.
After an index is deleted, the data associated with it is permanently removed, and without a backup, there is no way to recover it. For more information about indexes, refer to Managing indexes and OpenSearch Dashboards. For more information about managing Audit Store indexes, refer to Index state management (ISM).
Saved queries
Run a query and customize the log details displayed. Save the query and the settings for running a query, such as, the columns, row count, tail, and indexes for the query. The saved queries created are user-specific.
From Discover, click Open to use the following saved queries to view information:
- Policy search: This query is available to view policy logs. A policy log is a created during the the policy creation, policy deployment, policy enforcement, and during the collection, storage, forwarding, and analysis of logs.
- Security search: This query is available to view security operation logs. A security log is created during various security operations performed by protectors, such as, performing protect, unprotect, and reprotect operations.
- Signature Verification Search: This query is available to view signature verification information.
- Unsuccessful Security Operations: This query is available to view unsuccessful security operation-related logs. Unsuccessful Security Operations logs are created when security operations fail due to errors, warnings, or exceptions.
Log in to the Insight Dashboard using a web browser.
Select Discover from the menu, and optionally select a time period such as Last 30 days..
Select the index for running the query.
Enter the query in the Search field.
Optionally, select the required fields.
Click the See saved queries icon to save the query.
The Saved Queries list appears.
Click Save current query.
The Save query dialog box appears.
Specify a name for the query.
Click Save to save the query information, including the configurations specified, such as, the columns, row count, tail, indexes, and query.
The query is saved.
Click the See saved queries icon to view the saved queries.
3.4.2.1 - Understanding the Insight indexes
All the features and Protectors send logs to Insight. The logs from the Audit Store are displayed on the Discover screen of the Insight Dashboard. Here, you can view the different fields logged. In addition to viewing the data, these logs serve as input for Insight to analyze the health of the system and to monitor the system for providing security. These logs are stored in the Audit index with the name, such as, pty_insight_analytics_audits_1.0*.
You can view the Discover screen by logging into the Insight Dashboard, selecting Discover from the menu, and selecting a time period such as Last 30 days.
The following table lists the various indexes and information about the data contained in the index. You can view the index list for PPC, by logging into the Insight Dashboard, and navigating to Index Management > State management policies. To view all the indexes, select Indexes. Indexes can be created or deleted. However, deleting an index will lead to a permanent loss of data in the index. If the index was not backed up earlier, then the logs from the index deleted cannot be recreated or retrieved.
| Index Name | Description |
|---|---|
| .kibana_1 | This is a system index created by the Audit Store. This hold information about the dashboards. |
| .opendistro-job-scheduler-lock | This is a system index created by the Audit Store. This hold information about the security, roles, mapping, and so on. |
| .opendistro_security | This is a system index created by the Audit Store. It contains information about the security configurations, users, roles, and permissions. |
| .plugins-ml-config | This is a system index created by the Audit Store |
| .ql-datasources | This is a system index created by the Audit Store. |
| pty_insight_analytics_anonymization_dashboard_1.0- | This index logs Data Anonymization dashboard and process tracking information. |
| pty_insight_analytics_audits_1.0- | This index logs the audit data for all the URP operations and the cluster logs. It also captures all logs with the log type protection, metering, audit, and security. |
| pty_insight_analytics_crons_1.0 | This index logs information about the cron scheduler jobs. |
| pty_insight_analytics_crons_logs_1.0 | This index logs for the cron scheduler when the jobs are executed. |
| pty_insight_analytics_discovery_dashboard_1.0- | This index logs Data Discovery dashboard and metadata information. |
| pty_insight_analytics_encryption_store_1.0 | This index encrypts and stores the password specified for the jobs. |
| pty_insight_analytics_kvs_1.0 | This is an internal index for storing the key-value type information. |
| pty_insight_analytics_miscellaneous_1.0- | This index logs entries that are not categorized in the other index files. |
| pty_insight_analytics_policy_1.0 | This index logs information about the PPC policy. It is a system index created by the PPC. |
| pty_insight_analytics_policy_log_1.0- | This index logs for the PPC policy when the jobs are executed. |
| pty_insight_analytics_policy_status_dashboard_1.0-index | The index holds information about the policy of the protectors for the dashboard. |
| pty_insight_analytics_protector_status_dashboard_1.0-index | This index holds information about protectors for the dashboard. |
| pty_insight_analytics_protectors_status_1.0- | This index holds the status logs of protectors. |
| pty_insight_analytics_report_1.0 | This index holds information for the reports created. |
| pty_insight_analytics_signature_verification_jobs_1.0 | This index logs information about the signature verification jobs. |
| pty_insight_analytics_signature_verification_running_jobs_1.0 | This index logs information about the signature verification jobs that are currently running. |
| pty_insight_analytics_troubleshooting_1.0- | This index logs the log type application, kernel, system, and verification. |
| top_queries- | This index logs the top and most frequent search queries and query analytics data. |
3.4.2.2 - Understanding the index field values
Common Logging Information
These logging fields are common with the different log types generated by Protegrity products.
Note: These common fields are used across all log types.
| Field | Data Type | Description | Source | Example |
|---|---|---|---|---|
| cnt | Integer | The aggregated count for a specific log. | Protector | 5 |
| logtype | String | The type of log. For example, Protection, Policy, Application, Audit, Kernel, System, or Verification. For more examples about the log types, refer here. | Protector | Protection |
| level | String | The level of severity. For example, SUCCESS, WARNING, ERROR, or INFO. These are the results of the logging operation. For more information about the log levels, refer here. | Protector | SUCCESS |
| starttime | Date | This is an unused field. | Protector | |
| endtime | Date | This is an unused field. | Protector | |
| index_time_utc | Date | The time the log was inserted into the Audit Store. | Audit Store | Mar 8, 2025 @ 12:55:24.733 |
| ingest_time_utc | Date | The time the Log Forwarder processed the logs. | Log Forwarder | Mar 8, 2025 @ 12:56:22.027 |
| uri | String | The URI for the log. This is an unused field. | ||
| correlationid | String | A unique ID that is generated when the policy is deployed. | Hubcontroller | clo5nyx470bi59p22fdrsr7k3 |
| filetype | String | This is the file type, such as, regular file, directory, or device, when operations are performed on the file. This displays the value ISREG for files and ISDIR for directories. This is only used in File Protector. | File Protector | ISDIR |
| index_node | String | The index node that ingested the log. | Audit Store | protegrity-ppc746/192.168.2.20 |
| operation | String | This is an unused field. | ||
| path | String | This field is provided for Protector-related data. | File Protector | /hmount/source_dir/postmark_dir/postmark/1 |
| system_nano_time | Long | This displays the time in nano seconds for the Signature Verification job. | Signature Verification | 255073580723571 |
| tiebreaker | Long | This is an internal field that is used with the index time to make a record unique across nodes for sorting. | Protector, Signature Verification | 2590230 |
| _id | String | This is the entry id for the record stored in the Audit Store. | Log Forwarder, td-agent | NDgyNzAwMDItZDI5Yi00NjU1LWJhN2UtNzJhNWRkOWYwOGY3 |
| _index | String | This is the index name of the Audit Store where the log is stored. | Log Forwarder, td-agent | pty_insight_analytics_audits_10.0-2026.08.30-000001 |
Additional_Info
These descriptions are used for all types of logs.
| Field | Data Type | Description | Source | Example |
|---|---|---|---|---|
| description | String | Description about the log generated. | All modules | Data protect operation was successful, Executing attempt_rollover for |
| module | String | The module that generated the log. | All modules | .signature.job_runner |
| procedure | String | The method in the module that generated the log. | All modules | create_job |
| title | String | The title for the audit log. | Feature |
Process
This section describes the properties of the process that created the log. For example, the protector or the rputils.
| Field | Data Type | Description | Source | Example |
|---|---|---|---|---|
| thread_id | String | The thread_id of the process that generated the log. | PEP Server | 3382487360 |
| id | String | The id of the process that generated the log. | PEP Server | 41710 |
| user | String | The user that runs the program that generated the log. | All modules | service_admin |
| version | String | The version of the program or Protector that generated the log. | All modules | 1.2.2+49.g126b2.1.2 |
| platform | String | The platform that the program that generated the log is running on. | PEP Server | Linux_x64 |
| module | String | The module that generated the log. | PPC, Protector | rpstatus |
| name | String | The name of the process that generated the log. | All modules | Protegrity PEP Server |
| pcc_version | String | The core pcc version. | PEP Server | 3.4.0.20 |
Origin
This section describes the origin of the log, that is, from where the log came from and when it was generated.
| Field | Data Type | Description | Source | Example |
|---|---|---|---|---|
| time_utc | Date | The time in the Coordinated Universal Time (UTC) format when the log was generated. | All modules | Mar 8, 2026 @ 12:56:29.000 |
| hostname | String | The hostname of the machine where the log was generated. | All modules | ip-192-16-1-20.protegrity.com |
| ip | IP | The IP of the machine where the log was generated. | All modules | 192.168.1.20 |
Protector
This section describes the Protector that generated the log. For example, the vendor and the version of the Protector.
Note: For more information about the Protector vendor, family, and version, refer here.
| Field | Data Type | Description | Source | Example |
|---|---|---|---|---|
| vendor | String | The vendor of the Protector that generated the log. This is specified by the Protector. | Protector | |
| family | String | The Protector family of the Protector that generated the logs. This is specified by the Protector. For more information about the family, refer here. | Protector | gwp |
| version | String | The version of the Protector that generated the logs. This is specified by the Protector. | Protector | 1.2.2+49.g126b2.1.2 |
| core_version | String | This is the Core component version of the product. | Protector | 1.2.2+49.g126b2.1.2 |
| pcc_version | String | This is the PCC version. | Protector | 3.4.0.20 |
Protection
This section describes the protection that was done, what was done, the result of the operation, where it was done, and so on.
| Field | Data Type | Description | Source | Example |
|---|---|---|---|---|
| policy | String | The name of the policy. This is only used in File Protector. | Protector | aes1-rcwd |
| role | String | This field is not used and will be deprecated. | Protector | |
| datastore | String | The name of the datastore used for the security operation. | Protector | Testdatastore |
| audit_code | Integer | The return code for the operation. For more information about the return codes, refer to Log return codes. | Protector | 6 |
| session_id | String | The identifier for the session. | Protector | |
| request_id | String | The ID of the request that generated the log. | Protector | |
| old_dataelement | String | The old dataelement value before the reprotect to a new dataelement. | Protector | AES128 |
| mask_setting | String | The mask setting used to protect data. | Protector | Mask Left:4 Mask Right:4 Mark Character: |
| dataelement | String | The dataelement used when protecting or unprotecting data. This is passed by the Protector performing the operation. | Protector | PTY_DE_CCN |
| operation | String | The operation, for example Protect, Unprotect, or Reprotect. This is passed in by the Protector performing the operation. | Protector | Protect |
| policy_user | String | The policy user for which the operation is being performed. This is passed in by the Protector performing the operation. | Protector | exampleuser1 |
| devicepath | String | The path to the device. This is only used in File Protector. | Protector | /hmount/fuse_mount |
| filetype | String | The type of file that was protected or unprotected. This displays the value ISREG for files and ISDIR for directories. This is only used in File Protector. | Protector | ISREG |
| path | String | The path to the file protected or unprotected by the File Protector. This is only used in File Protector. | Protector | /testdata/src/ez/audit_log(13).csv |
Client
This section describes from where the log came from.
| Field | Data Type | Description | Source | Example |
|---|---|---|---|---|
| ip | String | The IP of the client that generated the log. | Protector | 192.168.2.10 |
| username | String | The username that ran the Protector or Server on the client that created the log. | Hubcontroller | johndoe |
Policy
This section describes the information about the policy.
| Field | Data Type | Description | Source | Example |
|---|---|---|---|---|
| audit_code | Integer | This is the policy audit code for the policy log. | PEP Server | 198 |
| policy_name | String | This is the policy name for the policy log. | PEP Server | AutomationPolicy |
| severity | String | This is the severity level for the policy log entry. | PEP Server | Low |
| username | String | This is the user who modified the policy. | PEP Server | johndoe |
Signature
This section handles the signing of the log. The key that was used to sign the log and the actual checksum that was generated.
| Field | Data Type | Description | Source | Example |
|---|---|---|---|---|
| key_id | String | The key ID of the signingkey that signed the log record. | Protector | cc93c930-2ba5-47e1-9341-56a8d67d55d4 |
| checksum | String | The checksum that was the result of signing the log. | Protector | 438FE13078719ACD4B8853AE215488ACF701ECDA2882A043791CDF99576DC0A0 |
| counter | Double | This is the chain of custody value. It helps maintain the integrity of the log data. | Protector | 50321 |
Verification
This section describes the log information generated for a failed signature verification job.
| Field | Data Type | Description | Source | Example |
|---|---|---|---|---|
| doc_id | String | This is the document ID for the audit log where the signature verification failed. | Signature Verification | N2U2N2JkM2QtMDhmYy00OGJmLTkyOGYtNmRhYzhhMGExMTFh |
| index_name | String | This is the index name where the log signature verification failed. | Signature Verification | pty_insight_analytics_audits_10.0-2026.08.30-000001 |
| job_id | String | This is the job ID of the signature verification job. | Signature Verification | 1T2RaosBEEC_iPz-zPjl |
| job_name | String | This is the job name of the signature verification job. | Signature Verification | System Job |
| reason | String | This is the audit log specifying the reason of the signature verification failure. | Signature Verification | INVALID_CHECKSUM | INVALID_KEY_ID | NO_KEY_AND_DOC_UPDATED |
3.4.2.3 - Index entries
Audit index
The log types of protection, metering, audit, and security are stored in the audit index. These log are generated during security operations. The logs generated by protectors are stored in the pty_insight_analytics_*audits* audit index.
Protection logs
These logs are generated by protectors during protecting, unprotecting, and reprotecting data operations. These logs are generated by protectors.
Use the following query in Discover to view these logs.
logtype:protection
A sample log is shown here:
 {
    "process": {
      "thread_id": "1227749696",
      "module": "coreprovider",
      "name": "java",
      "pcc_version": "3.6.0.1",
      "id": "4190",
      "user": "user4",
      "version": "10.0.0-alpha+13.gef09.10.0",
      "core_version": "2.1.0+17.gca723.2.1",
      "platform": "Linux_x64"
    },
    "level": "SUCCESS",
    "signature": {
      "key_id": "11a8b7d9-1621-4711-ace7-7d71e8adaf7c",
      "checksum": "43B6A4684810383C9EC1C01FF2C5CED570863A7DE609AE5A78C729A2EF7AB93A"
    },
    "origin": {
      "time_utc": "2024-09-02T13:55:17.000Z",
      "hostname": "hostname1234",
      "ip": "10.39.3.156"
    },
    "cnt": 1,
    "protector": {
      "vendor": "Java",
      "pcc_version": "3.6.0.1",
      "family": "sdk",
      "version": "10.0.0-alpha+13.gef09.10.0",
      "core_version": "2.1.0+17.gca723.2.1"
    },
    "protection": {
      "dataelement": "TE_A_S13_L1R2_Y",
      "datastore": "DataStore",
      "audit_code": 6,
      "operation": "Protect",
      "policy_user": "user1"
    },
    "index_node": "protegrity-ppc399/10.39.1.23",
    "tiebreaker": 210,
    "logtype": "Protection",
    "additional_info": {
      "description": "Data protect operation was successful"
    },
    "index_time_utc": "2024-09-02T13:55:24.766355224Z",
    "ingest_time_utc": "2024-09-02T13:55:17.678Z",
    "client": {},
    "correlationid": "cm0f1jlq700gbzb19cq65miqt"
  },
  "fields": {
    "origin.time_utc": [
      "2024-09-02T13:55:17.000Z"
    ],
    "index_time_utc": [
      "2024-09-02T13:55:24.766Z"
    ],
    "ingest_time_utc": [
      "2024-09-02T13:55:17.678Z"
    ]
  },
  "sort": [
    1725285317000
  ]
The above example contains the following information:
- additional_info
- origin
- protector
- protection
- process
- client
- protector
- signature
For more information about the various fields, refer here.
Metering logs
These logs are generated by protectors of prior to 8.0.0.0. These logs are not generated by latest protectors.
Use the following query in Discover to view these logs.
logtype:metering
For more information about the various fields, refer here.
Audit logs
These logs are generated when the rule set of the protector gets updated.
Use the following query in Discover to view these logs.
logtype:audit
A sample log is shown here:
 {
   "additional_info.description": "User admin modified default_80 tunnel successfully ",
   "additional_info.title": "Gateway : Tunnels : Tunnel 'default_80' Modified",
   "client.ip": "192.168.2.20",
   "cnt": 1,
   "index_node": "protegrity-ppc746/192.168.1.10",
   "index_time_utc": "2024-01-24T13:30:17.171646Z",
   "ingest_time_utc": "2024-01-24T13:29:35.000000000Z",
   "level": "Normal",
   "logtype": "Audit",
   "origin.hostname": "protegrity-cg406",
   "origin.ip": "192.168.2.20",
   "origin.time_utc": "2024-01-24T13:29:35.000Z",
   "process.name": "CGP",
   "process.user": "admin",
   "tiebreaker": 2260067,
   "_id": "ZTdhNzFmMTUtMWZlOC00MmY4LWJmYTItMjcwZjMwMmY4OGZh",
   "_index": "pty_insight_audit_v9.1-2024.01.23-000006"
 }
This example includes data from each of the following groups defined in the index:
- additional_info
- client
- origin
- process
For more information about the various fields, refer here.
Security logs
These logs are generated by security events of the system.
Use the following query in Discover to view these logs.
logtype:security
For more information about the various fields, refer here.
Troubleshooting index
The log types of application, kernel, system, and verification logs are stored in the troubleshooting index. These logs helps you understand the working of the system. The logs stored in this index are essential when the system is down or has issues. This is the pty_insight_analytics_troubleshooting index. The index pattern for viewing these logs in Discover is pty_insight_analytics_*troubleshooting_*.
Application Logs
These logs are generated by Protegrity servers and Protegrity applications.
Use the following query in Discover to view these logs.
logtype:application
A sample log is shown here:
{
    "process": {
      "name": "hubcontroller"
    },
    "level": "INFO",
    "origin": {
      "time_utc": "2024-09-03T10:02:34.597000000Z",
      "hostname": "protegrity-ppc503",
      "ip": "10.37.4.12"
    },
    "cnt": 1,
    "index_node": "protegrity-ppc503/10.37.4.12",
    "tiebreaker": 16916,
    "logtype": "Application",
    "additional_info": {
      "description": "GET /dps/v1/deployment/datastores | 304 | 127.0.0.1 | Protegrity Client | 8ms | "
    },
    "index_time_utc": "2024-09-03T10:02:37.314521452Z",
    "ingest_time_utc": "2024-09-03T10:02:36.262628342Z",
    "correlationid": "cm0m9gjq500ig1h03zwdv6kok"
  },
  "fields": {
    "origin.time_utc": [
      "2024-09-03T10:02:34.597Z"
    ],
    "index_time_utc": [
      "2024-09-03T10:02:37.314Z"
    ],
    "ingest_time_utc": [
      "2024-09-03T10:02:36.262Z"
    ]
  },
  "highlight": {
    "logtype": [
      "@opensearch-dashboards-highlighted-field@Application@/opensearch-dashboards-highlighted-field@"
    ]
  },
  "sort": [
    1725357754597
  ]
The above example contains the following information:
- additional_info
- origin
- process
For more information about the various fields, refer here.
Kernel logs
These logs are generated by the kernel and help you analyze the working of the internal system. Some of the modules that generate these logs are CRED_DISP, KERNEL, USER_CMD, and so on.
Use the following query in Discover to view these logs.
logtype:Kernel
For more information and description about the components that can generate kernel logs, refer here.
For a list of components and modules and the type of logs they generate, refer here.
A sample log is shown here:
{
    "process": {
      "name": "CRED_DISP"
    },
    "origin": {
      "time_utc": "2024-09-03T10:02:55.059999942Z",
      "hostname": "protegrity-ppc503",
      "ip": "10.37.4.12"
    },
    "cnt": "1",
    "index_node": "protegrity-ppc503/10.37.4.12",
    "tiebreaker": 16964,
    "logtype": "Kernel",
    "additional_info": {
      "module": "pid=38236",
      "description": "auid=4294967295 ses=4294967295 subj=unconfined msg='op=PAM:setcred grantors=pam_rootok acct=\"rabbitmq\" exe=\"/usr/sbin/runuser\" hostname=? addr=? terminal=? res=success'\u001dUID=\"root\" AUID=\"unset\"",
      "procedure": "uid=0"
    },
    "index_time_utc": "2024-09-03T10:02:59.315734771Z",
    "ingest_time_utc": "2024-09-03T10:02:55.062254541Z"
  },
  "fields": {
    "origin.time_utc": [
      "2024-09-03T10:02:55.059Z"
    ],
    "index_time_utc": [
      "2024-09-03T10:02:59.315Z"
    ],
    "ingest_time_utc": [
      "2024-09-03T10:02:55.062Z"
    ]
  },
  "highlight": {
    "logtype": [
      "@opensearch-dashboards-highlighted-field@Kernel@/opensearch-dashboards-highlighted-field@"
    ]
  },
  "sort": [
    1725357775059
  ]
This example includes data from each of the following groups defined in the index:
- additional_info
- origin
- process
For more information about the various fields, refer here.
System logs
These logs are generated by the operating system and help you analyze and troubleshoot the system when errors are found.
Use the following query in Discover to view these logs.
logtype:System
For a list of components and modules and the type of logs they generate, refer here.
A sample log is shown here:
 {
    "process": {
      "name": "PPCPAP",
      "version": "10.0.0+2412",
      "user": "admin"
    },
    "level": "Low",
    "origin": {
      "time_utc": "2024-09-03T10:00:34.000Z",
      "hostname": "protegrity-ppc503",
      "ip": "10.37.4.12"
    },
    "cnt": "1",
    "index_node": "protegrity-ppc503/10.37.4.12",
    "tiebreaker": 16860,
    "logtype": "System",
    "additional_info": {
      "description": "License is due to expire in 30 days. The validity of license has been acknowledged by the user. (web-user 'admin' , IP: '10.87.2.32')",
      "title": "Appliance Info : License is due to expire in 30 days. The validity of license has been acknowledged by the user. (web-user 'admin' , IP: '10.87.2.32')"
    },
    "index_time_utc": "2024-09-03T10:01:10.113708469Z",
    "client": {
      "ip": "10.37.4.12"
    },
    "ingest_time_utc": "2024-09-03T10:00:34.000000000Z"
  },
  "fields": {
    "origin.time_utc": [
      "2024-09-03T10:00:34.000Z"
    ],
    "index_time_utc": [
      "2024-09-03T10:01:10.113Z"
    ],
    "ingest_time_utc": [
      "2024-09-03T10:00:34.000Z"
    ]
  },
  "highlight": {
    "logtype": [
      "@opensearch-dashboards-highlighted-field@System@/opensearch-dashboards-highlighted-field@"
    ]
  },
  "sort": [
    1725357634000
  ]
This example includes data from each of the following groups defined in the index:
- additional_info
- origin
- process
For more information about the various fields, refer here.
Verification logs
These log are generated by Insight on when a signature verification fails.
Use the following query in Discover to view these logs.
logtype:Verification
For a list of components and modules and the type of logs they generate, refer here.
A sample log is shown here:
{
    "process": {
      "name": "insight.pyc",
      "id": 45277
    },
    "level": "Info",
    "origin": {
      "time_utc": "2024-09-03T10:14:03.120342Z",
      "hostname": "protegrity-ppc503",
      "ip": "10.37.4.12"
    },
    "cnt": 1,
    "index_node": "protegrity-ppc503/10.37.4.12",
    "tiebreaker": 17774,
    "logtype": "Verification",
    "additional_info": {
      "module": ".signature.job_executor",
      "description": "",
      "procedure": "__log_failure"
    },
    "index_time_utc": "2024-09-03T10:14:03.128435514Z",
    "ingest_time_utc": "2024-09-03T10:14:03.120376Z",
    "verification": {
      "reason": "SV_VERIFY_RESPONSES.INVALID_CHECKSUM",
      "job_name": "System Job",
      "job_id": "9Vq1opEBYpV14mHXU9hW",
      "index_name": "pty_insight_analytics_audits_10.0-2024.08.30-000001",
      "doc_id": "JI5bt5EBMqY4Eog-YY7C"
    }
  },
  "fields": {
    "origin.time_utc": [
      "2024-09-03T10:14:03.120Z"
    ],
    "index_time_utc": [
      "2024-09-03T10:14:03.128Z"
    ],
    "ingest_time_utc": [
      "2024-09-03T10:14:03.120Z"
    ]
  },
  "highlight": {
    "logtype": [
      "@opensearch-dashboards-highlighted-field@Verification@/opensearch-dashboards-highlighted-field@"
    ]
  },
  "sort": [
    1725358443120
  ]
This example includes data from each of the following groups defined in the index:
- additional_info
- process
- origin
- verification
For more information about the various fields, refer here.
Policy log index
The log type of policy is stored in the policy log index. They include logs for the policy-related operations, such as, when the policy is updated. The index pattern for viewing these logs in Discover is pty_insight_analytics_*policy_log_*.
Use the following query in Discover to view these logs.
logtype:policyLog
For a list of components and modules and the type of logs they generate, refer here.
A sample log is shown here:
{
    "process": {
      "name": "hubcontroller",
      "user": "service_admin",
      "version": "1.8.0+6.g5e62d8.1.8"
    },
    "level": "Low",
    "origin": {
      "time_utc": "2024-09-03T08:29:14.000000000Z",
      "hostname": "protegrity-ppc503",
      "ip": "10.37.4.12"
    },
    "cnt": 1,
    "index_node": "protegrity-ppc503/10.37.4.12",
    "tiebreaker": 10703,
    "logtype": "Policy",
    "additional_info": {
      "description": "Data element created. (Data Element 'TE_LASCII_L2R1_Y' created)"
    },
    "index_time_utc": "2024-09-03T08:30:31.358367506Z",
    "client": {
      "ip": "10.87.2.32",
      "username": "admin"
    },
    "ingest_time_utc": "2024-09-03T08:29:30.017906235Z",
    "correlationid": "cm0m64iap009r1h0399ey6rl8",
    "policy": {
      "severity": "Low",
      "audit_code": 150
    }
  },
  "fields": {
    "origin.time_utc": [
      "2024-09-03T08:29:14.000Z"
    ],
    "index_time_utc": [
      "2024-09-03T08:30:31.358Z"
    ],
    "ingest_time_utc": [
      "2024-09-03T08:29:30.017Z"
    ]
  },
  "highlight": {
    "additional_info.description": [
      "(Data Element '@opensearch-dashboards-highlighted-field@DE@/opensearch-dashboards-highlighted-field@' created)"
    ]
  },
  "sort": [
    1725352154000
  ]
The example contains the following information:
- additional_info
- origin
- policy
- process
For more information about the various fields, refer here.
Policy Status Dashboard index
The policy status dashboard index contains information for the Policy Status Dashboard. It holds the policy and trusted application deployment status information. The index pattern for viewing these logs in Discover is pty_insight_analytics*policy_status_dashboard_*.
{
    "logtype": "Status",
    "process": {
      "thread_id": "2458884416",
      "module": "rpstatus",
      "name": "java",
      "pcc_version": "3.6.0.1",
      "id": "2852",
      "user": "root",
      "version": "10.0.0-alpha+13.gef09.10.0",
      "core_version": "2.1.0+17.gca723.2.1",
      "platform": "Linux_x64"
    },
    "origin": {
      "time_utc": "2024-09-03T10:24:19.000Z",
      "hostname": "ip-10-49-2-49.ec2.internal",
      "ip": "10.49.2.49"
    },
    "cnt": 1,
    "protector": {
      "vendor": "Java",
      "datastore": "DataStore",
      "family": "sdk",
      "version": "10.0.0-alpha+13.gef09.10.0"
    },
    "ingest_time_utc": "2024-09-03T10:24:19.510Z",
    "status": {
      "core_correlationid": "cm0f1jlq700gbzb19cq65miqt",
      "package_correlationid": "cm0m1tv5k0019te89e48tgdug"
    },
    "policystatus": {
      "type": "TRUSTED_APP",
      "application_name": "APJava_sample",
      "deployment_or_auth_time": "2024-09-03T10:24:19.000Z",
      "status": "WARNING"
    }
  },
  "fields": {
    "policystatus.deployment_or_auth_time": [
      "2024-09-03T10:24:19.000Z"
    ],
    "origin.time_utc": [
      "2024-09-03T10:24:19.000Z"
    ],
    "ingest_time_utc": [
      "2024-09-03T10:24:19.510Z"
    ]
  },
  "sort": [
    1725359059000
  ]
The example contains the following information:
- additional_info
- origin
- protector
- policystatus
- policy
- process
Protectors status index
The protector status logs generated by protectors are stored in this index. The index pattern for viewing these logs in Discover is pty_insight_analytics_protectors_status_*.
Use the following query in Discover to view these logs.
logtype:status
A sample log is shown here:
{
   "logtype":"Status",
   "process":{
      "thread_id":"2559813952",
      "module":"rpstatus",
      "name":"java",
      "pcc_version":"3.6.0.1",
      "id":"1991",
      "user":"root",
      "version":"10.0.0.2.91.5ec4b8b",
      "core_version":"2.1.0-alpha+24.g7fc71.2.1",
      "platform":"Linux_x64"
   },
   "origin":{
      "time_utc":"2024-07-30T07:22:41.000Z",
      "hostname":"ip-10-39-3-218.ec2.internal",
      "ip":"10.39.3.218"
   },
   "cnt":1,
   "protector":{
      "vendor":"Java",
      "datastore":"PPC-10.39.2.7",
      "family":"sdk",
      "version":"10.0.0.2.91.5ec4b8b"
   },
   "ingest_time_utc":"2024-07-30T07:22:41.745Z",
   "status":{
      "core_correlationid":"clz79lc2o004jmb29neneto8k",
      "package_correlationid":"clz82ijw00037k790oxlnjalu"
   }
}
The example contains the following information:
- additional_info
- origin
- policy
- protector
Protector Status Dashboard index
The protector status dashboard index contains information for the Protector Status Dashboard. It holds the protector status information. The index pattern for viewing these logs in Discover is pty_insight_analytics*protector_status_dashboard_.
A sample log is shown here:
{
    "logtype": "Status",
    "process": {
      "thread_id": "2458884416",
      "module": "rpstatus",
      "name": "java",
      "pcc_version": "3.6.0.1",
      "id": "2852",
      "user": "root",
      "version": "10.0.0-alpha+13.gef09.10.0",
      "core_version": "2.1.0+17.gca723.2.1",
      "platform": "Linux_x64"
    },
    "origin": {
      "time_utc": "2024-09-03T10:24:19.000Z",
      "hostname": "ip-10-49-2-49.ec2.internal",
      "ip": "10.49.2.49"
    },
    "cnt": 1,
    "protector": {
      "vendor": "Java",
      "datastore": "DataStore",
      "family": "sdk",
      "version": "10.0.0-alpha+13.gef09.10.0"
    },
    "ingest_time_utc": "2024-09-03T10:24:19.510Z",
    "status": {
      "core_correlationid": "cm0f1jlq700gbzb19cq65miqt",
      "package_correlationid": "cm0m1tv5k0019te89e48tgdug"
    },
    "protector_status": "Warning"
  },
  "fields": {
    "origin.time_utc": [
      "2024-09-03T10:24:19.000Z"
    ],
    "ingest_time_utc": [
      "2024-09-03T10:24:19.510Z"
    ]
  },
  "sort": [
    1725359059000
  ]
The example contains the following information:
- additional_info
- origin
- protector
- process
Miscellaneous index
The logs that are not added to the other indexes are captured and stored in the miscellaneous index. The index pattern for viewing these logs in Discover is pty_insight_analytics_miscellaneous_*.
This index should not contain any logs. If any logs are visible in this index, then kindly contact Protegrity support.
Use the following query in Discover to view these logs.
logtype:miscellaneous;
3.4.2.4 - Log return codes
| Return Code | Description |
|---|---|
| 0 | Error code for no logging |
| 1 | The username could not be found in the policy |
| 2 | The data element could not be found in the policy |
| 3 | The user does not have the appropriate permissions to perform the requested operation |
| 4 | Tweak is null |
| 5 | Integrity check failed |
| 6 | Data protect operation was successful |
| 7 | Data protect operation failed |
| 8 | Data unprotect operation was successful |
| 9 | Data unprotect operation failed |
| 10 | The user has appropriate permissions to perform the requested operation but no data has been protected/unprotected |
| 11 | Data unprotect operation was successful with use of an inactive keyid |
| 12 | Input is null or not within allowed limits |
| 13 | Internal error occurring in a function call after the provider has been opened |
| 14 | Failed to load data encryption key |
| 15 | Tweak input is too long |
| 16 | The user does not have the appropriate permissions to perform the unprotect operation |
| 17 | Failed to initialize the PEP: this is a fatal error |
| 19 | Unsupported tweak action for the specified fpe data element |
| 20 | Failed to allocate memory |
| 21 | Input or output buffer is too small |
| 22 | Data is too short to be protected/unprotected |
| 23 | Data is too long to be protected/unprotected |
| 24 | The user does not have the appropriate permissions to perform the protect operation |
| 25 | Username too long |
| 26 | Unsupported algorithm or unsupported action for the specific data element |
| 27 | Application has been authorized |
| 28 | Application has not been authorized |
| 29 | The user does not have the appropriate permissions to perform the reprotect operation |
| 30 | Not used |
| 31 | Policy not available |
| 32 | Delete operation was successful |
| 33 | Delete operation failed |
| 34 | Create operation was successful |
| 35 | Create operation failed |
| 36 | Manage protection operation was successful |
| 37 | Manage protection operation failed |
| 38 | Not used |
| 39 | Not used |
| 40 | No valid license or current date is beyond the license expiration date |
| 41 | The use of the protection method is restricted by license |
| 42 | Invalid license or time is before license start |
| 43 | Not used |
| 44 | The content of the input data is not valid |
| 45 | Not used |
| 46 | Used for z/OS query default data element when policy name is not found |
| 47 | Access key security groups not found |
| 48 | Not used |
| 49 | Unsupported input encoding for the specific data element |
| 50 | Data reprotect operation was successful |
| 51 | Failed to send logs, connection refused |
| 52 | Return code used by bulkhandling in pepproviderauditor |
3.4.2.5 - Protectors security log codes
The security logging level can be configured when a data security policy is created in the Policy management in PPC. If logging level is set to audit successful and audit failed, then both successful and failed Unprotect/Protect/Reprotect/Delete operations will be logged.
You can define the server where these security audit logs will be sent to. You can do that by modifying the Log Server configuration section in pepserver.cfg file.
If you configure to send protector security logs to the PPC, you will be able view them in Discover, by logging into the Insight Dashboard, selecting Discover from the menu, and selecting a time period such as Last 30 days. The following table displays the logs sent by protectors.
| Log Code | Severity | Description | Error Message | DB / AP Operations | MSSQL | Teradata | Oracle | DB2 | XC API Definitions | Recovery Actions |
|---|---|---|---|---|---|---|---|---|---|---|
| 0 | S | Internal ID when audit record should not be generated. | - | - | - | - | - | - | XC_LOG_NONE | No action is required. |
| 1 | W | The username could not be found in the policy in shared memory. | No such user | URPD | 1 | 01H01 or U0001 | 20101 | 38821 | XC_LOG_USER_NOT_FOUND | Verify that the user that calls a PTY function is in the policy. Ensure that your policy is synchronized across all Teradata nodes. Make sure that the PPC connectivity information is correct in the pepserver.cfg file. |
| 2 | W | The data element could not be found in the policy in shared memory. | No such data element | URPD | 2 | U0002 | 20102 | 38822 | XC_LOG_DATA_ELEMENT_NOT_FOUND | Verify that you are calling a PTY function with data element that exists in the policy. |
| 3 | W | The data element was found, but the user does not have the appropriate permissions to perform the requested operation. | Permission denied | URPD | 3 | 01H03 or U0003 | 20103 | 38823 | XC_LOG_PERMISSION_DENIED | Verify that you are calling a PTY function with a user having access permissions to perform this operation according to the policy. |
| 4 | E | Tweak is null. | Tweak null | URPD | 4 | 01H04 or U0004 | 20104 | 38824 | XC_LOG_TWEAK_NULL | Ensure that the tweak is not a null value. |
| 5 | W | The data integrity check failed when decrypting using a Data Element with CRC enabled. | Integrity check failed | U— | 5 | U0005 | 20105 | 38825 | XC_LOG_INTEGRITY_CHECK_FAILED | Check that you use the correct data element to decrypt. Check that your data was not corrupted, restore data from the backup. |
| 6 | S | The data element was found, and the user has the appropriate permissions for the operation. Data protection was successful. | -RP- | 6 | U0006 | 20106 | 38826 | XC_LOG_PROTECT_SUCCESS | No action is required. | |
| 7 | W | The data element was found, and the user has the appropriate permissions for the operation. Data protection was NOT successful. | -RP- | 7 | U0007 | 20107 | 38827 | XC_LOG_PROTECT_FAILED | Failed to create Key ID crypto context. Verify that your data is not corrupted and you use valid combination of input data and data element to encrypt. | |
| 8 | S | The data element was found, and the user has the appropriate permissions for the operation. Data unprotect operation was successful. If mask was applied to the DE, then the appropriate record is added to the audit log description. | U— | 8 | U0008 | 20108 | 38828 | XC_LOG_UNPROTECT_SUCCESS | No action is required. | |
| 9 | W | The data element was found, and the user has the appropriate permissions for the operation. Data unprotect operation was NOT successful. | U— | 9 | U0009 | 20109 | 38829 | XC_LOG_UNPROTECT_FAILED | Failure to decrypt data with Key ID by data element without Key ID. Verify that your data is not corrupted and you use valid combination of input data and data element to decrypt. | |
| 10 | S | Policy check OK. The data element was found, and the user has the appropriate permissions for the operation. NO protection operation is done. | —D | 10 | U0010 | 20110 | 38830 | XC_LOG_OK_ACCESS | No action is required. Successful DELETE operation was performed. | |
| 11 | W | The data element was found, and the user has the appropriate permissions for the operation. Data unprotect operation was successful with use of an inactive key ID. | U— | 11 | U0011 | 20111 | 38831 | XC_LOG_INACTIVE_KEYID_USED | No action is required. Successful UNPROTECT operation was performed. | |
| 12 | E | Input parameters are either NULL or not within allowed limits. | URPD | 12 | U0012 | 20112 | 38832 | XC_LOG_INVALID_PARAM | Verify the input parameters are correct. | |
| 13 | E | Internal error occurring in a function call after the PEP Provider has been opened. For instance: - failed to get mutex/semaphore, - unexpected null parameter in internal (private) functions, - uninitialized provider, etc. | URPD | 13 | U0013 | 20113 | 38833 | XC_LOG_INTERNAL_ERROR | Restart PEP Server and re-deploy the policy. | |
| 14 | W | A key for a data element could not be loaded from shared memory into the crypto engine. | Failed to load data encryption key - Cache is full, or Failed to load data encryption key - No such key, or Failed to load data encryption key - Internal error. | URP- | 14 | U0014 | 20114 | 38834 | XC_LOG_LOAD_KEY_FAILED | If return message is ‘Cache is full’, then logoff and logon again, clear the session and cache. For all other return messages restart PEP Server and re-deploy the policy. |
| 15 | Tweak input is too long. | |||||||||
| 16 | The user does not have the appropriate permissions to perform the unprotect operation. | |||||||||
| 17 | E | A fatal error was encountered when initializing the PEP. | URPD | 17 | U0017 | 20117 | 38837 | XC_LOG_INIT_FAILED | Re-install the protector, re-deploy policy. | |
| 19 | Unsupported tweak action for the specified fpe data element. | |||||||||
| 20 | E | Failed to allocate memory. | URPD | 20 | U0020 | 20120 | 38840 | XC_LOG_OUT_OF_MEMORY | Check what uses the memory on the server. | |
| 21 | W | Supplied input or output buffer is too small. | Buffer too small | URPD | 21 | U0021 | 20121 | 38841 | XC_LOG_BUFFER_TOO_SMALL | Token specific error about supplied buffers. Data expands too much, using non-length preserving Token element. Check return message for specific error, and verify you use correct combination of data type (encoding), and token element. Verify supported data types according to Protegrity Protection Methods Reference 7.2.1. |
| 22 | W | Data is too short to be protected or unprotected. E.g. Too few characters were provided when tokenizing with a length-preserving token element. | Input too short | URPD | 22 | U0022 | 20122 | 38842 | XC_LOG_INPUT_TOO_SHORT | Provide the longer input data. |
| 23 | W | Data is too long to be protected or unprotected. E.g. Too many characters were provided. | Input too long | URPD | 23 | U0023 | 20123 | 38843 | XC_LOG_INPUT_TOO_LONG | Provide the shorter input data. |
| 24 | The user does not have the appropriate permissions to perform the protect operation. | |||||||||
| 25 | W | Unauthorized Username too long. | Username too long. | UPRD | - | U0025 | - | - | Run query by user with Username up to 255 characters long. | |
| 26 | E | Unsupported algorithm or unsupported action for the specific data element or unsupported policy version. For example, unprotect using HMAC data element. | URPD | 26 | U0026 | 20126 | 38846 | XC_LOG_UNSUPPORTED | Check the data elements used for the crypto operation. Note that HMAC data elements cannot be used for decrypt and re-encrypt operations. | |
| 27 | Application has been authorized. | |||||||||
| 28 | Application has not been authorized. | |||||||||
| 29 | The JSON type is not serializable. | |||||||||
| 30 | W | Failed to save audit record in shared memory. | Failed to save audit record | URPD | 30 | U0030 | 20130 | 38850 | XC_LOG_AUDITING_FAILED | Check if PEP Server is started. |
| 31 | E | The policy shared memory is empty. | Policy not available | URPD | 31 | U0031 | 20131 | 38851 | XC_LOG_EMPTY_POLICY | No policy is deployed on PEP Server. |
| 32 | Delete operation was successful. | |||||||||
| 33 | Delete operation failed. | |||||||||
| 34 | Create operation was successful. | |||||||||
| 35 | Create operation failed. | |||||||||
| 36 | Manage protection operation was successful. | |||||||||
| 37 | Manage protection operation failed. | |||||||||
| 39 | E | The policy in shared memory is locked. This is the result of a disk full alert. | Policy locked | URPD | 39 | U0039 | 20139 | 38859 | XC_LOG_POLICY_LOCKED | Fix the disk space and restart the PEP Server. |
| 40 | E | No valid license or current date is beyond the license expiration date. | License expired | -RP- | 40 | U0040 | 20140 | 38860 | XC_LOG_LICENSE_EXPIRED | PPC System Administrator should request and obtain a new license. Re-deploy policy with renewed license. |
| 41 | E | The use of the protection method is restricted by the license. | Protection method restricted by license. | URPD | 41 | U0041 | 20141 | 38861 | XC_LOG_METHOD_RESTRICTED | Perform the protection operation with the protection method that is not restricted by the license. Request license with desired protection method enabled. |
| 42 | E | Invalid license or time is before license start time. | License is invalid. | URPD | 42 | U0042 | 20142 | 38862 | XC_LOG_LICENSE_INVALID | PPC System Administrator should request and obtain a new license. Re-deploy policy with renewed license. |
| 44 | W | Content of the input data to protect is not valid (e.g. for Tokenization). E.g. Input is alphabetic when it is supposed to be numeric. | Invalid format | -RP- | 44 | U0044 | 20144 | 38864 | XC_LOG_INVALID_FORMAT | Verify the input data is of the supported alphabet for specified type of token element. |
| 46 | E | Used for z/OS Query Default Data element when policy name is not found. | No policy. Cannot Continue. | 46 | n/a | n/a | n/a | XC_LOG_INVALID_POLICY | Specify the valid policy. Policy name is case sensitive. | |
| 47 | Access Key security groups not found. | |||||||||
| 48 | Rule Set not found. | |||||||||
| 49 | Unsupported input encoding for the specific data element. | |||||||||
| 50 | S | The data element was found, and the user has the appropriate permissions for the operation. The data Reprotect operation is successful. | -R- | n/a | n/a | n/a | n/a | No action is required. Successful REPROTECT operation was performed. | ||
| 51 | Failed to send logs, connection refused! |
3.4.2.6 - Additional log information
These are values for understanding the values that are displayed in the log records.
Log levels
Most events on the system generate logs. The level of the log helps you understand whether the log is just an information message or denotes some issue with the system. The log message and the log level allows you to understand more about the working of the system and also helps you identify and troubleshoot any system issues.
Protection logs: These logs are generated for Unprotect, Reprotect, and Protect (URP) operations.
- SUCCESS: This log is generated for a successful URP operation.
- WARNING: This log is generated if a user does not have access and the operation is unprotect.
- EXCEPTION: This log is generated if a user does not have access, the operation is unprotect, and the return exception property is set.
- ERROR: This log is generated for all other issues.
Application logs: These logs are generated by the application. The log level denotes the severity level of the log, however, levels 1 and 6 are used for the log configuration.
- 1: OFF. This level is used to turn logging off.
- 2: SEVERE. This level indicates a serious failure that prevents normal program execution.
- 3: WARNING. This level indicates a potential problem or an issue with the system.
- 4: INFO. This level is used to display information messages about the application.
- 5: CONFIG. This level is used to display static configuration information that is useful during debugging.
- 6: ALL. This level is used to log all messages.
Policy logs: These logs are used for the policy logs.
- LOWEST
- LOW
- NORMAL
- HIGH
- CRITICAL
- N/A
Protector information
The information displayed in the Protector-related fields of the audit log are listed in the table.
| protector.family | protector.vendor | protector.version |
|---|---|---|
| APPLICATION PROTECTORS | ||
| sdk | C | 9.1.0.0.x |
| sdk | Java | 10.0.0+x, 9.1.0.0.x |
| sdk | Python | 9.1.0.0.x |
| sdk | Go | 9.1.0.0.x |
| sdk | NodeJS | 9.1.0.0.x |
| sdk | DotNet | 9.1.0.0.x |
| TRUSTED APPLICATION LOGS IN APPLICATION PROTECTORS | ||
| <process.name> | C | 9.1.0.0.x |
| <process.name> | Java | 9.1.0.0.x |
| <process.name> | Python | 9.1.0.0.x |
| <process.name> | Go | 9.1.0.0.x |
| <process.name> | NodeJS | 9.1.0.0.x |
| <process.name> | DotNet | 9.1.0.0.x |
| DATABASE PROTECTOR | ||
| dbp | SqlServer | 9.1.0.0.x |
| dbp | Oracle | 9.1.0.0.x |
| dbp | Db2 | 9.1.0.0.x |
| dwp | Teradata | 10.0.0+x, 9.1.0.0.x |
| dwp | Exadata | 9.1.0.0.x |
| BIG DATA PROTECTOR | ||
| bdp | Impala | 9.2.0.0.x, 9.1.0.0.x |
| bdp | Mapreduce | 9.2.0.0.x, 9.1.0.0.x |
| bdp | Pig | 9.2.0.0.x, 9.1.0.0.x |
| bdp | HBase | 9.2.0.0.x, 9.1.0.0.x |
| bdp | Hive | 9.2.0.0.x, 9.1.0.0.x |
| bdp | Spark | 9.2.0.0.x, 9.1.0.0.x |
| bdp | SparkSQL | 9.2.0.0.x, 9.1.0.0.x |
All Protectors displayed here may not be compatible with this release. Refer to your contract for compatible products.
Modules and components and the log type
Some of the components and modules and the logtype that they generate are provided in the following table.
| Module / Component | Protection | Policy | Application | Audit | Kernel | System | Verification |
|---|---|---|---|---|---|---|---|
| as_image_management.pyc | ✓ | ||||||
| as_memory_management.pyc | ✓ | ||||||
| asmanagement.pyc | ✓ | ||||||
| buffer_watch.pyc | ✓ | ||||||
| devops | ✓ | ||||||
| PPCPAP | ✓ | ||||||
| fluentbit | ✓ | ||||||
| hubcontroller | ✓ | ||||||
| imps | ✓ | ||||||
| insight.pyc | ✓ | ||||||
| insight_cron_executor.pyc | ✓ | ||||||
| insight_cron_job_method_executor.pyc | ✓ | ||||||
| kmgw_external | ✓ | ||||||
| kmgw_internal | ✓ | ||||||
| logfacade | ✓ | ||||||
| membersource | ✓ | ||||||
| meteringfacade | ✓ | ||||||
| PIM_Cluster | ✓ | ||||||
| Protegrity PEP Server | ✓ | ||||||
| TRIGGERING_AGENT_policy_deploy.pyc | ✓ |
For more information and description about the components that can generate kernel logs, refer here.
Kernel logs
This section lists the various kernel logs that are generated.
Note: This list is compiled using information from https://pmhahn.github.io/audit/.
User and group account management:
- ADD_USER: A user-space user account is added.
- USER_MGMT: The user-space management data.
- USER_CHAUTHTOK: A user account attribute is modified.
- DEL_USER: A user-space user is deleted.
- ADD_GROUP: A user-space group is added.
- GRP_MGMT: The user-space group management data.
- GRP_CHAUTHTOK: A group account attribute is modified.
- DEL_GROUP: A user-space group is deleted.
User login live cycle events:
- CRYPTO_KEY_USER: The cryptographic key identifier used for cryptographic purposes.
- CRYPTO_SESSION: The parameters set during a TLS session establishment.
- USER_AUTH: A user-space authentication attempt is detected.
- LOGIN: The user log in to access the system.
- USER_CMD: A user-space shell command is executed.
- GRP_AUTH: The group password is used to authenticate against a user-space group.
- CHUSER_ID: A user-space user ID is changed.
- CHGRP_ID: A user-space group ID is changed.
- Pluggable Authentication Modules (PAM) Authentication:
- USER_LOGIN: A user logs in.
- USER_LOGOUT: A user logs out.
- PAM account:
- USER_ERR: A user account state error is detected.
- USER_ACCT: A user-space user account is modified.
- ACCT_LOCK: A user-space user account is locked by the administrator.
- ACCT_UNLOCK: A user-space user account is unlocked by the administrator.
- PAM session:
- USER_START: A user-space session is started.
- USER_END: A user-space session is terminated.
- Credentials:
- CRED_ACQ: A user acquires user-space credentials.
- CRED_REFR: A user refreshes their user-space credentials.
- CRED_DISP: A user disposes of user-space credentials.
Linux Security Model events:
- DAC_CHECK: The record discretionary access control (DAC) check results.
- MAC_CHECK: The user space Mandatory Access Control (MAC) decision is made.
- USER_AVC: A user-space AVC message is generated.
- USER_MAC_CONFIG_CHANGE:
- SELinux Mandatory Access Control:
- AVC_PATH: dentry and vfsmount pair when an SELinux permission check.
- AVC: SELinux permission check.
- FS_RELABEL: file system relabel operation is detected.
- LABEL_LEVEL_CHANGE: object’s level label is modified.
- LABEL_OVERRIDE: administrator overrides an object’s level label.
- MAC_CONFIG_CHANGE: SELinux Boolean value is changed.
- MAC_STATUS: SELinux mode (enforcing, permissive, off) is changed.
- MAC_POLICY_LOAD: SELinux policy file is loaded.
- ROLE_ASSIGN: administrator assigns a user to an SELinux role.
- ROLE_MODIFY: administrator modifies an SELinux role.
- ROLE_REMOVE: administrator removes a user from an SELinux role.
- SELINUX_ERR: internal SELinux error is detected.
- USER_LABELED_EXPORT: object is exported with an SELinux label.
- USER_MAC_POLICY_LOAD: user-space daemon loads an SELinux policy.
- USER_ROLE_CHANGE: user’s SELinux role is changed.
- USER_SELINUX_ERR: user-space SELinux error is detected.
- USER_UNLABELED_EXPORT: object is exported without SELinux label.
- AppArmor Mandatory Access Control:
- APPARMOR_ALLOWED
- APPARMOR_AUDIT
- APPARMOR_DENIED
- APPARMOR_ERROR
- APPARMOR_HINT
- APPARMOR_STATUS APPARMOR
Audit framework events:
- KERNEL: Record the initialization of the Audit system.
- CONFIG_CHANGE: The Audit system configuration is modified.
- DAEMON_ABORT: An Audit daemon is stopped due to an error.
- DAEMON_ACCEPT: The auditd daemon accepts a remote connection.
- DAEMON_CLOSE: The auditd daemon closes a remote connection.
- DAEMON_CONFIG: An Audit daemon configuration change is detected.
- DAEMON_END: The Audit daemon is successfully stopped.
- DAEMON_ERR: An auditd daemon internal error is detected.
- DAEMON_RESUME: The auditd daemon resumes logging.
- DAEMON_ROTATE: The auditd daemon rotates the Audit log files.
- DAEMON_START: The auditd daemon is started.
- FEATURE_CHANGE: An Audit feature changed value.
Networking related:
- IPSec:
- MAC_IPSEC_ADDSA
- MAC_IPSEC_ADDSPD
- MAC_IPSEC_DELSA
- MAC_IPSEC_DELSPD
- MAC_IPSEC_EVENT: The IPSec event, when one is detected, or when the IPSec configuration changes.
- NetLabel:
- MAC_CALIPSO_ADD: The NetLabel CALIPSO DoI entry is added.
- MAC_CALIPSO_DEL: The NetLabel CALIPSO DoI entry is deleted.
- MAC_MAP_ADD: A new Linux Security Module (LSM) domain mapping is added.
- MAC_MAP_DEL: An existing LSM domain mapping is added.
- MAC_UNLBL_ALLOW: An unlabeled traffic is allowed.
- MAC_UNLBL_STCADD: A static label is added.
- MAC_UNLBL_STCDEL: A static label is deleted.
- Message Queue:
- MQ_GETSETATTR: The mq_getattr and mq_setattr message queue attributes.
- MQ_NOTIFY: The arguments of the mq_notify system call.
- MQ_OPEN: The arguments of the mq_open system call.
- MQ_SENDRECV: The arguments of the mq_send and mq_receive system calls.
- Netfilter firewall:
- NETFILTER_CFG: The Netfilter chain modifications are detected.
- NETFILTER_PKT: The packets traversing Netfilter chains.
- Commercial Internet Protocol Security Option:
- MAC_CIPSOV4_ADD: A user adds a new Domain of Interpretation (DoI).
- MAC_CIPSOV4_DEL: A user deletes an existing DoI.
Linux Cryptography:
- CRYPTO_FAILURE_USER: A decrypt, encrypt, or randomize cryptographic operation fails.
- CRYPTO_IKE_SA: The Internet Key Exchange Security Association is established.
- CRYPTO_IPSEC_SA: The Internet Protocol Security Association is established.
- CRYPTO_LOGIN: A cryptographic officer login attempt is detected.
- CRYPTO_LOGOUT: A cryptographic officer logout attempt is detected.
- CRYPTO_PARAM_CHANGE_USER: A change in a cryptographic parameter is detected.
- CRYPTO_REPLAY_USER: A replay attack is detected.
- CRYPTO_TEST_USER: The cryptographic test results as required by the FIPS-140 standard.
Process:
- BPRM_FCAPS: A user executes a program with a file system capability.
- CAPSET: Any changes in process-based capabilities.
- CWD: The current working directory.
- EXECVE; The arguments of the execve system call.
- OBJ_PID: The information about a process to which a signal is sent.
- PATH: The file name path information.
- PROCTITLE: The full command-line of the command that was used to invoke the analyzed process.
- SECCOMP: A Secure Computing event is detected.
- SYSCALL: A system call to the kernel.
Special system calls:
- FD_PAIR: The use of the pipe and socketpair system calls.
- IPC_SET_PERM: The information about new values set by an IPC_SET control operation on an Inter-Process Communication (IPC) object.
- IPC: The information about a IPC object referenced by a system call.
- MMAP: The file descriptor and flags of the mmap system call.
- SOCKADDR: Record a socket address.
- SOCKETCALL: Record arguments of the sys_socketcall system call (used to multiplex many socket-related system calls).
Systemd:
- SERVICE_START: A service is started.
- SERVICE_STOP: A service is stopped.
- SYSTEM_BOOT: The system is booted up.
- SYSTEM_RUNLEVEL: The system’s run level is changed.
- SYSTEM_SHUTDOWN: The system is shut down.
Virtual Machines and Container:
- VIRT_CONTROL: The virtual machine is started, paused, or stopped.
- VIRT_MACHINE_ID: The binding of a label to a virtual machine.
- VIRT_RESOURCE: The resource assignment of a virtual machine.
Device management:
- DEV_ALLOC: A device is allocated.
- DEV_DEALLOC: A device is deallocated.
Trusted Computing Integrity Measurement Architecture:
- INTEGRITY_DATA: The data integrity verification event run by the kernel.
- INTEGRITY_EVM_XATTR: The EVM-covered extended attribute is modified.
- INTEGRITY_HASH: The hash type integrity verification event run by the kernel.
- INTEGRITY_METADATA: The metadata integrity verification event run by the kernel.
- INTEGRITY_PCR: The Platform Configuration Register (PCR) invalidation messages.
- INTEGRITY_RULE: A policy rule.
- INTEGRITY_STATUS: The status of integrity verification.
Intrusion Prevention System:
- Anomaly detected:
- ANOM_ABEND
- ANOM_ACCESS_FS
- ANOM_ADD_ACCT
- ANOM_AMTU_FAIL
- ANOM_CRYPTO_FAIL
- ANOM_DEL_ACCT
- ANOM_EXEC
- ANOM_LINK
- ANOM_LOGIN_ACCT
- ANOM_LOGIN_FAILURES
- ANOM_LOGIN_LOCATION
- ANOM_LOGIN_SESSIONS
- ANOM_LOGIN_TIME
- ANOM_MAX_DAC
- ANOM_MAX_MAC
- ANOM_MK_EXEC
- ANOM_MOD_ACCT
- ANOM_PROMISCUOUS
- ANOM_RBAC_FAIL
- ANOM_RBAC_INTEGRITY_FAIL
- ANOM_ROOT_TRANS
- Responses:
- RESP_ACCT_LOCK_TIMED
- RESP_ACCT_LOCK
- RESP_ACCT_REMOTE
- RESP_ACCT_UNLOCK_TIMED
- RESP_ALERT
- RESP_ANOMALY
- RESP_EXEC
- RESP_HALT
- RESP_KILL_PROC
- RESP_SEBOOL
- RESP_SINGLE
- RESP_TERM_ACCESS
- RESP_TERM_LOCK
Miscellaneous:
- ALL: Matches all types.
- KERNEL_OTHER: The record information from third-party kernel modules.
- EOE: An end of a multi-record event.
- TEST: The success value of a test message.
- TRUSTED_APP: The record of this type can be used by third-party application that require auditing.
- TTY: The TTY input that was sent to an administrative process.
- USER_TTY: An explanatory message about TTY input to an administrative process that is sent from the user-space.
- USER: The user details.
- USYS_CONFIG: A user-space system configuration change is detected.
- TIME_ADJNTPVAL: The system clock is modified.
- TIME_INJOFFSET: A Timekeeping offset is injected to the system clock.
3.4.3 - Viewing the dashboards
The dashboards are built using visualizations. Use the information from Viewing visualizations to customize and build dashboards.
Note: Do not clone, delete, or modify the configuration or details of the dashboards that are provided by Protegrity. To create a customized dashboard, first clone and customize the required visualizations, then create a dashboard, and place the customized visualizations on the dashboard.
To view a dashboard:
Log in to the Insight Dashboard.
From the navigation panel, click Dashboards.
Click the dashboard.
Viewing the Security Operation Dashboard
The security operation dashboard displays the counts of individual and total number of security operations for successful and unsuccessful operations. The Security Operation Dashboard has a table and pie charts that summarizes the security operations performed by a specific data store, protector family, and protector vendor. This dashboard shows different visualizations for the Successful Security Operations, Security Operations, Reprotect Counts, Successful Security Operation Counts, Security Operation Counts, Security Operation Table, and Unsuccessful Security Operations.
Note: Do not delete this dashboard.
The dashboard has the following panels:
- Total Security Operations: Displays pie charts for the following security operations:
- Successful: Total number of security operations that succeeded.
- Unsuccessful: Total number of security operations that were unsuccessful.
- Successful Security Operations: Displays pie charts for the following security operations:
- Protect: Total number of protect operations.
- Unprotect: Total number of unprotect operations.
- Reprotect: Total number of reprotect operations.
- Unsuccessful Security Operations: Displays pie charts for the following security operations:
- Error: Total number of operations that were unsuccessful due to an error.
- Warning: Total number of operations that were unsuccessful due to a warning.
- Exception: Total number of operations that were unsuccessful due to an exception.
- Total Security Operation Values: Displays the following information:
- Successful - Count: Total number of security operations that succeeded.
- Unsuccessful - Count: Total number of security operations that were unsuccessful.
- Successful Security Operation Values: Displays the following information:
- Protect - Count: Total number of protect operations.
- Unprotect - Count: Total number of unprotect operations.
- Reprotect - Count: Total number of reprotect operations.
- Unsuccessful Security Operation Values: Displays the following information:
- ERROR - Count: Total number of error logs.
- WARNING - Count: Total number of warning logs.
- EXCEPTION - Count: Total number of exception logs.
- Security Operation Table: Displays the number of security operations done for a data store, protector family, protector vendor, and protector version.
- Unsuccessful Security Operations: Displays a list of unsuccessful security operations with details, such as, time, data store, protector family, protector vendor, protector version, IP, hostname, level, count, description, and source.
Viewing the Feature Usage Dashboard
The dashboard displays different visualizations for Successful Security Operation Count, Data Discovery, Semantic Guardrails, Anonymization, and Synthetic Data.
Note: Do not delete this dashboard.
The dashboard has the following panels:
Successful Security Operation Count: Displays the information on successful protection operations performed by protectors.
- Protect: Total number of successful protect operations.
- Reprotect: Total number of successful reprotect operations.
- Unprotect: Total number of successful unprotect operations.
Data Discovery Information: Displays the number of successful operations performed by Data Discovery.
- Operations Performed: Total number of operations performed.
- Sensitive Data Identified(MB): Sensitive data identified in MB.
Semantic Guardrails Information: Displays the following information:
- Total Messages: Total number of guardrail messages processed.
- Blocked messages: Total number of blocked messages.
Operation Counts: Displays the total number of operations performed by Protectors, Data Discovery, and Semantic Guardrails.
- Protection Operations: Total number of Protect, Reprotect, and Unprotect operations.
- Data Discovery Operations: Total number of operations performed by Data Discovery.
- Semantic Guardrails Operations: Total number of operations performed by Semantic Guardrails.
Anonymization Information: Displays the following information:
- Job Id: Displays the job id.
- Job Status: Displays the status of the job.
- Total Data(MB): Total data processed in MB.
- Data Anonymized(MB): Data anonymized in MB.
Synthetic Data Information: Displays the following information:
- Job Id: Displays the job id.
- Job Status: Displays the status of the job.
- Source DATA(MB): Displays the size of the original source data used as input for synthetic data generation, measured in MB.
- Synthetic Data(MB): Synthetic data generated in MB.
Viewing the Protector Inventory Dashboard
The protector inventory dashboard displays protector details connected to the cluster through pie charts and tables. This dashboard has the Protector Details, Protector Families, Protector Vendor, Protector Version, Protector Core Version, and Protector PCC Version visualizations. It is useful for understanding information about the installed Protectors.
Only protectors that perform security operations show up on the dashboard.
Note: Do not delete this dashboard.
The dashboard has the following panels:
- Protector Details: Displays the list of protectors installed with information, such as, Protector Family, Protector Vendor, Protector Version, PCC Version, Protector Core Version, and Deployment count. The Deployment count is based on the number of unique IPs. Updating the IP address of the Protector will consider both the old and new entries for the protector.
- Protector Families: Displays pie chart with protector family information.
- Protector Vendor: Displays pie chart with protector vendor information.
- Protector Version: Displays pie chart with protector version information.
- Protector Core Version: Displays pie chart with protector core version information.
- Protector PCC Version: Displays pie chart with protector PCC version information.
Viewing the Protector Operation Dashboard
The protector operation dashboard displays protector details connected to the cluster through tables. This dashboard has the Protector Count and Protector List tables. It is useful for understanding information about the operations performed by the Protectors.
Only protectors that perform security operations show up on the dashboard. Updating the IP address or the hostname of the Protector shows the old and new entry for the protector.
Note: Do not delete this dashboard.
The dashboard has the following panels:
- Protector Count: Displays the deployment count and operations performed for each Protector Family and Protector Vendor combination.
- Protector List: Displays the list of protection operations with information, such as, Protector Vendor, Protector Family, Protector Version, Protector IP, Hostname, Core Version, PCC Version, and URP operations performed.
Viewing the Protector Status Dashboard
The protector status dashboard displays the protector connectivity status through a pie chart and a table visualization. This information is available only for v10.0.0 and later protectors. Logs from earlier protector versions are not available for the dashboards due to differences between the log formats. It is useful for understanding information about the installed v10.0.0 protectors. This dashboard uses status logs sent by the protector, so the protector which performed at least one security operation shows up on this dashboard. A protector is shown in one of the following states on the dashboard:
- OK: The latest logs are sent from the protector to the Audit Store within the last 15 minutes.
- Warning: The latest logs sent from the protector to the Audit Store in the last 15 and 60 minutes.
- Error: The latest logs sent from the protector to the Audit Store are more than 60 minutes.
Updating the IP address or the hostname of the protector shows the old and new entry for the protector.
Note: This dashboard shows the v10.0.0 protectors that are connected to the cluster. Do not delete this dashboard.
The dashboard has the following panels:
- Connectivity Status: Displays a pie chart of the different states with the number of protectors that are in each state.
- Protector Status: Displays the list of protectors connectivity status with information, such as, Datastore, Node IP, Hostname, Protector Platform, Core Version, Protector Vendor, Protector Family, Protector Version, Status, and Last Seen.
Viewing the Policy Status Dashboard
The policy status dashboard displays the Policy and Trusted Application connectivity status for a DataStore. The status information, on this dashboard, is updated every 10 minutes. It is useful to understand deployment of the DataStore on all protector nodes. This dashboard displays the Policy deploy Status, Trusted Application deploy status, Policy Deploy details, and Trusted Application details visualizations. This information is available only for v10.0.0 and later protectors.
The policy status logs are sent to Insight. These logs are stored in the policy status index that is pty_insight_analytics_policy. The policy status index is analyzed using the correlation ID to identify the unique policies received by the Audit Store. The time duration and the correlation ID are then analyzed to determine the policy status.
The dashboard uses status logs sent by the protectors about the deployed policy. The Policy or Trusted Application used for at least one security operation shows up on this dashboard. A Policy and Trusted Application can be shown in one of the following states on the dashboard:
- OK: The latest correlation value of the logs sent for the Policy or Trusted Application to the Audit Store are within the last 15 minutes.
- Warning: The latest correlation value of the logs sent for the Policy or Trusted Application to the Audit Store are more than 15 minutes.
Note: Do not delete this dashboard.
The dashboard has the following panels:
- Policy Deploy Status: Displays a pie chart of the different states with the number of policies that are in each state.
- Trusted Application Status: Displays a pie chart of the different states with the number of trusted applications that are in each state.
- Policy Deploy Details: Displays the list of policies and details. For example, Datastore Name, Node IP, Hostname, Last Seen, Policy Status, Process Name, Process Id, Platform, Core Version, PCC Version, Vendor, Family, Version, Deployment Time, and Policy Count.
- Trusted Application Details: Displays the list of policies for Trusted Applications and details. For example, Datastore Name, Node IP, Hostname, Last Seen, Policy Status, Process Name, Process Id, Platform, Core Version, PCC Version, Vendor, Family, Version, Authorize Time, and Policy Count.
Data Element Usage Dashboard
The dashboard shows the security operation performed by users according to data elements. It displays the top 10 data elements used for the top five users.
Note: Do not delete this dashboard.
The following visualizations are displayed on the dashboard:
- Data Element Usage Intensity Of Users Per Protect operation
- Data Element Usage Intensity Of Users Per Unprotect operation
- Data Element Usage Intensity Of Users Per Reprotect operation
Sensitive Activity Dashboard
The dashboard shows the daily count of security events by data elements for specific time period.
Note: Do not delete this dashboard.
The following visualization is displayed on the dashboard:
- Sensitive Activity By Date
Server Activity Dashboard
The dashboard shows the daily count of all events by servers for specific time period. The older Audit index entries are not displayed on a new installation.
Note: Do not delete this dashboard.
The following visualizations are displayed on the dashboard:
- Server Activity of Troubleshooting Index By Date
- Server Activity of Policy Logs Index By Date
- Server Activity of Audit Index By Date
High & Critical Events Dashboard
The dashboard shows the daily count of system events of high and critical severity for selected time period. The older Audit index entries are not displayed on a new installation.
Note: Do not delete this dashboard.
The following visualizations are displayed on the dashboard:
- System Report - High & Critical Events of Troubleshooting Index
- System Report - High & Critical Events of Policy Logs Index
- System Report - High & Critical Events of Older Audit Indices
The System Report - High & Critical Events of Older Audit Indices graph is for legacy protectors.
Signature Verification Dashboard
Logs are generated on the protectors. The log is then processed using the signature key and a hash value, and a checksum is generated for the log entry. The hash and the checksum is sent to Insight for storage and further processing. When the log entry is received by Insight, Insight verifies log integrity when the signature verification job runs.
The log entries having checksums are identified. These entries are then processed using the signature key and the checksum received in the log entry from the protector is checked. If both the checksum values match, then the log entry has not been tampered with. If a mismatch is found, then it might be possible that the log entry was tampered or there is an issue receiving logs from a protector. These can be viewed on the Discover screen by using the logtype:verification search criteria.
Note: Do not delete this dashboard.
When the signature verification for an audit log fails, the failure logs are logged in Insight.
The following information is displayed on the dashboard:
- Time: Displays the date and time.
- Name: Displays the unique name for the signature verification job.
- Indexes: Displays the list of indexes on which the signature verification job runs.
- Query: Displays the signature verification query.
- Pending: Displays the number of logs pending for signature verification.
- Processed: Displays the current number of logs processed.
- Not-Verified: Displays the number of logs that could not be verified. Only protection logs are verified.
- Success: Displays the number of verifiable logs where signature verification succeeded.
- Failed: Displays the number of verifiable logs where signature verification failed.
- State: Displays the job status.
Support Logs Dashboard
The dashboard shows support logs required by support for troubleshooting. Filter the logs displayed using the Level, Pod, Container, and Namespace list.
Note: Do not delete this dashboard.
Unauthorized Access Dashboard
The dashboard shows the cumulative counts of unauthorized access and activity by users into Protegrity appliances and protectors.
Note: Do not delete this dashboard.
The following visualization is displayed on the dashboard:
- Unauthorized Access By Username
User Activity Dashboard
The dashboard shows the cumulative transactions performed by users over a date range.
Note: Do not delete this dashboard.
The following visualization is displayed on the dashboard:
- User Activity Across Date Range
3.4.4 - Viewing visualizations
Note: Do not delete or modify the configuration or details of the visualizations provided by Protegrity. To customize the visualization, create a copy of the visualization and perform the customization on the copy of the visualization.
To view visualizations:
Log in to the Insight Dashboard.
From the navigation panel, click Visualize.
Create and view visualizations from here.
Click a visualization to view it.
Anonymization Information
Description: The usage information for the Anonymization feature.
- Type: Date Table
- Configuration:
- Index: pty_insight_analytics*anonymization_dashboard_*
- Metrics:
- Aggregation: Sum
- Field: metrics.anon_bytes
- Custom label: Data Anonymized
- Buckets:
- Split rows
- Aggregation: Terms
- Field: request.id.keyword
- Order by: Metric: Data Anonymized
- Order: Descending
- Size: 9999
- Custom label: Job Id
- Split rows
- Aggregation: Terms
- Field: metrics.source_bytes
- Order by: Metric: Data Anonymized
- Order: Descending
- Size: 9999
- Custom label: Total Data
- Split rows
Data Discovery Information
Description: The usage information for the Data Discovery feature.
- Type: Date Table
- Configuration:
- Index: pty_insight_analytics*discovery_dashboard_*
- Metrics:
- Aggregation: Count
- Custom label: Operations Performed
- Metrics:
- Aggregation: Sum
- Field: metrics.classified_bytes
- Custom label: Sensitive Data Identified
User Activity Across Date Range
Description: The user activity during the date range specified.
- Type: Heat Map
- Filter: Audit Index Logtypes
- Configuration:
- Index: pty_insight_analytics*audits_*
- Metrics:
- Value: Sum
- Field: cnt
- Buckets:
- X-axis
- Aggregation: Date Histogram
- Field: origin.time_utc
- Minimum interval: Day
- Y-axis
- Sub aggregation: Terms
- Field: protection.policy_user.keyword
- Order by: Metric:Sum of cnt
- Order: Descending
- Size: 10
- Custom label: Policy Users
- X-axis
Sensitive Activity by Date
Description: The data element usage on a daily basis.
- Type: Line
- Filter: Audit Index Logtypes
- Configuration:
- Index: pty_insight_analytics*audits_*
- Metrics: Y-axis
- Aggregation: Sum
- Field: cnt
- Buckets:
- X-axis
- Aggregation: Date Histogram
- Field: origin.time_utc
- Minimum interval: Day
- Custom label: Date
- Split series
- Sub aggregation: Terms
- Field: protection.dataelement.keyword
- Order by: Metric:Sum of cnt
- Order: Descending
- Size: 10
- Custom label: Operation Count
- X-axis
Unauthorized Access By Username
Description: Top 10 Unauthorized Protect and Unprotect operation counts per user.
- Type: Line
- Filter 1: Audit Index Logtypes
- Filter 2: protection.audit_code: is one of 1,3
- Configuration:
- Index: pty_insight_analytics*audits_*
- Metrics: Y-axis:
- Aggregation: Sum
- Field: cnt
- Buckets:
- X-axis
- Aggregation: Terms
- Field: protection.policy_user.keyword
- Order by: Metric:Sum of cnt
- Order: Descending
- Size: 10
- Custom label: Top 10 Policy Users
- Split series
- Sub aggregation: Filters
- Filter 1-Protect: level=‘Error’
- Filter 2-Unprotect: level=‘WARNING’
- X-axis
System Report - High & Critical Events of Audit Indices
Description: The chart reporting high and critical events from the Audit index.
- Type: Vertical Bar
- Filter: Severity Level : (High & Critical)
- Configuration:
- Index: pty_insight_analytics*audits_*
- Metrics: Y-axis:
- Aggregation: Sum
- Field: cnt
- Buckets:
- X-axis
- Aggregation: Date Histogram
- Field: origin.time_utc
- Minimum Interval: Auto
- Custom label: Date
- Split series
- Sub aggregation: Terms
- Field: level.keyword
- Order by: Metric:Sum of cnt
- Order: Descending
- Size: 10
- Split series
- Sub aggregation: Terms
- Field: origin.hostname.keyword
- Order by: Metric:Sum of cnt
- Order: Descending
- Size: 50
- Custom label: Server
- X-axis
System Report - High & Critical Events of Policy Logs Index
Description: The chart reporting high and critical events from the Policy index.
- Type: Vertical Bar
- Filter: Severity Level : (High & Critical)
- Configuration:
- Index: pty_insight_analytics*policy_log_*
- Metrics: Y-axis:
- Aggregation: Sum
- Field: cnt
- Buckets:
- X-axis
- Aggregation: Date Histogram
- Field: origin.time_utc
- Minimum Interval: Auto
- Custom label: Date
- Split series
- Sub aggregation: Terms
- Field: level.keyword
- Order by: Metric:Sum of cnt
- Order: Descending
- Size: 20
- Split series
- Sub aggregation: Terms
- Field: origin.hostname.keyword
- Order by: Metric:Sum of cnt
- Order: Descending
- Size: 50
- Custom label: Server
- X-axis
System Report - High & Critical Events of Troubleshooting Index
Description: The chart reporting high and critical events from the Troubleshooting index.
- Type: Vertical Bar
- Filter: Severity Level : (High & Critical)
- Configuration:
- Index: pty_insight_analytics*troubleshooting_*
- Metrics: Y-axis:
- Aggregation: Sum
- Field: cnt
- Buckets:
- X-axis
- Aggregation: Date Histogram
- Field: origin.time_utc
- Minimum Interval: Auto
- Custom label: Date
- Split series
- Sub aggregation: Terms
- Field: level.keyword
- Order by: Metric:Sum of cnt
- Order: Descending
- Size: 10
- Split series
- Sub aggregation: Terms
- Field: origin.hostname.keyword
- Order by: Metric:Sum of cnt
- Order: Descending
- Size: 50
- Custom label: Server
- X-axis
Data Element Usage Intensity Of Users per Protect operation
Description: The chart shows the data element usage intensity of users per protect operation. It displays the top 10 data elements used by the top five users.
- Type: Heat Map
- Filter 1: protection.operation.keyword: Protect
- Filter 2: Audit Index Logtypes
- Configuration:
- Index: pty_insight_analytics*audits_*
- Metrics: Y-axis:
- Aggregation: Sum
- Field: cnt
- Buckets:
- X-axis
- Aggregation: Terms
- Field: protection.policy_user.keyword
- Order by: Metric: Sum of cnt
- Order: Descending
- Size: 5
- Y-axis
- Sub aggregation: Terms
- Field: protection.dataelement.keyword
- Order by: Metric:Sum of cnt
- Order: Descending
- Size: 10
- X-axis
Data Element Usage Intensity Of Users per Reprotect operation
Description: The chart shows the data element usage intensity of users per reprotect operation. It displays the top 10 data elements used by the top five users.
- Type: Heat Map
- Filter 1: protection.operation.keyword: Reprotect
- Filter 2: Audit Index Logtypes
- Configuration:
- Index: pty_insight_analytics*audits_*
- Metrics: Y-axis:
- Aggregation: Sum
- Field: cnt
- Buckets:
- X-axis
- Aggregation: Terms
- Field: protection.policy_user.keyword
- Order by: Metric: Sum of cnt
- Order: Descending
- Size: 5
- Y-axis
- Sub aggregation: Terms
- Field: protection.dataelement.keyword
- Order by: Metric:Sum of cnt
- Order: Descending
- Size: 10
- X-axis
Data Element Usage Intensity Of Users per Unprotect operation
Description: The chart shows the data element usage intensity of users per unprotect operation. It displays the top 10 data elements used by the top five users.
- Type: Heat Map
- Filter 1: protection.operation.keyword: Unprotect
- Filter 2: Audit Index Logtypes
- Configuration:
- Index: pty_insight_analytics*audits_*
- Metrics: Y-axis:
- Aggregation: Sum
- Field: cnt
- Buckets:
- X-axis
- Aggregation: Terms
- Field: protection.policy_user.keyword
- Order by: Metric: Sum of cnt
- Order: Descending
- Size: 5
- Y-axis
- Sub aggregation: Terms
- Field: protection.dataelement.keyword
- Order by: Metric:Sum of cnt
- Order: Descending
- Size: 10
- X-axis
Server Activity of Audit Index By Date
Description: The chart shows the daily count of all events by servers for specific time period from the audit index.
- Type: Line
- Configuration:
- Index: pty_insight_analytics*audits_*
- Metrics: Y-axis:
- Aggregation: Sum
- Field: cnt
- Buckets:
- X-axis
- Aggregation: Date Histogram
- Field: origin.time_utc
- Minimum interval: Day
- Split series
- Sub aggregation: Terms
- Field: origin.hostname.keyword
- Order by: Metric:Sum of cnt
- Order: Descending
- Size: 10
- X-axis
Server Activity of Policy Log Index By Date
Description: The chart shows the daily count of all events by servers for specific time period from the policy index.
- Type: Line
- Configuration:
- Index: pty_insight_analytics*policy_log_*
- Metrics: Y-axis:
- Aggregation: Sum
- Field: cnt
- Buckets:
- X-axis
- Aggregation: Date Histogram
- Field: origin.time_utc
- Minimum interval: Day
- Split series
- Sub aggregation: Terms
- Field: origin.hostname.keyword
- Order by: Metric:Sum of cnt
- Order: Descending
- Size: 10
- X-axis
Server Activity of Troubleshooting Index By Date
Description: The chart shows the daily count of all events by servers for specific time period from the troubleshooting index.
- Type: Line
- Configuration:
- Index: pty_insight_analytics*troubleshooting_*
- Metrics: Y-axis:
- Aggregation: Sum
- Field: cnt
- Buckets:
- X-axis
- Aggregation: Date Histogram
- Field: origin.time_utc
- Minimum interval: Day
- Split series
- Sub aggregation: Terms
- Field: origin.hostname.keyword
- Order by: Metric:Sum of cnt
- Order: Descending
- Size: 10
- X-axis
Connectivity status
Description: This pie chart display connectivity status for the protectors.
- Type: Pie
- Configuration:
- Index: pty_insight_analytics*protector_status_dashboard_*
- Metrics:
- Slice size
- Aggregation: Unique Count
- Field: origin.ip
- Custom label: Number
- Slice size
- Buckets:
- Split slices
- Aggregation: Terms
- Field: protector_status.keyword
- Order by: Metric:Number
- Order: Descending
- Size: 10000
- Split slices
Policy_Deploy_Status_Chart
Description: This pie chart displays the deployment status of the policy.
- Type: Pie
- Filter: policystatus.type.keyword: POLICY
- Configuration:
- Index: pty_insight_analytics*policy_status_dashboard_*
- Metrics:
- Slice size
- Aggregation: Unique Count
- Field: _id
- Slice size
- Buckets:
- Split slices
- Aggregation: Terms
- Field: policystatus.status.keyword
- Order by: Metric:Unique Count of _id
- Order: Descending
- Size: 50
- Custom label: Policy Status
- Split slices
Policy_Deploy_Status_Table
Description: This table displays the policy deployment status and uniquely identified information for the data store, protector, process, platform, node, and so on.
- Type: Data Table
- Filter: policystatus.type.keyword: POLICY
- Configuration:
- Index: pty_insight_analytics*policy_status_dashboard_*
- Metrics:
- Aggregation: Count
- Custom label: Metrics Count
- Buckets:
- Split rows
- Aggregation: Terms
- Field: protector.datastore.keyword
- Order by: Metric: Metrics Count
- Order: Descending
- Size: 50
- Custom label: Data Store Name
- Split rows
- Aggregation: Terms
- Field: origin.ip
- Order by: Metric: Metrics Count
- Order: Descending
- Size: 50
- Custom label: Node IP
- Split rows
- Aggregation: Terms
- Field: origin.hostname.keyword
- Order by: Metric: Metrics Count
- Order: Descending
- Size: 50
- Custom label: Host Name
- Split rows
- Aggregation: Terms
- Field: policystatus.status.keyword
- Order by: Metric: Metrics Count
- Order: Descending
- Size: 50
- Custom label: Status
- Split rows
- Aggregation: Terms
- Field: origin.time_utc
- Order by: Metric: Metrics Count
- Order: Descending
- Size: 50
- Custom label: Last Seen
- Split rows
- Aggregation: Terms
- Field: process.name.keyword
- Order by: Metric: Metrics Count
- Order: Descending
- Size: 50
- Custom label: Process Name
- Split rows
- Aggregation: Terms
- Field: process.id.keyword
- Order by: Metric: Metrics Count
- Order: Descending
- Size: 50
- Custom label: Process Id
- Split rows
- Aggregation: Terms
- Field: process.platform.keyword
- Order by: Metric: Metrics Count
- Order: Descending
- Size: 50
- Custom label: Platform
- Split rows
- Aggregation: Terms
- Field: process.core_version.keyword
- Order by: Metric: Metrics Count
- Order: Descending
- Size: 50
- Custom label: Core Version
- Split rows
- Aggregation: Terms
- Field: process.pcc_version.keyword
- Order by: Metric: Metrics Count
- Order: Descending
- Size: 50
- Custom label: PCC Version
- Split rows
- Aggregation: Terms
- Field: protector.version.keyword
- Order by: Metric: Metrics Count
- Order: Descending
- Size: 50
- Custom label: Protector Version
- Split rows
- Aggregation: Terms
- Field: protector.vendor.keyword
- Order by: Metric: Metrics Count
- Order: Descending
- Size: 50
- Custom label: Vendor
- Split rows
- Aggregation: Terms
- Field: protector.family.keyword
- Order by: Metric: Metrics Count
- Order: Descending
- Size: 50
- Custom label: Family
- Split rows
- Aggregation: Terms
- Field: policystatus.deployment_or_auth_time
- Order by: Metric: Metrics Count
- Order: Descending
- Size: 50
- Custom label: Deployment Time
- Split rows
Protector Core Version
Description: This pie chart displays the counts of protectors installed for each protector core version.
- Type: Pie
- Configuration:
- Index: pty_insight_analytics*audits_*
- Metrics: Slice size
- Aggregation: Unique Count
- Field: origin.ip
- Buckets:
- Split slices
- Aggregation: Terms
- Field: protector.core_version.keyword
- Order by: Metric:Unique count of origin.ip
- Order: Descending
- Size: 1000
- Custom label:CoreVersion
- Split slices
Protector Count
Description: This table displays the number of protector for each family, vendor, and version.
- Type: Data Table
- Filter: NOT protection.audit_code: is one of 27,28
- Configuration:
- Index: pty_insight_analytics*audits_*
- Metrics:
- Metric:
- Aggregation: Unique Count
- Field: origin.ip
- Custom label: Deployment Count
- Metric:
- Aggregation: Sum
- Field: cnt
- Custom label: URP
- Metric:
- Buckets:
- Split rows
- Aggregation: Terms
- Field: protector.family.keyword
- Order by: Metric: Deployment Count
- Order: Descending
- Size: 10000
- Custom label: Protector Family
- Split rows
- Aggregation: Terms
- Field: protector.vendor.keyword
- Order by: Metric: Metrics Count
- Order: Descending
- Size: 10000
- Custom label: Protector Vendor
- Split rows
- Aggregation: Terms
- Field: protector.version.keyword
- Order by: Metric: Deployment Count
- Order: Descending
- Size: 10000
- Custom label: Protector Version
- Split rows
Protector Details
Description: This table displays the number of protector for each family, vendor, version, pcc version, and core version.
- Type: Data Table
- Configuration:
- Index: pty_insight_analytics*audits_*
- Metrics:
- Metric:
- Aggregation: Unique Count
- Field: origin.ip
- Custom label: Deployment Count
- Metric:
- Aggregation: Sum
- Field: cnt
- Custom label: URP
- Metric:
- Buckets:
- Split rows
- Aggregation: Terms
- Field: protector.family.keyword
- Order by: Metric: Deployment Count
- Order: Descending
- Size: 10000
- Custom label: Protector Family
- Split rows
- Aggregation: Terms
- Field: protector.vendor.keyword
- Order by: Metric: Metrics Count
- Order: Descending
- Size: 10000
- Custom label: Protector Vendor
- Split rows
- Aggregation: Terms
- Field: protector.version.keyword
- Order by: Metric: Deployment Count
- Order: Descending
- Size: 10000
- Custom label: Protector Version
- Split rows
- Aggregation: Terms
- Field: protector.pcc_version.keyword
- Order by: Metric: Deployment Count
- Order: Descending
- Size: 10000
- Custom label: Protector Pcc Version
- Split rows
- Aggregation: Terms
- Field: protector.core_version.keyword
- Order by: Metric: Deployment Count
- Order: Descending
- Size: 10000
- Custom label: Protector Core Version
- Split rows
Protector Families
Description: This pie chart displays the counts of protectors installed for each protector family.
- Type: Pie
- Configuration:
- Index: pty_insight_analytics*audits_*
- Metrics: Slice size
- Aggregation: Unique Count
- Field: origin.ip
- Buckets:
- Split slices
- Aggregation: Terms
- Field: protector.family.keyword
- Order by: Metric:Unique count of origin.ip
- Order: Descending
- Size: 1000
- Custom label:Protector Family
- Split slices
Protector List
Description: This table displays details of the protector.
- Type: Data Table
- Filter: NOT protection.audit_code: is one of 27, 28
- Configuration:
- Index: pty_insight_analytics*audits_*
- Metrics:
- Aggregation: Sum
- Field: cnt
- Custom label: URP
- Buckets:
- Split rows
- Aggregation: Terms
- Field: protector.vendor.keyword
- Order by: Metric:URP
- Order: Descending
- Size: 10000
- Custom label: Protector Vendor
- Split rows
- Aggregation: Terms
- Field: protector.family.keyword
- Order by: Metric:URP
- Order: Descending
- Size: 10000
- Custom label: Protector Family
- Split rows
- Aggregation: Terms
- Field: protector.version.keyword
- Order by: Metric:URP
- Order: Descending
- Size: 10000
- Custom label: Protector Version
- Split rows
- Aggregation: Terms
- Field: origin.ip
- Order by: Metric:URP
- Order: Descending
- Size: 10000
- Custom label: Protector IP
- Split rows
- Aggregation: Terms
- Field: origin.hostname.keyword
- Order by: Metric:URP
- Order: Descending
- Size: 10000
- Custom label: Hostname
- Split rows
- Aggregation: Terms
- Field: protector.core_version.keyword
- Order by: Metric:URP
- Order: Descending
- Size: 10000
- Custom label: Core Version
- Split rows
- Aggregation: Terms
- Field: protector.pcc_version.keyword
- Order by: Metric:URP
- Order: Descending
- Size: 10000
- Custom label: Pcc Version
- Split rows
Protector Pcc Version
Description: This pie chart displays the counts of protectors installed for each protector pcc version.
- Type: Pie
- Configuration:
- Index: pty_insight_analytics*audits_*
- Metrics: Slice size
- Aggregation: Unique Count
- Field: origin.ip
- Buckets:
- Split slices
- Aggregation: Terms
- Field: protector.pcc_version.keyword
- Order by: Metric:Unique count of origin.ip
- Order: Descending
- Size: 999
- Custom label:PccVersion
- Split slices
Protector Status
Description: This table display protector status information.
- Type: Data Table
- Configuration:
- Index: pty_insight_analytics*protector_status_dashboard_*
- Metrics:
- Aggregation: Top Hit
- Field: origin.time_utc
- Aggregate with: Concatenate
- Size: 100
- Sort on: origin.time_utc
- Order: Descending
- Custom label: last seen
- Buckets:
- Split rows
- Aggregation: Terms
- Field: protector.datastore.keyword
- Order by: Alphabetically
- Order: Descending
- Size: 10000
- Custom label: Datastore
- Split rows
- Aggregation: Terms
- Field: origin.ip
- Order by: Alphabetically
- Order: Descending
- Size: 10000
- Custom label: Node IP
- Split rows
- Aggregation: Terms
- Field: origin.hostname.keyword
- Order by: Alphabetically
- Order: Descending
- Size: 10000
- Custom label: Hostname
- Split rows
- Aggregation: Terms
- Field: process.platform.keyword
- Order by: Alphabetically
- Order: Descending
- Size: 10000
- Custom label: Protector Platform
- Split rows
- Aggregation: Terms
- Field: process.core_version.keyword
- Order by: Alphabetically
- Order: Descending
- Size: 10000
- Custom label: Core Version
- Split rows
- Aggregation: Terms
- Field: protector.vendor.keyword
- Order by: Alphabetically
- Order: Descending
- Size: 10000
- Custom label: Protector Vendor
- Split rows
- Aggregation: Terms
- Field: protector.family.keyword
- Order by: Alphabetically
- Order: Descending
- Size: 10000
- Custom label: Protector Family
- Split rows
- Aggregation: Terms
- Field: protector.version.keyword
- Order by: Alphabetically
- Order: Descending
- Size: 10000
- Custom label: Protector Version
- Split rows
- Aggregation: Terms
- Field: protector_status.keyword
- Order by: Alphabetically
- Order: Descending
- Size: 10000
- Custom label: Protector Status
- Split rows
Protector Vendor
Description: This pie chart displays the counts of protectors installed for each protector vendor.
- Type: Pie
- Configuration:
- Index: pty_insight_analytics*audits_*
- Metrics: Slice size
- Aggregation: Unique Count
- Field: origin.ip
- Buckets:
- Split slices
- Aggregation: Terms
- Field: protector.vendor.keyword
- Order by: Metric:Unique count of origin.ip
- Order: Descending
- Size: 1000
- Custom label:Vendor
- Split slices
Protector Version
Description: This pie chart displays the protector count for each protector version.
- Type: Pie
- Configuration:
- Index: pty_insight_analytics*audits_*
- Metrics: Slice size
- Aggregation: Unique Count
- Field: origin.ip
- Buckets:
- Split slices
- Aggregation: Terms
- Field: protector.version.keyword
- Order by: Metric:Unique count of origin.ip
- Order: Descending
- Size: 1000
- Custom label: Version
- Split slices
Security Operation Table
Description: The table displays the number of security operations grouped by data stores, protector vendors, and protector families.
- Type: Data Table
- Filter: NOT protection.audit_code: is one of 27 , 28
- Configuration:
- Index: pty_insight_analytics*audits_*
- Metrics:
- Aggregation: Sum
- Field: cnt
- Custom label: Security Operations Count
- Buckets:
- Split rows
- Aggregation: Terms
- Field: protection.datastore.keyword
- Order by: Metric:Security Operation Count
- Order: Descending
- Size: 10000
- Custom label: Data Store Name
- Split rows
- Aggregation: Terms
- Field: protector.family.keyword
- Order by: Metric:Security Operation Count
- Order: Descending
- Size: 10000
- Custom label: Protector Family
- Split rows
- Aggregation: Terms
- Field: protector.vendor.keyword
- Order by: Metric:Security Operation Count
- Order: Descending
- Size: 10000
- Custom label: Protector Vendor
- Split rows
- Aggregation: Terms
- Field: protector.version.keyword
- Order by: Metric:Security Operation Count
- Order: Descending
- Size: 10000
- Custom label: Protector Version
- Split rows
Successful Security Operation Values
Description: The visualization displays only successful protect, unprotect, and reprotect operation counts.
- Type: Metric
- Configuration:
- Index: pty_insight_analytics*audits_*
- Metrics:
- Aggregation: Sum
- Field: cnt
- Custom label: Count
- Buckets:
- Split group
- Aggregation: Filters
- Filter 1-Protect: protection.operation: protect and level: success
- Filter 2-Unprotect: protection.operation: unprotect and level: success
- Filter 3-Reprotect: protection.operation: reprotect and level: success
- Split group
Successful Security Operations
Description: The pie chart displays only successful protect, unprotect, and reprotect operations.
- Type: Pie
- Configuration:
- Index: pty_insight_analytics*audits_*
- Metrics:
- Aggregation: Sum
- Field: cnt
- Custom label: URP
- Buckets:
- Split slices
- Aggregation: Filters
- Filter 1-Protect: protection.operation: protect and level: Success
- Filter 2-Unprotect: protection.operation: unprotect and level: Success
- Filter 3-Reprotect: protection.operation: reprotect and level: Success
- Split slices
Support Logs - Controls
Description: The visualization specifies the filters for the Support Logs data table.
- Type: Controls
- Configuration:
- Level:
- Control Label: Level
- Index Pattern: pty_insight_analytics*troubleshooting_*
- Field: level.keyword
- Multiselect: True
- Dynamic Options: True
- Pod:
- Control Label: Pod
- Index Pattern: pty_insight_analytics*troubleshooting_*
- Field: origin.pod_name.keyword
- Multiselect: True
- Dynamic Options: True
- Container:
- Control Label: Container
- Index Pattern: pty_insight_analytics*troubleshooting_*
- Field: origin.container_name.keyword
- Multiselect: True
- Dynamic Options: True
- Namespace:
- Control Label: Namespace
- Index Pattern: pty_insight_analytics*troubleshooting_*
- Field: origin.namespace_name.keyword
- Multiselect: True
- Dynamic Options: True
- Level:
Support Logs Data Table
Description: The table displays the filtered data for support logs.
- Type: Data Table
- Configuration:
- Index: pty_insight_analytics*troubleshooting_*
- Metrics:
- Aggregation: Unique Count
- Field: _id
- Custom label: COUNT
- Buckets:
- Split rows
- Aggregation: Terms
- Field: origin.time_utc
- Order by: Alphabetically
- Order: Descending
- Size: 200
- Custom label: ORIGIN TIME
- Split rows
- Buckets:
- Split rows
- Aggregation: Terms
- Field: level.keyword
- Order by: Alphabetically
- Order: Descending
- Size: 200
- Custom label: LEVEL
- Split rows
- Aggregation: Terms
- Field: additional_info.description.keyword
- Order by: Alphabetically
- Order: Descending
- Size: 200
- Custom label: DESCRIPTION
- Split rows
- Aggregation: Terms
- Field: origin.pod_name.keyword
- Order by: Alphabetically
- Order: Descending
- Size: 998
- Custom label: POD NAME
- Split rows
- Aggregation: Terms
- Field: origin.container_name.keyword
- Order by: Alphabetically
- Order: Descending
- Size: 200
- Custom label: CONTAINER NAME
- Split rows
- Aggregation: Terms
- Field: origin.namespace_name.keyword
- Order by: Alphabetically
- Order: Descending
- Size: 200
- Custom label: NAMESPACE
- Split rows
- Aggregation: Terms
- Field: logtype.keyword
- Order by: Metric:COUNT
- Order: Descending
- Size: 200
- Custom label: LOGTYPE
- Split rows
- Aggregation: Terms
- Field: index_time_utc
- Order by: Metric:COUNT
- Order: Descending
- Size: 98
- Custom label: INDEX TIME
- Split rows
- Aggregation: Terms
- Field: origin.ip
- Order by: Metric:COUNT
- Order: Descending
- Size: 200
- Custom label: ORIGIN IP
- Split rows
- Aggregation: Terms
- Field: origin.pod_id.keyword
- Order by: Metric:COUNT
- Order: Descending
- Size: 200
- Custom label: POD ID
- Split rows
- Sub Aggregation: Terms
- Field: _id
- Order by: Metric:COUNT
- Order: Descending
- Size: 200
- Custom label: DOC ID
- Split rows
Total Security Operation Values
Description: The visualization displays successful and unsuccessful security operation counts.
- Type: Metric
- Configuration:
- Index: pty_insight_analytics*audits_*
- Metrics:
- Aggregation: Sum
- Field: cnt
- Custom label: Count
- Buckets:
- Split group
- Aggregation: Filters
- Filter 1-Successful: logtype:protection and level: Success and not protection.audit_code: 27
- Filter 2-Unsuccessful: logtype:protection and not level: Success and not protection.audit_code: 28
- Split group
Total Security Operations
Description: The pie chart displays successful and unsuccessful security operations.
- Type: Pie
- Configuration:
- Index: pty_insight_analytics*audits_*
- Metrics: Slice size
- Aggregation: Sum
- Field: cnt
- Custom label: URP
- Buckets:
- Split slices
- Aggregation: Filters
- Filter 1-Successful: logtype:protection and level: Success and not protection.audit_code: 27
- Filter 2-Unsuccessful: logtype:protection and not level: Success and not protection.audit_code: 28
- Split slices
Trusted_App_Status_Chart
Description: The pie chart displays the trusted application deployment status.
- Type: Pie
- Filter: policystatus.type.keyword: TRUSTED_APP
- Configuration:
- Index: pty_insight_analytics*policy_status_dashboard_*
- Metrics:
- Slice size:
- Aggregation: Unique Count
- Field: _id
- Custom label: Trusted App
- Slice size:
- Buckets:
- Split slices
- Aggregation: Terms
- Field: policystatus.status.keyword
- Order by: Metric: Trusted App
- Order: Descending
- Size: 100
- Custom label: Trusted App Status
- Split slices
Trusted_App_Status_Table
Description: The trusted application deployment status that is displayed on the dashboard. This table uniquely identifies the data store, protector, process, platform, node, and so on.
- Type: Data Table
- Filter: policystatus.type.keyword: TRUSTED_APP
- Configuration:
- Index: pty_insight_analytics*policy_status_dashboard_*
- Metrics:
- Aggregation: Count
- Custom label: Metrics Count
- Buckets:
- Split rows
- Aggregation: Terms
- Field: policystatus.application_name.keyword
- Order by: Metric: Metric:Count
- Order: Descending
- Size: 50
- Custom label: Application Name
- Split rows
- Aggregation: Terms
- Field: protector.datastore.keyword
- Order by: Metric: Metric:Count
- Order: Descending
- Size: 50
- Custom label: Data Store Name
- Split rows
- Aggregation: Terms
- Field: origin.ip
- Order by: Metric: Metric:Count
- Order: Descending
- Size: 50
- Custom label: Node IP
- Split rows
- Aggregation: Terms
- Field: origin.hostname.keyword
- Order by: Metric: Metric:Count
- Order: Descending
- Size: 50
- Custom label: Host Name
- Split rows
- Aggregation: Terms
- Field: policystatus.status.keyword
- Order by: Metric: Metric:Count
- Order: Descending
- Size: 50
- Custom label: Status
- Split rows
- Aggregation: Terms
- Field: origin.time_utc
- Order by: Metric: Metric:Count
- Order: Descending
- Size: 50
- Custom label: Last Seen
- Split rows
- Aggregation: Terms
- Field: process.name.keyword
- Order by: Metric: Metric:Count
- Order: Descending
- Size: 50
- Custom label: Process Name
- Split rows
- Aggregation: Terms
- Field: process.id.keyword
- Order by: Metric: Metric:Count
- Order: Descending
- Size: 50
- Custom label: Process Id
- Split rows
- Aggregation: Terms
- Field: process.platform.keyword
- Order by: Metric: Metric:Count
- Order: Descending
- Size: 50
- Custom label: Platform
- Split rows
- Aggregation: Terms
- Field: process.core_version.keyword
- Order by: Metric: Metric:Count
- Order: Descending
- Size: 50
- Custom label: Core Version
- Split rows
- Aggregation: Terms
- Field: process.pcc_version.keyword
- Order by: Metric: Metric:Count
- Order: Descending
- Size: 50
- Custom label: PCC Version
- Split rows
- Aggregation: Terms
- Field: protector.version.keyword
- Order by: Metric: Metric:Count
- Order: Descending
- Size: 50
- Custom label: Protector Version
- Split rows
- Aggregation: Terms
- Field: protector.vendor.keyword
- Order by: Metric: Metric:Count
- Order: Descending
- Size: 50
- Custom label: Vendor
- Split rows
- Aggregation: Terms
- Field: protector.family.keyword
- Order by: Metric: Metric:Count
- Order: Descending
- Size: 50
- Custom label: Family
- Split rows
- Aggregation: Terms
- Field: policystatus.deployment_or_auth_time
- Order by: Metric: Metric:Count
- Order: Descending
- Size: 50
- Custom label: Authorize Time
- Split rows
- Split rows
- Aggregation: Terms
- Field: protector.datastore.keyword
- Order by: Metric: Metric:Count
- Order: Descending
- Size: 50
- Custom label: Data Store Name
Unsuccessful Security Operation Values
Description: The metric displays unsuccessful security operation counts.
- Type: Metric
- Filter 1: logtype: Protection
- Filter 2: NOT level: success
- Filter 3: NOT protection.audit_code: 28
- Configuration:
- Index: pty_insight_analytics*audits_*
- Metrics:
- Aggregation: Sum
- Field: cnt
- Custom label: Count
- Buckets: - Split group - Aggregation: Terms - Field: level.keyword - Order by: Metric:Count - Order: Descending - Size: 10000
Unsuccessful Security Operations
Description: The pie chart displays unsuccessful security operations.
- Type: Pie
- Filter 1: logtype: protection
- Filter 2: NOT level: success
- Filter 3: NOT protection.audit_code: 28
- Configuration:
- Index: pty_insight_analytics*audits_*
- Metrics:
- Slice size:
- Aggregation: Sum
- Field: cnt
- Custom label: Counts
- Slice size:
- Buckets:
- Split slices
- Aggregation: Terms
- Field: level.keyword
- Order by: Metric: Counts
- Order: Descending
- Size: 10000
- Split slices
3.4.5 - Index State Management (ISM)
The Protegrity Data Security Platform enforces security policies at many protection points throughout an enterprise and sends logs to the PPC. The logs are stored in a log repository, in this case the Audit Store. Manage the log repository using ISM in Insight Dashboard.
The following figure shows the components and the workflow of the ISM system.
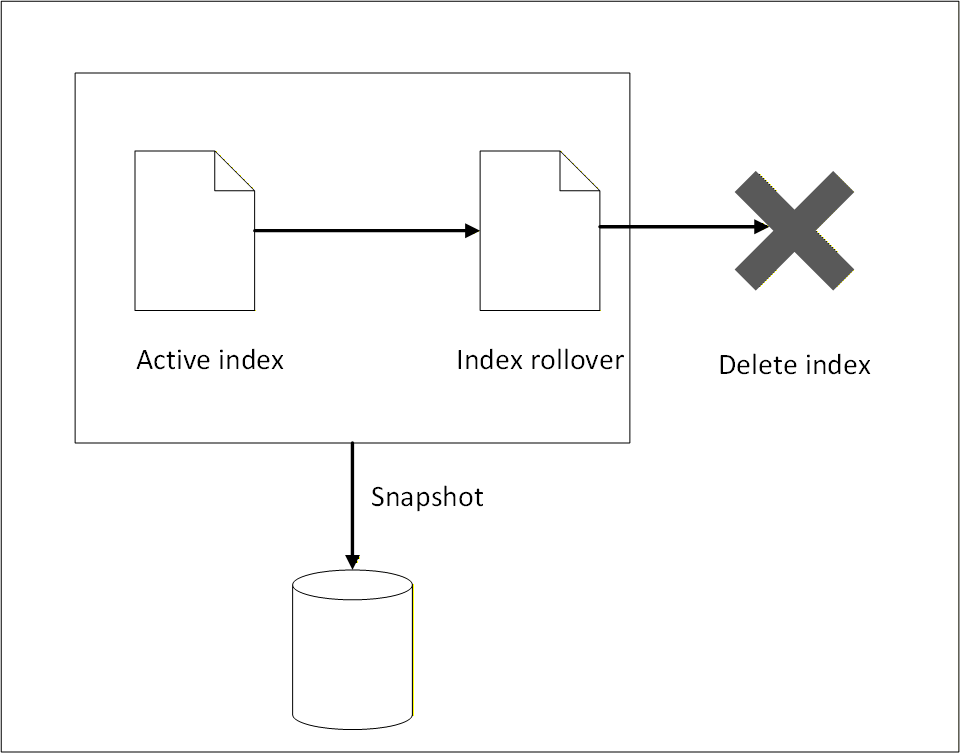
The ISM log repository consists of the following parts:
- Active logs that may be required for immediate reporting and are accessed regularly for high‑frequency analysis.
- Logs that are rolled over to a backup index using index rollover.
- Logs that are moved to external storage using snapshot backup.
- Logs that are deleted when they are no longer required.
To manage growing log data efficiently and ensure optimal performance of the Audit Store cluster, index rollover and index delete policy configurations are implemented. Index rollover allows the automatic creation of new indexes based on the size, age, or document count thresholds. The index delete policies must be defined by lifecycle actions such as rollover, delete, or transition to warm or cold storage. This setup is essential for maintaining healthy cluster performance and managing storage costs.
ISM does not take a snapshot automatically, logs must be manually backed up before the logs are deleted. ISM only performs index rollover and index delete operations.
Index rollover
This task performs an index rollover of the indexes when any of the specified conditions are fulfilled. The next index holds recent logs, making it faster to query and obtain current log information for monitoring and reporting. The earlier logs are available in the older indexes. Ensure that the older indexes are archived to an external storage before the delete policy permanently removes the older indexes. Alternatively, create a snapshot for backing up the logs. For more information about snapshots, refer to Backing up and restoring indexes.
The index rollover is applicable for the following indexes:
- pty_insight_analytics_troubleshooting_0.9*
- pty_insight_analytics_protectors_status_0.9*
- pty_insight_analytics_policy_log_0.9*
- pty_insight_analytics_miscellaneous_0.9*
- pty_insight_analytics_audits_0.9*
The index rollover is initiated when any one of the following criteria is fulfilled:
- rollover_min_index_age=“30d”
- rollover_min_doc_count=200000000
- rollover_min_size=“5gb”
Index delete
The index rollover creates a new index for entries. However, these indexes still reside on the same system and take up disk space. To reduce the disk space consumed, a rule is in place to delete rolled over indexes. Ensure that the older indexes are backed up to an external storage before the delete policy permanently removes the older indexes.
The following policy is defined for deleting indexes after rollover:
- delete_min_index_age=“90d”
Modifying index configurations
The index policies are set using industry standards and must not be changed. However, they can be modified based on company policies and requirements.
- Log in to the Insight Dashboard.
- From the menu, select Index Management.
- Click State management policies.
- Select the check box for the policy.
- Click Edit.
- Select JSON editor.
- Click Continue.
- Update the values in Define policy.
- Click Update.
Note: After policy modification, the new configuration will effect future indexes only. These new modifications are not applied to existing indexes.
3.4.6 - Backing up and restoring indexes
Backing up and restoring Audit Store indexes is essential for maintaining the reliability of Protegrity AI Team Edition. The Audit Store holds critical operational and audit data used for monitoring, troubleshooting, and compliance. Regular backups protect this data from loss due to failures, upgrades, or misconfiguration, while restore capabilities enable quick recovery and minimal downtime. A well-defined backup and restore strategy helps ensure data durability and platform stability.
Note: Use a dedicated backup bucket per cluster to prevent data corruption. Only snapshots backed up using the daily-insight-snapshots policy are restored during disaster management. Do not delete this policy.
Understanding the snapshot policy
Policies are defined for backing up Audit Store indexes regularly. This ensures that data is available for restoring the indexes and logs in case of data corruption or data deletion. This policy is different from the Index Statement Management (ISM) for rolling over indexes and deleting indexes for maintenance and ensuring the system works fast and smooth. For more information about ISM, refer to Index State Management (ISM). Indexes deleted by ISM can be recreated using the backup created. The state of the indexes are tracked and backed up when the policy is run. Any updated made to the index during the snapshot creation are not backed up during the current run. They will be backed up when the policy is run again as per the schedule set.
The following criteria is specified for creating backups:
- Policy settings
- Policy name:
daily-insight-snapshots - Indices:
*, -*-restored, -*_restored, -restored_* - Repository:
insight-snapshots - Include cluster state:
true - Ignore unavailable indices:
true - Allow partial snapshots:
false
- Policy name:
- Snapshot schedule
- Frequency:
Daily - Cron schedule:
3:00 am UTC (UTC)
- Frequency:
- Snapshot retention period
- Maximum age of snapshots:
60d - Minimum of snapshots retained:
1 - Maximum of snapshots retained:
undefined - Frequency:
Daily - Cron schedule:
4:00 am UTC (UTC)
- Maximum age of snapshots:
- Notification
- Notify on snapshot activities:
creation, deletion, failure
- Notify on snapshot activities:
Managing the backup policy
The default policy provides a Recovery Point Objective (RPO) of 24 hours. Update the snapshot schedule to modify the backup policy based on the required RPO and Recovery Time Objective (RTO).
View and update the policy using the following steps.
- Log in to the Insight Dashboard.
- Select the main menu.
- Navigate to Management > Snapshot Management > Snapshot policies.
- Click the daily-insight-snapshots policy.
- Click Edit.
- Update the required parameters, such as, the snapshot schedule.
- Select the retention period and number of snapshots to be retained.
- Select the deletion frequency for the snapshot. This is the scheduled task run for deleting snapshots that no longer need to be retained.
- Select the required Notifications check boxes for receiving notifications.
- Click Update.
The new backup policy settings are used for creating the restore points.
For disaster management, to restore the system and the indexes, refer to restoring. A snapshot needs to be available before it can be restored.
3.4.7 - Working with alerts
Viewing alerts
Generated alerts are displayed on the Insight Dashboard. View and acknowledge the alerts from the alerting dashboard by navigating to OpenSearch Plugins > Alerting > Alerts.
For more information about working with Monitors, Alerts, and Notifications, refer to Monitors in OpenSearch Dashboards.
Creating notifications
Create notification channels to receive alerts as per individual requirements. The alerts are sent to the destination specified in the channel.
Creating a custom webhook notification
A webhook notification sends the alerts generated by a monitor to a destination, such as, a web page.
Perform the following steps to configure the notification channel for generating webhook alerts:
Log in to the Web UI.
From the menu, navigate to Management > Notifications > Channels.
Click Create channel.
Specify the following information under Name and Description:
- Name: Http_webhook
- Description: For generating http webhook alerts.
Specify the following information under Configurations:
- Channel type: Custom webhook
- Method: POST
- Define endpoints by: Webhook URL
- Webhook URL: Specify the URL that receives the alert. For example
https://webhook.site/9385a259-3b82-4e99-ad1e-1eb875f00734. - Webhook headers: Specify the key value pairs for the webhook.
Click Send test message to send a message to the email recipients.
Click Create to create the channel.
The webhook is set up successfully.
Create a monitor and attach the channel created using the steps from the section Creating the monitor.
Creating email alerts using custom webhook
An email notification sends alerts generated by a monitor to an email address. It is also possible to configure the SMTP channel for sending an email alert. The email alerts can be encrypted or non-encrypted. Accordingly, the required SMTP settings for email notifications must be configured.
Ensure that the following is configured as per the requirement:
Ensure that the following prerequisites are met.
- Outbound SMTP access is enabled.
- Required SMTP port is open, for example, 587 for STARTTLS.
- Firewall and routing configurations allow SMTP traffic.
Log in to the CLI to configure the email service. For more information about using the CLI commands, refer to Administrator Command Line Interface (CLI) Reference.
Verify if any email service is already configured.
admin get email
- Configure the email service.
admin set email -h "email_provider" -p <port> --use-tls -u "<username>" -w "<password>"
- Send a test email message.
admin test email -f "<senders_email>" -t "<receivers_email>" -s "Test" -b "This is a test."
Log in to the Web UI.
From the menu, navigate to OpenSearch Plugins > Notifications > Channels.
Click Create channel.
Specify the following information under Name and Description:
- Name: send_email_with_certs_alerts
- Description: For secure SMTP alerts.
Specify the following information under Configurations:
-   **Channel type**: **Custom webhook**
-   **Webhook URL**: `http://pty-smtp-service.email-service.svc.cluster.local:8000/api/v1/email/send`
- Under Webhook headers, click Add header and specify the following information:
-   **Key**: **Pty-Username**
-   **Value**: `%internal_scheduler;`
- Under Webhook headers, click Add header and specify the following information:
-   **Key**: **Pty-Roles**
-   **Value**: **auditstore_admin**
Click Create to save the channel configuration.
Caution: Do not click Send test message because the configuration for the channel is not complete.
The success message appears and the channel is created. The webhook for the email alerts is set up successfully.
Create a monitor and attach the channel created using the steps from the section Creating the monitor.
Forwarding alerts to a local file
Complete the configuration provided in this section to send the logs to the alerting module. The logs are saved in the \fluentd\log directory.
- Log in to the jumpbox.
- Navigate to a directory for working with configuration files.
- Run the following command to update the
fluent.conffile.
kubectl get configmap standalone-fluentd-config -n pty-insight -o jsonpath='{.data.fluent\.conf}' > fluent.conf
- Update the following code at the start of the file.
<source>
    @type http
    bind "0.0.0.0"
    port 24284
    <parse>
        @type "json"
    </parse>
</source>
- Locate the following code.
<match *.*.* logdata flulog>
- Replace the text identified in the earlier step with the following code to process all the data.
<match **>
- Add the following code before the closing
</match>tag to output the content to a file.
<store>
@type "file"
path "/fluentd/log/buffer"
append true
<buffer time>
    path "/fluentd/log/buffer"
</buffer>
</store>
- Run the following command to load the new configuration.
kubectl create configmap standalone-fluentd-config -n pty-insight --from-file=fluent.conf --dry-run=client -o yaml > standalone-fluentd-config-new.yaml
- Run the following command to load the configuration.
kubectl replace -f standalone-fluentd-config-new.yaml -n pty-insight
- Run the following command to generate the
standalone-fluentd-deployment.yamlfile.
kubectl get deployment standalone-fluentd -n pty-insight -o yaml > standalone-fluentd-deployment.yaml
- Open the
standalone-fluentd-deployment.yamlfile. - Locate the following code.
spec:
  containers:
  - args:
    - |
    export GEM_HOME="$HOME/.local/gems" && \
    export PATH="$GEM_HOME/bin:$PATH" && \
    gem install fluent-plugin-opensearch --no-document --user-install && \
    fluentd -c /fluentd/etc/fluent.conf -v
- Add the following
fluent-plugin-httpfile in the code to install the required.gemfile.
spec:
  containers:
  - args:
    - |
    export GEM_HOME="$HOME/.local/gems" && \
    export PATH="$GEM_HOME/bin:$PATH" && \
    gem install fluent-plugin-opensearch fluent-plugin-http --no-document --user-install && \
    fluentd -c /fluentd/etc/fluent.conf -v
- Add the following code to the
volumeMounts:parameter. Append the mount path at the end retaining the current volume mounts.
        volumeMounts:
        - mountPath: /fluentd/etc/
          name: standalone-fluentd-config
- Locate the following code.
     volumes:
      - configMap:
          defaultMode: 420
          name: standalone-fluentd-config
        name: standalone-fluentd-config
      - name: tls-for-insight-key-pair
        secret:
          defaultMode: 420
          secretName: tls-for-insight-key-pair
- Update the code to add the directory details to the configuration file.
     volumes:
      - configMap:
          defaultMode: 420
          name: standalone-fluentd-config
        name: standalone-fluentd-config
      - name: tls-for-insight-key-pair
        secret:
          defaultMode: 420
          secretName: tls-for-insight-key-pair
      - emptyDir: {}
        name: fluentd-log
- Apply the configurations using the following command.
kubectl apply -f standalone-fluentd-deployment.yaml
- Process the configurations using the following command.
kubectl rollout restart deployment standalone-fluentd -n pty-insight
- Verify that the pods are running.
kubectl get pods -n pty-insight
- Proceed to create a monitor using the steps from Creating the monitor.
Creating the monitor
A monitor tracks the system and sends an alert when a trigger is activated. Triggers cause actions to occur when certain criteria are met. Those criteria are set when a trigger is created. For more information about monitors, actions, and triggers, refer to Alerting.
Perform the following steps to create a monitor. The configuration specified here is just an example. For real use, create whatever configuration is needed per individual requirements:
Ensure that a notification is created using the steps from Creating notifications.
From the menu, navigate to OpenSearch Plugins > Alerting > Monitors.
Click Create Monitor.
Specify a name for the monitor.
For the Monitor defining method, select Extraction query editor.
For the Schedule, select 30 Minutes.
For the Index, select the required index.
Specify the following query for the monitor. Modify the query as per the requirement.
{
    "size": 0,
    "query": {
        "match_all": {
            "boost": 1
        }
    }
}
Click Add trigger and specify the information provided here.
Specify a trigger name.
Specify a severity level.
Specify the following code for the trigger condition:
ctx.results[0].hits.total.value > 0
Click Add action.
From the Channels list, select the required channel.
Add the following code in the Message field. The default message displayed might not be formatted properly. Update the message by replacing the Line spaces with the n escape code. The message value is a JSON value. Use escape characters to structure the email properly using valid JSON syntax.
```
{
"message": "Please investigate the issue.\n  - Trigger: {{ctx.trigger.name}}\n  - Severity: {{ctx.trigger.severity}}\n  - Period start: {{ctx.periodStart}}\n  - Period end: {{ctx.periodEnd}}",
"subject": "Monitor {{ctx.monitor.name}} just entered alert status"
}
```
>	**Note:** The **message** value is a JSON value. Be sure to use escape characters to structure the email properly using valid JSON syntax. The default message displayed might not be formatted properly. Update the message by replacing the Line spaces with the **\\n** escape code.
- Select the Preview message check box to view the formatted email message.
- Click Send test message and verify the recipient’s inbox for the message.
- Click Save to update the configuration.
3.5 - Protegrity REST APIs
The Protegrity REST APIs include the following APIs:
- Policy Management REST APIs The Policy Management REST APIs are used to create or manage policies.
- Encrypted Resilient Package APIs
The Encrypted Resilient Package REST APIs include the REST API that is used to encrypt and export a resilient package, which is used by the resilient protectors.
For more information on how the REST API is used to export the encrypted resilient package in an immutable policy deployment, refer to the section DevOps Approach for Application Protector.
3.5.1 - Accessing the Protegrity REST APIs
The following section lists the requirements for accessing the Protegrity REST APIs.
Available endpoints - Protegrity has enabled the following endpoints to access the REST APIs.
- Base URL
- https://<FQDN>/pty/<Version>/<API>
Where:
- FQDN: Fully Qualified Domain Name provided by the user during PPC installation.
- Version: Specifies the version of the API.
- API: Endpoint of the REST API.
Authentication - You can access the REST APIs using client certificates or tokens. The authentication depends on the type of REST API that you are using. For more information about accessing the REST APIs using these authentication mechanisms, refer to the section Accessing REST API Resources.
Authorization - You must assign the permissions to roles for accessing the REST APIs. For more information about the roles and permissions required, refer to the section Managing Roles.
3.5.2 - View the Protegrity REST API Specification Document
The steps mentioned in this section contain the usage of Docker containers and services to download and launch the images for Swagger Editor within a Docker container. The following example uses Swagger Editor to view the REST API specification document.
For more information about Docker, refer to the Docker documentation.
Install and start the Swagger Editor.
Download the Swagger Editor image within a Docker container using the following command.
docker pull swaggerapi/swagger-editorLaunch the Docker container using the following command.
docker run -d -p 8888:8080 swaggerapi/swagger-editorPaste the following address on a browser window to access the Swagger Editor using the specified host port.
http://localhost:8888/Download the REST API specification document using the following command.
curl "https://<FQDN>/pty/<Version>/<API>/doc" -H "accept: application/x-yaml" --output api-doc.yamlIn this command:
- <Version> is the version number of the API. For example,
v1orv2. - <API> is the API for which you want to download the OpenAPI specifications document. For example, specify the value as
pimto download the OpenAPI specifications for the Policy Management REST API. Similarly, specify the value asauthto download the OpenAPI specifications for the Authentication and Token Management API. - <FQDN> is the Fully Qualified Domain Name of the Protegrity server. For example,
protegrity.example.com.
For more information about the Policy Management REST APIs, refer to the section Using the Policy Management REST APIs.
For more information about the Authentication and Token Management REST APIs, refer to the section Using the Authentication and Token Management REST APIs.
- <Version> is the version number of the API. For example,
Drag and drop the downloaded api-doc.yaml file into a browser window of the Swagger Editor.
Generating the REST API Samples Using the Swagger Editor
Perform the following steps to generate samples using the Swagger Editor.
Open the api-doc.yaml file in the Swagger Editor.
On the Swagger Editor UI, click on the required API request.
Click Try it out.
Enter the parameters for the API request.
Click Execute.
The generated cURL command and the URL for the request appear in the Responses section.
3.5.3 - Using the Common REST API Endpoints
The following section specifies the common operations that are applicable to all the Protegrity REST APIs.
The Base URL for each API will change depending on the version of the API being used. The following table specifies the version that you must use when executing the common operations for each API.
| REST API | Description | Base URL <Version> |
|---|---|---|
| pim | Policy Management | v2 |
| rps | Encrypted Resilient Package | v1 |
| auth | Authentication and Token Management | v1 |
Common REST API Endpoints
The following table lists the common operations for the Protegrity REST APIs.
| REST API | Description |
|---|---|
| /version | Retrieves the application version. |
| /buildVersion | Retrieves the full build version string including pre-release and build metadata. |
| /health | Retrieves the health information for the Protegrity REST APIs and identifies whether the corresponding service is running. |
| /doc | Retrieves the API specification document. |
| /log | Retrieves the current log level of the REST API service logs. |
| /log | Changes the log level for the REST API service during run-time. The level set through this resource is persisted until the corresponding service is restarted. This log level overrides the log level defined in the configuration. |
| /ready | Retrieves the information for the Protegrity REST APIs to identify whether the corresponding service can handle requests. |
| /live | Retrieves the information for the Protegrity REST APIs to determine whether the corresponding service should be restarted. |
Retrieving the Supported Application Versions
This API retrieves the application version information.
- Base URL
- https://{FQDN}/pty/<Version>/<API>
- Path
- /version
- Method
- GET
CURL request syntax
curl -X 'GET' \
  'https://<FQDN>/pty/v1/auth/version' \
  -H 'accept: application/json'
Authentication credentials
Not required.
Sample CURL request
curl -X 'GET' \
  'https://<FQDN>/pty/v1/auth/version' \
  -H 'accept: application/json'
Sample CURL response
{
  "version": "1.2.3",
  "buildVersion": "1.11.0-alpha+65.g9f0ae.master"
}
Retrieving the API Specification Document
This API request retrieves the API specification document.
- Base URL
- https://{FQDN}/pty/<Version>/<API>
- Path
- /doc
- Method
- GET
CURL request syntax
curl -X GET "https://<FQDN>/pty/<Version>/<API>/doc"
Authentication credentials
Not required.
Sample CURL requests
curl -X GET "https://<FQDN>/pty/v1/rps/doc"
curl -X GET "https://<FQDN>/pty/v1/rps/doc" -o "rps.yaml"
Sample CURL responses
The Encrypted Resilient Package API specification document is displayed as a response. If you have specified the “-o” parameter in the CURL request, then the API specification is saved to the output file name specified in the command, rather than being displayed in the terminal. You can use the Swagger UI to view the API specification document.
Retrieving the Log Level
This API request retrieves the current log level of the REST API service logs.
- Base URL
- https://{FQDN}/pty/<Version>/<API>
- Path
- /log
- Method
- GET
CURL request syntax
curl -X 'GET' \
  "https://<FQDN>/pty/v1/auth/log" \
  -H "accept: application/json" \
  -H "Authorization: Bearer <Token>"
In this command, Token indicates the JWT token used for authenticating the API.
Alternatively, you can also store the JWT token in an environment variable named TOKEN, as shown in the following command.
curl -X 'GET' \
  "https://<FQDN>/pty/v1/auth/log" \
  -H "accept: application/json" \
  -H "Authorization: ${TOKEN}"
Authentication credentials
TOKEN - Environment variable containing the JWT token.
For more information about creating a JWT token, refer to the section Generate token.
Sample CURL request
curl -X 'GET' \
  "https://<FQDN>/pty/v1/auth/log" \
  -H "accept: application/json" \
  -H "Authorization: Bearer <Token>"
This sample request uses the JWT token authentication.
Sample CURL response
{
  "level": "info"
}
Setting Log Level for the REST API Service Log
This API request changes the REST API service log level during run-time. The level set through this resource persists until the corresponding service is restarted. This log level overrides the log level defined in the configuration.
- Base URL
- https://{FQDN}/pty/<Version>/<API>
- Path
- /log
- Method
- POST
CURL request syntax
curl -X POST
  "https://<FQDN>/pty/<Version>/<API>/log"
  -H "Authorization: Bearer <TOKEN>"
  -H "accept: application/json"
  -H "Content-Type: application/json" -d "{\"level\":\"log level\"}"
In this command, Token indicates the JWT token used for authenticating the API.
Alternatively, you can also store the JWT token in an environment variable named TOKEN, as shown in the following command.
curl -X POST "https://<FQDN>/pty/<Version>/<API>/log" -H "Authorization: Bearer ${TOKEN}" -H "accept: application/json" -H "Content-Type: application/json" -d "{\"level\":\"log level\"}"
Authentication credentials
TOKEN - Environment variable containing the JWT token.
For more information about creating a JWT token, refer to the section Generate token.
Request body elements
log level
Set the log level. The log level can be set to SEVERE, WARNING, INFO, CONFIG, FINE, FINER, or FINEST.
| Log Level | Description | When to Use |
|---|---|---|
| SEVERE | Indicates a critical failure that prevents normal operation. | Use when the service encounters a fatal error that requires immediate attention, such as an unrecoverable system failure. |
| WARNING | Indicates a potential problem that does not stop the service but may require attention. | Use when an unexpected situation occurs that could lead to errors if not addressed. |
| INFO | Provides general informational messages about the progress of the service. | Use for routine operational messages, such as service startup, shutdown, or key processing milestones. |
| CONFIG | Captures static configuration details. | Use to log configuration settings and parameters at service startup for diagnostic purposes. |
| FINE | Provides general tracing and debugging information. | Use for basic debugging when troubleshooting issues. |
| FINER | Provides more detailed tracing than FINE, including method entry and exit points. | Use for in-depth debugging when more granular trace information is needed. |
| FINEST | Provides the most detailed and verbose tracing output. | Use only when exhaustive debugging information is required, as this level generates a high volume of log data. |
Sample CURL request
curl -X POST "https://<FQDN>/pty/v1/rps/log" -H "Authorization: Bearer ${TOKEN}" -H "accept: application/json" -H "Content-Type: application/json" -d "{\"level\":\"SEVERE\"}"
This sample request uses the JWT token authentication.
Sample response
The log level is set successfully.
Retrieving the Service Health Information
This API request retrieves the health information of the REST API service and identifies whether the service is running.
- Base URL
- https://{FQDN}/pty/<Version>/<API>
- Path
- /health
- Method
- GET
CURL request syntax
curl -H "Authorization: Bearer <TOKEN>" -X GET "https://<FQDN>/pty/<Version>/<API>/health"
In this command, Token indicates the JWT token used for authenticating the API.
Alternatively, you can also store the JWT token in an environment variable named TOKEN, as shown in the following command.
curl -H "Authorization: Bearer ${TOKEN}" -X GET "https://<FQDN>/pty/<Version>/<API>/health"
Authentication credentials
TOKEN - Environment variable containing the JWT token.
For more information about creating a JWT token, refer to the section Generate token.
Sample CURL request
curl -H "Authorization: Bearer ${TOKEN}" -X GET "https://<FQDN>/pty/v2/pim/health"
This sample request uses the JWT token authentication.
Sample CURL response
{
  "isHealthy" : true
}
Where,
- isHealthy: true - Indicates that the service is up and running.
- isHealthy: false - Indicates that the service is down.
Retrieving the Service Readiness Status
This API request retrieves the readiness status of the REST API service and identifies whether the corresponding service is ready to handle requests.
Base URLhttps://{FQDN}/pty/<Version>/<API>
Path
/ready
MethodGET
CURL request syntax
curl -H "Authorization: Bearer <TOKEN>" -X GET "https://<FQDN>/pty/<Version>/<API>/ready"
In this command, Token indicates the JWT token used for authenticating the API.
Alternatively, you can also store the JWT token in an environment variable named TOKEN, as shown in the following command.
curl -H "Authorization: Bearer ${TOKEN}" -X GET "https://<FQDN>/pty/<Version>/<API>/ready"
Authentication credentials
TOKEN - Environment variable containing the JWT token. For more information about creating a JWT token, refer to the section Generate token.
Sample CURL request
curl -X 'GET' \
  "https://<FQDN>/pty/v1/auth/ready" \
  -H "accept: */*" \
  -H "Authorization: Bearer <access_token>"
This sample request uses the JWT token authentication.
Sample Server response
Code : 204
Response Header:
date: Wed,01 Apr 2026
12:49:59 GMT
server: uvicorn
x-correlation-id: a7c3d2b8-9cfb-4dd9-b31e-57f6225d3d33
Retrieving the Service Liveness Status
This API request retrieves the liveness status of the REST API service and determines whether the corresponding service should be restarted.
Base URLhttps://{FQDN}/pty/<Version>/<API>
Path
/live
MethodGET
CURL request syntax
curl -H "Authorization: Bearer <TOKEN>" -X GET "https://<FQDN>/pty/<Version>/<API>/live"
In this command, Token indicates the JWT token used for authenticating the API.
Alternatively, you can also store the JWT token in an environment variable named TOKEN, as shown in the following command.
curl -H "Authorization: Bearer ${TOKEN}" -X GET "https://<FQDN>/pty/<Version>/<API>/live"
Authentication credentials
TOKEN - Environment variable containing the JWT token. For more information about creating a JWT token, refer to the section Generate token.
Sample CURL request
curl -X 'GET' \
  "https://<FQDN>/pty/v1/auth/live" \
  -H "accept: */*" \
  -H "Authorization: Bearer <access_token>"
This sample request uses the JWT token authentication.
Sample Server response
Code : 204
Response Header:
date: Wed,01 Apr 2026
12:49:59 GMT
server: uvicorn
x-correlation-id: a7c3d2b8-9cfb-4dd9-b31e-57f6225d3d33
3.5.4 - Using the Authentication and Token Management REST APIs
Note: The Authentication and Token Management API uses the v1 version.
If you want to perform common operations using the Authentication and Token REST API, then refer the section Using the Common REST API Endpoints.
The following table provides section references that explain usage of some of the Authentication and Token REST APIs. It includes sample examples to work with the Authentication and Token functions. If you want to view all the Authentication and Token APIs, then use the /doc API to retrieve the API specification.
Token Management
Tokens are short-lived credentials used to authenticate and authorize API requests securely, without transmitting user passwords on every call. The Protegrity REST APIs use JSON Web Tokens (JWTs). When a user logs in, an access token and a refresh token are issued. The access token is included in the Authorization header of each API request to verify the caller’s identity and permissions. Once the access token expires, the refresh token can be used to obtain a new access token without requiring the user to log in again.
The following section lists the commonly used APIs to manage tokens.
Generate token
This API explains how you can generate an access token for authenticating the APIs.
- Base URL
- https://<FQDN>/pty/<version>/<API>
- Path
- /login/token
- Method
- POST
Request Body
- loginname: User name for authentication.
- password: Password for authentication.
Result
This API returns JWT access token in the response header and the refresh token in the response body. You can use the refresh token in the Refresh token API to obtain new access tokens without logging again.
The response body includes the following expiry fields:
- expiresIn: Number of seconds until the access token expires. For example, a value of
300means the access token is valid for 5 minutes from the time it was issued. - refreshExpiresIn: Number of seconds until the refresh token expires. For example, a value of
900means the refresh token is valid for 15 minutes.
Sample Request
curl -X 'POST' \
  "https://<FQDN>/pty/v1/auth/login/token" \
  -H "accept: application/json" \
  -H "Content-Type: application/x-www-form-urlencoded" \
  -d 'loginname=<User name>&password=<Password>!'
If you have the CA certificate file for your environment, use --cacert to verify the server securely.
curl --cacert /path/to/ca-cert.pem -X 'POST' \
  "https://<FQDN>/pty/v1/auth/login/token" \
  -H "accept: application/json" \
  -H "Content-Type: application/x-www-form-urlencoded" \
  -d 'loginname=<User name>&password=<Password>'
Replace /path/to/ca-cert.pem with the actual path to your organization’s CA certificate.
Sample Response
The following response appears for the status code 200, if the API is invoked successfully.
Response body
{
  "status": 0,
  "data": {
    "accessToken": "eyJhbGciOiJIUzI1NiIsIn",
    "refreshToken": "eyJhbGciOiJIUzI1NiIsInR5cCI6IkpXVCJ9.e",
    "expiresIn": 300,
    "refreshExpiresIn": 900
  },
  "messages": []
}
Response header
content-length: 832
 content-type: application/json
 date: Thu,16 Oct 2025 10:30:53 GMT
 pty_access_jwt_token: eyJhbGciOiJSUzI1NiIsInR4YRUw
 strict-transport-security: max-age=31536000; includeSubDomains
Refresh token
This API explains how to refresh an access token using the refresh token.
- Base URL
- https://<FQDN>/pty/<version>/<API>
- Path
- /login/refresh
- Method
- POST
Request Body
- refreshToken: Refresh token for getting a new access token.
Result
This API returns a new JWT access token in the response header and a new refresh token in the response body. You can use this refresh token to obtain new access tokens without logging again.
Sample Request
curl -X 'POST' \
"https://<FQDN>/pty/v1/auth/login/token/refresh" \
-H "accept: application/json" \
-H "Content-Type: application/json" \
-d '{
"refreshToken": "eyJhbGciOiJIUzUxMiIsInR5cCINGFeZEf8hw"
}'
Sample Response
The following response appears for the status code 200, if the API is invoked successfully.
Response body
{
"status": 0,
"data": {
"accessToken": "eyJhbGciOiJIUzI1NiI",
"refreshToken": "eyJhbGciOiJIUzI1NiIs",
"expiresIn": 300,
"refreshExpiresIn": 900
},
"messages": []
}
Response header
content-length: 832
content-type: application/json
date: Thu,16 Oct 2025 10:36:28 GMT
pty_access_jwt_token: eyJhbGciOiJSUzI1Nim95VHqh00vHfr8ip9RhyO-4FcxQ
strict-transport-security: max-age=31536000; includeSubDomains
Invalidate a user session
This API explains how you can invalidate a user session using the provided refresh token.
When this API is called with a valid refresh token, the following occurs:
- The user session associated with the provided refresh token is immediately terminated.
- Both the refresh token and the corresponding access token are invalidated and can no longer be used to authenticate API requests.
- Any subsequent API request using the invalidated access token will return a
401 Unauthorizederror. - To resume making API requests, the user must log in again using the Generate token API to obtain a new access token and refresh token.
- Base URL
- https://<FQDN>/pty/<version>/<API>
- Path
- /logout
- Method
- POST
Request Body
- refreshToken: Refresh token for invalidating the user session.
Result
This API invalidates the user session using the refresh token in the Refresh token API.
Sample Request
curl -X 'POST' \
"https://<FQDN>/pty/v1/auth/logout" \
-H "accept: application/json" \
-H "Content-Type: application/json" \
-d '{
"refreshToken": "eyJhbGciOiJIUzUxMiIsInR5cCIgOiAiSldUOTEifQ."
}'
Sample Response
The following response appears for the status code 200, if the API is invoked successfully.
Response body
{
"status": 0,
"data": {
"message": "Token invalidated successfully."
},
"messages": []
}
Update access token lifespan and SSO idle timeout
This API explains how you can update the access token lifespan and SSO idle timeout.
- Base URL
- https://<FQDN>/pty/<version>/<API>
- Path
- /token/lifespan/update
- Method
- POST
Request Body
- accessTokenLifespan: Updated lifespan of the access token in seconds.
Result
This API updates the lifespan of the access token. It also automatically updates the lifespan of the refresh token or the SSO idle timeout by adding 10 minutes to the lifespan of the access token.
Sample Request
curl -X 'POST' \
"https://<FQDN>/pty/v1/auth/token/lifespan/update" \
-H "accept: application/json" \
-H "Content-Type: application/json" \
-d '{
"accessTokenLifespan": 600
}'
Sample Response
The following response appears for the status code 200, if the API is invoked successfully.
Response body
"Token lifespan updated successfully."
Roles and Permissions Management
The following section lists the commonly used APIs for managing user roles and permissions.
List all permissions
This API returns a list of all the permissions available ordefined in PPC.
- Base URL
- https://<FQDN>/pty/<version>/<API>
- Path
- /permissions
- Method
- GET
Request Body
No parameters.
Result
This API returns a list of all the permissions and roles available or defined in PPC.
Sample Request
curl -X 'GET' \
"https://<FQDN>/pty/v1/auth/permissions" \
-H "accept: application/json" \
-H "Authorization: Bearer <access_token>"
This sample request uses the access token of the logged-in user for authentication.
For more information about generating the access token, refer to the section Generate token.
Sample Response
The following response appears for the status code 200, if the API is invoked successfully.
Response body
[
{
"name": "user_manager_admin",
"description": "Permission to manage users with read-write access"
},
{
"name": "saml_viewer",
"description": "Permission to view SAML configurations with read-only access"
},
{
"name": "user_manager_viewer",
"description": "Permission to view users with read-only access"
},
{
"name": "cli_access",
"description": "Grants or restricts a user’s ability to access the CLI"
},
{
"name": "saml_admin",
"description": "Permission to update SAML configurations with read-write access"
},
{
"name": "group_viewer",
"description": "Permission to view groups with read-only access"
},
{
"name": "group_admin",
"description": "Permission to manage groups with read-write access"
},
{
"name": "password_policy_admin",
"description": "Permission to update password policy with read-write access"
},
{
"name": "insight_viewer",
"description": "Permission to view Insight Dashboard with read-only access."
},
{
"name": "password_policy_viewer",
"description": "Permission to view password policy with read-only access"
},
{
"name": "role_viewer",
"description": "Permission to view roles with read-only access"
},
{
"name": "can_create_token",
"description": "Permission to create/refresh tokens"
},
{
"name": "insight_admin",
"description": "Permission to view and edit Insight Dashboard with admin access."
},
{
"name": "role_admin",
"description": "Permission to manage roles with read-write access"
},
{
"name": "web_admin",
"description": "Permission to perform all operations available as part of the Web UI."
}
]
List all roles
This API returns a list of all the roles available or defined in PPC.
- Base URL
- https://<FQDN>/pty/<version>/<API>
- Path
- /roles
- Method
- GET
Request Body
No parameters.
Result
This API returns a list of all the roles available for the logged-in user.
Sample Request
curl -X 'GET' \
"https://<FQDN>/pty/v1/auth/roles" \
-H "accept: application/json" \
-H "Authorization: Bearer <access_token>"
This sample request uses the access token of the logged-in user for authentication.
For more information about generating the access token, refer to the section Generate token.
Sample Response
The following response appears for the status code 200, if the API is invoked successfully.
Response body
[
{
"name": "directory_administrator",
"description": "Directory Administrator",
"composite": true,
"permissions": [
"saml_admin", "role_admin", "user_manager_admin", "can_create_token", "password_policy_admin", "group_admin"
]
},
{
"name": "directory_viewer",
"description": "Directory Viewer",
"composite": true,
"permissions": [
"saml_viewer", "password_policy_viewer", "user_manager_viewer", "role_viewer", "group_viewer"
]
},
{
"name": "security_administrator",
"description": "Security Administrator",
"composite": true,
"permissions": [
"can_fetch_package", "role_admin", "web_admin", "cli_access", "saml_admin", "can_export_certificates", "user_manager_admin", "can_create_token", "password_policy_admin", "group_admin", "insight_admin"
]
},
{
"name": "security_viewer",
"description": "Security Administrator Viewer",
"composite": true,
"permissions": [
"saml_viewer", "password_policy_viewer", "insight_viewer", "user_manager_viewer", "role_viewer", "group_viewer"
]
}
]
Update role
This API enables you to update an existing role and its permissions.
- Base URL
- https://<FQDN>/pty/<version>/<API>
- Path
- /roles
- Method
- PUT
Request Body
- name: Role name.
- description: Description of the role.
- permissions: List of permissions that need to be updated for the existing role.
Result
This API updates the existing role and its permissions.
Sample Request
curl -X 'PUT' \
"https://<FQDN>/pty/v1/auth/roles" \
-H "accept: application/json" \
-H "Authorization: Bearer <access_token>" \
-H "Content-Type: application/json" \
-d '{
"name": "admin",
"description": "Administrator role",
"permissions": [
"perm1",
"perm2"
]
}'
This sample request uses the access token of the logged-in user for authentication.
For more information about generating the access token, refer to the section Generate token.
Sample Response
The following response appears for the status code 200, if the API is invoked successfully.
Response body
{
"role_name": "admin",
"status": "updated"
}
Create role
This API enables you to create a role.
- Base URL
- https://<FQDN>/pty/<version>/<API>
- Path
- /roles
- Method
- POST
Request Body
- name: Role name.
- description: Description of the role.
- permissions: List of permissions that need to be created for the existing role.
Result
This API creates a roles with the requested permissions.
Sample Request
curl -X 'POST' \
"https://<FQDN>/pty/v1/auth/roles" \
-H "accept: application/json" \
-H "Authorization: Bearer <access_token>" \
-H "Content-Type: application/json" \
-d '{
"name": "admin",
"description": "Administrator role",
"permissions": [
"perm1",
"perm2"
]
}'
This sample request uses the access token of the logged-in user for authentication.
For more information about generating the access token, refer to the section Generate token.
Sample Response
The following response appears for the status code 200, if the API is invoked successfully.
Response body
{
"role_name": "admin",
"status": "created"
}
Delete roles
This API enables you to delete a role. Deleting a default role, such as, directory_administrator, directory_viewer, security_administrator, and security_viewer, using the API is not supported. Only custom roles created by users can be deleted using the API.
- Base URL
- https://<FQDN>/pty/<version>/<API>
- Path
- /roles
- Method
- DELETE
Request Body
- name: Role name.
Result
This API deletes the specific role.
Sample Request
curl -X 'POST' \
"https://<FQDN>/pty/v1/auth/roles" \
-H "accept: application/json" \
-H "Authorization: Bearer <access_token>" \
-H "Content-Type: application/json" \
-d '{
"name": "user1"
}'
This sample request deletes the custom role named user1, from the system and returns the deletion status. This sample request uses the access token of the logged-in user for authentication.
For more information about generating the access token, refer to the section Generate token.
Sample Response
The following response appears for the status code 200, if the API is invoked successfully.
Response body
{
"role_name": "user1",
"status": "deleted"
}
Add or remove permissions from a role
This API enables to incrementally add or remove permissions from a role. Unlike PUT, this does not overwrite existing permissions; only the specified permissions are affected. At least one of ‘add’ or ‘remove’ must be provided, and a permission cannot appear in both.
- Base URL
- https://<FQDN>/pty/<version>/<API>
- Path
- /roles/{role_name}/permissions
- Method
- PATCH
Parameters
- role_name: Role name of the user. This is a mandatory field.
Request Body
{
"add": [
"perm3"
],
"remove": [
"perm1"
]
}
Result
This API adds or removes permissions from a role incrementally. It does not overwrite existing permissions.
Sample Request
curl -X 'PATCH' \
'https://<FQDN>/pty/v1/auth/roles/security_administrator/permissions' \
-H 'accept: application/json' \
-H 'Content-Type: application/json' \
-d '{
"add": [
"perm3"
],
"remove": [
"perm1"
]
}'
This sample request uses the access token of the logged-in user for authentication.
For more information about generating the access token, refer to the section Generate token.
Sample Response
The following response appears for the status code 200, if the API is invoked successfully.
Response body
{
"role_name": "security_administrator",
"added": [
"perm3"
],
"removed": [
"perm1"
],
"status": "updated"
}
User Management
The following section lists the commonly used APIs for managing users.
Create user endpoint
This API enables you to create a user.
- Base URL
- https://<FQDN>/pty/<version>/<API>
- Path
- /users
- Method
- POST
Request Body
- username: Name of the user. This is a mandatory field
- email: Email of the user.
- firstName: First name of the user.
- lastName: Last name of the user.
- enabled: Enable the user.
- password: Password for the user.
- roles: Roles to be assigned to the user.
- groups: Groups in which the user is included.
- identityProviders: An optional array that lists the SAML provider aliases to link the user, for example, AWS-IDP or AZURE-IDP, configured as part of the SAML SSO configuration.
Result
This API creates a user with a unique user ID.
Sample Request
{
"username": "alpha",
"email": "alpha@example.com",
"firstName": "Alpha",
"lastName": "User",
"password": "StrongPassword123!",
"roles": [
"directory_admin"
],
"groups": [
"framework"
],
"identityProviders": {
"AWS-IDP": {
"userId": "alpha@example.com",
"userName": "alpha@example.com"
}
}
}
This sample request uses the access token of the logged-in user for authentication.
For more information about generating the access token, refer to the section Generate token.
Sample Response
The following response appears for the status code 200, if the API is invoked successfully.
Response body
{
"user_id": "7636708c-c714-4e8e-a3e6-f5fc6c49f9c0",
"username": "alpha"
}
Fetch users
This API enables you to retrieve the user details.
- Base URL
- https://<FQDN>/pty/<version>/<API>
- Path
- /users
- Method
- GET
Request Body
No parameters.
Query Parameters
- max: Maximum number of entries that can retrieved.
- first: Number of entries that can be skipped from the start of the data. For example, if you specify the value as
4, then the first four entries will be skipped from the result.
Result
This API retrieves a list of users.
Sample Request
curl -X 'GET' \
"https://<FQDN>/pty/v1/auth/users?max=100&first=0" \
-H "accept: application/json" \
-H "Authorization: Bearer <access_token>"
This sample request uses the access token of the logged-in user for authentication.
For more information about generating the access token, refer to the section Generate token.
Sample Response
The following response appears for the status code 200, if the API is invoked successfully.
Response body
[
{
"username": "admin",
"email": "admin@example.com",
"firstName": "Admin",
"lastName": "User",
"enabled": true,
"id": "71c573a0-7412-475d-be67-4bf6fdf71404",
"createdTimestamp": null,
"attributes": null,
"emailVerified": true
},
{
"username": "alpha",
"email": "alpha@example.com",
"firstName": "Alpha",
"lastName": "User",
"enabled": true,
"id": "7636708c-c714-4e8e-a3e6-f5fc6c49f9c0",
"createdTimestamp": 1760643896108,
"attributes": null,
"emailVerified": false
},
{
"username": "dfuser",
"email": null,
"firstName": "se",
"lastName": "se",
"enabled": false,
"id": "12770ab4-d3a0-4243-8018-5bb1fb0d06d7",
"createdTimestamp": 1760425034931,
"attributes": null,
"emailVerified": false
},
{
"username": "janedoe",
"email": null,
"firstName": "jane",
"lastName": "doe",
"enabled": false,
"id": "a1251ca4-664d-469a-b1c1-539fe8c73a9d",
"createdTimestamp": 1760425052196,
"attributes": null,
"emailVerified": false
},
{
"username": "john",
"email": "john.doe@protegrity.com",
"firstName": "john",
"lastName": "doe",
"enabled": true,
"id": "0743b449-c050-4e49-ba95-974cd2069a84",
"createdTimestamp": 1760433609089,
"attributes": null,
"emailVerified": false
},
{
"username": "testuser1",
"email": null,
"firstName": "t",
"lastName": "tes",
"enabled": true,
"id": "948c1484-45d7-4df9-aea4-9534ca2d1923",
"createdTimestamp": 1760424968139,
"attributes": null,
"emailVerified": false
},
{
"username": "testuser2",
"email": null,
"firstName": "sdf",
"lastName": "df",
"enabled": true,
"id": "d4961126-d324-4166-97e6-2fac1f40566a",
"createdTimestamp": 1760425012482,
"attributes": null,
"emailVerified": false
}
]
Update user endpoint
This API enables you to update the details of a user.
- Base URL
- https://<FQDN>/pty/<version>/<API>
- Path
- /users
- Method
- PUT
Request Body
- id: ID of the user. This is a mandatory field
- email: Email of the user.
- firstName: First name of the user.
- lastName: Last name of the user.
- enabled: Enable the user.
- password: Password for the user.
- roles: Roles to be assigned to the user.
- groups: Groups in which the user is included.
- identityProviders: An optional array that lists the SAML provider aliases to link the user. For example, AWS-IDP or AZURE-IDP, configured as part of the SAML SSO configuration.
Result
This API updates the user details.
Sample Request
{
"username": "alpha",
"email": "alpha@example.com",
"firstName": "Alpha",
"lastName": "User",
"password": "StrongPassword123!",
"roles": [
"directory_admin"
],
"groups": [
"framework"
],
"identityProviders": {
"AWS-IDP": {
"userId": "alpha@example.com",
"userName": "alpha@example.com"
}
}
}
This sample request uses the access token of the logged-in user for authentication.
For more information about generating the access token, refer to the section Generate token.
Sample Response
The following response appears for the status code 200, if the API is invoked successfully.
Response body
{
"status": "updated",
"userId": "7636708c-c714-4e8e-a3e6-f5fc6c49f9c0"
}
Fetch User by Id
This API enables you to fetch the details of a specific user by specifying the user ID.
- Base URL
- https://<FQDN>/pty/<version>/<API>
- Path
- /users/{user_id}
- Method
- GET
Request Body
No parameters.
Path Parameters
- user_id: Unique ID of the user. This is a mandatory field.
Result
This API retrieves the details of the specific user.
Sample Request
curl -X 'GET' \
"https://<FQDN>/pty/v1/auth/users/7636708c-c714-4e8e-a3e6-f5fc6c49f9c0" \
-H "accept: application/json" \
-H "Authorization: Bearer <access_token>"
This sample request uses the access token of the logged-in user for authentication.
For more information about generating the access token, refer to the section Generate token.
Sample Response
The following response appears for the status code 200, if the API is invoked successfully.
Response body
{
"id": "7636708c-c714-4e8e-a3e6-f5fc6c49f9c0",
"username": "alpha",
"firstName": "lpha",
"lastName": "User",
"email": "alpha@example.com",
"emailVerified": false,
"enabled": true,
"createdTimestamp": 1760643896108,
"groups": [],
"roles": [
"directory_admin"
]
}
Delete user endpoint
This API enables you to delete a user.
- Base URL
- https://<FQDN>/pty/<version>/<API>
- Path
- /users/{user_id}
- Method
- DELETE
Request Body
No parameters.
Path Parameters
- user_id: Unique ID of the user. This is a mandatory field.
Result
This API deletes the specified user.
Sample Request
curl -X 'DELETE' \
"https://<FQDN>/pty/v1/auth/users/7636708c-c714-4e8e-a3e6-f5fc6c49f9c0" \
-H "accept: application/json" \
-H "Authorization: Bearer <access_token>"
}'
This sample request uses the access token of the logged-in user for authentication.
For more information about generating the access token, refer to the section Generate token.
Sample Response
The following response appears for the status code 200, if the API is invoked successfully.
Response body
{
"status": "deleted",
"user_id": "7636708c-c714-4e8e-a3e6-f5fc6c49f9c0"
}
Change own password endpoint
This API enables the authenticated user to change the logged in user’s password.
- Base URL
- https://<FQDN>/pty/<version>/<API>
- Path
- /me/password
- Method
- PUT
Request Body
{
"currentPassword": "OldPassword123!",
"newPassword": "NewStrongPassword123!"
}
Parameters
- currentPassword: Current password of the user.
- newPassword: New password to be set for the user. Ensure that the password confirms to the password policy set.
Result
This API enables the authenticated user to change their own password.
Sample Request
curl -X 'PUT' \
'https://<FQDN>//pty/v1/auth/me/password' \
-H 'accept: application/json' \
-H 'Content-Type: application/json' \
-d '{
"currentPassword": "OldPassword123!",
"newPassword": "NewStrongPassword123!"
}'
This sample request uses the access token of the logged-in user for authentication.
For more information about generating the access token, refer to the section Generate token.
Sample Response
The following response appears for the status code 200, if the API is invoked successfully.
Response body
{
"status": "password_updated",
"userId": "8dd69d89-5b34-4ad2-9d5d-dd2047867b73"
}
Update user password endpoint
This API enables you to update the password of an existing user.
- Base URL
- https://<FQDN>/pty/<version>/<API>
- Path
- /users/{user_id}/password
- Method
- PUT
Request Body
{
"newPassword": "NewStrongPassword123!",
"oldPassword": "OldPassword123!"
}
Path Parameters
- user_id: Unique ID of the user. This is a mandatory field.
Result
This API creates a roles with the requested permissions.
Sample Request
curl -X 'PUT' \
"https://<FQDN>/pty/v1/auth/users/password" \
-H "accept: application/json" \
-H "Authorization: Bearer <access_token>" \
-H "Content-Type: application/json" \
-d '{
"userId": "7636708c-c714-4e8e-a3e6-f5fc6c49f9c0",
"newPassword": "NewStrongPassword123!",
"temporary": false
}'
This sample request uses the access token of the logged-in user for authentication.
For more information about generating the access token, refer to the section Generate token.
Sample Response
The following response appears for the status code 200, if the API is invoked successfully.
Response body
{
"status": "password_updated",
"userId": "7636708c-c714-4e8e-a3e6-f5fc6c49f9c0",
"temporary": false
}
Lock user account
This API enables you to lock the user account.
- Base URL
- https://<FQDN>/pty/<version>/<API>
- Path
- /users/{user_id}/lock
- Method
- PUT
Request Body
No parameters.
Path Parameters
- user_id: Unique ID of the user. This is a mandatory field.
Result
This API locks the user.
Sample Request
curl -X 'PUT' \
"https://<FQDN>/pty/v1/auth/users/94070ecb-8639-41f4-b3e1-fda5cc7f8888/lock" \
-H "accept: application/json" \
-H "Authorization: Bearer <access_token>"
}'
This sample request uses the access token of the logged-in user for authentication.
For more information about generating the access token, refer to the section Generate token.
Sample Response
The following response appears for the status code 200, if the API is invoked successfully.
Response body
{
"status": "locked",
"user_id": "260e89e5-f77a-4aad-b733-22ca5c7c34a8"
}
unlock user account
This API enables you to unlock an existing user.
- Base URL
- https://<FQDN>/pty/<version>/<API>
- Path
- /users/password
- Method
- PUT
Request Body
- password: Password for the user.
Path Parameters
- user_id: Unique ID of the user. This is a mandatory field.
Result
This API unlocks the user.
Sample Request
curl -X 'PUT' \
"https://<FQDN>/pty/v1/auth/users/94070ecb-8639-41f4-b3e1-fda5cc7f8888/unlock" \
-H "accept: application/json" \
-H "Authorization: Bearer <access_token>" \
-H "Content-Type: application/json" \
-d '{
"password": "StrongPasword123!"
}'
This sample request uses the access token of the logged-in user for authentication.
For more information about generating the access token, refer to the section Generate token.
Sample Response
The following response appears for the status code 200, if the API is invoked successfully.
Response body
{
"status": "unlocked",
"user_id": "260e89e5-f77a-4aad-b733-22ca5c7c34a8",
"password_temporary": true
}
Update authenticated user’s own profile
This API enables self-service profile update. Updates only the profile of the user identified by the Bearer token. Cross-user updates are not possible.
- Base URL
- https://<FQDN>/pty/<version>/<API>
- Path
- /me/profile
- Method
- PATCH
Request Body
{
"firstName": "Alpha",
"lastName": "User",
"email": "alpha@example.com"
}
Parameters
- firstName: First name of the user.
- lastName: Last name of the user.
- email: Email address of the user.
Result
This API enables the authenticated user to change their profile details, such as first name, last name, and email address.
Sample Request
curl -X 'PATCH' \
'https://10.31.1.159/pty/v1/auth/me/profile' \
-H 'accept: application/json' \
-H 'Authorization: Bearer <access_token>' \
-H 'Content-Type: application/json' \
-d '{
"firstName": "Alpha",
"lastName": "User",
"email": "alpha@example.com"
}'
This sample request uses the access token of the logged-in user for authentication.
For more information about generating the access token, refer to the section Generate token.
Sample Response
The following response appears for the status code 200, if the API is invoked successfully.
Response body
{
"status": 0,
"data": {
"accessToken": "<access token>",
"refreshToken": "<refresh token>",
"expiresIn": 300,
"refreshExpiresIn": 900
},
"messages": []
}
Group Management
The following section lists the commonly used APIs for managing groups.
Fetch groups
This API enables you retrieve a list of all the groups.
- Base URL
- https://<FQDN>/pty/<version>/<API>
- Path
- /groups
- Method
- GET
Request Body
No parameters.
Query Parameters
- max: Maximum number of entries that can be retrieved.
- first: Number of entries that can be skipped from the start of the data. For example, if you specify the value as
4, then the first four entries will be skipped from the result.
Result
This API a list of the available groups.
Sample Request
curl -X 'GET' \
"https://<FQDN>/pty/v1/auth/groups?max=100&first=0" \
-H "accept: application/json" \
-H "Authorization: Bearer <access_token>"
This sample request uses the access token of the logged-in user for authentication.
For more information about generating the access token, refer to the section Generate token.
Sample Response
The following response appears for the status code 200, if the API is invoked successfully.
Response body
[
{
"id": "d93f9953-b016-4db3-b786-4d4402997ac1",
"name": "<group_name>",
"description": "<group_description>",
"attributes": {
"groupType": [
"local"
]
},
"members": [
"member1",
"member2"
],
"roles": [
"security_administrator"
]
}
]
Create group endpoint
This API enables you create a group.
- Base URL
- https://<FQDN>/pty/<version>/<API>
- Path
- /groups
- Method
- POST
Request Body
- name: Name of the group. This is a mandatory field.
- description: Description of the group.
- members: List of user names that need to be added as members.
- roles: List of role names that need to be assigned to the group.
Result
This API creates a group with the specified members and roles.
Sample Request
curl -X 'POST' \
"https://<FQDN>/pty/v1/auth/groups" \
-H "accept: application/json" \
-H "Authorization: Bearer <access_token>" \
-H "Content-Type: application/json" \
-d '{
"name": "developers",
"description": "",
"members": [
"testuser1",
"testuser2"
],
"roles": [
"service_admin",
"user_manager"
]
}'
This sample request uses the access token of the logged-in user for authentication.
For more information about generating the access token, refer to the section Generate token.
Sample Response
The following response appears for the status code 200, if the API is invoked successfully.
Response body
{
"group_id": "aee4c370-4e97-4b55-a072-0840fe83a2aa",
"name": "developers",
"status": "created",
"members_added": 2,
"roles_assigned": 2
}
Update group endpoint
This API enables you update an existing group.
- Base URL
- https://<FQDN>/pty/<version>/<API>
- Path
- /groups
- Method
- PUT
Request Body
- group_id: Unique ID of the group. This is a mandatory field.
- members: Members added to the group.
- roles: Roles assigned to the group.
Result
This API updates the existing role and its permissions.
Sample Request
curl -X 'PUT' \
"https://<FQDN>/pty/v1/auth/groups" \
-H "accept: application/json" \
-H "Authorization: Bearer <access_token>" \
-H "Content-Type: application/json" \
-d '{
"group_id": "group-uuid",
"members": [
"testuser2"
],
"roles": [
"service_admin"
]
}'
This sample request uses the access token of the logged-in user for authentication.
For more information about generating the access token, refer to the section Generate token.
Sample Response
The following response appears for the status code 200, if the API is invoked successfully.
Response body
{
"status": "updated",
"group_id": "d93f9953-b016-4db3-b786-4d4402997ac1",
"members_updated": 1,
"roles_updated": 1,
"identity_providers_updated": null
}
Get group endpoint
This API enables you to get specific information by group ID.
- Base URL
- https://<FQDN>/pty/<version>/<API>
- Path
- /groups/{group_id}
- Method
- GET
Request Body
No parameters.
Path Parameters
- group_id: ID of the group for which information needs to be retrieved. This is a mandatory field.
Result
This API retrieves the details of the specified group.
Sample Request
curl -X 'GET' \
"https://<FQDN>/pty/v1/auth/groups/aee4c370-4e97-4b55-a072-0840fe83a2aa" \
-H "accept: application/json" \
-H "Authorization: Bearer <access_token>"
This sample request uses the access token of the logged-in user for authentication.
For more information about generating the access token, refer to the section Generate token.
Sample Response
The following response appears for the status code 200, if the API is invoked successfully.
Response body
{
"id": "aee4c370-4e97-4b55-a072-0840fe83a2aa",
"name": "developers",
"description": "",
"attributes": {
"groupType": [
"local"
]
},
"members": [
"john.doe",
"jane.smith"
],
"roles": [
"service_admin",
"directory_admin"
]
}
Delete groupend point
This API enables you to delete an existing group.
- Base URL
- https://<FQDN>/pty/<version>/<API>
- Path
- /groups/{group_id}
- Method
- DELETE
Request Body
No parameters.
Path Parameters
- group_id: ID of the group that needs to be deleted. This is a mandatory field.
Result
This API deletes the specified group.
Sample Request
curl -X 'DELETE' \
"https://<FQDN>/pty/v1/auth/groups/aee4c370-4e97-4b55-a072-0840fe83a2aa" \
-H "accept: application/json" \
-H "Authorization: Bearer <access_token>"
-d '{
"deleteMembers":false
}'
This sample request uses the access token of the logged-in user for authentication.
For more information about generating the access token, refer to the section Generate token.
Sample Response
The following response appears for the status code 200, if the API is invoked successfully.
Response body
{
"status": "deleted",
"group_id": "aee4c370-4e97-4b55-a072-0840fe83a2aa"
}
SAML SSO Configuration
The following section lists the commonly used APIs for managing SAML providers.
List SAML providers
This API enables you to list the existing SAML providers.
- Base URL
- https://<FQDN>/pty/<version>/<API>
- Path
- /saml/providers
- Method
- GET
Request Body
No parameters
Result
This API retrieves a list of the existing SAML providers.
Sample Request
curl -X 'GET' \
"https://<FQDN>/pty/v1/auth/saml/providers" \
-H "accept: application/json" \
-H "Authorization: Bearer <access_token>"
This sample request uses the access token of the logged-in user for authentication.
For more information about generating the access token, refer to the section Generate token.
Sample Response
The following response appears for the status code 200, if the API is invoked successfully.
Response body
[
{
"alias": "azuread",
"displayName": "Protegrity SAML SSO (Azure AD IDP)",
"providerId": "saml",
"enabled": false,
"config": {
"postBindingLogout": "false",
"singleLogoutServiceUrl": "https://login.microsoftonline.com/c3ebfd9e-ec7b-4ab3-a13f-915e941a2785/saml2",
"postBindingResponse": "true",
"backchannelSupported": "false",
"caseSensitiveOriginalUsername": "false",
"encryptionAlgorithm": "RSA-OAEP",
"xmlSigKeyInfoKeyNameTransformer": "KEY_ID",
"idpEntityId": "https://sts.windows.net/c3ebfd9e-ec7b-4ab3-a13f-915e941a2785/",
"useMetadataDescriptorUrl": "false",
"loginHint": "false",
"allowCreate": "true",
"enabledFromMetadata": "true",
"syncMode": "LEGACY",
"authnContextComparisonType": "exact",
"singleSignOnServiceUrl": "https://login.microsoftonline.com/c3ebfd9e-ec7b-4ab3-a13f-915e941a2785/saml2",
"wantAuthnRequestsSigned": "true",
"allowedClockSkew": "0",
"artifactBindingResponse": "false",
"validateSignature": "true",
"nameIDPolicyFormat": "urn:oasis:names:tc:SAML:2.0:nameid-format:persistent",
"entityId": "https://<FQDN>/mysamlapp/saml/metadata",
"signSpMetadata": "true",
"wantAssertionsEncrypted": "false",
"signatureAlgorithm": "RSA_SHA256",
"sendClientIdOnLogout": "false",
"wantAssertionsSigned": "false",
"metadataDescriptorUrl": "https://login.microsoftonline.com/c3ebfd9e-ec7b-4ab3-a13f-915e941a2785/federationmetadata/2007-06/federationmetadata.xml?appid=967110c7-a06b-432e-ad40-47859837a76c",
"sendIdTokenOnLogout": "true",
"postBindingAuthnRequest": "true",
"forceAuthn": "false",
"attributeConsumingServiceIndex": "0",
"addExtensionsElementWithKeyInfo": "false",
"principalType": "SUBJECT"
}
},
{
"alias": "azured",
"displayName": "Protegrity 2 SAML SSO (Azure AD IDP)",
"providerId": "saml",
"enabled": true,
"config": {
"postBindingLogout": "false",
"singleLogoutServiceUrl": "https://login.microsoftonline.com/c3ebfd9e-ec7b-4ab3-a13f-915exyza2785/saml2",
"postBindingResponse": "true",
"backchannelSupported": "false",
"caseSensitiveOriginalUsername": "false",
"xmlSigKeyInfoKeyNameTransformer": "KEY_ID",
"idpEntityId": "https://sts.windows.net/c3ebfd9e-ec7b-4ab3-a13f-915exyza2785/",
"useMetadataDescriptorUrl": "false",
"loginHint": "false",
"allowCreate": "true",
"enabledFromMetadata": "true",
"syncMode": "LEGACY",
"authnContextComparisonType": "exact",
"singleSignOnServiceUrl": "https://login.microsoftonline.com/c3ebfd9e-ec7b-4ab3-a13f-915exyza2785/saml2",
"wantAuthnRequestsSigned": "true",
"allowedClockSkew": "0",
"guiOrder": "0",
"artifactBindingResponse": "false",
"validateSignature": "true",
"signingCertificate": "MIIC8DCCAdigf++2tyNO+YtIpa4MDh1hiQcoVX",
"nameIDPolicyFormat": "urn:oasis:names:tc:SAML:2.0:nameid-format:persistent",
"entityId": "https://<FQDN>/mysamlapp/saml/metadata",
"signSpMetadata": "true",
"wantAssertionsEncrypted": "false",
"signatureAlgorithm": "RSA_SHA256",
"sendClientIdOnLogout": "false",
"wantAssertionsSigned": "false",
"metadataDescriptorUrl": "https://login.microsoftonline.com/c3ebfd9e-ec7b-4ab3-a13f-915exyza2785/federationmetadata/2007-06/federationmetadata.xml?appid=967110c7-a06b-432e-ad40-47859837a76c",
"sendIdTokenOnLogout": "true",
"postBindingAuthnRequest": "true",
"forceAuthn": "false",
"attributeConsumingServiceIndex": "0",
"addExtensionsElementWithKeyInfo": "false",
"principalType": "SUBJECT"
}
}
]
Create SAML provider endpoint
This API enables you to create a SAML provider configuration.
Note: The
metadataFileContentparameter is not supported. You cannot upload or copy the metadata file. Instead, use themetadataUrloption to configure SAML.
- Base URL
- https://<FQDN>/pty/<version>/<API>
- Path
- /saml/providers
- Method
- POST
Request Body
- alias: Unique alias for the SAML provider. This is a mandatory field.
- displayName: Display name for the SAML provider that will appear on the login page. This is a mandatory field.
- configType: Configuration type, either metadata URL or metadata file content. This is a mandatory field.
- metadataUrl: URL to fetch the SAML metadata from the identity provider. For example,
https://login.microsoftonline.com/tenant-id/federationmetadata/2007-06/federationmetadata.xml. - metadataFileContent: SAML metadata XML content as a string. For example,
<?xml version=\"1.0\"?>...</EntityDescriptor>. - signingCertificate: X.509 certificate for signing SAML requests. Use the PEM format without the headers.
- nameIdPolicyFormat: NameID policy format for SAML authentication. For example,
urn:oasis:names:tc:SAML:2.0:nameid-format:persistent. - forceAuthn: Force re-authentication of the user even if the user is already authenticated.
- validateSignature: Validate the SAML response and assertion signatures.
- wantAssertionsSigned: Require the SAML assertions to be signed.
- wantAssertionsEncrypted: Require the SAML assertions to be encrypted.
- signatureAlgorithm: Signature algorithm for SAML requests. For example,
RSA_SHA256. - attributeMapping: Mapping of SAML attributes to user attributes.
- enabled: Enable or disable the SAML provider.
For details of the each parameter, refer the documentation for the corresponding SAML provider.
Result
This API enables you to add a SAML provider.
Sample Request
{
"alias": "azure-ad-saml",
"configType": "metadataUrl",
"displayName": "Azure AD SAML",
"enabled": true,
"forceAuthn": false,
"metadataUrl": "https://login.microsoftonline.com/tenant-id/federationmetadata/2007-06/federationmetadata.xml",
"serviceProviderEntityId": "my-service-provider"
}
This sample request uses the access token of the logged-in user for authentication.
For more information about generating the access token, refer to the section Generate token.
Sample Response
The following response appears for the status code 200, if the API is invoked successfully.
Response body
{
"status": "created",
"alias": "test-azure-ad-saml",
"configType": "metadataUrl",
"message": "SAML provider created successfully from metadata"
}
Get SAML provider
This API enables you retrieve the details of a specific SAML provider.
- Base URL
- https://<FQDN>/pty/<version>/<API>
- Path
- /providers/{alias}
- Method
- GET
Request Body
No parameters.
Path Parameters
- alias: Alias of the SAML provider. This is a mandatory field.
Result
This API retrieves the details about the specific SAML provider.
Sample Request
curl -X 'GET' \
"https://<FQDN>/pty/v1/auth/saml/providers/azure-ad-saml" \
-H "accept: application/json" \
-H "Authorization: Bearer <access_token>"
This sample request uses the access token of the logged-in user for authentication.
For more information about generating the access token, refer to the section Generate token.
Sample Response
The following response appears for the status code 200, if the API is invoked successfully.
Response body
{
"alias": "azure-ad-saml",
"displayName": "Azure AD SAML",
"providerId": "saml",
"enabled": true,
"config": {
"additionalProp1": {}
}
}
Update SAML provider endpoint
This API enables you update the configurations of an existing SAML provider.
Note: The
metadataFileContentparameter is not supported. You cannot upload or copy the metadata file. Instead, use themetadataUrloption to configure SAML.
- Base URL
- https://<FQDN>/pty/<version>/<API>
- Path
- /providers/{alias}
- Method
- PUT
Request Body
No parameters.
Path Parameters
- alias: Alias of the SAML provider that you want to update. This is a mandatory field.
Result
This API updates the existing SAML provider.
Sample Request
{
"alias": "azure-ad-saml",
"configType": "metadataUrl",
"displayName": "Azure AD SAML",
"enabled": true,
"forceAuthn": false,
"metadataUrl": "https://login.microsoftonline.com/tenant-id/federationmetadata/2007-06/federationmetadata.xml",
"serviceProviderEntityId": "my-service-provider"
}
This sample request uses the access token of the logged-in user for authentication.
For more information about generating the access token, refer to the section Generate token.
Sample Response
The following response appears for the status code 200, if the API is invoked successfully.
Response body
{
"status": "updated",
"alias": "azure-ad-saml"
}
Delete SAML provider endpoint
This API enables you to delete the configuration of an existing SAML provider.
- Base URL
- https://<FQDN>/pty/<version>/<API>
- Path
- /saml/providers/{alias}
- Method
- DELETE
Request Body
No parameters.
Path Parameters
- alias: Alias of the SAML provider that you want to delete. This is a mandatory field.
Result
This API deletes the SAML provider.
Sample Request
curl -X 'DELETE' \
"https://<FQDN>/pty/v1/auth/saml/providers/azure-ad-saml" \
-H "accept: application/json" \
-H "Authorization: Bearer <access_token>"
This sample request uses the access token of the logged-in user for authentication.
For more information about generating the access token, refer to the section Generate token.
Sample Response
The following response appears for the status code 200, if the API is invoked successfully.
Response body
{
"status": "deleted",
"alias": "azure-ad-saml"
}
List SAML attribute mappers
This API enables you to list all attribute mappers for a SAML provider.
- Base URL
- https://<FQDN>/pty/<version>/<API>
- Path
- /saml/providers/{alias}
- Method
- GET
Request Body
No parameters.
Path Parameters
- alias: Alias of the SAML provider that you want to list. This is a mandatory field.
Result
This API lists all attribute mappers for a SAML provider.
Sample Request
curl -X 'GET' \
"https://<FQDN>/pty/v1/auth/saml/providers/azure-ad-saml/mappers" \
-H "accept: application/json" \
-H "Authorization: Bearer <access_token>"
This sample request uses the access token of the logged-in user for authentication.
For more information about generating the access token, refer to the section Generate token.
Sample Response
The following response appears for the status code 200, if the API is invoked successfully.
Response body
[
{
"id": "mapper-uuid",
"name": "email-mapper",
"identityProviderMapper": "saml-user-attribute-idp-mapper",
"identityProviderAlias": "azure-ad-saml",
"config": {
"additionalProp1": "string",
"additionalProp2": "string",
"additionalProp3": "string"
}
}
]
Create SAML Attribute Mappers Endpoint
This API enables you to create attribute mappers for a SAML provider.
- Base URL
- https://<FQDN>/pty/<version>/<API>
- Path
- /saml/providers/{alias}
- Method
- POST
Request Body
No parameters.
Path Parameters
- alias: Alias of the SAML provider that you want to list. This is a mandatory field.
Result
This API lists all attribute mappers for a SAML provider.
Sample Request
{
"attributeName": "http://schemas.xmlsoap.org/ws/2005/05/identity/claims/emailaddress",
"mapperType": "saml-user-attribute-idp-mapper",
"name": "email-mapper",
"syncMode": "INHERIT",
"userAttribute": "email"
}
This sample request uses the access token of the logged-in user for authentication.
For more information about generating the access token, refer to the section Generate token.
Sample Response
The following response appears for the status code 200, if the API is invoked successfully.
Response body
{
"message": "Attribute mapper created successfully",
"mapperId": "a1b2c3d4-e5f6-7890-abcd-ef1234567890"
}
Delete SAML Attribute Mappers Endpoint
This API delete an attribute mappers for a SAML provider.
- Base URL
- https://<FQDN>/pty/<version>/<API>
- Path
- /saml/providers/{alias}
- Method
- DELETE
Request Body
No parameters.
Path Parameters
- alias: Alias of the SAML provider that you want to list. This is a mandatory field.
- mapper_id: Unique ID of the attribute mapper that you want to delete. This is a mandatory field.
Result
This API deletes all attribute mappers for a SAML provider.
Sample Request
curl -X 'DELETE' \
"https://<FQDN>/pty/v1/auth/saml/providers/azure-ad-saml/mappers/a1b2c3d4-e5f6-7890-abcd-ef1234567890" \
-H "accept: application/json" \
-H "Authorization: Bearer <access_token>"
This sample request uses the access token of the logged-in user for authentication.
For more information about generating the access token, refer to the section Generate token.
Sample Response
The following response appears for the status code 200, if the API is invoked successfully.
Response body
{
"status": "deleted",
"mapperId": "mapper-uuid",
"alias": "azure-ad-saml"
}
Password Policy
The following section lists the commonly used APIs for managing Password Policy.
Get Password Policy
This API allows you to get current password policy configuration.
Returns a JSON object with configured policy keys and their values.
Available policy keys include:
- length: Minimum password length. The ’length’ of the password must not be greater than ‘maxLength’.
- maxLength: Maximum password length.
- digits: Minimum number of digits.
- lowerCase: Minimum lowercase characters.
- upperCase: Minimum uppercase characters.
- specialChars: Minimum special characters.
- notUsername: Password must not contain username (boolean).
- notEmail: Password must not contain email (boolean).
- notContainsUsername: Password must not contain username (boolean).
- passwordHistory: Number of previous passwords to disallow.
- passwordAge: Number of days for password history.
- forceExpiredPasswordChange: Days until password expires.
- hashIterations: Number of hashing iterations.
- hashAlgorithm: Hashing algorithm, for example, pbkdf2-sha256.
- regexPattern: Custom regex pattern for password validation.
- maxAuthAge: Maximum authentication age in seconds.
- recoveryCodesWarningThreshold: Recovery codes warning threshold.
- Base URL
- https://<FQDN>/pty/<version>/<API>
- Path
- /passwordpolicy
- Method
- GET
Request Body
No parameters.
Path Parameters
No parameters.
Result
This API gets current password policy configuration.
Sample Request
curl -X 'GET' \
"https://<FQDN>/pty/v1/auth/passwordpolicy" \
-H "accept: application/json" \
-H "Authorization: Bearer <access token>"
This sample request uses the access token of the logged-in user for authentication.
For more information about generating the access token, refer to the section Generate token.
Sample Response
The following response appears for the status code 200, if the API is invoked successfully.
Response body
{
"policy": {
"digits": 1,
"forceExpiredPasswordChange": 365,
"hashAlgorithm": "pbkdf2-sha256",
"hashIterations": 27500,
"length": 8,
"lowerCase": 1,
"maxAuthAge": 3600,
"maxLength": 64,
"notContainsUsername": true,
"notEmail": true,
"notUsername": true,
"passwordAge": 365,
"passwordHistory": 3,
"recoveryCodesWarningThreshold": 3,
"regexPattern": "^(?=.*[a-z])(?=.*[A-Z])(?=.*\\d).*$",
"specialChars": 1,
"upperCase": 1
}
}
Note: The ’length’ of the password must not be greater than ‘maxLength’.
Update Password Policy
This API allows you to update password policy configuration.
Accepts a JSON object with policy keys and values to update. Only provided keys will be updated; omitted keys remain unchanged.
Example policy configurations:
- Basic:
{"length": 14, "digits": 1, "upperCase": 1, "lowerCase": 1}- Sets a minimum password length of 14 characters, requiring at least 1 digit, 1 uppercase, and 1 lowercase character. - Advanced:
{"length": 14, "specialChars": 2, "passwordHistory": 5, "forceExpiredPasswordChange": 90}- Enforces a 14-character minimum with 2 special characters, prevents reuse of the last 5 passwords, and requires a password change every 90 days. - Boolean flags:
{"notUsername": true, "notEmail": true}- Prevents users from setting a password that contains their username or email address.
Numeric values are specified as integers, boolean policies as true/false.
- Base URL
- https://<FQDN>/pty/<version>/<API>
- Path
- /passwordpolicy
- Method
- PUT
Request Body
No parameters.
Path Parameters
No parameters.
Result
This API updates the password policy configuration.
Sample Request
{
"policy": {
"digits": 2,
"forceExpiredPasswordChange": 90,
"length": 10,
"lowerCase": 1,
"notUsername": true,
"passwordHistory": 5,
"specialChars": 1,
"upperCase": 1
}
}
This sample request uses the access token of the logged-in user for authentication.
For more information about generating the access token, refer to the section Generate token.
Sample Response
The following response appears for the status code 200, if the API is invoked successfully.
Response body
{
"policy": {
"digits": 1,
"forceExpiredPasswordChange": 365,
"hashAlgorithm": "pbkdf2-sha512",
"hashIterations": 210000,
"length": 14,
"lowerCase": 1,
"maxAuthAge": 3600,
"maxLength": 64,
"notContainsUsername": true,
"notEmail": true,
"notUsername": true,
"passwordAge": 365,
"passwordHistory": 3,
"recoveryCodesWarningThreshold": 3,
"regexPattern": "^(?=.*[a-z])(?=.*[A-Z])(?=.*\\d).*$",
"specialChars": 1,
"upperCase": 1
}
}
Note: The ’length’ of the password must not be greater than ‘maxLength’.
Get brute force detection configuration
This API obtains the current brute force detection configuration.
Returns a JSON object with the following configurable keys:
- maxTemporaryLockouts: Number of temporary lockouts before permanent lockout.
- failureFactor: Number of consecutive login failures before lockout is triggered.
- waitIncrementSeconds: Lockout duration increment per failure in seconds.
- maxFailureWaitSeconds: Maximum lockout wait time cap in seconds.
- maxDeltaTimeSeconds: Time window after which failure count resets in seconds.
- Base URL
- https://<FQDN>/pty/<version>/<API>
- Path
- /bruteforce
- Method
- GET
Request Body
No parameters.
Path Parameters
No parameters.
Result
This API gets the current brute force detection configuration.
Sample Request
curl -X 'GET' \
'https://<FQDN>/pty/v1/auth/bruteforce' \
-H 'accept: application/json' \
-H 'Authorization: Bearer <access token>
This sample request uses the access token of the logged-in user for authentication.
For more information about generating the access token, refer to the section Generate token.
Sample Response
The following response appears for the status code 200, if the API is invoked successfully.
Response body
{
"bruteForceConfig": {
"maxTemporaryLockouts": 3,
"failureFactor": 5,
"waitIncrementSeconds": 300,
"maxFailureWaitSeconds": 900,
"maxDeltaTimeSeconds": 43200
}
}
Update brute force detection configuration
This API updates the brute force detection configuration.
Accepts a JSON object with configuration keys and values to update.
Configurable keys:
- failureFactor: Number of login failures before lockout. Must be an integer greater than or equal to 1.
- maxTemporaryLockouts: Temporary lockouts before permanent ban. Must be an integer greater than or equal to 1.
- waitIncrementSeconds: Wait time increment in seconds. Must be an integer greater than or equal to 60.
- maxFailureWaitSeconds: Maximum wait cap in seconds. Must be an integer greater than or equal to 60 and must be greater than or equal to waitIncrementSeconds.
- maxDeltaTimeSeconds: Failure count reset window in seconds. Must be an integer greater than or equal to 60.
For example:
{"failureFactor": 5, "waitIncrementSeconds": 300, "maxFailureWaitSeconds": 900} — Locks the account for 5 minutes after 5 failed attempts, capping the maximum lockout wait time at 15 minutes.
- Base URL
- https://<FQDN>/pty/<version>/<API>
- Path
- /bruteforce
- Method
- PUT
Request Body
{
"bruteForceConfig": {
"failureFactor": 5,
"maxDeltaTimeSeconds": 43200,
"maxFailureWaitSeconds": 900,
"maxTemporaryLockouts": 3,
"waitIncrementSeconds": 300
}
}
Path Parameters
No parameters.
Result
This API updates the brute force detection configuration.
Sample Request
curl -X 'PUT' \
'https://<FQDN>/pty/v1/auth/bruteforce' \
-H 'accept: application/json' \
-H 'Authorization: Bearer <access token> \
-H 'Content-Type: application/json' \
-d '{
"bruteForceConfig": {
"failureFactor": 5,
"maxDeltaTimeSeconds": 43200,
"maxFailureWaitSeconds": 960,
"maxTemporaryLockouts": 5,
"waitIncrementSeconds": 300
}
}'
This sample request uses the access token of the logged-in user for authentication.
For more information about generating the access token, refer to the section Generate token.
Sample Response
The following response appears for the status code 200, if the API is invoked successfully.
Response body
{
"bruteForceConfig": {
"failureFactor": 5,
"maxDeltaTimeSeconds": 43200,
"maxFailureWaitSeconds": 900,
"maxTemporaryLockouts": 3,
"waitIncrementSeconds": 300
}
}
Microsoft Entra ID Federation Configuration
Microsoft Entra ID is a cloud-based identity and access management service. It manages your cloud and on-premise applications and protects user identities and credentials. The following section lists the commonly used APIs for managing Microsoft Entra ID federation.
Get Entra ID configuration endpoint
This API enables you to list the current Entra ID configuration.
- Base URL
- https://<FQDN>/pty/<version>/<API>
- Path
- /federation/entra/config
- Method
- GET
Request Body
No parameters
Result
This API retrieves the current Entra ID configuration.
Sample Request
curl -X 'GET' \
"https://<FQDN>/pty/v1/auth/federation/entra/config" \
-H "accept: application/json" \
-H "Authorization: Bearer <access_token>"
This sample request uses the access token of the logged-in user for authentication.
For more information about generating the access token, refer to the section Generate token.
Sample Response
The following response appears for the status code 200, if the API is invoked successfully.
Response body
{
"tenantId": "<Tenant_ID>",
"clientId": "<Client_ID>",
"enabled": true,
"createdAt": "2026-01-16T11:02:43.259928",
"updatedAt": "2026-01-20T13:26:41.303308"
}
Create Entra ID configuration endpoint
This API enables you to create an Entra ID configuration.
- Base URL
- https://<FQDN>/pty/<version>/<API>
- Path
- /federation/entra/config
- Method
- POST
Request Body
- tenantID: Entra ID tenant ID.
- clientID: Entra ID application ID.
- clientSecret: Entra ID application client secret.
- enabled: Whether Entra ID configuration is enabled.
Result
This API creates an Entra ID configuration.
Sample Request
curl -X 'POST' \
"https://<FQDN>/pty/v1/auth/federation/entra/config" \
-H "accept: application/json" \
-H "Authorization: Bearer <access_token>"\
-H "Content-Type: application/json" \
-d '{
"tenantId": "<Tenant_ID>",
"clientId": "<Client_ID>",
"clientSecret": "<Kubernetes_client_secret>",
"enabled": true
}'
This sample request uses the access token of the logged-in user for authentication.
For more information about generating the access token, refer to the section Generate token.
Sample Response
The following response appears for the status code 201, if the API is invoked successfully.
Response body
{
"status": "created",
"message": "string",
"config": {
"tenantId": "<Tenant_ID>",
"clientId": "CLient_ID",
"enabled": true,
"createdAt": "2026-01-16T11:02:43.259928",
"updatedAt": "2026-01-20T13:26:41.303308"
}
}
Update Entra ID configuration endpoint
This API enables you to update the Entra ID configuration.
- Base URL
- https://<FQDN>/pty/<version>/<API>
- Path
- /federation/entra/config
- Method
- PUT
Request Body
- tenantID: Entra ID tenant ID.
- clientID: Entra ID application ID.
- clientSecret: Entra ID application client secret.
- enabled: Whether Entra ID configuration is enabled. It can have one of the following values:
- true: Entra ID configuration is enabled.
- false: Entra ID configuration is not enabled.
Result
This API updates the current Entra ID configuration.
Sample Request
curl -X 'PUT' \
"https://<FQDN>/pty/v1/auth/federation/entra/config" \
-H "accept: application/json" \
-H "Authorization: Bearer <access_token>"\
-H "Content-Type: application/json" \
-d '{
"clientId": "r1290385-00eb-43d4-b452-e4dc25b55c54",
"clientSecret": "ADC7Q~-PXz3kthHgldpNXLcBoYy_L0rTWRn2facz",
"enabled": true,
"tenantId": "2e56943b-6c92-446a-81b4-ead9ab5c5e0c"
}
'
This sample request uses the access token of the logged-in user for authentication.
For more information about generating the access token, refer to the section Generate token.
Sample Response
The following response appears for the status code 201, if the API is invoked successfully.
Response body
{
"status": "created",
"message": "Entra ID configuration created successfully",
"config": {
"tenantId": "2e56943b-6c92-446a-81b4-ead9ab5c5e0c",
"clientId": "r1290385-00eb-43d4-b452-e4dc25b55c54",
"enabled": true,
"createdAt": "2026-02-03T09:56:20.244693",
"updatedAt": "2026-02-03T09:56:20.244865"
}
}
Delete Entra ID configuration endpoint
This API enables you to delete an Entra ID configuration.
- Base URL
- https://<FQDN>/pty/<version>/<API>
- Path
- /federation/entra/config
- Method
- DELETE
Request Body
No parameters
Result
This API deletes a Microsoft Entra ID configuration.
Sample Request
curl -X 'DELETE' \
"https://<FQDN>/pty/v1/auth/federation/entra/config" \
-H "accept: application/json" \
-H "Authorization: Bearer <access_token>"
This sample request uses the access token of the logged-in user for authentication.
For more information about generating the access token, refer to the section Generate token.
Sample Response
The following response appears for the status code 200, if the API is invoked successfully.
Response body
{
"status": "deleted",
"message": "Entra ID configuration deleted successfully"
}
Test Entra ID connection endpoint
This API enables you to test an Entra ID connection endpoint.
- Base URL
- https://<FQDN>/pty/<version>/<API>
- Path
- /federation/entra/config/test
- Method
- POST
Request Body
- tenantID: Entra ID tenant ID.
- clientID: Entra ID application ID.
- clientSecret: Entra ID application client secret.
- useStoredConfig: Specify
trueto test the currently stored configuration. Speicifyfalseto provide credentials for testing without storing.
Result
This API tests an Entra ID endpoint connection.
Sample Request
curl -X 'POST' \
"https://<FQDN>/pty/v1/auth/federation/entra/config/test" \
-H "accept: application/json" \
-H "Authorization: Bearer <access_token>" \
-H "Content-Type: application/json" \
-d '{
"tenantId": "<Tenant_ID>",
"clientId": "<Client_ID>",
"clientSecret": "<Client_secret>",
"useStoredConfig": false
}'
This sample request uses the access token of the logged-in user for authentication.
For more information about generating the access token, refer to the section Generate token.
Sample Response
The following response appears for the status code 200, if the API is invoked successfully.
Response body
{
"status": "success",
"message": "string",
"tenantId": "<Tenant_ID>",
"userCount": 0,
"testTimestamp": "2026-01-20T13:26:41.303308"
}
Search Entra ID users endpoint
This API enables you to search Entra ID users using the stored configuration.
- Base URL
- https://<FQDN>/pty/<version>/<API>
- Path
- /federation/entra/users/search
- Method
- POST
Request Body
- searchQuery: Specify the name of the Entra ID user to search for specific users. Specify
nullto retrieve a list of all the Entra ID users.
Query Parameters
- max: Maximum number of entries that can retrieved.
- first: Number of entries that can be skipped from the start of the data. For example, if you specify the value as 4, then the first four entries will be skipped from the result.
Result
This API searches Entra ID users.
Sample Request
curl -X 'POST' \
"https://<FQDN>/pty/v1/auth/federation/entra/users/search?max=100&first=0" \
-H "accept: application/json" \
-H "Authorization: Bearer <access_token>" \
-H "Content-Type: application/json" \
-d '{
"searchQuery": "john"
}'
This sample request uses the access token of the logged-in user for authentication.
For more information about generating the access token, refer to the section Generate token.
Sample Response
The following response appears for the status code 200, if the API is invoked successfully.
Response body
{
"status": "success",
"message": "Found 1 users matching 'john'",
"users": [
{
"userPrincipalName": "John",
"email": "john.doe@protegrity.com",
"firstName": "John",
"lastName": "Doe"
}
],
"totalCount": 1,
"searchTimestamp": "2026-02-03T10:03:48.722709"
}
Import Entra ID users with roles endpoint
This API enables you to import Entra ID users with assigned roles.
- Base URL
- https://<FQDN>/pty/<version>/<API>
- Path
- /federation/entra/users
- Method
- POST
Request Body
- users: Array of user objects to import. Each user must have either the
userPrincipalNameoremailparameter specified.- userPrincipalName: User principal name from Entra ID.
- email: Primary email address of the user.
- firstName: First name of the user. This is an optional parameter.
- lastName: Last name of the user. This is an optional parameter.
- roles: An array that specifies the roles assigned to the user.
- identityProviders: An array that specifies the identity providers to be associated with the user. This is an optional field. For example, you can specify the value as
AWS-IDPorAZURE-IDP.
- dryRun: If true, validates the import without actually creating users. The default value is
false.
Result
This API imports Entra ID users with assigned roles.
Sample Request
curl -X 'POST' \
"https://<FQDN>/pty/v1/auth/federation/entra/users" \
-H "accept: application/json" \
-H "Authorization: Bearer <access_token>" \
-H "Content-Type: application/json" \
-d '{
"users": [
{
"userPrincipalName": "admin@company.com",
"email": "admin@company.com",
"firstName": "Admin",
"lastName": "User",
"roles": ["administrator", "user"],
"identityProviders": ["AWS-IDP"]
},
{
"userPrincipalName": "user@company.com",
"email": "user@company.com",
"firstName": "Regular",
"lastName": "User",
"roles": ["user"]
}
],
"dryRun": true
}'
This sample request uses the access token of the logged-in user for authentication.
For more information about generating the access token, refer to the section Generate token.
Sample Response
The following response appears for the status code 201, if the API is invoked successfully.
Response body
{
"status": "success",
"message": "Users imported successfully",
"totalUsers": 10,
"successCount": 9,
"failedCount": 1
}
Search Entra ID groups endpoint
This API enables you to search for Entra ID groups using stored configuration.
- Base URL
- https://<FQDN>/pty/<version>/<API>
- Path
- /federation/entra/groups/search
- Method
- POST
Request Body
- searchQuery: Specify the name of the Entra ID group to search for specific groups. Specify
nullto retrieve a list of all the Entra ID groups.
Query Parameters
- max: Maximum number of entries that can retrieved.
- first: Number of entries that can be skipped from the start of the data. For example, if you specify the value as 4, then the first four entries will be skipped from the result.
Result
This API searches for Entra ID groups.
Sample Request
curl -X 'POST' \
"https://<FQDN>/pty/v1/auth/federation/entra/groups/search" \
-H "accept: application/json" \
-H "Authorization: Bearer <access_token>" \
-H "Content-Type: application/json" \
-d '{
"searchQuery": "admin"
}'
This sample request uses the access token of the logged-in user for authentication.
For more information about generating the access token, refer to the section Generate token.
Sample Response
The following response appears for the status code 200, if the API is invoked successfully.
Response body
{
"status": "success",
"message": "string",
"groups": [
{
"id": "1",
"displayName": "admin"
}
],
"totalCount": 0,
"searchTimestamp": "2026-01-20T13:26:41.303308"
}
Search Entra ID group members endpoint
This API enables you to search for Entra ID group members using stored configuration.
- Base URL
- https://<FQDN>/pty/<version>/<API>
- Path
- /federation/entra/groups/members/search
- Method
- POST
Request Body
- groupID: ID of the searched group. This value is case-sensitive and must be an exact match.
- searchQuery: Specify the name of the Entra ID group member to search for a specific member. If this parameter is not specified, then the API retrieve a list of all the members of the Entra ID group.
Result
This API searches for Entra ID group members.
Sample Request
curl -X 'POST' \
"https://<FQDN>/pty/v1/auth/federation/entra/groups/members/search" \
-H "accept: application/json" \
-H "Authorization: Bearer <access_token>" \
-H "Content-Type: application/json" \
-d '{
"groupId": "12345678-1234-1234-1234-123456789012",
"searchQuery": "john"
}'
This sample request uses the access token of the logged-in user for authentication.
For more information about generating the access token, refer to the section Generate token.
Sample Response
The following response appears for the status code 200, if the API is invoked successfully.
Response body
{
"status": "success",
"message": "string",
"groupId": "12345678-1234-1234-1234-123456789012",
"groupName": "admin",
"members": [
{
"userPrincipalName": "John",
"email": "john.doe@protegrity.com",
"firstName": "John",
"lastName": "Doe"
}
],
"totalCount": 0,
"searchTimestamp": "2026-01-20T13:26:41.303308"
}
Import Entra ID groups endpoint
This API enables you to import Entra ID groups into the application.
- Base URL
- https://<FQDN>/pty/<version>/<API>
- Path
- /federation/entra/groups
- Method
- POST
Request Body
- groups: Array of group objects to import. Each user must have the
idordisplayNameparameters specified.- id: The unique group identifier from Entra ID is a required field.
- displayName: The group display name is a required field.
- description: Group description.
- importMembers: Specify
trueto import group members. The default value isfalse. - memberRoles: An array that specifies the roles assigned to group members.
- identityProviders: An array that specifies the identity providers to be associated with the group. This is an optional field. For example, you can specify the value as
AWS-IDPorAZURE-IDP.
- dryRun: If
true, validates the import without actually creating users. The default value isfalse.
Result
This API imports Entra ID groups.
Sample Request
curl -X 'POST' \
"https://<FQDN>/pty/v1/auth/federation/entra/groups" \
-H "accept: application/json" \
-H "Authorization: Bearer <access_token>" \
-H "Content-Type: application/json" \
-d '{
"groups": [
{
"id": "12345678-1234-1234-1234-123456789012",
"displayName": "Administrators",
"description": "Administrative users group",
"importMembers": true,
"memberRoles": [
"user",
"member"
],
"identityProviders": ["AWS-IDP"]
}
],
"dryRun": true
}'
This sample request uses the access token of the logged-in user for authentication.
For more information about generating the access token, refer to the section Generate token.
Sample Response
The following response appears for the status code 201, if the API is invoked successfully.
Response body
{
"status": "success",
"message": "Groups imported successfully",
"totalGroups": 5,
"successCount": 5,
"totalMembersImported": 25
}
3.5.5 - Using the Policy Management REST APIs
The Policy Management REST APIs will work only after you have installed the workbench.For more information about installing the workbench, refer to the Installing Policy Workbench.
The user accessing these APIs must have the workbench_management_policy_write permission for write access and the workbench_management_policy_read permission for read-only access.
For more information about the roles and permissions required, refer to the section Workbench Roles and Permissions.
Note: The Policy Management API uses the v2 version.
To perform common operations, such as, retrieving the supported application versions, retrieving the API specification document, and so on using the Policy Management REST API, then refer to the section Using the Common REST API Endpoints.
The following table provides section references that explain usage of some of the Policy Management REST APIs. It includes an example workflow to work with the Policy Management functions. If you want to view all the Policy Management APIs, then use the /doc API to retrieve the API specification.
| REST API | Section Reference |
|---|---|
| Policy Management initialization | Initializing the Policy Management |
| Creating an empty manual role that will accept all users | Creating a Manual Role |
| Create data elements | Creating Data Elements |
| Create policy | Creating Policy |
| Add roles and data elements to the policy | Adding roles and data elements to the policy |
| Create a default data store | Creating a default datastore |
| Deploy the data store | Deploying the Data Store |
| Get the deployment information | Getting the Deployment Information |
Initializing the Policy Management
This section explains how you can initialize Policy Management to create the keys-related data and the policy repository.
- Base URL
- https://{FQDN}/pty/v2
- Authentication credentials
- TOKEN - Environment variable containing the JWT token.
For more information about creating a JWT token, refer to the section Generate token.
For more information about refreshing the JWT token, refer to the section Refresh token. - Path
- /pim/init
- Method
- POST
Sample Request
curl -H "Authorization: Bearer ${TOKEN}" -X POST "https://<FQDN>:443/pty/v2/pim/init" -H "accept: application/json"
This sample request uses the JWT token authentication.
Creating a Manual Role
This section explains how you can create a manual role that accepts all the users.
For more information about working with roles, refer to the section Roles.
- Base URL
- https://{FQDN}/pty/v2
- Authentication credentials
- TOKEN - Environment variable containing the JWT token.
For more information about creating a JWT token, refer to the section Generate token.
For more information about refreshing the JWT token, refer to the section Refresh token. - Path
- /pim/roles
- Method
- POST
Request Body
- name: Name of the role. This is a mandatory field.
- mode: Mode of the role. Specify
MANUALfor a manually managed role. - allowAll: If
true, the role accepts all users. The default value isfalse.
Sample Request
curl -H "Authorization: Bearer ${TOKEN}" -X POST "https://<FQDN>:443/pty/v2/pim/roles" -H "accept: application/json" -H "Content-Type: application/json" -d "{\"name\":\"ROLE\",\"mode\":\"MANUAL\",\"allowAll\": true}"
This sample request uses the JWT token authentication.
Creating Data Elements
This section explains how you can create data elements.
For more information about working with data elements, refer to the section Data Elements.
- Base URL
- https://{FQDN}/pty/v2
- Authentication credentials
- TOKEN - Environment variable containing the JWT token.
For more information about creating a JWT token, refer to the section Generate token.
For more information about refreshing the JWT token, refer to the section Refresh token. - Path
- /pim/dataelements
- Method
- POST
Request Body
- name: Name of the data element. This is a mandatory field.
- description: Description of the data element.
- alphaNumericToken: Configuration object for alphanumeric tokenization.
- tokenizer: Tokenizer type to use. For example,
SLT_1_3. - fromLeft: Number of characters to preserve from the left.
- fromRight: Number of characters to preserve from the right.
- lengthPreserving: If true, the tokenized output preserves the original length.
- allowShort: Whether to allow tokenization of short values. Valid values:
YES,NO.
- tokenizer: Tokenizer type to use. For example,
Sample Request
curl -H "Authorization: Bearer ${TOKEN}" -X POST "https://<FQDN>:443/pty/v2/pim/dataelements" -H "accept: application/json" -H "Content-Type: application/json" -d "{\"name\": \"DE_ALPHANUM\",\"description\": \"DE_ALPHANUM\",\"alphaNumericToken\":{\"tokenizer\":\"SLT_1_3\",\"fromLeft\": 0,\"fromRight\": 0,\"lengthPreserving\": true, \"allowShort\": \"YES\"}}"
This sample request uses the JWT token authentication.
Creating Policy
This section explains how you can create a policy.
- Base URL
- https://{FQDN}/pty/v2
- Authentication credentials
- TOKEN - Environment variable containing the JWT token.
For more information about creating a JWT token, refer to the section Generate token.
For more information about refreshing the JWT token, refer to the section Refresh token. - Path
- /pim/policies
- Method
- POST
Request Body
- name: Name of the policy. This is a mandatory field.
- description: Description of the policy.
- template: Default permission template applied to roles added to the policy.
- access: Access permissions for the policy template.
- protect: Allow protect operations.
- reProtect: Allow re-protect operations.
- unProtect: Allow unprotect operations.
- audit: Audit logging configuration for the policy template.
- success: Audit settings for successful operations.
- protect: Log successful protect operations.
- reProtect: Log successful re-protect operations.
- unProtect: Log successful unprotect operations.
- failed: Audit settings for failed operations.
- protect: Log failed protect operations.
- reProtect: Log failed re-protect operations.
- unProtect: Log failed unprotect operations.
- success: Audit settings for successful operations.
- access: Access permissions for the policy template.
Sample Request
curl -H "Authorization: Bearer ${TOKEN}" -X POST "https://<FQDN>:443/pty/v2/pim/policies" -H "accept: application/json" -H "Content-Type: application/json" -d "{\"name\":\"POLICY\",\"description\": \"POLICY\", \"template\":{\"access\":{\"protect\":true,\"reProtect\":true,\"unProtect\":true},\"audit\":{\"success\":{\"protect\":false,\"reProtect\":false,\"unProtect\":false},\"failed\":{\"protect\":false,\"reProtect\":false,\"unProtect\":false}}}}"
This sample request uses the JWT token authentication.
Adding Roles and Data Elements to a Policy
This section explains how you can add roles and data elements to a policy.
For more information about adding roles and data elements to a policy, refer to the sections Adding Data Elements to Policy and Adding Roles to Policy respectively.
- Base URL
- https://{FQDN}/pty/v2
- Authentication credentials
- TOKEN - Environment variable containing the JWT token.
For more information about creating a JWT token, refer to the section Generate token.
For more information about refreshing the JWT token, refer to the section Refresh token. - Path
- /pim/policies/1/rules
- Method
- POST
Request Body
- role: ID of the role to add to the policy. This is a mandatory field.
- dataElement: ID of the data element to add to the policy. This is a mandatory field.
- noAccessOperation: Action to perform when access is denied. For example,
EXCEPTION. - permission: Permission configuration for this role and data element combination.
- access: Access permissions.
- protect: Allow protect operations.
- reProtect: Allow re-protect operations.
- unProtect: Allow unprotect operations.
- audit: Audit logging configuration.
- success: Audit settings for successful operations.
- protect: Log successful protect operations.
- reProtect: Log successful re-protect operations.
- unProtect: Log successful unprotect operations.
- failed: Audit settings for failed operations.
- protect: Log failed protect operations.
- reProtect: Log failed re-protect operations.
- unProtect: Log failed unprotect operations.
- success: Audit settings for successful operations.
- access: Access permissions.
Sample Request
curl -H "Authorization: Bearer ${TOKEN}" -X POST "https://<FQDN>:443/pty/v2/pim/policies/1/rules" -H "accept: application/json" -H "Content-Type: application/json" -d "{\"role\":\"1\",\"dataElement\":\"1\",\"noAccessOperation\":\"EXCEPTION\",\"permission\":{\"access\":{\"protect\":true,\"reProtect\":true,\"unProtect\":true},\"audit\":{\"success\":{\"protect\":false,\"reProtect\":false,\"unProtect\":false},\"failed\":{\"protect\":false,\"reProtect\":false,\"unProtect\":false}}}}"
This sample request uses the JWT token authentication.
Creating a Default Data Store
This section explains how you can create a default data store.
For more information about working with data stores, refer to the section Data Stores.
- Base URL
- https://{FQDN}/pty/v2
- Authentication credentials
- TOKEN - Environment variable containing the JWT token.
For more information about creating a JWT token, refer to the section Generate token.
For more information about refreshing the JWT token, refer to the section Refresh token. - Path
- /pim/datastores
- Method
- POST
Request Body
- name: Name of the data store. This is a mandatory field.
- description: Description of the data store.
- default: If true, sets this data store as the default data store.
Sample Request
curl -H "Authorization: Bearer ${TOKEN}" -X POST "https://<FQDN>:443/pty/v2/pim/datastores" -H "accept: application/json" -H "Content-Type: application/json" -d "{\"name\":\"DS\",\"description\": \"DS\", \"default\":true}"
This sample request uses the JWT token authentication.
Deploying the Data Store
This section explains how you can deploy policies or trusted applications linked to a specific data store or multiple data stores.
For more information about deploying the Data Store, refer to the section Deploying Data Stores.
Deploying a Specific Data Store
This section explains how you can deploy policies and trusted applications linked to a specific data store. The specifications provided for the specific data store are applied and become the end-result.
Note: If you deploy an array with empty policies or trusted applications, or both, then the connected protectors contain empty definitions for these respective items.
- Base URL
- https://{FQDN}/pty/v2
- Authentication credentials
- TOKEN - Environment variable containing the JWT token.
For more information about creating a JWT token, refer to the section Generate token.
For more information about refreshing the JWT token, refer to the section Refresh token. - Path
- /pim/datastores/{dataStoreUid}/deploy
- Method
- POST
Path Parameters
- dataStoreUid: Unique identifier of the data store to deploy. This is a mandatory field.
Request Body
- policies: Array of policy IDs to deploy to the data store.
- applications: Array of trusted application IDs to deploy to the data store.
Sample Request
curl -H "Authorization: Bearer ${TOKEN}" -X POST "https://<FQDN>:443/pty/v2/pim/datastores/{dataStoreUid}/deploy" -H "accept: application/json" -H "Content-Type: application/json" -d "{\"policies\":[\"1\"],\"applications\":[\"1\"]}"
This sample request uses the JWT token authentication.
Deploying Data Stores
This section explains how you can deploy data stores, which can contain the linking of either the policies or trusted applications, or both for the deployment.
Note: If you deploy a data store containing an array with empty policies or trusted applications, or both, then the connected protectors contain empty definitions for these respective items.
- Base URL
- https://{FQDN}/pty/v2
- Authentication credentials
- TOKEN - Environment variable containing the JWT token.
For more information about creating a JWT token, refer to the section Generate token.
For more information about refreshing the JWT token, refer to the section Refresh token. - Path
- /pim/deploy
- Method
- POST
Request Body
- dataStores: Array of data store objects to deploy. Each object contains:
- uid: Unique identifier of the data store. This is a mandatory field.
- policies: Array of policy IDs to deploy to the data store.
- applications: Array of trusted application IDs to deploy to the data store.
Sample Request
curl -H "Authorization: Bearer ${TOKEN}" -X POST "https://{FQDN}:443/pty/v2/pim/deploy" -H "accept: application/json" -H "Content-Type: application/json" -d "{\"dataStores\":[{\"uid\":\"1\",\"policies\":[\"1\"],\"applications\":[\"1\"]},{\"uid\":\"2\",\"policies\":[\"2\"],\"applications\":[\"2\"]}]}"
This sample request uses the JWT token authentication.
Getting the Deployment Information
This section explains how you can check the complete deployment information. This service returns the list of the data stores with the connected policies and trusted applications.
Note: The result might contain data store information that is pending deployment after combining the Policy Management operations performed through the ESA Web UI and PIM API.
- Base URL
- https://{FQDN}/pty/v2
- Authentication credentials
- TOKEN - Environment variable containing the JWT token.
For more information about creating a JWT token, refer to the section Generate token.
For more information about refreshing the JWT token, refer to the section Refresh token. - Path
- /pim/deploy
- Method
- GET
Sample Request
curl -H "Authorization: Bearer ${TOKEN}" -X GET "https://<FQDN>:443/pty/v2/pim/deploy" -H "accept: application/json"
This sample request uses the JWT token authentication.
Sample Response
The API returns the list of data stores with their connected policies and trusted applications.
3.5.6 - Using the Encrypted Resilient Package REST APIs
Important: The Encrypted Resilient Package REST API will work only after you have installed the Policy Workbench. For more information about installing Policy Workbench, refer to the section Installing Policy Workbench.
The Encrypted Resilient Package API is only used by the Immutable Resilient protectors.
Before you begin:
Ensure that the concept of resilient protectors and necessity of a resilient package is understood.
For more information on how the REST API is used to export the encrypted resilient package in an immutable policy deployment, refer to the section DevOps Approach for Application Protector.Ensure that the RPS service is running on the AI Team Edition.
The user accessing this API must have the workbench_deployment_immutablepackage_export permission.
For more information about the roles and permissions required, refer to the section Workbench Roles and Permissions.
The Encrypted Resilient Package API uses the v1 version.
If you want to perform common operations using the Encrypted Resilient Package API, then refer to the section Using the Common REST API Endpoints.
The following table provides a section reference to the Encrypted Resilient Package API.
| REST API | Section Reference |
|---|---|
| Exporting the resilient package | Exporting Resilient Package |
Exporting Resilient Package Using GET Method
This API request exports the resilient package that can be used with resilient protectors. You can use Certificate authentication and JWT authentication for encrypting and exporting the resilient package.
Warning: Do not modify the package that has been exported using the RPS Service API. If you modify the exported package, then the package will get corrupted.
The resilient package that has been exported using the Encrypted Resilient Package API is not FIPS-compliant.
- Base URL
- https://<FQDN>/pty/v1/rps
- Path
- /export
- Method
- GET
Request Body - TOKEN: JWT token used for authenticating the API- For more information about creating a JWT token, refer to the section Generate token.
- CURL request syntax
- Export API
curl -H "Authorization: Bearer <TOKEN>" -X GET https://<FQDN>/pty/v1/rps/export/<fingerprint>?version=1&coreVersion=1 -H "Content-Type: application/json" -o rps.json
- Query Parameters
- fingerprint
- Specify the fingerprint of the Data Store Export Key. The fingerprint is used to identify which Data Store to export and which export key to use for protecting the resilient package. The user with the Security Officer permissions must share the fingerprint of the Export Key with the user who is executing this API. For more information about obtaining the fingerprint of the Data Store Export Key, refer to step 7 of the section Adding Export Key.
version
- Set the schema version of the exported resilient package that is supported by the specific protector.
coreVersion
- Set the Core policy schema version that is supported by the specific protector.
- Sample CURL request
- Export API
curl -H "Authorization: Bearer <TOKEN>" -X GET https://<FQDN>/pty/v1/rps/export/a7fdbc0cccc954e00920a4520787f0a08488db8e0f77f95aa534c5f80477c03a?version=1&coreVersion=1 -H "Content-Type: application/json" -o rps.jsonThis sample request uses the JWT token authentication.
- Sample response
- The
rps.jsonfile is exported using the public key associated with the specified fingerprint.
Protect the encrypted resilient package with standard file permissions to ensure that only the dedicated protectors can access the package.
3.5.7 - Roles and Permissions
Roles are templates that include permissions and users can be assigned to one or more roles. All users in the appliance must be associated with a role.
The roles packaged with PPC are as follows:
| Roles | Description | Permissions |
|---|---|---|
| directory_administrator | Role to manage users, groups, and their attributes |
|
| directory_viewer | Role to query and view users and groups and their attributes |
|
| security_administrator | Role to manage users, roles, groups, and security‑related configurations, including SAML, certificates, packages, and insights |
|
| security_viewer | Role with Read access |
|
Note: Deleting the default roles, such as, directory_administrator, directory_viewer, security_administrator, and security_viewer, using the API or CLI is not supported.
The capabilities of a role are defined by the permissions attached to the role. Though roles can be created or modified from the appliance, permissions cannot be edited. The following permissions are packaged with PPC and are available to assign to roles:
| Permissions | Description |
|---|---|
| role_admin | Permission to manage roles with read-write access |
| role_viewer | Permission to view roles with read-only access |
| user_manager_admin | Permission to manage users with read-write access |
| user_manager_viewer | Permission to view users with read-only access |
| group_admin | Permission to manage groups with read-write access |
| group_viewer | Permission to view groups with read-only access |
| password_policy_admin | Permission to update password policies with read-write access |
| password_policy_viewer | Permission to view password policies with read-only access |
| saml_admin | Permission to update SAML configurations with read-write access |
| saml_viewer | Permission to view SAML configurations with read-only access |
| can_fetch_package | Permission to download resilient packages |
| can_create_token | Permission to create/refresh tokens |
| can_export_certificates | Permission to download protector certificates |
| web_admin | Permission to perform all operations available as part of the Web UI |
| cli_access | Permission to access CLI |
| insight_admin | Permission to view and edit Insight Dashboard with admin access |
| insight_viewer | Permission to view Insight Dashboard with read-only access |
3.6 - Protegrity Command Line Interface (CLI) Reference
The Protegrity CLI includes the following CLIs:
Administrator CLI: The Administrator CLI is used to perform administrative tasks for the PPC.
Policy Management CLI: The Policy Management CLI is used to create or manage policies. The CLI performs the same function that can be performed using the Policy Management APIs. For more information about using the Policy Management APIs, refer to the section Using the Policy Management REST APIs.
Important: The Policy Management CLI will work only after you have installed the
workbench.
- Insight CLI: The Insight CLI is used to work with logs, such as, forwarding logs to an external SIEM.
3.6.1 - Administrator Command Line Interface (CLI) Reference
Use the admin CLI commands to manage users, roles, permissions, groups, SAML providers, and Entra ID integrations. This section covers all available subcommands with syntax and examples.
admin
This section shows how to access help and provides examples for admin.
admin --help
Usage: admin [OPTIONS] COMMAND [ARGS]...
Users, Roles, Permissions, Groups, SAML and Azure AD management commands.
Options:
--help Show this message and exit.
Commands:
create Create a resource.
delete Delete a resource.
get Display one resource.
list List resources.
set Update fields of a resource.
test Test various configurations and connections.
create
This section lists the create commands.
The following command shows how to access help and provides examples for create.
admin create --help
Usage: admin create [OPTIONS] COMMAND [ARGS]...
Create a resource.
Options:
--help Show this message and exit.
Commands:
entra-id Create Entra ID configuration.
entra-id-import-groups Import Entra ID groups with optional member...
entra-id-import-users Import Entra ID users with role assignments.
groups Create a new group.
roles Create a new role.
saml-mappers Create an attribute mapper for a SAML provider.
saml-providers Create a new SAML SSO provider.
users Create a new user.
create entra-id
The following command shows how to access help and provides examples for create entra-id.
admin create entra-id --help
Usage: admin create entra-id [OPTIONS]
Create Entra ID configuration.
Required Entra ID Setup:
1. Register an application in Entra ID
2. Grant Microsoft Graph API permissions:
- User.Read.All (Application)
- Group.Read.All (Application) - if importing groups
3. Create a client secret for the application
4. Note the Tenant ID, Application (Client) ID, and Client Secret
Examples:
admin create entra-id --tenant-id "12345678-1234-1234-1234-123456789012" --client-id "87654321-4321-4321-4321-210987654321" --client-secret "your-secret-here"
Options:
-t, --tenant-id TEXT Entra ID Tenant ID [required]
-c, --client-id TEXT Entra ID Application (Client) ID [required]
-s, --client-secret TEXT Entra ID Application Client Secret [required]
--enabled / --disabled Enable/disable configuration
--help Show this message and exit.
create entra-id-import-users
The following command shows how to access help and provides examples for create entra-id-import-users.
admin create entra-id-import-users --help
Usage: admin create entra-id-import-users [OPTIONS]
Import Entra ID users with role assignments.
Import users from Entra ID into the application with role assignments.
Users must be provided via JSON data.
JSON Format:
{
"users": [
{
"userPrincipalName": "john.doe@company.com",
"email": "john.doe@company.com",
"firstName": "John",
"lastName": "Doe",
"roles": ["admin", "user"],
"identityProviders": ["AWS-IDP", "AZURE-IDP"]
}
],
"dryRun": false
}
Examples:
# Direct JSON input with identity providers
admin create entra-id-import-users --json-data '{"users":[{"userPrincipalName":"john@company.com","email":"john@company.com","firstName":"John","lastName":"Doe","roles":["user"],"identityProviders":["AWS-IDP","AZURE-IDP"]}]}'
# Dry run with JSON
admin create entra-id-import-users --json-data '{"users":[...]}' --dry-run
Options:
--dry-run Validate import without creating users
-j, --json-data TEXT JSON string with users data to import directly
[required]
--help Show this message and exit.
create entra-id-import-groups
The following command shows how to access help and provides examples for create entra-id-import-groups.
admin create entra-id-import-groups --help
Usage: admin create entra-id-import-groups [OPTIONS]
Import Entra ID groups with optional member import.
Import groups from Entra ID into the system with role assignments for members.
Groups must be provided via JSON data.
JSON Format:
{
"groups": [
{
"id": "12345678-1234-1234-1234-123456789012",
"displayName": "Administrators",
"description": "Administrative users group",
"importMembers": true,
"memberRoles": ["admin", "user"],
"identityProviders": ["AWS-IDP", "AZURE-IDP"]
}
],
"dryRun": false
}
Examples:
# Direct JSON input with identity providers
admin create entra-id-import-groups --json-data '{"groups":[{"id":"12345678-1234-1234-1234-123456789012","displayName":"IT Admins","description":"IT department administrators","importMembers":true,"memberRoles":["admin"],"identityProviders":["AWS-IDP","AZURE-IDP"]}]}'
# Dry run with JSON
admin create entra-id-import-groups --json-data '{"groups":[...]}' --dry-run
Options:
--dry-run Validate import without creating groups
-j, --json-data TEXT JSON string with groups data to import directly
[required]
--help Show this message and exit.
create groups
The following command shows how to access help and provides examples for create groups.
admin create groups --help
Usage: admin create groups [OPTIONS]
Create a new group.
Examples:
admin create groups --name developers --description "Development team"
admin create groups --name admins --members "john,jane" --roles "admin,user_manager"
admin create groups --name operators --description "System operators" --members "user1,user2" --roles "operator"
Options:
-n, --name TEXT Group name [required]
-d, --description TEXT Group description
-m, --members TEXT Comma-separated list of usernames to add as members
-r, --roles TEXT Comma-separated list of role names to assign to
group
--help Show this message and exit.
create roles
The following command shows how to access help and provides examples for create roles.
admin create roles --help
Usage: admin create roles [OPTIONS]
Create a new role.
Examples:
admin create roles --name admin --permissions "role_admin"
admin create roles --name operator --description "System operator" --permissions "role_admin"
Options:
-n, --name TEXT Role name [required]
-d, --description TEXT Role description
-p, --permissions TEXT Comma-separated list of permission names
--help Show this message and exit.
create saml-mappers
The following command shows how to access help and provides examples for create saml-mappers.
admin create saml-mappers --help
Usage: admin create saml-mappers [OPTIONS] PROVIDER_ALIAS
Create an attribute mapper for a SAML provider.
Examples:
admin create saml-mappers azure-ad --name email-mapper --mapper-type saml-user-attribute-idp-mapper --attribute-name "http://schemas.xmlsoap.org/ws/2005/05/identity/claims/emailaddress" --user-attribute email
admin create saml-mappers azure-ad --name role-mapper --mapper-type saml-role-idp-mapper --attribute-value admin --role admin
Options:
-n, --name TEXT Name of the attribute mapper [required]
--mapper-type [saml-user-attribute-idp-mapper|saml-role-idp-mapper|saml-advanced-group-idp-mapper|saml-username-idp-mapper]
Type of mapper [required]
--sync-mode TEXT Sync mode for the mapper
--attribute-name TEXT SAML attribute name to map from
--user-attribute TEXT User attribute to map to
--attribute-value TEXT SAML attribute value for role mapping
--role TEXT Role to assign
--group TEXT Group to assign users to
--template TEXT Username template
--attributes TEXT Key-value pairs for attribute mapping (JSON
format)
--help Show this message and exit.
create saml-providers
The following command shows how to access help and provides examples for create saml-providers.
admin create saml-providers --help
Usage: admin create saml-providers [OPTIONS]
Create a new SAML SSO provider.
Examples:
admin create saml-providers --alias azure-ad --display-name "Azure AD" --config-type metadataUrl --service-provider-entity-id "https://your-saml.com/realms/your-realm" --metadata-url "https://..."
admin create saml-providers --alias okta --display-name "Okta" --config-type metadataFile --service-provider-entity-id "https://your-saml.com/realms/your-realm" --metadata-file /path/to/metadata.xml
Options:
-a, --alias TEXT Unique alias for the SAML provider
[required]
-d, --display-name TEXT Display name shown in login pages
[required]
--config-type [metadataUrl|metadataFile]
Configuration type [required]
--service-provider-entity-id TEXT
Service Provider Entity ID [required]
--metadata-url TEXT URL to fetch SAML metadata (for metadataUrl
type)
--metadata-file FILENAME Path to SAML metadata XML file (for
metadataFile type)
--signing-certificate TEXT X.509 certificate for signing (PEM format
without headers)
--name-id-format TEXT NameID Policy Format
--force-authn / --no-force-authn
Force re-authentication
--validate-signature / --no-validate-signature
Validate SAML response signatures
--want-assertions-signed / --no-want-assertions-signed
Require signed assertions
--want-assertions-encrypted / --no-want-assertions-encrypted
Require encrypted assertions
--signature-algorithm TEXT Signature algorithm for SAML requests
--post-binding-response / --no-post-binding-response
Use POST binding for SAML responses
--post-binding-authn-request / --no-post-binding-authn-request
Use POST binding for SAML authentication
requests
--post-binding-logout / --no-post-binding-logout
Use POST binding for SAML logout requests
--want-authn-requests-signed / --no-want-authn-requests-signed
Sign SAML authentication requests
--attribute-mapping TEXT Attribute mapping as JSON string or
key=value pairs
--enabled / --disabled Enable/disable the provider
--store-token / --no-store-token
Store tokens returned by the identity
provider
--help Show this message and exit.
Note: The
--metadata-fileoption is not supported. You cannot upload or copy the metadata file. Instead, use the--metadata-urloption to configure SAML.
create users
The following command shows how to access help and provides examples for create users.
admin create users --help
Usage: admin create users [OPTIONS]
Create a new user.
Examples:
admin create users --username john.doe --email john@example.com --password "StrongPass123!"
admin create users --username jane --email jane@example.com --password "SecurePass123!" --first-name Jane --last-name Smith --roles "admin,user"
admin create users --username alpha --email alpha@example.com --password "AlphaPass123!" --identity-provider "AWS-IDP:alpha@example.com:alpha@example.com"
admin create users --username beta --password "BetaPass123!" --identity-provider "AWS-IDP:beta@example.com:beta@example.com" --identity-provider "AZURE-IDP:beta@azure.com:beta"
Options:
-u, --username TEXT Username [required]
-e, --email TEXT Email address
--first-name TEXT First name
--last-name TEXT Last name
-p, --password TEXT Password
--roles TEXT Comma-separated list of role names
--groups TEXT Comma-separated list of group names
--identity-provider TEXT Identity provider in format:
PROVIDER_NAME:userId:userName (can be specified
multiple times)
--help Show this message and exit.
delete
This section lists the delete commands.
The following command shows how to access help and provides examples for delete.
admin delete --help
Usage: admin delete [OPTIONS] COMMAND [ARGS]...
Delete a resource.
Options:
--help Show this message and exit.
Commands:
entra-id Delete Entra ID configuration.
groups Delete a group.
roles Delete a role.
saml-mappers Delete an attribute mapper for a SAML provider.
saml-providers Delete a SAML SSO provider.
users Delete a user by ID.
delete entra-id
The following command shows how to access help and provides examples for delete entra-id.
admin delete entra-id --help
Usage: admin delete entra-id [OPTIONS]
Delete Entra ID configuration.
Warning: This action cannot be undone and will permanently remove
all stored Entra ID settings.
Examples:
admin delete entra-id
Options:
--help Show this message and exit.
delete groups
The following command shows how to access help and provides examples for delete groups.
admin delete groups --help
Usage: admin delete groups [OPTIONS] GROUP_ID
Delete a group.
Examples:
admin delete groups group-uuid-here
admin delete groups group-uuid-here --delete-members
Options:
-d, --delete-members Delete all members of the group along with the group
--help Show this message and exit.
delete roles
The following command shows how to access help and provides examples for delete roles.
admin delete roles --help
Usage: admin delete roles [OPTIONS] ROLE_NAME
Delete a role.
Examples:
admin delete roles admin
Options:
--help Show this message and exit.
Note: Deleting a default role (directory_administrator, directory_viewer, security_administrator, and security_viewer) using
admin delete rolesis not supported. This command applies only to custom roles created by users.
delete saml-mappers
The following command shows how to access help and provides examples for delete saml-mappers.
admin delete saml-mappers --help
Usage: admin delete saml-mappers [OPTIONS] PROVIDER_ALIAS MAPPER_ID
Delete an attribute mapper for a SAML provider.
Examples:
admin delete saml-mappers azure-ad mapper-uuid
Options:
--help Show this message and exit.
delete saml-providers
The following command shows how to access help and provides examples for delete saml-providers.
admin delete saml-providers --help
Usage: admin delete saml-providers [OPTIONS] ALIAS
Delete a SAML SSO provider.
Examples:
admin delete saml-providers azure-ad
Options:
--help Show this message and exit.
delete users
The following command shows how to access help and provides examples for delete users.
admin delete users --help
Usage: admin delete users [OPTIONS] USER_ID
Delete a user by ID.
Examples:
admin delete users USER_ID
Options:
--help Show this message and exit.
get
This section lists the get commands.
The following command shows how to access help and provides examples for get.
admin get --help
Usage: admin get [OPTIONS] COMMAND [ARGS]...
Display one resource.
Options:
--help Show this message and exit.
Commands:
brute_force Get current brute force detection configuration.
email Get current SMTP configuration.
email-health Get detailed health status of the email service.
email-log Get current log level.
email-version Get email version information.
entra-id Get current Entra ID configuration.
groups Get detailed information about a specific group.
log-level Get current log level from the backend.
password_policy Get current password policy configuration.
roles Get detailed information about a specific role.
saml-mappers Get detailed information about a SAML provider...
saml-providers Get detailed information about a specific SAML provider.
users Get detailed information about a specific user.
version Get application version information.
get brute_force
The following command shows how to access help and provides examples for get brute_force.
admin get brute_force --help
Usage: admin get brute_force [OPTIONS]
Get current brute force detection configuration.
Options:
--help Show this message and exit.
get email
The following command shows how to access help and provides examples for get email.
admin get email --help
Usage: admin get email [OPTIONS]
Get current SMTP configuration.
Examples:
admin get email
Options:
--help Show this message and exit.
get email-health
The following command shows how to access help and provides examples for get email-health.
admin get email-health --help
Usage: admin get email-health [OPTIONS]
Get detailed health status of the email service.
Examples:
admin get email-health
Options:
--help Show this message and exit.
get email-log
The following command shows how to access help and provides examples for get email-log.
admin get email-log --help
Usage: admin get email-log [OPTIONS]
Get current log level.
Examples:
admin get email-log
Options:
--help Show this message and exit.
get email-version
The following command shows how to access help and provides examples for get email-version.
admin get email-version --help
Usage: admin get email-version [OPTIONS]
Get email version information.
Examples:
admin get email-version
Options:
--help Show this message and exit.
get entra-id
The following command shows how to access help and provides examples for get entra-id.
admin get entra-id --help
Usage: admin get entra-id [OPTIONS]
Get current Entra ID configuration.
Examples:
admin get entra-id
Options:
--help Show this message and exit.
get groups
The following command shows how to access help and provides examples for get groups.
admin get groups --help
Usage: admin get groups [OPTIONS] GROUP_ID
Get detailed information about a specific group.
Examples:
admin get groups group-uuid-here
admin get groups developers
Options:
--help Show this message and exit.
get password_policy
The following command shows how to access help and provides examples for get password_policy.
admin get password_policy --help
Usage: admin get password_policy [OPTIONS]
Get current password policy configuration.
Options:
--help Show this message and exit.
get roles
The following command shows how to access help and provides examples for get roles.
admin get roles --help
Usage: admin get roles [OPTIONS] ROLE_NAME
Get detailed information about a specific role.
Examples:
admin get roles admin
Options:
--help Show this message and exit.
get saml-mappers
The following command shows how to access help and provides examples for get saml-mappers.
admin get saml-mappers --help
Usage: admin get saml-mappers [OPTIONS] ALIAS
Get detailed information about a SAML provider including its mappers.
Examples:
admin get saml-mappers azure-ad
Options:
--help Show this message and exit.
get saml-providers
The following command shows how to access help and provides examples for get saml-providers.
admin get saml-providers --help
Usage: admin get saml-providers [OPTIONS] ALIAS
Get detailed information about a specific SAML provider.
Examples:
admin get saml-providers tttt
admin get saml-providers azure-ad-saml
Options:
--help Show this message and exit.
get users
The following command shows how to access help and provides examples for get users.
admin get users --help
Usage: admin get users [OPTIONS] USER_ID
Get detailed information about a specific user.
Examples:
admin get users USER_ID
admin get users 12345-uuid
Options:
--help Show this message and exit.
get version
The following command shows how to access help and provides examples for get version.
admin get version --help
Usage: admin get version [OPTIONS]
Get application version information.
Examples:
admin get version
Options:
--help Show this message and exit.
get log-level
The following command shows how to access help and provides examples for get log-level.
admin get log-level --help
Usage: admin get log-level [OPTIONS]
Get current log level from the backend.
Examples:
admin get log-level
Options:
--help Show this message and exit.
list
This section lists the list commands.
The following command shows how to access help and provides examples for list.
admin list --help
Usage: admin list [OPTIONS] COMMAND [ARGS]...
List resources.
Options:
--help Show this message and exit.
Commands:
entra-id-group-members Search Entra ID group members.
entra-id-groups Search Entra ID groups.
entra-id-users Search Entra ID users.
groups List all groups with their members and roles.
permissions List all available permissions.
roles List all roles.
saml-mappers List all attribute mappers for a SAML provider.
saml-providers List all SAML SSO providers.
users List all users.
list entra-id-group-members
The following command shows how to access help and provides examples for list entra-id-group-members.
admin list entra-id-group-members --help
Usage: admin list entra-id-group-members [OPTIONS]
Search Entra ID group members.
Search for members of a specific Entra ID group.
Search Parameters:
- Group ID: Required group unique identifier (GUID) - case-sensitive
- Search Query: Optional filter for members (searches name and email fields)
Examples:
admin list entra-id-group-members --group-id "12345678-1234-1234-1234-123456789012"
admin list entra-id-group-members --group-id "87654321-4321-4321-4321-210987654321" --search "john"
admin list entra-id-group-members -g "group-guid-here" -s "admin"
Options:
-g, --group-id TEXT Group unique identifier (GUID) [required]
-s, --search TEXT Search query to filter group members
--help Show this message and exit.
list entra-id-groups
The following command shows how to access help and provides examples for list entra-id-groups.
admin list entra-id-groups --help
Usage: admin list entra-id-groups [OPTIONS]
Search Entra ID groups.
Search across displayName field.
If no search query provided, returns all groups.
Pagination:
- Use --max to control number of results per page (max: 999)
- Use --first to skip results (offset)
- Response shows if more results are available
Examples:
# Get first 100 groups (default)
admin list entra-id-groups
# Search with default pagination
admin list entra-id-groups --search "admin"
# Get first 500 groups
admin list entra-id-groups --max 500
# Get maximum groups per page (999)
admin list entra-id-groups --max 999
# Get next page of results
admin list entra-id-groups --max 999 --first 999
# Search with custom pagination
admin list entra-id-groups --search "IT" --max 500 --first 0
To fetch all groups:
# Loop through pages until no more results
admin list entra-id-groups --max 999 --first 0
admin list entra-id-groups --max 999 --first 999
admin list entra-id-groups --max 999 --first 1998
# ... continue until "More results available" is not shown
Options:
-s, --search TEXT Search query to find groups
-m, --max INTEGER Maximum number of groups to return (default: 100, max:
999)
-f, --first INTEGER Offset for pagination (default: 0)
--help Show this message and exit.
list entra-id-users
The following command shows how to access help and provides examples for list entra-id-users.
admin list entra-id-users --help
Usage: admin list entra-id-users [OPTIONS]
Search Entra ID users.
Search across userPrincipalName, givenName, surname, and mail fields.
If no search query provided, returns all enabled users.
Pagination:
- Use --max to control number of results per page (max: 999)
- Use --first to skip results (offset)
- Response shows if more results are available
Examples:
# Get first 100 users (default)
admin list entra-id-users
# Search with default pagination
admin list entra-id-users --search "john"
# Get first 500 users
admin list entra-id-users --max 500
# Get maximum users per page (999)
admin list entra-id-users --max 999
# Get next page of results
admin list entra-id-users --max 999 --first 999
# Search with custom pagination
admin list entra-id-users --search "smith" --max 500 --first 0
To fetch all users:
# Loop through pages until no more results
admin list entra-id-users --max 999 --first 0
admin list entra-id-users --max 999 --first 999
admin list entra-id-users --max 999 --first 1998
# ... continue until "More results available" is not shown
Options:
-s, --search TEXT Search query to find users
-m, --max INTEGER Maximum number of users to return (default: 100, max:
999)
-f, --first INTEGER Offset for pagination (default: 0)
--help Show this message and exit.
list groups
The following command shows how to access help and provides examples for list groups.
admin list groups --help
Usage: admin list groups [OPTIONS]
List all groups with their members and roles.
Examples:
admin list groups
admin list groups --max 10
admin list groups --max 5 --first 10
Options:
-m, --max INTEGER RANGE Maximum number of groups to return [x>=0]
-f, --first INTEGER RANGE Offset for pagination [x>=0]
--help Show this message and exit.
list permissions
The following command shows how to access help and provides examples for list permissions.
admin list permissions --help
Usage: admin list permissions [OPTIONS]
List all available permissions.
Examples:
admin list permissions
admin list permissions --filter "read*"
Options:
-f, --filter TEXT Filter permissions by name pattern
--help Show this message and exit.
list roles
The following command shows how to access help and provides examples for list roles.
admin list roles --help
Usage: admin list roles [OPTIONS]
List all roles.
Examples:
admin list roles
Options:
--help Show this message and exit.
list saml-mappers
The following command shows how to access help and provides examples for list saml-mappers.
admin list saml-mappers --help
Usage: admin list saml-mappers [OPTIONS] PROVIDER_ALIAS
List all attribute mappers for a SAML provider.
Examples:
admin list saml-mappers azure-ad
Options:
--help Show this message and exit.
list saml-providers
The following command shows how to access help and provides examples for list saml-providers.
admin list saml-providers --help
Usage: admin list saml-providers [OPTIONS]
List all SAML SSO providers.
Examples:
admin list saml-providers
Options:
--help Show this message and exit.
list users
The following command shows how to access help and provides examples for list users.
admin list users --help
Usage: admin list users [OPTIONS]
List all users.
Examples:
admin list users
admin list users --max 10
admin list users --max 5 --first 10
Options:
-m, --max INTEGER Maximum number of users to return
-f, --first INTEGER Offset for pagination
--help Show this message and exit.
set
This section lists the set commands.
The following command shows how to access help and provides examples for set.
admin set --help
Usage: admin set [OPTIONS] COMMAND [ARGS]...
Update fields of a resource.
Options:
--help Show this message and exit.
Commands:
brute_force Update brute force detection configuration.
change_my_password Change your own password.
email Update SMTP configuration.
email-log Set email application log level.
entra-id Update existing Entra ID configuration.
groups Update an existing group.
lock_user Lock a user account.
log-level Update the log level (critical, error, warning,...
password_policy Update password policy configuration.
roles Update an existing role.
saml-providers Update an existing SAML SSO provider.
token Update access token lifespan and SSO idle timeout.
unlock_user Unlock a user account and set a new password.
update_my_profile Update your own profile (first name, last name,...
update_password Update user password.
users Update an existing user.
set brute_force
The following command shows how to access help and provides examples for set brute_force.
admin set brute_force --help
Usage: admin set brute_force [OPTIONS]
Update brute force detection configuration.
Options:
--config TEXT Brute force detection configuration as JSON string.
Configurable Keys:
- failureFactor: Number of login failures before lockout (>= 1)
- maxTemporaryLockouts: Temporary lockouts before permanent ban (>= 1)
- waitIncrementSeconds: Lockout wait increment in seconds (>= 60)
- maxFailureWaitSeconds: Maximum wait cap in seconds (>= 60, must be >= waitIncrementSeconds)
- maxDeltaTimeSeconds: Failure count reset window in seconds (>= 60)
Examples:
admin set brute_force --config '{"failureFactor": 5, "maxTemporaryLockouts": 3}'
admin set brute_force --config '{"waitIncrementSeconds": 300, "maxFailureWaitSeconds": 900}'
admin set brute_force --config '{"failureFactor": 10, "maxTemporaryLockouts": 5, "waitIncrementSeconds": 600, "maxFailureWaitSeconds": 1800, "maxDeltaTimeSeconds": 86400}' [required]
--help Show this message and exit.
set change_my_password
The following command shows how to access help and provides examples for set change_my_password.
admin set change_my_password --help
Usage: admin set change_my_password [OPTIONS]
Change your own password.
This command changes the password of the currently authenticated user.
Requires the current password for verification.
Examples:
admin set change_my_password --current-password "OldPass123!" --new-password "NewPass123!"
admin set change_my_password -c "OldPass123!" -n "NewPass123!"
Options:
-c, --current-password TEXT Current password [required]
-n, --new-password TEXT New password [required]
--help Show this message and exit.
set email
The following command shows how to access help and provides examples for set email.
admin set email --help
Usage: admin set email [OPTIONS]
Update SMTP configuration.
Examples:
admin set email -h "smtp.example.com" -p 587 --use-tls -u "app-user" -w "app-password"
Options:
-h, --smtp-host TEXT SMTP server hostname [required]
-p, --smtp-port INTEGER SMTP server port [required]
--use-tls / --no-tls Enable/disable TLS
-u, --username TEXT SMTP username
-w, --password TEXT SMTP password
--help Show this message and exit.
set email-log
The following command shows how to access help and provides examples for set email-log.
admin set email-log --help
Usage: admin set email-log [OPTIONS]
Set email application log level.
Examples:
admin set email-log -l debug
admin set email-log -l info
Options:
-l, --level [debug|info|warning|error|critical]
Log level to set [required]
--help Show this message and exit.
set entra-id
The following command shows how to access help and provides examples for set entra-id.
admin set entra-id --help
Usage: admin set entra-id [OPTIONS]
Update existing Entra ID configuration.
Only provided fields are updated. Configuration is tested if credentials are changed.
Examples:
admin set entra-id --enabled
admin set entra-id --client-secret "new-secret-here"
admin set entra-id --tenant-id "new-tenant-id" --client-id "new-client-id"
Options:
-t, --tenant-id TEXT Update Entra ID Tenant ID
-c, --client-id TEXT Update Entra ID Application (Client) ID
-s, --client-secret TEXT Update Entra ID Application Client Secret
--enabled / --disabled Enable/disable configuration
--help Show this message and exit.
set groups
The following command shows how to access help and provides examples for set groups.
admin set groups --help
Usage: admin set groups [OPTIONS] GROUP_ID
Update an existing group.
Examples:
admin set groups group-uuid --description "New description"
admin set groups group-uuid --members "john,jane,bob"
admin set groups group-uuid --roles "admin,user_manager"
admin set groups group-uuid --members "user1,user2" --roles "operator,viewer"
admin set groups group-uuid --identity-providers "AWS-IDP,AZURE-IDP"
admin set groups group-uuid --members "john.doe,senior.dev" --roles "senior_admin,lead_developer" --identity-providers "AWS-IDP,AZURE-IDP"
Options:
-d, --description TEXT Group description
-m, --members TEXT Comma-separated list of usernames (replaces
existing members)
-r, --roles TEXT Comma-separated list of role names (replaces
existing roles)
-i, --identity-providers TEXT Comma-separated list of identity provider
names (replaces existing providers)
--help Show this message and exit.
set lock_user
The following command shows how to access help and provides examples for set lock_user.
admin set lock_user --help
Usage: admin set lock_user [OPTIONS] USER_ID
Lock a user account.
Examples:
admin set lock_user USER_ID
Options:
--help Show this message and exit.
set log-level
The following command shows how to access help and provides examples for set log-level.
admin set log-level --help
Usage: admin set log-level [OPTIONS] {critical|error|warning|info|debug}
Update the log level (critical, error, warning, info, debug).
Examples:
admin set log-level info
admin set log-level debug
Options:
--help Show this message and exit.
set password_policy
The following command shows how to access help and provides examples for set password_policy.
admin set password_policy --help
Usage: admin set password_policy [OPTIONS]
Update password policy configuration.
Options:
--policy TEXT Password policy configuration as JSON string.
Common Keys:
- length: Minimum password length
- digits: Number of digits required
- lowerCase: Number of lowercase characters required
- upperCase: Number of uppercase characters required
- specialChars: Number of special characters required
- notUsername: Password cannot be same as username (true or false)
- passwordHistory: Number of previous passwords to remember
- maxLength: Maximum password length
- forceExpiredPasswordChange: Number of days before password expires and must be changed
Examples:
admin set password_policy --policy '{"length": 14, "digits": 1, "upperCase": 1, "specialChars": 1}'
admin set password_policy --policy '{"length": 14, "digits": 2, "lowerCase": 1, "upperCase": 1, "specialChars": 2, "notUsername": true}'
admin set password_policy --policy '{"length": 14, "passwordHistory": 5, "forceExpiredPasswordChange": 90, "maxLength": 128}' [required]
--help Show this message and exit.
set roles
The following command shows how to access help and provides examples for set roles.
admin set roles --help
Usage: admin set roles [OPTIONS] ROLE_NAME
Update an existing role.
Examples:
admin set roles admin --description "Updated admin role"
admin set roles manager --permissions --add "role_admin"
admin set roles manager --permissions --remove "group_admin"
admin set roles manager --permissions --add "role_admin" --remove "group_admin"
admin set roles operator --description "New desc" --permissions --add "role_admin"
admin set roles manager --permissions "role_admin"
admin set roles operator --description "System operator" --permissions "role_admin,group_admin"
Options:
-d, --description TEXT New role description
-p, --permissions TEXT Comma-separated permissions to overwrite all
existing, or bare flag with --add/--remove
--add TEXT Comma-separated permissions to add (use with
--permissions flag)
--remove TEXT Comma-separated permissions to remove (use with
--permissions flag)
--help Show this message and exit.
set saml-providers
The following command shows how to access help and provides examples for set saml-providers.
admin set saml-providers --help
Usage: admin set saml-providers [OPTIONS] ALIAS
Update an existing SAML SSO provider.
Only the parameters you explicitly provide will be updated.
Examples:
admin set saml-providers azure-ad --display-name "New Azure AD"
admin set saml-providers Test --enabled
admin set saml-providers Test --disabled
admin set saml-providers Test --force-authn
admin set saml-providers Test --no-validate-signature
admin set saml-providers Test --metadata-url "https://new-metadata-url.com"
admin set saml-providers Test --signature-algorithm "RSA_SHA512"
Options:
-d, --display-name TEXT Update display name for the provider
--config-type [metadataUrl|metadataFile]
Update configuration type
--service-provider-entity-id TEXT
Update Service Provider Entity ID
--metadata-url TEXT Update metadata URL
--metadata-file FILENAME Update metadata file content
--signing-certificate TEXT Update signing certificate
--name-id-policy-format TEXT Update NameID Policy Format
--force-authn Enable force authentication
--no-force-authn Disable force authentication
--validate-signature Enable signature validation
--no-validate-signature Disable signature validation
--want-assertions-signed Require signed assertions
--no-want-assertions-signed Don't require signed assertions
--want-assertions-encrypted Require encrypted assertions
--no-want-assertions-encrypted Don't require encrypted assertions
--signature-algorithm TEXT Update signature algorithm
--post-binding-response Enable POST binding for responses
--no-post-binding-response Disable POST binding for responses
--post-binding-authn-request Enable POST binding for auth requests
--no-post-binding-authn-request
Disable POST binding for auth requests
--post-binding-logout Enable POST binding for logout
--no-post-binding-logout Disable POST binding for logout
--want-authn-requests-signed Enable authentication request signing
--no-want-authn-requests-signed
Disable authentication request signing
--attribute-mapping TEXT Update attribute mapping (JSON format)
--enabled Enable the provider
--disabled Disable the provider
--store-token Enable token storage
--no-store-token Disable token storage
--help Show this message and exit.
Note: The
--metadata-fileoption is not supported. You cannot upload or copy the metadata file. Instead, use the--metadata-urloption to configure SAML.
set unlock_user
The following command shows how to access help and provides examples for set unlock_user.
admin set unlock_user --help
Usage: admin set unlock_user [OPTIONS] USER_ID
Unlock a user account and set a new password.
Examples:
admin set unlock_user USER_ID --password "NewPassword123!"
admin set unlock_user USER_ID -p "StrongPass123!"
Options:
-p, --password TEXT New password to set after unlocking [required]
--help Show this message and exit.
set update_my_profile
The following command shows how to access help and provides examples for set update_my_profile.
admin set update_my_profile --help
Usage: admin set update_my_profile [OPTIONS]
Update your own profile (first name, last name, email).
This command updates the profile of the currently authenticated user. Only
provided fields are updated (patch semantics).
Examples:
admin set update_my_profile --first-name "John" --last-name "Doe"
admin set update_my_profile --email "newemail@example.com"
admin set update_my_profile --first-name "Jane" --last-name "Smith" --email "jane@example.com"
Options:
-e, --email TEXT New email address
--first-name TEXT New first name
--last-name TEXT New last name
--help Show this message and exit.
set update_password
The following command shows how to access help and provides examples for set update_password.
admin set update_password --help
Usage: admin set update_password [OPTIONS] USER_ID
Update user password.
Examples:
admin set update_password USER_ID --new-password "NewPassword123!" --old-password "OldPass123!"
admin set update_password USER_ID -n "NewPass123!" -o "OldPass123!"
Options:
-n, --new-password TEXT New password [required]
-o, --old-password TEXT Current password for validation [required]
--help Show this message and exit.
set users
The following command shows how to access help and provides examples for set users.
admin set users --help
Usage: admin set users [OPTIONS] USER_ID
Update an existing user.
Examples:
admin set users USER_ID --email newemail@example.com
admin set users USER_ID --roles "admin,manager"
admin set users USER_ID --identity-provider "AWS-IDP:alpha@example.com:alpha@example.com"
admin set users USER_ID --identity-provider "AWS-IDP:alpha@example.com:alpha@example.com" --identity-provider "AZURE-IDP:beta@azure.com:beta"
Options:
-e, --email TEXT New email address
--first-name TEXT New first name
--last-name TEXT New last name
--roles TEXT Comma-separated list of role names (replaces
existing)
--groups TEXT Comma-separated list of group names (replaces
existing)
--identity-provider TEXT Identity provider in format:
PROVIDER_NAME:userId:userName (can be specified
multiple times, replaces existing)
--help Show this message and exit.
set token
The following command shows how to access help and provides examples for set token.
admin set token --help
Usage: admin set token [OPTIONS]
Update access token lifespan and SSO idle timeout.
Examples:
admin set token --lifespan 600
admin set token --lifespan 1200
Options:
--lifespan INTEGER RANGE Access token lifespan in seconds (minimum: 60,
maximum: 3600) [60<=x<=3600; required]
--help Show this message and exit.
test
This section lists the test commands.
The following command shows how to access help and provides examples for test.
admin test --help
Usage: admin test [OPTIONS] COMMAND [ARGS]...
Test various configurations and connections.
Options:
--help Show this message and exit.
Commands:
email Send an email.
entra-id Test Entra ID connection.
test email
The following command shows how to access help and provides examples for test email.
admin test email --help
Usage: admin test email [OPTIONS]
Send an email.
Examples:
admin test email -f "sender@example.com" -t "recipient@example.com" -s "Test" -b "This is a test"
admin test email -f "sender@example.com" -t "recipient@example.com" -c "cc@example.com" --bcc-emails "bcc@example.com" -s "Test" -b "Message"
Options:
-f, --from-email TEXT Sender email address [required]
-t, --to-emails TEXT Recipient email address. For multiple recipients,
provide a comma-separated list [required]
-s, --subject TEXT Email subject [required]
-b, --body TEXT Email body content [required]
-c, --cc-emails TEXT CC email address. For multiple recipients, provide a
comma-separated list
--bcc-emails TEXT BCC email address. For multiple recipients, provide a
comma-separated list
--help Show this message and exit.
test entra-id
The following command shows how to access help and provides examples for test entra-id.
admin test entra-id --help
Usage: admin test entra-id [OPTIONS]
Test Entra ID connection.
Test Options:
1. Test stored configuration: --use-stored
2. Test provided credentials: --tenant-id, --client-id, --client-secret
Examples:
admin test entra-id --use-stored
admin test entra-id --tenant-id "tenant-id" --client-id "client-id" --client-secret "secret"
Options:
--use-stored Test stored configuration
-t, --tenant-id TEXT Entra ID Tenant ID (for direct test)
-c, --client-id TEXT Entra ID Application (Client) ID (for direct test)
-s, --client-secret TEXT Entra ID Application Client Secret (for direct
test)
--help Show this message and exit.
3.6.1.1 - Configuring SAML SSO
SAML SSO enables users to authenticate using enterprise‑managed credentials instead of maintaining separate application passwords.
This section describes how to configure SAML Single Sign‑On (SSO) using an external Identity Provider (IdP) in cloud environments such as Entra ID, AWS, and Google Cloud Platform (GCP).
Setting up SAML SSO using the CLI
This section describes how to configure SAML SSO using the PPC CLI.
Prerequisites
Before you begin, ensure the following prerequisites are met:
- Access to an IdP.
- Administrative privileges to configure SAML settings in the IdP.
- Copy the Metadata URL.
- Users and groups already created in the IdP.
- Administrative access to the PPC CLI.
The same setup flow applies across Entra ID, AWS, and GCP, with differences limited to the IdP administration interface.
Setting up SAML SSO on Entra ID IdP - An Example
To configure SAML SSO on PPC using Entra ID IdP, perform the following steps:
Log in to the PPC CLI.
Create a SAML provider using the metadata URL from the IdP using the following command.
admin create saml-providers \ --alias <saml-provider-alias> \ --display-name "<saml-provider-display-name>" \ --config-type metadataUrl \ --service-provider-entity-id "https://<service-provider-entity-id>" \ --metadata-url "https://<idp-metadata-url>" \Uploading a metadata file is not supported.
--metadata-urlmust be used.The key parameters are listed below.
--alias: Unique identifier for the SAML provider.--display-name: Name shown on the login page.--config-type: Must bemetadataUrl.--service-provider-entity-id: Entity ID expected by the IdP.--metadata-url: URL from which SAML metadata is fetched.After successful execution, the following message displays.
SAML provider '<saml-provider-alias>' created successfully!
Verify if the SAML provider is created successfully using the following command.
admin list saml-providersA list of configured SAML providers appears.
After creating the SAML provider, retrieve the SAML provider details to obtain the Redirect URI using the following command.
admin get saml-providers <saml-provider-alias>Note the Redirect URI from the displayed information.
Update the SAML configuration in Entra ID Idp.
To update the SAML configuration in the Idp, perform the following steps:
- Log in to Entra ID IdP.
- Navigate to Enterprise applications, and select the application.
- In the Basic SAML Configuration, update the Redirect URI noted in the previous step.
In the PPC CLI, create the Entra ID configuration using the following command.
admin create entra-id --tenant-id "<tenant-id>" --client-id "<client-id>" --client-secret "your-secret-here"After successful execution, the following message displays.
Entra ID configuration '<tenant-id>' created successfully!This confirms trust is established between the IdP and the appliance.
Import the user from Entra ID IdP using the following command.
admin create entra-id-import-users --json data { "users": [ { "userPrincipalName": "john.doe@company.com", "email": "john.doe@company.com", "firstName": "John", "lastName": "Doe", "roles": ["security_administrator"], "identityProviders": ["Entra ID-IDP"], "password": "Password@123" } ], }'After successful execution, the following message displays.
Successfully imported 1 user(s)Verify if the user is imported using the following command.
admin list usersA list of all available users display. The imported user appears in the list. Note the USER_ID.
To get detailed information about a user, run the following command.
admin get users USER_IDThe user details display. The attributes display user type as external, stating that the user is imported from an external IdP.
Open the Web browser and enter the FQDN of the PPC. The Login page displays.
Click Sign in with SAML SSO.
The screen is redirected to the IdP portal for authentication. If the user is not logged in, the login dialog appears. Provide the user credentials for login.
After logging in successfully, the screen automatically redirects to the PPC Dashboard.
SAML SSO is now configured. Users can authenticate using enterprise‑managed credentials and are granted access based on the roles assigned in the PPC.
Creating users for AWS and GCP
This section describes environments where users are created locally using the Admin CLI, rather than being imported from an external IdP. This procedure is applicable to AWS and GCP deployments where SAML SSO is enabled but users are created using the CLI.
Creating local users for AWS and GCP using the CLI
In AWS and GCP environments, administrators can create users directly using the Admin CLI. These users authenticate through the configured SAML provider, while credentials, roles, and access control are managed locally.
To create the users for AWS and GCP using the CLI, perform the following steps:
Configure the SAML provider using the CLI.
Create a local user, set a password, assign one or more roles to define access permissions, using the following command.
admin create users \ --username john.doe \ --email john.doe@example.com \ --first-name John \ --last-name Doe \ --password StrongPassword123! \ --roles adminHere,
- The
--passwordparameter sets the initial login password. - The
--rolesparameter assigns one or more roles that control user permissions.
- The
The user authenticates via the SAML IdP and is authorized based on locally assigned roles.
To update the roles, run the following command:
admin set users USER_ID --roles admin,operatorTo update an existing user password, run the following command:
admin set update_password USER_ID \ --old-password OldPassword123! \ --new-password NewPassword123!To unlock an account, run the following command:
admin set unlock_user USER_ID --password NewPassword123!
Note: In this process, users are not imported from AWS IAM or GCP IAM. Identity authentication is handled through the SAML provider, while user records, passwords, and role assignments are managed locally through the CLI.
Understanding SAML Mappers
SAML mappers define how attributes received from the SAML Identity Provider (IdP) are mapped to local user attributes, roles, or groups during authentication.
SAML mappers are configured per SAML provider and allow administrators to control how identity data is interpreted and applied within the system.
Why SAML Mappers Are Required
SAML assertions typically contain user attributes such as email, username, group membership, or role indicators. SAML mappers translate these attributes into:
- Local usernames
- User attributes
- Role assignments
- Group memberships
Without SAML mappers, users may authenticate successfully but will not be assigned the correct access permissions.
Note: SAML mappers are evaluated during user authentication. Ensure that the IdP sends the required attributes and that mapper definitions align with the IdP’s SAML assertion format.
3.6.2 - Using the Insight Command Line Interface (CLI)
Main Insight Command
The following command shows to access the help for the insight commands.
insight --help
Usage: insight [OPTIONS] COMMAND [ARGS]...
Log Management and Log Forwarding commands.
EXAMPLES:
# Verify if configuration exists
insight list fluentd
or
insight list syslog
# Test connection to SIEM
insight test fluentd --host <fluentd_address> --port <fluentd_port>
or
insight test syslog --host <syslog_address> --port <syslog_port>
# Configure external SIEM
insight configure fluentd --host <fluentd_address> --port <fluentd_port> --ca_content "<ca.crt_content>" --cert_content "<client.crt_content>" --key_content "<client.key_content>"
or
insight configure syslog --host <syslog_address> --port <syslog_port> --ca_content "<ca.crt_content>" --cert_content "<client.crt_content>" --key_content "<client.key_content>"
# Update configurations
insight update fluentd --host <fluentd_address> --port <fluentd_port> --ca_content "<ca.crt_content>" --cert_content "<client.crt_content>" --key_content "<client.key_content>"
or
insight update syslog --host <syslog_address> --port <syslog_port> --ca_content "<ca.crt_content>" --cert_content "<client.crt_content>" --key_content "<client.key_content>"
# Delete if configuration exists
insight delete fluentd
or
insight delete syslog
Options:
--help Show this message and exit.
Commands:
configure Configure log forwarding to external system.
delete Remove log forwarding configurations to external system.
list Show the current log forwarding configurations.
test Test connectivity to external system.
update Update log forwarding configurations.
Configure Command
The following section lists the insight configure commands. The pods take some time to initialize and stabilize, about 15 minutes, after running this command. Avoid updating any more configurations till the pds are ready. Verify the status of the pods using the kubectl get pods -n pty-insightcommand.
Main Configure Command
The following command shows how to access help for the insight configure command.
insight configure --help
Usage: insight configure [OPTIONS] COMMAND [ARGS]...
Configure log forwarding to external system.
EXAMPLES:
# Configure external SIEM
insight configure fluentd --host <fluentd_address> --port <fluentd_port> --ca_content "<ca.crt_content>" --cert_content "<client.crt_content>" --key_content "<client.key_content>"
or
insight configure syslog --host <syslog_address> --port <syslog_port> --ca_content "<ca.crt_content>" --cert_content "<client.crt_content>" --key_content "<client.key_content>"
Options:
--help Show this message and exit.
Commands:
fluentd Set up log forwarding to an external Fluentd server.
syslog Set up log forwarding to an external Syslog server.
Configure Fluentd Command
The following command shows how to access help for the insight configure fluentd command.
insight configure fluentd --help
Usage: insight configure fluentd [OPTIONS]
Set up log forwarding to an external Fluentd server.
EXAMPLES:
# Configure external Fluentd server
insight configure fluentd --host <fluentd_address> --port <fluentd_port>
--ca_content "<ca.crt_content>" --cert_content "<client.crt_content>"
--key_content "<client.key_content>"
# Configure external Fluentd server (with troubleshooting logs)
insight configure fluentd --host <fluentd_address> --port <fluentd_port>
--ca_content "<ca.crt_content>" --cert_content "<client.crt_content>"
--key_content "<client.key_content>" --troubleshooting_log True
Options:
--host TEXT External Fluentd server address [required]
--port INTEGER External Fluentd server port [required]
--ca_content TEXT Content of the CA certificate [required]
--cert_content TEXT Content of the client certificate [required]
--key_content TEXT Content of the client private key [required]
--troubleshooting_log BOOLEAN Enable troubleshooting log forward
--help Show this message and exit.
Configure Syslog Command
The following command shows how to access help for the insight configure syslog command.
insight configure syslog --help
Usage: insight configure syslog [OPTIONS]
Set up log forwarding to an external Syslog server.
EXAMPLES:
# Configure external Syslog server
insight configure syslog --host <syslog_address> --port <syslog_port>
--ca_content "<ca.crt_content>" --cert_content "<client.crt_content>"
--key_content "<client.key_content>"
# Configure external Syslog server (with troubleshooting logs)
insight configure syslog --host <syslog_address> --port <syslog_port>
--ca_content "<ca.crt_content>" --cert_content "<client.crt_content>"
--key_content "<client.key_content>" --troubleshooting_log True
Options:
--host TEXT Syslog server address [required]
--port INTEGER Syslog server port [required]
--ca_content TEXT Content of the CA certificate [required]
--cert_content TEXT Content of the client certificate [required]
--key_content TEXT Content of the client private key [required]
--troubleshooting_log BOOLEAN Enable troubleshooting log forward
--help Show this message and exit.
Delete Command
The following section lists the insight delete commands. The pods take some time to initialize and stabilize, about 15 minutes, after running this command. Avoid updating any more configurations till the pds are ready. Verify the status of the pods using the kubectl get pods -n pty-insightcommand.
Main Delete Command
The following command shows how to access help for the insight delete command.
insight delete --help
Usage: insight delete [OPTIONS] COMMAND [ARGS]...
Remove log forwarding configurations to external system.
EXAMPLES:
# Delete if configuration exists
insight delete fluentd
or
insight delete syslog
Options:
--help Show this message and exit.
Commands:
fluentd Remove log forwarding configurations and certificates to external system.
syslog Remove log forwarding configurations and certificates to external system.
Delete Fluentd Command
The following command shows how to access help for the insight delete fluentd command.
insight delete fluentd --help
Usage: insight delete fluentd [OPTIONS]
Remove log forwarding configurations and certificates to external system.
EXAMPLES:
# Delete if configuration exists
insight delete fluentd
Options:
--help Show this message and exit.
Delete Syslog Command
The following command shows how to access help for the insight delete syslog command.
insight delete syslog --help
Usage: insight delete syslog [OPTIONS]
Remove log forwarding configurations and certificates to external system.
EXAMPLES:
# Delete if configuration exists
insight delete syslog
Options:
--help Show this message and exit.
List Command
The following section lists the insight list commands.
Main List Command
The following command shows how to access help for the insight list command.
insight list --help
Usage: insight list [OPTIONS] COMMAND [ARGS]...
Show the current log forwarding configurations.
EXAMPLES:
# Verify if configuration exists
insight list fluentd
or
insight list syslog
Options:
--help Show this message and exit.
Commands:
fluentd Show the current log forwarding configurations.
syslog Show the current log forwarding configurations.
List Fluentd Command
The following command shows how to access help for the insight list fluentd command.
insight list fluentd --help
Usage: insight list fluentd [OPTIONS]
Show the current log forwarding configurations.
EXAMPLES:
# Verify if configuration exists
insight list fluentd
Options:
--help Show this message and exit.
List Syslog Command
The following command shows how to access help for the insight list syslog command.
insight list syslog --help
Usage: insight list syslog [OPTIONS]
Show the current log forwarding configurations.
EXAMPLES:
# Verify if configuration exists
insight list syslog
Options:
--help Show this message and exit.
Test Command
The following section lists the insight test commands.
Main Test Command
The following command shows how to access help for the insight test command.
insight test --help
Usage: insight test [OPTIONS] COMMAND [ARGS]...
Test connectivity to external system.
EXAMPLES:
# Test connection to SIEM
insight test fluentd --host <fluentd_address> --port <fluentd_port>
or
insight test syslog --host <syslog_address> --port <syslog_port>
Options:
--help Show this message and exit.
Commands:
fluentd Test connectivity to external Fluentd server.
syslog Test connectivity to external Syslog server.
Test Fluentd Command
The following command shows how to access help for the insight test fluentd command.
insight test fluentd --help
Usage: insight test fluentd [OPTIONS]
Test connectivity to external Fluentd server.
EXAMPLES:
# Test connection
insight test fluentd --host <fluentd_address> --port <fluentd_port>
Options:
--host TEXT External Fluentd server address [required]
--port INTEGER External Fluentd server port [required]
--timeout INTEGER Time allowed for the test [default: 5]
--help Show this message and exit.
Test Syslog Command
The following command shows how to access help for the insight test syslog command.
insight test syslog --help
Usage: insight test syslog [OPTIONS]
Test connectivity to external Syslog server.
EXAMPLES:
# Test connection
insight test syslog --host <syslog_address> --port <syslog_port>
Options:
--host TEXT Syslog server address [required]
--port INTEGER Syslog server port [required]
--timeout INTEGER Time allowed for the test [default: 5]
--help Show this message and exit.
Update Command
The following section lists the insight update commands. The pods take some time to initialize and stabilize, about 15 minutes, after running this command. Avoid updating any more configurations till the pds are ready. Verify the status of the pods using the kubectl get pods -n pty-insightcommand.
Main Update Command
The following command shows how to access help for the insight update command.
insight update --help
Usage: insight update [OPTIONS] COMMAND [ARGS]...
Update log forwarding configurations.
EXAMPLES:
# Update log forwarding configurations to external SIEM
insight update fluentd --host <fluentd_address> --port <fluentd_port> --ca_content "<ca.crt_content>" --cert_content "<client.crt_content>" --key_content "<client.key_content>"
or
insight update syslog --host <syslog_address> --port <syslog_port> --ca_content "<ca.crt_content>" --cert_content "<client.crt_content>" --key_content "<client.key_content>"
Options:
--help Show this message and exit.
Commands:
fluentd Update log forwarding for external Fluentd server.
syslog Update log forwarding for external Syslog server.
Update Fluentd Command
The following command shows how to access help for the insight update fluentd command.
insight update fluentd --help
Usage: insight update fluentd [OPTIONS]
Update log forwarding for external Fluentd server.
EXAMPLES:
# Update configurations for external Fluentd server
insight update fluentd --host <fluentd_address> --port <fluentd_port>
--ca_content "<ca.crt_content>" --cert_content "<client.crt_content>"
--key_content "<client.key_content>"
# Update configurations for external Fluentd server (with troubleshooting
logs)
insight update fluentd --host <fluentd_address> --port <fluentd_port>
--ca_content "<ca.crt_content>" --cert_content "<client.crt_content>"
--key_content "<client.key_content>" --troubleshooting_log True
Options:
--host TEXT External Fluentd server address [required]
--port INTEGER External Fluentd server port [required]
--ca_content TEXT Content of the CA certificate [required]
--cert_content TEXT Content of the client certificate [required]
--key_content TEXT Content of the client private key [required]
--troubleshooting_log BOOLEAN Enable troubleshooting log forward
--help Show this message and exit.
Update Syslog Command
The following command shows how to access help for the insight update syslog command.
insight update syslog --help
Usage: insight update syslog [OPTIONS]
Update log forwarding for external Syslog server.
EXAMPLES:
# Update configurations for external Syslog server
insight update syslog --host <syslog_address> --port <syslog_port>
--ca_content "<ca.crt_content>" --cert_content "<client.crt_content>"
--key_content "<client.key_content>"
# Update configurations for external Syslog server (with troubleshooting
logs)
insight update syslog --host <syslog_address> --port <syslog_port>
--ca_content "<ca.crt_content>" --cert_content "<client.crt_content>"
--key_content "<client.key_content>" --troubleshooting_log True
Options:
--host TEXT Syslog server address [required]
--port INTEGER Syslog server port [required]
--ca_content TEXT Content of the CA certificate [required]
--cert_content TEXT Content of the client certificate [required]
--key_content TEXT Content of the client private key [required]
--troubleshooting_log BOOLEAN Enable troubleshooting log forward
--help Show this message and exit.
3.6.2.1 - Sending logs to an external security information and event management (SIEM)
This is an optional step.
The Protegrity infrastructure provides a robust setup for logging and analyzing the logs generated. It might be possible that an existing infrastructure is available for collating and analyzing logs.
In the default setup, the logs are sent from the protectors directly to the Audit Store using the Log Forwarder on the protector. Use the configuration provided in this section to send the logs to the Audit Store and the external SIEM.
Prerequisites
Ensure that the following prerequisites are met:
- The external SIEM is accessible.
- The required ports are open on the external SIEM.
- The certificates for accessing the external SIEM are available.
- Prepare the CA.pem, client.pem, and client.key certificate content using the following steps:
Navigate to the directory where the certificates from the SIEM are stored.
Run the following command to obtain the CA certificate file content.
awk '{printf "%s\\n", $0}' <CA_certificate_file>Example:
awk '{printf "%s\\n", $0}' CA.pemRun the following command to obtain the client certificate content.
awk '{printf "%s\\n", $0}' <client_certificate_file>Example:
awk '{printf "%s\\n", $0}' client.pemRun the following command to obtain the client key content.
awk '{printf "%s\\n", $0}' <client_key_file>Example:
awk '{printf "%s\\n", $0}' client.key
- Update the configuration on the protectors.
Updating the protector configuration
Configure the protector to send the logs to the fluentd. The fluentd in turn forwards the logs received to the Audit Store and the external location.
Log in and open a CLI on the protector machine.
Back up the existing files.
Navigate to the config.d directory using the following command.
cd /opt/protegrity/logforwarder/data/config.dBack up the existing out.conf file using the following command.
cp out.conf out.conf_backupBack up the existing upstream.cfg file using the following command.
cp upstream.cfg upstream.cfg_backup
Update the out.conf file for specifying the logs that must be forwarded to the Audit Store.
Navigate to the /opt/protegrity/logforwarder/data/config.d directory.
Open the out.conf file using a text editor.
Update the file contents with the following code.
Update the code blocks for all the options with the following information:
Update the Name parameter from opensearch to forward.
Delete the following Index, Type, and Time_Key parameters:
Index pty_insight_audit Type _doc Time_Key ingest_time_utcDelete the Supress_Type_Name and Buffer_Size parameters:
Suppress_Type_Name on Buffer_Size false
The updated extract of the code is shown here.
[OUTPUT] Name forward Match logdata Retry_Limit False Upstream /opt/protegrity/logforwarder/data/config.d/upstream.cfg storage.total_limit_size 256M net.max_worker_connections 1 net.keepalive off Workers 1 [OUTPUT] Name forward Match flulog Retry_Limit no_retries Upstream /opt/protegrity/logforwarder/data/config.d/upstream.cfg storage.total_limit_size 256M net.max_worker_connections 1 net.keepalive off Workers 1Ensure that the file does not have any trailing spaces or line breaks at the end of the file.
Save and close the file.
Update the upstream.cfg file for forwarding the logs to the Audit Store.
Navigate to the /opt/protegrity/logforwarder/data/config.d directory.
Open the upstream.cfg file using a text editor.
Update the file contents with the following code.
Update the code blocks for all the nodes with the following information:
Update the Port to 24284.
Delete the Pipeline, tls, and tls.verify parameters:
Pipeline logs_pipeline tls on tls.verify off
The updated extract of the code is shown here.
[UPSTREAM] Name pty-insight-balancing [NODE] Name node-1 Host <PPC FQDN> Port 24284The <PPC FQDN> was configured in Automated script-based installation or Manual component-based installation. Ensure the FQDN does not exceed 50 characters. The code shows information updated for one node. For multiple nodes, update the information for all the nodes.
Ensure that there are no trailing spaces or line breaks at the end of the file.
Save and close the file.
Restart logforwarder on the protector using the following commands.
/opt/protegrity/logforwarder/bin/logforwarderctrl stop /opt/protegrity/logforwarder/bin/logforwarderctrl startIf required, complete the configurations on the remaining protector machines.
Update the fluentd configuration to send logs to the external location using the information from syslog commands or fluentd commands.
syslog commands
The commands provided here are used for sending logs to the Audit Store, retaining the default storage location, and an external syslog SIEM.
Viewing the current configuration
The command to view the log forwarding configurations.
insight list syslog
Verifying connectivity
The command to verify that the external syslog SIEM is accessible.
insight test syslog --host <syslog_address> --port <syslog_port>
Example:
insight test syslog --host 192.168.1.100 --port 6514
Forwarding logs to the syslog server
The command to forward logs to the syslog server.
insight configure syslog --host <syslog_address> --port <syslog_port> --ca_content "<ca.crt_content>" --cert_content "<client.crt_content>" --key_content "<client.key_content>"
Example:
insight configure syslog --host 192.168.1.110 --port 6514 --ca_content "-----BEGIN CERTIFICATE-----\nMIIFmDCCA4CgAwIBAgIIWF8OX+P4jAAwDQYJKoZIhvcNAQELBQAwVzEYMBYGA1UE\nCgwPUHJvdGVncml0eSBJbmMuMQswCQYDVQQGEwJVUzEuMCwGA1UEAwwlUHJvdGVn\ncml0eSBSb290IENBIC0gWklTbkdKRE5tekdPdGEyQzAgGA8yMDI1MTIyMTAwMDAw\nMFoXDTM1MTIyMDA3NDE1MFowVzEYMBYGA1UECgwPUHJvdGVncml0eSBJbmMuMQsw\nCQYDVQQGEwJVUzEuMCwGA1UEAwwlUHJvdGVncml0eSBSb290IENBIC0gWklTbkdK\nRE5tekdPdGEyQzCCAiIwDQYJKoZIhvcNAQEBBQADggIPADCCAgoCggIBAL6nK47Y\n/hs1nBnHxg2/S6ieL/JH9H6M9321qHaSIbqAS2KBy2iNDoy3EhKvHXOgd4TgWc7+\nMGiREDK9QsOZ1UKFn5p5cXt0lkGsRSVB5sh2GurGxCtKEwtXlK8OGAWhz46dmjEr\nT02SH7H6WQA+Zh8+OTdzjpo/aujdI6pGVslSY/ulFcqQF16U7aRTmobPpdSZuFWN\nuBcoAXLhDBLutCWQaYSodksRha6I6olrlSditoHHGOnMWC6S4/+NT1XtSvBEIhVn\nMDRym6UKLNlhR+bb3lyGK5HgA2frXduNIL244z931Ii+JAnvpIsZrQ9k1UghG0L7\n3zLTMSCf1y3yWKhXWnPcN41zWeqiF+gk0zFoIQiaDPjhqNyjzTheXX8YqiTf226E\nxTg1Xrac3LF5Ju+3gCioUzpOo3WbphDmZfDTMBj0cWn7GszLkiNd/AX5bLf/+OdJ\n9KaZSOQcit4A9bxERWFS0vT8aGfN43mUFXrpKLmpltZkmtt4XloEeGndZbHF60hy\n+nRzJVNs9B63xP9+NdpWgvoiRVOBKB04XVcNC6nMCMwYjJRLmBzQQ9PT3dQ2dnpj\nj0TuU/44bj5S5t6aVvEOeKanHHeVqRQm8Kzt4WfDvjp1ASOkApvA5+Xs+DpcKbWH\nMCAZDQpi2vWu8d+c569FvN4e0SbP0qM26NgvAgMBAAGjZjBkMBIGA1UdEwEB/wQI\nMAYBAf8CAQAwDgYDVR0PAQH/BAQDAgEGMB0GA1UdDgQWBBSnfq6PGf8AwEL9XGyQ\nM1I6087OzjAfBgNVHSMEGDAWgBSnfq6PGf8AwEL9XGyQM1I6087OzjANBgkqhkiG\n9w0BAQsFAAOCAgEALXZZNaa60cpYNFEXgr780IqKUdZa995OvRUs1dCYd4WqzzJD\nVad8Z48GJX3/u/XAk2UM+mUSGaFowqhek58YX0b24O0PG+y3O0XT0EX/+80Fu+Kt\nkPSbiaPyeYxGqEjwed/Y9X5AJig68NA/FRcT5dq2sWA8hcej8Ghm6D3gu9PdBWpk\nRstITsdaSfx6N+avJ0keGMHqLDLSr948XbehRHH9FnvkPfDtkwKzNwhYmeB6/c+v\nal/JLfPy6VWi3fK37XmuhSh2aZ/vsjT7sxvfFTndUVBeumvCS4wW+bByxpC5XBHW\nB1TrPCczqaDqDD/ib1YCLfY6Qgi8IINEsDDkDgpevW2JxSjTywGGYea4J3M5oOdg\nNhjNWt00H/rugEzkB9hP4po9QHSFX5qWgzT/ws01mOcaOr4UQ8msSyVZmfpJkdHy\nx4n4jhvdlsQKhKM7OmpuXGIA7r/lqU5WDQl1Erj/6cNeWp4vx+606mvbjpzk2Lcp\ni0wBnz27jvN4Xvw+zBMzMBMm5iPwKDMKUyo3q87DFC6lBvBwF0kbPom+yLhHH/rF\n0hr21PATUrHHutFebZ3ZqZwusiKKOoD6fpQrF2mwnVGHQPwTUamSFKQZsf9jw3ic\n4zY2nruXc0OSWS2gf1FKRDxpgpMUjthA3nO1YJuiP4I7fB5mqSoYY8bsyhc=\n-----END CERTIFICATE-----\n" --cert_content "-----BEGIN CERTIFICATE-----\nMIIFHDCCAwSgAwIBAgIIcePfAqBgEAAwDQYJKoZIhvcNAQELBQAwVzEYMBYGA1UE\nCgwPUHJvdGVncml0eSBJbmMuMQswCQYDVQQGEwJVUzEuMCwGA1UEAwwlUHJvdGVn\ncml0eSBSb290IENBIC0gWkldeedKRE5tekdPdGEyQzAgGA8yMDI1MTIyMTAwMDAw\nMFoXDTM1MTIyMDA3NDE1MlowQzEYMBYGA1UECgwPUHJvdGVncml0eSBJbmMuMQsw\nCQYDVQQGEwJVUzEaMBgGA1UEAwwRUHJvdGVncml0eSBDbGllbnQwggIiMA0GCSqG\nSIb3DQEBAQUAA4ICDwAwggIKAoICAQCn7/6ZMkJkt1/9iOj+0S8aE64w69iSpEUH\ns/wlCJG5mx7QhMKwTeJSjXO+oVSDH7Kr+eoIpTh4Zt6aC9oUaynJ4tLpE1/xb5V9\n2Brafthx6b49/kgeCEvDQtFbmwJPOZ9f2W71oK8s6zgM/dASpH4LgAu3Y7vfJ9eH\nZB63MuDFc429WyDuXQ4xnQ07RUKd40Q7JSKt4WNIdl7IVlAdAwTg+/4+xhYohSgi\ndi82XJRD0MCs0EQg6K5G0Do8DcAmdBsE3LTjJr55G1Juscv6qfh0BCTuyhJpS3dI\nQa5YiSuTIDiO45h8V4BS/+AB42tYSejvQKVmCbaCb9aqwn9LjrM0G4GYU0llvVi0\nvi8d76s9wb1V0Au0lkr/xFMCXebYWGr1I48kKlFKf0l11fP0rjAQO+qWwNJI1ax8\n7g1dh49NwBJbnZJvlv1Hb5KlrOvwHfr8UkFBZ1GVBZum0wbwFirZXxuU43AZp2S\nnwVDl+i3fP4FEu8SMIijhU3NQeA8PbVcyx3xgsOiNO3wXp2Rt380D4Ynw5A7pF6Y\nUD4TefMzUCgDFEykuUzZlnT9mBR34F4bYUQSLPPqWDXedAHfuUh9na2ws3BltpAV\nvpNM9xWl2NQN6Xsp+gAuMwIHcj0FTiJ38UFyzvPCJ/e+FsW3qWQkgDNhUYlOAplf\np8o/+1Fm7wIDAQABMA0GCSqGSIb3DQEBCwUAA4ICAQB+s91FIrthptvdBygBsen4\nLaQpfAGIEyeiG1VdTeXtlev2HjPk0p3FnbjZVQhyT00SCWPHa7Vd6ypIqlIFYvnq\nUvUc0fkUqnpAeRWK9p1bif32Qs3rS6Q8mDDVbe2BP/gxOdrPkKPZLZ/rA4cYQAh0\nx/RsdxXtiBkOQpNjZO+UUbyPqohRKek/yLEiltsdBcXeFzcUbZMxks8CAmKVB3Pn\n69NmqZOcJtcj0ydBKL1MdUxPSHXks0z8afVa5IlbJaeaa+Ef0dMDzL/JdH7FslaZ\ntHvgJpq2RinHx1emIlmAk1ji0L/4MCqRrCdNU1rVIob7amyd6gkAkEIYUlsHFEp1\nBdVU8hh4F9UQ6dQvZ6etO4/Pus8t4DjdY8Xllsgot4NXL94r/asG+z3QjIIokUfu\nEDRorE82P809hWhRVbZ1A66/3XERD4BGmn3PML94YdC+vOxricqkrZ4oJDD3gbow\nfJWQIZ96hMndAG0H055qvgoWNqjifw9KXLHqelHWOiyJftJrchCOwZ3gRlA8WaOy\nHvCNN1VzCOfaNw9YJlJ4c3DLzwwRxo/KinycCvDaYGhBLTkWjZFqqkdwm4cqK9cf\n3joxQKh51a5ENZ2hoJUEvlcfjerQGPMRMUR4n3GwPf7Vca3fd+S1+qA7tcldEKx9\nHte3R2N5rYd/obrdkh5J0A==\n-----END CERTIFICATE-----\n" --key_content "-----BEGIN PRIVATE KEY-----\nMIIJQgIBADANBgkqhkiG9w0BAQEFAASCCSwwggkoAgEAAoICAQCn7/6ZMkJkt1/9\niOj+0S8aE64w69iSpEUHs/wlCJG5mx7QhMKwTeJSjXO+oVSDH7Kr+eoIpTh4Zt6a\nC9oUaynJ4tLpE1/xb5V92Brafthx6b49/kgeCEvDQtFbmwJPOZ9f2W71oK8s6zgM\n/dASpH4LgAu3Y7vfJ9eHZB63MuDFc429WyDuXQ4xnQ07RUKd40Q7JSKt4WNIdl7I\nVlAdAwTg+/4+xhYohSgidi82XJRD0MCs0EQg6K5G0Do8DcAmdBsE3LTjJr55G1Ju\nscv6qfh0BCTuyhJpS3dIQa5YiSuTIDiO45h8V4BS/+AB42tYSejvQKVmCbaCb9aq\nwn9LjrM0G4GYU0llvVi0vi8d76s9wb1V0Au0lkr/xFMCXebYWGr1I48kKlFKf0l1\n1fP0rjAQO+qWwNJI1ax87g1dh49NwBJbnZJvlv1Hb5Kls2rvwHVcp4UkFBZ1GVBZu\nm0wbwFirZXxuU43AZp2SnwVDl+i3fP4FEu8SMIijhU3NQeA8PbVcyx3xgsOiNO3w\nXp2Rt380D4Ynw5A7pF6YUD4TefMzUCgDFEykuUzZlnT9mBR34F4bYUQSLPPqWDXe\ndAHfuUh9na2ws3BltpAVvpNM9xWl2NQN6Xsp+gAuMwIHcj0FTiJ38UFyzvPCJ/e+\nFsW3qWQkgDNhUYlOAplfp8o/+1Fm7wIDAQABAoICAQCbaiSpzbNX1cRFs7A8MYZv\nkYsAxyJ0AwXHLS/Jbfa+V+naeyJZWpp6X2GgJ1k4x9roAK4vNgfelQSodxNpFgtk\nRD9/Z2jA3Mzx205uqjjQospmQK6o7HCA0ZNCPV+TxfXSFDz1n7C91yjWDQXEWuoy\n5lrxaqDw0cRKDcPHMpSE5n1jobQGI6QBEiCum1gdGbeJLMK9O/pPkwwARrB5SNP5\nCfuuSE81TJVp3wmuO1sSr1vAEjUaZ3rxGb7q2Kbcb1KZ206jcLWRClHtEyl8XlQJ\nudQcEHGddDN9cRtR4A+tZoIw6juxxqCBLz81QCuVV0D0OVVX6uE2MR3uhXSawwgEU\nVWIcWvgXkTgEbg/KgrZ3R9VN7XjawMLVv+3dLQp4idD7keoKWCOHXZtdEXalCmLV\nQQxNtwHkjF0yG+mu6nFEiy89onvTLJtzwriu16BYf8kVnUyd3F94LYQZDWRxCuuG\nNppl0VfikZGM+0P0PpKGy3Yn+qR6d4NhaYFxbrgezRg0KlshWpM/N6ZISBj9QjsZ\nPID4oVDNiTk0nEiHlz4SYqsGrTmPdEIwLTO0QL2SFrcNwqh+qT50s7QFqu+Mwl8E\nieRXdEc5mV0qTQvUWPjNh0l6oEwsKi0dxUL5j4utr3WQgk1Fq/1LNgVFL/rBbAIX\ncI3hmU3UQBiTUtzJ3iDytQKCAQEA3LpDbn7TAwr7DMwA1nBTrv5bwGKN7SGan6fN\nL9BI0uyW3H9EZtlhE2kxapF20//gMlvIYO1kW+vySvXTK6IrBzb9s8dzycqbhpyP\n1Z7HQHJeRjNuExTHlX8hU2kW/evmWeRswJwSo37zf6XWMBN4D/i78OEbNDpTLFDA\n2iYWGx2+Cex7nzsSI1omOhek4UyejKsk4Iv2621ezH2mTsHfyxajP/GsCUIHDB6r\nB2nL8YzY/u4nzOVXu5N+sSthQTn3L4KiFavlOd00cCL22J7Dk15CyXn11MHxdo1p\npXZD/sEJfgmiWvroFlHBDRQRzHhPO7j0SzrssOkysNq/aW1eGQKCAQEAwsYkdUWt\nx0fRSaKyC4IJhsKiFcceZdbmHXPd1iaK+oAGhTzz3xDBDlQYbwy6ej8uk8/3PqBW\nfZPOWD9DszTE7k/Rsd4jwVFMD2daE09JVGyPZ7bq4X3qQ7oL120b6Oi1ZuYIXMPs\nlJzgQbOyPzUZess1OUSNwfB8pZhMkjvgmkkSUlZgyQx5+PRW9cZsf4POO9vCAFRL\nOyNlPMAqT1vvGbtatnHc6iY0v1Gl5J0NJfrzpd6b/Cr619NflpSUw6nEd0PLaGl7\naTqCPdMb5Fh7iISmysfSgVavZo5nIvRNY8vVQX8MBaQdmTKXXfYFbiYgZ+uL4hWg\nlTYXdQGQlIx+RwKCAQAjCKVfSl3vo7SJKXAQmS+PHOwvMvVX5/eE07trlWGZqNeh\nE8olkOcpj466XXBA4eIR3COHzuYY+PAyGaZ0zH6L3JyUBlpIcxIQYZUq0NLLVdvE\nxLD58lhjUBRYCtwNXX3oUqs4Pw1uSd4YKpg+dTifQFmEOBZ7Sa6d4AtcFKN5llTt\nek18zoFofwyGN+6BnAmmRhvKUCzW3TsoteDJq1f8AhHTOmaV6Zb4w31d5drq8fIX\nNHG4wcYVDaoUMNB06+Bh+BgF3Iy7jHKgQcxwQXLFVza+h88O/+F1caiNDKJqMvVw\nvdK5Ig3oTP2ZN9BDZe0di5OqxSWARuM20uGCuEsxAoIBABMLXLU6wushUo1ooxAM\n/vF2RnLqrUY35PgsRByUWDJ2Ii0U8KN29+l2v4zcKb+aPeumAf7Vnp9YvGxUg0Ia\nfsbudwp1NfnJAS7gZCZPMlRW6Q6zC/RQY3+LyWye9oOnfVU6WMb5QUCmtia2c09K\n2drv05xt345+/TET2yjRQfzT+D6kw4Hk/mghO/98D0/Ii3m+2xE9LL3zkAqIn5py\n2sYhU5VTPM6IPdAXI6le0dJM31Xwlj/p0+0Wddo7XPBkwRkIP/NNnQuE9QcmhSum\nmy2WCtj5ANQ0raHRerQoPwjq/UcSLRLAIUTBdZtyWsWSZMjEd0D77F+qklCWfpSH\nyDECggEAEaCankeqpmPcSBDdvHZ9TP42aYqvvgrb36bK8A4HdGujx2dWafPcLojm\nizEtUPv2nVU2sGjGmPct5gSCS0oSwjVoIj7UKjT1dLN2QA115mFuZXNsz7UEifdU\n6XuIHztTcDTmhsDGx/XtsnZFyfEl9z3zZIkO4aJ9lbBiyw5LamGD1ykQ2DavxCFE\neFalDX9PGS/VERX9foHLLXDyEXYuoo8pf3ltupYmqbxMSX5Hf1NvtqYBSTvYiaCv\nmQJ3EuuxjzxXcCuI0YWPcAxlAViz9NAzgk+gxbOB6kEHvq/GWWRebQdvGdSHE9zV\ng5HfdOn7snl93cZxCP+JcOFG55h0Dg==\n-----END PRIVATE KEY-----\n"
insight configure syslog --host <syslog_address> --port <syslog_port> --ca_content "<ca.crt_content>" --cert_content "<client.crt_content>" --key_content "<client.key_content>" --troubleshooting_log True
Example:
insight configure syslog --host 192.168.1.110 --port 6514 --ca_content "-----BEGIN CERTIFICATE-----\nMIIFmDCCA4CgAwIBAgIIWF8OX+P4jAAwDQYJKoZIhvcNAQELBQAwVzEYMBYGA1UE\nCgwPUHJvdGVncml0eSBJbmMuMQswCQYDVQQGEwJVUzEuMCwGA1UEAwwlUHJvdGVn\ncml0eSBSb290IENBIC0gWklTbkdKRE5tekdPdGEyQzAgGA8yMDI1MTIyMTAwMDAw\nMFoXDTM1MTIyMDA3NDE1MFowVzEYMBYGA1UECgwPUHJvdGVncml0eSBJbmMuMQsw\nCQYDVQQGEwJVUzEuMCwGA1UEAwwlUHJvdGVncml0eSBSb290IENBIC0gWklTbkdK\nRE5tekdPdGEyQzCCAiIwDQYJKoZIhvcNAQEBBQADggIPADCCAgoCggIBAL6nK47Y\n/hs1nBnHxg2/S6ieL/JH9H6M9321qHaSIbqAS2KBy2iNDoy3EhKvHXOgd4TgWc7+\nMGiREDK9QsOZ1UKFn5p5cXt0lkGsRSVB5sh2GurGxCtKEwtXlK8OGAWhz46dmjEr\nT02SH7H6WQA+Zh8+OTdzjpo/aujdI6pGVslSY/ulFcqQF16U7aRTmobPpdSZuFWN\nuBcoAXLhDBLutCWQaYSodksRha6I6olrlSditoHHGOnMWC6S4/+NT1XtSvBEIhVn\nMDRym6UKLNlhR+bb3lyGK5HgA2frXduNIL244z931Ii+JAnvpIsZrQ9k1UghG0L7\n3zLTMSCf1y3yWKhXWnPcN41zWeqiF+gk0zFoIQiaDPjhqNyjzTheXX8YqiTf226E\nxTg1Xrac3LF5Ju+3gCioUzpOo3WbphDmZfDTMBj0cWn7GszLkiNd/AX5bLf/+OdJ\n9KaZSOQcit4A9bxERWFS0vT8aGfN43mUFXrpKLmpltZkmtt4XloEeGndZbHF60hy\n+nRzJVNs9B63xP9+NdpWgvoiRVOBKB04XVcNC6nMCMwYjJRLmBzQQ9PT3dQ2dnpj\nj0TuU/44bj5S5t6aVvEOeKanHHeVqRQm8Kzt4WfDvjp1ASOkApvA5+Xs+DpcKbWH\nMCAZDQpi2vWu8d+c569FvN4e0SbP0qM26NgvAgMBAAGjZjBkMBIGA1UdEwEB/wQI\nMAYBAf8CAQAwDgYDVR0PAQH/BAQDAgEGMB0GA1UdDgQWBBSnfq6PGf8AwEL9XGyQ\nM1I6087OzjAfBgNVHSMEGDAWgBSnfq6PGf8AwEL9XGyQM1I6087OzjANBgkqhkiG\n9w0BAQsFAAOCAgEALXZZNaa60cpYNFEXgr780IqKUdZa995OvRUs1dCYd4WqzzJD\nVad8Z48GJX3/u/XAk2UM+mUSGaFowqhek58YX0b24O0PG+y3O0XT0EX/+80Fu+Kt\nkPSbiaPyeYxGqEjwed/Y9X5AJig68NA/FRcT5dq2sWA8hcej8Ghm6D3gu9PdBWpk\nRstITsdaSfx6N+avJ0keGMHqLDLSr948XbehRHH9FnvkPfDtkwKzNwhYmeB6/c+v\nal/JLfPy6VWi3fK37XmuhSh2aZ/vsjT7sxvfFTndUVBeumvCS4wW+bByxpC5XBHW\nB1TrPCczqaDqDD/ib1YCLfY6Qgi8IINEsDDkDgpevW2JxSjTywGGYea4J3M5oOdg\nNhjNWt00H/rugEzkB9hP4po9QHSFX5qWgzT/ws01mOcaOr4UQ8msSyVZmfpJkdHy\nx4n4jhvdlsQKhKM7OmpuXGIA7r/lqU5WDQl1Erj/6cNeWp4vx+606mvbjpzk2Lcp\ni0wBnz27jvN4Xvw+zBMzMBMm5iPwKDMKUyo3q87DFC6lBvBwF0kbPom+yLhHH/rF\n0hr21PATUrHHutFebZ3ZqZwusiKKOoD6fpQrF2mwnVGHQPwTUamSFKQZsf9jw3ic\n4zY2nruXc0OSWS2gf1FKRDxpgpMUjthA3nO1YJuiP4I7fB5mqSoYY8bsyhc=\n-----END CERTIFICATE-----\n" --cert_content "-----BEGIN CERTIFICATE-----\nMIIFHDCCAwSgAwIBAgIIcePfAqBgEAAwDQYJKoZIhvcNAQELBQAwVzEYMBYGA1UE\nCgwPUHJvdGVncml0eSBJbmMuMQswCQYDVQQGEwJVUzEuMCwGA1UEAwwlUHJvdGVn\ncml0eSBSb290IENBIC0gWkldeedKRE5tekdPdGEyQzAgGA8yMDI1MTIyMTAwMDAw\nMFoXDTM1MTIyMDA3NDE1MlowQzEYMBYGA1UECgwPUHJvdGVncml0eSBJbmMuMQsw\nCQYDVQQGEwJVUzEaMBgGA1UEAwwRUHJvdGVncml0eSBDbGllbnQwggIiMA0GCSqG\nSIb3DQEBAQUAA4ICDwAwggIKAoICAQCn7/6ZMkJkt1/9iOj+0S8aE64w69iSpEUH\ns/wlCJG5mx7QhMKwTeJSjXO+oVSDH7Kr+eoIpTh4Zt6aC9oUaynJ4tLpE1/xb5V9\n2Brafthx6b49/kgeCEvDQtFbmwJPOZ9f2W71oK8s6zgM/dASpH4LgAu3Y7vfJ9eH\nZB63MuDFc429WyDuXQ4xnQ07RUKd40Q7JSKt4WNIdl7IVlAdAwTg+/4+xhYohSgi\ndi82XJRD0MCs0EQg6K5G0Do8DcAmdBsE3LTjJr55G1Juscv6qfh0BCTuyhJpS3dI\nQa5YiSuTIDiO45h8V4BS/+AB42tYSejvQKVmCbaCb9aqwn9LjrM0G4GYU0llvVi0\nvi8d76s9wb1V0Au0lkr/xFMCXebYWGr1I48kKlFKf0l11fP0rjAQO+qWwNJI1ax8\n7g1dh49NwBJbnZJvlv1Hb5KlrOvwHfr8UkFBZ1GVBZum0wbwFirZXxuU43AZp2S\nnwVDl+i3fP4FEu8SMIijhU3NQeA8PbVcyx3xgsOiNO3wXp2Rt380D4Ynw5A7pF6Y\nUD4TefMzUCgDFEykuUzZlnT9mBR34F4bYUQSLPPqWDXedAHfuUh9na2ws3BltpAV\nvpNM9xWl2NQN6Xsp+gAuMwIHcj0FTiJ38UFyzvPCJ/e+FsW3qWQkgDNhUYlOAplf\np8o/+1Fm7wIDAQABMA0GCSqGSIb3DQEBCwUAA4ICAQB+s91FIrthptvdBygBsen4\nLaQpfAGIEyeiG1VdTeXtlev2HjPk0p3FnbjZVQhyT00SCWPHa7Vd6ypIqlIFYvnq\nUvUc0fkUqnpAeRWK9p1bif32Qs3rS6Q8mDDVbe2BP/gxOdrPkKPZLZ/rA4cYQAh0\nx/RsdxXtiBkOQpNjZO+UUbyPqohRKek/yLEiltsdBcXeFzcUbZMxks8CAmKVB3Pn\n69NmqZOcJtcj0ydBKL1MdUxPSHXks0z8afVa5IlbJaeaa+Ef0dMDzL/JdH7FslaZ\ntHvgJpq2RinHx1emIlmAk1ji0L/4MCqRrCdNU1rVIob7amyd6gkAkEIYUlsHFEp1\nBdVU8hh4F9UQ6dQvZ6etO4/Pus8t4DjdY8Xllsgot4NXL94r/asG+z3QjIIokUfu\nEDRorE82P809hWhRVbZ1A66/3XERD4BGmn3PML94YdC+vOxricqkrZ4oJDD3gbow\nfJWQIZ96hMndAG0H055qvgoWNqjifw9KXLHqelHWOiyJftJrchCOwZ3gRlA8WaOy\nHvCNN1VzCOfaNw9YJlJ4c3DLzwwRxo/KinycCvDaYGhBLTkWjZFqqkdwm4cqK9cf\n3joxQKh51a5ENZ2hoJUEvlcfjerQGPMRMUR4n3GwPf7Vca3fd+S1+qA7tcldEKx9\nHte3R2N5rYd/obrdkh5J0A==\n-----END CERTIFICATE-----\n" --key_content "-----BEGIN PRIVATE KEY-----\nMIIJQgIBADANBgkqhkiG9w0BAQEFAASCCSwwggkoAgEAAoICAQCn7/6ZMkJkt1/9\niOj+0S8aE64w69iSpEUHs/wlCJG5mx7QhMKwTeJSjXO+oVSDH7Kr+eoIpTh4Zt6a\nC9oUaynJ4tLpE1/xb5V92Brafthx6b49/kgeCEvDQtFbmwJPOZ9f2W71oK8s6zgM\n/dASpH4LgAu3Y7vfJ9eHZB63MuDFc429WyDuXQ4xnQ07RUKd40Q7JSKt4WNIdl7I\nVlAdAwTg+/4+xhYohSgidi82XJRD0MCs0EQg6K5G0Do8DcAmdBsE3LTjJr55G1Ju\nscv6qfh0BCTuyhJpS3dIQa5YiSuTIDiO45h8V4BS/+AB42tYSejvQKVmCbaCb9aq\nwn9LjrM0G4GYU0llvVi0vi8d76s9wb1V0Au0lkr/xFMCXebYWGr1I48kKlFKf0l1\n1fP0rjAQO+qWwNJI1ax87g1dh49NwBJbnZJvlv1Hb5Kls2rvwHVcp4UkFBZ1GVBZu\nm0wbwFirZXxuU43AZp2SnwVDl+i3fP4FEu8SMIijhU3NQeA8PbVcyx3xgsOiNO3w\nXp2Rt380D4Ynw5A7pF6YUD4TefMzUCgDFEykuUzZlnT9mBR34F4bYUQSLPPqWDXe\ndAHfuUh9na2ws3BltpAVvpNM9xWl2NQN6Xsp+gAuMwIHcj0FTiJ38UFyzvPCJ/e+\nFsW3qWQkgDNhUYlOAplfp8o/+1Fm7wIDAQABAoICAQCbaiSpzbNX1cRFs7A8MYZv\nkYsAxyJ0AwXHLS/Jbfa+V+naeyJZWpp6X2GgJ1k4x9roAK4vNgfelQSodxNpFgtk\nRD9/Z2jA3Mzx205uqjjQospmQK6o7HCA0ZNCPV+TxfXSFDz1n7C91yjWDQXEWuoy\n5lrxaqDw0cRKDcPHMpSE5n1jobQGI6QBEiCum1gdGbeJLMK9O/pPkwwARrB5SNP5\nCfuuSE81TJVp3wmuO1sSr1vAEjUaZ3rxGb7q2Kbcb1KZ206jcLWRClHtEyl8XlQJ\nudQcEHGddDN9cRtR4A+tZoIw6juxxqCBLz81QCuVV0D0OVVX6uE2MR3uhXSawwgEU\nVWIcWvgXkTgEbg/KgrZ3R9VN7XjawMLVv+3dLQp4idD7keoKWCOHXZtdEXalCmLV\nQQxNtwHkjF0yG+mu6nFEiy89onvTLJtzwriu16BYf8kVnUyd3F94LYQZDWRxCuuG\nNppl0VfikZGM+0P0PpKGy3Yn+qR6d4NhaYFxbrgezRg0KlshWpM/N6ZISBj9QjsZ\nPID4oVDNiTk0nEiHlz4SYqsGrTmPdEIwLTO0QL2SFrcNwqh+qT50s7QFqu+Mwl8E\nieRXdEc5mV0qTQvUWPjNh0l6oEwsKi0dxUL5j4utr3WQgk1Fq/1LNgVFL/rBbAIX\ncI3hmU3UQBiTUtzJ3iDytQKCAQEA3LpDbn7TAwr7DMwA1nBTrv5bwGKN7SGan6fN\nL9BI0uyW3H9EZtlhE2kxapF20//gMlvIYO1kW+vySvXTK6IrBzb9s8dzycqbhpyP\n1Z7HQHJeRjNuExTHlX8hU2kW/evmWeRswJwSo37zf6XWMBN4D/i78OEbNDpTLFDA\n2iYWGx2+Cex7nzsSI1omOhek4UyejKsk4Iv2621ezH2mTsHfyxajP/GsCUIHDB6r\nB2nL8YzY/u4nzOVXu5N+sSthQTn3L4KiFavlOd00cCL22J7Dk15CyXn11MHxdo1p\npXZD/sEJfgmiWvroFlHBDRQRzHhPO7j0SzrssOkysNq/aW1eGQKCAQEAwsYkdUWt\nx0fRSaKyC4IJhsKiFcceZdbmHXPd1iaK+oAGhTzz3xDBDlQYbwy6ej8uk8/3PqBW\nfZPOWD9DszTE7k/Rsd4jwVFMD2daE09JVGyPZ7bq4X3qQ7oL120b6Oi1ZuYIXMPs\nlJzgQbOyPzUZess1OUSNwfB8pZhMkjvgmkkSUlZgyQx5+PRW9cZsf4POO9vCAFRL\nOyNlPMAqT1vvGbtatnHc6iY0v1Gl5J0NJfrzpd6b/Cr619NflpSUw6nEd0PLaGl7\naTqCPdMb5Fh7iISmysfSgVavZo5nIvRNY8vVQX8MBaQdmTKXXfYFbiYgZ+uL4hWg\nlTYXdQGQlIx+RwKCAQAjCKVfSl3vo7SJKXAQmS+PHOwvMvVX5/eE07trlWGZqNeh\nE8olkOcpj466XXBA4eIR3COHzuYY+PAyGaZ0zH6L3JyUBlpIcxIQYZUq0NLLVdvE\nxLD58lhjUBRYCtwNXX3oUqs4Pw1uSd4YKpg+dTifQFmEOBZ7Sa6d4AtcFKN5llTt\nek18zoFofwyGN+6BnAmmRhvKUCzW3TsoteDJq1f8AhHTOmaV6Zb4w31d5drq8fIX\nNHG4wcYVDaoUMNB06+Bh+BgF3Iy7jHKgQcxwQXLFVza+h88O/+F1caiNDKJqMvVw\nvdK5Ig3oTP2ZN9BDZe0di5OqxSWARuM20uGCuEsxAoIBABMLXLU6wushUo1ooxAM\n/vF2RnLqrUY35PgsRByUWDJ2Ii0U8KN29+l2v4zcKb+aPeumAf7Vnp9YvGxUg0Ia\nfsbudwp1NfnJAS7gZCZPMlRW6Q6zC/RQY3+LyWye9oOnfVU6WMb5QUCmtia2c09K\n2drv05xt345+/TET2yjRQfzT+D6kw4Hk/mghO/98D0/Ii3m+2xE9LL3zkAqIn5py\n2sYhU5VTPM6IPdAXI6le0dJM31Xwlj/p0+0Wddo7XPBkwRkIP/NNnQuE9QcmhSum\nmy2WCtj5ANQ0raHRerQoPwjq/UcSLRLAIUTBdZtyWsWSZMjEd0D77F+qklCWfpSH\nyDECggEAEaCankeqpmPcSBDdvHZ9TP42aYqvvgrb36bK8A4HdGujx2dWafPcLojm\nizEtUPv2nVU2sGjGmPct5gSCS0oSwjVoIj7UKjT1dLN2QA115mFuZXNsz7UEifdU\n6XuIHztTcDTmhsDGx/XtsnZFyfEl9z3zZIkO4aJ9lbBiyw5LamGD1ykQ2DavxCFE\neFalDX9PGS/VERX9foHLLXDyEXYuoo8pf3ltupYmqbxMSX5Hf1NvtqYBSTvYiaCv\nmQJ3EuuxjzxXcCuI0YWPcAxlAViz9NAzgk+gxbOB6kEHvq/GWWRebQdvGdSHE9zV\ng5HfdOn7snl93cZxCP+JcOFG55h0Dg==\n-----END PRIVATE KEY-----\n" --troubleshooting_log True
The pods take some time to initialize and stabilize after running this command. Verify the status of the pods using the kubectl get pods -n pty-insightcommand. Avoid updating any more configurations till the pods are ready.
Configuring the syslog that receives the logs
The logs forwarded to the SIEM are captured by syslog on the SIEM. Ensure that the syslog on the SIEM is configured to send the logs to the required location, such as, a file or another system. For more information about the forwarding logs to various systems, refer to the rsyslog documentation.
Updating the log forwarding configuration
The command to update the logs forwarding settings to the syslog server.
insight update syslog --host <syslog_address> --port <syslog_port> --ca_content "<ca.crt_content>" --cert_content "<client.crt_content>" --key_content "<client.key_content>"
Example:
insight update syslog --host 192.168.1.110 --port 6514 --ca_content "-----BEGIN CERTIFICATE-----\nMIIFmDCCA4CgAwIBAgIIWF8OX+P4jAAwDQYJKoZIhvcNAQELBQAwVzEYMBYGA1UE\nCgwPUHJvdGVncml0eSBJbmMuMQswCQYDVQQGEwJVUzEuMCwGA1UEAwwlUHJvdGVn\ncml0eSBSb290IENBIC0gWklTbkdKRE5tekdPdGEyQzAgGA8yMDI1MTIyMTAwMDAw\nMFoXDTM1MTIyMDA3NDE1MFowVzEYMBYGA1UECgwPUHJvdGVncml0eSBJbmMuMQsw\nCQYDVQQGEwJVUzEuMCwGA1UEAwwlUHJvdGVncml0eSBSb290IENBIC0gWklTbkdK\nRE5tekdPdGEyQzCCAiIwDQYJKoZIhvcNAQEBBQADggIPADCCAgoCggIBAL6nK47Y\n/hs1nBnHxg2/S6ieL/JH9H6M9321qHaSIbqAS2KBy2iNDoy3EhKvHXOgd4TgWc7+\nMGiREDK9QsOZ1UKFn5p5cXt0lkGsRSVB5sh2GurGxCtKEwtXlK8OGAWhz46dmjEr\nT02SH7H6WQA+Zh8+OTdzjpo/aujdI6pGVslSY/ulFcqQF16U7aRTmobPpdSZuFWN\nuBcoAXLhDBLutCWQaYSodksRha6I6olrlSditoHHGOnMWC6S4/+NT1XtSvBEIhVn\nMDRym6UKLNlhR+bb3lyGK5HgA2frXduNIL244z931Ii+JAnvpIsZrQ9k1UghG0L7\n3zLTMSCf1y3yWKhXWnPcN41zWeqiF+gk0zFoIQiaDPjhqNyjzTheXX8YqiTf226E\nxTg1Xrac3LF5Ju+3gCioUzpOo3WbphDmZfDTMBj0cWn7GszLkiNd/AX5bLf/+OdJ\n9KaZSOQcit4A9bxERWFS0vT8aGfN43mUFXrpKLmpltZkmtt4XloEeGndZbHF60hy\n+nRzJVNs9B63xP9+NdpWgvoiRVOBKB04XVcNC6nMCMwYjJRLmBzQQ9PT3dQ2dnpj\nj0TuU/44bj5S5t6aVvEOeKanHHeVqRQm8Kzt4WfDvjp1ASOkApvA5+Xs+DpcKbWH\nMCAZDQpi2vWu8d+c569FvN4e0SbP0qM26NgvAgMBAAGjZjBkMBIGA1UdEwEB/wQI\nMAYBAf8CAQAwDgYDVR0PAQH/BAQDAgEGMB0GA1UdDgQWBBSnfq6PGf8AwEL9XGyQ\nM1I6087OzjAfBgNVHSMEGDAWgBSnfq6PGf8AwEL9XGyQM1I6087OzjANBgkqhkiG\n9w0BAQsFAAOCAgEALXZZNaa60cpYNFEXgr780IqKUdZa995OvRUs1dCYd4WqzzJD\nVad8Z48GJX3/u/XAk2UM+mUSGaFowqhek58YX0b24O0PG+y3O0XT0EX/+80Fu+Kt\nkPSbiaPyeYxGqEjwed/Y9X5AJig68NA/FRcT5dq2sWA8hcej8Ghm6D3gu9PdBWpk\nRstITsdaSfx6N+avJ0keGMHqLDLSr948XbehRHH9FnvkPfDtkwKzNwhYmeB6/c+v\nal/JLfPy6VWi3fK37XmuhSh2aZ/vsjT7sxvfFTndUVBeumvCS4wW+bByxpC5XBHW\nB1TrPCczqaDqDD/ib1YCLfY6Qgi8IINEsDDkDgpevW2JxSjTywGGYea4J3M5oOdg\nNhjNWt00H/rugEzkB9hP4po9QHSFX5qWgzT/ws01mOcaOr4UQ8msSyVZmfpJkdHy\nx4n4jhvdlsQKhKM7OmpuXGIA7r/lqU5WDQl1Erj/6cNeWp4vx+606mvbjpzk2Lcp\ni0wBnz27jvN4Xvw+zBMzMBMm5iPwKDMKUyo3q87DFC6lBvBwF0kbPom+yLhHH/rF\n0hr21PATUrHHutFebZ3ZqZwusiKKOoD6fpQrF2mwnVGHQPwTUamSFKQZsf9jw3ic\n4zY2nruXc0OSWS2gf1FKRDxpgpMUjthA3nO1YJuiP4I7fB5mqSoYY8bsyhc=\n-----END CERTIFICATE-----\n" --cert_content "-----BEGIN CERTIFICATE-----\nMIIFHDCCAwSgAwIBAgIIcePfAqBgEAAwDQYJKoZIhvcNAQELBQAwVzEYMBYGA1UE\nCgwPUHJvdGVncml0eSBJbmMuMQswCQYDVQQGEwJVUzEuMCwGA1UEAwwlUHJvdGVn\ncml0eSBSb290IENBIC0gWkldeedKRE5tekdPdGEyQzAgGA8yMDI1MTIyMTAwMDAw\nMFoXDTM1MTIyMDA3NDE1MlowQzEYMBYGA1UECgwPUHJvdGVncml0eSBJbmMuMQsw\nCQYDVQQGEwJVUzEaMBgGA1UEAwwRUHJvdGVncml0eSBDbGllbnQwggIiMA0GCSqG\nSIb3DQEBAQUAA4ICDwAwggIKAoICAQCn7/6ZMkJkt1/9iOj+0S8aE64w69iSpEUH\ns/wlCJG5mx7QhMKwTeJSjXO+oVSDH7Kr+eoIpTh4Zt6aC9oUaynJ4tLpE1/xb5V9\n2Brafthx6b49/kgeCEvDQtFbmwJPOZ9f2W71oK8s6zgM/dASpH4LgAu3Y7vfJ9eH\nZB63MuDFc429WyDuXQ4xnQ07RUKd40Q7JSKt4WNIdl7IVlAdAwTg+/4+xhYohSgi\ndi82XJRD0MCs0EQg6K5G0Do8DcAmdBsE3LTjJr55G1Juscv6qfh0BCTuyhJpS3dI\nQa5YiSuTIDiO45h8V4BS/+AB42tYSejvQKVmCbaCb9aqwn9LjrM0G4GYU0llvVi0\nvi8d76s9wb1V0Au0lkr/xFMCXebYWGr1I48kKlFKf0l11fP0rjAQO+qWwNJI1ax8\n7g1dh49NwBJbnZJvlv1Hb5KlrOvwHfr8UkFBZ1GVBZum0wbwFirZXxuU43AZp2S\nnwVDl+i3fP4FEu8SMIijhU3NQeA8PbVcyx3xgsOiNO3wXp2Rt380D4Ynw5A7pF6Y\nUD4TefMzUCgDFEykuUzZlnT9mBR34F4bYUQSLPPqWDXedAHfuUh9na2ws3BltpAV\nvpNM9xWl2NQN6Xsp+gAuMwIHcj0FTiJ38UFyzvPCJ/e+FsW3qWQkgDNhUYlOAplf\np8o/+1Fm7wIDAQABMA0GCSqGSIb3DQEBCwUAA4ICAQB+s91FIrthptvdBygBsen4\nLaQpfAGIEyeiG1VdTeXtlev2HjPk0p3FnbjZVQhyT00SCWPHa7Vd6ypIqlIFYvnq\nUvUc0fkUqnpAeRWK9p1bif32Qs3rS6Q8mDDVbe2BP/gxOdrPkKPZLZ/rA4cYQAh0\nx/RsdxXtiBkOQpNjZO+UUbyPqohRKek/yLEiltsdBcXeFzcUbZMxks8CAmKVB3Pn\n69NmqZOcJtcj0ydBKL1MdUxPSHXks0z8afVa5IlbJaeaa+Ef0dMDzL/JdH7FslaZ\ntHvgJpq2RinHx1emIlmAk1ji0L/4MCqRrCdNU1rVIob7amyd6gkAkEIYUlsHFEp1\nBdVU8hh4F9UQ6dQvZ6etO4/Pus8t4DjdY8Xllsgot4NXL94r/asG+z3QjIIokUfu\nEDRorE82P809hWhRVbZ1A66/3XERD4BGmn3PML94YdC+vOxricqkrZ4oJDD3gbow\nfJWQIZ96hMndAG0H055qvgoWNqjifw9KXLHqelHWOiyJftJrchCOwZ3gRlA8WaOy\nHvCNN1VzCOfaNw9YJlJ4c3DLzwwRxo/KinycCvDaYGhBLTkWjZFqqkdwm4cqK9cf\n3joxQKh51a5ENZ2hoJUEvlcfjerQGPMRMUR4n3GwPf7Vca3fd+S1+qA7tcldEKx9\nHte3R2N5rYd/obrdkh5J0A==\n-----END CERTIFICATE-----\n" --key_content "-----BEGIN PRIVATE KEY-----\nMIIJQgIBADANBgkqhkiG9w0BAQEFAASCCSwwggkoAgEAAoICAQCn7/6ZMkJkt1/9\niOj+0S8aE64w69iSpEUHs/wlCJG5mx7QhMKwTeJSjXO+oVSDH7Kr+eoIpTh4Zt6a\nC9oUaynJ4tLpE1/xb5V92Brafthx6b49/kgeCEvDQtFbmwJPOZ9f2W71oK8s6zgM\n/dASpH4LgAu3Y7vfJ9eHZB63MuDFc429WyDuXQ4xnQ07RUKd40Q7JSKt4WNIdl7I\nVlAdAwTg+/4+xhYohSgidi82XJRD0MCs0EQg6K5G0Do8DcAmdBsE3LTjJr55G1Ju\nscv6qfh0BCTuyhJpS3dIQa5YiSuTIDiO45h8V4BS/+AB42tYSejvQKVmCbaCb9aq\nwn9LjrM0G4GYU0llvVi0vi8d76s9wb1V0Au0lkr/xFMCXebYWGr1I48kKlFKf0l1\n1fP0rjAQO+qWwNJI1ax87g1dh49NwBJbnZJvlv1Hb5Kls2rvwHVcp4UkFBZ1GVBZu\nm0wbwFirZXxuU43AZp2SnwVDl+i3fP4FEu8SMIijhU3NQeA8PbVcyx3xgsOiNO3w\nXp2Rt380D4Ynw5A7pF6YUD4TefMzUCgDFEykuUzZlnT9mBR34F4bYUQSLPPqWDXe\ndAHfuUh9na2ws3BltpAVvpNM9xWl2NQN6Xsp+gAuMwIHcj0FTiJ38UFyzvPCJ/e+\nFsW3qWQkgDNhUYlOAplfp8o/+1Fm7wIDAQABAoICAQCbaiSpzbNX1cRFs7A8MYZv\nkYsAxyJ0AwXHLS/Jbfa+V+naeyJZWpp6X2GgJ1k4x9roAK4vNgfelQSodxNpFgtk\nRD9/Z2jA3Mzx205uqjjQospmQK6o7HCA0ZNCPV+TxfXSFDz1n7C91yjWDQXEWuoy\n5lrxaqDw0cRKDcPHMpSE5n1jobQGI6QBEiCum1gdGbeJLMK9O/pPkwwARrB5SNP5\nCfuuSE81TJVp3wmuO1sSr1vAEjUaZ3rxGb7q2Kbcb1KZ206jcLWRClHtEyl8XlQJ\nudQcEHGddDN9cRtR4A+tZoIw6juxxqCBLz81QCuVV0D0OVVX6uE2MR3uhXSawwgEU\nVWIcWvgXkTgEbg/KgrZ3R9VN7XjawMLVv+3dLQp4idD7keoKWCOHXZtdEXalCmLV\nQQxNtwHkjF0yG+mu6nFEiy89onvTLJtzwriu16BYf8kVnUyd3F94LYQZDWRxCuuG\nNppl0VfikZGM+0P0PpKGy3Yn+qR6d4NhaYFxbrgezRg0KlshWpM/N6ZISBj9QjsZ\nPID4oVDNiTk0nEiHlz4SYqsGrTmPdEIwLTO0QL2SFrcNwqh+qT50s7QFqu+Mwl8E\nieRXdEc5mV0qTQvUWPjNh0l6oEwsKi0dxUL5j4utr3WQgk1Fq/1LNgVFL/rBbAIX\ncI3hmU3UQBiTUtzJ3iDytQKCAQEA3LpDbn7TAwr7DMwA1nBTrv5bwGKN7SGan6fN\nL9BI0uyW3H9EZtlhE2kxapF20//gMlvIYO1kW+vySvXTK6IrBzb9s8dzycqbhpyP\n1Z7HQHJeRjNuExTHlX8hU2kW/evmWeRswJwSo37zf6XWMBN4D/i78OEbNDpTLFDA\n2iYWGx2+Cex7nzsSI1omOhek4UyejKsk4Iv2621ezH2mTsHfyxajP/GsCUIHDB6r\nB2nL8YzY/u4nzOVXu5N+sSthQTn3L4KiFavlOd00cCL22J7Dk15CyXn11MHxdo1p\npXZD/sEJfgmiWvroFlHBDRQRzHhPO7j0SzrssOkysNq/aW1eGQKCAQEAwsYkdUWt\nx0fRSaKyC4IJhsKiFcceZdbmHXPd1iaK+oAGhTzz3xDBDlQYbwy6ej8uk8/3PqBW\nfZPOWD9DszTE7k/Rsd4jwVFMD2daE09JVGyPZ7bq4X3qQ7oL120b6Oi1ZuYIXMPs\nlJzgQbOyPzUZess1OUSNwfB8pZhMkjvgmkkSUlZgyQx5+PRW9cZsf4POO9vCAFRL\nOyNlPMAqT1vvGbtatnHc6iY0v1Gl5J0NJfrzpd6b/Cr619NflpSUw6nEd0PLaGl7\naTqCPdMb5Fh7iISmysfSgVavZo5nIvRNY8vVQX8MBaQdmTKXXfYFbiYgZ+uL4hWg\nlTYXdQGQlIx+RwKCAQAjCKVfSl3vo7SJKXAQmS+PHOwvMvVX5/eE07trlWGZqNeh\nE8olkOcpj466XXBA4eIR3COHzuYY+PAyGaZ0zH6L3JyUBlpIcxIQYZUq0NLLVdvE\nxLD58lhjUBRYCtwNXX3oUqs4Pw1uSd4YKpg+dTifQFmEOBZ7Sa6d4AtcFKN5llTt\nek18zoFofwyGN+6BnAmmRhvKUCzW3TsoteDJq1f8AhHTOmaV6Zb4w31d5drq8fIX\nNHG4wcYVDaoUMNB06+Bh+BgF3Iy7jHKgQcxwQXLFVza+h88O/+F1caiNDKJqMvVw\nvdK5Ig3oTP2ZN9BDZe0di5OqxSWARuM20uGCuEsxAoIBABMLXLU6wushUo1ooxAM\n/vF2RnLqrUY35PgsRByUWDJ2Ii0U8KN29+l2v4zcKb+aPeumAf7Vnp9YvGxUg0Ia\nfsbudwp1NfnJAS7gZCZPMlRW6Q6zC/RQY3+LyWye9oOnfVU6WMb5QUCmtia2c09K\n2drv05xt345+/TET2yjRQfzT+D6kw4Hk/mghO/98D0/Ii3m+2xE9LL3zkAqIn5py\n2sYhU5VTPM6IPdAXI6le0dJM31Xwlj/p0+0Wddo7XPBkwRkIP/NNnQuE9QcmhSum\nmy2WCtj5ANQ0raHRerQoPwjq/UcSLRLAIUTBdZtyWsWSZMjEd0D77F+qklCWfpSH\nyDECggEAEaCankeqpmPcSBDdvHZ9TP42aYqvvgrb36bK8A4HdGujx2dWafPcLojm\nizEtUPv2nVU2sGjGmPct5gSCS0oSwjVoIj7UKjT1dLN2QA115mFuZXNsz7UEifdU\n6XuIHztTcDTmhsDGx/XtsnZFyfEl9z3zZIkO4aJ9lbBiyw5LamGD1ykQ2DavxCFE\neFalDX9PGS/VERX9foHLLXDyEXYuoo8pf3ltupYmqbxMSX5Hf1NvtqYBSTvYiaCv\nmQJ3EuuxjzxXcCuI0YWPcAxlAViz9NAzgk+gxbOB6kEHvq/GWWRebQdvGdSHE9zV\ng5HfdOn7snl93cZxCP+JcOFG55h0Dg==\n-----END PRIVATE KEY-----\n"
insight update syslog --host <syslog_address> --port <syslog_port> --ca_content "<ca.crt_content>" --cert_content "<client.crt_content>" --key_content "<client.key_content>" --troubleshooting_log True
Example:
insight update syslog --host 192.168.1.110 --port 6514 --ca_content "-----BEGIN CERTIFICATE-----\nMIIFmDCCA4CgAwIBAgIIWF8OX+P4jAAwDQYJKoZIhvcNAQELBQAwVzEYMBYGA1UE\nCgwPUHJvdGVncml0eSBJbmMuMQswCQYDVQQGEwJVUzEuMCwGA1UEAwwlUHJvdGVn\ncml0eSBSb290IENBIC0gWklTbkdKRE5tekdPdGEyQzAgGA8yMDI1MTIyMTAwMDAw\nMFoXDTM1MTIyMDA3NDE1MFowVzEYMBYGA1UECgwPUHJvdGVncml0eSBJbmMuMQsw\nCQYDVQQGEwJVUzEuMCwGA1UEAwwlUHJvdGVncml0eSBSb290IENBIC0gWklTbkdK\nRE5tekdPdGEyQzCCAiIwDQYJKoZIhvcNAQEBBQADggIPADCCAgoCggIBAL6nK47Y\n/hs1nBnHxg2/S6ieL/JH9H6M9321qHaSIbqAS2KBy2iNDoy3EhKvHXOgd4TgWc7+\nMGiREDK9QsOZ1UKFn5p5cXt0lkGsRSVB5sh2GurGxCtKEwtXlK8OGAWhz46dmjEr\nT02SH7H6WQA+Zh8+OTdzjpo/aujdI6pGVslSY/ulFcqQF16U7aRTmobPpdSZuFWN\nuBcoAXLhDBLutCWQaYSodksRha6I6olrlSditoHHGOnMWC6S4/+NT1XtSvBEIhVn\nMDRym6UKLNlhR+bb3lyGK5HgA2frXduNIL244z931Ii+JAnvpIsZrQ9k1UghG0L7\n3zLTMSCf1y3yWKhXWnPcN41zWeqiF+gk0zFoIQiaDPjhqNyjzTheXX8YqiTf226E\nxTg1Xrac3LF5Ju+3gCioUzpOo3WbphDmZfDTMBj0cWn7GszLkiNd/AX5bLf/+OdJ\n9KaZSOQcit4A9bxERWFS0vT8aGfN43mUFXrpKLmpltZkmtt4XloEeGndZbHF60hy\n+nRzJVNs9B63xP9+NdpWgvoiRVOBKB04XVcNC6nMCMwYjJRLmBzQQ9PT3dQ2dnpj\nj0TuU/44bj5S5t6aVvEOeKanHHeVqRQm8Kzt4WfDvjp1ASOkApvA5+Xs+DpcKbWH\nMCAZDQpi2vWu8d+c569FvN4e0SbP0qM26NgvAgMBAAGjZjBkMBIGA1UdEwEB/wQI\nMAYBAf8CAQAwDgYDVR0PAQH/BAQDAgEGMB0GA1UdDgQWBBSnfq6PGf8AwEL9XGyQ\nM1I6087OzjAfBgNVHSMEGDAWgBSnfq6PGf8AwEL9XGyQM1I6087OzjANBgkqhkiG\n9w0BAQsFAAOCAgEALXZZNaa60cpYNFEXgr780IqKUdZa995OvRUs1dCYd4WqzzJD\nVad8Z48GJX3/u/XAk2UM+mUSGaFowqhek58YX0b24O0PG+y3O0XT0EX/+80Fu+Kt\nkPSbiaPyeYxGqEjwed/Y9X5AJig68NA/FRcT5dq2sWA8hcej8Ghm6D3gu9PdBWpk\nRstITsdaSfx6N+avJ0keGMHqLDLSr948XbehRHH9FnvkPfDtkwKzNwhYmeB6/c+v\nal/JLfPy6VWi3fK37XmuhSh2aZ/vsjT7sxvfFTndUVBeumvCS4wW+bByxpC5XBHW\nB1TrPCczqaDqDD/ib1YCLfY6Qgi8IINEsDDkDgpevW2JxSjTywGGYea4J3M5oOdg\nNhjNWt00H/rugEzkB9hP4po9QHSFX5qWgzT/ws01mOcaOr4UQ8msSyVZmfpJkdHy\nx4n4jhvdlsQKhKM7OmpuXGIA7r/lqU5WDQl1Erj/6cNeWp4vx+606mvbjpzk2Lcp\ni0wBnz27jvN4Xvw+zBMzMBMm5iPwKDMKUyo3q87DFC6lBvBwF0kbPom+yLhHH/rF\n0hr21PATUrHHutFebZ3ZqZwusiKKOoD6fpQrF2mwnVGHQPwTUamSFKQZsf9jw3ic\n4zY2nruXc0OSWS2gf1FKRDxpgpMUjthA3nO1YJuiP4I7fB5mqSoYY8bsyhc=\n-----END CERTIFICATE-----\n" --cert_content "-----BEGIN CERTIFICATE-----\nMIIFHDCCAwSgAwIBAgIIcePfAqBgEAAwDQYJKoZIhvcNAQELBQAwVzEYMBYGA1UE\nCgwPUHJvdGVncml0eSBJbmMuMQswCQYDVQQGEwJVUzEuMCwGA1UEAwwlUHJvdGVn\ncml0eSBSb290IENBIC0gWkldeedKRE5tekdPdGEyQzAgGA8yMDI1MTIyMTAwMDAw\nMFoXDTM1MTIyMDA3NDE1MlowQzEYMBYGA1UECgwPUHJvdGVncml0eSBJbmMuMQsw\nCQYDVQQGEwJVUzEaMBgGA1UEAwwRUHJvdGVncml0eSBDbGllbnQwggIiMA0GCSqG\nSIb3DQEBAQUAA4ICDwAwggIKAoICAQCn7/6ZMkJkt1/9iOj+0S8aE64w69iSpEUH\ns/wlCJG5mx7QhMKwTeJSjXO+oVSDH7Kr+eoIpTh4Zt6aC9oUaynJ4tLpE1/xb5V9\n2Brafthx6b49/kgeCEvDQtFbmwJPOZ9f2W71oK8s6zgM/dASpH4LgAu3Y7vfJ9eH\nZB63MuDFc429WyDuXQ4xnQ07RUKd40Q7JSKt4WNIdl7IVlAdAwTg+/4+xhYohSgi\ndi82XJRD0MCs0EQg6K5G0Do8DcAmdBsE3LTjJr55G1Juscv6qfh0BCTuyhJpS3dI\nQa5YiSuTIDiO45h8V4BS/+AB42tYSejvQKVmCbaCb9aqwn9LjrM0G4GYU0llvVi0\nvi8d76s9wb1V0Au0lkr/xFMCXebYWGr1I48kKlFKf0l11fP0rjAQO+qWwNJI1ax8\n7g1dh49NwBJbnZJvlv1Hb5KlrOvwHfr8UkFBZ1GVBZum0wbwFirZXxuU43AZp2S\nnwVDl+i3fP4FEu8SMIijhU3NQeA8PbVcyx3xgsOiNO3wXp2Rt380D4Ynw5A7pF6Y\nUD4TefMzUCgDFEykuUzZlnT9mBR34F4bYUQSLPPqWDXedAHfuUh9na2ws3BltpAV\nvpNM9xWl2NQN6Xsp+gAuMwIHcj0FTiJ38UFyzvPCJ/e+FsW3qWQkgDNhUYlOAplf\np8o/+1Fm7wIDAQABMA0GCSqGSIb3DQEBCwUAA4ICAQB+s91FIrthptvdBygBsen4\nLaQpfAGIEyeiG1VdTeXtlev2HjPk0p3FnbjZVQhyT00SCWPHa7Vd6ypIqlIFYvnq\nUvUc0fkUqnpAeRWK9p1bif32Qs3rS6Q8mDDVbe2BP/gxOdrPkKPZLZ/rA4cYQAh0\nx/RsdxXtiBkOQpNjZO+UUbyPqohRKek/yLEiltsdBcXeFzcUbZMxks8CAmKVB3Pn\n69NmqZOcJtcj0ydBKL1MdUxPSHXks0z8afVa5IlbJaeaa+Ef0dMDzL/JdH7FslaZ\ntHvgJpq2RinHx1emIlmAk1ji0L/4MCqRrCdNU1rVIob7amyd6gkAkEIYUlsHFEp1\nBdVU8hh4F9UQ6dQvZ6etO4/Pus8t4DjdY8Xllsgot4NXL94r/asG+z3QjIIokUfu\nEDRorE82P809hWhRVbZ1A66/3XERD4BGmn3PML94YdC+vOxricqkrZ4oJDD3gbow\nfJWQIZ96hMndAG0H055qvgoWNqjifw9KXLHqelHWOiyJftJrchCOwZ3gRlA8WaOy\nHvCNN1VzCOfaNw9YJlJ4c3DLzwwRxo/KinycCvDaYGhBLTkWjZFqqkdwm4cqK9cf\n3joxQKh51a5ENZ2hoJUEvlcfjerQGPMRMUR4n3GwPf7Vca3fd+S1+qA7tcldEKx9\nHte3R2N5rYd/obrdkh5J0A==\n-----END CERTIFICATE-----\n" --key_content "-----BEGIN PRIVATE KEY-----\nMIIJQgIBADANBgkqhkiG9w0BAQEFAASCCSwwggkoAgEAAoICAQCn7/6ZMkJkt1/9\niOj+0S8aE64w69iSpEUHs/wlCJG5mx7QhMKwTeJSjXO+oVSDH7Kr+eoIpTh4Zt6a\nC9oUaynJ4tLpE1/xb5V92Brafthx6b49/kgeCEvDQtFbmwJPOZ9f2W71oK8s6zgM\n/dASpH4LgAu3Y7vfJ9eHZB63MuDFc429WyDuXQ4xnQ07RUKd40Q7JSKt4WNIdl7I\nVlAdAwTg+/4+xhYohSgidi82XJRD0MCs0EQg6K5G0Do8DcAmdBsE3LTjJr55G1Ju\nscv6qfh0BCTuyhJpS3dIQa5YiSuTIDiO45h8V4BS/+AB42tYSejvQKVmCbaCb9aq\nwn9LjrM0G4GYU0llvVi0vi8d76s9wb1V0Au0lkr/xFMCXebYWGr1I48kKlFKf0l1\n1fP0rjAQO+qWwNJI1ax87g1dh49NwBJbnZJvlv1Hb5Kls2rvwHVcp4UkFBZ1GVBZu\nm0wbwFirZXxuU43AZp2SnwVDl+i3fP4FEu8SMIijhU3NQeA8PbVcyx3xgsOiNO3w\nXp2Rt380D4Ynw5A7pF6YUD4TefMzUCgDFEykuUzZlnT9mBR34F4bYUQSLPPqWDXe\ndAHfuUh9na2ws3BltpAVvpNM9xWl2NQN6Xsp+gAuMwIHcj0FTiJ38UFyzvPCJ/e+\nFsW3qWQkgDNhUYlOAplfp8o/+1Fm7wIDAQABAoICAQCbaiSpzbNX1cRFs7A8MYZv\nkYsAxyJ0AwXHLS/Jbfa+V+naeyJZWpp6X2GgJ1k4x9roAK4vNgfelQSodxNpFgtk\nRD9/Z2jA3Mzx205uqjjQospmQK6o7HCA0ZNCPV+TxfXSFDz1n7C91yjWDQXEWuoy\n5lrxaqDw0cRKDcPHMpSE5n1jobQGI6QBEiCum1gdGbeJLMK9O/pPkwwARrB5SNP5\nCfuuSE81TJVp3wmuO1sSr1vAEjUaZ3rxGb7q2Kbcb1KZ206jcLWRClHtEyl8XlQJ\nudQcEHGddDN9cRtR4A+tZoIw6juxxqCBLz81QCuVV0D0OVVX6uE2MR3uhXSawwgEU\nVWIcWvgXkTgEbg/KgrZ3R9VN7XjawMLVv+3dLQp4idD7keoKWCOHXZtdEXalCmLV\nQQxNtwHkjF0yG+mu6nFEiy89onvTLJtzwriu16BYf8kVnUyd3F94LYQZDWRxCuuG\nNppl0VfikZGM+0P0PpKGy3Yn+qR6d4NhaYFxbrgezRg0KlshWpM/N6ZISBj9QjsZ\nPID4oVDNiTk0nEiHlz4SYqsGrTmPdEIwLTO0QL2SFrcNwqh+qT50s7QFqu+Mwl8E\nieRXdEc5mV0qTQvUWPjNh0l6oEwsKi0dxUL5j4utr3WQgk1Fq/1LNgVFL/rBbAIX\ncI3hmU3UQBiTUtzJ3iDytQKCAQEA3LpDbn7TAwr7DMwA1nBTrv5bwGKN7SGan6fN\nL9BI0uyW3H9EZtlhE2kxapF20//gMlvIYO1kW+vySvXTK6IrBzb9s8dzycqbhpyP\n1Z7HQHJeRjNuExTHlX8hU2kW/evmWeRswJwSo37zf6XWMBN4D/i78OEbNDpTLFDA\n2iYWGx2+Cex7nzsSI1omOhek4UyejKsk4Iv2621ezH2mTsHfyxajP/GsCUIHDB6r\nB2nL8YzY/u4nzOVXu5N+sSthQTn3L4KiFavlOd00cCL22J7Dk15CyXn11MHxdo1p\npXZD/sEJfgmiWvroFlHBDRQRzHhPO7j0SzrssOkysNq/aW1eGQKCAQEAwsYkdUWt\nx0fRSaKyC4IJhsKiFcceZdbmHXPd1iaK+oAGhTzz3xDBDlQYbwy6ej8uk8/3PqBW\nfZPOWD9DszTE7k/Rsd4jwVFMD2daE09JVGyPZ7bq4X3qQ7oL120b6Oi1ZuYIXMPs\nlJzgQbOyPzUZess1OUSNwfB8pZhMkjvgmkkSUlZgyQx5+PRW9cZsf4POO9vCAFRL\nOyNlPMAqT1vvGbtatnHc6iY0v1Gl5J0NJfrzpd6b/Cr619NflpSUw6nEd0PLaGl7\naTqCPdMb5Fh7iISmysfSgVavZo5nIvRNY8vVQX8MBaQdmTKXXfYFbiYgZ+uL4hWg\nlTYXdQGQlIx+RwKCAQAjCKVfSl3vo7SJKXAQmS+PHOwvMvVX5/eE07trlWGZqNeh\nE8olkOcpj466XXBA4eIR3COHzuYY+PAyGaZ0zH6L3JyUBlpIcxIQYZUq0NLLVdvE\nxLD58lhjUBRYCtwNXX3oUqs4Pw1uSd4YKpg+dTifQFmEOBZ7Sa6d4AtcFKN5llTt\nek18zoFofwyGN+6BnAmmRhvKUCzW3TsoteDJq1f8AhHTOmaV6Zb4w31d5drq8fIX\nNHG4wcYVDaoUMNB06+Bh+BgF3Iy7jHKgQcxwQXLFVza+h88O/+F1caiNDKJqMvVw\nvdK5Ig3oTP2ZN9BDZe0di5OqxSWARuM20uGCuEsxAoIBABMLXLU6wushUo1ooxAM\n/vF2RnLqrUY35PgsRByUWDJ2Ii0U8KN29+l2v4zcKb+aPeumAf7Vnp9YvGxUg0Ia\nfsbudwp1NfnJAS7gZCZPMlRW6Q6zC/RQY3+LyWye9oOnfVU6WMb5QUCmtia2c09K\n2drv05xt345+/TET2yjRQfzT+D6kw4Hk/mghO/98D0/Ii3m+2xE9LL3zkAqIn5py\n2sYhU5VTPM6IPdAXI6le0dJM31Xwlj/p0+0Wddo7XPBkwRkIP/NNnQuE9QcmhSum\nmy2WCtj5ANQ0raHRerQoPwjq/UcSLRLAIUTBdZtyWsWSZMjEd0D77F+qklCWfpSH\nyDECggEAEaCankeqpmPcSBDdvHZ9TP42aYqvvgrb36bK8A4HdGujx2dWafPcLojm\nizEtUPv2nVU2sGjGmPct5gSCS0oSwjVoIj7UKjT1dLN2QA115mFuZXNsz7UEifdU\n6XuIHztTcDTmhsDGx/XtsnZFyfEl9z3zZIkO4aJ9lbBiyw5LamGD1ykQ2DavxCFE\neFalDX9PGS/VERX9foHLLXDyEXYuoo8pf3ltupYmqbxMSX5Hf1NvtqYBSTvYiaCv\nmQJ3EuuxjzxXcCuI0YWPcAxlAViz9NAzgk+gxbOB6kEHvq/GWWRebQdvGdSHE9zV\ng5HfdOn7snl93cZxCP+JcOFG55h0Dg==\n-----END PRIVATE KEY-----\n" --troubleshooting_log True
The pods take some time to initialize and stabilize after running this command. Verify the status of the pods using the kubectl get pods -n pty-insightcommand. Avoid updating any more configurations till the pods are ready.
Removing the log forwarding settings
The command stops external SIEM log forwarding, removes the associated configuration, and deletes the certificate-related secrets.
insight delete syslog
The pods take some time to initialize and stabilize after running this command. Verify the status of the pods using the kubectl get pods -n pty-insightcommand. Avoid updating any more configurations till the pods are ready.
fluentd commands
The commands provided here are used for sending logs to the Audit Store, retaining the default storage location, and an external fluentd SIEM.
Viewing the current configuration
The command to view the log forwarding configurations.
insight list fluentd
Verifying connectivity
The command to verify that the external fluentd SIEM is accessible.
insight test fluentd --host <fluentd_address> --port <fluentd_port>
Example:
insight test fluentd --host 192.168.1.100 --port 24284
Forwarding logs to the fluentd server
The command to forward logs to the fluentd server.
insight configure fluentd --host <fluentd_address> --port <fluentd_port> --ca_content "<ca.crt_content>" --cert_content "<client.crt_content>" --key_content "<client.key_content>"
Example:
insight configure fluentd --host 192.168.1.110 --port 24284 --ca_content "-----BEGIN CERTIFICATE-----\nMIIFmDCCA4CgAwIBAgIIWF8OX+P4jAAwDQYJKoZIhvcNAQELBQAwVzEYMBYGA1UE\nCgwPUHJvdGVncml0eSBJbmMuMQswCQYDVQQGEwJVUzEuMCwGA1UEAwwlUHJvdGVn\ncml0eSBSb290IENBIC0gWklTbkdKRE5tekdPdGEyQzAgGA8yMDI1MTIyMTAwMDAw\nMFoXDTM1MTIyMDA3NDE1MFowVzEYMBYGA1UECgwPUHJvdGVncml0eSBJbmMuMQsw\nCQYDVQQGEwJVUzEuMCwGA1UEAwwlUHJvdGVncml0eSBSb290IENBIC0gWklTbkdK\nRE5tekdPdGEyQzCCAiIwDQYJKoZIhvcNAQEBBQADggIPADCCAgoCggIBAL6nK47Y\n/hs1nBnHxg2/S6ieL/JH9H6M9321qHaSIbqAS2KBy2iNDoy3EhKvHXOgd4TgWc7+\nMGiREDK9QsOZ1UKFn5p5cXt0lkGsRSVB5sh2GurGxCtKEwtXlK8OGAWhz46dmjEr\nT02SH7H6WQA+Zh8+OTdzjpo/aujdI6pGVslSY/ulFcqQF16U7aRTmobPpdSZuFWN\nuBcoAXLhDBLutCWQaYSodksRha6I6olrlSditoHHGOnMWC6S4/+NT1XtSvBEIhVn\nMDRym6UKLNlhR+bb3lyGK5HgA2frXduNIL244z931Ii+JAnvpIsZrQ9k1UghG0L7\n3zLTMSCf1y3yWKhXWnPcN41zWeqiF+gk0zFoIQiaDPjhqNyjzTheXX8YqiTf226E\nxTg1Xrac3LF5Ju+3gCioUzpOo3WbphDmZfDTMBj0cWn7GszLkiNd/AX5bLf/+OdJ\n9KaZSOQcit4A9bxERWFS0vT8aGfN43mUFXrpKLmpltZkmtt4XloEeGndZbHF60hy\n+nRzJVNs9B63xP9+NdpWgvoiRVOBKB04XVcNC6nMCMwYjJRLmBzQQ9PT3dQ2dnpj\nj0TuU/44bj5S5t6aVvEOeKanHHeVqRQm8Kzt4WfDvjp1ASOkApvA5+Xs+DpcKbWH\nMCAZDQpi2vWu8d+c569FvN4e0SbP0qM26NgvAgMBAAGjZjBkMBIGA1UdEwEB/wQI\nMAYBAf8CAQAwDgYDVR0PAQH/BAQDAgEGMB0GA1UdDgQWBBSnfq6PGf8AwEL9XGyQ\nM1I6087OzjAfBgNVHSMEGDAWgBSnfq6PGf8AwEL9XGyQM1I6087OzjANBgkqhkiG\n9w0BAQsFAAOCAgEALXZZNaa60cpYNFEXgr780IqKUdZa995OvRUs1dCYd4WqzzJD\nVad8Z48GJX3/u/XAk2UM+mUSGaFowqhek58YX0b24O0PG+y3O0XT0EX/+80Fu+Kt\nkPSbiaPyeYxGqEjwed/Y9X5AJig68NA/FRcT5dq2sWA8hcej8Ghm6D3gu9PdBWpk\nRstITsdaSfx6N+avJ0keGMHqLDLSr948XbehRHH9FnvkPfDtkwKzNwhYmeB6/c+v\nal/JLfPy6VWi3fK37XmuhSh2aZ/vsjT7sxvfFTndUVBeumvCS4wW+bByxpC5XBHW\nB1TrPCczqaDqDD/ib1YCLfY6Qgi8IINEsDDkDgpevW2JxSjTywGGYea4J3M5oOdg\nNhjNWt00H/rugEzkB9hP4po9QHSFX5qWgzT/ws01mOcaOr4UQ8msSyVZmfpJkdHy\nx4n4jhvdlsQKhKM7OmpuXGIA7r/lqU5WDQl1Erj/6cNeWp4vx+606mvbjpzk2Lcp\ni0wBnz27jvN4Xvw+zBMzMBMm5iPwKDMKUyo3q87DFC6lBvBwF0kbPom+yLhHH/rF\n0hr21PATUrHHutFebZ3ZqZwusiKKOoD6fpQrF2mwnVGHQPwTUamSFKQZsf9jw3ic\n4zY2nruXc0OSWS2gf1FKRDxpgpMUjthA3nO1YJuiP4I7fB5mqSoYY8bsyhc=\n-----END CERTIFICATE-----\n" --cert_content "-----BEGIN CERTIFICATE-----\nMIIFHDCCAwSgAwIBAgIIcePfAqBgEAAwDQYJKoZIhvcNAQELBQAwVzEYMBYGA1UE\nCgwPUHJvdGVncml0eSBJbmMuMQswCQYDVQQGEwJVUzEuMCwGA1UEAwwlUHJvdGVn\ncml0eSBSb290IENBIC0gWkldeedKRE5tekdPdGEyQzAgGA8yMDI1MTIyMTAwMDAw\nMFoXDTM1MTIyMDA3NDE1MlowQzEYMBYGA1UECgwPUHJvdGVncml0eSBJbmMuMQsw\nCQYDVQQGEwJVUzEaMBgGA1UEAwwRUHJvdGVncml0eSBDbGllbnQwggIiMA0GCSqG\nSIb3DQEBAQUAA4ICDwAwggIKAoICAQCn7/6ZMkJkt1/9iOj+0S8aE64w69iSpEUH\ns/wlCJG5mx7QhMKwTeJSjXO+oVSDH7Kr+eoIpTh4Zt6aC9oUaynJ4tLpE1/xb5V9\n2Brafthx6b49/kgeCEvDQtFbmwJPOZ9f2W71oK8s6zgM/dASpH4LgAu3Y7vfJ9eH\nZB63MuDFc429WyDuXQ4xnQ07RUKd40Q7JSKt4WNIdl7IVlAdAwTg+/4+xhYohSgi\ndi82XJRD0MCs0EQg6K5G0Do8DcAmdBsE3LTjJr55G1Juscv6qfh0BCTuyhJpS3dI\nQa5YiSuTIDiO45h8V4BS/+AB42tYSejvQKVmCbaCb9aqwn9LjrM0G4GYU0llvVi0\nvi8d76s9wb1V0Au0lkr/xFMCXebYWGr1I48kKlFKf0l11fP0rjAQO+qWwNJI1ax8\n7g1dh49NwBJbnZJvlv1Hb5KlrOvwHfr8UkFBZ1GVBZum0wbwFirZXxuU43AZp2S\nnwVDl+i3fP4FEu8SMIijhU3NQeA8PbVcyx3xgsOiNO3wXp2Rt380D4Ynw5A7pF6Y\nUD4TefMzUCgDFEykuUzZlnT9mBR34F4bYUQSLPPqWDXedAHfuUh9na2ws3BltpAV\nvpNM9xWl2NQN6Xsp+gAuMwIHcj0FTiJ38UFyzvPCJ/e+FsW3qWQkgDNhUYlOAplf\np8o/+1Fm7wIDAQABMA0GCSqGSIb3DQEBCwUAA4ICAQB+s91FIrthptvdBygBsen4\nLaQpfAGIEyeiG1VdTeXtlev2HjPk0p3FnbjZVQhyT00SCWPHa7Vd6ypIqlIFYvnq\nUvUc0fkUqnpAeRWK9p1bif32Qs3rS6Q8mDDVbe2BP/gxOdrPkKPZLZ/rA4cYQAh0\nx/RsdxXtiBkOQpNjZO+UUbyPqohRKek/yLEiltsdBcXeFzcUbZMxks8CAmKVB3Pn\n69NmqZOcJtcj0ydBKL1MdUxPSHXks0z8afVa5IlbJaeaa+Ef0dMDzL/JdH7FslaZ\ntHvgJpq2RinHx1emIlmAk1ji0L/4MCqRrCdNU1rVIob7amyd6gkAkEIYUlsHFEp1\nBdVU8hh4F9UQ6dQvZ6etO4/Pus8t4DjdY8Xllsgot4NXL94r/asG+z3QjIIokUfu\nEDRorE82P809hWhRVbZ1A66/3XERD4BGmn3PML94YdC+vOxricqkrZ4oJDD3gbow\nfJWQIZ96hMndAG0H055qvgoWNqjifw9KXLHqelHWOiyJftJrchCOwZ3gRlA8WaOy\nHvCNN1VzCOfaNw9YJlJ4c3DLzwwRxo/KinycCvDaYGhBLTkWjZFqqkdwm4cqK9cf\n3joxQKh51a5ENZ2hoJUEvlcfjerQGPMRMUR4n3GwPf7Vca3fd+S1+qA7tcldEKx9\nHte3R2N5rYd/obrdkh5J0A==\n-----END CERTIFICATE-----\n" --key_content "-----BEGIN PRIVATE KEY-----\nMIIJQgIBADANBgkqhkiG9w0BAQEFAASCCSwwggkoAgEAAoICAQCn7/6ZMkJkt1/9\niOj+0S8aE64w69iSpEUHs/wlCJG5mx7QhMKwTeJSjXO+oVSDH7Kr+eoIpTh4Zt6a\nC9oUaynJ4tLpE1/xb5V92Brafthx6b49/kgeCEvDQtFbmwJPOZ9f2W71oK8s6zgM\n/dASpH4LgAu3Y7vfJ9eHZB63MuDFc429WyDuXQ4xnQ07RUKd40Q7JSKt4WNIdl7I\nVlAdAwTg+/4+xhYohSgidi82XJRD0MCs0EQg6K5G0Do8DcAmdBsE3LTjJr55G1Ju\nscv6qfh0BCTuyhJpS3dIQa5YiSuTIDiO45h8V4BS/+AB42tYSejvQKVmCbaCb9aq\nwn9LjrM0G4GYU0llvVi0vi8d76s9wb1V0Au0lkr/xFMCXebYWGr1I48kKlFKf0l1\n1fP0rjAQO+qWwNJI1ax87g1dh49NwBJbnZJvlv1Hb5Kls2rvwHVcp4UkFBZ1GVBZu\nm0wbwFirZXxuU43AZp2SnwVDl+i3fP4FEu8SMIijhU3NQeA8PbVcyx3xgsOiNO3w\nXp2Rt380D4Ynw5A7pF6YUD4TefMzUCgDFEykuUzZlnT9mBR34F4bYUQSLPPqWDXe\ndAHfuUh9na2ws3BltpAVvpNM9xWl2NQN6Xsp+gAuMwIHcj0FTiJ38UFyzvPCJ/e+\nFsW3qWQkgDNhUYlOAplfp8o/+1Fm7wIDAQABAoICAQCbaiSpzbNX1cRFs7A8MYZv\nkYsAxyJ0AwXHLS/Jbfa+V+naeyJZWpp6X2GgJ1k4x9roAK4vNgfelQSodxNpFgtk\nRD9/Z2jA3Mzx205uqjjQospmQK6o7HCA0ZNCPV+TxfXSFDz1n7C91yjWDQXEWuoy\n5lrxaqDw0cRKDcPHMpSE5n1jobQGI6QBEiCum1gdGbeJLMK9O/pPkwwARrB5SNP5\nCfuuSE81TJVp3wmuO1sSr1vAEjUaZ3rxGb7q2Kbcb1KZ206jcLWRClHtEyl8XlQJ\nudQcEHGddDN9cRtR4A+tZoIw6juxxqCBLz81QCuVV0D0OVVX6uE2MR3uhXSawwgEU\nVWIcWvgXkTgEbg/KgrZ3R9VN7XjawMLVv+3dLQp4idD7keoKWCOHXZtdEXalCmLV\nQQxNtwHkjF0yG+mu6nFEiy89onvTLJtzwriu16BYf8kVnUyd3F94LYQZDWRxCuuG\nNppl0VfikZGM+0P0PpKGy3Yn+qR6d4NhaYFxbrgezRg0KlshWpM/N6ZISBj9QjsZ\nPID4oVDNiTk0nEiHlz4SYqsGrTmPdEIwLTO0QL2SFrcNwqh+qT50s7QFqu+Mwl8E\nieRXdEc5mV0qTQvUWPjNh0l6oEwsKi0dxUL5j4utr3WQgk1Fq/1LNgVFL/rBbAIX\ncI3hmU3UQBiTUtzJ3iDytQKCAQEA3LpDbn7TAwr7DMwA1nBTrv5bwGKN7SGan6fN\nL9BI0uyW3H9EZtlhE2kxapF20//gMlvIYO1kW+vySvXTK6IrBzb9s8dzycqbhpyP\n1Z7HQHJeRjNuExTHlX8hU2kW/evmWeRswJwSo37zf6XWMBN4D/i78OEbNDpTLFDA\n2iYWGx2+Cex7nzsSI1omOhek4UyejKsk4Iv2621ezH2mTsHfyxajP/GsCUIHDB6r\nB2nL8YzY/u4nzOVXu5N+sSthQTn3L4KiFavlOd00cCL22J7Dk15CyXn11MHxdo1p\npXZD/sEJfgmiWvroFlHBDRQRzHhPO7j0SzrssOkysNq/aW1eGQKCAQEAwsYkdUWt\nx0fRSaKyC4IJhsKiFcceZdbmHXPd1iaK+oAGhTzz3xDBDlQYbwy6ej8uk8/3PqBW\nfZPOWD9DszTE7k/Rsd4jwVFMD2daE09JVGyPZ7bq4X3qQ7oL120b6Oi1ZuYIXMPs\nlJzgQbOyPzUZess1OUSNwfB8pZhMkjvgmkkSUlZgyQx5+PRW9cZsf4POO9vCAFRL\nOyNlPMAqT1vvGbtatnHc6iY0v1Gl5J0NJfrzpd6b/Cr619NflpSUw6nEd0PLaGl7\naTqCPdMb5Fh7iISmysfSgVavZo5nIvRNY8vVQX8MBaQdmTKXXfYFbiYgZ+uL4hWg\nlTYXdQGQlIx+RwKCAQAjCKVfSl3vo7SJKXAQmS+PHOwvMvVX5/eE07trlWGZqNeh\nE8olkOcpj466XXBA4eIR3COHzuYY+PAyGaZ0zH6L3JyUBlpIcxIQYZUq0NLLVdvE\nxLD58lhjUBRYCtwNXX3oUqs4Pw1uSd4YKpg+dTifQFmEOBZ7Sa6d4AtcFKN5llTt\nek18zoFofwyGN+6BnAmmRhvKUCzW3TsoteDJq1f8AhHTOmaV6Zb4w31d5drq8fIX\nNHG4wcYVDaoUMNB06+Bh+BgF3Iy7jHKgQcxwQXLFVza+h88O/+F1caiNDKJqMvVw\nvdK5Ig3oTP2ZN9BDZe0di5OqxSWARuM20uGCuEsxAoIBABMLXLU6wushUo1ooxAM\n/vF2RnLqrUY35PgsRByUWDJ2Ii0U8KN29+l2v4zcKb+aPeumAf7Vnp9YvGxUg0Ia\nfsbudwp1NfnJAS7gZCZPMlRW6Q6zC/RQY3+LyWye9oOnfVU6WMb5QUCmtia2c09K\n2drv05xt345+/TET2yjRQfzT+D6kw4Hk/mghO/98D0/Ii3m+2xE9LL3zkAqIn5py\n2sYhU5VTPM6IPdAXI6le0dJM31Xwlj/p0+0Wddo7XPBkwRkIP/NNnQuE9QcmhSum\nmy2WCtj5ANQ0raHRerQoPwjq/UcSLRLAIUTBdZtyWsWSZMjEd0D77F+qklCWfpSH\nyDECggEAEaCankeqpmPcSBDdvHZ9TP42aYqvvgrb36bK8A4HdGujx2dWafPcLojm\nizEtUPv2nVU2sGjGmPct5gSCS0oSwjVoIj7UKjT1dLN2QA115mFuZXNsz7UEifdU\n6XuIHztTcDTmhsDGx/XtsnZFyfEl9z3zZIkO4aJ9lbBiyw5LamGD1ykQ2DavxCFE\neFalDX9PGS/VERX9foHLLXDyEXYuoo8pf3ltupYmqbxMSX5Hf1NvtqYBSTvYiaCv\nmQJ3EuuxjzxXcCuI0YWPcAxlAViz9NAzgk+gxbOB6kEHvq/GWWRebQdvGdSHE9zV\ng5HfdOn7snl93cZxCP+JcOFG55h0Dg==\n-----END PRIVATE KEY-----\n"
insight configure fluentd --host <fluentd_IP_address> --port <fluentd_port> --ca_content "<ca.crt_content>" --cert_content "<client.crt_content>" --key_content "<client.key_content>" --troubleshooting_log True
Example:
insight configure fluentd --host 192.168.1.110 --port 24284 --ca_content "-----BEGIN CERTIFICATE-----\nMIIFmDCCA4CgAwIBAgIIWF8OX+P4jAAwDQYJKoZIhvcNAQELBQAwVzEYMBYGA1UE\nCgwPUHJvdGVncml0eSBJbmMuMQswCQYDVQQGEwJVUzEuMCwGA1UEAwwlUHJvdGVn\ncml0eSBSb290IENBIC0gWklTbkdKRE5tekdPdGEyQzAgGA8yMDI1MTIyMTAwMDAw\nMFoXDTM1MTIyMDA3NDE1MFowVzEYMBYGA1UECgwPUHJvdGVncml0eSBJbmMuMQsw\nCQYDVQQGEwJVUzEuMCwGA1UEAwwlUHJvdGVncml0eSBSb290IENBIC0gWklTbkdK\nRE5tekdPdGEyQzCCAiIwDQYJKoZIhvcNAQEBBQADggIPADCCAgoCggIBAL6nK47Y\n/hs1nBnHxg2/S6ieL/JH9H6M9321qHaSIbqAS2KBy2iNDoy3EhKvHXOgd4TgWc7+\nMGiREDK9QsOZ1UKFn5p5cXt0lkGsRSVB5sh2GurGxCtKEwtXlK8OGAWhz46dmjEr\nT02SH7H6WQA+Zh8+OTdzjpo/aujdI6pGVslSY/ulFcqQF16U7aRTmobPpdSZuFWN\nuBcoAXLhDBLutCWQaYSodksRha6I6olrlSditoHHGOnMWC6S4/+NT1XtSvBEIhVn\nMDRym6UKLNlhR+bb3lyGK5HgA2frXduNIL244z931Ii+JAnvpIsZrQ9k1UghG0L7\n3zLTMSCf1y3yWKhXWnPcN41zWeqiF+gk0zFoIQiaDPjhqNyjzTheXX8YqiTf226E\nxTg1Xrac3LF5Ju+3gCioUzpOo3WbphDmZfDTMBj0cWn7GszLkiNd/AX5bLf/+OdJ\n9KaZSOQcit4A9bxERWFS0vT8aGfN43mUFXrpKLmpltZkmtt4XloEeGndZbHF60hy\n+nRzJVNs9B63xP9+NdpWgvoiRVOBKB04XVcNC6nMCMwYjJRLmBzQQ9PT3dQ2dnpj\nj0TuU/44bj5S5t6aVvEOeKanHHeVqRQm8Kzt4WfDvjp1ASOkApvA5+Xs+DpcKbWH\nMCAZDQpi2vWu8d+c569FvN4e0SbP0qM26NgvAgMBAAGjZjBkMBIGA1UdEwEB/wQI\nMAYBAf8CAQAwDgYDVR0PAQH/BAQDAgEGMB0GA1UdDgQWBBSnfq6PGf8AwEL9XGyQ\nM1I6087OzjAfBgNVHSMEGDAWgBSnfq6PGf8AwEL9XGyQM1I6087OzjANBgkqhkiG\n9w0BAQsFAAOCAgEALXZZNaa60cpYNFEXgr780IqKUdZa995OvRUs1dCYd4WqzzJD\nVad8Z48GJX3/u/XAk2UM+mUSGaFowqhek58YX0b24O0PG+y3O0XT0EX/+80Fu+Kt\nkPSbiaPyeYxGqEjwed/Y9X5AJig68NA/FRcT5dq2sWA8hcej8Ghm6D3gu9PdBWpk\nRstITsdaSfx6N+avJ0keGMHqLDLSr948XbehRHH9FnvkPfDtkwKzNwhYmeB6/c+v\nal/JLfPy6VWi3fK37XmuhSh2aZ/vsjT7sxvfFTndUVBeumvCS4wW+bByxpC5XBHW\nB1TrPCczqaDqDD/ib1YCLfY6Qgi8IINEsDDkDgpevW2JxSjTywGGYea4J3M5oOdg\nNhjNWt00H/rugEzkB9hP4po9QHSFX5qWgzT/ws01mOcaOr4UQ8msSyVZmfpJkdHy\nx4n4jhvdlsQKhKM7OmpuXGIA7r/lqU5WDQl1Erj/6cNeWp4vx+606mvbjpzk2Lcp\ni0wBnz27jvN4Xvw+zBMzMBMm5iPwKDMKUyo3q87DFC6lBvBwF0kbPom+yLhHH/rF\n0hr21PATUrHHutFebZ3ZqZwusiKKOoD6fpQrF2mwnVGHQPwTUamSFKQZsf9jw3ic\n4zY2nruXc0OSWS2gf1FKRDxpgpMUjthA3nO1YJuiP4I7fB5mqSoYY8bsyhc=\n-----END CERTIFICATE-----\n" --cert_content "-----BEGIN CERTIFICATE-----\nMIIFHDCCAwSgAwIBAgIIcePfAqBgEAAwDQYJKoZIhvcNAQELBQAwVzEYMBYGA1UE\nCgwPUHJvdGVncml0eSBJbmMuMQswCQYDVQQGEwJVUzEuMCwGA1UEAwwlUHJvdGVn\ncml0eSBSb290IENBIC0gWkldeedKRE5tekdPdGEyQzAgGA8yMDI1MTIyMTAwMDAw\nMFoXDTM1MTIyMDA3NDE1MlowQzEYMBYGA1UECgwPUHJvdGVncml0eSBJbmMuMQsw\nCQYDVQQGEwJVUzEaMBgGA1UEAwwRUHJvdGVncml0eSBDbGllbnQwggIiMA0GCSqG\nSIb3DQEBAQUAA4ICDwAwggIKAoICAQCn7/6ZMkJkt1/9iOj+0S8aE64w69iSpEUH\ns/wlCJG5mx7QhMKwTeJSjXO+oVSDH7Kr+eoIpTh4Zt6aC9oUaynJ4tLpE1/xb5V9\n2Brafthx6b49/kgeCEvDQtFbmwJPOZ9f2W71oK8s6zgM/dASpH4LgAu3Y7vfJ9eH\nZB63MuDFc429WyDuXQ4xnQ07RUKd40Q7JSKt4WNIdl7IVlAdAwTg+/4+xhYohSgi\ndi82XJRD0MCs0EQg6K5G0Do8DcAmdBsE3LTjJr55G1Juscv6qfh0BCTuyhJpS3dI\nQa5YiSuTIDiO45h8V4BS/+AB42tYSejvQKVmCbaCb9aqwn9LjrM0G4GYU0llvVi0\nvi8d76s9wb1V0Au0lkr/xFMCXebYWGr1I48kKlFKf0l11fP0rjAQO+qWwNJI1ax8\n7g1dh49NwBJbnZJvlv1Hb5KlrOvwHfr8UkFBZ1GVBZum0wbwFirZXxuU43AZp2S\nnwVDl+i3fP4FEu8SMIijhU3NQeA8PbVcyx3xgsOiNO3wXp2Rt380D4Ynw5A7pF6Y\nUD4TefMzUCgDFEykuUzZlnT9mBR34F4bYUQSLPPqWDXedAHfuUh9na2ws3BltpAV\nvpNM9xWl2NQN6Xsp+gAuMwIHcj0FTiJ38UFyzvPCJ/e+FsW3qWQkgDNhUYlOAplf\np8o/+1Fm7wIDAQABMA0GCSqGSIb3DQEBCwUAA4ICAQB+s91FIrthptvdBygBsen4\nLaQpfAGIEyeiG1VdTeXtlev2HjPk0p3FnbjZVQhyT00SCWPHa7Vd6ypIqlIFYvnq\nUvUc0fkUqnpAeRWK9p1bif32Qs3rS6Q8mDDVbe2BP/gxOdrPkKPZLZ/rA4cYQAh0\nx/RsdxXtiBkOQpNjZO+UUbyPqohRKek/yLEiltsdBcXeFzcUbZMxks8CAmKVB3Pn\n69NmqZOcJtcj0ydBKL1MdUxPSHXks0z8afVa5IlbJaeaa+Ef0dMDzL/JdH7FslaZ\ntHvgJpq2RinHx1emIlmAk1ji0L/4MCqRrCdNU1rVIob7amyd6gkAkEIYUlsHFEp1\nBdVU8hh4F9UQ6dQvZ6etO4/Pus8t4DjdY8Xllsgot4NXL94r/asG+z3QjIIokUfu\nEDRorE82P809hWhRVbZ1A66/3XERD4BGmn3PML94YdC+vOxricqkrZ4oJDD3gbow\nfJWQIZ96hMndAG0H055qvgoWNqjifw9KXLHqelHWOiyJftJrchCOwZ3gRlA8WaOy\nHvCNN1VzCOfaNw9YJlJ4c3DLzwwRxo/KinycCvDaYGhBLTkWjZFqqkdwm4cqK9cf\n3joxQKh51a5ENZ2hoJUEvlcfjerQGPMRMUR4n3GwPf7Vca3fd+S1+qA7tcldEKx9\nHte3R2N5rYd/obrdkh5J0A==\n-----END CERTIFICATE-----\n" --key_content "-----BEGIN PRIVATE KEY-----\nMIIJQgIBADANBgkqhkiG9w0BAQEFAASCCSwwggkoAgEAAoICAQCn7/6ZMkJkt1/9\niOj+0S8aE64w69iSpEUHs/wlCJG5mx7QhMKwTeJSjXO+oVSDH7Kr+eoIpTh4Zt6a\nC9oUaynJ4tLpE1/xb5V92Brafthx6b49/kgeCEvDQtFbmwJPOZ9f2W71oK8s6zgM\n/dASpH4LgAu3Y7vfJ9eHZB63MuDFc429WyDuXQ4xnQ07RUKd40Q7JSKt4WNIdl7I\nVlAdAwTg+/4+xhYohSgidi82XJRD0MCs0EQg6K5G0Do8DcAmdBsE3LTjJr55G1Ju\nscv6qfh0BCTuyhJpS3dIQa5YiSuTIDiO45h8V4BS/+AB42tYSejvQKVmCbaCb9aq\nwn9LjrM0G4GYU0llvVi0vi8d76s9wb1V0Au0lkr/xFMCXebYWGr1I48kKlFKf0l1\n1fP0rjAQO+qWwNJI1ax87g1dh49NwBJbnZJvlv1Hb5Kls2rvwHVcp4UkFBZ1GVBZu\nm0wbwFirZXxuU43AZp2SnwVDl+i3fP4FEu8SMIijhU3NQeA8PbVcyx3xgsOiNO3w\nXp2Rt380D4Ynw5A7pF6YUD4TefMzUCgDFEykuUzZlnT9mBR34F4bYUQSLPPqWDXe\ndAHfuUh9na2ws3BltpAVvpNM9xWl2NQN6Xsp+gAuMwIHcj0FTiJ38UFyzvPCJ/e+\nFsW3qWQkgDNhUYlOAplfp8o/+1Fm7wIDAQABAoICAQCbaiSpzbNX1cRFs7A8MYZv\nkYsAxyJ0AwXHLS/Jbfa+V+naeyJZWpp6X2GgJ1k4x9roAK4vNgfelQSodxNpFgtk\nRD9/Z2jA3Mzx205uqjjQospmQK6o7HCA0ZNCPV+TxfXSFDz1n7C91yjWDQXEWuoy\n5lrxaqDw0cRKDcPHMpSE5n1jobQGI6QBEiCum1gdGbeJLMK9O/pPkwwARrB5SNP5\nCfuuSE81TJVp3wmuO1sSr1vAEjUaZ3rxGb7q2Kbcb1KZ206jcLWRClHtEyl8XlQJ\nudQcEHGddDN9cRtR4A+tZoIw6juxxqCBLz81QCuVV0D0OVVX6uE2MR3uhXSawwgEU\nVWIcWvgXkTgEbg/KgrZ3R9VN7XjawMLVv+3dLQp4idD7keoKWCOHXZtdEXalCmLV\nQQxNtwHkjF0yG+mu6nFEiy89onvTLJtzwriu16BYf8kVnUyd3F94LYQZDWRxCuuG\nNppl0VfikZGM+0P0PpKGy3Yn+qR6d4NhaYFxbrgezRg0KlshWpM/N6ZISBj9QjsZ\nPID4oVDNiTk0nEiHlz4SYqsGrTmPdEIwLTO0QL2SFrcNwqh+qT50s7QFqu+Mwl8E\nieRXdEc5mV0qTQvUWPjNh0l6oEwsKi0dxUL5j4utr3WQgk1Fq/1LNgVFL/rBbAIX\ncI3hmU3UQBiTUtzJ3iDytQKCAQEA3LpDbn7TAwr7DMwA1nBTrv5bwGKN7SGan6fN\nL9BI0uyW3H9EZtlhE2kxapF20//gMlvIYO1kW+vySvXTK6IrBzb9s8dzycqbhpyP\n1Z7HQHJeRjNuExTHlX8hU2kW/evmWeRswJwSo37zf6XWMBN4D/i78OEbNDpTLFDA\n2iYWGx2+Cex7nzsSI1omOhek4UyejKsk4Iv2621ezH2mTsHfyxajP/GsCUIHDB6r\nB2nL8YzY/u4nzOVXu5N+sSthQTn3L4KiFavlOd00cCL22J7Dk15CyXn11MHxdo1p\npXZD/sEJfgmiWvroFlHBDRQRzHhPO7j0SzrssOkysNq/aW1eGQKCAQEAwsYkdUWt\nx0fRSaKyC4IJhsKiFcceZdbmHXPd1iaK+oAGhTzz3xDBDlQYbwy6ej8uk8/3PqBW\nfZPOWD9DszTE7k/Rsd4jwVFMD2daE09JVGyPZ7bq4X3qQ7oL120b6Oi1ZuYIXMPs\nlJzgQbOyPzUZess1OUSNwfB8pZhMkjvgmkkSUlZgyQx5+PRW9cZsf4POO9vCAFRL\nOyNlPMAqT1vvGbtatnHc6iY0v1Gl5J0NJfrzpd6b/Cr619NflpSUw6nEd0PLaGl7\naTqCPdMb5Fh7iISmysfSgVavZo5nIvRNY8vVQX8MBaQdmTKXXfYFbiYgZ+uL4hWg\nlTYXdQGQlIx+RwKCAQAjCKVfSl3vo7SJKXAQmS+PHOwvMvVX5/eE07trlWGZqNeh\nE8olkOcpj466XXBA4eIR3COHzuYY+PAyGaZ0zH6L3JyUBlpIcxIQYZUq0NLLVdvE\nxLD58lhjUBRYCtwNXX3oUqs4Pw1uSd4YKpg+dTifQFmEOBZ7Sa6d4AtcFKN5llTt\nek18zoFofwyGN+6BnAmmRhvKUCzW3TsoteDJq1f8AhHTOmaV6Zb4w31d5drq8fIX\nNHG4wcYVDaoUMNB06+Bh+BgF3Iy7jHKgQcxwQXLFVza+h88O/+F1caiNDKJqMvVw\nvdK5Ig3oTP2ZN9BDZe0di5OqxSWARuM20uGCuEsxAoIBABMLXLU6wushUo1ooxAM\n/vF2RnLqrUY35PgsRByUWDJ2Ii0U8KN29+l2v4zcKb+aPeumAf7Vnp9YvGxUg0Ia\nfsbudwp1NfnJAS7gZCZPMlRW6Q6zC/RQY3+LyWye9oOnfVU6WMb5QUCmtia2c09K\n2drv05xt345+/TET2yjRQfzT+D6kw4Hk/mghO/98D0/Ii3m+2xE9LL3zkAqIn5py\n2sYhU5VTPM6IPdAXI6le0dJM31Xwlj/p0+0Wddo7XPBkwRkIP/NNnQuE9QcmhSum\nmy2WCtj5ANQ0raHRerQoPwjq/UcSLRLAIUTBdZtyWsWSZMjEd0D77F+qklCWfpSH\nyDECggEAEaCankeqpmPcSBDdvHZ9TP42aYqvvgrb36bK8A4HdGujx2dWafPcLojm\nizEtUPv2nVU2sGjGmPct5gSCS0oSwjVoIj7UKjT1dLN2QA115mFuZXNsz7UEifdU\n6XuIHztTcDTmhsDGx/XtsnZFyfEl9z3zZIkO4aJ9lbBiyw5LamGD1ykQ2DavxCFE\neFalDX9PGS/VERX9foHLLXDyEXYuoo8pf3ltupYmqbxMSX5Hf1NvtqYBSTvYiaCv\nmQJ3EuuxjzxXcCuI0YWPcAxlAViz9NAzgk+gxbOB6kEHvq/GWWRebQdvGdSHE9zV\ng5HfdOn7snl93cZxCP+JcOFG55h0Dg==\n-----END PRIVATE KEY-----\n" --troubleshooting_log True
The pods take some time to initialize and stabilize after running this command. Verify the status of the pods using the kubectl get pods -n pty-insightcommand. Avoid updating any more configurations till the pods are ready.
Configuring the fluentd that receives the logs
The logs forwarded to the SIEM are captured by fluentd on the SIEM. Ensure that the fluentd on the SIEM is configured to send the logs to the required location, such as, a file or another system. The steps provided here store the logs to a file. For more information about the forwarding logs to various systems, refer to the Fluentd documentation.
To configure the external fluentd:
- Log in to the external fluentd.
- Create a directory for storing the logs.
mkdir fluentd
- Update the required permissions for the directory.
For example:
chown -R td-agent:td-agent fluentd
chmod -R 755 fluentd
- Open the output configuration using a text edition. The file might be in one of the following locations.
/etc/fluent//etc/td-agent/conf.d//fluentd/etc/
Optional: Update the code to forward the protector logs to the existing location.
- Locate the
matchtag in the file. - Add the
logdata flulogcode to the tag to forward the protector logs.
<match logdata flulog>- Locate the
Add a
matchtag with the configuration to the required location. This example sends the logs to a file on the external SIEM. A sample code is provided here. Customize and use the code for your system.
<match kubernetes.**>
@type copy
<store>
@type file
@log_level info
# MUST include ${tag}
path /fluentd/log/out/audit.${tag}
append true
<format>
@type json
</format>
# MUST include tag because we used ${tag} above
<buffer tag,time>
@type file
path /fluentd/log/buffer/file_out
timekey 1m
timekey_wait 10s
flush_mode interval
flush_interval 10s
flush_thread_count 2
retry_forever true
retry_type periodic
retry_wait 5s
</buffer>
</store>
# keep your existing label routing behavior (optional but usually intended)
</match>
- Save and close the file.
- Restart the
fluentdservice.
Updating the log forwarding configuration
The command to update the logs forwarding settings to the syslog server.
insight update fluentd --host <fluentd_IP_address> --port <fluentd_port> --ca_content "<ca.crt_content>" --cert_content "<client.crt_content>" --key_content "<client.key_content>"
Example:
insight update fluentd --host 192.168.1.110 --port 24284 --ca_content "-----BEGIN CERTIFICATE-----\nMIIFmDCCA4CgAwIBAgIIWF8OX+P4jAAwDQYJKoZIhvcNAQELBQAwVzEYMBYGA1UE\nCgwPUHJvdGVncml0eSBJbmMuMQswCQYDVQQGEwJVUzEuMCwGA1UEAwwlUHJvdGVn\ncml0eSBSb290IENBIC0gWklTbkdKRE5tekdPdGEyQzAgGA8yMDI1MTIyMTAwMDAw\nMFoXDTM1MTIyMDA3NDE1MFowVzEYMBYGA1UECgwPUHJvdGVncml0eSBJbmMuMQsw\nCQYDVQQGEwJVUzEuMCwGA1UEAwwlUHJvdGVncml0eSBSb290IENBIC0gWklTbkdK\nRE5tekdPdGEyQzCCAiIwDQYJKoZIhvcNAQEBBQADggIPADCCAgoCggIBAL6nK47Y\n/hs1nBnHxg2/S6ieL/JH9H6M9321qHaSIbqAS2KBy2iNDoy3EhKvHXOgd4TgWc7+\nMGiREDK9QsOZ1UKFn5p5cXt0lkGsRSVB5sh2GurGxCtKEwtXlK8OGAWhz46dmjEr\nT02SH7H6WQA+Zh8+OTdzjpo/aujdI6pGVslSY/ulFcqQF16U7aRTmobPpdSZuFWN\nuBcoAXLhDBLutCWQaYSodksRha6I6olrlSditoHHGOnMWC6S4/+NT1XtSvBEIhVn\nMDRym6UKLNlhR+bb3lyGK5HgA2frXduNIL244z931Ii+JAnvpIsZrQ9k1UghG0L7\n3zLTMSCf1y3yWKhXWnPcN41zWeqiF+gk0zFoIQiaDPjhqNyjzTheXX8YqiTf226E\nxTg1Xrac3LF5Ju+3gCioUzpOo3WbphDmZfDTMBj0cWn7GszLkiNd/AX5bLf/+OdJ\n9KaZSOQcit4A9bxERWFS0vT8aGfN43mUFXrpKLmpltZkmtt4XloEeGndZbHF60hy\n+nRzJVNs9B63xP9+NdpWgvoiRVOBKB04XVcNC6nMCMwYjJRLmBzQQ9PT3dQ2dnpj\nj0TuU/44bj5S5t6aVvEOeKanHHeVqRQm8Kzt4WfDvjp1ASOkApvA5+Xs+DpcKbWH\nMCAZDQpi2vWu8d+c569FvN4e0SbP0qM26NgvAgMBAAGjZjBkMBIGA1UdEwEB/wQI\nMAYBAf8CAQAwDgYDVR0PAQH/BAQDAgEGMB0GA1UdDgQWBBSnfq6PGf8AwEL9XGyQ\nM1I6087OzjAfBgNVHSMEGDAWgBSnfq6PGf8AwEL9XGyQM1I6087OzjANBgkqhkiG\n9w0BAQsFAAOCAgEALXZZNaa60cpYNFEXgr780IqKUdZa995OvRUs1dCYd4WqzzJD\nVad8Z48GJX3/u/XAk2UM+mUSGaFowqhek58YX0b24O0PG+y3O0XT0EX/+80Fu+Kt\nkPSbiaPyeYxGqEjwed/Y9X5AJig68NA/FRcT5dq2sWA8hcej8Ghm6D3gu9PdBWpk\nRstITsdaSfx6N+avJ0keGMHqLDLSr948XbehRHH9FnvkPfDtkwKzNwhYmeB6/c+v\nal/JLfPy6VWi3fK37XmuhSh2aZ/vsjT7sxvfFTndUVBeumvCS4wW+bByxpC5XBHW\nB1TrPCczqaDqDD/ib1YCLfY6Qgi8IINEsDDkDgpevW2JxSjTywGGYea4J3M5oOdg\nNhjNWt00H/rugEzkB9hP4po9QHSFX5qWgzT/ws01mOcaOr4UQ8msSyVZmfpJkdHy\nx4n4jhvdlsQKhKM7OmpuXGIA7r/lqU5WDQl1Erj/6cNeWp4vx+606mvbjpzk2Lcp\ni0wBnz27jvN4Xvw+zBMzMBMm5iPwKDMKUyo3q87DFC6lBvBwF0kbPom+yLhHH/rF\n0hr21PATUrHHutFebZ3ZqZwusiKKOoD6fpQrF2mwnVGHQPwTUamSFKQZsf9jw3ic\n4zY2nruXc0OSWS2gf1FKRDxpgpMUjthA3nO1YJuiP4I7fB5mqSoYY8bsyhc=\n-----END CERTIFICATE-----\n" --cert_content "-----BEGIN CERTIFICATE-----\nMIIFHDCCAwSgAwIBAgIIcePfAqBgEAAwDQYJKoZIhvcNAQELBQAwVzEYMBYGA1UE\nCgwPUHJvdGVncml0eSBJbmMuMQswCQYDVQQGEwJVUzEuMCwGA1UEAwwlUHJvdGVn\ncml0eSBSb290IENBIC0gWkldeedKRE5tekdPdGEyQzAgGA8yMDI1MTIyMTAwMDAw\nMFoXDTM1MTIyMDA3NDE1MlowQzEYMBYGA1UECgwPUHJvdGVncml0eSBJbmMuMQsw\nCQYDVQQGEwJVUzEaMBgGA1UEAwwRUHJvdGVncml0eSBDbGllbnQwggIiMA0GCSqG\nSIb3DQEBAQUAA4ICDwAwggIKAoICAQCn7/6ZMkJkt1/9iOj+0S8aE64w69iSpEUH\ns/wlCJG5mx7QhMKwTeJSjXO+oVSDH7Kr+eoIpTh4Zt6aC9oUaynJ4tLpE1/xb5V9\n2Brafthx6b49/kgeCEvDQtFbmwJPOZ9f2W71oK8s6zgM/dASpH4LgAu3Y7vfJ9eH\nZB63MuDFc429WyDuXQ4xnQ07RUKd40Q7JSKt4WNIdl7IVlAdAwTg+/4+xhYohSgi\ndi82XJRD0MCs0EQg6K5G0Do8DcAmdBsE3LTjJr55G1Juscv6qfh0BCTuyhJpS3dI\nQa5YiSuTIDiO45h8V4BS/+AB42tYSejvQKVmCbaCb9aqwn9LjrM0G4GYU0llvVi0\nvi8d76s9wb1V0Au0lkr/xFMCXebYWGr1I48kKlFKf0l11fP0rjAQO+qWwNJI1ax8\n7g1dh49NwBJbnZJvlv1Hb5KlrOvwHfr8UkFBZ1GVBZum0wbwFirZXxuU43AZp2S\nnwVDl+i3fP4FEu8SMIijhU3NQeA8PbVcyx3xgsOiNO3wXp2Rt380D4Ynw5A7pF6Y\nUD4TefMzUCgDFEykuUzZlnT9mBR34F4bYUQSLPPqWDXedAHfuUh9na2ws3BltpAV\nvpNM9xWl2NQN6Xsp+gAuMwIHcj0FTiJ38UFyzvPCJ/e+FsW3qWQkgDNhUYlOAplf\np8o/+1Fm7wIDAQABMA0GCSqGSIb3DQEBCwUAA4ICAQB+s91FIrthptvdBygBsen4\nLaQpfAGIEyeiG1VdTeXtlev2HjPk0p3FnbjZVQhyT00SCWPHa7Vd6ypIqlIFYvnq\nUvUc0fkUqnpAeRWK9p1bif32Qs3rS6Q8mDDVbe2BP/gxOdrPkKPZLZ/rA4cYQAh0\nx/RsdxXtiBkOQpNjZO+UUbyPqohRKek/yLEiltsdBcXeFzcUbZMxks8CAmKVB3Pn\n69NmqZOcJtcj0ydBKL1MdUxPSHXks0z8afVa5IlbJaeaa+Ef0dMDzL/JdH7FslaZ\ntHvgJpq2RinHx1emIlmAk1ji0L/4MCqRrCdNU1rVIob7amyd6gkAkEIYUlsHFEp1\nBdVU8hh4F9UQ6dQvZ6etO4/Pus8t4DjdY8Xllsgot4NXL94r/asG+z3QjIIokUfu\nEDRorE82P809hWhRVbZ1A66/3XERD4BGmn3PML94YdC+vOxricqkrZ4oJDD3gbow\nfJWQIZ96hMndAG0H055qvgoWNqjifw9KXLHqelHWOiyJftJrchCOwZ3gRlA8WaOy\nHvCNN1VzCOfaNw9YJlJ4c3DLzwwRxo/KinycCvDaYGhBLTkWjZFqqkdwm4cqK9cf\n3joxQKh51a5ENZ2hoJUEvlcfjerQGPMRMUR4n3GwPf7Vca3fd+S1+qA7tcldEKx9\nHte3R2N5rYd/obrdkh5J0A==\n-----END CERTIFICATE-----\n" --key_content "-----BEGIN PRIVATE KEY-----\nMIIJQgIBADANBgkqhkiG9w0BAQEFAASCCSwwggkoAgEAAoICAQCn7/6ZMkJkt1/9\niOj+0S8aE64w69iSpEUHs/wlCJG5mx7QhMKwTeJSjXO+oVSDH7Kr+eoIpTh4Zt6a\nC9oUaynJ4tLpE1/xb5V92Brafthx6b49/kgeCEvDQtFbmwJPOZ9f2W71oK8s6zgM\n/dASpH4LgAu3Y7vfJ9eHZB63MuDFc429WyDuXQ4xnQ07RUKd40Q7JSKt4WNIdl7I\nVlAdAwTg+/4+xhYohSgidi82XJRD0MCs0EQg6K5G0Do8DcAmdBsE3LTjJr55G1Ju\nscv6qfh0BCTuyhJpS3dIQa5YiSuTIDiO45h8V4BS/+AB42tYSejvQKVmCbaCb9aq\nwn9LjrM0G4GYU0llvVi0vi8d76s9wb1V0Au0lkr/xFMCXebYWGr1I48kKlFKf0l1\n1fP0rjAQO+qWwNJI1ax87g1dh49NwBJbnZJvlv1Hb5Kls2rvwHVcp4UkFBZ1GVBZu\nm0wbwFirZXxuU43AZp2SnwVDl+i3fP4FEu8SMIijhU3NQeA8PbVcyx3xgsOiNO3w\nXp2Rt380D4Ynw5A7pF6YUD4TefMzUCgDFEykuUzZlnT9mBR34F4bYUQSLPPqWDXe\ndAHfuUh9na2ws3BltpAVvpNM9xWl2NQN6Xsp+gAuMwIHcj0FTiJ38UFyzvPCJ/e+\nFsW3qWQkgDNhUYlOAplfp8o/+1Fm7wIDAQABAoICAQCbaiSpzbNX1cRFs7A8MYZv\nkYsAxyJ0AwXHLS/Jbfa+V+naeyJZWpp6X2GgJ1k4x9roAK4vNgfelQSodxNpFgtk\nRD9/Z2jA3Mzx205uqjjQospmQK6o7HCA0ZNCPV+TxfXSFDz1n7C91yjWDQXEWuoy\n5lrxaqDw0cRKDcPHMpSE5n1jobQGI6QBEiCum1gdGbeJLMK9O/pPkwwARrB5SNP5\nCfuuSE81TJVp3wmuO1sSr1vAEjUaZ3rxGb7q2Kbcb1KZ206jcLWRClHtEyl8XlQJ\nudQcEHGddDN9cRtR4A+tZoIw6juxxqCBLz81QCuVV0D0OVVX6uE2MR3uhXSawwgEU\nVWIcWvgXkTgEbg/KgrZ3R9VN7XjawMLVv+3dLQp4idD7keoKWCOHXZtdEXalCmLV\nQQxNtwHkjF0yG+mu6nFEiy89onvTLJtzwriu16BYf8kVnUyd3F94LYQZDWRxCuuG\nNppl0VfikZGM+0P0PpKGy3Yn+qR6d4NhaYFxbrgezRg0KlshWpM/N6ZISBj9QjsZ\nPID4oVDNiTk0nEiHlz4SYqsGrTmPdEIwLTO0QL2SFrcNwqh+qT50s7QFqu+Mwl8E\nieRXdEc5mV0qTQvUWPjNh0l6oEwsKi0dxUL5j4utr3WQgk1Fq/1LNgVFL/rBbAIX\ncI3hmU3UQBiTUtzJ3iDytQKCAQEA3LpDbn7TAwr7DMwA1nBTrv5bwGKN7SGan6fN\nL9BI0uyW3H9EZtlhE2kxapF20//gMlvIYO1kW+vySvXTK6IrBzb9s8dzycqbhpyP\n1Z7HQHJeRjNuExTHlX8hU2kW/evmWeRswJwSo37zf6XWMBN4D/i78OEbNDpTLFDA\n2iYWGx2+Cex7nzsSI1omOhek4UyejKsk4Iv2621ezH2mTsHfyxajP/GsCUIHDB6r\nB2nL8YzY/u4nzOVXu5N+sSthQTn3L4KiFavlOd00cCL22J7Dk15CyXn11MHxdo1p\npXZD/sEJfgmiWvroFlHBDRQRzHhPO7j0SzrssOkysNq/aW1eGQKCAQEAwsYkdUWt\nx0fRSaKyC4IJhsKiFcceZdbmHXPd1iaK+oAGhTzz3xDBDlQYbwy6ej8uk8/3PqBW\nfZPOWD9DszTE7k/Rsd4jwVFMD2daE09JVGyPZ7bq4X3qQ7oL120b6Oi1ZuYIXMPs\nlJzgQbOyPzUZess1OUSNwfB8pZhMkjvgmkkSUlZgyQx5+PRW9cZsf4POO9vCAFRL\nOyNlPMAqT1vvGbtatnHc6iY0v1Gl5J0NJfrzpd6b/Cr619NflpSUw6nEd0PLaGl7\naTqCPdMb5Fh7iISmysfSgVavZo5nIvRNY8vVQX8MBaQdmTKXXfYFbiYgZ+uL4hWg\nlTYXdQGQlIx+RwKCAQAjCKVfSl3vo7SJKXAQmS+PHOwvMvVX5/eE07trlWGZqNeh\nE8olkOcpj466XXBA4eIR3COHzuYY+PAyGaZ0zH6L3JyUBlpIcxIQYZUq0NLLVdvE\nxLD58lhjUBRYCtwNXX3oUqs4Pw1uSd4YKpg+dTifQFmEOBZ7Sa6d4AtcFKN5llTt\nek18zoFofwyGN+6BnAmmRhvKUCzW3TsoteDJq1f8AhHTOmaV6Zb4w31d5drq8fIX\nNHG4wcYVDaoUMNB06+Bh+BgF3Iy7jHKgQcxwQXLFVza+h88O/+F1caiNDKJqMvVw\nvdK5Ig3oTP2ZN9BDZe0di5OqxSWARuM20uGCuEsxAoIBABMLXLU6wushUo1ooxAM\n/vF2RnLqrUY35PgsRByUWDJ2Ii0U8KN29+l2v4zcKb+aPeumAf7Vnp9YvGxUg0Ia\nfsbudwp1NfnJAS7gZCZPMlRW6Q6zC/RQY3+LyWye9oOnfVU6WMb5QUCmtia2c09K\n2drv05xt345+/TET2yjRQfzT+D6kw4Hk/mghO/98D0/Ii3m+2xE9LL3zkAqIn5py\n2sYhU5VTPM6IPdAXI6le0dJM31Xwlj/p0+0Wddo7XPBkwRkIP/NNnQuE9QcmhSum\nmy2WCtj5ANQ0raHRerQoPwjq/UcSLRLAIUTBdZtyWsWSZMjEd0D77F+qklCWfpSH\nyDECggEAEaCankeqpmPcSBDdvHZ9TP42aYqvvgrb36bK8A4HdGujx2dWafPcLojm\nizEtUPv2nVU2sGjGmPct5gSCS0oSwjVoIj7UKjT1dLN2QA115mFuZXNsz7UEifdU\n6XuIHztTcDTmhsDGx/XtsnZFyfEl9z3zZIkO4aJ9lbBiyw5LamGD1ykQ2DavxCFE\neFalDX9PGS/VERX9foHLLXDyEXYuoo8pf3ltupYmqbxMSX5Hf1NvtqYBSTvYiaCv\nmQJ3EuuxjzxXcCuI0YWPcAxlAViz9NAzgk+gxbOB6kEHvq/GWWRebQdvGdSHE9zV\ng5HfdOn7snl93cZxCP+JcOFG55h0Dg==\n-----END PRIVATE KEY-----\n"
insight update fluentd --host <fluentd_IP_address> --port <fluentd_port> --ca_content "<ca.crt_content>" --cert_content "<client.crt_content>" --key_content "<client.key_content>" --troubleshooting_log True
Example:
insight update fluentd --host 192.168.1.110 --port 24284 --ca_content "-----BEGIN CERTIFICATE-----\nMIIFmDCCA4CgAwIBAgIIWF8OX+P4jAAwDQYJKoZIhvcNAQELBQAwVzEYMBYGA1UE\nCgwPUHJvdGVncml0eSBJbmMuMQswCQYDVQQGEwJVUzEuMCwGA1UEAwwlUHJvdGVn\ncml0eSBSb290IENBIC0gWklTbkdKRE5tekdPdGEyQzAgGA8yMDI1MTIyMTAwMDAw\nMFoXDTM1MTIyMDA3NDE1MFowVzEYMBYGA1UECgwPUHJvdGVncml0eSBJbmMuMQsw\nCQYDVQQGEwJVUzEuMCwGA1UEAwwlUHJvdGVncml0eSBSb290IENBIC0gWklTbkdK\nRE5tekdPdGEyQzCCAiIwDQYJKoZIhvcNAQEBBQADggIPADCCAgoCggIBAL6nK47Y\n/hs1nBnHxg2/S6ieL/JH9H6M9321qHaSIbqAS2KBy2iNDoy3EhKvHXOgd4TgWc7+\nMGiREDK9QsOZ1UKFn5p5cXt0lkGsRSVB5sh2GurGxCtKEwtXlK8OGAWhz46dmjEr\nT02SH7H6WQA+Zh8+OTdzjpo/aujdI6pGVslSY/ulFcqQF16U7aRTmobPpdSZuFWN\nuBcoAXLhDBLutCWQaYSodksRha6I6olrlSditoHHGOnMWC6S4/+NT1XtSvBEIhVn\nMDRym6UKLNlhR+bb3lyGK5HgA2frXduNIL244z931Ii+JAnvpIsZrQ9k1UghG0L7\n3zLTMSCf1y3yWKhXWnPcN41zWeqiF+gk0zFoIQiaDPjhqNyjzTheXX8YqiTf226E\nxTg1Xrac3LF5Ju+3gCioUzpOo3WbphDmZfDTMBj0cWn7GszLkiNd/AX5bLf/+OdJ\n9KaZSOQcit4A9bxERWFS0vT8aGfN43mUFXrpKLmpltZkmtt4XloEeGndZbHF60hy\n+nRzJVNs9B63xP9+NdpWgvoiRVOBKB04XVcNC6nMCMwYjJRLmBzQQ9PT3dQ2dnpj\nj0TuU/44bj5S5t6aVvEOeKanHHeVqRQm8Kzt4WfDvjp1ASOkApvA5+Xs+DpcKbWH\nMCAZDQpi2vWu8d+c569FvN4e0SbP0qM26NgvAgMBAAGjZjBkMBIGA1UdEwEB/wQI\nMAYBAf8CAQAwDgYDVR0PAQH/BAQDAgEGMB0GA1UdDgQWBBSnfq6PGf8AwEL9XGyQ\nM1I6087OzjAfBgNVHSMEGDAWgBSnfq6PGf8AwEL9XGyQM1I6087OzjANBgkqhkiG\n9w0BAQsFAAOCAgEALXZZNaa60cpYNFEXgr780IqKUdZa995OvRUs1dCYd4WqzzJD\nVad8Z48GJX3/u/XAk2UM+mUSGaFowqhek58YX0b24O0PG+y3O0XT0EX/+80Fu+Kt\nkPSbiaPyeYxGqEjwed/Y9X5AJig68NA/FRcT5dq2sWA8hcej8Ghm6D3gu9PdBWpk\nRstITsdaSfx6N+avJ0keGMHqLDLSr948XbehRHH9FnvkPfDtkwKzNwhYmeB6/c+v\nal/JLfPy6VWi3fK37XmuhSh2aZ/vsjT7sxvfFTndUVBeumvCS4wW+bByxpC5XBHW\nB1TrPCczqaDqDD/ib1YCLfY6Qgi8IINEsDDkDgpevW2JxSjTywGGYea4J3M5oOdg\nNhjNWt00H/rugEzkB9hP4po9QHSFX5qWgzT/ws01mOcaOr4UQ8msSyVZmfpJkdHy\nx4n4jhvdlsQKhKM7OmpuXGIA7r/lqU5WDQl1Erj/6cNeWp4vx+606mvbjpzk2Lcp\ni0wBnz27jvN4Xvw+zBMzMBMm5iPwKDMKUyo3q87DFC6lBvBwF0kbPom+yLhHH/rF\n0hr21PATUrHHutFebZ3ZqZwusiKKOoD6fpQrF2mwnVGHQPwTUamSFKQZsf9jw3ic\n4zY2nruXc0OSWS2gf1FKRDxpgpMUjthA3nO1YJuiP4I7fB5mqSoYY8bsyhc=\n-----END CERTIFICATE-----\n" --cert_content "-----BEGIN CERTIFICATE-----\nMIIFHDCCAwSgAwIBAgIIcePfAqBgEAAwDQYJKoZIhvcNAQELBQAwVzEYMBYGA1UE\nCgwPUHJvdGVncml0eSBJbmMuMQswCQYDVQQGEwJVUzEuMCwGA1UEAwwlUHJvdGVn\ncml0eSBSb290IENBIC0gWkldeedKRE5tekdPdGEyQzAgGA8yMDI1MTIyMTAwMDAw\nMFoXDTM1MTIyMDA3NDE1MlowQzEYMBYGA1UECgwPUHJvdGVncml0eSBJbmMuMQsw\nCQYDVQQGEwJVUzEaMBgGA1UEAwwRUHJvdGVncml0eSBDbGllbnQwggIiMA0GCSqG\nSIb3DQEBAQUAA4ICDwAwggIKAoICAQCn7/6ZMkJkt1/9iOj+0S8aE64w69iSpEUH\ns/wlCJG5mx7QhMKwTeJSjXO+oVSDH7Kr+eoIpTh4Zt6aC9oUaynJ4tLpE1/xb5V9\n2Brafthx6b49/kgeCEvDQtFbmwJPOZ9f2W71oK8s6zgM/dASpH4LgAu3Y7vfJ9eH\nZB63MuDFc429WyDuXQ4xnQ07RUKd40Q7JSKt4WNIdl7IVlAdAwTg+/4+xhYohSgi\ndi82XJRD0MCs0EQg6K5G0Do8DcAmdBsE3LTjJr55G1Juscv6qfh0BCTuyhJpS3dI\nQa5YiSuTIDiO45h8V4BS/+AB42tYSejvQKVmCbaCb9aqwn9LjrM0G4GYU0llvVi0\nvi8d76s9wb1V0Au0lkr/xFMCXebYWGr1I48kKlFKf0l11fP0rjAQO+qWwNJI1ax8\n7g1dh49NwBJbnZJvlv1Hb5KlrOvwHfr8UkFBZ1GVBZum0wbwFirZXxuU43AZp2S\nnwVDl+i3fP4FEu8SMIijhU3NQeA8PbVcyx3xgsOiNO3wXp2Rt380D4Ynw5A7pF6Y\nUD4TefMzUCgDFEykuUzZlnT9mBR34F4bYUQSLPPqWDXedAHfuUh9na2ws3BltpAV\nvpNM9xWl2NQN6Xsp+gAuMwIHcj0FTiJ38UFyzvPCJ/e+FsW3qWQkgDNhUYlOAplf\np8o/+1Fm7wIDAQABMA0GCSqGSIb3DQEBCwUAA4ICAQB+s91FIrthptvdBygBsen4\nLaQpfAGIEyeiG1VdTeXtlev2HjPk0p3FnbjZVQhyT00SCWPHa7Vd6ypIqlIFYvnq\nUvUc0fkUqnpAeRWK9p1bif32Qs3rS6Q8mDDVbe2BP/gxOdrPkKPZLZ/rA4cYQAh0\nx/RsdxXtiBkOQpNjZO+UUbyPqohRKek/yLEiltsdBcXeFzcUbZMxks8CAmKVB3Pn\n69NmqZOcJtcj0ydBKL1MdUxPSHXks0z8afVa5IlbJaeaa+Ef0dMDzL/JdH7FslaZ\ntHvgJpq2RinHx1emIlmAk1ji0L/4MCqRrCdNU1rVIob7amyd6gkAkEIYUlsHFEp1\nBdVU8hh4F9UQ6dQvZ6etO4/Pus8t4DjdY8Xllsgot4NXL94r/asG+z3QjIIokUfu\nEDRorE82P809hWhRVbZ1A66/3XERD4BGmn3PML94YdC+vOxricqkrZ4oJDD3gbow\nfJWQIZ96hMndAG0H055qvgoWNqjifw9KXLHqelHWOiyJftJrchCOwZ3gRlA8WaOy\nHvCNN1VzCOfaNw9YJlJ4c3DLzwwRxo/KinycCvDaYGhBLTkWjZFqqkdwm4cqK9cf\n3joxQKh51a5ENZ2hoJUEvlcfjerQGPMRMUR4n3GwPf7Vca3fd+S1+qA7tcldEKx9\nHte3R2N5rYd/obrdkh5J0A==\n-----END CERTIFICATE-----\n" --key_content "-----BEGIN PRIVATE KEY-----\nMIIJQgIBADANBgkqhkiG9w0BAQEFAASCCSwwggkoAgEAAoICAQCn7/6ZMkJkt1/9\niOj+0S8aE64w69iSpEUHs/wlCJG5mx7QhMKwTeJSjXO+oVSDH7Kr+eoIpTh4Zt6a\nC9oUaynJ4tLpE1/xb5V92Brafthx6b49/kgeCEvDQtFbmwJPOZ9f2W71oK8s6zgM\n/dASpH4LgAu3Y7vfJ9eHZB63MuDFc429WyDuXQ4xnQ07RUKd40Q7JSKt4WNIdl7I\nVlAdAwTg+/4+xhYohSgidi82XJRD0MCs0EQg6K5G0Do8DcAmdBsE3LTjJr55G1Ju\nscv6qfh0BCTuyhJpS3dIQa5YiSuTIDiO45h8V4BS/+AB42tYSejvQKVmCbaCb9aq\nwn9LjrM0G4GYU0llvVi0vi8d76s9wb1V0Au0lkr/xFMCXebYWGr1I48kKlFKf0l1\n1fP0rjAQO+qWwNJI1ax87g1dh49NwBJbnZJvlv1Hb5Kls2rvwHVcp4UkFBZ1GVBZu\nm0wbwFirZXxuU43AZp2SnwVDl+i3fP4FEu8SMIijhU3NQeA8PbVcyx3xgsOiNO3w\nXp2Rt380D4Ynw5A7pF6YUD4TefMzUCgDFEykuUzZlnT9mBR34F4bYUQSLPPqWDXe\ndAHfuUh9na2ws3BltpAVvpNM9xWl2NQN6Xsp+gAuMwIHcj0FTiJ38UFyzvPCJ/e+\nFsW3qWQkgDNhUYlOAplfp8o/+1Fm7wIDAQABAoICAQCbaiSpzbNX1cRFs7A8MYZv\nkYsAxyJ0AwXHLS/Jbfa+V+naeyJZWpp6X2GgJ1k4x9roAK4vNgfelQSodxNpFgtk\nRD9/Z2jA3Mzx205uqjjQospmQK6o7HCA0ZNCPV+TxfXSFDz1n7C91yjWDQXEWuoy\n5lrxaqDw0cRKDcPHMpSE5n1jobQGI6QBEiCum1gdGbeJLMK9O/pPkwwARrB5SNP5\nCfuuSE81TJVp3wmuO1sSr1vAEjUaZ3rxGb7q2Kbcb1KZ206jcLWRClHtEyl8XlQJ\nudQcEHGddDN9cRtR4A+tZoIw6juxxqCBLz81QCuVV0D0OVVX6uE2MR3uhXSawwgEU\nVWIcWvgXkTgEbg/KgrZ3R9VN7XjawMLVv+3dLQp4idD7keoKWCOHXZtdEXalCmLV\nQQxNtwHkjF0yG+mu6nFEiy89onvTLJtzwriu16BYf8kVnUyd3F94LYQZDWRxCuuG\nNppl0VfikZGM+0P0PpKGy3Yn+qR6d4NhaYFxbrgezRg0KlshWpM/N6ZISBj9QjsZ\nPID4oVDNiTk0nEiHlz4SYqsGrTmPdEIwLTO0QL2SFrcNwqh+qT50s7QFqu+Mwl8E\nieRXdEc5mV0qTQvUWPjNh0l6oEwsKi0dxUL5j4utr3WQgk1Fq/1LNgVFL/rBbAIX\ncI3hmU3UQBiTUtzJ3iDytQKCAQEA3LpDbn7TAwr7DMwA1nBTrv5bwGKN7SGan6fN\nL9BI0uyW3H9EZtlhE2kxapF20//gMlvIYO1kW+vySvXTK6IrBzb9s8dzycqbhpyP\n1Z7HQHJeRjNuExTHlX8hU2kW/evmWeRswJwSo37zf6XWMBN4D/i78OEbNDpTLFDA\n2iYWGx2+Cex7nzsSI1omOhek4UyejKsk4Iv2621ezH2mTsHfyxajP/GsCUIHDB6r\nB2nL8YzY/u4nzOVXu5N+sSthQTn3L4KiFavlOd00cCL22J7Dk15CyXn11MHxdo1p\npXZD/sEJfgmiWvroFlHBDRQRzHhPO7j0SzrssOkysNq/aW1eGQKCAQEAwsYkdUWt\nx0fRSaKyC4IJhsKiFcceZdbmHXPd1iaK+oAGhTzz3xDBDlQYbwy6ej8uk8/3PqBW\nfZPOWD9DszTE7k/Rsd4jwVFMD2daE09JVGyPZ7bq4X3qQ7oL120b6Oi1ZuYIXMPs\nlJzgQbOyPzUZess1OUSNwfB8pZhMkjvgmkkSUlZgyQx5+PRW9cZsf4POO9vCAFRL\nOyNlPMAqT1vvGbtatnHc6iY0v1Gl5J0NJfrzpd6b/Cr619NflpSUw6nEd0PLaGl7\naTqCPdMb5Fh7iISmysfSgVavZo5nIvRNY8vVQX8MBaQdmTKXXfYFbiYgZ+uL4hWg\nlTYXdQGQlIx+RwKCAQAjCKVfSl3vo7SJKXAQmS+PHOwvMvVX5/eE07trlWGZqNeh\nE8olkOcpj466XXBA4eIR3COHzuYY+PAyGaZ0zH6L3JyUBlpIcxIQYZUq0NLLVdvE\nxLD58lhjUBRYCtwNXX3oUqs4Pw1uSd4YKpg+dTifQFmEOBZ7Sa6d4AtcFKN5llTt\nek18zoFofwyGN+6BnAmmRhvKUCzW3TsoteDJq1f8AhHTOmaV6Zb4w31d5drq8fIX\nNHG4wcYVDaoUMNB06+Bh+BgF3Iy7jHKgQcxwQXLFVza+h88O/+F1caiNDKJqMvVw\nvdK5Ig3oTP2ZN9BDZe0di5OqxSWARuM20uGCuEsxAoIBABMLXLU6wushUo1ooxAM\n/vF2RnLqrUY35PgsRByUWDJ2Ii0U8KN29+l2v4zcKb+aPeumAf7Vnp9YvGxUg0Ia\nfsbudwp1NfnJAS7gZCZPMlRW6Q6zC/RQY3+LyWye9oOnfVU6WMb5QUCmtia2c09K\n2drv05xt345+/TET2yjRQfzT+D6kw4Hk/mghO/98D0/Ii3m+2xE9LL3zkAqIn5py\n2sYhU5VTPM6IPdAXI6le0dJM31Xwlj/p0+0Wddo7XPBkwRkIP/NNnQuE9QcmhSum\nmy2WCtj5ANQ0raHRerQoPwjq/UcSLRLAIUTBdZtyWsWSZMjEd0D77F+qklCWfpSH\nyDECggEAEaCankeqpmPcSBDdvHZ9TP42aYqvvgrb36bK8A4HdGujx2dWafPcLojm\nizEtUPv2nVU2sGjGmPct5gSCS0oSwjVoIj7UKjT1dLN2QA115mFuZXNsz7UEifdU\n6XuIHztTcDTmhsDGx/XtsnZFyfEl9z3zZIkO4aJ9lbBiyw5LamGD1ykQ2DavxCFE\neFalDX9PGS/VERX9foHLLXDyEXYuoo8pf3ltupYmqbxMSX5Hf1NvtqYBSTvYiaCv\nmQJ3EuuxjzxXcCuI0YWPcAxlAViz9NAzgk+gxbOB6kEHvq/GWWRebQdvGdSHE9zV\ng5HfdOn7snl93cZxCP+JcOFG55h0Dg==\n-----END PRIVATE KEY-----\n" --troubleshooting_log True
The pods take some time to initialize and stabilize after running this command. Verify the status of the pods using the kubectl get pods -n pty-insightcommand. Avoid updating any more configurations till the pods are ready.
Removing the log forwarding settings
The command stops external SIEM log forwarding, removes the associated configuration, and deletes the certificate-related secrets.
insight delete fluentd
The pods take some time to initialize and stabilize after running this command. Verify the status of the pods using the kubectl get pods -n pty-insightcommand. Avoid updating any more configurations till the pods are ready.
3.6.3 - Policy Management Command Line Interface (CLI) Reference
Important: The Policy Management CLI will work only after you have installed the
workbench.
Main Pim Command
The following command shows to access the help for the pim commands.
pim --help
Usage: pim [OPTIONS] COMMAND [ARGS]...
Policy Information Management commands.
Options:
--help Show this message and exit.
Commands:
create Create a resource.
delete Delete a resource.
get Display one or many resources.
invoke Invoke resource by operation defined by the API.
set Update fields of a resource.
Invoke Commands
The following section lists the invoke commands.
Main Invoke Command
The following command shows how to access help for the invoke command.
pim invoke --help
Usage: pim invoke [OPTIONS] COMMAND [ARGS]...
Invoke resource by operation defined by the API.
Options:
--help Show this message and exit.
Commands:
datastores Commands for deploying datastore resources.
init Bootstrap PIM - Initialize the Policy Information system.
roles Commands for synchronizing role resources.
sources Commands for testing source resources.
Invoke Datastores
The following command shows how to access help for the invoke datastores command. It also provides examples on how to deploy datastore resources.
pim invoke datastores --help
Usage: pim invoke datastores [OPTIONS] COMMAND [ARGS]...
Commands for deploying datastore resources.
Options:
--help Show this message and exit.
Commands:
deploy Deploy policies and/or trusted applications to a specific datastore.
Invoke Datastores Types
The following commands show how to access help for the invoke datastores <type> command.
Invoke Datastores Deploy
The following command shows how to access help for the invoke datastores deploy command. It also provides examples on how to deploy policies or trusted applications or both to a specific datastore.
pim invoke datastores deploy --help
Usage: pim invoke datastores deploy [OPTIONS] DATASTORE_UID
Deploy policies and/or trusted applications to a specific datastore.
EXAMPLES:
# Deploy single policy to datastore
pim invoke datastores deploy 15 --policies 1
# Deploy multiple policies to datastore
pim invoke datastores deploy 15 --policies 1 --policies 2 --policies 3
# Deploy trusted applications to datastore
pim invoke datastores deploy 15 --applications 1 --applications 2
# Deploy both policies and applications together
pim invoke datastores deploy "<datastore-uid>" --policies 1 --policies 2 --applications 1 --applications 2
# Clear all deployments (deploy empty configuration)
pim invoke datastores deploy 42
WORKFLOW:
# Step 1: Verify datastore exists and is accessible
pim get datastores datastore <datastore-uid>
# Step 2: List available policies and applications
pim get policies policy
pim get applications application
# Step 3: Deploy to datastore
pim invoke datastores deploy <datastore-uid> --policies <policy-uid> --applications <app-uid>
Options:
--policies TEXT UIDs of policies to deploy (can be specified multiple
times).
--applications TEXT UIDs of trusted applications to deploy (can be
specified multiple times).
--help Show this message and exit.
Invoke Init
The following command shows how to access help for the invoke init command. It also provides examples on how to initialize the Policy Information Management system.
pim invoke init --help
Usage: pim invoke init [OPTIONS]
Bootstrap PIM - Initialize the Policy Information Management system.
EXAMPLES:
# Initialize PIM system for first-time setup
pim invoke init
Options:
--help Show this message and exit.
Invoke Roles
The following command shows how to access help for the invoke roles command. It also provides examples on how to synchronize role resources.
pim invoke roles --help
Usage: pim invoke roles [OPTIONS] COMMAND [ARGS]...
Commands for synchronizing role resources.
Options:
--help Show this message and exit.
Commands:
sync Synchronize all group members for a role with external identity sources.
Roles Types
The following commands show how to access help for the invoke roles <type> command.
Invoke Roles Sync
The following command shows how to access help for the invoke roles sync command. It also provides examples on how to synchronize all group members for a role.
pim invoke roles sync --help
Usage: pim invoke roles sync [OPTIONS] ROLE_UID
Synchronize all group members for a role with external identity sources.
EXAMPLES:
# Synchronize role members with LDAP/AD source
pim invoke roles sync 15
Options:
--help Show this message and exit.
Invoke Sources
The following command shows how to access help for the invoke sources command. It also provides examples on how to test source resources.
pim invoke sources --help
Usage: pim invoke sources [OPTIONS] COMMAND [ARGS]...
Commands for testing source resources.
Options:
--help Show this message and exit.
Commands:
test Tests the connection and functionality of a source.
Invoke Sources Types
The following commands show how to access help for the invoke sources <type> command.
Invoke Sources Test
The following command shows how to access help for the invoke sources test command. It also provides examples on how to test the connection to a member source.
pim invoke sources test --help
Usage: pim invoke sources test [OPTIONS] UID
Tests the connection and functionality of a source.
EXAMPLES:
# Basic connectivity test
pim invoke sources test 15
Options:
--help Show this message and exit.
Create Commands
The following section lists the create commands.
Main Create Command
The following command shows how to access help for the create command.
pim create --help
Usage: pim create [OPTIONS] COMMAND [ARGS]...
Create a resource.
Options:
--help Show this message and exit.
Commands:
alphabets Creates a new alphabet.
applications Creates a new application.
dataelements Creates a new data element of a specific type.
datastores Commands for creating datastore resources.
deploy Deploys policies and/or trusted applications to a datastore.
masks Creates a new mask with specified masking pattern and configuration.
policies Creates a new policy or rule.
roles Creates a new role or adds members to a role.
sources Creates a new source.
Create Alphabets
The following command shows how to access help for the create alphabets command. It also provides examples on how to create an alphabet.
pim create alphabets --help
Usage: pim create alphabets [OPTIONS]
Creates a new alphabet.
EXAMPLES:
# Create alphabet combining existing alphabets (use numeric UIDs from 'pim get alphabets')
pim create alphabets --label "LatinExtended" --alphabets "1,2"
# Create alphabet with Unicode ranges (Basic Latin + punctuation)
pim create alphabets --label "ASCIIPrintable" --ranges '[{"from": "0020", "to": "007E"}]'
# Create alphabet with specific code points (more than 10 examples)
pim create alphabets --label "SpecialChars" --code-points "00A9,00AE,2122,2603,2615,20AC,00A3,00A5,00B5,00B6,2020,2021,2030,2665,2660"
# Create complex alphabet with multiple options (use numeric UIDs)
pim create alphabets --label "CompleteSet" --alphabets "1,3,5" --ranges '[{"from": "0100", "to": "017F"}, {"from": "1E00", "to": "1EFF"}]' --code-points "20AC,00A3,00A5"
# Create mathematical symbols alphabet
pim create alphabets --label "MathSymbols" --ranges '[{"from": "2200", "to": "22FF"}, {"from": "2190", "to": "21FF"}]'
Options:
--label TEXT The label for the custom alphabet. [required]
--alphabets TEXT Comma-separated list of alphabet UIDs.
--ranges TEXT JSON string of code point ranges. For example, '[{"from":
"0020", "to": "007E"}]'.
--code-points TEXT Comma-separated list of code points.
--help Show this message and exit.
Create Applications
The following command shows how to access help for the create applications command. It also provides examples on how to create a trusted application.
pim create applications --help
Usage: pim create applications [OPTIONS]
Creates a new application.
EXAMPLES:
# Create a basic application with required fields
pim create applications --name "WebApp" --application-name "mywebapp" --application-user "webuser"
# Create application with description
pim create applications --name "DatabaseApp" --description "Main database application" --application-name "dbapp" --application-user "dbuser"
Options:
--name TEXT Name of the application. [required]
--description TEXT Description of the application.
--application-name TEXT The application name or the application loading the
API jar file. [required]
--application-user TEXT The application user or the OS user. [required]
--help Show this message and exit.
Create Dataelements
The following command shows how to access help for the create dataelements command. It also provides examples on how to create a data element.
pim create dataelements --help
Usage: pim create dataelements [OPTIONS] COMMAND [ARGS]...
Creates a new data element of a specific type.
AVAILABLE PROTECTION TYPES:
# Encryption Methods:
- aes128-cbc-enc # AES-128 CBC encryption
- aes128-cusp-enc # AES-128 CUSP encryption
- aes256-cbc-enc # AES-256 CBC encryption
- aes256-cusp-enc # AES-256 CUSP encryption
- triple-des-cbc-enc # 3DES CBC encryption
- triple-des-cusp-enc # 3DES CUSP encryption
- sha1-hmac-enc # SHA1 HMAC encryption (deprecated)
- sha256-hmac-enc # SHA256 HMAC encryption
- no-enc # No encryption (clear text)
# Tokenization Methods:
- token numeric # Numeric tokens
- token alphabetic # Alphabetic tokens
- token alpha-numeric # Alphanumeric tokens
- token printable # Printable character tokens
- token unicode # Unicode tokens
- token credit-card # Credit card specific tokens
- token email # Email specific tokens
# Format Preserving Encryption (FPE):
- fpe numeric # Numeric FPE
- fpe alphabetic # Alphabetic FPE
- fpe alpha-numeric # Alphanumeric FPE
# Special Protection Types:
- masking # Data masking using NoEnc
- monitor # Data monitoring using NoEnc
Options:
--help Show this message and exit.
Commands:
aes128-cbc-enc Creates a new AES-128-CBC-ENC data element.
aes128-cusp-enc Creates a new AES-128-CUSP-ENC data element.
aes256-cbc-enc Creates a new AES-256-CBC-ENC data element.
aes256-cusp-enc Creates a new AES-256-CUSP-ENC data element.
fpe Creates a new FPE (Format Preserving Encryption)...
masking Creates a new masking data element using NoEnc...
monitor Creates a new monitoring data element using NoEnc...
no-enc Creates a new No-Enc data element.
sha1-hmac-enc Creates a new SHA1-HMAC-ENC data element...
sha256-hmac-enc Creates a new SHA256-HMAC-ENC data element.
token Creates a new token data element of a specific type.
triple-des-cbc-enc Creates a new 3DES-CBC-ENC data element.
triple-des-cusp-enc Creates a new 3DES-CUSP-ENC data element.
Create Dataelements Types
The following commands show how to access help for the create dataelements <type> command. It also provides examples on how to create a data element of a specific type.
Create Dataelements aes128 cbc enc
The following command shows how to access help for the create dataelements aes128-cbc-enc command. It also provides examples on how to create a AES-128-CBC-ENC data element.
pim create dataelements aes128-cbc-enc --help
Usage: pim create dataelements aes128-cbc-enc [OPTIONS]
Creates a new AES-128-CBC-ENC data element.
EXAMPLES:
# Create basic AES-128 encryption data element
pim create dataelements aes128-cbc-enc --name "BasicEncryption" --description "Basic data encryption"
# Create with all security features enabled
pim create dataelements aes128-cbc-enc --name "FullSecurityEnc" --description "Full security encryption" --iv-type "SYSTEM_APPEND" --checksum-type "CRC32" --cipher-format "INSERT_KEYID_V1"
Options:
--name TEXT The name for the data element. [required]
--description TEXT An optional description for the data element.
--iv-type [NONE|SYSTEM_APPEND] Initialization Vector type.
--checksum-type [NONE|CRC32] Checksum type.
--cipher-format [NONE|INSERT_KEYID_V1] Cipher format.
--help Show this message and exit.
Create Dataelements aes128 cusp enc
The following command shows how to access help for the create dataelements aes128-cusp-enc command. It also provides examples on how to create a AES-128-CUSP-ENC data element.
pim create dataelements aes128-cusp-enc --help
Usage: pim create dataelements aes128-cusp-enc [OPTIONS]
Creates a new AES-128-CUSP-ENC data element. EXAMPLES:
# Create with key rotation support
pim create dataelements aes128-cusp-enc --name "RotatingCUSP" --description "CUSP with key rotation" --cipher-format "INSERT_KEYID_V1"
Options:
--name TEXT The name for the data element. [required]
--description TEXT An optional description for the data element.
--iv-type [NONE|SYSTEM_APPEND] Initialization Vector type.
--checksum-type [NONE|CRC32] Checksum type.
--cipher-format [NONE|INSERT_KEYID_V1] Cipher format.
--help Show this message and exit.
Create Dataelements aes256 cbc enc
The following command shows how to access help for the create dataelements aes256-cbc-enc command. It also provides examples on how to create a AES-256-CBC-ENC data element.
pim create dataelements aes256-cbc-enc --help
Usage: pim create dataelements aes256-cbc-enc [OPTIONS]
Creates a new AES-256-CBC-ENC data element.
EXAMPLES:
# Create with system-generated IV and CRC32 checksum
pim create dataelements aes256-cbc-enc --name "CreditCardEnc" --description "Credit card encryption" --iv-type "SYSTEM_APPEND" --checksum-type "CRC32"
Options:
--name TEXT The name for the data element. [required]
--description TEXT An optional description for the data element.
--iv-type [NONE|SYSTEM_APPEND] Initialization Vector type.
--checksum-type [NONE|CRC32] Checksum type.
--cipher-format [NONE|INSERT_KEYID_V1] Cipher format.
--help Show this message and exit.
Create Dataelements aes256 cusp enc
The following command shows how to access help for the create dataelements aes256-cusp-enc command. It also provides examples on how to create a AES-256-CUSP-ENC data element.
pim create dataelements aes256-cusp-enc --help
Usage: pim create dataelements aes256-cusp-enc [OPTIONS]
Creates a new AES-256-CUSP-ENC data element.
EXAMPLES:
# Create basic AES-256 CUSP encryption
pim create dataelements aes256-cusp-enc --name "HighSecurityEnc" --description "High security data encryption"
# Create with key ID insertion for key management
pim create dataelements aes256-cusp-enc --name "EnterpriseEnc" --description "Enterprise encryption with key tracking" --cipher-format "INSERT_KEYID_V1"
Options:
--name TEXT The name for the data element. [required]
--description TEXT An optional description for the data element.
--iv-type [NONE|SYSTEM_APPEND] Initialization Vector type.
--checksum-type [NONE|CRC32] Checksum type.
--cipher-format [NONE|INSERT_KEYID_V1] Cipher format.
--help Show this message and exit.
Create Dataelements triple des cbc enc
The following command shows how to access help for the create dataelements triple-des-cbc-enc command. It also provides examples on how to create a 3DES-CBC-ENC data element.
pim create dataelements triple-des-cbc-enc --help
Usage: pim create dataelements triple-des-cbc-enc [OPTIONS]
Creates a new 3DES-CBC-ENC data element.
EXAMPLES:
# Create basic 3DES-CBC encryption
pim create dataelements triple-des-cbc-enc --name "Legacy3DESEnc" --description "Legacy 3DES encryption for compatibility"
# Create with key ID insertion for key management
pim create dataelements triple-des-cbc-enc --name "Managed3DES" --description "3DES with key tracking" --cipher-format "INSERT_KEYID_V1"
Options:
--name TEXT The name for the data element. [required]
--description TEXT An optional description for the data
element.
--iv-type [NONE|SYSTEM_APPEND] Initialization Vector type.
--checksum-type [NONE|CRC32] Checksum type.
--cipher-format [NONE|INSERT_KEYID_V1]
Cipher format.
--help Show this message and exit.
Create Dataelements triple des cusp enc
The following command shows how to access help for the create dataelements triple-des-cusp-enc command. It also provides examples on how to create a 3DES-CUSP-ENC data element.
pim create dataelements triple-des-cusp-enc --help
Usage: pim create dataelements triple-des-cusp-enc [OPTIONS]
Creates a new 3DES-CUSP-ENC data element.
EXAMPLES:
# Create with system-generated IV and integrity checking
pim create dataelements triple-des-cusp-enc --name "Secure3DESCusp" --description "3DES CUSP with enhanced security" --iv-type "SYSTEM_APPEND" --checksum-type "CRC32"
Options:
--name TEXT The name for the data element. [required]
--description TEXT An optional description for the data
element.
--iv-type [NONE|SYSTEM_APPEND] Initialization Vector type.
--checksum-type [NONE|CRC32] Checksum type.
--cipher-format [NONE|INSERT_KEYID_V1]
Cipher format.
--help Show this message and exit.
Create Dataelements fpe
The following command shows how to access help for the create dataelements fpe command. It also provides examples on how to create a Format Preserving Encryption (FPE) data element.
pim create dataelements fpe --help
Usage: pim create dataelements fpe [OPTIONS] COMMAND [ARGS]...
Creates a new FPE (Format Preserving Encryption) data element of a specific
type.
AVAILABLE FPE TYPES:
- numeric # Numeric data (0-9)
- alphabetic # Alphabetic data (a-z, A-Z)
- alpha-numeric # Alphanumeric data (0-9, a-z, A-Z)
- unicode-basic-latin-alphabetic # Unicode Basic Latin alphabetic
- unicode-basic-latin-alpha-numeric # Unicode Basic Latin alphanumeric
Options:
--help Show this message and exit.
Commands:
alpha-numeric Creates a new Alpha Numeric FPE data element.
alphabetic Creates a new Alphabetic FPE data element.
numeric Creates a new Numeric FPE data element.
unicode-basic-latin-alpha-numeric Creates a new Unicode Basic Latin Alpha Numeric (Format Preserving Encryption) FPE data element.
unicode-basic-latin-alphabetic Creates a new Unicode Basic Latin Alphabetic FPE data element.
Create Dataelements fpe alpha numeric
The following command shows how to access help for the create dataelements fpe alpha numeric command. It also provides examples on how to create an alpha numeric (FPE) data element.
pim create dataelements fpe alpha-numeric --help
Usage: pim create dataelements fpe alpha-numeric [OPTIONS]
Creates a new Alpha Numeric FPE data element.
EXAMPLES:
# Create basic alphanumeric FPE for user IDs
pim create dataelements fpe alpha-numeric --name "UserIDFPE" --description "User ID alphanumeric format-preserving encryption"
# Create for product codes with flexible length handling
pim create dataelements fpe alpha-numeric --name "ProductCodeFPE" --description "Product code alphanumeric FPE" --from-left 2 --min-length 5 --allow-short "NOINPUTVALUE"
# Create for mixed case identifiers
pim create dataelements fpe alpha-numeric --name "MixedCaseIDFPE" --description "Mixed case identifier encryption" --from-left 1 --from-right 2 --min-length 7
Options:
--name TEXT The name for the data element. [required]
--description TEXT An optional description for the data
element.
--plain-text-encoding TEXT Kept for backwards compatibility, will be
ignored if sent in. Removed in later
releases.
--from-left INTEGER Number of characters to retain in clear from
the left.
--from-right INTEGER Number of characters to retain in clear from
the right.
--min-length INTEGER The minimum supported input length is 2
bytes and is configurable up to 10 bytes.
--tweak-mode [EXT_API|EXT_INPUT]
The tweak input is derived from either the
API (EXT_API) or the input message
(EXT_INPUT).
--allow-short [NOWITHERROR|NOINPUTVALUE]
Specifies whether the short data must be
supported or not.
--help Show this message and exit.
Create Dataelements fpe alphabetic
The following command shows how to access help for the create dataelements fpe alphabetic command. It also provides examples on how to create an alphabetic (FPE) data element.
pim create dataelements fpe alphabetic --help
Usage: pim create dataelements fpe alphabetic [OPTIONS]
Creates a new Alphabetic FPE data element.
EXAMPLES:
# Create with partial clear text (preserve first 2 and last 2 chars)
pim create dataelements fpe alphabetic --name "PartialAlphaFPE" --description "Partial alphabetic FPE with clear boundaries" --from-left 2 --from-right 2
Options:
--name TEXT The name for the data element. [required]
--description TEXT An optional description for the data
element.
--plain-text-encoding TEXT Kept for backwards compatibility, will be
ignored if sent in. Removed in later
releases.
--from-left INTEGER Number of characters to retain in clear from
the left.
--from-right INTEGER Number of characters to retain in clear from
the right.
--min-length INTEGER The minimum supported input length is 2
bytes and is configurable up to 10 bytes.
--allow-short [NOWITHERROR|NOINPUTVALUE]
Specifies whether the short data must be
supported or not.
--tweak-mode [EXT_API|EXT_INPUT]
The tweak input is derived from either the
API (EXT_API) or the input message
(EXT_INPUT).
--help Show this message and exit.
Create Dataelements fpe numeric
The following command shows how to access help for the create dataelements fpe numeric command. It also provides examples on how to create a numeric (FPE) data element.
pim create dataelements fpe numeric --help
Usage: pim create dataelements fpe numeric [OPTIONS]
Creates a new Numeric FPE data element.
EXAMPLES:
# Create basic numeric FPE for account numbers
pim create dataelements fpe numeric --name "AccountFPE" --description "Account number format-preserving encryption" --min-length 6
# Create FPE with partial masking (show first 4 digits)
pim create dataelements fpe numeric --name "PartialFPE" --description "Partial numeric FPE" --min-length 8 --from-left 4
# Create credit card FPE with BIN preservation
pim create dataelements fpe numeric --name "CreditCardFPE" --description "Credit card FPE with BIN visible" --min-length 8 --from-left 6 --from-right 4 --special-numeric-handling "CCN"
Options:
--name TEXT The name for the data element. [required]
--description TEXT An optional description for the data
element.
--plain-text-encoding TEXT Kept for backwards compatibility, will be
ignored if sent in. Removed in later
releases.
--from-left INTEGER Number of characters to retain in clear from
the left.
--from-right INTEGER Number of characters to retain in clear from
the right.
--min-length INTEGER The minimum supported input length is 2
bytes and is configurable up to 10 bytes.
The default minimum supported input length
for Credit Card Number (CCN) is 8 bytes and
is configurable up to 10 bytes.
--tweak-mode [EXT_API|EXT_INPUT]
The tweak input is derived from either the
API (EXT_API) or the input message
(EXT_INPUT).
--allow-short [NOWITHERROR|NOINPUTVALUE]
Specifies whether the short data must be
supported or not.
--special-numeric-handling [NONE|CCN]
The Format Preserving Encryption (FPE) for
Credit Card Number (CCN) is handled by
configuring numeric data type as the
plaintext alphabet.
--help Show this message and exit.
Create Dataelements fpe unicode basic latin alpha numeric
The following command shows how to access help for the create dataelements fpe unicode-basic-latin-alpha-numeric command. It also provides examples on how to create a unicode basic latin alpha numeric (FPE) data element.
pim create dataelements fpe unicode-basic-latin-alpha-numeric --help
Usage: pim create dataelements fpe unicode-basic-latin-alpha-numeric
[OPTIONS]
Creates a new Unicode Basic Latin Alpha Numeric (Format Preserving
Encryption) FPE data element.
EXAMPLES:
# Create basic Unicode Latin alphanumeric FPE
pim create dataelements fpe unicode-basic-latin-alpha-numeric --name "UnicodeLatinFPE" --description "Unicode Latin alphanumeric format-preserving encryption"
# Create with partial clear text for international IDs
pim create dataelements fpe unicode-basic-latin-alpha-numeric --name "IntlIDFPE" --description "International ID with clear prefix,suffix" --from-left 2 --from-right 2 --min-length 6
# Create for international user IDs with flexible length
pim create dataelements fpe unicode-basic-latin-alpha-numeric --name "GlobalUserIDFPE" --description "Global user ID format-preserving encryption" --min-length 4 --allow-short "NOINPUTVALUE"
Options:
--name TEXT The name for the data element. [required]
--description TEXT An optional description for the data
element.
--plain-text-encoding TEXT Kept for backwards compatibility, will be
ignored if sent in. Removed in later
releases.
--from-left INTEGER Number of characters to retain in clear from
the left.
--from-right INTEGER Number of characters to retain in clear from
the right.
--min-length INTEGER The minimum supported input length is 2
bytes and is configurable up to 10 bytes.
--tweak-mode [EXT_API|EXT_INPUT]
The tweak input is derived from either the
API (EXT_API) or the input message
(EXT_INPUT).
--allow-short [NOWITHERROR|NOINPUTVALUE]
Specifies whether the short data must be
supported or not.
--help Show this message and exit.
Create Dataelements fpe unicode basic latin alpha alphabetic
The following command shows how to access help for the create dataelements fpe unicode-basic-latin-alphabetic command. It also provides examples on how to create a unicode basic latin alphabetic (FPE) data element.
pim create dataelements fpe unicode-basic-latin-alphabetic --help
Usage: pim create dataelements fpe unicode-basic-latin-alphabetic
[OPTIONS]
Creates a new Unicode Basic Latin Alphabetic FPE data element.
EXAMPLES:
# Create basic Unicode Basic Latin alphabetic FPE
pim create dataelements fpe unicode-basic-latin-alphabetic --name "UnicodeAlphaFPE" --description "Unicode Basic Latin alphabetic FPE"
# Create for European customer names
pim create dataelements fpe unicode-basic-latin-alphabetic --name "EuropeanNameFPE" --description "European customer name FPE" --from-left 1 --min-length 3 --allow-short "NOWITHERROR"
Options:
--name TEXT The name for the data element. [required]
--description TEXT An optional description for the data
element.
--plain-text-encoding TEXT Kept for backwards compatibility, will be
ignored if sent in. Removed in later
releases.
--from-left INTEGER Number of characters to retain in clear from
the left.
--from-right INTEGER Number of characters to retain in clear from
the right.
--min-length INTEGER The minimum supported input length is 2
bytes and is configurable up to 10 bytes.
--tweak-mode [EXT_API|EXT_INPUT]
The tweak input is derived from either the
API (EXT_API) or the input message
(EXT_INPUT).
--allow-short [NOWITHERROR|NOINPUTVALUE]
Specifies whether the short data must be
supported or not.
--help Show this message and exit.
Create Dataelements masking
The following command shows how to access help for the create dataelements masking command. It also provides examples on how to create a masking data element using no encryption with masking enabled.
pim create dataelements masking --help
Usage: pim create dataelements masking [OPTIONS]
Creates a new masking data element using NoEnc with masking enabled.
EXAMPLES:
# Create basic data masking with a specific mask
pim create dataelements masking --name "SSNMasking" --description "Social Security Number masking" --mask-uid "1"
# Create email masking for development environment
pim create dataelements masking --name "EmailMasking" --description "Email masking for dev environment" --mask-uid "2"
Options:
--name TEXT The name for the data element. [required]
--description TEXT An optional description for the data element.
--mask-uid TEXT The UID of the mask to apply for masking data.
[required]
--help Show this message and exit.
Create Dataelements monitor
The following command shows how to access help for the create dataelements monitor command. It also provides examples on how to create a monitoring data element using NoEnc with monitoring enabled.
pim create dataelements monitor --help
Usage: pim create dataelements monitor [OPTIONS]
Creates a new monitoring data element using no encryption with monitoring enabled.
EXAMPLES:
# Create basic monitoring for sensitive database fields
pim create dataelements monitor --name "CustomerDataMonitor" --description "Monitor customer data access"
Options:
--name TEXT The name for the data element. [required]
--description TEXT An optional description for the data element.
--help Show this message and exit.
Create Dataelements no enc
The following command shows how to access help for the create dataelements no-enc command. It also provides examples on how to create a no encryption data element.
pim create dataelements no-enc --help
Usage: pim create dataelements no-enc [OPTIONS]
Creates a new No-Enc data element.
EXAMPLES:
# Create basic no-encryption element for testing
pim create dataelements no-enc --name "TestNoEnc" --description "Test data element with no encryption"
Options:
--name TEXT The name for the data element. [required]
--description TEXT An optional description for the data element.
--help Show this message and exit.
Create Dataelements sha1 hmac enc
The following command shows how to access help for the create dataelements sha1-hmac-enc command. It also provides examples on how to create a SHA1-HMAC-ENC data element.
Note: The SHA1-HMAC-ENC data element is deprecated.
pim create dataelements sha1-hmac-enc --help
Usage: pim create dataelements sha1-hmac-enc [OPTIONS]
Creates a new SHA1-HMAC-ENC data element (deprecated).
EXAMPLES:
# Create basic SHA1-HMAC encryption (legacy support)
pim create dataelements sha1-hmac-enc --name "LegacyHashEnc" --description "SHA1 HMAC for legacy system compatibility"
Options:
--name TEXT The name for the data element. [required]
--description TEXT An optional description for the data element.
--help Show this message and exit.
Create Dataelements sha256 hmac enc
The following command shows how to access help for the create dataelements sha256-hmac-enc command. It also provides examples on how to create a SHA256-HMAC-ENC data element.
pim create dataelements sha256-hmac-enc --help
Usage: pim create dataelements sha256-hmac-enc [OPTIONS]
Creates a new SHA256-HMAC-ENC data element.
EXAMPLES:
# Create basic SHA256-HMAC encryption
pim create dataelements sha256-hmac-enc --name "SecureHashEnc" --description "Strong SHA256 HMAC encryption"
Options:
--name TEXT The name for the data element. [required]
--description TEXT An optional description for the data element.
--help Show this message and exit.
Create Dataelements token
The following command shows how to access help for the create dataelements token command. It also provides examples on how to create a token data element.
pim create dataelements token --help
Usage: pim create dataelements token [OPTIONS] COMMAND [ARGS]...
Creates a new token data element of a specific type.
AVAILABLE TOKEN TYPES:
- numeric # Numeric data tokenization (0-9)
- alphabetic # Alphabetic data tokenization (a-z, A-Z)
- alpha-numeric # Alphanumeric tokenization (0-9, a-z, A-Z)
- printable # Printable ASCII characters
- unicode # Unicode character tokenization
- unicode-base64 # Base64 encoded Unicode tokens
- unicode-gen2 # Generation 2 Unicode tokens with custom alphabets
- binary # Binary data tokenization
- lower-ascii # Lowercase ASCII tokenization
- upper-alphabetic # Uppercase alphabetic tokens
- upper-alpha-numeric # Uppercase alphanumeric tokens
# Specialized Token Types:
- credit-card # Credit card number tokenization
- email # Email address tokenization
- integer # Integer value tokenization
- decimal # Decimal number tokenization
- date-yyyymmdd # Date in YYYY-MM-DD format
- date-ddmmyyyy # Date in DD-MM-YYYY format
- date-mmddyyyy # Date in MM-DD-YYYY format
- date-time # Date and time tokenization
COMMON OPTIONS:
--tokenizer # Lookup table type (SLT_1_3, SLT_2_3, SLT_1_6, SLT_2_6)
--from-left # Characters to keep in clear from left
--from-right # Characters to keep in clear from right
--length-preserving # Maintain original data length
--allow-short # Handle short input data (YES, NO, ERROR)
Options:
--help Show this message and exit.
Commands:
alpha-numeric Creates a new Alpha Numeric Token data element.
alphabetic Creates a new Alphabetic Token data element.
binary Creates a new Binary Token data element.
credit-card Creates a new Credit Card Token data element.
date-ddmmyyyy Creates a new Date DDMMYYYY Token data element.
date-mmddyyyy Creates a new Date MMDDYYYY Token data element.
date-time Creates a new Date Time Token data element.
date-yyyymmdd Creates a new Date YYYYMMDD Token data element.
decimal Creates a new Decimal Token data element.
email Creates a new Email Token data element.
integer Creates a new Integer Token data element.
lower-ascii Creates a new Lower ASCII Token data element.
numeric Creates a new Numeric Token data element.
printable Creates a new Printable Token data element.
unicode Creates a new Unicode Token data element.
unicode-base64 Creates a new Unicode Base64 Token data element.
unicode-gen2 Creates a new Unicode Gen2 Token data element.
upper-alpha-numeric Creates a new Upper Alpha Numeric Token data element.
upper-alphabetic Creates a new Upper Alphabetic Token data element.
Create Dataelements token alpha numeric
The following command shows how to access help for the create dataelements token alpa-numeric command. It also provides examples on how to create an alpha-numeric token data element.
pim create dataelements token alpha-numeric --help
Usage: pim create dataelements token alpha-numeric [OPTIONS]
Creates a new Alpha Numeric Token data element.
EXAMPLES: # Create for reference codes pim create dataelements token
alpha-numeric --name "RefCodeToken" --description "Reference code
alphanumeric tokenization" --tokenizer "SLT_1_3" --from-left 2 --allow-short
NOWITHERROR
Options:
--name TEXT The name for the data element. [required]
--description TEXT An optional description for the data
element.
--tokenizer [SLT_1_3|SLT_2_3|SLT_1_6|SLT_2_6]
The lookup tables to be generated.
[required]
--from-left INTEGER Number of characters to keep in clear from
the left.
--from-right INTEGER Number of characters to keep in clear from
the right.
--length-preserving Specifies whether the output must be of the
same length as the input.
--allow-short [YES|NOINPUTVALUE|NOWITHERROR]
Allow short tokens.
--help Show this message and exit.
Create Dataelements token alphabetic
The following command shows how to access help for the create dataelements token alpabetic command. It also provides examples on how to create an alphabetic token data element.
pim create dataelements token alphabetic --help
Usage: pim create dataelements token alphabetic [OPTIONS]
Creates a new Alphabetic Token data element.
EXAMPLES:
# Create length-preserving alphabetic token
pim create dataelements token alphabetic --name "ExactLengthAlpha" --description "Length-preserving alphabetic token" --tokenizer "SLT_2_3" --length-preserving
# Create for name tokenization with short value support
pim create dataelements token alphabetic --name "NameToken" --description "Name tokenization with short support" --tokenizer "SLT_2_3" --allow-short YES --length-preserving
Options:
--name TEXT The name for the data element. [required]
--description TEXT An optional description for the data
element.
--tokenizer [SLT_1_3|SLT_2_3] The lookup tables to be generated.
[required]
--from-left INTEGER Number of characters to keep in clear from
the left.
--from-right INTEGER Number of characters to keep in clear from
the right.
--length-preserving Specifies whether the output must be of the
same length as the input.
--allow-short [YES|NOINPUTVALUE|NOWITHERROR]
Allow short tokens.
--help Show this message and exit.
Create Dataelements token binary
The following command shows how to access help for the create dataelements token binary command. It also provides examples on how to create a binary token data element.
pim create dataelements token binary --help
Usage: pim create dataelements token binary [OPTIONS]
Creates a new Binary Token data element.
EXAMPLES:
# Create basic binary tokenization
pim create dataelements token binary --name "BinaryToken" --description "Binary data tokenization" --tokenizer "SLT_1_3"
Options:
--name TEXT The name for the data element. [required]
--description TEXT An optional description for the data element.
--tokenizer [SLT_1_3|SLT_2_3] The lookup tables to be generated.
[required]
--from-left INTEGER Number of characters to keep in clear from
the left.
--from-right INTEGER Number of characters to keep in clear from
the right.
--help Show this message and exit.
Create Dataelements token credit card
The following command shows how to access help for the create dataelements token credit-card command. It also provides examples on how to create a credit card token data element.
pim create dataelements token credit-card --help
Usage: pim create dataelements token credit-card [OPTIONS]
Creates a new Credit Card Token data element.
EXAMPLES:
# Create basic credit card tokenization
pim create dataelements token credit-card --name "CCTokenBasic" --description "Basic credit card tokenization" --tokenizer "SLT_1_6"
Options:
--name TEXT The name for the data element. [required]
--description TEXT An optional description for the data
element.
--tokenizer [SLT_1_3|SLT_2_3|SLT_1_6|SLT_2_6]
The lookup tables to be generated.
[required]
--from-left INTEGER Number of characters to keep in clear from
the left.
--from-right INTEGER Number of characters to keep in clear from
the right.
--invalid-card-type Token values will not begin with digits that
real credit card numbers begin with.
--invalid-luhn-digit Validate Luhn checksum (requires valid
credit cards as input).
--alphabetic-indicator Include one alphabetic character in the
token.
--alphabetic-indicator-position INTEGER
Position for the alphabetic indicator
(required when alphabetic-indicator is
enabled).
--help Show this message and exit.
Create Dataelements token date ddmmyyyy
The following command shows how to access help for the create dataelements token date-ddmmyyyy command. It also provides examples on how to create a DDMMYYYY date token data element.
pim create dataelements token date-ddmmyyyy --help
Usage: pim create dataelements token date-ddmmyyyy [OPTIONS]
Creates a new Date DDMMYYYY Token data element.
EXAMPLES:
# Create basic DDMMYYYY date tokenization
pim create dataelements token date-ddmmyyyy --name "DateDDMMYYYY" --description "European date format DD-MM-YYYY tokenization" --tokenizer "SLT_1_3"
# Create for compliance reporting dates
pim create dataelements token date-ddmmyyyy --name "ComplianceDate" --description "Compliance reporting DD-MM-YYYY dates" --tokenizer "SLT_2_3"
Options:
--name TEXT The name for the data element. [required]
--description TEXT An optional description for the data
element.
--tokenizer [SLT_1_3|SLT_2_3|SLT_1_6|SLT_2_6]
The lookup tables to be generated.
[required]
--help Show this message and exit.
Create Dataelements token date mmddyyyy
The following command shows how to access help for the create dataelements token date-mmddyyyy command. It also provides examples on how to create a MMDDYYYY date token data element.
pim create dataelements token date-mmddyyyy --help
Usage: pim create dataelements token date-mmddyyyy [OPTIONS]
Creates a new Date MMDDYYYY Token data element.
EXAMPLES:
# Create for financial reporting dates
pim create dataelements token date-mmddyyyy --name "FinancialReportDate" --description "Financial reporting MM-DD-YYYY format" --tokenizer "SLT_2_3"
Options:
--name TEXT The name for the data element. [required]
--description TEXT An optional description for the data
element.
--tokenizer [SLT_1_3|SLT_2_3|SLT_1_6|SLT_2_6]
The lookup tables to be generated.
[required]
--help Show this message and exit.
Create Dataelements token date time
The following command shows how to access help for the create dataelements token date-time command. It also provides examples on how to create a date-time token data element.
pim create dataelements token date-time --help
Usage: pim create dataelements token date-time [OPTIONS]
Creates a new Date Time Token data element.
EXAMPLES:
# Create basic date-time tokenization
pim create dataelements token date-time --name "DateTimeToken" --description "Basic date-time tokenization" --tokenizer "SLT_8_DATETIME"
Options:
--name TEXT The name for the data element. [required]
--description TEXT An optional description for the data
element.
--tokenizer [SLT_8_DATETIME] The lookup tables to be generated.
[required]
--tokenize-time Whether to tokenize time (HH:MM:SS).
--distinguishable-date Whether date tokens should be
distinguishable from real dates.
--date-in-clear [NONE|YEAR|MONTH]
Which date parts to keep in clear.
--help Show this message and exit.
Create Dataelements token date yyyymmdd
The following command shows how to access help for the create dataelements token date-yyyymmdd command. It also provides examples on how to create a YYYYMMDD date token data element.
pim create dataelements token date-yyyymmdd --help
Usage: pim create dataelements token date-yyyymmdd [OPTIONS]
Creates a new Date YYYYMMDD Token data element.
EXAMPLES:
# Create basic YYYYMMDD date tokenization
pim create dataelements token date-yyyymmdd --name "DateYYYYMMDD" --description "Date tokenization in YYYY-MM-DD format" --tokenizer "SLT_1_3"
# Create for event date tracking
pim create dataelements token date-yyyymmdd --name "EventDateToken" --description "Event date in YYYY-MM-DD format" --tokenizer "SLT_2_3"
Options:
--name TEXT The name for the data element. [required]
--description TEXT An optional description for the data
element.
--tokenizer [SLT_1_3|SLT_2_3|SLT_1_6|SLT_2_6]
The lookup tables to be generated.
[required]
--help Show this message and exit.
Create Dataelements token decimal
The following command shows how to access help for the create dataelements token decimal command. It also provides examples on how to create a decimal token data element.
pim create dataelements token decimal --help
Usage: pim create dataelements token decimal [OPTIONS]
Creates a new Decimal Token data element.
EXAMPLES:
# Create basic decimal tokenization for amounts
pim create dataelements token decimal --name "DecimalToken" --description "Financial decimal amount tokenization" --tokenizer "SLT_6_DECIMAL" --max-length 15
Options:
--name TEXT The name for the data element. [required]
--description TEXT An optional description for the data element.
--tokenizer [SLT_6_DECIMAL] The lookup tables to be generated. [required]
--min-length INTEGER Minimum length of the token element that can be
protected.
--max-length INTEGER Maximum length of the token element that can be
protected (max 38). [required]
--help Show this message and exit.
Create Dataelements token email
The following command shows how to access help for the create dataelements token email command. It also provides examples on how to create a email token data element.
pim create dataelements token email --help
Usage: pim create dataelements token email [OPTIONS]
Creates a new Email Token data element.
EXAMPLES:
# Create basic email tokenization
pim create dataelements token email --name "EmailTokenBasic" --description "Basic email tokenization" --tokenizer "SLT_1_3" --allow-short NOWITHERROR
# Create email tokenization with error on short input
pim create dataelements token email --name "EmailTokenError" --description "Email tokenization with short input errors" --tokenizer "SLT_1_3" --length-preserving --allow-short NOWITHERROR
Options:
--name TEXT The name for the data element. [required]
--description TEXT An optional description for the data
element.
--tokenizer [SLT_1_3|SLT_2_3] The lookup tables to be generated.
[required]
--length-preserving Specifies whether the output must be of the
same length as the input.
--allow-short [YES|NOINPUTVALUE|NOWITHERROR]
Allow short tokens.
--help Show this message and exit.
Create Dataelements token integer
The following command shows how to access help for the create dataelements token integer command. It also provides examples on how to create a integer token data element.
pim create dataelements token integer --help
Usage: pim create dataelements token integer [OPTIONS]
Creates a new Integer Token data element.
EXAMPLES:
# Create basic integer tokenization (default 4-byte)
pim create dataelements token integer --name "IntegerToken" --description "Basic integer tokenization" --tokenizer "SLT_1_3"
# Create short integer tokenization for small numbers
pim create dataelements token integer --name "ShortIntegerToken" --description "Short integer (2-byte) tokenization" --tokenizer "SLT_1_3" --integer-size "SHORT"
Options:
--name TEXT The name for the data element. [required]
--description TEXT An optional description for the data
element.
--tokenizer [SLT_1_3] The lookup tables to be generated.
[required]
--integer-size [SHORT|INT|LONG]
Integer size: 2 bytes (SHORT), 4 bytes
(INT), or 8 bytes (LONG).
--help Show this message and exit.
Create Dataelements token lower ascii
The following command shows how to access help for the create dataelements token lower-ascii command. It also provides examples on how to create a lower-ascii token data element.
pim create dataelements token lower-ascii --help
Usage: pim create dataelements token lower-ascii [OPTIONS]
Creates a new Lower ASCII Token data element.
EXAMPLES:
# Create strict ASCII tokenization (error on short input)
pim create dataelements token lower-ascii --name "StrictAsciiToken" --description "Strict ASCII tokenization" --tokenizer "SLT_1_3" --allow-short "NOWITHERROR"
Options:
--name TEXT The name for the data element. [required]
--description TEXT An optional description for the data
element.
--tokenizer [SLT_1_3] The lookup tables to be generated.
[required]
--from-left INTEGER Number of characters to keep in clear from
the left.
--from-right INTEGER Number of characters to keep in clear from
the right.
--length-preserving Specifies whether the output must be of the
same length as the input.
--allow-short [YES|NOINPUTVALUE|NOWITHERROR]
Allow short tokens.
--help Show this message and exit.
Create Dataelements token numeric
The following command shows how to access help for the create dataelements token numeric command. It also provides examples on how to create a numeric token data element.
pim create dataelements token numeric --help
Usage: pim create dataelements token numeric [OPTIONS]
Creates a new Numeric Token data element.
EXAMPLES:
# Create basic numeric token for SSN
pim create dataelements token numeric --name "SSNToken" --description "Social Security Number tokenization" --tokenizer "SLT_1_6" --length-preserving
# Create high-security token for financial data
pim create dataelements token numeric --name "FinancialToken" --description "Financial account tokenization" --tokenizer "SLT_2_6" --length-preserving --allow-short "NOWITHERROR"
Options:
--name TEXT The name for the data element. [required]
--description TEXT An optional description for the data
element.
--tokenizer [SLT_1_3|SLT_2_3|SLT_1_6|SLT_2_6]
The lookup tables to be generated.
[required]
--from-left INTEGER Number of characters to keep in clear from
the left.
--from-right INTEGER Number of characters to keep in clear from
the right.
--length-preserving Specifies whether the output must be of the
same length as the input.
--allow-short [YES|NOINPUTVALUE|NOWITHERROR]
Allow short tokens.
--help Show this message and exit.
Create Dataelements token printable
The following command shows how to access help for the create dataelements token printable command. It also provides examples on how to create a printable token data element.
pim create dataelements token printable --help
Usage: pim create dataelements token printable [OPTIONS]
Creates a new Printable Token data element.
EXAMPLES:
# Create length-preserving printable token
pim create dataelements token printable --name "ExactLengthPrintable" --description "Length-preserving printable tokenization" --tokenizer "SLT_1_3" --length-preserving
Options:
--name TEXT The name for the data element. [required]
--description TEXT An optional description for the data
element.
--tokenizer [SLT_1_3] The lookup tables to be generated.
[required]
--from-left INTEGER Number of characters to keep in clear from
the left.
--from-right INTEGER Number of characters to keep in clear from
the right.
--length-preserving Specifies whether the output must be of the
same length as the input.
--allow-short [YES|NOINPUTVALUE|NOWITHERROR]
Allow short tokens.
--help Show this message and exit.
Create Dataelements token unicode
The following command shows how to access help for the create dataelements token unicode command. It also provides examples on how to create a Unicode token data element.
pim create dataelements token unicode --help
Usage: pim create dataelements token unicode [OPTIONS]
Creates a new Unicode Token data element.
EXAMPLES:
# Create with short value support for names
pim create dataelements token unicode --name "IntlNameToken" --description "International name tokenization" --tokenizer "SLT_2_3" --allow-short "YES"
Options:
--name TEXT The name for the data element. [required]
--description TEXT An optional description for the data
element.
--tokenizer [SLT_1_3|SLT_2_3] The lookup tables to be generated.
[required]
--allow-short [NOWITHERROR|YES|NOINPUTVALUE]
Allow short tokens.
--help Show this message and exit.
Create Dataelements token unicode base64
The following command shows how to access help for the create dataelements token unicode-base64 command. It also provides examples on how to create a Unicode Base64 token data element.
pim create dataelements token unicode-base64 --help
Usage: pim create dataelements token unicode-base64 [OPTIONS]
Creates a new Unicode Base64 Token data element.
EXAMPLES:
# Create basic Unicode Base64 tokenization
pim create dataelements token unicode-base64 --name "UnicodeBase64Token" --description "Base64 encoded Unicode tokenization" --tokenizer "SLT_1_3"
Options:
--name TEXT The name for the data element. [required]
--description TEXT An optional description for the data
element.
--tokenizer [SLT_1_3|SLT_2_3|SLT_1_6|SLT_2_6]
The lookup tables to be generated.
[required]
--help Show this message and exit.
Create Dataelements token unicode gen2
The following command shows how to access help for the create dataelements token unicode-gen2 command. It also provides examples on how to create a Unicode Gen2 token data element.
pim create dataelements token unicode-gen2 --help
Usage: pim create dataelements token unicode-gen2 [OPTIONS]
Creates a new Unicode Gen2 Token data element.
EXAMPLES:
# Create basic Unicode Gen2 token with custom alphabet
pim create dataelements token unicode-gen2 --name "UnicodeGen2Token" --description "Unicode Gen2 with custom alphabet" --tokenizer "SLT_1_3" --alphabet-uid "1"
Options:
--name TEXT The name for the data element. [required]
--description TEXT An optional description for the data
element.
--tokenizer [SLT_1_3|SLT_X_1] The lookup tables to be generated.
[required]
--alphabet-uid TEXT The UID of the alphabet to use for
tokenization. [required]
--from-left INTEGER Number of characters to keep in clear from
the left.
--from-right INTEGER Number of characters to keep in clear from
the right.
--length-preserving Specifies whether the output must be of the
same length as the input.
--allow-short [YES|NOINPUTVALUE|NOWITHERROR]
Allow short tokens.
--default-encoding TEXT Default encoding (kept for backwards
compatibility).
--help Show this message and exit.
Create Dataelements token upper alpha numeric
The following command shows how to access help for the create dataelements token upper-alpha-numeric command. It also provides examples on how to create an upper alpha-numeic token data element.
pim create dataelements token upper-alpha-numeric --help
Usage: pim create dataelements token upper-alpha-numeric
[OPTIONS]
Creates a new Upper Alpha Numeric Token data element.
EXAMPLES:
# Create for product codes
pim create dataelements token upper-alpha-numeric --name "ProductCodeToken" --description "Product code uppercase tokenization" --tokenizer "SLT_1_3" --from-left 2 --length-preserving
Options:
--name TEXT The name for the data element. [required]
--description TEXT An optional description for the data
element.
--tokenizer [SLT_1_3|SLT_2_3] The lookup tables to be generated.
[required]
--from-left INTEGER Number of characters to keep in clear from
the left.
--from-right INTEGER Number of characters to keep in clear from
the right.
--length-preserving Specifies whether the output must be of the
same length as the input.
--allow-short [YES|NOINPUTVALUE|NOWITHERROR]
Allow short tokens.
--help Show this message and exit.
Create Dataelements token upper alphabetic
he following command shows how to access help for the create dataelements token upper-alphabetic command. It also provides examples on how to create an upper alphabetic token data element.
pim create dataelements token upper-alphabetic --help
Usage: pim create dataelements token upper-alphabetic [OPTIONS]
Creates a new Upper Alphabetic Token data element.
EXAMPLES:
# Create for organization names with short support
pim create dataelements token upper-alphabetic --name "OrgNameToken" --description "Organization name tokenization" --tokenizer "SLT_2_3" --allow-short "NOINPUTVALUE" --length-preserving
Options:
--name TEXT The name for the data element. [required]
--description TEXT An optional description for the data
element.
--tokenizer [SLT_1_3|SLT_2_3] The lookup tables to be generated.
[required]
--from-left INTEGER Number of characters to keep in clear from
the left.
--from-right INTEGER Number of characters to keep in clear from
the right.
--length-preserving Specifies whether the output must be of the
same length as the input.
--allow-short [YES|NOINPUTVALUE|NOWITHERROR]
Allow short tokens.
--help Show this message and exit.
Create Datastores
The following command shows how to access help for the create datastores command. It also provides examples on how to create a datastore resource.
pim create datastores --help
Usage: pim create datastores [OPTIONS] COMMAND [ARGS]...
Commands for creating datastore resources.
Options:
--help Show this message and exit.
Commands:
datastore Creates a new datastore with the specified name and configuration.
key Creates and exports a datastore key for secure data operations.
range Adds an IP address range to a datastore for network access control.
Create Datastores Types
The following commands show how to access help for the create datastores <type> command. It also provides examples on how to manage datastore resources.
Create Datastores Datastore
The following command shows how to access help for the create datastores datastore command. It also provides examples on how to create a datastore.
pim create datastores datastore --help
Usage: pim create datastores datastore [OPTIONS]
Creates a new datastore with the specified name and configuration.
Datastores represent physical or logical storage systems that host protected
data. They define where data protection policies are applied and provide the
foundation for implementing encryption, tokenization, and access controls.
EXAMPLES:
# Create a simple datastore for development
pim create datastores datastore --name "dev-database" --description "Development PostgreSQL database"
# Create production datastore with detailed description
pim create datastores datastore --name "prod-customer-db" --description "Production customer data warehouse with PII protection"
# Create datastore and set as default
pim create datastores datastore --name "primary-db" --description "Primary application database" --default
WORKFLOW:
# Step 1: Plan your datastore configuration
# - Choose descriptive name for identification
# - Decide if this should be the default datastore
# Step 2: Create the datastore
pim create datastores datastore --name <name> --description <description> [--default]
# Step 3: Configure IP ranges and access controls
pim create datastores range <datastore-uid> --from-ip <start> --to <end>
# Step 4: Set up encryption keys if needed
pim create datastores key <datastore-uid> --name <key-name>
Options:
--name TEXT Name of the datastore. [required]
--description TEXT Description for the datastore.
--default Set this datastore as the default.
--help Show this message and exit.
Create Datastores Key
The following command shows how to access help for the create datastores key command. It also provides examples on how to export a datastore key.
pim create datastores key --help
Usage: pim create datastores key [OPTIONS] DATASTORE_UID
Creates and exports a datastore key for secure data operations.
EXAMPLES:
# Create RSA export key for datastore
pim create datastores key 15 --algorithm "RSA-OAEP-512" --description "export key" --pem "-----BEGIN PUBLIC KEY-----\nMIIBIjANBgkqhkiG9w0BAQEFAAOCAQ8AMIIBCgKCAQ...\n-----END PUBLIC KEY-----"
WORKFLOW:
# Step 1: Generate a key pair (outside of PIM)
openssl genrsa -out private_key.pem 2048
openssl rsa -in private_key.pem -pubout -out public_key.pem
# Step 2: Prepare the PEM content (escape newlines for command line)
awk 'NF {sub(/
/, ""); printf "%s\n",$0;}' public_key.pem
# Step 3: Create the export key in PIM
pim create datastores key <datastore-uid> --algorithm <algorithm> --description <description> --pem <pem-content>
# Step 4: Verify the key was created
pim get datastores keys <datastore-uid>
Options:
--algorithm [RSA-OAEP-256|RSA-OAEP-512]
Algorithm for the key. [required]
--description TEXT Description of the key.
--pem TEXT PEM formatted public key. [required]
--help Show this message and exit.
Create Datastores Range
The following command shows how to access help for the create datastores range command. It also provides examples on how to add a range of IP addresses to a datastore.
pim create datastores range --help
Usage: pim create datastores range [OPTIONS] DATASTORE_UID
Adds an IP address range to a datastore for network access control.
IP ranges define which network addresses are allowed to access the
datastore. This provides network-level security by restricting datastore
access to specific IP addresses or CIDR blocks.
EXAMPLES:
# Add single IP address access
pim create datastores range 15 --from "192.168.1.100" --to "192.168.1.100"
# Add corporate network access range
pim create datastores range <datastore-uid> --from "10.0.0.1" --to "10.0.255.255"
WORKFLOW:
# Step 1: Get datastore UID
pim get datastores datastore
# Step 2: Plan your IP range requirements
# - Identify source networks that need access
# - Define start and end IP addresses
# Step 3: Create the IP range
pim create datastores range <datastore-uid> --from <start-ip> --to <end-ip>
# Step 4: Verify the range was created
pim get datastores ranges <datastore-uid>
Options:
--from TEXT Start IP address of the range. [required]
--to TEXT End IP address of the range. [required]
--help Show this message and exit.
Create Deploy
The following command shows how to access help for the create deploy command. It also provides examples on how to deploy policies or trusted applications or both to a datastore.
pim create deploy --help
Usage: pim create deploy [OPTIONS]
Deploys policies and/or trusted applications to a data store.
Creates a deployment that pushes data protection policies and trusted
application configurations to the specified datastore.
EXAMPLES:
# Deploy single policy to a datastore
pim create deploy --data-store-uid 15 --policy-uids 1
# Deploy multiple policies to a datastore
pim create deploy --data-store-uid 15 --policy-uids 1 --policy-uids 2 --policy-uids 3
# Deploy trusted applications to grant access
pim create deploy --data-store-uid 15 --trusted-application-uids 1 --trusted-application-uids 2
# Deploy both policies and applications together
pim create deploy --data-store-uid 15 --policy-uids 1 --policy-uids 2 --trusted-application-uids 1 --trusted-application-uids 2
WORKFLOW:
# Step 1: Verify datastore exists and is accessible
pim get datastores datastore <data-store-uid>
# Step 2: List available policies and applications
pim get policies policy
pim get applications application
# Step 3: Deploy to a datastore
pim create deploy --data-store-uid <datastore-uid> --policy-uids <policy-uid> --trusted-application-uids <app-uid>
# Step 4: Verify deployment was successful
pim get deploy
Options:
--data-store-uid TEXT UID of the data store to deploy. [required]
--policy-uids TEXT UIDs of the policies to deploy.
--trusted-application-uids TEXT UIDs of the trusted applications to deploy.
--help Show this message and exit.
Create Masks
The following command shows how to access help for the create masks command. It also provides examples on how to create a mask.
pim create masks --help
Usage: pim create masks [OPTIONS]
Creates a new mask with specified masking pattern and configuration.
EXAMPLES:
# Create mask for credit card numbers (show last 4 digits)
pim create masks --name "credit-card-mask" --description "Mask credit card showing last 4 digits" --from-left 0 --from-right 4 --character "*"
MASKING PATTERNS:
Credit Card Masking (****-****-****-1234):
--from-left 0 --from-right 4 --character "*"
Email Masking (j***@example.com):
--from-left 1 --from-right 0 --character "*"
Full Masking (***********):
--from-left 0 --from-right 0 --character "*" --masked
Options:
--name TEXT The name for the mask. [required]
--description TEXT An optional description for the mask.
--from-left INTEGER Number of characters to be masked or kept in clear
from the left. [required]
--from-right INTEGER Number of characters to be masked or kept in clear
from the right. [required]
--masked Specifies whether the left and right characters should
be masked or kept in clear.
--character TEXT Specifies the mask character (*,#,-,0,1,2,3,4,5,6,7,8,
or 9). [required]
--help Show this message and exit.
Create Policies
The following command shows how to access help for the create policies command. It also provides examples on how to create a policy.
pim create policies --help
Usage: pim create policies [OPTIONS] COMMAND [ARGS]...
Creates a new policy or rule.
Options:
--help Show this message and exit.
Commands:
policy Creates a new data protection policy with specified access permissions.
rules Creates multiple rules and adds them to a policy in bulk.
Create Policies Types
The following commands show how to access help for the create policies <type> command. It also provides examples on how to manage policy resources.
Create Policies Policy
The following command shows how to access help for the create policies policy command. It also provides examples on how to create a policy.
Important: Ensure that you mandatorily add a description while creating a policy. If you do not add the description, then the
pim get policiescommand fails.
pim create policies policy --help
Usage: pim create policies policy [OPTIONS]
Creates a new data protection policy with specified access permissions.
EXAMPLES:
# Create basic policy with all protection operations enabled
pim create policies policy --name "full-protection-policy" --description "Complete data protection with all operations" --protect --re-protect --un-protect
# Create read-only policy (no protection operations)
pim create policies policy --name "read-only-policy" --description "Read-only access without protection operations"
Options:
--name TEXT Name of the policy. [required]
--description TEXT Description of the policy. [required]
--protect Allow protect operation.
--re-protect Allow re-protect operation.
--un-protect Allow un-protect operation.
--help Show this message and exit.
Create Policies Rules
The following command shows how to access help for the create policies rules command. It also provides examples on how to create multiple rules and them to a policy.
pim create policies rules --help
Usage: pim create policies rules [OPTIONS] POLICY_UID
Creates multiple rules and adds them to a policy in bulk.
Rules define the mapping between roles and data elements with specific
protection methods and access permissions. Each rule specifies how a role
can access a data element, what masking to apply, and which protection
operations are allowed.
RULE FORMAT: role_uid,data_element_uid[,mask][,no_access_operation][,protect
][,re_protect][,un_protect]
EXAMPLES:
# Create rules for different roles accessing PII data elements
pim create policies rules 15 --rule "1,3,1,NULL_VALUE,true,true,true" --rule "3,3,1,PROTECTED_VALUE,false,false,false" --rule "4,2,,NULL_VALUE,true,false,false"
WORKFLOW:
# Step 1: Verify policy exists and review its configuration
pim get policies <policy-uid>
# Step 2: Identify required roles and data elements
pim get applications application # for roles
pim get data_elements data_element # for data elements
pim get masks # for available masks
# Step 3: Create rules in bulk
pim create policies rules <policy-uid> --rule "..." --rule "..." --rule "..."
# Step 4: Verify rules were created successfully
pim get policies <policy-uid> --rules
PARAMETER DESCRIPTIONS:
role_uid (Required): UID of the role/application that will access data
- References trusted applications or user roles
- Must exist in the system before creating rules
- Determines who can perform operations on data elements
data_element_uid (Required): UID of the data element
- References specific data fields or columns
- Must exist before creating rules
- Defines what data is being protected
mask (Optional): UID of mask to apply for data obfuscation
- Empty/omitted: No masking applied
- Must reference existing mask configuration
- Controls how data appears when accessed
no_access_operation (Optional, Default: NULL_VALUE):
- NULL_VALUE: Return null when access denied
- PROTECTED_VALUE: Return masked/protected format
- EXCEPTION: Throw exception when access denied
protect (Optional, Default: false): Allow data protection operations
- true: Role can encrypt/tokenize/mask data
- false: Role cannot perform protection operations
re_protect (Optional, Default: false): Allow data re-protection
- true: Role can change protection methods/keys
- false: Role cannot re-protect data
un_protect (Optional, Default: false): Allow data un-protection
- true: Role can decrypt/detokenize/unmask data
- false: Role cannot remove protection
Examples: --rule "role1,de1,mask1,NULL_VALUE,true,false,false" --rule
"role2,de2,,EXCEPTION,false,true,true" --rule "role3,de3"
Options:
--rule TEXT Rule specification in format: "role_uid,data_element_uid[,mask]
[,no_access_operation][,protect][,re_protect][,un_protect]".
Can be specified multiple times. [required]
--help Show this message and exit.
Create Roles
The following command shows how to access help for the create roles command. It also provides examples on how to create a role.
pim create roles --help
Usage: pim create roles [OPTIONS] COMMAND [ARGS]...
Creates a new role or adds members to a role.
Options:
--help Show this message and exit.
Commands:
members Adds members to a role in bulk.
role Creates a new role with specified configuration and access mode.
Create Roles Types
The following commands show how to access help for the create roles <type> command. It also provides examples on how to manage roles.
Create Roles Members
The following command shows how to access help for the create roles members command. It also provides examples on how to add members to a role.
pim create roles members --help
Usage: pim create roles members [OPTIONS] ROLE_UID
Adds members to a role in bulk.
Members can be individual users or groups from various identity sources.
This command allows adding multiple members at once with proper validation
and error handling for each member specification.
MEMBER FORMAT: name,source,sync_id,type OR name,source,type (sync_id
optional)
EXAMPLES:
# Add individual users from LDAP
pim create roles members 15 --member "john.doe,1,12345,USER" --member "jane.smith,1,67890,USER"
Examples: --member "john.doe,ldap,12345,USER" --member
"admin_group,ldap,67890,GROUP" --member "jane.smith,ad,USER" (sync_id
omitted)
Options:
--member TEXT Member specification in format: "name,source,sync_id,type" or
"name,source,type". Can be specified multiple times. Where
name is the member name (required, min_length=1), source is
the source of the member (required), sync_id is the
synchronization ID (optional), and type is the member type
(required: USER or GROUP).
--help Show this message and exit.
Create Roles Role
The following command shows how to access help for the create roles role command. It also provides examples on how to create a role.
pim create roles role --help
Usage: pim create roles role [OPTIONS]
Creates a new role with specified configuration and access mode.
EXAMPLES:
# Create semiautomatic role for project team
pim create roles role --name "project-alpha-team" --description "Project Alpha mixed access" --mode "SEMIAUTOMATIC"
Options:
--name TEXT Name of the role. [required]
--description TEXT Description of the role.
--mode [MANUAL|SEMIAUTOMATIC|AUTOMATIC] Role mode. [required]
--allow-all Allow access to all users for this role.
--help Show this message and exit.
Create Sources
The following command shows how to access help for the create sources command. It also provides examples on how to create a member source.
pim create sources --help
Usage: pim create sources [OPTIONS] COMMAND [ARGS]...
Creates a new source.
Options:
--help Show this message and exit.
Commands:
ad Creates a new Active Directory source for Windows domain integration.
azure Creates a new AZURE AD source for Microsoft cloud identity integration.
database Creates a new DATABASE source for relational database user repositories.
file Creates a new FILE source for static user and group management.
ldap Creates a new LDAP source for directory-based authentication and user management.
posix Creates a new POSIX source for Unix/Linux system account integration.
Create Sources Types
The following commands show how to access help for the create source <type> command. It also provides examples on how to create a member source of a specific type.
Create Source Ad
The following command shows how to access help for the create source ad command. It also provides examples on how to create an active directory member source.
pim create sources ad --help
Usage: pim create sources ad [OPTIONS]
Creates a new Active Directory source for Windows domain integration.
EXAMPLES:
Note: The following commands use line continuation (\) for readability.
In practice, run each command as a single line or use your shell's
line continuation syntax
# Create basic AD source with domain controller
pim create sources ad --name "corporate-ad" --description "Corporate Active Directory" \
--host "dc1.company.com" --port 389 \
--user-name "service@company.com" --pass-word "password123" \
--base-dn "dc=company,dc=com"
Options:
--name TEXT Name of the source. [required]
--description TEXT Description of the source.
--user-name TEXT Authentication user.
--pass-word TEXT Authentication password.
--host TEXT The Fully Qualified Domain Name (FQDN) or IP address of
the directory server.
--port INTEGER The network port on the directory server where the
service is listening.
--tls The TLS protocol is enabled to create a secure
communication to the directory server.
--base-dn TEXT The Base DN for the server to search for users.
--recursive Enables recursive search for active directory or Azure
AD.
--ldaps Use LDAPS instead of startTLS.
--help Show this message and exit.
Create Source Azure
The following command shows how to access help for the create source azure command. It also provides examples on how to create an Azure member source.
pim create sources azure --help
Usage: pim create sources azure [OPTIONS]
Creates a new AZURE AD source for Microsoft cloud identity integration.
EXAMPLES:
Note: The following commands use line continuation (\) for readability.
In practice, run each command as a single line or use your shell's
line continuation syntax.
# Create basic Azure AD source for corporate tenant
pim create sources azure --name "corporate-azure" --description "Corporate Azure AD" \
--client-id "12345678-1234-1234-1234-123456789012" \
--tenant-id "87654321-4321-4321-4321-210987654321" \
--environment "PUBLIC"
# Create Azure AD source with service principal authentication
pim create sources azure --name "sp-azure" --description "Service Principal Azure AD" \
--user-name "service-principal@company.onmicrosoft.com" \
--pass-word "sp-secret-key" \
--client-id "app-registration-id" \
--tenant-id "company-tenant-id" \
--environment "PUBLIC" --recursive
# Create Azure Government cloud source
pim create sources azure --name "gov-azure" --description "Azure Government Cloud" \
--client-id "gov-app-id" \
--tenant-id "gov-tenant-id" \
--environment "USGOVERNMENT" \
--user-attribute "userPrincipalName" \
--group-attribute "displayName"
# Create Azure China cloud source
pim create sources azure --name "china-azure" --description "Azure China Cloud" \
--client-id "china-app-id" \
--tenant-id "china-tenant-id" \
--environment "CHINA" \
--recursive
# Create Azure AD with custom attributes
pim create sources azure --name "custom-azure" --description "Custom Azure AD Configuration" \
--client-id "custom-app-id" \
--tenant-id "custom-tenant-id" \
--environment "PUBLIC" \
--user-attribute "mail" \
--group-attribute "displayName" \
--group-members-attribute "members" \
--recursive
# Create multi-tenant Azure AD source
pim create sources azure --name "partner-azure" --description "Partner Tenant Azure AD" \
--client-id "partner-app-id" \
--tenant-id "partner-tenant-id" \
--environment "PUBLIC" \
--user-name "guest@partner.onmicrosoft.com" \
--pass-word "guest-credentials"
Options:
--name TEXT Name of the source. [required]
--description TEXT Description of the source.
--user-name TEXT Authentication user.
--pass-word TEXT Authentication password.
--recursive Enables recursive search for active
directory or Azure AD.
--user-attribute TEXT The Relative Distinguished Name (RDN)
attribute of the user distinguished name.
--group-attribute TEXT The Relative Distinguished Name (RDN)
attribute of the group distinguished name.
--group-members-attribute TEXT The attribute that enumerates members of the
group.
--client-id TEXT The client id for AZURE AD.
--tenant-id TEXT The tenant id for the AZURE AD.
--environment [CHINA|CANARY|PUBLIC|USGOVERNMENT|USGOVERNMENTL5]
The AZURE AD environment that should be used.
--help Show this message and exit.
Create Source Database
The following command shows how to access help for the create source database command. It also provides examples on how to create a database member source.
pim create sources database --help
Usage: pim create sources database [OPTIONS]
Creates a new DATABASE source for relational database user repositories.
EXAMPLES:
Note: The following commands use line continuation (\) for readability.
In practice, run each command as a single line or use your shell's
line continuation syntax
# Create Oracle database source with DSN
pim create sources database --name "oracle-hr" --description "Oracle HR Database" \
--user-name "pim_service" --pass-word "oracle123" \
--host "oracle.company.com" --port 1521 \
--dsn "XE" --vendor "ORACLE"
Options:
--name TEXT Name of the source. [required]
--description TEXT Description of the source.
--user-name TEXT Authentication user.
--pass-word TEXT Authentication password.
--host TEXT The Fully Qualified Domain Name (FQDN) or IP
address of the database server.
--port INTEGER The network port on the directory server
where the service is listening.
--dsn TEXT The Data Source Name (DSN) for ODBC
connection.
--vendor [TERADATA|ORACLE|DATABASE|SQLSERVER|DB2|POSTGRESQLX]
The vendor of the ODBC driver.
--help Show this message and exit.
Create Source File
The following command shows how to access help for the create source file command. It also provides examples on how to create a file member source.
pim create sources file --help
Usage: pim create sources file [OPTIONS]
Creates a new FILE source for static user and group management.
EXAMPLES:
# Create basic file source with user list
pim create sources file --name "dev-users" --description "environment users" --user-file exampleusers.txt --group-file examplegroups.txt
Options:
--name TEXT Name of the source. [required]
--description TEXT Description of the source.
--user-file TEXT A sample file that contains a list of individual
members.
--group-file TEXT A sample file that contains groups of members.
--help Show this message and exit.
Create Source Ldap
The following command shows how to access help for the create source ldap command. It also provides examples on how to create an LDAP member source.
pim create sources ldap --help
Usage: pim create sources ldap [OPTIONS]
Creates a new LDAP source for directory-based authentication and user
management.
EXAMPLES:
Note: The following commands use line continuation (\) for readability.
In practice, run each command as a single line or use your shell's
line continuation syntax
# Create basic LDAP source with minimal configuration
pim create sources ldap --name "company-ldap" --description "Company LDAP directory" \
--host "ldap.company.com" --port 389 \
--user-name "cn=admin,dc=company,dc=com" --pass-word "password123" \
--user-base-dn "ou=users,dc=company,dc=com" \
--group-base-dn "ou=groups,dc=company,dc=com"
# Create OpenLDAP source with detailed configuration
pim create sources ldap --name "openldap-prod" --description "Production OpenLDAP" \
--host "openldap.company.com" --port 389 \
--user-name "cn=readonly,dc=company,dc=com" --pass-word "readonly123" \
--user-base-dn "ou=employees,dc=company,dc=com" \
--user-attribute "uid" --user-object-class "posixAccount" \
--user-login-attribute "uid" \
--group-base-dn "ou=departments,dc=company,dc=com" \
--group-attribute "cn" --group-object-class "posixGroup" \
--group-members-attribute "memberUid" --timeout 60
Options:
--name TEXT Name of the source. [required]
--description TEXT Description of the source.
--user-name TEXT Authentication user.
--pass-word TEXT Authentication password.
--host TEXT The Fully Qualified Domain Name (FQDN) or IP
address of the directory server.
--port INTEGER The network port on the directory server
where the service is listening.
--tls The TLS protocol is enabled to create a
secure communication to the directory
server.
--user-base-dn TEXT The base distinguished name where users can
be found in the directory.
--user-attribute TEXT The Relative Distinguished Name (RDN)
attribute of the user distinguished name.
--user-object-class TEXT The object class of entries where user
objects are stored.
--user-login-attribute TEXT The attribute intended for authentication or
login.
--group-base-dn TEXT The base distinguished name where groups can
be found in the directory.
--group-attribute TEXT The Relative Distinguished Name (RDN)
attribute of the group distinguished name.
--group-object-class TEXT The object class of entries where group
objects are stored.
--group-members-attribute TEXT The attribute that enumerates members of the
group.
--group-member-is-dn The members may be listed using their fully
qualified name.
--timeout INTEGER The timeout value when waiting for a
response from the directory server.
--help Show this message and exit.
Delete Commands
The following section lists the delete commands.
Main Delete Command
The following command shows how to access help for the delete command.
pim delete --help
Usage: pim delete [OPTIONS] COMMAND [ARGS]...
Delete a resource.
Options:
--help Show this message and exit.
Commands:
alphabets Deletes a specific alphabet by UID.
applications Deletes a specific application by UID.
dataelements Deletes a specific data element by UID.
datastores Commands for deleting datastore resources.
masks Deletes a specific mask by its UID.
policies Deletes a policy, a rule from a policy, or a data element from a policy.
roles Commands for deleting role resources.
sources Permanently deletes a source from the system.
Delete Alphabets
The following command shows how to access help for the delete alphabets command. It also provides examples on how to delete an alphabet.
pim delete alphabets --help
Usage: pim delete alphabets [OPTIONS] UID
Deletes a specific alphabet by UID.
WORKFLOW:
# Step 1: First, list all alphabets to find the UID you want to delete
pim get alphabets
# Step 2: Copy the UID from the list and use it to delete the alphabet
pim delete alphabets <uid-from-list>
EXAMPLES:
# Complete workflow example:
# 1. List all alphabets to see available UIDs
pim get alphabets
# 2. Delete a specific alphabet using UID from the list above
pim delete alphabets 14
Options:
--help Show this message and exit.
Delete Applications
The following command shows how to access help for the delete applications command. It also provides examples on how to delete a trusted application.
pim delete applications --help
Usage: pim delete applications [OPTIONS] UID
Deletes a specific application by UID.
WORKFLOW:
# Step 1: First, list all applications to find the UID you want to delete
pim get applications
# Step 2: Copy the UID from the list and use it to delete the application
pim delete applications <uid-from-list>
EXAMPLES:
# 1. List all applications to see available UIDs
pim get applications
# 2. Delete a specific application using numeric UID from the list above
pim delete applications 42
Options:
--help Show this message and exit.
Delete Dataelements
The following command shows how to access help for the delete dataelements command. It also provides examples on how to delete a dataelement.
pim delete dataelements --help
Usage: pim delete dataelements [OPTIONS] UID
Deletes a specific data element by UID.
WORKFLOW:
# Step 1: First, list all data elements to find the UID you want to delete
pim get dataelements
# Step 2: Copy the UID from the list and use it to delete the data element
pim delete dataelements <uid-from-list>
EXAMPLES:
# Complete workflow example: # 1. List all data elements to see available
UIDs pim get dataelements
# 2. Delete a specific data element using numeric UID from the list above
pim delete dataelements 42
Options:
--help Show this message and exit.
Delete Datastores
The following command shows how to access help for the delete datastores command. It also provides examples on how to delete a datastore.
pim delete datastores --help
Usage: pim delete datastores [OPTIONS] COMMAND [ARGS]...
Commands for deleting datastore resources.
Options:
--help Show this message and exit.
Commands:
datastore Deletes a datastore by UID.
key Deletes an export key from a datastore.
range Deletes an IP address range from a datastore.
Delete Datastores Types
The following commands show how to access help for the delete datastores <type> command. It also provides examples on how to delete a datastore of a specific type.
Delete Datastores Datastore
The following command shows how to access help for the delete datastores datastore command. It also provides examples on how to delete a datastore by the UID.
pim delete datastores datastore --help
Usage: pim delete datastores datastore [OPTIONS] UID
Deletes a datastore by UID.
EXAMPLES:
# Delete datastore by numeric UID
pim delete datastores datastore 15
Options:
--help Show this message and exit.
Delete Datastores Key
The following command shows how to access help for the delete datastores key command. It also provides examples on how to delete a key from a datastore.
pim delete datastores key --help
Usage: pim delete datastores key [OPTIONS] DATASTORE_UID KEY_UID
Deletes an export key from a datastore.
EXAMPLES:
# Remove specific export key from datastore
pim delete datastores key 1 2
WORKFLOW:
# Step 1: List current keys to identify the key UID
pim get datastores keys <datastore-uid>
# Step 2: Verify which processes use this key
# - Check backup and migration schedules
# - Verify no active export operations
# Step 3: Delete the key
pim delete datastores key <datastore-uid> <key-uid>
# Step 4: Verify deletion
pim get datastores keys <datastore-uid>
Options:
--help Show this message and exit.
Delete Datastores Range
The following command shows how to access help for the delete datastores range command. It also provides examples on how to delete a range of IP addresses from a datastore.
pim delete datastores range --help
Usage: pim delete datastores range [OPTIONS] DATASTORE_UID RANGE_UID
Deletes an IP address range from a datastore.
EXAMPLES:
# Remove specific IP range from datastore
pim delete datastores range 15 1
WORKFLOW:
# Step 1: List current ranges to identify the range UID
pim get datastores ranges <datastore-uid>
# Step 2: Verify which systems use this range
# - Check with network administrators
# - Verify no active connections from this range
# Step 3: Delete the range
pim delete datastores range <datastore-uid> <range-uid>
# Step 4: Verify deletion
pim get datastores ranges <datastore-uid>
Options:
--help Show this message and exit.
Delete Masks
The following command shows how to access help for the delete masks command. It also provides examples on how to delete a mask.
pim delete masks --help
Usage: pim delete masks [OPTIONS] UID
Deletes a specific mask by its UID.
EXAMPLES:
# Delete mask by UID
pim delete masks 15
Options:
--help Show this message and exit.
Delete Policies
The following command shows how to access help for the delete policies command. It also provides examples on how to delete a policy, a rule from a policy, or a data element from a policy.
pim delete policies --help
Usage: pim delete policies [OPTIONS] UID
Deletes a policy, a rule from a policy, or a data element from a policy.
EXAMPLES:
# Delete entire policy (removes all rules and deployments)
pim delete policies 15
# Remove specific rule from policy
pim delete policies 15 --rule-uid 23
# Remove all rules for specific data element from policy
pim delete policies 42 --data-element-uid 67
Options:
--rule-uid TEXT UID of the rule to remove.
--data-element-uid TEXT UID of the data element to remove from a policy.
--help Show this message and exit.
Delete Roles
The following command shows how to access help for the delete roles command. It also provides examples on how to delete a role.
pim delete roles --help
Usage: pim delete roles [OPTIONS] COMMAND [ARGS]...
Commands for deleting role resources.
Options:
--help Show this message and exit.
Commands:
members Removes a specific member from a role.
role Permanently deletes a role from the system.
Delete Roles Types
The following commands show how to access help for the delete roles <type> command.
Delete Roles Members
The following command shows how to access help for the delete roles members command. It also provides examples on how to remove a member from a role.
pim delete roles members --help
Usage: pim delete roles members [OPTIONS] ROLE_UID MEMBER_UID
Removes a specific member from a role.
EXAMPLES:
# Remove specific user from role
pim delete roles members 15 42
pim delete roles members <role_uuid> <member_uuid>
Options:
--help Show this message and exit.
Delete Roles Role
The following command shows how to access help for the delete roles role command. It also provides examples on how to remove a role by the UID.
pim delete roles role --help
Usage: pim delete roles role [OPTIONS] UID
Permanently deletes a role from the system.
EXAMPLES:
# Remove specific role
pim delete roles role 15
Options:
--help Show this message and exit.
Note: Deleting a default role (directory_administrator, directory_viewer, security_administrator, and security_viewer) using
pim delete roles roleis not supported. This command applies only to custom roles created by users.
Delete Sources
The following command shows how to access help for the delete source command. It also provides examples on how to delete a member source by the UID.
pim delete sources --help
Usage: pim delete sources [OPTIONS] UID
Permanently deletes a source from the system.
EXAMPLES:
# Interactive source deletion with confirmation
pim delete sources 15
Options:
--help Show this message and exit.
Get Commands
The following section lists the get commands.
Main Get Command
The following command shows how to access help for the get command.
pim get --help
Usage: pim get [OPTIONS] COMMAND [ARGS]...
Display one or many resources.
Options:
--help Show this message and exit.
Commands:
alphabets Gets a specific alphabet by UID, or lists all alphabets if no UID is provided.
applications Gets a specific application by UID, or lists all applications if no UID is provided.
dataelements Gets a specific data element by UID, or lists all data elements if no UID is provided.
datastores Commands for getting datastore resources.
deploy List deployment history across all datastores.
health Displays the server health information and status.
log Gets the current log level configuration.
masks Gets a specific mask by UID, or lists all masks if no UID is provided.
policies Gets a specific policy by UID, lists all policies, or lists rules of a policy.
ready Displays the server readiness information and operational status.
roles Commands for getting role resources.
sources Gets source information by UID, lists all sources, or lists source members.
version Displays the server version information.
Get Alphabets
The following command shows how to access help for the get alphabets command. It also provides examples on how to retrieve all the alphabets or a specific alphabet.
pim get alphabets --help
Usage: pim get alphabets [OPTIONS] [UID]
Gets a specific alphabet by UID, or lists all alphabets if no UID is
provided.
EXAMPLES:
# List all available alphabets
pim get alphabets
# Get details for a specific alphabet by UID
pim get alphabets 29
Options:
--help Show this message and exit.
Get Applications
The following command shows how to access help for the get applications command. It also provides examples on how to retrieve all trusted applications or a specific trusted application.
pim get applications --help
Usage: pim get applications [OPTIONS] [UID]
Gets a specific application by UID, or lists all applications if no UID is
provided.
EXAMPLES:
# List all available applications
pim get applications
# Get details for a specific application by UID
pim get applications 1
Options:
--help Show this message and exit.
Get Dataelements
The following command shows how to access help for the get dataelements command. It also provides examples on how to retrieve all the data elements or a specific data element.
pim get dataelements --help
Usage: pim get dataelements [OPTIONS] [UID]
Gets a specific data element by UID, or lists all data elements if no UID is
provided.
EXAMPLES:
# List all available data elements pim get dataelements
# Get details for a specific data element by UID pim get dataelements 15
Options:
--help Show this message and exit.
Get Datastores
The following command shows how to access help for the get datastores command. It also provides examples on how to retrieve the datastore resources.
pim get datastores --help
Usage: pim get datastores [OPTIONS] COMMAND [ARGS]...
Commands for getting datastore resources.
Options:
--help Show this message and exit.
Commands:
datastore Gets a specific datastore by UID, or lists all datastores if no UID is provided.
keys Gets a specific key by UID, or lists all keys for a datastore.
ranges Gets a specific range by UID, or lists all ranges for a datastore.
Get Datastores Types
The following commands show how to access help for the get datastores <type> command. It also provides examples on how to retrieve specific datastores.
Get Datastores Datastore
The following command shows how to access help for the get datastores datastore command. It also provides examples on how to retrieve all datastores or a specific datastore.
pim get datastores datastore --help
Usage: pim get datastores datastore [OPTIONS] [UID]
Gets a specific datastore by UID, or lists all datastores if no UID is
provided.
Datastores represent the physical or logical storage systems where protected
data is stored. They contain policies, applications, and IP ranges that
define access control.
EXAMPLES:
# List all available datastores
pim get datastores datastore
# Get details for a specific datastore by UID
pim get datastores datastore 15
Options:
--help Show this message and exit.
Get Datastores Keys
The following command shows how to access help for the get datastores key command. It also provides examples on how to retrieve all keys for a datastore or a specific key.
pim get datastores keys --help
Usage: pim get datastores keys [OPTIONS] DATASTORE_UID
Gets a specific key by UID, or lists all keys for a datastore.
Datastore keys manage encryption and access credentials for secure data
operations. Keys can be export keys for data migration or operational keys
for ongoing protection services. Key management is critical for data
security.
EXAMPLES:
# List all keys for a specific datastore
pim get datastores keys <datastore-uid>
# Get details for a specific key within a datastore
pim get datastores keys 15 --key-uid <key-uid>
WORKFLOW:
# Step 1: List all datastores to find the datastore UID
pim get datastores datastore
# Step 2: List keys for the specific datastore
pim get datastores keys <datastore-uid>
# Step 3: Get specific key details if needed
pim get datastores keys <datastore-uid> --key-uid <key-uid>
Options:
--key-uid TEXT UID of the specific key to get.
--help Show this message and exit.
Get Datastores Ranges
The following command shows how to access help for the get datastores ranges command. It also provides examples on how to retrieve all the IP address range for a datastore or a specific range.
pim get datastores ranges --help
Usage: pim get datastores ranges [OPTIONS] DATASTORE_UID
Gets a specific range by UID, or lists all ranges for a datastore.
IP ranges define which network addresses are allowed to access the
datastore. Ranges provide network-level security by restricting datastore
access to specific IP addresses or CIDR blocks.
EXAMPLES:
# List all IP ranges for a specific datastore
pim get datastores ranges 15
# Get details for a specific range within a datastore
pim get datastores ranges 15 --range-uid 1
WORKFLOW:
# Step 1: List all datastores to find the datastore UID
pim get datastores datastore
# Step 2: List ranges for the specific datastore
pim get datastores ranges <datastore-uid>
# Step 3: Get specific range details if needed
pim get datastores ranges <datastore-uid> --range-uid <range-uid>
Options:
--range-uid TEXT UID of the range to get.
--help Show this message and exit.
Get Deploy
The following command shows how to access help for the get deploy command. It also provides examples on how to list the deployment history.
pim get deploy --help
Usage: pim get deploy [OPTIONS]
List deployment history across all datastores.
EXAMPLES:
# List all deployment history
pim get deploy
Options:
--help Show this message and exit.
Get Health
The following command shows how to access help for the get health command. It also provides examples on how to display the server health information.
pim get health --help
Usage: pim get health [OPTIONS]
Displays the server health information and status.
EXAMPLES:
# Check current server health status
pim get health
Options:
--help Show this message and exit.
Get Log
The following command shows how to access help for the get log command. It also provides examples on how to retrieve the current log level.
pim get log --help
Usage: pim get log [OPTIONS]
Gets the current log level configuration.
EXAMPLES:
# Check current log level setting
pim get log
Options:
--help Show this message and exit.
Get Masks
The following command shows how to access help for the get masks command. It also provides examples on how to retrieve all masks or a specific mask.
pim get masks --help
Usage: pim get masks [OPTIONS] [UID]
Gets a specific mask by UID, or lists all masks if no UID is provided.
EXAMPLES:
# List all available masks
pim get masks
# Get details for a specific mask by UID
pim get masks 15
Options:
--help Show this message and exit.
Get Policies
The following command shows how to access help for the get policies command. It also provides examples on how to retrieve all policies, a specific policy, or all rules of a policy.
pim get policies --help
Usage: pim get policies [OPTIONS] [UID]
Gets a specific policy by UID, lists all policies, or lists rules of a
policy.
EXAMPLES:
# List all available policies
pim get policies
# Get details for a specific policy by UID
pim get policies 15
# List all rules within a specific policy
pim get policies 15 --rules
Options:
--rules List rules of the policy.
--help Show this message and exit.
Get Ready
The following command shows how to access help for the get ready command. It also provides examples on how to display the server readiness information.
pim get ready --help
Usage: pim get ready [OPTIONS]
Displays the server readiness information and operational status.
EXAMPLES:
# Check if server is ready for requests
pim get ready
Options:
--help Show this message and exit.
Get Roles
The following command shows how to access help for the get roles command. It also provides examples on how to retrieve the resources for a role.
pim get roles --help
Usage: pim get roles [OPTIONS] COMMAND [ARGS]...
Commands for getting role resources.
Options:
--help Show this message and exit.
Commands:
members Lists all members of a specific role.
role Gets a specific role by UID, or lists all roles if no UID is provided.
users Lists users of a specific member in a role.
Get Roles Types
The following commands show how to access help for the get roles <type> command.
Get Roles Members
The following command shows how to access help for the get roles members command. It also provides examples on how to list all members of a role.
pim get roles members --help
Usage: pim get roles members [OPTIONS] ROLE_UID
Lists all members of a specific role.
EXAMPLES:
# List all members of a specific role
pim get roles members 15
Options:
--help Show this message and exit.
Get Roles Role
The following command shows how to access help for the get roles role command. It also provides examples on how to retrieve all roles or a specific role.
pim get roles role --help
Usage: pim get roles role [OPTIONS] [UID]
Gets a specific role by UID, or lists all roles if no UID is provided.
EXAMPLES:
# List all available roles
pim get roles role
# Get details for a specific role by UID
pim get roles role 15
Options:
--help Show this message and exit.
Get Roles Users
The following command shows how to access help for the get roles users command. It also provides examples on how to retrieve users of a specific member in a role.
pim get roles users --help
Usage: pim get roles users [OPTIONS] ROLE_UID MEMBER_UID
Lists users of a specific member in a role.
EXAMPLES:
# List users in a specific group member of a role
pim get roles users 15 23
pim get roles users "<role-uuid>" "<member-uuid>"
Options:
--help Show this message and exit.
Get Sources
The following command shows how to access help for the get sources command. It also provides examples on how to retrieve all source, a specific source, or members of a source.
pim get sources --help
Usage: pim get sources [OPTIONS] [UID]
Gets source information by UID, lists all sources, or lists source members.
EXAMPLES:
# List all configured sources
pim get sources
# Get detailed information about a specific source
pim get sources 15
# List all members of a specific source
pim get sources 23 --members
Options:
--members List members of the source.
--help Show this message and exit.
Get Version
The following command shows how to access help for the get version command. It also provides examples on how to display the version information of the server.
pim get version --help
Usage: pim get version [OPTIONS]
Displays the server version information.
EXAMPLES:
# Display server version information
pim get version
Options:
--help Show this message and exit.
Set Commands
The following section lists the set commands.
Main Set Command
The following command shows how to access help for the set command.
pim set --help
Usage: pim set [OPTIONS] COMMAND [ARGS]...
Update fields of a resource.
Options:
--help Show this message and exit.
Commands:
log Sets the log level for the PIM server.
Set Log
The following command shows how to access help for the set log command. It also provides examples on how to set the log level.
pim set log --help
Usage: pim set log [OPTIONS] {ERROR|WARN|INFO|DEBUG|TRACE}
Sets the log level for the PIM server.
Higher levels include all lower levels (TRACE includes DEBUG, INFO, WARN,
ERROR).
EXAMPLES:
# Enable debug logging for troubleshooting
pim set log DEBUG
Options:
--help Show this message and exit.
3.6.3.1 - Using the Policy Management Command Line Interface (CLI)
The following table provides section references that explain usage of some of the Policy Management CLI. It includes an example workflow to work with the Policy Management functions. If you want to view all the Policy Management CLI, then refer to the section Policy Management Command Line Interface (CLI) Reference.
| Policy Management CLI | Section Reference |
|---|---|
| Policy Management initialization | Initializing the Policy Management |
| Creating an empty manual role that will accept all users | Creating a Manual Role |
| Create data elements | Create Data Elements |
| Create policy | Create Policy |
| Add roles and data elements to the policy | Adding roles and data elements to the policy |
| Create a default data store | Creating a default datastore |
| Deploy the data store | Deploying the Data Store |
| Get the deployment information | Getting the Deployment Information |
Initializing the Policy Management
This section explains how you can initialize Policy Management to create the keys-related data and the policy repository.
pim invoke init
The following output appears:
✅ PIM successfully initialized (bootstrapped).
Creating a Manual Role
This section explains how you can create a manual role that accepts all the users.
pim create roles role --name "project-alpha-team" --description "Project Alpha all access" --mode "MANUAL" --allow-all
The following output appears:
NAME DESCRIPTION MODE ALLOWALL UID
project-alpha-team Project Alpha all access RoleMode.MANUAL True 1
The command creates a role named project-alpha-team that has the UID as 1.
Creating Data Elements
This section explains how you can create a data element.
pim create dataelements aes128-cbc-enc --name "BasicEncryption" --description "Basic data encryption"
The following output appears:
UID NAME DESCRIPTION IVTYPE CHECKSUMTYPE CIPHERFORMAT
1 BasicEncryption Basic data encryption IvType.NONE ChecksumType.NONE CipherFormat.NONE
The command creates an AES-128-CBC-ENC encryption data element named BasicEncryption that has the UID as 1.
Creating Policy
This section explains how you can create a policy.
pim create policies policy --name "full-protection-policy" --description "Complete data protection with all operations" --protect --re-protect --un-protect
The following output appears:
NAME DESCRIPTION ACCESS UID
full-protection-policy Complete data protection with all operations {'protect': True, 'reProtect': True, 'unProtect': True} 1
The command creates a policy named full-protection-policy that has the UID as 1.
Adding Roles and Data Elements to a Policy
This section explains how you can add roles and data elements to a policy.
pim create policies rules <policy-uid> --rule "1,1,,NULL_VALUE,true,false,false"
The following output appears:
ROLE DATAELEMENT MASK NOACCESSOPERATION ACCESS
1 1 0 NULL_VALUE {'protect': True, 'reProtect': False, 'unProtect': False}
The command adds the role with the UID 1 and the data element with the UID 1 to the policy with the UID 1.
Creating a Default Data Store
This section explains how you can create a default data store.
pim create datastores datastore --name "primary-db" --description "Primary application database" --default
The following output appears:
NAME DESCRIPTION DEFAULT UID
primary-db Primary application database True 1
The command creates a default data store named primary-db that has the UID as 1.
Deploying a Specific Data Store
This section explains how you can deploy policies and trusted applications linked to a specific data store. The specifications provided for the specific data store are applied and becomes the end-result.
pim invoke datastores deploy 1 --policies 1
The following output appears:
Successfully deployed to datastore '1':
Policies: 1
The command deploys the policy with the UID 1 to the data store with the UID 1.
Getting the Deployment Information
This section explains how you can check the complete deployment information. This service returns the list of the data stores with the connected policies and trusted applications.
pim get deploy
The following output appears:
UID POLICIES APPLICATIONS
1 ['1'] []
The command retrieves the deployment information. It displays the UID of the data store and the policy that has been deployed.
3.7 - Troubleshooting
Accessing the PPC CLI
- Permission denied (publickey): Ensure you’re using the correct private key that matches the authorized_keys in the pod
- Connection refused: Verify the load balancer IP and hosts file configuration
- Key format issues: Ensure your private key is in the correct format (OpenSSH format for Linux/macOS, .ppk for PuTTY)
Failure of init-resiliency script
Issue: When running the init_resiliency.sh script on a fresh RHEL 10.1 system as the root user, some required tools, such as, AWS CLI, kubectl, or Helm are not detected during setup. The following error appears:
[2026-03-26 06:57:15] No credentials file found at ~/.aws/credentials. Triggering aws configure...
configuring credentials...
/home/ec2-user/bootstrap-scripts/setup-devtools-linux_redhat.sh: line 297: aws: command not found
[2026-03-26 06:57:15] Step failed: Tool installation (redhat) — command exited with non-zero status
[2026-03-26 06:57:15] ERROR: Step failed: Tool installation (redhat)
Cause: On RHEL systems, the default environment configuration for the root user does not include certain standard installation directories such as /usr/local/bin in the system path. As a result, tools that are installed successfully might not be immediately available to the script during execution.
Resolution: Before running the bootstrap or resiliency scripts as the root user on RHEL, ensure that /usr/local/bin (and the AWS CLI binary path, if applicable) is included in the $PATH. Alternatively, run the script using a non-root user (such as ec2-user) where /usr/local/bin is already part of the default PATH.
Certificate Authority (CA) is not backed up leading to protector disruption
Issue: CA certificates are not backed up during cluster migration, causing SSL certificate errors for protectors trying to communicate with the new cluster.
Description: When the CA that Envoy uses is not migrated to the new cluster, protectors cannot establish secure connections. The connection fails with SSL certificate errors like “unable to get local issuer certificate”. This disrupts protector functionality and requires manual intervention to restore communication.
Workaround:
Workaround 1: Custom CA is preserved before restore. This preserved CA is replaced with the default CA in the new restored cluster.
For more information, refer to Replacing the default Certificate Authority (CA) with a Custom CA in PPC.
This ensures protectors continue to trust the cluster without any changes.
Workaround 2: Run the GetCertificates command on each protector after restore.
cd /opt/protegrity/rpagent/bin/
./GetCertificates -u <username> -p <password>
This command downloads new CA‑signed certificates which results in restoring secure communication with the cluster.
Important: This approach is functional but not user‑friendly and should be avoided in production by preserving the custom CA across restores.
When upgrading PPC from v1.0.0 to v 1.1.0, Stage 01 shows unexpected IAM policy replacement
Issue: During PPC upgrade from v1.0.0 to v1.1.0, Stage 01 01_iam_roles displays an unexpected destroy and then create replacement for aws_iam_policy.eks_backup_recovery_utility_policy and its role-policy attachment, with the plan showing Plan: 4 to add, 0 to change, 2 to destroy.
Description: The PPC v1.0.0 created the IAM policy with a trailing space in the description field. AWS IAM treats description as an immutable attribute, and any change to it forces a full resource replacement (destroy + create). The PPC v1.1.0 removes the trailing space, which triggers the replacement. The following plan output is expected:
# aws_iam_policy.eks_backup_recovery_utility_policy must be replaced
-/+ resource "aws_iam_policy" "eks_backup_recovery_utility_policy" {
~ description = "IAM policy used by backup service to access S3 bucket " -> "IAM policy used by backup service to access S3 bucket" # forces replacement
}
Resolution: No action is required. This is expected and one-time behavior. The policy ARN changes as the policy is briefly recreated, and the role-policy attachment is disconnected for approximately 200ms. There is no functional impact because Stage 01 runs before any application pods that depend on this policy are started. By Stage 05, the policy is already recreated and attached. Subsequent upgrade runs show no changes.
3.8 - Replacing the default Certificate Authority (CA) with a Custom CA in PPC
In a PPC deployment, Envoy and other internal components rely on a CA to establish trusted TLS communication.
By default, PPC uses an internally generated CA. PPC supports replacing the default CA with a custom CA that can be preserved and reused across cluster restore or migration.
Prerequisites
Before you begin, ensure that:
- You have access to the PPC Kubernetes cluster (kubectl configured).
- Openssl is installed.
- Cert-manager is installed.
- The
eclipse-issuerClusterIssuer exists. - You have permission to create secrets in the cert-manager namespace.
Perform the following steps:
Custom CA certificates are available.
a. Users already have existing CA certificates.
To retrieve custom CA certificate and key from
custom-ca-secretsecret, run the following commands:```bash kubectl -n cert-manager get secret custom-ca-secret -o jsonpath='{.data.tls\.crt}' | base64 -d > <your-ca>.crt kubectl -n cert-manager get secret custom-ca-secret -o jsonpath='{.data.tls\.key}' | base64 -d > <your-ca>.key ```b. Users generate custom CA certificates.
For more information about generating New Certificate and Key with OpenSSL, refer to Openssl documentation.
Copy the CA certificate to the jumpbox.
To create a TLS secret containing the CA certificate and key, navigate to the folder where certificates are available and run the following command:
kubectl create secret tls custom-ca-secret \
--cert=<your-ca>.crt \
--key=<your-ca>.key \
-n cert-manager
- To verify the secret was created, run the following command:
kubectl get secret custom-ca-secret -n cert-manager
NAME TYPE DATA AGE
custom-ca-secret kubernetes.io/tls 2 5s
- To patch the
eclipse-issuerClusterIssuer to point to the new CA secret, run the following command:
kubectl patch clusterissuer eclipse-issuer \
--type='json' \
-p='[{"op":"replace","path":"/spec/ca/secretName","value":"custom-ca-secret"}]'
Note: This changes cert-manager to issue all new certificates using the custom CA.
- After patching the ClusterIssuer, existing certificates must be re-issued using the new CA. Use one of the following approaches:
Approach 1: Trigger renewal via cmctl (Recommended)
cmctl is the official cert-manager CLI and provides the most reliable way to trigger certificate renewal. The script below checks if cmctl is installed and downloads it automatically if not.
#!/bin/bash
# Install cmctl if not present
if ! command -v cmctl &>/dev/null; then
echo "cmctl not found, downloading..."
curl -L https://github.com/cert-manager/cmctl/releases/latest/download/cmctl_linux_amd64 \
-o /usr/local/bin/cmctl
chmod +x /usr/local/bin/cmctl
echo "cmctl installed successfully"
fi
# Renew all certificates using eclipse-issuer
kubectl get certificates --all-namespaces -o json | \
jq -r '.items[] | select(.spec.issuerRef.name=="eclipse-issuer") | "\(.metadata.namespace) \(.metadata.name)"' | \
while read -r ns cert_name; do
echo "Renewing certificate: $cert_name in namespace: $ns"
cmctl renew "$cert_name" -n "$ns"
done
Approach 2: Trigger renewal via kubectl (status patch)
Use this approach if cmctl cannot be installed. Requires kubectl 1.24+.
#!/bin/bash
kubectl get certificates --all-namespaces -o json | \
jq -r '.items[] | select(.spec.issuerRef.name=="eclipse-issuer") | "\(.metadata.namespace) \(.metadata.name)"' | \
while read -r ns cert_name; do
echo "Triggering renewal for certificate: $cert_name in namespace: $ns"
kubectl patch certificate "$cert_name" -n "$ns" \
--subresource=status \
--type=merge \
-p '{
"status": {
"conditions": [{
"type": "Issuing",
"status": "True",
"reason": "ManuallyTriggered",
"message": "Certificate renewal manually triggered",
"lastTransitionTime": "'"$(date -u +%Y-%m-%dT%H:%M:%SZ)"'"
}]
}
}'
done
Note: Due to cert-manager’s reconcile loop, some certificates may not renew on the first attempt. Re-run the script if any certificates remain unrenewed.
3.9 - Updating Registry Credentials for AKS/EKS Clusters
Protegrity Provisioned Cluster (PPC) uses image pull secrets to authenticate against the container registry, such as Harbor, when pulling images. When registry passwords are rotated, credentials expire, or the registry endpoint changes, the pull secrets must be updated across all namespaces in the cluster.
This procedure updates the harbor-secret image pull secret across all required namespaces using OpenTofu (tofu) -replace flags. This process does not require a reinstall of the full cluster.
Note: Existing running pods are unaffected by this operation. Only new image pulls use the rotated secret, for example, new pods, scaling events, and node replacements. If existing pods need to use the new credentials immediately, restart the affected deployments after applying the settings.
When to Use This Procedure
The following table outlines common scenarios and the frequency for updating registry credentials in PPC:
| Use Case | Trigger | Frequency |
|---|---|---|
| Scheduled password rotation | Policy/compliance schedule. | Quarterly |
| Security incident response | Credential compromise or leak. | Ad-hoc |
| Registry migration | Infrastructure change. For example, Artifactory to Harbor. | Rare |
| Multi-cluster credential management | Operational rollout across environments. | Ongoing |
| Service account token expiry | Automatic token expiration. For example, ECR or ACR. | Hours/days |
| User/team offboarding | HR process - account disabled. | Ad-hoc |
| Upgrade/patch deployment failures | Expired credentials blocking image pulls. | As needed |
| Audit and compliance | SOC2, ISO 27001, FedRAMP, HIPAA requirements. | Annual |
Prerequisites
Before you begin, ensure that the following requirements are met:
- You have access to the PPC Kubernetes cluster,
kubectlis configured. - OpenTofu (
tofu) is installed. - You have the new registry username and password.
- You have permission to manage secrets across namespaces in the cluster.
- The PPC directory is available at
/eclipse-init/iac/.
Target Namespaces
The harbor-secret is managed in the following namespaces:
| Namespace |
|---|
pty-admin |
api-gateway |
pty-loginui |
cert-manager |
karpenter |
default |
pty-backup-recovery |
email-service |
cli |
reloader |
pty-insight |
Procedure
This procedure must be run once per cloud, that is, AWS for EKS and Azure for AKS. Complete all steps for one cloud before proceeding to the next.
Follow these steps for each cloud environment:
Export the credentials for the new registry as environment variables.
export TF_VAR_username='<new-registry-username>' export TF_VAR_password='<new-registry-password>'Verify that the credentials are set.
[[ -n "$TF_VAR_username" && -n "$TF_VAR_password" ]] && echo "creds set" || echo "MISSING"Set the Kubernetes context to prevent accidentally writing secrets to the wrong cluster:
CLOUD=aws # or: azure KCTX=<your-cluster-context-name> kubectl config use-context "$KCTX" kubectl config current-context # must match the intended clusterNote: Operating on the wrong cluster will update secrets in the incorrect environment.
Navigate to the
iacdirectory.cd iac/azure/cluster/modules/05_helm_releasesPlan the credential update that targets only the
harbor-secretresources across all namespaces.NAMESPACES=(pty-admin api-gateway pty-loginui cert-manager karpenter default \ pty-backup-recovery email-service cli reloader pty-insight) REPLACE_ARGS=() for ns in "${NAMESPACES[@]}"; do REPLACE_ARGS+=(-replace="module.helm_releases.module.common.kubernetes_secret_v1.harbor_secret[\"$ns\"]") done tofu plan "${REPLACE_ARGS[@]}" -out="rotate-${CLOUD}.tfplan"Review the plan. Expected output:
Plan: 11 to add, 0 to change, 11 to destroy.Or equivalently,
11 to replace.The plan must affect only
harbor_secretresources. If any other resources appear in the plan, stop immediately and delete the plan file.rm "rotate-${CLOUD}.tfplan"Note: Investigate the unexpected changes before retrying.
Apply the plan.
tofu apply "rotate-${CLOUD}.tfplan"After successfully applying the plan, clean up the plan file. Use the command below:
rm "rotate-${CLOUD}.tfplan"Note: The
lifecycle.ignore_changes = [data]directive on the secret resource is bypassed by-replacebecause the resource is destroyed and recreated, not updated in place.Verify the update. Confirm that all
harbor-secretresources were recreated with current timestamps.for ns in pty-admin api-gateway pty-loginui cert-manager karpenter default \ pty-backup-recovery email-service cli reloader pty-insight; do kubectl -n "$ns" get secret harbor-secret \ -o jsonpath='{.metadata.namespace}{"\t"}{.metadata.creationTimestamp}{"\n"}' doneAll timestamps must reflect the time of the apply operation.
Reset the context variables, then repeat from step 4 for the next cloud.
CLOUD=azure KCTX=<your-azure-context-name>
Optional Post-Update Step: Rolling Deployments
If the running pods need to use the new credentials immediately, rather than waiting for the next pod restart, roll the affected deployments.
kubectl rollout restart deployment -n <namespace> <deployment-name>
Troubleshooting
| Symptom | Cause | Resolution |
|---|---|---|
tofu plan shows changes to non-secret resources. | State drift or other pending changes. | Do not apply. Investigate and resolve the unrelated changes first. |
tofu apply fails with state lock error. | Another operation is in progress. | Wait for the other operation to complete, or manually release the lock if it is stale. |
Pods enter ImagePullBackOff after apply. | New credentials are invalid, or a namespace was missed. | Verify credentials against the registry manually. Check that all 11 namespaces were updated. |
| Timestamps are not updated for some namespaces. | Partial apply failure. | Re-run the procedure for the affected namespaces only. |
MISSING TF_VAR_* error. | Environment variables not exported. | Re-export TF_VAR_username and TF_VAR_password and verify. |
4 - Governance and Policy
4.1 - Protegrity Policy Manager
Data Security Policy is at the core of Protegrity’s platform. A policy is a set of rules that governs how sensitive data is protected, and who in the organization can see the data in the clear. Sensitive data can include Personally Identifiable Information (PII), financial information, health-related information, and so on. A Data Security Policy is enforced within different systems and environments in the enterprise, providing the same level of security regardless of the location of the sensitive data.
The Protegrity Policy Manager enables users to perform protect, unprotect, and reprotect operations on sensitive data. Install the Policy Workbench to deploy the Protegrity Policy Manager.
Important: Protegrity Policy Manager is the name of the feature, while Policy Workbench is the name of the component.
For more information about installing the Policy Workbench, refer to the section Installing Policy Workbench.
For more information about the components used in the Protegrity Policy Manager, refer to the section Policy Components in the Policy Management documentation.
For more information about creating, managing, and viewing policies using the Policy Management API, refer to the section Using the Policy Management REST APIs.
For more information about creating, managing, and viewing policies using the Policy Management CLI, refer to the section Policy Management Command Line Interface (CLI) Reference.
4.1.1 - Installing Policy Workbench
This section provides the steps to install the Policy Workbench on Amazon Elastic Kubernetes Service (EKS) or Azure Kubernetes Service (AKS).
4.1.1.1 - Installing Policy Workbench on PPC in Amazon Elastic Kubernetes Service (EKS)
Before installing Policy Workbench, ensure that the prerequisites are met. For more information about the prerequisites, refer to the section Prerequisites.
To install Policy Workbench, first provision the AWS resources using the policy-workbench OpenTofu module and then deploy the Policy Workbench using Helm. The policy-workbench OpenTofu module is published to the Protegrity Container Registry and must be consumed from a root module. A root module is the working directory for executing the OpenTofu commands.
For more information about OpenTofu modules and the root module, refer to the section Modules in the OpenTofu documentation.
The Policy Workbench is installed depending on one of the following scenarios:
- Root module is not available.
- Root module is available.
Prerequisites
Ensure that the jumpbox can connect to the required registries. If not already authenticated, then log in to the required registry.
- For connecting and deploying from the Protegrity Container Registry (PCR), use the following command and the credentials obtained from the My.Protegrity portal during account creation:
helm registry login registry.protegrity.com:9443
For connecting and deploying to the local registry, use your local credentials and local registry endpoint as required.
Ensure that the PPC Cluster is installed and accessible, before installing Policy Workbench on PPC.
For more information about installing PPC, refer to the section Installing PPC.
Before installing Policy Workbench, verify that the PPC worker security group’s AWS Name tag is set to
<cluster-name>_SG, where<cluster-name>is the exact EKS cluster name used during PPC installation andSGmust be in uppercase.
Policy Workbench’s Karpenter EC2NodeClass discovers the worker security group by matching thetag Name = <cluster-name>_SG. This match is case-sensitive. If the tag value does not match exactly, Karpenter-provisioned nodes launch without the PPC worker security group attached. Those nodes cannot reach CoreDNS on the PPC system nodes, and Policy Workbench pods, such as, hubcontroller, will fail with DNS timeouts and enterCrashLoopBackOff.- In the Automated script-based installation, the
bootstrap.shscript sets this tag automatically using the cluster name provided. - In the Manual component-based installation, set
security_group_name = "<cluster-name>_SG"in theterraform.tfvarsfile of the02_eks_clustermodule.
For more information, refer to Manual component-based installation.
- In the Automated script-based installation, the
Required Tools
Ensure that the following tools are available on the jump box on which Policy Workbench is installed.
| Tool | Version | Description |
|---|---|---|
| OpenTofu | >=1.10.0 | Used to run the installer. |
| AWS CLI | Any version | Must be configured with credentials that have EKS and IAM permissions. The default region must also be set using either the AWS_DEFAULT_REGION or the AWS_REGION environment variables or the ~/.aws/config configuration file. |
| kubectl | Any version | Required for validating the deployment. It must be configured for the target PPC cluster where Policy Workbench is deployed. |
IAM Permissions
The following IAM permissions are automatically created by the OpenTofu script.
| Permission | Purpose |
|---|---|
iam:CreatePolicy / iam:DeletePolicy / iam:GetPolicy | Create and manage the AWS KMS access policy. |
iam:CreateRole / iam:DeleteRole / iam:GetRole / iam:UpdateAssumeRolePolicy | Create and manage the AWS KMS pod identity role. |
iam:AttachRolePolicy / iam:DetachRolePolicy | Attach the AWS KMS policy to the role. |
EKS Permissions
The following EKS permissions are automatically created by the OpenTofu script.
| Permission | Purpose |
|---|---|
eks:DescribeCluster | Read the cluster endpoint and the certificate authority data for the Helm provider in OpenTofu. The Helm provider requires this information to connect to the PPC. |
eks:DescribeAddon | Verify that the eks-podidentity-agent is installed. |
eks:CreatePodIdentityAssociation /eks:DeletePodIdentityAssociation /eks:DescribePodIdentityAssociation | Associate the AWS KMS role with the Policy Workbench service account. |
Configuring Credentials for the Policy Workbench
Perform the following steps to configure the credentials to access the Policy Workbench from the OCI registry.
Run the following command to create the configuration directory.
mkdir -p ~/.config/containersObtain the username and access token from the My.Protegrity portal. For more information about obtaining the credentials from the My.Protegrity portal, refer to the section Configuring Authentication for Protegrity AI Team Edition.
Generate base64 encoded string with padding for
username:accesstokenobtained from the My.Protegrity portal.Ensure that you specify the username and access token within single quotes when generating the base64 encoded value. For example,
'username:accesstoken'.Create a file named
~/.config/containers/auth.jsonwith the following content.
{
"auths": {
"registry.protegrity.com:9443": {
"auth": "<base64 generated string from step-3>"
}
}
}
Installing Policy Workbench when root module is not available
Install the Policy Workbench using the following commands:
- Run the following command to create the deployment directory.
# must install from an empty directory
mkdir policy-workbench && cd policy-workbench
- Create a root module with a single
main.tffile.
terraform {
required_version = "~> 1.10"
required_providers {
aws = {
source = "registry.opentofu.org/hashicorp/aws"
version = "~> 6.0"
}
kubernetes = {
source = "registry.opentofu.org/hashicorp/kubernetes"
version = "~> 2.35"
}
}
}
variable "cluster_name" {
type = string
description = "EKS cluster name."
nullable = false
validation {
condition = length(trimspace(var.cluster_name)) > 0
error_message = "cluster_name must be provided and cannot be empty."
}
}
variable "fips" {
type = bool
description = "Use FIPS Bottlerocket AMI for Karpenter nodes."
default = true
}
variable "ami_id" {
type = string
description = "Explicit AMI ID for Karpenter nodes. When set, overrides ami_family/fips-based AMI selection."
default = ""
}
data "aws_eks_cluster" "this" {
name = var.cluster_name
}
data "aws_eks_cluster_auth" "this" {
name = var.cluster_name
}
provider "kubernetes" {
host = data.aws_eks_cluster.this.endpoint
cluster_ca_certificate = base64decode(data.aws_eks_cluster.this.certificate_authority[0].data)
token = data.aws_eks_cluster_auth.this.token
}
module "policy_workbench" {
source = "oci://<Container_Registry_Path>/policy-workbench/opentofu/modules/policy-workbench/aws?tag=<version>"
cluster_name = var.cluster_name
oci_host = "<Container_Registry_Hostname>"
fips = var.fips
ami_id = var.ami_id
}
output "helm_install" {
value = module.policy_workbench.helm_install
}
In the main.tf file, specify the values of the following variables.
| Variable Name | Description | Value |
|---|---|---|
<Container_Registry_Path> | Location of the Protegrity Container Registry or the local registry where the policy-workbench OpenTofu module is published. |
|
<Container_Registry_Hostname> | OCI registry hostname used for oci_host. | registry.protegrity.com |
<version> | Tag version of the Protegrity Policy Manager, as specified in the product part number. Obtain the product part number from the Policy Manager Readme. | 1.12.0 |
Ensure that the credentials to install the Policy Workbench from the Protegrity Container Registry have been configured.
For more information about configuring the credentials, refer to the section Configuring Credentials for the Policy Workbench.
Run the following command to navigate to the deployment directory.
cd policy-workbenchRun the following commands to plan and install the Policy Workbench OpenTofu module.
# init, plan, and install
tofu init
tofu plan -var="cluster_name=<PPC-cluster-name>"
tofu apply -var="cluster_name=<PPC-cluster-name>"
To use a non-FIPS AMI, run the following tofu apply command:
tofu apply -var="cluster_name=<your-cluster-name>" -var="fips=false"
In this command, specify the value of the fips variable as false to use a non-FIPS AMI for Karpenter nodes.
To use a specific AMI, run the following tofu apply command:
tofu apply -var="cluster_name=<your-cluster-name>" -var="ami_id=<your AMI id>"
In this command, specify the value of the ami_id variable as the specific ID of the AMI for Karpenter nodes. If you specify this value, then it overrides the default FIPS-based AMI selection.
In the cluster_name field, specify the name of the PPC cluster that you have specified in step 1 while deploying the PPC.
For more information about deploying the PPC, refer to the section Deploying PPC.
OpenTofu prints the plan and prompts for confirmation. Enter yes to proceed. To skip the prompt, add the -auto-approve option to the commands.
- Run the following command to complete the installation of the Policy Workbench using Helm.
helm upgrade --install policy-workbench \
oci://<Container_Registry_Path>/policy-workbench/helm/policy-workbench \
--version <version> \
--namespace policy-workbench \
--create-namespace \
--values policy-workbench-values.yaml
In the command, specify the values of the following variables.
| Variable Name | Description | Value |
|---|---|---|
<Container_Registry_Path> | Location of the Protegrity Container Registry or the local registry where the policy-workbench OpenTofu module is published. |
|
<version> | Tag version of the Protegrity Policy Manager, as specified in the product part number. Obtain the product part number from the Policy Manager Readme. | 1.12.0 |
The OpenTofu module writes a policy-workbench-values.yaml file in your working directory with cloud-specific keystore settings. Pass it to Helm with the --values parameter.
Note: The
tofu output -raw helm_installcommand prints a ready-to-run Helm command with the correct version and namespace values already filled in.
Important: You need to pass the
<ami-id>in the command only if you are deploying the feature in regions other than us-east-1.
Option A (Recommended): Run the following AWS CLI command to retrieve the AMI ID dynamically.
aws ssm get-parameter \
--name /aws/service/bottlerocket/aws-k8s-1.34/x86_64/latest/image_id \
--region <region> \
--query "Parameter.Value" \
--output text
Alternatively, refer to these example AMI IDs.
Option B: The following table provides the list of AMI IDs.
| Region | AMI ID |
|---|---|
| ap-south-1 | ami-07959c05dcdb79a72 |
| eu-north-1 | ami-0268b0bfff0f25d31 |
| eu-west-3 | ami-0ea9454aef60045a2 |
| eu-west-2 | ami-0d5eee57a6a1398a3 |
| eu-west-1 | ami-00a8d14029b60a028 |
| ap-northeast-3 | ami-0e495c3ffd416c65e |
| ap-northeast-2 | ami-0fc18a24aec719c1c |
| ap-northeast-1 | ami-00ec85b83bf713aac |
| ca-central-1 | ami-03891f0d8b41eb296 |
| sa-east-1 | ami-0a30f044a5781b4e0 |
| ap-southeast-1 | ami-0ae51324bf2e89725 |
| ap-southeast-2 | ami-0ef7e8095b163dc42 |
| eu-central-1 | ami-00e36131a0343c374 |
| us-east-2 | ami-0e486911b2d0a5f7e |
| us-west-1 | ami-01183e1261529749e |
| us-west-2 | ami-04f850c412625dfe6 |
- Run the following command to view the pods created in the
policy-workbenchnamespace.
kubectl get pods -n policy-workbench
The following output appears.
NAME READY STATUS RESTARTS AGE
bootstrap-bffb4b5d9-v6ww4 1/1 Running 0 13m
cert-7b88dcd84-zx7cv 1/1 Running 0 13m
devops-75755d87d4-qw9n6 1/1 Running 0 13m
hubcontroller-0 1/1 Running 0 13m
kmgw-0 1/1 Running 0 13m
mbs-6b7dc765dd-brrfk 1/1 Running 0 13m
repository-0 1/1 Running 0 13m
rpproxy-79fc498d8-qp4fz 1/1 Running 0 13m
rpproxy-79fc498d8-s9k5p 1/1 Running 0 13m
rpproxy-79fc498d8-tbdtb 1/1 Running 0 13m
rps-8d79b7d98-svhdw 1/1 Running 0 13m
Installing Policy Workbench when root module is available
Install the Policy Workbench using the following commands:
- Add the
policy-workbenchOpenTofu module by adding the following code block to an existing root module.
module "policy_workbench" {
source = "oci://<Container_Registry_Path>/policy-workbench/opentofu/modules/policy-workbench/aws?tag=<version>"
cluster_name = "<PPC-cluster-name>"
oci_host = "<Container_Registry_Hostname>"
# fips = true # set to false for non-FIPS AMI
# ami_id = "<your AMI id>" # explicit AMI override
}
For more information about adding a module to an existing root module, refer to the section Module Blocks in the OpenTofu documentation.
In the root module, specify the values of the following variables.
| Variable Name | Description | Value |
|---|---|---|
<Container_Registry_Path> | Location of the Protegrity Container Registry or the local registry where the policy-workbench OpenTofu module is published. |
|
<Container_Registry_Hostname> | OCI registry hostname used for oci_host. | registry.protegrity.com |
<version> | Tag version of the Protegrity Policy Manager, as specified in the product part number. Obtain the product part number from the Policy Manager Readme. | 1.12.0 |
fips | Use FIPS Bottlerocket AMI for Karpenter nodes. | The default value is true. Set the value to false for non-FIPS. |
ami_id | Explicit AMI ID for Karpenter nodes. When this value is set, it overrides the ami_family or FIPS-based AMI selection. |
In the cluster_name field, specify the name of the PPC cluster that you have specified in step 1 while deploying the PPC.
For more information about deploying the PPC, refer to the section Deploying PPC.
- If the root module does not include the
hashicorp/awsprovider version>= 6.0andhashicorp/kubernetesprovider version>= 2.35, then add the following code block to theterraform {}block. Else navigate to the next step.
required_providers {
aws = {
source = "registry.opentofu.org/hashicorp/aws"
version = "~> 6.0"
}
kubernetes = {
source = "registry.opentofu.org/hashicorp/kubernetes"
version = "~> 2.35"
}
}
The kubernetes provider must be configured to connect to the target EKS cluster:
data "aws_eks_cluster" "this" {
name = "<PPC-cluster-name>"
}
data "aws_eks_cluster_auth" "this" {
name = "<PPC-cluster-name>"
}
provider "kubernetes" {
host = data.aws_eks_cluster.this.endpoint
cluster_ca_certificate = base64decode(data.aws_eks_cluster.this.certificate_authority[0].data)
token = data.aws_eks_cluster_auth.this.token
}
For more information about including the hashicorp/aws provider in the root module, refer to the OpenTofu Registry documentation.
For more information about including the hashicorp/kubernetes provider in the root module, refer to the OpenTofu Registry documentation.
Ensure that the credentials to install the Policy Workbench from the Protegrity Container Registry have been configured.
For more information about configuring the credentials, refer to the section Configuring Credentials for the Policy Workbench.
Navigate to the directory containing the root module.
Run the following commands to plan and install the Policy Workbench OpenTofu module.
# init, plan, and install
tofu init
tofu plan -var="cluster_name=<PPC-cluster-name>"
tofu apply -var="cluster_name=<PPC-cluster-name>"
OpenTofu prints the plan and prompts for confirmation. Enter yes to proceed. To skip the prompt, add the -auto-approve option to the commands.
In the cluster_name field, specify the name of the PPC cluster that you have specified in step 1 while deploying the PPC.
For more information about deploying the PPC, refer to the section Deploying PPC.
- Run the following command to complete the installation of the Policy Workbench using Helm.
helm upgrade --install policy-workbench \
oci://<Container_Registry_Path>/policy-workbench/helm/policy-workbench \
--version <version> \
--namespace policy-workbench \
--create-namespace \
--values policy-workbench-values.yaml
In the command, specify the values of the following variables.
| Variable Name | Description | Value |
|---|---|---|
<Container_Registry_Path> | Location of the Protegrity Container Registry or the local registry where the policy-workbench OpenTofu module is published. |
|
<version> | Tag version of the Protegrity Policy Manager, as specified in the product part number. Obtain the product part number from the Policy Manager Readme. | 1.12.0 |
The OpenTofu module writes a policy-workbench-values.yaml file in your working directory with cloud-specific keystore settings. Pass it to Helm with the --values parameter.
Note: The
tofu output -raw helm_installcommand prints a ready-to-run Helm command with the correct version and namespace values already filled in.
Important: You need to pass the
<ami-id>in the command only if you are deploying the feature in regions other than us-east-1.
Option A (Recommended): Run the following AWS CLI command to retrieve the AMI ID dynamically.
aws ssm get-parameter \
--name /aws/service/bottlerocket/aws-k8s-1.34/x86_64/latest/image_id \
--region <region> \
--query "Parameter.Value" \
--output text
Alternatively, refer to these example AMI IDs.
Option B: The following table provides the list of AMI IDs.
| Region | AMI ID |
|---|---|
| ap-south-1 | ami-07959c05dcdb79a72 |
| eu-north-1 | ami-0268b0bfff0f25d31 |
| eu-west-3 | ami-0ea9454aef60045a2 |
| eu-west-2 | ami-0d5eee57a6a1398a3 |
| eu-west-1 | ami-00a8d14029b60a028 |
| ap-northeast-3 | ami-0e495c3ffd416c65e |
| ap-northeast-2 | ami-0fc18a24aec719c1c |
| ap-northeast-1 | ami-00ec85b83bf713aac |
| ca-central-1 | ami-03891f0d8b41eb296 |
| sa-east-1 | ami-0a30f044a5781b4e0 |
| ap-southeast-1 | ami-0ae51324bf2e89725 |
| ap-southeast-2 | ami-0ef7e8095b163dc42 |
| eu-central-1 | ami-00e36131a0343c374 |
| us-east-2 | ami-0e486911b2d0a5f7e |
| us-west-1 | ami-01183e1261529749e |
| us-west-2 | ami-04f850c412625dfe6 |
- Run the following command to view the pods created in the
policy-workbenchnamespace.
kubectl get pods -n policy-workbench
The following output appears.
NAME READY STATUS RESTARTS AGE
bootstrap-bffb4b5d9-v6ww4 1/1 Running 0 13m
cert-7b88dcd84-zx7cv 1/1 Running 0 13m
devops-75755d87d4-qw9n6 1/1 Running 0 13m
hubcontroller-0 1/1 Running 0 13m
kmgw-0 1/1 Running 0 13m
mbs-6b7dc765dd-brrfk 1/1 Running 0 13m
repository-0 1/1 Running 0 13m
rpproxy-79fc498d8-qp4fz 1/1 Running 0 13m
rpproxy-79fc498d8-s9k5p 1/1 Running 0 13m
rpproxy-79fc498d8-tbdtb 1/1 Running 0 13m
rps-8d79b7d98-svhdw 1/1 Running 0 13m
Validating the deployment
Note: Before validating the deployment of the Policy Workbench, ensure that the
kubectlcontext is set to the target PPC cluster. Runkubectl config current-contextto verify the current context. Runkubectl config use-context <context-name>to switch the context.
After installation, validate the Policy Workbench deployment using the following steps. The desired outcome of these steps is to get a [] response from the datastores API call using a dedicated workbench user.
- Run the following command to retrieve the gateway host details.
export GW_HOST="$(kubectl get gateway pty-main -n api-gateway -o jsonpath='{.status.addresses[0].value}')"
- Run the following command to generate the JWT token.
TOKEN=$(curl -k -s "https://$GW_HOST/api/v1/auth/login/token" \
-X POST \
-H 'Content-Type: application/x-www-form-urlencoded' \
-d "loginname=admin" \
-d "password=Protegrity123!" \
-D - -o /dev/null 2>&1 \
| grep -i 'pty_access_jwt_token:' \
| sed 's/pty_access_jwt_token: //' \
| tr -d '\r') && echo "${TOKEN:0:10}"
- Create a workbench user using the following command. Due to separation of duties, the datastores API requires a user with workbench roles.
curl -sk -X POST "https://$GW_HOST/pty/v1/auth/users" \
-H "Authorization: Bearer $TOKEN" \
-H "Content-Type: application/json" \
-d '{
"username": "workbench",
"password": "<Password>",
"roles": [
"workbench_administrator"
]
}'
Note: The password policy requires a minimum of 14 characters, including at least one digit, one uppercase letter, one lowercase letter, and one special character.
The following output appears.
{"user_id":"397beecc-87bb-404e-85bb-f8a6d83984d6","username":"workbench"}
Use the JWT token generated in step 2.
- Ensure that the user with the
workbench_administratorroles has the following permissions:
- workbench_management_policy_write
- workbench_deployment_immutablepackage_export
- workbench_deployment_certificate_export
- cli_access
- can_create_token
To ensure the required permissions, run the following command:
curl -sk -X PUT "https://$GW_HOST/pty/v1/auth/roles" \
-H "Authorization: Bearer $TOKEN" \
-H "Content-Type: application/json" \
-d '{
"name": "workbench_administrator",
"permissions": [
"workbench_management_policy_write",
"workbench_deployment_immutablepackage_export",
"workbench_deployment_certificate_export",
"cli_access",
"can_create_token"
]
}'
The following output appears.
{"role_name":"workbench_administrator","status":"updated"}
For more information about the workbench_administrator permissions, refer to the section Workbench Roles and Permissions.
For more information about the cli_access and can_create_token permissions, refer to the section Roles and Permissions.
- Run the following command to get a token for the workbench user.
export TOKEN=$(curl -k -s https://$GW_HOST/pty/v1/auth/login/token \
-X POST \
-H 'Content-Type: application/x-www-form-urlencoded' \
-d 'loginname=workbench' \
-d 'password=<Password>' \
-D - -o /dev/null 2>&1 | grep -i 'pty_access_jwt_token:' | sed 's/pty_access_jwt_token: //' | tr -d '\r')
- Run the Policy Management REST API to get datastores. Use the JWT token generated in step 4.
curl -k -v https://$GW_HOST/pty/v2/pim/datastores -H "Authorization: Bearer $TOKEN"
The expected output is []. This indicates that the Policy Workbench is initialized but the datastore is not yet created.
Post-Installation steps
After installing PPW, rotate the certificates to ensure that the certificates on the PPW and PPC are sychronized.
Perform the following steps to rotate the certificates.
- Run the following command to rotate all the certificates.
# Renew all certificates using eclipse-issuer
kubectl get certificates --all-namespaces -o json | \
jq -r '.items[] | select(.spec.issuerRef.name=="eclipse-issuer") | "\(.metadata.namespace) \(.metadata.name)"' | \
while read -r ns cert_name; do
echo "Renewing certificate: $cert_name in namespace: $ns"
cmctl renew "$cert_name" -n "$ns"
done
- Run the following command to verify that the certificates have been rotated.
kubectl get certificates --all-namespaces
The following output appears.
NAMESPACE NAME READY SECRET AGE
api-gateway ingress-certificate-secret True ingress-certificate-secret 5h46m
cert-manager eclipse-ca True eclipse-ca 5h46m
policy-workbench bootstrap-certificate True bootstrap-certificate-secret 17m
policy-workbench cert-certificate True cert-certificate-secret 17m
policy-workbench devops-certificate True devops-certificate-secret 17m
policy-workbench hubcontroller-certificate True hubcontroller-certificate-secret 17m
policy-workbench kmgw-certificate True kmgw-certificate-secret 17m
policy-workbench mbs-certificate True mbs-certificate-secret 17m
policy-workbench protector-certificate True protector-certificate-secret 17m
policy-workbench pty-main-backend-client-cert True pty-main-backend-client-certificate 17m
policy-workbench repository-certificate True repository-certificate-secret 17m
policy-workbench rpproxy-certificate True rpproxy-certificate-secret 17m
policy-workbench rps-certificate True rps-certificate-secret 17m
pty-insight hubcontoller-client-secret True hubcontoller-client-secret 5h46m
pty-insight tls-for-insight True tls-for-insight-key-pair 5h46m
pty-loginui ingress-certificate-secret True ingress-certificate-secret 5h46m
The Ready column displays the value True for all the certificates indicating that they have been rotated.
4.1.1.2 - Installing Policy Workbench on PPC in Azure Kubernetes Service (AKS)
Before installing Policy Workbench, ensure that the prerequisites are met. For more information about the prerequisites, refer to the section Prerequisites.
To install Policy Workbench on PPC in AKS, first provision the Azure resources using the policy-workbench OpenTofu module and then deploy the Policy Workbench using Helm. The policy-workbench OpenTofu module is published to OCI and must be consumed from a root module. A root module is the working directory for executing the OpenTofu commands.
For more information about OpenTofu modules and the root module, refer to the section Modules in the OpenTofu documentation.
The Policy Workbench is installed depending on one of the following scenarios:
- Root module is not available.
- Root module is available.
Prerequisites
Ensure that the jumpbox can connect to the required registries. If not already authenticated, then log in to the required registry.
- For connecting and deploying from the Protegrity Container Registry (PCR), use the following command and the credentials obtained from the My.Protegrity portal during account creation:
helm registry login registry.protegrity.com:9443
- For connecting and deploying to the local registry, use your local credentials and local registry endpoint as required.
Ensure that the PPC Cluster is installed and accessible, before installing Policy Workbench on PPC.
For more information about installing PPC, refer to the section Installing PPC.
Required Tools
Ensure that the following tools are available on the jump box on which Policy Workbench is installed.
| Tool | Version | Description |
|---|---|---|
| OpenTofu | >=1.10.0 | Used to run the installer. |
| Azure CLI | Any version | Must be logged in (az login) with permissions to create Managed Identities and assign Key Vault or Managed HSM roles. |
| kubectl | Any version | Required for validating the deployment. It must be configured for the target PPC cluster where Policy Workbench is deployed. |
Azure Permissions
The following Azure permissions are automatically created by the OpenTofu script.
| Permission | Purpose |
|---|---|
Microsoft.ManagedIdentity/userAssignedIdentities/write | Create the managed identity. |
Microsoft.ManagedIdentity/userAssignedIdentities/federatedIdentityCredentials/write | Create the federated identity credential. |
Microsoft.KeyVault/vaults/read | Read the key vault properties. |
Microsoft.Authorization/roleAssignments/write | Assign the Key Vault Crypto Officer role on the key vault. |
Microsoft.KeyVault/managedHSMs/read | Read the managed HSM properties. |
HSM local RBAC: Microsoft.KeyVault/managedHsm/roleAssignments/write | Assign the Crypto User role on the HSM. |
Configuring Credentials for the Policy Workbench
Perform the following steps to configure the credentials to access the Policy Workbench from the OCI registry.
Run the following command to create the configuration directory.
mkdir -p ~/.config/containersObtain the username and access token from the My.Protegrity portal. For more information about obtaining the credentials from the My.Protegrity portal, refer to the section Configuring Authentication for Protegrity AI Team Edition.
Generate base64 encoded string with padding for
username:accesstokenobtained from the My.Protegrity portal.Ensure that you specify the username and access token within single quotes when generating the base64 encoded value. For example,
'username:accesstoken'.Create a file named
~/.config/containers/auth.jsonwith the following content.
{
"auths": {
"registry.protegrity.com:9443": {
"auth": "<base64 generated string from step-3>"
}
}
}
Installing Policy Workbench when root module is not available
Install the Policy Workbench using the following commands:
- Run the following command to create the deployment directory.
# must install from an empty directory
mkdir policy-workbench && cd policy-workbench
- Create a root module with a single
main.tffile.
terraform {
required_version = "~> 1.10"
required_providers {
azurerm = {
source = "registry.opentofu.org/hashicorp/azurerm"
version = "~> 4.20"
}
kubernetes = {
source = "registry.opentofu.org/hashicorp/kubernetes"
version = "~> 2.35"
}
}
}
provider "azurerm" {
features {}
resource_provider_registrations = "none"
}
data "azurerm_kubernetes_cluster" "this" {
name = var.cluster_name
resource_group_name = var.resource_group_name
}
provider "kubernetes" {
host = data.azurerm_kubernetes_cluster.this.kube_config[0].host
client_certificate = base64decode(data.azurerm_kubernetes_cluster.this.kube_config[0].client_certificate)
client_key = base64decode(data.azurerm_kubernetes_cluster.this.kube_config[0].client_key)
cluster_ca_certificate = base64decode(data.azurerm_kubernetes_cluster.this.kube_config[0].cluster_ca_certificate)
}
module "policy_workbench" {
source = "oci://<Container_Registry_Path>/policy-workbench/opentofu/modules/policy-workbench/azure?tag=<version>"
cluster_name = var.cluster_name
oci_host = "<Container_Registry_Hostname>"
resource_group_name = var.resource_group_name
azure_keystore = {
type = "key_vault"
name = var.key_vault_name
resource_group_name = var.key_vault_resource_group_name
}
fips = var.fips
instance_types = var.instance_types
}
variable "cluster_name" { type = string }
variable "resource_group_name" { type = string }
variable "key_vault_name" { type = string }
variable "key_vault_resource_group_name" {
type = string
default = ""
}
variable "fips" {
type = bool
description = "Use FIPS-enabled nodes for Karpenter. Set to false for non-FIPS."
default = true
}
variable "instance_types" {
type = list(string)
default = ["Standard_D8as_v5"]
}
output "helm_install" {
value = module.policy_workbench.helm_install
}
To use an existing Managed HSM instead of a Standard or Premium Key Vault, replace the keystore block in the main.tf file with the following code block:
azure_keystore = {
type = "managed_hsm"
name = "<managed-hsm-name>"
resource_group_name = "<hsm-resource-group>" # omit if same as resource_group_name
}
In the main.tf file, specify the values of the following parameters.
| Parameter Name | Description | Value |
|---|---|---|
<Container_Registry_Path> | Location of the Protegrity Container Registry or the local registry where the policy-workbench OpenTofu module is published. |
|
<Container_Registry_Hostname> | OCI registry hostname used for oci_host. | registry.protegrity.com |
<version> | Tag version of the Protegrity Policy Manager, as specified in the product part number. Obtain the product part number from the Policy Manager Readme. | 1.12.0 |
azure_keystore.type | Type of keystore used. | Specify one of the following values:
For more information about the Azure Key Vault, refer to the section About Azure Key Vault in the Azure documentation. For more information about the Azure Key Vault Managed HSM, refer to the section What is Azure Key Vault Managed HSM? in the Azure documentation. Note: Protegrity supports only software-protected keys for the Premium Key Vault. Protegrity does not support HSM-protected keys for the Premium Vault. For more information about software-protected and HSM-protected keys, refer to the Azure documentation. Important: You cannot migrate among the Standard Key Vault, Premium Key Vault, and Managed HSM. |
azure_keystore.name | Name of the existing Standard or Premium Key Vault or Managed HSM. | Specify one of the following values:
|
azure_keystore.resource_group_name | Resource group of the Standard or Premium Key Vault or Managed HSM. | Specify one of the following values:
|
Ensure that the credentials to install the Policy Workbench from the Protegrity Container Registry have been configured.
For more information about configuring the credentials, refer to the section Configuring Credentials for the Policy Workbench.
Run the following command to plan and install the Policy Workbench OpenTofu module.
# init, plan, and install
tofu init
tofu plan \
-var="cluster_name=<PPC-cluster-name>" \
-var="resource_group_name=<aks-resource-group-name>" \
-var="key_vault_name=<key-vault-name>"
tofu apply \
-var="cluster_name=<PPC-cluster-name>" \
-var="resource_group_name=<aks-resource-group-name>" \
-var="key_vault_name=<key-vault-name>"
If the Key Vault is in a different resource group, include the following variable:
-var="key_vault_resource_group_name=<key-vault-resource-group-name>"
To override the default Karpenter instance type, include the following variable:
-var='instance_types=["<Instance_type>"]'
To override the default FIPS-enabled mode, include the following variable:
-var='fips=["false"]'
In the command, specify the values of the following variables.
| Variable Name | Description | Value | Required |
|---|---|---|---|
cluster_name | Name of the PPC cluster that you have specified in step 1 while deploying the PPC in AKS. For more information about deploying the PPC, refer to the section Deploying PPC. | Required | |
resource_group_name | Resource group for the managed identity. | Required | |
key_vault_name | Name of the Standard or Premium Key Vault. | Required | |
fips | Use FIPS-enabled nodes for Karpenter. | The default value is set to true. Set to false for non-FIPS. | Not required |
instance_types | VM instance types for the Karpenter NodePool. Must be allowed by Azure Policy. | The default value is ["Standard_D8as_v5"]. Specify another value to override the default value. | Not required |
key_vault_resource_group_name | Resource group of the Standard or Premium Key Vault. | The default value is the same as the value of the resource_group_name parameter. Specify this value only if the resource group of the Key Vault is different from the value of the resource_group_name parameter. | Not required |
OpenTofu prints the plan and prompts for confirmation. Enter yes to proceed. To skip the prompt, add the -auto-approve option to the commands.
- Run the following command to complete the installation of the Policy Workbench using Helm.
helm upgrade --install policy-workbench \
oci://<Container_Registry_Path>/policy-workbench/helm/policy-workbench \
--version <version> \
--namespace policy-workbench \
--create-namespace \
--values policy-workbench-values.yaml
In the command, specify the values of the following variables.
| Variable Name | Description | Value |
|---|---|---|
<Container_Registry_Path> | Location of the Protegrity Container Registry or the local registry where the policy-workbench OpenTofu module is published. |
|
<version> | Tag version of the Protegrity Policy Manager, as specified in the product part number. Obtain the product part number from the Policy Manager Readme. | 1.12.0 |
The OpenTofu module writes a policy-workbench-values.yaml file in your working directory with cloud-specific keystore settings. Pass it to Helm with the --values parameter.
Note: The
tofu output -raw helm_installcommand prints a ready-to-run Helm command with the correct version and namespace values already filled in.
- Run the following command to view the pods created in the
policy-workbenchnamespace.
kubectl get pods -n policy-workbench
Installing Policy Workbench when root module is available
Install the Policy Workbench using the following commands:
- Add the
policy-workbenchOpenTofu module by adding the following code block to an existing root module.
module "policy_workbench" {
source = "oci://<Container_Registry_Path>/policy-workbench/opentofu/modules/policy-workbench/azure?tag=<version>"
cluster_name = "<PPC-cluster-name>"
oci_host = "<Container_Registry_Hostname>"
resource_group_name = "<resource-group>"
azure_keystore = {
type = "key_vault"
name = "<key-vault-name>"
resource_group_name = "<key-vault-resource-group>" # omit if same as resource_group_name
}
# fips = true # set to false for non-FIPS nodes
# instance_types = ["Standard_D8as_v5"]
}
To use an existing Managed HSM instead of a Standard or Premium Key Vault, replace the keystore block in the main.tf file with the following code block:
azure_keystore = {
type = "managed_hsm"
name = "<managed-hsm-name>"
resource_group_name = "<hsm-resource-group>" # omit if same as resource_group_name
}
For more information about adding a module to an existing root module, refer to the section Module Blocks in the OpenTofu documentation.
In the main.tf file, specify the values of the following parameters.
| Parameter Name | Description | Value |
|---|---|---|
<Container_Registry_Path> | Location of the Protegrity Container Registry or the local registry where the policy-workbench OpenTofu module is published. |
|
<Container_Registry_Hostname> | OCI registry hostname used for oci_host. | registry.protegrity.com |
<version> | Tag version of the Protegrity Policy Manager, as specified in the product part number. Obtain the product part number from the Policy Manager Readme. | 1.12.0 |
azure_keystore.type | Type of keystore used. | Specify one of the following values:
For more information about the Azure Key Vault, refer to the section About Azure Key Vault in the Azure documentation. For more information about the Azure Key Vault Managed HSM, refer to the section What is Azure Key Vault Managed HSM? in the Azure documentation. Note: Protegrity supports only software-protected keys for the Premium Key Vault. Protegrity does not support HSM-protected keys for the Premium Vault. For more information about software-protected and HSM-protected keys, refer to the Azure documentation. Important: You cannot migrate among the Standard Key Vault, Premium Key Vault, and Managed HSM. |
azure_keystore.name | Name of the existing Standard or Premium Key Vault or Managed HSM. | Specify one of the following values:
|
azure_keystore.resource_group_name | Resource group of the Standard or Premium Key Vault or Managed HSM. | Specify one of the following values:
|
- If the root module does not include the
hashicorp/azurermprovider version>= 4.20andhashicorp/kubernetesprovider version>= 2.35, then add the following code block to theterraform {}block. Else navigate to the next step.
required_providers {
azurerm = {
source = "registry.opentofu.org/hashicorp/azurerm"
version = ">= 4.20"
}
kubernetes = {
source = "registry.opentofu.org/hashicorp/kubernetes"
version = ">= 2.35"
}
}
- If the root module does not configure the Azure provider with
resource_provider_registrations = "none", add the following code block to avoid requiring subscription-level registration permissions.
provider "azurerm" {
features {}
resource_provider_registrations = "none"
}
- If the root module does not configure the Kubernetes provider for the target AKS cluster, add the following code block.
data "azurerm_kubernetes_cluster" "this" {
name = "<PPC-cluster-name>"
resource_group_name = "<aks-resource-group-name>"
}
provider "kubernetes" {
host = data.azurerm_kubernetes_cluster.this.kube_config[0].host
client_certificate = base64decode(data.azurerm_kubernetes_cluster.this.kube_config[0].client_certificate)
client_key = base64decode(data.azurerm_kubernetes_cluster.this.kube_config[0].client_key)
cluster_ca_certificate = base64decode(data.azurerm_kubernetes_cluster.this.kube_config[0].cluster_ca_certificate)
}
Ensure that the credentials to install the Policy Workbench from the Protegrity Container Registry have been configured.
For more information about configuring the credentials, refer to the section Configuring Credentials for the Policy Workbench.
Navigate to the directory containing the root module.
Run the following commands to plan and install the Policy Workbench OpenTofu module.
# init, plan, and install
tofu init
tofu plan \
-var="cluster_name=<PPC-cluster-name>" \
-var="resource_group_name=<aks-resource-group-name>" \
-var="key_vault_name=<key-vault-name>"
tofu apply \
-var="cluster_name=<PPC-cluster-name>" \
-var="resource_group_name=<aks-resource-group-name>" \
-var="key_vault_name=<key-vault-name>"
If the Key Vault is in a different resource group, include the following variable:
-var="key_vault_resource_group_name=<key-vault-resource-group-name>"
To override the default Karpenter instance type, include the following variable:
-var='instance_types=["<Instance_type>"]'
To override the default FIPS-enabled mode, include the following variable:
-var='fips=["false"]'
In the command, specify the values of the following variables.
| Variable Name | Description | Value | Required |
|---|---|---|---|
cluster_name | Name of the PPC cluster that you have specified in step 1 while deploying the PPC in AKS. For more information about deploying the PPC, refer to the section Deploying PPC. | Required | |
resource_group_name | Resource group for the managed identity. | Required | |
key_vault_name | Name of the Standard or Premium Key Vault. | Required | |
fips | Use FIPS-enabled nodes for Karpenter. | The default value is set to true. Set to false for non-FIPS. | Not required |
instance_types | VM instance types for the Karpenter NodePool. Must be allowed by Azure Policy. | The default value is ["Standard_D8as_v5"]. Specify another value to override the default value. | Not required |
key_vault_resource_group_name | Resource group of the Standard or Premium Key Vault. | The default value is the same as the value of the resource_group_name parameter. Specify this value only if the resource group of the Key Vault is different from the value of the resource_group_name parameter. | Not required |
OpenTofu prints the plan and prompts for confirmation. Enter yes to proceed. To skip the prompt, add the -auto-approve option to the commands.
In the cluster_name field, specify the name of the PPC cluster that you have specified in step 1 while deploying the PPC.
For more information about deploying the PPC, refer to the section Deploying PPC.
- Run the following command to complete the installation of the Policy Workbench using Helm.
helm upgrade --install policy-workbench \
oci://<Container_Registry_Path>/policy-workbench/helm/policy-workbench \
--version <version> \
--namespace policy-workbench \
--create-namespace \
--values policy-workbench-values.yaml
In the command, specify the values of the following variables.
| Variable Name | Description | Value |
|---|---|---|
<Container_Registry_Path> | Location of the Protegrity Container Registry or the local registry where the policy-workbench OpenTofu module is published. |
|
<version> | Tag version of the Protegrity Policy Manager, as specified in the product part number. Obtain the product part number from the Policy Manager Readme. | 1.12.0 |
The OpenTofu module writes a policy-workbench-values.yaml file in your working directory with cloud-specific keystore settings. Pass it to Helm with the --values parameter.
Note: The
tofu output -raw helm_installcommand prints a ready-to-run Helm command with the correct version and namespace values already filled in.
- Run the following command to view the pods created in the
policy-workbenchnamespace.
kubectl get pods -n policy-workbench
Validating the deployment
Note: Before validating the deployment of the Policy Workbench, ensure that the
kubectlcontext is set to the target PPC cluster. Runkubectl config current-contextto verify the current context. Runkubectl config use-context <context-name>to switch the context.
After installation, validate the Policy Workbench deployment using the following steps. The desired outcome of these steps is to get a [] response from the datastores API call using a dedicated workbench user.
- Run the following commands to retrieve the gateway host details and generate an admin JWT token.
export GW_HOST="$(kubectl get gateway pty-main -n api-gateway -o jsonpath='{.status.addresses[0].value}')"
TOKEN=$(curl -k -s https://$GW_HOST/pty/v1/auth/login/token \
-X POST \
-H 'Content-Type: application/x-www-form-urlencoded' \
-d 'loginname=admin' \
-d 'password=Protegrity123!' \
-D - -o /dev/null 2>&1 | grep -i 'pty_access_jwt_token:' | sed 's/pty_access_jwt_token: //' | tr -d '\r') && echo "${TOKEN:0:10}"
- Create a workbench user using the following command. Due to separation of duties, the datastores API requires a user with workbench roles.
curl -sk -X POST "https://$GW_HOST/pty/v1/auth/users" \
-H "Authorization: Bearer $TOKEN" \
-H "Content-Type: application/json" \
-d '{
"username": "workbench",
"password": "<Password>",
"roles": [
"workbench_administrator",
"security_administrator"
]
}'
Note: The password policy requires a minimum of 14 characters, including at least one digit, one uppercase letter, one lowercase letter, and one special character.
- Run the following command to get a token for the workbench user.
export TOKEN=$(curl -k -s https://$GW_HOST/pty/v1/auth/login/token \
-X POST \
-H 'Content-Type: application/x-www-form-urlencoded' \
-d 'loginname=workbench' \
-d 'password=<Password>' \
-D - -o /dev/null 2>&1 | grep -i 'pty_access_jwt_token:' | sed 's/pty_access_jwt_token: //' | tr -d '\r')
- Run the Policy Management REST API to get datastores.
curl -k -v https://$GW_HOST/pty/v2/pim/datastores \
-H "Authorization: Bearer $TOKEN"
The expected output is []. This indicates that the Policy Workbench is initialized but the datastore is not yet created.
For more information about the workbench_administrator permissions, refer to the section Workbench Roles and Permissions.
Post-Installation steps
After installing PPW, rotate the certificates to ensure that the certificates on the PPW and PPC are sychronized.
Perform the following steps to rotate the certificates.
- Run the following command to rotate all the certificates.
# Renew all certificates using eclipse-issuer
kubectl get certificates --all-namespaces -o json | \
jq -r '.items[] | select(.spec.issuerRef.name=="eclipse-issuer") | "\(.metadata.namespace) \(.metadata.name)"' | \
while read -r ns cert_name; do
echo "Renewing certificate: $cert_name in namespace: $ns"
cmctl renew "$cert_name" -n "$ns"
done
- Run the following command to verify that the certificates have been rotated.
kubectl get certificates --all-namespaces
The following output appears.
NAMESPACE NAME READY SECRET AGE
api-gateway ingress-certificate-secret True ingress-certificate-secret 5h46m
cert-manager eclipse-ca True eclipse-ca 5h46m
policy-workbench bootstrap-certificate True bootstrap-certificate-secret 17m
policy-workbench cert-certificate True cert-certificate-secret 17m
policy-workbench devops-certificate True devops-certificate-secret 17m
policy-workbench hubcontroller-certificate True hubcontroller-certificate-secret 17m
policy-workbench kmgw-certificate True kmgw-certificate-secret 17m
policy-workbench mbs-certificate True mbs-certificate-secret 17m
policy-workbench protector-certificate True protector-certificate-secret 17m
policy-workbench pty-main-backend-client-cert True pty-main-backend-client-certificate 17m
policy-workbench repository-certificate True repository-certificate-secret 17m
policy-workbench rpproxy-certificate True rpproxy-certificate-secret 17m
policy-workbench rps-certificate True rps-certificate-secret 17m
pty-insight hubcontoller-client-secret True hubcontoller-client-secret 5h46m
pty-insight tls-for-insight True tls-for-insight-key-pair 5h46m
pty-loginui ingress-certificate-secret True ingress-certificate-secret 5h46m
The Ready column displays the value True for all the certificates indicating that they have been rotated.
4.1.2 - Uninstalling the Protegrity Policy Manager
To uninstall the deployment:
- Run the following command to uninstall the Policy Workbench.
helm uninstall policy-workbench -n policy-workbench
- Run the following command to clean up the AWS resources.
tofu destroy -var='cluster_name=<PPC cluster name>'
4.1.3 - Backing up the Policy Workbench
The Policy Workbench supports daily scheduled backups and manual backups using Velero. This section describes the backup procedures for AWS and Azure deployments.
4.1.3.1 - Backing up the Policy Workbench for AWS
By default, the Policy Workbench data is backed up on a daily basis using a scheduled backup, after the Policy Workbench has been installed. The backed-up data includes the Kubernetes object state and the persistent volume data. The backed-up data is automatically stored in the encrypted AWS S3 bucket that you created when you deployed PPC.
For more information about the AWS S3 bucket, refer to the section Creating AWS KMS Key and S3 Bucket.
You can also choose to manually back up the data to the AWS S3 bucket using Velero.
Important: Before you manually back up the data, ensure that Velero CLI version 1.18 or later is installed.
To manually back up the data:
Run the following command on the jump box.
velero backup create --from-schedule workbench-backup-schedule -n <Namespace where data is backed up>For example:
velero backup create --from-schedule workbench-backup-schedule -n pty-backup-recoveryThe following output appears.
INFO[0001] No Schedule.template.metadata.labels set - using Schedule.labels for backup object backup=pty-backup-recovery/workbench-backup-schedule-20260331094735 labels="map[app.kubernetes.io/managed-by:Helm deployment:policy-workbench]" Creating backup from schedule, all other filters are ignored. Backup request "workbench-backup-schedule-20260331094735" submitted successfully. Run `velero backup describe workbench-backup-schedule-20260331094735` or `velero backup logs workbench-backup-schedule-20260331094735` for more details.For more information about the
velero backupcommand, refer to the section Backup Reference in the Velero documentation.Run the following commands to monitor the backup status.
Run the following command to retrieve the list of existing backups.
velero backup get -n pty-backup-recoveryThe following output appears.
NAME STATUS ERRORS WARNINGS CREATED EXPIRES STORAGE LOCATION SELECTOR authnz-postgresql-schedule-backup-20260331093017 Completed 0 0 2026-03-31 09:30:18 +0000 UTC 59d default app.kubernetes.io/persistence=enabled workbench-backup-schedule-20260331094735 WaitingForPluginOperations 0 0 2026-03-31 09:47:38 +0000 UTC 59d default <none> workbench-backup-schedule-20260331094704 WaitingForPluginOperations 0 0 2026-03-31 09:47:04 +0000 UTC 59dRun the following command to obtain details of a specific backup.
velero backup describe <backup-name> -n pty-backup-recoveryThe following code block shows a snippet of the output.
Name: workbench-backup-schedule-20260331094735 Namespace: pty-backup-recovery Labels: app.kubernetes.io/managed-by=Helm deployment=policy-workbench velero.io/schedule-name=workbench-backup-schedule velero.io/storage-location=default Annotations: meta.helm.sh/release-name=policy-workbench meta.helm.sh/release-namespace=policy-workbench velero.io/resource-timeout=10m0s velero.io/source-cluster-k8s-gitversion=v1.35.2-eks-f69f56f velero.io/source-cluster-k8s-major-version=1 velero.io/source-cluster-k8s-minor-version=35 Phase: WaitingForPluginOperationsRun the following command to obtain the log details for a specific backup.
velero backup logs <backup-name> -n pty-backup-recoveryThe following code block shows a snippet of the output.
time="2026-03-31T09:47:38Z" level=info msg="Setting up backup temp file" backup=pty-backup-recovery/workbench-backup-schedule-20260331094735 logSource="pkg/controller/backup_controller.go:690" time="2026-03-31T09:47:38Z" level=info msg="Setting up plugin manager" backup=pty-backup-recovery/workbench-backup-schedule-20260331094735 logSource="pkg/controller/backup_controller.go:697" time="2026-03-31T09:47:38Z" level=info msg="Getting backup item actions" backup=pty-backup-recovery/workbench-backup-schedule-20260331094735 logSource="pkg/controller/backup_controller.go:701"
4.1.3.2 - Backing up the Policy Workbench for Azure
By default, the Policy Workbench data is backed up on a daily basis using a scheduled backup, after the Policy Workbench has been installed. The backed-up data includes the Kubernetes object state and the persistent volume data. The backed-up data is automatically stored in the encrypted Azure Blob Storage container that you created when you deployed PPC.
For more information about the Azure Blob Storage container, refer to the section Creating a Storage Account in Azure.
You can also choose to manually back up the data to the Azure Blob Storage container using Velero.
Important: Before you manually back up the data, ensure that Velero CLI version 1.18 or later is installed.
To manually back up the data:
Run the following command on the jump box.
velero backup create --from-schedule workbench-backup-schedule -n <Namespace where data is backed up>For example:
velero backup create --from-schedule workbench-backup-schedule -n pty-backup-recoveryThe following output appears.
INFO[0000] No Schedule.template.metadata.labels set - using Schedule.labels for backup object backup=pty-backup-recovery/workbench-backup-schedule-20260702112543 labels="map[app.kubernetes.io/managed-by:Helm deployment:policy-workbench]" Creating backup from schedule, all other filters are ignored. Backup request "workbench-backup-schedule-20260702112543" submitted successfully. Run `velero backup describe workbench-backup-schedule-20260702112543` or `velero backup logs workbench-backup-schedule-20260702112543` for more details.For more information about the
velero backupcommand, refer to the section Backup Reference in the Velero documentation.Run the following commands to monitor the backup status.
Run the following command to retrieve the list of existing backups.
velero backup get -n pty-backup-recoveryThe following output appears.
NAME STATUS ERRORS WARNINGS CREATED EXPIRES STORAGE LOCATION SELECTOR workbench-backup-schedule-20260702112543 InProgress 0 0 2026-07-02 11:25:43 +0000 UTC 59d default <none>Run the following command to obtain details of a specific backup.
velero backup describe <backup-name> -n pty-backup-recoveryThe following code block shows a snippet of the output.
Name: workbench-backup-schedule-20260702112543 Namespace: pty-backup-recovery Labels: app.kubernetes.io/managed-by=Helm deployment=policy-workbench velero.io/schedule-name=workbench-backup-schedule velero.io/storage-location=default Annotations: meta.helm.sh/release-name=policy-workbench meta.helm.sh/release-namespace=policy-workbench velero.io/resource-timeout=10m0s velero.io/source-cluster-k8s-gitversion=v1.35.5 velero.io/source-cluster-k8s-major-version=1 velero.io/source-cluster-k8s-minor-version=35 Phase: InProgressRun the following command to obtain the log details for a specific backup.
velero backup logs <backup-name> -n pty-backup-recoveryThe following code block shows a snippet of the output.
time="2026-03-31T09:47:38Z" level=info msg="Setting up backup temp file" backup=pty-backup-recovery/workbench-backup-schedule-20260702112543 logSource="pkg/controller/backup_controller.go:690" time="2026-03-31T09:47:38Z" level=info msg="Setting up plugin manager" backup=pty-backup-recovery/workbench-backup-schedule-20260702112543 logSource="pkg/controller/backup_controller.go:697" time="2026-03-31T09:47:38Z" level=info msg="Getting backup item actions" backup=pty-backup-recovery/workbench-backup-schedule-20260702112543 logSource="pkg/controller/backup_controller.go:701"Note: Verify that the log output contains no entries with
level=error. Entries withlevel=warningare acceptable and do not indicate a backup failure.
Validating the backup
- Run the following command to validate the backup status.The following output appears.
velero backup get -n pty-backup-recoveryNAME STATUS ERRORS WARNINGS CREATED EXPIRES STORAGE LOCATION SELECTOR workbench-backup-schedule-20260702112543 Completed 0 0 2026-07-02 11:25:43 +0000 UTC 59d default <none>
4.1.4 - Restoring the Policy Workbench
The Policy Workbench supports restoring data from daily scheduled backups or manual backups created using Velero. This section describes how to restore the Policy Workbench from a backup on AWS and Azure deployments.
4.1.4.1 - Restoring the Policy Workbench for AWS
Before you begin
Before starting a restore, ensure that the following prerequisites are met:
An existing backup is available. Backups are taken automatically as part of the default installation of the Policy Workbench using scheduled backup mechanisms. The backups are available in the encrypted AWS S3 bucket that you created when you deployed PPC. You can also manually back up the data.
For more information about the AWS S3 bucket, refer to the section Creating AWS KMS Key and S3 Bucket.
For more information about manually backing up the data, refer to the section Backing up the Policy Workbench for AWS.
A restored PPC cluster is available. The Policy Workbench is restored on a restored PPC cluster. For information about restoring the PPC, refer to the section Restoring the PPC for AWS.
Note: You can restore the Policy Workbench without first restoring the PPC if only the Policy Workbench is corrupted.
Important: Before you restore the data, ensure that Velero CLI version 1.18 or later is installed.
Restore the Policy Workbench data
To restore the data:
Ensure that the
main.tffile in the root module, which is the working directory for executing the OpenTofu commands, contains the following code block. If the root module is not available, create a root module with themain.tffile.module "policy_workbench" { source = "oci://<Container_Registry_Path>/policy-workbench/opentofu/modules/policy-workbench/<cloud>?tag=<version>" cluster_name = var.cluster_name } variable "cluster_name" { type = string description = "EKS cluster name." nullable = false validation { condition = length(trimspace(var.cluster_name)) > 0 error_message = "cluster_name must be provided and cannot be empty." } }This code block adds the Policy Workbench OpenTofu module.
Run the following commands on the jump box.
Note: You do not need to run these commands if you only uninstall PPW and delete the namespace. These commands are required if you destroy the PPW cluster using
tofu destroy. They are also required if you are restoring to a new PPC cluster where PPW was not previously installed.tofu init tofu plan -var="cluster_name=<Restored-PPC-cluster-name>" tofu apply -var="cluster_name=<Restored-PPC-cluster-name>"Specify the name of the restored PPC cluster as the value of the
cluster_namevariable.For information about restoring the PPC, refer to the section Restoring the PPC for AWS.
Run the following command on the jump box.
velero restore create workbench-restore-$(date +%Y%m%d-%H%M%S) \ --from-backup <backup-name> \ -n pty-backup-recovery --waitFor example:
velero restore create workbench-restore-$(date +%Y%m%d-%H%M%S) \ --from-backup workbench-backup-schedule-20260331094735 \ -n pty-backup-recovery --waitFor more information about the
velero restorecommand, refer to the section Restore Reference in the Velero documentation.Run the following command to list all the restore operations in the specific namespace.
velero restore get -n pty-backup-recoveryEnsure that the status of the restore operation is
WaitingForPluginOperations.Run the following command to annotate the Kubernetes resources.
kubectl annotate productconfiguration workbench -n pty-admin kopf.zalando.org/last-handled-configuration- --overwriteThe following output appears if the annotation is added successfully.
productconfiguration.pty.com/workbench annotatedRun the following commands to monitor the restore status.
Run the following command to retrieve the list of existing restores.
velero restore get -n pty-backup-recoveryRun the following command to obtain details of a specific restore.
velero restore describe workbench-restore-<timestamp> -n pty-backup-recoveryRun the following command to obtain the log details for a specific restore.
velero restore logs workbench-restore-<timestamp> -n pty-backup-recoveryNote: Verify that the log output contains no entries with
level=error. Entries withlevel=warningare acceptable and do not indicate a restore failure.
Uninstall Policy Workbench before restoring on the same cluster
Note: Perform these steps only if you are restoring the Policy Workbench on the same cluster where it was previously installed. If you are restoring to a new cluster, skip this section.
Uninstall the policy-workbench module from the existing PPC cluster by running the following command on the jump box:
helm uninstall policy-workbench -n <namespace>For example:
helm uninstall policy-workbench -n policy-workbenchThe following output appears if the module is uninstalled successfully:
release "policy-workbench" uninstalledDelete the namespace where the Policy Workbench is installed by running the following command on the jump box:
kubectl delete namespace <namespace>For example:
kubectl delete namespace policy-workbenchThe following output appears if the namespace is deleted successfully:
namespace "policy-workbench" deleted
4.1.4.2 - Restoring the Policy Workbench for Azure
Before you begin
Before starting a restore, ensure that the following prerequisites are met:
An existing backup is available. Backups are taken automatically as part of the default installation of the Policy Workbench using scheduled backup mechanisms. The backups are available in the encrypted Azure Blob Storage container that is created by the PPC installation. You can also manually back up the data.
For more information about the Azure Blob Storage container, refer to the section Creating a Storage Account in Azure.
For more information about manually backing up the data, refer to the section Backing up the Policy Workbench for Azure.
A restored PPC cluster is available. The Policy Workbench is restored on a restored PPC cluster. For information about restoring the PPC, refer to Restoring the PPC on Azure.
Note: You can restore the Policy Workbench without first restoring the PPC if only the Policy Workbench is corrupted.
Important: Before you restore the data, ensure that Velero CLI version 1.18 or later is installed.
Restore the Policy Workbench data
To restore the data:
Ensure that the
main.tffile in the root module, which is the working directory for executing the OpenTofu commands, contains the following code block. If the root module is not available, create a root module with themain.tffile.module "policy_workbench" { source = "oci://<Container_Registry_Path>/policy-workbench/opentofu/modules/policy-workbench/<cloud>?tag=<version>" cluster_name = var.cluster_name } variable "cluster_name" { type = string description = "AKS cluster name." nullable = false validation { condition = length(trimspace(var.cluster_name)) > 0 error_message = "cluster_name must be provided and cannot be empty." } }This code block adds the Policy Workbench OpenTofu module.
Run the following commands on the jump box.
Note: You do not need to run these commands if you only uninstall PPW and delete the namespace. These commands are required if you destroy the PPW cluster using
tofu destroy. They are also required if you are restoring to a new PPC cluster where PPW was not previously installed.tofu init tofu plan -var="cluster_name=<Restored-cluster-name>" tofu apply -var="cluster_name=<Restored-cluster-name>"Specify the name of the restored PPC cluster as the value of the
cluster_namevariable.For information about restoring the PPC, refer to the section Restoring the PPC on Azure.
Run the following command on the jump box.
velero restore create workbench-restore-$(date +%Y%m%d-%H%M%S) \ --from-backup <backup-name> \ --resource-modifier-configmap workbench-restore-resource-modifier \ -n <Namespace where data is backed up> --waitFor example:
velero restore create workbench-restore-$(date +%Y%m%d-%H%M%S) \ --from-backup workbench-backup-schedule-20260702112543 \ --resource-modifier-configmap workbench-restore-resource-modifier \ -n pty-backup-recovery --waitThe following output appears if the restore operation is completed successfully:
Restore request "workbench-restore-20260702112543" submitted successfully. Waiting for restore to complete. You may safely press Ctrl+C to stop waiting, but the restore will continue to run in the background.After the restore operation is completed, the following output appears:
Restore completed with status: Completed. You may check for more information using the commands `velero restore describe workbench-restore-20260702-112955` and `velero restore logs workbench-restore-20260702-112955`.For more information about the
velero restorecommand, refer to the section Restore Reference in the Velero documentation.Run the following command to list all the restore operations in the specific namespace.
velero restore get -n pty-backup-recoveryEnsure that the status of the restore operation is
WaitingForPluginOperations.Run the following command to annotate the Kubernetes resources.
kubectl annotate productconfiguration workbench -n pty-admin \ kopf.zalando.org/last-handled-configuration- --overwriteThe following output appears if the annotation is added successfully.
productconfiguration.pty.com/workbench annotatedRun the following commands to monitor the restore status.
Run the following command to retrieve the list of existing restores.
velero restore get -n pty-backup-recoveryThe following output appears if the restore operation is completed successfully.
NAME BACKUP STATUS STARTED COMPLETED WARNINGS ERRORS CREATED SELECTOR workbench-restore-20260702-112955 workbench-backup-schedule-20260702112543 Completed 2026-07-02 11:29:55 +0000 UTC 2026-07-02 11:30:55 +0000 UTC 0 11 2026-07-02 11:29:55 +0000 UTC <none>Run the following command to obtain details of a specific restore.
velero restore describe workbench-restore-<timestamp> -n pty-backup-recoveryFor example:
velero restore describe workbench-restore-20260702-112955 -n pty-backup-recoveryThe following output appears if the restore operation is completed successfully.
Name: workbench-restore-20260702-112955 Namespace: pty-backup-recovery Labels: app.kubernetes.io/managed-by=Helm deployment=policy-workbench velero.io/schedule-name=workbench-backup-schedule velero.io/storage-location=default Annotations: <none> Phase: CompletedRun the following command to obtain the log details for a specific restore.
velero restore logs workbench-restore-<timestamp> -n pty-backup-recoveryFor example:
velero restore logs workbench-restore-20260702-112955 -n pty-backup-recoveryThe following code block shows a snippet of the output.
time="2026-07-02T11:30:01Z" level=warning msg="No annotations found in policy-workbench/sh.helm.release.v1.policy-workbench.v1, using restore spec setting: false" groupResource=secrets logSource="pkg/restore/restore.go:2630" namespace=policy-workbench original name=sh.helm.release.v1.policy-workbench.v1 restore=pty-backup-recovery/workbench-restore-20260702-112955Note: Verify that the log output contains no entries with
level=error. Entries withlevel=warningare acceptable and do not indicate a restore failure.
Uninstall Policy Workbench before restoring on the same cluster
Note: Perform these steps only if you are restoring the Policy Workbench on the same cluster where it was previously installed. If you are restoring to a new cluster, skip this section.
Uninstall the policy-workbench module from the existing PPC cluster by running the following command on the jump box:
helm uninstall policy-workbench -n <namespace>For example:
helm uninstall policy-workbench -n policy-workbenchThe following output appears if the module is uninstalled successfully:
release "policy-workbench" uninstalledDelete the namespace where the Policy Workbench is installed by running the following command on the jump box:
kubectl delete namespace <namespace>For example:
kubectl delete namespace policy-workbenchThe following output appears if the namespace is deleted successfully:
namespace "policy-workbench" deleted
4.1.5 - Workbench Roles and Permissions
Roles are templates that include permissions and users can be assigned to one or more roles. All users in the appliance must be associated with a role.
The roles packaged with Policy Workbench are as follows:
| Roles | Description | Permissions |
|---|---|---|
| workbench_administrator | Full administrative access to workbench. | workbench_management_policy_write, workbench_deployment_immutablepackage_export, workbench_deployment_certificate_export |
| workbench_viewer | Read-only access to workbench. | workbench_management_policy_read |
| workbench_deployment_administrator | Administrative access to workbench deployments. | workbench_deployment_immutablepackage_export, workbench_deployment_certificate_export |
The capabilities of a role are defined by the permissions attached to the role. Though roles can be created, modified, or deleted from the appliance, permissions cannot be edited. The permissions that are available to map with a user and packaged with Policy Workbench as default permissions are as follows:
| Permissions | Description |
|---|---|
| workbench_management_policy_write | Allows management of policies and configurations. |
| workbench_management_policy_read | Allows viewing of policies and configurations. |
| workbench_deployment_immutablepackage_export | Allows exporting encrypted resilient packages. |
| workbench_deployment_certificate_export | Allows exporting certificates used by protectors for dynamic resilient packages. |
4.1.6 - Troubleshooting the Protegrity Policy Manager
Helm upgrade fails due to existing Kubernetes jobs
Issue: Helm upgrade fails because existing jobs, such as hubcontroller-init and kmgw-create-keystore, cannot be patched.
Description: Helm upgrade cannot modify or replace existing Kubernetes jobs if fields such as image registry, environment variables, args, and volumes are changed. This happens because the pod template of a job is immutable. So, the existing pods cannot be replaced when their template changes. As a result, the Helm upgrade fails.
Workaround:
Delete the existing jobs manually and then run the Helm upgrade command.
To manually delete the jobs, run the following commands:
kubectl delete job hubcontroller-init -n policy-workbench
kubectl delete job kmgw-create-keystore -n policy-workbench
Upgrading Policy Workbench from v1.11 to v1.12 fails for restored deployments
Issue: Upgrading Policy Workbench from version 1.11 to 1.12 may fail for deployments that were restored using Velero.
Description: During backup and restore, Velero adds additional labels to Kubernetes resources, causing the live resources to differ from the state managed by OpenTofu. OpenTofu detects this drift and reports the affected resources as modified, which causes the upgrade to fail.
Non-graceful node shutdown prevents StatefulSet pod rescheduling
Issue: Policy Workbench pods do not recover after a non-graceful node termination.
Description: After a non-graceful termination, for example, hardware failure, OS crash, or abrupt shutdown, policy-workbench nodes transition to NotReady state with reason NodeStatusUnknown, and statefulsets remain bound to the node without being rescheduled.
Workaround:
- Restart the affected nodes if possible. If they return to
Readystate, no further action is required. - If the issue persists, run the following command on each affected node to force pod rescheduling on healthy nodes:
kubectl taint node <node-name> node.kubernetes.io/out-of-service=nodeshutdown:NoExecute
- Verify that pods are rescheduled.
For more information, refer to Non-Graceful Node Shutdown.
4.1.7 - Upgrading Policy Workbench in AWS
Before you begin
Back up the existing Policy Workbench data.
For more information, refer to Backing up the Policy Workbench for AWS.
Ensure that the existing IAM role, policy, and EKS Pod Identity association are in
OpenTofustate, before upgrading. If theOpenTofustate is not maintained, then runtofu importon untracked resources to prevent recreation conflicts duringtofu apply.
Configuring Credentials for the Policy Workbench
Perform the following steps to configure the credentials to access the Policy Workbench from the OCI registry.
Run the following command to create the configuration directory.
mkdir -p ~/.config/containersObtain the username and access token from the My.Protegrity portal. For more information about obtaining the credentials from the My.Protegrity portal, refer to the section Configuring Authentication for Protegrity AI Team Edition.
Generate base64 encoded string with padding for
username:accesstokenobtained from the My.Protegrity portal.Ensure that you specify the username and access token within single quotes when generating the base64 encoded value. For example,
'username:accesstoken'.Create a file named
~/.config/containers/auth.jsonwith the following content.
{
"auths": {
"registry.protegrity.com:9443": {
"auth": "<base64 generated string from step-3>"
}
}
}
Upgrade the Policy Workbench Deployment
Depending on the Policy Workbench installation type, follow the relevant steps:
Root module was not available during installation
Navigate to the deployment directory.
Copy the
main.tfcontents from step 2 of Installing Policy Workbench when root module is not available.Note: The new
main.tfincludes akubernetesprovider and additional module arguments (oci_host,fips,ami_id) that were not present in earlier versions.Replace the contents of the existing
main.tfwith the copied content.In
main.tf, set the following parameter values.Parameter Description Value <Container_Registry_Path>Location of the Protegrity Container Registry or the local registry where the policy-workbenchOpenTofu module is published.registry.protegrity.com:9443if Protegrity Container Registry is used.- local registry endpoint if a local registry is used.
<Container_Registry_Hostname>OCI registry hostname used for oci_host.registry.protegrity.com<version>Tag version of the Protegrity Policy Manager, as listed in the Policy Manager README. 1.12.0<PPC-cluster-name>Name of the PPC cluster specified during deployment. The value used for the cluster name when deploying PPC. fipsUse FIPS Bottlerocket AMI for Karpenter nodes. The default value is true. Set the value tofalsefor non-FIPS.ami_idExplicit Amazon Machine Image (AMI) ID for Karpenter nodes. When this value is set, it overrides the FIPS-based AMI selection. <ami-id>For more information about the
<PPC-cluster-name>, refer to Deploying PPC.Ensure that the credentials to install the Policy Workbench from the Protegrity Container Registry have been configured.
For more information about configuring the credentials, refer to the section Configuring Credentials for the Policy Workbench.
Root module was available during installation
Navigate to the root module directory.
Locate the
policy_workbenchmodule block in the.tffiles.Update the module block with the following:
Note: The
oci_host,fips, andami_idarguments are new in this version. If the existing module block does not include them, add them along with the updatedsourcevalue.module "policy_workbench" { source = "oci://<Container_Registry_Path>/policy-workbench/opentofu/modules/policy-workbench/aws?tag=<version>" cluster_name = var.cluster_name oci_host = "<Container_Registry_Hostname>" fips = var.fips ami_id = var.ami_id }In the
policy_workbenchmodule block, set the parameter values as specified in the parameter table.If the root module does not include the following provider versions, add them to the
terraform {}block:hashicorp/awsversion~> 6.0hashicorp/kubernetesversion~> 2.35
required_providers { aws = { source = "registry.opentofu.org/hashicorp/aws" version = "~> 6.0" } kubernetes = { source = "registry.opentofu.org/hashicorp/kubernetes" version = "~> 2.35" } }Configure the
kubernetesprovider to connect to the target EKS cluster by adding the following to the root module:data "aws_eks_cluster" "this" { name = "<PPC-cluster-name>" } data "aws_eks_cluster_auth" "this" { name = "<PPC-cluster-name>" } provider "kubernetes" { host = data.aws_eks_cluster.this.endpoint cluster_ca_certificate = base64decode(data.aws_eks_cluster.this.certificate_authority[0].data) token = data.aws_eks_cluster_auth.this.token }Ensure that the credentials to update the Policy Workbench from the Protegrity Container Registry have been configured.
For more information about configuring the credentials, refer to the section Configuring Credentials for the Policy Workbench.
Apply the Configuration
From the configured directory, complete the following steps:
Run the following command to initialize the OpenTofu providers.
tofu init -upgradeRun the following commands to import existing resources into the OpenTofu state.
MANAGED_BY=$(kubectl get nodepool policy-workbench -o jsonpath='{.metadata.labels.app\.kubernetes\.io/managed-by}') if [ "$MANAGED_BY" = "Helm" ]; then tofu import -var="cluster_name=<PPC-cluster-name>" \ 'module.policy_workbench.kubernetes_manifest.node_pool[0]' \ 'apiVersion=karpenter.sh/v1,kind=NodePool,name=policy-workbench' tofu import -var="cluster_name=<PPC-cluster-name>" \ 'module.policy_workbench.kubernetes_manifest.ec2_node_class[0]' \ 'apiVersion=karpenter.k8s.aws/v1,kind=EC2NodeClass,name=policy-workbench' fiRun the following commands to preview and apply the OpenTofu changes.
tofu plan -var="cluster_name=<PPC-cluster-name>" tofu apply -var="cluster_name=<PPC-cluster-name>"OpenTofu displays the plan and prompts for confirmation before applying. Enter
yesto proceed, or add the-auto-approveflag to thetofu applycommand to skip the prompt.
Deploy the Upgrade with Helm
Run the following command to upgrade Policy Workbench.
helm upgrade --install policy-workbench \
oci://<Container_Registry_Path>/policy-workbench/helm/policy-workbench \
--version <version> \
--namespace policy-workbench \
--values policy-workbench-values.yaml
Set the values of <Container_Registry_Path> and <version> as specified in the parameter table.
Note: The
policy-workbench-values.yamlfile is generated by the OpenTofu module in the working directory during the previous step. If the file is missing, re-runtofu applybefore proceeding.
If the upgrade is successful, then Helm displays the following output.
NOTES:
Protegrity policy-workbench 1.12.0 installed
The version number reflects the upgraded version.
Verify the Upgrade
Confirm that the Helm release and pods are running correctly.
Run the following command to verify the Helm release status.
helm list -n policy-workbenchThe output appears as follows.
NAME NAMESPACE REVISION STATUS CHART APP VERSION policy-workbench policy-workbench 2 deployed policy-workbench-1.12.0 1.12.0The
REVISIONnumber increments with each upgrade.Run the following command to verify the Policy Workbench pods are running.
kubectl get pods -n policy-workbenchThe output appears as follows.
NAME READY STATUS RESTARTS AGE bootstrap-bffb4b5d9-v6ww4 1/1 Running 0 13m cert-7b88dcd84-zx7cv 1/1 Running 0 13m devops-75755d87d4-qw9n6 1/1 Running 0 13m hubcontroller-0 1/1 Running 0 13m kmgw-0 1/1 Running 0 13m mbs-6b7dc765dd-brrfk 1/1 Running 0 13m repository-0 1/1 Running 0 13m rpproxy-79fc498d8-qp4fz 1/1 Running 0 13m rpproxy-79fc498d8-s9k5p 1/1 Running 0 13m rpproxy-79fc498d8-tbdtb 1/1 Running 0 13m rps-8d79b7d98-svhdw 1/1 Running 0 13mAll pods must show
1/1underREADYandRunningunderSTATUS. Pod names and ages may differ across environments.
Validate the Deployment
Confirm that the Policy Workbench API is accessible after the upgrade.
Run the following command to retrieve the gateway address.
export GW_HOST="$(kubectl get gateway pty-main -n api-gateway -o jsonpath='{.status.addresses[0].value}')"Run the following command to obtain an authentication token for the
workbenchuser.export TOKEN=$(curl -k -s https://$GW_HOST/pty/v1/auth/login/token \ -X POST \ -H 'Content-Type: application/x-www-form-urlencoded' \ -d 'loginname=workbench' \ -d 'password=<workbench-password>' \ -D - -o /dev/null 2>&1 | grep -i 'pty_access_jwt_token:' | sed 's/pty_access_jwt_token: //' | tr -d '\r')Set
<workbench-password>to the workbench user password specified during deployment.Run the following command to verify access to the Policy Workbench datastores API.
curl -k -v https://$GW_HOST/pty/v2/pim/datastores -H "Authorization: Bearer $TOKEN"
An empty array [] or a list of datastore objects returned by the command confirms that the upgrade is complete.
4.2 - Protegrity Agent
Protegrity Agent is an intelligent agentic AI system designed for Data Protection architects and administrators. Protegrity Agent manages the Protegrity Policy, Data Elements, Roles, Masks, Data Stores and other configurations through natural language conversations. The system provides automated planning and execution capabilities for complex data protection workflows, including policy management, data element configuration, and security rule deployment.
Protegrity Agent leverages advanced Large Language Model (LLM) capabilities within an agentic loop. The agent orchestrates operations across the Protegrity ecosystem through Protegrity Policy Management, providing an intuitive chatbot-like interface for sophisticated data protection management tasks.
The key capabilities of Protegrity Agent include:
- Natural Language Interface: Manages data protection configurations using conversational API.
- Intelligent Planning: Decomposes complex user queries into actionable and dynamic plans.
- Autonomous Execution: Executes multi-step workflows with adaptive tool selection and error recovery.
- Real-time Streaming: Displays Server-Sent Events (SSE) for live progress updates and intermediate results.
- Enterprise Integration: Integrates with Protegrity Policy Management seamlessly through comprehensive API coverage.
- Semantic Tool Discovery: Selects RAG-based tool for optimal endpoint matching.
- Conversation Management: Tracks conversation history with context-aware interactions.
- LLM APIs: Must have own LLM API keys.
Important: The current version of Protegrity Agent expects GPT 5.2 main endpoints and GPT 4o embeddings endpoint.
4.2.1 - Prerequisites
The following requirements are met before installing Protegrity Agent with PPC.
The jumpbox is registered and prepared.For more information about registering a jumpbox, refer to Configuring Authentication for Protegrity AI Team Edition.
Ensure that a PPC cluster is installed and accessible.For more information about installing a PPC, refer Installing PPC.
Ensure that the Protegrity Policy Manager is installed. Install the Policy Workbench to deploy the Protegrity Policy Manager.
For more information about installing the Policy Workbench, refer to the section Installing Protegrity Policy Manager.
Ensure to have access to OpenAI API keys. These are required to during the installation process.
The
agent_adminrole must be available.For more information about creating a role, refer Working with Roles.
4.2.2 - Roles and Permissions
4.2.2.1 - Required Roles and Permissions
The Protegrity Agent uses role-based access control (RBAC) to govern access to its features. The Protegrity Policy Cloud gateway enforces all permissions through JSON Web Token (JWT) authentication. The Agent API does not perform permission checks internally.
Roles
The following table lists the permissions assigned to the roles.
| Roles | Description | Permissions |
|---|---|---|
| agent_admin | Grants full read-write access to policy, packages, and Insight | proagent_conversations_permission , proagent_responses_permission, proagent_health_permission, proagent_readiness_permission, proagent_liveness_permission, proagent_version_permission, proagent_ui_permission, proagent_doc_permission, proagent_log_permission, workbench_policy_view, workbench_policy_manage, workbench_certificate_export, workbench_package_export_dynamic, workbench_package_export_encrypted, insight_viewer, insight_admin, can_create_token, workbench_management_policy_read, workbench_management_policy_write |
| agent_reader | Restricts access to read-only operations | proagent_conversations_permission, proagent_responses_permission, proagent_health_permission, proagent_readiness_permission, proagent_liveness_permission, proagent_version_permission, proagent_ui_permission, proagent_doc_permission, proagent_log_permission, workbench_policy_view, insight_viewer, can_create_token, workbench_management_policy_read |
For more information about creating the role, refer to Working with Roles.
Permissions
Protegrity Agent API Permissions
These permissions control access to the core Agent endpoints. All endpoints are authenticated using the jwt_token method.
| Permission | Description | Protected Endpoint | HTTP Methods |
|---|---|---|---|
proagent_ui_permission | Access the Agent web dashboard interface | /pty/proagent/v1.0/ui, /pty/proagent/v1.0/ui* | GET, POST |
proagent_conversations_permission | Access conversation management endpoints | /pty/proagent/v1.0/conversations, /pty/proagent/v1.0/conversations* | GET, POST, DELETE |
proagent_responses_permission | Access response generation endpoints | /pty/proagent/v1.0/responses | POST |
proagent_doc_permission | Access the Agent documentation endpoints | /pty/proagent/v1.0/doc | GET |
proagent_log_permission | Access the Agent log endpoints | /pty/proagent/v1.0/log | GET, POST |
proagent_health_permission | Access health check endpoints | /pty/proagent/v1.0/health | GET |
proagent_readiness_permission | Access readiness probe endpoints | /pty/proagent/v1.0/ready | GET |
proagent_liveness_permission | Access liveness probe endpoints | /pty/proagent/v1.0/live | GET |
proagent_version_permission | Access version information endpoints | /pty/proagent/v1.0/version | GET |
Workbench Permissions
These permissions control access to Workbench features such as policy management and package distribution.
| Permission | Description |
|---|---|
workbench_policy_view | View policies and configurations |
workbench_policy_manage | Create, update, and delete policies and configurations |
workbench_certificate_export | Export certificates used by protectors for dynamic Resilient Packages |
workbench_package_export_dynamic | Distribute Resilient Packages dynamically |
workbench_package_export_encrypted | Export encrypted Resilient Packages |
workbench_management_policy_read | View policies and configurations in the Policy Workbench (official platform permission) |
workbench_management_policy_write | Manage policies and configurations in the Policy Workbench (official platform permission) |
Note: The
workbench_policy_viewandworkbench_management_policy_readare different permissions. The former are registered by the Agent product, while the latter are required for direct PIM/Workbench access. Both permission types must be included in roles.
Insight Permissions
These permissions control access to the Insight dashboard.
| Permission | Description |
|---|---|
insight_viewer | View the Insight dashboard |
insight_admin | Manage the Insight dashboard, including configuration and settings |
Administrative Permissions
These permissions control token creation and user management.
| Permission | Description |
|---|---|
can_create_token | Create authentication tokens for Agent access |
user_manager_admin | Manage user accounts and retrieve user token and profile information |
4.2.2.2 - Working with Roles
This section describes about creating roles and users for the Protegrity Agent on a Protegrity Policy Cloud cluster. Roles define the features that a user can access. Users inherit permissions from their assigned roles.
For more information about permissions, refer to Required Roles and Permissions.
Prerequisites
- A running PPC cluster with the Protegrity Agent deployed.
kubectlis configured and is accessible for the target PPC cluster.- An admin account on the PPC cluster with required permissions to create roles and users.
Note: Install the Workbench Helm chart before creating roles with
workbench_management_policy_*permissions. The API rejects unregistered permission names and returns an HTTP 400 error.
Retrieving the Gateway Host
To store the PPC gateway address in a shell variable, run the following command .
export GW_HOST="$(kubectl get gateway pty-main -n api-gateway -o jsonpath='{.status.addresses[0].value}')"
The GW_HOST variable is used in every subsequent command.
Generate a JWT Token
Ensure to authenticate as the PPC admin user to obtain a JSON Web Token (JWT). All role and user creation commands require this token.
TOKEN=$(curl -k -s "https://$GW_HOST/api/v1/auth/login/token" \
-X POST \
-H 'Content-Type: application/x-www-form-urlencoded' \
-d "loginname=admin" \
-d "password=Admin123!" \
-D - -o /dev/null 2>&1 \
| grep -i 'pty_access_jwt_token:' \
| sed 's/pty_access_jwt_token: //' \
| tr -d '\r') && echo "${TOKEN:0:10}"
A successful response prints the first 10 characters of the token. If the output is empty, verify the admin credentials and gateway address.
Creating Agent Roles
Create one or more roles that bundle the permissions that are required by the users.
This section provides two recommended role skeletons:
- Administrator with complete access permissions
- Viewer with read-only permissions
Complete-Access Role (agent_admin)
This role grants read-write access to all Agent, Workbench, and Insight features.
curl -sk -X POST "https://$GW_HOST/pty/v1/auth/roles" \
-H "Authorization: Bearer $TOKEN" \
-H "Content-Type: application/json" \
-d '{
"name": "agent_admin",
"description": "Administrator role",
"permissions": [
"proagent_conversations_permission",
"proagent_doc_permission",
"proagent_health_permission",
"proagent_liveness_permission",
"proagent_log_permission",
"proagent_readiness_permission",
"proagent_responses_permission",
"proagent_ui_permission",
"proagent_version_permission",
"workbench_certificate_export",
"workbench_package_export_dynamic",
"workbench_package_export_encrypted",
"workbench_policy_manage",
"workbench_policy_view",
"workbench_management_policy_read",
"workbench_management_policy_write",
"insight_admin",
"insight_viewer",
"can_create_token"
]
}'
This user inherits all permissions from the agent_admin role.
For more information about the available permissions for agent_admin, refer to Roles.
Read-Only Role (agent_reader)
This role restricts access to read-only operations. The user can view conversations and policies but cannot modify or export them.
curl -sk -X POST "https://$GW_HOST/pty/v1/auth/roles" \
-H "Authorization: Bearer $TOKEN" \
-H "Content-Type: application/json" \
-d '{
"name": "agent_reader",
"description": "Read-only role",
"permissions": [
"proagent_conversations_permission",
"proagent_doc_permission",
"proagent_health_permission",
"proagent_liveness_permission",
"proagent_log_permission",
"proagent_readiness_permission",
"proagent_responses_permission",
"proagent_ui_permission",
"proagent_version_permission",
"workbench_policy_view",
"workbench_management_policy_read",
"insight_viewer",
"can_create_token"
]
}'
This role excludes workbench_policy_manage, all package export permissions, and insight_admin. The user can view policies and the Insight dashboard but cannot make changes.
For more information about the available permissions for agent_reader, refer to Permissions.
Building a Custom Role
To create a role with any subset of the available permissions, select the required permission from Protegrity Agent Permissions Reference . The JSON payload follows the same structure shown above. Replace the name, description, and permissions array with your values.
curl -sk -X POST "https://$GW_HOST/pty/v1/auth/roles" \
-H "Authorization: Bearer $TOKEN" \
-H "Content-Type: application/json" \
-d '{
"name": "<name of custom the role>",
"description": "<description custom the role>",
"permissions": [
<permission 1>,
<permission 2>,
<permission 3>
]
}'
Validate Role Creation
To list all roles and confirm your new roles exist, run the following command .
curl -sk -X GET "https://$GW_HOST/pty/v1/auth/roles" \
-H "Accept: application/json" \
-H "Authorization: Bearer $TOKEN"
The response includes every role on the PPC cluster. Ensure that agent_admin and agent_reader roles appear in the list.
Create Agent Users
Create user accounts and assign them to the required roles.
Admin User
This user inherits all permissions from the agent_admin role. To create an agent_admin, run the following command.
curl -sk -X POST "https://$GW_HOST/pty/v1/auth/users" \
-H "Accept: application/json" \
-H "Authorization: Bearer $TOKEN" \
-H "Content-Type: application/json" \
-d '{
"username": "agent_admin",
"email": "agent_admin@example.com",
"firstName": "Agent",
"lastName": "Admin",
"enabled": true,
"password": "Admin123!",
"roles": [
"agent_admin"
]
}'
Read-Only User
This user inherits the read-only permissions from the agent_reader role. To create an agent_reader, run the following command.
curl -sk -X POST "https://$GW_HOST/pty/v1/auth/users" \
-H "Accept: application/json" \
-H "Authorization: Bearer $TOKEN" \
-H "Content-Type: application/json" \
-d '{
"username": "agent_reader",
"email": "agent_reader@example.com",
"firstName": "Agent",
"lastName": "Reader",
"enabled": true,
"password": "Admin123!",
"roles": [
"agent_reader"
]
}'
```=
#### User Skeleton Structure
Every user creation request follows the same JSON structure.
```json
{
"username": "<unique-username>",
"email": "<email-address>",
"firstName": "<first-name>",
"lastName": "<last-name>",
"enabled": true,
"password": "<password>",
"roles": [
"<role-name-1>",
"<role-name-2>"
]
}
| Field | Description |
|---|---|
username | Set a unique identifier for the user account |
email | Set the email address associated with the user account |
firstName | Set the first name of the user |
lastName | Set the last name of the user |
enabled | Enable or disable the user account; set to true to activate |
password | Set the initial password for the user account |
roles | Assign one or more roles that define the permissions this user receives |
A user can hold multiple roles. The effective permission set is the union of all permissions from every assigned role. For example, assigning both agent_reader and a custom role that includes workbench_policy_manage grants the user both read and write access to policies.
Note: Change the default passwords before deploying to a production environment.
Verify the User Configuration
After creating the users, log in with the new credentials to confirm the accounts are accessible.
curl -k -s "https://$GW_HOST/api/v1/auth/login/token" \
-X POST \
-H 'Content-Type: application/x-www-form-urlencoded' \
-d "loginname=agent_admin" \
-d "password=Admin123!" \
-D - -o /dev/null 2>&1 \
| grep -i 'pty_access_jwt_token:'
A successful response returns a pty_access_jwt_token header. An empty response indicates incorrect credentials or a missing role.
4.2.3 - Installing Protegrity Agent
The Protegrity Agent can be installed using helm chart. The helm chart deploys the following components.
| Component | Description |
|---|---|
| Protegrity Agent Service | Main application service |
| PostgreSQL Database | Persistent database for conversation storage |
| UI | Web interface for Protegrity Agent |
4.2.3.1 - Installing Protegrity Agent
- Installing Protegrity Agent
- Verifying Protegrity Agent installation
- Creating Protegrity Agent Role and User
Installing Protegrity Agent
Before you begin
The my-values.yaml file must provide the OPENAI keys.
For OpenAI LLM endpoint, provide the following details. This is essential for the Agent to work. The my-values.yaml file should appear as mentioned below.
proagentService:
secrets:
# Main Endpoint
OPENAI_API_ENDPOINT: ""
OPENAI_API_KEY: ""
OPENAI_API_VERSION: ""
OPENAI_LLM_MODEL: ""
# Embeddings
OPENAI_EMBEDDINGS_API_ENDPOINT: ""
OPENAI_EMBEDDINGS_API_KEY: ""
OPENAI_EMBEDDINGS_API_VERSION: ""
OPENAI_EMBEDDING_MODEL: ""
For more information on additional configurations, refer to Configuring Protegrity Agent.
These values can be provided during installation with -f
my-values.yaml.
Important: The current version of Protegrity Agent requires GPT 5.2 main endpoints and GPT 4o embeddings endpoint.
Installing Protegrity Agent
Installing on AWS
To install the Protegrity Agent, run the following command.
helm upgrade --install protegrity-agent \
oci://<Container_Registry_Path>/protegrity-agent/helm/protegrity-agent \
--version 1.1.0 \
--namespace pty-protegrity-agent \
--create-namespace \
-f my-values.yaml
Where <Container_Registry_Path> is location of the Protegrity Container Registry or the local registry where the protegrity agent OpenTofu module is published.
Note: The PTY agent uses the ami value from the cluster config map. If the ami value needs to be manually set, then use the following flag in the above command:
--set karpenterResources.nodeClass.amiId="<ami-id>".Ensure that<ami-id>in the preceding command is replaced with a valid AMI ID for the AWS region in use.
The following table provides the list of AMI IDs
| Region | AMI ID |
|---|---|
| ap-south-1 | ami-07959c05dcdb79a72 |
| eu-north-1 | ami-0268b0bfff0f25d31 |
| eu-west-3 | ami-0ea9454aef60045a2 |
| eu-west-2 | ami-0d5eee57a6a1398a3 |
| eu-west-1 | ami-00a8d14029b60a028 |
| ap-northeast-3 | ami-0e495c3ffd416c65e |
| ap-northeast-2 | ami-0fc18a24aec719c1c |
| ap-northeast-1 | ami-00ec85b83bf713aac |
| ca-central-1 | ami-03891f0d8b41eb296 |
| sa-east-1 | ami-0a30f044a5781b4e0 |
| ap-southeast-1 | ami-0ae51324bf2e89725 |
| ap-southeast-2 | ami-0ef7e8095b163dc42 |
| eu-central-1 | ami-00e36131a0343c374 |
| us-east-1 | ami-07e4e828a19159636 |
| us-east-2 | ami-0e486911b2d0a5f7e |
| us-west-1 | ami-01183e1261529749e |
| us-west-2 | ami-04f850c412625dfe6 |
Installing on Microsoft Azure
To install the Protegrity Agent, run the following command.
helm upgrade --install protegrity-agent \
oci://<Container_Registry_Path>/protegrity-agent/helm/protegrity-agent \
--version 1.1.0 \
--namespace pty-protegrity-agent \
--create-namespace \
-f my-values.yaml
Where <Container_Registry_Path> is location of the Protegrity Container Registry or the local registry where the protegrity agent OpenTofu module is published.
Note: From the cluster config map, the image family is updated. If the image family needs to be manually set, then use the following flag in the above command:
--set karpenterResources.nodeClass.imageFamily="...".
Verifying Protegrity Agent installation
To verify whether the Protegrity Agent is successfully installed, run the following command:
kubectl get pods -n pty-protegrity-agent
The output should be similar to the following:
NAME READY STATUS RESTARTS AGE
database-statefulset-0 1/1 Running 0 3m6s
protegrity-agent-db-backup-init-r1-n5bwl 1/1 Running 0 3m6s
protegrity-agent-deployment-7488c88f6d-rgclq 1/1 Running 0 3m6s
protegrity-agent-ui-deployment-c8f848d57-mrm4r 1/1 Running 0 3m6s
Creating Protegrity Agent Role and User
To use Protegrity Agent, a user must have certain roles. Run the following commands to create administrator role and user:
# Get Token
export GW_HOST="$(kubectl get gateway pty-main -n api-gateway -o jsonpath='{.status.addresses[0].value}')"
echo $GW_HOST
TOKEN=$(curl -k -s "https://$GW_HOST/pty/v1/auth/login/token" \
-X POST \
-H 'Content-Type: application/x-www-form-urlencoded' \
-d "loginname=admin" \
-d "password=<password>" \
-D - -o /dev/null 2>&1 \
| grep -i 'pty_access_jwt_token:' \
| sed 's/pty_access_jwt_token: //' \
| tr -d '\r') && echo "${TOKEN:0:10}"
# Create Admin Role
curl -sk -X POST "https://$GW_HOST/pty/v1/auth/roles" \
-H "Authorization: Bearer $TOKEN" \
-H "Content-Type: application/json" \
-d '{
"name": "agent_admin",
"description": "Administrator role",
"permissions": [
"proagent_conversations_permission",
"proagent_doc_permission",
"proagent_health_permission",
"proagent_liveness_permission",
"proagent_log_permission",
"proagent_readiness_permission",
"proagent_responses_permission",
"proagent_ui_permission",
"proagent_version_permission",
"workbench_certificate_export",
"workbench_package_export_dynamic",
"workbench_package_export_encrypted",
"workbench_policy_manage",
"workbench_policy_view",
"workbench_management_policy_read",
"workbench_management_policy_write",
"insight_admin",
"insight_viewer",
"can_create_token"
]
}'
# Create Admin User
curl -sk -X POST "https://$GW_HOST/pty/v1/auth/users" \
-H "Accept: application/json" \
-H "Authorization: Bearer $TOKEN" \
-H "Content-Type: application/json" \
-d '{
"username": "agent_admin",
"email": "agent_admin@example.com",
"firstName": "Agent",
"lastName": "Admin",
"enabled": true,
"password": "<password>",
"roles": [
"agent_admin"
]
}'
For more information about managing Protegrity Agent different roles and users, including their creation, refer to Working with Roles.
4.2.4 - Configuring Protegrity Agent
API Service Endpoints
This section provides an overview of the service API endpoints exposed by Protegrity Agent.
| Name | Endpoint |
|---|---|
| Conversations | /pty/proagent/v1.0/conversations |
| Responses | /pty/proagent/v1.0/responses |
| Health Check | /pty/proagent/v1.0/health |
| Readiness Probe | /pty/proagent/v1.0/ready |
| Liveness Probe | /pty/proagent/v1.0/live |
| Version Info | /pty/proagent/v1.0/version |
| UI Dashboard | /pty/proagent/v1.0/ui |
Protegrity Agent Configurations
In addition to the OpenAI endpoints, the following parameters are configurable through a user-provided my-values.yaml file, supplied during deployment using the helm upgrade ... -f my-values.yaml command.
| Section | Variable | Comment |
|---|---|---|
| global | restore | Restore mode flag. When true, Velero restores the backup PVC from S3 and a restore Job imports the pg_dump into a fresh Postgres instance. |
proagentService.environment | LOG_LEVEL | Application log level (default: INFO) |
proagentService.environment | THINKING_TIMEOUT | Agent pauses and asks for feedback if it goes over this limit (in minutes). Must be less than the application’s internal response timeout or any other network timeouts. |
backup | enabled | Backup status |
backup | schedule | pg_dump CronJob schedule |
backup | veleroSchedule | Velero snapshot schedule (30-min offset) |
backup | scheduleName | Backup name |
backup | backupName | Set to a specific backup name for point-in-time restore |
Updating the Deployment
To update the deployed cluster it is recommended to create a my-values.yaml and then helm upgrade ... -f my-values.yaml.
helm upgrade --install protegrity-agent \
oci://<container_registry_path>:9443/protegrity-agent/1.0/helm/protegrity-agent \
--set karpenterResources.nodeClass.amiId="<ami-id>" \
--version 1.0.0 \
--namespace pty-protegrity-agent \
--create-namespace \
-f my-values.yaml
Ensure that
The following table provides the list of AMI IDs
| Region | AMI ID |
|---|---|
| ap-south-1 | ami-07959c05dcdb79a72 |
| eu-north-1 | ami-0268b0bfff0f25d31 |
| eu-west-3 | ami-0ea9454aef60045a2 |
| eu-west-2 | ami-0d5eee57a6a1398a3 |
| eu-west-1 | ami-00a8d14029b60a028 |
| ap-northeast-3 | ami-0e495c3ffd416c65e |
| ap-northeast-2 | ami-0fc18a24aec719c1c |
| ap-northeast-1 | ami-00ec85b83bf713aac |
| ca-central-1 | ami-03891f0d8b41eb296 |
| sa-east-1 | ami-0a30f044a5781b4e0 |
| ap-southeast-1 | ami-0ae51324bf2e89725 |
| ap-southeast-2 | ami-0ef7e8095b163dc42 |
| eu-central-1 | ami-00e36131a0343c374 |
| us-east-1 | ami-07e4e828a19159636 |
| us-east-2 | ami-0e486911b2d0a5f7e |
| us-west-1 | ami-01183e1261529749e |
| us-west-2 | ami-04f850c412625dfe6 |
After upgrading the parameters successfully, execute the following command.
kubectl rollout restart protegrity-agent -n pty-protegrity-agent
4.2.5 - Using Protegrity Agent
Protegrity Agent is a conversational AI assistant that helps to manage Protegrity data protection products.
It supports three main categories of tasks.
Answer Questions About Protegrity Products
Enquire about Protegrity concepts, configurations, and best practices. The agent searches the Protegrity documentation library to find accurate answers.
Example questions:
- “What is a data element in Protegrity?”
- “How do policies and rules relate to each other?”
- “What tokenization methods does Protegrity support?”
- “Explain the difference between masking and encryption.”
Manage PIM Resources
Enquire to create, view, update, or delete resources in PIM. The Protegrity Agent finds the correct application programming interface (API) schema, builds the request, and executes it in real-time.
The agent supports the following PIM resource types:
| Resource type | Description |
|---|---|
| Data element | Define how data receives cryptographic protection |
| Mask | Define a pattern that obscures data on presentation |
| Role | Define who receives access to protected data |
| Policy | Group rules that govern protection operations |
| Rule | Bind a role and data element within a policy |
| Data store | Group server locations for policy distribution |
| Source (member source) | Connect to an identity directory for role membership |
| Application (trusted application) | Authorize a specific application and user pair to use a protector |
The agent verifies each operation and reports the outcome.For multi-step tasks, it creates a plan and works through each step.
Look Up API and Product Details
Enquire about PIM API endpoints, schemas, or product concepts.
Example requests:
- “What fields do I need to create a policy?”
- “Show me the schema for adding a rule to a policy.”
- “What tokenizer types can I use for credit cards?”
4.2.5.1 - Accessing Protegrity Agent UI
Accessing the Dashboard
Access the PPC using the FQDN provided during the installation process.
Enter the username and password for the admin user to log in.
If Protegrity Agent is installed, then the Protegrity Agent dashboard appears. If Protegrity Agent is not installed, then the Insight Dashboard is available.
Afetr logging in successfully, a Welcome message is displayed prompting users to start a conversation.
The left panel contains Ongoing Conversation and Chat History icons.
Click Chat History to refer to previous requests and results.
The Protegrity Agent version is displayed at the bottom-right of the page. Currently, Protegrity Agent is on version 1.0.
Starting a Conversation
Get started with Protegrity Agent by typing a question in the Start your conversation here… textbox. The Protegrity Agent breaks down the request into actionable steps and executes them, providing live updates in the Canvas.
Once the Agent starts processing the query, the stop icon is enabled. Use this icon to stop the Agent from proceeding with the request.
Interacting with the Agent
The following are the best practices while interacting with the agent.
Be Specific
Provide clear instructions. Include resource names, values, and desired outcomes.
| Less effective | More effective |
|---|---|
| “Set up some security.” | “Create a policy named PCI_Compliance with a tokenization rule for the CC_Token data element.” |
| “Fix the policy.” | “Update the PCI_Compliance policy to change the masking rule for SSN_Token from full mask to partial mask.” |
Understanding the Canvas
The attributes displayed in the canvas response along with their description are listed below.
| Attribute | Description |
|---|---|
type | Items of an agent response can be one of several types: - TextResponse: The agent’s text output - AgentPlan: A plan created by the agent - ExecutedStep: An individual step in the plan - FeedbackRequest: A request for user feedback - Attestation: Evidence or reasoning from the agent |
id | Unique identifier for this conversation |
claim | The claim or assertion this evidence supports |
confidence_level | Confidence level (0-1) in the validity of this evidence |
evidence_data | The actual evidence data - source: Source of the evidence - collected_at: When the evidence was collected - data: The evidence payload |
evidence_type | Type of evidence being provided |
verification_method | Method used to verify or collect this evidence |
created_at | When the conversation was created |
If the response from the Agent is text information only, the Canvas does not display any output.
4.2.5.2 - Working with Protegrity Agent
This section walks through each step of creating a complete, working protection policy. The example protects three types of sensitive data: credit card numbers, Social Security numbers (SSN), and email addresses.
Each step can be run as an individual request, or the agent can build the entire setup in a single conversation.
PIM uses unique identifiers (UIDs) to reference resources. When you create a resource, PIM assigns it a UID. The Protegrity Agent tracks these UIDs across steps within the same conversation, so you can refer to resources by name.
Step 1: Create Data Elements
Data elements define how Protegrity protects a specific type of data. Each data element specifies one protection method. It is recommended to create data elements first because the rules might reference them later.
Data elements cannot change their protection method after creation. To change a protection method, create a new data element.
Caution: Deleting a data element destroys its cryptographic material. Data protected with a deleted data element can not be recovered.
Create a Credit Card Data Element
Request the agent to create a data element that tokenizes credit card numbers.
Create a data element named CC_Token that tokenizes credit card numbers
using the SLT_1_3 tokenizer.
The agent creates a data element with credit card tokenization. This protection method preserves the format of the card number and produces a token that passes Luhn validation.
Create a Social Security Number Data Element
Request the agent to create a data element that tokenizes numeric data for SSN values.
Create a data element named SSN_Token that uses numeric tokenization
with the SLT_1_3 tokenizer.
The agent creates a numeric tokenization data element. The token output contains only digits and preserves the original length.
Create an Email Data Element
Request the agent to create a data element that tokenizes email addresses.
Create a data element named Email_Token that uses email tokenization
with the SLT_1_3 tokenizer.
The Protegrity Agent creates an email tokenization data element. The token preserves the email format, including the @ symbol and domain structure.
Other Protection Methods
Protegrity supports several additional protection methods. The agent supports questions related to any of the following.
| Protection method | Use case |
|---|---|
| Format-preserving tokenization | Preserve data format and length in the token output |
| Format-preserving encryption (FPE) | Apply NIST 800-38G encryption while preserving format |
| AES-128 or AES-256 encryption | Apply strong encryption for data at rest |
| HMAC-SHA256 hashing | Create irreversible one-way hashes for comparison |
| No encryption with monitoring | Track data access without applying protection |
Request the agent for details on any method:
What tokenization options are available for numeric data?
Step 2: Create a Mask
Masks define how to partially reveal protected data for display. Rules can optionally reference a mask to control what users see when they access data without full unprotect permission.
Create a mask named CC_Show_Last_4 that shows the last 4 characters
and masks the rest with asterisks.
The Protegrity Agent creates a mask that displays the last four digits while replacing the remaining characters with * symbols. For example, a credit card number appears as ************1234 in the output.
Mask parameters:
| Parameter | Description |
|---|---|
fromLeft | Specify the number of characters to keep visible from the left |
fromRight | Specify the number of characters to keep visible from the right |
character | Set the masking character (*, #, -, or 0-9) |
Step 3: Create a Role
Roles define who can access protected data. Every rule in a policy requires a role.Ensure to create roles before creating rules.
Create a Role With Full Access
For a simple setup, create a role with the allowAll flag. This role grants access to all users without requiring a member source.
Create a role named DataAnalyst with manual mode and allow all users.
The agent creates a manual role where all authenticated users receive access.
Create a Role With Restricted Access
For more fine-grained control, create a role that restricts access to specific users or groups from a member source.
Create a role named PCI_Auditor with manual mode. Do not allow all users.
After the role is created, members can be added from a member source.For more information about setting up member source, refer Create a Member Source.
Role Modes
| Mode | Behavior |
|---|---|
| MANUAL | Manually manage role membership with no automatic refresh |
| SEMIAUTOMATIC | Refresh membership on a configured schedule |
| AUTOMATIC | Continuously synchronize membership from the member source |
Step 4: Create a Member Source (Optional)
Member sources connect PIM to an identity directory. Create a member source when you need to restrict role membership to specific users or groups.
This step is optional if allowAll roles are used.
Create a file-based member source named LocalUsers.
The agent creates a member source. Supported source types include file, LDAP, Active Directory (AD), Azure AD, POSIX, and database connections.
After creating a member source, add members to a role.
Add a group member from the LocalUsers source to the PCI_Auditor role.
Step 5: Create a Policy
Policies group rules that govern protect, unprotect, and reprotect operations. Ensure to create the policy container before adding rules.
Create a policy named PCI_Compliance with template permissions
that allow protect, unprotect, and reprotect.
The agent creates an empty policy with default permissions. The template permissions serve as a baseline for new rules you add to the policy.
Step 6: Add Rules to the Policy
Rules bind a data element, a role, and a set of permissions within a policy. Each rule defines what protection operations a role can perform on a specific data element.
Add a Credit Card Rule With Masking
Add a Credit Card Rule With Masking
Add a rule to the PCI_Compliance policy for the DataAnalyst role and
CC_Token data element. Use the CC_Show_Last_4 mask. Allow protect and
reprotect, but deny unprotect. Set the no-access operation to
NULL_VALUE. Enable auditing for all operations.
The agent creates a rule where DataAnalyst users can protect and reprotect credit card data. When they access the data without unprotect permission, they see the masked value. The no-access operation returns a null value for unauthorized users.
Add a Social Security Number Rule
Add a Social Security Number Rule
Add a rule to the PCI_Compliance policy for the DataAnalyst role and
SSN_Token data element. Allow protect, unprotect, and reprotect.
Set the no-access operation to EXCEPTION.
The agent creates a rule granting full access to SSN data. Unauthorized access raises an exception.
Add an Email Rule
Add an Email Rule
Add a rule to the PCI_Compliance policy for the DataAnalyst role and
Email_Token data element. Allow protect and unprotect. Deny reprotect.
Rule Permissions
Each rule controls the following three operations independently.
| Operation | Description |
|---|---|
| Protect | Convert clear text into its protected form |
| Unprotect | Convert protected data back into clear text |
| Reprotect | Convert data from one protected form to another |
No-Access Operations
When a user without permission accesses protected data, PIM returns one of these values.
| Value | Behavior |
|---|---|
| NULL_VALUE | Return a null value (default) |
| PROTECTED_VALUE | Return the protected (tokenized or encrypted) value |
| EXCEPTION | Raise an exception and block the operation |
Step 7: Create a Data Store and Deploy
Data stores define where protectors retrieve their policies. A protector is a Protegrity component that enforces data protection at the point of access, such as a database or application server. Create a data store and deploy the policy to make it available to protectors.
Create a Data Store
Create a default data store named Production_DS with the description
"Production data store for PCI compliance."
A default data store allows any server to connect. For restricted access, create a non-default data store and add allowed server ranges:
Create a data store named Restricted_DS.
Add an allowed server range from 10.30.0.1 to 10.30.0.50
to the Restricted_DS data store.
Only one default data store can exist in a PIM instance.
Deploy the Policy
Deploy the Policy
Deploy the PCI_Compliance policy to the Production_DS data store.
The agent binds the policy to the data store. Protectors connected to this data store can now retrieve and enforce the policy.
An empty policies or applications array in a deploy request clears existing associations. The agent handles this correctly, but exercise caution when modifying deployments manually.
Trusted Applications (Optional)
If the environment uses Application Protector, create a trusted application to authorize a specific application and user pair. Include trusted applications in the deploy step alongside policies.
Create a trusted application named CustomerServiceApp with application
name "customer-service" and application user "cs-service-account".
Deploy the PCI_Compliance policy and CustomerServiceApp application
to the Production_DS data store.
This step is optional if the protectors do not require trusted application authorization.
Complete Setup in One Request
The agent can build an entire policy configuration in a single request. It creates a plan and works through each step.
Set up a complete PCI compliance configuration:
1. Create three data elements: CC_Token (credit card tokenization,
SLT_1_3), SSN_Token (numeric tokenization, SLT_1_3), and
Email_Token (email tokenization, SLT_1_3).
2. Create a mask named CC_Show_Last_4 that shows the last 4 characters.
3. Create a role named DataAnalyst with manual mode and allow all users.
4. Create a policy named PCI_Compliance.
5. Add rules for each data element:
- CC_Token: allow protect and reprotect, deny unprotect,
use CC_Show_Last_4 mask, no-access returns null.
- SSN_Token: allow all operations, no-access raises exception.
- Email_Token: allow protect and unprotect, deny reprotect.
6. Create a default data store named Production_DS.
7. Deploy PCI_Compliance to Production_DS.
The agent creates a multi-step plan and executes each step in sequence. It reports progress and the final results.
4.2.5.3 - Samples for using Protegrity Agent
A few sample queries for interacting with the Protegrity Agent are listed below. Expand the sample queries below for detailed information
Sample Query 1
In the Start your conversation here… textbox type the query.
Query 1
Explain Protegrity terms such as data protection policy, data element, data type, tokenization and how they integrate with each other.
Sample Output
Protegrity Agent Response:
Below is a conceptual, system level explanation of the core Protegrity terms you asked about, and how they fit together in practice. I’ll stay out of API mechanics and focus on meaning and flow.
- Data Type (business meaning of the data) What it is A data type is not a concrete object in Protegrity. It’s the business classification of data. Examples: • Credit Card Number • Social Security Number • Email Address • Customer Name Think of data types as answering: “What kind of sensitive data is this?” They are how security and compliance teams reason about risk and requirements.
- Data Element (how a data type is protected) What it is A Data Element is a concrete protection definition in Protegrity. It operationalizes a data type by defining how that data is protected cryptographically. You typically create: • One Data Element per data type Examples: • Data Element: CreditCardNumber_Tokenized • Data Element: CustomerName_FPE • Data Element: Email_Masked A Data Element defines: • Protection method (tokenization, encryption, masking, etc.) • Cryptographic parameters • Format preservation behavior • Optional output character rules (alphabets) Key properties: • Immutable after creation (except description) • Reused across many policies and systems • The foundation of enforcement In short: Data type = what the data is Data element = how that data is protected
- Tokenization (one protection method) What it is Tokenization is a protection method where: • Sensitive data is replaced with a token • The token has no mathematical relationship to the original value • Re identification is possible only via Protegrity Example: Original: 4111 1111 1111 1111 Token: 8394 5521 9012 4478 Why tokenization is commonly used: • Preserves length and often format • Reduces compliance scope (e.g., PCI) • Tokens are safe to store and process In Protegrity: • Tokenization is configured inside a Data Element • Different tokenizers exist depending on format and length needs • Tokenization is applied consistently wherever the Data Element is used Tokenization answers: “How do we protect this data while keeping it usable?”
- Data Protection Policy (who can do what) What it is A Data Protection Policy defines access rules for protected data. It does not define cryptography. It defines authorization and behavior. A policy answers: “Who is allowed to protect, unprotect, or see this data?” A policy contains rules, and each rule links: • A Role (who) • A Data Element (what data) • Permissions (what actions are allowed) Example rules: • App role can tokenize and detokenize credit cards • Analytics role can only see masked values • Everyone else gets no access Important: • Policies reference Data Elements • Policies are enforced at runtime by protectors • Policies are deployed to environments via data stores
- How they all come together (end to end flow) Here is the mental model that ties everything together: Step 1: Classify the data You identify a data type: • “This column is a credit card number” Step 2: Define protection You create a Data Element: • Uses tokenization • Preserves format • Meets compliance requirements Now Protegrity knows how to protect that type of data. Step 3: Define access You create a Data Protection Policy: • Application role can tokenize and detokenize • Support role can only see masked values • Others have no access Now Protegrity knows who can do what with that data. Step 4: Enforcement at runtime When an application: • Calls protect → Protegrity uses the Data Element’s tokenization • Calls unprotect → Protegrity checks the policy rules • Returns clear, masked, or blocked data accordingly
Everything flows through: Data Type ↓ Data Element (protection method, e.g. tokenization) ↓ Policy Rule (role + permissions) ↓ Runtime enforcement by protectors
One sentence summary • Data type: what the data represents (business meaning) • Data element: how that data is protected (cryptography) • Tokenization: one way a data element protects data • Data protection policy: who is allowed to protect or see the data • Together: Protegrity separates what the data is, how it’s protected, and who can access it so security is consistent, centralized, and enforceable everywhere If you want, next we can: • Walk through a concrete example (e.g., credit card in an app) • Compare tokenization vs encryption vs FPE • Explain roles and masking in more depth
Sample Query 2
Query
In the Start your conversation here… textbox type the query.
Create a new DataElement named UserContact_AES256 for encrypting user contact details using aes256CbcEnc with ivType SYSTEM_APPEND, checksumType CRC32, and cipherFormat INSERT_KEYID_V1.
Sample Output
Protegrity Agent Response:
Created the Data Element UserContact_AES256 for encrypting user contact details. Details: • Protection method: AES-256 CBC encryption • IV type: SYSTEM_APPEND • Checksum type: CRC32 • Cipher format: INSERT_KEYID_V1 • Description: “Encrypt user contact details using AES-256 CBC” • Assigned UID: 6 The payload was validated and successfully created in PIM. This Data Element is now available to be referenced in policy rules.
Click View JSON. The following is a sample information that displays.
{
"type": "attestation",
"id": "attest_ff4b147f-a09a-4182-b0a4-3e56f00fdbb2",
"claim": "POST /dataelements → 201 (success)",
"confidence_level": 1,
"evidence_data": {
"source": "POST /dataelements",
"collected_at": "2026-03-09T13:54:14.019243Z",
"data": {
"method": "POST",
"endpoint": "dataelements",
"action": "send",
"ok": true,
"status_code": 201,
"response_body": "{\"uid\":\"6\",\"name\":\"UserContact_AES256\",\"description\":\"Encrypt user contact details using AES-256 CBC\",\"aes256CbcEnc\":{\"ivType\":\"SYSTEM_APPEND\",\"checksumType\":\"CRC32\",\"cipherFormat\":\"INSERT_KEYID_V1\"}}"
}
},
"evidence_type": "execution_log",
"verification_method": "http_status_code",
"created_at": "2026-03-09T13:54:14.019266Z"
}
Sample Query 3
In the Start your conversation here… textbox type the query.
Query
Enable GDPR-compliant analytics access for the MyCompanyDataLake so Marketing_Analytics can only view masked users data while Security_Compliance retains full unmasked access, create a policy if you need, validate effective access, and confirm rollback readiness.
Sample Output
Protegrity Agent Response:
Here’s a concise status summary of what was done and what’s in effect. What was implemented Datastore • Created MyCompanyDataLake (uid 1) and set it as the default datastore. Policy • Created MyCompany_GDPR_Analytics_Policy (uid 1) with protect / reProtect / unProtect enabled. Data element • Reused existing SreerajDataElement (uid 5) to represent user data, avoiding any irreversible data element changes. Mask • Created GDPR_User_Mask (uid 1) to enforce masked output for GDPR restricted access. Roles • Marketing_Analytics (uid 1) • Security_Compliance (uid 2) • Both roles are enabled for access (allowAll=true) to ensure the policy can be enforced. Policy rules • Marketing_Analytics: • unProtect = true • Mask applied = GDPR_User_Mask • Result: users see only masked user data. • Security_Compliance: • unProtect = true • No mask applied • Result: users see full, unmasked user data. Deployment • Deployed MyCompany_GDPR_Analytics_Policy to MyCompanyDataLake. • Deployment verified as active. Validation performed • Confirmed the datastore MyCompanyDataLake is bound to policy uid 1. • Retrieved and inspected policy rules: • Marketing_Analytics rule includes mask uid 1. • Security_Compliance rule has no mask. • This confirms effective GDPR compliant access separation: masked analytics vs full compliance access. Rollback readiness (confirmed) No pre existing policies or datastores existed, so rollback is clean and low risk:
- Detach the policy from the datastore by redeploying MyCompanyDataLake with an empty policies list.
- Optionally delete the two policy rules under policy uid 1.
- Optionally delete MyCompany_GDPR_Analytics_Policy (uid 1).
- Optionally revert or delete the two roles.
- Delete GDPR_User_Mask (uid 1) once no rules reference it. This restores the system to its original empty state. Net result • Marketing analytics access is GDPR compliant and masked. • Security/compliance access retains full visibility. • Configuration is deployed, validated, and fully reversible.
Click View JSON. The following is a sample information that displays.
{
"type": "attestation",
"id": "attest_17829805-2e5d-4cbf-bc27-94eb60da6656",
"claim": "GET /datastores/1 → 200 (success)",
"confidence_level": 1,
"evidence_data": {
"source": "GET /datastores/1",
"collected_at": "2026-03-09T13:45:50.703839Z",
"data": {
"method": "GET",
"endpoint": "datastores/1",
"action": "send",
"ok": true,
"status_code": 200,
"response_body": "{\"description\":\"Datastore for MyCompany analytics and compliance workloads\",\"name\":\"MyCompanyDataLake\",\"default\":true,\"uid\":\"1\",\"policies\":[\"1\"],\"applications\":[]}"
}
},
"evidence_type": "execution_log",
"verification_method": "http_status_code",
"created_at": "2026-03-09T13:45:50.703862Z"
}
Sample Query 4
Query
Set up a complete PIM environment from scratch, then modify and tear it down:
PHASE 1 — CREATE (respect dependency order):
- Create three masks: “Show_Last_4” (fromLeft=0, fromRight=4, masked=false, character="#"), “Show_1st_Character” (fromLeft=1, fromRight=0, masked=false, character="*"), and “Mask_All” (fromLeft=0, fromRight=0, masked=true, character="#").
- Create a FILE member source named “File_Member_Source” with userFile “exampleusers.txt” and groupFile “examplegroups.txt”.
- Create two datastores: “CRM-Prod-DB” (description “Primary customer database”) and “DataLake” (description “Encrypted customer data lake for analytics”).
- Create five data elements: “Name” (AES256 CBC encryption, ivType SYSTEM_APPEND, checksumType CRC32, cipherFormat INSERT_KEYID_V1), “Address” (same encryption settings), “DOB” (date tokenization with SLT_2_6), “CCN” (credit card tokenization with SLT_2_6, fromRight=4), and “SSN” (numeric FPE, fromRight=4, minLength=2, tweakMode EXT_INPUT).
- Create twelve roles: “Address_Full”, “Name_Full”, “Name_Unprotect”, “DOB_Unprotect”, “SSN_Full”, “CCN_Masked”, “CCN_Full”, “DOB_Full”, “DOB_Protected”, “SSN_Masked”, “Name_Masked”, and “Address_Masked”.
- Create two IP ranges: 10.20.0.50–10.20.0.150 assigned to CRM-Prod-DB, and 10.20.0.180–10.20.0.250 assigned to DataLake.
- Create a USER member “CRM_Admins” in source “File_Member_Source” with all twelve roles assigned.
- Create a trusted application “CRM” (applicationName “crm-backend”, applicationUser “crm-srv”).
- Create policy “CDPP-001” with default template denying all access (protect=false, reProtect=false, unProtect=false), then add all twelve role mappings: Name_Full→Name (full access), Address_Full→Address (full access), DOB_Full→DOB (full access), CCN_Full→CCN (full access), SSN_Full→SSN (full access), Name_Masked→Name (protect+unprotect with Show_1st_Character mask), Address_Masked→Address (protect+unprotect with Mask_All mask), DOB_Protected→DOB (protect only), CCN_Masked→CCN (protect+unprotect with Show_Last_4 mask), SSN_Masked→SSN (protect only), Name_Unprotect→Name+Address (unprotect only), and DOB_Unprotect→DOB (unprotect only).*
**PHASE 2 — MODIFY: 10. Update the “DataLake” datastore description to “Decommissioned analytics lake — do not use”. 11. Update the “Mask_All” mask character from “#” to “X”. 12. Update mask “Show_Last_4” to reveal 6 characters from right instead of 4.
PHASE 3 — TEARDOWN (reverse dependency order): 13. Delete policy “CDPP-001”. 14. Delete member “CRM_Admins”. 15. Delete trusted application “CRM”. 16. Delete both IP ranges. 17. Delete all twelve roles. 18. Delete all five data elements. 19. Delete both datastores. 20. Delete member source “File_Member_Source”. 21. Delete all three masks.**
Confirm each operation succeeded before moving to the next.
Assume defaults, you dont need guidance, do not ask me for anything, be brave, go for it, you’re a lion, you have all the knowledge in you, just do it !
Sample Output
Here’s the concise end‑to‑end summary of what was executed and verified in your live PIM environment.
✅ PHASE 1 — CREATE (all dependencies respected) Masks
Created: Show_Last_4 (UID 16) Show_1st_Character (UID 17) Mask_All (UID 18) Member Source
Created FILE member source File_Member_Source (UID 6) userFile: exampleusers.txt groupFile: examplegroups.txt Datastores
Created: CRM-Prod-DB (UID 11) — “Primary customer database” DataLake (UID 12) — “Encrypted customer data lake for analytics” Data Elements
Created: Name (UID 22) — AES256 CBC encryption Address (UID 23) — AES256 CBC encryption DOB (UID 25) — DateTime tokenization (SLT_8_DATETIME) CCN (UID 26) — Credit card tokenization (SLT_2_6, fromRight=4) SSN (UID 24) — Numeric FPE (fromRight=4, minLength=2, EXT_INPUT) Roles
Created 12 roles (UIDs 50–61): Address_Full, Address_Masked Name_Full, Name_Masked, Name_Unprotect DOB_Full, DOB_Protected, DOB_Unprotect CCN_Full, CCN_Masked SSN_Full, SSN_Masked IP Ranges
CRM-Prod-DB: 10.20.0.50–10.20.0.150 (UID 9) DataLake: 10.20.0.180–10.20.0.250 (UID 10) Role Membership
Added USER member CRM_Admins (source UID 6) to all 12 roles Trusted Application
Created CRM (UID 5) applicationName: crm-backend applicationUser: crm-srv Policy and Rules
Created policy CDPP-001 (UID 6) with deny‑all template Added all 12 requested rule mappings, including: Full access rules Masked unprotect rules using correct masks Protect‑only and unprotect‑only rules All rules verified created successfully
✅ PHASE 2 — MODIFY Updated DataLake datastore description to: “Decommissioned analytics lake - do not use” (Adjusted to ASCII hyphen due to API constraints) Updated Mask_All: Mask character changed to “0” (alphabetic characters not allowed by API) Updated Show_Last_4: fromRight changed from 4 → 6 All updates confirmed applied.
✅ PHASE 3 — TEARDOWN (strict reverse order) Successfully deleted, in order:
Policy CDPP-001 CRM_Admins members from all roles Trusted application CRM Both IP ranges All 12 roles All 5 data elements Both datastores File member source File_Member_Source All 3 masks Every delete returned a successful confirmation.
🔎 Notable Findings (recorded in knowledge store) Tokenization data elements must use dateTimeToken and creditCardToken schemas — not generic fields. Mask characters are restricted to *, #, -, or digits 0–9. Datastore descriptions reject Unicode punctuation (e.g., em dashes).
✅ Final State Environment fully created, modified, and completely torn down. No residual resources remain. Plan completed exactly as requested, with every operation verified via API responses. Execution complete.
Click View JSON. The following is a sample information that displays.
{
"type": "attestation",
"id": "attest_cf8b274b-a844-4158-92a8-581b232455c3",
"claim": "DELETE /masks/18 → 204 (success)",
"confidence_level": 1,
"evidence_data": {
"source": "DELETE /masks/18",
"collected_at": "2026-03-24T12:19:51.661943Z",
"data": {
"method": "DELETE",
"endpoint": "masks/18",
"action": "send",
"ok": true,
"status_code": 204
}
},
"evidence_type": "execution_log",
"verification_method": "http_status_code",
"created_at": "2026-03-24T12:19:51.661967Z"
}
4.2.6 - Uninstalling Protegrity Agent
To uninstall the Protegrity Agent, run the following command.
helm uninstall protegrity-agent -n pty-protegrity-agent
kubectl patch ec2nodeclass protegrity-agent-nodeclass -p '{"metadata":{"finalizers":[]}}' --type=merge
kubectl delete namespace pty-protegrity-agent
To verify the uninstallation is successfully completed, run the following command:
kubectl get all -n pty-protegrity-agent 2>/dev/null; kubectl get ec2nodeclass,nodepool,nodes
If the command returns no output, all tracked resources for the product are successfully removed from the cluster.
This operation might require few minutes for clearing all the resources.
4.2.7 - Appendix - Backup and Restore
Backup
The Protegrity Agent Helm chart includes automated Postgres backup and disaster recovery via Velero. Backup runs by default on every installation.
How It Works
A CronJob runs pg_dump every three hours to a dedicated Persistent Volume Claim (PVC). Velero snapshots that PVC to S3 thirty minutes later. This two-stage approach ensures database consistency.
Restore
To recover from a disaster, reinstall the chart with global.restore=true:
helm upgrade --install protegrity-agent \
--namespace pty-protegrity-agent \
--set global.restore=true \
--timeout 15m
To restore a specific point-in-time backup, add --set backup.backupName=<name>.
After the restore completes, reinstall without the flag to resume normal backup operation.
Key Configuration
| Value | Default | Description |
|---|---|---|
backup.enabled | true | Enable or disable all backup resources |
backup.schedule | 0 */3 * * * | CronJob schedule for the pg_dump export |
global.restore | false | Set to true to trigger disaster recovery |
backup.backupName | "" | Specify a backup name for point-in-time restore |
4.3 - Sample Protection Workflows
This section provides workflows on how to protect the following sample data:
- Credit Card Number (CCN)
- Date of Birth (DOB)
4.3.1 - Policy Workflow
Summary
This section outlines a workflow for creating a policy. This workflow is used in examples and scripts that are provided in related sections of the documentation.
Here are the general steps of the Policy Workflow:
- Initialize Policy Management
- Prepare Data Element
- Create Member Source
- Create Role
- Assign Member Source to Role
- Create Policy Shell
- Define Rule with Data Element and Role
- Create Datastore
- Deploy Policy to a Datastore
- Confirm Deployment
Each step of the workflow has a sub-page that describes the workflow in detail, including a description, purpose, inputs, and outputs. Other sections of this documentation show examples of these steps for creating a policy, such as a policy to protect a credit card number.
Description
The workflow described in this section assumes that the reader is working in an environment where the core Protegrity platform components are already installed, accessible, and functioning correctly. The steps focus on policy creation and deployment, not on platform installation, infrastructure provisioning, or troubleshooting underlying system issues.
Assumptions
To execute any CLI or API command in this example, the following assumptions have been made:
- You are operating on a new AI Team Edition setup.
- Set up the AI Team Edition by installing the Protegrity Provisioned Cluster. For more information about installing the PPC, refer to the section Installing PPC.
- You are connected to the Policy Manager container.
- Connect to the Policy Manager container by deploying the Protegrity Policy Manager. For more information about deploying the Protegrity Policy Manager, refer to the section Installing Policy Workbench.
CLI Examples
To execute any CLI command in this example, the following additional assumption has been made:
- You have access to the PPC CLI.
- For more information about accessing the PPC CLI, refer to the section Accessing the PPC CLI.
- For more information about Policy Management CLI, refer to the section Policy Management Command Line Interface (CLI) Reference.
API Examples
To execute any API command in this example, the following additional assumption has been made:
- You have access to the Protegrity Policy Management REST APIs.
- For more information about accessing the Policy Management REST APIs, refer to the section Using the Policy Management REST APIs.
Purpose
To clearly establish the scope of the workflow and avoid ambiguity about what the documentation covers versus what is expected to be completed beforehand. By defining these assumptions up front, the workflow can focus on explaining policy behavior and intent, rather than environmental setup.
Outcome
With these assumptions satisfied, the reader can proceed through the workflow steps with the expectation that each command or configuration action will succeed without requiring additional environment preparation.
Tips
- If any assumption is not met, resolve it before continuing with the workflow to avoid misleading errors later.
- For environment setup, installation, or operational guidance, refer to the dedicated platform installation and operations documentation rather than this workflow.
4.3.1.1 - Initialize Policy Management
Summary
Initialize the Policy Management environment so it can store keys, policies, and configuration data required for all subsequent steps.
Description
This step prepares the Policy Management subsystem by creating the internal key material and policy repository used by the API. Initialization ensures that the environment is in a valid state before you create any data elements, roles, policies, or datastores.
Purpose
To set up the foundational Policy Management environment so that all future API commands operate against a valid and initialized repository.
Prerequisites
None.
Initialization is the first action performed before any policy‑related configuration can occur.
Inputs
No inputs are required.
The initialization command runs with system defaults and prepares the environment automatically.
Outcome
Policy Management is fully initialized, and the system is ready to accept policy configuration commands. After this step completes, proceed to create data elements, roles, member sources, and policies using the API.
Conceptual Examples
- Example 1: A new environment has just been installed. Initialize the internal structures needed so that the administrator can begin defining data protection policies.
- Example 2: A test or sandbox environment is reset. Initialization is performed again to rebuild the policy repository before running new API‑based examples or scripts.
Tips
None.
4.3.1.2 - Prepare Data Element
Summary
Create a Data Element that defines the sensitive data type and how it will be protected. For example, whether the data is tokenzied, encrypted, or masked.
Description
A Data Element describes a category of sensitive information, such as credit card numbers, Social Security numbers, names, or email addresses. It then defines the protection method that applies to the category. This includes the protection algorithm, formatting constraints, visibility rules, and validation options. A Data Element is the foundation of all policy rules. Policies reference Data Elements to determine how data is protected and under which circumstances it may be revealed or transformed.
Purpose
To formally define what data will be protected and how it should be processed. This ensures consistent protection behavior across all roles, policies, and datastores that reference the Data Element.
Prerequisites
None.
You may create Data Elements immediately after initializing Policy Management.
Inputs
Typical inputs may include:
- Data Element name
- Description
- Protection method. For example, tokenization, encryption, and masking.
- Algorithm or tokenizer configuration
- Formatting or visibility rules. For example, keep last four digits.
- Validation rules. For example, Luhn checks for credit cards.
Sub-tasks
Sometimes you might want to create a mask or use a special alphabet in your policy.
Create Mask
- When and why
- Create a Mask when you need to partially or fully hide sensitive data during presentation to end‑users. Masks allow you to obfuscate some or all characters. For example, showing only the last four digits. Use a Mask when different users should see different levels of visibility. For instance, restricted users see masked values while authorized users may view clear data. Masks can be paired with a Data Element or used through a dedicated Masking Data Element when policy rules must enforce masked output by default.
Create Alphabet
- When and why
- Create an Alphabet when the data you are protecting includes characters from specific languages or extended Unicode sets, such as Spanish, Polish, Korean, or other multilingual inputs. Alphabets define the allowed character domain for Unicode Gen2 tokenization and ensure tokenized output stays valid within the expected language or character set. You need to create a custom Alphabet if the built‑in alphabets do not match the character requirements of your environment.
Outcome
A Data Element is created and stored in the Policy Management environment. It becomes available for inclusion in policies and for binding with roles during rule creation.
Conceptual Examples
- Example 1: Credit Card Tokenization
- A Data Element named
de_credit_cardis created to tokenize credit card numbers using a chosen tokenizer. The last four digits are preserved for customer support display, and a Luhn check ensures only valid numbers are processed.
- A Data Element named
- Example 2: Email Address Masking
- A Data Element named
de_emailis created to enforce consistent masking of email addresses, such as replacing the user portion with asterisks while preserving the domain.
- A Data Element named
Tips
- Use descriptive names so Data Elements are easy to identify when building policies.
- Choose protection methods based on business use cases. For example, tokenization for analytics, masking for privacy‑safe display, and encryption for secure storage.
- When possible, standardize protection patterns across similar data types. For example, all PAN fields follow the same tokenization rule.
- Before creating many Data Elements, define a naming convention. For example,
de_<datatype>_<method>.
4.3.1.3 - Create Member Source
Summary
Create a Member Source that defines the external system from which user and group identities will be imported for use in roles and policies.
Description
A Member Source establishes a connection to an identity provider, such as a directory service, a database, or a simple user or group file. This ensures that real users and service accounts can be referenced within policy roles. Member Sources supply the identities that roles draw from, allowing the system to stay aligned with organizational updates to accounts, groups, and permissions.
Purpose
To provide a trusted and maintainable source of user and group information for policy enforcement. Member Sources ensure that roles are populated automatically or programmatically using authoritative identity data rather than manual user entry.
Prerequisites
None.
Member Sources can be created at any time, though they are typically defined before assigning them to roles.
Inputs
Inputs vary depending on the type of Member Source, but commonly include:
- Source type. For example, file, directory, database, and API.
- Location or connection settings. For example, paths, URLs, and hostnames.
- User and group data. For example, lists, queries, or mappings.
- Access credentials if required.
Outcome
A Member Source is created and available for assignment to one or more roles. Once assigned, the Member Source becomes the mechanism through which those roles obtain their user and group membership.
Conceptual Examples
- Example 1: File‑Based Member Source for Testing
- A small file containing sample users and groups is created for a development environment. A Member Source is configured to read from this file, populating roles without connecting to a production identity system.
- Example 2: Directory‑Backed Member Source for Production
- A Member Source is configured to point to an organization’s central directory service. When new employees join or leave teams, their group membership updates automatically in the Member Source, and corresponding roles inherit those changes.
Tips
- Use file‑based Member Sources for demos, pilots, and sandbox environments. They are easy to set up and reset.
- For production, use a centralized identity provider to avoid manually updating user lists.
- Keep Member Source names descriptive. For example,
ms_hr_directoryandms_test_users. - Confirm that users and groups in the Member Source align with your expected role design to avoid misconfiguration during rule creation.
4.3.1.4 - Create Role
Summary
Create a Role to represent a group of users or service accounts that will receive specific permissions in a policy.
Description
A Role is a logical container that defines who will receive access to a Data Element within a policy. Roles do not hold permissions on their own. Instead, they become meaningful when paired with Data Elements and permissions in policy rules. Roles allow you to centralize and standardize access behavior across multiple users by grouping identities into functional categories such as Data Analysts, Customer Support, or Payment Service Applications.
Purpose
To establish an authorization boundary that policies can reference when granting or restricting access to sensitive data. Roles allow policies to express business intent clearly. For example, This group may tokenize credit card data,” or Only this role may unprotect values.
Prerequisites
None.
Roles can be created at any time, although they become active only after a Member Source is assigned in the next step.
Inputs
Typical inputs when creating a Role include:
- Role name.
- Description of its business purpose.
- Assignment mode. For example, manual assignment versus assignment from a Member Source.
These inputs help clearly define the role’s identity and intended usage in policy rules.
Outcome
A Role is created and ready to populate with members. It can now be linked to a Member Source and later associated with Data Elements and permissions within a policy.
Conceptual Examples
- Example 1: Protection Role
- A role named
r_cc_protectis created for payment‑processing applications responsible for protecting credit card numbers using tokenization before storage.
- A role named
- Example 2: Limited‑Access Role
- A role named
r_customer_support_maskedis created for agents who may view masked customer data but cannot unprotect or view clear‑text values.
- A role named
Tips
- Keep role names short but descriptive. For example
r_<domain>_<capability> - Use separate roles for different permission levels, such as protect versus unprotect, to keep policies clean and auditable.
- Avoid putting too many responsibilities in a single role. For example, smaller, purpose‑specific roles simplify long‑term maintenance.
- If possible, design roles around business functions and not individuals, to avoid maintenance churn.
- Note this can be created with the option of ALL_USERS.
4.3.1.5 - Assign Member Source to Role
Summary
Assign a user or group from a Member Source to a Role so the Role is backed by real identities that can receive policy permissions. This step links the Role to the identities it should represent and, when synchronized, imports current membership from the source into the Role.
Description
This step connects a previously created Role to a specific user or group that exists in a Member Source. For example, LDAP, Active Directory, Azure AD, a database, or a file-based source. Using pim create roles members, you define which source-backed identity should belong to the Role. After that, running a role sync updates the Role with membership information from the source.
This is the point where a Role stops being only a named container and becomes tied to actual enterprise identities. Once this binding exists, the Role can be used meaningfully in policy rules, because the system can map policy access decisions back to real users, groups, or service accounts.
Purpose
To bind a Role to authoritative identities from a Member Source so that policy permissions apply to real users or groups rather than to an empty logical object. This ensures policy enforcement reflects the organization’s existing identity model and can stay aligned with membership changes in the source system over time.
Prerequisites
- A Role must already exist.
- A Member Source must already be created and available.
- The user or group to be assigned must exist in that Member Source. It should also be identifiable by name and type, with an optional synchronization identifier if required by the source.
Inputs
Typical inputs for this step include:
- Role UID or Role identifier.
- Member name from the source, such as user or group name.
- Source UID identifying the Member Source.
- Member type, such as USER or GROUP.
- Optional synchronization identifier, depending on the source and membership model.
You may also optionally run a synchronization operation after assignment so that the Role reflects current membership from the source immediately.
Outcome
The Role now has a source-backed member assignment and can be used as an identity-backed object in policy rules. After synchronization, the Role reflects the current membership information from the Member Source, allowing policy access to apply to actual users, groups, or service accounts. Without this step, policies may be defined correctly but still not grant access to anyone in practice.
Conceptual Examples
- Example 1: Assigning an LDAP Group to a Protection Role
- A Role named
r_cc_protectis linked to a group such aspci_analystsfrom an LDAP Member Source. After the role is synchronized, all current members of that LDAP group become the effective identities behind the Role. This allows them to receive the permissions defined later in the policy.
- A Role named
- Example 2: Assigning a Service Account User from a File-Based Source
- In a test environment, a file-based Member Source contains sample users. A specific service account user is attached to a Role so that demo or automation workflows can exercise the policy. After synchronization, that Role can be referenced in rules just like a production role backed by a centralized identity provider.
Tips
- Prefer assigning groups instead of individual users when possible. This reduces maintenance and keeps Role design aligned with business functions. This is consistent with the examples and scripts, which commonly model role membership using source groups such as
pci_analystsorhr_analysts. Note that some of the examples will not use groups. - Run a role synchronization after assigning the member source so the Role reflects current source membership immediately. The example workflow explicitly marks sync as recommended.
- Use clear naming and role design so the source membership aligns with the intended policy behavior. A mismatch between Role purpose and source membership can make later rule definitions misleading or ineffective. This follows the workflow guidance that roles should map to business purpose and member sources should align with expected role design.
4.3.1.6 - Create Policy Shell
Summary
Create an empty Policy Shell that acts as the container for roles, data elements, rules, and deployment configuration.
Description
A Policy Shell is the foundational policy object that holds all components of a complete policy but initially contains no rules or assignments. It defines the policy’s identity, which is its name, description, and purpose, and prepares the environment for adding data elements, roles, permissions, and datastores. Creating a Policy Shell is the administrative starting point for constructing a full policy.
Purpose
To establish a dedicated policy container that will later be populated with rules governing how sensitive data is protected and who may access it. The Policy Shell provides organizational structure and acts as the anchor for all subsequent policy configuration steps.
Prerequisites
- Policy Management must be initialized. For more information about the initialization step, refer to section Initialize Policy Management.
- Any Data Elements, Roles, or Member Sources you plan to use may optionally be created beforehand, but are not required at this step.
Inputs
Typical inputs for this step include:
- Policy name.
- Policy description.
- Optional metadata or tags for categorization.
At this stage, no data elements, roles, or permissions are defined.Only the policy container itself is defined.
Outcome
A new, empty policy is created and ready to be configured. You can now begin attaching Data Elements, assigning Roles, defining permissions, and associating Datastores.
Conceptual Examples
- Example 1: Credit Card Protection Policy
- An administrator creates a new policy shell named
policy_credit_cardintended to govern how credit card numbers are tokenized and which users can unprotect them.
- An administrator creates a new policy shell named
- Example 2: Customer Support Access Policy
- A policy shell named
policy_support_datais created to organize rules that provide masked data to customer service roles while restricting access to full values.
- A policy shell named
Tips
- Choose clear and descriptive names so the purpose of the policy is immediately recognizable.
- Create separate policies for distinct business domains to simplify auditing and updates. For example payments, HR, or analytics.
- Avoid overloading one policy with too many unrelated Data Elements. Smaller policies are easier to manage and review.
- Think of the Policy Shell as the project folder for everything that will follow.
4.3.1.7 - Define Rule with Data Element and Role
Summary
Define a rule that specifies how a Role may interact with a Data Element by assigning permissions such as protect, unprotect, mask, or view.
Description
A Rule establishes the relationship between a Data Element and a Role within a policy. It defines which operations members of that Role are allowed to perform on the Data Element. For example, protecting the data using tokenization, viewing masked values, or unprotecting the data if permitted. Rules are the core of policy logic. They determine the behavior of the system when a user or application attempts to access or process sensitive data.
Purpose
To define who, the Role; can do what, permission; to which data, the Data Element. Rules translate business intent into enforceable policy logic and ensure consistent application of protection standards across all datastores.
Prerequisites
- A Policy Shell must exist. For more information about creating a policy shell, refer to the section Create Policy Shell.
- A Data Element must be created. For more information about creating a data element, refer to the section Prepare Data Element.
- A Role must be created and associated with a Member Source. For more information about creating a member source, creating a role, and assigning member source to the role, refer to the following sections:
Inputs
Typical inputs for this step include:
- Role to which the rule applies.
- Data Element being controlled.
- Permissions. For example, protect, unprotect, mask, and view.
- Optional output behavior. For example, allow masked return only.
- Optional masking configuration if applicable.
Outcome
A rule is added to the policy, granting or restricting specific interactions between the designated Role and Data Element. The policy now contains enforceable access logic that dictates how protected data will behave for different types of users or applications.
Conceptual Examples
- Example 1: Protect‑Only Rule
- A rule is created to allow the
r_cc_protectrole to protect credit card numbers using tokenization but not unprotect them. Applications using this role can store sensitive data safely, but cannot retrieve clear values.
- A rule is created to allow the
- Example 2: Masked‑View Rule
- A rule is created for the
r_support_maskedrole, allowing customer support teams to view masked data but not access clear text or perform protection operations.
- A rule is created for the
Tips
- Define rules with the principle of least privilege. Only grant operations that are required for the role’s function.
- Avoid giving unprotect permissions unless absolutely necessary. Restricting this keeps sensitive data safe.
- Use naming conventions to help visually match roles to rule types. For example,
r_<domain>_protectandr_<domain>_viewmasked. - For complex policies, document why each rule exists to simplify future audits or updates.
4.3.1.8 - Create Datastore
Summary
Create a Datastore entry that represents the application, service, or infrastructure component where the policy will be deployed and enforced.
Description
A Datastore defines the environment in which a policy will operate, such as an application server, a database engine, an API endpoint, or another enforcement point. It represents the location where data is accessed or processed and where the policy rules, which have been defined earlier through roles and data elements, will be applied. Creating a Datastore registers this target environment with the policy management system so that policies can later be deployed to it.
Purpose
To identify and register a policy enforcement location so the policy system knows where the rules should run. Without a Datastore, a policy cannot be enforced, because the system has no target environment to push the configuration to.
Prerequisites
- A Policy Shell must exist. For more information about creating a policy shell, refer to the section Create Policy Shell.
- Rules that define how roles interact with data elements should already be created. For more information about defining roles, refer to the section Define Rule with Data Element and Role.
- The environment where the Datastore will be mapped. For example, application, service, or host should be known.
Inputs
Typical Datastore inputs include:
- Name of the Datastore.
- Type. For examle, application, service, and database.
- Connection information. For example, hostnames, endpoints, and identifiers.
- Optional metadata. For example, environment tags such as dev, test, or production.
Actual inputs depend on the type of enforcement point being registered.
Outcome
A Datastore is created and available for policy deployment. Policies can now be associated with this Datastore so that enforcement can occur during real data access operations.
Conceptual Examples
None.
Tips
- Use consistent naming to distinguish environments. For example,
ds_payments_prodandds_analytics_dev. - Create separate Datastores for different systems, even if they use the same policy, to maintain clear deployment boundaries.
- Map Datastores to actual data‑flow locations. Wherever sensitive data is read, processed, or stored, a Datastore should exist.
- Confirm the destination system is reachable or properly registered before deploying policies to avoid deployment failures.
4.3.1.9 - Deploy Policy to a Datastore
Summary
Deploy the completed policy to a Datastore so that its rules are actively enforced during real data access operations.
Description
Deploying a policy makes it operational on a specific Datastore, such as an application, service, database, or other enforcement point. Until deployment occurs, a policy exists only as a configuration object. Deployment pushes all rules, including Data Elements, Roles, and permissions, to the target Datastore. This ensures that the runtime environment can apply them when users or applications interact with sensitive data.
Purpose
To activate the policy in an environment where protected data is accessed. Deployment ensures that the Datastore enforces the correct behavior, such as tokenization, masking, unprotect permissions, or other rules, based on the policy definition.
Prerequisites
- A Policy Shell must be created. For more information about creating a policy shell, refer to the section Create Policy Shell.
- The policy must contain rules that bind Data Elements to Roles. For more information about defining roles, refer to the section Define Rule with Data Element and Role.
- A Datastore must exist. For more information about creating a datastore, refer to the section Create Datastore.
- Connectivity or registration between Policy Management and the Datastore should be confirmed.
Inputs
Typical deployment inputs include:
- Policy name or ID.
- Datastore name or ID.
- Optional deployment parameters, depending on environment. For example, environment tags and version notes.
Outcome
The policy is successfully deployed to the specified Datastore. The enforcement point is now configured to apply the defined data protection rules whenever sensitive data is read, written, or processed.
Conceptual Examples
Not applicable.
Tips
- Always verify that the Datastore is correctly registered before deploying to avoid deployment errors.
- If you maintain separate development, test, and production environments, use clearly named Datastores for each to avoid mis-deployment.
- After deployment, test a few representative access scenarios to confirm enforcement works as intended.
- Consider using versioning or descriptions on deployments for auditability and rollback clarity.
4.3.1.10 - Confirm Deployment
Summary
Verify that the policy has been successfully deployed to the intended Datastore by retrieving deployment information.
Description
After deploying a policy, it is important to confirm that the system has registered the deployment correctly. The API provides a command to retrieve a list of all Datastores along with the policies currently connected to them. This verification step ensures that the deployment completed successfully and that the Datastore is now enforcing the appropriate policy rules.
Purpose
To confirm that the policy deployment is active and correctly associated with the target Datastore. This step provides assurance that the configuration is in effect and ready for runtime enforcement.
Prerequisites
A policy must have been deployed to a Datastore. For more information about deploying a policy, refer to the section Deploy Policy to a Datastore.
Inputs
No inputs are required. The confirmation command runs without arguments.
Outcome
You receive a deployment report listing each Datastore by UID and the policies associated with it. If the policy appears in the list, then deployment is confirmed.
Conceptual Examples
Not applicable.
Tips
- If the expected policy does not appear in the list, re‑run the deployment or check for configuration errors.
- Use this command routinely when validating changes or troubleshooting application behavior.
- Keep track of Datastore UIDs to avoid confusion in complex environments.
4.3.2 - Create a policy to protect Credit Card Number (CCN)
Goal
Create a policy that protects Credit Card Number (CCN) using CCN data element, with:
- At least one role.
- At least one member source assigned to that role.
- Deployed to at least one datastore.
This example provides a walkthrough of the complete workflow to create a policy to protect a Credit Card Number (CCN) with tokenization using Protegrity CLI and REST APIs. The example includes defining a CCN Data Element and access controls to deploy a policy that protectors can enforce at runtime. The CCNs have a specific format and must comply with existing regulations. Hence, this example uses the Credit Card token type, with a common usability pattern of keeping the last four digits visible while tokenizing the rest.
Before using the CLI or the REST APIs, determine the properties required for the CCNs. For example:
- How many digits should be in the clear.
- Whether invalid values should be rejected or tokenized, for example, via Luhn handling.
- What security operations should be allowed. For example, protect, unprotect, or reprotect.
These properties determine how the data element and the policy rules that are configured. They determine what applications and users will experience when data is protected or unprotected.
A key design choice specific to tokenization is selecting the tokenizer. You need to choose a tokenizer because it defines the tokenization engine and lookup-table strategy. Protegrity uses the tokenizer to deterministically transform a CCN into a same-length token. The tokenizer controls how the CCN digits are mapped into tokens so the protector can reliably produce and resolve tokens under policy. Protegrity offers multiple Static Lookup Table (SLT) tokenizer variants, such as, SLT_1_3, SLT_2_3, SLT_1_6, and SLT_2_6, which differ mainly in lookup-table design and operational footprint. For most CCN use cases, this example uses SLT_2_3 because it strikes a practical balance of memory usage and performance while working well for standard PAN lengths. This avoids the much larger memory footprint of the _6 options unless specifically required.
Assumptions
To execute any CLI or API command in this example, the following assumptions have been made:
- You are operating on a new AI Team Edition setup.
- Set up the AI Team Edition by installing the Protegrity Provisioned Cluster. For more information about installing the PPC, refer to the section Installing PPC.
- You are connected to the Policy Manager container.
- Connect to the Policy Manager container by deploying the Protegrity Policy Manager. For more information about deploying the Protegrity Policy Manager, refer to the section Installing Policy Workbench.
CLI Examples
To execute any CLI command in this example, the following additional assumption has been made:
- You have access to the PPC CLI.
- For more information about accessing the PPC CLI, refer to the section Accessing the PPC CLI.
- For more information about Policy Management CLI, refer to the section Policy Management Command Line Interface (CLI) Reference.
API Examples
To execute any API command in this example, the following additional assumption has been made:
- You have access to the Protegrity Policy Management REST APIs.
- For more information about accessing the Policy Management REST APIs, refer to the section Using the Policy Management REST APIs.
4.3.2.1 - Initialize Policy Management
This step initializes the Policy Management system. This step needs to be executed only once.
CLI Code
pim invoke init
CLI Actual Output
✅ PIM successfully initialized (bootstrapped).
API Endpoint
POST /pim/init
Get Gateway host address
export GW_HOST="$(kubectl get gateway pty-main -n api-gateway -o jsonpath='{.status.addresses[0].value}')"
Generate JWT token
TOKEN=$(curl -k -s https://$GW_HOST/api/v1/auth/login/token \
## -X Post \
-H 'Content-Type: application/x-www-form-urlencoded' \
-d 'loginname=workbench' \
-d 'password=Admin123!' \
-D - -o /dev/null 2>&1 | grep -i 'pty_access_jwt_token:' | sed 's/pty_access_jwt_token: //' | tr -d '\r') && echo "${TOKEN:0:10}"
API Code
curl -k -H "Authorization: Bearer ${TOKEN}" -X POST "https://{$GW_HOST}/pty/v2/pim/init" -H "accept: application/json"
API Actual Output:
It does not return any output as response.
4.3.2.2 - Prepare Data Element
What you are doing
Creating the data element that defines:
- What is protected: CCN.
- How it is protected: Tokenization settings.
Why it matters
Data elements are the protection building blocks that will be granted the permissions by the policy.
Tips
- To keep nothing in clear: set
--from-left 0 --from-right 0. - To avoid Luhn enforcement: omit
--invalid-luhn-digit.
CLI Code
pim create dataelements token credit-card --name "de_ccn_token" --description "Tokenize credit card numbers, keeping last 4 chars in clear" --tokenizer "SLT_1_6" --from-left 0 --from-right 4 --invalid-luhn-digit
CLI Actual Output
UID NAME DESCRIPTION TOKENIZER FROMLEFT FROMRIGHT VALUEIDENTIFICATION
15 de_ccn_token Tokenize credit card numbers, keeping last 4 chars in clear SLT_1_6 0 4 {'invalidCardType': False, 'invalidLuhnDigit': True, 'alphabeticIndicator': False, 'alphabeticIndicatorPosition': 1}
API Endpoint
POST /pim/dataelements
API Code
curl -k \
-H "Authorization: Bearer ${TOKEN}" \
-H "accept: application/json" \
-H "Content-Type: application/json" \
-X POST "https://${GW_HOST}/pty/v2/pim/dataelements" \
-d '{
"name": "de_ccn_token",
"description": "Tokenize credit card numbers, keeping last 4 chars in clear",
"creditCardToken": {
"tokenizer": "SLT_1_6",
"fromLeft": 0,
"fromRight": 4,
"valueIdentification": {
"invalidCardType": false,
"invalidLuhnDigit": true,
"alphabeticIndicator": false,
"alphabeticIndicatorPosition": 1
}
}
}'
API Actual Output
{"uid":"1","name":"de_ccn_token","description":"Tokenize credit card numbers, keeping last 4 chars in clear","creditCardToken":{"tokenizer":"SLT_1_6","fromLeft":0,"fromRight":4,"valueIdentification":{"invalidCardType":false,"invalidLuhnDigit":true,"alphabeticIndicator":false,"alphabeticIndicatorPosition":1}}}
4.3.2.2.1 - Create Mask
What you are doing
Creating the mask that is applied to the unprotection permission of a data element to customize how data is displayed. The mask is to be used later on de_ccn_token.
Why it matters
Creating a mask defines what characters are displayed in the clear when the data is unprotected. The mask is optionally applied to an unprotection to display only a certain value to a consumer of the data.
CLI Code
pim create masks --name "clear_mask" --from-left 0 --from-right 4 --character "*"
CLI Actual Output
## Name Description Fromleft Fromright Masked Character Uid
clear_mask 0 4 False * 1
API Code
curl -k \
-H "Authorization: Bearer ${TOKEN}" \
-H "accept: application/json" \
-H "Content-Type: application/json" \
-X POST "https://${GW_HOST}/pty/v2/pim/masks" \
-d '{
"name": "clear_mask",
"masked": true,
"fromLeft": 0,
"fromRight": 4,
"character": "*"
}'
API Endpoint
POST /pim/masks
API Actual Output
{"uid":"1","name":"clear_mask","description":"","fromLeft":0,"fromRight":4,"masked":true,"character":"*"}
4.3.2.3 - Create Member Source
What you are doing
You are creating a Member Source, which is a source that informs Protegrity where user identities are stored. For example, Active Directory, LDAP, Azure AD or a text file. This configuration stores the connection and the lookup context that Protegrity needs to discover users and groups that are then mapped to Roles.
Why it matters
Policies do not grant access to individual users directly. Access is granted through roles, and roles are populated from external identity systems via member sources. Without a source, you cannot reliably attach real enterprise groups or users to roles, synchronize memberships, or enforce policy access the same way your organization manages identity.
CLI Code
pim create sources file --name test-file --user-file exampleusers.txt --group-file examplegroups.txt
CLI Actual Output
NAME DESCRIPTION TYPE USERFILE GROUPFILE TIMEOUT UID
test-file SourceType.FILE exampleusers.txt examplegroups.txt 120 1
API Endpoint
POST /pim/sources
API Code
curl -k \
-H "Authorization: Bearer ${TOKEN}" \
-H "accept: application/json" \
-H "Content-Type: application/json" \
-X POST "https://${GW_HOST}/pty/v2/pim/sources" \
-d '{
"name": "test-file",
"type": "FILE",
"connection": {
"userFile": "exampleusers.txt",
"groupFile": "examplegroups.txt"
}
}'
API Actual Output
{"name":"test-file","description":"","type":"FILE","connection":{"userFile":"exampleusers.txt","groupFile":"examplegroups.txt"},"uid":"1"}
4.3.2.3.1 - Test New Member Source
CLI Code
pim invoke sources test 1
CLI Actual Output
+----------------+--------+---------+
| type | passed | message |
+----------------+--------+---------+
| connection | True | |
| authentication | True | |
| groups | True | |
| users | True | |
+----------------+--------+---------+
API Endpoint
POST /pim/sources/{SOURCE_UID}/test
API Code
curl -k \
-H "Authorization: Bearer ${TOKEN}" \
-H "accept: application/json" \
-H "Content-Type: application/json" \
-X POST "https://${GW_HOST}/pty/v2/pim/sources/1/test"
API Actual Output
{"connection":{"passed":true,"message":""},"authentication":{"passed":true,"message":""},"groups":{"passed":true,"message":""},"users":{"passed":true,"message":""}}
4.3.2.4 - Create Role
What you are doing
Creating the role that represents who can perform operations against the data element.
Why it matters
Permissions are granted to roles and roles map to users or groups, ideally from member sources.
Tips
- If you keep the
--allow-alloption in the command, then setALLOWALLtoTrue. - Consider which user needs what level of access and create a role for each set of users.
CLI Code
pim create roles role --name "role_protect_ccn" --description "This role have access to protect CCN data" --mode "MANUAL"
CLI Actual Output
NAME DESCRIPTION MODE ALLOWALL UID
role_protect_ccn This role have access to protect CCN data RoleMode.MANUAL False 1
API Endpoint
POST /pim/roles
API Code
curl -k \
-H "Authorization: Bearer ${TOKEN}" \
-H "accept: application/json" \
-H "Content-Type: application/json" \
-X POST "https://${GW_HOST}/pty/v2/pim/roles" \
-d '{
"name": "role_protect_ccn",
"description": "This role have access to protect CCN data",
"mode": "MANUAL",
"allowAll": false
}'
API Actual Output
{"name":"role_protect_ccn","description":"This role have access to protect CCN data","mode":"MANUAL","uid":"1","allowAll":false}
4.3.2.5 - Assign Member Source to Role
What you are doing
You are attaching a specific user or group from a member source to a role. This creates the who belongs in this role binding. If you run synchronization, it retrieves the current membership from the source into the role.
Why it matters
This is the step that turns a role from a named container into an identity-backed access control object. If you do not assign a source user or group to the role and synchronize it, then no real identities are associated with that role. This means that your policy rules may exist, but nobody in your organization will actually have the access that those rules intend to grant.
CLI Code
pim create roles members 1 --member "exampleuser1,1,USER"
CLI Actual Output
## Name Source Type Uid
exampleuser1 1 MemberType.USER 1
API Endpoint
POST /pim/roles/{SOURCE_UID}/test
API Code
curl -k \
-H "Authorization: Bearer ${TOKEN}" \
-H "accept: application/json" \
-H "Content-Type: application/json" \
-X POST "https://${GW_HOST}/pty/v2/pim/roles/1/members" \
-d '[
{
"name": "exampleuser1",
"source": "1",
"type": "USER"
}
]'
API Actual Output
[{"type":"USER","name":"exampleuser1","syncid":"exampleuser1","uid":"1","source":"1"}]
4.3.2.5.1 - Synchronize Member Source
Connect and synchronize the users with your member source.
CLI Code
pim invoke roles sync 1
CLI Actual Output
Successfully synchronized members for role with UID '1'.
API Endpoint
POST /pim/roles/{SOURCE_UID}/sync
API Code
curl -k \
-H "Authorization: Bearer ${TOKEN}" \
-H "accept: application/json" \
-H "Content-Type: application/json" \
-X POST "https://${GW_HOST}/pty/v2/pim/roles/1/sync"
API Actual Output
The API does not return any output as response.
4.3.2.6 - Create Policy Shell
What you are doing
Creating the policy that will hold the access rules. For example, Data Element, Role, and Rules.
Why it matters
The policy is the object that ties together the pieces and becomes deployable.
Tips
Multiple Roles, multiple data elements, and their corresponding rules can be added to a single policy. Consider structuring your policy around specific areas of focus, as in this example, the treatment of a Credit Card Number across the entirety of your enterprise.
CLI Code
pim create policies policy --name "ccn-policy" --description "Protect CCN with tokenization"
CLI Actual Output
NAME DESCRIPTION ACCESS UID
ccn-policy Protect CCN with tokenization {'protect': False, 'reProtect': False, 'unProtect': False} 1
API Endpoint
POST /pim/policies
API Code
curl -k \
-H "Authorization: Bearer ${TOKEN}" \
-H "accept: application/json" \
-H "Content-Type: application/json" \
-X POST "https://${GW_HOST}/pty/v2/pim/policies" \
-d '{
"name": "ccn-policy",
"description": "Protect CCN with tokenization",
"template": {
"access": {
"protect": false,
"reProtect": false,
"unProtect": false
}
}
}'
API Actual Output
{"name":"ccn-policy","description":"Protect CCN with tokenization","uid":"1","template":{"access":{"protect":false,"reProtect":false,"unProtect":false}}}
4.3.2.7 - Define Rule with Data Element and Role
What you are doing
Creating the policy rule that binds:
- A role: Who.
- A data element: What.
- Permitted operations: Protect, Reprotect, or Unprotect.
Why it matters
This binding is what makes the policy enforceable. Without rules, the policy exists but grants no access.
Tips
This rule grants the specified role permission to protect the CCN data element, while disallowing reprotect and unprotect.
CLI Code
pim create policies rules 1 --rule "1,1,1,NULL_VALUE,true,false,true"
CLI Actual Output
## Role Dataelement Mask Noaccessoperation Access
1 1 1 NULL_VALUE {'protect': True, 'reProtect': False, 'unProtect': True}
API Endpoint
POST /pim/policies/{POLICY_UID}/rules
API Code
curl -k \
-H "Authorization: Bearer ${TOKEN}" \
-H "accept: application/json" \
-H "Content-Type: application/json" \
-X POST "https://${GW_HOST}/pty/v2/pim/policies/1/rules" \
-d '{
"role": "1",
"dataElement": "1",
"mask": "1",
"noAccessOperation": "NULL_VALUE",
"permission": {
"access": {
"protect": true,
"reProtect": false,
"unProtect": true
}
}
}'
API Actual Output
{"role":"1","mask":"1","dataElement":"1","permission":{"access":{"protect":true,"reProtect":false,"unProtect":true}}}
4.3.2.8 - Create Datastore
What you are doing
Creating the datastore target where a policy will be deployed.
Why it matters
A policy is not active for protectors until it is deployed to a datastore.
CLI Code
pim create datastores datastore --name "ds_protect_ccn" --description "Datastore to demonstrate CCN protection" --default
CLI Actual Output
## Name Description Default Uid
ds_protect_ccn Datastore to demonstrate CCN protection True 1
API Endpoint
POST /pim/datastores
API Code
curl -k \
-H "Authorization: Bearer ${TOKEN}" \
-H "accept: application/json" \
-H "Content-Type: application/json" \
-X POST "https://${GW_HOST}/pty/v2/pim/datastores" \
-d '{
"name": "ds_protect_ccn",
"description": "Datastore to demonstrate CCN protection",
"default": true
}'
API Actual Output
{"description":"Datastore to demonstrate CCN protection","name":"ds_protect_ccn","default":true,"uid":"1"}
4.3.2.9 - Deploy Policy to a Datastore
What you are doing
Deploying the policy to the datastore so protectors that target that datastore can load the policy.
Why it matters
Until the policy is deployed, the policy is not available to runtime protectors.
Tips
- You may want to deploy the multiple policies to a single datastores. If so, include them by repeating the
–-policiesparameter. - You can also add a single policy to multiple datastores by creating a loop.
CLI Code
pim invoke datastores deploy 1 --policies 1
CLI Actual Output
Successfully deployed to datastore '1':
Policies: 1
API Endpoint
POST /pim/datastores/{DATASTORE_UID}/deploy
API Code
curl -k \
-H "Authorization: Bearer ${TOKEN}" \
-H "accept: application/json" \
-H "Content-Type: application/json" \
-X POST "https://${GW_HOST}/pty/v2/pim/datastores/1/deploy" \
-d '{
"policies": ["1"],
"applications": []
}'
API Actual Output
API does not return any output as response
4.3.2.10 - Confirm Deployment
What you are doing
Confirming which policies are deployed to which datastores.
Why it matters
Verifying deployment confirms the policy is active, correctly mapped, and enforceable.
CLI Code
pim get deploy
CLI Actual output
## Uid Policies Applications
1 ['1'] []
API Endpoint
POST /pim/deploy
API Code
curl -k \
-H "Authorization: Bearer ${TOKEN}" \
-H "accept: application/json" \
-X GET "https://${GW_HOST}/pty/v2/pim/deploy"
API Actual Output
{"dataStores":[{"uid":"1","policies":["1"],"applications":[]}]}
4.3.3 - Create a policy to protect Date of Birth (DOB)
Goal
Create one policy that protects Date of Birth (DOB) using Datetime data element, with:
- At least one role.
- At least one member source feeding that role.
- Deployed to at least one datastore.
This example provides a walkthrough of the complete workflow to create a policy to protect a Date of Birth (DOB). DOB is a common piece of sensitive personal data, and organizations typically protect it using datetime tokenization. This tokenization preserves the YYYY‑MM‑DD structure while preventing direct exposure of the original value. In this example, a single role is used whose members are obtained from an LDAP-based Member Source. The role is granted permission to protect (tokenize) DOB values.
For this walkthrough, a dedicated DOB data element is created using a date‑specific tokenizer, ensuring that the output maintains a valid date format for downstream systems. The role and data element are combined into a single policy. The policy is then deployed to a datastore so applications working with DOB information can enforce the protection rules at runtime.
Assumptions
To execute any CLI or API command in this example, the following assumptions have been made:
- You are operating on a new AI Team Edition setup.
- Set up the AI Team Edition by installing the Protegrity Provisioned Cluster. For more information about installing the PPC, refer to the section Installing PPC.
- You are connected to the Policy Manager container.
- Connect to the Policy Manager container by deploying the Protegrity Policy Manager. For more information about deploying the Protegrity Policy Manager, refer to the section Installing Policy Workbench.
CLI Examples
To execute any CLI command in this example, the following additional assumption has been made:
- You have access to the PPC CLI.
- For more information about accessing the PPC CLI, refer to the section Accessing the PPC CLI.
- For more information about Policy Management CLI, refer to the section Policy Management Command Line Interface (CLI) Reference.
API Examples
To execute any API command in this example, the following additional assumption has been made:
- You have access to the Protegrity Policy Management REST APIs.
- For more information about accessing the Policy Management REST APIs, refer to the section Using the Policy Management REST APIs.
4.3.3.1 - Initialize Policy Management
This step initializes the Policy Information Management system. This step needs to be executed only once.
CLI Code
pim invoke init
CLI Actual Output
✅ PIM successfully initialized (bootstrapped).
API Endpoint
POST /pim/init
Get Gateway host address
export GW_HOST="$(kubectl get gateway pty-main -n api-gateway -o jsonpath='{.status.addresses[0].value}')"
Generate JWT token
TOKEN=$(curl -k -s https://$GW_HOST/api/v1/auth/login/token \
## -X Post \
-H 'Content-Type: application/x-www-form-urlencoded' \
-d 'loginname=workbench' \
-d 'password=Admin123!' \
-D - -o /dev/null 2>&1 | grep -i 'pty_access_jwt_token:' | sed 's/pty_access_jwt_token: //' | tr -d '\r') && echo "${TOKEN:0:10}"
API Code
curl -k -H "Authorization: Bearer ${TOKEN}" -X POST "https://{$GW_HOST}/pty/v2/pim/init" -H "accept: application/json"
API Actual Output
The API does not return any output as response.
4.3.3.2 - Prepare Data Element
What you are doing
Creating a DOB data element that defines what is protected (Date of Birth) and how it is protected using date tokenization in YYYY-MM-DD format.
Why it matters
Data elements are the protection building blocks that policies grant access to.
CLI Code
pim create dataelements token date-time --name "de_dob_token" --description "Tokenize Date of Birth" --tokenizer "SLT_8_DATETIME"
CLI Actual Output
UID NAME DESCRIPTION TOKENIZER TOKENIZETIME DISTINGUISHABLEDATE DATEINCLEAR
1 de_dob_token Tokenize Date of Birth SLT_8_DATETIME False False TokenElementDateInClear.NONE
API Endpoint
POST /pim/dataelements
API Code
curl -k \
-H "Authorization: Bearer ${TOKEN}" \
-H "accept: application/json" \
-H "Content-Type: application/json" \
-X POST "https://${GW_HOST}/pty/v2/pim/dataelements" \
-d '{
"name": "de_dob_token",
"description": "Tokenize Date of Birth",
"dateTimeToken": {
"tokenizer": "SLT_8_DATETIME",
"tokenizeTime": false,
"distinguishableDate": false,
"dateInClear": "NONE"
}
}'
API Actual Output
{"uid":"1","name":"de_dob_token","description":"Tokenize Date of Birth","dateTimeToken":{"tokenizer":"SLT_8_DATETIME","tokenizeTime":false,"distinguishableDate":false,"dateInClear":"NONE"}}
4.3.3.3 - Create Member Source
What you are doing
You are creating a Member Source, which is a source that informs Protegrity where user identities are stored. For example, Active Directory, LDAP, Azure AD or a text file. This configuration stores the connection and the lookup context that Protegrity needs to discover users and groups that are then mapped to Roles.
Why it matters
Policies do not grant access to individual users directly. Access is granted through roles, and roles are populated from external identity systems via member sources. Without a source, you cannot reliably attach real enterprise groups or users to roles, synchronize memberships, or enforce policy access the same way your organization manages identity.
CLI Code
pim create sources file --name test-file --user-file exampleusers.txt --group-file examplegroups.txt
CLI Actual output
NAME DESCRIPTION TYPE USERFILE GROUPFILE TIMEOUT UID
test-file SourceType.FILE exampleusers.txt examplegroups.txt 120 1
API Endpoint
POST /pim/sources
API Code
curl -k \
-H "Authorization: Bearer ${TOKEN}" \
-H "accept: application/json" \
-H "Content-Type: application/json" \
-X POST "https://${GW_HOST}/pty/v2/pim/sources" \
-d '{
"name": "test-file",
"type": "FILE",
"connection": {
"userFile": "exampleusers.txt",
"groupFile": "examplegroups.txt"
}
}'
API Actual output
{"name":"test-file","description":"","type":"FILE","connection":{"userFile":"exampleusers.txt","groupFile":"examplegroups.txt"},"uid":"1"}
4.3.3.3.1 - Test the Member Source
CLI Code
pim invoke sources test 1
CLI Actual Output
+----------------+--------+---------+
| type | passed | message |
+----------------+--------+---------+
| connection | True | |
| authentication | True | |
| groups | True | |
| users | True | |
+----------------+--------+---------+
API Endpoint
POST /pim/sources/{SOURCE_UID}/test
API Code
curl -k \
-H "Authorization: Bearer ${TOKEN}" \
-H "accept: application/json" \
-H "Content-Type: application/json" \
-X POST "https://${GW_HOST}/pty/v2/pim/sources/1/test"
API Actual Output
{"connection":{"passed":true,"message":""},"authentication":{"passed":true,"message":""},"groups":{"passed":true,"message":""},"users":{"passed":true,"message":""}}
4.3.3.4 - Create Role
What you are doing
Creating the role that represents who can perform operations against the DOB data element.
Why it matters
Permissions are granted to roles, and roles map to real users or groups via member sources.
Tips
- If you keep the
--allow-alloption in the command, then setALLOWALLtoTrue. - Consider which user needs what level of access and create a role for each set of users.
CLI Code
pim create roles role --name "dob_protect_role" --description "Role having access to protect DOB" --mode "MANUAL"
CLI Actual Output
NAME DESCRIPTION MODE ALLOWALL UID
dob_protect_role Role having access to protect DOB RoleMode.MANUAL False 1
API Endpoint
POST /pim/roles
API Code
curl -k \
-H "Authorization: Bearer ${TOKEN}" \
-H "accept: application/json" \
-H "Content-Type: application/json" \
-X POST "https://${GW_HOST}/pty/v2/pim/roles" \
-d '{
"name": "dob_protect_role",
"description": "Role having access to protect DOB",
"mode": "MANUAL",
"allowAll": false
}'
API Actual Output
{"name":"dob_protect_role","description":"Role having access to protect DOB","mode":"MANUAL","uid":"1","allowAll":false}
4.3.3.5 - Assign Member Source to Role
What you are doing
You are attaching a specific user or group from a member source to a role. This creates the who belongs in this role binding. If you run synchronization, it retrieves the current membership from the source into the role.
Why it matters
This is the step that turns a role from a named container into an identity-backed access control object. If you do not assign a source user or group to the role and synchronize it, then no real identities are associated with that role. This means that your policy rules may exist, but nobody in your organization will actually have the access that those rules intend to grant.
CLI Code
pim create roles members 1 --member "exampleuser1,1,USER"
CLI Actual Output
## Name Source Type Uid
exampleuser1 1 MemberType.USER 1
API Endpoint
POST /pim/roles/{SOURCE_UID}/test
API Code
curl -k \
-H "Authorization: Bearer ${TOKEN}" \
-H "accept: application/json" \
-H "Content-Type: application/json" \
-X POST "https://${GW_HOST}/pty/v2/pim/roles/1/members" \
-d '[
{
"name": "exampleuser1",
"source": "1",
"type": "USER"
}
]'
API Actual Output
[{"type":"USER","name":"exampleuser1","syncid":"exampleuser1","uid":"1","source":"1"}]
4.3.3.5.1 - Synchronize Member Source
Connect and synchronize the users with your member source.
CLI Code
pim invoke roles sync 1
CLI Actual Output
Successfully synchronized members for role with UID '1'.
API Endpoint
POST /pim/roles/{SOURCE_UID}/sync
API Code
curl -k \
-H "Authorization: Bearer ${TOKEN}" \
-H "accept: application/json" \
-H "Content-Type: application/json" \
-X POST "https://${GW_HOST}/pty/v2/pim/roles/1/sync"
API Actual Output
The API does not return any output as response.
4.3.3.6 - Create Policy Shell
What you are doing
Creating the policy that will hold the access rules. For example, Data Element, Role, and Rules.
Why it matters
The policy is the object that ties together the pieces and becomes deployable.
Tips
Multiple roles, multiple data elements, and their corresponding rules can be added to a single policy. Consider structuring your policy around specific areas of focus. For example, how the DOB is used across the entire enterprise.
CLI Code
pim create policies policy --name "dob-policy" --description "Protect DOB with tokenization"
CLI Actual Output
NAME DESCRIPTION ACCESS UID
dob-policy Protect DOB with tokenization {'protect': False, 'reProtect': False, 'unProtect': False} 1
API Endpoint
POST /pim/policies
API Code
curl -k \
-H "Authorization: Bearer ${TOKEN}" \
-H "accept: application/json" \
-H "Content-Type: application/json" \
-X POST "https://${GW_HOST}/pty/v2/pim/policies" \
-d '{
"name": "dob-policy",
"description": "Protect DOB with tokenization",
"template": {
"access": {
"protect": false,
"reProtect": false,
"unProtect": false
}
}
}'
API Actual Output
{"name":"dob-policy","description":"Protect DOB with tokenization","uid":"1","template":{"access":{"protect":false,"reProtect":false,"unProtect":false}}}
4.3.3.7 - Define Rule with Data Element and Role
What you are doing
Creating the policy rule that binds:
- A role: Who.
- A data element: What.
- Permitted operations: Protect, Reprotect, or Unprotect.
Why it matters
This binding is what makes the policy enforceable. Without rules, the policy exists but grants no access.
Tips
This rule grants the specified role permission to protect and unprotect to the DOB data element, while disallowing reprotect.
CLI Code
# Format:
# "roleUid,dataElementUid,,NOACCESSOPERATION,protect,reProtect,unProtect"
pim create policies rules 1 --rule "1,1,,NULL_VALUE,true,false,true"
CLI Actual Output
## Role Dataelement Mask Noaccessoperation Access
1 1 0 NULL_VALUE {'protect': True, 'reProtect': False, 'unProtect': True}
API Endpoint
POST /pim/policies/{POLICY_UID}/rules
API Code
curl -k \
-H "Authorization: Bearer ${TOKEN}" \
-H "accept: application/json" \
-H "Content-Type: application/json" \
-X POST "https://${GW_HOST}/pty/v2/pim/policies/1/rules" \
-d '{
"role": "1",
"dataElement": "1",
"mask": "0",
"noAccessOperation": "NULL_VALUE",
"permission": {
"access": {
"protect": true,
"reProtect": false,
"unProtect": true
}
}
}'
API Actual Output
{"role":"1","mask":"0","dataElement":"1","permission":{"access":{"protect":true,"reProtect":false,"unProtect":true}}}
4.3.3.8 - Create Datastore
What you are doing
Creating the datastore target where a policy will be deployed.
Why it matters
A policy is not active for protectors until it is deployed to a datastore.
CLI Code
pim create datastores datastore --name "ds_protect_dob" --description "Datastore to demonstrate DOB protection" --default
CLI Actual Output
## Name Description Default Uid
ds_protect_dob Datastore to demonstrate DOB protection True 1
API Endpoint
POST /pim/datastores
API Code
curl -k \
-H "Authorization: Bearer ${TOKEN}" \
-H "accept: application/json" \
-H "Content-Type: application/json" \
-X POST "https://${GW_HOST}/pty/v2/pim/datastores" \
-d '{
"name": "ds_protect_dob",
"description": "Datastore to demonstrate DOB protection",
"default": true
}'
API Actual Output
{"description":"Datastore to demonstrate DOB protection","name":"ds_protect_dob","default":true,"uid":"1"}
4.3.3.9 - Deploy Policy to Datastore
What you are doing
Deploying the policy to the datastore so protectors that target that datastore can load the policy.
Why it matters
Until the policy is deployed, the policy is not available to runtime protectors.
Tips
- You may want to deploy the multiple policies to a single datastores. If so, include them by repeating the
–-policiesoption in the command. - You can also add a single policy to multiple datastores by creating a loop.
CLI Code
pim invoke datastores deploy 1 --policies 1
CLI Actual Output
Successfully deployed to datastore '1':
Policies: 1
API Endpoint
POST /pim/datastores/{DATASTORE_UID}/deploy
API Code
curl -k \
-H "Authorization: Bearer ${TOKEN}" \
-H "accept: application/json" \
-H "Content-Type: application/json" \
-X POST "https://${GW_HOST}/pty/v2/pim/datastores/1/deploy" \
-d '{
"policies": ["1"],
"applications": []
}'
API Actual Output
The API does not return any output as response.
4.3.3.10 - Confirm Deployment
What you are doing
Confirm that the policies have been deployed to the respective datastores.
Why it matters
Verifying deployment confirms the policy is active, correctly mapped, and enforceable.
CLI Code
pim get deploy
CLI Actual Output
## Uid Policies Applications
1 ['1'] []
API Endpoint
POST /pim/deploy
API Code
curl -k \
-H "Authorization: Bearer ${TOKEN}" \
-H "accept: application/json" \
-X GET "https://${GW_HOST}/pty/v2/pim/deploy"
API Actual Output
{"dataStores":[{"uid":"1","policies":["1"],"applications":[]}]}
4.3.4 - Full Script Examples
The following section contains the end-to-end full scripts that can be used to create and protect sample data using the Policy Management REST APIs.
4.3.4.1 - Full Script to Protect CCN using Policy Management REST APIs
The following code snippet contains the contents of the deploy-ccn-policy.sh shell script. This script enables the creation and deployment of a policy to protect CCN data using the Policy Management REST APIs.
#!/usr/bin/env bash
###############################################################################
# Script Name : ccn_policy.sh
# Description : End-to-end automation script for creating and deploying a
# Credit Card Number (CCN) protection policy using the
# Protegrity Policy Information Management (PIM) REST API.
#
#
# ─────────────────────────────────────────────────────────────────────────────
# IMPORTANT NOTES
# ─────────────────────────────────────────────────────────────────────────────
#
# 1. WORKBENCH REQUIREMENT:
# The Policy Management REST APIs will work only after you have installed
# the Protegrity Workbench. Attempting to use these APIs before the
# Workbench is installed will result in errors.
#
# 2. USER PERMISSIONS:
# The user account used to authenticate against these APIs must have the
# appropriate Protegrity role assigned:
# - Security Officer : Required for write access (create, update, delete)
# - Security Viewer : Required for read-only access (get, list)
# For more information about the roles and permissions required, refer to
# the section "Managing Roles" in the Protegrity documentation.
#
# 3. API VERSION:
# The Policy Management API uses version v2.
# All endpoints in this script are prefixed with /pty/v2/pim/
# Requests to older API versions will not be supported.
#
# ─────────────────────────────────────────────────────────────────────────────
# PREREQUISITES
# ─────────────────────────────────────────────────────────────────────────────
# - Protegrity Workbench must be installed and running
# - kubectl configured and connected to your Kubernetes cluster
# - curl installed on the machine running this script
# - Access to the Protegrity API Gateway
# - A user account with Security Officer permissions
#
# ─────────────────────────────────────────────────────────────────────────────
# USAGE
# ─────────────────────────────────────────────────────────────────────────────
# chmod +x deploy-ccn-policy.sh
# ./deploy-ccn-policy.sh
#
# ─────────────────────────────────────────────────────────────────────────────
# WORKFLOW
# ─────────────────────────────────────────────────────────────────────────────
# Step 1 - Initialize Policy Management
# Step 2 - Prepare Data Element (CCN Token)
# Step 2.1 - Create Mask (subsection of Prepare Data Element)
# Step 3 - Create Member Source
# Step 3.1 - Test Member Source Connectivity
# Step 4 - Create Role
# Step 5 - Assign Member Source to Role
# Step 5.1 - Sync Role Membership
# Step 6 - Create Policy Shell
# Step 7 - Define Policy Rule (bind Role + Data Element + Permissions)
# Step 8 - Create Datastore
# Step 9 - Deploy Policy to Datastore
# Step 10 - Confirm Deployment
#
# ─────────────────────────────────────────────────────────────────────────────
# SECURITY NOTES
# ─────────────────────────────────────────────────────────────────────────────
# - If any API call returns HTTP 401 (Unauthorized), the script will
# automatically attempt to re-generate the JWT token and retry the
# request once before failing.
# - If any API call indicates that a resource already exists, the script
# will exit immediately with an error. Delete the conflicting resource
# first, or update the name variables in SECTION 1 before re-running.
#
# ─────────────────────────────────────────────────────────────────────────────
# EXIT CODES
# ─────────────────────────────────────────────────────────────────────────────
# 0 - Success
# 1 - Script error (set -e will trigger on any failed command)
###############################################################################
set -euo pipefail
###############################################################################
# SECTION 1: USER-CONFIGURABLE VARIABLES
# ─────────────────────────────────────
# Modify the variables below to match your environment before running
# this script. All other values are derived automatically.
#
# NOTE: The user specified by ADMIN_USER must have the Security Officer
# permission to perform write operations via the Policy Management API.
# For read-only operations, the Security Viewer permission is sufficient.
# For more information, refer to the "Managing Roles" section in the
# Protegrity documentation.
###############################################################################
# --- Protegrity Admin Credentials ---
# WARNING: For production use, consider sourcing these values from a secrets
# manager (e.g., HashiCorp Vault, Kubernetes Secrets, AWS SSM).
ADMIN_USER="workbench"
ADMIN_PASS="Admin123!"
# --- Data Element ---
DE_NAME="de_ccn_token"
DE_DESC="Tokenize credit card numbers, keeping last 4 chars in clear"
DE_TOKENIZER="SLT_1_6" # Options: SLT_1_3 | SLT_2_3 | SLT_1_6 | SLT_2_6
DE_FROM_LEFT=0 # Number of digits to keep in clear from the left
DE_FROM_RIGHT=4 # Number of digits to keep in clear from the right
# --- Mask (subsection of Prepare Data Element) ---
MASK_NAME="clear_mask"
MASK_FROM_LEFT=0 # Number of characters to keep in clear from the left
MASK_FROM_RIGHT=4 # Number of characters to keep in clear from the right
MASK_CHARACTER="*" # Character used to mask hidden digits
# --- Role ---
ROLE_NAME="role_protect_ccn"
ROLE_DESC="This role has access to protect CCN data"
ROLE_MODE="MANUAL" # Options: MANUAL | SEMIAUTOMATIC | AUTOMATIC
# --- Member Source ---
SOURCE_NAME="test-file"
SOURCE_USER_FILE="exampleusers.txt"
SOURCE_GROUP_FILE="examplegroups.txt"
# --- Role Member ---
MEMBER_NAME="exampleuser1"
MEMBER_TYPE="USER" # Options: USER | GROUP
# --- Policy ---
POLICY_NAME="ccn-policy"
POLICY_DESC="Protect CCN with tokenization"
# --- Policy Rule Permissions ---
RULE_PROTECT=true # Allow protect operation
RULE_REPROTECT=false # Allow re-protect operation
RULE_UNPROTECT=true # Allow unprotect operation
RULE_NO_ACCESS_OP="NULL_VALUE" # Behavior for no-access: NULL_VALUE | EXCEPTION
# --- Datastore ---
DS_NAME="ds_protect_ccn"
DS_DESC="Datastore to demonstrate CCN protection"
DS_DEFAULT=true # Set as the default datastore: true | false
# --- Token Retry Settings ---
# On receiving HTTP 401 Unauthorized, the script will refresh the JWT token
# and retry the failed request. MAX_TOKEN_RETRIES controls how many refresh
# attempts are made before the script aborts.
MAX_TOKEN_RETRIES=1 # Number of times to retry generating a token on 401
###############################################################################
# SECTION 2: HELPER FUNCTIONS
# ────────────────────────────
# Internal utility functions used throughout the script.
# Do not modify unless necessary.
###############################################################################
# Prints a formatted primary section header to stdout
log() {
printf "\n%s\n" "━━━━━━━━━━━━━━━━━━━━━━━━━━━━━━━━━━━━━━━━━━━━━━━━━━━━━━━━━━━━━━━━━━━━━━━━━━━━━━"
printf " %s\n" "$*"
printf "%s\n" "━━━━━━━━━━━━━━━━━━━━━━━━━━━━━━━━━━━━━━━━━━━━━━━━━━━━━━━━━━━━━━━━━━━━━━━━━━━━━━"
}
# Prints a formatted subsection header to stdout (indented, lighter style)
log_sub() {
printf "\n%s\n" " ┄┄┄┄┄┄┄┄┄┄┄┄┄┄┄┄┄┄┄┄┄┄┄┄┄┄┄┄┄┄┄┄┄┄┄┄┄┄┄┄┄┄┄┄┄┄┄┄┄┄┄┄┄┄┄┄┄┄┄┄┄┄┄┄┄┄┄┄┄┄┄┄┄┄"
printf " %s\n" "$*"
printf "%s\n" " ┄┄┄┄┄┄┄┄┄┄┄┄┄┄┄┄┄┄┄┄┄┄┄┄┄┄┄┄┄┄┄┄┄┄┄┄┄┄┄┄┄┄┄┄┄┄┄┄┄┄┄┄┄┄┄┄┄┄┄┄┄┄┄┄┄┄┄┄┄┄┄┄┄┄"
}
# Prints an error message to stderr and exits with code 1
# Usage: die <message>
die() {
printf "\n [ERROR] %s\n" "$*" >&2
exit 1
}
# Attempts to extract a UID from a JSON API response.
# Handles both string UIDs ("uid":"1") and integer UIDs ("uid":1).
# Exits with an error if extraction fails — never prompts interactively.
# Usage: extract_uid <json_response> <resource_label>
extract_uid() {
local response="$1"
local label="$2"
local uid
# Match string-quoted UIDs: "uid":"<value>"
uid=$(echo "$response" | grep -o '"uid":"[^"]*"' | head -1 | sed 's/"uid":"//;s/"//' || true)
# Fallback: match integer UIDs: "uid":<number>
if [[ -z "${uid:-}" ]]; then
uid=$(echo "$response" | grep -o '"uid":[0-9]*' | head -1 | grep -o '[0-9]*' || true)
fi
if [[ -z "${uid:-}" ]]; then
die "Failed to extract UID for '${label}'. API response was: ${response}"
fi
echo "$uid"
}
# Generates a new JWT authentication token using the configured admin
# credentials (ADMIN_USER / ADMIN_PASS). Stores the result in the global
# TOKEN variable.
#
# NOTE: The user must have the Security Officer permission for write access
# or the Security Viewer permission for read-only access to the
# Policy Management API (v2). For more information, refer to
# the "Managing Roles" section in the Protegrity documentation.
#
# Usage: generate_token
generate_token() {
echo " Generating JWT authentication token..."
TOKEN=$(curl -k -s "https://${GW_HOST}/api/v1/auth/login/token" \
-X POST \
-H 'Content-Type: application/x-www-form-urlencoded' \
-d "loginname=${ADMIN_USER}" \
-d "password=${ADMIN_PASS}" \
-D - -o /dev/null 2>&1 \
| grep -i 'pty_access_jwt_token:' \
| sed 's/pty_access_jwt_token: //' \
| tr -d '\r')
if [[ -z "${TOKEN:-}" ]]; then
die "Failed to retrieve JWT token. Please verify the following:
- The Protegrity Workbench is installed and running.
- The API Gateway host (${GW_HOST}) is reachable.
- The credentials for user '${ADMIN_USER}' are correct.
- The user '${ADMIN_USER}' has the Security Officer or Security Viewer
permission assigned. Refer to 'Managing Roles' in the Protegrity
documentation for more information."
fi
echo " Token acquired successfully."
}
# Executes a curl API call and automatically retries with a refreshed JWT
# token if a 401 Unauthorized response is received.
#
# All Policy Management API calls in this script target the v2 API version:
# https://<gateway>/pty/v2/pim/...
#
# On HTTP 401, the token is refreshed (up to MAX_TOKEN_RETRIES times) and
# the request is retried. This can occur when a token expires mid-run.
# On any other non-2xx response, a warning is logged but execution continues.
#
# Usage: api_call <curl_args...>
api_call() {
local retries=0
local http_status
local response_body
local tmp_file
tmp_file=$(mktemp)
while true; do
# Execute the curl call, capturing body and HTTP status separately
http_status=$(curl -k -s -o "$tmp_file" -w "%{http_code}" \
-H "Authorization: Bearer ${TOKEN}" \
"$@")
response_body=$(cat "$tmp_file")
# Handle 401 Unauthorized:
# This typically means the JWT token has expired or is invalid.
# The script will attempt to refresh the token and retry the request.
# Ensure the user has the correct permissions (Security Officer / Viewer).
# Refer to "Managing Roles" in the Protegrity documentation.
if [[ "$http_status" == "401" ]]; then
if [[ "$retries" -lt "$MAX_TOKEN_RETRIES" ]]; then
echo " [Warning] Received HTTP 401 Unauthorized." >&2
echo " Refreshing JWT token and retrying (attempt $((retries + 1)) of ${MAX_TOKEN_RETRIES})..." >&2
generate_token
retries=$((retries + 1))
continue
else
rm -f "$tmp_file"
die "Received HTTP 401 Unauthorized after ${MAX_TOKEN_RETRIES} token refresh attempt(s).
Please verify that user '${ADMIN_USER}' has the required permissions:
- Security Officer : for write access
- Security Viewer : for read-only access
Refer to 'Managing Roles' in the Protegrity documentation."
fi
fi
# Fail on "already exists" (HTTP 400/409) — resource must be removed first
if echo "$response_body" | grep -qi "already exist"; then
rm -f "$tmp_file"
die "Resource already exists (HTTP ${http_status}). The script cannot continue.
Response : ${response_body}
Action : Delete or rename the existing resource before re-running,
or update the name variables at the top of this script."
fi
# Log other non-2xx responses (excluding 401 already handled above)
if [[ "$http_status" != 2* ]]; then
echo " [Warning] Received HTTP ${http_status}. Response: ${response_body}" >&2
fi
rm -f "$tmp_file"
echo "$response_body"
break
done
}
###############################################################################
# SECTION 3: ENVIRONMENT SETUP
# ─────────────────────────────
# Retrieves the API Gateway host address and generates a JWT authentication
# token required for all subsequent API calls.
#
# NOTE: The Policy Management REST APIs will work only after the Protegrity
# Workbench has been installed. All API calls target version v2:
# https://<gateway>/pty/v2/pim/
###############################################################################
log "Environment Setup: Retrieving API Gateway Host"
export GW_HOST
GW_HOST="$(kubectl get gateway pty-main -n api-gateway \
-o jsonpath='{.status.addresses[0].value}')"
echo " API Gateway Host : ${GW_HOST}"
echo " API Version : v2 (/pty/v2/pim/)"
log "Environment Setup: Generating JWT Authentication Token"
generate_token
###############################################################################
# SECTION 4: WORKFLOW EXECUTION
# ──────────────────────────────
# Executes each step of the CCN policy creation workflow in sequence.
# UIDs returned by each step are captured and reused in subsequent steps.
#
# NOTE: All write operations (POST) require the Security Officer permission.
# The read operation in Step 12 (GET) requires at minimum the
# Security Viewer permission.
###############################################################################
# ─────────────────────────────────────────────────────────────────────────────
# STEP 1: Initialize Policy Management
# ─────────────────────────────────────────────────────────────────────────────
# Initializes the PIM system. This step only needs to be performed once
# per environment setup.
#
# Requirement : Protegrity Workbench must be installed before running this step.
# Permission : Security Officer
# API Version : v2 — POST /pty/v2/pim/init
# ─────────────────────────────────────────────────────────────────────────────
log "Step 1: Initialize Policy Management"
INIT_RESPONSE=$(api_call \
-H "accept: application/json" \
-X POST "https://${GW_HOST}/pty/v2/pim/init")
if [[ -z "${INIT_RESPONSE}" ]]; then
echo " Status: OK (empty response — PIM already initialized or no content returned)"
else
echo " Response: ${INIT_RESPONSE}"
fi
echo ""
# ─────────────────────────────────────────────────────────────────────────────
# STEP 2: Prepare Data Element
# ─────────────────────────────────────────────────────────────────────────────
# Prepares the CCN Data Element that defines what data is protected and how
# it is tokenized. The tokenizer (SLT_1_6) and clear-text settings determine
# how many digits remain visible after tokenization.
#
# This step also includes the creation of a Mask (Step 2.1) as a subsection,
# since the mask is directly associated with how the data element's unprotected
# value is presented to consumers.
#
# Permission : Security Officer
# API Version : v2 — POST /pty/v2/pim/dataelements
# ─────────────────────────────────────────────────────────────────────────────
log "Step 2: Prepare Data Element — ${DE_NAME}"
DE_RESPONSE=$(api_call \
-H "accept: application/json" \
-H "Content-Type: application/json" \
-X POST "https://${GW_HOST}/pty/v2/pim/dataelements" \
-d '{
"name": "'"${DE_NAME}"'",
"description": "'"${DE_DESC}"'",
"creditCardToken": {
"tokenizer": "'"${DE_TOKENIZER}"'",
"fromLeft": '"${DE_FROM_LEFT}"',
"fromRight": '"${DE_FROM_RIGHT}"',
"valueIdentification": {
"invalidCardType": false,
"invalidLuhnDigit": true,
"alphabeticIndicator": false,
"alphabeticIndicatorPosition": 1
}
}
}')
echo " Response: ${DE_RESPONSE}"
DE_UID=$(extract_uid "$DE_RESPONSE" "$DE_NAME")
echo " Data Element UID: ${DE_UID}"
# ─────────────────────────────────────────────────────────────────────────────
# STEP 2.1: Create Mask
# ─────────────────────────────────────────────────────────────────────────────
# Subsection of: Prepare Data Element
#
# Creates a mask that controls how data is displayed when unprotected.
# The mask is optionally applied to an unprotect operation to display only
# certain characters to the consumer of the data. Hidden characters are
# replaced with the specified mask character, while the defined number of
# characters on each side remain visible in the clear.
#
# Permission : Security Officer
# API Version : v2 — POST /pty/v2/pim/masks
# ─────────────────────────────────────────────────────────────────────────────
log_sub "Step 2.1: Create Mask — ${MASK_NAME} (Subsection of: Prepare Data Element)"
MASK_RESPONSE=$(api_call \
-H "accept: application/json" \
-H "Content-Type: application/json" \
-X POST "https://${GW_HOST}/pty/v2/pim/masks" \
-d '{
"name": "'"${MASK_NAME}"'",
"masked": true,
"fromLeft": '"${MASK_FROM_LEFT}"',
"fromRight": '"${MASK_FROM_RIGHT}"',
"character": "'"${MASK_CHARACTER}"'"
}')
echo " Response: ${MASK_RESPONSE}"
MASK_UID=$(extract_uid "$MASK_RESPONSE" "$MASK_NAME")
echo " Mask UID: ${MASK_UID}"
# ─────────────────────────────────────────────────────────────────────────────
# STEP 3: Create Member Source
# ─────────────────────────────────────────────────────────────────────────────
# Creates a Member Source that defines where user and group identities are
# sourced from (in this example, a flat file). Member Sources are used to
# populate roles with real enterprise identities.
#
# Permission : Security Officer
# API Version : v2 — POST /pty/v2/pim/sources
# ─────────────────────────────────────────────────────────────────────────────
log "Step 4: Create Member Source — ${SOURCE_NAME}"
SOURCE_RESPONSE=$(api_call \
-H "accept: application/json" \
-H "Content-Type: application/json" \
-X POST "https://${GW_HOST}/pty/v2/pim/sources" \
-d '{
"name": "'"${SOURCE_NAME}"'",
"type": "FILE",
"connection": {
"userFile": "'"${SOURCE_USER_FILE}"'",
"groupFile": "'"${SOURCE_GROUP_FILE}"'"
}
}')
echo " Response: ${SOURCE_RESPONSE}"
SOURCE_UID=$(extract_uid "$SOURCE_RESPONSE" "$SOURCE_NAME")
echo " Source UID: ${SOURCE_UID}"
# ─────────────────────────────────────────────────────────────────────────────
# STEP 3.1: Test Member Source Connectivity
# ─────────────────────────────────────────────────────────────────────────────
# Validates that the Member Source is reachable and correctly configured.
# All connectivity checks (connection, authentication, groups, users) must
# pass before proceeding.
#
# Permission : Security Officer
# API Version : v2 — POST /pty/v2/pim/sources/{id}/test
# ─────────────────────────────────────────────────────────────────────────────
log "Step 3.1: Test Member Source Connectivity — UID: ${SOURCE_UID}"
api_call \
-H "accept: application/json" \
-H "Content-Type: application/json" \
-X POST "https://${GW_HOST}/pty/v2/pim/sources/${SOURCE_UID}/test"
echo ""
# ─────────────────────────────────────────────────────────────────────────────
# STEP 4: Create Role
# ─────────────────────────────────────────────────────────────────────────────
# Creates a role that represents who is allowed to perform operations on
# the protected data. Permissions are granted to roles, which are then
# mapped to users and groups via Member Sources.
#
# Permission : Security Officer
# API Version : v2 — POST /pty/v2/pim/roles
# ─────────────────────────────────────────────────────────────────────────────
log "Step 4: Create Role — ${ROLE_NAME}"
ROLE_RESPONSE=$(api_call \
-H "accept: application/json" \
-H "Content-Type: application/json" \
-X POST "https://${GW_HOST}/pty/v2/pim/roles" \
-d '{
"name": "'"${ROLE_NAME}"'",
"description": "'"${ROLE_DESC}"'",
"mode": "'"${ROLE_MODE}"'",
"allowAll": false
}')
echo " Response: ${ROLE_RESPONSE}"
ROLE_UID=$(extract_uid "$ROLE_RESPONSE" "$ROLE_NAME")
echo " Role UID: ${ROLE_UID}"
# ─────────────────────────────────────────────────────────────────────────────
# STEP 5: Assign Member Source to Role
# ─────────────────────────────────────────────────────────────────────────────
# Binds a specific user or group from the Member Source to the Role.
# This establishes the identity-to-role mapping that makes the policy
# enforceable for real users.
#
# Permission : Security Officer
# API Version : v2 — POST /pty/v2/pim/roles/{id}/members
# ─────────────────────────────────────────────────────────────────────────────
log "Step 5: Assign Member '${MEMBER_NAME}' to Role — UID: ${ROLE_UID}"
api_call \
-H "accept: application/json" \
-H "Content-Type: application/json" \
-X POST "https://${GW_HOST}/pty/v2/pim/roles/${ROLE_UID}/members" \
-d '[
{
"name": "'"${MEMBER_NAME}"'",
"source": "'"${SOURCE_UID}"'",
"type": "'"${MEMBER_TYPE}"'"
}
]'
echo ""
# ─────────────────────────────────────────────────────────────────────────────
# STEP 5.1: Sync Role Membership
# ─────────────────────────────────────────────────────────────────────────────
# Synchronizes the role membership from the Member Source. This pulls the
# current list of users and groups into the role so that access controls
# reflect the latest state of the identity source.
#
# Permission : Security Officer
# API Version : v2 — POST /pty/v2/pim/roles/{id}/sync
# ─────────────────────────────────────────────────────────────────────────────
log "Step 5.1: Sync Role Membership — Role UID: ${ROLE_UID}"
SYNC_RESPONSE=$(api_call \
-H "accept: application/json" \
-H "Content-Type: application/json" \
-X POST "https://${GW_HOST}/pty/v2/pim/roles/${ROLE_UID}/sync")
if [[ -z "${SYNC_RESPONSE}" ]]; then
echo " Status: OK"
else
echo " Response: ${SYNC_RESPONSE}"
fi
echo ""
# ─────────────────────────────────────────────────────────────────────────────
# STEP 6: Create Policy Shell
# ─────────────────────────────────────────────────────────────────────────────
# Creates the policy container that will hold the access rules. The policy
# is the deployable object that ties together Data Elements, Roles, and Rules.
#
# Permission : Security Officer
# API Version : v2 — POST /pty/v2/pim/policies
# ─────────────────────────────────────────────────────────────────────────────
log "Step 6: Create Policy Shell — ${POLICY_NAME}"
POLICY_RESPONSE=$(api_call \
-H "accept: application/json" \
-H "Content-Type: application/json" \
-X POST "https://${GW_HOST}/pty/v2/pim/policies" \
-d '{
"name": "'"${POLICY_NAME}"'",
"description": "'"${POLICY_DESC}"'",
"template": {
"access": {
"protect": false,
"reProtect": false,
"unProtect": false
}
}
}')
echo " Response: ${POLICY_RESPONSE}"
POLICY_UID=$(extract_uid "$POLICY_RESPONSE" "$POLICY_NAME")
echo " Policy UID: ${POLICY_UID}"
# ─────────────────────────────────────────────────────────────────────────────
# STEP 7: Define Policy Rule
# ─────────────────────────────────────────────────────────────────────────────
# Creates the rule that binds a Role (who), a Data Element (what), a Mask
# (how unprotected data is displayed), and the permitted operations
# (protect / reProtect / unProtect) into the policy.
# Without rules, the policy exists but grants no access.
#
# Permission : Security Officer
# API Version : v2 — POST /pty/v2/pim/policies/{id}/rules
# ─────────────────────────────────────────────────────────────────────────────
log "Step 7: Define Policy Rule — Policy UID: ${POLICY_UID}"
RULE_RESPONSE=$(api_call \
-H "accept: application/json" \
-H "Content-Type: application/json" \
-X POST "https://${GW_HOST}/pty/v2/pim/policies/${POLICY_UID}/rules" \
-d '{
"role": "'"${ROLE_UID}"'",
"dataElement": "'"${DE_UID}"'",
"mask": "'"${MASK_UID}"'",
"noAccessOperation": "'"${RULE_NO_ACCESS_OP}"'",
"permission": {
"access": {
"protect": '"${RULE_PROTECT}"',
"reProtect": '"${RULE_REPROTECT}"',
"unProtect": '"${RULE_UNPROTECT}"'
}
}
}')
if [[ -z "${RULE_RESPONSE}" ]]; then
echo " Status: OK"
else
echo " Response: ${RULE_RESPONSE}"
fi
echo ""
# ─────────────────────────────────────────────────────────────────────────────
# STEP 8: Create Datastore
# ─────────────────────────────────────────────────────────────────────────────
# Creates the datastore target to which the policy will be deployed.
# A policy is not active for protectors until it has been deployed to
# at least one datastore.
#
# Permission : Security Officer
# API Version : v2 — POST /pty/v2/pim/datastores
# ─────────────────────────────────────────────────────────────────────────────
log "Step 8: Create Datastore — ${DS_NAME}"
DS_RESPONSE=$(api_call \
-H "accept: application/json" \
-H "Content-Type: application/json" \
-X POST "https://${GW_HOST}/pty/v2/pim/datastores" \
-d '{
"name": "'"${DS_NAME}"'",
"description": "'"${DS_DESC}"'",
"default": '"${DS_DEFAULT}"'
}')
echo " Response: ${DS_RESPONSE}"
DS_UID=$(extract_uid "$DS_RESPONSE" "$DS_NAME")
echo " Datastore UID: ${DS_UID}"
# ─────────────────────────────────────────────────────────────────────────────
# STEP 9: Deploy Policy to Datastore
# ─────────────────────────────────────────────────────────────────────────────
# Deploys the policy to the target datastore. After this step, runtime
# protectors that reference this datastore will be able to load and
# enforce the policy.
#
# Permission : Security Officer
# API Version : v2 — POST /pty/v2/pim/datastores/{id}/deploy
# ─────────────────────────────────────────────────────────────────────────────
log "Step 9: Deploy Policy to Datastore — DS UID: ${DS_UID}, Policy UID: ${POLICY_UID}"
DEPLOY_RESPONSE=$(api_call \
-H "accept: application/json" \
-H "Content-Type: application/json" \
-X POST "https://${GW_HOST}/pty/v2/pim/datastores/${DS_UID}/deploy" \
-d '{
"policies": ["'"${POLICY_UID}"'"],
"applications": []
}')
if [[ -z "${DEPLOY_RESPONSE}" ]]; then
echo " Status: OK"
else
echo " Response: ${DEPLOY_RESPONSE}"
fi
echo ""
# ─────────────────────────────────────────────────────────────────────────────
# STEP 10: Confirm Deployment
# ─────────────────────────────────────────────────────────────────────────────
# Verifies that the policy has been successfully deployed to the datastore.
# Confirms the policy is active, correctly mapped, and enforceable.
#
# Permission : Security Viewer (read-only) or Security Officer
# API Version : v2 — GET /pty/v2/pim/deploy
# ─────────────────────────────────────────────────────────────────────────────
log "Step 10: Confirm Deployment"
api_call \
-H "accept: application/json" \
-X GET "https://${GW_HOST}/pty/v2/pim/deploy"
echo ""
###############################################################################
# SECTION 5: SUMMARY
# ───────────────────
# Displays a summary of all created resources and their UIDs.
###############################################################################
log "Workflow Complete ✅"
printf "\n%-20s %-30s %-10s\n" "Resource" "Name" "UID"
printf "%-20s %-30s %-10s\n" "────────────────────" "──────────────────────────────" "──────────"
printf "%-20s %-30s %-10s\n" "Data Element" "${DE_NAME}" "${DE_UID}"
printf "%-20s %-30s %-10s\n" " └─ Mask" "${MASK_NAME}" "${MASK_UID}"
printf "%-20s %-30s %-10s\n" "Role" "${ROLE_NAME}" "${ROLE_UID}"
printf "%-20s %-30s %-10s\n" "Member Source" "${SOURCE_NAME}" "${SOURCE_UID}"
printf "%-20s %-30s %-10s\n" "Policy" "${POLICY_NAME}" "${POLICY_UID}"
printf "%-20s %-30s %-10s\n" "Datastore" "${DS_NAME}" "${DS_UID}"
printf "\n"
4.3.4.2 - Full Script to Protect DOB using Policy Management REST APIs
The following code snippet contains the contents of the deploy-dob-policy.sh shell script. This script enables the creation and deployment of a policy to protect DOB data using the Policy Management REST APIs.
#!/usr/bin/env bash
###############################################################################
# Script Name : dob_policy.sh
# Description : End-to-end automation script for creating and deploying a
# Date of Birth (DOB) protection policy using the
# Protegrity Policy Information Management (PIM) REST API.
#
#
# ─────────────────────────────────────────────────────────────────────────────
# IMPORTANT NOTES
# ─────────────────────────────────────────────────────────────────────────────
#
# 1. WORKBENCH REQUIREMENT:
# The Policy Management REST APIs will work only after you have installed
# the Protegrity Workbench. Attempting to use these APIs before the
# Workbench is installed will result in errors.
#
# 2. USER PERMISSIONS:
# The user account used to authenticate against these APIs must have the
# appropriate Protegrity role assigned:
# - Security Officer : Required for write access (create, update, delete)
# - Security Viewer : Required for read-only access (get, list)
# For more information about the roles and permissions required, refer to
# the section "Managing Roles" in the Protegrity documentation.
#
# 3. API VERSION:
# The Policy Management API uses version v2.
# All endpoints in this script are prefixed with /pty/v2/pim/
# Requests to older API versions will not be supported.
#
# ─────────────────────────────────────────────────────────────────────────────
# PREREQUISITES
# ─────────────────────────────────────────────────────────────────────────────
# - Protegrity Workbench must be installed and running
# - kubectl configured and connected to your Kubernetes cluster
# - curl installed on the machine running this script
# - Access to the Protegrity API Gateway
# - A user account with Security Officer permissions
#
# ─────────────────────────────────────────────────────────────────────────────
# USAGE
# ─────────────────────────────────────────────────────────────────────────────
# chmod +x deploy-dob-policy.sh
# ./deploy-dob-policy.sh
#
# ─────────────────────────────────────────────────────────────────────────────
# WORKFLOW
# ─────────────────────────────────────────────────────────────────────────────
# Step 1 - Initialize Policy Management
# Step 2 - Prepare Data Element (DOB DateTime Token)
# Step 3 - Create Member Source
# Step 3.1 - Test Member Source Connectivity
# Step 4 - Create Role
# Step 5 - Assign Member Source to Role
# Step 5.1 - Sync Role Membership
# Step 6 - Create Policy Shell
# Step 7 - Define Policy Rule (bind Role + Data Element + Permissions)
# Step 8 - Create Datastore
# Step 9 - Deploy Policy to Datastore
# Step 10 - Confirm Deployment
#
# ─────────────────────────────────────────────────────────────────────────────
# SECURITY NOTES
# ─────────────────────────────────────────────────────────────────────────────
# - If any API call returns HTTP 401 (Unauthorized), the script will
# automatically attempt to re-generate the JWT token and retry the
# request once before failing.
# - If any API call indicates that a resource already exists, the script
# will exit immediately with an error. Delete the conflicting resource
# first, or update the name variables in SECTION 1 before re-running.
#
# ─────────────────────────────────────────────────────────────────────────────
# EXIT CODES
# ─────────────────────────────────────────────────────────────────────────────
# 0 - Success
# 1 - Script error (set -e will trigger on any failed command)
###############################################################################
set -euo pipefail
###############################################################################
# SECTION 1: USER-CONFIGURABLE VARIABLES
# ─────────────────────────────────────
# Modify the variables below to match your environment before running
# this script. All other values are derived automatically.
#
# NOTE: The user specified by ADMIN_USER must have the Security Officer
# permission to perform write operations via the Policy Management API.
# For read-only operations, the Security Viewer permission is sufficient.
# For more information, refer to the "Managing Roles" section in the
# Protegrity documentation.
###############################################################################
# --- Protegrity Admin Credentials ---
# WARNING: For production use, consider sourcing these values from a secrets
# manager (e.g., HashiCorp Vault, Kubernetes Secrets, AWS SSM).
ADMIN_USER="workbench"
ADMIN_PASS="Admin123!"
# --- Data Element ---
DE_NAME="de_dob_token"
DE_DESC="Tokenize Date of Birth"
DE_TOKENIZER="SLT_8_DATETIME" # DateTime tokenizer for date/time fields
# --- Role ---
ROLE_NAME="dob_protect_role"
ROLE_DESC="Role having access to protect DOB"
ROLE_MODE="MANUAL" # Options: MANUAL | SEMIAUTOMATIC | AUTOMATIC
# --- Member Source ---
SOURCE_NAME="test-file"
SOURCE_USER_FILE="exampleusers.txt"
SOURCE_GROUP_FILE="examplegroups.txt"
# --- Role Member ---
MEMBER_NAME="exampleuser1"
MEMBER_TYPE="USER" # Options: USER | GROUP
# --- Policy ---
POLICY_NAME="dob-policy"
POLICY_DESC="Protect Date of Birth with tokenization"
# --- Policy Rule Permissions ---
RULE_PROTECT=true # Allow protect operation
RULE_REPROTECT=false # Allow re-protect operation
RULE_UNPROTECT=true # Allow unprotect operation
RULE_NO_ACCESS_OP="NULL_VALUE" # Behavior for no-access: NULL_VALUE | EXCEPTION
# --- Datastore ---
DS_NAME="ds_protect_dob"
DS_DESC="Datastore to demonstrate DOB protection"
DS_DEFAULT=true # Set as the default datastore: true | false
# --- Token Retry Settings ---
# On receiving HTTP 401 Unauthorized, the script will refresh the JWT token
# and retry the failed request. MAX_TOKEN_RETRIES controls how many refresh
# attempts are made before the script aborts.
MAX_TOKEN_RETRIES=1 # Number of times to retry generating a token on 401
###############################################################################
# SECTION 2: HELPER FUNCTIONS
# ────────────────────────────
# Internal utility functions used throughout the script.
# Do not modify unless necessary.
###############################################################################
# Prints a formatted primary section header to stdout
log() {
printf "\n%s\n" "━━━━━━━━━━━━━━━━━━━━━━━━━━━━━━━━━━━━━━━━━━━━━━━━━━━━━━━━━━━━━━━━━━━━━━━━━━━━━━"
printf " %s\n" "$*"
printf "%s\n" "━━━━━━━━━━━━━━━━━━━━━━━━━━━━━━━━━━━━━━━━━━━━━━━━━━━━━━━━━━━━━━━━━━━━━━━━━━━━━━"
}
# Prints a formatted subsection header to stdout (indented, lighter style)
log_sub() {
printf "\n%s\n" " ┄┄┄┄┄┄┄┄┄┄┄┄┄┄┄┄┄┄┄┄┄┄┄┄┄┄┄┄┄┄┄┄┄┄┄┄┄┄┄┄┄┄┄┄┄┄┄┄┄┄┄┄┄┄┄┄┄┄┄┄┄┄┄┄┄┄┄┄┄┄┄┄┄┄"
printf " %s\n" "$*"
printf "%s\n" " ┄┄┄┄┄┄┄┄┄┄┄┄┄┄┄┄┄┄┄┄┄┄┄┄┄┄┄┄┄┄┄┄┄┄┄┄┄┄┄┄┄┄┄┄┄┄┄┄┄┄┄┄┄┄┄┄┄┄┄┄┄┄┄┄┄┄┄┄┄┄┄┄┄┄"
}
# Prints an error message to stderr and exits with code 1
# Usage: die <message>
die() {
printf "\n [ERROR] %s\n" "$*" >&2
exit 1
}
# Attempts to extract a UID from a JSON API response.
# Handles both string UIDs ("uid":"1") and integer UIDs ("uid":1).
# Exits with an error if extraction fails — never prompts interactively.
# Usage: extract_uid <json_response> <resource_label>
extract_uid() {
local response="$1"
local label="$2"
local uid
# Match string-quoted UIDs: "uid":"<value>"
uid=$(echo "$response" | grep -o '"uid":"[^"]*"' | head -1 | sed 's/"uid":"//;s/"//' || true)
# Fallback: match integer UIDs: "uid":<number>
if [[ -z "${uid:-}" ]]; then
uid=$(echo "$response" | grep -o '"uid":[0-9]*' | head -1 | grep -o '[0-9]*' || true)
fi
if [[ -z "${uid:-}" ]]; then
die "Failed to extract UID for '${label}'. API response was: ${response}"
fi
echo "$uid"
}
# Generates a new JWT authentication token using the configured admin
# credentials (ADMIN_USER / ADMIN_PASS). Stores the result in the global
# TOKEN variable.
#
# NOTE: The user must have the Security Officer permission for write access
# or the Security Viewer permission for read-only access to the
# Policy Management API (v2). For more information, refer to
# the "Managing Roles" section in the Protegrity documentation.
#
# Usage: generate_token
generate_token() {
echo " Generating JWT authentication token..."
TOKEN=$(curl -k -s "https://${GW_HOST}/api/v1/auth/login/token" \
-X POST \
-H 'Content-Type: application/x-www-form-urlencoded' \
-d "loginname=${ADMIN_USER}" \
-d "password=${ADMIN_PASS}" \
-D - -o /dev/null 2>&1 \
| grep -i 'pty_access_jwt_token:' \
| sed 's/pty_access_jwt_token: //' \
| tr -d '\r')
if [[ -z "${TOKEN:-}" ]]; then
die "Failed to retrieve JWT token. Please verify the following:
- The Protegrity Workbench is installed and running.
- The API Gateway host (${GW_HOST}) is reachable.
- The credentials for user '${ADMIN_USER}' are correct.
- The user '${ADMIN_USER}' has the Security Officer or Security Viewer
permission assigned. Refer to 'Managing Roles' in the Protegrity
documentation for more information."
fi
echo " Token acquired successfully."
}
# Executes a curl API call and automatically retries with a refreshed JWT
# token if a 401 Unauthorized response is received.
#
# All Policy Management API calls in this script target the v2 API version:
# https://<gateway>/pty/v2/pim/...
#
# On HTTP 401, the token is refreshed (up to MAX_TOKEN_RETRIES times) and
# the request is retried. This can occur when a token expires mid-run.
# On any other non-2xx response, a warning is logged but execution continues.
#
# Usage: api_call <curl_args...>
api_call() {
local retries=0
local http_status
local response_body
local tmp_file
tmp_file=$(mktemp)
while true; do
# Execute the curl call, capturing body and HTTP status separately
http_status=$(curl -k -s -o "$tmp_file" -w "%{http_code}" \
-H "Authorization: Bearer ${TOKEN}" \
"$@")
response_body=$(cat "$tmp_file")
# Handle 401 Unauthorized:
# This typically means the JWT token has expired or is invalid.
# The script will attempt to refresh the token and retry the request.
# Ensure the user has the correct permissions (Security Officer / Viewer).
# Refer to "Managing Roles" in the Protegrity documentation.
if [[ "$http_status" == "401" ]]; then
if [[ "$retries" -lt "$MAX_TOKEN_RETRIES" ]]; then
echo " [Warning] Received HTTP 401 Unauthorized." >&2
echo " Refreshing JWT token and retrying (attempt $((retries + 1)) of ${MAX_TOKEN_RETRIES})..." >&2
generate_token
retries=$((retries + 1))
continue
else
rm -f "$tmp_file"
die "Received HTTP 401 Unauthorized after ${MAX_TOKEN_RETRIES} token refresh attempt(s).
Please verify that user '${ADMIN_USER}' has the required permissions:
- Security Officer : for write access
- Security Viewer : for read-only access
Refer to 'Managing Roles' in the Protegrity documentation."
fi
fi
# Fail on "already exists" (HTTP 400/409) — resource must be removed first
if echo "$response_body" | grep -qi "already exist"; then
rm -f "$tmp_file"
die "Resource already exists (HTTP ${http_status}). The script cannot continue.
Response : ${response_body}
Action : Delete or rename the existing resource before re-running,
or update the name variables at the top of this script."
fi
# Log other non-2xx responses (excluding 401 already handled above)
if [[ "$http_status" != 2* ]]; then
echo " [Warning] Received HTTP ${http_status}. Response: ${response_body}" >&2
fi
rm -f "$tmp_file"
echo "$response_body"
break
done
}
###############################################################################
# SECTION 3: ENVIRONMENT SETUP
# ─────────────────────────────
# Retrieves the API Gateway host address and generates a JWT authentication
# token required for all subsequent API calls.
#
# NOTE: The Policy Management REST APIs will work only after the Protegrity
# Workbench has been installed. All API calls target version v2:
# https://<gateway>/pty/v2/pim/
###############################################################################
log "Environment Setup: Retrieving API Gateway Host"
export GW_HOST
GW_HOST="$(kubectl get gateway pty-main -n api-gateway \
-o jsonpath='{.status.addresses[0].value}')"
echo " API Gateway Host : ${GW_HOST}"
echo " API Version : v2 (/pty/v2/pim/)"
log "Environment Setup: Generating JWT Authentication Token"
generate_token
###############################################################################
# SECTION 4: WORKFLOW EXECUTION
# ──────────────────────────────
# Executes each step of the DOB policy creation workflow in sequence.
# UIDs returned by each step are captured and reused in subsequent steps.
#
# NOTE: All write operations (POST) require the Security Officer permission.
# The read operation in Step 12 (GET) requires at minimum the
# Security Viewer permission.
###############################################################################
# ─────────────────────────────────────────────────────────────────────────────
# STEP 1: Initialize Policy Management
# ─────────────────────────────────────────────────────────────────────────────
# Initializes the PIM system. This step only needs to be performed once
# per environment setup.
#
# Requirement : Protegrity Workbench must be installed before running this step.
# Permission : Security Officer
# API Version : v2 — POST /pty/v2/pim/init
# ─────────────────────────────────────────────────────────────────────────────
log "Step 1: Initialize Policy Management"
INIT_RESPONSE=$(api_call \
-H "accept: application/json" \
-X POST "https://${GW_HOST}/pty/v2/pim/init")
if [[ -z "${INIT_RESPONSE}" ]]; then
echo " Status: OK (empty response — PIM already initialized or no content returned)"
else
echo " Response: ${INIT_RESPONSE}"
fi
echo ""
# ─────────────────────────────────────────────────────────────────────────────
# STEP 2: Prepare Data Element
# ─────────────────────────────────────────────────────────────────────────────
# Prepares the DOB DateTime Data Element that defines what data is protected
# and how it is tokenized. The SLT_8_DATETIME tokenizer handles date/time
# field tokenization.
#
# Permission : Security Officer
# API Version : v2 — POST /pty/v2/pim/dataelements
# ─────────────────────────────────────────────────────────────────────────────
log "Step 2: Prepare Data Element — ${DE_NAME}"
DE_RESPONSE=$(api_call \
-H "accept: application/json" \
-H "Content-Type: application/json" \
-X POST "https://${GW_HOST}/pty/v2/pim/dataelements" \
-d '{
"name": "'"${DE_NAME}"'",
"description": "'"${DE_DESC}"'",
"dateTimeToken": {
"tokenizer": "'"${DE_TOKENIZER}"'"
}
}')
echo " Response: ${DE_RESPONSE}"
DE_UID=$(extract_uid "$DE_RESPONSE" "$DE_NAME")
echo " Data Element UID: ${DE_UID}"
# ─────────────────────────────────────────────────────────────────────────────
# STEP 3: Create Member Source
# ─────────────────────────────────────────────────────────────────────────────
# Creates a Member Source that defines where user and group identities are
# sourced from (in this example, a flat file). Member Sources are used to
# populate roles with real enterprise identities.
#
# Permission : Security Officer
# API Version : v2 — POST /pty/v2/pim/sources
# ─────────────────────────────────────────────────────────────────────────────
log "Step 3: Create Member Source — ${SOURCE_NAME}"
SOURCE_RESPONSE=$(api_call \
-H "accept: application/json" \
-H "Content-Type: application/json" \
-X POST "https://${GW_HOST}/pty/v2/pim/sources" \
-d '{
"name": "'"${SOURCE_NAME}"'",
"type": "FILE",
"connection": {
"userFile": "'"${SOURCE_USER_FILE}"'",
"groupFile": "'"${SOURCE_GROUP_FILE}"'"
}
}')
echo " Response: ${SOURCE_RESPONSE}"
SOURCE_UID=$(extract_uid "$SOURCE_RESPONSE" "$SOURCE_NAME")
echo " Source UID: ${SOURCE_UID}"
# ─────────────────────────────────────────────────────────────────────────────
# STEP 3.1: Test Member Source Connectivity
# ─────────────────────────────────────────────────────────────────────────────
# Validates that the Member Source is reachable and correctly configured.
# All connectivity checks (connection, authentication, groups, users) must
# pass before proceeding.
#
# Permission : Security Officer
# API Version : v2 — POST /pty/v2/pim/sources/{id}/test
# ─────────────────────────────────────────────────────────────────────────────
log "Step 3.1: Test Member Source Connectivity — UID: ${SOURCE_UID}"
api_call \
-H "accept: application/json" \
-H "Content-Type: application/json" \
-X POST "https://${GW_HOST}/pty/v2/pim/sources/${SOURCE_UID}/test"
echo ""
# ─────────────────────────────────────────────────────────────────────────────
# STEP 4: Create Role
# ─────────────────────────────────────────────────────────────────────────────
# Creates a role that represents who is allowed to perform operations on
# the protected data. Permissions are granted to roles, which are then
# mapped to users and groups via Member Sources.
#
# Permission : Security Officer
# API Version : v2 — POST /pty/v2/pim/roles
# ─────────────────────────────────────────────────────────────────────────────
log "Step 4: Create Role — ${ROLE_NAME}"
ROLE_RESPONSE=$(api_call \
-H "accept: application/json" \
-H "Content-Type: application/json" \
-X POST "https://${GW_HOST}/pty/v2/pim/roles" \
-d '{
"name": "'"${ROLE_NAME}"'",
"description": "'"${ROLE_DESC}"'",
"mode": "'"${ROLE_MODE}"'",
"allowAll": false
}')
echo " Response: ${ROLE_RESPONSE}"
ROLE_UID=$(extract_uid "$ROLE_RESPONSE" "$ROLE_NAME")
echo " Role UID: ${ROLE_UID}"
# ─────────────────────────────────────────────────────────────────────────────
# STEP 5: Assign Member Source to Role
# ─────────────────────────────────────────────────────────────────────────────
# Binds a specific user or group from the Member Source to the Role.
# This establishes the identity-to-role mapping that makes the policy
# enforceable for real users.
#
# Permission : Security Officer
# API Version : v2 — POST /pty/v2/pim/roles/{id}/members
# ─────────────────────────────────────────────────────────────────────────────
log "Step 5: Assign Member '${MEMBER_NAME}' to Role — UID: ${ROLE_UID}"
api_call \
-H "accept: application/json" \
-H "Content-Type: application/json" \
-X POST "https://${GW_HOST}/pty/v2/pim/roles/${ROLE_UID}/members" \
-d '[
{
"name": "'"${MEMBER_NAME}"'",
"source": "'"${SOURCE_UID}"'",
"type": "'"${MEMBER_TYPE}"'"
}
]'
echo ""
# ─────────────────────────────────────────────────────────────────────────────
# STEP 5.1: Sync Role Membership
# ─────────────────────────────────────────────────────────────────────────────
# Synchronizes the role membership from the Member Source. This pulls the
# current list of users and groups into the role so that access controls
# reflect the latest state of the identity source.
#
# Permission : Security Officer
# API Version : v2 — POST /pty/v2/pim/roles/{id}/sync
# ─────────────────────────────────────────────────────────────────────────────
log "Step 5.1: Sync Role Membership — Role UID: ${ROLE_UID}"
SYNC_RESPONSE=$(api_call \
-H "accept: application/json" \
-H "Content-Type: application/json" \
-X POST "https://${GW_HOST}/pty/v2/pim/roles/${ROLE_UID}/sync")
if [[ -z "${SYNC_RESPONSE}" ]]; then
echo " Status: OK"
else
echo " Response: ${SYNC_RESPONSE}"
fi
echo ""
# ─────────────────────────────────────────────────────────────────────────────
# STEP 6: Create Policy Shell
# ─────────────────────────────────────────────────────────────────────────────
# Creates the policy container that will hold the access rules. The policy
# is the deployable object that ties together Data Elements, Roles, and Rules.
#
# Permission : Security Officer
# API Version : v2 — POST /pty/v2/pim/policies
# ─────────────────────────────────────────────────────────────────────────────
log "Step 6: Create Policy Shell — ${POLICY_NAME}"
POLICY_RESPONSE=$(api_call \
-H "accept: application/json" \
-H "Content-Type: application/json" \
-X POST "https://${GW_HOST}/pty/v2/pim/policies" \
-d '{
"name": "'"${POLICY_NAME}"'",
"description": "'"${POLICY_DESC}"'",
"template": {
"access": {
"protect": false,
"reProtect": false,
"unProtect": false
}
}
}')
echo " Response: ${POLICY_RESPONSE}"
POLICY_UID=$(extract_uid "$POLICY_RESPONSE" "$POLICY_NAME")
echo " Policy UID: ${POLICY_UID}"
# ─────────────────────────────────────────────────────────────────────────────
# STEP 7: Define Policy Rule
# ─────────────────────────────────────────────────────────────────────────────
# Creates the rule that binds a Role (who), a Data Element (what), and
# the permitted operations (protect / reProtect / unProtect) into the
# policy. Without rules, the policy exists but grants no access.
# Note: No mask is applied for DateTime data elements.
#
# Permission : Security Officer
# API Version : v2 — POST /pty/v2/pim/policies/{id}/rules
# ─────────────────────────────────────────────────────────────────────────────
log "Step 7: Define Policy Rule — Policy UID: ${POLICY_UID}"
RULE_RESPONSE=$(api_call \
-H "accept: application/json" \
-H "Content-Type: application/json" \
-X POST "https://${GW_HOST}/pty/v2/pim/policies/${POLICY_UID}/rules" \
-d '{
"role": "'"${ROLE_UID}"'",
"dataElement": "'"${DE_UID}"'",
"noAccessOperation": "'"${RULE_NO_ACCESS_OP}"'",
"permission": {
"access": {
"protect": '"${RULE_PROTECT}"',
"reProtect": '"${RULE_REPROTECT}"',
"unProtect": '"${RULE_UNPROTECT}"'
}
}
}')
if [[ -z "${RULE_RESPONSE}" ]]; then
echo " Status: OK"
else
echo " Response: ${RULE_RESPONSE}"
fi
echo ""
# ─────────────────────────────────────────────────────────────────────────────
# STEP 8: Create Datastore
# ─────────────────────────────────────────────────────────────────────────────
# Creates the datastore target to which the policy will be deployed.
# A policy is not active for protectors until it has been deployed to
# at least one datastore.
#
# Permission : Security Officer
# API Version : v2 — POST /pty/v2/pim/datastores
# ─────────────────────────────────────────────────────────────────────────────
log "Step 8: Create Datastore — ${DS_NAME}"
DS_RESPONSE=$(api_call \
-H "accept: application/json" \
-H "Content-Type: application/json" \
-X POST "https://${GW_HOST}/pty/v2/pim/datastores" \
-d '{
"name": "'"${DS_NAME}"'",
"description": "'"${DS_DESC}"'",
"default": '"${DS_DEFAULT}"'
}')
echo " Response: ${DS_RESPONSE}"
DS_UID=$(extract_uid "$DS_RESPONSE" "$DS_NAME")
echo " Datastore UID: ${DS_UID}"
# ─────────────────────────────────────────────────────────────────────────────
# STEP 9: Deploy Policy to Datastore
# ─────────────────────────────────────────────────────────────────────────────
# Deploys the policy to the target datastore. After this step, runtime
# protectors that reference this datastore will be able to load and
# enforce the policy.
#
# Permission : Security Officer
# API Version : v2 — POST /pty/v2/pim/datastores/{id}/deploy
# ─────────────────────────────────────────────────────────────────────────────
log "Step 9: Deploy Policy to Datastore — DS UID: ${DS_UID}, Policy UID: ${POLICY_UID}"
DEPLOY_RESPONSE=$(api_call \
-H "accept: application/json" \
-H "Content-Type: application/json" \
-X POST "https://${GW_HOST}/pty/v2/pim/datastores/${DS_UID}/deploy" \
-d '{
"policies": ["'"${POLICY_UID}"'"],
"applications": []
}')
if [[ -z "${DEPLOY_RESPONSE}" ]]; then
echo " Status: OK"
else
echo " Response: ${DEPLOY_RESPONSE}"
fi
echo ""
# ─────────────────────────────────────────────────────────────────────────────
# STEP 10: Confirm Deployment
# ─────────────────────────────────────────────────────────────────────────────
# Verifies that the policy has been successfully deployed to the datastore.
# Confirms the policy is active, correctly mapped, and enforceable.
#
# Permission : Security Viewer (read-only) or Security Officer
# API Version : v2 — GET /pty/v2/pim/deploy
# ─────────────────────────────────────────────────────────────────────────────
log "Step 10: Confirm Deployment"
api_call \
-H "accept: application/json" \
-X GET "https://${GW_HOST}/pty/v2/pim/deploy"
echo ""
###############################################################################
# SECTION 5: SUMMARY
# ───────────────────
# Displays a summary of all created resources and their UIDs.
###############################################################################
log "Workflow Complete ✅"
printf "\n%-20s %-30s %-10s\n" "Resource" "Name" "UID"
printf "%-20s %-30s %-10s\n" "────────────────────" "──────────────────────────────" "──────────"
printf "%-20s %-30s %-10s\n" "Data Element" "${DE_NAME}" "${DE_UID}"
printf "%-20s %-30s %-10s\n" "Role" "${ROLE_NAME}" "${ROLE_UID}"
printf "%-20s %-30s %-10s\n" "Member Source" "${SOURCE_NAME}" "${SOURCE_UID}"
printf "%-20s %-30s %-10s\n" "Policy" "${POLICY_NAME}" "${POLICY_UID}"
printf "%-20s %-30s %-10s\n" "Datastore" "${DS_NAME}" "${DS_UID}"
printf "\n"
5 - Data Discovery
Data Discovery specializes in the detection of Personally Identifiable Information (PII), Protected Health Information (PHI), Payment Card Information (PCI) within free-text (unstructured) and table-based (structured/CSV) inputs. Unlike traditional data tools, it excels in dynamic, unstructured environments such as chatbot conversations, call transcripts, and Generative AI (Gen AI) outputs.
For more information about Data Discovery, refer to Data Discovery.
5.1 - Prerequisites
Ensure that the following prerequisites are met before installing Data Discovery with PPC:
PPC Cluster Team Edition must be installed and accessible. For more information on installing PPC, refer to Installing PPC for instructions.
Access to a Kubernetes cluster with sufficient permissions to manage the following resources:
- Namespace
- Deployment
- Service
- ConfigMap
- Secret
- HorizontalPodAutoscaler
- Gateway API resources (HTTPRoute, ReferenceGrant, SecurityPolicy)
- Karpenter resources (NodePool, EC2NodeClass)
Authorization to provision AWS
m5.largeinstances.Ensure that the jumpbox can connect to the required registries. If not already authenticated, then log in to the required registry.
For connecting and deploying from the Protegrity Container Registry (PCR), use the following command and the credentials obtained from the My.Protegrity portal during account creation:
helm registry login registry.protegrity.com:9443
- For connecting and deploying to the local registry, use your local credentials and local registry endpoint as required.
- AWS credentials with permission to read SSM parameters in the target region (required only when overriding the AMI ID).
Option A (Recommended): Run the following AWS CLI command to retrieve the AMI ID dynamically
aws ssm get-parameter \
--name /aws/service/bottlerocket/aws-k8s-1.34/x86_64/latest/image_id \
--region <region> \
--query "Parameter.Value" \
--output text
Alternatively, refer to these example AMI IDs.
Option B: The following table provides the list of AMI IDs
| Region | AMI ID |
|---|---|
| ap-south-1 | ami-07959c05dcdb79a72 |
| eu-north-1 | ami-0268b0bfff0f25d31 |
| eu-west-3 | ami-0ea9454aef60045a2 |
| eu-west-2 | ami-0d5eee57a6a1398a3 |
| eu-west-1 | ami-00a8d14029b60a028 |
| ap-northeast-3 | ami-0e495c3ffd416c65e |
| ap-northeast-2 | ami-0fc18a24aec719c1c |
| ap-northeast-1 | ami-00ec85b83bf713aac |
| ca-central-1 | ami-03891f0d8b41eb296 |
| sa-east-1 | ami-0a30f044a5781b4e0 |
| ap-southeast-1 | ami-0ae51324bf2e89725 |
| ap-southeast-2 | ami-0ef7e8095b163dc42 |
| eu-central-1 | ami-00e36131a0343c374 |
| us-east-2 | ami-0e486911b2d0a5f7e |
| us-west-1 | ami-01183e1261529749e |
| us-west-2 | ami-04f850c412625dfe6 |
5.2 - Installing Data Discovery
Data Discovery application can be deployed using helm.
Note: For connecting and deploying from the Protegrity Container Registry (PCR), use the
helm registry login <Container_Registry_Path>command and the credentials obtained from the My.Protegrity portal during account creation.
Install Data Discovery using the following command:
helm registry login <Container_Registry_Path>
helm upgrade --install data-discovery \
oci://<Container_Registry_Path>/data-discovery/2.0/classification/helm/data-discovery \
--version 2.0.0-373.gf464fa3e \
--namespace data-discovery \
--create-namespace
Replace the placeholder values in the command with the following variables.
| Variable Name | Description | Value |
|---|---|---|
<Container_Registry_Path> | Location of the container registry where the Data Discovery Helm chart is published. |
|
When installing Data Discovery in a region other than the default us-east-1, an AMI ID override may be required.
helm registry login <Container_Registry_Path>
helm upgrade --install data-discovery \
oci://<Container_Registry_Path>/data-discovery/2.0/classification/helm/data-discovery \
--version 2.0.0-373.gf464fa3e \
--namespace data-discovery \
--create-namespace \
--set karpenterResources.nodeClass.amiId="<ami-id>"
Note: Ensure that
<ami-id>in the preceding command is replaced with a valid AMI ID for the AWS region in use. For more information about AMI IDs and available options, refer AMI ID.
Validating the deployment
After installing Data Discovery, validate the deployment using the following steps.
- Check whether all Data Discovery Pods are ready and running using the following command.
kubectl get pods -n data-discovery
NAME READY STATUS RESTARTS AGE
classification-deployment-75db967f47-88kkc 1/1 Running 0 5h40m
context-provider-deployment-54f44fb4b6-p9wx2 1/1 Running 0 5h32m
pattern-provider-deployment-6b6cb5f8dd-2kx25 1/1 Running 0 5h40m
- Submit a classification request to the Data Discovery API.
Note: The following requirements are necessary to submit a classification request to the Data Discovery API:
- An Authentication token.
- To login with a user with
data_discovery_permissionaccess. This permission is currently assigned to thesecurity_administratorrole.
curl -k https://<CLUSTER_FQDN>/pty/data-discovery/v2/classify/text \
-H 'Content-Type: text/plain' \
-H "Authorization: Bearer <JWT_TOKEN>" \
--data 'You can reach Dave Elliot by phone 203-555-1286'
Where:
<CLUSTER_FQDN>is the Fully Qualified Domain Name of the cluster (FQDN). For example,eclipse.aws.protegrity.com.<JWT_TOKEN>is authentication token.
To view a sample response, refer to API Endpoints in Data Discovery.
Tip: To test classification without authentication, refer to Verify application functionality without authentication in the Troubleshooting section.
5.3 - Configuring Data Discovery
This section provides guidance on configuring Data Discovery logging and service providers.
Configurations can be set during deployment by overwriting the configurations defined in the Data Discovery Helm values.yaml.
Overriding Configurations
Create a
values-override.yamlfile with the custom configuration mentioned in the Logging Configuration.Save the changes.
If the application is already deployed, uninstall it using the following command.
helm uninstall data-discovery -n data-discoveryRun the installation command mentioned in the Installing Data Discovery.
Apply the custom configuration using the following command.
-f values-override.yaml
Logging Configuration
To configure the settings during deployment, add the following entries to the values-override.yaml file:
Setting the Log level
Update the log level in the values-override.yaml file.
- Classification Service:
# Custom logging configuration for classificationService
classificationService:
loggingConfig: |
{}
- Providers:
# Custom logging configuration for Providers
providers:
Pattern:
loggingConfig: |
{}
Context:
loggingConfig: |
{}
The empty braces can be populated using the standard Python logging configuration JSON format. For more information, refer the official documentation.
To set the log level, perform the following steps:
- Edit the
values-override.yamlfile. - Under
loggingConfig:, set the value ofroot:levelto one of the following:
- DEBUG
- INFO
- WARNING
- ERROR
- CRITICAL
For example, to change the log level to WARNING, configure any of the loggingConfig parameters as follows:
- Classification Service:
classificationService:
loggingConfig: |
{
"root": {
"level": "WARNING"
}
}
- Providers:
providers:
Pattern:
loggingConfig: |
{
"root": {
"level": "WARNING"
}
}
Context:
loggingConfig: |
{
"root": {
"level": "WARNING"
}
}
- Save the changes.
Configuring Input Validation Parameters
The Classification service in Data Discovery offers an input validation security feature that rejects invalid input data. For more information about Input Validation, refer to the Input Validation section.
Configure this feature during deployment by adding parameters to the values-override.yaml file. The below configuration uses the same override mechanism described in the Overriding Configuration section.
Following example shows how to Enable/Disable Input Validation Security Controls:
classificationAppConfig:
securitySettings:
# Can be set as True or False
ENABLE_ALL_SECURITY_CONTROLS: true
5.4 - Uninstalling Data Discovery
Run the following command to uninstall:
helm uninstall data-discovery -n data-discovery
Tip: If the uninstall process hangs, refer to the Manually remove the remaining resources in the Troubleshooting section.
5.5 - Troubleshooting
The following section provides a quick reference for common issues, their causes, and actions.
Pods remain in the
Pendingstate.- Likely cause: The NodePool is not ready or does not have sufficient capacity.
- Action: Check the NodePool status and verify that sufficient capacity is available.
HPA displays
unknown metrics.- Likely cause: The Metrics Server is missing or unhealthy.
- Action: Install the Metrics Server or restore its health.
Gateway API returns a
401 Unauthorizedresponse.- Likely cause: JWT authentication fails because the token is missing, malformed, or expired.
- Action:
- Verify that the
Authorization: Bearer <JWT_TOKEN>header is present and valid. - If required, Verify application functionality without authentication.
- Verify that the
Uninstall stops responding.
- Likely cause: A Karpenter finalizer prevents resource deletion.
- Action:Manually remove the remaining resources
NodePool or NodeClass resources remain in the cluster.
- Likely cause: Insufficient permissions prevent resource deletion.
- Action:Manually remove the remaining resources
Verify application functionality without authentication
kubectl -n data-discovery run curl --image=curlimages/curl -it --rm --restart=Never -- \
curl -v -X POST classification-service:8050/pty/data-discovery/v2/classify/text \
-H 'Content-Type: text/plain' \
--data 'Detect Jane Roe phone 203-555-1111'
Manually remove the remaining resources
Follow the steps to manually remove resources.
- Remove finalizer from the Data Discovery EC2NodeClass.
kubectl patch ec2nodeclass data-discovery-nodeclass \ --type merge \ -p '{"metadata":{"finalizers":[]}}' kubectl delete ec2nodeclass data-discovery-nodeclass - Delete NodePools.
kubectl delete nodepool data-discovery-classification kubectl delete nodepool data-discovery-context kubectl delete nodepool data-discovery-pattern - Delete EC2NodeClass (AWS provider)
kubectl delete ec2nodeclass data-discovery-nodeclass
5.6 - Logging usage metrics
Data Discovery generates usage logs for all classification requests submitted to the service. These logs provide visibility into how the service is being used and support monitoring, auditing, and operational analysis. Usage logs include high-level metrics such as request outcomes and the volume of data processed, enabling administrators to track usage patterns and assess service behavior over time.
For a detailed description of the usage log format and available fields, see the
Data Discovery Usage Logs documentation.
For information about Insight’s dashboards and access to usage logs, refer to AI Teams Edition Insight documentation.
6 - AI Security
6.1 - Semantic Guardrails
Protegrity’s Semantic Guardrails solution is a security guardrail engine for AI systems. It evaluates risks in GenAI systems such as chatbots, workflows, and agents, through advanced semantic analytics and intent classification to detect potentially malicious messages. PII detection can also be leveraged for comprehensive security coverage.
For more information about Semantic Guardrails, refer to the Semantic Guardrails documentation.
6.1.1 - Prerequisites
Ensure that the following requirements are met before installing Semantic Guardrails with PPC.
- The jumpbox is registered and prepared.For more information about registering a jumpbox, refer to Configuring Authentication for Protegrity AI Team Edition.
- PPC is installed and accessible.
- For PII detection, Data Discovery service is installed.
- Access to relevant images is available.
6.1.2 - Installing Semantic Guardrails
This section describes the steps to install Semantic Guardrails.
1. Installing Data Discovery
For PII detection, it is recommended to install Data Discovery services before installing Semantic Guardrails.
For more information about installing Data Discovery service, refer to Installing Data Discovery.
To verify the Data Discovery service status, run the following command.
kubectl get pods -n data-discovery
2. Preparing and Installing
To install Semantic Guardrails, you must have access to the v1.1.1 helmchart.
To install the helm chart, run the following command.
helm upgrade semantic-guardrails \
oci://<container_registry_path>/semantic-guardrails/1.1/helm/semantic-guardrails \
--install --namespace pty-semantic-guardrails \
--version 1.1.1 \
--create-namespace
Note: In some deployments the above permission is managed by ProductConfiguration in the Helmchart.
If you create the user after installing SGR, you may have to redeploy the SGR helmchart afterwards.
3. Creating an SGR User
SGR users need the semantic_guardrails_user role with can_create_token permissions to access the API.
For more information on assigning roles, refer to Policy Management Command Line Interface (CLI) Reference.
To create a user, run the following command.
# Auto-discover gateway host from the cluster
GW_HOST=$(kubectl get gateway pty-main -n api-gateway -o jsonpath='{.status.addresses[0].value}')
ADMIN_USER="admin"
ADMIN_PASS="Admin123!"
# Obtain an admin token
TOKEN=$(curl -sk -X POST "https://${GW_HOST}/pty/v1/auth/login/token" \
-H "Content-Type: application/x-www-form-urlencoded" \
-d "loginname=${ADMIN_USER}&password=${ADMIN_PASS}" \
-D - -o /dev/null | grep -i 'pty_access_jwt_token' | awk '{print $2}' | tr -d '\r\n')
echo $TOKEN
# Add `can_create_token` as a permission to the `semantic_guardrails_user` role.
# This only needs to be done **once per deployment** (not per user).
curl -sk -X PUT "https://${GW_HOST}/pty/v1/auth/roles" \
-H "Authorization: Bearer ${TOKEN}" \
-H "Content-Type: application/json" \
-d '{
"name": "semantic_guardrails_user",
"permissions": ["semantic_guardrails_administrator", "can_create_token"]
}'
# Create User
curl -sk -X POST "https://${GW_HOST}/pty/v1/auth/users" \
-H "Authorization: Bearer ${TOKEN}" \
-H "Content-Type: application/json" \
-d '{
"username": "semantic_guardrails_username",
"password": "Admin123!",
"roles": [
"semantic_guardrails_user"
]
}'
4. Verifying Deployment Status
To verify the deployment status, run the following command.
kubectl get pods -n pty-semantic-guardrails
After Semantic Guardrails feature is successfully deployed, the expected output is as follows.
NAME READY STATUS RESTARTS AGE
semantic-guardrails-deployment-xxxxxxxxxx-xxxxx 1/1 Running 0 2m
5. Verifying the Service Status
To verify the service status, run the following command.
kubectl get svc -n pty-semantic-guardrails
After Semantic Guardrails feature is successfully deployed, the expected output is as follows.
NAME TYPE CLUSTER-IP EXTERNAL-IP PORT(S) AGE
semantic-guardrails-service ClusterIP 172.20.109.155 <none> 8001/TCP 3h
6.1.3 - Testing the Semantic Guardrails deployment
Perform the following steps to test the Semantic Guardrails deployment.
1. Testing Semantic Guardrails API
To test the Semantic Guardrails API endpoint, run the following command.
Note: The endpoints require authentication. For more information on creating a user with correct permissions and getting the JWT token, refer to PPC documentation.
GATEWAY_URL=$(kubectl get gateway pty-main -n api-gateway -o jsonpath='{.status.addresses[0].value}')
USERNAME="semantic_guardrails_user"
PASSWORD="Admin123!"
YOUR_JWT_TOKEN=$(curl -sk -X POST "${GATEWAY_URL}/api/v1/auth/login/token" \
-H 'Content-Type: application/x-www-form-urlencoded' \
-d "loginname=${USERNAME}&password=${PASSWORD}" \
-D - -o /dev/null | grep -i 'pty_access_jwt_token' | awk '{print $2}' | tr -d '\r\n')
The sample response appears as follows.
{
"from": "user",
"to": "ai",
"content": "This is a test message for semantic analysis",
"outcome": "approved",
"score": 0.2,
"explanation": "in-domain"
}
2. Testing Data Discovery Integration
If Data Discovery is installed, then to test the Data Discovery integration, run the following command.
curl -sk -X POST "${GATEWAY_URL}/pty/semantic-guardrails/v1.1/conversations/messages/scan" -H 'Content-Type: application/json' -H "Authorization: Bearer $YOUR_JWT_TOKEN" --data '{
"messages": [
{
"from": "ai",
"to": "user",
"content": "My name is John Smith, my credit card number is 4868 7191 9682 9038",
"processors": ["pii"]
}
]
}'
The sample response appears as follows.
{
"messages": [
{
"id": "1",
"outcome": "rejected",
"score": 0.8774,
"processors": [
{
"name": "data-discovery",
"score": 0.8773500025272369,
"explanation": "['PERSON : [16, 21]', 'CREDIT_CARD : [48, 67]']"
}
]
}
],
"batch": {
"outcome": "rejected",
"score": 0.8774,
"rejected_messages": [
"1"
]
}
}
6.1.4 - Configuring Semantic Guardrails
This service provides AI conversation scanning and semantic analysis capabilities for Semantic Guardrails.
API Endpoints
This section provides an overview of the primary endpoints.
| Name | Endpoint |
|---|---|
| Main API | /pty/semantic-guardrail/v1.1/conversations/messages/ |
| Models API | /pty/semantic-guardrail/v1.1/domain-models/ |
Configuration Variables
The semantic-guardrail service can be configured by setting variables in the helm chart values.yaml, or overriding them
with -f my.values.yaml.
Service variables
| Key | Sub-Key | Description |
|---|---|---|
semanticGuardrailsAppConfig | environment.LOG_LEVEL | Sets the application log level, default is INFO |
Other variables
Semantic Guardrails Service Configuration
These Service variables are available to help diagnose and fix any resource allocation problems. It is not recommended to change them.
| Key | Sub-Key |
|---|---|
semanticGuardrailsService | port |
semanticGuardrailsService | containerName |
semanticGuardrailsService | resources.Required.memory |
semanticGuardrailsService | resources.Required.cpu |
semanticGuardrailsService | resources.Limits.memory |
semanticGuardrailsService | resources.Limits.cpu |
semanticGuardrailsService | replicas |
Application Runtime Configuration
These Data Discovery related variables are available to help diagnose and fix any connection problems. It is not recommended to change them.
| Key | Sub-Key |
|---|---|
semanticGuardrailsAppConfig | environment.LOG_LEVEL |
semanticGuardrailsAppConfig | environment.DATA_DISCOVERY_SEARCH |
semanticGuardrailsAppConfig | environment.DATA_DISCOVERY_URL |
semanticGuardrailsAppConfig | environment.DATA_DISCOVERY_VERSION |
semanticGuardrailsAppConfig | environment.DATA_DISCOVERY_PORT |
Updating cluster
To update the deployed cluster, run the following command.
helm template semantic-guardrails charts/semantic-guardrails > semantic_guardrails.yaml 2>&1
kubectl delete -f semantic_guardrails.yaml
kubectl apply -f semantic_guardrails.yaml
Update settings
To update the deployed cluster, run the following command.
helm template semantic-guardrails charts/semantic-guardrails > semantic_guardrails.yaml 2>&1
kubectl delete -f semantic_guardrails.yaml
kubectl apply -f semantic_guardrails.yaml
6.1.5 - Uninstalling Semantic Guardrails
Perform the following steps to uninstall Semantic Guardrails.
Uninstalling Semantic-Guardrails
To uninstall semantic-guardrails, run the following command.
helm uninstall semantic-guardrails -n pty-semantic-guardrails
Uninstalling Data Discovery
If Data Discovery is not needed, then uninstall the Data Discovery service.
To uninstall data discovery, run the following command.
helm uninstall data-discovery -n data-discovery
6.1.6 - Troubleshooting Semantic Guardrails
This section describes the connection errors that may occur while testing Semantic Guardrails integration using Ingress.
Verifying Ingress status
To verify the Ingress status, run the following command.
kubectl get ingress -n pty-semantic-guardrails -o wide
Verify the is accessability of load balancer
To verify the load balancer hostname
To verify the load balancer hostname, run the following command.
LB_HOST=$(kubectl get ingress nfa-semantic-guardrails -n pty-semantic-guardrails -o jsonpath='{.status.loadBalancer.ingress[0].hostname}')
echo "Load balancer: $LB_HOST"
Testing direct load balancer connection
To test direct load balancer connection, run the following command.
curl -k https://$LB_HOST/pty/semantic-guardrails/v1.1/health -H "Host: eclipse.aws.protegrity.com"
Port Forward for Local Testing
To forward the port for local testing run the following command.
kubectl port-forward svc/semantic-guardrails-service 8001:8001 -n pty-semantic-guardrails
curl http://localhost:8001/pty/semantic-guardrails/v1.1/health
7 - Data Privacy
7.1 - Protegrity Anonymization
Protegrity Anonymization is a software solution that removes personal information and transforms data attributes to maintain privacy. It takes raw data as input, applies techniques such as generalization and summarization, and outputs anonymized data. You can use this output for analysis without revealing individual identities.
For more information about Protegrity Anonymization, refer to Protegrity Anonymization.
7.1.1 - Prerequisites
Ensure that all PPC prerequisites are met:
Tools
Install and configure the following tools on the jumpbox:
opentofu1.10 or later. For more information about installation steps, refer to OpenTofu Installation.helm3.12+,kubectl1.27+, andawsCLI v2 with access to the Protegrity Provisioned Cluster (PPC).
AWS Setup
Ensure that the following AWS requirements are met:
A Protegrity Provisioned Cluster (PPC) is available. For more information about PPC, refer to Protegrity Provisioned Cluster.
AWS CLI credentials are configured using
aws configure.The AWS credentials have permission to provision IAM roles, S3 buckets, EKS Pod Identity associations, and Karpenter node resources. If you encounter
AccessDeniederrors, refer to IAM Permissions for Installation.The jumpbox can connect to the required registry. If you are not already authenticated, log in to it.
- To authenticate to the Protegrity Container Registry (PCR), use the following command with credentials from the My.Protegrity portal during account creation:
echo "<password>" | helm registry login registry.protegrity.com --username "<username>" --password-stdin- For a local registry, use your credentials and local registry endpoint as required.
EKS Cluster Requirements
Ensure that the EKS cluster meets the following requirements:
- Kubernetes 1.27 or later is installed.
- The default StorageClass is used unless you override it. Verify the StorageClass with
kubectl get storageclass. - The EKS Pod Identity Agent add-on is enabled on the cluster.
- Karpenter 1.0 or later is installed and configured on the cluster.
IAM Permissions for Installation
The AWS credentials used during installation require the following permissions. These permissions are required only during installation and can be reduced afterward.
| Service | Permissions | Purpose |
|---|---|---|
| EKS | eks:DescribeCluster, eks:DescribeAddon, eks:CreatePodIdentityAssociation, eks:DeletePodIdentityAssociation, eks:DescribePodIdentityAssociation | Verify the cluster and its add-ons, and associate the IAM role with the anonymization pods through EKS Pod Identity. |
| IAM | iam:CreateRole, iam:DeleteRole, iam:GetRole, iam:CreatePolicy, iam:DeletePolicy, iam:GetPolicy, iam:AttachRolePolicy, iam:DetachRolePolicy, iam:TagRole, iam:ListRolePolicies, iam:ListInstanceProfilesForRole, iam:PutRolePolicy, iam:GetRolePolicy, iam:DeleteRolePolicy, iam:PassRole | Create and manage the IAM role and policy that grant the anonymization workers access to the S3 bucket. |
| S3 | s3:CreateBucket, s3:DeleteBucket, s3:PutBucketPolicy, s3:GetBucketPolicy, s3:PutObject, s3:GetObject, s3:DeleteObject | Create and configure the S3 bucket that stores input and output datasets. |
7.1.2 - Installing Protegrity Anonymization
Note: This guide uses version
2.0.1throughout. Replace2.0.1with the version you are installing, including in the Python SDK Installation section.
This project deploys the Protegrity Anonymization service on Amazon EKS as part of the Protegrity AI Team Edition.
Deployment Steps
1. Provision Cloud Infrastructure with OpenTofu
The OpenTofu module creates the S3 bucket, IAM role, EKS Pod Identity association, and Karpenter NodePool. It also writes anonymization-values.yaml with cloud-specific Helm overrides.
Option A - You already have a root module
Add the following module block to your existing root module:
module "anonymization" {
source = "oci://registry.protegrity.com/anonymization/anonymization-server/opentofu/anonymization?tag=aws-2.0.1"
cluster_name = "<CLUSTER_NAME>"
bucket_name = "<globally-unique-s3-bucket-name>"
oci_host = "registry.protegrity.com"
environment = "production"
chart_version = "2.0.1"
bucket_name = "<BUCKET_NAME>"
#fips="false" #Uses FIPS Bottlerocket AMI when set to true, non-FIPS when set to false.
#ami_family = "Bottlerocket"
#ami_id = "<>" #Explicit AMI ID for Karpenter nodes; when set, this overrides fips-based AMI selection
}
Note: This module requires the hashicorp/aws
(~> 5.0)and hashicorp/kubernetes(~> 2.35)providers.
If your root module does not already declare them, add the following to your terraform {} block:
required_providers {
aws = {
source = "registry.opentofu.org/hashicorp/aws"
version = "~> 5.0"
}
kubernetes = {
source = "registry.opentofu.org/hashicorp/kubernetes"
version = "~> 2.35"
}
}
Configure the kubernetes provider to connect to the target EKS cluster:
data "aws_eks_cluster" "this" {
name = "<your-cluster-name>"
}
data "aws_eks_cluster_auth" "this" {
name = "<your-cluster-name>"
}
provider "kubernetes" {
host = data.aws_eks_cluster.this.endpoint
cluster_ca_certificate = base64decode(data.aws_eks_cluster.this.certificate_authority[0].data)
token = data.aws_eks_cluster_auth.this.token
}
Then run the following commands:
tofu init
tofu plan
tofu apply
Note: Running
tofu planis optional. It lets you review the planned changes before they are applied.
Option B - You do not have a root module
Create a new directory with a single main.tf:
terraform {
required_version = "~> 1.10"
required_providers {
aws = {
source = "registry.opentofu.org/hashicorp/aws"
version = "~> 5.0"
}
kubernetes = {
source = "registry.opentofu.org/hashicorp/kubernetes"
version = "~> 2.35"
}
}
}
variable "cluster_name" {
type = string
description = "EKS cluster name."
}
variable "environment" {
type = string
default = "production"
}
variable "bucket_name" {
type = string
description = "Storage bucket name."
}
data "aws_eks_cluster" "this" {
name = var.cluster_name
}
data "aws_eks_cluster_auth" "this" {
name = var.cluster_name
}
provider "kubernetes" {
host = data.aws_eks_cluster.this.endpoint
cluster_ca_certificate = base64decode(data.aws_eks_cluster.this.certificate_authority[0].data)
token = data.aws_eks_cluster_auth.this.token
}
module "anonymization" {
source = "oci://registry.protegrity.com/anonymization/anonymization-server/opentofu/anonymization?tag=aws-2.0.1"
cluster_name = var.cluster_name
oci_host = "registry.protegrity.com"
environment = var.environment
chart_version = "2.0.1"
bucket_name = var.bucket_name
#fips="false" #Uses FIPS Bottlerocket AMI when set to true, non-FIPS when set to false.
#ami_family = "Bottlerocket"
#ami_id = "<>" #Explicit AMI ID for Karpenter nodes; when set, this overrides fips-based AMI selection
}
output "helm_install" {
value = module.anonymization.helm_install
}
Then run the following commands:
tofu init
tofu plan -var="cluster_name=<cluster-name>" -var="bucket_name=<globally-unique-bucket>"
tofu apply -var="cluster_name=<cluster-name>" -var="bucket_name=<globally-unique-bucket>"
Note:
- Running
tofu planis optional. It lets you review the planned changes before they are applied.tofu output -raw helm_installprints a ready-to-run Helm command with the correct version and namespace.bucket_nameis a new S3 bucket name and it is created as part of this deployment.
2. Deploy with Helm
The OpenTofu module writes an anonymization-values.yaml file in your working directory. Passwords are required only for the first installation. They are preserved automatically for later upgrades.
export MLOPS_PASSWORD=<MLOPS_PASSWORD>
export JOBSTATE_PASSWORD=<JOBSTATE_PASSWORD>
helm install anonymization \
oci://registry.protegrity.com/anonymization/anonymization-server/helm/anonymization \
--version 2.0.1 \
--namespace anon-ns --create-namespace \
--values anonymization-values.yaml \
--set database.auth.mlopsPassword=$MLOPS_PASSWORD \
--set database.auth.jobstatePassword=$JOBSTATE_PASSWORD
Note: Ensure that “<JOBSTATE_PASSWORD>” contains only alphanumeric characters.
3. Monitor
Monitor the deployment process using the following command.
kubectl get pods -n anon-nsVerify that all pods are in the
Runningstate. The following is a sample output.NAME READY STATUS RESTARTS AGE anon-app-depl-f5c4d4cd6-42wgn 1/1 Running 0 3m20s anon-db-depl-0 1/1 Running 0 3m20s anon-scheduler-depl-7b87fcb74-l5q6v 1/1 Running 0 3m20s anon-worker-depl-7c4d95496f-djw7f 1/1 Running 0 3m20s anon-worker-depl-7c4d95496f-gnnvp 1/1 Running 0 3m20sVerify that the Anonymization service is deployed.
kubectl get svc -n anon-nsThe following is the sample output.
NAME TYPE CLUSTER-IP EXTERNAL-IP PORT(S) AGE anon-app-svc ClusterIP 172.20.151.139 <none> 8000/TCP 61s anon-dask-svc ClusterIP 172.20.224.133 <none> 8786/TCP 61s
Next Steps
For more information about the Python SDK, refer to Python SDK Reference.
If you encounter any error during or after installation, refer to Troubleshooting.
7.1.3 - Configuring Protegrity Anonymization
Warning: Use the
-kflag only in development or trusted internal environments. Do not use it in production, where valid certificates must be configured.
Role Update and User Creation
After deployment, update the default anonymization_administrator role to include the can_create_token permission and then create a user with this role.
1. Update anonymization_administrator role permission
Obtain the gateway URL using the following command:
export GATEWAY_URL="https://$(kubectl get configmap/nfa-config -n default -o jsonpath='{.data.FQDN}')"Obtain an Authentication Token.
Update the
anonymization_administratorrole with the following API call:curl -sk -X PUT \ "${GATEWAY_URL}/pty/v1/auth/roles" \ -H 'accept: application/json' \ -H "Authorization: Bearer ${TOKEN}" \ -H 'Content-Type: application/json' \ -d '{ "name": "anonymization_administrator", "description": "Administrator role", "permissions": [ "can_create_token", "anonymization_operations_admin" ] }'
2. Create a user with the anonymization_administrator role
Use the following request payload when creating the user:
{
"username": "anonymization_admin",
"email": "anonadmin@example.com",
"firstName": "Anon",
"lastName": "<USERNAME>",
"password": "<PASSWORD>",
"roles": [
"anonymization_administrator"
]
}
Create the user with the following API call:
curl -sk -X POST \
"${GATEWAY_URL}/pty/v1/auth/users" \
-H 'accept: application/json' \
-H "Authorization: Bearer ${TOKEN}" \
-H 'Content-Type: application/json' \
-d '{
"username": "anonymization_admin",
"email": "anonadmin@example.com",
"firstName": "Anon",
"lastName": "<USERNAME>",
"password": "<PASSWORD>",
"roles": [
"anonymization_administrator"
]
}'
Note: In production environments, replace the default credentials and URLs. For example, for
<USERNAME>, enterUserand for<PASSWORD>, enterStrongPassword123!.
7.1.4 - Protegrity Anonymization Python SDK Installation
Use this section to install, configure, and validate the Python SDK for Protegrity Anonymization.
Prerequisites
Ensure one of the following is met:
pipis available in your active Python virtual environment.- A conda environment is activated.
Overview
Use the Python SDK to access the Anonymization service programmatically.
1. Install the Anonymization Python SDK
Install the SDK using pip or conda using the version that matches the deployed Anonymization service.
Using pip:
pip install protegrity-anonymization-sdk==2.0.1
Using conda:
conda install -c protegrity protegrity-anonymization-sdk==2.0.1
2. Configure the SDK
Create a ClientConfig pointing to your PPC gateway. Obtain the gateway URL using the following command:
export GATEWAY_URL="https://$(kubectl get configmap/nfa-config -n default -o jsonpath='{.data.FQDN}')"
Then configure the client in Python:
from anonymization_sdk.config import ClientConfig
config = ClientConfig(
base_url="<GATEWAY_URL>/pty/anonymization/v3",
username="<USERNAME>",
password="<PASSWORD>",
verify_ssl=True,
)
Alternatively, configure using environment variables:
export ANON_API_URL="<GATEWAY_URL>/pty/anonymization/v3"
export ANON_USERNAME="anonymization_admin"
export ANON_PASSWORD="StrongPassword123!"
from anonymization_sdk.config import ClientConfig
config = ClientConfig.from_env()
Note: Replace default credentials and URLs for production environments. For example, for
<USERNAME>, enteranonymization_adminand for<PASSWORD>, enterStrongPassword123!.
3. Test the Anonymization Python SDK
from anonymization_sdk import AnonymizationClient
from anonymization_sdk.config import ClientConfig
config = ClientConfig(
base_url="<GATEWAY_URL>/pty/anonymization/v3",
username="anonymization_admin",
password="StrongPassword123!",
verify_ssl=True,
)
with AnonymizationClient(config=config) as client:
print("Connection established successfully.")
The connection is established successfully. If the connection fails, an error message is displayed. For more information about SDK Reference, refer to Python SDK Reference.
7.1.5 - Uninstallation and Cleanup Protegrity Anonymization
To remove the Anonymization service and all associated Kubernetes and AWS resources:
1. Uninstall the Helm release
# Removes all chart resources. PVC data is RETAINED by default (retentionPolicy: whenDeleted=Retain).
helm uninstall anonymization -n anon-ns
# To also delete the database PVC:
kubectl delete pvc -n anon-ns -l app.kubernetes.io/name=anonymization
Optionally, delete the namespace after the Helm release and PVCs are removed using the following command:
kubectl delete namespace anon-ns
2. Destroy OpenTofu infrastructure
Warning:
tofu destroydeletes the S3 bucket, including all stored input and output datasets. Back up any data you need before proceeding.
# Destroys the Karpenter nodes, IAM role, Pod Identity association, and S3 bucket.
tofu destroy -var="cluster_name=<CLUSTER_NAME>"
Note: By default,
tofu destroyprompts for confirmation before deleting resources. Add-auto-approveto skip the prompt.
7.2 - Protegrity Synthetic Data
Protegrity Synthetic Data generates privacy-safe synthetic datasets from real data using machine learning models such as VineCopula, TabDiff, TabularGAN, and SMOTE. The generated data is statistically representative and suitable for development, testing, and analytics workflows.
For more information about Protegrity Synthetic Data, refer to Protegrity Synthetic Data.
7.2.1 - Prerequisites
Ensure the following prerequisites are met:
Tools
Install and configure the following tools on the jumpbox:
opentofu1.10 or later. Refer to OpenTofu Installation.helm3.12+,kubectl1.27+, andawsCLI v2 with access to the Protegrity Provisioned Cluster (PPC).
AWS Setup
Ensure that the following AWS requirements are met:
A Protegrity Provisioned Cluster (PPC) is available. For more information, refer to Protegrity Provisioned Cluster.
AWS CLI credentials are configured by using
aws configure.The AWS credentials have permission to provision IAM roles, S3 buckets, EKS Pod Identity associations, and Karpenter node resources. If you encounter
AccessDeniederrors, refer to IAM Permissions for Installation.The jumpbox can connect to the required registry. If you are not already authenticated, log in to it.
- To authenticate to the Protegrity Container Registry (PCR), use the following command with credentials from the My.Protegrity portal during account creation:
echo "<password>" | helm registry login registry.protegrity.com --username "<username>" --password-stdin- For a local registry, use your credentials and local registry endpoint as required.
EKS Cluster Requirements
Ensure that the EKS cluster meets the following requirements:
- Kubernetes 1.27 or later is installed.
- The default StorageClass is used unless you override it. Verify the StorageClass with
kubectl get storageclass. - The EKS Pod Identity Agent add-on is enabled on the cluster.
- Karpenter 1.0 or later is installed and configured on the cluster.
IAM Permissions for Installation
The AWS credentials used during installation require the following permissions. You can reduce these permissions after installation is complete.
| Service | Permissions | Purpose |
|---|---|---|
| EKS | eks:DescribeCluster, eks:DescribeAddon, eks:CreatePodIdentityAssociation, eks:DeletePodIdentityAssociation, eks:DescribePodIdentityAssociation | Verify the cluster and its add-ons, and associate the IAM role with the pods through EKS Pod Identity. |
| IAM | iam:CreateRole, iam:DeleteRole, iam:GetRole, iam:CreatePolicy, iam:DeletePolicy, iam:GetPolicy, iam:AttachRolePolicy, iam:DetachRolePolicy, iam:TagRole, iam:ListRolePolicies, iam:ListInstanceProfilesForRole, iam:PutRolePolicy, iam:GetRolePolicy, iam:DeleteRolePolicy, iam:PassRole | Create and manage the IAM role and policy that grant the workloads access to the S3 bucket. |
| S3 | s3:CreateBucket, s3:DeleteBucket, s3:PutBucketPolicy, s3:GetBucketPolicy, s3:PutObject, s3:GetObject, s3:DeleteObject | Create and configure the S3 bucket that stores input and output datasets. |
7.2.2 - Installing Protegrity Synthetic Data
Note: This guide uses version
2.1.0throughout. Replace2.1.0with the version you are installing, including in the Python SDK Installation section.
This section describes how to deploy Protegrity Synthetic Data on Amazon EKS as part of Protegrity AI Team Edition.
It uses OpenTofu to provision cloud infrastructure, such as S3, IAM, and Karpenter. It also generates the syntheticdata-values.yaml file that Helm uses to deploy Kubernetes workloads.
Deployment Steps
1. Provision Cloud Infrastructure with OpenTofu
The OpenTofu module creates the S3 bucket, IAM role, EKS Pod Identity association, and Karpenter NodePool. It also writes syntheticdata-values.yaml with cloud-specific Helm overrides.
Option A - You already have a root module
Add the following module block to your existing root module:
module "synthetic_data" {
source = "oci://registry.protegrity.com/synthetic-data/synthetic-data-server/opentofu/synthetic-data?tag=aws-2.1.0"
cluster_name = "<CLUSTER_NAME>"
bucket_name = "<globally-unique-s3-bucket-name>"
oci_host = "registry.protegrity.com"
environment = "production"
chart_version = "2.1.0"
}
Then run the following commands:
tofu init
tofu plan
tofu apply
Option B - You do not have a root module
Create a new directory with a single main.tf:
terraform {
required_version = "~> 1.10"
required_providers {
aws = {
source = "registry.opentofu.org/hashicorp/aws"
version = "~> 5.0"
}
kubernetes = {
source = "registry.opentofu.org/hashicorp/kubernetes"
version = "~> 2.35"
}
}
}
variable "cluster_name" {
type = string
description = "EKS cluster name."
}
variable "environment" {
type = string
default = "production"
}
data "aws_eks_cluster" "this" {
name = var.cluster_name
}
data "aws_eks_cluster_auth" "this" {
name = var.cluster_name
}
provider "kubernetes" {
host = data.aws_eks_cluster.this.endpoint
cluster_ca_certificate = base64decode(data.aws_eks_cluster.this.certificate_authority[0].data)
token = data.aws_eks_cluster_auth.this.token
}
module "synthetic_data" {
source = "oci://registry.protegrity.com/synthetic-data/synthetic-data-server/opentofu/synthetic-data?tag=aws-2.1.0"
cluster_name = var.cluster_name
bucket_name = "<globally-unique-s3-bucket-name>"
oci_host = "registry.protegrity.com"
environment = var.environment
chart_version = "2.1.0"
}
output "helm_install" {
value = module.synthetic_data.helm_install
}
Then run the following commands:
tofu init
tofu plan -var="cluster_name=<CLUSTER_NAME>"
tofu apply -var="cluster_name=<CLUSTER_NAME>"
Note:
- Running
tofu planis optional. It lets you review the planned changes before they are applied.tofu output -raw helm_installprints a ready-to-run Helm command with the correct version and namespace.bucket_nameis a new S3 bucket name and it is created as part of this deployment.
2. Deploy with Helm
The OpenTofu module writes a syntheticdata-values.yaml file in your working directory. Passwords are required only for the first installation. They are preserved automatically for later upgrades.
export MLOPS_PASSWORD=<MLOPS_PASSWORD>
export JOBSTATE_PASSWORD=<JOBSTATE_PASSWORD>
helm upgrade --install synthetic-data \
oci://registry.protegrity.com/synthetic-data/synthetic-data-server/helm/synthetic-data \
--version 2.1.0 \
--namespace synthetic-data-ns --create-namespace \
--values syntheticdata-values.yaml \
--set database.auth.mlopsPassword=$MLOPS_PASSWORD \
--set database.auth.jobstatePassword=$JOBSTATE_PASSWORD
Note: Ensure that the “<JOBSTATE_PASSWORD>” contains only alphanumeric characters.
For upgrades, omit the --set flags because the passwords are already stored in the cluster secret:
helm upgrade synthetic-data \
oci://registry.protegrity.com/synthetic-data/synthetic-data-server/helm/synthetic-data \
--version 2.1.0 \
--namespace synthetic-data-ns \
--values syntheticdata-values.yaml
3. Monitor
Monitor the deployment process using the following command.
kubectl get pods -n synthetic-data-nsVerify that all pods are in the
Runningstate. The following is a sample output.NAME READY STATUS RESTARTS AGE synthetic-data-ffc69f588-q8l2d 1/1 Running 0 4m37s synthetic-data-ffc69f588-z2frx 1/1 Running 0 4m52s synthetic-data-postgresql-0 1/1 Running 0 4m52sVerify that the Synthetic Data service is deployed.
kubectl get svc -n synthetic-data-nsThe following is the sample output.
NAME TYPE CLUSTER-IP EXTERNAL-IP PORT(S) AGE synthetic-data ClusterIP 172.20.39.101 <none> 8000/TCP 5m6s synthetic-data-postgresql ClusterIP None <none> 5432/TCP 5m6s
Next Steps
For more information about the Python SDK, refer to Python SDK Reference.
If you encounter any error during or after installation, refer to Troubleshooting.
7.2.3 - Configuring Protegrity Synthetic Data
Warning: Use the
-kflag only in development or trusted internal environments. Do not use it in production, where valid certificates must be configured.
Role Update and User Creation
After deployment, update the default syntheticdata_administrator role to include can_create_token permission. Then create a user with this role.
1. Update syntheticdata_administrator role permission
- Obtain the gateway URL using the following command:
export GATEWAY_URL="https://$(kubectl get configmap/nfa-config -n default -o jsonpath='{.data.FQDN}')"
Obtain an Authentication Token.
Update the
syntheticdata_administratorrole with the following API call:
curl -sk -X PUT \
"${GATEWAY_URL}/pty/v1/auth/roles" \
-H 'accept: application/json' \
-H "Authorization: Bearer ${TOKEN}" \
-H 'Content-Type: application/json' \
-d '{
"name": "syntheticdata_administrator",
"description": "Administrator role",
"permissions": [
"can_create_token",
"syntheticdata_operations_admin"
]
}'
2. Create a user with the syntheticdata_administrator role attached
Use the following request payload when creating the user:
{
"username": "syntheticdata_admin",
"email": "synthadmin@example.com",
"firstName": "Synth",
"lastName": "<USERNAME>",
"password": "<PASSWORD>",
"roles": [
"syntheticdata_administrator"
]
}
Note: Replace default credentials and URLs for production environments. For example, for
<USERNAME>, enterUserand for<PASSWORD>, enterStrongPassword123!.
Create the user with the following API call:
curl -sk -X POST \
"${GATEWAY_URL}/pty/v1/auth/users" \
-H 'accept: application/json' \
-H "Authorization: Bearer ${TOKEN}" \
-H 'Content-Type: application/json' \
-d '{
"username": "syntheticdata_admin",
"email": "synthadmin@example.com",
"firstName": "Synth",
"lastName": "<USERNAME>",
"password": "<PASSWORD>",
"roles": [
"syntheticdata_administrator"
]
}'
7.2.4 - Uninstallation and Cleanup Protegrity Synthetic Data
To remove the Synthetic Data service and all associated Kubernetes and AWS resources:
1. Uninstall the Helm release
# Removes all chart resources. PVC data is RETAINED by default (retentionPolicy: whenDeleted=Retain).
helm uninstall synthetic-data -n synthetic-data-ns
# To also delete the database PVC:
kubectl delete pvc -n synthetic-data-ns -l app.kubernetes.io/name=synthetic-data
Optionally, delete the namespace after all resources are deleted:
kubectl delete namespace synthetic-data-ns
2. Destroy OpenTofu infrastructure
# Destroys Karpenter nodes, IAM role, Pod Identity association, and S3 bucket.
tofu destroy -var="cluster_name=<CLUSTER_NAME>"
Note: By default,
tofu destroyprompts for confirmation before deleting resources. Add-auto-approveto skip the prompt.
8 - Protectors
8.1 - Cloud Protector
Cloud Protectors keep your data safe when using cloud services like AWS. They work with tools such as Snowflake, Redshift, and Athena to protect sensitive information during queries and analytics. These protectors apply security rules, such as encryption and masking. This ensures that your data stays secure while moving through cloud-based workflows. They are designed to integrate easily with your existing cloud setup, making protection seamless without slowing down performance.
For more information about the Cloud Protect documentation, refer here.
8.2 - Application Protector
8.2.1 - Application Protector
8.2.1.1 - Application Protector Java
The Protegrity Application Protector (AP) Java provides APIs that integrate with the customer application to protect, unprotect, and reprotect sensitive data. The AP Java can be used with any customer application that is developed using the Java programming language.
To perform protect and unprotect operations, refer to Application Protector Java APIs.
8.2.1.1.1 - Installing the Application Protector Java
Setting up the Application Protector Java
The Protegrity Application Protector (AP) Java provides APIs that integrate with the customer application to protect, unprotect, and reprotect sensitive data. The AP Java can be used with any customer application that is developed using the Java programming language.
Prerequisites
For a detailed information on the prerequistes, refer to System Requirements.
Integrating the Application Protector Java with PPC
To integrate the Application Protector Java with PPC, perform the following steps:
Install and set up the PPC using the steps from the Installing PPC documentation.
Preparing the environment using the steps mentioned in the section Preparing the Environment.
Install the Application Protector Java using the steps mentioned in the section Application Protector Java Installation.
Note:
- Ensure a Workbench user exists to fetch certificates and create policy-related resources.
For more information, refer to Installing Policy Workbench on PPC in Amazon Elastic Kubernetes Service (EKS). - During RPA installation, when prompted for a username, enter the Workbench username.
For more information about username and password, refer to Log in to PPC. - When prompted for the ESA IP address, enter the PPC FQDN as configured in Automated script-based installation or Manual component-based installation. Ensure the FQDN does not exceed 50 characters. For the ESA listening port, enter
25400. These specific values are required to integrate the protector with the PPC.
- Ensure a Workbench user exists to fetch certificates and create policy-related resources.
Post Configuration Steps
For a detailed information on the post configuration steps, refer to Verifying Installation of AP Java.
8.2.1.1.2 - Uninstalling the Application Protector Java
Uninstalling the Application Protector Java
For more information about uninstalling the Application Protector Java, refer to Uninstalling the Application Protector Java.
Deleting the PPC
For more information about deleting the PPC, refer to Deleting PPC.
8.2.1.2 - Application Protector Python
The Protegrity Application Protector (AP) Python provides APIs that integrate with the customer application to protect, unprotect, and reprotect sensitive data. The AP Python can be used with any customer application that is developed using the Python programming language.
To perform protect and unprotect operations, refer to Application Protector Python APIs.
8.2.1.2.1 - Installing the Application Protector Python
Setting up the Application Protector Python
The Protegrity Application Protector (AP) Python provides APIs that integrate with the customer application to protect, unprotect, and reprotect sensitive data. The AP Python can be used with any customer application that is developed using the Python programming language.
Prerequisites
For a detailed information on the prerequistes, refer to System Requirements.
Integrating the Application Protector Python with PPC
To integrate the Application Protector Python with PPC, perform the following steps:
Install and set up the PPC using the steps from the Installing PPC documentation.
Preparing the environment using the steps mentioned in the section Preparing the Environment.
Install the Application Protector Python using the steps mentioned in the section Application Protector Python Installation.
Note:
- Ensure a Workbench user exists to fetch certificates and create policy-related resources.
For more information, refer to Installing Policy Workbench on PPC in Amazon Elastic Kubernetes Service (EKS). - During RPA installation, when prompted for a username, enter the Workbench username.
For more information about username and password, refer to Log in to PPC. - When prompted for the ESA IP address, enter the PPC FQDN as configured in Automated script-based installation or Manual component-based installation. Ensure the FQDN does not exceed 50 characters. For the ESA listening port, enter
25400. These specific values are required to integrate the protector with the PPC.
- Ensure a Workbench user exists to fetch certificates and create policy-related resources.
Post Configuration Steps
For a detailed information on the post configuration steps, refer to Verifying the installation of AP Python.
8.2.1.2.2 - Uninstalling the Application Protector Python
Uninstalling the Application Protector Python
For more information about uninstalling the Application Protector Python, refer to Uninstalling the Application Protector Python.
Deleting the PPC
For more information about deleting the PPC, refer to Deleting PPC.
8.2.1.3 - Application Protector .Net
The Protegrity Application Protector (AP) .Net provides APIs that integrate with customer applications to protect, unprotect, and reprotect sensitive data. It can be used with any application developed using .NET Standard 2.0.
To perform protect and unprotect operations, refer to the section Application Protector .Net APIs.
8.2.1.3.1 - Installing the Application Protector .Net
Setting up the Application Protector .Net
The Protegrity Application Protector (AP) .Net provides APIs that integrate with customer applications to protect, unprotect, and reprotect sensitive data. It can be used with any application developed using .NET Standard 2.0.
Prerequisites
For a detailed information on the prerequistes, refer to System Requirements.
Integrating the Application Protector .Net with PPC
To integrate the Application Protector .Net with PPC, perform the following steps:
Install and set up the PPC using the steps from the Installing PPC documentation.
Preparing the environment using the steps mentioned in the section Preparing the Environment.
Install the Application Protector .Net using the steps mentioned in the section Application Protector .Net Installation.
Note:
- Ensure a Workbench user exists to fetch certificates and create policy-related resources.
For more information, refer to Installing Policy Workbench on PPC in Amazon Elastic Kubernetes Service (EKS).- During RPA installation, when prompted for a username, enter the Workbench username.
For more information about username and password, refer to Log in to PPC.- When prompted for the ESA IP address, enter the PPC FQDN as configured in Automated script-based installation or Manual component-based installation. Ensure the FQDN does not exceed 50 characters. For the ESA listening port, enter
25400. These specific values are required to integrate the protector with the PPC.
Post Configuration Steps
For a detailed information on the post configuration steps, refer to Verifying Installation of AP .Net.
8.2.1.3.2 - Uninstalling the Application Protector .Net
Uninstalling the Application Protector .Net
For more information about uninstalling the Application Protector .Net, refer to Uninstalling the Application Protector .Net.
Deleting the PPC
For more information about deleting the PPC, refer to Deleting PPC.
8.2.1.4 - Application Protector C
The Protegrity Application Protector (AP) C provides APIs that integrate with the customer application to protect, unprotect, and reprotect sensitive data. The AP C can be used with any customer application that is developed using the C programming language.
To perform protect and unprotect operations, refer to Application Protector C APIs.
8.2.1.4.1 - Installing the Application Protector C
Setting up the Application Protector C
The Protegrity Application Protector (AP) C provides APIs that integrate with the customer application to protect, unprotect, and reprotect sensitive data. The AP C can be used with any customer application that is developed using the C programming language.
Prerequisites
For a detailed information on the prerequistes, refer to System Requirements.
Integrating the Application Protector C with PPC
To integrate the Application Protector C with PPC, perform the following steps:
Install and set up the PPC using the steps from the Installing PPC documentation.
Preparing the environment using the steps mentioned in the section Preparing the Environment.
Install the Application Protector C using the steps mentioned in the section Application Protector C Installation.
Note:
- Ensure a Workbench user exists to fetch certificates and create policy-related resources.
For more information, refer to Installing Policy Workbench on PPC in Amazon Elastic Kubernetes Service (EKS). - During RPA installation, when prompted for a username, enter the Workbench username.
For more information about username and password, refer to Log in to PPC. - When prompted for the ESA IP address, enter the PPC FQDN as configured in Automated script-based installation or Manual component-based installation. Ensure the FQDN does not exceed 50 characters. For the ESA listening port, enter
25400. These specific values are required to integrate the protector with the PPC.
- Ensure a Workbench user exists to fetch certificates and create policy-related resources.
Post Configuration Steps
For a detailed information on the post configuration steps, refer to Verifying Installation of AP C.
8.2.1.4.2 - Uninstalling the Application Protector C
Uninstalling the Application Protector C
For more information about uninstalling the Application Protector C, refer to Uninstalling the Application Protector C.
Deleting the PPC
For more information about deleting the PPC, refer to Deleting PPC.
8.2.2 - Application Protector Java Container
Application Protector Java Container is a Kubernetes-based solution to perform security operations using Application Protector Java SDKs in a native cloud environment.
To perform protect and unprotect operations, refer to Application Protector Java Container.
8.2.2.1 - Installing the Application Protector Java Container
Setting up the Application Protector Java Container
The Protegrity Application Protector Java Container provides a robust and scalable APIs designed to simplify integration of Protegrity functions across your systems. Whether you are building custom applications, streamlining workflows, or enabling third-party access, our API offers secure, reliable, and well-documented interface.
Prerequisites
For a detailed information on the prerequistes, refer to System Requirements.
Integrating the Application Protector Java Container with PPC
Before you begin
Ensure that the credentials for the My.Protegrity portal are set up and the PPC Cluster is installed and accessible.
For more information about setting up the credentials for the My.Protegrity portal, refer to the section Configuring Authentication for Protegrity AI Team Edition.
For more information about installing PPC, refer to the section Installing PPC.
To integrate the Application Protector Java Container with PPC, perform the following steps:
Preparing the environment using the steps mentioned in the section Preparing the Environment.
Install the Application Protector Java Container using the steps mentioned in the section Installing the Protector.
Note: When prompted for the ESA IP address, enter the PPC FQDN as configured in Automated script-based installation or Manual component-based installation. Ensure the FQDN does not exceed 50 characters. For the ESA listening port, enter
25400. These specific values are required to integrate the protector with the PPC.
8.2.3 - REST Container
REST Container is a Kubernetes-based solution to perform security operations using REST APIs in a native cloud environment.
To perform protect and unprotect operations, refer to REST Container.
8.2.3.1 - Installing the REST Container
Setting up the REST Container
The Protegrity REST Container provides a robust and scalable REST API designed to simplify integration of Protegrity functions across your systems. Whether you are building custom applications, streamlining workflows, or enabling third-party access, our API offers secure, reliable, and well-documented endpoints to help you achieve your goals efficiently. With support for standard HTTP methods and JSON payloads, developers can quickly get started.
Prerequisites
For a detailed information on the prerequistes, refer to System Requirements.
Integrating the REST Container with PPC
Before you begin
Ensure that the credentials for the My.Protegrity portal are set up and the PPC Cluster is installed and accessible.
For more information about setting up the credentials for the My.Protegrity portal, refer to the section Configuring Authentication for Protegrity AI Team Edition.
For more information about installing PPC, refer to the section Installing PPC.
To integrate the REST Container with PPC, perform the following steps:
Preparing the environment using the steps mentioned in the section Preparing the Environment.
Install the REST Container using the steps mentioned in the section Installing the Protector.
Note: When prompted for the ESA IP address, enter the PPC FQDN as configured in Automated script-based installation or Manual component-based installation. Ensure the FQDN does not exceed 50 characters. For the ESA listening port, enter
25400. These specific values are required to integrate the protector with the PPC.
8.3 - Repository Protector
8.3.1 - AWS Protectors
8.3.1.1 - Amazon EMR Protector
The Big Data Protector UDFs and APIs provide a robust framework for securing sensitive data within EMR environments on AWS. These components are part of the Protegrity Big Data Protector architecture, enabling developers and data engineers to integrate advanced data protection directly into big data workflows. The User Defined Functions (UDFs) allow seamless encryption, tokenization, and de-tokenization of sensitive fields during Hive and Spark. By embedding Protegrity UDFs into SQL queries, organizations can enforce column-level security without altering application logic. This ensures compliance while maintaining analytical performance.
To perform protect and unprotect operations using the User Defined Functions, refer to User Defined Functions and APIs.
8.3.1.1.1 - Installing the Amazon Elastic MapReduce Protector
Setting up the Amazon EMR Protector
The Amazon EMR Protector v10.0.0 is part of the Protegrity Big Data Protector suite, designed to secure sensitive data in distributed processing environments on AWS Elastic MapReduce (EMR). This protector enables organizations to run analytics on large-scale datasets while ensuring compliance with stringent data privacy regulations.
The Bootstrap Installer is designed to automate the deployment of the Protegrity Big Data Protector (BDP) components during the creation of an Amazon EMR cluster. By leveraging AWS bootstrap actions, this method ensures that all required libraries, configuration files, and services are installed and configured as part of the cluster initialization process.
The Static Installer provides a manual or scripted approach for installing BDP components on existing EMR clusters. This method is best suited for environments where clusters are persistent or require custom installation steps outside the bootstrap lifecycle.
Prerequisites
Register the jumpbox
To register and prepare the jumpbox, refer to Registering and preparing the jumpbox.
For a detailed information on the prerequistes for the Bootstrap installer, refer to Verifying the prerequisites.
For a detailed information on the prerequistes for the Static installer, refer to Verifying the prerequisites for Static Installer.
Integrating the Amazon EMR Protector with Protegrity Provisioned Cluster (PPC)
To integrate the Amazon EMR Protector with PPC, perform the following steps:
- Install the EMR protector using the bootstrap installer as per steps mentioned in the section Using the Bootstrap Installer.
OR
- Install the EMR protector using the static installer as per steps mentioned in the section Using the Static Installer.
Note: When prompted for the ESA IP address, enter the PPC FQDN as configured in Automated script-based installation or Manual component-based installation. Ensure the FQDN does not exceed 50 characters. For the ESA listening port, enter
25400. These specific values are required to integrate the protector with the PPC.
Post Configuration Steps
For a detailed information on the post configuration steps, refer to Configuring the Protector.
8.3.1.1.2 - Uninstalling the Amazon Elastic MapReduce Protector
For more information about uninstalling the Amazon EMR Protector, refer to Uninstalling the protector.
8.3.1.2 - AWS Databricks Protector
The Protegrity Big Data Protector for AWS Databricks delivers end‑to‑end data protection. Organizations deploying the Big Data Protector rely on modern, supported storage options such as Workspace storage, Unity Catalog Volumes, and cloud object storage like Amazon S3.
Designed to secure sensitive data across analytics pipelines, the Big Data Protector applies advanced tokenization and encryption during Spark execution and enforces centralized, policy‑driven controls. Whether installed via Workspace-backed paths or deployed using S3 buckets for configuration and script delivery, the Protector ensures resilient execution across AWS Databricks clusters.
By embracing cloud‑native storage paths, this approach ensures long‑term compatibility with Databricks platform changes while maintaining Protegrity’s standard of seamless and transparent protection. Organizations can continue to process high‑value datasets on AWS Databricks with confidence—knowing that sensitive information is secured across its lifecycle, even as the underlying platform evolves.
The Protegrity Big Data Protector for AWS Databricks empowers organizations to secure sensitive data across their analytics pipelines by combining high‑performance protection mechanisms with flexible deployment models tailored for modern cloud architectures. Central to this capability are two approaches; Application Protector REST (AP REST) and Cloud Protector approach. Each approach is designed to address different customer requirements around scalability, infrastructure usage, and cost optimization.
8.3.1.2.1 - Installing the AWS Databricks Protector
Prerequisites
For more information about the prerequisites, refer to the sections listed below.
Register the jumpbox
To register and prepare the jumpbox, refer to Registering and preparing the jumpbox.
For the Application Protector REST Approach
For more information about the prerequisites, refer to For the Application Protector REST Approach.
For the Cloud Protector Approach
For more information about the prerequisites, refer to For the Cloud Protector Approach
Preparing the Environment
For more information about the preparing the environment, refer to Preparing the Environment.
Installing the Protector
For more information about installing the protector, refer to Installing the Protector.
Integrating the AWS Databricks Protector with Protegrity Provisioned Cluster (PPC)
To integrate the AWS Databricks Protector with PPC, perform the following steps:
When prompted for the ESA IP address, enter the PPC FQDN as configured in Automated script-based installation or Manual component-based installation. Ensure the FQDN does not exceed 50 characters. For the ESA listening port, enter 25400. These specific values are required to integrate the protector with the PPC.
Configuring the Protector
For more information about protector configuration, refer to Configuring the Protector.
8.3.1.2.2 - Uninstalling the AWS Databricks Protector
For more information about uninstalling the AWS Databricks Protector, refer to Uninstalling the Protector.
8.3.1.3 - CDP-AWS-DataHub Protector
The CDP-AWS-DataHub UDFs and APIs provide a robust framework for securing sensitive data within Cloudera Data Platform (CDP) environments on AWS. These components are part of the Protegrity Big Data Protector architecture, enabling developers and data engineers to integrate advanced data protection directly into big data workflows. The User Defined Functions (UDFs) allow seamless encryption, tokenization, and de-tokenization of sensitive fields during Hive, Spark, and Impala operations. By embedding Protegrity UDFs into SQL queries, organizations can enforce column-level security without altering application logic. This ensures compliance while maintaining analytical performance.
To perform protect and unprotect operations using the User Defined Functions, refer to User Defined Functions and APIs.
8.3.1.3.1 - Installing the CDP-AWS-DataHub Protector
Setting up the CDP-AWS-DataHub Protector
The CDP-AWS-DataHub Protector v10.0.0 secures sensitive data across the Cloudera Data Platform (CDP) environments hosted on AWS. The protector leverages Protegrity’s tokenization and encryption features to secure data at rest, in transit, and during processing within AWS DataHub clusters.
Prerequisites
For a detailed information on the prerequistes, refer to System Requirements.
Register the jumpbox
To register and prepare the jumpbox, refer to Registering and preparing the jumpbox.
Integrating the CDP-AWS-DataHub Protector with Protegrity Provisioned Cluster (PPC)
To integrate the CDP-AWS-DataHub Protector with PPC, perform the following steps:
Preparing the environment using the steps mentioned in the section Preparing the Environment.
Install the Big Data Protector using the steps mentioned in the section Installing the Big Data Protector.
Note: When prompted for the ESA IP address, enter the PPC FQDN as configured in Automated script-based installation or Manual component-based installation. Ensure the FQDN does not exceed 50 characters. For the ESA listening port, enter
25400. These specific values are required to integrate the protector with the PPC.
Post Configuration Steps
For a detailed information on the post configuration steps, refer to Configuring the Big Data Protector.
8.3.1.3.2 - Uninstalling the CDP-AWS-DataHub Protector
For more information about uninstalling the CDP AWS DataHub Protector, refer to Uninstalling the Big Data Protector.
8.3.2 - Azure Protectors
8.3.2.1 - Azure Databricks Protector
The Protegrity Big Data Protector for Azure Databricks delivers end‑to‑end data protection. Organizations deploying the Big Data Protector rely on modern, supported storage options. These include Workspace storage, Unity Catalog Volumes, and cloud object storage like ADLS Gen2 or Azure Blob Storage.
Designed to secure sensitive data across analytics pipelines, the Big Data Protector applies advanced tokenization and encryption during Spark execution and enforces centralized, policy‑driven controls. Whether installed via Unity Catalog Volumes for init script and .tgz delivery, the Protector ensures resilient execution across Azure Databricks clusters.
By embracing cloud‑native storage paths, this approach ensures long‑term compatibility with Databricks platform changes while maintaining Protegrity’s standard of seamless and transparent protection. Organizations can continue to process high‑value datasets on Azure Databricks with confidence knowing that sensitive information is secured across its lifecycle, even as the underlying platform evolves.
The Protegrity Big Data Protector for Azure Databricks empowers organizations to secure sensitive data across their analytics pipelines. This can be achieved by combining high‑performance protection mechanisms with flexible deployment models tailored for modern cloud architectures. Central to this capability are two approaches: Application Protector REST (AP REST) and Cloud Protector approach. Each approach is designed to address different customer requirements around scalability, infrastructure usage, and cost optimization.
8.3.2.1.1 - Installing the Azure Databricks Protector
Prerequisites
For more information about the prerequisites, refer to the sections listed below.
Register the jumpbox
To register and prepare the jumpbox, refer to Registering and preparing the jumpbox.
For the Application Protector REST Approach
For more information about the prerequisites, refer to For the Application Protector REST Approach.
For the Cloud Protector Approach
For more information about the prerequisites, refer to For the Cloud Protector Approach
Preparing the Environment
For more information about the preparing the environment, refer to Preparing the Environment.
Installing the Protector
For more information about installing the protector, refer to Installing the Protector.
Integrating the Azure Databricks Protector with Protegrity Provisioned Cluster (PPC)
To integrate the Azure Databricks Protector with PPC, perform the following steps:
When prompted for the ESA IP address, enter the PPC FQDN as configured in Automated script-based installation or Manual component-based installation. Ensure the FQDN does not exceed 50 characters. For the ESA listening port, enter 25400. These specific values are required to integrate the protector with the PPC.
Configuring the Protector
For more information about protector configuration, refer to Configuring the Protector.
8.3.2.1.2 - Uninstalling the Azure Databricks Protector
For more information about uninstalling the Azure Databricks Protector, refer to Uninstalling the Protector.