Discover is Protegrity’s enterprise data intelligence layer. It comprises of two integrated services, Traverse and Classify.
Traverse maintains an updated catalog of an organization’s entire data estate. It continuously scans and indexes datastores, object stores, knowledge graphs, and identity directories (IDP/AD). It in turn maps every data source, schema, principal, and access path across the organization. This service directly supports the Sources views in the front-end of the application.
Classify runs across everything Traverse catalogs and can be used independently in User defined pipelines. It detects and classifies sensitive data, such as, PII, PHI, financial data, credentials, custom types at the field, file, and content level, including unstructured documents and live AI workflow content.
Together, Discover builds and maintains the foundational intelligence that powers the rest of the Protegrity platform.
1 - Architecture
General Architecture.
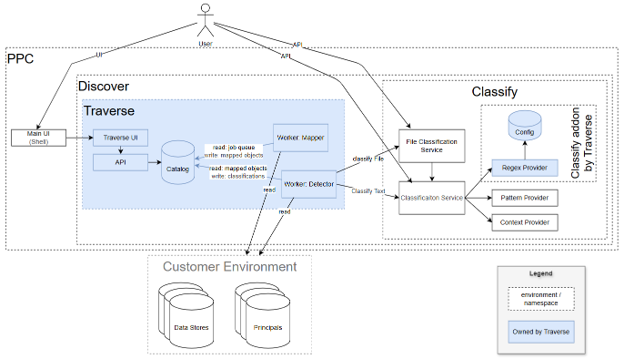
The following diagram illustrates the various components of the Discover architecture and how they work together.
The following are the important components in Discover:
Web UI: A unified user interface that hosts all product components, including Discover, and gives users one place to access and navigate the products they are licensed to use.
Traverse UI: The Discover interface in the Shell, where users manage scans, review the catalog, configure connections to their systems, and monitor results.
Catalog: The central repository for results, containing a map of the customer’s data such as databases, tables, and files along with the sensitive-data classifications identified during scans.
Worker Mapper: A component in the Traverse architecture that maps data from one format to another.
Worker Detector: A component in the Traverse architecture that detects sensitive data and sends the results to the Classification service.
Regex Dictionary Provider (RDP): A classification provider built by the DDX team that adds regex and dictionary-based detection to Discover. Ships as a separate Helm chart.
Classification Service (CS): The primary Classify entry point for text-based content, including plain text, tabular data, XML, and JSON. It analyzes content and returns any sensitive data it detects, with its capabilities extended by the providers listed here.
File Classification Service (FCS): The Classify entry point for files. It accepts files of various formats and returns the classifications of their contents by using the Classification Service.
Pattern Provider and Context Provider: The two built-in classification providers. They analyze the content and return a detailed list of the sensitive data found based on data patterns and surrounding context.
Customer Environment: The customer’s own environment, containing the databases, files, and identity providers (principals) that need to be scanned for sensitive data.
2 - Install
Instructions for installing Classify and Traverse.
Instructions for installing Classify and Traverse are provided here.
2.1 - Prerequisites
Following are the prerequisites for using Discover.
Platform and Access
PPC cluster version 1.2 or later.
Kubernetes access to the target cluster.
kubectl configured for the target cluster context.
Cluster permissions for the connected user .
Helm 3.x with OCI support enabled.
Container Registry Access
Ensure access and valid authentication to the container registry hosting the Classify and Traverse Helm charts.
For PCR, obtain valid registry credentials through your My.Protegrity account before installation. For more information about creating an account, refer to the documentation Obtaining Credentials.
For PCR or a private registry, ensure that the registry URL, username, and password/access token are available.
Log in to the container registry before proceeding with the installation:
Access to the registry that hosts Classify and Traverse Helm charts. Ensure that the required authentication to the container registry path is available.
For Protegrity Container Registry (PCR), use helm registry login with credentials from My.Protegrity account creation.
Cluster Dependencies
Karpenter operator available in the cluster that is provided by PPC.
Required Inputs
Container registry path for Discover that includes Classify and Traverse installation: registry.protegrity.com:9443 for PCR, or a local registry endpoint.
2.2 - Installing Discover
Steps to install Classify and Traverse.
Installing Classify
Classify can be installed as a standalone service or as a service on Traverse.
Run the following command to install Classify as a standalone service.
Note: The parameter --reset-then-reuse-values ensures that the release uses the existing values except for the ones explicitly overridden. For more information on the parameter, refer to the Helm documentation here.
Verifying the Installation
After installing Classify, run the following command to verify the installation:
kubectl get pods -n data-discovery
The status of all the pods must be Running.
Note: On AWS, the CPU node image is selected automatically from the cluster’s
region. Secure nodes, such FIPS nodes, are used in the US, Canada, and GovCloud. Outside the US, Canada, and GovCloud, AWS nodes no longer run secure
host cryptography. No region-specific configuration is required.
Installing Traverse
Traverse can be installed using the following steps.
Installation Steps
Run this command to install the Regex Dictionary provider.
Traverse includes the Kubernetes Event-driven Autoscaling (KEDA) operator. Helm
installs its custom resource definitions (CRDs) only on a first install. Apply them before every install or upgrade.
The expected output must return 30 or more entities.
Open Traverse on the Web Browser.
Log in to PPC UI with the administrator credentials.
Click Discover on the left pane.
3 - Uninstalling Discover
Steps to uninstall Classify and Traverse.
Traverse stores scan results and datastore credentials in a volume that remains after the release is uninstalled. The keys that protect these credentials are stored in a secret that Helm deletes with the release. Therefore, Traverse can be uninstalled either while retaining the database for a later reinstall or completely.
Important: It is recommended to not remove the volume or the keys independently. Removing only one of them, or removing them separately, results in data loss.
Uninstalling while retaining the database
To retain the database for a later reinstall, complete the following steps.
Uninstall Traverse and retain the database
Run the following commands to save the generated encryption key and database password. Helm deletes both values when it removes the release.
Important: Store both files securely, as they are credentials. Without the encryption key, the datastore credentials in the retained database cannot be decrypted.
Run the following command to back up the database.
Note: The backup contains the datastore credentials in their encrypted form. It can be used only with the saved encryption key.
Run the following command to remove the autoscaler configuration. Run it before uninstalling the release that owns the autoscaler, so that the release can finish deleting it.
Run the following commands to delete the persistent volumes. The volumes remain after their claims are deleted and continue to incur costs until they are removed.
kubectl get pv | grep -E 'discoverx|data-discovery'kubectl delete pv <name>
Optional: Run the following command to delete the autoscaler definitions that were applied during the Traverse installation. These definitions are cluster-wide and remain after any uninstall.
Important: Run this command only if no other component on the cluster uses KEDA. Deleting the definitions deletes every autoscaler object on the cluster.
Run the following command to delete the namespaces.
kubectl delete namespace discoverx data-discovery
Note: If Traverse is uninstalled without saving the encryption key and the database password, the database is retained, but a reinstall generates a new password and a new encryption key. This results in the following:
The pods fail with the error password authentication failed for user "discoverx".
Any datastore credential stored before the uninstall can no longer be decrypted.
To recover, perform one of the following actions:
Restore a database backup that was taken before the uninstall.
Start with an empty database and register the data sources again.
4 - Using Traverse
Connecting all the entities in Traverse.
The following is the order that a user can follow to map or detect data in Traverse. The order is not strict, but it is recommended to follow this order to ensure that all entities are connected properly.
Create a Source.
Create a Data Store. This is a container for the data that is detected from the Source. The Data Store can be a database, a file system, or any other type of storage that Traverse supports.
Perform a Scan on the Data Store to detect the data.
4.1 - Sources
Connecting all the entities in Traverse.
Sources is the main front end entry point for Protegrity’s enterprise data catalog service, the system of record for an organization’s entire data estate. It connects to and scans datastores, object stores, knowledge graphs, and identity providers and Active Directory integrations. It maintains a continuously updated inventory of every data source, schema, table, column, file structure, graph entity, principal, role, group, and access path across the organization. Every scan logs not just what exists, but who can reach it and how. It thus maps the relationship between data and the identities that have access to it.
The catalog that Sources maintains is the intelligence foundation for the rest of the Protegrity platform.
A scan is a job that runs against the configured sources to discover and classify data at scale. When a scan executes, it checks connectivity, traverses the source structure, and identifies sensitive content. It produces a set of findings that are surfaced in the Source Details for review and action.
Scans can be run on demand or on a schedule. Over time, operational control increases and measurable risk decreases. Coverage can be tracked, newly introduced sensitive data can be detected before it becomes a liability. Timestamped evidence can be generated for governance, compliance reporting, and remediation workflows.
Creating a Scan
A scan is a job that runs against the configured sources to discover and classify data at scale. When a scan executes, it checks connectivity, traverses the source structure, and identifies sensitive content. It produces a set of findings that are surfaced in the Source Details for review and action.
Scans can be run on demand or on a schedule. Over time, operational control increases and measurable risk decreases. Coverage can be tracked, newly introduced sensitive data can be detected before it becomes a liability. Timestamped evidence can be generated for governance, compliance reporting, and remediation workflows.
On the UI, click New Scan to create a scan.
Enter the scan name and description in the Name and Description fields respectively.
From the Select Datastore drop-down list, select the datastore to be scanned. If a new datastore needs to be created, click Add new Datastore to create a new datastore.
Select the scan type from the Scan Type drop-down list. The following options are available:
Full Scan. If this option is selected, the entire datastore will be scanned for PII data.
Map Only Scan. If this option is selected, only the structure will be scanned. PII data will not be classified.
Under Classification, set the minimum confidence score for the classification results by sliding the Score Threshold slider. The default value is 50%. Any classification with a score below this threshold will be excluded from the scan results.
Enter a value in the Sample Size field to set the maximum number of rows per table.
Click Save to create the scan.
Adding a Source
On the UI, click New Data Source to create a data source. The following data sources are supported:
Enter the source name and description in the Name and Description fields respectively.
Select the PostgreSQL from the Data Source type drop-down list.
Under Connection, enter data in the following fields:
Host - Hostname
Port - Port number
Database Name - Name for the database
Username - username to connect to the database
SSL mode - Select the SSL mode from the drop-down list. The following options are available:
disable
allow
prefer
require
Under Authentication, select the authentication method from the drop-down list. The following options are available:
Username and Password. If this option is selected, enter the password in the Password field.
No credentials
Click Test Connection to verify the connection to the database.
After the connection is successful, click Save to create the source.
Creating a Databricks Source
Enter the source name and description in the Name and Description fields respectively.
Select the Databricks from the Data Source type drop-down list.
Under Connection, enter data in the following fields:
Workspace URL - URL of the Databricks workspace.
HTTP Path - HTTP path.
Catalog - Name of the catalog.
Schema - Enter the username.
Under Authentication, select the authentication method from the drop-down list. The following options are available:
Personal Access Token. If this option is selected, enter the token in the Personal Access Token field.
Username and Password. If this option is selected, enter the username and password in the Username and Password fields respectively.
No credentials.
Click Test Connection to verify the connection to the database.
After the connection is successful, click Save to create the source.
Creating an Apache Hive Source
Enter the source name and description in the Name and Description fields respectively.
Select the Apache Hive from the Data Source type drop-down list.
Under Connection, enter data in the following fields:
Metastore URI - URI of the Hive metastore.
Database - Name of the database.
Under Authentication, select the authentication method from the drop-down list. The following options are available:
Username and Password. If this option is selected, enter the username and password in the Username and Password fields respectively.
No credentials.
Click Test Connection to verify the connection to the database.
After the connection is successful, click Save to create the source.
Creating an Amazon Redshift Source
Enter the source name and description in the Name and Description fields respectively.
Select the Amazon Redshift from the Data Source type drop-down list.
Under Connection, enter data in the following fields:
Host - Hostname of the Amazon Redshift cluster.
Port - Port number.
Database - Name of the database.
Schema - Name of the schema.
Under Authentication, select the authentication method from the drop-down list. The following options are available:
IAM Access Key. If this option is selected, enter the IAM Access Key ID in the Access Key ID field and the IAM Secret Access Key in the Secret Access Key field.
Username and Password. If this option is selected, enter the username and password in the Username and Password fields respectively.
No credentials.
Click Test Connection to verify the connection to the database.
After the connection is successful, click Save to create the source.
Creating an Oracle Database Source
Enter the source name and description in the Name and Description fields respectively.
Select the Oracle Database from the Data Source type drop-down list.
Under Connection, enter data in the following fields:
Driver - Oracle JDBC driver class name. For example, oracle.jdbc.OracleDriver.
Port - Port number.
Database - Name of the database.
Schema - Name of the schema.
Under Authentication, select the authentication method from the drop-down list. The following options are available:
Username and Password. If this option is selected, enter the username and password in the Username and Password fields respectively.
No credentials.
Click Test Connection to verify the connection to the database.
After the connection is successful, click Save to create the source.
Creating an Amazon S3 Source
Enter the source name and description in the Name and Description fields respectively.
Select the Amazon S3 from the Data Source type drop-down list.
Under Connection, enter data in the following fields:
Region - AWS region where the bucket is located.
Bucket - Name of the S3 bucket.
Under Authentication, select the authentication method from the drop-down list. The following options are available:
IAM Role. If this option is selected, enter the IAM role ARN in the Role ARN field.
Access Key ID. If this option is selected, enter the AWS access key ID in the Access Key ID field and the AWS secret access key in the Secret Access Key field.
Click Test Connection to verify the connection to the database.
After the connection is successful, click Save to create the source.
Creating a TigerGraph Source
Enter the source name and description in the Name and Description fields respectively.
Select the TigerGraph from the Data Source type drop-down list.
Under Connection, enter data in the following fields:
Host - Hostname of the TigerGraph server.
Graph Name - Name of the graph.
REST++Port - Port number.
GS Port - Port number.
Under Authentication, select the authentication method from the drop-down list. The following options are available:
Username and Password. If this option is selected, enter the username and password in the Username and Password fields respectively.
GSQL Secret. If this option is selected, enter the GSQL secret in the GSQL Secret field.
No credentials
Click Test Connection to verify the connection to the database.
After the connection is successful, click Save to create the source.
Creating a Neo4j Source
Enter the source name and description in the Name and Description fields respectively.
Select the Neo4j from the Data Source type drop-down list.
Under Connection, enter data in the following fields:
Host/URI - Hostname or the URL of the Neo4j server
Database - Name of the database
Under Authentication, select the authentication method from the drop-down list. The following options are available:
Username and Password. If this option is selected, enter the username and password in the Username and Password fields respectively.
No credentials
Click Test Connection to verify the connection to the database.
After the connection is successful, click Save to create the source.
Creating a OIDC/Okta Source
Enter the source name and description in the Name and Description fields respectively.
Select the OIDC/Okta from the Data Source type drop-down list.
Under Connection, enter data in the following fields:
Issuer URL - The URL of the OIDC/Okta issuer
Client ID - The client ID for the OIDC/Okta application
Client Secret - The client secret for the OIDC/Okta application
Token URL - The URL to obtain the access token
Click Test Connection to verify the connection to the OIDC/Okta provider.
After the connection is successful, click Save to create the source.
Creating a LDAP/Active Directory Source
Enter the source name and description in the Name and Description fields respectively.
Select the LDAP/Active Directory from the Data Source type drop-down list.
Under Connection, enter data in the following fields:
Host - The URL of the LDAP/Active Directory server
Port - The port of the LDAP/Active Directory server
Base DN - The base distinguished name for LDAP/Active Directory searches
Under Authentication, enter the username and password in the Username and Password fields respectively.
Click Test Connection to verify the connection to the LDAP/Active Directory server.
After the connection is successful, click Save to create the source.
Creating an SCIM 2.0 Source
Enter the source name and description in the Name and Description fields respectively.
Select the SCIM 2.0 from the Data Source type drop-down list.
Under Connection, enter the URL of the SCIM 2.0 server in the Base URL field.
Under Authentication, enter the bearer token for the SCIM 2.0 server in the Bearer Token
Click Test Connection to verify the connection to the SCIM 2.0 server.
After the connection is successful, click Save to create the source.
Reviewing a Scan
Reviewing scan details is where users turn discoveries into decisions. The Schema tab shows object-level results, exposing classifications at each discovered asset level: datasource, schema, table, column, and node or path for hierarchical sources. The value is traceable evidence and faster action. Teams can verify coverage, compare drift over time, confirm whether sensitive data increased or moved, prioritize remediation by risk and location. They can then provide defensible audit and compliance reporting based on exact findings rather than assumptions.
To investigate the metadata or classification history for any object, click the representative row to open the Source Detail Panel. The panel displays object metadata at the top, followed by the classification response and an activity log showing changes to that row over time.
The Scanners tab displays all configured scanners. For recurring scanners, click into a scanner item to see its individual jobs, such as currently running, scheduled, and past. Each job shows when it ran or is scheduled to run, its scope, status, and duration, along with how findings changed across executions.
4.2 - Classifications
About the Classifications.
Classifications allow a user to define and manage the custom detection logic required by an organization. Any classification created and marked as Active is applied by Discover during scanning, alongside Protegrity-provided classifications. The resulting outputs, both Protegrity-provided and custom, are written directly to the catalog and enrich each discovered entity with protection conditions, data type labels, and compliance framework tags. This enriched metadata drives downstream capabilities such as policy alignment, risk prioritization, reporting, and remediation workflows.
Note: Classifications marked as available are available anytime Classify as a Service is run using the same Classify container service.
Creating a Classification
On the left pane of the UI, navigate to Classifiers.
Click New Classification to create a classifier.
Enter the classifier name and description in the Name and Description fields respectively.
Under Classification, enter data in the following fields:
Entity Type - The PII identity that the classifier classifies. For example, Email, Phone Number, Credit Card Number, and so on.
Categories - The categories that the classifier can be grouped into. Following are the three categories:
PII
PHI
PCI
Under Detection, enter data in the following fields:
Score Adjustment - The confidence score for the classifier.
Data Qualifier Regex - Values that match the regex pattern are classified.
Schema Keywords - Column names that boost the confidence score when the regex is matched. Click Add Keyword to add more keywords.
Under Try It, enter a sample pattern and click Test.
Click Create to create the classifier.
5 - API Reference
API reference and supporting information.
The APIs for the Classification service and the File Classification service are listed here
5.1 - Classify
APIs for the Classification Service.
The following APIs are exposed for the Classification Service.
Text
Tabular
JSON
XML
Classify Text
This API endpoint classifies plain text unstructured data.
Content type must be a plain text and in an UTF-8 format.
Important:
Length of the body is limited to 10 KB. If the body exceeds this limit, it is recommended to use the File Classification Text API. For more information about this File Classification, refer to the File Classification API.
Non-Latin text is not supported. If the input contains a non-Latin text, the text is rejected with a 422 error code.
Query Parameters
score_threshold
Type: float
Description: Optional. Exclude results with a score lower than this threshold.
Values: Minimum 0, Maximum 1.0
Default: 0.7
Sample Request
curl -X POST "http://<Host_address>/pty/data-discovery/v2/classify/text?score_threshold=0.85" \
     -H "Content-Type: text/plain" \
     --data "You can reach Dave Elliot by phone 203-555-1286"
importrequestsurl="http://<Host_address>/pty/data-discovery/v2/classify/text"params={"score_threshold":0.85}headers={"Content-Type":"text/plain"}data="You can reach Dave Elliot by phone 203-555-1286"response=requests.post(url,params=params,headers=headers,data=data,verify=False)print("Status code:",response.status_code)print("Response JSON:",response.json())
Content type must be a plain text and in an UTF-8 format.
score_threshold
Type: float
Description: Optional. Exclude results with a score lower than this threshold.
Values: Must be greater than 0.
Default: 0.7
Body
Content type must be multipart/form-data.
The content field contains the plain text to scan.
Length of the content is limited to 5 MB.
Sample Request
curl -X POST "http://localhost:8053/pty/data-discovery/detection/v2/detect/text" \
  -F "file=@customer_data.txt"
importosimportjsonimportrequests# Path to the text file to submitINPUT_FILEPATH=os.path.join(os.path.dirname(__file__),"fixtures","example.txt")#INPUT_FILEPATH = os.path.abspath("/opt/workspaces/discover/classification/deployment_qa/tests/features/common/detection/fixtures/xml_data/5mb_with_pii.xml")# Detection service endpointurl="http://localhost:8053/pty/data-discovery/detection/v2/detect/text"withopen(INPUT_FILEPATH,"rb")asinput_file:response=requests.post(url,files={"file":(os.path.basename(INPUT_FILEPATH),input_file)})print("Status Code:",response.status_code)try:print("Response:",json.dumps(response.json(),indent=2))exceptValueError:print("Response is not valid JSON:",response.text)
Description: Optional. Exclude results with a score lower than this threshold.
Values: Must be greater than 0.
Default: 0.7
Body
Content type must be multipart/form-data.
The content field contains the JSON text to scan.
Length of the content is limited to 5 MB.
Sample Request
curl -X POST "http://localhost:8053/pty/data-discovery/detection/v2/detect/json" \
  -F "file=@customer_data.json"
importosimportjsonimportrequests# Path to the text file to submitINPUT_FILEPATH=os.path.join(os.path.dirname(__file__),"fixtures","complex_hr.json")# Detection service endpointurl="http://localhost:8053/pty/data-discovery/detection/v2/detect/json"withopen(INPUT_FILEPATH,"rb")asinput_file:response=requests.post(url,files={"file":(os.path.basename(INPUT_FILEPATH),input_file)})print("Status Code:",response.status_code)try:print("Response:",json.dumps(response.json(),indent=2))exceptValueError:print("Response is not valid JSON:",response.text)
Description: Optional. Exclude results with a score lower than this threshold.
Values: Must be greater than 0.
Default: 0.7
Body
Content type must be multipart/form-data.
The content field contains the XML text to scan.
Length of the content is limited to 5 MB.
Sample Request
curl -X POST \
  "http://localhost:8053/pty/data-discovery/detection/v2/detect/xml" \
  -F "file=@/path/to/fixtures/complex_hr.xml"
importosimportjsonimportrequests# Path to the text file to submitINPUT_FILEPATH=os.path.join(os.path.dirname(__file__),"fixtures","complex_hr.xml")# Detection service endpointurl="http://localhost:8053/pty/data-discovery/detection/v2/detect/xml"withopen(INPUT_FILEPATH,"rb")asinput_file:response=requests.post(url,files={"file":(os.path.basename(INPUT_FILEPATH),input_file)})print("Status Code:",response.status_code)try:print("Response:",json.dumps(response.json(),indent=2))exceptValueError:print("Response is not valid JSON:",response.text)
Partial Content. Some classifications succeeded; others failed.
400
Bad Request. Invalid input parameters or content.
413
Payload too large.
422
Validation Error.
500
Internal server error. Check server logs.
502
Bad Gateway. More than half of the classification calls failed.
5.3 - Transform
Identify, classify & transform sensitive data.
Identify and classify plain-text sensitive data. Replace the sensitive data with labels of the classified data types, such as, <CREDIT_CARD> and so on.
Standard operational endpoints available on the service.
These endpoints provide operational capabilities such as retrieving the API specification, managing log levels, checking version information, and monitoring service health.
An error occurred (e.g., invalid log level specified).
Note: The service currently returns 500 for invalid log level values. The OpenAPI spec defines 400 for this case — this is a known discrepancy to be addressed in a future release.
The OpenAPI specification is returned in YAML format.
6 - Additional Information
Additional information about Protegrity’s Discover.
Discover is Protegrity’s enterprise data intelligence layer. It comprises of two integrated services, Traverse and Classify.
Traverse maintains an updated catalog of an organization’s entire data estate. It continuously scans and indexes datastores, object stores, knowledge graphs, and identity directories (IDP/AD). It in turn maps every data source, schema, principal, and access path across the organization. This service directly supports the Sources views in the front-end of the application.
Classify runs across everything Traverse catalogs and can be used independently in User defined pipelines. It detects and classifies sensitive data, such as, PII, PHI, financial data, credentials, custom types at the field, file, and content level, including unstructured documents and live AI workflow content.
Together, Discover builds and maintains the foundational intelligence that powers the rest of the Protegrity platform.
6.1 - Handling Overlapping Conflicts
Resolving conflicts between entities that label sensitive data.
While classifying data, the providers may label an identical text under two different entities. This distinction arises from the detection strategies the classifiers adopt. Classify handles these conflicts by applying certain rules on these conflicting entities.
The rules for handling the conflicting entities are as follows:
No overlap: If the two entities do not conflict, retain the results in the original form.
For example, Jake Filbert lives in Connecticut. If only Jake Filbert is identified, the result will be labeled as [NAME] lives in Connecticut.
Full overlap: If both the entities overlap, the following logic will be applied:
Select the entity with a higher confidence score.
If both the entities contain the same confidence score, select the first entity.
For example, Jake Filbert lives in Connecticut. Here, the name is recognized as [USER] with a score 0.7 and [NAME] with a score 0.9. As [NAME] has a higher score, the result will be labeled as [NAME] lives in Connecticut.
One entity contained in other: If one entity is completely contained in the other, select the entity with the longer text.
For example, jake@email.com. Here, the classifiers may recognize the text as [NAME] and [EMAIL]. As [EMAIL] is the longer text, the result will be labeled as [EMAIL].
Partial intersection. If the two entities overlap partially, the result will be a combination of both.
For example, 092-33445. Here, the classifiers may recognize the text as [PHONE_NUMBER] and [SSN]. The result will be labeled as [PHONE_NUMBER&SSN].
6.2 - Input Validation
Rejecting unsanitized data.
The Classification service in Classify offers an input validation security feature that rejects invalid input data. Data that is malformed, non-normalized, containing homoglyphs, hieroglyphs, mixed Unicode variants, or control characters is considered as unsanitized or invalid data. These are rejected and will not be classified.
The following are few examples of data that will be rejected:
Ⅷ
𝓉𝑒𝓍𝓉
Pep
Before invoking the Classification endpoint, ensure that the input text is normalized. Replace invalid characters by their corresponding normalized plaintext characters. If the input text contains any invalid character, a status code of 422 and a message Untrusted input is returned.
For security purposes, the application rejects unsanitized data by default. It is recommended that this feature remains enabled. However, to override this feature, perform the following steps.
6.3 - Harmonization
Aggregate responses under a similar category.
Based on the detection logic, the Pattern and Context classification providers might classify the same data in different labels. The classification service standardizes provider outputs into a unified response.
Consider the example, You can visit our office located in New York City.
Context provider might categorize New York City as CITY.
Pattern provider might categorize New York City as LOCATION.
This can cause an inconsistency in the outputs generated across the providers.
Classify ensures standardization of responses by aggregating similar outputs of the providers under a common classification name. In the example shown, the classification service will categorize New York City under the category LOCATION.
Harmonization Process
The following pointers illustrate the harmonization process in detail.
Providers Mapping Entities
Each provider is responsible for mapping its identified entities to harmonized classification entities that are consistent with those used by other providers. This ensures that the classification service can accurately aggregate and interpret responses across multiple providers. When a provider’s classification is harmonized, the response must include the originally identified entity alongside the harmonized classification.
The following snippet shows how the Context classification provider initially classified the entity as CITY, which was then harmonized into the category LOCATION.
The entities are grouped together only if the responses shared by the providers contain the same start_index, end_index, and similar classification entity. If the start_index and end_index differ, the entities will not be grouped together.
As shown in the following snippet, the Context and Pattern providers classify the data as IT_IDENTITY_CARD and ID_CARD respectively. These are then grouped under the NATIONAL_ID category by the classification service:
If the responses for start_index and end_index differ, the entities will not be grouped together. However, the entities will appear under a common classification name.
The following table illustrates a common classification name for multiple providers.
Provider
Original Entity Labels
Common Classification Name
Pattern Provider
LOCATION
LOCATION
Context Provider
CITY, STATE, COUNTRY, COUNTY, ZIP_CODE, STREET, BUILDING, GEO_COORDINATE