Installing Protegrity Anonymization
Protegrity Anonymization is available as a REST API that can be installed and run from Kubernetes environments on AWS and Azure. After installing the REST API, you can use anonymize your data via this REST API or by leveraging a Python SDK. We also offer a local docker deployment mode.
Ensure that the following prerequisites are met:
- The user should be well versed with using container orchestration services like Kubernetes in AWS and Azure.
- Access as an Admin user is available for the cloud service used.
- A minimum of 2 nodes with the following minimum configuration for Kubernetes deployments:
- RAM: 16 GB
- CPU: 8 core
- Hard Disk: Unlimited
- For the local docker deployment mode, a machine with the following specifications will enable you to experiment with the main features of Protegrity Anonymization:
- RAM: 16 GB
- CPU: 8 core
- Hard Disk: 30GB
1 - Using Cloud Services
Protegrity Anonymization can be hosted in the Kubernetes service provided by various cloud platforms, such as AWS and Azure. Use the content provided in the following sections for configuring Protegrity Anonymization in the different cloud services.
Note: Protegrity Anonymization might be compatible with other cloud providers, other than Azure and AWS, but it has not been tested on additional cloud providers.
1.1 - Protegrity Anonymization on AWS
Set up and use Protegrity Anonymization on AWS.
Installation of Protegrity Anonymization requires working with the following AWS services: Elastic Container Registry, Elastic Kubernetes Service, EC2. You’ll need an administrator to be able to grant permissions for these services to interact with each other. Proficiency with helm, kubectl and eksctl is strongly recommended.
Create a base machine
We recommend creation of a virtual machine on EC2, from which you’ll interact with all the necessary services to standup Protegrity Anonymization. The following installation instructions have been tested with a Linux machine (Ubuntu 24.04). The following steps assume creation of such a virtual machine.
Install the latest AWS CLI on your virtual machine.
For more information about the installation steps, refer to Installing or updating to the latest version of the AWS CLI.
From your virtual machine, login to your account by running and completing the steps presented by:
Install Kubectl version 1.32 by following the instructions on the link below. Kubectl enables you to run commands from the virtual machine so that you can communicate with the Kubernetes cluster. Follow the instructions on this same page to install eksctl.
Note: For more information about installing kubectl, refer to Install eksctl.
- Install the Helm client version 3.17.2 for working with Kubernetes clusters.
Note: For more information about installing the Helm client, refer to Installing Helm.
- Install Docker engine 28.0.4.
Note: For more information about installing the Docker engine 28.0.4, refer to Install Docker Engine. Make sure to run the post-installation steps as well.
- Create a key pair, by accessing the Key Pairs service on the EC2 service on AWS (ED25519 key pair type and .pem key file format). You’ll need reference this key pair on the cluster-aws.yaml file, later described. This will enable you to authenticate into the k8s cluster.
Create a Container Registry
To create a container registry leverage the Elastic Container Registry service on AWS and configure it according to your environment requirements and constraints.
Note: For more information about creating the Elastic Container Registry, refer to Amazon Elastic Container Registry Documentation.
Deploy Protegrity Anonymization on EKS
Note: Because the installation script changes parameter values of configuration files, if you make a mistake during installation you might end up with inconsistent values for the same parameters. In that case, to attempt installation again, we recommend that you run step 3 again.
Make sure to read the optional section for additional configuration options Anonymization on AWS or Azure.
Obtain and copy Protegrity Anonymization’s installation artifact ANON-API_RHUBI-ALL-64_x86-64_Generic.K8S_1.3.0.tgz into a directory on your base machine.
From that directory, run tar -xvzf ANON-API_RHUBI-ALL-64_x86-64_Generic.K8S_1.3.0.tgz.
Edit the install.properties file and follow additional instructions on that file. You’ll encounter global configurations and Cloud specific sections.
Edit the cluster-aws.yaml file according to your environment. The mandatory fields that you need to edit are flagged with <>. You may want to change other fields, such as cluster name. Depending on your workloads, you may also want to change the maxSixe of the nodeGroups section.
You’ll find a AWS_Install.sh file. Make sure to read the script before you run it, since it contains delete operations, namely deleting Kubernetes namespaces and auxiliary files.
Run AWS_Install.sh. This will generally take less than 30 minutes to deploy Protegrity Anonymization. At the end of the script, you’ll be shown an IP address of Ingress which you’ll need to edit your hosts file, like so XX.XX.XX.XX anon.protegrity.com. To get additional information about the deployment, you may leverage the following commands (these are the default namespaces defined in install.properties):
kubectl get pods -n anon-ns
kubectl get svc -n anon-ns
kubectl get pods -n nginx
kubectl get svc -n nginx
You may now use Protegrity Anonymization. Use the URLs provided here for viewing the Protegrity Anonymization service and pod details after you have successfully deployed Protegrity Anonymization . For more information about updating the hosts file, refer to step 2 of the section Enabling custom certificates from SDK.
- Open a web browser. Use the following URL to view basic information about Protegrity Anonymization: https://anon.protegrity.com/.
- Use the following URL to view the Swagger UI. The various Protegrity Anonymization APIs are visible on this page: https://anon.protegrity.com/anonymization/api/v1/ui.
- Go to https://anon.protegrity.com/lab, where you’ll have a Jupyter Lab environment available to quickly experiment with Protegrity Anonymization. Inside the folder Anonymization-engine, you’ll find a Jupyter Notebook with several examples.
- Use the following URL to view the contractual information for Protegrity Anonymization: https://anon.protegrity.com/about.
- Visit https://anon.protegrity.com/sdkapi and you’ll find a link to download the python SDK.
- Refer to the Sample Requests for Protegrity Anonymization section for code snippets.
Note: Do not stop or delete the running Dask scheduler or the Protegrity Anonymization API container service, which might lead to loss of the respective data and logs.
Uninstall
From the same Virtual machine from where you installed the product, run the following commands in accordance with what you specified in the install.properties file
- List deployments with:
helm list -n anon-ns
helm list -n nginx
- Uninstall via:
helm uninstall <name of anon deployment> -n anon-ns
#eg: helm uninstall anon -n anon-ns
helm uninstall <name of nginx deployment> -n nginx
#eg: helm uninstall ingress-nginx -n nginx
- You may monitor the status of the uninstall with:
kubectl get pods -n anon-ns
kubectl get pods -n nginx
kubectl get pv -n anon-ns
kubectl get pvc -n anon-ns
- Wait for the deletion of the pods.
- If you face an issue with pv and or pvc at this stage, run:
# ----- anon-db-pvc -----
kubectl patch pvc anon-db-pvc -n anon-ns -p '{"metadata":{"finalizers":null}}'
kubectl patch pv anon-db-pv -n anon-ns -p '{"metadata":{"finalizers":null}}'

kubectl delete pvc anon-db-pvc -n anon-ns --ignore-not-found
kubectl delete pv anon-db-pv --grace-period=0 --force --ignore-not-found

# ----- anon-nb-pvc -----
kubectl patch pv anon-nb-pv -n anon-ns -p '{"metadata":{"finalizers":null}}'
kubectl patch pvc anon-nb-pvc -n anon-ns -p '{"metadata":{"finalizers":null}}'

kubectl delete pv anon-nb-pv --grace-period=0 --force --ignore-not-found
kubectl delete pvc anon-nb-pvc -n anon-ns --ignore-not-found

# ----- anon-storage-pvc -----
kubectl patch pvc anon-storage-pvc -n anon-ns -p '{"metadata":{"finalizers":null}}'
kubectl patch pv anon-storage-pv -n anon-ns -p '{"metadata":{"finalizers":null}}'

kubectl delete pvc anon-storage-pvc -n anon-ns --ignore-not-found
kubectl delete pv anon-storage-pv --grace-period=0 --force --ignore-not-found
- Delete the EKS cluster.
- The product installation will create 3 Volumes, which you’ll need to delete (e.g., from the AWS EC2 console). By default, given the properties in install.properties, those volumes are called: deployment_anon_storage; deployment__anon_db; deployment_anon_workstation.
1.2 - Protegrity Anonymization on Azure
Set up and use Protegrity Anonymization on Azure.
Installation of Protegrity Anonymization requires working with the following Microsoft Azure services: Container Registries, Kubernetes Services, Disks. You’ll need an administrator to be able to grant permissions for these services to interact with each other. Proficiency with helm and kubectl is strongly recommended.
Note: For ease of configuration and installation, we recommend that you work within your target Subscription, with the same Resource group, Virtual network, Subnet, and Zone.
Create a base machine
We recommend creation of a Virtual machine on Microsoft Azure, from which you’ll interact with all the necessary services to standup Protegrity Anonymization. The following installation instructions have been tested with a Linux machine (Ubuntu 24.04). The following steps assume creation of such a Virtual machine.
Install and initialize the Azure CLI on your virtual machine.
For more information about the installation steps, refer to How to install the Azure CLI.
From your virtual machine, login to your account by running:
Follow the steps presented by the wizard to complete authentication.
Install Kubectl version 1.32.3. Kubectl enables you to run commands from the virtual machine so that you can communicate with the Kubernetes cluster.
Note: For more information about installing kubectl, refer to Install Tools.
- Install the Helm client version 3.17.2 for working with Kubernetes clusters.
Note: For more information about installing the Helm client, refer to Installing Helm.
- Install Docker engine 28.0.4.
Note: For more information about installing the Docker engine 28.0.4, refer to Install Docker Engine. Make sure to run the post-installation steps as well.
Create a Container Registry
To create a container registry leverage the Container registries service on Azure and configure it according to your environment requirements and constraints.
Note: For more information about creating the Azure Container Registry, refer to Create an Azure container registry using the Azure portal.
Create a Kubernetes cluster
This section describes how to create a Kubernetes Cluster on Azure.
Note: The steps listed in this procedure for creating a Kubernetes cluster are for reference use. Be advised of potential differences between the screen captures here presented and what you’ll encounter on the user interface on the Azure user interface.
To create a Kubernetes cluster via the user interface:
Log in to the Azure Cloud and access Kubernetes services.
CLick on Create and the following options will appear:
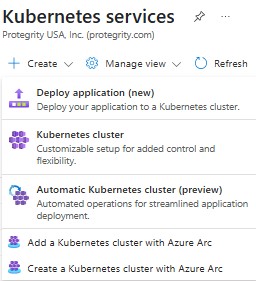
Click Kubernetes cluster and the Create Kubernetes cluster screen appears.
We’ll detail the basic and mandatory configurations to launch a cluster (of type private) for the Anonymization. In Basics tab, Subscription field select the desired subscription where you intend to deploy Protegrity Anonymization. In the Resource group field, select the required resource group. On Cluster preset configuration choose the preset that best suits your needs. In the Kubernetes cluster name field, specify a name for your Kubernetes cluster. Select 1.32.3 as the Kubernetes version. Retain the default values for the remaining settings.
In the Node pools tab:
- Under Node pools by default an agentpool is created with System Mode. System node pools are preferred for system pods.
- Click Add node pool, select a name for your Node pool name, select User Mode user node pools are preferred for your application pods, Ubuntu Linux OS SKU, Availability zones according to your regions and zones, Node size of at least 4 vCPUs and 16 RAM(GiB), Minimum node count of at least 2, and Maximum node count of 5 strikes a good balance. Everything else can be left with default values.
- In the Networking tab:
- Under Private access, select Enable private cluster.
- Under Container networking, select Azure CNI Node Subnet. Enable Bring your own Azure virtual network. On Virtual network select your virtual network and subnet for the Cluster subnet.
In the Integrations tab, choose the name of your Container Registry, previously created.
Click Review + create to validate the configuration.
Click Create to create the Kubernetes cluster.
The Kubernetes cluster is created.
Note: Protegrity Anonymization leverages volume mounts on Kubernetes. Be advised that this will require interaction between Kubernetes and Disks. Once the cluster has been created you must ensure the cluster managed identity has the necessary permissions to mount storage. You can find more information here. You may create your own customized set of permissions or use a default Azure role of Virtual Machine Contributor and add the Kubernetes cluster managed identity directly to the respective resource group.
Deploy Protegrity Anonymization on AKS
Note: Because the installation script changes parameter values of configuration files, if you make a mistake during installation you might end up with inconsistent values for the same parameters. In that case, to attempt installation again, we recommend that you run step 3 again.
Make sure to read the optional section for additional configuration options Anonymization on AWS or Azure.
Obtain and copy Protegrity Anonymization’s installation artifact ANON-API_RHUBI-ALL-64_x86-64_Generic.K8S_1.3.0.tgz into a directory on your base machine.
From that directory, run tar -xvzf ANON-API_RHUBI-ALL-64_x86-64_Generic.K8S_1.3.0.tgz.
Edit the install.properties file and follow additional instructions on that file. You’ll encounter global configurations and Cloud specific sections.
You’ll find a Azure_install.sh file. Make sure to read the script before you run it, since it contains delete operations, namely deleting Kubernetes namespaces and auxiliary files.
Run Azure_install.sh. This will generally take less than 30 minutes to deploy Protegrity Anonymization. At the end of the script, you’ll be shown an IP address of Ingress which you’ll need to edit your hosts file, like so XX.XX.XX.XX anon.protegrity.com. To get additional information about the deployment, you may leverage the following commands (these are the default namespaces defined in install.properties):
kubectl get pods -n anon-ns
kubectl get svc -n anon-ns
kubectl get pods -n nginx
kubectl get svc -n nginx
You may now use Protegrity Anonymization. Use the URLs provided here for viewing the Protegrity Anonymization service and pod details after you have successfully deployed the Protegrity Anonymization. For more information about updating the hosts file, refer to step 2 of the section Enabling custom certificates from SDK.
- Open a web browser. Use the following URL to view basic information about Protegrity Anonymization: https://anon.protegrity.com/.
- Use the following URL to view the Swagger UI. The various Protegrity Anonymization APIs are visible on this page: https://anon.protegrity.com/anonymization/api/v1/ui.
- Go to https://anon.protegrity.com/lab, where you’ll have a Jupyter Lab environment available to quickly experiment with Protegrity Anonymization. Inside the folder Anonymization-engine, you’ll find a Jupyter Notebook with several examples.
- Use the following URL to view the contractual information for Protegrity Anonymization: https://anon.protegrity.com/about.
- Visit https://anon.protegrity.com/sdkapi and you’ll find a link to download the python SDK. Install it and use it with python 3.12 in your environment to interact with Protegrity Anonymization.
- Refer to the Sample Requests for Protegrity Anonymization section for code snippets.
Note: Do not stop or delete the running Dask scheduler or the Protegrity Anonymization API container service, which might lead to loss of respective data and logs.
Uninstall
From the same Virtual machine from where you installed the product, run the following commands in accordance with what you specified in the install.properties file
- List deployments with:
helm list -n anon-ns
helm list -n nginx
- Uninstall via:
helm uninstall <name of anon deployment> -n anon-ns
#eg: helm uninstall anon -n anon-ns
helm uninstall <name of nginx deployment> -n nginx
#eg: helm uninstall ingress-nginx -n nginx
- You may monitor the status of the uninstall with:
kubectl get pods -n anon-ns
kubectl get pods -n nginx
kubectl get pv -n anon-ns
kubectl get pvc -n anon-ns
- Wait for the deletion of the pods.
- If you face an issue with pv and or pvc at this stage, run:
# ----- anon-db-pvc -----
kubectl patch pvc anon-db-pvc -n anon-ns -p '{"metadata":{"finalizers":null}}'
kubectl patch pv anon-db-pv -n anon-ns -p '{"metadata":{"finalizers":null}}'

kubectl delete pvc anon-db-pvc -n anon-ns --ignore-not-found
kubectl delete pv anon-db-pv --grace-period=0 --force --ignore-not-found

# ----- anon-nb-pvc -----
kubectl patch pv anon-nb-pv -n anon-ns -p '{"metadata":{"finalizers":null}}'
kubectl patch pvc anon-nb-pvc -n anon-ns -p '{"metadata":{"finalizers":null}}'

kubectl delete pv anon-nb-pv --grace-period=0 --force --ignore-not-found
kubectl delete pvc anon-nb-pvc -n anon-ns --ignore-not-found

# ----- anon-storage-pvc -----
kubectl patch pvc anon-storage-pvc -n anon-ns -p '{"metadata":{"finalizers":null}}'
kubectl patch pv anon-storage-pv -n anon-ns -p '{"metadata":{"finalizers":null}}'

kubectl delete pvc anon-storage-pvc -n anon-ns --ignore-not-found
kubectl delete pv anon-storage-pv --grace-period=0 --force --ignore-not-found
- Delete the AKS cluster.
- The product installation will create 3 Disks, which you’ll need to delete (e.g., from the Azure console). By default, given the properties in install.properties, those volumes are called: deployment_anon_storage; deployment__anon_db; deployment_anon_workstation.
1.3 - Optional steps for AWS and Azure
Optional steps for setting up Protegrity Anonymization on AWS or Azure.
Optional - Using custom certificates in Ingress
Protegrity Anonymization uses certificates for secure communication with the client. You can use the certificates provided by Protegrity or use your own certificates. Complete the configurations provided in this section to use your custom certificates with the Ingress Controller.
Ensure that the certificates and keys are in the .pem format.
Note: Skip the steps provided in this section if you want to use the default Protegrity certificates for Protegrity Anonymization.
Log in to the Base Machine where Ingress in configured and open a command prompt.
Copy your certificates to the Base Machine.
Create a Kubernetes secret of the server certificate using the following command. The namespace used must be the same where Protegrity Anonymization application is to be deployed.
kubectl create secret --namespace <namespace-name> generic <secret-name> --from-file=tls.crt=<path_to_certificate>/<certificate-name> --from-file=tls.key=<path_to_certificate>/<certificate-key>
For example,
kubectl create secret --namespace anon-ns generic anon-protegrity-tls --from-file=tls.crt=/tmp/cust_cert/anon-server-cert.pem --from-file=tls.key=/tmp/cust_cert/anon-server-key.pem
Create a Kubernetes secret of the CA certificate using the following command. The namespace used must be the same where the Protegrity Anonymization application is to be deployed.
kubectl create secret --namespace <namespace-name> generic <secret-name> --from-file=ca.crt=<path_to_certificate>/<certificate-name>
For example,
kubectl create secret --namespace anon-ns generic ca-protegrity --from-file=ca.crt=/tmp/cust_cert/anon-ca-cert.pem
Open the values.yaml file.
Add the following host and secret code for the Ingress configuration at the end of the values.yaml file.
## Refer section in documentation for setting up and configuring NGINX-INGRESS before deploying the application.
ingress:
  ## Add host section with the hostname used as CN while creating server certificates.
  ## While creating the certificates you can use *.protegrity.com as CN and SAN used in below example
  host: anon.protegrity.com                  # Update the host according to your server certificates.

  ## To terminate TLS on the Ingress Controller Load Balancer.
  ## K8s TLS Secret containing the certificate and key must also be provided.
  secret: anon-protegrity-tls                # Update the secretName according to your secretName.

  ## To validate the client certificate with the above server certificate
  ## Create the secret of the CA certificate used to sign both the server and client certificate as shown in example below
  ca_secret: ca-protegrity                    # Update the ca-secretName according to your secretName.

  ingress_class: nginx-anon
Note: Ensure that you replace the host, secret, and ca_secret attributes in the values.yaml file with the values as per your certificate.
For more information about using custom certificates, refer to Enabling custom certificates from SDK.
Optional - MinIO
MinIO uses access keys and secret for performing file operations. Protegrity provides a default set of credentials that are stored as part of the secret storage-creds. If you are creating your own secret, then, update the existingSecret section on the values.yaml file inside the Anon-helm folder.
    ```
    anonstorage:
      ## Refer the following command for creating your own secret.
      ## CMD: kubectl create secret generic my-minio-secret --from-literal=rootUser=foobarbaz --from-literal=rootPassword=foobarbazqux
      existingSecret: ""                # Supply your secret Name for ignoring below default credentials.
      bucket_name: "anonstorage"        # Default bucket name for minio
      secret:
        name: "storage-creds"           # Secret to access minio-server
        access_key: "anonuser"          # Access key for minio-server
        secret_key: "protegrity"        # Secret key for minio-server
    ```
Optional - Setting up logging for Protegrity Anonymization
Protegrity Anonymization centralizes logs into a file by leveraging the script Anon_logs.sh (edit according to your requirements). If you haven’t configured log forwarding, this is a quick way of obtaining logs from Protegrity Anonymization.
- Navigate to the base machine from where you deployed Protegrity Anonymization, which contains installation files.
- Use the
Anon_logs.sh script to pull the logs from all the pods. You may need to assign execute permissions to be able to run Anon_logs.sh. you’ll be prompted for the namespace where Anonymization is deployed.chmod +x Anon_logs.sh
./<path_to_script>/Anon_logs.sh
2 - Installing using Docker containers
Complete the following steps to run Protegrity Anonymization on a host machine.
Ensure that you have completed the following prerequisites before deploying the Protegrity Anonymization.
- Install Docker engine 28.0.4.
Note: For more information about installing the Docker engine 28.0.4, refer to Install Docker Engine. Make sure to run the post-installation steps as well.
To install Protegrity Anonymization:
Log in to the machine as an administrator.
Obtain and copy Protegrity Anonymization’s installation artifact ANON-API_RHUBI-ALL-64_x86-64_Generic.K8S_1.3.0.tgz into a directory on your base machine.
From that directory, run tar -xvzf ANON-API_RHUBI-ALL-64_x86-64_Generic.K8S_1.3.0.tgz.
Run Local_docker_install.sh.
Note: Depending on your workload, you may want to edit the docker-compose file, namely pty-worker and increase the replicas parameter.
The previous script will launch several containers. Retrieve the IP of the nginx container by running docker inspect -f '{{range .NetworkSettings.Networks}}{{.IPAddress}}{{end}}' <container ID> and map it in your hosts file, like so:
XX.XX.XX.XX anon.protegrity.com
- Open a web browser. Use the following URL to view basic information about Protegrity Anonymization: https://anon.protegrity.com/.
- Use the following URL to view the Swagger UI. The various Protegrity Anonymization APIs are visible on this page: https://anon.protegrity.com/anonymization/api/v1/ui.
- Go to https://anon.protegrity.com/lab, where you’ll have a Jupyter Lab environment available to quickly experiment with Protegrity Anonymization. Inside the folder Anonymization-engine, you’ll find a Jupyter Notebook with several examples.
- Use the following URL to view the contractual information for Protegrity Anonymization: https://anon.protegrity.com/about.
- Visit https://anon.protegrity.com/sdkapi and you’ll find a link to download the python SDK.
- Refer to the Sample Requests for Protegrity Anonymization section for code snippets.
3 - Installing the Protegrity Anonymization Python SDK
Complete the steps provided in this section to install the Protegrity Anonymization Python SDK in your environment. Protegrity Anonymization communicates with the Protegrity Anonymization REST API to anonymize data.
Prerequisites for deploying Protegrity Anonymization
Protegrity Anonymization Python SDK is provided as a wheel file that may be installed using pip. Additionally, ensure that the following prerequisites are met:
Python 3.12 is installed.
Protegrity Anonymization REST API is installed.
For more information about the installation steps, refer to the section Installing the Protegrity Anonymization REST API.
Note: If administrator has not updated the DNS entry for ANON REST API service, then map the hostname with the IP address of Anon Service in the hosts file of the system.
Installing Protegrity Anonymization Python
After having installed Protegrity Anonymization via one of the several installation methods, you may now leverage the provided Python SDK, provided as a wheel file, to interact with the product using Python. Install the Wheel file provided using pip to use the Protegrity Anonymization SDK:
Install Python 3.12 in the environment where you mapped the IP address of Ingress to anon.protegrity.com.
Obtain the whl file via the instructions given on the several installation methods of Protegrity Anonymization.
Instal the whl file via
pip install anonsdk_dir-1.3.0-py3-none-any.whl
You can now import and use the Protegrity Anonymization SDK using Python in your environment.
Refer to the Sample Requests for Protegrity Anonymization section for code snippets.
Optional - Enabling custom certificates from SDK
Protegrity Anonymization SDK uses certificates for secure communication with the client. You can use the certificates provided by Protegrity or use your own certificates. Complete the configurations provided in this section to use your custom certificates with the SDK.
Ensure that the certificates and keys are in the .pem format.
Note: If you want to use the default Protegrity certificates for the Protegrity Anonymization SDK, then skip the steps to set up the certificates provided in this section.
Complete the configuration on the machine where the Protegrity Anonymization SDK SDK will be used.
Create a directory that is named .pty_anon in the directory from where the SDK will run.
Create certs in the .pty_anon directory.
Create generated-certs in the certs directory.
Create ca-cert in the generated-certs directory.
Create cert in the generated-certs directory.
Create key in the generated-certs directory.
Copy the client certificates and key to the respective directories in the .pty_anon/certs/generated-certs directory.
The directory structure will be as follows:
.pty_anon/certs/generated-certs/ca-cert/CA-xyz-cert.pem
.pty_anon/certs/generated-certs/key/xyz-key.pem
.pty_anon/certs/generated-certs/cert/xyz-cert.pem
Make sure that you are using valid certificates.
Create a config.yaml file in the .pty_anon directory with the following Ingress Endpoint defined under CLUSTER_ENDPOINT. The BUCKET_NAME, ACCESS_KEY, and SECRET_KEY are the default details that are used to communicate with the MinIO container for reading and writing files from SDK.
STORAGE:
  CLUSTER_ENDPOINT: https://**anon.protegrity.com**/
  BUCKET_NAME: 'anonstorage'
  ACCESS_KEY: 'anonuser'
  SECRET_KEY: 'protegrity'
Note: Ensure that you replace anon.protegrity.com with your host name specified in values.yaml. Also, ensure that you update the default credentials if you have used your own secret.
Updating the hosts file.
Log in to the machine where Protegrity Anonymization SDK will be used.
Update the hosts file with the following code according to your setup.
For Kubernetes:
<LB-IP of Ingress> <host defined for ingress in values.yaml>
For Docker:
<LB-IP of Ingress> <server_name defined in nginx.conf>
For example,
XX.XX.XX.XX anon.protegrity.com
The URL can now be used while creating the Connection Object in the SDK, such as, conn = anonsdk.Connection("https://anon.protegrity.com/").