This is the multi-page printable view of this section. Click here to print.
Browser Protector
- 1: Overview
- 1.1: Protegrity Browser Protector
- 1.2: Architecture
- 2: Installation
- 2.1: Required Skills and Prerequisites
- 2.2: Pre-Configuration
- 2.2.1: Extension Source Code
- 2.2.2: Host Extension On Private Server
- 2.2.3: Entra ID Configuration
- 2.2.4: Cloud API Configuration
- 2.2.4.1: Configuration for AWS
- 2.2.4.2: Configuration for GCP
- 2.2.4.3: Configuration for Azure
- 2.2.5: Set Up Configuration File for Browser Protector
- 2.3: Installation
- 2.3.1: Testing the Protegrity Browser Protector Extension Locally
- 2.3.2: Installing Browser Protector on Windows Devices Using Intune
- 2.3.3: Installing Browser Protector on macOS Using Kandji
- 2.3.4: MDM File Generator Utility
- 2.4: Testing and Troubleshooting
- 3: Configuration
- 3.1: Page Content Processing
- 3.1.1: Protegrity Standard Attribute
- 3.1.2: Custom Mapping Configuration
- 3.1.2.1: Domain Matching Rules
- 3.1.3: Stored Suggestions
- 3.2: Data Element Auto Selection
- 4: Using the Protegrity Browser Protector Extension
1 - Overview
1.1 - Protegrity Browser Protector
Solution Overview
Protegrity Webapp Protectors secure web applications using low-code/no-code methods, avoiding major code changes required by Application Protectors.
The Browser Protector is deployed on end user client endpoints, including desktops and laptops, through standard deployment methodologies. It leverages existing authentication mechanisms so application end users can interact with applications secured by Protegrity data protection.
The Browser Protector is designed to enhance data security by dynamically revealing tokenized text in real-time when it is displayed in a web browser. This approach ensures that sensitive data remains protected throughout its lifecycle until it is actively rendered and visible to the end user.
Key Features
End-to-End Security: By maintaining tokenization until user authorization and keeping cryptographic operations server-side, the extension minimizes the risk of data exposure throughout its lifecycle.
Protegrity ESA Integration: The extension relies on the Enterprise Security Appliance (ESA) for defining and managing cryptographic properties and security policies. All tokenization and cryptographic operations are performed server-side, ensuring sensitive data is never exposed during client-side processing.
Azure Entra ID Integration for SSO User Authentication: The extension supports integration with Azure Entra ID for Single Sign-On (SSO) user authentication, utilizing the OAuth 2.0 authorization flow to ensure secure and efficient user access. This process leverages JWT token-based authentication, allowing users to log in via their organization’s centralized identity management system without exposing sensitive credentials. Furthermore, the extension communicates securely with the backend through encrypted channels, ensuring the safe exchange of authentication tokens and maintaining compliance with enterprise security standards.
Support For Windows/MacOS Operating Systems: End user devices must run Chrome browser. Supported operating systems are Windows 10 and higher and MacOS 15 Sequoia or higher.
User-Controlled Data Rendering: The extension allows users to explicitly select which tokenized text should be revealed and converted back into its original form. This ensures that sensitive data is only decrypted and displayed when explicitly authorized by the user.
Immediate Rendering: Once authorized by the user, the extension dynamically resolves tokenized text back into its original form and displays it securely in the browser.
1.2 - Architecture
The main layers of the Protegrity Browser Protector product are as follows:
- Management Layer: The management layer enables centralized control through Mobile Device Management (MDM) platforms such as Microsoft Intune or Kandji.
- Service Layer: The service layer is the backbone of the browser extension, enabling secure communication, user authentication, and data tokenization.
Centralized Management with MDM Tools
Utilization of MDM tools allows administrators to deploy, configure, and manage the browser extension across multiple devices and users within an organization from a single platform.
By leveraging MDM tools, organizations can ensure consistent and secure use of Protegrity Browser Protector across their environment while minimizing administrative overhead.
The following figure shows the key components of the management layer.

The management layer integrates an MDM platform with Azure Active Directory (Azure AD) to facilitate secure and centralized management of the browser extension across end-user devices. The core components of the Management Layer are as follows:
MDM Platform: Serves as the central system for managing and distributing the browser extension. It ensures that the extension is installed, updated, and configured consistently across all enrolled devices.
Azure AD: Provides identity and access management for users and devices. It ensures that only authorized users and devices can access the browser extension and its features, while enabling centralized control through conditional access policies.
Protegrity ESA: Acts as the central system for defining and managing cryptographic policies for the browser extension, particularly for backend systems such as the Cloud API Protector. ESA administrators define sensitive data elements, like tokenized fields, and user access policies, ensuring that cryptographic operations are governed by enterprise security standards. The ESA policies are used to safeguard sensitive information and enforce access controls.
- Integration with the Browser Configuration File: The list of data elements defined in the ESA must be configured by IT administrators in the browser extension’s configuration file. This configuration file is then distributed to end-user devices through the MDM platform, ensuring that the extension adheres to the cryptographic policies defined in the ESA.
- Seamless Policy Enforcement: By linking the ESA with the extension management layer, the organization ensures that cryptographic policies are consistently enforced across all devices, enhancing security and regulatory compliance.
File Storage Server: Hosts the browser extension code and related resources in a secure and centralized repository. This component allows IT personnel to upload new versions of the extension and push updates to end-user devices seamlessly. By integrating with the MDM platform, file storage enables efficient, automatic updates without manual intervention, minimizing disruption and ensuring operational consistency.
By combining these components, the management layer ensures that the browser extension is securely and consistently deployed, configured, and maintained across all end-user devices, while aligning with enterprise security and compliance standards.
Service Layer Components
The service layer integrates Azure Entra ID and Protegrity Cloud API to deliver secure, scalable authentication and tokenization while ensuring compliance and a seamless user experience.
The following figure shows the key components of the service layer.
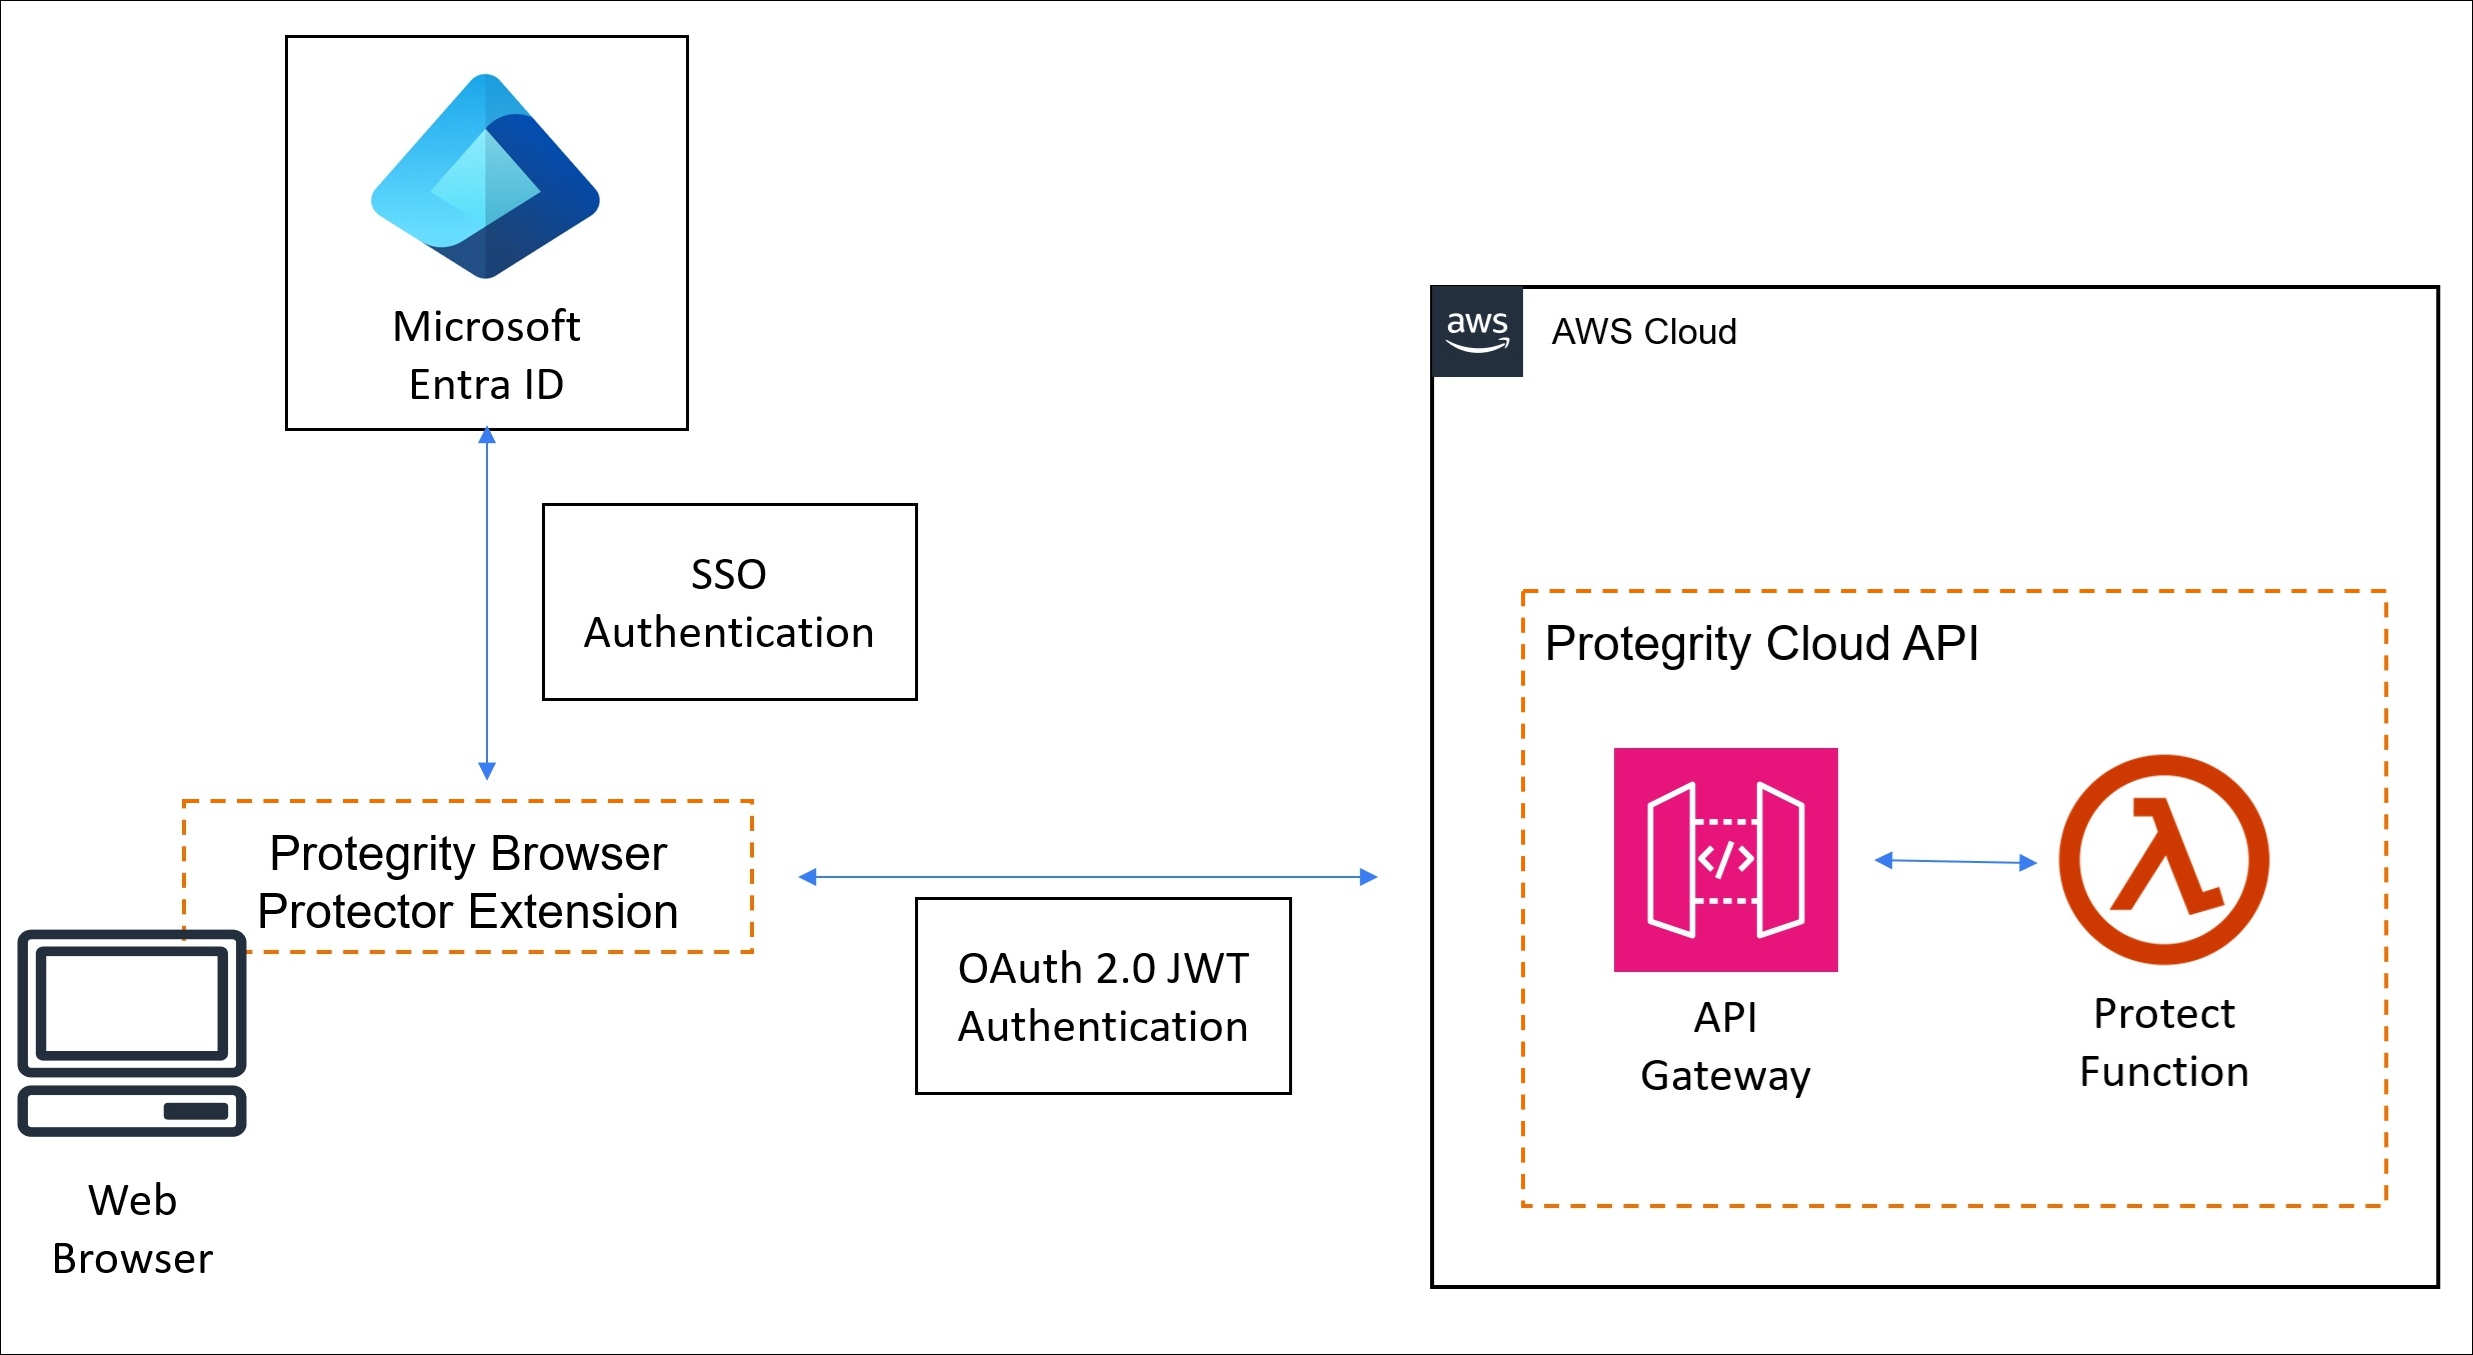
Cloud API Protector
- Performs all tokenization and cryptographic operations on the server, ensuring sensitive data remains protected before being delivered to the browser.
- Tokenized data is delivered to the browser via the web application, ensuring only non-sensitive placeholders are exposed to the client.
Browser Extension
- Enables the user to select specific tokenized text for decryption and rendering.
- Once selected, the extension requests the original data for the chosen tokens from the server, relying on ESA-managed security policies to process the data securely.
Secure Communication
- The extension uses encrypted communication channels, like HTTPS or WebSockets, to interact with the tokenization service and ESA securely.
- All sensitive data remains on the server, with the browser receiving decrypted data only for the user-selected content.
2 - Installation
2.1 - Required Skills and Prerequisites
Before beginning the installation, ensure you have the necessary technical knowledge and access rights to complete the process smoothly.
Required Skills
To successfully deploy the Protegrity Browser Protector, the following roles and skillsets are necessary:
| Roles | Description |
|---|---|
| IT Administrator | Responsible for configuring Group Policies for the organization using Mobile Device Management tools such as Microsoft Intune or Kandji. |
| Protegrity Administrator | Knowledgeable in configuring the Protegrity Cloud Protect API, ESA, and managing Protegrity solutions. |
Prerequisites
Before deploying the Protegrity Browser Protector, ensure that the following requirements are met:
| Requirement | Detail |
|---|---|
| Browser Protector Installation Bundle Archive | This package will be provided by Protegrity. |
| HTTPS File Storage | Used for hosting the Browser Extension signed source code. Cloud storage options such as Amazon S3, Azure Blob Storage, or Google Cloud Storage can be used. |
| Protegrity Cloud Protect API | This product is required to enable the Browser Protector’s functionality. Ensure Cloud API has JWT authentication enabled. Refer to the Cloud API on AWS Guide 3.2.1. |
| Azure Entra ID | Azure Entra ID is required to configure Single Sign-On (SSO). This allows designated users to authenticate seamlessly and securely, ensuring they can use the Browser Protector. Proper integration with Azure Entra ID is essential for managing access and user permissions. |
2.2 - Pre-Configuration
2.2.1 - Extension Source Code
Setting up the Browser Protector Extension For Distribution
Before deploying the Protegrity Browser Protector extension in your organization, you must set up the extension source code for secure distribution. This involves signing the extension and packaging it into a .crx file, which can then be distributed to users or deployed via MDM tools like Microsoft Intune.
Signing the extension ensures its integrity and authenticity, allowing browsers to verify that the extension has not been tampered with and originates from a trusted source. Packaging the extension into a .crx file makes it suitable for enterprise distribution and deployment.
Signing the Extension Binaries
Follow the steps below to create signed crx browser extension file.
Prepare the Extension Source Code
Protegrity will provide the following artifact.
- WAP_ALL-ALL-64_x86-64_Browser.Chrome-<version>.zip
The deployment package you receive from Protegrity must be extracted to reveal the Protegrity Browser Extension source files.
Extract the deployment package you receive from Protegrity to a folder. That folder will have Protegrity Browser Extension source files.
Place the extension source files folder in a directory on your system.
Generate a Private Key
- A private key is required to sign the extension. If you do not already have a private key, you can generate one using a key management tool or browser-specific utilities.
You can use the Chrome Developer Tools to generate a private key during the signing process.
- Store the private key securely, as it is critical for signing the extension and maintaining its authenticity, for instance when pushing new versions of the extension.
Security Guidelines
- Do not share the private key with unauthorized personnel.
- Store the private key in a secure location, such as a password-protected key management system or hardware security module (HSM).
- Ensure backups of the private key are kept in a secure environment.
Sign the Extension Using Chrome Developer Tools or the Chrome Command Prompt
Sign the Extension Using Chrome Browser Developer Tool
Open the Google Chrome browser.
Navigate to the extensions management page by entering the following URL in the address bar:
chrome://extensionsEnable Developer Mode.
At the top right corner of the extensions page, toggle the Developer Mode switch to enable it.
In Developer Mode, a new toolbar will appear at the top of the extensions page.
Click the Pack Extension button to open the packaging tool.
In the popup window:
- Extension root directory: Click the Browse button and select the folder containing Protegrity Browser Extension source files.
- Private key file (optional): If you already have a private key file (
.pem), provide its path by clicking Browse and selecting the file. This ensures the same key is used to sign the extension. - If you do not provide a private key, Chrome will generate one for you during the packaging process.
Click Pack Extension to generate the files.
Sign the Extension Using Chrome Command Prompt
Open a terminal or command prompt on your system.
Use Chrome’s
chrome.exetool or a third-party utility to sign the extension. For Chrome, the command is as follows:chrome.exe --pack-extension=path_to_extension_directory --pack-extension-key=path_to_private_key
Locate the Generated Files
Once the packaging process is complete, Chrome will create the following files:
- A
.crxfile: This is the signed extension package, which can be distributed and installed. - Optional: A
.pemfile: If no private key was provided, Chrome will generate a new.pemfile. This file contains the private key and must be securely stored. - The
.crxfile will be required in the Read Extension ID section.
Do not share the
.pemfile with unauthorized individuals, as it is used to sign future versions of the extension.
Read Extension ID
- Locate the
.crxfile from the Locate the Generated Files section. - Open Chrome and navigate to the Extensions page:
- Type
chrome://extensionsin the address bar and hit Enter.
- Type
- In the top-right corner of the Extensions page, toggle Developer mode ON.
- Drag the
.crxfile and drop it onto the Extensions page in Chrome. - When prompted, click Add Extension to complete the installation.
- The 32 character long extension ID will be displayed on the extension tile, for instance:
ID: abcdhleonbdlhddgbcfhffafcnjjabcd - Note the pty_extension_id.
The extension ID stays the same when as long as the same private key (.pem file) is used to sign it, even when updating the extension.
Security Guidelines
- Keep the
.pemfile secure. If it is lost, you will not be able to sign future versions of the extension, and you will need to distribute a new.crxsigned with a new key. - Never share the
.pemfile publicly or store it in insecure locations. - Use a secure key management system to protect your private key.
By following these steps, you can create a signed .crx file that is ready for secure distribution and installation in Chrome.
2.2.2 - Host Extension On Private Server
Prepare the .crx File
Ensure you have the .crx file for Protegrity Browser Protector extension. If you haven’t created one yet, follow the steps in the Extension Source Code section.
Set Up HTTPS File Hosting
HTTPS File hosting service is required to host the .crx file. This can be any web server, such as, Apache, Nginx, or a cloud storage service.
Set Up an Amazon S3 Bucket
Create a new S3 bucket:
- Log in to the AWS Management Console.
- Navigate to S3 and click Create bucket.
- Provide a unique name for the bucket, for example, s3-bucket-name and choose a region.
- Leave other settings as default and click Create bucket.
Upload the .crx file:
- Open the bucket in the S3 dashboard.
- Click Upload and select your .crx file.
- Set permissions to allow public access to the file as given in the below section.
Configure Permissions for Public Access
By default, files in S3 buckets are private. You need to make the .crx file publicly accessible:
Enable public access for the file:
- Navigate to the uploaded .crx file in the S3 bucket.
- Click Permissions.
- Under Block public access, ensure the bucket allows public file access.
Add a bucket policy:
- Navigate to the Permissions tab of the bucket.
- Click Bucket policy and add a policy like the following:
{ "Version": "2012-10-17", "Statement": [ { "Sid": "PublicReadGetObject", "Effect": "Allow", "Principal": "*", "Action": "s3:GetObject", "Resource": "arn:aws:s3:::s3-bucket-name/*" } ] } - Replace s3-bucket-name with the name of your bucket.
- Click Save.
Set the Correct MIME Type for .crx Files
You need to configure the file’s MIME type so browsers recognize it as a Chrome extension:
Edit the file properties:
- Navigate to the uploaded .crx file in the S3 bucket.
- Click Properties.
- Under Metadata, add the following key-value pair:
- Key:
Content-Type - Value:
application/x-chrome-extension
- Key:
Save the changes.
Access the Hosted .crx File
Once the file is uploaded and permissions are configured, you can access it via the S3 public URL:https://.s3..amazonaws.com/pty-browser-protector.crx
For example:
https://s3-bucket-name.s3.us-east-1.amazonaws.com/pty-browser-protector.crx
Create an Update Manifest for Updates
Create an updated manifest file (update.xml) and host it on S3 as well.
Example update.xml File:
<?xml version="1.0" encoding="UTF-8"?>
<gupdate xmlns="http://www.google.com/update2/response" protocol="2.0">
  <app appid="pty_extension_id">
    <updatecheck codebase="https://s3-bucket-name.s3.us-east-1.amazonaws.com/pty-browser-protector.crx" version="1.0.2" />
  </app>
</gupdate>
- Replace pty_extension_id with Protegrity Browser Protector extension’s unique ID recorded in the Extension Source Code section.
- Replace the codebase URL with the public S3 URL of your .crx file.
- Update the version field to match your extension’s version.
Upload this update.xml file to the same S3 bucket and set the MIME type to application/xml.
Note down the update.xml S3 URL. It will be used in the Installing Browser Protector on Windows Devices Using Intune and Installing Browser Protector on macOS Using Kandji sections.
2.2.3 - Entra ID Configuration
Configuring Entra ID Single Sign-On (SSO) for Protegrity Browser Protector
To enable SSO using Microsoft Entra ID, formerly Azure AD, for the Protegrity Browser Protector extension, follow the steps below.
Create a New App Registration
- Log in to the Microsoft Entra Admin Center.
- Navigate to App registrations > New registration.
- Provide the following details for the new app:
- Name: Enter a name for the app, for example,
Protegrity Browser Protector. - Supported account types: Choose the account type suitable for your organization. For example, accounts in this organizational directory only.
- Redirect URI: Leave this blank for now; you will configure it in a later step.
- Name: Enter a name for the app, for example,
- Click Register to create the app registration.
- After registration, copy the app_registration_client_id and app_registration_tenant_id displayed on the app overview page. You’ll need these IDs for configuration in Set Up Configuration File for Browser Protector.
Add Redirect URI for Single-Page Application
- Log in to the Microsoft Entra Admin Center.
- In the app registration overview, navigate to the Authentication tab.
- Under Platform configurations, click Add a platform.
- Select Single-page application from the list.
- Add a new Redirect URI with the following format:
- Format:
https://pty_extension_id.chromiumapp.org - Example:
https://epfnbngoodhmbeepjlcohfacgnbhbhah.chromiumapp.org/ - Replace
pty_extension_idwith extension id recorded inExtension Sourcesection.
- Format:
- Scroll down and set the Logout URL to the same URI:
- Example:
https://epfnbngoodhmbeepjlcohfacgnbhbhah.chromiumapp.org/
- Example:
- Click Save to apply the changes.
Finalize Authentication Settings
- In the Microsoft Entra Admin Center, ensure that:
- Access tokens and ID tokens are enabled in the Implicit grant and hybrid flows section.
- Redirect URIs are correctly configured.
- Save the changes.
2.2.4 - Cloud API Configuration
Configuring Cloud API for Protegrity Browser Protector
The Protegrity Browser Protector relies on a serverless REST API tokenization service provided by the Protegrity Cloud API. This section outlines the essential configuration steps for enabling JWT authentication in the Cloud API.
For more information about the Cloud API on AWS, refer to the Cloud API on AWS Guide 3.2.1.
Fetch Available Public Keys from the Azure AD OpenID Configuration Endpoint
The public keys for JWT authentication can be retrieved by calling the Azure AD OpenID configuration endpoint:
https://login.microsoftonline.com/{tenant_id}/discovery/keys?appid={client_id}- Replace {tenant_id} with your Azure AD tenant ID.
- Replace {client_id} with your app registration’s client ID.
Use a Python script or another method to fetch the public keys.
- Example Python script to fetch and print public keys:
import argparse import jwt import base64 import requests from cryptography.hazmat.primitives import serialization parser = argparse.ArgumentParser( prog='JWK To PEM converter', description='Helper program to download and convert public keys.', epilog='Protegrity') parser.add_argument('tenant') parser.add_argument('-c', '--client', help="appid for the Azure client application to narrow down keys result") args = parser.parse_args() jwks_uri = f'https://login.microsoftonline.com/{args.tenant}/discovery/keys' if args.client: jwks_uri += f"?appid={args.client}" jwks_response = requests.get(jwks_uri) if jwks_response.status_code != 200: print(f"Azure Entra request error: {jwks_response.text}") exit() for key in jwks_response.json()['keys']: public_key = jwt.algorithms.RSAAlgorithm.from_jwk(key) public_pem = public_key.public_bytes( encoding=serialization.Encoding.PEM, format=serialization.PublicFormat.SubjectPublicKeyInfo ) print(f"-----------Key Id: {key['kid']}--------------") print(f"{base64.encodebytes(public_pem).decode('utf-8').replace('\n', '')}\n") - Run
python3.12 ./tools/jwk_to_pem.py app_registration_tenant_id -c app_registration_client_id- Replace
app_registration_tenant_idandapp_registration_client_idwith values recorded in Entra ID Configuration section. - Install
pyjwt==.10.1Python library before running the script.
- Replace
- Example Python script to fetch and print public keys:
Record PEM base64 formatted keys required by the Cloud API configuration.
The script will print multiple public keys with their corresponding key Ids. Refer to example output below.
   -----------Key Id: CNv0AB3RwqlHFEVnaoMAshCH2XE--------------
   LS0tLS1CRUdJTiBQV...S0tLS1FTkQgUFVCTElDIEtFWS0tLS0tCg==

   -----------Key Id: PoVKeBDIOvmTyLQ9G9BenBwos7k--------------
   LS0tLS1CRUdJTiBQV...KLS0tLS1FTkQgUFVCTElDIEtFWS0tLS0tCg==

   -----------Key Id: _jNwjBDnvTTK8XEdr5QUPkBRLLo--------------
   LS0tLS1CRUdJTiBQV...QUIKLS0tLS1FTkQgUFVCTElDIEtFWS0tLS0tCg==
Record the the output for the next step.
Retrieve JWT Public Signing Key
Microsoft Azure AD maintains multiple public signing keys to ensures continuity in token validation during key transitions.
Follow the steps below to find the active signing key used for the Entra ID app registration configured in Entra ID Configuration section.
Set Cloud API Log Level to
config:- Update your Cloud API configuration to set the log level to
config. - This enables detailed logging, which will display the JWT token in the logs for debugging purposes.
Set the log level back to its original value after debugging to avoid exposing sensitive information.
- Update your Cloud API configuration to set the log level to
Retrieve the JWT Token from Logs:
- Trigger the API call that generates the error.
- Check the Cloud API CloudWatch logs to locate the JWT token. It will typically appear in the request logs.
Decode the JWT Token:
- Use a tool like jwt.ms or any other JWT decoding tool to inspect the token.
- Copy and paste the token into the decoding tool.
- The decoded JWT header will look something like this:
{ "alg": "RS256", "typ": "JWT", "kid": "exampleKeyId123" } - Note the
kidvalue, for example,"exampleKeyId123". This identifies the public key used to sign the token. - Match the
kidwith theKey Idfrom step 1. Record the corresponding base64 value, for example, LS0tLS1CRUdJTiBQV…QUIKLS0tLS1FTkQgUFVCTElDIEtFWS0tLS0tCg==:jwt_signing_key: <>
Microsoft may update or maintain the Azure AD service, which can involve replacing signing keys as part of operational processes. When public signing keys change, the Cloud API returns HTTP error
403 - Invalid JWT token. Verification failed..which manifests asProtector service unavailableerror in browser extension.
Cloud API Configuration for JWT Authentication
Please use the appropriate link below depending on the cloud provider in use.
2.2.4.1 - Configuration for AWS
When deploying the Cloud API on AWS using CloudFormation, ensure that JWT authentication is properly configured by setting the following parameters:
CloudFormation Parameters:
Set
authorizationtojwt:- This specifies that JWT authentication will be used to secure the API.
Set
jwt_verifyto1:- Enables verification of the JWT token during API requests.
Set
jwt_secret_base64to the Public Key (PEM Base64 Encoded):- Use the
jwt_signing_keypublic key obtained from Retrieve JWT Public Signing Key .
- Use the
Set
jwt_user_claimtoupnoremail:- Choose the claim used to identify the user. Typically, User Principal Name (upn) or
emailis selected based on your organization’s Entra ID configuration.
- Choose the claim used to identify the user. Typically, User Principal Name (upn) or
Obtain the API Gateway Endpoint
After deploying the Cloud API using CloudFormation, retrieve the API Gateway endpoint URL for the service:
- Navigate to the CloudFormation stack in your AWS Management Console.
- Locate the Outputs section of the deployed stack.
- Find the output parameter labeled
ApiGatewayId. - Use the
ApiGatewayIdand your AWS region to construct the endpoint URL for the Protegrity Cloud API:- Format:
https://{ApiGatewayId}.execute-api.{Region}.amazonaws.com/pty - Example: If
ApiGatewayIdisabc123xyzand the region isus-east-1, the service endpoint URL will be:
https://abc123xyz.execute-api.us-east-1.amazonaws.com/pty - Format:
- Record this endpoint URL for use in the Browser Protector configuration.
protector_endpoint_url: <>
Disable IAM Authentication for the /v1/unprotect Endpoint
By default, AWS API Gateway might enforce IAM authentication for API methods. Since authentication is already handled within the Cloud API protect Lambda function,
IAM authentication for the /v1/unprotect endpoint must be disabled.
Navigate to the API Gateway:
Open the AWS Management Console and go to the API Gateway service.Locate the API Gateway:
Find the API Gateway deployed for the Cloud API (use theApiGatewayIdobtained in Step 4).Select the
/v1/unprotectResource:
Locate the/v1/unprotectresource in the API Gateway.Choose the
POSTMethod:
Under Method Execution, select thePOSTmethod.Set Authorization to
None:
In the Method Request settings, set Authorization toNone.Save the Changes:
Confirm and save the changes.
2.2.4.2 - Configuration for GCP
When deploying the Cloud API on GCP, ensure that JWT authentication is properly configured by setting the following parameters:
Cloud Function Parameters (Can be set in terraform template or by GCP UI):
Set
authorizationtojwt:- This specifies that JWT authentication will be used to secure the API.
Set
jwt_verifyto1:- Enables verification of the JWT token during API requests.
Set
jwt_secret_base64to the Public Key (PEM Base64 Encoded):- Use the
jwt_signing_keypublic key obtained from Retrieve JWT Public Signing Key .
- Use the
Set
jwt_user_claimtoupnoremail:- Choose the claim used to identify the user. Typically, User Principal Name (upn) or
emailis selected based on your organization’s Entra ID configuration.
- Choose the claim used to identify the user. Typically, User Principal Name (upn) or
Configure GCP cloud protect function Authentication security setting:
By default, GCP cloud function might enforce IAM authentication for API methods. Since authentication is already handled within the Cloud API protect function, we can change the authentication setting to “allow for public access” as below:
- Navigate to the GCP cloud protect function
- On the service details screen, select the security tab
- In the Authentication section - ensure “allow public access” is selected.
Obtain the Gateway URL:
After deploying the Cloud API using terraform, retrieve the API endpoint URL for the service:
From Google Cloud Management console,
- Navigate to API Gateway.
- Select the deployed API Gateway instance.
- Under the “Gateway Details” section, copy the “Gateway URL” or “Managed Service URL”.
- Record the displayed URL for use in the Browser Protector configuration.
protector_endpoint_url: <>
example: https://{gateway-id}-{hash}.{region}.gateway.dev/api
2.2.4.3 - Configuration for Azure
Ensure that JWT authentication is properly configured by setting the following parameters:
Navigation:
- From Azure console, navigate to Function App and select protect function app.
- Navigate to Settings > Environment variables
Configuration Parameters to add / update:
Set OPENID_ENABLED to
false.Set
authorizationtojwt:- This specifies that JWT authentication will be used to secure the API.
Set
jwt_verifyto1:- Enables verification of the JWT token during API requests.
Set
jwt_secret_base64to the Public Key (PEM Base64 Encoded):- Use the
jwt_signing_keypublic key obtained from Retrieve JWT Public Signing Key .
- Use the
Set
jwt_user_claimtoupnoremail:- Choose the claim used to identify the user. Typically, User Principal Name (upn) or
emailis selected based on your organization’s Entra ID configuration.
- Choose the claim used to identify the user. Typically, User Principal Name (upn) or
Obtain the Gateway URL:
After deploying the Cloud API using ARM, retrieve the API endpoint URL for the service:
From Azure Management console,
- Navigate to the deployed API Management gateway.
- Under APIs, select the Cloud API.
- Locate the Gateway URL (base URL) for the API.
- Append the operation path
/v1/unprotectto the gateway URL. - Record the complete endpoint URL for use in the Browser Protector configuration and also pass code query parameter.
protector_endpoint_url: <>
example: https://{apim-name}.azure-api.net/api/v1/unprotect?code={appKey}
2.2.5 - Set Up Configuration File for Browser Protector
Configuring the Protegrity Browser Protector
The Protegrity Browser Protector can be customized and managed using a configuration file in JSON format distributed via MDM tools described in the installation chapters. The configuration file defines key settings, such as the service endpoint for tokenization, authentication service configuration, the data elements to be used to protect clear text values as well as administrative contact information display in the Browser Protector Extension.
Configuration File Overview
Below is an example configuration file for the Protegrity Browser Protector:
{
  "serviceEndpoint": {
    "authentication": {
      "type": "oauth2",
      "identityProvider": "microsoft_entra_id",
      "login_email_or_domain_hint": "",
      "settings": {
        "msal_api": {
          "clientId": "app_registration_client_id",
          "authority": "https://login.microsoftonline.com/app_registration_tenant_id"
        },
        "scopes": [
          "app_registration_client_id/.default"
        ]
      }
    },
    "url": "protector_endpoint_url"
  },
  "dataElements": [
    {
      "value": "data_element_1",
      "label": "data_element_1_label"
    },
    {
      "value": "data_element_2",
      "label": "data_element_2_label"
    }
  ],
  "adminContactInfo": {
    "url": "extension_admin_page_url",
    "phone": "extension_admin_phone",
    "email": "extension_admin_email"
  }
}
Summary Table of Placeholder Values
After completing all steps in pre-configuration chapter, you should have the following values recorded.
| Parameter | Description | Example Value | |||
|---|---|---|---|---|---|
app_registration_client_id | Client ID of the app registration. | 12345-abcde-67890-fghij | |||
app_registration_tenant_id | Tenant ID of the organization in Microsoft Entra ID. | abcdef12-3456-7890-abcd-ef1234567890 | |||
login_email_or_domain_hint | Login Email or Domain Name hint - used during Oauth single sign-on | Possible Values
Platform-Specific BehaviorWindowsOptional. While not required, providing this value improves the login experience by eliminating the need to select an account, particularly when users are signed into multiple accounts. MacOSRequired. Essential when users are signed into multiple accounts. Due to macOS popup window behavior (popups close when new windows appear), a login/domain hint must be provided during the single sign-on process. | |||
protector_endpoint_url | URL of the Cloud Protegrity service API endpoint. |
| |||
dataElements | List of data elements configured on ESA for Cloud API on AWS.
For more information on how it is displayed in the UI, refer to the | | |||
extension_admin_page_url | URL to the administrator's support page. | https://support.your-organization.com/ | |||
extension_admin_phone | Phone number for administrator support. | +1-800-123-4567 | |||
extension_admin_email | Email address for administrator support. | admin@protegrity.com |
2.3 - Installation
2.3.1 - Testing the Protegrity Browser Protector Extension Locally
Test the Protegrity Browser Protector Extension Locally
For testing and validation purposes, it is necessary to run the Protegrity Browser Protector extension locally. This allows developers and administrators to ensure the extension works as expected in a controlled environment before deploying it in production. In this section, we will outline the steps to load and use a local configuration file.
Load the Extension in the Google Chrome / Microsoft Edge Browser
- Open Chrome or Edge.
- Navigate to the Extensions page:
- Enter
chrome://extensions(for Chrome),edge://extensions(for Edge), in the address bar and press Enter.
- Enter
- Enable Developer Mode:
- Toggle the Developer mode switch in the top-right corner of the Extensions page.
- Click Load unpacked:
- Click the Load unpacked button in the top-left corner.
- Select the Protegrity Browser Protector Extension Folder:
- In the file dialog, navigate to the folder containing the extension’s source code and select it.
- Verify the Extension:
- Ensure the extension appears in the list with its name and icon. Check for any errors or warnings in the extension details.
Load the Extension JSON configuration file
- Use the JSON configuration from the
Configuration Summarystep and save it to a file on your local machine, e.g.config.json. - Open Google Chrome / Microsoft Edge.
- From the top-right portion of the browser click on Extensions menu, select
Protegrity Browser Protector. - Click
Select Fileand specify theconfig.jsonfile. - Test the extension following the instructions in the Using Protegrity Browser Protector Extension section.
Reviewing Logs
- Open the browser’s Developer Tools:
- Press
Ctrl + Shift + I(Windows/Linux) orCmd + Option + I(Mac) to open Developer Tools.
- Press
- View the Console:
- Navigate to the Console tab to view any logs or errors produced by the extension.
Unloading the Extension
Once testing is complete, remove the extension from the browser:
- Navigate to the Extensions page.
- Locate the Protegrity Browser Protector extension and click Remove.
2.3.2 - Installing Browser Protector on Windows Devices Using Intune
Deploy Protegrity Browser Protector Extension with Intune
Follow these steps to configure and deploy the Administrative Template files for the Protegrity Browser Protector policy using Intune.
For more information Administrative Templates, refer to Microsoft Intune Administrative Templates.
Utility script to generate configuration files for InTune
See MDM File Generator.
Prerequisites:
- Import the following ADMX files first:
google.admxWindows.admxchrome.admx- required if installing for Google Chrome browsermsedge.admx- required if installing for Microsoft Edge browser
Import ADMX and ADML Files
- Sign in to the Microsoft Intune admin center.
- Navigate to:
- Devices > Manage devices > Configuration > Import ADMX tab > Import.
- Or: Devices > By platform > Windows > Manage devices > Configuration > Import ADMX tab.
- Upload the ADMX File:
- Replace
pty_extension_idwith the extension’s ID generated in pre-configuration steps. - If installing on Microsoft Edge, replace “SOFTWARE\Policies\Google\Chrome” with “SOFTWARE\Policies\Microsoft\Edge” for key value (two occurrences).
- Save the file with a recognizable name, such as
ProtegrityBrowserProtector.admx
- Replace
<?xml version="1.0"?>
<policyDefinitions revision="1.0" schemaVersion="1.0" xmlns:xsd="http://www.w3.org/2001/XMLSchema" xmlns:xsi="http://www.w3.org/2001/XMLSchema-instance">
    <policyNamespaces>
        <target namespace="Protegrity.Policies.BrowserProtector" prefix="ptyBrowserProtector" />
        <using prefix="windows" namespace="Microsoft.Policies.Windows" />
    </policyNamespaces>
    <supersededAdm fileName="" />
    <resources minRequiredRevision="1.0" fallbackCulture="en-US" />
    <categories>
        <category name="Protegrity_Browser_Extension_Configuration" displayName="$(string.Protegrity_Browser_Extension_Configuration)" />
    </categories>
    <policies>
        <!-- Protegrity Browser Protector Configuration -->
        <policy name="POL_ProtegrityBrowserProtector"
        displayName="$(string.Protegrity_Browser_Extension_Configuration)"
        explainText="$(string.Protegrity_Browser_Extension_Configuration_HELP)"
        class="Machine" key="SOFTWARE\Policies\Google\Chrome\3rdparty\extensions\pty_extension_id\policy" presentation="$(presentation.POL_ProtegrityBrowserProtector)">
            <parentCategory ref="Protegrity_Browser_Extension_Configuration" />
            <supportedOn ref="windows:SUPPORTED_Windows10" />
            <elements>
                <text id="TXT_ProtegrityBrowserProtector" valueName="ProtegrityBrowserProtector" />
            </elements>
        </policy>

        <!-- Protegrity Browser Protector Installation/Updates -->
        <policy name="POL_ExtensionSettings"
        displayName="$(string.ExtensionSettings)"
        explainText="$(string.POL_ExtensionSettings_HELP)"
         class="Machine" key="SOFTWARE\Policies\Google\Chrome" presentation="$(presentation.POL_ExtensionSettings)">
            <parentCategory ref="Protegrity_Browser_Extension_Configuration" />
            <supportedOn ref="windows:SUPPORTED_Windows10" />
            <elements>
                <text id="TXT_ExtensionSettings" valueName="ExtensionSettings" />
            </elements>
        </policy>
    </policies>
</policyDefinitions>
- Upload the ADML File:
- Replace
https://s3.region.amazonaws.com/s3-bucket-name/update.xmlwith the URL where extension updates are hosted. - Replace all placeholder values (e.g.,
app_registration_client_id,protector_endpoint_url, etc.) with configuration values recorded in pre-configuration chapter. - Save the file with a recognizable name, such as
ProtegrityBrowserProtector.adml.
<?xml version="1.0"?>
<policyDefinitionResources revision="1.0" schemaVersion="1.0" xmlns:xsd="http://www.w3.org/2001/XMLSchema" xmlns:xsi="http://www.w3.org/2001/XMLSchema-instance">
    <displayName>Protegrity Browser Extension Configuration</displayName>
    <description>Protegrity Browser Extension Configuration</description>
    <resources>
        <stringTable>
            <string id="Protegrity_Browser_Extension_Configuration">Protegrity Browser Protector</string>
            <string id="Protegrity_Browser_Extension_Configuration_HELP">Configures Protegrity Browser Protector settings.</string>
            <string id="POL_ProtegrityBrowserProtector_HELP">Configures the JSON value for Protegrity Browser Protector settings.</string>
            <string id="ExtensionSettings">Extension Settings</string>
            <string id="POL_ExtensionSettings_HELP">Configures the settings for extension.</string>
        </stringTable>
        <presentationTable>
            <presentation id="POL_ProtegrityBrowserProtector">
                <textBox refId="TXT_ProtegrityBrowserProtector">
                    <label>ProtegrityBrowserProtector</label>
                    <defaultValue>{"serviceEndpoint":{"authentication":{"type":"oauth2","identityProvider":"microsoft_entra_id","settings":{"msal_api":{"clientId":"app_registration_client_id","authority":"https://login.microsoftonline.com/app_registration_tenant_id"},"scopes":["app_registration_client_id/.default"]}},"url":"protector_endpoint_url"},"dataElements":[{"value":"data_element_1","label":"data_element_1_label"},{"value":"data_element_2","label":"data_element_2_label"}],"adminContactInfo":{"url":"extension_admin_page_url","phone":"extension_admin_phone","email":"extension_admin_email"}}</defaultValue>
                </textBox>
            </presentation>
            <presentation id="POL_ExtensionSettings">
                <textBox refId="TXT_ExtensionSettings">
                    <label>ExtensionSettings</label>
                    <defaultValue>{"pty_extension_id":{"installation_mode":"normal_installed","override_update_url":true,"update_url":"https://s3.region.amazonaws.com/s3-bucket-name/update.xml"}}</defaultValue>
                </textBox>
            </presentation>
        </presentationTable>
    </resources>
</policyDefinitionResources>
- Click Next.
- In Review + Create, verify your selections and click Create.
Notes
- Once imported, ADMX templates will appear in the list.
- Use Refresh to update the list or Delete to remove templates.
Create a Profile Using Imported ADMX Files
For more details on the steps or configuration, refer to:
- Sign in to the Microsoft Intune admin center.
- Navigate to:
- Devices > Manage devices > Configuration > Create > New policy.
- Enter the following properties:
- Platform: Select Windows 10 and later.
- Profile Type: Select Templates > Imported Administrative Templates (Preview).
- Click Create.
- In Basics, enter:
- Name: Provide a descriptive name, e.g.,
ADMX: Protegrity Browser Protector for Windows Devices. - Description: (Optional) Add a brief description about the profile’s purpose, e.g., “Configures Protegrity Browser Protector security policies for managed devices.”
- Name: Provide a descriptive name, e.g.,
- Click Next.
- In Configuration Settings, configure the policies using the imported ADMX files specific to Protegrity Browser Protector.
- Click Next.
- Assign scope tags to filter the profile to specific IT groups, e.g.,
Security TeamorCompliance Department. - Click Next.
- Assign the profile to users or device groups:
- User Groups: Configured settings apply to devices where users sign in.
- Device Groups: Configured settings apply to all users on the assigned device.
- For more information, refer to User Groups vs. Device Groups.
- Click Next.
- In Review + Create, verify your settings.
- Click Create to save and assign the profile.
Assign the Profile to Devices
After creating the profile, go to the Assignments section. Assign the profile to the appropriate users or devices groups in Intune. Click Save to finalize the deployment.
Verify Deployment
On a managed device, sign in with a user account assigned to the policy. Open Chrome and navigate to chrome://policy to verify the ExtensionSettings policy is applied. Check that the extension is installed and updated from the private server.
2.3.3 - Installing Browser Protector on macOS Using Kandji
Deploy Protegrity Browser Protector Extension Using Kandji
Follow these steps to configure and deploy the .mobileconfig files for the Protegrity Browser Protector policy using Kandji.
Utility script to generate configuration files for Kandji
See MDM File Generator.
Testing .mobileconfig
- Test the
.mobileconfigfile on a single device before deploying it to a large number of devices. - If modifications are needed, edit the
.mobileconfigfile, re-upload it to Kandji, and reassign it to the blueprint.
Prepare the Browser Extension installation/update .mobileconfig File
- Use the
.mobileconfigfile below. Make sure to:
- Replace
https://s3.region.amazonaws.com/s3-bucket-name/update.xmlwith the URL where extension updates are hosted. - If installing on Microsoft Edge, replace
<key>com.google.Chrome</key>with<key>com.microsoft.Edge</key>.
- Save the file with a recognizable name, such as
ProtegrityBrowserProtector.mobileconfig.
<?xml version="1.0" encoding="UTF-8"?>
<!DOCTYPE plist PUBLIC "-//Apple//DTD PLIST 1.0//EN" "http://www.apple.com/DTDs/PropertyList-1.0.dtd">
<plist version="1.0">
<dict>
    <key>PayloadContent</key>
    <array>
        <dict>
            <key>PayloadType</key>
            <string>com.apple.ManagedClient.preferences</string>
            <key>PayloadVersion</key>
            <integer>1</integer>
            <key>PayloadIdentifier</key>
            <string>com.protegrity.browserprotector.install</string>
            <key>PayloadEnabled</key>
            <true/>
            <key>PayloadDisplayName</key>
            <string>Protegrity Browser Protector Management</string>
            <key>PayloadContent</key>
            <dict>
                <key>com.google.Chrome</key>
                <dict>
                    <key>Forced</key>
                    <array>
                        <dict>
                            <key>mcx_preference_settings</key>
                            <dict>
                                <key>ExtensionSettings</key>
                                <dict>
                                    <!-- Protegrity Browser Protector Installation/Updates -->
                                    <key>pty_extension_id</key>
                                    <dict>
                                        <key>installation_mode</key>
                                        <string>normal_installed</string>
                                        <key>update_url</key>
                                        <string>https://s3.region.amazonaws.com/s3-bucket-name/update.xml</string>
                                        <key>override_update_url</key>
                                        <true/>
                                    </dict>
                                </dict>
                            </dict>
                        </dict>
                    </array>
                </dict>
            </dict>
        </dict>
    </array>
    <key>PayloadDescription</key>
    <string>Configuration for managing the Protegrity Browser Protector Chrome extension.</string>
    <key>PayloadDisplayName</key>
    <string>Protegrity Browser Protector Management</string>
    <key>PayloadIdentifier</key>
    <string>com.protegrity.browserprotector.install</string>
    <key>PayloadOrganization</key>
    <string>Protegrity Inc.</string>
    <key>PayloadRemovalDisallowed</key>
    <true/>
    <key>PayloadScope</key>
    <string>System</string>
    <key>PayloadType</key>
    <string>Configuration</string>
    <key>PayloadVersion</key>
    <integer>1</integer>
</dict>
</plist>
Prepare the Browser Extension Configuration .mobileconfig File
- Use the
.mobileconfigfile below. Make sure to:- If installing on Microsoft Edge, replace
<key>com.google.Chrome.extensions.pty_extension_idwith<key>com.microsoft.Edge.extensions.pty_extension_id</key>. - Replace
pty_extension_idwith the extension id. - Replace all placeholder values (e.g.,
app_registration_client_id,protector_endpoint_url, etc.) with configuration values recorded in pre-configuration chapter.
- If installing on Microsoft Edge, replace
- Save the file with a recognizable name, such as
ProtegrityBrowserProtectorSettings.mobileconfig.
<?xml version="1.0" encoding="UTF-8"?>
<!DOCTYPE plist PUBLIC "-//Apple//DTD PLIST 1.0//EN" "http://www.apple.com/DTDs/PropertyList-1.0.dtd">
<plist version="1.0">
<dict>
    <key>PayloadContent</key>
    <array>
        <dict>
            <key>PayloadType</key>
            <string>com.apple.ManagedClient.preferences</string>
            <key>PayloadVersion</key>
            <integer>1</integer>
            <key>PayloadIdentifier</key>
            <string>com.protegrity.browserprotector.settings</string>
            <key>PayloadEnabled</key>
            <true/>
            <key>PayloadDisplayName</key>
            <string>Protegrity Browser Protector Management</string>
            <key>PayloadContent</key>
            <dict>
                <!-- Protegrity Browser Protector Configuration -->
                <key>com.google.Chrome.extensions.pty_extension_id</key>
                <dict>
                    <key>Forced</key>
                    <array>
                        <dict>
                            <key>mcx_preference_settings</key>
                            <dict>
                                <key>ProtegrityBrowserProtector</key>
                                <dict>
                                    <key>serviceEndpoint</key>
                                    <dict>
                                        <key>authentication</key>
                                        <dict>
                                            <key>type</key>
                                            <string>oauth2</string>
                                            <key>identityProvider</key>
                                            <string>microsoft_entra_id</string>
                                            <key>settings</key>
                                            <dict>
                                                <key>msal_api</key>
                                                <dict>
                                                    <key>clientId</key>
                                                    <string>app_registration_client_id</string>
                                                    <key>authority</key>
                                                    <string>https://login.microsoftonline.com/app_registration_tenant_id</string>
                                                </dict>
                                                <key>scopes</key>
                                                <array>
                                                    <string>app_registration_client_id/.default</string>
                                                </array>
                                            </dict>
                                        </dict>
                                        <key>url</key>
                                        <string>protector_endpoint_url</string>
                                    </dict>
                                    <key>dataElements</key>
                                    <array>
                                        <dict>
                                            <key>value</key>
                                            <string>data_element_1</string>
                                            <key>label</key>
                                            <string>data_element_1_label</string>
                                        </dict>
                                        <dict>
                                            <key>value</key>
                                            <string>data_element_2</string>
                                            <key>label</key>
                                            <string>data_element_2_label</string>
                                        </dict>
                                    </array>
                                    <key>adminContactInfo</key>
                                    <dict>
                                        <key>url</key>
                                        <string>extension_admin_page_url</string>
                                        <key>phone</key>
                                        <string>extension_admin_phone</string>
                                        <key>email</key>
                                        <string>extension_admin_email</string>
                                    </dict>
                                </dict>
                            </dict>
                        </dict>
                    </array>
                </dict>
            </dict>
        </dict>
    </array>
    <key>PayloadDescription</key>
    <string>Configuration for managing the Protegrity Browser Protector Chrome extension.</string>
    <key>PayloadDisplayName</key>
    <string>Protegrity Browser Protector Management</string>
    <key>PayloadIdentifier</key>
    <string>com.protegrity.browserprotector.settings</string>
    <key>PayloadOrganization</key>
    <string>Protegrity Inc.</string>
    <key>PayloadRemovalDisallowed</key>
    <true/>
    <key>PayloadScope</key>
    <string>System</string>
    <key>PayloadType</key>
    <string>Configuration</string>
    <key>PayloadVersion</key>
    <integer>1</integer>
</dict>
</plist>
Log In to Kandji
Visit the Kandji dashboard and log in with your administrative credentials.
Create a New Library Item
- Navigate to the Library section in the Kandji dashboard.
- Click Add New in the upper-right corner.
- Select Custom Profile from the list of options.
Upload the .mobileconfig Files
- In the Custom Profile section:
- Click Upload Profile.
- Select your
ProtegrityBrowserProtector.mobileconfigfile.
- Kandji will parse the
.mobileconfigfile and display its configuration details.
Review and Verify the Profile
- Carefully review the uploaded configuration:
- Ensure the
Payload Display Name,Payload Description, and other details match the intended configuration. - Confirm that the policy enforces the Protegrity Browser Protector settings correctly.
- Ensure the
- Click Save to save the profile.
Assign the Profile to a Blueprint
- Go to the Blueprints section in the Kandji dashboard.
- Select the blueprint for the devices you want to apply this policy to.
- Click Edit Blueprint.
- Scroll to the Custom Profiles section and click Add.
- Select the newly created Protegrity Browser Protector profile from the list.
- Click Save Changes to update the blueprint.
Deploy the Policy
- Devices assigned to the blueprint will automatically receive the new configuration the next time they check in with Kandji.
- To enforce the policy immediately:
- Go to the Devices section.
- Select a device assigned to the blueprint.
- Click Sync Device to push the updated configuration.
Verify Policy Deployment
- On a target device, open System Preferences > Profiles to confirm the new configuration profile (
Protegrity Browser Protector Management) is installed. - Open Google Chrome / Microsoft Edge (based on where the extension was installed) on the device and confirm:
- The Protegrity Browser Protector extension is installed.
- The enforced settings (OAuth2 authentication, service endpoint, etc.) are applied.
Optional: Monitor Compliance
- Navigate to the Devices section in Kandji to view the compliance status.
- Look for any deployment errors or issues and resolve them as necessary.
2.3.4 - MDM File Generator Utility
pty_policy_generator.py generates MDM policy configuration files for deploying the Protegrity Browser Protector extension on Mac and Windows. It currently supports both Chrome and Edge browser.
Output
Mac — 4 files written to output-mac/
| File | Purpose |
|---|---|
{extension_id}-chrome-install.mobileconfig | Deploys extension to Chrome via policy |
{extension_id}-chrome-settings.mobileconfig | Applies extension settings in Chrome |
{extension_id}-edge-install.mobileconfig | Deploys extension to Edge via policy |
{extension_id}-edge-settings.mobileconfig | Applies extension settings in Edge |
Windows — 4 files written to output-windows/
| File | Purpose |
|---|---|
{extension_id}-chrome-ProtegrityBrowserProtector.admx | Administrative template (ADMX) for Chrome |
{extension_id}-chrome-ProtegrityBrowserProtector.adml | Administrative template language strings (ADML) for Chrome |
{extension_id}-edge-ProtegrityBrowserProtector.admx | Administrative template (ADMX) for Edge |
{extension_id}-edge-ProtegrityBrowserProtector.adml | Administrative template language strings (ADML) for Edge |
Inputs
| Parameter | Description |
|---|---|
--platform | mac or windows |
--extension-id | Extension ID |
--update-url | Extension update URL |
--runtime-blocked-hosts | Comma separated blocked hosts (default: http://*, https://*) |
--runtime-allowed-hosts | Comma separated allowed hosts |
--configuration-file | Path to the JSON configuration file for extension settings |
Usage
The script accepts input in three ways.
CLI arguments
python3 pty_policy_generator.py \
  --platform mac \
  --extension-id glktrkejbpmhpaeekkmfinokdlbhcolr \
  --update-url "https://example.com/update" \
  --runtime-blocked-hosts "http://*, https://*" \
  --runtime-allowed-hosts "https://allowed1.com, https://allowed2.com" \
  --configuration-file config.json
JSON input
Pass all parameters as a single JSON string using --json-input.
python3 pty_policy_generator.py --json-input \
  '{"extension_id":"glktrkejbpmhpaeekkmfinokdlbhcolr","update_url":"https://example.com/update.xml","runtime_blocked_hosts":"http://*, https://*","runtime_allowed_hosts":"https://allowed1.com, https://allowed2.com","configuration_file":"config.json","platform":"windows"}'
Interactive prompts
Run with no arguments. The script will prompt for each value individually.
python3 pty_policy_generator.py
extension-id: glktrkejbpmhpaeekkmfinokdlbhcolr
update_url: https://example.com/update.xml
runtime_blocked_hosts (comma-separated, Enter for default http/https): http://*, https://*
runtime_allowed_hosts (comma-separated): https://allowed1.com, https://allowed2.com
configuration file path: config.json
platform (mac or windows): mac
Requirements
- Python 3.10 or later
- Standard library only (no third party packages required)
2.4 - Testing and Troubleshooting
Verifying Policy Deployment
On Managed Devices
- Ensure assigned devices have synced with Intune:
- Open Settings on the device.
- Navigate to Accounts > Access work or school > Sync to initiate a manual sync.
- Open the browser on the managed device to confirm that Protegrity Browser Protector settings are active.
In Microsoft Endpoint Manager
- Navigate to Devices > Configuration profiles.
- Select the policy profile you created.
- View the Device status and User status tabs to confirm successful deployment.
Testing Browser Extension
- Log in to a managed device and open the browser.
- Verify that the Protegrity Browser Protector extension is installed and enabled.
- Test the extension functionality by selecting tokenized text on a webpage and observing the reveal operation.
Troubleshooting
- If the extension does not appear:
- Confirm that the Intune configuration profile is assigned to the correct device group.
- Ensure the HTTPS file server is accessible from the device.
- If the tokenized text does not reveal:
- Verify the connection to the Protegrity Cloud Protect API.
- Check that the user has sufficient permissions to access the protected data.
3 - Configuration
3.1 - Page Content Processing
Page Content Processing
When the Browser Protector scans a page, it evaluates each element against a three-tier detection pipeline. Steps are executed in priority order — once an element is processed by an earlier step, it is marked and skipped by all subsequent steps.
The highest priority. Any element carrying the data-pty-dataelement attribute is processed first, unconditionally. This path requires no configuration beyond the attribute being present in the page’s HTML and is the most reliable and explicit method of identifying protected elements.
If no standard attribute is found, the extension checks whether the element matches any admin-preconfigured custom mapping rules for the current domain and page. Custom mappings target elements by their HTML attributes, values, and optionally by their position in the DOM hierarchy. This path is appropriate when the web application cannot be instrumented with Protegrity attributes but the page structure is well understood.
The lowest priority, and only active when Unprotect Based on Past Usage is enabled in the application settings. The extension checks whether the element’s location matches a previously saved user-confirmed mapping that has exceeded the required match frequency threshold. This path requires no upfront configuration and builds its knowledge from user interactions over time.
Each step only processes elements that have not already been handled by a higher-priority step. This ensures no element is submitted to the unprotection service more than once per page load.
3.1.1 - Protegrity Standard Attribute
Protegrity Standard Attribute
The Protegrity Standard Attribute is the most direct way to instruct the Browser Protector to unprotect a specific element on any web page. When an HTML element is annotated with the data-pty-dataelement attribute.
This approach is intended for use when the web application itself can be instrumented — for example, when the application’s front-end templates or server-rendered HTML can be modified to include Protegrity markup.
How It Works
Add the data-pty-dataelement attribute to any HTML element that contains a protected value. Set the attribute’s value to the name of the Protegrity data element that was used to protect the data.
<span data-pty-dataelement="SSN">***-**-1234</span>
When the extension runs (either on page load or on DOM change), it scans the page for all elements carrying this attribute and submits each element’s text content to the Protegrity service for unprotection using the specified data element. The element’s text content is then replaced in-place with the plaintext result.
Processing Behavior
- The attribute value matching against configured data elements is case-insensitive.
- Elements that have already been processed are marked with a
data-pty-processedattribute to prevent duplicate API calls. - Elements with an empty
data-pty-dataelementvalue or no text content are skipped. - If the attribute value does not match any data element configured in the extension, the element is skipped with a warning logged to the browser console.
- When Unprotect Automatically is enabled, the extension also monitors the DOM for newly added elements carrying this attribute (e.g. content loaded dynamically after page load).
Priority
Standard attribute processing runs first, before custom mapping rules. This means any element tagged with data-pty-dataelement will always be processed by the standard attribute path, regardless of whether a custom mapping also matches it.
Example
Given the following rendered HTML:
<td data-pty-dataelement="FullName">John Doe token here</td>
<td data-pty-dataelement="SSN">***-**-6789</td>
The extension will submit both elements to the unprotection service — one using the FullName data element and one using SSN — and replace their contents with the corresponding plaintext values.
3.1.2 - Custom Mapping Configuration
Custom Mapping Configuration
Custom mappings allow administrators to explicitly tell the Browser Protector which HTML elements on a specific site need to be protected or unprotected.
Custom mappings are defined under the optional customMappings key in the extension configuration JSON.
Structure Overview
customMappings
└── domains[]
    ├── domain                          — hostname to scope the rules to
    ├── page[]
    │   ├── path[]                      — URL path segments to scope rules to (empty = all paths on the domain)
    │   └── mappings[]                  — groups of attribute-based rules
    │       ├── attributeName           — HTML attribute to inspect (e.g. id, class, aria-label)
    │       ├── value                   — expected attribute value; omit to match on attribute presence alone
    │       └── entries[]
    │           ├── dataElement         — Protegrity data element name to use for the operation
    │           ├── operation           — "protect" or "unprotect"
    │           ├── splitSegments       — (optional) split text content into individual tokens before processing
    │           └── parentConditions[]  — (optional) ancestor element constraints for narrowing matches
    └── title[]
        ├── path[]                      — URL path segments to scope title rules to (empty = all paths on the domain)
        └── algo                        — identifier for the page title unprotection algorithm to use
Domain Matching
| Pattern | Behavior |
|---|---|
example.com | Matches example.com and www.example.com only |
*.example.com | Matches all subdomains (app.example.com, crm.example.com, etc.) |
Exact domain entries take precedence over wildcard entries.
To read more about domain rules, go here.
Path Matching
- An empty
patharray applies the mapping rules to every page on the matched domain. - When paths are provided, they are matched as substrings of the current URL path (e.g.
"/accounts"matches/accounts/list).
Parent Conditions
parentConditions can optionally restrict a mapping so it only fires when the target element has a specific ancestor within a certain number of DOM levels. Each condition can check the ancestor’s tag name, an attribute name, and/or an attribute value.
Example
The following configuration unprotects any element on crm.example.com that has aria-label="customer-ssn", using the SSN data element:
"customMappings": {
    "domains": [
        {
        "domain": "crm.example.com",
        "page": [
            {
            "path": [],
            "mappings": [
                {
                "attributeName": "aria-label",
                "value": "customer-ssn",
                "entries": [
                    {
                    "dataElement": "SSN",
                    "operation": "unprotect"
                }
              ]
            }
          ]
        }
      ]
    }
  ]
}
When the extension detects an element such as:
<span aria-label="customer-ssn">***-**-1234</span>
This example html element will match the custom mapping rule above, allowing the Protegrity browser protector to know this is an element that when selected, will use the SSN data element for unprotection.
Page Title Unprotection
The title array within a domain entry enables unprotection of protected values embedded in the browser’s page <title>. This is useful for single-page applications (such as Salesforce) that reflect record data in the tab title after navigation.
Each title entry specifies:
path— URL path scope (empty array = applies to all pages on the domain)algo— the name of the page title extraction algorithm to use
The extension monitors the <title> element for changes and re-runs unprotection on navigation or if the title changes.
Example
"customMappings": {
  "domains": [
    {
      "domain": "myorg.example.com",
      "title": [
        {
          "path": ["/example/r/User"],
          "algo": "Example_Algo"
        }
      ]
    }
  ]
}
For a title such as example Title, the extension will unprotect and rewrite the title with the plaintext result.
Notes
- Attribute matching is case-insensitive.
- Class attribute matching supports partial class list matching (i.e. the configured value only needs to appear as one class in a multi-class attribute).
3.1.2.1 - Domain Matching Rules
Exact Match Rules (config does NOT start with *)
Config: example.com
| Hostname (from URL) | Matches? | Reason |
|---|---|---|
example.com | ✅ | Exact |
www.example.com | ✅ | www. stripped → example.com |
example.com/about | ✅ | Path ignored; hostname = example.com |
example.com/login?next=/ | ✅ | Query ignored; hostname = example.com |
hr.example.com | ❌ | Only www. is stripped; hr. is not |
sub.example.com | ❌ | Subdomain not stripped |
app.hr.example.com | ❌ | Multi-level subdomain, no match |
notexample.com | ❌ | Different hostname |
example.com.evil.com | ❌ | Normalized to example.com.evil.com |
Config: www.example.com
| Hostname | Matches? | Reason |
|---|---|---|
example.com | ✅ | Config strips www. → example.com |
www.example.com | ✅ | Both strip www. |
hr.example.com | ❌ | hr.example.com !== example.com |
www.hr.example.com | ❌ | Strips to hr.example.com !== example.com |
Config: hr.example.com
| Hostname | Matches? | Reason |
|---|---|---|
hr.example.com | ✅ | Exact |
www.hr.example.com | ✅ | www. stripped → hr.example.com |
example.com | ❌ | Parent domain, not matched |
other.example.com | ❌ | Sibling subdomain |
app.hr.example.com | ❌ | Child subdomain; only www. is stripped |
Wildcard Rules (config starts with *)
Both *example.com and *.example.com normalize to base example.com.
Config: *example.com or *.example.com
| Hostname | Matches? | Reason |
|---|---|---|
example.com | ✅ | === base |
www.example.com | ✅ | Strips www. → === base |
hr.example.com | ✅ | Ends with .example.com |
app.hr.example.com | ✅ | Ends with .example.com |
a.b.c.example.com | ✅ | Ends with .example.com |
notexample.com | ❌ | Does not equal or end with .example.com |
other.com | ❌ | Unrelated |
example.com.evil.com | ❌ | Ends with .com, not .example.com |
Exact vs. Wildcard Priority
When both example.com (exact) and *.example.com (wildcard) are in config,
exact entries are evaluated first. Wildcard is only used as a fallback.
| Hostname | Rule used |
|---|---|
example.com | Exact example.com wins |
www.example.com | Exact example.com wins |
hr.example.com | No exact match → wildcard used |
app.hr.example.com | No exact match → wildcard used |
Things That NEVER Affect Matching
| Component | Example | Effect |
|---|---|---|
| Path | /about, /login | Ignored |
| Query string | ?id=123&next=/home | Ignored |
| Hash | #section-2 | Ignored |
| Port | :8080, :443 | Ignored |
| Protocol | https://, http:// | Ignored |
3.1.3 - Stored Suggestions
Stored Suggestions
Stored suggestions are the extension’s memory of past user-confirmed unprotection actions. When a user manually unprotects an element through the extension, that element’s location and data element mapping are saved locally. On subsequent visits to the same page, the extension can automatically re-apply those unprotections without any further user interaction — provided the Unprotect Based on Past Usage setting is enabled.
How Suggestions Are Created
Each time a user performs a manual unprotect operation on an element, the extension records a suggestion containing:
- The element’s XPath and positional offsets within the DOM
- Contextual XPaths of the surrounding elements (preceding sibling, following sibling, parent)
- The element’s
id,class, attributes, and any custom attributes - The data element and operation type selected by the user
- A
match_frequencycounter, starting at1
Suggestions are stored in Chrome’s local storage (device-local, not synced across browsers) and are scoped per URL — organised by domain, path segments, query parameters, and hash.
Match Frequency
Every time a suggestion is confirmed again on the same element, its match_frequency counter is incremented. This counter acts as a confidence signal: the more times a particular mapping has been confirmed by the user, the more reliably it can be applied automatically.
When Unprotect Based on Past Usage runs on page load, only suggestions whose match_frequency exceeds the configured frequencyResetThreshold are applied automatically.
| Config key | Default | Description |
|---|---|---|
matcherConfig.frequencyResetThreshold | 2 | Minimum match frequency a suggestion must exceed before it is applied automatically |
A suggestion with
match_frequencyof1will not be applied automatically at the default threshold — it must be confirmed at least twice before it is trusted for automatic unprotection.
How Automatic Re-application Works
When the page loads and Unprotect Based on Past Usage is enabled, the extension:
- Looks up stored suggestions for the current URL
- Filters to only those exceeding the frequency threshold
- Resolves each suggestion’s XPath against the current DOM
- Submits the matched element’s content to the Protegrity service for unprotection using the stored data element
Stored suggestion unprotection runs after standard attribute and custom mapping unprotection in the processing order. Elements already processed by an earlier step are skipped.
Storage Scope
Suggestions are stored in chrome.storage.local — they are local to the device and browser profile they were created on. They are not synced via Chrome’s sync storage and are not shared across devices or user profiles.
3.2 - Data Element Auto Selection
Data Element Auto Selection Feature
What It Does
When a user selects an element on a page and opens the extension popup, the extension checks if it has a stored record for that element. If a match is found, the data element and operation dropdowns are pre-selected automatically. This saves the user from manually choosing the same values on repeat visits.
When Data Element Auto-Selection Occurs
The extension runs the SuggestionMatcher every time a user selects an element and the popup opens. It checks the following in order:
data-pty-dataelementattribute — If the element has this HTML attribute and its value matches a configured data element, that data element is pre-selected immediately.Custom mapping — If a custom mapping config exists and the current domain + element matches an admin-defined rule, the mapped data element and operation are pre-selected.
Stored suggestions — If neither of the above applies:
- The current page URL is compared against previously stored documents.
- If the URL matches, the current element is compared against stored suggestions for that document using weighted scoring (id, xpath, custom attributes, table column name, context xpaths).
- An exact match or a score above the confidence threshold (default
0.5) results in pre-selection of the stored data element and operation. Among multiple matches, the one with the highestmatch_frequencywins.
If nothing matches, the dropdowns remain empty and the user selects manually.
When a Suggestion Gets Saved
After the user completes a protect or unprotect operation:
- If the element matched an existing suggestion and the user kept the same data element, the suggestion’s
match_frequencyis incremented. - If the element matched but the user chose a different data element, the suggestion is updated accordingly.
- If no match existed, a new suggestion is saved with the element’s identifying properties, the chosen data element, and operation.
Relationship to “Process Page Content” Settings
The popup settings Process Page Content Automatically and Process Page Content based on past usage are unrelated to data element auto-selection. Those settings control whether the extension automatically processes elements on page load without user interaction.
If a user has processed the same data on the page 3 or more times, if they have the “Process Page Content based on past usage” turned ON, that data will be automatically processed.
Meaning this feature won’t be able to be used for those pieces of data, but any data that has been processed by the user but has not been processed atleast 3 times, will still have its data element and operation auto selected.
4 - Using the Protegrity Browser Protector Extension
Understanding the Protegrity Browser Protector UI Components
The following figure illustrates the components of the browser extension pop-up window.
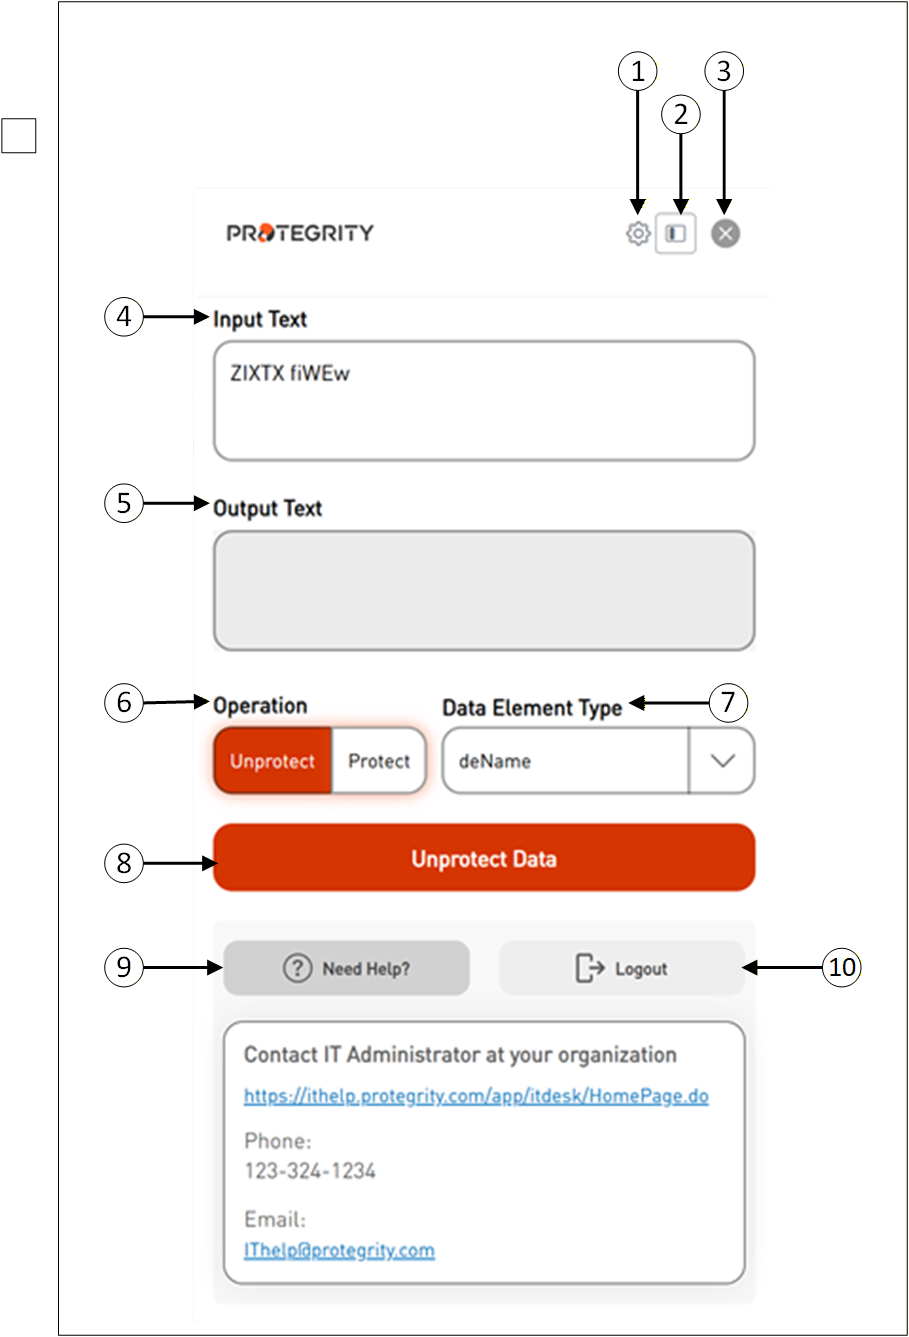
| Callout | Icon Name | Description |
|---|---|---|
| 1 | Settings | Click Settings to configure different options. |
| 2 | Sidebar View | This is used to toggle between different display modes, such as sidebar view, or page layout options. |
| 3 | Close | This represents closing a window. |
| 4 | Input Text | Displays the selected tokenized data. |
| 5 | Output Text | Displays the original data. |
| 6 | Operation | Select the appropriate operation “Unprotect or Protect”. |
| 7 | Data Element Type | Select the appropriate data element name to detokenize the data. |
| 8 | Unprotect Data or Protect Data | Click the Unprotect Data button to retrieve the original data. |
| 9 | Need Help | Click the Need Help button to provide you with additional IT contact details. |
| 10 | Logout | Click the Logout button to end your SSO login session. |
How to use Protegrity Browser Protector Extension
Once installed, the Browser Extension should appear in the list of available extensions next to the browser’s address bar.
Follow these steps to use the Browser Protector extension in Chrome.
Open the Chrome browser displaying the tokenized data.
Highlight the tokenized data that you want to convert back to its original form.
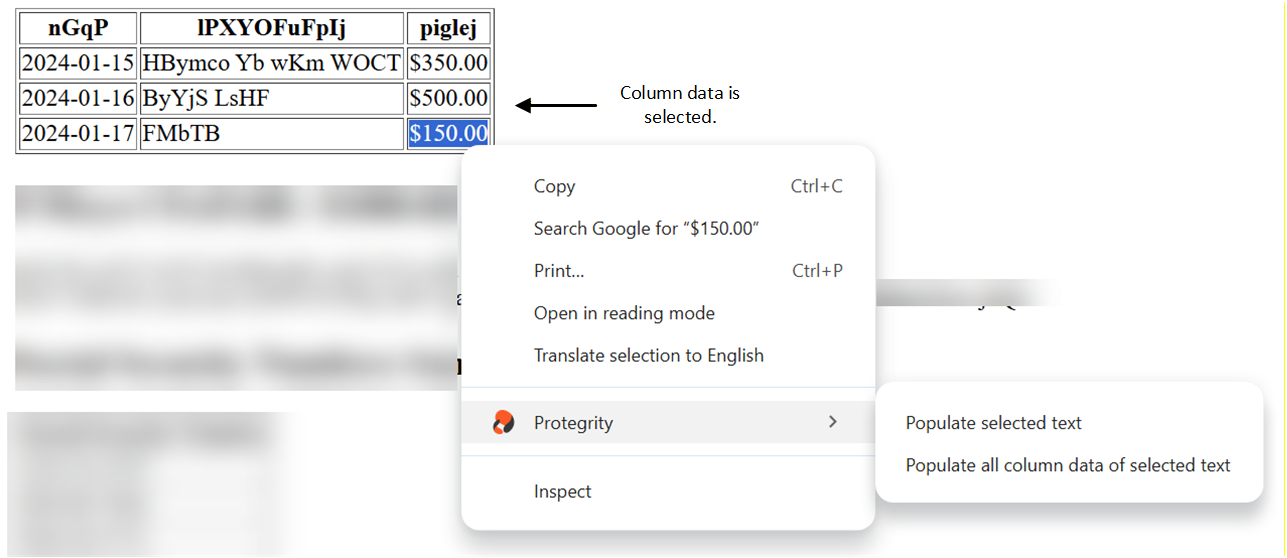
Right-click the selected data and choose the Browser Protector context menu. This menu shows two different options:
Populate selected text- This option appears when normal text data or column data is selected.
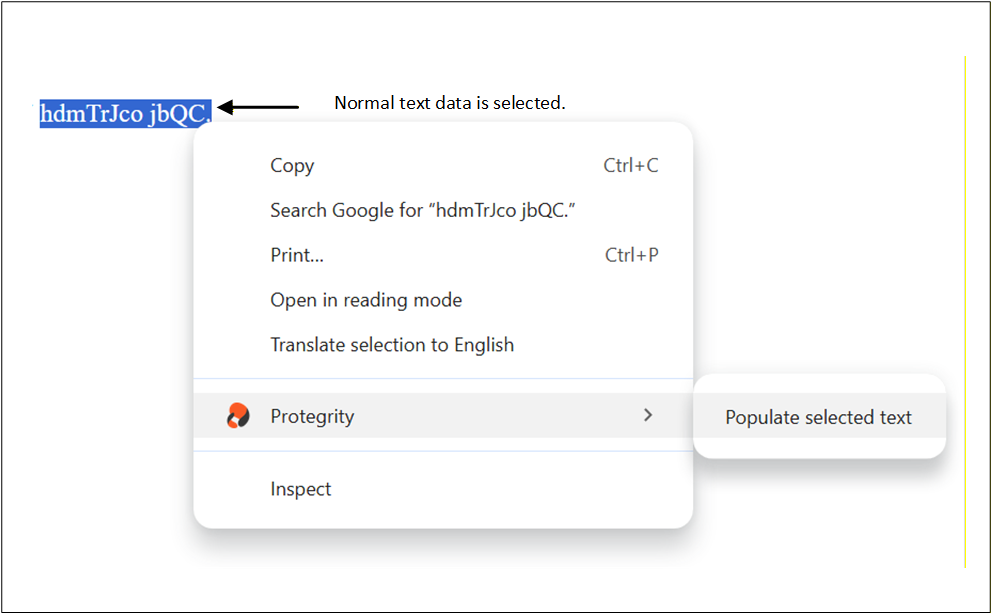
Populate all column data of selected text- This option appears when column data is selected.
A pop-up window will appear from the extension showing the selected data along with the SSO sign-in option.
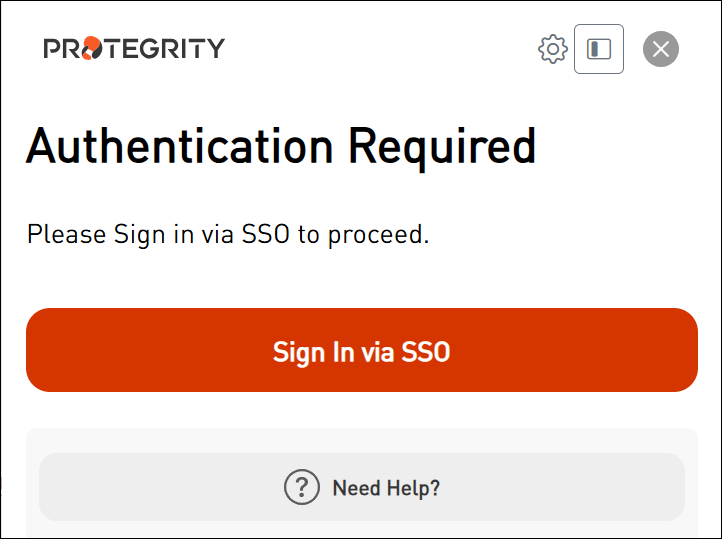
Enter the correct sign-in information and proceed.
After completing the sign-in process, the following screen appears.
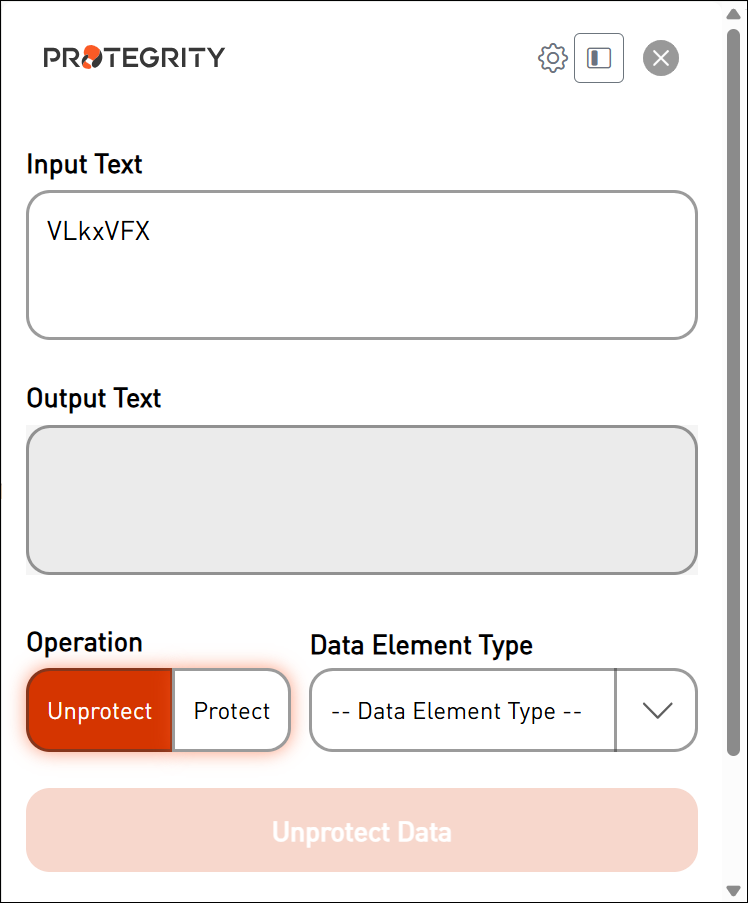
The selected data is loaded onto the screen.
Select the Data Element Type that was used to protect the sensitive data.
Extension Screen with Value as deName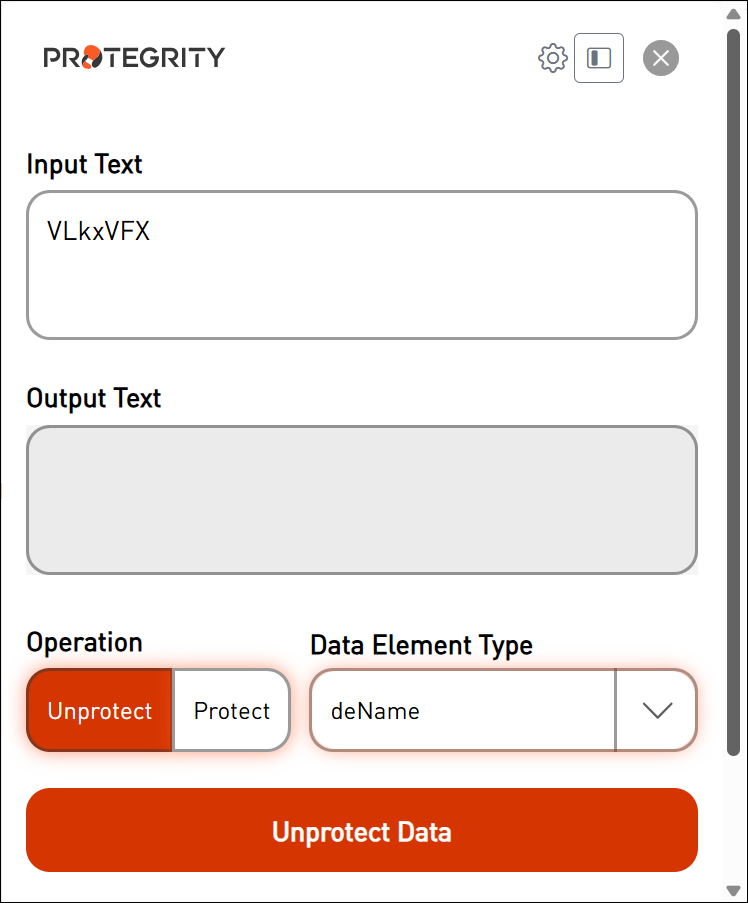
Select the operation “Unprotect or Protect”.
Click Unprotect Data.
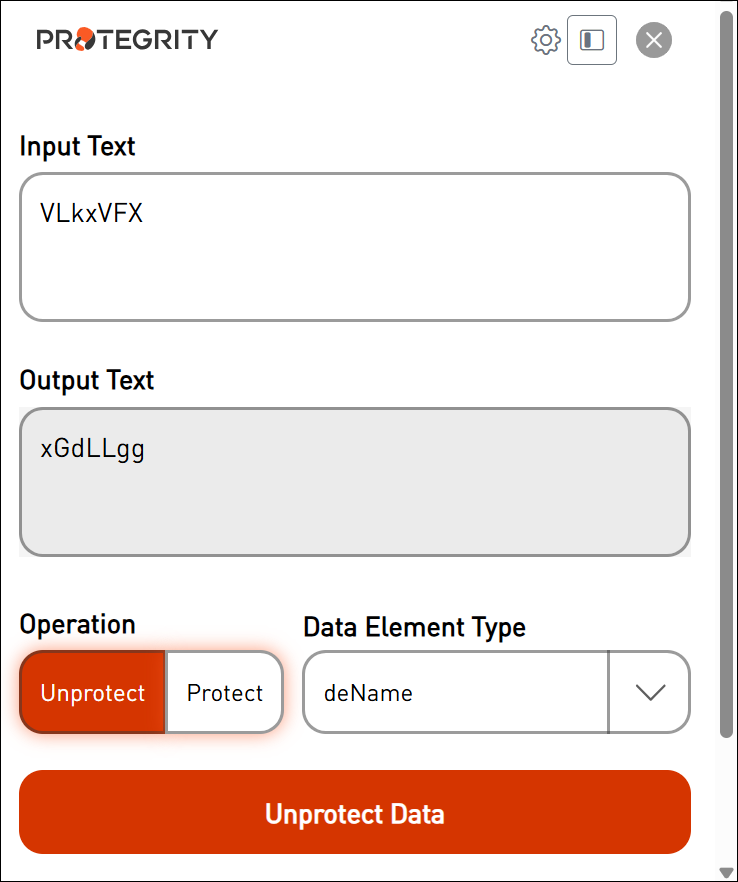
The original data is displayed on the screen.
4.1 - Browser Protector Settings
Extension Settings
The following settings are available in the extension’s Settings panel. All settings are persisted to Chrome sync storage and apply across sessions.
1. Popup / Side Panel
Setting key: OPEN_MODE
Options: Popup | Sidepanel
Controls how the extension UI is displayed when the browser action icon is clicked.
| Option | Behavior |
|---|---|
Popup | Opens the extension in a small floating popup window anchored to the toolbar icon. |
Sidepanel | Opens the extension in Chrome’s persistent side panel, docked to the side of the browser window. |
The side panel option is useful when you need the extension visible alongside web page content without it closing on focus loss.
Switching modes takes effect on the next click of the extension icon.
2. Process Page Content Automatically
Options: ON | OFF (default: OFF)
When enabled, the extension automatically detects and unprotects, protected values on the pageas soon as the content is loaded or updated, the extension will unprotect — and continues monitoring for DOM changes (e.g. single-page app navigation or dynamically loaded content) to unprotect new values as they appear.
Unprotection runs in the following priority order:
- Elements tagged with the
data-pty-dataelementattribute - Elements matched by configured Custom Mapping Configuration
- Elements matched from past usage history (only if “Unprotect Based on Past Usage” is also enabled)
This setting requires the user to be logged in. If no active session is found, automatic unprotection is skipped.
Turning this setting OFF will also automatically turn off Unprotect Based on Past Usage.
3. Unprotect Based on Past Usage
Options: ON | OFF (default: OFF)
Requires: Process Page Content Automatically = ON
When enabled alongside Process Page Content Automatically, the extension additionally applies unprotection to elements that were previously identified through user interactions (stored suggestions). This allows the extension to “remember” mappings discovered through past manual unprotect actions and re-apply them automatically on future page loads.
This setting has no effect if Process Page Content Automatically is
OFF— it will be forced toOFFif the parent setting is disabled.