This section describes the high-level architecture of Protegrity Cloud API, installation procedures, and performance guidance.
This section focuses on Protegrity specific aspects and should be consumed in conjunction with the corresponding AWS documentation.
Cloud API Protector on AWS is a cloud-native, serverless product for fine-grained data protection.
This enables the invocation of Protegrity data protection cryptographic methods in cloud-native serverless technology.
The benefits of serverless include rapid auto-scaling, performance, low administrative overhead, and reduced infrastructure
costs compared to a server-based solution.
This product provides a data protection API end-point for clients. The product is designed to scale elastically and
yield reliable query performance under extremely high concurrent loads. During idle use, the serverless product will
scale completely down, providing significant savings in Cloud compute fees.
Protegrity utilizes a data security policy maintained by an Enterprise Security Administrator (ESA), similar to other
Protegrity products. Using a simple REST API interface, authorized users can perform both de-identification (protect)
and re-identification (unprotect) operations on data. A user’s individual capabilities are subject to privileges and
policies defined by the Enterprise Security Administrator.
Analytics on Protected Data
Protegrity’s format and length preserving tokenization scheme make it possible to perform analytics directly on
protected data. Tokens are join-preserving so protected data can be joined across datasets. Often statistical analytics
and machine learning training can be performed without the need to re-identify protected data. However, a user or service
account with authorized security policy privileges may re-identify subsets of data using the Cloud API Protector on AWS
service.
Features
Cloud API Protector on AWS incorporates Protegrity’s patent-pending vaultless tokenization capabilities into
cloud-native serverless technology. Combined with an ESA security policy, the protector provides the following features:
Role-based access control (RBAC) to protect and unprotect (re-identify) data depending on the user privileges.
Policy enforcement features of other Protegrity application protectors.
For more information about the available protection options, such as, data types, Tokenization or Encryption types,
or length preserving and non-preserving tokens, refer to Protection Methods Reference.
2 - Architecture
Deployment architecture and connectivity
Protector Deployment Architecture
The product will be deployed in the Customer’s AWS account. The product incorporates Protegrity’s vaultless tokenization engine within an AWS Lambda Function. The encrypted data security policy from an ESA is deployed as a static resource through an Amazon Lambda Layer. The policy is decrypted in memory at runtime within the Lambda. This architecture allows Protegrity Serverless to be highly available and scale very quickly without direct dependency on any other Protegrity services.
The product exposes a remote data protection service. Each REST request includes a micro-batch of data to process and the data element type. The function applies the data security policy including user authorization and returns a corresponding response.
When used with an Enterprise Security Administrator (ESA) application, the security policy is synchronized through another serverless component called the Protegrity Policy Agent. The agent operates on a configurable schedule, fetches the policy from the ESA, performs additional envelope encryption using Amazon KMS, and deploys the policy into the Lambda Layer used by the serverless product. This solution can be configured to automatically provision the static policy or the final step can be performed on-demand by an administrator. The policy takes effect immediately for all new requests. There is no downtime for users during this process.
The following diagram shows the high-level architecture described above.
The following diagram shows a reference architecture for synchronizing the security policy from ESA.
The Protegrity Policy Agent requires network access to an Enterprise Security Administrator (ESA). Most organizations install the ESA on-premise. Therefore, it is recommended that the Policy Agent is installed into a private subnet with a Cloud VPC using a NAT Gateway to enable this communication through a corporate firewall.
The ESA is a soft appliance that must be pre-installed on a separate server. It is used to create and manage security policies.
For more information about installing the ESA, and creating and managing policies, refer to the Policy Management Guide.
Log Forwarding Architecture
Audit logs are by default sent to CloudWatch as long as the function’s execution role has the necessary permissions. The Protegrity Product can also be configured to send audit logs to ESA. Such configuration requires deploying Log Forwarder component which is available as part of Protegrity Product deployment bundle. The diagram below shows additional resources deployed with Log Forwarder component.
The log forwarder component includes Amazon Kinesis data stream and the forwarder Lambda function. Amazon Kinesis stream is used to batch audit records before sending them to forwarder function, where similar audit logs are aggregated before sending to ESA. Aggregation rules are described in the Protegrity Log Forwarding guide. When the protector function is configured to send audit logs to log forwarder, audit logs are aggregated on the protector function before sending to Amazon Kinesis. Due to specifics of the Lambda runtime lifecycle, audit logs may take up to 15 minutes before being sent to Amazon Kinesis. Protector function exposes configuration to minimize this time which is described in the protector function installation section.
The security of audit logs is ensured by using HTTPS connection on each link of the communication between protector function and ESA.
Integrity and authenticity of audit logs is additionally checked on log forwarder which verifies individual logs signature.
The signature verification is done upon arrival from Amazon Kinesis before applying aggregation.
If signature cannot be verified, the log is forwarded as is to ESA where additional signature verification can be configured.
Log forwarder function uses client certificate to authenticate calls to ESA.
To learn more about individual audit log entry structure and purpose of audit logs, refer to Audit Logging section in this document. Installation instructions can be found in Audit Log Forwarder installation.
The audit log forwarding requires network access from the cloud to the ESA. Most organizations install the ESA on-premise. Therefore, it is recommended that the Log Forwarder Function is installed into a private subnet with a Cloud VPC using a NAT Gateway to enable this communication through a corporate firewall.
Access Control
The following mechanisms are available for controlling and restricting access to the endpoint:
IAM policy: The IAM resource policy controls which IAM users or services may invoke Protect operations. IAM policies can be applied to the API Gateway and/or the Lambda directly depending on allowable access patterns and the client.
JWT tokens: The Lambda can be configured to use JSON Web Tokens (JWT) with optional verification. JSON Web Tokens (JWT) are an open, industry-standard RFC 7519 method for representing claims securely between two parties. JWT provides a mechanism for implementing custom authentication or integrating with AWS Cognito.
AWS Resources
Access and authorization between various AWS services involved in this architecture are achieved through IAM resource policies. For instance, the Amazon Lambda resource-based policy can restrict requests to the Amazon API Gateway or optionally allow direct invocation to the Lambda function itself. The installation steps provide a default recommended configuration. Alternative IAM role configurations are shown in the appendices in this document.
REST API Authentication
AWS API Gateway supports multiple mechanisms for controlling and managing access to the product.
In standard solutions, AWS API Gateway will authorize access tokens generated in the identity provider. When setting up an AWS API Gateway method to require an authorization, customers can leverage AWS Signature Version 4 or Lambda authorizers to support their organization’s bearer token auth strategy.
Once the request is authenticated and authorized in the API Gateway, Protegrity Lambda Protector validates the user received in the authorization header of JWT, and the data element and security operations (protect or unprotect) from the payload with Protegrity Security Policy.
If the API Gateway is not used or configured to verify JWT tokens, the product can be configured to perform the JWT verification in the Lambda function itself.
3 - Installation
Instructions for installing Protect Service, Policy Agent, and Log Forwarder.
3.1 - Prerequisites
Requirements before installing the protector.
AWS Services
The following table describes the AWS services that may be a part of your Protegrity installation.
Service
Description
Lambda
Provides serverless compute for Protegrity protection operations and the ESA integration to fetch policy updates or deliver audit logs.
API Gateway
Provides the endpoint and access control.
KMS
Provides secrets for envelope policy encryption/decryption for Protegrity.
Secrets Manager
Provides secrets management for the ESA credentials .
S3
Intermediate storage location for the encrypted ESA policy layer.
Kinesis
Required if Log Forwarder is to be deployed. Amazon Kinesis is used to batch audit logs sent from protector function to ESA.
VPC & NAT Gateway
Optional. Provides a private subnet to communicate with an on-prem ESA.
CloudWatch
Application and audit logs, performance monitoring, and alerts. Scheduling for the policy agent.
ESA Version Requirements
The Protector and Log Forwarder functions require a security policy from a compatible ESA version.
The table below shows compatibility between different Protector and ESA versions.
Protector was designed to work with this ESA version
No
Protector will not work with this ESA version
*
Backward compatible policy download supported:
Data elements and features which are common between this and previous ESA versions will be downloaded
Data elements and features which are new to this ESA version and do not exist in previous ESA version will not be downloaded
Prerequisites
Requirement
Detail
Protegrity distribution and installation scripts
These artifacts are provided by Protegrity
Protegrity ESA 10.0+
The Cloud VPC must be able to obtain network access to the ESA
AWS Account
Recommend creating a new sub-account for Protegrity Serverless
Required Skills and Abilities
Role / Skillset
Description
AWS Account Administrator
To run CloudFormation (or perform steps manually), create/configure a VPC and IAM permissions.
Protegrity Administrator
The ESA credentials required to extract the policy for the Policy Agent
Network Administrator
To open firewall to access ESA and evaluate AWS network setup
Cheat Sheet Recommendation
Tip
During the installation you will need output of steps, such as resources names and ids. We recommend copying the following cheat sheet into a notepad and fill in the information as you progress with the installation.
AWS Account ID: ___________________
AWS Region (AwsRegion): ___________________
S3 Bucket name (ArtifactS3Bucket): ___________________
KMS Key ARN (AWS_KMS_KEY_ID): ___________________
ProtectLambdaPolicyName: __________________
Role ARN (LambdaExecutionRoleArn): ___________________
ApiGatewayId: ________________________________
ProtectFunctionName: __________________________
ProtectLayerName: _____________________________
ESA IP address: ___________________
VPC name: ___________________
Subnet name: ___________________
Policy Agent Security Group Id: ___________________
ESA Credentials Secret Name: ___________________
Policy Name: ___________________
Agent Lambda IAM Execution Role Name: ___________________
Configuration steps before installing the protector.
Provide AWS sub-account
Identify or create an AWS account where the Protegrity solution will be installed.
It is recommended that a new AWS sub-account be created.
This can provide greater security controls and help avoid conflicts with other applications that might impact regional account limits.
An individual with the Cloud Administrator role will be required for some subsequent installation steps.
AWS Account ID: ___________________
AWS Region (AwsRegion): ___________________
Create S3 bucket for Installing Artifacts
This S3 bucket will be used for the artifacts required by the CloudFormation installation steps. This S3 bucket must be created in the region that is defined in Provide AWS sub-account
Sign in to the AWS Management Console and open the Amazon S3 console.
For example, protegrity-install.us-west-2.example.com
Upload the installation artifacts to this bucket. Protegrity will provide the following three artifacts:
protegrity-protect-<version>.zip
protegrity-agent-<version>.zip
protegrity-external-extension-<version>.zip
protegrity-sample-policy-<version>.zip
Important
The deployment package you receive from Protegrity must be extracted to reveal the Protegrity artifacts. CloudFormation requires them in the provided .zip format. Do not extract the individual Protegrity artifacts. Upload these artifacts to the S3 bucket created.
S3 Bucket name (ArtifactS3Bucket): ___________________
Create KMS Key
The Amazon Key Management Service (KMS) provides the ability for the Protegrity Serverless solution to encrypt and decrypt the Protegrity Security Policy.
Note
It is recommended to host the KMS key in a separate AWS sub-account. This allows dual control, separating the responsibility between the key administrator and the Protegrity Serverless account administrator.
To create KMS key:
In the AWS sub-account where the KMS key will reside, select the region.
Navigate to Key Management Service > Create Key.
Configure the key settings:
Key type: Asymmetric
Key usage: Encrypt and decrypt
Key spec: RSA_4096
Click Next
Create alias and optional description, such as, Protegrity-Serverless and click Next.
Define key administrative permissions, the IAM user who will administrate the key.
Note
It is recommended the administrator be different than the administrator of the Protegrity Serverless account
Click Next.
Define the key usage permissions.
In Other AWS accounts, enter the AWS account id used for the Protegrity Serverless installation.
Continue on to create the key. If there is a concern this permission is overly broad, then you can return later
to restrict access to the role of two Protegrity Serverless Lambda as principals. Click to open the key in the list and record the ARN.
KMS Key ARN (AWS_KMS_KEY_ID): ___________________
Download the public key from the KMS key. Navigate to the key in KMS console, select the Public key tab, and click Download.
Save the PEM file. This public key will be added to the ESA data store as an export key. Refer to Exporting Keys to Datastore
for instructions on adding the public key to the data store.
Note
This step is not applicable for ESA versions lower than 10.2.
If 0 is set, the user in the request body will be ignored and the REST API authenticated user will be the acting user.
Supported values: [0, 1]
0
LambdaAuthorization (Optional)
If “jwt” is set, then Authorization header for JWT will be required in the AWS Protect Lambda request. Any other value is ignored and effective policy user is taken from request payload.
Supported values: [“jwt”, “”]
""
jwtUsernameClaim (Optional)
The JWT claim with username.
Common claims: name, preferred_username, cognito:username
Also accepts ordered list of claim names in JSON array format, e.g. [“username”, “email”]
cognito:username
jwtVerify (Optional)
If 1 is set, then jwtSecretBase64 is required. Only applicable when LambdaAuthorization is set to “jwt”. Supported JWT algorithms are: RS256, RS384, RS512. While algorithms HS256, HS384, HS512 are supported, they are not recommended for use.
0
jwtSecretBase64 (Optional)
Required when jwtVerify is set to 1 and Authorization is set to “jwt”. The secret must be provided in base64 encoding. It is recommended to only use public key (asymmetric algorithm).
""
The log forwarder parameters can be provided later after log forwarder is deployed. If you are not planning to deploy log forwarder you can skip this step.
Parameter
Description
KinesisLogStreamArn
The ARN of the AWS Kinesis stream where audit logs will be sent for aggregation
AuditLogFlushInterval
Time interval in seconds used to accumulate audit logs before sending to Kinesis. Default value: 30. See Log Forwarder Performance section for more details.
Click Next with defaults to complete CloudFormation.
After CloudFormation is completed, select the Outputstab in the stack.
If this step fails, then check the console for the meaningful error.
Setting up Authentication
This step describes how to setup an AWS API Gateway Authorization.
By default, the API Gateway is configured to use AWS_IAM Authorization.
From AWS console access API Gateway.
If you are using AWS API Gateway Authorizer, ensure that the Authorizer is configured in Authorizers.
Go to Resources > /v1/protect POST > Method Request tab > Click Edit button
Select from Authorization. dropdown.
Click Save button.
Click Deploy API button to deploy to pty stage.
Protect Lambda Configuration
After Cloud Formation stack is deployed, Protector Lambda can be reconfigured based on the authentication selected in previous stage. From your AWS console navigate to lambda and select following lambda: Protegrity_Protect_RESTAPI_<STACK_NAME>. Scroll down to Environment variables section, select Edit and replace the entries based on the following information.
Environment Variable
Description
Notes
authorization
If “jwt” is set, Authorization header with JWT will be required in the AWS Protect Lambda request. Any other value is ignored and effective policy user is taken from request payload.
Supported Values: [“jwt”, “”]
If “jwt” is set, any request without valid JWT in the Authorization header, will result in error from API Gateway: 502 Bad Gateway.
Default Value: ""
allow_assume_user
If 0 is set, API Gateway user will not be used, and the effective user is the JWT user.
Supported Values: [0, 1]
Applicable when authorization is set to “jwt”.
Default Value: 0
jwt_user_claim
The JWT claim with username. Common claims: name, preferred_username, cognito:username
Applicable when authorization is set to “jwt”
Default Value: cognito:username
jwt_verify
If 1 is set, jwt_secret_base64 is required. Only applicable when authorization is set to “jwt”. Supported JWT algorithm RS256, RS384, RS512. While algorithms HS256, HS384, HS512 are supported, they are not recommended for use.
Applicable when authorization is set to “jwt”
jwt_secret_base64
Required when jwt_verify is set to 1 and Authorization is set to “jwt”. The secret must be provided in base64 encoding. It is recommended to only use public key (asymmetric algorithm).
Applicable when authorization is set to “jwt” and jwt_verify is set to 1
service_user
If set, it will be used as effective policy user.
service_user should be used when the Cloud API should always run as single service user or account no matter what user is in the request. service_user will always take priority over users in the payload and in the JWT header.
USERNAME_REGEX
If set, the effective policy user will be extracted from the user in the request using supplied regular expression.
The following sections will install the Policy Agent. The Policy Agent polls the ESA and deploys the policy to Protegrity Serverless as a static resource.
Some of the installation steps are not required for the operation of the software but recommended for establishing a secure environment.
Contact Protegrity Professional Services for further guidance on configuration alternatives in the Cloud.
Important
If you are deploying Policy Agent with Protegrity Provisioned Cluster (PPC), refer to the PPC Appendix: Policy Agent Certificate and Key Guidance for specific instructions on obtaining and using the CA certificate and datastore key fingerprint. The steps in this section are specific to ESA and may differ for PPC. Be sure to follow the PPC documentation for the most accurate and up-to-date setup guidance.
ESA Server
Policy Agent Lambda requires ESA server running and accessible on TCP port 443.
Note down ESA IP address:
ESA IP Address (EsaIpAddress): ___________________
Certificates on ESA
Note
If you are deploying Policy Agent with Protegrity Provisioned Cluster (PPC), see PPC Appendix: Policy Agent Certificate Guidance for specific instructions on obtaining and using the CA certificate. The steps in this section are specific to ESA and may differ for PPC.
Whether your ESA is configured with default self-signed certificate or your corporate CA certificate, Policy Agent can validate authenticity of ESA connection using CA certificate. The process for both scenarios is the same:
Obtain CA certificate
Convert CA certificate to a value accepted by Policy Agent
Provide converted CA certificate value to Policy Agent
To obtain self-signed CA certificate from ESA:
Log in to ESA Web UI.
Select Settings > Network > Manage Certificates.
Hover over Server Certificate and click on download icon to download the CA certificate.
To convert downloaded CA certificate to a value accepted by Policy Agent, open the downloaded PEM file in text editor and replace all new lines with escaped new line: \n.
To escape new lines from command line, use one of the following commands depending on your operating system:
Record the certificate content with new lines escaped.
ESA CA Server Certificate (EsaCaCert): ___________________
This value will be used to set PTY_ESA_CA_SERVER_CERT or PTY_ESA_CA_SERVER_CERT_SECRET Lambda variable in section Policy Agent Lambda Configuration
For more information about ESA certificate management refer to Certificate Management Guide in ESA documentation.
Identify or Create a new VPC
Establish a VPC where the Policy Agent will be hosted. This VPC will need connectivity to the ESA. The VPC should be in the same account and region established in Pre-Configuration.
VPC name: ___________________
VPC Subnet Configuration
Identify or create a new subnet in the VPC where tha Lambda function will be connected to. It is recommended to use a private subnet.
Subnet name: ___________________
NAT Gateway For ESA Hosted Outside AWS Network
If ESA server is hosted outside of the AWS Cloud network, the VPC configured for Lambda function must ensure additional network configuration is available to allow connectivity with ESA. For instance if ESA has a public IP, the Lambda function VPC must have public subnet with a NAT server to allow routing traffic outside of the AWS network. A Routing Table and Network ACL may need to be configured for outbound access to the ESA as well.
VPC Endpoints Configuration
If an internal VPC was created, then add VPC Endpoints, which will be used by the Policy Agent to access AWS services. Policy Agent needs access to the following AWS services:
Type
Service name
Interface
com.amazonaws.{REGION}.secretsmanager
Interface
com.amazonaws.{REGION}.kms
Gateway
com.amazonaws.{REGION}.s3
Interface
com.amazonaws.{REGION}.lambda
Identify or Create Security Groups
Policy Agent and cloud-based ESA appliance use AWS security groups to control traffic that is allowed to leave and reach them. Policy Agent runs on schedule and is mostly concerned with allowing traffic out of itself to ESA and AWS services it depends on. ESA runs most of the time and it must allow Policy Agent to connect to it.
Policy Agent security group must allow outbound traffic using rules described in the table below. To edit security group navigate:
From VPC > Security Groups > Policy Agent Security Group configuration.
Type
Protocol
Port Range
Destination
Reason
Custom TCP
TCP
443
Policy Agent Lambda SG
ESA Communication
HTTPS
TCP
443
Any
AWS Services
Record Policy Agent security group ID:
Policy Agent Security Group Id: ___________________
Policy Agent will reach out to ESA on port 443. Create following inbound security group rule for cloud-based ESA appliance to allow connections from Policy Agent:
Type
Protocol
Port Range
Source
Custom TCP
TCP
443
Policy Agent Lambda SG
Creating ESA Credentials
Policy Agent Lambda requires ESA credentials to be provided as one of the three options.
Note
The username and password of the ESA user requires role with Export Resilient Package and Can Create JWT Token permissions. Security Administrator is one of the predefined roles which contains the above permissions, however for separation of duties it is recommended to create custom role.
Creating secrets manager secret with ESA username and password.
From the AWS Secrets Manager Console, select Store New Secret.
Select Other Type of Secrets.
Specify the username and password key value pair.
Select the encryption key or leave default AWS managed key.
Specify the Secret Name and record it.
ESA Credentials Secret Name: __________________
Option 2: KMS Encrypted Password
ESA password is encrypted with AWS KMS symmetric key.
Create AWS KMS symmetric key which will be used to encrypt ESA password. See Create KMS Key for instructions on how to create KMS symmetric key using AWS console.
Record KMS Key ARN.
ESA PASSWORD KMS KEY ARN: __________________
Run AWS CLI command to encrypt ESA password. Below you can find sample Linux aws cli command. Replace <key_arn> with KMS symmetric key ARN.
With this option ESA username and password are returned by a custom AWS Lambda function. This method may be used to get the username and password from external vaults.
Create AWS Lambda in any AWS supported runtime.
There is no input needed.
The Lambda function must return the following response schema.
Type the role name, for example, ProtegrityAgentRole and click Confirm.
Select Create role.
Record the role ARN.
Agent Lambda IAM Execution Role Name: ___________________
Corporate Firewall Configuration
If an on-premise firewall is used, then the firewall must allow access from the NAT Gateway to an ESA. The firewall must allow access from the NAT Gateway IP to ESA via port 443 and 443.
CloudFormation Installation
Create the Policy Agent in the VPC using the CloudFormation script provided by Protegrity.
Access the CloudFormation service.
Select the target installation region.
Create a stack with new resources.
Upload the Policy Agent CloudFormation template (file name: pty_agent_cf.json).
Specify the following parameters for Cloud Formation:
Set to True to create a CloudWatch schedule for the agent to run.
Default: False
Policy Agent Lambda Configuration
After the CloudFormation stack is deployed, the Policy Agent Lambda must be configured with parameters recorded in earlier steps. From your AWS Console, navigate to lambda and select the following Lambda.
Protegrity_Agent<STACK_NAME>_
Select Configuration tab and scroll down to the Environment variables section. Select Editand replace all entries with the actual values.
In case ESA is configured with publicly signed certificates, the PTY_ESA_CA_SERVER_CERT configuration will be ignored.
PTY_ESA_CA_SERVER_CERT_SECRET
This configuration option fulfills the same function as PTY_ESA_CA_SERVER_CERT but supports larger configuration values,
making it the recommended choice. The value should specify the name of the AWS Secrets Manager secret containing the ESA self-signed CA certificate.
The secret value should be set to the json with “PTY_ESA_CA_SERVER_CERT” key and PEM formated CA certificate content value as shown below.
In case ESA is configured with publicly signed certificates, the PTY_ESA_CA_SERVER_CERT_SECRET configuration will be ignored.
When both PTY_ESA_CA_SERVER_CERT and PTY_ESA_CA_SERVER_CERT_SECRET are configured the PTY_ESA_CA_SERVER_CERT_SECRET takes precedence.
PTY_ESA_CREDENTIALS_SECRET
ESA username and password (encrypted value by AWS Secrets Manager)
ESA policy datastore public key fingerprint (64 char long) e.g. 123bff642f621123d845f006c6bfff27737b21299e8a2ef6380aa642e76e89e5.
Note
This configuration is not applicable for ESA versions lower than 10.2.
The export key is the public part of an asymmetric key pair created in a Create KMS Key.
A user with Security Officer permissions adds the public key to the data store in ESA via Policy Management > Data Stores > Export Keys.
The fingerprint can then be copied using the Copy Fingerprint icon next to the key.
Refer to Exporting Keys to Datastore for details.
This flag can be either 1 or 0. If set to 1, then the agent will not update PTY_PROTECT lambda with the newest policy. Else, the policy will be saved in the S3 bucket and deployed to the Lambda Layer
Default: 0
AWS_POLICY_LAYER_NAME
Lambda layer used to store the Protegrity policy used by the PTY_PROTECT function
POLICY_LAYER_RETAIN
Number of policy versions to retain as backup. (e.g. 2 will retain the latest 2 policies and remove older ones). -1 retains all.
Default: 2
POLICY_PULL_TIMEOUT
Time in seconds to wait for the ESA to send the full policy
Default: 20s
ESA_CONNECTION_TIMEOUT
Time in seconds to wait for the ESA response
Default: 5s
LOG_LEVEL
Application and audit logs verbiage level
Default: INFO
Allowed values: DEBUG – the most verbose, INFO, WARNING, ERROR – the least verbose
PTY_CORE_EMPTYSTRING
Override default behavior. Empty string response values are returned as null values. For instance:
(un)protect(’’) -> null
(un)protect(’’) -> ''
Default: empty
Allowed values:
null
empty
PTY_CORE_CASESENSITIVE
Specifies whether policy usernames should be case sensitive
Default: no
Allowed values:
yes
no
PTY_ADDIPADDRESSHEADER
When enabled, agent will send its source IP address in the request header. This configuration works in conjunction with ESA hubcontroller configuration ASSIGN_DATASTORE_USING_NODE_IP (default=false). See Associating ESA Data Store With Cloud Protect Agent for more information.
Default: yes
Allowed values:
yes
no
PTY_ESA_USERNAME
Plaintext ESA username which is used together with PTY_ESA_ENCRYPTED_PASSWORD as an optional ESA credentials
Presence of this parameter will cause PTY_ESA_CREDENTIALS_SECRET to be ignored
Value must be base64 encoded
EMPTY_POLICY_S3
This flag can be either 1 or 0. If set to 1, then the agent will remove the content of the policy file in S3 bucket, but will keep the checksum in the metadata. Else, the policy will be saved in the S3 bucket and not removed.
Default: 0
PTY_ESA_CREDENTIALS_LAMBDA
Lambda function to return ESA credentials
Recorded in step Option 3: Custom AWS Lambda function LAMBDA FOR ESA CREDENTIALS. Presence of PTY_ESA_USERNAME, or PTY_ESA_CREDENTIALS_SECRET will cause this value to be ignored.
The Policy Agent Lambda must have network access and IAM permissions to invoke the custom ESA Credentials Lambda you have created in Option 3: Custom AWS Lambda function.
Test Installation
Open the Lambda and configure Test to execute the lambda and specify the default test event. Wait for around 20 seconds for the Lambda to complete. If policy is downloaded successfully, then a success message appears.
Navigate to the AWS_POLICY_S3_BUCKET bucket and verify that the AWS_POLICY_S3_FILENAME file was created.
Troubleshooting
Lambda Error
Example Error
Action
Task timed out after x seconds
2020-10-06T23:40:54.121Z 2dc84942-b5cc-4be9-aa4c-965f322307e4 Task timed out after 90.09 seconds
Ensure that there is network connectivity between the Lambda and ESA. Check the Security groups and/or Network firewall configuration
When using internal VPC, AWS Lambda needs to have access to AWS Network. The Policy Agent Lambda can start using Secrets Manager with Amazon VPC endpoints by creating an Amazon VPC endpoint for Secrets Manager.
ESA connection error. Failed to download certificates
Policy Pull takes a long time
{"errorMessage":"Timeout! Unable to download policy in 20 seconds.","errorType":"Exception","stackTrace":[...]}
Increase POLICY_PULL_TIMEOUT.
Ensure that there is at least 1 policy with datastore matching the Lambda Policy Agent. Other considerations:
Policy has default datastore.
Policy has datastores matching AWS lambda IP range (check the subnet IP Range).
Lambda function has static IP, and at least one Data store has matching IP.
ESA connection error. Failed to download certificates. HTTP response code: 401
Ensure that the Lambda execution role has permissions to get the Secret Manager secret name.
Ensure that the Lambda execution role has permission to get the Secret Manager secret Encryption Key.
Master Key xyz unable to generate data key
Ensure that the Lambda can access xyz CMK key
The S3 bucket server-side encryption is enabled, the encryption key type is SSE-KMS but the Policy Agent execution IAM role doesn’t have permissions to encrypt using the KMS key .
[ERROR] PolicyAgentException: An error occurred (AccessDenied) when calling the PutObject operation: Access Denied
Add the following permissions to the Policy Agent excution role.
kms:Decrypt
kms:GenerateDatakey
Note
When the KMS key and the Policy Agent Lambda are in separate accounts, update both the AWS KMS key and the Policy Agent execution role.
The S3 bucket has bucket policy to only allow access from within the VPC.
The Policy Agent publishes a new Lambda Layer version, and the Lambda Layer service uploads the policy file from the s3 bucket and the upload request is originated from the AWS service outside the Policy Agent Lambda VPC. Update the S3 bucket resource policy to allow access from AWS Service. Sample security policy to lock down access to the vpc:
Strengthen the KMS IAM policy by granting access only to the required Lambda function(s).
Finalize the IAM policy for the Lambda Execution Role. Ensure to replace wildcard * with the region, account, and resource name information where required.
If specified in CloudFormation Installation, the agent installation created a CloudWatch event rule, which checks for policy update on an hourly schedule. This schedule can be altered to the required frequency.
Under CloudWatch > Events > Rules, find Protegrity_Agent_{stack_name}. Click Action > Edit Set the cron expression. A cron expression can easily be defined using CronMaker, a free online tool. Refer to http://www.cronmaker.com.
The following sections show steps how to install Audit Log Forwarder component in the AWS Cloud.
The Log Forwarder deployment allows for the audit logs generated by Protector to be delivered to ESA for auditing and governance purposes.
Log Forwarder component is optional and is not required for the Protector Service to work properly.
See Log Forwarding Architecture section in this document for more information.
Some of the installation steps are not required for the operation of the software but recommended for establishing a secure environment. C
ontact Protegrity for further guidance on configuration alternatives in the Cloud.
Note
The installation steps below assume that the Log Forwarder is going to be installed in the same AWS account as the corresponding Protect Lambda service.
For instructions on how to install Log Forwarder in the AWS account separate than the Protect Lambda, please contact Protegrity.
ESA Audit Store Configuration
ESA server is required as the recipient of audit logs. Verify the information below to ensure ESA is accessible and configured properly.
ESA server running and accessible on TCP port 9200 (Audit Store) or 24284 (td-agent).
Audit Store service is configured and running on ESA. Applies when audit logs are output to Audit Store directly or through td-agent. For information related to ESA Audit Store configuration, refer to Audit Store Guide.
This section is optional. If CA certificate is not provided, the Log Forwarder will skip server certificate validation and will connect to ESA without verifying that it is a trusted server.
By default, ESA is configured with self-signed certificates, which can optionally be validated using a self-signed CA certificate supplied in the Log Forwarder configuration. If no CA certificate is provided, the Log Forwarder will skip server certificate validation.
If ESA is configured with publicly signed certificates, this section can be skipped since the forwarder Lambda will use the public CA to validate ESA certificates.
To obtain the self-signed CA certificate from ESA:
Download ESA CA certificate from the /etc/ksa/certificates/plug directory of the ESA
After certificate is downloaded, open the PEM file in text editor and replace all new lines with escaped new line: \n.
To escape new lines from command line, use one of the following commands depending on your operating system:
For more information about ESA certificate management refer to Certificate Management Guide in ESA documentation.
AWS VPC Configuration
Log forwarder Lambda function requires network connectivity to ESA, similar to Policy Agent Lambda function. Therefore, it can be hosted in the same VPC as Policy Agent.
Separate VPC can be used, as long as it provides network connectivity to ESA.
Note
AWS Lambda service uses permissions in log forwarder function execution role to create and manage network interfaces.
Lambda creates a Hyperplane ENI and reuses it for other VPC-enabled functions in your account that use the same subnet and security group combination.
Each Hyperplane ENI can handle thousands of connections/ports as the Lambda function scales up.
If more connections are needed AWS Lambda service creates additional Hyperplane ENIs. There’s no additional charge for using a VPC or a Hyperplane ENI.
Refer to AWS official Lambda Hyperplane ENIs docs for more information.
VPC Name: ___________________
VPC Subnet Configuration
Log Forwarder can be connected to the same subnet as Policy Agent or separate one as long as it provides connectivity to ESA.
Subnet Name: ___________________
NAT Gateway For ESA Hosted Outside AWS Network
If ESA server is hosted outside of the AWS Cloud network, the VPC configured for Lambda function must ensure additional network configuration is available to allow connectivity with ESA. For instance if ESA has a public IP, the Lambda function VPC must have public subnet with a NAT server to allow routing traffic outside of the AWS network. A Routing Table and Network ACL may need to be configured for outbound access to the ESA as well.
VPC Endpoint Configuration
Log Forwarder Lambda function requires connectivity to Secrets Manager AWS service. If the VPC identified in the steps
before has no connectivity to public internet through the NAT Gateway, then the following service endpoint must be configured:
com.amazonaws.{REGION}.cloudwatch
com.amazonaws.{REGION}.secretsmanager
com.amazonaws.{REGION}.kms
Security Group Configuration
Security groups restrict communication between Log Forwarder Lambda function and the ESA appliance. The following rules must be in place for ESA and Log Forwarder Lambda function.
From VPC > Security Groups > Log Forwarder Security Group configuration.
Type
Protocol
Port Range
Destination
Reason
Custom TCP
TCP
9200
Log Forwarder Lambda SG
ESA Communication
Record the name of Log Forwarder security group name.
Log Forwarder Security Group Id: ___________________
The following port must be open for the ESA. If the ESA is running in the Cloud, then create the following security.
Note
If an on-premise firewall is used, then the firewall must allow access from the NAT Gateway to an ESA. The firewall must allow access the NAT Gateway IP access to ESA via port 9200.
ESA Security Group configuration
Type
Protocol
Port Range
Source
Custom TCP
TCP
9200
Log Forwarder Lambda SG
Configure ESA Audit Store Credentials
Note
This section is optional.
If client certificate authentication is not set up, the Log Forwarder will connect to ESA without authentication credentials.
Audit Log Forwarder can optionally authenticate with ESA using certificate-based authentication with a client certificate and certificate key.
If used, both the certificate and certificate key will be stored in AWS Secrets Manager.
Download the following certificates from the /etc/ksa/certificates/plug directory of the ESA:
client.key
client.pem
After certificates are downloaded, open each PEM file in text editor and replace all new lines with escaped new line: \n. To escape new lines from command line, use one of the commands below depending on your operating system.
This task defines a policy used by the Protegrity Log Forwarder Lambda function to write CloudWatch logs, access the KMS encryption key to decrypt the policy and access Secrets Manager for log forwarder user credentials.
Perform the following steps to create the Lambda execution role and required policies:
From the AWS IAM console, select Policies > Create Policy.
Select the JSON tab and copy the following sample policy.
Type the role name, for example, ProtegrityForwarderRole and click Confirm.
Record the role ARN.
Log Forwarder IAM Execution Role Name: ___________________
Installation Artifacts
Audit Log Forwarder installation artifacts are part of the same deployment package as the one used for protect and policy agent services. Follow the steps below to ensure the right artifacts are available for log forwarder installation.
Verify that the Protegrity deployment package is available on your local system, if not, you can download it from the Protegrity portal.
Note
If you maintain multiple Protegrity Cloud Protectors, make sure that the deployment package downloaded for Audit Log Forwarder is the same as the one used for Protect service installation.
Extract the pty_log_forwarder_cf.json cloud formation file from the deployment package.
Check the S3 deployment bucket identified in section Create S3 bucket for Installing Artifacts.
Make sure that all Protegrity deployment zip files are uploaded to the S3 bucket.
Install through CloudFormation
The following steps describe the deployment of the Audit Log Forwarder AWS cloud components.
Access CloudFormation and select the target AWS Region in the console.
Click Create Stack and choose With new resources.
Specify the template.
Select Upload a template file.
Upload the Protegrity-provided CloudFormation template called pty_log_forwarder_cf.json and click Next.
Specify the stack details. Enter a stack name.
Note
The stack name will be appended to all the services created by the template.
Enter the required parameters. All the values were generated in the pre-configuration steps.
Parameter
Description
Default Value
Required
LogForwarderSubnets
Subnets where the Log Forwarder will be hosted.
LogForwarderSecurityGroups
Security Groups, which allow communication between the Log Forwarder and ESA.
X
LambdaExecutionRoleArn
The ARN of Lambda role created in the prior step.
X
ArtifactS3Bucket
Name of S3 bucket created in the pre-configuration step.
X
LogDestinationEsaIp
IP or FQDN of the ESA instance or cluster.
X
AuditLogOutput
Audit log processor to target on ESA. Allowed values: audit-store, td-agent
audit-store
X
PtyEsaClientCertificatesSecretId
AWS Secrets Manager secret id containing client certificates used for authentication with ESA Audit Store.
It is expected that the public key will be stored in a field public_key and the private key in a field named private_key.
This parameter is optional. If not provided, Log Forwarder will connect to ESA without client certificate authentication.
EsaTlsDisableCertVerify
Disable certificate verification when connecting to ESA if set to 1. This is only for dev purposes, do not disable in production environment.
0
X
PtyEsaCaServerCert
ESA self-signed CA certificate used by log forwarder Lambda to ensure ESA is the trusted server.
In case ESA is configured with publicly signed certificates, the PtyEsaCaServerCert configuration will be ignored.
EsaConnectTimeout
Time in seconds to wait for the ESA response. Minimum value: 1.
5
X
EsaVirtualHost
ESA virtual hostname. This configuration is optional and it can be used when proxy server is present and supports TLS SNI extension.
KinesisLogStreamRetentionPeriodHours
The number of hours for the log records to be stored in Kinesis Stream in case log destination server is not available. Minimum value: 24. See Log Forwarder Performance section for more details.
24
X
KinesisLogStreamShardCount
The number of shards that the Kinesis log stream uses. For greater provisioned throughput, increase the number of shards. Minimum value: 1. See Log Forwarder Performance section for more details.
10
X
MinLogLevel
Minimum log level for protect function. Allowed Values: off, severe, warning, info, config, all
severe
X
Click Next with defaults to complete CloudFormation.
After CloudFormation is completed, select the Outputstab in the stack.
Under Permissions policies, select Add Permissions > Create inline policy.
In Specify permissions view, switch to JSON.
Copy the policy json from below replacing the placeholder value indicated in the following snippet as <Audit Log Kinesis Stream ARN> with the value recorded in the previous step.
On the Review and create page, type a Name, then choose Create policy.
Test Log Forwarder Installation
Testing in this section validates the connectivity between Log Forwarder and ESA. The sample policy included with the initial installation and test event below are not based on your ESA policy. Any logs forwarded to ESA which are not signed with a policy generated by your ESA will not be added to the audit store.
Install Log Forwarder and configure according to previous sections. Log Forwarder configuration MinLogLevel must be at least info level.
Navigate to the log forwarder lambda function.
Select the Test tab.
Copy the json test event into the Event JSON pane.
Continue to the next section once stack status indicates UPDATE_COMPLETE.
Update Policy Agent With Log Forwarder Function Target
Log Forwarder Lambda function requires a policy layer which is in sync with the Protegrity Protector. This section will describe the steps to update the policy agent to include updating Log Forwarder Lambda function.
Note
If the policy agent has not been installed, follow the steps in Policy Agent Installation.
Set AWS_PROTECT_FN_NAME to include both protector and log forwarder lambda functions.
Edit the value for environment variable AWS_PROTECT_FN_NAME to include the log forwarder function name/arn in the comma separated list of Lambda functions.
Save the changes and continue when update completes
Navigate to Test tab
Add an event {} and select Test to run the Policy Agent function
Verify Log forwarder function was updated to use the policy layer by inspecting the log output. Logs should include the following:
[INFO] 2024-07-09 18:58:04,793.793Z 622d374b-1f73-4123-9a38-abc61973adef iap_agent.policy_deployer:Updating lambda [Protegrity_LogForwarder_<stack ID>] to use layer version [arn:aws:lambda:<aws region>:<aws account number>:layer:Protegrity_Layer_<layer name>:<layer version>]
Test Full Log Forwarder Installation
Install and configure Protegrity Agent, Protector, and Log Forwarder components.
Send a protect operation to the protector using a data element or user which will result in audit log generation
Navigate to the CloudWatch log group for the Protect function
Select the log stream for the test operation and scroll to the latest logs
Navigate to the CloudWatch log group for the Log Forwarder function
Expect to see a new log stream - it may take several minutes for the stream to start
Select the new stream and scroll to the most recent logs in the stream
Expect to see a log similar to the below:
[2024-07-09T19:32:31.648] [INFO] [kinesis-log-aggregation-format.cpp:77] Aggregated 1 records into 0 aggregated, 1 forwarded and 0 failed records
Troubleshooting
Error
Action
Log forwarder log contains severe level secrets permissions error:
[SEVERE] User: <arn> is not authorized to perform: secretsmanager:
GetSecretValue on resource: <secret name> because no identity-based
policy allows the secretsmanager:GetSecretValue action
Verify the permission policy/role attached to the log forwarder function has secretsmanager:GetSecretValue permission for the insights esa user credentials secret.
{
  "error_msg": "Failed to decrypt the policy. Please verify
    that the function has access to the key service and the key.",
  "success": false
}
Verify the permission policy/role attached to the log forwarder function has kms:Decrypt permission for KMS key used to encrypt the Protegrity security policy.
The provided execution role does not have permissions to call
[CreateNetworkInterface|DescribeNetworkInterfaces|DeleteNetworkInterface]
on EC2 (Service: Lambda, Status Code: 400, Request ID: <request id>)"
(RequestToken: <request token>, HandlerErrorCode: InvalidRequest)
Verify the permission policy/role attached to the log forwarder function has ec2:CreateNetworkInterface, ec2:DescribeNetworkInterfaces, ec2:DeleteNetworkInterface permissions
Severe level kinesis permissions log message in protector function:
[SEVERE] Kinesis stream client returned 400 error with error message:
User: <function arn> is not authorized to perform: kinesis:PutRecords
on resource: <kinesis stream arn> because no identity-based policy
allows the kinesis:PutRecords action
Verify the permission policy/role attached to the protector function has kinesis:PutRecords permission
TLS errors reported in log forwarder function logs:
[error] [tls] <error message>
If ESA is using self-signed certificate, verify the correct
ESA certificate has been given in the format described in
Certificates on ESA
3.6 -
Cheat Sheet Recommendation
Tip
During the installation you will need output of steps, such as resources names and ids. We recommend copying the following cheat sheet into a notepad and fill in the information as you progress with the installation.
AWS Account ID: ___________________
AWS Region (AwsRegion): ___________________
S3 Bucket name (ArtifactS3Bucket): ___________________
KMS Key ARN (AWS_KMS_KEY_ID): ___________________
ProtectLambdaPolicyName: __________________
Role ARN (LambdaExecutionRoleArn): ___________________
ApiGatewayId: ________________________________
ProtectFunctionName: __________________________
ProtectLayerName: _____________________________
ESA IP address: ___________________
VPC name: ___________________
Subnet name: ___________________
Policy Agent Security Group Id: ___________________
ESA Credentials Secret Name: ___________________
Policy Name: ___________________
Agent Lambda IAM Execution Role Name: ___________________
3.7 -
Prerequisites
Requirement
Detail
Protegrity distribution and installation scripts
These artifacts are provided by Protegrity
Protegrity ESA 10.0+
The Cloud VPC must be able to obtain network access to the ESA
AWS Account
Recommend creating a new sub-account for Protegrity Serverless
3.8 -
AWS Services
The following table describes the AWS services that may be a part of your Protegrity installation.
Service
Description
Lambda
Provides serverless compute for Protegrity protection operations and the ESA integration to fetch policy updates or deliver audit logs.
API Gateway
Provides the endpoint and access control.
KMS
Provides secrets for envelope policy encryption/decryption for Protegrity.
Secrets Manager
Provides secrets management for the ESA credentials .
S3
Intermediate storage location for the encrypted ESA policy layer.
Kinesis
Required if Log Forwarder is to be deployed. Amazon Kinesis is used to batch audit logs sent from protector function to ESA.
VPC & NAT Gateway
Optional. Provides a private subnet to communicate with an on-prem ESA.
CloudWatch
Application and audit logs, performance monitoring, and alerts. Scheduling for the policy agent.
3.9 -
Required Skills and Abilities
Role / Skillset
Description
AWS Account Administrator
To run CloudFormation (or perform steps manually), create/configure a VPC and IAM permissions.
Protegrity Administrator
The ESA credentials required to extract the policy for the Policy Agent
Network Administrator
To open firewall to access ESA and evaluate AWS network setup
4 - REST API
Reference for Cloud API authorization and specification
The following sections describe the key concepts in understanding the REST API.
Once Protegrity Serverless REST API is installed, you can export the OpenAPI documentation file from API Gateway Export API, located in the AWS API Gateway Control Service.
For testing the REST API, we recommend using tools, such as, Postman.
4.1 - Authorization
Describes the available authorization methods
Policy Users
Protegrity Policy roles defines the unique data access privileges for every member. The Protegrity Lambda protects the data with the username sent in either the JWT-formatted authorization header or the request body.
User from request body. If not found user from JWT payload.
JWT Verification
To ensure the integrity of the user, the lambda protect can verify the JWT.
From your AWS console, navigate to lambda and select the following Lambda: Protegrity_Protect_RESTAPI_<STACK_NAME>
Scroll down to the Environment variables section, select Edit to replace the entries.
Parameter
Value
Notes
authorization
JWT
jwt_verify
1
jwt_secret_base64
Secret in base64 encoding. For example, the value of the public key is as follows.
-----BEGIN PUBLIC KEY-----
MIGfMA0GCSqGSIb3DQEBAQUAA4GNADCBiQKBgQC4fkg/JYyN3Skr6RYLiAd/Yhl0
2TE3/HzHSNPnCaRdUakGp9og7oXBMcoadFDjnoSq1sz+gUHnpoO7s2fwkD5Q4OnC
BGD3oKP2A4PlOOWD2B2cVmMqX/vf1nAA/343496jsbfgkh1Q7LTzR0IXfdii0o1U
CbvrVCuaBoyiv4TxWQIDAQAB
-----END PUBLIC KEY-----
JWT is invalid because secret is wrong or expired.
Get A new JWT or check the base64 secret in AWS Lambda environment variable.
Secret doesn’t match the algorithm type in the JWT header. Secret is symmetric but Algorithm is asymmetric.
500
{
    "error_msg": "Invalid json array in jwt_user_claim",
    "success": false
}

{    "error_msg": "jwt secret is missing ",
    "success": false
}
Configuration error in AWS Lambda.
Authorization is to JWT and jwt _user_claim is not a valid json array. Example valid input: [“username”, “firstname”].
JWT is set to verify and jwt_secret_base64 is missing.
4.3 - Payload Encoding
Describes the request/response payload encoding
Payload Encoding
The following encoding formats are supported in the REST API.
For every encoding, the resultant protected data is returned in the same encoding. For example, if request is hex-encoded, the response is also hex-encoded.
Accepts input of any length without line separators.
Optional padding.
Does not accept any non-base64 characters.
The following sections provide the payload schema and its examples.
4.4 - TLS Mutual Authentication
Describes the TLS Mutual Authentication setup for AWS API Gateway
By default, AWS API Gateway supports HTTPS endpoint and doesn’t allow HTTP protocol.
For an additional layer of security, you can configure AWS API Gateway TLS Mutual Authentication.
AWS API Gateway will ensure that the clients with a valid certificate only can call the REST API. Protegrity recommends to setup TLS Mutual Authentication in AWS API Gateway. For more information on how to set AWS API Gateway Mutual TLS go to the following link.
AWS Lambda service limits maximum size of payload to 6 MB. Client applications of Protegrity Cloud API must ensure their payload size is within this limit. This applies to all types of requests described below.
Request
AWS Lambda service limits maximum size of payload to 6 MB. Client applications of Protegrity Cloud API must ensure their payload size is within this limit. This applies to all types of requests described below.
Performs a policy operation such as protect, unprotect, or reprotect.
URI
/v1/protect or /v1/unprotect or /v1/reprotect
Method
POST
Parameters
data: Input data to the policy operation.
data_element: Data element to use for the policy operation.
encoding: Optional, encoding of the data. One of: base64, base64_mime, base64_pem, base64_url, hex, or utf8. Defaults to hex for binary data elements, otherwise defaults to utf8.
Performs policy operations using different data elements for each data set.
URI
/v1/protect or /v1/unprotect or /v1/reprotect
Method
POST
Parameters
encoding: Optional, encoding of the data. One of: base64, base64_mime, base64_pem, base64_url, hex, or utf8. Defaults to hex for binary data elements, otherwise defaults to utf8.
query_id: Optional, prefix for the request identifier.
user: User performing the operation.
arguments[].data: Input data to the policy operation.
arguments[].data_element: Data element to use for the policy operation.
arguments[].old_data_element: (reprotect) Data element for unprotecting the input.
arguments[].old_external_iv: (reprotect) Optional, external initialization vector for the input.
Note
When multiple data elements are sent in the payload, the Cloud API generates an audit log per argument. The Cloud API appends the argument id, if it exists, to the query_id. For example: query_id.id:{id}. If an argument id is not provided then the index in the argument array is appended to the query_id. For example: query_id.index:{index}.
Example 4 - multiple data elements support payload
The External IV feature provides an additional level of security by allowing different tokenized results across protectors for the same input data and token element, depending on the External IV set on each protector. External IVs must adhere to certain guardrails and not all data elements support External IV. To read more about the Tokenization model with External IV, refer to the External Initialization Vector (IV) chapter in the Protection Methods Reference.
If the all the subrequests were successful, the success flag will be true.
Example failure:
{
"results": [
{
"error_msg":
"Protect failed. Data element not found. Refer to audit log for details",
"success": false
},
{
  "encoding": "utf8",
  "results":["str1","str2"],
  "success": true
}
],
"success": false
}
It is possible to have a mix of successful and unsuccessful results. In this case, the global success flag will be false.
4.6 - Legacy Specification
Describes the Legacy REST API specification
Protegrity has multiple products with REST API capabilities, such as Protection Server (out of support), DSG, and the latest product - IAP REST. Each one has its use case. To help you move to cloud-native implementation, Cloud Product REST API supports legacy payload.
{"protect":{"bulk":{"returntype":"success","data":[{"returntype":"success","message":"Data
 protection was successful.","content":"RGZBUFR4ODAzejFwNjQ5TWg0TEFpcFNqbA=="},{"returntype":"success",
"message":"Data protection was successful.","content":"aHNnVVB5QWFDYw=="}]}}}
5 - Performance
Benchmarks and performance tuning
Performance Considerations
The following factors may cause variation in real performance versus benchmarks:
Cold startup: The Lambda spends additional time on the initial invocation to decrypt and load the policy into memory. This time can vary depending on the policy size. Once the Lambda is initialized, subsequent “warm executions” should process quickly.
Noisy neighbors: There are many multi-tenant components in the Cloud. The same request may differ by 50% between runs regardless of Protegrity. A single execution may not be the best predictor of average performance.
Size of policy: The size of the policy impacts cold start performance. Larger policies take more time to initialize.
Lambda memory: AWS provides more virtual cores based on the memory configuration. The initial configuration of 1728MB provides a good tradeoff between performance and cost with the benchmarked policy. Memory can be increased to optimize for your individual case.
Number of protect, unprotect and reprotect security operations.
Lambda Concurrent and Burst quotas: AWS limits the number of concurrent executions and how quickly lambda can scale to meet demand. This is discussed in an upcoming section of the document.
Size of data element. Operations on larger text may take more time.
API Gateway Authentication. API Gateway support different authorizers and authentication method, which may differ.
Lambda Tuning
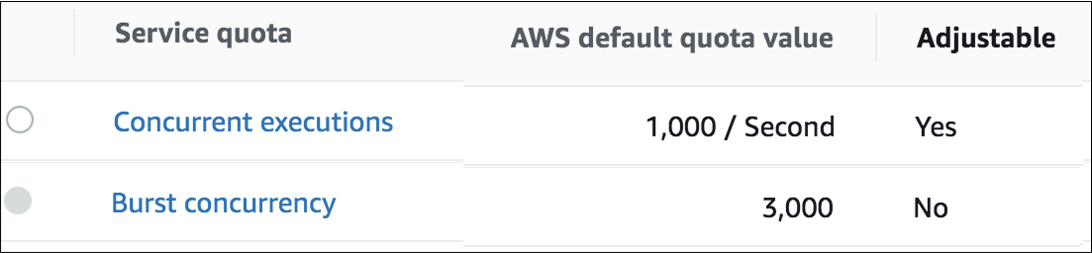
AWS maintains quotas for Lambda concurrent execution. Two of these quotas impact concurrency and compete with other Lambdas in the same account and region.
The concurrent executions quota cap is the maximum number of Lambda instances that can serve requests for an account and region. The default AWS quota may be inadequate based on peak concurrency based on the table in the previous section. This quota can be increased with an AWS support ticket.
The Burst concurrency quota limits the rate at which Lambda will scale to accommodate demand. This quota is also per account and region. The burst quota cannot be adjusted. AWS will quickly scale until the burst limit is reached. After the burst limit is reached, functions will scale at a reduced rate per minute (e.g. 500). If no Lambda instances can serve a request, the request will fail with a 429 Too Many Requests response.
The burst limit is a fixed value and varies significantly by AWS region. The highest burst (3,000) is currently available in the following regions: US West (Oregon), US East (N.Virginia), and Europe (Ireland). Other regions can burst between 500 and 1,000. It is recommended to select an AWS region with the highest burst limits.
API Gateway Tuning
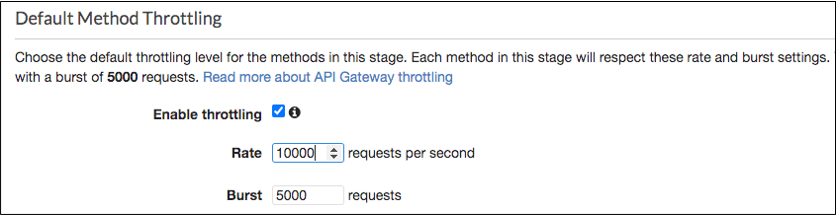
AWS maintains a Throttle quota for the API Gateway. By default, API Gateway limits concurrent requests to 10,000 requests per second and throttles subsequent traffic with a 429 Too Many Requests error response. This quota applies across all APIs in an account and region.
The API Gateway default quota may need to be increased based on the Concurrency table. Keep in mind that hitting quota limits effectively throttles any other API services in the region.
The API Gateway also limits burst. Burst is the maximum number of concurrent requests that API Gateway can fulfill at any instant without returning 429 Too Many Requests error responses. This limit can be increased by AWS, but is not adjustable.
Enable CloudWatch metrics within the API Gateway to monitor max concurrency and investigate throttling errors. See the Concurrency Troubleshooting section on interpreting CloudWatch metrics.
Quotas adjustments are applied for region and account. Throttling is also enabled by default in the API Gateway stage used by the Protegrity Lambda function. The stage configuration throttling must be adjusted if the quota is modified. Stage throttling is shown in the following image.
For example, the REST Client makes over 20,000 requests/sec to execute the given query. Using API Gateway’s default settings, the requests exceeding 10,000 requests/sec will be throttled. Therefore, this query may fail intermittently due to a high number of throttling errors.
Concurrency Troubleshooting
Hitting up against quota limits may indicate that quota adjustments are required. Exceeding quota limits may cause a client query to fail or reduce performance. In the worst case, significant throttling can impact the performance of all your API Gateway or Lambda services in the region.
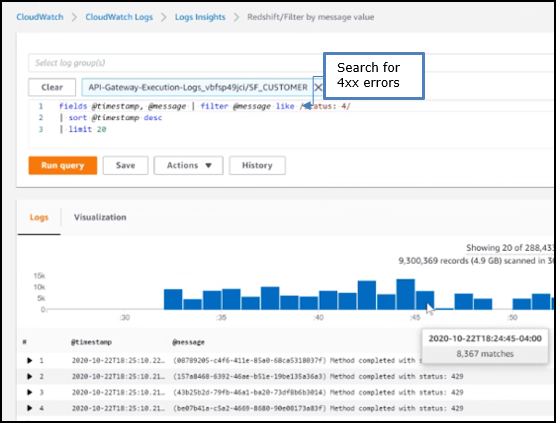
CloudWatch Metrics can be manually enabled on the API Gateway to reveal if quotas are being reached. Metrics aggregate errors into two buckets that are 4xx and 5xx. CloudWatch logs can be used to access the actual error code. The following table describes how to interpret the CloudWatch metrics.
Error Type
Possible issue
Remedy
4xx errors
API Gateway burst or throttle quota exceeded
Request an increase to the API Gateway throttle quota.
5xx errors
Lambda concurrent requests or burst quota exceeded. Verify 4xx errors in Lambda Metrics.
Request an increase the Lambda concurrent request quota
Note
The API Gateway Lambda proxy maps 429 errors from the Lambda service to 500 errors.
The following screenshot shows an example of searching CloudWatch Logs using Log Insights:
Cold-Start Performance
Cold-start vs warm execution refers to the state of the Lambda when a request is received. A cold-start undergoes additional initialization, such as, loading the security policy. Warm execution applies to all subsequent requests served by the Lambda.
The following table shows an example how these states impact latency and performance:
Execution state
Avg. Execution Duration
Avg. Total (w/ network latency)
Cold execution
438 ms
522 ms
Warm execution
< 2ms
84 ms
Note
Cold execution time will vary based on the physical size of the security policy. A large security policy will result in longer cold startup times.
Log Forwarder Performance
Log forwarder architecture is optimized to minimize the amount of connections and reduce the overall network bandwidth required to send audit logs to ESA. This is achieved with batching and aggregation taking place on two levels. The first level is in protect function instances, where audit logs from consecutive requests to an instance are batched and aggregated. The second level of batching takes place in Amazon Kinesis Stream where log records from different protect function instances are additionally batched and sent to log forwarder function where they are aggregated. This section shows how to configure the deployment to accommodate different patterns of anticipated audit log stream. It also shows how to monitor deployment resources to detect problems before audit records are lost.
Protector Cloud Formation Parameters
AuditLogFlushInterval: Determines the minimum amount of time required for the audit log to be sent to Amazon Kinesis. Changing flush interval may affect the level of aggregation, which in turn may result in different number of connections and different data rates to Amazon Kinesis. Default value is 30 seconds.
Increasing the flush interval may result in higher aggregation of audit logs, in fewer connections to Amazon Kinesis, in higher latency of audit logs arriving to ESA and in higher data throughput.
Lowering the flush interval may result in lower aggregation of audit logs, in more connections to Amazon Kinesis, in lower latency of audit logs arriving to ESA and in lower data throughput.
It is not recommended to reduce the flush interval from default value in production environment as it may overload the Amazon Kinesis service. However, it may be beneficial to reduce flush interval during testing to make audit records appear on ESA faster.
Log Forwarder Cloud Formation Parameters
Amazon KinesisLogStreamShardCount: The number of shards represents the level of parallel streams in the Amazon Kinesis and it is proportional to the throughput capacity of the stream. If the number of shards is too low and the volume of audit logs is too high, Amazon Kinesis service may be overloaded and some audit records sent from protect function may be lost.
Default value is 10, however you are advised to test with a production-like load to determine whether this is sufficient or not.
Amazon KinesisLogStreamRetentionPeriodHours: The time for the audit records to be retained in Amazon Kinesis log stream in cases where log forwarder function is unable to read records from the Kinesis stream or send records to ESA, for example due to a connectivity outage. Amazon Kinesis will retain failed audit records and retry periodically until connectivity with ESA is restored or retention period expires.
Default value is 24 hours, however you are advised to review this value to align it with your Recovery Time Objective and Recovery Point Objective SLAs.
Monitoring Log Forwarder Resources
Amazon Kinesis Stream Metrics: Any positive value in Amazon Kinesis PutRecords throttled records metric indicates that audit logs rate from protect function is too high. The recommended action is to increase the Amazon KinesisLogStreamShardCount or optionally increase the AuditLogFlushInterval.
Log Forwarder Function CloudWatch Logs: If log forwarder function is unable to send logs to ESA, it will log the following message:
[SEVERE] Dropped records: x.
Note
When the error message above occurs, the dropped audit records will be preserved in the Amazon Kinesis data stream and retried again according to Amazon Kinesis retry schedule. Records will be retried until Amazon KinesisLogStreamRetentionPeriodHours expires.
Protect Function CloudWatch Logs: If protect function is unable to send logs to Amazon Kinesis, it will log the following message:
[SEVERE] Amazon Kinesis error, retrying in x ms (retry: y/z) ..."
Any dropped audit log records will be reported with the following log message:
[SEVERE] Failed to send x/y audit logs to Amazon Kinesis.
6 - Audit Logging
Audit log description/formatting
Audit Logging
Audit records and application logs stream to Amazon CloudWatch Logs or optionally be sent to ESA. Cloud Protect uses a JSON format for audit records that is described in the following sections.
You can analyze and alert on audit records using Protegrity ESA or Amazon CloudWatch. Third-party solutions may be used if they are supported by Amazon Cloudwatch or AWS Lambda logging extensions. For more information about forwarding your audit records to ESA, contact Protegrity. For more information about Amazon CloudWatch, refer to the Amazon CloudWatch User Guide.
For more information about audit records, refer to the Protegrity Analytics Guide.
Audit record fields
The audit record format has been altered in version 3.1 of the protector to provide more information.
Field
Description
additional_info.deployment_id
The deployment_id contains the name of the Protect Function. It is automatically set based on the cloud-specific environment variables assigned to the Protect Function. This allows identifying the Cloud Protect deployment responsible for generating audit log.
additional_info.cluster
(Optional) Redshift cluster ARN
additional_info.description
A human-readable message describing the operation
additional_info.query_id
(Optional) Identifies the query that triggered the operation
additional_info.request_id
(Optional) AWS Lambda request identifier
cnt
Number of operations, may be aggregated
correlationid
(Deprecated) Use additional_info instead
level
Log severity, one of: SUCCESS, WARNING, ERROR, EXCEPTION
logtype
Always “Protection”
origin.ip
The private IP address of the compute resource that operates the Protect Function and is responsible for generating the log entry.
Note
The IP address is private, meaning it is used for internal network communication and is not accessible directly from the public internet. When Log Forwarding is enabled the IP address may be aggregated into minimal CIDR blocks.
origin.hostname
Hostname of the system that generated the log entry
origin.time_utc
UTC timestamp when the log entry was generated
protection.audit_code
Audit code of the protect operation; see the log return codes table in the Protegrity Troubleshooting Guide
protection.dataelement
Data element used for the policy operation
protection.datastore
Name of the data store corresponding to the deployed policy
protection.mask_setting
(Optional) Mask setting from policy management
protection.operation
Operation type, one of: Protect, Unprotect, Reprotect
protection.policy_user
User that performed the operation
protector.core_version
Internal core component version
protector.family
Always “cp” for Cloud Protect
protector.lambda_version
Protector Lambda application version.
protector.pcc_version
Internal pcc component version
protector.vendor
Identifies the cloud vendor and the database vendor
protector.version
Protector version number
signature.checksum
Hash value of the signature key ID used to sign the log message when the log is generated
signature.key_id
Key used to sign the log message when the log is generated
{
      "additional_info": {
        "deployment_id": "Protegrity-Protect-function-deployment-id",
        "description": "The data element could not be found in the policy.",
        "query_id": "sf-query-id:01978dbc-0582-d7e4-0000-002a3603a20d",
        "request_id": "8476a536-e9f4-11e8-9739-2dfe598c3fcd"
      },
      "cnt": 4000,
      "correlationid": "sf-query-id:01978dbc-0582-d7e4-0000-002a3603a20d",
      "logtype": "Protection",
      "level": "ERROR",
      "origin": {
        "hostname": "localhost",
        "ip": "127.0.0.1",
        "time_utc": 1635363966
      },
      "protection": {
        "dataelement": "deAddress",
        "operation": "Protect",
        "audit_code": 2,
        "datastore": "SAMPLE_POLICY",
        "policy_user": "test_user"
      },
      process":{
        "name":"protect",
        "id":"13",
        "module":"coreprovider",
        "thread_id":"573580544",
        "user":"sbx_user1051",
        "platform":"\"Linux_x64\"",
        "version":"UNKNOWN"
      },
      "client": {
        "ip":"169.254.62.117"
      },
      "protector": {
        "family": "cp",
        "version": "4.0.0.102",
        "vendor": "aws.snowflake",
        "datastore":"SAMPLE_POLICY",
        "pcc_version": "4.0.0.9",
        "core_version": "2.1.4+0.g93016.2.1",
        "lambda_version":"4.0.1"
      },
      "signature": {
        "key_id": "95f5a194-b0a4-4351-a",
        "checksum": "AF09217C56944D91C47847A77C0367C594C0B948E7E75654B889571BD4F60A71"
      }
    }
7 - No Access Behavior
Describes the result of various policy configurations with no access operations
No Access Behavior
The security policy maintains a No Access Operation, configured in an ESA, which determines the response for unauthorized unprotect requests.
The following table describes the result returned in the response for the various no access unprotect permissions.
No Access Operation
Data Returned
Null
null
Protected
(protected value)
Exception
Query will fail with an exception
Note
An unauthorized protect will throw an exception.
8 - Known Limitations
Known product limitations.
Known Limitations
Known product limitations:
FPE is supported only for ASCII values.
9 - Upgrading To The Latest Version
Instructions for upgrading the protector.
Download the Latest Version
You can download the latest version of the deployment package from https://my.protegrity.com.
Navigate to Data Protection > Cloud Protect to download the latest version.
After downloading the deployment package from the Protegrity Portal, unzip the package to extract the artifact files.
In the AWS Console, navigate to the S3 bucket that was previously created to upload deployment artifacts
(see: Create S3 bucket for Installing Artifacts).
Note
Only extract the deployment package and not the files in it.
Upload the following artifacts to the S3 bucket:
-
-
protegrity-protect-<version>.zip
protegrity-agent-<version>.zip
protegrity-external-extension-<version>.zip
protegrity-sample-policy-<version>.zip
protegrity-protect-<version>.zip
protegrity-agent-<version>.zip
protegrity-external-extension-<version>.zip
protegrity-sample-policy-<version>.zip
protegrity-protect-<version>.zip
protegrity-agent-<version>.zip
protegrity-external-extension-<version>.zip
protegrity-sample-policy-<version>.zip
protegrity-athena-protect-udfs-<version>.jar
protegrity-external-extension-<version>.zip
protegrity-agent-<version>.zip
protegrity-sample-policy-<version>.zip
If the release version matches your existing deployment, you don’t need to upload it again. Save the following artifacts on your local system so that you have them available during the next steps:
-
-
pty_protect_cf.json
pty_agent_cf.json
pty_protect_cf.json
pty_agent_cf.json
pty_protect_api_cf.json
pty_agent_cf.json
pty_log_forwarder_cf.json
pty_athena_protect_cf.json
pty_agent_cf.json
Perform the following steps to upgrade the Agent Lambda and Protect Lambda separately.
Important
If new versions are available for both Agent and Protect Lambdas, Agent Lambda must be upgraded first.
Disable Protegrity Agent Function CloudWatch Event Rule
Cloud Watch Event Rule is used to periodically run Protegrity Agent Function to synchronize policy from ESA.
This functionality is optional when deploying Protegrity Serverless Solution.
If the Event Rule is enabled, it must be disabled temporarily for the time of the upgrade process.
Follow the steps below to determine if your deployment uses Event Rule and disable it.
Go to AWS Cloud Formation and select existing Protegrity deployment stack.
Select Resources tab from the top portion of the screen.
Check if there is a resource with ScheduledRule LogicalID. If there is no such resource you can skip to Upgrading Policy Agent Lambda section. If the scheduled rule is there, continue with the next steps in this section.
Click on the Physical ID link in the ScheduledRule row. The link opens Policy Agent Event Rule configuration.
Select Disable from the top-right portion of the screen. This will disable the rule. You will re-enable it after the upgrade process is complete.
Upgrading Policy Agent Lambda
Note
If the release version of the artifact zip file has not changed since the previous installation, you can skip the Agent Lambda upgrade.
Go to AWS Lambda console and select existing Protegrity Agent Lambda.
Click Actions in top right portion of the screen. Select Publish new version. Click Publish. The version of Agent Lambda you just created will serve as restore point in the case you needed to rollback the upgrade.
Go to Lambda Configuration > Environment variables.
Record environment variables values. You will use them later to configure upgraded Lambda Function. You can use the aws cli command below to save the function variables into the local json file:
Go to AWS Cloud Formation and select existing Protegrity Agent deployment stack.
Select Update. Check Replace current template > Upload a template file.
Upload pty_agent_cf.json file and select Next.
Click Next until Review window and then select Update stack.
Wait for the Cloud Formation to complete.
Navigate back to Agent Lambda Function.
Note
Make sure you are viewing the latest Lambda Function, not the published version.
Go to Configuration > Environment variables. Replace placeholder values with values recorded in previous step. Alternatively, you can run the following aws cli command to update function configuration using json file saved in the previous steps:
If you are upgrading from versions prior to v3.0, backup and remove existing policy from the bucket defined by AWS_POLICY_S3_BUCKET property, so that the policy can be re-downloaded and re-encrypted with new ‘key commitment’ feature.
If you are upgrading from version prior to 1.6.1 please follow the steps below, otherwise the upgrade process is completed.
Click Review Policy, then Save Changes. Wait for the changes to save.
Upgrading Log Forwarder Lambda
Note
If you are upgrading protector to one of these versions: [3.2.2, 3.2.3], skip this section and follow instruction to install new Log Forwarder Audit Log Forwarder Installation.
Publish Log Forwarder Lambda Version
Publishing a version of the Log Forwarder Lambda allows to roll-back to pre-existing version if upgrade fails
Go to AWS Lambda console and select existing Protegrity Log Forwarder Lambda.
Click Actions in top right portion of the screen. Select Publish new version. Click Publish.
Record the Lambda version number. It will be displayed at the top of the screen. You can also retrieve it from the Lambda function view, under Versions tab.
Log Forwarder Lambda version number for roll-backs: ___________________
Disable Kinesis Trigger
Disabling Kinesis trigger ensures there are no unprocessed or re-processed events while function is upgraded.
Go to AWS Lambda console and select existing Protegrity Log Forwarder Lambda.
Select Configuration tab > Triggers
Check Kinesis trigger and click Edit button
Uncheck Activate trigger and click Save
Wait for function to stop processing events by monitoring function in Monitor tab
Upgrade Forwarder Lambda Version
Upgrade Log Forwarder function with new code
Go to AWS Cloud Formation and select existing Protegrity Log Forwarder deployment stack.
Select Update Stack > Make a direct update.
Select Replace existing template > Upload a template file.
Upload pty_log_forwarder_cf file and select Next.
Click Next until Review window and then select Update stack.
Wait for the Cloud Formation to complete.
Enable Kinesis Trigger
Go to AWS Lambda console and select existing Protegrity Log Forwarder Lambda.
Select Configuration tab > Triggers
Check Kinesis trigger and click Edit button
Check Activate trigger and click Save
Log Forwarder function will now start processing events from where it left off when Kinesis trigger was disabled.
Monitor and roll-back
Monitor Log Forwarder function for errors in its CloudWatch logs and in Montior tab. To roll back function to the previous version if any errors occur follow these steps:
Go to AWS Lambda console and select existing Protegrity Log Forwarder Lambda.
Select Configuration tab > Triggers
Expand Details section of Kinesis trigger and record UUID value
Execute the following AWS CLI command to move Kinesis trigger to previous version of Log Forwarder Lambda that was created earlier and recorded as Log Forwarder Lambda version number for roll-backs. Substitute kinesis-mapping-uuid, log-forwarder-function-name, version-for-roll-backs with your values:
Find Kinesis trigger attached to previous version of Log Forwarder Lambda by navigating Versions tab > Version number link in the Versions column
Kinesis trigger is now moved to previous version of Log Forwarder Lambda function.
Upgrading Protect Lambda
Note
If the release version of the artifact zip file has not changed since the previous installation, you can skip the Protect Lambda upgrade.
Diagram below illustrates upgrade steps.
Publish Protect Lambda Version
Publishing a version of the Protect Lambda allows updating it without interruptions to the existing traffic.
Go to AWS Lambda console and select existing Protegrity Protect Lambda.
Go to Lambda Configuration > Environment variables.
Record environment variables values. You will use them later to configure upgraded Lambda Function. You can use the aws cli command below to save the function variables into the local json file:
Click Actions in top right portion of the screen. Select Publish new version. Click Publish.
Record the Lambda version number. It will be displayed at the top of the screen. You can also retrieve it from the Lambda function view, under Versions tab.
Protect Lambda version number: ___________________
If you are upgrading a Cloud Protect Redshift version 1.x to 2.x/3x, you must recreate your Redshift external function definitions with Protect Lambda Function version appended to the Lambda Function name. See example below.
In this step, the Protect service including Lambda $LATEST version will be updated using Cloud Formation template. The Lambda version created in previous step will be used to serve existing traffic during the upgrade process.
Go to AWS Cloud Formation and select existing Protegrity deployment stack.
Select Update. Check Replace current template > Upload a template file.
Upload pty_protect_cf.json file and select Next.
Update ProtectFunctionProductionVersion parameter with Protect Lambda version number recorded in step 3.
Note
If you are upgrading protector to one of these versions: [3.2.2, 3.2.3], set parameter KinesisLogStreamArn to the output value recorded in Install through CloudFormation for the newly deployed log forwarder.
Click Next until Review window and then select Update stack.
Wait for the Cloud Formation to complete.
Go back to Lambda console and select Protect Lambda.
Go to Configuration > Environment variables. Replace placeholder values with values recorded in previous step. Alternatively, you can run the following aws cli command to update function configuration using json file saved in the previous steps:
Navigate to Aliases tab. Verify that Production alias points to the lambda version you specified in the cloud formation template.
The upgraded Protect Lambda is configured with a sample policy. Run Agent Lambda Function before continuing with next steps.
Finalize upgrade
In this step, the Protect Lambda will be configured to serve traffic using $LATEST version upgraded in the previous step.
Go back to Protegrity AWS Cloud Formation deployment stack.
Select Update. Check Use Current template.
Update ProtectFunctionProductionVersion parameter with the following value: $LATEST.
Click Next until Review window and then select Update stack.
Go back to Lambda console and select Protect Lambda.
From the Lambda console, verify that Latest alias points to $LATEST version.
Test your function to make sure it works as expected.
If you are upgrading a Cloud Protect Redshift version 1.x to 2.x/3x, you must recreate your Redshift external function definitions with Protect Lambda Function version appended to the Lambda Function name. See example below.
If you need to rollback to older version of Protect Lambda, you can re-run the cloud formation with ProtectFunctionProductionVersion parameter set to the previous version of Protect Lambda.
Re-enable Protegrity Agent Function CloudWatch Event Rule
If the Event Rule was disabled at the beginning of the upgrade process, you must re-enabled it. Follow the steps below to re-enable Policy Agent Event rule.
Go to the Protegrity Agent Cloud Formation Stack.
Select Resources tab from the top portion of the screen.
Click on the Physical ID link in the ScheduledRule row. The link opens Policy Agent Event Rule configuration.
Select Enable from the top-right portion of the screen. This will enable the rule. You will re-enable it after the upgrade process is complete.
10 - Appendices
Additional references for the protector.
10.1 - ADFS Federation using AWS Cognito User Pools
Reference for integrating ADFS with API Gateway
ADFS Federation using AWS Cognito User Pools
Common use case for Protegrity Policy Member source integrates with customer’s Active Directory. The AWS API Gateway can integrate with ADFS using AWS Cognito. The following article describes the procedure.
10.2 - Installing the Policy Agent and Protector in Different AWS Accounts
Example steps to install Agent in a different AWS account than the Protector
The Policy Agent Lambda function and Protect Lambda functions can be installed in separate AWS accounts. However, additional configuration is required to authorize the Policy Agent to provision the security policy to a remote Protect Lambda function.
Note
The Policy Agent will deploy an encrypted security policy file to an S3 bucket in the Protect function’s AWS Account.
Create Agent Lambda IAM policy
Login to the AWS account that hosts the Protect Lambda function.
From the AWS IAM console, select Policies > Create Policy.
Select the JSON tab and copy the following snippet.
Login to the AWS account that hosts the Protect Lambda function.
From the AWS IAM console, select Roles > Create Role
Select AWS Service > Lambda . Proceed to Permissions.
Select Policy created in the step above. Proceed to Tags.
Specify Tag, proceed to the final screen. Type in policy name and confirm. Record the name.
Policy Agent Cross Account IAM Role Name: ___________________
Allow the Policy Agent Cross-Account Role to be Assumed by the Policy Agent IAM Role
Login to the AWS account that hosts the Protect Lambda function.
Navigate to the previously created IAM Role (Agent Lambda Cross-Account IAM Role Name).
Navigate to Trust Relationships > Edit Trust Relationships.
Modify the Policy Document, replacing the placeholder value indicated in the following snippet as <Agent Lambda IAM Execution Role ARN> with ARN of Agent Lambda IAM Role that was created in Agent Installation.
Modify the Policy Document, replacing the placeholder value indicated in the following snippet as <Agent Lambda Cross-Account IAM ARN> with the value recorded in Create Policy Agent cross-account IAM Role.
On the Review policy page, type a Name, then choose Create Policy.
Update the Policy Agent Lambda Configuration
From the AWS console, navigate to Lambda, and select the Policy Agent Lambda function.
Select Configuration tab | Environment variables.
Select Edit and add the following environment variables with the value from Agent Lambda Cross-Account IAM ARN:
Parameter
Value
AWS_ASSUME_ROLE
Agent Lambda Cross-Account IAM ARN
Ensure the values in the Parameters AWS_POLICY_S3_BUCKET, AWS_PROTECT_FN_NAME and AWS_POLICY_LAYER_NAME are all in the Protect Lambda Function AWS Account.
Click Save and Run the Lambda. The Lambda will now assume the Role in Protect Lambda Function AWS Account and update the policy cross accounts.
10.3 - Integrating Cloud Protect with PPC (Protegrity Provisioned Cluster)
Concepts for integrating with PPC (Protegrity Provisioned Cluster)
This guide describes how to configure the Protegrity Policy Agent and Log Forwarder to connect to a Protegrity Provisioned Cluster (PPC), highlighting the differences from connecting to ESA.
Key Differences: PPC vs ESA
Feature
ESA 10.2
PPC (this guide)
Datastore Key Fingerprint
Optional/Recommended
Required
CA Certificate on Agent
Optional/Recommended
Optional/Recommended
CA Certificate on Log Forwarder
Optional/Recommended
Not supported
Client Certificate Authentication from Log Forwarder
Optional/Recommended
Not supported
IP Address
ESA IP address
PPC address
Prerequisites
Access to PPC and required credentials.
Tools: curl, kubectl installed.
Policy Agent Setup with PPC
Important
When connecting to PPC, the Policy Agent requires use of a datastore key fingerprint. For connecting to ESA 10.2 with Cloud Protect Policy Agent, the fingerprint is optional but recommended. See Policy Agent Installation for general setup steps.
Follow these instructions as a guide for understanding specific inputs for Policy Agent integrating with PPC:
Obtain the Datastore Key Fingerprint
To retrieve the fingerprint for your Policy Agent:
Retrieve public key from the Cloud Provider Key Management service for the policy encryption key created in pre-configuration:
Navigate to the Key Management Service in AWS console and open Customer Managed Keys
Select the desired key
Select the Public Key tab
Select Download
Navigate to the Key Vault in Azure console and open Objects>Keys
Select the desired key
Select the key indicated as CURRENT VERSION
Select Download public key
Navigate to Key Management in GCP console
Select the desired key and open the Versions tab
Select Get public key from the Actions column menu
Select Download
Escape the new line characters in the downloaded public key for use in the next step - for example:
When using PPC, certificate authentication and CA validation are not supported for the Log Forwarder. Configuration steps related to certificates in Log Forwarder Installation do not apply to PPC.
If you attempt to use certificates provided by PPC, the Log Forwarder will not function correctly.
The Log Forwarder will proceed without certificates and will print a warning if PTY_ESA_CA_SERVER_CERT is not provided.
No additional certificate or CA configuration is needed for PPC.
10.4 - Invoke Lambda Directly
Invoke protector lambda function directly (without API Gateway)
AWS Lambda can be invoked directly, such as from AWS SDK. This section contains information about request and response payloads with examples demonstrating direct invocation using AWS CLI and Python SDK (Boto3).
Request Payload
Lambda request payload for the direct invocation is defined as following
Cloud API Lambda returns following error responses depending on the error type
Cloud API Protection Operation Error Returned when invalid data element is used or user has insufficient permissions to execute security operation.
{
  "body": "{\"error_msg\":\"Unprotect failed. Data element not found. Refer to audit log for details.\",\"success\":false}",
  "isBase64Encoded": false,
  "statusCode": 400
}
Cloud API Invalid Request Error Missing fields in the incoming request or malformed request JSON.
{
  "body": "Request format is not supported",
  "isBase64Encoded": false,
  "statusCode": 400
}
Cloud API Unexpected Lambda Exception Error Caused by Lambda runtime exception, for instance due to too short timeout or not enough memory.
{
  "errorMessage": "2023-01-18T16:42:19.593Z d0cf62d0-9eaf-427b-8ca5-1bdd8bd0b082 Task timed out after 10.25 seconds"
}
Examples
Prerequisites:
AWS SDK or Command Line
AWS Access Key ID and AWS Access Key
Note
IAM roles must follow the Principle of Least Privilege. Only users / services who must have access need to have invoke permissions on AWS Lambda.
Sample Python code demonstrating Cloud API Direct Lambda Calls
importjsonimportloggingimportboto3lambda_client=boto3.client("lambda")logging.basicConfig(format="%(message)s")logger=logging.getLogger('pty_cloud_api_sample')logger.setLevel(logging.DEBUG)classProtectClient(object):"""
Sample client demonstrating how to invoke Protegrity Cloud API Lambda
protect_fn: str - Name of the Cloud API Lambda (for example, Protegrity_Protect_RESTAPI_my_deployment)
"""def__init__(self,protect_fn):self.protect_fn=protect_fndefinvoke_protect(self,values,data_element,operation,user,query_id,column_info=""):"""
Invokes Protegrity Cloud API Lambda to execute protect or unprotect operation
values: list[str] - List of values to be protected/unprotected
data_element: str - Name of the policy data element to use with protect/unprotect operation
operation: str - Either 'protect' or 'unprotect'
user: str - Policy user
query_id: str - Query id will be present in the audit log
column_info: - Used for troubleshooting, for instance, when protecting values/rows from multiple database columns
"""# Set authorization header here if JWT authorization is # enabled in Cloud API Function configurationheaders={"Authorization":""}request_body={"user":user,"data_element":data_element,"data":values,"query_id":query_id}payload=json.dumps({"body":json.dumps(request_body),"path":f"/v1/{operation}","headers":headers})logger.debug(f"Request payload: {payload}")response=lambda_client.invoke(FunctionName=self.protect_fn,Payload=payload)lambda_response_payload=json.loads(response["Payload"].read().decode())logger.debug(f"Response payload: {lambda_response_payload}")response_status_code=lambda_response_payload.get("statusCode")response_body_string=lambda_response_payload.get("body")ifresponse_status_code==Noneorresponse_body_string==None:raiseException(f"Unexpected Cloud API Lambda error: [{lambda_response_payload}]")try:body_json=json.loads(response_body_string)ifresponse_status_code==200:returnbody_json.get("results",[])elifbody_json.get("error_msg"):raiseException(f"Cloud API Lambda error: [{response_status_code} - {body_json.get('error_msg')}]")raiseException(f"Unexpected Cloud API Lambda error: [{lambda_response_payload}]")exceptjson.decoder.JSONDecodeError:# Cloud API may return error in the response body# For example, {"statusCode": 400, "body":"Error message"}raiseException(f"Cloud API Lambda error: [{response_status_code} - {response_body_string}]")# Replace cloud-api-lambda-name with the name of the Cloud API Lambda# For example, Protegrity_Protect_RESTAPI_my_deploymentprotect_client=ProtectClient('cloud-api-lambda-name')protected_data=["UtfVk UHgcD!"]logger.info(f"Protected data: {protected_data}")unprotected_data=protect_client.invoke_protect(values=protected_data,data_element='alpha',operation='unprrotect',user='test-user',query_id='1234')logger.info(f"Unprotected data: {unprotected_data}")
The Policy Agent uses default endpoint hostnames to communicate with other AWS services (for example, secretsmanager.amazonaws.com). This configuration will only work in VPCs where Amazon-provided DNS is available (default VPC configuration with private DNS option enabled for the endpoint). If your VPC uses custom DNS, follow the instructions below to configure the Policy Agent Lambda to use custom endpoint hostnames.
Note
This configuration is only available with the Cloud Protect version 1.5.0 or higher. For more information about the upgrade instructions, refer to Upgrading to the Latest Version.
Identify DNS Hostnames
To identify DNS hostnames:
From AWS console, select VPC > Endpoints.
Select Secrets Manager endpoint from the list of endpoints.
Under Details > DNS Names, note the private endpoint DNS names adding https:// at the beginning of the endpoint name.
^User regex$ - Custom regex with one capturing group. This group is used to extract the username.
Examples below show different regular expression values and the resulting policy user.
10.8 - Associating ESA Data Store With Cloud Protect Agent
Configure ESA data store for Policy Agent.
Associating ESA Data Store With Cloud Protect Agent
ESA controls which policy is deployed to protector using concept of data store. A data store may contain a list of IP addresses identifying servers allowed to pull the policy associated with that specific data store. Data store may also be defined as default data store, which allows any server to pull the policy, provided it does not belong to any other data stores. Node registration occurs when the policy server (in this case the policy agent) makes a policy request to ESA, where the agent’s IP address is identified by ESA.
Note
For more information about ESA data store refer to Policy Management Guide which is part of Protegrity ESA documentation.
Policy agent lambda source IP address used for node registration on ESA depends on ESA hubcontroller configuration ASSIGN_DATASTORE_USING_NODE_IP and the PTY_ADDIPADDRESSHEADER configuration exposed by the agent lambda.
The Lambda service uses multiple network interfaces, internal network interface with ephemeral IP range of 169.254.x.x and external network interface with IP range of the VPC subnet the Lambda is associated with. By default, when agent lambda is contacting ESA to register node for policy download, ESA uses agent Lambda VPC IP address. This default behavior is caused by the default ESA hubcontroller configuration ASSIGN_DATASTORE_USING_NODE_IP=false and agent default configuration PTY_ADDIPADDRESSHEADER=yes.
In some cases, when there is a proxy server between the ESA and agent lambda, the desirable ESA configuration is ASSIGN_DATASTORE_USING_NODE_IP=true. and PTY_ADDIPADDRESSHEADER=no which will cause the ESA to use proxy server IP address.
The table below shows how the hubcontroller and agent settings will affect node IP registration on ESA.