This is the multi-page printable view of this section. Click here to print.
Appendices
- 1: Installing the Policy Agent and Protector in Different AWS Accounts
- 2: Integrating Cloud Protect with PPC (Protegrity Provisioned Cluster)
- 3: Policy Agent - Custom VPC Endpoint Hostname Configuration
- 4: Redshift Cross-Account Configuration
- 5: Sample Redshift External Function
- 6: Configuring Regular Expression to Extract Policy Username
- 7: Associating ESA Data Store With Cloud Protect Agent
1 - Installing the Policy Agent and Protector in Different AWS Accounts
The Policy Agent Lambda function and Protect Lambda functions can be installed in separate AWS accounts. However, additional configuration is required to authorize the Policy Agent to provision the security policy to a remote Protect Lambda function.
Note
The Policy Agent will deploy an encrypted security policy file to an S3 bucket in the Protect function’s AWS Account.Create Agent Lambda IAM policy
Login to the AWS account that hosts the Protect Lambda function.
From the AWS IAM console, select Policies > Create Policy.
Select the JSON tab and copy the following snippet.
{
  "Version": "2012-10-17",
  "Statement": [
    {
      "Sid": "LambdaUpdateFunction",
      "Effect": "Allow",
      "Action": [
        "lambda:UpdateFunctionConfiguration"
      ],
      "Resource": [
        "arn:aws:lambda:*:*:function:*"
      ]
    },
    {
      "Sid": "LambdaReadLayerVersion",
      "Effect": "Allow",
      "Action": [
        "lambda:GetLayerVersion",
        "lambda:ListLayerVersions"
      ],
      "Resource": "*"
    },
    {
      "Sid": "LambdaDeleteLayerVersion",
      "Effect": "Allow",
      "Action": "lambda:DeleteLayerVersion",
      "Resource": "arn:aws:lambda:*:*:layer:*:*"
    },
    {
      "Sid": "LambdaPublishLayerVersion",
      "Effect": "Allow",
      "Action": "lambda:PublishLayerVersion",
      "Resource": "arn:aws:lambda:*:*:layer:*"
    },
    {
      "Sid": "S3GetObject",
      "Effect": "Allow",
      "Action": [
        "s3:GetObject"
      ],
      "Resource": "arn:aws:s3:::*/*"
    },
    {
      "Sid": "S3PutObject",
      "Effect": "Allow",
      "Action": [
        "s3:PutObject"
      ],
      "Resource": "arn:aws:s3:::*/*"
    },
    {
      "Sid": "LambdaGetConfiguration",
      "Effect": "Allow",
      "Action": [
          "lambda:GetFunctionConfiguration"
      ],
      "Resource": [
          "arn:aws:lambda:*:*:function:*"
      ]
    }
  ]
}
Replace the wildcards (*) with the region, account, and resource name information where required.
Select Review policy, type in the policy name, and confirm. Record policy name:
Agent Lambda Cross Account Policy Name: ___________________
Create Policy Agent cross-account IAM Role
Login to the AWS account that hosts the Protect Lambda function.
From the AWS IAM console, select Roles > Create Role
Select AWS Service > Lambda . Proceed to Permissions.
Select Policy created in the step above. Proceed to Tags.
Specify Tag, proceed to the final screen. Type in policy name and confirm. Record the name.
Policy Agent Cross Account IAM Role Name: ___________________
Allow the Policy Agent Cross-Account Role to be Assumed by the Policy Agent IAM Role
Login to the AWS account that hosts the Protect Lambda function.
Navigate to the previously created IAM Role (Agent Lambda Cross-Account IAM Role Name).
Navigate to Trust Relationships > Edit Trust Relationships.
Modify the Policy Document, replacing the placeholder value indicated in the following snippet as <Agent Lambda IAM Execution Role ARN> with ARN of Agent Lambda IAM Role that was created in Agent Installation.
{
  "Version": "2012-10-17",
  "Statement": [
    {
      "Effect": "Allow",

   "Principal": {

            "AWS": "<Agent Lambda IAM Execution Role Name>"

      },
      "Action": "sts:AssumeRole"
    }
  ]
}
Click Update Trust Policy.
Add Assume Role to the Policy Agent Execution IAM Role
Login to the AWS account that hosts the Policy Agent.
Navigate to the Agent Lambda IAM Execution Role that was created in Agent Installation.
{
  "Version": "2012-10-17",
  "Statement": [
    {
      "Effect": "Allow",

   "Principal": {

            "AWS": "<Agent Lambda IAM Execution Role Name>"

      },
      "Action": "sts:AssumeRole"
    }
  ]
}
Add Inline Policy.
Modify the Policy Document, replacing the placeholder value indicated in the following snippet as <Agent Lambda Cross-Account IAM ARN> with the value recorded in Create Policy Agent cross-account IAM Role.
{
  "Version": "2012-10-17",
  "Statement": [
    {
      "Effect": "Allow",
      "Action": [
        "sts:AssumeRole"
      ],
      "Resource": "<Agent Lambda Cross-Account IAM  ARN>."
    }
  ]
}
When you are finished, choose Review Policy.
On the Review policy page, type a Name, then choose Create Policy.
Update the Policy Agent Lambda Configuration
From the AWS console, navigate to Lambda, and select the Policy Agent Lambda function.
Select Configuration tab | Environment variables.
Select Edit and add the following environment variables with the value from Agent Lambda Cross-Account IAM ARN:
Parameter Value AWS_ASSUME_ROLE Agent Lambda Cross-Account IAM ARN Ensure the values in the Parameters AWS_POLICY_S3_BUCKET, AWS_PROTECT_FN_NAME and AWS_POLICY_LAYER_NAME are all in the Protect Lambda Function AWS Account.
In case custom VPC hostname configuration is used, you will need to set the ENDPOINT_URL. Refer to Policy Agent - Custom VPC Endpoint Hostname Configuration.
AWS_VPC_ENDPOINT_URL
<AWS_VPC_ENDPOINT>
Click Save and Run the Lambda. The Lambda will now assume the Role in Protect Lambda Function AWS Account and update the policy cross accounts.
2 - Integrating Cloud Protect with PPC (Protegrity Provisioned Cluster)
This guide describes how to configure the Protegrity Policy Agent and Log Forwarder to connect to a Protegrity Provisioned Cluster (PPC), highlighting the differences from connecting to ESA.
Key Differences: PPC vs ESA
| Feature | ESA 10.2 | PPC (this guide) |
|---|---|---|
| Datastore Key Fingerprint | Optional/Recommended | Required |
| CA Certificate on Agent | Optional/Recommended | Optional/Recommended |
| CA Certificate on Log Forwarder | Optional/Recommended | Not supported |
| Client Certificate Authentication from Log Forwarder | Optional/Recommended | Not supported |
| IP Address | ESA IP address | PPC address |
Prerequisites
- Access to PPC and required credentials.
- Tools:
curl,kubectlinstalled.
Policy Agent Setup with PPC
Important
When connecting to PPC, the Policy Agent requires use of a datastore key fingerprint. For connecting to ESA 10.2 with Cloud Protect Policy Agent, the fingerprint is optional but recommended. See Policy Agent Installation for general setup steps.Follow these instructions as a guide for understanding specific inputs for Policy Agent integrating with PPC:
Obtain the Datastore Key Fingerprint
To retrieve the fingerprint for your Policy Agent:
Retrieve public key from the Cloud Provider Key Management service for the policy encryption key created in pre-configuration:
- Navigate to the Key Management Service in AWS console and open Customer Managed Keys
- Select the desired key
- Select the Public Key tab
- Select Download
- Navigate to the Key Vault in Azure console and open Objects>Keys
- Select the desired key
- Select the key indicated as CURRENT VERSION
- Select Download public key
- Navigate to Key Management in GCP console
- Select the desired key and open the Versions tab
- Select Get public key from the Actions column menu
- Select Download
Escape the new line characters in the downloaded public key for use in the next step - for example:
awk 'NF {printf "%s\\n",$0}' "<public_key_file>" > "new-line-escaped-public-key.pem"
cat new-line-escaped-public-key.pem
Export key fingerprint using the PPC API as indicated in the curl example below:
curl -k -H "Authorization: Bearer ${TOKEN}" -X POST https://${HOST}/pty/v2/pim/datastores/1/export/keys  -H "Content-Type: application/json" --data '{
  "algorithm": "RSA-OAEP-256",
  "description": "example-key-from-key-management",
  "pem": "<value of new-line-escaped-public-key>"
}'
Sample Output:
{"uid":"1","algorithm":"RSA-OAEP-256","fingerprint":"4c:46:d8:05:35:2e:eb:39:4d:39:8e:6f:28:c3:ab:d3:bc:9e:7a:cb:95:cb:b1:8e:b5:90:21:0f:d3:2c:0b:27","description":"example-key-from-kms"}Note
Alternatively, set using the PPC CLI utility. See the export key example in Create Datastores KeyRecord the value for
fingerprintand configure the Policy Agent:Set the environment variable
PTY_DATASTORE_KEYin the Policy Agent Lambda function to thefingerprintvalue.Set the environment variable
PTY_DATASTORE_KEYin the Policy Agent Function App to thefingerprintvalue.Set the variable in Policy Agent main.tf
pty_datastore_keyto thefingerprintvalue and apply the changes.
Retrieve the PPC CA Certificate
To obtain the CA certificate from PPC:
kubectl -n api-gateway get secret ingress-certificate-secret -o jsonpath='{.data.ca\.crt}' | base64 -d > CA.pemUse the
ProtegrityCA.pemthat was returned as described in Policy Agent Installation.Configure the PPC Address
Use the PPC address in place of the ESA IP address wherever required in your configuration.
Note
Use FQDN as described in the PPC Rest API documentation
Log Forwarder Setup with PPC
Note
When using PPC, certificate authentication and CA validation are not supported for the Log Forwarder. Configuration steps related to certificates in Log Forwarder Installation do not apply to PPC. If you attempt to use certificates provided by PPC, the Log Forwarder will not function correctly.- The Log Forwarder will proceed without certificates and will print a warning if
PTY_ESA_CA_SERVER_CERTis not provided. - No additional certificate or CA configuration is needed for PPC.
3 - Policy Agent - Custom VPC Endpoint Hostname Configuration
The Policy Agent uses default endpoint hostnames to communicate with other AWS services (for example, secretsmanager.amazonaws.com). This configuration will only work in VPCs where Amazon-provided DNS is available (default VPC configuration with private DNS option enabled for the endpoint). If your VPC uses custom DNS, follow the instructions below to configure the Policy Agent Lambda to use custom endpoint hostnames.
Note
This configuration is only available with the Cloud Protect version 1.5.0 or higher. For more information about the upgrade instructions, refer to Upgrading to the Latest Version.Identify DNS Hostnames
To identify DNS hostnames:
From AWS console, select VPC > Endpoints.
Select Secrets Manager endpoint from the list of endpoints.
Under Details > DNS Names, note the private endpoint DNS names adding https:// at the beginning of the endpoint name.
For example, https://vpce-1234-4pzomrye.kms.us-west-1.vpce.amazonaws.com
Note down DNS names for the KMS and Lambda endpoints:
AWS_SECRETSMANAGER_ENDPOINT: https://_________________
AWS_KMS_ENDPOINT: https://_________________
AWS_LAMBDA_ENDPOINT: https://_________________
Update the Policy Agent Lambda configuration
To update policy agent lambda configuration:
From the AWS console, navigate to Lambda, and select the Policy Agent Lambda function.
Select the Configuration section and choose Environment variables.
Select Edit and add the following environment variables with the corresponding endpoint URLs recorded in steps 3-4:
Parameters Value AWS_SECRETSMANAGER_ENDPOINT_URL <AWS_SECRETS_ENDPOINT> AWS_KMS_ENDPOINT_URL <AWS KMS ENDPOINT> AWS_LAMBDA_ENDPOINT_URL <AWS LAMBDA ENDPOINT> Click Save and Run the Lambda. The Lambda will now use endpoints you have just configured.
4 - Redshift Cross-Account Configuration
Cross-Account Configuration
Important
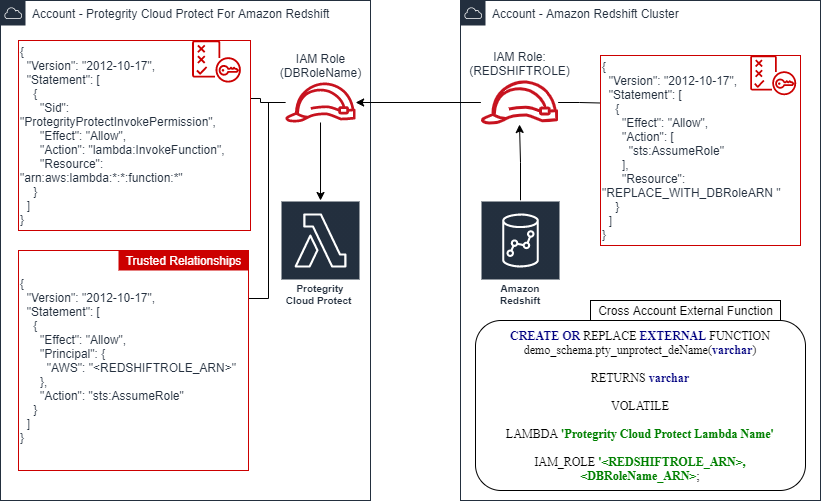
These steps are only required IF the Protegrity solution is installed in a separate AWS account from the Amazon Redshift cluster.The following figure illustrates the Protegrity Redshift Integration architecture when Protegrity Solution is installed on separate from Amazon Redshift Cluster Account.
Redshift Account IAM Configuration
This step creates Redshift IAM role with permissions to assume role in separate account.
Create Redshift IAM policy:
Login to the AWS account that hosts the Amazon Redshift cluster.
In the AWS console, access Services > IAM and click Policies.
Click Create Policy.
Select the JSON tab and paste the following JSON snippet:
{ "Version": "2012-10-17", "Statement": [ { "Effect": "Allow", "Action": [ "sts:AssumeRole" ], "Resource": "<DBRoleARN>" } ] }Replace the resource value with DBRoleARN recorded in Create IAM Account Role
Click Review policy to continue.
Enter a name for the policy.
Click Create Policy.
Record the policy name.
Redshift IAM Policy Name: ___________________
Create Redshift IAM Role
This step creates Redshift IAM role with permissions to assume role in separate account.
Create Redshift IAM Role:
Login to the AWS account that hosts the Amazon Redshift cluster.
In the AWS console, access Services > IAM and click Roles.
Click Create Role.
Select AWS Service as the trusted entity type, then select Redshift use case from the list of services.
Select Redshift – Customizable from the use case section.
Continue by clicking Next:Permissions.
Filter the list and search for the policy recorded in the step above (Redshift IAM Policy Name).
Click the Next:Tags button to continue to the next step.
Click the Next:Review button to continue.
Enter a role name, such as Redshift2ProtegrityRole.
Click Create Role.
Record role ARN:
RedshiftIAMRoleARN: ____________________
Attach IAM Role to Redshift Cluster
This step creates Redshift IAM role with permissions to assume role in separate account.
Attach IAM role to the Redshift cluster:
Login to AWS Console.
Access Amazon Redshift and select your cluster.
Select Properties > Cluster Permissions > Manage IAM Roles.
Select RedshiftIAMRoleARN configured in the step above and click Associate IAM role.
Save the changes.
After saving the changes it may take couple of minutes until the cluster IAM role is fully configured.
You can check configuration status by navigating back to the cluster IAM role settings.
The status field next to the IAM role will show in-sync once the role is configured.
Defining Redshift External Functions
The external function for cross-account differs slightly from the reference material in this document. The function requires two roles to be specified. The following is an example of the modified function definition.
CREATE OR REPLACE EXTERNAL FUNCTION demo_schema.pty_unprotect_deName(varchar)
RETURNS varchar
VOLATILE
LAMBDA 'ProtectFunctionProductionAlias'
IAM_ROLE '<RedshiftIAMRoleARN>,<DBRoleARN>;
Replace <ProtectFunctionProductionAlias> with the value recorded in Install through CloudFormation Replace <RedshiftIAMRoleARN> with the value recorded in Create Redshift IAM Role Replace <DBRoleARN> with the value recorded in Create IAM Account Role
5 - Sample Redshift External Function
Sample Redshift External Function
Method: Tokenization | ||
Type: ALPHA | ||
| ||
Redshift Data Types | Redshift Max Size | Protegrity Max Size |
VARCHAR | 4K (4,096 bytes) | 4K (4,096 bytes) |
CHAR | ||
| ||
| ||
| ||
External Function Sample Definitions: | ||
| ||
| ||
Sample EF Calls: | ||
| ||
| ||
| ||
| ||
Method: Tokenization | ||
Type: NUMERIC | ||
| ||
Redshift Data Types | Redshift Max Size | Protegrity Max Size |
DECIMAL | 4K (4,096 bytes) | 4K (4,096 bytes) |
INTEGER | ||
BIGINT | ||
| ||
| ||
External Function Sample Definitions: | ||
| ||
| ||
Sample EF Calls: | ||
| ||
| ||
6 - Configuring Regular Expression to Extract Policy Username
Configuring Regular Expression to Extract Policy Username
Cloud Protect Lambda Function exposes USERNAME_REGEX configuration to allow extraction of policy username from user in the request.
USERNAME_REGEX Lambda Environment configuration
The USERNAME_REGEX configuration can be used to extract policy username from user in the request. The following are allowed values for USERNAME_REGEX:
1 - Default build-in regular expression is used:
^arn:aws:(?:iam|sts)::[0-9]{12}:(?:role|user|group|assumed\-role|federated\-user)\/([\w\/+=,.\-]{1,1024}|[\w\/+=,.\-@]{1,1024})(?:@[a-zA-Z0-9\-]{1,320}(?:\.\w+)+)?$^User regex$ - Custom regex with one capturing group. This group is used to extract the username. Examples below show different regular expression values and the resulting policy user.
USERNAME_REGEX | User in the request | Effective Policy User |
|---|---|---|
Not Set | arn:aws:iam::123456789012:user/juliet.snow | arn:aws:iam::123456789012:user/juliet.snow |
arn:aws:sts::123456789012:assumed-role/TestSaml | arn:aws:sts::123456789012:assumed-role/TestSaml | |
1 | arn:aws:iam::123456789012:user/juliet.snow | juliet.snow |
arn:aws:sts::123456789012:assumed-role/TestSaml | TestSaml | |
| arn:aws:iam::123456789012:user/juliet.snow | user/juliet.snow |
arn:aws:sts::123456789012:assumed-role/TestSaml | assumed-role/TestSaml |
7 - Associating ESA Data Store With Cloud Protect Agent
Associating ESA Data Store With Cloud Protect Agent
ESA controls which policy is deployed to protector using concept of data store. A data store may contain a list of IP addresses identifying servers allowed to pull the policy associated with that specific data store. Data store may also be defined as default data store, which allows any server to pull the policy, provided it does not belong to any other data stores. Node registration occurs when the policy server (in this case the policy agent) makes a policy request to ESA, where the agent’s IP address is identified by ESA.
Note
For more information about ESA data store refer to Policy Management Guide which is part of Protegrity ESA documentation.Policy agent lambda source IP address used for node registration on ESA depends on ESA hubcontroller configuration ASSIGN_DATASTORE_USING_NODE_IP and the PTY_ADDIPADDRESSHEADER configuration exposed by the agent lambda.
The Lambda service uses multiple network interfaces, internal network interface with ephemeral IP range of 169.254.x.x and external network interface with IP range of the VPC subnet the Lambda is associated with. By default, when agent lambda is contacting ESA to register node for policy download, ESA uses agent Lambda VPC IP address. This default behavior is caused by the default ESA hubcontroller configuration ASSIGN_DATASTORE_USING_NODE_IP=false and agent default configuration PTY_ADDIPADDRESSHEADER=yes.
In some cases, when there is a proxy server between the ESA and agent lambda, the desirable ESA configuration is ASSIGN_DATASTORE_USING_NODE_IP=true. and PTY_ADDIPADDRESSHEADER=no which will cause the ESA to use proxy server IP address.
The table below shows how the hubcontroller and agent settings will affect node IP registration on ESA.
| Agent source IP | Agent VPC subnet IP | Proxy IP | ESA config - ASSIGN_DATASTORE_USING_NODE_IP | Agent lambda config - PTY_ADDIPADDRESSHEADER | Agent node registration IP |
|---|---|---|---|---|---|
| 169.254.144.81 | 10.1.2.173 | No Proxy | true | yes | 169.254.144.81 |
| true | no | 10.1.2.173 | |||
| false | yes | ||||
| false | no | ||||
| 169.254.144.81 | 10.1.2.173 | 34.230.42.110 | true | yes | 169.254.144.81 |
| true | no | 34.230.42.110 | |||
| false | yes | ||||
| false | no |