This is the multi-page printable view of this section. Click here to print.
Data Discovery
- 1: Introduction
- 2: General Architecture
- 3: Data Discovery API
- 4: Obtaining the Package
- 5: Uploading the Images
- 6: Deployment
- 6.1: Docker Compose
- 6.1.1: Prerequisites
- 6.1.2: Configuring Environment Variables
- 6.1.3: Deploying the Application
- 6.1.4: Viewing the Logs
- 6.1.5: Removing the Application
- 6.1.6:
- 6.1.7:
- 6.1.8:
- 6.1.9:
- 6.1.10:
- 6.1.11:
- 6.2: Deployment on EKS
- 6.2.1: Architecture for EKS
- 6.2.2: Prerequisites
- 6.2.3: Configuring Environment Variables
- 6.2.4: Deploying the Cluster and the Application
- 6.2.5: Viewing the Logs
- 6.2.6: Removing the Application
- 6.2.7:
- 6.2.8:
- 6.2.9:
- 6.2.10:
- 7: Security Feature
- 7.1: Input Sanitization
- 7.2:
- 7.3:
- 8: Performance and Accuracy
1 - Introduction
In an era where data privacy is paramount, safeguarding sensitive information in unstructured data has become critical—especially for organizations leveraging AI and machine learning technologies. Data Discovery is a powerful, developer-friendly product designed specifically to address this challenge.
Data Discovery Text Classification service advances data discovery and classification, specializing in the detection of Personally Identifiable Information (PII), Protected Health Information (PHI), Payment Card Information (PCI) within plain text and free-text inputs. Unlike traditional structured data tools, it excels in dynamic, unstructured environments such as chatbot conversations, call transcripts, and Generative AI (GenAI) outputs.
Harnessing a hybrid detection engine that combines machine learning and rule-based algorithms, Data Discovery offers unparalleled accuracy and flexibility. It empowers teams to perform the following:
Automate chatbot redaction to ensure compliance with privacy regulations.
Perform transcript cleanup for customer service, healthcare, and financial industries.
Enhance GenAI applications by proactively mitigating the risks associated with leaking sensitive information.
Built for developers, architects, and privacy engineers, Data Discovery seamlessly integrates into AI/ML pipelines and GenAI workflows. Deployment is fast and flexible, with support for both Docker containers and AWS EKS clusters, and interaction via robust, intuitive REST APIs.
Whether you’re building next-generation AI applications or enhancing existing systems to meet evolving data privacy standards, Data Discovery equips you with the tools to discover, classify, and protect sensitive information at scale.
2 - General Architecture
The main components of the Protegrity Data Discovery product are as follows:
Classification service: The access point for the requests.
Presidio and Roberta providers: These are used to identify, classify, and locate sensitive data.
The general architecture is illustrated in the following figure.

| Callout | Description |
|---|---|
| 1 | The user enters the data to be classified for sensitive data as text body and sends the request to the Classification service. |
| 2 | This Classification service then distributes the request to the Presidio and Roberta service providers to process the data. |
| 3 | The Presidio and Roberta providers process the data based on their logic and classify them in the form of a response to the Classification service. |
| 4 | The Classification service then aggregates the responses from the service providers and sends it to the user. |
3 - Data Discovery API
Data Discovery Classification Service
This API identifies, classifies, and locates sensitive data.
Endpoint
https://{Host Address}/pty/data-discovery/v1.0/classify
Path
/pty/data-discovery/v1.0/classify
Method
POST
Parameters
The API contains the following parameter.
floatDescription: Exclude results with a score lower than this threshold. This parameter is optional.
Values: minimum 0, maximum 1.0
Default: 0.00
Example: 0.75
Example Data
You can reach Dave Elliot by phone 203-555-1286.
The data should be in UTF-8 format. Also, the limit on the length of the characters is 10,000.
Sample Request
https://{Host address}/pty/data-discovery/v1.0/classify
Response Codes
Successful Response.{
"providers": [
{
"name": "Presidio Classification Provider",
"version": "1.0.0",
"status": 200,
"elapsed_time": 1.014178991317749,
"exception": null,
"config_provider": {
"name": "Presidio",
"address": "http://presidio_provider_service",
"supported_content_types": []
}
},
{
"name": "Roberta Classification Provider",
"version": "1.0.0",
"status": 200,
"elapsed_time": 19.091534852981567,
"exception": null,
"config_provider": {
"name": "Roberta",
"address": "http://roberta_provider_service",
"supported_content_types": []
}
}
],
"classifications": {
"PERSON": [
{
"score": 0.9236000061035157,
"location": {
"start_index": 14,
"end_index": 25
},
"classifiers": [
{
"provider_index": 0,
"name": "SpacyRecognizer",
"score": 0.85,
"details": {}
},
{
"provider_index": 1,
"name": "roberta",
"score": 0.9972000122070312,
"details": {}
}
]
}
],
"PHONE_NUMBER": [
{
"score": 0.8746500015258789,
"location": {
"start_index": 35,
"end_index": 47
},
"classifiers": [
{
"provider_index": 0,
"name": "PhoneRecognizer",
"score": 0.75,
"details": {}
},
{
"provider_index": 1,
"name": "roberta",
"score": 0.9993000030517578,
"details": {}
}
]
}
]
}
}Request must have a body, but no request body was provided.Payload too large.Unsupported media type.Unexpected internal server error. Check server logs.Internal server error. Check server logs.Sample Request
curl -X POST "https://<SERVER_IP>/pty/data-discovery/v1.0/classify?score_threshold=0.85" \
-H "Content-Type: text/plain" \
--data "You can reach Dave Elliot by phone 203-555-1286"import requests
url = "https://<SERVER_IP>/pty/data-discovery/v1.0/classify"
params = {"score_threshold": 0.85}
headers = {"Content-Type": "text/plain"}
data = "You can reach Dave Elliot by phone 203-555-1286"
response = requests.post(url, params=params, headers=headers, data=data, verify=False)
print("Status code:", response.status_code)
print("Response JSON:", response.json())URL: POST `https://<SERVER_IP>/pty/data-discovery/v1.0/classify`
Query Parameters:
-score_threshold (optional), float between 0.0 and 1.0, default: 0.
Headers:
-Content-Type: text/plain
Body:
-You can reach Dave Elliot by phone 203-555-12864 - Obtaining the Package
The artifacts that are required for setting the Data Discovery product are available on the Protegrity customer portal. Run the following steps to download the artifacts.
Log in to the
my.protegrity.comportal.Navigate to the page and download the DataDiscovery_RHUBI-9-64_x86-64_Generic.K8S_1.0.0.tar.gz file on the system.
Extract this package. The following files are available.
- README - File containing the instructions to deploy the product.
- Deployment - Files for deploying the application.
- Images - Images for the Classification, Presidio, and Roberta services.
5 - Uploading the Images
After the package is extracted, the images provided in the package must be uploaded to an image repository.
The images folder contains the following .tar files:
classification_servicepresidio_classification_providerroberta_classification_provider
The images can be uploaded to an image repository such as ECR so that they are available for the deployment. With ECR, the images must be loaded locally to the system using the docker load command.
For example, to upload the classification service image, run the following command.
docker load -i <classification_service_image_name>.tar
After the loading is completed, the images are now ready to be uploaded to an image repository such as ECR. For more information about uploading images to ECR, refer to Pushing Docker images to Amazon ECR.
6 - Deployment
6.1 - Docker Compose
Deploying Data Discovery Classification service on a non-production environment using Docker Compose.
6.1.1 - Prerequisites
Ensure that the following points are completed before deploying the application.
The development package provided by Protegrity is obtained from the portal and extracted.
The Docker CLI is installed to manage Docker containers.
The Docker Compose is installed for local containerized deployments. This application supports Docker Compose V2. Ensure that your installation supports this version.
The images for Classification service, Presidio service, and Roberta services provided in the images folder are uploaded to the required image repository and available for deployment.
6.1.2 - Configuring Environment Variables
Run the following steps to configure the environment variables.
Navigate to the
docker_composedirectory.Open the
.envfile and set the following variables:
| Variable | Description | Mandatory |
|---|---|---|
| CLASSIFICATION_DOCKER_IMAGE | Repository path where the docker image of Classification service is stored. | Yes |
| PRESIDIO_DOCKER_IMAGE | Repository path where the docker image of Presidio service is stored. | Yes |
| ROBERTA_DOCKER_IMAGE | Repository path where the docker image of Roberta service is stored. | Yes |
| DOCKER_NETWORK_NAME | Name of the Docker network. | No |
| PRESIDIO_LOGGING_CONFIG | Logging level for Presidio. | No |
| ROBERTA_LOGGING_CONFIG | Logging level for Roberta. | No |
| CLASSIFICATION_LOGGING_CONFIG | Logging level for the classification service. | No |
- Save the changes.
6.1.3 - Deploying the Application
Run the following steps to deploy the Data Discovery application on Docker.
- Navigate to the
docker_composedirectory.
cd /docker_compose
- Run the
compose_upscript.
./compose_up.sh
The network is set up based on the values provided in the docker-compose.yaml file. The images are extracted from the repositories provided in the .env file and the respective containers are started.
After the deployment is successful, the following message is displayed....[OK]
Verifying the Deployment
After the deployment is complete, verify the deployment on Docker.
Verifying the deployment from the Docker network. For example, verifying the deployment from another container.
curl -XPOST classification_service/pty/data-discovery/v1.0/classify --data 'You can reach Dave Elliot by phone 203-555-1286' -H "Content-Type: text/plain"
Verifying the deployment from a host machine.
curl -XPOST http://localhost:8580/pty/data-discovery/v1.0/classify --data 'You can reach Dave Elliot by phone 203-555-1286' -H "Content-Type: text/plain"
The response generated will be similar to the following snippet.
{
        "providers": [
          {
            "name": "Presidio Classification Provider",
            "version": "1.0.0",
            "status": 200,
            "elapsed_time": 1.014178991317749,
            "exception": null,
            "config_provider": {
              "name": "Presidio",
              "address": "http://presidio_provider_service",
              "supported_content_types": []
            }
          },
          {
            "name": "Roberta Classification Provider",
            "version": "1.0.0",
            "status": 200,
            "elapsed_time": 19.091534852981567,
            "exception": null,
            "config_provider": {
              "name": "Roberta",
              "address": "http://roberta_provider_service",
              "supported_content_types": []
            }
          }
        ],
        "classifications": {
          "PERSON": [
            {
              "score": 0.9236000061035157,
              "location": {
                "start_index": 14,
                "end_index": 25
              },
              "classifiers": [
                {
                  "provider_index": 0,
                  "name": "SpacyRecognizer",
                  "score": 0.85,
                  "details": {}
                },
                {
                  "provider_index": 1,
                  "name": "roberta",
                  "score": 0.9972000122070312,
                  "details": {}
                }
              ]
            }
          ],
          "PHONE_NUMBER": [
            {
              "score": 0.8746500015258789,
              "location": {
                "start_index": 35,
                "end_index": 47
              },
              "classifiers": [
                {
                  "provider_index": 0,
                  "name": "PhoneRecognizer",
                  "score": 0.75,
                  "details": {}
                },
                {
                  "provider_index": 1,
                  "name": "roberta",
                  "score": 0.9993000030517578,
                  "details": {}
                }
              ]
            }
          ]
        }
      }
6.1.4 - Viewing the Logs
Viewing Logs
The application logs can be viewed using the following commands:
docker logs -f classification_service
docker logs -f roberta_provider
docker logs -f presidio_provider
Setting the Log Level
The log level can be updated in the .env file.
To set the log level, run the following steps.
Navigate to the
docker_composedirectory.Edit the
.envfile.Uncomment the required logging configuration and set the logging level to one of the following:
- INFO
- DEBUG
- ERROR
- WARNING
For example, to change the log level for PRESIDIO_LOGGING_CONFIG, configure the parameter as follows.
PRESIDIO_LOGGING_CONFIG={"root":{"level":"ERROR"}}
Save the changes.
Run the
compose_down.shfile to undeploy the application.Run the
compose_up.shfile to redeploy the application.
6.1.5 - Removing the Application
To remove the application from Docker, run the following steps.
- Navigate to the
docker_composedirectory.
cd /docker_compose
- Run the
compose_downscript.
./compose_down.sh
Note: To remove the application completely, ensure that the images uploaded to the image repository are also deleted.
6.1.6 -
./compose_up.sh
6.1.7 -
./compose_up.sh
6.1.8 -
Navigate to the
/deployment/docker_composedirectory.Run the
compose_up.shfile.
6.1.9 -
Navigate to the
/deployment/docker_composedirectory.Run the
compose_up.shfile.
6.1.10 -
Verifying the deployment from a host machine.
curl -XPOST http://localhost:8580/pty/data-discovery/v1.0/classify --data 'You can reach Dave Elliot by phone 203-555-1286' -H "Content-Type: text/plain"
6.1.11 -
Verifying the deployment from the Docker network. For example, verifying the deployment from another container.
curl -XPOST classification_service/pty/data-discovery/v1.0/classify --data 'You can reach Dave Elliot by phone 203-555-1286' -H "Content-Type: text/plain"
6.2 - Deployment on EKS
An introduction and the steps to deploy the application on EKS.
6.2.1 - Architecture for EKS
The following architectural diagram illustrates the main components in the deployment of the product on EKS.
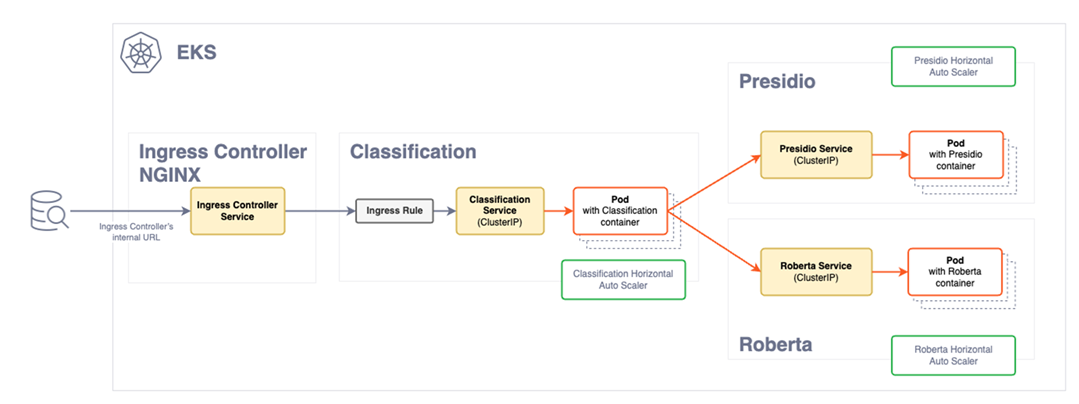
| Component | Description |
|---|---|
| Ingress Controller | The Ingress controller acts as the single point of entry for the requests provided by a user. |
| Ingress rule | The Ingress rule routes the requests to the Classification service. |
| Classification pods | The classification service deployment contains the classification service pods. Based on the load of requests, the pods for the classification service will scale horizontally to meet the demand. New pods are created when a certain threshold is reached. The pods are fronted by a load balancer that directs requests from the Ingress controller. Based on the load and availability, the requests are distributed amongst the pods. |
| Service provider deployment | The Service deployment contain the images of the Presidio and the Roberta service providers. The requests sent by Classification service are received by these pods for the classification of data. Similar to the classification service deployment, these pods will scale horizontally to meet the request load demand. |
6.2.2 - Prerequisites
Ensure that the following points are completed before deploying the application.
The development package provided by Protegrity is obtained from the portal and extracted.
The following tools are required to install the product:
AWS CLI: This must be configured with valid credentials. For more information, refer to Configuration and credentials precedence. The AWS account used must have the necessary permissions to create and manage EKS clusters and associated resources.
kubectl: This is used to manage the Kubernetes cluster.
Helm: This is used to deploy applications on the EKS cluster.
The NGINX and metric server: These components are downloaded from an external repository during the deployment process and require access to Internet. Ensure that these are available for deployment.
The following AWS requirements are completed:
- Virtual Private Cloud (VPC) for the EKS cluster. For more information about VPCs, refer to Amazon VPC.
- Role creation permissions to create IAM roles. If your account does not have these permissions, create the necessary roles as defined in the
eks-auto-mode.yamlfile in the/eks/cloudformationdirectory. - AWS must have permissions to access the Docker registry where your Docker images are stored.
Valid server certificate files are uploaded to the
/eks/helm_chart/classification_app/certsdirectory. These files are required for secure communication and are automatically pushed to the cluster during deployment. The following files must be uploaded:- Server certificate with .crt extension.
- Private key with the .key.
For more information about generating certificates, refer to create certificates.
The certificates in EKS are stored as secrets. It is recommended to secure the EKS secrets using KMS encryption. For more information about encrypting keys, refer to encrypt Kubernetes secrets with KMS.
6.2.3 - Configuring Environment Variables
Run the following steps to configure the environment variables.
Navigate to the
eksdirectory.Open the
.envfile and configure the following variables:
| Variable | Description | Mandatory |
|---|---|---|
| CLUSTER_NAME | Name for the cluster. Ensure that a unique name is provided to the cluster. | No |
| CLASSIFICATION_DOCKER_IMAGE | Repository path where the docker image of Classification service is stored. | Yes |
| ROBERTA_DOCKER_IMAGE | Repository path where the docker image of Roberta service is stored. | Yes |
| PRESIDIO_DOCKER_IMAGE | Repository path where the docker image of Presidio service is stored. | Yes |
| SUBNET_IDS | Subnetwork IDs. Provide a comma-separated list. For example,"subnet-YYYY\\,subnet-XXXXX" | Yes |
| AWS_REGION | Region of AWS infrastructure. | Yes |
| CLUSTER_IAM_ROLE_ARN | IAM role ARN for the cluster. If left blank, CloudFormation will automatically create the role. | No |
| NODE_IAM_ROLE_ARN | IAM role ARN for the nodes. If left blank, CloudFormation will automatically create the role. | No |
- Save the changes.
6.2.4 - Deploying the Cluster and the Application
Deploying the Application
Deploy the Data Discovery application on EKS.
- Navigate to the
eksdirectory.
cd /eks
- Run the
aws_deployscript.
./aws_deploy.sh
After the deployment is completed, the following message is displayed.
Service 'protegrity.classification-service is ready!Your Ingress Controller is available at {DNS address}
Note the DNS address of the Ingress controller.
Verifying the Installation
Run the following cURL command to verify the installation.
curl -k https://{Ingress Controller DNS address}/readiness
curl -k -X POST https://{Ingress Controller DNS address}/pty/data-discovery/v1.0/classify -H 'Content-Type: text/plain' --data 'Jake lives in 35, Hampden Street'
The response generated will be similar to the following snippet.
{
  "providers": [
    {
      "name": "Presidio Classification Provider",
      "version": "1.0.0",
      "status": 200,
      "elapsed_time": 1.014178991317749,
      "exception": null,
      "config_provider": {
        "name": "Presidio",
        "address": "http://presidio_provider_service",
        "supported_content_types": []
      }
    },
    {
      "name": "Roberta Classification Provider",
      "version": "1.0.0",
      "status": 200,
      "elapsed_time": 19.091534852981567,
      "exception": null,
      "config_provider": {
        "name": "Roberta",
        "address": "http://roberta_provider_service",
        "supported_content_types": []
      }
    }
  ],
  "classifications": {
    "PERSON": [
      {
        "score": 0.9236000061035157,
        "location": {
          "start_index": 14,
          "end_index": 25
        },
        "classifiers": [
          {
            "provider_index": 0,
            "name": "SpacyRecognizer",
            "score": 0.85,
            "details": {}
          },
          {
            "provider_index": 1,
            "name": "roberta",
            "score": 0.9972000122070312,
            "details": {}
          }
        ]
      }
    ],
    "PHONE_NUMBER": [
      {
        "score": 0.8746500015258789,
        "location": {
          "start_index": 35,
          "end_index": 47
        },
        "classifiers": [
          {
            "provider_index": 0,
            "name": "PhoneRecognizer",
            "score": 0.75,
            "details": {}
          },
          {
            "provider_index": 1,
            "name": "roberta",
            "score": 0.9993000030517578,
            "details": {}
          }
        ]
      }
    ]
  }
}6.2.5 - Viewing the Logs
Viewing Logs
The application logs can be viewed using the following commands:
 kubectl logs classification-deployment-{version} -n protegrity -f
 kubectl logs roberta-provider-deployment-{version} -n protegrity -f
 kubectl logs presidio-provider-deployment-{version} -n protegrity -f
Note: The version of the images can be obtained using the following command:
kubectl get pods -n <namespace-name>
Setting the Log Level
The log level can be updated in the value.yaml file.
  # Custom logging configuration for the application.
  #
  # EXAMPLE - default settings
  # loggingConfig:
  #   root:
  #     level: DEBUG
  #   loggers:
  #     tornado.access:
  #       level: WARNING
  #
To set the log level, run the following steps.
Navigate to the
/eks/helm/classification_appdirectory.Edit the
values.yamlfile.Uncomment the required logging configuration. Under
loggingConfig:, set the value ofroot:levelto one fo the following.
- INFO
- DEBUG
- ERROR
- WARNING
For example, to change the the log level to warning, configure the parameter as follows.
   loggingConfig:
     root:
       level: WARNING
     loggers:
       tornado.access:
         level: WARNING
Save the changes.
Navigate to the
eksdirectory and run theaws_undeploy.shfile to undeploy the application.Run the
aws_deploy.shfile to redeploy the application.
6.2.6 - Removing the Application
To remove the cluster and application from EKS, run the following steps.
- Navigate to the
eksdirectory.
cd /eks
- Run the
aws_undeployscript.
./aws_undeploy.sh
Note: To remove the application completely, ensure that the images uploaded to the image repository are also deleted.
6.2.7 -
./aws_undeploy.sh
6.2.8 -
./aws_deploy.sh [cluster_name]
6.2.9 -
Navigate to the
/deployment/eksdirectory.Run the
aws_undeploy.shfile.
6.2.10 -
Navigate to the
/deployment/eksdirectory.Run the
aws_deploy.shscript.
7 - Security Feature
7.1 - Input Sanitization
The Classification service in Data Discovery offers a security feature that sanitizes the input text. It ensures that invalid, fancy, or maliculous words are sanitized and normalized before data is classified. It normalizes, replaces hieroglyphs, and removes white spaces from input text.
The following are few examples of characters that will be converted to plaintext.
- “Ⅷ” will be converted to “VIII”.
- “𝓉𝑒𝓍𝓉” will be converted to “text”.
- “Pep” will be converted to “Pep”.
For security purposes, this feature is enabled in the application and it is recommended not to disable this feature.
However, if this feature is to be disabled, perform the following steps:
Navigate to the
docker_composedirectory.Edit the
docker-compose.yamlfile.Under the
environmentsection ofclassification_service, append the security parameter as follows.
- SECURITY_SETTINGS={"ENABLE_ALL_SECURITY_CONTROLS":false}
Save the changes.
Run the
compose_down.shfile to undeploy the application.Run the
compose_up.shfile to redeploy the application.
Navigate to the
/eks/helm/classification_appdirectory.Edit the
values.yamlfile.Under
securitySettingssection, configure the security settings parameter as follows.
ENABLE_ALL_SECURITY_CONTROLS: false
Save the changes.
Navigate to the
eksdirectory and run theaws_undeploy.shfile to undeploy the application.Run the
aws_deploy.shfile to redeploy the application.
7.2 -
Navigate to the
docker_composedirectory.Edit the
docker-compose.yamlfile.Under the
environmentsection ofclassification_service, append the security parameter as follows.
- SECURITY_SETTINGS={"ENABLE_ALL_SECURITY_CONTROLS":false}
Save the changes.
Run the
compose_down.shfile to undeploy the application.Run the
compose_up.shfile to redeploy the application.
7.3 -
Navigate to the
/eks/helm/classification_appdirectory.Edit the
values.yamlfile.Under
securitySettingssection, configure the security settings parameter as follows.
ENABLE_ALL_SECURITY_CONTROLS: false
Save the changes.
Navigate to the
eksdirectory and run theaws_undeploy.shfile to undeploy the application.Run the
aws_deploy.shfile to redeploy the application.
8 - Performance and Accuracy
Introduction
Performance and accuracy are critical metrics for data discovery tools. These ensure that large datasets can be processed swiftly and sensitive information is correctly identified. High performance minimizes latency and maximizes productivity, while accuracy reduces the risk of data breaches and ensures compliance with regulatory standards like GDPR and CCPA.
Together, these qualities are essential for maintaining data integrity and security in environments where unstructured data flows through various systems.
Performance Evaluation
The evaluation included Data Discovery deployed on Amazon EKS using a Helm Chart. The primary goal was to validate the application’s scalability and the infrastructure’s ability to handle varying loads under real-world conditions. Nevertheless, performance will vary between applications due to confounding variations in customer use cases. The key findings are as follows:
Scalability: The application and infrastructure configurations can efficiently scale to meet usage demands and support parallel service calls.
Instance Type: The m5.large8 instance was identified as a well-balanced choice for performance and cost.
- If the priority is Faster Response Times: Splitting messages into smaller chunks and processing them in parallel is more cost-effective with multiple weaker instance types.
- If the priority is Maximizing Processing Efficiency: Merging content into a single, larger request and using more powerful instance types is better for maximizing Processing Efficiency (characters processed per second).
EKS Auto Mode: Running EKS in auto mode offers a fully managed Kubernetes cluster with minimal maintenance. This enables the service to self-regulate by automatically scaling up or down based on demand.
Optimized CPU Usage: Maintain low CPU reservation for accurate measurement and effective self-regulation via the Horizontal Pod Autoscaler (HPA) that adjusts based on CPU usage percentage, balancing throughput, and idle time.
Detection Accuracy
Protegrity Data Discovery employs sophisticated Machine Learning (ML) and Natural Language Processing (NLP) technologies to achieve high accuracy in identifying sensitive data. The system processes English text inputs, with an NLP model pinpointing text spans within the document that correspond to various PII elements. The output includes text span as a PII entity, along with the entity type, entity position (start and end), and a confidence score. This confidence score reflects the likelihood of the text span being a PII entity, ensuring precise detection.
Dataset
Diverse datasets containing PII data, which differ based on demographic composition (volume and diversity), variations in data characteristics, types of labels, and other influencing factors were utilized. For example, labels such as “PERSON” and “PHONE_NUMBER” are used. The overall accuracy for detecting various PII data combinations in the dataset was measured with detection rate exceeding 96%.
Accuracy
Defined as an average of detection rates across sentences in a given text data.
Detection Rate = Valid Detections/Ground Truth
Where, Valid Detections is the number of correctly detected PII and Ground Truth is the total number of PIIs.
The variability in customer applications introduces differences in performance, meaning detection accuracy may fluctuate based on the quality of input text. Error rates in identifying PII are influenced not just by the detection service but also by customer workflows and evaluation datasets. It is recommended that customers assess and validate accuracy according to their specific use cases and requirements. It is also pertinent to note that the detected score of the input text may vary negligibly from user to user based on their underlying hardware configuration.
Supported Entity Types
PII entities supported by Data Discovery.
| Entity Name | Description |
|---|---|
| ABA_ROUTING_NUMBER | Routing number used to identify financial institutions in the United States. |
| ACCOUNT_NAME | Name associated with a financial account. |
| ACCOUNT_NUMBER | Bank account number used to identify financial accounts. |
| AGE | Age information used to identify individuals. |
| AMOUNT | Specific amount of money, which can be linked to financial transactions. |
| AU_ABN | Australian Business Number used to identify businesses in Australia. |
| AU_ACN | Australian Company Number used to identify businesses in Australia. |
| AU_MEDICARE | Medicare number used to identify individuals for healthcare services in Australia. |
| AU_TFN | Tax File Number used to identify taxpayers in Australia. |
| BIC | Bank Identifier Code used to identify financial institutions. |
| BITCOIN_ADDRESS | Bitcoin wallet address used for digital transactions. |
| BUILDING | Building information used to identify specific locations. |
| CITY | City information used to identify geographic locations. |
| COMPANY_NAME | Name of a company used to identify businesses. |
| COUNTRY | Country information used to identify geographic locations. |
| COUNTY | County information used to identify geographic locations. |
| CREDIT_CARD | Credit card number used for financial transactions. |
| CREDIT_CARD_CVV | Card Verification Value used to secure credit card transactions. |
| CRYPTO | Cryptocurrency wallet address used for digital transactions. |
| CURRENCY | Currency information used in financial transactions. |
| CURRENCY_CODE | Code representing currency used in financial transactions. |
| CURRENCY_NAME | Name of currency used in financial transactions. |
| CURRENCY_SYMBOL | Symbol representing currency, sometimes linked to financial transactions. |
| DATE | Specific date that can be linked to personal activities. |
| DATE_OF_BIRTH | Date of birth used to identify individuals. |
| DATE_TIME | Specific date and time that can be linked to personal activities. |
| DRIVER_LICENSE | Driver’s license number used to identify individuals. |
| EMAIL_ADDRESS | Email address used for communication and identification. |
| ES_NIE | Foreigner Identification Number used to identify non-residents in Spain. |
| ES_NIF | Tax Identification Number used to identify taxpayers in Spain. |
| ETHEREUM_ADDRESS | Ethereum wallet address used for digital transactions. |
| FI_PERSONAL_IDENTITY_CODE | Personal identity code used to identify individuals in Finland. |
| GENDER | Gender information used to identify individuals. |
| GEO_CCORDINATE | Geographic coordinates used to identify specific locations. |
| IBAN_CODE | International Bank Account Number used to identify bank accounts globally. |
| ID_CARD | Identity card number used to identify individuals. |
| IN_AADHAAR | Unique identification number used to identify residents in India. |
| IN_PAN | Permanent Account Number used to identify taxpayers in India. |
| IN_PASSPORT | Passport number used to identify individuals in India. |
| IN_VEHICLE_REGISTRATION | Vehicle registration number used to identify vehicles in India. |
| IN_VOTER | Voter ID number used to identify registered voters in India. |
| IP_ADDRESS | Internet Protocol address used to identify devices on a network. |
| IPV4 | IPv4 address used to identify devices on a network. |
| IPV6 | IPv6 address used to identify devices on a network. |
| IT_DRIVER_LICENSE | Driver’s license number used to identify individuals in Italy. |
| IT_FISCAL_CODE | Fiscal code used to identify taxpayers in Italy. |
| IT_IDENTITY_CARD | Identity card number used to identify individuals in Italy. |
| IT_PASSPORT | Passport number used to identify individuals in Italy. |
| LITECOIN_ADDRESS | Litecoin wallet address used for digital transactions. |
| LOCATION | Specific location or address that can be linked to an individual. |
| MAC | Media Access Control address used to identify devices on a network. |
| MEDICAL_LICENSE | License number used to identify medical professionals. |
| NRP | National Registration Number used to identify individuals. |
| ORGANIZATION | Name or identifier used to identify an organization. |
| PASSPORT | Passport number used to identify individuals. |
| PASSWORD | Password used to secure access to personal accounts. |
| PERSON | Name or identifier used to identify an individual. |
| PHONE_NUMBER | Number used to contact or identify an individual. |
| PIN | Personal Identification Number used to secure access to accounts. |
| PL_PESEL | Personal Identification Number used to identify individuals in Poland. |
| SECONDARY_ADDRESS | Additional address information used to identify locations. |
| SG_NRIC_FIN | National Registration Identity Card number used to identify residents in Singapore. |
| SG_UEN | Unique Entity Number used to identify businesses in Singapore. |
| SOCIAL_SECURITY_NUMBER | Social Security Number used to identify individuals. |
| STATE | State information used to identify geographic locations. |
| STREET | Street address used to identify specific locations. |
| TIME | Specific time that can be linked to personal activities. |
| TITLE | Title or honorific used to identify individuals. |
| UK_NHS | National Health Service number used to identify individuals for healthcare services in the United Kingdom. |
| URL | Web address that can sometimes contain personal information. |
| US_BANK_NUMBER | Bank account number used to identify financial accounts in the United States. |
| US_DRIVER_LICENSE | Driver’s license number used to identify individuals in the United States. |
| US_ITIN | Individual Taxpayer Identification Number used to identify taxpayers in the United States. |
| US_PASSPORT | Passport number used to identify individuals in the United States. |
| US_SSN | Social Security Number used to identify individuals in the United States. |
| USERNAME | Username used to identify individuals in online systems. |
| ZIP_CODE | Postal code used to identify specific geographic areas. |