An introduction and the steps to deploy the application on EKS.
This is the multi-page printable view of this section. Click here to print.
Deployment on EKS
Deploying the application on EKS.
- 1: Architecture for EKS
- 2: Prerequisites
- 3: Configuring Environment Variables
- 4: Deploying the Cluster and the Application
- 5: Viewing the Logs
- 6: Removing the Application
- 7:
- 8:
- 9:
- 10:
1 - Architecture for EKS
Components and their description.
The following architectural diagram illustrates the main components in the deployment of the product on EKS.
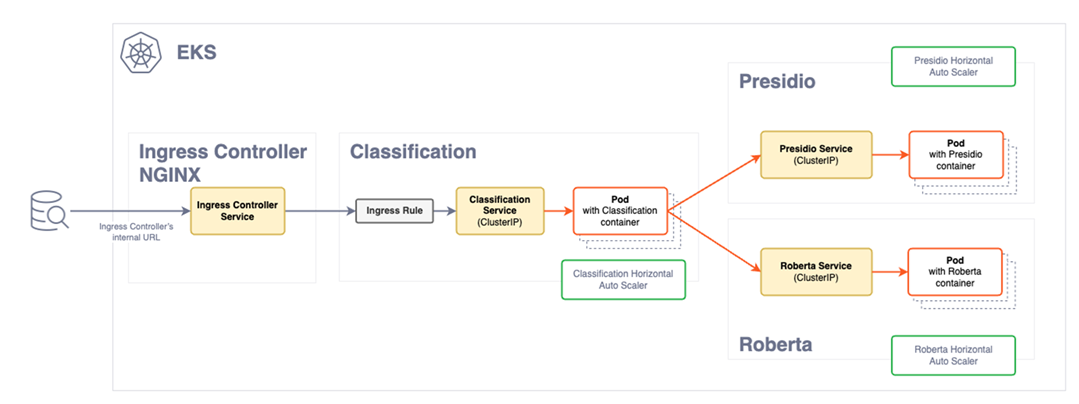
| Component | Description |
|---|---|
| Ingress Controller | The Ingress controller acts as the single point of entry for the requests provided by a user. |
| Ingress rule | The Ingress rule routes the requests to the Classification service. |
| Classification pods | The classification service deployment contains the classification service pods. Based on the load of requests, the pods for the classification service will scale horizontally to meet the demand. New pods are created when a certain threshold is reached. The pods are fronted by a load balancer that directs requests from the Ingress controller. Based on the load and availability, the requests are distributed amongst the pods. |
| Service provider deployment | The Service deployment contain the images of the Presidio and the Roberta service providers. The requests sent by Classification service are received by these pods for the classification of data. Similar to the classification service deployment, these pods will scale horizontally to meet the request load demand. |
2 - Prerequisites
Prerequisites for EKS.
Ensure that the following points are completed before deploying the application.
The development package provided by Protegrity is obtained from the portal and extracted.
The following tools are required to install the product:
AWS CLI: This must be configured with valid credentials. For more information, refer to Configuration and credentials precedence. The AWS account used must have the necessary permissions to create and manage EKS clusters and associated resources.
kubectl: This is used to manage the Kubernetes cluster.
Helm: This is used to deploy applications on the EKS cluster.
The NGINX and metric server: These components are downloaded from an external repository during the deployment process and require access to Internet. Ensure that these are available for deployment.
The following AWS requirements are completed:
- Virtual Private Cloud (VPC) for the EKS cluster. For more information about VPCs, refer to Amazon VPC.
- Role creation permissions to create IAM roles. If your account does not have these permissions, create the necessary roles as defined in the
eks-auto-mode.yamlfile in the/eks/cloudformationdirectory. - AWS must have permissions to access the Docker registry where your Docker images are stored.
Valid server certificate files are uploaded to the
/eks/helm_chart/classification_app/certsdirectory. These files are required for secure communication and are automatically pushed to the cluster during deployment. The following files must be uploaded:- Server certificate with .crt extension.
- Private key with the .key.
For more information about generating certificates, refer to create certificates.
The certificates in EKS are stored as secrets. It is recommended to secure the EKS secrets using KMS encryption. For more information about encrypting keys, refer to encrypt Kubernetes secrets with KMS.
3 - Configuring Environment Variables
Setting the environment variables for EKS.
Run the following steps to configure the environment variables.
Navigate to the
eksdirectory.Open the
.envfile and configure the following variables:
| Variable | Description | Mandatory |
|---|---|---|
| CLUSTER_NAME | Name for the cluster. Ensure that a unique name is provided to the cluster. | No |
| CLASSIFICATION_DOCKER_IMAGE | Repository path where the docker image of Classification service is stored. | Yes |
| ROBERTA_DOCKER_IMAGE | Repository path where the docker image of Roberta service is stored. | Yes |
| PRESIDIO_DOCKER_IMAGE | Repository path where the docker image of Presidio service is stored. | Yes |
| SUBNET_IDS | Subnetwork IDs. Provide a comma-separated list. For example,"subnet-YYYY\\,subnet-XXXXX" | Yes |
| AWS_REGION | Region of AWS infrastructure. | Yes |
| CLUSTER_IAM_ROLE_ARN | IAM role ARN for the cluster. If left blank, CloudFormation will automatically create the role. | No |
| NODE_IAM_ROLE_ARN | IAM role ARN for the nodes. If left blank, CloudFormation will automatically create the role. | No |
- Save the changes.
4 - Deploying the Cluster and the Application
Deploying the application on EKS and verifying it.
Deploying the Application
Deploy the Data Discovery application on EKS.
- Navigate to the
eksdirectory.
cd /eks
- Run the
aws_deployscript.
./aws_deploy.sh
After the deployment is completed, the following message is displayed.
Service 'protegrity.classification-service is ready!Your Ingress Controller is available at {DNS address}
Note the DNS address of the Ingress controller.
Verifying the Installation
Run the following cURL command to verify the installation.
curl -k https://{Ingress Controller DNS address}/readiness

curl -k -X POST https://{Ingress Controller DNS address}/pty/data-discovery/v1.0/classify -H 'Content-Type: text/plain' --data 'Jake lives in 35, Hampden Street'
The response generated will be similar to the following snippet.
{
  "providers": [
    {
      "name": "Presidio Classification Provider",
      "version": "1.0.0",
      "status": 200,
      "elapsed_time": 1.014178991317749,
      "exception": null,
      "config_provider": {
        "name": "Presidio",
        "address": "http://presidio_provider_service",
        "supported_content_types": []
      }
    },
    {
      "name": "Roberta Classification Provider",
      "version": "1.0.0",
      "status": 200,
      "elapsed_time": 19.091534852981567,
      "exception": null,
      "config_provider": {
        "name": "Roberta",
        "address": "http://roberta_provider_service",
        "supported_content_types": []
      }
    }
  ],
  "classifications": {
    "PERSON": [
      {
        "score": 0.9236000061035157,
        "location": {
          "start_index": 14,
          "end_index": 25
        },
        "classifiers": [
          {
            "provider_index": 0,
            "name": "SpacyRecognizer",
            "score": 0.85,
            "details": {}
          },
          {
            "provider_index": 1,
            "name": "roberta",
            "score": 0.9972000122070312,
            "details": {}
          }
        ]
      }
    ],
    "PHONE_NUMBER": [
      {
        "score": 0.8746500015258789,
        "location": {
          "start_index": 35,
          "end_index": 47
        },
        "classifiers": [
          {
            "provider_index": 0,
            "name": "PhoneRecognizer",
            "score": 0.75,
            "details": {}
          },
          {
            "provider_index": 1,
            "name": "roberta",
            "score": 0.9993000030517578,
            "details": {}
          }
        ]
      }
    ]
  }
}
5 - Viewing the Logs
Viewing logs on EKS.
Viewing Logs
The application logs can be viewed using the following commands:
 kubectl logs classification-deployment-{version} -n protegrity -f
 kubectl logs roberta-provider-deployment-{version} -n protegrity -f
 kubectl logs presidio-provider-deployment-{version} -n protegrity -f
Note: The version of the images can be obtained using the following command:
kubectl get pods -n <namespace-name>
Setting the Log Level
The log level can be updated in the value.yaml file.
  # Custom logging configuration for the application.
  #
  # EXAMPLE - default settings
  # loggingConfig:
  #   root:
  #     level: DEBUG
  #   loggers:
  #     tornado.access:
  #       level: WARNING
  #
To set the log level, run the following steps.
Navigate to the
/eks/helm/classification_appdirectory.Edit the
values.yamlfile.Uncomment the required logging configuration. Under
loggingConfig:, set the value ofroot:levelto one fo the following.
- INFO
- DEBUG
- ERROR
- WARNING
For example, to change the the log level to warning, configure the parameter as follows.
   loggingConfig:
     root:
       level: WARNING
     loggers:
       tornado.access:
         level: WARNING
Save the changes.
Navigate to the
eksdirectory and run theaws_undeploy.shfile to undeploy the application.Run the
aws_deploy.shfile to redeploy the application.
6 - Removing the Application
Removing the cluster and application on EKS.
To remove the cluster and application from EKS, run the following steps.
- Navigate to the
eksdirectory.
cd /eks
- Run the
aws_undeployscript.
./aws_undeploy.sh
Note: To remove the application completely, ensure that the images uploaded to the image repository are also deleted.
7 -
./aws_undeploy.sh
8 -
./aws_deploy.sh [cluster_name]
9 -
Navigate to the
/deployment/eksdirectory.Run the
aws_undeploy.shfile.
10 -
Navigate to the
/deployment/eksdirectory.Run the
aws_deploy.shscript.