This is the multi-page printable view of this section. Click here to print.
Deployment
- 1: Obtaining the Deployment Package
- 2: Docker Compose
- 2.1: Docker Compose Deployment
- 2.2: Configuring Environment Variables
- 2.3: Viewing Application Logs
- 2.4:
- 2.5:
- 3: Amazon EKS
- 3.1: Prerequisites
- 3.2: EKS Deployment Architecture
- 3.3: Deploying the Application
- 3.3.1: EKS Control Plane Provisioning (Terraform)
- 3.3.2: Metrics Server
- 3.3.3: Karpenter NodePool
- 3.3.4: Ingress Controller
- 3.3.5: Data Discovery Classification
- 3.4: Viewing Application Logs
1 - Obtaining the Deployment Package
Run the following steps to download the artifacts.
Log in to the Customer Portal.
Navigate to the page and download the DataDiscovery_RHUBI-9-64_x86-64_Generic.K8S_1.1.0.tar.gz file on the system.
Extract this package. The following files are available:
- README - File containing the instructions to deploy the product.
- docker_compose - Deploying the product on a local developer setup.
- eks-terraform-helm - Deploying the product on a scalable deployment on Amazon EKS. Terraform is used for deploying the infrastructure and Helm Charts are used for the application components.
2 - Docker Compose
2.1 - Docker Compose Deployment
Prerequisites
The Deployment Package provided by Protegrity is obtained from the portal and extracted.
Docker CLI version greater than or equal to 28.3.0 is installed. This is required for managing Docker containers.
Docker Compose version greater than or equal to 2.37.3 is installed. This is required for local containerized deployments.
Docker Compose v2 that uses the
docker composecommand syntax. Ensure that the the installation supports this version.
For Apple Macbook users, refer Additional Notes.
Starting the Containers
- If a Docker network does not exist, run the following command to create a Docker network.
docker network create protegrity-network
This step ensures that all services communicate with each other within the same Docker network.
- Run the following script to launch the services in detached mode.
docker compose up -d
The classification_service is exposed on port 8050.
Verifying the Deployment
When running command from outside the docker network, e.g., from your host machine, use the published port mapping. e.g.,
curl -XPOST classification_service/pty/data-discovery/v1.1/classify --data 'You can reach Dave Elliot by phone 203-555-1286' -H "Content-Type: text/plain"
When running commands from inside the Docker network (for example, from another container), use the service name directly. This leverages Docker’s internal DNS. e.g.,
curl -XPOST http://localhost:8050/pty/data-discovery/v1.1/classify --data 'You can reach Dave Elliot by phone 203-555-1286' -H "Content-Type: text/plain"
Stopping the Containers
Run the following script to stop, remove the Docker services. Also, remove the created Docker network created.
docker compose downTo remove a Docker network that has been created, run the following command:
docker network rm protegrity-network
Additional Notes
For Apple users running containers on Apple Silicon (M1/M2/M3/M4).
For Docker Desktop on a MacBook.
- Open Docker Desktop.
- Navigate to Settings > General.
- Enable Use Virtualization Framework and Use Rosetta for x86/amd64 emulation on Apple Silicon.
- Click Apply & Restart.
For Colima. Start Colima using Rosetta and Apple’s virtualization framework:
colima start --vm-type vz --vz-rosetta
2.2 - Configuring Environment Variables
Run the following steps to edit the environment variables:
Navigate to the
docker_composedirectory.Open the
.envfile and set the following variables as required:
| Variable | Description | Required |
|---|---|---|
| DOCKER_CLASSIFICATION_IMAGE | Repository path where the docker image of Classification Service is stored. | Yes |
| DOCKER_PATTERN_PROVIDER_IMAGE | Repository path where the docker image of Pattern classification Service is stored. | Yes |
| DOCKER_CONTEXT_PROVIDER_IMAGE | Repository path where the docker image of Context clarification Service is stored. | Yes |
| DOCKER_NETWORK_NAME | Name of the Docker network. | No |
| PATTERN_PROVIDER_LOGGING_CONFIG | a valid JSON python logging configuration for the Pattern Classification Provider. | No |
| CONTEXT_PROVIDER_LOGGING_CONFIG | a valid JSON python logging configuration for the Context Classification Provider. | No |
| CLASSIFICATION_LOGGING_CONFIG | a valid JSON python logging configuration for the Classification Service. | No |
| ENABLE_ALL_SECURITY_CONTROLS | Controls whether security mitigations are enabled. Accepted values: true (default) or false | No |
- Save the changes.
2.3 - Viewing Application Logs
The application logs can be viewed using the following commands:
docker logs -f classification_service
docker logs -f context_provider
docker logs -f pattern_provider
Setting the Log Level and other logging configuration
The log level and other valid Python Logging configuration can be set in the .env file using JSON.
Run the following steps to set the overall logging level.
Navigate to the
docker_composedirectory.Edit the
.envfile.Uncomment the required logging configuration and set the logging level to one of the following:
- INFO
- DEBUG
- ERROR
- WARNING
For example, to change the log level for PATTERN_PROVIDER_LOGGING_CONFIG, configure the parameter as follows.
PATTERN_PROVIDER_LOGGING_CONFIG={"root":{"level":"ERROR"}}
Save the changes.
Run the folllwing command to undeploy the application.
docker compose down -d
- Run the following command to redeploy the application.
docker compose up -d
2.4 -
When running commands from inside the Docker network (for example, from another container), use the service name directly. This leverages Docker’s internal DNS. e.g.,
curl -XPOST http://localhost:8050/pty/data-discovery/v1.1/classify --data 'You can reach Dave Elliot by phone 203-555-1286' -H "Content-Type: text/plain"
2.5 -
When running command from outside the docker network, e.g., from your host machine, use the published port mapping. e.g.,
curl -XPOST classification_service/pty/data-discovery/v1.1/classify --data 'You can reach Dave Elliot by phone 203-555-1286' -H "Content-Type: text/plain"
3 - Amazon EKS
3.1 - Prerequisites
Before deploying Data Discovery on Amazon EKS, ensure that following requirements are met for a smooth deployment process.
Tools and Permissions
The following tools must be installed and properly configured on your local machine:
AWS CLI of version 2.28.3 is installed. It us a command-line interface for AWS services. Must be configured with valid credentials having EKS cluster creation and management permissions. For more information about the configuration details, refer to Configuration and credentials precedence.
kubectl of version v1.32.0-eks-5ca49cb, Server v1.33.3-eks-ace6451 is installed. It is a Kubernetes command-line tool for cluster management and application deployment operations.
Helm of version 3.18.4 is installed. It is a Kubernetes package manager to deploy and manage Data Discovery application charts on the EKS cluster.
Terraform of version 1.12.2 is installed. It is an infrastructure as a code tool for provisioning and managing EKS cluster resources in a reproducible manner.
Infrastructure Requirements
- Amazon VPC, a properly configured Virtual Private Cloud with at least two subnets in different availability zones for high availability and fault tolerance.
3.2 - EKS Deployment Architecture
The following architectural diagram illustrates the main components in the deployment of the product on EKS.
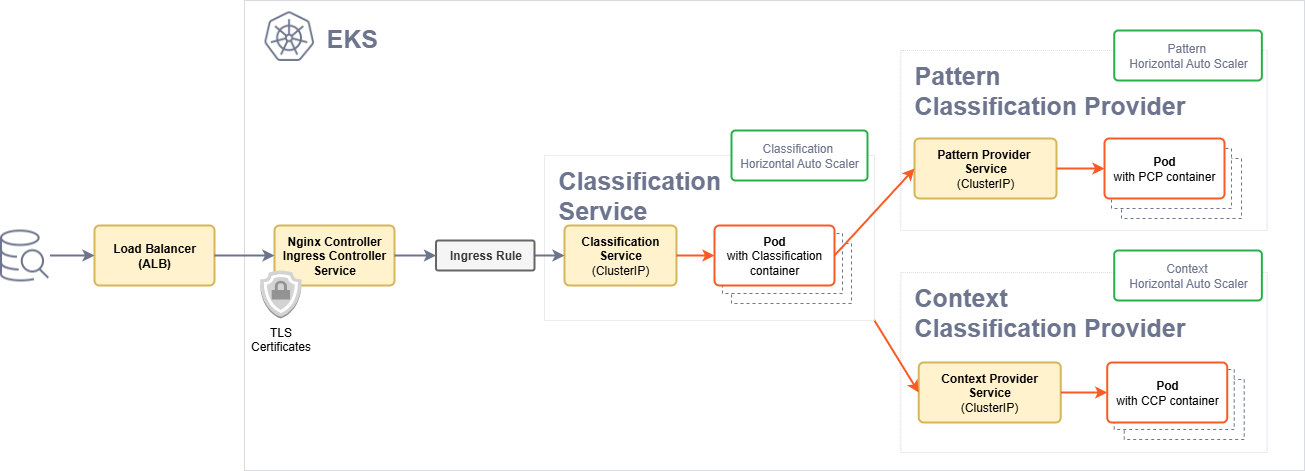
| Component | Description |
|---|---|
| Ingress Controller | The Ingress controller acts as the single point of entry for the requests provided by a user. |
| Ingress rule | The Ingress rule routes the requests to the Classification service. |
| Classification pods | Classification service pods that act as the main entry point and the aggregator of the responses provided by the service providers. |
| Context and Pattern service providers | Pattern and the Context service providers pods that perform that task of identifying the sensitive data. |
3.3 - Deploying the Application
The step-by-step deployment of Data Discovery on Amazon EKS is explained here. Each component builds on the previous, ensuring a reliable and production-ready environment.
The deployment is separated into two main phases:
- Phase 1: Infrastructure (Terraform) - Provisions the EKS cluster and underlying AWS resources
- Phase 2: Applications (Helm) - Deploys Kubernetes components and the Data Discovery application
After completing Step 1 (Terraform), if an existing EKS cluster is used, configure the kubectl context to connect to the cluster:
   aws eks update-kubeconfig --region <region> --name <cluster-name>
   # Replace `<region>` with your AWS region and `<cluster-name>` with your EKS cluster name.
3.3.1 - EKS Control Plane Provisioning (Terraform)
Before you Begin
Ensure that the following points are considered.
The AWS CLI is configured.
The VPC is configured with at least two private subnets.
Terraform is installed.
kubectlis installed.
Configuring the Parameters
Configure the following parameters in the terraform.tfvars file available in the terraform directory.
| Name | Description | Type | Required |
|---|---|---|---|
vpc_id | Existing VPC ID. | string | Yes |
vpc_subnet_ids | List of private subnet IDs. | list(string) | Yes |
cluster_name | Name of the EKS cluster. Default set to "eks-terraform". | string | No |
aws_region | Region for the AWS deployment. Default set to "us-east-1". | string | No |
eks_cluster_role_arn | Existing IAM role for EKS control plane. Default set to null. | string | No |
eks_node_role_arn | Existing IAM role for node group. Default set to null. | string | No |
Deploying Terraform
Run the following script to deploy the application.
cd terraform
terraform init
terraform apply -auto-approve
Verifying the Installation
Run the following commands to verify the deployment.
terraform output
Sample output:
eks_cluster_name = "eks-terraform"
eks_cluster_endpoint = "<Endpoint URL>"
eks_cluster_region = "us-east-1"
eks_update_kubeconfig_command = "aws eks update-kubeconfig --region us-east-1 --name eks-terraform"
Run the following command to verify the cluster that was created.
kubectl get nodepools
Sample output:
NAME              NODECLASS   NODES   READY   AGE
general-purpose   default     0       True    ...
system            default     0       True    ...
Updating kubeconfig after Deployment
After deploying the cluster, update the local kubeconfig to interact with the cluster. The following commands links the kubeconfig command to the new EKS cluster.
$(terraform output -raw eks_update_kubeconfig_command)
3.3.2 - Metrics Server
Requirements
An EKS cluster is provisioned.
The cluster is connected and the
kubeconfigis properly configured.
Run the following command to connect a local environment to the EKS cluster.
aws eks update-kubeconfig --region <region> --name <cluster-name>
Installing the Component
cd helm/metrics-server
helm repo add metrics-server https://kubernetes-sigs.github.io/metrics-server || true
helm repo update
helm dependency build
helm install metrics-server . \
  --namespace kube-system \
  --create-namespace
For any custom configuration changes, create a
values-override.yamlfile and add-f values-override.yamlto the helm install command. It is not recommended to modify the configurations in thevalues.yamlfile.
Verifying the Installation
Check that the Metrics Server deployment is ready:
kubectl get deployment metrics-server -n kube-system
Sample output.
NAME             READY   UP-TO-DATE   AVAILABLE   AGE
metrics-server   1/1     1            1           ...
Run the following command to verify that node metrics are available.
kubectl top nodes
Uninstalling the Component
Run the following command to uninstall the Metrics Server:
helm uninstall metrics-server \
  --namespace kube-system
3.3.3 - Karpenter NodePool
Requirements
An EKS cluster is provisioned.
The cluster is connected and the
kubeconfigis properly configured.karpenter.sh/v1CRDs are available. Auto Mode includes these by default.
Run the following command to connect a local environment to the EKS cluster.
aws eks update-kubeconfig --region <region> --name <cluster-name>
Installing the Component
cd helm/karpenter-node-pool
helm install karpenter-nodepool . \
  --namespace default \
  --create-namespace
Verifying the Installation
Run the following command to check the NodePool resource.
kubectl get nodepools
Sample output after the process is completed.
NAME                  NODECLASS   NODES   READY   AGE
m5-large-node-pool    default     0       True    ...
No nodes will appear until a matching workload is scheduled. Node creation is confirmed after a pod requests this NodePool’s label.
Uninstalling the Component
Run the following command to uninstall the Karpenter NodePool.
helm uninstall karpenter-nodepool \
  --namespace default
Ensure that no workloads are actively using this NodePool before removal. Any running pods scheduled on nodes from this pool may be terminated during the uninstall process.
3.3.4 - Ingress Controller
Requirements
The EKS cluster is provisioned.
The cluster is connected and the
kubeconfigis properly configured.
Run the following command to connect a local environment to the EKS cluster.
aws eks update-kubeconfig --region <region> --name <cluster-name>
Configuration
This chart wraps the official ingress-nginx chart using the alias private-ingress and allows to customize the default certificate that is used on all TLS communications handled by this controller.
To configure TLS certificates, place the certificate files in the following folder.
ingress-controller/certs/tls.crt
ingress-controller/certs/tls.key
For more information about creating TLS certificates, refer to Create and configure certificates (AWS docs)
It is recommended not to edit the values.yaml file unless required. To customize configurations, create a values-override.yaml file with the desired changes and use the -f values-override.yaml flag during installation.
Installing the Component
cd helm/ingress-controller
helm repo add ingress-nginx https://kubernetes.github.io/ingress-nginx || true
helm repo update
helm dependency build
helm install ingress-controller . \
  --namespace ingress-nginx \
  --create-namespace \
  --set-file tls.crt=./certs/tls.crt \
  --set-file tls.key=./certs/tls.key
If TLS is not configured, ommit the --set-file tls lines in the command above.
For any custom configuration changes, create a
values-override.yamlfile and add-f values-override.yamlto the helm install command. It is not recommended to modify the configurations in thevalues.yamlfile.
This deploys the controller (and a TLS secret if configured) under the ingress-nginx namespace and exposes it through an internal AWS NLB.
Verifying the Installation
Checking the controller pods
kubectl get pods -n ingress-nginx
Example output:
NAME                             READY   STATUS    RESTARTS   AGE
private-ingress-controller-xxx   1/1     Running   0          ...
Confirming the service is created
kubectl get svc -n ingress-nginx
Example output:
NAME                        TYPE           CLUSTER-IP     EXTERNAL-IP                                                               PORT(S)
private-ingress-controller  LoadBalancer   10.x.x.x       internal-<hash>.<region>.elb.amazonaws.com   443:xxxx/TCP
Checking the IngressClass
kubectl get ingressclass
Example output:
NAME             CONTROLLER             PARAMETERS   AGE
private-nginx    k8s.io/ingress-nginx   <none>       ...
This IngressClass is automatically used by any Ingress with no ingressClassName or one explicitly set to private-nginx.
Uninstalling the Component
Run the following command to uninstall the Ingress Controller.
helm uninstall ingress-controller \
  --namespace ingress-nginx
This will remove the AWS Load Balancer and make any applications using this ingress controller inaccessible from outside the cluster. Ensure all dependent services are stopped or reconfigured before removal.
3.3.5 - Data Discovery Classification
Requirements
The following requirements are mandatory before deploying the product.
An EKS cluster is provisioned.
The cluster is connected and the
kubeconfigis properly configured.
The following components are optional.
Metrics Server to enables Horizontal Pod Autoscaling (HPA). If it is not installed, HPA will not function.
Ingress Controller for HTTPS access.
Karpenter NodePool for automatic node provisioning.
Run the following command to connect a local environment to the EKS cluster.
aws eks update-kubeconfig --region <region> --name <cluster-name>
Installing the Service
- Define the docker registry credentials that were provided in the environment variables:
export DOCKER_USERNAME=myuser
export DOCKER_PASSWORD=mypassword
- Install the chart using the following command.
cd helm/data-discovery-classification
helm install data-discovery-classification . \
  --namespace default \
  --create-namespace \
  --wait \
  --wait-for-jobs \
  --timeout 900s \
  --set docker.creds.username=$DOCKER_USERNAME \
  --set docker.creds.password=$DOCKER_PASSWORD
Note: For any custom configuration changes, create a
values-override.yamlfile and add-f values-override.yamlto the helm install command instead of modifying the defaultvalues.yamlfile.
The --wait flag with a 15-minute timeout is recommended as the installation typically completes in 5-7 minutes due to large Docker image downloads. Monitor the installation progress in another terminal using the verification commands.
If a registry is used that does not require basic authentication (e.g., ECR or a private registry), ommit the --set docker lines in the command above.
Verifying the Installation
Get Deployments, Services, and HPAs
kubectl get deploy,svc,hpa -n default
Expected output:
NAME                                          READY   UP-TO-DATE   AVAILABLE   AGE
deployment.apps/classification-deployment     1/1     1            1           ...
deployment.apps/context-provider-deployment   1/1     1            1           ...
deployment.apps/pattern-provider-deployment   1/1     1            1           ...

NAME                               TYPE        CLUSTER-IP      EXTERNAL-IP   PORT(S)    AGE
service/classification-service     ClusterIP   172.20.x.x      <none>        8050/TCP   ...
service/context-provider-service   ClusterIP   172.20.x.x      <none>        8052/TCP   ...
service/pattern-provider-service   ClusterIP   172.20.x.x      <none>        8051/TCP   ...

NAME                                                             REFERENCE                                TARGETS              MINPODS   MAXPODS   REPLICAS   AGE
horizontalpodautoscaler.autoscaling/classification-service-hpa   Deployment/classification-deployment     cpu: 50%/50%        1         5         1          ...
horizontalpodautoscaler.autoscaling/context-provider-hpa         Deployment/context-provider-deployment   cpu: 65%/65%        1         20        1          ...
horizontalpodautoscaler.autoscaling/pattern-provider-hpa         Deployment/pattern-provider-deployment   cpu: 90%/90%        1         3         1          ...
All deployments must show 1/1 in the READY column after deployment is completed. During startup, it is an expected behaviour to see 0/1 and cpu: <unknown>.
Ingress
kubectl get ingress -n default
Expected output:
NAME                          CLASS           HOSTS   ADDRESS                                        PORTS   AGE
classification-ingress-rule   private-nginx   *       <load-balancer-dns>.elb.amazonaws.com.         443     ...
Ingress Endpoint Testing
INGRESS_HOST=$(kubectl get svc ingress-controller-private-ingress-controller \
  -n ingress-nginx \
  -o jsonpath='{.status.loadBalancer.ingress[0].hostname}')

# Fallback to IP
if [ -z "$INGRESS_HOST" ]; then
  INGRESS_HOST=$(kubectl get svc ingress-controller-private-ingress-controller \
    -n ingress-nginx \
    -o jsonpath='{.status.loadBalancer.ingress[0].ip}')
fi

echo "Ingress available at: $INGRESS_HOST"
Running Requests
curl -k https://$INGRESS_HOST/readiness
curl -k https://$INGRESS_HOST/healthz
curl -k https://$INGRESS_HOST/startup

curl -k -X POST https://$INGRESS_HOST/pty/data-discovery/v1.1/classify \
  -H 'Content-Type: text/plain' \
  --data 'You can reach Dave Elliot by phone 203-555-1286'
Custom Configuration
The chart is production-ready and the required configurations and default container images are set in the values.yaml file. However, customized container images can also be configured.
To use your own container images, perform the following steps:
- Create a
values-override.yamlfile with the following configuration.
docker:
  registry: "<Address of the image-repository>"
# e.g.:
# docker:
#   registry: "registry.protegrity.com"

serviceImages:
  classification: "<Name of the classification-image>"
  pattern: "<Name of the pattern-provider-image>"
  context: "<Name of the context-provider-image>"
# e.g.:
# serviceImages:
#  classification: "products/data_discovery/1.1/classification_service:latest"
#  pattern: "products/data_discovery/1.1/pattern_classification_provider:latest"
#  context: "products/data_discovery/1.1/context_classification_provider:latest"
- Run the following installation command.
helm install data-discovery-classification . \
  --namespace default \
  --create-namespace \
  --wait \
  --wait-for-jobs \
  --timeout 900s \
  --set docker.creds.username=$DOCKER_USERNAME \
  --set docker.creds.password=$DOCKER_PASSWORD \
  -f values-override.yaml
Uninstalling the Service
Run the following command to uninstall the Data Discovery Classification application.
helm uninstall data-discovery-classification \
  --namespace default \
  --wait \
  --timeout 300s
This will remove the classification, pattern provider, and context provider services. Also, the associated ConfigMaps, Services, and HPA resources will be removed. Any persistent data or logs will be lost during this process.
Resources may take a couple of minutes to be fully terminated. Re-installing immediately after uninstall can lead to an inconsistent state. Wait for all pods to be completely removed before reinstalling.
Troubleshooting
Run the following commands to inspect the state of the deployment.
Viewing all Pods in the Namespace
kubectl get pods -n default
Viewing all Services in the Namespace
kubectl get svc -n default
Viewing Logs for a Specific Pod
kubectl logs <pod-name> -n default
Describing a Specific Pod
kubectl describe pod <pod-name> -n default
3.4 - Viewing Application Logs
The application logs can be viewed using the following commands:
 kubectl logs classification-deployment-{version} -n protegrity -f
 kubectl logs roberta-provider-deployment-{version} -n protegrity -f
 kubectl logs presidio-provider-deployment-{version} -n protegrity -f
Run the
kubectl get pods -n <namespace-name>command to obtain the version of the images.
Setting the Log Level and other Logging Configuration
Set the log level and other valid Python Logging configuration.
Navigate to the
helm/data-discovery-classificationdirectory in your downloaded deployment package.Create a
values-override.yamlfile with the required logging configuration.
classificationAppConfig:
  loggingConfig:
    root:
      level: WARNING  # Can be INFO, DEBUG, ERROR, or WARNING
Save the changes.
Run the following installation command.
helm install data-discovery-classification . \
  --namespace default \
  --create-namespace \
  --wait \
  --wait-for-jobs \
  --timeout 900s \
  -f values-override.yaml