Post installation/upgrade steps
After the DSG installed or upgraded certain steps must be performed.
The DSG v3.3.0.1 can be upgraded on an on-premise or cloud platforms. It can be upgraded to 3.3.0.1 from the following versions:
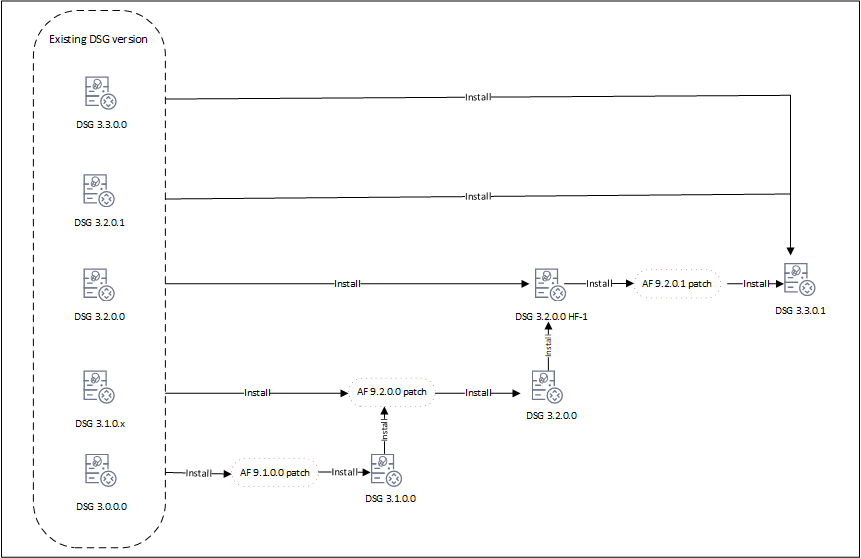
The DSG patch in ESA is added to extend the DSG functionality on ESA. It allows ESA to deploy configurations to other DSG nodes. The following figure illustrates DSG component upgrade on ESA.
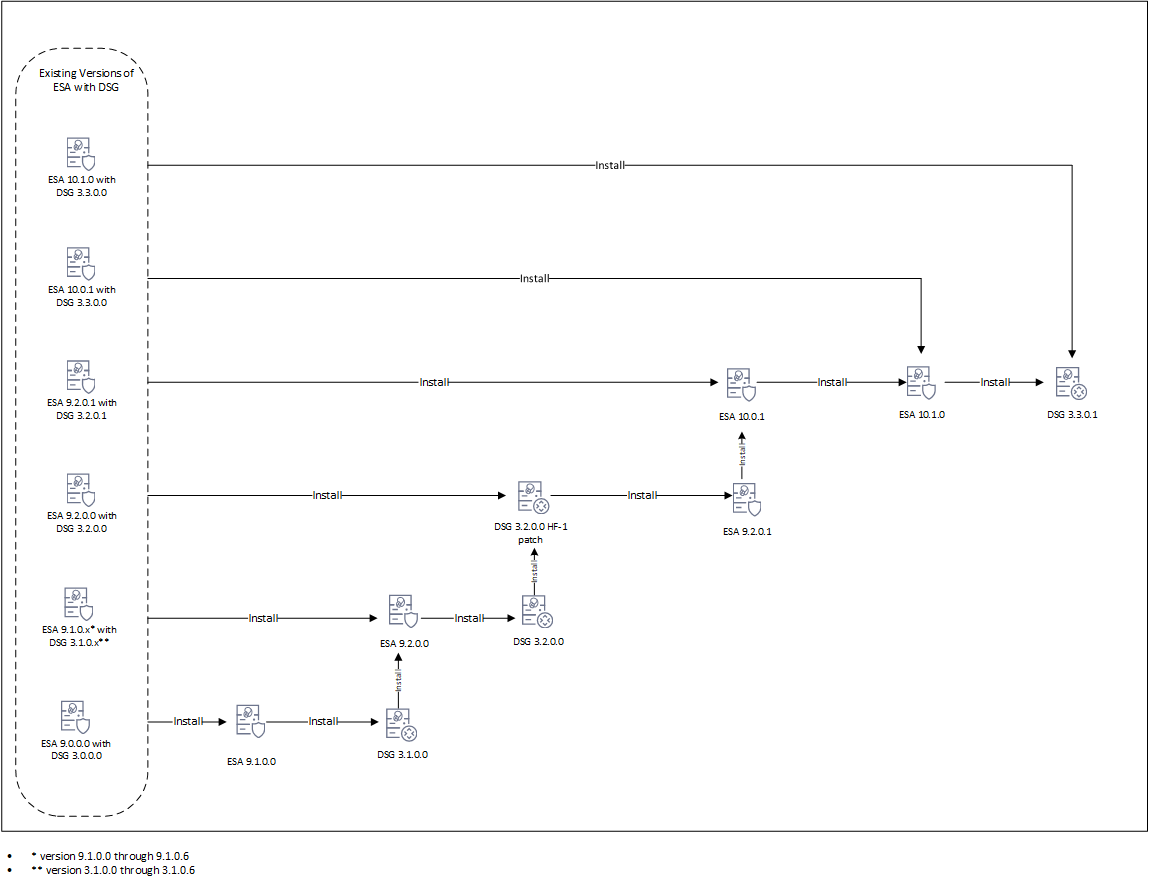
The following figure illustrates the DSG upgrade.
Upgrading the DSG version involves a series of steps that must be performed on ESA and DSG. The following order illustrates the upgrade process.
Ensure that DSG and ESA are backed up. For more information about backing up, refer to Backing up from the Web UI.
Ensure that communication is established between the ESA and DSG.
Ensure that DSGs and ESA are in a cluster. All the DSGs in the cluster are healthy.
Ensure that ESAs and DSGs are accessible through their hostnames. If not, refer to Update Host Details for the detailed steps.
Ensure that the buffer folders in /opt/protegrity/fluent-bit/data/buffer/tcp.<n> and /opt/protegrity/td-agent/es_bufferare empty.
If these folders are not empty, check for errors in /var/log/td-agent/td-agent.log or /opt/protegrity/fluent-bit/data/logforwarder.log.
Record any configurations added to the /opt/protegrity/alliance/config/features.json file. These configurations will not be retained after the upgrade.
Ensure that configurations in the pepserver.cfg are saved for each DSG node in the cluster. These configurations must be manually set after upgrade. For more information about the PEP server, refer to Managing PEP server
Configure Ruleset definitions on the ESA to push the same configuration to all cluster nodes. Perform any import/export of DSG and Ruleset configurations from the ESA Web UI only.
In DSG, the custom files related to LogForwarder are placed in the /opt/protegrity/fluent-bit/data/config.d directory. These files can be configured as required. When the the upgrade is in process, DSG backs up the custom LogForwarder files. The files are moved to the /opt/protegrity/fluent_backup directory. However, after the upgrade is completed, the files are not automatically restored to the /opt/protegrity/fluent-bit/data/config.d directory. All the custom configuration files and the modifications to existing default configuration files done before upgrade must to be manually applied after upgrade.
Export/import of DSG configurations and Ruleset configurations to DSG v3.3.0.1 is supported only from DSG v3.0.0.0 and higher. Do not import DSG Ruleset backups (
.zip) from older DSG versions into DSG v3.3.0.1. Navigate to Settings > Backup & Restore to export/import the DSG configurations.
If Codebook reshuffling is used, back up the following files on each DSG node:
random.dat (BLOB)dps.envuserpin.bin (User PIN)After backing up the files, create a .tgz file using the following command.
 tar --same-owner -zcpvf /products/uploads/<filename>.tgz \
 /opt/protegrity/defiance_dps/data/random.dat \
 /opt/protegrity/defiance_dps/data/userpin.bin \
 /opt/protegrity/defiance_dps/bin/dps.env
Run the following command to set the required permissions for downloading the .tgz package from the DSG Web UI.
chmod 644 /products/uploads/<filename>.tgz
Perform the following steps to download the .tgz package from the DSG Web UI.
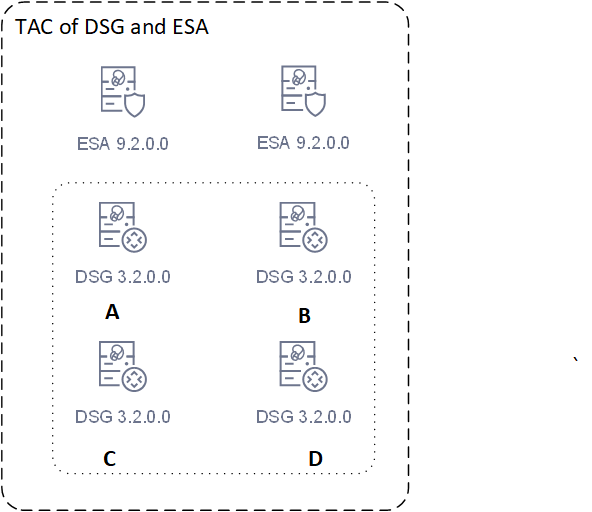
Save the details of the TAC before starting the upgrade. For more information about the TAC, refer to Trusted Appliances Cluster.
The patch can be uploaded from the CLI Manager or the Web UI.
Uploading patch from Web UI.
Uploading patch from CLI Manager
/opt/products_uploads directory using the FTP or SCP command.Perform the following steps to install the patch from the CLI Manager.
Steps to upgrade to DSG v3.3.0.1 from DSG v3.3.0.0.
Ensure that ESA v10.0.1 or ESA 10.1.0 is available with the DSG v3.3.0.0 patch applied on it.
Ensure that DSG v3.3.0.0 is available.
ESA_PAP-ALL-64_x86-64_10.1.0.xxxx.DSGUP.3.3.0.1.x.DSGUP patch.Install the ESA_PAP-ALL-64_x86-64_10.1.0+P.xxxx patch.
Install the ESA_PAP-ALL-64_x86-64_10.1.0.xxxx.DSGUP.3.3.0.1.x.UP patch.
DSG_PAP-ALL-64_x86-64_3.3.0.1.xxxx patch.Ensure that all the required nodes are upgraded to v3.3.0.1. After installing the patches perform the post upgrade steps.
Steps to upgrade to DSG v3.3.0.1 from DSG v3.2.0.1.
Ensure that ESA v9.2.0.1 is available with the DSG v3.2.0.1 patch applied on it.
Ensure that DSG v3.2.0.1 is available.
Install the ESA_PAP-ALL-64_x86-64_10.0.1+UP.xxxx patch.
Install the ESA_PAP-ALL-64_x86-64_10.1.0+P.xxxx patch.
Install the ESA_PAP-ALL-64_x86-64_10.1.0.xxxx.DSGUP.3.3.0.1.x.pty patch.
DSG_PAP-ALL-64_x86-64_3.3.0.1.xxxx patch.Ensure that all the required nodes are upgraded to v3.3.0.1. After installing the patches perform the post upgrade steps.
Steps to upgrade to DSG v3.3.0.1 from DSG v3.2.0.0.
Ensure that ESA v9.2.0.0 is available with the DSG v3.2.0.0 patch applied on it.
Ensure that DSG v3.2.0.0 is available.
Install the DSG_PAP-ALL-64_x86-64_3.2.0.0.x.HF-1 patch.
Install the ESA_PAP-ALL-64_x86-64_9.2.0.1.xxxx-UP patch.
Install the ESA_PAP-ALL-64_x86-64_10.0.1+UP.xxxx patch.
Install the ESA_PAP-ALL-64_x86-64_10.1.0+P.xxxx patch.
Install the ESA_PAP-ALL-64_x86-64_10.1.0.xxxx.DSGUP.3.3.0.1.x.pty patch.
Install the DSG_PAP-ALL-64_x86-64_3.2.0.0.x.HF-1 patch.
Install the AF-9201 patch.
Install the DSG_PAP-ALL-64_x86-64_3.3.0.1.xxxx patch.
Ensure that all the required nodes are upgraded to v3.3.0.1. After installing the patches perform the post upgrade steps.
Steps to upgrade to DSG v3.3.0.1 from any of the following DSG versions:
Ensure that ESA v9.1.0.x is available with the corresponding DSG v3.1.0.x patch applied on it.
Ensure that corresponding DSG v3.2.0.x is available.
Install the ESA_PAP-ALL-64_x86-64_9.2.0.0.xxxx-UP patch.
Install the DSG_PAP-ALL-64_x86-64_3.2.0.0.x.UP patch.
Install the DSG_PAP-ALL-64_x86-64_3.2.0.0.x.HF-1 patch.
Install the ESA_PAP-ALL-64_x86-64_9.2.0.1.xxxx-UP patch.
Install the ESA_PAP-ALL-64_x86-64_10.0.1+UP.xxxx patch.
Install the ESA_PAP-ALL-64_x86-64_10.1.0+P.xxxx patch.
Install the ESA_PAP-ALL-64_x86-64_10.1.0.xxxx.DSGUP.3.3.0.1.x.pty patch.
Install the AF 9.2.0.0 patch.
Install the DSG_PAP-ALL-64_x86-64_3.2.0.0.x.UP patch.
Install the DSG_PAP-ALL-64_x86-64_3.2.0.0.x.HF-1 patch.
Install the AF-9201 patch.
Install the DSG_PAP-ALL-64_x86-64_3.3.0.1.xxxx patch.
Ensure that all the required nodes are upgraded to v3.3.0.1. After installing the patches perform the post upgrade steps.
Steps to upgrade to v3.3.0.1 from DSG v3.0.0.0.
Ensure that ESA v9.0.0.0 is available with the corresponding DSG v3.1.0.0 patch applied on it.
Ensure that DSG v3.0.0.0 is available.
Install the ESA_PAP-ALL-64_x86-64_9.1.0.0.xxxx-UP patch.
Install the ESA_PAP-ALL-64_x86-64_9.1.0.0.xxxx.DSGUP patch.
Install the ESA_PAP-ALL-64_x86-64_9.2.0.0.xxxx-UP patch.
Install the ESA_PAP-ALL-64_x86-64_9.2.0.0.xxxx.DSGUP patch.
Install the DSG_PAP-ALL-64_x86-64_3.2.0.0.x.HF-1 patch.
Install the ESA_PAP-ALL-64_x86-64_9.2.0.1.xxxx-UP patch.
Install the ESA_PAP-ALL-64_x86-64_10.0.1+UP.xxxx patch.
Install the ESA_PAP-ALL-64_x86-64_10.1.0+P.xxxx patch.
Install the ESA_PAP-ALL-64_x86-64_10.1.0.xxxx.DSGUP.3.3.0.1.x.pty patch.
Install the AF 9.1.0.0 patch.
Install the DSG_PAP-ALL-64_x86-64_3.1.0.0.x.UP patch.
Install the AF-9.2.0.0 patch.
Install the DSG_PAP-ALL-64_x86-64_3.2.0.0.x.UP patch.
Install the DSG_PAP-ALL-64_x86-64_3.2.0.0.x.HF-1 patch.
Install the AF-9201 patch.
Install the DSG_PAP-ALL-64_x86-64_3.3.0.1.xxxx patch.
Ensure that all the required nodes are upgraded to v3.3.0.1. After installing the patches perform the post upgrade steps.
The post upgrade steps must be performed only after each DSG node is upgraded to v3.3.0.1. Run the following steps after upgrade is completed.
Log forwarder custom files backed up during upgrade are restored.
If Codebook reshuffling is used, restore the following files on each DSG node:
random.dat (BLOB)dps.envuserpin.bin (User PIN)For more information about restoring the files, refer to Restore Backed up Files for Codebook Reshuffling.
Scheduled tasks related to DSG on the Audit Store are enabled. The DSG metrics logs that are generated over time can be scheduled for cleanup regularly. Click Audit Store > Analytics > Scheduler, select the Delete DSG Error Indices, Delete DSG Usage Indices, or Delete DSG Transaction Indices, and then click Edit to modify the scheduled task that initiates the Indices file cleanup at regular intervals. The scheduled task can be set to n days based on your preference.
The blocked_modules and blocked_methods added in the gateway.json file before upgrade are retained after the DSG is
upgraded. However, it is recommended to use the allowed modules and methods for enhanced security. For more information about blocked and allowed modules, refer to
PEP server configurations for the respective DSG nodes are added in the pepserver.cfg file. For more information about the PEP server, refer to Managing PEP server.
Run the command to create a trusted appliances cluster. For more information about the creating TAC, refer to Trusted Appliances Cluster.
If any changes are made on a DSG node in the cluster, then create a scheduler task to replicate policies, configuration, DSG rulesets, and so on, from the DSG having changes to the other DSGs in the cluster.
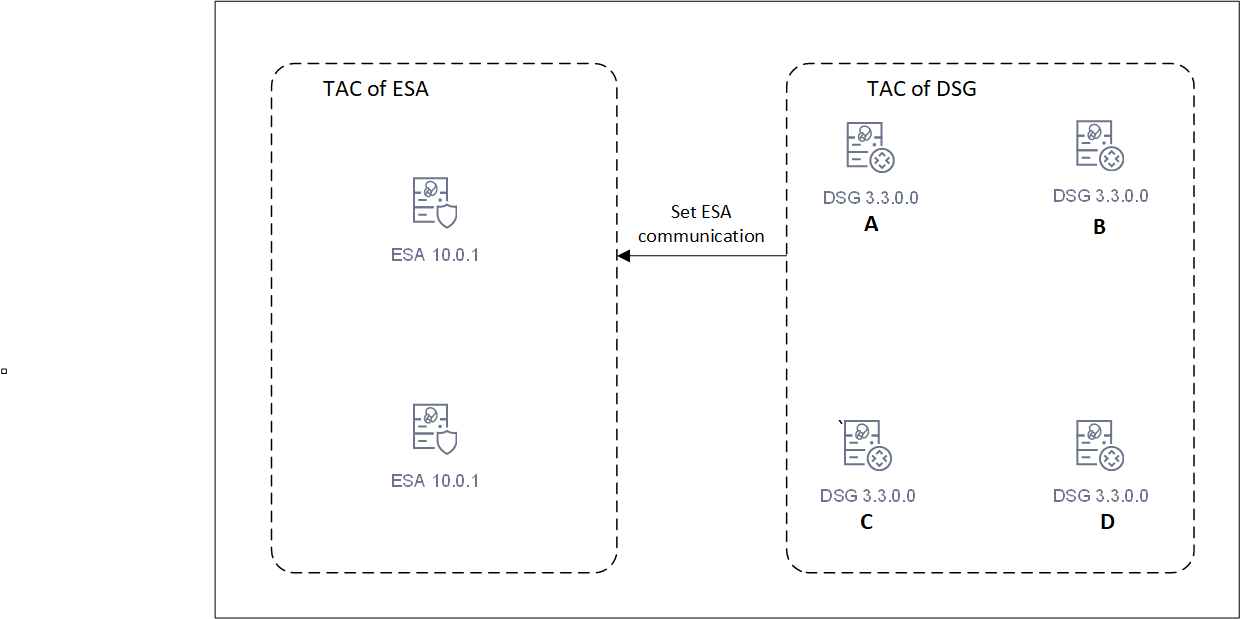
Run the set ESA communication on the DSG nodes. For more information, refer to Setting up ESA communication.
Ensure that the primary DSG node is registered with all ESA nodes. For more information about registering DSG, refer to Registering the DSG.
In a canary upgrade, the DSG nodes are re-imaged to v.3.3.0.0. The DSG image is installed afresh on an existing or a new system.
Before proceeding with the upgrade, back up the PEP server configuration from the DSG nodes. Run the following steps.
pepserver.cfg file.Consider the following figure.
Run the following steps on ESA A.
Run the following steps on node A.
pepserver.cfg file that was backed up for node A.Run the following steps on node B.
pepserver.cfg file backed up for node B.Run the following steps on node C.
pepserver.cfg file backed up for node C.Run the following steps on node D.
pepserver.cfg file that was backed up for node D.Run the following steps on ESA B.
The following figure illustrates the upgraded setup.
After the DSG installed or upgraded certain steps must be performed.
Was this page helpful?