Codebook reshuffling is a feature that provides an organization the ability to share protected data outside of its tokenization domain to meet data privacy, analysis, and regulatory requirements. A tokenization domain or a token domain can be defined as a business unit, a geographical location, or a subsidiary organization where protected data is stored. The data protected by enabling Codebook Reshuffling cannot be unprotected outside the tokenization domain.
Codebook reshuffling provides support for the following tokenization data elements:
Some data elements are deprecated in ESA v10.2. For more information, refer to Deprecations.
- Alpha (a-z, A-Z)
- Alpha-Numeric (0-9, a-z, A-Z)
- Binary
- Credit Card (0-9)
- DateTime Date (YYYY-MM-DD HH:MM:SS MMM)
- Decimal (numeric with decimal point and sign)
- Integer
- Lower ASCII (Lower part of ASCII table)
- Numeric (0-9)
- Uppercase Alpha (A-Z)
- Uppercase Alpha-Numeric (0-9, A-Z)
- Unicode Gen2
Codebook Reshuffling can be enabled on the DSG for all the supported tokenization data elements to generate unique tokens for protected values across the tokenization domains. The following generic example will help you to understand more about the functionality of Codebook Reshuffling.
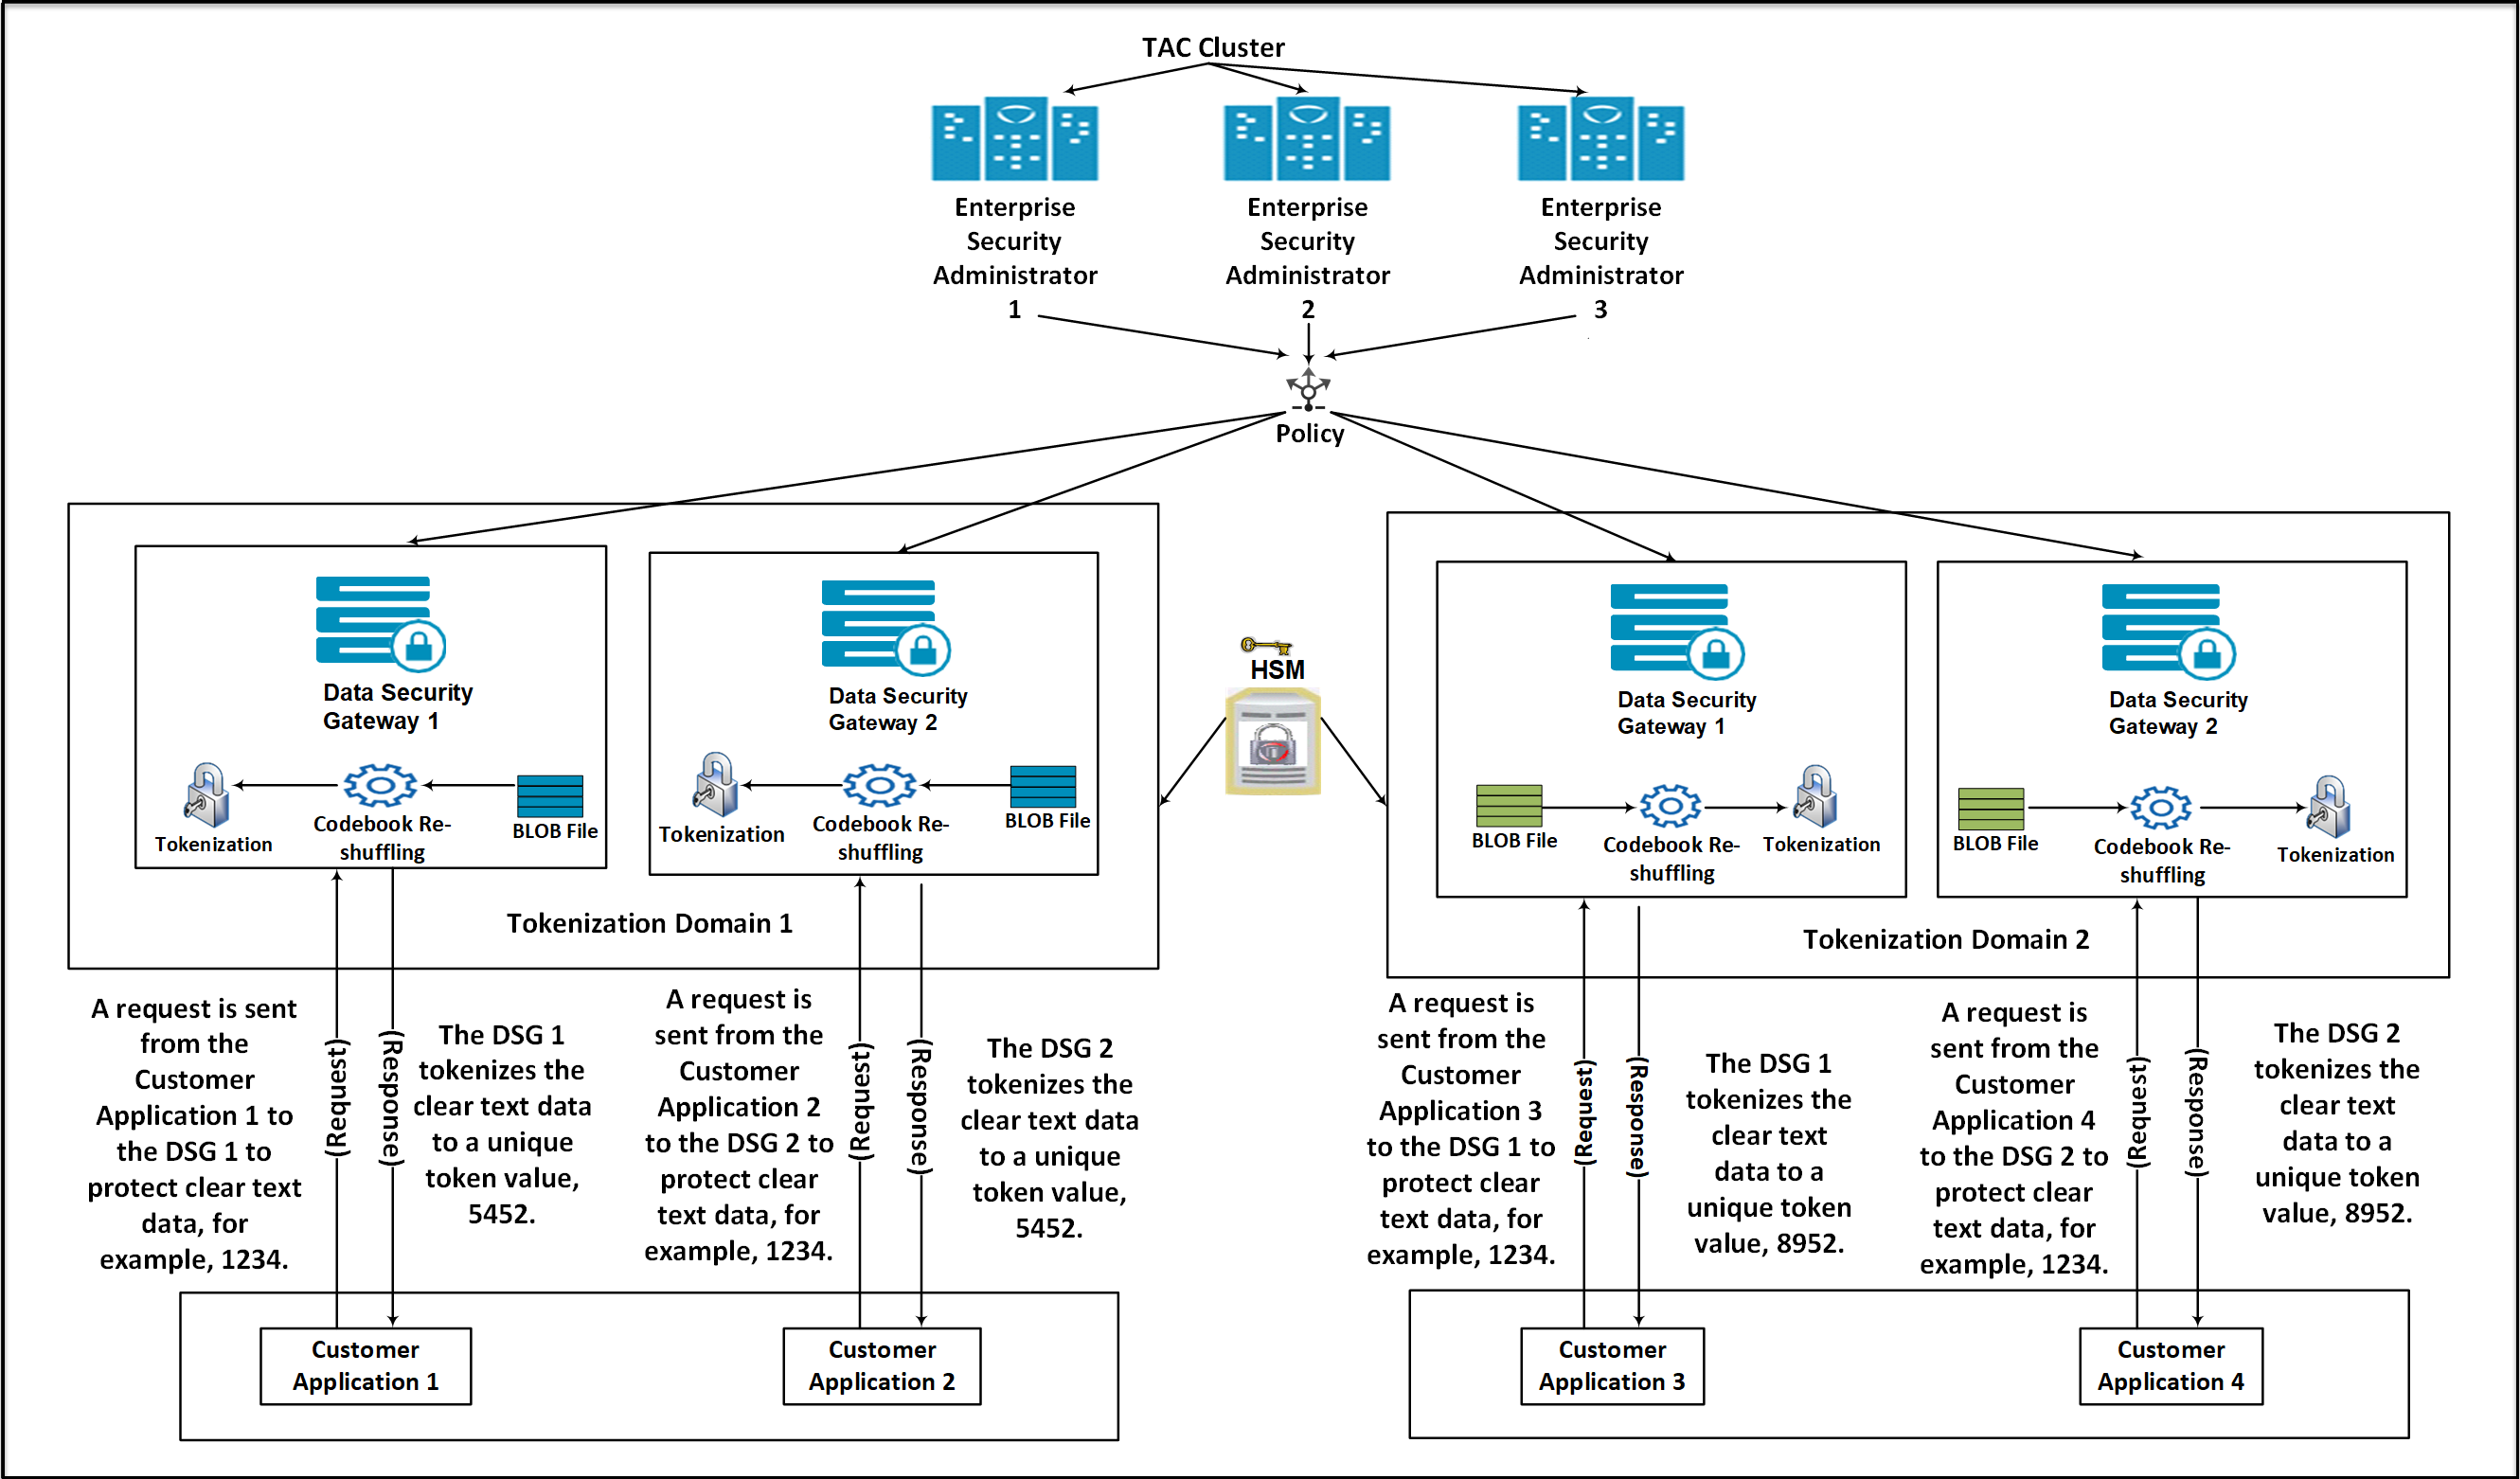
Consider a scenario where an organization has two tokenization domains, Tokenization Domain 1 and Tokenization Domain 2, which are distributed in two different tokenization domains. The Tokenization Domain 1 contains an ESA connected to multiple DSG nodes. A separate TAC for ESAs and DSGs is created.
On the ESA, create a tokenization data element. Codebooks are generated on the ESA when a tokenization data element is created.
Add the newly created tokenization data element to a policy.
Create a Ruleset on the ESA node to protect the sensitive data.
After a request is sent from the client, the DSG processes and protects the sensitive data. It generates unique tokens for protected values across the tokenization domains.
Create a Binary Large Object (BLOB) file on each DSG node that contains random bytes. The BLOB file will be encrypted automatically using an AES encryption key fetched from the HSM.
Deploy the policy created on the master ESA to the DSG nodes in Token Domain 1 and Token Domain 2. The DSG nodes download the policy information from the ESA. After the policy is deployed on the DSG, if the codebook reshuffling parameter is enabled, then the codebook will be shuffled again by using the BLOB file created on the DSG.
The advantage offered by codebook reshuffling is that sensitive data in Token Domain 1 cannot be accessed by Token Domain 2. It cannot be accessed because it is protected by a different codebook, available only on the Token Domain 1. The unique tokens generated for the protected data on the Token Domain 1 can be used to derive an insightful analysis for an organization without compromising on any data security compliance and regulatory norms.
Codebook Reshuffling in DSG
To enable codebook reshuffling, the DSG has introduced a new service called the Blob Manangement Service (BMS). This service connects to the Hardware Security Module (HSM) to generate random data. The generated random data is encrypted using AES-256 and stored on disk. Additionally, the BMS caches the decrypted random data in memory, which is then used to reshuffle the codebooks.
When the codebook reshuffling is enabled, BMS sends this encrypted random bytes to HSM for decryption. The HSM then decrypts the random bytes and sends it back to DSG. The DSG decrypts the BLOB file using the key from the HSM. This decrypted random bytes are tne stored in the process memory of the DSG. These bytes are then used to reshuffle the code books. Based on the random bytes decrypted from the BLOB, codebook Reshuffling generates unique tokens for protected values across the tokenization domains.
Ensure that you do not unprotect historically protected data using any token element as it causes data corruption.
After the data is protected by enabling Codebook Reshuffling on the Data Security Gateway (DSG), run data security operations such as protect, unprotect, and re-protect only by using the DSG protector. The DSG does not support migration of protected data to other protectors. If you migrate protected data to another protector and try to unprotect it, the data may become corrupted.
The Codebook Reshuffling feature is tested and supported for the Safenet Luna 7.4 HSM devices. The procedure provided in this section is for the Safenet Luna 7.4 HSM devices.
HSM and BMS Setup for Codebook Reshuffling
Setting up HSM
The process to enable codebook reshuffling starts with setting up the HSM using the following steps.
Download the HSM library files. In this procedure, it is assumed that the HSM files are added to the /opt/protegrity/hsm directory.
Note: The HSM directory is not created on the DSG by default after DSG installation. Ensure that you use the following commands to create the HSM directory.
mkdir -p /opt/protegrity/hsmEnsure that the required ownership and permissions are set for the HSM library files in the /opt/protegrity/hsm directory by running the following commands.
chown -R blob-data:blob-data /opt/protegrity/hsm
chmod -R 740 /opt/protegrity/hsm
Ensure that the HSM library configuration files are available on the DSG.
Creating Key, Random BLOB, and User Pin
After setting up the HSM, perform the following steps to set up the Blob Management Service (BMS).
Create the credentials file to connect to the HSM using the following command.
In the command, password refers to the slot password.
cd /opt/protegrity/blobcache/data/
touch userpin.bin && echo "<password>" >>userpin.bin
Run the following command to set the ownership of the user pin.
chown blob-data:blob-data userpin.bin
chmod 640 userpin.bin
Set all values in the blobconfig.env file, except the path to random.dat file.
For more information about the parameters in the blobconfig.env file, refer to the section Configuring the blobconfig.env File# Logging configurations export BMS_LOG_LEVEL=WARNING export BMS_LOG_FILE="/opt/protegrity/blobcache/log/bms.log" # Send logs to fluentbit export BMS_FLUENTBIT_PORT=15780 # HSM configurations export BMS_PKCS11_LIBRARY=/opt/protegrity/hsm/libCryptoki2_64.so export ChrystokiConfigurationPath=/opt/protegrity/hsm export BMS_PKCS11_SLOT=0 export BMS_PKCS11_USERPIN_FILE=/opt/protegrity/blobcache/data/userpin.bin #export BMS_RANDOM_FILE_PATH=/opt/protegrity/blobcache/data/random.dat # Server configurations export BMS_LISTENER_SSL_CERT=/mnt/ramdisk/certificates/mng/server.pem export BMS_LISTENER_SSL_KEY=/mnt/ramdisk/certificates/mng/server.key export BMS_LISTENER_SSL_CA=/mnt/ramdisk/certificates/mng/CA.pem #export BMS_LISTENER_SSL_PASS=/mnt/ramdisk/certificates/mng/server.binStart the BMS service. On the ESA Web UI, navigate to System > Services and start the BLOB Management Service.
Run the following command to create an alias for the curl.
export CERT_DIR="/mnt/ramdisk/certificates/mng" export BMS_URL="https://localhost:31111" alias curl="/opt/protegrity/rpproxy/bin/curl"Run the following command to create a new AES key in the HSM.
curl -k \ -X POST \ --cert "$CERT_DIR/client.pem" \ --key "$CERT_DIR/client.key" \ "$BMS_URL/key/<Label name>"A label is a unique name associated with an AES key that is used to reference the key.
If the key with the specified label is already present in the HSM, the BMS will return an error.
Run the following command to create the random blob.
curl -k \ -H 'content-type: application/json' \ --cert "$CERT_DIR/client.pem" \ --key "$CERT_DIR/client.key" \ --data-binary '{"blob_size":500000}' \ -o <Name of the BLOB>.json \ "$BMS_URL/blob/<Label name>"Run the following command to set the ownership of the random blob.
chown blob-data:blob-data <Name of the BLOB>.json chmod 640 <Name of the BLOB>.jsonSet the path to the random.json file in the blobconfig.env file.
# Logging configurations export BMS_LOG_LEVEL=WARNING export BMS_LOG_FILE="/opt/protegrity/blobcache/log/bms.log" # Send logs to fluentbit export BMS_FLUENTBIT_PORT=15780 # HSM configurations export BMS_PKCS11_LIBRARY=/opt/protegrity/hsm/libCryptoki2_64.so export ChrystokiConfigurationPath=/opt/protegrity/hsm export BMS_PKCS11_SLOT=0 export BMS_PKCS11_USERPIN_FILE=/opt/protegrity/blobcache/data/userpin.bin export BMS_RANDOM_FILE_PATH=/opt/protegrity/blobcache/data/random.json # Server configurations export BMS_LISTENER_SSL_CERT=/mnt/ramdisk/certificates/mng/server.pem export BMS_LISTENER_SSL_KEY=/mnt/ramdisk/certificates/mng/server.key export BMS_LISTENER_SSL_CA=/mnt/ramdisk/certificates/mng/CA.pem #export BMS_LISTENER_SSL_PASS=/mnt/ramdisk/certificates/mng/server.binTo enable codebook reshuffling, set the shuffle_codebook to true in the bms_client.json file. On the ESA Web UI, navigate to Settings > System > Files to edit the bms_client.json file.
For more information about the parameters in the bms_client.json file, refer to the section Configuring the bms_client.json File.On the DSG Web UI, navigate to System > Services and restart the BLOB Management Service.
On the DSG Web UI, navigate to System > Services and restart the Cloud Gateway service.
Setting up HSM
The process to enable codebook reshuffling starts with setting up the HSM using the following steps.
Note: Perform the following steps on all DSG nodes.
Download the HSM library files. In this procedure, it is assumed that the HSM files are added to the /opt/protegrity/hsm directory.
Note: The HSM directory is not created on the DSG by default after DSG installation. Ensure that you use the following commands to create the HSM directory.
mkdir -p /opt/protegrity/hsmEnsure that the HSM library configuration files are available on the DSG.
Ensure that the required ownership and permissions are set for the HSM library files in the /opt/protegrity/hsm directory by running the following commands.
chown -R blob-data:blob-data /opt/protegrity/hsm chmod -R 740 /opt/protegrity/hsm
Initial Setup on the First DSG Node
After setting up the HSM, perform the following steps to set up the Blob Management Service (BMS).
Set all values in the blobconfig.env file, except the paths to userpin.bin and random.dat files.
For more information about the parameters in the blobconfig.env file, refer to the section Configuring the blobconfig.env File# Logging configurations export BMS_LOG_LEVEL=WARNING export BMS_LOG_FILE="/opt/protegrity/blobcache/log/bms.log" # Send logs to fluentbit export BMS_FLUENTBIT_PORT=15780 # HSM configurations export BMS_PKCS11_LIBRARY=/opt/protegrity/hsm/libCryptoki2_64.so export ChrystokiConfigurationPath=/opt/protegrity/hsm export BMS_PKCS11_SLOT=0 #export BMS_PKCS11_USERPIN_FILE=/opt/protegrity/blobcache/data/userpin.bin #export BMS_RANDOM_FILE_PATH=/opt/protegrity/blobcache/data/random.dat # Server configurations export BMS_LISTENER_SSL_CERT=/mnt/ramdisk/certificates/mng/server.pem export BMS_LISTENER_SSL_KEY=/mnt/ramdisk/certificates/mng/server.key export BMS_LISTENER_SSL_CA=/mnt/ramdisk/certificates/mng/CA.pem #export BMS_LISTENER_SSL_PASS=/mnt/ramdisk/certificates/mng/server.binStart the BMS service. On the DSG Web UI, navigate to System > Services and start the BLOB Management Service.
Run the following command to create an alias for the curl.
export CERT_DIR="/mnt/ramdisk/certificates/mng" export BMS_URL="https://localhost:31111" alias curl="/opt/protegrity/rpproxy/bin/curl"Send a request to encrypt the user pin.
curl -H "content-type: text/plain" --cert $CERT_DIR/client.pem --key $CERT_DIR/client.key -k -o userpin.bin $BMS_URL/userpin/encrypt -d "<Plaintext Userpin>"Copy the generated userpin.bin file to the following directory.
cp userpin.bin /opt/protegrity/blobcache/data/Run the following command to set the ownership and permission of the user pin.
chown blob-data:blob-data /opt/protegrity/blobcache/data/userpin.bin chmod 640 /opt/protegrity/blobcache/data/userpin.binSet the path to the userpin.bin file in the blobconfig.env file.
# Logging configurations export BMS_LOG_LEVEL=WARNING export BMS_LOG_FILE="/opt/protegrity/blobcache/log/bms.log" # Send logs to fluentbit export BMS_FLUENTBIT_PORT=15780 # HSM configurations export BMS_PKCS11_LIBRARY=/opt/protegrity/hsm/libCryptoki2_64.so export ChrystokiConfigurationPath=/opt/protegrity/hsm export BMS_PKCS11_SLOT=0 export BMS_PKCS11_USERPIN_FILE=/opt/protegrity/blobcache/data/userpin.bin #export BMS_RANDOM_FILE_PATH=/opt/protegrity/blobcache/data/random.dat # Server configurations export BMS_LISTENER_SSL_CERT=/mnt/ramdisk/certificates/mng/server.pem export BMS_LISTENER_SSL_KEY=/mnt/ramdisk/certificates/mng/server.key export BMS_LISTENER_SSL_CA=/mnt/ramdisk/certificates/mng/CA.pem #export BMS_LISTENER_SSL_PASS=/mnt/ramdisk/certificates/mng/server.binOn the DSG Web UI, navigate to System > Services and restart the BLOB Management Service.
Run the following command to create a new AES key in the HSM.
curl -k \ -X POST \ --cert "$CERT_DIR/client.pem" \ --key "$CERT_DIR/client.key" \ "$BMS_URL/key/<Label name>"A label is a unique name associated with an AES key that is used to reference the key.
If the key with the specified label is already present in the HSM, the BMS will return an error.
Run the following command to create the random blob.
curl -k \ -H 'content-type: application/json' \ --cert "$CERT_DIR/client.pem" \ --key "$CERT_DIR/client.key" \ --data-binary '{"blob_size":500000}' \ -o random.json \ "$BMS_URL/blob/<Label name>"Copy the random.json file to the following directory.
cp random.json /opt/protegrity/blobcache/data/
Run the following command to set the ownership and permission of the random blob.
chown blob-data:blob-data /opt/protegrity/blobcache/data/random.json chmod 640 /opt/protegrity/blobcache/data/random.jsonSet the path to the random.json file in the blobconfig.env file.
# Logging configurations export BMS_LOG_LEVEL=WARNING export BMS_LOG_FILE="/opt/protegrity/blobcache/log/bms.log" # Send logs to fluentbit export BMS_FLUENTBIT_PORT=15780 # HSM configurations export BMS_PKCS11_LIBRARY=/opt/protegrity/hsm/libCryptoki2_64.so export ChrystokiConfigurationPath=/opt/protegrity/hsm export BMS_PKCS11_SLOT=0 export BMS_PKCS11_USERPIN_FILE=/opt/protegrity/blobcache/data/userpin.bin export BMS_RANDOM_FILE_PATH=/opt/protegrity/blobcache/data/random.json # Server configurations export BMS_LISTENER_SSL_CERT=/mnt/ramdisk/certificates/mng/server.pem export BMS_LISTENER_SSL_KEY=/mnt/ramdisk/certificates/mng/server.key export BMS_LISTENER_SSL_CA=/mnt/ramdisk/certificates/mng/CA.pem #export BMS_LISTENER_SSL_PASS=/mnt/ramdisk/certificates/mng/server.binTo enable codebook reshuffling, set the shuffle_codebook to true in the bms_client.json file. On the DSG Web UI, navigate to Settings > System > Files to edit the bms_client.json file.
For more information about the parameters in the bms_client.json file, refer to the section Configuring the bms_client.json File.On the DSG Web UI, navigate to System > Services and restart the BLOB Management Service.
On the DSG Web UI, navigate to System > Services and restart the Cloud Gateway service.
Setup on Subsequent DSG Nodes
Set all values in the blobconfig.env file, except the paths to userpin.bin and random.dat files.
For more information about the parameters in the blobconfig.env file, refer to the section Configuring the blobconfig.env File# Logging configurations export BMS_LOG_LEVEL=WARNING export BMS_LOG_FILE="/opt/protegrity/blobcache/log/bms.log" # Send logs to fluentbit export BMS_FLUENTBIT_PORT=15780 # HSM configurations export BMS_PKCS11_LIBRARY=/opt/protegrity/hsm/libCryptoki2_64.so export ChrystokiConfigurationPath=/opt/protegrity/hsm export BMS_PKCS11_SLOT=0 #export BMS_PKCS11_USERPIN_FILE=/opt/protegrity/blobcache/data/userpin.bin #export BMS_RANDOM_FILE_PATH=/opt/protegrity/blobcache/data/random.dat # Server configurations export BMS_LISTENER_SSL_CERT=/mnt/ramdisk/certificates/mng/server.pem export BMS_LISTENER_SSL_KEY=/mnt/ramdisk/certificates/mng/server.key export BMS_LISTENER_SSL_CA=/mnt/ramdisk/certificates/mng/CA.pem #export BMS_LISTENER_SSL_PASS=/mnt/ramdisk/certificates/mng/server.binStart the BMS service. On the DSG Web UI, navigate to System > Services and start the BLOB Management Service.
Run the following command to create an alias for the curl.
export CERT_DIR="/mnt/ramdisk/certificates/mng" export BMS_URL="https://localhost:31111" alias curl="/opt/protegrity/rpproxy/bin/curl"Send a request to encrypt the user pin.
curl -H "content-type: text/plain" --cert $CERT_DIR/client.pem --key $CERT_DIR/client.key -k -o userpin.bin $BMS_URL/userpin/encrypt -d "<Plaintext Userpin>"Copy the generated userpin.bin file to the data directory.
cp userpin.bin /opt/protegrity/blobcache/data/Run the following command to set the ownership and permission of the user pin.
chown blob-data:blob-data /opt/protegrity/blobcache/data/userpin.bin chmod 640 /opt/protegrity/blobcache/data/userpin.binCopy the random.json file generated in Step 10 from the first DSG node to
/opt/protegrity/blobcache/data/.Set the paths to the userpin.bin and random.json files in the blobconfig.env file.
# Logging configurations
export BMS_LOG_LEVEL=WARNING
export BMS_LOG_FILE="/opt/protegrity/blobcache/log/bms.log"

# Send logs to fluentbit
export BMS_FLUENTBIT_PORT=15780

# HSM configurations
export BMS_PKCS11_LIBRARY=/opt/protegrity/hsm/libCryptoki2_64.so
export ChrystokiConfigurationPath=/opt/protegrity/hsm
export BMS_PKCS11_SLOT=0
export BMS_PKCS11_USERPIN_FILE=/opt/protegrity/blobcache/data/userpin.bin
export BMS_RANDOM_FILE_PATH=/opt/protegrity/blobcache/data/random.json

# Server configurations
export BMS_LISTENER_SSL_CERT=/mnt/ramdisk/certificates/mng/server.pem
export BMS_LISTENER_SSL_KEY=/mnt/ramdisk/certificates/mng/server.key
export BMS_LISTENER_SSL_CA=/mnt/ramdisk/certificates/mng/CA.pem
#export BMS_LISTENER_SSL_PASS=/mnt/ramdisk/certificates/mng/server.bin
To enable codebook reshuffling, set the shuffle_codebook to true in the bms_client.json file. On the DSG Web UI, navigate to Settings > System > Files to edit the bms_client.json file.
For more information about the parameters in the bms_client.json file, refer to the section Configuring the bms_client.json File.On the DSG Web UI, navigate to System > Services and restart the BLOB Management Service.
On the DSG Web UI, navigate to System > Services and restart the Cloud Gateway service.
Configuring the blobconfig.env File
The blobconfig.env file allows to set logging, HSM integration, and SSL for secure communication. On the DSG Web UI, navigate to Settings > System > Files to edit the configurations.
The following table illustrates the variables that must be configured for setting up blob management service.
| Section | Variable | Description |
|---|---|---|
| Logging | BMS_LOG_LEVEL | Sets log level. |
BMS_LOG_FILE | Path for blob management service log file. | |
| Fluent Bit | BMS_FLUENTBIT_PORT | Port for sending logs to Fluent Bit. If the port is specified, the logs will also be forwarded to ESA Forensics; otherwise, they will only be logged locally. |
| HSM | BMS_PKCS11_LIBRARY | PKCS#11 library for HSM integration. |
ChrystokiConfigurationPath | HSM configuration directory. | |
BMS_PKCS11_SLOT | Slot number for HSM token. | |
BMS_PKCS11_USERPIN_FILE | File containing the user PIN for HSM access. | |
BMS_RANDOM_FILE_PATH | Random data file for codebook reshuffling. | |
| Server | BMS_LISTENER_SSL_CERT | Server certificate for blob management service. |
BMS_LISTENER_SSL_KEY | SSL private key for blob management service. | |
BMS_LISTENER_SSL_CA | CA certificate for blob management service. | |
BMS_LISTENER_SSL_PASS | Password for the SSL private key. Uncomment this parameter when you are using encrypted private key. |
After configuring the parameters, on the DSG Web UI, navigate to System > Services and restart the BLOB Management Service and then the Cloud Gateway service.
Configuring the bms_client.json File
After configuring the HSM and log-related settings, the codebook reshuffling has to be enabled in the bms_client.json file. On the DSG Web UI, navigate to Settings > System > Files to edit the configurations. The following table illustrates the variables that must be configured for setting up codebook reshuffling in the bms_client.json file.
| Key | Description |
|---|---|
shuffle_codebook | Set to true when codebook reshuffling must be enabled. The default value is false. |
ca_cert | Path to CA certificate for secure communication with BMS. |
client_cert | Path to client certificate for secure communication with BMS. |
client_key | Path to client key for secure communication with BMS. |
| Retry Settings | Configuration for retry mechanism. The retry settings are optional and hidden by default. |
retry.max_attempts | Maximum number of retry attempts. |
retry.initial_delay | Initial delay before first retry (in seconds). |
retry.max_delay | Maximum delay between retries (in seconds). |
retry.backoff_factor | Exponential backoff multiplier for retries. |
After configuring the parameters, on the DSG Web UI, navigate to System > Services and restart the BLOB Management Service and then the Cloud Gateway service.
Re-protecting the Existing BLOB
User can create the encrypted blob file by using the steps mentioned in the Creating Key, Random BLOB and User Pin section. However, if the same BLOB is to be protected with a new key, create a new key and use the new key label to reprotect the BLOB. The reprotect operation will decrypt the blob, encrypt it with a new key label, and will not change the content in the BLOB.
To reprotect the existing BLOB:
Run the following command to create a key.
curl -k \
-X POST \
--cert "$CERT_DIR/client.pem" \
--key "$CERT_DIR/client.key" \
"$BMS_URL/key/<New key label>"
Run the following command to create a BLOB and protect it.
curl -k \
--cert "$CERT_DIR/client.pem" \
--key "$CERT_DIR/client.key" \
--data-binary "@<Name of the old BLOB>.json" \
-o <Name of the new BLOB>.json \
"$BMS_URL/blob/<New key label>/reprotect"