Amazon EMR
Amazon EMR Protector
The Big Data Protector on Amazon Elastic MapReduce (EMR) is a cloud-based protector that allows users to process data efficiently. The EMR cluster is a collection of Amazon EC2 instances that collaborate to process data using popular Big Data frameworks, such as, Apache Hadoop, Apache Spark, Apache HBase, and others.
The Big Data Protector on EMR utilizes the following components to process and protect data:
- HBase
- Pig
- MapReduce
- Hive
- Spark
- SparkSQL
1 - Understanding the architecture
The architecture for the protector.
1.1 - Bootstrap installer architecture
Understanding the architecture for the bootstrap installer
The architecture for the EMR distribution of the Big Data Protector is depicted in the image below.
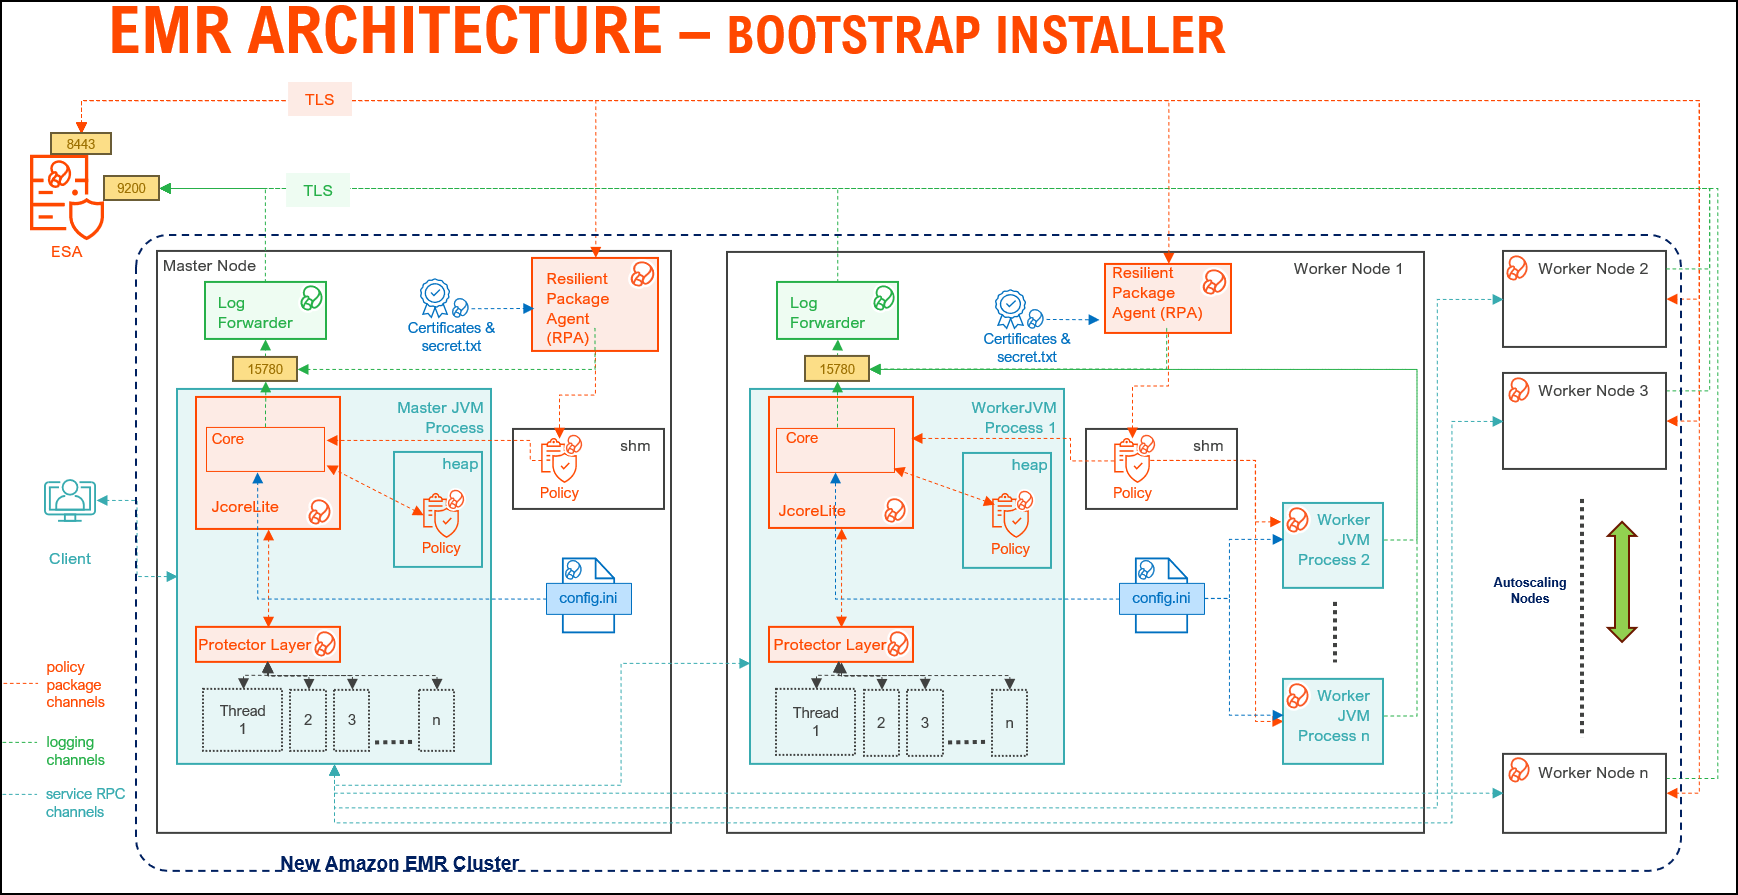
| Component | Description |
|---|
| RPAgent | Is a daemon running on each node that downloads the package from ESA over a TLS channel using the installed Certificates. |
| Log Forwarder | Is a daemon running on each node that routes the audit logs and application logs to ESA/Audit Store. |
| config.ini | Is a file on each node containing the set of configuration parameters to modify the protector behavior. |
| BDP Layer | Contains the Big Data Protector UDFs and APIs executing in CDP service processes. |
| JcoreLite | Is the JNI library that provides a Java API layer to the Core libraries. |
| Core | Is the set of various libraries that provide the Protegrity Core functionality. |
1.2 - Static installer architecture
Understanding the architecture for the static installer
The architecture for the EMR distribution of the Big Data Protector is depicted in the image below.
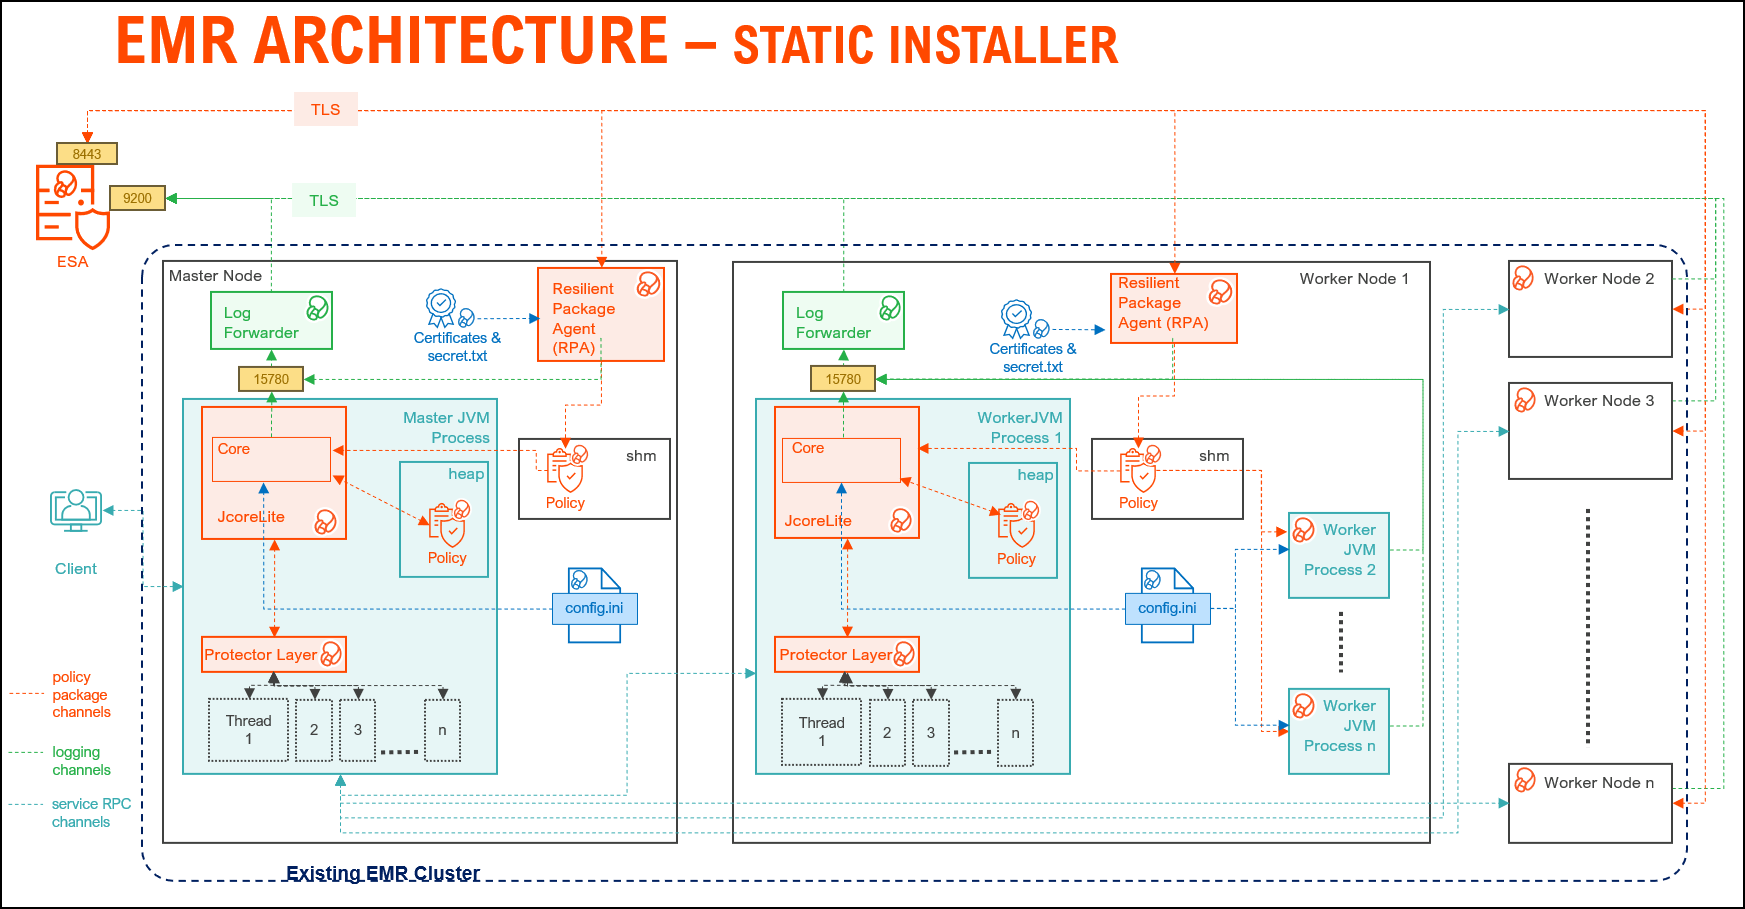
| Component | Description |
|---|
| RPAgent | A daemon running on each node that downloads the package from ESA over a TLS channel using the installed Certificates. |
| Log Forwarder | A daemon running on each node that routes the audit logs and application logs to ESA/Audit Store. |
| config.ini | A file on each node containing the set of configuration parameters to modify the protector behavior. |
| BDP Layer | Contains the Big Data Protector UDFs and APIs executing in CDP service processes. |
| JcoreLite | The JNI library that provides a Java API layer to the Core libraries. |
| Core | The set of various libraries that provide the Protegrity Core functionality. |
2 - Preparing the environment
Completing the requirements for installing the protector.
2.1 - Setting up for the Bootstrap Installer
Prepare the system for using the Bootstrap Installer
The procedures mentioned in this section are applicable only for the Bootstrap installer approach to prepare the environment for the Big Data Protector.
2.1.1 - Verifying the prerequisites
Verifying the Prerequisites for Installing the Big Data Protector
The content mentioned in this section is applicable only for the Bootstrap approach to install the Big Data Protector.
Ensure that the following prerequisites are met, before installing the Big Data Protector on an Amazon EMR cluster:
- It is recommended to be familiar with the following parts:
- The Amazon EMR environment
- Storage bucket, used to store the Big Data Protector installation files
- Bootstrap Action, used to invoke the installation of Big Data Protector
- Amazon Virtual Private Cloud (VPC)
- An ESA appliance v10.x.x is installed and running.
- An S3 bucket is available to copy the Big Data Protector installation files, which are created using the Configurator script.
For more information about creating an S3 bucket, refer to the Amazon documentation for creating the S3 bucket.
- The following table depicts the list of ports that are configured on ESA and the nodes in the cluster, which will run the Big Data Protector:
8443 | TCP | RPAgent on the Big Data Protector cluster node | ESA | The RPAgent communicates with ESA through port
8443 to download a Policy. |
9200 | Log Forwarder on the Big Data Protector cluster
node | Protegrity Audit Store appliance | The Log Forwarder sends all the logs to the Protegrity
Audit Store appliance through port
9200. |
15780 | Protector on the Big Data Protector cluster node | Log Forwarder on the Big Data Protector cluster
node | The Big Data Protector writes Audit Logs to localhost
through port 15780. The RPAgent
Application Logs are also written to localhost through port
15780. The Log Forwarder reads the logs from
that socket. |
2.1.2 - Extracting the Big Data Protector Package
Extracting the Big Data Protector Package
The steps mentioned in this section are applicable only for the Bootstrap approach to install the Big Data Protector.
After receiving the Big Data Protector installation package from Protegrity, copy it to any Amazon EC2 instance or any node that
has connectivity to ESA.
After downloading the Big Data Protector package, extract it to:
- Access the Configurator script and
- Install the Big Data Protector on all the nodes on an Amazon EMR cluster.
To extract the Configurator script from the installation package:
Log in to the CLI on a machine or an Amazon EC2 node that has connectivity to ESA.
Copy the Big Data Protector package BigDataProtector_Linux-ALL-64_x86-64_EMR-<EMR_version>-64_<BDP_version>.tgz to any directory.
For example, /opt/protegrity/.
To extract the contents of the package, run the following command:
tar -xvf BigDataProtector_Linux-ALL-64_x86-64_EMR-<EMR_version>-64_<BDP_version>.tgz
Press ENTER.
The command extracts the installer package and the signature files.
BigDataProtector_Linux-ALL-64_x86-64_EMR-<EMR_version>-64_<BDP_version>.tgz
signatures/
signatures/BigDataProtector_Linux-ALL-64_x86-64_EMR-<EMR_version>-64_<BDP_version>.tgz_<BDP_version>.sig
Verify the authenticity of the build using the signatures folder. For more information, refer Verification of Signed Protector Build.
To extract the configurator script, run the following command:
tar –xvf BigDataProtector_Linux-ALL-64_x86-64_EMR-<EMR_version>-64_<BDP_version>.tgz
Press ENTER.
The command extracts the configurator script.
BDP_Configurator_EMR-<EMR_version>_<BDP_version>.sh
2.1.3 - Executing the Configurator Script
Executing the Configurator Script
The steps mentioned in this section are applicable only for the Bootstrap approach to install the Big Data Protector.
Execute the configurator script to create the installation files for installing the Big Data Protector on an Amazon EMR
cluster. You can install the Big Data Protector on an Amazon EMR cluster in any one of the following methods:
- New EMR cluster: The configurator script will:
- Download the certificates and key encryption files from ESA.
- Create the Big Data Protector installation files for a new EMR cluster.
- Create the bootstrap installer and classpath configurator script for a new EMR cluster.
- Copy the Big Data Protector installation files, bootstrap installer, and the classpath configurator script to the S3 bucket.
- Existing EMR cluster: The configurator script will generate the installation package to install the Big Data Protector on an existing EMR cluster.
To execute the configurator script:
Log in to the staging environment.
Navigate to the directory that contains the BDP_Configurator_EMR-<EMR_version>_<BDP_version>.sh script.
To execute the configurator script, run the following command:
./BDP_Configurator_EMR-<EMR_version>_<BDP_version>.sh
Press ENTER.
The prompt to continue the installation of the Big Data Protector appears.
***********************************************************************
     Welcome to the Big Data Protector Configurator Wizard
***********************************************************************
This will create the Big Data Protector Installation files for AWS EMR.
Do you want to continue? [yes or no]:
To continue, type yes.
Press ENTER.
The prompt to create the Big Data Protector installation package, depending on the EMR cluster, appears.
Protegrity Big Data Protector Configurator started...

Enter the EMR cluster for which the Big Data Protector installation package needs to be created:
[ 1 ] : New EMR Cluster
[ 2 ] : Existing EMR cluster
[ 1 or 2 ]:
Depending on your requirement, select any one of the following options:
- To create the Big Data Protector installation package for a new EMR cluster, type
1. - To generate the Big Data Protector installation package, in a local directory, for an existing EMR cluster, type
2.
For more information about installing the Big Data Protector on an existing EMR cluster, refer Using the Static Installer.
To create the Big Data Protector installation package for a new EMR cluster, type 1.
Press ENTER.
The prompt to enter the S3 URI to upload the Big Data Protector installation files appears.
Generating Big Data Protector for a new EMR cluster......
Enter the S3 URI where the BDP Installation files are to be uploaded.
(E.g. s3://examplebucket/folder):
Type the path of the S3 storage bucket.
Note: Ensure that the path of the S3 storage bucket is in the following format:
s3://<bucket_name>/<folder_in_the_bucket>
where,
- <bucket_name> - specifies the name of the storage bucket.
- <folder_in_the_bucket> - specifies the directory within the bucket.
Press ENTER.
The prompt to either upload the installation files to the S3 bucket or generate them locally appears.
Choose one option among the following for BDP Installation files:
[1] -> Upload files to 's3://<bucket_name>/<folder_in_the_bucket>' S3 URI.
[2] -> Generate files locally to current working directory. (You would have to manually upload the files to the specified S3 URI)
[ 1 or 2 ]:
To upload the installation files to the S3 storage bucket, type 1.
Press ENTER.
The prompt to select the type of AWS access key appears.
Choose the Type of AWS Access Keys from the following options:
[1] -> IAM User Access Keys (Permanent access key id & secret access key)
[2] -> Temporary Security Credentials (Temporary access key id, secret access key & session token)
[ 1 or 2 ]:
Depending on the type of AWS Access Keys you want to use, type 1 or 2. For example, to use the temporary security credentials, type 2.
Press ENTER.
The prompt to enter the access key ID appears.
Enter the access key ID.
Press ENTER.
The prompt to enter the secret access key appears.
Enter the Secret Access Key:
Enter the secret access key.
Press ENTER.
The prompt to enter the security session token appears.
Enter the Security Session Token:
Enter the Security Session Token.
Press ENTER.
The prompt to enter ESA hostname or IP address appears.
Enter the ESA Hostname/IP Address:
Enter the hostname or the IP address of ESA.
Press ENTER.
The prompt to enter the listening port for ESA appears.
Enter ESA host listening port [8443]:
Enter the listening port for ESA.
Alternatively, to use the default listening port, press ENTER.
Press ENTER.
The prompt to enter the JWT token appears.
If you have an existing ESA JSON Web Token (JWT) with Export Certificates role, enter it otherwise enter 'no':
Enter the JWT token.
Press ENTER.
The prompt to select the audit store type appears.
Select the Audit Store type where Log Forwarder(s) should send logs to.

[ 1 ] : Protegrity Audit Store
[ 2 ] : External Audit Store
[ 3 ] : Protegrity Audit Store + External Audit Store

Enter the no.:
Depending on the Audit Store type, select any one of the following options:
| Option | Description |
|---|
1 | To use the default setting using the Protegrity Audit Store appliance, type 1. If you enter 1, then the default Fluent Bit configuration files are used and Fluent Bit will forward the logs to the Protegrity Audit Store appliances. |
2 | To use an external audit store, type 2. If you enter 2, then the default Fluent Bit configuration files used for the External Audit Store (out.conf and upstream.cfg in the /opt/protegrity/fluent-bit/data/config.d/ directory) are renamed (out.conf.bkp and upstream.cfg.bkp) so that they will not be used by Fluent Bit. Additionally, the custom Fluent Bit configuration files for the external audit store are copied to the /opt/protegrity/fluent-bit/data/config.d/ directory. |
3 | To use a combination of the default setting with an external audit store, type 3. If you enter 3, then the default Fluent Bit configuration files used for the Protegrity Audit Store (out.conf and upstream.cfg in the /opt/protegrity/fluent-bit/data/config.d/ directory) are not renamed. However, the custom Fluent Bit configuration files for the external audit store are copied to the /opt/protegrity/fluent-bit/data/config.d/ directory. |
Press ENTER.
The prompt to enter the comma separated list of hostname or IP addresses appears.
Enter comma-separated list of Hostnames/IP Addresses and/or Ports of Protegrity Audit Store.
Allowed Syntax: hostname[:port][,hostname[:port],hostname[:port]...] (Default Value - <ESA_IP_Address>:9200)
Enter the list:
Enter the comma-separated IP addresses/ports in the correct syntax.
Press ENTER.
The prompt to enter the local directory path that stores the custom Fluent Bit configuration file appears.
Enter the local directory path on this node that stores the custom Fluent-Bit configuration files for External Audit Store:
Note: The configurator script will display this prompt only if you select option 2 or 3 in step 28. When you select option 2 or
3 in step 28, the custom configuration files are copied to the /<installation_directory>/fluent-bit/data/config.d/ directory during the execution of bootstrap script on the EMR nodes.
Enter the local directory path that stores the custom Fluent Bit configuration files.
Press ENTER.
The prompt to generate the application logs for the RPAgent appears.
Do you want RPAgent's log to be generated in a file? [yes or no]:
To generate the logs in a file, type yes.
Press ENTER.
The script generates the installation files and uploads them to the specified S3 bucket.
RPAgent's log will be generated in a file.
************************************************************************************
                    Welcome to the RPAgent Setup Wizard.
************************************************************************************

Unpacking...................
Extracting files...
Unpacked rpagent compressed file...
Temporarily setting up rpagent directory structure on current node...
Unpacking...
Extracting files...
Downloading certificates from <ESA_IP_Address>:8443...
% Total    % Received % Xferd  Average Speed   Time    Time     Time  Current
                                Dload  Upload   Total   Spent    Left  Speed
100 11264  100 11264    0     0   163k      0 --:--:-- --:--:-- --:--:--  164k

Extracting certificates...
Certificates successfully downloaded and stored in /<installation_dir>/rpagent/data

Protegrity RPAgent installed in /<installation_dir>/rpagent.


Retrieving the S3 bucket's AWS Region via AWS S3 REST API...
Successfully retrieved S3 bucket's AWS region: <AWS_region_name>


Started Uploading the generated installation files via AWS S3 REST API......

Uploading bdp_bootstrap_installer.sh to the S3 bucket.
File uploaded to s3://<bucket_name>/<folder_in_the_bucket>/bdp_bootstrap_installer.sh

Uploading bdp_classpath_configurator.py to the S3 bucket.
File uploaded to s3://<bucket_name>/<folder_in_the_bucket>/bdp_classpath_configurator.py

Uploading BigDataProtector_Linux-ALL-64_x86-64_EMR-7.9-64_<BDP_version>.tgz to the S3 bucket.
File uploaded to s3://<bucket_name>/<folder_in_the_bucket>/BigDataProtector_Linux-ALL-64_x86-64_EMR-<EMR_version>-64_<BDP_version>.tgz

Successfully Uploaded BigDataProtector_Linux-ALL-64_x86-64_EMR-<EMR_version>-64_<BDP_version>.tgz, bdp_bootstrap_installer.sh, bdp_classpath_configurator.py to S3 bucket 's3://<bucket_name>/<folder_in_the_bucket>'

Successfully Generated installation files at ./Installation_Files/ directory.

Successfully configured Big Data Protector for a new EMR cluster..
2.2 - Setting up for the Static Installer
Prepare the system for using the Static Installer
The procedures mentioned in this section are applicable only for the Static installer approach to prepare the environment for the Big Data Protector.
2.2.1 - Verifying the prerequisites for Static Installer
Verifying the Prerequisites for Installing the Big Data Protector using the Static Installer
The content mentioned in this section is applicable only for the Static installer approach to install the Big Data Protector.
Ensure that the following prerequisites are met, before installing the Big Data Protector:
The EMR cluster is installed, configured, and running.
The ESA v10.0.x instance is installed, configured, and running.
The static installer for EMR uses utilities, such as, pssh (parallel ssh) and pscp (parallel scp). These utilities require Python to
be installed on the Primary node. To verify whether Python is installed on the Primary node, run the following command:
/usr/bin/env python --version
The command returns the version of Python installed on the system.
If you are unable to detect Python on the Primary node, then ensure that you have a compatible version of Python installed
on the lead node (preferably Python 3.x). Ensure that the utilities are able to detect the version of Python using the following
command:
A sudoer user account with privileges to perform the following tasks:
- Update the system by modifying the configuration, permissions, or ownership of directories and files.
- Perform third party configuration.
- Create directories and files.
- Modify the permissions and ownership for the created directories and files.
- Set the required permissions to the create directories and files for the Protegrity Service Account.
- Permissions for using the SSH service.
The following user accounts are present to perform the required tasks:
ADMINISTRATOR_USER is the sudoer user account that is responsible to install and uninstall the Big Data Protector
on the cluster. This user account must have sudo access to install the product.EXECUTOR_USER: It is a user that has ownership of all Protegrity files, directories, and services.OPERATOR_USER: It is responsible for performing tasks, such as, starting or stopping tasks, monitoring services,
updating the configuration, and maintaining the cluster while the Big Data Protector is installed on it. If you want to start, stop, or restart the Protegrity services, then you require sudoer privileges for this user to impersonate the EXECUTOR_USER.- Depending on the requirements, a single user on the system may perform multiple roles. If a single user is performing multiple roles, then ensure that the following conditions are met:
- The user has the required permissions and privileges to impersonate the other user accounts, for performing their roles, and perform tasks as the impersonated user.
- The user is assigned the highest set of privileges, from the required roles that it needs to perform, to execute the required tasks. For example, if a single user is performing tasks as
ADMINISTRATOR_USER, EXECUTOR_USER, and OPERATOR_USER,
then ensure that the user is assigned the privileges of the ADMINISTRATOR_USER.
A Private Key file (.pem file) for the sudoer user, which is used for enabling key-based authentication, and for communicating
with all the nodes in the EMR cluster, is present on the Master node.
As key-based authentication for the sudoer user is provided, which is required for installing and using Big Data Protector
on the EMR cluster, ensure that the ADMINISTRATOR_USER or OPERATOR_USER have the value of the NOPASSWD
parameter set to ALL in the sudoer’s file.
The management scripts provided by the installer in the cluster_utils directory should be run only by the user
(OPERATOR_USER) having privileges to impersonate the EXECUTOR_USER.
- If the value of the
AUTOCREATE_PROTEGRITY_IT_USR parameter in the BDP.config file is set to No, then ensure that
a service group containing a user for running the Protegrity services on all the nodes in the cluster already exists. - If the Hadoop cluster is configured with AD or LDAP for user management, then ensure that the
AUTOCREATE_PROTEGRITY_IT_USR parameter in the BDP.config file is set to No and that the required service
account user is created on all the nodes in the cluster.
The table lists the ports required for the EMR cluster.
8443 | TCP | RPAgent on the Big Data Protector cluster node | ESA | The RPAgent communicates with ESA through port
8443 to download a Policy. |
9200 | Log Forwarder on the Big Data Protector cluster
node | Protegrity Audit Store appliance | The Log Forwarder sends all the logs to the Protegrity
Audit Store appliance through port
9200. |
15780 | Protector on the Big Data Protector cluster node | Log Forwarder on the Big Data Protector cluster
node | The Big Data Protector writes Audit Logs to localhost
through port 15780. The RPAgent
Application Logs are also written to localhost through port
15780. The Log Forwarder reads the logs from
that socket. |
2.2.2 - Extracting the Installation Package
Extracting the Instllation Package for the Static Installer
The steps mentioned in this section are applicable only for the Static installer approach to install the Big Data Protector.
To extract the files from the installation package:
Ensure that the installation package BigDataProtector_Linux-ALL-64_x86-64_EMR-<emr_version>-64_<BDP_version>.tgz is copied to the Master node on the EMR cluster in any temporary directory, such as /opt/protegrity/.
To extract the files from the installation package, run the following command:
tar -xvf BigDataProtector_Linux-ALL-64_x86-64_EMR-<emr_version>-64_<BDP_version>.tgz
Press ENTER.
The command extracts the following files:
uninstall.sh
ptyLogAnalyzer.sh
ptyLog_Consolidator.sh
PepHbaseProtector<HBase_version>Setup_Linux_emr-<emr_version>_<BDP_version>.sh
bdp_classpath_deconfigurator.py
PepSpark<Spark_version>Setup_Linux_emr-<emr_version>_<BDP_version>.sh
JcoreLiteSetup_Linux_x64_<JcoreLite_version>.gadcc.release-<BDP_version>.sh
PepPig<pig_version>Setup_Linux_emr-<emr_version>_<BDP_version>.sh
bdp_common/
bdp_common/bdp.properties.template
bdp_common/config.ini.template
Logforwarder_Setup_Linux_x64_<core_version>.sh
node_uninstall.sh
bdp_classpath_configurator.py
RPAgent_Setup_Linux_x64_<core_version>.sh
PepMapreduce<MapReduce_version>Setup_Linux_emr-<emr_version>_<BDP_version>.sh
PepHive<Hive_version>Setup_Linux_emr-<emr_version>_<BDP_version>.sh
BDP.config
BdpInstallx.x.x_Linux_<BDP_version>.sh
2.2.3 - Updating the BDP.Config File
Updating the BDP.Config File for the Static Installer
The steps mentioned in this section are applicable only for the Static Installer approach to install the Big Data Protector.
Note: Ensure that the BDP.config file is updated before the Big Data Protector is installed.
Do not update the BDP.config file when the installation of the Big Data Protector is in progress.
To update the BDP.config file:
Create a hosts file containing the IP addresses of all the nodes in the cluster, except the Lead node, and specify them in the BDP.config file.
The installation script uses this file to install the Big Data Protector on the nodes.
Open the BDP.config file in any text editor and modify the following parameter values:
HADOOP_DIR – is the installation home directory for the Hadoop distribution.
PROTEGRITY_DIR – is the directory where the Big Data Protector will be installed.
The examples used in this document assume that the Big Data Protector is installed in the /opt/protegrity/ directory.
CLUSTERLIST_FILE – This file contains the host name or IP addresses all the nodes in the cluster, except the Lead node, listing one host name and IP address per line.
Ensure that you specify the file name with the complete path.
SPARK_PROTECTOR – Specifies one of the following values, as required:
Yes – Specifies to install the Spark protector. Set the value of this parameter to Yes, if the user wants to run Hive UDFs with Spark SQL, or use the Spark protector samples if the INSTALL_DEMO parameter is set to Yes.No – Specifies to skip installing the Spark protector.
AUTOCREATE_PROTEGRITY_IT_USR – Determines the Protegrity service account. The service group and service user name specified in the PROTEGRITY_IT_USR_GROUP and PROTEGRITY_IT_USR parameters respectively will be created if this parameter is set to Yes. One of the following values can be specified, as required:
Yes – Instructs the installer to create the service group PROTEGRITY_IT_USR_GROUP containing the user PROTEGRITY_IT_USR for executing the Protegrity services on all the nodes in the cluster.
If the service group or service user are already present, then the installer exits.
If you uninstall the Big Data Protector, then the service group and the service user are deleted.
No – Instructs the installer to skip creating a service group PROTEGRITY_IT_USR_GROUP with the service user PROTEGRITY_IT_USR for executing the Protegrity services on all the nodes in the cluster.
PROTEGRITY_IT_USR_GROUP – is the service group required for running the Protegrity services on all the nodes in the cluster. All the Protegrity installation directories are owned by this service group.
PROTEGRITY_IT_USR – is the service account user required for running the Protegrity services on all the nodes in the cluster and is a part of the group PROTEGRITY_IT_USR_GROUP. All the Protegrity installation directories are owned by this service user.
3 - Installing the protector
Steps for installing the protector.
3.1 - Using the Bootstrap Installer
Installing the Big Data Protector using the Bootstrap Installer
The Big Data Protector on Amazon EMR enables cluster creation using a bootstrap action. This action enables:
- configuration of cluster instances
- installation of custom and additional software
- setting up of the environment variables
Bootstrap actions are scripts that run on cluster instances after they are launched. These scripts installs the specified applications during cluster creation and before the cluster nodes start processing data. To create a bootstrap action, can specify the script when creating the cluster in any one of the following methods:
- Amazon EMR console - pass the location of the script in the Bootstrap actions section.
- AWS CLI - pass the location of the script to the
--bootstrap-actions parameter. - API
In this method of cluster creation, the nodes are automatically scaled depending on the workload. In case of instances where the workloads are minimal for a node, Amazon decomissions the node to balance the workload optimally.
3.1.1 - Creating a Cluster
Creating a Cluster
The procedures mentioned in this section are applicable only for the Bootstrap approach to install the Big Data Protector.
Perform the following steps to create an EMR cluster on AWS and install Big Data Protector on all the nodes in the EMR cluster.
To install Big Data Protector on a New EMR Cluster:
On the AWS services screen, click EMR under the Analytics section.
The Amazon EMR screen appears.
Click Create cluster.
The Create Cluster - Quick Options screen appears.
Type the name of the cluster in the Cluster name box.
Depending on the requirements, enter the sum of the master and core nodes in the Number of instances box.
Click Create cluster.
The Software and Steps tab on the Create Cluster - Advanced Options screen appears.
Depending on the requirements, select the components under the Software Configuration section.
Click Next.
The Hardware tab on the Create Cluster - Advanced Options screen appears.
On the Hardware tab, if required, you can add or reduce the number of instances of the Master, Core, and Task nodes.
Click Next.
The General Cluster Settings tab on the Create Cluster - Advanced Options screen appears.
Type the name of the cluster in the Cluster name box.
Under the Bootstrap Actions area, in the Add bootstrap action drop-down list, click Custom action.
The Add Bootstrap Action dialog box appears.
Enter the name of the bootstrap action in the Name box.
To select the location of the bootstrap script, click the icon besides the Script location box.
The Select S3 File dialog box appears.
Enter the path of the S3 bucket in the URL box.
The contents of the S3 bucket appear.
Select the bdp_bootstrap_installer.sh file from the S3 bucket.
Click Select.
The Big Data Protector bootstrap script file is selected and the Add Bootstrap Action dialog box appears.
To specify the directory in which the Big Data Protector needs to be installed on the nodes in the cluster, then provide the directory path in the Optional arguments box.
If an installation directory for the Big Data Protector is not specified, then /opt/protegrity/ is considered as the default directory.
Click Add.
The General Cluster Settings tab on the Create Cluster - Advanced Options screen appears and the Bootstrap actions are updated.
Click Next.
The Security tab on the Create Cluster - Advanced Options screen appears.
Select the required EC2 key pair for the EMR cluster from the EC2 key pair drop-down list.
Click Create Cluster.
The EMR cluster is created, Big Data Protector is installed on all the nodes in the cluster, and the required Big Data Protector parameters are configured.
You can also install create a new EMR cluster and install Big Data Protector on the nodes in the cluster using the CLI using the following command:
aws emr create-cluster --auto-scaling-role EMR_AutoScaling_DefaultRole --termination-protected --applications Name=Hadoop Name=Hive Name=Pig Name=Hue Name=Spark Name=Tez Name=HBase --bootstrap-actions '[{"Path":"<S3_Path_For_BootstrapInstaller>","Name":"<Script_Name>"}]' --ec2-attributes '{"KeyName":"<KEY_NAME>","InstanceProfile":"EMR_EC2_DefaultRole","EmrManagedSlaveSecurityGroup":"sg-c8ef00de","EmrManagedMasterSecurityGroup":"sg-2deb043b"}' --service-role EMR_DefaultRole --enable-debugging --release-label emr-<EMR_Version> --log-uri 's3n://aws-logs-406396743807-us-east-1/elasticmapreduce/' --name '<Cluster_Name>' --instance-groups '[{"InstanceCount":2,"InstanceGroupType":"CORE","InstanceType":"m3.xlarge","Name":"Core - 2"},{"InstanceCount":1,"InstanceGroupType":"MASTER","InstanceType":"m3.xlarge","Name":"Master - 1"}]' –
scale-down-behavior TERMINATE_AT_INSTANCE_HOUR --region us-east-1
where:
S3_Path_For_BootstrapInstaller: Specifies the S3 bucket path containing the Big Data Protector bootstrap installer script.Script_Name: Specifies the name of the Big Data Protector installation script.KEY_NAME: Specifies the Private Key file on the Master node in the EMR cluster, which is used to communicate with the other nodes in the cluster.Cluster_Name: Specifies the name of the new EMR cluster.
3.1.2 - Managing the Cluster Nodes
Managing the Cluster Nodes
The steps mentioned in this section are applicable only for the Bootstrap approach to install the Big Data Protector.
Depending on the workload on the EMR cluster, you can add or remove the Big Data Protector nodes. You can either set the
cluster to automatically scale or manually add or remove nodes in the EMR cluster. You can add or remove nodes in the EMR
cluster either while you create the cluster or after you have created the cluster. Before you add or remove the nodes from the
cluster, ensure that you save all your data to S3, as standard practice, to avoid any data loss.
This section covers the procedure to add or remove nodes from an Amazon EMR cluster after you have created it.
To add or remove nodes from an Amazon EMR cluster:
On the AWS management console, expand Services and click Analytics.
The sub-menu appears.
From the sub-menu, click EMR.
The Amazon EMR page appears.
Click the required cluster.
The Properties tab of the cluster appears.
Click the Instances tab.
To add an instance, perform the following steps:
- Under Instance groups, click Add task instance group.
The Add task instance group page appears.
- In the Name box, enter the name to identify the node.
- From the Choose EC2 instance type list, select the required storage type.
- In the Instance group size box, enter the required number of instances.
- Click Add task instance group. The new instance is added to the node and appears on the Instances tab.
To resize an instance, perform the following steps:
- Under Instance groups, select the required instance that you want to resize.
- Click Resize instance group. The Resize page appears.
- In the Instance group size box, enter the required number of instances.
- Click Resize. The instance is resized as per the inputs and appears on the Instances tab.
3.1.3 - Verifying the Parameters
Verifying the Parameters for the Bootstrap Installer
The content mentioned in this section is applicable only for the Bootstrap approach to install the Big Data Protector.
Before using Big Data Protector, configure the required Protegrity-related parameters in EMR. The Big Data Protector configuration parameters are set for the EMR cluster when it is installed on all the nodes in the cluster.
The following table provides the parameters that are set for the existing Amazon EMR cluster before using the Big Data Protector:
| Component | Configuration File | Updated Classpath Parameter |
|---|
| MapReduce | /etc/hadoop/conf/mapred-site.xml | mapreduce.application.classpath : /opt/protegrity/pepmapreduce/lib/*
/opt/protegrity/pephive/lib/*
/opt/protegrity/bdp_version/
mapreduce.admin.user.env : LD_LIBRARY_PATH=/opt/protegrity/jpeplite/lib |
| Hive | /etc/hive/conf/hive-site.xml
/etc/tez/conf/tez-site.xml
/etc/hive/conf/hive-env.sh | hive.exec.pre.hooks : com.protegrity.hive.PtyHiveUserPreHook
tez.cluster.additional.classpath.prefix:/opt/protegrity/pephive/lib/:/opt/protegrity/bdp_version/
tez.am.launch.env: LD_LIBRARY_PATH=/opt/protegrity/jpeplite/lib/
export HIVE_CLASSPATH=${HIVE_CLASSPATH}:/opt/protegrity/pephive/lib/:/opt/protegrity/bdp_version/
export JAVA_LIBRARY_PATH=${JAVA_LIBRARY_PATH}:/opt/protegrity/jpeplite/lib/ |
| Pig | /etc/pig/conf/pig-env.sh | PIG_CLASSPATH="/opt/protegrity/peppig/lib/*:/opt/protegrity/bdp_version/"
export JAVA_LIBRARY_PATH=${JAVA_LIBRARY_PATH}:/opt/protegrity/jpeplite/lib/ |
| HBase | /etc/hbase/conf/hbase-site.xml
/etc/hbase/conf/hbase-env.sh | hbase.coprocessor.region.classes:com.protegrity.hbase.PTYRegionObserver
export HBASE_CLASSPATH=${HBASE_CLASSPATH}:/opt/protegrity/pephbase/lib/*:/opt/protegrity/bdp_version/
export JAVA_LIBRARY_PATH=${JAVA_LIBRARY_PATH}:/opt/protegrity/jpeplite/lib/ |
| Spark | /etc/spark/conf/spark-defaults.conf | spark.driver.extraClassPath=/opt/protegrity/pephive/lib/:/opt/protegrity/pepspark/lib/:/opt/protegrity/bdp_version/
spark.executor.extraClassPath=/opt/protegrity/pephive/lib/:/opt/protegrity/pepspark/lib/:/opt/protegrity/bdp_version/
spark.executor.extraLibraryPath= /opt/protegrity/jpeplite/lib
spark.driver.extraLibraryPath= /opt/protegrity/jpeplite/lib |
3.2 - Using the Static Installer
Installing the Big Data Protector using the Static Installer
The static installer method of installation is applicable where the Big Data Protector must be installed on an existing EMR cluster. Using the Static Installer, users can enforce data protection policies at a granular level. This feature helps organizations to define specific rules for data protection based on sensitivity and usage.
The nodes in the cluster created using the static installer are do not have auto-scaling enabled. The nodes must be manually added or decommissioned depending upon the usage. The installation provides additional scripts to monitor and control the cluster behaviour. These scripts are available in the <installation_directory>/cluster_utils/ directory after installation.
3.2.1 - Installing the Protector on all the Nodes
Installing the Protector on all the Nodes using the Static Installer
The steps mentioned in this section are applicable only for the Static Installer approach to install the Big Data Protector.
Log in to the Master or Lead node of the EMR cluster.
Navigate to the directory that contains the BdpInstallx.x.x_Linux_<BDP_version>.sh script.
To run the installer, execute the following script:
./BdpInstallx.x.x_Linux_<BDP_version>.sh
Press ENTER.
The prompt to continue the installation of the Big Data Protector appears.
************************************************************************************
           Welcome to the Hadoop Big Data Protector Setup Wizard
************************************************************************************
This will install the Hadoop Big Data Protector on your system.

This installation requires a Private Key file for communicating with other nodes in the cluster.

Do you want to continue? [yes or no]:
To continue, type yes.
Press ENTER.
The prompt to enter path of the Private Key file (.pem file) appears.
Big Data Protector installation started
Enter the path of the Private Key (.PEM) file:
Enter the path of the .PEM file.
Press ENTER.
The prompt to enter ESA hostname or IP address appears.
libhadoop.so located in directory '/usr/lib/hadoop/lib/native'
Unpacking...
Extracting files...

Preparing for cluster deploy, Wait...

Enter ESA Hostname or IP Address:
If you have installed a proxy, then enter the IP address of the proxy node. Alternatively, enter the IP Address of ESA.
Press ENTER.
The prompt to enter the listening port for ESA appears.
Enter ESA host listening port [8443]:
Enter the port for ESA.
Press ENTER.
The prompt to enter the JWT token appears.
If you have an existing ESA JSON Web Token (JWT) with Export Certificates role, enter it otherwise enter 'no':
Enter the JWT token.
Press ENTER.
If you fail to provide a JWT token, the script will prompt to enter the username and password for ESA.
JWT was not provided. Script will now prompt for ESA username and password.

Enter ESA Username:
Enter the username for ESA.
Press ENTER.
The prompt to enter the password appears.
************************************************************************************
                Welcome to the RPAgent Setup Wizard.
************************************************************************************

Unpacking...................
Extracting files...
Unpacked rpagent compressed file...
RPAgent Installing in Lead Node...
Please enter the password for downloading certificates[]:
Enter the password.
Press ENTER.
The script retrieves the JWT token from ESA, installs the RPAgent, and the prompt to select the Audit Store type appears.
Unpacking...
Extracting files...
Obtaining token from <ESA_IP_Address>:8443...
Downloading certificates from <ESA_IP_Address>:8443...
  % Total    % Received % Xferd  Average Speed   Time    Time     Time  Current
                                Dload  Upload   Total   Spent    Left  Speed
100 11264  100 11264    0     0  12124      0 --:--:-- --:--:-- --:--:-- 12111

Extracting certificates...
Certificates successfully downloaded and stored in /opt/protegrity/rpagent/data

Protegrity RPAgent installed in /opt/protegrity/rpagent.


RPAgent installed on Lead node at location /opt/protegrity/rpagent.

Performing install on other nodes...

RPAgent installed on other nodes at location /opt/protegrity/rpagent.

Check the status in /opt/protegrity/logs/rpagent_setup.log


Select the Audit Store type where Log Forwarder(s) should send logs to.

[ 1 ] : Protegrity Audit Store
[ 2 ] : External Audit Store
[ 3 ] : Protegrity Audit Store + External Audit Store

Enter the no.:
Depending on the Audit Store type, select any one of the following options:
| Option | Description |
|---|
1 | To use the default setting using the Protegrity Audit Store appliance, type 1. If you enter 1, then the default Fluent Bit configuration files are used and Fluent Bit will forward the logs to the Protegrity Audit Store appliances. |
2 | To use an external audit store, type 2. If you enter 2, then the default Fluent Bit configuration files used for the External Audit Store (out.conf and upstream.cfg in the /opt/protegrity/fluent-bit/data/config.d/ directory) are renamed (out.conf.bkp and upstream.cfg.bkp) so that they will not be used by Fluent Bit. Additionally, the custom Fluent Bit configuration files for the external audit store are copied to the /opt/protegrity/fluent-bit/data/config.d/ directory. |
3 | To use a combination of the default setting with an external audit store, type 3. If you enter 3, then the default Fluent Bit configuration files used for the Protegrity Audit Store (out.conf and upstream.cfg in the /opt/protegrity/fluent-bit/data/config.d/ directory) are not renamed. However, the custom Fluent Bit configuration files for the external audit store are copied to the /opt/protegrity/fluent-bit/data/config.d/ directory. |
Press ENTER.
The prompt to enter the comma separated list of hostnames/IP addresses appears.
Enter comma-separated list of Hostnames/IP Addresses and/or Ports of Protegrity Audit Store.
Allowed Syntax: hostname[:port][,hostname[:port],hostname[:port]...] (Default Value - <ESA_IP_Address>:9200)
Enter the list:
To use the default value, press ENTER.
The prompt to enter the location of the Fluent Bit configuration file appears.
Enter the local directory path on this node that stores the custom Fluent-Bit configuration files for External Audit Store:
Note: The script will display this prompt only if you select option 2 in step 19. When you select option 2 in step 19, the custom configuration files are copied to the /<Installation directory>/fluent-bit/data/config.d/ directory on all the EMR nodes selected for installation.
Enter the path that contains the Fluent Bit configuration file.
Press ENTER.
The prompt to save the RPAgent’s log in a file appears.
Do you want RPAgent's log to be generated in a file? [yes or no]:
To generate the logs in a file, type yes.
Press ENTER.
The script installs the protector on all the nodes in the cluster.
RPAgent's log will be generated in a file.
************************************************************************************
                Welcome to the LogForwarder Setup Wizard.
************************************************************************************

Unpacking...................
Extracting files...
Unpacked logforwarder compressed file...
Logforwarder Installing in Lead Node...
Unpacking...
Extracting files...

Protegrity Log Forwarder installed in /opt/protegrity/logforwarder.


LogForwarder installed on Lead node at location /opt/protegrity/logforwarder.

Performing install on other nodes...

Logforwarder installed on other nodes at location /opt/protegrity/logforwarder.

Check the status in /opt/protegrity/logs/logforwarder_setup.log
************************************************************************************
                    Welcome to the JcoreLite Setup Wizard.
************************************************************************************

Unpacking...................
Extracting files...
Unpacked jcorelite compressed file...
Installing JcoreLite ....

JcoreLite installed on lead node at location /opt/protegrity/bdp/lib.

Performing install on other nodes...

JcoreLite installed on other nodes at location /opt/protegrity/bdp/lib.

Check the status in /opt/protegrity/logs/jcorelite_setup.log
************************************************************************************
                Welcome to the Hive Protector Setup Wizard.
************************************************************************************

Unpacking...................
Extracting files...
Unpacked pephive compressed file...

Hive Big Data Protector installed on lead node at location /opt/protegrity/bdp/lib/ and /opt/protegrity/pephive/scripts/.

Performing install on other nodes...

Hive Big Data Protector installed on other nodes at location /opt/protegrity/bdp/lib/ and /opt/protegrity/pephive/scripts/.

Check the status in /opt/protegrity/logs/pephive_setup.log
************************************************************************************
                    Welcome to the Pig Protector Setup Wizard.
************************************************************************************

Unpacking...................
Extracting files...
Unpacked peppig compressed file...

Pig Big Data Protector installed on lead node at location /opt/protegrity/bdp/lib/ and /opt/protegrity/peppig.

Performing install on other nodes...

Pig Big Data Protector installed on other nodes at location /opt/protegrity/bdp/lib/ and /opt/protegrity/peppig.

Check the status in /opt/protegrity/logs/peppig_setup.log
************************************************************************************
                Welcome to the MapReduce Protector Setup Wizard.
************************************************************************************

Unpacking...................
Extracting files...
Unpacked pepmapreduce compressed file...

Mapreduce Big Data Protector installed on lead node at location /opt/protegrity/bdp/lib/.

Performing install on other nodes...

Mapreduce Big Data Protector installed on other nodes at location /opt/protegrity/bdp/lib/.

Check the status in /opt/protegrity/logs/pepmapreduce_setup.log
************************************************************************************
                    Welcome to the Hbase Protector Setup Wizard.
************************************************************************************

Unpacking...................
Extracting files...
Unpacked pephbase compressed file...

Hbase Big Data Protector installed on lead node at location /opt/protegrity/bdp/lib/.

Performing install on other nodes...

Hbase Big Data Protector installed on other nodes at location /opt/protegrity/bdp/lib/.

Check the status in /opt/protegrity/logs/pephbase_setup.log
************************************************************************************
                Welcome to the Spark Protector Setup Wizard.
************************************************************************************

Unpacking...................
Extracting files...
Unpacked pepspark compressed file...

Spark Big Data Protector installed on lead node at location /opt/protegrity/bdp/lib/ and /opt/protegrity/pepspark/scripts/.

Performing install on other nodes...

Spark Big Data Protector installed on other nodes at location /opt/protegrity/bdp/lib/ and /opt/protegrity/pepspark/scripts/.

Check the status in /opt/protegrity/logs/pepspark_setup.log

Starting Logforwarder on lead node...

Starting Logforwarder on other nodes...

Starting RPAgent on lead node...

Starting RPAgent on other nodes...

Hadoop Big Data Protector installed in /opt/protegrity.

Generating Big Data Protector installation status report ...

Clearing previous logs files ...

Installation Status report generated in /opt/protegrity/cluster_utils/installation_report.txt
Restart the Hadoop, Hive, and HBase service daemon processes to start using the updated configuration.
3.2.2 - Installing the Protector on Specific Nodes
Installing the Protector on Specific Nodes using the Static Installer
The steps mentioned in this section are applicable only for the Static Installer approach to install the Big Data Protector.
Protegrity provides the BdpInstallx.x.x_Linux_<arch>_<BDP_version>.sh script to install the Big Data Protector on the new nodes that you add to an existing EMR cluster.
Ensure to install the Big Data Protector from an account having full sudoer privileges.
Log in to the Lead Node on the EMR cluster.
Navigate to the <PROTEGRITY_DIR>/cluster_utils directory.
In the NEW_HOSTS_FILE file, add an additional entry for each new node in the EMR cluster, on which you want to install the Big Data Protector. The new nodes from the NEW_HOSTS_FILE file will be appended to the CLUSTERLIST_FILE.
To install the Big Data Protector on the new nodes, run the the following command:
./BdpInstallx.x.x_Linux_<arch>_<BDP_version>.sh –a <NEW_HOSTS_FILE>
Press ENTER.
The prompt to enter the path of the Private Key file (.pem file) appears.
Enter the path of the Private Key file.
Press ENTER.
The script installs the Big Data Protector on the new nodes in the EMR cluster.
3.2.3 - Verifying the Parameters
Verifying the Parameters for the Static Installer
The content in this section is applicable only for the Static installer approach to install the Big Data Protector.
Before using the Big Data Protector, configure the required Protegrity-related parameters in EMR. The Big Data Protector configuration parameters are set for the EMR cluster when it is installed on all the nodes in the cluster.
The following table provides the parameters that are set for the existing Amazon EMR cluster before using the Big Data Protector:
| Component | Configuration File | Updated Classpath Parameter |
|---|
| MapReduce | /etc/hadoop/conf/mapred-site.xml | mapreduce.application.classpath : /opt/protegrity/pepmapreduce/lib/*
/opt/protegrity/pephive/lib/*
/opt/protegrity/bdp_version/
mapreduce.admin.user.env : LD_LIBRARY_PATH=/opt/protegrity/jpeplite/lib |
| Hive | /etc/hive/conf/hive-site.xml
/etc/tez/conf/tez-site.xml
/etc/hive/conf/hive-env.sh | hive.exec.pre.hooks : com.protegrity.hive.PtyHiveUserPreHook
tez.cluster.additional.classpath.prefix:/opt/protegrity/pephive/lib/:/opt/protegrity/bdp_version/
tez.am.launch.env: LD_LIBRARY_PATH=/opt/protegrity/jpeplite/lib/
export HIVE_CLASSPATH=${HIVE_CLASSPATH}:/opt/protegrity/pephive/lib/:/opt/protegrity/bdp_version/
export JAVA_LIBRARY_PATH=${JAVA_LIBRARY_PATH}:/opt/protegrity/jpeplite/lib/ |
| Pig | /etc/pig/conf/pig-env.sh | PIG_CLASSPATH="/opt/protegrity/peppig/lib/*:/opt/protegrity/bdp_version/"
export JAVA_LIBRARY_PATH=${JAVA_LIBRARY_PATH}:/opt/protegrity/jpeplite/lib/ |
| HBase | /etc/hbase/conf/hbase-site.xml
/etc/hbase/conf/hbase-env.sh | hbase.coprocessor.region.classes:com.protegrity.hbase.PTYRegionObserver
export HBASE_CLASSPATH=${HBASE_CLASSPATH}:/opt/protegrity/pephbase/lib/*:/opt/protegrity/bdp_version/
export JAVA_LIBRARY_PATH=${JAVA_LIBRARY_PATH}:/opt/protegrity/jpeplite/lib/ |
| Spark | /etc/spark/conf/spark-defaults.conf | spark.driver.extraClassPath=/opt/protegrity/pephive/lib/:/opt/protegrity/pepspark/lib/:/opt/protegrity/bdp_version/
spark.executor.extraClassPath=/opt/protegrity/pephive/lib/:/opt/protegrity/pepspark/lib/:/opt/protegrity/bdp_version/
spark.executor.extraLibraryPath= /opt/protegrity/jpeplite/lib
spark.driver.extraLibraryPath= /opt/protegrity/jpeplite/lib |
4 - Configuring the protector
Updating the Configuration Parameters
The Big Data Protector provides the following files that contain different parameters to control the protector behavior:
config.ini - provides parameters to control the protector behavior.rpagent.cfg - provides parameters to control the RPAgent behavior.
The procedure to access the configuration files and update the parameters is the same. However, the stage in which the modification is to be done differs between the bootstrap and the static installer.
- Bootstrap installer - modify the parameters after executing the configurator script and before uploading the files to the S3 bucket to create the cluster.
- Static installer - modify the parameters after installing the Big Data Protector.
Updating the paramaters for the bootstrap installer
- Log in to the staging server.
- Navigate to the
/Installation_Files/ directory, where the files are generated using the configurator script. - To create a directory to store the extracted files, run the following command:
- To extract the contents of the Big Data Protector archive, run the following command:
tar -xf BDP_Package_<version>_<tag>.tgz -C extraction_dir/
- Navigate to the directory that contains the
config.ini file. - Using an editor, open the
config.ini file. - Update the parameters as per requirements.
Note: For more information about the parameters in the config.ini file, refer here.
- Save the changes to the
config.ini file. - Navigate to the directory that contains the
rpagent.cfg file. - Using an editor, open the
rpagent.cfg file. - Update the parameters as per requirements.
Note: For more information about the parameters in the rpagent.cfg file, refer here.
- Save the changes to the
rpagent.cfg file. - To recreate the Big Data Protector package, run the following command:
tar -zcf BDP_Package_<version>_<tag>.tgz -C extraction_dir/ $(ls extraction_dir) --owner=0 --group=0
- Manually upload the updated installation package to the S3 bucket. This location must be the same from where the cluster will retrieve the artifacts.
Updating the parameters in the config.ini file:
Log in to the master node.
Navigate to the /opt/protegrity/bdp/data directory.
To open the config.ini file, run the following command:
Press ENTER.
The command opens the config.ini file.
###############################################################################
# Protector configuration
###############################################################################
[protector]

# Cadence determines how often the protector connects with ESA / proxy to fetch the policy updates in background.
# Default is 60 seconds. So by default, every 60 seconds protector tries to fetch the policy updates.
# If the cadence is set to "0", then the protector will get the policy only once.
#
# Default 60.
cadence = 60


###############################################################################
# Log Provider Config
###############################################################################
[log]

# In case that connection to fluent-bit is lost, set how audits/logs are handled
#
# drop  : (default) Protector throws logs away if connection to the fluentbit is lost
# error : Protector returns error without protecting/unprotecting
#         data if connection to the fluentbit is lost
mode = drop

# Host/IP to fluent-bit where audits/logs will be forwarded from the protector
#
# Default localhost
host = localhost
Update the parameters, as per the description in the table.
| Parameter | Description |
|---|
cadence | Specifies the frequency at which the protector connects to ESA to fetch the policy. The default value is 60 seconds. If the cadence is set to “0”, then the protector will get the policy only once. |
mode | Specifies the approach of handling logs when the connection to the Log Forwarder is lost. |
Save the changes to the config.ini file.
For the static installer, use the sync_config_ini.sh script to load the changes to the configuration files in all the cluster nodes.
Note: For more information about using the helper script, refer Sync Config.ini
Updating the parameters in the rpagent.cfg file:
Log in to the master node.
Navigate to the /opt/protegrity/rpagent/data directory.
To open the rpagent.cfg file, run the following command:
Press ENTER.
The command opens the rpagent.cfg file.
###############################################################################
# Resilient Package Sync Config
###############################################################################
[sync]

# Protocol to use when communicating with the service providing Resilient Packages.
# Use 'https' for ESA or 'shmem' for local shared memory.
protocol = https

# Host/IP to the service providing Resilient Packages
host = <IP_address>
port = 8443

# Path to CA certificate
ca = /opt/protegrity/rpagent/data/CA.pem

# Path to client certificate
cert = /opt/protegrity/rpagent/data/cert.pem

# Path to client certificate key
key = /opt/protegrity/rpagent/data/cert.key

# Path to a secret file that is used to decrypt the client certificate key.
# When using a custom certificate bundle, the 'secretcommand' can instead be
# used to execute an external command that obtains the secret.
secretfile = /opt/protegrity/rpagent/data/secret.txt

###############################################################################
# Log Provider Config
###############################################################################
[log]

# In case that connection to fluent-bit is lost, set how audits/logs are handled
#
# drop  : (default) Protector throws logs away if connection to the fluentbit is lost
# error : Protector returns error without protecting/unprotecting
#         data if connection to the fluentbit is lost
mode = drop

# Host/IP to fluent-bit where audits/logs will be forwarded from the protector
#
# Default localhost
host = localhost
Update the parameters, as per the description in the table.
| Parameter | Description |
|---|
| interval | Specifies the frequency at which the RPAgent will fetch the policy from ESA. The minimum value is 1 second and the maximum value is 86400 seconds. This is an optional parameter and must be included in the Sync section of the rpagent.cfg file. |
| protocol | Specifies the protocol to use when communicating with the service providing Resilient Packages. |
| host | Specifies the hostname to the service providing the Resilient packages. |
| port | Specifies the port to the service providing the Resilient packages. |
| ca | Specifies the path to the CA certificate. |
| cert | Specifies the path to the client certificate. |
| key | Specifies the path to the client certificate key. |
| secretfile | Specifies the path to the secret file that is used to decrypt the client certificate key. |
| mode | Specifies the approach of handling logs when the connection to the Log Forwarder is lost. |
| host | Specifies the hostname or the IP address to where the Log Forwarder will forward the audit logs from the protector. |
Save the changes to the rpagent.cfg file.
For the static installer, use the sync_config_ini.sh script to load the changes to the configuration files in all the cluster nodes.
Note: For more information about using the helper script, refer Sync RPAgent Configuration.
5 - Working with Cluster Utilities
Perform operations on the cluster using the utility scripts
The Big Data Protector package provides utility scripts to perform different operations on the EMR cluster. The scripts and their usage is listed in the table.
| Script | Description |
|---|
| RPAgent Control | Manages the RPAgent service across the cluster. |
| Log Forwarder Control | Manages the Log Forwarder service across the cluster. |
| Sync Configuration | Updates the configuration from the config.ini file across the nodes in the cluster. |
| RPAgent Configuration | Updates the RPAgent configuration from the rpagent.cfg file across the nodes in the cluster. |
| Log Forwarder Configuration | Updates the Log Forwarder configuration across the nodes in the cluster. |
5.1 - RPAgent Control Script
Perform operations on the cluster using the RPAgent Control Script
The cluster_rpagentctrl.sh script, in the <installation_directory>/cluster_utils directory, manages the RPAgent services on all
the nodes in the cluster that are listed in the BDP hosts file.
The utility provides the following options:
- Start – Starts the RPAgent on all the nodes in the cluster.
- Stop – Stops the RPAgent on all the nodes in the cluster.
- Restart – Restarts the RPAgent on all the nodes in the cluster.
- Status – Reports the status of the RPAgent on all the nodes in the cluster.
Note: When you run the RPAgent Control utility, the script will prompt to enter the path of the SSH private key file to securely login into
the cluster nodes.
Verifying the Status of RPAgent
To verify the status of the RPAgent on all the nodes in the cluster:
Log in to the lead or Primary node.
Navigate to the <installation_directory>/cluster_utils directory.
Run the following command:
Press ENTER.
The prompt to enter the path of the private key file appears.
Enter the path of the Private Key (.PEM) file:
Enter the location of the Private Key (.PEM) file.
Press ENTER.
The script verifies the connectivity on the cluster nodes and the options appear.
Checking connectivity of cluster nodes...

Select option:
    1) Start
    2) Stop
    3) Restart
    4) Status
Option(1-4):
To verify the status of the RPAgent on all the nodes, type 4.
Press ENTER.
The script checks the status of the RPAgent on all the nodes and appends the event details to a log file.
Checking status of RPAgent on current node...

Checking status of RPAgent on all nodes...

The script's logs and operation results are logged in /opt/protegrity/logs/cluster_rpagentctrl.log
Starting the RPAgent
To start the RPAgent on all the nodes in the cluster:
Log in to the lead or Primary node.
Navigate to the <installation_directory>/cluster_utils directory.
Run the following command:
Press ENTER.
The prompt to enter the path of the private key file appears.
Enter the path of the Private Key (.PEM) file:
Enter the location of the Private Key (.PEM) file.
Press ENTER.
The script verifies the connectivity on the cluster nodes and the options appear.
Checking connectivity of cluster nodes...

Select option:
    1) Start
    2) Stop
    3) Restart
    4) Status
Option(1-4):
To start the RPAgent on all the nodes, type 1.
Press ENTER.
The script starts the RPAgent on all the nodes and appends the event details to a log file.
Starting RPAgent on current node...

RPAgent started on current node

Starting RPAgent on all nodes...

RPAgent started on all nodes

The script's logs and operation results are logged in /opt/protegrity/logs/cluster_rpagentctrl.log
Stopping the RPAgent
To stop the RPAgent on all the nodes in the cluster:
Log in to the lead or Primary node.
Navigate to the <installation_directory>/cluster_utils directory.
Run the following command:
Press ENTER.
The prompt to enter the path of the private key file appears.
Enter the path of the Private Key (.PEM) file:
Enter the location of the Private Key (.PEM) file.
Press ENTER.
The script verifies the connectivity on the cluster nodes and the options appear.
Checking connectivity of cluster nodes...

Select option:
    1) Start
    2) Stop
    3) Restart
    4) Status
Option(1-4):
To stop the RPAgent on all the nodes, type 2.
Press ENTER.
The script stops the RPAgent on all the nodes and appends the event details to a log file.
Stopping RPAgent on current node...

RPAgent stopped on current node

Stopping RPAgent on all nodes...

RPAgent stopped on all nodes


The script's logs and operation results are logged in /opt/protegrity/logs/cluster_rpagentctrl.log
Restarting the RPAgent
To restart the RPAgent on all the nodes in the cluster:
Log in to the lead or Primary node.
Navigate to the <installation_directory>/cluster_utils directory.
Run the following command:
Press ENTER.
The prompt to enter the path of the private key file appears.
Enter the path of the Private Key (.PEM) file:
Enter the location of the Private Key (.PEM) file.
Press ENTER.
The script verifies the connectivity on the cluster nodes and the options appear.
Checking connectivity of cluster nodes...

Select option:
    1) Start
    2) Stop
    3) Restart
    4) Status
Option(1-4):
To restart the RPAgent on all the nodes, type 3.
Press ENTER.
The script restarts the RPAgent on all the nodes and appends the event details to a log file.
Stopping RPAgent on current node...

RPAgent stopped on current node

Starting RPAgent on current node...

RPAgent started on current node

Stopping RPAgent on all nodes...

RPAgent stopped on all nodes

Starting RPAgent on all nodes...

RPAgent started on all nodes

The script's logs and operation results are logged in /opt/protegrity/logs/cluster_rpagentctrl.log
5.2 - Log Forwarder Control Script
Perform operations on the cluster using the Log Forwarder Control Script
The cluster_logforwarderctrl.sh script, in the <installation_directory>/cluster_utils directory, manages the Log Forwarder services on all
the nodes in the cluster that are listed in the BDP hosts file.
The utility provides the following options:
- Start – Starts the Log Forwarder on all the nodes in the cluster.
- Stop – Stops the Log Forwarder on all the nodes in the cluster.
- Restart – Restarts the Log Forwarder on all the nodes in the cluster.
- Status – Reports the status of the Log Forwarder on all the nodes in the cluster.
Note: When you run the Log Forwarder Control utility, the script will prompt to enter the path of the SSH private key file to securely login into
the cluster nodes.
Verifying the Status of Log Forwarder
To verify the status of the Log Forwarder on all the nodes in the cluster:
Log in to the lead or Primary node.
Navigate to the <installation_directory>/cluster_utils directory.
Run the following command:
./cluster_logforwarderctrl.sh
Press ENTER.
The prompt to enter the path of the private key file appears.
Enter the path of the Private Key (.PEM) file:
Enter the location of the Private Key (.PEM) file.
Press ENTER.
The script verifies the connectivity on the cluster nodes and the options appear.
Checking connectivity of cluster nodes...

Select option:
    1) Start
    2) Stop
    3) Restart
    4) Status
Option(1-4):
To verify the status of the Log Forwarder on all the nodes, type 4.
Press ENTER.
The script checks the status of the Log Forwarder on all the nodes and appends the event details to a log file.
Checking status of Logforwarder on current node...

Checking status of Logforwarder on all nodes...

The script's logs and operation results are logged in /opt/protegrity/logs/cluster_logforwarderctrl.log
Starting the Log Forwarder
To start the Log Forwarder on all the nodes in the cluster:
Log in to the lead or Primary node.
Navigate to the <installation_directory>/cluster_utils directory.
Run the following command:
./cluster_logforwarderctrl.sh
Press ENTER.
The prompt to enter the path of the private key file appears.
Enter the path of the Private Key (.PEM) file:
Enter the location of the Private Key (.PEM) file.
Press ENTER.
The script verifies the connectivity on the cluster nodes and the options appear.
Checking connectivity of cluster nodes...

Select option:
    1) Start
    2) Stop
    3) Restart
    4) Status
Option(1-4):
To start the Log Forwarder on all the nodes, type 1.
Press ENTER.
The script starts the Log Forwarder on all the nodes and appends the event details to a log file.
Starting Logforwarder on current node...

Logforwarder started on current node

Starting Logforwarder on all nodes...

Logforwarder started on all nodes

The script's logs and operation results are logged in /opt/protegrity/logs/cluster_logforwarderctrl.log
Stopping the Log Forwarder
To stop the Log Forwarder on all the nodes in the cluster:
Log in to the lead or Primary node.
Navigate to the <installation_directory>/cluster_utils directory.
Run the following command:
./cluster_logforwarderctrl.sh
Press ENTER.
The prompt to enter the path of the private key file appears.
Enter the path of the Private Key (.PEM) file:
Enter the location of the Private Key (.PEM) file.
Press ENTER.
The script verifies the connectivity on the cluster nodes and the options appear.
Checking connectivity of cluster nodes...

Select option:
    1) Start
    2) Stop
    3) Restart
    4) Status
Option(1-4):
To stop the Log Forwarder on all the nodes, type 2.
Press ENTER.
The script stops the Log Forwarder on all the nodes and appends the event details to a log file.
Stopping Logforwarder on current node...

Logforwarder stopped on current node

Stopping Logforwarder on all nodes...

Logforwarder stopped on all nodes

The script's logs and operation results are logged in /opt/protegrity/logs/cluster_logforwarderctrl.log
Restarting the Log Forwarder
To restart the Log Forwarder on all the nodes in the cluster:
Log in to the lead or Primary node.
Navigate to the <installation_directory>/cluster_utils directory.
Run the following command:
./cluster_logforwarderctrl.sh
Press ENTER.
The prompt to enter the path of the private key file appears.
Enter the path of the Private Key (.PEM) file:
Enter the location of the Private Key (.PEM) file.
Press ENTER.
The script verifies the connectivity on the cluster nodes and the options appear.
Checking connectivity of cluster nodes...

Select option:
    1) Start
    2) Stop
    3) Restart
    4) Status
Option(1-4):
To restart the Log Forwarder on all the nodes, type 3.
Press ENTER.
The script restarts the Log Forwarder on all the nodes and appends the event details to a log file.
Stopping Logforwarder on current node...

Logforwarder stopped on current node

Starting Logforwarder on current node...

Logforwarder started on current node

Stopping Logforwarder on all nodes...

Logforwarder stopped on all nodes

Starting Logforwarder on all nodes...

Logforwarder started on all nodes

The script's logs and operation results are logged in /opt/protegrity/logs/cluster_logforwarderctrl.log
5.3 - Sync Config.ini
Replicate the Config.ini on all the nodes in the cluster using the utility Script
The sync_config_ini.sh script in the <installation_directory>/cluster_utils/ directory, updates the config.ini parameters across all the nodes in the cluster.
For example, if you want to make any changes to the config.ini file, make the changes on the Lead node and then
propagate the change to all the nodes in the cluster using the sync_config_ini.sh script.
Log in to the lead or the Primary node.
Navigate to the <installation_directory>/cluster_utils/ directory.
To replicate the config.ini file from the lead node to all the nodes, run the following command:
Press ENTER.
The prompt to continue appears.
********************************************
Welcome to BDP Script for Cloning config.ini
********************************************

This will clone deployed config.ini from lead node to all other nodes.

Do you want to continue? [yes or no]:
To continue, type yes.
Press ENTER.
The prompt to enter the location of the Private Key file appears.
Big Data Protector config.ini cloning started
Enter the path of the Private Key (.PEM) file:
Enter the location of the Private Key file.
Press ENTER.
The script creates a backup, updates the configuration, and updates the file permissions on all the nodes.
Checking connectivity of cluster nodes...

Big Data Protector config.ini cloning started

Creating config.ini backup on all nodes...

Creating bdp/data_07-24-2025_07:44:54/ directory on all nodes...

Changing ownership of bdp/data_07-24-2025_07:44:54/ directory recursively on all nodes...

Changing permission of bdp/data_07-24-2025_07:44:54/ on all nodes...

Removing original config.ini from all nodes...
Removed config.ini from all nodes

Copying current node's config.ini to all other nodes...

Changing ownership of bdp/data_07-24-2025_07:44:54/config.ini...

Changing permission of bdp/data_07-24-2025_07:44:54/config.ini...

Moving bdp/data_07-24-2025_07:44:54/config.ini to bdp/data/...

Changing permission of bdp/data/config.ini...

Removing bdp/data_07-24-2025_07:44:54/ directory and config.ini backup file...

Successfully updated BDP config.ini across all cluster nodes. Please restart Hadoop Service daemons to reload new config.ini.

The script's logs and operation results are logged in /opt/protegrity/logs/sync_config_ini.log
5.4 - Sync Log Forwarder Configuration
Update the Log Forwarder configuration on the cluster using the Log Forwarder Script
The sync_logforwarder.sh script in the <installation_directory>/cluster_utils/ directory, updates the Log Forwarder configuration across the nodes in the cluster.
For example, if you want to make any changes to the Log Forwarder conifguration, make the changes on the Lead node and then
propagate the change to all the nodes in the cluster using the sync_logforwarder.sh script.
Log in to the lead or the Primary node.
Navigate to the <installation_directory>/cluster_utils/ directory.
To replicate the RPAgent configuration from the lead node to all the nodes, run the following command:
Press ENTER.
The prompt to continue appears.
************************************************************
Welcome to BDP Script for Cloning Logforwarder Configuration
************************************************************

This will clone deployed Logforwarder configuration & files from lead node
to all other nodes.

Do you want to continue? [yes or no]:
To continue, type yes.
Press ENTER.
The prompt to enter the location of the Private Key file appears.
Big Data Protector Logforwarder Configuration cloning started
Enter the path of the Private Key (.PEM) file:
Enter the location of the Private Key file.
Press ENTER.
The script stops the Log Forwarder on all the nodes, creates a backup, updates the configuration, and restarts the Log Forwarder on all the nodes.
Checking connectivity of cluster nodes...

Big Data Protector Logforwarder Configuration cloning started

Stopping Logforwarder on current node...

Stopping Logforwarder on all nodes...

Creating logforwarder_old/data_07-24-2025_07:46:51/new_data directory on all nodes...

Changing ownership of logforwarder_old/ directory recursively on all nodes...

Changing permission of logforwarder_old/ on all nodes...

Removing Logforwarder Configuration from all nodes...
Removed /opt/protegrity/logforwarder/data/ from all nodes

Copying current node's logforwarder/data/ to all other nodes...

Changing ownership of logforwarder_old/data_07-24-2025_07:46:51/new_data/data.tgz...

Changing permission of logforwarder_old/data_07-24-2025_07:46:51/new_data/data.tgz...

Extracting logforwarder_old/data_07-24-2025_07:46:51/new_data/data.tgz to logforwarder/data/...

Changing permission of logforwarder/data/...

Removing backup directory logforwarder_old/...

Starting Logforwarder on current node...

Starting Logforwarder on all nodes...

Successfully updated Logforwarder Configuration across all cluster nodes

The script's logs and operation results are logged in /opt/protegrity/logs/sync_logforwarder.log
5.5 - Sync RPAgent Configuration
Update the RPAgent configuration on the cluster using the RPAgent Script
The sync_rpagent.sh script in the <installation_directory>/cluster_utils/ directory, updates the RPAgent configuration and the
certificates across the nodes in the cluster.
For example, if you want to make any changes to the RPAgent conifguration, make the changes on the Lead node and then
propagate the change to all the nodes in the cluster using the sync_rpagent.sh script.
Log in to the lead or the Primary node.
Navigate to the <installation_directory>/cluster_utils/ directory.
To replicate the RPAgent configuration from the lead node to all the nodes, run the following command:
Press ENTER.
The prompt to continue appears.
**********************************************************************
Welcome to BDP Script for Cloning RPAgent Configuration & Certificates
**********************************************************************

This will clone deployed RPAgent configuration & files from lead node
to all other nodes.

Do you want to continue? [yes or no]:
To continue, type yes.
Press ENTER.
The prompt to enter the location of the Private Key file appears.
Big Data Protector RPAgent Configuration & Certificates cloning started
Enter the path of the Private Key (.PEM) file:
Enter the location of the Private Key file.
Press ENTER.
The script stops the RPAgent on all the nodes, creates a backup, updates the configuration, and restarts the RPAgent on all the nodes.
Checking connectivity of cluster nodes...

Big Data Protector RPAgent Configuration & Certificates cloning started

Stopping RPAgent on current node...

Stopping RPAgent on all nodes...

Creating rpagent_old/data_07-24-2025_07:45:43/new_data directory on all nodes...

Changing ownership of rpagent_old/ directory recursively on all nodes...

Changing permission of rpagent_old/ on all nodes...

Removing RPAgent Configuration & Certificates from all nodes...
Removed /opt/protegrity/rpagent/data/ from all nodes

Copying current node's rpagent/data/ to all other nodes...

Changing ownership of rpagent_old/data_07-24-2025_07:45:43/new_data/data.tgz...

Changing permission of rpagent_old/data_07-24-2025_07:45:43/new_data/data.tgz...

Extracting rpagent_old/data_07-24-2025_07:45:43/new_data/data.tgz to rpagent/data/...

Changing permission of rpagent/data/...

Removing backup directory rpagent_old/...

Starting RPAgent on current node...

Starting RPAgent on all nodes...

Successfully updated RPAgent Configuration and Certificates across all cluster nodes

The script's logs and operation results are logged in /opt/protegrity/logs/sync_rpagent.log
6 - Uninstalling the protector
Steps to remove the protector from the system.
6.1 - Uninstalling the Big Data Protector when Bootstrap is used
Uninstalling the Big Data Protector.
This section is applicable only for the Bootstrap installer.
When the Bootstrap installer is used, the cluster auto scales as per the requirement. When the nodes are not required, they are automatically reduced.
6.2 - Uninstalling the Big Data Protector when Static installer is used
Uninstalling the Big Data Protector
This section is applicable only for the Static installer.
The procedures to uninstall the Big Data Protector from the EMR cluster are listed below. Use any one of the following methods to remove the Big Data Protector from the EMR cluster:
- Uninstalling the Big Data Protector from all the Nodes on the EMR Cluster
- Uninstalling the Big Data Protector from Selective Nodes on the EMR Cluster
6.2.1 - From all the Nodes
Uninstalling the Big Data Protector from all the Nodes
Log in to the Lead or Primary node as the sudoer user.
Navigate to the <installation_directory>/cluster_utils directory.
To remove the Big Data Protector from all the nodes in the cluster, execute the following script:
Press ENTER.
The prompt to continue the uninstallation of the Big Data Protector appears.
************************************************************************************
     Welcome to the Hadoop Big Data Protector Uninstallation Wizard
************************************************************************************
This will uninstall the Hadoop Big Data Protector on your system.
Do you want to continue? [yes or no]:
To continue with the uninstall, type yes.
Press ENTER.
The prompt to enter the path of the private key file appears.
Big Data Protector uninstallation started
Enter the path of the Private Key (.PEM) file:
Enter the path of the Private Key (.PEM) file.
Press ENTER.
The script starts and completes the uninstallation process.
************************************************************************************
                Welcome to the RPAgent Setup Wizard.
************************************************************************************


Uninstalling RPAgent...
Stopping RPAgent. Please wait...

RPAgent uninstalled on Lead node at location /opt/protegrity/rpagent.

Performing uninstall on other nodes...

RPAgent uninstalled on other nodes at location /opt/protegrity/rpagent.

Check the status in /opt/protegrity/logs/rpagent_setup.log
************************************************************************************
                Welcome to the LogForwarder Setup Wizard.
************************************************************************************

Uninstalling LogForwarder....
Stopping Logforwarder. Please wait...

LogForwarder uninstalled on Lead node at location /opt/protegrity/logforwarder.

Performing uninstall on other nodes...

Logforwarder uninstalled on other nodes at location /opt/protegrity/logforwarder.

Check the status in /opt/protegrity/logs/logforwarder_setup.log
************************************************************************************
                    Welcome to the JcoreLite Setup Wizard.
************************************************************************************

Uninstalling JcoreLite ....

JcoreLite uninstalled on lead node at location /opt/protegrity/bdp/lib.

Performing uninstall on other nodes...

JcoreLite uninstalled on other nodes at location /opt/protegrity/bdp/lib.

Check the status in /opt/protegrity/logs/jcorelite_setup.log
************************************************************************************
                Welcome to the Hive Protector Setup Wizard.
************************************************************************************

Uninstalling PepHive ....

Hive Big Data Protector uninstalled on lead node at location /opt/protegrity/bdp/lib/ and /opt/protegrity/pephive/scripts/.

Performing uninstall on other nodes...

Hive Big Data Protector uninstalled on other nodes at location /opt/protegrity/bdp/lib/ and /opt/protegrity/pephive/scripts/.

Check the status in /opt/protegrity/logs/pephive_setup.log
************************************************************************************
                    Welcome to the Pig Protector Setup Wizard.
************************************************************************************

Uninstalling PepPig ....

Pig Big Data Protector uninstalled on lead node at location /opt/protegrity/bdp/lib/ and /opt/protegrity/peppig.

Performing uninstall on other nodes...

Pig Big Data Protector uninstalled on other nodes at location /opt/protegrity/bdp/lib/ and /opt/protegrity/peppig.

Check the status in /opt/protegrity/logs/peppig_setup.log
************************************************************************************
                Welcome to the MapReduce Protector Setup Wizard.
************************************************************************************

Uninstalling PepMapreduce ....

Mapreduce Big Data Protector uninstalled on lead node at location /opt/protegrity/bdp/lib/.

Performing uninstall on other nodes...

Mapreduce Big Data Protector uninstalled on other nodes at location /opt/protegrity/bdp/lib/.

Check the status in /opt/protegrity/logs/pepmapreduce_setup.log
************************************************************************************
                    Welcome to the Hbase Protector Setup Wizard.
************************************************************************************

Uninstalling PepHbase....

Hbase Big Data Protector uninstalled on lead node at location /opt/protegrity/bdp/lib/.

Performing uninstall on other nodes...

Hbase Big Data Protector uninstalled on other nodes at location /opt/protegrity/bdp/lib/.

Check the status in /opt/protegrity/logs/pephbase_setup.log
************************************************************************************
                Welcome to the Spark Protector Setup Wizard.
************************************************************************************


Spark Big Data Protector uninstalled on lead node at location /opt/protegrity/bdp/lib/ and /opt/protegrity/pepspark/scripts/.

Performing uninstall on other nodes...

Spark Big Data Protector uninstalled on other nodes at location /opt/protegrity/bdp/lib/ and /opt/protegrity/pepspark/scripts/.

Check the status in /opt/protegrity/logs/pepspark_setup.log

Clearing previous log files ...

Uninstallation Status report generated in /opt/protegrity/cluster_utils/uninstallation_report.txt

Removing Protegrity service user from all nodes...
Uninstallation process done.
6.2.2 - From Specific Nodes
Uninstalling the Big Data Protector from Specific Nodes
To uninstall Big Data Protector from selective nodes in the EMR cluster, use the node_uninstall.sh script from the <installation_directory>/cluster_utils/ directory.
Ensure that you uninstall the Big Data Protector from an account having full sudoer privileges.
Log in to the Lead node.
Navigate to the <installation_directory>/cluster_utils/ directory.
Create a new hosts file.
For example, NEW_HOSTS_FILE. The NEW_HOSTS_FILE file contains the required nodes in the EMR cluster from where the Big Data Protector must be uninstalled.
Add the nodes on the EMR cluster, from which the Big Data Protector needs to be uninstalled in the NEW_HOSTS_FILE.
To remove the Big Data Protector from the nodes that are listed in the new hosts file, run the following command:
./node_uninstall.sh -c NEW_HOSTS_FILE
Press ENTER.
The prompt to enter the path of the Private Key file (.pem file) appears.
Type the path of the private key file.
Press ENTER.
The Big Data Protector is uninstalled from the nodes in the EMR cluster, which are listed in the new hosts file.
Check whether the nodes from which the Big Data Protector is uninstalled in Step 5 are removed from the CLUSTERLIST_FILE file.