This is the multi-page printable view of this section. Click here to print.

Return to the regular view of this page.

Azure Databricks

Big Data Protector on Azure Databricks

The Protegrity Big Data Protector for Azure Databricks delivers end‑to‑end data protection. Organizations deploying the Big Data Protector rely on modern, supported storage options. These include Workspace storage, Unity Catalog Volumes, and cloud object storage like ADLS Gen2 or Azure Blob Storage.

Designed to secure sensitive data across analytics pipelines, the Big Data Protector applies advanced tokenization and encryption during Spark execution and enforces centralized, policy‑driven controls. Whether installed via Unity Catalog Volumes for init script and .tgz delivery, the Protector ensures resilient execution across Azure Databricks clusters.

By embracing cloud‑native storage paths, this approach ensures long‑term compatibility with Databricks platform changes while maintaining Protegrity’s standard of seamless and transparent protection. Organizations can continue to process high‑value datasets on Azure Databricks with confidence knowing that sensitive information is secured across its lifecycle, even as the underlying platform evolves.

The Protegrity Big Data Protector for Azure Databricks empowers organizations to secure sensitive data across their analytics pipelines. This can be achieved by combining high‑performance protection mechanisms with flexible deployment models tailored for modern cloud architectures. Central to this capability are two approaches:

The two approaches provide enterprises the flexibility to choose a data protection strategy aligned with their architectural, cost, and compliance requirements. For example, a fully cluster-local data protection strategy can be leveraged using AP REST. On the other hand, a data protection strategy can also be centrally managed via Cloud Protector, or in hybrid deployments. This dual-path model ensures that Azure Databricks customers can achieve seamless, transparent, policy-based data protection while continuing to extract high-value insights from their data securely and efficiently.

Application Protector REST Approach

The AP REST model enables data protection directly within the Databricks cluster itself, eliminating the need for a separate Cloud API infrastructure. This approach is particularly suitable for customers who want to avoid maintaining additional cloud-native services for protection operations.

With AP REST, protection workflows are executed through REST endpoints running on the cluster, allowing seamless scaling along with Databricks’ auto-scaling compute. This ensures that sensitive data remains protected throughout processing while also adapting automatically to dynamically assigned IPs in auto-scaling environments. This results in an operationally efficient fit for Spark-driven workloads on Azure.

For the Application Protector REST Approach, the following cluster types are supported:

  • Databricks Dedicated Compute
  • Databricks Standard Compute

For the Application Protector REST approach, the following sections are applicable:

Cloud Protector Approach

The Cloud Protector approach extends protection capabilities by offering centralized, cloud-hosted security services for environments that require externally managed protection layers. It enables highly scalable, policy-driven tokenization and encryption without requiring protection logic to reside inside the Databricks compute itself.

In contexts where Cloud Protector is integrated with the Big Data Protector, organizations benefit from lifecycle-wide protection that spans storage, compute, and inter-system data transfers. Cloud Protector provides the foundation for UDF-driven protections including Spark and Unity Catalog–level enforcement, ensuring centralized governance across distributed analytics ecosystems.

For the Cloud Protector approach, the following cluster types are supported:

  • Databricks Dedicated Compute
  • Databricks Standard Compute
  • Databricks SQL Warehouse

For the Cloud Protector approach, the following sections are applicable:

1 - Understanding the architecture

Architecture for the Big Data Protector on Azure Databricks

1.1 - For the Application Protector REST Approach

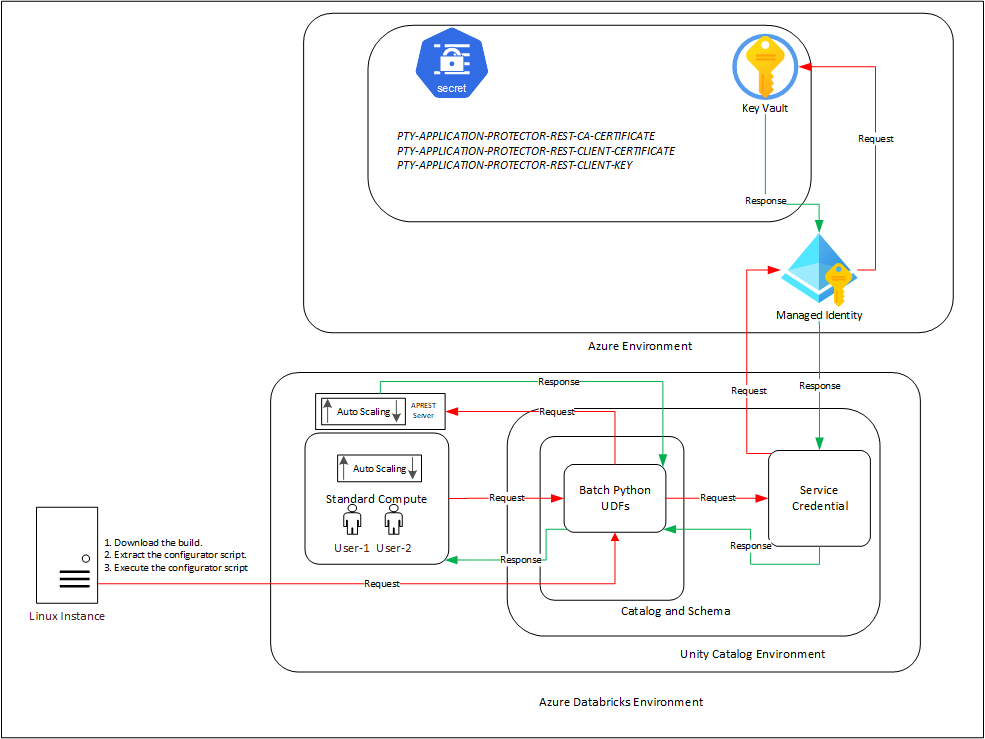
Architecture for the Big Data Protector on Azure Databricks using the Application Protector REST Approach

The architecture for installing the Azure Databricks protector using the Application Protector REST approach is depicted in the image below.

An outline of the steps in the workflow is explained below.

  1. Download the Azure Databricks build from the customer portal and extract the configurator script.
  2. Execute the configurator script to retrieve the IP address of the Application Protector REST server.
  3. Use the IP address to generate the CA, client, and server certificates.
  4. Store the content of the CA and the client certificates in the Azure Key Vault.
  5. Create a Databricks Unity Catalog Service Credentials to access the Secrets from the Azure Key Vault.
  6. Execute the configurator script to create the Unity Catalog Batch Python UDFs.
  7. Edit the cluster configuration to include the environment variables and attach the initialization script.

1.2 - For the Cloud Protector Approach

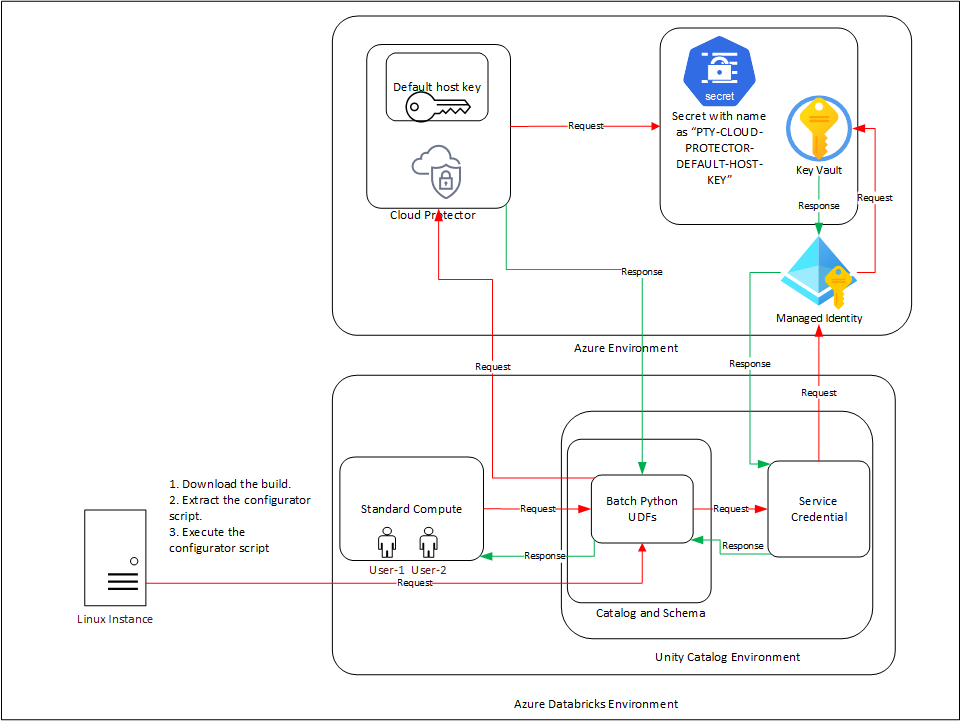
Architecture for the Big Data Protector on Azure Databricks using the Cloud Protector Approach

The architecture for installing the Azure Databricks protector using the Cloud Protector approach is depicted in the image below.

An outline of the steps in the workflow is explained below.

  1. Install and configure the Cloud Protector.
  2. Store the Cloud Protector’s default host key into an Azure Key Vault Secret with name as PTY-CLOUD-PROTECTOR-DEFAULT-HOST-KEY.
  3. Create an Azure Managed Identity and connect it with the Azure Key Vault Secret.
  4. Create an Azure Databricks Unity Catalog Service Credential and connect it with the Azure Managed Identity.
  5. Create either of a Dedicated Compute, Standard Compute, and SQL Warehouse.
  6. Download and extract the installation package on a Linux instance having connectivity to PPC.
  7. Execute the configurator script to create the Batch Python UDFs at the Unity Catalog level.
  8. Attach an Azure Databricks Notebook to the compute.
  9. Execute the Unity Catalog Batch Python UDFs to protect data.

2 - System Requirements

Understand the system requirements to install the Big Data Protector

2.1 - For the Application Protector REST Approach

Understand the system requirements to install the Big Data Protector using the Application Protector REST Approach

Ensure that the following prerequisites are available before installing the Big Data Protector:

  • Python3 along with the requests module is installed on the machine to execute the configurator script.

  • A compatible version of the ESA/PPC is installed, configured, and running.

  • Access to the Databricks workspace is available.

  • A Databricks cluster, of any one of the following types, is created and is in the running state:

    • Dedicated Compute
    • Standard Compute
  • Create the Databricks Service Principal.

  • The Databricks Service Principal must have the Can attach to permission on the cluster.

  • Create the following certificates for mutual TLS authorization:

    • CA Certificate
    • Server Certificate
    • Non-encrypted Server Key
    • Client Certificate
    • Non-encrypted Client Key

    Note: Generate these certificates ONLY after retrieving the IP address of the Application Protector REST server.

  • Create an Azure Managed Identity and connect it with the Azure Key Vault Secret.

  • Permission to create an Azure Key Vault and store secrets is available.

  • Create an Azure Databricks Unity Catalog Service Credential using the Azure Managed Identity.

    Note: For more information about creating the credential, refer to Create a service credential using a managed identity.

  • The Azure Managed Identity is granted the Key Vault Secrets User permission.

  • The Databricks Service Principal must have the access permissions on the Databricks Unity Catalog Service Credential.

  • A Databricks Unity Catalog Volume is available with a Catalog and a Schema and the following permissions:

    • The Databricks Service Principal must have the Read volume and Write volume permission on the Databricks Unity Catalog Volume.
    • The Databricks Service Principal must have the Use catalog permission at the Catalog level.
    • The Databricks Service Principal must have the Use schema permission at the Schema level.
    • The Databricks Service Principal must have the Create function permission at the Schema level.
    • The Databricks Service Principal must have the manage permission at the Schema level.

2.2 - For the Cloud Protector Approach

Understand the system requirements to install the Big Data Protector using the Cloud Protector Approach

The prerequisites required to install and run the Big Data Protector on a Databricks Compute are listed below.

  • Python3 along with the requests module is installed on the machine to execute the configurator script.

  • A compatible version of the ESA/PPC is installed, configured, and running.

  • Access to the Databricks workspace is available.

  • A Databricks cluster, of any one of the following types, is created and is in the running state:

    • Dedicated Compute
    • Standard Compute
    • SQL Warehouse
  • Create the Databricks Service Principal.

  • The Databricks Service Principal must have the Can attach to permission on the cluster.

  • Install and configure the Cloud API on Azure.

    Note: For more information about installing and configuring the Cloud API on Azure, refer to Cloud API.

  • To modify the core parameters for RPSync, refer to Policy Agent Installation.

  • Install and configure a compatible version of the ESA.

    Note: For more information about compatible ESA versions, refer to Cloud API.

  • Create an Azure Databricks Unity Catalog Service Credential.

    Note: For more information about creating the credential, refer to Create service credentials.

  • Assigned the ACCESS privilege to the principals that will be using the Azure Databricks Unity Catalog Service Credential.

  • Create a service principal and OAuth secret to deploy the UDFs.

    Note: For more information, refer to Authorize service principal access to Azure Databricks with OAuth.

  • Optional: Configure private connectivity to the Protegrity Cloud API.

    Note: For more information, refer to Configure private connectivity to resources in your VNet.

  • A Databricks Unity Catalog Volume is available with a Catalog and a Schema and the following permissions:

    • The Databricks Service Principal must have the ATTACH or MANAGE permission on the compute.
    • The Databricks Service Principal must have the Read volume and Write volume permission on the Databricks Unity Catalog Volume.
    • The Databricks Service Principal must have the Use catalog permission at the Catalog level.
    • The Databricks Service Principal must have the Use schema permission at the Schema level.
    • The Databricks Service Principal must have the Create function permission at the Schema level.
    • The Databricks Service Principal must have the manage permission at the Schema level.
  • To use a SQL Warehouse with the Cloud Protector approach, create a SQL Warehouse. For more information, refer to Create a SQL warehouse.

3 - Preparing the Environment

Prepare the environment to install the Big Data Protector

3.1 - Extracting the Installation Package

Extract the files from the installation package

Extract the contents of the installation package to access the configurator script. This script generates the required files to install the Big Data Protector.

To extract the files from the installation package:

  1. Log in to the Linux machine that has connectivity to ESA/PPC.

  2. Download the Big Data Protector package BigDataProtector_Linux-ALL-64_x86-64_Azure.Databricks-<DBR_version>-64_<BDP_version>.tgz to any local directory.

  3. To extract the files from the installation packaage, run the following command:

    tar -xvf BigDataProtector_Linux-ALL-64_x86-64_Azure.Databricks-<DBR_version>-64_<BDP_version>.tgz
    
  4. Press ENTER.
    The command extracts the installation package and the GPG signature files.

    BigDataProtector_Linux-ALL-64_x86-64_Azure.Databricks-<DBR_version>-64_<BDP_version>.tgz
    signatures/
    signatures/BigDataProtector_Linux-ALL-64_x86-64_Azure.Databricks-<DBR_version>-64_<BDP_version>.tgz_10.0.sig
    

    Verify the authenticity of the build using the signatures folder. For more information, refer to Verification of Signed Protector Build.

  5. To extract the configurator script, run the following command:

    tar -xvf BigDataProtector_Linux-ALL-64_x86-64_Azure.Databricks-<DBR_version>-64_<BDP_version>.tgz
    
  6. Press ENTER.
    The command extracts the configurator script.

    BigDataProtector-Configurator_Linux-ALL-64_x86-64_Azure.Databricks-<DBR_version>-64_<BDP_version>.sh
    

3.2 - Working with the Configurator Script

Understand help options available in the Configurator script

Viewing the Help Options

The configurator script performs the following tasks:

  1. Generate the IP address for the Application Protector REST server.
  2. Create the UDFs.
  3. Delete the UDFs.

The configurator script provides the --help option to understand the options and the arguments to be provided.

To understand the options and the arguments for the configurator script:

  1. Log in to the node where the installation files are extracted.
  2. To view the options and the arguments, run the following command:
    ./BigDataProtector-Configurator_Linux-ALL-64_x86-64_Azure.Databricks-<DBR_version>-64_<BDP_version>.sh --help
    
  3. Press ENTER.
    The command displays all the options and the arguments required to execute the configurator script.
    This script utilizes one of the following approaches:
    -----------------------------------
    | ID | Approach                   |
    -----------------------------------
    |  1 | Application Protector REST |
    |  2 | Cloud Protector            |
    -----------------------------------
    
    ###########################################################################################
    
    If you want to use Application Protector REST approach, following operations are supported:
    ----------------------------------------------------------
    | ID | Operation                                         |
    ----------------------------------------------------------
    |  1 | Get Application Protector REST's Server IP        |
    |  2 | Create Databricks Unity Catalog Batch Python UDFs |
    |  3 | Delete Databricks Unity Catalog Batch Python UDFs |
    ----------------------------------------------------------
    
    To Get Application Protector REST's Server IP, following inputs are required:
    Using interactive prompts:
    1. The ID of the operation as "1"
    2. The URL of the Databricks Workspace
    3. The Application ID of the Databricks Service Principal
    4. The OAuth Secret of the Databricks Service Principal
    5. The ID of the Databricks Compute
    
    Using command-line arguments:
    --operation_id "1"
    --databricks_workspace_url "databricks_workspace_url"
    --databricks_service_principal_application_id "databricks_service_principal_application_id"
    --databricks_service_principal_oauth_secret "databricks_service_principal_oauth_secret"
    --databricks_compute_id "databricks_compute_id"
    
    Using .cfg file (pass the path of the .cfg file to this script as a command-line argument):
    operation_id = "1"
    databricks_workspace_url = "databricks_workspace_url"
    databricks_service_principal_application_id = "databricks_service_principal_application_id"
    databricks_service_principal_oauth_secret = "databricks_service_principal_oauth_secret"
    databricks_compute_id = "databricks_compute_id"
    
    To Create Databricks Unity Catalog Batch Python UDFs, following inputs are required:
    Using interactive prompts:
    1. The ID of the operation as "2"
    2. The URL of the Databricks Workspace
    3. The Application ID of the Databricks Service Principal
    4. The OAuth Secret of the Databricks Service Principal
    5. The ID of the Databricks Compute
    6. The name of the Databricks Unity Catalog Catalog-Schema
    7. The ID of the approach as "1"
    8. The path of the CA Certificate
    9. The path of the Server Certificate
    10. The path of the Server Key
    11. The name of the Azure Key Vault
    12. The name of the Databricks Unity Catalog Service Credential
    13. The path of the Databricks Unity Catalog Volume
    
    Using command-line arguments:
    --operation_id "2"
    --databricks_workspace_url "databricks_workspace_url"
    --databricks_service_principal_application_id "databricks_service_principal_application_id"
    --databricks_service_principal_oauth_secret "databricks_service_principal_oauth_secret"
    --databricks_compute_id "databricks_compute_id"
    --databricks_unity_catalog_catalog_schema_name "databricks_unity_catalog_catalog_schema_name"
    --approach_id "1"
    --ca_certificate_path "ca_certificate_path"
    --server_certificate_path "server_certificate_path"
    --server_key_path "server_key_path"
    --azure_key_vault_name "azure_key_vault_name"
    --databricks_unity_catalog_service_credential_name "databricks_unity_catalog_service_credential_name"
    --databricks_unity_catalog_volume_path "databricks_unity_catalog_volume_path"
    
    Using .cfg file (pass the path of the .cfg file to this script as a command-line argument):
    operation_id = "2"
    databricks_workspace_url = "databricks_workspace_url"
    databricks_service_principal_application_id = "databricks_service_principal_application_id"
    databricks_service_principal_oauth_secret = "databricks_service_principal_oauth_secret"
    databricks_compute_id = "databricks_compute_id"
    databricks_unity_catalog_catalog_schema_name = "databricks_unity_catalog_catalog_schema_name"
    approach_id = "1"
    ca_certificate_path = "ca_certificate_path"
    server_certificate_path = "server_certificate_path"
    server_key_path = "server_key_path"
    azure_key_vault_name = "azure_key_vault_name"
    databricks_unity_catalog_service_credential_name = "databricks_unity_catalog_service_credential_name"
    databricks_unity_catalog_volume_path = "databricks_unity_catalog_volume_path"
    
    To Delete Databricks Unity Catalog Batch Python UDFs, following inputs are required:
    Using interactive prompts:
    1. The ID of the operation as "3"
    2. The URL of the Databricks Workspace
    3. The Application ID of the Databricks Service Principal
    4. The OAuth Secret of the Databricks Service Principal
    5. The ID of the Databricks Compute
    6. The name of the Databricks Unity Catalog Catalog-Schema
    7. The ID of the approach as "1"
    8. The path of the Databricks Unity Catalog Volume
    
    Using command-line arguments:
    --operation_id "3"
    --databricks_workspace_url "databricks_workspace_url"
    --databricks_service_principal_application_id "databricks_service_principal_application_id"
    --databricks_service_principal_oauth_secret "databricks_service_principal_oauth_secret"
    --databricks_compute_id "databricks_compute_id"
    --databricks_unity_catalog_catalog_schema_name "databricks_unity_catalog_catalog_schema_name"
    --approach_id "1"
    --databricks_unity_catalog_volume_path "databricks_unity_catalog_volume_path"
    
    Using .cfg file (pass the path of the .cfg file to this script as a command-line argument):
    operation_id = "3"
    databricks_workspace_url = "databricks_workspace_url"
    databricks_service_principal_application_id = "databricks_service_principal_application_id"
    databricks_service_principal_oauth_secret = "databricks_service_principal_oauth_secret"
    databricks_compute_id = "databricks_compute_id"
    databricks_unity_catalog_catalog_schema_name = "databricks_unity_catalog_catalog_schema_name"
    approach_id = "1"
    databricks_unity_catalog_volume_path = "databricks_unity_catalog_volume_path"
    
    ################################################################################
    
    If you want to use Cloud Protector approach, following operations are supported:
    ----------------------------------------------------------
    | ID | Operation                                         |
    ----------------------------------------------------------
    |  1 | Create Databricks Unity Catalog Batch Python UDFs |
    |  2 | Delete Databricks Unity Catalog Batch Python UDFs |
    ----------------------------------------------------------
    
    To Create Databricks Unity Catalog Batch Python UDFs, following inputs are required:
    Using interactive prompts:
    1. The ID of the operation as "2"
    2. The URL of the Databricks Workspace
    3. The Application ID of the Databricks Service Principal
    4. The OAuth Secret of the Databricks Service Principal
    5. The ID of the Databricks Compute
    6. The name of the Databricks Unity Catalog Catalog-Schema
    7. The ID of the approach as "2"
    8. The URL of the Azure Function App's Protect Function
    9. The URL of the Azure Function App's Unprotect Function
    10. The name of the Azure Key Vault
    11. The name of the Databricks Unity Catalog Service Credential
    12. The path of the Databricks Unity Catalog Volume
    
    Using command-line arguments:
    --operation_id "2"
    --databricks_workspace_url "databricks_workspace_url"
    --databricks_service_principal_application_id "databricks_service_principal_application_id"
    --databricks_service_principal_oauth_secret "databricks_service_principal_oauth_secret"
    --databricks_compute_id "databricks_compute_id"
    --databricks_unity_catalog_catalog_schema_name "databricks_unity_catalog_catalog_schema_name"
    --approach_id "2"
    --azure_function_app_protect_function_url "azure_function_app_protect_function_url"
    --azure_function_app_unprotect_function_url "azure_function_app_unprotect_function_url"
    --azure_key_vault_name "azure_key_vault_name"
    --databricks_unity_catalog_service_credential_name "databricks_unity_catalog_service_credential_name"
    --databricks_unity_catalog_volume_path "databricks_unity_catalog_volume_path"
    
    Using .cfg file (pass the path of the .cfg file to this script as a command-line argument):
    operation_id = "2"
    databricks_workspace_url = "databricks_workspace_url"
    databricks_service_principal_application_id = "databricks_service_principal_application_id"
    databricks_service_principal_oauth_secret = "databricks_service_principal_oauth_secret"
    databricks_compute_id = "databricks_compute_id"
    databricks_unity_catalog_catalog_schema_name = "databricks_unity_catalog_catalog_schema_name"
    approach_id = "2"
    azure_function_app_protect_function_url = "azure_function_app_protect_function_url"
    azure_function_app_unprotect_function_url = "azure_function_app_unprotect_function_url"
    azure_key_vault_name = "azure_key_vault_name"
    databricks_unity_catalog_service_credential_name = "databricks_unity_catalog_service_credential_name"
    databricks_unity_catalog_volume_path = "databricks_unity_catalog_volume_path"
    
    To Delete Databricks Unity Catalog Batch Python UDFs, following inputs are required:
    Using interactive prompts:
    1. The ID of the operation as "3"
    2. The URL of the Databricks Workspace
    3. The Application ID of the Databricks Service Principal
    4. The OAuth Secret of the Databricks Service Principal
    5. The ID of the Databricks Compute
    6. The name of the Databricks Unity Catalog Catalog-Schema
    7. The ID of the approach as "2"
    8. The path of the Databricks Unity Catalog Volume
    
    Using command-line arguments:
    --operation_id "3"
    --databricks_workspace_url "databricks_workspace_url"
    --databricks_service_principal_application_id "databricks_service_principal_application_id"
    --databricks_service_principal_oauth_secret "databricks_service_principal_oauth_secret"
    --databricks_compute_id "databricks_compute_id"
    --databricks_unity_catalog_catalog_schema_name "databricks_unity_catalog_catalog_schema_name"
    --approach_id "2"
    --databricks_unity_catalog_volume_path "databricks_unity_catalog_volume_path"
    
    Using .cfg file (pass the path of the .cfg file to this script as a command-line argument):
    operation_id = "3"
    databricks_workspace_url = "databricks_workspace_url"
    databricks_service_principal_application_id = "databricks_service_principal_application_id"
    databricks_service_principal_oauth_secret = "databricks_service_principal_oauth_secret"
    databricks_compute_id = "databricks_compute_id"
    databricks_unity_catalog_catalog_schema_name = "databricks_unity_catalog_catalog_schema_name"
    approach_id = "2"
    databricks_unity_catalog_volume_path = "databricks_unity_catalog_volume_path"
    

3.3 - Retrieving the IP Address

Retrieve the IP Address for the Application Protector REST server

The IP address for the Application Protector REST approach is required to generate the certificates. The certificates must be created using the retrieved IP address. These certificates will be used to establish a mutual trust between the Unity Catalog Batch Python UDFs and the Application Protector REST Server.

Note: The instructions mentioned in the section apply only to the Application Protector REST approach.

  1. Log in to the node where the installation files are extracted.
  2. To execute the configurator script, run the following command:
    ./BigDataProtector-Configurator_Linux-ALL-64_x86-64_Azure.Databricks-<DBR_version>-64_<BDP_version>.sh
    
  3. Press ENTER.
    The prompt to enter the operation ID appears.
    Creating installation files...
    Created installation files.
    
    The ID of the operation needs to be one of the following:
    ----------------------------------------------------------
    | ID | Operation                                         |
    ----------------------------------------------------------
    |  1 | Get Application Protector REST's Server IP        |
    |  2 | Create Databricks Unity Catalog Batch Python UDFs |
    |  3 | Delete Databricks Unity Catalog Batch Python UDFs |
    ----------------------------------------------------------
    Enter the ID of the operation:
    
  4. To retrieve the IP address of the Application Protector REST server, type 1.
  5. Press ENTER.
    The prompt to enter the Databricks Workspace URL appears.
    Enter the URL of the Databricks Workspace:
    
  6. Enter the Databricks Workspace URL.
  7. Press ENTER.
    The prompt to enter the application ID of the Databricks Service Principal appears.
    Enter the Application ID of the Databricks Service Principal:
    
  8. Enter the Application ID of the Databricks Service Principal.
  9. Press ENTER.
    The prompt to enter the OAuth secret for the Service Principal appears.
    Enter the OAuth Secret of the Databricks Service Principal:
    
  10. Enter the OAuth secret.
  11. Press ENTER.
    The prompt to enter the cluster ID appears.
    Enter the ID of the Databricks Compute:
    
  12. Enter the Cluster ID.

    Note: The Cluster ID can be either for Standard Compute or Dedicated Compute. For more information about identifying the Cluster ID, refer to Get identifiers for workspace objects.

  13. Press ENTER.
    The script retrieves the IP address of the Application Protector REST server.
    Executing specified operation...
    
    APREST Protector's Server IP: x.x.x.x
    
    Executed specified operation.
    

3.4 - Uploading the Secrets to the Azure Key Vault

Upload the secrets to the Azure Key Vault for the Application Protector REST approach

The CA and the Client certificates are important entities in the mutual trust process. These certificates determine the authentication and authorization for the Application Protector REST server. As a result, it is critical to store these certificates in a secured location. Therefore, upload the certificates to the Azure Key Vault in Azure where they will be stored as secrets.

Note: The instructions mentioned in the section apply only to the Application Protector REST approach.

Before you begin:

  1. Create a key vault to upload the secrets.
  2. Assign the required access permissions to the key vault.

To upload the secrets:

  1. Log in to the machine where the certificates are created.

  2. Launch the python console.

  3. To view the contents of the CA.pem file and store it as PTY-APPLICATION-PROTECTOR-REST-CA-CERTIFICATE, run the following command:

    with open("ca/CA.pem") as file:
        file.read()
    
  4. Press ENTER.
    The command displays the contents of the CA.pem file.

  5. To view the contents of the client.pem file and store it as PTY-APPLICATION-PROTECTOR-REST-CLIENT-CERTIFICATE, run the following command:

    with open("client/client.pem") as file:
        file.read()
    
  6. Press ENTER.
    The command displays the contents of the client.pem file.

  7. To view the contents of the client.key file and store it as PTY-APPLICATION-PROTECTOR-REST-CLIENT-KEY, run the following command:

    with open("client/client.key") as file:
        file.read()
    
  8. Press ENTER.
    The command displays the contents of the client.key file.

  9. Log in to the Azure portal.

  10. Navigate to the required key vault.

  11. From the left-pane, expand Objects and click Secrets.
    The Secrets page appears.

  12. Click Generate/Import.
    The Create a secret page appears.

  13. Enter the details, as listed in the table, in a new row.

    Key

    Value

    PTY-APPLICATION-PROTECTOR-REST-CA-CERTIFICATE

    1. In the Name box, enter PTY-APPLICATION-PROTECTOR-REST-CA-CERTIFICATE.
    2. In the Secret Value box, enter the contents of the CA.pem file.
    3. Click Create.

    PTY-APPLICATION-PROTECTOR-REST-CLIENT-CERTIFICATE

    1. In the Name box, enter PTY-APPLICATION-PROTECTOR-REST-CLIENT-CERTIFICATE.
    2. In the Secret Value box, enter the contents of the client.pem file.
    3. Click Create.

    PTY-APPLICATION-PROTECTOR-REST-CLIENT-KEY

    1. In the Name box, enter PTY-APPLICATION-PROTECTOR-REST-CLIENT-KEY.
    2. In the Secret Value box, enter the contents of the client.key file.
    3. Click Create.

    The parameters are displayed on the Secrets page of the key vault.

4 - Installing the Protector

Install the Big Data Protector on Azure Databricks

The process of installing the Big Data Protector involves the process of creating the user-defined functions.

The following combinations will work for a successful execution of the configurator script:

  • Databricks Dedicated Compute + Application Protector REST approach
  • Databricks Dedicated Compute + Cloud Protector approach
  • Databricks Standard Compute + Application Protector REST approach
  • Databricks Standard Compute + Cloud Protector approach
  • Databricks SQL Warehouse + Cloud Protector approach

The Databricks SQL Warehouse + Application Protector REST approach combination will not work. This is because Protegrity executes a few Python commands on the Databricks Compute to retrieve a listening IP for the Application Protector REST’s Server. When the Databricks Compute is a SQL Warehouse, the Python commands fail to execute. This occurs because the SQL Warehouse supports only SQL commands.

Creating the UDFs for the Application Protector REST Approach

The configurator script creates the UDFs. These Unity Catalog Batch Python UDFs are designed to perform data protection and unprotection operations. Select the required approach and the operation ID to create the UDFs using the Application Protector REST server. This section explains the process to create the UDFs using the interactive method of installation.

To create the UDFs:

  1. Log in to the node having connectivity to ESA/PPC.

  2. Navigate to the directory where the installation files are extracted.

  3. To execute the configurator script, run the following command:

    ./BigDataProtector-Configurator_Linux-ALL-64_x86-64_Azure.Databricks-<DBR_version>-64_<BDP_version>.sh
    
  4. Press ENTER.
    The prompt to enter the operation ID appears.

    Creating installation files...
    Created installation files.
    
    The ID of the operation needs to be one of the following:
    ----------------------------------------------------------
    | ID | Operation                                         |
    ----------------------------------------------------------
    |  1 | Get Application Protector REST's Server IP        |
    |  2 | Create Databricks Unity Catalog Batch Python UDFs |
    |  3 | Delete Databricks Unity Catalog Batch Python UDFs |
    ----------------------------------------------------------
    Enter the ID of the operation:
    
  5. To create the UDFs, type 2.

  6. Press ENTER.
    The prompt to enter the Databricks Workspace URL appears.

    Enter the URL of the Databricks Workspace:
    
  7. Enter the Databricks Workspace URL.

  8. Press ENTER.
    The prompt to enter the application ID of the Databricks Service Principal appears.

    Enter the Application ID of the Databricks Service Principal:
    
  9. Enter the Application ID of the Databricks Service Principal.

  10. Press ENTER.
    The prompt to enter the OAuth secret for the Service Principal appears.

    Enter the OAuth Secret of the Databricks Service Principal:
    
  11. Enter the OAuth secret.

  12. Press ENTER.
    The prompt to enter the cluster ID appears.

    Enter the ID of the Databricks Compute:
    

    Note: The Cluster ID can be either for Standard Compute or Dedicated Compute. For more information about identifying the Cluster ID, refer to Get identifiers for workspace objects.

  13. Enter the Cluster ID.

  14. Press ENTER.
    The prompt to enter the name of the schema appears.

    Enter the name of the Databricks Unity Catalog Catalog-Schema:
    
  15. Enter the name of the catalog and the schema in the <catalog_name.schema_name> format.

  16. Press ENTER.
    The prompt to select the approach appears.

    The ID of the approach needs to be one of the following:
    -----------------------------------
    | ID | Approach                   |
    -----------------------------------
    |  1 | Application Protector REST |
    |  2 | Cloud Protector            |
    -----------------------------------
    Enter the ID of the approach:
    
  17. To create the UDFs using the Application Protector REST approach, type 1.

  18. Press ENTER.
    The prompt to enter the path of the CA Certificate appears.

    Enter the path of the CA Certificate:
    
  19. Enter the path of the CA Certificate.

  20. Press ENTER.
    The prompt to enter the path of the Server Certificate appears.

    Enter the path of the Server Certificate:
    
  21. Enter the path of the Server Certificate.

  22. Press ENTER.
    The prompt to enter the path of the Server key appears.

    Enter the path of the Server Key:
    
  23. Enter the path of the Server Key.

  24. Press ENTER.
    The prompt to enter the name of the key vault appears.

    Enter the name of the Azure Key Vault:
    
  25. Enter the name of the Azure Key Vault.

  26. Press ENTER.
    The prompt to enter the name of the Service Credential appears.

    Enter the name of the Databricks Unity Catalog Service Credential:
    
  27. Enter the name of the Databricks Unity Catalog Service Credential.

  28. Press ENTER.
    The prompt to enter the path of the Unity Catalog Volume appears.

    Enter the path of the Databricks Unity Catalog Volume:
    
  29. Enter the path of the Databricks Unity Catalog Volume.

  30. Press ENTER.
    The script creates the UDFs at the specified location.

    Executing specified operation...
    
    Creating /Volumes/<catalog_name>/<schema_name>/<volume_name>/azure_identity-1.25.3-py3-none-any.whl file...
    Created /Volumes/<catalog_name>/<schema_name>/<volume_name>/azure_identity-1.25.3-py3-none-any.whl file.
    
    Creating /Volumes/<catalog_name>/<schema_name>/<volume_name>/azure_keyvault_secrets-4.11.0-py3-none-any.whl file...
    Created /Volumes/<catalog_name>/<schema_name>/<volume_name>/azure_keyvault_secrets-4.11.0-py3-none-any.whl file.
    
    Creating <catalog_name>.<schema_name>.pty_decrypt_string Databricks Unity Catalog Batch Python UDF...
    Created <catalog_name>.<schema_name>.pty_decrypt_string Databricks Unity Catalog Batch Python UDF.
    
    Creating <catalog_name>.<schema_name>.pty_encrypt_string Databricks Unity Catalog Batch Python UDF...
    Created <catalog_name>.<schema_name>.pty_encrypt_string Databricks Unity Catalog Batch Python UDF.
    
    Creating <catalog_name>.<schema_name>.pty_get_version Databricks Unity Catalog Batch Python UDF...
    Created <catalog_name>.<schema_name>.pty_get_version Databricks Unity Catalog Batch Python UDF.
    
    Creating <catalog_name>.<schema_name>.pty_get_version_extended Databricks Unity Catalog Batch Python UDF...
    Created <catalog_name>.<schema_name>.pty_get_version_extended Databricks Unity Catalog Batch Python UDF.
    
    Creating <catalog_name>.<schema_name>.pty_protect_binary Databricks Unity Catalog Batch Python UDF...
    Created <catalog_name>.<schema_name>.pty_protect_binary Databricks Unity Catalog Batch Python UDF.
    
    Creating <catalog_name>.<schema_name>.pty_protect_date Databricks Unity Catalog Batch Python UDF...
    Created <catalog_name>.<schema_name>.pty_protect_date Databricks Unity Catalog Batch Python UDF.
    
    Creating <catalog_name>.<schema_name>.pty_protect_int Databricks Unity Catalog Batch Python UDF...
    Created <catalog_name>.<schema_name>.pty_protect_int Databricks Unity Catalog Batch Python UDF.
    
    Creating <catalog_name>.<schema_name>.pty_protect_smallint Databricks Unity Catalog Batch Python UDF...
    Created <catalog_name>.<schema_name>.pty_protect_smallint Databricks Unity Catalog Batch Python UDF.
    
    Creating <catalog_name>.<schema_name>.pty_protect_string Databricks Unity Catalog Batch Python UDF...
    Created <catalog_name>.<schema_name>.pty_protect_string Databricks Unity Catalog Batch Python UDF.
    
    Creating <catalog_name>.<schema_name>.pty_protect_string_fpe Databricks Unity Catalog Batch Python UDF...
    Created <catalog_name>.<schema_name>.pty_protect_string_fpe Databricks Unity Catalog Batch Python UDF.
    
    Creating <catalog_name>.<schema_name>.pty_unprotect_binary Databricks Unity Catalog Batch Python UDF...
    Created <catalog_name>.<schema_name>.pty_unprotect_binary Databricks Unity Catalog Batch Python UDF.
    
    Creating <catalog_name>.<schema_name>.pty_unprotect_date Databricks Unity Catalog Batch Python UDF...
    Created <catalog_name>.<schema_name>.pty_unprotect_date Databricks Unity Catalog Batch Python UDF.
    
    Creating <catalog_name>.<schema_name>.pty_unprotect_int Databricks Unity Catalog Batch Python UDF...
    Created <catalog_name>.<schema_name>.pty_unprotect_int Databricks Unity Catalog Batch Python UDF.
    
    Creating <catalog_name>.<schema_name>.pty_unprotect_smallint Databricks Unity Catalog Batch Python UDF...
    Created <catalog_name>.<schema_name>.pty_unprotect_smallint Databricks Unity Catalog Batch Python UDF.
    
    Creating <catalog_name>.<schema_name>.pty_unprotect_string Databricks Unity Catalog Batch Python UDF...
    Created <catalog_name>.<schema_name>.pty_unprotect_string Databricks Unity Catalog Batch Python UDF.
    
    Creating <catalog_name>.<schema_name>.pty_unprotect_string_fpe Databricks Unity Catalog Batch Python UDF...
    Created <catalog_name>.<schema_name>.pty_unprotect_string_fpe Databricks Unity Catalog Batch Python UDF.
    
    Creating <catalog_name>.<schema_name>.pty_who_am_i Databricks Unity Catalog Batch Python UDF...
    Created <catalog_name>.<schema_name>.pty_who_am_i Databricks Unity Catalog Batch Python UDF.
    
    Creating /Volumes/<catalog_name>/<schema_name>/<volume_name>/BigDataProtector_Linux-ALL-64_x86-64_Azure.Databricks-<DBR_version>-64_<BDP_version>.tgz file...
    Created /Volumes/<catalog_name>/<schema_name>/<volume_name>/BigDataProtector_Linux-ALL-64_x86-64_Azure.Databricks-<DBR_version>-64_<BDP_version>.tgz file.
    
    Creating /Volumes/<catalog_name>/<schema_name>/<volume_name>/BigDataProtector-Init-Script_Linux-ALL-64_x86-64_Azure.Databricks-<DBR_version>-64_<BDP_version>.sh file...
    Created /Volumes/<catalog_name>/<schema_name>/<volume_name>/BigDataProtector-Init-Script_Linux-ALL-64_x86-64_Azure.Databricks-<DBR_version>-64_<BDP_version>.sh file.
    
    1. Create the following environment variables in the Spark section of the Advanced properties of the Databricks Compute:
    PTY_ESA_IP=PTY_ESA_IP
    PTY_ESA_PORT=PTY_ESA_PORT
    Either PTY_ESA_TOKEN=PTY_ESA_TOKEN or PTY_ESA_ADMINISTRATOR_USERNAME=PTY_ESA_ADMINISTRATOR_USERNAME and PTY_ESA_ADMINISTRATOR_PASSWORD=PTY_ESA_ADMINISTRATOR_PASSWORD
    PTY_AUDIT_STORE_IP_PORT=PTY_AUDIT_STORE_IP_PORT
    PTY_PROTECTOR_CONFIGURATION=PTY_PROTECTOR_CONFIGURATION
    PTY_ESA_CA_CERTIFICATE=PTY_ESA_CA_CERTIFICATE
    PTY_ESA_FQDN=PTY_ESA_FQDN
    2. Attach "/Volumes/<catalog_name>/<schema_name>/<volume_name>/BigDataProtector-Init-Script_Linux-ALL-64_x86-64_Azure.Databricks-<DBR_version>-64_<BDP_version>.sh" as an Init Script to the Databricks Compute.
    3. Restart the Databricks Compute.
    
    Executed specified operation.
    

Creating the UDFs for the Cloud Protector Approach

The configurator script creates the UDFs. These Unity Catalog Batch Python UDFs can perform data protection and unprotection operations. Select the required approach and the operation ID to create the UDFs using the Cloud Protector. This section explains the process to create the UDFs using the interactive method of installation.

To create the UDFs:

  1. Log in to the node having connectivity to ESA/PPC.

  2. Navigate to the directory where the installation files are extracted.

  3. To execute the configurator script, run the following command:

    ./BigDataProtector-Configurator_Linux-ALL-64_x86-64_Azure.Databricks-<DBR_version>-64_<BDP_version>.sh
    
  4. Press ENTER.
    The prompt to enter the operation ID appears.

    Creating installation files...
    Created installation files.
    
    The ID of the operation needs to be one of the following:
    ----------------------------------------------------------
    | ID | Operation                                         |
    ----------------------------------------------------------
    |  1 | Get Application Protector REST's Server IP        |
    |  2 | Create Databricks Unity Catalog Batch Python UDFs |
    |  3 | Delete Databricks Unity Catalog Batch Python UDFs |
    ----------------------------------------------------------
    Enter the ID of the operation:
    
  5. To create the UDFs, type 2.

  6. Press ENTER.
    The prompt to enter the Databricks Workspace URL appears.

    Enter the URL of the Databricks Workspace:
    
  7. Enter the Databricks Workspace URL.

  8. Press ENTER.
    The prompt to enter the application ID of the Databricks Service Principal appears.

    Enter the Application ID of the Databricks Service Principal:
    
  9. Enter the Application ID of the Databricks Service Principal.

  10. Press ENTER.
    The prompt to enter the OAuth secret for the Service Principal appears.

    Enter the OAuth Secret of the Databricks Service Principal:
    
  11. Enter the OAuth secret.

  12. Press ENTER.
    The prompt to enter the cluster ID appears.

    Enter the ID of the Databricks Compute:
    

    Note: The Cluster ID can be either for SQL Warehouse, Standard Compute or Dedicated Compute. For more information about identifying the Cluster ID, refer to Get identifiers for workspace objects.

  13. Enter the Cluster ID.

  14. Press ENTER.
    The prompt to enter the name of the schema appears.

    Enter the name of the Databricks Unity Catalog Catalog-Schema:
    
  15. Enter the name of the catalog and the schema in the <catalog_name.schema_name> format.

  16. Press ENTER.
    The prompt to select the approach appears.

    The ID of the approach needs to be one of the following:
    -----------------------------------
    | ID | Approach                   |
    -----------------------------------
    |  1 | Application Protector REST |
    |  2 | Cloud Protector            |
    -----------------------------------
    Enter the ID of the approach:
    
  17. To create the UDFs using the Cloud Protector approach, type 2.

  18. Press ENTER.
    The prompt to enter the protection endpoint appears.

    Enter the URL of the Azure Function App's Protect Function:
    
  19. Enter the protection endpoint.

  20. Press ENTER.
    The prompt to enter the unprotection endpoint appears.

    Enter the URL of the Azure Function App's Unprotect Function:
    
  21. Enter the unprotection endpoint.

  22. Press ENTER.
    The prompt to enter the name of the key vault appears.

    Enter the name of the Azure Key Vault:
    
  23. Enter the name of the Azure Key Vault.

  24. Press ENTER.
    The prompt to enter the name of the Service Credential appears.

    Enter the name of the Databricks Unity Catalog Service Credential:
    
  25. Enter the name of the Databricks Unity Catalog Service Credential.

  26. Press ENTER.
    The prompt to enter the path of the Unity Catalog volume appears.

    Enter the path of the Databricks Unity Catalog Volume:
    
  27. Enter the location of the Unity Catalog volume.

  28. Press ENTER.
    The script creates the UDFs at the specified location.

    Executing specified operation...
    
    Creating /Volumes/<catalog_name>/<schema_name>/<volume_name>/azure_identity-1.25.3-py3-none-any.whl file...
    Created /Volumes/<catalog_name>/<schema_name>/<volume_name>/azure_identity-1.25.3-py3-none-any.whl file.
    
    Creating /Volumes/<catalog_name>/<schema_name>/<volume_name>/azure_keyvault_secrets-4.11.0-py3-none-any.whl file...
    Created /Volumes/<catalog_name>/<schema_name>/<volume_name>/azure_keyvault_secrets-4.11.0-py3-none-any.whl file.
    
    Creating <catalog_name>.<schema_name>.pty_decrypt_string Databricks Unity Catalog Batch Python UDF...
    Created <catalog_name>.<schema_name>.pty_decrypt_string Databricks Unity Catalog Batch Python UDF.
    
    Creating <catalog_name>.<schema_name>.pty_encrypt_string Databricks Unity Catalog Batch Python UDF...
    Created <catalog_name>.<schema_name>.pty_encrypt_string Databricks Unity Catalog Batch Python UDF.
    
    Creating <catalog_name>.<schema_name>.pty_get_version Databricks Unity Catalog Batch Python UDF...
    Created <catalog_name>.<schema_name>.pty_get_version Databricks Unity Catalog Batch Python UDF.
    
    Creating <catalog_name>.<schema_name>.pty_get_version_extended Databricks Unity Catalog Batch Python UDF...
    Created <catalog_name>.<schema_name>.pty_get_version_extended Databricks Unity Catalog Batch Python UDF.
    
    Creating <catalog_name>.<schema_name>.pty_protect_binary Databricks Unity Catalog Batch Python UDF...
    Created <catalog_name>.<schema_name>.pty_protect_binary Databricks Unity Catalog Batch Python UDF.
    
    Creating <catalog_name>.<schema_name>.pty_protect_date Databricks Unity Catalog Batch Python UDF...
    Created <catalog_name>.<schema_name>.pty_protect_date Databricks Unity Catalog Batch Python UDF.
    
    Creating <catalog_name>.<schema_name>.pty_protect_int Databricks Unity Catalog Batch Python UDF...
    Created <catalog_name>.<schema_name>.pty_protect_int Databricks Unity Catalog Batch Python UDF.
    
    Creating <catalog_name>.<schema_name>.pty_protect_smallint Databricks Unity Catalog Batch Python UDF...
    Created <catalog_name>.<schema_name>.pty_protect_smallint Databricks Unity Catalog Batch Python UDF.
    
    Creating <catalog_name>.<schema_name>.pty_protect_string Databricks Unity Catalog Batch Python UDF...
    Created <catalog_name>.<schema_name>.pty_protect_string Databricks Unity Catalog Batch Python UDF.
    
    Creating <catalog_name>.<schema_name>.pty_unprotect_binary Databricks Unity Catalog Batch Python UDF...
    Created <catalog_name>.<schema_name>.pty_unprotect_binary Databricks Unity Catalog Batch Python UDF.
    
    Creating <catalog_name>.<schema_name>.pty_unprotect_date Databricks Unity Catalog Batch Python UDF...
    Created <catalog_name>.<schema_name>.pty_unprotect_date Databricks Unity Catalog Batch Python UDF.
    
    Creating <catalog_name>.<schema_name>.pty_unprotect_int Databricks Unity Catalog Batch Python UDF...
    Created <catalog_name>.<schema_name>.pty_unprotect_int Databricks Unity Catalog Batch Python UDF.
    
    Creating <catalog_name>.<schema_name>.pty_unprotect_smallint Databricks Unity Catalog Batch Python UDF...
    Created <catalog_name>.<schema_name>.pty_unprotect_smallint Databricks Unity Catalog Batch Python UDF.
    
    Creating <catalog_name>.<schema_name>.pty_unprotect_string Databricks Unity Catalog Batch Python UDF...
    Created <catalog_name>.<schema_name>.pty_unprotect_string Databricks Unity Catalog Batch Python UDF.
    
    Creating <catalog_name>.<schema_name>.pty_who_am_i Databricks Unity Catalog Batch Python UDF...
    Created <catalog_name>.<schema_name>.pty_who_am_i Databricks Unity Catalog Batch Python UDF.
    
    Executed specified operation.
    

5 - Configuring the Protector

Modify the Cluster Configuration for the Application Protector REST approach

The process of configuring the Big Data Protector involves the process of editing the cluster configuration.

After executing the configurator script and creating the UDFs, update the cluster to include the following configurations:

  1. Inclusion of the environment variables.
  2. Attach the BigDataProtector-Init-Script_Linux-ALL-64_x86-64_Azure.Databricks-<DBR_version>-64_<BDP_version>.sh script to the Databricks compute.

Ensure that the ESA is started and in a running state before restarting the Databricks cluster after updating the configurations.

Note: The instructions mentioned in the section apply only to the Application Protector REST approach.

Before you begin

  1. Log in to PPC node through SSH.
  2. To get the CA certificate, run the following command:
    kubectl -n api-gateway get secret ingress-certificate-secret -o jsonpath='{.data.ca\.crt}' | base64 -d > /tmp/ProtegrityCA.pem
    
  3. Optional: To verify the certificate, run the following command:
    openssl x509 -in /tmp/ProtegrityCA.pem -noout -subject -issuer
    
  4. To encode the certificate as a single-line base64 value, run the following command:
    base64 -w0 /tmp/ProtegrityCA.pem
    
  5. Store the output of step 4 in the PTY_ESA_CA_CERTIFICATE variable.

    Note: For security reasons, Protegrity recommends storing the base64-encoded value from step 4 in a Databricks Secret and referencing it as {{secrets/<scope_name>/<key_name>}}. For more information about using Databricks Secrets, refer to Secret management.

Editing the Cluster Configuration

  1. Log in to the Databricks portal.

  2. Edit the required cluster.

  3. Expand the Advanced section.

  4. Click the Spark tab.

  5. Under Environment variables, add the variables, with their values, listed in the table:

    VariableValue
    PTY_ESA_IPEnter ESA or PPC IP address.
    PTY_ESA_PORTEnter the port number to connect to ESA or PPC.
    PTY_ESA_TOKENEnter the JWT token to connect to ESA or PPC.
    PTY_ESA_ADMINISTRATOR_USERNAMEEnter the username to connect to ESA or PPC. This is required only if a token is not used.
    PTY_ESA_ADMINISTRATOR_PASSWORD{{secrets/<scope_name>/<key_name>}}This is required only if a token is not used.
    PTY_AUDIT_STORE_IP_PORTEnter the IP address to connect to the Audit Store. The value is a comma-separated string of <audit_store_ip>:<audit_store_port>. For example, 11.22.33.44:9200, 55.66.77.88:9200
    PTY_PROTECTOR_CONFIGURATIONEnter the protector configuration values. The values will be a single string of comma-separated configurations.
    For example:
    [Policy management] policyrefreshinterval = 60
    [Policy management] emptystring = null
    PTY_ESA_CA_CERTIFICATE{{secrets/<scope_name>/<key_name>}} Set this configuration only to interact with PPC. Enter the base64-encoded PEM of the ESA signing CA. Required when the ESA presents a CA-signed certificate without its CA chain.
    PTY_ESA_FQDNEnter the Fully Qualified Domain Name of ESA or PPC. This is an optional parameter.

    Note: To store the ESA or PPC password and PPC CA certificate, it is recommended to use Databricks Secrets. For more information about using Databricks Secrets, refer to Secret management.

  6. Click the Init scripts tab.

  7. From the Source list, select Volumes.

  8. In the File path box, enter the location of the initialization script.

  9. To save the changes and restart the cluster, click Confirm and restart.

    Note: If the initialization script fails with a non-zero exit code, enable cluster logging to view the error log files for troubleshooting purposes.

    When the cluster is restarted, the initialization script starts the Application Protector REST service on every node in the cluster. After the Application Protector REST service is started, use the Unity Catalog Batch Python UDFs to protect and unprotect data.

    Note: The process to execute the initialization script will take some time before the cluster is ready to use for performing protect and unprotect operations. For more information on using the UDFs for protect and unprotect operations, refer to Unity Catalog Batch Python UDFs.

6 - Uninstalling the Protector

Uninstall the Big Data Protector

The process of uninstalling the Big Data Protector involves the process of removing the user-defined functions.

Deleting the UDFs for the Application Protector REST Approach

Deleting the UDFs is an optional step and must be performed only to clean up the Databricks cluster. The configurator script is used to delete the UDFs. You must select the required approach and the operation ID to delete the UDFs using the Application Protector REST server. This section explains the process to delete the UDFs using the interactive method of installation.

To delete the UDFs:

  1. Log in to the node having connectivity to ESA/PPC.

  2. Navigate to the directory where the installation files are extracted.

  3. To execute the configurator script, run the following command:

    ./BigDataProtector-Configurator_Linux-ALL-64_x86-64_Azure.Databricks-<DBR_version>-64_<BDP_version>.sh
    
  4. Press ENTER.
    The prompt to enter the operation ID appears.

    Creating installation files...
    Created installation files.
    
    The ID of the operation needs to be one of the following:
    ----------------------------------------------------------
    | ID | Operation                                         |
    ----------------------------------------------------------
    |  1 | Get Application Protector REST's Server IP        |
    |  2 | Create Databricks Unity Catalog Batch Python UDFs |
    |  3 | Delete Databricks Unity Catalog Batch Python UDFs |
    ----------------------------------------------------------
    Enter the ID of the operation:
    
  5. To delete the UDFs, type 3.

  6. Press ENTER.
    The prompt to enter the Databricks Workspace URL appears.

    Enter the URL of the Databricks Workspace:
    
  7. Enter the Databricks Workspace URL.

  8. Press ENTER.
    The prompt to enter the application ID of the Databricks Service Principal appears.

    Enter the Application ID of the Databricks Service Principal:
    
  9. Enter the Application ID of the Databricks Service Principal.

  10. Press ENTER.
    The prompt to enter the OAuth secret for the Service Principal appears.

    Enter the OAuth Secret of the Databricks Service Principal:
    
  11. Enter the OAuth secret.

  12. Press ENTER.
    The prompt to enter the cluster ID appears.

    Enter the ID of the Databricks Compute:
    
  13. Enter the Cluster ID.

    Note: The Cluster ID can be either for Standard Compute or Dedicated Compute. For more information about identifying the Cluster ID, refer to Get identifiers for workspace objects.

  14. Press ENTER.
    The prompt to enter the name of the schema appears.

    Enter the name of the Databricks Unity Catalog Catalog-Schema:
    
  15. Enter the name of the catalog and the schema in the <catalog_name.schema_name> format.

  16. Press ENTER.
    The prompt to enter the ID of the approach appears.

    The ID of the approach needs to be one of the following:
    -----------------------------------
    | ID | Approach                   |
    -----------------------------------
    |  1 | Application Protector REST |
    |  2 | Cloud Protector            |
    -----------------------------------
    Enter the ID of the approach:
    
  17. To delete the UDFs using the APREST approach, type 1.

  18. Press ENTER.
    The prompt to enter the path of the Databricks Unity Catalog Volume appears.

    Enter the path of the Databricks Unity Catalog Volume:
    
  19. Enter the complete location of the Databricks Unity Catalog Volume.

  20. Press ENTER.
    The script deletes the UDFs from the specified location.

    Executing specified operation...
    
    Deleting <catalog_name>.<schema_name>.pty_decrypt_string Databricks Unity Catalog Batch Python UDF...
    Deleted <catalog_name>.<schema_name>.pty_decrypt_string Databricks Unity Catalog Batch Python UDF.
    
    Deleting <catalog_name>.<schema_name>.pty_encrypt_string Databricks Unity Catalog Batch Python UDF...
    Deleted <catalog_name>.<schema_name>.pty_encrypt_string Databricks Unity Catalog Batch Python UDF.
    
    Deleting <catalog_name>.<schema_name>.pty_get_version Databricks Unity Catalog Batch Python UDF...
    Deleted <catalog_name>.<schema_name>.pty_get_version Databricks Unity Catalog Batch Python UDF.
    
    Deleting <catalog_name>.<schema_name>.pty_get_version_extended Databricks Unity Catalog Batch Python UDF...
    Deleted <catalog_name>.<schema_name>.pty_get_version_extended Databricks Unity Catalog Batch Python UDF.
    
    Deleting <catalog_name>.<schema_name>.pty_protect_binary Databricks Unity Catalog Batch Python UDF...
    Deleted <catalog_name>.<schema_name>.pty_protect_binary Databricks Unity Catalog Batch Python UDF.
    
    Deleting <catalog_name>.<schema_name>.pty_protect_date Databricks Unity Catalog Batch Python UDF...
    Deleted <catalog_name>.<schema_name>.pty_protect_date Databricks Unity Catalog Batch Python UDF.
    
    Deleting <catalog_name>.<schema_name>.pty_protect_int Databricks Unity Catalog Batch Python UDF...
    Deleted <catalog_name>.<schema_name>.pty_protect_int Databricks Unity Catalog Batch Python UDF.
    
    Deleting <catalog_name>.<schema_name>.pty_protect_smallint Databricks Unity Catalog Batch Python UDF...
    Deleted <catalog_name>.<schema_name>.pty_protect_smallint Databricks Unity Catalog Batch Python UDF.
    
    Deleting <catalog_name>.<schema_name>.pty_protect_string Databricks Unity Catalog Batch Python UDF...
    Deleted <catalog_name>.<schema_name>.pty_protect_string Databricks Unity Catalog Batch Python UDF.
    
    Deleting <catalog_name>.<schema_name>.pty_protect_string_fpe Databricks Unity Catalog Batch Python UDF...
    Deleted <catalog_name>.<schema_name>.pty_protect_string_fpe Databricks Unity Catalog Batch Python UDF.
    
    Deleting <catalog_name>.<schema_name>.pty_unprotect_binary Databricks Unity Catalog Batch Python UDF...
    Deleted <catalog_name>.<schema_name>.pty_unprotect_binary Databricks Unity Catalog Batch Python UDF.
    
    Deleting <catalog_name>.<schema_name>.pty_unprotect_date Databricks Unity Catalog Batch Python UDF...
    Deleted <catalog_name>.<schema_name>.pty_unprotect_date Databricks Unity Catalog Batch Python UDF.
    
    Deleting <catalog_name>.<schema_name>.pty_unprotect_int Databricks Unity Catalog Batch Python UDF...
    Deleted <catalog_name>.<schema_name>.pty_unprotect_int Databricks Unity Catalog Batch Python UDF.
    
    Deleting <catalog_name>.<schema_name>.pty_unprotect_smallint Databricks Unity Catalog Batch Python UDF...
    Deleted <catalog_name>.<schema_name>.pty_unprotect_smallint Databricks Unity Catalog Batch Python UDF.
    
    Deleting <catalog_name>.<schema_name>.pty_unprotect_string Databricks Unity Catalog Batch Python UDF...
    Deleted <catalog_name>.<schema_name>.pty_unprotect_string Databricks Unity Catalog Batch Python UDF.
    
    Deleting <catalog_name>.<schema_name>.pty_unprotect_string_fpe Databricks Unity Catalog Batch Python UDF...
    Deleted <catalog_name>.<schema_name>.pty_unprotect_string_fpe Databricks Unity Catalog Batch Python UDF.
    
    Deleting <catalog_name>.<schema_name>.pty_who_am_i Databricks Unity Catalog Batch Python UDF...
    Deleted <catalog_name>.<schema_name>.pty_who_am_i Databricks Unity Catalog Batch Python UDF.
    
    Deleting /Volumes/<catalog_name>/<schema_name>/<volume_name>/azure_identity-1.25.3-py3-none-any.whl file...
    Deleted /Volumes/<catalog_name>/<schema_name>/<volume_name>/azure_identity-1.25.3-py3-none-any.whl file.
    
    Deleting /Volumes/<catalog_name>/<schema_name>/<volume_name>/azure_keyvault_secrets-4.11.0-py3-none-any.whl file...
    Deleted /Volumes/<catalog_name>/<schema_name>/<volume_name>/azure_keyvault_secrets-4.11.0-py3-none-any.whl file.
    
    Deleting /Volumes/<catalog_name>/<schema_name>/<volume_name>/BigDataProtector_Linux-ALL-64_x86-64_Azure.Databricks-<DBR_version>-64_<BDP_version>.tgz file...
    Deleted /Volumes/<catalog_name>/<schema_name>/<volume_name>/BigDataProtector_Linux-ALL-64_x86-64_Azure.Databricks-<DBR_version>-64_<BDP_version>.tgz file.
    
    Deleting /Volumes/<catalog_name>/<schema_name>/<volume_name>/BigDataProtector-Init-Script_Linux-ALL-64_x86-64_Azure.Databricks-<DBR_version>-64_<BDP_version>.sh file...
    Deleted /Volumes/<catalog_name>/<schema_name>/<volume_name>/BigDataProtector-Init-Script_Linux-ALL-64_x86-64_Azure.Databricks-<DBR_version>-64_<BDP_version>.sh file.
    
    Executed specified operation.
    

Deleting the UDFs for the Cloud Protector Approach

Deleting the UDFs is an optional step and must be performed only to clean up the Databricks cluster. The configurator script is used to delete the UDFs. Select the required approach and the operation ID to delete the UDFs using the Cloud Protector. This section explains the process to delete the UDFs using the interactive method of installation.

To delete the UDFs:

  1. Log in to the node having connectivity to ESA/PPC.
  2. Navigate to the directory where the installation files are extracted.
  3. To execute the configurator script, run the following command:
    ./BigDataProtector-Configurator_Linux-ALL-64_x86-64_Azure.Databricks-<DBR_version>-64_<BDP_version>.sh
    
  4. Press ENTER.
    The prompt to enter the operation ID appears.
    Creating installation files...
    Created installation files.
    
    The ID of the operation needs to be one of the following:
    ----------------------------------------------------------
    | ID | Operation                                         |
    ----------------------------------------------------------
    |  1 | Get Application Protector REST's Server IP        |
    |  2 | Create Databricks Unity Catalog Batch Python UDFs |
    |  3 | Delete Databricks Unity Catalog Batch Python UDFs |
    ----------------------------------------------------------
    Enter the ID of the operation:
    
  5. To delete the UDFs, type 3.
  6. Press ENTER.
    The prompt to enter the Databricks Workspace URL appears.
    Enter the URL of the Databricks Workspace:
    
  7. Enter the Databricks Workspace URL.
  8. Press ENTER.
    The prompt to enter the application ID of the Databricks Service Principal appears.
    Enter the Application ID of the Databricks Service Principal:
    
  9. Enter the Application ID of the Databricks Service Principal.
  10. Press ENTER.
    The prompt to enter the OAuth secret for the Service Principal appears.
    Enter the OAuth Secret of the Databricks Service Principal
    
  11. Enter the OAuth secret.
  12. Press ENTER.
    The prompt to enter the cluster ID appears.
    Enter the ID of the Databricks Compute:
    
  13. Enter the Cluster ID.

    Note: The Cluster ID can be either for SQL Warehouse, Standard Compute or Dedicated Compute. For more information about identifying the Cluster ID, refer to Get identifiers for workspace objects.

  14. Press ENTER.
    The prompt to enter the name of the schema appears.
    Enter the name of the Databricks Unity Catalog Catalog-Schema:
    
  15. Enter the name of the catalog and the schema in the <catalog_name.schema_name> format.
  16. Press ENTER.
    The prompt to select the approach appears.
    The ID of the approach needs to be one of the following:
    -----------------------------------
    | ID | Approach                   |
    -----------------------------------
    |  1 | Application Protector REST |
    |  2 | Cloud Protector            |
    -----------------------------------
    Enter the ID of the approach:
    
  17. To delete the UDFs using the Cloud Protector approach, type 2.
  18. Press ENTER.
    The prompt to enter the path of the Unity Catalog Volume appears.
    Enter the path of the Databricks Unity Catalog Volume:
    
  19. Enter the path of the Databricks Unity Catalog Volume.
  20. Press ENTER.
    The script deletes the UDFs from the specified location.
    Executing specified operation...
    
    Deleting <catalog_name>.<schema_name>.pty_decrypt_string Databricks Unity Catalog Batch Python UDF...
    Deleted <catalog_name>.<schema_name>.pty_decrypt_string Databricks Unity Catalog Batch Python UDF.
    
    Deleting <catalog_name>.<schema_name>.pty_encrypt_string Databricks Unity Catalog Batch Python UDF...
    Deleted <catalog_name>.<schema_name>.pty_encrypt_string Databricks Unity Catalog Batch Python UDF.
    
    Deleting <catalog_name>.<schema_name>.pty_get_version Databricks Unity Catalog Batch Python UDF...
    Deleted <catalog_name>.<schema_name>.pty_get_version Databricks Unity Catalog Batch Python UDF.
    
    Deleting <catalog_name>.<schema_name>.pty_get_version_extended Databricks Unity Catalog Batch Python UDF...
    Deleted <catalog_name>.<schema_name>.pty_get_version_extended Databricks Unity Catalog Batch Python UDF.
    
    Deleting <catalog_name>.<schema_name>.pty_protect_binary Databricks Unity Catalog Batch Python UDF...
    Deleted <catalog_name>.<schema_name>.pty_protect_binary Databricks Unity Catalog Batch Python UDF.
    
    Deleting <catalog_name>.<schema_name>.pty_protect_date Databricks Unity Catalog Batch Python UDF...
    Deleted <catalog_name>.<schema_name>.pty_protect_date Databricks Unity Catalog Batch Python UDF.
    
    Deleting <catalog_name>.<schema_name>.pty_protect_int Databricks Unity Catalog Batch Python UDF...
    Deleted <catalog_name>.<schema_name>.pty_protect_int Databricks Unity Catalog Batch Python UDF.
    
    Deleting <catalog_name>.<schema_name>.pty_protect_smallint Databricks Unity Catalog Batch Python UDF...
    Deleted <catalog_name>.<schema_name>.pty_protect_smallint Databricks Unity Catalog Batch Python UDF.
    
    Deleting <catalog_name>.<schema_name>.pty_protect_string Databricks Unity Catalog Batch Python UDF...
    Deleted <catalog_name>.<schema_name>.pty_protect_string Databricks Unity Catalog Batch Python UDF.
    
    Deleting <catalog_name>.<schema_name>.pty_protect_string_fpe Databricks Unity Catalog Batch Python UDF...
    Deleted <catalog_name>.<schema_name>.pty_protect_string_fpe Databricks Unity Catalog Batch Python UDF.
    
    Deleting <catalog_name>.<schema_name>.pty_unprotect_binary Databricks Unity Catalog Batch Python UDF...
    Deleted <catalog_name>.<schema_name>.pty_unprotect_binary Databricks Unity Catalog Batch Python UDF.
    
    Deleting <catalog_name>.<schema_name>.pty_unprotect_date Databricks Unity Catalog Batch Python UDF...
    Deleted <catalog_name>.<schema_name>.pty_unprotect_date Databricks Unity Catalog Batch Python UDF.
    
    Deleting <catalog_name>.<schema_name>.pty_unprotect_int Databricks Unity Catalog Batch Python UDF...
    Deleted <catalog_name>.<schema_name>.pty_unprotect_int Databricks Unity Catalog Batch Python UDF.
    
    Deleting <catalog_name>.<schema_name>.pty_unprotect_smallint Databricks Unity Catalog Batch Python UDF...
    Deleted <catalog_name>.<schema_name>.pty_unprotect_smallint Databricks Unity Catalog Batch Python UDF.
    
    Deleting <catalog_name>.<schema_name>.pty_unprotect_string Databricks Unity Catalog Batch Python UDF...
    Deleted <catalog_name>.<schema_name>.pty_unprotect_string Databricks Unity Catalog Batch Python UDF.
    
    Deleting <catalog_name>.<schema_name>.pty_unprotect_string_fpe Databricks Unity Catalog Batch Python UDF...
    Deleted <catalog_name>.<schema_name>.pty_unprotect_string_fpe Databricks Unity Catalog Batch Python UDF.
    
    Deleting <catalog_name>.<schema_name>.pty_who_am_i Databricks Unity Catalog Batch Python UDF...
    Deleted <catalog_name>.<schema_name>.pty_who_am_i Databricks Unity Catalog Batch Python UDF.
    
    Deleting /Volumes/<catalog_name>/<schema_name>/<volume_name>/azure_identity-1.25.3-py3-none-any.whl file...
    Deleted /Volumes/<catalog_name>/<schema_name>/<volume_name>/azure_identity-1.25.3-py3-none-any.whl file.
    
    Deleting /Volumes/<catalog_name>/<schema_name>/<volume_name>/azure_keyvault_secrets-4.11.0-py3-none-any.whl file...
    Deleted /Volumes/<catalog_name>/<schema_name>/<volume_name>/azure_keyvault_secrets-4.11.0-py3-none-any.whl file.
    
    Executed specified operation.
    

7 - User Defined Functions and APIs

7.1 - Unity Catalog Batch Python UDFs

Understand the Unity Catalog Batch Python UDFs

The UDFs in this section are applicable only to install and configure the Big Data Protector in the Databricks environment.
This version of the build only supports Unity Catalog Batch Python UDFs that use the Application Protector REST and Cloud Protect approaches. The Hive and Spark UDFs and APIs that provide native protection within the cluster nodes are not packaged in this build. To use those features, please use the 9.1.0.0 builds.

pty_who_am_i()

The UDF returns the current user.

Signature:

pty_who_am_i()

Parameters:

NameData TypeDescription
inputSTRINGSpecifies any random string value to be passed to fetch the current user.

Result:

  • The UDF returns the current user.

pty_get_version()

The UDF returns the current version of the protector.

Signature:

pty_get_version()

Parameters:

NameData TypeDescription
inputSTRINGSpecifies any random string value to be passed to fetch the current version.

Result:

  • The UDF returns the current version of the protector.

Example:

select pty_get_version();

pty_get_version_extended()

The UDF returns the extended version information of the protector.

Signature:

pty_get_version_extended();

Parameters:

NameData TypeDescription
inputSTRINGSpecifies any random string value to be passed to fetch the extended version details.

Result:

The UDF returns a String in the following format:

BDP: <bdp_version>, Application Protector REST: <aprest_version>, Jcore: <jcore_version>, Core: <core_version>;

where:

  • BDP: is the current version of the Protector
  • Application Protector REST: is the Application Protector REST version
  • Jcore: is the Jcorelite version
  • Core: is the Core library version

Example:

select pty_get_version_extended();

pty_protect_binary()

The UDF protects the BINARY format data, which is provided as input.

Signature:

pty_protect_binary (input BINARY, data_element STRING)

Parameters:

NameDescription
inputSpecifies the column that contains data in BINARY format, which needs to be protected.
data_elementSpecifies the data element used to protect the BINARY format data.

Returns:
The UDF returns the BINARY format data, which is protected.

Example:

SELECT pty_protect_binary(<column_with_binary_data>, "<binary_data_element>");

pty_unprotect_binary()

The UDF unprotects the protected BINARY data, which is provided as an input.

Signature:

pty_unprotect_binary (input BINARY, data_element STRING)

Parameters:

NameDescription
inputSpecifies the column that contains data in BINARY format, which needs to be unprotected.
data_elementSpecifies the data element used to unprotect the BINARY format data.

Returns:
The UDF returns the BINARY format data, which is unprotected.

Example:

SELECT pty_unprotect_binary(<column_with_protected_binary_data>, "<binary_data_element>");

pty_protect_date()

The UDF protects the DATE format data, which is provided as input.

Signature:

pty_protect_date (input DATE, data_element STRING)

Note: The supported DATE format is YYYY-MM-DD.

Parameters:

NameDescription
inputSpecifies the column that contains data in DATE format, which needs to be protected.
data_elementSpecifies the data element used to protect the DATE format data.

Returns:
The UDF returns the DATE format data, which is protected.

Example:

SELECT pty_protect_date(<column_with_date_data>, "de_datetime");

pty_unprotect_date()

The UDF unprotects the protected DATE data, which is provided as an input.

Signature:

pty_unprotect_date (input DATE, data_element STRING)

Note: The supported DATE format is YYYY-MM-DD.

Parameters:

NameDescription
inputSpecifies the column that contains data in DATE format, which needs to be unprotected.
data_elementSpecifies the data element used to unprotect the DATE format data.

Returns:
The UDF returns the DATE format data, which is unprotected.

Example:

SELECT pty_unprotect_date(<column_with_protected_date_data>, "de_datetime");

pty_protect_smallint()

The UDF protects the SMALLINT format data, which is provided as input.

Signature:

pty_protect_smallint (input SMALLINT, data_element STRING)

Parameters:

NameDescription
inputSpecifies the column that contains data in SMALLINT format, which needs to be protected.
data_elementSpecifies the data element used to protect the SMALLINT format data.

Returns:
The UDF returns the SMALLINT format data, which is protected.

Example:

SELECT pty_protect_smallint(<column_with_smallint_data>, "de_int2");

pty_unprotect_smallint()

The UDF unprotects the protected SMALLINT data, which is provided as an input.

Signature:

pty_unprotect_smallint (input SMALLINT, data_element STRING)

Parameters:

NameDescription
inputSpecifies the column that contains data in SMALLINT format, which needs to be unprotected.
data_elementSpecifies the data element used to unprotect the SMALLINT format data.

Returns:
The UDF returns the SMALLINT format data, which is unprotected.

Example:

SELECT pty_unprotect_smallint(<column_with_protected_smallint_data>, "de_int2");

pty_protect_int()

The UDF protects the INT format data, which is provided as input.

Signature:

pty_protect_int (input INT, data_element STRING)

Parameters:

NameDescription
inputSpecifies the column that contains data in INT format, which needs to be protected.
data_elementSpecifies the data element used to protect the INT format data.

Returns:
The UDF returns the INT format data, which is protected.

Example:

SELECT pty_protect_int(<column_with_int_data>, "de_int4");

pty_unprotect_int()

The UDF unprotects the protected INT data, which is provided as an input.

Signature:

pty_unprotect_int (input INT, data_element STRING)

Parameters:

NameDescription
inputSpecifies the column that contains data in INT format, which needs to be unprotected.
data_elementSpecifies the data element used to unprotect the INT format data.

Returns:
The UDF returns the INT format data, which is unprotected.

Example:

SELECT pty_unprotect_int(<column_with_protected_int_data>, "de_int4");

pty_protect_string()

The UDF protects the STRING format data, which is provided as input.

For BIGINT, DATETIME, DECIMAL, DOUBLE, and FLOAT data types, it is recommended to use the pty_protect_string() UDF.

For example:

SELECT pty_protect_string(CAST(<column_with_input_data> AS STRING), "<data_element>");

It is recommended to use the following data elements corresponding to their input data type:

  • For BIGINT input, use an integer data element.
    SELECT pty_protect_string(CAST(<column_with_bigint_data> AS STRING), "de_int8");
    
  • For DATETIME input, use the datetime data element.
    SELECT pty_protect_string(CAST(<column_with_datetime_data> AS STRING), "de_datetime");
    
  • For DECIMAL input, use a decimal data element.
    SELECT pty_protect_string(CAST(<column_with_decimal_data> AS STRING), "de_decimal");
    
  • For DOUBLE input, either use a decimal, numeric, or a no encryption data element.
    SELECT pty_protect_string(CAST(<column_with_double_data> AS STRING), "de_decimal");
    
    SELECT pty_protect_string(CAST(<column_with_double_data> AS STRING), "de_numeric");
    
  • For FLOAT input, either use a decimal, numeric, or a no encryption data element.
    SELECT pty_protect_string(CAST(<column_with_float_data> AS STRING), "de_decimal");
    
    SELECT pty_protect_string(CAST(<column_with_float_data> AS STRING), "de_numeric");
    

Signature:

pty_protect_string (input STRING, data_element STRING)

Note: The UDF accepts a maximum input length of 4081 characters.

Parameters:

NameDescription
inputSpecifies the column that contains data in STRING format, which needs to be protected.
data_elementSpecifies the data element used to protect the STRING format data.

Returns:
The UDF returns the STRING format data, which is protected.

Example:

SELECT pty_protect_string(<column_with_string_data>, "de_alphanum");

pty_unprotect_string()

The UDF unprotects the STRING format data, which is provided as input.

For BIGINT, DATETIME, DECIMAL, DOUBLE, and FLOAT data types, it is recommended to use the pty_unprotect_string() UDF.

For example:

SELECT pty_unprotect_string(CAST(<column_with_protected_data> AS STRING), "<data_element>");

It is recommended to use the following data elements corresponding to their input data type:

  • For BIGINT input, use an integer data element.
    SELECT pty_unprotect_string(CAST(<column_with_protected_bigint_data> AS STRING), "de_int8");
    
  • For DATETIME input, use the datetime data element.
    SELECT pty_unprotect_string(CAST(<column_with_protected_datetime_data> AS STRING), "de_datetime");
    
  • For DECIMAL input, use a decimal data element.
    SELECT pty_unprotect_string(CAST(<column_with_protected_decimal_data> AS STRING), "de_decimal");
    
  • For DOUBLE input, either use a decimal, numeric, or a no encryption data element.
    SELECT pty_unprotect_string(CAST(<column_with_protected_double_data> AS STRING), "de_decimal");
    
    SELECT pty_unprotect_string(CAST(<column_with_protected_double_data> AS STRING), "de_numeric");
    
  • For FLOAT input, either use a decimal, numeric, or a no encryption data element.
    SELECT pty_unprotect_string(CAST(<column_with_protected_float_data> AS STRING), "de_decimal");
    
    SELECT pty_unprotect_string(CAST(<column_with_protected_float_data> AS STRING), "de_numeric");
    

Signature:

pty_unprotect_string (input STRING, data_element STRING)

Parameters:

NameDescription
inputSpecifies the column that contains data in STRING format, which needs to be unprotected.
data_elementSpecifies the data element used to unprotect the STRING format data.

Returns:
The UDF returns the STRING format data, which is unprotected.

Example:

SELECT pty_unprotect_string(<column_with_protected_string_data>, "de_alphanum");

pty_encrypt_string()

The UDF encrypts STRING format data, which is provided as input.

Signature:

pty_encrypt_string (input STRING, data_element STRING)

Parameters:

NameDescription
inputSpecifies the column that contains data in STRING format, which needs to be encrypted.
data_elementSpecifies the data element used to encrypt the STRING format data.

Returns:
The UDF returns the BINARY format data, which is encrypted.

Example:

SELECT pty_encrypt_string(<column_with_string_data>, "<encryption_data_element>");

pty_decrypt_string()

The UDF decrypts the encrypted BINARY data, which is provided as an input.

Signature:

pty_decrypt_string (input BINARY, data_element STRING)

Parameters:

NameDescription
inputSpecifies the column that contains the data in the BINARY format, which needs to be decrypted.
data_elementSpecifies the data element used to decrypt the BINARY format data.

Returns:
The UDF returns the STRING format data, which is decrypted.

Example:

SELECT pty_decrypt_string(<column_with_encrypted_string_data>, "<encryption_data_element>");

pty_protect_string_fpe()

The UDF protects the STRING format data, which is provided as input.

Note: The UDF is compatible only with the Application Protector REST approach.

Signature:

pty_protect_string_fpe (input STRING, data_element STRING, encoding STRING)

Note: The UDF accepts a maximum input length of 4081 characters.

Parameters:

NameDescription
inputSpecifies the column that contains the data in the STRING format, which needs to be protected.
data_elementSpecifies the data element used to protect the STRING format data.
encodingSpecifies the encoding to be used for data protection.

Returns:
The UDF returns the STRING format data, which is protected.

Example:

SELECT pty_protect_string_fpe(<column_with_string_data>, "de_alphanum", "utf_8");

Note: For more information about the supported encoding formats, refer to Standard Encodings

pty_unprotect_string_fpe()

The UDF unprotects the protected STRING format data, which is provided as input.

Note: The UDF is compatible only with the Application Protector REST approach.

Signature:

pty_unprotect_string_fpe (input STRING, data_element STRING, encoding STRING)

Parameters:

NameDescription
inputSpecifies the column that contains the data in the STRING format, which needs to be unprotected.
data_elementSpecifies the data element used to unprotect the STRING format data.
encodingSpecifies the encoding to be used for data protection.

Returns:
The UDF returns the STRING format data, which is unprotected.

Example:

SELECT pty_unprotect_string_fpe(<column_with_protected_string_data>, "de_alphanum", "utf_8");

Note: For more information about the supported encoding formats, refer Standard Encodings