This is the multi-page printable view of this section. Click here to print.

Return to the regular view of this page.

Python Iceberg Protector on Snowflake

Introduction to the Python Iceberg Protector on Snowflake.

The Protegrity Python Iceberg Protector on Snowflake delivers column-level data protection for Apache Iceberg tables. These tables are managed by the Snowflake REST Catalog (Polaris) and stored as Parquet in cloud object storage, such as AWS S3. It enables data engineers and analysts to read from and write to Iceberg tables from Python workloads while sensitive fields are transparently protected. Protection uses the same Protegrity policy that governs the rest of the enterprise data estate.

The protector is delivered as a Custom Runtime Environment (CRE) that runs inside Snowflake Snowpark Container Services (SPCS). The runtime image is built and published through a standard container pipeline like Docker and the Snowflake CLI and deployed to SPCS as a managed container. Inside the CRE, a Snowflake Notebook hosts user code that calls the Protegrity-instrumented Iceberg and Arrow libraries, PTYPyIceberg and PTYPyArrow. These libraries are drop-in replacements for the standard Python Iceberg and PyArrow APIs, so existing Iceberg workloads can adopt protection with minimal code changes.

Protection is enforced by the Application Protector for C (AP-C), which is co-located in the runtime and invoked by PTYPyIceberg and PTYPyArrow on the columns identified by policy. On write, protected column values are encrypted, tokenized, or masked before the Parquet files are persisted to S3. On read, the same operations are reversed in memory based on the caller’s entitlements. Because protection is applied in the client runtime, the Parquet objects that land in the Iceberg table are already protected at rest, independently of the storage layer’s own encryption.

AP-C obtains its policy and key material from the DevOps Policy and Remote Protection Agent (RPAgent) components that ship inside the CRE. Policy is authored and managed centrally on the Protegrity Data Security Platform (ESA) and distributed to the runtime. Data element definitions, protection methods, and role-based access rules remain consistent with the customer’s existing Protegrity deployment.

Access to Iceberg metadata and data is brokered by Snowflake. The runtime authenticates to the Snowflake REST Catalog (Polaris) using a Personal Access Token (PAT) to resolve namespaces, table locations, and snapshots. Polaris then vends short-lived, scoped credentials that PTYPyIceberg and PTYPyArrow use to read and write the underlying Parquet files in S3. This removes the need for long-lived storage credentials in the runtime.

The following sections describe how to prepare the environment, build and deploy the CRE, and configure the Snowflake and Polaris resources. They also show how to use the Python Iceberg Protector from a notebook to read and write protected Iceberg tables.
1 - Preparing the Environment

Prepare the Environment to Install the Python Iceberg Protector on Snowflake.

1.1 - Extracting the Installation Package

Extract the files from the Installation Package to install the Python Iceberg Protector on Snowflake.
  1. Log in to the Linux instance.
  2. Download the build PyIcebergProtector_Linux-ALL-64_x86-64_Snowflake-SPCS-Python-3.12_<Protector_version>.tgz, made available by Protegrity.
  3. To extract the contents of the package, run the following command:
    tar -xvf PyIcebergProtector_Linux-ALL-64_x86-64_Snowflake-SPCS-Python-3.12_<Protector_version>.tgz
    
  4. Press ENTER.
    The command extracts the signature files and the installation package.
     PyIcebergProtector_Linux-ALL-64_x86-64_Snowflake-SPCS-Python-3.12_<Protector_version>.tgz
     signatures/
     signatures/PyIcebergProtector_Linux-ALL-64_x86-64_Snowflake-SPCS-Python-3.12_<Protector_version>.tgz_<release_version>.sig
    
  5. To extract the configurator script, run the following command:
    tar -xvf PyIcebergProtector_Linux-ALL-64_x86-64_Snowflake-SPCS-Python-3.12_<Protector_version>.tgz
    
  6. Press ENTER.
    The command extracts the configurator script.
    PyIcebergProtector-Snowflake-Configurator_Linux-ALL-64_x86-64_Snowflake-SPCS-Python-3.12_<Protector_version>.sh
    

1.2 - Downloading the DevOps Policy

Download the DevOps policy to install the Python Iceberg Protector on Snowflake.
  1. Log in to the instance containing the configurator script.
  2. Navigate to the directory where the installation package is extracted.
  3. To generate a new RSA private key and save it to a file, run the following command:
    openssl genrsa -out private.pem 4096
    
  4. To extract the public key from an existing RSA private key and write it to a separate file, run the following command:
    openssl rsa -in private.pem -pubout -out public.pem
    
  5. Press ENTER.
    The command generates a RSA private key and saves it to a file.
    writing RSA key
    
  6. To build a JSON request file that embeds the contents of a PEM public key, run the following command:
    jq -n \
    --arg key "$(sed -z 's/\n$//' public.pem)" \
    '{kek:{publicKey:{label:"test_key",algorithm:"RSA-OAEP-256",value:$key}}}' \
    > rps_request.json
    
  7. To verify whether the public-key string embedded in rps_request.json ends cleanly, run the following command:
    jq -r '.kek.publicKey.value' rps_request.json | tail -c 30 | cat -A AQ==$
    
  8. To send the JSON payload to a RPS REST endpoint and save the server response to rps.json, run the following command:
    curl -k -u <user_name>:<password> \
    -X POST \
    "https://10.49.0.11/pty/v1/rps/export?version=1&coreversion=1" \
    -H "Content-Type: application/json" \
    -d @rps_request.json \
    -o rps.json
    
  9. Press ENTER.
    The command send the JSON payload to a RPS REST endpoint and saves the server response to rps.json.
      % Total    % Received % Xferd  Average Speed   Time    Time     Time  Current
                                 Dload  Upload   Total   Spent    Left  Speed
    100 3089k  100 3088k  100   927   839k    251  0:00:03  0:00:03 --:--:--  839k
    

2 - Python Iceberg Protector Architecture on Snowflake

Understand the Python Iceberg Protector Architecture on Snowflake.

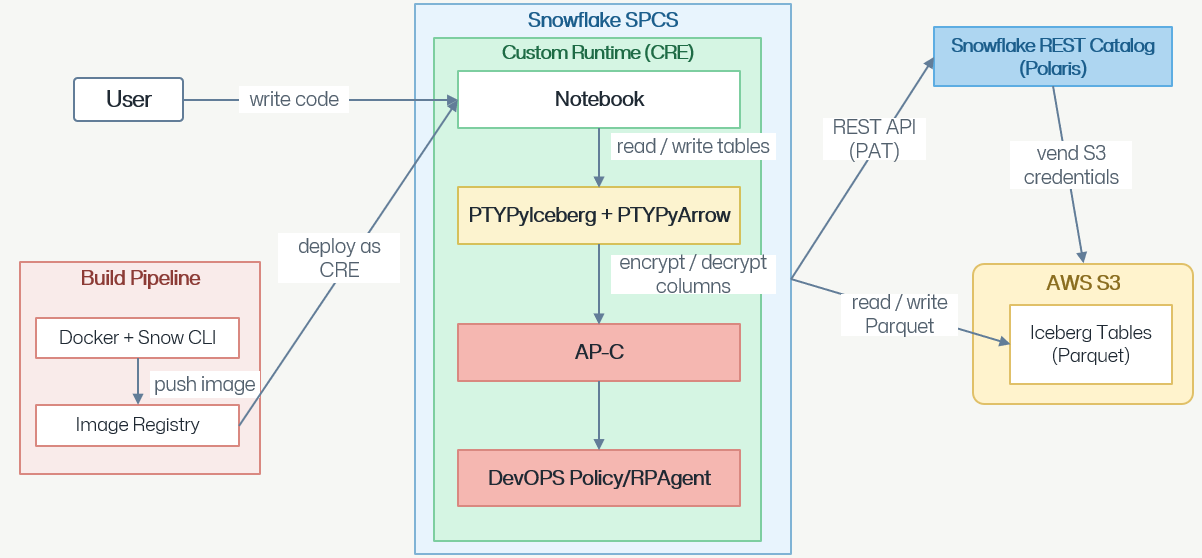
The architecture of the Python Iceberg Protector using Snowflake is depicted in the following diagram:

  1. User writes code: A developer/data engineer authors application logic like Python in a Notebook that runs inside Snowflake.

  2. Notebook runs inside a Custom Runtime on Snowflake SPCS: The notebook is hosted in a Custom Runtime Environment, which is also referred to as CRE. The CRE is deployed to Snowflake Snowpark Container Services, which is abbreviated as SPCS. SPCS provides the compute sandbox for the whole stack.

  3. Build pipeline delivers the runtime image: A separate Build Pipeline uses Docker and Snow CLI to build the CRE image and pushes it to an Image Registry. The image is then deployed as CRE into Snowflake SPCS, which is how the Notebook, PTYPyIceberg/PTYPyArrow, AP-C, and DevOps Policy/RPAgent components get installed together.

  4. Notebook reads/writes tables via PTYPyIceberg and PTYPyArrow: When the notebook issues table reads or writes, it calls into the PTYPyIceberg and PTYPyArrow layer, which is the Iceberg/Arrow data-access library used inside the runtime.

  5. PTYPyIceberg and PTYPyArrow encrypts/decrypts columns via AP-C: Sensitive columns are passed to Application Protector – C before the data leaves or after it arrives. Application Protector – C performs the actual field-level encryption on write and decryption on read.

  6. AP-C is driven by DevOps Policy or RPAgent: AP-C uses the DevOps Policy / RPAgent component for its security policy and key material. The policy defines which fields to protect, with which method or key, and for which users. This ensures that protection is consistent and centrally governed.

  7. Data is stored as Parquet Iceberg tables in AWS S3: After encryption, PTYPyIceberg and PTYPyArrow reads/writes Parquet files that make up the Iceberg Tables in AWS S3. Therefore, the data at-rest in S3 is already column-level protected.

  8. Snowflake REST Catalog manages the Iceberg metadata: The Snowflake REST Catalog is also known as Polaris. The runtime talks to Polaris over a REST API authenticated with a Personal Access Token, which is abbreviated as PAT. The API call resolves Iceberg table metadata, such as namespaces, table locations, and snapshots.

  9. Polaris vends S3 credentials for data access: Polaris then vends short-lived S3 credentials to the runtime, which PTYPyIceberg and PTYPyArrow uses to actually read/write the Parquet files in the S3 Iceberg tables. Therefore, S3 access is brokered by the catalog rather than using long-lived static keys.

3 - System Requirements for the Python Iceberg Protector on Snowflake

Understand the System Requirements for the Python Iceberg Protector on Snowflake.

Ensure that the following requirements are available:

  1. Snowflake CLI installed.
  2. Snowflake data storage is available. For more information, refer to Data storage.
  3. A Snowflake CLI connection is configured either with: a. key-pair authentication b. external-browser authentication
  4. An encrypted static policy is exported from ESA as rps.json.
  5. The private key matches the public key used for the ESA static policy export.
  6. Docker is installed and running.
  7. Utilities like openssl, zip, and unzip are installed.

4 - Installing the Protector

Install the Python Iceberg Protector on Snowflake.
  1. Log in to the Linux instance.
  2. Navigate to the directory where the installation files are available.
  3. To install the protector, run the following command:
    ./PyIcebergProtector-Snowflake-Configurator_Linux-ALL-64_x86-64_Snowflake-SPCS-Python-3.12_<Protector_version>.sh
    
  4. Press ENTER. The prompt to confirm the prerequisites appears.
     Prerequisites:
     1. Snowflake CLI installed.
     2. A Snowflake CLI connection configured with either:
         a. key-pair authentication
         b. external-browser authentication
     3. An encrypted static policy exported from ESA as rps.json.
     4. The private key matching the public key used for the ESA static policy export.
     5. Docker installed and running.
     6. openssl, zip, and unzip utilities installed.
     Are these prerequisites met? ("yes" or "no"):
    
  5. To confirm the availability of prerequisites, type yes.
  6. Press ENTER. The prompt to enter the absolute path of the policy appears.
    Specify ESA-exported static policy's absolute path (example: /tmp/rps.json):
    
  7. Enter the absolute path of the policy.
  8. Press ENTER. The prompt to enter the absolute path for the policy decryption key appears.
    Specify ESA static policy decryption private key's absolute path (example: /tmp/private_key.pem):
    
  9. Enter the static policy decryption private key’s absolute path.
  10. Press ENTER. The prompt to enter the Snowflake CLI connection appears.
    Specify Snowflake CLI connection (default: protegrity_keypair):
    
  11. Enter the Snowflake CLI connection details.
  12. Press ENTER. The prompt to enter the browser command if the connection uses external-browser authentication appears.
    Specify browser command if the connection uses external-browser authentication (optional):
    
  13. Enter the browser command if the connection uses external-browser authentication.
  14. Press ENTER. The prompt to enter the Snowflake image registry appears.
    Specify Snowflake image registry (example: account.registry.snowflakecomputing.com):
    
  15. Enter the Snowflake image registry path.
  16. Press ENTER. The prompt to enter the Snowflake image repository appears.
    Specify Snowflake image repository (example: database/schema/repository):
    
  17. Enter the Snowflake image repository path.
  18. Press ENTER. The prompt to enter the image tag appears.
    Specify image tag:
    
  19. Enter the image tag.
  20. Press ENTER. The script completes the installation.
    Preparing Snowflake image with an ESA static policy...
    Login Succeeded
    [+] Building 5.0s (16/16) FINISHED
    docker:default
    => [internal] load build definition from Dockerfile 0.0s
    => => transferring dockerfile: 1.89kB  0.0s
    => [internal] load metadata for protegritypartner-aws-bigdata.registry.snowflakecomputing.com/snowflake/images/snowflake_images/container_runtime/cpu_x86_64:2.8.1-py312         0.0s
    => [internal] load .dockerignore                                  0.0s
    => => transferring context: 2B                                    0.0s
    => CACHED [ 1/11] FROM protegritypartner-aws-bigdata.registry.snowflakecomputing.com/snowflake/images/snowflake_images/container_runtime/cpu_x86_64:2.8.1-py312         0.0s
    => [internal] load build context                                  0.6s
    => => transferring context: 64.26MB                               0.6s
    => [ 2/11] COPY pyiceberg-0.11.0-cp312-cp312-manylinux2014_x86_64.manylinux_2_17_x86_64.manylinux_2_28_x86_64.whl /tmp/wheels/                                                  0.1s
    => [ 3/11] COPY pyarrow-24.0.0+g090aba87f-cp312-cp312-manylinux_2_28_x86_64.whl /tmp/wheels/    0.1s
    => [ 4/11] RUN uv pip install --system --break-system-packages --no-deps         /tmp/wheels/pyiceberg-0.11.0-cp312-cp312-manylinux2014_x86_64.manylinux_2_17_x86_64.manylinux_2_28_x86_64.whl         /t  3.0s
    => [ 5/11] COPY csdk.tgz /tmp/csdk.tgz                             0.0s
    => [ 6/11] RUN mkdir --parents /opt/protegrity/sdk/c &&     tar --extract --file /tmp/csdk.tgz --gzip --directory /opt/protegrity/sdk/c &&     rm --force /tmp/csdk.tgz  0.3s
    => [ 7/11] COPY libs/ /opt/protegrity/libs/                        0.1s
    => [ 8/11] COPY libstaticPolicyDecryptionProgram.so /opt/protegrity/sdk/c/lib/libstaticPolicyDecryptionProgram.so                                                                 0.0s
    => [ 9/11] COPY private_key.pem /opt/protegrity/sdk/c/lib/static_policy_decryption_key.key                                                                0.0s
    => [10/11] COPY rps.json /opt/protegrity/sdk/c/data/policy.json                                                               0.0s
    => [11/11] RUN cp /opt/protegrity/sdk/c/lib/xcpep.plm /opt/protegrity/sdk/c/lib/libxcpep.so &&     sed --in-place 's/\[protector\]/[protector]\nuser = root/' /opt/protegrity/sdk/c/data/config.ini &&     0.2s
    => exporting to image                                               0.5s
    => => exporting layers                                              0.4s
    => => writing image sha256:75186efe31540a3c5ca82ed61d784f7f6209c450e515c93b270e7db1bbc44fbe     0.0s
    => => naming to docker.io/library/pyiceberg-protector:v1            0.0s
    The push refers to repository [protegritypartner-aws-bigdata.registry.snowflakecomputing.com/iceberg_tutorial_db/public/pyiceberg_images/pyiceberg-protector]
    42ed636049e4: Pushed
    8ff292ef175c: Pushed
    b3e78f588f4c: Pushed
    64a4292cd305: Pushed
    69d3f57f53d9: Pushed
    14e602bb9494: Pushed
    77fe202deebe: Pushed
    9705eb8ab870: Pushed
    f2991fa3f517: Pushed
    5f4af0ec4ca3: Pushed
    v1: digest: sha256:5ca92074258c5f35a42841c32b3278cc020a54b0710c8c63d5c8377b69a212e5 size: 8485
    Pushed Snowflake image: protegritypartner-aws-bigdata.registry.snowflakecomputing.com/iceberg_tutorial_db/public/pyiceberg_images/pyiceberg-protector:v1
    
    Next steps:
    1. Create a Snowflake custom runtime environment for this image.
       Use this image path: /iceberg_tutorial_db/public/pyiceberg_images/pyiceberg-protector:v50
    
    -- CUSTOM RUNTIME ENVIRONMENT
    CREATE OR REPLACE CUSTOM RUNTIME ENVIRONMENT <name>
            IMAGE_PATH = '<path>'
            BASE_IMAGE_TYPE = CPU;
    
    2. Configure the Snowflake service that runs your notebook to use this custom image.
    
    3. Run the following sample from a Snowflake notebook attached to that service:
    
    # %% [CELL 1] -- Install/imports
    # The notebook must run on a service that uses the custom image created above.
    
    # %% [CELL 2] -- Config
    ACCOUNT_URL = "https://<account_identifier>.snowflakecomputing.com"
    ROLE = "<snowflake_role>"
    DATABASE = "<database_name>"
    TABLE_NAME = "<schema_name>.<table_name>"
    PAT = open("/secrets/<database_name>/<schema_name>/<secret_name>/secret_string").read().strip()
    if not PAT:
            raise RuntimeError("Set PAT with a Snowflake secret mounted in the notebook service.")
    print("Config OK.")
    

    Note: The complete script will be displayed in the logs.

4.1 - Executing the Sample Script

Execute the Python Iceberg Protector Sample Script on Snowflake.

Validating the PyIceberg Protector installation involves the execution of the sample script. Verify the installation using any one of the following methods:

  • Using External Parquet Modular Encryption (EPME)
  • Using built-in AES encryption

Before you begin

Create a Snowflake custom runtime environment for the custom image.

CREATE OR REPLACE CUSTOM RUNTIME ENVIRONMENT <name>
    IMAGE_PATH = '<path>'
    BASE_IMAGE_TYPE = CPU;

To use the encryption methods, modify the notebook to add the changes under the properties: section.

For External Parquet Modular Encryption (EPME)

  1. Log in to the Snowflake portal.
  2. Navigate to the workspace.
  3. Edit the service.
  4. From the Custom Image list, select the image that is created.
  5. Click Save and Restart.
  6. Create a Programmatic Access Token.

    Note: For more information about creating a Programmatic Access Token, refer to Using programmatic access tokens for authentication.

  7. Create an external access integration.

    Note: For more information about creating an external access integration, refer to Creating and using an external access integration.

  8. In a notebook, attached to the service, update the values in CELL 2:
     # %% [CELL 2] -- Config
     ACCOUNT_URL = "https://<account_identifier>.snowflakecomputing.com"
     ROLE = "<snowflake_role>"
     DATABASE = "<database_name>"
     TABLE_NAME = "<schema_name>.<table_name>"
     PAT = open("/secrets/<database_name>/<schema_name>/<secret_name>/secret_string").read().strip()
    
  9. In a notebook, attached to the service, update the data element in CELL 4.
    properties={
                     "write.parquet.compression-codec": "snappy",
                     "protegrity.encryption.customer_name": "EXTERNAL_DBPA_V1",
                     "protegrity.key.customer_name": "<data_element>",
                }
    
    Where,
    • write.parquet.compression-codec - Compresses the Parquet column data using the codec for a strong size-vs-speed tradeoff.
    • protegrity.encryption.customer_name - Identifies the external crypto profile like DBPS or EXTERNAL_DBPA_V1 used to encrypt or decrypt the target column. Alternatively, internal encryption like AES_GCM_V1 or AES_GCM_CTR_V1 can be used.
    • protegrity.key.customer_name - Specifies the Protegrity data element whose cryptographic material is used to protect the target column when the external encryption is used. In case of internal encryption, the encryption key is used.
  10. Save the changes to the notebook.

For built-in AES Encryption

  1. Log in to the Snowflake portal.
  2. Navigate to the workspace.
  3. Edit the service.
  4. From the Custom Image list, select the image that is created.
  5. Click Save and Restart.
  6. Create a Programmatic Access Token.

    Note: For more information about creating a Programmatic Access Token, refer to Using programmatic access tokens for authentication.

  7. Create an external access integration.

    Note: For more information about creating an external access integration, refer to Creating and using an external access integration.

  8. In a notebook, attached to the service, update the values in CELL 2:
     # %% [CELL 2] -- Config
     ACCOUNT_URL = "https://<account_identifier>.snowflakecomputing.com"
     ROLE = "<snowflake_role>"
     DATABASE = "<database_name>"
     TABLE_NAME = "<schema_name>.<table_name>"
     PAT = open("/secrets/<database_name>/<schema_name>/<secret_name>/secret_string").read().strip()
    
  9. In a notebook, attached to the service, update the <column_name> and <column_key_identifier> in CELL 4.
     properties={
     "internal.encryption.<column_name>": "AES_GCM_V1" or "AES_GCM_CTR_V1",
     "internal.key.<column_name>": "<column_key_identifier>",
                 }
    
    Where,
    • internal.encryption.<column_name> - Specifies the built-in encryption algorithm.
    • internal.key.<column_name> - Specifies the AES encryption key.
  10. Save the changes to the notebook.