Protegrity MSSQL Database Protector v10.0 is a database‑native security solution that provides column‑level data protection for Microsoft SQL Server environments. The protector integrates directly with the SQL Server execution layer, enabling secure protect, unprotect, and reprotect operations on sensitive data while minimizing runtime overhead. Managed centrally through the Protegrity Enterprise Security Administrator (ESA), it enforces standardized security policies and key management without requiring changes to existing applications or database schemas.
This is the multi-page printable view of this section. Click here to print.
MSSQL Database Protector
Learn about the MSSQL Database Protector.
- 1: Understanding the Architecture
- 2: System Requirements
- 3: Preparing the Environment
- 3.1: Extracting the Installation Package
- 3.2: Installing the Log Forwarder
- 3.3: Installing the RPAgent
- 4: Installing the MSSQL Database Protector
- 4.1: Installing the Policy Enforcement Point (PEP)
- 4.2: Managing Certificate Based Login
- 4.2.1: Creating the certificate
- 4.2.2: Upgrading the certificate
- 4.3: Creating the User Defined Functions
- 5: Configuring the MSSQL Database Protector
- 6: Upgrading the Database Protector
- 6.1: Preparing the System for Upgrade
- 6.2: Dropping the UDFs
- 6.3: Upgrading the Database Protector
- 6.4: Recreating the UDFs
- 6.5: Restarting the RPAgent
- 7: Uninstalling the MSSQL Database Protector
1 - Understanding the Architecture
The following diagram illustrates the architecture of the MSSQL Database Protector:
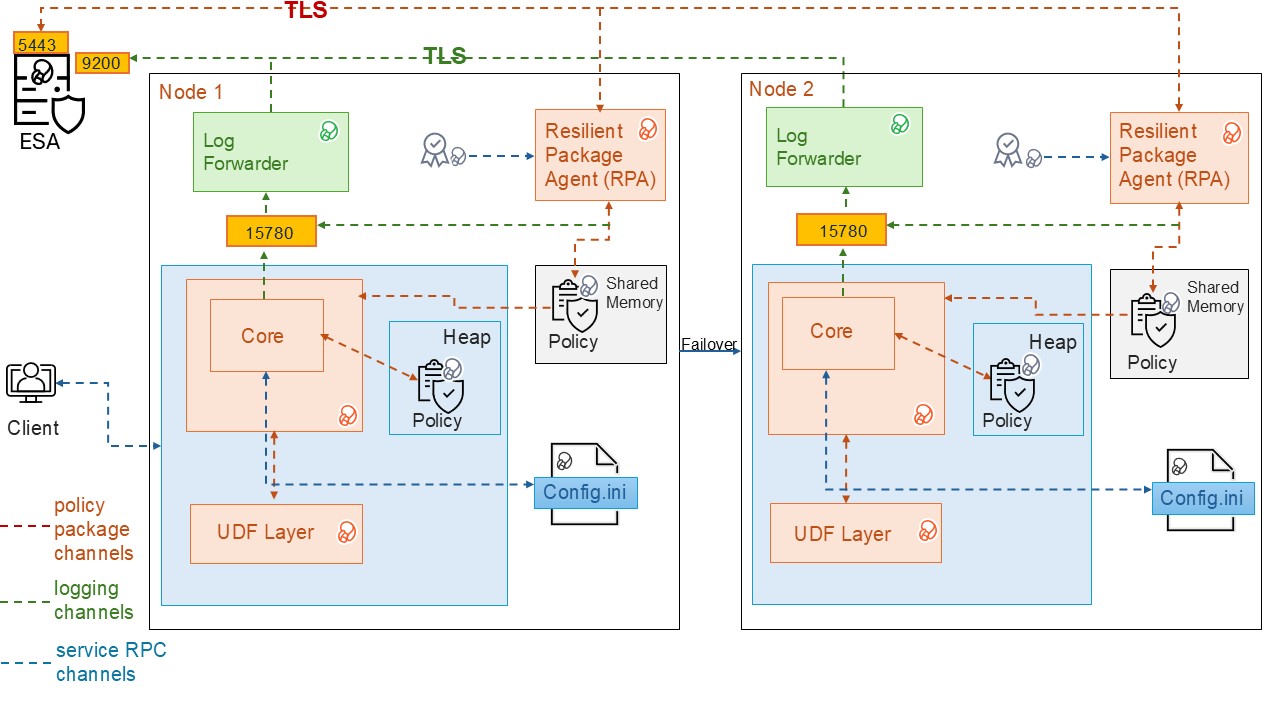
| Component | Description |
|---|---|
| RPAgent | A service on each node that downloads the package from the ESA over a TLS‑secured channel. |
| Log Forwarder | A service running on each node that routes audit logs and application logs to the ESA/Audit Store. |
| config.ini | A configuration file on each node that defines parameters used to control Database Protector behavior. |
| UDF Layer | A set of Database Protector user‑defined functions (UDFs) and APIs. |
| Core | A set of shared libraries that provide the core Protegrity functionality. |
2 - System Requirements
This section describes the System Requirements including the hardware, software, and network requirements for installing the MSSQL database protector.
The following are the prerequisites required for installing the MSSQL Database Protector:
- The ESA v10.0 appliance is installed, configured, and running.
- The IP address or host name of the ESA is noted.
- The administrator rights for the operating system are granted.
- The DBA rights to the MSSQL database are granted.
- Before installing the protector, ensure that the Policy Information Management(PIM) is initialized, if you are installing the ESA for the first time. This prerequisite holds true for versions 7.2.0 and later releases.
Note: For more information about initializing the PIM, refer to the section Initializing the Policy Management.
3 - Preparing the Environment
The steps to prepare the environment to install the MSSQL Database Protector are explained in the sub-sections mentioned below.
3.1 - Extracting the Installation Package
Download the
DatabaseProtector_WIN-ALL-64_x86-64_MSSQL-ALL-64_<version>.zipinstallation package made available by Protegrity.Create a directory to install the protector.
Note: In case of a failure to create the installation directory, the script will use
C:\Program Files\Protegrity\as the default installation directory.To obtain the
signaturefiles, extract the contents of theDatabaseProtector_WIN-ALL-64_x86-64_MSSQL-ALL-64_<version>.zipfile.DatabaseProtector_WIN-ALL-64_x86-64_MSSQL-ALL-64_<version>.zipsignatures\DatabaseProtector_WIN-ALL-64_x86-64_MSSQL-ALL-64_<version>.zip_10.0.sig
To obtain the
installationfiles from the package, extract theDatabaseProtector_WIN-ALL-64_x86-64_MSSQL-ALL-64_<version>.zipfile.The following files are available in the installation package:
LogforwarderSetup_Windows_x64_<version>.exePepSQLServerSetup_Windows_x64_<version>.exeRPAgentSetup_Windows_x64_<version>.exeU.S.Patent.No.6,321,201.Legend.txt
3.2 - Installing the Log Forwarder
Log in to the database server as the user that has the permissions to install the Log Forwarder. Usually, this tends to be the instance owner.
Navigate to the directory containing the installation files.
To install the Log Forwarder, double-click the
LogforwarderSetup_Windows_x64_<version>.exefile.The Welcome to the Log Forwarder Setup Wizard dialog box appears.
Caution: It is mandatory to install the Log Forwarder before installing the RPAgent to ensure that the MSSQL Database Protector is configured correctly.
Click Next.
The Audit Store Connectivity Information dialog box appears.
In the Audit Store Connectivity Information dialog box, select the number of audit stores.
Note: The minimum and maximum Audit Store endpoints supported are 1 and 3 respectively.
In the Endpoint 1 box, enter the IP address for the audit store.
Note: The default port number is
9200.Click Next.
The Select Destination location dialog box appears.
To change the default installation directory for the Log Forwarder:
Click Browse.
Select the required installation directory to install the Log Forwarder.
Click OK.
Note: The default installation directory is
C:\Program Files\Protegrity\logforwarder.Click Next.
The Ready to Install dialog box appears.
Click Install.
The installer completes the installation and the Completing the Log Forwarder Setup dialog box appears.
To exit the installer, click Finish.
Note: After the Log Forwarder is installed successfully, to ensure that the Logforwarder sends logs to the ESA, verify that the Log Forwarder service is in the Running state.
To check the logforwarder service state, navigate to Start > Control Panel > System and Security > Administrative Tools > Services.
The Services window appears.
Verify that the Protegrity Log Forwarder service is in the Running state.
3.3 - Installing the RPAgent
Before you begin:
Before proceeding with the RPA installation in secure mode, ensure that the required CA certificate is available and trusted on the system.
For ESA
Download the certificate from ESA.
For more information about downloading certificates from ESA, refer to Manage Certificates.
After obtaining the certificate, configure the system environment variable:
| Variable | Value |
|---|---|
| SSL_CERT_FILE | Full path to the certificate file (for example, C:\Program Files\Protegrity\Database Protector\ca.crt) |
Ensure the ESA hostname or IP is present in the ESA TLS certificate (SAN or CN) and it is resolvable from the RPAgent host.
After the CA certificate is available, proceed with the RPA installation.
To install the RPAgent:
Navigate to the directory containing the installation files.
To install the RPAgent, double-click the
RPAgentSetup_Windows_x64_<version>.exefile.The Welcome to Resilient Package Agent Setup Wizard dialog box appears.
Click Next.
The Upstream Connectivity Information dialog box appears.
In the Address box, enter the host name or the IP address of the ESA.
Caution: Ensure that the ESA is up and running with the HubController service. The HubController service must be in the Running state to enable automatic download of certificates.
In the Port box, type the ESA port number.
Note: The default port for ESA is
8443.In the Certificate Download User box, type the ESA username.
In the Certificate Download Password box, type the ESA password.
Click Next.
The Select Destination Location dialog box appears.
To change the default installation directory for the RPAgent:
Click Browse.
Select the required installation directory to install the RPAgent.
Click OK.
Note: The default directory is
C:\Program Files\Protegrity\rpagentwhere the RPAgent is installed.Click Next.
The Ready to Install dialog box appears.
Click Install.
The installer completes the installation and the Completing the Protegrity RPAgent Setup Wizard dialog box appears.
To exit the wizard, click Finish.
To check the Protegrity RPAgent service status, navigate to Start > Control Panel > System and Security > Administrative Tools > Services. The Services window appears.
Verify that the Protegrity RPAgent service is in the Running state.
4 - Installing the MSSQL Database Protector
This section describes the procedure to install the MSSQL Database Protector and create the required User‑Defined Functions (UDFs). The process includes instructions to install the Policy Enforcement Point (PEP) for Microsoft SQL Server, optionally managing certificate‑based logins, and creating the UDFs.
Note: Certificate-based login management is only required in case of certificate creation. Depending on the specific requirements, create the User-defined functions (UDFs) with or without the certificates.
4.1 - Installing the Policy Enforcement Point (PEP)
The Policy Enforcement Point (PEP) integrates with SQL Server to enforce data protection and security policies at runtime, ensuring controlled access to sensitive data. This section outlines the installation procedure, and key considerations to ensure a successful installation.
To install the PEP:
Navigate to the directory containing the installation files.
To install the PEP for MSSQL server, double-click the
PepSQLServerSetup_Windows_x64_<version>.exefile.The Select Destination Location dialog box appears.
To change the default installation directory:
Click Browse.
Select the required installation directory to install the PEP for MSSQL Server.
Click OK.
Note: The default directory is
C:\Program Files\Protegrity\Database Protector.Click Next.
The Ready to Install dialog box appears.
Click Next.
The Configure SQL Server Database Name dialog box appears.
Note: The default database name is set to
master.Enter the database name in the box.
Click Install.
The installer completes the installation successfully and the Completing the Protegrity Data Security Platform - SQL Server UDF Setup Wizard dialog box appears.
Click Finish.
Note: After creating the UDFs, Protegrity recommends to restart the MSSQL service. For more information, refer to Restarting the SQL server.
Note: After installing Database Protector, configure Certificate-based login or continue with UDF installation without certificate-based authentication.
4.2 - Managing Certificate Based Login
Certificate‑based login securely authorizes Protegrity assemblies in SQL Server by using a certificate created from the Protegrity‑signed dll.
This section provides information about creating and upgrading the certificate based login for the MSSQL database protector.
4.2.1 - Creating the certificate
Certificate‑based login securely authorizes Protegrity assemblies in SQL Server by using a certificate created from the Protegrity‑signed dll. The certificate is mapped to a login with the UNSAFE ASSEMBLY permission. This permission enables the trusted execution of assemblies and UDFs without enabling the database‑wide TRUSTWORTHY setting.
To create a certificate-based login:
Login to SQL Server Management Studio.
To create a database certificate using a signed
dll. execute the following query.CREATE CERTIFICATE MSSQL_90009_cert FROM EXECUTABLE FILE = 'C:\Program Files\Protegrity\Database Protector\sqlserver\DNPepConnector.dll' GOTo create a certificate‑based login and grant the
UNSAFE ASSEMBLYpermissions, execute the following query.CREATE LOGIN John FROM CERTIFICATE MSSQL_90009_cert GO GRANT UNSAFE ASSEMBLY TO <John>; GOTo verify the certificate, navigate to System Database > Security > Certificates.
Select the appropriate database type to install the UDFs.
To create an assembly:
- Verify whether any assembly exists.
- If the assembly exists, then drop the existing assembly.
- Open the
createassembly.sqlscript. - Set the value of the
TRUSTWORTHYparameter toOFF. - Save the changes to the
createassembly.sqlscript. - Execute the
createassembly.sqlscript.
A sample script is given below.
USE [master]
GO

sp_configure 'clr enable',1
RECONFIGURE
GO

alter database [master] set trustworthy OFF
GO

if exists(SELECT name FROM sys.assemblies WHERE name = 'DNPepConnector')
DROP ASSEMBLY [DNPepConnector]
GO

CREATE ASSEMBLY [DNPepConnector]
AUTHORIZATION [dbo]
FROM 'C:\Program Files\Protegrity\Database Protector\sqlserver\DNPepConnector.dll'
WITH PERMISSION_SET = UNSAFE
GO
To verify the user, navigate to the
C:\Program Files\Protegrity\Database Protector\sqlserver.To install the database objects, execute the
CreateObjects.sqlscript.Execute the protect/unprotect operations.
4.2.2 - Upgrading the certificate
This section describes the instructions to upgrade certificates for certificate‑based logins. Certificate upgrades are required only when replacing or renewing an existing certificate and are not part of the initial installation. Perform this procedure only if certificate‑based login is already configured.
To upgrade the certificate:
Login to SQL Server Management Studio.
To identify the login mapped to the certificate, execute the following query:
SELECT name
FROM sys.server_principals
WHERE sid IN (
   SELECT sid
   FROM sys.certificates
   WHERE name = '<certificate_name>'
);
Note: Replace the placeholder with actual names.
This query returns the login_name associated with the existing certificate.
To drop the login name, execute the following query:
DROP LOGIN [login_name];Note: Replace the placeholder with actual names.
This command removes the login_name associated with the existing certificate.
To drop the associated objects, execute the following script:
DropObjects.sqlTo drop the user, execute the following query:
DROP USER [user_name];Note: Replace the placeholder with actual names.
This command removes the user_name associated with the existing certificate.
To drop the certificate, execute the following query:
DROP CERTIFICATE <certificate_name>;To re-create the certificate, follow the steps mentioned in Creating a Certificate-Based Login.
4.3 - Creating the User Defined Functions
This section describes the instructions install the User Defined Functions (UDFs). Create the UDFs with or without a certificate-based login. For more information about certificate-based login, refer to Managing Certificate-Based Login.
Note: If the
TRUSTWORTHYdatabase property isOFF, create a certificate-based login from the signed.dllfile provided by Protegrity. Create the certificate-based login before creating the UDFs. If theTRUSTWORTHYdatabase property isON, create the UDFs without creating a certificate-based login.
To install the user-defined functions:
Note: In MSSQL Server, the
salogin is disabled by default. Enable thesalogin to connect to the database using thesauser. By default, the database name ismaster.
To connect to the database, login as the privileged user with the CREATE ASSEMBLY permissions.
To run the scripts, navigate to the
C:\Program Files\Protegrity\Database Protector\sqlserver\sqlscriptsdirectory.To execute the registered assembly, execute the
CreateAssembly.sqlscript.Open the
CreateFunctions.sqlfile.Replace the default database name with the database to install the UDFs.
Save the changes to the
CreateFunctions.sqlscript.To create the UDFs, execute the
CreateFunctions.sqlscript.Note: After creating the UDFs, Protegrity recommends to restart the MSSQL service. For more information, refer to Restarting the SQL server.
5 - Configuring the MSSQL Database Protector
The installer script implements the required configurations automatically while installing the MSSQL Database Protector. These settings are done automatically by the installation process and do not require manual intervention. The following table describes these settings.
| Settings | Description |
|---|---|
| Communication | Set the Communication ID to 0 in the following registry entry: HKEY_LOCAL_MACHINE > SOFTWARE > Protegrity > Defiance DPS > SQL CLR This becomes the MSSQL Server default setting. |
| Domain Name | Using the LDAP member-source component, update the registry value in: HKEY_LOCAL_MACHINE > SOFTWARE > Protegrity > Defiance DPS > SQL CLR This helps the Administrator include domain names with every user name, making the user name unique. |
Note: Truncating the user names could lead to a security vulnerability and could result in user names, without the domain names, being treated as duplicate.
Note: It is recommended not to truncate the domain name as it is insecure. If the SQL Server instance is configured to perform windows authentication, then the mixed mode authentication should be disabled. A Windows authenticated user must provide the user name with the domain or host name prepended.
Configuring the TRUSTWORTHY Database Property
It is necessary to secure the connection between any client application and a SQL Server instance. The TRUSTWORTHY property for the MSSQL database is used to indicate whether the SQL Server instance trusts the database and its contents.
Earlier, while running the CreateAssembly.sql script during installation of the MSSQL Database Protector, the TRUSTWORTHY property was set to ON in the ALTER DATABASE statement. Keeping the TRUSTWORTHY property set to ON, increases security risk. It is recommended to keep the TRUSTWORTHY property set to OFF to avoid malicious threats when the database is connected to the server. However, if the TRUSTWORTHY database property is set to OFF while running the CreateAssembly.sql script, then the installation fails with the following error:
CREATE ASSEMBLY for assembly 'DNPepConnector' failed because assembly 'DNPepConnector' is not authorized for PERMISSION_SET = UNSAFE.
The assembly is authorized when either of the following is true: the database owner (DBO) has UNSAFE ASSEMBLY permission and the database has the TRUSTWORTHY database property on; or the assembly is signed with a certificate or an asymmetric key that has a corresponding login with UNSAFE ASSEMBLY permission.
Note: It is recommended to avoid changing the
TRUSTWORTHYproperty setting. An alternative method to mitigate this issue is that a certificate can be created for the MSSQL database using the signeddllfrom Protegrity. From this certificate a certificate-based login can be created for the database. An authorized certificate signed by a trusted source can validate the secured connection between the SQL Server instance and the database. A login is created with the certificate to connect the database securely with the server.
For more information about how to create a certificate-based login for the MSSQL database using the signed dll from Protegrity, refer to the section Managing Certificate-Based Login.
For more information about configuring the TRUSTWORTHY** property and creating a certificate, refer to the sections TRUSTWORTHY Database Property and Create a certificate for package signing respectively, in Microsoft’s website.
Updating Parameters in the config.ini File
The MSSQL Database Protector provides the following files that contain different parameters to control the protector behavior:
config.ini- provides parameters to control the protector behavior.rpagent.cfg- provides parameters to control the RPAgent behavior.
To update paramenters in the config.ini file follow the steps below:
Log in to the node.
Navigate to the
C:\Program Files\Protegrity\Database Protector\sqlserver\datadirectory.To open the
config.inifile, run the following command:vi config.iniPress ENTER.
The command opens the
config.inifile.############################################################################### # Protector configuration ############################################################################### [protector] # Cadence determines how often the protector connects with ESA / proxy to fetch the policy updates in background. # Default is 60 seconds. So by default, every 60 seconds protector tries to fetch the policy updates. # If the cadence is set to "0", then the protector will get the policy only once. # # Default 60. cadence = 60 ############################################################################### # Log Provider Config ############################################################################### [log] # In case that connection to fluent-bit is lost, set how audits/logs are handled # # drop : (default) Protector throws logs away if connection to the fluentbit is lost # error : Protector returns error without protecting/unprotecting # data if connection to the fluentbit is lost mode = drop # Host/IP to fluent-bit where audits/logs will be forwarded from the protector # # Default localhost host = localhostUpdate the parameters, as per the description in the table.
Parameter Description cadenceSpecifies the frequency at which the protector retrieves the policy. The default value is 60 seconds. If the cadence is set to “0”, then the protector will get the policy only once. modeSpecifies the approach of handling logs when the connection to the Log Forwarder is lost. Save the changes to the
config.inifile.
Updating the parameters in the rpagent.cfg file
Log in to the required node.
Navigate to the
C:\Program Files\Protegrity\rpagent\datadirectory.To open the
rpagent.cfgfile, run the following command:vi rpagent.cfgPress ENTER.
The command opens the rpagent.cfg file.
###############################################################################
# Resilient Package Sync Config
###############################################################################
[sync]

# Protocol to use when communicating with the service providing Resilient Packages.
# Use 'https' for ESA or 'shmem' for local shared memory.
protocol = https

# Host/IP to the service providing Resilient Packages
host = <IP_address>
port = 8443

# Path to CA certificate
ca = /opt/protegrity/rpagent/data/CA.pem

# Path to client certificate
cert = /opt/protegrity/rpagent/data/cert.pem

# Path to client certificate key
key = /opt/protegrity/rpagent/data/cert.key

# Path to a secret file that is used to decrypt the client certificate key.
# When using a custom certificate bundle, the 'secretcommand' can instead be
# used to execute an external command that obtains the secret.
secretfile = /opt/protegrity/rpagent/data/secret.txt

###############################################################################
# Log Provider Config
###############################################################################
[log]

# In case that connection to fluent-bit is lost, set how audits/logs are handled
#
# drop  : (default) Protector throws logs away if connection to the fluentbit is lost
# error : Protector returns error without protecting/unprotecting
#         data if connection to the fluentbit is lost
mode = drop

# Host/IP to fluent-bit where audits/logs will be forwarded from the protector
#
# Default localhost
host = localhost
Update the parameters, as per the description in the table.
Parameter Description interval Specifies the frequency at which the RPAgent retrieves the policy. The minimum value is 1 second and the maximum value is 86400 seconds. This is an optional parameter and must be included in the Sync section of the rpagent.cfgfile.protocol Specifies the protocol to use when communicating with the service providing Resilient Packages. host Specifies the hostname to the service providing the Resilient packages. port Specifies the port to the service providing the Resilient packages. ca Specifies the path to the CA certificate. cert Specifies the path to the client certificate. key Specifies the path to the client certificate key. secretfile Specifies the path to the secret file that is used to decrypt the client certificate key. mode Specifies the approach of handling logs when the connection to the Log Forwarder is lost. host Specifies the hostname or the IP address to where the Log Forwarder will forward the audit logs from the protector. Save the changes to the
rpagent.cfgfile.
Restarting SQL server to apply configuration changes
Note: After the initial installation using the default path, restart the
MSSQLSERVERservice before executing any queries. If the installation path is modified in later installations, theMSSQLSERVERservice must be restarted again prior to query execution.
If the protector is already installed, restart the SQL Server to apply the config.ini changes.
To restart the SQL Server follow the steps below:
- Open SQL Server Management Studio > SQL Server Configuration Manager.
- In the left pane, select SQL Server Services.
- Identify the SQL Server instance to restart:
- SQL Server
MSSQLSERVERfor the default instance, or - SQL Server
<instance_name>for a named instance.
- SQL Server
- Right-click the selected SQL Server instance.
- Click Restart.
The SQL Server service restarts and the configuration changes are implemented.
5.1 - Configuring MSSQL User Access Permissions
A user must be granted access and permissions to the certain tables such that they can query the database for members and groups.
Grant the following privilege rights to the user, defined in the member source configuration on the ESA, for executing the queries:
- Select access to
MASTER.SYSLOGINS - Select access to
SYSUSERS
5.2 - Impersonating a User
User impersonation is a security feature that allows one user to temporarily act under the permissions of another user (usually a privileged user) within the same session. This enables controlled execution of privileged actions without permanently granting elevated access, and all actions are audited as performed by the impersonated user.
To impersonate a user:
Login to the server as the proxy user,
USER1.To change the user execution to privileged user, USER2, run the following command:
EXECUTE AS USER = 'USER2'Perform the protect/unprotect functionality on the data using a data element.
Disconnect the current session and initiate the session as
USER1.Similarly, the EXEC AS statement enables impersonation of a privileged user to perform operations according to the user’s assigned privileges.
Note:
- User impersonation settings apply only to the current session.
- If a proxy user impersonates a privileged user and performs any operation, then entries in the Audit logs are displayed as performed by the privileged user, and not the proxy user.
6 - Upgrading the Database Protector
To upgrade the MSSQL Database Protector:
Drop the existing UDFs.
Uninstall the existing version of the protector.
Install the new version of the protector.
Start the RPAgent.
Create the new user-defined functions.
6.1 - Preparing the System for Upgrade
Before proceeding with an upgrade, stop the required services and create a backup of all the configuration files.
To prepare the system for an upgrade:
Log in to the database server as a user with the required permissions.
In the Windows search box, type Run
Press ENTER.
The Run dialog box appears.
Type
services.msc.Press ENTER.
The Services window appears.
To stop the RPAgent, right-click the Resilient Package Agent service and select Stop.
To stop the Log Forwarder, right-click the Logforwarder service and select Stop.
Note: To preserve the current configuration, copy the
config.inifile to the required location. Theconfig.inifile is available in theC:\Program Files\Protegrity\Database Protector\sqlserver\datadirectory.
6.2 - Dropping the UDFs
After stopping the services and creating a backup of the configuration files, drop the existing user defined functions.
To delete the UDFs:
Log in to the database server as the user that has the permissions.
Navigate to the
C:\Program Files\Protegrity\Database Protector\sqlserver\sqlscriptsfolder.Execute the
DropObjects.sqlfile.Create a backup of the
Database Protectordirectory.
6.3 - Upgrading the Database Protector
Note: Starting with version 7.2.0, for first‑time ESA installations, initialize Policy Management before installing the protector. For more information about initializing the Policy Management, refer to the section Initializing the Policy Management.
To upgrade the Database Protector, install the newer version of the Database protector. For more information, refer Installing the MSSQL Database Protector.
6.4 - Recreating the UDFs
After the upgrade, recreate the required UDFs to restore the Database Protector functionality.
To re-create the UDFs:
Log in to the database server as the user that has the permissions.
Navigate to the
C:\Program Files\Protegrity\Database Protector\sqlserver\sqlscripts directory.To register the assembly, execute the
CreateAssembly.sqlscript.To create the UDFs, execute the
CreateFunctions.sqlscript.
6.5 - Restarting the RPAgent
After the upgrade, restart the required services and deploy policies to restore Database Protector operations.
To restart the RPAgent service:
In the Windows search box, type Run.
Press ENTER.
The Run dialog box appears.
Type services.msc.
Press ENTER.
The Services window appears.
To restart the RPAgent service, right-click Resilient Package Agent service and select Restart.
To restart SQL Server, right-click on the SQL Server service and select Restart.
Deploy the policies from the ESA to the Database Protector.
7 - Uninstalling the MSSQL Database Protector
The section describes the procedures to uninstall the MSSQL Database Protector and the components.
Before proceeding to uninstall the MSSQL Database protector, stop the MSSQL Service.
To stop the MSSQL Service
Navigate to Start > Control Panel > System and Security > Administrative Tools > Services.
Note: Alternatively, navigate to the Windows > Start > Run. In the Run window, type services.msc and then, click OK.
The Services window appears.
Select MSSQL Server.
To stop the MSSQL Service, select Action > Stop.
7.1 - Dropping the Database Protector UDFs
Log in to the MSSQL database with a username that owns the UDF functions.
Note: The
DropObjects.sqlscript must be executed either before or after uninstalling all MSSQL Server Database Protector components.Navigate to the
C:\Program Files\Protegrity\Database Protector\sqlserver\sqlscripts directory.Open the
DropObjects.sqlfile.Replace the default database name with the database name to uninstall the UDFs.
Save the changes to the
DropObjects.sqlfile.To uninstall the UDFs, execute the
DropObjects.sqlscript.
7.2 - Uninstalling the RPAgent
Navigate to Start > Control Panel > System and Security > Administrative Tools > Services.
Note: Alternatively, navigate to the Windows > Start > Run. In the Run window, type services.msc and then, click OK.
The Services window appears.
Select Protegrity Resilient Package Agent.
To stop the RPAgent server, select Action > Stop.
To remove the RPAgent component:
From the Windows menu, navigate to Start > Control Panel > Programs > Programs and Features.
From the list of programs, under the Name column, select Protegrity Resilient Package Agent.
Click Uninstall.
Note: Alternatively, go to the
C:\Program Files\Protegrity\rpagentdirectory. To uninstall the RPAgent, select unins000 file and then double-click it.The RPAgent installer deletes the rpagent directory.
7.3 - Uninstalling the Log Forwarder
Navigate to Start > Control Panel > System and Security > Administrative Tools > Services.
Note: Alternatively, navigate to the Windows > Start > Run. In the Run window, type services.msc and then, click OK.
The Services window appears.
Select Logforwarder.
To stop the Log Forwarder, select Action > Stop.
To remove the Log Forwarder component:
From the Windows menu, navigate to Start > Control Panel > Programs > Programs and Features.
From the list of programs, under the Name column, select Logforwarder.
Click Uninstall.
Note: Alternatively, go to the
C:\Program Files\Protegrity\logforwarderdirectory. To uninstall the Log Forwarder, select unins000 file and then double-click it.The installer removes the Log Forwarder and deletes the Log Forwarder directory.
7.4 - Removing the Database Protector
The section describes the procedures to uninstall the MSSQL Database Protector and the components.
From the Windows menu, navigate to Start > Control Panel > Programs > Programs and Features.
The Programs and Features window appears.
From the list of programs, under the Name column, select Protegrity Data security platform - SQL Server UDF.
Click Uninstall.
Note: Alternatively, go to the
C:\Program Files\Protegrity\Database Protectordirectory. To uninstall the Protegrity Data security platform - SQL Server UDF, select unins000 file and then double-click it.The Protegrity Data security platform - SQL Server UDF is uninstalled and the Database Protector directory is deleted.