This is the multi-page printable view of this section. Click here to print.

Return to the regular view of this page.

Oracle Database Protector

Learn about the Oracle Database Protector.

The Oracle Database Protector can be installed by the user with sudoer permissions and the Oracle admin user. This section discusses the installation with a user having the sudoer permissions. Wherever possible, the oracle commands for Oracle admin user would be provided.

To use the Oracle Database Protector, update the environment variables in Oracle.

User Privileges

The Oracle Database Protector installation can be broadly divided into installing the RPAgent and installing the UDFs. The RPAgent installation establishes the connection between the ESA and the Database Protector, while the UDFs use the policies to enforce protection on the data.

User for retrieving users from Oracle Database

For policies to be defined in the ESA, users can be imported from any of the multiple sources such as Active Directory (AD), file, or an Oracle database. To pull users from an Oracle database, a membersource must be created. The following information applies if the users must be pulled from an Oracle database.

To retrieve users from the Member Source Server:

  1. Either create a functional database user with create session permissions
    or
    Use an existing user with create session permissions
  2. Grant the following two specific grants:
    • Grant select on sys.dba_roles to protegrity
    • Grant select on sys.dba_role_privs to protegrity

Where, protegrity is the functional user created.

User for installing UDFs

After the RPAgent is installed, the UDFs can be installed on the Oracle Database server. Create a functional database user with the following privilege rights:

  • Grant unlimited tablespace to USER1
  • Grant create session to USER1
  • Grant select any table to USER1
  • Grant create library to USER1
  • Grant create procedure to USER1
  • Grant drop public synonym to USER1
  • Grant create public synonym to USER1
  • Grant create table to USER1
  • Grant create view to USER1

Where, USER1 is the functional user created.
1 - Understanding the Architecture

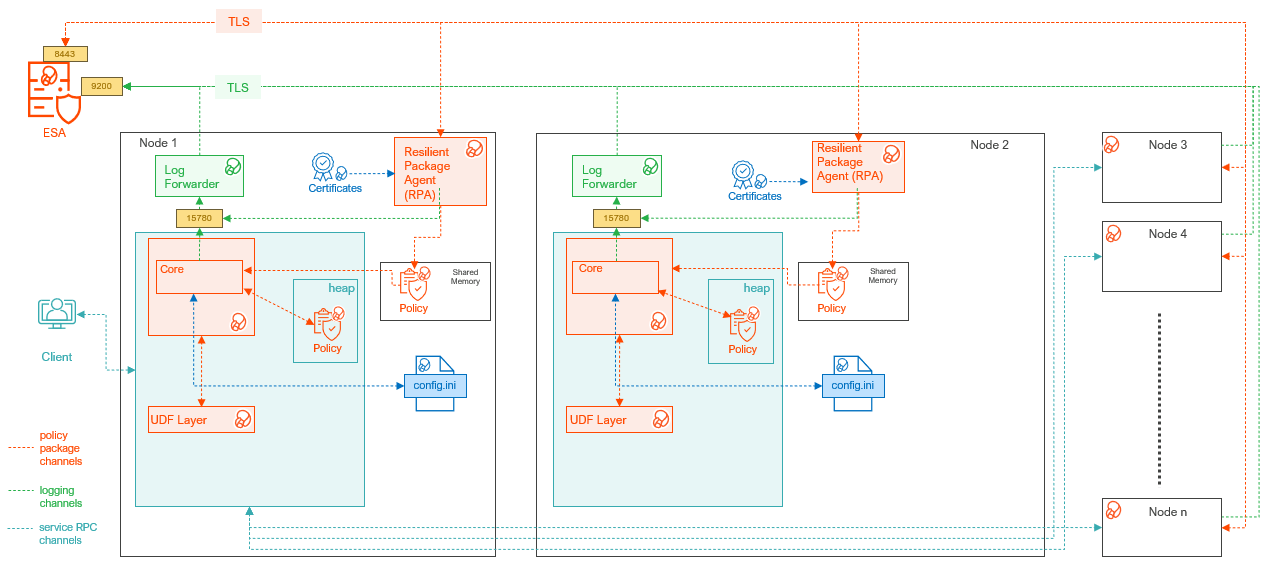
The architecture for the Oracle Database Protector is depicted in the image below.

ComponentDescription
RPAgentA daemon running on each node that downloads the package from the ESA over a TLS channel using the installed Certificates.
Log ForwarderA daemon running on each node that routes the audit logs and application logs to the ESA/Audit Store.
config.iniA file on each node containing the set of configuration parameters to modify the protector behavior.
DBP LayerContains the Database Protector UDFs and APIs.
CoreThe set of various libraries that provide the Protegrity Core functionality.

2 - System Requirements

Ensure that the following prerequisites are met:

  • The Oracle Database is installed and configured.

  • The Enterprise Security Administrator (ESA) is installed, configured, and running.

  • The IP address or host name of the ESA is noted.

  • Ensure that Policy Management (PIM) has been initialized on the ESA. The initialization of PIM ensures that cryptographic keys for protecting data and the policy repository have been created.

  • Download and save the Oracle Database Protector, DatabaseProtector_<operating_system>-<arch>_<Oracle_version>-64_<version>.tgz, made available by Protegrity.

  • Even if it is not mandatory, create a backup of the database where the Oracle Database Protector and the UDFs will be installed.

  • Access to the server, as the oracle instance owner or the user created specifically for Protegrity, is available.

  • Access to the Oracle database as the sysdba superuser, should be available.

3 - Preparing the Environment

The steps to prepare the environment to install the Oracle Databsae Protector are explained in the sub-sections mentioned below.

3.1 - Extracting the Installation Package

  1. Log in to the Oracle database server with an account having the required privileges.
  2. Save the Oracle database protector installation package, DatabaseProtector_<operating_system>-<arch>_<Oracle_distribution>-64_<version>.tgz, made available by Protegrity, in any sample directory. For example, /opt/protegrity/
  3. Navigate to the /opt/Protegrity/ directory.
  4. To extract the contents, run the following command:
    tar -xvf DatabaseProtector_Linux-ALL-64_x86-64_Oracle-ALL-64_<DBP_version>.tgz
    
  5. Press ENTER. The command extracts the package and the signature files.
    DatabaseProtector_Linux-ALL-64_x86-64_Oracle-ALL-64_<DBP_version>.tgz
    signatures/
    signatures/DatabaseProtector_Linux-ALL-64_x86-64_Oracle-ALL-64_<DBP_version>.tgz_10.0.sig
    
  6. To extract the contents of the installation package, run the following command:
    tar -xvf DatabaseProtector_Linux-ALL-64_x86-64_Oracle-ALL-64_<DBP_version>.tgz
    
  7. Press ENTER. The command extracts the files from the package.
    LogforwarderSetup_Linux_x64_<DBP_version>.sh
    RPAgentSetup_Linux_x64_<DBP_version>.sh
    PepOracleSetup_Linux_x64_<DBP_version>.sh
    U.S.Patent.No.6,321,201.Legend.txt
    

3.2 - Installing the Log Forwarder

  1. Log in to the database server as the user that has the permissions to install the Log Forwarder. Usually, this tends to be the instance owner.
  2. Navigate to the directory where the installation files are extracted.
  3. To install the Log Forwarder, run the following command:
    ./LogforwarderSetup_Linux_x64_<DBP_version>.sh
    
  4. Press ENTER. The prompt to enter the audit store endpoint appears.
    Enter the audit store endpoint (host), alternative (host:port) to use another port than the default port 9200 :
    
  5. Enter the IP address of the audit store.
  6. Press ENTER. The prompt to enter additional endpoint appears.
    Audit store endpoints: <Audit_store_IP_address>:9200
    Do you want to add another audit store endpoint? [y/n]:
    
  7. To skip adding additional endpoints, type no.
  8. Press ENTER. The prompt to continue the installation appears.
    These audit store endpoints will be added:
    <Audit_store_IP_address>:9200
    
    Type 'y' to accept or 'n' to abort installation:
    
  9. To continue the installation, type yes.
  10. Press ENTER. The script extracts the files and installs the Log Forwarder.
    Unpacking...
    Extracting files...
    Protegrity Log Forwarder installed in /opt/protegrity/logforwarder.
    

3.3 - Installing the RPAgent

  1. Log in to the database server as the user that has permissions to install the RPAgent.
  2. Navigate to the directory where the installation files are extracted.
  3. To install the RPAgent, run the following command:
    ./RPAgentSetup_Linux_x64_<DBP_version>.sh
    
  4. Press ENTER. The prompt to enter ESA host name or IP address appears.
    Please enter upstream host name or IP address[]:
    
  5. Enter the IP address of the ESA.
  6. Press ENTER. The prompt to enter the username to download the certificates appears.
    Please enter the user name for downloading certificates[]:
    
  7. Enter the username to download the certificates from ESA.
  8. Press ENTER. The prompt to enter the password to download the certificates appears.
    Please enter the password for downloading certificates[]:
    
  9. Enter the password.
  10. Press ENTER. The script connects to the ESA, retrives the JWT token, extracts the certificates, and installs the RPAgent.
    Unpacking...
    Extracting files...
    Obtaining token from <ESA_IP_Address>:25400...
    Downloading certificates from <ESA_IP_Address>:25400...
    % Total    % Received % Xferd  Average Speed   Time    Time     Time  Current
                                    Dload  Upload   Total   Spent    Left  Speed
    100 11264  100 11264    0     0   136k      0 --:--:-- --:--:-- --:--:--  137k
    
    Extracting certificates...
    Certificates successfully downloaded and stored in /opt/protegrity/rpagent/data
    
    Protegrity RPAgent installed in /opt/protegrity/rpagent.
    

4 - Installing the Oracle Database Protector

4.1 - Installing the Policy Enforcement Point (PEP)

  1. Log in to the node where the installation files are extracted.
  2. To install the Oracle objects, run the following command:
    ./PepOracleSetup_Linux_x64_<DBP_version>.sh
    
  3. Press ENTER. The prompt to continue appears.
    *****************************************************
    Welcome to the Database Protector Setup Wizard
    *****************************************************
    
    This will install the oracle objects on your computer
    Do you want to continue? [yes or no]
    
  4. To continue, type yes.
  5. Press ENTER. The prompt to enter the installation directory appears.
    Enter installation directory.
    A new directory will be created in the installation directory.
    [/opt/protegrity]:
    
  6. Enter the location to install the Oracle objects.
  7. Press ENTER. The command extracts the files and installs the objects.
    Unpacking...
    Extracting files...
    oracle objects installed in /opt/protegrity/databaseprotector/oracle.
    

4.2 - Creating the User Defined Functions (UDFs)

The Oracle Database Protector provides the createobjects.sql script to create or install the UDFs. Before executing the createobjects.sql script, configure the listener.ora, tnsnames.ora, and the extproc.ora configuration files, depending on the version of the Oracle database.

To install UDFs for the Oracle Database Protector:

  1. Connect to the database as the oracle user with the database owner credentials.

  2. Navigate to the /opt/protegrity/databaseprotector/oracle/sqlscripts/ directory.

  3. To install the UDFs, run the following command:

    sqlplus User1/Password1 @createobjects.sql
    

    where, User1 and Password1 are the credentials of the database owner. The symbol \ is used for Windows and / for UNIX environments.

  4. To view the list of all the installed UDFs, run the following command:

    select PROCEDURE_NAME from user_procedures order by 1;
    
  5. To verify the successful installation of the UDFs, execute any one of the following queries:

    select pty.whoami() from dual;
    

    The function returns the name of the user that is logged in to the database.

    select pty.getversion() from dual;
    

    The function returns the protector version.

5 - Configuring the Oracle Database Protector

The Oracle Database Protector provides the following files that contain different parameters to control the protector behavior:

  • config.ini - provides parameters to control the protector behavior.
  • rpagent.cfg - provides parameters to control the RPAgent behavior.

Updating the parameters in the config.ini file:

  1. Log in to the node.

  2. Navigate to the /opt/protegrity/databaseprotector/oracle/data directory.

  3. To open the config.ini file, run the following command:

    vi config.ini
    
  4. Press ENTER.

    The command opens the config.ini file.

    ###############################################################################
    # Protector configuration
    ###############################################################################
    [protector]
    
    # Cadence determines how often the protector connects with ESA / proxy to fetch the policy updates in background.
    # Default is 60 seconds. So by default, every 60 seconds protector tries to fetch the policy updates.
    # If the cadence is set to "0", then the protector will get the policy only once.
    #
    # Default 60.
    cadence = 60
    
    
    ###############################################################################
    # Log Provider Config
    ###############################################################################
    [log]
    
    # In case that connection to fluent-bit is lost, set how audits/logs are handled
    #
    # drop  : (default) Protector throws logs away if connection to the fluentbit is lost
    # error : Protector returns error without protecting/unprotecting
    #         data if connection to the fluentbit is lost
    mode = drop
    
    # Host/IP to fluent-bit where audits/logs will be forwarded from the protector
    #
    # Default localhost
    host = localhost
    
  5. Update the parameters, as per the description in the table.

    ParameterDescription
    cadenceSpecifies the frequency at which the protector retrieves the policy. The default value is 60 seconds. If the cadence is set to “0”, then the protector will get the policy only once.
    modeSpecifies the approach of handling logs when the connection to the Log Forwarder is lost.
  6. Save the changes to the config.ini file.

Updating the parameters in the rpagent.cfg file:

  1. Log in to the required node.

  2. Navigate to the /opt/protegrity/rpagent/data directory.

  3. To open the rpagent.cfg file, run the following command:

    vi rpagent.cfg
    
  4. Press ENTER.

    The command opens the rpagent.cfg file.

    ###############################################################################
    # Resilient Package Sync Config
    ###############################################################################
    [sync]
    
    # Protocol to use when communicating with the service providing Resilient Packages.
    # Use 'https' for ESA or 'shmem' for local shared memory.
    protocol = https
    
    # Host/IP to the service providing Resilient Packages
    host = <IP_address>
    port = 8443
    
    # Path to CA certificate
    ca = /opt/protegrity/rpagent/data/CA.pem
    
    # Path to client certificate
    cert = /opt/protegrity/rpagent/data/cert.pem
    
    # Path to client certificate key
    key = /opt/protegrity/rpagent/data/cert.key
    
    # Path to a secret file that is used to decrypt the client certificate key.
    # When using a custom certificate bundle, the 'secretcommand' can instead be
    # used to execute an external command that obtains the secret.
    secretfile = /opt/protegrity/rpagent/data/secret.txt
    
    ###############################################################################
    # Log Provider Config
    ###############################################################################
    [log]
    
    # In case that connection to fluent-bit is lost, set how audits/logs are handled
    #
    # drop  : (default) Protector throws logs away if connection to the fluentbit is lost
    # error : Protector returns error without protecting/unprotecting
    #         data if connection to the fluentbit is lost
    mode = drop
    
    # Host/IP to fluent-bit where audits/logs will be forwarded from the protector
    #
    # Default localhost
    host = localhost
    
  5. Update the parameters, as per the description in the table.

    ParameterDescription
    intervalSpecifies the frequency at which the RPAgent retrieves the policy. The minimum value is 1 second and the maximum value is 86400 seconds. This is an optional parameter and must be included in the Sync section of the rpagent.cfg file.
    protocolSpecifies the protocol to use when communicating with the service providing Resilient Packages.
    hostSpecifies the hostname to the service providing the Resilient packages.
    portSpecifies the port to the service providing the Resilient packages.
    caSpecifies the path to the CA certificate.
    certSpecifies the path to the client certificate.
    keySpecifies the path to the client certificate key.
    secretfileSpecifies the path to the secret file that is used to decrypt the client certificate key.
    modeSpecifies the approach of handling logs when the connection to the Log Forwarder is lost.
    hostSpecifies the hostname or the IP address to where the Log Forwarder will forward the audit logs from the protector.
  6. Save the changes to the rpagent.cfg file.

5.1 - User Impersonation

This section describes how to impersonate a user in the Oracle database protector. The user impersonation feature enables you to perform operations and access resources on behalf of another user. Service users leverage this feature to impersonate individual users. However, to supply user context to execute a query, upper applications provide the CLIENT_IDENTIFIER. Set the impersonation parameter to YES in the config.ini file, to use the CLIENT_IDENTIFIER parameter of the inbuilt USERENV application context SYS_CONTEXT provided by the Oracle database.

To impersonate a user:

  1. Log in to the node where the Oracle database is installed.

  2. Navigate to the /opt/protegrity/databaseprotector/oracle/data/ directory.

  3. To open the config.ini file, run the following command:

    vi config.ini
    
  4. Press ENTER.

    The command opens the config.ini file.

    ###############################################################################
    # Protector configuration
    ###############################################################################
    [protector]
    
    # Cadence determines how often the protector connects with ESA / proxy to fetch the policy updates in background.
    # Default is 60 seconds. So by default, every 60 seconds protector tries to fetch the policy updates.
    # If the cadence is set to "0", then the protector will get the policy only once.
    #
    # Default 60.
    cadence = 60
    
    
    ###############################################################################
    # Log Provider Config
    ###############################################################################
    [log]
    
    # In case that connection to fluent-bit is lost, set how audits/logs are handled
    #
    # drop  : (default) Protector throws logs away if connection to the fluentbit is lost
    # error : Protector returns error without protecting/unprotecting
    #         data if connection to the fluentbit is lost
    mode = drop
    
    # Host/IP to fluent-bit where audits/logs will be forwarded from the protector
    #
    # Default localhost
    host = localhost
    
  5. To include the impersonation parameter and set the value to YES, add the following code:

    [userimpersonation]
    impersonation = yes/no or YES/NO
    

    The default value of the impersonation parameter is set to NO or no.

  6. Assign 644 permissions to the config.ini file. This is required only tf the ownership of the config.ini file is not set to the oracle user and the oinstall group.

  7. Connect to the database session using the service account. For example, USER1.

  8. To set the CLIENT_IDENTIFIER, execute the following query:

    EXEC DBMS_SESSION.SET_IDENTIFIER ('USER2');
    
  9. Press ENTER. The query returns the name of the user for whom you set the CLIENT_IDENTIFIER parameter.

    USER2
    
  10. To verify the value that is set for the CLIENT_IDENTIFIER parameter, execute the following query: SQL> select sys_context('USERENV','CLIENT_IDENTIFIER') from dual; SYS_CONTEXT('USERENV','CLIENT_IDENTIFIER')

  11. Press ENTER. The query returns the name of the user for whom you set the CLIENT_IDENTIFIER parameter.

    USER2
    

    Warning: When you set the value of the impersonation parameter to yes/YES, then set a value for the the CLIENT_IDENTIFIER parameter. The protect/unprotect UDFs will run only after the value for the CLIENT_IDENTIFIER parameter is set. If you set the value of the impersonation parameter to yes/YES, and fail to set the value for the CLIENT_IDENTIFIER parameter, then the PTY.WHOAMI() UDF will return the username as <no_user>. This will cause the protect/unprotect operations to fail with the Failed to retrieve user error message.

  12. To verify the user who is logged into the database session, execute the following query:

    select pty.whoami() from dual;
    
  13. Press ENTER. The query returns the name of the user that is logged into the current database session.

    USER2
    
  14. To clear the value set for the CLIENT_IDENTIFIER parameter, execute the following query:

    EXEC DBMS_SESSION.CLEAR_IDENTIFIER;
    

5.2 - Enterprise User Security (EUS) in the Oracle Database

Enterprise User Security (EUS) is an important component of the Oracle database that allows you to centrally manage the database users across the enterprise. Enterprise users are the users that are defined and managed in a directory. Every enterprise user has a unique identity across the enterprise. The Enterprise User Security relies on the Oracle Identity Management infrastructure, which uses an LDAP-compliant directory service to centrally store and manage the users.

Protegrity supports the following authentication methods:

  • Password-based authentication
  • SSL-based authentication
  • Kerberos-based authentication

In the following list, the type of user is followed by the value returned:

  • Password-authenticated enterprise user: nickname (same as the login name)
  • Password-authenticated database user: the database username (same as the schema name)
  • SSL-authenticated enterprise user: the DN in the user’s PKI certificate
  • SSL-authenticated external user: the DN in the user’s PKI certificate
  • Kerberos-authenticated enterprise user: Kerberos principal name
  • Kerberos-authenticated external user: Kerberos principal name, which is the same as the schema name

The Oracle database protector supports the retrieval of the user information using the AUTHENTICATED_IDENTITY parameter that returns the identity used for the authentication.

Using the EUS Feature

The instructions and examples provided in the section use Kerberos-based authentication.

Note:

  • Ensure that the username in the ESA policy contains only the username and does not include the domain name. For example, USER1.
  • Currently, only one domain name is supported.

To use the EUS feature:

  1. To create a Kerberos ticket for the enterprise user, run the following command:
    okinit <username>
    
  2. Press ENTER. The command prompts for the password of the enterprise user.
    [oracle@db ~]$ okinit USER1
    Kerberos Utilities for Linux: Version 18.0.0.0.0 - Production on 15-DEC-2021 06:07:06
    Copyright (c) 1996, 2017 Oracle. All rights reserved.
    Configuration file : /u01/app/oracle/product/18.0.0/dbhome_1/network/admin/kerberos/krb5.conf.
    Password for USER1@TESTLAB.COM:
    
  3. Enter the password.
  4. Press ENTER.
  5. To verify whether the authentication ticket is generated successfully, run the following command:
    oklist
    
  6. Press ENTER. The command displays the authentication ticket details.
    [oracle@db ~]$ oklist
    Kerberos Utilities for Linux: Version 18.0.0.0.0 - Production on 15-DEC-2021 06:07:37
    Copyright (c) 1996, 2017 Oracle. All rights reserved.
    Configuration file : /u01/app/oracle/product/18.0.0/dbhome_1/network/admin/kerberos/
    krb5.conf.
    Ticket cache: FILE:/tmp/krb5cc_54321
    Default principal: USER1@TESTLAB.COM
    Valid starting Expires Service principal
    12/15/21 06:07:06 12/15/21 16:07:06 krbtgt/TESTLAB.COM@TESTLAB.COM
    renew until 12/16/21 06:07:06
    [oracle@db ~]$
    
  7. To login to the Oracle database, run the following command:
    sqlplus /@<database_name>
    
  8. Press ENTER. The SQL prompt appears.
  9. To verify the authentication method, run the following command:
    select sys_context('USERENV','AUTHENTICATION_METHOD') from dual;
    
  10. Press ENTER. The command displays the authentication method.
    select sys_context('USERENV','AUTHENTICATION_METHOD') from dual;
    SYS_CONTEXT('USERENV','AUTHENTICATION_METHOD')
    --------------------------------------------------------------------------------
    KERBEROS
    
  11. To view the user, run the following command:
    select user from dual;
    
  12. Execute a sample protect operation.
    SQL> select pty.ins_encrypt('AES128', 'Original data', 0) from dual;
    PTY.INS_ENCRYPT('AES128','ORIGINALDATA',0)
    --------------------------------------------------------------------------------
    3713D5C1E058701568115B28885707CA
    SQL>
    
  13. Execute a sample unprotect operation.
    SQL> select pty.sel_decrypt('AES128', pty.ins_encrypt('AES128', 'Protegrity', 0) , 0) from dual;
    PTY.SEL_DECRYPT('AES128',PTY.INS_ENCRYPT('AES128','PROTEGRITY',0),0)
    --------------------------------------------------------------------------------
    Protegrity
    SQL>
    

Retrieving User Information

This section describes how to use the AUTHENTICATED_IDENTITY parameter to retrieve the information of an enterprise user.

To fetch the information of an enterprise user, run the following query:

select sys_context( 'userenv', 'AUTHENTICATED_IDENTITY' ) from dual;

Note: The AUTHENTICATED_IDENTITY parameter contains the information of the enterprise user and returns the identity that is used in the authentication.

6 - Uninstalling the Oracle Database Protector

The process to uninstall the Oracle Database Protector involves the following steps:

  1. Dropping the User Defined Functions.
  2. Uninstalling the RPAgent.
  3. Uninstalling the Log Forwarder.

Dropping the User Defined Functions

  1. Log in to the Oracle Database server using the same account used to create the UDFs.
  2. Navigate to the /opt/protegrity/databaseprotector/oracle/sqlscripts/ directory.
  3. To drop the UDFs, run the following command:
    sqlplus USER1/Password1 @dropobjects.sql
    

Uninstalling the RPAgent

Before uninstalling the RPAgent, Protegrity recommends creating a backup.

  1. Log in to the Oracle Database server.
  2. Navigate to the /opt/protegrity/rpagent/data directory.
  3. To stop the RPAgent, run the following command:
    rpagentctrl stop
    
  4. Delete the rpagent directory.

Uninstalling the Log Forwarder

Before uninstalling the Log Forwarder, Protegrity recommends creating a backup.

  1. Log in to the Oracle Database server.
  2. Navigate to the /opt/protegrity/logforwarder/data directory.
  3. To stop the RPAgent, run the following command:
    logforwarderctrl stop
    
  4. Delete the logforwarder directory.