Data Warehouse Protectors
Learn about the Data Warehouse Protectors.
This page discusses about the Protegrity Data Warehouse Protector. It also provides detailed information, features, deployment process, and architecture for the Protegrity Data Warehouse Protector.
The Protegrity Data Warehouse Protector is an advanced security solution designed to protect sensitive data at the column level. This enables you to secure your data, while still permitting access to authorized users. Additionally, the Data Warehouse Protector integrates seamlessly with existing database systems using the User-Defined Functions for an enhanced security.
Protegrity provides Data Warehouse Protector support for the Teradata Data Warehouse platform.
Features of the Data Warehouse Protector
The Protegrity Data Warehouse Protector uses vaultless tokenization and central policy control for access management and secures sensitive data at rest in data warehouses like Teradata, Exadata etc.
The data is protected from internal and external threats, and users and business processes can continue to utilize the secured data.
Protegrity protects the data using encryption and tokenization methods. In tokenization, the data is converted to similar looking inert data known as tokens where the data format and type can be preserved. These tokens can be detokenized back to the original values whenever required. Depending on the user access rights and the policies set using Policy Management in ESA, this data is unprotected.
The Protegrity Data Warehouse Protector provides the following features:
Provides fine grained field-level protection using role-based administration with a centralized security policy.
Provides Protegrity Format Preserving Encryption (FPE) method for structured data. The following data types are supported:
Numeric (0-9)
Alpha (a-z, A-Z)
Alpha-Numeric (0-9, a-z, A-Z)
Credit Card (0-9)
Unicode Basic Latin and Latin-1 Supplement Alpha
Unicode Basic Latin and Latin-1 Supplement Alpha-Numeric
Provides logging and viewing data access activities and real-time alerts with a centralized monitoring system.
Ensures minimal overhead for processing secured data, with minimal consumption of resources, threads and processes, and network bandwidth.
1 - Deploying the Data Warehouse Protectors
This page discusses the deployment process for the Protegrity Data Warehouse Protector.
Deploying the Protegrity Data Warehouse Protector involves the following key steps:
- The customer installs and initializes the required Data Warehouse Protector.
- The configurations that are required for the initialization process, are passed to the protector by using the
config.ini file. - The RPAgent synchronizes with the RP Proxy or ESA at regular intervals and checks for any changes in the policy. If there is a change in policy, then the RPAgent downloads the updated policy package over a TLS channel and stores in the shared memory.
- The protector synchronizes with the shared memory using the
cadence value set in the config.ini file. Any updates in the policy are fetched in the policy package. The policy is available in the shared memory and the policy package is available in the process memory. The updated policy package is read from the process memory and is used to perform the data security operations, such as, protect and unprotect. - The Audit logs from the Data Warehouse Protector are forwarded to the Audit Store using the Log Forwarder. The Audit logs generated by the RPAgent are forwarded to the Audit Store using the Log Forwarder.
The following are the two main components of Data Warehouse Protector:
Log Forwarder - is a log processing tool that collects the data security operation logs from the Data Warehouse Protector and forwards them to the Audit Store (Insight) in the ESA.
Resilient Package Agent - synchronizes with the RPProxy or ESA at regular intervals of 60 seconds and checks for any changes in the policy. If there is a change in policy, then it downloads the updated policy package over a TLS channel and stores in the shared memory.
2 - Teradata Data Warehouse Protector
The Protegrity Teradata Data Warehouse Protector has been optimized to work with the fast, parallel, and multi-node Teradata systems. This protector is the fastest protection point available on the market for Teradata databases.
This page discusses about the Teradata Data Warehouse Protector architecture, components, and the protector usage in detail.
2.1 - Understanding the Architecture
The architecture for the Teradata distribution of the Data Warehouse Protector is depicted in the image below.
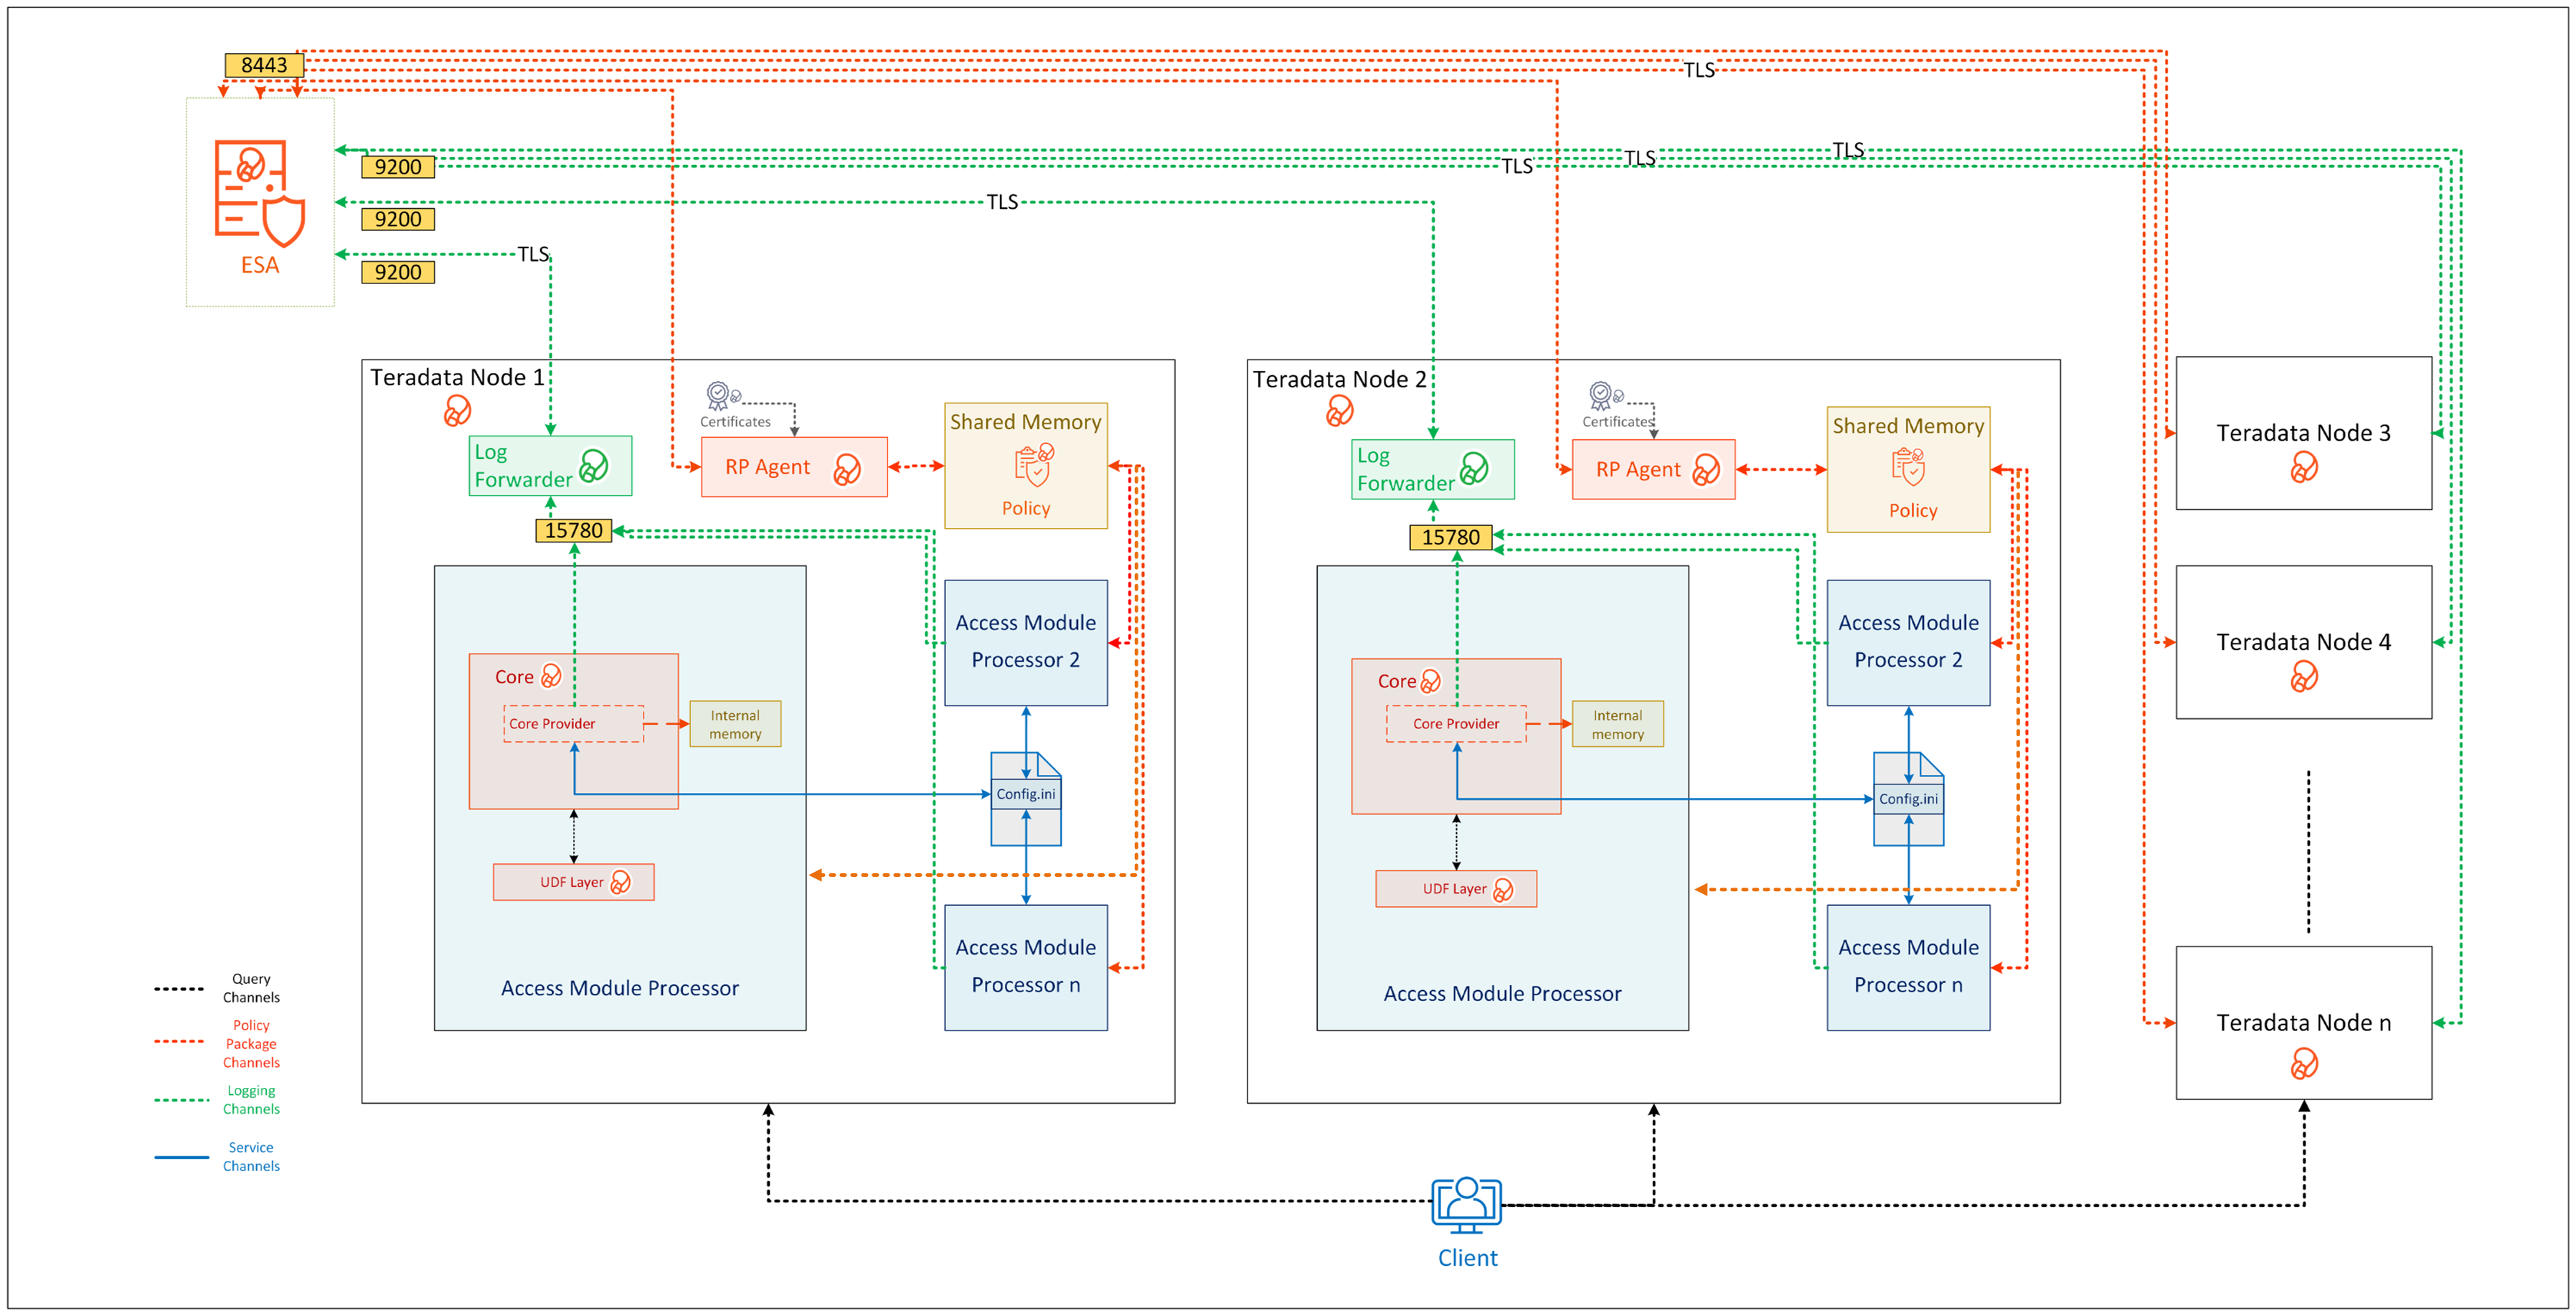
| Component Name | Description |
|---|
| Access Module Processor | Stores and retrieves all the protector data. It is also called as the Virtual Processor (vproc). |
| config.ini | Contains the set of configuration parameters to modify the protector behavior. |
| Core | Is the set of various libraries that provide the Protegrity Core functionality. |
| Log Forwarder | Forwards the protector logs to Insight. |
| Node | Serves as a central processing unit where the database operations are executed using a single operating system. |
| Resilient Package (RP) Agent | Is a daemon running on each node that downloads the Policy from the ESA over a TLS channel using the installed Certificates. |
| UDF Layer | Contains the Data Warehouse Protector UDFs and APIs executing in the Teradata service process. |
2.2 - System Requirements
Ensure that the following prerequisites are met, before installing the Teradata Data Warehouse Protector:
- The ESA appliance, v10.0.x or higher, is installed, configured, and running.
- The ports that are configured on the ESA and the nodes in the cluster, which will run the Data Warehouse Protector, are listed in the following table:
| Destination Port | Protocol | Source | Destination | Description |
|---|
| 8443 | TCP | RP Agent on the Data Warehouse Protector node | ESA | The RP Agent communicates with the ESA through port
8443 to download a policy. |
| 9200 | TCP | Log Forwarder on the Data Warehouse Protector node | Protegrity Audit
Store appliance | The Log Forwarder sends all the logs to
the Protegrity Audit Appliance through port 9200. |
| 15780 | TCP | Protector on the Data Warehouse Protector node | Log Forwarder on the Data Warehouse Protector node | The Data Warehouse Protector writes Audit Logs to localhost through port 15780. The Application Logs are also written to localhost through port 15780. The Log Forwarder reads the logs from that socket. |
The following table lists the minimum hardware configuration for the Data Warehouse Protector on Teradata distribution.
| Hardware Components | Configuration |
|---|
| CPU | Depends on the application. |
| Disk Space | 400 MB on every node - Includes the Log Forwarder, RP Agent, and User Defined Functions (UDFs) |
| RAM | 4 GB on every node |
Note: In v10.0.0, the RPAgent loads the policy package into the shared memory. Every individual service process on a node that initializes the protector will load a copy of the policy package into the process heap memory. Therefore, the RAM requirement on each node depends on the policy size and the number of protector instances (number of processes).
2.3 - Preparing the Environment
2.3.1 - Extracting the Teradata Installation Package
You must extract the Teradata Data Warehouse Protector package to access the Teradata Protector components required for the installation process.
To extract the files from the installation package:
Log in to the server as the user with the required permissions.
Navigate to the directory where you have saved the Teradata Data Warehouse protector package.
For example, /opt/protegrity/.
To extract the contents of the Teradata Data Warehouse Protector package, run the following command:
tar -xvf DatabaseProtector_SLES-ALL-64_x86-64_Teradata-ALL-64_10.0.0+x.tgz
Press ENTER.
The commands extracts the installation package and signature file from the Teradata Data Warehouse Protector package:
DatabaseProtector_SLES-ALL-64_x86-64_Teradata-ALL-64_10.0.0+x.tgz
signatures/DatabaseProtector_SLES-ALL-64_x86-64_Teradata-ALL-64_10.0.0+x.sig
For more information about the steps to verify the signed Teradata Data Warehouse protector build, refer to Verification of Signed Protector Build.
To extract the contents of the installation package, run the following command:
tar -xvf DatabaseProtector_SLES-ALL-64_x86-64_Teradata-ALL-64_10.0.0+x.tgz
Press ENTER.
The commands extracts the following files:
LogforwarderSetup_Linux_x64_10.0.0+x.sh
RPAgentSetup_Linux_x64_10.0.0+x.sh
PepTeradataSetup_Linux_x64_10.0.0+x.sh
PepTeradata_UDTSetup_Linux_x64_10.0.0+x.sh
U.S.Patent.No.6,321,201.Legend.txt
2.3.2 - Installing the Log Forwarder
Log in to the server as the user with the required permissions.
Navigate to the directory where you have extracted the Teradata data warehouse protector package.
For example, /opt/protegrity/.
To install the Log Forwarder, run the following command:
./LogforwarderSetup_Linux_x64_10.0.0+x.sh
Press ENTER.
The prompt to enter the Audit Store endpoint appears.
Enter the audit store endpoint (host:port):
Enter the IP address of the Audit Store.
Important: If you fail to specify an IP address, then the script will terminate the installation process.
Press ENTER.
The installer script appends the port number to the IP address and the prompt to enter an additional Audit Store appears.
Audit store endpoints: x.x.x.x:9200

Do you want to add another audit store endpoint? [y/n]:
The default value for the port is 9200.
If you want to skip adding an additional Audit Store endpoint, then type n.
Do you want to add another audit store endpoint? [y/n]: n
To proceed with the installation, without adding an additional endpoint, skip to step 10.
To enter additional Audit Store endpoints, type y.
Press ENTER.
The prompt to enter an additional Audit Store appears.
Do you want to add another audit store endpoint? [y/n]: y
Enter the audit store endpoint (host), alternative (host:port) to use another port than the default port 9200 :
For every additional Audit Store point that you want to add, repeat steps 6 and step 7.
Press ENTER.
The script displays list of the Audit Store endpoints and the prompt to accept or abort the
installation appears.
These audit store endpoints will be added:
x.x.x.x:9200
Type 'y' to accept or 'n' to abort installation:
To continue with the installation process, type y.
Press ENTER.
The script extracts the files and a confirmation message appears.
Type 'y' to accept or 'n' to abort installation: y
Unpacking...
Extracting files...
Protegrity Log Forwarder installed in /opt/protegrity/logforwarder.
To abort the installation process, type n.
The installer aborts the installation and the following message appears:
Type 'y' to accept or 'n' to abort installation: n
The logforwarder installation is aborted.
Navigate to the /opt/protegrity/logforwarder/bin/ directory.
To start the Log Forwarder, run the following command:
Press ENTER.
The command starts the Log Forwarder.
[ info] switching to background mode (PID=8329)
Logforwarder started, PID (<process_ID>) written to PID file /opt/protegrity/logforwarder/
bin/fluent-bit.pid
For more information about changing the authentication, refer to Updating the Configuration Parameters for the Log Forwarder.
2.3.3 - Installing the Resilient Package Agent
The Resilient Package (RP) Agent downloads the certificates. These certificates are further used to authenticate the login credentials, public or private keys, and certify the code reliability.
To install the RPAgent:
Log in to the server as the user with the required permissions.
Navigate to the directory where you have extracted the Teradata Data Warehouse protector package.
For example, /opt/protegrity/.
To install the RPAgent, run the following command:
./RPAgentSetup_Linux_x64_10.0.0+x.sh
Press ENTER.
The prompt to enter the host name or the IP address of the ESA appears.
Please Enter ESA host name or IP address []:
Enter the IP address of the ESA.
If you fail to specify an IP address, then the installation script will terminate the installation
process.
Press ENTER.
The prompt to enter the username for downloading the certificate appears.
Please enter the user name for downloading certificates[]:
Enter the username to download the certificates.
Press ENTER.
The prompt to enter the password for downloading the certificate appears.
Please enter the password for downloading certificates []:
Enter the password to download the certificates.
Press ENTER.
The installer extracts the files and downloads the certificates.
Unpacking...
Extracting files...
Obtaining token from x.x.x.x:25400...
Downloading certificates from x.x.x.x:25400...
% Total % Received % Xferd Average Speed Time Time Time Current
Dload Upload Total Spent Left Speed
100 8704 100 8704 0 0 209k 0 --:--:-- --:--:-- --:--:-- 212k
Extracting certificates...
Certificates successfully downloaded and stored in /opt/protegrity/rpagent/data
Protegrity RPAgent installed in /opt/protegrity/rpagent.
If the JWT token is not specified while downloading the certificates, then the RPAgent fetches the token automatically from the ESA.
Navigate to the /opt/protegrity/rpagent/bin/ directory.
To start the RPAgent, run the following command:
Press ENTER.
The command starts the RPAgent successfully and a confirmation message appears.
To verify the status of the RPAgent, run the following command:
Press ENTER.
The status of the RPAgent service appears.
rpagent is running (pid=10817)
2.4 - Installing the Protector
This section outlines the installation process for the Protegrity Teradata Data Warehouse Protector.
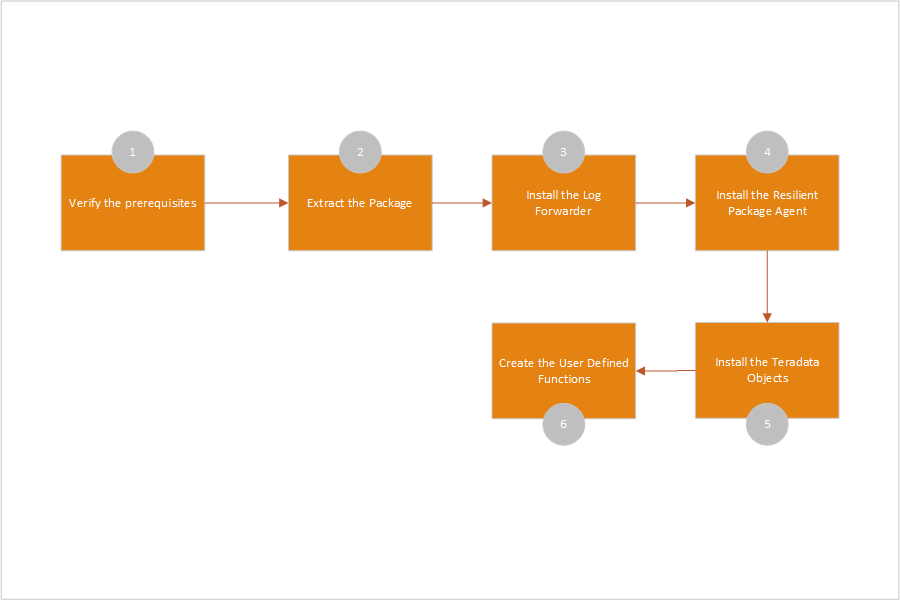
The following figure shows a complete task flow to install the Protegrity Teradata Data Warehouse Protector.
2.4.1 - Installing the Teradata Objects
Log in to the server as the user with the required permissions.
Navigate to the /opt/protegrity/ directory.
To install the Teradata objects, run the following command:
./PepTeradataSetup_Linux_x64_10.0.0+x.sh
Press ENTER.
The prompt to continue installing the Teradata objects appears.
*****************************************************
Welcome to the Database Protector Setup Wizard
*****************************************************
This will install the teradata objects on your computer
Do you want to continue? [yes or no]
To proceed with the installation of the Teradata objects, type yes.
Press ENTER.
The prompt to enter the name of the database to install the UDFs appears.
Enter name of database where the UDFs will be installed.
Enter the database name to continue.
Press ENTER
The prompt to mention the maximum size of the VARCHAR allocated by the UDFs appears.
Enter the maximum size of the VARCHAR to be allocated by the UDFs.
The default value is 500 characters. You must modify the default value in this step, as per your requirement, for maximum character length. The mentioned VARCHAR size is the maximum value allocated by the UDFs for UNICODE character set.
Press ENTER.
The script installs the Teradata objects in the /opt/protegrity/databaseprotector/teradata/ directory.
[500]:
1000
***********BUFFER LENGTH INITIALIZATION**************
UDF VARCHAR MAX INPUT BUFFER LENGTH (TOKENIZATION) : 1000 Latin characters
UDF VARCHAR MAX OUTPUT BUFFER LENGTH (TOKENIZATION) : 1351 Latin characters
UDF VARCHAR MAX INPUT BUFFER LENGTH (ENCRYPTION) : 1000 Latin characters
UDF VARCHAR MAX OUTPUT BUFFER LENGTH (ENCRYPTION) : 1038 Bytes
UDF VARCHAR_UNICODE MAX INPUT BUFFER LENGTH (TOKENIZATION) : 1000 UNICODE characters
UDF VARCHAR_UNICODE MAX OUTPUT BUFFER LENGTH (TOKENIZATION) : 2706 UNICODE characters
UDF VARCHAR_UNICODE MAX INPUT BUFFER LENGTH (ENCRYPTION) : 1000 UNICODE characters
UDF VARCHAR_UNICODE MAX OUTPUT BUFFER LENGTH (ENCRYPTION) : 2038 Bytes
teradata objects installed in /opt/protegrity/databaseprotector/teradata.
Permission for /opt/protegrity/databaseprotector is successfully set.
Important: By default, all the configurations provided for the UDFs are stored in the dbpuserconf.ini file within the /etc/protegrity/ directory.
The Teradata Data Warehouse Protector uses the dbpuserconf.ini file for internal purposes only.
2.4.2 - Creating the Teradata User Defined Functions (UDFs)
Before creating the UDFs, ensure that the following prerequisites are met:
You have installed the Teradata Data Warehouse Protector on all the nodes.
When installing the Teradata objects, you must specify the maximum data size to be allocated by the UDFs. This value should not exceed 500 MB.
- When you calculate the data size, ensure that you also consider the space for the overheads.
For example:- For the data that would be tokenized using non-length preserving tokens, you must add an overhead of approximately 6% to the original data size.
- For the AES-encrypted data, with the blocks of 16 bytes, you must add an overhead of an additional 16 bytes to include CRC or IV.
The database user that installs the UDFs must have the following privileges:
GRANT CREATE FUNCTION ON PROTEGRITY to USER1;
GRANT ALTER FUNCTION ON PROTEGRITY to USER1;
- USER1 is the database user who install the UDFs.
- PROTEGRITY is the name of the database where the UDFs are installed.
- ROLE1 is the group to which the USER1 belongs.
Ensure that the database user who installs the UDFs is part of the ROLE1 group.
To grant privileges to a database user to perform database administration functions, run the following query:
GRANT EXECUTE, SELECT, INSERT, UPDATE, DELETE, STATISTICS, DUMP, RESTORE, CHECKPOINT, SHOW, EXECUTE PROCEDURE, ALTER PROCEDURE, EXECUTE FUNCTION, ALTER FUNCTION, ALTER EXTERNAL PROCEDURE, CREATE OWNER PROCEDURE, CREATE TABLE, CREATE VIEW, CREATE MACRO, CREATE TRIGGER, CREATE PROCEDURE, CREATE FUNCTION, DROP TABLE, DROP VIEW, DROP MACRO, DROP TRIGGER, DROP PROCEDURE, DROP FUNCTION ON TESTDB TO ROLE1;
To distribute the installation on all the nodes while installing the UDF in a multi-node environment, you can run either of the following commands:
- UNIX commands:
psh mkdir /opt/protegrity/
- PUT utility:
pcl -send /opt/protegrity/* /opt/protegrity/
To create the UDFs for Teradata:
Log in to the server as the user with the required permissions.
Navigate to the /opt/protegrity/databaseprotector/teradata/sqlscripts/ directory.
To view the .sql queries, run the following command:
/opt/protegrity/databaseprotector/teradata/sqlscripts/ # ls -ltr
Press ENTER.
The list of available queries in the .sql file format appears.
total 164
-rw-r----- 1 tdatuser tdtrusted 8939 createdecimalobjects.sql
-rw-r----- 1 tdatuser tdtrusted 2560 dropobjects.sql
-rw-r----- 1 tdatuser tdtrusted 781 dropvarcharunicode.sql
-rw-r----- 1 tdatuser tdtrusted 67128 createobjects.sql
-rw-r----- 1 tdatuser tdtrusted 10294 createvarcharunicode.sql
-rw-r----- 1 tdatuser tdtrusted 8401 createdecimalobjects_a.sql
-rw-r----- 1 tdatuser tdtrusted 793 dropvarcharunicode_a.sql
-rw-r----- 1 tdatuser tdtrusted 1875 dropobjects_a.sql
-rw-r----- 1 tdatuser tdtrusted 19643 createobjects_a.sql
-rw-r----- 1 tdatuser tdtrusted 5078 createvarcharunicode_a.sql
-rw-r----- 1 tdatuser tdtrusted 5300 testscript.sql
-rw-r----- 1 tdatuser tdtrusted 3558 sample_tok.sql
-rw-r----- 1 tdatuser tdtrusted 3324 sample_enc.sql
To start the bteq, run the following command:
/opt/protegrity/databaseprotector/teradata/sqlscripts/ # bteq
Press ENTER.
The prompt to log in to the database appears.
Enter your logon or BTEQ command:
To log in to the database, run the following command:
Press ENTER.
The prompt to enter the database password appears.
Enter the database password.
Press ENTER.
The connection to the Teradata database is completed successfully.
*** Logon successfully completed.
To create the UDFs, execute the following query:
.run file=createobjects.sql
Press ENTER.
The script creates the UDFs and the following message for each of the created UDF appears.
*** Function has been created.
*** Warning: 5607 Check output for possible warnings encountered in compiling and/or linking UDF/XSP/UDM/UDT.
*** Total elapsed time was 1 second.
To create the Varchar Unicode UDFs, execute the following query:
.run file=createvarcharunicode.sql
Press ENTER.
The script creates the UDFs and the following message for each of the created UDF appears.
*** Function has been created.
*** Warning: 5607 Check output for possible warnings encountered in compiling and/or linking UDF/XSP/UDM/UDT.
*** Total elapsed time was 1 second.
To create the Decimal UDFs, execute the following query:
.run file=createdecimal.sql
Press ENTER.
The script creates the Decimal UDFs and the following message for each of the created UDF appears.
*** Function has been created.
*** Warning: 5607 Check output for possible warnings encountered in compiling and/or linking UDF/XSP/UDM/UDT.
*** Total elapsed time was 1 second.
For more information about the User Defined Functions (UDFs) for Teradata, refer to User Defined Functions and API.
2.4.3 - Installing the Teradata User Defined Types (UDTs)
The UDTs allows you to create the data-types that can be used as pre-defined data-types.
To install the UDT for Teradata:
Log in to the server as the user with the required permissions.
Navigate to the /opt/protegrity/ directory.
To install the UDT setup for Teradata, run the following command:
./PepTeradata_UDTSetup_Linux_x64_10.0.0+x.sh
Press ENTER.
The prompt to continue the installation appears.
*****************************************************
Welcome to the Database Protector Setup Wizard
*****************************************************
This will install the teradata user defined types on your computer
Do you want to continue? [yes or no]
To proceed, type yes.
Press ENTER.
The script extracts the files and installs the data types in the default directory. The script also sets the permissions for the data types.
[/opt/protegrity]:
Unpacking...
To get started with UDTs, please run /opt/protegrity/databaseprotector/teradata
generate_udt_scripts.sh.
Teradata UDTs installed in /opt/protegrity/databaseprotector/teradata.
Permission for /opt/protegrity/databaseprotector/teradata is successfully set.
For more information about the Teradata User Defined Types (UDTs), refer to
Teradata User Defined Types (UDTs).
2.4.4 - Creating the Teradata User Defined Types (UDTs)
The Teradata Data Warehouse Protector automatically creates the To-SQL and From-SQL transform, the ordering, and the necessary casts for a distinct UDT once the CREATE TYPE statement is issued.
On the Data Warehouse Protector installation, the /databaseprotector/teradata/udt/ directory is created with the following files:
generate_udt_scripts.sh is an executable file that generates UDT scriptspepteradataudt.plm is a library that contains protect and unprotect functions for UDT usage.
The generate_udt_scripts.sh generates UDT scripts using the following command:
/opt/protegrity/databaseprotector/teradata/udt # ./generate_udt_scripts.sh --help

Protegrity Data Security Platform - Teradata UDT Scripts
Usage: generate_udt_scripts udtname dataelement scid dbtype
udtname    : UDT Name
dataelement: Data Element
scid       : Security Coordinate ID
dbtype     : Database data type, must be one of: bigint,date,float,integer,varchar
The following are some limitations for the UDT arguments:
- Udtname – any applicable name
- Dataelement – DE deployed
- Scid – applicable security coordinate (0 by default)
- Dbtype – one of the data types bigint, date, float, integer, varchar.
Important: The scid parameter is no longer used and is retained for compatibility purpose only.
To create the User Defined Types:
Log in to the server as the user with the required permissions.
Navigate to the /opt/protegrity/databaseprotector/teradata/udt/ directory.
To view the files and directories in the ../udt/ directory, run the following command:
/opt/protegrity/databaseprotector/udt # ls
Press ENTER.
The list of available content appears.
/opt/protegrity/databaseprotector/teradata/udt # ls
generate_udt_scripts.sh  pepteradataudt.plm  sqlscripts
To generate the UDT scripts required for creating the UDTs, run the following command:
./generate_udt_scripts.sh <udtname> <dataelement> <scid> <dbtype>
For example:
./generate_udt_scripts.sh UDT_VARCHAR AES128 0 varchar
Press ENTER.
The script generates the following .sql queries for the UDTs in the /opt/protegrity/databaseprotector/teradata/udt directory.
create_UDT_VARCHAR.sql
drop_UDT_VARCHAR.sql
It is recommended to use the data element names in the upper-case.
You can modify the .sql queries using the bteq utility for error handling.
To start the bteq utility, run the following command:
/opt/protegrity/databaseprotector/teradata/sqlscripts # bteq
Press ENTER.
The prompt to log in to the database appears.
Enter your logon or BTEQ command:
To log in to the database, run the following command:
Press ENTER.
The prompt to enter the database password appears.
To proceed, type the database password.
Press ENTER.
The connection to the Teradata Data Warehouse is completed successfully.
*** Logon successfully completed.
To create the UDTs, run the following query:
.run file=create_UDT_VARCHAR.sql
Press ENTER.
The query creates the UDTs and the following message for each of the created UDT appears.
*** Function has been created.
*** Warning: 5607 Check output for possible warnings encountered in compiling and/or linking UDF/XSP/UDM/UDT.
*** Total elapsed time was 1 second.
It is recommended to create only one UDT for each data type.
Creating an additional UDT, with a basic data type that is used by an existing UDT, results in a linked error.
To grant the access permissions to the UDTs, execute the following SQL statements using the bteq utility.
To provide the execute access to the UDTs, run the following command:
chmod 755 create_UDT_VARCHAR.sql
Press ENTER.
To provide the UDTUSAGE access for the UDTs to public with a GRANT option, run the following query:
GRANT UDTUSAGE ON SYSUDTLIB TO PUBLIC WITH GRANT OPTION;
Press ENTER.
To provide the execute function for all the UDTs to public with a GRANT option, run the following query:
GRANT ALL ON TYPE SYSUDTLIB.UDT_VARCHAR TO PUBLIC WITH GRANT OPTION;
The protect/unprotect operations for the UDTs must be performed using the bteq utility.
Press ENTER.
The script creates the UDTs and grants access permissions using the SQL statements.
2.5 - Configuring the Protector
2.5.1 - Working with the config.ini file
This page discusses about the config.ini file for the Teradata Data Warehouse Protector.
By default, this file is located in the /opt/protegrity/databaseprotector/teradata/data/ directory.
2.5.1.1 - Accessing the config.ini File
Log in to the server as the user with the required permissions.
Navigate to the directory where you have downloaded the installation package.
For example, /opt/protegrity/databaseprotector/teradata/data/
To view the contents within the directory, run the following command:
/opt/protegrity/databaseprotector/teradata/data # ls -ltr
Press ENTER.
The list of available configurable files appears.
total 4
-rw-r----- 1 tdatuser tdtrusted 1058 Oct 14 01:27 config.ini
To open the config.ini file, run the following command:
/opt/protegrity/databaseprotector/teradata/data # vim config.ini
Press ENTER.
The vim utility starts and the contents of the config.ini file appears.
###############################################################################
# Log Provider Config
###############################################################################
[log]

# In case that connection to fluent-bit is lost, set how audits/logs are handled
#
# drop  : (default) Protector throws logs away if connection to the fluentbit is lost
# error : Protector returns error without protecting/unprotecting
#         data if connection to the fluentbit is lost
mode = drop

# Host/IP to fluent-bit where audits/logs will be forwarded from the protector
#
# Default localhost
host = localhost

###############################################################################
# Protector Config
###############################################################################
[protector]

# cadence is used to decide whether deployment is dynamic or immutable.
#
# '0' is used for immutable deployment.
# Non-negative values other than '0' is used as policy sync interval for dynamic deployment.
# default cadence value is '60'.
cadence = 60
For more information about parameters in the config.ini file, refer to Parameters in the config.ini file.
To close the config.ini file, run the following command:
Important: To reflect any changes made to the config.ini file, you must restart the Teradata Database.
To restart the Teradata Database, run the following command:
# tpareset -f <reason for restart>
Press ENTER.
A prompt to continue with restarting the database appears.
You are about to restart the database
  on the system
     'localhost'
Do you wish to continue (default: n) [y,n]
To continue with restarting the database, type y.
The Teradata Database restarts successfully.
2.5.1.2 - Understanding the Parameters in the config.ini File
The following table consists of the config.ini parameters along with the descriptions:
| Configuration Component | Parameter | Description |
|---|
| Log | mode | Specifies how the protector logs are handled by the Log Forwarder. If the connection to the Log Forwarder host is lost, you can set the connection mode to one of the following types:
- drop: Specifies the logs that the protector fails to record when the connection to the Log Forwarder is lost. By default, the Log Forwarder is configured to operate in the drop mode.
- error: Stops all the data security operations and throws an error when the connection to the Log Forwarder is lost.
Syntax: Parameter = Value
Example: mode = error |
| host | Specifies the Log Forwarder hostname or the IP address where the logs are forwarded from the protector. The default host for the Log Forwarder is localhost.
Syntax: Parameter = Value
Example: host = <Hostname or IP Address> |
| Protector | cadence | Specifies the time interval at which the protector synchronizes with the shared memory for fetching the policy package. The default value for the cadence parameter is 60 seconds. The minimum and maximum values that can be set for the cadence parameter are 0 seconds and 86400 seconds (24 hours) respectively.
Important: If the cadence parameter value is set to 0 seconds, then the policy is fetched only once at the time of initialization. After initialization, the protector does not fetch for the new policy changes as a result of immutable deployment.
Syntax: Parameter = Value
Example: cadence = <time interval in seconds> |
2.5.2 - Updating the Output Buffer for the Unicode UDFs
This page discusses the process to update the output buffer length for the Varchar Unicode UDFs.
By default, the value of the output buffer length is 500 characters. This value can be modified during the installation of the Teradata objects.
After completing the installation process, you may need to manually update the output buffer length values if necessary. For instance, if you need to protect strings longer than 500 bytes, adjust the buffer length to accommodate the largest string size. Be aware that a big buffer size slows the overall performance. Additionally, each protection method has a size limitations. For example, tokenization has a maximum size limit of 4096 bytes.
The output buffer sizes for all the UDFs are stored in both, the dbpuserconf.ini and createvarcharunicode.sql files.
The process to update the output buffer length for the Varchar Unicode UDFs involves the following steps:
- To update the output buffer length in the
dbpuserconf.ini file, refer to Updating the dbpuserconf.ini file. - To update the output buffer length in the
createvarcharunicode.sql file, refer to Updating the createvarcharunicode.sql file. - To uninstall the Varchar Unicode UDFs using the
dropvarcharunicode.sql file, refer to Uninstalling the UDFs. - To re-create the Varchar Unicode UDFs using the
createvarcharunicode.sql file, refer to Creating the UDFs.
2.5.2.1 - Updating the dbpuserconf.ini file
Log in to the server as the user with the required permissions.
Navigate to the directory where you have downloaded the dbpuserconf.ini file.
For example, /etc/protegrity/
To view the contents within the directory, run the following command:
/etc/protegrity/ # ls -ltr
Press ENTER.
The list of available configurable files appears.
total 4
-rw-r----- 1 tdatuser tdtrusted 1058 Jan 28 01:27 dbpuserconf.ini
To open the dbpuserconf.ini file, run the following command:
/etc/protegrity/ # vim dbpuserconf.ini
Press ENTER.
The vim utility starts and the contents of the dbpuserconf.ini file appears.
###############################################################################
# Config ini
###############################################################################
[config_ini]
# path points to database protector installation directory
path = /opt/protegrity/databaseprotector/teradata/data/config.ini

###############################################################################
# Protector Varchar Sizes (set by user during installation)
###############################################################################
[varchar_sizes]
UDF_VARCHAR_MAX = 500
UDF_VARCHAR_OVERHEADMAX = 500
VARCHAR_MAX_IN_BUF_LEN_TOKEN_LATIN = 500
VARCHAR_MAX_OUT_BUF_LEN_TOKEN_LATIN = 676
VARCHAR_MAX_IN_BUF_LEN_ENC_LATIN = 500
VARCHAR_MAX_OUT_BUF_LEN_ENC_BYTES = 538
VARCHAR_MAX_IN_BUF_LEN_TOKEN_UNICODE = 500
VARCHAR_MAX_OUT_BUF_LEN_TOKEN_UNICODE = 1356
VARCHAR_MAX_IN_BUF_LEN_ENC_UNICODE = 500
VARCHAR_UNICODE_MAX_OUT_BUF_LEN_ENC_BYTES = 1038
TdvmDev2:/etc/protegrity/ #
Important: You must update the VARCHAR_MAX_OUT_BUF_LEN_TOKEN_UNICODE parameter with the required output buffer length.
To save the changes to the dbpuserconf.ini file, run the following command:
2.5.2.2 - Updating the createvarcharunicode.sql file
Log in to the server as the user with the required permissions.
Navigate to the /opt/protegrity/databaseprotector/teradata/sqlscripts/ directory.
To update the output buffer length in the createvarcharunicode.sql file, run the following command:
vim createvarcharunicode.sql
Press ENTER.
The vim utility starts and the contents of the createvarcharunicode.sql file appears.
Ensure to update the value of the output buffer length for the PTY_VARCHARUNICODEINS, PTY_VARCHARUNICODESEL, and PTY_VARCHARUNICODESELEX UDFs as per your requirements.
To save changes to the createvarcharunicode.sql file, run the following command:
Important: To reflect any changes made to the createvarcharunicode file, you must restart the Teradata Database.
To restart the Teradata Database, run the following command:
# tpareset -f <reason for restart>
Important: Updating the createvarcharunicode.sql file does not require a tpareset.
Press ENTER.
A prompt to continue with restarting the database appears.
You are about to restart the database
  on the system
     'localhost'
Do you wish to continue (default: n) [y,n]
To continue with restarting the database, type y.
The Teradata Database restarts successfully.
2.6 - Uninstalling the Protector
This page discusses the uninstallation process for the Protegrity Teradata Data Warehouse Protector.
2.6.1 - Uninstalling the Log Forwarder
Log in to the server as the user with the required permissions.
Navigate to the /opt/protegrity/logforwarder/bin/ directory.
To stop the Log Forwarder, run the following command:
Press ENTER.
The command stops the Log Forwarder.
Stopping Logforwarder with PID: 20658
Please Wait
To verify the status of Log Forwarder, run the following command:
./logforwarderctrl status
Press ENTER.
The status of the Log Forwarder appears.
Logforwarder is not running
Navigate to the /opt/protegrity/ directory.
To remove the /logforwarder/ directory, run the following command.
Press ENTER.
The command removes the the /logforwarder/ directory and completes the uninstallation for the Log Forwarder.
2.6.2 - Uninstalling the RPAgent
Log in to the server as the user with the required permissions.
Navigate to the /opt/protegrity/rpagent/bin/ directory.
To stop the RPAgent, run the following command:
Press ENTER.
The command stops the RPAgent.
Stopping RP Agent (PID: 10856)
Please Wait
To verify the status of RPAgent, run the following command:
Press ENTER.
The status of the RPAgent appears.
Navigate to the /opt/protegrity/ directory.
To remove the /rpagent/ directory, run the following command:
Press ENTER.
The command removes the /rpagent/ directory and completes the uninstallation for the RPAgent.
2.6.3 - Uninstalling the User Defined Functions (UDFs)
Log in to the server as the user with the required permissions.
Navigate to the /opt/protegrity/databaseprotector/teradata/sqlscripts/ directory.
To start the bteq utility, run the following command:
/opt/protegrity/databaseprotector/teradata/sqlscripts/ # bteq
Press ENTER.
The prompt to log in to the database appears.
Enter your logon or BTEQ command:
To log in to the database, run the following command:
Press ENTER.
The prompt to enter the database password appears.
To proceed with the removal of the UDFs, type the database password.
Press ENTER.
The connection to the Teradata database is completed successfully.
*** Logon successfully completed.
To remove the installed UDFs from the Teradata Data Warehouse Protector, run the following query:
.run file=dropobjects.sql
Press ENTER.
The script removes each of the UDFs and the following message for each of the removed UDF appears.
*** Function has been dropped.
*** Warning: 5607 Check output for possible warnings encountered in compiling and/or linking UDF/XSP/UDM/UDT.
*** Total elapsed time was 1 second.
To remove the Varchar Unicode UDFs installed on the Teradata Data Warehouse Protector, run the following query:
.run file=dropvarcharunicode.sql
Press ENTER.
The script removes each of the UDFs and the following message for each of the removed UDF appears.
*** Function has been dropped.
*** Warning: 5607 Check output for possible warnings encountered in compiling and/or linking UDF/XSP/UDM/UDT.
*** Total elapsed time was 1 second.
To remove the Decimal UDFs installed on the Teradata Data Warehouse Protector, run the following query:
.run file=dropdecimalobjects.sql
Press ENTER.
The script removes each of the UDFs and the following message for each of the removed UDF appears.
*** Function has been dropped.
*** Warning: 5607 Check output for possible warnings encountered in compiling and/or linking UDF/XSP/UDM/UDT.
*** Total elapsed time was 1 second.
2.6.4 - Removing the Installation Directory
You must delete the installation directory to complete the process of uninstalling the Teradata Data Warehouse Protector.
To remove the installation directory:
Log in to the server as the user with the required permissions.
Navigate to the /opt/protegrity/ directory.
To delete the installation directory, run the following command:
rm -rf /databaseprotector/
Press ENTER.
The command deletes the files and the sub-directories within the specified directory.
This step completes the uninstallation process of the Teradata Data Warehouse Protector.
3 - User Defined Functions and APIs
The Data Warehouse Protector contains User Defined Functions (UDF), which perform the following:
- Fetches the policy related information from the shared memory
- Applies the access control settings that are derived on the basis of policy settings
- Encrypts or tokenizes the data based on the policy settings
- Generates Audit logs
To avoid any performance issues resulting due to casting of the data, a general best practice is to protect the data and present the decryption related API/UDFs/commands, as applicable, in the tables as views to authorized users only. This eliminates the unauthorized user’s access to the decryption API/UDFs/commands by limiting the access to the protected data only.
The decryption process is limited to authorized users and thus, does not cause any performance impact as the API/UDFs/commands are executed restrictively.
Warning: With the Data Warehouse protector, you cannot use different data elements for different rows in the same query because of the caching feature. The caching feature will cache the data element that you pass and it will use the same data element for protect or unprotect actions in the column.
3.1 - Teradata UDFs
Learn about the User Defined Functions and Procedures in Teradata.
This page provides a detailed list of User Defined Functions (UDFs) for general information, protection, and unprotection of data with different data types.
It is recommended to run the sample queries in BTEQ (Basic Teradata Query). For more information, refer to Sample Scripts provided in the Teradata Data Warehouse Protector package at the default location, /opt/protegrity/databaseprotector/teradata/sqlscripts/.
Protegrity UDFs can support the JSON format for protection and unprotection. It is not possible to mask data stored in XML or JSON (JavaScript Object Notation) formats. While executing the Unprotect UDFs for these formats, clear data is returned with an error message. Masking is supported only with the Varchar UDFs.
Teradata UDFs for Protection
This section provides a detailed list of User Defined Functions (UDFs) for general information, and protection, unprotection, and tokenization of data with different data types.
Teradata UDFs - Deterministic and Non-deterministic clauses
Teradata supports the following two optional clauses to categorize if the UDF returns identical results for identical inputs or not.
- DETERMINISTIC - specifies that the UDF function returns the same results for identical inputs. The de-tokenization and decryption UDFs are defined with the DETERMINISTIC clause.
- NOT DETERMINISTIC - specifies that the UDF function returns non-identical results for identical inputs. This is the default option. The tokenization and encryption UDFs are defined with the NOT DETERMINISTIC clause.
Risk
In case of a query with constant arguments to the DETERMINISTIC UDF call, Teradata may cache the result of the evaluated UDF, as designed. During subsequent query execution, the results may be fetched from the Teradata internal cache without evaluating the UDF.
This is a risk because it can cause unauthorized access to the protected data due to lack of authorization check during the UDF execution. In addition, altering the clause to NOT DETERMINISTIC may cause performance issues as the UDFs defined with the DETERMINISTIC clause execute faster in comparison to the UDFs defined with the NOT DETERMINISTIC clause.
As per usage, if you are not using any constants in the UDF call, then you can recreate the UDF with the DETERMINISTIC clause to ensure faster performance.
Important: For all the Teradata UDFs, the communicationid and scid parameters are no longer used and are retained for compatibility purposes only. It is recommended to set the values for these parameters as zero.
- General UDFs
- Access Check UDFs
- Varchar Latin UDFs
- Varchar Unicode UDF
- Float UDFs
- Small Integer UDFs
- Integer UDFs
- Big Integer UDFs
- Date UDFs
- 8-Byte AND 16-Byte Decimal UDFs
- JSON UDFs
- XML UDFs
Teradata UDFs for No Encryption
This section provides a list of User Defined Functions (UDFs) that can be used with No Encryption data elements.
- Float UDFs for No Encryption
- Date UDFs for No Encryption
- 8-Byte and 16-Byte Decimal UDFs for No Encryption
3.1.1 - General UDFs
This section includes the general UDFs that can be used to retrieve the Teradata Protector version and the current user.
pty_whoami
This UDF returns the name of the user who is currently logged in.
Signature:
Parameters:
None
Returns:
The function returns the name of user logged in to the database.
Example:
pty_getversion
This UDF returns the version of the installed Teradata Data Warehouse Protector.
Signature:
Parameters:
None
Returns:
The function returns the version of the product as a string
Example:
pty_getdbsinfo
This UDF returns the Teradata session, statement, and request numbers. These parameters are captured in audit logs and can be cross-referenced in the ESA Forensics View.
Signature:
Parameters:
None
Returns:
The function returns the following parameters in a string.
| Name | Type | Description |
|---|
session | STRING | Specifies the Teradata session number. |
request | STRING | Specifies the Teradata request number |
statement | STRING | Specifies the Teradata statement identifier. |
Example:
3.1.2 - Access Check UDFs
This section includes list of UDFs that can be used to check select access-related information.
pty_checkselaccess
This UDF checks whether a database user has unprotect access for a set of data elements. To run this UDF, the database user should be granted access rights for protection.
Signature:
pty_checkselaccess(dataelement<n> VARCHAR, resultlen INTEGER, communicationid INTEGER)
Parameters:
| Name | Type | Description |
|---|
dataelement1 | VARCHAR | Specifies the name of the data element to check. |
dataelement2 | VARCHAR | Specifies the name of the data element to check. |
dataelement3 | VARCHAR | Specifies the name of the data element to check. |
resultlen | INTEGER | Specifies the length of the buffer to hold the result. |
communicationid | INTEGER | Specify the value as 0. This parameter is deprecated. |
Returns:
The function returns a 3-CHARACTER string.
- Position 1: Value 1 indicates select permissions on dataelement1, value 0 indicates no select permissions
- Position 2: Value 1 indicates select permissions on dataelement2, value 0 indicates no select permissions
- Position 3: Value 1 indicates select permissions on dataelement3, value 0 indicates no select permissions
Exception:
None
Example:
select pty_checkselaccess('AES256', 'AES128', 'AES128_IV_CRC_KID', 3, 0);
3.1.3 - Varchar Latin UDFs
The Varchar Latin UDFs accept the string data encoded in the Latin character set.
Important: Do not exceed the maximum output buffer length when using the result length parameter (resultlen) in the Varchar Latin UDFs.
For more information about the maximum output buffer length, for each Varchar Latin UDF, refer to Installing the Teradata Objects.
pty_varcharlatinenc
This UDF protects the string data using an Encryption data element.
Signature:
pty_varcharlatinenc(col VARCHAR, dataelement VARCHAR, resultlen INTEGER, communicationid INTEGER, scid INTEGER)
Parameters:
| Name | Type | Description |
|---|
col | VARCHAR | Specifies the data to protect. |
dataelement | VARCHAR | Specifies the name of the data element. |
resultlen | INTEGER | Specifies the length of the buffer to hold the result. |
communicationid | INTEGER | Specify the value as 0. This parameter is deprecated. |
scid | INTEGER | Specify the value as 0. This parameter is deprecated. |
Returns:
The function returns the protected VARBYTE value.
Exception:
If the user does not have protect access rights in the policy, then the UDF terminates with an error message explaining what went wrong.
Example:
select pty_varcharlatinenc ('Any character value! ', 'AES256',500,0,0);
pty_varcharlatindec
This UDF unprotects the protected string data.
Signature:
pty_varcharlatindec(col VARBYTE, dataelement VARCHAR, resultlen INTEGER, communicationid INTEGER, scid INTEGER)
Parameters:
| Name | Type | Description |
|---|
col | VARBYTE | Specifies the data to unprotect. |
dataelement | VARCHAR | Specifies the name of the data element. |
resultlen | INTEGER | Specifies the length of the buffer to hold the result. |
communicationid | INTEGER | Specify the value as 0. This parameter is deprecated. |
scid | INTEGER | Specify the value as 0. This parameter is deprecated. |
Returns:
- The function returns an unprotected character value.
- The function returns NULL when the user has no access to the data in the policy.
Exception:
If you configure an exception in the policy and the user does not have access, then the UDF terminates with an error message explaining what went wrong.
Example:
select pty_varcharlatindec(pty_varcharlatinenc('Any character value! ', 'dataelement',500,0,0 ), 'dataelement',500,0,0 );
pty_varcharlatindecex
This UDF unprotects the protected string data.
Signature:
pty_varcharlatindecex(col VARCHAR, dataelement VARCHAR, resultlen INTEGER, communicationid INTEGER, scid INTEGER)
Parameters:
| Name | Type | Description |
|---|
col | VARCHAR | Specifies the data to unprotect. |
dataelement | VARCHAR | Specifies the name of the data element to check. |
resultlen | INTEGER | Specifies the length of the buffer to hold the result. |
communicationid | INTEGER | Specify the value as 0. This parameter is deprecated. |
scid | INTEGER | Specify the value as 0. This parameter is deprecated. |
Returns:
- The function returns an unprotected character value.
- The function returns an error instead of NULL, if the user does not have access rights.
Exception:
If the user does not have access rights in the policy, then the UDF terminates with an error message explaining what went wrong.
Example:
select pty_varcharlatindecex(PTY_VARCHARLATINENC('ProtegrityProt', 'AES256',100,0,0 ), 'AES256',100,0,0 );
pty_varcharlatinins
This UDF protects the string data using type-preserving data elements, such as, tokens, and No Encryption for access control.
Signature:
pty_varcharlatinins(col VARCHAR, dataelement VARCHAR, resultlen INTEGER, communicationid INTEGER, scid INTEGER)
Parameters:
| Name | Type | Description |
|---|
col | VARCHAR | Specifies the data to protect. |
dataelement | VARCHAR | Specifies the name of the data element. |
resultlen | INTEGER | Specifies the length of the buffer to hold the result. |
communicationid | INTEGER | Specify the value as 0. This parameter is deprecated. |
scid | INTEGER | Specify the value as 0. This parameter is deprecated. |
Returns:
- The function returns the protected VARCHAR value.
- The function returns NULL when user has no access to the data in the policy.
Exception:
If the user does not have access rights in the policy, then the UDF terminates with an error message explaining what went wrong.
Example:
SELECT pty_varcharlatinins('Any character value! ', 'dataelement',500,0,0 );
Email Tokenization:
This UDF can be used to tokenize email input type.
In the following example, email is a token element created in the ESA of email type.
pty_varcharlatinins('email@protegrity.com','email',32,0,0);
Timestamp Tokenization:
This UDF can be used to tokenize timestamp data.
The following example displays a sample of timestamp tokenization:
select pty_varcharlatinins(cast('22-09-1990' as varchar(32)),'alphanum',64,0,0);
pty_varcharlatinsel
This UDF unprotects the protected string data.
Signature:
pty_varcharlatinsel(col VARCHAR, dataelement VARCHAR, resultlen INTEGER, communicationid INTEGER, scid INTEGER)
Parameters:
| Name | Type | Description |
|---|
col | VARCHAR | Specifies the data to unprotect. |
dataelement | VARCHAR | Specifies the name of the data element. |
resultlen | INTEGER | Specifies the length of the buffer to hold the result. |
communicationid | INTEGER | Specify the value as 0. This parameter is deprecated. |
scid | INTEGER | Specify the value as 0. This parameter is deprecated. |
Returns:
- The function returns an unprotected character value.
- The function returns the protected value if this option is configured in the policy and the user does not have access to data.
- The function returns NULL when user has no access to the data in the policy.
Exception:
If the user does not have access rights in the policy, then the UDF terminates with an error message explaining what went wrong.
Note: If the input data length exceeds the given output buffer length, then the audit logs are blocked and the following error message appears:
Input or output buffer is too small
Example:
SELECT pty_varcharlatinsel(pty_varcharlatinins('Any character value! ', 'dataelement',500,0,0 ), 'dataelement',500,0,0 );
Email De-tokenization:
This UDF can be used to de-tokenize email input type tokenized using the PTY_VARCHARLATININS UDF.
In the following example, email is a token element created in the ESA of email type.
pty_varcharlatinsel('F00CJ@protegrity.com','email',32,0,0);
Timestamp Data De-tokenization:
This UDF can be used to de-tokenize timestamp data tokenized using the PTY_VARCHARLATININS UDF. The following example displays a sample of timestamp data de-tokenization.
sel cast(pty_varcharlatinsel(pty_varcharlatinins(cast('2019-04-14 08:30:41-04:00' as varchar(64)),'TE_N_S16_L3R1_ASTYES',64,0,0),'TE_N_S16_L3R1_ASTYES',64,0,0) AS TIMESTAMP(0));
pty_varcharlatinselex
This UDF unprotects the protected string data.
Signature:
pty_varcharlatinselex(col VARCHAR, dataelement VARCHAR, resultlen INTEGER, communicationid INTEGER, scid INTEGER)
Parameters:
| Name | Type | Description |
|---|
col | VARCHAR | Specifies the data to unprotect. |
dataelement | VARCHAR | Specifies the name of the data element. |
resultlen | INTEGER | Specifies the length of the buffer to hold the result. |
communicationid | INTEGER | Specify the value as 0. This parameter is deprecated. |
scid | INTEGER | Specify the value as 0. This parameter is deprecated. |
Returns:
- The function returns an unprotected character value.
- The function returns the protected value if this option is configured in the policy and the user does not have access to the data.
- The function returns an error instead of NULL if the user does not have access.
Exception:
If the user does not have access rights in the policy, then the UDF terminates with an error message explaining what went wrong.
Note: If the input data length exceeds the given output buffer length, then the audit logs are blocked and the following error message appears:
Input or output buffer is too small
.
Example:
SELECT pty_varcharlatinselex(pty_varcharlatinins('Any character value! ', 'dataelement',500,0,0 ), 'dataelement',500,0,0 );
pty_varcharlatinhash
This UDF calculates the hash value of a string data.
Attention: This is a one-way function and you cannot unprotect the data.
Signature:
pty_varcharlatinhash(col VARCHAR, dataelement VARCHAR, resultlen INTEGER, communicationid INTEGER, scid INTEGER)
Parameters:
| Name | Type | Description |
|---|
col | VARCHAR | Specifies the data to protect. |
dataelement | VARCHAR | Specifies the name of the data element. |
resultlen | INTEGER | Specifies the length of the buffer to hold the result. |
communicationid | INTEGER | Specify the value as 0. This parameter is deprecated. |
scid | INTEGER | Specify the value as 0. This parameter is deprecated. |
Returns:
The function returns the hash value.
Exception:
If the user does not have protect access rights in the policy, then the UDF terminates with an error message explaining what went wrong.
Caution: Starting from the version 10.0.x, the HMAC-SHA1 protection method is deprecated.
It is recommended to use the HMAC-SHA256 protection method instead of the HMAC-SHA1 protection method.
For assistance in switching to a different protection method, contact Protegrity Support.
Example:
SELECT pty_varcharlatinhash ('ProtegrityProt', 'HMAC_SHA256', 100,0,0);
3.1.4 - Varchar Unicode UDFs
The Varchar Unicode UDFs accept the string data encoded in the UNICODE character set.
Important: Do not exceed the maximum output buffer length when using the result length parameter (resultlen) in the Varchar Unicode UDFs.
For more information about the maximum output buffer length, for each Varchar Unicode UDF, refer to Installing the Teradata Objects.
pty_varcharunicodeenc
This UDF protects the Unicode string using an Encryption data element for encryption.
Signature:
pty_varcharunicodeenc(col VARCHAR, dataelement VARCHAR, resultlen INTEGER, communicationid INTEGER, scid INTEGER)
Parameters:
| Name | Type | Description |
|---|
col | VARCHAR | Specifies the data to protect. |
dataelement | VARCHAR | Specifies the name of the data element. |
resultlen | INTEGER | Specifies the length of the buffer to hold the result. |
communicationid | INTEGER | Specify the value as 0. This parameter is deprecated. |
scid | INTEGER | Specify the value as 0. This parameter is deprecated. |
Returns:
The function returns the protected VARBYTE value.
Exception:
If the user does not have protect access rights in the policy, then the UDF terminates with an error message explaining what went wrong.
Example:
SELECT pty_varcharunicodeenc (TRANSLATE(CAST('ProtegrityProt' AS VARCHAR(50)) USING LATIN_TO_UNICODE), 'AES_128',100,0,0 );
pty_varcharunicodedec
This UDF unprotects the protected Unicode string data.
Signature:
pty_varcharunicodedec(col VARBYTE, dataelement VARCHAR, resultlen INTEGER, communicationid INTEGER, scid INTEGER)
Parameters:
| Name | Type | Description |
|---|
col | VARBYTE | Specifies the data to unprotect. |
dataelement | VARCHAR | Specifies the name of the data element. |
resultlen | INTEGER | Specifies the length of the buffer to hold the result. |
communicationid | INTEGER | Specify the value as 0. This parameter is deprecated. |
scid | INTEGER | Specify the value as 0. This parameter is deprecated. |
Returns:
- The function returns an unprotected Unicode character value.
- The function returns NULL when user has no access to the data in the policy.
Exception:
If you configure an exception in the policy and the user does not have access, then the UDF terminates with an error message explaining what went wrong.
Example:
SELECT pty_varcharunicodedec(pty_varcharunicodeenc(TRANSLATE(CAST ('ProtegrityProt' AS VARCHAR(50)) USING LATIN_TO_UNICODE, 'AES256',100,0,0), 'AES256',100,0,0 ));
pty_varcharunicodedecex
This UDF unprotects the protected Unicode string data.
Signature:
pty_varcharunicodedecex(col VARBYTE, dataelement VARCHAR, resultlen INTEGER, communicationid INTEGER, scid INTEGER)
Parameters:
| Name | Type | Description |
|---|
col | VARBYTE | Specifies the data to unprotect. |
dataelement | VARCHAR | Specifies the name of the data element. |
resultlen | INTEGER | Specifies the length of the buffer to hold the result. |
communicationid | INTEGER | Specify the value as 0. This parameter is deprecated. |
scid | INTEGER | Specify the value as 0. This parameter is deprecated. |
Returns:
- The function returns an unprotected character value.
- The function returns an error instead of NULL if the user does not have access.
Exception:
If you configure an exception in the policy and the user does not have access, then the UDF terminates with an error message explaining what went wrong.
Example:
SELECT pty_varcharunicodedecex(pty_varcharunicodeenc(TRANSLATE(CAST ('ProtegrityProt' AS VARCHAR(50)) USING LATIN_TO_UNICODE), 'AES256', 100, 0,0), 'AES256', 100, 0,0);
pty_varcharunicodeins
This UDF protects Unicode string data using type-preserving data elements, such as, tokens, Format Preserving Encryption (FPE) data elements, and No Encryption for access control.
Signature:
pty_varcharunicodeins(col VARCHAR, dataelement VARCHAR, resultlen INTEGER, communicationid INTEGER, scid INTEGER)
Parameters:
| Name | Type | Description |
|---|
col | VARCHAR | Specifies the data to protect.The maximum input size for single-byte characters is 4096 code points.The maximum input size for multi-byte characters will vary depending on the session character set. |
dataelement | VARCHAR | Specifies the name of the data element. |
resultlen | INTEGER | Specifies the length of the buffer to hold the result. |
communicationid | INTEGER | Specify the value as 0. This parameter is deprecated. |
scid | INTEGER | Specify the value as 0. This parameter is deprecated. |
Note: For pty_varcharunicodeins, set the resultlen parameter to four times the input buffer length for optimal results.
If the calculated value (four times the input buffer length) exceeds the maximum configured output buffer length, then it is recommended to use the maximum allowed output buffer length.
For more information about the maximum output buffer length, for each Varchar Unicode UDF, refer to Installing the Teradata Objects.
Returns:
The function returns the protected VARCHAR value.
Exception:
If the user does not have protect access rights in the policy, then the UDF terminates with an error message explaining what went wrong.
Example for Unicode Gen2:
The Unicode Gen2 data elements supports the newly introduced SLT_X_1 tokenizer along with the existing SLT_1_3 tokenizer.
For more information about the Unicode Gen2 data elements, refer to Unicode Gen2.
SELECT pty_varcharunicodeins(TRANSLATE(CAST ('ProtegrityProt' AS VARCHAR(50)) USINGLATIN_TO_UNICODE), 'TE_UG2_SLT_13_L2R2_Y_BasicLatin', 100, 0,0);
SELECT pty_varcharunicodeins(TRANSLATE(CAST ('ϠϡϢϣϥϦ' AS VARCHAR(1000)) USINGLATIN_TO_UNICODE), 'TE_UG2_SLTX1_L2R2_N_IPA_Greek_Coptic_UTF16LE', 1000, 0,0);
pty_varcharunicodesel
This UDF unprotects Unicode string data protected by data elements, such as, tokens, Format Preserving Encryption (FPE) data elements, and No Encryption for access control.
Warning: This UDF does not support masking.
Signature:
pty_varcharunicodesel(col VARCHAR, dataelement VARCHAR, resultlen INTEGER, communicationid INTEGER, scid INTEGER)
Parameters:
| Name | Type | Description |
|---|
col | VARCHAR | Specifies the data to unprotect.The maximum input size for single-byte characters is 4096 code points.The maximum input size for multi-byte characters will vary depending on the session character set. |
dataelement | VARCHAR | Specifies the name of the data element. |
resultlen | INTEGER | Specifies the length of the buffer to hold the result. |
communicationid | INTEGER | Specify the value as 0. This parameter is deprecated. |
scid | INTEGER | Specify the value as 0. This parameter is deprecated. |
For pty_varcharunicodesel, you must set the resultlen parameter to four times the input buffer length for optimal results.
If the calculated value (four times the input buffer length) exceeds the maximum configured output buffer length, then it is recommended to use the maximum allowed output buffer length.
For more information about the maximum output buffer length, for each Varchar Unicode UDF, refer to Installing the Teradata Objects.
Returns:
- The function returns an unprotected character value.
- The function returns a protected value if this option is configured in the policy and the user does not have access to data.
- The function returns NULL when the user has no access to data in the policy.
Exception:
- If you configure an exception in the policy and the user does not have access, then the UDF terminates with an error message explaining what went wrong.
If the input data length exceeds the given output buffer length, then the audit logs are blocked and the following error message appears:
Input or output buffer is too small
Example for Unicode Gen2:
The Unicode Gen2 data elements support the newly introduced SLT_X_1 tokenizer along with the existing SLT_1_3 tokenizer.
For more information about the Unicode Gen2 data elements, refer to Unicode Gen2.
select pty_varcharunicodesel(pty_varcharunicodeins(TRANSLATE(CAST ('ProtegrityProt' AS VARCHAR(50)) USING LATIN_TO_UNICODE),'TE_UG2_SLT_13_L2R2_Y_BasicLatin', 100, 0,0),'TE_UG2_SLT_13_L2R2_Y_BasicLatin', 100, 0,0);
select pty_varcharunicodesel(pty_varcharunicodeins(TRANSLATE(CAST ('ϠϡϢϣϥϦ' AS VARCHAR(1000)) USINGLATIN_TO_UNICODE), 'TE_UG2_SLTX1_L2R2_N_IPA_Greek_Coptic_UTF16LE', 1000, 0,0), 'TE_UG2_SLTX1_L2R2_N_IPA_Greek_Coptic_UTF16LE', 1000, 0,0);
pty_varcharunicodeselex
This UDF unprotects Unicode string data protected by data elements, such as, tokens, Format Preserving Encryption (FPE) data elements, and No Encryption for access control.
Warning: This UDF does not support masking.
Signature:
pty_varcharunicodeselex(col VARCHAR, dataelement VARCHAR, resultlen INTEGER, communicationid INTEGER, scid INTEGER)
Parameters:
| Name | Type | Description |
|---|
col | VARCHAR | Specifies the data to unprotect. |
dataelement | VARCHAR | Specifies the name of the data element. |
resultlen | INTEGER | Specifies the length of the buffer to hold the result. |
communicationid | INTEGER | Specify the value as 0. This parameter is deprecated. |
scid | INTEGER | Specify the value as 0. This parameter is deprecated. |
For pty_varcharunicodeselex, set the resultlen parameter to four times the input buffer length for optimal results.
If the calculated value (four times the input buffer length) exceeds the maximum configured output buffer length, then it is recommended to use the maximum allowed output buffer length.
For more information about the maximum output buffer length, for each Varchar Unicode UDF, refer to Installing the Teradata Objects.
Returns:
- The function returns an unprotected character value.
- The function returns the protected value if this option is configured in the policy and the user does not have access to the data.
- The function returns an error instead of NULL if the user does not have access.
Exception:
If you configure an exception in the policy and the user does not have access, then the UDF terminates with an error message explaining what went wrong.
If the input data length exceeds the given output buffer length, then the audit logs are blocked and the following error message appears:
Input or output buffer is too small
.
Example:
select pty_varcharunicodeselex(pty_varcharunicodeins(TRANSLATE(CAST ('ProtegrityProt' AS VARCHAR(50)) USING LATIN_TO_UNICODE), 'NoEncryption', 100, 0,0), 'NoEncryption', 100, 0,0);
3.1.5 - Float UDFs
pty_floatenc
This UDF protects the float value using an Encryption data element.
Signature:
pty_floatenc(col FLOAT, dataelement VARCHAR, resultlen INTEGER, communicationid INTEGER, scid INTEGER)
Parameters:
| Name | Type | Description |
|---|
col | FLOAT | Specifies the data to protect. |
dataelement | VARCHAR | Specifies the name of the data element. |
resultlen | INTEGER | Specifies the length of the buffer to hold the result. |
communicationid | INTEGER | Specify the value as 0. This parameter is deprecated. |
scid | INTEGER | Specify the value as 0. This parameter is deprecated. |
Returns:
The function returns the protected VARBYTE value.
Exception:
If the user does not have protect access rights in the policy, then the UDF terminates with an error message explaining what went wrong.
Example:
select pty_floatenc(26656.0, 'AES256', 100, 0,0);
pty_floatdec
This UDF unprotects the protected float value.
Signature:
pty_floatdec(col VARBYTE, dataelement VARCHAR, communicationid INTEGER, scid INTEGER)
Parameters:
| Name | Type | Description |
|---|
col | VARBYTE | Specifies the data to unprotect. |
dataelement | VARCHAR | Specifies the name of the data element. |
communicationid | INTEGER | Specify the value as 0. This parameter is deprecated. |
scid | INTEGER | Specify the value as 0. This parameter is deprecated. |
Returns:
- The function returns an unprotected FLOAT value.
- The function returns NULL when the user has no access to the data in the policy.
Exception:
If you configure an exception in the policy and the user does not have access, then the UDF terminates with an error message explaining what went wrong.
Example:
select pty_floatdec(pty_floatenc(26656.0, 'AES256', 100, 0,0), 'AES256', 0,0);
pty_floatdecex
This UDF unprotects the protected float value.
Signature:
pty_floatdecex(col VARBYTE, dataelement VARCHAR, communicationid INTEGER, scid INTEGER)
Parameters:
| Name | Type | Description |
|---|
col | VARBYTE | Specifies the data to unprotect. |
dataelement | VARCHAR | Specifies the name of the data element. |
communicationid | INTEGER | Specify the value as 0. This parameter is deprecated. |
scid | INTEGER | Specify the value as 0. This parameter is deprecated. |
Returns:
- The function returns an unprotected FLOAT value.
- The function returns an error instead of NULL if the user does not have access
Exception:
If you configure an exception in the policy and the user does not have access, then the UDF terminates with an error message explaining what went wrong.
Example:
select pty_floatdecex(pty_floatenc(26656.0, 'AES256', 100, 0,0), 'AES256', 0,0);
pty_floathash
This UDF calculates the hash value for a float value.
Attention: This is a one-way function and you cannot unprotect the data.
Signature:
pty_floathash(col FLOAT, dataelement VARCHAR, resultlen INTEGER, communicationid INTEGER, scid INTEGER)
Parameters:
| Name | Type | Description |
|---|
col | FLOAT | Specifies the data to unprotect. |
dataelement | VARCHAR | Specifies the name of the data element. |
resultlen | INTEGER | Specifies the length of the buffer to hold the result. |
communicationid | INTEGER | Specify the value as 0. This parameter is deprecated. |
scid | INTEGER | Specify the value as 0. This parameter is deprecated. |
Returns:
The function returns the hash value.
Exception:
If you configure an exception in the policy and the user does not have access, then the UDF terminates with an error message explaining what went wrong.
Caution: Starting from the version 10.0.x, the HMAC-SHA1 protection method is deprecated.
It is recommended to use the HMAC-SHA256 protection method instead of the HMAC-SHA1 protection method.
For assistance in switching to a different protection method, contact Protegrity Support.
Example:
select pty_floathash(26656.0, 'HMAC_SHA256', 100, 0,0);
3.1.6 - Small Integer UDFs
pty_smallintenc
This UDF protects the small integer value using an Encryption data element.
Signature:
pty_smallintenc(col SMALLINT, dataelement VARCHAR, resultlen INTEGER, communicationidINTEGER, scid INTEGER)
Parameters:
| Name | Type | Description |
|---|
col | SMALLINT | Specifies the data to protect. |
dataelement | VARCHAR | Specifies the name of the data element. |
resultlen | INTEGER | Specifies the length of the buffer to hold the result. |
communicationid | INTEGER | Specify the value as 0. This parameter is deprecated. |
scid | INTEGER | Specify the value as 0. This parameter is deprecated. |
Returns:
The function returns the protected VARBYTE value.
Exception:
If the user does not have protect access rights in the policy, then the UDF terminates with an error message explaining what went wrong.
Example:
select pty_smallintenc(12345,'AES256',100,0,0);
pty_smallintdec
This UDF unprotects the small integer value.
Signature:
pty_smallintdec(col VARBYTE, dataelement VARCHAR, communicationid INTEGER, scid INTEGER)
Parameters:
| Name | Type | Description |
|---|
col | VARBYTE | Specifies the data to unprotect. |
dataelement | VARCHAR | Specifies the name of the data element. |
communicationid | INTEGER | Specify the value as 0. This parameter is deprecated. |
scid | INTEGER | Specify the value as 0. This parameter is deprecated. |
Returns:
- The function returns an unprotected SMALLINT value.
- The function returns NULL when the user has no access to the data in the policy.
Exception:
If you configure an exception in the policy and the user does not have access, then the UDF terminates with an error message explaining what went wrong.
Example:
select pty_smallintdec(pty_smallintenc(12345,'AES256',100,0,0),'AES256',0,0);
pty_smallintdecex
This UDF unprotects the protected small integer value.
Signature:
pty_smallintdecex(col VARBYTE, dataelement VARCHAR, communicationid INTEGER, scid INTEGER)
Parameters:
| Name | Type | Description |
|---|
col | VARBYTE | Specifies the data to unprotect. |
dataelement | VARCHAR | Specifies the name of the data element. |
communicationid | INTEGER | Specify the value as 0. This parameter is deprecated. |
scid | INTEGER | Specify the value as 0. This parameter is deprecated. |
Returns:
- The function returns an unprotected SMALLINT value.
- The function returns an error instead of NULL if the user does not have access
Exception:
If you configure an exception in the policy and the user does not have access, then the UDF terminates with an error message explaining what went wrong.
Example:
select pty_smallintdecex(pty_smallintenc(12345,'AES256',100,0,0),'AES256',0,0);
pty_smallintins
This UDF protects the small integer value using type-preserving data elements, such as, tokens and No Encryption for access control.
Signature:
pty_smallintins(col SMALLINT, dataelement VARCHAR, resultlen INTEGER, communicationid INTEGER, scid INTEGER)
Parameters:
| Name | Type | Description |
|---|
col | SMALLINT | Specifies the data to protect. |
dataelement | VARCHAR | Specifies the name of the data element. |
resultlen | INTEGER | Specifies the length of the buffer to hold the result. |
communicationid | INTEGER | Specify the value as 0. This parameter is deprecated. |
scid | INTEGER | Specify the value as 0. This parameter is deprecated. |
Returns:
The function returns the protected SMALLINT value.
Exception:
If you configure an exception in the policy and the user does not have access, then the UDF terminates with an error message explaining what went wrong.
Example:
select pty_smallintins(12345, 'TE_INT_2', 100, 0,0);
pty_smallintsel
This UDF unprotects the small integer value using type-preserving data elements, such as, tokens and No Encryption for access control.
Signature:
pty_smallintsel(col SMALLINT, dataelement VARCHAR, communicationid INTEGER, scid INTEGER)
Parameters:
| Name | Type | Description |
|---|
col | SMALLINT | Specifies the data to unprotect. |
dataelement | VARCHAR | Specifies the name of the data element. |
communicationid | INTEGER | Specify the value as 0. This parameter is deprecated. |
scid | INTEGER | Specify the value as 0. This parameter is deprecated. |
Returns:
- The function returns the unprotected SMALLINT value.
- The function returns the protected value if this option is configured in the policy and the user does not have access to the data.
- The function returns NULL when the user has no access to the data in the policy.
Exception:
If you configure an exception in the policy and the user does not have access, then the UDF terminates with an error message explaining what went wrong.
Example:
select pty_smallintsel(pty_smallintins(12345, 'TE_INT_2', 100, 0,0), 'TE_INT_2',0,0);
pty_smallintselex
This UDF unprotects the protected small integer value.
Signature:
pty_smallintselex(col SMALLINT, dataelement VARCHAR, communicationid INTEGER, scid INTEGER)
Parameters:
| Name | Type | Description |
|---|
col | SMALLINT | Specifies the data to unprotect. |
dataelement | VARCHAR | Specifies the name of the data element. |
communicationid | INTEGER | Specify the value as 0. This parameter is deprecated. |
scid | INTEGER | Specify the value as 0. This parameter is deprecated. |
Returns:
- The function returns the SMALLINT value.
- The function returns the protected value if this option is configured in the policy and the user does not have access to the data.
Exception:
If you configure an exception in the policy and the user does not have access, then the UDF terminates with an error message explaining what went wrong.
Example:
select pty_smallintselex(pty_smallintins(12345, 'TE_INT_2', 100, 0,0), 'TE_INT_2',0,0);
pty_smallinthash
This UDF calculates the hash value for a SMALLINT value. This is a one-way function and you cannot unprotect the data.
Signature:
pty_smallinthash(col SMALLINT, dataelement VARCHAR, resultlen INTEGER, communicationid INTEGER, scid INTEGER)
Parameters:
| Name | Type | Description |
|---|
col | SMALLINT | Specifies the data to protect. |
dataelement | VARCHAR | Specifies the name of the data element. |
resultlen | INTEGER | Specifies the length of the buffer to hold the result. |
communicationid | INTEGER | Set the value of the parameter to zero.
Note: This parameter is no longer used and is retained for compatibility purposes only. |
scid | INTEGER | Specifies the security co-ordinate ID. Set the value of the parameter to zero.
Note: This parameter is no longer used and is retained for compatibility purposes only. |
Returns:
The function returns the hash value.
Exception:
If you configure an exception in the policy and the user does not have access rights, then the UDF terminates with an error message explaining what went wrong.
Example:
select PTY_SMALLINTHASH(1234, 'HMAC_SHA256', 100, 0,0);
3.1.7 - Integer UDFs
pty_integerenc
This UDF protects integer value using an Encryption data element.
Signature:
pty_integerenc(col INTEGER, dataelement VARCHAR, resultlen INTEGER, communicationid INTEGER, scid INTEGER)
Parameters:
| Name | Type | Description |
|---|
col | INTEGER | Specifies the data to protect. |
dataelement | VARCHAR | Specifies the name of the data element. |
resultlen | INTEGER | Specifies the length of the buffer to hold the result. |
communicationid | INTEGER | Specify the value as 0. This parameter is deprecated. |
scid | INTEGER | Specify the value as 0. This parameter is deprecated. |
Returns:
The function returns the protected VARBYTE value.
Exception:
If the user does not have protect access rights in the policy, then the UDF terminates with an error message explaining what went wrong.
Example:
select pty_integerenc(1234, 'AES256', 100, 0,0);
pty_integerdec
This UDF unprotects the protected integer value.
Signature:
pty_integerdec(col VARBYTE, dataelement VARCHAR, communicationid INTEGER, scid INTEGER)
Parameters:
| Name | Type | Description |
|---|
col | VARBYTE | Specifies the data to unprotect. |
dataelement | VARCHAR | Specifies the name of the data element. |
communicationid | INTEGER | Specify the value as 0. This parameter is deprecated. |
scid | INTEGER | Specify the value as 0. This parameter is deprecated. |
Returns:
- The function returns the unprotected INTEGER value.
- The function returns NULL when the user has no access to the data in the policy.
Exception:
If you configure an exception in the policy and the user does not have access, then the UDF terminates with an error message explaining what went wrong.
Example:
select pty_integerdec(pty_integerenc(1234, 'AES256', 100, 0,0), 'AES256', 0,0);
pty_integerdecex
This UDF unprotects the protected integer value.
Signature:
pty_integerdecex(col VARBYTE, dataelement VARCHAR, communicationid INTEGER, scid INTEGER)
Parameters:
| Name | Type | Description |
|---|
col | VARBYTE | Specifies the data to unprotect. |
dataelement | VARCHAR | Specifies the name of the data element. |
communicationid | INTEGER | Specify the value as 0. This parameter is deprecated. |
scid | INTEGER | Specify the value as 0. This parameter is deprecated. |
Returns:
The function returns the unprotected INTEGER value.
Exception:
If the user does not have access rights in the policy, then the UDF terminates with an error message.
Example:
select pty_integerdecex(pty_integerenc(1234, 'AES256', 100, 0,0), 'AES256', 0,0);
pty_integerins
This UDF protects the integer value using type-preserving data elements, such as, tokens and No Encryption for access control.
Signature:
pty_integerins(col INTEGER, dataelement VARCHAR, resultlen INTEGER, communicationid INTEGER, scid INTEGER)
Parameters:
| Name | Type | Description |
|---|
col | INTEGER | Specifies the data to protect. |
dataelement | VARCHAR | Specifies the name of the data element. |
resultlen | INTEGER | Specifies the length of the buffer to hold the result. |
communicationid | INTEGER | Specify the value as 0. This parameter is deprecated. |
scid | INTEGER | Specify the value as 0. This parameter is deprecated. |
Returns:
The function returns the protected INTEGER value.
Exception:
If the user does not have protect access rights in the policy, then the UDF terminates with an error message explaining what went wrong.
Example:
select pty_integerins(1234, 'TE_INT_4', 100, 0,0);
pty_integersel
This UDF unprotects the protected integer value.
Signature:
pty_integersel(col INTEGER, dataelement VARCHAR, communicationid INTEGER, scid INTEGER)
Parameters:
| Name | Type | Description |
|---|
col | INTEGER | Specifies the data to protect. |
dataelement | VARCHAR | Specifies the name of the data element. |
communicationid | INTEGER | Specify the value as 0. This parameter is deprecated. |
scid | INTEGER | Specify the value as 0. This parameter is deprecated. |
Returns:
- The function returns the unprotected INTEGER value.
- The function returns the protected value if this option is configured in the policy and the user does not have access to the data.
- The function returns NULL when the user has no access to the data in the policy.
Exception:
If the user does not have protect access rights in the policy, then the UDF terminates with an error message explaining what went wrong.
Example:
select pty_integersel(pty_integerins(1234, 'TE_INT_4', 100, 0,0), 'TE_INT_4', 0,0);
pty_integerselex
This UDF unprotects the protected integer value.
Signature:
pty_integerselex(col INTEGER, dataelement VARCHAR, communicationid INTEGER, scid INTEGER)
Parameters:
| Name | Type | Description |
|---|
col | INTEGER | Specifies the data to unprotect. |
dataelement | VARCHAR | Specifies the name of the data element. |
communicationid | INTEGER | Specify the value as 0. This parameter is deprecated. |
scid | INTEGER | Specify the value as 0. This parameter is deprecated. |
Returns:
- The function returns the unprotected INTEGER value.
- The function returns the protected value if this option is configured in the policy and the user does not have access to the data.
Exception:
If you configure an exception in the policy and the user does not have the access rights in the policy, then the UDF terminates with an error message.
Example:
select pty_integerselex(pty_integerins(1234, 'TE_INT_4', 100, 0,0), 'TE_INT_4', 0,0);
pty_integerhash
This UDF calculates the hash value for integer value.
Attention: This is a one-way function and you cannot unprotect the data.
Signature:
pty_integerhash(col INTEGER, dataelement VARCHAR, resultlen INTEGER, communicationid INTEGER, scid INTEGER)
Parameters:
| Name | Type | Description |
|---|
col | INTEGER | Specifies the data to protect. |
dataelement | VARCHAR | Specifies the name of the data element. |
resultlen | INTEGER | Specifies the length of the buffer to hold the result. |
communicationid | INTEGER | Specify the value as 0. This parameter is deprecated. |
scid | INTEGER | Specify the value as 0. This parameter is deprecated. |
Returns:
- The function returns the hash value.
- The function returns NULL when the user has no access to the data in the policy.
Exception:
If the user does not have protect access rights in the policy, then the UDF terminates with an error message explaining what went wrong.
Example:
select pty_integerhash(1234, 'HMAC_SHA256', 100, 0,0);
Caution: Starting from the version 10.0.x, the HMAC-SHA1 protection method is deprecated.
It is recommended to use the HMAC-SHA256 protection method instead of the HMAC-SHA1 protection method.
For assistance in switching to a different protection method, contact Protegrity Support.
3.1.8 - Big Integer UDFs
pty_bigintenc
This UDF protects the Big Integer value using a data element for encryption.
Signature:
pty_bigintenc(col BIGINT, dataelement VARCHAR, resultlen INTEGER, communicationid INTEGER, scid INTEGER)
Parameters:
| Name | Type | Description |
|---|
col | VARBYTE | Specifies the data to unprotect. |
dataelement | VARCHAR | Specifies the name of the data element. |
resultlen | INTEGER | Specifies the length of the buffer to hold the result. |
communicationid | INTEGER | Specify the value as 0. This parameter is deprecated. |
scid | INTEGER | Specify the value as 0. This parameter is deprecated. |
Returns:
The function returns the protected VARBYTE value.
Exception:
If you configure an exception in the policy and the user does not have access, then the UDF terminates with an error message explaining what went wrong.
Example:
select pty_bigintenc(12345678,'AES256',100,0,0);
pty_bigintdec
This UDF unprotects the Big Integer value.
Signature:
select pty_bigintdec(col VARBYTE, dataelement VARCHAR, communicationid INTEGER, scid INTEGER)
Parameters:
| Name | Type | Description |
|---|
col | VARBYTE | Specifies the data to unprotect. |
dataelement | VARCHAR | Specifies the name of the data element. |
communicationid | INTEGER | Specify the value as 0. This parameter is deprecated. |
scid | INTEGER | Specify the value as 0. This parameter is deprecated. |
Returns:
- The function returns the unprotected BIGINT value.
- The function returns NULL when the user has no access to the data in the policy.
Exception:
If you configure an exception in the policy and the user does not have access, then the UDF terminates with an error message explaining what went wrong.
Example:
select pty_bigintdec(pty_bigintenc(12345678,'AES256',100,0,0),'AES256',0,0);
pty_bigintdecex
This UDF unprotects the protected Big Integer value.
Signature:
pty_bigintdec(col VARBYTE, dataelement VARCHAR, communicationid INTEGER, scid INTEGER)
Parameters:
| Name | Type | Description |
|---|
col | VARBYTE | Specifies the data to unprotect. |
dataelement | VARCHAR | Specifies the name of the data element. |
communicationid | INTEGER | Specify the value as 0. This parameter is deprecated. |
scid | INTEGER | Specify the value as 0. This parameter is deprecated. |
Returns:
The function returns the unprotected BIGINT value.
Exception:
If the user does not have access rights in the policy, then the UDF terminates with an error message.
Example:
select pty_bigintdec(pty_bigintenc(12345678,'AES256',100,0,0),'AES256',0,0);
pty_bigintins
This UDF protects the Big Integer value using type-preserving data elements, such as, tokens and No Encryption for access control.
Signature:
pty_bigintins(col BIGINT, dataelement VARCHAR, resultlen INTEGER, communicationid INTEGER, scid INTEGER)
Parameters:
| Name | Type | Description |
|---|
col | BIGINT | Specifies the data to protect. |
dataelement | VARCHAR | Specifies the name of the data element. |
resultlen | INTEGER | Specifies the length of the buffer to hold the result. |
communicationid | INTEGER | Specify the value as 0. This parameter is deprecated. |
scid | INTEGER | Specify the value as 0. This parameter is deprecated. |
Returns:
The function returns the protected BIGINT value.
Exception:
If the user does not have protect access rights in the policy, then the UDF terminates with an error message explaining what went wrong.
Example:
select pty_bigintins(12345678, 'TE_INT_8', 100, 0,0);
pty_bigintsel
This UDF unprotects the Big Integer value.
Signature:
pty_bigintsel(col BIGINT, dataelement VARCHAR, communicationid INTEGER, scid INTEGER)
Parameters:
| Name | Type | Description |
|---|
col | BIGINT | Specifies the data to unprotect. |
dataelement | VARCHAR | Specifies the name of the data element. |
communicationid | INTEGER | Specify the value as 0. This parameter is deprecated. |
scid | INTEGER | Specify the value as 0. This parameter is deprecated. |
Returns:
- The function returns the unprotected BIGINT value.
- The function returns the protected value if this option is configured in the policy and the user does not have access to the data.
- The function returns NULL when the user has no access to the data in the policy.
Exception:
If you configure an exception in the policy and the user does not have access, then the UDF terminates with an error message explaining what went wrong.
Example:
select pty_bigintsel(pty_bigintins(12345678, 'TE_INT_8', 100, 0,0), 'TE_INT_8',0,0);
pty_bigintselex
This UDF unprotects the protected Big Integer value and returns an error instead of NULL if user does not have access.
Signature:
pty_bigintselex(col BIGINT, dataelement VARCHAR, communicationid INTEGER, scid INTEGER)
Parameters:
| Name | Type | Description |
|---|
col | BIGINT | Specifies the data to unprotect. |
dataelement | VARCHAR | Specifies the name of the data element. |
communicationid | INTEGER | Specify the value as 0. This parameter is deprecated. |
scid | INTEGER | Specify the value as 0. This parameter is deprecated. |
Returns:
- The function returns the unprotected BIGINT value.
- The function returns the protected value if this option is configured in the policy and the user does not have access to the data.
Exception:
If the user user does not have access rights in the policy, then the UDF terminates with an error message explaining what went wrong.
Example:
select pty_bigintselex(PTY_BIGINTINS(12345678, 'TE_INT_8', 100, 0,0), 'TE_INT_8',0,0);
3.1.9 - Date UDFs
The dates can be protected using encryption and tokenization as the data protection method. The native UDFs, such as, pty_dateenc and pty_datedec, can be used for encryption and decryption respectively. To tokenize the date formats using the date data element, the data must be cast to VARCHAR type and then protected/unprotected with PTY_VARCHARLATININS/PTY_VARCHARLATINSEL UDFs.
To avoid any performance issues resulting due to casting of the data, a general best practice is to protect the data and present the decryption-related UDFs in the tables as views to authorized users only. This eliminates the unauthorized user’s access to the decryption UDFs and has the protected data only. The decryption process is limited to authorized users and thus, doesn’t cause any performance impact as the UDFs are executed restrictively.
pty_dateenc
This UDF protects the date value using an Encrytion data element.
Signature:
pty_dateenc(col DATE, dataelement VARCHAR, resultlen INTEGER, communicationid INTEGER, scid INTEGER)
Parameters:
| Name | Type | Description |
|---|
col | DATE | Specifies the data to protect. |
dataelement | VARCHAR | Specifies the name of the data element. |
resultlen | INTEGER | Specifies the length of the buffer to hold the result. |
communicationid | INTEGER | Specify the value as 0. This parameter is deprecated. |
scid | INTEGER | Specify the value as 0. This parameter is deprecated. |
Returns:
The function returns the protected VARBYTE value.
Exception:
If the user does not have protect access rights in the policy, then the UDF terminates with an error message explaining what went wrong.
Example:
select pty_dateenc('1990-11-22', 'AES256', 100, 0,0);
pty_datedec
This UDF unprotects the protected date value.
Signature:
pty_datedec(col VARBYTE, dataelement VARCHAR, communicationid INTEGER, scid INTEGER)
Parameters:
| Name | Type | Description |
|---|
col | VARBYTE | Specifies the data to unprotect. |
dataelement | VARCHAR | Specifies the name of the data element. |
communicationid | INTEGER | Specify the value as 0. This parameter is deprecated. |
scid | INTEGER | Specify the value as 0. This parameter is deprecated. |
Returns:
- The function returns the unprotected DATE value.
The function returns the output as per the system date format.
- The function returns NULL when the user has no access to the data in the policy.
Exception:
If you configure an exception in the policy and the user does not have access, then the UDF will terminate with an error message explaining what went wrong.
Example:
select pty_datedec(pty_dateenc('1990-10-22', 'AES256', 100, 0,0), 'AES256', 0,0);
pty_datedecex
This UDF unprotects the protected date value and returns an error instead of NULL if the user does not have access.
Signature:
pty_datedecexex(col VARBYTE, dataelement VARCHAR, communicationid INTEGER, scid INTEGER)
Parameters:
| Name | Type | Description |
|---|
col | VARBYTE | Specifies the data to unprotect. |
dataelement | VARCHAR | Specifies the name of the data element. |
communicationid | INTEGER | Specify the value as 0. This parameter is deprecated. |
scid | INTEGER | Specify the value as 0. This parameter is deprecated. |
Returns:
The function returns the unprotected DATE value.
Exception:
If the user does not have access rights in the policy, then the UDF terminates with an error message explaining what went wrong.
Example:
select pty_datedecex(pty_dateenc(CAST ('22 Sep 90' AS DATE FORMAT 'DD-MMM-YY'), 'AES256', 100, 0,0), 'AES256', 0,0);
3.1.10 - 8-Byte and 16-Byte Decimal UDFs
These UDFs work on the Decimal data types that are either 8 or 16 bytes in size. The 8-byte Decimal data types have a precision between 10 and 18 digits, while the 16-byte Decimals have a precision between 19 and 38 digits.
Note: Only one set of Decimal UDFs can be created for each range. The user must provide the UDF name. It is recommended that you replace with, for example, 10_2 if the target data type is Decimal(10,2) to get a function pty_decimal_10_2enc, or 22_3 if the target data type is Decimal(22,3) to get pty_decimal_22_3enc.
pty_decimalenc
This UDF protects the decimal value with a data element for encryption.
Signature:
pty_decimal<n>enc(col DECIMAL<n>, dataelement VARCHAR, resultlen INTEGER, communicationid INTEGER, scid INTEGER)
Parameters:
| Name | Type | Description |
|---|
col | DECIMAL(m,n) | Specifies the data to protect. |
dataelement | VARCHAR | Specifies the name of the data element. |
resultlen | INTEGER | Specifies the length of the buffer to hold the result. |
communicationid | INTEGER | Specify the value as 0. This parameter is deprecated. |
scid | INTEGER | Specify the value as 0. This parameter is deprecated. |
Returns:
The function returns the protected VARBYTE value.
Exception:
If the user does not have protect access rights in the policy, then the UDF terminates with an error message explaining what went wrong.
Example:
select pty_decimal37_1enc(26656.0, 'AES256', 100, 0,0);
pty_decimaldec
This UDF unprotects the protected decimal value.
Signature:
pty_decimal<n>dec(col VARBYTE, dataelement VARCHAR, communicationid INTEGER, scid INTEGER)
Parameters:
| Name | Type | Description |
|---|
col | VARBYTE | Specifies the data to unprotect. |
dataelement | VARCHAR | Specifies the name of the data element. |
communicationid | INTEGER | Specify the value as 0. This parameter is deprecated. |
scid | INTEGER | Specify the value as 0. This parameter is deprecated. |
Returns:
- The function returns the unprotected DECIMAL value.
- The function returns NULL when the user has no access to the data in the policy.
Exception:
If you configure an exception in the policy and the user does not have access, then the UDF terminates with an error message explaining what went wrong.
Example:
select pty_decimal37_1dec(pty_decimal37_1enc(26656.0, 'AES256', 100, 0,0), 'AES256', 0,0);
pty_decimaldecex
This UDF unprotects the protected decimal value and returns an error instead of NULL if the user does not have access.
Signature:
pty_decimal<n>decex(col VARBYTE, dataelement VARCHAR, communicationid INTEGER, scid INTEGER)
Parameters:
| Name | Type | Description |
|---|
col | VARBYTE | Specifies the data to unprotect. |
dataelement | VARCHAR | Specifies the name of the data element. |
communicationid | INTEGER | Specify the value as 0. This parameter is deprecated. |
scid | INTEGER | Specify the value as 0. This parameter is deprecated. |
Returns:
The function returns the unprotected DECIMAL value.
Exception:
If you configure an exception in the policy and the user does not have access, then the UDF terminates with an error message explaining what went wrong.
Example:
select pty_decimal37_1decex(pty_decimal37_1enc(26656.0, 'AES256', 100, 0,0), 'AES256', 0,0);
3.1.11 - JSON UDFs
These UDFs are used to protect and unprotect data for JSON data type. These UDFs have been introduced to support LOB or Large Objects that can be loaded to or extracted from the Teradata Database tables. Depending on the data element chosen, the data is tokenized or encrypted. The data in JSON are protected as CLOBs.
The examples provided for protection and unprotection are for single queries.
pty_jsonins
This UDF protects the JSON value using the type-preserving data elements, such as, token and No Encryption data element for access control.
Signature:
pty_jsonins(col JSON, dataelement VARCHAR, resultlen INTEGER, communicationid INTEGER, scid INTEGER)
Parameters:
| Name | Type | Description |
|---|
col or data | JSON | Specifies the JSON data to protect. |
dataelement | VARCHAR | Specifies the name of the data element. |
resultlen | INTEGER | Specifies the length of the buffer to hold the result. |
communicationid | INTEGER | Specify the value as 0. This parameter is deprecated. |
scid | INTEGER | Specify the value as 0. This parameter is deprecated. |
Returns:
The function returns the protected JSON CLOB (Character Large Objects) value.
Exception:
If the user does not have protect access rights in the policy, then the UDF terminates with an error message explaining what went wrong.
Note: Tokenizing a JSON format data with a Printable tokenization data element will not return a valid JSON format output.
Example:
SELECT pty_jsonins(NEW JSON('{"emp_name" : "John Doe", "emp_address" : "Stamford 1"}'), 'TE_A_N_S23_L2R2_Y', 500, 0, 0);
pty_jsonsel
This UDF unprotects the protected JSON CLOBs.
Signature:
pty_jsonsel(col CLOB, dataelement VARCHAR, resultlen INTEGER, communicationid INTEGER, scid INTEGER)
Parameters:
| Name | Type | Description |
|---|
col or data | CLOB | Specifies the CLOB data to unprotect. |
dataelement | VARCHAR | Specifies the name of the data element. |
resultlen | INTEGER | Specifies the length of the buffer to hold the result. |
communicationid | INTEGER | Specify the value as 0. This parameter is deprecated. |
scid | INTEGER | Specify the value as 0. This parameter is deprecated. |
Returns:
- The function returns the unprotected JSON values.
- The function returns the protected value if this option is configured in the policy and the user does not have access to the data.
- The function returns NULL when the user has no access to the data in the policy.
Exception:
If you configure an exception in the policy and the user does not have access, then the UDF terminates with an error message explaining what went wrong.
Example:
SELECT pty_jsonsel(pty_jsonins(NEW JSON('{"emp_name" : "John Doe", "emp_address" : "Stamford 1"}'), 'TE_A_N_S23_L2R2_Y', 500, 0, 0), 'TE_A_N_S23_L2R2_Y', 500, 0, 0);
pty_jsonselex
This UDF unprotects the JSON CLOBs that are protected using a tokenization data element.
Signature:
pty_jsonselex(col CLOB, dataelement VARCHAR, resultlen INTEGER, communicationid INTEGER, scid INTEGER)
Parameters:
| Name | Type | Description |
|---|
col or data | CLOB | Specifies the CLOB data to unprotect. |
dataelement | VARCHAR | Specifies the name of the data element. |
resultlen | INTEGER | Specifies the length of the buffer to hold the result. |
communicationid | INTEGER | Specify the value as 0. This parameter is deprecated. |
scid | INTEGER | Specify the value as 0. This parameter is deprecated. |
Returns:
- The function returns the unprotected JSON values.
- The function returns the protected value if this option is configured in the policy and the user does not have access to the data.
Exception:
If the user does not have access rights in the policy, then the UDF terminates with an error explaining what went wrong.
Example:
SELECT pty_jsonselex(pty_jsonins(NEW JSON('{"emp_name" : "John Doe", "emp_address" : "Stamford 1"}'), 'TE_A_N_S23_L2R2_Y', 500, 0, 0), 'TE_A_N_S23_L2R2_Y', 500, 0, 0);
pty_jsonenc
This UDF protects the JSON value using an encrytion data element.
Signature:
pty_jsonenc(col JSON, dataelement VARCHAR, resultlen INTEGER, communicationid INTEGER, scid INTEGER)
Parameters:
| Name | Type | Description |
|---|
col or data | JSON | Specifies the JSON data to protect. |
dataelement | VARCHAR | Specifies the name of the data element. |
resultlen | INTEGER | Specifies the length of the buffer to hold the result. |
communicationid | INTEGER | Specify the value as 0. This parameter is deprecated. |
scid | INTEGER | Specify the value as 0. This parameter is deprecated. |
Returns:
The function returns the protected JSON CLOB (Character Large Objects) value.
Exception:
If the user does not have protect access rights in the policy, then the UDF terminates with an error message explaining what went wrong.
Example:
SELECT pty_jsonenc(pty_jsonenc(NEW JSON('{"emp_name" : "John Doe", "emp_address" : "Stamford 1"}'), 'AES256', 500, 0, 0), 'AES256', 500, 0, 0);
pty_jsondec
This UDF unprotects the CLOB value that are protected using an encryption data element.
Signature:
pty_jsondec(col CLOB, dataelement VARCHAR, resultlen INTEGER, communicationid INTEGER, scid INTEGER)
Parameters:
| Name | Type | Description |
|---|
col or data | CLOB | Specifies the CLOB data to unprotect. |
dataelement | VARCHAR | Specifies the name of the data element. |
resultlen | INTEGER | Specifies the length of the buffer to hold the result. |
communicationid | INTEGER | Specify the value as 0. This parameter is deprecated. |
scid | INTEGER | Specify the value as 0. This parameter is deprecated. |
Returns:
- The function returns the unprotected JSON values.
- The function returns NULL when the user has no access to the data in the policy.
Exception:
If you configure an exception in the policy and the user does not have access, then the UDF terminates with an error message explaining what went wrong.
Example:
SELECT pty_jsondec(pty_jsonenc(NEW JSON('{"emp_name" : "John Doe", "emp_address" : "Stamford 1"}'), 'AES256', 500, 0, 0), 'AES256', 500, 0, 0);
3.1.12 - XML UDFs
These UDFs support the XML data type. The XML content is stored in compact binary form or CLOBs that preserve the information set of the XML document. These UDFs have been introduced to support the XML files that can be loaded to or extracted from the Teradata Database tables. Depending on the data element chosen, the data is either tokenized or encrypted.
pty_xmlins
This UDF protects the XML value using type-preserving data elements, such as, token and No Encryption for access control.
Signature:
pty_xmlins(col XML, dataelement VARCHAR, resultlen INTEGER, communicationid INTEGER, scid INTEGER)
Parameters:
| Name | Type | Description |
|---|
col | XML | Specifies the XML data to protect. |
dataelement | VARCHAR | Specifies the name of the data element. |
resultlen | INTEGER | Specifies the length of the buffer to hold the result. |
communicationid | INTEGER | Specify the value as 0. This parameter is deprecated. |
scid | INTEGER | Specify the value as 0. This parameter is deprecated. |
Returns:
The function returns the protected CLOB value.
Exception:
If the user does not have protect access rights in the policy, then the UDF terminates with an error message explaining what went wrong.
Caution: Tokenizing XML data with Printable tokenization does not return a valid XML format output.
Example:
select pty_xmlins(CREATEXML('<?xml version="1.0" encoding="UTF-8"?>
<Customer ID="C00-10101">
<Name>John Hancock</Name>
<Address>100 1st Street, San Francisco, CA 94118</Address>
<Phone1>(858)555-1234</Phone1>
<Phone2>(858)555-9876</Phone2>
<Fax>(858)555-9999</Fax>
<Email>John@somecompany.com</Email>
<Order Number="NW-01-16366" Date="2012-02-28">
<Contact>Mary Jane</Contact>
<Phone>(987)654-3210</Phone>
<ShipTo>Some company, 2467 Pioneer Road, San Francisco, CA - 94117</ShipTo>
<SubTotal>434.99</SubTotal>
<Tax>32.55</Tax>
<Total>467.54</Total>
<Item ID="001">
<Quantity>10</Quantity>
<PartNumber>F54709</PartNumber>
<Description>Motorola S10-HD Bluetooth Stereo Headphones</Description>
<UnitPrice>29.50</UnitPrice>
<Price>295.00</Price>
</Item>
<Item ID="101">
<Quantity>1</Quantity>
<PartNumber>Z19743</PartNumber>
<Description>Motorola Milestone XT800 Cell Phone</Description>
<UnitPrice>139.99</UnitPrice>
<Price>139.99</Price>
</Item>
</Order>
</Customer>'),'TE_A_N_S23_L2R2_Y',1500,0,0) "Protected Data";
pty_xmlsel
This UDF unprotects the protected CLOB value.
Signature:
pty_xmlsel(col CLOB, dataelement VARCHAR, resultlen INTEGER, communicationid INTEGER, scid INTEGER)
Parameters:
| Name | Type | Description |
|---|
col | CLOB | Specifies the CLOB data to unprotect. |
dataelement | VARCHAR | Specifies the name of the data element. |
resultlen | INTEGER | Specifies the length of the buffer to hold the result. |
communicationid | INTEGER | Specify the value as 0. This parameter is deprecated. |
scid | INTEGER | Specify the value as 0. This parameter is deprecated. |
Returns:
- The function returns the unprotected XML values.
- The function returns the protected value if this option is configured in the policy and the user does not have access to the data.
- The function returns NULL when the user has no access to the data in the policy.
Exception:
If you configure an exception in the policy and the user does not have access, then the UDF terminates with an error message explaining what went wrong.
Example:
sel
pty_xmlsel(
pty_xmlins(CREATEXML('<?xml version="1.0" encoding="UTF-8"?>
<Customer ID="C00-10101">
<Name>John Hancock</Name>
<Address>100 1st Street, San Francisco, CA 94118</Address>
<Phone1>(858)555-1234</Phone1>
<Phone2>(858)555-9876</Phone2>
<Fax>(858)555-9999</Fax>
<Email>John@somecompany.com</Email>
<Order Number="NW-01-16366" Date="2012-02-28">
<Contact>Mary Jane</Contact>
<Phone>(987)654-3210</Phone>
<ShipTo>Some company, 2467 Pioneer Road, San Francisco, CA - 94117</ShipTo>
<SubTotal>434.99</SubTotal>
<Tax>32.55</Tax>
<Total>467.54</Total>
<Item ID="001">
<Quantity>10</Quantity>
<PartNumber>F54709</PartNumber>
<Description>Motorola S10-HD Bluetooth Stereo Headphones</Description>
<UnitPrice>29.50</UnitPrice>
<Price>295.00</Price>
</Item>
<Item ID="101">
<Quantity>1</Quantity>
<PartNumber>Z19743</PartNumber>
<Description>Motorola Milestone XT800 Cell Phone</Description>
<UnitPrice>139.99</UnitPrice>
<Price>139.99</Price>
</Item>
</Order>
</Customer>'),'TE_A_N_S23_L2R2_Y',1500,0,0),'TE_A_N_S23_L2R2_Y',1500,0,0) "UnProtected Data";
pty_xmlselex
This UDF unprotects the protected CLOB value with strong encryption.
Signature:
pty_xmlselex(col CLOB, dataelement VARCHAR, resultlen INTEGER, communicationid INTEGER, scid INTEGER)
Parameters:
| Name | Type | Description |
|---|
col | CLOB | Specifies the CLOB data to unprotect. |
dataelement | VARCHAR | Specifies the name of the data element. |
resultlen | INTEGER | Specifies the length of the buffer to hold the result. |
communicationid | INTEGER | Specify the value as 0. This parameter is deprecated. |
scid | INTEGER | Specify the value as 0. This parameter is deprecated. |
Returns:
- The function returns the unprotected XML values.
- The function returns the protected value if this option is configured in the policy and the user does not have access to the data.
Exception:
If the user does not have access rights in the policy, then the UDF terminates with an error message explaining what went wrong.
Example:
sel
pty_xmlselex(
pty_xmlins(CREATEXML('<?xml version="1.0" encoding="UTF-8"?>
<Customer ID="C00-10101">
<Name>John Hancock</Name>
<Address>100 1st Street, San Francisco, CA 94118</Address>
<Phone1>(858)555-1234</Phone1>
<Phone2>(858)555-9876</Phone2>
<Fax>(858)555-9999</Fax>
<Email>John@somecompany.com</Email>
<Order Number="NW-01-16366" Date="2012-02-28">
<Contact>Mary Jane</Contact>
<Phone>(987)654-3210</Phone>
<ShipTo>Some company, 2467 Pioneer Road, San Francisco, CA - 94117</ShipTo>
<SubTotal>434.99</SubTotal>
<Tax>32.55</Tax>
<Total>467.54</Total>
<Item ID="001">
<Quantity>10</Quantity>
<PartNumber>F54709</PartNumber>
<Description>Motorola S10-HD Bluetooth Stereo Headphones</Description>
<UnitPrice>29.50</UnitPrice>
<Price>295.00</Price>
</Item>
<Item ID="101">
<Quantity>1</Quantity>
<PartNumber>Z19743</PartNumber>
<Description>Motorola Milestone XT800 Cell Phone</Description>
<UnitPrice>139.99</UnitPrice>
<Price>139.99</Price>
</Item>
</Order>
</Customer>'),'TE_A_N_S23_L2R2_Y',1500,0,0),'TE_A_N_S23_L2R2_Y',1500,0,0) "UnProtected Data";
pty_xmlenc
This UDF protects the XML data using an Encryption data element.
Signature:
pty_xmlenc(col XML, dataelement VARCHAR, resultlen INTEGER, communicationid INTEGER, scid INTEGER)
Parameters:
| Name | Type | Description |
|---|
col | XML | Specifies the XML data to protect. |
| dataelemen | VARCHAR | Specifies the name of the data element. |
resultlen | INTEGER | Specifies the length of the buffer to hold the result. |
communicationid | INTEGER | Specify the value as 0. This parameter is deprecated. |
scid | INTEGER | Specify the value as 0. This parameter is deprecated. |
Returns:
The function returns the protected CLOB value.
Exception:
If the user does not have protect access rights in the policy, UDF terminates with an error message explaining what went wrong.
Example:
sel
pty_xmlenc(CREATEXML('<?xml version="1.0" encoding="UTF-8"?>
<Customer ID="C00-10101">
<Name>John Hancock</Name>
<Address>100 1st Street, San Francisco, CA 94118</Address>
<Phone1>(858)555-1234</Phone1>
<Phone2>(858)555-9876</Phone2>
<Fax>(858)555-9999</Fax>
<Email>John@somecompany.com</Email>
<Order Number="NW-01-16366" Date="2012-02-28">
<Contact>Mary Jane</Contact>
<Phone>(987)654-3210</Phone>
<ShipTo>Some company, 2467 Pioneer Road, San Francisco, CA - 94117</ShipTo>
<SubTotal>434.99</SubTotal>
<Tax>32.55</Tax>
<Total>467.54</Total>
<Item ID="001">
<Quantity>10</Quantity>
<PartNumber>F54709</PartNumber>
<Description>Motorola S10-HD Bluetooth Stereo Headphones</Description>
<UnitPrice>29.50</UnitPrice>
<Price>295.00</Price>
</Item>
<Item ID="101">
<Quantity>1</Quantity>
<PartNumber>Z19743</PartNumber>
<Description>Motorola Milestone XT800 Cell Phone</Description>
<UnitPrice>139.99</UnitPrice>
<Price>139.99</Price>
</Item>
</Order>
</Customer>'),'AES256',1500,0,0) "Protected Data";
pty_xmldec
This UDF unprotects the protected CLOB values.
Signature:
pty_xmldec(col CLOB, dataelement VARCHAR, resultlen INTEGER, communicationid INTEGER, scid INTEGER)
Parameters:
| Name | Type | Description |
|---|
col | CLOB | Specifies the CLOB data to unprotect. |
dataelement | VARCHAR | Specifies the name of the data element. |
resultlen | INTEGER | Specifies the length of the buffer to hold the result. |
communicationid | INTEGER | Specify the value as 0. This parameter is deprecated. |
scid | INTEGER | Specify the value as 0. This parameter is deprecated. |
Returns:
- The function returns the unprotected XML value.
- The function returns NULL when the user has no access to the data in the policy.
Exception:
If the user does not have access rights in the policy, then the UDF terminates with an error message explaining what went wrong.
Example:
select
pty_xmldec(
pty_xmlenc(CREATEXML('<?xml version="1.0" encoding="UTF-8"?>
<Customer ID="C00-10101">
<Name>John Hancock</Name>
<Address>100 1st Street, San Francisco, CA 94118</Address>
<Phone1>(858)555-1234</Phone1>
<Phone2>(858)555-9876</Phone2>
<Fax>(858)555-9999</Fax>
<Email>John@somecompany.com</Email>
<Order Number="NW-01-16366" Date="2012-02-28">
<Contact>Mary Jane</Contact>
<Phone>(987)654-3210</Phone>
<ShipTo>Some company, 2467 Pioneer Road, San Francisco, CA - 94117</ShipTo>
<SubTotal>434.99</SubTotal>
<Tax>32.55</Tax>
<Total>467.54</Total>
<Item ID="001">
<Quantity>10</Quantity>
<PartNumber>F54709</PartNumber>
<Description>Motorola S10-HD Bluetooth Stereo Headphones</Description>
<UnitPrice>29.50</UnitPrice>
<Price>295.00</Price>
</Item>
<Item ID="101">
<Quantity>1</Quantity>
<PartNumber>Z19743</PartNumber>
<Description>Motorola Milestone XT800 Cell Phone</Description>
<UnitPrice>139.99</UnitPrice>
<Price>139.99</Price>
</Item>
</Order>
</Customer>'),'AES256',1500,0,0),'AES256',1500,0,0) "UnProtected Data";
pty_xmldecex
This UDF unprotects the protected CLOB value with strong encryption.
Signature:
pty_xmldecex(col CLOB, dataelement VARCHAR, resultlen INTEGER, communicationid INTEGER, scid INTEGER)
Parameters:
| Name | Type | Description |
|---|
col | CLOB | Specifies the CLOB data to protect. |
dataelement | VARCHAR | Specifies the name of the data element. |
resultlen | INTEGER | Specifies the length of the buffer to hold the result. |
communicationid | INTEGER | Specify the value as 0. This parameter is deprecated. |
scid | INTEGER | Specify the value as 0. This parameter is deprecated. |
Returns:
The function returns the unprotected XML value.
Exception:
If the user does not have protect access rights in the policy, then the UDF terminates with an error message explaining what went wrong.
Example:
select
pty_xmldecex(
pty_xmlenc(CREATEXML('<?xml version="1.0" encoding="UTF-8"?>
<Customer ID="C00-10101">
<Name>John Hancock</Name>
<Address>100 1st Street, San Francisco, CA 94118</Address>
<Phone1>(858)555-1234</Phone1>
<Phone2>(858)555-9876</Phone2>
<Fax>(858)555-9999</Fax>
<Email>John@somecompany.com</Email>
<Order Number="NW-01-16366" Date="2012-02-28">
<Contact>Mary Jane</Contact>
<Phone>(987)654-3210</Phone>
<ShipTo>Some company, 2467 Pioneer Road, San Francisco, CA - 94117</ShipTo>
<SubTotal>434.99</SubTotal>
<Tax>32.55</Tax>
<Total>467.54</Total>
<Item ID="001">
<Quantity>10</Quantity>
<PartNumber>F54709</PartNumber>
<Description>Motorola S10-HD Bluetooth Stereo Headphones</Description>
<UnitPrice>29.50</UnitPrice>
<Price>295.00</Price>
</Item>
<Item ID="101">
<Quantity>1</Quantity>
<PartNumber>Z19743</PartNumber>
<Description>Motorola Milestone XT800 Cell Phone</Description>
<UnitPrice>139.99</UnitPrice>
<Price>139.99</Price>
</Item>
</Order>
</Customer>'),'AES256',1500,0,0),'AES256',1500,0,0) "UnProtected Data";
3.1.13 - Float UDFs for No Encryption
pty_floatins
This UDF can be used only with the No Encryption data element.
Signature:
pty_floatins(col FLOAT, dataelement VARCHAR, resultlen INTEGER, communicationid INTEGER, scid INTEGER)
Parameters:
| Name | Type | Description |
|---|
col | FLOAT | Specifies the data to protect. |
dataelement | VARCHAR | Specifies the name of the data element. |
resultlen | INTEGER | Specifies the length of the buffer to hold the result. |
communicationid | INTEGER | Specify the value as 0. This parameter is deprecated. |
scid | INTEGER | Specify the value as 0. This parameter is deprecated. |
Returns:
The function returns the input value as it is.
Exception:
If the user does not have protect access rights in the policy, then the UDF terminates with an error message explaining what went wrong.
Example:
select pty_floatins(26656.0, 'NoEncryption', 100, 0,0);
pty_floatsel
This UDF unprotects the float value for a No Encryption data element.
Signature:
pty_floatsel(col FLOAT, dataelement VARCHAR, communicationid INTEGER, scid INTEGER)
Parameters:
| Name | Type | Description |
|---|
col | FLOAT | Specifies the data to unprotect. |
dataelement | VARCHAR | Specifies the name of the data element. |
resultlen | INTEGER | Specifies the length of the buffer to hold the result. |
communicationid | INTEGER | Specify the value as 0. This parameter is deprecated. |
scid | INTEGER | Specify the value as 0. This parameter is deprecated. |
Returns:
- The function returns the input value as it is.
- The function returns the protected value if this option is configured in the policy and the user does not have access to the data.
- The function returns NULL when the user has no access to the data in the policy.
Exception:
If you configure an exception in the policy and the user does not have access, then the UDF terminates with an error message explaining what went wrong.
Example:
select pty_floatsel(pty_floatins(26656.0, 'NoEncryption', 100, 0,0), 'NoEncryption', 0,0);
pty_floatselex
This UDF unprotects the float value protected with a No Encryption data element.
Signature:
pty_floatselex(col FLOAT, dataelement VARCHAR, communicationid INTEGER, scid INTEGER)
Parameters:
| Name | Type | Description |
|---|
col | FLOAT | Specifies the data to unprotect. |
dataelement | VARCHAR | Specifies the name of the data element. |
communicationid | INTEGER | Specify the value as 0. This parameter is deprecated. |
scid | INTEGER | Specify the value as 0. This parameter is deprecated. |
Returns:
- The function returns the input value as it is.
- The function returns the protected value if this option is configured in the policy and the user does not have access to the data.
- The function returns an error instead of NULL if the user does not have access.
Exception:
If the user does not have access rights in the policy, then the UDF terminates with an error message explaining what went wrong.
Example:
select pty_floatselex(pty_floatins(26656.0, 'NoEncryption', 100, 0,0), 'NoEncryption', 0,0);
3.1.14 - Date UDFs for No Encryption
This section provides DATE UDFs that are applicable for No Encryption data elements.
pty_dateins
This UDF protects a date value with a No Encryption data element to impose access control.
Signature:
pty_dateins(col DATE, dataelement VARCHAR, resultlen INTEGER, communicationid INTEGER, scid INTEGER)
Parameters:
| Name | Type | Description |
|---|
col | DATE | Specifies the data to protect. |
dataelement | VARCHAR | Specifies the name of the data element. |
resultlen | INTEGER | Specifies the length of the buffer to hold the result. |
communicationid | INTEGER | Specify the value as 0. This parameter is deprecated. |
scid | INTEGER | Specify the value as 0. This parameter is deprecated. |
Returns:
The function returns the input value as is.
The function returns the output as per the system date format.
Exception:
If the user does not have protect access rights in the policy, then the UDF terminates with an error message explaining what went wrong.
Example:
select pty_dateins(CAST ('22-09-1990' AS DATE FORMAT 'DD-MM-YYYY'), 'NoEncryption', 100, 0,0);
pty_datesel
This UDF unprotects the date value that is protected using a No Encryption data element.
Signature:
pty_datesel(col DATE, dataelement VARCHAR, communicationid INTEGER, scid INTEGER)
Parameters:
| Name | Type | Description |
|---|
col | DATE | Specifies the data to unprotect. |
dataelement | VARCHAR | Specifies the name of the data element. |
communicationid | INTEGER | Specify the value as 0. This parameter is deprecated. |
scid | INTEGER | Specify the value as 0. This parameter is deprecated. |
Returns:
- The function returns the input value as is.
- The function returns the protected value if this option is configured in the policy and the user does not have access to the data.
- The function returns NULL when the user has no access to the data in the policy.
Exception:
If you configure an exception in the policy and the user does not have access, then the UDF terminates with an error message explaining what went wrong.
Example:
select pty_datesel(pty_dateins(CAST ('22-09-1990' AS DATE FORMAT 'DD-MM-YYYY'), 'NoEncryption', 100, 0,0), 'NoEncryption', 0,0);
pty_dateselex
This UDF unprotects the date value that is protected with a No Encryption data element and returns an error instead of NULL if the user does not have access.
Signature:
pty_dateselex(col DATE, dataelement VARCHAR, communicationid INTEGER, scid INTEGER)
Parameters:
| Name | Type | Description |
|---|
col | DATE | Specifies the data to unprotect. |
dataelement | VARCHAR | Specifies the name of the data element. |
communicationid | INTEGER | Specify the value as 0. This parameter is deprecated. |
scid | INTEGER | Specify the value as 0. This parameter is deprecated. |
Returns:
- The function returns the input value as is.
- The function returns the protected value if this option is configured in the policy and the user does not have access to the data.
Exception:
If the user does not have protect access rights in the policy, then the UDF terminates with an error message.
Example:
select pty_dateselex(pty_dateins(CAST ('22-09-1990' AS DATE FORMAT 'DD-MM-YYYY'), 'NoEncryption', 100, 0,0), 'NoEncryption', 0,0);
3.1.15 - 8-Byte AND 16-Byte Decimal UDFs for No Encryption
These UDFs work on the Decimal data types that are either 8 or 16 bytes in size. The 8-byte Decimals have a precision between 10 and 18 digits, while the 16-byte Decimals have a precision between 19 and 38 digits. These UDFs apply to the No Encryption data elements only.
pty_decimalins
This UDF protects the decimal value using a No Encryption data element.
Signature:
pty_decimal<n>ins(col DECIMAL<M,N>, dataelement VARCHAR, resultlen INTEGER, communicationid INTEGER, scid INTEGER)
Parameters:
| Name | Type | Description |
|---|
col | DECIMAL(m,n) | Specifies the data to protect. |
dataelement | VARCHAR | Specifies the name of the data element. |
resultlen | INTEGER | Specifies the length of the buffer to hold the result. |
communicationid | INTEGER | Specify the value as 0. This parameter is deprecated. |
scid | INTEGER | Specify the value as 0. This parameter is deprecated. |
Returns:
The function returns the input value as is.
Exception:
If the user does not have protect access rights in the policy, then the UDF terminates with an error message explaining what went wrong.
Example:
select pty_decimal37_1ins(26656.0, 'NoEncryption', 100, 0,0);
pty_decimalsel
This UDF unprotects the decimal value that is protected using a No Encryption data element.
Signature:
pty_decimal<n>sel(col DECIMAL<M,N>, dataelement VARCHAR, communicationid INTEGER, SCID INTEGER)
Parameters:
| Name | Type | Description |
|---|
col | DECIMAL(m,n) | Specifies the data to unprotect. |
dataelement | VARCHAR | Specifies the name of the data element. |
communicationid | INTEGER | Specify the value as 0. This parameter is deprecated. |
scid | INTEGER | Specify the value as 0. This parameter is deprecated. |
Returns:
- The function returns the input value as is.
- The function returns the protected value if this option is configured in the policy and the user does not have access to the data.
- The function returns NULL when the user has no access to the data in the policy.
Exception:
If you configure an exception in the policy and the user does not have access, then the UDF terminates with an error message explaining what went wrong.
Example:
select pty_decimal37_1sel(pty_decimal37_1ins(26656.0, 'NoEncryption', 100, 0,0), 'NoEncryption', 0,0);
pty_decimalselex
This UDF unprotects the decimal value that is protected using a No Encryption data element.
Signature:
pty_decimal<n>selex(col DECIMAL(m,n), dataelement VARCHAR, communicationid INTEGER, scid INTEGER)
Parameters:
| Name | Type | Description |
|---|
col | DECIMAL(m,n) | Specifies the data to unprotect. |
dataelement | VARCHAR | Specifies the name of the data element. |
communicationid | INTEGER | Specify the value as 0. This parameter is deprecated. |
scid | INTEGER | Specify the value as 0. This parameter is deprecated. |
Returns:
- The function returns the input value as is.
- The function returns the protected value if this option is configured in the policy and the user does not have access to the data.
Exception:
If the user does not have protect access rights in the policy, then the UDF terminates with an error message explaining what went wrong.
Example:
select pty_decimal37_1selex(pty_decimal37_1ins(26656.0, 'NoEncryption', 100, 0,0),'NoEncryption', 0,0);
3.2 - Trino User Defined Functions and Procedures
Learn about the User Defined Functions and Procedures in Trino.
This section provides a detailed list of User Defined Functions (UDFs) for general information, and protection and unprotection of different data types.
3.2.1 - General UDFs
General UDFs in Trino
This section includes list of general UDFs that can be used to retrieve the Trino Protector version and the current user.
ptyWhoAmI()
This function returns the name of the user.
Signature:
Parameters:
None
Returns:
This UDF returns the name of the user logged in to the database as VARCHAR.
Example:
ptyGetVersion()
This UDF returns the JpepLite version used in Trino UDFs.
Signature:
Parameters:
None
Returns:
This UDF returns the JpepLite version used in Trino UDFs.
Example:
ptyGetVersionExtended()
The UDF returns the extended version information.
Signature:
pty_getversionextended();
Parameters:
Returns:
The UDF returns a string in the following format:
JpepLite: <1>; CORE: <2>;
where,
- Is the JpepLite version
- Is the Core library version
Example:
select pty_getversionextended();
3.2.2 - VarChar UDFs
VarChar UDFs in Trino
This section provides a list of Varchar UDFs for the protect, unprotect, and reprotect operations.
Consider a Trino session where you impersonate a user using the –user parameter as shown in the following example.
./TrinoCLI --server localhost:8080 --catalog hive --schema default --user=<sample_user>
If you execute any UDF after impersonating a user, then the query execution happens for the impersonated user <sample_user>. This is a limitation of Trino.
ptyProtectStr()
This UDF protects the varchar values.
Signature:
ptyProtectStr(varchar input, varchar dataElement)
Parameters:
| Name | Type | Description |
|---|
input | VarChar | Specifies the varchar value to protect. |
dataElement | VarChar | Specifies the name of the data element to protect the varchar value. |
Returns:
This UDF returns the protected varchar value.
Example:
select ptyProtectStr('ProtegrityProt','Varchar_DE');
Supported Protection Methods:
| Function Name | Tokenization | Encryption | FPE | No Encryption | Masking | Monitoring |
| ptyProtectStr() | - Numeric (0-9)
- Credit Card
- Alpha
- Upper Case Alpha
- Alpha Numeric
- Upper Alpha Numeric
- Lower ASCII
- Datetime (YYYY-MM-DD HH:MM:SS)
- Date (YYYY-MM-DD, DD/MM/YYYY, MM.DD.YYYY)
- Decimal
- Email
- Unicode (Legacy)
- Unicode (Base64 - Encoded Byte's Charset should match
Dataelement's Encoding Type)
- Unicode (Gen2)
| No | Yes | Yes | Yes | Yes |
ptyUnprotectStr()
This UDF unprotects the existing protected varchar value.
Signature:
ptyUnprotectStr(varchar input, varchar dataElement)
Parameters:
| Name | Type | Description |
|---|
input | VarChar | Specifies the protected varchar value to unprotect. |
dataElement | VarChar | Specifies the name of the data element to unprotect the varchar value. |
Returns:
This UDF returns the unprotected varchar value.
Example:
select ptyUnProtectStr(PtyProtectStr('ProtegrityProt','Varchar_DE'),'Varchar_DE');
Supported Protection Methods:
| Function Name | Tokenization | Encryption | FPE | No Encryption | Masking | Monitoring |
| ptyUnprotectStr() | - Numeric (0-9)
- Credit Card
- Alpha
- Upper Case Alpha
- Alpha Numeric
- Upper Alpha Numeric
- Lower ASCII
- Datetime (YYYY-MM-DD HH:MM:SS)
- Date (YYYY-MM-DD, DD/MM/YYYY, MM.DD.YYYY)
- Decimal
- Email
- Unicode (Legacy)
- Unicode (Base64 - Encoded Byte's Charset should match Dataelement's Encoding Type)
- Unicode (Gen2)
| No | Yes | Yes | Yes | Yes |
ptyReprotect() - Str
This UDF reprotects the varchar protected data, which was earlier protected using the ptyProtectStr UDF, with a different data element.
Signature:
ptyReprotect(varchar input, varchar oldDataElement, varchar newDataElement)
Parameters:
| Name | Type | Description |
|---|
input | VarChar | Specifies the varchar value to reprotect. |
oldDataElement | VarChar | Specifies the name of the data element that was initially used to protect the data. |
newDataElement | VarChar | Specifies the name of the new data element to reprotect the data. |
Returns:
This UDF returns the protected varchar value.
Example:
select ptyReprotect(PtyProtectStr('ProtegrityProt','Varchar_DE'),'Varchar_DE','new_Varchar_DE');
Supported Protection Methods:
| Function Name | Tokenization | Encryption | FPE | No Encryption | Masking | Monitoring |
| ptyReprotect() | - Numeric (0-9)
- Credit Card
- Alpha
- Upper Case Alpha
- Alpha Numeric
- Upper Alpha Numeric
- Lower ASCII
- Datetime (YYYY-MM-DD HH:MM:SS)
- Date (YYYY-MM-DD, DD/MM/YYYY, MM.DD.YYYY)
- Decimal
- Email
- Unicode (Legacy)
- Unicode (Base64 - Encoded Byte's Charset should match Dataelement's Encoding Type)
- Unicode (Gen2)
| No | Yes | Yes | Yes | Yes |
3.2.3 - BigInt UDFs
BigInt UDFs in Trino
This section provides a list of the BigInt UDFs for the protect, unprotect, and reprotect operations.
ptyProtectBigInt()
This UDF protects the BigInt value.
Signature:
ptyProtectBigInt(bigint input, varchar dataElement)
Parameters:
| Name | Type | Description |
|---|
input | BigInt | Specifies the data to protect. |
dataElement | VarChar | Specifies the name of the data element to protect the data. |
Returns:
This UDF returns the protected BigInt value.
Example:
select PtyProtectBigInt(1234567, 'BigInt_DE');
Supported Protection Methods:
| Function Name | Tokenization | Encryption | FPE | No Encryption | Masking | Monitoring |
|---|
| ptyProtectBigInt() | Integer - 8 bytes | No | No | Yes | No | Yes |
ptyUnprotectBigInt()
This UDF unprotects the protected BigInt value.
Signature:
ptyUnProtectBigInt(bigint input, varchar dataElement)
Parameters:
| Name | Type | Description |
|---|
input | BigInt | Specifies the protected data to unprotect. |
dataElement | VarChar | Specifies the name of the data element to unprotect the data. |
Returns:
This UDF returns the unprotected BigInt value.
Example:
select PtyUnProtectBigInt(PtyProtectBigInt(1234567, 'BigInt_DE'), 'BigInt_DE');
Supported Protection Methods:
| Function Name | Tokenization | Encryption | FPE | No Encryption | Masking | Monitoring |
|---|
| PtyUnProtectBigInt() | Integer - 8 bytes | No | No | Yes | No | Yes |
ptyReprotect() - BigInt
This UDF reprotects the BigInt format protected data with a different data element.
If you are using numeric data with the ptyReprotect() UDF for protection, then ensure to cast the data to BigInt before using the UDF.
Signature:
ptyReprotect(bigint input, varchar oldDataElement, varchar newDataElement)
Parameters:
| Name | Type | Description |
|---|
input | BigInt | Specifies the BigInt value to reprotect. |
oldDataElement | VarChar | Specifies the name of the data element that was initially used to protect the data. |
newDataElement | VarChar | Specifies the name of the new data element to reprotect the data. |
Returns:
This UDF returns the protected BigInt value.
Example:
select ptyReprotect(PtyProtectBigInt(123456, 'BigInt_DE'),'BigInt_DE','new_BigInt_DE');
Supported Protection Methods:
| Function Name | Tokenization | Encryption | FPE | No Encryption | Masking | Monitoring |
|---|
| ptyReprotect() | Integer - 8 bytes | No | No | Yes | No | Yes |
3.2.4 - SmallInt UDFs
SmallInt UDFs in Trino
This section provides a list of the SmallInt UDFs for the protect, unprotect, and reprotect operations.
ptyProtectSmallInt()
This UDF protects the SmallInt value.
Signature:
ptyProtectSmallInt(smallint input, varchar dataElement)
Parameters:
| Name | Type | Description |
|---|
input | SmallInt | Specifies the data to protect. |
dataElement | VarChar | Specifies the name of the data element to protect the data. |
Returns:
This UDF returns the protected SmallInt value.
Example:
select ptyProtectSmallInt(cast(12 as smallint), 'SmallInt_DE');
Supported Protection Methods:
| Function Name | Tokenization | Encryption | FPE | No Encryption | Masking | Monitoring |
|---|
| ptyProtectSmallInt() | Integer - 2 bytes | No | No | Yes | No | Yes |
ptyUnprotectSmallInt()
This UDF unprotects the protected SmallInt value.
Signature:
ptyUnprotectSmallInt(smallint input, varchar dataElement)
Parameters:
| Name | Type | Description |
|---|
input | SmallInt | Specifies the protected data to unprotect. |
dataElement | VarChar | Specifies the name of the data element to unprotect the data. |
Returns:
This UDF returns the unprotected SmallInt value.
Example:
select PtyUnprotectSmallInt(PtyProtectSmallInt(cast(12 as smallint), 'SmallInt_DE'), 'SmallInt_DE');
Supported Protection Methods:
| Function Name | Tokenization | Encryption | FPE | No Encryption | Masking | Monitoring |
|---|
| ptyUnprotectSmallInt() | Integer - 2 bytes | No | No | Yes | No | Yes |
ptyReprotect() - SmallInt
This UDF reprotects the SmallInt format protected data, which was earlier protected using the ptyProtectSmallInt UDF, with a different data element.
Signature:
ptyReprotect (SmallInt input, varchar oldDataElement, varchar newDataElement)
Parameters:
| Name | Type | Description |
|---|
input | SmallInt | Specifies the SmallInt value to reprotect. |
oldDataElement | VarChar | Specifies the name of the data element that was initially used to protect the data. |
newDataElement | VarChar | Specifies the name of the new data element to reprotect the data. |
Returns:
This UDF returns the protected SmallInt value.
Example:
select ptyReprotect(PtyProtectSmallInt(cast(12 as smallint), 'SmallInt_DE'),'SmallInt_DE','new_SmallInt_DE');
Supported Protection Methods:
| Function Name | Tokenization | Encryption | FPE | No Encryption | Masking | Monitoring |
|---|
| ptyReprotect() | Integer - 2 bytes | No | No | Yes | No | Yes |
3.2.5 - Integer UDFs
Integer UDFs in Trino
This section provides a list of the integer UDFs for the protect, unprotect, and reprotect operations.
ptyProtectInt()
This UDF protects the Int value.
Signature:
ptyProtectInt(Int input, varchar dataElement)
Parameters:
| Name | Type | Description |
|---|
input | Int | Specifies the data to protect. |
dataElement | VarChar | Specifies the name of the data element to protect the data. |
Returns:
This UDF returns the protected Int value.
Example:
select ptyProtectInt(1234567, 'Int_DE');
Supported Protection Methods:
| Function Name | Tokenization | Encryption | FPE | No Encryption | Masking | Monitoring |
|---|
| ptyProtectInt() | Integer - 4 bytes | No | No | Yes | No | Yes |
ptyUnprotectInt()
This UDF unprotects the protected Int value.
Signature:
ptyUnprotectInt(int input, varchar dataElement)
Parameters:
| Name | Type | Description |
|---|
input | Int | Specifies the protected data to unprotect. |
dataElement | VarChar | Specifies the name of the data element to unprotect the data. |
Returns:
This UDF returns the unprotected Int value.
Example:
select ptyUnprotectInt(ptyProtectInt(1234567, 'Int_DE'), 'Int_DE');
Supported Protection Methods:
| Function Name | Tokenization | Encryption | FPE | No Encryption | Masking | Monitoring |
|---|
| ptyUnprotectInt() | Integer - 4 bytes | No | No | Yes | No | Yes |
ptyReprotect() - Int
This UDF reprotects the Int format protected data, which was earlier protected using the ptyProtectInt UDF, with a different data element.
Signature:
ptyReprotect(int input, varchar oldDataElement, varchar newDataElement)
Parameters:
| Name | Type | Description |
|---|
input | Int | Specifies the Int value to reprotect. |
oldDataElement | VarChar | Specifies the name of the data element that was initially used to protect the data. |
newDataElement | VarChar | Specifies the name of the new data element to reprotect the data. |
Returns:
This UDF returns the protected Int value.
Example:
select ptyReprotect(ptyProtectInt(1234567, 'Token_Integer'), 'Token_Integer','new_Token_Integer');
Supported Protection Methods:
| Function Name | Tokenization | Encryption | FPE | No Encryption | Masking | Monitoring |
|---|
| ptyReprotect() | Integer - 4 bytes | No | No | Yes | No | Yes |
3.2.6 - Date UDFs
Date UDFs in Trino
This section provides a list of the Date UDFs for the protect, unprotect, and reprotect operations.
Caution: There are inconsistencies observed when Trino is used to fetch and store date values from HDFS, where data was stored using Hive. It is recommended to verify if the correct date and datetime values are retrieved when the data is fetched from or stored in HDFS without using the Trino UDFs. If the data consistency is maintained, only then proceed to the Trino Date or DateTime UDFs.
ptyProtectDate()
This UDF protects the Date value.
Signature:
ptyProtectDate(date input, varchar dataElement)
Parameters:
| Name | Type | Description |
|---|
input | Date | Specifies the data to protect. |
dataElement | VarChar | Specifies the name of the data element to protect the data. |
Returns:
This UDF returns the protected Date value.
Example:
select PtyProtectDate(cast('2018-10-10' as date), 'Date_DE');
Supported Protection Methods:
| Function Name | Tokenization | Encryption | FPE | No Encryption | Masking | Monitoring |
|---|
| ptyProtectDate() | Date | No | No | Yes | No | Yes |
ptyUnprotectDate()
This UDF unprotects the protected Date value.
Signature:
ptyUnprotectDate(date input, varchar dataElement)
Parameters:
| Name | Type | Description |
|---|
input | Date | Specifies the protected data to unprotect. |
dataElement | VarChar | Specifies the name of the data element to unprotect the data. |
Returns:
This UDF returns the unprotected Date value.
Example:
select ptyUnprotectDate(PtyProtectDate(cast('2018-10-10' as date), 'Date_DE'), 'Date_DE');
Supported Protection Methods:
| Function Name | Tokenization | Encryption | FPE | No Encryption | Masking | Monitoring |
|---|
| ptyUnprotectDate() | Date | No | No | Yes | No | Yes |
ptyReprotect() - Date
This UDF reprotects the Date format protected data, which was earlier protected using the ptyProtectDate UDF, with a different data element.
Signature:
ptyReprotect(date input, varchar oldDataElement, varchar newDataElement)
Parameters:
| Name | Type | Description |
|---|
input | Date | Specifies the Date value to reprotect. |
oldDataElement | VarChar | Specifies the name of the data element that was initially used to protect the data. |
newDataElement | VarChar | Specifies the name of the new data element to reprotect the data. |
Warning: Ensure to use the data element with the No Encryption method only. Using any other data element might cause data corruption.
Returns:
This UDF returns the protected Date value.
Example:
select PtyReprotect(cast('2018-10-10' as date), 'Date_DE', 'new_Date_DE');
Supported Protection Methods:
| Function Name | Tokenization | Encryption | FPE | No Encryption | Masking | Monitoring |
|---|
| ptyReprotect() | Date | No | No | Yes | No | Yes |
3.2.7 - DateTime UDFs
DateTime UDFs in Trino
This section provides a list of DateTime UDFs for the protect, unprotect, and reprotect operations.
Caution: There are inconsistencies observed when Trino is used to fetch and store date values from HDFS, where data was stored using Hive. It is recommended to verify if the correct date and datetime values are retrieved when the data is fetched from or stored in HDFS without using the Trino UDFs. If the data consistency is maintained, only then proceed to the Trino Date or DateTime UDFs.
ptyProtectDateTime()
This UDF protects the TIMESTAMP value. The DateTime UDFs in Trino support an input precision of 12 digits or picoseconds.
Signature:
ptyProtectDateTime(timestamp(p) input, varchar dataElement)
Parameters:
| Name | Type | Description |
|---|
input | Timestamp(p) | Specifies the data in the Timestamp(p) format, which needs to be protected where p is the digits of precision for the fraction of seconds. |
dataElement | VarChar | Specifies the name of the data element to protect the data. |
Returns:
This UDF returns the protected Timestamp(p) value.
Example:
select ptyProtectDateTime(cast('2018-10-10 20:35:17.123' as TIMESTAMP(3)), 'DateTime_DE');
Supported Protection Methods:
| Function Name | Tokenization | Encryption | FPE | No Encryption | Masking | Monitoring |
|---|
| ptyProtectDateTime() | DateTime | No | No | Yes | No | Yes |
ptyUnprotectDateTime()
This UDF unprotects the protected Timestamp value.
Signature:
ptyUnprotectDateTime(timestamp(p) input, varchar dataElement)
Parameters:
| Name | Type | Description |
|---|
input | Timestamp(p) | Specifies the data in the Timestamp(p) format, which needs to be unprotected where p is the digits of precision for the fraction of seconds. |
dataElement | VarChar | Specifies the name of the data element to unprotect the data. |
Returns:
This UDF returns the unprotected Timestamp(p) value.
Example:
select ptyUnprotectDateTime(ptyProtectDateTime(cast('2018-10-10 03:04:05.123' as TIMESTAMP(3)), 'DateTime_DE'), 'DateTime_DE');
Supported Protection Methods:
| Function Name | Tokenization | Encryption | FPE | No Encryption | Masking | Monitoring |
|---|
| ptyUnprotectDateTime() | DateTime | No | No | Yes | No | Yes |
ptyReprotect() - DateTime
3.2.8 - VarChar Encryption UDFs
VarChar Encryption UDFs in Trino
This section provides a list of VarChar encryption UDFs for the protect, unprotect, and reprotect operations.
ptyStringEnc()
This UDF encrypts the Varchar value.
Signature:
ptyStringEnc(varchar input, varchar DataElement)
Parameters:
| Name | Type | Description |
|---|
input | VarChar | Specifies the data to encrypt. |
dataElement | VarChar | Specifies the name of the data element to encrypt the data. |
Warning:
- The string encryption UDFs are limited to accept 2 GB data size at maximum as input.
- Ensure that the field size for the protected binary data post the required encoding does not exceed the 2 GB input limit.
- The field size to store the input data is dependent on the encryption algorithm selected, such as, AES-128, AES-256, 3DES, and CUSP, and the encoding type selected, such as, No Encoding, Base64, and Hex.
- Ensure to set the input data size based on the required encryption algorithm and encoding so that the it does not exceed the 2 GB input limit.
Returns:
This UDF returns the encrypted Varbinary value.
Example:
select ptyStringEnc('ProtegrityProt','AES128_DE');
Exception:
ptyTrinoProtectorException: INPUT-ERROR: Tokenization or Format Preserving Data Elements are not supported: An unsupported data element is provided.java.io.IOException: Too many bytes before newline: 2147483648: The length of the input needs to be less than the maximum limit of 2 GB.
Supported Protection Methods:
| Function Name | Tokenization | Encryption | FPE | No Encryption | Masking | Monitoring |
| ptyStringEnc() | No | | No | Yes | No | Yes |
ptyStringDec()
This UDF decrypts the Varbinary value.
Signature:
ptyStringDec(varbinary input, varchar DataElement)
Parameters:
| Name | Type | Description |
|---|
input | VarBinary | Specifies the data to decrypt. |
dataElement | VarChar | Specifies the name of the data element to decrypt the data. |
Returns:
This UDF returns the decrypted VarChar value.
Example:
select ptyStringDec(ptyStringEnc('ProtegrityProt','AES128_DE'),'AES128_DE');
Exception:
ptyTrinoProtectorException: INPUT-ERROR: First argument (Input Data to be unprotected) is not a valid Binary Datatype: The input data, which is not in binary format is provided.ptyHiveProtectorException: INPUT-ERROR: Tokenization or Format Preserving Data Elements are not supported: An unsupported data element is provided.
Supported Protection Methods:
| Function Name | Tokenization | Encryption | FPE | No Encryption | Masking | Monitoring |
| ptyStringDec() | No | | No | Yes | No | Yes |
ptyStringReEnc()
This UDF re-encrypts the Varbinary format encrypted data with a different data element.
Signature:
ptyStringReEnc(varbinary input, varchar oldDataElement, varchar newDataElement)
Parameters:
| Name | Type | Description |
|---|
input | VarBinary | Specifies the VarBinary value to re-encrypt. |
oldDataElement | VarChar | Specifies the name of the data element that was initially used to encrypt the data. |
newDataElement | VarChar | Specifies the name of the new data element to re-encrypt the data. |
Returns:
This UDF returns the Varbinary format data, which is re-encrypted.
Example:
select ptyStringReEnc(ptyStringEnc('ProtegrityProt','AES128_DE'),'AES128_DE','new_AES128_DE');
Exception:
ptyTrinoProtectorException: INPUT-ERROR: First argument (Input Data to be reprotected) is not a valid Binary Datatype: The input data, which is not in binary format is provided.java.io.IOException: Too many bytes before newline: 2147483648: The length of the input needs to be less than the maximum limit of 2 GB.com.protegrity.hive.udf.ptyTrinoProtectorException: 26, Unsupported algorithm or unsupported action for the specific data element: An unsupported data element is provided.
Supported Protection Methods:
| Function Name | Tokenization | Encryption | FPE | No Encryption | Masking | Monitoring |
| ptyStringDec() | No | | No | Yes | No | Yes |
3.2.9 - Unicode UDFs
Unicode UDFs in Trino
This section provides a list of Unicode UDFs for the protect, unprotect, and reprotect operations. This UDF should be used only to tokenize the Unicode data in Trino, migrate the tokenized data from Trino to a Teradata database, and detokenize the data using the Protegrity Database Protector. Ensure to use this UDF with a Unicode tokenization data element only.
ptyProtectUnicode()
This UDF protects the Varchar (Unicode) values.
Signature:
ptyProtectUnicode(varchar input, varchar dataElement)
Parameters:
| Name | Type | Description |
|---|
input | VarChar | Specifies the data to protect. |
dataElement | VarChar | Specifies the name of the data element to protect the data. |
Returns:
This UDF returns the protected Varchar value.
Example:
select ptyProtectUnicode('ProtegrityProt','Unicode_DE');
Supported Protection Methods:
| Function Name | Tokenization | Encryption | FPE | No Encryption | Masking | Monitoring |
|---|
| ptyProtectUnicode() | Unicode (Legacy)
Unicode Base64 | No | No | Yes | No | Yes |
ptyUnprotectUnicode()
This UDF unprotects the existing protected string value. This UDF should be used only to tokenize the Unicode data in Trino, migrate the tokenized data from Trino to a Teradata database, and detokenize the data using the Protegrity Database Protector. Ensure to use this UDF with a Unicode tokenization data element only.
Signature:
ptyUnprotectUnicode(varchar input, varchar dataElement)
Parameters:
| Name | Type | Description |
|---|
input | VarChar | Specifies the data to unprotect. |
dataElement | VarChar | Specifies the name of the data element to unprotect the data. |
Returns:
This UDF returns the unprotected Varchar(Unicode) value.
Example:
select ptyUnprotectUnicode(ptyProtectUnicode('ProtegrityProt','Unicode_DE'),'Unicode_DE');
Supported Protection Methods:
| Function Name | Tokenization | Encryption | FPE | No Encryption | Masking | Monitoring |
|---|
| ptyUnprotectUnicode() | Unicode (Legacy)
Unicode Base64 | No | No | Yes | No | Yes |
ptyReprotectUnicode()
This UDF reprotects the Varchar format protected data, which was earlier protected using the ptyProtectUnicode() UDF, with a different data element. This UDF should be used only to tokenize the Unicode data in Trino, migrate the tokenized data from Trino to a Teradata database, and detokenize the data using the Protegrity Database Protector. Ensure to use this UDF with a Unicode tokenization data element only.
Signature:
ptyReprotectUnicode(varchar input, varchar oldDataElement, varchar newDataElement)
Parameters:
| Name | Type | Description |
|---|
input | VarChar | Specifies the Varchar(Unicode) value to reprotect. |
oldDataElement | VarChar | Specifies the name of the data element that was initially used to protect the data. |
newDataElement | VarChar | Specifies the name of the new data element to reprotect the data. |
Returns:
This UDF returns the protected VarChar value.
Example:
select ptyReprotectUnicode(ptyProtectUnicode('ProtegrityProt','Unicode_DE'),'Unicode_DE','new_Unicode_DE');
Supported Protection Methods:
| Function Name | Tokenization | Encryption | FPE | No Encryption | Masking | Monitoring |
|---|
| ptyReprotectUnicode() | Unicode (Legacy)
Unicode Base64 | No | No | Yes | No | Yes |
3.2.10 - Decimal UDFs
Decimal UDFs in Trino
This section provides a list of the Decimal UDFs for the protect, unprotect, and reprotect operations. Ensure to use the data element with the No Encryption method only. Using any other data element might cause data corruption.
ptyProtectDecimal()
This UDF protects the Decimal value.
Signature:
ptyProtectDecimal(decimal input, varchar dataElement)
Parameters:
| Name | Type | Description |
|---|
input | Decimal | Specifies the data to protect. |
dataElement | VarChar | Specifies the name of the data element to protect the data. |
Returns:
This UDF returns the protected Decimal value. If the input value is NULL and the data element is not a part of the policy, then the output value returned is NULL.
Example:
select ptyProtectDecimal(12332212222223.033, 'NoEnc');
Supported Protection Methods:
| Function Name | Tokenization | Encryption | FPE | No Encryption | Masking | Monitoring |
|---|
| ptyProtectDecimal() | No | No | No | Yes | No | Yes |
ptyUnprotectDecimal()
This UDF unprotects the protected Decimal value. Ensure to use the data element with the No Encryption method only. Using any other data element might cause data corruption.
Signature:
ptyUnprotectDecimal(decimal input, varchar dataElement)
Parameters:
| Name | Type | Description |
|---|
input | Decimal | Specifies the protected data to unprotect. |
dataElement | VarChar | Specifies the name of the data element to unprotect the data. |
Returns:
This UDF returns the unprotected Decimal value. If the input value is NULL and the data element is not a part of the policy, then the output value returned is NULL.
Example:
select ptyUnprotectDecimal(12332212222223.033, 'NoEnc');
Supported Protection Methods:
| Function Name | Tokenization | Encryption | FPE | No Encryption | Masking | Monitoring |
|---|
| ptyUnprotectDecimal() | No | No | No | Yes | No | Yes |
ptyReprotect() - Decimal
This UDF reprotects the Decimal format protected data, which was earlier protected using the ptyProtectDecimal() UDF, with a different data element.
Signature:
ptyReprotect(decimal input, varchar oldDataElement, varchar newDataElement)
Parameters:
| Name | Type | Description |
|---|
input | Decimal | Specifies the Decimal value to reprotect. |
oldDataElement | VarChar | Specifies the name of the data element that was initially used to protect the data. |
newDataElement | VarChar | Specifies the name of the new data element to reprotect the data. |
Returns:
This UDF returns the protected Decimal value.
Example:
select ptyReprotect(12332212222223.033,'NoEnc','NoEnc');
Supported Protection Methods:
| Function Name | Tokenization | Encryption | FPE | No Encryption | Masking | Monitoring |
|---|
| ptyReprotect() - Decimal | No | No | No | Yes | No | Yes |
3.2.11 - Double UDFs
Double UDFs in Trino
This section provides a list of Double UDFs for the protect, unprotect, and reprotect operations.
ptyProtectDouble()
This UDF protects the Double value.
Signature:
ptyProtectDouble(double input, varchar dataElement)
Parameters:
| Name | Type | Description |
|---|
input | Double | Specifies the data to protect. |
dataElement | VarChar | Specifies the name of the data element to protect the data. |
Note: It is an observed behavior with Trino that the UDF accepting double parameter also accepts decimal and integer parameter due to internal data type conversion.
Returns:
This UDF returns the protected Double value.
Example:
select ptyProtectDouble(12345, 'No_Enc');
Supported Protection Methods:
| Function Name | Tokenization | Encryption | FPE | No Encryption | Masking | Monitoring |
|---|
| ptyProtectDouble() | No | No | No | Yes | No | Yes |
ptyUnprotectDouble()
This UDF unprotects the protected Double value. Ensure to use the data element with the No Encryption method only. Using any other data element might cause data corruption.
Signature:
ptyUnprotectDouble(double input, varchar dataElement)
Parameters:
| Name | Type | Description |
|---|
input | Double | Specifies the protected data to unprotect. |
dataElement | VarChar | Specifies the name of the data element to unprotect the data. |
Returns:
This UDF returns the original Double value.
Example:
select ptyUnprotectDouble(12345, 'No_Enc');
Supported Protection Methods:
| Function Name | Tokenization | Encryption | FPE | No Encryption | Masking | Monitoring |
|---|
| ptyUnprotectDouble() | No | No | No | Yes | No | Yes |
ptyReprotect() - Double
This UDF reprotects the Double format protected data, which was earlier protected using the ptyProtectDouble() UDF, with a different data element. Ensure to use the data element with the No Encryption method only. Using any other data element might cause data corruption.
Signature:
ptyReprotect(double input, varchar oldDataElement, varchar newDataElement)
Parameters:
| Name | Type | Description |
|---|
input | Double | Specifies the Double value to reprotect. |
oldDataElement | VarChar | Specifies the name of the data element that was initially used to protect the data. |
newDataElement | VarChar | Specifies the name of the new data element to reprotect the data. |
Returns:
This UDF returns the protected Double value.
Example:
select ptyReprotect(09457, 'No_Enc', 'new_No_Enc');
Supported Protection Methods:
| Function Name | Tokenization | Encryption | FPE | No Encryption | Masking | Monitoring |
|---|
| ptyReprotect() - Double | No | No | No | Yes | No | Yes |
3.2.12 - VarBinary Encryption UDFs
VarBinary Encryption UDFs in Trino
ptyBinaryEnc()
This UDF protects the VarBinary values. If the varbinary data size exceeds 32 MB, then set the configuration in the config.properties file and then restart the Trino server on all the nodes (co-ordinator and worker).
node-manager.http-client.max-content-length=64MB
exchange.http-client.max-content-length=64MB
Signature:
ptyBinaryEnc(VarBinary input, Varchar DataElement)
Parameters:
| Name | Type | Description |
|---|
input | VarBinary | Specifies the data to encrypt. |
dataElement | VarChar | Specifies the name of the data element to encrypt the data. |
Returns:
This UDF returns the encrypted Varbinary value.
Example:
select ptyBinaryEnc(X'12A23D43', 'AES256');
select ptyBinaryEnc(binary_col1, 'AES256') from table1;
Supported Protection Methods:
| Function Name | Tokenization | Encryption | FPE | No Encryption | Masking | Monitoring |
| ptyBinaryEnc() | No | | No | Yes | No | Yes |
ptyBinaryDec()
This UDF decrypts the Varbinary value.
Signature:
ptyBinaryDec(VarBinary input, Varchar DataElement)
Parameters:
| Name | Type | Description |
|---|
input | VarBinary | Specifies the data to decrypt. |
dataElement | VarChar | Specifies the name of the data element to decrypt the data. |
Returns:
This UDF returns the decrypted VarBinary value.
Example:
select ptyBinaryDec(X'215b807cdfbc', 'AES256');
select ptyBinaryDec(binary_col1, 'AES256') from table1;
Supported Protection Methods:
| Function Name | Tokenization | Encryption | FPE | No Encryption | Masking | Monitoring |
| ptyBinaryDec() | No | | No | Yes | No | Yes |
ptyBinaryReEnc()
This UDF re-encrypts the Varbinary format encrypted data with a different data element.
Signature:
ptyBinaryReEnc(VarBinary input, Varchar oldDataElement, Varchar newDataElement)
Parameters:
| Name | Type | Description |
|---|
input | VarBinary | Specifies the VarBinary value to re-encrypt. |
oldDataElement | VarChar | Specifies the name of the data element that was initially used to encrypt the data. |
newDataElement | VarChar | Specifies the name of the new data element to re-encrypt the data. |
Returns:
This UDF returns the Varbinary format data, which is re-encrypted.
Tokenization or Format Preserving Data Elements are not supported. Only encryption data elements are supported.
Example:
select ptyBinaryReEnc(X'12A23D43', 'Old_AES256', 'New_AES256');
select ptyBinaryReEnc(binary_col1, 'Old_AES256', 'New_AES256') from table1;
Supported Protection Methods:
| Function Name | Tokenization | Encryption | FPE | No Encryption | Masking | Monitoring |
| ptyBinaryReEnc() | No | | No | Yes | No | Yes |
4 - Appendix
This page consists of the Additional References, Return Codes, Sample Scripts, and Supported Platforms Matrix for the Data Warehouse Protectors.
4.1 - Additional references for the Protectors
This page consists of the the additional references for all the Data Warehouse Protectors v10.0.0.
4.1.1 - Additional references for the Teradata Protector
This page consists of the the additional references for the Teradata Data Warehouse Protector.
4.1.1.1 - Configuring access to execute queries
When configuring a Teradata Member Source in ESA, the following grants must be given to the user that will be connecting to the database. This is required in order to retrieve policy users and groups.
The following is a list of privilege rights that are required for the access configuration:
- Select access to DBC.DBASE
- Select access to DBC.ROLEINFO
- Select access to DBC.RoleMembers
The privilege rights must be granted in the member source configuration on the ESA when you are defining a database user with the roles.
There are three basic types of queries performed in Teradata:
Retrieving the database users
SELECT DBASE.DatabaseNameI FROM DBC.DBASE DBASE WHERE DBASE.ROWTYPE = 'U' ORDER BY 1;
For more information about fetching the users, refer to Additional References for Teradata.
Retrieving the database roles/groups
SELECT RoleName,UPPER(GRANTEE) FROM DBC.RoleMembers ORDER BY RoleName;
Retrieving the database users that are members of a role/group
SELECT UPPER(GRANTEE) FROM DBC.RoleMembers ORDER BY GRANTEE;
4.1.1.2 - Teradata Query Bands and Trusted Sessions
When a middle-tier application is used together with the Teradata database, it typically logs on to the database as a permanent database user (application user) and establishes a connection pool. End-users that access the database through the middle-tier application are given all authorized database privileges and are audited based on that single application user.
For the sites that require users to be individually identified, authorized, and audited, the middle-tier application can be configured to offer trusted sessions. Application users that access the database through a trusted session must be set up as proxy users and assigned one or more database roles, which determine their access rights in the database. When a proxy user requests database access, the application forwards the user identity and applicable role information to the database.
For more information about Teradata trusted sessions, refer to https://docs.teradata.com/r/Enterprise_IntelliFlex_VMware/Security-Administration/Introduction-to-Security-Administration.
The system uses a proxy user if the query band contains the reserved name PROXYUSER. In order for the proxy user to access sensitive data, UDFs and UDTs need to know the requestor of the data. They obtain this information from the query band parameters.
For more information about query bands, refer to https://docs.teradata.com/r/Teradata-VantageCloud-Lake/SQL-Reference/SQL-Data-Definition-Language
If a proxy user is found among the query band parameters, then it is used in the authorization process instead of the regular data user (which could be a different user). This means that only the proxy user’s permissions apply. This is similar to how the Teradata permissions work for trusted sessions. The database permissions for the proxy user are used, and not the application user’s permissions.
Before such a user can access the database, a Grant Connect through Access right should be given by the database administrator to the user. The following example provides the query to ensure that the user ‘JSMITH’ can connect through.
The application My_App is confiured to connect to Teradata with a service account My_App_User that is not part of the Protegrity security policy. However, in case the app user JSMITH which does not exist in Teradata needs to see the data in the clear. Then, the database administrator must first Grant Connect access to the user, JSMITH.
GRANT CONNECT THROUGH My_App_User
TO JSMITH
WITH ROLE AppRole;
The user JSMITH can now access the database. However, since JSMITH does not exist in the database, Teradata needs to know what role it needs to inherit. This can be any role already configured within Teradata.
Then, every time JSMITH wants to run a SQL command through My_App, the following query band statement needs to be executed first:
SET QUERY_BAND=‘PROXYUSER=JSMITH;’ FOR SESSION;
The UDF getqueryband is provided by Teradata.
select getqueryband();
*** Query completed. One row found. One column returned.
*** Total elapsed time was 1 second.
getqueryband()
---------------------------------------------------------------------------
select pty_varcharlatinenc('abcd','AES',123,0,0);
*** Query completed. One row found. One column returned.
*** Total elapsed time was 1 second.
pty_varcharlatinenc('abcd','AES',123,0,0)
---------------------------------------------------------------------------
E3AE49B5C44E4CE64CC7AB3A20F82325
SET QUERY_BAND='PROXYUSER=JSMITH;' FOR SESSION;
*** Set QUERY_BAND accepted.
*** Total elapsed time was 1 second.
select getqueryband();
*** Query completed. One row found. One column returned.
*** Total elapsed time was 1 second.
getqueryband()
---------------------------------------------------------------------------
=S> PROXYUSER=JSMITH;
select pty_varcharlatinenc('abcd','AES',123,0,0);
*** Failure 7504 in UDF/XSP/UDM SYSLIB.pty_varcharlatinenc: SQLSTATE U0001:
No such user
Statement# 1, Info =0
*** Total elapsed time was 1 second.
AUDIT TRACE:
Thu Dec 30 01:21:53.530 2010 JSMITH AES 0 1 0 0 Insert, unknown user dbp 1
SET QUERY_BAND=NONE FOR SESSION;
*** Set QUERY_BAND accepted.
*** Total elapsed time was 1 second.
select pty_varcharlatinenc('abcd','AES',123,0,0);
*** Query completed. One row found. One column returned.
*** Total elapsed time was 1 second.
pty_varcharlatinenc('abcd','AES',123,0,0)
---------------------------------------------------------------------------
E3AE49B5C44E4CE64CC7AB3A20F82325
Important: The Data Warehouse Protector supports user names that are up to 255 characters in length. However, the Teradata platform supports user name lengths of 128 characters only. Hence, the user name is limited to the value supported by the Teradata platform.
4.2 - Data Warehouse Sample Scripts
This page provides sample scripts for the operations performed using the Data Warehouse Protectors.
4.2.1 - Teradata Database Data Warehouse Sample Scripts
This page consists of the sample scripts for encryption and tokenization by the Teradata Data Warehouse Protector. It is recommended to view them and replace the values if required.
The following sample scripts are also included in the installation package.
Encryption sample script
---------------------------------------------------------------------
-- Protegrity User Defined Functions sample script.
--
-- NOTE: Please change the following 'tags' before executing the script:
--      - REPLACE_DATABASE- Specify the testdatabase.
--      - <data element1> - dataelement used for protecting varchar
--      - <data element2> - dataelement used for protecting integer
--      - <data element3> - dataelement used for protecting date
--
-- This script should be run in BTEQ.
--
-- Copyright (c) 2025 Protegrity USA, Inc. All rights reserved
--
---------------------------------------------------------------------
DATABASE REPLACE_DATABASE;
.IF ERRORCODE != 0 THEN .QUIT 99

BT;
  DROP TABLE SAMPLE1_BAK;
ET;

BT;
  DROP TABLE SAMPLE1_PTY;
ET;

DROP VIEW SAMPLE1;

-----------------------------------------------------------------------
--
-- SAMPLE1: Table with no protection. Contains sample data.
--
-----------------------------------------------------------------------
BT;
  CREATE MULTISET TABLE SAMPLE1 (
    CCN     VARCHAR(32)               NOT NULL,
    LNAM    VARCHAR(32)               NOT NULL,
    RATING  INTEGER                   NOT NULL,
    REFN    INTEGER                   NOT NULL,
    BIRT    DATE FORMAT 'YYYY/MM/DD'  NOT NULL,
    LUPD    DATE FORMAT 'YYYY/MM/DD'  NOT NULL
  );
ET;

BT;
  INSERT INTO SAMPLE1 ('4000567834561233', 'PTY_IVP_FPRTEST_LNAME', 123456789, 987654321, CAST( '2013/02/15' AS DATE ), CAST( '2013/02/15' AS DATE ));
ET;

BT;
RENAME TABLE SAMPLE1 to SAMPLE1_BAK;
ET;

-----------------------------------------------------------------------
--
-- SAMPLE1_PTY: This table is similar to SAMPLE1 will contain protected data.
--              The 'LNAM','REFN', and 'LUPD' columns now are of type VARBYTE.
--              Data is migrated from the 'SAMPLE1_BAK' table using UDF calls.
--
-----------------------------------------------------------------------
BT;
  CREATE MULTISET TABLE SAMPLE1_PTY (
    CCN     VARCHAR(32)               NOT NULL,
    LNAM    VARBYTE(48)               NOT NULL,
    RATING  INTEGER                   NOT NULL,
    REFN    VARBYTE(16)               NOT NULL,
    BIRT    DATE FORMAT 'YYYY/MM/DD'  NOT NULL,
    LUPD    VARBYTE(16)               NOT NULL
  );
ET;

BT;
  INSERT INTO SAMPLE1_PTY("CCN", "LNAM", "RATING", "REFN", "BIRT", "LUPD") SELECT
    "CCN",
    TESTDB.PTY_VARCHARLATINENC("LNAM",'<data element1>',50,0,0),
    "RATING",
    TESTDB.PTY_INTEGERENC("REFN",'<data element2>',34,0,0),
    "BIRT",
    TESTDB.PTY_DATEENC("LUPD",'<data element3>',34,0,0)
  FROM SAMPLE1_BAK;
ET;

-----------------------------------------------------------------------
--
--  SAMPLE1: This is a view that shows how data is unprotected using the UDFs.
--           Data is selected from the 'SAMPLE1_PTY' table.
--           The name of this view is the same as the original table
--
-----------------------------------------------------------------------
BT;
  CREATE VIEW SAMPLE1 ("CCN", "LNAM", "RATING", "REFN", "BIRT", "LUPD") AS SELECT
    "CCN",
    CAST(TESTDB.PTY_VARCHARLATINDEC("LNAM",'<data element1>',32,0,0) AS VARCHAR(32)),
    "RATING",
    CAST(TESTDB.PTY_INTEGERDEC("REFN",'<data element2>',0,0) AS INTEGER),
    "BIRT"
    ,
    CAST(TESTDB.PTY_DATEDEC("LUPD",'<data element3>',0,0) AS DATE)
  FROM SAMPLE1_PTY;
ET;
Tokenization sample script
---------------------------------------------------------------------
-- Protegrity User Defined Functions.
-- Copyright (c) 2025 Protegrity USA, Inc. All rights reserved
--
-- This script should be run in BTEQ
--
-- NOTE: Please change the following 'tags' before executing the script:
--      - TESTDB - database where the protegrity UDF's are installed
--      - REPLACEDB - Database where you have testdata
--      - <data element1> - dataelement used for protecting varchar
--      - <data element2> - dataelement used for protecting integer
--      - <data element3> - dataelement used for protecting date
--NOTE: Use datetime dataelement to protect and unprotect YMD date data
---------------------------------------------------------------------
DATABASE REPLACE_DATABASE;
.IF ERRORCODE != 0 THEN .QUIT 99

-----------------------------------------------------------------------
--
-- SAMPLE - Two tables and one view is created as follows:
--
-- Run the sample_tok.sql job to verify protect / unprotect of datatypes
-- VARCHAR, DATE and INTEGER.
--
-----------------------------------------------------------------------
BT;
  DROP TABLE SAMPLE1_BAK;
ET;

BT;
  DROP TABLE SAMPLE1_PTY;
ET;

DROP VIEW SAMPLE1;

-----------------------------------------------------------------------
--
-- SAMPLE1  Base table with no protection
--
-----------------------------------------------------------------------
BT;
  CREATE MULTISET TABLE SAMPLE1 (
    CCN     VARCHAR(32)               NOT NULL,
    LNAM    VARCHAR(32)               NOT NULL,
    RATING  INTEGER                   NOT NULL,
    REFN    INTEGER                   NOT NULL,
    BIRT    DATE FORMAT 'yyyy-mm-dd'  NOT NULL,
    LUPD    DATE FORMAT 'yyyy-mm-dd'  NOT NULL
  );
ET;

BT;
  INSERT INTO SAMPLE1 ('4000567834561233', 'PTY_IVP_FPRTEST_LNAME', 123456789, 987654321, CAST( '2013/02/15' AS DATE ), CAST( '2013/02/15' AS DATE ));
ET;

BT;
RENAME TABLE SAMPLE1 to SAMPLE1_BAK;
ET;

-----------------------------------------------------------------------
--
-- SAMPLE1_PTY Same as SAMPLE1 but with protection added fo
--             columns, which are encrypted / tokenized when the
--             table is loaded from SAMPLE1_BAK.
--
-----------------------------------------------------------------------
BT;
  CREATE MULTISET TABLE SAMPLE1_PTY (
    CCN     VARCHAR(32)               NOT NULL,
    LNAM    VARCHAR(32)               NOT NULL,
    RATING  INTEGER                   NOT NULL,
    REFN    INTEGER                   NOT NULL,
    BIRT    DATE FORMAT 'yyyy-mm-dd'  NOT NULL,
    LUPD    DATE FORMAT 'yyyy-mm-dd'  NOT NULL
  );
ET;

BT;
  INSERT INTO SAMPLE1_PTY("CCN", "LNAM", "RATING", "REFN", "BIRT", "LUPD") SELECT
    TESTDB.PTY_VARCHARLATININS("CCN",'<data element1>',32,0,0),
    "LNAM",
    TESTDB.PTY_INTEGERINS("RATING",'<data element2>',32,0,0),
    "REFN",
    CAST(TESTDB.PTY_VARCHARLATININS(CAST("BIRT" AS VARCHAR(32)),'<data element3>',32,0,0) AS DATE),
    "LUPD"
  FROM SAMPLE1_BAK;
ET;

-----------------------------------------------------------------------
--
--  SAMPLE1 Same as SAMPLE1_PTY. But data is decrypted /detokenized
--              when SAMPLE1 is loaded from SAMPLE1_PTY.
--
-----------------------------------------------------------------------
BT;
  CREATE VIEW SAMPLE1 ("CCN", "LNAM", "RATING", "REFN", "BIRT", "LUPD") AS SELECT
    TESTDB.PTY_VARCHARLATINSEL("CCN",'<data element1>',32,0,0),
    "LNAM",
    TESTDB.PTY_INTEGERSEL ("RATING",'<data element2>',0,0),
    "REFN",
    CAST(TESTDB.PTY_VARCHARLATINSEL(CAST("BIRT" AS VARCHAR(32)),'<data element3>',32,0,0) AS DATE),
    "LUPD"
  FROM SAMPLE1_PTY;
ET;
4.3 - Return Codes for Data Warehouse Protectors
This page includes the list of return codes for the Data Warehouse Protectors.
| Return Code | Description |
|---|
| 1 | The username could not be found in the policy |
| 2 | The data element could not be found in the policy |
| 3 | The user does not have the appropriate permissions to perform the requested operation |
| 4 | Tweak is null |
| 5 | Integrity check failed |
| 6 | Data protect operation was successful |
| 7 | Data protect operation failed |
| 8 | Data unprotect operation was successful |
| 9 | Data unprotect operation failed |
| 10 | The user has appropriate permissions to perform the requested operation but no data has been protected/unprotected |
| 11 | Data unprotect operation was successful with use of an inactive keyid |
| 12 | Input is null or not within allowed limits |
| 13 | Internal error occurring in a function call after the provider has been opened |
| 14 | Failed to load data encryption key |
| 15 | Tweak input is too long |
| 19 | Unsupported tweak action for the specified fpe data element |
| 20 | Failed to allocate memory |
| 21 | Input or output buffer is too small |
| 22 | Data is too short to be protected/unprotected |
| 23 | Data is too long to be protected/unprotected |
| 26 | Unsupported algorithm or unsupported action for the specific data element |
| 31 | Policy not available |
| 44 | The content of the input data is not valid |
| 49 | Unsupported input encoding for the specific data element |
| 50 | Data reprotect operation was successful |
| 51 | Failed to send logs, connection refused |
4.4 - Supported Data Warehouse Protectors Matrix
The below table lists the Data Warehouse protectors with the supported Data Warehouse version and platform details:
| Protector | Supported Data Warehouse Version | Supported Platforms |
|---|
| Teradata Data Warehouse Protector | Teradata 17.05 | SLES 12 |
| Teradata 17.10 | SLES 12 |
| Teradata 17.20 | SLES 12 |
| | SLES 15 |
| Vantage Cloud Lake Teradata 20 | SLES 15 SP4 |
5 - Trino Data Warehouse Protector
5.1 - Understanding the Architecture
The architecture for the Trino Data Warehouse Protector is depicted in the image below.
| Component | Description |
|---|
| RPAgent | Is a daemon running on each node that downloads the policy package from the ESA over a TLS channel using the installed Certificates. |
| Log Forwarder | Is a daemon running on each node that routes the audit logs and application logs to the ESA/Audit Store. |
| config.ini | Is a file on each node containing the set of configuration parameters to modify the protector behavior. |
| Protector Layer | Contains the Trino Protector UDFs and APIs. |
| JcoreLite | Is the JNI library that provides a Java API layer to the Core libraries. |
| Core | Is the set of various libraries that provide the Protegrity Core functionality. |
5.2 - System Requirements
Ensure that the following prerequisites are met, before installing the Trino Protector:
- The Trino cluster is installed, configured, and running.
- The ESA appliance, version 10.0.x or v10.1.x, is installed, configured, and running.
- The ports that are configured on the ESA and the nodes in the cluster, which will run the Trino Protector, are listed in the following table:
| Destination Port | Protocol | Source | Destination | Description |
|---|
| 8443 | TLS | RPAgent on the Big Data Protector cluster node | ESA | The RPAgent communicates with the ESA through port
8443 to download a policy. |
| 9200 | TLS | Log Forwarder on the Trino Protector Cluster node | Protegrity Audit
Store appliance | The Log Forwarder sends all the logs to
the Protegrity Audit Appliance through port 9200. |
| 15780 | TCP | Protector on the Trino Protector
cluster node | Log Forwarder
on the Trino
Protector cluster
node | The Trino Protector writes Audit Logs to
localhost through port 15780. The Application
Logs are also written to localhost through
port 15780. The Log Forwarder reads the logs from that
socket. |
5.3 - Preparing the Environment
5.3.1 - Extracting the Files from the Installation Package
Extract the contents of the installation package to access the configurator script. This script generates the single node installation script to install the Trino Protector.
To extract the files from the installation package:
Log in to the Linux machine that has connectivity to ESA.
Download the Trino Protector package DatabaseProtector_Linux-ALL-64_x86-64_Trino-ALL-64_10.0.0+x.tgz to any local directory.
To extract the files from the installation pacakage, run the following command:
tar -xvf DatabaseProtector_Linux-ALL-64_x86-64_Trino-ALL-64_10.0.0+x.tgz
Press ENTER.
The command extracts the installation package and the GPG signature files.
DatabaseProtector_Linux-ALL-64_x86-64_Trino-ALL-64_10.0.0+x.tgz
signatures/
signatures/DatabaseProtector_Linux-ALL-64_x86-64_Trino-ALL-64_10.0.0+x.tgz_10.0.sig
Verify the authenticity of the build using the signatures folder. For more information, refer Verification of Signed Protector Build.
To extract the configurator script, run the following command:
tar -xvf DatabaseProtector_Linux-ALL-64_x86-64_Trino-ALL-64_10.0.0+x.tgz
Press ENTER.
The command extracts the configurator script.
TrinoProtectorConfigurator_10.0.0+x.sh
5.3.2 - Executing the Configurator Script
The configuator script generates the single-node installation script to install the Trino Protector.
To execute the configurator script:
Log in to the staging machine that has connectivity to ESA.
To execute the configurator script, run the following command:
./TrinoProtectorConfigurator_10.0.0+x.sh
Press ENTER.
The prompt to continue the configuration of the Trino Protector appears.
************************************************************************************
            Welcome to the Configurator for Protegrity Trino Protector
************************************************************************************
This will configure and generate the Protegrity Trino Protector Generic Installation
Script for a single Trino node.

Do you want to continue? [yes or no]:
To continue, type yes.
Press ENTER.
The prompt to enter the installation directory on the cluster node appears.
Protegrity Trino Protector Configurator started...

Enter the Installation Directory on cluster node
[default: /opt/protegrity]:
Enter the location of the directory to install the Trino protector.
To use the default directory, press ENTER.
Press ENTER.
The prompt to enter a temporary directory appears.
Enter a Temporary Staging Directory on the cluster node.
This directory will be used for extracting files from the Installation/Uninstallation scripts.
The user executing the Installation/Uninstallation scripts must have permission to create this directory and execute in it.
If the directory exists, ensure it is empty, as the scripts will delete its contents recursively.
[default: /tmp/protegrity]:
Enter the location of the temporary directory.
Press ENTER.
The prompt to enter the ESA IP address or host name appears.
Enter the ESA Hostname/IP Address:
Enter the ESA hostname or IP address.
Press ENTER.
The prompt to enter the listening port appears.
Enter ESA host listening port [8443]:
Enter the ESA host listening port.
Press ENTER.
The prompt to enter the JSON Web Token appears.
If you have an existing ESA JSON Web Token (JWT) with Export Certificates role, enter it otherwise enter 'no':
Note: The script silently reads the user input. Therefore, the user will be unable to see the entered JWT or no.
Enter the JWT token.
a. If you do not have an existing ESA JSON Web Token (JWT), type no.
b. Press ENTER.
The prompt to enter the user name with Export Certificates permission appears.
```
JWT was not provided. Script will now prompt for ESA username and password.
Enter ESA Username:
```
c. Enter the username that has permissions to export the certificates.
d. Press ENTER.
The prompt to enter the password appears.
```
Temporarily setting up RPAgent directory structure on current node...
Please enter the password for downloading certificates[]:

```
e. Enter the password.
f. Press ENTER.
The script retrieves the JWT from the ESA, validates it, and the prompt to select the Audit Store type appears.
```
Unpacking...
Extracting files...
Obtaining token from <ESA_IP_Address>:<ESA_Port>...
Downloading certificates from ESA_IP_Address:ESA_Port...
% Total    % Received % Xferd  Average Speed   Time    Time     Time  Current
                                Dload  Upload   Total   Spent    Left  Speed
100 11264  100 11264    0     0   116k      0 --:--:-- --:--:-- --:--:--  117k

Extracting certificates...
Certificates successfully downloaded and stored in /<installation_directory>/rpagent/data

Protegrity RPAgent installed in /<installation_directory>/rpagent.


Repackaging rpagent with ESA certificates...

Fetched and Repackaged ESA Certificates successfully..


Select the Audit Store type where Log Forwarder(s) should send logs to.

[ 1 ] : Protegrity Audit Store
[ 2 ] : External Audit Store
[ 3 ] : Protegrity Audit Store + External Audit Store

Enter the no.:
```
Depending on the Audit Store type, select any one of the following options:
| Option | Description |
|---|
1 | To use the default setting using the Protegrity Audit Store appliance, type 1. If you enter 1, then the default Fluent Bit configuration files are used and Fluent Bit will forward the logs to the Protegrity Audit Store appliances. |
2 | To use an external audit store, type 2. If you enter 2, then the default Fluent Bit configuration files used for the External Audit Store (out.conf and upstream.cfg in the /opt/protegrity/fluent-bit/data/config.d/ directory) are renamed (out.conf.bkp and upstream.cfg.bkp) so that they will not be used by Fluent Bit. Additionally, the custom Fluent Bit configuration files for the external audit store are copied to the /opt/protegrity/fluent-bit/data/config.d/ directory. |
3 | To use a combination of the default setting with an external audit store, type 3. If you enter 3, then the default Fluent Bit configuration files used for the Protegrity Audit Store (out.conf and upstream.cfg in the /opt/protegrity/fluent-bit/data/config.d/ directory) are not renamed. However, the custom Fluent Bit configuration files for the external audit store are copied to the /opt/protegrity/fluent-bit/data/config.d/ directory. |
Press ENTER.
The prompt to enter the comma-separated list of the Audit Store appears.
Enter comma-separated list of Hostnames/IP Addresses and/or Ports of Protegrity Audit Store.
Allowed Syntax: hostname[:port][,hostname[:port],hostname[:port]...] (Default Value - <ESA_IP_Address>:<ESA_Port>)
Enter the list:
Enter the comma-separated IP addresses/ports in the correct syntax.
Press ENTER.
The prompt to enter the local directory path that stores the LogForwarder configuration file appears.
Enter the local directory path on this machine that stores the LogForwarder configuration files for External Audit Store:
The configurator script will display this prompt only if you select option 2 or 3
Enter the location to store the Log Forwarder configuration files.
Press ENTER.
The prompt to generate the application logs for the RPAgent appears.
Do you want RPAgent's log to be generated in a file? [yes or no]:
To generate the application logs for the RPAgent, type yes.
Press ENTER.
The script enables the application log file and generates the single-node installation script.
RPAgent's log will be generated in a file.

Configuring the Trino Protector Installation Script...

Successfully finished configuring the Trino Protector Installation Script.

The single-node Installation Script is generated at /<installation_directory>/Installation_Script/TrinoProtector_InstallationScript_10.0.0+x.sh

Next Steps:

1) Copy the Installation Script to a storage location that is reachable by the Trino cluster nodes.

2) You can create a shell script that will download the Installation Script and execute it by passing the correct arguments.

3) Ensure to pass the correct Command Line arguments to the Installation Script.
Run ./TrinoProtector_InstallationScript_10.0.0+x.sh --help  to print Usage and Help Info.

4) For a new Trino cluster, you can configure the shell script to be executed at Node Startup via Bootstrap/Init Script mechanism if your cluster provides it.

5) For a running Trino cluster, you can execute the shell script on the existing nodes.
5.4 - Installing the Trino Protector
The single-node installation script generated by the configurator script is used to install the Trino Protector. Copy and execute the single-node installation script to all the nodes in the Trino cluster.
Execute the following steps on every coordinator and worker node of the Trino Cluster.
Important: If you want to add a new node to the Trino cluster after installing the Trino protector, then ensure that you run the installation script on the new node.
Log in to the node, where you want to execute the installation script.
Copy/Download the single-node installation script previously generated by the configurator script to any directory.
Navigate to the directory where the single-node installation script is located.
To view the syntax and the usage of the installation script, run the following command.
./TrinoProtector_InstallationScript_10.0.0+x.sh --help
Press ENTER.
The command displays the syntax with the mandatory and optional arguments. The mandatory and optional arguments are explained in the following tables.
| Argument | Description |
|---|
--install-rpagent-and-logforwarder=<yes|no> | Instructs the script whether to install the RPAgent and
the Log Forwarder on the current node in the Trino cluster. The
acceptable values are:yes - install the RPAgent and the
Log Forwarder on the current node in the Trino cluster.no - skip installing the RPAgent
and the Log Forwarder if it is already installed and running
on the current node in the Trino cluster.
|
--trino-plugin-dir=</path/to/plugin/> | Specifies the absolute path of the Trino plugin
directory.Note- You can set a custom plugin path using the
plugin.dir property in the
node.properties Trino configuration
file. - Ensure the current
sudoer user has
permissions to read and write into this directory
|
--trino-service-user=<user> | Specifies the name of the user running the Trino server.
You can use this argument to set the ownership of the
peptrino plugin directory and also to restart
the Trino server if you specify the
--restart-trino-server-via=launcher
argument.Note- Ensure the current sudoer user is able to run commands as
Trino service user using the
sudo -u
command. - Ensure the Trino service user is able to read files from
the
<installation_directory>.
|
Table 2. Optional Arguments for the Installation Script
| Argument | Description |
|---|
–sudo-disabled | |
–protegrity-user=<user> | If you specify this argument, then the script will create
the given Protegrity service user if it is unavailable and will
set it as the owner of the directories and files in the
<installation_directory>. Ensure that
the Protegrity service user has read permissions on the parent
directories of the
<installation_directory> path.Note- If you set the value of the
–install-pepserver-and-logforwarder
argument to yes, then the installation
script will use this user account to start the RPAgent and
the Log Forwarder services. - Ensure that the current user with
sudoer privileges is able to execute the
commands as the Protegrity service user (using the
sudo -u command) to start the Protegrity
services. - If you set the value of the
–sudo-disabled argument to
yes, then the script will use the current
user account to start the Protegrity services.
If you fail to specify this argument, then the
installation script will set the current user as the Protegrity
service user. |
–protegrity-group=<group> | This script will create the given Protegrity service group
if it is unavailable and will set it as the group for the
directories and the files in the
<installation_directory> path.If you
fail to specify this argument, then the installation script will
set the current user’s primary group root as
the Protegrity service group. |
–restart-trino-server-via=<systemd|init|launcher> | If you specify this argument, then the script will restart
the running Trino server after installing the
peptrino plugin. The script will not restart
the Trino server if the server is in the stopped state. If you
want to use this argument, ensure that you enable Sudo to restart
the Trino server. The acceptable values are:systemd - instructs the script to use
the systemctl command to check the status
and restart the Trino server. This argument requires the
–trino-systemd-service-name argument to
be specified.init - instructs the script to use
the service command to check the status
and restart the Trino server. This argument also requires you
to specify the –trino-init-service-name
argument.launcher - instructs the script to
use the Trino launcher script to check the status and restart
Trino server. This argument requires the
–trino-launcher-path and the optional
–trino-launcher-args arguments.
If you exclude this argument, then the script will not
attempt to restart the Trino server. You must manually restart the
Trino server after the script execution is complete. |
–trino-systemd-service-name=<systemd service
name> | Specifies the name of the systemd
service associated with the Trino server. You must specify this
argument when you use the
–restart-trino-server-via=systemd
argument. |
–trino-init-service-name=<init service
name> | Specifies the name of the Sys V init service associated
with the Trino server. You must pass this argument when you
specify the –restart-trino-server-via=init
argument. |
–trino-launcher-path=</path/to/bin/launcher> | Specifies the absolute path to the Trino server launcher
script. For example,
/usr/lib/trino/bin/launcher. You must specify
this argument when you use the
–restart-trino-server-via=launcher
argument. |
–trino-launcher-args=“arg1
[arg2…]" | Specifies the valid command line arguments to the Trino
launcher script. You can use this argument with the
–trino-launcher-path argument. If you
specify this argument, then the arguments listed between the
double-quotes will be passed to the Trino launcher script for the
status and restart
commands. If you fail to specify this argument, then no argument
will be passed to the Trino launcher script for the status and
restart commands. |
–reuse-jpeplite-from-path=</path/to/jpeplite/lib> | Specifies the absolute path to the existing
jpeplite/lib/ directory on the cluster node.
You can use this argument with the
–install-pepserver-and-logforwarder=no
argument when the JpepLite libraries packaged
in this build is incompatible with the existing installed PEP
server version. The existing
/path/to/jpeplite/lib/ directory must contain
the jpeplite.jar,
jpeplite.properties, and
jpeplite.plm files and must be
readable. |
–protector-logs-output=<tcp|stdout|file> | Instructs the Trino Protector to write the protector logs
to this output. If you specify an attribute for this argument,
then the installation script will change the output property in
the pepserver.cfg file. The acceptable values
are:tcp (Default) - specifies that the
logs are written to the TCP socket specified in the
pepserver.cfg file.stdout - specifies that the logs are
written to the Trino server’s stdout
parameter.file - specifies that the logs are
written to the file whose path is set in the
–protector-logs-output-filename
argument.
|
–protector-logs-output-filename=</path/to/logs.txt> | Specifies the absolute path to the file on the cluster node
on which the protector logs are written. You must use this
argument with the
–protector-logs-output=file argument. If you
fail to specify this argument, then the default file name of
/opt/logs.txt will be used. This argument
will add the outputfilename property in the
pepserver.cfg file. This script will create
the file on the cluster node if the file is not available. Ensure
that the Trino service user has write
permissions to this file path. |
–wait-for-trino-installation | - If you specify this argument, then the installation script
will create and run a secondary bash script as a background
process that will wait for the Trino server to be installed
and started on the node and only then install the plugin
.jar files and restart the Trino server.
This argument can be used in scenarios where the Trino server
will always be installed and started after this installation
script is executed. E.g. EMR clusters. This flag requires the
–restart-trino-server-via argument for
restarting the Trino server. You must enable Sudo for this
argument. - If you fail to specify this argument, then the
installation script will not wait for the Trino server to be
installed and started and will proceed to install the plugin.
Ensure that the Trino server is installed and the plugin
directory exists before the you execute the installation
script.
|
Depending on the requirements, run the installation script with the required arguments.
For example, on a Starburst Trino cluster installed via RPM, one combination of the arguments to the single-node installation script is listed below.
./TrinoProtector_InstallationScript_10.0.0.x.sh \
               --install-rpagent-and-logforwarder=yes \
               --trino-plugin-dir=/usr/lib/starburst/plugin \
               --trino-service-user=starburst \
               --protegrity-user=ptyitusr \
               --protegrity-group=ptyitusrgroup \
               --restart-trino-server-via=systemd \
               --trino-systemd-service-name=starburst \
Note: If you want the Trino Server to automatically restart after installing the components, then specify the value for the –restart-trino-server-via argument for the installation script. Otherwise, you will have to manually restart the Trino Server after the installation is complete.
Press ENTER.
The script installs the components as specified in the arguments.
./TrinoProtector_InstallationScript_10.0.0+6.sh \
> --install-rpagent-and-logforwarder=yes \
> --trino-plugin-dir=/usr/lib/starburst/plugin \
> --trino-service-user=starburst \
> --restart-trino-server-via=systemd \
> --protegrity-user=ptyitusr \
> --protegrity-group=ptyitusrgroup \
> --trino-systemd-service-name=starburst
> --restart-trino-server-via=systemd \
> --trino-systemd-service-name=starburst

Protegrity Trino Protector Installation Script started...

Validating sudo permissions for root
************************************************************************************
                Welcome to the Trino Protector Install Wizard.
************************************************************************************
This will install the Trino Protector on your system.

Group 'ptyitusrgroup' created

User 'ptyitusr' created

RPAgent installation started
************************************************************************************
                    Welcome to the RPAgent Setup Wizard.
************************************************************************************

RPAgent installed on current node at location /opt/protegrity/rpagent/

Logforwarder installation started
************************************************************************************
                    Welcome to the LogForwarder Setup Wizard.
************************************************************************************

Unpacking...................
Extracting files...
Unpacked logforwarder compressed file...

LogForwarder installed on current node at location /opt/protegrity/logforwarder/

PepTrino Plugin Jars installation started
************************************************************************************
                    Welcome to the PepTrino Setup Wizard.
************************************************************************************

Unpacking...................
Extracting files...
Unpacked peptrino compressed file...

PepTrino installed on current node at location /opt/protegrity/peptrino/

JcoreLite installation started
************************************************************************************
                        Welcome to the JcoreLite Setup Wizard.
************************************************************************************

Unpacking...................
Extracting files...
Unpacked jcorelite compressed file...

JcoreLite for Trino Protector installed on current node at location /opt/protegrity/peptrino/lib/

Moving Uninstallation Script to /opt/protegrity/peptrino/scripts/

Creating cluster_utils directory in /opt/protegrity/peptrino/scripts/

Creating data directory in /opt/protegrity/peptrino/

Starting Logforwarder on current node...

Starting RPAgent on current node...

Trino Protector plugin jars and JcoreLite libraries are installed within /opt/protegrity/peptrino/ directory

Finished executing TrinoProtectorInstall468_Linux-ALL_10.0.0+x.sh script. Check the logs at /opt/protegrity/logs/

NOT waiting for Trino Server Installation and Start...

Started installation of PepTrino in plugin dir in foreground...

Checking if Trino Plugin Dir is present on node.
Trino Plugin Directory /usr/lib/starburst/plugin found.

Creating peptrino directory within Trino plugin directory.

Getting the names of plugin jars

Creating Symbolic Links within Plugin Directory...

Trino Protector jars' symbolic links created in /usr/lib/starburst/plugin/peptrino/

Checking if Trino service user exists.

Service User starburst exists on node

Changing ownership of PepTrino Plugin dir to starburst

Checking if systemctl is on PATH.
systemctl found on PATH.

Checking if 'starburst' is a valid systemd unit.
'starburst' is a valid systemd unit.

Checking if Trino Server is started and running via systemctl
Trino server is running
Restarting Trino Server...

Trino Server successfully restarted via systemctl.
Successfully completed all steps of Installation Script.
The installation script generates the logs in the /<installation_directory>/logs/ directory.
5.5 - Configuring the Trino Protector
The Big Data Protector provides the following files that contain different parameters to control the protector behavior:
config.ini - provides parameters to control the protector behavior.rpagent.cfg - provides parameters to control the RPAgent behavior.
Updating the parameters in the config.ini file:
Log in to the co-ordinator node.
Navigate to the /opt/protegrity/bdp/data directory.
To open the config.ini file, run the following command:
Press ENTER.
The command opens the config.ini file.
###############################################################################
# Protector configuration
###############################################################################
[protector]

# Cadence determines how often the protector connects with ESA / proxy to fetch the policy updates in background.
# Default is 60 seconds. So by default, every 60 seconds protector tries to fetch the policy updates.
# If the cadence is set to "0", then the protector will get the policy only once.
#
# Default 60.
cadence = 60


###############################################################################
# Log Provider Config
###############################################################################
[log]

# In case that connection to fluent-bit is lost, set how audits/logs are handled
#
# drop  : (default) Protector throws logs away if connection to the fluentbit is lost
# error : Protector returns error without protecting/unprotecting
#         data if connection to the fluentbit is lost
mode = drop

# Host/IP to fluent-bit where audits/logs will be forwarded from the protector
#
# Default localhost
host = localhost
Update the parameters, as per the description in the table.
| Parameter | Description |
|---|
cadence | Specifies the frequency at which the protector connects to the ESA to fetch the policy. The default value is 60 seconds. If the cadence is set to “0”, then the protector will get the policy only once. |
mode | Specifies the approach of handling logs when the connection to the Log Forwarder is lost. |
Save the changes to the config.ini file.
Updating the parameters in the rpagent.cfg file:
Log in to the co-ordinator node.
Navigate to the /opt/protegrity/rpagent/data directory.
To open the rpagent.cfg file, run the following command:
Press ENTER.
The command opens the rpagent.cfg file.
###############################################################################
# Resilient Package Sync Config
###############################################################################
[sync]

# Protocol to use when communicating with the service providing Resilient Packages.
# Use 'https' for ESA or 'shmem' for local shared memory.
protocol = https

# Host/IP to the service providing Resilient Packages
host = <IP_address>
port = 8443

# Path to CA certificate
ca = /opt/protegrity/rpagent/data/CA.pem

# Path to client certificate
cert = /opt/protegrity/rpagent/data/cert.pem

# Path to client certificate key
key = /opt/protegrity/rpagent/data/cert.key

# Path to a secret file that is used to decrypt the client certificate key.
# When using a custom certificate bundle, the 'secretcommand' can instead be
# used to execute an external command that obtains the secret.
secretfile = /opt/protegrity/rpagent/data/secret.txt

###############################################################################
# Log Provider Config
###############################################################################
[log]

# In case that connection to fluent-bit is lost, set how audits/logs are handled
#
# drop  : (default) Protector throws logs away if connection to the fluentbit is lost
# error : Protector returns error without protecting/unprotecting
#         data if connection to the fluentbit is lost
mode = drop

# Host/IP to fluent-bit where audits/logs will be forwarded from the protector
#
# Default localhost
host = localhost
Update the parameters, as per the description in the table.
| Parameter | Description |
|---|
| interval | Specifies the frequency at which the RPAgent will fetch the policy from the ESA. The minimum value is 1 second and the maximum value is 86400 seconds. This is an optional parameter and must be included in the Sync section of the rpagent.cfg file. |
| protocol | Specifies the protocol to use when communicating with the service providing Resilient Packages. |
| host | Specifies the hostname to the service providing the Resilient packages. |
| port | Specifies the port to the service providing the Resilient packages. |
| ca | Specifies the path to the CA certificate. |
| cert | Specifies the path to the client certificate. |
| key | Specifies the path to the client certificate key. |
| secretfile | Specifies the path to the secret file that is used to decrypt the client certificate key. |
| mode | Specifies the approach of handling logs when the connection to the Log Forwarder is lost. |
| host | Specifies the hostname or the IP address to where the Log Forwarder will forward the audit logs from the protector. |
Save the changes to the rpagent.cfg file.
Use the sync_rpagent.sh script to load the changes to the configuration files in all the cluster nodes.
5.5.1 - Working with Cluster Utilities
The Big Data Protector package provides utility scripts to perform different operations on the Trino cluster. The scripts and their usage is listed in the table.
| Script | Description |
|---|
| RPAgent Control | Manages the RPAgent service across the cluster. |
| Log Forwarder Control | Manages the Log Forwarder service across the cluster. |
| Sync Configuration | Updates the configuration from the config.ini file across the nodes in the cluster. |
| RPAgent Configuration | Updates the RPAgent configuration from the rpagent.cfg file across the nodes in the cluster. |
| Log Forwarder Configuration | Updates the Log Forwarder configuration across the nodes in the cluster. |
5.5.1.1 - Log Forwarder Control Script
The cluster_logforwarderctrl.sh script, in the <installation_directory>/peptrino/scripts/cluster_utils/ directory, manages the Log Forwarder services on all the nodes in the cluster that are listed in the hosts file.
The utility provides the following options:
- Start – Starts the Log Forwarder on all the nodes in the cluster.
- Stop – Stops the Log Forwarder on all the nodes in the cluster.
- Restart – Restarts the Log Forwarder on all the nodes in the cluster.
- Status – Reports the status of the Log Forwarder on all the nodes in the cluster.
Note: When you run the Log Forwarder Control utility, the script will prompt to enter the path of the SSH private key file to securely connect to the cluster nodes.
Reporting the Status of the Log Forwarder
To check the status of the log forwarder on all the nodes:
- Log in to the co-ordinator node.
- Run the following command:
./cluster_logforwarderctrl.sh \
 --hostsfile=<path_of_the_hosts_file> \
 --ssh-auth-type=publickey \
 --private-key-path=<key_file_path>/<name_of_the_private_key_file> \
 status
- Press ENTER.
The script reports the status of the log forwarder in a log file.
==========================================================================

Hosts file set to '<path_of_the_hosts_file>'

SSH Authentication Type is set to 'Public Key Authentication'

SSH Private Key file path is set to '<key_file_path>/<name_of_the_private_key_file>'

Checking connectivity of cluster nodes...

Checking status of Logforwarder on current node...

Checking status of Logforwarder on all nodes...

The script's logs and operation results are logged in /opt/protegrity/logs/cluster_logforwarderctrl.log
Stopping the Log Forwarder on all the Nodes
- Log in to the co-ordinator node.
- Run the following command:
./cluster_logforwarderctrl.sh \
 --hostsfile=<path_of_the_hosts_file> \
 --ssh-auth-type=publickey \
 --private-key-path=<key_file_path>/<name_of_the_private_key_file> \
 stop
- Press ENTER.
The script stops the log forwarder and generates the log in a file.
==========================================================================

Hosts file set to '<path_of_the_hosts_file>'

SSH Authentication Type is set to 'Public Key Authentication'

SSH Private Key file path is set to '<key_file_path>/<name_of_the_private_key_file>'

Checking connectivity of cluster nodes...

Stopping Logforwarder on current node...

Logforwarder stopped on current node

Stopping Logforwarder on all nodes...

Logforwarder stopped on all nodes

The script's logs and operation results are logged in /opt/protegrity/logs/cluster_logforwarderctrl.log
Starting the Log Forwarder on all the Nodes
- Log in to the co-ordinator node.
- Run the following command:
./cluster_logforwarderctrl.sh \
 --hostsfile=<path_of_the_hosts_file> \
 --ssh-auth-type=publickey \
 --private-key-path=<key_file_path>/<name_of_the_private_key_file> \
 start
- Press ENTER.
The script starts the log forwarder and generates the log in a file.
==========================================================================

Hosts file set to '<path_of_the_hosts_file>'

SSH Authentication Type is set to 'Public Key Authentication'

SSH Private Key file path is set to '<key_file_path>/<name_of_the_private_key_file>'

Checking connectivity of cluster nodes...

Starting Logforwarder on current node...

Logforwarder started on current node

Starting Logforwarder on all nodes...

Logforwarder started on all nodes

The script's logs and operation results are logged in /opt/protegrity/logs/cluster_logforwarderctrl.log
Restarting the Log Forwarder on all the Nodes
- Log in to the co-ordinator node.
- Run the following command:
./cluster_logforwarderctrl.sh \
 --hostsfile=<path_of_the_hosts_file> \
 --ssh-auth-type=publickey \
 --private-key-path=<key_file_path>/<name_of_the_private_key_file> \
 restart
- Press ENTER.
The script restarts the log forwarder and generates the log in a file.
==========================================================================

Hosts file set to '<path_of_the_hosts_file>'

SSH Authentication Type is set to 'Public Key Authentication'

SSH Private Key file path is set to '<key_file_path>/<name_of_the_private_key_file>'

Checking connectivity of cluster nodes...

Stopping Logforwarder on current node...

Logforwarder stopped on current node

Starting Logforwarder on current node...

Logforwarder started on current node

Stopping Logforwarder on all nodes...

Logforwarder stopped on all nodes

Starting Logforwarder on all nodes...

Logforwarder started on all nodes

The script's logs and operation results are logged in /opt/protegrity/logs/cluster_logforwarderctrl.log
5.5.1.2 - RPAgent Control Script
The cluster_rpagentctrl.sh script, in the <installation_directory>/peptrino/scripts/cluster_utils/ directory, manages the RPAgent services on all the nodes in the cluster that are listed in the hosts file.
The utility provides the following options:
- Start – Starts the RPAgent on all the nodes in the cluster.
- Stop – Stops the RPAgent on all the nodes in the cluster.
- Restart – Restarts the RPAgent on all the nodes in the cluster.
- Status – Reports the status of the RPAgent on all the nodes in the cluster.
Note: When you run the RPAgent Control utility, the script will prompt to enter the path of the SSH private key file to securely connect to the cluster nodes.
Reporting the Status of the RPAgent
To check the status of the RPAgent on all the nodes:
- Log in to the co-ordinator node.
- Run the following command:
./cluster_rpagentctrl.sh \
 --hostsfile=<path_of_the_hosts_file> \
 --ssh-auth-type=publickey \
 --private-key-path=<key_file_path>/<name_of_the_private_key_file> \
 status
- Press ENTER.
The script reports the status of the RPAgent in a log file.
==========================================================================

Hosts file set to '<path_of_the_hosts_file>'

SSH Authentication Type is set to 'Public Key Authentication'

SSH Private Key file path is set to '<key_file_path>/<name_of_the_private_key_file>'

Checking connectivity of cluster nodes...

Checking status of RPAgent on current node...

Checking status of RPAgent on all nodes...

The script's logs and operation results are logged in /opt/protegrity/logs/cluster_rpagentctrl.log
Stopping the RPAgent on all the Nodes
- Log in to the co-ordinator node.
- Run the following command:
./cluster_rpagentctrl.sh \
 --hostsfile=<path_of_the_hosts_file> \
 --ssh-auth-type=publickey \
 --private-key-path=<key_file_path>/<name_of_the_private_key_file> \
 stop
- Press ENTER.
The script stops the RPAgent and generates the log in a file.
==========================================================================

Hosts file set to '<path_of_the_hosts_file>'

SSH Authentication Type is set to 'Public Key Authentication'

SSH Private Key file path is set to '<key_file_path>/<name_of_the_private_key_file>'

Checking connectivity of cluster nodes...

Stopping RPAgent on current node...

RPAgent stopped on current node

Stopping RPAgent on all nodes...

RPAgent stopped on all nodes

The script's logs and operation results are logged in /opt/protegrity/logs/cluster_rpagentctrl.log
Starting the RPAgent on all the Nodes
- Log in to the co-ordinator node.
- Run the following command:
./cluster_rpagentctrl.sh \
 --hostsfile=<path_of_the_hosts_file> \
 --ssh-auth-type=publickey \
 --private-key-path=<key_file_path>/<name_of_the_private_key_file> \
 start
- Press ENTER.
The script starts the RPAgent and generates the log in a file.
==========================================================================

Hosts file set to '<path_of_the_hosts_file>'

SSH Authentication Type is set to 'Public Key Authentication'

SSH Private Key file path is set to '<key_file_path>/<name_of_the_private_key_file>'

Checking connectivity of cluster nodes...

Starting RPAgent on current node...

RPAgent started on current node

Starting RPAgent on all nodes...

RPAgent started on all nodes

The script's logs and operation results are logged in /opt/protegrity/logs/cluster_rpagentctrl.log
Restarting the RPAgent on all the Nodes
- Log in to the co-ordinator node.
- Run the following command:
./cluster_rpagentctrl.sh \
 --hostsfile=<path_of_the_hosts_file> \
 --ssh-auth-type=publickey \
 --private-key-path=<key_file_path>/<name_of_the_private_key_file> \
 restart
- Press ENTER.
The script restarts the RPAgent and generates the log in a file.
==========================================================================

Hosts file set to '<path_of_the_hosts_file>'

SSH Authentication Type is set to 'Public Key Authentication'

SSH Private Key file path is set to '<key_file_path>/<name_of_the_private_key_file>'

Checking connectivity of cluster nodes...

Stopping RPAgent on current node...

RPAgent stopped on current node

Starting RPAgent on current node...

RPAgent started on current node

Stopping RPAgent on all nodes...

RPAgent stopped on all nodes

Starting RPAgent on all nodes...

RPAgent started on all nodes

The script's logs and operation results are logged in /opt/protegrity/logs/cluster_rpagentctrl.log
5.5.1.3 - Sync Config.ini
The sync_config_ini.sh script in the <installation_directory>/cluster_utils/ directory, updates the config.ini parameters across all the nodes in the cluster.
For example, if you want to make any changes to the config.ini file, make the changes on the Lead node and then
propagate the change to all the nodes in the cluster using the sync_config_ini.sh script.
- Log in to the co-ordinator node.
- Navigate to the
<installation_directory>/cluster_utils/ directory. - To view the arguments for the helper script, run the following command:
./sync_config_ini.sh --help
- Press ENTER.
The command lists the arguments for the script.
==========================================================================
Usage: ./sync_config_ini.sh [ARGUMENTS]...

Examples:
./sync_config_ini.sh \
    --hostsfile=</path/to/hosts> \
    --ssh-auth-type=publickey \
    --private-key-path=</path/to/private_key>

./sync_config_ini.sh \
    --hostsfile=</path/to/hosts> \
    --ssh-auth-type=password \
    --password=<actual_password>

Description:
* Cluster Utility script to synchronize the protector's config.ini file on current node across
the Trino cluster nodes.
* This script uses 'pssh' and 'pscp' utilities to replicate the current node's /opt/protegrity/peptrino/data/config.ini file
to all other nodes.
* Python is required for execution of 'pssh/pscp' and the python executable is searched via '/usr/bin/env python' command.
* This script doesn't restart the Trino Servers and it must be done by the user.
* It requires a path to Hosts file which contains the IP Address/hostname of all cluster nodes other than the
current node on each line.
* When the required command line arguments are not passed, it will interactively prompt for them.
* Note: This script will only work on clusters where sudoers is enabled.


Arguments:
    --hostsfile=</path/to/hosts>
                    * Path to hosts file.
                    * Each line should contain the IP Address/Hostname of the remaining cluster nodes.
                    * You can optionally include the user to be used by pssh utility by using this
                    syntax: [user@]host[:port]
                    * When no user is written, the current user running the script is used.

    --ssh-auth-type=<password|publickey>
                    * SSH Authentication Type.
                    * Allowed values: password or publickey
                    * password : for Password based SSH authentication.
                    * publickey : for Public Key Authentication.

    --password=<actual_password>
                    * Actual password of current user to be passed to pssh utility.
                    * Used along with Password based SSH authentication.

    --private-key-path=</path/to/privatekeyfile>
                    * Path to SSH private key file to be used by pssh utility.
                    * Used along with Public Key SSH authentication.
- To replicate the changes to all the nodes, run the following command:
./sync_config_ini.sh \
--hostsfile=<path_of_the_hosts_file> \
--ssh-auth-type=publickey \
--private-key-path=<key_file_path>/<name_of_the_private_key_file> \
- Press ENTER.
The script creates a backup and then replicates the configuration on all the nodes in the cluster.
==========================================================================

Hosts file set to '<path_of_the_hosts_file>'

SSH Authentication Type is set to 'Public Key Authentication'

SSH Private Key file path is set to '<key_file_path>/<name_of_the_private_key_file>'

Checking connectivity of cluster nodes...

Trino Protector config.ini cloning started

Creating config.ini backup on all nodes...

Creating peptrino/data_10-14-2025_12:13:18/ directory on all nodes...

Changing ownership of peptrino/data_10-14-2025_12:13:18/ directory recursively on all nodes...

Changing permission of peptrino/data_10-14-2025_12:13:18/ on all nodes...

Removing original config.ini from all nodes...
Removed config.ini from all nodes

Copying current node's config.ini to all other nodes...

Changing ownership of peptrino/data_10-14-2025_12:13:18/config.ini...

Changing permission of peptrino/data_10-14-2025_12:13:18/config.ini...

Moving peptrino/data_10-14-2025_12:13:18/config.ini to peptrino/data/...

Changing permission of peptrino/data/config.ini...

Removing peptrino/data_10-14-2025_12:13:18/ directory and config.ini backup file...

Successfully updated Protector config.ini across all cluster nodes. Please restart Trino Server(s) manually to reload new config.ini.

The script's logs and operation results are logged in /opt/protegrity/logs/sync_config_ini.log
5.5.1.4 - Sync RPAgent
The sync_rpagent.sh script in the <installation_directory>/cluster_utils/ directory, updates the RPAgent parameters across all the nodes in the cluster.
For example, if you want to make any changes to the RPAgent parameters, make the changes on the Lead node and then
propagate the change to all the nodes in the cluster using the sync_rpagent.sh script.
- Log in to the co-ordinator node.
- Navigate to the
<installation_directory>/cluster_utils/ directory. - To view the arguments for the helper script, run the following command:
- Press ENTER.
The command lists the arguments for the script.
- To replicate the changes to all the nodes, run the following command:
./sync_rpagent.sh \
--hostsfile=<path_of_the_hosts_file> \
--ssh-auth-type=publickey \
--private-key-path=<key_file_path>/<name_of_the_private_key_file> \
- Press ENTER.
The script creates a backup and then replicates the configuration on all the nodes in the cluster.
==========================================================================

Hosts file set to '<path_of_the_hosts_file>'

SSH Authentication Type is set to 'Public Key Authentication'

SSH Private Key file path is set to '<key_file_path>/<name_of_the_private_key_file>'

Checking connectivity of cluster nodes...

Trino Protector RPAgent Configuration & Certificates cloning started

Stopping RPAgent on current node...

Stopping RPAgent on all nodes...

Creating rpagent_old/data_10-14-2025_12:15:26/new_data directory on all nodes...

Changing ownership of rpagent_old/ directory recursively on all nodes...

Changing permission of rpagent_old/ on all nodes...

Removing RPAgent Configuration & Certificates from all nodes...
Removed /opt/protegrity/rpagent/data/ from all nodes

Copying current node's rpagent/data/ to all other nodes...

Changing ownership of rpagent_old/data_10-14-2025_12:15:26/new_data/data.tgz...

Changing permission of rpagent_old/data_10-14-2025_12:15:26/new_data/data.tgz...

Extracting rpagent_old/data_10-14-2025_12:15:26/new_data/data.tgz to rpagent/data/...

Changing permission of rpagent/data/...

Removing backup directory rpagent_old/...

Starting RPAgent on current node...

Starting RPAgent on all nodes...

Successfully updated RPAgent Configuration and Certificates across all cluster nodes

The script's logs and operation results are logged in /opt/protegrity/logs/sync_rpagent.log
5.5.1.5 - Sync Log Forwarder
The sync_logforwarder.sh script in the <installation_directory>/cluster_utils/ directory, updates the Log Forwarder parameters across all the nodes in the cluster.
For example, if you want to make any changes to the Log Forwarder parameters, make the changes on the Lead node and then
propagate the change to all the nodes in the cluster using the sync_logforwarder.sh script.
- Log in to the co-ordinator node.
- Navigate to the
<installation_directory>/cluster_utils/ directory. - To view the arguments for the helper script, run the following command:
./sync_logforwarder.sh --help
- Press ENTER.
The command lists the arguments for the script.
- To replicate the changes to all the nodes, run the following command:
./sync_logforwarder.sh \
--hostsfile=<path_of_the_hosts_file> \
--ssh-auth-type=publickey \
--private-key-path=<key_file_path>/<name_of_the_private_key_file> \
- Press ENTER.
The script creates a backup and then replicates the configuration on all the nodes in the cluster.
==========================================================================

Hosts file set to '<path_of_the_hosts_file>'

SSH Authentication Type is set to 'Public Key Authentication'

SSH Private Key file path is set to '<key_file_path>/<name_of_the_private_key_file>'

Checking connectivity of cluster nodes...

Trino Protector Logforwarder Configuration cloning started

Stopping Logforwarder on current node...

Stopping Logforwarder on all nodes...

Creating logforwarder_old/data_10-14-2025_12:14:12/new_data directory on all nodes...

Changing ownership of logforwarder_old/ directory recursively on all nodes...

Changing permission of logforwarder_old/ on all nodes...

Removing Logforwarder Configuration from all nodes...
Removed /opt/protegrity/logforwarder/data/ from all nodes

Copying current node's logforwarder/data/ to all other nodes...

Changing ownership of logforwarder_old/data_10-14-2025_12:14:12/new_data/data.tgz...

Changing permission of logforwarder_old/data_10-14-2025_12:14:12/new_data/data.tgz...

Extracting logforwarder_old/data_10-14-2025_12:14:12/new_data/data.tgz to logforwarder/data/...

Changing permission of logforwarder/data/...

Removing backup directory logforwarder_old/...

Starting Logforwarder on current node...

Starting Logforwarder on all nodes...

Successfully updated Logforwarder Configuration across all cluster nodes

The script's logs and operation results are logged in /opt/protegrity/logs/sync_logforwarder.log
5.6 - Uninstalling the Trino Protector
The single-node uninstallation script generated by the configurator script is used to uninstall the Trino Protector. Copy and execute the single-node uninstallation script to all the nodes in the Trino cluster.
Execute the following steps on every co-ordinator and worker node of the Trino Cluster.
Log in to the node, where you want to execute the uninstallation script.
Copy/Download the single-node uninstallation script previously generated by the configurator script to any directory.
Navigate to the directory where the single-node uninstallation script is located.
To view the syntax and the usage of the uninstallation script, run the following command.
./TrinoProtector_UninstallationScript_10.0.0+x.sh --help
Press ENTER.
The command displays the syntax with the mandatory and optional arguments. The mandatory and optional arguments are explained in the following tables.
Table 1. Mandatory Arguments for the Uninstallation Script
| Argument | Description |
|---|
--uninstall-rpagent-and-logforwarder=<yes|no> | Instructs the script whether to remove the RPAgent and
the Log Forwarder from the current node in the Trino cluster. The
acceptable values are:yes - remove the RPAgent and the
Log Forwarder from the current node in the Trino cluster.no - skip removing the RPAgent and
the Log Forwarder if they were already not installed by the
corresponding Trino Protector installation script.
|
--trino-plugin-dir=</path/to/plugin/> | Specifies the absolute path to the Trino plugin
directory.NoteYou can set a custom plugin path using the
plugin.dir property in the
node.properties Trino configuration file.
Ensure that the current sudoer user has permissions to read and
write into this directory. |
--trino-service-user=<user> | Specifies the name of the user running the Trino server.
You can use this argument to set the ownership of the
peptrino plugin directory and also to restart
the Trino server if you specify the
--restart-trino-server-via=launcher
argument.Note- Ensure that the current
sudoer user
is able to run commands as the Trino service user using the
sudo -u command. - Ensure that the Trino service user is able to read the
files from the
<installation_directory> path.
|
--delete-protegrity-user=<yes|no> | Specifies whether to remove or retain the Protegrity
service user and group, that were created during the installation
process, from the current node in the Trino cluster. Set the value
for this argument to no when you set the
value for the
--uninstall-rpagent-and-logforwarder
argument to no. The accepted values are:yes - instructs the script to remove
the Protegrity service user and group from the current node in
the cluster.no - instructs the script to skip the
removal of the Protegrity service user and the group.
|
Table 2. Optional Arguments for the Uninstallation Script
| Argument | Description |
|---|
–sudo-disabled | - Use this flag if
sudoers is disabled
on the cluster. - If you use this flag, the script will skip the use of the
sudo command. The current user will be
used to remove and stop the Protegrity services. Therefore,
the user must have permissions to remove the Protegrity files
under the <installation_directory>
and the Trino plugin directory and to modify the
config.properties file. - The input values for the
–trino-service-user and the
–protegrity-user arguments must be same
as the current user. - You will be unable to use the
–restart-trino-server-via argument - When you exclude this argument, a user with
sudoers privilege is required to execute
the script. It is recommended to use a
NOPASSWD sudoers user. Else, the script
will prompt for a password.
|
–protegrity-user=<user> | If you specify this argument, then the script will set the
Protegrity service user that was provided during installation to
set the owner of the installed directories and files, and to start
the Protegrity services. Ensure that the Protegrity service user
has read permissions on the parent directories of the
<installation_directory>.Note- If you set the value of the
–uninstall-rpagent-and-logforwarder
argument to yes, then the uninstallation
script will use this user account to stop the RPAgent and
the Log Forwarder services. - Ensure that the current user with sudoer privileges is
able to execute the commands as the Protegrity service user
(using the
sudo -u command) to stop the
Protegrity services. - If you set the value of the
–sudo-disabled argument to
yes, then the script will use this user
account to stop the Protegrity services.
If you fail to specify this argument, then the
installation script will set the current user as the Protegrity
service user. |
–protegrity-group=<group> | If you specify this argument, then the script will set the
Protegrity service group that was given during installation to set
the group of the installed directories and files, and to start the
Protegrity services. If you fail to specify this argument, then
the installation script will set the current user’s primary group
as the Protegrity service group. |
–restart-trino-server-via=<systemd|init|launcher> | If you specify this argument, then the script will restart
the running Trino server after removing the
peptrino plugin. The script will not restart
the Trino server if the server is in the stopped state. If you
want to use this argument, ensure that you enable
sudo to restart the Trino server. The
acceptable values are:systemd - instructs the script to use
the systemctl command to check the status
and restart the Trino server. This argument requires the
–trino-systemd-service-name argument to
be specified.init - instructs the script to use
the service command to check the status
and restart the Trino server. This argument also requires you
to specify the –trino-init-service-name
argument.launcher - instructs the script to
use the Trino launcher script to check the status and restart
Trino server. This argument requires the
–trino-launcher-path and the optional
–trino-launcher-args arguments.
If you exclude this argument, then the script will not
attempt to restart the Trino server. You must manually restart the
Trino server after the script execution completes. |
–trino-systemd-service-name=<service
name> | Specifies the name of the systemd
service associated with the Trino server. You must specify this
argument when you use the
–restart-trino-server-via=systemd
argument. |
–trino-init-service-name=<init service
name> | Specifies the name of the Sys V init service associated
with the Trino server. You must pass this argument when you
specify the –restart-trino-server-via=init
argument. |
–trino-launcher-path=</path/to/bin/launcher> | Specifies the absolute path to the Trino server launcher
script. For example,
/usr/lib/trino/bin/launcher. You must specify
this argument when you use the
–restart-trino-server-via=launcher
argument. |
–trino-launcher-args=“arg1
[arg2…]" | Specifies the valid command line arguments to the Trino
launcher script. You can use this argument with the
–trino-launcher-path argument. If you
specify this argument, then the arguments listed between the
double-quotes will be passed to the Trino launcher script for the
status and the restart
commands. If you fail to specify this argument, then no argument
will be passed to the Trino launcher script for the
status and the restart
commands. |
Depending on the requirements, run the uninstallation script with the required arguments.
For example, on a Starburst Trino cluster installed via RPM, one combination of the arguments to the single-node uninstallation script is listed below.
./TrinoProtector_UninstallationScript_10.0.0+x.sh \
>   --uninstall-rpagent-and-logforwarder=yes \
>   --trino-plugin-dir=/usr/lib/starburst/plugin \
>   --trino-service-user=starburst \
>   --protegrity-user=ptyitusr \
>   --protegrity-group=ptyitusr \
>   --delete-protegrity-user=yes
Note: If you want the Trino Server to automatically restart after removing the components, then specify the value for the --restart-trino-server-via argument for the uninstallation script. Otherwise, you will have to manually restart the Trino Server after the uninstallation is complete.
Press ENTER.
The script removes the components as specified in the arguments.
./TrinoProtector_UninstallationScript_10.0.0+6.sh \
>   --uninstall-rpagent-and-logforwarder=yes \
>   --trino-plugin-dir=/usr/lib/starburst/plugin \
>   --trino-service-user=starburst \
>   --protegrity-user=ptyitusr \
>   --protegrity-group=ptyitusr \
>   --delete-protegrity-user=yes

Protegrity Trino Protector Uninstallation Script started...

Validating sudo permissions for root
************************************************************************************
                Welcome to the Trino Protector Uninstall Wizard.
************************************************************************************
This will uninstall the Trino Protector from your system.

Stopping RPAgent on current node...

Stopping Logforwarder on current node...

RPAgent uninstallation started
************************************************************************************
                    Welcome to the RPAgent Setup Wizard.
************************************************************************************

Uninstalled RPAgent on current node...

Logforwarder uninstallation started
************************************************************************************
                    Welcome to the LogForwarder Setup Wizard.
************************************************************************************

Uninstalling LogForwarder ....

LogForwarder uninstalled on current node at location /opt/protegrity/logforwarder/

PepTrino Plugin Jars uninstallation started
************************************************************************************
                    Welcome to the PepTrino Setup Wizard.
************************************************************************************

Uninstalling PepTrino ....

PepTrino uninstalled on current node at location /opt/protegrity/peptrino/

JcoreLite uninstallation started
************************************************************************************
                        Welcome to the JcoreLite Setup Wizard.
************************************************************************************

Uninstalling JcoreLite ....

JcoreLite for Trino Protector uninstalled on current node at location /opt/protegrity/peptrino/lib/

Setting ownership of /opt/protegrity/logs and /opt/protegrity/peptrino recursively to root:root.

Setting ownership of /opt/protegrity to root:root.

Removing Protegrity service user 'ptyitusr' and group 'ptyitusr' from current node.

User 'ptyitusr' deleted

Group 'ptyitusr' deleted

Trino Protector plugin jars and JcoreLite libraries uninstalled from /opt/protegrity/peptrino/ directory

Finished executing TrinoProtectorUninstall468_Linux-ALL_10.0.0+x.sh script. Check the logs at /opt/protegrity/logs/

Started uninstallation of PepTrino from plugin dir in foreground...

Checking if Trino Plugin Dir is present on node.
Trino Plugin Directory /usr/lib/starburst/plugin found.

Removing peptrino plugin directory from /usr/lib/starburst/plugin

Trino Protector Plugin successfully removed from /usr/lib/starburst/plugin

Checking if Trino service user exists.

Checking if systemctl is on PATH.

systemctl found on PATH.

Checking if 'starburst' is a valid systemd unit.

'starburst' is a valid systemd unit.

Checking if Trino Server is started and running via systemctl

Trino server is running

Restarting Trino Server...

Trino Server successfully restarted via systemctl.

Trino Protector UDFs were unregistered on Trino Server restart. Verify via trino CLI (show functions;) or by checking Trino's server.log

Successfully completed all steps of Uninstallation Script