Teradata Data Warehouse Protector
The Protegrity Teradata Data Warehouse Protector has been optimized to work with the fast, parallel, and multi-node Teradata systems. This protector is the fastest protection point available on the market for Teradata databases.
This page discusses about the Teradata Data Warehouse Protector architecture, components, and the protector usage in detail.
1 - Understanding the Architecture
The architecture for the Teradata distribution of the Data Warehouse Protector is depicted in the image below.
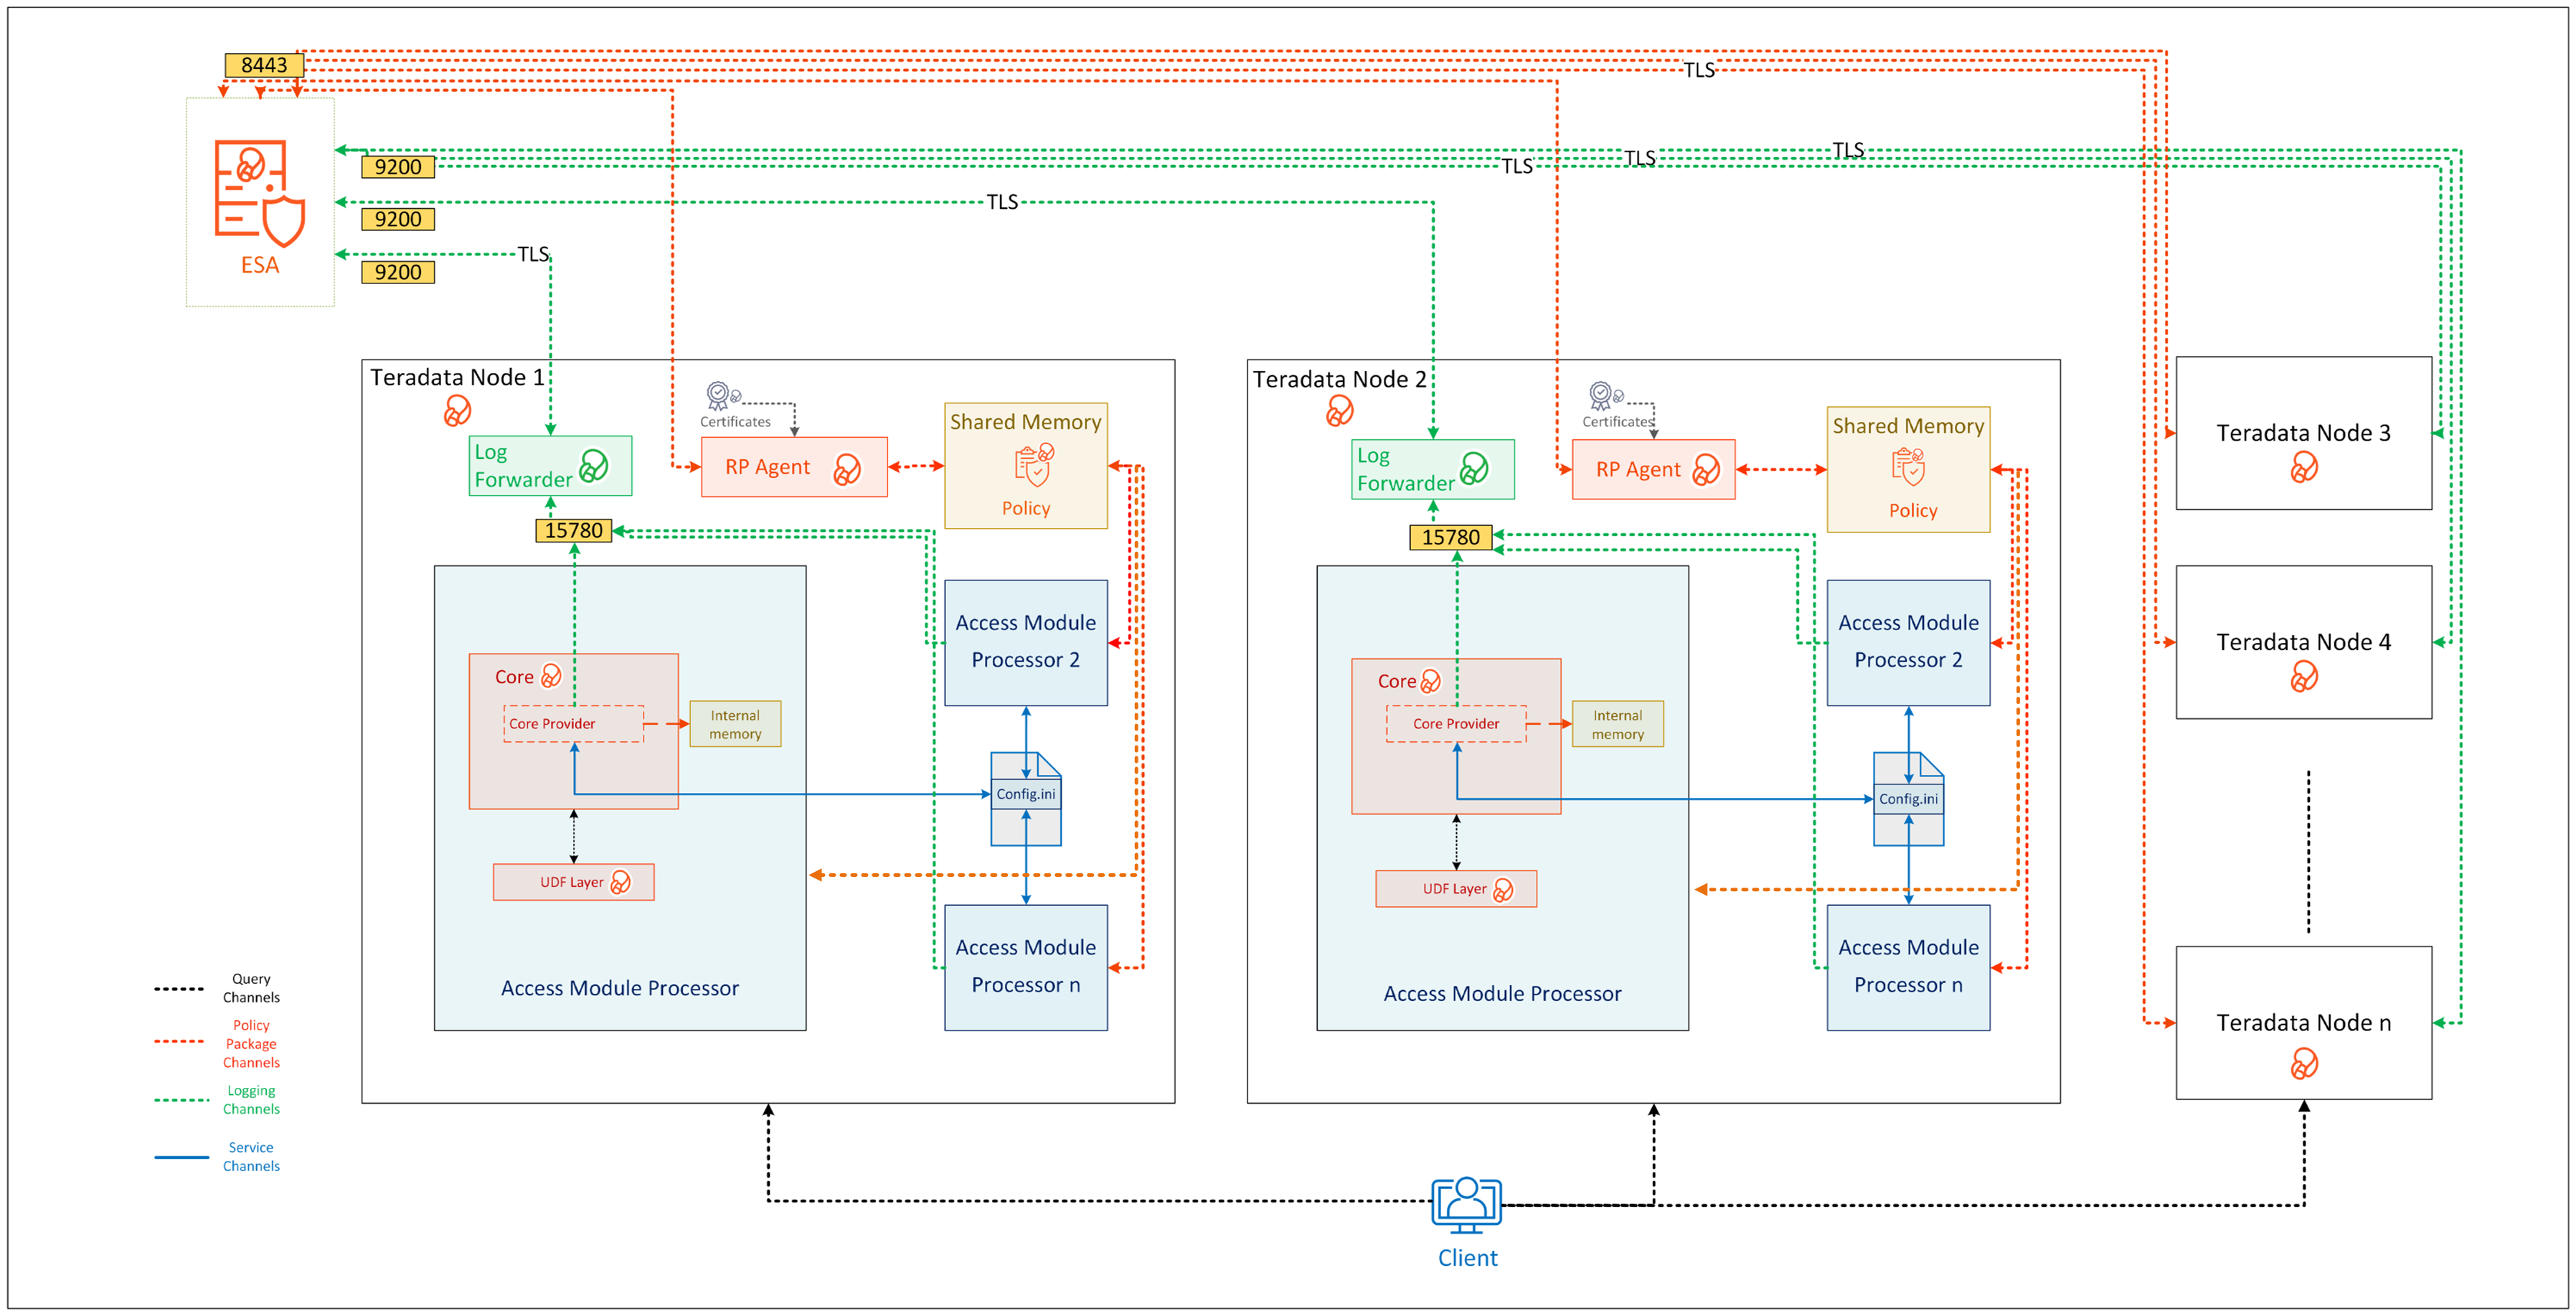
| Component Name | Description |
|---|
| Access Module Processor | Stores and retrieves all the protector data. It is also called as the Virtual Processor (vproc). |
| config.ini | Contains the set of configuration parameters to modify the protector behavior. |
| Core | Is the set of various libraries that provide the Protegrity Core functionality. |
| Log Forwarder | Forwards the protector logs to Insight. |
| Node | Serves as a central processing unit where the database operations are executed using a single operating system. |
| Resilient Package (RP) Agent | Is a daemon running on each node that downloads the Policy from the ESA over a TLS channel using the installed Certificates. |
| UDF Layer | Contains the Data Warehouse Protector UDFs and APIs executing in the Teradata service process. |
2 - System Requirements
Ensure that the following prerequisites are met, before installing the Teradata Data Warehouse Protector:
- The ESA appliance, v10.0.x or higher, is installed, configured, and running.
- The ports that are configured on the ESA and the nodes in the cluster, which will run the Data Warehouse Protector, are listed in the following table:
| Destination Port | Protocol | Source | Destination | Description |
|---|
| 8443 | TCP | RP Agent on the Data Warehouse Protector node | ESA | The RP Agent communicates with the ESA through port
8443 to download a policy. |
| 9200 | TCP | Log Forwarder on the Data Warehouse Protector node | Protegrity Audit
Store appliance | The Log Forwarder sends all the logs to
the Protegrity Audit Appliance through port 9200. |
| 15780 | TCP | Protector on the Data Warehouse Protector node | Log Forwarder on the Data Warehouse Protector node | The Data Warehouse Protector writes Audit Logs to localhost through port 15780. The Application Logs are also written to localhost through port 15780. The Log Forwarder reads the logs from that socket. |
The following table lists the minimum hardware configuration for the Data Warehouse Protector on Teradata distribution.
| Hardware Components | Configuration |
|---|
| CPU | Depends on the application. |
| Disk Space | 400 MB on every node - Includes the Log Forwarder, RP Agent, and User Defined Functions (UDFs) |
| RAM | 4 GB on every node |
Note: In v10.0.0, the RPAgent loads the policy package into the shared memory. Every individual service process on a node that initializes the protector will load a copy of the policy package into the process heap memory. Therefore, the RAM requirement on each node depends on the policy size and the number of protector instances (number of processes).
3.1 - Extracting the Teradata Installation Package
You must extract the Teradata Data Warehouse Protector package to access the Teradata Protector components required for the installation process.
To extract the files from the installation package:
Log in to the server as the user with the required permissions.
Navigate to the directory where you have saved the Teradata Data Warehouse protector package.
For example, /opt/protegrity/.
To extract the contents of the Teradata Data Warehouse Protector package, run the following command:
tar -xvf DatabaseProtector_SLES-ALL-64_x86-64_Teradata-ALL-64_10.0.0+x.tgz
Press ENTER.
The commands extracts the installation package and signature file from the Teradata Data Warehouse Protector package:
DatabaseProtector_SLES-ALL-64_x86-64_Teradata-ALL-64_10.0.0+x.tgz
signatures/DatabaseProtector_SLES-ALL-64_x86-64_Teradata-ALL-64_10.0.0+x.sig
For more information about the steps to verify the signed Teradata Data Warehouse protector build, refer to Verification of Signed Protector Build.
To extract the contents of the installation package, run the following command:
tar -xvf DatabaseProtector_SLES-ALL-64_x86-64_Teradata-ALL-64_10.0.0+x.tgz
Press ENTER.
The commands extracts the following files:
LogforwarderSetup_Linux_x64_10.0.0+x.sh
RPAgentSetup_Linux_x64_10.0.0+x.sh
PepTeradataSetup_Linux_x64_10.0.0+x.sh
PepTeradata_UDTSetup_Linux_x64_10.0.0+x.sh
U.S.Patent.No.6,321,201.Legend.txt
3.3 - Installing the Resilient Package Agent
The Resilient Package (RP) Agent downloads the certificates. These certificates are further used to authenticate the login credentials, public or private keys, and certify the code reliability.
To install the RPAgent:
Log in to the server as the user with the required permissions.
Navigate to the directory where you have extracted the Teradata Data Warehouse protector package.
For example, /opt/protegrity/.
To install the RPAgent, run the following command:
./RPAgentSetup_Linux_x64_10.0.0+x.sh
Press ENTER.
The prompt to enter the host name or the IP address of the ESA appears.
Please Enter ESA host name or IP address []:
Enter the IP address of the ESA.
If you fail to specify an IP address, then the installation script will terminate the installation
process.
Press ENTER.
The prompt to enter the username for downloading the certificate appears.
Please enter the user name for downloading certificates[]:
Enter the username to download the certificates.
Press ENTER.
The prompt to enter the password for downloading the certificate appears.
Please enter the password for downloading certificates []:
Enter the password to download the certificates.
Press ENTER.
The installer extracts the files and downloads the certificates.
Unpacking...
Extracting files...
Obtaining token from x.x.x.x:25400...
Downloading certificates from x.x.x.x:25400...
% Total % Received % Xferd Average Speed Time Time Time Current
Dload Upload Total Spent Left Speed
100 8704 100 8704 0 0 209k 0 --:--:-- --:--:-- --:--:-- 212k
Extracting certificates...
Certificates successfully downloaded and stored in /opt/protegrity/rpagent/data
Protegrity RPAgent installed in /opt/protegrity/rpagent.
If the JWT token is not specified while downloading the certificates, then the RPAgent fetches the token automatically from the ESA.
Navigate to the /opt/protegrity/rpagent/bin/ directory.
To start the RPAgent, run the following command:
Press ENTER.
The command starts the RPAgent successfully and a confirmation message appears.
To verify the status of the RPAgent, run the following command:
Press ENTER.
The status of the RPAgent service appears.
rpagent is running (pid=10817)
4 - Installing the Protector
This section outlines the installation process for the Protegrity Teradata Data Warehouse Protector.
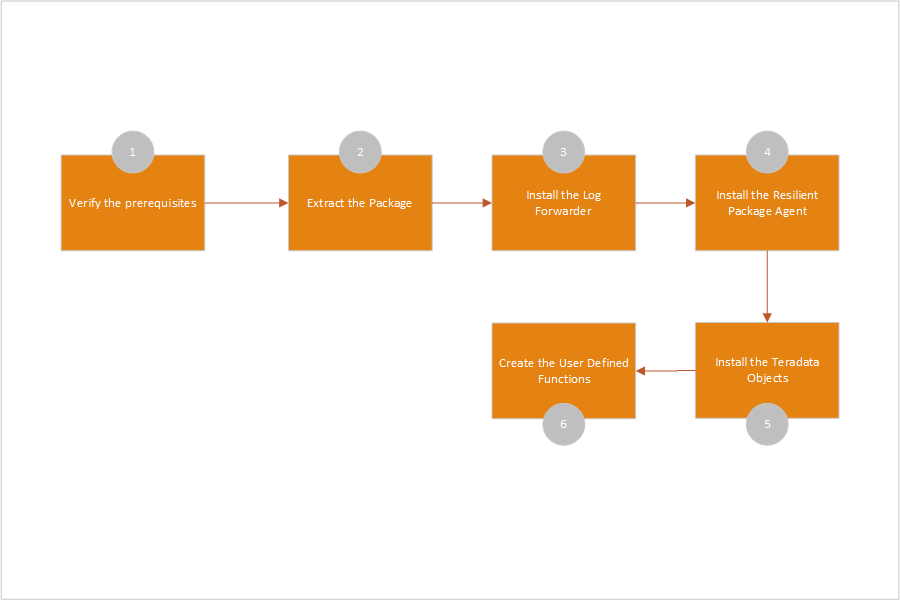
The following figure shows a complete task flow to install the Protegrity Teradata Data Warehouse Protector.
4.2 - Creating the Teradata User Defined Functions (UDFs)
Before creating the UDFs, ensure that the following prerequisites are met:
You have installed the Teradata Data Warehouse Protector on all the nodes.
When installing the Teradata objects, you must specify the maximum data size to be allocated by the UDFs. This value should not exceed 500 MB.
- When you calculate the data size, ensure that you also consider the space for the overheads.
For example:- For the data that would be tokenized using non-length preserving tokens, you must add an overhead of approximately 6% to the original data size.
- For the AES-encrypted data, with the blocks of 16 bytes, you must add an overhead of an additional 16 bytes to include CRC or IV.
The database user that installs the UDFs must have the following privileges:
GRANT CREATE FUNCTION ON PROTEGRITY to USER1;
GRANT ALTER FUNCTION ON PROTEGRITY to USER1;
- USER1 is the database user who install the UDFs.
- PROTEGRITY is the name of the database where the UDFs are installed.
- ROLE1 is the group to which the USER1 belongs.
Ensure that the database user who installs the UDFs is part of the ROLE1 group.
To grant privileges to a database user to perform database administration functions, run the following query:
GRANT EXECUTE, SELECT, INSERT, UPDATE, DELETE, STATISTICS, DUMP, RESTORE, CHECKPOINT, SHOW, EXECUTE PROCEDURE, ALTER PROCEDURE, EXECUTE FUNCTION, ALTER FUNCTION, ALTER EXTERNAL PROCEDURE, CREATE OWNER PROCEDURE, CREATE TABLE, CREATE VIEW, CREATE MACRO, CREATE TRIGGER, CREATE PROCEDURE, CREATE FUNCTION, DROP TABLE, DROP VIEW, DROP MACRO, DROP TRIGGER, DROP PROCEDURE, DROP FUNCTION ON TESTDB TO ROLE1;
To distribute the installation on all the nodes while installing the UDF in a multi-node environment, you can run either of the following commands:
- UNIX commands:
psh mkdir /opt/protegrity/
- PUT utility:
pcl -send /opt/protegrity/* /opt/protegrity/
To create the UDFs for Teradata:
Log in to the server as the user with the required permissions.
Navigate to the /opt/protegrity/databaseprotector/teradata/sqlscripts/ directory.
To view the .sql queries, run the following command:
/opt/protegrity/databaseprotector/teradata/sqlscripts/ # ls -ltr
Press ENTER.
The list of available queries in the .sql file format appears.
total 164
-rw-r----- 1 tdatuser tdtrusted 8939 createdecimalobjects.sql
-rw-r----- 1 tdatuser tdtrusted 2560 dropobjects.sql
-rw-r----- 1 tdatuser tdtrusted 781 dropvarcharunicode.sql
-rw-r----- 1 tdatuser tdtrusted 67128 createobjects.sql
-rw-r----- 1 tdatuser tdtrusted 10294 createvarcharunicode.sql
-rw-r----- 1 tdatuser tdtrusted 8401 createdecimalobjects_a.sql
-rw-r----- 1 tdatuser tdtrusted 793 dropvarcharunicode_a.sql
-rw-r----- 1 tdatuser tdtrusted 1875 dropobjects_a.sql
-rw-r----- 1 tdatuser tdtrusted 19643 createobjects_a.sql
-rw-r----- 1 tdatuser tdtrusted 5078 createvarcharunicode_a.sql
-rw-r----- 1 tdatuser tdtrusted 5300 testscript.sql
-rw-r----- 1 tdatuser tdtrusted 3558 sample_tok.sql
-rw-r----- 1 tdatuser tdtrusted 3324 sample_enc.sql
To start the bteq, run the following command:
/opt/protegrity/databaseprotector/teradata/sqlscripts/ # bteq
Press ENTER.
The prompt to log in to the database appears.
Enter your logon or BTEQ command:
To log in to the database, run the following command:
Press ENTER.
The prompt to enter the database password appears.
Enter the database password.
Press ENTER.
The connection to the Teradata database is completed successfully.
*** Logon successfully completed.
To create the UDFs, execute the following query:
.run file=createobjects.sql
Press ENTER.
The script creates the UDFs and the following message for each of the created UDF appears.
*** Function has been created.
*** Warning: 5607 Check output for possible warnings encountered in compiling and/or linking UDF/XSP/UDM/UDT.
*** Total elapsed time was 1 second.
To create the Varchar Unicode UDFs, execute the following query:
.run file=createvarcharunicode.sql
Press ENTER.
The script creates the UDFs and the following message for each of the created UDF appears.
*** Function has been created.
*** Warning: 5607 Check output for possible warnings encountered in compiling and/or linking UDF/XSP/UDM/UDT.
*** Total elapsed time was 1 second.
To create the Decimal UDFs, execute the following query:
.run file=createdecimal.sql
Press ENTER.
The script creates the Decimal UDFs and the following message for each of the created UDF appears.
*** Function has been created.
*** Warning: 5607 Check output for possible warnings encountered in compiling and/or linking UDF/XSP/UDM/UDT.
*** Total elapsed time was 1 second.
For more information about the User Defined Functions (UDFs) for Teradata, refer to User Defined Functions and API.
4.3 - Installing the Teradata User Defined Types (UDTs)
The UDTs allows you to create the data-types that can be used as pre-defined data-types.
To install the UDT for Teradata:
Log in to the server as the user with the required permissions.
Navigate to the /opt/protegrity/ directory.
To install the UDT setup for Teradata, run the following command:
./PepTeradata_UDTSetup_Linux_x64_10.0.0+x.sh
Press ENTER.
The prompt to continue the installation appears.
*****************************************************
Welcome to the Database Protector Setup Wizard
*****************************************************
This will install the teradata user defined types on your computer
Do you want to continue? [yes or no]
To proceed, type yes.
Press ENTER.
The script extracts the files and installs the data types in the default directory. The script also sets the permissions for the data types.
[/opt/protegrity]:
Unpacking...
To get started with UDTs, please run /opt/protegrity/databaseprotector/teradata
generate_udt_scripts.sh.
Teradata UDTs installed in /opt/protegrity/databaseprotector/teradata.
Permission for /opt/protegrity/databaseprotector/teradata is successfully set.
For more information about the Teradata User Defined Types (UDTs), refer to
Teradata User Defined Types (UDTs).
4.4 - Creating the Teradata User Defined Types (UDTs)
The Teradata Data Warehouse Protector automatically creates the To-SQL and From-SQL transform, the ordering, and the necessary casts for a distinct UDT once the CREATE TYPE statement is issued.
On the Data Warehouse Protector installation, the /databaseprotector/teradata/udt/ directory is created with the following files:
generate_udt_scripts.sh is an executable file that generates UDT scriptspepteradataudt.plm is a library that contains protect and unprotect functions for UDT usage.
The generate_udt_scripts.sh generates UDT scripts using the following command:
/opt/protegrity/databaseprotector/teradata/udt # ./generate_udt_scripts.sh --help

Protegrity Data Security Platform - Teradata UDT Scripts
Usage: generate_udt_scripts udtname dataelement scid dbtype
udtname    : UDT Name
dataelement: Data Element
scid       : Security Coordinate ID
dbtype     : Database data type, must be one of: bigint,date,float,integer,varchar
The following are some limitations for the UDT arguments:
- Udtname – any applicable name
- Dataelement – DE deployed
- Scid – applicable security coordinate (0 by default)
- Dbtype – one of the data types bigint, date, float, integer, varchar.
Important: The scid parameter is no longer used and is retained for compatibility purpose only.
To create the User Defined Types:
Log in to the server as the user with the required permissions.
Navigate to the /opt/protegrity/databaseprotector/teradata/udt/ directory.
To view the files and directories in the ../udt/ directory, run the following command:
/opt/protegrity/databaseprotector/udt # ls
Press ENTER.
The list of available content appears.
/opt/protegrity/databaseprotector/teradata/udt # ls
generate_udt_scripts.sh  pepteradataudt.plm  sqlscripts
To generate the UDT scripts required for creating the UDTs, run the following command:
./generate_udt_scripts.sh <udtname> <dataelement> <scid> <dbtype>
For example:
./generate_udt_scripts.sh UDT_VARCHAR AES128 0 varchar
Press ENTER.
The script generates the following .sql queries for the UDTs in the /opt/protegrity/databaseprotector/teradata/udt directory.
create_UDT_VARCHAR.sql
drop_UDT_VARCHAR.sql
It is recommended to use the data element names in the upper-case.
You can modify the .sql queries using the bteq utility for error handling.
To start the bteq utility, run the following command:
/opt/protegrity/databaseprotector/teradata/sqlscripts # bteq
Press ENTER.
The prompt to log in to the database appears.
Enter your logon or BTEQ command:
To log in to the database, run the following command:
Press ENTER.
The prompt to enter the database password appears.
To proceed, type the database password.
Press ENTER.
The connection to the Teradata Data Warehouse is completed successfully.
*** Logon successfully completed.
To create the UDTs, run the following query:
.run file=create_UDT_VARCHAR.sql
Press ENTER.
The query creates the UDTs and the following message for each of the created UDT appears.
*** Function has been created.
*** Warning: 5607 Check output for possible warnings encountered in compiling and/or linking UDF/XSP/UDM/UDT.
*** Total elapsed time was 1 second.
It is recommended to create only one UDT for each data type.
Creating an additional UDT, with a basic data type that is used by an existing UDT, results in a linked error.
To grant the access permissions to the UDTs, execute the following SQL statements using the bteq utility.
To provide the execute access to the UDTs, run the following command:
chmod 755 create_UDT_VARCHAR.sql
Press ENTER.
To provide the UDTUSAGE access for the UDTs to public with a GRANT option, run the following query:
GRANT UDTUSAGE ON SYSUDTLIB TO PUBLIC WITH GRANT OPTION;
Press ENTER.
To provide the execute function for all the UDTs to public with a GRANT option, run the following query:
GRANT ALL ON TYPE SYSUDTLIB.UDT_VARCHAR TO PUBLIC WITH GRANT OPTION;
The protect/unprotect operations for the UDTs must be performed using the bteq utility.
Press ENTER.
The script creates the UDTs and grants access permissions using the SQL statements.
5.1 - Working with the config.ini file
This page discusses about the config.ini file for the Teradata Data Warehouse Protector.
By default, this file is located in the /opt/protegrity/databaseprotector/teradata/data/ directory.
5.1.2 - Understanding the Parameters in the config.ini File
The following table consists of the config.ini parameters along with the descriptions:
| Configuration Component | Parameter | Description |
|---|
| Log | mode | Specifies how the protector logs are handled by the Log Forwarder. If the connection to the Log Forwarder host is lost, you can set the connection mode to one of the following types:
- drop: Specifies the logs that the protector fails to record when the connection to the Log Forwarder is lost. By default, the Log Forwarder is configured to operate in the drop mode.
- error: Stops all the data security operations and throws an error when the connection to the Log Forwarder is lost.
Syntax: Parameter = Value
Example: mode = error |
| host | Specifies the Log Forwarder hostname or the IP address where the logs are forwarded from the protector. The default host for the Log Forwarder is localhost.
Syntax: Parameter = Value
Example: host = <Hostname or IP Address> |
| Protector | cadence | Specifies the time interval at which the protector synchronizes with the shared memory for fetching the policy package. The default value for the cadence parameter is 60 seconds. The minimum and maximum values that can be set for the cadence parameter are 0 seconds and 86400 seconds (24 hours) respectively.
Important: If the cadence parameter value is set to 0 seconds, then the policy is fetched only once at the time of initialization. After initialization, the protector does not fetch for the new policy changes as a result of immutable deployment.
Syntax: Parameter = Value
Example: cadence = <time interval in seconds> |
5.2 - Updating the Output Buffer for the Unicode UDFs
This page discusses the process to update the output buffer length for the Varchar Unicode UDFs.
By default, the value of the output buffer length is 500 characters. This value can be modified during the installation of the Teradata objects.
After completing the installation process, you may need to manually update the output buffer length values if necessary. For instance, if you need to protect strings longer than 500 bytes, adjust the buffer length to accommodate the largest string size. Be aware that a big buffer size slows the overall performance. Additionally, each protection method has a size limitations. For example, tokenization has a maximum size limit of 4096 bytes.
The output buffer sizes for all the UDFs are stored in both, the dbpuserconf.ini and createvarcharunicode.sql files.
The process to update the output buffer length for the Varchar Unicode UDFs involves the following steps:
- To update the output buffer length in the
dbpuserconf.ini file, refer to Updating the dbpuserconf.ini file. - To update the output buffer length in the
createvarcharunicode.sql file, refer to Updating the createvarcharunicode.sql file. - To uninstall the Varchar Unicode UDFs using the
dropvarcharunicode.sql file, refer to Uninstalling the UDFs. - To re-create the Varchar Unicode UDFs using the
createvarcharunicode.sql file, refer to Creating the UDFs.
6 - Uninstalling the Protector
This page discusses the uninstallation process for the Protegrity Teradata Data Warehouse Protector.
6.4 - Removing the Installation Directory
You must delete the installation directory to complete the process of uninstalling the Teradata Data Warehouse Protector.
To remove the installation directory:
Log in to the server as the user with the required permissions.
Navigate to the /opt/protegrity/ directory.
To delete the installation directory, run the following command:
rm -rf /databaseprotector/
Press ENTER.
The command deletes the files and the sub-directories within the specified directory.
This step completes the uninstallation process of the Teradata Data Warehouse Protector.