This section outlines the installation process for the Protegrity Teradata Data Warehouse Protector.
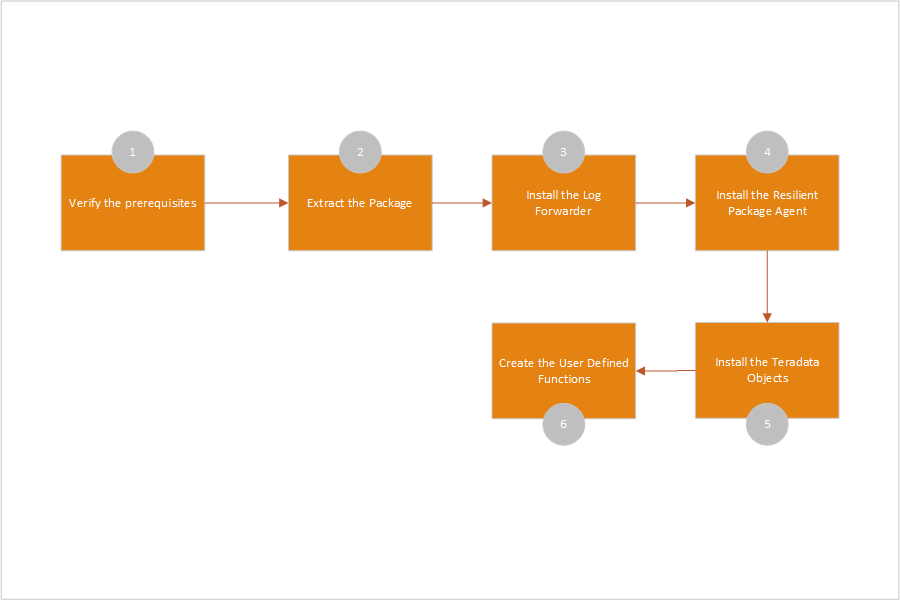
The following figure shows a complete task flow to install the Protegrity Teradata Data Warehouse Protector.
This is the multi-page printable view of this section. Click here to print.
This section outlines the installation process for the Protegrity Teradata Data Warehouse Protector.
The following figure shows a complete task flow to install the Protegrity Teradata Data Warehouse Protector.
Log in to the server as the user with the required permissions.
Navigate to the /opt/protegrity/ directory.
To install the Teradata objects, run the following command:
./PepTeradataSetup_Linux_x64_10.0.0+x.sh
Press ENTER.
The prompt to continue installing the Teradata objects appears.
*****************************************************
Welcome to the Database Protector Setup Wizard
*****************************************************
This will install the teradata objects on your computer
Do you want to continue? [yes or no]
To proceed with the installation of the Teradata objects, type yes.
Press ENTER.
The prompt to enter the name of the database to install the UDFs appears.
Enter name of database where the UDFs will be installed.
Enter the database name to continue.
Press ENTER
The prompt to mention the maximum size of the VARCHAR allocated by the UDFs appears.
Enter the maximum size of the VARCHAR to be allocated by the UDFs.
The default value is 500 characters. You must modify the default value in this step, as per your requirement, for maximum character length. The mentioned VARCHAR size is the maximum value allocated by the UDFs for UNICODE character set.
Press ENTER.
The script installs the Teradata objects in the /opt/protegrity/databaseprotector/teradata/ directory.
[500]:
1000
***********BUFFER LENGTH INITIALIZATION**************
UDF VARCHAR MAX INPUT BUFFER LENGTH (TOKENIZATION) : 1000 Latin characters
UDF VARCHAR MAX OUTPUT BUFFER LENGTH (TOKENIZATION) : 1351 Latin characters
UDF VARCHAR MAX INPUT BUFFER LENGTH (ENCRYPTION) : 1000 Latin characters
UDF VARCHAR MAX OUTPUT BUFFER LENGTH (ENCRYPTION) : 1038 Bytes
UDF VARCHAR_UNICODE MAX INPUT BUFFER LENGTH (TOKENIZATION) : 1000 UNICODE characters
UDF VARCHAR_UNICODE MAX OUTPUT BUFFER LENGTH (TOKENIZATION) : 2706 UNICODE characters
UDF VARCHAR_UNICODE MAX INPUT BUFFER LENGTH (ENCRYPTION) : 1000 UNICODE characters
UDF VARCHAR_UNICODE MAX OUTPUT BUFFER LENGTH (ENCRYPTION) : 2038 Bytes
teradata objects installed in /opt/protegrity/databaseprotector/teradata.
Permission for /opt/protegrity/databaseprotector is successfully set.
Important: By default, all the configurations provided for the UDFs are stored in the
dbpuserconf.inifile within the/etc/protegrity/directory.
The Teradata Data Warehouse Protector uses thedbpuserconf.inifile for internal purposes only.
Before creating the UDFs, ensure that the following prerequisites are met:
You have installed the Teradata Data Warehouse Protector on all the nodes.
When installing the Teradata objects, you must specify the maximum data size to be allocated by the UDFs. This value should not exceed 500 MB.
The database user that installs the UDFs must have the following privileges:
GRANT CREATE FUNCTION ON PROTEGRITY to USER1;
GRANT ALTER FUNCTION ON PROTEGRITY to USER1;
To grant privileges to a database user to perform database administration functions, run the following query:
GRANT EXECUTE, SELECT, INSERT, UPDATE, DELETE, STATISTICS, DUMP, RESTORE, CHECKPOINT, SHOW, EXECUTE PROCEDURE, ALTER PROCEDURE, EXECUTE FUNCTION, ALTER FUNCTION, ALTER EXTERNAL PROCEDURE, CREATE OWNER PROCEDURE, CREATE TABLE, CREATE VIEW, CREATE MACRO, CREATE TRIGGER, CREATE PROCEDURE, CREATE FUNCTION, DROP TABLE, DROP VIEW, DROP MACRO, DROP TRIGGER, DROP PROCEDURE, DROP FUNCTION ON TESTDB TO ROLE1;
To distribute the installation on all the nodes while installing the UDF in a multi-node environment, you can run either of the following commands:
psh mkdir /opt/protegrity/
pcl -send /opt/protegrity/* /opt/protegrity/
To create the UDFs for Teradata:
Log in to the server as the user with the required permissions.
Navigate to the /opt/protegrity/databaseprotector/teradata/sqlscripts/ directory.
To view the .sql queries, run the following command:
/opt/protegrity/databaseprotector/teradata/sqlscripts/ # ls -ltr
Press ENTER.
The list of available queries in the .sql file format appears.
total 164
-rw-r----- 1 tdatuser tdtrusted 8939 createdecimalobjects.sql
-rw-r----- 1 tdatuser tdtrusted 2560 dropobjects.sql
-rw-r----- 1 tdatuser tdtrusted 781 dropvarcharunicode.sql
-rw-r----- 1 tdatuser tdtrusted 67128 createobjects.sql
-rw-r----- 1 tdatuser tdtrusted 10294 createvarcharunicode.sql
-rw-r----- 1 tdatuser tdtrusted 8401 createdecimalobjects_a.sql
-rw-r----- 1 tdatuser tdtrusted 793 dropvarcharunicode_a.sql
-rw-r----- 1 tdatuser tdtrusted 1875 dropobjects_a.sql
-rw-r----- 1 tdatuser tdtrusted 19643 createobjects_a.sql
-rw-r----- 1 tdatuser tdtrusted 5078 createvarcharunicode_a.sql
-rw-r----- 1 tdatuser tdtrusted 5300 testscript.sql
-rw-r----- 1 tdatuser tdtrusted 3558 sample_tok.sql
-rw-r----- 1 tdatuser tdtrusted 3324 sample_enc.sql
To start the bteq, run the following command:
/opt/protegrity/databaseprotector/teradata/sqlscripts/ # bteq
Press ENTER.
The prompt to log in to the database appears.
Enter your logon or BTEQ command:
To log in to the database, run the following command:
.logon < username >
Press ENTER.
The prompt to enter the database password appears.
Password:
Enter the database password.
Press ENTER.
The connection to the Teradata database is completed successfully.
*** Logon successfully completed.
To create the UDFs, execute the following query:
.run file=createobjects.sql
Press ENTER.
The script creates the UDFs and the following message for each of the created UDF appears.
*** Function has been created.
*** Warning: 5607 Check output for possible warnings encountered in compiling and/or linking UDF/XSP/UDM/UDT.
*** Total elapsed time was 1 second.
To create the Varchar Unicode UDFs, execute the following query:
.run file=createvarcharunicode.sql
Press ENTER.
The script creates the UDFs and the following message for each of the created UDF appears.
*** Function has been created.
*** Warning: 5607 Check output for possible warnings encountered in compiling and/or linking UDF/XSP/UDM/UDT.
*** Total elapsed time was 1 second.
To create the Decimal UDFs, execute the following query:
.run file=createdecimal.sql
Press ENTER.
The script creates the Decimal UDFs and the following message for each of the created UDF appears.
*** Function has been created.
*** Warning: 5607 Check output for possible warnings encountered in compiling and/or linking UDF/XSP/UDM/UDT.
*** Total elapsed time was 1 second.
For more information about the User Defined Functions (UDFs) for Teradata, refer to User Defined Functions and API.
The UDTs allows you to create the data-types that can be used as pre-defined data-types.
To install the UDT for Teradata:
Log in to the server as the user with the required permissions.
Navigate to the /opt/protegrity/ directory.
To install the UDT setup for Teradata, run the following command:
./PepTeradata_UDTSetup_Linux_x64_10.0.0+x.sh
Press ENTER.
The prompt to continue the installation appears.
*****************************************************
Welcome to the Database Protector Setup Wizard
*****************************************************
This will install the teradata user defined types on your computer
Do you want to continue? [yes or no]
To proceed, type yes.
Press ENTER.
The script extracts the files and installs the data types in the default directory. The script also sets the permissions for the data types.
[/opt/protegrity]:
Unpacking...
To get started with UDTs, please run /opt/protegrity/databaseprotector/teradata
generate_udt_scripts.sh.
Teradata UDTs installed in /opt/protegrity/databaseprotector/teradata.
Permission for /opt/protegrity/databaseprotector/teradata is successfully set.
For more information about the Teradata User Defined Types (UDTs), refer to Teradata User Defined Types (UDTs).
The Teradata Data Warehouse Protector automatically creates the To-SQL and From-SQL transform, the ordering, and the necessary casts for a distinct UDT once the CREATE TYPE statement is issued.
On the Data Warehouse Protector installation, the /databaseprotector/teradata/udt/ directory is created with the following files:
generate_udt_scripts.sh is an executable file that generates UDT scriptspepteradataudt.plm is a library that contains protect and unprotect functions for UDT usage.The generate_udt_scripts.sh generates UDT scripts using the following command:
/opt/protegrity/databaseprotector/teradata/udt # ./generate_udt_scripts.sh --help

Protegrity Data Security Platform - Teradata UDT Scripts
Usage: generate_udt_scripts udtname dataelement scid dbtype
udtname    : UDT Name
dataelement: Data Element
scid       : Security Coordinate ID
dbtype     : Database data type, must be one of: bigint,date,float,integer,varchar
The following are some limitations for the UDT arguments:
Important: The scid parameter is no longer used and is retained for compatibility purpose only.
To create the User Defined Types:
Log in to the server as the user with the required permissions.
Navigate to the /opt/protegrity/databaseprotector/teradata/udt/ directory.
To view the files and directories in the ../udt/ directory, run the following command:
/opt/protegrity/databaseprotector/udt # ls
Press ENTER.
The list of available content appears.
/opt/protegrity/databaseprotector/teradata/udt # ls
generate_udt_scripts.sh  pepteradataudt.plm  sqlscripts
To generate the UDT scripts required for creating the UDTs, run the following command:
./generate_udt_scripts.sh <udtname> <dataelement> <scid> <dbtype>
For example:
./generate_udt_scripts.sh UDT_VARCHAR AES128 0 varchar
Press ENTER.
The script generates the following .sql queries for the UDTs in the /opt/protegrity/databaseprotector/teradata/udt directory.
create_UDT_VARCHAR.sql
drop_UDT_VARCHAR.sql
It is recommended to use the data element names in the upper-case.
You can modify the
.sqlqueries using thebtequtility for error handling.
To start the bteq utility, run the following command:
/opt/protegrity/databaseprotector/teradata/sqlscripts # bteq
Press ENTER.
The prompt to log in to the database appears.
Enter your logon or BTEQ command:
To log in to the database, run the following command:
.logon <username>
Press ENTER.
The prompt to enter the database password appears.
Password:
To proceed, type the database password.
Press ENTER.
The connection to the Teradata Data Warehouse is completed successfully.
*** Logon successfully completed.
To create the UDTs, run the following query:
.run file=create_UDT_VARCHAR.sql
Press ENTER.
The query creates the UDTs and the following message for each of the created UDT appears.
*** Function has been created.
*** Warning: 5607 Check output for possible warnings encountered in compiling and/or linking UDF/XSP/UDM/UDT.
*** Total elapsed time was 1 second.
It is recommended to create only one UDT for each data type.
Creating an additional UDT, with a basic data type that is used by an existing UDT, results in a linked error.
To grant the access permissions to the UDTs, execute the following SQL statements using the bteq utility.
To provide the execute access to the UDTs, run the following command:
chmod 755 create_UDT_VARCHAR.sql
Press ENTER.
To provide the UDTUSAGE access for the UDTs to public with a GRANT option, run the following query:
GRANT UDTUSAGE ON SYSUDTLIB TO PUBLIC WITH GRANT OPTION;
Press ENTER.
To provide the execute function for all the UDTs to public with a GRANT option, run the following query:
GRANT ALL ON TYPE SYSUDTLIB.UDT_VARCHAR TO PUBLIC WITH GRANT OPTION;
The protect/unprotect operations for the UDTs must be performed using the bteq utility.
Press ENTER.
The script creates the UDTs and grants access permissions using the SQL statements.