This is the multi-page printable view of this section. Click here to print.
Trino Data Warehouse Protector
- 1: Understanding the Architecture
- 2: System Requirements
- 3: Preparing the Environment
- 4: Installing the Trino Protector
- 5: Configuring the Trino Protector
- 5.1: Working with Cluster Utilities
- 5.1.1: Log Forwarder Control Script
- 5.1.2: RPAgent Control Script
- 5.1.3: Sync Config.ini
- 5.1.4: Sync RPAgent
- 5.1.5: Sync Log Forwarder
- 6: Uninstalling the Trino Protector
1 - Understanding the Architecture
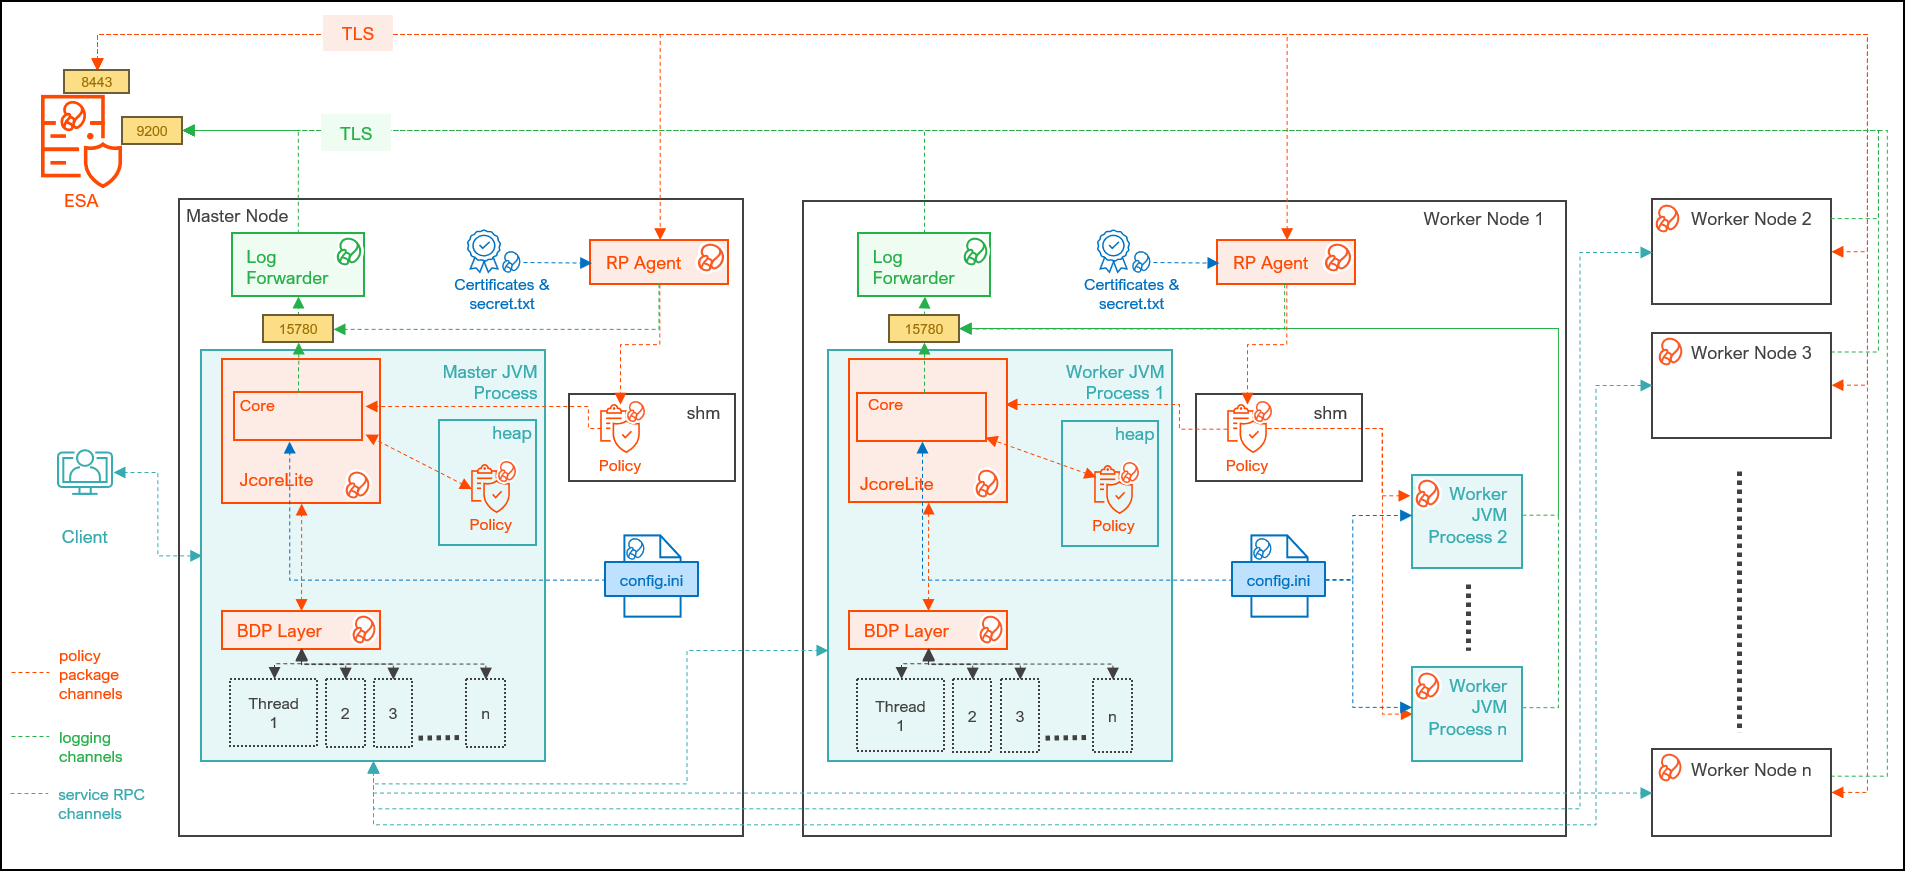
The architecture for the Trino Data Warehouse Protector is depicted in the image below.
| Component | Description |
|---|---|
| RPAgent | Is a daemon running on each node that downloads the policy package from the ESA over a TLS channel using the installed Certificates. |
| Log Forwarder | Is a daemon running on each node that routes the audit logs and application logs to the ESA/Audit Store. |
| config.ini | Is a file on each node containing the set of configuration parameters to modify the protector behavior. |
| Protector Layer | Contains the Trino Protector UDFs and APIs. |
| JcoreLite | Is the JNI library that provides a Java API layer to the Core libraries. |
| Core | Is the set of various libraries that provide the Protegrity Core functionality. |
2 - System Requirements
Ensure that the following prerequisites are met, before installing the Trino Protector:
- The Trino cluster is installed, configured, and running.
- The ESA appliance, version 10.0.x or v10.1.x, is installed, configured, and running.
- The ports that are configured on the ESA and the nodes in the cluster, which will run the Trino Protector, are listed in the following table:
| Destination Port | Protocol | Source | Destination | Description |
|---|---|---|---|---|
| 8443 | TLS | RPAgent on the Big Data Protector cluster node | ESA | The RPAgent communicates with the ESA through port 8443 to download a policy. |
| 9200 | TLS | Log Forwarder on the Trino Protector Cluster node | Protegrity Audit Store appliance | The Log Forwarder sends all the logs to the Protegrity Audit Appliance through port 9200. |
| 15780 | TCP | Protector on the Trino Protector cluster node | Log Forwarder on the Trino Protector cluster node | The Trino Protector writes Audit Logs to localhost through port 15780. The Application Logs are also written to localhost through port 15780. The Log Forwarder reads the logs from that socket. |
3 - Preparing the Environment
3.1 - Extracting the Files from the Installation Package
Extract the contents of the installation package to access the configurator script. This script generates the single node installation script to install the Trino Protector.
To extract the files from the installation package:
Log in to the Linux machine that has connectivity to ESA.
Download the Trino Protector package
DatabaseProtector_Linux-ALL-64_x86-64_Trino-ALL-64_10.0.0+x.tgzto any local directory.To extract the files from the installation pacakage, run the following command:
tar -xvf DatabaseProtector_Linux-ALL-64_x86-64_Trino-ALL-64_10.0.0+x.tgzPress ENTER. The command extracts the installation package and the GPG signature files.
DatabaseProtector_Linux-ALL-64_x86-64_Trino-ALL-64_10.0.0+x.tgz
signatures/
signatures/DatabaseProtector_Linux-ALL-64_x86-64_Trino-ALL-64_10.0.0+x.tgz_10.0.sig
Verify the authenticity of the build using the signatures folder. For more information, refer Verification of Signed Protector Build.
To extract the configurator script, run the following command:
tar -xvf DatabaseProtector_Linux-ALL-64_x86-64_Trino-ALL-64_10.0.0+x.tgzPress ENTER. The command extracts the configurator script.
TrinoProtectorConfigurator_10.0.0+x.sh
3.2 - Executing the Configurator Script
The configuator script generates the single-node installation script to install the Trino Protector.
To execute the configurator script:
Log in to the staging machine that has connectivity to ESA.
To execute the configurator script, run the following command:
./TrinoProtectorConfigurator_10.0.0+x.shPress ENTER. The prompt to continue the configuration of the Trino Protector appears.
************************************************************************************
            Welcome to the Configurator for Protegrity Trino Protector
************************************************************************************
This will configure and generate the Protegrity Trino Protector Generic Installation
Script for a single Trino node.

Do you want to continue? [yes or no]:
To continue, type
yes.Press ENTER. The prompt to enter the installation directory on the cluster node appears.
Protegrity Trino Protector Configurator started...

Enter the Installation Directory on cluster node
[default: /opt/protegrity]:
Enter the location of the directory to install the Trino protector.
To use the default directory, press ENTER.Press ENTER. The prompt to enter a temporary directory appears.
Enter a Temporary Staging Directory on the cluster node.
This directory will be used for extracting files from the Installation/Uninstallation scripts.
The user executing the Installation/Uninstallation scripts must have permission to create this directory and execute in it.
If the directory exists, ensure it is empty, as the scripts will delete its contents recursively.
[default: /tmp/protegrity]:
Enter the location of the temporary directory.
Press ENTER. The prompt to enter the ESA IP address or host name appears.
Enter the ESA Hostname/IP Address:Enter the ESA hostname or IP address.
Press ENTER. The prompt to enter the listening port appears.
Enter ESA host listening port [8443]:Enter the ESA host listening port.
Press ENTER. The prompt to enter the JSON Web Token appears.
If you have an existing ESA JSON Web Token (JWT) with Export Certificates role, enter it otherwise enter 'no':Note: The script silently reads the user input. Therefore, the user will be unable to see the entered JWT or
no.Enter the JWT token.
a. If you do not have an existing ESA JSON Web Token (JWT), type
no.b. Press ENTER. The prompt to enter the user name with Export Certificates permission appears.
```
JWT was not provided. Script will now prompt for ESA username and password.
Enter ESA Username:
```
c. Enter the username that has permissions to export the certificates.
d. Press ENTER. The prompt to enter the password appears.
```
Temporarily setting up RPAgent directory structure on current node...
Please enter the password for downloading certificates[]:

```
e. Enter the password.
f. Press ENTER. The script retrieves the JWT from the ESA, validates it, and the prompt to select the Audit Store type appears.
```
Unpacking...
Extracting files...
Obtaining token from <ESA_IP_Address>:<ESA_Port>...
Downloading certificates from ESA_IP_Address:ESA_Port...
% Total    % Received % Xferd  Average Speed   Time    Time     Time  Current
                                Dload  Upload   Total   Spent    Left  Speed
100 11264  100 11264    0     0   116k      0 --:--:-- --:--:-- --:--:--  117k

Extracting certificates...
Certificates successfully downloaded and stored in /<installation_directory>/rpagent/data

Protegrity RPAgent installed in /<installation_directory>/rpagent.


Repackaging rpagent with ESA certificates...

Fetched and Repackaged ESA Certificates successfully..


Select the Audit Store type where Log Forwarder(s) should send logs to.

[ 1 ] : Protegrity Audit Store
[ 2 ] : External Audit Store
[ 3 ] : Protegrity Audit Store + External Audit Store

Enter the no.:
```
Depending on the Audit Store type, select any one of the following options:
Option Description 1To use the default setting using the Protegrity Audit Store appliance, type 1. If you enter1, then the default Fluent Bit configuration files are used and Fluent Bit will forward the logs to the Protegrity Audit Store appliances.2To use an external audit store, type 2. If you enter2, then the default Fluent Bit configuration files used for the External Audit Store (out.conf and upstream.cfg in the/opt/protegrity/fluent-bit/data/config.d/directory) are renamed (out.conf.bkp and upstream.cfg.bkp) so that they will not be used by Fluent Bit. Additionally, the custom Fluent Bit configuration files for the external audit store are copied to the /opt/protegrity/fluent-bit/data/config.d/ directory.3To use a combination of the default setting with an external audit store, type 3. If you enter3, then the default Fluent Bit configuration files used for the Protegrity Audit Store (out.conf and upstream.cfg in the/opt/protegrity/fluent-bit/data/config.d/directory) are not renamed. However, the custom Fluent Bit configuration files for the external audit store are copied to the/opt/protegrity/fluent-bit/data/config.d/directory.Press ENTER. The prompt to enter the comma-separated list of the Audit Store appears.
Enter comma-separated list of Hostnames/IP Addresses and/or Ports of Protegrity Audit Store.
Allowed Syntax: hostname[:port][,hostname[:port],hostname[:port]...] (Default Value - <ESA_IP_Address>:<ESA_Port>)
Enter the list:
Enter the comma-separated IP addresses/ports in the correct syntax.
Press ENTER.
The prompt to enter the local directory path that stores the LogForwarder configuration file appears.
Enter the local directory path on this machine that stores the LogForwarder configuration files for External Audit Store:The configurator script will display this prompt only if you select option
2or3Enter the location to store the Log Forwarder configuration files.
Press ENTER.
The prompt to generate the application logs for the RPAgent appears.
Do you want RPAgent's log to be generated in a file? [yes or no]:To generate the application logs for the RPAgent, type
yes.Press ENTER.
The script enables the application log file and generates the single-node installation script.
RPAgent's log will be generated in a file.

Configuring the Trino Protector Installation Script...

Successfully finished configuring the Trino Protector Installation Script.

The single-node Installation Script is generated at /<installation_directory>/Installation_Script/TrinoProtector_InstallationScript_10.0.0+x.sh

Next Steps:

1) Copy the Installation Script to a storage location that is reachable by the Trino cluster nodes.

2) You can create a shell script that will download the Installation Script and execute it by passing the correct arguments.

3) Ensure to pass the correct Command Line arguments to the Installation Script.
Run ./TrinoProtector_InstallationScript_10.0.0+x.sh --help  to print Usage and Help Info.

4) For a new Trino cluster, you can configure the shell script to be executed at Node Startup via Bootstrap/Init Script mechanism if your cluster provides it.

5) For a running Trino cluster, you can execute the shell script on the existing nodes.
4 - Installing the Trino Protector
The single-node installation script generated by the configurator script is used to install the Trino Protector. Copy and execute the single-node installation script to all the nodes in the Trino cluster.
Execute the following steps on every coordinator and worker node of the Trino Cluster.
Important: If you want to add a new node to the Trino cluster after installing the Trino protector, then ensure that you run the installation script on the new node.
Log in to the node, where you want to execute the installation script.
Copy/Download the single-node installation script previously generated by the configurator script to any directory.
Navigate to the directory where the single-node installation script is located.
To view the syntax and the usage of the installation script, run the following command.
./TrinoProtector_InstallationScript_10.0.0+x.sh --helpPress ENTER.
The command displays the syntax with the mandatory and optional arguments. The mandatory and optional arguments are explained in the following tables.
Argument Description --install-rpagent-and-logforwarder=<yes|no>Instructs the script whether to install the RPAgent and the Log Forwarder on the current node in the Trino cluster. The acceptable values are: yes- install the RPAgent and the Log Forwarder on the current node in the Trino cluster.no- skip installing the RPAgent and the Log Forwarder if it is already installed and running on the current node in the Trino cluster.
--trino-plugin-dir=</path/to/plugin/>Specifies the absolute path of the Trino plugin directory. Note
- You can set a custom plugin path using the
plugin.dirproperty in thenode.propertiesTrino configuration file. - Ensure the current
sudoeruser has permissions to read and write into this directory
--trino-service-user=<user>Specifies the name of the user running the Trino server. You can use this argument to set the ownership of the peptrinoplugin directory and also to restart the Trino server if you specify the--restart-trino-server-via=launcherargument.Note
- Ensure the current sudoer user is able to run commands as
Trino service user using the
sudo -ucommand. - Ensure the Trino service user is able to read files from
the
<installation_directory>.
Table 2. Optional Arguments for the Installation Script
Argument Description –sudo-disabled- Use this flag if
sudoersis disabled on the cluster. - If you use this flag, the script will skip the use of the
sudocommand. The current user will be used to install and start the Protegrity services. Therefore, the user must have permissions to create the Protegrity files under the<installation_directory>and the Trino plugin directory and to modify theconfig.propertiesfile. - The
–trino-service-userand–protegrity-usermust be same as the current user. - You will be unable to use the
–restart-trino-server-viaargument. - When you exclude this argument, a user with
sudoerprivileges is required to execute the script.It is recommended to use aNOPASSWDsudoer user. Else, the script will prompt for a password.
–protegrity-user=<user>If you specify this argument, then the script will create the given Protegrity service user if it is unavailable and will set it as the owner of the directories and files in the <installation_directory>. Ensure that the Protegrity service user has read permissions on the parent directories of the<installation_directory>path.Note
- If you set the value of the
–install-pepserver-and-logforwarderargument toyes, then the installation script will use this user account to start the RPAgent and the Log Forwarder services. - Ensure that the current user with
sudoerprivileges is able to execute the commands as the Protegrity service user (using thesudo -ucommand) to start the Protegrity services. - If you set the value of the
–sudo-disabledargument toyes, then the script will use the current user account to start the Protegrity services.
If you fail to specify this argument, then the installation script will set the current user as the Protegrity service user.–protegrity-group=<group>This script will create the given Protegrity service group if it is unavailable and will set it as the group for the directories and the files in the <installation_directory>path.If you fail to specify this argument, then the installation script will set the current user’s primary grouprootas the Protegrity service group.–restart-trino-server-via=<systemd|init|launcher>If you specify this argument, then the script will restart the running Trino server after installing the peptrinoplugin. The script will not restart the Trino server if the server is in the stopped state. If you want to use this argument, ensure that you enable Sudo to restart the Trino server. The acceptable values are:systemd- instructs the script to use thesystemctlcommand to check the status and restart the Trino server. This argument requires the–trino-systemd-service-nameargument to be specified.init- instructs the script to use theservicecommand to check the status and restart the Trino server. This argument also requires you to specify the–trino-init-service-nameargument.launcher- instructs the script to use the Trino launcher script to check the status and restart Trino server. This argument requires the–trino-launcher-pathand the optional–trino-launcher-argsarguments.
–trino-systemd-service-name=<systemd service
name>
Specifies the name of the systemdservice associated with the Trino server. You must specify this argument when you use the–restart-trino-server-via=systemdargument.–trino-init-service-name=<init service name>Specifies the name of the Sys V init service associated with the Trino server. You must pass this argument when you specify the –restart-trino-server-via=initargument.–trino-launcher-path=</path/to/bin/launcher>Specifies the absolute path to the Trino server launcher script. For example, /usr/lib/trino/bin/launcher. You must specify this argument when you use the–restart-trino-server-via=launcherargument.–trino-launcher-args=“arg1 [arg2…]"Specifies the valid command line arguments to the Trino launcher script. You can use this argument with the –trino-launcher-pathargument. If you specify this argument, then the arguments listed between the double-quotes will be passed to the Trino launcher script for thestatusandrestartcommands. If you fail to specify this argument, then no argument will be passed to the Trino launcher script for the status and restart commands.–reuse-jpeplite-from-path=</path/to/jpeplite/lib>Specifies the absolute path to the existing jpeplite/lib/directory on the cluster node. You can use this argument with the–install-pepserver-and-logforwarder=noargument when theJpepLitelibraries packaged in this build is incompatible with the existing installed PEP server version. The existing/path/to/jpeplite/lib/directory must contain thejpeplite.jar,jpeplite.properties, andjpeplite.plmfiles and must be readable.–protector-logs-output=<tcp|stdout|file>Instructs the Trino Protector to write the protector logs to this output. If you specify an attribute for this argument, then the installation script will change the output property in the pepserver.cfgfile. The acceptable values are:tcp(Default) - specifies that the logs are written to the TCP socket specified in thepepserver.cfgfile.stdout- specifies that the logs are written to the Trino server’sstdoutparameter.file- specifies that the logs are written to the file whose path is set in the–protector-logs-output-filenameargument.
–protector-logs-output-filename=</path/to/logs.txt>Specifies the absolute path to the file on the cluster node on which the protector logs are written. You must use this argument with the –protector-logs-output=fileargument. If you fail to specify this argument, then the default file name of/opt/logs.txtwill be used. This argument will add theoutputfilenameproperty in thepepserver.cfgfile. This script will create the file on the cluster node if the file is not available. Ensure that the Trino service user haswritepermissions to this file path.–wait-for-trino-installation- If you specify this argument, then the installation script
will create and run a secondary bash script as a background
process that will wait for the Trino server to be installed
and started on the node and only then install the plugin
.jarfiles and restart the Trino server. This argument can be used in scenarios where the Trino server will always be installed and started after this installation script is executed. E.g. EMR clusters. This flag requires the–restart-trino-server-viaargument for restarting the Trino server. You must enable Sudo for this argument. - If you fail to specify this argument, then the installation script will not wait for the Trino server to be installed and started and will proceed to install the plugin. Ensure that the Trino server is installed and the plugin directory exists before the you execute the installation script.
Depending on the requirements, run the installation script with the required arguments.
For example, on a Starburst Trino cluster installed via RPM, one combination of the arguments to the single-node installation script is listed below.
./TrinoProtector_InstallationScript_10.0.0.x.sh \
               --install-rpagent-and-logforwarder=yes \
               --trino-plugin-dir=/usr/lib/starburst/plugin \
               --trino-service-user=starburst \
               --protegrity-user=ptyitusr \
               --protegrity-group=ptyitusrgroup \
               --restart-trino-server-via=systemd \
               --trino-systemd-service-name=starburst \
Note: If you want the Trino Server to automatically restart after installing the components, then specify the value for the –restart-trino-server-via argument for the installation script. Otherwise, you will have to manually restart the Trino Server after the installation is complete.
Press ENTER.
The script installs the components as specified in the arguments.
./TrinoProtector_InstallationScript_10.0.0+6.sh \
> --install-rpagent-and-logforwarder=yes \
> --trino-plugin-dir=/usr/lib/starburst/plugin \
> --trino-service-user=starburst \
> --restart-trino-server-via=systemd \
> --protegrity-user=ptyitusr \
> --protegrity-group=ptyitusrgroup \
> --trino-systemd-service-name=starburst
> --restart-trino-server-via=systemd \
> --trino-systemd-service-name=starburst

Protegrity Trino Protector Installation Script started...

Validating sudo permissions for root
************************************************************************************
                Welcome to the Trino Protector Install Wizard.
************************************************************************************
This will install the Trino Protector on your system.

Group 'ptyitusrgroup' created

User 'ptyitusr' created

RPAgent installation started
************************************************************************************
                    Welcome to the RPAgent Setup Wizard.
************************************************************************************

RPAgent installed on current node at location /opt/protegrity/rpagent/

Logforwarder installation started
************************************************************************************
                    Welcome to the LogForwarder Setup Wizard.
************************************************************************************

Unpacking...................
Extracting files...
Unpacked logforwarder compressed file...

LogForwarder installed on current node at location /opt/protegrity/logforwarder/

PepTrino Plugin Jars installation started
************************************************************************************
                    Welcome to the PepTrino Setup Wizard.
************************************************************************************

Unpacking...................
Extracting files...
Unpacked peptrino compressed file...

PepTrino installed on current node at location /opt/protegrity/peptrino/

JcoreLite installation started
************************************************************************************
                        Welcome to the JcoreLite Setup Wizard.
************************************************************************************

Unpacking...................
Extracting files...
Unpacked jcorelite compressed file...

JcoreLite for Trino Protector installed on current node at location /opt/protegrity/peptrino/lib/

Moving Uninstallation Script to /opt/protegrity/peptrino/scripts/

Creating cluster_utils directory in /opt/protegrity/peptrino/scripts/

Creating data directory in /opt/protegrity/peptrino/

Starting Logforwarder on current node...

Starting RPAgent on current node...

Trino Protector plugin jars and JcoreLite libraries are installed within /opt/protegrity/peptrino/ directory

Finished executing TrinoProtectorInstall468_Linux-ALL_10.0.0+x.sh script. Check the logs at /opt/protegrity/logs/

NOT waiting for Trino Server Installation and Start...

Started installation of PepTrino in plugin dir in foreground...

Checking if Trino Plugin Dir is present on node.
Trino Plugin Directory /usr/lib/starburst/plugin found.

Creating peptrino directory within Trino plugin directory.

Getting the names of plugin jars

Creating Symbolic Links within Plugin Directory...

Trino Protector jars' symbolic links created in /usr/lib/starburst/plugin/peptrino/

Checking if Trino service user exists.

Service User starburst exists on node

Changing ownership of PepTrino Plugin dir to starburst

Checking if systemctl is on PATH.
systemctl found on PATH.

Checking if 'starburst' is a valid systemd unit.
'starburst' is a valid systemd unit.

Checking if Trino Server is started and running via systemctl
Trino server is running
Restarting Trino Server...

Trino Server successfully restarted via systemctl.
Successfully completed all steps of Installation Script.
The installation script generates the logs in the
/<installation_directory>/logs/directory.
5 - Configuring the Trino Protector
The Big Data Protector provides the following files that contain different parameters to control the protector behavior:
config.ini- provides parameters to control the protector behavior.rpagent.cfg- provides parameters to control the RPAgent behavior.
Updating the parameters in the config.ini file:
Log in to the co-ordinator node.
Navigate to the
/opt/protegrity/bdp/datadirectory.To open the
config.inifile, run the following command:vi config.iniPress ENTER.
The command opens the
config.inifile.############################################################################### # Protector configuration ############################################################################### [protector] # Cadence determines how often the protector connects with ESA / proxy to fetch the policy updates in background. # Default is 60 seconds. So by default, every 60 seconds protector tries to fetch the policy updates. # If the cadence is set to "0", then the protector will get the policy only once. # # Default 60. cadence = 60 ############################################################################### # Log Provider Config ############################################################################### [log] # In case that connection to fluent-bit is lost, set how audits/logs are handled # # drop : (default) Protector throws logs away if connection to the fluentbit is lost # error : Protector returns error without protecting/unprotecting # data if connection to the fluentbit is lost mode = drop # Host/IP to fluent-bit where audits/logs will be forwarded from the protector # # Default localhost host = localhostUpdate the parameters, as per the description in the table.
Parameter Description cadenceSpecifies the frequency at which the protector connects to the ESA to fetch the policy. The default value is 60 seconds. If the cadence is set to “0”, then the protector will get the policy only once. modeSpecifies the approach of handling logs when the connection to the Log Forwarder is lost. Save the changes to the
config.inifile.
Updating the parameters in the rpagent.cfg file:
Log in to the co-ordinator node.
Navigate to the
/opt/protegrity/rpagent/datadirectory.To open the
rpagent.cfgfile, run the following command:vi rpagent.cfgPress ENTER.
The command opens the rpagent.cfg file.
###############################################################################
# Resilient Package Sync Config
###############################################################################
[sync]

# Protocol to use when communicating with the service providing Resilient Packages.
# Use 'https' for ESA or 'shmem' for local shared memory.
protocol = https

# Host/IP to the service providing Resilient Packages
host = <IP_address>
port = 8443

# Path to CA certificate
ca = /opt/protegrity/rpagent/data/CA.pem

# Path to client certificate
cert = /opt/protegrity/rpagent/data/cert.pem

# Path to client certificate key
key = /opt/protegrity/rpagent/data/cert.key

# Path to a secret file that is used to decrypt the client certificate key.
# When using a custom certificate bundle, the 'secretcommand' can instead be
# used to execute an external command that obtains the secret.
secretfile = /opt/protegrity/rpagent/data/secret.txt

###############################################################################
# Log Provider Config
###############################################################################
[log]

# In case that connection to fluent-bit is lost, set how audits/logs are handled
#
# drop  : (default) Protector throws logs away if connection to the fluentbit is lost
# error : Protector returns error without protecting/unprotecting
#         data if connection to the fluentbit is lost
mode = drop

# Host/IP to fluent-bit where audits/logs will be forwarded from the protector
#
# Default localhost
host = localhost
Update the parameters, as per the description in the table.
Parameter Description interval Specifies the frequency at which the RPAgent will fetch the policy from the ESA. The minimum value is 1 second and the maximum value is 86400 seconds. This is an optional parameter and must be included in the Sync section of the rpagent.cfgfile.protocol Specifies the protocol to use when communicating with the service providing Resilient Packages. host Specifies the hostname to the service providing the Resilient packages. port Specifies the port to the service providing the Resilient packages. ca Specifies the path to the CA certificate. cert Specifies the path to the client certificate. key Specifies the path to the client certificate key. secretfile Specifies the path to the secret file that is used to decrypt the client certificate key. mode Specifies the approach of handling logs when the connection to the Log Forwarder is lost. host Specifies the hostname or the IP address to where the Log Forwarder will forward the audit logs from the protector. Save the changes to the
rpagent.cfgfile.Use the
sync_rpagent.shscript to load the changes to the configuration files in all the cluster nodes.
5.1 - Working with Cluster Utilities
The Big Data Protector package provides utility scripts to perform different operations on the Trino cluster. The scripts and their usage is listed in the table.
| Script | Description |
|---|---|
| RPAgent Control | Manages the RPAgent service across the cluster. |
| Log Forwarder Control | Manages the Log Forwarder service across the cluster. |
| Sync Configuration | Updates the configuration from the config.ini file across the nodes in the cluster. |
| RPAgent Configuration | Updates the RPAgent configuration from the rpagent.cfg file across the nodes in the cluster. |
| Log Forwarder Configuration | Updates the Log Forwarder configuration across the nodes in the cluster. |
5.1.1 - Log Forwarder Control Script
The cluster_logforwarderctrl.sh script, in the <installation_directory>/peptrino/scripts/cluster_utils/ directory, manages the Log Forwarder services on all the nodes in the cluster that are listed in the hosts file.
The utility provides the following options:
- Start – Starts the Log Forwarder on all the nodes in the cluster.
- Stop – Stops the Log Forwarder on all the nodes in the cluster.
- Restart – Restarts the Log Forwarder on all the nodes in the cluster.
- Status – Reports the status of the Log Forwarder on all the nodes in the cluster.
Note: When you run the Log Forwarder Control utility, the script will prompt to enter the path of the SSH private key file to securely connect to the cluster nodes.
Reporting the Status of the Log Forwarder
To check the status of the log forwarder on all the nodes:
- Log in to the co-ordinator node.
- Run the following command:
./cluster_logforwarderctrl.sh \ --hostsfile=<path_of_the_hosts_file> \ --ssh-auth-type=publickey \ --private-key-path=<key_file_path>/<name_of_the_private_key_file> \ status - Press ENTER.
The script reports the status of the log forwarder in a log file.
==========================================================================

Hosts file set to '<path_of_the_hosts_file>'

SSH Authentication Type is set to 'Public Key Authentication'

SSH Private Key file path is set to '<key_file_path>/<name_of_the_private_key_file>'

Checking connectivity of cluster nodes...

Checking status of Logforwarder on current node...

Checking status of Logforwarder on all nodes...

The script's logs and operation results are logged in /opt/protegrity/logs/cluster_logforwarderctrl.log
Stopping the Log Forwarder on all the Nodes
- Log in to the co-ordinator node.
- Run the following command:
./cluster_logforwarderctrl.sh \ --hostsfile=<path_of_the_hosts_file> \ --ssh-auth-type=publickey \ --private-key-path=<key_file_path>/<name_of_the_private_key_file> \ stop - Press ENTER.
The script stops the log forwarder and generates the log in a file.
==========================================================================

Hosts file set to '<path_of_the_hosts_file>'

SSH Authentication Type is set to 'Public Key Authentication'

SSH Private Key file path is set to '<key_file_path>/<name_of_the_private_key_file>'

Checking connectivity of cluster nodes...

Stopping Logforwarder on current node...

Logforwarder stopped on current node

Stopping Logforwarder on all nodes...

Logforwarder stopped on all nodes

The script's logs and operation results are logged in /opt/protegrity/logs/cluster_logforwarderctrl.log
Starting the Log Forwarder on all the Nodes
- Log in to the co-ordinator node.
- Run the following command:
./cluster_logforwarderctrl.sh \ --hostsfile=<path_of_the_hosts_file> \ --ssh-auth-type=publickey \ --private-key-path=<key_file_path>/<name_of_the_private_key_file> \ start - Press ENTER.
The script starts the log forwarder and generates the log in a file.
==========================================================================

Hosts file set to '<path_of_the_hosts_file>'

SSH Authentication Type is set to 'Public Key Authentication'

SSH Private Key file path is set to '<key_file_path>/<name_of_the_private_key_file>'

Checking connectivity of cluster nodes...

Starting Logforwarder on current node...

Logforwarder started on current node

Starting Logforwarder on all nodes...

Logforwarder started on all nodes

The script's logs and operation results are logged in /opt/protegrity/logs/cluster_logforwarderctrl.log
Restarting the Log Forwarder on all the Nodes
- Log in to the co-ordinator node.
- Run the following command:
./cluster_logforwarderctrl.sh \ --hostsfile=<path_of_the_hosts_file> \ --ssh-auth-type=publickey \ --private-key-path=<key_file_path>/<name_of_the_private_key_file> \ restart - Press ENTER.
The script restarts the log forwarder and generates the log in a file.
==========================================================================

Hosts file set to '<path_of_the_hosts_file>'

SSH Authentication Type is set to 'Public Key Authentication'

SSH Private Key file path is set to '<key_file_path>/<name_of_the_private_key_file>'

Checking connectivity of cluster nodes...

Stopping Logforwarder on current node...

Logforwarder stopped on current node

Starting Logforwarder on current node...

Logforwarder started on current node

Stopping Logforwarder on all nodes...

Logforwarder stopped on all nodes

Starting Logforwarder on all nodes...

Logforwarder started on all nodes

The script's logs and operation results are logged in /opt/protegrity/logs/cluster_logforwarderctrl.log
5.1.2 - RPAgent Control Script
The cluster_rpagentctrl.sh script, in the <installation_directory>/peptrino/scripts/cluster_utils/ directory, manages the RPAgent services on all the nodes in the cluster that are listed in the hosts file.
The utility provides the following options:
- Start – Starts the RPAgent on all the nodes in the cluster.
- Stop – Stops the RPAgent on all the nodes in the cluster.
- Restart – Restarts the RPAgent on all the nodes in the cluster.
- Status – Reports the status of the RPAgent on all the nodes in the cluster.
Note: When you run the RPAgent Control utility, the script will prompt to enter the path of the SSH private key file to securely connect to the cluster nodes.
Reporting the Status of the RPAgent
To check the status of the RPAgent on all the nodes:
- Log in to the co-ordinator node.
- Run the following command:
./cluster_rpagentctrl.sh \ --hostsfile=<path_of_the_hosts_file> \ --ssh-auth-type=publickey \ --private-key-path=<key_file_path>/<name_of_the_private_key_file> \ status - Press ENTER.
The script reports the status of the RPAgent in a log file.
==========================================================================

Hosts file set to '<path_of_the_hosts_file>'

SSH Authentication Type is set to 'Public Key Authentication'

SSH Private Key file path is set to '<key_file_path>/<name_of_the_private_key_file>'

Checking connectivity of cluster nodes...

Checking status of RPAgent on current node...

Checking status of RPAgent on all nodes...

The script's logs and operation results are logged in /opt/protegrity/logs/cluster_rpagentctrl.log
Stopping the RPAgent on all the Nodes
- Log in to the co-ordinator node.
- Run the following command:
./cluster_rpagentctrl.sh \ --hostsfile=<path_of_the_hosts_file> \ --ssh-auth-type=publickey \ --private-key-path=<key_file_path>/<name_of_the_private_key_file> \ stop - Press ENTER.
The script stops the RPAgent and generates the log in a file.
==========================================================================

Hosts file set to '<path_of_the_hosts_file>'

SSH Authentication Type is set to 'Public Key Authentication'

SSH Private Key file path is set to '<key_file_path>/<name_of_the_private_key_file>'

Checking connectivity of cluster nodes...

Stopping RPAgent on current node...

RPAgent stopped on current node

Stopping RPAgent on all nodes...

RPAgent stopped on all nodes

The script's logs and operation results are logged in /opt/protegrity/logs/cluster_rpagentctrl.log
Starting the RPAgent on all the Nodes
- Log in to the co-ordinator node.
- Run the following command:
./cluster_rpagentctrl.sh \ --hostsfile=<path_of_the_hosts_file> \ --ssh-auth-type=publickey \ --private-key-path=<key_file_path>/<name_of_the_private_key_file> \ start - Press ENTER.
The script starts the RPAgent and generates the log in a file.
==========================================================================

Hosts file set to '<path_of_the_hosts_file>'

SSH Authentication Type is set to 'Public Key Authentication'

SSH Private Key file path is set to '<key_file_path>/<name_of_the_private_key_file>'

Checking connectivity of cluster nodes...

Starting RPAgent on current node...

RPAgent started on current node

Starting RPAgent on all nodes...

RPAgent started on all nodes

The script's logs and operation results are logged in /opt/protegrity/logs/cluster_rpagentctrl.log
Restarting the RPAgent on all the Nodes
- Log in to the co-ordinator node.
- Run the following command:
./cluster_rpagentctrl.sh \ --hostsfile=<path_of_the_hosts_file> \ --ssh-auth-type=publickey \ --private-key-path=<key_file_path>/<name_of_the_private_key_file> \ restart - Press ENTER.
The script restarts the RPAgent and generates the log in a file.
==========================================================================

Hosts file set to '<path_of_the_hosts_file>'

SSH Authentication Type is set to 'Public Key Authentication'

SSH Private Key file path is set to '<key_file_path>/<name_of_the_private_key_file>'

Checking connectivity of cluster nodes...

Stopping RPAgent on current node...

RPAgent stopped on current node

Starting RPAgent on current node...

RPAgent started on current node

Stopping RPAgent on all nodes...

RPAgent stopped on all nodes

Starting RPAgent on all nodes...

RPAgent started on all nodes

The script's logs and operation results are logged in /opt/protegrity/logs/cluster_rpagentctrl.log
5.1.3 - Sync Config.ini
The sync_config_ini.sh script in the <installation_directory>/cluster_utils/ directory, updates the config.ini parameters across all the nodes in the cluster.
For example, if you want to make any changes to the config.ini file, make the changes on the Lead node and then
propagate the change to all the nodes in the cluster using the sync_config_ini.sh script.
- Log in to the co-ordinator node.
- Navigate to the
<installation_directory>/cluster_utils/directory. - To view the arguments for the helper script, run the following command:
./sync_config_ini.sh --help - Press ENTER.
The command lists the arguments for the script.
========================================================================== Usage: ./sync_config_ini.sh [ARGUMENTS]... Examples: ./sync_config_ini.sh \ --hostsfile=</path/to/hosts> \ --ssh-auth-type=publickey \ --private-key-path=</path/to/private_key> ./sync_config_ini.sh \ --hostsfile=</path/to/hosts> \ --ssh-auth-type=password \ --password=<actual_password> Description: * Cluster Utility script to synchronize the protector's config.ini file on current node across the Trino cluster nodes. * This script uses 'pssh' and 'pscp' utilities to replicate the current node's /opt/protegrity/peptrino/data/config.ini file to all other nodes. * Python is required for execution of 'pssh/pscp' and the python executable is searched via '/usr/bin/env python' command. * This script doesn't restart the Trino Servers and it must be done by the user. * It requires a path to Hosts file which contains the IP Address/hostname of all cluster nodes other than the current node on each line. * When the required command line arguments are not passed, it will interactively prompt for them. * Note: This script will only work on clusters where sudoers is enabled. Arguments: --hostsfile=</path/to/hosts> * Path to hosts file. * Each line should contain the IP Address/Hostname of the remaining cluster nodes. * You can optionally include the user to be used by pssh utility by using this syntax: [user@]host[:port] * When no user is written, the current user running the script is used. --ssh-auth-type=<password|publickey> * SSH Authentication Type. * Allowed values: password or publickey * password : for Password based SSH authentication. * publickey : for Public Key Authentication. --password=<actual_password> * Actual password of current user to be passed to pssh utility. * Used along with Password based SSH authentication. --private-key-path=</path/to/privatekeyfile> * Path to SSH private key file to be used by pssh utility. * Used along with Public Key SSH authentication. - To replicate the changes to all the nodes, run the following command:
./sync_config_ini.sh \ --hostsfile=<path_of_the_hosts_file> \ --ssh-auth-type=publickey \ --private-key-path=<key_file_path>/<name_of_the_private_key_file> \ - Press ENTER.
The script creates a backup and then replicates the configuration on all the nodes in the cluster.
==========================================================================

Hosts file set to '<path_of_the_hosts_file>'

SSH Authentication Type is set to 'Public Key Authentication'

SSH Private Key file path is set to '<key_file_path>/<name_of_the_private_key_file>'

Checking connectivity of cluster nodes...

Trino Protector config.ini cloning started

Creating config.ini backup on all nodes...

Creating peptrino/data_10-14-2025_12:13:18/ directory on all nodes...

Changing ownership of peptrino/data_10-14-2025_12:13:18/ directory recursively on all nodes...

Changing permission of peptrino/data_10-14-2025_12:13:18/ on all nodes...

Removing original config.ini from all nodes...
Removed config.ini from all nodes

Copying current node's config.ini to all other nodes...

Changing ownership of peptrino/data_10-14-2025_12:13:18/config.ini...

Changing permission of peptrino/data_10-14-2025_12:13:18/config.ini...

Moving peptrino/data_10-14-2025_12:13:18/config.ini to peptrino/data/...

Changing permission of peptrino/data/config.ini...

Removing peptrino/data_10-14-2025_12:13:18/ directory and config.ini backup file...

Successfully updated Protector config.ini across all cluster nodes. Please restart Trino Server(s) manually to reload new config.ini.

The script's logs and operation results are logged in /opt/protegrity/logs/sync_config_ini.log
5.1.4 - Sync RPAgent
The sync_rpagent.sh script in the <installation_directory>/cluster_utils/ directory, updates the RPAgent parameters across all the nodes in the cluster.
For example, if you want to make any changes to the RPAgent parameters, make the changes on the Lead node and then
propagate the change to all the nodes in the cluster using the sync_rpagent.sh script.
- Log in to the co-ordinator node.
- Navigate to the
<installation_directory>/cluster_utils/directory. - To view the arguments for the helper script, run the following command:
./sync_rpagent.sh --help - Press ENTER. The command lists the arguments for the script.
- To replicate the changes to all the nodes, run the following command:
./sync_rpagent.sh \ --hostsfile=<path_of_the_hosts_file> \ --ssh-auth-type=publickey \ --private-key-path=<key_file_path>/<name_of_the_private_key_file> \ - Press ENTER.
The script creates a backup and then replicates the configuration on all the nodes in the cluster.
==========================================================================

Hosts file set to '<path_of_the_hosts_file>'

SSH Authentication Type is set to 'Public Key Authentication'

SSH Private Key file path is set to '<key_file_path>/<name_of_the_private_key_file>'

Checking connectivity of cluster nodes...

Trino Protector RPAgent Configuration & Certificates cloning started

Stopping RPAgent on current node...

Stopping RPAgent on all nodes...

Creating rpagent_old/data_10-14-2025_12:15:26/new_data directory on all nodes...

Changing ownership of rpagent_old/ directory recursively on all nodes...

Changing permission of rpagent_old/ on all nodes...

Removing RPAgent Configuration & Certificates from all nodes...
Removed /opt/protegrity/rpagent/data/ from all nodes

Copying current node's rpagent/data/ to all other nodes...

Changing ownership of rpagent_old/data_10-14-2025_12:15:26/new_data/data.tgz...

Changing permission of rpagent_old/data_10-14-2025_12:15:26/new_data/data.tgz...

Extracting rpagent_old/data_10-14-2025_12:15:26/new_data/data.tgz to rpagent/data/...

Changing permission of rpagent/data/...

Removing backup directory rpagent_old/...

Starting RPAgent on current node...

Starting RPAgent on all nodes...

Successfully updated RPAgent Configuration and Certificates across all cluster nodes

The script's logs and operation results are logged in /opt/protegrity/logs/sync_rpagent.log
5.1.5 - Sync Log Forwarder
The sync_logforwarder.sh script in the <installation_directory>/cluster_utils/ directory, updates the Log Forwarder parameters across all the nodes in the cluster.
For example, if you want to make any changes to the Log Forwarder parameters, make the changes on the Lead node and then
propagate the change to all the nodes in the cluster using the sync_logforwarder.sh script.
- Log in to the co-ordinator node.
- Navigate to the
<installation_directory>/cluster_utils/directory. - To view the arguments for the helper script, run the following command:
./sync_logforwarder.sh --help - Press ENTER. The command lists the arguments for the script.
- To replicate the changes to all the nodes, run the following command:
./sync_logforwarder.sh \ --hostsfile=<path_of_the_hosts_file> \ --ssh-auth-type=publickey \ --private-key-path=<key_file_path>/<name_of_the_private_key_file> \ - Press ENTER.
The script creates a backup and then replicates the configuration on all the nodes in the cluster.
==========================================================================

Hosts file set to '<path_of_the_hosts_file>'

SSH Authentication Type is set to 'Public Key Authentication'

SSH Private Key file path is set to '<key_file_path>/<name_of_the_private_key_file>'

Checking connectivity of cluster nodes...

Trino Protector Logforwarder Configuration cloning started

Stopping Logforwarder on current node...

Stopping Logforwarder on all nodes...

Creating logforwarder_old/data_10-14-2025_12:14:12/new_data directory on all nodes...

Changing ownership of logforwarder_old/ directory recursively on all nodes...

Changing permission of logforwarder_old/ on all nodes...

Removing Logforwarder Configuration from all nodes...
Removed /opt/protegrity/logforwarder/data/ from all nodes

Copying current node's logforwarder/data/ to all other nodes...

Changing ownership of logforwarder_old/data_10-14-2025_12:14:12/new_data/data.tgz...

Changing permission of logforwarder_old/data_10-14-2025_12:14:12/new_data/data.tgz...

Extracting logforwarder_old/data_10-14-2025_12:14:12/new_data/data.tgz to logforwarder/data/...

Changing permission of logforwarder/data/...

Removing backup directory logforwarder_old/...

Starting Logforwarder on current node...

Starting Logforwarder on all nodes...

Successfully updated Logforwarder Configuration across all cluster nodes

The script's logs and operation results are logged in /opt/protegrity/logs/sync_logforwarder.log
6 - Uninstalling the Trino Protector
The single-node uninstallation script generated by the configurator script is used to uninstall the Trino Protector. Copy and execute the single-node uninstallation script to all the nodes in the Trino cluster.
Execute the following steps on every co-ordinator and worker node of the Trino Cluster.
Log in to the node, where you want to execute the uninstallation script.
Copy/Download the single-node uninstallation script previously generated by the configurator script to any directory.
Navigate to the directory where the single-node uninstallation script is located.
To view the syntax and the usage of the uninstallation script, run the following command.
./TrinoProtector_UninstallationScript_10.0.0+x.sh --helpPress ENTER.
The command displays the syntax with the mandatory and optional arguments. The mandatory and optional arguments are explained in the following tables.
Table 1. Mandatory Arguments for the Uninstallation ScriptArgument Description --uninstall-rpagent-and-logforwarder=<yes|no>Instructs the script whether to remove the RPAgent and the Log Forwarder from the current node in the Trino cluster. The acceptable values are: yes- remove the RPAgent and the Log Forwarder from the current node in the Trino cluster.no- skip removing the RPAgent and the Log Forwarder if they were already not installed by the corresponding Trino Protector installation script.
--trino-plugin-dir=</path/to/plugin/>Specifies the absolute path to the Trino plugin directory. Note
You can set a custom plugin path using theplugin.dirproperty in thenode.propertiesTrino configuration file. Ensure that the current sudoer user has permissions to read and write into this directory.--trino-service-user=<user>Specifies the name of the user running the Trino server. You can use this argument to set the ownership of the peptrinoplugin directory and also to restart the Trino server if you specify the--restart-trino-server-via=launcherargument.Note
- Ensure that the current
sudoeruser is able to run commands as the Trino service user using thesudo -ucommand. - Ensure that the Trino service user is able to read the
files from the
<installation_directory>path.
--delete-protegrity-user=<yes|no>Specifies whether to remove or retain the Protegrity service user and group, that were created during the installation process, from the current node in the Trino cluster. Set the value for this argument to nowhen you set the value for the--uninstall-rpagent-and-logforwarderargument tono. The accepted values are:yes- instructs the script to remove the Protegrity service user and group from the current node in the cluster.no- instructs the script to skip the removal of the Protegrity service user and the group.
Table 2. Optional Arguments for the Uninstallation Script
Argument Description –sudo-disabled- Use this flag if
sudoersis disabled on the cluster. - If you use this flag, the script will skip the use of the
sudocommand. The current user will be used to remove and stop the Protegrity services. Therefore, the user must have permissions to remove the Protegrity files under the<installation_directory>and the Trino plugin directory and to modify theconfig.propertiesfile. - The input values for the
–trino-service-userand the–protegrity-userarguments must be same as the current user. - You will be unable to use the
–restart-trino-server-viaargument - When you exclude this argument, a user with
sudoersprivilege is required to execute the script. It is recommended to use aNOPASSWDsudoers user. Else, the script will prompt for a password.
–protegrity-user=<user>If you specify this argument, then the script will set the Protegrity service user that was provided during installation to set the owner of the installed directories and files, and to start the Protegrity services. Ensure that the Protegrity service user has read permissions on the parent directories of the <installation_directory>.Note
- If you set the value of the
–uninstall-rpagent-and-logforwarderargument toyes, then the uninstallation script will use this user account to stop the RPAgent and the Log Forwarder services. - Ensure that the current user with sudoer privileges is
able to execute the commands as the Protegrity service user
(using the
sudo -ucommand) to stop the Protegrity services. - If you set the value of the
–sudo-disabledargument toyes, then the script will use this user account to stop the Protegrity services.
If you fail to specify this argument, then the installation script will set the current user as the Protegrity service user.–protegrity-group=<group>If you specify this argument, then the script will set the Protegrity service group that was given during installation to set the group of the installed directories and files, and to start the Protegrity services. If you fail to specify this argument, then the installation script will set the current user’s primary group as the Protegrity service group.–restart-trino-server-via=<systemd|init|launcher>If you specify this argument, then the script will restart the running Trino server after removing the peptrinoplugin. The script will not restart the Trino server if the server is in the stopped state. If you want to use this argument, ensure that you enablesudoto restart the Trino server. The acceptable values are:systemd- instructs the script to use thesystemctlcommand to check the status and restart the Trino server. This argument requires the–trino-systemd-service-nameargument to be specified.init- instructs the script to use theservicecommand to check the status and restart the Trino server. This argument also requires you to specify the–trino-init-service-nameargument.launcher- instructs the script to use the Trino launcher script to check the status and restart Trino server. This argument requires the–trino-launcher-pathand the optional–trino-launcher-argsarguments.
–trino-systemd-service-name=<service
name>
Specifies the name of the systemdservice associated with the Trino server. You must specify this argument when you use the–restart-trino-server-via=systemdargument.–trino-init-service-name=<init service name>Specifies the name of the Sys V init service associated with the Trino server. You must pass this argument when you specify the –restart-trino-server-via=initargument.–trino-launcher-path=</path/to/bin/launcher>Specifies the absolute path to the Trino server launcher script. For example, /usr/lib/trino/bin/launcher. You must specify this argument when you use the–restart-trino-server-via=launcherargument.–trino-launcher-args=“arg1 [arg2…]"Specifies the valid command line arguments to the Trino launcher script. You can use this argument with the –trino-launcher-pathargument. If you specify this argument, then the arguments listed between the double-quotes will be passed to the Trino launcher script for thestatusand therestartcommands. If you fail to specify this argument, then no argument will be passed to the Trino launcher script for thestatusand therestartcommands.Depending on the requirements, run the uninstallation script with the required arguments.
For example, on a Starburst Trino cluster installed via RPM, one combination of the arguments to the single-node uninstallation script is listed below.
./TrinoProtector_UninstallationScript_10.0.0+x.sh \
>   --uninstall-rpagent-and-logforwarder=yes \
>   --trino-plugin-dir=/usr/lib/starburst/plugin \
>   --trino-service-user=starburst \
>   --protegrity-user=ptyitusr \
>   --protegrity-group=ptyitusr \
>   --delete-protegrity-user=yes
Note: If you want the Trino Server to automatically restart after removing the components, then specify the value for the
--restart-trino-server-viaargument for the uninstallation script. Otherwise, you will have to manually restart the Trino Server after the uninstallation is complete.Press ENTER. The script removes the components as specified in the arguments.
./TrinoProtector_UninstallationScript_10.0.0+6.sh \
>   --uninstall-rpagent-and-logforwarder=yes \
>   --trino-plugin-dir=/usr/lib/starburst/plugin \
>   --trino-service-user=starburst \
>   --protegrity-user=ptyitusr \
>   --protegrity-group=ptyitusr \
>   --delete-protegrity-user=yes

Protegrity Trino Protector Uninstallation Script started...

Validating sudo permissions for root
************************************************************************************
                Welcome to the Trino Protector Uninstall Wizard.
************************************************************************************
This will uninstall the Trino Protector from your system.

Stopping RPAgent on current node...

Stopping Logforwarder on current node...

RPAgent uninstallation started
************************************************************************************
                    Welcome to the RPAgent Setup Wizard.
************************************************************************************

Uninstalled RPAgent on current node...

Logforwarder uninstallation started
************************************************************************************
                    Welcome to the LogForwarder Setup Wizard.
************************************************************************************

Uninstalling LogForwarder ....

LogForwarder uninstalled on current node at location /opt/protegrity/logforwarder/

PepTrino Plugin Jars uninstallation started
************************************************************************************
                    Welcome to the PepTrino Setup Wizard.
************************************************************************************

Uninstalling PepTrino ....

PepTrino uninstalled on current node at location /opt/protegrity/peptrino/

JcoreLite uninstallation started
************************************************************************************
                        Welcome to the JcoreLite Setup Wizard.
************************************************************************************

Uninstalling JcoreLite ....

JcoreLite for Trino Protector uninstalled on current node at location /opt/protegrity/peptrino/lib/

Setting ownership of /opt/protegrity/logs and /opt/protegrity/peptrino recursively to root:root.

Setting ownership of /opt/protegrity to root:root.

Removing Protegrity service user 'ptyitusr' and group 'ptyitusr' from current node.

User 'ptyitusr' deleted

Group 'ptyitusr' deleted

Trino Protector plugin jars and JcoreLite libraries uninstalled from /opt/protegrity/peptrino/ directory

Finished executing TrinoProtectorUninstall468_Linux-ALL_10.0.0+x.sh script. Check the logs at /opt/protegrity/logs/

Started uninstallation of PepTrino from plugin dir in foreground...

Checking if Trino Plugin Dir is present on node.
Trino Plugin Directory /usr/lib/starburst/plugin found.

Removing peptrino plugin directory from /usr/lib/starburst/plugin

Trino Protector Plugin successfully removed from /usr/lib/starburst/plugin

Checking if Trino service user exists.

Checking if systemctl is on PATH.

systemctl found on PATH.

Checking if 'starburst' is a valid systemd unit.

'starburst' is a valid systemd unit.

Checking if Trino Server is started and running via systemctl

Trino server is running

Restarting Trino Server...

Trino Server successfully restarted via systemctl.

Trino Protector UDFs were unregistered on Trino Server restart. Verify via trino CLI (show functions;) or by checking Trino's server.log

Successfully completed all steps of Uninstallation Script