This is the multi-page printable view of this section. Click here to print.

Return to the regular view of this page.

Application Protector .Net

Learn about the Application Protector (AP) .Net.

Protegrity Application Protector (AP) .Net Overview

The Protegrity Application Protector (AP) .Net provides APIs that integrate with customer applications to protect, unprotect, and reprotect sensitive data. It can be used with any application developed using .NET Standard 2.0.

Note: The DLL file creation is supported only by .NET Core 8.0 and .NET Core 9.0. The .NET application can be run by using any supported versions.

Protection and Security Access Methods

The AP .Net provides the following methods:

  • Get product version
  • Check Access
  • Protect
  • Unprotect
  • Reprotect

For more information about these protection and security access methods, refer to AP .Net APIs.

Key Features

The key features of this protector include support of the .Net distributions listed here. Other key features include use of only trusted applications for access, audit logs, and initialization audit logs.

Supported .Net Distributions

The AP .Net supports the following versions:

AP .Net DistributionsVersions
.NET Framework4.6.2, 4.7, 4.7.1, 4.7.2, 4.8, 4.8.1
.NET Core8.0, 9.0
.NET Standard2.0

Trusted Applications

The AP .Net can only be accessed by trusted applications.
Any application that protects, unprotects, or reprotects data must first be configured as a trusted application.

For details on configuring a trusted application, refer to Creating a Trusted Application.

Audit Logs

The AP .Net generates an audit record for every protection method call, including the data element and user name.

Single Data Item Audit Example

Three audit log events are generated in the following scenarios:

  • 1 protect operation with data element a (count = 1)
  • 5 protect operations with data element b (count = 5)
  • 1000 unprotect operations with data element a (count = 1000)

Bulk Data Item Audit Example

For bulk operations, each protect, unprotect, and reprotect call generates audit logs.

Example:

  • If bulk size = 3 and 2 bulk protect operations of the same data element are performed, then 1 audit log event is generated with a count = 6.

Initialization Audit Logs

  • Each time a trusted application is initialized, an audit log is generated showing whether initialization was successful.
  • These audits are available in ESA Audit Store Dashboard for easy access by the Security Officer.

1 - Architecture and Workflow

The architecture and workflow of Application Protector.

This page describes the architecture, the individual components, and the workflow of the Protegrity Application Protector (AP) solution.

Architecture and Workflow

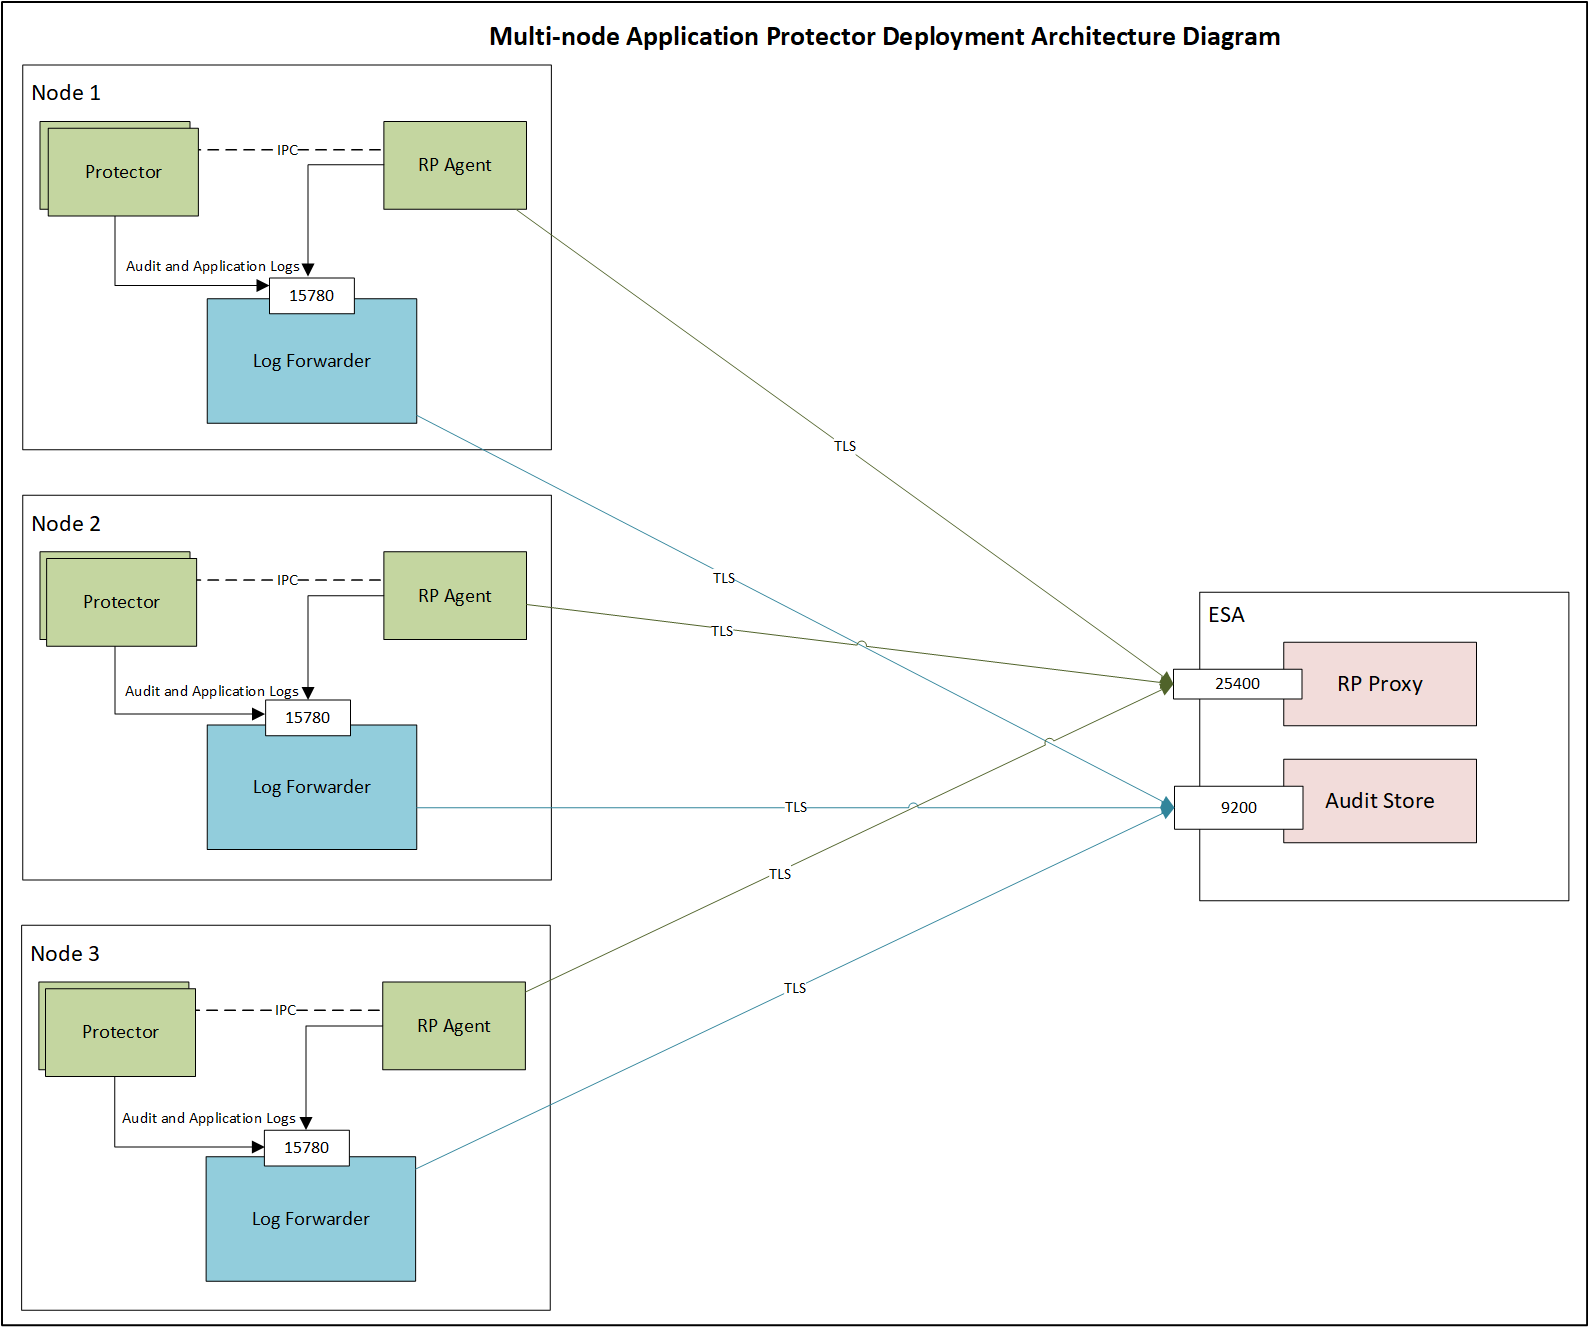
The following figure illustrates the deployment architecture of the Application Protector (AP).

Architecture and Workflow of Application Protector

The following table describes the components of the AP deployment architecture.

ComponentDescription
Customer ApplicationBuilt in supported programming languages and integrates with AP for data protection.
Application ProtectorCore protection engine that enforces security policies and performs data protection operations.
Configuration File (config.ini)Contains initialization parameters passed to AP during startup.
Native InterfaceNative interface between AP and the C layer.
  • .Net: Platform Invocation Services (P/Invoke)
  • Package Enforcement and DeploymentDownloads policy packages from the RP Agent and executes protection operations, such as, protect, unprotect, and reprotect.
    Log ForwarderCollects logs from AP and forwards them to the Audit Store for centralized auditing.
    Resilient Package (RP) AgentStandalone process that retrieves policy packages from ESA and shares them with AP processes using shared memory IPC.

    The following steps describe the workflow of a sample AP deployment in the production environment.

    1. The customer application initializes the SDK.
    2. The configurations that are required configuration parameters are passed to the protector using the config.ini file.

      Note: The configurations can be set through environment variables. ENV overrides values in the config.ini file, except for cadence and session timeout which must be set in the config file.
      For more information about environment variables configuration, refer to Configuration Parameters for Protector.

    3. The RP Agent regularly syncs with the RP Proxy or ESA to check for policy updates. If a change is detected, the updated policy package is securely downloaded over a TLS channel and stored in shared memory.
    4. The protector synchronizes with shared memory based on the cadence value defined in config.ini file. If a new package is available, it is fetched into process memory. This updated package is then used to perform data protection operations such as, protect, unprotect, and reprotect.
    5. The audit logs generated during protection operations are forwarded to the Audit Store:
      • Logs from the application are sent through the Log Forwarder.
      • Logs from the RP Agent are also forwarded using the Log Forwarder.

    Components of the Application Protector

    The Protegrity Application Protector (AP) solution comprises several key components that work together to enforce data protection policies and ensure secure operations.

    Application Protector

    The core engine that integrates with customer applications to perform data protection operations:

    • Protect
    • Unprotect
    • Reprotect

    AP is available in multiple language-specific variants:

    • AP Java: For applications developed in Java
    • AP Python: For applications developed in Python
    • AP .Net: For applications developed in C#

    Resilient Package (RP) Agent

    A standalone process responsible for policy synchronization.

    • To sync with the RP Proxy or ESA at regular intervals of 60 seconds.
    • To detect policy changes and download updated packages over a secure TLS channel.
    • To store the packages in shared memory for use by the protector.

    Log Forwarder

    A log processing tool that handles audit and protection logs.

    • Collects logs generated by AP and RP Agent.
    • Forwards logs to the Audit Store within ESA.

    Ports used to transport the protection and audit logs to the ESA:

    • 15780: Configurable
    • 15781: Non-configurable

    Package Deployment

    The different approaches for package deployment during the initialization process of the Application Protector are described in this section.

    Dynamic Package Deployment

    Use this approach when the protector needs to continuously check for policy updates after initialization.

    • Set the cadence parameter to a non-zero value in the config.ini file.
    • This value defines the interval in seconds at which the protector synchronizes with the RP Agent.
    • If a policy change is detected, the protector automatically fetches the updated package and applies it during protection operations.

      Note: This method ensures that the protector always operates with the latest policy.

    Immutable Package Deployment

    Use this approach when the protector does not need to check for policy changes after initialization.

    • Add the [devops] parameter in the config.ini file before initializing the protector.
    • A REST API call is used to download an envelope-encrypted package from the ESA.
    • The protector uses this static package for all operations without further synchronization.
      For more information about the DevOps approach, refer to DevOps Approach for Application Protector.

    2 - System Requirements

    Lists the recommended minimum system requirements

    The following table lists the minimum hardware configurations.

    Hardware ComponentConfiguration Details
    CPUDepends on the application.
    Disk SpaceUnder 200 MB - including LogForwarder, RP Agent, and AP Java, AP Python or AP .Net.
    RAMMemory usage depends on the AP flavor and application behavior.
    Refer to AP .Net

    Note: The Disk Space depends on the policy size and stored logs on the disk.

    3 - Preparing the Environment

    The prerequisites to install the AP .Net Installation on Windows are described in the section.

    The Protegrity Application Protector (AP) .NET provides APIs that integrate with customer applications to protect and unprotect sensitive data. It is compatible with applications developed using .NET Core and C#.

    Caution: Install only one environment at a time either production or development. Do not install Mock AP .Net protector in a Production environment.

    Preparing the Environment for AP .Net Installation on Windows in a Production Environment

    Before installing Protegrity Application Protector (AP) .Net on a Windows platform in a Production environment, ensure the following prerequisites are met:

    • The ESA appliance is installed, configured, and running.
    • The IP address or hostname of the ESA is noted.
    • Policy Management (PIM) is initialized on the ESA. This ensures cryptographic keys and the policy repository are created. For more information about initializing the PIM, refer to Initializing the Policy Management.
    • A supported version of .NET is installed.
      For more information about Supported .Net version, refer to Supported .Net Distributions.

    4 - Installing the AP .Net Protector

    Steps to set up AP .Net on Windows in a Production Environment

    Extracting the AP .Net Setup Scripts and Package

    To extract the setup scripts and package:

    1. Download the ApplicationProtector_WIN-ALL-64_x86-64_NET-STD-2.0-64_<version>.zip file to any location on the machine where you want to install the protector.
    2. Extract the contents of the ApplicationProtector_WIN-ALL-64_x86-64_NET-STD-2.0-64_<version>.zip file.
      The following setup files are extracted:
      • ApplicationProtector_WIN-ALL-64_x86-64_NET-STD-2.0-64_<version>.zip
      • signatures/ApplicationProtector_WIN-ALL-64_x86-64_NET-STD-2.0-64_<version>.zip_10.0.sig
    3. Verify the digital signature of the signed AP .Net build.
      For more information about verifying the signed AP .Net build, refer to Verification of Signed Protector Build.
    4. Extract the contents of the AP .Net installation package again.
      The following setup files are extracted:
      • LogforwarderSetup_Windows_x64_<version>.exe
      • RPAgentSetup_Windows_x64_<version>.exe
      • APDotNetSetup_Windows_x64_<version>.exe
      • APDotNetMockSetup_Windows_x64_<version>.exe

    Before you begin

    To preserve all configurations during upgrade:

    • For Log Forwarder, backup all files present under C:\Program Files\Protegrity\logforwarder\data\config.d directory.
    • For RP Agent, backup all files present under C:\Program Files\Protegrity\rpagent\data directory.

    Installing Log Forwarder on Windows

    This section describes how to install the Log Forwarder on a Windows platform using either the Windows Wizard or Silent mode.

    Using Windows Wizard

    For more information about installing the Log Forwarder using the Windows wizard, refer to Installing Log Forwarder on Windows.

    Using Silent Mode

    For more information about installing Log Forwarder using the silent mode, refer to Installing Log Forwarder on Windows using Silent Mode.

    Installing RP Agent on Windows

    This section describes how to install the RP Agent on a Windows platform using either the Windows Wizard or Silent Mode.

    Using Windows Wizard

    For more information about installing RP Agent using the Windows wizard, refer to Installing RP Agent on Windows.

    Using Silent Mode

    For more information about installing RP Agent using the silent mode, refer to Installing RP Agent on Windows using Silent Mode.

    RPA Secure Mode with ESA / PPC on Windows

    Before proceeding with the RPA installation in secure mode, ensure that the required CA certificate is available and trusted on the system.

    • For PPC (Windows)

      Retrieve the custom CA certificate using the following command:

      kubectl -n cert-manager get secret eclipse-ca -o jsonpath='{.data.tls\.crt}' | base64 -d > ca.crt
      
    • For ESA

      Download the certificate from ESA.

      For more information about downloading certificates from ESA, refer to Manage Certificates.

    After obtaining the certificate, configure the system environment variable:

    VariableValue
    SSL_CERT_FILEFull path to the certificate file (for example, C:\Users\Administrator\ca.crt)

    When prompted for the ESA hostname or IP during RPA installation, ensure it is included in the ESA TLS certificate (CN or SAN) and is resolvable from the RPAgent host.

    After the CA certificate is available, proceed with the RPA installation.

    Using Windows Wizard

    For more information about installing RP Agent using the Windows wizard, refer to Installing RP Agent on Windows.

    Using Silent Mode

    For more information about installing RP Agent using the silent mode, refer to Installing RP Agent on Windows using Silent Mode.

    Installing Application Protector .Net on Windows

    Using Windows Wizard

    This section describes how to install AP .NET on a Windows platform.

    Note: Before installation, ensure that the C:\Users\Administrator\.nuget\packages directory does not contain the dotnetprotector folder.

    To install the AP .Net on the Windows platform:

    1. Run the APDotNetSetup_Windows_x64_<version>.exe installer from the created directory.
      The Select Destination Location screen appears.

    2. Set the installation directory to C:\Program Files\Protegrity\sdk\dotnet.

    3. Click Next.
      The Ready to Install screen appears.

    4. Click Install.
      The Completing the Defiance AP DOTNET API Setup Wizard screen appears.

    5. Click Finish to complete the installation.

      The AP .NET is now installed successfully.

      The default installation directories for different platforms are given in the following table.

      Table: AP .Net Default Installation Directories

      PlatformDirectory
      Windows 64-bitC:\Program Files\Protegrity\sdk\dotnet\lib
      API DocsC:\Program Files\Protegrity\sdk\dotnet\doc
    6. Verify that the following files exist in the dotnet\lib directory:

      • DotNetProtector.<version>.nupkg - NuGet package for AP .NET
      • dotnetprovider.plm - Dynamically loadable module for Windows

    Installing the NuGet Package

    1. In Solution Explorer, right-click on Dependencies and select Manage NuGet Packages.
      The NuGet Package Manager screen appears.

    2. Click the Settings icon next to the Package source list.
      The Options dialog box appears.

    3. Click the ellipsis icon next to the Source field.

    4. Browse to select the lib directory that contains the DotNetProtector.<version>.nupkg package.
      For example, select the C:\Program Files\Protegrity\sdk\dotnet\lib directory.

    5. Specify a name for the package source in the Name field.

    6. Click Update.
      The lib directory path appears in the Package sources list.

    7. Click OK to close the Options dialog box.

    8. In the NuGet Package Manager screen, in the Package source list, select the newly created package source.

    9. Click Browse.
      The DotNetProtector package appears in the list of packages.

    10. Select DotNetProtector and click Install.
      The DotNetProtector package is installed.

      The AP .NET is installed successfully.

    Using Silent Mode

    This section describes how to perform a silent installation of AP .Net using command-line parameters.

    Silent installation allows you to install AP .Net without user interaction, making it suitable for automated deployments and scripting.

    To view usage of the AP .Net installation, use the -help parameter during silent installation.

    APDotNetSetup_Windows_x64_10.0.0+0.g8606.exe -help
    

    To specify the directory for the AP .Net installation, use the -dir parameter during silent installation.

    APDotNetSetup_Windows_x64_10.0.0+0.g8606.exe -dir C:\Users\Administrator
    

    Note: -dir is a mandatory parameter for silent installation.

    5 - Configuring the Protector

    Configuring and Verifying AP .Net Installation on different platforms

    Setting Up Environment Variables for AP .NET on Windows

    This section describes the steps to configure environment variables required to run the Application Protector .NET application on a Windows platform.

    To set up the environment variables on the Windows platform:

    1. On the machine where AP .NET is installed, navigate to Control Panel > System > Advanced system settings.
      The System Properties dialog box appears.

    2. Click Environment Variables.
      The Environment Variables dialog box appears.

    3. Select the Path variable and click Edit.
      The Edit Environment Variable dialog box appears.

    4. Click New.

    5. Add the path where the dotnetprovider.plm file is located.
      For example, specify the path as C:\Program Files\Protegrity\sdk\dotnet\lib.

    6. Click OK to save the changes.

      The environment variable is now set successfully.

    Verifying Installation of AP .Net

    To verify that the AP .Net has been successfully installed:

    1. Create a data element and data store in the ESA.
      For more information about creating data elements, refer to Working With Data Elements.
      For more information about creating data stores, refer to Creating a Data Store.

    2. Create a member source and role in the ESA.
      For more information about creating a member source, refer to Working With Member Sources.
      For more information about creating a role, refer to Working with Roles.

    3. Configure a policy in the ESA.
      For more information about creating a data security policy, refer to Creating Policies.

    4. Configure the application as a trusted application in the ESA.
      For more information about trusted applications, refer to Working With Trusted Applications.

    5. Initialize the AP .Net.
      For more information about the AP .Net initialization API, refer to GetProtector API.

    6. To verify the version of the installed AP .Net, run the GetVersion method using the following code:

      using System;
      using System.Collections.Generic;
      using System.Text;
      using Protegrity.Net;
      using Protegrity.PException;
      
      namespace APDotNetTest
      {
          class Program
          {
              static void Main(string[] args)
              { 
                  try
                  {
                      using Protector protector = Protector.GetProtector();
      
                      /**
                      * Calling GetVersion to print APDotNet sdk and Core version.
                      */
                      Console.WriteLine(protector.GetVersion() + "\n");
                  }
                  catch (ProtectorException e)
                  {
                      Console.WriteLine(e);
                  }
              }
          }
      }
      

    6 - Using the AP .Net APIs

    Sample application for the AP .Net.

    The process to use the AP .Net protect, unprotect, and reprotect methods are described on this page.

    It is assumed that the ESA is already available.

    The tasks can be divided in the following order.

    1. Create the data elements and data store in the Policy Management on the ESA Web UI.
    2. Create the member sources and roles.
    3. Configure the policy.
    4. Configure the trusted application.
    5. Add a trusted application to the data store.
    6. Install the AP .Net.
    7. Run the sample application.

    Creating a Data Element and Data Store

    Determine how the data needs to be protected either by using encryption or tokenization before running the application. Protection and unprotection methods are available for both.

    Create a data element and data store in the ESA by performing the following.

    1. To create a data element, from the ESA Web UI, navigate to Policy ManagementData Elements & MasksData Elements.
      For more information about creating data elements, refer to Working With Data Elements.
    2. To create a data store, navigate to Policy ManagementData Stores.
      For more information about creating data stores, refer to Creating a Data Store.

    Creating a Member Source and Role

    Create a member source and role in the ESA by performing the following.

    1. To create a member source, from the ESA Web UI, navigate to Policy ManagementRoles & Member SourcesMember Sources.
      For more information about creating a member source, refer to Working With Member Sources.
    2. To create a role, from the ESA Web UI, navigate to Policy ManagementRoles & Member SourcesRoles.
      For more information about creating a role, refer to Working with Roles.

    Configuring a Policy

    Configure a policy in the ESA by performing the following.

    1. From the ESA Web UI, navigate to Policy ManagementPolicies & Trusted ApplicationsPolicies.
    2. Click Add New Policy.
      The New Policy screen appears.
    3. After the policy is configured for the application user, add the permissions, data elements, roles, and data stores to the policy and then save it.
    4. Deploy the policy using the Policy Management Web UI.

    For more information about creating a data security policy, refer to Creating Policies.

    Configuring a Trusted Application

    Only the applications and users configured as trusted applications under the ESA security policy can access the AP APIs.
    If a policy is deployed but the application or the user is not trusted, then the AP aborts with the following message while performing the protect or unprotect operations.
    API consumer is not part of the trusted applications, please contact the Security Officer

    Configure a trusted application in the ESA by performing the following.

    1. From the ESA Web UI, navigate to Policy ManagementPolicies & Trusted ApplicationsTrusted Application.
    2. Create a trusted application.
    3. Deploy the trusted application using the Policy Management Web UI.

    For more information about trusted applications, refer to Working With Trusted Applications.

    Adding a Trusted Application to Data Store

    Add a trusted application to data store by performing the following.

    1. From the ESA Web UI, navigate to Policy ManagementData Stores.
      The list of all the data stores appear.
    2. Select the required data store.
      The screen to edit the data store appears.
    3. Under the Trusted Applications tab, click Add.
      The screen to add the trusted application appears.
    4. Select the required trusted application and click Add.
    5. Select the required policy and deploy it using the Policy Management Web UI.

    For more information about adding a trusted application to data store, refer to Linking Data Store to a Trusted Application.

    Installing the AP .Net

    Install the AP .Net by performing the following.

    1. To install the AP .Net, refer to Application Protector .Net Installation.
    2. Verify if the AP .Net is successfully installed by performing the following.
      a. Configure the application as a trusted application in the ESA.
      For more information about trusted applications, refer to Working With Trusted Applications.
      b. Initialize the AP .Net.
      For more information about the AP .Net initialization API, refer to getProtector.
      c. Run the GetVersion method to check the version of the installed AP .Net.
      For more information about the GetVersion method, refer to GetVersion API.

    Running the AP .Net APIs

    After setting up the policy and trusted application, you can begin testing the AP .Net APIs for protection, unprotection, and reprotection.

    For more information about the AP .Net APIs, refer to Application Protector .Net APIs.

    For more information about the AP .Net return codes, refer to Application Protector API Return Codes.

    The following represents a sample AP .Net application for performing the protect, unprotect, and reprotect operations.

    using System;
    using System.Collections.Generic;
    using System.Text;
    using Protegrity.Net;
    using Protegrity.PException;
    
    namespace APDotNetTest
    {
        /**********************************************************************************************/
        /**
         * @class   Program
         *
         * @brief   A sample program for Application .NET Protector.
         *
         **************************************************************************************************/
        class Program
        {
            private const string dataElementName = "alphanum";
            private const string newDataElementName = "alphanumreprot";
            private const string userName = "policyuser";
    
    
            /**********************************************************************************************/
            /**
             * @fn  static void Main(string[] args)
             *
             * @brief   Main entry-point for this application
             *
             * @param   args    An array of command-line argument strings.
             **************************************************************************************************/
    
            static void Main(string[] args)
            { 
                try
                {
                    /* Dispose() is a method defined by the IDisposable interface in .NET. 
                     * Its used to release unmanaged resources.
                     * .NET garbage collector only cleans up managed memory. If your class uses unmanaged resources, 
                     * you must clean them up manually  and thats what Dispose() is for.
                     * 
                     * ====================
                     * With using 
                     * ====================
                     * You're telling the compiler:
                     * "Create this object, and automatically call Dispose() on it 
                     * when it goes out of scope."
                     * This is called a using declaration, and it ensures that cleanup happens even if
                     * an exception occurs.
                     * 
                     * ======================
                     * Without using
                     * ======================
                     * You have to call dispose manually.
                     */
    
                    using Protector protector = Protector.GetProtector();
    
                    /**
                     * Sample input string data for single operations.
                     */
                    string singleInput = "Hello Protegrity";
                    byte[] singleByteInput = Encoding.UTF8.GetBytes(singleInput);
    
                    Console.WriteLine("#########################################");
                    Console.WriteLine("# Protegrity Application .NET Protector #");
                    Console.WriteLine("#########################################\n");
    
                    /**
                     * Calling GetVersion to print APDotNet sdk and Core version.
                     */
                    Console.WriteLine(protector.GetVersion() + "\n");
                    Console.WriteLine("--------------------------------------");
                    Console.WriteLine("-     Single Protect API             -");
                    Console.WriteLine("--------------------------------------");
                    Console.WriteLine($"Input Data is:        {singleInput}\n");
    
    
                    /**
                     * Use protector object to call single string Protect API.
                     */
                    string protectedData = protector.Protect(singleInput, userName, dataElementName);
                    Console.WriteLine("With String Data Type");
                    Console.WriteLine("-----------------------");
                    Console.WriteLine($"Protected Data is:    {protectedData}");
    
                    /**
                     * Use protector object to call single string Unprotect API
                     */
                    string unprotectedData = protector.Unprotect(protectedData, userName, dataElementName);
                    Console.WriteLine($"Unprotected Data is:  {unprotectedData}\n");
    
                    /**
                    * Use protector object to call single string Reprotect API.
                    */
                    string reprotectedData = protector.Reprotect(protectedData, userName, dataElementName, newDataElementName);
                    Console.WriteLine($"Reprotected Data is:  {reprotectedData}");
    
                    /**
                     * Use protector object to call single string Unprotect API
                     */
                    string unprotectReprotectedData = protector.Unprotect(reprotectedData, userName, newDataElementName);
                    Console.WriteLine($"Unprotected Data is:  {unprotectReprotectedData}\n");
    
                    /** 
                     * Use protector object to call single byte Protect API.
                     */
                    byte[] byteProtectedData = protector.Protect(singleByteInput, userName, dataElementName);
                    Console.WriteLine("With Byte Data Type");
                    Console.WriteLine("----------------------");
                    Console.WriteLine($"Protected Byte Data is:    {Encoding.UTF8.GetString(byteProtectedData)}");
    
                    /**
                     * Use protector object to call single byte Unprotect API
                     */
                    byte[] byteUnprotectedData = protector.Unprotect(byteProtectedData, userName, dataElementName);
                    Console.WriteLine($"Unprotected Byte Data is:  {Encoding.UTF8.GetString(byteUnprotectedData)}\n");
    
                    /**
                     * Use protector object to call single byte Reprotect API.
                     */
                    byte[] byteReprotectedData = protector.Reprotect(byteProtectedData, userName, dataElementName, newDataElementName);
                    Console.WriteLine($"Reprotected Byte Data is:  {Encoding.UTF8.GetString(byteReprotectedData)}");
    
                    /**
                     * Use protector object to call single byte Unprotect API
                     */
                    byte[] byteUnprotectReprotectedData = protector.Unprotect(byteReprotectedData, userName, newDataElementName);
                    Console.WriteLine($"Unprotected Byte Data is:  {Encoding.UTF8.GetString(byteUnprotectReprotectedData)}");
                    Console.WriteLine("\n");
    
                    /**
                     * Sample bulk string input data
                     */
                    string[] bulkInput = { "The Alpha-numeric token type tokenizes all alphabetic symbols (both lowercase and uppercase letters), as well as digits.", "Digits 0 through 9, Lowercase letters a through z, Uppercase letters A through Z", "alphanumeric data 1234567890 !@#$%^&* with special characters", "ALL THE CHARACTERS IN THIS STRING ARE UPPERCASE", "UPPERCASE WITH 1234567890 NUMBERS AND !@#$%^&*() SPECIAL CHARACTERS" };
                    List<byte[]> byteBulkInput = new List<byte[]>(bulkInput.Length);
    
                    Console.WriteLine("--------------------------------------");
                    Console.WriteLine("-         Bulk Protect API           -");
                    Console.WriteLine("--------------------------------------");
    
                    Console.WriteLine("Input Data is:");
    
                    /**
                     * Converting string data to byte data.
                     */
                    for (int i = 0; i < bulkInput.Length; i++)
                    {
                        Console.WriteLine($"{bulkInput[i]}");
                        byteBulkInput.Add(Encoding.UTF8.GetBytes(bulkInput[i]));
                    }
    
                    Console.WriteLine("\n");
                    Console.WriteLine("With String Data Type");
                    Console.WriteLine("----------------------");
    
                    /**
                     * Use protector object to call bulk string Protect API
                     */
                    Tuple<string[], int[]> bulkProtectedData = protector.Protect(bulkInput, userName, dataElementName);
                    Console.WriteLine("Protected Data is: ");
                    for (int i = 0; i < bulkProtectedData.Item1.Length; i++)
                    {
                        Console.WriteLine(bulkProtectedData.Item1[i] + " " + bulkProtectedData.Item2[i]);
                    }
                    Console.WriteLine("\n");
    
                    /**
                     * Use protector object to call bulk string Unprotect API
                     */
                    Tuple<string[], int[]> bulkUnprotectedData = protector.Unprotect(bulkProtectedData.Item1, userName, dataElementName);
                    Console.WriteLine("Unprotected Data is: ");
                    for (int i = 0; i < bulkUnprotectedData.Item1.Length; i++)
                    {
                        Console.WriteLine(bulkUnprotectedData.Item1[i] + " " + bulkUnprotectedData.Item2[i]);
                    }
                    Console.WriteLine("\n");
    
                    /**
                     * Use protector object to call bulk string Reprotect API
                     */
                    Tuple<string[], int[]> bulkReprotectedData = protector.Reprotect(bulkProtectedData.Item1, userName, dataElementName, newDataElementName);
                    Console.WriteLine("Reprotected Data is: ");
                    for (int i = 0; i < bulkReprotectedData.Item1.Length; i++)
                    {
                        Console.WriteLine(bulkReprotectedData.Item1[i] + " " + bulkReprotectedData.Item2[i]);
                    }
                    Console.WriteLine("\n");
    
                    /**
                    * Use protector object to call bulk string Unprotect API
                    */
                    Tuple<string[], int[]> bulkUnprotectReprotectedData = protector.Unprotect(bulkReprotectedData.Item1, userName, newDataElementName);
                    Console.WriteLine("Unprotected Data is: ");
                    for (int i = 0; i < bulkUnprotectReprotectedData.Item1.Length; i++)
                    {
                        Console.WriteLine(bulkUnprotectReprotectedData.Item1[i] + " " + bulkUnprotectReprotectedData.Item2[i]);
                    }
                    Console.WriteLine("\n");
    
                    Console.WriteLine("With Byte Data Type");
                    Console.WriteLine("----------------------");
    
                    /**
                     * Use protector object to call bulk byte Protect API
                     */
                    Tuple<List<byte[]>, int[]> byteBulkProtectedData = protector.Protect(byteBulkInput, userName, dataElementName);
                    Console.WriteLine("Protected Data is: ");
                    for (int i = 0; i < byteBulkProtectedData.Item1.Count; i++)
                    {
                        Console.WriteLine(Encoding.UTF8.GetString(byteBulkProtectedData.Item1[i]) + " " + byteBulkProtectedData.Item2[i]);
                    }
                    Console.WriteLine("\n");
    
                    /**
                    * Use protector object to call bulk byte Unprotect API
                    */
                    Tuple<List<byte[]>, int[]> byteBulkUnprotectedData = protector.Unprotect(byteBulkProtectedData.Item1, userName, dataElementName);
                    Console.WriteLine("Unprotected Data is: ");
                    for (int i = 0; i < byteBulkUnprotectedData.Item1.Count; i++)
                    {
                        Console.WriteLine(Encoding.UTF8.GetString(byteBulkUnprotectedData.Item1[i]) + " " + byteBulkUnprotectedData.Item2[i]);
                    }
                    Console.WriteLine("\n");
    
                    /**
                    * Use protector object to call bulk byte Reprotect API
                    */
                    Tuple<List<byte[]>, int[]> byteBulkReprotectedData = protector.Reprotect(byteBulkProtectedData.Item1, userName, dataElementName, newDataElementName);
                    Console.WriteLine("Reprotected Data is: ");
                    for (int i = 0; i < byteBulkReprotectedData.Item1.Count; i++)
                    {
                        Console.WriteLine(Encoding.UTF8.GetString(byteBulkReprotectedData.Item1[i]) + " " + byteBulkReprotectedData.Item2[i]);
                    }
                    Console.WriteLine("\n");
    
                    /**
                    * Use protector object to call bulk byte Unprotect API
                    */
                    Tuple<List<byte[]>, int[]> byteBulkUnprotectReprotectedData = protector.Unprotect(byteBulkReprotectedData.Item1, userName, newDataElementName);
                    Console.WriteLine("Unprotected Data is: ");
                    for (int i = 0; i < byteBulkUnprotectReprotectedData.Item1.Count; i++)
                    {
                        Console.WriteLine(Encoding.UTF8.GetString(byteBulkUnprotectReprotectedData.Item1[i]) + " " + byteBulkUnprotectReprotectedData.Item2[i]);
                    }
                    Console.WriteLine("\n");
                }
                catch (ProtectorException e)
                {
                    Console.WriteLine(e);
                }
            } /* End scope of main function */
    
        } /* End scope of class */
    
    } /* closure of namespace */
    

    6.1 - Application Protector .Net APIs

    The various APIs of the AP .Net.

    A Trusted Application must be added in the datastore for running AP .Net. The AP .Net accesses the information on the Trusted Application from the policy stored in the memory. If the application is trusted, then the user can invoke the protect, unprotect, or reprotect APIs, depending on the requirements.

    The following diagram represents the basic flow of the AP .Net.
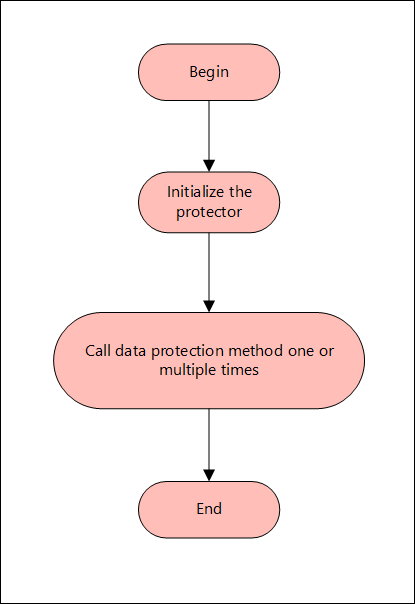
    Flowchart for AP .Net

    Note:
    The AP .Net supports only bytes and string data type.

    The following sections provide detailed information for the various functions used by the Protegrity Application Protector .Net.

    Using AP .Net in a Production Environment

    This section provides a list of the APIs that are supported by AP .Net. It describes the syntax of the AP .Net APIs and provides sample use cases.

    GetProtector API

    The GetProtector returns the Protector object associated with the AP .Net API.

    public static Protector GetProtector
    

    Parameters

    None

    Returns

    • Protector Instance: Object associated with the AP .Net API.

    Exception

    • ProtectorException: If the configuration is invalid, then an exception is returned.

    Example

    using Protector protector = Protector.GetProtector();
    

    The Protector class implements the IDisposable interface. This ensures that resources held by the Protector object are released properly when it is no longer needed. The using keyword automatically disposes of objects at the end of their scope. This helps prevent resource leaks and improves application stability.

    GetVersion API

    The GetVersion API returns the extended version of the AP .Net in use. The extended version consists of the AP .Net version number and Core version.

    public string GetVersion()
    

    Parameters

    None

    Returns

    • string: Returns an object with product version of the installed AP .Net and the Core version.

    Exception

    None

    Example

    protector.GetVersion();
    

    CheckAccess API

    The CheckAccess API returns the access permission status of the user for a specified data element.

    public bool CheckAccess(string userName, string dataElement, int accessType=CheckAccessType.PROTECT, string newDataElement = null)
    

    Parameters

    ParameterDescription
    userNameString containing the username defined in the policy.
    dataElementString containing the name of the data element defined in the policy.
    checkAccessType of the access permission of the user for the specified data element. You can specify a value for this parameter from the accessType constants, such as, PROTECT, UNPROTECT, or REPROTECT.
    newDataElementString containing the name of the data element defined in the policy when we are checking access for reprotect.

    Returns

    • boolean: Returns true if the user has the requested access on the data element and false if the user does not have access to the data element.

    Exception

    • ProtectorException: If the CheckAccess operation is unsuccessful, then an exception is thrown.

    Example

    To check whether user1 will be able to perform protect operation or not using Alphanum data element:

    bool access = protector.CheckAccess("user1", "Alphanum", CheckAccessType.PROTECT);
    

    To check whether user1 will be able to perform unprotect operation or not using Alphanum data element:

    bool access = protector.CheckAccess("user1", "Alphanum", CheckAccessType.UNPROTECT);
    

    To check whether user1 will be able to perform reportect operation or not using Alphanum (old) and Alphanum1 (new) data element

    bool access = protector.CheckAccess("user1", "Alphanum", CheckAccessType.REPROTECT, "Alphanum1");
    

    Protect - String API

    This API protects the data provided as a string using a tokenization or Format Preserving Encryption (FPE) data elements.

    public string Protect(string input, string userName, string dataElementName, byte[] externalIv = null, byte[] externalTweak = null)
    

    Parameters

    ParameterDescription
    inputInput data to be protected in string format.
    userNameString containing the user name defined in the policy.
    dataElementNameString containing the data element name defined in the policy.
    externalIVExternal IV is an optional argument. It is a buffer containing data that is used as an initialization vector and accepts input in byte format. When the external IV is null, its value is ignored.
    externalTweakExternal Tweak is an optional argument that is used only for the FPE data elements. It is a buffer containing data that is used as an external tweak and accepts input in byte format. When the external tweak is empty, its value is ignored.

    Returns

    • string: Protected data in string format.

    Exception

    • ProtectorException: If the protect operation is unsuccessful, then an exception is thrown.

    Example

    string singleProt = protector.Protect("Protegrity1234", "user1", "AlphaNum", Encoding.UTF8.GetBytes("abcd123"), null);
    

    Protect - Bulk String API

    This API protects the data provided as a string array using a tokenization or Format Preserving Encryption (FPE) data elements.

    It supports bulk protection. There is no maximum data limit. For more information about input data and data elements, refer to Protection Methods Reference.

    public Tuple<string[], int[]> Protect(string[] input, string userName, string dataElementName, byte[] externalIv = null, byte[] externalTweak = null)
    

    Parameters

    ParameterDescription
    inputInput array to be protected in string format.
    userNameString containing the user name defined in the policy.
    dataElementNameString containing the data element name defined in the policy.
    externalIVExternal IV is an optional argument. It is a buffer containing data that is used as an initialization vector and accepts input in byte format. When the external IV is null, its value is ignored.
    externalTweakExternal Tweak is an optional argument that is used only for the FPE data elements. It is a buffer containing data that is used as an external tweak and accepts input in byte format. When the external tweak is empty, its value is ignored.

    Returns

    • Tuple<string[], int[]>: Returns a tuple of the following data:
      • String array of the protected data.
      • Int array of the return codes.

    Exception

    • ProtectorException: If the protect operation is unsuccessful, then an exception is thrown. For string array, an exception is not thrown for error codes 22, 23, and 44. Instead, an error list is returned for the individual items in the bulk data.

    Example

    Tuple<string[], int[]> prot = protector.Protect({"Protegrity1", "Protegrity2", "Protegrity3"}, "user1", "AlphaNum", Encoding.UTF8.GetBytes("abcd123"), null);
    

    Protect - Byte API

    This API protects the data provided as bytes using an encryption or a tokenization data element.

    public Protect(byte[] input, string userName, string dataElementName, byte[] externalIv = null, byte[] externalTweak = null, int charset = Charset.UTF8)
    

    Parameters

    ParameterDescription
    inputInput data to be protected in byte format.
    userNameString containing the user name defined in the policy.
    dataElementNameString containing the data element name defined in the policy.
    externalIVExternal IV is an optional argument. It is a buffer containing data that is used as an initialization vector and accepts input in byte format. When the external IV is null, its value is ignored.
    externalTweakExternal Tweak is an optional argument that is used only for the FPE data elements. It is a buffer containing data that is used as an external tweak and accepts input in byte format. When the external tweak is empty, its value is ignored.
    charsetCharset is an optional argument. It indicates the encoding associated with the bytes of the input data. You can specify a value for this argument from the charset constants, such as, UTF8, UTF16LE, or UTF16BE.
    The default value for the charset argument is UTF8.

    Important:
    The charset parameter is mandatory for the data elements created with Unicode Gen2 tokenization method and the FPE encryption method.
    The encoding set for the charset parameter must match the encoding of the input data passed.

    Note: The charset argument is only applicable for the input data of byte type.

    Returns

    • byte[]: Protected data in byte format.

    Exception

    • ProtectorException: If the protect operation is unsuccessful, then an exception is thrown.

    Example

    byte[] singleByteProt = protector.Protect(Encoding.Unicode.GetBytes("Protegrity123"), "user1", "UnicodeGen2_UTF16LE", Encoding.UTF8.GetBytes("abcd123"), null, charset:Charset.UTF16LE);
    

    Protect - Bulk Byte API

    This API protects the data provided as a byte array using an encryption or a tokenization data element.

    It supports bulk protection. There is no maximum data limit. For more information about input data and data elements, refer to Protection Methods Reference.

    public Tuple<List<byte[]>, int[]> Protect(List<byte[]> input, string userName, string dataElementName, byte[] externalIv = null, byte[] externalTweak = null, int charset = Charset.UTF8)
    

    Parameters

    ParameterDescription
    inputList of byte arrays.
    userNameString containing the user name defined in the policy.
    dataElementNameString containing the data element name defined in the policy.
    externalIVExternal IV is an optional argument. It is a buffer containing data that is used as an initialization vector and accepts input in byte format. When the external IV is null, its value is ignored.
    externalTweakExternal Tweak is an optional argument that is used only for the FPE data elements. It is a buffer containing data that is used as an external tweak and accepts input in byte format. When the external tweak is empty, its value is ignored.
    charsetCharset is an optional argument. It indicates the encoding associated with the bytes of the input data. You can specify a value for this argument from the charset constants, such as, UTF8, UTF16LE, or UTF16BE.
    The default value for the charset argument is UTF8.

    Important:
    The charset parameter is mandatory for the data elements created with Unicode Gen2 tokenization method and the FPE encryption method.
    The encoding set for the charset parameter must match the encoding of the input data passed.

    Note: The charset argument is only applicable for the input data of byte type.

    Returns

    • Tuple<List<byte[]>, int[]>: Returns a tuple of the following data:
      • List of byte arrays of the protected data.
      • Int array of the return codes.

    Exception

    • ProtectorException: If the protect operation is unsuccessful, then an exception is thrown. For byte array, an exception is not thrown for error codes 22, 23, and 44. Instead, an error list is returned for the individual items in the bulk data.

    Example

    Tuple<List<byte[]>, int[]> bProt = protector.Protect({Encoding.BigEndianUnicode.GetBytes("Protegrity123"), Encoding.BigEndianUnicode.GetBytes("Protegrity12345")}, "user1", "UnicodeGen2_UTF16BE", Encoding.UTF8.GetBytes("abcd123"), null, charset:Charset.UTF16BE);
    

    Unprotect - String API

    This API unprotects the data provided as a string using a tokenization or Format Preserving Encryption (FPE) data elements.

    public string Unprotect(string input, string userName, string dataElementName, byte[] externalIv = null, byte[] externalTweak = null)
    

    Parameters

    ParameterDescription
    inputInput data to be unprotected in string format.
    userNameString containing the user name defined in the policy.
    dataElementNameString containing the data element name defined in the policy.
    externalIVExternal IV is an optional argument. It is a buffer containing data that is used as an initialization vector and accepts input in byte format. When the external IV is null, its value is ignored.
    externalTweakExternal Tweak is an optional argument that is used only for the FPE data elements. It is a buffer containing data that is used as an external tweak and accepts input in byte format. When the external tweak is empty, its value is ignored.

    Returns

    • string: Unprotected data in string format.

    Exception

    • ProtectorException: If the unprotect operation is unsuccessful, then an exception is thrown.

    Example

    string singleProt = protector.Protect("Protegrity1234", "user1", "AlphaNum", Encoding.UTF8.GetBytes("abcd123"), null);  
    
    string singleUnprot = protector.Unprotect(singleProt, "user1", "AlphaNum", Encoding.UTF8.GetBytes("abcd123"), null);
    

    Unprotect - Bulk String API

    This API unprotects the data provided as a string array using a tokenization or Format Preserving Encryption (FPE) data elements.

    It supports bulk unprotection. There is no maximum data limit. For more information about input data and data elements, refer to Protection Methods Reference.

    public Tuple<string[],int[]> Unprotect(string[] input, string userName, string dataElementName, byte[] externalIv = null, byte[] externalTweak = null)
    

    Parameters

    ParameterDescription
    inputInput array to be unprotected in string format.
    userNameString containing the user name defined in the policy.
    dataElementNameString containing the data element name defined in the policy.
    externalIVExternal IV is an optional argument. It is a buffer containing data that is used as an initialization vector and accepts input in byte format. When the external IV is null, its value is ignored.
    externalTweakExternal Tweak is an optional argument that is used only for the FPE data elements. It is a buffer containing data that is used as an external tweak and accepts input in byte format. When the external tweak is empty, its value is ignored.

    Returns

    • Tuple<string[], int[]>: Returns a tuple of the following data:
      • String array of the unprotected data.
      • Int array of the return codes.

    Exception

    • ProtectorException: If the unprotect operation is unsuccessful, then an exception is thrown. For string array, an exception is not thrown for error codes 22, 23, and 44. Instead, an error list is returned for the individual items in the bulk data.

    Example

    Tuple<string[], int[]> prot = protector.Protect({"Protegrity1", "Protegrity2", "Protegrity3"}, "user1", "AlphaNum", Encoding.UTF8.GetBytes("abcd123"), null);  
    
    Tuple<string[], int[]> unprot = protector.Unprotect(prot.Item1, "user1", "AlphaNum", Encoding.UTF8.GetBytes("abcd123"), null);
    

    Unprotect - Byte API

    This API unprotects the data provided as bytes using an encryption or a tokenization data element.

    public Unprotect(byte[] input, string userName, string dataElementName, byte[] externalIv =
    null, byte[] externalTweak = null, int charset = Charset.UTF8)
    

    Parameters

    ParameterDescription
    inputInput data to be unprotected in byte format.
    userNameString containing the user name defined in the policy.
    dataElementNameString containing the data element name defined in the policy.
    externalIVExternal IV is an optional argument. It is a buffer containing data that is used as an initialization vector and accepts input in byte format. When the external IV is null, its value is ignored.
    externalTweakExternal Tweak is an optional argument that is used only for the FPE data elements. It is a buffer containing data that is used as an external tweak and accepts input in byte format. When the external tweak is empty, its value is ignored.
    charsetCharset is an optional argument. It indicates the encoding associated with the bytes of the input data. You can specify a value for this argument from the charset constants, such as, UTF8, UTF16LE, or UTF16BE.
    The default value for the charset argument is UTF8.

    Important:
    The charset parameter is mandatory for the data elements created with Unicode Gen2 tokenization method and the FPE encryption method.
    The encoding set for the charset parameter must match the encoding of the input data passed.

    Note: The charset argument is only applicable for the input data of byte type.

    Returns

    • byte[]: Unprotected data in byte format.

    Exception

    • ProtectorException: If the unprotect operation is unsuccessful, then an exception is thrown.

    Example

    byte[] singleByteProt = protector.Protect(Encoding.Unicode.GetBytes("Protegrity123"),
    "user1", "UnicodeGen2_UTF16LE", Encoding.UTF8.GetBytes("abcd123"), null, charset: Charset.UTF16LE);  
    
    byte[] singleByteUnprot = protector.Unprotect(singleByteProt, "user1", "UnicodeGen2_UTF16LE", Encoding.UTF8.GetBytes("abcd123"), null, charset:Charset.UTF16LE);
    

    Unprotect - Bulk Byte API

    This API unprotects the data provided as a byte array using an encryption or a tokenization data element.

    It supports bulk unprotection. There is no maximum data limit. For more information about input data and data elements, refer to Protection Methods Reference.

    public Tuple<List<byte[]>, int[]> Unprotect(List<byte[]> input, string userName, string dataElementName, byte[] externalIv = null, byte[] externalTweak = null, int charset = Charset.UTF8 )
    

    Parameters

    ParameterDescription
    inputList of byte arrays.
    userNameString containing the user name defined in the policy.
    dataElementNameString containing the data element name defined in the policy.
    externalIVExternal IV is an optional argument. It is a buffer containing data that is used as an initialization vector and accepts input in byte format. When the external IV is null, its value is ignored.
    externalTweakExternal Tweak is an optional argument that is used only for the FPE data elements. It is a buffer containing data that is used as an external tweak and accepts input in byte format. When the external tweak is empty, its value is ignored.
    charsetCharset is an optional argument. It indicates the encoding associated with the bytes of the input data. You can specify a value for this argument from the charset constants, such as, UTF8, UTF16LE, or UTF16BE.
    The default value for the charset argument is UTF8.

    Important:
    The charset parameter is mandatory for the data elements created with Unicode Gen2 tokenization method and the FPE encryption method.
    The encoding set for the charset parameter must match the encoding of the input data passed.

    Note: The charset argument is only applicable for the input data of byte type.

    Returns

    • Tuple<List<byte[]>, int[]>: Returns a tuple of the following data:
      • List of byte arrays of the protected data.
      • Int array of the return codes.

    Exception

    • ProtectorException: If the unprotect operation is unsuccessful, then an exception is thrown. For byte array, an exception is not thrown for error codes 22, 23, and 44. Instead, an error list is returned for the individual items in the bulk data.

    Example

    Tuple<List<byte[]>, int[]> bProt = protector.Protect({Encoding.BigEndianUnicode.GetBytes("Protegrity123"), Encoding.BigEndianUnicode.GetBytes("Protegrity12345")}, "user1", "UnicodeGen2_UTF16BE", Encoding.UTF8.GetBytes("abcd123"), null, charset: Charset.UTF16BE);  
    
    Tuple<List<byte[]>, int[]> bUnprot = protector.Unprotect(bProt.Item1, "user1", "UnicodeGen2_UTF16BE", Encoding.UTF8.GetBytes("abcd123"), null, charset:Charset.UTF16BE);
    

    Reprotect - String API

    This API reprotects the data provided as a string using a tokenization or Format Preserving Encryption (FPE) data elements.

    Warning:
    If you are using the reprotect API, then the old data element and the new data element must have the same data type.
    For example, if you have used an Alpha-Numeric data element to protect the data, then you must use only Alpha-Numeric data element to reprotect the data.

    public string Reprotect(string input, string userName, string oldDataElementName, string newDataElementName, byte[] oldExternalIv = null, byte[] newExternalIv = null, byte[] oldExternalTweak = null, byte[] newExternalTweak = null)
    

    Parameters

    ParameterDescription
    inputInput data to be reprotected in string format.
    userNameString containing the user name defined in the policy.
    oldDataElementNameString containing the old data element name defined in the policy.
    newDataElementNameString containing the new data element name defined in the policy.
    oldExternalIvOld external IV is an optional argument. It is a buffer containing data that is used as an initialization vector and accepts input in byte format. When the old external IV is null, its value is ignored.
    newExternalIvNew external IV is an optional argument. It is a buffer containing data that is used as an initialization vector and accepts input in byte format. When the new external IV is null, its value is ignored.
    oldExternalTweakOld external Tweak is an optional argument that is used only for the FPE data elements. It is a buffer containing data that is used as an external tweak and accepts input in byte format. When the old external tweak is empty, its value is ignored.
    newExternalTweakNew external Tweak is an optional argument that is used only for the FPE data elements. It is a buffer containing data that is used as an external tweak and accepts input in byte format. When the new external tweak is empty, its value is ignored.

    Returns

    • string: Reprotected data in string format.

    Exception

    • ProtectorException: If the reprotect operation is unsuccessful, then an exception is thrown.

    Example

    string singleProt = protector.Protect("Protegrity1234", "user1", "AlphaNum",
    Encoding.UTF8.GetBytes("abcd123"), null);  
    
    string singleReprot = protector.Reprotect(singleProt, "user1", "AlphaNum", "AlphaNum_1", Encoding.UTF8.GetBytes("abcd123"), Encoding.UTF8.GetBytes("abcd123456"), null, null);
    

    Reprotect - Bulk String API

    This API reprotects the data provided as a string array using a tokenization or Format Preserving Encryption (FPE) data elements.

    It supports bulk reprotection. There is no maximum data limit. For more information about input data and data elements, refer to Protection Methods Reference.

    Warning:
    If you are using the reprotect API, then the old data element and the new data element must have the same data type.
    For example, if you have used an Alpha-Numeric data element to protect the data, then you must use only Alpha-Numeric data element to reprotect the data.

    public Tuple<string[], int[]> Reprotect(string[] input, string userName, string oldDataElementName, string newDataElementName, byte[] oldExternalIv = null, byte[] newExternalIv = null, byte[] oldExternalTweak = null, byte[] newExternalTweak = null)
    

    Parameters

    ParameterDescription
    inputInput array to be reprotected in string format.
    userNameString containing the user name defined in the policy.
    oldDataElementNameString containing the old data element name defined in the policy.
    newDataElementNameString containing the new data element name defined in the policy.
    oldExternalIvOld external IV is an optional argument. It is a buffer containing data that is used as an initialization vector and accepts input in byte format. When the old external IV is null, its value is ignored.
    newExternalIvNew external IV is an optional argument. It is a buffer containing data that is used as an initialization vector and accepts input in byte format. When the new external IV is null, its value is ignored.
    oldExternalTweakOld external Tweak is an optional argument that is used only for the FPE data elements. It is a buffer containing data that is used as an external tweak and accepts input in byte format. When the old external tweak is empty, its value is ignored.
    newExternalTweakNew external Tweak is an optional argument that is used only for the FPE data elements. It is a buffer containing data that is used as an external tweak and accepts input in byte format. When the new external tweak is empty, its value is ignored.

    Returns

    • Tuple<string[], int[]>: Returns a tuple of the following data:
      • String array of the protected data.
      • Int array of the return codes.

    Exception

    • ProtectorException: If the reprotect operation is unsuccessful, then an exception is thrown. For string array, an exception is not thrown for error codes 22, 23, and 44. Instead, an error list is returned for the individual items in the bulk data.

    Example

    Tuple<string[], int[]> bulkProt = protector.Protect({"Protegrity1", "Protegrity2", "Protegrity3"}, "user1", "AlphaNum", Encoding.UTF8.GetBytes("abcd123"), null);  
    
    Tuple<string[], int[]> bulkReprot = protector.Reprotect(bulkProt.Item1, "user1", "AlphaNum", "AlphaNum_1", Encoding.UTF8.GetBytes("abcd123"), Encoding.UTF8.GetBytes("abcd123456"), null, null);
    

    Reprotect - Byte API

    This API reprotects the data provided as bytes using an encryption or a tokenization data element.

    Warning:
    If you are using the reprotect API, then the old data element and the new data element must have the same data type.
    For example, if you have used an Alpha-Numeric data element to protect the data, then you must use only Alpha-Numeric data element to reprotect the data.

    public Reprotect(byte[] input, string userName, string oldDataElementName, string newDataElementName, byte[] oldExternalIv = null, byte[] newExternalIv = null, byte[] oldExternalTweak = null, byte[] newExternalTweak = null, int charset = Charset.UTF8)
    

    Parameters

    ParameterDescription
    inputInput data to be reprotected in byte format.
    userNameString containing the user name defined in the policy.
    oldDataElementNameString containing the old data element name defined in the policy.
    newDataElementNameString containing the new data element name defined in the policy.
    oldExternalIvOld external IV is an optional argument. It is a buffer containing data that is used as an initialization vector and accepts input in byte format. When the old external IV is null, its value is ignored.
    newExternalIvNew external IV is an optional argument. It is a buffer containing data that is used as an initialization vector and accepts input in byte format. When the new external IV is null, its value is ignored.
    oldExternalTweakOld external Tweak is an optional argument that is used only for the FPE data elements. It is a buffer containing data that is used as an external tweak and accepts input in byte format. When the old external tweak is empty, its value is ignored.
    newExternalTweakNew external Tweak is an optional argument that is used only for the FPE data elements. It is a buffer containing data that is used as an external tweak and accepts input in byte format. When the new external tweak is empty, its value is ignored.
    charsetCharset is an optional argument. It indicates the encoding associated with the bytes of the input data. You can specify a value for this argument from the charset constants, such as, UTF8, UTF16LE, or UTF16BE.
    The default value for the charset argument is UTF8.

    Important:
    The charset parameter is mandatory for the data elements created with Unicode Gen2 tokenization method and the FPE encryption method.
    The encoding set for the charset parameter must match the encoding of the input data passed.

    Note: The charset argument is only applicable for the input data of byte type.

    Returns

    • byte[]: Reprotected data in byte format.

    Exception

    • ProtectorException: If the reprotect operation is unsuccessful, then an exception is thrown.

    Example

    byte[] singleByteProt = protector.Protect(Encoding.Unicode.GetBytes("Protegrity123"), "user1", "UnicodeGen2_UTF16LE", Encoding.UTF8.GetBytes("abcd123"), null, charset: Charset.UTF16LE);  
    
    byte[] singleByteReprot = protector.Reprotect(singleByteProt, "user1", "UnicodeGen2_UTF16LE", "UnicodeGen2_UTF16LE_1", Encoding.UTF8.GetBytes("abcd123"), Encoding.UTF8.GetBytes("abcd123456"), null, null, charset:Charset.UTF16LE);
    

    Reprotect - Bulk Byte API

    This API reprotects the data provided as a byte array using an encryption or a tokenization data element.

    It supports bulk reprotection. There is no maximum data limit. For more information about input data and data elements, refer to Protection Methods Reference.

    Warning:
    If you are using the reprotect API, then the old data element and the new data element must have the same data type.
    For example, if you have used an Alpha-Numeric data element to protect the data, then you must use only Alpha-Numeric data element to reprotect the data.

    public Tuple<List<byte[]>, int[]> Reprotect(List<byte[]> input, string userName, string oldDataElementName, string newDataElementName, byte[] oldExternalIv = null, byte[] newExternalIv = null, byte[] oldExternalTweak = null, byte[] newExternalTweak = null, int charset = Charset.UTF8)
    

    Parameters

    ParameterDescription
    inputList of byte arrays.
    userNameString containing the user name defined in the policy.
    oldDataElementNameString containing the old data element name defined in the policy.
    newDataElementNameString containing the new data element name defined in the policy.
    oldExternalIvOld external IV is an optional argument. It is a buffer containing data that is used as an initialization vector and accepts input in byte format. When the old external IV is null, its value is ignored.
    newExternalIvNew external IV is an optional argument. It is a buffer containing data that is used as an initialization vector and accepts input in byte format. When the new external IV is null, its value is ignored.
    oldExternalTweakOld external Tweak is an optional argument that is used only for the FPE data elements. It is a buffer containing data that is used as an external tweak and accepts input in byte format. When the old external tweak is empty, its value is ignored.
    newExternalTweakNew external Tweak is an optional argument that is used only for the FPE data elements. It is a buffer containing data that is used as an external tweak and accepts input in byte format. When the new external tweak is empty, its value is ignored.
    charsetCharset is an optional argument. It indicates the encoding associated with the bytes of the input data. You can specify a value for this argument from the charset constants, such as, UTF8, UTF16LE, or UTF16BE.
    The default value for the charset argument is UTF8.

    Important:
    The charset parameter is mandatory for the data elements created with Unicode Gen2 tokenization method and the FPE encryption method.
    The encoding set for the charset parameter must match the encoding of the input data passed.

    Note: The charset argument is only applicable for the input data of byte type.

    Returns

    • Tuple<List<byte[]>, int[]>: Returns a tuple of the following data:
      • List of byte arrays of the protected data.
      • Int array of the return codes.

    Exception

    • ProtectorException: If the reprotect operation is unsuccessful, then an exception is thrown. For byte array, an exception is not thrown for error codes 22, 23, and 44. Instead, an error list is returned for the individual items in the bulk data.

    Example

    Tuple<List<byte[]>, int[]> bProt = protector.Protect({Encoding.BigEndianUnicode.GetBytes("Protegrity123"), Encoding.BigEndianUnicode.GetBytes("Protegrity12345")}, "user1", "UnicodeGen2_UTF16BE", Encoding.UTF8.GetBytes("abcd123"), null, charset: Charset.UTF16BE);  
    
    Tuple<List<byte[]>, int[]> bReprot = protector.Reprotect(bProt.Item1, "user1", "UnicodeGen2_UTF16BE", "UnicodeGen2_UTF16BE_1", Encoding.UTF8.GetBytes("abcd123"), Encoding.UTF8.GetBytes("abcd123456"), null, null, charset:Charset.UTF16BE);
    

    Using AP .Net Mock in a development environment

    The AP .Net Mock can be used in a development environment. This is also known as mock implementation of AP .Net APIs. In this mode, the AP .Net Mock development package provides you with sample users and data elements that can be used to simulate the behavior of the actual APIs in production environment.

    Caution: Do not install Mock AP .Net protector in a Production environment. When the AP .Net Mock APIs are used with the sample users and data elements provided with the development package, the output data is only a simulation of the protected or encrypted data. Do not use the AP .Net APIs in the development environment to protect, unprotect, or reprotect sensitive data.

    Using Sample Data Elements and Sample Users for Simulating Protect, Unprotect, and Reprotect Scenarios

    This section describes how to use the sample data elements and sample users for simulating the protect, unprotect, and reprotect scenarios.

    Note: To view the sample project, refer to the following default location: C:\Program Files\Protegrity\sdk\dotnet\sample. This location contains the sample project with the Mock build for running code snippets simulating the protect, unprotect, and reprotect scenarios.

    Mock Example - Protecting, Unprotecting, and Reprotecting String

    This section describes how to use the protect, unprotect, and reprotect APIs for a string input data.

    Example: Input string data
    In the following example, the Protegrity1 string is used as the input data, which is protected and unprotected using the SUCCESS_STR data element. It is further reprotected using SUCCESS_REPROTECT_STR data element.

    string protectedData = protector.Protect("Protegrity1", MockPolicyUser.ALL_USER, MockDataElement.SUCCESS_STR);
    Console.WriteLine($"Protected Data is:    {protectedData}");
    
    string unprotectedData = protector.Unprotect(protectedData, MockPolicyUser.ALL_USER, MockDataElement.SUCCESS_STR);
    Console.WriteLine($"Unprotected Data is:  {unprotectedData}");
    
    string reprotectedData = protector.Reprotect(protectedData, MockPolicyUser.ALL_USER, MockDataElement.SUCCESS_STR, MockDataElement.SUCCESS_REPROTECT_STR);
    Console.WriteLine($"Reprotected Data is:  {reprotectedData}");
    

    Result

    Protected Data is: ESUgkmSlgtq
    Unprotected Data is: Protegrity1
    Reprotected Data is: 5j4mBnjRmgT
    

    Mock Example - Protecting, Unprotecting, and Reprotecting String Data with External IV

    This section describes how to use the protect, unprotect, and reprotect APIs for string input data using external IV.

    Note: If you want to pass the external IV to protect, unprotect, and reprotect APIs, then you must pass the external IV as bytes to the API.

    Example
    In the following example, the Protegrity1 string is used as the input data, which is protected and unprotected using the SUCCESS_STR data element, with the help of external IV 1234 that is passed as bytes. It is reprotected using the same SUCCESS_STR data element, but with the help of a different external IV 5678 that is passed as bytes.

    string protectedData = protector.Protect("Protegrity1", MockPolicyUser.ALL_USER, MockDataElement.SUCCESS_STR, Encoding.UTF8.GetBytes("1234"));
    Console.WriteLine($"Protected Data is:    {protectedData}");
    
    string unprotectedData = protector.Unprotect(protectedData, MockPolicyUser.ALL_USER, MockDataElement.SUCCESS_STR, Encoding.UTF8.GetBytes("1234"));
    Console.WriteLine($"Unprotected Data is:  {unprotectedData}");
    
    string reprotectedData = protector.Reprotect(protectedData, MockPolicyUser.ALL_USER, MockDataElement.SUCCESS_STR, MockDataElement.SUCCESS_STR, Encoding.UTF8.GetBytes("1234"), Encoding.UTF8.GetBytes("5678"));
    Console.WriteLine($"Reprotected Data is:  {reprotectedData}");
    

    Result

    Protected Data is: LEtjnVE8jUy
    Unprotected Data is: Protegrity1
    Reprotected Data is: d1jhkG1MheU
    

    Mock Example - Protecting, Unprotecting, and Reprotecting String Data with External IV and External Tweak

    This section describes how to use the protect, unprotect, and reprotect APIs for string input data using external IV and external tweak.

    Note: If you want to pass the external IV and external tweak to protect, unprotect, and reprotect APIs, then you must pass the external IV and external tweak as bytes.

    Example
    In the following example, the Protegrity1 string is used as the input data, which is protected and unprotected using the SUCCESS_STR data element, with the help of external IV 1234 and external tweak abcd passed as bytes. It is reprotected using the same SUCCESS_STR data element, but with the help of a different external IV 5678 and external tweak zyxw passed as bytes.

    string protectedData = protector.Protect("Protegrity1", MockPolicyUser.ALL_USER, MockDataElement.SUCCESS_STR, Encoding.UTF8.GetBytes("1234"), Encoding.UTF8.GetBytes("abcd"));
    Console.WriteLine($"Protected Data is:    {protectedData}");
    
    string unprotectedData = protector.Unprotect(protectedData, MockPolicyUser.ALL_USER, MockDataElement.SUCCESS_STR, Encoding.UTF8.GetBytes("1234"), Encoding.UTF8.GetBytes("abcd"));
    Console.WriteLine($"Unprotected Data is:  {unprotectedData}");
    
    string reprotectedData = protector.Reprotect(protectedData, MockPolicyUser.ALL_USER, MockDataElement.SUCCESS_STR, MockDataElement.SUCCESS_STR, Encoding.UTF8.GetBytes("1234"), Encoding.UTF8.GetBytes("5678"), Encoding.UTF8.GetBytes("abcd"), Encoding.UTF8.GetBytes("zyxw"));
    Console.WriteLine($"Reprotected Data is:  {reprotectedData}");
    

    Result

    Protected Data is: euDUv6uoUrP
    Unprotected Data is: Protegrity1
    Reprotected Data is: vmXGROmDGue
    

    Mock Example - Protecting, Unprotecting, and Reprotecting Bulk String Data

    This section describes how to use the protect, unprotect, and reprotect APIs for bulk string input data.

    Example 1
    In the following example, protegrity1234, Protegrity1, and Protegrity56 strings are stored in an array and used as bulk data, which is protected and unprotected using the SUCCESS_STR data element. It is further reprotected using SUCCESS_REPROTECT_STR data element.

    string[] bulkInput = { "protegrity1234", "Protegrity1", "Protegrity56" };
    
    Tuple<string[], int[]> bulkProtectedData = protector.Protect(bulkInput, MockPolicyUser.ALL_USER, MockDataElement.SUCCESS_STR);
    Console.WriteLine("Protected Data is: ");
    for (int i = 0; i < bulkProtectedData.Item1.Length; i++)
    {
        Console.WriteLine(bulkProtectedData.Item1[i] + " " + bulkProtectedData.Item2[i]);
    }
    Console.WriteLine("\n");
    
    Tuple<string[], int[]> bulkUnprotectedData = protector.Unprotect(bulkProtectedData.Item1, MockPolicyUser.ALL_USER, MockDataElement.SUCCESS_STR);
    Console.WriteLine("Unprotected Data is: ");
    for (int i = 0; i < bulkUnprotectedData.Item1.Length; i++)
    {
        Console.WriteLine(bulkUnprotectedData.Item1[i] + " " + bulkUnprotectedData.Item2[i]);
    }
    Console.WriteLine("\n");
    
    Tuple<string[], int[]> bulkReprotectedData = protector.Reprotect(bulkProtectedData.Item1, MockPolicyUser.ALL_USER, MockDataElement.SUCCESS_STR, MockDataElement.SUCCESS_REPROTECT_STR);
    Console.WriteLine("Reprotected Data is: ");
    for (int i = 0; i < bulkReprotectedData.Item1.Length; i++)
    {
        Console.WriteLine(bulkReprotectedData.Item1[i] + " " + bulkReprotectedData.Item2[i]);
    }
    

    Result

    Protected Data is:
    cSUgkmSlgtqwi8 6
    ESUgkmSlgtq 6
    ESUgkmSlgtNK 6
    
    Unprotected Data is:
    protegrity1234 8
    Protegrity1 8
    Protegrity56 8
    
    Reprotected Data is:
    Oj4mBnjRmgTIlD 50
    5j4mBnjRmgT 50
    5j4mBnjRmgYh 50
    

    For each element in an array -

    • 6 is the success return code for the protect operation.
    • 8 is the success return code for the unprotect operation.
    • 50 is the success return code for the reprotect operation.

    Mock Example - Protecting, Unprotecting, and Reprotecting Bulk String Data with External IV

    This section describes how to use the protect, unprotect, and reprotect APIs for bulk string input data using external IV.

    Note: If you want to pass the external IV to protect, unprotect, and reprotect APIs, then you must pass the external IV as bytes to the API.

    Example: Input string data
    In the following example, protegrity1234, Protegrity1, and Protegrity56 strings are stored in an array and used as bulk input data, which is protected and unprotected using the SUCCESS_STR data element with the help of external IV 1234 that is passed as bytes. It is reprotected using the same SUCCESS_STR data element, but with the help of a different external IV 5678 that is passed as bytes.

    string[] bulkInput = { "protegrity1234", "Protegrity1", "Protegrity56" };
    
    Tuple<string[], int[]> bulkProtectedData = protector.Protect(bulkInput, MockPolicyUser.ALL_USER, MockDataElement.SUCCESS_STR, Encoding.UTF8.GetBytes("1234"));
    Console.WriteLine("Protected Data is: ");
    for (int i = 0; i < bulkProtectedData.Item1.Length; i++)
    {
        Console.WriteLine(bulkProtectedData.Item1[i] + " " + bulkProtectedData.Item2[i]);
    }
    Console.WriteLine("\n");
    
    Tuple<string[], int[]> bulkUnprotectedData = protector.Unprotect(bulkProtectedData.Item1, MockPolicyUser.ALL_USER, MockDataElement.SUCCESS_STR, Encoding.UTF8.GetBytes("1234"));
    Console.WriteLine("Unprotected Data is: ");
    for (int i = 0; i < bulkUnprotectedData.Item1.Length; i++)
    {
        Console.WriteLine(bulkUnprotectedData.Item1[i] + " " + bulkUnprotectedData.Item2[i]);
    }
    Console.WriteLine("\n");
    
    Tuple<string[], int[]> bulkReprotectedData = protector.Reprotect(bulkProtectedData.Item1, MockPolicyUser.ALL_USER, MockDataElement.SUCCESS_STR, MockDataElement.SUCCESS_STR, Encoding.UTF8.GetBytes("1234"), Encoding.UTF8.GetBytes("5678"));
    Console.WriteLine("Reprotected Data is: ");
    for (int i = 0; i < bulkReprotectedData.Item1.Length; i++)
    {
        Console.WriteLine(bulkReprotectedData.Item1[i] + " " + bulkReprotectedData.Item2[i]);
    }
    

    Result

    Protected Data is:
    WEtjnVE8jUy2Xr 6
    LEtjnVE8jUy 6
    LEtjnVE8jUlR 6
    
    Unprotected Data is:
    protegrity1234 8
    Protegrity1 8
    Protegrity56 8
    
    Reprotected Data is:
    i1jhkG1MheU26E 50
    d1jhkG1MheU 50
    d1jhkG1MheZF 50
    

    For each element in an array -

    • 6 is the success return code for the protect operation.
    • 8 is the success return code for the unprotect operation.
    • 50 is the success return code for the reprotect operation.

    Mock Example - Protecting, Unprotecting, and Reprotecting Bulk String Data Using External IV and External Tweak

    This section describes how to use the protect, unprotect, and reprotect APIs for bulk string input data using external IV and external tweak.

    Note: If you want to pass the external IV and external tweak to protect, unprotect, and reprotect APIs, then you must pass the external IV and external tweak as bytes.

    Example
    In the following example, protegrity1234, Protegrity1, and Protegrity56 strings are stored in an array and used as bulk input data. This bulk data is protected and unprotected using the SUCCESS_STR data element, with the help of external IV 1234 and external tweak xyz that are both passed as bytes. It is reprotected using the same SUCCESS_STR data element, but with the help of a different external IV 5678 and external tweak abc passed as bytes.

    string[] bulkInput = { "protegrity1234", "Protegrity1", "Protegrity56" };
    
    Tuple<string[], int[]> bulkProtectedData = protector.Protect(bulkInput, MockPolicyUser.ALL_USER, MockDataElement.SUCCESS_STR, Encoding.UTF8.GetBytes("1234"), Encoding.UTF8.GetBytes("abcd"));
    Console.WriteLine("Protected Data is: ");
    for (int i = 0; i < bulkProtectedData.Item1.Length; i++)
    {
        Console.WriteLine(bulkProtectedData.Item1[i] + " " + bulkProtectedData.Item2[i]);
    }
    Console.WriteLine("\n");
    
    Tuple<string[], int[]> bulkUnprotectedData = protector.Unprotect(bulkProtectedData.Item1, MockPolicyUser.ALL_USER, MockDataElement.SUCCESS_STR, Encoding.UTF8.GetBytes("1234"), Encoding.UTF8.GetBytes("abcd"));
    Console.WriteLine("Unprotected Data is: ");
    for (int i = 0; i < bulkUnprotectedData.Item1.Length; i++)
    {
        Console.WriteLine(bulkUnprotectedData.Item1[i] + " " + bulkUnprotectedData.Item2[i]);
    }
    Console.WriteLine("\n");
    
    Tuple<string[], int[]> bulkReprotectedData = protector.Reprotect(bulkProtectedData.Item1, MockPolicyUser.ALL_USER, MockDataElement.SUCCESS_STR, MockDataElement.SUCCESS_STR, Encoding.UTF8.GetBytes("1234"), Encoding.UTF8.GetBytes("5678"), Encoding.UTF8.GetBytes("abcd"), Encoding.UTF8.GetBytes("zyxw"));
    Console.WriteLine("Reprotected Data is: ");
    for (int i = 0; i < bulkReprotectedData.Item1.Length; i++)
    {
        Console.WriteLine(bulkReprotectedData.Item1[i] + " " + bulkReprotectedData.Item2[i]);
    }
    

    Result

    Protected Data is:
    huDUv6uoUrPBbk 6
    euDUv6uoUrP 6
    euDUv6uoUrKO 6  
    
    Unprotected Data is:
    protegrity1234 8
    Protegrity1 8
    Protegrity56 8  
    
    Reprotected Data is:
    HmXGROmDGueMs7 50
    vmXGROmDGue 50
    vmXGROmDGuEY 50
    

    For each element in an array -

    • 6 is the success return code for the protect operation.
    • 8 is the success return code for the unprotect operation.
    • 50 is the success return code for the reprotect operation.

    Mock Example - Protecting, Unprotecting, and Reprotecting Bytes Data

    This section describes how to use the protect, unprotect, and reprotect APIs for bytes data.

    Example 1
    In the following example, Protegrity1 string is first converted to bytes. The bytes data is then protected and unprotected using the SUCCESS_BYTE data element. It is further reprotected using SUCCESS_REPROTECT_BYTE data element.

    byte[] inputData = Encoding.UTF8.GetBytes("Protegrity1");
    Console.WriteLine("Input Data is: ");
    for (int i = 0; i < inputData.Length; i++)
    {
        Console.Write(inputData[i]);
    }
    Console.WriteLine("\n");
    
    byte[] protectedData = protector.Protect(inputData, MockPolicyUser.ALL_USER, MockDataElement.SUCCESS_BYTE);
    Console.WriteLine("Protected Data is: ");
    for (int i = 0; i < protectedData.Length; i++)
    {
        Console.Write(protectedData[i]);
    }
    Console.WriteLine("\n");
    
    byte[] unprotectedData = protector.Unprotect(protectedData, MockPolicyUser.ALL_USER, MockDataElement.SUCCESS_BYTE);
    Console.WriteLine("Unprotected Data is: ");
    for (int i = 0; i < unprotectedData.Length; i++)
    {
        Console.Write(unprotectedData[i]);
    }
    Console.WriteLine("\n");
    
    byte[] reprotectedData = protector.Reprotect(protectedData, MockPolicyUser.ALL_USER, MockDataElement.SUCCESS_BYTE, MockDataElement.SUCCESS_REPROTECT_BYTE);
    Console.WriteLine("Reprotected Data is: ");
    for (int i = 0; i < reprotectedData.Length; i++)
    {
        Console.Write(reprotectedData[i]);
    }
    

    Result

    Input Data is: 
    8011411111610110311410511612149  
    
    Protected Data is:
    47682201011125321921025550132517810423224  
    
    Unprotected Data is:
    8011411111610110311410511612149  
    
    Reprotected Data is:
    2363619902426812914815513921612420620922714019534172719623784164388416718387142154
    

    Mock Example - Protecting, Unprotecting, and Reprotecting Bulk Bytes Data

    This section describes how to use the protect, unprotect, and reprotect APIs for bulk bytes data.

    Example
    In the following example, protegrity1234, Protegrity1, and Protegrity56 strings are first converted to bytes. The converted byte arrays are stored together in a tuple structure which is protected and unprotected using the SUCCESS_BYTE data element. It is further reprotected using SUCCESS_REPROTECT_BYTE data element.

    string[] input = { "protegrity1234", "Protegrity1", "Protegrity56" };
    List<byte[]> bulkInput = new List<byte[]>(input.Length);
    for (int i = 0; i < input.Length; i++)
    {
        bulkInput.Add(Encoding.UTF8.GetBytes(input[i]));
    }
    Console.WriteLine("Input Data is: ");
    for (int i = 0; i < bulkInput.Count; i++)
    {
        for (int j = 0; j < bulkInput[i].Length; j++)
        {
            Console.Write(bulkInput[i][j]);
        }
        Console.WriteLine();
    }
    Console.WriteLine("\n");
    
    
    Tuple<List<byte[]>, int[]> bulkProtectedData = protector.Protect(bulkInput, MockPolicyUser.ALL_USER, MockDataElement.SUCCESS_BYTE);
    Console.WriteLine("Protected Data is: ");
    for (int i = 0; i < bulkProtectedData.Item1.Count; i++)
    {
        for (int j = 0; j < bulkProtectedData.Item1[i].Length; j++)
        {
            Console.Write(bulkProtectedData.Item1[i][j]);
        }
        Console.WriteLine();
    }
    Console.WriteLine("\n");
    
    Tuple<List<byte[]>, int[]> bulkUnprotectedData = protector.Unprotect(bulkProtectedData.Item1, MockPolicyUser.ALL_USER, MockDataElement.SUCCESS_BYTE);
    Console.WriteLine("Unprotected Data is: ");
    for (int i = 0; i < bulkUnprotectedData.Item1.Count; i++)
    {
        for (int j = 0; j < bulkUnprotectedData.Item1[i].Length; j++)
        {
            Console.Write(bulkUnprotectedData.Item1[i][j]);
        }
        Console.WriteLine();
    }
    Console.WriteLine("\n");
    
    Tuple<List<byte[]>, int[]> bulkReprotectedData = protector.Reprotect(bulkProtectedData.Item1, MockPolicyUser.ALL_USER, MockDataElement.SUCCESS_BYTE, MockDataElement.SUCCESS_REPROTECT_BYTE);
    Console.WriteLine("Reprotected Data is: ");
    for (int i = 0; i < bulkReprotectedData.Item1.Count; i++)
    {
        for (int j = 0; j < bulkReprotectedData.Item1[i].Length; j++)
        {
            Console.Write(bulkReprotectedData.Item1[i][j]);
        }
        Console.WriteLine();
    }
    

    Result

    Input Data is:
    11211411111610110311410511612149505152
    8011411111610110311410511612149
    801141111161011031141051161215354  
    
    Protected Data is:
    24093431762273117614310419921525514617222667
    47682201011125321921025550132517810423224
    1226546236412520317611892221391111512195  
    
    Unprotected Data is:
    11211411111610110311410511612149505152
    8011411111610110311410511612149
    801141111161011031141051161215354  
    
    Reprotected Data is:
    1097873234601451681642431861332456611012491206245210191127130232438913019025466141128178
    2363619902426812914815513921612420620922714019534172719623784164388416718387142154
    172272218917715815199140240911562181962161361652852686202401579322821724417010138
    

    Using Sample Data Elements for Simulating Auxiliary API Scenarios

    This section describes how to use the sample data elements and sample users for simulating the following auxiliary API scenarios:

    • Get the protector and core version.
    • Checking access permissions with success output.
    • Checking access permissions with failure output.

    Mock Example - GetVersion API

    The GetVersion API returns the mock extended version of the AP .Net in use. The mock extended version consists of the AP .Net version number and sample Core version.

    public string GetVersion()
    

    Parameters

    None

    Returns

    • string: Returns an object with product version of the installed AP .Net and sample Core version.

    Exception

    None

    Example

    protector.GetVersion();
    

    Result

    SDK Version: 10.0.0.x, Core Version: 2.1.1+0.x
    

    Note: The Core Version is for representational purposes only. The actual implementation may vary depending on the customer’s installation.

    Mock Example - Success Scenario for Checking Access Permissions

    This section lists the success scenario when you check the access permission status of the user for a specified data element.

    Example
    In the following example, the CheckAccess API returns True when you check the permission of ALL_USER for unprotecting the data using the SUCCESS_STR data element.

    bool access = protector.CheckAccess(MockPolicyUser.ALL_USER,
    MockDataElement.SUCCESS_STR, CheckAccessType.UNPROTECT);
    Console.WriteLine(access);
    

    Result

    True
    

    Mock Example - Failure Scenario for Checking Access Permissions

    This section lists the failure scenario when you check the access permission status of the user for a specified data element.

    Example
    In the following example, the CheckAccess API returns False when you check the permission of NO_PROTECT_USER for protecting the data using the SUCCESS_STR data element.

    bool access = protector.CheckAccess(MockPolicyUser.NO_PROTECT_USER,
    MockDataElement.SUCCESS_STR, CheckAccessType.PROTECT);
    Console.WriteLine(access);
    

    Result

    False
    

    Using Sample Data Elements for Simulating Error Scenarios

    This section describes how to use the sample data elements for simulating error scenarios while protecting, unprotecting, and reprotecting the data.

    Mock Example - Invalid Data Element Exception

    This section describes an example scenario where if a data element that is not defined in a policy is used to protect single or bulk data.

    Example: Single Data
    In the following example, the Protegrity1 string is used as the data, which is being protected using an INVALID data element.

    try
    {
        protector = Protector.GetProtector();
    
        protector.Protect("Protegrity1", MockPolicyUser.ALL_USER, "INVALID_DE");
    }
    catch (ProtectorException e)
    {
        Console.WriteLine(e);
    }
    

    Result

    2, The data element could not be found in the policy.
    

    Mock Example - Input Data Too Short

    This section describes an example scenario where if the data to be protected or unprotected is too short.

    Example: Single Data
    In the following example, the Protegrity1 string is used as the data, which is being protected using the INPUT_TOO_SHORT data element.

    try
    {
        protector = Protector.GetProtector();
    
        protector.Protect("Protegrity1", MockPolicyUser.ALL_USER, MockDataElement.INPUT_TOO_SHORT);
    }
    catch (ProtectorException e)
    {
        Console.WriteLine(e);
    }
    

    Result

    22, Data is too short to be protected/unprotected.
    

    Example: Bulk Data
    In the following example, the Protegrity1234, Protegrity1, and Protegrity56 strings are added in an array and used as input bulk data. The input data is being protected using the INPUT_TOO_SHORT data element.

    string[] bulkInput = { "protegrity1234", "Protegrity1", "Protegrity56" };
    
    Tuple<string[], int[]> protectedData = protector.Protect(bulkInput, MockPolicyUser.ALL_USER, MockDataElement.INPUT_TOO_SHORT);
    
    foreach (int retCode in protectedData.Item2) {
        Console.WriteLine(retCode);
    }
    

    Result

    22
    22
    22
    

    Mock Example - Input Data Too Long

    This section describes an example scenario where if the data to be protected or unprotected is too long.

    Example: Single Data
    In the following example, the Protegrity1 string is used as the data, which is being protected using the INPUT_TOO_LONG data element.

    try
    {
        protector = Protector.GetProtector();
    
        protector.Protect("Protegrity1", MockPolicyUser.ALL_USER, MockDataElement.INPUT_TOO_LONG);
    }
    catch (ProtectorException e)
    {
        Console.WriteLine(e);
    }
    

    Result

    23, Data is too long to be protected/unprotected.
    

    Example: Bulk Data

    In the following example, the Protegrity1234, Protegrity1, and Protegrity56 strings are added in an array and used as input bulk data. The input data is being protected using the INPUT_TOO_LONG data element.

    string[] bulkInput = { "protegrity1234", "Protegrity1", "Protegrity56" };
    
    Tuple<string[], int[]> protectedData = protector.Protect(bulkInput, MockPolicyUser.ALL_USER, MockDataElement.INPUT_TOO_LONG);
    
    foreach (int retCode in protectedData.Item2) {
        Console.WriteLine(retCode);
    }
    

    Result

    23
    23
    23
    

    Mock Example - Unsupported Algorithm

    This section describes an example scenario where if the protection method used to protect the data is not supported by the API.

    Example
    In the following example, the Protegrity1 string is used as the data, which is being protected using the UNSUPPORTED_ALGORITHM data element.

    try
    {
        protector = Protector.GetProtector();
    
        protector.Protect("Protegrity1", MockPolicyUser.ALL_USER, MockDataElement.UNSUPPORTED_ALGORITHM);
    }
    catch (ProtectorException e)
    {
        Console.WriteLine(e);
    }
    

    Result

    26, Unsupported algorithm or unsupported action for the specific data element.
    

    Mock Example - Empty Policy

    This section describes an example scenario where if the data is protected without the policy being present in shared memory.

    Example: Single Data
    In the following example, the Protegrity1 string is used as the data, which is being protected using the EMPTY_POLICY data element.

    try
    {
        protector = Protector.GetProtector();
    
        protector.Protect("Protegrity1", MockPolicyUser.ALL_USER, MockDataElement.EMPTY_POLICY);
    }
    catch (ProtectorException e)
    {
        Console.WriteLine(e);
    }
    

    Result

    31, Policy not available.
    

    Mock Example - Invalid Input

    This section describes an example scenario where if the data to be protected is invalid.

    Example: Single Data
    In the following example, the Protegrity1 string is used as the data, which is being protected using the INPUT_NOT_VALID data element.

    try
    {
        protector = Protector.GetProtector();
    
        protector.Protect("Protegrity1", MockPolicyUser.ALL_USER, MockDataElement.INPUT_NOT_VALID);
    }
    catch (ProtectorException e)
    {
        Console.WriteLine(e);
    }
    

    Result

    44, The content of the input data is not valid.
    

    Example: Bulk Data
    In the following example, the Protegrity1234, Protegrity1, and Protegrity56 strings are added in an array and used as input bulk data. The input data is being protected using the INPUT_NOT_VALID data element.

    string[] bulkInput = { "protegrity1234", "Protegrity1", "Protegrity56" };
    
    Tuple<string[], int[]> protectedData = protector.Protect(bulkInput, MockPolicyUser.ALL_USER, MockDataElement.INPUT_NOT_VALID);
    
    foreach (int retCode in protectedData.Item2) {
        Console.WriteLine(retCode);
    }
    

    Result

    44
    44
    44
    

    Using Sample Users for Simulating Error Scenarios

    This section describes how to use sample users for simulating the user-related error scenarios while protecting, unprotecting, and reprotecting the data.

    Mock Example - Invalid User Exception

    This section describes an example scenario where if a user who is not defined in a policy is used to protect single or bulk data.

    Example: Single Data
    In the following example, the Protegrity1 string is used as the data, which is being protected using the NO_USER user and SUCCESS_STR data element.

    try
    {
        protector = Protector.GetProtector();
    
        protector.Protect("Protegrity1", MockPolicyUser.NO_USER, MockDataElement.SUCCESS_STR);
    }
    catch (ProtectorException e)
    {
        Console.WriteLine(e);
    }
    

    Result

    1, The username could not be found in the policy.
    

    Mock Example - Long User Name

    This section describes an example scenario where if the name of the user, who is protecting or unprotecting the data, is too long. For instance, if the user name is greater than 255 bytes.

    Example: Single Data
    In the following example, the Protegrity1 string is used as the data, which is being protected using the SUCCESS_STR data element and USER_TOO_LONG user.

    try
    {
        protector = Protector.GetProtector();
    
        protector.Protect("Protegrity1", MockPolicyUser.USER_TOO_LONG, MockDataElement.SUCCESS_STR);
    }
    catch (ProtectorException e)
    {
        Console.WriteLine(e);
    }
    

    Result

    25, Username too long.
    

    Mock Example - No Protect User

    This section describes an example scenario where in which a user does not have privileges to protect data.

    Example: Single Data
    In the following example, the NO_PROTECT_USER user is used to protect the Protegrity1 string using the SUCCESS_STR data element.

    try
    {
        protector = Protector.GetProtector();
    
        protector.Protect("Protegrity1", MockPolicyUser.NO_PROTECT_USER, MockDataElement.SUCCESS_STR);
    }
    catch (ProtectorException e)
    {
        Console.WriteLine(e);
    }
    

    Result

    3, The user does not have the appropriate permissions to perform the requested operation.
    

    Mock Example - No Reprotect User

    This section describes an example scenario where in which a user does not have privileges to reprotect data.

    Example: Single Data
    In the following example, the NO_REPROTECT_USER user is used to try and reprotect the Protegrity1 string using the SUCCESS_REPROTECT_STR data element.

    try
    {
        protector = Protector.GetProtector();
    
        protector.Reprotect("Protegrity1", MockPolicyUser.NO_REPROTECT_USER, MockDataElement.SUCCESS_STR, MockDataElement.SUCCESS_REPROTECT_STR);
    }
    catch (ProtectorException e)
    {
        Console.WriteLine(e);
    }
    

    Result

    3, The user does not have the appropriate permissions to perform the requested operation.
    

    Mock Example - No Unprotect Null User

    This section describes an example scenario where in which a user does not have privileges to unprotect data. In this case, if the user tries to unprotect the data, then the unprotect API returns a null value.

    Example: Single Data
    In the following example, the NO_UNPROTECT_NULL_USER user is first used to protect the Protegrity1 string using the SUCCESS_STR data element. Then, the NO_UNPROTECT_NULL_USER user is used to try and unprotect the protected input data using the same data element. However, the user is unable to unprotect the data and the API returns a null value.

    try
    {
        protector = Protector.GetProtector();
    
        string protData = protector.Protect("Protegrity1", MockPolicyUser.NO_UNPROTECT_NULL_USER, MockDataElement.SUCCESS_STR);
        Console.WriteLine(protData);
        string unprotData = protector.Unprotect(protData, MockPolicyUser.NO_UNPROTECT_NULL_USER, MockDataElement.SUCCESS_STR);
    
        if (unprotData == null)
        {
            Console.WriteLine("The unprotect output is null.");
        }
    }
    catch (ProtectorException e)
    {
        Console.WriteLine(e);
    }
    

    Result

    ESUgkmSlgtq
    The unprotect output is null.
    

    Example: Bulk Data
    In the following example, Protegrity1234, Protegrity1, and Protegrity56 strings are added in an array, which is used as the input bulk data. The NO_UNPROTECT_NULL_USER user is first used to protect the input data using the SUCCESS_STR data element. Then, the NO_UNPROTECT_NULL_USER user is used to try and unprotect the protected input data using the same data element.

    try
    {
        protector = Protector.GetProtector();
        
        string[] bulkInput = { "protegrity1234", "Protegrity1", "Protegrity56" };
    
        Tuple<string[], int[]> protectedData = protector.Protect(bulkInput, MockPolicyUser.NO_UNPROTECT_NULL_USER, MockDataElement.SUCCESS_STR);
        Tuple<string[], int[]> unprotectedData = protector.Unprotect(protectedData.Item1, MockPolicyUser.NO_UNPROTECT_NULL_USER, MockDataElement.SUCCESS_STR);
    
        Console.WriteLine("Return codes:");
        for (int i = 0; i < unprotectedData.Item1.Length; i++)
        {
            Console.WriteLine(unprotectedData.Item2[i]);
            if (unprotectedData.Item1[i] == null)
            {
                Console.WriteLine("The unprotect output is null.");
            }
        }
    }
    catch (ProtectorException e)
    {
        Console.WriteLine(e);
    }
    

    Result

    Return codes:
    3
    The unprotect output is null.
    3
    The unprotect output is null.
    3
    The unprotect output is null.
    

    Mock Example - No Unprotect Exception User

    This section describes an example scenario where in which a user does not have privileges to unprotect data. In this case, if the user tries to unprotect the data, then the unprotect API throws an exception.

    Example: Single Data
    In the following example, the NO_UNPROTECT_EXC_USER user is first used to protect the Protegrity1 string using the SUCCESS_STR data element. Then, the NO_UNPROTECT_EXC_USER user is used to try and unprotect the protected input data using the same data element. However, the user is unable to unprotect the data and the API throws an exception.

    try
    {
        protector = Protector.GetProtector();
    
        string protData = protector.Protect("Protegrity1", MockPolicyUser.NO_UNPROTECT_EXC_USER, MockDataElement.SUCCESS_STR);
        string unprotData = protector.Unprotect(protData, MockPolicyUser.NO_UNPROTECT_EXC_USER, MockDataElement.SUCCESS_STR);
    }
    catch (ProtectorException e)
    {
        Console.WriteLine(e);
    }
    

    Result

    3, The user does not have the appropriate permissions to perform the requested operation.
    

    Mock Example - No Unprotect Protected User

    This section provides an example scenario where in which a user does not have privileges to unprotect data. In this case, if the user tries to unprotect the data, then the unprotect API returns the protected input data.

    Example: Single Data
    In the following example, the NO_UNPROTECT_PROTECTED_USER user is first used to protect the Protegrity1 string using the SUCCESS_STR data element. Then, the NO_UNPROTECT_PROTECTED_USER user is used to try and unprotect the protected input data using the same data element. However, the user is unable to unprotect the data, and the API returns the protected input data.

    try
    {
        protector = Protector.GetProtector();
    
        string protData = protector.Protect("Protegrity1", MockPolicyUser.NO_UNPROTECT_PROTECTED_USER, MockDataElement.SUCCESS_STR);
        Console.WriteLine($"Protected Data is: {protData}");
        string unprotData = protector.Unprotect(protData, MockPolicyUser.NO_UNPROTECT_PROTECTED_USER, MockDataElement.SUCCESS_STR);
        Console.WriteLine($"Unprotected Data is:  {unprotData}");
    }
    catch (ProtectorException e)
    {
        Console.WriteLine(e);
    }
    

    Result

    Protected Data is: ESUgkmSlgtq
    Unprotected Data is: ESUgkmSlgtq
    

    Example: Bulk Data
    In the following example, Protegrity1234, Protegrity1, and Protegrity56 strings are added in an array, which is used as the input bulk data. The NO_UNPROTECT_PROTECTED_USER user is first used to protect the input data using the SUCCESS_STR data element. Then, the NO_UNPROTECT_PROTECTED_USER user is used to try and unprotect the protected input data using the same data element.

    try
    {
        protector = Protector.GetProtector();
    
        string[] bulkInput = { "protegrity1234", "Protegrity1", "Protegrity56" };
    
        Tuple<string[], int[]> protData = protector.Protect(bulkInput, MockPolicyUser.NO_UNPROTECT_PROTECTED_USER, MockDataElement.SUCCESS_STR);
        Tuple<string[], int[]> unprotData = protector.Unprotect(protData.Item1, MockPolicyUser.NO_UNPROTECT_PROTECTED_USER, MockDataElement.SUCCESS_STR);
    
        Console.WriteLine($"Protected Data is:  {string.Join(", ", protData.Item1)}");
        Console.WriteLine($"Unprotected Data is:  {string.Join(", ", unprotData.Item1)}");
    }
    catch (ProtectorException e)
    {
        Console.WriteLine(e);
    }
    

    Result

    Protected Data is: cSUgkmSlgtqwi8, ESUgkmSlgtq, ESUgkmSlgtNK
    Unprotected Data is: cSUgkmSlgtqwi8, ESUgkmSlgtq, ESUgkmSlgtNK
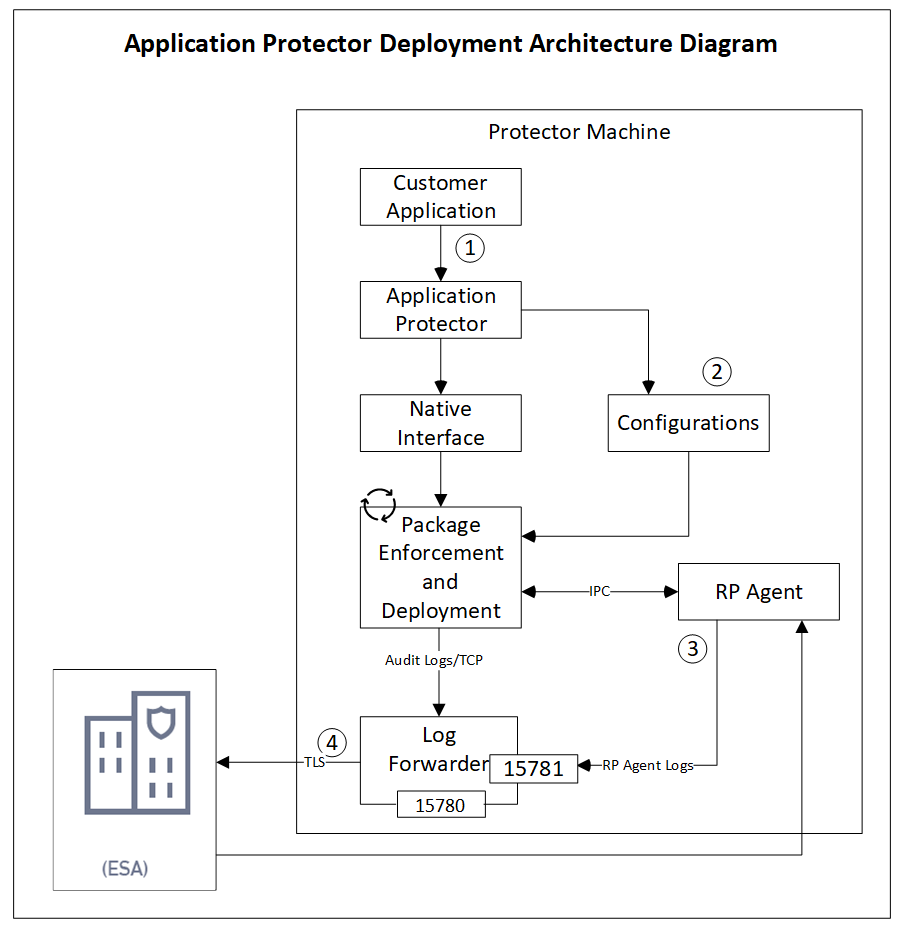
    

    7 - Additional Topics

    Learn about the AP .Net documentation with advanced operational insights and platform-specific guidance.

    This section expands the core Application Protector (AP) .Net documentation.

    • Uninstalling AP .Net on Windows involves removing binaries, configuration files, and dependencies.
    • Understanding AP .Net’s memory footprint is critical for performance tuning and resource allocation.
    • Understanding the installation of AP .Net on Windows in a development environment.

    7.1 - Memory Usage of the AP .Net

    The memory usage in the AP .Net for different policy sizes with a sample.

    Using the Sample .Net Application to Test Memory Usage for Policies

    This article provides information about memory requirements of the AP .Net. A sample .Net application is provided below. It can be used to test the memory requirements of policies of various sizes. Results of that testing are based on the memory usage of a single instance of a .Net process, excluding LogForwarder and RP Agent.

    Sample application

    The following is a sample .Net application.

    using System;
    using System.Collections.Generic;
    using System.Text;
    using Protegrity.Net;
    using Protegrity.PException;
    
    namespace APDotNetTest
    {
        /**********************************************************************************************/
        /**
         * @class   Program
         *
         * @brief   A sample program for Application .NET Protector.
         *
         **************************************************************************************************/
        class Program
        {
            private const string dataElementName = "alphanum";
            private const string newDataElementName = "alphanumreprot";
            private const string userName = "policyuser";
    
    
            /**********************************************************************************************/
            /**
             * @fn  static void Main(string[] args)
             *
             * @brief   Main entry-point for this application
             *
             * @param   args    An array of command-line argument strings.
             **************************************************************************************************/
    
            static void Main(string[] args)
            { 
                try
                {
                    /* Dispose() is a method defined by the IDisposable interface in .NET. 
                     * Its used to release unmanaged resources.
                     * .NET garbage collector only cleans up managed memory. If your class uses unmanaged resources, 
                     * you must clean them up manually  and thats what Dispose() is for.
                     * 
                     * ====================
                     * With using 
                     * ====================
                     * You're telling the compiler:
                     * "Create this object, and automatically call Dispose() on it 
                     * when it goes out of scope."
                     * This is called a using declaration, and it ensures that cleanup happens even if
                     * an exception occurs.
                     * 
                     * ======================
                     * Without using
                     * ======================
                     * You have to call dispose manually.
                     */
    
                    using Protector protector = Protector.GetProtector();
    
                    /**
                     * Sample input string data for single operations.
                     */
                    string singleInput = "Hello Protegrity";
                    byte[] singleByteInput = Encoding.UTF8.GetBytes(singleInput);
    
                    Console.WriteLine("#########################################");
                    Console.WriteLine("# Protegrity Application .NET Protector #");
                    Console.WriteLine("#########################################\n");
    
                    /**
                     * Calling GetVersion to print APDotNet sdk and Core version.
                     */
                    Console.WriteLine(protector.GetVersion() + "\n");
                    Console.WriteLine("--------------------------------------");
                    Console.WriteLine("-     Single Protect API             -");
                    Console.WriteLine("--------------------------------------");
                    Console.WriteLine($"Input Data is:        {singleInput}\n");
    
    
                    /**
                     * Use protector object to call single string Protect API.
                     */
                    string protectedData = protector.Protect(singleInput, userName, dataElementName);
                    Console.WriteLine("With String Data Type");
                    Console.WriteLine("-----------------------");
                    Console.WriteLine($"Protected Data is:    {protectedData}");
    
                    /**
                     * Use protector object to call single string Unprotect API
                     */
                    string unprotectedData = protector.Unprotect(protectedData, userName, dataElementName);
                    Console.WriteLine($"Unprotected Data is:  {unprotectedData}\n");
    
                    /**
                    * Use protector object to call single string Reprotect API.
                    */
                    string reprotectedData = protector.Reprotect(protectedData, userName, dataElementName, newDataElementName);
                    Console.WriteLine($"Reprotected Data is:  {reprotectedData}");
    
                    /**
                     * Use protector object to call single string Unprotect API
                     */
                    string unprotectReprotectedData = protector.Unprotect(reprotectedData, userName, newDataElementName);
                    Console.WriteLine($"Unprotected Data is:  {unprotectReprotectedData}\n");
    
                    /** 
                     * Use protector object to call single byte Protect API.
                     */
                    byte[] byteProtectedData = protector.Protect(singleByteInput, userName, dataElementName);
                    Console.WriteLine("With Byte Data Type");
                    Console.WriteLine("----------------------");
                    Console.WriteLine($"Protected Byte Data is:    {Encoding.UTF8.GetString(byteProtectedData)}");
    
                    /**
                     * Use protector object to call single byte Unprotect API
                     */
                    byte[] byteUnprotectedData = protector.Unprotect(byteProtectedData, userName, dataElementName);
                    Console.WriteLine($"Unprotected Byte Data is:  {Encoding.UTF8.GetString(byteUnprotectedData)}\n");
    
                    /**
                     * Use protector object to call single byte Reprotect API.
                     */
                    byte[] byteReprotectedData = protector.Reprotect(byteProtectedData, userName, dataElementName, newDataElementName);
                    Console.WriteLine($"Reprotected Byte Data is:  {Encoding.UTF8.GetString(byteReprotectedData)}");
    
                    /**
                     * Use protector object to call single byte Unprotect API
                     */
                    byte[] byteUnprotectReprotectedData = protector.Unprotect(byteReprotectedData, userName, newDataElementName);
                    Console.WriteLine($"Unprotected Byte Data is:  {Encoding.UTF8.GetString(byteUnprotectReprotectedData)}");
                    Console.WriteLine("\n");
    
                    /**
                     * Sample bulk string input data
                     */
                    string[] bulkInput = { "The Alpha-numeric token type tokenizes all alphabetic symbols (both lowercase and uppercase letters), as well as digits.", "Digits 0 through 9, Lowercase letters a through z, Uppercase letters A through Z", "alphanumeric data 1234567890 !@#$%^&* with special characters", "ALL THE CHARACTERS IN THIS STRING ARE UPPERCASE", "UPPERCASE WITH 1234567890 NUMBERS AND !@#$%^&*() SPECIAL CHARACTERS" };
                    List<byte[]> byteBulkInput = new List<byte[]>(bulkInput.Length);
    
                    Console.WriteLine("--------------------------------------");
                    Console.WriteLine("-         Bulk Protect API           -");
                    Console.WriteLine("--------------------------------------");
    
                    Console.WriteLine("Input Data is:");
    
                    /**
                     * Converting string data to byte data.
                     */
                    for (int i = 0; i < bulkInput.Length; i++)
                    {
                        Console.WriteLine($"{bulkInput[i]}");
                        byteBulkInput.Add(Encoding.UTF8.GetBytes(bulkInput[i]));
                    }
    
                    Console.WriteLine("\n");
                    Console.WriteLine("With String Data Type");
                    Console.WriteLine("----------------------");
    
                    /**
                     * Use protector object to call bulk string Protect API
                     */
                    Tuple<string[], int[]> bulkProtectedData = protector.Protect(bulkInput, userName, dataElementName);
                    Console.WriteLine("Protected Data is: ");
                    for (int i = 0; i < bulkProtectedData.Item1.Length; i++)
                    {
                        Console.WriteLine(bulkProtectedData.Item1[i] + " " + bulkProtectedData.Item2[i]);
                    }
                    Console.WriteLine("\n");
    
                    /**
                     * Use protector object to call bulk string Unprotect API
                     */
                    Tuple<string[], int[]> bulkUnprotectedData = protector.Unprotect(bulkProtectedData.Item1, userName, dataElementName);
                    Console.WriteLine("Unprotected Data is: ");
                    for (int i = 0; i < bulkUnprotectedData.Item1.Length; i++)
                    {
                        Console.WriteLine(bulkUnprotectedData.Item1[i] + " " + bulkUnprotectedData.Item2[i]);
                    }
                    Console.WriteLine("\n");
    
                    /**
                     * Use protector object to call bulk string Reprotect API
                     */
                    Tuple<string[], int[]> bulkReprotectedData = protector.Reprotect(bulkProtectedData.Item1, userName, dataElementName, newDataElementName);
                    Console.WriteLine("Reprotected Data is: ");
                    for (int i = 0; i < bulkReprotectedData.Item1.Length; i++)
                    {
                        Console.WriteLine(bulkReprotectedData.Item1[i] + " " + bulkReprotectedData.Item2[i]);
                    }
                    Console.WriteLine("\n");
    
                    /**
                    * Use protector object to call bulk string Unprotect API
                    */
                    Tuple<string[], int[]> bulkUnprotectReprotectedData = protector.Unprotect(bulkReprotectedData.Item1, userName, newDataElementName);
                    Console.WriteLine("Unprotected Data is: ");
                    for (int i = 0; i < bulkUnprotectReprotectedData.Item1.Length; i++)
                    {
                        Console.WriteLine(bulkUnprotectReprotectedData.Item1[i] + " " + bulkUnprotectReprotectedData.Item2[i]);
                    }
                    Console.WriteLine("\n");
    
                    Console.WriteLine("With Byte Data Type");
                    Console.WriteLine("----------------------");
    
                    /**
                     * Use protector object to call bulk byte Protect API
                     */
                    Tuple<List<byte[]>, int[]> byteBulkProtectedData = protector.Protect(byteBulkInput, userName, dataElementName);
                    Console.WriteLine("Protected Data is: ");
                    for (int i = 0; i < byteBulkProtectedData.Item1.Count; i++)
                    {
                        Console.WriteLine(Encoding.UTF8.GetString(byteBulkProtectedData.Item1[i]) + " " + byteBulkProtectedData.Item2[i]);
                    }
                    Console.WriteLine("\n");
    
                    /**
                    * Use protector object to call bulk byte Unprotect API
                    */
                    Tuple<List<byte[]>, int[]> byteBulkUnprotectedData = protector.Unprotect(byteBulkProtectedData.Item1, userName, dataElementName);
                    Console.WriteLine("Unprotected Data is: ");
                    for (int i = 0; i < byteBulkUnprotectedData.Item1.Count; i++)
                    {
                        Console.WriteLine(Encoding.UTF8.GetString(byteBulkUnprotectedData.Item1[i]) + " " + byteBulkUnprotectedData.Item2[i]);
                    }
                    Console.WriteLine("\n");
    
                    /**
                    * Use protector object to call bulk byte Reprotect API
                    */
                    Tuple<List<byte[]>, int[]> byteBulkReprotectedData = protector.Reprotect(byteBulkProtectedData.Item1, userName, dataElementName, newDataElementName);
                    Console.WriteLine("Reprotected Data is: ");
                    for (int i = 0; i < byteBulkReprotectedData.Item1.Count; i++)
                    {
                        Console.WriteLine(Encoding.UTF8.GetString(byteBulkReprotectedData.Item1[i]) + " " + byteBulkReprotectedData.Item2[i]);
                    }
                    Console.WriteLine("\n");
    
                    /**
                    * Use protector object to call bulk byte Unprotect API
                    */
                    Tuple<List<byte[]>, int[]> byteBulkUnprotectReprotectedData = protector.Unprotect(byteBulkReprotectedData.Item1, userName, newDataElementName);
                    Console.WriteLine("Unprotected Data is: ");
                    for (int i = 0; i < byteBulkUnprotectReprotectedData.Item1.Count; i++)
                    {
                        Console.WriteLine(Encoding.UTF8.GetString(byteBulkUnprotectReprotectedData.Item1[i]) + " " + byteBulkUnprotectReprotectedData.Item2[i]);
                    }
                    Console.WriteLine("\n");
                }
                catch (ProtectorException e)
                {
                    Console.WriteLine(e);
                }
            } /* End scope of main function */
    
        } /* End scope of class */
    
    } /* closure of namespace */
    

    Expected Memory Usage

    The process to find the policy size and expected memory usage for different policy sizes used by the .Net application is described in this section.

    To find the policy size:

    1. On Insights dashboard, under the Discover section, navigate to the troubleshooting index.
    2. Search using the process.module.keyword: coreprovider filter.
    3. Navigate to the logs with description as Policy successfully loaded. The additional_info.memoryUsed field depicts the policy size.

    Memory Usage

    Dynamic Memory Usage

    The following is the expected memory usage for different policy sizes used by the .Net application.

    Policy sizeProcess memory consumption
    171 MB223 MB
    240 MB292 MB
    931 MB982 MB

    The process memory increases substantially for a few milliseconds when the application is running in the following cases:

    • The policy is replaced with another policy
    • Changes are made in the current policy

    DevOps Memory Usage

    If we increase the policy size, the time to load the policy file in the memory increases. For example; for 37 MB, it takes 1 min to load the policy file whereas for 370 MB, it takes approximately an hour to load the policy file.

    7.2 - Setting Up AP .Net Mock on Windows in a Development Environment

    Learn about installating AP .Net on Windows in a development environment.

    This section describes how to install Application Protector (AP) .Net on a Windows platform for development purposes.

    Note: The Log Forwarder and RP Agent should not be installed in a development environment.

    Verifying prerequisites

    Ensure that the following prerequisites are met:

    • A supported version of .NET Standard 2.0 is installed on the machine.

    Extracting the AP .Net Setup Scripts and Package

    To extract the setup scripts and package:

    1. Download the ApplicationProtector_WIN-ALL-64_x86-64_NET-STD-2.0-64_<version>.zip file to any location on the machine where you want to install the protector.
    2. Extract the contents of the ApplicationProtector_WIN-ALL-64_x86-64_NET-STD-2.0-64_<version>.zip file.
      The following setup files are extracted:
      • ApplicationProtector_WIN-ALL-64_x86-64_NET-STD-2.0-64_<version>.zip
      • signatures/ApplicationProtector_WIN-ALL-64_x86-64_NET-STD-2.0-64_<version>.zip_10.0.sig
    3. Verify the digital signature of the signed AP .Net build.
      For more information about verifying the signed AP .Net build, refer to Verification of Signed Protector Build.
    4. Extract the contents of the AP .Net installation package again.
      The following setup files are extracted:
      • LogforwarderSetup_Windows_x64_<version>.exe
      • RPAgentSetup_Windows_x64_<version>.exe
      • APDotNetSetup_Windows_x64_<version>.exe
      • APDotNetMockSetup_Windows_x64_<version>.exe

    Installing AP .Net Mock on Windows in a Development Environment

    This section describes how to install AP .Net Mock on a Windows platform for development purposes.

    Important:

    • Ensure that the following folders do not exist before installation:
      - C:\Users\Administrator\.nuget\packages\dotnetprotector
      - C:\Users\Administrator\.nuget\packages\dotnetprotectormocksetup
    • You can install only one environment at a time either production or development.

    Using Windows Wizard

    1. Run the APDotNetMockSetup_Windows_x64_<version>.exe installer from the created directory.
      The Select Destination Location screen appears.

    2. Set the installation directory to C:\Program Files\Protegrity\sdk\dotnet.

    3. Click Next.
      The Ready to Install screen appears.

    4. Click Install.
      The Completing the Defiance AP DOTNET API Setup Wizard screen appears.

    5. Click Finish to exit the installer.

      The AP .Net Mock is installed successfully.

      The default installation directories for different platforms are given in the following table.
      Table: Default Installation Directories

      PlatformDirectory
      Windows 64-bitC:\Program Files\Protegrity\sdk\dotnet\lib
      API DocsC:\Program Files\Protegrity\sdk\dotnet\doc
    6. Verify that DotNetProtectorMockSetup.<version>.nupkg NuGet package for the AP .NET is installed in the <installation_directory>\dotnet\lib installation directory.

    7. Install the NuGet Package.
      a. In Visual Studio, open Solution Explorer.

      b. Right-click on Dependencies and select Manage NuGet Packages.
      The NuGet Package Manager screen appears.

      c. Click the Settings icon next to the Package source list.

      d. In the Options dialog box, click the ellipsis next to the Source field.

      e. Browse to and select the C:\Program Files\Protegrity\sdk\dotnet\lib lib directory.

      f. Enter a name for the package source, for example APDotNetMockLib and click Update.
      The lib directory path appears in the Package sources list.

      g. Click OK to close the dialog box.

      h. In the Package source list, select the newly created source.

      i. Click Browse, locate the DotNetProtectorMockSetup package.

      The DotNetProtectorMockSetup package appears in the list of packages.

      j. Click Install.

      The DotNetProtectorMockSetup package is installed.

      1. Run the Program.
        After installation, run your application to verify integration.
        For more information about installing a NuGet package, refer to Install and manage packages in Visual Studio using the NuGet Package Manager.

    Using Silent Mode

    This section describes how to perform a silent installation of AP .Net Mock using command-line parameters.

    Silent installation allows you to install AP .Net Mock without user interaction, making it suitable for automated deployments and scripting.

    To view usage of the AP .Net Mock installation, use the -help parameter during silent installation.

    APDotNetMockSetup_Windows_x64_10.0.0+0.g8606.exe -help
    

    To specify the directory for the AP .Net Mock installation, use the -dir parameter during silent installation.

    APDotNetMockSetup_Windows_x64_10.0.0+0.g8606.exe -dir C:\Users\Administrator
    

    Note: -dir is a mandatory parameter for silent installation.

    Uninstalling Application Protector .Net Mock on Windows in a Development Environment

    This section describes how to completely remove AP .Net Mock from a Windows platform used for development.

    To uninstall the .Net Mock from the development environment:

    1. Navigate to the Installation Directory.
      a. Go to C:\Program Files\Protegrity\sdk\dotnet.

    2. Run the Uninstall Utility located in the directory.

    3. Delete the Installation Directory.
      a. After uninstallation, delete the C:\Program Files\Protegrity\sdk folder.

    4. Uninstall the NuGet Package.
      a. Open Visual Studio and go to Manage NuGet Packages for Solution.
      b. Browse and select the DotNetProtectorMockSetup package.
      c. Click Uninstall.

      The AP .Net Mock Setup is uninstalled from the development environment.
      The dotnetprotector package will be deleted from the NuGet Package Folder during the unintallation process.

    7.3 - DevOps Approach for Application Protector

    The DevOps approach for package deployment.

    Note: The DLL file creation is supported only by .NET Core 8.0 and .NET Core 9.0. The .NET application can be run by using any supported versions.

    The DevOps approach enables immutable package deployment. It uses a REST API call to download packages from the ESA in an encrypted format.

    Note: The RP Agent should not be installed for immutable package deployments using DevOps.

    For more information about package deployment approaches, refer to Resilient Package Deployment.

    A REST API call is used to download the package on your local machine. Configure the package path in the config.ini file within the DevOps section and the path to decryptor dll file.

    If a downloaded path is overwritten, a new package will be reflected in the running application at the set time interval. This occurs when another package with the same name overwrites the existing one. This changes the protector’s behaviour. The protector no longer functions as an immutable protector.

    DevOps approach architecture

    1. A REST API call is used to download the policy from the ESA in an envelop encrypted format. A public key is created using a Key Management System (KMS) or Hardware Security Module (HSM). This public key must be passed to the REST API.
    2. The ESA generates a JSON file for the package with policy.
    3. The encrypted DEK needs to be decrypted to perform the security operations. A Decryptor class is implemented using the Decryptor interface, to decrypt the Data Encryption Key (DEK) using a private key.

    Before you begin

    Ensure the following prerequisites are met:

    • The installation of the RP Agent is not required for immutable package deployment using the DevOps approach.
    • The decryptor parameter must have a complete path to a decryptor dll file.
      A Decryptor class needs to be implemented using the Decryptor interface, which decrypts the Data Encryption Key (DEK) using a private key. It returns the decrypted DEK in bytes.
      For more information on the decryptor interface of AP .Net, refer to Configuring the Decryptor interface.
    • A decryptor dll file needs to be created using the decryptor interface and decryptor class.
    • Create a solution project “DotNetDecryptor” where you want to generate the Decryptor DLL file.

      Note: To create Decryptor DLL file, we require the IDEKDecryptor.cs, DotNetDecryptor.csproj, Decryptor.cs, and cloud specific decryptor files for AWSKMSDecryptor.cs, AzureKeyVaultDecryptor.cs, and GCPKMSDecryptor.cs.

    • The data store is properly configured before exporting your Application Protector policy. Define allowed servers for seamless policy deployment and secure access control.
      For more information about configuring a data store, refer to -

    AP .Net

    Using the DevOps Approach

    Perform the following steps to use the DevOps approach for immutable package deployment.

    1. Add the [devops] parameter in the config.ini file.
      Ensure the decryptor class has a fully qualified domain name.

      [devops]
      package.path = /path/to/policyFile
      decryptor = /path/to/DotNetDecryptor.dll
      

      The following is an example for adding the [devops] parameter in the config.ini file.

      [devops]
      package.path = C:\Users\User1\policies\test.json
      decryptor = C:\Users\User1\DotNetDecryptor\DotNetDecryptor.dll
      

    Note: For ESA 10.2.0 and later, Application Protector DevOps must use the Encrypted Resilient Package REST APIs using GET method. The legacy Export API using POST method is deprecated and not supported for Teams (PPC). The deprecated API remains supported only for the Enterprise edition for backward compatibility.

    For more information about exporting Resilient Package using POST method for 10.0.1 and 10.1.0 ESA, refer to Using the Encrypted Resilient Package REST APIs.

    For more information about exporting Resilient Package using GET method for 10.2 ESA, refer to Using the Encrypted Resilient Package REST APIs.

    For more information about exporting Resilient Package using GET method for PPC, refer to Using the Encrypted Resilient Package REST APIs.

    Sample Code for DevOps Approach

    The sample code for DevOps approach for the AP .Net using different cloud platforms is provided in this section.

    Configuring the Decryptor Interface

    A Decryptor class must implement the IDEKDecryptor interface to decrypt the DEK. This interface includes the decrypt method. The decrypt method provides keyLabel, algorithmId, and encDek parameters. The decrypted DEK must be returned in byte[] format.

    The following is the sample code for the decryptor file for using the DevOps Approach with specific cloud platforms.

    IDEKDecryptor.cs

    The following is a sample code for IDEKDecryptor.cs.

    namespace Decryptor
    {
        public interface IDEKDecryptor
        {
            byte[] Decrypt(string keyLabel, string algorithmId, byte[] encDEK, out int decryptedDekLength);
    
        }
    }
    
    DotNetDecryptor.csproj

    The following is a sample code for DotNetDecryptor.csproj.

    <Project Sdk="Microsoft.NET.Sdk">
    
    	<PropertyGroup>
    		<TargetFramework>net8.0</TargetFramework>
    		<PlatformTarget>AnyCPU</PlatformTarget>
    		<PublishAot>true</PublishAot>
    		<AllowUnsafeBlocks>true</AllowUnsafeBlocks>
    		<EnableDynamicLoading>true</EnableDynamicLoading>
    		<RuntimeIdentifier>win-x64</RuntimeIdentifier>
    		<UseNativeAot>true</UseNativeAot>
    	</PropertyGroup>
    
    </Project>
    
    Decryptor.cs

    The following is a sample code for Decryptor.cs.

    using System;
    using System.Runtime.CompilerServices;
    using System.Runtime.InteropServices;
    
    namespace Decryptor
    {
    
        [UnmanagedFunctionPointer(CallingConvention.Cdecl)]
        public delegate IntPtr DecryptDelegate(
           [MarshalAs(UnmanagedType.LPUTF8Str)] string keyLabel,
           [MarshalAs(UnmanagedType.LPUTF8Str)] string algorithmId,
           IntPtr encData,
           int encLen,
           out int outLen);
    
       
        public static class DecryptorBridge
        {
            public static IDEKDecryptor Implementation { get; set; }
            static DecryptorBridge()
            {
                Implementation = new RSADecryptor();
            }
            public static IntPtr DecryptEntry(string keyLabel, string algorithmId, IntPtr encData, int encLen, out int outLen)
            {
                if (Implementation == null)
                    throw new InvalidOperationException("Decryptor implementation not set.");
                byte[] encryptedDek = new byte[encLen];
                Marshal.Copy(encData, encryptedDek, 0, encLen);
                byte[] result = Implementation.Decrypt(keyLabel, algorithmId, encryptedDek, out outLen);
                IntPtr resultPtr = Marshal.AllocHGlobal(outLen);
                Marshal.Copy(result, 0, resultPtr, outLen);
                return resultPtr;
            }
    
            [UnmanagedCallersOnly(EntryPoint = "GetDecryptDelegate")]
            public static IntPtr GetDecryptDelegate() 
            {
                DecryptDelegate del = DecryptEntry;
                return Marshal.GetFunctionPointerForDelegate(del);
            }
    
            [UnmanagedCallersOnly(EntryPoint = "FreeBuffer", CallConvs = new[] { typeof(CallConvCdecl) })]
            public static void FreeBuffer(IntPtr ptr) { Marshal.FreeHGlobal(ptr); }


        }
    
    }
    

    Using AWS

    For AWS, we require the IDEKDecryptor.cs, DotNetDecryptor.csproj, Decryptor.cs along with AWSKMSDecryptor.cs. The following is a sample implementation using the private key obtained from AWS KMS for decryption.

    using System;
    using System.IO;
    using System.Security.Cryptography.X509Certificates;
    using System.Text;
    using System.Threading.Tasks;
    using Amazon;
    using Amazon.KeyManagementService;
    using Amazon.KeyManagementService.Model;
    using Decryptor;
    
    namespace DotNetDecryptor
    {
        public class AWSKMSDecryptor : IDEKDecryptor
        {
            // Replace with your actual AWS region name (e.g., "us-east-1", "ap-south-1")
            private static readonly RegionEndpoint KMSRegion = RegionEndpoint.GetBySystemName("your-default-region");
    
            // Replace with your actual KMS Key ID 
            private static readonly string KMSKeyId = "your-key-id";
            public byte[] Decrypt(string keyLabel, string algorithmId, byte[] encDek, out int decryptedDekLength)
            {
                Console.WriteLine("Key Label: " + keyLabel);
                Console.WriteLine("AlgorithmID: " + algorithmId);
                Console.WriteLine("Base64 encoded input: " + Convert.ToBase64String(encDek));
    
                // Initialize the AWS KMS client using the specified region
                var kmsClient = new AmazonKeyManagementServiceClient(KMSRegion); 
                // Specify the encryption algorithm used during encryption
                EncryptionAlgorithmSpec algorithm = EncryptionAlgorithmSpec.RSAES_OAEP_SHA_256;
                // Create a decryption request with the encrypted DEK and algorithm
                var decryptRequest = new DecryptRequest
                {
                    KeyId = KMSKeyId,
                    CiphertextBlob = new MemoryStream(encDek),
                    EncryptionAlgorithm = algorithm
                };
                // Send the decryption request to AWS KMS and wait for the response
                var decryptResponse = kmsClient.DecryptAsync(decryptRequest).Result;
                byte[] plaintext = decryptResponse.Plaintext.ToArray();
                decryptedDekLength = plaintext.Length;
    
                return plaintext;
            }
    
        }
    }
    

    Using Azure

    For Azure, we require the IDEKDecryptor.cs, DotNetDecryptor.csproj, Decryptor.cs along with AzureKeyVaultDecryptor.cs. The following is a sample implementation using the private key obtained from Azure Key Vault for decryption.

    using Azure.Identity;
    using Azure.Security.KeyVault.Keys;
    using Azure.Security.KeyVault.Keys.Cryptography;
    using Decryptor;
    using System;
    using System.Net;
    using System.Text;
    using System.Threading.Tasks;
    
    namespace Decryptor
    {
        public class AzureKeyVaultDecryptor : IDEKDecryptor
        {
    
            public byte[] Decrypt(string keyLabel, string algorithmId, byte[] encDek, out int decryptedDekLength)
            {
                Console.WriteLine("Key Label:" + keyLabel);
                Console.WriteLine("AlgorithmID:" + algorithmId);
                Console.WriteLine("Base64 encoded input: " + Convert.ToBase64String(encDek));
                var keyVaultUrl = "https://devops-key.vault.azure.net/";
                var keyName = "testkey";
                var credential = new DefaultAzureCredential();
                var keyClient = new KeyClient(new Uri(keyVaultUrl), credential);
                KeyVaultKey key = keyClient.GetKey(keyName);
                CryptographyClient _cryptoClient = new CryptographyClient(key.Id, credential);
                EncryptionAlgorithm algorithm = EncryptionAlgorithm.RsaOaep256;
                DecryptResult result = _cryptoClient.Decrypt(algorithm, encDek);
                decryptedDekLength = result.Plaintext.Length;
                Console.WriteLine("Base64 encoded output: " + Convert.ToBase64String(result.Plaintext));
                return result.Plaintext;
            }
        }
    }
    

    Using GCP

    For GCP, we require the IDEKDecryptor.cs, DotNetDecryptor.csproj, Decryptor.cs along with GCPKMSDecryptor.cs. The following is a sample implementation using the private key obtained from Google Cloud KMS for decryption.

    using System;
    using System.Collections.Generic;
    using System.IdentityModel.Tokens.Jwt;
    using System.Net.Http;
    using System.Reflection.Metadata;
    using System.Security.Cryptography;
    using System.Text;
    using System.Threading.Tasks;
    using Decryptor;
    using Microsoft.IdentityModel.Tokens;
    using Newtonsoft.Json;
    
    namespace DotNetDecryptor
    {
        public class GCPKMSDecryptor : IDEKDecryptor
        {
            public byte[] Decrypt(string keyLabel, string algorithmId, byte[] encDEK, out int decryptedDekLength)
            {
                Console.WriteLine("Key Name: " + keyLabel);
                Console.WriteLine("AlgorithmID: " + algorithmId);
                Console.WriteLine("Base64 encoded input: " + Convert.ToBase64String(encDEK));
    
                // TODO: Replace the below path with the full path to your service account key JSON file
                // Example: @"C:\Path\To\Your\File\your-file-name.json"
    
                string jsonPath = @"C:\Path\To\Your\File\your-file-name.json";
                var serviceAccount = JsonConvert.DeserializeObject<Dictionary<string, string>>(System.IO.File.ReadAllText(jsonPath));
    
                string privateKey = serviceAccount["private_key"];
                string clientEmail = serviceAccount["client_email"];
                string tokenUri = serviceAccount["token_uri"];
    
                var rsa = RSA.Create();
                rsa.ImportFromPem(privateKey.ToCharArray());
    
                var creds = new SigningCredentials(new RsaSecurityKey(rsa), SecurityAlgorithms.RsaSha256);
    
                var now = DateTimeOffset.UtcNow;
                var jwtHeader = new JwtHeader(creds);
                var jwtPayload = new JwtPayload
                {
                    { "iss", clientEmail },
                    { "scope", "https://www.googleapis.com/auth/cloud-platform" },
                    { "aud", tokenUri },
                    { "iat", now.ToUnixTimeSeconds() },
                    { "exp", now.AddMinutes(60).ToUnixTimeSeconds() }
                };
    
                var jwt = new JwtSecurityToken(jwtHeader, jwtPayload);
                string signedJwt = new JwtSecurityTokenHandler().WriteToken(jwt);
    
                var httpClient = new HttpClient();
                var tokenResponse = httpClient.PostAsync(tokenUri, new FormUrlEncodedContent(new Dictionary<string, string>
                {
                    { "grant_type", "urn:ietf:params:oauth:grant-type:jwt-bearer" },
                    { "assertion", signedJwt }
                })).Result;
    
                var tokenJson = JsonConvert.DeserializeObject<Dictionary<string, string>>(tokenResponse.Content.ReadAsStringAsync().Result);
                string accessToken = tokenJson["access_token"];
    
                string ciphertext = Convert.ToBase64String(encDEK);
    
                // TODO: Replace the below URL with your actual Google Cloud KMS key version URL
                // Format: https://cloudkms.googleapis.com/v1/projects/{PROJECT_ID}/locations/{LOCATION}/keyRings/{KEY_RING}/cryptoKeys/{KEY_NAME}/cryptoKeyVersions/{VERSION}:asymmetricDecrypt
                string kmsUrl = "https://cloudkms.googleapis.com/v1/projects/{PROJECT_ID}/locations/{LOCATION}/keyRings/{KEY_RING}/cryptoKeys/{KEY_NAME}/cryptoKeyVersions/{VERSION}:asymmetricDecrypt";
    
                var payload = new Dictionary<string, string>
                {
                    { "ciphertext", ciphertext }
                };
    
                var kmsRequest = new StringContent(JsonConvert.SerializeObject(payload), Encoding.UTF8, "application/json");
    
                httpClient.DefaultRequestHeaders.Authorization = new System.Net.Http.Headers.AuthenticationHeaderValue("Bearer", accessToken);
    
                var kmsResponse = httpClient.PostAsync(kmsUrl, kmsRequest).Result;
                
                var responseContent = kmsResponse.Content.ReadAsStringAsync().Result;
    
                if (!kmsResponse.IsSuccessStatusCode)
                {
                    Console.WriteLine("KMS API Error:");
                    Console.WriteLine(responseContent);
                    throw new Exception("KMS decryption failed.");
                }
    
                var kmsJson = JsonConvert.DeserializeObject<Dictionary<string, string>>(responseContent);
                string plaintextBase64 = kmsJson["plaintext"];
    
                byte[] plaintext = Convert.FromBase64String(plaintextBase64);
    
                decryptedDekLength = plaintext.Length;
              
                return plaintext;
            }
        }
    }
    

    Create a DotNetDecryptor.dll File

    To create a DLL file:

    1. Open x64 Native Tools Command Prompt for VS.

    2. Navigate to the folder where you have saved the DevOps Approach files using the following command.

      cd path\to\your\directory
      
    3. To build the Decryptor DLL, run the following command:

      dotnet publish -r win-x64 -c Release
      
    4. Navigate to the bin\x64\Release\net8.0\win-x64\publish\ folder.

    5. The DotNetDecryptor.dll is created in the publish folder.

      Note: It is recommended to move the DotNetDecryptor file to a shorter path location.

    6. Update the decryptor parameter to the DotNetDecryptor.dll full path in the config.ini file.

    7.4 - Application Protector API Return Codes

    Learn about the Application Protector API Return Codes.

    When an application is developed using the APIs of the Protegrity Application Protector Suite, you may encounter the Application Protector API Return Codes. For more information about log return codes, refer to Log return codes.

    Sample Log for AP Return Codes

    The following is a sample log generated in Discover on the Audit Store Dashboards in ESA.

    Sample log for AP return codes

    Protection audit logs are stored in the Audit Store. Select the pty_insight_*audit* index to view the protection logs.

    For more information about viewing the logs, refer to Working with Discover.

    7.5 - Config.ini file for Application Protector

    Sample config.ini file for Application Protector.

    The Application Protector can be configured using the config.ini file. By default, this file is located in the <installation directory>/sdk/<protector>/data/ directory.

    The various configurations required for setting up the Application Protector are described in this section.

    Sample config.ini file

    The following represents a sample config.ini file.

    # -----------------------------
    # Protector configuration
    # ----------------------------- 
    [protector]
    
    # Cadence determines how often the protector connects with shared memory to fetch the policy updates in background.
    # Default is 60 seconds. So by default, every 60 seconds protector tries to fetch the policy updates.
    #
    # Default 60.
    cadence = 60
    
    # The time during which a session object is valid. Default = 15 minutes.
    session.sessiontimeout = 15
    
    ###############################################################################
    # Log Provider Config
    ###############################################################################
    [log]
    
    # In case that connection to fluent-bit is lost, set how audits/logs are handled
    # 
    # drop  : (default) Protector throws logs away if connection to the fluentbit is lost
    # error : Protector returns error without protecting/unprotecting 
    #         data if connection to the fluentbit is lost
    mode = drop
    
    # Host/IP to fluent-bit where audits/logs will be forwarded from the protector
    #
    # Default localhost
    host = localhost
    

    Different configurations for Application Protector

    The following are the various configurations:

    Protector configurations

    • cadence: The interval at which the protector synchronizes with the shared memory for fetching the package with policy. The default value for cadence is 60 seconds. The maximum and minimum value that can be set for cadence are 86400 seconds (24 hours) and 1 respectively.
      For more information about the policy deployment with different cadence configurations, refer to Policy Deployment.
      For more information about the Resilient Package sync configuration parameters, refer to Resilient Package Sync Configuration Parameters.
      For more information about changing protector status interval, refer to Resilient Package Status Configuration Parameter.
    • session.sessiontimeout: The time during which a session object is valid. The default value for session.sessiontimeout is 15 minutes.

      Note: The session.sessiontimeout parameter is a feature of AP Java and not valid for AP Python and AP .Net.

    Log Provider configurations

    • mode: This describes how the protector logs are handled if you lose connection to the Log Forwarder host, can be set to one of the following values:
      • drop: The logs are dropped when the connection to the Log Forwarder is lost. The default mode is drop.
      • error: The data security operations are stopped and an error is generated when the connection to the Log Forwarder is lost.
    • host: The Log Forwarder hostname or IP address where the logs will be forwarded from the protector. The default host for Log Forwarder is localhost.

    For more information about the configuration parameters for forwarding the audits and logs, refer to Configuration Parameters for Forwarding Audits and Logs.

    7.6 - Multi-node Application Protector Architecture

    Architecture for multi-node Application Protector.

    The multi-node Application Protector (AP) architecture, its individual components, and how logs are collected using the Log Forwarder are described in this section.

    The following figure describes the multi-node AP architecture.

    Multi-node AP architecture

    For example, some AP nodes are connected to an ESA, which includes the Audit Store component. Each AP node contains a Log Forwarder, RP Agent, and AP instance for sending logs to the ESA.

    Protector: The AP can be configured using the config.ini file.
    For more information about the configurations, refer to Config.ini file for Application Protector.

    RP Agent: The RP Agent downloads the package with policy from the ESA, which is used by the protector to perform the protect, unprotect, or reprotect operations. It checks for the updates in the policy at set intervals and downloads the latest policy package when an update is detected.

    Log Forwarder: The Log Forwarder component collects the logs from the AP and forwards them to the Audit Store. The Log Forwarder uses the 15780 port which is configurable to transport protection and audit logs to the ESA. The ESA receives the logs and stores it in the Audit Store.

    7.7 - Uninstalling the Application Protector

    Uninstalling Application Protector .Net in a Production Environment

    This section provides step-by-step instructions to uninstall Application Protector .Net (AP .Net) and its associated components from a Windows platform.

    Uninstalling the Log Forwarder

    Follow these instructions to uninstall the Log Forwarder.

    Before you begin

    • To preserve all the configurations during an upgrade, ensure that all the files present under the C:\Program Files\Protegrity\logforwarder\data\config.d directory are backed up.
    • Close all AP .Net files and folders.

    Instructions

    For more information about uninstalling the Log Forwarder, refer to Uninstalling Log Forwarder on Windows.

    Uninstalling the RPAgent

    Follow these instructions to uninstall the RPAgent

    Before you begin

    • To preserve all the configurations during an upgrade, ensure that all the files present under the C:\Program Files\Protegrity\sdk\data directory are backed up.
    • Close all AP .Net files and folders.

    Instructions

    For more information about uninstalling the RP Agent, refer to Unstalling RP Agent on Windows.

    Uninstalling Application Protector .Net

    To uninstall the AP .Net:

    1. Run the Uninstall Utility.
      a. Navigate to C:\Program Files\Protegrity\sdk\dotnet directory.
      b. Run the unins000 file located in this directory.

    2. Delete the Installation Directory.
      a. After uninstallation, delete the C:\Program Files\Protegrity\sdk folder.

    3. Remove the Environment Variable.
      a. Delete the path to the dotnetprovider.plm file from the Environment Variables.

    4. Uninstall the NuGet Package.
      a. Open Visual Studio and go to Manage NuGet Packages for Solution.
      b. Search for and select DotNetProtector.
      c. Click Uninstall.

    The Application Protector .Net and its components are successfully uninstalled from the Windows platform.
    The dotnetprotector package will be deleted from the NuGet Package Folder during the unintallation process.