1 - Memory Usage of the AP Python
The memory usage in the AP Python for different policy sizes with a sample.
The memory used for the different policy sizes using a sample python application is described in this section.
Sample application
The following is a sample python application.
from appython import Protector
if __name__ == "__main__":

    # Initialize the protector
    protector = Protector()

    # Create session with policy user
    session = protector.create_session("USER1")

    # Protect operation
    p_out = session.protect("Protegrity1", "TE_AN_SLT13_L0R0_N")
    print("Protected Data: %s" %p_out)

    # Reprotect operation
    r_out = session.reprotect(p_out, "TE_AN_SLT13_L0R0_N", "TE_AN_SLT13_L0R0_N")
    print("Reprotected Data: %s" %r_out)

    # Unprotect operation
    org = session.unprotect(r_out, "TE_AN_SLT13_L0R0_N")
    print("Unprotected Data: %s" %org)
Expected memory usage
The process to find the policy size and expected memory usage for different policy sizes used by the python application is described in this section.
To find the policy size:
- On Insights dashboard, under the Discover section, navigate to the troubleshooting index.
- Search using the
process.module.keyword: coreprovider filter. - Navigate to the logs with description as Policy successfully loaded.
The
additional_info.memoryUsed field depicts the policy size.
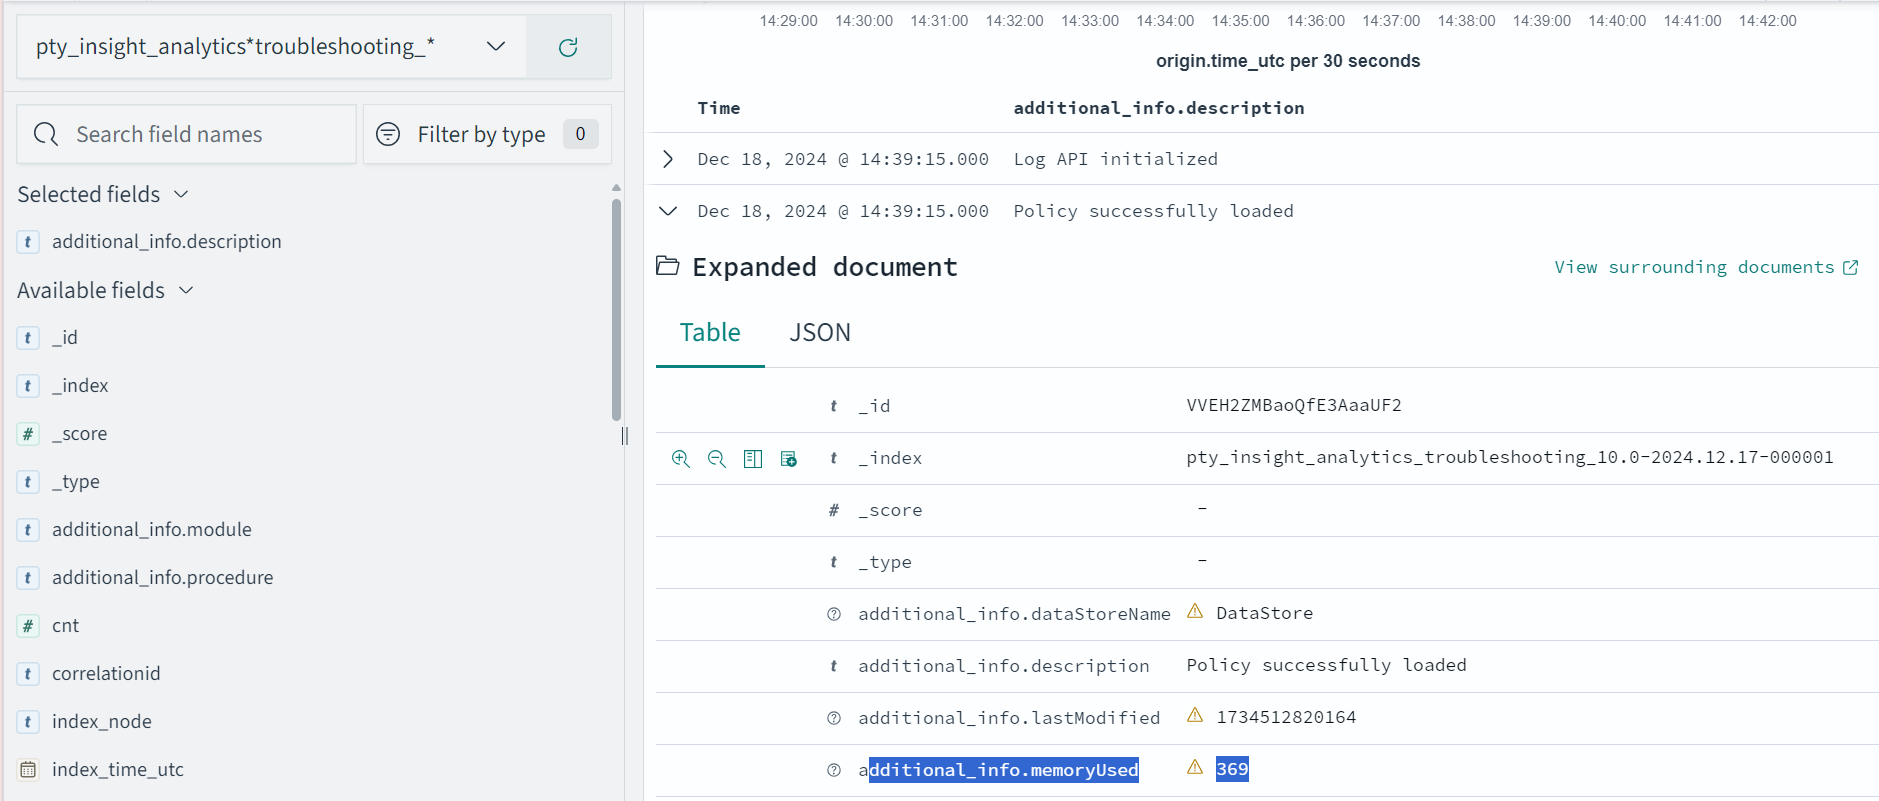
The following is the expected memory usage for different policy sizes used by the python application.
| Policy size | Process memory consumption |
|---|
| 13 MB | 42 MB |
| 38 MB | 89 MB |
| 536 MB | 979 MB |
The process memory increases substantially for a few milliseconds when the application is running in the following cases:
- The policy is replaced with another policy
- Changes are made in the current policy
Conclusion
The results for memory required by various policy sizes using the sample python application can be used to determine the memory requirements of the Python application. The results are based on memory usage of a single instance of python processes. The results exclude LogForwarder and RP Agent.
2 - Setting Up AP Python on Linux in a Development Environment
Learn about installating AP Python on Linux in a development environment.
The steps to set up the AP Python on a Linux platform in a development environment are described in the section.
Verifying prerequisites
Ensure that the following prerequisites are met:
- Python 3, version from 3.7 to 3.11, must be installed on the machine.
- Latest version of pip, the Python package manager, must be installed.
Note: <arch> can be x86-64 or arm64.
To set up the AP Python on the Linux platform in development environment.
Download the ApplicationProtector_Linux-ALL-64_<arch>_PY-<py_version>_<version>.tgz file to any location on the machine where you want to install the protector.
Extract the AP Python installation package using the following command.
tar –xvf ApplicationProtector_Linux-ALL-64_<arch>_PY-<py_version>_<version>.tgz
The following setup files are extracted:
Note: Here, <arch> can be x64 or arm64.
LogforwarderSetup_Linux_<arch>_<version>.shRPAgentSetup_Linux_<arch>_<version>.shAPPythonSetup_Linux_<arch>_<version>.shAPPythonDevSetup_Linux_<arch>_<version>.tar
Installing AP Python in a Development Environment
Note: Here, <arch> can be x64 or arm64.
Run the following script to install AP Python in a development environment.
pip install APPythonDevSetup_Linux_<arch>_<version>.tar
This installs the AP Python in the development environment on the Linux platform. The default installation directory for the Linux platform is /usr/local/lib/python<version>/site-packages.
Verify that the following directories are created in the AP Python site-packages installation directory:
- appython
- mocks
- pypepprovider
To verify the version of the AP Python, run the following command:
The name and version of the installed AP Python package are displayed on the console.
For information on how to use the AP Python APIs in a development environment, refer to Using AP Python in a development environment.
Perform the following steps to access the AP Python Pydoc, which contains the API documentation.
Run the following command to extract the AP Python setup file:
tar –xvf APPythonDevSetup_Linux_<arch>_<version>.tar
The appython_dev-<version> directory is extracted.
Navigate to the appython_dev-<version>\docs\ directory.
Open the index.html file in a browser to access the AP Python Pydoc.
If you are setting up the AP Python in a virtual Linux environment, then convert the appython_dev-<version>\docs\ directory to a zip file and download it locally. You can then open the index.html file in a browser to access the AP Python Pydoc.
Uninstalling AP Python from the Development Environment
To uninstall the AP Python from the development environment:
Login to the machine where AP Python is installed.
Uninstall the AP Python by running the following command.
pip uninstall appython-dev
3 - DevOps Approach for Application Protector Python
The DevOps approach for package deployment.
The DevOps approach enables immutable package deployment. It uses a REST API call to download packages from the ESA in an encrypted format.
Note: The RP Agent should not be installed for immutable package deployments using DevOps.
For more information about package deployment approaches, refer to Resilient Package Deployment.
A REST API call is used to download the package on your local machine. Configure the package path in the config.ini file within the DevOps section and the decryptor class.
If a downloaded path is overwritten, a new package will be reflected in the running application at the set time interval (cadence). This occurs when another package with the same name overwrites the existing one. This changes the protector’s behaviour. The protector no longer functions as an immutable protector. To keep it immutable, set the cadence value in config.ini file to 0.
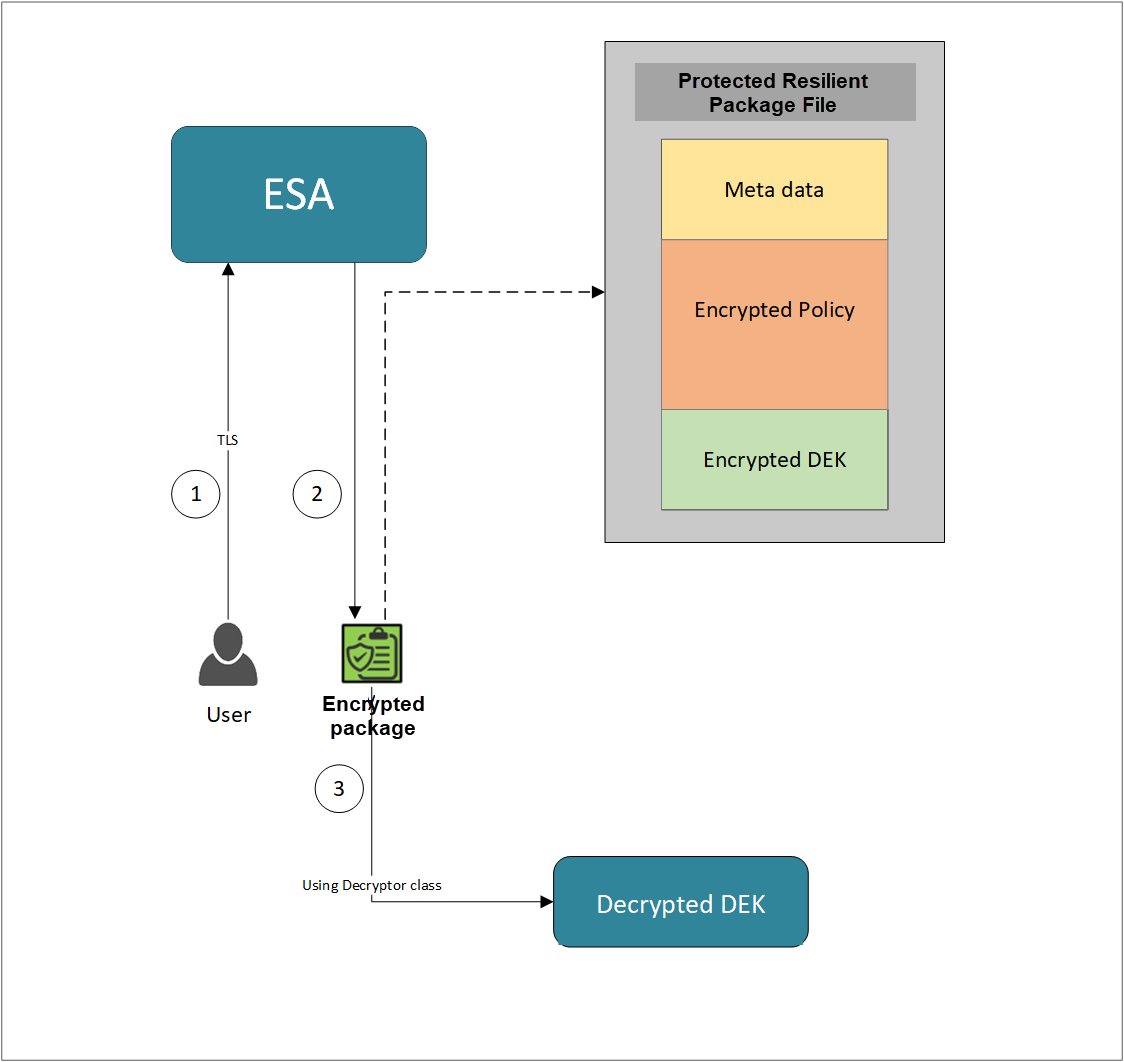
- A REST API call is used to download the policy from the ESA in an envelop encrypted format. A public key is created using a Key Management System (KMS) or Hardware Security Module (HSM). This public key must be passed to the REST API.
- The ESA generates a JSON file for the package with policy.
- The encrypted DEK needs to be decrypted to perform the security operations. A Decryptor class is implemented using the Decryptor interface, to decrypt the Data Encryption Key (DEK) using a private key.
Before you begin
Ensure the following prerequisites are met:
- The installation of the RP Agent is not required for immutable package deployment using the DevOps approach.
- The
decryptor parameter must have a fully qualified name of the decryptor class.
A Decryptor class needs to be implemented using the Decryptor interface, which decrypts the Data Encryption Key (DEK) using a private key. It returns the decrypted DEK in bytes.
For more information on the decryptor interface of AP Python, refer to Configuring the Decryptor interface.
- The data store is properly configured before exporting your Application Protector policy. For ESA 10.0.1 and 10.1.0 versions, define allowed servers for seamless policy deployment and secure access control.
For more information about configuring a data store, refer to - - For ESA version 10.2.0 and higher, export key must be created in the data store for secure access control.
For more information refer to Using the Encrypted Resilient Package REST APIs.
AP Python
Using the DevOps approach
Perform the following steps to use the DevOps approach for immutable package deployment.
Add the [devops] parameter in the config.ini file.
Ensure the decryptor class has a fully qualified domain name.
[devops]
package.path = /path/to/policyFile
decryptor.path = /path/to/decryptorClassFile
decryptor.class = decryptorClassName
The following is an example for adding the [devops] parameter in the config.ini file.
[devops]
package.path = /opt/policies/test.json
decryptor.path = /opt/protegrity/sdk/python/lib/RSADecryptor.py
decryptor.class = RSADecryptor
Note: For ESA 10.2.0 and later, Application Protector DevOps must use the Encrypted Resilient Package REST APIs using GET method. The legacy Export API using POST method is deprecated and not supported for Teams (PPC). The deprecated API remains supported only for the Enterprise edition for backward compatibility.
For more information about exporting Resilient Package using POST method for 10.0.1 and 10.1.0 ESA, refer to Using the Encrypted Resilient Package REST APIs.
For more information about exporting Resilient Package using GET method for 10.2 ESA, refer to Using the Encrypted Resilient Package REST APIs.
For more information about exporting Resilient Package using GET method for PPC, refer to Using the Encrypted Resilient Package REST APIs.
Sample code for DevOps approach for AP Python
The following sections provide sample code for the DevOps approach for Application Protectors using different cloud platforms.
Configuring the Decryptor interface
A Decryptor class must implement the DEKDecryptor interface to decrypt the DEK. This interface includes the decrypt method. The decrypt method provides keyLabel, algorithmId, and encDek parameters. The decrypted DEK must be returned in byte[] format.
The following is a sample code for implementing the DEKDecryptor interface.
from abc import ABC, abstractmethod

class DEKDecryptor(ABC):
   @abstractmethod
   def decrypt(self,keylabel:str,algorithm_id:str,enc_dek:bytes) -> bytes:
      """
      Provides keyLabel,algorithmID and encDEK
      """
Using AWS
The following is a sample implementation using the private key from AWS KMS.
import logging
import boto3
from botocore.exceptions import ClientError
from pycoreprovider.utils.DEKDecryptor import DEKDecryptor


logger = logging.getLogger(__name__)

class KeyDecrypt:
    def __init__(self, kms_client):
        self.kms_client = kms_client

    @classmethod
    def from_client(cls) -> "KeyDecrypt":
        """
        Creates a KeyDecrypt instance with a default KMS client.

        :return: An instance of KeyDecrypt initialized with the default KMS client.
        """
        kms_client = boto3.client("kms",region_name="us-east-1")
        return cls(kms_client)


    def decrypt(self, key_id: str, cipher_text: bytes) -> bytes:
        """
        Decrypts text previously encrypted with a key.

        :param key_id: The ARN or ID of the key used to decrypt the data.
        :param cipher_text: The encrypted text to decrypt.
        :return: The decrypted text.
        """
        try:
            return self.kms_client.decrypt(KeyId=key_id, CiphertextBlob=cipher_text,EncryptionAlgorithm="ALGORITHM_NAME")[
                "Plaintext"
            ]
        except ClientError as err:
            logger.error(
                "Couldn't decrypt your ciphertext. Here's why: %s",
                err.response,
            )
            raise


class AWSKMSDecryptor(DEKDecryptor):
    def decrypt(self,keyLabel,algorithmID,encDek):
        key_decrypt = KeyDecrypt.from_client()
        return key_decrypt.decrypt("key:arn",encDek)
Using Azure
The following is a sample implementation using the private key from Azure Key Vault.
from azure.identity import DefaultAzureCredential
from azure.keyvault.keys.crypto import CryptographyClient, EncryptionAlgorithm
from pycoreprovider.utils.DEKDecryptor import DEKDecryptor

"""
Sample Decryptor class for decrypting the encrypted DEK using Azure Key Vault

[Azure Prerequisite]
* Install azure cli
* Login to azure : az login --use-device-code

[Protegrity Prerequisite]
* For creating a key in Azure Key Vault using Azure CLI, refer :
  https://learn.microsoft.com/en-us/azure/key-vault/keys/quick-create-cli
* Download the public key from the key vault :
  az keyvault key download --vault-name test -n testkey -e PEM -f publickey.pem
* Replace all the new lines with '\n' in publickey.pem
* Public key is now ready to be used for downloading the ESA policy
* Azure supports RSA1_5, RSA_OAEP and RSA_OAEP_256 algorithms, whose
  correspoding names in REST API call are RSA1_5, RSA-OAEP-SHA1 and
  RSA-OAEP-256 respectively. Refer:
  https://azuresdkdocs.blob.core.windows.net/$web/python/azure-keyvault-keys/latest/azure.keyvault.keys.crypto.html
* Make sure that decrypt permission is present for the key vault :
  az keyvault set-policy -n "test" --key-permissions decrypt --object-id 7e821e4c-e0ad-4a6f-aa26-f445c7c7e3ea
* To get the private key URI from azure key vault, refer :
  https://learn.microsoft.com/en-us/azure/key-vault/keys/quick-create-cli
[Python Prerequisite]
* Refer the minimum required python version from here -
  https://learn.microsoft.com/en-us/python/api/overview/azure/keyvault-keys-readme?view=azure-python
* pip install azure-keyvault-keys azure-identity cryptography

"""

class AzureKeyVaultDecryptor(DEKDecryptor):
    key_id = "https://automation-cntrs.vault.azure.net/keys/testkey/aaf3861366a24b1bb4f6871eb11afafe"

    def decrypt(self,keyLabel,algorithmID,encDek):
        credential = DefaultAzureCredential()
        crypto_client = CryptographyClient(AzureKeyVaultDecryptor.key_id, credential=credential)
        decrypted = crypto_client.decrypt(EncryptionAlgorithm.rsa_oaep_256, encDek)
        return decrypted.plaintext
Using GCP
The following is a sample implementation using the private key from Google Cloud KMS.
from pycoreprovider.utils.DEKDecryptor import DEKDecryptor

# Import the client library.
from google.cloud import kms

def decrypt_asymmetric(
    project_id: str,
    location_id: str,
    key_ring_id: str,
    key_id: str,
    version_id: str,
    ciphertext: bytes,
) -> kms.DecryptResponse:
    """
    Decrypt the ciphertext using an asymmetric key.

    Args:
        project_id (string): Google Cloud project ID (e.g. 'my-project').
        location_id (string): Cloud KMS location (e.g. 'us-east1').
        key_ring_id (string): ID of the Cloud KMS key ring (e.g. 'my-key-ring').
        key_id (string): ID of the key to use (e.g. 'my-key').
        version_id (string): ID of the key version to use (e.g. '1').
        ciphertext (bytes): Encrypted bytes to decrypt.

    Returns:
        DecryptResponse: Response including plaintext.

    """

    # Create the client.
    client = kms.KeyManagementServiceClient()

    # Build the key version name.
    key_version_name = client.crypto_key_version_path(
        project_id, location_id, key_ring_id, key_id, version_id
    )

    # Optional, but recommended: compute ciphertext's CRC32C.
    # See crc32c() function defined below.
    ciphertext_crc32c = crc32c(ciphertext)

    # Call the API.
    decrypt_response = client.asymmetric_decrypt(
        request={
            "name": key_version_name,
            "ciphertext": ciphertext,
            "ciphertext_crc32c": ciphertext_crc32c,
        }
    )

    # Optional, but recommended: perform integrity verification on decrypt_response.
    # For more details on ensuring E2E in-transit integrity to and from Cloud KMS visit:
    # https://cloud.google.com/kms/docs/data-integrity-guidelines
    if not decrypt_response.verified_ciphertext_crc32c:
        raise Exception("The request sent to the server was corrupted in-transit.")
    if not decrypt_response.plaintext_crc32c == crc32c(decrypt_response.plaintext):
        raise Exception(
            "The response received from the server was corrupted in-transit."
        )
    # End integrity verification

    print(f"Plaintext: {decrypt_response.plaintext!r}")
    return decrypt_response


def crc32c(data: bytes) -> int:
    """
    Calculates the CRC32C checksum of the provided data.
    Args:
        data: the bytes over which the checksum should be calculated.
    Returns:
        An int representing the CRC32C checksum of the provided bytes.
    """
    import crcmod  # type: ignore

    crc32c_fun = crcmod.predefined.mkPredefinedCrcFun("crc-32c")
    return crc32c_fun(data)

class GCPKMSDecryptor(DEKDecryptor):
    def decrypt(self,keyLabel,algorithmID,encDek):
        print(keyLabel,algorithmID,encDek)
        decDek=decrypt_asymmetric("project_id","location_id","key_ring_id","key_id","version_id","ciphertext")
        return decDek.plaintext
4 - Application Protector API Return Codes
Learn about the Application Protector API Return Codes.
When an application is developed using the APIs of the Protegrity Application Protector Suite, you may encounter the Application Protector API Return Codes.
For more information about log return codes, refer to Log return codes.
Sample Log for AP Return Codes
The following is a sample log generated in Discover on the Audit Store Dashboards in the ESA.
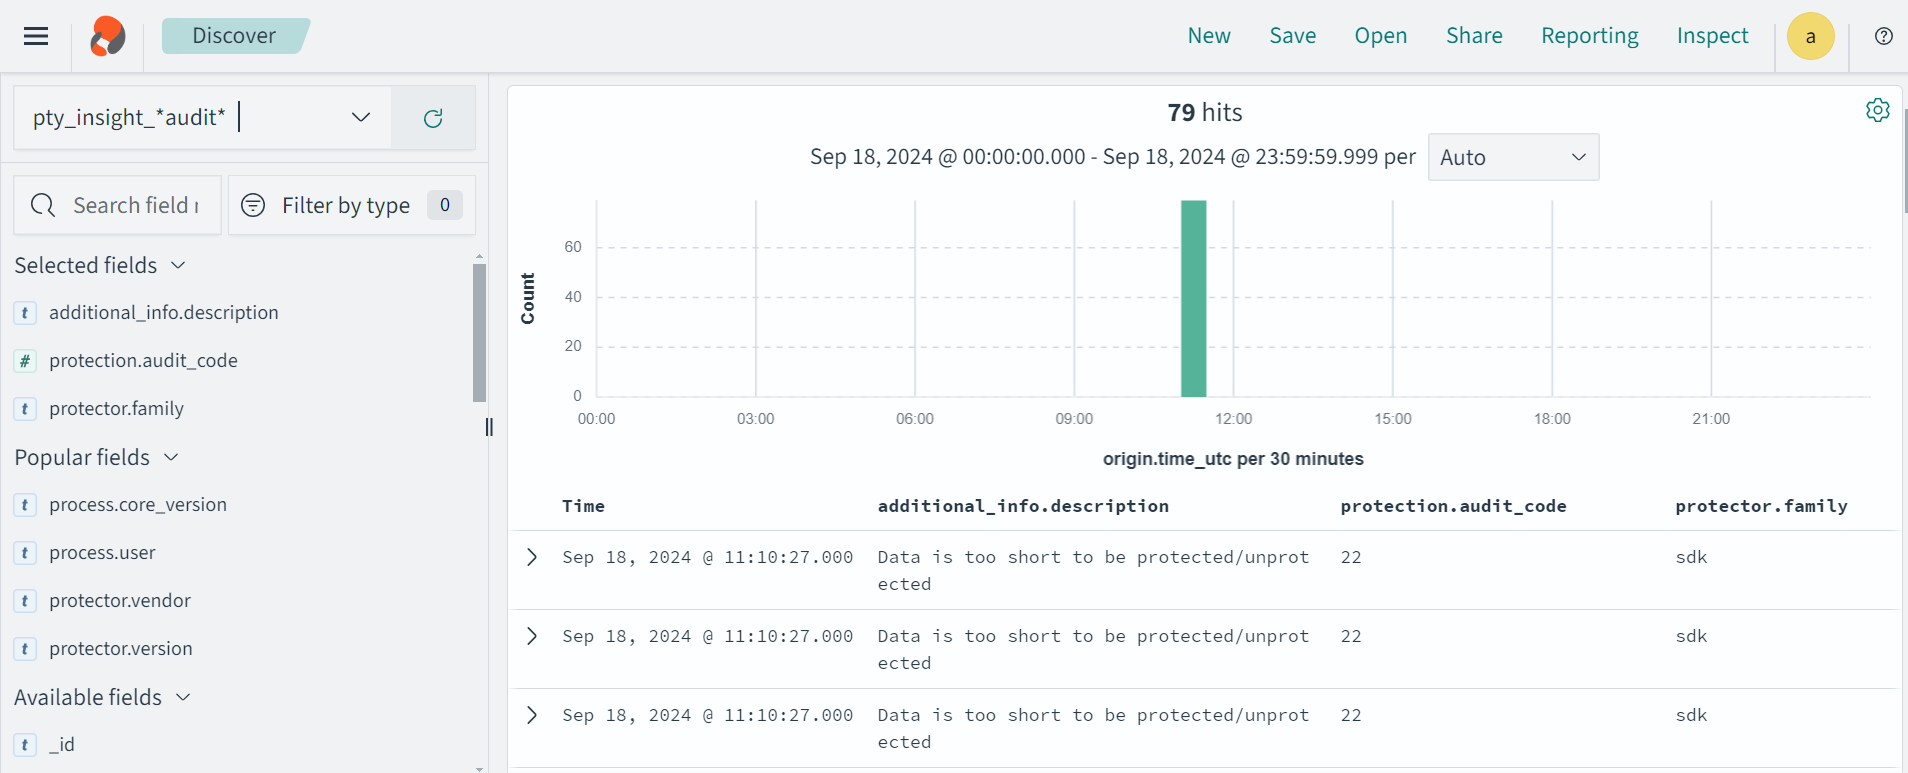
Protection audit logs are stored in the Audit Store. Select the pty_insight_*audit* index to view the protection logs.
For more information about viewing the logs, refer to Working with Discover.
5 - Config.ini file for Application Protector
Sample config.ini file for Application Protector.
The Application Protector can be configured using the config.ini file. By default, this file is located in the <installation directory>/sdk/<protector>/data/ directory.
The various configurations required for setting up the Application Protector are described in this section.
Sample config.ini file
The following represents a sample config.ini file.
# -----------------------------
# Protector configuration
# -----------------------------
[protector]

# Cadence determines how often the protector connects with shared memory to fetch the policy updates in background.
# Default is 60 seconds. So by default, every 60 seconds protector tries to fetch the policy updates.
#
# Default 60.
cadence = 60

# The time during which an session object is valid. Default = 15 minutes.
session.sessiontimeout = 15

###############################################################################
# Log Provider Config
###############################################################################
[log]

# In case that connection to fluent-bit is lost, set how audits/logs are handled
#
# drop  : (default) Protector throws logs away if connection to the fluentbit is lost
# error : Protector returns error without protecting/unprotecting
#         data if connection to the fluentbit is lost
mode = drop

# Host/IP to fluent-bit where audits/logs will be forwarded from the protector
#
# Default localhost
host = localhost
Different configurations for Application Protector
The following are the various configurations:
Protector configurations
cadence: The interval at which the protector synchronizes with the shared memory for fetching the package with policy. The default value for cadence is 60 seconds. The maximum and minimum value that can be set for cadence are 86400 seconds (24 hours) and 0 respectively.
For more information about the policy deployment with different cadence configurations, refer to Policy Deployment.
For more information about the Resilient Package sync configuration parameters, refer to Resilient Package Sync Configuration Parameters.
For more information about changing protector status interval, refer to Resilient Package Status Configuration Parameter.session.sessiontimeout: The time during which a session object is valid. The default value for session.sessiontimeout is 15 minutes.Note: The session.sessiontimeout parameter is supported only by AP Java. Other Application Protectors do not support this parameter.
Log Provider configurations
mode: This describes how the protector logs are handled if you lose connection to the Log Forwarder host, can be set to one of the following values:drop: The logs are dropped when the connection to the Log Forwarder is lost. The default mode is drop.error: The data security operations are stopped and an error is generated when the connection to the Log Forwarder is lost.
host: The Log Forwarder hostname or IP address where the logs will be forwarded from the protector. The default host for Log Forwarder is localhost.
For more information about the configuration parameters for forwarding the audits and logs, refer to Configuration Parameters for Forwarding Audits and Logs.
6 - Multi-node Application Protector Architecture
Architecture for multi-node Application Protector.
The multi-node Application Protector (AP) architecture, its individual components, and how logs are collected using the Log Forwarder are described in this section.
The following figure describes the multi-node AP architecture.
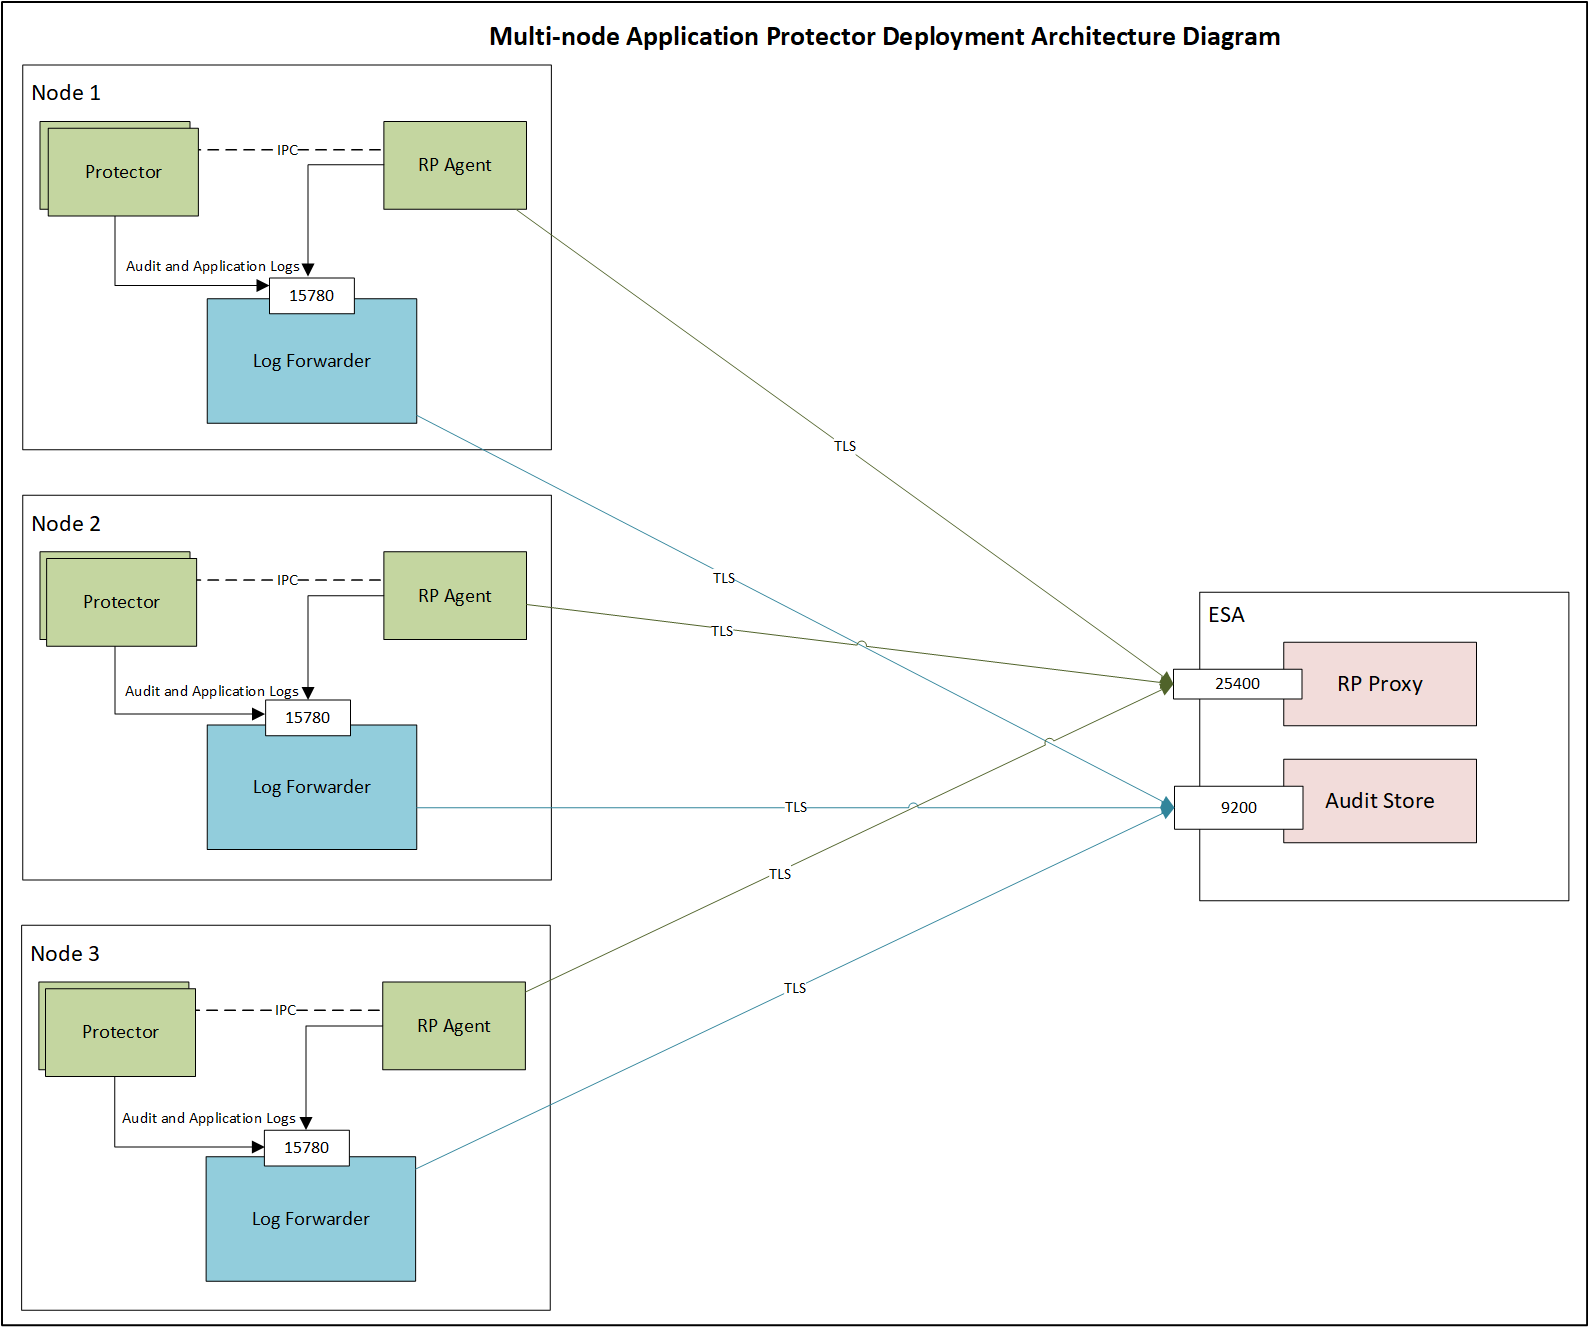
For example, some AP nodes are connected to an ESA, which includes the Audit Store component. Each AP node contains a Log Forwarder, RP Agent, and AP instance for sending logs to the ESA.
Protector: The AP can be configured using the config.ini file.
For more information about the configurations, refer to Config.ini file for Application Protector.
RP Agent: The RP Agent downloads the package with policy from the ESA, which is used by the protector to perform the protect, unprotect, or reprotect operations. It checks for the updates in the policy at set intervals and downloads the latest policy package when an update is detected.
Log Forwarder: The Log Forwarder component collects the logs from the AP and forwards them to the Audit Store. The Log Forwarder uses the 15780 port which is configurable to transport protection and audit logs to the ESA. The ESA receives the logs and stores it in the Audit Store.
7 - Uninstalling the Application Protector
Uninstalling the AP Python Installation on different platforms
Uninstalling Application Protector (AP) Python from Linux in Production Environment
The steps to uninstall the different components of the AP Python in production environment are described in this section.
Uninstalling the Log Forwarder from Linux
To preserve all the configurations while upgrading the Log Forwarder, ensure that all the files present under the /opt/protegrity/logforwarder/data/config.d directory are backed up.
To uninstall the Log Forwarder from a Linux platform:
Navigate to the /opt/protegrity/logforwarder/bin directory.
Stop the Log Forwarder using the following command.
Delete the /opt/protegrity/logforwarder directory.
The Log Forwarder is uninstalled.
Uninstalling the RP Agent from Linux
Before uninstalling the RP Agent, ensure that all the files present under the /opt/protegrity/rpagent/data directory are backed up.
To uninstall the RP Agent from a Linux platform:
Navigate to the /opt/protegrity/rpagent/bin directory.
Stop the RP Agent using the following command.
Delete the /opt/protegrity/rpagent directory.
The RP Agent is uninstalled.
Uninstalling the AP Python from Linux
To uninstall the AP Python from a Linux platform:
- Login to the machine from where you want to uninstall the AP Python.
- Uninstall the AP Python by running the following command.
- Delete the
/opt/protegrity/sdk/python directory.
The AP Python is uninstalled.