This section expands the core Application Protector (AP) Java documentation.
This is the multi-page printable view of this section. Click here to print.
Additional Topics
Learn about the AP Java documentation with advanced operational insights and platform-specific guidance.
- 1: Memory Usage of the AP Java
- 2: DevOps Approach for Application Protector Java
- 3: Application Protector API Return Codes
- 4: Config.ini file for Application Protector
- 5: Multi-node Application Protector Architecture
- 6: Installation Directory Structure Overview
- 7: SDK Upgrader Agent Configuration File
- 8: Troubleshooting for AP Java Upgrade
- 9: Uninstalling the Application Protector
1 - Memory Usage of the AP Java
The memory usage in the AP Java for different policy sizes with a sample.
The memory used for the different policy sizes using a sample HelloWorld java application is described in this section. This is a sample memory usage. You can use this as a reference for memory usage in the AP Java for different policy sizes.
Sample application
Before running the following program, update the HelloWorld.java file with the policy username and data element name.
Compile and Run the Sample Application
Compile the sample application using the following command.
cd /opt/protegrity/sdk/java/lib
javac -cp .:ApplicationProtectorJava.jar HelloWorld.java
Run the sample application using the following command.
java -cp .:ApplicationProtectorJava.jar HelloWorld
By default, the config.ini file is located in the SDK data directory /opt/protegrity/sdk/java/data and is picked up automatically at runtime.
If the config.ini file is moved to a different location, specify its path explicitly when running the application:
java -Dconfig.path=/opt/config.ini -cp .:ApplicationProtectorJava.jar HelloWorld
If config.ini is present in the same directory as ApplicationProtectorJava.jar and jcorelite.plm, the SDK loads it automatically and the -Dconfig.path option is not required.
The following is a sample HelloWorld.java application.
/* HelloWorld.java
*
* This is sample program demonstrating the usage of Java SDK API
*
* Configure Trusted Application policy in ESA with
* - Application name: lib.HelloWorld
* - Application user: <SYSTEM USER>
*
* Compiled as : javac -cp .:<PATH_TO_INSTALL_DIR>/sdk/java/lib/ApplicationProtectorJava.jar HelloWorld.java
* Run as :
* java -cp .:<PATH_TO_INSTALL_DIR>/sdk/java/lib/ApplicationProtectorJava.jar HelloWorld policyUser dataElement inputData
*
* Use either Token Elements or NoEncryption as dataElement while running this code.
*/

package lib;

import com.protegrity.ap.java.Protector;
import com.protegrity.ap.java.ProtectorException;
import com.protegrity.ap.java.SessionObject;

public class HelloWorld {

  public static void performProtectionOperation(
      String policyUser, String dataElement, String inputData) throws ProtectorException {

    String[] input = {inputData};
    String[] protectedOutput = new String[input.length];
    String[] unprotectedOutput = new String[input.length];

    // Initialize Java SDK Protector
    Protector protector = Protector.getProtector();

    // Create a new protection operation session for policyUser
    SessionObject session = protector.createSession(policyUser);
    // Get Java SDK Version
    System.out.println("Java SDK Version:" + protector.getVersion());

    // Perform Protect Operation
    boolean res = protector.protect(session, dataElement, input, protectedOutput);
    if (!res) {
      System.out.println(protector.getLastError(session));
    } else {
      System.out.println("Protected Data:");
      for (String out : protectedOutput) {
        System.out.print(out + " ");
      }
      System.out.println();
    }

    // Perform Unprotect Operation
    res = protector.unprotect(session, dataElement, protectedOutput, unprotectedOutput);
    if (!res) {
      System.out.println(protector.getLastError(session));
    } else {
      System.out.println("Unprotected Data:");
      for (String out : unprotectedOutput) {
        System.out.print(out + " ");
      }
      System.out.println();
    }
  }

  public static void main(String[] args) throws ProtectorException {

    if (args.length == 3) {
      System.out.println(
          "Testing input data "
              + args[2]
              + " "
              + "with dataElement "
              + args[1]
              + " "
              + "and policyUser "
              + args[0]);

      performProtectionOperation(args[0], args[1], args[2]);

    } else {
      System.out.println(
          " Usage : java -cp .:<PATH_TO_INSTALL_DIR>/sdk/java/lib/ApplicationProtectorJava.jar HelloWorld PolicyUser DataElement Data");
      System.out.println(
          " Example : java -cp .:<PATH_TO_INSTALL_DIR>/sdk/java/lib/ApplicationProtectorJava.jarr HelloWorld user1 TE_AN_SLT13_L0R0_N"
              + " Protegrity");
      System.exit(0);
    }
  }
}
Expected memory usage
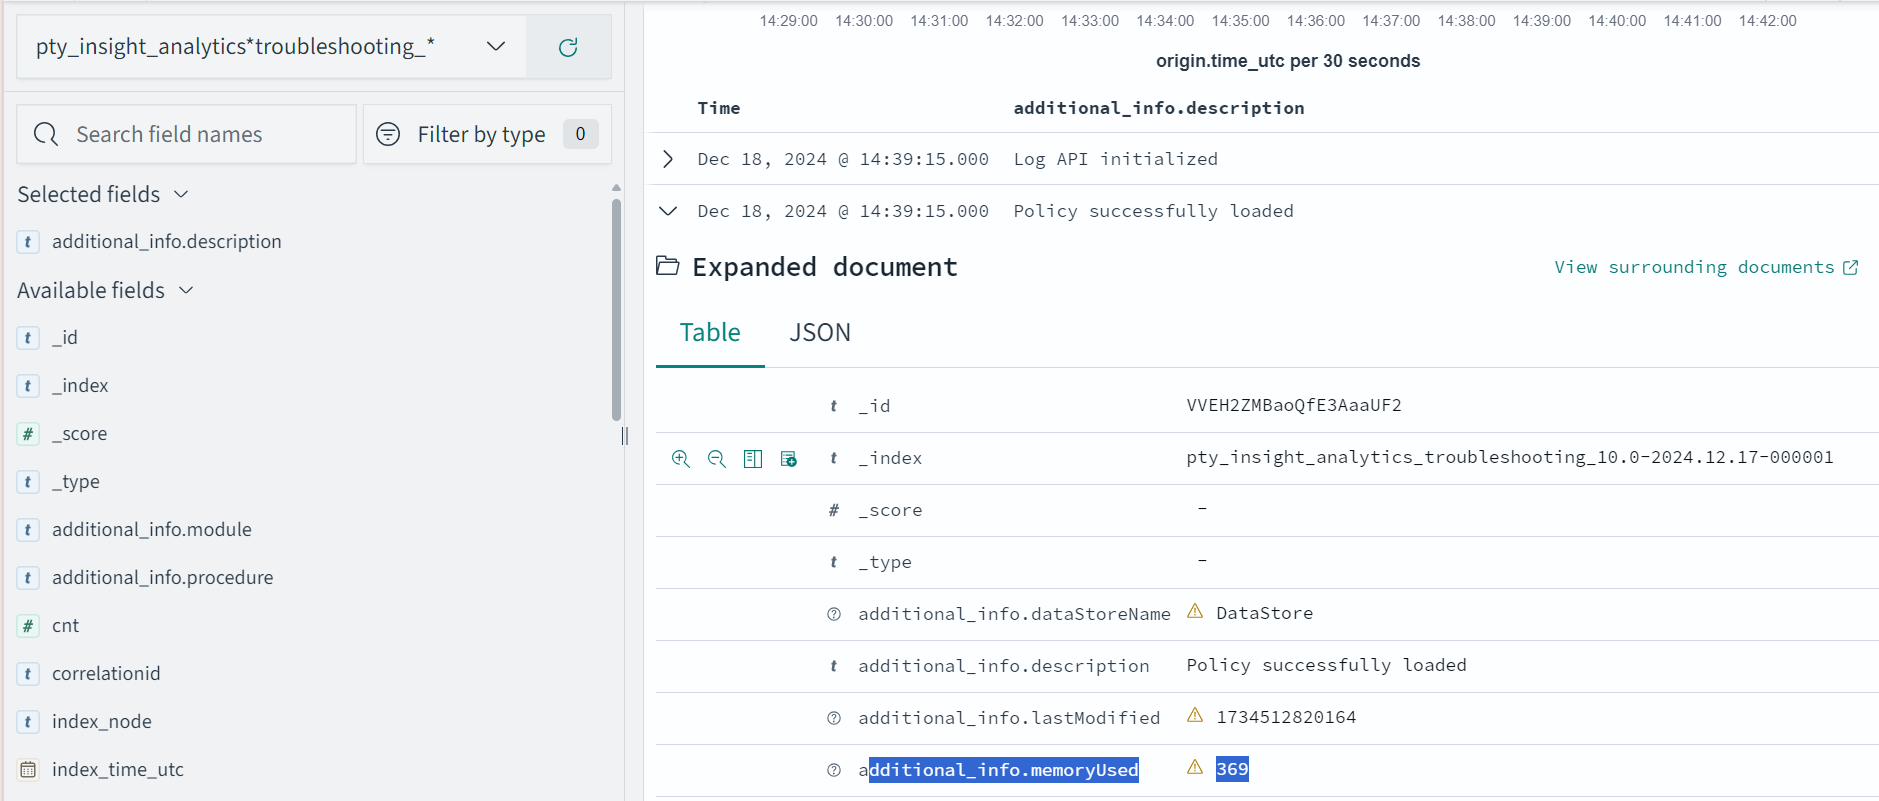
The process to find the policy size and expected memory usage for different policy sizes used by the java application is described in this section.
To find the policy size:
- On Insight dashboard, under the Discover section, navigate to the troubleshooting index.
- Search using the
process.module.keyword: coreproviderfilter. - Navigate to the logs with description as Policy successfully loaded.
The
additional_info.memoryUsedfield depicts the policy size.
The following is the expected memory usage for different policy sizes used by the HelloWorld java application.
| Policy size | Process memory consumption |
|---|---|
| 13 MB | 36.4 MB |
| 34 MB | 59.4 MB |
| 536 MB | 932.7 MB |
The process memory increases substantially for a few milliseconds when the application is running in the following cases:
- The policy is replaced with another policy
- Changes are made in the current policy
Conclusion
The results for memory required by various policy sizes using the sample HelloWorld.java application can be used to determine the memory requirements of the Java application.
2 - DevOps Approach for Application Protector Java
The DevOps approach for package deployment.
The DevOps approach enables immutable package deployment. It uses a REST API call to download packages from the ESA in an encrypted format.
Note: The RP Agent should not be installed for immutable package deployments using DevOps.
For more information about package deployment approaches, refer to Resilient Package Deployment.
A REST API call is used to download the package on your local machine. Configure the package path in the config.ini file within the DevOps section and the decryptor class.
If a downloaded path is overwritten, a new package will be reflected in the running application at the set time interval. This occurs when another package with the same name overwrites the existing one. This changes the protector’s behaviour. The protector no longer functions as an immutable protector.

- A REST API call is used to download the policy from the ESA in an envelop encrypted format. A public key is created using a Key Management System (KMS) or Hardware Security Module (HSM). This public key must be passed to the REST API.
- The ESA generates a JSON file for the package with policy.
- The encrypted DEK needs to be decrypted to perform the security operations. A Decryptor class is implemented using the Decryptor interface, to decrypt the Data Encryption Key (DEK) using a private key.
Before you begin
Ensure the following prerequisites are met:
- The installation of the RP Agent is not required for immutable package deployment using the DevOps approach.
- The
decryptorparameter must have a fully qualified name of the decryptor class.
A Decryptor class needs to be implemented using the Decryptor interface, which decrypts the Data Encryption Key (DEK) using a private key. It returns the decrypted DEK in bytes.
For more information on the decryptor interface of AP Java, refer to Configuring the Decryptor interface.
For more information on the decryptor interface of AP Python, refer to Configuring the Decryptor interface. - The data store is properly configured before exporting your Application Protector policy. Define allowed servers for seamless policy deployment and secure access control.
For more information about configuring a data store, refer to -
AP Java
Using the DevOps approach
Perform the following steps to use the DevOps approach for immutable package deployment.
Add the [devops] parameter in the config.ini file.
Ensure the decryptor class has a fully qualified domain name.[devops] package.path = /path/to/policyFile decryptor = packageName.DecryptorClassNameThe following is an example for adding the
[devops]parameter in theconfig.inifile.[devops] package.path = /opt/policies/policy1.json decryptor = com.protegrity.apjava.test.RSADecryptor
Note: For ESA 10.2.0 and later, Application Protector DevOps must use the Encrypted Resilient Package REST APIs using GET method. The legacy Export API using POST method is deprecated and not supported for Teams (PPC). The deprecated API remains supported only for the Enterprise edition for backward compatibility.
For more information about exporting Resilient Package using POST method for 10.0.1 and 10.1.0 ESA, refer to Using the Encrypted Resilient Package REST APIs.
For more information about exporting Resilient Package using GET method for 10.2 ESA, refer to Using the Encrypted Resilient Package REST APIs.
For more information about exporting Resilient Package using GET method for PPC, refer to Using the Encrypted Resilient Package REST APIs.
Sample code for DevOps approach
The sample code for DevOps approach for various Application Protectors using different cloud platforms is provided in this section.
DevOps approach for AP Java
The sample code for DevOps approach for the AP Java using different cloud platforms is provided in this section.
Configuring the Decryptor interface
A Decryptor class must implement the DEKDecryptor interface to decrypt the DEK. This interface includes the decrypt method. The decrypt method provides keyLabel, algorithmId, and encDek parameters. The decrypted DEK must be returned in byte[] format.
The following is a sample code for implementing the DEKDecryptor interface.
package com.protegrity.jcorelite.decryptor;

import com.protegrity.jcorelite.constants.KEK_ALGO;
import com.protegrity.jcorelite.exceptions.PtyDecryptorException;

public interface DEKDecryptor {

    public byte[] decrypt(String keyLabel, KEK_ALGO algorithmId, byte[] encDek) throws PtyDecryptorException;
}
Using AWS
The following is a sample implementation using the private key from AWS KMS.
/* Sample Application for decrypting encrypted DEK using AWS KMS keys.
 *
 * [Protegrity Prerequisite]
 * Create an asymmetric KMS key in the AWS KMS.
 * Use the public key of the generated asymmetric key to download ESA policy using the curl request.
 *
 * [AWS Prerequisite]
 * Install AWS CLI.
 * Ensure that the AWS credentials and configurations are properly set before running the code that interacts with the AWS services.
 * There are multiple ways to configure the AWS credentials and configurations.
 * 1. AWS CLI configuration:
 *    Command: $aws configure
 *    A prompt appears to enter the following information:
 *     - AWS Access Key ID: The access key associated with the AWS account or IAM user.
 *     - AWS Secret Access Key: The secret key associated with the access key.
 *     - Default region name: The AWS region to use by default.
 *     - Default output format: The format for CLI command output.
 *    The AWS credentials and configuration settings are set up in the ~/.aws/credentials and ~/.aws/config files.
 *
 * 2. Environment variables:
 *    The AWS credentials using environment variables can be set using the following commands.
 *       export AWS_ACCESS_KEY_ID = "your_access_key_id"
 *       export AWS_SECRET_ACCESS_KEY = "your_secret_access_key"
 *       export AWS_REGION= "your_aws_default_region"
 *
 * [Java Prerequisite]
 * Add AWS KMS Java SDK as part of your dependency:
 *      implementation 'com.amazonaws:aws-java-sdk-kms:1.12.423'
 */

import com.amazonaws.services.kms.AWSKMS;
import com.amazonaws.services.kms.AWSKMSClientBuilder;
import com.amazonaws.services.kms.model.DecryptRequest;
import com.amazonaws.services.kms.model.DecryptResult;
import com.protegrity.jcorelite.constants.KEK_ALGO;
import com.protegrity.jcorelite.decryptor.DEKDecryptor;
import com.protegrity.jcorelite.exceptions.PtyDecryptorException;
import java.nio.ByteBuffer;
import java.util.Base64;

public class AWSKMSDecryptor implements DEKDecryptor {
    private static final String KEY_ID  = "3068b3ef-4924-4be5-9e9a-440b418553b3";
    public byte[] decrypt(String keyLabel, KEK_ALGO algorithm, byte[] encDek) throws PtyDecryptorException {
        getEncoder().encodeToString(encDek));
        /* create an AWS KMS client */
        AWSKMS kmsClient = AWSKMSClientBuilder.standard().build();
        /* wrap byte array into buffer */
        ByteBuffer ciphertextBuffer = ByteBuffer.wrap(encDek);
        /* decrypt request */
        DecryptRequest decryptRequest =  new DecryptRequest().withCiphertextBlob(ciphertextBuffer).withEncryptionAlgorithm("RSAES_OAEP_SHA_256").withKeyId(KEY_ID);
        /* decrypt the ciphertext */
        DecryptResult decryptResult = kmsClient.decrypt(decryptRequest);
        /* get the decrypted data */
        ByteBuffer decryptedBuffer = decryptResult.getPlaintext();
        /* buffer to byte array */
        byte[] decryptedDek = decryptedBuffer.array();

        return decryptedDek;

    }
}
Using Azure
The following is a sample implementation using the private key from Azure Key Vault.
/*
* Sample Application for decrypting encrypted DEK using Azure Key Vault
*
* [Azure Prerequisite]
* Install azure cli
* Login to azure :
  az login --use-device-code
*
* [Protegrity Prerequisite]
* For creating a key in Azure Key Vault using Azure CLI, refer :
  https://learn.microsoft.com/en-us/azure/key-vault/keys/quick-create-cli
* Download the public key from the key vault :
  az keyvault key download --vault-name test -n testkey -e PEM -f publickey.pem
* Replace all the new lines with \n in publickey.pem
* Public key is now ready to be used for downloading your ESA policy
* Azure supports RSA1_5, RSA_OAEP and RSA_OAEP_256 algorithms,
  whose correspoding names in REST API call are RSA1_5, RSA-OAEP-SHA1 and RSA-OAEP-256 respectively
  Refer : https://learn.microsoft.com/en-us/java/api/com.azure.security.keyvault.keys.cryptography.models.encryptionalgorithm?view=azure-java-stable
* Make sure that decrypt permission is present for the key vault :
  az keyvault set-policy -n "test" --key-permissions decrypt --object-id 7e821e4c-e0ad-4a6f-aa26-f445c7c7e3ea
* To get the private key URI from azure key vault, refer :
  https://learn.microsoft.com/en-us/azure/key-vault/keys/quick-create-cli
*
* [Java Prerequisite]
* Add Azure key vault and azure identity as part of your dependency
  artifactIds : azure-security-keyvault-keys, azure-identity
*
* The below code demonstrates decryption of encrypted DEK using private key URI received from Azure key vault
*/

import com.azure.identity.DefaultAzureCredentialBuilder;
import com.azure.security.keyvault.keys.cryptography.CryptographyClient;
import com.azure.security.keyvault.keys.cryptography.CryptographyClientBuilder;
import com.azure.security.keyvault.keys.cryptography.models.EncryptionAlgorithm;
import com.azure.security.keyvault.keys.cryptography.models.EncryptResult;
import com.azure.security.keyvault.keys.cryptography.models.DecryptResult;

import com.protegrity.jcorelite.constants.KEK_ALGO;
import com.protegrity.jcorelite.decryptor.DEKDecryptor;
import com.protegrity.jcorelite.exceptions.PtyDecryptorException;

public class AzureDecryptor2 {
    private static final String KEY_ID  = "https://test.vault.azure.net/keys/testkey/aaf3861366a24b1bb4f6871eb11afafe";

    public byte[] decrypt(String keyLabel, KEK_ALGO algorithm, byte[] encDek) throws PtyDecryptorException {
        /*
         * Instantiate a CryptographyClient that will be used to call the service.
         * Notice that the client is using
         * default Azure credentials. For more information on this and other types of
         * credentials, see this document:
         * https://docs.microsoft.com/java/api/overview/azure/identity-readme?view=azure
         * -java-stable.
         *
         * To get started, you'll need a key identifier for a key stored in a key vault.
         * See the README
         * (https://github.com/Azure/azure-sdk-for-java/blob/main/sdk/keyvault/azure-
         * security-keyvault-keys/README.md)
         * for links and instructions.
         */
        CryptographyClient cryptoClient = new CryptographyClientBuilder()
                .credential(new DefaultAzureCredentialBuilder().build())
                .keyIdentifier(KEY_ID)
                .buildClient();

        DecryptResult decryptResult = cryptoClient.decrypt(EncryptionAlgorithm.RSA_OAEP, encDek);

        return decryptResult.getPlainText();
    }
}
Using GCP
The following is a sample implementation using the private key from Google Cloud KMS.
/*
* Sample Application decrypting encrypted DEK using Google Cloud Key Management
*
* [Protegrity Prerequisite]
* Create an asymmetric key using Google Cloud Key Management with key purpose of ASYMMETRIC_DECRYPT.
* This example uses a key with algorithm 2048 bit RSA key OAEP Padding - SHA256 Digest
* Now use the public key of the generated asymmetric key to download your ESA policy
*
* Example curl command to download policy
* curl --location 'https://{ESA_IP}/pty/v1/rps/export?version=1&coreversion=1' \
       --header 'accept: application/json' \
       --header 'Content-Type: application/json' \
       --header 'Authorization: Basic' \
       --data '{
         "kek":{
         "publicKey":{
         "label": "LABEL_NAME",
         "algorithm": "ALGORITHM_NAME",
         "value": "-----BEGIN PUBLIC KEY-----
                   [asymmetric public key using Google Cloud Key Management]
                   -----END PUBLIC KEY-----"}
       }
       }'
*
* The below code demonstrates decrypting encrypted DEK using key generated using Google Cloud Key Management
*
* [Google Prerequisite]
* Google Cloud Account with Google Cloud Key Management enabled
* Install gcloud cli
  gcloud auth application-default command creates application_default_credentials.json
*
* [Java Prerequisite]
* Add Google Cloud KMS as part of your dependency
  implementation 'com.google.cloud:google-cloud-kms:<version_number>'
*
* Check Google Cloud API Documentation for more information
*/

package com.protegrity.test;

import com.google.cloud.kms.v1.AsymmetricDecryptResponse;
import com.google.cloud.kms.v1.CryptoKeyVersionName;
import com.google.cloud.kms.v1.KeyManagementServiceClient;
import com.google.protobuf.ByteString;
import com.protegrity.jcorelite.constants.KEK_ALGO;
import com.protegrity.jcorelite.exceptions.PtyDecryptorException;
import java.io.IOException;

public class GCPKMSDecryptor {

  public byte[] decryptAsymmetricKey(byte[] encDek) throws IOException {
    // Replace these variables before running the sample.
    String projectId = "your-project-id";
    String locationId = "us-east1";
    String keyRingId = "my-key-ring";
    String keyId = "my-key";
    String keyVersionId = "123";
    return decryptAsymmetricKey(projectId, locationId, keyRingId, keyId, keyVersionId, encDek);
  }

  // Decrypt data that was encrypted using the public key component of the given
  // key version.
  public byte[] decryptAsymmetricKey(
      String projectId,
      String locationId,
      String keyRingId,
      String keyId,
      String keyVersionId,
      byte[] ciphertext)
      throws IOException {
    // Initialize client that will be used to send requests. This client only
    // needs to be created once, and can be reused for multiple requests. After
    // completing all of your requests, call the "close" method on the client to
    // safely clean up any remaining background resources.
    try (KeyManagementServiceClient client = KeyManagementServiceClient.create()) {
      // Build the key version name from the project, location, key ring, key,
      // and key version.
      CryptoKeyVersionName keyVersionName =
          CryptoKeyVersionName.of(projectId, locationId, keyRingId, keyId, keyVersionId);
      // Decrypt the ciphertext.
      AsymmetricDecryptResponse response =
          client.asymmetricDecrypt(keyVersionName, ByteString.copyFrom(ciphertext));
      return response.getPlaintext().toByteArray();
    }
  }

  public byte[] decrypt(String keyLabel, KEK_ALGO algorithm, byte[] encDek)
      throws PtyDecryptorException, IOException {
    return decryptAsymmetricKey(encDek);
  }
}
3 - Application Protector API Return Codes
Learn about the Application Protector API Return Codes.
When an application is developed using the APIs of the Protegrity Application Protector Suite, you may encounter the Application Protector API Return Codes. For more information about log return codes, refer to Log return codes.
Sample Log for AP Return Codes
The following is a sample log generated in Discover on the Audit Store Dashboards in the ESA.
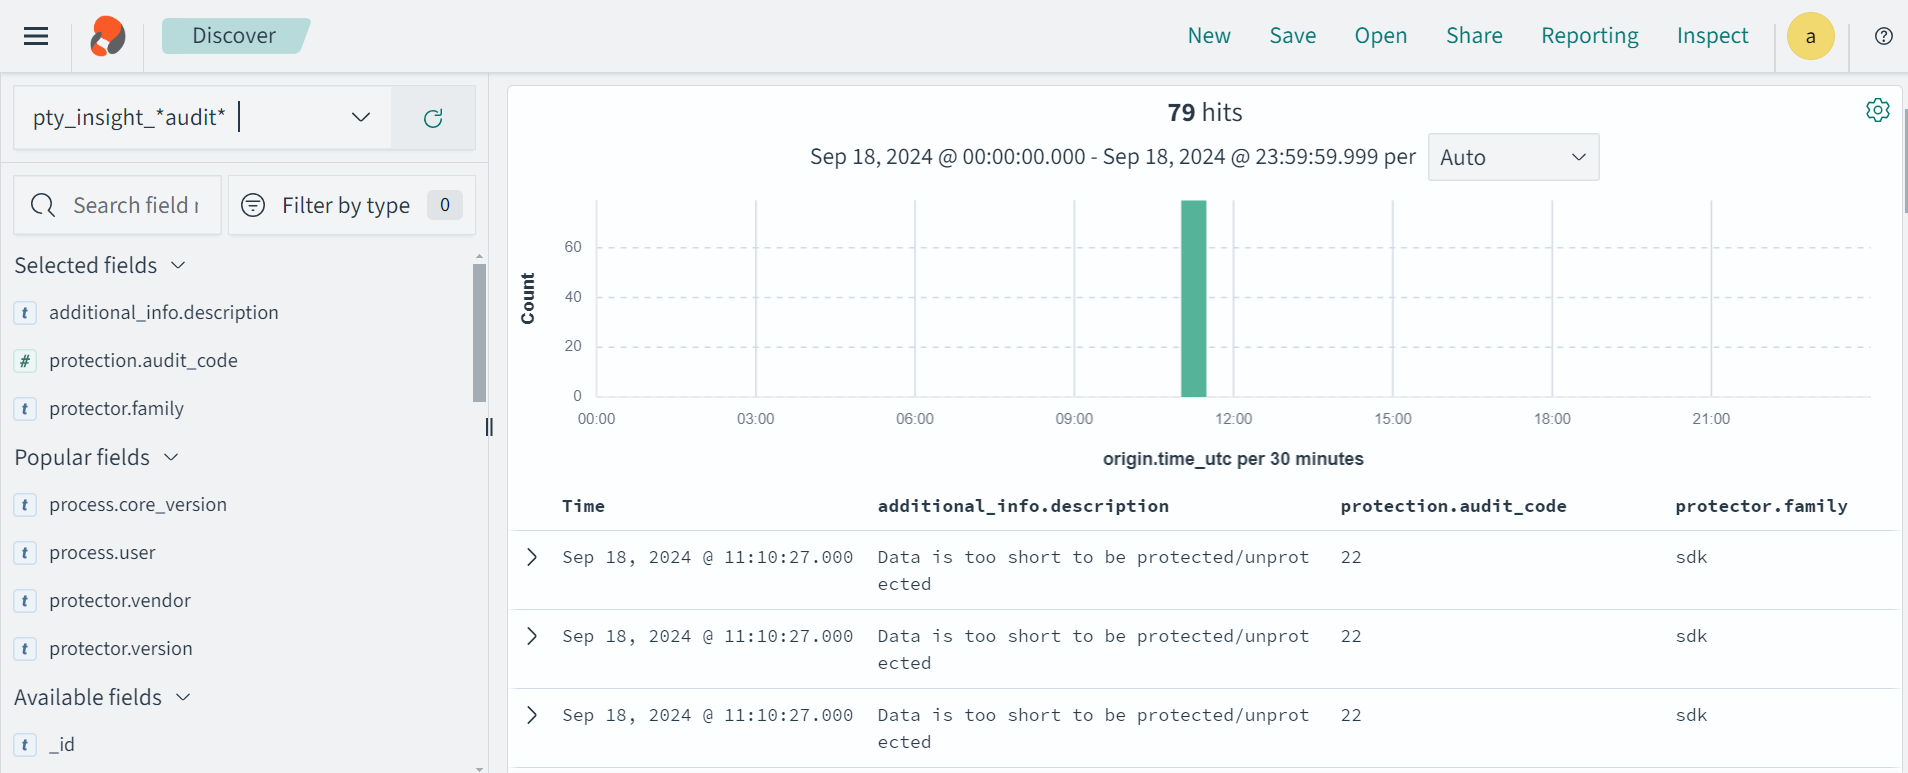
Protection audit logs are stored in the Audit Store. Select the pty_insight_*audit* index to view the protection logs.
For more information about viewing the logs, refer to Working with Discover.
4 - Config.ini file for Application Protector
Sample config.ini file for Application Protector.
The Application Protector can be configured using the config.ini file. By default, this file is located in the <installation directory>/sdk/<protector>/data/ directory.
The various configurations required for setting up the Application Protector are described in this section.
Sample config.ini file
The following represents a sample config.ini file.
# -----------------------------
# Protector configuration
# -----------------------------
[protector]

# Cadence determines how often the protector connects with shared memory to fetch the policy updates in background.
# Default is 60 seconds. So by default, every 60 seconds protector tries to fetch the policy updates.
#
# Default 60.
cadence = 60

# The time during which an session object is valid. Default = 15 minutes.
session.sessiontimeout = 15

###############################################################################
# Log Provider Config
###############################################################################
[log]

# In case that connection to fluent-bit is lost, set how audits/logs are handled
#
# drop  : (default) Protector throws logs away if connection to the fluentbit is lost
# error : Protector returns error without protecting/unprotecting
#         data if connection to the fluentbit is lost
mode = drop

# Host/IP to fluent-bit where audits/logs will be forwarded from the protector
#
# Default localhost
host = localhost
Different configurations for Application Protector
The following are the various configurations:
Protector configurations
cadence: The interval at which the protector synchronizes with the shared memory for fetching the package with policy. The default value forcadenceis 60 seconds. The maximum and minimum value that can be set forcadenceare 86400 seconds (24 hours) and 1 respectively.
For more information about the package deployment with differentcadenceconfigurations, refer to Package Deployment.
For more information about the Resilient Package sync configuration parameters, refer to Resilient Package Sync Configuration Parameters.
For more information about changing protector status interval, refer to Resilient Package Status Configuration Parameter.session.sessiontimeout: The time during which a session object is valid. The default value forsession.sessiontimeoutis 15 minutes.
Log Provider configurations
mode: This describes how the protector logs are handled if you lose connection to the Log Forwarder host, can be set to one of the following values:drop: The logs are dropped when the connection to the Log Forwarder is lost. The defaultmodeisdrop.error: The data security operations are stopped and an error is generated when the connection to the Log Forwarder is lost.
host: The Log Forwarder hostname or IP address where the logs will be forwarded from the protector. The defaulthostfor Log Forwarder islocalhost.
For more information about the configuration parameters for forwarding the audits and logs, refer to Configuration Parameters for Forwarding Audits and Logs.
5 - Multi-node Application Protector Architecture
Architecture for multi-node Application Protector.
The multi-node Application Protector (AP) architecture, its individual components, and how logs are collected using the Log Forwarder are described in this section.
The following figure describes the multi-node AP architecture.
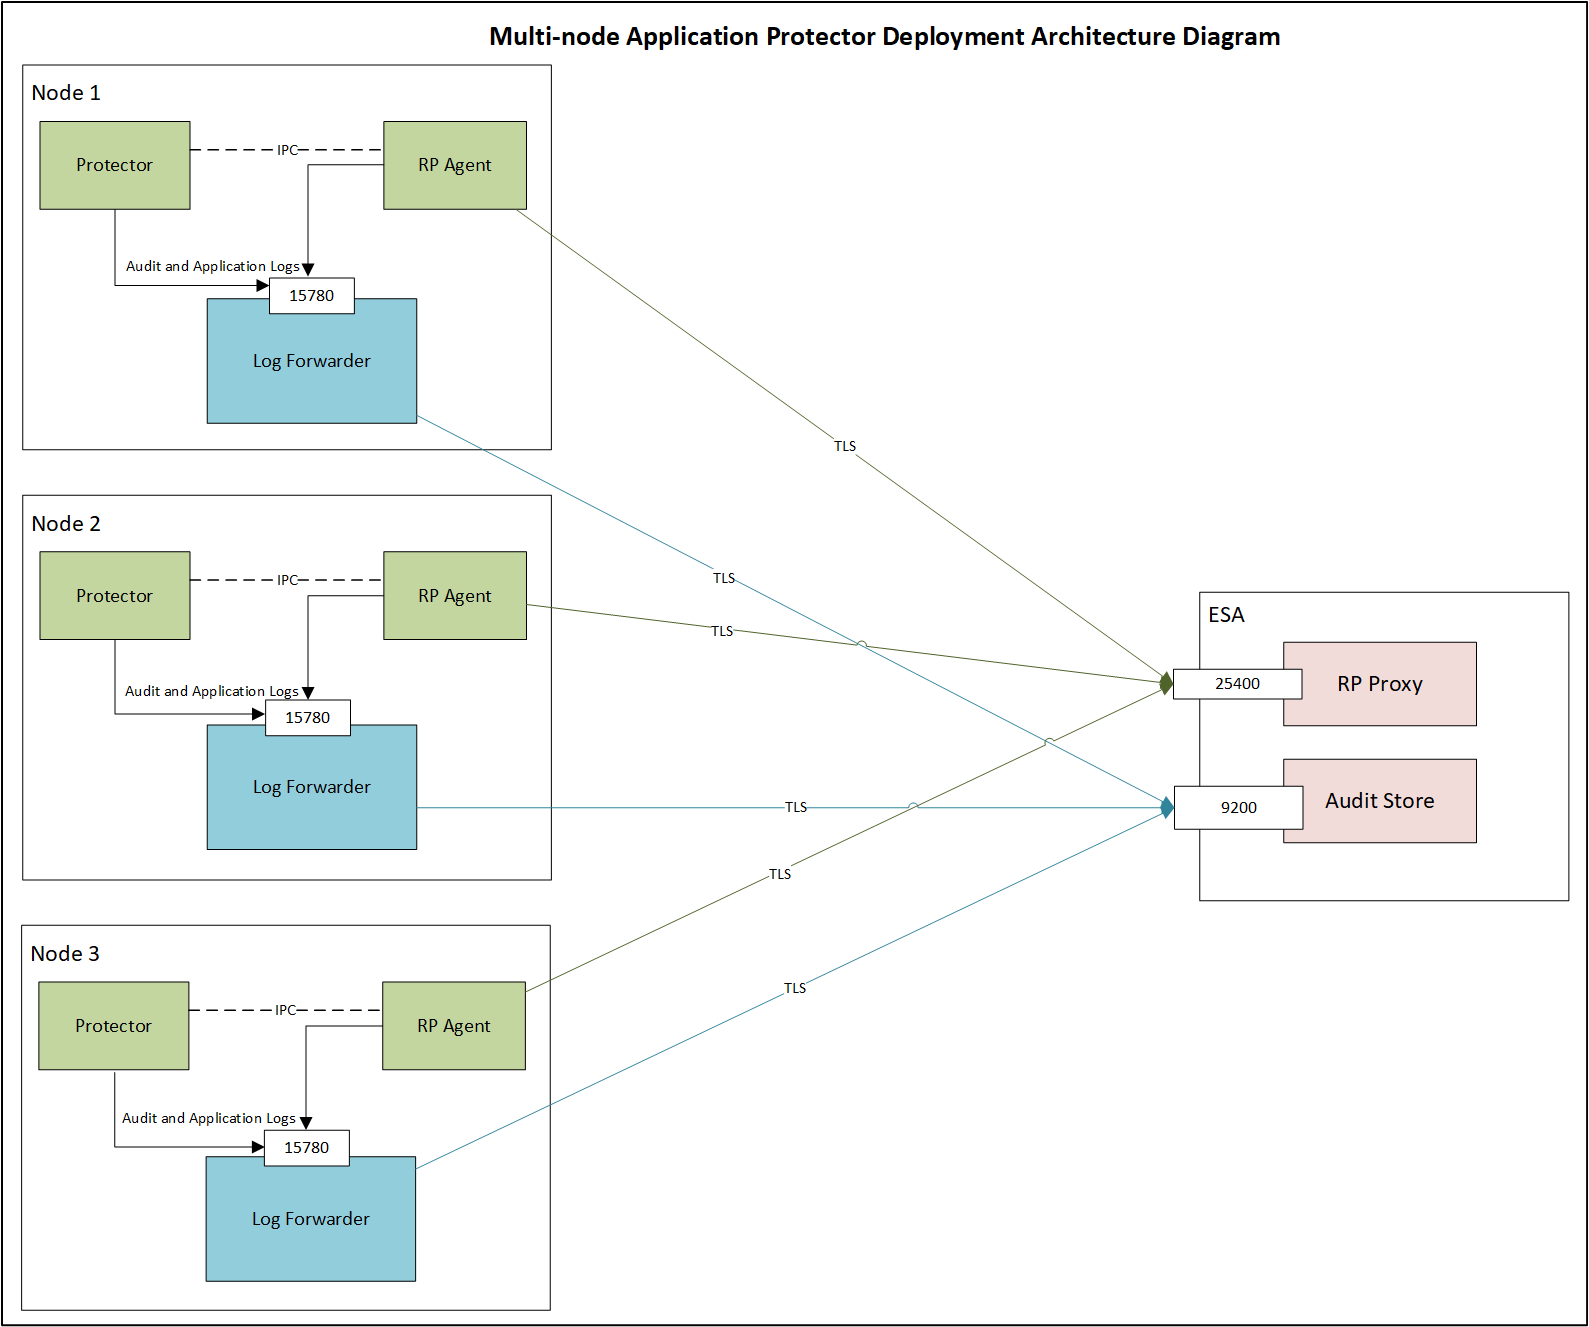
For example, some AP nodes are connected to an ESA, which includes the Audit Store component. Each AP node contains a Log Forwarder, RP Agent, and AP instance for sending logs to the ESA.
Protector: The AP can be configured using the config.ini file.
For more information about the configurations, refer to Config.ini file for Application Protector.
RP Agent: The RP Agent downloads the package with policy from the ESA, which is used by the protector to perform the protect, unprotect, or reprotect operations. It checks for the updates in the policy at set intervals and downloads the latest policy package when an update is detected.
Log Forwarder: The Log Forwarder component collects the logs from the AP and forwards them to the Audit Store. The Log Forwarder uses the 15780 port which is configurable to transport protection and audit logs to the ESA. The ESA receives the logs and stores it in the Audit Store.
6 - Installation Directory Structure Overview
Details about subdirectories contained in the Installation Directory.
The installation directory is organized into clearly defined subdirectories. This directory structure applies specifically to the /opt/protegrity/upgrade directory. Each directory has a specific role during installation, upgrade, rollback, and runtime operations.
bin/ Directory
The bin directory contains the executable component required to perform upgrade and rollback operations. This directory includes:
The sdkupgrd binary, which is the primary executable used for upgrade and rollback workflows.
The 10.0.gpg file must be manually added to this directory from ESA and is required for verification purposes.
For more information about GPG signature verification, refer to GPG Signature Verification.
Note: No additional binaries or scripts are stored in this directory.
data/ Directory
The data directory stores configuration and metadata files that drive upgrade and rollback behavior. It also enables coordination between components. This directory contains:
sdkupgrd.conf, which is the main configuration file used to provide inputs for:- Upgrade operations
- Rollback operations
Note: The configuration file supports both mandatory and optional settings and is updated as part of upgrade workflows.
metadata.ini, which acts as a coordination and interaction point between the protector and the agent upgrader. It is used to exchange state and progress information during upgrades and ensures both components remain synchronized.
logs/ Directory
The logs directory is used to store runtime and upgrade‑related logs. It is logically divided into two types of logs with different lifecycles and purposes.
- Agent logs are stored here temporarily. These logs are sent to ESA Insight and are automatically removed once their contents are successfully uploaded.
- A version‑defined subdirectory is used to store protector logs. These logs are retained locally and are not sent to ESA Insight.
active_processes/ Directory
The active_processes directory is used to track currently running protector processes. This directory contains:
- active_pid files, where each file represents an active protector process.
- Each active_pid file includes metadata related to the corresponding running AP Java process.
This directory is used to track running protector instances and to prevent conflicting upgrade or rollback operations. It also provides visbility into currently running processes.
7 - SDK Upgrader Agent Configuration File
Configuration parameters for the SDK Upgrader Agent.
Note: All configuration file parameters must be reviewed and updated as needed prior to upgrade or rollback, except for
new-logforwarder-path.
# ==============================================================================
# SDK Upgrader Agent Configuration File
# ==============================================================================
# This file contains all configuration parameters for the SDK Upgrader Agent.
# The agent reads values from this file instead of command-line arguments.
#
# Format: key = value
# Lines starting with '#' are comments and ignored.
# Empty lines are ignored.
# Leading/trailing whitespace around keys and values is trimmed.
# ==============================================================================

# ------------------------------------------------------------------------------
# Build Location (REQUIRED)
# URL or local path to the build file
# Examples:
#   location-of-build = https://example.com/build/sdk-10.1.0.tgz
#   location-of-build = /tmp/sdk-10.1.0.tgz
# ------------------------------------------------------------------------------
location-of-build =

# ------------------------------------------------------------------------------
# Upgrade Mode
# Set to "yes" to enable offline upgrade mode (default: no)
# ------------------------------------------------------------------------------
offline = no

# ------------------------------------------------------------------------------
# RPAgent Configuration
# Path to RPAgent installation directory
# Default: /opt/protegrity/rpagent
# ------------------------------------------------------------------------------
rpagent-path = /opt/protegrity/rpagent

# ------------------------------------------------------------------------------
# LogForwarder Configuration
# Path to LogForwarder installation directory
# Default: /opt/protegrity/logforwarder
# ------------------------------------------------------------------------------
logforwarder-path = /opt/protegrity/logforwarder

# ------------------------------------------------------------------------------
# LogForwarder Endpoints
# Comma-separated list of LogForwarder endpoints (host[:port])
# Default port is 9200 if not specified
# Example: endpoints = eshost1:9200,eshost2:9200
# ------------------------------------------------------------------------------
endpoints =

# ------------------------------------------------------------------------------
# ESA (Enterprise Security Administrator) Configuration
# Note: ESA username and password are NOT stored in this file for security.
# They will be prompted interactively (password hidden) or can be passed
# via --esa-user and --esa-password command-line arguments.
# ------------------------------------------------------------------------------
esa-host =
esa-port = 25400

# ------------------------------------------------------------------------------
# DevOps Mode
# When enabled, skips RPAgent installation
# Values: yes | no (default: no)
# ------------------------------------------------------------------------------
devops = no

# ------------------------------------------------------------------------------
# LogForwarder Upgrade
# Enable or disable LogForwarder upgrade
# Values: yes | no (default: yes)
# ------------------------------------------------------------------------------
isFluentBit = yes

# ------------------------------------------------------------------------------
# Insecure Mode
# RPAgent with insecure mode
# Values: yes | no (default: no)
# ------------------------------------------------------------------------------
insecure = no

# ------------------------------------------------------------------------------
# Protector Paths
# Comma-separated list of protector installation paths
# Example: protector-paths = /opt/protegrity/sdk/java,/opt/protegrity/sdk/python
# Default: /opt/protegrity/sdk/java
# ------------------------------------------------------------------------------
protector-paths = /opt/protegrity/sdk/java

# ------------------------------------------------------------------------------
# New LogForwarder Path (Error Mode)
# Path to install new logforwarder for error mode parallel upgrade.
# The {version} placeholder will be replaced with the actual build version at runtime.
# Default is derived from logforwarder-path by stripping the trailing directory
# name and appending logforwarder_{version}. For example:
#   logforwarder-path = /opt/protegrity/logforwarder
#     → new-logforwarder-path = /opt/protegrity/logforwarder_{version}
#   logforwarder-path = /root/abcc/logforwarder
#     → new-logforwarder-path = /root/abcc/logforwarder_{version}
# ------------------------------------------------------------------------------
new-logforwarder-path =

# ------------------------------------------------------------------------------
# Logging Options
# ------------------------------------------------------------------------------
# Print logs to console (yes | no, default: no)
stdout = no

# Enable debug logging (yes | no, default: no)
debug = no
8 - Troubleshooting for AP Java Upgrade
List of common issues that occur during AP Java upgrade.
This section describes common issues that may occur during AP Java upgrades and how to resolve them.
| Issue | Symptom | Resolution |
|---|---|---|
| Offline upgrade fails due to a running process error | The offline upgrade fails with an error indicating that a process is still running, even though no AP Java process is active. | 1. Navigate to the <INSTALL_DIR>/upgrader/active_processes directory.2. Check for any stale PID files. 3. Remove the stale PID files. 4. Retry the offline upgrade. |
| Upgrade fails during build extraction when using a local build file | The upgrade fails during the build extraction phase when a local build file path .tgz is provided to the Agent.This happens if an extracted build directory or an inner .tgz file is passed instead of the original build archive. | Ensure that: - You pass only the unextracted build file ( .tgz) to the Agent.- The path does not point to any inner or manually extracted .tgz file.Retry the upgrade after correcting the build file path. |
| Upgrade or auto-rollback fails | The upgrade or the automatic rollback operation does not complete successfully. | - Perform an offline rollback to recover the system state. - After the offline rollback completes, verify system stability before retrying the upgrade. |
| “Upgrade is still in progress” error when starting AP Java | AP Java fails to start and reports that an upgrade is still in progress. | 1. Open the <INSTALL_DIR>/upgrader/data/metadata.ini file.2. Verify that the IsUpgradeInProgress parameter value is set to false.3. If the value is set to true, update it to false.4. Save the file. 5. Restart the AP Java application. |
9 - Uninstalling the Application Protector
Uninstalling the AP Java Installation on different platforms
Uninstalling Application Protector (AP) Java from Linux
This section outlines the steps to uninstall the various components of AP Java from a Linux platform.
Uninstalling the Log Forwarder from Linux
Note: To preserve all the configurations while upgrading the Log Forwarder, ensure all the files present under the
/opt/protegrity/logforwarder/data/config.ddirectory are backed up.
To uninstall the Log Forwarder from a Linux platform:
Navigate to the
/opt/protegrity/logforwarder/bindirectory.Stop the Log Forwarder using the following command.
./logforwarderctrl stopDelete the
/opt/protegrity/logforwarderdirectory.The Log Forwarder is uninstalled.
Uninstalling the RP Agent from Linux
Note: Before uninstalling the RP Agent, ensure that all the files present under the
/opt/protegrity/rpagent/datadirectory are backed up.
To uninstall the RP Agent from a Linux platform:
Navigate to the
/opt/protegrity/rpagent/bindirectory.Stop the RP Agent using the following command.
./rpagentctrl stopDelete the
/opt/protegrity/rpagentdirectory.The RP Agent is uninstalled.
Uninstalling the AP Java from Linux
To uninstall the AP Java from a Linux platform:
Navigate to the
/opt/protegrity/sdkdirectory.Delete the
/javadirectory.The AP Java is uninstalled.