1.6 - Application Protector Java APIs
The various APIs of the AP Java.
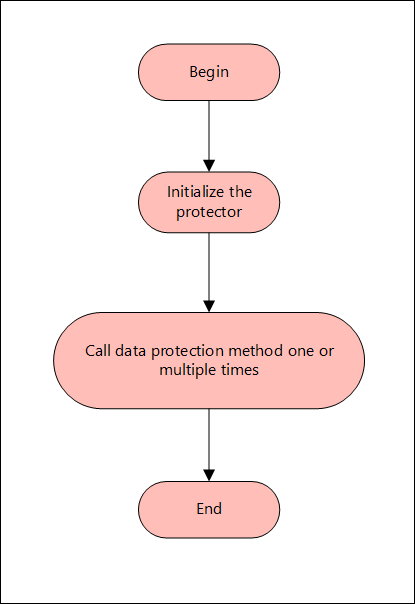
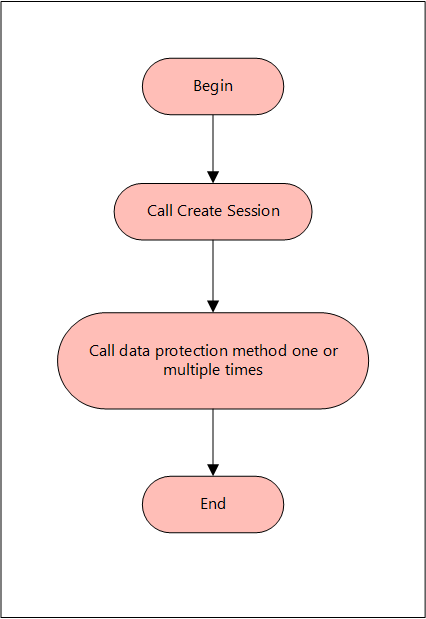
A session must be created to run the Application Protector (AP) Java. The session enables AP Java to access information about the Trusted Application from the policy stored in memory. If the application is trusted, then the protect, unprotect, or reprotect method is called, one or many times, depending on the data.
The AP Java can be initialized by an OS User who is registered and deployed as the Trusted Application User in the ESA. The OS User can also be a Policy User.
The following diagram represents the basic flow of a session.
Note: The AP Java only supports bytes converted from the string data type.
If any other data type is directly converted to bytes and passed as an input to the API that supports byte as an input and provides byte as an output, then data corruption might occur.
Supported data types for the AP Java
The AP Java supports the following data types:
- Bytes
- Double
- Float
- Integer
- java.util.Date
- Long
- Short
- String
The following are the various APIs provided by the AP Java.
getProtector
The getProtector method returns the Protector object associated with the AP Java APIs. After initialization, this object is used to create a session. The session is then passed as a parameter to protect, unprotect, or reprotect methods.
static Protector getProtector()
Parameters
None
Returns
Protector Object: An object associated with the Protegrity Application Protector API.
Exception
ProtectorException: If the configurations are invalid, then an exception is thrown indicating a
failed initialization.
getVersion
The getVersion method returns the product version of the AP Java in use.
public java.lang.String getVersion()
Parameters
None
Returns
String: Product version
getVersionEx
The getVersionEx method returns the extended version of the AP Java in use. The extended version consists of the Product version number and the CORE version number.
Note: The Core version is a sub-module used for troubleshooting protector issues.
public java.lang.String getVersionEx()
Parameters
None
Returns
String: Product version and CORE version
getLastError
The getLastError method returns the last error and a description of why this error was returned. When the methods used for protecting, unprotecting, or reprotecting data return an exception or a Boolean false, the getLastError method is called that describes why the method failed.
public java.lang.String getLastError(SessionObject session)
Parameters
Session: Session ID that is obtained by calling the createSession method.
Returns
String: Error message
Exception
ProtectorException: If the SessionObject is null, then an exception is thrown
SessionTimeoutException: If the session is invalid or has timed out, then an exception is thrown
For more information about the return codes, refer to Application Protector API Return Codes.
createSession
The createSession method creates a new session. The sessions that have not been utilized for a while, are automatically removed according to the sessiontimeout parameter defined in the [protector] section of the config.ini file.
The methods in the Protector API that take the SessionObject as a parameter, might throw an exception SessionTimeoutException if the session is invalid or has timed out. The application developers can handle the SessionTimeoutException and create a new session with a new SessionObject.
public SessionObject createSession(java.lang.String policyUser)
Parameters
policyUser: User name defined in the policy, as a string value.
Returns
SessionObject: Object of the SessionObject class.
Exception
ProtectionException: If input is null or empty, then an exception is thrown.
protect - Short array data
It It protects the data provided as a short array that uses the preservation data type or No Encryption data element. It supports bulk protection. There is no maximum data limit. For more information about the data limit, refer to AES Encryption.
If the data type preservation methods are used for data protection, then the protected data can be stored in the same data type as used for the input data.
public boolean protect(SessionObject sessionObj, java.lang.String dataElementName, short[] input, short[] output, byte[] externalIv)
Parameters
sessionObj: SessionObject that is obtained by calling the createSession method.
dataElementName: String containing the data element name defined in policy.
input: Input array with short format data.
output: Resultant output array with short format data.
externalIv: Buffer containing data that will be used as external IV, when externalIv = null, the value is ignored.
Result
True: The data is successfully protected.
False: The parameters passed are accurate, but the method failed when:
- The protection methods failed to perform the required action
- The data element is null or empty
For more information, such as, a text explanation and reason for the failure, call getLastError(session).
Exception
Protector Exception: If the SessionObject is null or if policy is configured to throw an exception, then an exception is thrown.
SessionTimeoutException: If the session is invalid or has timed out, then an exception is thrown.
protect - Short array data for encryption
It protects the data provided as a short array that uses an encryption data element. It supports bulk protection. There is no maximum data limit.
For more information about the data limit, refer to AES Encryption.
When the encryption method is used to protect data, the output of data protection (protected data) should be stored in byte[].
public boolean protect(SessionObject sessionObj, java.lang.String dataElementName, short[] input, byte[][] output, byte[] externalIv)
Parameters
sessionObj: SessionObject that is obtained by calling the createSession method.
dataElementName: String containing the data element name defined in policy.
input: Input array with short format data.
output: Resultant output array with byte format data.
externalIv: Optional parameter, which is a buffer containing data that will be used as external IV, when externalIv = null, the value is ignored.
Note: Encryption data elements do not support external IV.
Result
True: The data is successfully protected.
False: The parameters passed are accurate, but the method failed when:
- The protection methods failed to perform the required action
- The data element is null or empty
For more information, such as, a text explanation and reason for the failure, call getLastError(session).
Exception
Protector Exception: If the SessionObject is null or if policy is configured to throw an exception, then an exception is thrown.
SessionTimeoutException: If the session is invalid or has timed out, then an exception is thrown.
protect - Int array data
It It protects the data provided as an int array that uses the preservation data type or No Encryption data element. It supports bulk protection. However, you are recommended to pass not more than 1 MB of input data for each protection call.
If the data type preservation methods are used for data protection, then the protected data can be stored in the same data type as used for the input data.
public boolean protect(SessionObject sessionObj, java.lang.String dataElementName, int[] input, int[] output, byte[] externalIv)
Parameters
sessionObj: SessionObject that is obtained by calling the createSession method.
dataElementName: String containing the data element name defined in policy.
input: Input array with int data.
output: Resultant output array with int data.
externalIv: Optional parameter, which is a buffer containing data that will be used as external IV, when externalIv = null, the value is ignored.
Result
True: The data is successfully protected.
False: The parameters passed are accurate, but the method failed when:
- The protection methods failed to perform the required action
- The data element is null or empty
For more information, such as, a text explanation and reason for the failure, call getLastError(session).
Exception
Protector Exception: If the SessionObject is null or if policy is configured to throw an exception, then an exception is thrown.
SessionTimeoutException: If the session is invalid or has timed out, then an exception is thrown.
protect - Int array data for encryption
It protects the data provided as an int array that uses an encryption data element. It supports bulk protection. There is no maximum data limit. However, you are recommended to pass not more than 1 MB of input data for each protection call.
Data protected by using encryption data elements with input as integers, long or short data types, and output as bytes, cannot move between platforms with different endianness.
For example, you cannot move the protected data from the AIX platform to Linux or Windows platform and vice versa while using encryption data elements in the following scenarios:
- Input as integers and output as bytes
- Input as short integers and output as bytes
- Input as long integers and output as bytes
When the encryption method is used to protect data, the output of data protection (protected data) should be stored in byte[].
public boolean protect(SessionObject sessionObj, java.lang.String dataElementName, int[] input, byte[][] output, byte[] externalIv)
Parameters
sessionObj: SessionObject that is obtained by calling the createSession method.
dataElementName: String containing the data element name defined in policy.
input: Input array with int data.
output: Resultant output array with byte data.
externalIv: Optional parameter, which is a buffer containing data that will be used as external IV, when externalIv = null, the value is ignored.
Note: Encryption data elements do not support external IV.
Result
True: The data is successfully protected.
False: The parameters passed are accurate, but the method failed when:
- The protection methods failed to perform the required action
- The data element is null or empty
For more information, such as, a text explanation and reason for the failure, call getLastError(session).
Exception
Protector Exception: If the SessionObject is null or if policy is configured to throw an exception, then an exception is thrown.
SessionTimeoutException: If the session is invalid or has timed out, then an exception is thrown.
protect - Long array data
It protects the data provided as a long array that uses the preservation data type or No Encryption data element. It supports bulk protection. There is no maximum data limit. However, you are recommended to pass not more than 1 MB of input data for each protection call.
If the data type preservation methods are used for data protection, then the protected data can be stored in the same data type as used for the input data.
public boolean protect(SessionObject sessionObj, java.lang.String dataElementName, long[] input, long[] output, byte[] externalIv)
Parameters
sessionObj: SessionObject that is obtained by calling the createSession method.
dataElementName: String containing the data element name defined in policy.
input: Input array with long format data.
output: Resultant output array with long format data.
externalIv: Optional parameter, which is a buffer containing data that will be used as external IV, when externalIv = null, the value is ignored.
Result
True: The data is successfully protected.
False: The parameters passed are accurate, but the method failed when:
- The protection methods failed to perform the required action
- The data element is null or empty
For more information, such as, a text explanation and reason for the failure, call getLastError(session).
Exception
Protector Exception: If the SessionObject is null or if policy is configured to throw an exception, then an exception is thrown.
SessionTimeoutException: If the session is invalid or has timed out, then an exception is thrown.
protect - Long array data for encryption
It protects the data provided as a long array that uses an encryption data element. It supports bulk protection. There is no maximum data limit. However, you are recommended to pass not more than 1 MB of input data for each protection call.
When the encryption method is used to protect data, the output of data protection (protected data) should be stored in byte[].
protect(SessionObject sessionObj, java.lang.String dataElementName, long[] input, byte[][] output)
Parameters
sessionObj: SessionObject that is obtained by calling the createSession method.
dataElementName: String containing the data element name defined in policy.
input: Input array with long format data.
output: Resultant output array with byte format data.
externalIv: Optional parameter, which is a buffer containing data that will be used as external IV, when externalIv = null, the value is ignored.
Note: Encryption data elements do not support external IV.
Result
True: The data is successfully protected.
False: The parameters passed are accurate, but the method failed when:
- The protection methods failed to perform the required action
- The data element is null or empty
For more information, such as, a text explanation and reason for the failure, call getLastError(session).
Exception
Protector Exception: If the SessionObject is null or if policy is configured to throw an exception, then an exception is thrown.
SessionTimeoutException: If the session is invalid or has timed out, then an exception is thrown.
protect - Float array data
It protects the data provided as a float array that uses the No Encryption data element. It supports bulk protection. There is no maximum data limit. However, you are recommended to pass not more than 1 MB of input data for each protection call.
If the data type preservation methods are used for data protection, then the protected data can be stored in the same data type as used for the input data.
public boolean protect(SessionObject sessionObj, java.lang.String dataElementName, float[] input, float[] output, byte[] externalIv)
Parameters
sessionObj: SessionObject that is obtained by calling the createSession method.
dataElementName: String containing the data element name defined in policy.
input: Input array with float format data.
output: Resultant output array with float format data.
Result
True: The data is successfully protected.
False: The parameters passed are accurate, but the method failed when:
- The protection methods failed to perform the required action
- The data element is null or empty
For more information, such as, a text explanation and reason for the failure, call getLastError(session).
Exception
Protector Exception: If the SessionObject is null or if policy is configured to throw an exception, then an exception is thrown.
SessionTimeoutException: If the session is invalid or has timed out, then an exception is thrown.
protect - Float array data for encryption
It protects the data provided as a float array that uses an encryption data element. It supports bulk protection. There is no maximum data limit. However, you are recommended to pass not more than 1 MB of input data for each protection call.
When the encryption method is used to protect data, the output of data protection (protected data) should be stored in byte[].
public boolean protect(SessionObject sessionObj, java.lang.String dataElementName, float[] input, byte[][] output)
Parameters
sessionObj: SessionObject that is obtained by calling the createSession method.
dataElementName: String containing the data element name defined in policy.
input: Input array with float format data.
output: Resultant output array with byte format data.
Result
True: The data is successfully protected.
False: The parameters passed are accurate, but the method failed when:
- The protection methods failed to perform the required action
- The data element is null or empty
For more information, such as, a text explanation and reason for the failure, call getLastError(session).
Exception
Protector Exception: If the SessionObject is null or if policy is configured to throw an exception, then an exception is thrown.
SessionTimeoutException: If the session is invalid or has timed out, then an exception is thrown.
protect - Double array data
It protects the data provided as a double array that uses the No Encryption data element. It supports bulk protection. There is no maximum data limit. However, you are recommended to pass not more than 1 MB of input data for each protection call.
When the data type preservation methods are used to protect data, the output of data protection can be stored in the same data type that was used for the input data.
public boolean protect(SessionObject sessionObj, java.lang.String dataElementName, double[] input, double[] output)
Parameters
sessionObj: SessionObject that is obtained by calling the createSession method.
dataElementName: String containing the data element name defined in policy.
input: Input array with double format data.
output: Resultant output array with double format data.
Result
True: The data is successfully protected.
False: The parameters passed are accurate, but the method failed when:
- The protection methods failed to perform the required action
- The data element is null or empty
For more information, such as, a text explanation and reason for the failure, call getLastError(session).
Exception
Protector Exception: If the SessionObject is null or if policy is configured to throw an exception, then an exception is thrown.
SessionTimeoutException: If the session is invalid or has timed out, then an exception is thrown.
protect - Double array data for encryption
It protects the data provided as a double array that uses an encryption data element. It supports bulk protection. There is no maximum data limit. However, you are recommended to pass not more than 1 MB of input data for each protection call.
When the encryption method is used to protect data, the output of data protection (protected data) should be stored in byte[].
public boolean protect(SessionObject sessionObj, java.lang.String dataElementName, double[] input, byte[][] output)
Parameters
sessionObj: SessionObject that is obtained by calling the createSession method.
dataElementName: String containing the data element name defined in policy.
input: Input array with double format data.
output: Resultant output array with byte format data.
Result
True: The data is successfully protected.
False: The parameters passed are accurate, but the method failed when:
- The protection methods failed to perform the required action
- The data element is null or empty
For more information, such as, a text explanation and reason for the failure, call getLastError(session).
Exception
Protector Exception: If the SessionObject is null or if policy is configured to throw an exception, then an exception is thrown.
SessionTimeoutException: If the session is invalid or has timed out, then an exception is thrown.
protect - Date array data
It protects the data provided as a java.util.Data array that uses a preservation data type. It supports bulk protection. There is no maximum data limit. However, you are recommended to pass not more than 1 MB of input data for each protection call.
If the data type preservation methods are used for data protection, then the protected data can be stored in the same data type as used for the input data.
If the protect and unprotect operations are performed in different time zones using the java.util.Date API, then the unprotected data does not match with the input data.
For example, if you perform the protect operation in EDT time zone using the java.util.Date API, then you must perform the unprotect operation only in EDT time zone. This ensures that the unprotect operation returns back the original data.
public boolean protect(SessionObject sessionObj, java.lang.String dataElementName, java.util.Date[] input, java.util.Date[] output)
Parameters
sessionObj: SessionObject that is obtained by calling the createSession method.
dataElementName: String containing the data element name defined in policy.
input: Input array with date format data.
output: Resultant output array with date format data.
Result
True: The data is successfully protected.
False: The parameters passed are accurate, but the method failed when:
- The protection methods failed to perform the required action
- The data element is null or empty
For more information, such as, a text explanation and reason for the failure, call getLastError(session).
Exception
Protector Exception: If the SessionObject is null or if policy is configured to throw an exception, then an exception is thrown.
SessionTimeoutException: If the session is invalid or has timed out, then an exception is thrown.
protect - String array data
It protects the data provided as a string array that uses a preservation data type or the No Encryption data element. It supports bulk protection. There is no maximum data limit. However, you are recommended to pass not more than 1 MB of input data for each protection call.
For String and Byte data types, the maximum length for tokenization is 4096 bytes, while for encryption there is no maximum length defined.
If the data type preservation methods are used for data protection, then the protected data can be stored in the same data type as used for the input data.
For Date and Datetime type of data elements, an invalid input data error is returned by the protect API if the input value falls between the non-existent date range. It ranges from 05-OCT-1582 to 14-OCT-1582 of the Gregorian Calendar.
For more information about the tokenization and de-tokenization of the cutover dates of the Proleptic Gregorian Calendar, refer to section Datetime Tokenization for Cutover Dates of the Proleptic Gregorian Calendar.
public boolean protect(SessionObject sessionObj, java.lang.String dataElementName, java.lang.String[] input, java.lang.String[] output, byte[] externalIv)
Parameters
sessionObj: SessionObject that is obtained by calling the createSession method.
dataElementName: String containing the data element name defined in policy.
input: Input array with string format data.
output: Resultant output array with string format data.
externalIv: Optional parameter, which is a buffer containing data that will be used as external IV, when externalIv = null, the value is ignored.
Result
True: The data is successfully protected.
False: The parameters passed are accurate, but the method failed when:
- The protection methods failed to perform the required action
- The data element is null or empty
For more information, such as, a text explanation and reason for the failure, call getLastError(session).
Exception
Protector Exception: If the SessionObject is null or if policy is configured to throw an exception, then an exception is thrown.
SessionTimeoutException: If the session is invalid or has timed out, then an exception is thrown.
protect - String array data for encryption
It protects the data provided as s string array that uses an encryption data element. It supports bulk protection. There is no maximum data limit. However, you are recommended to pass not more than 1 MB of input data for each protection call.
For String and Byte data types, the maximum length for tokenization is 4096 bytes, while for encryption there is no maximum length defined.
The output of data protection is stored in byte[] when:
- Encryption method is used to protect data
- Format Preserving Encryption (FPE) method is used for Char and String APIs
The string as an input and byte as an output API is unsupported by Unicode Gen2 and FPE data elements for the AP Java.
public boolean protect(SessionObject sessionObj, java.lang.String dataElementName, java.lang.String[] input, byte[][] output, byte[] externalIv)
Parameters
sessionObj: SessionObject that is obtained by calling the createSession method.
dataElementName: String containing the data element name defined in policy.
input: Input array with string format data.
output: Resultant output array with byte format data.
externalIv: Optional parameter, which is a buffer containing data that will be used as external IV, when externalIv = null, the value is ignored.
Note: Encryption data elements do not support external IV.
Result
True: The data is successfully protected.
False: The parameters passed are accurate, but the method failed when:
- The protection methods failed to perform the required action
- The data element is null or empty
For more information, such as, a text explanation and reason for the failure, call getLastError(session).
Exception
Protector Exception: If the SessionObject is null or if policy is configured to throw an exception, then an exception is thrown.
SessionTimeoutException: If the session is invalid or has timed out, then an exception is thrown.
protect - Char array data
It protects the data provided as a char array that uses a preservation data type or the No Encryption data element. It supports bulk protection. There is no maximum data limit. However, you are recommended to pass not more than 1 MB of input data for each protection call.
If the data type preservation methods are used for data protection, then the protected data can be stored in the same data type as used for the input data.
For Date and Datetime type of data elements, an invalid input data error is returned by the protect API if the input value falls between the non-existent date range. It ranges from 05-OCT-1582 to 14-OCT-1582 of the Gregorian Calendar.
For more information about the tokenization and de-tokenization of the cutover dates of the Proleptic Gregorian Calendar, refer to section Datetime Tokenization for Cutover Dates of the Proleptic Gregorian Calendar.
public boolean protect(SessionObject sessionObj, java.lang.String dataElementName, char[][] input, char[][] output, byte[] externalIv)
Parameters
sessionObj: SessionObject that is obtained by calling the createSession method.
dataElementName: String containing the data element name defined in policy.
input: Input array with char format data.
output: Resultant output array with char format data.
externalIv: Optional parameter, which is a buffer containing data that will be used as external IV, when externalIv = null, the value is ignored.
Result
True: The data is successfully protected.
False: The parameters passed are accurate, but the method failed when:
- The protection methods failed to perform the required action
- The data element is null or empty
For more information, such as, a text explanation and reason for the failure, call getLastError(session).
Exception
Protector Exception: If the SessionObject is null or if policy is configured to throw an exception, then an exception is thrown.
SessionTimeoutException: If the session is invalid or has timed out, then an exception is thrown.
protect - Char array data for encryption
It protects the data provided as a char array that uses an encryption data element. It supports bulk protection. There is no maximum data limit. However, you are recommended to pass not more than 1 MB of input data for each protection call.
The output of data protection is stored in byte[] when:
- Encryption method is used to protect data
- Format Preserving Encryption (FPE) method is used for Char and String APIs
public boolean protect(SessionObject sessionObj, java.lang.String dataElementName, char[][] input, byte[][] output, byte[] externalIv)
Parameters
sessionObj: SessionObject that is obtained by calling the createSession method.
dataElementName: String containing the data element name defined in policy.
input: Input array with char format data.
output: Resultant output array with byte format data.
externalIv: Optional parameter, which is a buffer containing data that will be used as external IV, when externalIv = null, the value is ignored.
Note: Encryption data elements do not support external IV.
Result
True: The data is successfully protected.
False: The parameters passed are accurate, but the method failed when:
- The protection methods failed to perform the required action
- The data element is null or empty
For more information, such as, a text explanation and reason for the failure, call getLastError(session).
Exception
Protector Exception: If the SessionObject is null or if policy is configured to throw an exception, then an exception is thrown.
SessionTimeoutException: If the session is invalid or has timed out, then an exception is thrown.
protect - Byte array data
It protects the data provided as a byte array that uses the encryption data element, No Encryption data element, and preservation data type. It supports bulk protection. There is no maximum data limit. However, you are recommended to pass not more than 1 MB of input data for each protection call.
For String and Byte data types, the maximum length for tokenization is 4096 bytes, while for encryption there is no maximum length defined.
The Protegrity AP Java protector only supports bytes converted from the string data type.
If any data type is converted to bytes and passed as input to the API supporting byte as input and providing byte as output, then data corruption might occur.
If the data type preservation methods are used for data protection, then the protected data can be stored in the same data type as used for the input data.
For Date and Datetime type of data elements, an invalid input data error is returned by the protect API if the input value falls between the non-existent date range. It ranges from 05-OCT-1582 to 14-OCT-1582 of the Gregorian Calendar.
For more information about the tokenization and de-tokenization of the cutover dates of the Proleptic Gregorian Calendar, refer to section Datetime Tokenization for Cutover Dates of the Proleptic Gregorian Calendar.
public boolean protect(SessionObject sessionObj, java.lang.String dataElementName, byte[][] input, byte[][] output, PTYCharset ...ptyCharsets)
Parameters
sessionObj: SessionObject that is obtained by calling the createSession method.
dataElementName: String containing the data element name defined in policy.
input: Input array with byte format data.
output: Resultant output array with byte format data.
ptyCharsets: Encoding associated with the bytes of the input data.
PTYCharset ptyCharsets = PTYCharset.<encoding>;
The ptyCharsets parameter supports the following encodings:
The ptyCharsets parameter is mandatory for the data elements created with Unicode Gen2 tokenization method and the FPE encryption method for byte APIs.
The encoding set for the ptyCharsets parameter must match the encoding of the input data passed.
The default value for the ptyCharsets parameter is UTF-8.
Result
True: The data is successfully protected.
False: The parameters passed are accurate, but the method failed when:
- The protection methods failed to perform the required action
- The data element is null or empty
For more information, such as, a text explanation and reason for the failure, call getLastError(session).
Exception
Protector Exception: If the SessionObject is null or if policy is configured to throw an exception, then an exception is thrown.
SessionTimeoutException: If the session is invalid or has timed out, then an exception is thrown.
protect - String array data with External Tweak
It protects the data provided as a string array using the FPE (FF1) that uses a preservation data type with FPE data elements. It supports bulk protection. There is no maximum data limit. However, you are recommended to pass not more than 1 MB of input data for each protection call.
When FPE method is used with FPE data elements for data protection, the protected data can be stored in the same data type that was used for input data.
public boolean protect(SessionObject sessionObj, java.lang.String dataElementName, java.lang.String[] input, java.lang.String[] output, byte[] externalIv, byte[] externalTweak)
Parameters
sessionObj: SessionObject that is obtained by calling the createSession method.
dataElementName: String containing the data element name defined in policy.
input: Input array with string format data.
output: Resultant output array with string format data.
externalIv: Optional parameter, which is a buffer containing data that will be used as external IV, when externalIv = null, the value is ignored.
externalTweak: Optional parameter, which is a buffer containing data that will be used as Tweak, when externalTweak = null, the value is ignored.
Result
True: The data is successfully protected.
False: The parameters passed are accurate, but the method failed when:
- The protection methods failed to perform the required action
- The data element is null or empty
For more information, such as, a text explanation and reason for the failure, call getLastError(session).
Exception
Protector Exception: If the SessionObject is null or if policy is configured to throw an exception, then an exception is thrown.
SessionTimeoutException: If the session is invalid or has timed out, then an exception is thrown.
unprotect - Short array data
It unprotects the data provided as a short array that uses the preservation data type or the No Encryption data element. It supports the bulk unprotection. There is no maximum data limit. However, you are recommended to pass not more than 1 MB of input data for each unprotection call.
public boolean unprotect(SessionObject sessionObj, java.lang.String dataElementName, short[] input, short[] output, byte[] externalIv)
Parameters
sessionObj: SessionObject that is obtained by calling the createSession method.
dataElementName: String containing the data element name defined in policy.
input: Input array with short format data.
output: Resultant output array with short format data.
externalIv: Optional parameter, which is a buffer containing data that will be used as external IV, when externalIv = null, the value is ignored.
Result
True: The data is successfully unprotected.
False: The parameters passed are accurate, but the method failed to perform the required action
For more information, such as, a text explanation and reason for the failure, call getLastError(session).
Exception
Protector Exception: If the SessionObject is null or if policy is configured to throw an exception, then an exception is thrown.
SessionTimeoutException: If the session is invalid or has timed out, then an exception is thrown.
unprotect - Short array data for encryption
It unprotects the data provided as a short array that uses an encryption data element. It supports the bulk unprotection. There is no maximum data limit. However, you are recommended to pass not more than 1 MB of input data for each unprotection call.
public boolean unprotect(SessionObject sessionObj, java.lang.String dataElementName, byte[][] input, short[] output, byte[] externalIv)
Parameters
sessionObj: SessionObject that is obtained by calling the createSession method.
dataElementName: String containing the data element name defined in policy.
input: Input array with byte format data.
output: Resultant output array with short format data.
externalIv: Optional parameter, which is a buffer containing data that will be used as external IV, when externalIv = null, the value is ignored.
Note: Encryption data elements do not support external IV.
Result
True: The data is successfully unprotected.
False: The parameters passed are accurate, but the method failed to perform the required action.
For more information, such as, a text explanation and reason for the failure, call getLastError(session).
Exception
Protector Exception: If the SessionObject is null or if policy is configured to throw an exception, then an exception is thrown.
SessionTimeoutException: If the session is invalid or has timed out, then an exception is thrown.
unprotect - Int array data
It unprotects the data provided as an int array that uses a preservation data type or a No Encryption data element. It supports the bulk unprotection. There is no maximum data limit. However, you are recommended to pass not more than 1 MB of input data for each unprotection call.
public boolean unprotect(SessionObject sessionObj, java.lang.String dataElementName, int[] input, int[] output, byte[] externalIv)
Parameters
sessionObj: SessionObject that is obtained by calling the createSession method.
dataElementName: String containing the data element name defined in policy.
input: Input array with int format data.
output: Resultant output array with int format data.
externalIv: Optional parameter, which is a buffer containing data that will be used as external IV, when externalIv = null, the value is ignored.
Result
True: The data is successfully unprotected.
False: The parameters passed are accurate, but the method failed to perform the required action.
For more information, such as, a text explanation and reason for the failure, call getLastError(session).
Exception
Protector Exception: If the SessionObject is null or if policy is configured to throw an exception, then an exception is thrown.
SessionTimeoutException: If the session is invalid or has timed out, then an exception is thrown.
unprotect - Int array data for encryption
It unprotects the data provided as an int array that uses an encryption data element. It supports the bulk unprotection. There is no maximum data limit. However, you are recommended to pass not more than 1 MB of input data for each unprotection call.
public boolean unprotect(SessionObject sessionObj, java.lang.String dataElementName, byte[][] input, int[] output, byte[] externalIv)
Parameters
sessionObj: SessionObject that is obtained by calling the createSession method.
dataElementName: String containing the data element name defined in policy.
input: Input array with byte format data.
output: Resultant output array with int format data.
externalIv: Optional parameter, which is a buffer containing data that will be used as external IV, when externalIv = null, the value is ignored.
Note: Encryption data elements do not support external IV.
Result
True: The data is successfully unprotected.
False: The parameters passed are accurate, but the method failed to perform the required action.
For more information, such as, a text explanation and reason for the failure, call getLastError(session).
Exception
Protector Exception: If the SessionObject is null or if policy is configured to throw an exception, then an exception is thrown.
SessionTimeoutException: If the session is invalid or has timed out, then an exception is thrown.
unprotect - Long array data
It unprotects the data provided as a long array that uses the preservation data type or the No Encryption data element. It supports the bulk unprotection. However, you are recommended to pass not more
than 1 MB of input data for each unprotection call.
public boolean unprotect(SessionObject sessionObj, java.lang.String dataElementName, long[] input, long[] output, byte[] externalIv)
Parameters
sessionObj: SessionObject that is obtained by calling the createSession method.
dataElementName: String containing the data element name defined in policy.
input: Input array with long format data.
output: Resultant output array with long format data.
externalIv: Optional parameter, which is a buffer containing data that will be used as external IV, when externalIv = null, the value is ignored.
Result
True: The data is successfully unprotected.
False: The parameters passed are accurate, but the method failed to perform the required action.
For more information, such as, a text explanation and reason for the failure, call getLastError(session).
Exception
Protector Exception: If the SessionObject is null or if policy is configured to throw an exception, then an exception is thrown.
SessionTimeoutException: If the session is invalid or has timed out, then an exception is thrown.
unprotect - Long array data for encryption
It unprotects the data provided as a long array that uses an encryption data element. It supports the bulk unprotection. There is no maximum data limit. However, you are recommended to pass not more than 1 MB of input data for each unprotection call.
public boolean unprotect(SessionObject sessionObj, java.lang.String dataElementName, byte[][] input, long[] output, byte[] externalIv)
Parameters
sessionObj: SessionObject that is obtained by calling the createSession method.
dataElementName: String containing the data element name defined in policy.
input: Input array with byte format data.
output: Resultant output array with long format data.
externalIv: Optional parameter, which is a buffer containing data that will be used as external IV, when externalIv = null, the value is ignored.
Note: Encryption data elements do not support external IV.
Result
True: The data is successfully unprotected.
False: The parameters passed are accurate, but the method failed to perform the required action.
For more information, such as, a text explanation and reason for the failure, call getLastError(session).
Exception
Protector Exception: If the SessionObject is null or if policy is configured to throw an exception, then an exception is thrown.
SessionTimeoutException: If the session is invalid or has timed out, then an exception is thrown.
unprotect - Float array data
It unprotects the data provided as a float array that uses a No Encryption data element. It supports the bulk unprotection. There is no maximum data limit. However, you are recommended to pass not more than 1 MB of input data for each unprotection call.
public boolean unprotect(SessionObject sessionObj, java.lang.String dataElementName, float[] input, float[] output)
Parameters
sessionObj: SessionObject that is obtained by calling the createSession method.
dataElementName: String containing the data element name defined in policy.
input: Input array with float format data.
output: Resultant output array with float format data.
Result
True: The data is successfully unprotected.
False: The parameters passed are accurate, but the method failed to perform the required action.
For more information, such as, a text explanation and reason for the failure, call getLastError(session).
Exception
Protector Exception: If the SessionObject is null or if policy is configured to throw an exception, then an exception is thrown.
SessionTimeoutException: If the session is invalid or has timed out, then an exception is thrown.
unprotect - Float array data for encryption
It unprotects the data provided as a float array that uses an encryption data element. It supports the bulk unprotection. There is no maximum data limit. However, you are recommended to pass not more than 1 MB of input data for each unprotection call.
public boolean unprotect(SessionObject sessionObj, java.lang.String dataElementName, byte[][] input, float[] output)
Parameters
sessionObj: SessionObject that is obtained by calling the createSession method.
dataElementName: String containing the data element name defined in policy.
input: Input array with byte format data.
output: Resultant output array with float format data.
Result
True: The data is successfully unprotected.
False: The parameters passed are accurate, but the method failed to perform the required action.
For more information, such as, a text explanation and reason for the failure, call getLastError(session).
Exception
Protector Exception: If the SessionObject is null or if policy is configured to throw an exception, then an exception is thrown.
SessionTimeoutException: If the session is invalid or has timed out, then an exception is thrown.
unprotect - Double array data
It unprotects the data provided as a double array that uses the No Encryption data element. It supports the bulk unprotection. There is no maximum data limit. However, you are recommended to pass not more than 1 MB of input data for each unprotection call.
public boolean unprotect(SessionObject sessionObj, java.lang.String dataElementName, double[] input, double[] output)
Parameters
sessionObj: SessionObject that is obtained by calling the createSession method.
dataElementName: String containing the data element name defined in policy.
input: Input array with double format data.
output: Resultant output array with double format data.
Result
True: The data is successfully unprotected.
False: The parameters passed are accurate, but the method failed to perform the required action.
For more information, such as, a text explanation and reason for the failure, call getLastError(session).
Exception
Protector Exception: If the SessionObject is null or if policy is configured to throw an exception, then an exception is thrown.
SessionTimeoutException: If the session is invalid or has timed out, then an exception is thrown.
unprotect - Double array data for encryption
It unprotects the data provided as a double array that uses an encryption data element. It supports the bulk unprotection. There is no maximum data limit. However, you are recommended to pass not more than 1 MB of input data for each unprotection call.
public boolean unprotect(SessionObject sessionObj, java.lang.String dataElementName, byte[][] input, double[] output)
Parameters
sessionObj: SessionObject that is obtained by calling the createSession method.
dataElementName: String containing the data element name defined in policy.
input: Input array with byte format data.
output: Resultant output array with double format data.
Result
True: The data is successfully unprotected.
False: The parameters passed are accurate, but the method failed to perform the required action.
For more information, such as, a text explanation and reason for the failure, call getLastError(session).
Exception
Protector Exception: If the SessionObject is null or if policy is configured to throw an exception, then an exception is thrown.
SessionTimeoutException: If the session is invalid or has timed out, then an exception is thrown.
unprotect - Date array data
It unprotects the data provided as a java.util.Date array using the preservation data type. It supports the bulk unprotection. There is no maximum data limit. However, you are recommended to pass not more than 1 MB of input data for each unprotection call.
If the protect and unprotect operations are performed in different time zones using the java.util.Date API, then the unprotected data does not match with the input data.
For example, if you perform the protect operation in EDT time zone using the java.util.Date API, then you must perform the unprotect operation only in EDT time zone. This ensures that the unprotect operation returns back the original data.
public boolean unprotect(SessionObject sessionObj, java.lang.String dataElementName, java.util.Date[] input, java.util.Date[] output)
Parameters
sessionObj: SessionObject that is obtained by calling the createSession method.
dataElementName: String containing the data element name defined in policy.
input: Input array with date format data.
output: Resultant output array with date format data.
Result
True: The data is successfully unprotected.
False: The parameters passed are accurate, but the method failed to perform the required action.
For more information, such as, a text explanation and reason for the failure, call getLastError(session).
Exception
Protector Exception: If the SessionObject is null or if policy is configured to throw an exception, then an exception is thrown.
SessionTimeoutException: If the session is invalid or has timed out, then an exception is thrown.
unprotect - String array data
It unprotects the data provided as a string array that uses a preservation data type or a No Encryption data element. It supports the bulk unprotection. There is no maximum data limit. However, you are recommended to pass not more than 1 MB of input data for each unprotection call.
public boolean unprotect(SessionObject sessionObj, java.lang.String dataElementName, String[] input, String[] output, byte[] externalIv)
Parameters
sessionObj: SessionObject that is obtained by calling the createSession method.
dataElementName: String containing the data element name defined in policy.
input: Input array with string format data.
output: Resultant output array with string format data.
externalIv: This is optional. Buffer containing data that will be used as external IV, when externalIv = null, the value is ignored.
Result
True: The data is successfully unprotected.
False: The parameters passed are accurate, but the method failed to perform the required action.
For more information, such as, a text explanation and reason for the failure, call getLastError(session).
Exception
Protector Exception: If the SessionObject is null or if policy is configured to throw an exception, then an exception is thrown.
SessionTimeoutException: If the session is invalid or has timed out, then an exception is thrown.
unprotect - String array data for encryption
It unprotects the data provided as a string array that uses an encryption data element. It supports the bulk unprotection. There is no maximum data limit. However, you are recommended to pass not more than 1 MB of input data for each unprotection call.
public boolean unprotect(SessionObject sessionObj, java.lang.String dataElementName, byte[][] input, String[] output, byte[] externalIv)
Parameters
sessionObj: SessionObject that is obtained by calling the createSession method.
dataElementName: String containing the data element name defined in policy.
input: Input array with byte format data.
output: Resultant output array with string format data.
externalIv: This is optional. Buffer containing data that will be used as external IV, when externalIv = null, the value is ignored.
Note: Encryption data elements do not support external IV.
Result
True: The data is successfully unprotected
False: The parameters passed are accurate, but the method failed to perform the required action.
For more information, such as, a text explanation and reason for the failure, call getLastError(session).
Exception
Protector Exception: If the SessionObject is null or if policy is configured to throw an exception, then an exception is thrown.
SessionTimeoutException: If the session is invalid or has timed out, then an exception is thrown.
unprotect - Char array data
It unprotects the data provided as a char array that uses a preservation data type or a No Encryption data element. It supports the bulk unprotection. There is no maximum data limit. However, you are recommended to pass not more than 1 MB of input data for each unprotection call.
public boolean unprotect(SessionObject sessionObj, java.lang.String dataElementName, char[][] input, char[][] output, byte[] externalIv)
Parameters
sessionObj: SessionObject that is obtained by calling the createSession method.
dataElementName: String containing the data element name defined in policy.
input: Input array with char format data.
output: Resultant output array with char data.
externalIv: Optional parameter, which is a buffer containing data that will be used as external IV, when externalIv = null, the value is ignored.
Result
True: The data is successfully unprotected.
False: The parameters passed are accurate, but the method failed to perform the required action.
For more information, such as, a text explanation and reason for the failure, call getLastError(session).
Exception
Protector Exception: If the SessionObject is null or if policy is configured to throw an exception, then an exception is thrown.
SessionTimeoutException: If the session is invalid or has timed out, then an exception is thrown.
unprotect - Char array data for encryption
It unprotects the data provided as a char array that uses an encryption data element. It supports the bulk unprotection. There is no maximum data limit. However, you are recommended to pass not more than 1 MB of input data for each unprotection call.
public boolean unprotect(SessionObject sessionObj, java.lang.String dataElementName, byte[][] input, char[][] output, byte[] externalIv)
Parameters
sessionObj: SessionObject that is obtained by calling the createSession method.
dataElementName: String containing the data element name defined in policy.
input: Input array with byte format data.
output: Resultant output array with char format data.
externalIv: This is optional. Buffer containing data that will be used as external IV, when externalIv = null, the value is ignored.
Result
True: The data is successfully unprotected.
False: The parameters passed are accurate, but the method failed to perform the required action.
For more information, such as, a text explanation and reason for the failure, call getLastError(session).
Exception
Protector Exception: If the SessionObject is null or if policy is configured to throw an exception, then an exception is thrown.
SessionTimeoutException: If the session is invalid or has timed out, then an exception is thrown.
unprotect - Byte array data
It unprotects the data provided as a byte array that uses an encryption data element or a No Encryption data element, or a preservation data type. It supports the bulk unprotection. There is no maximum data limit. However, you are recommended to pass not more than 1 MB of input data for each unprotection call.
The Protegrity AP Java protector only supports bytes converted from the string data type.
If any data type is converted to bytes and passed as input to the API supporting byte as input and providing byte as output, then data corruption might occur.
public boolean unprotect(SessionObject sessionObj, java.lang.String dataElementName, byte[][] input, byte[][] output, byte[] externalIv, PTYCharset ...ptyCharsets)
Parameters
sessionObj: SessionObject that is obtained by calling the createSession method.
dataElementName: String containing the data element name defined in policy.
input: Input array with byte format data.
output: Resultant output array with byte format data.
externalIv: This is optional. Buffer containing data that will be used as external IV, when externalIv = null, the value is ignored.
ptyCharsets: Encoding associated with the bytes of the input data.
PTYCharset ptyCharsets = PTYCharset.<encoding>;
The ptyCharsets parameter supports the following encodings:
The ptyCharsets parameter is mandatory for the data elements created with Unicode Gen2 tokenization method and the FPE encryption method for byte APIs. The encoding set for the ptyCharsets parameter must match the encoding of the input data passed.
The default value for the ptyCharsets parameter is UTF-8.
Result
True: The data is successfully unprotected.
False: The parameters passed are accurate, but the method failed to perform the required action.
For more information, such as, a text explanation and reason for the failure, call getLastError(session).
Exception
Protector Exception: If the SessionObject is null or if policy is configured to throw an exception, then an exception is thrown.
SessionTimeoutException: If the session is invalid or has timed out, then an exception is thrown.
unprotect - String array data with External Tweak
It unprotects the data provided as a string array using the FPE (FF1) that uses a preservation data type with FPE data elements. It supports the bulk unprotection. There is no maximum data limit. However, you are recommended to pass not more than 1 MB of input data for each unprotection call.
public boolean unprotect(SessionObject sessionObj, java.lang.String dataElementName, String[] input, String[] output, byte[] externalIv, byte[] externalTweak)
Parameters
sessionObj: SessionObject that is obtained by calling the createSession method.
dataElementName: String containing the data element name defined in policy.
input: Input array with byte format data.
output: Resultant output array with byte format data.
externalIv: This is optional. Buffer containing data that will be used as external IV, when externalIv = null, the value is ignored.
Result
True: The data is successfully unprotected.
False: The parameters passed are accurate, but the method failed to perform the required action.
For more information, such as, a text explanation and reason for the failure, call getLastError(session).
Exception
Protector Exception: If the SessionObject is null or if policy is configured to throw an exception, then an exception is thrown.
SessionTimeoutException: If the session is invalid or has timed out, then an exception is thrown.
reprotect - String array data
It reprotects the data provided as a string array that uses a preservation data type or a No Encryption data element. The protected data is first unprotected and then protected again with a new data element. It supports the bulk reprotection. There is no maximum data limit. However, you are recommended to pass not more than 1 MB of input data for each reprotection call.
For String and Byte data types, the maximum length for tokenization is 4096 bytes.
If you are using the reprotect API, then the old data element and the new data element must have the same data type.
For example, if you have used Alpha-Numeric data element to protect the data, then you must use only Alpha-Numeric data element to reprotect the data.
public boolean reprotect(SessionObject sessionObj, String newDataElementName, String oldDataElementName, java.lang.String[] input, java.lang.String[] output, byte[] newExternalIv, byte[] oldExternalIv)
Parameters
sessionObj: SessionObject that is obtained by calling the createSession method.
newdataElementName: String containing the data element name defined in policy to create the output data.
olddataElementName: String containing the data element name defined in policy for the input data.
input: Input array with string format data.
output: Resultant output array with string format data.
newexternalIv: Optional parameter, which is a buffer containing data that will be used as external IV, when newExternalIv = null, the value is ignored.
oldexternalIv: Optional parameter, which is a buffer containing data that will be used as external IV, when oldExternalIv = null, the value is ignored.
Result
True: The data is successfully reprotected.
False: The parameters passed are accurate, but the method failed to perform the required action.
For more information, such as a text explanation and reason for the failure, call getLastError(session).
Exception
ProtectorException: If the SessionObject is null or if policy is configured to throw an exception, then an exception is thrown.
SessionTimeoutException: If the session is invalid or has timed out, then an exception is thrown.
reprotect - Short array data
It reprotects the data provided as a short array that uses a preservation data type or a No Encryption data element. The protected data is first unprotected and then protected again with a new data element. It supports the bulk reprotection. There is no maximum data limit. However, you are recommended to pass not more than 1 MB of input data for each reprotection call.
If you are using the reprotect API, then the old data element and the new data element must have the same data type.
For example, if you have used Alpha-Numeric data element to protect the data, then you must use only Alpha-Numeric data element to reprotect the data.
public boolean reprotect(SessionObject sessionObj, String newDataElementName, String oldDataElementName, short[] input, short[] output, byte[] newExternalIv, byte[] oldExternalIv)
Parameters
sessionObj: SessionObject that is obtained by calling the createSession method.
newdataElementName: String containing the data element name defined in policy to create the output data.
olddataElementName: String containing the data element name defined in policy for the input data.
input: Input array with short format data.
output: Resultant output array with short format data.
newexternalIv: Optional parameter, which is a buffer containing data that will be used as external IV, when newExternalIv = null, the value is ignored.
oldexternalIv: Optional parameter, which is a buffer containing data that will be used as external IV, when oldExternalIv = null, the value is ignored.
Result
True: The data is successfully reprotected.
False: The parameters passed are accurate, but the method failed to perform the required action.
For more information, such as, a text explanation and reason for the failure, call getLastError(session).
Exception
Protector Exception: If the SessionObject is null or if policy is configured to throw an exception, then an exception is thrown.
SessionTimeoutException: If the session is invalid or has timed out, then an exception is thrown.
reprotect - Int array data
It reprotects the data provided as an int array that uses a preservation data type or a No Encryption data element. The protected data is first unprotected and then protected again with a new data element. It supports the bulk reprotection. There is no maximum data limit. However, you are recommended to pass not more than 1 MB of input data for each reprotection call.
If you are using the reprotect API, then the old data element and the new data element must have the same data type.
For example, if you have used Alpha-Numeric data element to protect the data, then you must use only Alpha-Numeric data element to reprotect the data.
public boolean reprotect(SessionObject sessionObj, String newDataElementName, String oldDataElementName, int[] input, int[] output, byte[] newExternalIv, byte[] oldExternalIv)
Parameters
sessionObj: SessionObject that is obtained by calling the createSession method.
newdataElementName: String containing the data element name defined in policy to create the output data.
olddataElementName: String containing the data element name defined in policy for the input data.
input: Input array with int format data.
output: Resultant output array with int format data.
newexternalIv: Optional parameter, which is a buffer containing data that will be used as external IV, when newExternalIv = null, the value is ignored.
oldexternalIv: Optional parameter, which is a buffer containing data that will be used as external IV, when oldExternalIv = null, the value is ignored.
Result
True: The data is successfully reprotected.
False: The parameters passed are accurate, but the method failed to perform the required action.
For more information, such as, a text explanation and reason for the failure, call getLastError(session).
Exception
Protector Exception: If the SessionObject is null or if policy is configured to throw an exception, then an exception is thrown.
SessionTimeoutException: If the session is invalid or has timed out, then an exception is thrown.
reprotect - Long array data
It reprotects the data provided as a long array that uses a preservation data type or a No Encryption data element. The protected data is first unprotected and then protected again with a new data element. It supports the bulk reprotection. There is no maximum data limit. However, you are recommended to pass not more than 1 MB of input data for each reprotection call.
If you are using the reprotect API, then the old data element and the new data element must have the same data type.
For example, if you have used Alpha-Numeric data element to protect the data, then you must use only Alpha-Numeric data element to reprotect the data.
public boolean reprotect(SessionObject sessionObj, String newDataElementName, String oldDataElementName, long[] input, long[] output, byte[] newExternalIv, byte[] oldExternalIv)
Parameters
sessionObj: SessionObject that is obtained by calling the createSession method.
newdataElementName: String containing the data element name defined in policy to create the output data.
olddataElementName: String containing the data element name defined in policy for the input data.
input: Input array with long format data.
output: Resultant output array with long format data.
newexternalIv: Optional parameter, which is a buffer containing data that will be used as external IV, when newExternalIv = null, the value is ignored.
oldexternalIv: Optional parameter, which is a buffer containing data that will be used as external IV, when oldExternalIv = null, the value is ignored.
Result
True: The data is successfully reprotected.
False: The parameters passed are accurate, but the method failed to perform the required action.
For more information, such as, a text explanation and reason for the failure, call getLastError(session).
Exception
Protector Exception: If the SessionObject is null or if policy is configured to throw an exception, then an exception is thrown.
SessionTimeoutException: If the session is invalid or has timed out, then an exception is thrown.
reprotect - Float array data
It reprotects the data provided as a float array that uses a No Encryption data element. The protected data is first unprotected and then protected again with a new data element. It supports the bulk reprotection. There is no maximum data limit. However, you are recommended to pass not more than 1 MB of input data for each reprotection call.
If you are using the reprotect API, then the old data element and the new data element must have the same data type.
For example, if you have used Alpha-Numeric data element to protect the data, then you must use only Alpha-Numeric data element to reprotect the data.
public boolean reprotect(SessionObject sessionObj, String newDataElementName, String oldDataElementName, float[] input, float[] output)
Parameters
sessionObj: SessionObject that is obtained by calling the createSession method.
newdataElementName: String containing the data element name defined in policy to create the output data.
olddataElementName: String containing the data element name defined in policy for the input data.
input: Input array with float format data.
output: Resultant output array with float format data.
newexternalIv: Optional parameter, which is a buffer containing data that will be used as external IV, when newExternalIv = null, the value is ignored.
oldexternalIv: Optional parameter, which is a buffer containing data that will be used as external IV, when oldExternalIv = null, the value is ignored.
Result
True: The data is successfully reprotected.
False: The parameters passed are accurate, but the method failed to perform the required action.
For more information, such as, a text explanation and reason for the failure, call getLastError(session).
Exception
Protector Exception: If the SessionObject is null or if policy is configured to throw an exception, then an exception is thrown.
SessionTimeoutException: If the session is invalid or has timed out, then an exception is thrown.
reprotect - Double array data
It reprotects the data provided as a double array that uses a No Encryption data element. The protected data is first unprotected and then protected again with a new data element. It supports the bulk reprotection. There is no maximum data limit. However, you are recommended to pass not more than 1 MB of input data for each reprotection call.
If you are using the reprotect API, then the old data element and the new data element must have the same data type.
For example, if you have used Alpha-Numeric data element to protect the data, then you must use only Alpha-Numeric data element to reprotect the data.
public boolean reprotect(SessionObject sessionObj, String newDataElementName, String oldDataElementName, double[] input, double[] output)
Parameters
sessionObj: SessionObject that is obtained by calling the createSession method.
newdataElementName: String containing the data element name defined in policy to create the output data
olddataElementName: String containing the data element name defined in policy for the input data.
input: Input array with double format data.
output: Resultant output array with double format data.
Result
True: The data is successfully reprotected.
False: The parameters passed are accurate, but the method failed to perform the required action.
For more information, such as, a text explanation and reason for the failure, call getLastError(session).
Exception
Protector Exception: If the SessionObject is null or if policy is configured to throw an exception, then an exception is thrown.
SessionTimeoutException: If the session is invalid or has timed out, then an exception is thrown.
reprotect - Date array data
It reprotects the data provided as a date array that uses a preservation data type. The protected data is first unprotected and then protected again with a new data element. It supports the bulk reprotection. There is no maximum data limit. However, you are recommended to pass not more than 1 MB of input data for each reprotection call.
If you are using the reprotect API, then the old data element and the new data element must have the same data type.
For example, if you have used Alpha-Numeric data element to protect the data, then you must use only Alpha-Numeric data element to reprotect the data.
If the protect and unprotect operations are performed in different time zones using the java.util.Date API, then the unprotected data does not match with the input data.
For example, if you perform the protect operation in EDT time zone using the java.util.Date API, then you must perform the unprotect operation only in EDT time zone. This ensures that the unprotect operation returns back the original data.
public boolean reprotect(SessionObject sessionObj, String newDataElementName, String oldDataElementName, java.util.Date[] input, java.util.Date[] output)
Parameters
sessionObj: SessionObject that is obtained by calling the createSession method.
newdataElementName: String containing the data element name defined in policy to create the output data.
olddataElementName: String containing the data element name defined in policy for the input data.
input: Input array with date format data.
output: Resultant output array with date format data.
Result
True: The data is successfully reprotected.
False: The parameters passed are accurate, but the method failed to perform the required action.
For more information, such as, a text explanation and reason for the failure, call getLastError(session).
Exception
Protector Exception: If the SessionObject is null or if policy is configured to throw an exception, then an exception is thrown.
SessionTimeoutException: If the session is invalid or has timed out, then an exception is thrown.
reprotect - Byte array data
It reprotects the data provided as a byte array that uses an encryption data element or a No Encryption data element, or a preservation data type. The protected data is first unprotected and then protected again with a new data element. However, you are recommended to pass not more than 1 MB of input data for each reprotection call.
When the data type preservation methods, such as, Tokenization and No Encryption are used to reprotect data, the output of data protection (protected data) can be stored in the same data type that was used for input data.
The Protegrity AP Java protector only supports bytes converted from the string data type.
If any data type is converted to bytes and passed as input to the API supporting byte as input and providing byte as output, then data corruption might occur.
If you are using the reprotect API, then the old data element and the new data element must have the same data type.
For example, if you have used Alpha-Numeric data element to protect the data, then you must use only Alpha-Numeric data element to reprotect the data.
public boolean reprotect(SessionObject sessionObj, String newDataElementName, String oldDataElementName, byte[][] input, byte[][] output, byte[] newExternalIv, byte[] oldExternalIv, PTYCharset ...ptyCharsets)
Parameters
sessionObj: SessionObject that is obtained by calling the createSession method.
newdataElementName: String containing the data element name defined in policy to create the output data.
olddataElementName: String containing the data element name defined in policy for the input data.
input: Input array with byte format data.
output: Resultant output array with byte format data.
newexternalIv: Optional parameter, which is a buffer containing data that will be used as external IV, when newExternalIv = null, the value is ignored.
oldexternalIv: Optional parameter, which is a buffer containing data that will be used as external IV, when oldExternalIv = null, the value is ignored.
ptyCharsets: Encoding associated with the bytes of the input data.
PTYCharset ptyCharsets = PTYCharset.<encoding>;
The ptyCharsets parameter supports the following encodings:
The ptyCharsets parameter is mandatory for the data elements created with Unicode Gen2 tokenization method and the FPE encryption method for byte APIs. The encoding set for the ptyCharsets parameter must match the encoding of the input data passed.
The default value for the ptyCharsets parameter is UTF-8.
Result
True: The data is successfully reprotected.
False: The parameters passed are accurate, but the method failed to perform the required action.
For more information, such as, a text explanation and reason for the failure, call getLastError(session).
Exception
Protector Exception: If the SessionObject is null or if policy is configured to throw an exception, then an exception is thrown.
SessionTimeoutException: If the session is invalid or has timed out, then an exception is thrown.
reprotect - String array data with External Tweak
It reprotects the data provided as a string array using the FPE (FF1) that uses a preservation data type with FPE data elements. The protected data is first unprotected and then protected again with a new FPE data element. It supports the bulk reprotection. There is no maximum data limit. However, you are recommended to pass not more than 1 MB of input data for each reprotection call.
If you are using the reprotect API, then the old data element and the new data element must have the same data type.
For example, if you have used Alpha-Numeric data element to protect the data, then you must use only Alpha-Numeric data element to reprotect the data.
public boolean reprotect(SessionObject sessionObj, String newDataElementName, String oldDataElementName, String[] input, String[] output, byte[] newExternalIv, byte[] oldExternalIv, byte[] newExternalTweak, byte[] oldExternalTweak)
Parameters
sessionObj: SessionObject that is obtained by calling the createSession method.
newdataElementName: String containing the data element name defined in policy to create the output data.
olddataElementName: String containing the data element name defined in policy for the input data.
input: Input array with String format data.
output: Resultant output array with String format data.
newexternalIv: Optional parameter, which is a buffer containing data that will be used as external IV, when newExternalIv = null, the value is ignored.
oldexternalIv: Optional parameter, which is a buffer containing data that will be used as external IV, when oldExternalIv = null, the value is ignored.
newExternalTweak: Optional parameter, which is a buffer containing data that will be used as Tweak, when newExternalTweak = null, the value is ignored.
oldExternalTweak: Optional parameter, which is a buffer containing data that will be used as Tweak, when oldExternalTweak = null, the value is ignored.
Result
True: The data is successfully reprotected.
False: The parameters passed are accurate, but the method failed to perform the required action.
For more information, such as, a text explanation and reason for the failure, call getLastError(session).
Exception
Protector Exception: If the SessionObject is null or if policy is configured to throw an exception, then an exception is thrown.
SessionTimeoutException: If the session is invalid or has timed out, then an exception is thrown.
reprotect - Char array data
It reprotects the data provided as a char array that uses a preservation data type or a No Encryption data element. The protected data is first unprotected and then protected again with a new data element. It supports the bulk reprotection. There is no maximum data limit. However, you are recommended to pass not more than 1 MB of input data for each reprotection call.
If you are using the reprotect API, then the old data element and the new data element must have the same data type.
For example, if you have used Alpha-Numeric data element to protect the data, then you must use only Alpha-Numeric data element to reprotect the data.
public boolean reprotect(SessionObject sessionObj, String newDataElementName, String oldDataElementName, char[][] input, char[][] output, byte[] newExternalIv, byte[] oldExternalIv)
Parameters
sessionObj: SessionObject that is obtained by calling the createSession method.
newdataElementName: String containing the data element name defined in policy to create the output data.
olddataElementName: String containing the data element name defined in policy for the input data.
input:Input array with char format data.
output: Resultant output array with char format data.
newexternalIv: Optional parameter, which is a buffer containing data that will be used as external IV, when newExternalIv = null, the value is ignored.
oldexternalIv: Optional parameter, which is a buffer containing data that will be used as external IV, when oldExternalIv = null, the value is ignored.
Result
True: The data is successfully reprotected.
False: The parameters passed are accurate, but the method failed to perform the required action.
For more information, such as a text explanation and reason for the failure, call getLastError(session).
Exception
ProtectorException: If the SessionObject is null or if policy is configured to throw an exception, then an exception is thrown.
SessionTimeoutException: If the session is invalid or has timed out, then an exception is thrown.
2.6 - Application Protector Python APIs
The various APIs of the AP Python.
A session must be created to run the AP Python. Before creating the session, the AP Python verifies whether the application invoking the AP Python APIs is trusted. If it is trusted, then a new session is created, and the protect, unprotect, or reprotect methods can be called, one or many times, depending on the data. After the operation is complete, this session closes implicitly or the session times out if it is idle.
A session is valid for a specific time, which is managed by the timeout value passed during the create_session() method. By default, the session timeout value is set to 15 minutes. For every call to the create_session() method, a new session object is created - a pool of session objects is not maintained. Python’s garbage collector is used for destroying the session objects once they are out of scope. You can also use the session object as Python’s Context manager using the with statement. A session is automatically renewed every time it is used. Thus, for each call to a data protection operation, such as, protect, unprotect, and reprotect, the time for the session to remain alive is renewed.
For single data item calls, a total of three audit log events are generated if you perform the following operations:
- 1 protect operation with data element a → 1 audit log
- 5 protect operations with data element b → 5 audit logs
- 1000 unprotect operations with data element a → 1000 audit logs
For more information about audit logs information, refer to Audit logs.
The following figure explains a basic flow of a session.
The AP Python only supports bytes converted from the string data type. Data corruption might occur when a data type is directly converted to bytes and passed as an input to an API. This API supports byte as input and provides byte as output.
You do not have to explicitly close the session. The session is closed implicitly after the API protects, unprotects, or reprotects the data. The session object is implemented as a Python Context Manager and can be used with the with statement.
Supported data types for the AP Python
The AP Python supports the following data types:
- Bytes
- Date Object
- Float
- Integer
- String
Note: The AP Python does not support the Datetime object.
Supported Modes for AP Python
You can use the AP Python APIs in the following modes:
- Production Environment: Use the AP Python APIs to protect, unprotect, and reprotect the data using the data elements deployed on the ESA.
- Development Environment: Use sample users and data elements with the AP Python Mock APIs to simulate the protect, unprotect, and reprotect operations. You do not require the Log Forwarder, the RP Agent, and the ESA to be installed on your machine.
Using AP Python in a Production Environment
The various APIs supported by the AP Python in a production environment are described in this section. It describes the syntax of the AP Python APIs and provides the sample use cases.
Initialize the protector
The Protector API returns the Protector object associated with the AP Python APIs. After instantiation, this object is used to create a session. The session object provides APIs to perform the protect, unprotect, or reprotect operations.
Note: Do not pass the self parameter while invoking the API.
Parameters
None
Returns
Protector: Object associated with the AP Python APIs.
Exceptions
InitializationError: This exception is thrown if the protector fails to initialize.
Example
In the following example, the AP Python is initialized.
from appython import Protector
protector = Protector()
create_session
The create_session API creates a new session. The sessions that are created using this API, automatically time out after the session timeout value has been reached. The default session timeout value is 15 minutes. However, you can also pass the session timeout value as a parameter to this API.
Note: If the session is invalid or has timed out, then the AP Python APIs that are invoked using this session object, may throw an InvalidSessionError exception. Application developers can catch the InvalidSessionError exception and create a session by again by invoking the create_session API.
def create_session(self, policy_user, timeout=15)
Note: Do not pass the self parameter while invoking the API.
Parameters
policy_user: Username defined in the policy, as a string value.
timeout: Session timeout, specified in minutes. By default, the value of this parameter is set to 15. This parameter is optional.
Returns
session: Object of the Session class. A session object is required for calling the data protection operations, such as, protect, unprotect, and reprotect.
Exceptions
ProtectorError: This exception is thrown if a null or empty value is passed as the policy_user parameter.
Example
In the following example, User1 is passed as the policy_user parameter.
from appython import Protector
protector = Protector()
session = protector.create_session("User1")
get_version
The get_version API returns the version of the AP Python in use. Ensure that the version number of the AP Python matches with the AP Python build package.
Note: You do not need to create a session for invoking the get_version API.
Note: Do not pass the self parameter while invoking the API.
Parameters
None
Returns
String: Product version of the installed AP Python.
Exceptions
None
Example
In the following example, the current version of the installed AP Python is retrieved.
from appython import Protector
protector = Protector()
print(protector.get_version())
Result
get_version_ex
The get_version_ex API returns the extended version of the AP Python in use. The extended version consists of the AP Python version number and the Core version.
Note:
- You do not need to create a session for invoking the get_version_ex API.
- The Core version is a sub-module which is required for troubleshooting protector issues.
Note: Do not pass the self parameter while invoking the API.
Parameters
None
Returns
String: The product version of the installed AP Python and the Core version.
Exceptions
None
Example
In the following example, the current version of the AP Python and the Core version is retrieved.
from appython import Protector
protector = Protector()
print(protector.get_version_ex())
Result
SDK Version: 10.0.0+x, Core Version: 2.1.1+20.g78ac6ac.2.1
check_access
The check_access API returns the access permission status of the user for a specified data element.
For checking protect and unprotect access:
def check_access(self, DE, access_type)
For checking reprotect access:
def check_access(self, DE, access_type, newDE)
Note: Do not pass the self parameter while invoking the API.
Parameters
DE: String containing the data element name defined in the policy.
access_type: Type of the access permission of the user for the specified data element. You can specify a value for this parameter from the CheckAccessType enumeration.
The following are the different values for the CheckAccessType enumeration:
| Access Type | Check Access Type |
|---|
| PROTECT | 2 |
| REPROTECT | 4 |
| UNPROTECT | 8 |
| newDE: String containing the new data element name defined in the policy. | |
Returns
True: The user has access to the data element.
False: The user does not have access to the data element.
Exceptions
ProtectorError: This exception is thrown if the API is unable to retrieve the default data element.
InvalidSessionError: This exception is thrown if the session is invalid or has timed out.
Example
In the following example, the check_access API is used to check whether the user has reprotect permissions for the TE_A_N_S23_L2R2_Y token data element with TE_A_N_S23_L3R3_Y as the new token data element.
from appython import Protector
from appython import CheckAccessType
protector = Protector()
session = protector.create_session("User1")
print(session.check_access("TE_A_N_S23_L2R2_Y",
 CheckAccessType.REPROTECT, "TE_A_N_S23_L3R3_Y"))
Result
flush_audits
The flush_audits API is used for flushing the audit logs at any point within the application. This API is required for a short running process that lasts less than a second, to get the audit logs. It is recommended to invoke the API at the point where the application exits.
Note: Do not pass the self parameter while invoking the API.
Parameters
None
Returns
None
Exceptions
ProtectorError: This exception is thrown if the API is unable to flush the audit logs.
Example
In the following example, the flush_audits API is used to flush the audit logs.
from appython import Protector
protector = Protector()
session = protector.create_session("User1")
output = session.protect("Protegrity1", "Alpha_Num")
print("Protected Data: %s" %output)
session.flush_audits()
protect
The protect API protects the data using tokenization, data type preserving encryption, No Encryption, or encryption data element. It supports both single and bulk protection without a maximum bulk size limit. However, you are recommended not to pass more than 1 MB of input data for each protection call.
For String and Byte data types, the maximum length for tokenization is 4096 bytes, while no maximum length is defined for encryption.
def protect(self, data, de, **kwargs)
Note: Do not pass the self parameter while invoking the API.
Parameters
data: Data to be protected. You can provide the data of any type that is supported by the AP Python. For example, you can specify data of type string, float, or integer. However, you cannot provide the data of multiple data types at the same time in a bulk call.
de: String containing the data element name defined in policy.
**kwargs: Specify one or more of the following keyword arguments:
- external_iv: Specify the external initialization vector for Tokenization and FPE protection methods. This argument is optional.
- encrypt_to: Specify this argument for encrypting the data and set its value to bytes. This argument is Mandatory. It must not be used for Tokenization and FPE protection methods.
- external_tweak: Specify the external tweak value for FPE protection method. This argument is optional.
- charset: This is an optional argument. It indicates the byte order of the input buffer. You can specify a value for this argument from the charset constants, such as, UTF8, UTF16LE, or UTF16BE. The default value for the charset argument is UTF8.
The charset argument is only applicable for the input data of byte type.
The charset parameter is mandatory for the data elements created with Unicode Gen2 tokenization method and the FPE encryption method for byte APIs. The encoding set for the charset parameter must match the encoding of the input data passed.
Note: Keyword arguments are case sensitive.
Returns
- For single data: Returns the protected data
- For bulk data: Returns a tuple of the following data:
- List or tuple of the protected data
- Tuple of error codes
Exceptions
InvalidSessionError: This exception is thrown if the session is invalid or has timed out.
ProtectError: This exception is thrown if the API is unable to protect the data.
If the protect API is used with bulk data, then it does not throw any exception. Instead, it only returns an error code.
For more information about the return codes, refer to Application Protector Return Codes.
Example - Tokenizing String Data
The examples for using the protect API for tokenizing the string data are described in this section.
Example 1: Input string data
In the following example, the Protegrity1 string is used as the data, which is tokenized using the
TE_A_N_S23_L2R2_Y Alpha Numeric data element.
from appython import Protector
protector = Protector()
session = protector.create_session("User1")
output = session.protect("Protegrity1", "TE_A_N_S23_L2R2_Y")
print("Protected Data: %s" %output)
Result
Protected Data: Pr9zdglWRy1
Example 2: Input string data using session as Context Manager
In the following example, the Protegrity1 string is used as the data, which is tokenized using the
TE_A_N_S23_L2R2_Y Alpha Numeric data element.
from appython import Protector
protector = Protector()
with protector.create_session("User1") as session:
    output = session.protect("Protegrity1", "TE_A_N_S23_L2R2_Y")
    print("Protected Data: %s" %output)
Result
Protected Data: Pr9zdglWRy1
Example 3: Input date passed as a string
In the following example, the 29/05/1998 string is used as the data, which is tokenized using the
TE_Date_DMY_S13 Date data element.
If a date string is provided as input, then the data element with the same tokenization type as the input date format must be used to protect the data. For example, if you have provided the input date string in DD/MM/YYYY format, then you must use only the Date (DD/MM/YYYY) data element to protect the data.
from appython import Protector
protector = Protector()
session = protector.create_session("User1")
output = session.protect("29/05/1998", "TE_Date_DMY_S13")
print("Protected data: "+str(output))
Result
Protected data: 08/07/2443
Example 4: Input date and time passed as a string
In the following example, the 1998/05/29 10:54:47 string is used as the data, which is tokenized using the
TE_Datetime_TN_DN_M Datetime data element.
If a date and time string is provided as input, then the data element with the same tokenization type as the input format must be used for data protection. For example, if the input date and time string in YYYY/MM/DD HH:MM:SS MMM format is provided, then only the Datetime (YYYY-MM-DD HH:MM:SS MMM) data element must be used to protect the data.
from appython import Protector
protector = Protector()
session = protector.create_session("User1")
output = session.protect("1998/05/29 10:54:47", "TE_Datetime_TN_DN_M")
print("Protected data: "+str(output))
Result
Protected data: 3311/02/22 10:54:47
Example - Tokenizing String Data with External Initialization Vector (IV)
The example for using using the protect API for tokenizing string data using external initialization
vector (IV) is described in this section.
If you want to pass the external IV as a keyword argument to the protect API, then you must first pass the external IV as bytes to the API.
Example
In this example, the Protegrity1 string is used as the data tokenized using the TE_A_N_S23_L2R2_Y data element, with the help of the external IV 1234 passed as bytes.
from appython import Protector
protector = Protector()
session = protector.create_session("User1")
output = session.protect("Protegrity1", "TE_A_N_S23_L2R2_Y",
external_iv=bytes("1234", encoding="utf-8"))
print("Protected Data: %s" %output)
Result
Protected Data: PrksvEshuy1
Example - Encrypting String Data
The example for using the protect API for encrypting the string data is described in this section.
If you want to encrypt the data, then you must use bytes in the encrypt_to keyword.
To avoid data corruption, do not convert the encrypted bytes data into the string format. It is recommended to convert the encrypted bytes data to a Hexadecimal, Base 64, or any other appropriate format.
Example
In the following example, the Protegrity1 string is used as the data, which is encrypted using the AES256_IV_CRC_KID data element. Therefore, the encrypt_to parameter is passed as a keyword argument and its value is set to bytes.
from appython import Protector
protector = Protector()
session = protector.create_session("User1")
output = session.protect("Protegrity1", "AES256_IV_CRC_KID",
 encrypt_to=bytes)
print("Encrypted Data: %s" %output)
Result
Encrypted Data: b'#▒>▒gךڭm▒A΅,i=▒w▒▒▒▒'
The example for using the protect API to protect the string data using Format Preserving Encryption (FPE) (FF1) is described in this section.
Example
In the following example, the protegrity1234ÀÁÂÃÄÅÆÇÈÉ string is used as the data, which is protected using the FPE data element FPE_FF1_AES256_ID_AN_LnRn_ASTNE.
from appython import Protector
protector = Protector()
session = protector.create_session("User1")
output = session.protect("protegrity1234ÀÁÂÃÄÅÆÇÈÉ",
 "FPE_FF1_AES256_ID_AN_LnRn_ASTNE")
print("Protected Data: %s" %output)
Result
Protected Data: NRejBkN7LcBOT4ÀÁÂÃÄÅÆÇÈÉ
Example - Protecting String Data Using FPE with External IV and External Tweak
This section describes how to use the protect API for protecting string data using FPE (FF1), with external IV and external tweak is described in this section.
If the external IV and external tweak are passed as keyword arguments to the protect API, then the external IV and external tweak must be passed as bytes.
Example
In this example, the protegrity1234 string is used as the data, which is protected using the FPE data element FPE_FF1_AES256_ASCII_APIP_AN_L2R1_ASTNI_ML2. It is used along with the external IV 1234 and external tweak abcdef that are passed as bytes.
from appython import Protector
protector = Protector()
session = protector.create_session("User1")
output = session.protect("protegrity1234",
 "FPE_FF1_AES256_ASCII_APIP_AN_L2R1_ASTNI_ML2", external_iv=bytes("1234",
 encoding="utf-8"),
 external_tweak=bytes("abcdef", encoding="utf-8"))
print("Protected Data: %s" %output)
Result
Protected Data: prS6DaU5Dtd5g4
Example - Tokenizing Bulk String Data
The example for using the protect API for tokenizing bulk string data is described in this section. The bulk string data can be passed as a list or a tuple.
The individual elements of the list or tuple must be of the same data type.
Example 1: Input bulk string data
In the following example, protegrity1234, Protegrity1, and Protegrity56 strings are stored in a list and used as bulk data, which is tokenized using the TE_A_N_S23_L2R2_Y data element.
from appython import Protector
protector = Protector()
session = protector.create_session("User1")
data = ["protegrity1234", "Protegrity1", "Protegrity56"]
p_out = session.protect(data, "TE_A_N_S23_L2R2_Y")
print("Protected Data: ")
print(p_out)
Result
Protected Data:
(['prMLJsM8fZUp34', 'Pr9zdglWRy1', 'Pra9Ez5LPG56'], (6, 6, 6))
6 is the success return code for the protect operation of each element in the list.
Example 2: Input bulk string data
In Example 1, the protected output was a tuple of the tokenized data and the error list. This example shows how the code can be tweaked to ensure that the protected output and the error list are retrieved separately, and not as part of a tuple.
from appython import Protector
protector = Protector()
session = protector.create_session("User1")
data = ["protegrity1234", "Protegrity1", "Protegrity56"]
p_out, error_list = session.protect(data, "TE_A_N_S23_L2R2_Y")
print("Protected Data: ")
print(p_out)
print("Error List: ")
print(error_list)
Result
Protected Data:
['prMLJsM8fZUp34', 'Pr9zdglWRy1', 'Pra9Ez5LPG56']
Error List:
(6, 6, 6)
6 is the success return code for the protect operation of each element in the list.
Example 3: Input dates passed as bulk strings
In the following example, the 14/02/2019 and 11/03/2018 strings are stored in a list and used as bulk data, which is tokenized using the TE_Date_DMY_S13 Date data element.
If a date string is provided as input, then the data element with the same tokenization type as the input date format must be used to protect the data. For example, if you have provided the input date string in DD/MM/YYYY format, then you must use only the Date (DD/MM/YYYY) data element to protect the data.
from appython import Protector
protector = Protector()
session = protector.create_session("User1")
data = ["14/02/2019", "11/03/2018"]
output = session.protect(data, "TE_Date_DMY_S13")
print("Protected data: "+str(output))
Result
Protected data: (['08/07/2443', '17/08/1830'], (6, 6))
6 is the success return code for the protect operation of each element in the list.
Example 4: Input date and time passed as bulk strings
In the following example, the 2019/02/14 10:54:47 and 2019/11/03 11:01:32 strings is used as the data, which is tokenized using the TE_Datetime_TN_DN_M Datetime data element.
If a date and time string is provided as input, then the data element with the same tokenization type as the input format must be used for data protection. For example, if you have provided the input date and time string in YYYY/MM/DD
HH:MM:SS MMM format, then you must use only the Datetime (YYYY-MM-DD HH:MM:SS MMM) data element to protect the data.
from appython import Protector
protector = Protector()
session = protector.create_session("User1")
data = ["2019/02/14 10:54:47", "2019/11/03 11:01:32"]
output = session.protect(data, "TE_Datetime_TN_DN_M")
print("Protected data: "+str(output))
Result
Protected data: (['3311/02/22 10:54:47', '3311/11/02 11:01:32'], (6, 6))
6 is the success return code for the protect operation of each element in the list.
Example - Tokenizing Bulk String Data with External IV
The example for using the protect API for tokenizing bulk string data using external IV is described in this section. The bulk string data can be passed as a list or a tuple.
The individual elements of the list or tuple must be of the same data type.
If you want to pass the external IV as a keyword argument to the protect API, then you must pass external IV as bytes.
Example
In this example, protegrity1234, Protegrity1, and Protegrity56 strings are stored in a list and used as bulk data. This bulk data is tokenized using the TE_A_N_S23_L2R2_Y data element, with the help of external IV 123 that is passed as bytes.
from appython import Protector
protector = Protector()
session = protector.create_session("User1")
data = ["protegrity1234", "Protegrity1", "Protegrity56"]
p_out = session.protect(data, "TE_A_N_S23_L2R2_Y",
 external_iv=bytes("123", encoding="utf-8"))
print("Protected Data: ")
print(p_out)
Result
Protected Data:
(['prv0WozsSjbS34', 'PrtigABOCy1', 'PrvjDdC2TD56'], (6, 6, 6))
6 is the success return code for the protect operation of each element in the list.
Example - Protecting Bulk String Data Using FPE
The example for using the protect API for protecting bulk string data using FPE (FF1) is described in this section. The bulk string data can be passed as a list or a tuple.
Caution: The individual elements of the list or tuple must be of the same data type.
Example
In the following example, protegrity1234ÀÁ, Protegrity1ÆÇÈ, and Protegrity56ÀÁÂÃÄÅ strings are stored in a list and used as bulk data, which is protected using the FPE data element FPE_FF1_AES256_APIP_AN_LnRn_ASTNE.
from appython import Protector
protector = Protector()
session = protector.create_session("User1")
data = ["protegrity1234ÀÁ", "Protegrity1ÆÇÈ", "Protegrity56ÀÁÂÃÄÅ"]
p_out = session.protect(data, "FPE_FF1_AES256_APIP_AN_LnRn_ASTNE")
print("Protected Data: ")
print(p_out)
Result
Protected Data:
([u'MG01UHDQ8VyON3\xc0\xc1', u'8APfLh3W9TY\xc6\xc7\xc8', u'4XYdSFURF4bV\xc0\xc1\xc2\xc3\xc4\xc5'], (6, 6, 6))
6 is the success return code for the protect operation of each element in the list.
Example - Protecting Bulk String Data Using FPE with External IV and External Tweak
The example for using the protect API for protecting the bulk str ing data using FPE (FF1), with external IV and external tweak is described in this section. The bulk string data can be passed as a list or a tuple.
The individual elements of the list or tuple must be of the same data type.
If the external IV and external tweak are passed as keyword arguments to the protect API, then the external IV and external tweak must be passed as bytes.
Example
In the following example, protegrity1234ÀÁ, Protegrity1ÆÇÈ, and Protegrity56ÀÁÂÃÄÅ strings are stored in a list and used as bulk data. This bulk data is protected using the FPE data element FPE_FF1_AES256_APIP_AN_LnRn_ASTNE, with the help of external IV 1234 and external tweak xyz that are passed as bytes.
from appython import Protector
protector = Protector()
session = protector.create_session("User1")
data = ["protegrity1234ÀÁ", "Protegrity1ÆÇÈ", "Protegrity56ÀÁÂÃÄÅ"]
p_out = session.protect(data, "FPE_FF1_AES256_APIP_AN_LnRn_ASTNE",
 external_iv=bytes("1234", encoding="utf-8"), external_tweak=bytes("xyz",
 encoding="utf-8"))
print("Protected Data: ")
print(p_out)
Result
Protected Data:
([u'WwR5aK2BMoUlcz\xc0\xc1', u'nW6lqjd7NGR\xc6\xc7\xc8', u'o6eBUZDNuyWU\xc0\xc1\xc2\xc3\xc4\xc5'], (6, 6, 6))
6 is the success return code for the protect operation of each element in the list.
Example - Tokenizing Integer Data
The example for using the protect API for tokenizing integer data is described in this section.
Example
In the following example, 21 is used as the integer data, which is tokenized using the TE_INT_4 data element.
from appython import Protector
protector = Protector()
session = protector.create_session("User1")
output = session.protect(21, "TE_INT_4")
print("Protected Data: %s" %output)
Result
Protected Data: -1926573911
Example - Tokenizing Integer Data with External IV
The example for using the protect API for tokenizing integer data using the external IV is described in this section.
If you want to pass the external IV as a keyword argument to the protect API, then you must pass the
external IV as bytes to the API.
Example
In this example, 21 is used as the integer data, which is tokenized using the TE_INT_4 data element, with the help of external IV 1234 passed as bytes.
from appython import Protector
protector = Protector()
session = protector.create_session("User1")
output = session.protect(21, "TE_INT_4", external_iv=bytes("1234", encoding="utf-8"))
print("Protected Data: %s" %output)
Result
Protected Data: -2122057622
Example - Encrypting Integer Data
The example for using the protect API for encrypting integer data is described in this section.
If you want to encrypt the data, then you must use bytes in the encrypt_to keyword.
To avoid data corruption, do not convert the encrypted bytes data into string format. It is recommended to convert the encrypted bytes data to a Hexadecimal, Base 64, or any other appropriate format.
Example
In the following example, 21 is used as the integer data, which is encrypted using the AES256 data element. Therefore, the encrypt_to parameter is passed as a keyword argument, and its value is set to bytes.
from appython import Protector
protector = Protector()
session = protector.create_session("User1")
output = session.protect(21, "AES256", encrypt_to=bytes)
print("Encrypted Data: %s" %output)
Result
Encrypted Data: b'@▒u▒▒▒p▒▒k▒N▒'
Example - Tokenizing Bulk Integer Data
The example for using the protect API for tokenizing bulk integer data is described in this section. The bulk integer data can be passed as a list or a tuple.
The individual elements of the list or tuple must be of the same data type.
Example
In the following example, 21, 42, and 55 integers are stored in a list and used as bulk data, which is tokenized using the TE_INT_4 data element.
from appython import Protector
protector = Protector()
session = protector.create_session("User1")
data = [21, 42, 55]
p_out = session.protect(data, "TE_INT_4")
print("Protected Data: ")
print(p_out)
Result
Protected Data:
([-1926573911, -1970496120, -814489753], (6, 6, 6))
6 is the success return code for the protect operation of each element in the list.
Example - Tokenizing Bulk Integer Data with External IV
The example for using the protect API for tokenizing bulk integer data using external IV is described in this section. The bulk integer data can be passed as a list or a tuple.
The individual elements of the list or tuple must be of the same data type.
If you want to pass the external IV as a keyword argument to the protect API, then you must pass the external IV as bytes to the API.
Example
In the following example, 21, 42, and 55 integers are stored in a list and used as bulk data, which is tokenized using the TE_INT_4 data element, with the help of external IV 1234 that is passed as bytes.
from appython import Protector
protector = Protector()
session = protector.create_session("User1")
data = [21, 42, 55]
p_out = session.protect(data, "TE_INT_4", external_iv=bytes("1234", encoding="utf-8"))
print("Protected Data: ")
print(p_out)
Result
Protected Data:
([-2122057622, 1795905968, 228587043], (6, 6, 6))
6 is the success return code for the protect operation of each element in the list.
Example - Encrypting Bulk Integer Data
The example for using the protect API for encrypting bulk integer data is described in this section. The bulk integer data can be passed as a list or a tuple.
If you want to encrypt the data, then you must use bytes in the encrypt_to keyword.
To avoid data corruption, do not convert the encrypted bytes data into string format. It is recommended to convert the encrypted bytes data to a Hexadecimal, Base 64, or any other appropriate format.
Example
In the following example, 21, 42, and 55 integers are stored in a list and used as bulk data, which is encrypted using the AES256 data element. Therefore, the encrypt_to parameter is passed as a keyword argument and its value is set to bytes.
from appython import Protector
protector = Protector()
session = protector.create_session("User1")
data = [21, 42, 55]
p_out = session.protect(data, "AES256", encrypt_to=bytes)
print("Encrypted Data: ")
print(p_out)
Result
Encrypted Data:
([b'@\x19\xccu\x04\xc7\xd8\xc1p\xad\xa7\x1fk\xe4N\xd0', b'"@\xec\x97(\x96\xab\x18\xd0\x99\xd4~\x1e\xf4\xba\xd1', b'y\xec\x9b+f\xa8\xb1I\xc2=[\x11\xfd\x06\xa1C'], (6,
 6, 6))
6 is the success return code for the protect operation of each element in the list.
Example - Tokenizing Long Data
The example for using the protect API for tokenizing long data is described in this section.
Example
In the following example, 1376235139103947 is used as the long data, which is tokenized using the TE_INT_8 data element.
from appython import Protector
protector = Protector()
session = protector.create_session("User1")
output = session.protect(1376235139103947, "TE_INT_8")
print("Protected Data: %s" %output)
Result
Protected Data: -1770169866845757900
Example - Tokenizing Long Data with External IV
The example for using the protect API for tokenizing long data using external IV is described in this section.
If you want to pass the external IV as a keyword argument to the protect API, then you must use bytes in the encrypt_to keyword.
Example
In this example, 1376235139103947 is used as the long data, which is tokenized using the TE_INT_8 data element, with the help of external IV 1234 passed as bytes.
from appython import Protector
protector = Protector()
session = protector.create_session("User1")
output = session.protect(1376235139103947, "TE_INT_8",
 external_iv=bytes("1234", encoding="utf-8"))
print("Protected Data: %s" %output)
Result
Protected Data: 5846214101577367207
Example - Encrypting Long Data
The example for using the protect API for encrypting long data is described in this section.
If you want to encrypt the data, then you must use bytes in the encrypt_to keyword.
To avoid data corruption, do not convert the encrypted bytes data into string format. It is recommended to convert the encrypted bytes data to a Hexadecimal, Base 64, or any other appropriate format.
Example
In the following example, 1376235139103947 is used as the long data, which is encrypted using the AES256 data element. Therefore, the encrypt_to parameter is passed as a keyword argument and its value is set to bytes.
from appython import Protector
protector = Protector()
session = protector.create_session("User1")
output = session.protect(1376235139103947, "AES256", encrypt_to=bytes)
print("Encrypted Data: %s" %output)
Result
Encrypted Data: b'#Ds####wp0Xl<\'
Example - Tokenizing Bulk Long Data
The example for using the protect API for tokenizing bulk long data is described in this section. The bulk long
data can be passed as a list or a tuple.
The individual elements of the list or tuple must be of the same data type.
Example
In the following example, 1376235139103947, 2396235839173981, and 9371234126176985 long data are stored in a list and used as bulk data, which is tokenized using the TE_INT_8 data element.
from appython import Protector
protector = Protector()
session = protector.create_session("User1")
data = [1376235139103947, 2396235839173981, 9371234126176985]
p_out = session.protect(data, "TE_INT_8")
print("Protected Data: ")
print(p_out)
Result
Protected Data:
([-1770169866845757900L, -8142006510957348982L, -206876567049699669L], (6, 6, 6))
6 is the success return code for the protect operation of each element in the list.
Example - Tokenizing Bulk Long Data with External IV
The example for using the protect API for tokenizing bulk long data using external IV is described in this section. The bulk long data can be passed as a
list or a tuple.
The individual elements of the list or tuple must be of the same data type.
If you want to pass the external IV as a keyword argument to the protect API, then you must pass the external IV and external tweak as bytes.
Example
In the following example, 1376235139103947, 2396235839173981, and 9371234126176985 long data are stored in a list and used as bulk data, which is tokenized using the TE_INT_8 data element, with the help of external IV 1234 that is passed as bytes.
from appython import Protector
protector = Protector()
session = protector.create_session("User1")
data = [1376235139103947, 2396235839173981, 9371234126176985]
p_out = session.protect(data, "TE_INT_8", external_iv=bytes("1234", encoding="utf-8"))
print("Protected Data: ")
print(p_out)
Result
Protected Data:
([5846214101577367207L, 5661139619224336475L, 7806173497368534531L], (6, 6, 6))
6 is the success return code for the protect operation of each element in the list.
Example - Encrypting Bulk Long Data
The example for using the protect API for encrypting bulk long data is described in this section. The bulk long data can be passed as a list or a tuple.
The individual elements of the list or tuple must be of the same data type.
If you want to encrypt the data, then you must use bytes in the encrypt_to keyword.
To avoid data corruption, do not convert the encrypted bytes data into string format. It is recommended to convert the encrypted bytes data to a Hexadecimal,
Base 64, or any other appropriate format.
Example
In the following example, 1376235139103947, 2396235839173981, and 9371234126176985 long data are stored in a list and used as bulk data, which is encrypted using the AES256 data element. Therefore, the encrypt_to parameter is passed as a keyword argument and its value is set to bytes.
from appython import Protector
protector = Protector()
session = protector.create_session("User1")
data = [1376235139103947, 2396235839173981, 9371234126176985]
p_out = session.protect(data, "AES256", encrypt_to=bytes)
print("Encrypted Data: ")
print(p_out)
Result
Encrypted Data:
([b'\xd5Ds\xb3\xfb\x95\xf2wp0Xl<\\\x1a\x07', b'\xaf\x05aq\xb6\xcd,L`JC4\x87\x87\t\x0b',
 b']j@*S\x96\xf5\xf5S<\x08M\xa6\x18\xbf\xda'], (6, 6, 6))
6 is the success return code for the protect operation of each element in the list.
Example - Protecting Float Data
The example for using the protect API for protecting float data using a No Encryption data element is described in this section. This API can be used for
access control and auditing.
Example
In the following example, 22.5 is used as the float data, which is protected using the NoEncryption_1 data element.
from appython import Protector
protector = Protector()
session = protector.create_session("User1")
output = session.protect(22.5, "NoEncryption_1")
print("Protected Data: %s" %output)
Result
As we are using a No Encryption data element to protect the data, the protected output data is the same as the input data.
Example - Protecting Bulk Float Data
The example for using the protect API for protecting bulk float data using a No Encryption data element is described in this section. The bulk float data can be passed as a list or a tuple. This API can be used for access control and auditing.
The individual elements of the list or tuple must be of the same data type.
Example
In the following example, 22.5, 48.93, and 94.14 float data are stored in a list and used as bulk data, which is protected using the NoEncryption_1 data element.
from appython import Protector
protector = Protector()
session = protector.create_session("User1")
data = [22.5, 48.93, 94.31]
p_out = session.protect(data, "NoEncryption_1")
print("Protected Data: ")
print(p_out)
Result
Protected Data:
([22.5, 48.93, 94.31], (6, 6, 6))
6 is the success return code for the protect operation of each element in the list.
As we are using a No Encryption data element to protect the data, the protected output data is the same as the input data.
Example - Encrypting Bulk Float Data
The example for using the protect API for encrypting bulk float data is described in this section. The bulk float data can be passed as a list or a tuple.
If you want to encrypt the data, then you must use bytes in the encrypt_to keyword.
To avoid data corruption, do not convert the encrypted bytes data into string format. It is recommended to convert the encrypted bytes data to a Hexadecimal, Base 64, or any other appropriate format.
Example
In the following example, 22.5, 48.93, and 94.14 float data are stored in a list and used as bulk data, which is encrypted using the AES256 data element.
Therefore, the encrypt_to parameter is passed as a keyword argument and its value is set to bytes.
from appython import Protector
protector = Protector()
session = protector.create_session("User1")
data = [22.5, 48.93, 94.31]
p_out = session.protect(data, "AES256", encrypt_to=bytes)
print("Encrypted Data: ")
print(p_out)
Result
Encrypted Data:
([b'g.O\xd8\x8b\x12\x89\x15Vk\x88\xbe\xf4;\x18>', b'.\xb0Q\xb9\xc9\xca\xba\xc2\xcb8\xfe\xd8\xf4q\x00\xb8', b'\xb6x\xf4\x94l9\xe6uaN\x83\x8d\n\x98\n;'], (6, 6, 6))
6 is the success return code for the protect operation of each element in the list.
Example - Tokenizing Bytes Data
The example for using the protect API for tokenizing bytes data is described in this section.
Example
In the following example, “Protegrity1” string is first converted to bytes using the Python bytes() method. The bytes data is then tokenized using the TE_A_N_S23_L2R2_Y data element.
from appython import Protector
protector = Protector()
session = protector.create_session("User1")
data=bytes("Protegrity1", encoding="utf-8")
p_out = session.protect(data, "TE_A_N_S23_L2R2_Y")
print("Protected Data: %s" %p_out)
Result
Protected Data: b'Pr9zdglWRy1'
Example - Tokenizing Bytes Data with External IV
The example for using the protect API for tokenizing bytes data using external IV is described in this section.
Example
In the following example, “Protegrity1” string is first converted to bytes using the Python bytes() method. The bytes data is then tokenized using the TE_A_N_S23_L2R2_Y data element, with the help of external IV 1234 that is passed as bytes.
from appython import Protector
protector = Protector()
session = protector.create_session("User1")
data=bytes("Protegrity1", encoding="utf-8")
output = session.protect(data, "TE_A_N_S23_L2R2_Y",
 external_iv=bytes("1234", encoding="utf-8"))
print("Protected Data: %s" %output)
Result
Protected Data: b'PrksvEshuy1'
Example - Encrypting Bytes Data
The example for using the protect API for encrypting bytes data is described in this section.
To avoid data corruption, do not convert the encrypted bytes data into string format. It is recommended to convert the encrypted bytes data to a Hexadecimal, Base 64, or any other appropriate format.
Example
In the following example, “Protegrity1” string is first converted to bytes using the Python bytes() method. The bytes data is then encrypted using the AES256
data element. Therefore, the encrypt_to parameter is passed as a keyword argument and its value is set to bytes.
from appython import Protector
protector = Protector()
session = protector.create_session("User1")
data=bytes("Protegrity1", encoding="utf-8")
p_out = session.protect(data, "AES256", encrypt_to = bytes)
print("Encrypted Data: %s" %p_out)
Result
Encrypted Data: b't####+4Lq##ۏx'
Example - Tokenizing Bulk Bytes Data
The example for using the protect API for tokenizing bulk bytes data. The bulk bytes data can be passed as a list or a tuple.
The individual elements of the list or tuple must be of the same data type.
Example
In the following example, protegrity1234, Protegrity1, and Protegrity56 strings are first converted to bytes using the Python bytes() method. The converted bytes
are then stored in a list and used as bulk data, which is tokenized using the TE_A_N_S23_L2R2_Y data element.
from appython import Protector
protector = Protector()
session = protector.create_session("User1")
data = [bytes("protegrity1234", encoding="UTF-8"), bytes("Protegrity1",
 encoding="UTF-8"), bytes("Protegrity56", encoding="UTF-8")]
p_out = session.protect(data, "TE_A_N_S23_L2R2_Y")
print("Protected Data: ")
print(p_out)
Result
Protected Data:
([b'prMLJsM8fZUp34', b'Pr9zdglWRy1', b'Pra9Ez5LPG56'], (6, 6, 6))
6 is the success return code for the protect operation of each element in the list.
Example - Tokenizing Bulk Bytes Data with External IV
The example for using the protect API for r tokenizing bulk bytes data using
external IV is described in this section. The bulk bytes data can be passed as a
list or a tuple.
The individual elements of the list or tuple must be of the same data type.
Example
In the following example, protegrity1234, Protegrity1, and Protegrity56 strings
are first converted to bytes using the Python bytes() method. The converted bytes are then stored in a list and used as bulk data. This bulk data is tokenized using the TE_A_N_S23_L2R2_Y data element, with the help of external IV 1234 that is passed as bytes.
Example - Encrypting Bulk Bytes Data
The example for using the protect API for encrypting bulk bytes data is described in this section. The bulk bytes data can be passed as a list or a tuple.
The individual elements of the list or tuple must be of the same data type.
To avoid data corruption, do not convert the encrypted bytes data into string format. It is recommended to convert the encrypted bytes data to a Hexadecimal, Base 64, or any other appropriate format.
Example
In the following example, protegrity1234, Protegrity1, and Protegrity56 strings are first converted to bytes using the Python bytes() method. The converted bytes are then stored in a list and used as bulk data, which is encrypted using the AES256 data element. Therefore, the encrypt_to parameter is passed as a keyword argument and its value is set to bytes.
from appython import Protector
protector = Protector()
session = protector.create_session("User1")
data = [bytes("protegrity1234", encoding="UTF-8"), bytes("Protegrity1",
 encoding="UTF-8"), bytes("Protegrity56", encoding="UTF-8")]
p_out = session.protect(data, "AES256", encrypt_to = bytes)
print("Encrypted Data: ")
print(p_out)
Result
Encrypted Data:
([b'\xc9^x\x02)\xcbB\x91}\x7fi\x8a\xce\x8d>H', b't\x80\xf5\x8d\x9e\x0b+4Lq\x8a\x97\xdb
\x8fx\x16', b'\x87\x08\x938\xf7o~\xab\xa3\xc2L\xa90>\x18_'], (6, 6, 6))
6 is the success return code for the protect operation of each element in the list.
Example - Tokenizing Bytes Data
The example for using the protect API for tokenizing bytes data is described in this section.
Example
In the following example, “Protegrity1” string is first converted to bytes using the Python bytes() method. The bytes data is then tokenized using the TE_A_N_S23_L2R2_Y data element.
from appython import Protector
protector = Protector()
session = protector.create_session("User1")
data=bytes("Protegrity1", encoding="utf-8")
p_out = session.protect(data, "TE_A_N_S23_L2R2_Y")
print("Protected Data: %s" %p_out)
In the following example, “Protegrity1” string is first converted to bytes using the Python bytes() method. The bytes data is then tokenized using the UnicodeGen2_BasicAlphaNum data element.
from appython import Protector
from appython import Charset
session = protector.create_session("User1")
data = bytes("Protegrity1", encoding="utf-16le")
p_out = session.protect(data, "UnicodeGen2_BasicAlphaNum", encrypt_to=bytes, charset=Charset.UTF16LE)
print("Protected Data: %s" %p_out)
Result
Protected Data: b'Pr9zdglWRy1'
Example - Tokenizing Bytes Data with External IV
The example for using the protect API for tokenizing bytes data using external IV is described in this section.
Example
In the following example, “Protegrity1” string is first converted to bytes using the Python bytes() method. The bytes data is then tokenized using the TE_A_N_S23_L2R2_Y data element, with the help of external IV 1234 that is passed as bytes.
from appython import Protector
protector = Protector()
session = protector.create_session("User1")
data=bytes("Protegrity1", encoding="utf-8")
output = session.protect(data, "TE_A_N_S23_L2R2_Y",
 external_iv=bytes("1234", encoding="utf-8"))
print("Protected Data: %s" %output)
Result
Protected Data: b'PrksvEshuy1'
Example - Tokenizing Bytes Data with External IV
The example for using the protect API for tokenizing bytes data using external IV is described in this section.
To avoid data corruption, do not convert the encrypted bytes data into string format. It is recommended to convert the encrypted bytes data to a Hexadecimal, Base 64, or any other appropriate format.
Example
In the following example, “Protegrity1” string is first converted to bytes using the Python bytes() method. The bytes data is then tokenized using the TE_A_N_S23_L2R2_Y data element, with the help of external IV 1234 that is passed as bytes.
from appython import Protector
protector = Protector()
session = protector.create_session("User1")
data=bytes("Protegrity1", encoding="utf-8")
output = session.protect(data, "TE_A_N_S23_L2R2_Y",
 external_iv=bytes("1234", encoding="utf-8"))
print("Protected Data: %s" %output)
Result
Protected Data: b'PrksvEshuy1'
Example - Tokenizing Bulk Bytes Data
The example for using the protect API for tokenizing bulk bytes data is described in this section. The bulk bytes data can be passed as a list or a tuple.
The individual elements of the list or tuple must be of the same data type.
Example
In the following example, protegrity1234, Protegrity1, and Protegrity56 strings are first converted to bytes using the Python bytes() method. The converted bytes are then stored in a list and used as bulk data, which is tokenized using the TE_A_N_S23_L2R2_Y data element.
from appython import Protector
protector = Protector()
session = protector.create_session("User1")
data = [bytes("protegrity1234", encoding="UTF-8"), bytes("Protegrity1",
 encoding="UTF-8"), bytes("Protegrity56", encoding="UTF-8")]
p_out = session.protect(data, "TE_A_N_S23_L2R2_Y")
print("Protected Data: ")
print(p_out)
Result
Protected Data:
([b'prMLJsM8fZUp34', b'Pr9zdglWRy1', b'Pra9Ez5LPG56'], (6, 6, 6))
6 is the success return code for the protect operation of each element in the list.
Example - Tokenizing Bulk Bytes Data with External IV
The example for using the protect API for tokenizing bulk bytes data using external IV is described in this section. The bulk bytes data can be passed as a list or a tuple.
The individual elements of the list or tuple must be of the same data type.
Example
In the following example, protegrity1234, Protegrity1, and Protegrity56 strings are first converted to bytes using the Python bytes() method. The converted bytes are then stored in a list and used as bulk data, which is tokenized using the TE_A_N_S23_L2R2_Y data element,
with the help of external IV 1234 that is passed as bytes.
from appython import Protector
protector = Protector()
session = protector.create_session("User1")
data = [bytes("protegrity1234", encoding="UTF-8"), bytes("Protegrity1",
 encoding="UTF-8"), bytes("Protegrity56", encoding="UTF-8")]
p_out = session.protect(data, "TE_A_N_S23_L2R2_Y",
 external_iv=bytes("1234", encoding="utf-8"))
print("Protected Data: ")
print(p_out)
Result
Protected Data:
([b'prbm147L5pc434', b'PrksvEshuy1', b'Prmx0hG8Nj56'], (6, 6, 6))
6 is the success return code for the protect operation of each element in the list.
Example - Encrypting Bulk Bytes Data
The example for using the protect API for encrypting bulk bytes data is described in this section. The bulk bytes data can be passed as a list or a tuple.
The individual elements of the list or tuple must be of the same data type.
To avoid data corruption, do not convert the encrypted bytes data into string format. It is recommended to convert the encrypted bytes data to a Hexadecimal, Base 64, or any other appropriate format.
Example
In the following example, protegrity1234, Protegrity1, and Protegrity56 strings are first converted to bytes using the Python bytes() method. The converted bytes are then stored in a list and used as bulk data, which is encrypted using the AES256 data element. Therefore, the
encrypt_to parameter is passed as a keyword argument and its value is set to bytes.
from appython import Protector
protector = Protector()
session = protector.create_session("User1")
data = [bytes("protegrity1234", encoding="UTF-8"), bytes("Protegrity1",
 encoding="UTF-8"), bytes("Protegrity56", encoding="UTF-8")]
p_out = session.protect(data, "AES256", encrypt_to = bytes)
print("Encrypted Data: ")
print(p_out)
Result
Encrypted Data:
([b'\xc9^x\x02)\xcbB\x91}\x7fi\x8a\xce\x8d>H', b't\x80\xf5\x8d\x9e\x0b+4Lq\x8a\x97\xdb
\x8fx\x16',  b'\x87\x08\x938\xf7o~\xab\xa3\xc2L\xa90>\x18_'], (6, 6, 6))
6 is the success return code for the protect operation of each element in the list.
Example - Tokenizing Date Objects
The examples for using the protect API for tokenizing the date objects are described in this section.
If a date string is provided as input, then the data element with the same tokenization type as the input format must be used for data protection. For example, if you have provided the input date object in DD/MM/YYYY format, then you must use only the Date (DD/MM/YYYY) data element to protect the data.
Example 1: Input date object in DD/MM/YYYY format
In the following example, the 29/05/1998 date string is used as the data, which is first converted to a date object using the Python date method of the datetime module.
The date object is then tokenized using the TE_Date_DMY_S13 data element.
from appython import Protector
from datetime import datetime
protector = Protector()
session = protector.create_session("User1")
data = datetime.strptime("29/05/1998", "%d/%m/%Y").date()
print("Input date as a Date object : "+str(data))
p_out = session.protect(data, "TE_Date_DMY_S13")
print("Protected date: "+str(p_out))
Result
Input date as a Date object : 1998-05-29
Protected date: 1896-10-21
Example 2: Input date object in MM/DD/YYYY format
In the following example, the 05/29/1998 date string is used as the data, which is first converted to a date object using the Python date method of the datetime module.
The date object is then tokenized using the TE_Date_MDY_S13 data element.
from appython import Protector
from datetime import datetime
protector = Protector()
session = protector.create_session("User1")
data = datetime.strptime("05/29/1998", "%m/%d/%Y").date()
print("\nInput date as a Date object : "+str(data))
p_out = session.protect(data, "TE_Date_MDY_S13")
print("Protected date: "+str(p_out))
Result
Input date as a Date object : 1998-05-29
Protected date: 2037-06-12
Example 3: Input date object in YYYY/DD/MM format
In the following example, the 1998/05/29 date string is used as the data, which is first converted to a date object using the Python date method of the datetime module.
The date object is then tokenized using the TE_Date_YMD_S13 data element.
from appython import Protector
from datetime import datetime
protector = Protector()
session = protector.create_session("User1")
data = datetime.strptime("1998/05/29", "%Y/%m/%d").date()
print("\nInput date as a Date object : "+str(data))
p_out = session.protect(data, "TE_Date_YMD_S13")
print("Protected date: "+str(p_out))
Result
Input date as a Date object : 1998-05-29
Protected date: 2615-12-23
Example - Tokenizing Bulk Date Objects
The example for using the protect API for tokenizing bulk date objects is described in this section. The bulk
date objects can passed as a list or a tuple.
The individual elements of the list or tuple must be of the same data type.
If a date object is provided as input, then the data element with the same tokenization type as the input date format must be used to protect the data. For example, if you have provided the input date object in DD/MM/YYYY format, then you must use only the Date (DD/MM/YYYY) data element to protect the data.
Example: Input as a Date Object
In the following example, the 12/02/2019 and 11/01/2018 date strings are used as the data, which are first converted to a date objects using the Python date method of the datetime module. The two date objects are then used to create a list, which is used as the input data.
The input list is then tokenized using the TE_Date_DMY_S13 data element.
from appython import Protector
from datetime import datetime
protector = Protector()
session = protector.create_session("User1")
data1 = datetime.strptime("12/02/2019", "%d/%m/%Y").date()
data2 = datetime.strptime("11/01/2018", "%d/%m/%Y").date()
data = [data1, data2]
print("Input data: ", str(data))
p_out = session.protect(data, "TE_Date_DMY_S13")
print("Protected data: "+str(p_out))
Result
Input data: [datetime.date(2019, 2, 12), datetime.date(2018, 1, 11)]
Protected data: ([datetime.date(1896, 10, 21), datetime.date(696, 3, 1)], (6, 6))
6 is the success return code for the protect operation of each element in the list.
Example - Tokenizing Unicode Data
The example for using the protect API for tokenizing unicode data is described in this section.
Example
In the following example, the u’protegrity1234ÀÁÂÃÄÅÆÇÈÉ’ unicode data is used as the input data, which is tokenized using the TE_A_N_S23_L2R2_Y data element.
from appython import Protector
protector = Protector()
session = protector.create_session("User1")
output = session.protect(u'protegrity1234ÀÁÂÃÄÅÆÇÈÉ', "TE_A_N_S23_L2R2_Y")
print("Protected Data: %s" %output)
Result
Protected Data:prZeslalwuQQy3ÀÁÂÃÄÅÆÇÈÉ
Example - Encrypting Unicode Data
The example for using the protect API for encrypting unicode data is described in this section.
If you want to encrypt the data, then you must use bytes in the encrypt_to keyword.
To avoid data corruption, do not convert the encrypted bytes data into string format. It is recommended to convert the encrypted bytes data to a Hexadecimal, Base 64, or any other appropriate format.
Example
In the following example, the u’protegrity1234ÀÁÂÃÄÅÆÇÈÉ’ unicode data is used as the input data, which is encrypted using the AES256_IV_CRC_KID data element.
Therefore, the encrypt_to parameter is passed as a keyword argument, and its value is set to bytes.
from appython import Protector
protector = Protector()
session = protector.create_session("User1")
output = session.protect(u'protegrity1234ÀÁÂÃÄÅÆÇÈÉ', "AES256_IV_CRC_KID",
 encrypt_to=bytes)
print("Encrypted Data: %s" %output)
Result
Encrypted Data: b' ##+###>##{4Az#V#O##K#c#######\1W#~&ng%-##'
Example - Tokenizing Bulk Unicode Data
The example for using the protect API for tokenizing bulk unicode data is described in this section. The bulk
unicode data can be passed as a list or a tuple.
The individual elements of the list or tuple must be of the same data type.
Example
In the following example, u’protegrity1234ÀÁÂÃÄÅÆÇÈÉ’, u’Protegrity1ÆÇÈÉÀÁÂÃÄÅ’, and u’Protegrity56ÇÅÆÈÉÂÃ’ unicode data are stored in a list and used as bulk data, which is tokenized using the TE_A_N_S23_L2R2_Y data element.
from appython import Protector
protector = Protector()
session = protector.create_session("User1")
data = [u'protegrity1234ÀÁÂÃÄÅÆÇÈÉ', u'Protegrity1ÆÇÈÉÀÁÂÃÄÅ', u'Protegrity56ÇÅÆÈÉÂÃ']
p_out = session.protect(data, "TE_A_N_S23_L2R2_Y")
print("Protected Data: ")
print(p_out)
Result
Protected Data:
([u'prZeslalwuQQy3\xc0\xc1\xc2\xc3\xc4\xc5\xc6\xc7\xc8\xc9',  u'PrVt6rfyW81\xc6\xc7\xc8\xc9\xc0\xc1\xc2\xc3\xc4\xc5', u'PrFgczleNkNG\xc7\xc5\xc6\xc8\xc9\xc2\xc3'], (6, 6, 6))
6 is the success return code for the protect operation of each element in the list.
Example - Encrypting Bulk Unicode Data
The example for using the protect API for encrypting bulk unicode data is described in this section. The bulk
string data can be passed as a list or a tuple.
The individual elements of the list or tuple must be of the same data type.
If you want to encrypt the data, then you must use bytes in the encrypt_to keyword.
To avoid data corruption, do not convert the encrypted bytes data into string format. It is recommended to convert the encrypted bytes data to a Hexadecimal, Base 64, or any other appropriate format.
Example
In the following example, u’protegrity1234ÀÁÂÃÄÅÆÇÈÉ’, u’Protegrity1ÆÇÈÉÀÁÂÃÄÅ’, and u’Protegrity56ÇÅÆÈÉÂÃ’ unicode data are stored in a list and used as bulk data, which is encrypted using the AES256 data element. Therefore, the encrypt_to parameter is passed as a
keyword argument and its value is set to bytes.
from appython import Protector
protector = Protector()
session = protector.create_session("User1")
data = [u'protegrity1234ÀÁÂÃÄÅÆÇÈÉ', u'Protegrity1ÆÇÈÉÀÁÂÃÄÅ', u'Protegrity56ÇÅÆÈÉÂÃ']
p_out = session.protect(data, "AES256", encrypt_to=bytes)
print("Encrypted Data: ")
print(p_out)
Result
Encrypted Data:
([b'F2\xd2\xddR\xda\x9e7#\xfc\xe6\xe2Ore\x18>=\x87\xfc\xea\x9c\xb8\x94\x9e$M?\x9a\xec\xefO5\xc3\x8fjun\xe3\r4\x0f\xedD76\xe4\xfa', b'\x9f\xc0}G\x12\x1bu\x02\xfdMO\x8e\x01\xb6\x0f\xf5\xbbi\xbe\xc9\x11J\x1c\xa4\x12\x1e\xf0\xbeA\x19\xa4\xc3', b'G\xa3(\xee
\xb7\x81m\xfc\x96-I\xa2\x9eGt\xcc\x0b-\x97\xc73\x00O\xdc\xfb\t.\xfa=\x99:\xe7'], (6, 6, 6))
6 is the success return code for the protect operation of each element in the list.
unprotect
This function returns the data in its original form.
def unprotect(self, data, de, **kwargs)
Do not pass the self parameter while invoking the API.
Parameters
data: Data to be unprotected.
de: String containing the data element name defined in policy.
**kwargs: Specify one or more of the following keyword arguments:
- external_iv: Specify the external initialization vector for Tokenization and FPE protection methods. This argument is optional.
- decrypt_to: Specify this argument for decrypting the data and set its value to the data type of the original data. For example, if you are unprotecting a string data, then you must specify the output data type as str. This argument is Mandatory. This argument must not be used for Tokenization and FPE protection methods. The possible values for the decrypt_to argument are:
- str
- int
- long
- float
- bytes
- external_tweak: Specify the external tweak value for FPE protection method. This argument is optional.
- charset: This is an optional argument. It indicates the byte order of the input buffer. You can specify a value for this argument from the charset constants, such as, UTF8, UTF16LE, or UTF16BE. The default value for the charset argument is UTF8.
The charset argument is only applicable for the input data of byte type.
The charset parameter is mandatory for the data elements created with Unicode Gen2 tokenization method and the FPE encryption method for byte APIs. The encoding set for the charset parameter must match the encoding of the input data passed.
Keyword arguments are case sensitive.
Returns
- For single data: Returns the unprotected data
- For bulk data: Returns a tuple of the following data:
- List or tuple of the unprotected data
- Tuple of error codes
Exceptions
InvalidSessionError: This exception is thrown if the session is invalid or has timed out.
ProtectError: This exception is thrown if the API is unable to protect the data.
If the unprotect API is used with bulk data, then it does not throw any exception. Instead, it only
returns an error code.
For more information about the return codes, refer to Application Protector API Return Codes.
Example - Detokenizing String Data
The examples for using the unprotect API for retrieving the original string data from the token data are described in this section.
Example 1: Input string data
In the following example, the Protegrity1 string that was tokenized using the TE_A_N_S23_L2R2_Y data element, is now detokenized using the same data element.
from appython import Protector
protector = Protector()
session = protector.create_session("User1")
output = session.protect("Protegrity1", "TE_A_N_S23_L2R2_Y")
print("Protected Data: %s" %output)
org = session.unprotect(output, "TE_A_N_S23_L2R2_Y")
print("Unprotected Data: %s" %org)
Result
Protected Data: Pr9zdglWRy1
Unprotected Data: Protegrity1
Example 2: Input date passed as a string
In the following example, the 29/05/1998 string that was tokenized using the TE_Date_DMY_S13 Date data element, is now detokenized using the same data element.
If a date string is provided as input, then the data element with the same tokenization type as the input date format must be used to protect the data. For example, if you have provided the input date string in DD/MM/YYYY format, then you must use only the Date (DD/MM/YYYY) data element to protect the data.
from appython import Protector
protector = Protector()
session = protector.create_session("User1")
output = session.protect("29/05/1998", "TE_Date_DMY_S13")
print("Protected data: "+str(output))
org = session.unprotect(output, "TE_Date_DMY_S13")
print("Unprotected data: "+str(org))
Result
Protected data: 08/07/2443
Unprotected data: 29/05/1998
Example 3: Input date and time passed as a string
In the following example, the 1998/05/29 10:54:47 string that was tokenized using the TE_Datetime_TN_DN_M Datetime data element is now detokenized using the same data element.
If a date and time string is provided as input, then the data element with the same tokenization type as the input format must be used for data protection. For example, if the input date and time string in YYYY/MM/DD HH:MM:SS MMM format is provided, then only the Datetime (YYYY-MM-DD HH:MM:SS MMM) data element must be used to protect the data.
from appython import Protector
protector = Protector()
session = protector.create_session("User1")
output = session.protect("1998/05/29 10:54:47", "TE_Datetime_TN_DN_M")
print("Protected data: "+str(output))
org = session.unprotect(output, "TE_Datetime_TN_DN_M")
print("Unprotected data: "+str(org))
Result
Protected data: 3311/02/22 10:54:47
Unprotected data: 1998/05/29 10:54:47
Example - Detokenizing String Data with External IV
The example for using the unprotect API for retrieving the original string data from token data, using external IV is described in this section.
If you want to pass the external IV as a keyword argument to the unprotect API, then you must pass the external IV as bytes to the API.
Example
In the following example, the Protegrity1 string that was tokenized using the TE_A_N_S23_L2R2_Y data element and the external IV 1234 is now detokenized using the same
data element and external IV.
from appython import Protector
protector = Protector()
session = protector.create_session("User1")
output = session.protect("Protegrity1", "TE_A_N_S23_L2R2_Y",
 external_iv=bytes("1234", encoding="utf-8"))
print("Protected Data: %s" %output)
org = session.unprotect(output, "TE_A_N_S23_L2R2_Y",
 external_iv=bytes("1234", encoding="utf-8"))
print("Unprotected Data: %s" %org)
Result
Protected Data: PrksvEshuy1
Unprotected Data: Protegrity1
Example - Decrypting String Data
The example for using the unprotect API for decrypting string data is described in this section.
If you want to decrypt the data, then you must use bytes in the decrypt_to keyword.
Example
In the following example, the Protegrity1 string that was encrypted using the AES256_IV_CRC_KID data element is now decrypted using the same data element. Therefore,
the decrypt_to parameter is passed as a keyword argument and its value is set to str.
from appython import Protector
protector = Protector()
session = protector.create_session("User1")
output = session.protect("Protegrity1", "AES256_IV_CRC_KID",
 encrypt_to=bytes)
print("Encrypted Data: %s" %output)
org = session.unprotect(output, "AES256_IV_CRC_KID", decrypt_to=str)
print("Decrypted Data: %s" %org)
Result
Encrypted Data: b'#▒>▒gךڭm▒A΅,i=▒w▒▒▒▒'
Decrypted Data: Protegrity1
Example - Unprotecting String Data Using FPE
The example for using the unprotect API for unprotecting string data using FPE (FF1) is described in this section.
Example
In the following example, the protegrity1234ÀÁÂÃÄÅÆÇÈÉ string that was protected using the FPE_FF1_AES256_ID_AN_LnRn_ASTNE data element, is now unprotected using the same data element.
from appython import Protector
protector = Protector()
session = protector.create_session("User1")
output = session.protect("protegrity1234ÀÁÂÃÄÅÆÇÈÉ",
 "FPE_FF1_AES256_ID_AN_LnRn_ASTNE")
print("Protected Data: %s" %output)
org = session.unprotect(output, "FPE_FF1_AES256_ID_AN_LnRn_ASTNE")
print("Unprotected Data: %s" %org)
Result
Protected Data: NRejBkN7LcBOT4ÀÁÂÃÄÅÆÇÈÉ
Unprotected Data: protegrity1234ÀÁÂÃÄÅÆÇÈÉ
Example - Unprotecting String Data Using FPE with External IV and External Tweak
The example for using the unprotect API for unprotecting string data using FPE (FF1), with external IV and tweak is described in this section.
If the external IV and external tweak are passed as keyword arguments to the protect API, then the external IV and external tweak must be passed as bytes.
Example
In the following example, the protegrity1234 string that was protected using the FPE_FF1_AES256_ID_AN_LnRn_ASTNE data element, is now unprotected using the same data
element, external IV, and external tweak.
from appython import Protector
protector = Protector()
session = protector.create_session("User1")
output = session.protect("protegrity1234",
 "FPE_FF1_AES256_ASCII_APIP_AN_L2R1_ASTNI_ML2", external_iv=bytes("1234", encoding="utf-8"),
 external_tweak=bytes("abcdef", encoding="utf-8"))
print("Protected Data: %s" %output)
org = session.unprotect(output,
 "FPE_FF1_AES256_ASCII_APIP_AN_L2R1_ASTNI_ML2", external_iv=bytes("1234", encoding="utf-8"),
 external_tweak=bytes("abcdef", encoding="utf-8"))
print("Unprotected Data: %s" %org)
Result
Protected Data: prS6DaU5Dtd5g4
Unprotected Data: protegrity1234
Example - Detokenizing Bulk String Data
The examples for using the unprotect API for retrieving the original bulk string data from the token data are described in this section.
Example 1: Input bulk string data
In the following example, protegrity1234, Protegrity1, and Protegrity56 strings are stored in a list and used as bulk data, which is tokenized using the TE_A_N_S23_L2R2_Y data element. The bulk string data is then detokenized using the same data element.
from appython import Protector
protector = Protector()
session = protector.create_session("User1")
data = ["protegrity1234", "Protegrity1", "Protegrity56"]
p_out = session.protect(data, "TE_A_N_S23_L2R2_Y")
print("Protected Data: ")
print(p_out)
out = session.unprotect(p_out[0], "TE_A_N_S23_L2R2_Y")
print("Unprotected Data: ")
print(out)
Result
Protected Data:
(['prMLJsM8fZUp34', 'Pr9zdglWRy1', 'Pra9Ez5LPG56'], (6, 6, 6))
Unprotected Data:
(['protegrity1234', 'Protegrity1', 'Protegrity56'], (8, 8, 8))
6 is the success return code for the protect operation of each element in the list.
8 is the success return code for the unprotect operation of each element in the list.
Example 2: Input bulk string data
In Example 1, the unprotected output was a tuple of the detokenized data and the error list. This example shows how the code can be tweaked to ensure that the unprotected output and the error list are retrieved separately, and not as part of a tuple.
from appython import Protector
protector = Protector()
session = protector.create_session("User1")
data = protegrity1234
data = [data]*5
p_out, error_list = session.protect(data, "TE_A_N_S23_L2R2_Y")
print("Protected Data: ")
print(p_out)
print("Error List: ")
print(error_list)
org, error_list = session.unprotect(p_out, "TE_A_N_S23_L2R2_Y")
print("Unprotected Data: ")
print(org)
print("Error List: ")
print(error_list)
Result
Protected Data:
['prMLJsM8fZUp34', 'prMLJsM8fZUp34', 'prMLJsM8fZUp34', 'prMLJsM8fZUp34',
 'prMLJsM8fZUp34']
Error List:
(6, 6, 6, 6, 6)
Unprotected Data:
['protegrity1234', 'protegrity1234', 'protegrity1234', 'protegrity1234',
 'protegrity1234']
Error List:
(8, 8, 8, 8, 8)
6 is the success return code for the protect operation of each element in the list.
8 is the success return code for the unprotect operation of each element in the list.
Example 3: Input dates passed as bulk strings
In the following example, the 14/02/2019 and 11/03/2018 strings are stored in a list and used as bulk data, which is tokenized using the TE_Date_DMY_S13 Date data element. The bulk string data is then detokenized using the same data element.
If a date string is provided as input, then the data element with the same tokenization type as the input date format must be used to protect the data. For example, if you have provided the input date string in DD/MM/YYYY format, then you must use only the Date (DD/MM/YYYY) data element to protect the data.
from appython import Protector
protector = Protector()
session = protector.create_session("User1")
data = ["14/02/2019", "11/03/2018"]
output = session.protect(data, "TE_Date_DMY_S13")
print("Protected data: "+str(output))
Confidential 165
Protegrity APIs, UDFs, Commands Reference Guide 9.1.0.0 Application Protector
org = session.unprotect(output[0], "TE_Date_DMY_S13")
print("Unprotected data: "+str(org))
Result
Protected data: (['08/07/2443', '17/08/1830'], (6, 6))
Unprotected data: (['14/02/2019', '11/03/2018'], (8, 8))
6 is the success return code for the protect operation of each element in the list.
8 is the success return code for the unprotect operation of each element in the list.
Example 4: Input date and time passed as bulk strings
In the following example, the 2019/02/14 10:54:47 and 2019/11/03 11:01:32 strings is used as the data, which is tokenized using the TE_Datetime_TN_DN_M Datetime data element. The bulk string data is then detokenized using the same data element.
If a date and time string is provided as input, then the data element with the same tokenization type as the input format must be used for data protection. For example, if you have provided the input date and time string in YYYY/MM/DD
HH:MM:SS MMM format, then you must use only the Datetime (YYYY-MM-DD HH:MM:SS MMM) data element to protect the data.
from appython import Protector
protector = Protector()
session = protector.create_session("User1")
data = ["2019/02/14 10:54:47", "2019/11/03 11:01:32"]
output = session.protect(data, "TE_Datetime_TN_DN_M")
print("Protected data: "+str(output))
org = session.unprotect(output[0], "TE_Datetime_TN_DN_M")
print("Unprotected data: "+str(org))
Result
Protected data: (['3311/02/22 10:54:47', '3311/11/02 11:01:32'], (6, 6))
Unprotected data: (['2019/02/14 10:54:47', '2019/11/03 11:01:32'], (8, 8))
6 is the success return code for the protect operation of each element in the list.
8 is the success return code for the unprotect operation of each element in the list.
Example - Detokenizing Bulk String Data with External IV
The example for using the unprotect API for retrieving the original bulk string data from token data using the external IV is described in this section.
If you want to pass the external IV as a keyword argument to the unprotect API, then you must pass the external IV as bytes to the API.
Example
In the following example, protegrity1234, Protegrity1, and Protegrity56 strings are stored in a list and used as bulk data, which is tokenized using the TE_A_N_S23_L2R2_Y data element, with the help of external IV 123 that is passed as bytes. The bulk string data is then detokenized using the same data element and external IV.
from appython import Protector
protector = Protector()
session = protector.create_session("User1")
data = ["protegrity1234", "Protegrity1", "Protegrity56"]
p_out = session.protect(data, "TE_A_N_S23_L2R2_Y",
 external_iv=bytes("123", encoding="UTF-8"))
print("Protected Data: ")
print(p_out)
out = session.unprotect(p_out[0], "TE_A_N_S23_L2R2_Y",
 external_iv=bytes("123", encoding="UTF-8"))
print("Unprotected Data: ")
print(out)
Result
Protected Data:
(['prv0WozsSjbS34', 'PrtigABOCy1', 'PrvjDdC2TD56'], (6, 6, 6))
Unprotected Data:
(['protegrity1234', 'Protegrity1', 'Protegrity56'], (8, 8, 8))
6 is the success return code for the protect operation of each element in the list.
8 is the success return code for the unprotect operation of each element in the list.
Example - Decrypting Bulk String Data
The example for using the unprotect API for decrypting bulk string data is described in this section.
If you want to decrypt the data, then you must use bytes in the decrypt_to keyword.
Example
In the following example, protegrity1234, Protegrity1, and Protegrity56 strings are stored in a list and used as bulk data, which is encrypted using the AES256 data element. The bulk string data is then decrypted using the same data element. Therefore, the decrypt_to parameter is passed as a keyword argument and its value is set to str.
from appython import Protector
protector = Protector()
session = protector.create_session("User1")
data = ["protegrity1234", "Protegrity1", "Protegrity56"]
p_out = session.protect(data, "AES256", encrypt_to=bytes)
print("Encrypted Data: ")
print(p_out)
out = session.unprotect(p_out[0], "AES256", decrypt_to=str)
print("Decrypted Data: ")
print(out)
Result
Encrypted Data:
([b'\xc9^x\x02)\xcbB\x91}\x7fi\x8a\xce\x8d>H', b't\x80\xf5\x8d\x9e\x0b+4Lq\x8a\x97\xdb\x8fx\x16',b'\x87\x08\x938\xf7o~\xab\xa3\xc2L\xa90>\x18_'], (6, 6, 6))
Decrypted Data:
(['protegrity1234', 'Protegrity1', 'Protegrity56'], (8, 8, 8))
6 is the success return code for the protect operation of each element in the list.
8 is the success return code for the unprotect operation of each element in the list.
Example - Unprotecting Bulk String Data Using FPE
The example for using the unprotect API for retrieving the original bulk string data from token data using FPE (FF1) is described in this section.
Example
In the following example, protegrity1234ÀÁ, Protegrity1ÆÇÈ, and Protegrity56ÀÁÂÃÄÅ strings are stored in a list and used as bulk data, which is protected using the FPE data element FPE_FF1_AES256_APIP_AN_LnRn_ASTNE. The bulk string data is then unprotected using the
same data element.
from appython import Protector
protector = Protector()
session = protector.create_session("User1")
data = ["protegrity1234ÀÁ", "Protegrity1ÆÇÈ", "Protegrity56ÀÁÂÃÄÅ"]
p_out = sessionr.protect(data, "FPE_FF1_AES256_APIP_AN_LnRn_ASTNE")
print("Protected Data: ")
print(p_out)
out = session.unprotect(p_out[0], "FPE_FF1_AES256_APIP_AN_LnRn_ASTNE")
print("Unprotected Data: ")
print(out)
Result
Protected Data:
([u'MG01UHDQ8VyON3\xc0\xc1', u'8APfLh3W9TY\xc6\xc7\xc8', u'4XYdSFURF4bV\xc0\xc1\xc2\xc3\xc4\xc5'], (6, 6, 6))
Unprotected Data:
([u'protegrity1234\xc0\xc1', u'Protegrity1\xc6\xc7\xc8',
 u'Protegrity56\xc0\xc1\xc2\xc3\xc4\xc5'], (8, 8, 8))
6 is the success return code for the protect operation of each element in the list.
8 is the success return code for the unprotect operation of each element in the list.
Example - Unprotecting Bulk String Data Using FPE with External IV and External Tweak
This example describes using the unprotect API to retrieve the original bulk string from token data using FPE (FF1) using external IV and external tweak.
If the external IV and external tweak are passed as keyword arguments to the protect API, then the external IV and external tweak must be passed as bytes.
Example
In the following example, protegrity1234ÀÁ, Protegrity1ÆÇÈ, and Protegrity56ÀÁÂÃÄÅ strings are stored in a list and used as bulk data. This bulk data is protected using the FPE data element FPE_FF1_AES256_APIP_AN_LnRn_ASTNE, with the help of external IV 1234 and external tweak xyz that are both passed as bytes. The protected bulk string data is then unprotected using the same data element, external IV, and external tweak.
from appython import Protector
protector = Protector()
session = protector.create_session("User1")
data = ["protegrity1234ÀÁ", "Protegrity1ÆÇÈ", "Protegrity56ÀÁÂÃÄÅ"]
p_out = session.protect(data, "FPE_FF1_AES256_APIP_AN_LnRn_ASTNE",
 external_iv=bytes("1234", encoding="utf-8"), external_tweak=bytes("xyz",
 encoding="utf-8"))
print("Protected Data: ")
print(p_out)
out = session.unprotect(p_out[0], "FPE_FF1_AES256_APIP_AN_LnRn_ASTNE",
 external_iv=bytes("1234", encoding="utf-8"), external_tweak=bytes("xyz",
 encoding="utf-8"))
print("Unprotected Data: ")
print(out)
Result
Protected Data:
([u'WwR5aK2BMoUlcz\xc0\xc1', u'nW6lqjd7NGR\xc6\xc7\xc8', u'o6eBUZDNuyWU
\xc0\xc1\xc2\xc3\xc4\xc5'], (6, 6, 6))
Unprotected Data:
([u'protegrity1234\xc0\xc1', u'Protegrity1\xc6\xc7\xc8',
 u'Protegrity56\xc0\xc1\xc2\xc3\xc4\xc5'], (8, 8, 8))
6 is the success return code for the protect operation of each element in the list.
8 is the success return code for the unprotect operation of each element in the list.
Example - Detokenizing Integer Data
The example for using the unprotect API for retrieving the original integer data from token data is described in this section.
Example
In the following example, the integer data 21 that was tokenized using the TE_INT_4 data element, is now detokenized using the same data element.
from appython import Protector
protector = Protector()
session = protector.create_session("User1")
output = session.protect(21, "TE_INT_4")
print("Protected Data: %s" %output)
org = session.unprotect(output, "TE_INT_4")
print("Unprotected Data: %s" %org)
Result
Protected Data: -2122057622
Unprotected Data: 21
Example - Detokenizing Integer Data with External IV
The example for using the unprotect API for retrieving the original integer data from token data, using external IV is described in this section.
If you want to pass the external IV as a keyword argument to the unprotect API, then you must pass the external IV as bytes to the API.
Example
In the following example, the integer data 21 that was tokenized using the TE_INT_4 data element and the external IV 1234 is now detokenized using the same data element and external IV.
from appython import Protector
protector = Protector()
session = protector.create_session("User1")
output = session.protect(21, "TE_INT_4",
 external_iv=bytes("1234", encoding="utf-8"))
print("Protected Data: %s" %output)
org = session.unprotect(output, "TE_INT_4",
 external_iv=bytes("1234", encoding="utf-8"))
print("Unprotected Data: %s" %org)
Result
Protected Data: -2122057622
Unprotected Data: 21
Example - Decrypting Integer Data
The example for using the unprotect API for decrypting integer data is described in this section.
If you want to decrypt the data, then you must use bytes in the decrypt_to keyword.
Example
In the following example, the integer data 21 that was encrypted using the AES256 data element is now decrypted using the same data element. Therefore, the decrypt_to parameter is passed as a keyword argument and its value is set to int.
from appython import Protector
protector = Protector()
session = protector.create_session("User1")
output = session.protect(21, "AES256", encrypt_to=bytes)
print("Encrypted Data: %s" %output)
org = session.unprotect(output, "AES256", decrypt_to=int)
print("Decrypted Data: %s" %org)
Result
Encrypted Data: b'@▒u▒▒▒p▒▒k▒N▒'
Decrypted Data: 21
Example - Detokenizing Bulk Integer Data
The example for using the unprotect API for retrieving the original bulk integer data from token data is described in this section.
The AP Python APIs support integer values only between -2147483648 and 2147483648, both inclusive.
Example
In the following example, 21, 42, and 55 integers are stored in a list and used as bulk data, which is tokenized using the TE_INT_4 data element. The bulk integer data is then detokenized using the same data element.
from appython import Protector
protector = Protector()
session = protector.create_session("User1")
data = [21, 42, 55]
p_out = session.protect(data, "TE_INT_4")
print("Protected Data: ")
print(p_out)
Confidential 170
Protegrity APIs, UDFs, Commands Reference Guide 9.1.0.0 Application Protector
out = session.unprotect(p_out[0], "TE_INT_4")
print("Unprotected Data: ")
print(out)
Result
Protected Data:
([-1926573911, -1970496120, -814489753], (6, 6, 6))
Unprotected Data:
([21, 42, 55], (8, 8, 8))
6 is the success return code for the protect operation of each element in the list.
8 is the success return code for the unprotect operation of each element in the list.
Example - Detokenizing Bulk Integer Data with External IV
The example for using the unprotect API for retrieving the original bulk integer data from token data using external IV is described in this section.
If you want to pass the external IV as a keyword argument to the unprotect API, then you must pass the external IV as bytes to the API.
Example
In this example, 21, 42, and 55 integers are stored in a list and used as bulk data. This bulk data is tokenized using the TE_INT_4 data element, with the help of external IV 1234 that is passed as bytes.The bulk integer data is then detokenized using the same data element and external IV.
from appython import Protector
protector = Protector()
session = protector.create_session("User1")
data = [21, 42, 55]
p_out = session.protect(data, "TE_INT_4", external_iv=bytes("1234", encoding="utf-8"))
print("Protected Data: ")
print(p_out)
out = session.unprotect(p_out[0], "TE_INT_4", external_iv=bytes("1234",  encoding="utf-8"))
print("Unprotected Data: ")
print(out)
Result
Protected Data:
([-2122057622, 1795905968, 228587043], (6, 6, 6))
Unprotected Data:
([21, 42, 55], (8, 8, 8))
6 is the success return code for the protect operation of each element in the list.
8 is the success return code for the unprotect operation of each element in the list.
Example - Decrypting Bulk Integer Data
The example for using the unprotect API for decrypting bulk integer data is described in this section.
If you want to decrypt the data, then you must use bytes in the decrypt_to keyword.
Example
In the following example, 21, 42, and 55 integers are stored in a list and used as bulk data, which is encrypted using the AES256 data element. The bulk integer data is then decrypted using the same data element. Therefore, the decrypt_to parameter is passed as a keyword argument and its value is set to int.
from appython import Protector
protector = Protector()
session = protector.create_session("User1")
data = [21, 42, 55]
p_out = session.protect(data, "AES256", encrypt_to=bytes)
print("Encrypted Data: ")
print(p_out)
out = session.unprotect(p_out[0], "AES256", decrypt_to=int)
print("Decrypted Data: ")
print(out)
Result
Encrypted Data:
([b'@\x19\xccu\x04\xc7\xd8\xc1p\xad\xa7\x1fk\xe4N\xd0', b'"@\xec\x97(\x96\xab\x18\xd0\x99\xd4~\x1e\xf4\xba\xd1', b'y\xec\x9b+f\xa8\xb1I\xc2=[\x11\xfd\x06\xa1C'], (6,
 6, 6))
Decrypted Data:
([21, 42, 55], (8, 8, 8))
6 is the success return code for the protect operation of each element in the list.
8 is the success return code for the unprotect operation of each element in the list.
Example - Detokenizing Long Data
The example for using the unprotect API for retrieving the original long data from the token data is described in this section.
Example
In the following example, the long data 1376235139103947 that was tokenized using the TE_INT_8 data element, is now detokenized using the same data element.
from appython import Protector
protector = Protector()
session = protector.create_session("User1")
output = session.protect(1376235139103947, "TE_INT_8")
print("Protected Data: %s" %output)
org = session.unprotect(output, "TE_INT_8")
print("Unprotected Data: %s" %org)
Result
Protected Data: -1770169866845757900
Unprotected Data: 1376235139103947
Example - Detokenizing Long Data with External IV
The example for using the unprotect API for retrieving the original long data from the token data using external IV is described in this section.
If you want to pass the external IV as a keyword argument to the unprotect API, then you must pass the external IV as bytes to the API.
Example
In this example, the long data 1376235139103947 was tokenized using the TE_INT_8 data element and the external IV 1234. It is now detokenized using the same data element and external IV.
from appython import Protector
protector = Protector()
session = protector.create_session("User1")
output = session.protect(1376235139103947, "TE_INT_8",
 external_iv=bytes("1234", encoding="utf-8"))
print("Protected Data: %s" %output)
org = session.unprotect(output, "TE_INT_8",
 external_iv=bytes("1234", encoding="utf-8"))
print("Unprotected Data: %s" %org)
Result
Protected Data: 5846214101577367207
Unprotected Data: 1376235139103947
Example - Decrypting Long Data
The example for using the unprotect API for decrypting long data is described in this section.
If you want to decrypt the data, then you must use bytes in the decrypt_to keyword.
Example
In the following example, the long data 1376235139103947 that was encrypted using the AES256 data element is now decrypted using the same data element. Therefore, the decrypt_to parameter is passed as a keyword argument and its value is set to long.
from appython import Protector
protector = Protector()
session = protector.create_session("User1")
output = session.protect(1376235139103947, "AES256", encrypt_to=bytes)
print("Encrypted Data: %s" %output)
org = session.unprotect(output, "AES256", decrypt_to=int)
print("Decrypted Data: %s" %org)
Result
Encrypted Data: b'#Ds####wp0Xl<\'
Decrypted Data: 1376235139103947
Example - Detokenizing Bulk Long Data
The example for using the unprotect API for retrieving the original bulk long data from the token data is described in this section.
Example
In the following example, 1376235139103947, 2396235839173981, and 9371234126176985 long data are stored in a list and used as bulk data, which is tokenized using the TE_INT_8 data element. The bulk long data is then detokenized using the same data element.
from appython import Protector
protector = Protector()
session = protector.create_session("User1")
data = [1376235139103947, 2396235839173981, 9371234126176985]
p_out = session.protect(data, "TE_INT_8")
print("Protected Data: ")
print(p_out)
out = session.unprotect(p_out[0], "TE_INT_8")
print("Unprotected Data: ")
print(out)
Result
Protected Data:
([-1770169866845757900L, -8142006510957348982L, -206876567049699669L], (6, 6, 6))
Unprotected Data:
([1376235139103947L, 2396235839173981L, 9371234126176985L], (8, 8, 8))
6 is the success return code for the protect operation of each element in the list.
8 is the success return code for the unprotect operation of each element in the list.
Example - Detokenizing Bulk Long Data with External IV
The example for using the unprotect API for retrieving the original bulk long data from the token data using external IV is described in this section.
If you want to pass the external IV as a keyword argument to the unprotect API, then you must pass the external IV as bytes to the API.
Example
In this example, 1376235139103947, 2396235839173981, and 9371234126176985 long data are stored in a list and used as bulk data, which is tokenized using the TE_INT_8 data element, with the help of external IV 1234 passed as bytes. The bulk long data is then detokenized using the same data element and external IV.
from appython import Protector
protector = Protector()
session = protector.create_session("User1")
data = [1376235139103947, 2396235839173981, 9371234126176985]
p_out = session.protect(data, "TE_INT_8", external_iv=bytes("1234", encoding="utf-8"))
print("Protected Data: ")
print(p_out)
out = session.unprotect(p_out[0], "TE_INT_8", external_iv=bytes("1234",
 encoding="utf-8"))
print("Unprotected Data: ")
print(out)
Result
Protected Data:
([5846214101577367207L, 5661139619224336475L, 7806173497368534531L], (6, 6, 6))
Unprotected Data:
([1376235139103947L, 2396235839173981L, 9371234126176985L], (8, 8, 8))
6 is the success return code for the protect operation of each element in the list.
8 is the success return code for the unprotect operation of each element in the list.
Example - Decrypting Bulk Long Data
The example for using the unprotect API for decrypting bulk long data is described in this section.
If you want to decrypt the data, then you must use bytes in the decrypt_to keyword.
Example
In the following example, 1376235139103947, 2396235839173981, and 9371234126176985 long data are stored in a list and used as bulk data, which is encrypted using the AES256 data element. The bulk long data is then decrypted using the same data element. Therefore, the decrypt_to parameter is passed as a keyword argument and its value is set to long.
from appython import Protector
protector = Protector()
session = protector.create_session("User1")
data = [1376235139103947, 2396235839173981, 9371234126176985]
p_out = session.protect(data, "AES256", encrypt_to=bytes)
print("Encrypted Data: ")
print(p_out)
out = session.unprotect(p_out[0], "AES256", decrypt_to=int)
print("Decrypted Data: ")
print(out)
Result
Encrypted Data:
([b'\xd5Ds\xb3\xfb\x95\xf2wp0Xl<\\\x1a\x07', b'\xaf\x05aq\xb6\xcd,L`JC4\x87\x87\t\x0b', b']j@*S\x96\xf5\xf5S<\x08M\xa6\x18\xbf\xda'], (6, 6, 6))
Decrypted Data:
([1376235139103947L, 2396235839173981L, 9371234126176985L], (8, 8, 8))
6 is the success return code for the protect operation of each element in the list.
8 is the success return code for the unprotect operation of each element in the list.
Example - Unprotecting Float Data
The example for using the unprotect API for unprotecting float data using a No Encryption data element. This API can be used for access control and auditing.
Example
In the following example, the long data 22.5 that was protected using the NoEncryption_1 data element, is now unprotected using the same data element.
from appython import Protector
protector = Protector()
session = protector.create_session("User1")
output = session.protect(22.5, "NoEncryption_1")
print("Protected Data: %s" %output)
org = session.unprotect(output, "NoEncryption_1")
print("Unprotected Data: %s" %org)
Result
Protected Data: 22.5
Unprotected Data: 22.5
The input data, the protected output data, and the unprotected data are the same, as we are using a No Encryption data element to protect and unprotect the data.
Example - Decrypting Float Data
The example for using the unprotect API for decrypting float data is described in this section.
If you want to decrypt the data, then you must use bytes in the decrypt_to keyword.
Example
In the following example, the float data 22.5 that was encrypted using the AES256 data element is now decrypted using the same data element. Therefore, the decrypt_to parameter is passed as a keyword argument and its value is set to float.
from appython import Protector
protector = Protector()
session = protector.create_session("User1")
output = session.protect(22.5, "AES256", encrypt_to=bytes)
print("Encrypted Data: %s" %output)
org = session.unprotect(output, "AES256", decrypt_to=float)
print("Decrypted Data: %s" %org)
Result
Encrypted Data: b'g.O؋#Vk###;>'
Decrypted Data: 22.5
Example - Unprotecting Bulk Float Data
This section describes how to use the unprotect API for unprotecting bulk float data using a No Encryption data element. This API can be used for access control and auditing.
Example
In the following example, 22.5, 48.93, and 94.14 float data are stored in a list and used as bulk data, which is protected using the NoEncryption_1 data element. The bulk float data is then unprotected using the same data element.
from appython import Protector
protector = Protector()
session = protector.create_session("User1")
data = [22.5, 48.93, 94.31]
p_out = session.protect(data, "NoEncryption_1")
print("Protected Data: ")
print(p_out)
out = session.unprotect(p_out[0], "NoEncryption_1")
print("Unprotected Data: ")
print(out)
Result
Protected Data:
([22.5, 48.93, 94.31], (6, 6, 6))
Unprotected Data:
([22.5, 48.93, 94.31], (8, 8, 8))
6 is the success return code for the protect operation of each element in the list.
8 is the success return code for the unprotect operation of each element in the list.
The input data, the protected output data, and the unprotected data are the same, as we are using a No Encryption data element to protect and unprotect the data.
Example - Decrypting Bulk Float Data
The example for using the unprotect API for decrypting bulk float data is described in this section.
If you want to decrypt the data, then you must use bytes in the decrypt_to keyword.
Example
In the following example, 22.5, 48.93, and 94.14 float data are stored in a list and used as bulk data, which is encrypted using the AES256 data element. The bulk float data is then decrypted using the same data element. Therefore, the decrypt_to parameter is passed as a keyword argument and its value is set to float.
from appython import Protector
protector = Protector()
session = protector.create_session("User1")
data = [22.5, 48.93, 94.31]
p_out = session.protect(data, "AES256", encrypt_to=bytes)
print("Encrypted Data: ")
print(p_out)
out = session.unprotect(p_out[0], "AES256", decrypt_to=float)
print("Decrypted Data: ")
print(out)
Result
Encrypted Data:
([b'g.O\xd8\x8b\x12\x89\x15Vk\x88\xbe\xf4;\x18>', b'.\xb0Q\xb9\xc9\xca\xba\xc2\xcb8\xfe\xd8\xf4q\x00\xb8', b'\xb6x\xf4\x94l9\xe6uaN\x83\x8d\n\x98\n;'], (6, 6, 6))
Decrypted Data:
([22.5, 48.93, 94.31], (8, 8, 8))
6 is the success return code for the protect operation of each element in the list.
8 is the success return code for the unprotect operation of each element in the list.
Example - Detokenizing Bytes Data
The example for using the unprotect API for retrieving the original bytes data from the token data is described in this section.
Example
In the following example, the bytes data ‘Protegrity1’ that was tokenized using the TE_A_N_S23_L2R2_Y data element, is now detokenized using the same data element.
from appython import Protector
protector = Protector()
session = protector.create_session("User1")
data=bytes("Protegrity1", encoding="utf-8")
p_out = session.protect(data, "TE_A_N_S23_L2R2_Y")
print("Protected Data: %s" %p_out)
org = session.unprotect(p_out, "TE_A_N_S23_L2R2_Y")
print("Unprotected Data: %s" %org)
In the following example, the bytes data ‘Protegrity1’ that was tokenized using the UnicodeGen2_BasicAlphaNum data element, is now detokenized using the same data element.
from appython import Protector
from appython import Charset
session = protector.create_session("User1")
data = bytes("Protegrity1", encoding="utf-16le")
p_out = session.protect(data, "UnicodeGen2_BasicAlphaNum", encrypt_to=bytes, charset=Charset.UTF16LE)
print("Protected Data: %s" %p_out)
org = session.unprotect(p_out, "UnicodeGen2_BasicAlphaNum", decrypt_to=bytes, charset=Charset.UTF16LE)
print("Unprotected Data: %s" %org)
Result
Protected Data: b'Pr9zdglWRy1'
Unprotected Data: b'Protegrity1'
Example - Detokenizing Bytes Data with External IV
The example for using the unprotect API for retrieving the original bytes data from the token data using external IV is described in this section.
Example
In this example, the bytes data ‘Protegrity1’ was tokenized using the TE_A_N_S23_L2R2_Y data element and the external IV 1234. It is now detokenized using the same data element and external IV.
from appython import Protector
protector = Protector()
session = protector.create_session("User1")
data=bytes("Protegrity1", encoding="utf-8")
p_out = session.protect(data, "TE_A_N_S23_L2R2_Y",
 external_iv=bytes("1234", encoding="utf-8"))
print("Protected Data: %s" %p_out)
org = session.unprotect(p_out, "TE_A_N_S23_L2R2_Y",
 external_iv=bytes("1234", encoding="utf-8"))
print("Unprotected Data: %s" %org)
Result
Protected Data: b'PrksvEshuy1'
Unprotected Data: b'Protegrity1'
Example - Decrypting Bytes Data
The example for using the unprotect API for decrypting bytes data is described in this section.
Example
In the following example, the bytes data b’Protegrity1’ that was encrypted using the AES256 data element, is now decrypted using the same data element. Therefore, the decrypt_to parameter is passed as a keyword argument and its value is set to bytes.
from appython import Protector
protector = Protector()
session = protector.create_session("User1")
data=bytes("Protegrity1", encoding="utf-8")
p_out = session.protect(data, "AES256", encrypt_to=bytes)
print("Encrypted Data: %s" %p_out)
org = session.unprotect(p_out, "AES256", decrypt_to=bytes)
print("Decrypted Data: %s" %org)
Result
Encrypted Data: b't####+4Lq##ۏx'
Decrypted Data: b'Protegrity1'
Example - Detokenizing Bulk Bytes Data
The example for using the unprotect API for retrieving the original bulk bytes data from the token data is described in this section.
Example
In the following example, protegrity1234, Protegrity1, and Protegrity56 strings are first converted to bytes using the Python bytes() method. The converted bytes are then stored in a list and used as bulk data, which is tokenized using the TE_A_N_S23_L2R2_Y data element. The bulk bytes data is then detokenized using the same data element.
from appython import Protector
protector = Protector()
session = protector.create_session("User1")
data = [bytes("protegrity1234"), bytes("Protegrity1"), bytes("Protegrity56")]
p_out = session.protect(data, "TE_A_N_S23_L2R2_Y")
print("Protected Data: ")
print(p_out)
org = session.unprotect(p_out[0], "TE_A_N_S23_L2R2_Y")
print("Unprotected Data: ")
print(org)
Result
Protected Data:
([b'prMLJsM8fZUp34', b'Pr9zdglWRy1', b'Pra9Ez5LPG56'], (6, 6, 6))
Unprotected Data:
([b'protegrity1234', b'Protegrity1', b'Protegrity56'], (8, 8, 8))
6 is the success return code for the protect operation of each element in the list.
8 is the success return code for the unprotect operation of each element in the list.
Example - Detokenizing Bulk Bytes Data with External IV
The example for using the unprotect API for retrieving the original bulk bytes data from the token data using external IV is described in this section.
Example
In the following example, protegrity1234, Protegrity1, and Protegrity56 strings are first converted to bytes using the Python bytes() method. The converted bytes are then stored in a list and used as bulk data. This bulk data is tokenized using the TE_A_N_S23_L2R2_Y data element, with the help of external IV 1234 passed as bytes. The bulk bytes data is then detokenized using the same data element and external IV.
from appython import Protector
protector = Protector()
session = protector.create_session("User1")
data = [bytes("protegrity1234"), bytes("Protegrity1"), bytes("Protegrity56")]
p_out = session.protect(data, "TE_A_N_S23_L2R2_Y",
 external_iv=bytes("1234"))
print("Protected Data: ")
print(p_out)
org = session.unprotect(p_out[0], "TE_A_N_S23_L2R2_Y",
 external_iv=bytes("1234"))
print("Unprotected Data: ")
print(org)
Result
Protected Data:
([b'prbm147L5pc434', b'PrksvEshuy1', b'Prmx0hG8Nj56'], (6, 6, 6))
Unprotected Data:
([b'protegrity1234', b'Protegrity1', b'Protegrity56'], (8, 8, 8))
6 is the success return code for the protect operation of each element in the list.
8 is the success return code for the unprotect operation of each element in the list.
Example - Decrypting Bulk Bytes Data
The example for using the unprotect API for decrypting bulk bytes data is described in this section.
Example
In the following example, protegrity1234, Protegrity1, and Protegrity56 strings are first converted to bytes using the Python bytes() method. The converted bytes are then stored in a list and used as bulk data, which is encrypted using the AES256 data element. The bulk bytes
data is then decrypted using the same data element. Therefore, the decrypt_to parameter is passed as a keyword argument and its value is set to bytes.
from appython import Protector
protector = Protector()
session = protector.create_session("User1")
data = [bytes("protegrity1234", encoding ="UTF-8"), bytes("Protegrity1", encoding
 ="UTF-8"), bytes("Protegrity56", encoding ="UTF-8")]
p_out = session.protect(data, "AES256", encrypt_to=bytes)
print("Encrypted Data: ")
print(p_out)
org = session.unprotect(p_out[0], "AES256", decrypt_to=bytes)
print("Decrypted Data: ")
print(org)
Result
Encrypted Data:
([b'\xc9^x\x02)\xcbB\x91}\x7fi\x8a\xce\x8d>H', b't\x80\xf5\x8d\x9e\x0b+4Lq\x8a\x97\xdb\x8fx\x16', b'\x87\x08\x938\xf7o~\xab\xa3\xc2L\xa90>\x18_'], (6, 6, 6))
Decrypted Data:
([b'protegrity1234', b'Protegrity1', b'Protegrity56'], (8, 8, 8))
6 is the success return code for the protect operation of each element in the list.
8 is the success return code for the unprotect operation of each element in the list.
Example - Detokenizing Date Objects
The example for using the unprotect API for retrieving the original data objects from token data is described in this section.
If a date object is provided as input, then the data element with the same tokenization type as the input date format must be used to protect the data. For example, if you have provided the input date object in DD/MM/YYYY format, then you must use only the Date (DD/MM/YYYY) data element to protect the data.
Example 1: Input date object in DD/MM/YYYY format
In this example, the 12/02/2019 date string is used as the data, which is first converted to a date object using the Python date method of the datetime module.
The date object is then tokenized using the TE_Date_DMY_S13 data element, and then detokenized using the same data element.
from appython import Protector
from datetime import datetime
protector = Protector()
session = protector.create_session("User1")
data = datetime.strptime("12/02/2019", "%d/%m/%Y").date()
print("Input date as a Date object : "+str(data))
p_out = session.protect(data, "TE_Date_DMY_S13")
print("Protected date: "+str(p_out))
unprotected_output = session.unprotect(p_out, "TE_Date_DMY_S13")
print("Unprotected date: "+str(unprotected_output))
Result
Input date as a Date object : 2019-02-12
Protected date: 1896-10-21
Unprotected date: 2019-02-12
Example 2: Input date object in MM.DD.YYYY format
In this example, the 02/12/2019 date string is used as the data, which is first converted to a date object using the Python date method of the datetime module.
The date object is then tokenized using the TE_Date_MDY_S13 data element, and then detokenized using the same data element.
from appython import Protector
from datetime import datetime
protector = Protector()
session = protector.create_session("User1")
data = datetime.strptime("02/12/2019", "%m/%d/%Y").date()
print("\nInput date as a Date object : "+str(data))
p_out = session.protect(data, "TE_Date_MDY_S13")
print("Protected date: "+str(p_out))
unprotected_output = session.unprotect(p_out, "TE_Date_MDY_S13")
print("Unprotected date: "+str(unprotected_output))
Result
Input date as a Date object : 2019-02-12
Protected date: 2037-06-12
Unprotected date: 2019-02-12
Example 3: Input date object in YYYY-MM-DD format
In this example, the 2019/02/12 date string is used as the data, which is first converted to a date object using the Python date method of the datetime module.
The date object is then tokenized using the TE_Date_YMD_S13 data element, and then detokenized using the same data element.
from appython import Protector
from datetime import datetime
protector = Protector()
session = protector.create_session("User1")
data = datetime.strptime("2019/02/12", "%Y/%m/%d").date()
print("\nInput date as a Date object : "+str(data))
p_out = session.protect(data, "TE_Date_YMD_S13")
print("Protected date: "+str(p_out))
unprotected_output = session.unprotect(p_out, "TE_Date_YMD_S13")
print("Unprotected date: "+str(unprotected_output))
Result
Input date as a Date object : 2019-02-12
Protected date: 2615-12-23
Unprotected date: 2019-02-12
Example - Detokenizing Bulk Date Objects
The example for using the unprotect API for retrieving the original bulk date objects from the token data is described in this section.
If a date object is provided as input, then the data element with the same tokenization type as the input date format must be used to protect the data. For example, if you have provided the input date object in DD/MM/YYYY format, then you must use only the Date (DD/MM/YYYY) data element to protect the data.
Example: Input as a Date Object
In this example, the 12/02/2019 and 11/01/2018 date strings are used as the data, which are first converted to a date objects using the Python date method of the datetime module. The two date objects are then used to create a list, which is used as the input data.
The input list is then tokenized using the TE_Date_DMY_S13 data element, and then detokenized using the same data element.
from appython import Protector
from datetime import datetime
protector = Protector()
session = protector.create_session("User1")
data1 = datetime.strptime("12/02/2019", "%d/%m/%Y").date()
data2 = datetime.strptime("11/01/2018", "%d/%m/%Y").date()
data = [data1, data2]
print("Input data: "+str(data))
p_out = session.protect(data, "TE_Date_DMY_S13")
print("Protected data: "+str(p_out))
unprotected_output = session.unprotect(p_out[0], "TE_Date_DMY_S13")
print("Unprotected date: "+str(unprotected_output))
Result
Input data: [datetime.date(2019, 2, 12), datetime.date(2018, 1, 11)]
Protected data: ([datetime.date(1896, 10, 21), datetime.date(696, 3, 1)], (6, 6))
Unprotected date: ([datetime.date(2019, 2, 12), datetime.date(2018, 1, 11)], (8, 8))
6 is the success return code for the protect operation of each element in the list.
8 is the success return code for the unprotect operation of each element in the list.
Example - Detokenizing Unicode Data
The example for using the unprotect API for retrieving the original unicode data from the token data is described in this section.
Example
In the following example, the u’protegrity1234ÀÁÂÃÄÅÆÇÈÉ’ unicode data that was tokenized using the TE_A_N_S23_L2R2_Y data element, is now detokenized using the same data element.
from appython import Protector
protector = Protector()
session = protector.create_session("User1")
output = session.protect(u'protegrity1234ÀÁÂÃÄÅÆÇÈÉ', "TE_A_N_S23_L2R2_Y")
print("Protected Data: %s" %output)
org = session.unprotect(output, "TE_A_N_S23_L2R2_Y")
print("Unprotected Data: %s" %org)
Result
Protected Data: prZeslalwuQQy3ÀÁÂÃÄÅÆÇÈÉ
Unprotected Data: protegrity1234ÀÁÂÃÄÅÆÇÈÉ
Example - Decrypting Unicode Data
The example for using the unprotect API for decrypting unicode data is described in this section.
If you want to decrypt the data, then you must use bytes in the decrypt_to keyword.
Example
In the following example, the u’protegrity1234ÀÁÂÃÄÅÆÇÈÉ’ unicode data that was encrypted using the AES256_IV_CRC_KID data element is now decrypted using the same data element.
Therefore, the decrypt_to parameter is passed as a keyword argument and its value is set to unicode.
from appython import Protector
protector = Protector()
session = protector.create_session("User1")
output = session.protect(u'protegrity1234ÀÁÂÃÄÅÆÇÈÉ', "AES256_IV_CRC_KID",
 encrypt_to=bytes)
print("Encrypted Data: %s" %output)
org = session.unprotect(output, "AES256_IV_CRC_KID", decrypt_to=unicode)
print("Decrypted Data: %s" %org)
Result
Encrypted Data: b' 8"+[/O##*#wɆ#M#aX#{#B[#u####|E#(R#1##!w#t?V6#Q###W###jG'
Decrypted Data: protegrity1234ÀÁÂÃÄÅÆÇÈÉ
Example - Detokenizing Bulk Unicode Data
The example for using the unprotect API for retrieving the original bulk unicode data from the token data is described in this section.
Example
In the following example, u’protegrity1234ÀÁÂÃÄÅÆÇÈÉ’, u’Protegrity1ÆÇÈÉÀÁÂÃÄÅ’, and u’Protegrity56ÇÅÆÈÉÂÃ’ unicode data are stored in a list and used as bulk data, which is tokenized using the TE_A_N_S23_L2R2_Y data element. The bulk unicode data is then detokenized using the same data element.
from appython import Protector
protector = Protector()
session = protector.create_session("User1")
data = [u'protegrity1234ÀÁÂÃÄÅÆÇÈÉ', u'Protegrity1ÆÇÈÉÀÁÂÃÄÅ', u'Protegrity56ÇÅÆÈÉÂÃ']
Confidential 183
Protegrity APIs, UDFs, Commands Reference Guide 9.1.0.0 Application Protector
p_out = session.protect(data, "TE_A_N_S23_L2R2_Y")
print("Protected Data: ")
print(p_out)
out = session.unprotect(p_out[0], "TE_A_N_S23_L2R2_Y")
print("Unprotected Data: ")
print(out)
Result
Protected Data:
([u'prZeslalwuQQy3\xc0\xc1\xc2\xc3\xc4\xc5\xc6\xc7\xc8\xc9',  u'PrVt6rfyW81\xc6\xc7\xc8\xc9\xc0\xc1\xc2\xc3\xc4\xc5', u'PrFgczleNkNG\xc7\xc5\xc6\xc8\xc9\xc2\xc3'], (6, 6, 6))
Unprotected Data:
([u'protegrity1234\xc0\xc1\xc2\xc3\xc4\xc5\xc6\xc7\xc8\xc9',  u'Protegrity1\xc6\xc7\xc8\xc9\xc0\xc1\xc2\xc3\xc4\xc5',  u'Protegrity56\xc7\xc5\xc6\xc8\xc9\xc2\xc3'], (8, 8, 8))
6 is the success return code for the protect operation of each element in the list.
8 is the success return code for the unprotect operation of each element in the list.
Example - Decrypting Bulk Unicode Data
The example for using the unprotect API for decrypting bulk unicode data is described in this section.
If you want to decrypt the data, then you must use bytes in the decrypt_to keyword.
Example
In the following example, u’protegrity1234ÀÁÂÃÄÅÆÇÈÉ’, u’Protegrity1ÆÇÈÉÀÁÂÃÄÅ’, and u’Protegrity56ÇÅÆÈÉÂÃ’ unicode data are stored in a list and used as bulk data, which is encrypted using the AES256 data element. The bulk unicode data is then decrypted using the same data element. Therefore, the decrypt_to parameter is passed as a keyword argument and its value is set to unicode.
from appython import Protector
protector = Protector()
session = protector.create_session("User1")
data = [u'protegrity1234ÀÁÂÃÄÅÆÇÈÉ', u'Protegrity1ÆÇÈÉÀÁÂÃÄÅ', u'Protegrity56ÇÅÆÈÉÂÃ']
p_out = session.protect(data, "AES256", encrypt_to=bytes)
print("Encrypted Data: ")
print(p_out)
out = session.unprotect(p_out[0], "AES256", decrypt_to=str)
print("Decrypted Data: ")
print(out)
Result
Encrypted Data:
([b'F2\xd2\xddR\xda\x9e7#\xfc\xe6\xe2Ore\x18>=\x87\xfc\xea\x9c\xb8\x94\x9e$M?\x9a\xec\xefO5\xc3\x8fjun\xe3\r4\x0f\xedD76\xe4\xfa', b'\x9f\xc0}G\x12\x1bu\x02\xfdMO\x8e\x01\xb6\x0f\xf5\xbbi\xbe\xc9\x11J\x1c\xa4\x12\x1e\xf0\xbeA\x19\xa4\xc3', b'G\xa3(\xee\xb7\x81m\xfc\x96-I\xa2\x9eGt\xcc\x0b-\x97\xc73\x00O\xdc\xfb\t.\xfa=\x99:\xe7'], (6, 6, 6))
Decrypted Data:
([u'protegrity1234\xc0\xc1\xc2\xc3\xc4\xc5\xc6\xc7\xc8\xc9',  u'Protegrity1\xc6\xc7\xc8\xc9\xc0\xc1\xc2\xc3\xc4\xc5',  u'Protegrity56\xc7\xc5\xc6\xc8\xc9\xc2\xc3'], (8, 8, 8))
6 is the success return code for the protect operation of each element in the list.
8 is the success return code for the unprotect operation of each element in the list.
reprotect
The reprotect API reprotects data using tokenization, data type preserving encryption, No Encryption, or encryption data element. The protected data is first unprotected and then protected again with a new data element. It supports bulk protection without a maximum data limit. However, you are recommended not to pass more than 1 MB of input data for each protection call.
For String and Byte data types, the maximum length for tokenization is 4096 bytes, while no maximum length is defined for encryption.
If you are retokenizing the data using the reprotect API, then the old data element and the new data element must have the same tokenization type. For example, if you have used Alpha-Numeric data element to protect the data, then you must use only Alpha-Numeric data element to reprotect the data.
def reprotect(self, data, old_de, new_de, **kwargs)
Do not pass the self parameter while invoking the API.
Parameters
data: Protected data to be reprotected. The data is first unprotected with the old data element and then protected with the new data element.
old_de: String containing the data element name defined in the policy for the input data. This data element is used to unprotect the protected data as part of the reprotect operation.
new_de: String containing the data element name defined in the policy to create the output data. This data element is used to protect the data as part of the reprotect operation.
**kwargs: Specify one or more of the following keyword arguments:
- old_external_iv: Specify the old external IV in bytes for Tokenization and FPE protection methods. This old external IV is used to unprotect the protected data as part of the reprotect operation. This argument is optional.
- new_external_iv: Specify the new external IV in bytes for Tokenization and FPE protection methods. This new external IV is used to protect the data as part of the reprotect operation. This argument is optional.
- old_external_tweak: Specify the old external tweak value in bytes for the FPE protection method. This old external tweak is used to unprotect the protected data as part of the reprotect operation. This argument is optional.
- new_external_tweak: Specify the new external tweak value in bytes for the FPE protection method. This new external tweak is used to protect the data as part of the reprotect operation. This argument is optional.
- encrypt_to: Specify this argument for re-encrypting the bytes data and set its value to bytes. This argument is Mandatory. This argument must not be used for Tokenization and FPE protection methods.
- charset: This is an optional argument. It indicates the byte order of the input buffer. You can specify a value for this argument from the charset constants, such as, UTF8, UTF16LE, or UTF16BE. The default value for the charset argument is UTF8.
The charset argument is only applicable for the input data of byte type.
The charset parameter is mandatory for the data elements created with Unicode Gen2 tokenization method and the FPE encryption method for byte APIs. The encoding set for the charset parameter must match the encoding of the input data passed.
Keyword arguments are case sensitive.
Returns
- For single data: Returns the reprotected data
- For bulk data: Returns a tuple of the following data:
- List or tuple of the reprotected data
- Tuple of error codes
Exceptions
InvalidSessionError: This exception is thrown if the session is invalid or has timed out.
ProtectError: This exception is thrown if the API is unable to protect the data.
If the reprotect API is used with bulk data, then it does not throw any exception. Instead, it only
returns an error code.
For more information about the return codes, refer to Application Protector API Return Codes.
Example - Retokenizing String Data
The examples for using the reprotect API for retokenizing string data are described in this section.
If you are retokenizing the data using the reprotect API, then the old data element and the new data element must have the same tokenization type. For example, if you have used the Alpha-Numeric data element to protect the data, then you must use only the Alpha-Numeric data element to reprotect the data.
Example 1: Input string data
In the following example, the Protegrity1 string is used as the input data, which is first tokenized using the TE_A_N_S23_L2R2_Y data element.
The tokenized input data, the old data element TE_A_N_S23_L2R2_Y, and a new data element TE_A_N_S23_L0R0_Y are then passed as inputs to the reprotect API. The reprotect API detokenizes the protected input data using the old data element and then retokenizes it using the new data element, as part of a single reprotect operation.
from appython import Protector
protector = Protector()
session = protector.create_session("User1")
output = session.protect("Protegrity1", "TE_A_N_S23_L2R2_Y")
print("Protected Data: %s" %output)
r_out = session.reprotect(output, "TE_A_N_S23_L2R2_Y",
 "TE_A_N_S23_L0R0_Y")
print("Reprotected Data: %s" %r_out)
Result
Protected Data: Pr9zdglWRy1
Reprotected Data: 7gD6aY1Aja9
Example 2: Input date passed as a string
In the following example, the 14/02/2019 string is used as the input data, which is first tokenized using the TE_Date_DMY_S13 Date data element.
If a date string is provided as input, then the data element with the same tokenization type as the input date format must be used to protect the data. For example, if you have provided the input date string in DD/MM/YYYY format, then you must use only the Date (DD/MM/YYYY) data element to protect the data.
The tokenized input data, the old data element TE_Date_DMY_S13, and a new data element
TE_Date_DMY_S16 are then passed as inputs to the reprotect API. The reprotect API detokenizes the protected input data using the old data element and then retokenizes it using the new data element, as part of a single reprotect operation.
from appython import Protector
protector = Protector()
session = protector.create_session("User1")
output = session.protect("14/02/2019", "TE_Date_DMY_S13")
print("Protected data: "+str(output))
r_out = session.reprotect(output, "TE_Date_DMY_S13", "TE_Date_DMY_S16")
print("Reprotected data: "+str(r_out))
Result
Protected data: 08/07/2443
Reprotected data: 19/10/1231
Example 3: Input date and time passed as a string
In the following example, the 2019/02/14 10:54:47 string is used as the input data, which is first tokenized using the TE_Datetime_TN_DN_M Datetime data element.
If a date and time string is provided as input, then the data element with the same tokenization type as the input format must be used for data protection. For example, if the input date and time string in YYYY/MM/DD HH:MM:SS MMM format is provided, then only the Datetime (YYYY-MM-DD HH:MM:SS MMM) data element must be used to protect the data.
The tokenized input data, the old data element TE_Datetime_TN_DN_M, and a new data element TE_Datetime_TN_DN_Y are then passed as inputs to the reprotect API. The reprotect API detokenizes the protected input data using the old data element and then retokenizes it using the new data element, as part of a single reprotect operation.
from appython import Protector
protector = Protector()
session = protector.create_session("User1")
output = session.protect("2019/02/14 10:54:47", "TE_Datetime_TN_DN_M")
print("Protected data: "+str(output))
r_out = session.reprotect(output, "TE_Datetime_TN_DN_M", "TE_Datetime_TN_DN_Y")
print("Reprotected data: "+str(r_out))
Result
Protected data: 3311/02/22 10:54:47
Reprotected data: 2019/09/25 10:54:47
Example - Retokenizing String Data with External IV
The example for using the reprotect API for retokenizing string data using external IV is described in this section.
If you are retokenizing the data using the reprotect API, then the old data element and the new data element must have the same tokenization type. For example, if you have used the Alpha-Numeric data element to protect the data, then you must use only the Alpha-Numeric data element to reprotect the data.
If you want to pass the external IV as a keyword argument to the reprotect API, then you must pass the external IV as bytes to the API.
Example
In the following example, the Protegrity1 string is used as the input data, which is first tokenized using the TE_A_N_S23_L2R2_Y data element, with the help of external IV 1234 that is passed as bytes.
The tokenized input data, the TE_A_N_S23_L2R2_Y data element, the old external IV 1234 in bytes, and a new external IV 123456 in bytes are then passed as inputs to the reprotect API. As part of a single reprotect operation, the reprotect API first detokenizes the protected input data using the given data element and old external IV. It then retokenizes the data using the same data element, but with the new external IV.
from appython import Protector
protector = Protector()
session = protector.create_session("User1")
p_out = session.protect("Protegrity1", "TE_A_N_S23_L2R2_Y",
 external_iv=bytes("1234", encoding="utf-8"))
print("Protected Data: %s" %p_out)
r_out = session.reprotect(p_out, "TE_A_N_S23_L2R2_Y",
 "TE_A_N_S23_L2R2_Y", old_external_iv=bytes("1234", encoding="utf-8"),
 new_external_iv=bytes("123456", encoding="utf-8"))
print("Reprotected Data: %s" %r_out)
Result
Protected Data: PrksvEshuy1
Reprotected Data: PrKxfmdTGy1
Example - Reprotecting String Data Using FPE
The example for using the reprotect API for reprotecting string data using FPE (FF1) is described in this section.
The ptyCharsets parameter is mandatory for data elements created with Unicode Gen2 tokenization method and the Format Preserving Encryption (FPE) method for byte APIs. The encoding set for the ptyCharsets parameter must match the encoding of the input data passed.
Example
In the following example, the protegrity1234ÀÁÂÃÄÅÆÇÈÉ string is used as the input data, which is first protected using the FPE data element FPE_FF1_AES256_ID_AN_LnRn_ASTNE.
The protected input data, the old data element FPE_FF1_AES256_ID_AN_LnRn_ASTNE, and
a new data element FPE_FF1_AES256_ID_AN_LnRn_ASTNI are then passed as inputs to the reprotect API. The reprotect API first unprotects the protected input data using the old data element and then reprotects it using the new data element, as part of a single reprotect operation.
from appython import Protector
protector = Protector()
session = protector.create_session("User1")
p_out = session.protect("protegrity1234ÀÁÂÃÄÅÆÇÈÉ",
 "FPE_FF1_AES256_ID_AN_LnRn_ASTNE")
print("Protected Data: %s" %p_out)
r_out = session.reprotect(p_out, "FPE_FF1_AES256_ID_AN_LnRn_ASTNE",
 "FPE_FF1_AES256_ID_AN_LnRn_ASTNI")
print("Reprotected Data: %s" %r_out)
Result
Protected Data: NRejBkN7LcBOT4ÀÁÂÃÄÅÆÇÈÉ
Reprotected Data: AdbY0XkXIW7MvHÀÁÂÃÄÅÆÇÈÉ
Example - Reprotecting String Data Using FPE with External IV and External Tweak
The example for using the reprotect API for reprotecting string data using FPE (FF1), with external IV and external tweak is described in this section.
The ptyCharsets parameter is mandatory for data elements created with Unicode Gen2 tokenization method and the Format Preserving Encryption (FPE) method for byte APIs. The encoding set for the ptyCharsets parameter must match the encoding of the input data passed.
If the external IV and external tweak are passed as keyword arguments to the reprotect API, then the external IV and external tweak must be passed as bytes.
Example
In the following example, the protegrity1234 string is used as the data, which is first protected using the FPE data element FPE_FF1_AES256_ASCII_APIP_AN_L2R1_ASTNI_ML2, with the help of external IV 1234 and external tweak abcdef that are both passed as bytes.
The protected input data, the FPE_FF1_AES256_ASCII_APIP_AN_L2R1_ASTNI_ML2 data
element, the old external IV 1234 and external tweak abcdef in bytes, and a new external IV 123456 and external tweak xyz in bytes are then passed as inputs to the reprotect API. As part of a single reprotect operation, the reprotect API first unprotects the protected input data using the given data element, and old external IV and external tweak. It then reprotects it using the same data element, but with the new external IV and external tweak.
from appython import Protector
protector = Protector()
session = protector.create_session("User1")
p_out = session.protect("protegrity1234",
 "FPE_FF1_AES256_ASCII_APIP_AN_L2R1_ASTNI_ML2", external_iv=bytes("1234",
 encoding="utf-8"),
 external_tweak=bytes("abcdef", encoding="utf-8"))
print("Protected Data: %s" %p_out)
r_out = session.reprotect(p_out,
 "FPE_FF1_AES256_ASCII_APIP_AN_L2R1_ASTNI_ML2",
 "FPE_FF1_AES256_ASCII_APIP_AN_L2R1_ASTNI_ML2",
 old_external_iv=bytes("1234", encoding="utf-8"), new_external_iv=bytes("12345",
 encoding="utf-8"),
 old_external_tweak=bytes("abcdef", encoding="utf-8"),
 new_external_tweak=bytes("xyz", encoding="utf-8"))
print("Reprotected Data: %s" %r_out)
Result
Protected Data: prS6DaU5Dtd5g4
Reprotected Data: pr7hzGvIWOZQf4
Example - Retokenizing Bulk String Data
The examples for using the reprotect API for retokenizing bulk string data are described in this section. The bulk
string data can be passed as a list or a tuple.
The individual elements of the list or tuple must be of the same data type.
If you are retokenizing the data using the reprotect API, then the old data element and the new data element must have the same tokenization type. For example, if you have used the Alpha-Numeric data element to protect the data, then you must use only the Alpha-Numeric data element to reprotect the data.
Example 1: Input bulk string data
In the following example, protegrity1234, Protegrity1, and Protegrity56 strings are stored in a list and used as bulk data, which is tokenized using the TE_A_N_S13_L1R3_N data element.
The tokenized input data, the old data element TE_A_N_S13_L1R3_N, and a new data element TE_A_N_S23_L2R2_Y are then passed as inputs to the reprotect API. The reprotect API detokenizes the protected input data using the old data element and then retokenizes it using the new data element, as part of a single reprotect operation.
from appython import Protector
protector = Protector()
session = protector.create_session("User1")
data = ["protegrity1234", "Protegrity1", "Protegrity56"]
p_out = session.protect(data, "TE_A_N_S13_L1R3_N")
print("Protected Data: ")
print(p_out)
r_out = session.reprotect(p_out[0], "TE_A_N_S13_L1R3_N",
 "TE_A_N_S23_L2R2_Y")
print("Reprotected Data: ")
print(r_out)
Result
Protected Data:
(['pLAvXYIAbp5234', 'P8PCmC8gty1', 'PHNjXrw7Iy56'], (6, 6, 6))
Reprotected Data:
(['prMLJsM8fZUp34', 'Pr9zdglWRy1', 'Pra9Ez5LPG56'], (6, 6, 6))
6 is the success return code for the protect operation of each element in the list.
Example 2: Input dates passed as bulk strings
In the following example, the 14/02/2019 and 11/03/2018 strings are stored in a list and used as bulk data, which is tokenized using the TE_Date_DMY_S13 Date data element.
If a date string is provided as input, then the data element with the same tokenization type as the input date format must be used to protect the data. For example, if you have provided the input date string in DD/MM/YYYY format, then you must use only the Date (DD/MM/YYYY) data element to protect the data.
The tokenized input data, the old data element TE_Date_DMY_S13, and a new data element TE_Date_DMY_S16 are then passed as inputs to the reprotect API. The reprotect API detokenizes the protected input data using the old data element and then retokenizes it using the new data element, as part of a single reprotect operation.
from appython import Protector
protector = Protector()
session = protector.create_session("User1")
data = ["14/02/2019", "11/03/2018"]
output = session.protect(data, "TE_Date_DMY_S13")
print("Protected data: "+str(output))
r_out = session.reprotect(output[0], "TE_Date_DMY_S13", "TE_Date_DMY_S16")
print("Reprotected data: "+str(r_out))
Result
Protected data: (['08/07/2443', '17/08/1830'], (6, 6))
Reprotected data: (['19/10/1231', '25/09/2588'], (6, 6))
6 is the success return code for the protect operation of each element in the list.
Example 3: Input date and time passed as bulk strings
In the following example, the 2019/02/14 10:54:47 and 2019/11/03 11:01:32 strings is used as the data, which is tokenized using the TE_Datetime_TN_DN_M Datetime data element.
If a date and time string is provided as input, then the data element with the same tokenization type as the input format must be used for data protection. For example, if you have provided the input date and time string in YYYY-MM-DD
HH:MM:SS MMM format, then you must use only the Datetime (YYYY-MM-DD HH:MM:SS MMM) data element to protect the data.
The tokenized input data, the old data element TE_Datetime_TN_DN_M, and a new data element TE_Datetime_TN_DN_Y are then passed as inputs to the reprotect API. The reprotect API detokenizes the protected input data using the old data element and then retokenizes it using the new data element, as part of a single reprotect operation.
from appython import Protector
protector = Protector()
session = protector.create_session("User1")
data = ["2019/02/14 10:54:47", "2019/11/03 11:01:32"]
output = session.protect(data, "TE_Datetime_TN_DN_M")
print("Protected data: "+str(output))
r_out = session.reprotect(output[0], "TE_Datetime_TN_DN_M", "TE_Datetime_TN_DN_Y")
print("Reprotected data: "+str(r_out))
Result
Protected data: (['3311/02/22 10:54:47', '3311/11/02 11:01:32'], (6, 6))
Reprotected data: (['2019/09/25 10:54:47', '2019/05/16 11:01:32'], (6, 6))
6 is the success return code for the protect operation of each element in the list.
Example - Retokenizing Bulk String Data with External IV
The example for using the reprotect API for retokenizing bulk string data using external IV is described int his section. The bulk string data can be passed as a list or a tuple.
The individual elements of the list or tuple must be of the same data type.
If you are retokenizing the data using the reprotect API, then the old data element and the new data element must have the same tokenization type. For example, if you have used the Alpha-Numeric data element to protect the data, then you must use only the Alpha-Numeric data element to reprotect the data.
If you want to pass the external IV as a keyword argument to the reprotect API, then you must pass the external IV as bytes to the API.
Example
In the following example, protegrity1234, Protegrity1, and Protegrity56 strings are stored in a list and used as bulk data, which is tokenized using the TE_A_N_S23_L2R2_Y data element, with the help of external IV 123 that is passed as bytes.
The tokenized input data, the TE_A_N_S23_L2R2_Y data element, the old external IV 1234 in bytes, and a new external IV 123456 in bytes are then passed as inputs to the reprotect API. As part of a single reprotect operation, the reprotect API first detokenizes the protected input data using the given data element and old external IV, and then retokenizes it using the same data
element, but with the new external IV.
from appython import Protector
protector = Protector()
session = protector.create_session("User1")
data = ["protegrity1234", "Protegrity1", "Protegrity56"]
p_out = session.protect(data, "TE_A_N_S23_L2R2_Y",
external_iv=bytes("1234", encoding="utf-8"))
print("Protected Data: ")
print(p_out)
r_out = session.reprotect(p_out[0], "TE_A_N_S23_L2R2_Y","TE_A_N_S23_L2R2_Y",
old_external_iv=bytes("1234", encoding="utf-8"),
new_external_iv=bytes("123456", encoding="utf-8"))
print("Reprotected Data: ")
print(r_out)
Result
Protected Data:
(['prbm147L5pc434', 'PrksvEshuy1', 'Prmx0hG8Nj56'], (6, 6, 6))
Reprotected Data:
(['prFApvQWkhC934', 'PrKxfmdTGy1', 'PrKciFj8Ng56'], (6, 6, 6))
6 is the success return code for the protect operation of each element in the list.
Example - Reprotecting Bulk String Data Using FPE
The example for using the reprotect API for reprotecting bulk string data using FPE (FF1) is described in this section. The bulk string data can be passed as a list or a tuple.
The individual elements of the list or tuple must be of the same data type.
The ptyCharsets parameter is mandatory for data elements created with Unicode Gen2 tokenization method and the Format Preserving Encryption (FPE) method for byte APIs. The encoding set for the ptyCharsets parameter must match the encoding of the input data passed.
Example
In the following example, protegrity1234ÀÁ, Protegrity1ÆÇÈ, and Protegrity56ÀÁÂÃÄÅ strings are stored in a list and used as bulk data, which is protected using the FPE data element FPE_FF1_AES256_ID_AN_LnRn_ASTNE.
The tokenized input data, the old data element FPE_FF1_AES256_ID_AN_LnRn_ASTNE, and a new data element FPE_FF1_AES256_ID_AN_LnRn_ASTNI are then passed as inputs to the reprotect API. The reprotect API first unprotects the protected input data using the old data element and then reprotects it using the new data element, as part of a single reprotect operation.
from appython import Protector
protector = Protector()
session = protector.create_session("User1")
data = ["protegrity1234ÀÁ", "Protegrity1ÆÇÈ", "Protegrity56ÀÁÂÃÄÅ"]
p_out = session.protect(data, "FPE_FF1_AES256_ID_AN_LnRn_ASTNE")
print("Protected Data: ")
print(p_out)
r_out = session.reprotect(p_out[0], "FPE_FF1_AES256_ID_AN_LnRn_ASTNE",
"FPE_FF1_AES256_ID_AN_LnRn_ASTNI")
print("Reprotected Data: ")
print(r_out)
Result
Protected Data:
([u'NRejBkN7LcBOT4\xc0\xc1', u'8BT1NNNqnPZ\xc6\xc7\xc8', u'ecZslauY6iAl\xc0\xc1\xc2\xc3\xc4\xc5'], (6, 6, 6))
Reprotected Data:
([u'AdbY0XkXIW7MvH\xc0\xc1', u'1sw4XpkXXn2\xc6\xc7\xc8', u'0dEqKSUy7OEX\xc0\xc1\xc2\xc3\xc4\xc5'], (6, 6, 6))
6 is the success return code for the protect operation of each element in the list.
Example - Reprotecting Bulk String Data Using FPE with External IV and External Tweak
The example for using the reprotect API for reprotecting bulk string data using FPE (FF1), with external IV and external tweak is described in this section. The bulk string data can be passed as a list or a tuple.
The individual elements of the list or tuple must be of the same data type.
The ptyCharsets parameter is mandatory for data elements created with Unicode Gen2 tokenization method and the Format Preserving Encryption (FPE) method for byte APIs. The encoding set for the ptyCharsets parameter must match the encoding of the input data passed.
If the external IV and external tweak are passed as keyword arguments to the reprotect API, then the external IV and external tweak must be passed as bytes.
Example
In the following example, protegrity1234ÀÁ, Protegrity1ÆÇÈ, and Protegrity56ÀÁÂÃÄÅ strings are stored in a list and used as bulk data, which is first protected using the FPE data element FPE_FF1_AES256_ASCII_APIP_AN_L2R1_ASTNI_ML2 data element, with the help of an external IV 1234 and external tweak abc that are both passed as bytes.
The protected input data, the FPE_FF1_AES256_ASCII_APIP_AN_L2R1_ASTNI_ML2 data
element, the old external IV 1234 and external tweak abc in bytes, and a new external IV 123456 and external tweak xyz in bytes are then passed as inputs to the reprotect API. As part of a single reprotect operation, the reprotect API first unprotects the protected input data using the given data element, and old external IV and external tweak. It then reprotects it using the same data element, but with the new external IV and external tweak.
from appython import Protector
protector = Protector()
session = protector.create_session("User1")
data = ["protegrity1234ÀÁ", "Protegrity1ÆÇÈ", "Protegrity56ÀÁÂÃÄÅ"]
p_out = session.protect(data,
"FPE_FF1_AES256_ASCII_APIP_AN_L2R1_ASTNI_ML2", external_iv=bytes("1234",
encoding="utf-8"),
external_tweak=bytes("abc", encoding="utf-8"))
print("Protected Data: ")
print(p_out)
r_out = session.reprotect(p_out[0],
"FPE_FF1_AES256_ASCII_APIP_AN_L2R1_ASTNI_ML2",
"FPE_FF1_AES256_ASCII_APIP_AN_L2R1_ASTNI_ML2",
old_external_iv=bytes("1234", encoding="utf-8"), new_external_iv=bytes("123456",
encoding="utf-8"),
old_external_tweak=bytes("abc", encoding="utf-8"),
new_external_tweak=bytes("xyz", encoding="utf-8"))
print("Reprotected Data: ")
print(r_out)
Result
Protected Data:
([u'prngoI74u6NZrY\xc0\xc1', u'PrFBtLOLDBJ\xc6\xc7\xc8', u'PrlIizsBZ8Bc\xc0\xc1\xc2\xc3\xc4\xc5'], (6, 6, 6))
Reprotected Data:
([u'prvKwWyJiHTjtV\xc0\xc1', u'PrOjAc1YuIp\xc6\xc7\xc8', u'PrgiU5fdHGXE\xc0\xc1\xc2\xc3\xc4\xc5'], (6, 6, 6))
6 is the success return code for the protect operation of each element in the list.
Example - Retokenizing Integer Data
The example for using the reprotect API for retokenizing integer data is described in this section.
If you are retokenizing the data using the reprotect API, then the old data element and the new data element must have the same tokenization type. For example, if you have used Integer data element to protect the data, then you must use only Integer data element to reprotect the data.
Example
In the following example, 21 is used as the input integer data, which is first tokenized using the TE_INT_4 data element.
The tokenized input data, the old data element TE_INT_4, and a new data element TE_INT_4_1 are then passed as inputs to the reprotect API. The reprotect API detokenizes the protected input data using the old data element and then retokenizes it using the new data element, as part of a single reprotect operation.
from appython import Protector
protector = Protector()
session = protector.create_session("User1")
output = session.protect(21, "TE_INT_4")
print("Protected Data: %s" %output)
r_out = session.reprotect(output, "TE_INT_4", "TE_INT_4_1")
print("Reprotected Data: %s" %r_out)
Result
Protected Data: -1926573911
Reprotected Data: 1673602066
Example - Retokenizing Integer Data with External IV
The example for using the reprotect API for retokenizing integer data using external IV is described in this section.
If you are retokenizing the data using the reprotect API, then the old data element and the new data element must have the same tokenization type. For example, if you have used the Integer data element to protect the data, then you must use only the Integer data element to reprotect the data.
If you want to pass the external IV as a keyword argument to the reprotect API, then you must pass the external IV as bytes to the API.
The AP Python APIs support integer values only between -2147483648 and 2147483648, both inclusive.
Example
In the following example, 21 is used as the input integer data, which is first tokenized using the TE_INT_4 data element, with the help of external IV 1234 that is passed as bytes.
The tokenized input data, the TE_INT_4 data element, the old external IV 1234 in bytes, and a new external IV 123456 in bytes are then passed as inputs to the reprotect API. As part of a single reprotect operation, the reprotect API first detokenizes the protected input data using the given data element and old external IV. It then retokenizes the data using the same data element, but with the new external IV.
from appython import Protector
protector = Protector()
session = protector.create_session("User1")
p_out = session.protect(21, "TE_INT_4",
external_iv=bytes("1234", encoding="utf-8"))
print("Protected Data: %s" %p_out)
r_out = session.reprotect(p_out, "TE_INT_4", "TE_INT_4",
old_external_iv=bytes("1234", encoding="utf-8"), new_external_iv=bytes("123456",
encoding="utf-8"))
print("Reprotected Data: %s" %r_out)
Result
Protected Data: -2122057622
Reprotected Data: 342830163
Example - Retokenizing Bulk Integer Data
The example for using the reprotect API for retokenizing bulk integer data is described in this section. The bulk integer data can be passed as a list or a tuple.
The individual elements of the list or tuple must be of the same data type.
If you are retokenizing the data using the reprotect API, then the old data element and the new data element must have the same tokenization type. For example, if you have used the Integer data element to protect the data, then you must use only the Integer data element to reprotect the data.
Example
In the following example, 21, 42, and 55 integers are stored in a list and used as bulk data, which is tokenized using the TE_INT_4 data element.
The tokenized input data, the old data element TE_INT_4, and a new data element TE_INT_4_1 are then passed as inputs to the reprotect API. The reprotect API detokenizes the protected input data using the old data element and then retokenizes it using the new data element, as part of a single reprotect operation.
from appython import Protector
protector = Protector()
session = protector.create_session("User1")
data = [21, 42, 55]
p_out = session.protect(data, "TE_INT_4")
print("Protected Data: ")
print(p_out)
r_out = session.reprotect(p_out[0], "TE_INT_4", "TE_INT_4_1")
print("Reprotected Data: ")
print(r_out)
Result
Protected Data:
([-1926573911, -1970496120, -814489753], (6, 6, 6))
Reprotected Data:
([1673602066, -2106523868, 1683756976], (6, 6, 6))
6 is the success return code for the protect operation of each element in the list.
Example - Retokenizing Bulk Integer Data with External IV
The example for using the reprotect API for retokenizing bulk integer data using external IV is described in this section. The bulk integer data can be passed as a list or a tuple.
The individual elements of the list or tuple must be of the same data type.
If you are retokenizing the data using the reprotect API, then the old data element and the new data element must have the same tokenization type. For example, if you have used the Integer data element to protect the data, then you must use only the Integer data element to reprotect the data.
If you want to pass the external IV as a keyword argument to the reprotect API, then you must pass the external IV as bytes to the API.
Example
In the following example, 21, 42, and 55 integers are stored in a list and used as bulk data, which is tokenized using the TE_INT_4 data element, with the help of external IV 1234 that is passed as bytes.
The tokenized input data, the TE_INT_4 data element, the old external IV 1234 in bytes, and a new external IV 123456 in bytes are then passed as inputs to the reprotect API. As part of a single reprotect operation, the reprotect API first detokenizes the protected input data using the given data element and old external IV. It then retokenizes the data using the same data element, but with the new external IV.
from appython import Protector
protector = Protector()
session = protector.create_session("User1")
data = [21, 42, 55]
p_out = session.protect(data, "TE_INT_4", external_iv=bytes("1234", encoding="utf-8"))
print("Protected Data: ")
print(p_out)
r_out = session.reprotect(p_out[0], "TE_INT_4", "TE_INT_4",
old_external_iv=bytes("1234", encoding="utf-8"), new_external_iv=bytes("123456",
encoding="utf-8"))
print("Reprotected Data: ")
print(r_out)
Result
Protected Data:
([-2122057622, 1795905968, 228587043], (6, 6, 6))
Reprotected Data:
([342830163, 1360764745, -1892139659], (6, 6, 6))
6 is the success return code for the protect operation of each element in the list.
Example - Retokenizing Long Data
The example for using the reprotect API for retokenizing long data is described in this section.
If you are retokenizing the data using the reprotect API, then the old data element and the new data element must have the same tokenization type. For example, if you have used the Integer data element to protect the data, then you must use only the Integer data element to reprotect the data.
Example
In the following example, 1376235139103947 is used as the input long data, which is first tokenized using the TE_INT_8 data element.
The tokenized input data, the old data element TE_INT_8, and a new data element TE_INT_8_1 are then passed as inputs to the reprotect API. The reprotect API detokenizes the protected input data using the old data element and then retokenizes it using the new data element, as part of a single reprotect operation.
from appython import Protector
protector = Protector()
session = protector.create_session("User1")
output = session.protect(1376235139103947, "TE_INT_8")
print("Protected Data: %s" %output)
r_out = session.reprotect(output, "TE_INT_8", "TE_INT_8_1")
print("Reprotected Data: %s" %r_out)
Result
Protected Data: -1770169866845757900
Reprotected Data: 1496033169477057599
Example - Retokenizing Long Data with External IV
The example for using the reprotect API for retokenizing long data using external IV is described in this section.
If you are retokenizing the data using the reprotect API, then the old data element and the new data element must have the same tokenization type. For example, if you have used the Integer data element to protect the data, then you must use only the Integer data element to reprotect the data.
If you want to pass the external IV as a keyword argument to the reprotect API, then you must pass the external IV as bytes to the API.
Example
In the following example, 1376235139103947 is used as the input long data, which is first tokenized using the TE_INT_8 data element, with the help of external IV 1234 that is passed as bytes.
The tokenized input data, the TE_INT_8 data element, the old external IV 1234 in bytes, and a new external IV 123456 in bytes are then passed as inputs to the reprotect API. As part of a single reprotect operation, the reprotect API first detokenizes the protected input data using the given data element and old external IV, and then retokenizes it using the same data element,
but with the new external IV.
from appython import Protector
protector = Protector()
session = protector.create_session("User1")
p_out = session.protect(1376235139103947, "TE_INT_8",
external_iv=bytes("1234", encoding="utf-8"))
print("Protected Data: %s" %p_out)
r_out = session.reprotect(p_out, "TE_INT_8", "TE_INT_8",
old_external_iv=bytes("1234", encoding="utf-8"), new_external_iv=bytes("123456",
encoding="utf-8"))
print("Reprotected Data: %s" %r_out)
Result
Protected Data: 5846214101577367207
Reprotected Data: 2547273918835895593
Example - Retokenizing Bulk Long Data
The example for using the reprotect API for retokenizing bulk long data is described in this section. The bulk
long data can be passed as a list or a tuple.
The individual elements of the list or tuple must be of the same data type.
If you are retokenizing the data using the reprotect API, then the old data element and the new data element must have the same tokenization type. For example, if you have used the Integer data element to protect the data, then you must use only the Integer data element to reprotect the data.
Example
In the following example, 1376235139103947, 2396235839173981, and 9371234126176985 long data are stored in a list and used as bulk data, which is tokenized using the TE_INT_8 data element.
The tokenized input data, the old data element TE_INT_8, and a new data element TE_INT_8_1 are then passed as inputs to the reprotect API. The reprotect API detokenizes the protected input data using the old data element and then retokenizes it using the new data element, as part of a single reprotect operation.
from appython import Protector
protector = Protector()
session = protector.create_session("User1")
data = [1376235139103947, 2396235839173981, 9371234126176985]
p_out = session.protect(data, "TE_INT_8")
print("Protected Data: ")
print(p_out)
r_out = session.reprotect(p_out[0], "TE_INT_8", "TE_INT_8_1")
print("Reprotected Data: ")
print(r_out)
Result
Protected Data:
([-1770169866845757900L, -8142006510957348982L, -206876567049699669L], (6, 6, 6))
Reprotected Data:
([1496033169477057599L, -751706970736718821L, 6484885126927122847L], (6, 6, 6))
6 is the success return code for the protect operation of each element in the list.
Example - Retokenizing Bulk Long Data with External IV
The example for using the reprotect API for retokenizing bulk long data using external IV is described in this section. The bulk long data can be passed as a list or a tuple.
The individual elements of the list or tuple must be of the same data type.
If you are retokenizing the data using the reprotect API, then the old data element and the new data element must have the same tokenization type. For example, if you have used the Integer data element to protect the data, then you must use only the Integer data element to reprotect the data.
If you want to pass the external IV as a keyword argument to the reprotect API, then you must pass the external IV as bytes to the API.
Example
In the following example, 1376235139103947, 2396235839173981, and 9371234126176985 long data are stored in a list and used as bulk data, which is tokenized using the TE_INT_8 data element, with the help of external IV 1234 that is passed as bytes.
The tokenized input data, the TE_INT_8 data element, the old external IV 1234 in bytes, and a new external IV 123456 in bytes are then passed as inputs to the reprotect API. As part of a single reprotect operation, the reprotect API first detokenizes the protected input data using the given data element and old external IV. It then retokenizes the data using the same data element, but with the new external IV.
from appython import Protector
protector = Protector()
session = protector.create_session("User1")
data = [1376235139103947, 2396235839173981, 9371234126176985]
p_out = session.protect(data, "TE_INT_8", external_iv=bytes("1234", encoding="utf-8"))
print("Protected Data: ")
print(p_out)
r_out = session.reprotect(p_out[0], "TE_INT_8", "TE_INT_8",
old_external_iv=bytes("1234", encoding="utf-8"), new_external_iv=bytes("123456",
encoding="utf-8"))
print("Reprotected Data: ")
print(r_out)
Result
Protected Data:
([5846214101577367207L, 5661139619224336475L, 7806173497368534531L], (6, 6, 6))
Reprotected Data:
([2547273918835895593L, 3484073575451507396L, 1789344813959912458L], (6, 6, 6))
6 is the success return code for the protect operation of each element in the list.
Example - Reprotecting Float Data
The example for using the reprotect API for reprotecting float data using a No-Encryption data element is described in this section. This API can be used for access control and auditing.
If you are reprotecting the data using the reprotect API, then the old data element and the new data element must have the same tokenization type. For example, if you have used the No Encryption data element to protect the data, then you must use only the No Encryption data element to reprotect the data.
Example
In the following example, 22.5 is used as the input float data, which is first protected using the NoEncryption_1 data element.
The protected input data, the old data element NoEncryption_1, and a new data element NoEncryption_2 are then passed as inputs to the reprotect API. The reprotect API first unprotects the protected input data using the old data element and then reprotects it using the new data element, as part of a single reprotect operation.
from appython import Protector
protector = Protector()
session = protector.create_session("User1")
output = session.protect(22.5, "NoEncryption_1")
print("Protected Data: %s" %output)
r_out = session.reprotect(output, "NoEncryption_1", "NoEncryption_2")
print("Reprotected Data: %s" %r_out)
Result
Protected Data: 22.5
Reprotected Data: 22.5
As we are using a No-Encryption data element to protect and reprotect the data, the reprotected output data is the same as the protected data.
Example - Reprotecting Bulk Float Data
The example for using the reprotect API for reprotecting bulk float data using a No Encryption data element is described in this section. The bulk float data can be passed as a list or a tuple. This API can be used for access control and auditing.
The individual elements of the list or tuple must be of the same data type.
If you are reprotecting the data using the reprotect API, then the old data element and the new data element must have the same tokenization type. For example, if you have used the No Encryption data element to protect the data, then you must use only the No Encryption data element to reprotect the data.
Example
In the following example, 22.5, 48.93, and 94.14 float data are stored in a list and used as bulk data, which is tokenized using the NoEncryption_1 data element.
The tokenized input data, the old data element NoEncryption_1, and a new data element NoEncryption_2 are then passed as inputs to the reprotect API. The reprotect API first unprotects the protected input data using the old data element and then reprotects it using the new data element, as part of a single reprotect operation.
from appython import Protector
protector = Protector()
session = protector.create_session("User1")
data = [22.5, 48.93, 94.31]
p_out = session.protect(data, "NoEncryption_1")
print("Protected Data: ")
print(p_out)
r_out = session.reprotect(p_out[0], "NoEncryption_1", "NoEncryption_2")
print("Reprotected Data: ")
print(r_out)
Result
Protected Data:
([22.5, 48.93, 94.31], (6, 6, 6))
Reprotected Data:
([22.5, 48.93, 94.31], (6, 6, 6))
6 is the success return code for the protect operation of each element in the list.
As we are using a No Encryption data element to protect and reprotect the data, the reprotected output data is the same as the protected data.
Example - Retokenizing Bytes Data
The example for using the reprotect API for retokenizing bytes data is described in this section.
If you are retokenizing the data using the reprotect API, then the old data element and the new data element must have the same tokenization type. For example, if you have used the Alpha-Numeric data element to protect the data, then you must use only the Alpha-Numeric data element to reprotect the data.
Example
In the following example, Protegrity1 string is first converted to bytes using the Python bytes() method. The bytes data is then tokenized using the TE_A_N_S23_L2R2_Y data element.
The tokenized input data, the old data element TE_A_N_S23_L2R2_Y, and a new data element TE_A_N_S13_L1R3_N are then passed as inputs to the reprotect API. The reprotect API detokenizes the protected input data using the old data element and then retokenizes it using the new data element, as part of a single reprotect operation.
from appython import Protector
protector = Protector()
session = protector.create_session("User1")
data=bytes("Protegrity1", encoding="utf-8")
p_out = session.protect(data, "TE_A_N_S23_L2R2_Y")
print("Protected Data: %s" %p_out)
r_out = session.reprotect(p_out, "TE_A_N_S23_L2R2_Y",
"TE_A_N_S13_L1R3_N")
print("Reprotected Data: %s" %r_out)
In the following example, Protegrity1 string is first converted to bytes using the Python bytes() method. The bytes data is then tokenized using the UnicodeGen2_BasicAlphaNum data element.
The tokenized input data, the old data element UnicodeGen2_BasicAlphaNum, and a new data element UnicodeGen2_BasicAlpha are then passed as inputs to the reprotect API. The reprotect API detokenizes the protected input data using the old data element and then retokenizes it using the new data element, as part of a single reprotect operation.
from appython import Protector
from appython import Charset
protector = Protector()
session = protector.create_session("User1")
data=bytes("Protegrity1", encoding="utf-1be")
p_out = session.protect(data, "UnicodeGen2_BasicAlphaNum", encrypt_to=bytes, charset=Charset.UTF16BE)
print("Protected Data: %s" %p_out)
r_out = session.reprotect(p_out, "UnicodeGen2_BasicAlphaNum", "UnicodeGen2_BasicAlpha", encrypt_to=bytes, charset=Charset.UTF16BE)
print("Reprotected Data: %s" %r_out)
Result
Protected Data: b'Pr9zdglWRy1'
Reprotected Data: b'P8PCmC8gty1'
Example - Retokenizing Bytes Data with External IV
The example for using the reprotect API for retokenizing bytes data using external IV is described in this section.
If you are retokenizing the data using the reprotect API, then the old data element and the new data element must have the same tokenization type. For example, if you have used the Alpha-Numeric data element to protect the data, then you must use only the Alpha-Numeric data element to reprotect the data.
Example
In the following example, Protegrity1 string is first converted to bytes using the Python bytes() method. The bytes data is then tokenized using the TE_A_N_S23_L2R2_Y data element, with the help of external IV 1234 that is passed as bytes.
The tokenized input data, the TE_A_N_S23_L2R2_Y data element, the old external IV 1234 in bytes, and a new external IV 123456 in bytes are then passed as inputs to the reprotect API. As part of a single reprotect operation, the reprotect API first detokenizes the protected input data using the given data element and old external IV, and then retokenizes it using the same data
element, but with the new external IV.
from appython import Protector
protector = Protector()
session = protector.create_session("User1")
data=bytes("Protegrity1", encoding="utf-8")
p_out = session.protect(data, "TE_A_N_S23_L2R2_Y",
external_iv=bytes("1234", encoding="utf-8"))
print("Protected Data: %s" %p_out)
r_out = session.reprotect(p_out, "TE_A_N_S23_L2R2_Y",
"TE_A_N_S23_L2R2_Y", old_external_iv=bytes("1234", encoding="utf-8"),
new_external_iv=bytes("123456", encoding="utf-8"))
print("Reprotected Data: %s" %r_out)
Result
Protected Data: b'PrksvEshuy1'
Reprotected Data: b'PrKxfmdTGy1'
Example - Re-Encrypting Bytes Data
The example for using the reprotect API for re-encrypting bytes data is described in this section.
If you are using the reprotect API, then the old data element and the new data element must be of the same protection method. For example, if you have used the AES256 data element to protect the data, then you must use only the AES256 data element to reprotect the data.
Example
In the following example, Protegrity1 string is first converted to bytes using the Python bytes() method. The bytes data is then encrypted using the AES256 data element. Therefore, the encrypt_to parameter is passed as a keyword argument, and its value is set to bytes.
The encrypted input data, the old data element AES256, and a new data element AES256_IV_CRC_KID are then passed as inputs to the reprotect API. The reprotect API first decrypts the protected input data using the old data element and then re-encrypts it using the new data element, as part of a single reprotect operation. Therefore, the encrypt_to parameter is passed as a keyword argument, and its value is set to bytes.
from appython import Protector
protector = Protector()
session = protector.create_session("User1")
data=bytes("Protegrity1", encoding="utf-8")
p_out = session.protect(data, "AES256", encrypt_to = bytes)
print("Encrypted Data: %s" %p_out)
r_out = session.reprotect(p_out, "AES256", "AES256_IV_CRC_KID", encrypt_to = bytes)
print("Re-encrypted Data: %s" %r_out)
Result
Encrypted Data: b't####+4Lq##ۏx'
Re-encrypted Data: b' #,f#7d####l#:##s##D&#w]#Vd#y#-'
Example - Retokenizing Bulk Bytes Data
The example for using the reprotect API for retokenizing bulk bytes data is described in this section. The bulk
bytes data can be passed as a list or a tuple.
The individual elements of the list or tuple must be of the same data type.
If you are retokenizing the data using the reprotect API, then the old data element and the new data element must have the same tokenization type. For example, if you have used the Alpha-Numeric data element to protect the data, then you must use only the Alpha-Numeric data element to reprotect the data.
Example
In the following example, protegrity1234, Protegrity1, and Protegrity56 strings are first converted to bytes using the Python bytes() method. The converted bytes are then stored in a list and used as bulk data, which is tokenized using the TE_A_N_S23_L2R2_Y data element.
The tokenized input data, the old data element TE_A_N_S23_L2R2_Y, and a new data element
TE_A_N_S13_L1R3_N are then passed as inputs to the reprotect API. The reprotect API detokenizes the protected input data using the old data element and then retokenizes it using the new data element, as part of a single reprotect operation.
from appython import Protector
protector = Protector()
session = protector.create_session("User1")
data = [bytes("protegrity1234"), bytes("Protegrity1"), bytes("Protegrity56")]
p_out = session.protect(data, "TE_A_N_S23_L2R2_Y")
print("Protected Data: ")
print(p_out)
r_out = session.reprotect(p_out[0], "TE_A_N_S23_L2R2_Y",
"TE_A_N_S13_L1R3_N")
print("Reprotected Data: ")
print(r_out)
Result
Protected Data:
([b'prMLJsM8fZUp34', b'Pr9zdglWRy1', b'Pra9Ez5LPG56'], (6, 6, 6))
Reprotected Data:
([b'pLAvXYIAbp5234', b'P8PCmC8gty1', b'PHNjXrw7Iy56'], (6, 6, 6))
6 is the success return code for the protect operation of each element in the list.
Example - Retokenizing Bulk Bytes Data with External IV
The example for using the reprotect API for retokenizing bulk bytes data using external IV is described in this section. The bulk bytes data can be passed as a list or a tuple.
The individual elements of the list or tuple must be of the same data type.
If you are retokenizing the data using the reprotect API, then the old data element and the new data element must have the same tokenization type. For example, if you have used the Alpha-Numeric data element to protect the data, then you must use only the Alpha-Numeric data element to reprotect the data.
Example
In the following example, protegrity1234, Protegrity1, and Protegrity56 strings are first converted to bytes using the Python bytes() method. The converted bytes are then stored in a list and used as bulk data, which is tokenized using the TE_A_N_S23_L2R2_Y data element,
with the help of external IV 1234 that is passed as bytes.
The tokenized input data, the TE_A_N_S23_L2R2_Y data element, the old external IV 1234 in bytes, and a new external IV 123456 in bytes are then passed as inputs to the reprotect API. As part of a single reprotect operation, the reprotect API first detokenizes the protected input data using the given data element and old external IV. It then retokenizes the data using the same data element, but with the new external IV.
from appython import Protector
protector = Protector()
session = protector.create_session("User1")
data = [bytes("protegrity1234", encoding="utf-8"), bytes("Protegrity1",
encoding="utf-8"), bytes("Protegrity56", encoding="utf-8")]
p_out = session.protect(data, "TE_A_N_S23_L2R2_Y",
external_iv=bytes("1234", encoding="utf-8"))
print("Protected Data: ")
print(p_out)
r_out = session.reprotect(p_out[0], "TE_A_N_S23_L2R2_Y",
"TE_A_N_S23_L2R2_Y", old_external_iv=bytes("1234", encoding="utf-8"),
new_external_iv=bytes("123456", encoding="utf-8"))
print("Reprotected Data: ")
print(r_out)
Result
Protected Data:
([b'prbm147L5pc434', b'PrksvEshuy1', b'Prmx0hG8Nj56'], (6, 6, 6))
Reprotected Data:
([b'prFApvQWkhC934', b'PrKxfmdTGy1', b'PrKciFj8Ng56'], (6, 6, 6))
6 is the success return code for the protect operation of each element in the list.
Example - Re-Encrypting Bulk Bytes Data
The example for using the reprotect API for re-encrypting bulk bytes data is described in this section. The bulk bytes data canbe passed as a list or a tuple.
The individual elements of the list or tuple must be of the same data type.
If you are using the reprotect API, then the old data element and the new data element must be of the same protection method. For example, if you have used the AES256 data element to protect the data, then you must use only the AES256 data element to reprotect the data.
To avoid data corruption, do not convert the encrypted bytes data into string format. It is recommended that you to convert the encrypted bytes data to a Hexadecimal, Base 64, or any other appropriate format.
Example
In the following example, protegrity1234, Protegrity1, and Protegrity56 strings are first converted to bytes using the Python bytes() method. The converted bytes are then stored in a list and used as bulk data, which is encrypted using the AES256 data element. Therefore, the encrypt_to parameter is passed as a keyword argument, and its value is set to bytes.
The encrypted input data, the old data element AES256, and a new data element AES256_IV_CRC_KID are then passed as inputs to the reprotect API. The reprotect API first decrypts the protected input data using the old data element and then re-encrypts it using the new data element, as part of a single reprotect operation. Therefore, the encrypt_to parameter is passed as a keyword argument, and its value is set to bytes.
from appython import Protector
protector = Protector()
session = protector.create_session("User1")
data = [bytes("protegrity1234", encoding ="UTF-8"), bytes("Protegrity1", encoding
="UTF-8"), bytes("Protegrity56", encoding ="UTF-8")]
p_out = session.protect(data, "AES256", encrypt_to = bytes)
print("Encrypted Data: ")
print(p_out)
r_out = session.reprotect(p_out[0], "AES256", "AES256_IV_CRC_KID", encrypt_to = bytes)
print("Re-encrypted Data: ")
print(r_out)
Result
Encrypted Data:
([b'\xc9^x\x02)\xcbB\x91}\x7fi\x8a\xce\x8d>H', b't\x80\xf5\x8d\x9e\x0b+4Lq\x8a\x97\xdb\x8fx\x16', b'\x87\x08\x938\xf7o~\xab\xa3\xc2L\xa90>\x18_'], (6, 6, 6))
Re-encrypted Data:
([b' \x08\xdfV2)A/\xc2\x96X\x86M\xbf&$P\xa1\xb9\x83o\xb4\x90\x9b\x8d\xf8\xf5\x976\x95\xcd\xf4\xea\xc7\xad\xedl\xbck\xd1\xf3@\xf7.\xfd\xe0\x13H\xe6\xb1', b'\x08\x11\x7f\xdf\x05\xf0I\xaa\xd1\xe2v`\xe9\x9dH\xa1\xa3\x025oW~\xc7\xf0KT\xd4\x1c\x05V\xaei\xee', b' \x08)\x84N&\xd4e(lq\xfa\x8d\x05\xa9\xe5\x8do(\xf2T\xe3l\xa9|V\xc2&X\x1d\x02yF[\xbfb(x\xe3\x1a/|x91K\xc2\xc8\xf2"\x89\xc3'], (6, 6, 6))
Example - Retokenizing Date Objects
The example for using the reprotect API for retokenizing date objects is described in this section.
If you are retokenizing the data using the reprotect API, then the old data element and the new data element must have the same tokenization type. For example, if you have used the Date (DD/MM/YYYY) data element to protect the data, then you must use only the Date (DD/MM/YYYY) data element to reprotect the data.
Example: Input as a data object
In the following example, the 12/02/2019 date string is used as the data, which is first converted to a date object using the Python date method of the datetime module. The date object is then tokenized using the TE_Date_DMY_S13 data element.
The tokenized input data, the old data element TE_Date_DMY_S13, and a new data element TE_Date_DMY_S16 are then passed as inputs to the reprotect API. The reprotect API detokenizes the protected input data using the old data element and then retokenizes it using the new data element, as part of a single reprotect operation.
from appython import Protector
from datetime import datetime
protector = Protector()
session = protector.create_session("User1")
data = datetime.strptime("12/02/2019", "%d/%m/%Y").date()
print("Input date as a Date object : "+str(data))
p_out = session.protect(data, "TE_Date_DMY_S13")
print("Protected date: "+str(p_out))
r_out = session.reprotect(p_out, "TE_Date_DMY_S13", "TE_Date_DMY_S16")
print("Reprotected date: "+str(r_out))
Result
Input date as a Date object : 2019-02-12
Protected date: 1896-10-21
Reprotected date: 2130-06-19
Example - Retokenizing Bulk Date Objects
The example for using the reprotect API for retokenizing bulk date objects is described in this section. The bulk date objects can be passed as a list or a tuple.
The individual elements of the list or tuple must be of the same data type.
If you are retokenizing the data using the reprotect API, then the old data element and the new data element must have the same tokenization type. For example, if you have used the Date (DD/MM/YYYY) data element to protect the data, then you must use only the Date (DD/MM/YYYY) data element to reprotect the data.
Example: Input as a Date Object
In the following example, the 12/02/2019 and 11/01/2018 date strings are used as the data, which are first converted to a date objects using the Python date method of the datetime module. The two date objects are then used to create a list, which is used as the input data.
The input list is then tokenized using the TE_Date_DMY_S13 data element.
The tokenized input data, the old data element TE_Date_DMY_S13, and a new data element TE_Date_DMY_S16 are then passed as inputs to the reprotect API. The reprotect API detokenizes the protected input data using the old data element and then retokenizes it using the new data element, as part of a single reprotect operation.
from appython import Protector
from datetime import datetime
protector = Protector()
session = protector.create_session("User1")
data1 = datetime.strptime("12/02/2019", "%d/%m/%Y").date()
data2 = datetime.strptime("11/01/2018", "%d/%m/%Y").date()
data = [data1, data2]
print("Input data: ", str(data))
p_out = session.protect(data, "TE_Date_DMY_S13")
print("Protected data: "+str(p_out))
r_out = session.reprotect(p_out[0], "TE_Date_DMY_S13", "TE_Date_DMY_S16")
print("Reprotected date: "+str(r_out))
Result
Input data: [datetime.date(2019, 2, 12), datetime.date(2018, 1, 11)]
Protected data: ([datetime.date(1896, 10, 21), datetime.date(696, 3, 1)], (6, 6))
Reprotected date: ([datetime.date(2130, 6, 19), datetime.date(1339, 10, 10)], (6, 6))
6 is the success return code for the protect operation of each element in the list.
Example - Retokenizing Unicode Data
The example for using the reprotect API for retokenizing unicode data is described in this section.
If you are retokenizing the data using the reprotect API, then the old data element and the new data element must have the same tokenization type. For example, if you have used the Alpha-Numeric data element to protect the data, then you must use only the Alpha-Numeric data element to reprotect the data.
Example
In the following example, the u’protegrity1234ÀÁÂÃÄÅÆÇÈÉ’ unicode data is used as the input data, which is first tokenized using the TE_A_N_S23_L2R2_Y data element.
The tokenized input data, the old data element TE_A_N_S23_L2R2_Y, and a new data element TE_AN_S23_L0R0_Y are then passed as inputs to the reprotect API. The reprotect API detokenizes the protected input data using the old data element and then retokenizes it using the new data element, as part of a single reprotect operation.
from appython import Protector
protector = Protector()
session = protector.create_session("User1")
output = session.protect(u'protegrity1234ÀÁÂÃÄÅÆÇÈÉ', "TE_A_N_S23_L2R2_Y")
print("Protected Data: %s" %output)
r_out = session.reprotect(output, "TE_A_N_S23_L2R2_Y",
"TE_AN_S23_L0R0_Y")
print("Reprotected Data: %s" %r_out)
Result
Protected Data: prZeslalwuQQy3ÀÁÂÃÄÅÆÇÈÉ
Reprotected Data: Nw8MLVwbdcBMUaÀÁÂÃÄÅÆÇÈÉ
Example - Retokenizing Bulk Unicode Data
The example for using the reprotect API for retokenizing bulk unicode data is described in this section. The bulk string data can be passed as a list or a tuple.
The individual elements of the list or tuple must be of the same data type.
If you are retokenizing the data using the reprotect API, then the old data element and the new data element must have the same tokenization type. For example, if you have used the Alpha-Numeric data element to protect the data, then you must use only the Alpha-Numeric data element to reprotect the data.
Example
In the following example, u’protegrity1234ÀÁÂÃÄÅÆÇÈÉ’, u’Protegrity1ÆÇÈÉÀÁÂÃÄÅ’, and u’Protegrity56ÇÅÆÈÉÂÃ’ unicode data are stored in a list and used as bulk data, which is tokenized using the TE_A_N_S23_L2R2_Y data element.
The tokenized input data, the old data element TE_A_N_S13_L1R3_N, and a new data element
TE_A_N_S23_L2R2_Y are then passed as inputs to the reprotect API. The reprotect API detokenizes the protected input data using the old data element and then retokenizes it using the new data element, as part of a single reprotect operation.
from appython import Protector
protector = Protector()
session = protector.create_session("User1")
data = [u'protegrity1234ÀÁÂÃÄÅÆÇÈÉ', u'Protegrity1ÆÇÈÉÀÁÂÃÄÅ', u'Protegrity56ÇÅÆÈÉÂÃ']
p_out = session.protect(data, "TE_A_N_S13_L1R3_N")
print("Protected Data: ")
print(p_out)
r_out = session.reprotect(p_out[0], "TE_A_N_S13_L1R3_N",
"TE_A_N_S23_L2R2_Y")
print("Reprotected Data: ")
print(r_out)
Result
Protected Data:
([u'p3oZN1j1PF33hz\xc0\xc1\xc2\xc3\xc4\xc5\xc6\xc7\xc8\xc9', u'P5fjL8vdBci\xc6\xc7\xc8\xc9\xc0\xc1\xc2\xc3\xc4\xc5', u'PIo45D7g73Sm\xc7\xc5\xc6\xc8\xc9\xc2\xc3'], (6, 6, 6))
Reprotected Data:
([u'prZeslalwuQQy3\xc0\xc1\xc2\xc3\xc4\xc5\xc6\xc7\xc8\xc9', u'PrVt6rfyW81\xc6\xc7\xc8\xc9\xc0\xc1\xc2\xc3\xc4\xc5', u'PrFgczleNkNG\xc7\xc5\xc6\xc8\xc9\xc2\xc3'], (6, 6, 6))
6 is the success return code for the protect operation of each element in the list.
Using AP Python Mock in a Development Environment
The AP Python Mock can be used in a development environment. This is also known as mock implementation of AP Python APIs. In this mode, the AP Python Mock development package provides you with sample users and data elements that can be used to simulate the behavior of the actual APIs in production environment.
When the AP Python Mock APIs are used with the sample users and data elements provided with the development package, the output data is only a simulation of the protected or encrypted data. Do not use the AP Python APIs in the development environment to protect, unprotect, or reprotect sensitive data.
The examples on how to use the sample data elements for simulating the protect, unprotect, and reprotect scenarios are described in this section.
In the mock implementation, the ALL_USER user name must be passed as an argument to the create_session API for creating a session.
Mock example - protecting string
The example for using the protect API for protecting a string input data is described in this section.
Example: Input string data
In the following example, the Protegrity1 string is used as the input data, which is protected using the SUCCESS_STR data element.
from appython import Protector
protector = Protector()
session = protector.create_session("ALL_USER")
output = session.protect("Protegrity1", "SUCCESS_STR")
print("Protected Data: %s" %output)
Result
Protected Data: 6JPqrjJEqLX
Mock Example - Protecting String Data with External IV
The example for using the protect API for protecting string input data using external IV is described in this section.
If you want to pass the external IV as a keyword argument to the protect API, then you must pass the external IV as bytes to the API.
Example
In this example, the Protegrity1 string is used as the input data, which is tokenized using the SUCCESS_STR data element, with external IV 1234 passed as bytes.
from appython import Protector
protector = Protector()
session = protector.create_session("ALL_USER")
output = session.protect("Protegrity1", "SUCCESS_STR",
external_iv=bytes("1234"))
print("Protected Data: %s" %output)
Result
Protected Data: Ho9bgXoebxa
Mock Example - Protecting String Data Using External IV and External Tweak
The example for using the protect API for protecting string input data using external IV and external tweak is described in this section.
If the external IV and external tweak are passed as keyword arguments to the protect API, then the external IV and external tweak must be passed as bytes.
Example
In this example, the protegrity1234 string is used as the input data protected using the data element SUCCESS_STR, with external IV 1234 and external tweak abcdef passed as bytes.
from appython import Protector
protector = Protector()
session = protector.create_session("ALL_USER")
output = session.protect("protegrity1234", "SUCCESS_STR",
external_iv=bytes("1234", encoding="utf-8"), external_tweak=bytes("abcdef",
encoding="utf-8"))
print("Protected Data: %s" %output)
Result
Protected Data: 9GsvVbGRvTQwxr
Mock Example - Protecting Bulk String Data
The examples for using the protect API for protecting bulk string input data are described in this section. The bulk string input data can be passed as a list or a tuple.
The individual elements of the list or tuple must be of the same data type.
Example 1
In the following example, protegrity1234, Protegrity1, and Protegrity56 strings are stored in a list and used as bulk data, which is protected using the SUCCESS_STR data element.
from appython import Protector
protector = Protector()
session = protector.create_session("ALL_USER")
data = ["protegrity1234", "Protegrity1", "Protegrity56"]
p_out = session.protect(data, "SUCCESS_STR")
print("Protected Data: ")
print(p_out)
Result
Protected Data:
(['pJPqrjJEqLXHaO', '6JPqrjJEqLX', '6JPqrjJEqLl5'], (6, 6, 6))
6 is the success return code for the protect operation of each element in the list.
Example 2
In Example 1, the protected output was a tuple of the tokenized data and the error list. This example shows how the code can be tweaked to ensure that you retrieve the protected output and the error list separately, and not as part of a tuple.
from appython import Protector
protector = Protector()
session = protector.create_session("ALL_USER")
data = "protegrity1234"
data = [data]*5
p_out, error_list = session.protect(data, "SUCCESS_STR")
print("Protected Data: ", end="")
print(p_out)
print("Error List: ", end="")
print(error_list)
Result
Protected Data: ['pJPqrjJEqLXHaO', 'pJPqrjJEqLXHaO', 'pJPqrjJEqLXHaO', 'pJPqrjJEqLXHaO', 'pJPqrjJEqLXHaO']
Error List: (6, 6, 6, 6, 6)
6 is the success return code for the protect operation of each element in the list.
Mock Example - Protecting Bulk String Data with External IV
The example for using the protect API for protecting bulk string input data using external IV is described in this section. The bulk string data can be passed as a list or a tuple.
The individual elements of the list or tuple must be of the same data type.
If you want to pass the external IV as a keyword argument to the protect API, then you must pass the external IV as bytes to the API.
Example
In this example, protegrity1234, Protegrity1, and Protegrity56 strings are stored in a list and used as bulk input data. This bulk data is protected using the SUCCESS_STR data element, with external IV 123 passed as bytes.
from appython import Protector
protector = Protector()
session = protector.create_session("ALL_USER")
data = ["protegrity1234", "Protegrity1", "Protegrity56"]
p_out = session.protect(data, "SUCCESS_STR",
external_iv=bytes("123"))
print("Protected Data: ")
print(p_out)
Result
Protected Data:
(['nx8mEaxwmR2VSq', '1x8mEaxwmR2', '1x8mEaxwmRdF'], (6, 6, 6))
6 is the success return code for the protect operation of each element in the list.
Mock Example - Protecting Bulk String Data Using External IV and External Tweak
The example for using the protect API for protecting bulk string input data using external IV and external tweak is described in this section. The bulk string data can be passed as a list or a tuple.
The individual elements of the list or tuple must be of the same data type.
If you want to pass the external IV and external tweak as keyword arguments to the protect API, then you must pass the external IV and external tweak as bytes.
Example
In the following example, protegrity1234ÀÁ, Protegrity1ÆÇÈ, and Protegrity56ÀÁÂÃÄÅ strings are stored in a list and used as bulk input data. This bulk data is protected using the SUCCESS_STR data element, with the help of external IV 1234 and external tweak xyz that are both passed as bytes.
from appython import Protector
protector = Protector()
session = protector.create_session("ALL_USER")
data = ["protegrity1234ÀÁ", "Protegrity1ÆÇÈ", "Protegrity56ÀÁÂÃÄÅ"]
p_out = session.protect(data, "SUCCESS_STR",
external_iv=bytes("1234", encoding="utf-8"), external_tweak=bytes("xyz", encoding="utf-8"))
print("Protected Data: ")
print(p_out)
Result
Protected Data:
(['uc72ntca2dI896Ã\x83Â\x80Ã\x83Â\x81', 'xc72ntca2dIÃ\x83Â\x86Ã\x83Â\x87Ã\x83Â\x88',
'xc72ntca2dEBÃ\x83Â\x80Ã\x83Â\x81Ã\x83Â\x82Ã\x83Â\x83Ã\x83Â\x84Ã\x83Â\x85'], (6, 6, 6))
6 is the success return code for the protect operation of each element in the list.
Mock Example - Unprotecting String Data
The example for using the unprotect API for retrieving the original string data from the protected data is described in this section.
Example: Input string data
In the following example, the Protegrity1 string that was protected using the SUCCESS_STR data element, is now unprotected using the same data element.
from appython import Protector
protector = Protector()
session = protector.create_session("ALL_USER")
output = session.protect("Protegrity1", "SUCCESS_STR")
print("Protected Data: %s" %output)
org = session.unprotect(output, "SUCCESS_STR")
print("Unprotected Data: %s" %org)
Result
Protected Data: 6JPqrjJEqLX
Unprotected Data: Protegrity1
Mock Example - Unprotecting String Data with External IV
The example for using the unprotect API for retrieving the original string data from protected data, using external initialization vector (IV) is described in this section.
If you want to pass the external IV as a keyword argument to the unprotect API, then you must pass the external IV as bytes to the API.
Example
In the following example, the Protegrity1 string that was protected using the SUCCESS_STR data element and the external IV 1234 is now unprotected using the same data element and same external IV.
from appython import Protector
protector = Protector()
session = protector.create_session("ALL_USER")
output = session.protect("Protegrity1", "SUCCESS_STR",
external_iv=bytes("1234", encoding="utf-8"))
print("Protected Data: %s" %output)
org = session.unprotect(output, "SUCCESS_STR",
external_iv=bytes("1234", encoding="utf-8"))
print("Unprotected Data: %s" %org)
Result
Protected Data: Ho9bgXoebxa
Unprotected Data: Protegrity1
Mock Example - Unprotecting String Data Using External IV and External Tweak
The example for using the unprotect API for unprotecting string data using external IV and tweak is described in this section.
If the external IV and external tweak are passed as keyword arguments to the protect API, then the external IV and external tweak must be passed as bytes.
Example
In the following example, the protegrity1234 string that was protected using the SUCCESS_STR data element, is now unprotected using the same data element and the same external IV and external tweak.
from appython import Protector
protector = Protector()
session = protector.create_session("ALL_USER")
output = session.protect("protegrity1234", "SUCCESS_STR",
external_iv=bytes("1234", encoding="utf-8"), external_tweak=bytes("abcdef",
encoding="utf-8"))
print("Protected Data: %s" %output)
org = session.unprotect(output, "SUCCESS_STR",
external_iv=bytes("1234", encoding="utf-8"), external_tweak=bytes("abcdef",
encoding="utf-8"))
print("Unprotected Data: %s" %org)
Result
Protected Data: 9GsvVbGRvTQwxr
Unprotected Data: protegrity1234
Mock Example - Unprotecting Bulk String Data
The examples for using the unprotect API for retrieving the original bulk string data from the protected data are described in this section.
Example 1
In the following example, protegrity1234, Protegrity1, and Protegrity56 strings are stored in a list and used as bulk data, which is protected using the SUCCESS_STR data element. The bulk string data is then unprotected using the same data element.
from appython import Protector
protector = Protector()
session = protector.create_session("ALL_USER")
data = ["protegrity1234", "Protegrity1", "Protegrity56"]
p_out = session.protect(data, "SUCCESS_STR")
print("Protected Data: ")
print(p_out)
out = session.unprotect(p_out[0], "SUCCESS_STR")
print("Unprotected Data: ")
print(out)
Result
Protected Data:
(['pJPqrjJEqLXHaO', '6JPqrjJEqLX', '6JPqrjJEqLl5'], (6, 6, 6))
Unprotected Data:
(['protegrity1234', 'Protegrity1', 'Protegrity56'], (8, 8, 8))
6 is the success return code for the protect operation of each element in the list.
8 is the success return code for the unprotect operation of each element in the list.
Example 2
In Example 1, the unprotected output was a tuple of the unprotected data and the error list.
The following example shows how you can tweak the code to ensure that you retrieve the unprotected output and the error list separately, and not as part of a tuple.
from appython import Protector
protector = Protector()
session = protector.create_session("ALL_USER")
data = protegrity1234
data = [data]*5
p_out, error_list = session.protect(data, "SUCCESS_STR")
print("Protected Data: ", end="")
print(p_out)
print("Error List: ", end="")
print(error_list)
org, error_list = session.unprotect(p_out, "SUCCESS_STR")
print("Unprotected Data: ", end="")
print(org)
print("Error List: ", end="")
print(error_list)
Result
Protected Data: ['pJPqrjJEqLXHaO', 'pJPqrjJEqLXHaO', 'pJPqrjJEqLXHaO', 'pJPqrjJEqLXHaO',
'pJPqrjJEqLXHaO']
Error List: (6, 6, 6, 6, 6)
Unprotected Data: ['protegrity1234', 'protegrity1234', 'protegrity1234',
'protegrity1234', 'protegrity1234']
Error List: (8, 8, 8, 8, 8)
6 is the success return code for the protect operation of each element in the list.
8 is the success return code for the unprotect operation of each element in the list.
Mock Example - Unprotecting Bulk String Data with External IV
The example for using the unprotect API for retrieving the original bulk string data from protected data using external IV is described in this section.
If you want to pass the external IV as a keyword argument to the unprotect API, then you must pass the external IV as bytes to the API.
Example
In the following example, protegrity1234, Protegrity1, and Protegrity56 strings are stored in a list and used as bulk data, which is protected using the SUCCESS_STR data element and external IV 123. The bulk string data is then unprotected using the same data element and same external IV.
from appython import Protector
protector = Protector()
session = protector.create_session("ALL_USER")
data = ["protegrity1234", "Protegrity1", "Protegrity56"]
p_out = session.protect(data, "SUCCESS_STR",
external_iv=bytes("123"))
print("Protected Data: ")
print(p_out)
out = session.unprotect(p_out[0], "SUCCESS_STR",
external_iv=bytes("123"))
print("Unprotected Data: ")
print(out)
Result
Protected Data:
(['nx8mEaxwmR2VSq', '1x8mEaxwmR2', '1x8mEaxwmRdF'], (6, 6, 6))
Unprotected Data:
(['protegrity1234', 'Protegrity1', 'Protegrity56'], (8, 8, 8))
6 is the success return code for the protect operation of each element in the list.
8 is the success return code for the unprotect operation of each element in the list.
Mock Example - Unprotecting Bulk String Data Using External IV and External Tweak
The example for using the unprotect API for retrieving the original bulk string data from protected data using external IV and external tweak is described in this section.
If the external IV and external tweak are passed as keyword arguments to the protect API, then the external IV and external tweak must be passed as bytes.
Example
In the following example, protegrity1234ÀÁ, Protegrity1ÆÇÈ, and Protegrity56ÀÁÂÃÄÅ strings
are stored in a list and used as bulk data. This bulk data is protected using the SUCCESS_STR data element, with the help of external IV 1234 and external tweak xyz that are both passed as bytes. The protected bulk string data is then unprotected using the same data element, same external IV, and external tweak.
from appython import Protector
protector = Protector()
session = protector.create_session("ALL_USER")
data = ["protegrity1234ÀÁ", "Protegrity1ÆÇÈ", "Protegrity56ÀÁÂÃÄÅ"]
p_out = session.protect(data, "SUCCESS_STR",
external_iv=bytes("1234", encoding="utf-8"), external_tweak=bytes("xyz",
encoding="utf-8"))
print("Protected Data: ")
print(p_out)
out = session.unprotect(p_out[0], "SUCCESS_STR",
external_iv=bytes("1234", encoding="utf-8"), external_tweak=bytes("xyz",
encoding="utf-8"))
print("Unprotected Data: ")
print(out)
Result
Protected Data:
(['uc72ntca2dI896Ã\x83Â\x80Ã\x83Â\x81', 'xc72ntca2dIÃ\x83Â\x86Ã\x83Â\x87Ã\x83Â\x88',
'xc72ntca2dEBÃ\x83Â\x80Ã\x83Â\x81Ã\x83Â\x82Ã\x83Â\x83Ã\x83Â\x84Ã\x83Â\x85'], (6, 6, 6))
Unprotected Data:
([u'protegrity1234\xc0\xc1', u'Protegrity1\xc6\xc7\xc8',
u'Protegrity56\xc0\xc1\xc2\xc3\xc4\xc5'], (8, 8, 8))
6 is the success return code for the protect operation of each element in the list.
8 is the success return code for the unprotect operation of each element in the list.
Mock Example - Reprotecting String
The example for using the reprotect API for reprotecting string data is described in this section.
If you are retokenizing the data using the reprotect API, then the old data element and the new data element must have the same tokenization type. For example, if you have used Alpha-Numeric data element to protect the data, then you must use only Alpha-Numeric data element to reprotect the data.
Example: Input string data
In the following example, the Protegrity1 string is used as the input data, which is first protected using the SUCCESS_STR data element.
The protected input data, the old data element SUCCESS_STR, and a new data element SUCCESS_REPROTECT_STR are then passed as inputs to the reprotect API. The reprotect API first unprotects the protected input data using the old data element, and then reprotects it using the new data element, as part of a single reprotect operation.
from appython import Protector
protector = Protector()
session = protector.create_session("ALL_USER")
output = session.protect("Protegrity1", "SUCCESS_STR")
print("Protected Data: %s" %output)
r_out = session.reprotect(output, "SUCCESS_STR",
"SUCCESS_REPROTECT_STR")
print("Reprotected Data: %s" %r_out)
Result
Protected Data: 6JPqrjJEqLX
Reprotected Data: JQbePhQ2eGC
Mock Example - Reprotecting String Data with External IV
The example for using the reprotect API for reprotecting string data using external IV is described in this section.
If you are retokenizing the data using the reprotect API, then the old data element and the new data element must have the same tokenization type. For example, if you have used Alpha-Numeric data element to protect the data, then you must use only Alpha-Numeric data element to reprotect the data.
If you want to pass the external IV as a keyword argument to the reprotect API, then you must pass the external IV as bytes to the API.
Example
In the following example, the Protegrity1 string is used as the input data, which is first protected using the SUCCESS_STR data element, with the help of external IV 1234 that is passed as bytes.
The protected input data, the old data element SUCCESS_STR, a new data element SUCCESS_REPROTECT_STR, the old external IV 1234 in bytes, and a new external IV 123456 in bytes are then passed as inputs to the reprotect API. As part of a single reprotect operation, the reprotect API first unprotects the protected input data using the given data element and old external IV, and then reprotects it using the new data element and new external IV.
from appython import Protector
protector = Protector()
session = protector.create_session("ALL_USER")
p_out = session.protect("Protegrity1", "SUCCESS_STR",
external_iv=bytes("1234", encoding="utf-8"))
print("Protected Data: %s" %p_out)
r_out = session.reprotect(p_out, "SUCCESS_STR",
"SUCCESS_REPROTECT_STR", old_external_iv=bytes("1234", encoding="utf-8"),
new_external_iv=bytes("123456", encoding="utf-8"))
print("Reprotected Data: %s" %r_out)
Result
Protected Data: Ho9bgXoebxa
Reprotected Data: vQIqelQyqY6
Mock Example - Reprotecting String Data Using External IV and External Tweak
The example for using the reprotect API for reprotecting string data using external IV and
external tweak is described in this section.
The ptyCharsets parameter is mandatory for data elements created with Unicode Gen2 tokenization method and the Format Preserving Encryption (FPE) method for byte APIs. The encoding set for the ptyCharsets parameter must match the encoding of the input data passed.
If the external IV and external tweak are passed as keyword arguments to the reprotect API, then the external IV and external tweak must be passed as bytes.
Example
In the following example, the protegrity1234 string is used as the data, which is first protected using the SUCCESS_STR data element, with the help of external IV 1234 and external tweak abcdef that are both passed as bytes.
The protected input data, the SUCCESS_STR data element, a new data element SUCCESS_REPROTECT_STR, the old external IV 1234 and external tweak abcdef in bytes, and a new external IV 123456 and external tweak xyz in bytes are then passed as inputs to the reprotect API. As part of a single reprotect operation, the reprotect API first unprotects the protected input data using the given data element, and old external IV and external tweak, and then reprotects it using the same data element, but with the new external IV and external
tweak.
from appython import Protector
protector = Protector()
session = protector.create_session("ALL_USER")
p_out = session.protect("protegrity1234", "SUCCESS_STR",
external_iv=bytes("1234", encoding="utf-8"), external_tweak=bytes("abcdef"))
print("Protected Data: %s" %p_out)
r_out = session.reprotect(p_out, "SUCCESS_STR",
"SUCCESS_REPROTECT_STR", old_external_iv=bytes("1234", encoding="utf-8"),
new_external_iv=bytes("12345", encoding="utf-8"),
old_external_tweak=bytes("abcdef", encoding="utf-8"),
new_external_tweak=bytes("xyz"))
print("Reprotected Data: %s" %r_out)
Result
Protected Data: 9GsvVbGRvTQwxr
Reprotected Data: 3AZjIrAvjOsnwb
Mock Example - Reprotecting Bulk String Data
The example for using the reprotect API for reprotecting bulk string data is described in this section. The bulk string data can be passed as a list or a tuple.
The individual elements of the list or tuple must be of the same data type.
If you are retokenizing the data using the reprotect API, then the old data element and the new data element must have the same tokenization type. For example, if you have used Alpha-Numeric data element to protect the data, then you must use only Alpha-Numeric data element to reprotect the data.
Example
In the following example, protegrity1234, Protegrity1, and Protegrity56 strings are stored in a list and used as bulk data, which is protected using the SUCCESS_STR data element.
The protected input data, the old data element SUCCESS_STR, and a new data element SUCCESS_REPROTECT_STR are then passed as inputs to the reprotect API. The reprotect API first unprotects the protected input data using the old data element and then reprotects it using the new data element, as part of a single reprotect operation.
from appython import Protector
protector = Protector()
session = protector.create_session("ALL_USER")
data = ["protegrity1234", "Protegrity1", "Protegrity56"]
p_out = session.protect(data, "SUCCESS_STR")
print("Protected Data: ")
print(p_out)
r_out = session.reprotect(p_out[0], "SUCCESS_STR",
"SUCCESS_REPROTECT_STR")
print("Reprotected Data: ")
print(r_out)
Result
Protected Data:
(['pJPqrjJEqLXHaO', '6JPqrjJEqLX', '6JPqrjJEqLl5'], (6, 6, 6))
Reprotected Data:
(['gQbePhQ2eGCjqW', 'JQbePhQ2eGC', 'JQbePhQ2eGBK'], (6, 6, 6))
6 is the success return code for the protect operation of each element in the list.
Mock Example - Reprotecting Bulk String Data with External IV
The example for using the reprotect API for reprotecting bulk string data using external IV is described in this section. The bulk string data can be passed as a list or a tuple.
The individual elements of the list or tuple must be of the same data type.
If you are retokenizing the data using the reprotect API, then the old data element and the new data element must have the same tokenization type. For example, if you have used Alpha-Numeric data element to protect the data, then you must use only Alpha-Numeric data element to reprotect the data.
If you want to pass the external IV as a keyword argument to the reprotect API, then you must pass the external IV as bytes to the API.
Example
In the following example, protegrity1234, Protegrity1, and Protegrity56 strings are stored in a list and used as bulk data, which is protected using the SUCCESS_STR data element, with the help of an external IV 1234 that is passed as bytes.
The protected input data, the old data element SUCCESS_STR, a new data element SUCCESS_REPROTECT_STR, the old external IV 1234 in bytes, and a new external IV 123456 in bytes are then passed as inputs to the reprotect API. As part of a single reprotect operation, the reprotect API first unprotects the protected input data using the given data element and old external IV, and then reprotects it using the new data element and new external IV.
from appython import Protector
protector = Protector()
session = protector.create_session("ALL_USER")
data = ["protegrity1234", "Protegrity1", "Protegrity56"]
p_out = session.protect(data, "SUCCESS_STR",
external_iv=bytes("1234", encoding="utf-8"))
print("Protected Data: ")
print(p_out)
r_out = session.reprotect(p_out[0], "SUCCESS_STR",
"SUCCESS_REPROTECT_STR", old_external_iv=bytes("1234", encoding="utf-8"),
new_external_iv=bytes("123456", encoding="utf-8"))
print("Reprotected Data: ")
print(r_out)
Result
Protected Data:
(['fo9bgXoebxaCTN', 'Ho9bgXoebxa', 'Ho9bgXoebx2q'], (6, 6, 6))
Reprotected Data:
(['cQIqelQyqY6OoN', 'vQIqelQyqY6', 'vQIqelQyqYXa'], (6, 6, 6))
6 is the success return code for the protect operation of each element in the list.
Mock Example - Reprotecting Bulk String Data Using External IV and External Tweak
The example for using the reprotect API for reprotecting bulk string data using external IV and external tweak is described in this section. The bulk string data can be used as a list or a tuple.
The individual elements of the list or tuple must be of the same data type.
If the external IV and external tweak are passed as keyword arguments to the reprotect API, then the external IV and external tweak must be passed as bytes.
Example
In the following example, protegrity1234ÀÁ, Protegrity1ÆÇÈ, and Protegrity56ÀÁÂÃÄÅ strings are stored in a list and used as bulk data, which is first protected using the SUCCESS_STR data element, with the help of an external IV 1234 and external tweak abc that are both passed as bytes.
The protected input data, the old data element SUCCESS_STR, a new data element SUCCESS_REPROTECT_STR, the old external IV 1234 and external tweak abc in bytes, and a new external IV 123456 and external tweak xyz in bytes are then passed as inputs to the reprotect API. As part of a single reprotect operation, the reprotect API first unprotects the protected input data using the old data element, and old external IV and external tweak, and then reprotects it using the new data element, new external IV, and external tweak.
from appython import Protector
protector = Protector()
session = protector.create_session("ALL_USER")
data = ["protegrity1234ÀÁ", "Protegrity1ÆÇÈ", "Protegrity56ÀÁÂÃÄÅ"]
p_out = session.protect(data, "SUCCESS_STR",
external_iv=bytes("1234", encoding="utf-8"), external_tweak=bytes("abc",
encoding="utf-8"))
print("Protected Data: ")
print(p_out)
r_out = session.reprotect(p_out[0], "SUCCESS_STR",
"SUCCESS_REPROTECT_STR", old_external_iv=bytes("1234", encoding="utf-8"),
new_external_iv=bytes("123456", encoding="utf-8"),
old_external_tweak=bytes("abc", encoding="utf-8"),
new_external_tweak=bytes("xyz", encoding="utf-8"))
print("Reprotected Data: ")
print(r_out)
Result
Protected Data:
(['A2XIHe2vIEFmShÃ\x83Â\x80Ã\x83Â\x81', 'N2XIHe2vIEFÃ\x83Â\x86Ã\x83Â\x87Ã\x83Â\x88',
'N2XIHe2vIE5oÃ\x83Â\x80Ã\x83Â\x81Ã\x83Â\x82Ã\x83Â\x83Ã\x83Â\x84Ã\x83Â\x85'],
(6, 6, 6))
Reprotected Data:
(['VmDBawmlBAsfc6Ã\x83Â\x83Ã\x82Â\x83Ã\x83Â\x82Ã\x82Â\x83Ã\x83Â\x83Ã\x82Â\x82Ã\x83Â\x82Ã
\x82Â\x83Ã\x83Â\x83Ã\x82Â\x83Ã\x83Â\x82Ã\x82Â\x82Ã\x83Â\x83Ã\x82Â\x82Ã\x83Â\
x82Ã\x82Â\x83Ã\x83Â\x83Ã\x82Â\x83Ã\x83Â\x82Ã\x82Â\x83Ã\x83Â\x83Ã\x82Â\x82Ã\x83Â\x82Ã
\x82Â\x82Ã\x83Â\x83Ã\x82Â\x83Ã\x83Â\x82Ã\x82Â\x82Ã\x83Â\x83Ã\x82Â\x82Ã\x83Â\x82Ã\
x82Â\x80Ã\x83Â\x83Ã\x82Â\x83Ã\x83Â\x82Ã\x82Â\x83Ã\x83Â\x83Ã\x82Â\x82Ã\x83Â\x82Ã\x82Â
\x83Ã\x83Â\x83Ã\x82Â\x83Ã\x83Â\x82Ã\x82Â\x82Ã\x83Â\x83Ã\x82Â\x82Ã\x83Â\x82Ã\x82Â\
x83Ã\x83Â\x83Ã\x82Â\x83Ã\x83Â\x82Ã\x82Â\x83Ã\x83Â\x83Ã\x82Â\x82Ã\x83Â\x82Ã\x82Â\x82Ã
\x83Â\x83Ã\x82Â\x83Ã\x83Â\x82Ã\x82Â\x82Ã\x83Â\x83Ã\x82Â\x82Ã\x83Â\x82Ã\x82Â\x81',
'emDBawmlBAsÃ\x83Â\x83Ã\x82Â\x83Ã\x83Â\x82Ã\x82Â\x83Ã\x83Â\x83Ã\x82Â\x82Ã\x83Â\x82Ã\x82Â
\x83Ã\x83Â\x83Ã\x82Â\x83Ã\x83Â\x82Ã\x82Â\x82Ã\x83Â\x83Ã\x82Â\x82Ã\x83Â\x82Ã\x82Â\
x83Ã\x83Â\x83Ã\x82Â\x83Ã\x83Â\x82Ã\x82Â\x83Ã\x83Â\x83Ã\x82Â\x82Ã\x83Â\x82Ã\x82Â\x82Ã
\x83Â\x83Ã\x82Â\x83Ã\x83Â\x82Ã\x82Â\x82Ã\x83Â\x83Ã\x82Â\x82Ã\x83Â\x82Ã\x82Â\x86Ã\x83Â\
x83Ã\x82Â\x83Ã\x83Â\x82Ã\x82Â\x83Ã\x83Â\x83Ã\x82Â\x82Ã\x83Â\x82Ã\x82Â\x83Ã\x83Â\x83Ã
\x82Â\x83Ã\x83Â\x82Ã\x82Â\x82Ã\x83Â\x83Ã\x82Â\x82Ã\x83Â\x82Ã\x82Â\x83Ã\x83Â\x83Ã\x82Â\
x83Ã\x83Â\x82Ã\x82Â\x83Ã\x83Â\x83Ã\x82Â\x82Ã\x83Â\x82Ã\x82Â\x82Ã\x83Â\x83Ã\x82Â\x83Ã
\x83Â\x82Ã\x82Â\x82Ã\x83Â\x83Ã\x82Â\x82Ã\x83Â\x82Ã\x82Â\x87Ã\x83Â\x83Ã\x82Â\x83Ã\x83Â\
x82Ã\x82Â\x83Ã\x83Â\x83Ã\x82Â\x82Ã\x83Â\x82Ã\x82Â\x83Ã\x83Â\x83Ã\x82Â\x83Ã\x83Â\x82Ã
\x82Â\x82Ã\x83Â\x83Ã\x82Â\x82Ã\x83Â\x82Ã\x82Â\x83Ã\x83Â\x83Ã\x82Â\x83Ã\x83Â\x82Ã\x82Â\
x83Ã\x83Â\x83Ã\x82Â\x82Ã\x83Â\x82Ã\x82Â\x82Ã\x83Â\x83Ã\x82Â\x83Ã\x83Â\x82Ã\x82Â\x82Ã
\x83Â\x83Ã\x82Â\x82Ã\x83Â\x82Ã\x82Â\x88','emDBawmlBAtIÃ\x83Â\x83Ã\x82Â\x83Ã\x83Â\x82Ã\
x82Â\x83Ã\x83Â\x83Ã\x82Â\x82Ã\x83Â\x82Ã\x82Â\x83Ã\x83Â\x83Ã\x82Â\x83Ã\x83Â\x82Ã\x82Â
\x82Ã\x83Â\x83Ã\x82Â\x82Ã\x83Â\x82Ã\x82Â\x83Ã\x83Â\x83Ã\x82Â\x83Ã\x83Â\x82Ã\x82Â\x83Ã\
x83Â\x83Ã\x82Â\x82Ã\x83Â\x82Ã\x82Â\x82Ã\x83Â\x83Ã\x82Â\x83Ã\x83Â\x82Ã\x82Â\x82Ã\x83Â
\x83Ã\x82Â\x82Ã\x83Â\x82Ã\x82Â\x80Ã\x83Â\x83Ã\x82Â\x83Ã\x83Â\x82Ã\x82Â\x83Ã\x83Â\x83Ã\
x82Â\x82Ã\x83Â\x82Ã\x82Â\x83Ã\x83Â\x83Ã\x82Â\x83Ã\x83Â\x82Ã\x82Â\x82Ã\x83Â\x83Ã\x82Â
\x82Ã\x83Â\x82Ã\x82Â\x83Ã\x83Â\x83Ã\x82Â\x83Ã\x83Â\x82Ã\x82Â\x83Ã\x83Â\x83Ã\x82Â\x82Ã\
x83Â\x82Ã\x82Â\x82Ã\x83Â\x83Ã\x82Â\x83Ã\x83Â\x82Ã\x82Â\x82Ã\x83Â\x83Ã\x82Â\x82Ã\x83Â
\x82Ã\x82Â\x81Ã\x83Â\x83Ã\x82Â\x83Ã\x83Â\x82Ã\x82Â\x83Ã\x83Â\x83Ã\x82Â\x82Ã\x83Â\x82Ã\
x82Â\x83Ã\x83Â\x83Ã\x82Â\x83Ã\x83Â\x82Ã\x82Â\x82Ã\x83Â\x83Ã\x82Â\x82Ã\x83Â\x82Ã\x82Â
\x83Ã\x83Â\x83Ã\x82Â\x83Ã\x83Â\x82Ã\x82Â\x83Ã\x83Â\x83Ã\x82Â\x82Ã\x83Â\x82Ã\x82Â\x82Ã\
x83Â\x83Ã\x82Â\x83Ã\x83Â\x82Ã\x82Â\x82Ã\x83Â\x83Ã\x82Â\x82Ã\x83Â\x82Ã\x82Â\x82Ã\x83Â
\x83Ã\x82Â\x83Ã\x83Â\x82Ã\x82Â\x83Ã\x83Â\x83Ã\x82Â\x82Ã\x83Â\x82Ã\x82Â\x83Ã\x83Â\x83Ã\
x82Â\x83Ã\x83Â\x82Ã\x82Â\x82Ã\x83Â\x83Ã\x82Â\x82Ã\x83Â\x82Ã\x82Â\x83Ã\x83Â\x83Ã\x82Â
\x83Ã\x83Â\x82Ã\x82Â\x83Ã\x83Â\x83Ã\x82Â\x82Ã\x83Â\x82Ã\x82Â\x82Ã\x83Â\x83Ã\x82Â\x83Ã\
x83Â\x82Ã\x82Â\x82Ã\x83Â\x83Ã\x82Â\x82Ã\x83Â\x82Ã\x82Â\x83Ã\x83Â\x83Ã\x82Â\x83Ã\x83Â
\x82Ã\x82Â\x83Ã\x83Â\x83Ã\x82Â\x82Ã\x83Â\x82Ã\x82Â\x83Ã\x83Â\x83Ã\x82Â\x83Ã\x83Â\x82Ã\
x82Â\x82Ã\x83Â\x83Ã\x82Â\x82Ã\x83Â\x82Ã\x82Â\x83Ã\x83Â\x83Ã\x82Â\x83Ã\x83Â\x82Ã\x82Â
\x83Ã\x83Â\x83Ã\x82Â\x82Ã\x83Â\x82Ã\x82Â\x82Ã\x83Â\x83Ã\x82Â\x83Ã\x83Â\x82Ã\x82Â\x82Ã\
x83Â\x83Ã\x82Â\x82Ã\x83Â\x82Ã\x82Â\x84Ã\x83Â\x83Ã\x82Â\x83Ã\x83Â\x82Ã\x82Â\x83Ã\x83Â
\x83Ã\x82Â\x82Ã\x83Â\x82Ã\x82Â\x83Ã\x83Â\x83Ã\x82Â\x83Ã\x83Â\x82Ã\x82Â\x82Ã\x83Â\x83Ã\
x82Â\x82Ã\x83Â\x82Ã\x82Â\x83Ã\x83Â\x83Ã\x82Â\x83Ã\x83Â\x82Ã\x82Â\x83Ã\x83Â\x83Ã\x82Â
\x82Ã\x83Â\x82Ã\x82Â\x82Ã\x83Â\x83Ã\x82Â\x83Ã\x83Â\x82Ã\x82Â\x82Ã\x83Â\x83Ã\x82Â\x82Ã\
x83Â\x82Ã\x82Â\x85'], (6, 6, 6))
6 is the success return code for the protect operation of each element in the list.
Mock Example - Protecting Integer Data
The example for using the protect API for protecting integer data is described in this section.
The AP Python APIs support integer values only between -2147483648 and 2147483648, both inclusive.
Example
In the following example, 21 is used as the integer data, which is tokenized using the SUCCESS_INT data element.
from appython import Protector
protector = Protector()
session = protector.create_session("ALL_USER")
output = session.protect(21, "SUCCESS_INT")
print("Protected Data: %s" %output)
Result
Mock Example - Protecting Integer Data with External Initialization Vector (IV)
The example for using the protect API for protecting integer data using external initialization vector (IV) is described in this section.
If you want to pass the external IV as a keyword argument to the protect API, then you must pass the external IV as bytes to the API.
Example
In the following example, 21 is used as the integer data, which is tokenized using the SUCCESS_INT data element, with the help of external IV 1234 that is passed as bytes.
from appython import Protector
protector = Protector()
session = protector.create_session("ALL_USER")
output = session.protect(21, "SUCCESS_INT", external_iv=bytes("1234", encoding="utf-8"))
print("Protected Data: %s" %output)
Result
Mock Example - Protecting Bulk Integer Data
The example for using the protect API for protecting bulk integer data is described in this section. The bulk
integer data can be passed as a list or a tuple.
The individual elements of the list or tuple must be of the same data type.
The AP Python APIs support integer values only between -2147483648 and 2147483648, both inclusive.
Example
In the following example, 21, 42, and 55 integers are stored in a list and used as bulk data, which is protected using the SUCCESS_INT data element.
from appython import Protector
protector = Protector()
session = protector.create_session("ALL_USER")
data = [21, 42, 55]
p_out = session.protect(data, "SUCCESS_INT")
print("Protected Data: ")
print(p_out)
Result
Protected Data:
([68, 46, 55], (6, 6, 6))
6 is the success return code for the protect operation of each element in the list.
Mock Example - Protecting Bulk Integer Data with External IV
The example for using the protect API for protecting bulk integer data using external IV is described in this section. The bulk integer data can be passed as a list or a tuple.
The individual elements of the list or tuple must be of the same data type.
If you want to pass the external IV as a keyword argument to the protect API, then you must pass the external IV as bytes to the API.
Example
In the following example, 21, 42, and 55 integers are stored in a list and used as bulk data, which is protected using the SUCCESS_INT data element, with the help of external IV 1234 that is passed as bytes.
from appython import Protector
protector = Protector()
session = protector.create_session("ALL_USER")
data = [21, 42, 55]
p_out = session.protect(data, "SUCCESS_INT", external_iv=bytes("1234",
encoding="utf-8"))
print("Protected Data: ")
print(p_out)
Result
Protected Data:
([36, 13, 99], (6, 6, 6))
6 is the success return code for the protect operation of each element in the list.
Mock Example - Unprotecting Integer Data
The example for using the unprotect API for retrieving the original integer data from protected data is described in this section.
The AP Python APIs support integer values only between -2147483648 and 2147483648, both inclusive.
Example
In the following example, the integer data 21 that was protected using the SUCCESS_INT data element, is now unprotected using the same data element.
from appython import Protector
protector = Protector()
session = protector.create_session("ALL_USER")
output = session.protect(21, "SUCCESS_INT")
print("Protected Data: %s" %output)
org = session.unprotect(output, "SUCCESS_INT")
print("Unprotected Data: %s" %org)
Result
Protected Data: 68
Unprotected Data: 21
Mock Example - Unprotecting Integer Data with External IV
The example for using the unprotect API for retrieving the original integer data from protected data, using external initialization vector (IV) is described in this section.
If you want to pass the external IV as a keyword argument to the unprotect API, then you must pass the external IV as bytes to the API.
Example
In the following example, the integer data 21 that was protected using the SUCCESS_INT data element and the external IV 1234, is now unprotected using the same data element and same external IV.
from appython import Protector
protector = Protector()
session = protector.create_session("ALL_USER")
output = session.protect(21, "SUCCESS_INT",
external_iv=bytes("1234", encoding="utf-8"))
print("Protected Data: %s" %output)
org = session.unprotect(output, "SUCCESS_INT",
external_iv=bytes("1234", encoding="utf-8"))
print("Unprotected Data: %s" %org)
Result
Protected Data: 36
Unprotected Data: 21
Mock Example - Unprotecting Bulk Integer Data
The example for using the unprotect API for retrieving the original bulk integer data from protected data is described in this section.
Example
In the following example, 21, 42, and 55 integers are stored in a list and used as bulk data, which is protected using the SUCCESS_INT data element. The bulk integer data is then unprotected using the same data element.
from appython import Protector
protector = Protector()
session = protector.create_session("ALL_USER")
data = [21, 42, 55]
p_out = session.protect(data, "SUCCESS_INT")
print("Protected Data: ")
print(p_out)
out = session.unprotect(p_out[0], "SUCCESS_INT")
print("Unprotected Data: ")
print(out)
Result
Protected Data:
([68, 46, 55], (6, 6, 6))
Unprotected Data:
([21, 42, 55], (8, 8, 8))
6 is the success return code for the protect operation of each element in the list.
Mock Example - Unprotecting Bulk Integer Data with External IV
The example for using the unprotect API for retrieving the original bulk integer data from protected data using external IV is described in this section.
If you want to pass the external IV as a keyword argument to the unprotect API, then you must pass the external IV as bytes to the API.
Example
In the following example, 21, 42, and 55 integers are stored in a list and used as bulk data, which is protected using the SUCCESS_INT data element and external IV 1234. The bulk integer data is then unprotected using the same data element and external IV.
from appython import Protector
protector = Protector()
session = protector.create_session("ALL_USER")
data = [21, 42, 55]
p_out = session.protect(data, "SUCCESS_INT", external_iv=bytes("1234",
encoding="utf-8"))
print("Protected Data: ")
print(p_out)
out = session.unprotect(p_out[0], "SUCCESS_INT", external_iv=bytes("1234",
encoding="utf-8"))
print("Unprotected Data: ")
print(out)
Result
Protected Data:
([36, 13, 99], (6, 6, 6))
Unprotected Data:
([21, 42, 55], (8, 8, 8))
6 is the success return code for the protect operation of each element in the list.
8 is the success return code for the unprotect operation of each element in the list.
Mock Example - Reprotecting Integer Data
The example for using the reprotect API for reprotecting integer data is described in this section.
If you are retokenizing the data using the reprotect API, then the old data element and the new data element must have the same tokenization type. For example, if you have used Integer data element to protect the data, then you must use only Integer data element to reprotect the data.
The AP Python APIs support integer values only between -2147483648 and 2147483648, both inclusive.
Example
In the following example, 21 is used as the input integer data, which is first protected using the SUCCESS_INT data element.
The tokenized input data, the old data element SUCCESS_INT, and a new data element SUCCESS_REPROTECT_INT are then passed as inputs to the reprotect API. The reprotect API first unprotects the protected input data using the old data element, and then reprotects it using the new data element, as part of a single reprotect operation.
from appython import Protector
protector = Protector()
session = protector.create_session("ALL_USER")
output = session.protect(21, "SUCCESS_INT")
print("Protected Data: %s" %output)
r_out = session.reprotect(output, "SUCCESS_INT", "SUCCESS_REPROTECT_INT")
print("Reprotected Data: %s" %r_out)
Result
Protected Data: 68
Reprotected Data: 69
Mock Example - Reprotecting Integer Data with External IV
The example for using the reprotect API for reprotecting integer data using external IV is described in this section.
If you are retokenizing the data using the reprotect API, then the old data element and the new data element must have the same tokenization type. For example, if you have used Integer data element to protect the data, then you must use only Integer data element to reprotect the data.
If you want to pass the external IV as a keyword argument to the reprotect API, then you must pass the external IV as bytes to the API.
Example
In the following example, 21 is used as the input integer data, which is first tokenized using the SUCCESS_INT data element, with the help of external IV 1234 that is passed as bytes.
The protected input data, the old data element SUCCESS_INT, a new data element SUCCESS_REPROTECT_INT, the old external IV 1234 in bytes, and a new external IV 123456 in bytes are then passed as inputs to the reprotect API. As part of a single reprotect operation, the reprotect API first unprotects the protected input data using the given data element and old external IV, and then reprotects it using the new data element and new external IV.
from appython import Protector
protector = Protector()
session = protector.create_session("ALL_USER")
p_out = session.protect(21, "SUCCESS_INT",
external_iv=bytes("1234", encoding="utf-8"))
print("Protected Data: %s" %p_out)
r_out = session.reprotect(p_out, "SUCCESS_INT", "SUCCESS_REPROTECT_INT",
old_external_iv=bytes("1234", encoding="utf-8"), new_external_iv=bytes("123456",
encoding="utf-8"))
print("Reprotected Data: %s" %r_out)
Result
Protected Data: 36
Reprotected Data: 14
Mock Example - Reprotecting Bulk Integer Data
The example for using the reprotect API for reprotecting bulk integer data. The bulk integer data can be passed as a list or a tuple.
The individual elements of the list or tuple must be of the same data type.
If you are retokenizing the data using the reprotect API, then the old data element and the new data element must have the same tokenization type. For example, if you have used Integer data element to protect the data, then you must use only Integer data element to reprotect the data.
The AP Python APIs support integer values only between -2147483648 and 2147483648, both inclusive.
Example
In the following example, 21, 42, and 55 integers are stored in a list and used as bulk data, which is protected using the SUCCESS_INT data element.
The protected input data, the old data element SUCCESS_INT, and a new data element SUCCESS_REPROTECT_INT are then passed as inputs to the reprotect API. The reprotect API first unprotects the protected input data using the old data element and then reprotects it using the new data element, as part of a single reprotect operation.
from appython import Protector
protector = Protector()
session = protector.create_session("ALL_USER")
data = [21, 42, 55]
p_out = session.protect(data, "SUCCESS_INT")
print("Protected Data: ")
print(p_out)
r_out = session.reprotect(p_out[0], "SUCCESS_INT", "SUCCESS_REPROTECT_INT")
print("Reprotected Data: ")
print(r_out)
Result
Protected Data:
([68, 46, 55], (6, 6, 6))
Reprotected Data:
([69, 86, 22], (6, 6, 6))
6 is the success return code for the protect operation of each element in the list.
Mock Example - Reprotecting Bulk Integer Data with External IV
The example for using the reprotect API for rerotecting bulk integer data using external IV is described in this section. The bulk integer data can be passed as a list or a tuple.
The individual elements of the list or tuple must be of the same data type.
If you are retokenizing the data using the reprotect API, then the old data element and the new data element must have the same tokenization type. For example, if you have used Integer data element to protect the data, then you must use only Integer data element to reprotect the data.
If you want to pass the external IV as a keyword argument to the reprotect API, then you must pass the external IV as bytes to the API.
Example
In the following example, 21, 42, and 55 integers are stored in a list and used as bulk data, which is protected using the SUCCESS_INT data element, with the help of an external IV 123 that is passed as bytes.
The tokenized input data, the old data element SUCCESS_INT, a new data element SUCCESS_REPROTECT_INT, the old external IV 123 in bytes, and a new external IV 1234 in bytes are then passed as inputs to the reprotect API. As part of a single reprotect operation, the reprotect API first unprotects the protected input data using the given data element and old external IV, and then reprotects it using the new data element and new external IV.
from appython import Protector
protector = Protector()
session = protector.create_session("ALL_USER")
data = [21, 42, 55]
p_out = session.protect(data, "SUCCESS_INT", external_iv=bytes("1234",
encoding="utf-8"))
print("Protected Data: ")
print(p_out)
r_out = session.reprotect(p_out[0], "SUCCESS_INT", "SUCCESS_REPROTECT_INT",
old_external_iv=bytes("123", encoding="utf-8"), new_external_iv=bytes("1234",
encoding="utf-8"))
print("Reprotected Data: ")
print(r_out)
Result
Protected Data:
([36, 13, 99], (6, 6, 6))
Reprotected Data:
([24, 72, 33], (6, 6, 6))
6 is the success return code for the protect operation of each element in the list.
Mock Example - Protecting Long Data
The example for using the protect API for protecting long data is described in this section.
Example
In the following example, 1376235139103947 is used as the long data, which is protected using the SUCCESS_LONG data element.
from appython import Protector
protector = Protector()
session = protector.create_session("ALL_USER")
output = session.protect(1376235139103947, "SUCCESS_LONG")
print("Protected Data: %s" %output)
Result
Protected Data: 8632961867806753
Mock Example - Protecting Long Data with External IV
The example for using the protect API for protecting long data using external IV is described in this section.
If you want to pass the external IV as a keyword argument to the protect API, then you must pass the external IV as bytes to the API.
Example
In the following example, 1376235139103947 is used as the long data, which is protected using the SUCCESS_LONG data element, with the help of external IV 1234 that is passed as bytes.
from appython import Protector
protector = Protector()
session = protector.create_session("ALL_USER")
output = session.protect(1376235139103947, "SUCCESS_LONG",
external_iv=bytes("1234", encoding="utf-8"))
print("Protected Data: %s" %output)
Result
Protected Data: 6278329624602417
Mock Example - Protecting Bulk Long Data
The example for using the protect API for protecting bulk long data. The bulk long data can be passed as a list or a tuple.
The individual elements of the list or tuple must be of the same data type.
Example
In the following example, 1376235139103947, 2396235839173981, and 9371234126176985 long data are stored in a list and used as bulk data, which is protected using the SUCCESS_LONG data element.
from appython import Protector
protector = Protector()
session = protector.create_session("ALL_USER")
data = [1376235139103947, 2396235839173981, 9371234126176985]
p_out = session.protect(data, "SUCCESS_LONG")
print("Protected Data: ")
print(p_out)
Result
Protected Data:
([8632961867806753, 9672961467836748, 7638965892832741], (6, 6, 6))
6 is the success return code for the protect operation of each element in the list.
Mock Example - Protecting Bulk Long Data with External IV
The example for using the protect API for protecting bulk long data using external IV is described in this section. The bulk long data can be passed as a list or a tuple.
The individual elements of the list or tuple must be of the same data type.
If you want to pass the external IV as a keyword argument to the protect API, then you must pass the external IV as bytes to the API.
Example
In the following example, 1376235139103947, 2396235839173981, and 9371234126176985 long data are stored in a list and used as bulk data, which is protected using the SUCCESS_LONG data element, with the help of external IV 1234 that is passed as bytes.
from appython import Protector
protector = Protector()
session = protector.create_session("ALL_USER")
data = [1376235139103947, 2396235839173981, 9371234126176985]
p_out = session.protect(data, "SUCCESS_LONG", external_iv=bytes("1234",
encoding="utf-8"))
print("Protected Data: ")
print(p_out)
Result
Protected Data:
([6278329624602417, 3248329524672456, 4276321638678459], (6, 6, 6))
6 is the success return code for the protect operation of each element in the list.
Mock Example - Unprotecting Long Data
The example for using the unprotect API for retrieving the original long data from protected data is described in this section.
Example
In the following example, the long data 1376235139103947 that was tokenized using the SUCCESS_LONG data element, is now unprotected using the same data element.
from appython import Protector
protector = Protector()
session = protector.create_session("ALL_USER")
output = session.protect(1376235139103947, "SUCCESS_LONG")
print("Protected Data: %s" %output)
org = session.unprotect(output, "SUCCESS_LONG")
print("Unprotected Data: %s" %org)
Result
Protected Data: 8632961867806753
Unprotected Data: 1376235139103947
Mock Example - Unprotecting Long Data with External IV
The example for using the unprotect API for retrieving the original long data from protected data, using external initialization vector (IV) is described in this section.
If you want to pass the external IV as a keyword argument to the unprotect API, then you must pass the external IV as bytes to the API.
Example
In the following example, the long data 1376235139103947 that was protected using the SUCCESS_LONG data element and the external IV 1234 is now unprotected using the same data element and external IV.
from appython import Protector
protector = Protector()
session = protector.create_session("ALL_USER")
output = session.protect(1376235139103947, "SUCCESS_LONG",
external_iv=bytes("1234", encoding="utf-8"))
print("Protected Data: %s" %output)
org = session.unprotect(output, "SUCCESS_LONG",
external_iv=bytes("1234", encoding="utf-8"))
print("Unprotected Data: %s" %org)
Result
Protected Data: 6278329624602417
Unprotected Data: 1376235139103947
Mock Example - Unprotecting Bulk Long Data
The example for using the unprotect API for retrieving the original bulk long data from protected data is described in this section.
Example
In the following example, 1376235139103947, 2396235839173981, and 9371234126176985 long data are stored in a list and used as bulk data, which is protected using the SUCCESS_LONG data element. The bulk long data is then unprotected using the same data element.
from appython import Protector
protector = Protector()
session = protector.create_session("ALL_USER")
data = [1376235139103947, 2396235839173981, 9371234126176985]
p_out = session.protect(data, "SUCCESS_LONG")
print("Protected Data: ")
print(p_out)
out = session.unprotect(p_out[0], "SUCCESS_LONG")
print("Unprotected Data: ")
print(out)
Result
Protected Data:
([8632961867806753, 9672961467836748, 7638965892832741], (6, 6, 6))
Unprotected Data:
([1376235139103947, 2396235839173981, 9371234126176985], (8, 8, 8))
6 is the success return code for the protect operation of each element in the list.
8 is the success return code for the unprotect operation of each element in the list.
Mock Example - Unprotecting Bulk Long Data with External IV
The example for using the unprotect API for retrieving the original bulk long data from protected data using external IV is described in this section.
If you want to pass the external IV as a keyword argument to the unprotect API, then you must pass the external IV as bytes to the API.
Example
In the following example, 1376235139103947, 2396235839173981, and 9371234126176985 long data are stored in a list and used as bulk data, which is protected using the SUCCESS_LONG data element and external IV 1234. The bulk long data is then unprotected using the same data element and same external IV.
from appython import Protector
protector = Protector()
session = protector.create_session("ALL_USER")
data = [1376235139103947, 2396235839173981, 9371234126176985]
p_out = session.protect(data, "SUCCESS_LONG", external_iv=bytes("1234",
encoding="utf-8"))
print("Protected Data: ")
print(p_out)
out = session.unprotect(p_out[0], "SUCCESS_LONG", external_iv=bytes("1234",
encoding="utf-8"))
print("Unprotected Data: ")
print(out)
Result
Protected Data:
([6278329624602417, 3248329524672456, 4276321638678459], (6, 6, 6))
Unprotected Data:
([1376235139103947, 2396235839173981, 9371234126176985], (8, 8, 8))
6 is the success return code for the protect operation of each element in the list.
8 is the success return code for the unprotect operation of each element in the list.
Mock Example - Reprotecting Long Data
The example for using the reprotect API for reprotecting long data is described in this section.
If you are retokenizing the data using the reprotect API, then the old data element and the new data element must have the same tokenization type. For example, if you have used Integer data element to protect the data, then you must use only Integer data element to reprotect the data.
Example
In the following example, 1376235139103947 is used as the input long data, which is first protected using the SUCCESS_LONG data element.
The protected input data, the old data element SUCCESS_LONG, and a new data element SUCCESS_REPROTECT_LONG are then passed as inputs to the reprotect API. The reprotect API first unprotects the protected input data using the old data element and then reprotects it using the new data element, as part of a single reprotect operation.
from appython import Protector
protector = Protector()
session = protector.create_session("ALL_USER")
output = session.protect(1376235139103947, "SUCCESS_LONG")
print("Protected Data: %s" %output)
r_out = session.reprotect(output, "SUCCESS_LONG", "SUCCESS_REPROTECT_LONG")
print("Reprotected Data: %s" %r_out)
Result
Protected Data: 8632961867806753
Mock Example - Reprotecting Long Data with External IV
The example for using the reprotect API for reprotecting long data using external IV is described in this section.
If you are retokenizing the data using the reprotect API, then the old data element and the new data element must have the same tokenization type. For example, if you have used Integer data element to protect the data, then you must use only Integer data element to reprotect the data.
If you want to pass the external IV as a keyword argument to the reprotect API, then you must pass the external IV as bytes to the API.
Example
In the following example, 1376235139103947 is used as the input long data, which is first protected using the SUCCESS_LONG data element, with the help of external IV 1234 that is passed as bytes.
The protected input data, the old data element SUCCESS_LONG, a new data element SUCCESS_REPROTECT_LONG, the old external IV 1234 in bytes, and a new external IV 123456 in bytes are then passed as inputs to the reprotect API. As part of a single reprotect operation, the reprotect API first unprotects the protected input data using the given data element and old external IV, and then reprotects it using the new data element and new external IV.
from appython import Protector
protector = Protector()
session = protector.create_session("ALL_USER")
p_out = session.protect(1376235139103947, "SUCCESS_LONG",
external_iv=bytes("1234", encoding="utf-8"))
print("Protected Data: %s" %p_out)
r_out = session.reprotect(p_out, "SUCCESS_LONG", "SUCCESS_REPROTECT_LONG",
old_external_iv=bytes("1234", encoding="utf-8"), new_external_iv=bytes("123456",
encoding="utf-8"))
print("Reprotected Data: %s" %r_out)
Result
Protected Data: 6278329624602417
Reprotected Data: 4563152458405896
Mock Example - Reprotecting Bulk Long Data
The example for using the reprotect API for reprotecting bulk long data is described in this section. The bulk long data can be passed as a list or a tuple.
The individual elements of the list or tuple must be of the same data type.
If you are retokenizing the data using the reprotect API, then the old data element and the new data element must have the same tokenization type. For example, if you have used Integer data element to protect the data, then you must use only Integer data element to reprotect the data.
Example
In the following example, 1376235139103947, 2396235839173981, and 9371234126176985 long data are stored in a list and used as bulk data, which is protected using the SUCCESS_LONG data element.
The tokenized input data, the old data element SUCCESS_LONG, and a new data element SUCCESS_REPROTECT_LONG are then passed as inputs to the reprotect API. The reprotect API first unprotects the protected input data using the old data element and then reprotects it using the new data element, as part of a single reprotect operation.
from appython import Protector
protector = Protector()
session = protector.create_session("ALL_USER")
data = [1376235139103947, 2396235839173981, 9371234126176985]
p_out = session.protect(data, "SUCCESS_LONG")
print("Protected Data: ")
print(p_out)
r_out = session.reprotect(p_out[0], "SUCCESS_LONG", "SUCCESS_REPROTECT_LONG")
print("Reprotected Data: ")
print(r_out)
Result
Protected Data:
([8632961867806753, 9672961467836748, 7638965892832741], (6, 6, 6))
Reprotected Data:
([4213926425402581, 9253926725412574, 5214928493413576], (6, 6, 6))
6 is the success return code for the protect operation of each element in the list.
Mock Example - Reprotecting Bulk Long Data with External IV
The example for using the reprotect API for reprotecting bulk long data using external IV.
The bulk long data can be passed as a list or a tuple.
The individual elements of the list or tuple must be of the same data type.
If you are retokenizing the data using the reprotect API, then the old data element and the new data element must have the same tokenization type. For example, if you have used Integer data element to protect the data, then you must use only Integer data element to reprotect the data.
If you want to pass the external IV as a keyword argument to the reprotect API, then you must pass the external IV as bytes to the API.
Example
In the following example, 1376235139103947, 2396235839173981, and 9371234126176985 long data are stored in a list and used as bulk data, which is protected using the SUCCESS_LONG data element, with the help of an external IV 1234 that is passed as bytes.
The protected input data, the old data element SUCCESS_LONG, a new data element SUCCESS_REPROTECT_LONG, the old external IV 1234 in bytes, and a new external IV 123456 in bytes are then passed as inputs to the reprotect API. As part of a single reprotect operation, the reprotect API first unprotects the protected input data using the given data element and old external IV, and then reprotects it using the new data element and new external IV.
from appython import Protector
protector = Protector()
session = protector.create_session("ALL_USER")
data = [1376235139103947, 2396235839173981, 9371234126176985]
p_out = session.protect(data, "SUCCESS_LONG", external_iv=bytes("1234",
encoding="utf-8"))
print("Protected Data: ")
print(p_out)
r_out = session.reprotect(p_out[0], "SUCCESS_LONG", "SUCCESS_REPROTECT_LONG",
old_external_iv=bytes("1234", encoding="utf-8"), new_external_iv=bytes("123456",
encoding="utf-8"))
print("Reprotected Data: ")
print(r_out)
Result
Protected Data:
([6278329624602417, 3248329524672456, 4276321638678459], (6, 6, 6))
Reprotected Data:
([4563152458405896, 1583152758465874, 8564159413463872], (6, 6, 6))
6 is the success return code for the protect operation of each element in the list.
Mock Example - Protecting Float Data
The example for using the protect API for protecting float data using a No Encryption data element. This API can be used for access control and auditing.
Example
In the following example, 22.5 is used as the float data, which is protected using the SUCCESS_FLOAT data element.
from appython import Protector
protector = Protector()
session = protector.create_session("ALL_USER")
output = session.protect(22.5, "SUCCESS_FLOAT")
print("Protected Data: %s" %output)
Result
As we are using a No Encryption data element to protect the data, the protected output data is the same as the input data.
Mock Example - Protecting Bulk Float Data
The example for using the protect API for protecting bulk float data using a No Encryption data element is described in this section. The bulk float data can be passed as a list or a tuple. This API can be used for access control and auditing.
The individual elements of the list or tuple must be of the same data type.
Example
In the following example, 22.5, 48.93, and 94.14 float data are stored in a list and used as bulk data, which is protected using the SUCCESS_FLOAT data element.
from appython import Protector
protector = Protector()
session = protector.create_session("ALL_USER")
data = [22.5, 48.93, 94.31]
p_out = session.protect(data, "SUCCESS_FLOAT")
print("Protected Data: ")
print(p_out)
Result
Protected Data:
([22.5, 48.93, 94.31], (6, 6, 6))
6 is the success return code for the protect operation of each element in the list.
As we are using a No Encryption data element to protect the data, the protected output data is
the same as the input data.
Mock Example - Unprotecting Float Data
The example for using the unprotect API for unprotecting float data using a No Encryption data element. This API can be used for access control and auditing.
Example
In the following example, the long data 22.5 that was protected using the SUCCESS_FLOAT data element, is now unprotected using the same data element.
from appython import Protector
protector = Protector()
session = protector.create_session("ALL_USER")
output = session.protect(22.5, "SUCCESS_FLOAT")
print("Protected Data: %s" %output)
org = session.unprotect(output, "SUCCESS_FLOAT")
print("Unprotected Data: %s" %org)
Result
Protected Data: 22.5
Unprotected Data: 22.5
The input data, the protected output data, and the unprotected data are the same, as we are using a No Encryption data element to protect and unprotect the data.
Mock Example - Unprotecting Bulk Float Data
The example for using the unprotect API for unprotecting bulk float data using a No Encryption data element. This API can be used for access control and auditing.
Example
In the following example, 22.5, 48.93, and 94.14 float data are stored in a list and used as bulk data, which is protected using the SUCCESS_FLOAT data element. The bulk float data is then unprotected using the same data element.
from appython import Protector
protector = Protector()
session = protector.create_session("ALL_USER")
data = [22.5, 48.93, 94.31]
p_out = session.protect(data, "SUCCESS_FLOAT")
print("Protected Data: ")
print(p_out)
out = session.unprotect(p_out[0], "SUCCESS_FLOAT")
print("Unprotected Data: ")
print(out)
Result
Protected Data:
([22.5, 48.93, 94.31], (6, 6, 6))
Unprotected Data:
([22.5, 48.93, 94.31], (8, 8, 8))
6 is the success return code for the protect operation of each element in the list.
8 is the success return code for the unprotect operation of each element in the list.
The input data, the protected output data, and the unprotected data are the same, as we are using a No Encryption data element to protect and unprotect the data.
Mock Example - Reprotecting Float Data
The example for using the reprotect API for reprotecting float data using a No Encryption data element. This API can be used for access control and auditing.
If you are reprotecting the data using the reprotect API, then the old data element and the new data element must have the same tokenization type. For example, if you have used No Encryption data element to protect the data, then you must use only No Encryption data element to reprotect the data.
Example
In the following example, 22.5 is used as the input float data, which is first protected using the SUCCESS_FLOAT data element.
The protected input data, the old data element SUCCESS_FLOAT, and a new data element SUCCESS_REPROTECT_FLOAT are then passed as inputs to the reprotect API. The reprotect API first unprotects the protected input data using the old data element and then reprotects it using the new data element, as part of a single reprotect operation.
from appython import Protector
protector = Protector()
session = protector.create_session("ALL_USER")
output = session.protect(22.5, "SUCCESS_FLOAT")
print("Protected Data: %s" %output)
r_out = session.reprotect(output, "SUCCESS_FLOAT", "SUCCESS_REPROTECT_FLOAT")
print("Reprotected Data: %s" %r_out)
Result
Protected Data: 22.5
Reprotected Data: 22.5
As we are using a No Encryption data element to protect and reprotect the data, the reprotected output data is the same as the protected data.
Mock Example - Reprotecting Bulk Float Data
The example for using the reprotect API for reprotecting bulk float data using a No Encryption data element is described in this section. The bulk long data can be passed as a list or a tuple. This API can be used for access control and auditing.
The individual elements of the list or tuple must be of the same data type.
If you are reprotecting the data using the reprotect API, then the old data element and the new data element must have the same tokenization type. For example, if you have used No Encryption data element to protect the data, then you must use only No Encryption data element to reprotect the data.
Example
In the following example, 22.5, 48.93, and 94.14 float data are stored in a list and used as bulk data, which is protected using the SUCCESS_FLOAT data element.
The tokenized input data, the old data element SUCCESS_FLOAT, and a new data element SUCCESS_REPROTECT_FLOAT are then passed as inputs to the reprotect API. The reprotect API first unprotects the protected input data using the old data element and then reprotects it using the new data element, as part of a single reprotect operation.
from appython import Protector
protector = Protector()
session = protector.create_session("ALL_USER")
data = [22.5, 48.93, 94.31]
p_out = session.protect(data, "SUCCESS_FLOAT")
print("Protected Data: ")
print(p_out)
r_out = session.reprotect(p_out[0], "SUCCESS_FLOAT", "SUCCESS_REPROTECT_FLOAT")
print("Reprotected Data: ")
print(r_out)
Result
Protected Data:
([22.5, 48.93, 94.31], (6, 6, 6))
Reprotected Data:
([22.5, 48.93, 94.31], (6, 6, 6))
6 is the success return code for the protect operation of each element in the list.
As we are using a No Encryption data element to protect and reprotect the data, the reprotected output data is the same as the protected data.
Mock Example - Protecting Bytes Data
The example for using the protect API for protecting bytes data is described in this section.
Example
In the following example, “Protegrity1” string is first converted to bytes using the Python bytes() method. The bytes data is then protected using the SUCCESS_BYTE data element.
from appython import Protector
protector = Protector()
session = protector.create_session("ALL_USER")
data=bytes("Protegrity1", encoding="utf-8")
p_out = session.protect(data, "SUCCESS_BYTE")
print("Protected Data: %s" %p_out)
Result
Protected Data: b'nLiNJRL7N2P'
Mock Example - Protecting Bytes Data with External IV
The example for using the protect API for protecting bytes data using external IV is described in this section.
Example
In the following example, “Protegrity1” string is first converted to bytes using the Python bytes() method. The bytes data is then protected using the SUCCESS_BYTE data element, with the help of external IV 1234 that is passed as bytes.
from appython import Protector
protector = Protector()
session = protector.create_session("ALL_USER")
data=bytes("Protegrity1", encoding="utf-8")
output = session.protect(data, "SUCCESS_BYTE",
external_iv=bytes("1234", encoding="utf-8"))
print("Protected Data: %s" %output)
Result
Protected Data: b'Ho9bgXoebxa'
Mock Example - Protecting Bulk Bytes Data
The example for using the protect API for protecting bulk bytes data. The bulk bytes data can be used as a list or a tuple.
The individual elements of the list or tuple must be of the same data type.
Example
In the following example, protegrity1234, Protegrity1, and Protegrity56 strings are first converted to bytes using the Python bytes() method. The converted bytes are then stored in a list and used as bulk data, which is protected using the SUCCESS_BYTE data element.
from appython import Protector
protector = Protector()
session = protector.create_session("ALL_USER")
data = [bytes("protegrity1234"), bytes("Protegrity1"), bytes("Protegrity56")]
p_out = session.protect(data, "SUCCESS_BYTE")
print("Protected Data: ")
print(p_out)
Result
Protected Data:
([b'pJPqrjJEqLXHaO', b'6JPqrjJEqLX', b'6JPqrjJEqLl5'], (6, 6, 6))
6 is the success return code for the protect operation of each element in the list.
Mock Example - Protecting Bulk Bytes Data with External IV
The example for using the protect API for protecting bulk bytes data using external IV. The bulk bytes data can be passed as a list or a tuple.
Example
In the following example, protegrity1234, Protegrity1, and Protegrity56 strings are first converted to bytes using the Python bytes() method. The converted bytes are then stored in a list and used as bulk data, which is protected using the SUCCESS_BYTE data element, with the
help of external IV 1234 that is passed as bytes.
from appython import Protector
protector = Protector()
session = protector.create_session("ALL_USER")
data = [bytes("protegrity1234", encoding="utf-8"), bytes("Protegrity1",
encoding="utf-8"), bytes("Protegrity56", encoding="utf-8")]
p_out = session.protect(data, "SUCCESS_BYTE",
external_iv=bytes("1234", encoding="utf-8"))
print("Protected Data: ")
print(p_out)
Result
Protected Data:
([b'fo9bgXoebxaCTN', b'Ho9bgXoebxa', b'Ho9bgXoebx2q'], (6, 6, 6))
6 is the success return code for the protect operation of each element in the list.
Mock Example - Unprotecting Bytes Data
The example for using the unprotect API for retrieving the original bytes data from protected data is described in this section.
Example
In the following example, the bytes data b’Protegrity1’ that was protected using the SUCCESS_BYTE data element, is now unprotected using the same data element.
from appython import Protector
protector = Protector()
session = protector.create_session("ALL_USER")
data=bytes("Protegrity1", encoding="utf-8")
p_out = session.protect(data, "SUCCESS_BYTE")
print("Protected Data: %s" %p_out)
org = session.unprotect(p_out, "SUCCESS_BYTE")
print("Unprotected Data: %s" %org)
Result
Protected Data: b'6JPqrjJEqLX'
Unprotected Data: b'Protegrity1'
Mock Example - Unprotecting Bytes Data with External IV
The example for using the unprotect API for retrieving the original bytes data from protected data, using external initialization vector (IV) is described in this section.
Example
In the following example, the bytes data b’Protegrity1’ that was protected using the SUCCESS_BYTE data element and the external IV 1234 is now unprotected using the same data element and same external IV.
from appython import Protector
protector = Protector()
session = protector.create_session("ALL_USER")
data=bytes("Protegrity1", encoding="utf-8")
p_out = session.protect(data, "SUCCESS_BYTE", external_iv=bytes("1234",
encoding="utf-8"))
print("Protected Data:", p_out)
org = session.unprotect(p_out, "SUCCESS_BYTE", external_iv=bytes("1234",
encoding="utf-8"))
print("Unprotected Data:", org)
Result
Protected Data: b'Ho9bgXoebxa'
Unprotected Data: b'Protegrity1'
Mock Example - Unprotecting Bulk Bytes Data
The example for using the unprotect API for retrieving the original bulk bytes data from protected data is described in this section.
Example
In the following example, protegrity1234, Protegrity1, and Protegrity56 strings are first converted to bytes using the Python bytes() method. The converted bytes are then stored in a list and used as bulk data, which is protected using the SUCCESS_BYTE data element. The bulk bytes data is then unprotected using the same data element.
from appython import Protector
protector = Protector()
session = protector.create_session("ALL_USER")
data = [bytes("protegrity1234"), bytes("Protegrity1"), bytes("Protegrity56")]
p_out = session.protect(data, "SUCCESS_BYTE")
print("Protected Data: ")
print(p_out)
org = session.unprotect(p_out[0], "SUCCESS_BYTE")
print("Unprotected Data: ")
print(org)
Result
Protected Data:
([b'pJPqrjJEqLXHaO', b'6JPqrjJEqLX', b'6JPqrjJEqLl5'], (6, 6, 6))
Unprotected Data:
([b'protegrity1234', b'Protegrity1', b'Protegrity56'], (8, 8, 8))
6 is the success return code for the protect operation of each element in the list.
8 is the success return code for the unprotect operation of each element in the list.
Mock Example - Unprotecting Bulk Bytes Data with External IV
The example for using the unprotect API for retrieving the original bulk bytes data from protected data using external IV is described in this section.
Example
In the following example, protegrity1234, Protegrity1, and Protegrity56 strings are first converted to bytes using the Python bytes() method. The converted bytes are then stored in a list and used as bulk data, which is protected using the SUCCESS_BYTE data element, with the help of external IV 1234 that is passed as bytes. The bulk bytes data is then unprotected using the same data element and same external IV.
from appython import Protector
protector = Protector()
session = protector.create_session("ALL_USER")
data = [bytes("protegrity1234", encoding="utf-8"), bytes("Protegrity1",
encoding="utf-8"), bytes("Protegrity56", encoding="utf-8")]
p_out = session.protect(data, "SUCCESS_BYTE",
external_iv=bytes("1234", encoding="utf-8"))
print("Protected Data: ")
print(p_out)
org = session.unprotect(p_out[0], "SUCCESS_BYTE",
external_iv=bytes("1234", encoding="utf-8"))
print("Unprotected Data: ")
print(org)
Result
Protected Data:
([b'fo9bgXoebxaCTN', b'Ho9bgXoebxa', b'Ho9bgXoebx2q'], (6, 6, 6))
Unprotected Data:
([b'protegrity1234', b'Protegrity1', b'Protegrity56'], (8, 8, 8))
6 is the success return code for the protect operation of each element in the list.
8 is the success return code for the unprotect operation of each element in the list.
Mock Example - Re-encrypting Bytes Data
The example for using the reprotect API for re-encrypting bytes data is described in this section.
If you are using the reprotect API, then the old data element and the new data element must be of the same protection method. For example, if you have used AES256 data element to protect the data, then you must use only AES256 data element to reprotect the data.
Example
In the following example, Protegrity1 string is first converted to bytes using the Python bytes() method. The bytes data is then encrypted using the SUCCESS_BYTE data element. Therefore, the encrypt_to parameter is passed as a keyword argument and its value is set to bytes.
The protected input data, the old data element SUCCESS_BYTE, and a new data element SUCCESS_REPROTECT_BYTE are then passed as inputs to the reprotect API. The reprotect API first decrypts the protected input data using the old data element and then re-encrypts it using the new data element, as part of a single reprotect operation. Therefore, the encrypt_to parameter is passed as a keyword argument and its value is set to bytes.
from appython import Protector
protector = Protector()
session = protector.create_session("ALL_USER")
data=bytes("Protegrity1", encoding="utf-8")
p_out = session.protect(data, "SUCCESS_BYTE", encrypt_to=bytes)
print("Encrypted Data: %s" %p_out)
r_out = session.reprotect(p_out, "SUCCESS_BYTE", "SUCCESS_REPROTECT_BYTE",
encrypt_to=bytes)
print("Re-encrypted Data: %s" %r_out)
Result
Encrypted Data: b'6JPqrjJEqLX'
Re-encrypted Data: b'JQbePhQ2eGC'
Mock Example - Reprotecting Bytes Data with External IV
The example for using the reprotect API for reprotecting bytes data using external IV is described in this section.
If you are retokenizing the data using the reprotect API, then the old data element and the new data element must have the same tokenization type. For example, if you have used Alpha-Numeric data element to protect the data, then you must use only Alpha-Numeric data element to reprotect the data.
Example
In the following example, Protegrity1 string is first converted to bytes using the Python bytes() method. The bytes data is then protected using the SUCCESS_BYTE data element, with the help of external IV 1234 that is passed as bytes.
The protected input data, the old data element SUCCESS_BYTE, a new data element SUCCESS_REPROTECT_BYTE, the old external IV 1234 in bytes, and a new external IV 123456 in bytes are then passed as inputs to the reprotect API. As part of a single reprotect operation, the reprotect API first unprotects the protected input data using the given data element and old external IV, and then reprotects it using the new data element and new external IV.
from appython import Protector
protector = Protector()
session = protector.create_session("ALL_USER")
data=bytes("Protegrity1", encoding="utf-8")
p_out = session.protect(data, "SUCCESS_BYTE",
external_iv=bytes("1234", encoding="utf-8"))
print("Protected Data: %s" %p_out)
r_out = session.reprotect(p_out, "SUCCESS_BYTE",
"SUCCESS_REPROTECT_BYTE", old_external_iv=bytes("1234", encoding="utf-8"),
new_external_iv=bytes("123456", encoding="utf-8"))
print("Reprotected Data: %s" %r_out)
Result
Protected Data: b'Ho9bgXoebxa'
Reprotected Data: b'vQIqelQyqY6'
Mock Example - Reprotecting Bulk Bytes Data
The example for using the reprotect API for reprotecting bulk bytes data. The bulk bytes data can be passed as a list or a tuple.
The individual elements of the list or tuple must be of the same data type.
If you are retokenizing the data using the reprotect API, then the old data element and the new data element must have the same tokenization type. For example, if you have used Alpha-Numeric data element to protect the data, then you must use only Alpha-Numeric data element to reprotect the data.
Example
In the following example, protegrity1234, Protegrity1, and Protegrity56 strings are first converted to bytes using the Python bytes() method. The converted bytes are then stored in a list and used as bulk data, which is protected using the SUCCESS_BYTE data element.
The tokenized input data, the old data element SUCCESS_BYTE, and a new data element
SUCCESS_REPROTECT_BYTE are then passed as inputs to the reprotect API. The reprotect API first unprotects the protected input data using the old data element and then reprotects it using the new data element, as part of a single reprotect operation.
from appython import Protector
protector = Protector()
session = protector.create_session("ALL_USER")
data = [bytes("protegrity1234"), bytes("Protegrity1"), bytes("Protegrity56")]
p_out = session.protect(data, "SUCCESS_BYTE")
print("Protected Data: ")
print(p_out)
r_out = session.reprotect(p_out[0], "SUCCESS_BYTE",
"SUCCESS_REPROTECT_BYTE")
print("Reprotected Data: ")
print(r_out)
Result
Protected Data:
([b'pJPqrjJEqLXHaO', b'6JPqrjJEqLX', b'6JPqrjJEqLl5'], (6, 6, 6))
Reprotected Data:
([b'gQbePhQ2eGCjqW', b'JQbePhQ2eGC', b'JQbePhQ2eGBK'], (6, 6, 6))
6 is the success return code for the protect operation of each element in the list.
Mock Example - Reprotecting Bulk Bytes Data with External IV
The example for using the reprotect API for reprotecting bulk bytes data using external IV is described in this section. The bulk bytes data can be passed as a list or a tuple.
The individual elements of the list or tuple must be of the same data type.
If you are retokenizing the data using the reprotect API, then the old data element and the new data element must have the same tokenization type. For example, if you have used Alpha-Numeric data element to protect the data, then you must use only Alpha-Numeric data element to reprotect the data.
Example
In the following example, protegrity1234, Protegrity1, and Protegrity56 strings are first converted to bytes using the Python bytes() method. The converted bytes are then stored in a list and used as bulk data, which is protected using the SUCCESS_BYTE data element, with the
help of an external IV 1234 that is passed as bytes.
The protected input data, the SUCCESS_BYTE data element, a new data element SUCCESS_REPROTECT_BYTE, the old external IV 1234 in bytes, and a new external IV 123456 in bytes are then passed as inputs to the reprotect API. As part of a single reprotect operation, the reprotect API first unprotects the protected input data using the given data element and old external IV, and then reprotects it using the new data element and with the new external IV.
from appython import Protector
protector = Protector()
session = protector.create_session("ALL_USER")
data = [bytes("protegrity1234", encoding="utf-8"), bytes("Protegrity1",
encoding="utf-8"), bytes("Protegrity56", encoding="utf-8")]
p_out = session.protect(data, "SUCCESS_BYTE",
external_iv=bytes("1234", encoding="utf-8"))
print("Protected Data: ")
print(p_out)
r_out = session.reprotect(p_out[0], "SUCCESS_BYTE",
"SUCCESS_REPROTECT_BYTE", old_external_iv=bytes("1234", encoding="utf-8"),
new_external_iv=bytes("123456", encoding="utf-8"))
print("Reprotected Data: ")
print(r_out)
Result
Protected Data:
([b'fo9bgXoebxaCTN', b'Ho9bgXoebxa', b'Ho9bgXoebx2q'], (6, 6, 6))
Reprotected Data:
([b'cQIqelQyqY6OoN', b'vQIqelQyqY6', b'vQIqelQyqYXa'], (6, 6, 6))
6 is the success return code for the protect operation of each element in the list.
The example for using the protect API for protecting the date object.
Example: Input date object in DD/MM/YYYY format
In the following example, the 27/01/2019 date string is used as the data, which is first converted to a date object using the Python date method of the datetime module.
The date object is then protected using the SUCCESS_DATE_DDMMYYYY data element.
For information regarding the Python datetime module, refer to Python documentation.
from appython import Protector
from datetime import datetime
protector = Protector()
session = protector.create_session("ALL_USER")
data = datetime.strptime("27/01/2019", "%d/%m/%Y").date()
print("\nInput date as a Date object : "+str(data))
p_out = session.protect(data, "SUCCESS_DATE_DDMMYYYY")
print("Protected date: "+str(p_out))
Result
Input date as a Date object : 2019-01-27
Protected date: 2022-06-14
The example for using the protect API for protecting bulk date objects. The bulk date objects can be passed as a list or a tuple.
The individual elements of the list or tuple must be of the same data type.
Example
In the following example, the 27/01/2019 and 22/04/2018 date strings are used as the data, which are first converted to a date objects using the Python date method of the datetime module. The two date objects are then used to create a list, which is used as the input data.
The input list is then protected using the SUCCESS_DATE_DDMMYYYY data element.
For information regarding the Python datetime module, refer to Python documentation.
from appython import Protector
from datetime import datetime
protector = Protector()
session = protector.create_session("ALL_USER")
data1 = datetime.strptime("27/01/2019", "%d/%m/%Y").date()
data2 = datetime.strptime("22/04/2018", "%d/%m/%Y").date()
data = [data1, data2]
print("Input data: "+str(data))
p_out = session.protect(data, "SUCCESS_DATE_DDMMYYYY")
print("Protected data: "+str(p_out))
Result
Input data: [datetime.date(2019, 1, 27), datetime.date(2018, 4, 22)]
Protected data: ([datetime.date(2022, 6, 14), datetime.date(2021, 9, 7)], (6, 6))
6 is the success return code for the protect operation of each element in the list.
The example for using the protect API for protecting a date string in DD/MM/YYYY format is described in this section.
Example: Input date string in DD/MM/YYYY format
In the following example, the 27/01/2019 date string is used as the input data, which is protected using the SUCCESS_DATE_DDMMYYYY data element.
from appython import Protector
protector = Protector()
session = protector.create_session("ALL_USER")
p_out = session.protect("27/01/2019", "SUCCESS_DATE_DDMMYYYY")
print("Protected date: " + p_out)
Result
Protected date: 14/06/2022
The example for using the protect API for protecting bulk date strings. The bulk date strings can be used as a list or a tuple.
The individual elements of the list or tuple must be of the same data type.
Example
In the following example, the 27/01/2019 and 22/04/2018 date strings are used to create a list, which is used as the input data. The input list is then protected using the
SUCCESS_DATE_DDMMYYYY data element.
from appython import Protector
protector = Protector()
session = protector.create_session("ALL_USER")
data = ["27/01/2019", "22/04/2018"]
print("Input data: " + str(data))
p_out = session.protect(data, "SUCCESS_DATE_DDMMYYYY")
print("Protected data: " + str(p_out))
Result
Input data: ['27/01/2019', '22/04/2018']
Protected data: (['14/06/2022', '07/09/2021'], (6, 6))
6 is the success return code for the protect operation of each element in the list.
The example for using the unprotect API for retrieving the original data object from protected data is described in this section.
Example: Input date object in DD/MM/YYYY format
In the following example, the 27/01/2019 date string is used as the data, which is first converted to a date object using the Python date method of the datetime module.
The date object is first protected using the SUCCESS_DATE_DDMMYYYY data element, and is then unprotected using the same data element.
For information regarding the Python datetime module, refer to Python documentation.
from appython import Protector
from datetime import datetime
protector = Protector()
session = protector.create_session("ALL_USER")
data = datetime.strptime("27/01/2019", "%d/%m/%Y").date()
print("\nInput date as a Date object : "+str(data))
p_out = session.protect(data, "SUCCESS_DATE_DDMMYYYY")
print("Protected date: "+str(p_out))
unprotected_output = session.unprotect(p_out, "SUCCESS_DATE_DDMMYYYY")
print("Unprotected date: "+str(unprotected_output))
Result
Input date as a Date object : 2019-01-27
Protected date: 2022-06-14
Unprotected date: 2019-01-27
The example for using the unprotect API for retrieving the original bulk date objects from token data is described in this section.
Example
In the following example, the 27/01/2019 and 22/04/2018 date strings are used as the data, which are first converted to a date objects using the Python date method of the datetime module. The two date objects are then used to create a list, which is used as the input data.
The input list is then protected using the SUCCESS_DATE_DDMMYYYY data element, and then unprotected using the same data element.
For information regarding the Python datetime module, refer to Python documentation.
from appython import Protector
from datetime import datetime
protector = Protector()
session = protector.create_session("ALL_USER")
data1 = datetime.strptime("27/01/2019", "%d/%m/%Y").date()
data2 = datetime.strptime("22/04/2018", "%d/%m/%Y").date()
data = [data1, data2]
print("Input data: "+str(data))
p_out = session.protect(data, "SUCCESS_DATE_DDMMYYYY")
print("Protected data: "+str(p_out))
unprotected_output = session.unprotect(p_out[0], "SUCCESS_DATE_DDMMYYYY")
print("Unprotected data: "+str(unprotected_output))
Result
Input data: [datetime.date(2019, 1, 27), datetime.date(2018, 4, 22)]
Protected data: ([datetime.date(2022, 6, 14), datetime.date(2021, 9, 7)], (6, 6))
Unprotected data: ([datetime.date(2019, 1, 27), datetime.date(2018, 4, 22)], (8, 8))
6 is the success return code for the protect operation of each element in the list.
8 is the success return code for the unprotect operation of each element in the list.
The example for using the unprotect API for retrieving the original data string from protected data is described in this section.
Example: Input date string in DD/MM/YYYY format
In the following example, the 27/01/2019 date string that was protected using the SUCCESS_DATE_DDMMYYYY data element, is unprotected using the SUCCESS_DATE_DDMMYYYY data element.
from appython import Protector
protector = Protector()
session = protector.create_session("ALL_USER")
p_out = session.protect("27/01/2019", "SUCCESS_DATE_DDMMYYYY")
print("Protected date: "+str(p_out))
unprotected_output = session.unprotect(p_out, "SUCCESS_DATE_DDMMYYYY")
print("Unprotected date: "+str(unprotected_output))
Result
Protected date: 14/06/2022
Unprotected date: 27/01/2019
The example for using the unprotect API for retrieving the original bulk date strings from token data is described in this section.
Example
In the following example, the 27/01/2019 and 22/04/2018 date strings are used to create a list, which is used as the input data.
The input list is then protected using the SUCCESS_DATE_DDMMYYYY data element, and then unprotected using the same data element.
from appython import Protector
protector = Protector()
session = protector.create_session("ALL_USER")
data = ["27/01/2019", "22/04/2018"]
print("Input data: "+str(data))
p_out = session.protect(data, "SUCCESS_DATE_DDMMYYYY")
print("Protected data: "+str(p_out))
unprotected_output = session.unprotect(p_out[0], "SUCCESS_DATE_DDMMYYYY")
print("Unprotected data: "+str(unprotected_output))
Result
Input data: ['27/01/2019', '22/04/2018']
Protected data: (['14/06/2022', '07/09/2021'], (6, 6))
Unprotected data: (['27/01/2019', '22/04/2018'], (8, 8))
The example for using the reprotect API for reprotecting a date object is described in this section.
If you are retokenizing the data using the reprotect API, then the old data element and the new data element must have the same tokenization type. For example, if you have used the Date (DD/MM/YYYY) data element to protect the data, then you must use only the Date (DD/MM/YYYY) data element to reprotect the data.
Example
In the following example, the 27/01/2019 date string is used as the data, which is first converted to a date object using the Python date method of the datetime module. The date object is then protected using the SUCCESS_DATE_DDMMYYYY data element.
The protected input data, the old data element SUCCESS_DATE_DDMMYYYY, and a new data element SUCCESS_REPROTECT_DATE_DDMMYYYY are then passed as inputs to the reprotect API. The reprotect API first unprotects the protected input data using the old data element and then reprotects it using the new data element, as part of a single reprotect operation.
For information regarding the Python datetime module, refer to Python documentation.
from appython import Protector
from datetime import datetime
protector = Protector()
session = protector.create_session("ALL_USER")
data = datetime.strptime("27/01/2019", "%d/%m/%Y").date()
print("\nInput date as a Date object : "+str(data))
p_out = session.protect(data, "SUCCESS_DATE_DDMMYYYY")
print("Protected date: "+str(p_out))
r_out = session.reprotect(p_out, "SUCCESS_DATE_DDMMYYYY",
"SUCCESS_REPROTECT_DATE_DDMMYYYY")
print("Reprotected date: "+str(r_out))
Result
Input date as a Date object : 2019-01-27
Protected date: 2022-06-14
Reprotected date: 2030-11-26
The example for using the reprotect API for reprotecting bulk date objects is described in this section. The bulk date objects can be passed as a list or a tuple.
The individual elements of the list or tuple must be of the same data type.
If you are retokenizing the data using the reprotect API, then the old data element and the new data element must have the same tokenization type. For example, if you have used the Date (DD/MM/YYYY) data element to protect the data, then you must use only the Date (DD/MM/YYYY) data element to reprotect the data.
Example
In the following example, the two date strings 27/01/2019 and 22/04/2018 are used as data, which are first converted to date objects using the Python date method of the datetime module. The two date objects are joined together to create a list, which is protected using the
SUCCESS_DATE_DDMMYYYY data element. The protected input data, the old data element SUCCESS_DATE_DDMMYYYY, and a new data
element SUCCESS_REPROTECT_DATE_DDMMYYYY are then passed as inputs to the reprotect API. The reprotect API first unprotects the protected input data using the old data element and then reprotects it using the new data element, as part of a single reprotect operation.
For information regarding the Python datetime module, refer to Python documentation.
from appython import Protector
from datetime import datetime
protector = Protector()
session = protector.create_session("ALL_USER")
data1 = datetime.strptime("27/01/2019", "%d/%m/%Y").date()
data2 = datetime.strptime("22/04/2018", "%d/%m/%Y").date()
data = [data1, data2]
print("Input data: "+str(data))
p_out = session.protect(data, "SUCCESS_DATE_DDMMYYYY")
print("Protected data: "+str(p_out))
r_out = session.reprotect(p_out[0], "SUCCESS_DATE_DDMMYYYY",
"SUCCESS_REPROTECT_DATE_DDMMYYYY")
print("Reprotected data: "+str(r_out))
Result
Input data: [datetime.date(2019, 1, 27), datetime.date(2018, 4, 22)]
Protected data: ([datetime.date(2022, 6, 14), datetime.date(2021, 9, 7)], (6, 6))
Reprotected data: ([datetime.date(2030, 11, 26), datetime.date(2030, 2, 19)], (6, 6))
6 is the success return code for the protect operation of each element in the list.
The example for using the reprotect API for reprotecting a date in string format is described in this section.
If you are retokenizing the data using the reprotect API, then the old data element and the new data element must have the same tokenization type. For example, if you have used the Date (DD/MM/YYYY) data element to protect the data, then you must use only the Date (DD/MM/YYYY) data element to reprotect the data.
Example
In the following example, the 27/01/2019 date string is protected using the SUCCESS_DATE_DDMMYYYY data element.
The protected input data, the old data element SUCCESS_DATE_DDMMYYYY, and a new data element SUCCESS_REPROTECT_DATE_DDMMYYYY are then passed as inputs to the reprotect API. The reprotect API first unprotects the protected input data using the old data element and then reprotects it using the new data element, as part of a single reprotect operation.
from appython import Protector
protector = Protector()
session = protector.create_session("ALL_USER")
p_out = session.protect("27/01/2019", "SUCCESS_DATE_DDMMYYYY")
print("Protected date: "+str(p_out))
r_out = session.reprotect(p_out, "SUCCESS_DATE_DDMMYYYY",
"SUCCESS_REPROTECT_DATE_DDMMYYYY")
print("Reprotected date: "+str(r_out))
Result
Protected date: 14/06/2022
Reprotected date: 26/11/2030
The example for using the reprotect API for reprotecting bulk date strings is described in this section. The bulk date strings can be passed as a list or a tuple.
The individual elements of the list or tuple must be of the same data type.
If you are retokenizing the data using the reprotect API, then the old data element and the new data element must have the same tokenization type. For example, if you have used the Date (DD/MM/YYYY) data element to protect the data, then you must use only the Date (DD/MM/YYYY) data element to reprotect the data.
Example
In the following example, the two date strings 27/01/2019 and 22/04/2018 are used to create a list, which is protected using the SUCCESS_DATE_DDMMYYYY data element.
The protected input data, the old data element SUCCESS_DATE_DDMMYYYY, and a new data element SUCCESS_REPROTECT_DATE_DDMMYYYY are then passed as inputs to the reprotect API. The reprotect API first unprotects the protected input data using the old data element and then reprotects it using the new data element, as part of a single reprotect operation.
from appython import Protector
protector = Protector()
session = protector.create_session("ALL_USER")
data = ["27/01/2019", "22/04/2018"]
print("Input data: "+str(data))
p_out = session.protect(data, "SUCCESS_DATE_DDMMYYYY")
print("Protected data: "+str(p_out))
r_out = session.reprotect(p_out[0], "SUCCESS_DATE_DDMMYYYY",
"SUCCESS_REPROTECT_DATE_DDMMYYYY")
print("Reprotected data: "+str(r_out))
Result
Input data: ['27/01/2019', '22/04/2018']
Protected data: (['14/06/2022', '07/09/2021'], (6, 6))
Reprotected data: (['26/11/2030', '19/02/2030'], (6, 6))
6 is the success return code for the protect operation of each element in the list.
The example for using the protect API for protecting the date object is described in this section.
Example: Input date object in MM.DD.YYYY format
In the following example, the 01/27/2019 date string is used as the data, which is first converted to a date object using the Python date method of the datetime module.
The date object is then protected using the SUCCESS_DATE_MMDDYYYY data element.
For information regarding the Python datetime module, refer to Python documentation.
from appython import Protector
from datetime import datetime
protector = Protector()
session = protector.create_session("ALL_USER")
data = datetime.strptime("01/27/2019", "%m/%d/%Y").date()
print("\nInput date as a Date object : "+str(data))
p_out = session.protect(data, "SUCCESS_DATE_MMDDYYYY")
print("Protected date: "+str(p_out))
Result
Input date as a Date object : 2019-01-27
Protected date: 2025-06-29
The example for using the protect API for tokenizing bulk date objects. The bulk date objects can be passed as a list or a tuple.
The individual elements of the list or tuple must be of the same data type.
Example
In the following example, the 01/27/2019 and 04/22/2018 date strings are used as the data, which are first converted to a date objects using the Python date method of the datetime module. The two date objects are then used to create a list, which is used as the input data.
The input list is then protected using the SUCCESS_DATE_MMDDYYYY data element.
For information regarding the Python datetime module, refer to Python documentation.
from appython import Protector
from datetime import datetime
protector = Protector()
session = protector.create_session("ALL_USER")
data1 = datetime.strptime("01/27/2019", "%m/%d/%Y").date()
data2 = datetime.strptime("04/22/2018", "%m/%d/%Y").date()
data = [data1, data2]
print("Input data: "+str(data))
p_out = session.protect(data, "SUCCESS_DATE_MMDDYYYY")
print("Protected data: "+str(p_out))
Result
Input data: [datetime.date(2019, 1, 27), datetime.date(2018, 4, 22)]
Protected data: ([datetime.date(2025, 6, 29), datetime.date(2024, 9, 22)], (6, 6))
6 is the success return code for the protect operation of each element in the list.
The example for using the protect API for protecting a date string in MM/DD/YYYY format is described in this section.
Example: Input date string in MM.DD.YYYY format
In the following example, the 01/27/2019 date string is used as the data, which is protected using the SUCCESS_DATE_MMDDYYYY data element.
from appython import Protector
protector = Protector()
session = protector.create_session("ALL_USER")
p_out = session.protect("01/27/2019", "SUCCESS_DATE_MMDDYYYY")
print("Protected date: " + p_out)
Result
Protected date: 06/29/2025
The example for using the protect API for tokenizing bulk dates in string format is described in this section. The bulk date strings can be passed as a list or a tuple.
The individual elements of the list or tuple must be of the same data type.
Example
In the following example, the 01/27/2019 and 04/22/2018 date strings are used to create a list, which is used as the input data. The input list is then protected using the
SUCCESS_DATE_MMDDYYYY data element.
from appython import Protector
protector = Protector()
session = protector.create_session("ALL_USER")
data = ["01/27/2019", "04/22/2018"]
print("Input data: "+str(data))
p_out = session.protect(data, "SUCCESS_DATE_MMDDYYYY")
print("Protected data: "+str(p_out))
Result
Input data: ['01/27/2019', '04/22/2018']
Protected data: (['06/29/2025', '09/22/2024'], (6, 6))
6 is the success return code for the protect operation of each element in the list.
The example for using the unprotect API for retrieving the original data object from protected data is described in this section.
Example: Input date object in MM.DD.YYYY format
In the following example, the 01/27/2019 date string is used as the data, which is first converted to a date object using the Python date method of the datetime module.
The date object is first protected using the SUCCESS_DATE_MMDDYYYY data element, and is then unprotected using the same data element.
For information regarding the Python datetime module, refer to Python documentation.
from appython import Protector
from datetime import datetime
protector = Protector()
session = protector.create_session("ALL_USER")
data = datetime.strptime("01/27/2019", "%m/%d/%Y").date()
print("\nInput date as a Date object : "+str(data))
p_out = session.protect(data, "SUCCESS_DATE_MMDDYYYY")
print("Protected date: "+str(p_out))
unprotected_output = session.unprotect(p_out, "SUCCESS_DATE_MMDDYYYY")
print("Unprotected date: "+str(unprotected_output))
Result
Input date as a Date object : 2019-01-27
Protected date: 2025-06-29
Unprotected date: 2019-01-27
The example for using the unprotect API for retrieving the original bulk date objects from token data is described in htis section.
Example
In the following example, the 01/27/2019 and 04/22/2018 date strings are used as the data, which are first converted to a date objects using the Python date method of the datetime module. The two date objects are then used to create a list, which is used as the input data.
The input list is then protected using the SUCCESS_DATE_MMDDYYYY data element, and then unprotected using the same data element.
For information regarding the Python datetime module, refer to Python documentation.
from appython import Protector
from datetime import datetime
protector = Protector()
session = protector.create_session("ALL_USER")
data1 = datetime.strptime("01/27/2019", "%m/%d/%Y").date()
data2 = datetime.strptime("04/22/2018", "%m/%d/%Y").date()
data = [data1, data2]
print("Input data: "+str(data))
p_out = session.protect(data, "SUCCESS_DATE_MMDDYYYY")
print("Protected data: "+str(p_out))
unprotected_output = session.unprotect(p_out[0], "SUCCESS_DATE_MMDDYYYY")
print("Unprotected data: "+str(unprotected_output))
Result
Input data: [datetime.date(2019, 1, 27), datetime.date(2018, 4, 22)]
Protected data: ([datetime.date(2025, 6, 29), datetime.date(2024, 9, 22)], (6, 6))
Unprotected data: ([datetime.date(2019, 1, 27), datetime.date(2018, 4, 22)], (8, 8))
6 is the success return code for the protect operation of each element in the list.
8 is the success return code for the unprotect operation of each element in the list.
The example for using the unprotect API for retrieving the original data object from protected data is described in this section.
Example: Input date object in MM.DD.YYYY format
In the following example, the 01/27/2019 date string that was protected using the SUCCESS_DATE_MMDDYYYY data element, is unprotected using the same data element.
For information regarding the Python datetime module, refer to Python documentation.
from appython import Protector
protector = Protector()
session = protector.create_session("ALL_USER")
p_out = session.protect("01/27/2019", "SUCCESS_DATE_MMDDYYYY")
print("Protected date: "+str(p_out))
unprotected_output = session.unprotect(p_out, "SUCCESS_DATE_MMDDYYYY")
print("Unprotected date: "+str(unprotected_output))
Result
Protected date: 06/29/2025
Unprotected date: 01/27/2019
The example for using the unprotect API for retrieving the original bulk date strings from token data is described in this section.
Example
In the following example, the 01/27/2019 and 04/22/2018 date strings are used to create a list, which is used as the input data.
The input list is then protected using the SUCCESS_DATE_MMDDYYYY data element, and then unprotected using the same data element.
from appython import Protector
protector = Protector()
session = protector.create_session("ALL_USER")
data = ["01/27/2019", "04/22/2018"]
print("Input data: "+str(data))
p_out = session.protect(data, "SUCCESS_DATE_MMDDYYYY")
print("Protected data: "+str(p_out))
unprotected_output = session.unprotect(p_out[0], "SUCCESS_DATE_MMDDYYYY")
print("Unprotected data: "+str(unprotected_output))
Result
Input data: ['01/27/2019', '04/22/2018']
Protected data: (['06/29/2025', '09/22/2024'], (6, 6))
Unprotected data: (['01/27/2019', '04/22/2018'], (8, 8))
6 is the success return code for the protect operation of each element in the list.
8 is the success return code for the unprotect operation of each element in the list.
The example for using the reprotect API for reprotecting date object is described in this section.
If you are retokenizing the data using the reprotect API, then the old data element and the new data element must have the same tokenization type. For example, if you have used the Date (DD/MM/YYYY) data element to protect the data, then you must use only the Date (DD/MM/YYYY) data element to reprotect the data.
Example
In the following example, the 01/27/2019 date string is used as the data, which is first converted to a date object using the Python date method of the datetime module. The datetime object is then protected using the SUCCESS_DATE_MMDDYYYY data element.
The protected input data, the old data element SUCCESS_DATE_MMDDYYYY, and a new data element SUCCESS_REPROTECT_DATE_MMDDYYYY are then passed as inputs to the reprotect API. The reprotect API first unprotects the protected input data using the old data element and then reprotects it using the new data element, as part of a single reprotect operation.
For information regarding the Python datetime module, refer to Python documentation.
from appython import Protector
from datetime import datetime
protector = Protector()
session = protector.create_session("ALL_USER")
data = datetime.strptime("01/27/2019", "%m/%d/%Y").date()
print("\nInput date as a Date object : "+str(data))
p_out = session.protect(data, "SUCCESS_DATE_MMDDYYYY")
print("Protected date: "+str(p_out))
r_out = session.reprotect(p_out, "SUCCESS_DATE_MMDDYYYY",
"SUCCESS_REPROTECT_DATE_MMDDYYYY")
print("Reprotected date: "+str(r_out))
Result
Input date as a Date object : 2019-01-27
Protected date: 2025-06-29
Reprotected date: 2033-12-11
The example for using the reprotect API for reprotecting bulk date objects. The bulk date objects can be passed as a list or a tuple.
The individual elements of the list or tuple must be of the same data type.
If you are retokenizing the data using the reprotect API, then the old data element and the new data element must have the same tokenization type. For example, if you have used the Date (DD/MM/YYYY) data element to protect the data, then you must use only the Date (DD/MM/YYYY) data element to reprotect the data.
Example
In the following example, the two date strings 01/27/2019 and 04/22/2018 are used as data, which are first converted to date objects using the Python date method of the datetime module. The two date objects are joined together to create a list, which is protected using the SUCCESS_DATE_MMDDYYYY data element.
The protected input data, the old data element SUCCESS_DATE_MMDDYYYY, and a new data element SUCCESS_REPROTECT_DATE_MMDDYYYY are then passed as inputs to the reprotect API. The reprotect API first unprotects the protected input data using the old data element and then reprotects it using the new data element, as part of a single reprotect operation.
For information regarding the Python datetime module, refer to Python documentation.
from appython import Protector
from datetime import datetime
protector = Protector()
session = protector.create_session("ALL_USER")
data1 = datetime.strptime("01/27/2019", "%m/%d/%Y").date()
data2 = datetime.strptime("04/22/2018", "%m/%d/%Y").date()
data = [data1, data2]
print("Input data: "+str(data))
p_out = session.protect(data, "SUCCESS_DATE_MMDDYYYY")
print("Protected data: "+str(p_out))
r_out = session.reprotect(p_out[0], "SUCCESS_DATE_MMDDYYYY",
"SUCCESS_REPROTECT_DATE_MMDDYYYY")
print("Reprotected data: "+str(r_out))
Result
Input data: [datetime.date(2019, 1, 27), datetime.date(2018, 4, 22)]
Protected data: ([datetime.date(2025, 6, 29), datetime.date(2024, 9, 22)], (6, 6))
Reprotected data: ([datetime.date(2033, 12, 11), datetime.date(2033, 3, 6)], (6, 6))
6 is the success return code for the protect operation of each element in the list.
The example for using the reprotect API for reprotecting a date in string format is described in this section.
If you are retokenizing the data using the reprotect API, then the old data element and the new data element must have the same tokenization type. For example, if you have used the Date (DD/MM/YYYY) data element to protect the data, then you must use only the Date (DD/MM/YYYY) data element to reprotect the data.
Example
In the following example, the 01/27/2019 date string is used as the data, which is protected using the SUCCESS_DATE_MMDDYYYY data element.
The protected input data, the old data element SUCCESS_DATE_MMDDYYYY, and a new data element SUCCESS_REPROTECT_DATE_MMDDYYYY are then passed as inputs to the reprotect API. The reprotect API first unprotects the protected input data using the old data element and then reprotects it using the new data element, as part of a single reprotect operation.
from appython import Protector
protector = Protector()
session = protector.create_session("ALL_USER")
p_out = session.protect("01/27/2019", "SUCCESS_DATE_MMDDYYYY")
print("Protected date: "+str(p_out))
r_out = session.reprotect(p_out, "SUCCESS_DATE_MMDDYYYY",
"SUCCESS_REPROTECT_DATE_MMDDYYYY")
print("Reprotected date: "+str(r_out))
Result
Protected date: 06/29/2025
Reprotected date: 12/11/2033
The example for uisng the reprotect API for reprotecting bulk dates in string format. The bulk date strings can be passed as a list or a tuple.
The individual elements of the list or tuple must be of the same data type.
If you are retokenizing the data using the reprotect API, then the old data element and the new data element must have the same tokenization type. For example, if you have used the Date (DD/MM/YYYY) data element to protect the data, then you must use only the Date (DD/MM/YYYY) data element to reprotect the data.
Example
In the following example, the two date strings 01/27/2019 and 04/22/2018 are used to create a list, which is protected using the SUCCESS_DATE_MMDDYYYY data element.
The protected input data, the old data element SUCCESS_DATE_MMDDYYYY, and a new data element SUCCESS_REPROTECT_DATE_MMDDYYYY are then passed as inputs to the reprotect API. The reprotect API first unprotects the protected input data using the old data element and then reprotects it using the new data element, as part of a single reprotect operation.
from appython import Protector
protector = Protector()
session = protector.create_session("ALL_USER")
data = ["01/27/2019", "04/22/2018"]
print("Input data: "+str(data))
p_out = session.protect(data, "SUCCESS_DATE_MMDDYYYY")
print("Protected data: "+str(p_out))
r_out = session.reprotect(p_out[0], "SUCCESS_DATE_MMDDYYYY",
"SUCCESS_REPROTECT_DATE_MMDDYYYY")
print("Reprotected data: "+str(r_out))
Result
Input data: ['01/27/2019', '04/22/2018']
Protected data: (['06/29/2025', '09/22/2024'], (6, 6))
Reprotected data: (['12/11/2033', '03/06/2033'], (6, 6))
6 is the success return code for the protect operation of each element in the list.
The example for using the reprotect API for reprotecting bulk dates in string format. The bulk date strings can be passed as a list or a tuple.
The individual elements of the list or tuple must be of the same data type.
If you are retokenizing the data using the reprotect API, then the old data element and the new data element must have the same tokenization type. For example, if you have used the Date (DD/MM/YYYY) data element to protect the data, then you must use only the Date (DD/MM/YYYY) data element to reprotect the data.
Example
In the following example, the two date strings 01/27/2019 and 04/22/2018 are used to create a list, which is protected using the SUCCESS_DATE_MMDDYYYY data element.
The protected input data, the old data element SUCCESS_DATE_MMDDYYYY, and a new data element SUCCESS_REPROTECT_DATE_MMDDYYYY are then passed as inputs to the reprotect API. The reprotect API first unprotects the protected input data using the old data element and then reprotects it using the new data element, as part of a single reprotect operation.
from appython import Protector
protector = Protector()
session = protector.create_session("ALL_USER")
data = ["01/27/2019", "04/22/2018"]
print("Input data: "+str(data))
p_out = session.protect(data, "SUCCESS_DATE_MMDDYYYY")
print("Protected data: "+str(p_out))
r_out = session.reprotect(p_out[0], "SUCCESS_DATE_MMDDYYYY",
"SUCCESS_REPROTECT_DATE_MMDDYYYY")
print("Reprotected data: "+str(r_out))
Result
Input data: ['01/27/2019', '04/22/2018']
Protected data: (['06/29/2025', '09/22/2024'], (6, 6))
Reprotected data: (['12/11/2033', '03/06/2033'], (6, 6))
6 is the success return code for the protect operation of each element in the list.
The example for using the protect API for protecting bulk date objects is described in this section. The bulk date objects can be passed as a list or a tuple.
The individual elements of the list or tuple must be of the same data type.
Example
In the following example, the 2019/01/27 and 2018/04/22 date strings are used as the data, which are first converted to a date object using the Python date method of the datetime module. The two date objects are then used to create a list, which is used as the input data.
The input list is then protected using the SUCCESS_DATE_YYYYMMDD data element.
For information regarding the Python datetime module, refer to Python documentation.
from appython import Protector
from datetime import datetime
protector = Protector()
session = protector.create_session("ALL_USER")
data1 = datetime.strptime("2019/01/27", "%Y/%m/%d").date()
data2 = datetime.strptime("2018/04/22", "%Y/%m/%d").date()
data = [data1, data2]
print("Input data: "+str(data))
p_out = session.protect(data, "SUCCESS_DATE_YYYYMMDD")
print("Protected data: "+str(p_out))
Result
Input data: [datetime.date(2019, 1, 27), datetime.date(2018, 4, 22)]
Protected data: ([datetime.date(2028, 7, 14), datetime.date(2027, 10, 8)], (6, 6))
6 is the success return code for the protect operation of each element in the list.
The example for using the protect API for protecting the date object is described in this section.
Example: Input date object in YYYY-MM-DD format
In the following example, the 2019/01/27 date string is used as the data, which is first converted to a date object using the Python date method of the datetime module.
The date object is then protected using the SUCCESS_DATE_YYYYMMDD data element.
For information regarding the Python datetime module, refer to Python documentation.
from appython import Protector
from datetime import datetime
protector = Protector()
session = protector.create_session("ALL_USER")
data = datetime.strptime("2019/01/27", "%Y/%m/%d").date()
print("\nInput date as a Date object : "+str(data))
p_out = session.protect(data, "SUCCESS_DATE_YYYYMMDD")
print("Protected date: "+str(p_out))
Result
Input date as a Date object : 2019-01-27
Protected date: 2028-07-14
The example for using the protect API for protecting bulk date objects is described in this section. The bulk
date objects can be passed as a list or a tuple.
The individual elements of the list or tuple must be of the same data type.
Example
In the following example, the 2019/01/27 and 2018/04/22 date strings are used as the data, which are first converted to a date object using the Python date method of the datetime module.
The two date objects are then used to create a list, which is used as the input data.
The input list is then protected using the SUCCESS_DATE_YYYYMMDD data element.
For information regarding the Python datetime module, refer to Python documentation.
from appython import Protector
from datetime import datetime
protector = Protector()
session = protector.create_session("ALL_USER")
data1 = datetime.strptime("2019/01/27", "%Y/%m/%d").date()
data2 = datetime.strptime("2018/04/22", "%Y/%m/%d").date()
data = [data1, data2]
print("Input data: "+str(data))
p_out = session.protect(data, "SUCCESS_DATE_YYYYMMDD")
print("Protected data: "+str(p_out))
Result
Input data: [datetime.date(2019, 1, 27), datetime.date(2018, 4, 22)]
Protected data: ([datetime.date(2028, 7, 14), datetime.date(2027, 10, 8)], (6, 6))
6 is the success return code for the protect operation of each element in the list.
The example for using the unprotect API for retrieving the original data object from
protected data is described in this section.
Example: Input date object in YYYY-MM-DD format
In the following example, the 2019/01/27 date string is used as the data, which is first converted to a date object using the Python date method of the datetime module.
The date object is first protected using the SUCCESS_DATE_YYYYMMDD data element, and is
then unprotected using the same data element.
For information regarding the Python datetime module, refer to Python documentation.
from appython import Protector
from datetime import datetime
Confidential 268
Protegrity APIs, UDFs, Commands Reference Guide 9.1.0.0 Application Protector
protector = Protector()
session = protector.create_session("ALL_USER")
data = datetime.strptime("2019/01/27", "%Y/%m/%d").date()
print("\nInput date as a Date object : "+str(data))
p_out = session.protect(data, "SUCCESS_DATE_YYYYMMDD")
print("Protected date: "+str(p_out))
unprotected_output = session.unprotect(p_out, "SUCCESS_DATE_YYYYMMDD")
print("Unprotected date: "+str(unprotected_output))
Result
Input date as a Date object : 2019-01-27
Protected date: 2028-07-14
Unprotected date: 2019-01-27
The example for using the unprotect API for retrieving the original bulk date objects from token data is described on this section.
Example
In the following example, the 2019/01/27 and 2018/04/22 date strings are used as the data, which are first converted to date objects using the Python date method of the datetime module.
The two date objects are then used to create a list, which is used as the input data.
The input list is then protected using the SUCCESS_DATE_YYYYMMDD data element, and then unprotected using the same data element.
For information regarding the Python datetime module, refer to Python documentation.
from appython import Protector
from datetime import datetime
protector = Protector()
session = protector.create_session("ALL_USER")
data1 = datetime.strptime("2019/01/27", "%Y/%m/%d").date()
data2 = datetime.strptime("2018/04/22", "%Y/%m/%d").date()
data = [data1, data2]
print("Input data: "+str(data))
p_out = session.protect(data, "SUCCESS_DATE_YYYYMMDD")
print("Protected data: "+str(p_out))
unprotected_output = session.unprotect(p_out[0], "SUCCESS_DATE_YYYYMMDD")
print("Unprotected data: "+str(unprotected_output))
Result
Input data: [datetime.date(2019, 1, 27), datetime.date(2018, 4, 22)]
Protected data: ([datetime.date(2028, 7, 14), datetime.date(2027, 10, 8)], (6, 6))
Unprotected data: ([datetime.date(2019, 1, 27), datetime.date(2018, 4, 22)], (8, 8))
6 is the success return code for the protect operation of each element in the list.
8 is the success return code for the unprotect operation of each element in the list.
The example for using the unprotect API for retrieving the original data string from protected data is described in this section.
Example: Input date string in YYYY-MM-DD format
In the following example, the 2019/01/27 date string that was protected using the SUCCESS_DATE_YYYYMMDD data element, is unprotected using the same data element.
from appython import Protector
protector = Protector()
session = protector.create_session("ALL_USER")
p_out = session.protect("2019/01/27", "SUCCESS_DATE_YYYYMMDD")
print("Protected date: "+str(p_out))
unprotected_output = session.unprotect(p_out, "SUCCESS_DATE_YYYYMMDD")
print("Unprotected date: "+str(unprotected_output))
Result
Protected date: 2028/07/14
Unprotected date: 2019/01/27
The example for using the unprotect API for retrieving the original bulk date strings from token data is described in this section.
Example
In the following example, the 2019/01/27 and 2018/04/22 date strings are used to create a list, which is used as the input data.
The input list is then protected using the SUCCESS_DATE_YYYYMMDD data element, and then
unprotected using the same data element.
from appython import Protector
protector = Protector()
session = protector.create_session("ALL_USER")
data = ["2019/01/27", "2018/04/22"]
print("Input data: "+str(data))
p_out = session.protect(data, "SUCCESS_DATE_YYYYMMDD")
print("Protected data: "+str(p_out))
unprotected_output = session.unprotect(p_out[0], "SUCCESS_DATE_YYYYMMDD")
print("Unprotected data: "+str(unprotected_output))
Result
Input data: ['2019/01/27', '2018/04/22']
Protected data: (['2028/07/14', '2027/10/08'], (6, 6))
Unprotected data: (['2019/01/27', '2018/04/22'], (8, 8))
6 is the success return code for the protect operation of each element in the list.
8 is the success return code for the unprotect operation of each element in the list.
The example for using the reprotect API for reprotecting date object is described in this section.
If you are retokenizing the data using the reprotect API, then the old data element and the new data element must have the same tokenization type. For example, if you have used the Date (DD/MM/YYYY) data element to protect the data, then you must use only the Date (DD/MM/YYYY) data element to reprotect the data.
Example
In the following example, the 2019/01/27 date string is used as the data, which is first converted to a date object using the Python date method of the datetime module. The date object is then protected using the SUCCESS_DATE_YYYYMMDD data element.
The protected input data, the old data element SUCCESS_DATE_YYYYMMDD, and a new data element SUCCESS_REPROTECT_DATE_YYYYMMDD are then passed as inputs to the reprotect API. The reprotect API first unprotects the protected input data using the old data element and then reprotects it using the new data element, as part of a single reprotect operation.
For information regarding the Python datetime module, refer to Python documentation.
from appython import Protector
from datetime import datetime
protector = Protector()
session = protector.create_session("ALL_USER")
data = datetime.strptime("2019/01/27", "%Y/%m/%d").date()
print("\nInput date as a Date object : "+str(data))
p_out = session.protect(data, "SUCCESS_DATE_YYYYMMDD")
print("Protected date: "+str(p_out))
r_out = session.reprotect(p_out, "SUCCESS_DATE_YYYYMMDD",
"SUCCESS_REPROTECT_DATE_YYYYMMDD")
print("Reprotected date: "+str(r_out))
Result
Input date as a Date object : 2019-01-27
Protected date: 2028-07-14
Reprotected date: 2036-12-26
The example for using the reprotect API for reprotecting bulk date objects is described in this section. The bulk date objects can be passed as a list or a tuple.
The individual elements of the list or tuple must be of the same data type.
If you are retokenizing the data using the reprotect API, then the old data element and the new data element must have the same tokenization type. For example, if you have used the Date (DD/MM/YYYY) data element to protect the data, then you must use only the Date (DD/MM/YYYY) data element to reprotect the data.
Example
In the following example, the two date strings 2019/01/27 and 2018/04/22 are used as data, which are first converted to date objects using the Python date method of the datetime module. The two date objects are joined together to create a list, which is protected using the
SUCCESS_DATE_YYYYMMDD data element.
The protected input data, the old data element SUCCESS_DATE_YYYYMMDD, and a new data element SUCCESS_REPROTECT_DATE_YYYYMMDD are then passed as inputs to the reprotect API. The reprotect API first unprotects the protected input data using the old data element and then reprotects it using the new data element, as part of a single reprotect operation.
For information regarding the Python datetime module, refer to Python documentation.
from appython import Protector
from datetime import datetime
protector = Protector()
session = protector.create_session("ALL_USER")
data1 = datetime.strptime("2019/01/27", "%Y/%m/%d").date()
data2 = datetime.strptime("2018/04/22", "%Y/%m/%d").date()
data = [data1, data2]
print("Input data: "+str(data))
p_out = session.protect(data, "SUCCESS_DATE_YYYYMMDD")
print("Protected data: "+str(p_out))
r_out = session.reprotect(p_out[0], "SUCCESS_DATE_YYYYMMDD",
"SUCCESS_REPROTECT_DATE_YYYYMMDD")
print("Reprotected data: "+str(r_out))
Result
Input data: [datetime.date(2019, 1, 27), datetime.date(2018, 4, 22)]
Protected data: ([datetime.date(2028, 7, 14), datetime.date(2027, 10, 8)], (6, 6))
Reprotected data: ([datetime.date(2036, 12, 26), datetime.date(2036, 3, 21)], (6, 6))
6 is the success return code for the protect operation of each element in the list.
The example for using the reprotect API for reprotecting a date in string format is described in this section.
If you are retokenizing the data using the reprotect API, then the old data element and the new data element must have the same tokenization type. For example, if you have used the Date (DD/MM/YYYY) data element to protect the data, then you must use only the Date (DD/MM/YYYY) data element to reprotect the data.
Example
In the following example, the 2019/01/27 date string is protected using the SUCCESS_DATE_YYYYMMDD data element.
The protected input data, the old data element SUCCESS_DATE_YYYYMMDD, and a new data element SUCCESS_REPROTECT_DATE_YYYYMMDD are then passed as inputs to the reprotect API. The reprotect API first unprotects the protected input data using the old data element and then reprotects it using the new data element, as part of a single reprotect operation.
from appython import Protector
protector = Protector()
session = protector.create_session("ALL_USER")
p_out = session.protect("2019/01/27", "SUCCESS_DATE_YYYYMMDD")
print("Protected date: "+str(p_out))
r_out = session.reprotect(p_out, "SUCCESS_DATE_YYYYMMDD",
"SUCCESS_REPROTECT_DATE_YYYYMMDD")
print("Reprotected date: "+str(r_out))
Result
Protected date: 2028/07/14
Reprotected date: 2036/12/26
The example for using the reprotect API for reprotecting bulk dates in string format is described in this section. The bulk date strings can be passes as a list or a tuple.
The individual elements of the list or tuple must be of the same data type.
If you are retokenizing the data using the reprotect API, then the old data element and the new data element must have the same tokenization type. For example, if you have used the Date (DD/MM/YYYY) data element to protect the data, then you must use only the Date (DD/MM/YYYY) data element to reprotect the data.
Example
In the following example, the two date strings 2019/01/27 and 2018/04/22 are used to create a list, which is protected using the SUCCESS_DATE_YYYYMMDD data element.
The protected input data, the old data element SUCCESS_DATE_YYYYMMDD, and a new data element SUCCESS_REPROTECT_DATE_YYYYMMDD are then passed as inputs to the reprotect API. The reprotect API first unprotects the protected input data using the old data element and then reprotects it using the new data element, as part of a single reprotect operation.
from appython import Protector
protector = Protector()
session = protector.create_session("ALL_USER")
data = ["2019/01/27", "2018/04/22"]
print("Input data: "+str(data))
p_out = session.protect(data, "SUCCESS_DATE_YYYYMMDD")
print("Protected data: "+str(p_out))
r_out = session.reprotect(p_out[0], "SUCCESS_DATE_YYYYMMDD",
"SUCCESS_REPROTECT_DATE_YYYYMMDD")
print("Reprotected data: "+str(r_out))
Result
Input data: ['2019/01/27', '2018/04/22']
Protected data: (['2028/07/14', '2027/10/08'], (6, 6))
Reprotected data: (['2036/12/26', '2036/03/21'], (8, 8))
6 is the success return code for the protect operation of each element in the list.
Mock Example - Protecting Date and Time String
The example for using the protect API for protecting the date and time string is described in this section.
If you are providing the input as a Datetime object, then you must use the data element with the tokenization type as Datetime to protect the data.
Example: Input date and time string in YYYY-MM-DD HH:MM:SS MMM format
In the following example, the 2019/01/27 02:34:54.123 date and time string is protected using the SUCCESS_DATETIME data element.
from appython import Protector
protector = Protector()
session = protector.create_session("ALL_USER")
p_out = session.protect("2019/01/27 02:34:54.123", "SUCCESS_DATETIME")
print("Protected date: "+str(p_out))
Result
Protected date: 2021/10/27 08:16:34.123000
Mock Example - Protecting Bulk Date and Time Strings
The example for using the protect API for protecting bulk date and time strings is described in this section. The bulk date and time strings can be passed as a list or a tuple.
The individual elements of the list or tuple must be of the same data type.
Example
In the following example, the 2019/01/27 02:34:54.123 and 2018/04/22 01:24:35.123 date and time strings are used to create a list, which is used as the input data.
The input list is then tokenized using the SUCCESS_DATETIME data element.
from appython import Protector
protector = Protector()
session = protector.create_session("ALL_USER")
data = ["2019/01/27 02:34:54.123", "2018/04/22 01:24:35.123"]
print("Input data: "+str(data))
p_out = session.protect(data, "SUCCESS_DATETIME")
print("Protected data: "+str(p_out))
Result
Input data: ['2019/01/27 02:34:54.123', '2018/04/22 01:24:35.123']
Protected data: (['2021/10/27 08:16:34.123000', '2021/01/20 07:06:15.123000'], (6, 6))
6 is the success return code for the protect operation of each element in the list.
Mock Example - Unprotecting Date and Time String
The example for using the unprotect API for retrieving the original bulk data and time string from protected data is described in this section.
Example: Input date and time string in YYYY-MM-DD HH:MM:SS MMM format
In the following example, the 2019/01/27 02:34:54.123 date and time string that was protected using the SUCCESS_DATETIME data element, is unprotected using the same data element.
from appython import Protector
protector = Protector()
session = protector.create_session("ALL_USER")
p_out = session.protect("2019/01/27 02:34:54.123", "SUCCESS_DATETIME")
print("Protected date: "+str(p_out))
unprotected_output = session.unprotect(p_out, "SUCCESS_DATETIME")
print("Unprotected data: "+str(unprotected_output))
Result
Protected date: 2021/10/27 08:16:34.123000
Unprotected data: 2019/01/27 02:34:54.123000
Mock Example - Unprotecting Bulk Date and Time Strings
The example for using the unprotect API for retrieving the original bulk date and time strings from token data is described in this section.
Example
In the following example, the 2019/01/27 02:34:54.123 and 2018/04/22 01:24:35.123 date and time strings are used to create a list, which is used as the input data.
The input list is then protected using the SUCCESS_DATETIME data element, and then unprotected using the same data element.
from appython import Protector
protector = Protector()
session = protector.create_session("ALL_USER")
data = ["2019/01/27 02:34:54.123", "2018/04/22 01:24:35.123"]
print("Input data: "+str(data))
p_out = session.protect(data, "SUCCESS_DATETIME")
print("Protected data: "+str(p_out))
unprotected_output = session.unprotect(p_out[0], "SUCCESS_DATETIME")
print("Unprotected data: "+str(unprotected_output))
Result
Protected data: (['2021/10/27 08:16:34.123000', '2021/01/20 07:06:15.123000'], (6, 6))
Unprotected data: (['2019/01/27 02:34:54.123000', '2018/04/22 01:24:35.123000'], (8, 8))
6 is the success return code for the protect operation of each element in the list.
8 is the success return code for the unprotect operation of each element in the list.
Mock Example - Reprotecting Date and Time String
The example for using the reprotect API for reprotecting date and time string is described in this section.
If you are retokenizing the data using the reprotect API, then the old data element and the new data element must have the same tokenization type. For example, if you have used the Datetime (YYYY-MM-DD HH:MM:SS MMM) data element to protect the data, then you must use only the Datetime (YYYY-MM-DD HH:MM:SS MMM) data element to reprotect the data.
Example: Input date and time in YYYY-MM-DD HH:MM:SS MMM format
In the following example, the 2019/01/27 02:34:54.123 date string is protected using the SUCCESS_DATETIME data element.
The protected input data, the old data element SUCCESS_DATETIME, and a new data element SUCCESS_REPROTECT_DATETIME are then passed as inputs to the reprotect API. The reprotect API first unprotects the protected input data using the old data element and then reprotects it using the new data element, as part of a single reprotect operation.
from appython import Protector
protector = Protector()
session = protector.create_session("ALL_USER")
p_out = session.protect("2019/01/27 02:34:54.123", "SUCCESS_DATETIME")
print("Protected date: "+str(p_out))
r_out = session.reprotect(p_out, "SUCCESS_DATETIME", "SUCCESS_REPROTECT_DATETIME")
print("Reprotected date: "+str(r_out))
Result
Protected date: 2021/10/27 08:16:34.123000
Reprotected date: 2022/06/24 02:27:30.123000
Mock Example - Reprotecting Bulk Date and Time Strings
The example for using the reprotect API for reprotecting bulk date and time strings is described in this section. The bulk date and time strings can be passed as a list or a tuple.
The individual elements of the list or tuple must be of the same data type.
If you are retokenizing the data using the reprotect API, then the old data element and the new data element must have the same tokenization type. For example, if you have used the Datetime (YYYY-MM-DD HH:MM:SS MMM) data element to protect the data, then you must use only the Datetime (YYYY-MM-DD HH:MM:SS MMM) data element to reprotect the data.
Example
In the following example, the 2019/01/27 02:34:54.123 and 2018/04/22 01:24:35.123 date and time strings are used to create a list, which is used as the input data.
The input list is then protected using the SUCCESS_DATETIME data element.
The protected input data, the old data element SUCCESS_DATETIME, and a new data element
SUCCESS_REPROTECT_DATETIME are then passed as inputs to the reprotect API. The reprotect API first unprotects the protected input data using the old data element and then reprotects it using the new data element, as part of a single reprotect operation.
from appython import Protector
protector = Protector()
session = protector.create_session("ALL_USER")
data = ["2019/01/27 02:34:54.123", "2018/04/22 01:24:35.123"]
print("Input data: "+str(data))
p_out = session.protect(data, "SUCCESS_DATETIME")
print("Protected data: "+str(p_out))
r_out = session.reprotect(p_out[0], "SUCCESS_DATETIME", "SUCCESS_REPROTECT_DATETIME")
print("Reprotected date: "+str(r_out))
Result
Protected data: (['2021/10/27 08:16:34.123000', '2021/01/20 07:06:15.123000'], (6, 6))
Reprotected date: (['2022/06/24 02:27:30.123000', '2021/09/17 01:17:11.123000'], (6, 6))
6 is the success return code for the protect operation of each element in the list.
Mock Example - Encrypting String Data
The example for using the protect API for encrypting string data is described in this section.
If you want to encrypt the data, then you must use bytes in the encrypt_to keyword.
Example: Input string data
In the following example, the Protegrity1 string is used as the data, which is encrypted using the SUCCESS_ENC data element. Therefore, the encrypt_to parameter is passed as a keyword argument, and its value is set to bytes.
from appython import Protector
protector = Protector()
session = protector.create_session("ALL_USER")
output = session.protect("Protegrity1", "SUCCESS_ENC",
encrypt_to=bytes)
print("Encrypted Data: %s" %output)
Result
Encrypted Data: b'1\x05\n\x07\n\n\x17\x19\x15\nB'
Mock Example - Encrypting Bulk String Data
The example for using the protect API for encrypting bulk string data is described in this section. The bulk
string data can be passed as a list or a tuple.
The individual elements of the list or tuple must be of the same data type.
If you want to encrypt the data, then you must must use bytes in the encrypt_to keyword.
Example
In the following example, protegrity1234, Protegrity1, and Protegrity56 strings are stored in a list and used as bulk data, which is encrypted using the SUCCESS_ENC data element. Therefore, the encrypt_to parameter is passed as a keyword argument, and its value is set to bytes.
from appython import Protector
protector = Protector()
session = protector.create_session("ALL_USER")
data = ["protegrity1234", "Protegrity1", "Protegrity56"]
p_out = session.protect(data, "SUCCESS_ENC",
encrypt_to=bytes)
print("Encrypted Data: ")
print(p_out)
Result
Encrypted Data:
([b'\x11\x05\n\x07\n\n\x17\x19\x15\nBE\\F', b'1\x05\n\x07\n\n\x17\x19\x15\nB', b'1\x05\n
\x07\n\n\x17\x19\x15\nFA'], (6, 6, 6))
6 is the success return code for the protect operation of each element in the list.
Mock Example - Decrypting String Data
The example for using the unprotect API for decrypting string data is described in this section.
If you want to encrypt the data, then you must use bytes in the encrypt_to keyword.
Example: Input string data
In the following example, the Protegrity1 string that was encrypted using the SUCCESS_ENC data element is now decrypted using the same data element. Therefore, the decrypt_to parameter is passed as a keyword argument, and its value is set to str.
from appython import Protector
protector = Protector()
session = protector.create_session("ALL_USER")
output = session.protect("Protegrity1", "SUCCESS_ENC",
encrypt_to=bytes)
print("Encrypted Data: %s" %output)
org = session.unprotect(output, "SUCCESS_ENC",
decrypt_to=str)
print("Decrypted Data: %s" %org)
Result
Encrypted Data: b'1\x05\n\x07\n\n\x17\x19\x15\nB'
Decrypted Data: Protegrity1
Mock Example - Decrypting Bulk String Data
The example for using the unprotect API for decrypting bulk string data is described in this section.
If you want to encrypt the data, then you must use bytes in the encrypt_to keyword.
Example
In the following example, protegrity1234, Protegrity1, and Protegrity56 strings are stored in a list and used as bulk data, which is encrypted using the SUCCESS_STR data element. The bulk string data is then decrypted using the same data element. Therefore, the decrypt_to parameter is passed as a keyword argument, and its value is set to str.
from appython import Protector
protector = Protector()
session = protector.create_session("ALL_USER")
data = ["protegrity1234", "Protegrity1", "Protegrity56"]
p_out = session.protect(data, "SUCCESS_STR", encrypt_to=bytes)
print("Encrypted Data: ")
print(p_out)
out = session.unprotect(p_out[0], "SUCCESS_STR", decrypt_to=str)
print("Decrypted Data: ")
print(out)
Result
Encrypted Data:
([b'pJPqrjJEqLXHaO', b'6JPqrjJEqLX', b'6JPqrjJEqLl5'], (6, 6, 6))
Decrypted Data:
(['protegrity1234', 'Protegrity1', 'Protegrity56'], (8, 8, 8))
6 is the success return code for the protect operation of each element in the list.
8 is the success return code for the unprotect operation of each element in the list.
Mock Example - Encrypting Integer Data
The example for using the protect API for encrypting integer data is described in this section.
If you want to encrypt the data, then you must use bytes in the encrypt_to keyword.
Example
In the following example, 21 is used as the integer data, which is encrypted using the SUCCESS_ENC data element. Therefore, the encrypt_to parameter is passed as a keyword argument, and its value is set to bytes.
from appython import Protector
protector = Protector()
session = protector.create_session("ALL_USER")
output = session.protect(21, "SUCCESS_ENC", encrypt_to=bytes)
print("Encrypted Data: %s" %output)
Result
Mock Example - Encrypting Bulk Integer Data
The example foe using the protect API for encrypting bulk integer data is described in this section. The bulk
integer data can be passed as a list or a tuple.
If you want to encrypt the data, then you must use bytes in the encrypt_to keyword.
Example
In the following example, 21, 42, and 55 integers are stored in a list and used as bulk data, which is encrypted using the SUCCESS_ENC data element. Therefore, the encrypt_to parameter is passed as a keyword argument, and its value is set to bytes.
from appython import Protector
protector = Protector()
session = protector.create_session("ALL_USER")
data = [21, 42, 55]
p_out = session.protect(data, "SUCCESS_ENC", encrypt_to=bytes)
print("Encrypted Data: ")
print(p_out)
Result
Encrypted Data:
([b'twes', b'Kwes', b'Vwes'], (6, 6, 6))
6 is the success return code for the protect operation of each element in the list.
Mock Example - Decrypting Integer Data
The example for using the unprotect API for decrypting integer data is described in this section.
If you want to encrypt the data, then you must use bytes in the encrypt_to keyword.
Example
In the following example, the integer data 21 that was encrypted using the SUCCESS_ENC data element is now decrypted using the same data element. Therefore, the decrypt_to parameter is passed as a keyword argument, and its value is set to int.
from appython import Protector
protector = Protector()
session = protector.create_session("ALL_USER")
output = session.protect(21, "SUCCESS_ENC", encrypt_to=bytes)
print("Encrypted Data: %s" %output)
org = session.unprotect(output, "SUCCESS_ENC", decrypt_to=int)
print("Decrypted Data: %s" %org)
Result
Encrypted Data: b'twes'
Decrypted Data: 21
Mock Example - Decrypting Bulk Integer Data
The example for using the unprotect API for decrypting bulk integer data is described in this section.
If you want to encrypt the data,then you must use bytes in the encrypt_to keyword.
Example
In the following example, 21, 42, and 55 integers are stored in a list and used as bulk data, which is encrypted using the SUCCESS_ENC data element. The bulk integer data is then decrypted using the same data element. Therefore, the decrypt_to parameter is passed as a keyword argument, and its value is set to int.
from appython import Protector
protector = Protector()
session = protector.create_session("ALL_USER")
data = [21, 42, 55]
p_out = session.protect(data, "SUCCESS_ENC", encrypt_to=bytes)
print("Encrypted Data: ")
print(p_out)
out = session.unprotect(p_out[0], "SUCCESS_ENC", decrypt_to=int)
print("Decrypted Data: ")
print(out)
Result
Encrypted Data:
([b'twes', b'Kwes', b'Vwes'], (6, 6, 6))
Decrypted Data:
([21, 42, 55], (6, 6, 6))
6 is the success return code for the protect operation of each element in the list.
8 is the success return code for the unprotect operation of each element in the list.
Mock Example - Encrypting Long Data
The example for uisng the protect API for encrypting long data is described in this section.
If you want to encrypt the data, then you must use bytes in the encrypt_to keyword.
Example
In the following example, 1376235139103947 is used as the long data, which is encrypted using the SUCCESS_ENC data element. Therefore, the encrypt_to parameter is passed as a keyword argument, and its value is set to bytes.
from appython import Protector
protector = Protector()
session = protector.create_session("ALL_USER")
output = session.protect(1376235139103947, "SUCCESS_ENC", encrypt_to=bytes)
print("Encrypted Data: %s" %output)
Result
Encrypted Data: b'\xaa\x8b\xf2\xc5\xc2\x8eap'
Mock Example - Encrypting Bulk Long Data
The example for using the protect API for encrypting bulk long data is described in this section. The bulk long
data can be passed as a list or a tuple.
The individual elements of the list or tuple must be of the same data type.
If you want to encrypt the data, then you must use bytes in the encrypt_to keyword.
Example
In the following example, 1376235139103947, 2396235839173981, and 9371234126176985 long data are stored in a list and used as bulk data, which is encrypted using the SUCCESS_ENC data element. Therefore, the encrypt_to parameter is passed as a keyword argument, and its value is set to bytes.
from appython import Protector
protector = Protector()
session = protector.create_session("ALL_USER")
data = [1376235139103947, 2396235839173981, 9371234126176985]
p_out = session.protect(data, "SUCCESS_ENC", encrypt_to=bytes)
print("Encrypted Data: ")
print(p_out)
Result
Encrypted Data:
([b'\xaa\x8b\xf2\xc5\xc2\x8eap', b'<\x82\x98R2\xeemp', b'\xb8\xd5W\ny&Dp'], (6, 6, 6))
6 is the success return code for the protect operation of each element in the list.
Mock Example - Decrypting Long Data
The example for using the unprotect API for decrypting long data is described in this section.
If you want to encrypt the data, then you must use bytes in the encrypt_to keyword.
Example
In the following example, the long data 1376235139103947 that was encrypted using the SUCCESS_ENC data element is now decrypted using the same data element. Therefore, the decrypt_to parameter is passed as a keyword argument, and its value is set to long.
from appython import Protector
protector = Protector()
session = protector.create_session("ALL_USER")
output = session.protect(1376235139103947, "SUCCESS_ENC", encrypt_to=bytes)
Confidential 282
Protegrity APIs, UDFs, Commands Reference Guide 9.1.0.0 Application Protector
print("Encrypted Data: %s" %output)
org = session.unprotect(output, "SUCCESS_ENC", decrypt_to=int)
print("Decrypted Data: %s" %org)
Result
Encrypted Data: b'\xaa\x8b\xf2\xc5\xc2\x8eap'
Decrypted Data: 1376235139103947
Mock Example - Decrypting Bulk Long Data
The example for using the unprotect API for decrypting bulk long data is described in this section.
If you want to encrypt the data, then you must use bytes in the encrypt_to keyword.
Example
In the following example, 1376235139103947, 2396235839173981, and 9371234126176985 long data are stored in a list and used as bulk data, which is encrypted using the SUCCESS_ENC data element. The bulk long data is then decrypted using the same data element. Therefore, the decrypt_to parameter is passed as a keyword argument, and its value is set to long.
from appython import Protector
protector = Protector()
session = protector.create_session("ALL_USER")
data = [1376235139103947, 2396235839173981, 9371234126176985]
p_out = session.protect(data, "SUCCESS_ENC", encrypt_to=bytes)
print("Encrypted Data: ")
print(p_out)
out = session.unprotect(p_out[0], "SUCCESS_ENC", decrypt_to=int)
print("Decrypted Data: ")
print(out)
Result
Encrypted Data:
([b'\xaa\x8b\xf2\xc5\xc2\x8eap', b'<\x82\x98R2\xeemp', b'\xb8\xd5W\ny&Dp'], (6, 6, 6))
Decrypted Data:
([1376235139103947, 2396235839173981, 9371234126176985], (6, 6, 6))
6 is the success return code for the protect operation of each element in the list.
8 is the success return code for the unprotect operation of each element in the list.
Mock Example - Encrypting Float Data
The example for using the protect API for encrypting float data is described in this section.
If you want to encrypt the data, then you must use bytes in the encrypt_to keyword.
Example
In the following example, 22.5 is used as the float data, which is encrypted using the SUCCESS_ENC data element. Therefore, the encrypt_to parameter is passed as a keyword argument, and its value is set to bytes.
from appython import Protector
protector = Protector()
session = protector.create_session("ALL_USER")
output = session.protect(22.5, "SUCCESS_ENC", encrypt_to=bytes)
print("Encrypted Data: %s" %output)
Result
Mock Example - Encrypting Bulk Float Data
The example for using the protect API for encrypting bulk float data is described in this section. The bulk
float data can be passed as a list or a tuple.
The individual elements of the list or tuple must be of the same data type.
If you want to encrypt the data, then you must use bytes in the encrypt_to keyword.
Example
In the following example, 22.5, 48.93, and 94.14 float data are stored in a list and used as bulk data, which is encrypted using the SUCCESS_ENC data element. Therefore, the encrypt_to parameter is passed as a keyword argument, and its value is set to bytes.
from appython import Protector
protector = Protector()
session = protector.create_session("ALL_USER")
data = [22.5, 48.93, 94.31]
p_out = session.protect(data, "SUCCESS_ENC", encrypt_to=bytes)
print("Encrypted Data: ")
print(p_out)
Result
Encrypted Data:
([b'SEKF', b'UOKJ\\', b'XCK@^'], (6, 6, 6))
6 is the success return code for the protect operation of each element in the list.
Mock Example - Decrypting Float Data
The example for using the unprotect API for decrypting float data is described in this section.
If you want to encrypt the data, then you must use bytes in the encrypt_to keyword.
Example
In the following example, the float data 22.5 that was encrypted using the SUCCESS_ENC data element is now decrypted using the same data element. Therefore, the decrypt_to parameter is passed as a keyword argument and its value is set to float.
from appython import Protector
protector = Protector()
session = protector.create_session("ALL_USER")
output = session.protect(22.5, "SUCCESS_ENC", encrypt_to=bytes)
print("Encrypted Data: %s" %output)
org = session.unprotect(output, "SUCCESS_ENC", decrypt_to=float)
print("Decrypted Data: %s" %org)
Result
Encrypted Data: b'SEKF'
Decrypted Data: 22.5
Mock Example - Decrypting Bulk Float Data
The example for using the unprotect API for decrypting bulk float data is described in this section.
If you want to encrypt the data, then you must use bytes in the encrypt_to keyword.
Example
In the following example, 22.5, 48.93, and 94.14 float data are stored in a list and used as bulk data, which is encrypted using the SUCCESS_ENC data element. The bulk float data is then decrypted using the same data element. Therefore, the decrypt_to parameter is passed as a
keyword argument and its value is set to float.
from appython import Protector
protector = Protector()
session = protector.create_session("ALL_USER")
data = [22.5, 48.93, 94.31]
p_out = session.protect(data, "SUCCESS_ENC", encrypt_to=bytes)
print("Encrypted Data: ")
print(p_out)
out = session.unprotect(p_out[0], "SUCCESS_ENC", decrypt_to=float)
print("Decrypted Data: ")
print(out)
Result
Encrypted Data:
([b'SEKF', b'UOKJ\\', b'XCK@^'], (6, 6, 6))
Decrypted Data:
([22.5, 48.93, 94.31], (6, 6, 6))
6 is the success return code for the protect operation of each element in the list.
8 is the success return code for the unprotect operation of each element in the list.
Mock Example - Encrypting Bytes Data
The example for using the protect API for encrypting bytes data is described in this section.
If you want to encrypt the data, then you must use bytes in the encrypt_to keyword.
Example
In the following example, Protegrity1 string is first converted to bytes using the Python bytes() method. The bytes data is then encrypted using the SUCCESS_BYTE data element. Therefore, the encrypt_to parameter is passed as a keyword argument and its value is set to bytes.
from appython import Protector
protector = Protector()
session = protector.create_session("ALL_USER")
data=bytes("Protegrity1", encoding="utf-8")
p_out = session.protect(data, "SUCCESS_BYTE", encrypt_to=bytes)
print("Encrypted Data: %s" %p_out)
Result
Encrypted Data: b'6JPqrjJEqLX'
Mock Example - Encrypting Bulk Bytes Data
The example for using the protect API for encrypting bulk bytes data is described in this section. The bulk
bytes data can be passes as a list or a tuple.
The individual elements of the list or tuple must be of the same data type.
If you want to encrypt the data, then you must use bytes in the encrypt_to keyword.
Example
In the following example, Protegrity1 string is first converted to bytes using the Python bytes() method. The bytes data is then repeated five times in a list and used as bulk data, which is encrypted using the SUCCESS_BYTE data element. Therefore, the encrypt_to parameter is
passed as a keyword argument and its value is set to bytes.
from appython import Protector
protector = Protector()
session = protector.create_session("ALL_USER")
data=[bytes("Protegrity1")]*5
p_out = session.protect(data, "SUCCESS_BYTE", encrypt_to=bytes)
print("Encrypted Data: ")
print(p_out)
Result
Encrypted Data:
([b'6JPqrjJEqLX', b'6JPqrjJEqLX', b'6JPqrjJEqLX', b'6JPqrjJEqLX', b'6JPqrjJEqLX'], (6,
6, 6, 6, 6))
6 is the success return code for the protect operation of each element in the list.
Mock Example - Decrypting Bytes Data
The example for using the protect API for decrypting bytes data is described in this section.
Example
In the following example, Protegrity1 string is first converted to bytes using the Python bytes() method. The bytes data is then encrypted using the SUCCESS_BYTE data element. Therefore, the encrypt_to parameter is passed as a keyword argument, and its value is set to bytes.
The encrypted data is then decrypted using the same data element. Therefore, the decrypt_to parameter is passed as a keyword argument and its value is set to bytes.
from appython import Protector
protector = Protector()
session = protector.create_session("ALL_USER")
data=bytes("Protegrity1", encoding="utf-8")
p_out = session.protect(data, "SUCCESS_BYTE", encrypt_to=bytes)
print("Encrypted Data: %s" %p_out)
org = session.unprotect(p_out, "SUCCESS_BYTE", decrypt_to=bytes)
print("Decrypted Data: %s" org)
Result
Encrypted Data: b'6JPqrjJEqLX'
Decrypted Data: %s b'Protegrity1'
Mock Example - Decrypting Bulk Bytes Data
The example for using the protect API for encrypting bulk bytes data is described in this section. The bulk
bytes data can be passed as a list or a tuple.
The individual elements of the list or tuple must be of the same data type.
Example
In the following example, Protegrity1 string is first converted to bytes using the Python bytes() method. The bytes data is then repeated five times in a list and used as bulk data, which is encrypted using the SUCCESS_BYTE data element. Therefore, the encrypt_to parameter is
passed as a keyword argument and its value is set to bytes.
The encrypted bulk data is then decrypted using the same data element. Therefore, the decrypt_to parameter is passed as a keyword argument and its value is set to bytes.
from appython import Protector
protector = Protector()
session = protector.create_session("ALL_USER")
data=[bytes("Protegrity1")]*5
p_out = session.protect(data, "SUCCESS_BYTE", encrypt_to=bytes)
print("Encrypted Data: ")
print(p_out)
org = session.unprotect(p_out[0], "SUCCESS_BYTE", decrypt_to=bytes)
print("Decrypted Data: ")
print(org)
Result
Encrypted Data:
([b'6JPqrjJEqLX', b'6JPqrjJEqLX', b'6JPqrjJEqLX', b'6JPqrjJEqLX', b'6JPqrjJEqLX'], (6,
6, 6, 6, 6))
Decrypted Data:
([b'Protegrity1', b'Protegrity1', b'Protegrity1', b'Protegrity1', b'Protegrity1'], (8,
8, 8, 8, 8))
6 is the success return code for the protect operation of each element in the list.
8 is the success return code for the unprotect operation of each element in the list.
Mock Example - Re-encrypting Bytes Data
The example for using the reprotect API for re-encrypting bytes data is described in this section.
If you are using the reprotect API, then the old data element and the new data element must be of the same protection method. For example, if you have used AES256 data element to protect the data, then you must use only AES256 data element to reprotect the data.
Example
In the following example, Protegrity1 string is first converted to bytes using the Python bytes() method. The bytes data is then encrypted using the SUCCESS_BYTE data element. Therefore, the encrypt_to parameter is passed as a keyword argument and its value is set to bytes.
The protected input data, the old data element SUCCESS_BYTE, and a new data element SUCCESS_REPROTECT_BYTE are then passed as inputs to the reprotect API. The reprotect API first decrypts the protected input data using the old data element and then re-encrypts it using the new data element, as part of a single reprotect operation. Therefore, the encrypt_to parameter is passed as a keyword argument and its value is set to bytes.
from appython import Protector
protector = Protector()
session = protector.create_session("ALL_USER")
data=bytes("Protegrity1", encoding="utf-8")
p_out = session.protect(data, "SUCCESS_BYTE", encrypt_to=bytes)
print("Encrypted Data: %s" %p_out)
r_out = session.reprotect(p_out, "SUCCESS_BYTE", "SUCCESS_REPROTECT_BYTE",
encrypt_to=bytes)
print("Re-encrypted Data: %s" %r_out)
Result
Encrypted Data: b'6JPqrjJEqLX'
Re-encrypted Data: b'JQbePhQ2eGC'
Mock Example - Re-Encrypting Bulk Bytes Data
The example for using the reprotect API for re-encrypting bulk bytes data is described in this section. The bulk bytes data can be passed as a list or a tuple.
The individual elements of the list or tuple must be of the same data type.
If you are using the reprotect API, then the old data element and the new data element must be of the same protection method. For example, if you have used AES256 data element to protect the data, then you must use only AES256 data element to reprotect the data.
Example
In the following example, Protegrity1 string is first converted to bytes using the Python bytes() method. The bytes data is then repeated five times in a list and used as bulk data, which is encrypted using the SUCCESS_BYTE data element. Therefore, the encrypt_to parameter is
passed as a keyword argument and its value is set to bytes.
The encrypted input data, the old data element SUCCESS_BYTE, and a new data element SUCCESS_REPROTECT_BYTE are then passed as inputs to the reprotect API. The reprotect API first decrypts the protected input data using the old data element and then re-encrypts it using the new data element, as part of a single reprotect operation. Therefore, the encrypt_to
parameter is passed as a keyword argument and its value is set to bytes.
from appython import Protector
protector = Protector()
session = protector.create_session("ALL_USER")
data=[bytes("Protegrity1")]*5
p_out = session.protect(data, "SUCCESS_BYTE", encrypt_to=bytes)
print("Encrypted Data: ")
print(p_out)
r_out = session.reprotect(p_out[0], "SUCCESS_BYTE", "SUCCESS_REPROTECT_BYTE",
encrypt_to=bytes)
print("Re-encrypted Data: ")
print(r_out)
Result
Encrypted Data:
([b'6JPqrjJEqLX', b'6JPqrjJEqLX', b'6JPqrjJEqLX', b'6JPqrjJEqLX', b'6JPqrjJEqLX'], (6,
6, 6, 6, 6))
Re-encrypted Data:
([b'JQbePhQ2eGC', b'JQbePhQ2eGC', b'JQbePhQ2eGC', b'JQbePhQ2eGC', b'JQbePhQ2eGC'], (6,
6, 6, 6, 6))
Using sample data elements for simulating auxiliary API scenarios
The examples on how to use the sample data elements for simulating the following auxiliary API scenarios are described in this section:
• Checking access permissions with success output
• Checking access permissions with failure output
In the mock implementation, you must pass the ALL_USER user name as an argument to the create_session API for creating a session.
Mock Example - Success Scenario for Checking Access Permissions
This example describes the success scenario on checking the access permission status of the user for a specified data element.
Example
In the following example, the check_access API returns True when you check the permission of User1 for protecting the data using the SUCCESS_CHECK_ACCESS data element.
from appython import Protector
from appython import CheckAccessType
protector = Protector()
session = protector.create_session("ALL_USER")
print(session.check_access("SUCCESS_CHECK_ACCESS", CheckAccessType.PROTECT))
Result
Mock Example - Failure Scenario for Checking Access Permissions
This example describes the failure scenario on checking the access permission status of the user for a specified data element.
Example
In the following example, the check_access API returns True when you check the permission of User1 for protecting the data using the FAIL_CHECK_ACCESS data element.
from appython import Protector
from appython import CheckAccessType
protector = Protector()
session = protector.create_session("ALL_USER")
print(session.check_access("FAIL_CHECK_ACCESS", CheckAccessType.PROTECT))
Result
Using sample data elements for simulating error scenarios
The examples on how to use the sample data elements for simulating the error scenarios while protecting, unprotecting, and reprotecting the data are described in this section.
In the mock implementation, you must pass the ALL_USER user name as an argument to the create_session API for creating a session.
Mock Example - Invalid User Exception
The examples for the scenario if a user who is not defined in a policy is used to protect single or bulk data are described in this section.
Example: Single Data
In the following example, the Protegrity1 string is used as the data, which is being protected using the EXCEPTION_INVALID_USER data element.
from appython import Protector
from appython.exceptions import ProtectError
protector = Protector()
session = protector.create_session("ALL_USER")
try:
output = session.protect("Protegrity1", "EXCEPTION_INVALID_USER")
print("protect: "+output)
except ProtectError as error:
print(error)
Result
1, The username could not be found in the policy in shared memory.
Example: Bulk Data
In the following example, the Protegrity1 string is repeated five times in a list, which is used as the input bulk data. The input data is being protected using the EXCEPTION_INVALID_USER data element.
from appython import Protector
protector = Protector()
session = protector.create_session("ALL_USER")
data = ["Protegrity1"]*5
output = session.protect(data, "EXCEPTION_INVALID_USER")
print(output)
Result
([None, None, None, None, None], ('1', '1', '1', '1', '1'))
Mock Example - Invalid Data Element Exception
The examples for the scenario if a data element that is not defined in a policy is used to protect single or bulk data are described in this section.
Example: Single Data
In the following example, the Protegrity1 string is used as the data, which is being protected using the EXCEPTION_INVALID_DE data element.
from appython import Protector
from appython.exceptions import ProtectError
protector = Protector()
Confidential 291
Protegrity APIs, UDFs, Commands Reference Guide 9.1.0.0 Application Protector
session = protector.create_session("ALL_USER")
try:
output = session.protect("Protegrity1", "EXCEPTION_INVALID_DE")
print("protect: "+output)
except ProtectError as error:
print(error)
Result
2, The data element could not be found in the policy in shared memory.
Example: Bulk Data
In the following example, the Protegrity1 string is repeated five times in a list, which is used as the input bulk data. The input data is being protected using the EXCEPTION_INVALID_DE data element.
from appython import Protector
protector = Protector()
session = protector.create_session("ALL_USER")
data = ["Protegrity1"]*5
output = session.protect(data, "EXCEPTION_INVALID_DE")
print(output)
Result
([None, None, None, None, None], ('2', '2', '2', '2', '2'))
Mock Example - External Tweak is Null
The examples for the scenario if a null external tweak is used to protect single or bulk data are described in this section.
Example: Single Data
In the following example, the Protegrity1 string is used as the data, which is being protected using the EXCEPTION_TWEAK_IS_NULL data element.
from appython import Protector
protector = Protector()
session = protector.create_session("ALL_USER")
try:
output = session.protect("Protegrity1", "EXCEPTION_TWEAK_IS_NULL")
print("protect: "+output)
except ProtectError as error:
print(error)
Result
Example: Bulk Data
In the following example, the Protegrity1 string is repeated five times in a list, which is used as the input bulk data. The input data is being protected using the EXCEPTION_TWEAK_IS_NULL data element.
from appython import Protector
from appython.exceptions import ProtectError
protector = Protector()
session = protector.create_session("ALL_USER")
data = ["Protegrity1"]*5
output = session.protect(data, "EXCEPTION_TWEAK_IS_NULL")
print(output)
Result
([None, None, None, None, None], ('4', '4', '4', '4', '4'))
Mock Example - Data Too Short
The examples for the scenario if the data to be protected or unprotected is too short are described in this section.
Example: Single Data
In the following example, the Protegrity1 string is used as the data, which is being protected using the DATA_TOO_SHORT data element.
from appython import Protector
from appython.exceptions import ProtectError
protector = Protector()
session = protector.create_session("ALL_USER")
try:
output = session.protect("Protegrity1", "DATA_TOO_SHORT")
print("protect: "+output)
except ProtectError as error:
print(error)
Result
22, Data is too short to be protected/unprotected.
Example: Bulk Data
In the following example, the Protegrity1 string is repeated five times in a list, which is used as the input bulk data. The input data is being protected using the DATA_TOO_SHORT data element.
from appython import Protector
protector = Protector()
session = protector.create_session("ALL_USER")
data = ["Protegrity1"]*5
output = session.protect(data, "DATA_TOO_SHORT")
print(output)
Result
([None, None, None, None, None], ('22', '22', '22', '22', '22'))
Mock Example - Long User Name
The examples for the scenario if the name of the user, who is protecting or unprotecting the data, is too long are described in this section.
Example: Single Data
In the following example, the Protegrity1 string is used as the data, which is being protected using the USER_TOO_LONG data element.
from appython import Protector
from appython.exceptions import ProtectError
protector = Protector()
session = protector.create_session("ALL_USER")
try:
output = session.protect("Protegrity1", "USER_TOO_LONG")
print("protect: "+output)
except ProtectError as error:
Confidential 293
Protegrity APIs, UDFs, Commands Reference Guide 9.1.0.0 Application Protector
print(error)
Result
Example: Bulk Data
In the following example, the Protegrity1 string is repeated five times in a list, which is used as the input bulk data. The input data is being protected using the USER_TOO_LONG data element.
from appython import Protector
protector = Protector()
session = protector.create_session("ALL_USER")
data = ["Protegrity1"]*5
output = session.protect(data, "USER_TOO_LONG")
print(output)
Result
([None, None, None, None, None], ('25', '25', '25', '25', '25'))
Mock Example - Unsupported Algorithm
The examples for the scenario if the protection method used to protect the data is not supported by the API are described in this section.
Example: Single Data
In the following example, the Protegrity1 string is used as the data, which is being protected using the EXCEPTION_UNSUPPORTED_ALGORITHM data element.
from appython import Protector
from appython.exceptions import ProtectError
protector = Protector()
session = protector.create_session("ALL_USER")
try:
output = session.protect("Protegrity1", "EXCEPTION_UNSUPPORTED_ALGORITHM")
print("protect: "+output)
except ProtectError as error:
print(error)
Result
26, Unsupported algorithm or unsupported action for the specific data element.
Example: Bulk Data
In the following example, the Protegrity1 string is repeated five times in a list, which is used as the input bulk data. The input data is being protected using the
EXCEPTION_UNSUPPORTED_ALGORITHM data element.
from appython import Protector
protector = Protector()
session = protector.create_session("ALL_USER")
data = ["Protegrity1"]*5
output = session.protect(data, "EXCEPTION_UNSUPPORTED_ALGORITHM")
print(output)
Result
([None, None, None, None, None], ('26', '26', '26', '26', '26'))
Mock Example - Empty Policy
The examples for the scenario if the data is protected without the policy being present in shared memory are described in this section.
Example: Single Data
In the following example, the Protegrity1 string is used as the data, which is being protected using the EMPTY_POLICY data element.
from appython import Protector
from appython.exceptions import ProtectError
protector = Protector()
session = protector.create_session("ALL_USER")
try:
output = session.protect("Protegrity1", "EMPTY_POLICY")
print("protect: "+output)
except ProtectError as error:
print(error)
Result
31, Policy not available.
Example: Bulk Data
In the following example, the Protegrity1 string is repeated five times in a list, which is used as the input bulk data. The input data is being protected using the EMPTY_POLICY data element.
from appython import Protector
protector = Protector()
session = protector.create_session("ALL_USER")
data = ["Protegrity1"]*5
output = session.protect(data, "EMPTY_POLICY")
print(output)
Result
([None, None, None, None, None], ('31', '31', '31', '31', '31'))
The examples for the scenario if the data to be protected is invalid are described in this section.
Example: Single Data
In the following example, the Protegrity1 string is used as the data, which is being protected using the INPUT_NOT_VALID data element.
from appython import Protector
from appython.exceptions import ProtectError
protector = Protector()
session = protector.create_session("ALL_USER")
try:
output = session.protect("Protegrity1", "INPUT_NOT_VALID")
print("protect: "+output)
except ProtectError as error:
print(error)
Result
44, The content of the input data is not valid.
Example: Bulk Data
In the following example, the Protegrity1 string is repeated five times in a list, which is used as the input bulk data. The input data is being protected using the INPUT_NOT_VALID data element.
from appython import Protector
protector = Protector()
session = protector.create_session("ALL_USER")
data = ["Protegrity1"]*5
output = session.protect(data, "INPUT_NOT_VALID")
print(output)
Result
([None, None, None, None, None], ('44', '44', '44', '44', '44'))
Mock Example - Reprotecting Data with Heterogenous Data Elements
This example describes the error when the new data element used to reprotect the data does not have the same tokenization type or the protection method as that of the old data element.
Example: Single Data
In the following example, the Protegrity1 string is used as the data, which is being protected using the SUCCESS_STR data element.
The protected input data, the old data element SUCCESS_STR, and a new data element REPROTECT_HETERO_STR are then passed as inputs to the reprotect API. The reprotect API returns an error as the old and new data elements do not have the same tokenization type or the protection method.
from appython import Protector
from appython.exceptions import ProtectError
protector = Protector()
session = protector.create_session("ALL_USER")
output = session.protect("Protegrity1", "SUCCESS_STR" )
try:
org = session.reprotect(output, "SUCCESS_STR", "REPROTECT_HETERO_STR" )
print("Reprotected data: "+org)
except Exception as error:
print(error)
Result
26, Unsupported algorithm or unsupported action for the specific data element.
Example: Bulk Data
In the following example, the Protegrity1 string is repeated five times in a list, which is used as the input bulk data. The input data is being protected using the SUCCESS_STR data element.
The protected input data, the old data element SUCCESS_STR, and a new data element REPROTECT_HETERO_STR are then passed as inputs to the reprotect API. The reprotect API returns an error as the old and new data elements do not have the same tokenization type or the protection method.
from appython import Protector
protector = Protector()
session = protector.create_session("ALL_USER")
data=["Protegrity1"]*5
output = session.protect(data, "SUCCESS_STR" )
try:
org = session.reprotect(output[0], "SUCCESS_STR", "REPROTECT_HETERO_STR" )
print("Reprotected data:")
print(org)
except Exception as error:
print(error)
Result
26, Unsupported algorithm or unsupported action for the specific data element.
Using sample users for simulating error scenarios
The examples on how to use sample users for simulating the user-related error scenarios while protecting, unprotecting, and reprotecting the data are described in this section.
Mock Example - No Protect User
The examples for the scenario in which a user does not have privileges to protect data are described in this section.
Example: Single Data
In the following example, the NO_PROTECT_USER user is used to try and protect the Protegrity1 string using the SUCCESS_STR data element.
from appython import Protector
from appython.exceptions import ProtectError
protector = Protector()
session = protector.create_session("NO_PROTECT_USER")
try:
output = session.protect("Protegrity1", "SUCCESS_STR")
print("Protected data: "+output)
except ProtectError as error:
print(error)
Result
3, The user does not have the appropriate permissions to perform the requested operation.
Example: Bulk Data
In the following example, the Protegrity1 string is repeated five times in a list, which is used as the input bulk data. The NO_PROTECT_USER is used to try and protect the input data using the SUCCESS_STR data element.
from appython import Protector
from appython.exceptions import ProtectError
protector = Protector()
session = protector.create_session("NO_PROTECT_USER")
data = ["Protegrity1"]*5
output = session.protect(data, "SUCCESS_STR")
print(output)
Result
([None, None, None, None, None], ('3', '3', '3', '3', '3'))
Mock Example - No Reprotect User
The examples for the scenario in which a user does not have privileges to reprotect data are described in this section.
Example: Single Data
In the following example, the NO_REPROTECT_USER user is used to try and reprotect the Protegrity1 string using the SUCCESS_REPROTECT_STR data element.
from appython import Protector
from appython.exceptions import ReprotectError
protector = Protector()
session = protector.create_session("NO_REPROTECT_USER")
try:
org = session.reprotect("Protegrity1", "SUCCESS_STR", "SUCCESS_REPROTECT_STR")
print("reprotect: " + org)
except ReprotectError as e:
print(e)
Result
3, The user does not have the appropriate permissions to perform the requested operation.
Example: Bulk Data
In the following example, the Protegrity1 string is repeated five times in a list, which is used as the input bulk data. The NO_REPROTECT_USER is used to try and reprotect the input data using the SUCCESS_REPROTECT_STR data element.
from appython import Protector
from appython.exceptions import ReprotectError
protector = Protector()
session = protector.create_session("NO_REPROTECT_USER")
data = ["Protegrity1"]*5
org = session.reprotect(data, "SUCCESS_STR", "SUCCESS_REPROTECT_STR")
print(org)
Result
([None, None, None, None, None], ('3', '3', '3', '3', '3'))
Mock Example - No Unprotect Null User
The examples for the scenario in which a user does not have privileges to unprotect data are described in this section. In this case, if the user tries to unprotect the data, then the unprotect API returns a null value.
Example: Single Data
In the following example, the NO_UNPROTECT_NULL_USER user is first used to protect the Protegrity1 string using the SUCCESS_STR data element. Then, the NO_UNPROTECT_NULL_USER user is used to try and unprotect the protected input data using the same data element. However, the user is unable to unprotect the data and the API returns a null value.
from appython import Protector
from appython.exceptions import UnprotectError
protector = Protector()
session = protector.create_session("NO_UNPROTECT_NULL_USER")
p_out = session.protect("Protegrity1", "SUCCESS_STR")
print("Protected data: " + p_out)
org = session.unprotect(p_out, "SUCCESS_STR")
print("Unprotected data: ")
print(org)
Result
Protected data: lSvH5dvO5l5vvH5zvOvzaX
Unprotected data: None
Example: Bulk Data
In the following example, the Protegrity1 string is repeated five times in a list, which is used as the input bulk data. The NO_UNPROTECT_NULL_USER user is first used to protect the input data using the SUCCESS_STR data element. Then, the NO_UNPROTECT_NULL_USER user is used to try and unprotect the protected input data using the same data element.
from appython import Protector
from appython.exceptions import UnprotectError
protector = Protector()
session = protector.create_session("NO_UNPROTECT_NULL_USER")
data = ["Protegrity1"]*5
p_out = session.protect(data, "SUCCESS_STR")
print("Protected data: ")
print(p_out)
org = session.unprotect(p_out[0], "SUCCESS_STR")
print("Unprotected data: ")
print(org)
Result
Protected data:
(['lSvH5dvO5l5vvH5zvOvzaX', 'lSvH5dvO5l5vvH5zvOvzaX', 'lSvH5dvO5l5vvH5zvOvzaX',
'lSvH5dvO5l5vvH5zvOvzaX', 'lSvH5dvO5l5vvH5zvOvzaX'], (6, 6, 6, 6, 6))
Unprotected data:
([None, None, None, None, None], ('3', '3', '3', '3', '3'))
Mock Example - No Unprotect Exception User
The example for the scenario in which a user does not have privileges to unprotect data are described in this section. In this case, if the user tries to unprotect the data, then the unprotect API throws an exception.
Example: Single Data
In the following example, the NO_UNPROTECT_NULL_USER user is first used to protect the Protegrity1 string using the SUCCESS_STR data element. Then, the
NO_UNPROTECT_NULL_USER user is used to try and unprotect the protected input data using the same data element. However, the user is unable to unprotect the data and the API throws an exception.
from appython import Protector
from appython.exceptions import UnprotectError
protector = Protector()
session = protector.create_session("NO_UNPROTECT_EXC_USER")
p_out = session.protect("Protegrity1", "SUCCESS_STR")
print("Protected data: " + p_out)
try:
org = session.unprotect(p_out, "SUCCESS_STR")
print("Unprotected data: " + org)
except UnprotectError as e:
print(e)
Result
Protected data: lSvH5dvO5l5vvH5zvOvzaX
3, The user does not have the appropriate permissions to perform the requested operation.
Example: Bulk Data
In the following example, the Protegrity1 string is repeated five times in a list, which is used as the input bulk data. The NO_UNPROTECT_NULL_USER user is first used to protect the input data using the SUCCESS_STR data element. Then, the NO_UNPROTECT_NULL_USER user is used to try and unprotect the protected input data using the same data element.
from appython import Protector
from appython.exceptions import UnprotectError
protector = Protector()
session = protector.create_session("NO_UNPROTECT_EXC_USER")
data = ["Protegrity1"]*5
p_out = session.protect(data, "SUCCESS_STR")
print("Protected data: ")
print(p_out)
org = session.unprotect(p_out[0], "SUCCESS_STR")
print("Unprotected data: ")
print(org)
Result
Protected data:
(['lSvH5dvO5l5vvH5zvOvzaX', 'lSvH5dvO5l5vvH5zvOvzaX', 'lSvH5dvO5l5vvH5zvOvzaX',
'lSvH5dvO5l5vvH5zvOvzaX', 'lSvH5dvO5l5vvH5zvOvzaX'], (6, 6, 6, 6, 6))
Unprotected data:
([None, None, None, None, None], ('3', '3', '3', '3', '3'))
Mock Example - No Unprotect Protected User
The examples for the scenario in which a user does not have privileges to unprotect data are described in this section. In this case, if the user tries to unprotect the data, then the unprotect API returns the protected
input data.
Example: Single Data
In the following example, the NO_UNPROTECT_PROTECTED_USER user is first used
to protect the Protegrity1 string using the SUCCESS_STR data element. Then, the NO_UNPROTECT_NULL_USER user is used to try and unprotect the protected input data using
the same data element. However, the user is unable to unprotect the data, and the API returns the protected input data.
from appython import Protector
from appython.exceptions import UnprotectError
protector = Protector()
session = protector.create_session("NO_UNPROTECT_PROTECTED_USER")
p_out = session.protect("Protegrity1", "SUCCESS_STR")
print("Protected data: " + p_out)
org = session.unprotect(p_out, "SUCCESS_STR")
print("Unprotected data: " + org)
Result
Protected data: lSvH5dvO5l5vvH5zvOvzaX
Unprotected data: lSvH5dvO5l5vvH5zvOvzaX
Example: Bulk Data
In the following example, the Protegrity1 string is repeated five times in a list, which is used as the input bulk data. The NO_UNPROTECT_PROTECTED_USER user is first
used to protect the input data using the SUCCESS_STR data element. Then, the NO_UNPROTECT_PROTECTED_USER user is used to try and unprotect the protected input data
using the same data element.
from appython import Protector
from appython.exceptions import UnprotectError
protector = Protector()
session = protector.create_session("NO_UNPROTECT_PROTECTED_USER")
data = ["Protegrity1"]*5
p_out = session.protect(data, "SUCCESS_STR")
print("Protected data: ")
print(p_out)
org = session.unprotect(p_out[0], "SUCCESS_STR")
print("Unprotected data: ")
print(org)
Result
Protected data:
(['lSvH5dvO5l5vvH5zvOvzaX', 'lSvH5dvO5l5vvH5zvOvzaX', 'lSvH5dvO5l5vvH5zvOvzaX',
'lSvH5dvO5l5vvH5zvOvzaX', 'lSvH5dvO5l5vvH5zvOvzaX'], (6, 6, 6, 6, 6))
Unprotected data:
(['lSvH5dvO5l5vvH5zvOvzaX', 'lSvH5dvO5l5vvH5zvOvzaX', 'lSvH5dvO5l5vvH5zvOvzaX',
'lSvH5dvO5l5vvH5zvOvzaX', 'lSvH5dvO5l5vvH5zvOvzaX'], (3, 3, 3, 3, 3))
Mock Example - No User
The examples for the scenario in which a user has not been defined in the security policy are described in this section.
Example: Single Data
In the following example, the NO_USER user is used to try and protect the Protegrity1 string using the SUCCESS_STR data element. However, the user is unable to perform the requested operation because the user has not been defined in the security policy.
from appython import Protector
from appython.exceptions import ProtectError, ReprotectError, UnprotectError
protector = Protector()
session = protector.create_session("NO_USER")
try:
output = session.protect("Protegrity1", "SUCCESS_STR")
print("Protected data: " + output)
except ProtectError as e:
print(e)
Result
1, The username could not be found in the policy.
Example: Bulk Data
In the following example, the Protegrity1 string is repeated five times in a list, which is used as the input bulk data. The NO_USER user is used to try and protect the Protegrity1 string using the SUCCESS_STR data element. However, the user is unable to perform the requested operation because the user has not been defined in the security policy.
from appython import Protector
from appython.exceptions import ProtectError, ReprotectError, UnprotectError
protector = Protector()
session = protector.create_session("NO_USER")
data = ["Protegrity1"]*5
output = session.protect(data, "SUCCESS_STR")
print(output)
Result
([None, None, None, None, None], ('1', '1', '1', '1', '1'))