4 - Installing the AP C Protector
Steps to setup AP C.
Extracting the Setup Scripts and Package
Note: <arch> can be x86-64 or arm64.
To extract the setup scripts and package:
Download the ApplicationProtector_Linux-ALL-64_<arch>_GCC-9.3.1_<version>.tgz file to any location on the machine where you want to install the protector.
Extract the AP C installation package using the following command.
tar –xvf ApplicationProtector_Linux-ALL-64_<arch>_GCC-9.3.1_<version>.tgz
The following setup files are extracted:
ApplicationProtector_Linux-ALL-64_<arch>_GCC-9.3.1_<version>.tgzsignatures/ApplicationProtector_Linux-ALL-64_<arch>_GCC-9.3.1_<version>.sig
Verify the digital signature of the signed AP C build.
For more information about verifying the signed AP C build, refer to Verification of Signed Protector Build.
Extract the AP C installation package again using the following command.
tar –xvf ApplicationProtector_Linux-ALL-64_<arch>_GCC-9.3.1_<version>.tgz
The following setup files are extracted:
Note: Here, <arch> can be x64 or arm64.
LogforwarderSetup_Linux_<arch>_<version>.shRPAgentSetup_Linux_<arch>_<version>.shXCDevSetup_Linux_<arch>_<version>.shXCSamplesSetup_Linux_<arch>_<version>.sh
Installing Log Forwarder on Linux
The steps to install the Log Forwarder on a Linux platform using the Interactive mode or through the Silent mode are described in this section.
Note: To preserve all the configurations while upgrading the Log Forwarder, ensure that you backup all the files present under the /opt/protegrity/logforwarder/data/config.d directory.
For more information about installing Log Forwarder on Linux, refer to Installing Log Forwarder on Linux.
Using Interactive Mode
For more information about installing the Log Forwarder using Interactive Mode, refer to Installing Log Forwarder on Linux using Interactive Mode.
Using Silent Mode
For more information about installing Log Forwarder using the silent mode, refer to Installing Log Forwarder on Linux using Silent Mode.
Installing RP Agent on Linux
The steps to install the RP Agent on a Linux platform using the Interactive mode or through the Silent mode of installation are described in this section.
RPA Secure Mode with ESA on Linux
Before proceeding with the RPA installation in secure mode, ensure that the required CA certificate is available and trusted on the system.
For PPC
Retrieve the custom CA certificate using the following command:
kubectl -n cert-manager get secret eclipse-ca -o jsonpath='{.data.tls\.crt}' | base64 -d > ca.crt
For ESA
Download the certificate from ESA.
For more information about downloading certificates from ESA, refer to Manage Certificates.
After obtaining the certificate, configure the environment variable:
| Variable | Value |
|---|
| SSL_CERT_FILE | Full path to the certificate file (for example, /opt/ca.crt) |
When prompted for the ESA hostname or IP during RPA installation, ensure it is included in the ESA TLS certificate (CN or SAN) and is resolvable from the RPAgent host.
After the CA certificate is available, proceed with the RPA installation.
For more information about installing RP Agent, refer to Installing RP Agent on Linux or Unix.
Using Interactive Mode
For more information about installing RP Agent on Linux using Interactive Mode, refer to Installing RP Agent on Linux or Unix using Interactive Mode.
Using Silent Mode
For more information about installing RP Agent using Silent Mode, refer to Installing RP Agent on Linux or Unix using Silent Mode.
Installing Application Protector C on Linux
The steps to install the AP C on a Linux platform using the Linux installer or through the Silent mode of installation, are described in this section.
Using Linux Installer
To install the AP C on the Linux platform using the Linux installer:
Note: Here, <arch> can be x64 or arm64.
Run the AP C installer using the following command.
./XCDevSetup_Linux_<arch>_<version>.sh
The prompt to continue the installation appears.
*****************************************************
Welcome to the C SDK Setup Wizard
*****************************************************

This will install the XCDev on your computer.
Do you want to continue? [yes or no]
If you want to continue with the installation of the XCDev, then type yes else type no.
If you type yes, then the prompt to enter the installation directory appears.
Enter installation directory.
A new directory will be created in the installation directory.
[/opt/protegrity]:
If you type no, then the installation of the XCDev aborts.
Note:
The xcpep.plm file is installed in the /opt/protegrity/sdk/c/bin directory.
The xcpep.plm file is a shared library that is required for compiling the applications which use AP C APIs.
Link your application to the xcpep.plm file.
The default installation directory for the XCDev on a Linux platform is /opt/protegrity/sdk/c.
Run the AP C sample installer using the following command.
./XCSamplesSetup_Linux_<arch>_<version>.sh
The prompt to continue the installation appears.
*****************************************************
Welcome to the C SDK Samples Setup Wizard
*****************************************************

This will install XCSamples on your computer.
Do you want to continue? [yes or no]
If you want to continue with the installation of the XCSamples, then type yes else type no.
If you type yes, then the prompt to enter the installation directory appears.
Enter installation directory.
A new directory will be created in the installation directory.
[/opt/protegrity]:
The XCSamples are installed in /opt/protegrity/sdk/c by default.
If you type no, then the installation of the XCSamples aborts.
The following samples are installed in the /opt/protegrity/sdk/c/samples/ directory:
xcapcsample/xccsharpsample/
- Sample codes support Token DEs only.
- To use FPE and Unicode Gen2 DEs, user needs to make use of
ui4CharSet field in XC_PARAM_EX. For more information about ui4CharSet field, refer to values supported for ui4CharSet field.
For more information about the samples, refer to the readme.txt file located in the respective sample directories.
Note:
- For C# (.NET) development, Protegrity recommends using the Application Protector for .NET.
The AP C is successfully installed.
Using Silent Mode
You can also execute the AP C installer without any manual intervention, which is also known as the Silent mode of installation. The following parameter must be provided to execute the installer in the Silent mode.
| Parameter | Description |
|---|
| -dir | Optional install directory
Default: /opt/protegrity |
Note: Here, <arch> can be x64 or arm64.
- Run the AP C installer using the following command.
./XCDevSetup_Linux_<arch>_<version>.sh [-dir <directory>]
The following output appears.
XCDev installed in `/opt/protegrity/sdk/c`.
- Run the AP C sample installer using the following command.
./XCSamplesSetup_Linux_<arch>_<version>.sh [-dir <directory>]
The following output appears.
XCSamples installed in `/opt/protegrity/sdk/c`.
6 - Using the AP C APIs
Sample application for the AP C.
The process to use the AP C protect, unprotect, and reprotect methods are described on this page.
It is assumed that the ESA is already available.
The tasks can be divided in the following order.
- Create the data elements and data store in the Policy Management on the ESA Web UI.
- Create the member sources and roles.
- Configure the policy.
- Configure the trusted application.
- Add a trusted application to the data store.
- Install the AP C.
- Run the sample application.
Creating a data element and data store
Determine how the data needs to be protected either by using encryption or tokenization before running the application. Protection and unprotection methods are available for both.
Create a data element and data store in the ESA by performing the following.
- To create a data element, from the ESA Web UI, navigate to
Policy Management → Data Elements & Masks → Data Elements.
For more information about creating data elements, refer to Working With Data Elements. - To create a data store, navigate to
Policy Management → Data Stores.
For more information about creating data stores, refer to Creating a Data Store.
Creating a member source and role
Create a member source and role in the ESA by performing the following.
- To create a member source, from the ESA Web UI, navigate to
Policy Management → Roles & Member Sources → Member Sources.
For more information about creating a member source, refer to Working With Member Sources. - To create a role, from the ESA Web UI, navigate to
Policy Management → Roles & Member Sources → Roles.
For more information about creating a role, refer to Working with Roles.
Configuring a policy
Configure a policy in the ESA by performing the following.
- From the ESA Web UI, navigate to
Policy Management → Policies & Trusted Applications → Policies. - Click
Add New Policy.
The New Policy screen appears. - After the policy is configured for the application user, add the permissions, data elements, roles, and data stores to the policy and then save it.
- Deploy the policy using the Policy Management Web UI.
For more information about creating a data security policy, refer to Creating Policies.
Configuring a trusted application
Only the applications and users configured as trusted applications under the ESA security policy can access the AP APIs.
If a policy is deployed but the application or the user is not trusted, then the AP aborts with the following message while performing the protect or unprotect operations.
API consumer is not part of the trusted applications, please contact the Security Officer
Configure a trusted application in the ESA by performing the following.
- From the ESA Web UI, navigate to
Policy Management → Policies & Trusted Applications → Trusted Application. - Create a trusted application.
- Deploy the trusted application using the Policy Management Web UI.
For more information about trusted applications, refer to Working With Trusted Applications.
Adding a trusted application to data store
Add a trusted application to data store by performing the following.
- From the ESA Web UI, navigate to
Policy Management → Data Stores.
The list of all the data stores appear. - Select the required data store.
The screen to edit the data store appears. - Under the
Trusted Applications tab, click Add.
The screen to add the trusted application appears. - Select the required trusted application and click
Add. - Select the required policy and deploy it using the Policy Management Web UI.
For more information about adding a trusted application to data store, refer to Linking Data Store to a Trusted Application.
Installing the AP C
Install the AP C by performing the following.
To install the AP C, refer to Application Protector C Installation.
Verify if the AP C is installed successfully.
For more information about verifying the AP C installation, refer to Verifying the AP C Installation.
Running the AP C APIs
After setting up the policy and trusted application, you can begin testing the AP C APIs for protection, unprotection, and reprotection.
For more information about the AP C APIs, refer to Application Protector C APIs.
For more information about the AP C return codes, refer to Application Protector API Return Codes.
To run this sample application, ensure that the Application Name in the Trusted Application is set as HelloWorld.
For more information about the sample application, refer to samples installed in directory.
7 - Application Protector C APIs
The various APIs of the AP C.
The Protegrity Application Protector (AP) C provides APIs that integrate with the customer application to protect, unprotect, and reprotect sensitive data. A session must be created to run the AP C.
Note:
- The AP C APIs can be invoked by a valid Policy User.
- The AP C supports only the byte data type.
The following diagram represents the basic flow of a session.
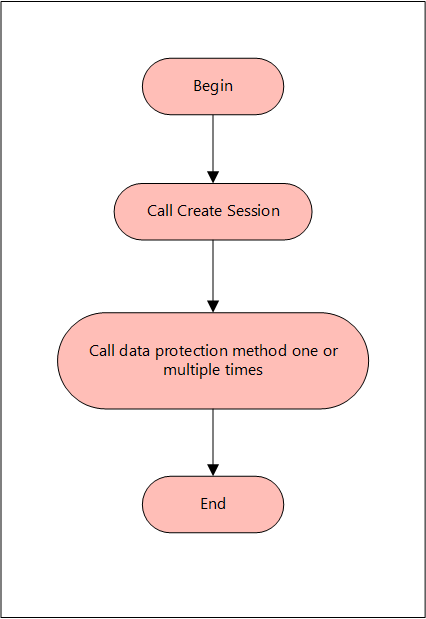
The following sections provide detailed information of the various structures and functions used by the Protegrity Application Protector C.
stXC_PARAM_EX
The stXC_PARAM_EX structure is used for the XC APIs that are used by the AP C. This structure contains metadata and information related to protect, unprotect, and reprotect operations.
The following is a sample of the stXC_PARAM_EX structure.
typedef struct stXC_PARAM_EX
{
  XC_CHAR   szVendor[XC_MAX_VENDOR_NAME_SIZE];          /**< It is for internal use, Do not use ! */
  XC_UINT8  ui8ScambledSessionHandle;                   /**< It is for internal use, Do not use ! */
  XC_CHAR   cUserIp[XC_MAX_IP_ADDRESS_SIZE];            /**< It is for internal use, Do not use ! */
  XC_UINT4  ui4Operation;                               /**< It is for internal use, Do not use ! */
  XC_UINT4  ui4DataType;                                /**< It is for internal use, Do not use ! */
  XC_UINT4  ui4CharSet;                                 /**< Character set of the input data (UTF-8/UTF-16/UTF-32). Unknown values are treated as UTF-8. */
  XC_CHAR   cPlainTextEncoding[XC_ENCODING_SIZE];       /**< It is for internal use, Do not use ! */
  XC_BYTE   bOldExternalIV[XC_MAX_IV_SIZE];             /**< It is for internal use, Do not use ! */
  XC_UINT4  ui4OldExternalIVLength;                     /**< It is for internal use, Do not use ! */
  XC_BYTE   bNewExternalIV[XC_MAX_IV_SIZE];             /**< It is for internal use, Do not use ! */
  XC_UINT4  ui4NewExternalIVLength;                     /**< It is for internal use, Do not use ! */
  XC_BYTE   bOldExternalTweak[XC_MAX_TWEAK_SIZE];       /**< Old external tweak for FPE. Used by unprotect and reprotect operations. */
  XC_UINT4  ui4OldExternalTweakLength;                  /**< Length in bytes of bOldExternalTweak. Set to 0 when no tweak is used. */
  XC_BYTE   bNewExternalTweak[XC_MAX_TWEAK_SIZE];       /**< New external tweak for FPE. Used by protect and reprotect operations. */
  XC_UINT4  ui4NewExternalTweakLength;                  /**< Length in bytes of bNewExternalTweak. Set to 0 when no tweak is used. */
} XC_PARAM_EX;
stXC_DATA_ITEM
Note: It is recommended to use stXC_DATA_ITEM_EX structure over stXC_DATA_ITEM structure.
The stXC_DATA_ITEM structure is used as a container to store the protected or unprotected data.
The following is a sample for the stXC_DATA_ITEM structure.
typedef struct stXC_DATA_ITEM
{
  XC_UINT4 ui4Capacity; /* Max number of bytes that can be stored in pvValue  */
  XC_UINT4 ui4Length;   /* Actual number of bytes stored in pvValue           */
  XC_VOID* pvValue;     /* The actual value of the data                       */
} XC_DATA_ITEM;
stXC_DATA_ITEM_EX
The stXC_DATA_ITEM_EX structure is typically used for bulk operations with the various APIs.
typedef struct stXC_DATA_ITEM_EX
{
  XC_UINT4 ui4Capacity;    /**< Max number of bytes that can be stored in pvValue  */
  XC_UINT4 ui4Length;      /**< Actual number of bytes stored in pvValue           */
  XC_VOID* pvValue;        /**< The actual value of the data                       */
  XC_BYTE  bNullIndicator; /**< Used to set if the data is null or not. XC_TRUE = Null. XC_FALSE = not null  */
  XC_UINT4 ui4ErrorCode;   /**< The errorcode for the returning data struct, if an error occured, otherwise it is PEP_LOG_PROTECT_SUCCESS or PEP_LOG_UNPROTECT_SUCCESS */
} XC_DATA_ITEM_EX;
stXC_ACTION_RESULT
For each bulk call, the stXC_ACTION_RESULT structure contains a summary status for the entire batch.
The following is a sample for the stXC_ACTION_RESULT structure.
typedef struct stXC_ACTION_RESULT
{
  XC_UINT4 ui4LogReturnCode; /* This is the returncode of the operation */
  XC_UINT4 ui4LogSeverity;   /* This is the severity,  SUCCESS, SUCCESS WITH WARNING or ERROR */
  XC_UINT4 ui4NoAccessOperation; /* What should we return if we do not have access to unprotect data, NULL, EXCEPTION, PROTECTED VALUE or NOACCESS VALUE */
  XC_UINT4 ui4ProtectionAlgId; /* Algorithm that was used for protecting/unprotecting */
  XC_UINT4 ui4TokenType;       /* Type of data being tokenized */
  XC_UINT4 ui4OutputEncoding;  /* Encoding of output data */
  XC_MASK_SETTINGS stMaskSettings; /* Indicates type of masking used */
} stXC_ACTION_RESULT;
The following parameters are important for the bulk calls:
ui4LogReturnCode contains only the most severe error code in the processed batch. For example, if there is one success with warning entry and one with severe error, the severe error entry will be logged.
ui4LogSeverity reports on the status of the processed batch.
The ui4LogSeverity has three different types. The first type applies to successful operations. The other two states apply to erroneous operations: success with warning and error. Each indicates what went wrong in a batch.
The following table describes the various ui4LogSeverity types.
| ui4LogSeverity Type | ui4LogSeverity Possible Errors | |
|---|
| Success (operation completed successfully) | Operation completed successfully - no exception | |
| Success With Warning (operation completed successfully but some data failed) | Policy constraints:
- User/DE/Time/Access
- Load Key (Key ID)
- Audit failed | Data constraints:
- Integrity Check failed
- Invalid format
- Length
- Token alphabet constraints |
Error
(Major error- batch failed) | System constraints:
- RPA not running
- Fatal errors | Exceptions:
- Policy locked
- Policy not available
- Unsupported algorithm
- Input Parameter missing
- Disk full
- No access operation = exception (Policy set)
- Out of memory |
By turn, each data item in a batch contains its own log return code. It is defined by ui4ErrorCode in the XC_DATA_ITEM_EX structure for the AP C API.
stXC_MASK_SETTINGS
The stXC_MASK_SETTINGS structure holds information about the mask settings applied on the data element for access and audit purposes.
The following is a sample for the stXC_MASK_SETTINGS structure.
typedef struct stXC_MASK_SETTINGS
{
  XC_UINT4 bLeftIsMasked  : 1;
  XC_UINT4 bLeft          : 7;
  XC_UINT4 bRightIsMasked : 1;
  XC_UINT4 bRight         : 7;
  XC_UINT4 bFillerBits    : 16;
  XC_BYTE bMaskCharacter;
} XC_MASK_SETTINGS;
eXC_LOGRETURNTYPE
The eXC_LOGRETURNTYPE enum indicates the type of the log return code depending on the value returned.
The following is a sample for the eXC_LOGRETURNTYPE enum.
typedef enum eXC_LOGRETURNTYPE
{
  XC_LOGRETURNSUCCESS        = 0,  /* Success, no additional test            */
  XC_LOGRETURNSUCCESSWARNING = 1,  /* Success, with additional warning text  */
  XC_LOGRETURNERROR          = 2,  /* Error type of logreturn code           */
  XC_LOGRETURNEXCEPTION      = 3   /* If we want to throw exception if no acceess */
} XC_LOGRETURNTYPE;
eXC_FUNCTION
The eXC_FUNCTION enum indicates the type of algorithm used while protecting the data.
The following is a sample for the eXC_FUNCTION enum.
typedef enum eXC_FUNCTION
{
  XC_ANY_FUNCTION = 0,              /* This is the default - some kind of cipher function */
  XC_HMAC_FUNCTION = 1,             /* Hash message digest - one way cipher function      */
  XC_TYPE_PRESERVING_FUNCTION = 2,  /* Type Preserving, i.e. Token, NoEncryption         */
  XC_CRYPTO_FUNCTION = 3            /* Regular encryption algorithm           */
} XC_FUNCTION;
eXC_DATATYPE
The eXC_DATATYPE enum indicates the type of datatype you want to protect.
The following is a sample for the eXC_DATATYPE enum.
typedef enum eXC_DATATYPE
{
  XC_DATATYPE_BYTE = 0,     /* Byte */
  XC_DATATYPE_CHARACTER,    /* Character data */
  XC_DATATYPE_UNICODE,      /* Unicode data */
  XC_DATATYPE_DATE,         /* Date data */
  XC_DATATYPE_INTEGER,      /* Integer data */
  XC_DATATYPE_OTHER         /* For example real, blob, clob, time, timestamp */
} XC_DATATYPE;
XCInitLib Function
The XCInitLib function initializes the Protegrity AP library. This should be performed once in each application that uses the Protegrity AP API. When the application terminates, it should call the corresponding terminate function.
This function returns XC_SUCCESS on success.
The following is a sample for the XCInitLib function.
XCInitLib( XC_HANDLE* phXCHandle,
           const XC_CHAR* pcParameter );
The following table lists the various parameters used for the XCInitLib function.
| Parameter | Description | Data Type |
|---|
| phXCHandle | [out] A handle for the library. It should be used for the other functions. | XC_HANDLE* |
| pcParameter | [in] NULL terminated string containing the parameter.
CAUTION: This parameter is not used. | const XC_CHAR* |
XCTerminateLib Function
The XCTerminateLib function terminates the Protegrity AP library. This should be performed when the application terminates. No other functions should be invoked after invoking the XCTerminateLib function. It should always be invoked after a call to the XCInitLib function for cleanup purposes.
This function returns XC_SUCCESS on success.
The following is a sample of the XCTerminateLib function.
XCTerminateLib( XC_HANDLE* phXCHandle );
The following table lists the parameter used for the XCTerminateLib function.
| Parameter | Description | Data Type |
|---|
| phXCHandle | [in/out] A handle for the library that has been initialized. | XC_HANDLE* |
XCGetVersion Function
The XCGetVersion function obtains a null terminated version string for the Protegrity AP.
This function returns XC_SUCCESS on success.
The following is a sample for the XCGetVersion function.
XCGetVersion( XC_CHAR* pszVersion,
              const XC_UINT4 ui4VersionLength );
The following table lists the various parameters used for the XCGetVersion function.
| Parameter | Description | Data Type |
|---|
| pszVersion | [in/out] The null terminated version string is returned. The buffer needs to be allocated before it is sent to the function. | XC_CHAR* |
| ui4VersionLength | [in] The length of the buffer allocated for the version. | const XC_UINT4 |
XCGetVersionEx Function
The XCGetVersionEx function obtains a null terminated version string for the Protegrity AP. It returns the current version of the AP C and the core version.
The following is a sample for the XCGetVersionEx function.
XCGetCoreVersion Function
The XCGetCoreVersion function obtains a null terminated version string for the Protegrity AP.
This function returns XC_SUCCESS on success.
The following is a sample for the XCGetCoreVersion function.
XCGetCoreVersion( XC_CHAR* pszCoreVersion, const XC_UINT4 ui4CoreVerLen );
The following table lists the various parameters used for the XCGetCoreVersion function.
| Parameter | Description | Data Type |
|---|
| pszCoreVersion | [in/out] The null terminated version string is returned. The buffer needs to be allocated before it is sent to the function. | XC_CHAR* |
| ui4CoreVerLen | [in] The length of the buffer allocated for the version. | const XC_UINT4 |
XCOpenSession Function
The XCOpenSession function opens a session and returns a handle for that session to be used in calls to the XCProtect and XCUnprotect functions. When the session is no longer needed, it should be closed by a call to XCCloseSession function.
This function returns XC_SUCCESS on success.
The following is a sample for the XCOpenSession function.
XCOpenSession( const XC_HANDLE    hXCHandle,
               const XC_CHAR*     pcUser,
               const XC_CHAR*     pcPassword,
               const XC_CHAR*     pcParameter,
               XC_SESSION*        phSession );
The following table lists the various parameters used for the XCOpenSession function.
| Parameter | Description | Data Type |
|---|
| hXCHandle | [in] A handle for the library that has been initialized. | const XC_HANDLE |
| pcUser | [in] NULL terminated string for the user opening the session.
Important: This parameter is only applicable for the AP Lite. | const XC_CHAR* |
| pcPassword | [in] NULL terminated string for the password for that user.
Important: This parameter is only applicable for the AP Lite. | const XC_CHAR* |
| pcParameter | [in] NULL terminated string containing the parameter needed to create a session.
For AP Client, the required parameter is ipaddress;port;TCP for the PEP server that is configured to handle the AP requests.
For AP Lite, the required parameter is the <export_keys_filename>.xml file, which is the key export file from REST API service.
For the XCPep.plm file, the parameter 0 needs to be set for the communicationid. | const XC_CHAR* |
| phSession | [out] On success, this will point to the handle for the established session. | XC_SESSION* |
XCCloseSession Function
The XCCloseSession function will terminate an established session and reset the handle for it, after which no calls to XCProtect and XCUnprotect functions will work.
This function returns XC_SUCCESS on success.
The following is a sample for the XCCloseSession function.
XCCloseSession( const XC_HANDLE hXCHandle,
                XC_SESSION* phSession );
The following table lists the various parameters used for the XCCloseSession function.
| Parameter | Description | Data Type |
|---|
| hXCHandle | [in] Handle for the library that has been initialized. | const XC_HANDLE |
| phSession | [in/out] Session to close. | XC_SESSION* |
XCProtect Function
The XCProtect function will take the supplied plaintext and send a request to the Protegrity AP that will protect the data. It will then read the response from the Protegrity AP and return the cipher text to the caller.
This function returns XC_SUCCESS on success.
Note:
Data protected using encryption data elements with input as integers, long, or short data types and output as bytes is platform-specific. You cannot move such protected data between platforms having different endianness.
For example, consider data protected using encryption data elements with input as integers and output as bytes. You cannot move such protected data from the AIX platform to the Linux or Windows platform, and vice-versa.
The ui4CharSet field in XC_PARAM_EX is required when using FPE or Unicode Gen2 data elements with the byte API. It must match the encoding of the input data. The following values are supported:
| Value | Encoding |
|---|
| 2 | UTF-8 |
| 4 | UTF-16LE |
| 5 | UTF-16BE |
Warning:
For Date and DateTime type of data elements, the XCProtect API returns an invalid input data error for certain input values. This occurs when the input value falls within the non-existent date range from 05-OCT-1582 to 14-OCT-1582 of the Gregorian Calendar.
For more information about the tokenization and de-tokenization of the cutover dates, refer to Datetime Tokenization for Cutover Dates of the Proleptic Gregorian Calendar.
The following is a sample of the XCProtect function.
XCProtect( const XC_HANDLE     hXCHandle,
           const XC_SESSION    hSession,
           const XC_UINT4      ui4EventType,
           const XC_CHAR*      pcPolicyUser,
           const XC_CHAR*      pcDataElement,
           const XC_BYTE*      pcExternalIV,
           const XC_UINT4      ui4ExternalIVLength,
           const XC_BYTE*      pcInputData,
           const XC_UINT4      ui4InputDataLength,
           const XC_BYTE       bNiInputData,
           XC_BYTE*            pcOutputData,
           XC_UINT4*           pui4OutputDataLength,
           XC_BYTE*            pbNiOutputData,
           const XC_PARAM_EX*  pXCParam,
           const XC_UINT4      ui4XCParamSize,
           stXC_ACTION_RESULT* pstActionResult );
The following table lists the various parameters used for the XCProtect function.
| Parameter | Description | Data Type |
|---|
| hXCHandle | [in] Handle for the library that has been initialized. | const XC_HANDLE |
| hSession | [in] Handle for the established session. | const XC_SESSION |
| ui4EventType | [in] Used to identify whether the call type of the function is First Call or Normal Call.
This parameter can be set to one of the following values:
- 1: Internally sets the XC event type to XC_EVENT_FIRST_CALL. This identifies the call type as First Call. If the call type is First Call, then data is written to the internal cache, which includes:
- SessionID
- RequestID
- DataElement
- UserName
- ProductID
- VendorID
- 0: Identifies the call type as Normal Call. If the call type is Normal Call, then the data is only read from the internal cache. Data is written to the internal cache only if it is different from the one that was written during the First Call.
Important: An entry is generated in the pepserver.log file only if any new data is written to the internal cache.
Note:
If logging is not enabled, but the XC_EVENT_FIRST_CALL parameter is set, then logs are not generated.
Similarly, if logging is enabled, but XC_EVENT_FIRST_CALL is not set, then logs are generated only if any new data is written to the cache. | const XC_UINT4 |
| pcPolicyUser | [in] NULL terminated string for the policy user. | const XC_CHAR * |
| pcDataElement | [in] NULL terminated string for the data element. | const XC_CHAR * |
| pcExternalIV | [in] Buffer containing data that will be used as external IV. | const XC_BYTE* |
| ui4ExternalIVLength | [in] Number of bytes provided in the pcExternalIv buffer. The total amount of data to be protected should not exceed 256 bytes. | const XC_UINT4 |
| pcInputData | [in] Buffer containing the plain data to encrypt. | const XC_BYTE * |
| ui4InputDataLength | [in] Number of bytes contained in pcInputData. The total amount of data to be protected should not exceed 2 GB. | const XC_UINT4 |
| bNiInputData | [in] Flag to indicate NULL input. | const XC_BYTE |
| pcOutputData | [out] Buffer that will hold the resulting encrypted data. Needs to be larger than the input buffer. | XC_BYTE * |
| pui4OutputDataLength | [in/out] On input it should specify the max size of the output data buffer. When the function returns, it will contain the actual number of bytes stored in the output. This size needs to be big enough to hold the resulting data as well as the packed request. Consider having an output buffer that is XC_BYTES_OVERHEAD bytes larger than the input buffer for additional overhead.
If the value is set to zero as *pui4OutputDataLength = 0;, then the following value is returned.
*pui4OutputDataLength = ui4InputDataLength + XC_BYTES_OVERHEAD; | XC_UINT4 * |
| pbNiOutputData | [out] Flag indicating that the output is NULL. | XC_BYTE * |
| pXCParam | [in] Additional information associated with the protection, refer to XC_Param_Ex function. | const XC_PARAM_EX* |
| ui4XCParamSize | [in] Size of the structure passed in the pXCParam parameter. | const XC_UINT4 |
| pstActionResult | [out] Structure containing the result of the operation. For more information refer to the xcdefinitions.h file. | stXC_ACTION_RESULT* |
XCUnprotect Function
The XCUnprotect function will take the supplied ciphered data and send a request to the Protegrity AP that will unprotect the data. It will then read the response from the Protegrity AP and return the plain data to the caller.
This function returns XC_SUCCESS on success.
The ui4CharSet field in XC_PARAM_EX is required when using FPE or Unicode Gen2 data elements with the byte API. It must match the encoding of the input data. The following values are supported:
| Value | Encoding |
|---|
| 2 | UTF-8 |
| 4 | UTF-16LE |
| 5 | UTF-16BE |
The following is a sample of the XCUnprotect function.
XCUnprotect( const XC_HANDLE     hXCHandle,
             const XC_SESSION    hSession,
             const XC_UINT4      ui4EventType,
             const XC_CHAR*      pcPolicyUser,
             const XC_CHAR*      pcDataElement,
             const XC_BYTE*      pcExternalIV,
             const XC_UINT4      ui4ExternalIVLength,
             const XC_BYTE*      pcInputData,
             const XC_UINT4      ui4InputDataLength,
             const XC_BYTE       bNiInputData,
             XC_BYTE*            pcOutputData,
             XC_UINT4*           pui4OutputDataLength,
             XC_BYTE*            pbNiOutputData,
             const XC_PARAM_EX*  pXCParam,
             const XC_UINT4      ui4XCParamSize,
             stXC_ACTION_RESULT* pstActionResult );
The following table lists the various parameters used for the XCUnprotect function.
| Parameter | Description | Data Type |
|---|
| hXCHandle | [in] Handle for the library that has been initialized. | const XC_HANDLE |
| hSession | [in] Handle for the established session. | const XC_SESSION |
| ui4EventType | [in] Used to identify whether the call type of the function is First Call or Normal Call.
This parameter can be set to one of the following values:
- 1: Internally sets the XC event type to XC_EVENT_FIRST_CALL. This identifies the call type as First Call. If the call type is First Call, then data is written to the internal cache, which includes:
- SessionID
- RequestID
- DataElement
- UserName
- ProductID
- VendorID
- 0: Identifies the call type as Normal Call. If the call type is Normal Call, then the data is only read from the internal cache. Data is written to the internal cache only if it is different from the one that was written during the First Call.
Important: An entry is generated in the pepserver.log file only if any new data is written to the internal cache.
Note:
If logging is not enabled, but the XC_EVENT_FIRST_CALL parameter is set, then logs are not generated.
Similarly, if logging is enabled, but XC_EVENT_FIRST_CALL is not set, then logs are generated only if any new data is written to the cache. | const XC_UINT4 |
| pcPolicyUser | [in] NULL terminated string for the policy user. | const XC_CHAR * |
| pcDataElement | [in] NULL terminated string for the data element. | const XC_CHAR* |
| pcExternalIV | [in] Buffer containing data that will be used as external IV. | const XC_BYTE* |
| ui4ExternalIVLength | [in] Number of bytes provided in the pcExternalIv buffer. The total amount of data to be unprotected should not exceed 256 bytes. | const XC_UINT4 |
| pcInputData | [in] Buffer containing the data to unprotect. | const XC_BYTE* |
| ui4InputDataLength | [in] Number of bytes contained in pcInputData. The total amount of data to be unprotected should not exceed 2 GB. | const XC_UINT4 |
| bNiInputData | [in] Flag to indicate NULL input. | const XC_BYTE |
| pcOutputData | [out] Buffer that will hold the resulting decrypted data. Needs to be larger than the input buffer. | XC_BYTE* |
| pui4OutputDataLength | [in/out] On input it should specify the max size of the output data buffer. When the function returns, it will contain the actual number of bytes stored in the output. This size needs to be big enough to hold the resulting data as well as the packed request. Consider having an output buffer that is XC_BYTES_OVERHEAD bytes larger than the input buffer for additional overhead.
If the value is set to zero as *pui4OutputDataLength = 0;, then the following value is returned.
*pui4OutputDataLength = ui4InputDataLength + XC_BYTES_OVERHEAD; | XC_UINT4* |
| pbNiOutputData | [out] Flag indicating that the output is NULL. | XC_BYTE* |
| pXCParam | [in] Additional information associated with the protection, refer to the XC_Param_Ex function. | const XC_PARAM_EX* |
| ui4XCParamSize | [in] Size of the structure passed in the pXCParam parameter. | const XC_UINT4 |
| pstActionResult | [out] Structure containing the result of the operation. For more information refer to the xcdefinitions.h file. | stXC_ACTION_RESULT* |
XCReprotect Function
The XCReprotect function will take the supplied protected data and send a request to the Protegrity AP that will reprotect the data. It will then read the response from the Protegrity AP and return the cipher text to the caller.
This function returns XC_SUCCESS on success.
The following is a sample for the XCReprotect function.
XCReprotect( const XC_HANDLE     hXCHandle,
             const XC_SESSION    hSession,
             const XC_UINT4      ui4EventType,
             const XC_CHAR*      pcPolicyUser,
             const XC_CHAR*      pcOldDataElement,
             const XC_CHAR*      pcNewDataElement,
             const XC_BYTE*      pcOldExternalIV,
             const XC_UINT4      ui4OldExternalIVLength,
             const XC_BYTE*      pcNewExternalIV,
             const XC_UINT4      ui4NewExternalIVLength,
             const XC_BYTE*      pcInputData,
             const XC_UINT4      ui4InputDataLength,
             const XC_BYTE       bNiInputData,
             XC_BYTE*            pcOutputData,
             XC_UINT4*           pui4OutputDataLength,
             XC_BYTE*            pbNiOutputData,
             const XC_PARAM_EX*  pXCParam,
             const XC_UINT4      ui4XCParamSize,
             stXC_ACTION_RESULT* pstActionResult );
The following table lists the various parameters used for the XCReprotect function.
| Parameter | Description | Data Type |
|---|
| hXCHandle | [in] Handle for the library that has been initialized. | const XC_HANDLE |
| hSession | [in] Handle for the established session. | const XC_SESSION |
| ui4EventType | [in] Used to identify whether the call type of the function is First Call or Normal Call.
This parameter can be set to one of the following values:
- 1: Internally sets the XC event type to XC_EVENT_FIRST_CALL. This identifies the call type as First Call. If the call type is First Call, then data is written to the internal cache, which includes:
- SessionID
- RequestID
- DataElement
- UserName
- ProductID
- VendorID
- 0: Identifies the call type as Normal Call. If the call type is Normal Call, then the data is only read from the internal cache. Data is written to the internal cache only if it is different from the one that was written during the First Call.
Important: An entry is generated in the pepserver.log file only if any new data is written to the internal cache.
Note:
If logging is not enabled, but the XC_EVENT_FIRST_CALL parameter is set, then logs are not generated.
| |
| Similarly, if logging is enabled, but XC_EVENT_FIRST_CALL is not set, then logs are generated only if any new data is written to the cache. | const XC_UINT4 | |
| pcPolicyUser | [in] String for the policy user. | const XC_CHAR* |
| pcOldDataElement | [in] String for the old data element. | const XC_CHAR* |
| pcNewDataElement | [in] String for the new data element to be used. | const XC_CHAR* |
| pcOldExternalIV | [in] External IV that was used when data was protected. | const XC_BYTE* |
| ui4OldExternalIVLength | [in] Number of bytes in pcOldExternalIV. The total amount of data to be reprotected should not exceed 256 bytes. | const XC_UINT4 |
| pcNewExternalIV | [in] External IV to use when data is protected with the new data element. | const XC_BYTE* |
| ui4NewExternalIVLength | [in] Number of bytes in pcNewExternalIV. The total amount of data to be reprotected should not exceed 256 bytes. | const XC_UINT4 |
| pcInputData | [in] Buffer containing the data to be re-encrypted. | const XC_BYTE* |
| ui4InputDataLength | [in] Number of bytes contained in pcInputData. The total amount of data to be unprotected should not exceed 2 GB. | const XC_UINT4 |
| bNiInputData | [in] Flag to indicate NULL input. | const XC_BYTE |
| pcOutputData | [out] Buffer that will hold the resulting re-encrypted data. Needs to be larger than the input buffer. | XC_BYTE* |
| pui4OutputDataLength | [in/out] On input it should specify the max size of the output data buffer. When the function returns, it will contain the actual number of bytes stored in the output. This size needs to be big enough to hold the resulting data as well as the packed request. Consider having an output buffer that is XC_BYTES_OVERHEAD bytes larger than the input buffer for additional overhead.
If the value is set to zero as *pui4OutputDataLength = 0;, then the following value is returned.
*pui4OutputDataLength = ui4InputDataLength + XC_BYTES_OVERHEAD; | XC_UINT4* |
| pbNiOutputData | [out] Flag indicating that the output is NULL. | XC_BYTE* |
| pXCParam | [in] Additional information associated with the protection, refer to the XC_Param_Ex function. | const XC_PARAM_EX* |
| ui4XCParamSize | [in] Size of the structure passed in the pXCParam parameter. | const XC_UINT4 |
| pstActionResult | [out] Structure containing the result of the operation. For more information refer to the xcdefinitions.h file. | stXC_ACTION_RESULT* |
XCBulkProtect Function
The XCBulkProtect function protects the data in bulk. It will take a list of data items and send them in a single request to the Protegrity AP, which will then process them in a batch. It will then read the response from the Protegrity AP and return a list of data items containing the protected data.
This function returns XC_SUCCESS on success.
The ui4CharSet field in XC_PARAM_EX is required when using FPE or Unicode Gen2 data elements with the byte API. It must match the encoding of the input data. The following values are supported:
| Value | Encoding |
|---|
| 2 | UTF-8 |
| 4 | UTF-16LE |
| 5 | UTF-16BE |
Warning:
For Date and DateTime type of data elements, the XCBulkProtect API returns an invalid input data error for certain input values. This occurs when the input value falls within the non-existent date range from 05-OCT-1582 to 14-OCT-1582 of the Gregorian Calendar.
For more information about the tokenization and de-tokenization of the cutover dates, refer to Datetime Tokenization for Cutover Dates of the Proleptic Gregorian Calendar.
The following is a sample of the XCBulkProtect function.
XCBulkProtect( const XC_HANDLE        hXCHandle,
               const XC_SESSION       hSession,
               const XC_UINT4         ui4EventType,
               const XC_CHAR*         pcPolicyUser,
               const XC_CHAR*         pcDataElement,
               const XC_BYTE*         pcExternalIV,
               const XC_UINT4         ui4ExternalIVLength,
               const XC_DATA_ITEM_EX* pInDataItems,
               const XC_UINT4         ui4InDataItemCount,
               XC_DATA_ITEM_EX*       pOutDataItems,
               XC_UINT4*              pui4OutDataItemCount,
               XC_INT4*               pi4ErrorIndex,
               const XC_PARAM_EX*     pXCParam,
               const XC_UINT4         ui4XCParamSize,
               stXC_ACTION_RESULT*    pstActionResult );
The following table lists the various parameters used for the XCBulkProtect function.
| Parameter | Description | Data Type |
|---|
| hXCHandle | [in] Handle for the library that has been initialized. | const XC_HANDLE |
| hSession | [in] Handle for the established session. | const XC_SESSION |
| ui4EventType | [in] Used to identify whether the call type of the function is First Call or Normal Call.
This parameter can be set to one of the following values:
- 1: Internally sets the XC event type to XC_EVENT_FIRST_CALL. This identifies the call type as First Call. If the call type is First Call, then data is written to the internal cache, which includes:
- SessionID
- RequestID
- DataElement
- UserName
- ProductID
- VendorID
- 0: Identifies the call type as Normal Call. If the call type is Normal Call, then the data is only read from the internal cache. Data is written to the internal cache only if it is different from the one that was written during the First Call.
Important: An entry is generated in the pepserver.log file only if any new data is written to the internal cache.
Note: If logging is not enabled, but the XC_EVENT_FIRST_CALL parameter is set, then logs are not generated.
Similarly, if logging is enabled, but XC_EVENT_FIRST_CALL is not set, then logs are generated only if any new data is written to the cache. | const XC_UINT4 |
| pcPolicyUser | [in] NULL terminated string for the policy user. | const XC_CHAR* |
| pcDataElement | [in] NULL terminated string for the data element. | const XC_CHAR* |
| pcExternalIV | [in] Buffer containing data that will be used as external IV. | const XC_BYTE* |
| ui4ExternalIVLength | [in] Number of bytes provided in the pcExternalIv buffer. The total amount of data for bulk protection should not exceed 256 bytes. | const XC_UINT4 |
| pInDataItems | [in] Buffer containing the protected data to unprotect. | const XC_DATA_ITEM_EX* |
| ui4InDataItemCount | [in] Number of items contained in pInDataItems. The maximum number of data items should not exceed 1000 elements. | const XC_UINT4 |
| pOutDataItems | [out] Buffer containing the unprotected data after a successful operation. | XC_DATA_ITEM_EX* |
| pui4OutDataItemCount | [out] Resulting number of items placed in pOutDataItems. | XC_UINT4* |
| pi4ErrorIndex | [out] Zero-based index of first item that failed, if any, otherwise it will be set to XC_ERROR_INDEX_NONE. | XC_INT4* |
| pXCParam | [in] Additional parameters. | const XC_PARAM_EX* |
| ui4XCParamSize | [in] Size of the additional parameters. | const XC_UINT4 |
| pstActionResult | [out] Structure containing the result of the operation. For more information refer to the xcdefinitions.h file. | stXC_ACTION_RESULT* |
XCBulkUnProtect Function
The XCBulkUnProtect function decrypts the data in bulk. It will take a list of data items and send them in a single request to the Protegrity AP, which will then process them in a batch. It will then read the response from the Protegrity AP and return a list of data items containing the plain data.
This function returns XC_SUCCESS on success.
The ui4CharSet field in XC_PARAM_EX is required when using FPE or Unicode Gen2 data elements with the byte API. It must match the encoding of the input data. The following values are supported:
| Value | Encoding |
|---|
| 2 | UTF-8 |
| 4 | UTF-16LE |
| 5 | UTF-16BE |
The following is a sample of the XCBulkUnProtect function.
XCBulkUnprotect( const XC_HANDLE          hXCHandle,
                 const XC_SESSION         hSession,
                 const XC_UINT4           ui4EventType,
                 const XC_CHAR*           pcPolicyUser,
                 const XC_CHAR*           pcDataElement,
                 const XC_BYTE*           pcExternalIV,
                 const XC_UINT4           ui4ExternalIVLength,
                 const XC_DATA_ITEM_EX*   pInDataItems,
                 const XC_UINT4           ui4InDataItemCount,
                 XC_DATA_ITEM_EX*         pOutDataItems,
                 XC_UINT4*                pui4OutDataItemCount,
                 XC_INT4*                 pi4ErrorIndex,
                 const XC_PARAM_EX*       pXCParam,
                 const XC_UINT4           ui4XCParamSize,
                 stXC_ACTION_RESULT*      pstActionResult );
The following table lists the various parameters used for the XCBulkUnProtect function.
| Parameter | Description | Data Type |
|---|
| hXCHandle | [in] Handle for the library that has been initialized. | const XC_HANDLE |
| hSession | [in] Handle for the established session. | const XC_SESSION |
| ui4EventType | [in] Used to identify whether the call type of the function is First Call or Normal Call.
This parameter can be set to one of the following values:
- 1: Internally sets the XC event type to XC_EVENT_FIRST_CALL. This identifies the call type as First Call. If the call type is First Call, then data is written to the internal cache, which includes:
- SessionID
- RequestID
- DataElement
- UserName
- ProductID
- VendorID
- 0: Identifies the call type as Normal Call. If the call type is Normal Call, then the data is only read from the internal cache. Data is written to the internal cache only if it is different from the one that was written during the First Call.
Important: An entry is generated in the pepserver.log file only if any new data is written to the internal cache.
Note: If logging is not enabled, but the XC_EVENT_FIRST_CALL parameter is set, then logs are not generated.
Similarly, if logging is enabled, but XC_EVENT_FIRST_CALL is not set, then logs are generated only if any new data is written to the cache. | const XC_UINT4 |
| pcPolicyUser | [in] NULL terminated string for the policy user. | const XC_CHAR* |
| pcDataElement | [in] NULL terminated string for the data element. | const XC_CHAR* |
| pcExternalIV | [in] Buffer containing data that will be used as external IV. | const XC_BYTE* |
| ui4ExternalIVLength | [in] Number of bytes provided in the pcExternalIv buffer. The total amount of data for bulk protection should not exceed 256 bytes. | const XC_UINT4 |
| pInDataItems | [in] Buffer containing the plain data to protect. | const XC_DATA_ITEM_EX* |
| ui4InDataItemCount | [in] Number of items contained in pInDataItems. The maximum number of data items should not exceed 1000 elements. | const XC_UINT4 |
| pOutDataItems | [out] Buffer containing the protected data after a successful operation. | XC_DATA_ITEM_EX* |
| pui4OutDataItemCount | [in/out] On input the capacity of pOutDataItems which must be the same as ui4InDataItemCount.
On return it will contain the number of items placed in pOutDataItems. | XC_UINT4* |
| pi4ErrorIndex | [out] Zero-based index of first item that failed, if any, otherwise it will be set to XC_ERROR_INDEX_NONE. | XC_INT4* |
| pXCParam | [in] Additional parameters. | const XC_PARAM_EX* |
| ui4XCParamSize | [in] Size of the additional parameters. | const XC_UINT4 |
| pstActionResult | [out] Structure containing the result of the operation. For more information refer to the xcdefinitions.h file. | stXC_ACTION_RESULT* |
XCBulkReprotect Function
The XCBulkReprotect function reprotects the data in bulk from one data element to another. It will take a list of data items and send them in a single request to the Protegrity AP, which will then process them in a batch. It will then read the response from the Protegrity AP and return a list of data items containing the reprotected data.
This function returns XC_SUCCESS on success.
The following is a sample of the XCBulkReprotect function.
XCBulkReprotect( const XC_HANDLE          hXCHandle,
                 const XC_SESSION         hSession,
                 const XC_UINT4           ui4EventType,
                 const XC_CHAR*           pcPolicyUser,
                 const XC_CHAR*           pcNewDataElement,
                 const XC_CHAR*           pcOldDataElement,
                 const XC_BYTE*           pcOldExternalIV,
                 const XC_UINT4           ui4OldExternalIVLength,
                 const XC_BYTE*           pcNewExternalIV,
                 const XC_UINT4           ui4NewExternalIVLength,
                 const XC_DATA_ITEM_EX*   pInDataItems,
                 const XC_UINT4           ui4InDataItemCount,
                 XC_DATA_ITEM_EX*         pOutDataItems,
                 XC_UINT4*                pui4OutDataItemCount,
                 XC_INT4*                 pi4ErrorIndex,
                 const XC_PARAM_EX*       pXCParam,
                 const XC_UINT4           ui4XCParamSize,
                 stXC_ACTION_RESULT*      pstActionResult );
The following table lists the various parameters used for the XCBulkReprotect function.
| Parameter | Description | Data Type |
|---|
| hXCHandle | [in] Handle for the library that has been initialized. | const XC_HANDLE |
| hSession | [in] Handle for the established session. | const XC_SESSION |
| ui4EventType | [in] Event type for logging. | const XC_UINT4 |
| pcPolicyUser | [in] String for the policy user. | const XC_CHAR* |
| pcNewDataElement | [in] String for the new data element. | const XC_CHAR* |
| pcOldDataElement | [in] String for the old data element. | const XC_CHAR* |
| pcOldExternalIV | [in] Buffer containing data that will be used as old external IV. It can be NULL. | const XC_BYTE* |
| ui4OldExternalIVLength | [in] Length of old external IV. | const XC_UINT4 |
| pcNewExternalIV | [in] Buffer containing data that will be used as new external IV. It can be NULL. | const XC_BYTE* |
| ui4NewExternalIVLength | [in] Length of new external IV. | const XC_UINT4 |
| pInDataItems | [in] Array of input data items. | const XC_DATA_ITEM_EX* |
| ui4InDataItemCount | [in] Number of input data items. | const XC_UINT4 |
| pOutDataItems | [out] Array of output data items. | XC_DATA_ITEM_EX* |
| pui4OutDataItemCount | [in/out] Number of output data items. | XC_UINT4* |
| pi4ErrorIndex | [out] Index of the item that caused error. | XC_INT4* |
| pXCParam | [in] Additional parameters. | const XC_PARAM_EX* |
| ui4XCParamSize | [in] Size of the additional parameters. | const XC_UINT4 |
| pstActionResult | [out] Action result structure. | stXC_ACTION_RESULT* |
XCCheckAccess Function
The XCCheckAccess function checks whether a policy user is permitted to perform an operation on a specific Data Element.
This function returns XC_SUCCESS if access is permitted and returns XC_ACCESS_DENIED if no access permitted.
The following is a sample for the XCCheckAccess function.
XCCheckAccess( const XC_HANDLE     hXCHandle,
               const XC_SESSION    hSession,
               const XC_UINT4      ui4Operation,
               const XC_CHAR*      pcPolicyUser,
               const XC_CHAR*      pcDataElement,
               const XC_CHAR*      pcOldDataElement,
               const XC_PARAM_EX*  pXCParam,
               const XC_UINT4      ui4XCParamSize );
The following table lists the various parameters used for the XCCheckAccess function.
| Parameter | Description | Data Type |
|---|
| hXCHandle | [in] Handle for the initialized library. | const XC_HANDLE |
| hSession | [in] Handle for the established session. | const XC_SESSION |
| ui4Operation | [in] Check operation to perform, one of XC_OPERATION_CHECK_PROTECT, XC_OPERATION_CHECK_UNPROTECT or XC_OPERATION_CHECK_REPROTECT. | const XC_UINT4 |
| pcPolicyUser | [in] String for the policy user. | const XC_CHAR* |
| pcDataElement | [in] String for the data element to check the new data element for reprotect. | const XC_CHAR* |
| pcOldDataElement | [in] String for the old data element, mandatory only for a reprotect check. | const XC_CHAR* |
| pXCParam | [in] Additional parameters. | const XC_PARAM_EX* |
| ui4XCParamSize | [in] Size of the additional parameters. | const XC_UINT4 |
XCGetErrorDescription Function
The XCGetErrorDescription function gets error description when a previous call to a Protegrity AP function fails. To get the required size of the message buffer, you can call the function with pszMessage set to XC_NULL. The required buffer size will then be returned in parameter pui4MessageLength, and the return code set to XC_BUFFER_TOO_SMALL.
This function returns XC_SUCCESS if successful and it returns XC_BUFFER_TOO_SMALL if the pui4MessageLength is not big enough.
The following is a sample of the XCGetErrorDescription function.
XCGetErrorDescription( const XC_HANDLE  hXCHandle,
                       const XC_SESSION hSession,
                       XC_CHAR*         pszMessage,
                       XC_UINT4*        pui4MessageLength );
The following table lists the various parameters used for the XCGetErrorDescription function.
| Parameter | Description | Data Type |
|---|
| hXCHandle | [in] Handle for the library that has been initialized. | const XC_HANDLE |
| hSession | [in] Handle for the session or NULL if no session exists. For example, when XCOpenSession failed. | const XC_SESSION |
| pszMessage | [in/out] The null terminated message string. | XC_CHAR* |
| pui4MessageLength | [in/out] On input, it should specify the max length of the pszMessage buffer. On return, it will contain the length of the message, not counting null. | XC_UINT4* |
8.2 - DevOps Approach for Application Protector C
The DevOps approach for package deployment.
The DevOps approach enables immutable package deployment. It uses a REST API call to download packages from the ESA in an encrypted format.
Note: The RP Agent should not be installed for immutable package deployments using DevOps.
For more information about package deployment approaches, refer to Resilient Package Deployment.
A REST API call is used to download the package on your local machine. Configure the package path in the config.ini file within the DevOps section and the decryptor shared library.
If a downloaded path is overwritten, a new package will be reflected in the running application at the set time interval (cadence). This occurs when another package with the same name overwrites the existing one. This changes the protector’s behavior. The protector no longer functions as an immutable protector. To keep it immutable, set the cadence value in config.ini file to 0.
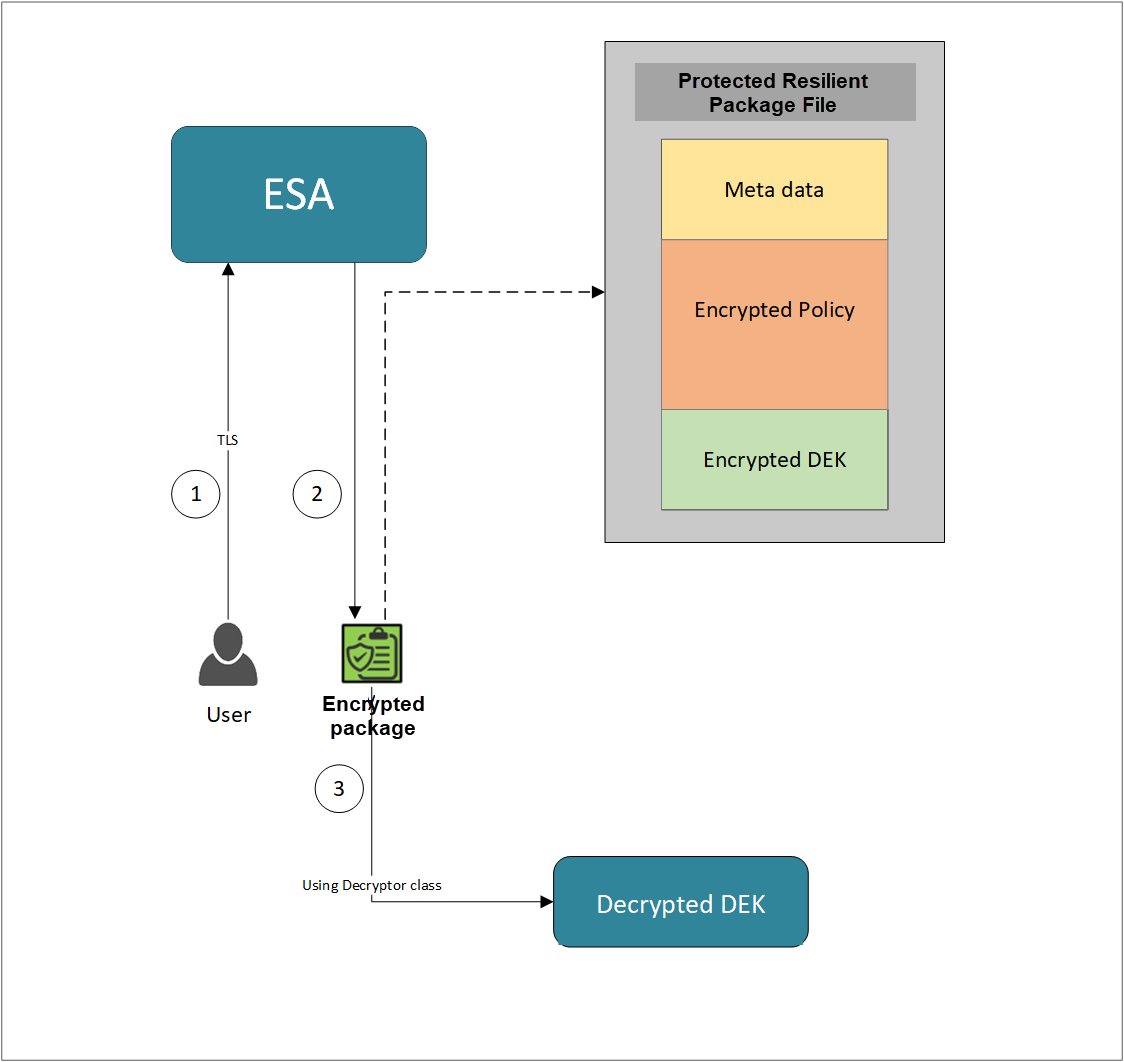
- A REST API call is used to download the policy from the ESA in an envelope encrypted format. A public key is created using a Key Management System (KMS) or Hardware Security Module (HSM). This public key must be passed to the REST API.
- The ESA generates a JSON file for the package with policy.
- The encrypted DEK needs to be decrypted to perform the security operations. A Decryptor class is implemented using the Decryptor interface, to decrypt the Data Encryption Key (DEK) using a private key.
Before you begin
Ensure the following prerequisites are met:
- The installation of the RP Agent is not required for immutable package deployment using the DevOps approach.
- The
decryptor parameter must be the full path to the decryptor shared library.
A decryptor shared library must implement the decrypt() function, which decrypts the Data Encryption Key (DEK) using a private key. It returns the decrypted DEK in bytes.
For more information on the decryptor interface of AP C, refer to Configuring the Decryptor interface.
- The data store is properly configured before exporting your Application Protector policy. For ESA 10.0.1 and 10.1.0 versions, define allowed servers for seamless policy deployment and secure access control.
For more information about configuring a data store, refer to: - For ESA version 10.2.0 and higher, export key must be created in the data store for secure access control.
For more information refer to Using the Encrypted Resilient Package REST APIs.
AP C
Using the DevOps approach
Perform the following steps to use the DevOps approach for immutable package deployment.
Create the RSA decryptor file, for example: rsa_decryptor.c, using decrypt() function and then compile it which will create a .so shared library.
For example -
gcc -shared -fPIC -o /opt/apc/rsa_decryptor.so /opt/apc/rsa_decryptor.c -lssl -lcrypto
Add the [devops] parameter in the config.ini file.
[devops]
package.path = /path/to/policyFile
decryptor = /path/to/decryptor_shared_library.so
The following is an example for adding the [devops] parameter in the config.ini file.
[devops]
package.path = /opt/policies/policy1.json
decryptor = /opt/apc/rsa_decryptor.so
Note: For ESA 10.2.0 and later, Application Protector DevOps must use the Encrypted Resilient Package REST APIs using GET method. The legacy Export API using POST method is deprecated and not supported for Teams (PPC). The deprecated API remains supported only for the Enterprise edition for backward compatibility.
For more information about exporting Resilient Package using POST method for 10.0.1 and 10.1.0 ESA, refer to Using the Encrypted Resilient Package REST APIs.
For more information about exporting Resilient Package using GET method for 10.2 ESA, refer to Using the Encrypted Resilient Package REST APIs.
For more information about exporting Resilient Package using GET method for PPC, refer to Using the Encrypted Resilient Package REST APIs.
Sample code for DevOps approach for AP C
The following sections provide sample code for the DevOps approach for Application Protectors using different cloud platforms.
Configuring the Decryptor interface
The decrypt function provides key_label, algorithm, encrypted_dek, and encrypted_dek_len parameters. The decrypted DEK must be returned as an unsigned char *, and its length written to *decrypted_dek_len. The path to the compiled .so is set using decryptor= in the [devops] section of config.ini.
Custom DEK Decryptor Implementation Requirements:
Exact function signature — must match precisely, including parameter names and types:
unsigned char *decrypt(char *key_label, const unsigned char *encrypted_dek,
                       char *algorithm, int encrypted_dek_len, int *decrypted_dek_len);
Include the header — #include "decryptor.h" is required; the AP C runtime provides this header.
Memory allocation — the return value must be allocated with OPENSSL_malloc(), not malloc(), because the APC runtime frees it with OPENSSL_free().
Return contract — return NULL on failure; on success write the plaintext length to *decrypted_dek_len and return the plaintext buffer.
Algorithm strings — the algorithm parameter will be one of: RSA_OAEP_SHA1, RSA_OAEP_SHA256, RSA_OAEP_SHA512, RSA_PKCS1_v1_5. The code must handle whichever algorithm was used to encrypt the DEK.
Private key path — hardcode or configure the path to the private key (PKCS#8 PEM format) inside the .c file before compiling.
Build — compile as a shared library:
gcc -shared -fPIC -o rsa_decryptor.so rsa_decryptor.c -lssl -lcrypto
Register the .so — set decryptor=<absolute_path_to_rsa_decryptor.so> in the [devops] section of config.ini.
Using AWS
The following is a sample implementation using the private key from AWS KMS.
/*
 * Prerequisites to build and run this file:
 *
 * 1. Install AWS C++ SDK (kms + core only):
 *      cmake .. -DBUILD_ONLY="kms;core"
 *      make && sudo make install
 *    Ref: GitHub - aws/aws-sdk-cpp: AWS SDK for C++
 *
 * 2. Set LD_LIBRARY_PATH to include AWS SDK and APC libraries:
 *      export LD_LIBRARY_PATH=/home/ec2-user/c_sdk/apc/build/lib:/usr/local/lib64
 *    Ensure libaws-cpp-sdk-kms.so and libaws-cpp-sdk-core.so are present.
 *
 * 3. Configure AWS credentials (one of):
 *    a) CLI:  aws configure
 *    b) Env:  export AWS_ACCESS_KEY_ID="..."
 *             export AWS_SECRET_ACCESS_KEY="..."
 *             export AWS_REGION="..."
 *
 * 4. Ensure the KMS key (RSA_4096, ENCRYPT_DECRYPT) exists in your AWS account.
 *    Retrieve the key ID from AWS KMS Console or:
 *      aws kms get-public-key --key-id <your-key-id>
 *
 * 5. Compile:
 *      g++ -g -shared -o aws.so test.cpp -lcrypto -laws-cpp-sdk-kms -laws-cpp-sdk-core -fPIC
 */
#include <aws/core/Aws.h>
#include <aws/kms/KMSClient.h>
#include <aws/kms/model/DecryptRequest.h>
#include "../../../apc/decryptor.h"

extern "C"{
unsigned char* decrypt(char* key_label, const unsigned char *encrypted_dek, char* algorithm, int encrypted_dek_len, int *decrypted_dek_len)
{
    Aws::SDKOptions options;
    /* Initialize AWS SDK*/
    Aws::InitAPI(options);
    Aws::Client::ClientConfiguration clientConfig;
    /* Disable SSL verification */
    clientConfig.verifySSL = false;
    /* Create KMS Client */
    Aws::KMS::KMSClient kms(clientConfig);
    /* Create Decrypt Request*/
    Aws::KMS::Model::DecryptRequest decrypt_request;
    unsigned char* decrypted_data = nullptr;
    decrypt_request.SetCiphertextBlob(Aws::Utils::ByteBuffer(encrypted_dek, encrypted_dek_len));
    decrypt_request.WithEncryptionAlgorithm(Aws::KMS::Model::EncryptionAlgorithmSpec::RSAES_OAEP_SHA_256);
    decrypt_request.WithKeyId("3068b3ef-4924-4be5-9e9a-440b418553b3");
    auto decryptOutcome = kms.Decrypt(decrypt_request);
    if(!decryptOutcome.IsSuccess()){
       std::cerr << "Error Decrypting data: " << decryptOutcome.GetError().GetMessage() << std::endl;
    }
    Aws::Utils::ByteBuffer plaintext = decryptOutcome.GetResult().GetPlaintext();
    /* Allocate memory for decrypted data */
    decrypted_data = new unsigned char[plaintext.GetLength()];
    std::memcpy(decrypted_data, plaintext.GetUnderlyingData(), plaintext.GetLength());
    *decrypted_dek_len = plaintext.GetLength();
    return decrypted_data;
}
}
Using Azure
The following is a sample implementation using the private key from Azure Key Vault.
/*
 * Prerequisites to build and run this file:
 *
 * 1. Install Azure SDK and the dependencies required by azure.cpp.
 *
 * 2. Log in to Azure:
 *      az login
 *
 *      Verify the active subscription:
 *      az account show
 *
 * 3. Create an Azure Key Vault:
 *      az keyvault create \
 *        --name <key-vault-name> \
 *        --resource-group <resource-group> \
 *        --location <location>
 *
 * 4. Create an RSA key in the Key Vault:
 *      az keyvault key create \
 *        --vault-name <key-vault-name> \
 *        --name <key-name> \
 *        --kty RSA \
 *        --size 2048 \
 *        --ops encrypt decrypt wrapKey unwrapKey sign verify
 *
 * 5. Get the VM Managed Identity Object ID:
 *      az vm identity show \
 *        --resource-group <resource-group> \
 *        --name <vm-name> \
 *        --query principalId -o tsv
 *
 * 6. Grant Key Vault permissions:
 *      az keyvault set-policy \
 *        --name <key-vault-name> \
 *        --object-id <principal-id> \
 *        --key-permissions get list decrypt unwrapKey
 *
 * 7. Get the Key Vault key URI (key_label):
 *      az keyvault key show \
 *        --vault-name <key-vault-name> \
 *        --name <key-name> \
 *        --query "key.kid" -o tsv
 *
 *      Example:
 *      https://<key-vault-name>.vault.azure.net/keys/<key-name>/<version>
 *
 * 8. Download the public key:
 *      az keyvault key download \
 *        --vault-name <key-vault-name> \
 *        --name <key-name> \
 *        --file <public-key>.pem \
 *        --encoding PEM
 *
 * 9. Export the APC policy package:
 *      curl -k -u <user>:<password> -X POST \
 *        'https://<rps-host>/pty/v1/rps/export?version=1&coreversion=1' \
 *        -H 'Content-Type: application/json' \
 *        -d '{
 *              "kek": {
 *                "publicKey": {
 *                  "label": "<key_label>",
 *                  "algorithm": "RSA-OAEP-256",
 *                  "value": "-----BEGIN PUBLIC KEY----- ... -----END PUBLIC KEY-----"
 *                }
 *              }
 *            }' \
 *        -o pkg_azure.json
 *
 * 10. Compile:
 *      g++ -std=c++17 -fPIC -shared -o azure.so azure.cpp \
 *          -I<azure-sdk-include-dir> \
 *          -I<apc-source-dir> \
 *          -lcurl \
 *          -lpthread
 *
 * 11. Set environment variables:
 *      export LD_LIBRARY_PATH=<apc-library-dir>:$LD_LIBRARY_PATH
 *      export PTY_APC_CONFIG=<config-file>
 *
 * 12. Run:
 *      ./xcapcsample -p <parameter> -u <user> -d1 <data-element-name>
 */
/*******************************************************************************
 * azure.cpp
 *
 * Azure Key Vault decryptor plug-in — C++ implementation via REST API.
 *
 * Calls the Azure Key Vault decrypt REST endpoint using libcurl and OpenSSL
 * for base64url encoding/decoding.  No Azure C++ SDK required.
 *
 * key_label must be the full Azure Key Vault key identifier URL:
 *   https://<vault-name>.vault.azure.net/keys/<key-name>/<key-version>
 *
 * Authentication (in priority order):
 *   1. AZURE_ACCESS_TOKEN env var   — pre-obtained Bearer token.
 *   2. Client credentials flow      — set AZURE_TENANT_ID, AZURE_CLIENT_ID,
 *                                     AZURE_CLIENT_SECRET env vars.
 *   3. Azure Managed Identity (IMDS)— works on Azure VMs / AKS / App Service.
 *
 * Build:
 *   g++ -std=c++17 -fPIC -shared -o azure.so azure.cpp \
 *       -I<path-to-apc-includes> \
 *       -lcurl -lssl -lcrypto
 ******************************************************************************/

#include <cstdlib>
#include <cstring>
#include <iostream>
#include <string>
#include <vector>

#include <curl/curl.h>
#include <openssl/bio.h>
#include <openssl/buffer.h>
#include <openssl/evp.h>

#include "../../../apc/decryptor.h"

/* ==========================================================================
 * Internal helpers
 * ========================================================================== */

namespace {

/* --------------------------------------------------------------------------
 * libcurl write callback — appends received data to a std::string.
 * -------------------------------------------------------------------------- */
std::size_t curlWriteCallback(char* ptr, std::size_t size,
                               std::size_t nmemb, void* userdata)
{
    auto* buf = static_cast<std::string*>(userdata);
    buf->append(ptr, size * nmemb);
    return size * nmemb;
}

/* --------------------------------------------------------------------------
 * base64urlEncode
 *
 * Azure Key Vault uses base64url (RFC 4648 §5): '+' → '-', '/' → '_',
 * no '=' padding.
 * -------------------------------------------------------------------------- */
std::string base64urlEncode(const unsigned char* src, int len)
{
    /* Standard base64 first */
    BIO* b64 = BIO_new(BIO_f_base64());
    BIO* mem = BIO_new(BIO_s_mem());
    BUF_MEM* bptr = nullptr;

    BIO_set_flags(b64, BIO_FLAGS_BASE64_NO_NL);
    BIO_push(b64, mem);
    BIO_write(b64, src, len);
    BIO_flush(b64);
    BIO_get_mem_ptr(b64, &bptr);
    BIO_set_close(b64, BIO_NOCLOSE);
    BIO_free_all(b64);

    std::string result(bptr->data, bptr->length);
    BUF_MEM_free(bptr);

    /* Convert to base64url */
    for (char& c : result) {
        if (c == '+') c = '-';
        else if (c == '/') c = '_';
    }
    /* Strip padding */
    while (!result.empty() && result.back() == '=')
        result.pop_back();

    return result;
}

/* --------------------------------------------------------------------------
 * base64urlDecode
 *
 * Converts base64url back to standard base64 then decodes.
 * -------------------------------------------------------------------------- */
std::vector<unsigned char> base64urlDecode(const std::string& src)
{
    std::string b64 = src;

    /* Convert base64url → standard base64 */
    for (char& c : b64) {
        if (c == '-') c = '+';
        else if (c == '_') c = '/';
    }
    /* Re-add padding */
    while (b64.size() % 4 != 0)
        b64 += '=';

    std::vector<unsigned char> out(b64.size());
    BIO* bmem = BIO_new_mem_buf(b64.data(), static_cast<int>(b64.size()));
    BIO* b64bio = BIO_new(BIO_f_base64());
    BIO_set_flags(b64bio, BIO_FLAGS_BASE64_NO_NL);
    BIO_push(b64bio, bmem);

    int n = BIO_read(b64bio, out.data(), static_cast<int>(b64.size()));
    BIO_free_all(b64bio);

    if (n <= 0)
        return {};
    out.resize(static_cast<std::size_t>(n));
    return out;
}

/* --------------------------------------------------------------------------
 * jsonGetString
 *
 * Extracts the value of a flat JSON string field.
 * Handles optional whitespace around ':'.
 * -------------------------------------------------------------------------- */
std::string jsonGetString(const std::string& json, const std::string& field)
{
    const std::string key = "\"" + field + "\"";
    auto pos = json.find(key);
    if (pos == std::string::npos)
        return {};

    pos += key.size();

    /* Skip whitespace then ':' */
    while (pos < json.size() && (json[pos] == ' ' || json[pos] == '\t' ||
                                  json[pos] == '\r' || json[pos] == '\n'))
        ++pos;
    if (pos >= json.size() || json[pos] != ':')
        return {};
    ++pos;

    /* Skip whitespace after ':' */
    while (pos < json.size() && (json[pos] == ' ' || json[pos] == '\t' ||
                                  json[pos] == '\r' || json[pos] == '\n'))
        ++pos;
    if (pos >= json.size() || json[pos] != '"')
        return {};
    ++pos; /* skip opening '"' */

    auto end = json.find('"', pos);
    if (end == std::string::npos)
        return {};
    return json.substr(pos, end - pos);
}

/* --------------------------------------------------------------------------
 * getTokenClientCredentials
 *
 * Fetches an Azure AD Bearer token using the client credentials OAuth2 flow.
 * Requires: AZURE_TENANT_ID, AZURE_CLIENT_ID, AZURE_CLIENT_SECRET env vars.
 * -------------------------------------------------------------------------- */
std::string getTokenClientCredentials()
{
    const char* tenantId     = std::getenv("AZURE_TENANT_ID");
    const char* clientId     = std::getenv("AZURE_CLIENT_ID");
    const char* clientSecret = std::getenv("AZURE_CLIENT_SECRET");

    if (!tenantId || !clientId || !clientSecret ||
        tenantId[0] == '\0' || clientId[0] == '\0' || clientSecret[0] == '\0')
        return {};

    const std::string tokenUrl =
        "https://login.microsoftonline.com/" + std::string(tenantId) +
        "/oauth2/v2.0/token";

    const std::string body =
        "grant_type=client_credentials"
        "&client_id="     + std::string(clientId) +
        "&client_secret=" + std::string(clientSecret) +
        "&scope=https%3A%2F%2Fvault.azure.net%2F.default";

    std::string response;
    CURL* curl = curl_easy_init();
    if (!curl) return {};

    curl_easy_setopt(curl, CURLOPT_URL,           tokenUrl.c_str());
    curl_easy_setopt(curl, CURLOPT_POSTFIELDS,    body.c_str());
    curl_easy_setopt(curl, CURLOPT_WRITEFUNCTION, curlWriteCallback);
    curl_easy_setopt(curl, CURLOPT_WRITEDATA,     &response);
    curl_easy_setopt(curl, CURLOPT_TIMEOUT,       10L);

    CURLcode rc = curl_easy_perform(curl);
    curl_easy_cleanup(curl);

    if (rc != CURLE_OK) {
        std::cerr << "[Azure KV] token request failed: "
                  << curl_easy_strerror(rc) << std::endl;
        return {};
    }

    /* {"access_token":"<TOKEN>","token_type":"Bearer",...} */
    std::string token = jsonGetString(response, "access_token");
    if (token.empty())
        std::cerr << "[Azure KV] unexpected token response: " << response << std::endl;
    return token;
}

/* --------------------------------------------------------------------------
 * getTokenManagedIdentity
 *
 * Fetches a Bearer token from the Azure IMDS endpoint (Azure VMs / AKS).
 * -------------------------------------------------------------------------- */
std::string getTokenManagedIdentity()
{
    std::string response;
    CURL* curl = curl_easy_init();
    if (!curl) return {};

    curl_slist* headers = nullptr;
    headers = curl_slist_append(headers, "Metadata: true");

    curl_easy_setopt(curl, CURLOPT_URL,
        "http://169.254.169.254/metadata/identity/oauth2/token"
        "?api-version=2018-02-01&resource=https://vault.azure.net");
    curl_easy_setopt(curl, CURLOPT_HTTPHEADER,    headers);
    curl_easy_setopt(curl, CURLOPT_WRITEFUNCTION, curlWriteCallback);
    curl_easy_setopt(curl, CURLOPT_WRITEDATA,     &response);
    curl_easy_setopt(curl, CURLOPT_TIMEOUT,       5L);

    CURLcode rc = curl_easy_perform(curl);
    curl_slist_free_all(headers);
    curl_easy_cleanup(curl);

    if (rc != CURLE_OK) {
        std::cerr << "[Azure KV] IMDS token fetch failed: "
                  << curl_easy_strerror(rc) << std::endl;
        return {};
    }

    std::string token = jsonGetString(response, "access_token");
    if (token.empty())
        std::cerr << "[Azure KV] unexpected IMDS response: " << response << std::endl;
    return token;
}

/* --------------------------------------------------------------------------
 * getAccessToken
 *
 * Returns a Bearer token for Azure Key Vault API calls.
 *
 * Priority:
 *   1. AZURE_ACCESS_TOKEN env var   (any environment)
 *   2. Client credentials flow      (AZURE_TENANT_ID + CLIENT_ID + SECRET)
 *   3. Azure Managed Identity IMDS  (Azure VMs / AKS / App Service)
 * -------------------------------------------------------------------------- */
std::string getAccessToken()
{
    const char* env = std::getenv("AZURE_ACCESS_TOKEN");
    if (env && env[0] != '\0')
        return std::string(env);

    std::string token = getTokenClientCredentials();
    if (!token.empty())
        return token;

    token = getTokenManagedIdentity();
    if (!token.empty())
        return token;

    std::cerr << "[Azure KV] could not obtain access token. Set "
                 "AZURE_ACCESS_TOKEN, or AZURE_TENANT_ID + AZURE_CLIENT_ID + "
                 "AZURE_CLIENT_SECRET, or run on an Azure VM with Managed Identity."
              << std::endl;
    return {};
}

} /* anonymous namespace */

/* ==========================================================================
 * decrypt — public interface
 * ========================================================================== */

extern "C" {

/*******************************************************************************
 * decrypt
 *
 * Decrypts an RSA-OAEP-wrapped DEK via Azure Key Vault decrypt REST API.
 *
 * Parameters:
 *   key_label         - Full Azure Key Vault key identifier URL:
 *                       https://<vault>.vault.azure.net/keys/<key>/<version>
 *   encrypted_dek     - Raw ciphertext bytes.
 *   algorithm         - Encryption algorithm (e.g. "RSA-OAEP-256").
 *                       Passed directly to the Azure KV API.
 *   encrypted_dek_len - Length of encrypted_dek in bytes.
 *   decrypted_dek_len - Out: length of the returned plaintext buffer.
 *
 * Returns:
 *   Heap-allocated plaintext on success (caller must free with delete[]),
 *   or nullptr on failure.
 ******************************************************************************/
unsigned char* decrypt(char*                key_label,
                       const unsigned char* encrypted_dek,
                       char*                algorithm,
                       int                  encrypted_dek_len,
                       int*                 decrypted_dek_len)
{
    if (!key_label || !encrypted_dek || encrypted_dek_len <= 0 || !decrypted_dek_len)
    {
        std::cerr << "[Azure KV] decrypt: invalid argument(s)." << std::endl;
        return nullptr;
    }

    *decrypted_dek_len = 0;

    /* -- 1. Determine algorithm ------------------------------------------- */
    /* Normalize algorithm name to Azure Key Vault format.
     * xcpep.plm passes underscore-style names (e.g. RSA_OAEP_SHA256) but
     * Azure KV REST API expects hyphen-style (e.g. RSA-OAEP-256). */
    auto normalizeAlg = [](const std::string& a) -> std::string {
        if (a == "RSA_OAEP_SHA256" || a == "RSA-OAEP-SHA256") return "RSA-OAEP-256";
        if (a == "RSA_OAEP_SHA384" || a == "RSA-OAEP-SHA384") return "RSA-OAEP-384";
        if (a == "RSA_OAEP_SHA512" || a == "RSA-OAEP-SHA512") return "RSA-OAEP-512";
        if (a == "RSA_OAEP" || a == "RSA_OAEP_SHA1")           return "RSA-OAEP";
        if (a == "RSA_PKCS1")                                   return "RSA1_5";
        return a; /* pass through if already correct or unknown */
    };
    const std::string alg = normalizeAlg(
        (algorithm && algorithm[0] != '\0') ? std::string(algorithm) : "RSA-OAEP-256"
    );

    /* -- 2. Base64url-encode the ciphertext ------------------------------- */
    const std::string b64urlCipher = base64urlEncode(encrypted_dek, encrypted_dek_len);

    /* -- 3. Obtain a Bearer token ----------------------------------------- */
    const std::string token = getAccessToken();
    if (token.empty())
        return nullptr;

    /* -- 4. Build request URL --------------------------------------------- */
    /* https://<vault>.vault.azure.net/keys/<key>/<ver>/decrypt?api-version=7.4 */
    const std::string url = std::string(key_label) + "/decrypt?api-version=7.4";

    /* -- 5. Build JSON request body --------------------------------------- */
    /* {"alg":"RSA-OAEP-256","value":"<base64url-ciphertext>"} */
    const std::string body =
        "{\"alg\":\"" + alg + "\","
        "\"value\":\"" + b64urlCipher + "\"}";

    const std::string authHdr = "Authorization: Bearer " + token;

    /* -- 6. POST to Azure Key Vault decrypt endpoint ---------------------- */
    std::string response;
    CURL* curl = curl_easy_init();
    if (!curl)
    {
        std::cerr << "[Azure KV] curl_easy_init failed." << std::endl;
        return nullptr;
    }

    curl_slist* headers = nullptr;
    headers = curl_slist_append(headers, "Content-Type: application/json");
    headers = curl_slist_append(headers, authHdr.c_str());

    curl_easy_setopt(curl, CURLOPT_URL,           url.c_str());
    curl_easy_setopt(curl, CURLOPT_POSTFIELDS,    body.c_str());
    curl_easy_setopt(curl, CURLOPT_HTTPHEADER,    headers);
    curl_easy_setopt(curl, CURLOPT_WRITEFUNCTION, curlWriteCallback);
    curl_easy_setopt(curl, CURLOPT_WRITEDATA,     &response);
    curl_easy_setopt(curl, CURLOPT_TIMEOUT,       30L);

    CURLcode rc = curl_easy_perform(curl);

    long httpCode = 0;
    curl_easy_getinfo(curl, CURLINFO_RESPONSE_CODE, &httpCode);
    curl_slist_free_all(headers);
    curl_easy_cleanup(curl);

    if (rc != CURLE_OK)
    {
        std::cerr << "[Azure KV] HTTP request failed: "
                  << curl_easy_strerror(rc) << std::endl;
        return nullptr;
    }
    if (httpCode != 200)
    {
        std::cerr << "[Azure KV] HTTP " << httpCode << ": " << response << std::endl;
        return nullptr;
    }

    /* -- 7. Extract "value" (plaintext) from JSON response ---------------- */
    /* Response: {"kid":"...","value":"<base64url-plaintext>"} */
    const std::string b64urlPlain = jsonGetString(response, "value");
    if (b64urlPlain.empty())
    {
        std::cerr << "[Azure KV] could not parse 'value' field: "
                  << response << std::endl;
        return nullptr;
    }

    /* -- 8. Base64url-decode the plaintext -------------------------------- */
    std::vector<unsigned char> plaintext = base64urlDecode(b64urlPlain);
    if (plaintext.empty())
    {
        std::cerr << "[Azure KV] base64url decode of plaintext failed." << std::endl;
        return nullptr;
    }

    /* -- 9. Return caller-owned buffer ------------------------------------ */
    unsigned char* out = new unsigned char[plaintext.size()];
    std::memcpy(out, plaintext.data(), plaintext.size());
    *decrypted_dek_len = static_cast<int>(plaintext.size());
    return out;
}

} /* extern "C" */
Using GCP
The following is a sample implementation using the private key from Google Cloud KMS.
/*
 * Prerequisites to build and run this file:
 *
 * 1. Install Google Cloud SDK and required dependencies.
 *
 * 2. Authenticate with GCP:
 *      gcloud init
 *
 *      Verify active account:
 *      gcloud auth list
 *
 * 3. Create a KMS Key Ring:
 *      gcloud kms keyrings create <key-ring-name> \
 *          --location global
 *
 * 4. Create an Asymmetric RSA Key:
 *      gcloud kms keys create <key-name> \
 *          --location global \
 *          --keyring <key-ring-name> \
 *          --purpose asymmetric-encryption \
 *          --default-algorithm rsa-decrypt-oaep-2048-sha256
 *
 * 5. Get the Key Label:
 *      gcloud kms keys versions list \
 *          --location global \
 *          --keyring <key-ring-name> \
 *          --key <key-name>
 *
 *      Example:
 *      projects/<project-id>/locations/global/keyRings/<key-ring-name>/cryptoKeys/<key-name>/cryptoKeyVersions/1
 *
 * 6. Download the public key:
 *      gcloud kms keys versions get-public-key 1 \
 *          --location global \
 *          --keyring <key-ring-name> \
 *          --key <key-name> \
 *          --output-file gcp_public_key.pem
 *
 * 7. Export the APC policy package:
 *      curl -k -u <user>:<password> -X POST \
 *        'https://<rps-host>/pty/v1/rps/export?version=1&coreversion=1' \
 *        -H 'Content-Type: application/json' \
 *        -d '{
 *              "kek": {
 *                "publicKey": {
 *                  "label": "<key-label>",
 *                  "algorithm": "RSA-OAEP-256",
 *                  "value": "-----BEGIN PUBLIC KEY----- ... -----END PUBLIC KEY-----"
 *                }
 *              }
 *            }' \
 *        -o pkg_gcp.json
 *
 * 8. Generate an access token:
 *      export GOOGLE_ACCESS_TOKEN=$(gcloud auth print-access-token)
 *
 * 9. Compile:
 *      g++ -std=c++17 -fPIC -shared -o gcp.so gcp.cpp \
 *          -I<apc-source-dir> \
 *          -lcurl -lssl -lcrypto
 *
 * 10. Build xapcsample:
 *      cc -g -o xcapcsample -DUNIX \
 *          -I<apc-include-dir> \
 *          -L<apc-library-dir> \
 *          -lxcpep \
 *          xcapcsample.c
 *
 * 11. Set environment variables:
 *      export LD_LIBRARY_PATH=<apc-library-dir>:$LD_LIBRARY_PATH
 *      export PTY_APC_CONFIG=<config-file>
 *
 * 12. Run:
 *      ./xcapcsample -p <parameter> -u <user> -d1 <data-element-name>
 */
/*******************************************************************************
 * gcp.cpp
 *
 * GCP Cloud KMS decryptor plug-in — C++ implementation via REST API.
 *
 * Calls the GCP KMS AsymmetricDecrypt REST endpoint using libcurl and
 * OpenSSL for base64.  No google-cloud-cpp SDK required.
 *
 * key_label must be the full CryptoKeyVersion resource name:
 *   projects/<P>/locations/<L>/keyRings/<R>/cryptoKeys/<K>/cryptoKeyVersions/<V>
 *
 * Authentication (in priority order):
 *   1. GOOGLE_ACCESS_TOKEN env var  — any environment.
 *   2. GCE metadata server          — GCE / GKE / Cloud Run.
 *      Requires roles/cloudkms.cryptoKeyDecrypter on the service account.
 *
 * Build:
 *   g++ -std=c++17 -fPIC -shared -o gcp.so gcp.cpp \
 *       -I<path-to-apc-includes> \
 *       -lcurl -lssl -lcrypto
 ******************************************************************************/

#include <cstdlib>
#include <cstring>
#include <iostream>
#include <memory>
#include <stdexcept>
#include <string>
#include <vector>

#include <curl/curl.h>
#include <openssl/bio.h>
#include <openssl/buffer.h>
#include <openssl/evp.h>

#include "../../../apc/decryptor.h"

/* ==========================================================================
 * Internal helpers
 * ========================================================================== */

namespace {

/* --------------------------------------------------------------------------
 * libcurl write callback — appends received data to a std::string.
 * -------------------------------------------------------------------------- */
std::size_t curlWriteCallback(char* ptr, std::size_t size,
                               std::size_t nmemb, void* userdata)
{
    auto* buf = static_cast<std::string*>(userdata);
    buf->append(ptr, size * nmemb);
    return size * nmemb;
}

/* --------------------------------------------------------------------------
 * base64Encode — standard base64, no line breaks.
 * -------------------------------------------------------------------------- */
std::string base64Encode(const unsigned char* src, int len)
{
    BIO* b64 = BIO_new(BIO_f_base64());
    BIO* mem = BIO_new(BIO_s_mem());
    BUF_MEM* bptr = nullptr;

    BIO_set_flags(b64, BIO_FLAGS_BASE64_NO_NL);
    BIO_push(b64, mem);
    BIO_write(b64, src, len);
    BIO_flush(b64);
    BIO_get_mem_ptr(b64, &bptr);
    BIO_set_close(b64, BIO_NOCLOSE);
    BIO_free_all(b64);

    std::string result(bptr->data, bptr->length);
    BUF_MEM_free(bptr);
    return result;
}

/* --------------------------------------------------------------------------
 * base64Decode — standard base64, no line breaks.
 * -------------------------------------------------------------------------- */
std::vector<unsigned char> base64Decode(const std::string& src)
{
    std::vector<unsigned char> out(src.size());
    BIO* bmem = BIO_new_mem_buf(src.data(), static_cast<int>(src.size()));
    BIO* b64  = BIO_new(BIO_f_base64());
    BIO_set_flags(b64, BIO_FLAGS_BASE64_NO_NL);
    BIO_push(b64, bmem);

    int n = BIO_read(b64, out.data(), static_cast<int>(src.size()));
    BIO_free_all(b64);

    if (n <= 0)
        return {};
    out.resize(static_cast<std::size_t>(n));
    return out;
}

/* --------------------------------------------------------------------------
 * jsonGetString — extracts the value of a flat JSON string field.
 * Handles optional whitespace between ':' and the opening '"'.
 * -------------------------------------------------------------------------- */
std::string jsonGetString(const std::string& json, const std::string& field)
{
    /* Search for "field" : "  (with optional spaces around colon) */
    const std::string key = "\"" + field + "\"";
    auto pos = json.find(key);
    if (pos == std::string::npos)
        return {};

    pos += key.size();

    /* Skip whitespace and the colon */
    while (pos < json.size() && (json[pos] == ' ' || json[pos] == '\t' || json[pos] == '\r' || json[pos] == '\n'))
        ++pos;
    if (pos >= json.size() || json[pos] != ':')
        return {};
    ++pos; /* skip ':' */

    /* Skip whitespace after colon */
    while (pos < json.size() && (json[pos] == ' ' || json[pos] == '\t' || json[pos] == '\r' || json[pos] == '\n'))
        ++pos;
    if (pos >= json.size() || json[pos] != '"')
        return {};
    ++pos; /* skip opening '"' */

    auto end = json.find('"', pos);
    if (end == std::string::npos)
        return {};
    return json.substr(pos, end - pos);
}

/* --------------------------------------------------------------------------
 * getAccessToken — fetches a Bearer token.
 *   1. GOOGLE_ACCESS_TOKEN env var.
 *   2. GCE instance metadata server.
 * -------------------------------------------------------------------------- */
std::string getAccessToken()
{
    const char* env = std::getenv("GOOGLE_ACCESS_TOKEN");
    if (env && env[0] != '\0')
        return std::string(env);

    /* Query GCE metadata server. */
    std::string response;
    CURL* curl = curl_easy_init();
    if (!curl)
        return {};

    curl_slist* headers = nullptr;
    headers = curl_slist_append(headers, "Metadata-Flavor: Google");

    curl_easy_setopt(curl, CURLOPT_URL,
        "http://metadata.google.internal/computeMetadata/v1"
        "/instance/service-accounts/default/token");
    curl_easy_setopt(curl, CURLOPT_HTTPHEADER,    headers);
    curl_easy_setopt(curl, CURLOPT_WRITEFUNCTION, curlWriteCallback);
    curl_easy_setopt(curl, CURLOPT_WRITEDATA,     &response);
    curl_easy_setopt(curl, CURLOPT_TIMEOUT,       5L);

    CURLcode rc = curl_easy_perform(curl);
    curl_slist_free_all(headers);
    curl_easy_cleanup(curl);

    if (rc != CURLE_OK) {
        std::cerr << "[GCP KMS] metadata token fetch failed: "
                  << curl_easy_strerror(rc) << std::endl;
        return {};
    }

    /* {"access_token":"<TOKEN>","expires_in":...,"token_type":"Bearer"} */
    std::string token = jsonGetString(response, "access_token");
    if (token.empty())
        std::cerr << "[GCP KMS] unexpected token response: " << response << std::endl;
    return token;
}

} /* anonymous namespace */

/* ==========================================================================
 * decrypt — public interface
 * ========================================================================== */

extern "C" {

/*******************************************************************************
 * decrypt
 *
 * Decrypts an RSA-OAEP-wrapped DEK via GCP Cloud KMS AsymmetricDecrypt REST.
 *
 * Parameters:
 *   key_label         - Full GCP KMS CryptoKeyVersion resource name.
 *   encrypted_dek     - Raw ciphertext bytes.
 *   algorithm         - Algorithm string (informational; derived by GCP KMS
 *                       from the key version).
 *   encrypted_dek_len - Length of encrypted_dek in bytes.
 *   decrypted_dek_len - Out: length of the returned plaintext buffer.
 *
 * Returns:
 *   Heap-allocated plaintext on success (caller must free with delete[]),
 *   or nullptr on failure.
 ******************************************************************************/
unsigned char* decrypt(char*                key_label,
                       const unsigned char* encrypted_dek,
                       char*                algorithm,
                       int                  encrypted_dek_len,
                       int*                 decrypted_dek_len)
{
    if (!key_label || !encrypted_dek || encrypted_dek_len <= 0 || !decrypted_dek_len)
    {
        std::cerr << "[GCP KMS] decrypt: invalid argument(s)." << std::endl;
        return nullptr;
    }

    *decrypted_dek_len = 0;

    /* -- 1. Base64-encode the ciphertext ---------------------------------- */
    const std::string b64Cipher = base64Encode(encrypted_dek, encrypted_dek_len);

    /* -- 2. Obtain a Bearer token ----------------------------------------- */
    const std::string token = getAccessToken();
    if (token.empty())
    {
        std::cerr << "[GCP KMS] failed to obtain access token." << std::endl;
        return nullptr;
    }

    /* -- 3. Build request body and headers -------------------------------- */
    const std::string body    = "{\"ciphertext\":\"" + b64Cipher + "\"}";
    const std::string authHdr = "Authorization: Bearer " + token;
    const std::string url     = "https://cloudkms.googleapis.com/v1/" +
                                 std::string(key_label) + ":asymmetricDecrypt";

    /* -- 4. POST to GCP KMS REST endpoint --------------------------------- */
    std::string response;
    CURL* curl = curl_easy_init();
    if (!curl)
    {
        std::cerr << "[GCP KMS] curl_easy_init failed." << std::endl;
        return nullptr;
    }

    curl_slist* headers = nullptr;
    headers = curl_slist_append(headers, "Content-Type: application/json");
    headers = curl_slist_append(headers, authHdr.c_str());

    curl_easy_setopt(curl, CURLOPT_URL,           url.c_str());
    curl_easy_setopt(curl, CURLOPT_POSTFIELDS,    body.c_str());
    curl_easy_setopt(curl, CURLOPT_HTTPHEADER,    headers);
    curl_easy_setopt(curl, CURLOPT_WRITEFUNCTION, curlWriteCallback);
    curl_easy_setopt(curl, CURLOPT_WRITEDATA,     &response);
    curl_easy_setopt(curl, CURLOPT_TIMEOUT,       30L);

    CURLcode rc = curl_easy_perform(curl);

    long httpCode = 0;
    curl_easy_getinfo(curl, CURLINFO_RESPONSE_CODE, &httpCode);
    curl_slist_free_all(headers);
    curl_easy_cleanup(curl);

    if (rc != CURLE_OK)
    {
        std::cerr << "[GCP KMS] HTTP request failed: "
                  << curl_easy_strerror(rc) << std::endl;
        return nullptr;
    }
    if (httpCode != 200)
    {
        std::cerr << "[GCP KMS] HTTP " << httpCode << ": " << response << std::endl;
        return nullptr;
    }

    /* -- 5. Extract and decode plaintext from JSON response --------------- */
    const std::string b64Plain = jsonGetString(response, "plaintext");
    if (b64Plain.empty())
    {
        std::cerr << "[GCP KMS] could not parse 'plaintext' field: "
                  << response << std::endl;
        return nullptr;
    }

    std::vector<unsigned char> plaintext = base64Decode(b64Plain);
    if (plaintext.empty())
    {
        std::cerr << "[GCP KMS] base64 decode of plaintext failed." << std::endl;
        return nullptr;
    }

    /* -- 6. Return caller-owned buffer ------------------------------------ */
    unsigned char* out = new unsigned char[plaintext.size()];
    std::memcpy(out, plaintext.data(), plaintext.size());
    *decrypted_dek_len = static_cast<int>(plaintext.size());
    return out;
}

} /* extern "C" */