This is the multi-page printable view of this section. Click here to print.
Protectors
- 1: Protection Method Reference
- 1.1: Protegrity Tokenization
- 1.1.1: Tokenization Support by Protegrity Products
- 1.1.2: Delimiters
- 1.1.3: Tokenization Properties
- 1.1.3.1: Data Type and Alphabet
- 1.1.3.2: Static Lookup Table (SLT) Tokenizers
- 1.1.3.3: From Left and From Right Settings
- 1.1.3.4: Internal Initialization Vector (IV)
- 1.1.3.5: Minimum and Maximum Input Length
- 1.1.3.5.1: Calculating Token Length
- 1.1.3.6: Length Preserving
- 1.1.3.7: Short Data Tokenization
- 1.1.3.8: Case-Preserving and Position-Preserving Tokenization
- 1.1.3.8.1: Case-Preserving Tokenization
- 1.1.3.8.2: Position-Preserving Tokenization
- 1.1.3.9: External Initialization Vector (EIV)
- 1.1.3.9.1: Tokenization Model with External IV
- 1.1.3.9.2: External IV Tokenization Properties
- 1.1.3.10: Truncating Whitespaces
- 1.1.4: Tokenization Types
- 1.1.4.1: Numeric (0-9)
- 1.1.4.2: Integer (0-9)
- 1.1.4.3: Credit Card
- 1.1.4.4: Alpha (A-Z)
- 1.1.4.5: Upper-Case Alpha (A-Z)
- 1.1.4.6: Alpha-Numeric (0-9, a-z, A-Z)
- 1.1.4.7: Upper-Case Alpha-Numeric (0-9, A-Z)
- 1.1.4.8: Lower ASCII
- 1.1.4.9: Datetime (YYYY-MM-DD HH:MM:SS)
- 1.1.4.10: Decimal
- 1.1.4.11: Unicode Gen2
- 1.1.4.12: Binary
- 1.1.4.13: Email
- 1.1.4.14: Printable
- 1.1.4.15: Date (YYYY-MM-DD, DD/MM/YYYY, MM.DD.YYYY)
- 1.1.4.16: Unicode
- 1.1.4.17: Unicode Base64
- 1.1.4.18:
- 1.1.4.19:
- 1.1.4.20:
- 1.1.4.21:
- 1.1.4.22:
- 1.1.4.23:
- 1.1.4.24:
- 1.1.4.25:
- 1.1.4.26:
- 1.1.4.27:
- 1.1.4.28:
- 1.1.4.29:
- 1.1.4.30:
- 1.1.4.31:
- 1.1.4.32:
- 1.1.4.33:
- 1.1.4.34:
- 1.1.4.35:
- 1.1.4.36:
- 1.1.4.37:
- 1.1.4.38:
- 1.1.4.39:
- 1.1.4.40:
- 1.1.4.41:
- 1.1.4.42:
- 1.1.4.43:
- 1.1.4.44:
- 1.1.4.45:
- 1.1.4.46:
- 1.1.4.47:
- 1.1.4.48:
- 1.1.4.49:
- 1.1.4.50:
- 1.1.4.51:
- 1.1.5:
- 1.1.6:
- 1.2: Protegrity Format Preserving Encryption
- 1.2.1: FPE Properties
- 1.2.2: Code Points
- 1.2.3: Tweak Input
- 1.2.4: Left and Right Settings
- 1.2.5: Handling Special Numeric Credit Card Data
- 1.3: Protegrity Encryption
- 1.3.1: Encryption Algorithms
- 1.3.1.1: AES-128 and AES-256
- 1.3.1.2: CUSP
- 1.3.1.3: 3DES
- 1.3.2: Encryption Properties - IV, CRC, Key ID
- 1.3.3: Data Length and Padding in Encryption
- 1.3.4:
- 1.3.5:
- 1.3.6:
- 1.4: No Encryption
- 1.5: Monitoring
- 1.6: Masking
- 1.7: Hashing
- 1.8: ASCII Character Codes
- 1.9: Examples of Column Sized Calculation for AES and 3DES Encryption
- 1.10: Empty String Handling by Protectors
- 1.11: Hashing Functions and Examples
- 1.11.1: Hash Data column size
- 1.11.2: Using Hashing Triggers and View
- 1.12: Codebook Re-shuffling in the Data Security Gateway
- 1.13:
- 1.14:
- 1.15:
- 1.16:
- 2: Application Protector
- 2.1: Application Protector Java
- 2.1.1: Understanding the Architecture
- 2.1.2: System Requirements
- 2.1.3: Preparing the Environment
- 2.1.4: Installing the AP Java Protector
- 2.1.5: Configuring the Protector
- 2.1.6: Upgrading the Application Protector Java
- 2.1.6.1: About Upgrade Agent
- 2.1.6.2: Installing the Upgrade Agent
- 2.1.6.3: Setting Up the Upgrade Agent
- 2.1.6.3.1: Upgrade Configurations
- 2.1.6.3.2: Rollback Behavior
- 2.1.6.3.3: Protegrity SDK Upgrade Permissions and Deployment
- 2.1.6.3.3.1: User Roles and Groups
- 2.1.6.3.3.2: Component Overview
- 2.1.6.3.3.3: Recommended File and Folder Permissions
- 2.1.6.4: AP Java Upgrade and Rollback Examples
- 2.1.6.4.1: Online and Offline Upgrade
- 2.1.6.4.2: Online and Offline Rollback
- 2.1.7: Application Protector Java APIs
- 2.1.7.1: Using the AP Java APIs
- 2.1.8: Additional Topics
- 2.1.8.1: Memory Usage of the AP Java
- 2.1.8.2: DevOps Approach for Application Protector Java
- 2.1.8.3: Application Protector API Return Codes
- 2.1.8.4: Config.ini file for Application Protector
- 2.1.8.5: Multi-node Application Protector Architecture
- 2.1.8.6: Installation Directory Structure Overview
- 2.1.8.7: SDK Upgrader Agent Configuration File
- 2.1.8.8: Troubleshooting for AP Java Upgrade
- 2.1.8.9: Uninstalling the Application Protector
- 3: Big Data Protector
- 3.1: CDP-PVC-Base
- 3.1.1: Understanding the Architecture
- 3.1.2: System Requirements
- 3.1.3: Preparing the Environment
- 3.1.3.1: Extracting the Installation Package
- 3.1.3.2: Running the Configurator Script
- 3.1.3.3: Setting up the Parcels
- 3.1.3.4: Distributing the Parcels
- 3.1.3.5: Activating the Parcels
- 3.1.4: Installing the Big Data Protector
- 3.1.5: Configuring the Big Data Protector
- 3.1.5.1: Registering the UDFs using Helper scripts
- 3.1.5.1.1: Registering and Dropping the Hive UDFs
- 3.1.5.1.2: Registering the Spark UDFs
- 3.1.5.1.3: Registering the Impala UDFs
- 3.1.5.1.4: Installing the Impala UDFs
- 3.1.5.2: Updating the Parcels
- 3.1.5.2.1: Updating the Certificate Parcel with a Restart
- 3.1.5.2.2: Updating the Certificate Parcel without a Restart
- 3.1.5.2.3: Updating the Log Forwarder Parcel
- 3.1.5.3: Updating the Configuration Parameters
- 3.1.5.3.1: Setting the Big Data Protector Configuration
- 3.1.5.3.2: Updating Parameters in the config.ini File
- 3.1.5.3.3: Updating the RPAgent Parameters
- 3.1.5.3.4: Updating the Log Forwarder Parameters
- 3.1.5.3.5: Adding a New Configuration Parameter
- 3.1.6: Upgrading the Big Data Protector
- 3.1.6.1: Editing the Cluster Configuration File
- 3.1.6.2: Executing the Upgrade Script
- 3.1.6.3: Downgrading to an Older Version
- 3.1.7: Uninstalling the Big Data Protector
- 3.1.7.1: Uninstalling the Impala UDFs
- 3.1.7.2: Restoring the Big Data Protector Configuration
- 3.1.7.3: Removing the Big Data Protector Services
- 3.1.7.4: Deactivating the Parcels
- 3.1.7.5: Removing the Parcels
- 3.1.7.6: Deleting the Parcels from the Local Repository
- 3.1.7.7: Deleting the CSD Files
- 3.2: Amazon Elastic MapReduce Protector
- 3.2.1: Understanding the architecture
- 3.2.1.1: Bootstrap installer architecture
- 3.2.1.2: Static installer architecture
- 3.2.1.3: EMR Serverless architecture
- 3.2.2: Preparing the environment
- 3.2.2.1: Setting up for the Bootstrap Installer
- 3.2.2.1.1: Verifying the prerequisites
- 3.2.2.1.2: Extracting the Big Data Protector Package
- 3.2.2.1.3: Executing the Configurator Script
- 3.2.2.2: Setting up for the Static Installer
- 3.2.2.2.1: Verifying the prerequisites for Static Installer
- 3.2.2.2.2: Executing the Configurator Script
- 3.2.2.2.3: Extracting the Installation Package
- 3.2.2.2.4: Updating the BDP.Config File
- 3.2.2.3: Setting up for the EMR Serverless Installer
- 3.2.2.3.1: Extracting the Big Data Protector Package
- 3.2.2.3.2: Executing the Configurator Script
- 3.2.3: Installing the protector
- 3.2.3.1: Using the Bootstrap Installer
- 3.2.3.1.1: Creating a Cluster
- 3.2.3.1.2: Managing the Cluster Nodes
- 3.2.3.1.3: Verifying the Parameters
- 3.2.3.2: Using the Static Installer
- 3.2.3.2.1: Installing the Protector on all the Nodes
- 3.2.3.2.2: Installing the Protector on Specific Nodes
- 3.2.3.2.3: Verifying the Parameters
- 3.2.3.3: Using the EMR Serverless Installer
- 3.2.3.3.1: EMR Serverless Setup CLI
- 3.2.3.3.2: Setting up the Log Forwarder
- 3.2.3.3.3: Performing URP Operations
- 3.2.4: Configuring the protector
- 3.2.5: Working with Cluster Utilities
- 3.2.5.1: RPAgent Control Script
- 3.2.5.2: Log Forwarder Control Script
- 3.2.5.3: Sync Config.ini
- 3.2.5.4: Sync Log Forwarder Configuration
- 3.2.5.5: Sync RPAgent Configuration
- 3.2.6: Uninstalling the protector
- 3.3: User Defined Functions and APIs
- 3.3.1: MapReduce APIs
- 3.3.2: Hive UDFs
- 3.3.3: Pig UDFs
- 3.3.4: HBase Commands
- 3.3.5: Impala UDFs
- 3.3.6: Spark Java APIs
- 3.3.7: Spark SQL UDFs
- 3.3.8: PySpark - Scala Wrapper UDFs
- 3.3.9: Unity Catalog Batch Python UDFs
- 3.4: Additional Information
- 4: Database Protector
- 4.1: Oracle Database Protector
- 4.1.1: Understanding the Architecture
- 4.1.2: System Requirements
- 4.1.3: Preparing the Environment
- 4.1.3.1: Extracting the Installation Package
- 4.1.3.2: Installing the Log Forwarder
- 4.1.3.3: Installing the RPAgent
- 4.1.4: Installing Oracle Database Protector
- 4.1.4.1: Installing the Database Objects
- 4.1.4.2: Installing Oracle Database Protector on Standalone System
- 4.1.4.3: Installing the Oracle Database Protector on RAC (Multinode) system
- 4.1.4.4: Creating the User Defined Functions (UDFs)
- 4.1.5: Configuring the Oracle Database Protector
- 4.1.5.1: User Impersonation
- 4.1.5.2: Enterprise User Security (EUS) in the Oracle Database
- 4.1.5.3: Troubleshooting
- 4.1.6: Upgrading the Oracle Database Protector
- 4.1.6.1: Upgrading the Oracle Database Protector on Standalone system
- 4.1.6.2: Creating the UDFs after Upgrade
- 4.1.6.3: Upgrading the Oracle Database Protector on RAC system
- 4.1.7: Uninstalling the Oracle Database Protector
- 4.1.7.1: Dropping User Defined Functions
- 4.1.7.2: Uninstalling the RPAgent
- 4.1.7.3: Uninstalling the Log Forwarder
- 4.2: User Defined Functions and APIs
- 4.2.1: Oracle User Defined Functions and APIs
- 4.2.1.1: General UDFs
- 4.2.1.2: Access Check Procedures
- 4.2.1.3: Insert Encryption UDFs
- 4.2.1.4: Insert No-Encryption, Token, and FPE UDFs
- 4.2.1.5: Multiple Insert Encryption Procedures
- 4.2.1.6: Select Decryption UDFs
- 4.2.1.7: Select No-Encryption, Token, and FPE UDFs
- 4.2.1.8: Update Encryption UDFs
- 4.2.1.9: Update No-Encryption, Token, and FPE UDFs
- 4.2.1.10: Multiple Update Encryption Procedures
- 4.2.1.11: Hash UDFs
- 4.2.1.12: Blob UDFs
- 4.2.1.13: Clob UDFs
- 4.2.1.14: Bulk UDFs
- 4.2.1.15: Oracle Input Datatype to UDF Mapping
- 5: Data Warehouse Protectors
- 5.1: Teradata Data Warehouse Protector
- 5.1.1: Understanding the Teradata Architecture
- 5.1.2: System Requirements
- 5.1.3: Preparing the Environment
- 5.1.3.1: Extracting the Installation Package
- 5.1.3.2: Installing the Log Forwarder
- 5.1.3.3: Installing the Resilient Package Agent
- 5.1.4: Installing the Teradata Data Warehouse Protector
- 5.1.4.1: Installing the Objects
- 5.1.4.2: Installing the Protector on Single Node
- 5.1.4.3: Installing the Protector on Multi Node
- 5.1.4.4: Creating the User Defined Functions
- 5.1.4.5: User Defined Types
- 5.1.5: Configuring the Teradata Data Warehouse Protector
- 5.1.5.1: Updating the Config.ini File
- 5.1.5.2: Updating the Output Buffer
- 5.1.5.3: Troubleshooting
- 5.1.6: Upgrading the Teradata Data Warehouse Protector
- 5.1.7: Uninstalling the Teradata Data Warehouse Protector
- 5.1.7.1: Uninstalling the Log Forwarder
- 5.1.7.2: Uninstalling the RPAgent
- 5.1.7.3: Dropping the User Defined Functions
- 5.1.7.4: Removing the Installation Directory
- 5.1.8: Appendix
- 5.1.8.1: Additional references for the Protectors
- 5.1.8.1.1: Additional references for the Teradata Protector
- 5.1.8.1.1.1: Configuring access to execute queries
- 5.1.8.1.1.2: Teradata Query Bands and Trusted Sessions
- 5.1.8.2: Data Warehouse Sample Scripts
- 5.2: User Defined Functions and APIs
- 5.2.1: Teradata UDFs
- 5.2.1.1: General UDFs
- 5.2.1.2: Access Check UDFs
- 5.2.1.3: Varchar Latin UDFs
- 5.2.1.4: Varchar Unicode UDFs
- 5.2.1.5: Float UDFs
- 5.2.1.6: Small Integer UDFs
- 5.2.1.7: Integer UDFs
- 5.2.1.8: Big Integer UDFs
- 5.2.1.9: Date UDFs
- 5.2.1.10: 8-Byte and 16-Byte Decimal UDFs
- 5.2.1.11: JSON UDFs
- 5.2.1.12: XML UDFs
- 5.2.1.13: Float UDFs for No Encryption
- 5.2.1.14: Date UDFs for No Encryption
- 5.2.1.15: 8-Byte AND 16-Byte Decimal UDFs for No Encryption
- 6: REST Container
- 6.1: Understanding the Architecture
- 6.1.1: Architecture and Components using Dynamic-based Deployment
- 6.1.2: Architecture and Components using Static Deployment
- 6.2: System Requirements
- 6.2.1: Software Requirements
- 6.2.2: Hardware Requirements
- 6.3: Preparing the Environment
- 6.3.1: Initializing the Jump Box
- 6.3.2: Extracting the Installation Package
- 6.3.3: Creating Certificates
- 6.3.4: Uploading the Images to the Container Repository
- 6.3.5: Creating the AWS Environment
- 6.3.5.1: Creating the AWS Setup for Static Mode
- 6.3.5.1.1: Creating an Data Encryption Key (DEK)
- 6.3.5.1.2: Creating an AWS S3 Bucket
- 6.3.5.1.3: Creating an AWS EFS
- 6.3.5.2: Creating a Kubernetes Cluster
- 6.3.6: Creating the OpenShift Environment
- 6.3.7: Creating the Azure Environment
- 6.3.7.1: Creating the Azure Setup for Static Mode
- 6.3.7.1.1: Creating an Azure Key
- 6.3.7.1.2: Creating an Azure Storage container
- 6.3.7.2: Creating a Kubernetes Cluster
- 6.4: Installing the Protector
- 6.4.1: Installing the Protector on Amazon EKS or Azure AKS
- 6.4.1.1: Deploying REST Container for Dynamic Method
- 6.4.1.1.1: Deploying Log Forwarder
- 6.4.1.1.2: Deploying Resilient Package Proxy (RPP)
- 6.4.1.1.3: Deploying the REST Container with Dynamic Method
- 6.4.1.1.4: Uninstalling the Protector in Dynamic Method
- 6.4.1.2: Deploying REST Container in Static Mode
- 6.4.1.2.1: Retrieving the Policy Package from the ESA
- 6.4.1.2.2: Deploying Log Forwarder
- 6.4.1.2.3: Deploying KMSProxy Container
- 6.4.1.2.4: Deploying REST Container Using Static Method
- 6.4.1.2.5: Updating the Policy Package
- 6.4.1.2.6: Uninstalling the Protector in Static Method
- 6.4.2: Installing the Protector on OpenShift
- 6.4.2.1: Deploying REST Container for Dynamic Method
- 6.4.2.1.1: Deploying Log Forwarder
- 6.4.2.1.2: Deploying Resilient Package Proxy (RPP)
- 6.4.2.1.3: Deploying the REST Container with Dynamic Method
- 6.4.2.1.4: Uninstalling the Protector in Dynamic Method
- 6.4.2.2: Deploying REST Container in Static Mode
- 6.4.2.2.1: Retrieving the Policy Package from the ESA
- 6.4.2.2.2: Deploying Log Forwarder
- 6.4.2.2.3: Deploying KMSProxy Container
- 6.4.2.2.4: Deploying REST Container Using Static Method
- 6.4.2.2.5: Updating the Policy Package
- 6.4.2.2.6: Uninstalling the Protector in Static Method
- 6.5: Application Protector API on REST
- 6.5.1: Version 4 (V4) Application Protector API on REST
- 6.5.1.1: List of REST APIs
- 6.5.1.1.1: HTTP GET version
- 6.5.1.1.2: HTTP POST protect
- 6.5.1.1.3: HTTP POST unprotect
- 6.5.1.1.4: HTTP POST reprotect
- 6.5.1.1.5: HTTP GET doc
- 6.5.1.1.6: HTTP Headers
- 6.5.1.2: V4 AP REST HTTP Response Codes
- 6.5.2: Version 1 (V1) Application Protector API on REST
- 6.5.2.1: List of REST APIs
- 6.5.2.1.1: HTTP GET version
- 6.5.2.1.2: HTTP POST protect
- 6.5.2.1.3: HTTP POST unprotect
- 6.5.2.1.4: HTTP POST reprotect
- 6.5.2.1.5: HTTP Headers
- 6.5.2.2: Error Handling for v1 API
- 6.5.2.3: V1 AP REST HTTP Response Codes
- 6.6: Using Samples
- 6.7: Running the Autoscaling Script
- 6.8: Upgrading the Protector from Version 9.x to 10.x
- 6.9: Upgrading the Protector from Version 10.x to 10.y
- 6.10: Using Dockerfiles to Build Custom Images
- 6.11: Appendix - Deploying the Helm Charts by Using the Set Argument
- 7: Application Protector Java Container
- 7.1: Understanding the Architecture
- 7.1.1: Architecture and Components using Dynamic-based Deployment
- 7.1.2: Architecture and Components using Static Deployment
- 7.2: System Requirements
- 7.2.1: Software Requirements
- 7.2.2: Hardware Requirements
- 7.3: Preparing the Environment
- 7.3.1: Initializing the Jump Box
- 7.3.2: Extracting the Installation Package
- 7.3.3: Creating Certificates
- 7.3.4: Uploading the Images to the Container Repository
- 7.3.5: Creating the AWS Environment
- 7.3.5.1: Creating the AWS Setup for Static Mode
- 7.3.5.1.1: Creating a Data Encryption Key (DEK)
- 7.3.5.1.2: Creating an AWS S3 Bucket
- 7.3.5.1.3: Creating an AWS EFS
- 7.3.5.2: Creating a Kubernetes Cluster
- 7.3.6: Creating the OpenShift Environment
- 7.3.7: Creating the Azure Environment
- 7.3.7.1: Creating the Azure Setup for Static Mode
- 7.3.7.1.1: Creating an Azure Key
- 7.3.7.1.2: Creating an Azure Storage container
- 7.3.7.2: Creating a Kubernetes Cluster
- 7.4: Installing the Protector
- 7.4.1: Installing the Protector on Amazon EKS or Azure AKS
- 7.4.1.1: Deploying AP Java Container for Dynamic Method
- 7.4.1.1.1: Deploying Log Forwarder
- 7.4.1.1.2: Deploying Resilient Package Proxy (RPP)
- 7.4.1.1.3: Deploying the AP Java Container with Dynamic Method
- 7.4.1.1.4: Uninstalling the Protector in Dynamic Method
- 7.4.1.2: Deploying AP Java Container in Static Mode
- 7.4.1.2.1: Retrieving the Policy Package from the ESA
- 7.4.1.2.2: Deploying Log Forwarder
- 7.4.1.2.3: Deploying KMSProxy Container
- 7.4.1.2.4: Deploying AP Java Container Using Static Method
- 7.4.1.2.5: Updating the Policy Package
- 7.4.1.2.6: Uninstalling the Protector in Static Method
- 7.4.2: Installing the Protector on OpenShift
- 7.4.2.1: Deploying AP Java Container for Dynamic Method
- 7.4.2.1.1: Deploying Log Forwarder
- 7.4.2.1.2: Deploying Resilient Package Proxy (RPP)
- 7.4.2.1.3: Deploying the AP Java Container with Dynamic Method
- 7.4.2.1.4: Uninstalling the Protector in Dynamic Method
- 7.4.2.2: Deploying AP Java Container in Static Mode
- 7.4.2.2.1: Retrieving the Policy Package from the ESA
- 7.4.2.2.2: Deploying Log Forwarder
- 7.4.2.2.3: Deploying KMSProxy Container
- 7.4.2.2.4: Deploying AP Java Container Using Static Method
- 7.4.2.2.5: Updating the Policy Package
- 7.4.2.2.6: Uninstalling the Protector in Static Method
- 7.5: Running Security Operations
- 7.6: Upgrading the Protector from Version 9.x to 10.x
- 7.7: Upgrading the Protector from Version 10.x to 10.y
- 7.8: Using Dockerfiles to Build Custom Images
- 7.9: Appendix - Deploying the Helm Charts by Using the Set Argument
1 - Protection Method Reference
Protegrity products can protect sensitive data with the following protection methods:
The following table describes the protection methods for structured and unstructured data security policy types.
Table: Protection Methods by Data Security Policy Type
| Protection Method | Description | Structured | Unstructured |
|---|---|---|---|
| Tokenization (all types) | Tokenization is the process of replacing sensitive data with tokens that has no worth to someone who gains unauthorized access to the data. | √ | |
| Format Preserving Encryption (FPE) | A data encryption technique that preserves the ciphertext format using FF1 mode of operation for AES-256 block cipher algorithm. | √ | |
| AES-128 | A block cipher with 128 bit encryption keys. | √ | √ |
| AES-256 | A block cipher with 256 bit encryption keys. | √ | √ |
| CUSP AES-128, CUSP AES-256 | A modified block algorithm mainly used in environments where an IBM mainframe is present. | √ | |
| No Encryption | It does not protect data but lets the sensitive data be stored in clear. Protection comes from access control, monitoring, and masking. | √ | |
| Monitoring | It does not protect data but is used for monitoring and auditing. | √ | |
| Masking | It does not protect the data but applies masking to the sensitive data. | √ | |
| Hashing (HMAC-SHA256) | A Keyed-Hash Message Authentication Code. It is used only for protection of data using hashing. Since hashing is a one-way function, the original data cannot be restored. | √ |
The following table describes the deprecated protection methods for structured and unstructured data security policy types.
Table: Deprecated Protection Methods by Data Security Policy Type
| Protection Method | Description | Structured | Unstructured |
|---|---|---|---|
| 3DES | A block cipher with 168 bit encryption keys. | √ | √ |
| CUSP 3DES | A modified block algorithm mainly used in environments where an IBM mainframe is present. | √ | |
| Hashing (HMAC-SHA1) | A Keyed-Hash Message Authentication Code. It is used only for protection of data using hashing. Since hashing is a one-way function, the original data cannot be restored. | √ |
Protegrity protection methods, including tokenization, encryption, monitoring, masking, and hashing, support various input formats. This enables you to protect sensitive data using these methods. Some examples of input formats are as follows:
- Social Security Numbers (SSNs)
- Credit Card Numbers (CCNs)
- Electronic Personal Health Information (ePHI), which is controlled by Health Insurance Portability and Accountability Act (HIPPA) and Health Information Technology for Economic and Clinical Health (HITECH)
- Personally identifiable information (PII)
The following table shows different types of sensitive data that can be protected using different protection methods. It demonstrates input values and their corresponding protected values.
Table: Examples of Protected Data
| # | Type of Data | Input | Protected Value | Comments on Protected Value |
|---|---|---|---|---|
| 1 | SSN delimiters | 075-67-2278 | 287-38-2567 | Numeric token, delimiters in input |
| 2 | Credit Card | 5511 3092 3993 4975 | 8278 2789 2990 2789 | Numeric token |
| 3 | Credit Card | 5511 3092 3993 4975 | 8278 2789 2990 4975 | Numeric token, last 4 digits in clear |
| 4 | Credit Card | 5511309239934975 | 551130########## | No Encryption with mask exposing the first 6 digits. A mask is applied by the data security policy when a user tries to unprotect the protected value. |
| 5 | Credit Card | 5511309239934975 | 1437623387940746 | Credit Card token with invalid Luhn digit property. Tokenized value has invalid Luhn checksum. |
| 6 | Credit Card | 5511309239934975 | 8313123036143103 | Credit Card token with invalid card type identification. The first digit in tokenized value is not a valid card type. |
| 7 | Credit Card | 5511309239934975 | 1854817J97347370 | Credit Card token with alphabetic indicator on the 8th position. |
| 8 | Phone/Fax number | 1 888 397 8192 | 9 853 888 8435 | Numeric token |
| 9 | Medical ID | 29M2009ID | iA6wx0Mw1 | Alpha-Numeric token |
| 10 | Date and Time | 2012.12.31 12:23:34 | 1816.07.22 14:31:51 | Datetime token, date and time parts are tokenized |
| 11 | Proper names | Alfred Hitchcock | uRLzbg cvofdBFJh | Alpha token |
| 12 | Short names | Al | kKX | Alpha token non-length preserving |
| 13 | Abbreviations | CXR | GTP | Upper-case Alpha token |
| 14 | License plates | 583-LBE | 44J-KLT | Upper Alpha-Numeric token |
| 15 | Addresses | 5 High Ridge Park, Stamford | 5 hcY2 k9rLp Z0uA, KunZYNEM | Alpha-Numeric token. Punctuation marks and spaces are treated as delimiters. |
| 16 | E-mail Address | Protegrity1234@gmail.com | tzJkXJDRwjcNLU@02ici.com | Alpha-Numeric token, delimiters in input, last 3 characters in clear |
| 17 | E-mail Address | Protegrity1234@gmail.com | UNfOxcZ51jWbXMq@gmail.com | Email token |
| 18 | Password | 2$trongPa$$ | ]tlÙÖëÍÈÃW | Unicode Gen2 token with alphabet: Printable (U+20-U+7E, U+A0-U+FF) |
| 19 | Fuzzy times | 1994-01-01_00.00.00 | wfÏÛöò·×ÚøÕuðÔt´þà8 | Unicode Gen2 token with alphabet: Printable (U+20-U+7E, U+A0-U+FF) |
| 20 | Unicode text | ýç"ö÷Ó | Ƕf$ùI | Unicode Gen2 token with alphabet: Printable (U+20-U+7E, U+A0-U+FF) |
| 21 | Unicode text | Протегрити | Чцдяайыбм | Unicode Gen2 token with alphabet: Cyrillic (U+410-U+44F) |
| 22 | Japanese text | データ保護 | 睯窯闒懻辶 | Unicode Gen2 token with alphabet: Numeric (U+0030-U+0039) Hiragana (U+3041-U+3096) Katakana (U+30A0-U+30FF) Kanji (U+4E00-U+9FFF) |
| 23 | Japanese address | 〒106-0044東京都港区東麻布1-8-1 東麻布ISビル4F | 〒门醆湏-鑹晓侐晊秦龡箳蕛矱蝠苲四猿-蠵-堻 鞄眡莧IS閲楌蹬F | Unicode Gen2 token with alphabet: Numeric (U+0030-U+0039) Hiragana (U+3041-U+3096) Katakana (U+30A0-U+30FF) Kanji (U+4E00-U+9FFF) |
| 24 | Financial data | -3015.039 | -4416.646 | Decimal token. Protected value will never contain any zeroes. |
| 25 | Photographic images, media files | Media stored as BLOB type | Encrypted BLOB | Encryption (AES-256, AES-128) or hashing (HMAC-SHA256) |
| 26 | Irreversible data to be destroyed | AnyDataTo Destroy | Q2LKa2UhIhMTiRsi0l8BUF5xVag= | Hashing (HMAC-SHA256), data cannot be decrypted |
You can combine Protegrity protection methods to obtain the required level of data access control within the enterprise.
For example, a Security Officer can use a data security policy to control what is delivered to different roles in the policy. The following figure shows how Social Security Number access can vary by different users and applications.
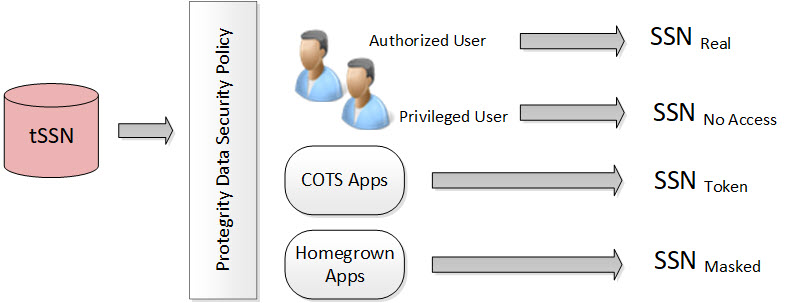
In the figure, the tokenized SSN is stored in the database. However, there are four roles defined in the policy:
Table: Different Roles in the Policy
| Users and Roles | Description |
|---|---|
| Authorized users - Real | It is the original or real value. A user with unprotect rights. |
| Privileged users - No Access | It is the default configuration. If the user does not have protect access rights, a null value is returned. |
| Commercial off-the-shelf (COTS) application users - Token | If the user does not have unprotect rights but the configuration is set as protect, then the configuration allows the output section to be protected. |
| Homegrown application users - Masked | It is how the masking data element is configured and the users are granted view access. For more information about masking, refer to Masking. |
Each role can receive a different form of the SSN based on its need. The Security Officer determines the SSN form by role.
Protegrity tokenization maintains a separation of duties by way of the data security policy.
The DBA, Developers, and System Administrators do not have direct access to the data. Everything goes through the data security policy, regardless of who manages the system.
For more information about data security policies, refer to Managing policies.
1.1 - Protegrity Tokenization
Tokenization is the process of replacing sensitive data with tokens that has no worth to someone who gains unauthorized access to the data. With tokenization, specific pieces of original data can be preserved, while the system tokenizes data according to design. Tokens can be set up and deployed directly on the protectors, depending on your enterprise configuration and data security needs. Once tokenization is deployed, operational systems continually work with the tokens. If the operational systems experience a security breach, then only the tokens are at risk of being compromised. Protegrity tokenization is transparent to end-users. Data integrity is strongly enforced by way of the data security policy.
Protegrity tokenization can be configured to preserve different parts of the original value in the token, such as the last 4 digits. It also recognizes and preserves delimiters, which are often used in SSNs, dates, etc.
Protegrity tokenization enables the user to tokenize various input data types, such as payment card industry (PCI), personally identifiable information (PII), and protected health information (PHI).
With Protegrity tokenization, there is a 1:1 relationship between the real data value and its token value. This enables token values to be used as alternative unique IDs that can be used for joining related information.
The following table describes the token types supported by Protegrity tokenization.
Table: Tokenization Types
| Tokenization Type | Alphabet Characters | Comment |
|---|---|---|
| Numeric (0-9) | Digits 0 through 9 | |
| Integer | Digits 0 through 9 | Data length: 2 bytes, 4 bytes, and 8 bytes |
| Credit Card | Digits 0 through 9 | Special settings: Invalid LUHN digit, invalid card type, alphabetic indicator |
| Alpha (a-z, A-Z) | Lowercase letters a through z Uppercase letters A through Z | |
| Upper-case Alpha (A-Z) | Uppercase letters A through Z | Lower case characters will be converted to upper-case in tokenized output value. |
| Alpha-Numeric (0-9, a-z, A-Z) | Digits 0 through 9 Lowercase letters a through z Uppercase letters A through Z | |
| Upper-Case Alpha-Numeric (0-9, A-Z) | Digits 0 through 9 Uppercase letters A through Z | Lower case characters will be converted to upper-case in tokenized output value. |
| Lower ASCII | The lower part of ASCII table. Hex character codes from 0x21 to 0x7E | Support of 94 printable characters (ASCII from 33 (!) to 126(~)), the rest are treated as delimiters |
| Datetime | YYYY-MM-DD HH:MM:SS | Special settings: Tokenize time, Distinguishable date, Date in clear |
| Decimal | Digits 0 through 9 sign and .(decimal delimiter) | Numeric data with precision and scale. The token will not contain any zeros. |
| Unicode Gen2 | Unicode code points between U+0020 and U+3FFFF | Result is based on the customized set of characters named as alphabet to generate token values. |
| Binary | Hex character codes from 0x00 to 0xFF | |
| Digits 0 through 9 Lowercase letters a through z Uppercase letters A through Z Special characters with restrictions @ sign and .(dot) are delimiters | Domain part after @ sign will not be tokenized |
The following table describes the deprecated token types supported by Protegrity tokenization.
| Tokenization Type | Alphabet Characters | Comment |
|---|---|---|
| Printable | ASCII printable characters, which include letters, digits, punctuation marks, and miscellaneous symbols. Hex character codes from 0x20 to 0x7E, and from 0xA0 to 0xFF. | ISO 8859-15 Latin alphabet no. 9 |
| Date (YYYY-MM-DD) | Date in big endian form, starting with the year. The following separators are supported: .(dot), / (slash), - (dash). | |
| Date (DD/MM/YYYY) | Date in little endian form, starting with the day. The following separators are supported: . (dot), / (slash), - (dash). | |
| Date (MM.DD.YYYY) | Date in middle endian form, starting with the month. The following separators are supported: . (dot), / (slash), - (dash) supported. | |
| Unicode | UTF-8 text. Hex character codes from 0x00 to 0xFF | Result is Alpha-Numeric. |
| Unicode Base64 | UTF-8 text. Hex character codes from 0x00 to 0xFF | Result is Alpha-Numeric, +, /, and =. |
1.1.1 - Tokenization Support by Protegrity Products
Protegrity offers various types of protectors which helps to protect data in different software and platforms. For example, we can use:
- Application Protectors: To protect data in C, C++, Python, Java, .Net, and Go programming languages.
- Big Data Protectors: To protect data in Big Data at various component levels, such as, Hive, Pig, MapReduce, etc.
- Data Warehouse Protectors: To protect data in the Teradata Data Warehouses.
- Gateway Protectors: To protect data in Gateway Protectors like Data Security Gateway (DSG).
- Cloud Protectors: To protect data in Cloud Protectors.
Each protector has certain tokenization types which are listed in the following sections.
Application Protector
The Protegrity Application Protector (AP) is a high-performance, versatile solution that provides a packaged interface to integrate comprehensive, granular security and auditing into enterprise applications.
Application Protectors support all types of tokens.
Table: Supported Tokenization Types by Application Protector
| Tokenization Type | AP Java*1 | AP Python | AP C |
|---|---|---|---|
| Credit Card Numeric Alpha Upper-case Alpha Alpha-Numeric Upper Alpha-Numeric Lower ASCII | STRING CHAR[] BYTE[] | STRING BYTES | STRING CHAR[] BYTE[] |
| Integer | SHORT: 2 bytes INT: 4 bytes LONG: 8 bytes | INT: 4 bytes and 8 bytes | SHORT: 2 bytes INT: 4 bytes LONG: 8 bytes |
| Datetime | DATE STRING CHAR[] BYTE[] | DATE STRING BYTES | DATE STRING CHAR[] BYTE[] |
| Decimal | STRING CHAR[] BYTE[] | STRING BYTES | STRING CHAR[] BYTE[] |
| Unicode Gen2 | STRING CHAR[] BYTE[] | STRING BYTES | STRING CHAR[] BYTE[] |
| Binary | BYTE[] | BYTES | BYTE[] |
*1 - If the input and output types of the API are BYTE[], then the customer application should convert the input to and output from the byte array, before calling the API.
Table: Deprecated Tokenization Types supported by Application Protector
| Tokenization Type | AP Java*1 | AP Python | AP C |
|---|---|---|---|
| Printable | STRING CHAR[] BYTE[] | STRING BYTES | STRING CHAR[] BYTE[] |
| Date | DATE STRING CHAR[] BYTE[] | DATE STRING BYTES | DATE STRING CHAR[] BYTE[] |
| Unicode | STRING CHAR[] BYTE[] | STRING BYTES | STRING CHAR[] BYTE[] |
| Unicode Base64 | STRING CHAR[] BYTE[] | STRING BYTES | STRING CHAR[] BYTE[] |
*1 - If the input and output types of the API are BYTE[], then the customer application should convert the input to and output from the byte array, before calling the API.
For more information about Application protectors, refer to Application Protector.
Big Data Protector
Protegrity supports MapReduce, Hive, Pig, HBase, Spark, and Impala, which utilizes Hadoop Distributed File System (HDFS) or Ozone as the data storage layer. The data is protected from internal and external threats, and users and business processes can continue to utilize the secured data. Protegrity protects data inside the files using tokenization and strong encryption protection methods.
The following table shows the tokenization types supported for Big Data Protectors.
Table: Supported Tokenization Types for Big Data Protectors
| Tokenization Type | MapReduce*1 | Hive | Pig | HBase*1 | Impala | Spark*1 | Spark SQL | Trino |
|---|---|---|---|---|---|---|---|---|
| Credit Card Numeric*3 Alpha*3 Upper-case Alpha*3 Alpha-Numeric*3 Upper Alpha-Numeric*3 Lower ASCII Email*3 | BYTE[] | STRING | CHARARRAY | BYTE[] | STRING | VARCHAR STRING | STRING | VARCHAR |
| Integer | INT: 4 bytes LONG: 8 bytes | INT: 4 bytes BIGINT: 8 bytes | INT: 4 bytes | BYTE[] | SMALL INT: 2 bytes INT: 4 bytes BIGINT: 8 bytes | SHORT: 2 bytes INT: 4 bytes LONG: 8 bytes | SHORT: 2 bytes INT: 4 bytes LONG: 8 bytes | SMALL INT: 2 bytes INT: 4 bytes BIGINT: 8 bytes |
| Datetime*2 | BYTE[] | STRING DATE DATETIME | CHARARRAY | BYTE[] | STRING | BYTE[] STRING | STRING DATE DATETIME | VARCHAR DATE TIMESTAMP |
| Decimal | BYTE[] | STRING | CHARARRAY | BYTE[] | STRING | BYTE[] STRING | STRING | VARCHAR |
| Unicode Gen2 | BYTE[] | STRING | Not supported | BYTE[] | STRING | BYTE[] STRING | STRING | VARCHAR |
| Binary | BYTE[] | Not supported | Not supported | BYTE[] | Not supported | BYTE[] | Not supported | Not supported |
*1 - The customer application should convert the input into a byte array and generate the output from the byte array in the required data type.
*2 - The Datetime tokenization will only work with VARCHAR data type.
*3 - The Char tokenization UDFs only support Numeric, Alpha, Alpha Numeric, Upper-case Alpha, Upper Alpha-Numeric, and Email data elements, and with length preservation selected. Using any other data elements with Char tokenization UDFs is not supported. Using non-length preserving data elements with Char tokenization UDFs is not supported.
The following table shows the deprecated tokenization types supported for Big Data Protectors.
Table: Deprecated Tokenization Types supported for Big Data Protectors
| Tokenization Type | MapReduce*1 | Hive | Pig | HBase*1 | Impala | Spark*1 | Spark SQL | Trino |
|---|---|---|---|---|---|---|---|---|
| Printable | BYTE[] | Not supported | Not supported | BYTE[] | STRING | BYTE[] | Not supported | Not supported |
| Date | BYTE[] | STRING DATE DATETIME | CHARARRAY | BYTE[] | STRING | BYTE[] STRING | STRING DATE DATETIME | VARCHAR DATE TIMESTAMP |
| Unicode | BYTE[] | STRING | Not supported | BYTE[] | STRING | BYTE[] STRING | STRING | VARCHAR |
| Unicode Base64 | BYTE[] | STRING | Not supported | BYTE[] | STRING | BYTE[] STRING | STRING | VARCHAR |
*1 - The customer application should convert the input into a byte array and generate the output from the byte array in the required data type.
For more information about Big Data protectors, refer to Big Data Protector.
Data Warehouse Protector
The Protegrity Data Warehouse Protector is an advanced security solution designed to protect sensitive data at the column level. This enables you to secure your data, while still permitting access to authorized users. Additionally, the Data Warehouse Protector integrates seamlessly with existing database systems using the User-Defined Functions for an enhanced security. Protegrity protects data inside the data warehouses using various tokenization and encryption methods.
Table: Supported Tokenization Types for Data Warehouse Protector
| Tokenization Type | Teradata |
|---|---|
| Credit Card Numeric Alpha Upper-case Alpha Alpha-Numeric Upper Alpha-Numeric Lower ASCII Datetime Decimal | VARCHAR LATIN |
| Integer | SMALLINT: 2 bytes INTEGER: 4 bytes BIGINT: 8 bytes |
| Unicode Gen2 | VARCHAR UNICODE |
| Binary | Not supported |
Table: Deprecated Tokenization Types supported by Data Warehouse Protector
| Tokenization Type | Teradata |
|---|---|
| Printable | VARCHAR LATIN |
| Date | DATE CHAR |
| Unicode | VARCHAR UNICODE |
| Unicode Base64 | Not supported |
For more information about Data Warehouse protectors, refer to Data Warehouse Protector.
- If you have fixed-length data fields and the input data is shorter than the length of the field, then truncate the leading and trailing white spaces before passing the input to the respective Protect and Unprotect UDFs.
- The truncation of whitespaces ensures consistent data output for the protect and unprotect operations. This consistency holds true across all Protegrity products.
- For more information, refer to Truncating Whitespaces.
Database Protector
Oracle Database Protector
| Tokenization Type | Oracle |
|---|---|
| Credit Card Numeric Alpha Upper-case Alpha Alpha-Numeric Upper Alpha-Numeric Lower ASCII | VARCHAR2 CHAR |
| Integer | INTEGER |
| Datetime | DATE VARCHAR2 CHAR[] |
| Decimal | NUMBER VARCHAR2 CHAR[] |
| Unicode | Not Supported |
| Unicode Base64 | VARCHAR2 NVARCHAR2 |
| Binary | Not Supported |
1.1.2 - Delimiters
Protegrity tokenization can generate the same token regardless of how the data is formatted. Any character in the input that does not comply with the token types in the Tokenization Types is generally treated as a delimiter and remains unchanged during tokenization.
The following table shows how the Protegrity Token types handles delimiters and spaces as compared to plain numerical data.
Table: Tokenization with Delimiters
Note: Some tokenizers can tokenize delimiters. Unicode Gen2, lower ASCII, printable, and binary are examples of tokenizers that can tokenize delimiters.
| Input | Value returned by Protegrity Tokenization |
|---|---|
| 5332711989955364 | 8344588301109112 |
| 5332-7119-8995-5364 | 8344-5883-0110-9112 |
| 5332 7119 8995 5364 | 8344 5883 0110 9112 |
1.1.3 - Tokenization Properties
Table: Common Tokenization Properties
| Token Property | Description |
|---|---|
| User configured token properties | |
| Name | Unique name identifying the token element. Maximum length is 56 characters. |
| Data Type | Type of data to tokenize. Name of the alphabet, which indicates the specific characters to tokenize. |
| Static Lookup Table (SLT) Tokenizers | Mentions the type of SLT tokenizers (SLT_1_3, SLT_1_6, SLT_2_3, SLT_2_6, SLT_6_DECIMAL, SLT_DATETIME, and SLT_X_1). |
| Preserve Case | Whether the case of the alphabets and position of the alphabets and numbers must be preserved when tokenizing the value. This is applicable when using the Alpha-Numeric (0-9, a-z, A-Z) token type and the SLT_2_3 tokenizer only. |
| Preserve Position | Whether the position of the alphabets and numbers must be preserved when tokenizing the value. This is applicable when using the Alpha-Numeric (0-9, a-z, A-Z) token type and the SLT_2_3 tokenizer only. |
| Preserve Length | Whether tokens will be the same length as the input or not. |
| Allow Short Data Tokenization | Whether short tokens will be enabled or not. We have the following options: “Yes”, “No, generate error”, or “No, return input as it is”. |
| From Left | Number of characters from left to keep in clear in tokenized output. |
| From Right | Number of characters from right to keep in clear in tokenized output. |
| Minimum Input Length | Minimum length of the input data that can be tokenized. |
| Maximum Input Length | Maximum length of the input data that can be tokenized. |
| Alphabet | Name of the alphabet, which is configured to enable specific set of characters to use for tokenization. |
| Automatically calculated token properties | |
| Internal Initialization Vector (IV) | Whether internal initialization vector (IV) will be used or not. |
| Other token properties | |
| External Initialization Vector (IV) | Whether external initialization vector (IV) will be used or not. |
The following table shows what properties can be set for the token types.
Table: Tokenization Properties for Token Types
| Tokenization Data Type | Tokenizer | Preserve length | Preserve Case/ Preserve Position | Allow Short Tokens | From Left, From Right | Minimum/ Maximum length | External IV | Internal IV |
|---|---|---|---|---|---|---|---|---|
| Numeric | SLT_1_3, SLT_2_3, SLT_1_6, SLT_2_6 | √ | X | √ | √ | X | √ | √ |
| Integer | SLT_1_3 | √ | X | X | X | X | X | X |
| Credit Card | SLT_1_3, SLT_2_3, SLT_1_6, SLT_2_6 | √ (always yes) | X | X | √ | X | √ | √ |
| Alpha | SLT_1_3, SLT_2_3 | √ | X | √ | √ | X | √ | √ |
| Upper-case Alpha | SLT_1_3, SLT_2_3 | √ | X | √ | √ | X | √ | √ |
| Alpha-Numeric | SLT_1_3 | √ | X | √ | √ | X | √ | √ |
| SLT_2_3 | √ | √ | √ | √ | X | √ | √ | |
| Upper-Case Alpha-Numeric | SLT_1_3, SLT_2_3 | √ | X | √ | √ | X | √ | √ |
| Lower ASCII | SLT_1_3 | √ | X | √ | √ | X | √ | √ |
| Datetime | SLT_DATETIME | √ (always yes) | X | X | X (Left in clear = 0, Right in clear = 0) | X | X | X |
| Decimal | SLT_6_DECIMAL | X (always no) | X | X | X (Left in clear = 0, Right in clear = 0) | √ | X | X |
| Unicode Gen2 | SLT_1_3, SLT_X_1 | √ | X | √ | √ | X | √ | √ |
| Binary | SLT_1_3, SLT_2_3 | X (always no) | X | X | √ | X | √ | √ |
| SLT_1_3, SLT_2_3 | √ | X | √ | X (Left in clear = 0, Right in clear = 0) | X | √ | X |
- X - means that Property is disabled and cannot be specified.
- √ - means that Property is enabled or can be specified.
The following table shows what properties can be set for the deprecated token types.
Table: Tokenization Properties for deprecated Token Types
| Tokenization Data Type | Tokenizer | Preserve length | Preserve Case/ Preserve Position | Allow Short Tokens | From Left, From Right | Minimum/ Maximum length | External IV | Internal IV |
|---|---|---|---|---|---|---|---|---|
| Printable | SLT_1_3 | √ | X | √ | √ | X | √ | √ |
| Date (YYYY-MM-DD) | SLT_1_3, SLT_2_3, SLT_1_6, SLT_2_6 | √ (always yes) | X | X | X (Left in clear = 0, Right in clear = 0) | X | X | X |
| Date (DD/MM/YYYY) | SLT_1_3, SLT_2_3, SLT_1_6, SLT_2_6 | √ (always yes) | X | X | X (Left in clear = 0, Right in clear = 0) | X | X | X |
| Date (MM.DD.YYYY) | SLT_1_3, SLT_2_3, SLT_1_6, SLT_2_6 | √ (always yes) | X | X | X (Left in clear = 0, Right in clear = 0) | X | X | X |
| Unicode | SLT_1_3, SLT_2_3 | X (always no) | X | √ | X (Left in clear = 0, Right in clear = 0) | X | √ | X |
| Unicode Base64 | SLT_1_3, SLT_2_3 | X (always no) | X | √ | X (Left in clear = 0, Right in clear = 0) | X | √ | X |
- X - means that Property is disabled and cannot be specified.
- √ - means that Property is enabled or can be specified.
1.1.3.1 - Data Type and Alphabet
An alphabet contains all characters considered for tokenization, it is derived from the tokenization type. Characters outside the alphabet are considered delimiters.
Note: This is applicable only for Unicode Gen2 token.
Refer to Tokenization Types for the full list of supported token types.
1.1.3.2 - Static Lookup Table (SLT) Tokenizers
A static lookup table (SLT) contains a pre-generated list of all possible values from a given set of characters. An alphabetic lookup table for instance might contain all values from “Aa” to “Zz”. All entries are then shuffled so that they are in random order.
SLT tokenizer uses multiple SLTs to generate tokens. This is done by first dividing the input value into smaller pieces, called token blocks, which correspond to entries in the lookup tables. The token blocks are then substituted with values from the SLTs and chained together to form the final token value. This means that the token is a result of multiple lookups in multiple SLTs.
Another benefit of SLT tokenizers is that tokenization can be done locally on the protector. With this solution, tokenization is performed locally within the protector environment.
For more information, refer to Working with Data Elements.
There are several types of SLT tokenizers from which you can choose. They are distinguished by their block size and the number of lookup tables.
Table: SLT Tokenizer with block size and lookup tables
| Tokenizer | Allow Short Tokens | No. of lookup tables | Block size |
|---|---|---|---|
| SLT_1_3 | Yes | 1 | 1 |
| 1 | 2 | ||
| 1 | 3 | ||
No, return input as it is No, generate error | 1 | 3 | |
| SLT_2_3 | Yes | 2 | 1 |
| 2 | 2 | ||
| 2 | 3 | ||
No, return input as it is No, generate error | 2 | 3 | |
| SLT_1_6 | Yes | 1 | 1 |
| 1 | 2 | ||
| 1 | 3 | ||
| 1 | 6 | ||
No, return input as it is No, generate error | 1 | 6 | |
SLT_2_6 | Yes | 2 | 1 |
| 2 | 2 | ||
| 2 | 3 | ||
| 2 | 6 | ||
No, return input as it is No, generate error | 2 | 6 | |
| SLT_6_DECIMAL | NA | Multiple lookup tables: One for each input length in the range 1 to 5 One for input lengths >= 6 | |
| SLT_DATETIME | NA | Multiple lookup tables | |
| SLT_X_1 | Yes | 5-98*1 | 1 |
No, return input as it is No, generate error | 3-96*1 | 1 | |
*1 - For the SLT_X_1 tokenizer, the number of lookup tables used for the security operations is determined during the creation of the data elements.
The following table describes the types of SLT tokenizers and compares their characteristics.
Table: SLT Tokenizer Memory Footprint for Token Types
| Token Type | Tokenizer | Allow Short Tokens | Size of Token Tables (number of entries) | Size of Token Tables (kB) | Amount of Memory used in the Protector (kB) | Comments |
|---|---|---|---|---|---|---|
| Numeric | SLT_1_3 SLT_2_3 SLT_1_6 SLT_2_6 | No, generate error No, return input as it is | 1,000 2,000 1,000,000 2,000,000 | 4 8 3,906 7,812 | 8 16 7,812 15,624 | |
| Yes | 1,110 2,220 1,001,110 2,002,220 | 4.33 8.66 3,910.58 7,821.17 | 8.66 17.32 7,821.17 15,642.34 | |||
| Integer | SLT_1_3 | NA | 4096 | 16 | 32 | |
| Credit Card | SLT 1_3 SLT 2_3 SLT 1_6 SLT 2_6 | NA | 1,000 2,000 1,000,000 2,000,000 | 4 8 3,906 7,812 | 8 16 7,812 15,624 | |
| Alpha | SLT 1_3 SLT 2_3 | No, generate error No, return input as it is | 140,608 281,216 | 549 1,098 | 1,098 2,196 | |
| Yes | 143,364 286,728 | 560.01 1,120.02 | 1,120.02 2,240.04 | |||
| Upper-case Alpha | SLT 1_3 SLT 2_3 | No, generate error No, return input as it is | 17,576 35,152 | 69 138 | 138 276 | |
| Yes | 18,278 36,556 | 71.39 142.79 | 142.79 285.59 | |||
| Alpha-Numeric | SLT 1_3 SLT 2_3 | No, generate error No, return input as it is | 238,328 476,656 | 931 1,862 | 1,862 3,724 | |
| Yes | 242,234 484,468 | 946.22 1,892.45 | 1,892.45 3,784.90 | |||
| Upper-Case Alpha-Numeric | SLT 1_3 SLT 2_3 | No, generate error No, return input as it is | 46,656 93,312 | 182 364 | 364 728 | |
| Yes | 47,988 95,976 | 187.45 374.90 | 374.90 749.81 | |||
| Lower ASCII | SLT 1_3 | No, generate error No, return input as it is | 830,584 | 3,244 | 6,488 | |
| Yes | 839,514 | 3,279.35 | 6,558.70 | |||
| Datetime | SLT_DATETIME | NA | 1,086,400 | 4,244 | 8,488 | Maximum memory is used when both date part and time part will be tokenized |
| Decimal | SLT_6_DECIMAL | NA | 597,870 | 2,335 | 4,670 | |
| Unicode Gen2 | SLT_1_3 SLT_X_1 | No, generate error No, generate error No, return input as it is | 4,096,000 359,994 | 16,384 1,440 | 32,768 2,880 | |
SLT_1_3 SLT_X_1 | Yes Yes | 4,121,760 500,000 | 16,488 2,000 | 32,975 4,000 | ||
| Binary | SLT_1_3 SLT_2_3 | NA | 238,328 476,656 | 931 1,862 | 1,862 3,724 | Same tokenizers and other values as for Alpha-Numeric token element |
SLT_1_3 SLT_2_3 | No, generate error No, return input as it is | 238,328 476,656 | 931 1,862 | 1,862 3,724 | Same tokenizers and other values as for Alpha-Numeric token element | |
| Yes | 242,234 484,468 | 946.22 1,892.45 | 1,892.45 3,784.90 |
Note: The amount of memory used in the protector is twice the size of the token tables (kB) because an inverted SLT is stored in the memory, in addition to the original SLT.
Table: SLT Tokenizer Characteristics for Deprecated Token Types
| Token Type | Tokenizer | Allow Short Tokens | Size of Token Tables (number of entries) | Size of Token Tables (kB) | Amount of Memory used in the Protector (kB) | Comments |
|---|---|---|---|---|---|---|
| Printable | SLT 1_3 | No, generate error No, return input as it is | 6,967,871 | 27,218 | 54,436 | |
| Yes | 7,004,543 | 27,361.49 | 54,722.99 | |||
| Date YYYY-MM-DD | SLT_1_3 SLT_2_3 SLT_1_6 SLT_2_6 | NA | 1,000 2,000 1,000,000 2,000,000 | 4 8 3,906 7,812 | 8 16 7,812 15,624 | |
| Date DD/MM/YYYY | SLT_1_3 SLT_2_3 SLT_1_6 SLT_2_6 | NA | 1,000 2,000 1,000,000 2,000,000 | 4 8 3,906 7,812 | 8 16 7,812 15,624 | |
| Date MM.DD.YYYY | SLT_1_3 SLT_2_3 SLT_1_6 SLT_2_6 | NA | 1,000 2,000 1,000,000 2,000,000 | 4 8 3,906 7,812 | 8 16 7,812 15,624 | |
| Unicode | SLT_1_3 SLT_2_3 | No, generate error No, return input as it is | 238,328 476,656 | 931 1,862 | 1,862 3,724 | Same tokenizers and other values as for Alpha-Numeric token element |
| Yes | ||||||
| Unicode Base64 | SLT_1_3 SLT_2_3 | No, generate error No, return input as it is | 274,625 549,250 | 1,073 2,146 | 2,146 4,292 | Same tokenizers and other values as for Alpha-Numeric token elements. It also includes +, /, and =. |
| Yes |
1.1.3.3 - From Left and From Right Settings
This property indicates the number of characters from left and right that will remain in the clear and hence be excluded from tokenization. Not all token types will allow the end-user to specify these values. The From Left and From Right settings can be configured in the Tokenize Options during the Data Element creation on the ESA Web UI.
For example;
Input Value: 5511309239934975
Credit Card Token: Left=0 Right=4
Output Value: 8278278929904975
When processing input data, you must check the From Left and From Right settings. Validate the input data based on the From Left and From Right settings before applying the Allow Short Data settings.
For more information about how From Left and From Right settings work together with short data settings, refer to Calculating Token Length.
1.1.3.4 - Internal Initialization Vector (IV)
Internal IV is automatically applied to the input value when the token element’s left and right properties are non-zero, designating some characters to remain in the clear. An Internal IV provides an additional security during the tokenization process.
Data to tokenize can be logically divided into three components: left, middle, and right. If an IV is used, then the left and right components are concatenated to form the IV. This IV is then added to the middle component before the value is tokenized.
Table: Examples of Tokenization with Internal IV
| Token Properties | Input Value | Output Value | Comments |
|---|---|---|---|
| Alpha Token Left=1 Right=0 | 1Protegrity 2Protegrity 3Protegrity | 1aOkCUXmhXC 2DeKeldVpKj 3hASBMvvfuL | Left=1 thus the first character in the input value is not tokenized but used as internal IV. For each of three input values the value “Protegrity” is tokenized, with internal IVs “1”, “2”, and “3” respectively. Tokenized value is different for all three cases. |
| Alpha Token Left=2 Right=4 | W2Protegrity2012 W2Protegrity2013 Q2Protegrity2013 | W2NXgfOdLQEy2012 W2XdjFTIFQNC2013 Q2gWjpyMwvDJ2013 | Left=2, Right=4 thus the first 2 and the last 4 characters in the input value are not tokenized but used as internal IV. For each of three input values the value “Protegrity” is tokenized, with internal IVs “W22012”, “W22013”, and “Q22013” respectively. Tokenized value is different for all three cases. |
| Alpha Token Left=0 Right=0 | Protegrity | RlfZVOmhQD | Left and Right are undefined thus the internal IV is not used. |
1.1.3.5 - Minimum and Maximum Input Length
In Protegrity tokenization only the Decimal token type allows for defining the Minimum and Maximum length of the token element when created. Some token types, such as Datetime, have a fixed length. For the remainder, Minimum and Maximum length depends on token type, tokenizer, length preservation, and short token setting.
The following table illustrates length settings by token type.
Table: Minimum and Maximum Input Length for Token Types
Token Type | Tokenizer | Length Preservation | Allow Short Data | Minimum Length | Maximum Length |
|---|---|---|---|---|---|
Numeric | SLT_1_3 SLT_2_3 | Yes | Yes | 1 | 4096 |
No, return input as it is | 3 | ||||
No, generate error | |||||
No | NA | 1 | 3933 | ||
SLT_1_6 SLT_2_6 | Yes | Yes | 1 | 4096 | |
No, return input as it is | 6 | ||||
No, generate error | |||||
No | NA | 1 | 3933 | ||
Integer | SLT_1_3 | Yes | NA | 2 | 8 |
Credit Card | SLT_1_3 SLT_2_3 | Yes | NA | 3 | 4096 |
SLT_1_6 SLT_2_6 | Yes | NA | 6 | 4096 | |
Alpha | SLT_1_3 SLT_2_3 | Yes | Yes | 1 | 4096 |
No, return input as it is | 3 | ||||
No, generate error | |||||
No | NA | 1 | 4076 | ||
Upper-case Alpha | SLT_1_3 SLT_2_3 | Yes | Yes | 1 | 4096 |
No, return input as it is | 3 | ||||
No, generate error | |||||
No | NA | 1 | 4049 | ||
Alpha-Numeric | SLT_1_3 SLT_2_3 | Yes | Yes | 1 | 4096 |
No, return input as it is | 3 | ||||
No, generate error | |||||
No | NA | 1 | 4080 | ||
Upper-Case Alpha-Numeric | SLT_1_3 SLT_2_3 | Yes | Yes | 1 | 4096 |
No, return input as it is | 3 | ||||
No, generate error | |||||
No | NA | 1 | 4064 | ||
Lower ASCII | SLT_1_3 | Yes | Yes | 1 | 4096 |
No, return input as it is | 3 | ||||
No, generate error | |||||
No | NA | 1 | 4086 | ||
Datetime | SLT_DATETIME | Yes | NA | 10 | 29 |
Decimal | SLT_6_DECIMAL | No | NA | 1 | 36 |
Unicode Gen2 | SLT_1_3 SLT_X_1 | Yes | Yes | 1 Code Point | 4096 Code Points |
| No, return input as it is | 3 Code Points | ||||
| No, generate error | |||||
Binary | SLT_1_3 SLT_2_3 | No | NA | 3 | 4095 |
SLT_1_3 SLT_2_3 | Yes | Yes | 3 | 256 | |
No, return input as it is | 5 | ||||
No, generate error | |||||
No | NA | 3 | 256 |
- The minimum and maximum length validation on input data is done on the characters to tokenize.
- The From Left and From right clear characters are not counted. Additionally, characters outside of the alphabet for the selected token type are also not counted.
- The NULL values are accepted but not tokenized.
Table: Minimum and Maximum Input Length for Deprecated Token Types
Token Type | Tokenizer | Length Preservation | Allow Short Data | Minimum Length | Maximum Length |
|---|---|---|---|---|---|
Printable | SLT_1_3 | Yes | Yes | 1 | 4096 |
No, return input as it is | 3 | ||||
No, generate error | |||||
No | NA | 1 | 4091 | ||
Date YYYY-MM-DD Date DD/MM/YYYY Date MM.DD.YYYY | SLT_1_3 SLT_2_3 SLT_1_6 SLT_2_6 | Yes | NA | 10 | 10 |
Unicode | SLT_1_3 SLT_2_3 | No | Yes | 1 byte | 4096 bytes |
| No, return input as it is | 3 bytes | ||||
| No, generate error | |||||
Unicode Base64 | SLT_1_3 | No | Yes | 1 byte | 4096 bytes |
1.1.3.5.1 - Calculating Token Length
For a Numeric token type, non-numeric values are considered as delimiters. The unsupported characters will be treated as delimiters and left un-tokenized. This occurs when the input value does not contain tokenizable characters with the selected token type.
The number of characters to tokenize is calculated as described on the following image:

If the input value does not contain characters to tokenize, then it is considered a zero-length token. The tokenization of a zero-length input value will not produce an error during the tokenization, and input value will be returned as output.
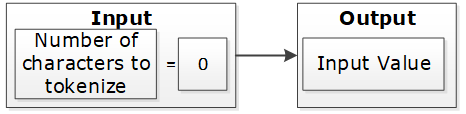
If the input value has at least one character and short data tokenization is enabled, then the source data can be tokenized. If short data tokenization is not enabled, then the source data will be returned as it is. Alternatively, an appropriate error will appear due to tokenization.
For more information on short data tokenization, refer to Short Data Tokenization.

If the input value contains more characters than the maximum for tokenization, then the value of tokenization is considered too long. The tokenization process provides an appropriate error message.

If the input value has a sufficient number of characters, the tokenization process is successful. This occurs when the character count falls between the minimum and maximum settings.

Table: Token Length Examples
| Token Properties | Input Value | Output Value | Comments |
|---|---|---|---|
Numeric Token Left/Right undefined Allow Short Data=Yes | ab1cd | ab6cd | Non-numeric values are considered as delimiters. Input is tokenized as short data is enabled and minimum length is 1 character. |
Numeric Token Left=0 Right=0 Allow Short Data=No, generate error | ab1cd | Error. Input too short. | Non-numeric values are considered as delimiters. Input is short since short data is not enabled and the minimum number of characters to tokenize for this token type is 3 characters. |
Numeric Token Left=0 Right=0 Allow Short Data= No, return input as it is | 12 | 12 | Input is returned as is as per the settings for short data. |
Numeric Token Left=2Right=2 | 48ghdg83 | 48ghdg83 | The input value is left unchanged during tokenization. This is because it is an empty value for tokenization. In tokenization, both left and right settings remove all numeric characters during tokenization. |
Numeric Token Left=2Right=2 | 4568 | 4568 | The input value is left unchanged by the tokenization since it is an empty value for tokenization. |
Numeric Token Left=0 Right=0 | ab123cd | ab857cd | Input value has enough characters for tokenization, only supported by numeric token type values are tokenized. |
Alpha Numeric Token Left=5Right=0 Allow Short Data=Yes | 345465 | 34546c | Input is evaluated first for left and right settings. Since left settings are set to 5, the first five digits are excluded and the sixth digit can be tokenized. As the Allow Short Data is set as yes, the sixth digit is tokenized. |
Alpha Numeric Token Left=5Right=0 Allow Short Data=No, generate error | 345465 | error | Input is evaluated first for left and right settings. Since left settings are set to 5, the first five digits are excluded and the sixth digit can be tokenized. As the Allow Short Data is set as no, generate error and the length of data to be tokenized is less than 3, an Input too short error is generated. |
Alpha Numeric Token Left=5Right=0 Allow Short Data=No, return input as it is | 345465 | 345465 | Input is evaluated first for left and right settings. Since left settings are set to 5, the first five digits are excluded and the sixth digit can be tokenized. As the Allow Short Data is set as No, return input as it is and the length of data to be tokenized is less than 3, the data is passed as is. |
Alpha Numeric Token Left=5Right=0 Allow Short Data=Yes | 34546 | 34546 | Input is evaluated first for left and right settings. Since left settings are set to 5 and the input is five digits, no data exists to be tokenized. As no data exists, it is considered as a zero length token and the input is passed as is. |
Alpha Numeric Token Left=5Right=0 Allow Short Data=No, generate error | 34546 | 34546 | |
Alpha Numeric Token Left=5Right=0 Allow Short Data=No, return input as it is | 34546 | 34546 | |
Alpha Numeric Token Left=5Right=0 Allow Short Data=Yes | 3454 | error | Input is evaluated first for left and right settings. Since left settings are set to 5 and the input is four digits, the left and right settings condition is not met. This results in an Input too short error. |
Alpha Numeric Token Left=5Right=0 Allow Short Data=No, generate error | 3454 | error | |
Alpha Numeric Token Left=5Right=0 Allow Short Data=No, return input as it is | 3454 | error | |
Unicode Token (Cyrillic alphabet) Left= 0Right=0 Allow Short Data=Yes | abдаcd | abшcd | Non-Cyrillic values are considered as delimiters. Input data is tokenized as as short data is enabled. |
Unicode Token (Cyrillic alphabet) Left= 0Right=0 Allow Short Data=No | abдаcd | Error. Input too Short | Non-Cyrillic values are considered as delimiters. Input is too short since the word да (Cyrillic meaning yes - pronounced da) is only two codepoints. The minimum number of codepoints for this token type is 3 characters. |
1.1.3.6 - Length Preserving
With the Preserve Length flag enabled, the length of the input data and protected token value is the same.
For data elements with the Preserve Length flag available, you have an option to generate token values that are of the same length as the input data.
Note: The Unicode Gen2 token element is Code Point length preserving when this option is enabled. The length in bytes can vary depending on the alphabet selected during data element creation.
As an extension to this flag, the Allow Short Data flag provides multiple options to manage short input data handling. If the Preserve Length property is not set, then short input protected will not keep its original length. Generated tokens will at least have the minimum length defined for the token type.
For more information about short data tokenization, refer to Short Data Tokenization.
A check for maximum input length is performed regardless of the preservation setting. This check ensures that the input is within the allowed length limit.
If Preserve Length is not selected, then tokenized data may be longer than the input value up to +5%, or at least +1 symbol on a very small initial value (1-2 symbols). Here, symbol can represent a character or a code point.
If Preserve Length is not selected, then for applying protection in database columns, column length of the resulting protected table should be bigger than length of the column to tokenize in the initial table. This will allow inserting tokenized data during protection when tokenized data is longer than the input data.
1.1.3.7 - Short Data Tokenization
When using tokenizers, such as, SLT_1_3, SLT_2_3, and SLT_X_1, the minimum input limit for tokenizable characters or bytes is three. When using tokenizers, such as, SLT_1_6 and SLT_2_6, the minimum input limit for tokenizable characters or bytes is six.
The possible flag values for short data tokenization are described in the following table.
Table: Short tokens flag values
| Short Token Flag Value | Action |
|---|---|
| No, generate error | Do not tokenize the short input but generate an error code and an audit log stating that the data is too short. |
| Yes | Tokenize the data if the input is short. |
| No, return input as it is | Do not tokenize the short input but return the input as it is. |
The following tokens support short data tokenization:
- Numeric (0-9)
- Alpha (a-z, A-Z)
- Upper-case Alpha (A-Z)
- Alpha-Numeric (0-9, a-z, A-Z)
- Upper-Case Alpha-Numeric (0-9, A-Z)
- Lower ASCII
- Unicode Gen2
The following deprecated tokens support short data tokenization:
Important: Short input data tokenization can be at risk as a user can easily guess the lookup table and the original data by tokenizing some input data. Consider carefully before using the short data tokenization. If possible, short data input must be avoided.
For more information about the maximum length setting for non-length-preserving token elements, refer to Minimum and Maximum Input Length by Token Types.
1.1.3.8 - Case-Preserving and Position-Preserving Tokenization
This section explains the Case-Preserving and Position-Preserving tokenization options.
- Case-Preserving and Position-Preserving tokenization was designed to support specific business requirements. However, this design comes with a trade-off, as it affects the cryptographic strength of the tokens.
- When preserving the case and position of Alpha-Numeric characters, some information may be leaked through the tokenized value.
- In addition, depending on the length of the Alpha and Numeric substrings, tokens may suffer the same weaknesses as Short Tokens, as described in the section Short Data Tokenization.
- It is recommended that this method should not be used for most use cases. Before using this method, contact Protegrity Support to ensure that the risks are fully understood.
1.1.3.8.1 - Case-Preserving Tokenization
When working with data that is received from multiple sources, the data can contain different casing properties. The data processing stage makes the casing consistent prior to distributing the data to additional systems.
If tokenization is performed prior to the data processing stage, then it results in tokens that differ in its casing properties as per the non-processed data.
To preserve the casing of the non-processed data while tokenizing, an additional tokenization option is provided for the Alpha-Numeric (0-9, a-z, A-Z) token type. The casing of the alphabets in the tokenized value matches the casing of the alphabets in the input value.
Note:
You can specify the case-preserving tokenization option when using the SLT_2_3 tokenizer and Alpha-Numeric (0-9, a-z, A-Z) token type only.
If you select the Preserve Case property on the ESA Web UI, then the Preserve Position property is also selected, by default. Hence, the position of the alphabets and numbers is preserved along with the casing of the alphabets in the output tokenized value.
If you are selecting the Preserve Case or Preserve Position property on the ESA Web UI, then the following additional properties are set:
- The Preserve Length property is enabled and Allow Short Data property is set to Yes, by default. These two properties are not modifiable.
- The retention of characters or digits from the left and the right are disabled, by default. The From Left and From Right properties are both set to zero.
For more information about specifying the case-preserving tokenization option for the Alpha-Numeric (0-9, a-z, A-Z) token type, refer to Create Token Data Elements.
The following table provides some examples for the case-preserving tokenization option.
Table: Case-Preserving Tokenization Examples
| Input Value | Tokenized Value using the Case-Preserving Tokenization |
|---|---|
| Dan123 | Abc567 |
| DAn123 | ABc567 |
| daN123 | abC567 |
1.1.3.8.2 - Position-Preserving Tokenization
The alphabetic and numeric positions in the position-preserving tokenized value matches the alphabetic and numeric positions in the input value.
You can specify the position-preserving tokenization option when using the SLT_2_3 tokenizer and Alpha-Numeric (0-9, a-z, A-Z) token type only.
If you are selecting the Preserve Case or Preserve Position property, then the following additional properties are set:
- The Preserve Length property is enabled and Allow Short Data property is set to Yes, by default. These two properties are not modifiable.
- The retention of characters or digits from the left and the right are disabled, by default. The From Left and From Right properties are both set to zero.
For more information about specifying the position-preserving tokenization option for the Alpha-Numeric (0-9, a-z, A-Z) token type, refer to Create Token Data Elements.
The following table provides some examples for the position-preserving tokenization option.
Table: Position-Preserving Tokenization Examples
| Input | Tokenized Value using the Position-Preserving Tokenization |
|---|---|
| Dan123 | pXz789 |
| DAn123 | Abp708 |
| daN123 | Axz642 |
1.1.3.9 - External Initialization Vector (EIV)
1.1.3.9.1 - Tokenization Model with External IV
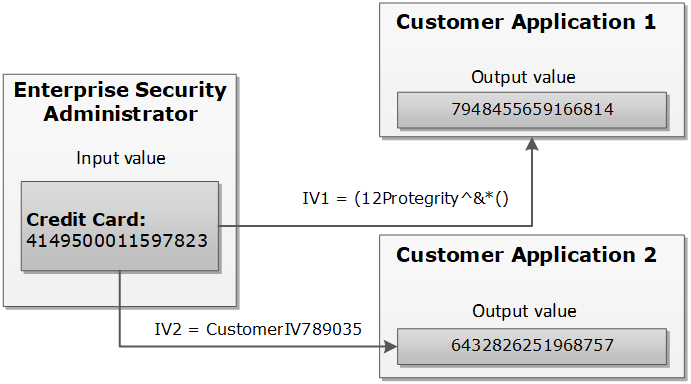
The External IV value is set as a new parameter when calling protect, unprotect or reprotect API from the client application.
The following example explains how the tokenization is performed with the External IV defined. As mentioned before, the main characteristic of the External IV feature is obtaining different outputs for the same input. To have different outputs, you need to specify different IVs.
Note: The External IV is used, prior to protection, as input to modify the data to protect. The External IV is ignored when using encryption.
1.1.3.9.2 - External IV Tokenization Properties
The tokenization with the External IV is done only if the IV is specified during the protect operation through the end user API. When performing unprotect and re-protect operations, the same IV value used for protection must be identified.
If External IV is not provided in either a protect or unprotect function call, then the input is tokenized as-is without any IV.
The External IV value has the following properties:
- Supports ASCII and Unicode characters.
- Minimum 1 byte for the input.
- Maximum 256 bytes for the input.
- Empty and NULL strings are not supported as External IV values. These strings will be ignored during tokenization. The process will continue as if External IV was not used.
Here is an example of the tokenized input value with the External IV for a Numeric token:
Table: Example-External IV for a Numeric token
Input Value | External IV | Output Value | Comments |
1234567890 | None | 5108318538 | External IV is not applied. |
1234567890 | 1234 | 0442985096 | Output values differ because different external IVs were applied. |
12 | 1197578213 | ||
abc | 9423146024 |
1.1.3.10 - Truncating Whitespaces
With fixed length fields or columns, input data may be shorter than the length of the field. When this happens, data may be appended with either, or both, trailing and leading whitespace. In those situations, the whitespace is considered during Tokenization. It will affect the tokenization results.
For instance, consider a scenario where the name “Hultgren Caylor” is stored in a Hive Char(30) column.
As the length of the data is less than 30 characters, trailing whitespaces are appended to it. In this case, assume that we need to protect this column with a data element that preserves the first and last character (L=1, R=1). Now with this setting, the expectation is to preserve character H at the start and the character r at the end, in the protected value output. However, the actual data has trailing whitespaces. This results in the output containing the character “H” at the start and a whitespace character " " at the end. The unnecessary trailing whitespaces cause the final protected output to generate a different token.
It is recommended to truncate trailing and leading whitespaces from the data. This applies before sending the data to Protect, Unprotect, or Reprotect UDFs. Truncating unnecessary whitespaces ensures that only the actual data is considered during tokenization. Any trailing and leading whitespaces are not taken into account.
In addition, it is important to follow a consistent approach for truncating the whitespaces across all operations, such as, Protect, Unprotect, Reprotect. For instance, if we have truncated unnecessary trailing whitespaces from the input before the Protect operation, then the same logic of truncating whitespaces from the input, during Unprotect and Reprotect operations needs to be followed.
1.1.4 - Tokenization Types
1.1.4.1 - Numeric (0-9)
The Numeric token type tokenizes digits from 0 to 9.
Table: Numeric Tokenization Type properties
| Tokenization Type Properties | Settings | |||||||||||||||
|---|---|---|---|---|---|---|---|---|---|---|---|---|---|---|---|---|
Name | Numeric | |||||||||||||||
Token type and Format | Digits 0 through 9 | |||||||||||||||
| Tokenizer | Length Preservation | Allow Short Data | Minimum Length | Maximum Length | ||||||||||||
SLT_1_3 SLT_2_3 | Yes | Yes | 1 | 4096 | ||||||||||||
No, return input as it is | 3 | |||||||||||||||
No, generate error | ||||||||||||||||
No | NA | 1 | 3933 | |||||||||||||
SLT_1_6 SLT_2_6 | Yes | Yes | 1 | 4096 | ||||||||||||
No, return input as it is | 6 | |||||||||||||||
No, generate error | ||||||||||||||||
No | NA | 1 | 3933 | |||||||||||||
Possibility to set Minimum/ maximum length | No | |||||||||||||||
Left/Right settings | Yes | |||||||||||||||
Internal IV | Yes, if Left/Right settings are non-zero | |||||||||||||||
External IV | Yes | |||||||||||||||
Return of Protected value | Yes | |||||||||||||||
Token specific properties | None | |||||||||||||||
The following table lists the examples of numeric tokenization values.
Table: Examples of Numeric tokenization values
| Input Value | Tokenized Value | Comments |
|---|---|---|
| 123 | 977 | Numeric, SLT_1_3, Left=0, Right=0, Length Preservation=Yes The value has minimum length for SLT_1_3 tokenizer. |
| 1 | 555241 | Numeric, SLT_1_6, Left=0, Right=0, Length Preservation=No The value is padded up to 6 characters which is minimum length for SLT_1_6 tokenizer. |
| -7634.119 | -4306.861 | Numeric, SLT_1_3, Left=0, Right=0, Length Preservation=Yes Decimal point and sign are treated as delimiters and not tokenized. |
| 12+38=50 | 98+24=62 | Numeric, SLT_2_6, Left=0, Right=0, Length Preservation=Yes Arithmetic signs are treated as delimiters and not tokenized. |
| 704-BBJ | 134-BBJ | Numeric, SLT_1_3, Left=0, Right=0, Length Preservation=Yes Alpha characters are treated as delimiters and not tokenized. |
| 704-BBJ | Error. Input too short. | Numeric, SLT_2_6, Left=0, Right=0, Length Preservation=Yes, Allow Short Data=No, generate error Input value has only three numeric characters to tokenize, which is short for SLT_2_6 tokenizer when Length Preservation=Yes and Allow Short Data=No, generate error. |
| 704-BBJ 704356 | 704-BBJ 134432 | Numeric, SLT_2_6, Left=0, Right=0, Length Preservation=Yes, Allow Short Data=No, return input as it is If the input value has less than six characters to tokenize, then it is returned as is else it is tokenized. |
| 704-BBJ | 134-BBJ | Numeric, SLT_2_6, Left=0, Right=0, Length Preservation=Yes, Allow Short Data=Yes Input value has three numeric characters to tokenize, which meets minimum length requirement for SLT_2_6 tokenizer when Length Preservation=Yes and Allow Short Data=Yes. |
| 704 | 134 | Numeric, SLT_1_3, Left=0, Right=0, Length Preservation=Yes, Allow Short Data=No, return input as it is If the input value has less than three characters to tokenize, then it is returned as is else it is tokenized. |
| 704-BBJ | 669-BBJ642 | Numeric, SLT_1_6, Left=0, Right=0, Length Preservation=No Input value is padded up to 6 characters because Length Preservation=No. Alpha characters are treated as delimiters and not tokenized. |
| 704-BBJ | 764-6BBJ | Numeric, SLT_2_3, Left=1, Right=3, Length Preservation=No 1 character from left and 3 from right are left in clear. Two numeric characters left for tokenization “04” were padded and tokenized as “646”. |
Numeric Tokenization Properties for different protectors
Application Protector
The following table shows supported input data types for Application protectors with the Numeric token.
Table: Supported input data types for Application protectors with Numeric token
| Application Protectors*2 | AP Java*1 | AP Python |
|---|---|---|
| Supported input data types | STRING CHAR[] BYTE[] | STRING BYTES |
*1 - The API accepts and returns data in BYTE[] format. The customer application needs to convert the input into byte arrays before calling the API, and similarly, convert the output from byte arrays after receiving the response from the API.
*2 - The Protegrity Application Protector only supports bytes converted from the string data type. If any other data type is directly converted to bytes and passed as input to the Application Protectors APIs that support byte as input and provide byte as output, then data corruption might occur.
For more information about Application protectors, refer to Application Protector.
Big Data Protector
Protegrity supports MapReduce, Hive, Pig, HBase, Spark, and Impala, which utilizes Hadoop Distributed File System (HDFS) or Ozone as the data storage layer. The data is protected from internal and external threats, and users and business processes can continue to utilize the secured data. Protegrity protects data inside the files using tokenization and strong encryption protection methods.
The following table shows supported input data types for Big Data protectors with the Numeric token.
Table: Supported input data types for Big Data protectors with Numeric token
| Big Data Protectors | MapReduce*2 | Hive | Pig | HBase*2 | Impala | Spark*2 | Spark SQL | Trino |
|---|---|---|---|---|---|---|---|---|
| Supported input data types*1 | BYTE[] | CHAR*3 STRING | CHARARRAY | BYTE[] | STRING | BYTE[] STRING | STRING | VARCHAR |
*1 – If the input and output types of the API are BYTE[], then the customer application should convert the input to and output from the byte array, before calling the API.
*2 – The Protegrity MapReduce protector, HBase coprocessor, and Spark protector only support bytes converted from the string data type. Data types that are not bytes converted from the string data type might cause data corruption to occur when:
- Any other data type is directly converted to bytes and passed as input to the MapReduce or Spark API that supports byte as input and provides byte as output.
- Any other data type is directly converted to bytes and inserted in an HBase table. Where the HBase table is configured with the Protegrity HBase coprocessor.
*3 – If you are using the Char tokenization UDFs in Hive, then ensure that the data elements have length preservation selected. In Char tokenization UDFs, using data elements without length preservation selected, is not supported.
For more information about Big Data protectors, refer to Big Data Protector.
Data Warehouse Protector
The Protegrity Data Warehouse Protector is an advanced security solution designed to protect sensitive data at the column level. This enables you to secure your data, while still permitting access to authorized users. Additionally, the Data Warehouse Protector integrates seamlessly with existing database systems using the User-Defined Functions for an enhanced security. Protegrity protects data inside the data warehouses using various tokenization and encryption methods.
The following table shows the supported input data types for the Teradata protector with the Numeric token.
Table: Supported input data types for Data Warehouse protectors with Numeric token
| Data Warehouse Protectors | Teradata |
|---|---|
| Supported input data types | VARCHAR LATIN |
For more information about Data Warehouse protectors, refer to Data Warehouse Protector.
Database Protectors
Oracle Database Protector
The supported input data types for the Oracle Database Protector are listed below.
| Protector | Supported Input Data Types |
|---|---|
| Oracle | VARCHAR2 |
| Oracle | CHAR |
Note: For numeric data elements where length preservation is not enabled, the maximum supported length is 3,842 characters. Data up to this length can be tokenized and de-tokenized without errors.
1.1.4.2 - Integer (0-9)
The Integer token type tokenizes 2, 4, or 8 byte size integers.
Table: Integer Tokenization Type properties
Tokenization Type Properties | Settings | |||||||||||||
|---|---|---|---|---|---|---|---|---|---|---|---|---|---|---|
Name | Integer | |||||||||||||
Token type and Format | 2, 4, or 8 byte size integers | |||||||||||||
Tokenizer | Length Preservation | Minimum Length | Maximum Length | |||||||||||
SLT_1_3 | Yes | 2 bytes | 8 bytes | |||||||||||
Possibility to set Minimum/ maximum length | No | |||||||||||||
Left/Right settings | No | |||||||||||||
Internal IV | No | |||||||||||||
External IV | Yes | |||||||||||||
Return of Protected value | Yes | |||||||||||||
Token specific properties | Size 2, 4, or 8 bytes | |||||||||||||
The following table shows examples of the way in which a value will be tokenized with the Integer token.
Table: Examples of Integer tokenization values
| Input Value | Tokenized Value | Comments |
|---|---|---|
| 12 | 31345 | Integer, SLT_1_3, Left=0, Right=0, Length Preservation=Yes |
| 3 | 1465 | For 2 bytes, the values can range from -32768 to 32767. |
| 3 | 782939681 | For 4 bytes, the values can range from -2147483648 to 2147483647. |
| 3 | 7268379031142372719 | For 8 bytes, the value range can range from -9223372036854775808 to 9223372036854775807. |
The pty.ins_integer UDF in the Oracle, Teradata, and Impala Protectors, supports input data length of 4 bytes only. For 2 bytes, the following error is returned: Invalid input size.
Integer Tokenization Properties for different protectors
Application Protector
The following table shows supported input data types for Application protectors with the Integer token.
Table: Supported input data types for Application protectors with Integer token
| Application Protectors | AP Java | AP Python |
|---|---|---|
| Supported input data types | SHORT: 2 bytes INT: 4 bytes LONG: 8 bytes | INT: 4 bytes and 8 bytes |
If the user passes a 4-byte integer with values ranging from -2,147,483,648 to +2,147,483,647, the data element for the protect, unprotect, or reprotect APIs should be an 4-byte integer token type. However, if the user uses 2-byte integer token type, the data protection operation will not be successful. For a Bulk call using the protect, unprotect, and reprotect APIs, the error code, 44, appears. For a single call using the protect, unprotect, and reprotect APIs, an exception will be thrown and the error message, 44, Content of input data is not valid appears.
For more information about Application protectors, refer to Application Protector.
Big Data Protector
Protegrity supports MapReduce, Hive, Pig, HBase, Spark, and Impala, which utilizes Hadoop Distributed File System (HDFS) or Ozone as the data storage layer. The data is protected from internal and external threats, and users and business processes can continue to utilize the secured data. Protegrity protects data inside the files using tokenization and strong encryption protection methods.
The following table shows supported input data types for Big Data protectors with the Integer token.
Table: Supported input data types for Big Data protectors with Integer token
| Big Data Protectors | MapReduce*2 | Hive | Pig | HBase*2 | Impala | Spark*2 | Spark SQL | Trino |
|---|---|---|---|---|---|---|---|---|
| Supported input data types*1 | INT: 4 bytes LONG: 8 bytes | INT: 4 bytes BIGINT: 8 bytes | INT: 4 bytes | BYTE[] | SMALLINT: 2 bytes INT: 4 bytes BIGINT: 8 bytes | SHORT: 2 bytes INT: 4 bytes LONG: 8 bytes | SHORT: 2 bytes INT: 4 bytes LONG: 8 bytes | SMALLINT: 2 bytes INT: 4 bytes BIGINT: 8 bytes |
*1 – If the input and output types of the API are BYTE[], then the customer application should convert the input to and output from the byte array, before calling the API.
*2 – The Protegrity MapReduce protector, HBase coprocessor, and Spark protector only support bytes converted from the string data type. Bytes as input that are not generated from string data type might cause data corruption to occur when:
- Any other data type is directly converted to bytes should be passed as input to the MapReduce or Spark API that supports byte as input and provides byte as output.
- Any other data type is directly converted to bytes and inserted in an HBase table. Where the HBase table is configured with the Protegrity HBase coprocessor.
For more information about Big Data protectors, refer to Big Data Protector.
Data Warehouse Protector
The Protegrity Data Warehouse Protector is an advanced security solution designed to protect sensitive data at the column level. This enables you to secure your data, while still permitting access to authorized users. Additionally, the Data Warehouse Protector integrates seamlessly with existing database systems using the User-Defined Functions for an enhanced security. Protegrity protects data inside the data warehouses using various tokenization and encryption methods.
The following table shows the supported input data types for the Teradata protector with the Integer token.
Table: Supported input data types for Data Warehouse protectors with Integer token
| Data Warehouse Protectors | Teradata |
|---|---|
| Supported input data types | SMALLINT: 2 bytes INTEGER: 4 bytes BIGINT: 8 bytes |
For more information about Data Warehouse protectors, refer to Data Warehouse Protector.
Database Protectors
Oracle Database Protector
The supported input data types for the Oracle Database Protector are listed below.
| Protector | Supported Input Data Types |
|---|---|
| Oracle | INTEGER |
1.1.4.3 - Credit Card
The Credit Card token type helps maintain transparency. It provides ways to clearly distinguish a token from the real value which is a recommendation of the PCI DSS. The Credit Card token type supports only numeric input (no separators are allowed as input).
Table: Credit Card Tokenization properties
Tokenization Type Properties | Settings | |||||||||||||
|---|---|---|---|---|---|---|---|---|---|---|---|---|---|---|
Name | Credit Card | |||||||||||||
Token type and Format | Digits 0 through 9 (no separators are allowed as input) | |||||||||||||
Tokenizer | Length Preservation | Minimum Length | Maximum Length | |||||||||||
SLT_1_3 SLT_2_3 | Yes | 3 | 4096 | |||||||||||
SLT_1_6 SLT_2_6 | Yes | 6 | 4096 | |||||||||||
Possibility to set Minimum/ maximum length | No | |||||||||||||
Left/Right settings | Yes | |||||||||||||
Internal IV | Yes, if Left/Right settings are non-zero | |||||||||||||
External IV | Yes | |||||||||||||
Return of Protected value | Yes | |||||||||||||
Token specific properties | Invalid LUHN Checksum Invalid Card Type Alphabetic Indicator | |||||||||||||
The credit card number real value is distinguished from the tokenized value based on the token value validation properties.
Table: Specific Properties of the Credit Card Token Type
| Credit Card Token Value Validation Properties | Left in Clear | Right in Clear | Comments | Validation Properties Compatibility |
| Invalid Luhn Checksum (On/Off) | Yes | Yes | Right characters which are to be left in the clear can be specified. This usually requires specifying a group of up to four characters. | Can be used together. |
| Invalid Card Type (On/Off) | 0 | Yes | Left cannot be specified, it is zero by default. | |
| Alphabetic Indicator (On/Off) | Yes | Yes | The indicator will be in the token, which means that left and right can be specified. | Can be used only separately from the other token validation properties. |
You can create a Credit Card token element and select no validation property for it. If the Credit Card token is involved, it will be handled similar to a Numeric token. However, additional checks will be applied to the input based on the properties detailed in the Credit Card token general properties column in the table above.
To enable the Credit Card token properties, such as, Invalid LUHN checksum and Invalid Card Type, with the SLT Tokenizers, refer to Credit Card Properties with SLT Tokenizers.
Invalid Luhn Checksum
The purpose of the Luhn checksum is to detect incorrectly entered card details. If you enable Invalid Luhn Checksum token validation, then you must use valid credit cards otherwise tokenization will be denied for an invalid credit card number.
A valid credit card has a valid Luhn checksum. Upon tokenization, the tokenized value will have an invalid Luhn checksum. Here is an example of the tokenized credit card with the invalid Luhn digit.
Table: Credit Card Number with Luhn Checksum Examples
| Credit Card Number | Tokenized Values | Comments |
|---|---|---|
| 4067604564321453 | Token is not generated due to invalid input value. Error is returned. | The input value contains invalid Luhn checksum. The value cannot be tokenized with Luhn enabled. |
| 4067604564321454 | 2009071778438613 | The Luhn in the input value is correct, the value is tokenized. Tokenized value has invalid Luhn checksum. |
Invalid Card Type
An invalid credit card indicates an issue with the credit card details. An invalid card type will result in token values not starting with the digits that real credit card numbers begin with. The first digit in a real credit card number is the Major Industry Identifier. Thus, digits 3,4,5,6, and 0 can be the first digits of the real credit card number, which are then substituted during tokenization.
Table: Real Credit Card Values with Tokenized Values
| Real Credit Card Value | 3 | 4 | 5 | 6 | 0 |
|---|---|---|---|---|---|
| Tokenized Value | 2 | 7 | 8 | 9 | 1 |
Here is an example of the tokenized credit card with the invalid card type.
Table: Credit Card Number with Invalid Card Type Examples
| Credit Card Number | Tokenized Values | Comments |
|---|---|---|
| 4067604564321454 | 7335610268467066 | The credit card type is valid, the tokenization is successful. |
| 2067604564321454 | Token is not generated due to invalid input value. Error is returned. | The credit card type is invalid since the first digit of the value “2” does not belong to a real credit card. The value cannot be tokenized. |
Alphabetic Indicator
The alphabetic indicator replaces the tokenized value with an alphabet. If you enable Alphabetic Indicator validation, then the resulting token value will have one alphabetic character.
You will need to choose the position of the alphabetic character before tokenizing a credit card number otherwise the resulting token will have no alphabetic indicator.
The alphabetic indicator will substitute the tokenized value according to the following rule:
Table: Alphabetic Indicator with Tokenized Digits
| Tokenized digit | 0 | 1 | 2 | 3 | 4 | 5 | 6 | 7 | 8 | 9 |
|---|---|---|---|---|---|---|---|---|---|---|
| Alphabetic indicator | A | B | C | D | E | F | G | H | I | J |
In the following table, the Visa Card Number “4067604564321454” is tokenized. A tokenized value, represented by “7594107411315001”, is substituted with an alphabetic character in a selected position.
Table: Examples of Credit Card Tokenization with Alphabetic Indicator
| Credit Card Number (Input Value) | Position | Tokenized Values | Comments |
|---|---|---|---|
| 4067604564321454 | - | 7594107411315001 | No substitution since the position is undefined. |
| 4067604564321454 | 14 | 7594107411315A01 | Digit “0” is substituted with character “A” at position 14. |
Credit Card Properties with SLT Tokenizers
The Credit Card Properties with SLT Tokenizers explains the minimum data length required for tokenization. This occurs when the Credit Card token properties is used in combination with the SLT Tokenizers.
If you enable Credit Card token properties for tokenization, such as Invalid LUHN checksum and Invalid Card Type, you need to select an appropriate SLT Tokenizer. This is required to ensure the minimum data length is available for successful tokenization.
The following table represents the minimum data length required for tokenization as per the usage of Credit Card token properties with the SLT Tokenizers.
Table: Minimum Data Length - Credit Card Token Properties with SLT Tokenizers
| Enabled Credit Card Token Property | Minimum Data Length (in digits) Required for Tokenization | |
| SLT_1_3/SLT_2_3 | SLT_1_6/SLT_2_6 | |
| Invalid LUHN Checksum | 4 | 7 |
| Invalid Card Type | 4 | 7 |
| Invalid LUHN Checksum and Invalid Card Type | 5 | 8 |
Credit Card Tokenization Properties for different protectors
Application Protector
The following table shows supported input data types for Application protectors with the Credit Card token.
Table: Supported input data types for Application protectors with Credit Card token
| Application Protectors*2 | AP Java*1 | AP Python |
|---|---|---|
| Supported input data types | STRING CHAR[] BYTE[] | STRING BYTES |
*1 - The API accepts and returns data in BYTE[] format. The customer application needs to convert the input into byte arrays before calling the API, and similarly, convert the output from byte arrays after receiving the response from the API.
*2 - The Protegrity Application Protector only supports bytes converted from the string data type. If any other data type is directly converted to bytes and passed as input to the Application Protectors APIs that support byte as input and provide byte as output, then data corruption might occur.
For more information about Application protectors, refer to Application Protector.
Big Data Protector
Protegrity supports MapReduce, Hive, Pig, HBase, Spark, and Impala, which utilizes Hadoop Distributed File System (HDFS) or Ozone as the data storage layer. The data is protected from internal and external threats, and users and business processes can continue to utilize the secured data. Protegrity protects data inside the files using tokenization and strong encryption protection methods.
The following table shows supported input data types for Big Data protectors with the Credit Card token.
Table: Supported input data types for Big Data protectors with Credit Card token
| Big Data Protectors | MapReduce*2 | Hive | Pig | HBase*2 | Impala | Spark*2 | Spark SQL | Trino |
|---|---|---|---|---|---|---|---|---|
| Supported input data types*1 | BYTE[] | STRING | CHARARRAY | BYTE[] | STRING | BYTE[] STRING | STRING | VARCHAR |
*1 – If the input and output types of the API are BYTE[], then the customer application should convert the input to and output from the byte array, before calling the API.
*2 – The Protegrity MapReduce protector, HBase coprocessor, and Spark protector only support bytes converted from the string data type. Bytes as input that are not generated from string data type might cause data corruption to occur when:
- Any other data type is directly converted to bytes should be passed as input to the MapReduce or Spark API that supports byte as input and provides byte as output.
- Any other data type is directly converted to bytes and inserted in an HBase table. Where the HBase table is configured with the Protegrity HBase coprocessor.
For more information about Big Data protectors, refer to Big Data Protector.
Data Warehouse Protector
The Protegrity Data Warehouse Protector is an advanced security solution designed to protect sensitive data at the column level. This enables you to secure your data, while still permitting access to authorized users. Additionally, the Data Warehouse Protector integrates seamlessly with existing database systems using the User-Defined Functions for an enhanced security. Protegrity protects data inside the data warehouses using various tokenization and encryption methods.
The following table shows the supported input data types for the Teradata protector with the Credit Card token.
Table: Supported input data types for Data Warehouse protectors with Credit Card token
| Data Warehouse Protectors | Teradata |
|---|---|
| Supported input data types | VARCHAR LATIN |
For more information about Data Warehouse protectors, refer to Data Warehouse Protector.
Database Protectors
Oracle Database Protector
The supported input data types for the Oracle Database Protector are listed below.
| Protector | Supported Input Data Types |
|---|---|
| Oracle | VARCHAR2 |
| Oracle | CHAR |
1.1.4.4 - Alpha (A-Z)
The Alpha token type tokenizes both uppercase and lowercase letters.
Table: Alpha Tokenization Type properties
Tokenization Type Properties | Settings | ||||||||||||||||
|---|---|---|---|---|---|---|---|---|---|---|---|---|---|---|---|---|---|
Name | Alpha | ||||||||||||||||
Token type and Format | Lowercase letters a through z Uppercase letters A through Z | ||||||||||||||||
SLT_1_3 SLT_2_3 | Yes | Yes | 1 | 4096 | |||||||||||||
No, return input as it is | 3 | ||||||||||||||||
No, generate error | |||||||||||||||||
No | NA | 1 | 4076 | ||||||||||||||
Possibility to set Minimum/ maximum length | No | ||||||||||||||||
Left/Right settings | Yes | ||||||||||||||||
Internal IV | Yes, if
Left/Right settings are non-zero | ||||||||||||||||
External IV | Yes | ||||||||||||||||
Yes | |||||||||||||||||
Token specific properties | None | ||||||||||||||||
The following table shows examples of the way in which a value will be tokenized with the Alpha token.
Table: Examples of Numeric tokenization values
| Input Value | Tokenized Value | Comments |
|---|---|---|
| abc | nvr | Alpha, SLT_1_3, Left=0, Right=0, Length Preservation=Yes The value has minimum length for SLT_1_3 tokenizer. |
| MA | TGi | Alpha, SLT_2_3, Left=0, Right=0, Length Preservation=No The value is padded up to 3 characters which is minimum length for SLT_2_3 tokenizer. |
| MA | Error. Input too short. | Alpha, SLT_1_3, Left=0, Right=0, Length Preservation=Yes, Allow Short Data=No, generate error Input value has only two alpha characters to tokenize, which is short for SLT_1_3 tokenizer when Length Preservation=Yes and Allow Short Data=No, generate error. |
| MA MAC | MA TGH | Alpha, SLT_1_3, Left=0, Right=0, Length Preservation=Yes, Allow Short Data=No, return input as it is If the input value has less than three characters to tokenize, then it is returned as is else it is tokenized. |
| MA | TG | Alpha, SLT_1_3, Left=0, Right=0, Length Preservation=Yes, Allow Short Data=Yes Input value has only two alpha characters, which meets minimum length requirement for SLT_1_3 tokenizer when Length Preservation=Yes and Allow Short Data=Yes. |
| 131 Summer Street, Bridgewater | 131 VDYgAK q vMDUn, zAEXmwqWYNQG | Alpha, SLT_2_3, Left=0, Right=0, Length Preservation=No Numeric characters, spaces and comma are treated as delimiters and not tokenized. Output value is longer than initial value. |
| Albert Einstein | SldGzm OOCTzSFo | Alpha, SLT_1_3, Left=0, Right=0, Length Preservation=Yes Space is treated as delimiters and not tokenized. Output value is the same length as initial value. |
| Albert Einstein | AjAkqD vvBFYLdo | Alpha, SLT_1_3, Left=1, Right=0, Length Preservation=Yes 1 character from left remains in the clear. |
Alpha Tokenization Properties for different protectors
Application Protector
The following table shows supported input data types for Application protectors with the Alpha token.
Note: For both SLT_1_3 and SLT_2_3, the maximum length of the protected data is 4096 bytes. This occurs for the Alpha token element for Application Protector with no length preservation.
Table: Supported input data types for Application protectors with Alpha token
| Application Protectors*2 | AP Java*1 | AP Python |
|---|---|---|
| Supported input data types | BYTE[] CHAR[] STRING | BYTES STRING |
*1 - The API accepts and returns data in BYTE[] format. The customer application needs to convert the input into byte arrays before calling the API, and similarly, convert the output from byte arrays after receiving the response from the API.
*2 - The Protegrity Application Protector only supports bytes converted from the string data type. If any other data type is directly converted to bytes and passed as input to the Application Protector APIs that support byte as input and provide byte as output, then data corruption might occur.
For more information about Application protectors, refer to Application Protector.
Big Data Protector
Protegrity supports MapReduce, Hive, Pig, HBase, Spark, and Impala, which utilizes Hadoop Distributed File System (HDFS) or Ozone as the data storage layer. The data is protected from internal and external threats, and users and business processes can continue to utilize the secured data. Protegrity protects data inside the files using tokenization and strong encryption protection methods.
The following table shows supported input data types for Big Data protectors with the Alpha token.
Table: Supported input data types for Big Data protectors with Alpha token
| Big Data Protectors | MapReduce*2 | Hive | Pig | HBase*2 | Impala | Spark*2 | Spark SQL | Trino |
|---|---|---|---|---|---|---|---|---|
| Supported input data types*1 | BYTE[] | CHAR*3 STRING | CHARARRAY | BYTE[] | STRING | BYTE[] STRING | STRING | VARCHAR |
*1 – If the input and output types of the API are BYTE[], then the customer application should convert the input to and output from the byte array, before calling the API.
*2– The Protegrity MapReduce protector, HBase coprocessor, and Spark protector only support bytes converted from the string data type. Data that is not converted to bytes from string data type might cause data corruption to occur when:
- Any other data type is directly converted to bytes and passed as input to the MapReduce or Spark API that supports byte as input and provides byte as output.
- Any other data type is directly converted to bytes and inserted in an HBase table. Where the HBase table is configured with the Protegrity HBase coprocessor.
*3 – If you are using the Char tokenization UDFs in Hive, then ensure that the data elements have length preservation selected. In Char tokenization UDFs, using data elements without length preservation selected, is not supported.
For more information about Big Data protectors, refer to Big Data Protector.
Data Warehouse Protector
The Protegrity Data Warehouse Protector is an advanced security solution designed to protect sensitive data at the column level. This enables you to secure your data, while still permitting access to authorized users. Additionally, the Data Warehouse Protector integrates seamlessly with existing database systems using the User-Defined Functions for an enhanced security. Protegrity protects data inside the data warehouses using various tokenization and encryption methods.
The following table shows the supported input data types for the Teradata protector with the Alpha token.
Table: Supported input data types for Data Warehouse protectors with Alpha token
| Data Warehouse Protectors | Teradata |
|---|---|
| Supported input data types | VARCHAR LATIN |
For more information about Data Warehouse protectors, refer to Data Warehouse Protector.
Database Protectors
Oracle Database Protector
The supported input data types for the Oracle Database Protector are listed below.
| Protector | Supported Input Data Types |
|---|---|
| Oracle | VARCHAR2 |
| Oracle | CHAR |
1.1.4.5 - Upper-Case Alpha (A-Z)
The Upper-Case Alpha token type tokenizes all alphabetic symbols as uppercase. After de-tokenization, all alphabetic symbols are returned as uppercase. This means that initial and detokenized values would not match if the input contains lowercase letters.
Table: Upper-Case Alpha Tokenization Type properties
Tokenization Type Properties | Settings | ||||||||||||||
|---|---|---|---|---|---|---|---|---|---|---|---|---|---|---|---|
Name | Upper-Case Alpha | ||||||||||||||
Token type and Format | Upper-Case letters A through Z | ||||||||||||||
Tokenizer | Length Preservation | Allow Short Data | Minimum Length | Maximum Length | |||||||||||
SLT_1_3 SLT_2_3 | Yes | Yes | 1 | 4096 | |||||||||||
No, return input as it is | 3 | ||||||||||||||
No, generate error | |||||||||||||||
No | NA | 1 | 4049 | ||||||||||||
Possibility to set Minimum/ maximum length | No | ||||||||||||||
Left/Right settings | Yes | ||||||||||||||
Internal IV | Yes, if Left/Right settings are non-zero | ||||||||||||||
External IV | Yes | ||||||||||||||
Return of Protected value | Yes | ||||||||||||||
Token specific properties | Lower case characters are accepted in the input but they will be converted to upper-case in output value. | ||||||||||||||
The following table shows examples of the way in which a value will be tokenized with the Upper-case Alpha token.
Table: Examples of Upper Case Alpha tokenization values
| Input Value | Tokenized Value | Comments |
|---|---|---|
| abc | OIM | Upper-case Alpha, SLT_2_3, Left=0, Right=0, Length Preservation=Yes The value has minimum length for SLT_2_3 tokenizer. Lowercase characters in the input are converted to uppercase in output. De-tokenization will return “ABC”. |
| NY | ZIZ | Upper-case Alpha, SLT_1_3, Left=0, Right=0, Length Preservation=No The value is padded up to 3 characters which is minimum length for SLT_1_3 tokenizer. |
| NY | Error. Input too short. | Upper-case Alpha, SLT_2_3, Left=0, Right=0, Length Preservation=Yes, Allow Short Data=No, generate error Input value has only two alpha characters to tokenize, which is short for SLT_2_3 tokenizer when Length Preservation=Yes and Allow Short Data=No, generate error. |
| NY NYA | NY ZIO | Upper-case Alpha, SLT_2_3, Left=0, Right=0, Length Preservation=Yes, Allow Short Data=No, return input as it is If the input value has less than three characters to tokenize, then it is returned as is else it is tokenized. |
| NY | ZI | Upper-case Alpha, SLT_2_3, Left=0, Right=0, Length Preservation=Yes, Allow Short Data=Yes Input value has only two alpha characters to tokenize, which meets minimum length requirement for SLT_2_3 tokenizer when Length Preservation=Yes and Allow Short Data=Yes. |
| 131 Summer Street, Bridgewater | 131 ZBXDPW G FYTZP, CRTTPXPLYGCU | Upper-case Alpha, SLT_1_3, Left=0, Right=0, Length Preservation=No Numeric characters, spaces and comma are treated as delimiters and not tokenized. Output value is longer than initial value. |
| Albert Einstein | AOALXO POHLFHMU | Upper-case Alpha, SLT_2_3, Left=0, Right=0, Length Preservation=Yes Space is treated as delimiters and not tokenized. Output value is the same length as initial value. |
| 704-BBJ | 704-GTU | Upper-case Alpha, SLT_1_3, Left=3, Right=0, Length Preservation=Yes Three characters from left are left in clear. Dash is treated as delimiter. |
Upper-case Alpha Tokenization Properties for different protectors
Application Protector
The following table shows supported input data types for Application protectors with the Upper-case Alpha token.
Table: Supported input data types for Application protectors with Upper-case Alpha token
| Application Protectors*2 | AP Java*1 | AP Python |
|---|---|---|
| Supported input data types | BYTE[] CHAR[] STRING | BYTES STRING |
*1 - The API accepts and returns data in BYTE[] format. The customer application needs to convert the input into byte arrays before calling the API, and similarly, convert the output from byte arrays after receiving the response from the API.
*2 - The Protegrity Application Protectors only support bytes converted from the string data type. If int, short, or long format data is directly converted to bytes and passed as input to the Application Protector APIs that support byte as input and provide byte as output, then data corruption might occur.
For more information about Application protectors, refer to Application Protector.
Big Data Protector
Protegrity supports MapReduce, Hive, Pig, HBase, Spark, and Impala, which utilizes Hadoop Distributed File System (HDFS) or Ozone as the data storage layer. The data is protected from internal and external threats, and users and business processes can continue to utilize the secured data. Protegrity protects data inside the files using tokenization and strong encryption protection methods.
The following table shows supported input data types for Big Data protectors with the Upper-Case Alpha token.
Table: Supported input data types for Big Data protectors with Upper-Case Alpha token
| Big Data Protectors | MapReduce*2 | Hive | Pig | HBase*2 | Impala | Spark*2 | Spark SQL | Trino |
|---|---|---|---|---|---|---|---|---|
| Supported input data types*1 | BYTE[] | CHAR*3 STRING | CHARARRAY | BYTE[] | STRING | BYTE[] STRING | STRING | VARCHAR |
*1 – If the input and output types of the API are BYTE[], then the customer application should convert the input to and output from the byte array, before calling the API.
*2 – The Protegrity MapReduce protector, HBase coprocessor, and Spark protector only support bytes converted from the string data type. Data types that are not bytes converted from the string data type might cause data corruption to occur when:
- Any other data type is directly converted to bytes and passed as input to the MapReduce or Spark API that supports byte as input and provides byte as output.
- Any other data type is directly converted to bytes and inserted in an HBase table. Where the HBase table is configured with the Protegrity HBase coprocessor.
*3 – If you are using the Char tokenization UDFs in Hive, then ensure that the data elements have length preservation selected. In Char tokenization UDFs, using data elements without length preservation selected, is not supported.
For more information about Big Data protectors, refer to Big Data Protector.
Data Warehouse Protector
The Protegrity Data Warehouse Protector is an advanced security solution designed to protect sensitive data at the column level. This enables you to secure your data, while still permitting access to authorized users. Additionally, the Data Warehouse Protector integrates seamlessly with existing database systems using the User-Defined Functions for an enhanced security. Protegrity protects data inside the data warehouses using various tokenization and encryption methods.
The following table shows the supported input data types for the Teradata protector with the Upper-case Alpha token.
Table: Supported input data types for Data Warehouse protectors with Upper-case Alpha token
| Data Warehouse Protectors | Teradata |
|---|---|
| Supported input data types | VARCHAR LATIN |
For more information about Data Warehouse protectors, refer to Data Warehouse Protector.
Database Protectors
Oracle Database Protector
The supported input data types for the Oracle Database Protector are listed below.
| Protector | Supported Input Data Types |
|---|---|
| Oracle | VARCHAR2 |
| Oracle | CHAR |
1.1.4.6 - Alpha-Numeric (0-9, a-z, A-Z)
The Alpha-numeric token type tokenizes all alphabetic symbols, including lowercase and uppercase letters. It also tokenizes digits from 0 to 9.
Table: Alpha-Numeric Tokenization Type properties
Tokenization Type Properties | Settings | |||||||||||||||||
|---|---|---|---|---|---|---|---|---|---|---|---|---|---|---|---|---|---|---|
Name | Alpha-Numeric | |||||||||||||||||
Token type and Format | Digits 0 through 9 Lowercase letters a through z Uppercase letters A through Z | |||||||||||||||||
Tokenizer | Length Preservation | Allow Short Data | Minimum Length | Maximum Length | ||||||||||||||
SLT_1_3 SLT_2_3 | Yes | Yes | 1 | 4096 | ||||||||||||||
No, return input as it is | 3 | |||||||||||||||||
No, generate error | ||||||||||||||||||
No | NA | 1 | 4080 | |||||||||||||||
| Preserve Case | Yes, if SLT_2_3 tokenizer is selected If you select the Preserve Case or Preserve Position property on the ESA Web UI, the Preserve Length property is enabled. If you set the Allow Short Data property to Yes, it is also enabled by default. In addition, these two properties are not modifiable. | |||||||||||||||||
| Preserve Position | ||||||||||||||||||
Possibility to set Minimum/ maximum length | No | |||||||||||||||||
Left/Right settings | Yes If you are selecting the Preserve Case or Preserve Position property on the ESA Web UI, then the retention of characters or digits from the left and the right are disabled, by default. In addition, the From Left and From Right properties are both set to zero. | |||||||||||||||||
Internal IV | Yes, if Left/Right settings are non-zero If you are selecting the Preserve Case or Preserve Position property on the ESA Web UI, then the alphabetic part of the input value is applied as an internal IV to the numeric part of the input value prior to tokenization. | |||||||||||||||||
External IV | Yes If you are selecting the Preserve Case or Preserve Position property on the ESA Web UI, then the external IV property is not supported. | |||||||||||||||||
Return of Protected value | Yes | |||||||||||||||||
Token specific properties | None | |||||||||||||||||
The following table shows examples of the way in which a value will be tokenized with the Alpha-Numeric token.
Table: Examples of Tokenization for Alpha-Numeric Values
| Input Value | Tokenized Value | Comments |
|---|---|---|
| 123 | sQO | Alpha-Numeric, SLT_1_3, Left=0, Right=0, Length Preservation=Yes Input is numeric but tokenized value contains uppercase and lowercase alpha characters. |
| NY | 1DT | Alpha-Numeric, SLT_2_3, Left=0, Right=0, Length Preservation=No The value is padded up to 3 characters which is minimum length for SLT_2_3 tokenizer. |
| j1 | 4t | Alpha-Numeric, SLT_1_3, Left=0, Right=0, Length Preservation=Yes, Allow Short Data=Yes The minimum length meets the requirement for SLT_1_3 tokenizer when Length Preservation=Yes and Allow Short Data=Yes. |
| j1 | Error. Input too short. | Alpha-Numeric, SLT_1_3, Left=0, Right=0, Length Preservation=Yes, Allow Short Data=No, generate error The input has two characters to tokenize, which is short for SLT_1_3 tokenizer when Length Preservation=Yes and Allow Short Data=No, generate error. |
| j1 j1Y | j1 4tD | Alpha-Numeric, SLT_1_3, Left=0, Right=0, Length Preservation=Yes, Allow Short Data=No, return input as it is If the input value has less than three characters to tokenize, then it is returned as is else it is tokenized. |
| 131 Summer Street, Bridgewater | ikC ejCxxp kLa 2ZZ, 5x8K2IMubcn | Alpha-Numeric, SLT_2_3, Left=0, Right=0, Length Preservation=No Spaces and comma are treated as delimiters and not tokenized. |
| 704-BBJ | jf7-oVY | Alpha-Numeric, SLT_1_3, Left=3, Right=0, Length Preservation=Yes Dash is treated as delimiter. The rest of value is tokenized. |
| 704-BBJ | uHq-fTr | Alpha-Numeric, SLT_2_3, Left=3, Right=0, Length Preservation=Yes Dash is treated as delimiter. The rest of value is tokenized. |
| Protegrity2012 | Pr3CYMPilr9n12 | Alpha-Numeric, SLT_1_3, Left=2, Right=2, Length Preservation=Yes Two characters from left and 2 characters from right are left in clear. The rest of value is tokenized. |
Alpha-Numeric Tokenization Properties for different protectors
Application Protector
The following table shows supported input data types for Application protectors with the Alpha-Numeric token.
Table: Supported input data types for Application protectors with Alpha-Numeric token
| Application Protectors*2 | AP Java*1 | AP Python |
|---|---|---|
| Supported input data types | STRING CHAR[] BYTE[] | STRING BYTES |
*1 - The API accepts and returns data in BYTE[] format. The customer application needs to convert the input into byte arrays before calling the API, and similarly, convert the output from byte arrays after receiving the response from the API.
*2 - The Protegrity Application Protectors only support bytes converted from the string data type. If int, short, or long format data is directly converted to bytes and passed as input to the Application Protector APIs that support byte as input and provide byte as output, then data corruption might occur.
For more information about Application protectors, refer to Application Protector.
Big Data Protector
Protegrity supports MapReduce, Hive, Pig, HBase, Spark, and Impala, which utilizes Hadoop Distributed File System (HDFS) or Ozone as the data storage layer. The data is protected from internal and external threats, and users and business processes can continue to utilize the secured data. Protegrity protects data inside the files using tokenization and strong encryption protection methods.
The following table shows supported input data types for Big Data protectors with the Alpha-Numeric token.
Table: Supported input data types for Big Data protectors with Alpha-Numeric token
| Big Data Protectors | MapReduce*2 | Hive | Pig | HBase*2 | Impala | Spark*2 | Spark SQL | Trino |
|---|---|---|---|---|---|---|---|---|
| Supported input data types*1 | BYTE[] | CHAR*3 STRING | CHARARRAY | BYTE[] | STRING | BYTE[] STRING | STRING | VARCHAR |
*1 – If the input and output types of the API are BYTE[], then the customer application should convert the input to and output from the byte array, before calling the API.
*2 – The Protegrity MapReduce protector, HBase coprocessor, and Spark protector only support bytes converted from the string data type. Data types that are not bytes converted from the string data type might cause data corruption to occur when:
- Any other data type is directly converted to bytes and passed as input to the MapReduce or Spark API that supports byte as input and provides byte as output.
- Any other data type is directly converted to bytes and inserted in an HBase table. Where the HBase table is configured with the Protegrity HBase coprocessor.
*3 – If you are using the Char tokenization UDFs in Hive, then ensure that the data elements have length preservation selected. In Char tokenization UDFs, using data elements without length preservation selected, is not supported.
For more information about Big Data protectors, refer to Big Data Protector.
Data Warehouse Protector
The Protegrity Data Warehouse Protector is an advanced security solution designed to protect sensitive data at the column level. This enables you to secure your data, while still permitting access to authorized users. Additionally, the Data Warehouse Protector integrates seamlessly with existing database systems using the User-Defined Functions for an enhanced security. Protegrity protects data inside the data warehouses using various tokenization and encryption methods.
The following table shows the supported input data types for the Teradata protector with the Alpha-Numeric token.
Table: Supported input data types for Data Warehouse protectors with Alpha-Numeric token
| Data Warehouse Protectors | Teradata |
|---|---|
| Supported input data types | VARCHAR LATIN |
For more information about Data Warehouse protectors, refer to Data Warehouse Protector.
Database Protectors
Oracle Database Protector
The supported input data types for the Oracle Database Protector are listed below.
| Protector | Supported Input Data Types |
|---|---|
| Oracle | VARCHAR2 |
| Oracle | CHAR |
1.1.4.7 - Upper-Case Alpha-Numeric (0-9, A-Z)
The Upper-Case Alpha-Numeric token type tokenizes uppercase letters A through Z and digits 0 to 9. It tokenizes all alphabetic symbols as uppercase. After de-tokenization, all alphabetic symbols are returned as uppercase. This means that initial and detokenized values would not match if the input contains lowercase letters.
Table: Upper-Case Alpha-Numeric Tokenization Type properties
Tokenization Type Properties | Settings | ||||||||||||
|---|---|---|---|---|---|---|---|---|---|---|---|---|---|
Name | Upper-Case Alpha-Numeric | ||||||||||||
Token type and Format | Digits 0 through 9 Uppercase letters A through Z | ||||||||||||
Tokenizer | Length Preservation | Allow Short Data | Minimum Length | Maximum Length | |||||||||
SLT_1_3 SLT_2_3 | Yes | Yes | 1 | 4096 | |||||||||
No, return input as it is | 3 | ||||||||||||
No, generate error | |||||||||||||
No | NA | 1 | 4064 | ||||||||||
Possibility to set Minimum/ maximum length | No | ||||||||||||
Left/Right settings | Yes | ||||||||||||
Internal IV | Yes, if Left/Right settings are non-zero | ||||||||||||
External IV | Yes | ||||||||||||
Return of Protected value | Yes | ||||||||||||
Token specific properties | Lower case characters are accepted in the input but they will be converted to upper-case in output value. | ||||||||||||
The following table shows examples of the way in which a value will be tokenized with the Upper-Case Alpha-Numeric token.
Table: Examples of Tokenization for Upper-Case Alpha-Numeric Values
| Input Value | Tokenized Value | Comments |
|---|---|---|
| 123 | STD | Upper-Case Alpha-Numeric, SLT_1_3, Left=0, Right=0, Length Preservation=Yes Input is numeric but tokenized value contains uppercase alpha characters. |
| J1 | 4T | Upper Alpha-Numeric, SLT_1_3, Left=0, Right=0, Length Preservation=Yes, Allow Short Data=Yes The minimum length meets the requirement for SLT_1_3 tokenizer when Length Preservation=Yes and Allow Short Data=Yes. |
| J1 | Error. Input too short. | Upper-Case Alpha-Numeric, SLT_1_3, Left=0, Right=0, Length Preservation=Yes, Allow Short Data=No, generate error The input has two characters to tokenize, which is short for SLT_1_3 tokenizer when Length Preservation=Yes and Allow Short Data=No, generate error. |
| J1 J1Y | J1 4TD | Upper-Case Alpha-Numeric, SLT_1_3, Left=0, Right=0, Length Preservation=Yes, Allow Short Data=No, return input as it is If the input value has less than three characters to tokenize, then it is returned as is else it is tokenized. |
| NY | AOZ | Upper-Case Alpha-Numeric, SLT_2_3, Left=0, Right=0, Length Preservation=No The value is padded up to 3 characters which is minimum length for SLT_2_3 tokenizer. |
| 131 Summer Street, Bridgewater | 8C9 CSD5PS 1X5 ZJH, 231JHXW8CVF | Upper-Case Alpha-Numeric, SLT_2_3, Left=0, Right=0, Length Preservation=No Spaces and comma are treated as delimiters and not tokenized. Lowercase characters in the input are converted to uppercase in output. De-tokenization will return all alpha characters in uppercase. |
| 704-BBJ | 704-EC0 | Upper-Case Alpha-Numeric, SLT_1_3, Left=3, Right=0, Length Preservation=Yes Dash is treated as delimiter. The rest of value is tokenized. |
| 704-BBJ | 704-HHT | Upper-Case Alpha-Numeric, SLT_2_3, Left=3, Right=0, Length Preservation=Yes Dash is treated as delimiter. The rest of value is tokenized. |
| support@protegrity.com | FKNKHHQ@72CN84UKEI.com | Upper-Case Alpha-Numeric, SLT_2_3, Left=0, Right=3, Length Preservation=Yes Three characters from right are left in clear. “@” and “.” are treated as delimiters. The rest of value is tokenized. De-tokenization will return all alpha characters in uppercase. |
Upper-Case Alpha-Numeric Tokenization Properties for different protectors
Application Protector
The following table shows supported input data types for Application protectors with the Upper-Case Alpha-Numeric token.
Table: Supported input data types for Application protectors with Upper-Case Alpha-Numeric token
| Application Protectors*2 | AP Java*1 | AP Python |
|---|---|---|
| Supported input data types | STRING CHAR[] BYTE[] | STRING BYTES |
*1 - The API accepts and returns data in BYTE[] format. The customer application needs to convert the input into byte arrays before calling the API, and similarly, convert the output from byte arrays after receiving the response from the API.
*2 - The Protegrity Application Protectors only support bytes converted from the string data type. If int, short, or long format data is directly converted to bytes and passed as input to the Application Protector APIs that support byte as input and provide byte as output, then data corruption might occur.
For more information about Application protectors, refer to Application Protector.
Big Data Protector
Protegrity supports MapReduce, Hive, Pig, HBase, Spark, and Impala, which utilizes Hadoop Distributed File System (HDFS) or Ozone as the data storage layer. The data is protected from internal and external threats, and users and business processes can continue to utilize the secured data. Protegrity protects data inside the files using tokenization and strong encryption protection methods.
The following table shows supported input data types for Big Data protectors with the Upper-Case Alpha-Numeric token.
Table: Supported input data types for Big Data protectors with Upper-Case Alpha-Numeric token
| Big Data Protectors | MapReduce*2 | Hive | Pig | HBase*2 | Impala | Spark*2 | Spark SQL | Trino |
|---|---|---|---|---|---|---|---|---|
| Supported input data types*1 | BYTE[] | CHAR*3 STRING | CHARARRAY | BYTE[] | STRING | BYTE[] STRING | STRING | VARCHAR |
*1 – If the input and output types of the API are BYTE[], then the customer application should convert the input to and output from the byte array, before calling the API.
*2 – The Protegrity MapReduce protector, HBase coprocessor, and Spark protector only support bytes converted from the string data type. Data types that are not bytes converted from the string data type might cause data corruption to occur when:
- Any other data type is directly converted to bytes and passed as input to the MapReduce or Spark API that supports byte as input and provides byte as output.
- Any other data type is directly converted to bytes and inserted in an HBase table. Where the HBase table is configured with the Protegrity HBase coprocessor.
*3 – If you are using the Char tokenization UDFs in Hive, then ensure that the data elements have length preservation selected. In Char tokenization UDFs, using data elements without length preservation selected, is not supported.
For more information about Big Data protectors, refer to Big Data Protector.
Data Warehouse Protector
The Protegrity Data Warehouse Protector is an advanced security solution designed to protect sensitive data at the column level. This enables you to secure your data, while still permitting access to authorized users. Additionally, the Data Warehouse Protector integrates seamlessly with existing database systems using the User-Defined Functions for an enhanced security. Protegrity protects data inside the data warehouses using various tokenization and encryption methods.
The following table shows the supported input data types for the Teradata protector with the Upper-Case Alpha-Numeric token.
Table: Supported input data types for Data Warehouse protectors with Upper-Case Alpha-Numeric token
| Data Warehouse Protectors | Teradata |
|---|---|
| Supported input data types | VARCHAR LATIN |
For more information about Data Warehouse protectors, refer to Data Warehouse Protector.
Database Protectors
Oracle Database Protector
The supported input data types for the Oracle Database Protector are listed below.
| Protector | Supported Input Data Types |
|---|---|
| Oracle | VARCHAR2 |
| Oracle | CHAR |
1.1.4.8 - Lower ASCII
The Lower ASCII token type is used to tokenize printable ASCII characters.
Table: Lower ASCII Tokenization Type properties
Tokenization Type Properties | Settings | ||||||||||||||||
|---|---|---|---|---|---|---|---|---|---|---|---|---|---|---|---|---|---|
Name | Lower ASCII | ||||||||||||||||
Token type and Format | The lower part of ASCII table. Hex character codes from 0x21 to 0x7E. For the list of ASCII characters supported by Lower ASCII token, refer to ASCII Character Codes. | ||||||||||||||||
Tokenizer | Length Preservation | Allow Short Data | Minimum Length | Maximum Length | |||||||||||||
SLT_1_3 | Yes | Yes | 1 | 4096 | |||||||||||||
No, return input as it is | 3 | ||||||||||||||||
No, generate error | |||||||||||||||||
No | NA | 1 | 4086 | ||||||||||||||
Possibility to set Minimum/ maximum length | No | ||||||||||||||||
Left/Right settings | Yes | ||||||||||||||||
Internal IV | Yes, if Left/Right settings are non-zero | ||||||||||||||||
External IV | Yes | ||||||||||||||||
Return of Protected value | Yes | ||||||||||||||||
Token specific properties | Space character is treated as delimiter | ||||||||||||||||
The following table shows examples of the way in which a value will be tokenized with the Lower ASCII token.
Table: Examples of Tokenization for Lower ASCII Values
| Input Value | Tokenized Value | Comments |
|---|---|---|
| La Scala 05698 | :H HnwqP v/Q`> | All characters in the input value are tokenized. Spaces are excluded from the tokenization process. |
| Ford Mondeo CA-0256TY M34 567 K-45 | j`1$ nRSD<X T]!(~4MWF l:f cF+ R?V{ | All characters in the input value are tokenized. Spaces are excluded from the tokenization process. |
| ac | ;H | Lower ASCII, SLT_1_3, Left=0, Right=0, Length Preservation=Yes, Allow Short Data=Yes The minimum length meets the requirement for the SLT_1_3 tokenizer when Length Preservation=Yes and Allow Short Data=Yes. |
| ac | Error. Input too short. | Lower ASCII, SLT_1_3, Left=0, Right=0, Length Preservation=Yes, Allow Short Data=No, generate an error The input has two characters to tokenize, which is short for SLT_1_3 tokenizer when Length Preservation=Yes and Allow Short Data=No, generate an error. |
| ac aca | ac ;HH | Lower ASCII, SLT_1_3, Left=0, Right=0, Length Preservation=Yes, Allow Short Data=No, return input as it is If the input value has less than three characters to tokenize, then it is returned as is else it is tokenized. |
Lower ASCII Tokenization Properties for different protectors
Lower ASCII tokenization should not be used with JSON or XML UDFs.
Application Protector
The following table shows supported input data types for Application protectors with the Lower ASCII token.
Table: Supported input data types for Application protectors with Lower ASCII token
| Application Protectors*2 | AP Java*1 | AP Python |
|---|---|---|
| Supported input data types | STRING CHAR[] BYTE[] | STRING BYTES |
*1 - The API accepts and returns data in BYTE[] format. The customer application needs to convert the input into byte arrays before calling the API, and similarly, convert the output from byte arrays after receiving the response from the API.
*2 - The Protegrity Application Protectors only support bytes converted from the string data type. If int, short, or long format data is directly converted to bytes and passed as input to the Application Protector APIs that support byte as input and provide byte as output, then data corruption might occur.
For more information about Application protectors, refer to Application Protector.
Big Data Protector
Protegrity supports MapReduce, Hive, Pig, HBase, Spark, and Impala, which utilizes Hadoop Distributed File System (HDFS) or Ozone as the data storage layer. The data is protected from internal and external threats, and users and business processes can continue to utilize the secured data. Protegrity protects data inside the files using tokenization and strong encryption protection methods.
The following table shows supported input data types for Big Data protectors with the Lower ASCII token.
Table: Supported input data types for Big Data protectors with Lower ASCII token
| Big Data Protectors | MapReduce*3 | Hive*2 | Pig*2 | HBase*3 | Impala*2 | Spark*3 | Spark SQL | Trino*2 |
|---|---|---|---|---|---|---|---|---|
| Supported input data types*1 | BYTE[] | STRING | CHARARRAY | BYTE[] | STRING | BYTE[] STRING | STRING | VARCHAR |
*1 – If the input and output types of the API are BYTE[], then the customer application should convert the input to and output from the byte array, before calling the API.
*2 – Ensure that you use the Horizontal tab “\t” as the field or column delimiter when loading data that is tokenized using Lower ASCII tokens for Hive, Pig, Impala, and Trino.
*3 – The Protegrity MapReduce protector, HBase coprocessor, and Spark protector only support bytes converted from the string data type. Data types that are not bytes converted from the string data type might cause data corruption to occur when:
- Any other data type is directly converted to bytes and passed as input to the MapReduce or Spark API that supports byte as input and provides byte as output.
- Any other data type is directly converted to bytes and inserted in an HBase table. Where the HBase table is configured with the Protegrity HBase coprocessor.
For more information about Big Data protectors, refer to Big Data Protector.
Data Warehouse Protector
The Protegrity Data Warehouse Protector is an advanced security solution designed to protect sensitive data at the column level. This enables you to secure your data, while still permitting access to authorized users. Additionally, the Data Warehouse Protector integrates seamlessly with existing database systems using the User-Defined Functions for an enhanced security. Protegrity protects data inside the data warehouses using various tokenization and encryption methods.
The following table shows the supported input data types for the Teradata protector with the Lower ASCII token.
Table: Supported input data types for Data Warehouse protectors with Lower ASCII token
| Data Warehouse Protectors | Teradata |
|---|---|
| Supported input data types | VARCHAR LATIN |
For more information about Data Warehouse protectors, refer to Data Warehouse Protector.
Database Protectors
Oracle Database Protector
The supported input data types for the Oracle Database Protector are listed below.
| Protector | Supported Input Data Types |
|---|---|
| Oracle | VARCHAR2 |
| Oracle | CHAR |
1.1.4.9 - Datetime (YYYY-MM-DD HH:MM:SS)
The Datetime token type was introduced in response to requirements to allow specific date parts to remain in the clear and for date tokens to be distinguishable from real dates. The Datetime token type allows time to be tokenized (HH:MM:SS) in fractions of a second, including milliseconds (MMM), microseconds (mmmmmm), and nanoseconds (nnnnnnnnn).
Extended DateTime Tokenization with Timezone Offsets
The ISO 8601 DateTime format with timezone offsets are supported only for the following protectors:
| Protector | Version |
|---|---|
| AP Java AMD64 | 10.1.0 |
| Teradata Data Warehouse Protector | 10.1.0 |
| Big Data Protector on EMR ARM64 | 10.1.0 |
| Big Data Protector on CDP-PVC-Base | 10.1.0 |
Note: No other protectors support the ISO 8601 formatted DateTime inputs.
The extended DateTime tokenization now supports ISO 8601 formatted dates including timezone offsets. For example, +05:30. The tokenizer applies protection only to the date and time element up to seconds. The fractional seconds and additional identifiers remains unchanged. The Delimiters are preserved.
Supported Format:
- Examples of valid input:
- YYYY-MM-DD HH:MM:SS+hh:mm
- YYYY.MM.DD HH:MM:SS+hh:mm
- Maximum length: 37 bytes
For example, the longest supported format is -2019-11-07 13:37:00:000000000+05:30
Table: Datetime Tokenization Type properties
Tokenization Type Properties | Settings | |||||||||||||
|---|---|---|---|---|---|---|---|---|---|---|---|---|---|---|
Name | Datetime | |||||||||||||
Token type and Format | Datetime in the following formats: YYYY-MM-DD HH:MM:SS.MMM YYYY-MM-DDTHH:MM:SS.MMM YYYY-MM-DD HH:MM:SS.mmmmmm YYYY-MM-DDTHH:MM:SS.mmmmmm YYYY-MM-DD HH:MM:SS.nnnnnnnnn YYYY-MM-DDTHH:MM:SS.nnnnnnnnn YYYY-MM-DD HH:MM:SS YYYY-MM-DDTHH:MM:SS YYYY-MM-DD YYYY-MM-DD HH:MM:SS.MMM +05:30*1 YYYY-MM-DDTHH:MM:SS.MMM +05:30*1 YYYY-MM-DD HH:MM:SS.mmmmmm +05:30*1 YYYY-MM-DDTHH:MM:SS.mmmmmm +05:30*1 YYYY-MM-DD HH:MM:SS.nnnnnnnnn +05:30*1 YYYY-MM-DDTHH:MM:SS.nnnnnnnnn +05:30*1 YYYY-MM-DD HH:MM:SS +05:30*1 YYYY-MM-DDTHH:MM:SS +05:30*1 | |||||||||||||
Input separators "delimiter" between date, month and year | dot ".", slash "/", or dash "-" | |||||||||||||
Input separators "delimiter" between hours, minutes, and seconds | colon ":" only | |||||||||||||
Input separator "delimiter" between date and hour | space " " or letter "T" | |||||||||||||
Input separator "delimiter" between seconds and fractions of a second | For DATE datatype dot "." | |||||||||||||
For CHAR, VARCHAR, and STRING datatypes dot "." and comma "," | ||||||||||||||
Input separator "delimiter" between hours, minutes, seconds, and fractions of second and timezone offset*1 | space " " or "+" or "-" | |||||||||||||
Tokenizer | Length Preservation | Minimum Length | Maximum Length | |||||||||||
SLT_DATETIME | Yes | 10 | 29 | |||||||||||
Possibility to set Minimum/ maximum length | No | |||||||||||||
Left/Right settings | No | |||||||||||||
Internal IV | No | |||||||||||||
External IV | No | |||||||||||||
Return of Protected value | Yes | |||||||||||||
Token specific properties | ||||||||||||||
Tokenize time | Yes/No | |||||||||||||
Distinguishable date | Yes/No | |||||||||||||
Date in clear | Month/Year/None | |||||||||||||
Supported range of input dates | From "0600-01-01" to "3337-11-27" | |||||||||||||
Non-supported range of Gregorian cutover dates | From "1582-10-05" to "1582-10-14" | |||||||||||||
Note:
*1 - Limitation. For more information, refer to Extended DateTime Tokenization with Timezone Offsets.
The Tokenize Time property defines whether the time part (HH:MM:SS) will be tokenized. If Tokenize Time is set to “No”, the time part will be treated as a delimiter. It will be added to the date after tokenization.
The Distinguishable Date property defines whether the tokenized values will be outside of the normal date range.
If the Distinguishable Date option is enabled, then all tokenized dates will be in the range from year 5596-09-06 to 8334-08-03. The tokenized value will become recognizable. As an example, tokenizing “2012-04-25” can result in “6457-07-12”, which is distinguishable.
If the Distinguishable Date option is disabled, then the tokenized dates will be in the range from year 0600-01-01 to 3337-11-27. As an example, tokenizing “2012-04-25” will result in “1856-12-03”, which is non-distinguishable.
The Date in Clear property defines whether Month or Year will be left in the clear in the tokenized value.
Note: You cannot use enabled Distinguishable Date and select month or year to be left in the clear at the same time.
The following points are applicable when you tokenize the Dates with Year as 3337 by setting the Year part to be in clear:
- The tokenized Date value can be outside of the accepted Date range.
- The tokenized Date value can be de-tokenized to obtain the original Date value.
For example, if the Date 3337-11-27 is tokenized by setting the Year part 3337 in clear, then the resultant tokenized value 3337-12-15 is outside of the accepted Date range. The detokenization of this tokenized value returns the original Date 3337-11-27.
The following table shows examples of the way in which a value will be tokenized with the Datetime token.
Table: Examples of Tokenization for DateTime Values
| Input Values | Tokenized Values | Comments |
|---|---|---|
| 2009.04.12 12:23:34.333 | 1595.06.19 14:31:51.333 | YYYY-MM-DD HH:MM:SS.MMM. The milliseconds value is left in the clear. |
| 2009.04.12 12:23:34.333666 | 1595.06.19 14:31:51.333666 | YYYY-MM-DD HH:MM:SS.mmmmmm. The microseconds value is left in the clear. |
| 2009.04.12 12:23:34.333666999 | 1595.06.19 14:31:51.333666999 | YYYY-MM-DD HH:MM:SS.nnnnnnnnn. The nanoseconds value is left in the clear. |
| 2009.04.12 12:23:34 | 1595.06.19 14:31:51 | YYYY-MM-DD HH:MM:SS with space separator between day and hour. |
| 2234.10.12T12:23:23 | 2755.08.04T22:33:43 | YYYY-MM-DDTHH:MM:SS with T separator between day and hour values. |
| 2009.04.12 12:23:34.333 | 5150.05.14T17:49:34.333 | Datetime with distinguishable date property enabled and the year value is outside the normal date range. |
| 2234.12.22 22:53:34 | 2755.03.15 19:03:21 | Datetime token in any format with distinguishable date property enabled and the year value is within the normal date range in the tokenized output. |
| 2009.04.12 12:23:34.333 | 1595.04.19 14:31:51.333 | Datetime token with month in the clear. |
| 2009.04.12 12:23:34.333 | 2009.06.19 14:31:51.333 | Datetime token with year in the clear. |
| 2009.04.12 12:23:34.333666999+05:30*1 | 2009.06.19 14:31:51.333666999+05:30 | Extended DateTime token with nanoseconds value and timezone identifier left in the clear. |
Note:
*1 - Limitation. For more information, refer to Extended DateTime Tokenization with Timezone Offsets.
Datetime Tokenization for Cutover Dates of the Proleptic Gregorian Calendar
The data systems, such as, Oracle or Java-based systems, do not accept the cutover dates of the Proleptic Gregorian Calendar. The cutover dates of the Proleptic Gregorian Calendar fall in the interval 1582-10-05 to 1582-10-14. These dates are converted to 1582-10-15. When using Oracle, conversion occurs by adding ten days to the source date. Due to this conversion, data loss occurs as the system is not capable to return the actual date value after the de-tokenization.
Note: The tokenization of the Date values in the cutover Date range of the Proleptic Gregorian Calendar results in an “Invalid Input” error.
The following points are applicable when the Distinguishable Date option is disabled:
- If the Distinguishable Date option is disabled, then the tokenized dates are in the range 0600-01-01 to 3337-11-27, which also includes the cutover date range. During tokenization, an internal validation is performed to check whether the value is tokenized to the cutover date. If it is a cutover date, then the Year part (1582) of the tokenized value is converted to 3338 and then returned.
- During de-tokenization, an internal check is performed to validate whether the Year is 3338. If the Year is 3338, then it is internally converted to 1582.
The following points are applicable when you tokenize the dates from the Year 1582 by setting the Year part to be in clear:
- The tokenized value can result in the cutover Date range. In such a scenario, the Year part of the tokenized Date value is converted to 3338.
- During de-tokenization, the Year part of the Date value is converted to 1582 to obtain the original date value.
For example, if the date 1582.04.30 12:12:12 is tokenized by setting the Year part in clear and the resultant tokenized value falls in the cutover Date range, then the Year part is converted to 3338 resulting in a tokenized value as 3338.10.10 12:12:12. The de-tokenization of this tokenized value returns the original Date 1582.04.30 12:12:12.
Note:
The tokenization accepts the date range 0600-01-01 to 3337-11-27 excluding the cutover date range.
The de-tokenization accepts the date range 0600-01-01 to 3337-11-27 and date values from the Year 3338. The year 3338 is accepted due to our support for tokenized value from the cutover date range.
Consider a scenario where you are migrating the protected data from Protector 1 to Protector 2. The Protector 1 includes the Datetime tokenizer update to process the cutover dates of the Proleptic Gregorian Calendar as input. The Protector 2 does not include this update. In such a scenario, an “Invalid Date Format” error occurs in Protector 2, when you try to unprotect the protected data as it fails to accept the input year 3338. The following steps must be performed to mitigate this issue:
- Unprotect the protected data from Protector 1.
- Migrate the unprotected data to Protector 2.
- Protect the data from Protector 2.
Time zone Normalization for Datetime Tokens
The Datetime tokenizer does not normalize the timestamp with respect to the timezone before protecting the data.
In a few Protectors, the timezone normalization is done by the APIs that are used by the Protectors to retrieve the timestamp. However, this behavior can also be configured.
There are differences in handling timestamps. Therefore, you cannot rely on Datetime tokens for migration or transfer to different systems or timezones.
So, before migrating the Datetime tokens, ensure that the timestamps are normalized for timezones so that unprotecting the token value returns the original expected value.
Datetime Tokenization Properties for different protectors
Application Protector
The following table shows supported input data types for Application protectors with the Datetime token.
Table: Supported input data types for Application protectors with Datetime token
| Application Protectors*2 | AP Java*1 | AP Python |
|---|---|---|
| Supported input data types | DATE STRING CHAR[] BYTE[] | DATE BYTES STRING |
*1 - The API accepts and returns data in BYTE[] format. The customer application needs to convert the input into byte arrays before calling the API, and similarly, convert the output from byte arrays after receiving the response from the API.
*2 - The Protegrity Application Protectors only support bytes converted from the string data type. If int, short, or long format data is directly converted to bytes and passed as input to the Application Protector APIs that support byte as input and provide byte as output, then data corruption might occur.
For more information about Application protectors, refer to Application Protector.
Big Data Protector
Protegrity supports MapReduce, Hive, Pig, HBase, Spark, and Impala, which utilizes Hadoop Distributed File System (HDFS) or Ozone as the data storage layer. The data is protected from internal and external threats, and users and business processes can continue to utilize the secured data. Protegrity protects data inside the files using tokenization and strong encryption protection methods.
The following table shows supported input data types for Big Data protectors with the Datetime token.
Table: Supported input data types for Big Data protectors with Datetime token
| Big Data Protectors | MapReduce*2 | Hive | Pig | HBase*2 | Impala | Spark*2 | Spark SQL | Trino |
|---|---|---|---|---|---|---|---|---|
| Supported input data types*1 | BYTE[] | STRING DATETIME | CHARARRAY | BYTE[] | STRING | BYTE[] STRING | STRING DATETIME | TIMESTAMP |
*1 – If the input and output types of the API are BYTE [], the customer application should convert the input to a byte array. Then, call the API and convert the output from the byte array.
*2 – The Protegrity MapReduce protector, HBase coprocessor, and Spark protector only support bytes converted from the string data type. Data types that are not bytes converted from the string data type might cause data corruption to occur when:
- Any other data type is directly converted to bytes and passed as input to the MapReduce or Spark API that supports byte as input and provides byte as output.
- Any other data type is directly converted to bytes and inserted in an HBase table. Where the HBase table is configured with the Protegrity HBase coprocessor.
For more information about Big Data protectors, refer to Big Data Protector.
Data Warehouse Protector
The Protegrity Data Warehouse Protector is an advanced security solution designed to protect sensitive data at the column level. This enables you to secure your data, while still permitting access to authorized users. Additionally, the Data Warehouse Protector integrates seamlessly with existing database systems using the User-Defined Functions for an enhanced security. Protegrity protects data inside the data warehouses using various tokenization and encryption methods.
The following table shows the supported input data types for the Teradata protector with the Datetime token.
Table: Supported input data types for Data Warehouse protectors with Datetime token
| Data Warehouse Protectors | Teradata |
|---|---|
| Supported input data types | VARCHAR LATIN |
For more information about Data Warehouse protectors, refer to Data Warehouse Protector.
Database Protectors
Oracle Database Protector
The supported input data types for the Oracle Database Protector are listed below.
| Protector | Supported Input Data Types |
|---|---|
| Oracle | DATE |
| Oracle | VARCHAR2 |
| Oracle | CHAR |
1.1.4.10 - Decimal
The Decimal token type tokenizes numbers which may have a precision and scale. The resulting token does not contain any zeros which makes it suitable to store in a decimal data type in a database. Any sign or decimal point delimiter are stripped from the input value before tokenization and put back after tokenization.
Note: When data with decimal point delimiter is protected, the number of digits counted after the decimal point are length preserving. For example, consider decimal data “345645.345” is protected to return the protected value as “8638714.842”. The number of digits that exist after the decimal point remain the same in both the values.
Table: Decimal Tokenization Type properties
Tokenization Type Properties | Settings | |||||||||||||
|---|---|---|---|---|---|---|---|---|---|---|---|---|---|---|
Name | Decimal | |||||||||||||
Token type and Format | Digits 0 through 9 in input value, 1 thorough 9 in output value The sign "+" or "-" and decimal point "." or "," separator | |||||||||||||
Tokenizer | Length Preservation | Minimum Length | Maximum Length | |||||||||||
SLT_6_DECIMAL | No | 1 | 36*1 | |||||||||||
Possibility to set Minimum/ maximum length | Yes | |||||||||||||
Left/Right settings | No | |||||||||||||
Internal IV | No | |||||||||||||
External IV | No | |||||||||||||
Return of Protected value | Yes | |||||||||||||
Token specific properties | Supports Numeric data with precision and scale. The token will not contain any zeros. | |||||||||||||
*1 – The configurable input length for decimal values is between 1 and 36 digits. The upper range is 38 digits. However, since decimal token is not length preserving, only up to 36 digits are supported. Separators and sign characters are included in the length calculation.
Note: If you set custom maximum length for decimal token, then take into account that the actual maximum length of the input value should be 1-2 characters less than custom maximum. This type of token is non-length preserving, and the tokenized value can be 1-2 characters longer than the input value.
The following table shows examples of the way in which a value will be tokenized with the Decimal token.
Table: Examples of Tokenization for Decimal Values
| Input Values | Tokenized Values | Comments |
|---|---|---|
| 519.02 | 268.68 | Input value has “.” dot separator. |
| -0.333807 | -9.893967 | Input value has sign and “.” dot separator. |
| +,461 | +,918 | Input value has sign and “,” comma separator. |
| 0 | 1 | Minimum length, no sign or separator. |
Decimal Tokenization Properties for different protectors
Application Protector
The following table shows supported input data types for Application protectors with the Decimal token.
Table: Supported input data types for Application protectors with Decimal token
| Application Protectors*2 | AP Java*1 | AP Python |
|---|---|---|
| Supported input data types | STRING CHAR[] BYTE[] | STRING BYTES |
*1 - The API accepts and returns data in BYTE[] format. The customer application needs to convert the input into byte arrays before calling the API, and similarly, convert the output from byte arrays after receiving the response from the API.
*2 - The Protegrity Application Protectors only support bytes converted from the string data type. If int, short, or long format data is directly converted to bytes and passed as input to the Application Protector APIs that support byte as input and provide byte as output, then data corruption might occur.
For more information about Application protectors, refer to Application Protector.
Big Data Protector
Protegrity supports MapReduce, Hive, Pig, HBase, Spark, and Impala, which utilizes Hadoop Distributed File System (HDFS) or Ozone as the data storage layer. The data is protected from internal and external threats, and users and business processes can continue to utilize the secured data. Protegrity protects data inside the files using tokenization and strong encryption protection methods.
The following table shows supported input data types for Big Data protectors with the Decimal token.
Table: Supported input data types for Big Data protectors with Decimal token
| Big Data Protectors | MapReduce*2 | Hive | Pig | HBase*2 | Impala | Spark*2 | Spark SQL | Trino |
|---|---|---|---|---|---|---|---|---|
| Supported input data types*1 | BYTE[] | STRING | CHARARRAY | BYTE[] | STRING | BYTE[] STRING | STRING | VARCHAR |
*1 – If the input and output types of the API are BYTE [], the customer application should convert the input to a byte array. Then, call the API and convert the output from the byte array.
*2 – The Protegrity MapReduce protector, HBase coprocessor, and Spark protector only support bytes converted from the string data type. Data types that are not bytes converted from the string data type might cause data corruption to occur when:
- Any other data type is directly converted to bytes and passed as input to the MapReduce or Spark API that supports byte as input and provides byte as output.
- Any other data type is directly converted to bytes and inserted in an HBase table. Where the HBase table is configured with the Protegrity HBase coprocessor.
For more information about Big Data protectors, refer to Big Data Protector.
Data Warehouse Protector
The Protegrity Data Warehouse Protector is an advanced security solution designed to protect sensitive data at the column level. This enables you to secure your data, while still permitting access to authorized users. Additionally, the Data Warehouse Protector integrates seamlessly with existing database systems using the User-Defined Functions for an enhanced security. Protegrity protects data inside the data warehouses using various tokenization and encryption methods.
The following table shows the supported input data types for the Teradata protector with the Decimal token.
Table: Supported input data types for Data Warehouse protectors with Decimal token
| Data Warehouse Protectors | Teradata |
|---|---|
| Supported input data types | VARCHAR LATIN |
For more information about Data Warehouse protectors, refer to Data Warehouse Protector.
Database Protectors
Oracle Database Protector
The supported input data types for the Oracle Database Protector are listed below.
| Protector | Supported Input Data Types |
|---|---|
| Oracle | NUMBER (p,s) |
| Oracle | VARCHAR2 |
| Oracle | CHAR |
1.1.4.11 - Unicode Gen2
The Unicode Gen2 token type can be used to tokenize multi-byte code point character strings. The input Unicode data after protection returns a token value in the same Unicode character format. The Unicode Gen2 token type gives you the liberty to customize how the protected token value is returned. It allows you to leverage existing built-in alphabets or create custom alphabets by defining code points. The Unicode Gen2 token type preserves code point length. If the length preservation option is selected, the protected token length will be equal to the input data length in code points.
For instance, the respective lengths for UTF-8 and UTF-16 in bytes, is described in the following table. The input is protected with the Unicode Gen2 tokenizer. The example alphabet used is Basic Latin combined with Japanese characters. The code point length is preserved.
Table: Lengths for UTF-8 and UTF-16
| Input Value | Code Points | UTF-8 | UTF-16 | Output Value | UTF-8 | UTF-16 |
|---|---|---|---|---|---|---|
| データ保護 | 5 | 15 | 10 | 睯窯闒懻辶 | 15 | 10 |
| Protegrity | 10 | 10 | 20 | 鑹晓侐晊秦龡箳蕛矱蝠 | 30 | 20 |
| Protegrity_データ保護 | 16 | 26 | 32 | 门醆湏鞄眡莧閲楌蹬鑹_晓箳麻京眡 | 46 | 32 |
As the token type provides customizations through defining code points and creating custom token values, there are some considerations that must be taken before using such custom alphabets.
Note: For more information about the considerations, refer to Considerations while creating custom Unicode alphabets.
The performance benefits of this token type are higher compared to the other Unicode token types.
Table: Unicode Gen2 Tokenization Type properties
Tokenization Type Properties | Settings | |||||||||||||
|---|---|---|---|---|---|---|---|---|---|---|---|---|---|---|
Name | Unicode Gen2 | |||||||||||||
Token type and Format | Application Protectors support UTF-8, UTF-16LE and UTF-16BE encoding. Code points from U+0020 to U+3FFFF excluding D800-DFFF. Encoding supported by the Unicode Gen2 data element is UTF-8,UTF-16LE, and UTF-16BE. | |||||||||||||
Tokenizer | Length Preservation | Allow Short Data | Minimum Length | Maximum Length*1 | ||||||||||
SLT_1_3*2 SLT_X_1*3 | Yes | Yes | 1 Code Point | 4096 Code Points | ||||||||||
| No, return input as it is | 3 Code Points | |||||||||||||
| No, generate error | ||||||||||||||
Possibility to set Minimum/Maximum length | No | |||||||||||||
Left/Right settings | Yes | |||||||||||||
Internal IV | Yes | |||||||||||||
External IV | Yes | |||||||||||||
Return of Protected value | Yes | |||||||||||||
Token specific properties | Result is based on the alphabets selected while creating the token. | |||||||||||||
*1 – The maximum input length to safely tokenize and detokenize the data is 4096 code points, which is irrespective of the byte representation.
*2 - The SLT_1_3 tokenizer supports small alphabet size from 10-160 code points.
*3 - The SLT_X_1 tokenizer supports large alphabet size from 161-100k code points.
The following table shows examples of the way in which a value will be tokenized with the Unicode Gen2 token.
Table: Examples of Tokenization for Unicode Gen2 Values
| Input Values | Tokenized Values | Comments |
|---|---|---|
| даних | Ухбыш | Input value contains Cyrillic characters. Tokenization results include Cyrillic characters as the data element is created with the Cyrillic alphabet in its definition. The length of the tokenized value is equal to the length of the input data. |
| Protegrity | 93VbLvI12g | Input value contains English characters. Tokenization results include English characters as the data element is created with the Basic Latin Alpha Numeric alphabet in its definition. Algorithm is length preserving. Hence, the length of the tokenized value is equal to the length of the input data. |
| ЕЖ | ao | Input value contains Cyrillic characters. Tokenization results include Cyrillic characters as the data element is created with the Cyrillic alphabet in its definition. Allow Short Data=Yes Algorithm is length preserving. The length of the tokenized value is equal to the length of the input data. |
Considerations while creating custom Unicode alphabets
This section describes the important considerations to be aware of while working with Unicode. When creating a custom alphabet, a combination of existing alphabets, individual code points or ranges of code points can be used. The alphabet determines which code points are considered for tokenization. The code points not in the alphabet function as delimiters.
While this feature gives you the flexibility to generate token values in Unicode characters, the data element creation does not validate if the code point is defined or undefined. For example, consider that you create a data element that protects Greek and Coptic Unicode block. Though not recommended, a way you might consider to create the custom alphabet would be using the code point range option to include the whole Unicode block that ranges from U+0370 to U+03FF. As seen from the following image, this range includes both defined and undefined code points.
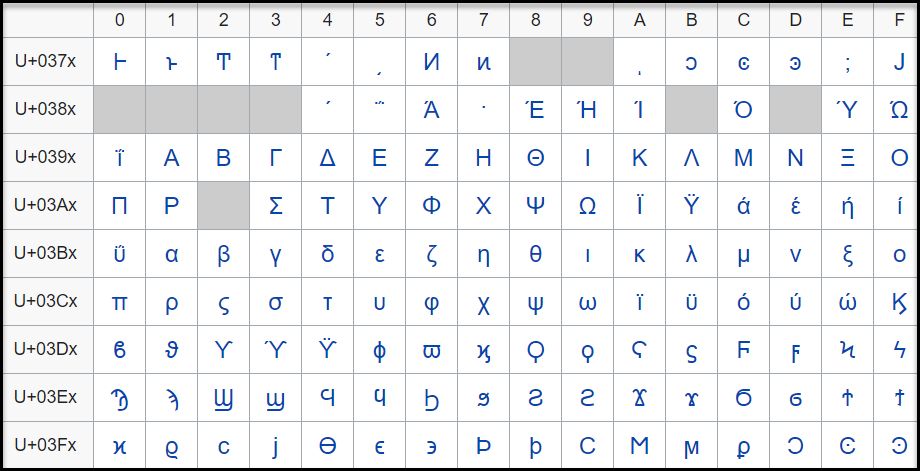
The code point, U+0378 in the defined Greek and Coptic code point range is an undefined code point. When any input data is protected, since the code point range includes both defined and undefined code points, it might result in a corrupted token value if the entire code point range is defined.
It is hence recommended that for Unicode code point ranges where both defined and undefined code points exist, you must create code points ranges excluding any undefined code points. So, in case of the Greek and Coptic characters, a recommended strategy to define alphabets would be to create multiple alphabet entries, such as a range to cover U+0371 to U+0377, another range to cover U+037A to U+037F, and so on, thus skipping undefined code points.
Note: Only the alphabet characters that are supported by the OS fonts are displayed on the Web UI.
Note: Ensure that code points in the alphabet are supported by the protectors using this alphabet.
Unicode Gen2 Tokenization Properties for different protectors
Application Protector
The following table shows supported input data types for Application protectors with the Unicode Gen2 token.
Note: The string as an input and byte as an output API is unsupported by Unicode Gen2 data elements for AP Java and AP Python.
Table: Supported input data types for Application protectors with Unicode Gen2 token
| Application Protectors*2 | AP Java*1 | AP Python |
|---|---|---|
| Supported input data types | BYTE[] CHAR[] STRING | BYTES STRING |
*1 - The API accepts and returns data in BYTE[] format. The customer application needs to convert the input into byte arrays before calling the API, and similarly, convert the output from byte arrays after receiving the response from the API.
*2 - The Protegrity Application Protectors only support bytes converted from the string data type. If int, short, or long format data is directly converted to bytes and passed as input to the Application Protector APIs that support byte as input and provide byte as output, then data corruption might occur.
For more information about Application protectors, refer to Application Protector.
Big Data Protector
Protegrity supports MapReduce, Hive, Pig, HBase, Spark, and Impala, which utilizes Hadoop Distributed File System (HDFS) or Ozone as the data storage layer. The data is protected from internal and external threats, and users and business processes can continue to utilize the secured data. Protegrity protects data inside the files using tokenization and strong encryption protection methods.
The following table shows supported input data types for Big Data protectors with the Unicode Gen2 token.
Table: Supported input data types for Big Data protectors with Unicode Gen2 token
| Big Data Protectors | MapReduce*2 | Hive | Pig | HBase*2 | Impala | Spark*2 | Spark SQL | Trino |
|---|---|---|---|---|---|---|---|---|
| Supported input data types*1 | BYTE[] | STRING | Not supported | BYTE[] | STRING | BYTE[] STRING | STRING | VARCHAR |
*1 – If the input and output types of the API are BYTE [], the customer application should convert the input to a byte array. Then, call the API and convert the output from the byte array.
*2 – The Protegrity MapReduce protector, HBase coprocessor, and Spark protector only support bytes converted from the string data type. Data types that are not bytes converted from the string data type might cause data corruption to occur when:
- Any other data type is directly converted to bytes and passed as input to the MapReduce or Spark API that supports byte as input and provides byte as output.
- Any other data type is directly converted to bytes and inserted in an HBase table. Where the HBase table is configured with the Protegrity HBase coprocessor.
For more information about Big Data protectors, refer to Big Data Protector.
Data Warehouse Protector
The Protegrity Data Warehouse Protector is an advanced security solution designed to protect sensitive data at the column level. This enables you to secure your data, while still permitting access to authorized users. Additionally, the Data Warehouse Protector integrates seamlessly with existing database systems using the User-Defined Functions for an enhanced security. Protegrity protects data inside the data warehouses using various tokenization and encryption methods.
The External IV is not supported in Data Warehouse Protector.
The following table shows the supported input data types for the Teradata protector with the Unicode Gen2 token.
Table: Supported input data types for Data Warehouse protectors with Unicode Gen2 token
| Data Warehouse Protectors | Teradata |
|---|---|
| Supported input data types | VARCHAR UNICODE |
For more information about Data Warehouse protectors, refer to Data Warehouse Protector.
Database Protectors
Oracle Database Protector
The supported input data types for the Oracle Database Protector are listed below.
| Protector | Supported Input Data Types |
|---|---|
| Oracle | VARCHAR2 |
| Oracle | NVARCHAR2 |
The maximum input lengths supported for the Oracle database protector are as described by the following points:
- Unicode Gen2 – Data type : VARCHAR2:
- If the tokenizer length preservation parameter is selected as Yes, then the maximum limit that can be safely tokenized and detokenized is 4000 bytes.
- If the tokenizer length preservation parameter is selected as No, then the maximum limit that can be safely tokenized and detokenized is 3000 bytes.
- Unicode Gen2 – Data type : NVARCHAR2:
- If the tokenizer length preservation parameter is selected as Yes, then the maximum limit that can be safely tokenized and detokenized is 4000 bytes.
- If the tokenizer length preservation parameter is selected as No, then the maximum limit that can be safely tokenized and detokenized is 3000 bytes.
- Unicode Gen2 - Tokenizers
- The Unicode Gen2 data element supports SLT_1_3 and SLT_X_1 tokenizers.
- The SLT_1_3 tokenizer supports small alphabet size from 10-160 code points.
- The SLT_X_1 tokenizer supports large alphabet size from 161-100K code points.
1.1.4.12 - Binary
The Binary token type can be used to tokenize binary data with Hex codes from 0x00 to 0xFF.
Table: Binary Tokenization Type properties
Tokenization Type Properties | Settings | |||||||||||
|---|---|---|---|---|---|---|---|---|---|---|---|---|
Name | Binary | |||||||||||
Token type and Format | Hex character codes from 0x00 to 0xFF. | |||||||||||
Tokenizer | Length Preservation | Minimum Length | Maximum Length | |||||||||
SLT_1_3 SLT_2_3 | No | 3 | 4095 | |||||||||
Possibility to set Minimum/ maximum length | No | |||||||||||
Left/Right settings | Yes | |||||||||||
Internal IV | Yes, if Left/Right settings are non-zero. | |||||||||||
External IV | Yes | |||||||||||
Return of Protected value | No | |||||||||||
Token specific properties | Tokenization result is binary. | |||||||||||
The following table shows examples of the way in which a value will be tokenized with the Binary token.
Table: Examples of Tokenization for Binary Values
| Input Values | Tokenized Values | Comments |
|---|---|---|
| Protegrity | 0x05C1CF0C310B2D38ACAD4C | Tokenization result is returned as a binary stream. |
| 123 | 0x19707E | Tokenization of the value with Minimum supported length. |
Binary Tokenization Properties for different protectors
Application Protector
It is recommended to use Binary tokenization only with APIs that accept BYTE[] as input and provide BYTE[] as output. If Binary tokens are generated using APIs that accept BYTE[] as input and provide BYTE[] as output, and uniform encoding is maintained across protectors, then the tokens can be used across various protectors.
The following table shows supported input data types for Application protectors with the Binary token.
Table: Supported input data types for Application protectors with Binary token
| Application Protectors*2 | AP Java*1 | AP Python |
|---|---|---|
| Supported input data types | BYTE[] | BYTES |
*1 - The API accepts and returns data in BYTE[] format. The customer application needs to convert the input into byte arrays before calling the API, and similarly, convert the output from byte arrays after receiving the response from the API.
*2 - The Protegrity Application Protectors only support bytes converted from the string data type. If int, short, or long format data is directly converted to bytes and passed as input to the Application Protector APIs that support byte as input and provide byte as output, then data corruption might occur.
For more information about Application protectors, refer to Application Protector.
Big Data Protector
Protegrity supports MapReduce, Hive, Pig, HBase, Spark, and Impala, which utilizes Hadoop Distributed File System (HDFS) or Ozone as the data storage layer. The data is protected from internal and external threats, and users and business processes can continue to utilize the secured data. Protegrity protects data inside the files using tokenization and strong encryption protection methods.
The following table shows supported input data types for Big Data protectors with the Binary token.
Table: Supported input data types for Big Data protectors with Binary token
| Big Data Protectors | MapReduce*2 | Hive | Pig | HBase*2 | Impala | Spark*2 | Spark SQL | Trino |
|---|---|---|---|---|---|---|---|---|
| Supported input data types*1 | BYTE[]*3 | Not supported | Not supported | BYTE[]*3 | Not supported | BYTE[]*3 | Not supported | Not supported |
*1 – If the input and output types of the API are BYTE [], the customer application should convert the input to a byte array. Then, call the API and convert the output from the byte array.
*2 – The Protegrity MapReduce protector, HBase coprocessor, and Spark protector only support bytes converted from the string data type. Data types that are not bytes converted from the string data type might cause data corruption to occur when:
- Any other data type is directly converted to bytes and passed as input to the MapReduce or Spark API that supports byte as input and provides byte as output.
- Any other data type is directly converted to bytes and inserted in an HBase table. Where the HBase table is configured with the Protegrity HBase coprocessor.
*3 – It is recommended to use Binary tokenization only with APIs that accept BYTE[] as input and provide BYTE[] as output. If Binary tokens are generated using APIs that accept input and provide output as BYTE[], these tokens can be used across various protectors. The Binary tokens is assumed to have uniform encoding across protectors.
For more information about Big Data protectors, refer to Big Data Protector.
Data Warehouse Protector
The Protegrity Data Warehouse Protector is an advanced security solution designed to protect sensitive data at the column level. This enables you to secure your data, while still permitting access to authorized users. Additionally, the Data Warehouse Protector integrates seamlessly with existing database systems using the User-Defined Functions for an enhanced security. Protegrity protects data inside the data warehouses using various tokenization and encryption methods.
The following table shows the supported input data types for the Teradata protector with the Binary token.
Table: Supported input data types for Data Warehouse protectors with Binary token
| Data Warehouse Protectors | Teradata |
|---|---|
| Supported input data types | Not Supported |
For more information about Data Warehouse protectors, refer to Data Warehouse Protector.
Database Protectors
Oracle Database Protector
The supported input data types for the Oracle Database Protector are listed below.
| Protector | Supported Input Data Types |
|---|---|
| Oracle | Unsupported |
1.1.4.13 - Email
Email token type allows tokenization of an email address. Email tokens keep the domain name and all characters after the “@” sign in the clear. The local part, which is the part before the “@” sign, gets tokenized.
The table lists minimum and maximum length requirements for this token type, which should be applied for the local part, domain part and the entire e-mail.
Table: Email Tokenization Type Properties
Tokenization Type Properties | Settings | ||||||||||||||||||
|---|---|---|---|---|---|---|---|---|---|---|---|---|---|---|---|---|---|---|---|
Name | |||||||||||||||||||
Token type and Format | Alphabetic and numeric only. The rest of the characters will be treated as delimiters. | ||||||||||||||||||
Tokenizer | Length Preservation | Minimum Length | Maximum Length | ||||||||||||||||
Local | Domain | Entire | Local | Domain | Entire | ||||||||||||||
SLT_1_3 SLT_2_3 | No | 1 | 1 | 3 | 63 | 252 | 256 | ||||||||||||
No | 1 | 1 | 3 | 63 | 252 | 256 | |||||||||||||
SLT_1_3 SLT_2_3 | Yes | 3*1 | 1 | 5 | 64 | 252*2 | 256 | ||||||||||||
Yes | 3*1 | 1 | 5 | 64 | 252*2 | 256 | |||||||||||||
Possibility to set minimum/ maximum length | No | ||||||||||||||||||
Left/Right settings | No | ||||||||||||||||||
Internal IV | N/A | ||||||||||||||||||
External IV | Yes | ||||||||||||||||||
Return of Protected value | Yes | ||||||||||||||||||
Token specific properties | At least one @ character is required in the input. The right most @ character defines the delimiter between the local and domain parts. | ||||||||||||||||||
*1 – If the settings for short data tokenization is set to Yes, then the minimum tokenizable length for the local part of an email is one else it is three.
*2 – If the settings for short data tokenization is set to Yes, then the maximum length for the domain part of an email is 253 else it is 252.
Email Token Format
An Email token format indicates the tokenization format for email. The email address consists of a local part and a domain, local-part@domain. The local part can be up to 64 characters and the domain name can be up to 254 characters, but the entire email address cannot be longer than 256 characters.
The following table explains email token format input requirements and tokenized output format:
Table: Output Values for Email Token Format
Local Part Input value can consist | Output value can consist |
Commonly used:
| The part before “@” sign will be tokenized. The following will be tokenized:
The following characters will be considered as delimiters and not tokenized:
|
@ Part The “@” character defines the delimiter between the local and domain parts, and will be left in clear. | |
Domain Part Input value can consist | Output value can consist |
| The part after “@” sign will not be tokenized. |
Note:
Comments are allowed both in local and domain part of the e-mail token, and comments will be tokenized only if they are in the local part. Here are the examples of comments usage for the e-mail - john.smith@example.com:
- john.smith(comment)@example.com
- “john(comment).smith@example.com”
- john(comment)n.smith@example.com
- john.smith@(comment)example.com
- john.smith@example.com(comment)
The following table shows examples of the way in which a value will be tokenized with the Email token.
Table: Examples of Tokenization for Email Token Formats
| Input Values | Tokenized Values | Comments |
|---|---|---|
| Protegrity1234@gmail.com | UNfOxcZ51jWbXMq@gmail.com | All characters before @ symbol are tokenized. |
| john.smith!@#@$%$%^&@gmail.com | hX3p.yDcwD!@#@$%$%@gmail.com | All symbols except alphabetic are distinguish as delimiters. |
| email@protegrity@gmail.com | F00CJ@RjDEX9LMDq@gmail.com | The right most @ character defines the delimiter between the local and domain parts. |
| q@a | asj@a | Min 3 symbols in local part for none length preserving tokens |
| qdd@a | S0Y@a | Min 5 symbols in local part for length preserving tokens |
| a@protegrity.com | o@protegrity.com | Email, SLT_1_3, Length Preservation=Yes, Allow Short Data=Yes The local part of the email has at least one character to tokenize, which meets the minimum length requirement for SLT_1_3 tokenizer when Length Preservation=Yes and Allow Short Data=Yes. |
| a@protegrity.com email@protegrity.com | a@protegrity.com F00CJ@protegrity.com | Email, SLT_1_3, Length Preservation=Yes, Allow Short Data=No, return input as it is If the input value has less than three characters to tokenize, then it is returned as is else it is tokenized. |
| a@protegrity.com | Error. Input too short. | Email, SLT_1_3, Length Preservation=Yes, Allow Short Data=No, generate an error The local part of the email has one character to tokenize, which is short for SLT_1_3 tokenizer when Length Preservation=Yes and Allow Short Data=No, generate an error. |
Email Tokenization Properties for different protectors
Application Protector
The following table shows supported input data types for Application protectors with the Email token.
Table: Supported input data types for Application protectors with Email token
| Application Protectors*2 | AP Java*1 | AP Python |
|---|---|---|
| Supported input data types | STRING CHAR[] BYTE[] | STRING BYTES |
*1 – The API accepts and returns data in BYTE[] format. The customer application needs to convert the input into byte arrays before calling the API, and similarly, convert the output from byte arrays after receiving the response from the API.
*2 – The Protegrity Application Protectors only support bytes converted from the string data type. If int, short, or long format data is directly converted to bytes and passed as input to the Application Protector APIs that support byte as input and provide byte as output, then data corruption might occur.
For more information about Application protectors, refer to Application Protector.
Big Data Protector
Protegrity supports MapReduce, Hive, Pig, HBase, Spark, and Impala, which utilizes Hadoop Distributed File System (HDFS) or Ozone as the data storage layer. The data is protected from internal and external threats, and users and business processes can continue to utilize the secured data. Protegrity protects data inside the files using tokenization and strong encryption protection methods.
The following table shows supported input data types for Big Data protectors with the Email token.
Table: Supported input data types for Big Data protectors with Email token
| Big Data Protectors | MapReduce*2 | Hive | Pig | HBase*2 | Impala | Spark*2 | Spark SQL | Trino |
|---|---|---|---|---|---|---|---|---|
| Supported input data types*1 | BYTE[] | CHAR*3 STRING | CHARARRAY | BYTE[] | STRING | BYTE[] STRING | STRING | VARCHAR |
*1 – If the input and output types of the API are BYTE [], the customer application should convert the input to a byte array. Then, call the API and convert the output from the byte array.
*2 – The Protegrity MapReduce protector, HBase coprocessor, and Spark protector only support bytes converted from the string data type. Data types that are not bytes converted from the string data type might cause data corruption to occur when:
- Any other data type is directly converted to bytes and passed as input to the MapReduce or Spark API that supports byte as input and provides byte as output.
- Any other data type is directly converted to bytes and inserted in an HBase table. Where the HBase table is configured with the Protegrity HBase coprocessor.
*3 – If you are using the Char tokenization UDFs in Hive, then ensure that the data elements have length preservation selected. In Char tokenization UDFs, using data elements without length preservation selected, is not supported.
For more information about Big Data protectors, refer to Big Data Protector.
Data Warehouse Protector
The Protegrity Data Warehouse Protector is an advanced security solution designed to protect sensitive data at the column level. This enables you to secure your data, while still permitting access to authorized users. Additionally, the Data Warehouse Protector integrates seamlessly with existing database systems using the User-Defined Functions for an enhanced security. Protegrity protects data inside the data warehouses using various tokenization and encryption methods.
The following table shows the supported input data types for the Teradata protector with the Email token.
Table: Supported input data types for Data Warehouse protectors with Email token
| Data Warehouse Protectors | Teradata |
|---|---|
| Supported input data types | VARCHAR LATIN |
For more information about Data Warehouse protectors, refer to Data Warehouse Protector.
Database Protectors
Oracle Database Protector
The supported input data types for the Oracle Database Protector are listed below.
| Protector | Supported Input Data Types |
|---|---|
| Oracle | VARCHAR2 |
| Oracle | CHAR |
1.1.4.14 - Printable
Deprecated
Starting from v10.0.x, the Printable token type is deprecated.
It is recommended to use the Unicode Gen2 token type instead of the Printable token type.
The Printable token type tokenizes ASCII printable characters from the ISO 8859-15 alphabet, which include letters, digits, punctuation marks, and miscellaneous symbols.
Table: Printable Tokenization Type properties
Tokenization Type Properties | Settings | |||||||||||
|---|---|---|---|---|---|---|---|---|---|---|---|---|
Name | Printable | |||||||||||
Token type and Format | ASCII printable characters, which include letters, digits, punctuation marks, and miscellaneous symbols. Hex character codes from 0x20 to 0x7E and from 0xA0 to 0xFF. Refer to ASCII Character Codes for the list of ASCII characters supported by Printable token. | |||||||||||
Tokenizer*1*2 | Length Preservation | Allow Short Data | Minimum Length | Maximum Length | ||||||||
SLT_1_3 | Yes | Yes | 1 | 4096 | ||||||||
No, return input as it is | 3 | |||||||||||
No, generate error | ||||||||||||
No | NA | 1 | 4091 | |||||||||
Possibility to set Minimum/ maximum length | No | |||||||||||
Left settings | Yes | |||||||||||
Internal IV | Yes, if Left/Right settings are non-zero | |||||||||||
External IV | Yes | |||||||||||
Return of Protected value | Yes | |||||||||||
Token specific properties | Token tables are large in size, approximately 27MB. Refer to SLT Tokenizer Characteristics for the exact numbers. | |||||||||||
*1 – The character column “CHAR” to protect is configured to remove trailing spaces before the tokenization. This means that the space character can be lost in translation for Printable tokens. To avoid this consider using Lower ASCII token instead of Printable for CHAR columns and input data having spaces.
*2 – Printable tokenization is not supported on databases where the character set is UTF.
The following table shows examples of the way in which a value will be tokenized with the Printable token.
Table: Examples of Tokenization for Printable Values
| Input Values | Tokenized Values | Comments |
|---|---|---|
| La Scala 05698 | F|ZpÙç|Ôä%s^¦4 | All characters in the input value, including spaces, are tokenized. |
| Ford Mondeo CA-0256TY M34 567 K-45 | §)%ß#)ðYjt{¬ÓÊEµV²ù² | All characters in the input value, including spaces, are tokenized. |
| qw | rD | Printable, SLT_1_3, Left=0, Right=0, Length Preservation=Yes, Allow Short Data=Yes The minimum length meets the requirement for the SLT_1_3 tokenizer when Length Preservation=Yes and Allow Short Data=Yes. |
| qw | Error. Input too short. | Printable, SLT_1_3, Left=0, Right=0, Length Preservation=Yes, Allow Short Data=No, generate an error The input has two characters to tokenize, which is short for SLT_1_3 tokenizer when Length Preservation=Yes and Allow Short Data=No, generate an error. |
| qw qwa | qw rDZ | Printable, SLT_1_3, Left=0, Right=0, Length Preservation=Yes, Allow Short Data=No, return input as it is. If the input value has less than three characters to tokenize, then it is returned as is else it is tokenized. |
Printable Tokenization Properties for different protectors
Application Protector
Printable tokenization is recommended for APIs that accept BYTE [] as input and provide BYTE [] as output. If uniform encoding is maintained across protectors, tokens generated by these APIs can be used across various protectors.
To ensure accurate tokenization results, user must use ISO 8859-15 character encoding when converting String data to Byte. This input should then be passed to Byte APIs.
Note: If Printable tokens are generated using APIs or UDFs that accept STRING or VARCHAR as input, then the protected values can only be unprotected using the protector with which it was protected. If you are unprotecting the protected data using any other protector, then you could get inconsistent results.
The following table shows supported input data types for Application protectors with the Printable token.
Table: Supported input data types for Application protectors with Printable token
| Application Protectors*2 | AP Java*1 | AP Python |
|---|---|---|
| Supported input data types | STRING CHAR[] BYTE[] | STRING BYTES |
*1 - The API accepts and returns data in BYTE[] format. The customer application needs to convert the input into byte arrays before calling the API, and similarly, convert the output from byte arrays after receiving the response from the API.
*2 - The Protegrity Application Protector only supports bytes converted from the string data type. If any other data type is directly converted to bytes and passed as input to the Application Protectors APIs that support byte as input and provide byte as output, then data corruption might occur.
For more information about Application protectors, refer to Application Protector.
Big Data Protector
Protegrity supports MapReduce, Hive, Pig, HBase, Spark, and Impala, which utilizes Hadoop Distributed File System (HDFS) or Ozone as the data storage layer. The data is protected from internal and external threats, and users and business processes can continue to utilize the secured data. Protegrity protects data inside the files using tokenization and strong encryption protection methods.
The following table shows supported input data types for Big Data protectors with the Printable token.
Table: Supported input data types for Big Data protectors with Printable token
| Big Data Protectors | MapReduce*4*5 | Hive | Pig | HBase*4*5 | Impala*2*3 | Spark*4*5 | Spark SQL | Trino |
|---|---|---|---|---|---|---|---|---|
| Supported input data types*1*6 | BYTE[] | Not supported | Not supported | BYTE[] | STRING | BYTE[]*5 | Not supported | VARCHAR |
*1 – If the input and output types of the API are BYTE[], then the customer application should convert the input to and output from the byte array, before calling the API.
*2 – Ensure that you use the Horizontal tab “\t” as the field or column delimiter when loading data that is tokenized using Printable tokens for Impala.
*3 – Though the tokenization results for Impala may not be formatted and displayed accurately, they will be unprotected to the original values, using the respective protector.
*4 – The Protegrity MapReduce protector, HBase coprocessor, and Spark protector only support bytes converted from the string data type. Data types that are not bytes converted from the string data type might cause data corruption to occur when:
- Any other data type is directly converted to bytes and passed as input to the MapReduce or Spark API that supports byte as input and provides byte as output.
- Any other data type is directly converted to bytes and inserted in an HBase table. Where the HBase table is configured with the Protegrity HBase coprocessor.
*5 – It is recommended to use Printable tokenization with APIs that accepts BYTE[] as input and provides BYTE[] as output. If uniform encoding is maintained across protectors, Printable tokens generated by such APIs can be used across various protectors. To ensure accurate formatting and display of tokenization results, clients should use ISO 8859-15 character encoding. Before passing input to Byte APIs, clients must convert String data type to Byte and apply ISO 8859-15 character encoding.
*6 – Printable tokens are generated using APIs or UDFs. These APIs or UDFs accept STRING or VARCHAR as input. Then, the protected values can only be unprotected using the protector with which it was protected. If you are unprotecting the protected data using any other protector, then you could get inconsistent results.
For more information about Big Data protectors, refer to Big Data Protector.
Data Warehouse Protector
The Protegrity Data Warehouse Protector is an advanced security solution designed to protect sensitive data at the column level. This enables you to secure your data, while still permitting access to authorized users. Additionally, the Data Warehouse Protector integrates seamlessly with existing database systems using the User-Defined Functions for an enhanced security. Protegrity protects data inside the data warehouses using various tokenization and encryption methods.
Printable tokens are generated using APIs or UDFs. These APIs or UDFs accept STRING or VARCHAR as input. Then, the protected values can only be unprotected using the protector with which it was protected. If you are unprotecting the protected data using any other protector, then you could get inconsistent results.
Important: Tokenizing XML or JSON data with Printable tokenization will not return valid XML or JSON format output.
JSON and XML UDFs are supported for the Teradata Data Warehouse Protector.
The following table shows the supported input data types for the Teradata protector with the Printable token.
Table: Supported input data types for Data Warehouse protectors with Printable token
| Data Warehouse Protectors | Teradata |
|---|---|
| Supported input data types | VARCHAR LATIN |
For more information about Data Warehouse protectors, refer to Data Warehouse Protector.
Database Protectors
Oracle Database Protector
The supported input data types for the Oracle Database Protector are listed below.
| Protector | Supported Input Data Types |
|---|---|
| Oracle | VARCHAR2 |
| Oracle | CHAR |
1.1.4.15 - Date (YYYY-MM-DD, DD/MM/YYYY, MM.DD.YYYY)
Deprecated
Starting from v10.0.x, the Date YYYY-MM-DD, Date DD/MM/YYYY, and Date MM.DD.YYYY tokenization types are deprecated.
It is recommended to use the Datetime (YYYY-MM-DD HH:MM:SS MMM) token type instead of the Date YYYY-MM-DD, Date DD/MM/YYYY, and Date MM.DD.YYYY token types.
The Date token type supports date formats corresponding to the big endian, little endian, and middle endian forms. It protects dates in one of the following formats:
- YYYY<delim>MM<delim>DD
- DD<delim>MM<delim>YYYY
- MM<delim>DD<delim>YYYY
Where <delim> is one of the allowed separators: dot “.”, slash “/”, or dash “-”.
Table: Date Tokenization Type properties
Tokenization Type Properties | Settings | |||||||||||
|---|---|---|---|---|---|---|---|---|---|---|---|---|
Name | Date | |||||||||||
Token type and Format | Date in big endian form, starting with the year (YYYY-MM-DD). Date in little endian form, starting with the day (DD/MM/YYYY). Date in middle endian form, starting with the month (MM.DD.YYYY). The following separators are supported: dot ".", slash "/", or dash "-". | |||||||||||
Tokenizer | Length Preservation | Minimum Length | Maximum Length | |||||||||
SLT_1_3 SLT_2_3 SLT_1_6 SLT_2_6 | Yes | 10 | 10 | |||||||||
Possibility to set Minimum/ maximum length | No | |||||||||||
Left/Right settings | No | |||||||||||
Internal IV | No | |||||||||||
External IV | No | |||||||||||
Return of Protected value | Yes | |||||||||||
Token specific properties | All separators, such as dot ".", slash "/", or dash "-" are allowed. | |||||||||||
Supported range of input dates | From “0600-01-01” to “3337-11-27” | |||||||||||
Non-supported range of Gregorian cutover dates | From "1582-10-05" to "1582-10-14" | |||||||||||
The following table shows examples of the way in which a value will be tokenized with the Date token.
Table: Examples for Tokenization of Date
| Input Values | Tokenized Values | Comments |
|---|---|---|
| 2012-02-29 2012/02/29 2012.02.29 | 2150-02-20 2150/02/20 2150.02.20 | Date (YYYY-MM-DD) token is used. All three separators are successfully accepted. They are treated as delimiters not impacting tokenized value. |
| 31/01/0600 | 08/05/2215 | Date (DD/MM/YYYY) token is used. Date in the past is tokenized. |
| 10.30.3337 | 09.05.2042 | Date (MM.DD.YYYY) token is used. Date in the future is tokenized. |
| 2012:08:24 1975-01-32 | Token is not generated due to invalid input value. Error is returned. | Date (YYYY-MM-DD) token is used. Input values with non-supported separators or with invalid dates produce error. |
Date Tokenization for Cutover Dates of the Proleptic Gregorian Calendar
The data systems, such as, Oracle or Java-based systems, do not accept the cutover dates of the Proleptic Gregorian Calendar. The cutover dates of the Proleptic Gregorian Calendar fall in the interval 1582-10-05 to 1582-10-14. These dates are converted to 1582-10-15. When using Oracle, conversion occurs by adding ten days to the source date. Due to this conversion, data loss occurs as the system is not capable to return the actual date value after the de-tokenization.
The following points are applicable for the tokenization and de-tokenization of the cutover dates of the Proleptic Gregorian Calendar:
- The tokenization of the date values in the cutover date range of the Proleptic Gregorian Calendar results in an ‘Invalid Input’ error.
- During tokenization, an internal validation is performed to check whether the value is tokenized to the cutover date. If it is a cutover date, then the Year part (1582) of the tokenized value is converted to 3338 and then returned. During de-tokenization, an internal check is performed to validate whether the Year is 3338. If the Year is 3338, then it is internally converted to 1582.
Note:
The tokenization accepts the date range 0600-01-01 to 3337-11-27 excluding the cutover date range.
The de-tokenization accepts the date ranges 0600-01-01 to 3337-11-27 and 3338-10-05 to 3338-10-14.
Consider a scenario where you are migrating the protected data from Protector 1 to Protector 2. The Protector 1 includes the Date tokenizer update to process the cutover dates of the Proleptic Gregorian Calendar as input. The Protector 2 does not include this update. In such a scenario, an “Invalid Date Format” error occurs in Protector 2, when you try to unprotect the protected data as it fails to accept the input year 3338. The following steps must be performed to mitigate this issue:
- Unprotect the protected data from Protector 1.
- Migrate the unprotected data to Protector 2.
- Protect the data from Protector 2.
Date Tokenization Properties for different protectors
Application Protector
The following table shows supported input data types for Application protectors with the Date token.
Table: Supported input data types for Application protectors with Date token
| Application Protectors*2 | AP Java*1 | AP Python |
|---|---|---|
| Supported input data types | DATE STRING CHAR[] BYTE[] | DATE BYTES STRING |
*1 - The API accepts and returns data in BYTE[] format. The customer application needs to convert the input into byte arrays before calling the API, and similarly, convert the output from byte arrays after receiving the response from the API.
*2 - The Protegrity Application Protectors only support bytes converted from the string data type. If int, short, or long format data is directly converted to bytes and passed as input to the Application Protector APIs that support byte as input and provide byte as output, then data corruption might occur.
For more information about Application protectors, refer to Application Protector.
Big Data Protector
Protegrity supports MapReduce, Hive, Pig, HBase, Spark, and Impala, which utilizes Hadoop Distributed File System (HDFS) or Ozone as the data storage layer. The data is protected from internal and external threats, and users and business processes can continue to utilize the secured data. Protegrity protects data inside the files using tokenization and strong encryption protection methods.
The following table shows supported input data types for Big Data protectors with the Date token.
Table: Supported input data types for Big Data protectors with Date token
| Big Data Protectors | MapReduce*2 | Hive | Pig | HBase*2 | Impala | Spark*2 | Spark SQL | Trino |
|---|---|---|---|---|---|---|---|---|
| Supported input data types*1 | BYTE[] | STRING DATE*3 | CHARARRAY | BYTE[] | STRING DATE*3 | BYTE[] STRING | STRING DATE*3 | DATE*3 |
*1 – If the input and output types of the API are BYTE [], the customer application should convert the input to a byte array. Then, call the API and convert the output from the byte array.
*2 – The Protegrity MapReduce protector, HBase coprocessor, and Spark protector only support bytes converted from the string data type. Data types that are not bytes converted from the string data type might cause data corruption to occur when:
- Any other data type is directly converted to bytes and passed as input to the MapReduce or Spark API that supports byte as input and provides byte as output.
- Any other data type is directly converted to bytes and inserted in an HBase table. Where the HBase table is configured with the Protegrity HBase coprocessor.
*3 – In the Big Data Protector, the date format supported for Hive, Impala, Spark SQL, and Trino is YYYY-MM-DD only.
Date input values are not fully validated to ensure they represent valid dates. For instance, entering a day value greater than 31 or a month value greater than 12 will result in an error. However, the date 2011-02-30 does not cause an error but is converted to 2011-03-02, which is not the intended date.
For more information about Big Data protectors, refer to Big Data Protector.
Data Warehouse Protector
The Protegrity Data Warehouse Protector is an advanced security solution designed to protect sensitive data at the column level. This enables you to secure your data, while still permitting access to authorized users. Additionally, the Data Warehouse Protector integrates seamlessly with existing database systems using the User-Defined Functions for an enhanced security. Protegrity protects data inside the data warehouses using various tokenization and encryption methods.
The following table shows the supported input data types for the Teradata protector with the Date token.
Table: Supported input data types for Data Warehouse protectors with Date token
| Data Warehouse Protectors | Teradata |
|---|---|
| Supported input data types | VARCHAR LATIN |
For more information about Data Warehouse protectors, refer to Data Warehouse Protector.
Database Protectors
Oracle Database Protector
The supported input data types for the Oracle Database Protector are listed below.
| Protector | Supported Input Data Types |
|---|---|
| Oracle | DATE |
| Oracle | VARCHAR2 |
| Oracle | CHAR |
1.1.4.16 - Unicode
Deprecated
Starting from v10.0.x, the Unicode token type is deprecated.
It is recommended to use the Unicode Gen2 token type instead of the Unicode token type.
The Unicode token type can be used to tokenize multi-byte character strings. The input is treated as a byte stream, hence there are no delimiters. There are also no character conversions or code point validation done on the input. The token value will be alpha-numeric.
The encoding and unicode character set of the input data will affect the protected data length. For instance, the respective lengths for UTF-8 and UTF-16, in bytes, is described in the following table.
Table: Lengths for UTF-8 and UTF-16
| Input Values | UTF-8 | UTF-16 |
|---|---|---|
| 導字社導字會 | 18 bytes | 12 bytes |
| Protegrity | 10 bytes | 20 bytes |
Table: Unicode Tokenization Type properties
Tokenization Type Properties | Settings | |||||||||||||
|---|---|---|---|---|---|---|---|---|---|---|---|---|---|---|
Name | Unicode | |||||||||||||
Token type and Format | Application protectors support UTF-8, UTF-16LE, and UTF-16BE encoding. Hex character codes from 0x00 to 0xFF. For the list of supported characters, refer to ASCII Character Codes. | |||||||||||||
Tokenizer | Length Preservation | Allow Short Data | Minimum Length | Maximum Length*2 | ||||||||||
SLT_1_3*1 SLT_2_3*1 | No | Yes | 1 byte | 4096 | ||||||||||
| No, return input as it is | 3 bytes | |||||||||||||
| No, generate error | ||||||||||||||
Possibility to set Minimum/ maximum length | No | |||||||||||||
Left/Right settings | No | |||||||||||||
Internal IV | No | |||||||||||||
External IV | Yes | |||||||||||||
Return of Protected value | Yes | |||||||||||||
Token specific properties | Tokenization result is Alpha-Numeric. | |||||||||||||
*1 - If the input and output types of the API are BYTE[], then the customer application should convert the input to and output from the byte array, before calling the API.
*2 - The maximum input length to safely tokenize and detokenize the data is 4096 bytes, which is irrespective of the byte representation.
The following table shows examples of the way in which a value will be tokenized with the Unicode token.
Table: Examples of Tokenization for Unicode Values
Input Value | Tokenized Value | Comments |
| Протегріті | WurIeXLFZPApXQorkFCKl3hpRaGR28K | Input value contains Cyrillic characters. Tokenization result is Alpha-Numeric. |
| 安全 | xM2EcAQ0LVtQJ | Input value contains characters in Simplified Chinese. Tokenization result is Alpha-Numeric. |
Protegrity | RsbQU8KdcQzHJ1 | Algorithm is non-length preserving. Tokenized value is longer than initial one. |
| a | V2wU | Unicode, Allow Short Data=Yes Algorithm is non-length preserving. Tokenized value is longer than initial one. |
| a9c | A0767Vo |
Unicode Tokenization Properties for different protectors
Unicode tokenization is supported only by Application Protectors, Big Data Protector and Data Warehouse Protector.
Application Protector
The following table shows supported input data types for Application protectors with the Unicode token.
Table: Supported input data types for Application protectors with Unicode token
| Application Protectors*2 | AP Java*1 | AP Python |
|---|---|---|
| Supported input data types | BYTE[] CHAR[] STRING | BYTES STRING |
*1 - The API accepts and returns data in BYTE[] format. The customer application needs to convert the input into byte arrays before calling the API, and similarly, convert the output from byte arrays after receiving the response from the API.
*2 - The Protegrity Application Protectors only support bytes converted from the string data type. If int, short, or long format data is directly converted to bytes and passed as input to the Application Protector APIs that support byte as input and provide byte as output, then data corruption might occur.
For more information about Application protectors, refer to Application Protector.
Big Data Protector
Protegrity supports MapReduce, Hive, Pig, HBase, Spark, and Impala, which utilizes Hadoop Distributed File System (HDFS) or Ozone as the data storage layer. The data is protected from internal and external threats, and users and business processes can continue to utilize the secured data. Protegrity protects data inside the files using tokenization and strong encryption protection methods.
The minimum and maximum lengths supported for the Big Data Protector are as described by the following points:
- MapReduce: The maximum limit that can be safely tokenized and detokenized back is 4096 bytes. The user controls the encoding, as required.
- Spark: The maximum limit that can be safely tokenized and detokenized back is 4096 bytes. The user controls the encoding, as required.
- Hive: The ptyProtectUnicode and ptyUnprotectUnicode UDFs convert data to UTF-16LE encoding internally. These encoding has a minimum requirement of four bytes of data in UTF-16LE encoding. Additionally, it has a maximum limit of 4096 bytes in UTF-16LE encoding for safely tokenizing and detokenizing the data. The pty_ProtectStr and pty_UnprotectStr UDFs convert data to UTF-8 encoding internally. This encoding has a minimum requirement of three bytes for data in UTF-8 encoding. Additionally, it has a maximum limit of 4096 bytes for safely tokenizing and detokenizing the data.
- Impala: The pty_UnicodeStringIns and pty_UnicodeStringSel UDFs convert data to UTF-16LE encoding internally. These encoding has a minimum requirement of four bytes of data in UTF-16LE encoding. Additionally, it has a maximum limit of 4096 bytes in UTF-16LE encoding for safely tokenizing and detokenizing the data. The pty_StringIns and pty_StringSel UDFs convert data to UTF-8 encoding internally. This encoding has a minimum requirement of three bytes for data in UTF-8 encoding. Additionally, it has a maximum limit of 4096 bytes for safely tokenizing and detokenizing the data.
The following table shows supported input data types for Big Data protectors with the Unicode token.
Table: Supported input data types for Big Data protectors with Unicode token
| Big Data Protectors | MapReduce*2 | Hive | Pig | HBase*2 | Impala | Spark*2 | Spark SQL | Trino |
|---|---|---|---|---|---|---|---|---|
| Supported input data types*1 | BYTE[] | STRING | Not supported | BYTE[] | STRING | BYTE[] STRING | STRING | VARCHAR |
*1 – If the input and output types of the API are BYTE [], the customer application should convert the input to a byte array. Then, call the API and convert the output from the byte array.
*2 – The Protegrity MapReduce protector, HBase coprocessor, and Spark protector only support bytes converted from the string data type. Data types that are not bytes converted from the string data type might cause data corruption to occur when:
- Any other data type is directly converted to bytes and passed as input to the MapReduce or Spark API that supports byte as input and provides byte as output.
- Any other data type is directly converted to bytes and inserted in an HBase table. Where the HBase table is configured with the Protegrity HBase coprocessor.
For more information about Big Data protectors, refer to Big Data Protector.
Data Warehouse Protector
The Protegrity Data Warehouse Protector is an advanced security solution designed to protect sensitive data at the column level. This enables you to secure your data, while still permitting access to authorized users. Additionally, the Data Warehouse Protector integrates seamlessly with existing database systems using the User-Defined Functions for an enhanced security. Protegrity protects data inside the data warehouses using various tokenization and encryption methods.
If short data tokenization is not enabled, the minimum length for Unicode tokenization type is 3 bytes. The input value in Teradata Unicode UDF is encoded using UTF16 due to which internally the data length is multiplied by 2 bytes. Hence, the Teradata Unicode UDF is able to tokenize a data length that is less than the minimum supported length of 3 bytes.
The External IV is not supported in Data Warehouse Protector.
The following table shows the supported input data types for the Teradata protector with the Unicode token.
Table: Supported input data types for Data Warehouse protectors with Unicode token
| Data Warehouse Protectors | Teradata |
|---|---|
| Supported input data types | VARCHAR UNICODE |
For more information about Data Warehouse protectors, refer to Data Warehouse Protector.
Database Protectors
Oracle Database Protector
The supported input data types for the Oracle Database Protector are listed below.
| Protector | Supported Input Data Types |
|---|---|
| Oracle | VARCHAR2 |
1.1.4.17 - Unicode Base64
Deprecated
Starting from v10.0.x, the Unicode Base64 token type is deprecated.
It is recommended to use the Unicode Gen2 token type instead of the Unicode Base64 token type.
The Unicode Base64 token type can be used to tokenize multi-byte character strings. The input is treated as a byte stream, hence there are no delimiters. Any character conversions or code point validation are not performed on the input. This token element uses Base64 encoding. This encoding results in better performance compared to Unicode token element. It includes three additional characters, namely +, /, and = along with alpha numeric characters. The token value generated includes alpha numeric, +, /, and =.
The encoding and unicode character set of the input data will affect the protected data length. For instance, the respective lengths for UTF-8 and UTF-16, in bytes, is described in the following table.
Table: Lengths for UTF-8 and UTF-16
| Input Values | UTF-8 | UTF-16 |
|---|---|---|
| 導字社導字會 | 18 bytes | 12 bytes |
| Protegrity | 10 bytes | 20 bytes |
Table: Unicode Base64 Tokenization Type properties
Tokenization Type Properties | Settings | |||||||||||||
|---|---|---|---|---|---|---|---|---|---|---|---|---|---|---|
Name | Unicode Base64 | |||||||||||||
Token type and Format | Application protectors support UTF-8, UTF-16LE, and UTF-16BE encoding. Hex character codes from 0x00 to 0xFF. For the list of supported characters, refer to ASCII Character Codes. | |||||||||||||
Tokenizer | Length Preservation | Allow Short Data | Minimum Length | Maximum Length*1 | ||||||||||
SLT_1_3 SLT_2_3 | No | Yes | 1 byte | 4096 | ||||||||||
| No, return input as it is | 3 bytes | |||||||||||||
| No, generate error | ||||||||||||||
Possibility to set Minimum/Maximum length | No | |||||||||||||
Left/Right settings | No | |||||||||||||
Internal IV | No | |||||||||||||
External IV | Yes | |||||||||||||
Return of Protected value | Yes | |||||||||||||
Token specific properties | Tokenization result is Alpha-Numeric, "+", "/", and "=". | |||||||||||||
*1 - The maximum input length to safely tokenize and detokenize the data is 4096 bytes, which is irrespective of the byte representation.
The following table shows examples of the way in which a value will be tokenized with the Unicode Base64 token.
Table: Examples of Tokenization for Unicode Base64 Values
| Input Values | Tokenized Values | Comments |
|---|---|---|
| захист даних | B/ftgx=VysiXmq0t+O+I8v | Input value contains Cyrillic characters. Tokenization result include alpha numeric characters, such as =, /, and +. |
| Protegrity | 9NHI=znyLfgRiRvD | Algorithm is non-length preserving. Tokenized value is longer than initial one. |
| aÈ | =+bg | Unicode Base64 token element Algorithm is non-length preserving. Tokenized value is longer than initial one. |
| P+ | +BIN | Unicode Base64 token element, Allow Short Data=Yes Algorithm is non-length preserving. Tokenized value is longer than initial one. |
Unicode Base64 Tokenization Properties for different protectors
The Unicode Base64 tokenization is supported only by Application Protectors, Big Data Protector, Data Warehouse Protector, and Data Security Gateway.
Application Protector
The following table shows supported input data types for Application protectors with the Unicode Base64 token.
Table: Supported input data types for Application protectors with Unicode Base64 token
| Application Protectors*2 | AP Java*1 | AP Python |
|---|---|---|
| Supported input data types | BYTE[] CHAR[] STRING | BYTES STRING |
*1 - The API accepts and returns data in BYTE[] format. The customer application needs to convert the input into byte arrays before calling the API, and similarly, convert the output from byte arrays after receiving the response from the API.
*2 - The Protegrity Application Protectors only support bytes converted from the string data type. If int, short, or long format data is directly converted to bytes and passed as input to the Application Protector APIs that support byte as input and provide byte as output, then data corruption might occur.
For more information about Application protectors, refer to Application Protector.
Big Data Protector
Protegrity supports MapReduce, Hive, Pig, HBase, Spark, and Impala, which utilizes Hadoop Distributed File System (HDFS) or Ozone as the data storage layer. The data is protected from internal and external threats, and users and business processes can continue to utilize the secured data. Protegrity protects data inside the files using tokenization and strong encryption protection methods.
The minimum and maximum lengths supported for the Big Data Protector are as described by the following points:
- MapReduce: The maximum limit that can be safely tokenized and detokenized back is 4096 bytes. The user controls the encoding, as required.
- Spark: The maximum limit that can be safely tokenized and detokenized back is 4096 bytes. The user controls the encoding, as required.
- Hive: The ptyProtectUnicode and ptyUnprotectUnicode UDFs convert data to UTF-16LE encoding internally. These encoding has a minimum requirement of four bytes of data in UTF-16LE encoding. Additionally, it has a maximum limit of 4096 bytes in UTF-16LE encoding for safely tokenizing and detokenizing the data.
The pty_ProtectStr and pty_UnprotectStr UDFs convert data to UTF-8 encoding internally. This encoding has a minimum requirement of three bytes for data in UTF-8 encoding. Additionally, it has a maximum limit of 4096 bytes for safely tokenizing and detokenizing the data. - Impala: The pty_UnicodeStringIns and pty_UnicodeStringSel UDFs convert data to UTF-16LE encoding internally. These encoding has a minimum requirement of four bytes of data in UTF-16LE encoding.
Additionally, it has a maximum limit of 4096 bytes in UTF-16LE encoding for safely tokenizing and detokenizing the data.
The pty_StringIns and pty_StringSel UDFs convert data to UTF-8 encoding internally. This encoding has a minimum requirement of three bytes for data in UTF-8 encoding. Additionally, it has a maximum limit of 4096 bytes for safely tokenizing and detokenizing the data.
The following table shows supported input data types for Big Data protectors with the Unicode Base64 token.
Table: Supported input data types for Big Data protectors with Unicode Base64 token
| Big Data Protectors | MapReduce*2 | Hive | Pig | HBase*2 | Impala | Spark*2 | Spark SQL | Trino |
|---|---|---|---|---|---|---|---|---|
| Supported input data types*1 | BYTE[] | STRING | Not supported | BYTE[] | STRING | BYTE[] STRING | STRING | VARCHAR |
*1 – If the input and output types of the API are BYTE [], the customer application should convert the input to a byte array. Then, call the API and convert the output from the byte array.
*2 – The Protegrity MapReduce protector, HBase coprocessor, and Spark protector only support bytes converted from the string data type. Data types that are not bytes converted from the string data type might cause data corruption to occur when:
- Any other data type is directly converted to bytes and passed as input to the MapReduce or Spark API that supports byte as input and provides byte as output.
- Any other data type is directly converted to bytes and inserted in an HBase table. Where the HBase table is configured with the Protegrity HBase coprocessor.
For more information about Big Data protectors, refer to Big Data Protector.
Data Warehouse Protector
The Protegrity Data Warehouse Protector is an advanced security solution designed to protect sensitive data at the column level. This enables you to secure your data, while still permitting access to authorized users. Additionally, the Data Warehouse Protector integrates seamlessly with existing database systems using the User-Defined Functions for an enhanced security. Protegrity protects data inside the data warehouses using various tokenization and encryption methods.
The External IV is not supported in Data Warehouse Protector.
The following table shows the supported input data types for the Teradata protector with the Unicode Base64 token.
Table: Supported input data types for Data Warehouse protectors with Unicode Base64 token
| Data Warehouse Protectors | Teradata |
|---|---|
| Supported input data types | VARCHAR UNICODE |
For more information about Data Warehouse protectors, refer to Data Warehouse Protector.
Database Protectors
Oracle Database Protector
The supported input data types for the Oracle Database Protector are listed below.
| Protector | Supported Input Data Types |
|---|---|
| Oracle | VARCHAR2 |
| Oracle | NVARCHAR2 |
The maximum input lengths supported for the Oracle database protector are as described by the following points:
- Base 64 – Data type : VARCHAR2: The maximum limit that can be safely tokenized and detokenized back is 3000 bytes.
1.1.4.18 -
The Protegrity Data Warehouse Protector is an advanced security solution designed to protect sensitive data at the column level. This enables you to secure your data, while still permitting access to authorized users. Additionally, the Data Warehouse Protector integrates seamlessly with existing database systems using the User-Defined Functions for an enhanced security. Protegrity protects data inside the data warehouses using various tokenization and encryption methods.
The following table shows the supported input data types for the Teradata protector with the Alpha token.
Table: Supported input data types for Data Warehouse protectors with Alpha token
| Data Warehouse Protectors | Teradata |
|---|---|
| Supported input data types | VARCHAR LATIN |
For more information about Data Warehouse protectors, refer to Data Warehouse Protector.
1.1.4.19 -
The Protegrity Data Warehouse Protector is an advanced security solution designed to protect sensitive data at the column level. This enables you to secure your data, while still permitting access to authorized users. Additionally, the Data Warehouse Protector integrates seamlessly with existing database systems using the User-Defined Functions for an enhanced security. Protegrity protects data inside the data warehouses using various tokenization and encryption methods.
The following table shows the supported input data types for the Teradata protector with the Alpha-Numeric token.
Table: Supported input data types for Data Warehouse protectors with Alpha-Numeric token
| Data Warehouse Protectors | Teradata |
|---|---|
| Supported input data types | VARCHAR LATIN |
For more information about Data Warehouse protectors, refer to Data Warehouse Protector.
1.1.4.20 -
The following table shows supported input data types for Application protectors with the Alpha-Numeric token.
Table: Supported input data types for Application protectors with Alpha-Numeric token
| Application Protectors*2 | AP Java*1 | AP Python |
|---|---|---|
| Supported input data types | STRING CHAR[] BYTE[] | STRING BYTES |
*1 - The API accepts and returns data in BYTE[] format. The customer application needs to convert the input into byte arrays before calling the API, and similarly, convert the output from byte arrays after receiving the response from the API.
*2 - The Protegrity Application Protectors only support bytes converted from the string data type. If int, short, or long format data is directly converted to bytes and passed as input to the Application Protector APIs that support byte as input and provide byte as output, then data corruption might occur.
For more information about Application protectors, refer to Application Protector.
1.1.4.21 -
The following table shows supported input data types for Application protectors with the Alpha token.
Note: For both SLT_1_3 and SLT_2_3, the maximum length of the protected data is 4096 bytes. This occurs for the Alpha token element for Application Protector with no length preservation.
Table: Supported input data types for Application protectors with Alpha token
| Application Protectors*2 | AP Java*1 | AP Python |
|---|---|---|
| Supported input data types | BYTE[] CHAR[] STRING | BYTES STRING |
*1 - The API accepts and returns data in BYTE[] format. The customer application needs to convert the input into byte arrays before calling the API, and similarly, convert the output from byte arrays after receiving the response from the API.
*2 - The Protegrity Application Protector only supports bytes converted from the string data type. If any other data type is directly converted to bytes and passed as input to the Application Protector APIs that support byte as input and provide byte as output, then data corruption might occur.
For more information about Application protectors, refer to Application Protector.
1.1.4.22 -
The Protegrity Data Warehouse Protector is an advanced security solution designed to protect sensitive data at the column level. This enables you to secure your data, while still permitting access to authorized users. Additionally, the Data Warehouse Protector integrates seamlessly with existing database systems using the User-Defined Functions for an enhanced security. Protegrity protects data inside the data warehouses using various tokenization and encryption methods.
The following table shows the supported input data types for the Teradata protector with the Binary token.
Table: Supported input data types for Data Warehouse protectors with Binary token
| Data Warehouse Protectors | Teradata |
|---|---|
| Supported input data types | Not Supported |
For more information about Data Warehouse protectors, refer to Data Warehouse Protector.
1.1.4.23 -
It is recommended to use Binary tokenization only with APIs that accept BYTE[] as input and provide BYTE[] as output. If Binary tokens are generated using APIs that accept BYTE[] as input and provide BYTE[] as output, and uniform encoding is maintained across protectors, then the tokens can be used across various protectors.
The following table shows supported input data types for Application protectors with the Binary token.
Table: Supported input data types for Application protectors with Binary token
| Application Protectors*2 | AP Java*1 | AP Python |
|---|---|---|
| Supported input data types | BYTE[] | BYTES |
*1 - The API accepts and returns data in BYTE[] format. The customer application needs to convert the input into byte arrays before calling the API, and similarly, convert the output from byte arrays after receiving the response from the API.
*2 - The Protegrity Application Protectors only support bytes converted from the string data type. If int, short, or long format data is directly converted to bytes and passed as input to the Application Protector APIs that support byte as input and provide byte as output, then data corruption might occur.
For more information about Application protectors, refer to Application Protector.
1.1.4.24 -
The Protegrity Data Warehouse Protector is an advanced security solution designed to protect sensitive data at the column level. This enables you to secure your data, while still permitting access to authorized users. Additionally, the Data Warehouse Protector integrates seamlessly with existing database systems using the User-Defined Functions for an enhanced security. Protegrity protects data inside the data warehouses using various tokenization and encryption methods.
The following table shows the supported input data types for the Teradata protector with the Credit Card token.
Table: Supported input data types for Data Warehouse protectors with Credit Card token
| Data Warehouse Protectors | Teradata |
|---|---|
| Supported input data types | VARCHAR LATIN |
For more information about Data Warehouse protectors, refer to Data Warehouse Protector.
1.1.4.25 -
The following table shows supported input data types for Application protectors with the Credit Card token.
Table: Supported input data types for Application protectors with Credit Card token
| Application Protectors*2 | AP Java*1 | AP Python |
|---|---|---|
| Supported input data types | STRING CHAR[] BYTE[] | STRING BYTES |
*1 - The API accepts and returns data in BYTE[] format. The customer application needs to convert the input into byte arrays before calling the API, and similarly, convert the output from byte arrays after receiving the response from the API.
*2 - The Protegrity Application Protector only supports bytes converted from the string data type. If any other data type is directly converted to bytes and passed as input to the Application Protectors APIs that support byte as input and provide byte as output, then data corruption might occur.
For more information about Application protectors, refer to Application Protector.
1.1.4.26 -
The Protegrity Data Warehouse Protector is an advanced security solution designed to protect sensitive data at the column level. This enables you to secure your data, while still permitting access to authorized users. Additionally, the Data Warehouse Protector integrates seamlessly with existing database systems using the User-Defined Functions for an enhanced security. Protegrity protects data inside the data warehouses using various tokenization and encryption methods.
The following table shows the supported input data types for the Teradata protector with the Date token.
Table: Supported input data types for Data Warehouse protectors with Date token
| Data Warehouse Protectors | Teradata |
|---|---|
| Supported input data types | VARCHAR LATIN |
For more information about Data Warehouse protectors, refer to Data Warehouse Protector.
1.1.4.27 -
The following table shows supported input data types for Application protectors with the Date token.
Table: Supported input data types for Application protectors with Date token
| Application Protectors*2 | AP Java*1 | AP Python |
|---|---|---|
| Supported input data types | DATE STRING CHAR[] BYTE[] | DATE BYTES STRING |
*1 - The API accepts and returns data in BYTE[] format. The customer application needs to convert the input into byte arrays before calling the API, and similarly, convert the output from byte arrays after receiving the response from the API.
*2 - The Protegrity Application Protectors only support bytes converted from the string data type. If int, short, or long format data is directly converted to bytes and passed as input to the Application Protector APIs that support byte as input and provide byte as output, then data corruption might occur.
For more information about Application protectors, refer to Application Protector.
1.1.4.28 -
The Protegrity Data Warehouse Protector is an advanced security solution designed to protect sensitive data at the column level. This enables you to secure your data, while still permitting access to authorized users. Additionally, the Data Warehouse Protector integrates seamlessly with existing database systems using the User-Defined Functions for an enhanced security. Protegrity protects data inside the data warehouses using various tokenization and encryption methods.
The following table shows the supported input data types for the Teradata protector with the Datetime token.
Table: Supported input data types for Data Warehouse protectors with Datetime token
| Data Warehouse Protectors | Teradata |
|---|---|
| Supported input data types | VARCHAR LATIN |
For more information about Data Warehouse protectors, refer to Data Warehouse Protector.
1.1.4.29 -
The following table shows supported input data types for Application protectors with the Datetime token.
Table: Supported input data types for Application protectors with Datetime token
| Application Protectors*2 | AP Java*1 | AP Python |
|---|---|---|
| Supported input data types | DATE STRING CHAR[] BYTE[] | DATE BYTES STRING |
*1 - The API accepts and returns data in BYTE[] format. The customer application needs to convert the input into byte arrays before calling the API, and similarly, convert the output from byte arrays after receiving the response from the API.
*2 - The Protegrity Application Protectors only support bytes converted from the string data type. If int, short, or long format data is directly converted to bytes and passed as input to the Application Protector APIs that support byte as input and provide byte as output, then data corruption might occur.
For more information about Application protectors, refer to Application Protector.
1.1.4.30 -
The Protegrity Data Warehouse Protector is an advanced security solution designed to protect sensitive data at the column level. This enables you to secure your data, while still permitting access to authorized users. Additionally, the Data Warehouse Protector integrates seamlessly with existing database systems using the User-Defined Functions for an enhanced security. Protegrity protects data inside the data warehouses using various tokenization and encryption methods.
The following table shows the supported input data types for the Teradata protector with the Decimal token.
Table: Supported input data types for Data Warehouse protectors with Decimal token
| Data Warehouse Protectors | Teradata |
|---|---|
| Supported input data types | VARCHAR LATIN |
For more information about Data Warehouse protectors, refer to Data Warehouse Protector.
1.1.4.31 -
The following table shows supported input data types for Application protectors with the Decimal token.
Table: Supported input data types for Application protectors with Decimal token
| Application Protectors*2 | AP Java*1 | AP Python |
|---|---|---|
| Supported input data types | STRING CHAR[] BYTE[] | STRING BYTES |
*1 - The API accepts and returns data in BYTE[] format. The customer application needs to convert the input into byte arrays before calling the API, and similarly, convert the output from byte arrays after receiving the response from the API.
*2 - The Protegrity Application Protectors only support bytes converted from the string data type. If int, short, or long format data is directly converted to bytes and passed as input to the Application Protector APIs that support byte as input and provide byte as output, then data corruption might occur.
For more information about Application protectors, refer to Application Protector.
1.1.4.32 -
The Protegrity Data Warehouse Protector is an advanced security solution designed to protect sensitive data at the column level. This enables you to secure your data, while still permitting access to authorized users. Additionally, the Data Warehouse Protector integrates seamlessly with existing database systems using the User-Defined Functions for an enhanced security. Protegrity protects data inside the data warehouses using various tokenization and encryption methods.
The following table shows the supported input data types for the Teradata protector with the Email token.
Table: Supported input data types for Data Warehouse protectors with Email token
| Data Warehouse Protectors | Teradata |
|---|---|
| Supported input data types | VARCHAR LATIN |
For more information about Data Warehouse protectors, refer to Data Warehouse Protector.
1.1.4.33 -
The following table shows supported input data types for Application protectors with the Email token.
Table: Supported input data types for Application protectors with Email token
| Application Protectors*2 | AP Java*1 | AP Python |
|---|---|---|
| Supported input data types | STRING CHAR[] BYTE[] | STRING BYTES |
*1 – The API accepts and returns data in BYTE[] format. The customer application needs to convert the input into byte arrays before calling the API, and similarly, convert the output from byte arrays after receiving the response from the API.
*2 – The Protegrity Application Protectors only support bytes converted from the string data type. If int, short, or long format data is directly converted to bytes and passed as input to the Application Protector APIs that support byte as input and provide byte as output, then data corruption might occur.
For more information about Application protectors, refer to Application Protector.
1.1.4.34 -
The Protegrity Data Warehouse Protector is an advanced security solution designed to protect sensitive data at the column level. This enables you to secure your data, while still permitting access to authorized users. Additionally, the Data Warehouse Protector integrates seamlessly with existing database systems using the User-Defined Functions for an enhanced security. Protegrity protects data inside the data warehouses using various tokenization and encryption methods.
The following table shows the supported input data types for the Teradata protector with the Integer token.
Table: Supported input data types for Data Warehouse protectors with Integer token
| Data Warehouse Protectors | Teradata |
|---|---|
| Supported input data types | SMALLINT: 2 bytes INTEGER: 4 bytes BIGINT: 8 bytes |
For more information about Data Warehouse protectors, refer to Data Warehouse Protector.
1.1.4.35 -
The following table shows supported input data types for Application protectors with the Integer token.
Table: Supported input data types for Application protectors with Integer token
| Application Protectors | AP Java | AP Python |
|---|---|---|
| Supported input data types | SHORT: 2 bytes INT: 4 bytes LONG: 8 bytes | INT: 4 bytes and 8 bytes |
If the user passes a 4-byte integer with values ranging from -2,147,483,648 to +2,147,483,647, the data element for the protect, unprotect, or reprotect APIs should be an 4-byte integer token type. However, if the user uses 2-byte integer token type, the data protection operation will not be successful. For a Bulk call using the protect, unprotect, and reprotect APIs, the error code, 44, appears. For a single call using the protect, unprotect, and reprotect APIs, an exception will be thrown and the error message, 44, Content of input data is not valid appears.
For more information about Application protectors, refer to Application Protector.
1.1.4.36 -
The Protegrity Data Warehouse Protector is an advanced security solution designed to protect sensitive data at the column level. This enables you to secure your data, while still permitting access to authorized users. Additionally, the Data Warehouse Protector integrates seamlessly with existing database systems using the User-Defined Functions for an enhanced security. Protegrity protects data inside the data warehouses using various tokenization and encryption methods.
The following table shows the supported input data types for the Teradata protector with the Lower ASCII token.
Table: Supported input data types for Data Warehouse protectors with Lower ASCII token
| Data Warehouse Protectors | Teradata |
|---|---|
| Supported input data types | VARCHAR LATIN |
For more information about Data Warehouse protectors, refer to Data Warehouse Protector.
1.1.4.37 -
The following table shows supported input data types for Application protectors with the Lower ASCII token.
Table: Supported input data types for Application protectors with Lower ASCII token
| Application Protectors*2 | AP Java*1 | AP Python |
|---|---|---|
| Supported input data types | STRING CHAR[] BYTE[] | STRING BYTES |
*1 - The API accepts and returns data in BYTE[] format. The customer application needs to convert the input into byte arrays before calling the API, and similarly, convert the output from byte arrays after receiving the response from the API.
*2 - The Protegrity Application Protectors only support bytes converted from the string data type. If int, short, or long format data is directly converted to bytes and passed as input to the Application Protector APIs that support byte as input and provide byte as output, then data corruption might occur.
For more information about Application protectors, refer to Application Protector.
1.1.4.38 -
The Protegrity Data Warehouse Protector is an advanced security solution designed to protect sensitive data at the column level. This enables you to secure your data, while still permitting access to authorized users. Additionally, the Data Warehouse Protector integrates seamlessly with existing database systems using the User-Defined Functions for an enhanced security. Protegrity protects data inside the data warehouses using various tokenization and encryption methods.
The following table shows the supported input data types for the Teradata protector with the Numeric token.
Table: Supported input data types for Data Warehouse protectors with Numeric token
| Data Warehouse Protectors | Teradata |
|---|---|
| Supported input data types | VARCHAR LATIN |
For more information about Data Warehouse protectors, refer to Data Warehouse Protector.
1.1.4.39 -
The following table shows supported input data types for Application protectors with the Numeric token.
Table: Supported input data types for Application protectors with Numeric token
| Application Protectors*2 | AP Java*1 | AP Python |
|---|---|---|
| Supported input data types | STRING CHAR[] BYTE[] | STRING BYTES |
*1 - The API accepts and returns data in BYTE[] format. The customer application needs to convert the input into byte arrays before calling the API, and similarly, convert the output from byte arrays after receiving the response from the API.
*2 - The Protegrity Application Protector only supports bytes converted from the string data type. If any other data type is directly converted to bytes and passed as input to the Application Protectors APIs that support byte as input and provide byte as output, then data corruption might occur.
For more information about Application protectors, refer to Application Protector.
1.1.4.40 -
The Protegrity Data Warehouse Protector is an advanced security solution designed to protect sensitive data at the column level. This enables you to secure your data, while still permitting access to authorized users. Additionally, the Data Warehouse Protector integrates seamlessly with existing database systems using the User-Defined Functions for an enhanced security. Protegrity protects data inside the data warehouses using various tokenization and encryption methods.
Printable tokens are generated using APIs or UDFs. These APIs or UDFs accept STRING or VARCHAR as input. Then, the protected values can only be unprotected using the protector with which it was protected. If you are unprotecting the protected data using any other protector, then you could get inconsistent results.
Important: Tokenizing XML or JSON data with Printable tokenization will not return valid XML or JSON format output.
JSON and XML UDFs are supported for the Teradata Data Warehouse Protector.
The following table shows the supported input data types for the Teradata protector with the Printable token.
Table: Supported input data types for Data Warehouse protectors with Printable token
| Data Warehouse Protectors | Teradata |
|---|---|
| Supported input data types | VARCHAR LATIN |
For more information about Data Warehouse protectors, refer to Data Warehouse Protector.
1.1.4.41 -
Printable tokenization is recommended for APIs that accept BYTE [] as input and provide BYTE [] as output. If uniform encoding is maintained across protectors, tokens generated by these APIs can be used across various protectors.
To ensure accurate tokenization results, user must use ISO 8859-15 character encoding when converting String data to Byte. This input should then be passed to Byte APIs.
Note: If Printable tokens are generated using APIs or UDFs that accept STRING or VARCHAR as input, then the protected values can only be unprotected using the protector with which it was protected. If you are unprotecting the protected data using any other protector, then you could get inconsistent results.
The following table shows supported input data types for Application protectors with the Printable token.
Table: Supported input data types for Application protectors with Printable token
| Application Protectors*2 | AP Java*1 | AP Python |
|---|---|---|
| Supported input data types | STRING CHAR[] BYTE[] | STRING BYTES |
*1 - The API accepts and returns data in BYTE[] format. The customer application needs to convert the input into byte arrays before calling the API, and similarly, convert the output from byte arrays after receiving the response from the API.
*2 - The Protegrity Application Protector only supports bytes converted from the string data type. If any other data type is directly converted to bytes and passed as input to the Application Protectors APIs that support byte as input and provide byte as output, then data corruption might occur.
For more information about Application protectors, refer to Application Protector.
1.1.4.42 -
The Protegrity Data Warehouse Protector is an advanced security solution designed to protect sensitive data at the column level. This enables you to secure your data, while still permitting access to authorized users. Additionally, the Data Warehouse Protector integrates seamlessly with existing database systems using the User-Defined Functions for an enhanced security. Protegrity protects data inside the data warehouses using various tokenization and encryption methods.
The External IV is not supported in Data Warehouse Protector.
The following table shows the supported input data types for the Teradata protector with the Unicode Base64 token.
Table: Supported input data types for Data Warehouse protectors with Unicode Base64 token
| Data Warehouse Protectors | Teradata |
|---|---|
| Supported input data types | VARCHAR UNICODE |
For more information about Data Warehouse protectors, refer to Data Warehouse Protector.
1.1.4.43 -
The following table shows supported input data types for Application protectors with the Unicode Base64 token.
Table: Supported input data types for Application protectors with Unicode Base64 token
| Application Protectors*2 | AP Java*1 | AP Python |
|---|---|---|
| Supported input data types | BYTE[] CHAR[] STRING | BYTES STRING |
*1 - The API accepts and returns data in BYTE[] format. The customer application needs to convert the input into byte arrays before calling the API, and similarly, convert the output from byte arrays after receiving the response from the API.
*2 - The Protegrity Application Protectors only support bytes converted from the string data type. If int, short, or long format data is directly converted to bytes and passed as input to the Application Protector APIs that support byte as input and provide byte as output, then data corruption might occur.
For more information about Application protectors, refer to Application Protector.
1.1.4.44 -
The Protegrity Data Warehouse Protector is an advanced security solution designed to protect sensitive data at the column level. This enables you to secure your data, while still permitting access to authorized users. Additionally, the Data Warehouse Protector integrates seamlessly with existing database systems using the User-Defined Functions for an enhanced security. Protegrity protects data inside the data warehouses using various tokenization and encryption methods.
If short data tokenization is not enabled, the minimum length for Unicode tokenization type is 3 bytes. The input value in Teradata Unicode UDF is encoded using UTF16 due to which internally the data length is multiplied by 2 bytes. Hence, the Teradata Unicode UDF is able to tokenize a data length that is less than the minimum supported length of 3 bytes.
The External IV is not supported in Data Warehouse Protector.
The following table shows the supported input data types for the Teradata protector with the Unicode token.
Table: Supported input data types for Data Warehouse protectors with Unicode token
| Data Warehouse Protectors | Teradata |
|---|---|
| Supported input data types | VARCHAR UNICODE |
For more information about Data Warehouse protectors, refer to Data Warehouse Protector.
1.1.4.45 -
The Protegrity Data Warehouse Protector is an advanced security solution designed to protect sensitive data at the column level. This enables you to secure your data, while still permitting access to authorized users. Additionally, the Data Warehouse Protector integrates seamlessly with existing database systems using the User-Defined Functions for an enhanced security. Protegrity protects data inside the data warehouses using various tokenization and encryption methods.
The External IV is not supported in Data Warehouse Protector.
The following table shows the supported input data types for the Teradata protector with the Unicode Gen2 token.
Table: Supported input data types for Data Warehouse protectors with Unicode Gen2 token
| Data Warehouse Protectors | Teradata |
|---|---|
| Supported input data types | VARCHAR UNICODE |
For more information about Data Warehouse protectors, refer to Data Warehouse Protector.
1.1.4.46 -
The following table shows supported input data types for Application protectors with the Unicode Gen2 token.
Note: The string as an input and byte as an output API is unsupported by Unicode Gen2 data elements for AP Java and AP Python.
Table: Supported input data types for Application protectors with Unicode Gen2 token
| Application Protectors*2 | AP Java*1 | AP Python |
|---|---|---|
| Supported input data types | BYTE[] CHAR[] STRING | BYTES STRING |
*1 - The API accepts and returns data in BYTE[] format. The customer application needs to convert the input into byte arrays before calling the API, and similarly, convert the output from byte arrays after receiving the response from the API.
*2 - The Protegrity Application Protectors only support bytes converted from the string data type. If int, short, or long format data is directly converted to bytes and passed as input to the Application Protector APIs that support byte as input and provide byte as output, then data corruption might occur.
For more information about Application protectors, refer to Application Protector.
1.1.4.47 -
The following table shows supported input data types for Application protectors with the Unicode token.
Table: Supported input data types for Application protectors with Unicode token
| Application Protectors*2 | AP Java*1 | AP Python |
|---|---|---|
| Supported input data types | BYTE[] CHAR[] STRING | BYTES STRING |
*1 - The API accepts and returns data in BYTE[] format. The customer application needs to convert the input into byte arrays before calling the API, and similarly, convert the output from byte arrays after receiving the response from the API.
*2 - The Protegrity Application Protectors only support bytes converted from the string data type. If int, short, or long format data is directly converted to bytes and passed as input to the Application Protector APIs that support byte as input and provide byte as output, then data corruption might occur.
For more information about Application protectors, refer to Application Protector.
1.1.4.48 -
The Protegrity Data Warehouse Protector is an advanced security solution designed to protect sensitive data at the column level. This enables you to secure your data, while still permitting access to authorized users. Additionally, the Data Warehouse Protector integrates seamlessly with existing database systems using the User-Defined Functions for an enhanced security. Protegrity protects data inside the data warehouses using various tokenization and encryption methods.
The following table shows the supported input data types for the Teradata protector with the Upper-case Alpha token.
Table: Supported input data types for Data Warehouse protectors with Upper-case Alpha token
| Data Warehouse Protectors | Teradata |
|---|---|
| Supported input data types | VARCHAR LATIN |
For more information about Data Warehouse protectors, refer to Data Warehouse Protector.
1.1.4.49 -
The Protegrity Data Warehouse Protector is an advanced security solution designed to protect sensitive data at the column level. This enables you to secure your data, while still permitting access to authorized users. Additionally, the Data Warehouse Protector integrates seamlessly with existing database systems using the User-Defined Functions for an enhanced security. Protegrity protects data inside the data warehouses using various tokenization and encryption methods.
The following table shows the supported input data types for the Teradata protector with the Upper-Case Alpha-Numeric token.
Table: Supported input data types for Data Warehouse protectors with Upper-Case Alpha-Numeric token
| Data Warehouse Protectors | Teradata |
|---|---|
| Supported input data types | VARCHAR LATIN |
For more information about Data Warehouse protectors, refer to Data Warehouse Protector.
1.1.4.50 -
The following table shows supported input data types for Application protectors with the Upper-Case Alpha-Numeric token.
Table: Supported input data types for Application protectors with Upper-Case Alpha-Numeric token
| Application Protectors*2 | AP Java*1 | AP Python |
|---|---|---|
| Supported input data types | STRING CHAR[] BYTE[] | STRING BYTES |
*1 - The API accepts and returns data in BYTE[] format. The customer application needs to convert the input into byte arrays before calling the API, and similarly, convert the output from byte arrays after receiving the response from the API.
*2 - The Protegrity Application Protectors only support bytes converted from the string data type. If int, short, or long format data is directly converted to bytes and passed as input to the Application Protector APIs that support byte as input and provide byte as output, then data corruption might occur.
For more information about Application protectors, refer to Application Protector.
1.1.4.51 -
The following table shows supported input data types for Application protectors with the Upper-case Alpha token.
Table: Supported input data types for Application protectors with Upper-case Alpha token
| Application Protectors*2 | AP Java*1 | AP Python |
|---|---|---|
| Supported input data types | BYTE[] CHAR[] STRING | BYTES STRING |
*1 - The API accepts and returns data in BYTE[] format. The customer application needs to convert the input into byte arrays before calling the API, and similarly, convert the output from byte arrays after receiving the response from the API.
*2 - The Protegrity Application Protectors only support bytes converted from the string data type. If int, short, or long format data is directly converted to bytes and passed as input to the Application Protector APIs that support byte as input and provide byte as output, then data corruption might occur.
For more information about Application protectors, refer to Application Protector.
1.1.5 -
The Protegrity Data Warehouse Protector is an advanced security solution designed to protect sensitive data at the column level. This enables you to secure your data, while still permitting access to authorized users. Additionally, the Data Warehouse Protector integrates seamlessly with existing database systems using the User-Defined Functions for an enhanced security. Protegrity protects data inside the data warehouses using various tokenization and encryption methods.
Table: Supported Tokenization Types for Data Warehouse Protector
| Tokenization Type | Teradata |
|---|---|
| Credit Card Numeric Alpha Upper-case Alpha Alpha-Numeric Upper Alpha-Numeric Lower ASCII Datetime Decimal | VARCHAR LATIN |
| Integer | SMALLINT: 2 bytes INTEGER: 4 bytes BIGINT: 8 bytes |
| Unicode Gen2 | VARCHAR UNICODE |
| Binary | Not supported |
Table: Deprecated Tokenization Types supported by Data Warehouse Protector
| Tokenization Type | Teradata |
|---|---|
| Printable | VARCHAR LATIN |
| Date | DATE CHAR |
| Unicode | VARCHAR UNICODE |
| Unicode Base64 | Not supported |
For more information about Data Warehouse protectors, refer to Data Warehouse Protector.
1.1.6 -
The Protegrity Application Protector (AP) is a high-performance, versatile solution that provides a packaged interface to integrate comprehensive, granular security and auditing into enterprise applications.
Application Protectors support all types of tokens.
Table: Supported Tokenization Types by Application Protector
| Tokenization Type | AP Java*1 | AP Python | AP C |
|---|---|---|---|
| Credit Card Numeric Alpha Upper-case Alpha Alpha-Numeric Upper Alpha-Numeric Lower ASCII | STRING CHAR[] BYTE[] | STRING BYTES | STRING CHAR[] BYTE[] |
| Integer | SHORT: 2 bytes INT: 4 bytes LONG: 8 bytes | INT: 4 bytes and 8 bytes | SHORT: 2 bytes INT: 4 bytes LONG: 8 bytes |
| Datetime | DATE STRING CHAR[] BYTE[] | DATE STRING BYTES | DATE STRING CHAR[] BYTE[] |
| Decimal | STRING CHAR[] BYTE[] | STRING BYTES | STRING CHAR[] BYTE[] |
| Unicode Gen2 | STRING CHAR[] BYTE[] | STRING BYTES | STRING CHAR[] BYTE[] |
| Binary | BYTE[] | BYTES | BYTE[] |
*1 - If the input and output types of the API are BYTE[], then the customer application should convert the input to and output from the byte array, before calling the API.
Table: Deprecated Tokenization Types supported by Application Protector
| Tokenization Type | AP Java*1 | AP Python | AP C |
|---|---|---|---|
| Printable | STRING CHAR[] BYTE[] | STRING BYTES | STRING CHAR[] BYTE[] |
| Date | DATE STRING CHAR[] BYTE[] | DATE STRING BYTES | DATE STRING CHAR[] BYTE[] |
| Unicode | STRING CHAR[] BYTE[] | STRING BYTES | STRING CHAR[] BYTE[] |
| Unicode Base64 | STRING CHAR[] BYTE[] | STRING BYTES | STRING CHAR[] BYTE[] |
*1 - If the input and output types of the API are BYTE[], then the customer application should convert the input to and output from the byte array, before calling the API.
For more information about Application protectors, refer to Application Protector.
1.2 - Protegrity Format Preserving Encryption
In the Protegrity’s Format Preserving Encryption (FPE), input data is encrypted using a block cipher method. A cryptographic key and algorithm are applied to a block of data at once, rather than one bit at a time. For example, using FPE, a 16-digit credit card number is encrypted such that the generated ciphertext is another 16-digit number. Since encrypted data retains its original format with FPE, there is no need for any schema-related changes to the database or application.
Protegrity supports FPE using NIST-approved Format preserving, Feistel based type 1 (FF1) mode of operation with AES-256 block cipher encryption algorithm.
Protegrity Format Preserving Encryption (FPE) currently supports encryption using AES-256 block cipher algorithm.
For more information about the AES-256 algorithm, refer to AES-256.
1.2.1 - FPE Properties
The following table describes the properties provided by FPE.
Table: FPE Properties
FPE Property | Description |
User configured FPE properties | |
Name | Unique name that identifies the FPE data element. |
Protection Method | FPE NIST 800-38G NIST 800-38G is the recommended FPE specification by NIST that identifies the supported FPE cipher. |
Plaintext Alphabet | Plaintext alphabet type of the data that is to be encrypted. The following data types are supported for encryption:
The plaintext alphabet maps to code points that denotes a range of accepted characters. For more information about code point mappings, refer to Code points. |
Minimum Input Length | The default minimum supported input data length is 2 bytes and configurable up to 10 bytes. The default minimum supported input length for Credit Card Number (CCN) is 8 bytes and configurable up to 10 bytes. |
Tweak Input Mode | The tweak input process ensures that the same data in different position encrypts to a unique value. Tweak input can be derived from the following options:
|
From Left | Number of characters from left to retain in clear in encrypted output. |
From Right | Number of characters from right to retain in clear in encrypted output. |
Allow Short Data | Data is considered short when the amount of encrypted characters is less than the "Minimum Input Length". Based on whether the short data is supported or not, the possible options are "No, generate error", or "No, return input as it is". This is supported by Numeric and Alpha-Numeric data types only. The FPE does not support data less than 2 bytes, hence you can set the minimum input length value accordingly. For more information about short data support, refer to Length Preserving. |
Special numeric alphabet handling | Here are the specific options for numeric data type validation with different Credit Card Number (CCN) checks:
|
Read-only FPE properties | |
Ciphertext Alphabet | Ciphertext alphabet type of the encrypted data. This property value is same as the Plaintext Alphabet value. |
Key Input | Internally generated by the active Key Store. For more information about the key store, refer to Key Store. |
FPE Mode | Mode of operation for the block cipher algorithm with FF1 as the supported mode. |
Pseudorandom Function (PRF) | Block cipher algorithm that is used for encryption with AES-256 as the supported algorithm. |
Feistel Rounds | 10 |
Max tweak length | The maximum supported tweak input length is 256 bytes. |
Support Delimiters | Any input other than the supported data type is treated as a delimiter. If the input contains only delimiters, then the output value is equal to the input. By default, delimiters are supported for Numeric and Alpha-Numeric data type. Credit Card Number (CCN) data type does not support delimiters. |
Preserve Length | The length preservation setting is true for:
|
Other FPE properties | |
Maximum Input Length (including delimiters) | The following are the maximum input lengths for the supported data types:
The recommended maximum input size for the FPE data elements is 4096 characters. The performance decreases as the input length increases. |
Table: Examples of Format Preserving Encryption
| Input Value | Encrypted Value | Comments |
|---|---|---|
| 123456789012345 | 187868154999435 | Plaintext alphabet – Numeric Tweak Input – Extract from Input Message Left=1, Right=1 Allow Short Data = No, return input as it is Minimum Input Length=3 |
| Protegrity1234567 | PyNqSJybYp1234567 | Plaintext alphabet – Alpha Tweak Input – API Argument Left=1, Right=0 Allow Short Data = No, generate error Minimum Input Length=2 |
| Protegrity1234567 | ProZSNbyADNoPb2ns | Plaintext alphabet – Alpha-Numeric Tweak Input – Extract from Input Message Left=3, Right=0 Allow Short Data = No, return input as it is Minimum Input Length=10 |
| 43211234567890 | 76454340562108 | Plaintext alphabet – CCN Tweak Input – Extract from Input Message Left=0, Right=0 Allow Short Data = No, generate error Minimum Input Length=9 Invalid Card Type=True |
| þrõtégrîtÝ@123456789 | þràñTÿwõùÞ@123456789 | Plaintext alphabet – Unicode Basic Latin and Latin1 Supplement Alpha Tweak Input – Extract from Input Message Left=2, Right=1 Allow Short Data = No, generate error Minimum Input Length=4 |
| þrõtégrîtÝ@123456789 | þrWtçjÑHÿÖ@9íKLksvp9 | Plaintext alphabet – Unicode Basic Latin and Latin1 Supplement Alpha-Numeric Tweak Input – API Argument Left=2, Right=1 Allow Short Data = No, return input as it is Minimum Input Length=6 |
FPE Support for Protectors
- The maximum supported input length differs for different protectors based on the input length supported by the protector.
For more information maximum supported input length for different protectors, refer to Minimum and Maximum Input Length. - The maximum input length supported by the PTY.INS_UNICODENVARCHAR2 UDF for the Oracle Database Protectors is 2000 characters.
- If you are using Format Preserving Encryption (FPE) with Teradata UDFs, you can extend the maximum data length size provided by these UDFs, which is up to 47407 bytes by default.
- Starting from v10.0.x, the Format Preserving Encryption (FPE) is only supported by the following UDFs in Teradata Protector:
- pty_varcharunicodeins
- pty_varcharunicodesel
- pty_varcharunicodeselex
The maximum data length size for these UDFs can be modified in the createvarcharunicode.sql file.For more information about updating the output buffer parameter, refer to Updating the Output Buffer for the Teradata UDFs.
- The REPLACE_UDFVARCHARTOKENMAX parameter value for these functions can be set up to 64000. Teradata supports the maximum row size length of approximately 64000 bytes.
- Starting from v10.0.x, Masking is not supported for FPE data elements as the default encoding set is UTF-8.
- For FPE data elements, the External IV is only supported with the Alpha, Numeric, and Alpha-Numeric plaintext alphabets.
- The string as an input and byte as an output API is unsupported by FPE data elements for the AP Java and AP Python.
For more information about empty string handling by protectors, refer to Empty String Handling by Protectors.
1.2.2 - Code Points
The Unicode Standard is a character encoding system that supports the processing and representation of text from diverse languages. It includes various character encoding schemes, such as UTF-8 and UTF-16, which use character code points as input and generate encoded numeric values using pre-defined formulas.
The Unicode code space is divided into 17 planes:
- Basic Multilingual Plane (BMP): Contains the most commonly used characters.
- 16 Supplementary Planes
Format-Preserving Encryption (FPE) supports encryption for BMP with Basic Latin (ASCII) and Latin-1 supplement blocks of characters.
For more information about the Unicode Standard and code points, refer to http://www.unicode.org/ and http://www.unicode.org/charts/ respectively.
The following table represents the Unicode code points for FPE-supported plaintext alphabet types and encodings.
Table: Unicode Code Points for FPE-supported Plaintext Alphabet Types
| Plaintext Alphabet | Codepoint range |
|---|---|
| Numeric | U+0030 - U+0039 |
| Alpha | U+0041 - U+005A U+0061 - U+007A |
| Alpha-Numeric | U+0030 - U+0039 U+0041 - U+005A U+0061 - U+007A |
| Unicode Basic Latin and Latin-1 Supplement Alpha | U+0041 - U+005A U+0061 - U+007A U+00C0 - U+00FF (excluding U+00D7 and U+00F7) |
| Unicode Basic Latin and Latin-1 Supplement Alpha-Numeric | U+0030 - U+0039 U+0041 - U+005A U+0061 - U+007A U+00C0 - U+00FF (excluding U+00D7 and U+00F7) |
1.2.3 - Tweak Input
The tweak input is derived through either of the following methods:
- Extract from input message - If the tweak is set to be derived from input message, then the left and right property settings are used as a configurable tweak option.
- API argument - If the tweak is set to be derived through API argument, then the tweak value is provided as an input parameter through the API during the protect or unprotect operation.
The resultant tweak input is zero for the following conditions:
- When extracting the tweak from input message, the left and right property settings are set to zero.
- When tweak input is to be derived as an API argument, the tweak input parameter is empty or not specified.
The maximum supported tweak input length is 256 bytes.
1.2.4 - Left and Right Settings
Starting from v10.0.x, the new FPE data elements created with the Left and Right settings cannot be deployed to the previous versions of protectors.
It is recommended not to use the Left and Right settings for the FPE token as these settings are not present in the version of FPE that has been approved by NIST. If you use the Left and Right settings, then it reduces the strength of the FPE token.
A maximum of 99 characters can be retained in clear with the left and right setting. These characters are used to generate the tweak.
1.2.5 - Handling Special Numeric Credit Card Data
The Format Preserving Encryption (FPE) for Credit Card Number (CCN) is handled by configuring numeric data type as the plaintext alphabet. The following default settings for CCN are applicable:
- Credit Card Number (CCN) data type does not support delimiters.
- Short Data Encryption is not supported by CCN. The CCN supports a minimum input length of 8 bytes.
For more information about Invalid Card Type (ICT), Invalid Luhn, and Alphabet Indicator validation for CCN, refer to Credit Card.
1.3 - Protegrity Encryption
Encryption algorithms vary by input and output data types they support. Some preserve length, while others do not.
Table: Encryption Algorithms - Supported Length
Encryption Algorithm | Preserves Length | Maximum Length |
|---|---|---|
3DES | No | Depends on protector and data type. |
AES-128 | No | |
AES-256 | No | |
CUSP 3DES | Yes*1 | |
CUSP AES-128 | Yes*1 | |
CUSP AES-256 | Yes*1 |
*1 - All CUSP are length preserving as long as no CRC or Key ID is configured.
Encryption Algorithms for Protectors
Application Protector
The Protegrity solutions can encode data with the following encryption algorithms:
Table: Input Data Types Supported by Application Protectors
| Encryption Algorithm | AP Java*1*2 | AP Python | AP C |
|---|---|---|---|
| 3DES AES-128 AES-256 CUSP 3DES CUSP AES-128 CUSP AES-256 | STRING CHAR[] BYTE[] | STRING BYTES INT LONG FLOAT | STRING CHAR[] BYTE[] |
*1 - If the input and output types of the API are BYTE [], the customer application should convert the input to a byte array. Then, call the API and convert the output from the byte array.
*2 - The output type is BYTE[] only. The input type String or Char is supported with the API that provides BYTE[] output type.
*3 - You must pass the encrypt_to=bytes keyword argument to the AP Python protect API for encrypting data. However, if you are encrypting or re-encrypting data already in bytes format, you do not need to pass the encrypt_to=bytes argument to the protect and reprotect APIs.
Data Warehouse Protector
The Protegrity solutions can encode data with the following encryption algorithms:
Table: Input Data Types Supported by Data Warehouse Protectors
| Encryption Algorithm | Teradata |
|---|---|
| 3DES AES-128 AES-256 CUSP 3DES CUSP AES-128 CUSP AES-256 | VARCHAR LATIN CHAR FLOAT DECIMAL DATE VARCHAR UNICODE SMALLINT INTEGER BIGINT JSON XML |
Application Protector
For the Input type / Character set property, refer to Supported Input Data Types by Application Protectors for supported data types.
Big Data Protector
For the Input type / Character set property, refer to Supported Input Data Types by Big Data Protectors for supported data types.
1.3.1.2 - CUSP
Protegrity supports CUSP encryption. Cryptographic Unit Service Provider (CUSP) is used for handling data with length that is not a multiple of the key block length. It is often used when you want to maintain the original length of the data. The length of encrypted data in CUSP mode will always equal the length of clear text data.
CUSP is best suited for varying types of environments and usage scenarios. For very small-sized data, encrypting with a stream cipher such as CUSP could result in reduced security because it may not include an initialization vector (IV). CUSP is appropriate if the data is greater than one block in size. Larger amounts of data encrypted with CUSP are secure because the CUSP algorithm uses standard chaining block ciphering for the cipher block size pieces of data. For the final data piece less than a cipher block, the CUSP algorithm uses a generated IV only.
The CUSP mode of encryption is not certified by NIST. It is therefore not a part of the NIST standards, or of any other generally accepted body of standards, and has not been formally reviewed by the cryptographic community. Therefore, the use of CUSP mode would be outside the scope of most data security regulations.
Protegrity supports three types of CUSP encryption: CUSP 3DES, CUSP AES-128, and CUSP AES-256.
CUSP AES-128 and CUSP AES-256
CUSP AES-128 and CUSP AES-256 CBC encrypt data in 16 byte blocks using AES key. Any remaining data is ciphered using the same AES key. The IV for this encryption is derived from the double encrypted last full block. AES-128 uses a 128 bit key and AES-256 uses a 256 bit key.
Table: CUSP Encryption Algorithm Properties
| Properties | Values |
|---|---|
| Name | CUSP AES-128 CUSP AES-256 |
| Operation Mode | CBC – Cipher Block Chaining, combined with ECB - Electronic codebook |
| Encryption Properties | CRC, Key ID |
| Length Preservation with padding formula for non-length preserving algorithms | Yes No, if CRC or Key ID are used. |
| Minimum Length | None |
| Maximum Length | 2147483610 bytes (2 GB) |
| Specifics of algorithm | A modified block algorithm mainly used in environments where an IBM mainframe is present. |
The following table shows examples of the way in which the value “Protegrity” will be encrypted with the CUSP algorithm.
Table: Examples of CUSP Encryption
| Encryption Algorithm | Output Value |
|---|---|
| CUSP AES-128 | 0x1D95BEFC71590AA7B5C3 |
| CUSP AES-256 | 0x1C7244BB85827D36435D |
CUSP Encryption Properties for Protectors
The Application Protector, Big Data Protector, and Database Protector can use CUSP encryption algorithm.
For the protect operation, the Input type / Character set can be any value depending upon the DB, then the Output type / Character set is Binary. For the unprotect operation, the Input type / Character set is binary and the Output type / Character set can be any value depending upon the DB.
Application Protector
For the Input type / Character set property -
- Refer to Supported Input Data Types by Application Protectors for supported data types.
Big Data Protector
For the Input type / Character set property, refer to Supported Input Data Types by Big Data Protectors for supported data types.
1.3.1.3 - 3DES
Deprecated
Starting from v10.0.x, the 3DES protection method is deprecated based on NIST recommendations around weak ciphers.
It is recommended to use the AES-128 and AES-256 protection method instead of the 3DES protection method.
The 3DES algorithm applies the DES algorithm. It is the first USA national standard of block ciphering, three times to each data block. The Triple Data Encryption Standard (3DES) cipher key size is 168 bits, compared to 56 bits key of DES. The 3DES algorithm, using the DES cipher algorithm, provides a simple method of data protection.
Table: 3DES Encryption Algorithm Properties
| Properties | Values |
|---|---|
| Name | 3DES |
| Operation Mode | EDE3 CBC - triple CBC DES encryption with three keys. - CBC = Cipher Block Chaining - EDE = E(ks3,D(ks2,E(ks1,M))) - E=Encrypt - D=Decrypt |
| Encryption Properties | IV, CRC, Key ID |
| Length Preservation with padding formula for non-length preserving algorithms | No For explanation on calculating data length, refer to Data Length and Padding in Encryption. |
| Minimum Length | None |
| Maximum Length | 2147483610 bytes (2 GB) |
| Specifics of algorithm | A block cipher with 168 bit key |
The following table shows examples of the way in which the value “Protegrity” will be encrypted with the 3DES algorithm.
Table: Examples of 3DES Encryption
| Encryption Algorithm | Output Value | Comments |
|---|---|---|
| 3DES | 0x4AA7402C77808D80D093A15A51318D19 | The input value, which is 10 bytes long, is padded to become 16 bytes. This represents two blocks of 8 bytes. The output value consists of 16 bytes. |
| 3DES-CRC | 0xF1B7EFD118D27E5568AB192CE2A12E35 | The input value, which is 10 bytes long with a checksum of 4 bytes, is padded to become 16 bytes. This represents two blocks of 8 bytes. The output value consists of 16 bytes. |
| 3DES-IV | 0x5126D8EB02A213922FB7E6DEDA861ABF661A01AEF7CAEC86 | 8 bytes IV is added. The output value consists of 24 bytes. This represents three blocks of 8 bytes. |
| 3DES-KeyID | 0x200479E1CC7983040987362DA49DD68B6E16 | 2 bytes are added for the Key ID. The output value consists of 18 bytes. |
| 3DES-IV-CRC-KeyID | 0x20055B72BF6E9B55B799A9DF51587E93ED8CF42E48A80F9474C0 | The input value, which is 10 bytes long with a checksum of 4 bytes, is padded to a total length of 16 bytes. Additionally, 8 bytes IV and 2 bytes of Key ID are added to the output. The final output value consists of 26 bytes. |
CUSP 3DES
Deprecated
Starting from v10.0.x, the CUSP 3DES protection method is deprecated based on NIST recommendations around weak ciphers.
It is recommended to use the CUSP AES-128 and CUSP AES-256 protection method instead of the CUSP 3DES protection method.
CUSP 3DES uses a 3DES key with the CUSP expansion to the 3DES algorithm. Data is CBC encrypted in 8 byte blocks. Any remaining data is stream ciphered using the same 3DES key with an IV of a double encrypted last full block.
Table: CUSP 3DES Encryption Algorithm Properties
| Properties | Values |
|---|---|
| Name | CUSP 3DES |
| Operation Mode | CBC – Cipher Block Chaining, combined with ECB - Electronic codebook |
| Encryption Properties | CRC, Key ID |
| Length Preservation with padding formula for non-length preserving algorithms | Yes No, if CRC or Key ID are used. |
| Minimum Length | None |
| Maximum Length | 2147483610 bytes (2 GB) |
| Specifics of algorithm | A modified block algorithm mainly used in environments where an IBM mainframe is present. |
The following table shows examples of the way in which the value “Protegrity” will be encrypted with the CUSP 3DES algorithm.
| Encryption Algorithm | Output Value | Comments |
|---|---|---|
| CUSP 3DES | 0xD7DE903612B29BA825B4 | Length of the output value is the same as input value - 10 bytes as CUSP preserves length. |
| CUSP 3DES - CRC | 0x7920A9AF0CEE96E1C4EDB8F5E9EF | 4 bytes checksum is added. The output value consists of 14 bytes. |
| CUSP 3DES - KeyID | 0x200525200D62B05DCB17E8DB | 2 bytes Key ID is added. The output value consists of 12 bytes. |
| CUSP 3DES - CRC-KeyID | 0x20068C2A54ACB80DB3C3332421B8851B | 4 bytes checksum and 2 bytes of Key ID are added. The output value consists of 16 bytes. |
3DES Encryption Properties for Protectors
The Application Protector, Big Data Protector, and Database Protector can use 3DES encryption algorithm.
All protectors support encryption properties, such as, IV, CRC, and Key ID. The Key ID is a part of the encrypted data.
The 3DES encryption algorithm can also be used with File Protectors.
For the protect operation, the Input type / Character set can be any value depending upon the DB, then the Output type / Character set is Binary. For the unprotect operation, the Input type / Character set is binary and the Output type / Character set can be any value depending upon the DB.
Application Protector
For the Input type / Character set property, refer to Supported Input Data Types by Application Protectors for supported data types.
Big Data Protector
For the Input type / Character set property, refer to Supported Input Data Types by Big Data Protectors for supported data types.
1.3.2 - Encryption Properties - IV, CRC, Key ID
The encryption properties include Initialization Vector (IV), Integrity Check (CRC), and Key ID.
For encrypting Unstructured Data using File Protector, you can enable the Key ID property in the encryption data element to be used with unstructured policy.
The following table describes encryption properties.
Table: Encryption Properties
| Feature | Description |
|---|---|
| Initialization Vector (IV) | Encrypting the same value with the IV property will result in different crypto text for the same value. |
| Integrity Check (CRC) | A type of function that takes as input a data stream of any length and produces as output a value of a certain fixed size. A CRC can be used as a checksum to detect alteration of data during transmission or storage. |
| Key ID | A Key ID is an identifier that associates encrypted data with the protection method so that the data can be decrypted regardless of where it ultimately resides. A data element can have multiple instances of key IDs associated with it. When the Key ID property is turned on there will be an extra 2 bytes in the beginning of the cipher text. This piece of information contains the reference to the Key ID that was used to produce the cipher text. Caution: It is recommended not to create a large number of keys. All Data Encryption Keys (DEKs) are generated and decrypted using the configured Key Store. This process might take some time and incur costs. |
Key IDs
Key IDs are a way to correlate a data element key with its encrypted data. Data elements can have multiple key IDs associated with them. The Key IDs facilitate tasks related to the management of sensitive data such as archiving and key rotation. It is important to note that you can create a maximum number of 8191 keys.
Caution: It is recommended not to create a large number of keys. All Data Encryption Keys (DEKs) are generated and decrypted using the configured Key Store. This process might take some time and incur costs.
The following table describes the key ID states.
Table: Key ID States
| Feature | Description |
|---|---|
| Pre-Active | The initial state of a key that is created by the Create Key option. |
| Active | A key becomes Active once it is distributed to a protector by deploying the data security policy. |
| Deactivated | An Active key becomes automatically Deactivated when the data security policy is redeployed with a new Pre-Active key. |
For more information about key ID states, refer to Working with Keys.
Table: Examples of Encryption Properties for AES-256 algorithm (initial value is “Protegrity”)
| Encryption Property | Encrypted Values | Comments |
|---|---|---|
| AES-256-IV | 0x1361D69E18A692507895780C2FB26DD7869979CC1BB6612A994B5EA5585FCF0B 0xE2D579E937EE92C67167749151B30809A538CC6A6871B8D9B0C17FBA6F1A8D94 | Encrypting the same value with the IV property resulted in different output values. Decrypt will be performed correctly for both values. |
| AES-256-CRC | 0x7A0C701B4B30E6BF141196FE44F125BD 0x3964DD0ACAF5B39D159BE7518B46D84A8DCC0B62F2183B3888FEF82B65C7F87D | The first value is a result of encryption of “Protegrity1” along with a CRC checksum of 4-bytes. The resulting input is 15-bytes which fit a single AES block. The second value is a result of encryption of “Protegrity12” along with a CRC checksum of 4-bytes. The resulting input is 16-bytes which requires two AES blocks. |
| AES-256-KeyID | 0x200936F85C3BD86F008A57C3DF33F200BC42 0x20157C0E98A1C9E4E6F4D1DCB6FE72B2DA69 | Key ID of the first value equals to 9 (0x2009 in HEX), key ID of the second value equals to 21 (0x2015 in HEX). |
Key IDs in Protectors
For all protectors, the Key IDs can only be used with data elements that use AES, CUSP, or 3DES algorithms. The Key ID is included in the encrypted value.
For more information on the format of encrypted data, refer to Data Length and Padding in Encryption.
1.3.3 - Data Length and Padding in Encryption
Cipher text are formatted in a specific way depending on which encryption properties are being used.
The block ciphers operate on blocks of data. These encryption algorithms require padding. The block size for AES is 16 bytes, and for 3DES it is 8 bytes. The input is always padded, even if it is already a multiple of the block size. Padding ensures that the input data, along with the checksum, if enabled, equals the algorithm’s block size.
Ciphertext Format
Ciphertext format uses an encryption algorithm to convert the plaintext into encrypted text. The length of an encrypted value for a non-length-preserving encryption method, such as 3DES, AES-128, or AES-256, depends on the block size and the length of the input data. The encryption properties used, including Key ID, CRC, and IV also influence the encrypted value’s length.
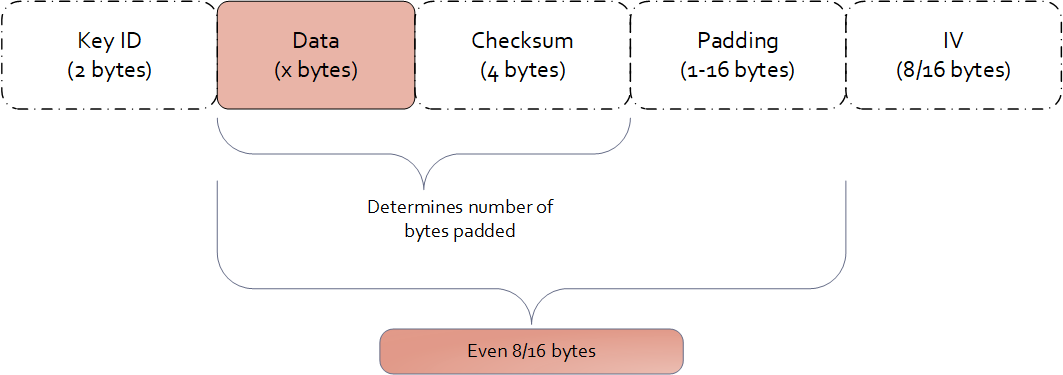
Examples of data length calculation by column types are provided in Examples of Column Sizes Calculation for Encryption.
1.3.4 -
Encryption Algorithm | Oracle |
3DES AES-128 AES-256 CUSP 3DES CUSP AES-128 CUSP AES-256 | varchar2 char number real float date raw blob clob |
1.3.5 -
The Protegrity solutions can encode data with the following encryption algorithms:
Table: Input Data Types Supported by Data Warehouse Protectors
| Encryption Algorithm | Teradata |
|---|---|
| 3DES AES-128 AES-256 CUSP 3DES CUSP AES-128 CUSP AES-256 | VARCHAR LATIN CHAR FLOAT DECIMAL DATE VARCHAR UNICODE SMALLINT INTEGER BIGINT JSON XML |
1.3.6 -
The Protegrity solutions can encode data with the following encryption algorithms:
Table: Input Data Types Supported by Application Protectors
| Encryption Algorithm | AP Java*1*2 | AP Python | AP C |
|---|---|---|---|
| 3DES AES-128 AES-256 CUSP 3DES CUSP AES-128 CUSP AES-256 | STRING CHAR[] BYTE[] | STRING BYTES INT LONG FLOAT | STRING CHAR[] BYTE[] |
*1 - If the input and output types of the API are BYTE [], the customer application should convert the input to a byte array. Then, call the API and convert the output from the byte array.
*2 - The output type is BYTE[] only. The input type String or Char is supported with the API that provides BYTE[] output type.
*3 - You must pass the encrypt_to=bytes keyword argument to the AP Python protect API for encrypting data. However, if you are encrypting or re-encrypting data already in bytes format, you do not need to pass the encrypt_to=bytes argument to the protect and reprotect APIs.
1.4 - No Encryption
The No Encryption protection method when applied lets sensitive data be stored in the clear. It is highly transparent, which means that the implementation of this method does not cause any changes in the target environment.
If you are reprotecting data using the No Encryption method, then the reprotect operation fails in the following scenarios:
- If the data was previously protected using a tokenization or encryption method.
- If the user performing the reprotection of data does not have the unprotect privileges on the data element that was used to protect the data.
Table: No Encryption Algorithm Properties
| Properties | Values |
|---|---|
| Name | No Encryption |
| Operation Mode | N/A |
| Length Preservation | Yes |
| Minimum Length | None |
| Maximum Length | ≥500 bytes |
| Specifics of algorithm | Does not protect data at rest by changing it. |
The following table shows examples of the way in which a value will be protected with the No Encryption algorithm.
Table: Output Values for No Encryption Algorithm
| Protection Method | Input Value | Output Value | Comments |
|---|---|---|---|
| No Encryption | Protegrity | Protegrity | The value is stored in the clear. |
No Encryption for Protectors
The Input type / Character set for all protectors vary across DBs. The Output type / Character set is the same as the input type. For example; if the input type is an integer, then the output type is also an integer.
Application Protector
Table: Input Data Types Supported by Application Protectors
| Protection Method | AP Java*1 | AP Python |
|---|---|---|
| NoEncryption | SHORT INT LONG FLOAT DOUBLE STRING CHAR[] BYTE[] | STRING BYTES FLOAT INT |
*1 - If the input and output types of the API are BYTE [], the customer application should convert the input to a byte array. Then, call the API and convert the output from the byte array.
For more information about Application protectors, refer to Application Protector.
Big Data Protector
Table: Input Data Types Supported by Big Data Protectors
| Protection Method*1 | MapReduce | Hive | Pig | HBase | Impala | Spark | Spark SQL | Trino |
|---|---|---|---|---|---|---|---|---|
| NoEncryption | BYTE[] INT LONG | CHAR STRING FLOAT DOUBLE INT BIGINT HIVEDECIMAL | CHARARRAY INT | BYTE[] | STRING INT FLOAT DOUBLE | BYTE[] STRING FLOAT DOUBLE SHORT INT LONG | STRING FLOAT DOUBLE SHORT INT LONG BIGDECIMAL*2 | VARCHAR SMALLINT INT BIGINT DATE TIMESTAMP DOUBLE DECIMAL |
*1 - The customer application should convert the input to and output from byte array.
*2 - If decimal format data is protected by the Decimal UDFs using the No Encryption data element, then the protected data is trimmed to the scale of 18 digits.
For more information about Big Data protectors, refer to Big Data Protector.
Data Warehouse Protector
Table: Input Data Types Supported for Data Warehouse Protectors
| Protection Method | Teradata |
|---|---|
| NoEncryption | VARCHAR CHAR INTEGER FLOAT DECIMAL DATE SMALLINT |
Database Protectors
Oracle Database Protector
The supported input data types for the Oracle Database Protector are listed below.
| Protection Method | Supported Input Data Types |
|---|---|
| NoEncryption | VARCHAR2 |
| NoEncryption | CHAR |
| NoEncryption | NUMBER |
| NoEncryption | REAL |
| NoEncryption | FLOAT |
| NoEncryption | DATE |
| NoEncryption | RAW |
| NoEncryption | BLOB |
| NoEncryption | CLOB |
1.5 - Monitoring
As an organization, if you plan to monitor and assess users that are trying to access the data without protection, choose the Monitor protection method. This element does not restrict any data security operation for any user, but instead audits attempts to add, access, or change data by users. The audit logs generated on the protectors are forwarded to Insight.
With the Monitor method, sensitive data is accessible by users. The usage of this data is monitored through audit logs that are generated on the protectors and then delivered to Insight.
The monitoring method is controlled by the security officer from the centrally administered ESA Appliance.
The Monitoring protection method works in a similar way as the No Encryption method. However, it gives full access to all users by default and does not require roles to be added to the policy. Access can be changed by adding a role and setting role permissions.
Table: Monitor Algorithm Properties
| Properties | Values |
|---|---|
| Name | Monitor |
| Operation Mode | N/A |
| Length Preservation with padding formula for non-length preserving algorithms | Yes |
| Specifics of algorithm | Does not protect data at rest by changing it. Used for monitoring and auditing. |
The following table shows examples of the way in which a value will be protected with the Monitor algorithm.
Table: Output Values for Monitor Algorithm
| Protection Method | Input Value | Output Value | Comments |
|---|---|---|---|
| Monitor | Protegrity | Protegrity | The value is stored in the clear. An audit log is generated. |
Monitoring for Protectors
The Input type / Character set for all protectors vary across DBs. The Output type / Character set is the same as the input type. For example; if the input type is an integer, then the output type is also an integer.
Application Protector
Table: Input Data Types Supported by Application Protectors
| Protection Method | AP Java | AP Python |
|---|---|---|
| Monitor | SHORT INT LONG FLOAT DOUBLE STRING CHAR[] BYTE[] | STRING BYTES FLOAT INT |
If the input and output types of the API are BYTE [], the customer application should convert the input to a byte array. Then, call the API and convert the output from the byte array.
For more information about Application protectors, refer to Application Protector.
Big Data Protector
Table: Input Data Types Supported by Big Data Protectors
| Protection Method*1 | MapReduce | Hive | Pig | HBase | Impala | Spark | Spark SQL | Trino |
|---|---|---|---|---|---|---|---|---|
| Monitor | BYTE[] INT LONG | CHAR STRING FLOAT DOUBLE INT BIGINT HIVEDECIMAL | CHARARRAY INT | BYTE[] | STRING INT FLOAT DOUBLE | BYTE[] STRING FLOAT DOUBLE SHORT INT LONG | STRING FLOAT DOUBLE SHORT INT LONG BIGDECIMAL*2 | VARCHAR SMALLINT INT BIGINT DATE TIMESTAMP DOUBLE DECIMAL |
*1 - The customer application should convert the input to and output from byte array.
*2 - If decimal format data is protected by the Decimal UDFs using the Monitor data element, then the protected data is trimmed to the scale of 18 digits.
For more information about Big Data protectors, refer to Big Data Protector.
Data Warehouse Protector
Table: Input Data Types Supported for Data Warehouse Protectors
| Protection Method | Teradata |
|---|---|
| Monitor | VARCHAR CHAR INTEGER FLOAT DECIMAL DATE SMALLINT |
Database Protectors
Oracle Database Protector
The supported input data types for the Oracle Database Protector are listed below.
| Protection Method | Supported Input Data Types |
|---|---|
| Monitor | VARCHAR2 |
| Monitor | CHAR |
| Monitor | NUMBER |
| Monitor | REAL |
| Monitor | FLOAT |
| Monitor | DATE |
| Monitor | RAW |
| Monitor | BLOB |
| Monitor | CLOB |
1.6 - Masking
As an organization, if you plan to restrict access such that only users with required privileges can view sensitive data, while other users view masked data, the Masking method can be used. Considering the sensitive data is residing in protection endpoint in clear, based on how the Masking data element is configured, users are granted view access. The masking data element as a default considers all users as restricted users and displays masked sensitive data. If any user must be granted access to view clear data, then it must be configured through roles.
For example, consider policy users user1 and user2 trying to access CCN data. As default, when policy with the masking data element is created, both users view the CCN data in masked format, such as ****45856655****.
If the user1 is granted privilege to view data in clear, then user1 sees the CCN data in clear while the user2 still sees masked CCN data.
With the Masking method, the users who should not use sensitive assets can be prevented from receiving this data, even if the data is stored in the clear.
Unlike Masking data element, masking cannot be enabled for No Encryption data element. It can only be mapped to roles in policy. In contrast, when masking is enabled through a Masking data element, the data is masked for all users unless authorized users have permission to view it in clear.
Similar to the No Encryption method, implementation of the Masking method does not cause any changes in the target environment.
The Masking data element is created in combination with the Masks option. The Masks option helps define how the masked data output format is visible to users.
The masking method is controlled by the security officer from the centrally administered ESA Appliance.
For more information about creating masks, refer to Creating a Mask.
Note:
If a masking data element is configured in the policy, and username is not specified in the policy, an error message will display when the data is protected. That error message appears as:The user does not have the appropriate permissions to perform the requested operation
Table: Masking Algorithm Properties
| Properties | Values |
|---|---|
| Name | Masking |
| Operation Mode | N/A |
| Length Preservation with padding formula for non-length preserving algorithms | Yes |
| Specifics of algorithm | Does not protect data at rest by changing it. Protection comes from masking. |
The following table shows examples in which a value will be protected with the Masking algorithm.
Table: Output Values for Masking Algorithm
| Protection Method | Roles in Data Element | Input Value | Output Value | Comments |
|---|---|---|---|---|
| Masking | None | Protegrity | None | The following error message appears: “The user does not have the appropriate permissions to perform the requested operation” |
| Masking | exampleuser1 with Unprotect access and output format is set to “Clear” | Protegrity | - All users: "****egrity" - exampleuser1: “Protegrity” | Any other user apart from exampleuser1 will see masked content. |
Using Masks
The Masks option is a data output restriction that is used in combination with the tokenization, encryption, no encryption, and masking protection methods. Masks define data output formatting, which means what data to disclose to users that want to view the data. The formatting includes unprotecting and transforming the result in a way that part of it is obfuscated. For example, a masked social security number could look like: 12345****, or ***456789.
Using a mask for the output is optional. If none is specified, then all data is returned in the masked output format by default for all users who are not a part of any policy. If users are a part of the policy:
- Data is shown in the clear for No Encryption data elements.
- Data is masked in output format for Masking data elements.
Masks are defined in the ESA and have the following properties:
- Mask name and description
- Number of characters from left
- Number of characters from right
- Whether “left” and “right” should be masked or clear
- Specific mask character - *,#,-,0,1,2,3,4,5,6,7,8, or 9.
The mask definition or how the mask looks like is implemented as per role and data element combination. This means that one data element can have multiple mask definitions.
When a mask is applied to data that is too short, that is, the data will not match to what has been defined in the mask, everything gets masked. For example, if a mask of 6 from the left and 2 from the right will be applied to data that has a length of 4, such as a name John, then all four characters will be masked.
If a user role is included in multiple policies with masks, then the masks may conflict in one of the following conditions:
- The user has different mask settings for both roles for the same data element. In this case, the unprotect access rights to the data element with the conflicting masks are revoked.
- The user has the data element with a mask in a role and another with no mask settings in the other role. In this case, the user’s access rights to the data element is set to the role with no mask settings.
For more information about masking rules for users in multiple roles, refer to Masking Rules for Users in Multiple Roles.
Important: Masking is supported only for character-based data types. If a role with masking is applied to unsupported data types, the operation will fail.
It is not recommended to use Masking with multibyte encodings, such as UTF-8, UTF-16, and so on, as it might corrupt the data.
| Properties | Examples |
|---|---|
| Sample Protected Data | Текст на русском |
| Left and Right Masking settings | L-3 and R-3 |
| Unprotected Data with Mask applied | ##?кст на русск?## |
| Sample Protected Data | Текст на русском |
| Left and Right Clear settings | L-3 and R-3 |
| Unprotected Data with Mask applied | Т?###### #### ##########?м |
The masked, unprotected value is distorted in the above case. Since each character in the input is represented by 2 bytes in UTF-8 encoding, we aim to preserve the first 3 bytes from the left and the next 3 bytes from the right. However, this approach results in a distorted output.
The following table shows examples of the way in which Masks can be used in combination with other protection methods.
Table: Examples of Masks
| Protection Method/ Mask | Input Value | Output Value | Comments |
|---|---|---|---|
| CCN 6x4 Left=6, Right=4, Clear, * | 4537432557929840 | 453743******9840 | Pre-defined mask: - Exposes the first 6 characters - Exposes the last 4 characters |
| CCN 12x0 Left=12, Right=0, Mask, * | 4537432557929840 | ************9840 | Pre-defined mask: - Hides the first 12 characters |
| CCN 4x4 Left=4, Right=4, Clear, * | 4537432557929840 | 4537********9840 | Pre-defined mask: - Exposes the first 4 characters - Exposes the last 4 characters |
| CCN 6x4 Left=6, Right=4, Clear, 1 | 4537432557929840 | 4537431111119840 | Pre-defined mask: - Exposes the first 6 characters - Exposes the last 4 characters |
| SSN x-4 Left=0, Right=4, Clear, * | 721-07-4426 | *******4426 | Pre-defined mask: - Exposes the last 4 characters |
| SSN 5-x Left=5, Right=0, Clear, * | 72107-4426 | 72107***** | Pre-defined mask: - Exposes the first 5 characters |
| SSN 5-x Left=5, Right=0, Clear, 0 | 72107-4426 | 7210700000 | Pre-defined mask: - Exposes the first 5 characters |
| CustomMask1 Left=6, Right=0, Mask, # | 721-07-4426 | ######-4426 | Custom mask: - Illustrates the usage of “#” mask character |
| CustomMask2 Left=4, Right=4, Mask, - | 4537432557929840 | ----43255792---- | Custom mask: - Illustrates the usage of “-” mask character |
| CustomMask3 Left=4, Right=4, Mask, 8 | 4537432557929840 | 8888432557928888 | Custom mask: - Illustrates the usage of “8” mask character |
Combining Data Elements and Masks
Masks are always applied using the supported Data Elements. The Masks are applied right before the data is presented to the end-user.
Tokenization, Encryption, FPE, No Encryption, and Masking Data Elements all support Masks, with some exceptions as to the configuration. Refer to support matrix below to check whether a specific Data Element and Mask combination is supported.
When combining Masks with tokenization, encryption, and FPE, sensitive data will be unprotected before a Mask is applied. In the case of the Masking Data Element, data is masked during the unprotect operation only.
Table: Data Element and Mask Support Matrix
| Data Element Method | Data Type | Mask Support |
|---|---|---|
| Tokenization | Numeric (0-9) | Yes |
| Integer | No | |
| Credit Card (0-9) | Yes | |
| Alpha (a-z, A-Z) | Yes | |
| Uppercase Alpha (A-Z) | Yes | |
| Uppercase Alpha-Numeric (0-9, A-Z) | Yes | |
| Lower ASCII | Yes | |
| DateTime | No | |
| Decimal | No | |
| Unicode Gen2 | No | |
| Binary | No | |
| Yes | ||
| Printable | Yes | |
| Date (YYYY-MM-DD, DD/MM/YYYY, MM.DD.YYYY) | No | |
| Unicode | No | |
| Unicode Base64 | No | |
| Encryption Algorithm | AES-128, AES-256, CUSP AES-128, CUSP AES-256, 3DES, CUSP 3DES | Yes |
| Format Preserving Encryption (FPE) | Yes, only in version 10.0.X, with ASCII plaintext encoding without Left and Right settings. | |
| No Encryption | Yes | |
| Masking | Yes |
Masking for Protectors
The Input type / Character set for all protectors vary across DBs. The Output type / Character set is the same as the input type. For example; if the input type is an integer, then the output type is also an integer.
Application Protector
Table: Input Data Types Supported by Application Protectors
| Protection Method | AP Java | AP Python |
|---|---|---|
| Masking | STRING CHAR[] BYTE[] | STRING BYTES |
If the input and output types of the API are BYTE [], the customer application should convert the input to a byte array. Then, call the API and convert the output from the byte array.
For more information about Application protectors, refer to Application Protector.
Big Data Protector
Table: Input Data Types Supported by Big Data Protectors
| Protection Method*1 | MapReduce | Hive | Pig | HBase | Impala | Spark | Spark SQL | Trino |
|---|---|---|---|---|---|---|---|---|
| Masking | BYTE[] | CHAR STRING | CHARARRAY | BYTE[] | STRING | BYTE[] STRING | STRING | VARCHAR |
*1 - The customer application should convert the input to and output from byte array.
For more information about Big Data protectors, refer to Big Data Protector.
Data Warehouse Protector
Table: Input Data Types Supported for Data Warehouse Protectors
| Protection Method | Teradata |
|---|---|
| Masking | VARCHAR CHAR INTEGER FLOAT DECIMAL DATE SMALLINT |
Important: Masking is supported only for character-based data types. If a data element with masking is applied to an unsupported data type, the operation will fail.
Database Protectors
Oracle Database Protector
The supported input data types for the Oracle Database Protector are listed below.
| Protection Method | Supported Input Data Types |
|---|---|
| Masking | VARCHAR2 |
| Masking | CHAR |
| Masking | NUMBER |
| Masking | REAL |
| Masking | FLOAT |
| Masking | DATE |
| Masking | BLOB |
| Masking | CLOB |
Note: While unprotecting the data, the masked value is passed to Oracle. These masked strings are not valid hex values. Therefore, the following error is observed;
ORA-06502: PL/SQL: numeric or value error: hex to raw conversion error.
Important: Masking is supported only for character-based data types. If a data element with masking is applied to an unsupported data type, the operation will fail.
1.7 - Hashing
A hash function produces a small number that serves as a digital fingerprint of the data. The resulting number is relatively small. The algorithm “chops and mixes” data to create fingerprints. For example, it substitutes or transposes the data.
Protegrity offers two different algorithms for creating hash values:
- The Hashed Message Authentication Code with SHA-256 (HMAC-SHA256) algorithm returns a 256 bit - 32 bytes hash value for any data.
- The HMAC-SHA1 algorithm returns a 160 bit - 20 bytes hash value for any data.
Deprecated
Starting from v10.0.x, the HMAC-SHA1 protection method is deprecated.
It is recommended to use the HMAC-SHA256 protection method instead of the HMAC-SHA1 protection method.
Hashing is utilized to transform sensitive data. HMAC-SHA1 and HMAC-SHA256 are specific hashing methods used for this purpose. Transformed data, which is the result of hashing, is irreversible as it is replaced with a checksum and not stored anywhere as an encrypted value. Unlike encryption, the original data can’t be retrieved back from the hashed value.
Table: Hashing Protection Algorithm Properties
Properties | Keyed Hash Algorithm | |
HMAC-SHA1 | HMAC-SHA256 | |
Operation Mode | N/A | N/A |
Encryption Properties - IV, CRC, Key ID | No | N/A |
Length Preservation with padding formula for non-length preserving algorithms | No Result is always 20 bytes regardless of input length. | No Result is always 32 bytes regardless of input length. |
Minimum Length | None | None |
Maximum Length | ≥ 500 bytes | ≥ 500 bytes |
Input type / Character set | Vary across DBs | Vary across DBs |
Output type / Character set | Binary | Binary |
Return of Protected value | No | No |
Specifics of algorithm | Irreversible protection method. Original data is replaced with a checksum and cannot be retrieved back, when decrypted. | Irreversible protection method. Original data is replaced with a checksum and cannot be retrieved back, when decrypted. |
The following table shows examples of the way in which a value will be replaced with the HMAC-SHA1 / HMAC-SHA256 hashing type.
Table: HMAC-SHA1 / HMAC-SHA256 Hashing Output Values
| Protection Method | Input Value | Output Value | Comments |
|---|---|---|---|
| HMAC-SHA1 | Protegrity | 0x5855682AB16B3C818C33CCA382B0F32A00EC2915 | Output value cannot be decrypted. |
| HMAC-SHA256 | Protegrity | 0x9EE0CD797365EA5E2A76DC6663E98D0147CAE004DE0D5E0D7F2730E7F9BF165A | Output value cannot be decrypted. |
Hashing for Protectors
Application Protector
Table: Supported Input Data Types by Application Protectors
| Protection Method | AP Java*1 | AP Python |
|---|---|---|
| HMAC-SHA1 | FLOAT DOUBLE STRING CHAR[] BYTE[] | STRING BYTES |
*1 - If the input and output types of the API are BYTE [], the customer application should convert the input to a byte array. Then, call the API and convert the output from the byte array.
For more information about Application protectors, refer to Application Protector.
Big Data Protector
Table: Supported Input Data Types for Big Data Protectors
| Protection Method*1 | MapReduce | Hive | Pig | HBase | Impala | Spark | Spark SQL | Trino |
|---|---|---|---|---|---|---|---|---|
| HMAC-SHA1 | BYTE[] | Not supported | Not supported | BYTE[] | Not supported | BYTE[] | Not supported | Not supported |
| HMAC-SHA256 | BYTE[] | Not supported | Not supported | BYTE[] | Not supported | BYTE[] | Not supported | Not supported |
*1 – The customer application should convert the input to and output from byte array.
For more information about Big Data protectors, refer to Big Data Protector.
Data Warehouse Protector
Table: Supported Input Data Types for Data Warehouse Protectors
| Protection Method | Teradata |
|---|---|
| HMAC-SHA1 | VARCHAR INTEGER FLOAT |
| HMAC-SHA256 | VARCHAR INTEGER FLOAT |
Database Protectors
Oracle Database Protector
The supported input data types for the Oracle Database Protector are listed below.
| Protection Method | Supported Input Data Types |
|---|---|
| HMAC-SHA1 | VARCHAR2 |
| HMAC-SHA1 | CHAR |
| HMAC-SHA256 | VARCHAR2 |
| HMAC-SHA256 | CHAR |
1.8 - ASCII Character Codes
Lower ASCII token – character codes 33-126 (Table A-1)
Printable token – character codes 32-126 (Table A-1), 160-255 (Table A-2)
Unicode token – character codes 32-127 (Table A-1), 128-255 (Table A-2), 0-31 (Table A-3)
Binary token – character codes 32-127 (Table A-1), 128-255 (Table A-2), 0-31 (Table A-3)
Table A-1: ASCII printable characters (character code 32-127)
Character ASCII code | Character Description | Character ASCII code | Character Description | ||||
DEC | HEX | Symbol | Description | DEC | HEX | Symbol | Description |
32 | 20 | Space | Space | 80 | 50 | P | Uppercase P |
33 | 21 | ! | Exclamation mark | 81 | 51 | Q | Uppercase Q |
34 | 22 | " | Double quotes (or speech marks) | 82 | 52 | R | Uppercase R |
35 | 23 | # | Number | 83 | 53 | S | Uppercase S |
36 | 24 | $ | Dollar | 84 | 54 | T | Uppercase T |
37 | 25 | % | Percent sign | 85 | 55 | U | Uppercase U |
38 | 26 | & | Ampersand | 86 | 56 | V | Uppercase V |
39 | 27 | ' | Single quote | 87 | 57 | W | Uppercase W |
40 | 28 | ( | Open parenthesis (or open bracket) | 88 | 58 | X | Uppercase X |
41 | 29 | ) | Close parenthesis (or close bracket) | 89 | 59 | Y | Uppercase Y |
42 | 2A | * | Asterisk | 90 | 5A | Z | Uppercase Z |
43 | 2B | + | Plus | 91 | 5B | [ | Opening bracket |
44 | 2C | , | Comma | 92 | 5C | \ | Backslash |
45 | 2D | - | Hyphen | 93 | 5D | ] | Closing bracket |
46 | 2E | . | Period, dot or full stop | 94 | 5E | ^ | Caret - circumflex |
47 | 2F | / | Slash or divide | 95 | 5F | _ | Underscore |
48 | 30 | 0 | Zero | 96 | 60 | ` | Grave accent |
49 | 31 | 1 | One | 97 | 61 | a | Lowercase a |
50 | 32 | 2 | Two | 98 | 62 | b | Lowercase b |
51 | 33 | 3 | Three | 99 | 63 | c | Lowercase c |
52 | 34 | 4 | Four | 100 | 64 | d | Lowercase d |
53 | 35 | 5 | Five | 101 | 65 | e | Lowercase e |
54 | 36 | 6 | Six | 102 | 66 | f | Lowercase f |
55 | 37 | 7 | Seven | 103 | 67 | g | Lowercase g |
56 | 38 | 8 | Eight | 104 | 68 | h | Lowercase h |
57 | 39 | 9 | Nine | 105 | 69 | i | Lowercase i |
58 | 3A | : | Colon | 106 | 6A | j | Lowercase j |
59 | 3B | ; | Semicolon | 107 | 6B | k | Lowercase k |
60 | 3C | Less than (or open angled bracket) | 108 | 6C | l | Lowercase l | |
61 | 3D | = | Equals | 109 | 6D | m | Lowercase m |
62 | 3E | Greater than (or close angled bracket) | 110 | 6E | n | Lowercase n | |
63 | 3F | ? | Question mark | 111 | 6F | o | Lowercase o |
64 | 40 | @ | At symbol | 112 | 70 | p | Lowercase p |
65 | 41 | A | Uppercase A | 113 | 71 | q | Lowercase q |
66 | 42 | B | Uppercase B | 114 | 72 | r | Lowercase r |
67 | 43 | C | Uppercase C | 115 | 73 | s | Lowercase s |
68 | 44 | D | Uppercase D | 116 | 74 | t | Lowercase t |
69 | 45 | E | Uppercase E | 117 | 75 | u | Lowercase u |
70 | 46 | F | Uppercase F | 118 | 76 | v | Lowercase v |
71 | 47 | G | Uppercase G | 119 | 77 | w | Lowercase w |
72 | 48 | H | Uppercase H | 120 | 78 | x | Lowercase x |
73 | 49 | I | Uppercase I | 121 | 79 | y | Lowercase y |
74 | 4A | J | Uppercase J | 122 | 7A | z | Lowercase z |
75 | 4B | K | Uppercase K | 123 | 7B | { | Opening brace |
76 | 4C | L | Uppercase L | 124 | 7C | | | Vertical bar |
77 | 4D | M | Uppercase M | 125 | 7D | } | Closing brace |
78 | 4E | N | Uppercase N | 126 | 7E | ~ | Equivalency sign - tilde |
79 | 4F | O | Uppercase O | 127 | 7F | (Delete) | Delete |
Table A-2: Extended ASCII codes (character code 128-255)
Character ASCII code | Character Description | Character ASCII code | Character Description | ||||
DEC | HEX | Symbol | Description | DEC | HEX | Symbol | Description |
128 | 80 | € | Euro sign | 192 | C0 | À | Latin capital letter A with grave |
129 | 81 | 193 | C1 | Á | Latin capital letter A with acute | ||
130 | 82 | ‚ | Single low-9 quotation mark | 194 | C2 | Â | Latin capital letter A with circumflex |
131 | 83 | ƒ | Latin small letter f with hook | 195 | C3 | Ã | Latin capital letter A with tilde |
132 | 84 | „ | Double low-9 quotation mark | 196 | C4 | Ä | Latin capital letter A with diaeresis |
133 | 85 | … | Horizontal ellipsis | 197 | C5 | Å | Latin capital letter A with ring above |
134 | 86 | † | Dagger | 198 | C6 | Æ | Latin capital letter AE |
135 | 87 | ‡ | Double dagger | 199 | C7 | Ç | Latin capital letter C with cedilla |
136 | 88 | ˆ | Modifier letter circumflex accent | 200 | C8 | È | Latin capital letter E with grave |
137 | 89 | ‰ | Per mille sign | 201 | C9 | É | Latin capital letter E with acute |
138 | 8A | Š | Latin capital letter S with caron | 202 | CA | Ê | Latin capital letter E with circumflex |
139 | 8B | ‹ | Single left-pointing angle quotation | 203 | CB | Ë | Latin capital letter E with diaeresis |
140 | 8C | Œ | Latin capital ligature OE | 204 | CC | Ì | Latin capital letter I with grave |
141 | 8D | 205 | CD | Í | Latin capital letter I with acute | ||
142 | 8E | Ž | Latin captial letter Z with caron | 206 | CE | Î | Latin capital letter I with circumflex |
143 | 8F | 207 | CF | Ï | Latin capital letter I with diaeresis | ||
144 | 90 | 208 | D0 | Ð | Latin capital letter ETH | ||
145 | 91 | ‘ | Left single quotation mark | 209 | D1 | Ñ | Latin capital letter N with tilde |
146 | 92 | ’ | Right single quotation mark | 210 | D2 | Ò | Latin capital letter O with grave |
147 | 93 | “ | Left double quotation mark | 211 | D3 | Ó | Latin capital letter O with acute |
148 | 94 | ” | Right double quotation mark | 212 | D4 | Ô | Latin capital letter O with circumflex |
149 | 95 | • | Bullet | 213 | D5 | Õ | Latin capital letter O with tilde |
150 | 96 | – | En dash | 214 | D6 | Ö | Latin capital letter O with diaeresis |
151 | 97 | — | Em dash | 215 | D7 | × | Multiplication sign |
152 | 98 | ˜ | Small tilde | 216 | D8 | Ø | Latin capital letter O with slash |
153 | 99 | ™ | Trade mark sign | 217 | D9 | Ù | Latin capital letter U with grave |
154 | 9A | š | Latin small letter S with caron | 218 | DA | Ú | Latin capital letter U with acute |
155 | 9B | › | Single right-pointing angle quotation mark | 219 | DB | Û | Latin capital letter U with circumflex |
156 | 9C | œ | Latin small ligature oe | 220 | DC | Ü | Latin capital letter U with diaeresis |
157 | 9D | 221 | DD | Ý | Latin capital letter Y with acute | ||
158 | 9E | ž | Latin small letter z with caron | 222 | DE | Þ | Latin capital letter THORN |
159 | 9F | Ÿ | Latin capital letter Y with diaeresis | 223 | DF | ß | Latin small letter sharp s - ess-zed |
160 | A0 | Non-breaking space | Non-breaking space | 224 | E0 | à | Latin small letter a with grave |
161 | A1 | ¡ | Inverted exclamation mark | 225 | E1 | á | Latin small letter a with acute |
162 | A2 | ¢ | Cent sign | 226 | E2 | â | Latin small letter a with circumflex |
163 | A3 | £ | Pound sign | 227 | E3 | ã | Latin small letter a with tilde |
164 | A4 | ¤ | Currency sign | 228 | E4 | ä | Latin small letter a with diaeresis |
165 | A5 | ¥ | Yen sign | 229 | E5 | å | Latin small letter a with ring above |
166 | A6 | ¦ | Pipe, Broken vertical bar | 230 | E6 | æ | Latin small letter ae |
167 | A7 | § | Section sign | 231 | E7 | ç | Latin small letter c with cedilla |
168 | A8 | ¨ | Spacing dieresis - umlaut | 232 | E8 | è | Latin small letter e with grave |
169 | A9 | © | Copyright sign | 233 | E9 | é | Latin small letter e with acute |
170 | AA | ª | Feminine ordinal indicator | 234 | EA | ê | Latin small letter e with circumflex |
171 | AB | « | Left double angle quotes | 235 | EB | ë | Latin small letter e with diaeresis |
172 | AC | ¬ | Not sign | 236 | EC | ì | Latin small letter i with grave |
173 | AD | Soft hyphen | Soft hyphen | 237 | ED | í | Latin small letter i with acute |
174 | AE | ® | Registered trade mark sign | 238 | EE | î | Latin small letter i with circumflex |
175 | AF | ¯ | Spacing macron - overline | 239 | EF | ï | Latin small letter i with diaeresis |
176 | B0 | ° | Degree sign | 240 | F0 | ð | Latin small letter eth |
177 | B1 | ± | Plus-or-minus sign | 241 | F1 | ñ | Latin small letter n with tilde |
178 | B2 | ² | Superscript two - squared | 242 | F2 | ò | Latin small letter o with grave |
179 | B3 | ³ | Superscript three - cubed | 243 | F3 | ó | Latin small letter o with acute |
180 | B4 | ´ | Acute accent - spacing acute | 244 | F4 | ô | Latin small letter o with circumflex |
181 | B5 | µ | Micro sign | 245 | F5 | õ | Latin small letter o with tilde |
182 | B6 | ¶ | Pilcrow sign - paragraph sign | 246 | F6 | ö | Latin small letter o with diaeresis |
183 | B7 | · | Middle dot - Georgian comma | 247 | F7 | ÷ | Division sign |
184 | B8 | ¸ | Spacing cedilla | 248 | F8 | ø | Latin small letter o with slash |
185 | B9 | ¹ | Superscript one | 249 | F9 | ù | Latin small letter u with grave |
186 | BA | º | Masculine ordinal indicator | 250 | FA | ú | Latin small letter u with acute |
187 | BB | » | Right double angle quotes | 251 | FB | û | Latin small letter u with circumflex |
188 | BC | ¼ | Fraction one quarter | 252 | FC | ü | Latin small letter u with diaeresis |
189 | BD | ½ | Fraction one half | 253 | FD | ý | Latin small letter y with acute |
190 | BE | ¾ | Fraction three quarters | 254 | FE | þ | Latin small letter thorn |
191 | BF | ¿ | Inverted question mark | 255 | FF | ÿ | Latin small letter y with diaeresis |
Table A-3: ASCII control characters (character code 0-31)
Character ASCII code | Character Description | Character ASCII code | Character Description | ||||
DEC | HEX | Symbol | Description | DEC | HEX | Symbol | Description |
0 | 0 | NUL | Null char | 16 | 10 | DLE | Data Line Escape |
1 | 1 | SOH | Start of Heading | 17 | 11 | DC1 | Device Control 1 (oft. XON) |
2 | 2 | STX | Start of Text | 18 | 12 | DC2 | Device Control 2 |
3 | 3 | ETX | End of Text | 19 | 13 | DC3 | Device Control 3 (oft. XOFF) |
4 | 4 | EOT | End of Transmission | 20 | 14 | DC4 | Device Control 4 |
5 | 5 | ENQ | Enquiry | 21 | 15 | NAK | Negative Acknowledgement |
6 | 6 | ACK | Acknowledgment | 22 | 16 | SYN | Synchronous Idle |
7 | 7 | BEL | Bell | 23 | 17 | ETB | End of Transmit Block |
8 | 8 | BS | Back Space | 24 | 18 | CAN | Cancel |
9 | 9 | HT | Horizontal Tab | 25 | 19 | EM | End of Medium |
10 | 0A | LF | Line Feed | 26 | 1A | SUB | Substitute |
11 | 0B | VT | Vertical Tab | 27 | 1B | ESC | Escape |
12 | 0C | FF | Form Feed | 28 | 1C | FS | File Separator |
13 | 0D | CR | Carriage Return | 29 | 1D | GS | Group Separator |
14 | 0E | SO | Shift Out / X-On | 30 | 1E | RS | Record Separator |
15 | 0F | SI | Shift In / X-Off | 31 | 1F | US | Unit Separator |
1.9 - Examples of Column Sized Calculation for AES and 3DES Encryption
The sizes of database native data types may vary, but the column sizes calculation provided in the following tables is generic.
Table: Column Sizes Calculation for AES encryption - AES-128 and AES-256
| Data Type | Size (bytes) | AES | AES-CRC | AES-IV | AES-IV-CRC | AES-IV-CRC-KeyID |
|---|---|---|---|---|---|---|
| Maximum padding size | - | 16 | 16 | 16 | 16 | 16 |
| Checksum size | - | 0 | 4 | 0 | 4 | 4 |
| IV Size | - | 0 | 0 | 16 | 16 | 16 |
| SMALLINT | 2 | 16 | 16 | 32 | 32 | 34 |
| INTEGER | 4 | 16 | 16 | 32 | 32 | 34 |
| BIGINT | 8 | 16 | 16 | 32 | 32 | 34 |
| DATE | 4 | 16 | 16 | 32 | 32 | 34 |
| DECIMAL(1..2) | 1 | 16 | 16 | 32 | 32 | 34 |
| DECIMAL(3..4) | 2 | 16 | 16 | 32 | 32 | 34 |
| DECIMAL(5..9) | 4 | 16 | 16 | 32 | 32 | 34 |
| DECIMAL(10..18) | 8 | 16 | 16 | 32 | 32 | 34 |
| DECIMAL(19..38) | 16 | 32 | 32 | 48 | 48 | 50 |
| FLOAT, REAL | 8 | 16 | 16 | 32 | 32 | 34 |
| Latin CHAR / VARCHAR | 5 | 16 | 16 | 32 | 32 | 34 |
| Unicode CHAR / VARCHAR | 5 | 16 | 16 | 32 | 32 | 34 |
The following table shows the column sized calculation for deprecated 3DES encryption.
Table: Column Sized Calculation for 3DES Encryption
| Data Type | Size (bytes) | 3DES | 3DES-CRC | 3DES-IV | 3DES-IV-CRC | 3DES-IV-CRC-KeyID |
|---|---|---|---|---|---|---|
| Maximum padding size | 8 | 8 | 8 | 8 | 8 | |
| Checksum size | 0 | 4 | 0 | 4 | 4 | |
| IV Size | 0 | 0 | 8 | 8 | 8 | |
| SMALLINT | 2 | 8 | 8 | 16 | 16 | 18 |
| INTEGER | 4 | 8 | 16 | 16 | 24 | 26 |
| BIGINT | 8 | 16 | 16 | 24 | 24 | 26 |
| DATE | 4 | 8 | 16 | 16 | 24 | 26 |
| DECIMAL(1..2) | 1 | 8 | 8 | 16 | 16 | 18 |
| DECIMAL(3..4) | 2 | 8 | 8 | 16 | 16 | 18 |
| DECIMAL(5..9) | 4 | 8 | 16 | 16 | 24 | 26 |
| DECIMAL(10..18) | 8 | 16 | 16 | 24 | 24 | 26 |
| DECIMAL(19..38) | 16 | 24 | 24 | 32 | 32 | 34 |
| FLOAT, REAL | 8 | 16 | 16 | 24 | 24 | 26 |
| Latin CHAR / VARCHAR | 5 | 8 | 16 | 16 | 24 | 26 |
| Unicode CHAR / VARCHAR | 5 | 16 | 16 | 24 | 24 | 26 |
1.10 - Empty String Handling by Protectors
Starting from v10.0.x, Protegrity Protectors handle empty string "" as NULL. If you protect an empty string, then the Protegrity APIs and UDFs will return a NULL value.
1.11 - Hashing Functions and Examples
Hashing is accomplished by two functions of the protector, an Insert hash function and an Update hash function. Both functions take the same parameters and return a hash value that is always a 160 bit (SHA1) or a 256 bit (SHA256) binary value. The difference between the functions is the access rights that they check.
Here is the functions syntax example, applicable to an Oracle database:
FUNCTION ins_hash_varchar2(dataelement IN CHAR, cdata IN VARCHAR, SCID IN BINARY_INTEGER) RETURN RAW;
FUNCTION upd_hash_varchar2(dataelement IN CHAR, cdata IN VARCHAR, SCID IN BINARY_INTEGER) RETURN RAW;
Table: Functions Syntax Example
| Where… | Is… |
|---|---|
| dataelement | The data element name. |
| cdata | The data. |
| SCID | The security ID. Not used parameter. It is kept in signature due to backwards compatibility reasons. |
There is no decrypt function since a hash is a checksum and not data.
1.11.1 - Hash Data column size
A hash value is always 160 bits / 20 bytes (SHA1) or 256 bits / 32 bytes (SHA256) long regardless of what data it’s calculated on. Basically you should have a table with a binary column of 20 bytes or 32 bytes for the hash value.
Here is an example of an Oracle table with hash value instead of name:
CREATE TABLE NAMETABLE ( ident NUMBER PRIMARY KEY,
name RAW(32));
1.11.2 - Using Hashing Triggers and View
Oracle example:
CREATE OR REPLACE TRIGGER SCOTT.NAMETABLE_INS
INSTEAD OF INSERT ON SCOTT.NAMETABLE
FOR EACH ROW
DECLARE
NAME_ RAW(2000) := NULL;
BEGIN
**NAME\_:=PTY.INS\_HASH\_VARCHAR2\('HashDE', :new.NAME, 0\)**;
INSERT INTO SCOTT.NAMETABLE_ENC(IDENT, NAME)
VALUES(:new.IDENT, NAME_);
END;
CREATE OR REPLACE TRIGGER SCOTT.NAMETABLE_UPD
INSTEAD OF UPDATE ON SCOTT.NAMETABLE
FOR EACH ROW
DECLARE
NAME_ RAW(2000) := NULL;
BEGIN
**PTY.SEL\_CHECK\('HashDE'\);
NAME\_:=PTY.UPD\_HASH\_VARCHAR2\('HashDE', :new.NAME, 0\)**;
IF: old.IDENT = :new.IDENT THEN
UPDATE NAMETABLE_ENC SET
NAME= NAME_,
WHERE IDENT=:old.IDENT;
ELSE
UPDATE NAMETABLE_ENC SET
IDENT=:new.IDENT,
NAME= NAME_,
WHERE IDENT=:old.IDENT;
END IF;
END;
The view selects the hash value directly from the table instead of running a decrypt function. To make this work as a normal trigger/view solution, the binary data type is cast into the original data type. In Oracle it should be VARCHAR2. The data type must be cast to insert data through the view as usual.
CREATE OR REPLACE VIEW SCOTT.NAMETABLE(IDENT,
NAME)
AS SELECT IDENT, utl\_raw.cast\_to\_varchar2\(NAME\))
FROM SCOTT.NAMETABLE_ENC;
The application handles the return value, which will now be a 20 byte or 32 byte binary string converted into a character string.
1.12 - Codebook Re-shuffling in the Data Security Gateway
You can enable the Codebook Re-shuffling in the Data Security Gateway (DSG) for all the tokenization data elements to generate unique tokens for protected values across the tokenization domains.
For more information about the Codebook Re-shuffling for the Data Security Gateway, refer to Codebook Re-shuffling.
Note: As the Codebook Re-shuffling feature is an advanced functionality, contact Protegrity Support.
1.13 -
Table: Supported Input Data Types for Data Warehouse Protectors
| Protection Method | Teradata |
|---|---|
| HMAC-SHA1 | VARCHAR INTEGER FLOAT |
| HMAC-SHA256 | VARCHAR INTEGER FLOAT |
1.14 -
Table: Input Data Types Supported for Data Warehouse Protectors
| Protection Method | Teradata |
|---|---|
| Masking | VARCHAR CHAR INTEGER FLOAT DECIMAL DATE SMALLINT |
Important: Masking is supported only for character-based data types. If a data element with masking is applied to an unsupported data type, the operation will fail.
1.15 -
Table: Input Data Types Supported for Data Warehouse Protectors
| Protection Method | Teradata |
|---|---|
| NoEncryption | VARCHAR CHAR INTEGER FLOAT DECIMAL DATE SMALLINT |
1.16 -
Table: Input Data Types Supported for Data Warehouse Protectors
| Protection Method | Teradata |
|---|---|
| Monitor | VARCHAR CHAR INTEGER FLOAT DECIMAL DATE SMALLINT |
2 - Application Protector
The detailed information and examples of libraries and deployment architectures for all flavors of the Protegrity Application Protector (AP) are provided in this section.
2.1 - Application Protector Java
Protegrity Application Protector (AP) Java Overview
AP Java provides a set of APIs that integrate with Java-based customer applications to perform data protection operations such as:
- Protect
- Unprotect
- Reprotect
- Get Product Version
- Get Last Error
Key Features
Supported Java Distributions
- Java by Oracle Corporation, versions 1.8 and later
- Open JRE, versions 1.8 and later
- IBM J9, versions 1.8 and later
Trusted Applications
The AP Java can be accessed only by the trusted applications. Any application that protects, unprotects, or reprotects data, must first be created as a trusted application in the ESA.
A trusted application name should be the name of the running application. For example, refer to the sample program in the section Running IAP - Example in the Protegrity Application Protector On-Premises Immutable Policy User Guide 9.1.0.0. Here, the trusted application name is “HelloWorld”. The trusted application user is the user who is running the program.
For AP Java, the logic is to determine the fully qualified name of the Main class. For console applications, the Main class is the one with the main method, while for web applications, the logic uses the JVM’s name represented by RuntimeMXBean (Java Platform SE 8).
For more information about how to make an application trusted, refer to Creating a Trusted Application.
Session Validity
A session is valid until the sessiontimeout is reached, which is passed as a parameter in the config.ini file. The default validity of a session is 15 minutes. An active session is renewed every time the session is used.
Audit Logs
Single Data Item Operations
- Each operation (protect/unprotect/reprotect) generates audit events.
- Example:
- Protect on element a → 1 event.
- 5 protect on element b → 5 events.
- 1000 unprotect on element a → 1000 events.
Bulk Data Item Operations
- Audit logs are generated per operation.
- Example:
- 2 bulk protect operations with size 3 → 1 audit log with count 6
Initialization Logs
- Audit logs are created when an application initializes, indicating whether initialization was successful or not.
- Audits are available in ESA forensics after
jcorelite.plmis loaded.
Protector Status Logs
While the protector is running, a status log is sent to Discover, which can be viewed using the pty_insight_analytics\*protector_status_* index on Discover in the Audit Store.
For more information about viewing the status logs, refer to Protector Status Dashboard index.
The protector status dashboard displays the protector connectivity status through a pie chart and a table visualization. This dashboard uses status logs sent by the protector, so the protector which performed at least one security operation shows up on this dashboard.
For more information about the protector status dashboard, refer to Viewing the Protector Status Dashboard.
Error Handling
If the AP Java is used to perform a security operation on bulk data, then an exception appears for all errors except for the error codes 22, 23, and 44. Instead, an error list is returned for the individual items in the bulk data.
For more information about the log return codes, refer to Log return codes.
AP Java Upgrade
AP Java Upgrade allows the Protegrity Application Protector (AP) Java SDK to be upgraded with zero downtime by hot‑reloading updated SDK libraries at runtime. Upgrade eliminates application restarts while ensuring uninterrupted protection operations during the upgrade.
2.1.1 - Understanding the Architecture
This page describes the architecture, the individual components, and the workflow of the Protegrity Application Protector (AP) solution.
Architecture and Workflow
The following figure illustrates the deployment architecture of the Application Protector (AP).
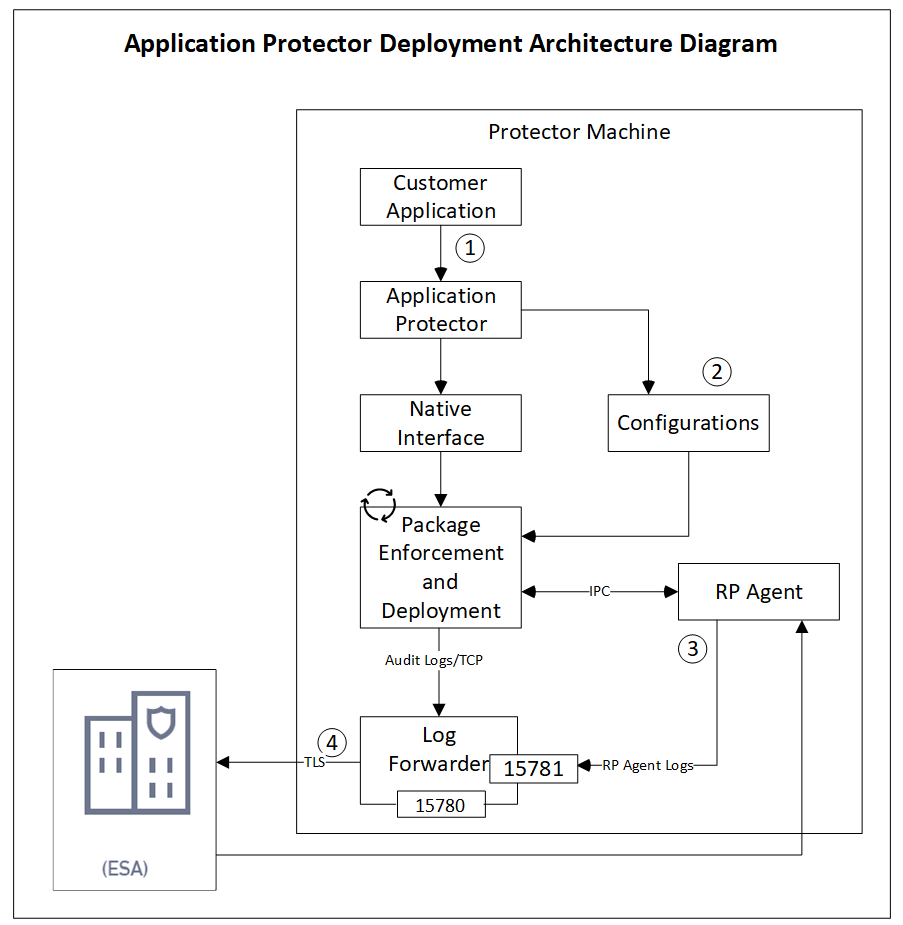
The following table describes the components of the AP deployment architecture.
| Component | Description |
|---|---|
| Customer Application | Provides built-in supported programming languages and integrates with AP for data protection. |
| Application Protector | Acts as the Core protection engine that enforces security policies and performs data protection operations. |
Configuration File (config.ini) | Stores initialization parameters that are passed to AP during startup. |
| Native Interface | Provides a native interface between AP and the C layer. Java: Java Native Interface (JNI) layer |
| Package Enforcement and Deployment | Retrieves policy packages from the RP Agent and executes protection operations, such as, protect, unprotect, and reprotect. |
| Log Forwarder | Collects logs from AP and forwards them to the Audit Store for centralized auditing. |
| Resilient Package (RP) Agent | Operates as a standalone process that retrieves policy packages from ESA and shares them with AP processes using shared memory IPC. |
The following steps describe the workflow of a sample AP deployment in the production environment.
The customer application initializes the SDK.
The required configuration parameters are passed to the protector using the
config.inifile.
The configurations can be set through environment variables. ENV overrides values in theconfig.inifile, except forcadenceandsession timeoutwhich must be set in the config file.For more information about environment variables configuration, refer to:
The RP Agent regularly syncs with the RP Proxy or ESA to check for policy updates. If a change is detected, the updated policy package is securely downloaded over a TLS channel and stored in shared memory.
The protector synchronizes with shared memory based on the
cadencevalue defined inconfig.inifile. If a new package is available, it is fetched into process memory. This updated package is then used to perform data protection operations such as, protect, unprotect, and reprotect.The audit logs generated during protection operations are forwarded to the Audit Store:
- Logs from the application are sent through the Log Forwarder.
- Logs from the RP Agent are also forwarded using the Log Forwarder.
Components of the Application Protector
The Protegrity Application Protector (AP) solution comprises several key components that work together to enforce data protection policies and ensure secure operations.
Application Protector
The core engine that integrates with customer applications to perform data protection operations:
- Protect
- Unprotect
- Reprotect
AP is available in multiple language-specific variants. One of which is:
- AP Java: For applications developed in Java
Resilient Package (RP) Agent
A standalone process responsible for policy synchronization:
- To sync with the RP Proxy or ESA at regular intervals of 60 seconds
- To detect policy changes and download updated packages over a secure TLS channel
- To store the packages in shared memory for use by the protector
Log Forwarder
A log processing tool that handles audit and protection logs:
- Collects logs generated by AP and RP Agent
- Forwards logs to the Audit Store within ESA
Ports used to transport the protection and audit logs to the ESA:
15780: Configurable15781: Non-configurable
Package Deployment
The different approaches for package deployment during the initialization process of the Application Protector are described in this section.
Dynamic Package Deployment
Use this approach when the protector needs to continuously check for policy updates after initialization.
- Set the
cadenceparameter to a non-zero value in theconfig.inifile. - This value defines the interval in seconds at which the protector synchronizes with the RP Agent.
- If a policy change is detected, the protector automatically fetches the updated package and applies it during protection operations.
Note: This method ensures that the protector always operates with the latest policy.
Immutable Package Deployment
Use this approach when the protector does not need to check for policy changes after initialization.
- Add the
[devops]parameter in theconfig.inifile before initializing the protector. - A REST API call is used to download an envelope-encrypted package from the ESA.
- The protector uses this static package for all operations without further synchronization.
For more information about the DevOps approach, refer to DevOps Approach for Application Protector.
2.1.2 - System Requirements
The following table lists the minimum hardware configurations.
| Hardware Component | Configuration Details |
|---|---|
| CPU | Depends on the application. |
| Disk Space | Under 200 MB - including Log Forwarder, RP Agent, and AP Java. |
| RAM | Memory usage depends on the AP flavor and application behavior. Refer to AP Java. |
2.1.3 - Preparing the Environment
Preparing the Environment for AP Java Installation on Linux
Before installing Protegrity Application Protector (AP) Java on a Linux platform, ensure the following prerequisites are met:
Prerequisites
- The Enterprise Security Administrator (ESA) is installed, configured, and running.
- The IP address or host name of the Load Balancer, Proxy, or ESA is noted.
- The Policy Management (PIM) is initialized on the ESA. It creates cryptographic keys and the policy repository for data protection.
For more information about initializing the PIM, refer to Initializing the Policy Management.
2.1.4 - Installing the AP Java Protector
Extracting the Setup Scripts and Package
Important: If the Upgrade Agent is already installed, do not extract the product build
.tgzfile manually. The Upgrade Agent automatically extracts the build as part of the upgrade workflow.
To extract the setup scripts and package:
- Download the
ApplicationProtector_Linux-ALL-64_x86-64_JRE-1.8-64_<version>.tgzfile to any location on the machine where you want to install the protector. - Extract the AP Java installation package using the following command.The following setup files are extracted:
tar –xvf ApplicationProtector_Linux-ALL-64_x86-64_JRE-1.8-64_<version>.tgzApplicationProtector_Linux-ALL-64_x86-64_JRE-1.8-64_<version>.tgzsignatures/ApplicationProtector_Linux-ALL-64_x86-64_JRE-1.8-64_<version>.sig
- Verify the digital signature of the signed AP Java build.
For more information about verifying the signed AP Java build, refer to Verification of Signed Protector Build. - Extract the AP Java installation package again using the following command.The following setup files are extracted:
tar –xvf ApplicationProtector_Linux-ALL-64_x86-64_JRE-1.8-64_<version>.tgzLogforwarderSetup_Linux_x64_<version>.shRPAgentSetup_Linux_x64_<version>.shAPJavaSetup_Linux_x64_<version>.shUpgradeAgentSetup_Linux_x64_<version>.sh
Installing Log Forwarder on Linux
The steps to install the Log Forwarder on a Linux platform using the Interactive mode or through the Silent mode are described in this section.
Note: To preserve all the configurations while upgrading the Log Forwarder, ensure that you backup all the files present under the
/opt/protegrity/logforwarder/data/config.ddirectory.
For more information about installing Log Forwarder on Linux platform, refer to Installing Log Forwarder on Linux.
Using Interactive Mode
For more information about installing Log Forwarder using Interactive Mode, refer to Installing Log Forwarder on Linux using Interactive Mode.
Using Silent Mode
For more information about installing Log Forwarder using Silent Mode, refer to Installing Log Forwarder on Linux using Silent Mode.
Installing RP Agent on Linux
The steps to install the RP Agent on a Linux platform using the Interactive mode or through the Silent mode of installation are described in this section.
RPA Secure Mode with ESA on Linux
Before proceeding with the RPA installation in secure mode, ensure that the required CA certificate is available and trusted on the system.
For PPC
Retrieve the custom CA certificate using the following command:
kubectl -n cert-manager get secret eclipse-ca -o jsonpath='{.data.tls\.crt}' | base64 -d > ca.crtFor ESA
Download the certificate from ESA.
For more information about downloading certificates from ESA, refer to Manage Certificates.
After obtaining the certificate, configure the environment variable:
| Variable | Value |
|---|---|
| SSL_CERT_FILE | Full path to the certificate file (for example, /opt/ca.crt) |
When prompted for the ESA hostname or IP during RPA installation, ensure it is included in the ESA TLS certificate (CN or SAN) and is resolvable from the RPAgent host.
After the CA certificate is available, proceed with the RPA installation.
For more information about installing RP Agent, refer to Installing RP Agent on Linux or Unix.
Using Interactive Mode
For more information about installing RP Agent on Linux using Interactive Mode, refer to Installing RP Agent on Linux or Unix using Interactive Mode.
Using Silent Mode
For more information about installing RP Agent using Silent Mode, refer to Installing RP Agent on Linux or Unix using Silent Mode.
Installing Application Protector Java on Linux
The steps to install the AP Java on a Linux platform using the Linux installer or through the Silent mode of installation, are described in this section.
Using Linux Installer
To install the AP Java on the Linux platform using the Linux installer:
Run the AP Java installer using the following command.
./APJavaSetup_Linux_x64_<version>.shThe prompt to continue the installation appears.
***************************************************** Welcome to the AP Java SDK Setup Wizard ***************************************************** This will install AP Java SDK on your computer. Do you want to continue? [yes or no]If you want to continue with the installation of the AP Java SDK, then type yes else type no.
If you type yes, then the prompt to enter the installation directory appears.
Please enter installation directory [/opt/protegrity]:If you type no, then the installation of the AP Java aborts.
The AP Java is installed successfully.
The default installation directory for the AP Java on a Linux platform is /opt/protegrity/sdk/java.
Using Silent Mode
You can also execute the AP Java installer without any manual intervention, which is also known as the Silent mode of installation. The following parameter must be provided to execute the installer in the Silent mode.
| Parameter | Description |
|---|---|
| -dir | Optional install directory Default: /opt/protegrity |
./APJavaSetup_Linux_x64_<version>.sh [-dir <directory>]
Installing the Upgrade Agent
Agent‑based upgrade is supported only when AP Java version 10.1.0 or later is already installed.
For more information about installing the Upgrade Agent, refer to Installing the Upgrade Agent.
2.1.5 - Configuring the Protector
Configuring AP Java on Linux
To configure the AP Java on the Linux platform:
Setup the Java classpath.
Operating System Classpath Linux /opt/protegrity/sdk/java/libBefore the trusted application can successfully load the
ApplicationProtectorJava.jarfile, ensure that -- The Java
classpathis set accurately. - The path to
jcorelite.plmis configured properly.
- The Java
Deploy a policy to test the application.
For more information about deploying a policy, refer to Deploying Policies.
For more information about configuring the various parameters for the AP Java using the config.ini file, refer to Config.ini file for Application Protector.
Verifying Installation of AP Java
The steps to verify the successful installation of the AP Java are described in this section.
Configure the application as a trusted application in the ESA.
For more information about trusted applications, refer to Working With Trusted Applications.Initialize AP Java.
For more information about the AP Java initialization API, refer to getProtector.Run the
GetVersionmethod using the following command to check the version of the installed AP Java.public java.lang.String getVersion()
Before running the following program, update the GetVersion.java file with the policy username and data element name.
Compile and Run the Sample Application
Compile the sample application using the following command.
cd /opt/protegrity/sdk/java/lib
javac -cp .:ApplicationProtectorJava.jar GetVersion.java
Run the sample application using the following command.
java -cp .:ApplicationProtectorJava.jar GetVersion
By default, the config.ini file is located in the SDK data directory /opt/protegrity/sdk/java/data and is picked up automatically at runtime.
If the config.ini file is moved to a different location, specify its path explicitly when running the application:
java -Dconfig.path=/opt/config.ini -cp .:ApplicationProtectorJava.jar GetVersion
If config.ini is present in the same directory as ApplicationProtectorJava.jar and jcorelite.plm, the SDK loads it automatically and the -Dconfig.path option is not required.
The following is a sample code to check the version number of the installed AP Java.
/* Illustrates how to call getVersion() api to know the version of Application Protector
* Executing this for the first time creates a forensic entry that should be added to the authorized app
*
*/
import com.protegrity.ap.java.*;
public class GetVersion {
public static void main(String[] args) throws ProtectorException {
Protector protector=null;
try {
protector=Protector.getProtector();
System.out.println("Product version : "+protector.getVersion());
} catch (ProtectorException e) {
e.printStackTrace();
throw e;
}
}
}
2.1.6 - Upgrading the Application Protector Java
Purpose
The AP Java Upgrade feature enables zero‑downtime upgrades of the Protegrity Application Protector Java SDK.
Traditionally, upgrading the SDK required restarting the Java application, resulting in service disruption. The upgrade process removes this requirement by dynamically reloading updated SDK libraries at runtime, ensuring that protection operations continue uninterrupted throughout the upgrade process.
Overview
AP Java Upgrade is implemented through coordination between two primary components:
- Upgrade Agent
- Protector SDK (AP Java)
Upgrade Agent
An external process, installed and run separately from the application, that orchestrates the upgrade. The Upgrade Agent deploys new SDK binaries and upgrades shared companion components, such as RP Agent and Log Forwarder. It also signals upgrade availability to running protector instances through a shared metadata.ini metadata file.
Protector SDK for Zero-downtime Upgrade
The AP Java SDK embedded in the customer’s Java application. It continuously monitors metadata.ini for version changes. When an upgrade is detected, the SDK performs a hot reload and upgrades the protector seamlessly without requiring a restart.
Key Terminologies related to Upgrade
| Term | Definition |
|---|---|
| Upgrade Agent | An external process that orchestrates the upgrade lifecycle, including deploying new binaries, upgrading shared components, and coordinating with running protector instances. |
metadata.ini | A shared control file located at /opt/protegrity/upgrader/data/metadata.inithat acts as the communication channel between the Upgrade Agent and the Protector SDK. |
| PID file | A per‑process file located at /opt/protegrity/upgrader/active_processes/<pid>.pid that identifies active protector processes and records their current upgrade state and version. |
| Hot Reload | The process of replacing the active SDK implementation at runtime by loading updated JARs without restarting the Java application. |
2.1.6.1 - About Upgrade Agent
The Upgrade Agent is a new component introduced in the AP Java 10.1.0 build package to enable upgrade capability. It is the core module that provides safe, automated, coordinated, and reversible upgrades for AP Java protectors.
The Upgrade Agent is responsible for upgrading the AP Java protector, regardless of whether it is online or offline. It also handles rollback operations for online and offline protectors. To ensure seamless upgrades in the future without needing to stop the protector application, it is essential to install the Upgrade Agent before running the protector application.
Features of AP Java Upgrade Agent
- Ensures that protection operations are never interrupted during an upgrade.
- Supports upgrades and rollbacks for protectors.
- Executes upgrade and rollback operations on a single node in a coordinated manner.
- Monitors and coordinates multiple protector processes.
- Automatically creates backups of existing components to enable safe and reliable restoration during rollback.
Note:
Only one protector type is supported per node. The upgrade agent can upgrade only one protector at a time and currently supports AP Java only.Upgrading AP Java also upgrades the shared RP Agent (RPA) and Log Forwarder components. If additional protectors (for example, AP Python) are installed on the same node, they must be manually upgraded to a version compatible with the upgraded AP Java core. This is required because RPA and Log Forwarder are shared across protectors.
For more information about core version compatibility, refer to the README.
After a successful upgrade, the Upgrade Agent automatically creates a backup of the previous protector version at /opt/protegrity/upgrader/backup/.
The backup includes:
- AP Java protector directory
- RP Agent directory
- Log Forwarder directory
This backup is required for rollback operations.
2.1.6.2 - Installing the Upgrade Agent
Agent‑based upgrade is supported only when AP Java version 10.1.0 or later is already installed.
The Agent coordinates AP Java upgrade, takes backup, validates signatures, and manages services during upgrade or rollback operation.
To perform seamless upgrades in the future without stopping the protector, ensure that the Upgrade Agent is installed before running the protector.
Installation Scenarios
Fresh Installation - Manual, Without Upgrade Agent
- Fresh installation must be performed manually.
- The Upgrade Agent is not used during fresh installation.
- Agent upgrader installation is silent which means there are no prompts or user interaction.
To perform the fresh installation of SDK Upgrader:
Note:
<arch>can bex86-64orarm64.
When you extract the ApplicationProtector_Linux-ALL-64_<arch>_JRE-1.8-64_<version>.tgz package, the UpgradeAgentSetup_Linux_x64_<version>.sh agent installer file is extracted along with other files.
For more information about extracting the build package, refer to Extracting the Setup Scripts and Package.
Run the AP Java installer using the following command.
./UpgradeAgentSetup_Linux_x64_<version>.sh
The SDK Upgrader Agent installation starts.
*****************************************************
Welcome to the SDK Upgrader Agent Setup Wizard
*****************************************************
This will install the SDK Upgrader Agent on your computer.
Unpacking...
Extracting files...
Protegrity SDK Upgrader Agent is installed in /opt/protegrity/upgrader.
Upgrading the Agent
Manual extraction of the product build .tgz is not required. If a newer Upgrade Agent is included, the agent self‑upgrades itself and prompts the user to re‑run the agent to continue the upgrade.
The installation of the new Upgrade Agent does not affect existing backups or log files. The update is limited to the following components:
upgrader/bin/sdkupgrd binaryupgrader/data/sdkupgrd.confupgrader/data/metadata.ini
The installation directory is organized into clearly defined subdirectories.
For more information about the installation directory structure and the purpose of each subdirectory, refer to Installation Directory Structure Overview.
2.1.6.3 - Setting Up the Upgrade Agent
This section explains how users should interact with the Upgrade Agent for performing upgrades and rollback operations for AP Java protectors.
AP Java Upgrade allows you to upgrade the AP Java SDK, RP Agent, and Log Forwarder without stopping your applications.
Note: For both online and offline upgrade, you should not pass the path of the extracted local
.tgzbuild file. The Upgrade agent must extract the.tgzfile to generate thesignatures/directory.
Before performing an online or offline upgrade or rollback, review the following important considerations and limitations.
Scalability and Performance Considerations
With a policy size of approximately 5MB, upgrade and rollback operations are validated safely for up to 70 concurrent processes on the tested machine configuration.
Supported Deployment
- Ensure that only one RPA and one Log Forwarder are installed on the system.
- Upgrading multiple RPAs on the same host is not supported.
- Upgrading or rolling back only one version of AP Java at a time is allowed on the same host.
Log Forwarder Upgrade Behavior and Requirements
- The Upgrade Agent does not perform fresh installations of the Log Forwarder. The Log Forwarder must already be installed for the agent to upgrade it.
- To skip the Log Forwarder upgrade when it is not required or not installed, set the
isFluentBitparameter tonoin thesdkupgrd.conffile. - If
isFluentBitis set toyesinsdkupgrd.conf, you must also configure the Log Forwarder endpoint in thesdkupgrd.conffile. - When Log Forwarder mode is set to
error, upgrading renames the Log Forwarder directory fromlogforwardertologforwarder_<new_version>.
Port Requirements for Error Mode
- If mode=error is enabled in
config.ini, ensure that ports15780and15781are open. - The Upgrade Agent uses port
15781to run the new Log Forwarder during upgrade. - Although port
15780is released after an upgrade, it is required again if an online rollback is initiated.
Backup and Rollback Limitations
- Backup is maintained only for the most recent upgrade.
- Rollback is supported only for that most recent upgrade.
Online vs Offline Upgrade and Rollback Rules
- During upgrade or rollback, multiple AP Java installations on a node must be in a consistent state. All processes must be either running or stopped. Mixed process states are not supported.
- Offline upgrade and offline rollback requires all AP Java processes to be stopped, while online upgrade and online rollback requires at least one AP Java process to be running.
DevOps Flow Limitations
- When using the DevOps flow, only offline upgrade and rollback are supported.
- Online upgrade is not supported with the DevOps flow.
- To enable the DevOps flow, set the
devopsparameter toyesin thesdkupgrd.conffile.
Upgrade and Hot Reload Logging
A hot upgrade or reload refers to replacing AP Java JAR and PLM files while the AP Java process is running, without restarting the service.
- Protector hot-reload logs are created by the protector and stored under
/opt/protegrity/upgrader/logs/<protector_version>/. Protector upgrade logs are not sent to Protegrity Insights. - Upgrade Agent logs are created under
/opt/protegrity/upgrader/logs/Agent/. When Fluent Bit is enabled, Upgrade Agent logs are removed after being successfully pushed to Protegrity Insights.
Viewing Upgrade Agent Audit Logs
Upgrade and rollback audit logs generated by the Upgrade Agent are available in Protegrity Insights.
To locate Upgrade Agent logs:
Index:
pty_insight_analytics*troubleshooting_*
Filter:
process.name: sdkupgrd
Use this filter to view audit and troubleshooting logs related specifically to Upgrade Agent execution, including upgrade and rollback activities.
Note: Upgrade is not supported if Log Forwarder contains custom configurations for forwarding audit logs to an external SIEM.
2.1.6.3.1 - Upgrade Configurations
View the Agent Help
Generic Agent Help
Before running any upgrade or rollback operation, run the agent help using the following command.
/opt/protegrity/upgrader/bin/sdkupgrd -h
OR
/opt/protegrity/upgrader/bin/sdkupgrd --help
/opt/protegrity/upgrader/bin/sdkupgrd -help
This command displays all supported parameters and usage instructions.
The following help parameters are listed.
SDK Upgrader Agent Version: 1.0.0+5.g0493
Usage:
./sdkupgrd upgrade [--conf <path>] [--esa-user <user>] [--esa-password <pass>]
./sdkupgrd rollback
./sdkupgrd version | -v | --version
./sdkupgrd -h | --help | -help
Commands:
upgrade Upgrade agent and protectors to a new version
rollback Rollback agent and protectors to a previous version
version Display agent version information
Configuration:
All parameters are read from data/sdkupgrd.conf
Use --conf <path> to specify a custom conf file path
ESA Credentials (security):
ESA username and password are NOT stored in the conf file.
Provide via --esa-user / --esa-password arguments,
or they will be prompted interactively (password is hidden).
For detailed help on a specific command:
./sdkupgrd upgrade -h
./sdkupgrd rollback -h
Agent Upgrade Help
Run the agent upgrade help using the following command.
/opt/protegrity/upgrader/bin/sdkupgrd upgrade -h
The following help parameters are listed.
SDK Upgrader Agent Version: 1.0.0+5.g0493
Usage:
./sdkupgrd upgrade [--conf <path>] [--esa-user <user>] [--esa-password <pass>]
Description:
Upgrades the agent, RPAgent, LogForwarder, and protectors to a new version.
Supports both online (ESA-connected) and offline upgrade modes.
Configuration keys (read from data/sdkupgrd.conf or --conf <path>):
Key Description Default
---------------------- ----------------------------------------------- --------------------------------
location-of-build URL or local path to the build file (REQUIRED) -
offline Enable offline upgrade mode (yes/no) no
rpagent-path Path to RPAgent installation /opt/protegrity/rpagent
logforwarder-path Path to LogForwarder installation /opt/protegrity/logforwarder
endpoints LogForwarder endpoints (comma-separated) -
protector-paths Protector paths (comma-separated) /opt/protegrity/sdk/java
devops Enable DevOps mode / skip RPAgent (yes/no) no
isFluentBit Enable LogForwarder upgrade (yes/no) yes
insecure RPAgent insecure mode (yes/no) no
esa-host ESA server hostname or IP address -
esa-port ESA server port 25400
new-logforwarder-path New logforwarder path (error mode) /opt/protegrity/logforwarder_{version}
stdout Print logs to console (yes/no) no
debug Enable debug logging (yes/no) no
ESA Credentials (NOT stored in conf file for security):
ESA username and password must be provided via CLI arguments or interactive prompt.
They are never read from the conf file to prevent credential exposure.
Password input is always masked/hidden for security.
--esa-user <username> ESA username (prompted interactively if not provided)
--esa-password <pass> ESA password (prompted with hidden input if not provided)
Note: In DevOps mode (devops=yes), ESA credentials are not required.
Options:
--conf <path> Path to sdkupgrd.conf file (default: data/sdkupgrd.conf)
--esa-user <username> ESA username
--esa-password <pass> ESA password (hidden in logs, masked with *)
-v, --version Show agent version
-h, --help Show this help message
Examples:
./sdkupgrd upgrade # interactive mode
./sdkupgrd upgrade --esa-user admin --esa-password secret # credentials via args
./sdkupgrd upgrade --conf /path/to/sdkupgrd.conf # custom conf file
./sdkupgrd upgrade --esa-user admin # password prompted
Agent Rollback Help
Run the agent rollback help using the following command.
/opt/protegrity/upgrader/bin/sdkupgrd rollback -h
The following help parameters are listed.
SDK Upgrader Agent Version: 1.0.0+5.g0493
Usage:
./sdkupgrd rollback
Description:
Rolls back the agent, RPAgent, LogForwarder, and protectors to a previous version.
Restores from the most recent backup created during an upgrade.
Options:
-v, --version Show agent version
-h, --help Show this help message
Examples:
./sdkupgrd rollback # rollback with defaults
./sdkupgrd rollback --offline # rollback in offline mode
Note: The
sdkupgrd rollback -h(or--help) output provides the lists command line options. However, the parameters, such as--offline,--stdout, and--debugare not supported on the command line. These parameters must be configured in thesdkupgrd.conffile instead.
GPG Signature Verification
The Upgrade Agent performs GPG signature verification before upgrade to ensure the integrity and authenticity of the build file. Ensure that the .gpg file is obtained from the ESA and placed in the /opt/protegrity/upgrader/bin/ directory for the signature verification.
Note: Without the
.gpgfile, the Upgrade Agent cannot verify or upgrade the protector.
To get the GPG encryption key from the ESA, which is in the /opt/verification_keys/ directory, run the following command on the protector machine.
sshpass -p <ESA root password> scp -r root@<ESA ip>:/opt/verification_keys/10.0.gpg /opt/protegrity/upgrader/bin
For more information about verification of signed protector build, refer to Verification of Signed Protector Build.
Build File Path
When initiating an upgrade, ensure that the compressed .tgz build file is available, or provide the build URL.
location-of-build = <path_to_build.tgz>
Caution: Do not set the path of the extracted
.tgzbuild file manually. The Upgrade Agent expects the raw.tgzfile and handles extraction internally.
Upgrade Modes Supported
The Upgrade Agent supports upgrades in two modes:
- Online upgrade: When AP Java application is running.
- Offline upgrade: When AP Java application is not running.
Offline upgrade mode should be used when:
- The application is manually stopped.
- DevOps deployment only supports offline upgrade.
For more information about DevOps deployment, refer to DevOps Approach for Application Protector Java.
Upgrade Process
Protector Upgrade
For an upgrade, update the sdkupgrd.conf configuration file located in the data/ directory.
For more information about the configuration file, refer to SDK Upgrader Agent Configuration File.
ESA Credential Requirements
- ESA credentials, username and password are required when performing upgrade operations.
2.1.6.3.2 - Rollback Behavior
The Upgrade Agent restores all backed-up components to their previous state. Rollback supports both online and offline mode.
- If the backup folder is missing or deleted, rollback cannot proceed.
- Always verify that the backup directory exists before performing any rollback. The agent performs automatic rollback in case of upgrade failure.
- Rollback is supported only for the most recent upgrade, as a backup is created only for the last upgrade performed.
2.1.6.3.3 - Protegrity SDK Upgrade Permissions and Deployment
Overview
Protegrity deployments include the following components:
- Upgrade Agent
- Application Protector (AP) Java SDK
- Resilient Package (RP) Agent
- Log Forwarder
It requires a structured permission model to ensure that only authorized users can access protected resources. The permissions define the ability to execute, read, or modify protected resources. This section provides recommended user and group configurations, file and folder permissions, and step‑by‑step deployment guidance for a common use case.
2.1.6.3.3.1 - User Roles and Groups
Groups
| Group | Purpose | Example |
|---|---|---|
| Admin group | Users who manage the Upgrade Agent, RPAgent, and Log Forwarder. This group is always required. | ptyadmin |
| SDK users group | AP Java users who run applications using the SDK. | ptyusers |
User Configuration Examples
| User | Primary Group | Purpose |
|---|---|---|
ptyadmin | ptyadmin | Admin user who can install and run Upgrade Agent, RPAgent, Log Forwarder, and AP Java. |
ptyuser1, ptyuser2, and so on | ptyadmin | AP Java user who can run application using the SDK. |
User and Group Setup Commands
This section provide commands to create users and groups on Linux.
sudo groupadd ptyadmin
sudo useradd -m -g ptyadmin ptyadmin
sudo useradd -m -g ptyadmin ptyuser1
Here, ptyuser1 uses ptyadmin as the primary group. PID files are created with the following ownership:
ptyuser1:ptyadmin
The Upgrade Agent can read the files with this permission automatically.
2.1.6.3.3.2 - Component Overview
All Protegrity components are owned and primarily run by the ptyadmin user. The following table lists the components and their ownership.
| Component | Description | Owner or User* | Who Runs It |
|---|---|---|---|
| Upgrade Agent | Upgrades and rolls back Protegrity components. | ptyadmin | ptyadmin user |
| AP Java SDK | Java libraries used by applications to protect and unprotect data. | ptyadmin | User (ptyuser1) in the ptyadmin group. |
| RPAgent | Downloads and keeps security policy packages in sync. | ptyadmin | ptyadmin user |
| Log Forwarder | - Collects logs and forwards them to the ESA. - It is based on Fluent Bit. | ptyadmin | ptyadmin user |
* - All components are owned by ptyadmin.
The 10.0.gpg file is used by the Upgrade Agent for signature verification. However, it is not a part of the product build. Complete the following steps.
- Copy it manually from the ESA machine.
- Place it in
upgrader/bin/. - Set permissions to
640.
2.1.6.3.3.3 - Recommended File and Folder Permissions
This section explains the required users and groups, core components, and recommended file permissions for running Protegrity Upgrade Agent and the AP Java SDK securely on Linux systems.
Note: The user running the Upgrade Agent must own the extracted old SDK build used for the upgrade. If a local path is configured in
sdkupgrd.conf, the user must also own the downloaded new build.
The following tables describe which users can access specific directories under the Upgrade Agent installation and explain why these permissions are required.
ptyadmin- Admin user who owns and manages the Upgrade Agent, RPAgent, and Log Forwarder.ptyuser1- AP Java application user.
Upgrader Agent
The Upgrade Agent is always installed under /opt/protegrity/upgrader/.
| Path | Owner:Group | Mode | Notes |
|---|---|---|---|
/opt/protegrity/ | ptyadmin:ptyadmin | 751 | Allows users to traverse into subdirectories without listing the contents of /opt/protegrity. |
upgrader/ | ptyadmin:ptyadmin | 750 | - |
upgrader/bin/ | ptyadmin:ptyadmin | 750 | - |
upgrader/bin/sdkupgrd | ptyadmin:ptyadmin | 700 | Ensures upgrades and rollbacks can be initiated only by ptyadmin. |
upgrader/data/ | ptyadmin:ptyadmin | 750 | - |
upgrader/data/metadata.ini | ptyadmin:ptyadmin | 660 | Enables the SDK to read and update active version information required for upgrade coordination. |
upgrader/data/sdkupgrd.conf | ptyadmin:ptyadmin | 660 | - |
upgrader/logs/ | ptyadmin:ptyadmin | 770 | Allows SDK users to create and write log files during runtime and upgrades. |
upgrader/active_processes/ | ptyadmin:ptyadmin | 770 | Allows SDK users to create PID files so the Upgrade Agent can detect running processes. |
upgrader/backup/ | ptyadmin:ptyadmin | 750 | Stores backup and rollback data. |
AP Java SDK
| Path | Owner:Group | Mode | Notes |
|---|---|---|---|
sdk/ | ptyadmin:ptyadmin | 750 | Grants AP Java users read and execute access to the SDK. |
sdk/java/lib/ | ptyadmin:ptyadmin | 750 | Contains SDK JARs and native libraries. |
sdk/java/lib/ApplicationProtectorJava.jar | ptyadmin:ptyadmin | 640 | Read‑only access for AP Java users. |
sdk/java/lib/jcorelite.plm | ptyadmin:ptyadmin | 640 | Native library used by the SDK runtime. |
sdk/java/data/ | ptyadmin:ptyadmin | 750 | SDK configuration directory. |
sdk/java/data/config.ini | ptyadmin:ptyadmin | 640 | SDK configuration file. Read‑only access for AP Java users. |
RPAgent
| Path | Owner:Group | Mode | Notes |
|---|---|---|---|
rpagent/ | ptyadmin:ptyadmin | 755 | Allows read and execute access without exposing writable permissions. |
rpagent/bin/rpagent | ptyadmin:ptyadmin | 750 | RPAgent runtime binary. |
rpagent/bin/rpagentctrl | ptyadmin:ptyadmin | 750 | RPAgent control script. |
rpagent/data/rpagent.cfg | ptyadmin:ptyadmin | 640 | RPAgent configuration file. |
Log Forwarder
| Path | Owner:Group | Mode | Notes |
|---|---|---|---|
logforwarder/ | ptyadmin:ptyadmin | 755 | Allows read and execute access without write permissions. |
logforwarder/bin/fluent-bit | ptyadmin:ptyadmin | 750 | Log Forwarder runtime binary. |
logforwarder/bin/logforwarderctrl | ptyadmin:ptyadmin | 750 | Log Forwarder control script. |
logforwarder/data/logforwarder.conf | ptyadmin:ptyadmin | 640 | Log Forwarder configuration file. |
2.1.6.4 - AP Java Upgrade and Rollback Examples
2.1.6.4.1 - Online and Offline Upgrade
This section outlines the online and offline upgrade of the Protegrity Application Protector (AP) Java.
In online mode, the upgrade runs without interrupting ongoing Java protector processes. The Protegrity Upgrade Agent manages state transitions, metadata updates, and version synchronization during the upgrade.
In offline mode, there are no protector processes that are in a running state.
Specifying Custom Configuration File Location
To perform an online upgrade, the offline parameter in the sdkupgrd.conf file must be set to no.
To perform an offline upgrade, the offline parameter in the sdkupgrd.conf file must be set to yes.
Before running the sdkupgrd binary, ensure to update the sdkupgrd.conf file with the required configuration values. By default, the configuration file is located at /opt/protegrity/upgrader/data/sdkupgrd.conf.
For more information about the configuration values, refer to SDK Upgrader Agent Configuration File.
To perform the upgrade:
Run the following command to start the upgrade.
/opt/protegrity/upgrader/bin/sdkupgrd upgradeThe prompt to add the ESA username and password appears.
Note: If the configuration file is moved to a different location, specify the custom path using the
--confoption./opt/protegrity/upgrader/bin/sdkupgrd upgrade --conf /opt/sdkupgrd.confRun the upgrade in silent mode using the following command. Provide the ESA credentials with the command.
/opt/protegrity/upgrader/bin/sdkupgrd upgrade --esa-user <esa_username> --esa-password <esa_user_password>Important: Do not set the path of the extracted
.tgzbuild file manually. The Upgrade Agent expects the raw.tgzfile and handles extraction internally.Do not extract the build manually. The Upgrade Agent validates the
/signatures/directory inside the.tgzbundle. If the/signatures/directory is properly extracted, only then does the upgrade proceed.
For online and offline upgrade, these steps ensure that a smooth, zero‑downtime upgrade of AP Java protectors.
To confirm a successful online and offline upgrade -
- Review the Upgrade Agent logs in Insight for a success message indicating that the operation completed.
- Check the audit logs to verify that protection operations are being performed using the new AP Java version.
- Use Insight to review protector and audit logs.
- Confirm that logs reflect the new protector version after upgrade.
The application continues to serve protect and unprotect requests without interruption during the upgrade. In‑flight requests complete on the existing SDK version, while new requests are handled by the upgraded version after the reload. No requests are dropped, blocked, or fail during upgrade.
2.1.6.4.2 - Online and Offline Rollback
This section describes the complete procedure to perform an online and offline rollback operation for the Protegrity Application Protector Java components. It is assumed that the protector is already in the upgraded state.
Specifying Custom Configuration File Location
To perform an online rollback, the offline parameter in the sdkupgrd.conf file must be set to no.
To perform an offline rollback, the offline parameter in the sdkupgrd.conf file must be set to yes.
For rollback, the Upgrade Agent reads stdout, offline, and debug parameters from the sdkupgrd.conf file.
To perform online and offline rollback operation:
Run the following command to start the rollback.
/opt/protegrity/upgrader/bin/sdkupgrd rollback
Note: If the configuration file is moved to a different location, specify the custom path using the
--confoption./opt/protegrity/upgrader/bin/sdkupgrd rollback --conf /opt/sdkupgrd.conf
For online and offline rollback, these steps ensure a smooth, zero‑downtime rollback of AP Java protectors. It safely restores the system to the previously backed-up protector version, ensuring continuity if an upgrade fails or needs to be aborted.
To confirm a successful rollback -
- Ensure that the protector version has reverted.
- Review the Upgrade Agent logs in Insight for a success message indicating that the operation completed.
- Verify that the running AP Java processes report the expected older version after rollback.
- Use Insight to review protector and audit logs.
- Confirm that logs reflect the rolled‑back version after rollback.
2.1.7 - Application Protector Java APIs
A session must be created to run the Application Protector (AP) Java. The session enables AP Java to access information about the Trusted Application from the policy stored in memory. If the application is trusted, then the protect, unprotect, or reprotect method is called, one or many times, depending on the data.
The AP Java can be initialized by an OS User who is registered and deployed as the Trusted Application User in the ESA. The OS User can also be a Policy User.
The following diagram represents the basic flow of a session.
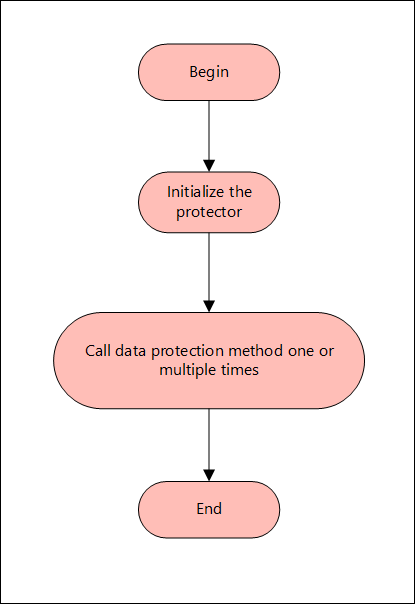
Note: The AP Java only supports bytes converted from the string data type.
If any other data type is directly converted to bytes and passed as an input to the API that supports byte as an input and provides byte as an output, then data corruption might occur.
Supported data types for the AP Java
The AP Java supports the following data types:
- Bytes
- Double
- Float
- Integer
- java.util.Date
- Long
- Short
- String
The following are the various APIs provided by the AP Java.
getProtector
The getProtector method returns the Protector object associated with the AP Java APIs. After initialization, this object is used to create a session. The session is then passed as a parameter to protect, unprotect, or reprotect methods.
static Protector getProtector()
Parameters
None
Returns
Protector Object: An object associated with the Protegrity Application Protector API.
Exception
ProtectorException: If the configurations are invalid, then an exception is thrown indicating a
failed initialization.
getVersion
The getVersion method returns the product version of the AP Java in use.
public java.lang.String getVersion()
Parameters
None
Returns
String: Product version
getVersionEx
The getVersionEx method returns the extended version of the AP Java in use. The extended version consists of the Product version number and the CORE version number.
Note: The Core version is a sub-module used for troubleshooting protector issues.
public java.lang.String getVersionEx()
Parameters
None
Returns
String: Product version and CORE version
getLastError
The getLastError method returns the last error and a description of why this error was returned. When the methods used for protecting, unprotecting, or reprotecting data return an exception or a Boolean false, the getLastError method is called that describes why the method failed.
public java.lang.String getLastError(SessionObject session)
Parameters
Session: Session ID that is obtained by calling the createSession method.
Returns
String: Error message
Exception
ProtectorException: If the SessionObject is null, then an exception is thrown
SessionTimeoutException: If the session is invalid or has timed out, then an exception is thrown
For more information about the return codes, refer to Application Protector API Return Codes.
createSession
The createSession method creates a new session. The sessions that have not been utilized for a while, are automatically removed according to the sessiontimeout parameter defined in the [protector] section of the config.ini file.
The methods in the Protector API that take the SessionObject as a parameter, might throw an exception SessionTimeoutException if the session is invalid or has timed out. The application developers can handle the SessionTimeoutException and create a new session with a new SessionObject.
public SessionObject createSession(java.lang.String policyUser)
Parameters
policyUser: User name defined in the policy, as a string value.
Returns
SessionObject: Object of the SessionObject class.
Exception
ProtectionException: If input is null or empty, then an exception is thrown.
protect - Short array data
It It protects the data provided as a short array that uses the preservation data type or No Encryption data element. It supports bulk protection. There is no maximum data limit. For more information about the data limit, refer to AES Encryption.
If the data type preservation methods are used for data protection, then the protected data can be stored in the same data type as used for the input data.
public boolean protect(SessionObject sessionObj, java.lang.String dataElementName, short[] input, short[] output, byte[] externalIv)
Parameters
sessionObj: SessionObject that is obtained by calling the createSession method.
dataElementName: String containing the data element name defined in policy.
input: Input array with short format data.
output: Resultant output array with short format data.
externalIv: Buffer containing data that will be used as external IV, when externalIv = null, the value is ignored.
Result
True: The data is successfully protected.
False: The parameters passed are accurate, but the method failed when:
- The protection methods failed to perform the required action
- The data element is null or empty
For more information, such as, a text explanation and reason for the failure, call getLastError(session).
Exception
Protector Exception: If the SessionObject is null or if policy is configured to throw an exception, then an exception is thrown.
SessionTimeoutException: If the session is invalid or has timed out, then an exception is thrown.
protect - Short array data for encryption
It protects the data provided as a short array that uses an encryption data element. It supports bulk protection. There is no maximum data limit.
For more information about the data limit, refer to AES Encryption.
When the encryption method is used to protect data, the output of data protection (protected data) should be stored in byte[].
public boolean protect(SessionObject sessionObj, java.lang.String dataElementName, short[] input, byte[][] output, byte[] externalIv)
Parameters
sessionObj: SessionObject that is obtained by calling the createSession method.
dataElementName: String containing the data element name defined in policy.
input: Input array with short format data.
output: Resultant output array with byte format data.
externalIv: Optional parameter, which is a buffer containing data that will be used as external IV, when externalIv = null, the value is ignored.
Note: Encryption data elements do not support external IV.
Result
True: The data is successfully protected.
False: The parameters passed are accurate, but the method failed when:
- The protection methods failed to perform the required action
- The data element is null or empty
For more information, such as, a text explanation and reason for the failure, call getLastError(session).
Exception
Protector Exception: If the SessionObject is null or if policy is configured to throw an exception, then an exception is thrown.
SessionTimeoutException: If the session is invalid or has timed out, then an exception is thrown.
protect - Int array data
It It protects the data provided as an int array that uses the preservation data type or No Encryption data element. It supports bulk protection. However, you are recommended to pass not more than 1 MB of input data for each protection call.
If the data type preservation methods are used for data protection, then the protected data can be stored in the same data type as used for the input data.
public boolean protect(SessionObject sessionObj, java.lang.String dataElementName, int[] input, int[] output, byte[] externalIv)
Parameters
sessionObj: SessionObject that is obtained by calling the createSession method.
dataElementName: String containing the data element name defined in policy.
input: Input array with int data.
output: Resultant output array with int data.
externalIv: Optional parameter, which is a buffer containing data that will be used as external IV, when externalIv = null, the value is ignored.
Result
True: The data is successfully protected.
False: The parameters passed are accurate, but the method failed when:
- The protection methods failed to perform the required action
- The data element is null or empty
For more information, such as, a text explanation and reason for the failure, call getLastError(session).
Exception
Protector Exception: If the SessionObject is null or if policy is configured to throw an exception, then an exception is thrown.
SessionTimeoutException: If the session is invalid or has timed out, then an exception is thrown.
protect - Int array data for encryption
It protects the data provided as an int array that uses an encryption data element. It supports bulk protection. There is no maximum data limit. However, you are recommended to pass not more than 1 MB of input data for each protection call.
Data protected by using encryption data elements with input as integers, long or short data types, and output as bytes, cannot move between platforms with different endianness.
For example, you cannot move the protected data from the AIX platform to Linux or Windows platform and vice versa while using encryption data elements in the following scenarios:
- Input as integers and output as bytes
- Input as short integers and output as bytes
- Input as long integers and output as bytes
When the encryption method is used to protect data, the output of data protection (protected data) should be stored in byte[].
public boolean protect(SessionObject sessionObj, java.lang.String dataElementName, int[] input, byte[][] output, byte[] externalIv)
Parameters
sessionObj: SessionObject that is obtained by calling the createSession method.
dataElementName: String containing the data element name defined in policy.
input: Input array with int data.
output: Resultant output array with byte data.
externalIv: Optional parameter, which is a buffer containing data that will be used as external IV, when externalIv = null, the value is ignored.
Note: Encryption data elements do not support external IV.
Result
True: The data is successfully protected.
False: The parameters passed are accurate, but the method failed when:
- The protection methods failed to perform the required action
- The data element is null or empty
For more information, such as, a text explanation and reason for the failure, call getLastError(session).
Exception
Protector Exception: If the SessionObject is null or if policy is configured to throw an exception, then an exception is thrown.
SessionTimeoutException: If the session is invalid or has timed out, then an exception is thrown.
protect - Long array data
It protects the data provided as a long array that uses the preservation data type or No Encryption data element. It supports bulk protection. There is no maximum data limit. However, you are recommended to pass not more than 1 MB of input data for each protection call.
If the data type preservation methods are used for data protection, then the protected data can be stored in the same data type as used for the input data.
public boolean protect(SessionObject sessionObj, java.lang.String dataElementName, long[] input, long[] output, byte[] externalIv)
Parameters
sessionObj: SessionObject that is obtained by calling the createSession method.
dataElementName: String containing the data element name defined in policy.
input: Input array with long format data.
output: Resultant output array with long format data.
externalIv: Optional parameter, which is a buffer containing data that will be used as external IV, when externalIv = null, the value is ignored.
Result
True: The data is successfully protected.
False: The parameters passed are accurate, but the method failed when:
- The protection methods failed to perform the required action
- The data element is null or empty
For more information, such as, a text explanation and reason for the failure, call getLastError(session).
Exception
Protector Exception: If the SessionObject is null or if policy is configured to throw an exception, then an exception is thrown.
SessionTimeoutException: If the session is invalid or has timed out, then an exception is thrown.
protect - Long array data for encryption
It protects the data provided as a long array that uses an encryption data element. It supports bulk protection. There is no maximum data limit. However, you are recommended to pass not more than 1 MB of input data for each protection call.
When the encryption method is used to protect data, the output of data protection (protected data) should be stored in byte[].
protect(SessionObject sessionObj, java.lang.String dataElementName, long[] input, byte[][] output)
Parameters
sessionObj: SessionObject that is obtained by calling the createSession method.
dataElementName: String containing the data element name defined in policy.
input: Input array with long format data.
output: Resultant output array with byte format data.
externalIv: Optional parameter, which is a buffer containing data that will be used as external IV, when externalIv = null, the value is ignored.
Note: Encryption data elements do not support external IV.
Result
True: The data is successfully protected.
False: The parameters passed are accurate, but the method failed when:
- The protection methods failed to perform the required action
- The data element is null or empty
For more information, such as, a text explanation and reason for the failure, call getLastError(session).
Exception
Protector Exception: If the SessionObject is null or if policy is configured to throw an exception, then an exception is thrown.
SessionTimeoutException: If the session is invalid or has timed out, then an exception is thrown.
protect - Float array data
It protects the data provided as a float array that uses the No Encryption data element. It supports bulk protection. There is no maximum data limit. However, you are recommended to pass not more than 1 MB of input data for each protection call.
If the data type preservation methods are used for data protection, then the protected data can be stored in the same data type as used for the input data.
public boolean protect(SessionObject sessionObj, java.lang.String dataElementName, float[] input, float[] output, byte[] externalIv)
Parameters
sessionObj: SessionObject that is obtained by calling the createSession method.
dataElementName: String containing the data element name defined in policy.
input: Input array with float format data.
output: Resultant output array with float format data.
Result
True: The data is successfully protected.
False: The parameters passed are accurate, but the method failed when:
- The protection methods failed to perform the required action
- The data element is null or empty
For more information, such as, a text explanation and reason for the failure, call getLastError(session).
Exception
Protector Exception: If the SessionObject is null or if policy is configured to throw an exception, then an exception is thrown.
SessionTimeoutException: If the session is invalid or has timed out, then an exception is thrown.
protect - Float array data for encryption
It protects the data provided as a float array that uses an encryption data element. It supports bulk protection. There is no maximum data limit. However, you are recommended to pass not more than 1 MB of input data for each protection call.
When the encryption method is used to protect data, the output of data protection (protected data) should be stored in byte[].
public boolean protect(SessionObject sessionObj, java.lang.String dataElementName, float[] input, byte[][] output)
Parameters
sessionObj: SessionObject that is obtained by calling the createSession method.
dataElementName: String containing the data element name defined in policy.
input: Input array with float format data.
output: Resultant output array with byte format data.
Result
True: The data is successfully protected.
False: The parameters passed are accurate, but the method failed when:
- The protection methods failed to perform the required action
- The data element is null or empty
For more information, such as, a text explanation and reason for the failure, call getLastError(session).
Exception
Protector Exception: If the SessionObject is null or if policy is configured to throw an exception, then an exception is thrown.
SessionTimeoutException: If the session is invalid or has timed out, then an exception is thrown.
protect - Double array data
It protects the data provided as a double array that uses the No Encryption data element. It supports bulk protection. There is no maximum data limit. However, you are recommended to pass not more than 1 MB of input data for each protection call.
When the data type preservation methods are used to protect data, the output of data protection can be stored in the same data type that was used for the input data.
public boolean protect(SessionObject sessionObj, java.lang.String dataElementName, double[] input, double[] output)
Parameters
sessionObj: SessionObject that is obtained by calling the createSession method.
dataElementName: String containing the data element name defined in policy.
input: Input array with double format data.
output: Resultant output array with double format data.
Result
True: The data is successfully protected.
False: The parameters passed are accurate, but the method failed when:
- The protection methods failed to perform the required action
- The data element is null or empty
For more information, such as, a text explanation and reason for the failure, call getLastError(session).
Exception
Protector Exception: If the SessionObject is null or if policy is configured to throw an exception, then an exception is thrown.
SessionTimeoutException: If the session is invalid or has timed out, then an exception is thrown.
protect - Double array data for encryption
It protects the data provided as a double array that uses an encryption data element. It supports bulk protection. There is no maximum data limit. However, you are recommended to pass not more than 1 MB of input data for each protection call.
When the encryption method is used to protect data, the output of data protection (protected data) should be stored in byte[].
public boolean protect(SessionObject sessionObj, java.lang.String dataElementName, double[] input, byte[][] output)
Parameters
sessionObj: SessionObject that is obtained by calling the createSession method.
dataElementName: String containing the data element name defined in policy.
input: Input array with double format data.
output: Resultant output array with byte format data.
Result
True: The data is successfully protected.
False: The parameters passed are accurate, but the method failed when:
- The protection methods failed to perform the required action
- The data element is null or empty
For more information, such as, a text explanation and reason for the failure, call getLastError(session).
Exception
Protector Exception: If the SessionObject is null or if policy is configured to throw an exception, then an exception is thrown.
SessionTimeoutException: If the session is invalid or has timed out, then an exception is thrown.
protect - Date array data
It protects the data provided as a java.util.Data array that uses a preservation data type. It supports bulk protection. There is no maximum data limit. However, you are recommended to pass not more than 1 MB of input data for each protection call.
If the data type preservation methods are used for data protection, then the protected data can be stored in the same data type as used for the input data.
If the protect and unprotect operations are performed in different time zones using the java.util.Date API, then the unprotected data does not match with the input data.
For example, if you perform the protect operation in EDT time zone using the java.util.Date API, then you must perform the unprotect operation only in EDT time zone. This ensures that the unprotect operation returns back the original data.
public boolean protect(SessionObject sessionObj, java.lang.String dataElementName, java.util.Date[] input, java.util.Date[] output)
Parameters
sessionObj: SessionObject that is obtained by calling the createSession method.
dataElementName: String containing the data element name defined in policy.
input: Input array with date format data.
output: Resultant output array with date format data.
Result
True: The data is successfully protected.
False: The parameters passed are accurate, but the method failed when:
- The protection methods failed to perform the required action
- The data element is null or empty
For more information, such as, a text explanation and reason for the failure, call getLastError(session).
Exception
Protector Exception: If the SessionObject is null or if policy is configured to throw an exception, then an exception is thrown.
SessionTimeoutException: If the session is invalid or has timed out, then an exception is thrown.
protect - String array data
It protects the data provided as a string array that uses a preservation data type or the No Encryption data element. It supports bulk protection. There is no maximum data limit. However, you are recommended to pass not more than 1 MB of input data for each protection call.
For String and Byte data types, the maximum length for tokenization is 4096 bytes, while for encryption there is no maximum length defined.
If the data type preservation methods are used for data protection, then the protected data can be stored in the same data type as used for the input data.
For Date and Datetime type of data elements, an invalid input data error is returned by the protect API if the input value falls between the non-existent date range. It ranges from 05-OCT-1582 to 14-OCT-1582 of the Gregorian Calendar.
For more information about the tokenization and de-tokenization of the cutover dates of the Proleptic Gregorian Calendar, refer to section Datetime Tokenization for Cutover Dates of the Proleptic Gregorian Calendar.
public boolean protect(SessionObject sessionObj, java.lang.String dataElementName, java.lang.String[] input, java.lang.String[] output, byte[] externalIv)
Parameters
sessionObj: SessionObject that is obtained by calling the createSession method.
dataElementName: String containing the data element name defined in policy.
input: Input array with string format data.
output: Resultant output array with string format data.
externalIv: Optional parameter, which is a buffer containing data that will be used as external IV, when externalIv = null, the value is ignored.
Result
True: The data is successfully protected.
False: The parameters passed are accurate, but the method failed when:
- The protection methods failed to perform the required action
- The data element is null or empty
For more information, such as, a text explanation and reason for the failure, call getLastError(session).
Exception
Protector Exception: If the SessionObject is null or if policy is configured to throw an exception, then an exception is thrown.
SessionTimeoutException: If the session is invalid or has timed out, then an exception is thrown.
protect - String array data for encryption
It protects the data provided as s string array that uses an encryption data element. It supports bulk protection. There is no maximum data limit. However, you are recommended to pass not more than 1 MB of input data for each protection call.
For String and Byte data types, the maximum length for tokenization is 4096 bytes, while for encryption there is no maximum length defined.
The output of data protection is stored in byte[] when:
- Encryption method is used to protect data
- Format Preserving Encryption (FPE) method is used for Char and String APIs
The string as an input and byte as an output API is unsupported by Unicode Gen2 and FPE data elements for the AP Java.
public boolean protect(SessionObject sessionObj, java.lang.String dataElementName, java.lang.String[] input, byte[][] output, byte[] externalIv)
Parameters
sessionObj: SessionObject that is obtained by calling the createSession method.
dataElementName: String containing the data element name defined in policy.
input: Input array with string format data.
output: Resultant output array with byte format data.
externalIv: Optional parameter, which is a buffer containing data that will be used as external IV, when externalIv = null, the value is ignored.
Note: Encryption data elements do not support external IV.
Result
True: The data is successfully protected.
False: The parameters passed are accurate, but the method failed when:
- The protection methods failed to perform the required action
- The data element is null or empty
For more information, such as, a text explanation and reason for the failure, call getLastError(session).
Exception
Protector Exception: If the SessionObject is null or if policy is configured to throw an exception, then an exception is thrown.
SessionTimeoutException: If the session is invalid or has timed out, then an exception is thrown.
protect - Char array data
It protects the data provided as a char array that uses a preservation data type or the No Encryption data element. It supports bulk protection. There is no maximum data limit. However, you are recommended to pass not more than 1 MB of input data for each protection call.
If the data type preservation methods are used for data protection, then the protected data can be stored in the same data type as used for the input data.
For Date and Datetime type of data elements, an invalid input data error is returned by the protect API if the input value falls between the non-existent date range. It ranges from 05-OCT-1582 to 14-OCT-1582 of the Gregorian Calendar.
For more information about the tokenization and de-tokenization of the cutover dates of the Proleptic Gregorian Calendar, refer to section Datetime Tokenization for Cutover Dates of the Proleptic Gregorian Calendar.
public boolean protect(SessionObject sessionObj, java.lang.String dataElementName, char[][] input, char[][] output, byte[] externalIv)
Parameters
sessionObj: SessionObject that is obtained by calling the createSession method.
dataElementName: String containing the data element name defined in policy.
input: Input array with char format data.
output: Resultant output array with char format data.
externalIv: Optional parameter, which is a buffer containing data that will be used as external IV, when externalIv = null, the value is ignored.
Result
True: The data is successfully protected.
False: The parameters passed are accurate, but the method failed when:
- The protection methods failed to perform the required action
- The data element is null or empty
For more information, such as, a text explanation and reason for the failure, call getLastError(session).
Exception
Protector Exception: If the SessionObject is null or if policy is configured to throw an exception, then an exception is thrown.
SessionTimeoutException: If the session is invalid or has timed out, then an exception is thrown.
protect - Char array data for encryption
It protects the data provided as a char array that uses an encryption data element. It supports bulk protection. There is no maximum data limit. However, you are recommended to pass not more than 1 MB of input data for each protection call.
The output of data protection is stored in byte[] when:
- Encryption method is used to protect data
- Format Preserving Encryption (FPE) method is used for Char and String APIs
public boolean protect(SessionObject sessionObj, java.lang.String dataElementName, char[][] input, byte[][] output, byte[] externalIv)
Parameters
sessionObj: SessionObject that is obtained by calling the createSession method.
dataElementName: String containing the data element name defined in policy.
input: Input array with char format data.
output: Resultant output array with byte format data.
externalIv: Optional parameter, which is a buffer containing data that will be used as external IV, when externalIv = null, the value is ignored.
Note: Encryption data elements do not support external IV.
Result
True: The data is successfully protected.
False: The parameters passed are accurate, but the method failed when:
- The protection methods failed to perform the required action
- The data element is null or empty
For more information, such as, a text explanation and reason for the failure, call getLastError(session).
Exception
Protector Exception: If the SessionObject is null or if policy is configured to throw an exception, then an exception is thrown.
SessionTimeoutException: If the session is invalid or has timed out, then an exception is thrown.
protect - Byte array data
It protects the data provided as a byte array that uses the encryption data element, No Encryption data element, and preservation data type. It supports bulk protection. There is no maximum data limit. However, you are recommended to pass not more than 1 MB of input data for each protection call.
For String and Byte data types, the maximum length for tokenization is 4096 bytes, while for encryption there is no maximum length defined.
The Protegrity AP Java protector only supports bytes converted from the string data type.
If any data type is converted to bytes and passed as input to the API supporting byte as input and providing byte as output, then data corruption might occur.
If the data type preservation methods are used for data protection, then the protected data can be stored in the same data type as used for the input data.
For Date and Datetime type of data elements, an invalid input data error is returned by the protect API if the input value falls between the non-existent date range. It ranges from 05-OCT-1582 to 14-OCT-1582 of the Gregorian Calendar.
For more information about the tokenization and de-tokenization of the cutover dates of the Proleptic Gregorian Calendar, refer to section Datetime Tokenization for Cutover Dates of the Proleptic Gregorian Calendar.
public boolean protect(SessionObject sessionObj, java.lang.String dataElementName, byte[][] input, byte[][] output, PTYCharset ...ptyCharsets)
Parameters
sessionObj: SessionObject that is obtained by calling the createSession method.
dataElementName: String containing the data element name defined in policy.
input: Input array with byte format data.
output: Resultant output array with byte format data.
ptyCharsets: Encoding associated with the bytes of the input data.
PTYCharset ptyCharsets = PTYCharset.<encoding>;
The ptyCharsets parameter supports the following encodings:
- UTF-8
- UTF-16LE
- UTF-16BE
The ptyCharsets parameter is mandatory for the data elements created with Unicode Gen2 tokenization method and the FPE encryption method for byte APIs.
The encoding set for the ptyCharsets parameter must match the encoding of the input data passed.
The default value for the ptyCharsets parameter is UTF-8.
Result
True: The data is successfully protected.
False: The parameters passed are accurate, but the method failed when:
- The protection methods failed to perform the required action
- The data element is null or empty
For more information, such as, a text explanation and reason for the failure, call getLastError(session).
Exception
Protector Exception: If the SessionObject is null or if policy is configured to throw an exception, then an exception is thrown.
SessionTimeoutException: If the session is invalid or has timed out, then an exception is thrown.
protect - String array data with External Tweak
It protects the data provided as a string array using the FPE (FF1) that uses a preservation data type with FPE data elements. It supports bulk protection. There is no maximum data limit. However, you are recommended to pass not more than 1 MB of input data for each protection call.
When FPE method is used with FPE data elements for data protection, the protected data can be stored in the same data type that was used for input data.
public boolean protect(SessionObject sessionObj, java.lang.String dataElementName, java.lang.String[] input, java.lang.String[] output, byte[] externalIv, byte[] externalTweak)
Parameters
sessionObj: SessionObject that is obtained by calling the createSession method.
dataElementName: String containing the data element name defined in policy.
input: Input array with string format data.
output: Resultant output array with string format data.
externalIv: Optional parameter, which is a buffer containing data that will be used as external IV, when externalIv = null, the value is ignored.
externalTweak: Optional parameter, which is a buffer containing data that will be used as Tweak, when externalTweak = null, the value is ignored.
Result
True: The data is successfully protected.
False: The parameters passed are accurate, but the method failed when:
- The protection methods failed to perform the required action
- The data element is null or empty
For more information, such as, a text explanation and reason for the failure, call getLastError(session).
Exception
Protector Exception: If the SessionObject is null or if policy is configured to throw an exception, then an exception is thrown.
SessionTimeoutException: If the session is invalid or has timed out, then an exception is thrown.
unprotect - Short array data
It unprotects the data provided as a short array that uses the preservation data type or the No Encryption data element. It supports the bulk unprotection. There is no maximum data limit. However, you are recommended to pass not more than 1 MB of input data for each unprotection call.
public boolean unprotect(SessionObject sessionObj, java.lang.String dataElementName, short[] input, short[] output, byte[] externalIv)
Parameters
sessionObj: SessionObject that is obtained by calling the createSession method.
dataElementName: String containing the data element name defined in policy.
input: Input array with short format data.
output: Resultant output array with short format data.
externalIv: Optional parameter, which is a buffer containing data that will be used as external IV, when externalIv = null, the value is ignored.
Result
True: The data is successfully unprotected.
False: The parameters passed are accurate, but the method failed to perform the required action
For more information, such as, a text explanation and reason for the failure, call getLastError(session).
Exception
Protector Exception: If the SessionObject is null or if policy is configured to throw an exception, then an exception is thrown.
SessionTimeoutException: If the session is invalid or has timed out, then an exception is thrown.
unprotect - Short array data for encryption
It unprotects the data provided as a short array that uses an encryption data element. It supports the bulk unprotection. There is no maximum data limit. However, you are recommended to pass not more than 1 MB of input data for each unprotection call.
public boolean unprotect(SessionObject sessionObj, java.lang.String dataElementName, byte[][] input, short[] output, byte[] externalIv)
Parameters
sessionObj: SessionObject that is obtained by calling the createSession method.
dataElementName: String containing the data element name defined in policy.
input: Input array with byte format data.
output: Resultant output array with short format data.
externalIv: Optional parameter, which is a buffer containing data that will be used as external IV, when externalIv = null, the value is ignored.
Note: Encryption data elements do not support external IV.
Result
True: The data is successfully unprotected.
False: The parameters passed are accurate, but the method failed to perform the required action.
For more information, such as, a text explanation and reason for the failure, call getLastError(session).
Exception
Protector Exception: If the SessionObject is null or if policy is configured to throw an exception, then an exception is thrown.
SessionTimeoutException: If the session is invalid or has timed out, then an exception is thrown.
unprotect - Int array data
It unprotects the data provided as an int array that uses a preservation data type or a No Encryption data element. It supports the bulk unprotection. There is no maximum data limit. However, you are recommended to pass not more than 1 MB of input data for each unprotection call.
public boolean unprotect(SessionObject sessionObj, java.lang.String dataElementName, int[] input, int[] output, byte[] externalIv)
Parameters
sessionObj: SessionObject that is obtained by calling the createSession method.
dataElementName: String containing the data element name defined in policy.
input: Input array with int format data.
output: Resultant output array with int format data.
externalIv: Optional parameter, which is a buffer containing data that will be used as external IV, when externalIv = null, the value is ignored.
Result
True: The data is successfully unprotected.
False: The parameters passed are accurate, but the method failed to perform the required action.
For more information, such as, a text explanation and reason for the failure, call getLastError(session).
Exception
Protector Exception: If the SessionObject is null or if policy is configured to throw an exception, then an exception is thrown.
SessionTimeoutException: If the session is invalid or has timed out, then an exception is thrown.
unprotect - Int array data for encryption
It unprotects the data provided as an int array that uses an encryption data element. It supports the bulk unprotection. There is no maximum data limit. However, you are recommended to pass not more than 1 MB of input data for each unprotection call.
public boolean unprotect(SessionObject sessionObj, java.lang.String dataElementName, byte[][] input, int[] output, byte[] externalIv)
Parameters
sessionObj: SessionObject that is obtained by calling the createSession method.
dataElementName: String containing the data element name defined in policy.
input: Input array with byte format data.
output: Resultant output array with int format data.
externalIv: Optional parameter, which is a buffer containing data that will be used as external IV, when externalIv = null, the value is ignored.
Note: Encryption data elements do not support external IV.
Result
True: The data is successfully unprotected.
False: The parameters passed are accurate, but the method failed to perform the required action.
For more information, such as, a text explanation and reason for the failure, call getLastError(session).
Exception
Protector Exception: If the SessionObject is null or if policy is configured to throw an exception, then an exception is thrown.
SessionTimeoutException: If the session is invalid or has timed out, then an exception is thrown.
unprotect - Long array data
It unprotects the data provided as a long array that uses the preservation data type or the No Encryption data element. It supports the bulk unprotection. However, you are recommended to pass not more than 1 MB of input data for each unprotection call.
public boolean unprotect(SessionObject sessionObj, java.lang.String dataElementName, long[] input, long[] output, byte[] externalIv)
Parameters
sessionObj: SessionObject that is obtained by calling the createSession method.
dataElementName: String containing the data element name defined in policy.
input: Input array with long format data.
output: Resultant output array with long format data.
externalIv: Optional parameter, which is a buffer containing data that will be used as external IV, when externalIv = null, the value is ignored.
Result
True: The data is successfully unprotected.
False: The parameters passed are accurate, but the method failed to perform the required action.
For more information, such as, a text explanation and reason for the failure, call getLastError(session).
Exception
Protector Exception: If the SessionObject is null or if policy is configured to throw an exception, then an exception is thrown.
SessionTimeoutException: If the session is invalid or has timed out, then an exception is thrown.
unprotect - Long array data for encryption
It unprotects the data provided as a long array that uses an encryption data element. It supports the bulk unprotection. There is no maximum data limit. However, you are recommended to pass not more than 1 MB of input data for each unprotection call.
public boolean unprotect(SessionObject sessionObj, java.lang.String dataElementName, byte[][] input, long[] output, byte[] externalIv)
Parameters
sessionObj: SessionObject that is obtained by calling the createSession method.
dataElementName: String containing the data element name defined in policy.
input: Input array with byte format data.
output: Resultant output array with long format data.
externalIv: Optional parameter, which is a buffer containing data that will be used as external IV, when externalIv = null, the value is ignored.
Note: Encryption data elements do not support external IV.
Result
True: The data is successfully unprotected.
False: The parameters passed are accurate, but the method failed to perform the required action.
For more information, such as, a text explanation and reason for the failure, call getLastError(session).
Exception
Protector Exception: If the SessionObject is null or if policy is configured to throw an exception, then an exception is thrown.
SessionTimeoutException: If the session is invalid or has timed out, then an exception is thrown.
unprotect - Float array data
It unprotects the data provided as a float array that uses a No Encryption data element. It supports the bulk unprotection. There is no maximum data limit. However, you are recommended to pass not more than 1 MB of input data for each unprotection call.
public boolean unprotect(SessionObject sessionObj, java.lang.String dataElementName, float[] input, float[] output)
Parameters
sessionObj: SessionObject that is obtained by calling the createSession method.
dataElementName: String containing the data element name defined in policy.
input: Input array with float format data.
output: Resultant output array with float format data.
Result
True: The data is successfully unprotected.
False: The parameters passed are accurate, but the method failed to perform the required action.
For more information, such as, a text explanation and reason for the failure, call getLastError(session).
Exception
Protector Exception: If the SessionObject is null or if policy is configured to throw an exception, then an exception is thrown.
SessionTimeoutException: If the session is invalid or has timed out, then an exception is thrown.
unprotect - Float array data for encryption
It unprotects the data provided as a float array that uses an encryption data element. It supports the bulk unprotection. There is no maximum data limit. However, you are recommended to pass not more than 1 MB of input data for each unprotection call.
public boolean unprotect(SessionObject sessionObj, java.lang.String dataElementName, byte[][] input, float[] output)
Parameters
sessionObj: SessionObject that is obtained by calling the createSession method.
dataElementName: String containing the data element name defined in policy.
input: Input array with byte format data.
output: Resultant output array with float format data.
Result
True: The data is successfully unprotected.
False: The parameters passed are accurate, but the method failed to perform the required action.
For more information, such as, a text explanation and reason for the failure, call getLastError(session).
Exception
Protector Exception: If the SessionObject is null or if policy is configured to throw an exception, then an exception is thrown.
SessionTimeoutException: If the session is invalid or has timed out, then an exception is thrown.
unprotect - Double array data
It unprotects the data provided as a double array that uses the No Encryption data element. It supports the bulk unprotection. There is no maximum data limit. However, you are recommended to pass not more than 1 MB of input data for each unprotection call.
public boolean unprotect(SessionObject sessionObj, java.lang.String dataElementName, double[] input, double[] output)
Parameters
sessionObj: SessionObject that is obtained by calling the createSession method.
dataElementName: String containing the data element name defined in policy.
input: Input array with double format data.
output: Resultant output array with double format data.
Result
True: The data is successfully unprotected.
False: The parameters passed are accurate, but the method failed to perform the required action.
For more information, such as, a text explanation and reason for the failure, call getLastError(session).
Exception
Protector Exception: If the SessionObject is null or if policy is configured to throw an exception, then an exception is thrown.
SessionTimeoutException: If the session is invalid or has timed out, then an exception is thrown.
unprotect - Double array data for encryption
It unprotects the data provided as a double array that uses an encryption data element. It supports the bulk unprotection. There is no maximum data limit. However, you are recommended to pass not more than 1 MB of input data for each unprotection call.
public boolean unprotect(SessionObject sessionObj, java.lang.String dataElementName, byte[][] input, double[] output)
Parameters
sessionObj: SessionObject that is obtained by calling the createSession method.
dataElementName: String containing the data element name defined in policy.
input: Input array with byte format data.
output: Resultant output array with double format data.
Result
True: The data is successfully unprotected.
False: The parameters passed are accurate, but the method failed to perform the required action.
For more information, such as, a text explanation and reason for the failure, call getLastError(session).
Exception
Protector Exception: If the SessionObject is null or if policy is configured to throw an exception, then an exception is thrown.
SessionTimeoutException: If the session is invalid or has timed out, then an exception is thrown.
unprotect - Date array data
It unprotects the data provided as a java.util.Date array using the preservation data type. It supports the bulk unprotection. There is no maximum data limit. However, you are recommended to pass not more than 1 MB of input data for each unprotection call.
If the protect and unprotect operations are performed in different time zones using the java.util.Date API, then the unprotected data does not match with the input data.
For example, if you perform the protect operation in EDT time zone using the java.util.Date API, then you must perform the unprotect operation only in EDT time zone. This ensures that the unprotect operation returns back the original data.
public boolean unprotect(SessionObject sessionObj, java.lang.String dataElementName, java.util.Date[] input, java.util.Date[] output)
Parameters
sessionObj: SessionObject that is obtained by calling the createSession method.
dataElementName: String containing the data element name defined in policy.
input: Input array with date format data.
output: Resultant output array with date format data.
Result
True: The data is successfully unprotected.
False: The parameters passed are accurate, but the method failed to perform the required action.
For more information, such as, a text explanation and reason for the failure, call getLastError(session).
Exception
Protector Exception: If the SessionObject is null or if policy is configured to throw an exception, then an exception is thrown.
SessionTimeoutException: If the session is invalid or has timed out, then an exception is thrown.
unprotect - String array data
It unprotects the data provided as a string array that uses a preservation data type or a No Encryption data element. It supports the bulk unprotection. There is no maximum data limit. However, you are recommended to pass not more than 1 MB of input data for each unprotection call.
public boolean unprotect(SessionObject sessionObj, java.lang.String dataElementName, String[] input, String[] output, byte[] externalIv)
Parameters
sessionObj: SessionObject that is obtained by calling the createSession method.
dataElementName: String containing the data element name defined in policy.
input: Input array with string format data.
output: Resultant output array with string format data.
externalIv: This is optional. Buffer containing data that will be used as external IV, when externalIv = null, the value is ignored.
Result
True: The data is successfully unprotected.
False: The parameters passed are accurate, but the method failed to perform the required action.
For more information, such as, a text explanation and reason for the failure, call getLastError(session).
Exception
Protector Exception: If the SessionObject is null or if policy is configured to throw an exception, then an exception is thrown.
SessionTimeoutException: If the session is invalid or has timed out, then an exception is thrown.
unprotect - String array data for encryption
It unprotects the data provided as a string array that uses an encryption data element. It supports the bulk unprotection. There is no maximum data limit. However, you are recommended to pass not more than 1 MB of input data for each unprotection call.
public boolean unprotect(SessionObject sessionObj, java.lang.String dataElementName, byte[][] input, String[] output, byte[] externalIv)
Parameters
sessionObj: SessionObject that is obtained by calling the createSession method.
dataElementName: String containing the data element name defined in policy.
input: Input array with byte format data.
output: Resultant output array with string format data.
externalIv: This is optional. Buffer containing data that will be used as external IV, when externalIv = null, the value is ignored.
Note: Encryption data elements do not support external IV.
Result
True: The data is successfully unprotected
False: The parameters passed are accurate, but the method failed to perform the required action.
For more information, such as, a text explanation and reason for the failure, call getLastError(session).
Exception
Protector Exception: If the SessionObject is null or if policy is configured to throw an exception, then an exception is thrown.
SessionTimeoutException: If the session is invalid or has timed out, then an exception is thrown.
unprotect - Char array data
It unprotects the data provided as a char array that uses a preservation data type or a No Encryption data element. It supports the bulk unprotection. There is no maximum data limit. However, you are recommended to pass not more than 1 MB of input data for each unprotection call.
public boolean unprotect(SessionObject sessionObj, java.lang.String dataElementName, char[][] input, char[][] output, byte[] externalIv)
Parameters
sessionObj: SessionObject that is obtained by calling the createSession method.
dataElementName: String containing the data element name defined in policy.
input: Input array with char format data.
output: Resultant output array with char data.
externalIv: Optional parameter, which is a buffer containing data that will be used as external IV, when externalIv = null, the value is ignored.
Result
True: The data is successfully unprotected.
False: The parameters passed are accurate, but the method failed to perform the required action.
For more information, such as, a text explanation and reason for the failure, call getLastError(session).
Exception
Protector Exception: If the SessionObject is null or if policy is configured to throw an exception, then an exception is thrown.
SessionTimeoutException: If the session is invalid or has timed out, then an exception is thrown.
unprotect - Char array data for encryption
It unprotects the data provided as a char array that uses an encryption data element. It supports the bulk unprotection. There is no maximum data limit. However, you are recommended to pass not more than 1 MB of input data for each unprotection call.
public boolean unprotect(SessionObject sessionObj, java.lang.String dataElementName, byte[][] input, char[][] output, byte[] externalIv)
Parameters
sessionObj: SessionObject that is obtained by calling the createSession method.
dataElementName: String containing the data element name defined in policy.
input: Input array with byte format data.
output: Resultant output array with char format data.
externalIv: This is optional. Buffer containing data that will be used as external IV, when externalIv = null, the value is ignored.
Result
True: The data is successfully unprotected.
False: The parameters passed are accurate, but the method failed to perform the required action.
For more information, such as, a text explanation and reason for the failure, call getLastError(session).
Exception
Protector Exception: If the SessionObject is null or if policy is configured to throw an exception, then an exception is thrown.
SessionTimeoutException: If the session is invalid or has timed out, then an exception is thrown.
unprotect - Byte array data
It unprotects the data provided as a byte array that uses an encryption data element or a No Encryption data element, or a preservation data type. It supports the bulk unprotection. There is no maximum data limit. However, you are recommended to pass not more than 1 MB of input data for each unprotection call.
The Protegrity AP Java protector only supports bytes converted from the string data type.
If any data type is converted to bytes and passed as input to the API supporting byte as input and providing byte as output, then data corruption might occur.
public boolean unprotect(SessionObject sessionObj, java.lang.String dataElementName, byte[][] input, byte[][] output, byte[] externalIv, PTYCharset ...ptyCharsets)
Parameters
sessionObj: SessionObject that is obtained by calling the createSession method.
dataElementName: String containing the data element name defined in policy.
input: Input array with byte format data.
output: Resultant output array with byte format data.
externalIv: This is optional. Buffer containing data that will be used as external IV, when externalIv = null, the value is ignored.
ptyCharsets: Encoding associated with the bytes of the input data.
PTYCharset ptyCharsets = PTYCharset.<encoding>;
The ptyCharsets parameter supports the following encodings:
- UTF-8
- UTF-16LE
- UTF-16BE
The ptyCharsets parameter is mandatory for the data elements created with Unicode Gen2 tokenization method and the FPE encryption method for byte APIs. The encoding set for the ptyCharsets parameter must match the encoding of the input data passed.
The default value for the ptyCharsets parameter is UTF-8.
Result
True: The data is successfully unprotected.
False: The parameters passed are accurate, but the method failed to perform the required action.
For more information, such as, a text explanation and reason for the failure, call getLastError(session).
Exception
Protector Exception: If the SessionObject is null or if policy is configured to throw an exception, then an exception is thrown.
SessionTimeoutException: If the session is invalid or has timed out, then an exception is thrown.
unprotect - String array data with External Tweak
It unprotects the data provided as a string array using the FPE (FF1) that uses a preservation data type with FPE data elements. It supports the bulk unprotection. There is no maximum data limit. However, you are recommended to pass not more than 1 MB of input data for each unprotection call.
public boolean unprotect(SessionObject sessionObj, java.lang.String dataElementName, String[] input, String[] output, byte[] externalIv, byte[] externalTweak)
Parameters
sessionObj: SessionObject that is obtained by calling the createSession method.
dataElementName: String containing the data element name defined in policy.
input: Input array with byte format data.
output: Resultant output array with byte format data.
externalIv: This is optional. Buffer containing data that will be used as external IV, when externalIv = null, the value is ignored.
Result
True: The data is successfully unprotected.
False: The parameters passed are accurate, but the method failed to perform the required action.
For more information, such as, a text explanation and reason for the failure, call getLastError(session).
Exception
Protector Exception: If the SessionObject is null or if policy is configured to throw an exception, then an exception is thrown.
SessionTimeoutException: If the session is invalid or has timed out, then an exception is thrown.
reprotect - String array data
It reprotects the data provided as a string array that uses a preservation data type or a No Encryption data element. The protected data is first unprotected and then protected again with a new data element. It supports the bulk reprotection. There is no maximum data limit. However, you are recommended to pass not more than 1 MB of input data for each reprotection call.
For String and Byte data types, the maximum length for tokenization is 4096 bytes.
If you are using the reprotect API, then the old data element and the new data element must have the same data type. For example, if you have used Alpha-Numeric data element to protect the data, then you must use only Alpha-Numeric data element to reprotect the data.
public boolean reprotect(SessionObject sessionObj, String newDataElementName, String oldDataElementName, java.lang.String[] input, java.lang.String[] output, byte[] newExternalIv, byte[] oldExternalIv)
Parameters
sessionObj: SessionObject that is obtained by calling the createSession method.
newdataElementName: String containing the data element name defined in policy to create the output data.
olddataElementName: String containing the data element name defined in policy for the input data.
input: Input array with string format data.
output: Resultant output array with string format data.
newexternalIv: Optional parameter, which is a buffer containing data that will be used as external IV, when newExternalIv = null, the value is ignored.
oldexternalIv: Optional parameter, which is a buffer containing data that will be used as external IV, when oldExternalIv = null, the value is ignored.
Result
True: The data is successfully reprotected.
False: The parameters passed are accurate, but the method failed to perform the required action.
For more information, such as a text explanation and reason for the failure, call getLastError(session).
Exception
ProtectorException: If the SessionObject is null or if policy is configured to throw an exception, then an exception is thrown.
SessionTimeoutException: If the session is invalid or has timed out, then an exception is thrown.
reprotect - Short array data
It reprotects the data provided as a short array that uses a preservation data type or a No Encryption data element. The protected data is first unprotected and then protected again with a new data element. It supports the bulk reprotection. There is no maximum data limit. However, you are recommended to pass not more than 1 MB of input data for each reprotection call.
If you are using the reprotect API, then the old data element and the new data element must have the same data type.
For example, if you have used Alpha-Numeric data element to protect the data, then you must use only Alpha-Numeric data element to reprotect the data.
public boolean reprotect(SessionObject sessionObj, String newDataElementName, String oldDataElementName, short[] input, short[] output, byte[] newExternalIv, byte[] oldExternalIv)
Parameters
sessionObj: SessionObject that is obtained by calling the createSession method.
newdataElementName: String containing the data element name defined in policy to create the output data.
olddataElementName: String containing the data element name defined in policy for the input data.
input: Input array with short format data.
output: Resultant output array with short format data.
newexternalIv: Optional parameter, which is a buffer containing data that will be used as external IV, when newExternalIv = null, the value is ignored.
oldexternalIv: Optional parameter, which is a buffer containing data that will be used as external IV, when oldExternalIv = null, the value is ignored.
Result
True: The data is successfully reprotected.
False: The parameters passed are accurate, but the method failed to perform the required action.
For more information, such as, a text explanation and reason for the failure, call getLastError(session).
Exception
Protector Exception: If the SessionObject is null or if policy is configured to throw an exception, then an exception is thrown.
SessionTimeoutException: If the session is invalid or has timed out, then an exception is thrown.
reprotect - Int array data
It reprotects the data provided as an int array that uses a preservation data type or a No Encryption data element. The protected data is first unprotected and then protected again with a new data element. It supports the bulk reprotection. There is no maximum data limit. However, you are recommended to pass not more than 1 MB of input data for each reprotection call.
If you are using the reprotect API, then the old data element and the new data element must have the same data type.
For example, if you have used Alpha-Numeric data element to protect the data, then you must use only Alpha-Numeric data element to reprotect the data.
public boolean reprotect(SessionObject sessionObj, String newDataElementName, String oldDataElementName, int[] input, int[] output, byte[] newExternalIv, byte[] oldExternalIv)
Parameters
sessionObj: SessionObject that is obtained by calling the createSession method.
newdataElementName: String containing the data element name defined in policy to create the output data.
olddataElementName: String containing the data element name defined in policy for the input data.
input: Input array with int format data.
output: Resultant output array with int format data.
newexternalIv: Optional parameter, which is a buffer containing data that will be used as external IV, when newExternalIv = null, the value is ignored.
oldexternalIv: Optional parameter, which is a buffer containing data that will be used as external IV, when oldExternalIv = null, the value is ignored.
Result
True: The data is successfully reprotected.
False: The parameters passed are accurate, but the method failed to perform the required action.
For more information, such as, a text explanation and reason for the failure, call getLastError(session).
Exception
Protector Exception: If the SessionObject is null or if policy is configured to throw an exception, then an exception is thrown.
SessionTimeoutException: If the session is invalid or has timed out, then an exception is thrown.
reprotect - Long array data
It reprotects the data provided as a long array that uses a preservation data type or a No Encryption data element. The protected data is first unprotected and then protected again with a new data element. It supports the bulk reprotection. There is no maximum data limit. However, you are recommended to pass not more than 1 MB of input data for each reprotection call.
If you are using the reprotect API, then the old data element and the new data element must have the same data type.
For example, if you have used Alpha-Numeric data element to protect the data, then you must use only Alpha-Numeric data element to reprotect the data.
public boolean reprotect(SessionObject sessionObj, String newDataElementName, String oldDataElementName, long[] input, long[] output, byte[] newExternalIv, byte[] oldExternalIv)
Parameters
sessionObj: SessionObject that is obtained by calling the createSession method.
newdataElementName: String containing the data element name defined in policy to create the output data.
olddataElementName: String containing the data element name defined in policy for the input data.
input: Input array with long format data.
output: Resultant output array with long format data.
newexternalIv: Optional parameter, which is a buffer containing data that will be used as external IV, when newExternalIv = null, the value is ignored.
oldexternalIv: Optional parameter, which is a buffer containing data that will be used as external IV, when oldExternalIv = null, the value is ignored.
Result
True: The data is successfully reprotected.
False: The parameters passed are accurate, but the method failed to perform the required action.
For more information, such as, a text explanation and reason for the failure, call getLastError(session).
Exception
Protector Exception: If the SessionObject is null or if policy is configured to throw an exception, then an exception is thrown.
SessionTimeoutException: If the session is invalid or has timed out, then an exception is thrown.
reprotect - Float array data
It reprotects the data provided as a float array that uses a No Encryption data element. The protected data is first unprotected and then protected again with a new data element. It supports the bulk reprotection. There is no maximum data limit. However, you are recommended to pass not more than 1 MB of input data for each reprotection call.
If you are using the reprotect API, then the old data element and the new data element must have the same data type.
For example, if you have used Alpha-Numeric data element to protect the data, then you must use only Alpha-Numeric data element to reprotect the data.
public boolean reprotect(SessionObject sessionObj, String newDataElementName, String oldDataElementName, float[] input, float[] output)
Parameters
sessionObj: SessionObject that is obtained by calling the createSession method.
newdataElementName: String containing the data element name defined in policy to create the output data.
olddataElementName: String containing the data element name defined in policy for the input data.
input: Input array with float format data.
output: Resultant output array with float format data.
newexternalIv: Optional parameter, which is a buffer containing data that will be used as external IV, when newExternalIv = null, the value is ignored.
oldexternalIv: Optional parameter, which is a buffer containing data that will be used as external IV, when oldExternalIv = null, the value is ignored.
Result
True: The data is successfully reprotected.
False: The parameters passed are accurate, but the method failed to perform the required action.
For more information, such as, a text explanation and reason for the failure, call getLastError(session).
Exception
Protector Exception: If the SessionObject is null or if policy is configured to throw an exception, then an exception is thrown.
SessionTimeoutException: If the session is invalid or has timed out, then an exception is thrown.
reprotect - Double array data
It reprotects the data provided as a double array that uses a No Encryption data element. The protected data is first unprotected and then protected again with a new data element. It supports the bulk reprotection. There is no maximum data limit. However, you are recommended to pass not more than 1 MB of input data for each reprotection call.
If you are using the reprotect API, then the old data element and the new data element must have the same data type.
For example, if you have used Alpha-Numeric data element to protect the data, then you must use only Alpha-Numeric data element to reprotect the data.
public boolean reprotect(SessionObject sessionObj, String newDataElementName, String oldDataElementName, double[] input, double[] output)
Parameters
sessionObj: SessionObject that is obtained by calling the createSession method.
newdataElementName: String containing the data element name defined in policy to create the output data
olddataElementName: String containing the data element name defined in policy for the input data.
input: Input array with double format data.
output: Resultant output array with double format data.
Result
True: The data is successfully reprotected.
False: The parameters passed are accurate, but the method failed to perform the required action.
For more information, such as, a text explanation and reason for the failure, call getLastError(session).
Exception
Protector Exception: If the SessionObject is null or if policy is configured to throw an exception, then an exception is thrown.
SessionTimeoutException: If the session is invalid or has timed out, then an exception is thrown.
reprotect - Date array data
It reprotects the data provided as a date array that uses a preservation data type. The protected data is first unprotected and then protected again with a new data element. It supports the bulk reprotection. There is no maximum data limit. However, you are recommended to pass not more than 1 MB of input data for each reprotection call.
If you are using the reprotect API, then the old data element and the new data element must have the same data type.
For example, if you have used Alpha-Numeric data element to protect the data, then you must use only Alpha-Numeric data element to reprotect the data.
If the protect and unprotect operations are performed in different time zones using the java.util.Date API, then the unprotected data does not match with the input data.
For example, if you perform the protect operation in EDT time zone using the java.util.Date API, then you must perform the unprotect operation only in EDT time zone. This ensures that the unprotect operation returns back the original data.
public boolean reprotect(SessionObject sessionObj, String newDataElementName, String oldDataElementName, java.util.Date[] input, java.util.Date[] output)
Parameters
sessionObj: SessionObject that is obtained by calling the createSession method.
newdataElementName: String containing the data element name defined in policy to create the output data.
olddataElementName: String containing the data element name defined in policy for the input data.
input: Input array with date format data.
output: Resultant output array with date format data.
Result
True: The data is successfully reprotected.
False: The parameters passed are accurate, but the method failed to perform the required action.
For more information, such as, a text explanation and reason for the failure, call getLastError(session).
Exception
Protector Exception: If the SessionObject is null or if policy is configured to throw an exception, then an exception is thrown.
SessionTimeoutException: If the session is invalid or has timed out, then an exception is thrown.
reprotect - Byte array data
It reprotects the data provided as a byte array that uses an encryption data element or a No Encryption data element, or a preservation data type. The protected data is first unprotected and then protected again with a new data element. However, you are recommended to pass not more than 1 MB of input data for each reprotection call.
When the data type preservation methods, such as, Tokenization and No Encryption are used to reprotect data, the output of data protection (protected data) can be stored in the same data type that was used for input data.
The Protegrity AP Java protector only supports bytes converted from the string data type.
If any data type is converted to bytes and passed as input to the API supporting byte as input and providing byte as output, then data corruption might occur.
If you are using the reprotect API, then the old data element and the new data element must have the same data type.
For example, if you have used Alpha-Numeric data element to protect the data, then you must use only Alpha-Numeric data element to reprotect the data.
public boolean reprotect(SessionObject sessionObj, String newDataElementName, String oldDataElementName, byte[][] input, byte[][] output, byte[] newExternalIv, byte[] oldExternalIv, PTYCharset ...ptyCharsets)
Parameters
sessionObj: SessionObject that is obtained by calling the createSession method.
newdataElementName: String containing the data element name defined in policy to create the output data.
olddataElementName: String containing the data element name defined in policy for the input data.
input: Input array with byte format data.
output: Resultant output array with byte format data.
newexternalIv: Optional parameter, which is a buffer containing data that will be used as external IV, when newExternalIv = null, the value is ignored.
oldexternalIv: Optional parameter, which is a buffer containing data that will be used as external IV, when oldExternalIv = null, the value is ignored.
ptyCharsets: Encoding associated with the bytes of the input data.
PTYCharset ptyCharsets = PTYCharset.<encoding>;
The ptyCharsets parameter supports the following encodings:
- UTF-8
- UTF-16LE
- UTF-16BE
The ptyCharsets parameter is mandatory for the data elements created with Unicode Gen2 tokenization method and the FPE encryption method for byte APIs. The encoding set for the ptyCharsets parameter must match the encoding of the input data passed.
The default value for the ptyCharsets parameter is UTF-8.
Result
True: The data is successfully reprotected.
False: The parameters passed are accurate, but the method failed to perform the required action.
For more information, such as, a text explanation and reason for the failure, call getLastError(session).
Exception
Protector Exception: If the SessionObject is null or if policy is configured to throw an exception, then an exception is thrown.
SessionTimeoutException: If the session is invalid or has timed out, then an exception is thrown.
reprotect - String array data with External Tweak
It reprotects the data provided as a string array using the FPE (FF1) that uses a preservation data type with FPE data elements. The protected data is first unprotected and then protected again with a new FPE data element. It supports the bulk reprotection. There is no maximum data limit. However, you are recommended to pass not more than 1 MB of input data for each reprotection call.
If you are using the reprotect API, then the old data element and the new data element must have the same data type.
For example, if you have used Alpha-Numeric data element to protect the data, then you must use only Alpha-Numeric data element to reprotect the data.
public boolean reprotect(SessionObject sessionObj, String newDataElementName, String oldDataElementName, String[] input, String[] output, byte[] newExternalIv, byte[] oldExternalIv, byte[] newExternalTweak, byte[] oldExternalTweak)
Parameters
sessionObj: SessionObject that is obtained by calling the createSession method.
newdataElementName: String containing the data element name defined in policy to create the output data.
olddataElementName: String containing the data element name defined in policy for the input data.
input: Input array with String format data.
output: Resultant output array with String format data.
newexternalIv: Optional parameter, which is a buffer containing data that will be used as external IV, when newExternalIv = null, the value is ignored.
oldexternalIv: Optional parameter, which is a buffer containing data that will be used as external IV, when oldExternalIv = null, the value is ignored.
newExternalTweak: Optional parameter, which is a buffer containing data that will be used as Tweak, when newExternalTweak = null, the value is ignored.
oldExternalTweak: Optional parameter, which is a buffer containing data that will be used as Tweak, when oldExternalTweak = null, the value is ignored.
Result
True: The data is successfully reprotected.
False: The parameters passed are accurate, but the method failed to perform the required action.
For more information, such as, a text explanation and reason for the failure, call getLastError(session).
Exception
Protector Exception: If the SessionObject is null or if policy is configured to throw an exception, then an exception is thrown.
SessionTimeoutException: If the session is invalid or has timed out, then an exception is thrown.
reprotect - Char array data
It reprotects the data provided as a char array that uses a preservation data type or a No Encryption data element. The protected data is first unprotected and then protected again with a new data element. It supports the bulk reprotection. There is no maximum data limit. However, you are recommended to pass not more than 1 MB of input data for each reprotection call.
If you are using the reprotect API, then the old data element and the new data element must have the same data type. For example, if you have used Alpha-Numeric data element to protect the data, then you must use only Alpha-Numeric data element to reprotect the data.
public boolean reprotect(SessionObject sessionObj, String newDataElementName, String oldDataElementName, char[][] input, char[][] output, byte[] newExternalIv, byte[] oldExternalIv)
Parameters
sessionObj: SessionObject that is obtained by calling the createSession method.
newdataElementName: String containing the data element name defined in policy to create the output data.
olddataElementName: String containing the data element name defined in policy for the input data.
input:Input array with char format data.
output: Resultant output array with char format data.
newexternalIv: Optional parameter, which is a buffer containing data that will be used as external IV, when newExternalIv = null, the value is ignored.
oldexternalIv: Optional parameter, which is a buffer containing data that will be used as external IV, when oldExternalIv = null, the value is ignored.
Result
True: The data is successfully reprotected.
False: The parameters passed are accurate, but the method failed to perform the required action.
For more information, such as a text explanation and reason for the failure, call getLastError(session).
Exception
ProtectorException: If the SessionObject is null or if policy is configured to throw an exception, then an exception is thrown.
SessionTimeoutException: If the session is invalid or has timed out, then an exception is thrown.
2.1.7.1 - Using the AP Java APIs
The process to use the AP Java protect, unprotect, and reprotect methods are described on this page.
It is assumed that the ESA is already available.
The tasks can be divided in the following order.
- Create the data elements and data store in the Policy Management on the ESA Web UI.
- Create the member sources and roles.
- Configure the policy.
- Configure the trusted application.
- Add a trusted application to the data store.
- Install the AP Java.
- Run the sample application.
Creating a data element and data store
Determine how the data needs to be protected either by using encryption or tokenization before running the application. Protection and unprotection methods are available for both.
Create a data element and data store in the ESA by performing the following.
- To create a data element, from the ESA Web UI, navigate to
Policy Management→Data Elements & Masks→Data Elements.
For more information about creating data elements, refer to Working With Data Elements. - To create a data store, navigate to
Policy Management→Data Stores.
For more information about creating data stores, refer to Creating a Data Store.
Creating a member source and role
Create a member source and role in the ESA by performing the following.
- To create a member source, from the ESA Web UI, navigate to
Policy Management→Roles & Member Sources→Member Sources.
For more information about creating a member source, refer to Working With Member Sources. - To create a role, from the ESA Web UI, navigate to
Policy Management→Roles & Member Sources→Roles.
For more information about creating a role, refer to Working with Roles.
Configuring a policy
Configure a policy in the ESA by performing the following.
- From the ESA Web UI, navigate to
Policy Management→Policies & Trusted Applications→Policies. - Click
Add New Policy.
The New Policy screen appears. - After the policy is configured for the application user, add the permissions, data elements, roles, and data stores to the policy and then save it.
- Deploy the policy using the Policy Management Web UI.
For more information about creating a data security policy, refer to Creating Policies.
Configuring a trusted application
Only the applications and users configured as trusted applications under the ESA security policy can access the AP APIs.
If a policy is deployed but the application or the user is not trusted, then the AP aborts with the following message while performing the protect or unprotect operations.
API consumer is not part of the trusted applications, please contact the Security Officer
Configure a trusted application in the ESA by performing the following.
- From the ESA Web UI, navigate to
Policy Management→Policies & Trusted Applications→Trusted Application. - Create a trusted application.
- Deploy the trusted application using the Policy Management Web UI.
For more information about trusted applications, refer to Working With Trusted Applications.
Adding a trusted application to data store
Add a trusted application to data store by performing the following.
- From the ESA Web UI, navigate to
Policy Management→Data Stores.
The list of all the data stores appear. - Select the required data store.
The screen to edit the data store appears. - Under the
Trusted Applicationstab, clickAdd.
The screen to add the trusted application appears. - Select the required trusted application and click
Add. - Select the required policy and deploy it using the Policy Management Web UI.
For more information about adding a trusted application to data store, refer to Linking Data Store to a Trusted Application.
Installing the AP Java
Install the AP Java by performing the following.
To install the AP Java, refer to Application Protector Java Installation.
Verify if the AP Java is successfully installed by performing the following.
a. Configure the application as a trusted application in the ESA.
For more information about trusted applications, refer to Working With Trusted Applications.
b. Initialize the AP Java.
For more information about the AP Java initialization API, refer to getProtector.
c. Run theGetVersionmethod using the following command to check the version of the installed AP Java.public java.lang.String getVersion()For more information about sample code to check the version number of the installed AP Java, refer to sample AP Java application for performing the protect, unprotect, and reprotect operations.
Running the AP Java APIs
After setting up the policy and trusted application, you can begin testing the AP Java APIs for protection, unprotection, and reprotection.
For more information about the AP Java APIs, refer to Application Protector Java APIs.
For more information about the AP Java return codes, refer to Application Protector API Return Codes.
To run this sample application, ensure that the Application Name in the Trusted Application is set as
HelloWorld.
Before running the following program, update the HelloWorld.java file with the policy username and data element name.
Compile and Run the Sample Application
Compile the sample application using the following command.
cd /opt/protegrity/sdk/java/lib
javac -cp .:ApplicationProtectorJava.jar HelloWorld.java
Run the sample application using the following command.
java -cp .:ApplicationProtectorJava.jar HelloWorld
By default, the config.ini file is located in the SDK data directory /opt/protegrity/sdk/java/data and is picked up automatically at runtime.
If the config.ini file is moved to a different location, specify its path explicitly when running the application:
java -Dconfig.path=/opt/config.ini -cp .:ApplicationProtectorJava.jar HelloWorld
If config.ini is present in the same directory as ApplicationProtectorJava.jar and jcorelite.plm, the SDK loads it automatically and the -Dconfig.path option is not required.
The following represents a sample AP Java application for performing the protect, unprotect, and reprotect operations.
/* Save the file as: HelloWorld.java
*
* This is sample program demonstrating the usage of Java SDK API
*
* Configure Trusted Application policy in ESA with
* - Application name: HelloWorld
* - Application user: <SYSTEM USER>
*
* Compiled as : javac -cp .:<PATH_TO_INSTALL_DIR>/sdk/java/lib/ApplicationProtectorJava.jar HelloWorld.java
* Run as :
* java -cp .:<PATH_TO_INSTALL_DIR>/sdk/java/lib/ApplicationProtectorJava.jar HelloWorld policyUser dataElement inputData
*
* Example: java -cp .:/opt/protegrity/sdk/java/lib/ApplicationProtectorJava.jar HelloWorld user1 TE_AN_SLT13_L0R0_N "This is data"
*
* Use either Token Elements or NoEncryption as dataElement while running this code.
*/
import com.protegrity.ap.java.Protector;
import com.protegrity.ap.java.ProtectorException;
import com.protegrity.ap.java.SessionObject;
public class HelloWorld {
public static void performProtectionOperation(
String policyUser, String dataElement, String inputData) throws ProtectorException {
String[] input = {inputData};
String[] protectedOutput = new String[input.length];
String[] unprotectedOutput = new String[input.length];
// Initialize Java SDK Protector
Protector protector = Protector.getProtector();
// Create a new protection operation session for policyUser
SessionObject session = protector.createSession(policyUser);
// Get Java SDK and Core Version
System.out.println(protector.getVersionEx());
// Perform Protect Operation
boolean res = protector.protect(session, dataElement, input, protectedOutput);
if (!res) {
System.out.println(protector.getLastError(session));
} else {
System.out.println("Protected Data:");
for (String out : protectedOutput) {
System.out.print(out + " ");
}
System.out.println();
}
// Perform Unprotect Operation
res = protector.unprotect(session, dataElement, protectedOutput, unprotectedOutput);
if (!res) {
System.out.println(protector.getLastError(session));
} else {
System.out.println("Unprotected Data:");
for (String out : unprotectedOutput) {
System.out.print(out + " ");
}
System.out.println();
}
}
public static void main(String[] args) throws ProtectorException {
if (args.length == 3) {
System.out.println(
"Testing input data "
+ args[2]
+ " "
+ "with dataElement "
+ args[1]
+ " "
+ "and policyUser "
+ args[0]);
performProtectionOperation(args[0], args[1], args[2]);
} else {
System.out.println(
" Usage : java -cp .:<PATH_TO_INSTALL_DIR>/sdk/java/lib/ApplicationProtectorJava.jar HelloWorld PolicyUser DataElement Data");
System.out.println(
" Example : java -cp .:<PATH_TO_INSTALL_DIR>/sdk/java/lib/ApplicationProtectorJava.jar HelloWorld user1 TE_AN_SLT13_L0R0_N Protegrity");
System.exit(0);
}
}
}
2.1.8 - Additional Topics
This section expands the core Application Protector (AP) Java documentation.
2.1.8.1 - Memory Usage of the AP Java
The memory used for the different policy sizes using a sample HelloWorld java application is described in this section. This is a sample memory usage. You can use this as a reference for memory usage in the AP Java for different policy sizes.
Sample application
Before running the following program, update the HelloWorld.java file with the policy username and data element name.
Compile and Run the Sample Application
Compile the sample application using the following command.
cd /opt/protegrity/sdk/java/lib
javac -cp .:ApplicationProtectorJava.jar HelloWorld.java
Run the sample application using the following command.
java -cp .:ApplicationProtectorJava.jar HelloWorld
By default, the config.ini file is located in the SDK data directory /opt/protegrity/sdk/java/data and is picked up automatically at runtime.
If the config.ini file is moved to a different location, specify its path explicitly when running the application:
java -Dconfig.path=/opt/config.ini -cp .:ApplicationProtectorJava.jar HelloWorld
If config.ini is present in the same directory as ApplicationProtectorJava.jar and jcorelite.plm, the SDK loads it automatically and the -Dconfig.path option is not required.
The following is a sample HelloWorld.java application.
/* HelloWorld.java
*
* This is sample program demonstrating the usage of Java SDK API
*
* Configure Trusted Application policy in ESA with
* - Application name: lib.HelloWorld
* - Application user: <SYSTEM USER>
*
* Compiled as : javac -cp .:<PATH_TO_INSTALL_DIR>/sdk/java/lib/ApplicationProtectorJava.jar HelloWorld.java
* Run as :
* java -cp .:<PATH_TO_INSTALL_DIR>/sdk/java/lib/ApplicationProtectorJava.jar HelloWorld policyUser dataElement inputData
*
* Use either Token Elements or NoEncryption as dataElement while running this code.
*/
package lib;
import com.protegrity.ap.java.Protector;
import com.protegrity.ap.java.ProtectorException;
import com.protegrity.ap.java.SessionObject;
public class HelloWorld {
public static void performProtectionOperation(
String policyUser, String dataElement, String inputData) throws ProtectorException {
String[] input = {inputData};
String[] protectedOutput = new String[input.length];
String[] unprotectedOutput = new String[input.length];
// Initialize Java SDK Protector
Protector protector = Protector.getProtector();
// Create a new protection operation session for policyUser
SessionObject session = protector.createSession(policyUser);
// Get Java SDK Version
System.out.println("Java SDK Version:" + protector.getVersion());
// Perform Protect Operation
boolean res = protector.protect(session, dataElement, input, protectedOutput);
if (!res) {
System.out.println(protector.getLastError(session));
} else {
System.out.println("Protected Data:");
for (String out : protectedOutput) {
System.out.print(out + " ");
}
System.out.println();
}
// Perform Unprotect Operation
res = protector.unprotect(session, dataElement, protectedOutput, unprotectedOutput);
if (!res) {
System.out.println(protector.getLastError(session));
} else {
System.out.println("Unprotected Data:");
for (String out : unprotectedOutput) {
System.out.print(out + " ");
}
System.out.println();
}
}
public static void main(String[] args) throws ProtectorException {
if (args.length == 3) {
System.out.println(
"Testing input data "
+ args[2]
+ " "
+ "with dataElement "
+ args[1]
+ " "
+ "and policyUser "
+ args[0]);
performProtectionOperation(args[0], args[1], args[2]);
} else {
System.out.println(
" Usage : java -cp .:<PATH_TO_INSTALL_DIR>/sdk/java/lib/ApplicationProtectorJava.jar HelloWorld PolicyUser DataElement Data");
System.out.println(
" Example : java -cp .:<PATH_TO_INSTALL_DIR>/sdk/java/lib/ApplicationProtectorJava.jarr HelloWorld user1 TE_AN_SLT13_L0R0_N"
+ " Protegrity");
System.exit(0);
}
}
}
Expected memory usage
The process to find the policy size and expected memory usage for different policy sizes used by the java application is described in this section.
To find the policy size:
- On Insight dashboard, under the Discover section, navigate to the troubleshooting index.
- Search using the
process.module.keyword: coreproviderfilter. - Navigate to the logs with description as Policy successfully loaded.
The
additional_info.memoryUsedfield depicts the policy size.
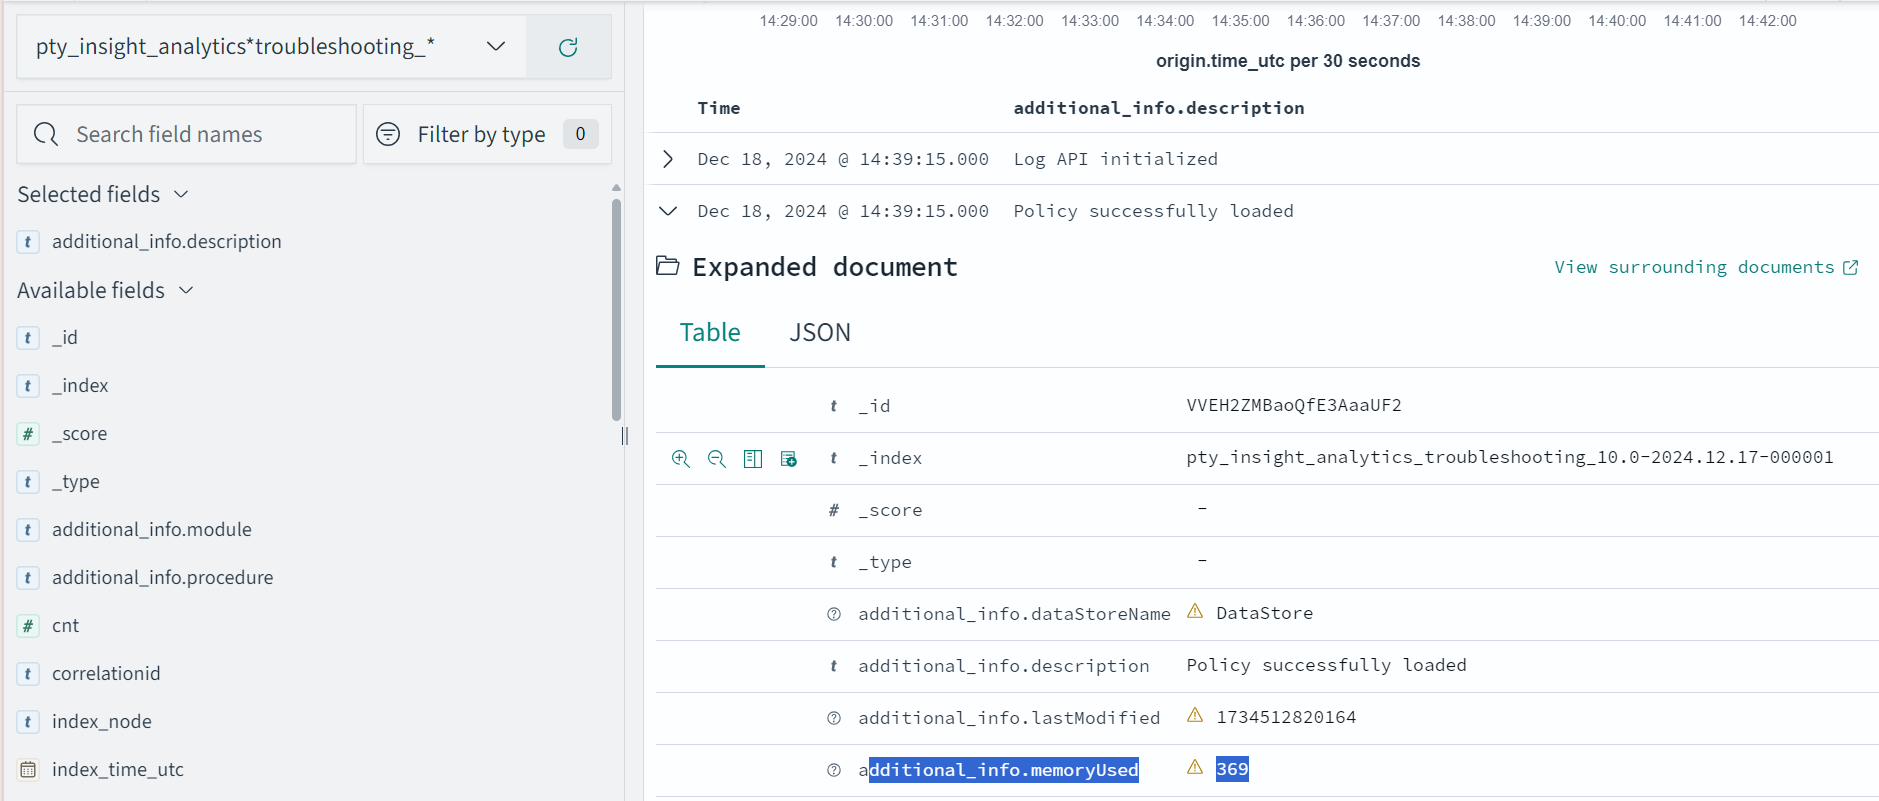
The following is the expected memory usage for different policy sizes used by the HelloWorld java application.
| Policy size | Process memory consumption |
|---|---|
| 13 MB | 36.4 MB |
| 34 MB | 59.4 MB |
| 536 MB | 932.7 MB |
The process memory increases substantially for a few milliseconds when the application is running in the following cases:
- The policy is replaced with another policy
- Changes are made in the current policy
Conclusion
The results for memory required by various policy sizes using the sample HelloWorld.java application can be used to determine the memory requirements of the Java application.
2.1.8.2 - DevOps Approach for Application Protector Java
The DevOps approach enables immutable package deployment. It uses a REST API call to download packages from the ESA in an encrypted format.
Note: The RP Agent should not be installed for immutable package deployments using DevOps.
For more information about package deployment approaches, refer to Resilient Package Deployment.
A REST API call is used to download the package on your local machine. Configure the package path in the config.ini file within the DevOps section and the decryptor class.
If a downloaded path is overwritten, a new package will be reflected in the running application at the set time interval (cadence). This occurs when another package with the same name overwrites the existing one. This changes the protector’s behaviour. The protector no longer functions as an immutable protector. To keep it immutable, set the cadence value in config.ini file to 0.
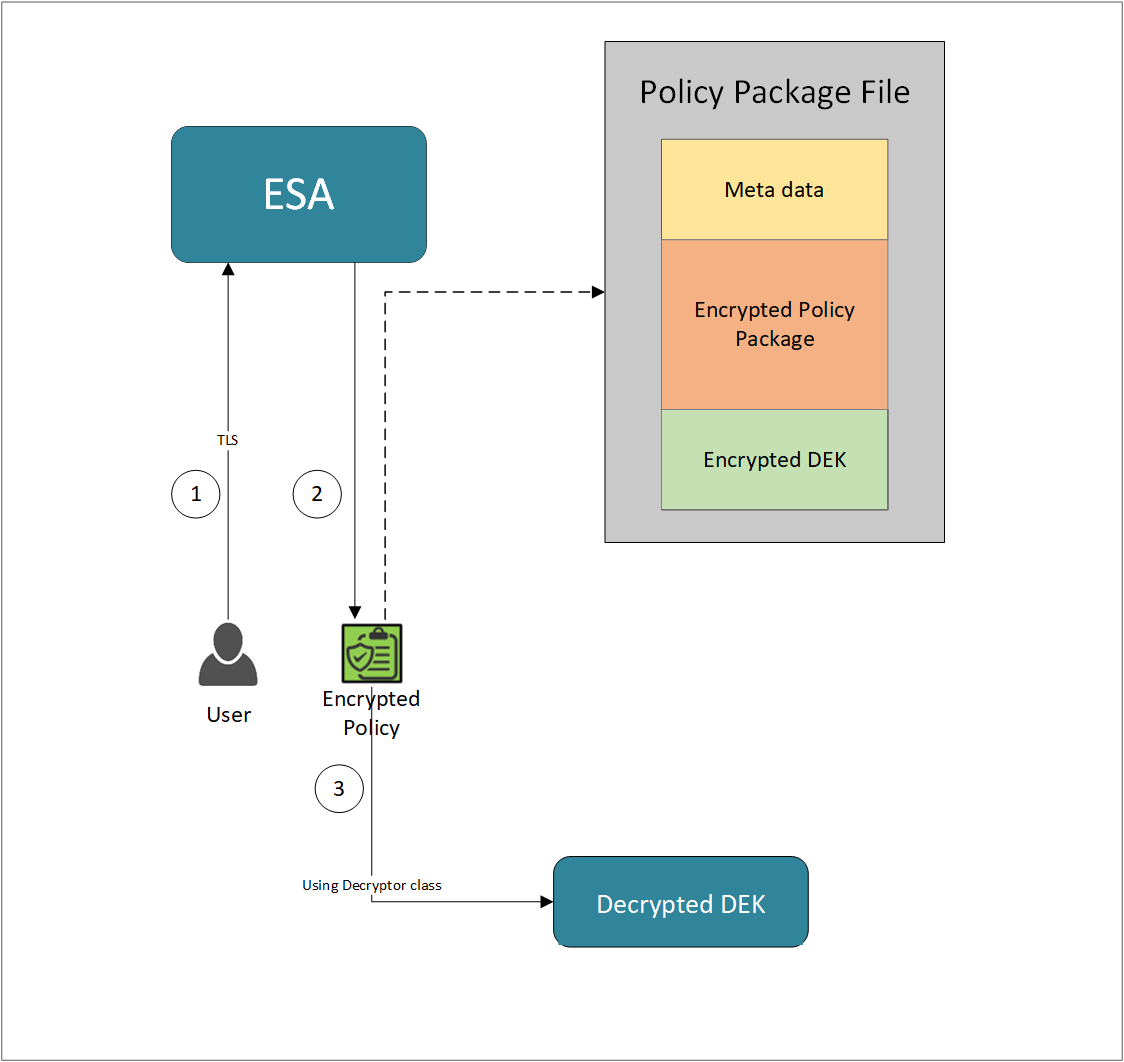
- A REST API call is used to download the policy from the ESA in an envelop encrypted format. A public key is created using a Key Management System (KMS) or Hardware Security Module (HSM). This public key must be passed to the REST API.
- The ESA generates a JSON file for the package with policy.
- The encrypted DEK needs to be decrypted to perform the security operations. A Decryptor class is implemented using the Decryptor interface, to decrypt the Data Encryption Key (DEK) using a private key.
Before you begin
Ensure the following prerequisites are met:
- The installation of the RP Agent is not required for immutable package deployment using the DevOps approach.
- The
decryptorparameter must have a fully qualified name of the decryptor class.
A Decryptor class needs to be implemented using the Decryptor interface, which decrypts the Data Encryption Key (DEK) using a private key. It returns the decrypted DEK in bytes.
For more information on the decryptor interface of AP Java, refer to Configuring the Decryptor interface.
For more information on the decryptor interface of AP Python, refer to Configuring the Decryptor interface. - The data store is properly configured before exporting your Application Protector policy. For ESA 10.0.1 and 10.1.0 versions, define allowed servers for seamless policy deployment and secure access control.
For more information about configuring a data store, refer to - - For ESA version 10.2.0 and higher, export key must be created in the data store for secure access control. For more information refer to Using the Encrypted Resilient Package REST APIs.
AP Java
Using the DevOps approach
Perform the following steps to use the DevOps approach for immutable package deployment.
Add the [devops] parameter in the config.ini file.
Ensure the decryptor class has a fully qualified domain name.[devops] package.path = /path/to/policyFile decryptor = packageName.DecryptorClassNameThe following is an example for adding the
[devops]parameter in theconfig.inifile.[devops] package.path = /opt/policies/policy1.json decryptor = com.protegrity.apjava.test.RSADecryptor
Note: For ESA 10.2.0 and later, Application Protector DevOps must use the Encrypted Resilient Package REST APIs using GET method. The legacy Export API using POST method is deprecated and not supported for Teams (PPC). The deprecated API remains supported only for the Enterprise edition for backward compatibility.
For more information about exporting Resilient Package using POST method for 10.0.1 and 10.1.0 ESA, refer to Using the Encrypted Resilient Package REST APIs.
For more information about exporting Resilient Package using GET method for 10.2 ESA, refer to Using the Encrypted Resilient Package REST APIs.
For more information about exporting Resilient Package using GET method for PPC, refer to Using the Encrypted Resilient Package REST APIs.
Sample code for DevOps approach
The sample code for DevOps approach for various Application Protectors using different cloud platforms is provided in this section.
DevOps approach for AP Java
The sample code for DevOps approach for the AP Java using different cloud platforms is provided in this section.
Configuring the Decryptor interface
A Decryptor class must implement the DEKDecryptor interface to decrypt the DEK. This interface includes the decrypt method. The decrypt method provides keyLabel, algorithmId, and encDek parameters. The decrypted DEK must be returned in byte[] format.
The following is a sample code for implementing the DEKDecryptor interface.
package com.protegrity.jcorelite.decryptor;
import com.protegrity.jcorelite.constants.KEK_ALGO;
import com.protegrity.jcorelite.exceptions.PtyDecryptorException;
public interface DEKDecryptor {
public byte[] decrypt(String keyLabel, KEK_ALGO algorithmId, byte[] encDek) throws PtyDecryptorException;
}
Using AWS
The following is a sample implementation using the private key from AWS KMS.
/* Sample Application for decrypting encrypted DEK using AWS KMS keys.
*
* [Protegrity Prerequisite]
* Create an asymmetric KMS key in the AWS KMS.
* Use the public key of the generated asymmetric key to download ESA policy using the curl request.
*
* [AWS Prerequisite]
* Install AWS CLI.
* Ensure that the AWS credentials and configurations are properly set before running the code that interacts with the AWS services.
* There are multiple ways to configure the AWS credentials and configurations.
* 1. AWS CLI configuration:
* Command: $aws configure
* A prompt appears to enter the following information:
* - AWS Access Key ID: The access key associated with the AWS account or IAM user.
* - AWS Secret Access Key: The secret key associated with the access key.
* - Default region name: The AWS region to use by default.
* - Default output format: The format for CLI command output.
* The AWS credentials and configuration settings are set up in the ~/.aws/credentials and ~/.aws/config files.
*
* 2. Environment variables:
* The AWS credentials using environment variables can be set using the following commands.
* export AWS_ACCESS_KEY_ID = "your_access_key_id"
* export AWS_SECRET_ACCESS_KEY = "your_secret_access_key"
* export AWS_REGION= "your_aws_default_region"
*
* [Java Prerequisite]
* Add AWS KMS Java SDK as part of your dependency:
* implementation 'com.amazonaws:aws-java-sdk-kms:1.12.423'
*/
import com.amazonaws.services.kms.AWSKMS;
import com.amazonaws.services.kms.AWSKMSClientBuilder;
import com.amazonaws.services.kms.model.DecryptRequest;
import com.amazonaws.services.kms.model.DecryptResult;
import com.protegrity.jcorelite.constants.KEK_ALGO;
import com.protegrity.jcorelite.decryptor.DEKDecryptor;
import com.protegrity.jcorelite.exceptions.PtyDecryptorException;
import java.nio.ByteBuffer;
import java.util.Base64;
public class AWSKMSDecryptor implements DEKDecryptor {
private static final String KEY_ID = "3068b3ef-4924-4be5-9e9a-440b418553b3";
public byte[] decrypt(String keyLabel, KEK_ALGO algorithm, byte[] encDek) throws PtyDecryptorException {
getEncoder().encodeToString(encDek));
/* create an AWS KMS client */
AWSKMS kmsClient = AWSKMSClientBuilder.standard().build();
/* wrap byte array into buffer */
ByteBuffer ciphertextBuffer = ByteBuffer.wrap(encDek);
/* decrypt request */
DecryptRequest decryptRequest = new DecryptRequest().withCiphertextBlob(ciphertextBuffer).withEncryptionAlgorithm("RSAES_OAEP_SHA_256").withKeyId(KEY_ID);
/* decrypt the ciphertext */
DecryptResult decryptResult = kmsClient.decrypt(decryptRequest);
/* get the decrypted data */
ByteBuffer decryptedBuffer = decryptResult.getPlaintext();
/* buffer to byte array */
byte[] decryptedDek = decryptedBuffer.array();
return decryptedDek;
}
}
Using Azure
The following is a sample implementation using the private key from Azure Key Vault.
/*
* Sample Application for decrypting encrypted DEK using Azure Key Vault
*
* [Azure Prerequisite]
* Install azure cli
* Login to azure :
az login --use-device-code
*
* [Protegrity Prerequisite]
* For creating a key in Azure Key Vault using Azure CLI, refer :
https://learn.microsoft.com/en-us/azure/key-vault/keys/quick-create-cli
* Download the public key from the key vault :
az keyvault key download --vault-name test -n testkey -e PEM -f publickey.pem
* Replace all the new lines with \n in publickey.pem
* Public key is now ready to be used for downloading your ESA policy
* Azure supports RSA1_5, RSA_OAEP and RSA_OAEP_256 algorithms,
whose correspoding names in REST API call are RSA1_5, RSA-OAEP-SHA1 and RSA-OAEP-256 respectively
Refer : https://learn.microsoft.com/en-us/java/api/com.azure.security.keyvault.keys.cryptography.models.encryptionalgorithm?view=azure-java-stable
* Make sure that decrypt permission is present for the key vault :
az keyvault set-policy -n "test" --key-permissions decrypt --object-id 7e821e4c-e0ad-4a6f-aa26-f445c7c7e3ea
* To get the private key URI from azure key vault, refer :
https://learn.microsoft.com/en-us/azure/key-vault/keys/quick-create-cli
*
* [Java Prerequisite]
* Add Azure key vault and azure identity as part of your dependency
artifactIds : azure-security-keyvault-keys, azure-identity
*
* The below code demonstrates decryption of encrypted DEK using private key URI received from Azure key vault
*/
import com.azure.identity.DefaultAzureCredentialBuilder;
import com.azure.security.keyvault.keys.cryptography.CryptographyClient;
import com.azure.security.keyvault.keys.cryptography.CryptographyClientBuilder;
import com.azure.security.keyvault.keys.cryptography.models.EncryptionAlgorithm;
import com.azure.security.keyvault.keys.cryptography.models.EncryptResult;
import com.azure.security.keyvault.keys.cryptography.models.DecryptResult;
import com.protegrity.jcorelite.constants.KEK_ALGO;
import com.protegrity.jcorelite.decryptor.DEKDecryptor;
import com.protegrity.jcorelite.exceptions.PtyDecryptorException;
public class AzureDecryptor2 {
private static final String KEY_ID = "https://test.vault.azure.net/keys/testkey/aaf3861366a24b1bb4f6871eb11afafe";
public byte[] decrypt(String keyLabel, KEK_ALGO algorithm, byte[] encDek) throws PtyDecryptorException {
/*
* Instantiate a CryptographyClient that will be used to call the service.
* Notice that the client is using
* default Azure credentials. For more information on this and other types of
* credentials, see this document:
* https://docs.microsoft.com/java/api/overview/azure/identity-readme?view=azure
* -java-stable.
*
* To get started, you'll need a key identifier for a key stored in a key vault.
* See the README
* (https://github.com/Azure/azure-sdk-for-java/blob/main/sdk/keyvault/azure-
* security-keyvault-keys/README.md)
* for links and instructions.
*/
CryptographyClient cryptoClient = new CryptographyClientBuilder()
.credential(new DefaultAzureCredentialBuilder().build())
.keyIdentifier(KEY_ID)
.buildClient();
DecryptResult decryptResult = cryptoClient.decrypt(EncryptionAlgorithm.RSA_OAEP, encDek);
return decryptResult.getPlainText();
}
}
Using GCP
The following is a sample implementation using the private key from Google Cloud KMS.
/*
* Sample Application decrypting encrypted DEK using Google Cloud Key Management
*
* [Protegrity Prerequisite]
* Create an asymmetric key using Google Cloud Key Management with key purpose of ASYMMETRIC_DECRYPT.
* This example uses a key with algorithm 2048 bit RSA key OAEP Padding - SHA256 Digest
* Now use the public key of the generated asymmetric key to download your ESA policy
*
* Example curl command to download policy
* curl --location 'https://{ESA_IP}/pty/v1/rps/export?version=1&coreversion=1' \
--header 'accept: application/json' \
--header 'Content-Type: application/json' \
--header 'Authorization: Basic' \
--data '{
"kek":{
"publicKey":{
"label": "LABEL_NAME",
"algorithm": "ALGORITHM_NAME",
"value": "-----BEGIN PUBLIC KEY-----
[asymmetric public key using Google Cloud Key Management]
-----END PUBLIC KEY-----"}
}
}'
*
* The below code demonstrates decrypting encrypted DEK using key generated using Google Cloud Key Management
*
* [Google Prerequisite]
* Google Cloud Account with Google Cloud Key Management enabled
* Install gcloud cli
gcloud auth application-default command creates application_default_credentials.json
*
* [Java Prerequisite]
* Add Google Cloud KMS as part of your dependency
implementation 'com.google.cloud:google-cloud-kms:<version_number>'
*
* Check Google Cloud API Documentation for more information
*/
package com.protegrity.test;
import com.google.cloud.kms.v1.AsymmetricDecryptResponse;
import com.google.cloud.kms.v1.CryptoKeyVersionName;
import com.google.cloud.kms.v1.KeyManagementServiceClient;
import com.google.protobuf.ByteString;
import com.protegrity.jcorelite.constants.KEK_ALGO;
import com.protegrity.jcorelite.exceptions.PtyDecryptorException;
import java.io.IOException;
public class GCPKMSDecryptor {
public byte[] decryptAsymmetricKey(byte[] encDek) throws IOException {
// Replace these variables before running the sample.
String projectId = "your-project-id";
String locationId = "us-east1";
String keyRingId = "my-key-ring";
String keyId = "my-key";
String keyVersionId = "123";
return decryptAsymmetricKey(projectId, locationId, keyRingId, keyId, keyVersionId, encDek);
}
// Decrypt data that was encrypted using the public key component of the given
// key version.
public byte[] decryptAsymmetricKey(
String projectId,
String locationId,
String keyRingId,
String keyId,
String keyVersionId,
byte[] ciphertext)
throws IOException {
// Initialize client that will be used to send requests. This client only
// needs to be created once, and can be reused for multiple requests. After
// completing all of your requests, call the "close" method on the client to
// safely clean up any remaining background resources.
try (KeyManagementServiceClient client = KeyManagementServiceClient.create()) {
// Build the key version name from the project, location, key ring, key,
// and key version.
CryptoKeyVersionName keyVersionName =
CryptoKeyVersionName.of(projectId, locationId, keyRingId, keyId, keyVersionId);
// Decrypt the ciphertext.
AsymmetricDecryptResponse response =
client.asymmetricDecrypt(keyVersionName, ByteString.copyFrom(ciphertext));
return response.getPlaintext().toByteArray();
}
}
public byte[] decrypt(String keyLabel, KEK_ALGO algorithm, byte[] encDek)
throws PtyDecryptorException, IOException {
return decryptAsymmetricKey(encDek);
}
}
2.1.8.3 - Application Protector API Return Codes
When an application is developed using the APIs of the Protegrity Application Protector Suite, you may encounter the Application Protector API Return Codes. For more information about log return codes, refer to Log return codes.
Sample Log for AP Return Codes
The following is a sample log generated in Discover on the Audit Store Dashboards in the ESA.
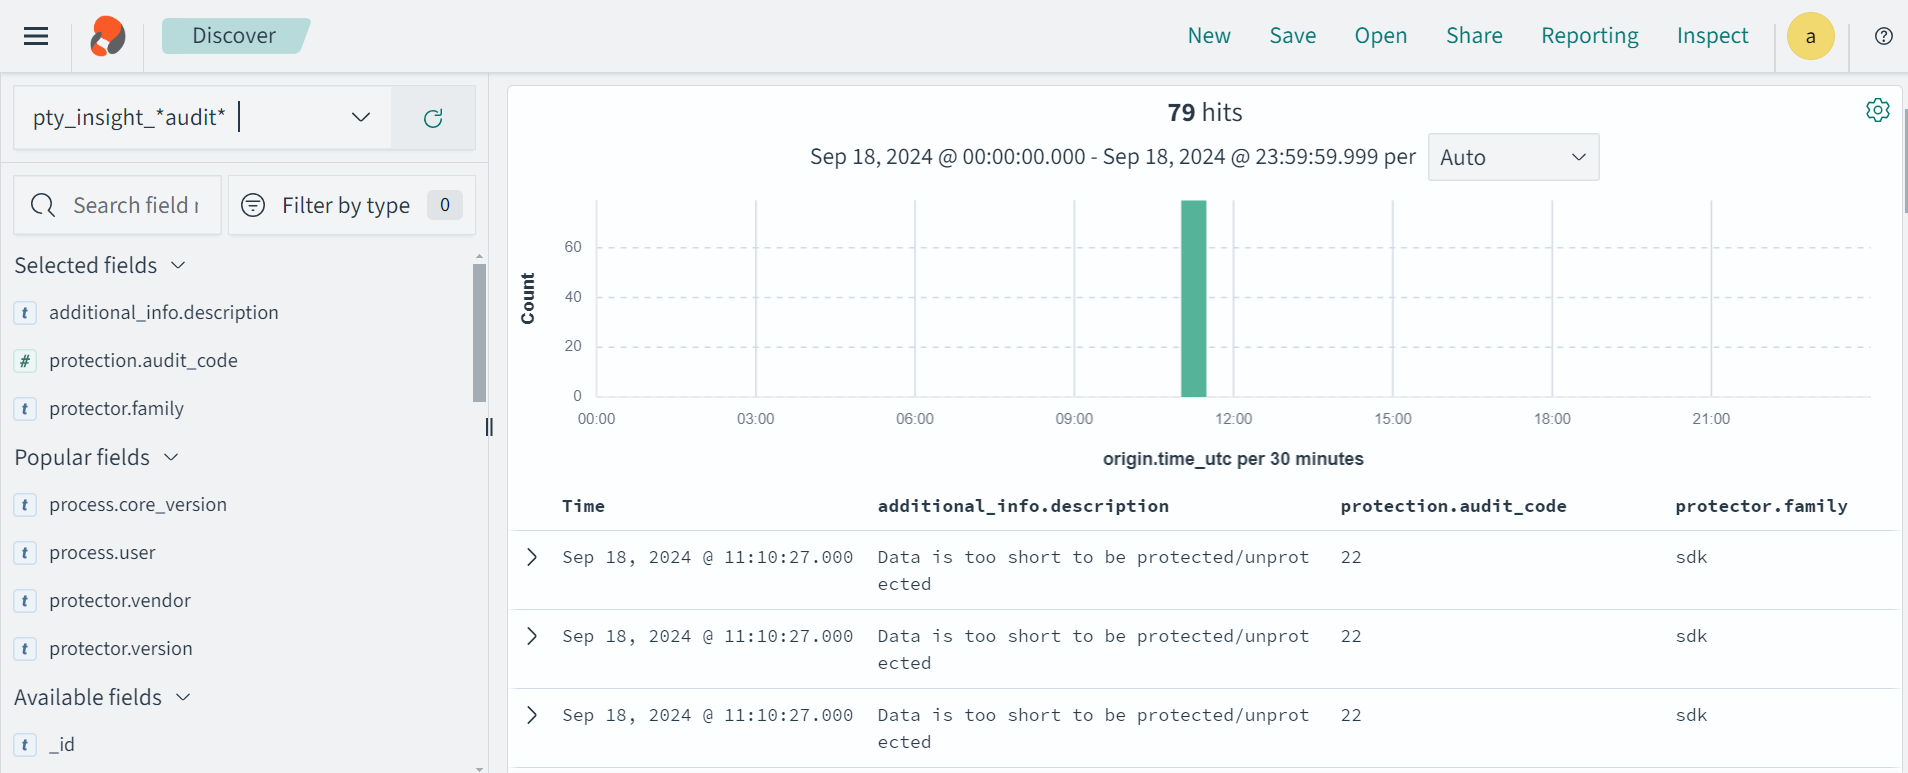
Protection audit logs are stored in the Audit Store. Select the pty_insight_*audit* index to view the protection logs.
For more information about viewing the logs, refer to Working with Discover.
2.1.8.4 - Config.ini file for Application Protector
The Application Protector can be configured using the config.ini file. By default, this file is located in the <installation directory>/sdk/<protector>/data/ directory.
The various configurations required for setting up the Application Protector are described in this section.
Sample config.ini file
The following represents a sample config.ini file.
# -----------------------------
# Protector configuration
# -----------------------------
[protector]
# Cadence determines how often the protector connects with shared memory to fetch the policy updates in background.
# Default is 60 seconds. So by default, every 60 seconds protector tries to fetch the policy updates.
#
# Default 60.
cadence = 60
# The time during which an session object is valid. Default = 15 minutes.
session.sessiontimeout = 15
###############################################################################
# Log Provider Config
###############################################################################
[log]
# In case that connection to fluent-bit is lost, set how audits/logs are handled
#
# drop : (default) Protector throws logs away if connection to the fluentbit is lost
# error : Protector returns error without protecting/unprotecting
# data if connection to the fluentbit is lost
mode = drop
# Host/IP to fluent-bit where audits/logs will be forwarded from the protector
#
# Default localhost
host = localhost
Different configurations for Application Protector
The following are the various configurations:
Protector configurations
cadence: The interval at which the protector synchronizes with the shared memory for fetching the package with policy. The default value forcadenceis 60 seconds. The maximum and minimum value that can be set forcadenceare 86400 seconds (24 hours) and 0 respectively.
For more information about the policy deployment with differentcadenceconfigurations, refer to Policy Deployment.
For more information about the Resilient Package sync configuration parameters, refer to Resilient Package Sync Configuration Parameters.
For more information about changing protector status interval, refer to Resilient Package Status Configuration Parameter.session.sessiontimeout: The time during which a session object is valid. The default value forsession.sessiontimeoutis 15 minutes.Note: The
session.sessiontimeoutparameter is supported only by AP Java. Other Application Protectors do not support this parameter.
Log Provider configurations
mode: This describes how the protector logs are handled if you lose connection to the Log Forwarder host, can be set to one of the following values:drop: The logs are dropped when the connection to the Log Forwarder is lost. The defaultmodeisdrop.error: The data security operations are stopped and an error is generated when the connection to the Log Forwarder is lost.
host: The Log Forwarder hostname or IP address where the logs will be forwarded from the protector. The defaulthostfor Log Forwarder islocalhost.
For more information about the configuration parameters for forwarding the audits and logs, refer to Configuration Parameters for Forwarding Audits and Logs.
2.1.8.5 - Multi-node Application Protector Architecture
The multi-node Application Protector (AP) architecture, its individual components, and how logs are collected using the Log Forwarder are described in this section.
The following figure describes the multi-node AP architecture.
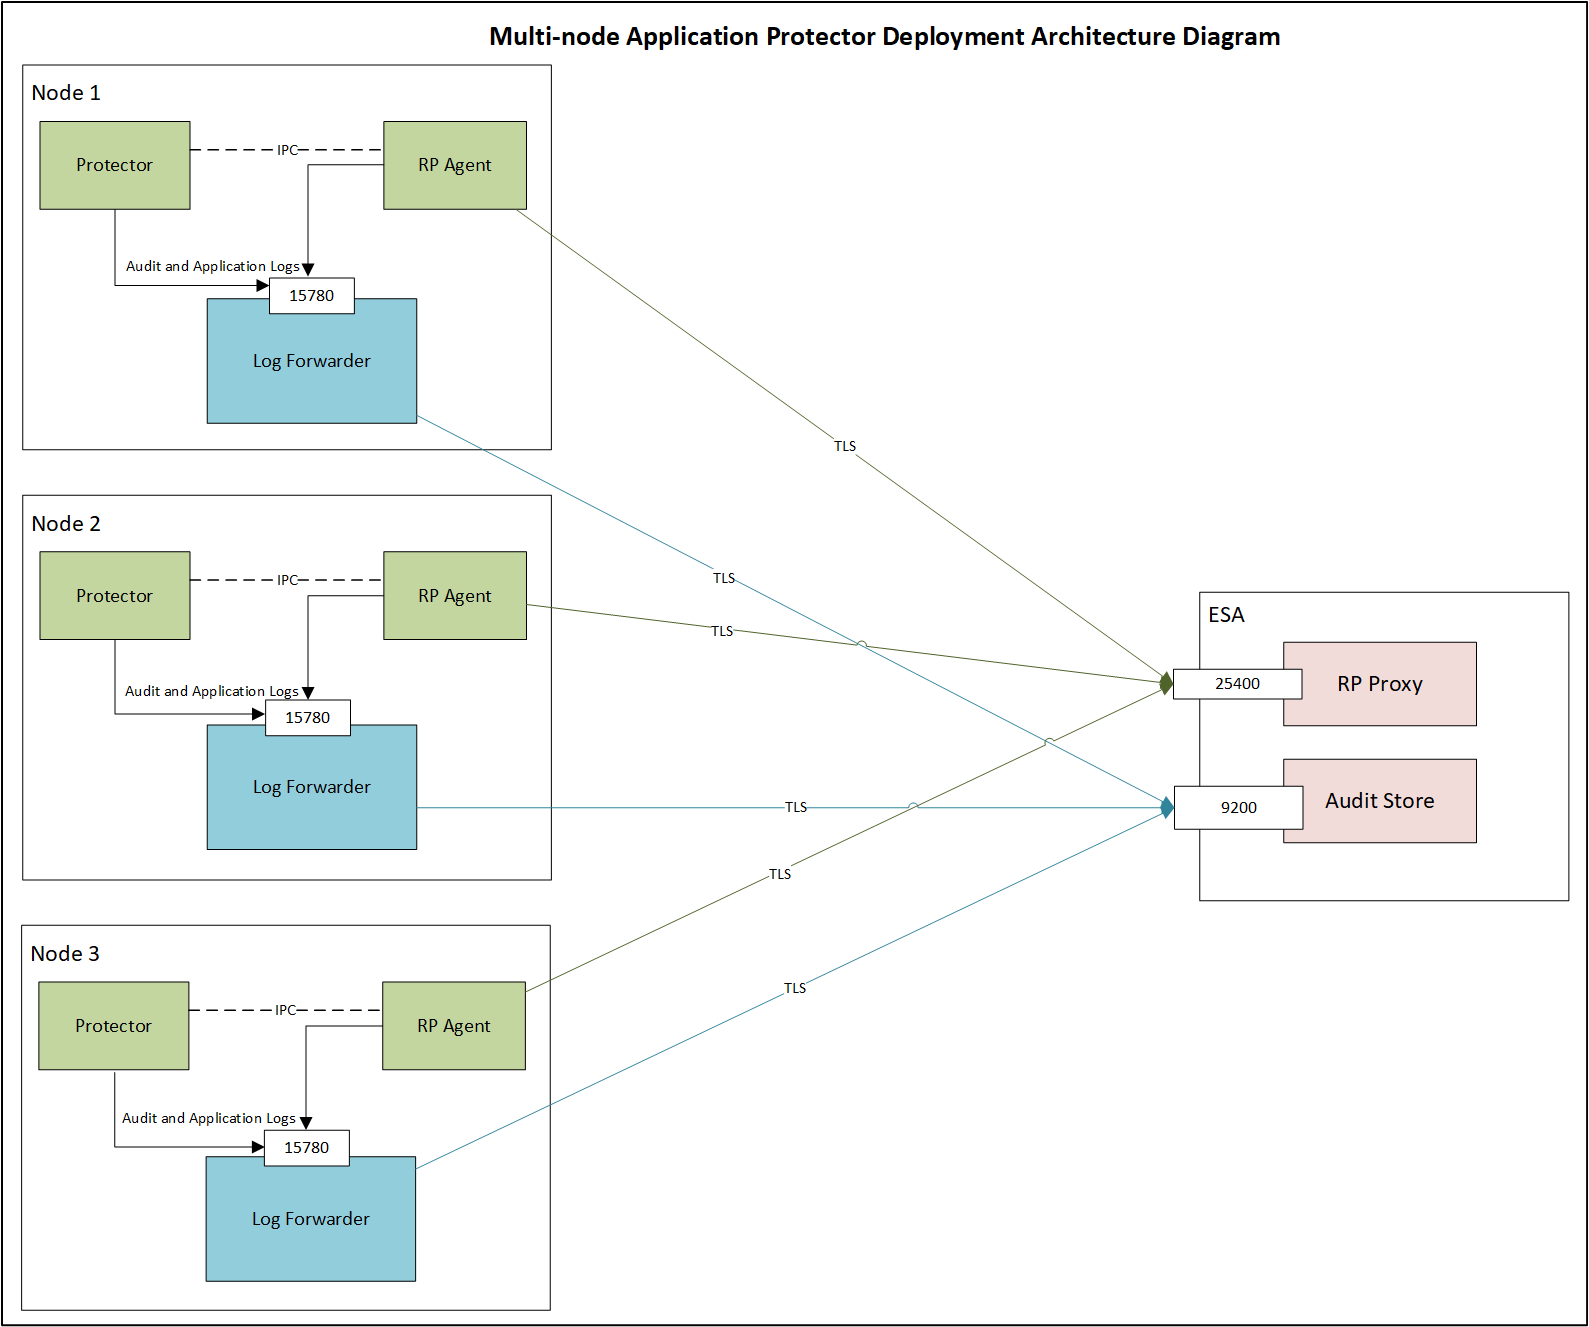
For example, some AP nodes are connected to an ESA, which includes the Audit Store component. Each AP node contains a Log Forwarder, RP Agent, and AP instance for sending logs to the ESA.
Protector: The AP can be configured using the config.ini file.
For more information about the configurations, refer to Config.ini file for Application Protector.
RP Agent: The RP Agent downloads the package with policy from the ESA, which is used by the protector to perform the protect, unprotect, or reprotect operations. It checks for the updates in the policy at set intervals and downloads the latest policy package when an update is detected.
Log Forwarder: The Log Forwarder component collects the logs from the AP and forwards them to the Audit Store. The Log Forwarder uses the 15780 port which is configurable to transport protection and audit logs to the ESA. The ESA receives the logs and stores it in the Audit Store.
2.1.8.6 - Installation Directory Structure Overview
The installation directory is organized into clearly defined subdirectories. This directory structure applies specifically to the /opt/protegrity/upgrade directory. Each directory has a specific role during installation, upgrade, rollback, and runtime operations.
bin/ Directory
The bin directory contains the executable component required to perform upgrade and rollback operations. This directory includes:
The sdkupgrd binary, which is the primary executable used for upgrade and rollback workflows.
The 10.0.gpg file must be manually added to this directory from ESA and is required for verification purposes.
For more information about GPG signature verification, refer to GPG Signature Verification.
Note: No additional binaries or scripts are stored in this directory.
data/ Directory
The data directory stores configuration and metadata files that drive upgrade and rollback behavior. It also enables coordination between components. This directory contains:
sdkupgrd.conf, which is the main configuration file used to provide inputs for:- Upgrade operations
- Rollback operations
Note: The configuration file supports both mandatory and optional settings and is updated as part of upgrade workflows.
metadata.ini, which acts as a coordination and interaction point between the protector and the agent upgrader. It is used to exchange state and progress information during upgrades and ensures both components remain synchronized.
logs/ Directory
The logs directory is used to store runtime and upgrade‑related logs. It is logically divided into two types of logs with different lifecycles and purposes.
- Agent logs are stored here temporarily. These logs are sent to ESA Insight and are automatically removed once their contents are successfully uploaded.
- A version‑defined subdirectory is used to store protector logs. These logs are retained locally and are not sent to ESA Insight.
active_processes/ Directory
The active_processes directory is used to track currently running protector processes. This directory contains:
- active_pid files, where each file represents an active protector process.
- Each active_pid file includes metadata related to the corresponding running AP Java process.
This directory is used to track running protector instances and to prevent conflicting upgrade or rollback operations. It also provides visbility into currently running processes.
2.1.8.7 - SDK Upgrader Agent Configuration File
Note: All configuration file parameters must be reviewed and updated as needed prior to upgrade or rollback, except for
new-logforwarder-path.
# ==============================================================================
# SDK Upgrader Agent Configuration File
# ==============================================================================
# This file contains all configuration parameters for the SDK Upgrader Agent.
# The agent reads values from this file instead of command-line arguments.
#
# Format: key = value
# Lines starting with '#' are comments and ignored.
# Empty lines are ignored.
# Leading/trailing whitespace around keys and values is trimmed.
# ==============================================================================
# ------------------------------------------------------------------------------
# Build Location (REQUIRED)
# URL or local path to the build file
# Examples:
# location-of-build = https://example.com/build/sdk-10.1.0.tgz
# location-of-build = /tmp/sdk-10.1.0.tgz
# ------------------------------------------------------------------------------
location-of-build =
# ------------------------------------------------------------------------------
# Upgrade Mode
# Set to "yes" to enable offline upgrade mode (default: no)
# ------------------------------------------------------------------------------
offline = no
# ------------------------------------------------------------------------------
# RPAgent Configuration
# Path to RPAgent installation directory
# Default: /opt/protegrity/rpagent
# ------------------------------------------------------------------------------
rpagent-path = /opt/protegrity/rpagent
# ------------------------------------------------------------------------------
# LogForwarder Configuration
# Path to LogForwarder installation directory
# Default: /opt/protegrity/logforwarder
# ------------------------------------------------------------------------------
logforwarder-path = /opt/protegrity/logforwarder
# ------------------------------------------------------------------------------
# LogForwarder Endpoints
# Comma-separated list of LogForwarder endpoints (host[:port])
# Default port is 9200 if not specified
# Example: endpoints = eshost1:9200,eshost2:9200
# ------------------------------------------------------------------------------
endpoints =
# ------------------------------------------------------------------------------
# ESA (Enterprise Security Administrator) Configuration
# Note: ESA username and password are NOT stored in this file for security.
# They will be prompted interactively (password hidden) or can be passed
# via --esa-user and --esa-password command-line arguments.
# ------------------------------------------------------------------------------
esa-host =
esa-port = 25400
# ------------------------------------------------------------------------------
# DevOps Mode
# When enabled, skips RPAgent installation
# Values: yes | no (default: no)
# ------------------------------------------------------------------------------
devops = no
# ------------------------------------------------------------------------------
# LogForwarder Upgrade
# Enable or disable LogForwarder upgrade
# Values: yes | no (default: yes)
# ------------------------------------------------------------------------------
isFluentBit = yes
# ------------------------------------------------------------------------------
# Insecure Mode
# RPAgent with insecure mode
# Values: yes | no (default: no)
# ------------------------------------------------------------------------------
insecure = no
# ------------------------------------------------------------------------------
# Protector Paths
# Comma-separated list of protector installation paths
# Example: protector-paths = /opt/protegrity/sdk/java,/opt/protegrity/sdk/python
# Default: /opt/protegrity/sdk/java
# ------------------------------------------------------------------------------
protector-paths = /opt/protegrity/sdk/java
# ------------------------------------------------------------------------------
# New LogForwarder Path (Error Mode)
# Path to install new logforwarder for error mode parallel upgrade.
# The {version} placeholder will be replaced with the actual build version at runtime.
# Default is derived from logforwarder-path by stripping the trailing directory
# name and appending logforwarder_{version}. For example:
# logforwarder-path = /opt/protegrity/logforwarder
# → new-logforwarder-path = /opt/protegrity/logforwarder_{version}
# logforwarder-path = /root/abcc/logforwarder
# → new-logforwarder-path = /root/abcc/logforwarder_{version}
# ------------------------------------------------------------------------------
new-logforwarder-path =
# ------------------------------------------------------------------------------
# Logging Options
# ------------------------------------------------------------------------------
# Print logs to console (yes | no, default: no)
stdout = no
# Enable debug logging (yes | no, default: no)
debug = no
2.1.8.8 - Troubleshooting for AP Java Upgrade
This section describes common issues that may occur during AP Java upgrades and how to resolve them.
| Issue | Symptom | Resolution |
|---|---|---|
| Offline upgrade fails due to a running process error | The offline upgrade fails with an error indicating that a process is still running, even though no AP Java process is active. | 1. Navigate to the <INSTALL_DIR>/upgrader/active_processes directory.2. Check for any stale PID files. 3. Remove the stale PID files. 4. Retry the offline upgrade. |
| Upgrade fails during build extraction when using a local build file | The upgrade fails during the build extraction phase when a local build file path .tgz is provided to the Agent.This happens if an extracted build directory or an inner .tgz file is passed instead of the original build archive. | Ensure that: - You pass only the unextracted build file ( .tgz) to the Agent.- The path does not point to any inner or manually extracted .tgz file.Retry the upgrade after correcting the build file path. |
| Upgrade or auto-rollback fails | The upgrade or the automatic rollback operation does not complete successfully. | - Perform an offline rollback to recover the system state. - After the offline rollback completes, verify system stability before retrying the upgrade. |
| “Upgrade is still in progress” error when starting AP Java | AP Java fails to start and reports that an upgrade is still in progress. | 1. Open the <INSTALL_DIR>/upgrader/data/metadata.ini file.2. Verify that the IsUpgradeInProgress parameter value is set to false.3. If the value is set to true, update it to false.4. Save the file. 5. Restart the AP Java application. |
2.1.8.9 - Uninstalling the Application Protector
Uninstalling Application Protector (AP) Java from Linux
This section outlines the steps to uninstall the various components of AP Java from a Linux platform.
Uninstalling the Log Forwarder from Linux
Note: To preserve all the configurations while upgrading the Log Forwarder, ensure all the files present under the
/opt/protegrity/logforwarder/data/config.ddirectory are backed up.
To uninstall the Log Forwarder from a Linux platform:
Navigate to the
/opt/protegrity/logforwarder/bindirectory.Stop the Log Forwarder using the following command.
./logforwarderctrl stopDelete the
/opt/protegrity/logforwarderdirectory.The Log Forwarder is uninstalled.
Uninstalling the RP Agent from Linux
Note: Before uninstalling the RP Agent, ensure that all the files present under the
/opt/protegrity/rpagent/datadirectory are backed up.
To uninstall the RP Agent from a Linux platform:
Navigate to the
/opt/protegrity/rpagent/bindirectory.Stop the RP Agent using the following command.
./rpagentctrl stopDelete the
/opt/protegrity/rpagentdirectory.The RP Agent is uninstalled.
Uninstalling the AP Java from Linux
To uninstall the AP Java from a Linux platform:
Navigate to the
/opt/protegrity/sdkdirectory.Delete the
/javadirectory.The AP Java is uninstalled.
3 - Big Data Protector
3.1 - CDP-PVC-Base
Features of the Big Data Protector on CDP-PVC-Base
The Protegrity Big Data Protector (Big Data Protector) uses vaultless tokenization and central policy control for access management and secures sensitive data at rest in the following areas:
- Data in HDFS and Ozone
- Data used during processing with MapReduce, Hive, Pig, HBase, Impala, and Spark
- Data traversing enterprise data systems
The data is protected from internal and external threats, and users and business processes can continue to utilize the secured data.
Data protection may be by encryption or tokenization. In tokenization, the data is converted to similar looking inert data known as tokens where the data format and type can be preserved. These tokens can be detokenized back to the original values whenever required.
Protegrity protects data inside the files using tokenization and strong encryption protection methods. Depending on the user access rights and the policies set using Policy management in ESA, this data is unprotected.
The Protegrity Hadoop Big Data Protector provides the following features:
- Provides fine grained field-level protection within the MapReduce, Hive, Pig, HBase, and Spark frameworks.
- Provides Protegrity Format Preserving Encryption (FPE) method for structured data. The following data types are supported:
- Numeric (0-9)
- Alpha (a-z, A-Z)
- Alpha-Numeric (0-9, a-z, A-Z)
- Credit Card (0-9)
- Unicode Basic Latin and Latin-1 Supplement Alpha
- Unicode Basic Latin and Latin-1 Supplement Alpha-Numeric
- Retains distributed processing capability as field-level protection is applied to the data.
- Protects data in the Hadoop cluster using role-based administration with a centralized security policy.
- Simplified installation, administration, and managem ent of Big Data Protector using the following components:
- Parcels: In Cloudera Manager, the Big Data Protector Parcel is a single consolidated file. This file contains all the required files for installing and using Big Data Protector on a cluster. It also contains the metadata used by Cloudera Manager.
- Custom Service Descriptors (CSDs): In Cloudera Manager, a CSD contains all the configurations required to describe and manage the Big Data Protector services. The CSDs are provided as Jar files.
- Easy monitoring of the Big Data Protector services, such as, BDP, using the Cloudera Manager UI instead of the CLI.
- Provides logging and viewing data access activities and real-time alerts with a centralized monitoring system.
- Ensures minimal overhead for processing secured data, with minimal consumption of resources, threads and processes, and network bandwidth.
- Provides transparent data protection with Protegrity HBase protectors.
Currently, Protegrity supports MapReduce, Hive, Pig, HBase, Spark, and Impala, which utilizes HDFS or Ozone as the data storage layer. The following points can be referred to as general guidelines:
- Beeline and Hue: Beeline and Hue are certified with the Hive protector.
- Ranger: Ranger is certified to work with the Hive protector.
- Sentry (CDH): Sentry is certified with the Hive and Impala protector only.
Overview of Hadoop Application Protection
The various levels of protection provided by Hadoop Application Protection are explained below.
Protection in MapReduce Jobs
A MapReduce job in the Hadoop cluster involves sensitive data. You can use Protegrity interfaces to protect data when it is saved or retrieved from a protected source. The output data written by the job can be encrypted or tokenized. The protected data can be subsequently used by other jobs in the cluster in a secured manner. Field level data can be secured and ingested into HDFS by independent Hadoop jobs or other ETL tools. For more information about secure ingestion of data in Hadoop, refer to section Ingesting Files Using Hive Staging. For more information on the list of available APIs, refer to section MapReduce APIs. If Hive queries are created to operate on sensitive data, then you can use Protegrity Hive UDFs for securing data. While inserting data to Hive tables, or retrieving data from protected Hive table columns, you can call Protegrity UDFs loaded into Hive during installation. The UDFs protect data based on the input parameters provided. Secure ingestion of data into HDFS to operate Hive queries can be achieved by independent Hadoop jobs or other ETL tools. For more information about securely ingesting data in Hadoop, refer Ingesting Data Securely.
Protection in Hive Queries
Protection in Hive queries is done by Protegrity Hive UDFs. These UDFs translate a HiveQL query into a MapReduce, Tez or Spark distributed job before sending it to the Hadoop cluster. For more information on the list of available UDFs, refer Hive UDFs.
Protection in Pig Jobs
Protection in Pig jobs is done by Protegrity Pig UDFs, which are similar in function to the Protegrity UDFs in Hive. For more information on the list of available UDFs, refer Pig UDFs.
Protection in HBase
HBase is a database which provides random read and write access to tables, consisting of rows and columns, in real-time. HBase is designed to run on commodity servers, to automatically scale as more servers are added, and is fault tolerant as data is divided across servers in the cluster. HBase tables are partitioned into multiple regions. Each region stores a range of rows in the table. Regions contain a datastore in memory and a persistent datastore(HFile). The Name node assigns multiple regions to a region server. The Name node manages the cluster and the region servers store portions of the HBase tables and perform the work on the data.
The Protegrity HBase protector extends the functionality of the data storage framework. It also provides a transparent data protection and unprotection using coprocessors. These coprocessors provide the functionality to run the code directly on region servers. The Protegrity coprocessor for HBase runs on the region servers and protects the data stored in the servers. All clients which work with HBase are supported. The data is transparently protected or unprotected, as required, utilizing the coprocessor framework.
Protection in Impala
Impala is an MPP SQL query engine for querying the data stored in a cluster. It provides the flexibility of the SQL format and is capable of running the queries on HDFS in HBase. The Protegrity Impala protector extends the functionality of the Impala query engine and provides UDFs which protect or unprotect the data as it is stored or retrieved. For more information about the Impala protector, refer Impala UDFs.
Protection in Spark
Spark is an execution engine that carries out batch processing of jobs in-memory and handles a wider range of computational workloads. In addition to processing a batch of stored data, Spark is capable of manipulating data in real time. You can also utilise Spark Streaming to process live data streams and store the processed data in Hadoop. The Protegrity Spark Java protector extends the functionality of the Spark engine and provides Java APIs that protect, unprotect, or reprotect the data as it is stored or retrieved. For more information about the Spark Java and SQL protectors, refer to section Spark. The Protegrity Spark Java protector extends the functionality of the Spark engine and provides Java APIs that protect, unprotect, or reprotect the data as it is stored or retrieved. The Protegrity Spark SQL protector provides native UDFs that can be utilized with Spark Scala to protect, unprotect, or reprotect the data as it is stored or retrieved. You can create and submit Spark jobs using the methods listed in the following table.
| Create and submit Spark jobs using | Reference Section |
|---|---|
| Spark Java APIs | Spark Java |
| Spark SQL UDFs | Spark SQL |
| PySpark Scala Wrapper UDFs | PySpark Scala Wrapper UDFs |
Ingesting Data Securely
The methods by which data can be secured and ingested by various jobs in Hadoop at a field or file level are explained below.
Ingesting Files Using Hive Staging
Semi-structured data files can be loaded into a Hive staging table for ingestion into a Hive table with Hive queries and Protegrity UDFs. After loading data in the table, the data will be stored in protected form.
Data Security Policy and Protection Methods
A data security policy establishes processes to ensure the security and confidentiality of sensitive information. In addition, the data security policy establishes administrative and technical safeguards against unauthorized access or use of the sensitive information. Depending on the requirements, the data security policy typically performs the following functions:
- Classifies the data that is sensitive for the organization.
- Defines the methods to protect sensitive data, such as encryption and tokenization.
- Defines the methods to present the sensitive data, such as masking the display of sensitive information.
- Defines the access privileges of the users that would be able to access the data.
- Defines the time frame for privileged users to access the sensitive data.
- Enforces the security policies at the location where sensitive data is stored.
- Provides a means of auditing authorized and unauthorized accesses to the sensitive data. In addition, it can also provide a means of auditing operations to protect and unprotect the sensitive data. The data security policy contains a number of components, such as, data elements, datastores, member sources, masks, and roles. The following list describes the functions of each of these entities:
- Data elements define the data protection properties for protecting sensitive data, consisting of the data securing method, data element type and its description. In addition, Data elements describe the tokenization or encryption properties, which can be associated with roles.
- Datastores consist of enterprise systems, which might contain the data that needs to be processed, where the policy is deployed and the data protection function is utilized.
- Member sources are the external sources from which users (or members) and groups of users are accessed. Examples are a file, database, LDAP, and Active Directory.
- Masks are a pattern of symbols and characters, that when imposed on a data field, obscures its actual value to the user. Masks effectively aid in hiding sensitive data.
- Roles define the levels of member access that are appropriate for various types of information. Combined with a data element, roles determine and define the unique data access privileges for each member.
For more information about creating a policy, refer Creating a Structured Policy.
3.1.1 - Understanding the Architecture
The architecture for the CDP-PVC-Base distribution of the Big Data Protector is depicted in the image below.
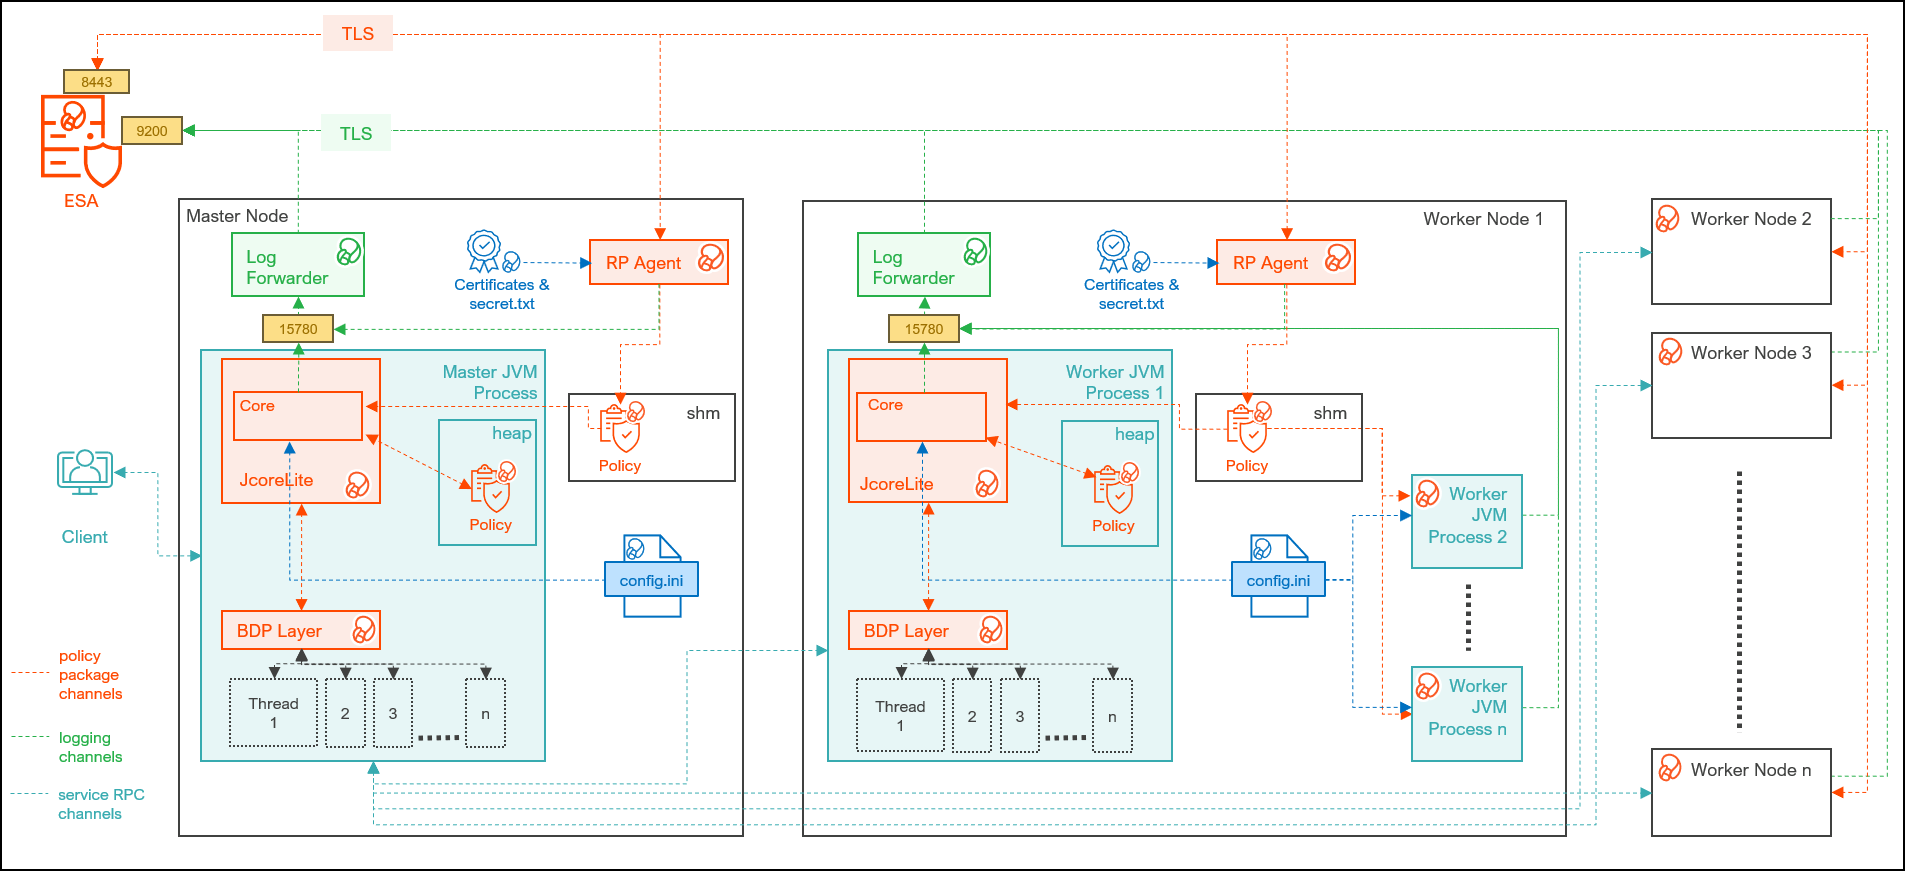
| Component | Description |
|---|---|
| RPAgent | A daemon running on each node that downloads the package from the ESA over a TLS channel using the installed Certificates. |
| Log Forwarder | A daemon running on each node that routes the audit logs and application logs to the ESA/Audit Store. |
| config.ini | A file on each node containing the set of configuration parameters to modify the protector behavior. |
| BDP Layer | Contains the Big Data Protector UDFs and APIs executing in CDP service processes. |
| JcoreLite | The JNI library that provides a Java API layer to the Core libraries. |
| Core | The set of various libraries that provide the Protegrity Core functionality. |
3.1.2 - System Requirements
Ensure that the following prerequisites are met, before installing the Big Data Protector from the Cloudera Manager:
- The cluster is installed, configured, and running CDP-PVC-Base Cloudera Runtime 7.1 and above with any compatible version of ClouderaManager.
- The ESA appliance, version v10.1.x, is installed, configured, and running.
- The ports that are configured on the ESA and the nodes in the cluster, which will run the Big Data Protector, are listed in the following table:
| Destination Port | Protocol | Source | Destination | Description |
|---|---|---|---|---|
| 8443 | TLS | RPAgent on the Big Data Protector cluster node | ESA | The RPAgent communicates with the ESA through port 8443 to download a policy. |
| 25400 | TLS | RPAgent on the Big Data Protector cluster node | PPC | The RPAgent communicates with the PPC through port 25400 to download a policy. |
| 9200 | TLS | Log Forwarder on the Big Data Protector Cluster node | Protegrity Audit Store appliance | The Log Forwarder sends all the logs to the Protegrity Audit Appliance through port 9200. |
| 15780 | TCP | Protector on the Big Data Protector cluster node | Log Forwarder on the Big Data Protector cluster node. | The Big Data Protector writes Audit Logs to localhost through port 15780. The Application Logs are also written to localhost through port 15780. The Log Forwarder reads the logs from that socket. |
- The user, installing the Big Data Protector, has the requisite permissions to perform the following tasks:
- Copy the Big Data Protector parcels and CSDs to the Cloudera Manager repository directories
- Restart the Cloudera SCM Server
- If you are installing the Big Data Protector on a cluster, then ensure that it is installed on all the nodes in the cluster.
- The group
ptyitusrand the userptyitusr, responsible to manage the Big Data Protector-related services are managed by Cloudera Manager. The user and group are unavailable on the cluster nodes.
Note: This build supports both Spark 2 and Spark 3 on the cluster using a single pepspark jar.
For more information about installing Spark3 on CDP PVC Base cluster, refer to Installing CDS 3.3 Powered by Apache Spark.
3.1.3 - Preparing the Environment
3.1.3.1 - Extracting the Installation Package
Extract the Big Data Protector package to access the Big Data Protector Configurator script. This script will generate the Big Data Protector parcels and CSDs to install the Big Data Protector on all the nodes in the cluster. The nodes in the cluster are managed by Cloudera Manager.
To extract the files from the installation package:
Log in to the CLI on the Master node that has connectivity to ESA/PPC.
Copy the Big Data Protector package
BigDataProtector_Linux-ALL-64_x86-64_CDP-PVC-Base-<CDP_version>-64_<BDP_version>.tgzto any directory. For example,/opt/bigdata/.To create a temporary directory under the specified directory, to extract the files, run the following command:
mkdir /opt/bigdata/extracted/To navigate to the directory where you have downloaded the installation package, run the following command:
cd /opt/bigdata/To extract the contents of the Big Data Protector installation package to a specific directory, run the following command:
tar –xvf BigDataProtector_Linux-ALL-64_x86-64_CDP-PVC-Base-<CDP_version>-64_<BDP_version>.tgz -C extracted/To navigate to the directory where you have extracted the files, run the following command:
cd /opt/bigdata/extracted/Press ENTER.
The command extracts theBigDataProtector_Linux-ALL-64_x86-64_CDP-PVC-Base-<CDP_version>-64_<BDP_version>.tgzpackage and the GPG signature files from the installation package.BigDataProtector_Linux-ALL-64_x86-64_CDP-PVC-Base-<CDP_version>-64_<BDP_version>.tgz signatures/Note: Verify the authenticity of the build using the signatures folder. For more information, refer to Verification of Signed Protector Build.
To extract the configurator script, run the following command:
tar –xvf BigDataProtector_Linux-ALL-64_x86-64_CDP-PVC-Base-<CDP_version>-64_<BDP_version>.tgzPress ENTER.
The command extracts the configurator script.BDPConfigurator_CDP-PVC-Base-<CDP_version>_<BDP_version>.sh
3.1.3.2 - Running the Configurator Script
Execute the Big Data Protector configurator script to:
- Download certificates from the ESA/PPC.
- Create the parcels and CSDs to install the Big Data Protector.
The certificates are required to establish a secure communication between the CDP-PVC-Base cluster nodes and ESA.
Before you begin
Perform the steps, mentioned in the section, before executing the configurator script. These steps are required to:
- Export the ESA/PPC IP and port as variables.
- Create a directory to store ESA/PPC certificates.
- Download ESA/PPC certificates.
- Retrieve the Fully Qualified Domain Name for ESA/PPC.
- Add the ESA/PPC FQDN and IP address to the
/etc/hostsfile. - Set the
SSL_CERT_FILEvariable to point to the ESA/PPC certificate.
- To export the variables for ESA/PPC IP and port, run the following command:
export ESA_IP=<ESA_IP_Address> export ESA_PORT=8443 - To create a directory for the certificates, run the following command:
sudo mkdir -p /opt/esa/certs - To download the Server certificate from ESA/PPC, run the following command:
openssl s_client -connect $ESA_IP:$ESA_PORT -servername $ESA_IP -showcerts </dev/null 2>/dev/null \ | sed -n '/-----BEGIN CERTIFICATE-----/,/-----END CERTIFICATE-----/p' \ | sudo tee /opt/esa/certs/ProtegrityCA.pem >/dev/null - To retrieve ESA/PPC FQDN, run the following command:
ESA_FQDN=$(openssl x509 -in /opt/esa/certs/ProtegrityCA.pem -noout -subject \ | grep -oP 'CN\s*=\s*\K[^,]+') echo "ESA FQDN: $ESA_FQDN" - To add the ESA/PPC FQDN and the IP Address to the
/etc/hostsfile, run the following command:echo "$ESA_IP $ESA_FQDN" | sudo tee -a /etc/hosts - Set the
SSL_CERT_FILEvariable on the instance where the configurator script will run. The variable must point to the location of the Server certificate. For example:export SSL_CERT_FILE=<full_path_to_the_server_certificate_file>
Executing the Configurator Script
Execute the Big Data Protector configurator script to:
- Download certificates from the ESA/PPC.
- Create the parcels and CSDs to install the Big Data Protector.
To run the configurator script and generate the Big Data Protector Parcels and CSDs:
Log in to the CLI on the Master node that has connectivity to ESA/PPC.
To execute the configurator script, run the following command:
./BDPConfigurator_CDP-PVC-Base-<CDP_version>_<BDP_version>.shPress ENTER.
The prompt to continue the configuration of Big Data Protector appears.***************************************************************************** Welcome to the Big Data Protector Configurator Wizard ***************************************************************************** This will setup the Big Data Protector Installation Files for CDP PVC Base Do you want to continue? [yes or no]:To start the configuration of Big Data Protector, type
yes.Press ENTER.
The prompt to select the type of installation files appears.Big Data Protector Configurator started... Unpacking... Extracting files... Select the type of Installation files you want to generate. [ 1: Create All ] : Creates entire Big Data Protector CSDs and Parcels. [ 2: Update PTY_CERT ] : Creates new PTY_CERT parcel with an incremented patch version. Use this if you have updated the ESA certificates. [ 3: Update PTY_LOGFORWARDER_CONF ] : Creates new PTY_LOGFORWARDER_CONF parcel with an incremented patch version. Use this if you want to set Custom LogForwarder configuration files to forward logs to an External Audit Store. [ 1, 2 or 3 ]:Note: From v10.0.0, the
PTY_FLUENTBIT_CONFparcel is renamed toPTY_LOGFORWARDER_CONF.To create the Big Data Protector parcels and CSDs, type
1.To update the
PTY_CERTparcels with an incremented patch version, type2.Note: For more information about updating the
PTY_CERTparcel, refer to Updating the Certificates Parcel.To update the PTY_LOGFORWARDER_CONF parcel with an incremented patch version, type
3.Note: For more information about updating the PTY_LOGFORWARDER_CONF parcel, refer to Updating the Log Forwarder Parcel.
Press ENTER.
The prompt to select the operating system for the Cloudera Manager parcel appears.Select the OS version for Cloudera Manager Parcel. This will be used as the OS Distro suffix in the Parcel name. [ 1: el7 ] : RHEL 7 and clones (CentOS, Scientific Linux, etc) [ 2: el8 ] : RHEL 8 and clones (CentOS, Scientific Linux, etc) [ 3: el9 ] : RHEL 9 and clones (CentOS, Scientific Linux, etc) [ 4: sles12 ] : SuSE Linux Enterprise Server 12.x [ 5: sles15 ] : SuSE Linux Enterprise Server 15.x Enter the no.:Note: Failure to set the value of the
SSL_CERT_FILEvariable returns the following error:ERROR: SSL_CERT_FILE is not set or does not point at a valid CA bundle. Secure mode is mandatory for ESA TLS validation. 1. Save the ESA CA cert to a readable path (e.g. /opt/esa/certs/ProtegrityCA.pem). 2. Add '<esa_ip> <esa_cn>' to /etc/hosts so the ESA CN/SAN resolves. 3. export SSL_CERT_FILE=<path-from-step-1> and re-run this configurator. Exiting Configurator Script....For more information about setting the value of the
SSL_CERT_FILEvariable, refer to Before you begin.Depending on the requirements, type
1,2,3,4, or5to select the operating system version for the Big Data Protector parcels.Press ENTER.
The prompt to enter the Fully Qualified Domain Name (FQDN) for ESA appears.Secure mode: verifying ESA against CA bundle '/<location_of_certificate>/CA.pem'. Enter ESA Fully Qualified Domain Name (FQDN):Enter Fully Qualified Domain Name (FQDN) for ESA/PPC.
Press ENTER.
The prompt to enter the ESA host listening port appears.Enter ESA host listening port:Enter ESA/PPC host listening port or leave it blank to use the default port.
Press ENTER.
The prompt to enter the ESA/PPC JSON Web Token appears.If you have an existing ESA JSON Web Token (JWT) with Export Certificates role, enter it otherwise enter 'no':Note: The script silently reads the user input. Therefore, the user will be unable to see the entered JWT or
no.Enter the JWT token.
a. If you do not have an existing ESA JSON Web Token (JWT), type
no.
b. Press ENTER.
The prompt to enter the user name with Export Certificates permission appears.``` JWT was not provided. Script will now prompt for ESA username and password. Enter ESA Username with Export Certificates role: admin ```c. Enter the ESA username that has permissions to export the certificates.
d. Press ENTER.
The prompt to enter the password appears.e. Enter the password.
f. Press ENTER.
The script retrieves the JWT from the ESA, validates it, and the prompt to package custom log forwarder configuration appears.Fetching JWT from ESA.... Fetching Certificates from ESA.... % Total % Received % Xferd Average Speed Time Time Time Current Dload Upload Total Spent Left Speed 100 11264 100 11264 0 0 164k 0 --:--:-- --:--:-- --:--:-- 166k ------------------------------------------------------------------------------- Do you want to package any custom LogForwarder configuration files for External Audit Store? [ yes ] : Create a PTY_LOGFORWARDER_CONF parcel containing configuration files to be used with External Audit Store. [ no ] : Skip this step. [ yes or no ]:To package the Log Forwarder configuration file(s) for an external Audit Store, type
yes.Note: Entering
noat this prompt will skip the generation of the Log Forwarder configuration files. For more information on the logs, refer to the end of this section.Press ENTER.
The prompt to enter the local directory path containing the Log Forwarder configuration files appears.Do you want to package any custom LogForwarder configuration files for External Audit Store? [ yes ] : Create a PTY_LOGFORWARDER_CONF parcel containing configuration files to be used with External Audit Store. [ no ] : Skip this step. [ yes or no ]: yes Creation of PTY_LOGFORWARDER_CONF parcel is enabled. Enter the local directory path on this machine that stores the LogForwarder configuration files for External Audit Store:Note: The
PTY_LOGFORWARDER_CONFparcel is used to package any custom Log Forwarder configuration files that the user provides and can be distributed across the CDP nodes through the Cloudera Manager. Ensure that you name the custom Log Forwarder configuration files for the external Audit Store with the.confextension.Enter the local directory path that contains the Log Forwarder configuration files.
Press ENTER.
Generating Installation files... Big Data Protector parcels & CSDs are generated in ./Installation_Files/ directory. NOTE: Copy Big Data Protector CSDs (jars) to Cloudera Manager local csd repository. Copy Big Data Protector parcels (*.parcel and *.sha files) to Cloudera Manager local parcel repository. You can use the './Installation_Files/set_unset_bdp_config.sh' helper script for setting/unsetting BDP configs in Cloudera Manager. You can use the './Installation_Files/bdp_smooth_upgrade.sh' script to automate the Cloudera BDP smooth upgrade process, including parcel deployment, activation, and configuration updates. Check the updated configurations on Cloudera Manager and Restart the required services.The configurator script generates the following Big Data Protector parcels and CSDs in the
./Installation_Files/directory:BDP_PEP-<BDP_version>.jarbdp_smooth_upgrade.shcluster.configPTY_BDP-<BDP_version>_CDP7.1.p0-<operating_system_version>.parcelPTY_BDP-<BDP_version>_CDP7.1.p0-<operating_system_version>.parcel.shaPTY_CERT-<BDP_version>_CDP7.1.p0-<operating_system_version>.parcelPTY_CERT-<BDP_version>_CDP7.1.p0-<operating_system_version>.parcel.shaPTY_LOGFORWARDER_CONF-<BDP_version>_CDP7.1.p0-<operating_system_version>.parcelPTY_LOGFORWARDER_CONF-<BDP_version>_CDP7.1.p0-<operating_system_version>.parcel.shaset_unset_bdp_config.sh
If you type
noat the prompt to create thePTY_LOGFORWARDER_CONFparcel, then the installer skips the creation of the Log Forwarder parcel and proceeds to generate the installation files.Do you want to package any custom LogForwarder configuration files for External Audit Store? [ yes ] : Create a PTY_LOGFORWARDER_CONF parcel containing configuration files to be used with External Audit Store. [ no ] : Skip this step. [ yes or no ] : no Creation of PTY_LOGFORWARDER_CONF parcel is skipped. Generating Installation files... Big Data Protector parcels & CSDs are generated in ./Installation_Files/ directory. NOTE: Copy Big Data Protector CSDs (jars) to Cloudera Manager local csd repository. Copy Big Data Protector parcels (*.parcel and *.sha files) to Cloudera Manager local parcel repository. You can use the './Installation_Files/set_unset_bdp_config.sh' helper script for setting/unsetting BDP configs in Cloudera Manager. You can use the './Installation_Files/bdp_smooth_upgrade.sh' script to automate the Cloudera BDP smooth upgrade process, including parcel deployment, activation, and configuration updates. Check the updated configurations on Cloudera Manager and Restart the required services.This completes the process of executing the configurator script. The required installation files are generated under the
./Installation_Files/directory.
3.1.3.3 - Setting up the Parcels
After the Big Data Protector parcels and CSDs are copied to the local Cloudera repository directories, restart the Cloudera SCM server. The restart ensures Cloudera Manager identifies the new CSD and parcel files. The restart also enables Cloudera Manager to display the Big Data Protector services in the Add Services section in Cloudera Manager.
To set up the Big Data Protector Parcels and CSDs:
Log in to the Master node.
Caution: Ensure to delete the older versions of the Big Data Protector parcels and
.jarfiles before installing the new parcels and.jarfiles to the local repository of the Cloudera Manager.Copy the following Big Data Protector parcels with the .parcel extension and their corresponding checksum files with the .sha extension to the local parcel repository of Cloudera Manager:
PTY_BDP-<BDP_version>_CDP<CDP_version>.p0-<operating_system_version>.parcelPTY_BDP-<BDP_version>_CDP<CDP_version>.p0-<operating_system_version>.parcel.shaPTY_CERT-<BDP_version>_CDP<CDP_version>.p0-<operating_system_version>.parcelPTY_CERT-<BDP_version>_CDP<CDP_version>.p0-<operating_system_version>.parcel.shaPTY_LOGFORWARDER_CONF-<BDP_version>_CDP<CDP_version>.p0-<operating_system_version>.parcelPTY_LOGFORWARDER_CONF-<BDP_version>_CDP<CDP_version>.p0-<operating_system_version>.parcel.sha
Note: The local parcels for the Cloudera Manager are stored in the
/opt/cloudera/parcel-repo/directory.Copy the following
.jarfiles file to the local CSD repository:BDP_PEP-<BDP_version>.jar
Note: The local CSD or
.jarfiles for Cloudera Manager are stored in the/opt/cloudera/csd/directory.Navigate to the local parcel repository directory.
Note: The local parcel files are available in the
/opt/cloudera/parcel-repo/directory.To assign the ownership permissions for the Cloudera SCM user to the Protegrity Big Data Protector parcels and checksum files, run the following command:
chown cloudera-scm:cloudera-scm PTY_*Press ENTER.
To assign
640permissions to the parcel files, run the following command:chmod 640 PTY_*Press ENTER.
The command assigns read and write permissions to the owner, read permissions to the group, and restricts access to all other users.Navigate to the local CSD repository directory.
Note: The local CSD or
.jarfiles are available in the/opt/cloudera/csddirectory.To assign the ownership permissions for the Cloudera SCM user to the Big Data Protector CSD or
.jarfiles, run the following command:chown cloudera-scm:cloudera-scm *Press ENTER.
To assign
640permissions to the CSD or.jarfiles, run the following command:chmod 640 *Press ENTER.
The command assigns read and write permissions to the owner, read permissions to the group, and restricts access for all other users.To restart the Cloudera SCM server and load the Big Data Protector CSDs in the Cloudera Manager, run the following command:
service cloudera-scm-server restartPress ENTER.
The Cloudera Manager detects the new parcels in the local parcel repository.Note: Restart the Cloudera SCM server to ensure that the Big Data Protector services are listed on the Add Services page in Cloudera Manager.
3.1.3.4 - Distributing the Parcels
Distribute the following Big Data Protector parcels to the nodes in the cluster before installing or activating them on the nodes:
- Big Data Protector parcel: PTY_BDP
- Certificates parcel: PTY_CERT
- Log Forwarder configuration parcel: PTY_LOGFORWARDER_CONF
Note: To distribute the Big Data Protector parcels to the nodes, Cluster Administrator privileges are required.
For more information about the required role, refer to Parcels.
To distribute the Big Data Protector Parcels to the Nodes in the Cluster:
Using a browser, navigate to the Cloudera Manager page.
Enter the Username.
Enter the Password.
Click Sign In.
The Cloudera Manager Home page appears.Navigate to Administration > Settings. The Settings page appears.
To view the settings related to parcels, from the Filters pane, under CATEGORY, click Parcels.
The options related to the parcels appear.Ensure to select the following options:
- Create Users and Groups for Parcels
- Apply Permissions with respect to files installed by the parcels
From the left pane, click Parcels. The Cloudera Manager Parcels page appears.
Note: The PTY_LOGFORWARDER_CONF parcel will be visible only when the location of the Log Forwarder configuration files is specified while generating the installation files.
Ensure that the following Protegrity parcels appear on the Parcels page:
- PTY_BDP: Big Data Protector parcel
- PTY_CERT: Certificates parcel
- PTY_LOGFORWARDER_CONF: Log Forwarder configuration parcel
To distribute the Big Data Protector parcel, beside the PTY_BDP parcel, click Distribute.
The distribution of the Big Data Protector parcel starts.To distribute the Certificates parcel, beside the PTY_CERT parcel, click Distribute.
The distribution of the Certificates parcel starts.To distribute the Log Forwarder configuration parcel, beside the PTY_LOGFORWARDER_CONF parcel, click Distribute.
The distribution of the Log Forwarder configuration parcel starts.After the Protegrity parcels are distributed to the nodes, Cloudera Manager updates the status of the parcels. The status on the Parcels page is updated to Distributed, and the Activate button appears.
3.1.3.5 - Activating the Parcels
After distributing the Big Data Protector parcels on the cluster nodes, activate the parcels to add and start the Big Data Protector-related services on the nodes in the cluster.
To activate the Big Data Protector Parcels on the Nodes:
- Using a browser, navigate to the Cloudera Manager page.
- Enter the Username.
- Enter the Password.
- Click Sign In.
The Cloudera Manager Home page appears. - From the left pane, click Parcels.
The Cloudera Manager Parcels page appears.Note: The PTY_LOGFORWARDER_CONF parcel will be visible only if the location of the Log Forwarder configuration files is specified while generating the installation files.
- To activate the Big Data Protector parcel, beside the PTY_BDP parcel, click Activate.
A prompt to confirm the activation of the parcel appears. - To activate the Big Data Protector parcel, click OK.
Cloudera Manager activates the Big Data Protector parcel on all the nodes in the cluster. - To activate the Certificates parcel, beside the PTY_CERT parcel, click Activate.
A prompt to confirm the activation of the parcel appears. - To activate the Certificates parcel, click OK.
Cloudera Manager activates the Certificates parcel on all the nodes in the cluster. - To activate the Log Forwarder configuration parcel, beside the PTY_LOGFORWARDER_CONF parcel, click Activate.
A prompt to confirm the activation of the parcel appears. - To activate the PTY_LOGFORWARDER_CONF parcel, click OK.
After the Protegrity parcels are activated on the nodes, their status on the Parcels page is updated to Distributed, Activated. The Deactivate button appears. - Restart the Cloudera Management Service to re-deploy the service configuration for the stale configurations.
Note: After activating the PTY_BDP parcel, the CDP services will change to Stale configuration state and will require a restart. However, it is recommended to defer the restart of the services until you set all the required configurations for the Big Data Protector.
For more information about setting the configuration, refer to Setting the Big Data Protector Configuration.
3.1.4 - Installing the Big Data Protector
To use the Big Data Protector, start the Big Data Protector PEP service on all the nodes in the cluster.
Before starting the Big Data Protector PEP service, ensure the following Big Data Protector-related parcels are in the Activated state:
- Big Data Protector parcel: PTY_BDP
- Certificates parcel: PTY_CERT
- Log Forwarder configuration parcel: PTY_LOGFORWARDER_CONF
To start the Big Data Protector PEP Service on the Nodes:
Log in to the Cloudera Manager web interface.
Beside the cluster name, click the kebab menu icon.
The cluster drop-down list appears.Select Add Service.
The cluster services wizard page appears.From the Service Type list, select BDP Service.
After selecting the service, Cloudera enables the Continue button.Click Continue.
The Assign Roles page appears.For each of the roles, click the highlighted text box. The list of nodes in the cluster appear.
Select the required nodes in the list where you want to install the service.
Note: For more information about installing the
BDP Serviceservice, refer https://my.protegrity.com/knowledge/ka0Ul0000000KYDIA2/. Cloudera enables the OK button. Note: The PTY RPAgent, PTY Log Forwarder, and the Gateway roles are installed on the selected node.Click OK.
The Assign Roles page appears with the nodes in the cluster, which are selected for installing the service.Click Continue.
The Review Changes page appears.Depending on the Audit Store type, select any one of the following options:
Option Description Protegrity Audit Store To use the default setting select the Protegrity Audit Store option. If you select Protegrity Audit Store, then the default Log Forwarder configuration files are used and Log Forwarder will forward the logs to the Protegrity Audit Store. External Audit Store Enter the comma-separated IP/ports using the accurate syntax in the External Audit Store box. If you select External Audit Store, then enter NA in the Protegrity Audit Store List of Hostnames/IP Address and/or Ports box. Ensure that the PTY_LOGFORWARDER_CONF parcel is distributed and activated. If you select External Audit Store, then the default Log Forwarder configuration files used for Protegrity Audit Store (out.conf and upstream.cfg in the /opt/cloudera/parcels/PTY_BDP/logforwarder/data/config.d/directory) are renamed (out.conf.bkp and upstream.cfg.bkp) so that they will not be used by the Log Forwarder. Additionally, the custom Log Forwarder configuration files for the external Audit Store are copied to the/opt/cloudera/parcels/PTY_BDP/logforwarder/data/config.d/directory.Protegrity Audit Store + External Audit Store To use a combination of the default setting with an external Audit Store, select Protegrity Audit Store + External Audit Store. If you select Protegrity Audit Store + External Audit Store, then the default Log Forwarder configuration files used for the Protegrity Audit Store (out.conf and upstream.cfg in the /opt/cloudera/parcels/PTY_BDP/logforwarder/data/config.d/directory) are not renamed. However, the custom Log Forwarder configuration files for the external audit store are copied to the/opt/cloudera/parcels/PTY_BDP/logforwarder/data/config.d/directory.In the Protegrity Audit Store List of Hostnames/IP Address and/or Ports box, enter the IP address of the Protegrity Audit Store appliance(s) (can be ESA) in the suggested syntax.
In the RPA Sync Hostname/IP Address box, enter the IP address of the ESA/PPC, in the suggested syntax.
Cloudera Manager enables the Continue button.Click Continue.
The Summary page appears.Click Finish.
The Cloudera Manager Home page appears and the PTY_BDP service is added on all the nodes in the cluster.Note: In the Cloudera Manager native installer, there is a caveat in the BDP Service service. This causes the PTY Log Forwarder and the RPAgent roles to start at the same time on a cluster node. Therefore, some of the initial RPAgent application logs will not be sent to the Log Forwarder. This will result in the logs not being forwarded to the Audit Store. After the Log Forwarder starts up, it will start forwarding the application logs. By default, the BDP Service service is in the stopped state.
To start the BDP Service service, besides BDP Service, click the kebab menu icon.
The BDP Service Actions sub-menu appears.From the sub-menu, select Start.
The prompt to confirm the action appears.Click Start.
Cloudera Manager starts theBDP Serviceservice on all the nodes in the cluster.Click Close.
The Cloudera Manager Home page appears.Click BDP Service.
The BDP Service page appears.To generate the
config.inifile on the nodes where you have installed the Gateway Role, select Actions » Deploy Client Configuration. The prompt to confirm the action appears.Click Deploy Client Configuration.
Cloudera Manager generates theconfig.inifile to all the nodes where the Gateway role is installed.
3.1.5 - Configuring the Big Data Protector
3.1.5.1 - Registering the UDFs using Helper scripts
The Big Data Protector build provides helper scripts to register and drop the user-defined functions for the following components:
- Hive
- Spark
- Impala
3.1.5.1.1 - Registering and Dropping the Hive UDFs
You can register the Hive protector UDFs in two ways:
- Permanent user-defined functions
- Temporary user-defined functions
Registering the Permanent Hive user-defined functions
Log in to the master node with a user account having permissions to create and drop UDFs.
To navigate to the directory that contains the helper script, run the following command:
cd /opt/cloudera/parcels/PTY_BDP/pephive/scriptsTo create the UDFs using the helper script, run the following command:
0: jdbc:hive2://master.localdomain.com:2181,n> source create_perm_hive_udfs.hql;Execute the command in beeline after establishing a connection.
Press ENTER.
The script creates all the permanent user-defined functions for Hive.INFO : Compiling command(queryId=hive_20240903111742_5f440820-56b8-4937-a368-93242e02f75e): CREATE FUNCTION ptyGetVersion AS 'com.protegrity.hive.udf.ptyGetVersion' WARN : permanent functions created without USING clause will not be replicated. INFO : Semantic Analysis Completed (retrial = false) INFO : Created Hive schema: Schema(fieldSchemas:null, properties:null) INFO : Completed compiling command(queryId=hive_20240903111742_5f440820-56b8-4937-a368-93242e02f75e); Time taken: 0.044 seconds INFO : Executing command(queryId=hive_20240903111742_5f440820-56b8-4937-a368-93242e02f75e): CREATE FUNCTION ptyGetVersion AS 'com.protegrity.hive.udf.ptyGetVersion' INFO : Starting task [Stage-0:DDL] in serial mode INFO : Completed executing command(queryId=hive_20240903111742_5f440820-56b8-4937-a368-93242e02f75e); Time taken: 0.044 seconds INFO : OK No rows affected (0.109 seconds) INFO : Compiling command(queryId=hive_20240903111742_f164d63c-af8d-4b76-bae1-d0d4607b79df): CREATE FUNCTION ptyGetVersionExtended AS 'com.protegrity.hive.udf.ptyGetVersionExtended' WARN : permanent functions created without USING clause will not be replicated. INFO : Semantic Analysis Completed (retrial = false) INFO : Created Hive schema: Schema(fieldSchemas:null, properties:null) INFO : Completed compiling command(queryId=hive_20240903111742_f164d63c-af8d-4b76-bae1-d0d4607b79df); Time taken: 0.021 seconds INFO : Executing command(queryId=hive_20240903111742_f164d63c-af8d-4b76-bae1-d0d4607b79df): CREATE FUNCTION ptyGetVersionExtended AS 'com.protegrity.hive.udf.ptyGetVersionExtended' INFO : Starting task [Stage-0:DDL] in serial mode INFO : Completed executing command(queryId=hive_20240903111742_f164d63c-af8d-4b76-bae1-d0d4607b79df); Time taken: 0.009 seconds INFO : OK No rows affected (0.048 seconds) INFO : Compiling command(queryId=hive_20240903111742_1c22cc0c-fa1d-4e6c-abd2-00e5859cfea5): CREATE FUNCTION ptyWhoAmI AS 'com.protegrity.hive.udf.ptyWhoAmI' WARN : permanent functions created without USING clause will not be replicated. INFO : Semantic Analysis Completed (retrial = false) INFO : Created Hive schema: Schema(fieldSchemas:null, properties:null) INFO : Completed compiling command(queryId=hive_20240903111742_1c22cc0c-fa1d-4e6c-abd2-00e5859cfea5); Time taken: 0.012 seconds INFO : Executing command(queryId=hive_20240903111742_1c22cc0c-fa1d-4e6c-abd2-00e5859cfea5): CREATE FUNCTION ptyWhoAmI AS 'com.protegrity.hive.udf.ptyWhoAmI' INFO : Starting task [Stage-0:DDL] in serial mode INFO : Completed executing command(queryId=hive_20240903111742_1c22cc0c-fa1d-4e6c-abd2-00e5859cfea5); Time taken: 0.015 seconds INFO : OK No rows affected (0.042 seconds) INFO : Compiling command(queryId=hive_20240903111742_084d1053-3fdc-41f0-8372-542439becfea): CREATE FUNCTION ptyProtectStr AS 'com.protegrity.hive.udf.ptyProtectStr' WARN : permanent functions created without USING clause will not be replicated. INFO : Semantic Analysis Completed (retrial = false) INFO : Created Hive schema: Schema(fieldSchemas:null, properties:null) INFO : Completed compiling command(queryId=hive_20240903111742_084d1053-3fdc-41f0-8372-542439becfea); Time taken: 0.012 seconds INFO : Executing command(queryId=hive_20240903111742_084d1053-3fdc-41f0-8372-542439becfea): CREATE FUNCTION ptyProtectStr AS 'com.protegrity.hive.udf.ptyProtectStr' INFO : Starting task [Stage-0:DDL] in serial mode INFO : Completed executing command(queryId=hive_20240903111742_084d1053-3fdc-41f0-8372-542439becfea); Time taken: 0.013 seconds INFO : OK No rows affected (0.048 seconds) INFO : Compiling command(queryId=hive_20240903111743_86ca369f-a9f3-4573-b974-35f5937d3448): CREATE FUNCTION ptyUnprotectStr AS 'com.protegrity.hive.udf.ptyUnprotectStr' WARN : permanent functions created without USING clause will not be replicated. INFO : Semantic Analysis Completed (retrial = false) INFO : Created Hive schema: Schema(fieldSchemas:null, properties:null) INFO : Completed compiling command(queryId=hive_20240903111743_86ca369f-a9f3-4573-b974-35f5937d3448); Time taken: 0.016 seconds INFO : Executing command(queryId=hive_20240903111743_86ca369f-a9f3-4573-b974-35f5937d3448): CREATE FUNCTION ptyUnprotectStr AS 'com.protegrity.hive.udf.ptyUnprotectStr' INFO : Starting task [Stage-0:DDL] in serial mode INFO : Completed executing command(queryId=hive_20240903111743_86ca369f-a9f3-4573-b974-35f5937d3448); Time taken: 0.014 seconds INFO : OK No rows affected (0.044 seconds) INFO : Compiling command(queryId=hive_20240903111743_12a5a1c4-5c36-449c-963c-0ffffa42a243): CREATE FUNCTION ptyReprotect AS 'com.protegrity.hive.udf.ptyReprotect' WARN : permanent functions created without USING clause will not be replicated. INFO : Semantic Analysis Completed (retrial = false) INFO : Created Hive schema: Schema(fieldSchemas:null, properties:null) INFO : Completed compiling command(queryId=hive_20240903111743_12a5a1c4-5c36-449c-963c-0ffffa42a243); Time taken: 0.026 seconds INFO : Executing command(queryId=hive_20240903111743_12a5a1c4-5c36-449c-963c-0ffffa42a243): CREATE FUNCTION ptyReprotect AS 'com.protegrity.hive.udf.ptyReprotect' INFO : Starting task [Stage-0:DDL] in serial mode INFO : Completed executing command(queryId=hive_20240903111743_12a5a1c4-5c36-449c-963c-0ffffa42a243); Time taken: 0.015 seconds INFO : OK No rows affected (0.061 seconds) INFO : Compiling command(queryId=hive_20240903111743_cc835a71-ba14-450b-8f90-a4e2ede83630): CREATE FUNCTION ptyProtectUnicode AS 'com.protegrity.hive.udf.ptyProtectUnicode' WARN : permanent functions created without USING clause will not be replicated. INFO : Semantic Analysis Completed (retrial = false) INFO : Created Hive schema: Schema(fieldSchemas:null, properties:null) INFO : Completed compiling command(queryId=hive_20240903111743_cc835a71-ba14-450b-8f90-a4e2ede83630); Time taken: 0.023 seconds INFO : Executing command(queryId=hive_20240903111743_cc835a71-ba14-450b-8f90-a4e2ede83630): CREATE FUNCTION ptyProtectUnicode AS 'com.protegrity.hive.udf.ptyProtectUnicode' INFO : Starting task [Stage-0:DDL] in serial mode INFO : Completed executing command(queryId=hive_20240903111743_cc835a71-ba14-450b-8f90-a4e2ede83630); Time taken: 0.016 seconds INFO : OK No rows affected (0.062 seconds) INFO : Compiling command(queryId=hive_20240903111743_1844eb3d-8e5f-4df4-99d0-62b5fa5c42e3): CREATE FUNCTION ptyUnprotectUnicode AS 'com.protegrity.hive.udf.ptyUnprotectUnicode' WARN : permanent functions created without USING clause will not be replicated. INFO : Semantic Analysis Completed (retrial = false) INFO : Created Hive schema: Schema(fieldSchemas:null, properties:null) INFO : Completed compiling command(queryId=hive_20240903111743_1844eb3d-8e5f-4df4-99d0-62b5fa5c42e3); Time taken: 0.016 seconds INFO : Executing command(queryId=hive_20240903111743_1844eb3d-8e5f-4df4-99d0-62b5fa5c42e3): CREATE FUNCTION ptyUnprotectUnicode AS 'com.protegrity.hive.udf.ptyUnprotectUnicode' INFO : Starting task [Stage-0:DDL] in serial mode INFO : Completed executing command(queryId=hive_20240903111743_1844eb3d-8e5f-4df4-99d0-62b5fa5c42e3); Time taken: 0.017 seconds INFO : OK No rows affected (0.056 seconds) INFO : Compiling command(queryId=hive_20240903111743_4e5e4b46-e506-4a95-a70c-34ca26597ec3): CREATE FUNCTION ptyReprotectUnicode AS 'com.protegrity.hive.udf.ptyReprotectUnicode' WARN : permanent functions created without USING clause will not be replicated. INFO : Semantic Analysis Completed (retrial = false) INFO : Created Hive schema: Schema(fieldSchemas:null, properties:null) INFO : Completed compiling command(queryId=hive_20240903111743_4e5e4b46-e506-4a95-a70c-34ca26597ec3); Time taken: 0.016 seconds INFO : Executing command(queryId=hive_20240903111743_4e5e4b46-e506-4a95-a70c-34ca26597ec3): CREATE FUNCTION ptyReprotectUnicode AS 'com.protegrity.hive.udf.ptyReprotectUnicode' INFO : Starting task [Stage-0:DDL] in serial mode INFO : Completed executing command(queryId=hive_20240903111743_4e5e4b46-e506-4a95-a70c-34ca26597ec3); Time taken: 0.013 seconds INFO : OK No rows affected (0.053 seconds) INFO : Compiling command(queryId=hive_20240903111743_7fea3ced-35ae-444b-b211-0746ebbc0efc): CREATE FUNCTION ptyProtectShort AS 'com.protegrity.hive.udf.ptyProtectShort' WARN : permanent functions created without USING clause will not be replicated. INFO : Semantic Analysis Completed (retrial = false) INFO : Created Hive schema: Schema(fieldSchemas:null, properties:null) INFO : Completed compiling command(queryId=hive_20240903111743_7fea3ced-35ae-444b-b211-0746ebbc0efc); Time taken: 0.015 seconds INFO : Executing command(queryId=hive_20240903111743_7fea3ced-35ae-444b-b211-0746ebbc0efc): CREATE FUNCTION ptyProtectShort AS 'com.protegrity.hive.udf.ptyProtectShort' INFO : Starting task [Stage-0:DDL] in serial mode INFO : Completed executing command(queryId=hive_20240903111743_7fea3ced-35ae-444b-b211-0746ebbc0efc); Time taken: 0.013 seconds INFO : OK No rows affected (0.06 seconds) INFO : Compiling command(queryId=hive_20240903111743_238059b4-d9e2-49c9-be17-3a281634b16c): CREATE FUNCTION ptyUnprotectShort AS 'com.protegrity.hive.udf.ptyUnprotectShort' WARN : permanent functions created without USING clause will not be replicated. INFO : Semantic Analysis Completed (retrial = false) INFO : Created Hive schema: Schema(fieldSchemas:null, properties:null) INFO : Completed compiling command(queryId=hive_20240903111743_238059b4-d9e2-49c9-be17-3a281634b16c); Time taken: 0.023 seconds INFO : Executing command(queryId=hive_20240903111743_238059b4-d9e2-49c9-be17-3a281634b16c): CREATE FUNCTION ptyUnprotectShort AS 'com.protegrity.hive.udf.ptyUnprotectShort' INFO : Starting task [Stage-0:DDL] in serial mode INFO : Completed executing command(queryId=hive_20240903111743_238059b4-d9e2-49c9-be17-3a281634b16c); Time taken: 0.018 seconds INFO : OK No rows affected (0.062 seconds) INFO : Compiling command(queryId=hive_20240903111743_f0702c03-03f6-4120-8a1d-d16ea0477e9d): CREATE FUNCTION ptyProtectInt AS 'com.protegrity.hive.udf.ptyProtectInt' WARN : permanent functions created without USING clause will not be replicated. INFO : Semantic Analysis Completed (retrial = false) INFO : Created Hive schema: Schema(fieldSchemas:null, properties:null) INFO : Completed compiling command(queryId=hive_20240903111743_f0702c03-03f6-4120-8a1d-d16ea0477e9d); Time taken: 0.02 seconds INFO : Executing command(queryId=hive_20240903111743_f0702c03-03f6-4120-8a1d-d16ea0477e9d): CREATE FUNCTION ptyProtectInt AS 'com.protegrity.hive.udf.ptyProtectInt' INFO : Starting task [Stage-0:DDL] in serial mode INFO : Completed executing command(queryId=hive_20240903111743_f0702c03-03f6-4120-8a1d-d16ea0477e9d); Time taken: 0.014 seconds INFO : OK No rows affected (0.05 seconds) INFO : Compiling command(queryId=hive_20240903111743_ae7f1dc6-6397-47c6-b917-722d17d9f87f): CREATE FUNCTION ptyUnprotectInt AS 'com.protegrity.hive.udf.ptyUnprotectInt' WARN : permanent functions created without USING clause will not be replicated. INFO : Semantic Analysis Completed (retrial = false) INFO : Created Hive schema: Schema(fieldSchemas:null, properties:null) INFO : Completed compiling command(queryId=hive_20240903111743_ae7f1dc6-6397-47c6-b917-722d17d9f87f); Time taken: 0.013 seconds INFO : Executing command(queryId=hive_20240903111743_ae7f1dc6-6397-47c6-b917-722d17d9f87f): CREATE FUNCTION ptyUnprotectInt AS 'com.protegrity.hive.udf.ptyUnprotectInt' INFO : Starting task [Stage-0:DDL] in serial mode INFO : Completed executing command(queryId=hive_20240903111743_ae7f1dc6-6397-47c6-b917-722d17d9f87f); Time taken: 0.014 seconds INFO : OK No rows affected (0.058 seconds) INFO : Compiling command(queryId=hive_20240903111743_2810a4eb-ccba-466f-bb65-1e646392773f): CREATE FUNCTION ptyProtectBigInt as 'com.protegrity.hive.udf.ptyProtectBigInt' WARN : permanent functions created without USING clause will not be replicated. INFO : Semantic Analysis Completed (retrial = false) INFO : Created Hive schema: Schema(fieldSchemas:null, properties:null) INFO : Completed compiling command(queryId=hive_20240903111743_2810a4eb-ccba-466f-bb65-1e646392773f); Time taken: 0.014 seconds INFO : Executing command(queryId=hive_20240903111743_2810a4eb-ccba-466f-bb65-1e646392773f): CREATE FUNCTION ptyProtectBigInt as 'com.protegrity.hive.udf.ptyProtectBigInt' INFO : Starting task [Stage-0:DDL] in serial mode INFO : Completed executing command(queryId=hive_20240903111743_2810a4eb-ccba-466f-bb65-1e646392773f); Time taken: 0.012 seconds INFO : OK No rows affected (0.049 seconds) INFO : Compiling command(queryId=hive_20240903111743_f5d8dc7e-e103-4f5c-a5ef-3eaf113ac8ee): CREATE FUNCTION ptyUnprotectBigInt as 'com.protegrity.hive.udf.ptyUnprotectBigInt' WARN : permanent functions created without USING clause will not be replicated. INFO : Semantic Analysis Completed (retrial = false) INFO : Created Hive schema: Schema(fieldSchemas:null, properties:null) INFO : Completed compiling command(queryId=hive_20240903111743_f5d8dc7e-e103-4f5c-a5ef-3eaf113ac8ee); Time taken: 0.014 seconds INFO : Executing command(queryId=hive_20240903111743_f5d8dc7e-e103-4f5c-a5ef-3eaf113ac8ee): CREATE FUNCTION ptyUnprotectBigInt as 'com.protegrity.hive.udf.ptyUnprotectBigInt' INFO : Starting task [Stage-0:DDL] in serial mode INFO : Completed executing command(queryId=hive_20240903111743_f5d8dc7e-e103-4f5c-a5ef-3eaf113ac8ee); Time taken: 0.023 seconds INFO : OK No rows affected (0.055 seconds) INFO : Compiling command(queryId=hive_20240903111743_95c6b6f2-f57a-4d9f-8a46-5b1dec8f17b1): CREATE FUNCTION ptyProtectFloat as 'com.protegrity.hive.udf.ptyProtectFloat' WARN : permanent functions created without USING clause will not be replicated. INFO : Semantic Analysis Completed (retrial = false) INFO : Created Hive schema: Schema(fieldSchemas:null, properties:null) INFO : Completed compiling command(queryId=hive_20240903111743_95c6b6f2-f57a-4d9f-8a46-5b1dec8f17b1); Time taken: 0.013 seconds INFO : Executing command(queryId=hive_20240903111743_95c6b6f2-f57a-4d9f-8a46-5b1dec8f17b1): CREATE FUNCTION ptyProtectFloat as 'com.protegrity.hive.udf.ptyProtectFloat' INFO : Starting task [Stage-0:DDL] in serial mode INFO : Completed executing command(queryId=hive_20240903111743_95c6b6f2-f57a-4d9f-8a46-5b1dec8f17b1); Time taken: 0.015 seconds INFO : OK No rows affected (0.043 seconds) INFO : Compiling command(queryId=hive_20240903111743_ea31fbed-1433-4cb9-b9d1-6005eef860a3): CREATE FUNCTION ptyUnprotectFloat as 'com.protegrity.hive.udf.ptyProtectFloat' WARN : permanent functions created without USING clause will not be replicated. INFO : Semantic Analysis Completed (retrial = false) INFO : Created Hive schema: Schema(fieldSchemas:null, properties:null) INFO : Completed compiling command(queryId=hive_20240903111743_ea31fbed-1433-4cb9-b9d1-6005eef860a3); Time taken: 0.014 seconds INFO : Executing command(queryId=hive_20240903111743_ea31fbed-1433-4cb9-b9d1-6005eef860a3): CREATE FUNCTION ptyUnprotectFloat as 'com.protegrity.hive.udf.ptyProtectFloat' INFO : Starting task [Stage-0:DDL] in serial mode INFO : Completed executing command(queryId=hive_20240903111743_ea31fbed-1433-4cb9-b9d1-6005eef860a3); Time taken: 0.013 seconds INFO : OK No rows affected (0.062 seconds) INFO : Compiling command(queryId=hive_20240903111743_2d353253-fa96-42ac-963e-75e7b7e773f4): CREATE FUNCTION ptyProtectDouble as 'com.protegrity.hive.udf.ptyProtectDouble' WARN : permanent functions created without USING clause will not be replicated. INFO : Semantic Analysis Completed (retrial = false) INFO : Created Hive schema: Schema(fieldSchemas:null, properties:null) INFO : Completed compiling command(queryId=hive_20240903111743_2d353253-fa96-42ac-963e-75e7b7e773f4); Time taken: 0.026 seconds INFO : Executing command(queryId=hive_20240903111743_2d353253-fa96-42ac-963e-75e7b7e773f4): CREATE FUNCTION ptyProtectDouble as 'com.protegrity.hive.udf.ptyProtectDouble' INFO : Starting task [Stage-0:DDL] in serial mode INFO : Completed executing command(queryId=hive_20240903111743_2d353253-fa96-42ac-963e-75e7b7e773f4); Time taken: 0.014 seconds INFO : OK No rows affected (0.066 seconds) INFO : Compiling command(queryId=hive_20240903111743_feeafa3b-4fb0-438b-b820-54abb3e207b5): CREATE FUNCTION ptyUnprotectDouble as 'com.protegrity.hive.udf.ptyUnprotectDouble' WARN : permanent functions created without USING clause will not be replicated. INFO : Semantic Analysis Completed (retrial = false) INFO : Created Hive schema: Schema(fieldSchemas:null, properties:null) INFO : Completed compiling command(queryId=hive_20240903111743_feeafa3b-4fb0-438b-b820-54abb3e207b5); Time taken: 0.013 seconds INFO : Executing command(queryId=hive_20240903111743_feeafa3b-4fb0-438b-b820-54abb3e207b5): CREATE FUNCTION ptyUnprotectDouble as 'com.protegrity.hive.udf.ptyUnprotectDouble' INFO : Starting task [Stage-0:DDL] in serial mode INFO : Completed executing command(queryId=hive_20240903111743_feeafa3b-4fb0-438b-b820-54abb3e207b5); Time taken: 0.012 seconds INFO : OK No rows affected (0.047 seconds) INFO : Compiling command(queryId=hive_20240903111743_1fa14590-0ce0-4511-9d4c-8a3fd8d7ec89): CREATE FUNCTION ptyProtectDec as 'com.protegrity.hive.udf.ptyProtectDec' WARN : permanent functions created without USING clause will not be replicated. INFO : Semantic Analysis Completed (retrial = false) INFO : Created Hive schema: Schema(fieldSchemas:null, properties:null) INFO : Completed compiling command(queryId=hive_20240903111743_1fa14590-0ce0-4511-9d4c-8a3fd8d7ec89); Time taken: 0.011 seconds INFO : Executing command(queryId=hive_20240903111743_1fa14590-0ce0-4511-9d4c-8a3fd8d7ec89): CREATE FUNCTION ptyProtectDec as 'com.protegrity.hive.udf.ptyProtectDec' INFO : Starting task [Stage-0:DDL] in serial mode INFO : Completed executing command(queryId=hive_20240903111743_1fa14590-0ce0-4511-9d4c-8a3fd8d7ec89); Time taken: 0.019 seconds INFO : OK No rows affected (0.052 seconds) INFO : Compiling command(queryId=hive_20240903111743_e510b9c4-95da-4d8e-94a7-6585b653a1af): CREATE FUNCTION ptyUnprotectDec as 'com.protegrity.hive.udf.ptyUnprotectDec' WARN : permanent functions created without USING clause will not be replicated. INFO : Semantic Analysis Completed (retrial = false) INFO : Created Hive schema: Schema(fieldSchemas:null, properties:null) INFO : Completed compiling command(queryId=hive_20240903111743_e510b9c4-95da-4d8e-94a7-6585b653a1af); Time taken: 0.013 seconds INFO : Executing command(queryId=hive_20240903111743_e510b9c4-95da-4d8e-94a7-6585b653a1af): CREATE FUNCTION ptyUnprotectDec as 'com.protegrity.hive.udf.ptyUnprotectDec' INFO : Starting task [Stage-0:DDL] in serial mode INFO : Completed executing command(queryId=hive_20240903111743_e510b9c4-95da-4d8e-94a7-6585b653a1af); Time taken: 0.017 seconds INFO : OK No rows affected (0.048 seconds) INFO : Compiling command(queryId=hive_20240903111744_e259b2c3-79fb-4074-8af5-28ea84ade779): CREATE FUNCTION ptyProtectHiveDecimal as 'com.protegrity.hive.udf.ptyProtectHiveDecimal' WARN : permanent functions created without USING clause will not be replicated. INFO : Semantic Analysis Completed (retrial = false) INFO : Created Hive schema: Schema(fieldSchemas:null, properties:null) INFO : Completed compiling command(queryId=hive_20240903111744_e259b2c3-79fb-4074-8af5-28ea84ade779); Time taken: 0.019 seconds INFO : Executing command(queryId=hive_20240903111744_e259b2c3-79fb-4074-8af5-28ea84ade779): CREATE FUNCTION ptyProtectHiveDecimal as 'com.protegrity.hive.udf.ptyProtectHiveDecimal' INFO : Starting task [Stage-0:DDL] in serial mode INFO : Completed executing command(queryId=hive_20240903111744_e259b2c3-79fb-4074-8af5-28ea84ade779); Time taken: 0.01 seconds INFO : OK No rows affected (0.048 seconds) INFO : Compiling command(queryId=hive_20240903111744_67a37abb-7f8c-4a95-917e-6020c60640ab): CREATE FUNCTION ptyUnprotectHiveDecimal as 'com.protegrity.hive.udf.ptyUnprotectHiveDecimal' WARN : permanent functions created without USING clause will not be replicated. INFO : Semantic Analysis Completed (retrial = false) INFO : Created Hive schema: Schema(fieldSchemas:null, properties:null) INFO : Completed compiling command(queryId=hive_20240903111744_67a37abb-7f8c-4a95-917e-6020c60640ab); Time taken: 0.014 seconds INFO : Executing command(queryId=hive_20240903111744_67a37abb-7f8c-4a95-917e-6020c60640ab): CREATE FUNCTION ptyUnprotectHiveDecimal as 'com.protegrity.hive.udf.ptyUnprotectHiveDecimal' INFO : Starting task [Stage-0:DDL] in serial mode INFO : Completed executing command(queryId=hive_20240903111744_67a37abb-7f8c-4a95-917e-6020c60640ab); Time taken: 0.013 seconds INFO : OK No rows affected (0.052 seconds) INFO : Compiling command(queryId=hive_20240903111744_c58bc4ac-052a-4a20-9f60-0d87967c8bf5): CREATE FUNCTION ptyProtectDate AS 'com.protegrity.hive.udf.ptyProtectDate' WARN : permanent functions created without USING clause will not be replicated. INFO : Semantic Analysis Completed (retrial = false) INFO : Created Hive schema: Schema(fieldSchemas:null, properties:null) INFO : Completed compiling command(queryId=hive_20240903111744_c58bc4ac-052a-4a20-9f60-0d87967c8bf5); Time taken: 0.018 seconds INFO : Executing command(queryId=hive_20240903111744_c58bc4ac-052a-4a20-9f60-0d87967c8bf5): CREATE FUNCTION ptyProtectDate AS 'com.protegrity.hive.udf.ptyProtectDate' INFO : Starting task [Stage-0:DDL] in serial mode INFO : Completed executing command(queryId=hive_20240903111744_c58bc4ac-052a-4a20-9f60-0d87967c8bf5); Time taken: 0.017 seconds INFO : OK No rows affected (0.059 seconds) INFO : Compiling command(queryId=hive_20240903111744_bf1c6978-ffd3-4195-ac23-2dca14b25da1): CREATE FUNCTION ptyUnprotectDate AS 'com.protegrity.hive.udf.ptyUnprotectDate' WARN : permanent functions created without USING clause will not be replicated. INFO : Semantic Analysis Completed (retrial = false) INFO : Created Hive schema: Schema(fieldSchemas:null, properties:null) INFO : Completed compiling command(queryId=hive_20240903111744_bf1c6978-ffd3-4195-ac23-2dca14b25da1); Time taken: 0.015 seconds INFO : Executing command(queryId=hive_20240903111744_bf1c6978-ffd3-4195-ac23-2dca14b25da1): CREATE FUNCTION ptyUnprotectDate AS 'com.protegrity.hive.udf.ptyUnprotectDate' INFO : Starting task [Stage-0:DDL] in serial mode INFO : Completed executing command(queryId=hive_20240903111744_bf1c6978-ffd3-4195-ac23-2dca14b25da1); Time taken: 0.01 seconds INFO : OK No rows affected (0.046 seconds) INFO : Compiling command(queryId=hive_20240903111744_6e6245b2-78b3-45d5-817e-9d9f0ba63c91): CREATE FUNCTION ptyProtectDateTime AS 'com.protegrity.hive.udf.ptyProtectDateTime' WARN : permanent functions created without USING clause will not be replicated. INFO : Semantic Analysis Completed (retrial = false) INFO : Created Hive schema: Schema(fieldSchemas:null, properties:null) INFO : Completed compiling command(queryId=hive_20240903111744_6e6245b2-78b3-45d5-817e-9d9f0ba63c91); Time taken: 0.018 seconds INFO : Executing command(queryId=hive_20240903111744_6e6245b2-78b3-45d5-817e-9d9f0ba63c91): CREATE FUNCTION ptyProtectDateTime AS 'com.protegrity.hive.udf.ptyProtectDateTime' INFO : Starting task [Stage-0:DDL] in serial mode INFO : Completed executing command(queryId=hive_20240903111744_6e6245b2-78b3-45d5-817e-9d9f0ba63c91); Time taken: 0.029 seconds INFO : OK No rows affected (0.07 seconds) INFO : Compiling command(queryId=hive_20240903111744_34ca86c7-e01f-4026-9ed3-7f1f18603f3f): CREATE FUNCTION ptyUnprotectDateTime AS 'com.protegrity.hive.udf.ptyUnprotectDateTime' WARN : permanent functions created without USING clause will not be replicated. INFO : Semantic Analysis Completed (retrial = false) INFO : Created Hive schema: Schema(fieldSchemas:null, properties:null) INFO : Completed compiling command(queryId=hive_20240903111744_34ca86c7-e01f-4026-9ed3-7f1f18603f3f); Time taken: 0.018 seconds INFO : Executing command(queryId=hive_20240903111744_34ca86c7-e01f-4026-9ed3-7f1f18603f3f): CREATE FUNCTION ptyUnprotectDateTime AS 'com.protegrity.hive.udf.ptyUnprotectDateTime' INFO : Starting task [Stage-0:DDL] in serial mode INFO : Completed executing command(queryId=hive_20240903111744_34ca86c7-e01f-4026-9ed3-7f1f18603f3f); Time taken: 0.015 seconds INFO : OK No rows affected (0.06 seconds) INFO : Compiling command(queryId=hive_20240903111744_9a8982fa-670c-4dce-9174-83dc33cd03b9): CREATE FUNCTION ptyProtectChar AS 'com.protegrity.hive.udf.ptyProtectChar' WARN : permanent functions created without USING clause will not be replicated. INFO : Semantic Analysis Completed (retrial = false) INFO : Created Hive schema: Schema(fieldSchemas:null, properties:null) INFO : Completed compiling command(queryId=hive_20240903111744_9a8982fa-670c-4dce-9174-83dc33cd03b9); Time taken: 0.012 seconds INFO : Executing command(queryId=hive_20240903111744_9a8982fa-670c-4dce-9174-83dc33cd03b9): CREATE FUNCTION ptyProtectChar AS 'com.protegrity.hive.udf.ptyProtectChar' INFO : Starting task [Stage-0:DDL] in serial mode INFO : Completed executing command(queryId=hive_20240903111744_9a8982fa-670c-4dce-9174-83dc33cd03b9); Time taken: 0.01 seconds INFO : OK No rows affected (0.046 seconds) INFO : Compiling command(queryId=hive_20240903111744_7eae812d-dbd8-41f6-a23e-cc43a5e0875a): CREATE FUNCTION ptyUnprotectChar AS 'com.protegrity.hive.udf.ptyUnprotectChar' WARN : permanent functions created without USING clause will not be replicated. INFO : Semantic Analysis Completed (retrial = false) INFO : Created Hive schema: Schema(fieldSchemas:null, properties:null) INFO : Completed compiling command(queryId=hive_20240903111744_7eae812d-dbd8-41f6-a23e-cc43a5e0875a); Time taken: 0.019 seconds INFO : Executing command(queryId=hive_20240903111744_7eae812d-dbd8-41f6-a23e-cc43a5e0875a): CREATE FUNCTION ptyUnprotectChar AS 'com.protegrity.hive.udf.ptyUnprotectChar' INFO : Starting task [Stage-0:DDL] in serial mode INFO : Completed executing command(queryId=hive_20240903111744_7eae812d-dbd8-41f6-a23e-cc43a5e0875a); Time taken: 0.015 seconds INFO : OK No rows affected (0.061 seconds) INFO : Compiling command(queryId=hive_20240903111744_f49a9580-4975-4ab3-9785-0b4b2fae414b): CREATE FUNCTION ptyStringEnc as 'com.protegrity.hive.udf.ptyStringEnc' WARN : permanent functions created without USING clause will not be replicated. INFO : Semantic Analysis Completed (retrial = false) INFO : Created Hive schema: Schema(fieldSchemas:null, properties:null) INFO : Completed compiling command(queryId=hive_20240903111744_f49a9580-4975-4ab3-9785-0b4b2fae414b); Time taken: 0.026 seconds INFO : Executing command(queryId=hive_20240903111744_f49a9580-4975-4ab3-9785-0b4b2fae414b): CREATE FUNCTION ptyStringEnc as 'com.protegrity.hive.udf.ptyStringEnc' INFO : Starting task [Stage-0:DDL] in serial mode INFO : Completed executing command(queryId=hive_20240903111744_f49a9580-4975-4ab3-9785-0b4b2fae414b); Time taken: 0.023 seconds INFO : OK No rows affected (0.084 seconds) INFO : Compiling command(queryId=hive_20240903111744_b3d167ac-430f-466a-95cf-05c660131b12): CREATE FUNCTION ptyStringDec as 'com.protegrity.hive.udf.ptyStringDec' WARN : permanent functions created without USING clause will not be replicated. INFO : Semantic Analysis Completed (retrial = false) INFO : Created Hive schema: Schema(fieldSchemas:null, properties:null) INFO : Completed compiling command(queryId=hive_20240903111744_b3d167ac-430f-466a-95cf-05c660131b12); Time taken: 0.022 seconds INFO : Executing command(queryId=hive_20240903111744_b3d167ac-430f-466a-95cf-05c660131b12): CREATE FUNCTION ptyStringDec as 'com.protegrity.hive.udf.ptyStringDec' INFO : Starting task [Stage-0:DDL] in serial mode INFO : Completed executing command(queryId=hive_20240903111744_b3d167ac-430f-466a-95cf-05c660131b12); Time taken: 0.016 seconds INFO : OK No rows affected (0.066 seconds) INFO : Compiling command(queryId=hive_20240903111744_38d564a0-5a3d-4b5d-9159-655bc0fd9006): CREATE FUNCTION ptyStringReEnc as 'com.protegrity.hive.udf.ptyStringReEnc' WARN : permanent functions created without USING clause will not be replicated. INFO : Semantic Analysis Completed (retrial = false) INFO : Created Hive schema: Schema(fieldSchemas:null, properties:null) INFO : Completed compiling command(queryId=hive_20240903111744_38d564a0-5a3d-4b5d-9159-655bc0fd9006); Time taken: 0.02 seconds INFO : Executing command(queryId=hive_20240903111744_38d564a0-5a3d-4b5d-9159-655bc0fd9006): CREATE FUNCTION ptyStringReEnc as 'com.protegrity.hive.udf.ptyStringReEnc' INFO : Starting task [Stage-0:DDL] in serial mode INFO : Completed executing command(queryId=hive_20240903111744_38d564a0-5a3d-4b5d-9159-655bc0fd9006); Time taken: 0.012 seconds INFO : OK No rows affected (0.064 seconds)
Dropping the Permanent Hive user-defined functions
Log in to the master node with a user account having permissions to create and drop UDFs.
To navigate to the directory that contains the helper script, run the following command:
cd /opt/cloudera/parcels/PTY_BDP/pephive/scriptsTo drop the UDFs using the helper script, run the following command:
0: jdbc:hive2://master.localdomain.com:2181,n> source drop_perm_hive_udfs.hql;Execute the command in beeline after establishing a connection.
Press ENTER.
The script drops all the permanent user-defined functions for Hive.INFO : Compiling command(queryId=hive_20240903111328_1f5113fc-9329-4394-b879-4baa86f47bed): DROP FUNCTION IF EXISTS ptyGetVersion INFO : Semantic Analysis Completed (retrial = false) INFO : Created Hive schema: Schema(fieldSchemas:null, properties:null) INFO : Completed compiling command(queryId=hive_20240903111328_1f5113fc-9329-4394-b879-4baa86f47bed); Time taken: 0.045 seconds INFO : Executing command(queryId=hive_20240903111328_1f5113fc-9329-4394-b879-4baa86f47bed): DROP FUNCTION IF EXISTS ptyGetVersion INFO : Starting task [Stage-0:DDL] in serial mode INFO : Completed executing command(queryId=hive_20240903111328_1f5113fc-9329-4394-b879-4baa86f47bed); Time taken: 0.024 seconds INFO : OK No rows affected (0.087 seconds) INFO : Compiling command(queryId=hive_20240903111328_615623de-2081-43d0-ade2-3c91634767ac): DROP FUNCTION IF EXISTS ptyGetVersionExtended INFO : Semantic Analysis Completed (retrial = false) INFO : Created Hive schema: Schema(fieldSchemas:null, properties:null) INFO : Completed compiling command(queryId=hive_20240903111328_615623de-2081-43d0-ade2-3c91634767ac); Time taken: 0.027 seconds INFO : Executing command(queryId=hive_20240903111328_615623de-2081-43d0-ade2-3c91634767ac): DROP FUNCTION IF EXISTS ptyGetVersionExtended INFO : Starting task [Stage-0:DDL] in serial mode INFO : Completed executing command(queryId=hive_20240903111328_615623de-2081-43d0-ade2-3c91634767ac); Time taken: 0.011 seconds INFO : OK No rows affected (0.062 seconds) INFO : Compiling command(queryId=hive_20240903111329_397e9588-371f-439b-83f5-d8694bf4eb05): DROP FUNCTION IF EXISTS ptyWhoAmI INFO : Semantic Analysis Completed (retrial = false) INFO : Created Hive schema: Schema(fieldSchemas:null, properties:null) INFO : Completed compiling command(queryId=hive_20240903111329_397e9588-371f-439b-83f5-d8694bf4eb05); Time taken: 0.018 seconds INFO : Executing command(queryId=hive_20240903111329_397e9588-371f-439b-83f5-d8694bf4eb05): DROP FUNCTION IF EXISTS ptyWhoAmI INFO : Starting task [Stage-0:DDL] in serial mode INFO : Completed executing command(queryId=hive_20240903111329_397e9588-371f-439b-83f5-d8694bf4eb05); Time taken: 0.012 seconds INFO : OK No rows affected (0.056 seconds) INFO : Compiling command(queryId=hive_20240903111329_7d5b0c04-efd8-41ca-90be-c52482f878da): DROP FUNCTION IF EXISTS ptyProtectStr INFO : Semantic Analysis Completed (retrial = false) INFO : Created Hive schema: Schema(fieldSchemas:null, properties:null) INFO : Completed compiling command(queryId=hive_20240903111329_7d5b0c04-efd8-41ca-90be-c52482f878da); Time taken: 0.016 seconds INFO : Executing command(queryId=hive_20240903111329_7d5b0c04-efd8-41ca-90be-c52482f878da): DROP FUNCTION IF EXISTS ptyProtectStr INFO : Starting task [Stage-0:DDL] in serial mode INFO : Completed executing command(queryId=hive_20240903111329_7d5b0c04-efd8-41ca-90be-c52482f878da); Time taken: 0.013 seconds INFO : OK No rows affected (0.045 seconds) INFO : Compiling command(queryId=hive_20240903111329_861d10c5-cb01-48be-a66e-9f69f09922a2): DROP FUNCTION IF EXISTS ptyUnprotectStr INFO : Semantic Analysis Completed (retrial = false) INFO : Created Hive schema: Schema(fieldSchemas:null, properties:null) INFO : Completed compiling command(queryId=hive_20240903111329_861d10c5-cb01-48be-a66e-9f69f09922a2); Time taken: 0.017 seconds INFO : Executing command(queryId=hive_20240903111329_861d10c5-cb01-48be-a66e-9f69f09922a2): DROP FUNCTION IF EXISTS ptyUnprotectStr INFO : Starting task [Stage-0:DDL] in serial mode INFO : Completed executing command(queryId=hive_20240903111329_861d10c5-cb01-48be-a66e-9f69f09922a2); Time taken: 0.017 seconds INFO : OK No rows affected (0.054 seconds) INFO : Compiling command(queryId=hive_20240903111329_5b4be0a4-9010-49f0-8a30-2e8209aeeb56): DROP FUNCTION IF EXISTS ptyReprotect INFO : Semantic Analysis Completed (retrial = false) INFO : Created Hive schema: Schema(fieldSchemas:null, properties:null) INFO : Completed compiling command(queryId=hive_20240903111329_5b4be0a4-9010-49f0-8a30-2e8209aeeb56); Time taken: 0.013 seconds INFO : Executing command(queryId=hive_20240903111329_5b4be0a4-9010-49f0-8a30-2e8209aeeb56): DROP FUNCTION IF EXISTS ptyReprotect INFO : Starting task [Stage-0:DDL] in serial mode INFO : Completed executing command(queryId=hive_20240903111329_5b4be0a4-9010-49f0-8a30-2e8209aeeb56); Time taken: 0.011 seconds INFO : OK No rows affected (0.042 seconds) INFO : Compiling command(queryId=hive_20240903111329_f5b47ddc-a6d1-493c-9450-9cbf144c5100): DROP FUNCTION IF EXISTS ptyProtectUnicode INFO : Semantic Analysis Completed (retrial = false) INFO : Created Hive schema: Schema(fieldSchemas:null, properties:null) INFO : Completed compiling command(queryId=hive_20240903111329_f5b47ddc-a6d1-493c-9450-9cbf144c5100); Time taken: 0.013 seconds INFO : Executing command(queryId=hive_20240903111329_f5b47ddc-a6d1-493c-9450-9cbf144c5100): DROP FUNCTION IF EXISTS ptyProtectUnicode INFO : Starting task [Stage-0:DDL] in serial mode INFO : Completed executing command(queryId=hive_20240903111329_f5b47ddc-a6d1-493c-9450-9cbf144c5100); Time taken: 0.014 seconds INFO : OK No rows affected (0.05 seconds) INFO : Compiling command(queryId=hive_20240903111329_1dab917a-5e1b-4a20-bd41-aa4f13e756e8): DROP FUNCTION IF EXISTS ptyUnprotectUnicode INFO : Semantic Analysis Completed (retrial = false) INFO : Created Hive schema: Schema(fieldSchemas:null, properties:null) INFO : Completed compiling command(queryId=hive_20240903111329_1dab917a-5e1b-4a20-bd41-aa4f13e756e8); Time taken: 0.022 seconds INFO : Executing command(queryId=hive_20240903111329_1dab917a-5e1b-4a20-bd41-aa4f13e756e8): DROP FUNCTION IF EXISTS ptyUnprotectUnicode INFO : Starting task [Stage-0:DDL] in serial mode INFO : Completed executing command(queryId=hive_20240903111329_1dab917a-5e1b-4a20-bd41-aa4f13e756e8); Time taken: 0.014 seconds INFO : OK No rows affected (0.052 seconds) INFO : Compiling command(queryId=hive_20240903111329_e17d65c5-53e1-4dd0-91d9-720e866deb59): DROP FUNCTION IF EXISTS ptyReprotectUnicode INFO : Semantic Analysis Completed (retrial = false) INFO : Created Hive schema: Schema(fieldSchemas:null, properties:null) INFO : Completed compiling command(queryId=hive_20240903111329_e17d65c5-53e1-4dd0-91d9-720e866deb59); Time taken: 0.023 seconds INFO : Executing command(queryId=hive_20240903111329_e17d65c5-53e1-4dd0-91d9-720e866deb59): DROP FUNCTION IF EXISTS ptyReprotectUnicode INFO : Starting task [Stage-0:DDL] in serial mode INFO : Completed executing command(queryId=hive_20240903111329_e17d65c5-53e1-4dd0-91d9-720e866deb59); Time taken: 0.011 seconds INFO : OK No rows affected (0.064 seconds) INFO : Compiling command(queryId=hive_20240903111329_aeb923c8-1302-43b2-a3dc-6f5ad042543b): DROP FUNCTION IF EXISTS ptyProtectShort INFO : Semantic Analysis Completed (retrial = false) INFO : Created Hive schema: Schema(fieldSchemas:null, properties:null) INFO : Completed compiling command(queryId=hive_20240903111329_aeb923c8-1302-43b2-a3dc-6f5ad042543b); Time taken: 0.019 seconds INFO : Executing command(queryId=hive_20240903111329_aeb923c8-1302-43b2-a3dc-6f5ad042543b): DROP FUNCTION IF EXISTS ptyProtectShort INFO : Starting task [Stage-0:DDL] in serial mode INFO : Completed executing command(queryId=hive_20240903111329_aeb923c8-1302-43b2-a3dc-6f5ad042543b); Time taken: 0.016 seconds INFO : OK No rows affected (0.061 seconds) INFO : Compiling command(queryId=hive_20240903111329_d192e194-99fc-4b5c-b92f-2bbcb9c04604): DROP FUNCTION IF EXISTS ptyUnprotectShort INFO : Semantic Analysis Completed (retrial = false) INFO : Created Hive schema: Schema(fieldSchemas:null, properties:null) INFO : Completed compiling command(queryId=hive_20240903111329_d192e194-99fc-4b5c-b92f-2bbcb9c04604); Time taken: 0.021 seconds INFO : Executing command(queryId=hive_20240903111329_d192e194-99fc-4b5c-b92f-2bbcb9c04604): DROP FUNCTION IF EXISTS ptyUnprotectShort INFO : Starting task [Stage-0:DDL] in serial mode INFO : Completed executing command(queryId=hive_20240903111329_d192e194-99fc-4b5c-b92f-2bbcb9c04604); Time taken: 0.013 seconds INFO : OK No rows affected (0.081 seconds) INFO : Compiling command(queryId=hive_20240903111329_a2c3dc7a-7096-43a8-9146-a908bd1a1881): DROP FUNCTION IF EXISTS ptyProtectInt INFO : Semantic Analysis Completed (retrial = false) INFO : Created Hive schema: Schema(fieldSchemas:null, properties:null) INFO : Completed compiling command(queryId=hive_20240903111329_a2c3dc7a-7096-43a8-9146-a908bd1a1881); Time taken: 0.021 seconds INFO : Executing command(queryId=hive_20240903111329_a2c3dc7a-7096-43a8-9146-a908bd1a1881): DROP FUNCTION IF EXISTS ptyProtectInt INFO : Starting task [Stage-0:DDL] in serial mode INFO : Completed executing command(queryId=hive_20240903111329_a2c3dc7a-7096-43a8-9146-a908bd1a1881); Time taken: 0.016 seconds INFO : OK No rows affected (0.062 seconds) INFO : Compiling command(queryId=hive_20240903111329_00b17519-3c00-4345-aa3a-521ce42dbc91): DROP FUNCTION IF EXISTS ptyUnprotectInt INFO : Semantic Analysis Completed (retrial = false) INFO : Created Hive schema: Schema(fieldSchemas:null, properties:null) INFO : Completed compiling command(queryId=hive_20240903111329_00b17519-3c00-4345-aa3a-521ce42dbc91); Time taken: 0.02 seconds INFO : Executing command(queryId=hive_20240903111329_00b17519-3c00-4345-aa3a-521ce42dbc91): DROP FUNCTION IF EXISTS ptyUnprotectInt INFO : Starting task [Stage-0:DDL] in serial mode INFO : Completed executing command(queryId=hive_20240903111329_00b17519-3c00-4345-aa3a-521ce42dbc91); Time taken: 0.01 seconds INFO : OK No rows affected (0.053 seconds) INFO : Compiling command(queryId=hive_20240903111329_81896531-da3a-460e-a592-a8e035f3463f): DROP FUNCTION IF EXISTS ptyProtectBigInt INFO : Semantic Analysis Completed (retrial = false) INFO : Created Hive schema: Schema(fieldSchemas:null, properties:null) INFO : Completed compiling command(queryId=hive_20240903111329_81896531-da3a-460e-a592-a8e035f3463f); Time taken: 0.013 seconds INFO : Executing command(queryId=hive_20240903111329_81896531-da3a-460e-a592-a8e035f3463f): DROP FUNCTION IF EXISTS ptyProtectBigInt INFO : Starting task [Stage-0:DDL] in serial mode INFO : Completed executing command(queryId=hive_20240903111329_81896531-da3a-460e-a592-a8e035f3463f); Time taken: 0.011 seconds INFO : OK No rows affected (0.048 seconds) INFO : Compiling command(queryId=hive_20240903111329_baecd861-5f61-4858-b5ca-9ec68a12068f): DROP FUNCTION IF EXISTS ptyUnprotectBigInt INFO : Semantic Analysis Completed (retrial = false) INFO : Created Hive schema: Schema(fieldSchemas:null, properties:null) INFO : Completed compiling command(queryId=hive_20240903111329_baecd861-5f61-4858-b5ca-9ec68a12068f); Time taken: 0.014 seconds INFO : Executing command(queryId=hive_20240903111329_baecd861-5f61-4858-b5ca-9ec68a12068f): DROP FUNCTION IF EXISTS ptyUnprotectBigInt INFO : Starting task [Stage-0:DDL] in serial mode INFO : Completed executing command(queryId=hive_20240903111329_baecd861-5f61-4858-b5ca-9ec68a12068f); Time taken: 0.012 seconds INFO : OK No rows affected (0.048 seconds) INFO : Compiling command(queryId=hive_20240903111329_40583cce-ac0e-490b-a328-66f2c3065c21): DROP FUNCTION IF EXISTS ptyProtectFloat INFO : Semantic Analysis Completed (retrial = false) INFO : Created Hive schema: Schema(fieldSchemas:null, properties:null) INFO : Completed compiling command(queryId=hive_20240903111329_40583cce-ac0e-490b-a328-66f2c3065c21); Time taken: 0.019 seconds INFO : Executing command(queryId=hive_20240903111329_40583cce-ac0e-490b-a328-66f2c3065c21): DROP FUNCTION IF EXISTS ptyProtectFloat INFO : Starting task [Stage-0:DDL] in serial mode INFO : Completed executing command(queryId=hive_20240903111329_40583cce-ac0e-490b-a328-66f2c3065c21); Time taken: 0.016 seconds INFO : OK No rows affected (0.061 seconds) INFO : Compiling command(queryId=hive_20240903111329_13fb9909-9320-4185-9057-2f1279ac2783): DROP FUNCTION IF EXISTS ptyUnprotectFloat INFO : Semantic Analysis Completed (retrial = false) INFO : Created Hive schema: Schema(fieldSchemas:null, properties:null) INFO : Completed compiling command(queryId=hive_20240903111329_13fb9909-9320-4185-9057-2f1279ac2783); Time taken: 0.017 seconds INFO : Executing command(queryId=hive_20240903111329_13fb9909-9320-4185-9057-2f1279ac2783): DROP FUNCTION IF EXISTS ptyUnprotectFloat INFO : Starting task [Stage-0:DDL] in serial mode INFO : Completed executing command(queryId=hive_20240903111329_13fb9909-9320-4185-9057-2f1279ac2783); Time taken: 0.01 seconds INFO : OK No rows affected (0.051 seconds) INFO : Compiling command(queryId=hive_20240903111329_fbd0cb43-d3fd-4d9f-a449-0aebc3515f9a): DROP FUNCTION IF EXISTS ptyProtectDouble INFO : Semantic Analysis Completed (retrial = false) INFO : Created Hive schema: Schema(fieldSchemas:null, properties:null) INFO : Completed compiling command(queryId=hive_20240903111329_fbd0cb43-d3fd-4d9f-a449-0aebc3515f9a); Time taken: 0.015 seconds INFO : Executing command(queryId=hive_20240903111329_fbd0cb43-d3fd-4d9f-a449-0aebc3515f9a): DROP FUNCTION IF EXISTS ptyProtectDouble INFO : Starting task [Stage-0:DDL] in serial mode INFO : Completed executing command(queryId=hive_20240903111329_fbd0cb43-d3fd-4d9f-a449-0aebc3515f9a); Time taken: 0.012 seconds INFO : OK No rows affected (0.054 seconds) INFO : Compiling command(queryId=hive_20240903111329_ca9962d3-3c30-4428-9246-f4b7e7b9b866): DROP FUNCTION IF EXISTS ptyUnprotectDouble INFO : Semantic Analysis Completed (retrial = false) INFO : Created Hive schema: Schema(fieldSchemas:null, properties:null) INFO : Completed compiling command(queryId=hive_20240903111329_ca9962d3-3c30-4428-9246-f4b7e7b9b866); Time taken: 0.017 seconds INFO : Executing command(queryId=hive_20240903111329_ca9962d3-3c30-4428-9246-f4b7e7b9b866): DROP FUNCTION IF EXISTS ptyUnprotectDouble INFO : Starting task [Stage-0:DDL] in serial mode INFO : Completed executing command(queryId=hive_20240903111329_ca9962d3-3c30-4428-9246-f4b7e7b9b866); Time taken: 0.015 seconds INFO : OK No rows affected (0.054 seconds) INFO : Compiling command(queryId=hive_20240903111330_b83fd6fb-88db-4935-b9eb-684660f7152a): DROP FUNCTION IF EXISTS ptyProtectDec INFO : Semantic Analysis Completed (retrial = false) INFO : Created Hive schema: Schema(fieldSchemas:null, properties:null) INFO : Completed compiling command(queryId=hive_20240903111330_b83fd6fb-88db-4935-b9eb-684660f7152a); Time taken: 0.017 seconds INFO : Executing command(queryId=hive_20240903111330_b83fd6fb-88db-4935-b9eb-684660f7152a): DROP FUNCTION IF EXISTS ptyProtectDec INFO : Starting task [Stage-0:DDL] in serial mode INFO : Completed executing command(queryId=hive_20240903111330_b83fd6fb-88db-4935-b9eb-684660f7152a); Time taken: 0.014 seconds INFO : OK No rows affected (0.053 seconds) INFO : Compiling command(queryId=hive_20240903111330_b4f7646a-9fcc-4f95-9bbf-5f24dafac2b6): DROP FUNCTION IF EXISTS ptyUnprotectDec INFO : Semantic Analysis Completed (retrial = false) INFO : Created Hive schema: Schema(fieldSchemas:null, properties:null) INFO : Completed compiling command(queryId=hive_20240903111330_b4f7646a-9fcc-4f95-9bbf-5f24dafac2b6); Time taken: 0.023 seconds INFO : Executing command(queryId=hive_20240903111330_b4f7646a-9fcc-4f95-9bbf-5f24dafac2b6): DROP FUNCTION IF EXISTS ptyUnprotectDec INFO : Starting task [Stage-0:DDL] in serial mode INFO : Completed executing command(queryId=hive_20240903111330_b4f7646a-9fcc-4f95-9bbf-5f24dafac2b6); Time taken: 0.013 seconds INFO : OK No rows affected (0.056 seconds) INFO : Compiling command(queryId=hive_20240903111330_492c2d08-0794-43e2-837a-17e2ec24c860): DROP FUNCTION IF EXISTS ptyProtectHiveDecimal INFO : Semantic Analysis Completed (retrial = false) INFO : Created Hive schema: Schema(fieldSchemas:null, properties:null) INFO : Completed compiling command(queryId=hive_20240903111330_492c2d08-0794-43e2-837a-17e2ec24c860); Time taken: 0.017 seconds INFO : Executing command(queryId=hive_20240903111330_492c2d08-0794-43e2-837a-17e2ec24c860): DROP FUNCTION IF EXISTS ptyProtectHiveDecimal INFO : Starting task [Stage-0:DDL] in serial mode INFO : Completed executing command(queryId=hive_20240903111330_492c2d08-0794-43e2-837a-17e2ec24c860); Time taken: 0.018 seconds INFO : OK No rows affected (0.056 seconds) INFO : Compiling command(queryId=hive_20240903111330_b2fc34e9-37fe-4a68-ba3f-858297985994): DROP FUNCTION IF EXISTS ptyUnprotectHiveDecimal INFO : Semantic Analysis Completed (retrial = false) INFO : Created Hive schema: Schema(fieldSchemas:null, properties:null) INFO : Completed compiling command(queryId=hive_20240903111330_b2fc34e9-37fe-4a68-ba3f-858297985994); Time taken: 0.016 seconds INFO : Executing command(queryId=hive_20240903111330_b2fc34e9-37fe-4a68-ba3f-858297985994): DROP FUNCTION IF EXISTS ptyUnprotectHiveDecimal INFO : Starting task [Stage-0:DDL] in serial mode INFO : Completed executing command(queryId=hive_20240903111330_b2fc34e9-37fe-4a68-ba3f-858297985994); Time taken: 0.011 seconds INFO : OK No rows affected (0.045 seconds) INFO : Compiling command(queryId=hive_20240903111330_4c95d0c1-171b-4ca5-81e1-049d799a9390): DROP FUNCTION IF EXISTS ptyProtectDate INFO : Semantic Analysis Completed (retrial = false) INFO : Created Hive schema: Schema(fieldSchemas:null, properties:null) INFO : Completed compiling command(queryId=hive_20240903111330_4c95d0c1-171b-4ca5-81e1-049d799a9390); Time taken: 0.015 seconds INFO : Executing command(queryId=hive_20240903111330_4c95d0c1-171b-4ca5-81e1-049d799a9390): DROP FUNCTION IF EXISTS ptyProtectDate INFO : Starting task [Stage-0:DDL] in serial mode INFO : Completed executing command(queryId=hive_20240903111330_4c95d0c1-171b-4ca5-81e1-049d799a9390); Time taken: 0.01 seconds INFO : OK No rows affected (0.041 seconds) INFO : Compiling command(queryId=hive_20240903111330_f01dfc3f-bcda-4470-a61f-fe4f499ad8c9): DROP FUNCTION IF EXISTS ptyUnprotectDate INFO : Semantic Analysis Completed (retrial = false) INFO : Created Hive schema: Schema(fieldSchemas:null, properties:null) INFO : Completed compiling command(queryId=hive_20240903111330_f01dfc3f-bcda-4470-a61f-fe4f499ad8c9); Time taken: 0.016 seconds INFO : Executing command(queryId=hive_20240903111330_f01dfc3f-bcda-4470-a61f-fe4f499ad8c9): DROP FUNCTION IF EXISTS ptyUnprotectDate INFO : Starting task [Stage-0:DDL] in serial mode INFO : Completed executing command(queryId=hive_20240903111330_f01dfc3f-bcda-4470-a61f-fe4f499ad8c9); Time taken: 0.015 seconds INFO : OK No rows affected (0.052 seconds) INFO : Compiling command(queryId=hive_20240903111330_031d0971-770a-4b39-96da-d8d7ad44b726): DROP FUNCTION IF EXISTS ptyProtectDateTime INFO : Semantic Analysis Completed (retrial = false) INFO : Created Hive schema: Schema(fieldSchemas:null, properties:null) INFO : Completed compiling command(queryId=hive_20240903111330_031d0971-770a-4b39-96da-d8d7ad44b726); Time taken: 0.019 seconds INFO : Executing command(queryId=hive_20240903111330_031d0971-770a-4b39-96da-d8d7ad44b726): DROP FUNCTION IF EXISTS ptyProtectDateTime INFO : Starting task [Stage-0:DDL] in serial mode INFO : Completed executing command(queryId=hive_20240903111330_031d0971-770a-4b39-96da-d8d7ad44b726); Time taken: 0.014 seconds INFO : OK No rows affected (0.052 seconds) INFO : Compiling command(queryId=hive_20240903111330_1f9ac40c-b5d7-4a3e-a8e7-fb473daf1ae1): DROP FUNCTION IF EXISTS ptyUnprotectDateTime INFO : Semantic Analysis Completed (retrial = false) INFO : Created Hive schema: Schema(fieldSchemas:null, properties:null) INFO : Completed compiling command(queryId=hive_20240903111330_1f9ac40c-b5d7-4a3e-a8e7-fb473daf1ae1); Time taken: 0.016 seconds INFO : Executing command(queryId=hive_20240903111330_1f9ac40c-b5d7-4a3e-a8e7-fb473daf1ae1): DROP FUNCTION IF EXISTS ptyUnprotectDateTime INFO : Starting task [Stage-0:DDL] in serial mode INFO : Completed executing command(queryId=hive_20240903111330_1f9ac40c-b5d7-4a3e-a8e7-fb473daf1ae1); Time taken: 0.014 seconds INFO : OK No rows affected (0.05 seconds) INFO : Compiling command(queryId=hive_20240903111330_09bf8810-caf6-4abb-8e92-40a6f62845fe): DROP FUNCTION IF EXISTS ptyProtectChar INFO : Semantic Analysis Completed (retrial = false) INFO : Created Hive schema: Schema(fieldSchemas:null, properties:null) INFO : Completed compiling command(queryId=hive_20240903111330_09bf8810-caf6-4abb-8e92-40a6f62845fe); Time taken: 0.015 seconds INFO : Executing command(queryId=hive_20240903111330_09bf8810-caf6-4abb-8e92-40a6f62845fe): DROP FUNCTION IF EXISTS ptyProtectChar INFO : Starting task [Stage-0:DDL] in serial mode INFO : Completed executing command(queryId=hive_20240903111330_09bf8810-caf6-4abb-8e92-40a6f62845fe); Time taken: 0.012 seconds INFO : OK No rows affected (0.059 seconds) INFO : Compiling command(queryId=hive_20240903111330_a301413c-901f-4f79-a98a-0a90ba5210db): DROP FUNCTION IF EXISTS ptyUnprotectChar INFO : Semantic Analysis Completed (retrial = false) INFO : Created Hive schema: Schema(fieldSchemas:null, properties:null) INFO : Completed compiling command(queryId=hive_20240903111330_a301413c-901f-4f79-a98a-0a90ba5210db); Time taken: 0.016 seconds INFO : Executing command(queryId=hive_20240903111330_a301413c-901f-4f79-a98a-0a90ba5210db): DROP FUNCTION IF EXISTS ptyUnprotectChar INFO : Starting task [Stage-0:DDL] in serial mode INFO : Completed executing command(queryId=hive_20240903111330_a301413c-901f-4f79-a98a-0a90ba5210db); Time taken: 0.015 seconds INFO : OK No rows affected (0.051 seconds) INFO : Compiling command(queryId=hive_20240903111330_a8dcd36f-47db-4d6a-ab20-7ea173bc1b39): DROP FUNCTION IF EXISTS ptyStringEnc INFO : Semantic Analysis Completed (retrial = false) INFO : Created Hive schema: Schema(fieldSchemas:null, properties:null) INFO : Completed compiling command(queryId=hive_20240903111330_a8dcd36f-47db-4d6a-ab20-7ea173bc1b39); Time taken: 0.017 seconds INFO : Executing command(queryId=hive_20240903111330_a8dcd36f-47db-4d6a-ab20-7ea173bc1b39): DROP FUNCTION IF EXISTS ptyStringEnc INFO : Starting task [Stage-0:DDL] in serial mode INFO : Completed executing command(queryId=hive_20240903111330_a8dcd36f-47db-4d6a-ab20-7ea173bc1b39); Time taken: 0.014 seconds INFO : OK No rows affected (0.054 seconds) INFO : Compiling command(queryId=hive_20240903111330_c61f969f-31c7-4503-976b-d4152dfa10f7): DROP FUNCTION IF EXISTS ptyStringDec INFO : Semantic Analysis Completed (retrial = false) INFO : Created Hive schema: Schema(fieldSchemas:null, properties:null) INFO : Completed compiling command(queryId=hive_20240903111330_c61f969f-31c7-4503-976b-d4152dfa10f7); Time taken: 0.037 seconds INFO : Executing command(queryId=hive_20240903111330_c61f969f-31c7-4503-976b-d4152dfa10f7): DROP FUNCTION IF EXISTS ptyStringDec INFO : Starting task [Stage-0:DDL] in serial mode INFO : Completed executing command(queryId=hive_20240903111330_c61f969f-31c7-4503-976b-d4152dfa10f7); Time taken: 0.016 seconds INFO : OK No rows affected (0.075 seconds) INFO : Compiling command(queryId=hive_20240903111330_06ba2983-a469-414b-9215-4712f2197dd4): DROP FUNCTION IF EXISTS ptyStringReEnc INFO : Semantic Analysis Completed (retrial = false) INFO : Created Hive schema: Schema(fieldSchemas:null, properties:null) INFO : Completed compiling command(queryId=hive_20240903111330_06ba2983-a469-414b-9215-4712f2197dd4); Time taken: 0.023 seconds INFO : Executing command(queryId=hive_20240903111330_06ba2983-a469-414b-9215-4712f2197dd4): DROP FUNCTION IF EXISTS ptyStringReEnc INFO : Starting task [Stage-0:DDL] in serial mode INFO : Completed executing command(queryId=hive_20240903111330_06ba2983-a469-414b-9215-4712f2197dd4); Time taken: 0.017 seconds INFO : OK No rows affected (0.067 seconds)
Registering the Temporary Hive user-defined functions
- Log in to the master node with a user account having permissions to create and drop UDFs.
- To navigate to the directory that contains the helper script, run the following command:
cd /opt/cloudera/parcels/PTY_BDP/pephive/scripts - To create the UDFs using the helper script, run the following command:
0: jdbc:hive2://master.localdomain.com:2181,n> source create_temp_hive_udfs.hql;Note: Execute the command in beeline after establishing a connection.
- Press ENTER.
The script creates all the temporary user-defined functions for Hive.INFO : Compiling command(queryId=hive_20240903111055_8b6b5109-9a76-460a-b72b-568c7a5b738a): CREATE TEMPORARY FUNCTION ptyGetVersion AS 'com.protegrity.hive.udf.ptyGetVersion' INFO : Semantic Analysis Completed (retrial = false) INFO : Created Hive schema: Schema(fieldSchemas:null, properties:null) INFO : Completed compiling command(queryId=hive_20240903111055_8b6b5109-9a76-460a-b72b-568c7a5b738a); Time taken: 2.012 seconds INFO : Executing command(queryId=hive_20240903111055_8b6b5109-9a76-460a-b72b-568c7a5b738a): CREATE TEMPORARY FUNCTION ptyGetVersion AS 'com.protegrity.hive.udf.ptyGetVersion' INFO : Starting task [Stage-0:DDL] in serial mode INFO : Completed executing command(queryId=hive_20240903111055_8b6b5109-9a76-460a-b72b-568c7a5b738a); Time taken: 8.642 seconds INFO : OK No rows affected (10.883 seconds) INFO : Compiling command(queryId=hive_20240903111106_3054fd0a-8ec1-47e0-963a-6ded115e7ec4): CREATE TEMPORARY FUNCTION ptyGetVersionExtended AS 'com.protegrity.hive.udf.ptyGetVersionExtended' INFO : Semantic Analysis Completed (retrial = false) INFO : Created Hive schema: Schema(fieldSchemas:null, properties:null) INFO : Completed compiling command(queryId=hive_20240903111106_3054fd0a-8ec1-47e0-963a-6ded115e7ec4); Time taken: 0.015 seconds INFO : Executing command(queryId=hive_20240903111106_3054fd0a-8ec1-47e0-963a-6ded115e7ec4): CREATE TEMPORARY FUNCTION ptyGetVersionExtended AS 'com.protegrity.hive.udf.ptyGetVersionExtended' INFO : Starting task [Stage-0:DDL] in serial mode INFO : Completed executing command(queryId=hive_20240903111106_3054fd0a-8ec1-47e0-963a-6ded115e7ec4); Time taken: 0.004 seconds INFO : OK No rows affected (0.045 seconds) INFO : Compiling command(queryId=hive_20240903111106_ff542de8-301f-498d-a9da-c7a79cc7fd51): CREATE TEMPORARY FUNCTION ptyWhoAmI AS 'com.protegrity.hive.udf.ptyWhoAmI' INFO : Semantic Analysis Completed (retrial = false) INFO : Created Hive schema: Schema(fieldSchemas:null, properties:null) INFO : Completed compiling command(queryId=hive_20240903111106_ff542de8-301f-498d-a9da-c7a79cc7fd51); Time taken: 0.019 seconds INFO : Executing command(queryId=hive_20240903111106_ff542de8-301f-498d-a9da-c7a79cc7fd51): CREATE TEMPORARY FUNCTION ptyWhoAmI AS 'com.protegrity.hive.udf.ptyWhoAmI' INFO : Starting task [Stage-0:DDL] in serial mode INFO : Completed executing command(queryId=hive_20240903111106_ff542de8-301f-498d-a9da-c7a79cc7fd51); Time taken: 0.006 seconds INFO : OK No rows affected (0.065 seconds) INFO : Compiling command(queryId=hive_20240903111106_46993da8-78ae-4eb4-a14f-fa328fa5a308): CREATE TEMPORARY FUNCTION ptyProtectStr AS 'com.protegrity.hive.udf.ptyProtectStr' INFO : Semantic Analysis Completed (retrial = false) INFO : Created Hive schema: Schema(fieldSchemas:null, properties:null) INFO : Completed compiling command(queryId=hive_20240903111106_46993da8-78ae-4eb4-a14f-fa328fa5a308); Time taken: 0.027 seconds INFO : Executing command(queryId=hive_20240903111106_46993da8-78ae-4eb4-a14f-fa328fa5a308): CREATE TEMPORARY FUNCTION ptyProtectStr AS 'com.protegrity.hive.udf.ptyProtectStr' INFO : Starting task [Stage-0:DDL] in serial mode INFO : Completed executing command(queryId=hive_20240903111106_46993da8-78ae-4eb4-a14f-fa328fa5a308); Time taken: 0.006 seconds INFO : OK No rows affected (0.062 seconds) INFO : Compiling command(queryId=hive_20240903111106_da50ea75-1aa4-4eca-b941-fd6e13c9e122): CREATE TEMPORARY FUNCTION ptyUnprotectStr AS 'com.protegrity.hive.udf.ptyUnprotectStr' INFO : Semantic Analysis Completed (retrial = false) INFO : Created Hive schema: Schema(fieldSchemas:null, properties:null) INFO : Completed compiling command(queryId=hive_20240903111106_da50ea75-1aa4-4eca-b941-fd6e13c9e122); Time taken: 0.015 seconds INFO : Executing command(queryId=hive_20240903111106_da50ea75-1aa4-4eca-b941-fd6e13c9e122): CREATE TEMPORARY FUNCTION ptyUnprotectStr AS 'com.protegrity.hive.udf.ptyUnprotectStr' INFO : Starting task [Stage-0:DDL] in serial mode INFO : Completed executing command(queryId=hive_20240903111106_da50ea75-1aa4-4eca-b941-fd6e13c9e122); Time taken: 0.003 seconds INFO : OK No rows affected (0.046 seconds) INFO : Compiling command(queryId=hive_20240903111106_52204f4a-e988-472c-9791-3c1ee8030963): CREATE TEMPORARY FUNCTION ptyReprotect AS 'com.protegrity.hive.udf.ptyReprotect' INFO : Semantic Analysis Completed (retrial = false) INFO : Created Hive schema: Schema(fieldSchemas:null, properties:null) INFO : Completed compiling command(queryId=hive_20240903111106_52204f4a-e988-472c-9791-3c1ee8030963); Time taken: 0.013 seconds INFO : Executing command(queryId=hive_20240903111106_52204f4a-e988-472c-9791-3c1ee8030963): CREATE TEMPORARY FUNCTION ptyReprotect AS 'com.protegrity.hive.udf.ptyReprotect' INFO : Starting task [Stage-0:DDL] in serial mode INFO : Completed executing command(queryId=hive_20240903111106_52204f4a-e988-472c-9791-3c1ee8030963); Time taken: 0.004 seconds INFO : OK No rows affected (0.058 seconds) INFO : Compiling command(queryId=hive_20240903111107_cb8f9439-6009-47ec-9cf9-25fd8c42ea59): CREATE TEMPORARY FUNCTION ptyProtectUnicode AS 'com.protegrity.hive.udf.ptyProtectUnicode' INFO : Semantic Analysis Completed (retrial = false) INFO : Created Hive schema: Schema(fieldSchemas:null, properties:null) INFO : Completed compiling command(queryId=hive_20240903111107_cb8f9439-6009-47ec-9cf9-25fd8c42ea59); Time taken: 0.017 seconds INFO : Executing command(queryId=hive_20240903111107_cb8f9439-6009-47ec-9cf9-25fd8c42ea59): CREATE TEMPORARY FUNCTION ptyProtectUnicode AS 'com.protegrity.hive.udf.ptyProtectUnicode' INFO : Starting task [Stage-0:DDL] in serial mode INFO : Completed executing command(queryId=hive_20240903111107_cb8f9439-6009-47ec-9cf9-25fd8c42ea59); Time taken: 0.004 seconds INFO : OK No rows affected (0.057 seconds) INFO : Compiling command(queryId=hive_20240903111107_6790604b-5121-4fb4-b7fb-05e688194e64): CREATE TEMPORARY FUNCTION ptyUnprotectUnicode AS 'com.protegrity.hive.udf.ptyUnprotectUnicode' INFO : Semantic Analysis Completed (retrial = false) INFO : Created Hive schema: Schema(fieldSchemas:null, properties:null) INFO : Completed compiling command(queryId=hive_20240903111107_6790604b-5121-4fb4-b7fb-05e688194e64); Time taken: 0.029 seconds INFO : Executing command(queryId=hive_20240903111107_6790604b-5121-4fb4-b7fb-05e688194e64): CREATE TEMPORARY FUNCTION ptyUnprotectUnicode AS 'com.protegrity.hive.udf.ptyUnprotectUnicode' INFO : Starting task [Stage-0:DDL] in serial mode INFO : Completed executing command(queryId=hive_20240903111107_6790604b-5121-4fb4-b7fb-05e688194e64); Time taken: 0.004 seconds INFO : OK No rows affected (0.064 seconds) INFO : Compiling command(queryId=hive_20240903111107_f3e6db85-af7f-45a4-8232-f3a278b71b21): CREATE TEMPORARY FUNCTION ptyReprotectUnicode AS 'com.protegrity.hive.udf.ptyReprotectUnicode' INFO : Semantic Analysis Completed (retrial = false) INFO : Created Hive schema: Schema(fieldSchemas:null, properties:null) INFO : Completed compiling command(queryId=hive_20240903111107_f3e6db85-af7f-45a4-8232-f3a278b71b21); Time taken: 0.014 seconds INFO : Executing command(queryId=hive_20240903111107_f3e6db85-af7f-45a4-8232-f3a278b71b21): CREATE TEMPORARY FUNCTION ptyReprotectUnicode AS 'com.protegrity.hive.udf.ptyReprotectUnicode' INFO : Starting task [Stage-0:DDL] in serial mode INFO : Completed executing command(queryId=hive_20240903111107_f3e6db85-af7f-45a4-8232-f3a278b71b21); Time taken: 0.007 seconds INFO : OK No rows affected (0.054 seconds) INFO : Compiling command(queryId=hive_20240903111107_d7e7209c-3b8b-4b94-bfd4-30aaa3580d02): CREATE TEMPORARY FUNCTION ptyProtectShort AS 'com.protegrity.hive.udf.ptyProtectShort' INFO : Semantic Analysis Completed (retrial = false) INFO : Created Hive schema: Schema(fieldSchemas:null, properties:null) INFO : Completed compiling command(queryId=hive_20240903111107_d7e7209c-3b8b-4b94-bfd4-30aaa3580d02); Time taken: 0.015 seconds INFO : Executing command(queryId=hive_20240903111107_d7e7209c-3b8b-4b94-bfd4-30aaa3580d02): CREATE TEMPORARY FUNCTION ptyProtectShort AS 'com.protegrity.hive.udf.ptyProtectShort' INFO : Starting task [Stage-0:DDL] in serial mode INFO : Completed executing command(queryId=hive_20240903111107_d7e7209c-3b8b-4b94-bfd4-30aaa3580d02); Time taken: 0.007 seconds INFO : OK No rows affected (0.049 seconds) INFO : Compiling command(queryId=hive_20240903111107_72115414-678c-4937-813a-964b5abec33d): CREATE TEMPORARY FUNCTION ptyUnprotectShort AS 'com.protegrity.hive.udf.ptyUnprotectShort' INFO : Semantic Analysis Completed (retrial = false) INFO : Created Hive schema: Schema(fieldSchemas:null, properties:null) INFO : Completed compiling command(queryId=hive_20240903111107_72115414-678c-4937-813a-964b5abec33d); Time taken: 0.015 seconds INFO : Executing command(queryId=hive_20240903111107_72115414-678c-4937-813a-964b5abec33d): CREATE TEMPORARY FUNCTION ptyUnprotectShort AS 'com.protegrity.hive.udf.ptyUnprotectShort' INFO : Starting task [Stage-0:DDL] in serial mode INFO : Completed executing command(queryId=hive_20240903111107_72115414-678c-4937-813a-964b5abec33d); Time taken: 0.003 seconds INFO : OK No rows affected (0.056 seconds) INFO : Compiling command(queryId=hive_20240903111107_610fd909-80db-4aa5-84b3-851bcd58e2e8): CREATE TEMPORARY FUNCTION ptyProtectInt AS 'com.protegrity.hive.udf.ptyProtectInt' INFO : Semantic Analysis Completed (retrial = false) INFO : Created Hive schema: Schema(fieldSchemas:null, properties:null) INFO : Completed compiling command(queryId=hive_20240903111107_610fd909-80db-4aa5-84b3-851bcd58e2e8); Time taken: 0.015 seconds INFO : Executing command(queryId=hive_20240903111107_610fd909-80db-4aa5-84b3-851bcd58e2e8): CREATE TEMPORARY FUNCTION ptyProtectInt AS 'com.protegrity.hive.udf.ptyProtectInt' INFO : Starting task [Stage-0:DDL] in serial mode INFO : Completed executing command(queryId=hive_20240903111107_610fd909-80db-4aa5-84b3-851bcd58e2e8); Time taken: 0.004 seconds INFO : OK No rows affected (0.047 seconds) INFO : Compiling command(queryId=hive_20240903111107_8f5d95ed-8d4b-4509-933c-54d341c5cebb): CREATE TEMPORARY FUNCTION ptyUnprotectInt AS 'com.protegrity.hive.udf.ptyUnprotectInt' INFO : Semantic Analysis Completed (retrial = false) INFO : Created Hive schema: Schema(fieldSchemas:null, properties:null) INFO : Completed compiling command(queryId=hive_20240903111107_8f5d95ed-8d4b-4509-933c-54d341c5cebb); Time taken: 0.018 seconds INFO : Executing command(queryId=hive_20240903111107_8f5d95ed-8d4b-4509-933c-54d341c5cebb): CREATE TEMPORARY FUNCTION ptyUnprotectInt AS 'com.protegrity.hive.udf.ptyUnprotectInt' INFO : Starting task [Stage-0:DDL] in serial mode INFO : Completed executing command(queryId=hive_20240903111107_8f5d95ed-8d4b-4509-933c-54d341c5cebb); Time taken: 0.004 seconds INFO : OK No rows affected (0.064 seconds) INFO : Compiling command(queryId=hive_20240903111107_cf10d06c-c238-4f87-8688-fb0899ca7084): CREATE TEMPORARY FUNCTION ptyProtectBigInt as 'com.protegrity.hive.udf.ptyProtectBigInt' INFO : Semantic Analysis Completed (retrial = false) INFO : Created Hive schema: Schema(fieldSchemas:null, properties:null) INFO : Completed compiling command(queryId=hive_20240903111107_cf10d06c-c238-4f87-8688-fb0899ca7084); Time taken: 0.019 seconds INFO : Executing command(queryId=hive_20240903111107_cf10d06c-c238-4f87-8688-fb0899ca7084): CREATE TEMPORARY FUNCTION ptyProtectBigInt as 'com.protegrity.hive.udf.ptyProtectBigInt' INFO : Starting task [Stage-0:DDL] in serial mode INFO : Completed executing command(queryId=hive_20240903111107_cf10d06c-c238-4f87-8688-fb0899ca7084); Time taken: 0.004 seconds INFO : OK No rows affected (0.067 seconds) INFO : Compiling command(queryId=hive_20240903111107_b52e463f-8b6a-4de0-9484-6aac4d2e03d5): CREATE TEMPORARY FUNCTION ptyUnprotectBigInt as 'com.protegrity.hive.udf.ptyUnprotectBigInt' INFO : Semantic Analysis Completed (retrial = false) INFO : Created Hive schema: Schema(fieldSchemas:null, properties:null) INFO : Completed compiling command(queryId=hive_20240903111107_b52e463f-8b6a-4de0-9484-6aac4d2e03d5); Time taken: 0.016 seconds INFO : Executing command(queryId=hive_20240903111107_b52e463f-8b6a-4de0-9484-6aac4d2e03d5): CREATE TEMPORARY FUNCTION ptyUnprotectBigInt as 'com.protegrity.hive.udf.ptyUnprotectBigInt' INFO : Starting task [Stage-0:DDL] in serial mode INFO : Completed executing command(queryId=hive_20240903111107_b52e463f-8b6a-4de0-9484-6aac4d2e03d5); Time taken: 0.003 seconds INFO : OK No rows affected (0.049 seconds) INFO : Compiling command(queryId=hive_20240903111107_bb311098-5258-4676-97a9-4faff87db845): CREATE TEMPORARY FUNCTION ptyProtectFloat as 'com.protegrity.hive.udf.ptyProtectFloat' INFO : Semantic Analysis Completed (retrial = false) INFO : Created Hive schema: Schema(fieldSchemas:null, properties:null) INFO : Completed compiling command(queryId=hive_20240903111107_bb311098-5258-4676-97a9-4faff87db845); Time taken: 0.014 seconds INFO : Executing command(queryId=hive_20240903111107_bb311098-5258-4676-97a9-4faff87db845): CREATE TEMPORARY FUNCTION ptyProtectFloat as 'com.protegrity.hive.udf.ptyProtectFloat' INFO : Starting task [Stage-0:DDL] in serial mode INFO : Completed executing command(queryId=hive_20240903111107_bb311098-5258-4676-97a9-4faff87db845); Time taken: 0.006 seconds INFO : OK No rows affected (0.075 seconds) INFO : Compiling command(queryId=hive_20240903111107_eaee0e89-b25b-4bf4-bf25-6a0e13ee67bd): CREATE TEMPORARY FUNCTION ptyUnprotectFloat as 'com.protegrity.hive.udf.ptyProtectFloat' INFO : Semantic Analysis Completed (retrial = false) INFO : Created Hive schema: Schema(fieldSchemas:null, properties:null) INFO : Completed compiling command(queryId=hive_20240903111107_eaee0e89-b25b-4bf4-bf25-6a0e13ee67bd); Time taken: 0.02 seconds INFO : Executing command(queryId=hive_20240903111107_eaee0e89-b25b-4bf4-bf25-6a0e13ee67bd): CREATE TEMPORARY FUNCTION ptyUnprotectFloat as 'com.protegrity.hive.udf.ptyProtectFloat' INFO : Starting task [Stage-0:DDL] in serial mode INFO : Completed executing command(queryId=hive_20240903111107_eaee0e89-b25b-4bf4-bf25-6a0e13ee67bd); Time taken: 0.002 seconds INFO : OK No rows affected (0.051 seconds) INFO : Compiling command(queryId=hive_20240903111107_975de679-d7b6-40e1-a34d-b22947e67ab9): CREATE TEMPORARY FUNCTION ptyProtectDouble as 'com.protegrity.hive.udf.ptyProtectDouble' INFO : Semantic Analysis Completed (retrial = false) INFO : Created Hive schema: Schema(fieldSchemas:null, properties:null) INFO : Completed compiling command(queryId=hive_20240903111107_975de679-d7b6-40e1-a34d-b22947e67ab9); Time taken: 0.013 seconds INFO : Executing command(queryId=hive_20240903111107_975de679-d7b6-40e1-a34d-b22947e67ab9): CREATE TEMPORARY FUNCTION ptyProtectDouble as 'com.protegrity.hive.udf.ptyProtectDouble' INFO : Starting task [Stage-0:DDL] in serial mode INFO : Completed executing command(queryId=hive_20240903111107_975de679-d7b6-40e1-a34d-b22947e67ab9); Time taken: 0.003 seconds INFO : OK No rows affected (0.042 seconds) INFO : Compiling command(queryId=hive_20240903111107_0da998bf-ba5d-47f2-be21-06b234f37ab0): CREATE TEMPORARY FUNCTION ptyUnprotectDouble as 'com.protegrity.hive.udf.ptyUnprotectDouble' INFO : Semantic Analysis Completed (retrial = false) INFO : Created Hive schema: Schema(fieldSchemas:null, properties:null) INFO : Completed compiling command(queryId=hive_20240903111107_0da998bf-ba5d-47f2-be21-06b234f37ab0); Time taken: 0.011 seconds INFO : Executing command(queryId=hive_20240903111107_0da998bf-ba5d-47f2-be21-06b234f37ab0): CREATE TEMPORARY FUNCTION ptyUnprotectDouble as 'com.protegrity.hive.udf.ptyUnprotectDouble' INFO : Starting task [Stage-0:DDL] in serial mode INFO : Completed executing command(queryId=hive_20240903111107_0da998bf-ba5d-47f2-be21-06b234f37ab0); Time taken: 0.003 seconds INFO : OK No rows affected (0.04 seconds) INFO : Compiling command(queryId=hive_20240903111107_f14d9eae-3090-4f34-a476-842bfa1946c5): CREATE TEMPORARY FUNCTION ptyProtectDec as 'com.protegrity.hive.udf.ptyProtectDec' INFO : Semantic Analysis Completed (retrial = false) INFO : Created Hive schema: Schema(fieldSchemas:null, properties:null) INFO : Completed compiling command(queryId=hive_20240903111107_f14d9eae-3090-4f34-a476-842bfa1946c5); Time taken: 0.012 seconds INFO : Executing command(queryId=hive_20240903111107_f14d9eae-3090-4f34-a476-842bfa1946c5): CREATE TEMPORARY FUNCTION ptyProtectDec as 'com.protegrity.hive.udf.ptyProtectDec' INFO : Starting task [Stage-0:DDL] in serial mode INFO : Completed executing command(queryId=hive_20240903111107_f14d9eae-3090-4f34-a476-842bfa1946c5); Time taken: 0.003 seconds INFO : OK No rows affected (0.041 seconds) INFO : Compiling command(queryId=hive_20240903111107_f4621d7d-7daf-49e5-aa9f-1c55a7cb1b30): CREATE TEMPORARY FUNCTION ptyUnprotectDec as 'com.protegrity.hive.udf.ptyUnprotectDec' INFO : Semantic Analysis Completed (retrial = false) INFO : Created Hive schema: Schema(fieldSchemas:null, properties:null) INFO : Completed compiling command(queryId=hive_20240903111107_f4621d7d-7daf-49e5-aa9f-1c55a7cb1b30); Time taken: 0.023 seconds INFO : Executing command(queryId=hive_20240903111107_f4621d7d-7daf-49e5-aa9f-1c55a7cb1b30): CREATE TEMPORARY FUNCTION ptyUnprotectDec as 'com.protegrity.hive.udf.ptyUnprotectDec' INFO : Starting task [Stage-0:DDL] in serial mode INFO : Completed executing command(queryId=hive_20240903111107_f4621d7d-7daf-49e5-aa9f-1c55a7cb1b30); Time taken: 0.004 seconds INFO : OK No rows affected (0.057 seconds) INFO : Compiling command(queryId=hive_20240903111107_fa5ce746-bea5-41e8-9d0f-0fedfbe9e885): CREATE TEMPORARY FUNCTION ptyProtectHiveDecimal as 'com.protegrity.hive.udf.ptyProtectHiveDecimal' INFO : Semantic Analysis Completed (retrial = false) INFO : Created Hive schema: Schema(fieldSchemas:null, properties:null) INFO : Completed compiling command(queryId=hive_20240903111107_fa5ce746-bea5-41e8-9d0f-0fedfbe9e885); Time taken: 0.016 seconds INFO : Executing command(queryId=hive_20240903111107_fa5ce746-bea5-41e8-9d0f-0fedfbe9e885): CREATE TEMPORARY FUNCTION ptyProtectHiveDecimal as 'com.protegrity.hive.udf.ptyProtectHiveDecimal' INFO : Starting task [Stage-0:DDL] in serial mode INFO : Completed executing command(queryId=hive_20240903111107_fa5ce746-bea5-41e8-9d0f-0fedfbe9e885); Time taken: 0.003 seconds INFO : OK No rows affected (0.057 seconds) INFO : Compiling command(queryId=hive_20240903111107_ec5fc8ed-471f-4eed-bc5e-3e27aaef153e): CREATE TEMPORARY FUNCTION ptyUnprotectHiveDecimal as 'com.protegrity.hive.udf.ptyUnprotectHiveDecimal' INFO : Semantic Analysis Completed (retrial = false) INFO : Created Hive schema: Schema(fieldSchemas:null, properties:null) INFO : Completed compiling command(queryId=hive_20240903111107_ec5fc8ed-471f-4eed-bc5e-3e27aaef153e); Time taken: 0.017 seconds INFO : Executing command(queryId=hive_20240903111107_ec5fc8ed-471f-4eed-bc5e-3e27aaef153e): CREATE TEMPORARY FUNCTION ptyUnprotectHiveDecimal as 'com.protegrity.hive.udf.ptyUnprotectHiveDecimal' INFO : Starting task [Stage-0:DDL] in serial mode INFO : Completed executing command(queryId=hive_20240903111107_ec5fc8ed-471f-4eed-bc5e-3e27aaef153e); Time taken: 0.004 seconds INFO : OK No rows affected (0.077 seconds) INFO : Compiling command(queryId=hive_20240903111108_f1333ce3-c1f4-4f82-b172-ee77173ece61): CREATE TEMPORARY FUNCTION ptyProtectDate AS 'com.protegrity.hive.udf.ptyProtectDate' INFO : Semantic Analysis Completed (retrial = false) INFO : Created Hive schema: Schema(fieldSchemas:null, properties:null) INFO : Completed compiling command(queryId=hive_20240903111108_f1333ce3-c1f4-4f82-b172-ee77173ece61); Time taken: 0.072 seconds INFO : Executing command(queryId=hive_20240903111108_f1333ce3-c1f4-4f82-b172-ee77173ece61): CREATE TEMPORARY FUNCTION ptyProtectDate AS 'com.protegrity.hive.udf.ptyProtectDate' INFO : Starting task [Stage-0:DDL] in serial mode INFO : Completed executing command(queryId=hive_20240903111108_f1333ce3-c1f4-4f82-b172-ee77173ece61); Time taken: 0.003 seconds INFO : OK No rows affected (0.167 seconds) INFO : Compiling command(queryId=hive_20240903111108_1dd57664-b5b5-421a-90a9-ea0d1527ec05): CREATE TEMPORARY FUNCTION ptyUnprotectDate AS 'com.protegrity.hive.udf.ptyUnprotectDate' INFO : Semantic Analysis Completed (retrial = false) INFO : Created Hive schema: Schema(fieldSchemas:null, properties:null) INFO : Completed compiling command(queryId=hive_20240903111108_1dd57664-b5b5-421a-90a9-ea0d1527ec05); Time taken: 0.041 seconds INFO : Executing command(queryId=hive_20240903111108_1dd57664-b5b5-421a-90a9-ea0d1527ec05): CREATE TEMPORARY FUNCTION ptyUnprotectDate AS 'com.protegrity.hive.udf.ptyUnprotectDate' INFO : Starting task [Stage-0:DDL] in serial mode INFO : Completed executing command(queryId=hive_20240903111108_1dd57664-b5b5-421a-90a9-ea0d1527ec05); Time taken: 0.005 seconds INFO : OK No rows affected (0.097 seconds) INFO : Compiling command(queryId=hive_20240903111108_c4dbbbed-3b86-4905-a2cb-e8ae85aeee7a): CREATE TEMPORARY FUNCTION ptyProtectDateTime AS 'com.protegrity.hive.udf.ptyProtectDateTime' INFO : Semantic Analysis Completed (retrial = false) INFO : Created Hive schema: Schema(fieldSchemas:null, properties:null) INFO : Completed compiling command(queryId=hive_20240903111108_c4dbbbed-3b86-4905-a2cb-e8ae85aeee7a); Time taken: 0.033 seconds INFO : Executing command(queryId=hive_20240903111108_c4dbbbed-3b86-4905-a2cb-e8ae85aeee7a): CREATE TEMPORARY FUNCTION ptyProtectDateTime AS 'com.protegrity.hive.udf.ptyProtectDateTime' INFO : Starting task [Stage-0:DDL] in serial mode INFO : Completed executing command(queryId=hive_20240903111108_c4dbbbed-3b86-4905-a2cb-e8ae85aeee7a); Time taken: 0.003 seconds INFO : OK No rows affected (0.1 seconds) INFO : Compiling command(queryId=hive_20240903111108_a6664244-2109-40f0-aeed-b41aa89a2a39): CREATE TEMPORARY FUNCTION ptyUnprotectDateTime AS 'com.protegrity.hive.udf.ptyUnprotectDateTime' INFO : Semantic Analysis Completed (retrial = false) INFO : Created Hive schema: Schema(fieldSchemas:null, properties:null) INFO : Completed compiling command(queryId=hive_20240903111108_a6664244-2109-40f0-aeed-b41aa89a2a39); Time taken: 0.013 seconds INFO : Executing command(queryId=hive_20240903111108_a6664244-2109-40f0-aeed-b41aa89a2a39): CREATE TEMPORARY FUNCTION ptyUnprotectDateTime AS 'com.protegrity.hive.udf.ptyUnprotectDateTime' INFO : Starting task [Stage-0:DDL] in serial mode INFO : Completed executing command(queryId=hive_20240903111108_a6664244-2109-40f0-aeed-b41aa89a2a39); Time taken: 0.013 seconds INFO : OK No rows affected (0.05 seconds) INFO : Compiling command(queryId=hive_20240903111108_4d88fee7-0fbc-41d8-9730-2f96decae088): CREATE TEMPORARY FUNCTION ptyProtectChar AS 'com.protegrity.hive.udf.ptyProtectChar' INFO : Semantic Analysis Completed (retrial = false) INFO : Created Hive schema: Schema(fieldSchemas:null, properties:null) INFO : Completed compiling command(queryId=hive_20240903111108_4d88fee7-0fbc-41d8-9730-2f96decae088); Time taken: 0.018 seconds INFO : Executing command(queryId=hive_20240903111108_4d88fee7-0fbc-41d8-9730-2f96decae088): CREATE TEMPORARY FUNCTION ptyProtectChar AS 'com.protegrity.hive.udf.ptyProtectChar' INFO : Starting task [Stage-0:DDL] in serial mode INFO : Completed executing command(queryId=hive_20240903111108_4d88fee7-0fbc-41d8-9730-2f96decae088); Time taken: 0.003 seconds INFO : OK No rows affected (0.051 seconds) INFO : Compiling command(queryId=hive_20240903111108_b87a4d61-4eb1-4b18-bdb2-5ddd6e67f1fe): CREATE TEMPORARY FUNCTION ptyUnprotectChar AS 'com.protegrity.hive.udf.ptyUnprotectChar' INFO : Semantic Analysis Completed (retrial = false) INFO : Created Hive schema: Schema(fieldSchemas:null, properties:null) INFO : Completed compiling command(queryId=hive_20240903111108_b87a4d61-4eb1-4b18-bdb2-5ddd6e67f1fe); Time taken: 0.024 seconds INFO : Executing command(queryId=hive_20240903111108_b87a4d61-4eb1-4b18-bdb2-5ddd6e67f1fe): CREATE TEMPORARY FUNCTION ptyUnprotectChar AS 'com.protegrity.hive.udf.ptyUnprotectChar' INFO : Starting task [Stage-0:DDL] in serial mode INFO : Completed executing command(queryId=hive_20240903111108_b87a4d61-4eb1-4b18-bdb2-5ddd6e67f1fe); Time taken: 0.004 seconds INFO : OK No rows affected (0.06 seconds) INFO : Compiling command(queryId=hive_20240903111108_030a49e5-aabe-47f3-8396-ee55b9c37832): CREATE TEMPORARY FUNCTION ptyStringEnc as 'com.protegrity.hive.udf.ptyStringEnc' INFO : Semantic Analysis Completed (retrial = false) INFO : Created Hive schema: Schema(fieldSchemas:null, properties:null) INFO : Completed compiling command(queryId=hive_20240903111108_030a49e5-aabe-47f3-8396-ee55b9c37832); Time taken: 0.025 seconds INFO : Executing command(queryId=hive_20240903111108_030a49e5-aabe-47f3-8396-ee55b9c37832): CREATE TEMPORARY FUNCTION ptyStringEnc as 'com.protegrity.hive.udf.ptyStringEnc' INFO : Starting task [Stage-0:DDL] in serial mode INFO : Completed executing command(queryId=hive_20240903111108_030a49e5-aabe-47f3-8396-ee55b9c37832); Time taken: 0.008 seconds INFO : OK No rows affected (0.063 seconds) INFO : Compiling command(queryId=hive_20240903111108_554d5092-6a0b-4f26-a1ce-00c7f3b3adb1): CREATE TEMPORARY FUNCTION ptyStringDec as 'com.protegrity.hive.udf.ptyStringDec' INFO : Semantic Analysis Completed (retrial = false) INFO : Created Hive schema: Schema(fieldSchemas:null, properties:null) INFO : Completed compiling command(queryId=hive_20240903111108_554d5092-6a0b-4f26-a1ce-00c7f3b3adb1); Time taken: 0.026 seconds INFO : Executing command(queryId=hive_20240903111108_554d5092-6a0b-4f26-a1ce-00c7f3b3adb1): CREATE TEMPORARY FUNCTION ptyStringDec as 'com.protegrity.hive.udf.ptyStringDec' INFO : Starting task [Stage-0:DDL] in serial mode INFO : Completed executing command(queryId=hive_20240903111108_554d5092-6a0b-4f26-a1ce-00c7f3b3adb1); Time taken: 0.003 seconds INFO : OK No rows affected (0.057 seconds) INFO : Compiling command(queryId=hive_20240903111108_312d30ce-6c7a-445f-9ca8-40a8ca981d8b): CREATE TEMPORARY FUNCTION ptyStringReEnc as 'com.protegrity.hive.udf.ptyStringReEnc' INFO : Semantic Analysis Completed (retrial = false) INFO : Created Hive schema: Schema(fieldSchemas:null, properties:null) INFO : Completed compiling command(queryId=hive_20240903111108_312d30ce-6c7a-445f-9ca8-40a8ca981d8b); Time taken: 0.01 seconds INFO : Executing command(queryId=hive_20240903111108_312d30ce-6c7a-445f-9ca8-40a8ca981d8b): CREATE TEMPORARY FUNCTION ptyStringReEnc as 'com.protegrity.hive.udf.ptyStringReEnc' INFO : Starting task [Stage-0:DDL] in serial mode INFO : Completed executing command(queryId=hive_20240903111108_312d30ce-6c7a-445f-9ca8-40a8ca981d8b); Time taken: 0.005 seconds INFO : OK No rows affected (0.044 seconds)
Dropping the Temporary Hive user-defined functions
Log in to the master node with a user account having permissions to create and drop UDFs.
To navigate to the directory that contains the helper script, run the following command:
cd /opt/cloudera/parcels/PTY_BDP/pephive/scriptsTo create the UDFs using the helper script, run the following command:
0: jdbc:hive2://master.localdomain.com:2181,n> source drop_temp_hive_udfs.hql;Note: Execute the command in beeline after establishing a connection.
Press ENTER.
The script drops all the temporary user-defined functions for Hive.INFO : Compiling command(queryId=hive_20240903111218_b026a769-0b28-4667-8f17-f2799da1ed45): DROP TEMPORARY FUNCTION IF EXISTS ptyGetVersion INFO : Semantic Analysis Completed (retrial = false) INFO : Created Hive schema: Schema(fieldSchemas:null, properties:null) INFO : Completed compiling command(queryId=hive_20240903111218_b026a769-0b28-4667-8f17-f2799da1ed45); Time taken: 0.022 seconds INFO : Executing command(queryId=hive_20240903111218_b026a769-0b28-4667-8f17-f2799da1ed45): DROP TEMPORARY FUNCTION IF EXISTS ptyGetVersion INFO : Starting task [Stage-0:DDL] in serial mode INFO : Completed executing command(queryId=hive_20240903111218_b026a769-0b28-4667-8f17-f2799da1ed45); Time taken: 0.002 seconds INFO : OK No rows affected (0.043 seconds) INFO : Compiling command(queryId=hive_20240903111218_704176eb-7a63-4183-84ff-2a6596335a65): DROP TEMPORARY FUNCTION IF EXISTS ptyGetVersionExtended INFO : Semantic Analysis Completed (retrial = false) INFO : Created Hive schema: Schema(fieldSchemas:null, properties:null) INFO : Completed compiling command(queryId=hive_20240903111218_704176eb-7a63-4183-84ff-2a6596335a65); Time taken: 0.015 seconds INFO : Executing command(queryId=hive_20240903111218_704176eb-7a63-4183-84ff-2a6596335a65): DROP TEMPORARY FUNCTION IF EXISTS ptyGetVersionExtended INFO : Starting task [Stage-0:DDL] in serial mode INFO : Completed executing command(queryId=hive_20240903111218_704176eb-7a63-4183-84ff-2a6596335a65); Time taken: 0.001 seconds INFO : OK No rows affected (0.038 seconds) INFO : Compiling command(queryId=hive_20240903111218_aef01b79-cba9-43be-b91f-eb91ac63f793): DROP TEMPORARY FUNCTION IF EXISTS ptyWhoAmI INFO : Semantic Analysis Completed (retrial = false) INFO : Created Hive schema: Schema(fieldSchemas:null, properties:null) INFO : Completed compiling command(queryId=hive_20240903111218_aef01b79-cba9-43be-b91f-eb91ac63f793); Time taken: 0.016 seconds INFO : Executing command(queryId=hive_20240903111218_aef01b79-cba9-43be-b91f-eb91ac63f793): DROP TEMPORARY FUNCTION IF EXISTS ptyWhoAmI INFO : Starting task [Stage-0:DDL] in serial mode INFO : Completed executing command(queryId=hive_20240903111218_aef01b79-cba9-43be-b91f-eb91ac63f793); Time taken: 0.002 seconds INFO : OK No rows affected (0.044 seconds) INFO : Compiling command(queryId=hive_20240903111218_5315f076-fad1-40fb-b49a-5527c103f80c): DROP TEMPORARY FUNCTION IF EXISTS ptyProtectStr INFO : Semantic Analysis Completed (retrial = false) INFO : Created Hive schema: Schema(fieldSchemas:null, properties:null) INFO : Completed compiling command(queryId=hive_20240903111218_5315f076-fad1-40fb-b49a-5527c103f80c); Time taken: 0.014 seconds INFO : Executing command(queryId=hive_20240903111218_5315f076-fad1-40fb-b49a-5527c103f80c): DROP TEMPORARY FUNCTION IF EXISTS ptyProtectStr INFO : Starting task [Stage-0:DDL] in serial mode INFO : Completed executing command(queryId=hive_20240903111218_5315f076-fad1-40fb-b49a-5527c103f80c); Time taken: 0.007 seconds INFO : OK No rows affected (0.066 seconds) INFO : Compiling command(queryId=hive_20240903111218_71431e3e-e1b3-4fad-99e5-b9fe668a953c): DROP TEMPORARY FUNCTION IF EXISTS ptyUnprotectStr INFO : Semantic Analysis Completed (retrial = false) INFO : Created Hive schema: Schema(fieldSchemas:null, properties:null) INFO : Completed compiling command(queryId=hive_20240903111218_71431e3e-e1b3-4fad-99e5-b9fe668a953c); Time taken: 0.022 seconds INFO : Executing command(queryId=hive_20240903111218_71431e3e-e1b3-4fad-99e5-b9fe668a953c): DROP TEMPORARY FUNCTION IF EXISTS ptyUnprotectStr INFO : Starting task [Stage-0:DDL] in serial mode INFO : Completed executing command(queryId=hive_20240903111218_71431e3e-e1b3-4fad-99e5-b9fe668a953c); Time taken: 0.002 seconds INFO : OK No rows affected (0.061 seconds) INFO : Compiling command(queryId=hive_20240903111219_ab9796c4-97b8-4229-b060-c33c449a76db): DROP TEMPORARY FUNCTION IF EXISTS ptyReprotect INFO : Semantic Analysis Completed (retrial = false) INFO : Created Hive schema: Schema(fieldSchemas:null, properties:null) INFO : Completed compiling command(queryId=hive_20240903111219_ab9796c4-97b8-4229-b060-c33c449a76db); Time taken: 0.017 seconds INFO : Executing command(queryId=hive_20240903111219_ab9796c4-97b8-4229-b060-c33c449a76db): DROP TEMPORARY FUNCTION IF EXISTS ptyReprotect INFO : Starting task [Stage-0:DDL] in serial mode INFO : Completed executing command(queryId=hive_20240903111219_ab9796c4-97b8-4229-b060-c33c449a76db); Time taken: 0.002 seconds INFO : OK No rows affected (0.052 seconds) INFO : Compiling command(queryId=hive_20240903111219_56cc8b55-d525-4e5e-af1d-3b6444675305): DROP TEMPORARY FUNCTION IF EXISTS ptyProtectUnicode INFO : Semantic Analysis Completed (retrial = false) INFO : Created Hive schema: Schema(fieldSchemas:null, properties:null) INFO : Completed compiling command(queryId=hive_20240903111219_56cc8b55-d525-4e5e-af1d-3b6444675305); Time taken: 0.012 seconds INFO : Executing command(queryId=hive_20240903111219_56cc8b55-d525-4e5e-af1d-3b6444675305): DROP TEMPORARY FUNCTION IF EXISTS ptyProtectUnicode INFO : Starting task [Stage-0:DDL] in serial mode INFO : Completed executing command(queryId=hive_20240903111219_56cc8b55-d525-4e5e-af1d-3b6444675305); Time taken: 0.003 seconds INFO : OK No rows affected (0.047 seconds) INFO : Compiling command(queryId=hive_20240903111219_5a4a753d-487d-4414-bfeb-d659ae68adbd): DROP TEMPORARY FUNCTION IF EXISTS ptyUnprotectUnicode INFO : Semantic Analysis Completed (retrial = false) INFO : Created Hive schema: Schema(fieldSchemas:null, properties:null) INFO : Completed compiling command(queryId=hive_20240903111219_5a4a753d-487d-4414-bfeb-d659ae68adbd); Time taken: 0.024 seconds INFO : Executing command(queryId=hive_20240903111219_5a4a753d-487d-4414-bfeb-d659ae68adbd): DROP TEMPORARY FUNCTION IF EXISTS ptyUnprotectUnicode INFO : Starting task [Stage-0:DDL] in serial mode INFO : Completed executing command(queryId=hive_20240903111219_5a4a753d-487d-4414-bfeb-d659ae68adbd); Time taken: 0.004 seconds INFO : OK No rows affected (0.051 seconds) INFO : Compiling command(queryId=hive_20240903111219_0f67c868-0870-4c8f-a003-b1c5d00b08e1): DROP TEMPORARY FUNCTION IF EXISTS ptyReprotectUnicode INFO : Semantic Analysis Completed (retrial = false) INFO : Created Hive schema: Schema(fieldSchemas:null, properties:null) INFO : Completed compiling command(queryId=hive_20240903111219_0f67c868-0870-4c8f-a003-b1c5d00b08e1); Time taken: 0.022 seconds INFO : Executing command(queryId=hive_20240903111219_0f67c868-0870-4c8f-a003-b1c5d00b08e1): DROP TEMPORARY FUNCTION IF EXISTS ptyReprotectUnicode INFO : Starting task [Stage-0:DDL] in serial mode INFO : Completed executing command(queryId=hive_20240903111219_0f67c868-0870-4c8f-a003-b1c5d00b08e1); Time taken: 0.002 seconds INFO : OK No rows affected (0.049 seconds) INFO : Compiling command(queryId=hive_20240903111219_5e7798c5-7340-41ea-aa9e-5656f92fc1d1): DROP TEMPORARY FUNCTION IF EXISTS ptyProtectShort INFO : Semantic Analysis Completed (retrial = false) INFO : Created Hive schema: Schema(fieldSchemas:null, properties:null) INFO : Completed compiling command(queryId=hive_20240903111219_5e7798c5-7340-41ea-aa9e-5656f92fc1d1); Time taken: 0.013 seconds INFO : Executing command(queryId=hive_20240903111219_5e7798c5-7340-41ea-aa9e-5656f92fc1d1): DROP TEMPORARY FUNCTION IF EXISTS ptyProtectShort INFO : Starting task [Stage-0:DDL] in serial mode INFO : Completed executing command(queryId=hive_20240903111219_5e7798c5-7340-41ea-aa9e-5656f92fc1d1); Time taken: 0.002 seconds INFO : OK No rows affected (0.056 seconds) INFO : Compiling command(queryId=hive_20240903111219_8879dbd3-6ce9-43cb-a7ec-dcaec8ff5231): DROP TEMPORARY FUNCTION IF EXISTS ptyUnprotectShort INFO : Semantic Analysis Completed (retrial = false) INFO : Created Hive schema: Schema(fieldSchemas:null, properties:null) INFO : Completed compiling command(queryId=hive_20240903111219_8879dbd3-6ce9-43cb-a7ec-dcaec8ff5231); Time taken: 0.015 seconds INFO : Executing command(queryId=hive_20240903111219_8879dbd3-6ce9-43cb-a7ec-dcaec8ff5231): DROP TEMPORARY FUNCTION IF EXISTS ptyUnprotectShort INFO : Starting task [Stage-0:DDL] in serial mode INFO : Completed executing command(queryId=hive_20240903111219_8879dbd3-6ce9-43cb-a7ec-dcaec8ff5231); Time taken: 0.002 seconds INFO : OK No rows affected (0.04 seconds) INFO : Compiling command(queryId=hive_20240903111219_b15cdc9e-11a9-458a-bf69-d48ecbc6cdc0): DROP TEMPORARY FUNCTION IF EXISTS ptyProtectInt INFO : Semantic Analysis Completed (retrial = false) INFO : Created Hive schema: Schema(fieldSchemas:null, properties:null) INFO : Completed compiling command(queryId=hive_20240903111219_b15cdc9e-11a9-458a-bf69-d48ecbc6cdc0); Time taken: 0.012 seconds INFO : Executing command(queryId=hive_20240903111219_b15cdc9e-11a9-458a-bf69-d48ecbc6cdc0): DROP TEMPORARY FUNCTION IF EXISTS ptyProtectInt INFO : Starting task [Stage-0:DDL] in serial mode INFO : Completed executing command(queryId=hive_20240903111219_b15cdc9e-11a9-458a-bf69-d48ecbc6cdc0); Time taken: 0.001 seconds INFO : OK No rows affected (0.035 seconds) INFO : Compiling command(queryId=hive_20240903111219_99e5eb87-8acb-4fab-810e-99c10392bd5b): DROP TEMPORARY FUNCTION IF EXISTS ptyUnprotectInt INFO : Semantic Analysis Completed (retrial = false) INFO : Created Hive schema: Schema(fieldSchemas:null, properties:null) INFO : Completed compiling command(queryId=hive_20240903111219_99e5eb87-8acb-4fab-810e-99c10392bd5b); Time taken: 0.012 seconds INFO : Executing command(queryId=hive_20240903111219_99e5eb87-8acb-4fab-810e-99c10392bd5b): DROP TEMPORARY FUNCTION IF EXISTS ptyUnprotectInt INFO : Starting task [Stage-0:DDL] in serial mode INFO : Completed executing command(queryId=hive_20240903111219_99e5eb87-8acb-4fab-810e-99c10392bd5b); Time taken: 0.001 seconds INFO : OK No rows affected (0.038 seconds) INFO : Compiling command(queryId=hive_20240903111219_95014e56-33c8-4b2c-83ec-b954b6aa1dcc): DROP TEMPORARY FUNCTION IF EXISTS ptyProtectBigInt INFO : Semantic Analysis Completed (retrial = false) INFO : Created Hive schema: Schema(fieldSchemas:null, properties:null) INFO : Completed compiling command(queryId=hive_20240903111219_95014e56-33c8-4b2c-83ec-b954b6aa1dcc); Time taken: 0.012 seconds INFO : Executing command(queryId=hive_20240903111219_95014e56-33c8-4b2c-83ec-b954b6aa1dcc): DROP TEMPORARY FUNCTION IF EXISTS ptyProtectBigInt INFO : Starting task [Stage-0:DDL] in serial mode INFO : Completed executing command(queryId=hive_20240903111219_95014e56-33c8-4b2c-83ec-b954b6aa1dcc); Time taken: 0.002 seconds INFO : OK No rows affected (0.033 seconds) INFO : Compiling command(queryId=hive_20240903111219_2c5806b2-ac82-4248-bcd5-a70f65f8a51f): DROP TEMPORARY FUNCTION IF EXISTS ptyUnprotectBigInt INFO : Semantic Analysis Completed (retrial = false) INFO : Created Hive schema: Schema(fieldSchemas:null, properties:null) INFO : Completed compiling command(queryId=hive_20240903111219_2c5806b2-ac82-4248-bcd5-a70f65f8a51f); Time taken: 0.018 seconds INFO : Executing command(queryId=hive_20240903111219_2c5806b2-ac82-4248-bcd5-a70f65f8a51f): DROP TEMPORARY FUNCTION IF EXISTS ptyUnprotectBigInt INFO : Starting task [Stage-0:DDL] in serial mode INFO : Completed executing command(queryId=hive_20240903111219_2c5806b2-ac82-4248-bcd5-a70f65f8a51f); Time taken: 0.001 seconds INFO : OK No rows affected (0.054 seconds) INFO : Compiling command(queryId=hive_20240903111219_89d82d00-bb1e-4a6c-81b5-81d2e32dcf38): DROP TEMPORARY FUNCTION IF EXISTS ptyProtectFloat INFO : Semantic Analysis Completed (retrial = false) INFO : Created Hive schema: Schema(fieldSchemas:null, properties:null) INFO : Completed compiling command(queryId=hive_20240903111219_89d82d00-bb1e-4a6c-81b5-81d2e32dcf38); Time taken: 0.014 seconds INFO : Executing command(queryId=hive_20240903111219_89d82d00-bb1e-4a6c-81b5-81d2e32dcf38): DROP TEMPORARY FUNCTION IF EXISTS ptyProtectFloat INFO : Starting task [Stage-0:DDL] in serial mode INFO : Completed executing command(queryId=hive_20240903111219_89d82d00-bb1e-4a6c-81b5-81d2e32dcf38); Time taken: 0.001 seconds INFO : OK No rows affected (0.037 seconds) INFO : Compiling command(queryId=hive_20240903111219_ebf878b1-a1be-4ec3-8db3-5e4191998f43): DROP TEMPORARY FUNCTION IF EXISTS ptyUnprotectFloat INFO : Semantic Analysis Completed (retrial = false) INFO : Created Hive schema: Schema(fieldSchemas:null, properties:null) INFO : Completed compiling command(queryId=hive_20240903111219_ebf878b1-a1be-4ec3-8db3-5e4191998f43); Time taken: 0.01 seconds INFO : Executing command(queryId=hive_20240903111219_ebf878b1-a1be-4ec3-8db3-5e4191998f43): DROP TEMPORARY FUNCTION IF EXISTS ptyUnprotectFloat INFO : Starting task [Stage-0:DDL] in serial mode INFO : Completed executing command(queryId=hive_20240903111219_ebf878b1-a1be-4ec3-8db3-5e4191998f43); Time taken: 0.001 seconds INFO : OK No rows affected (0.035 seconds) INFO : Compiling command(queryId=hive_20240903111219_bde5d3d8-e6e7-4543-aded-65ed1dcf4d2a): DROP TEMPORARY FUNCTION IF EXISTS ptyProtectDouble INFO : Semantic Analysis Completed (retrial = false) INFO : Created Hive schema: Schema(fieldSchemas:null, properties:null) INFO : Completed compiling command(queryId=hive_20240903111219_bde5d3d8-e6e7-4543-aded-65ed1dcf4d2a); Time taken: 0.01 seconds INFO : Executing command(queryId=hive_20240903111219_bde5d3d8-e6e7-4543-aded-65ed1dcf4d2a): DROP TEMPORARY FUNCTION IF EXISTS ptyProtectDouble INFO : Starting task [Stage-0:DDL] in serial mode INFO : Completed executing command(queryId=hive_20240903111219_bde5d3d8-e6e7-4543-aded-65ed1dcf4d2a); Time taken: 0.001 seconds INFO : OK No rows affected (0.032 seconds) INFO : Compiling command(queryId=hive_20240903111219_3d155400-b09d-4e5e-9c4e-f3d170926608): DROP TEMPORARY FUNCTION IF EXISTS ptyUnprotectDouble INFO : Semantic Analysis Completed (retrial = false) INFO : Created Hive schema: Schema(fieldSchemas:null, properties:null) INFO : Completed compiling command(queryId=hive_20240903111219_3d155400-b09d-4e5e-9c4e-f3d170926608); Time taken: 0.011 seconds INFO : Executing command(queryId=hive_20240903111219_3d155400-b09d-4e5e-9c4e-f3d170926608): DROP TEMPORARY FUNCTION IF EXISTS ptyUnprotectDouble INFO : Starting task [Stage-0:DDL] in serial mode INFO : Completed executing command(queryId=hive_20240903111219_3d155400-b09d-4e5e-9c4e-f3d170926608); Time taken: 0.002 seconds INFO : OK No rows affected (0.032 seconds) INFO : Compiling command(queryId=hive_20240903111219_4a2872e3-1cb0-480b-a2b3-de5a701c703b): DROP TEMPORARY FUNCTION IF EXISTS ptyProtectDec INFO : Semantic Analysis Completed (retrial = false) INFO : Created Hive schema: Schema(fieldSchemas:null, properties:null) INFO : Completed compiling command(queryId=hive_20240903111219_4a2872e3-1cb0-480b-a2b3-de5a701c703b); Time taken: 0.011 seconds INFO : Executing command(queryId=hive_20240903111219_4a2872e3-1cb0-480b-a2b3-de5a701c703b): DROP TEMPORARY FUNCTION IF EXISTS ptyProtectDec INFO : Starting task [Stage-0:DDL] in serial mode INFO : Completed executing command(queryId=hive_20240903111219_4a2872e3-1cb0-480b-a2b3-de5a701c703b); Time taken: 0.001 seconds INFO : OK No rows affected (0.038 seconds) INFO : Compiling command(queryId=hive_20240903111219_36f466a8-310b-4f25-818a-28b60821db7f): DROP TEMPORARY FUNCTION IF EXISTS ptyUnprotectDec INFO : Semantic Analysis Completed (retrial = false) INFO : Created Hive schema: Schema(fieldSchemas:null, properties:null) INFO : Completed compiling command(queryId=hive_20240903111219_36f466a8-310b-4f25-818a-28b60821db7f); Time taken: 0.009 seconds INFO : Executing command(queryId=hive_20240903111219_36f466a8-310b-4f25-818a-28b60821db7f): DROP TEMPORARY FUNCTION IF EXISTS ptyUnprotectDec INFO : Starting task [Stage-0:DDL] in serial mode INFO : Completed executing command(queryId=hive_20240903111219_36f466a8-310b-4f25-818a-28b60821db7f); Time taken: 0.001 seconds INFO : OK No rows affected (0.028 seconds) INFO : Compiling command(queryId=hive_20240903111219_fddc9e49-099e-4292-aee0-24bfbfecacca): DROP TEMPORARY FUNCTION IF EXISTS ptyProtectHiveDecimal INFO : Semantic Analysis Completed (retrial = false) INFO : Created Hive schema: Schema(fieldSchemas:null, properties:null) INFO : Completed compiling command(queryId=hive_20240903111219_fddc9e49-099e-4292-aee0-24bfbfecacca); Time taken: 0.01 seconds INFO : Executing command(queryId=hive_20240903111219_fddc9e49-099e-4292-aee0-24bfbfecacca): DROP TEMPORARY FUNCTION IF EXISTS ptyProtectHiveDecimal INFO : Starting task [Stage-0:DDL] in serial mode INFO : Completed executing command(queryId=hive_20240903111219_fddc9e49-099e-4292-aee0-24bfbfecacca); Time taken: 0.001 seconds INFO : OK No rows affected (0.03 seconds) INFO : Compiling command(queryId=hive_20240903111219_74d95d0f-7e76-425b-ae66-6dfd920ac557): DROP TEMPORARY FUNCTION IF EXISTS ptyUnprotectHiveDecimal INFO : Semantic Analysis Completed (retrial = false) INFO : Created Hive schema: Schema(fieldSchemas:null, properties:null) INFO : Completed compiling command(queryId=hive_20240903111219_74d95d0f-7e76-425b-ae66-6dfd920ac557); Time taken: 0.011 seconds INFO : Executing command(queryId=hive_20240903111219_74d95d0f-7e76-425b-ae66-6dfd920ac557): DROP TEMPORARY FUNCTION IF EXISTS ptyUnprotectHiveDecimal INFO : Starting task [Stage-0:DDL] in serial mode INFO : Completed executing command(queryId=hive_20240903111219_74d95d0f-7e76-425b-ae66-6dfd920ac557); Time taken: 0.003 seconds INFO : OK No rows affected (0.033 seconds) INFO : Compiling command(queryId=hive_20240903111219_febafb87-20ea-4a02-8ab9-72ca0d2a0b77): DROP TEMPORARY FUNCTION IF EXISTS ptyProtectDate INFO : Semantic Analysis Completed (retrial = false) INFO : Created Hive schema: Schema(fieldSchemas:null, properties:null) INFO : Completed compiling command(queryId=hive_20240903111219_febafb87-20ea-4a02-8ab9-72ca0d2a0b77); Time taken: 0.015 seconds INFO : Executing command(queryId=hive_20240903111219_febafb87-20ea-4a02-8ab9-72ca0d2a0b77): DROP TEMPORARY FUNCTION IF EXISTS ptyProtectDate INFO : Starting task [Stage-0:DDL] in serial mode INFO : Completed executing command(queryId=hive_20240903111219_febafb87-20ea-4a02-8ab9-72ca0d2a0b77); Time taken: 0.001 seconds INFO : OK No rows affected (0.035 seconds) INFO : Compiling command(queryId=hive_20240903111219_e8c294d8-f6fe-4658-997c-03a4777012db): DROP TEMPORARY FUNCTION IF EXISTS ptyUnprotectDate INFO : Semantic Analysis Completed (retrial = false) INFO : Created Hive schema: Schema(fieldSchemas:null, properties:null) INFO : Completed compiling command(queryId=hive_20240903111219_e8c294d8-f6fe-4658-997c-03a4777012db); Time taken: 0.012 seconds INFO : Executing command(queryId=hive_20240903111219_e8c294d8-f6fe-4658-997c-03a4777012db): DROP TEMPORARY FUNCTION IF EXISTS ptyUnprotectDate INFO : Starting task [Stage-0:DDL] in serial mode INFO : Completed executing command(queryId=hive_20240903111219_e8c294d8-f6fe-4658-997c-03a4777012db); Time taken: 0.001 seconds INFO : OK No rows affected (0.034 seconds) INFO : Compiling command(queryId=hive_20240903111219_30494334-c4a3-4283-832c-f6b90cd71158): DROP TEMPORARY FUNCTION IF EXISTS ptyProtectDateTime INFO : Semantic Analysis Completed (retrial = false) INFO : Created Hive schema: Schema(fieldSchemas:null, properties:null) INFO : Completed compiling command(queryId=hive_20240903111219_30494334-c4a3-4283-832c-f6b90cd71158); Time taken: 0.012 seconds INFO : Executing command(queryId=hive_20240903111219_30494334-c4a3-4283-832c-f6b90cd71158): DROP TEMPORARY FUNCTION IF EXISTS ptyProtectDateTime INFO : Starting task [Stage-0:DDL] in serial mode INFO : Completed executing command(queryId=hive_20240903111219_30494334-c4a3-4283-832c-f6b90cd71158); Time taken: 0.003 seconds INFO : OK No rows affected (0.038 seconds) INFO : Compiling command(queryId=hive_20240903111219_6122f7cb-fa9b-4ba2-914d-ba38dcde9637): DROP TEMPORARY FUNCTION IF EXISTS ptyUnprotectDateTime INFO : Semantic Analysis Completed (retrial = false) INFO : Created Hive schema: Schema(fieldSchemas:null, properties:null) INFO : Completed compiling command(queryId=hive_20240903111219_6122f7cb-fa9b-4ba2-914d-ba38dcde9637); Time taken: 0.009 seconds INFO : Executing command(queryId=hive_20240903111219_6122f7cb-fa9b-4ba2-914d-ba38dcde9637): DROP TEMPORARY FUNCTION IF EXISTS ptyUnprotectDateTime INFO : Starting task [Stage-0:DDL] in serial mode INFO : Completed executing command(queryId=hive_20240903111219_6122f7cb-fa9b-4ba2-914d-ba38dcde9637); Time taken: 0.003 seconds INFO : OK No rows affected (0.038 seconds) INFO : Compiling command(queryId=hive_20240903111219_ccea3a08-1e38-496b-b7c5-3e02c2c8c1b8): DROP TEMPORARY FUNCTION IF EXISTS ptyProtectChar INFO : Semantic Analysis Completed (retrial = false) INFO : Created Hive schema: Schema(fieldSchemas:null, properties:null) INFO : Completed compiling command(queryId=hive_20240903111219_ccea3a08-1e38-496b-b7c5-3e02c2c8c1b8); Time taken: 0.014 seconds INFO : Executing command(queryId=hive_20240903111219_ccea3a08-1e38-496b-b7c5-3e02c2c8c1b8): DROP TEMPORARY FUNCTION IF EXISTS ptyProtectChar INFO : Starting task [Stage-0:DDL] in serial mode INFO : Completed executing command(queryId=hive_20240903111219_ccea3a08-1e38-496b-b7c5-3e02c2c8c1b8); Time taken: 0.003 seconds INFO : OK No rows affected (0.043 seconds) INFO : Compiling command(queryId=hive_20240903111220_261a30df-1194-4a11-8ba8-f1c8bd2e5631): DROP TEMPORARY FUNCTION IF EXISTS ptyUnprotectChar INFO : Semantic Analysis Completed (retrial = false) INFO : Created Hive schema: Schema(fieldSchemas:null, properties:null) INFO : Completed compiling command(queryId=hive_20240903111220_261a30df-1194-4a11-8ba8-f1c8bd2e5631); Time taken: 0.016 seconds INFO : Executing command(queryId=hive_20240903111220_261a30df-1194-4a11-8ba8-f1c8bd2e5631): DROP TEMPORARY FUNCTION IF EXISTS ptyUnprotectChar INFO : Starting task [Stage-0:DDL] in serial mode INFO : Completed executing command(queryId=hive_20240903111220_261a30df-1194-4a11-8ba8-f1c8bd2e5631); Time taken: 0.002 seconds INFO : OK No rows affected (0.047 seconds) INFO : Compiling command(queryId=hive_20240903111220_d6e8ce00-1eb0-461f-ac52-7e9af1910186): DROP TEMPORARY FUNCTION IF EXISTS ptyStringEnc INFO : Semantic Analysis Completed (retrial = false) INFO : Created Hive schema: Schema(fieldSchemas:null, properties:null) INFO : Completed compiling command(queryId=hive_20240903111220_d6e8ce00-1eb0-461f-ac52-7e9af1910186); Time taken: 0.013 seconds INFO : Executing command(queryId=hive_20240903111220_d6e8ce00-1eb0-461f-ac52-7e9af1910186): DROP TEMPORARY FUNCTION IF EXISTS ptyStringEnc INFO : Starting task [Stage-0:DDL] in serial mode INFO : Completed executing command(queryId=hive_20240903111220_d6e8ce00-1eb0-461f-ac52-7e9af1910186); Time taken: 0.004 seconds INFO : OK No rows affected (0.037 seconds) INFO : Compiling command(queryId=hive_20240903111220_35720d17-47e4-4552-9780-461b282b6913): DROP TEMPORARY FUNCTION IF EXISTS ptyStringDec INFO : Semantic Analysis Completed (retrial = false) INFO : Created Hive schema: Schema(fieldSchemas:null, properties:null) INFO : Completed compiling command(queryId=hive_20240903111220_35720d17-47e4-4552-9780-461b282b6913); Time taken: 0.012 seconds INFO : Executing command(queryId=hive_20240903111220_35720d17-47e4-4552-9780-461b282b6913): DROP TEMPORARY FUNCTION IF EXISTS ptyStringDec INFO : Starting task [Stage-0:DDL] in serial mode INFO : Completed executing command(queryId=hive_20240903111220_35720d17-47e4-4552-9780-461b282b6913); Time taken: 0.001 seconds INFO : OK No rows affected (0.033 seconds) INFO : Compiling command(queryId=hive_20240903111220_2bb57209-4ac3-4c29-b913-775f504671b6): DROP TEMPORARY FUNCTION IF EXISTS ptyStringReEnc INFO : Semantic Analysis Completed (retrial = false) INFO : Created Hive schema: Schema(fieldSchemas:null, properties:null) INFO : Completed compiling command(queryId=hive_20240903111220_2bb57209-4ac3-4c29-b913-775f504671b6); Time taken: 0.016 seconds INFO : Executing command(queryId=hive_20240903111220_2bb57209-4ac3-4c29-b913-775f504671b6): DROP TEMPORARY FUNCTION IF EXISTS ptyStringReEnc INFO : Starting task [Stage-0:DDL] in serial mode INFO : Completed executing command(queryId=hive_20240903111220_2bb57209-4ac3-4c29-b913-775f504671b6); Time taken: 0.002 seconds INFO : OK No rows affected (0.056 seconds)
3.1.5.1.2 - Registering the Spark UDFs
Registering the SparkSQL user-defined functions
- Log in to the master node with a user account having permissions to create and drop UDFs.
- To navigate to the directory that contains the helper script, run the following command:
cd /opt/cloudera/parcels/PTY_BDP/pepspark/scripts - To create the UDFs using the helper script, on the spark-shell, run the following command:
:load /opt/cloudera/parcels/PTY_BDP/pepspark/scripts/create_spark_sql_udfs.scala - Press ENTER.
The script creates all the required user-defined functions for SparkSQL in the current spark-shell session.Loading /opt/cloudera/parcels/PTY_BDP/pepspark/scripts/create_spark_sql_udfs.scala... res0: org.apache.spark.sql.expressions.UserDefinedFunction = SparkUserDefinedFunction($Lambda$2557/1214243533@e9f28,StringType,List(),Some(class[value[0]: string]),Some(ptyGetVersion),true,true) res1: org.apache.spark.sql.expressions.UserDefinedFunction = SparkUserDefinedFunction($Lambda$2603/321785376@684ad81c,StringType,List(),Some(class[value[0]: string]),Some(ptyGetVersionExtended),true,true) res2: org.apache.spark.sql.expressions.UserDefinedFunction = SparkUserDefinedFunction($Lambda$2604/289080194@594bedf5,StringType,List(),Some(class[value[0]: string]),Some(ptyWhoAmI),true,true) res3: org.apache.spark.sql.expressions.UserDefinedFunction = SparkUserDefinedFunction($Lambda$2605/430442099@6ec6adcc,StringType,List(Some(class[value[0]: string]), Some(class[value[0]: string])),Some(class[value[0]: string]),Some(ptyProtectStr),true,true) res4: org.apache.spark.sql.expressions.UserDefinedFunction = SparkUserDefinedFunction($Lambda$2612/1566019818@55b678dc,StringType,List(Some(class[value[0]: string]), Some(class[value[0]: string])),Some(class[value[0]: string]),Some(ptyUnprotectStr),true,true) res5: org.apache.spark.sql.expressions.UserDefinedFunction = SparkUserDefinedFunction($Lambda$2613/1992744664@2dff4ef9,StringType,List(Some(class[value[0]: string]), Some(class[value[0]: string]), Some(class[value[0]: string])),Some(class[value[0]: string]),Some(ptyReprotectStr),true,true) res6: org.apache.spark.sql.expressions.UserDefinedFunction = SparkUserDefinedFunction($Lambda$2621/2144907913@4d13970d,StringType,List(Some(class[value[0]: string]), Some(class[value[0]: string])),Some(class[value[0]: string]),Some(ptyProtectUnicode),true,true) res7: org.apache.spark.sql.expressions.UserDefinedFunction = SparkUserDefinedFunction($Lambda$2622/567181258@7c8d4a94,StringType,List(Some(class[value[0]: string]), Some(class[value[0]: string])),Some(class[value[0]: string]),Some(ptyUnprotectUnicode),true,true) res8: org.apache.spark.sql.expressions.UserDefinedFunction = SparkUserDefinedFunction($Lambda$2623/1248911890@590eb2c5,StringType,List(Some(class[value[0]: string]), Some(class[value[0]: string]), Some(class[value[0]: string])),Some(class[value[0]: string]),Some(ptyReprotectUnicode),true,true) res9: org.apache.spark.sql.expressions.UserDefinedFunction = SparkUserDefinedFunction($Lambda$2639/1206966491@4e3617fe,ShortType,List(Some(class[value[0]: smallint]), Some(class[value[0]: string])),Some(class[value[0]: smallint]),Some(ptyProtectShort),false,true) res10: org.apache.spark.sql.expressions.UserDefinedFunction = SparkUserDefinedFunction($Lambda$2643/1430577369@5056f8d7,ShortType,List(Some(class[value[0]: smallint]), Some(class[value[0]: string])),Some(class[value[0]: smallint]),Some(ptyUnprotectShort),false,true) res11: org.apache.spark.sql.expressions.UserDefinedFunction = SparkUserDefinedFunction($Lambda$2644/1959246940@3e7d458a,ShortType,List(Some(class[value[0]: smallint]), Some(class[value[0]: string]), Some(class[value[0]: string])),Some(class[value[0]: smallint]),Some(ptyReprotectShort),false,true) res12: org.apache.spark.sql.expressions.UserDefinedFunction = SparkUserDefinedFunction($Lambda$2646/468430240@6b874125,IntegerType,List(Some(class[value[0]: int]), Some(class[value[0]: string])),Some(class[value[0]: int]),Some(ptyProtectInt),false,true) res13: org.apache.spark.sql.expressions.UserDefinedFunction = SparkUserDefinedFunction($Lambda$2648/1849024377@377b8c99,IntegerType,List(Some(class[value[0]: int]), Some(class[value[0]: string])),Some(class[value[0]: int]),Some(ptyUnprotectInt),false,true) res14: org.apache.spark.sql.expressions.UserDefinedFunction = SparkUserDefinedFunction($Lambda$2649/1850050643@1ddbf1b0,IntegerType,List(Some(class[value[0]: int]), Some(class[value[0]: string]), Some(class[value[0]: string])),Some(class[value[0]: int]),Some(ptyReprotectInt),false,true) res15: org.apache.spark.sql.expressions.UserDefinedFunction = SparkUserDefinedFunction($Lambda$2650/1751709974@65f23702,LongType,List(Some(class[value[0]: bigint]), Some(class[value[0]: string])),Some(class[value[0]: bigint]),Some(ptyProtectLong),false,true) res16: org.apache.spark.sql.expressions.UserDefinedFunction = SparkUserDefinedFunction($Lambda$2652/1397163963@5d98ac30,LongType,List(Some(class[value[0]: bigint]), Some(class[value[0]: string])),Some(class[value[0]: bigint]),Some(ptyUnprotectLong),false,true) res17: org.apache.spark.sql.expressions.UserDefinedFunction = SparkUserDefinedFunction($Lambda$2653/231449448@5ce648c7,LongType,List(Some(class[value[0]: bigint]), Some(class[value[0]: string]), Some(class[value[0]: string])),Some(class[value[0]: bigint]),Some(ptyReprotectLong),false,true) res18: org.apache.spark.sql.expressions.UserDefinedFunction = SparkUserDefinedFunction($Lambda$2654/916221467@203dff48,FloatType,List(Some(class[value[0]: float]), Some(class[value[0]: string])),Some(class[value[0]: float]),Some(ptyProtectFloat),false,true) res19: org.apache.spark.sql.expressions.UserDefinedFunction = SparkUserDefinedFunction($Lambda$2656/1642716671@2403ecd0,FloatType,List(Some(class[value[0]: float]), Some(class[value[0]: string])),Some(class[value[0]: float]),Some(ptyUnprotectFloat),false,true) res20: org.apache.spark.sql.expressions.UserDefinedFunction = SparkUserDefinedFunction($Lambda$2657/449484397@780f6346,FloatType,List(Some(class[value[0]: float]), Some(class[value[0]: string]), Some(class[value[0]: string])),Some(class[value[0]: float]),Some(ptyReprotectFloat),false,true) res21: org.apache.spark.sql.expressions.UserDefinedFunction = SparkUserDefinedFunction($Lambda$2658/311232024@4718da4b,DoubleType,List(Some(class[value[0]: double]), Some(class[value[0]: string])),Some(class[value[0]: double]),Some(ptyProtectDouble),false,true) res22: org.apache.spark.sql.expressions.UserDefinedFunction = SparkUserDefinedFunction($Lambda$2660/1882823613@136e7e2c,DoubleType,List(Some(class[value[0]: double]), Some(class[value[0]: string])),Some(class[value[0]: double]),Some(ptyUnprotectDouble),false,true) res23: org.apache.spark.sql.expressions.UserDefinedFunction = SparkUserDefinedFunction($Lambda$2661/1574577816@2f4f900d,DoubleType,List(Some(class[value[0]: double]), Some(class[value[0]: string]), Some(class[value[0]: string])),Some(class[value[0]: double]),Some(ptyReprotectDouble),false,true) res24: org.apache.spark.sql.expressions.UserDefinedFunction = SparkUserDefinedFunction($Lambda$2662/701508258@404d6f2,DateType,List(Some(class[value[0]: date]), Some(class[value[0]: string])),Some(class[value[0]: date]),Some(ptyProtectDate),true,true) res25: org.apache.spark.sql.expressions.UserDefinedFunction = SparkUserDefinedFunction($Lambda$2673/1441934479@512f3e71,DateType,List(Some(class[value[0]: date]), Some(class[value[0]: string])),Some(class[value[0]: date]),Some(ptyUnprotectDate),true,true) res26: org.apache.spark.sql.expressions.UserDefinedFunction = SparkUserDefinedFunction($Lambda$2674/19354823@7bacb1b0,DateType,List(Some(class[value[0]: date]), Some(class[value[0]: string]), Some(class[value[0]: string])),Some(class[value[0]: date]),Some(ptyReprotectDate),true,true) res27: org.apache.spark.sql.expressions.UserDefinedFunction = SparkUserDefinedFunction($Lambda$2675/1203531300@31fe39d3,TimestampType,List(Some(class[value[0]: timestamp]), Some(class[value[0]: string])),Some(class[value[0]: timestamp]),Some(ptyProtectDateTime),true,true) res28: org.apache.spark.sql.expressions.UserDefinedFunction = SparkUserDefinedFunction($Lambda$2676/1395761147@5d81b1ef,TimestampType,List(Some(class[value[0]: timestamp]), Some(class[value[0]: string])),Some(class[value[0]: timestamp]),Some(ptyUnprotectDateTime),true,true) res29: org.apache.spark.sql.expressions.UserDefinedFunction = SparkUserDefinedFunction($Lambda$2677/971152222@1af59a5e,TimestampType,List(Some(class[value[0]: timestamp]), Some(class[value[0]: string]), Some(class[value[0]: string])),Some(class[value[0]: timestamp]),Some(ptyReprotectDateTime),true,true) res30: org.apache.spark.sql.expressions.UserDefinedFunction = SparkUserDefinedFunction($Lambda$2678/449445798@4f994c53,DecimalType(38,18),List(Some(class[value[0]: decimal(38,18)]), Some(class[value[0]: string]), Some(class[value[0]: string])),Some(class[value[0]: decimal(38,18)]),Some(ptyProtectDecimal),true,true) res31: org.apache.spark.sql.expressions.UserDefinedFunction = SparkUserDefinedFunction($Lambda$2687/375594857@7f5ae905,DecimalType(38,18),List(Some(class[value[0]: decimal(38,18)]), Some(class[value[0]: string]), Some(class[value[0]: string])),Some(class[value[0]: decimal(38,18)]),Some(ptyUnprotectDecimal),true,true) res32: org.apache.spark.sql.expressions.UserDefinedFunction = SparkUserDefinedFunction($Lambda$2688/2133807474@33f1f5a,DecimalType(38,18),List(Some(class[value[0]: decimal(38,18)]), Some(class[value[0]: string]), Some(class[value[0]: string])),Some(class[value[0]: decimal(38,18)]),Some(ptyReprotectDecimal),true,true) res33: org.apache.spark.sql.expressions.UserDefinedFunction = SparkUserDefinedFunction($Lambda$2691/1933809761@d57894d,BinaryType,List(Some(class[value[0]: string]), Some(class[value[0]: string])),Some(class[value[0]: binary]),Some(ptyStringEnc),true,true) res34: org.apache.spark.sql.expressions.UserDefinedFunction = SparkUserDefinedFunction($Lambda$2693/255369243@25ed9699,StringType,List(Some(class[value[0]: binary]), Some(class[value[0]: string])),Some(class[value[0]: string]),Some(ptyStringDec),true,true) res35: org.apache.spark.sql.expressions.UserDefinedFunction = SparkUserDefinedFunction($Lambda$2694/542980564@7382cd26,BinaryType,List(Some(class[value[0]: binary]), Some(class[value[0]: string]), Some(class[value[0]: string])),Some(class[value[0]: binary]),Some(ptyStringReEnc),true,true)
Registering the PySpark Scala Wrapper user-defined functions
- Log in to the master node with a user account having permissions to create and drop UDFs.
- To navigate to the directory that contains the helper script, run the following command:
cd /opt/cloudera/parcels/PTY_BDP/pepspark/scripts - To create the UDFs using the helper script, run the following command in the
pysparkshell:exec(open("/opt/cloudera/parcels/PTY_BDP/pepspark/scripts/create_scala_wrapper_udfs.py").read()); - Press ENTER.
The script creates all the required Scala Wrapper user-defined functions in the current pyspark session.
3.1.5.1.3 - Registering the Impala UDFs
Registering the Impala user-defined functions
- Log in to the master node with a user account having permissions to create and drop UDFs.
- To navigate to the directory that contains the helper script, run the following command:
cd /opt/cloudera/parcels/PTY_BDP/pepimpala/sqlscripts - To create the UDFs using the helper script, run the following command:
impala-shell -i node1 -k -f createobjects.sql - Press ENTER.
The script creates all the required user-defined functions for Impala.Starting Impala Shell with Kerberos authentication using Python 2.7.18 Using service name 'impala' Warning: live_progress only applies to interactive shell sessions, and is being skipped for now. Opened TCP connection to node1:21000 Connected to node1:21000 Server version: impalad version 4.0.0.7.1.8.0-801 RELEASE (build a3b56f90d9c31ebfa5ce3c266700284a420db28f) Query: --------------------------------------------------------------------- -- Protegrity DPS User Defined Functions. -- Copyright (c) 2014 Protegrity USA, Inc. All rights reserved -- -- This script must be run by user that has 'superuser' privilegies. --------------------------------------------------------------------- CREATE FUNCTION pty_getversion() RETURNS STRING LOCATION '/opt/protegrity/impala/udfs/pepimpala3_4_RHEL.so' SYMBOL = 'pty_getversion' +----------------------------+ | summary | +----------------------------+ | Function has been created. | +----------------------------+ Fetched 1 row(s) in 1.51s Query: CREATE FUNCTION pty_getversionextended() RETURNS STRING LOCATION '/opt/protegrity/impala/udfs/pepimpala3_4_RHEL.so' SYMBOL = 'pty_getversionextended' +----------------------------+ | summary | +----------------------------+ | Function has been created. | +----------------------------+ Fetched 1 row(s) in 0.22s Query: CREATE FUNCTION pty_whoami() RETURNS STRING LOCATION '/opt/protegrity/impala/udfs/pepimpala3_4_RHEL.so' SYMBOL = 'pty_whoami' +----------------------------+ | summary | +----------------------------+ | Function has been created. | +----------------------------+ Fetched 1 row(s) in 0.12s Query: CREATE FUNCTION pty_stringenc(STRING, STRING) RETURNS STRING LOCATION '/opt/protegrity/impala/udfs/pepimpala3_4_RHEL.so' SYMBOL = 'pty_stringenc' prepare_fn='UdfPrepare' close_fn='UdfClose' +----------------------------+ | summary | +----------------------------+ | Function has been created. | +----------------------------+ Fetched 1 row(s) in 0.12s Query: CREATE FUNCTION pty_stringdec(STRING, STRING ) RETURNS STRING LOCATION '/opt/protegrity/impala/udfs/pepimpala3_4_RHEL.so' SYMBOL = 'pty_stringdec' prepare_fn='UdfPrepare' close_fn='UdfClose' +----------------------------+ | summary | +----------------------------+ | Function has been created. | +----------------------------+ Fetched 1 row(s) in 0.23s Query: CREATE FUNCTION pty_stringins(STRING,STRING ) RETURNS STRING LOCATION '/opt/protegrity/impala/udfs/pepimpala3_4_RHEL.so' SYMBOL = 'pty_stringins' prepare_fn='UdfPrepare' close_fn='UdfClose' +----------------------------+ | summary | +----------------------------+ | Function has been created. | +----------------------------+ Fetched 1 row(s) in 0.19s Query: CREATE FUNCTION pty_stringsel(STRING, STRING ) RETURNS STRING LOCATION '/opt/protegrity/impala/udfs/pepimpala3_4_RHEL.so' SYMBOL = 'pty_stringsel' prepare_fn='UdfPrepare' close_fn='UdfClose' +----------------------------+ | summary | +----------------------------+ | Function has been created. | +----------------------------+ Fetched 1 row(s) in 0.13s Query: CREATE FUNCTION pty_unicodestringins(STRING,STRING ) RETURNS STRING LOCATION '/opt/protegrity/impala/udfs/pepimpala3_4_RHEL.so' SYMBOL = 'pty_unicodestringins' prepare_fn='UdfPrepare' close_fn='UdfClose' +----------------------------+ | summary | +----------------------------+ | Function has been created. | +----------------------------+ Fetched 1 row(s) in 0.14s Query: CREATE FUNCTION pty_unicodestringsel(STRING,STRING ) RETURNS STRING LOCATION '/opt/protegrity/impala/udfs/pepimpala3_4_RHEL.so' SYMBOL = 'pty_unicodestringsel' prepare_fn='UdfPrepare' close_fn='UdfClose' +----------------------------+ | summary | +----------------------------+ | Function has been created. | +----------------------------+ Fetched 1 row(s) in 0.12s Query: CREATE FUNCTION pty_unicodestringfpeins(STRING,STRING ) RETURNS STRING LOCATION '/opt/protegrity/impala/udfs/pepimpala3_4_RHEL.so' SYMBOL = 'pty_unicodestringfpeins' prepare_fn='UdfPrepare' close_fn='UdfClose' +----------------------------+ | summary | +----------------------------+ | Function has been created. | +----------------------------+ Fetched 1 row(s) in 0.14s Query: CREATE FUNCTION pty_unicodestringfpesel(STRING,STRING ) RETURNS STRING LOCATION '/opt/protegrity/impala/udfs/pepimpala3_4_RHEL.so' SYMBOL = 'pty_unicodestringfpesel' prepare_fn='UdfPrepare' close_fn='UdfClose' +----------------------------+ | summary | +----------------------------+ | Function has been created. | +----------------------------+ Fetched 1 row(s) in 0.12s Query: CREATE FUNCTION pty_integerenc(INTEGER, STRING ) RETURNS STRING LOCATION '/opt/protegrity/impala/udfs/pepimpala3_4_RHEL.so' SYMBOL = 'pty_integerenc' prepare_fn='UdfPrepare' close_fn='UdfClose' +----------------------------+ | summary | +----------------------------+ | Function has been created. | +----------------------------+ Fetched 1 row(s) in 0.23s Query: CREATE FUNCTION pty_integerdec(STRING, STRING ) RETURNS INTEGER LOCATION '/opt/protegrity/impala/udfs/pepimpala3_4_RHEL.so' SYMBOL = 'pty_integerdec' prepare_fn='UdfPrepare' close_fn='UdfClose' +----------------------------+ | summary | +----------------------------+ | Function has been created. | +----------------------------+ Fetched 1 row(s) in 0.13s Query: CREATE FUNCTION pty_integerins(INTEGER, STRING ) RETURNS INTEGER LOCATION '/opt/protegrity/impala/udfs/pepimpala3_4_RHEL.so' SYMBOL = 'pty_integerins' prepare_fn='UdfPrepare' close_fn='UdfClose' +----------------------------+ | summary | +----------------------------+ | Function has been created. | +----------------------------+ Fetched 1 row(s) in 0.15s Query: CREATE FUNCTION pty_integersel(INTEGER, STRING ) RETURNS INTEGER LOCATION '/opt/protegrity/impala/udfs/pepimpala3_4_RHEL.so' SYMBOL = 'pty_integersel' prepare_fn='UdfPrepare' close_fn='UdfClose' +----------------------------+ | summary | +----------------------------+ | Function has been created. | +----------------------------+ Fetched 1 row(s) in 0.13s Query: CREATE FUNCTION pty_doubleenc(double, STRING ) RETURNS string LOCATION '/opt/protegrity/impala/udfs/pepimpala3_4_RHEL.so' SYMBOL = 'pty_doubleenc' prepare_fn='UdfPrepare' close_fn='UdfClose' +----------------------------+ | summary | +----------------------------+ | Function has been created. | +----------------------------+ Fetched 1 row(s) in 0.15s Query: CREATE FUNCTION pty_doubledec(STRING, STRING ) RETURNS double LOCATION '/opt/protegrity/impala/udfs/pepimpala3_4_RHEL.so' SYMBOL = 'pty_doubledec' prepare_fn='UdfPrepare' close_fn='UdfClose' +----------------------------+ | summary | +----------------------------+ | Function has been created. | +----------------------------+ Fetched 1 row(s) in 0.14s Query: CREATE FUNCTION pty_doubleins(double, STRING ) RETURNS double LOCATION '/opt/protegrity/impala/udfs/pepimpala3_4_RHEL.so' SYMBOL = 'pty_doubleins' prepare_fn='UdfPrepare' close_fn='UdfClose' +----------------------------+ | summary | +----------------------------+ | Function has been created. | +----------------------------+ Fetched 1 row(s) in 0.13s Query: CREATE FUNCTION pty_doublesel(DOUBLE, STRING ) RETURNS DOUBLE LOCATION '/opt/protegrity/impala/udfs/pepimpala3_4_RHEL.so' SYMBOL = 'pty_doublesel' prepare_fn='UdfPrepare' close_fn='UdfClose' +----------------------------+ | summary | +----------------------------+ | Function has been created. | +----------------------------+ Fetched 1 row(s) in 0.14s Query: CREATE FUNCTION pty_floatenc(float, STRING ) RETURNS string LOCATION '/opt/protegrity/impala/udfs/pepimpala3_4_RHEL.so' SYMBOL = 'pty_floatenc' prepare_fn='UdfPrepare' close_fn='UdfClose' +----------------------------+ | summary | +----------------------------+ | Function has been created. | +----------------------------+ Fetched 1 row(s) in 0.12s Query: CREATE FUNCTION pty_floatdec(STRING, STRING ) RETURNS float LOCATION '/opt/protegrity/impala/udfs/pepimpala3_4_RHEL.so' SYMBOL = 'pty_floatdec' prepare_fn='UdfPrepare' close_fn='UdfClose' +----------------------------+ | summary | +----------------------------+ | Function has been created. | +----------------------------+ Fetched 1 row(s) in 0.13s Query: CREATE FUNCTION pty_floatins(float, STRING ) RETURNS float LOCATION '/opt/protegrity/impala/udfs/pepimpala3_4_RHEL.so' SYMBOL = 'pty_floatins' prepare_fn='UdfPrepare' close_fn='UdfClose' +----------------------------+ | summary | +----------------------------+ | Function has been created. | +----------------------------+ Fetched 1 row(s) in 0.13s Query: CREATE FUNCTION pty_floatsel(float, STRING ) RETURNS float LOCATION '/opt/protegrity/impala/udfs/pepimpala3_4_RHEL.so' SYMBOL = 'pty_floatsel' prepare_fn='UdfPrepare' close_fn='UdfClose' +----------------------------+ | summary | +----------------------------+ | Function has been created. | +----------------------------+ Fetched 1 row(s) in 0.13s Query: CREATE FUNCTION pty_smallintenc(smallint, STRING ) RETURNS string LOCATION '/opt/protegrity/impala/udfs/pepimpala3_4_RHEL.so' SYMBOL = 'pty_smallintenc' prepare_fn='UdfPrepare' close_fn='UdfClose' +----------------------------+ | summary | +----------------------------+ | Function has been created. | +----------------------------+ Fetched 1 row(s) in 0.13s Query: CREATE FUNCTION pty_smallintdec(STRING, STRING ) RETURNS smallint LOCATION '/opt/protegrity/impala/udfs/pepimpala3_4_RHEL.so' SYMBOL = 'pty_smallintdec' prepare_fn='UdfPrepare' close_fn='UdfClose' +----------------------------+ | summary | +----------------------------+ | Function has been created. | +----------------------------+ Fetched 1 row(s) in 0.13s Query: CREATE FUNCTION pty_smallintins(smallint, STRING ) RETURNS smallint LOCATION '/opt/protegrity/impala/udfs/pepimpala3_4_RHEL.so' SYMBOL = 'pty_smallintins' prepare_fn='UdfPrepare' close_fn='UdfClose' +----------------------------+ | summary | +----------------------------+ | Function has been created. | +----------------------------+ Fetched 1 row(s) in 0.12s Query: CREATE FUNCTION pty_smallintsel(smallint, STRING ) RETURNS smallint LOCATION '/opt/protegrity/impala/udfs/pepimpala3_4_RHEL.so' SYMBOL = 'pty_smallintsel' prepare_fn='UdfPrepare' close_fn='UdfClose' +----------------------------+ | summary | +----------------------------+ | Function has been created. | +----------------------------+ Fetched 1 row(s) in 0.13s Query: CREATE FUNCTION pty_bigintenc(bigint, STRING) RETURNS string LOCATION '/opt/protegrity/impala/udfs/pepimpala3_4_RHEL.so' SYMBOL = 'pty_bigintenc' prepare_fn='UdfPrepare' close_fn='UdfClose' +----------------------------+ | summary | +----------------------------+ | Function has been created. | +----------------------------+ Fetched 1 row(s) in 0.13s Query: CREATE FUNCTION pty_bigintdec(STRING, STRING) RETURNS bigint LOCATION '/opt/protegrity/impala/udfs/pepimpala3_4_RHEL.so' SYMBOL = 'pty_bigintdec' prepare_fn='UdfPrepare' close_fn='UdfClose' +----------------------------+ | summary | +----------------------------+ | Function has been created. | +----------------------------+ Fetched 1 row(s) in 0.12s Query: CREATE FUNCTION pty_bigintins(bigint, STRING) RETURNS bigint LOCATION '/opt/protegrity/impala/udfs/pepimpala3_4_RHEL.so' SYMBOL = 'pty_bigintins' prepare_fn='UdfPrepare' close_fn='UdfClose' +----------------------------+ | summary | +----------------------------+ | Function has been created. | +----------------------------+ Fetched 1 row(s) in 0.12s Query: CREATE FUNCTION pty_bigintsel(bigint, STRING) RETURNS bigint LOCATION '/opt/protegrity/impala/udfs/pepimpala3_4_RHEL.so' SYMBOL = 'pty_bigintsel' prepare_fn='UdfPrepare' close_fn='UdfClose' +----------------------------+ | summary | +----------------------------+ | Function has been created. | +----------------------------+ Fetched 1 row(s) in 0.12s Query: CREATE FUNCTION pty_dateenc(date, STRING ) RETURNS string LOCATION '/opt/protegrity/impala/udfs/pepimpala3_4_RHEL.so' SYMBOL = 'pty_dateenc' prepare_fn='UdfPrepare' close_fn='UdfClose' +----------------------------+ | summary | +----------------------------+ | Function has been created. | +----------------------------+ Fetched 1 row(s) in 0.12s Query: CREATE FUNCTION pty_datedec(STRING, STRING ) RETURNS date LOCATION '/opt/protegrity/impala/udfs/pepimpala3_4_RHEL.so' SYMBOL = 'pty_datedec' prepare_fn='UdfPrepare' close_fn='UdfClose' +----------------------------+ | summary | +----------------------------+ | Function has been created. | +----------------------------+ Fetched 1 row(s) in 0.13s Query: CREATE FUNCTION pty_dateins(date, STRING ) RETURNS date LOCATION '/opt/protegrity/impala/udfs/pepimpala3_4_RHEL.so' SYMBOL = 'pty_dateins' prepare_fn='UdfPrepare' close_fn='UdfClose' +----------------------------+ | summary | +----------------------------+ | Function has been created. | +----------------------------+ Fetched 1 row(s) in 0.13s Query: CREATE FUNCTION pty_datesel(date, STRING ) RETURNS date LOCATION '/opt/protegrity/impala/udfs/pepimpala3_4_RHEL.so' SYMBOL = 'pty_datesel' prepare_fn='UdfPrepare' close_fn='UdfClose' +----------------------------+ | summary | +----------------------------+ | Function has been created. | +----------------------------+ Fetched 1 row(s) in 0.14s
3.1.5.1.4 - Installing the Impala UDFs
To use the Impala component, first install the UDFs. The UDFs for Impala are available in the pepimpala.so file. This file is available in the /opt/cloudera/parcels/PTY_BDP/pepimpala/ directory after installing the Big Data Protector. To install the Impala UDFs:
- Load the
pepimpala.sofile to HDFS. - Execute the
.sqlscripts to load the Impala UDFs.
To install the Impala UDFs:
Ensure that the cluster is installed, configured, and running.
To create the
/opt/protegrity/impala/udfs/directory in HDFS, run the following command:sudo -u hdfs hadoop fs -mkdir -p /opt/protegrity/impala/udfs/To assign Impala supergroup permissions to the
/opt/protegrity/impala/udfs/directory, run the following command:sudo -u hdfs hadoop fs -chown -R impala:supergroup /opt/protegrity/impala/udfs/To navigate to the
/opt/cloudera/parcels/PTY_BDP/pepimpala/directory, run the following command:cd /opt/cloudera/parcels/PTY_BDP/pepimpala/To load the
pepimpala.sofile to the/opt/Protegrity/impala/udfs/directory, run the following command:sudo -u hdfs hadoop fs -put pepimpala<version>.so /opt/protegrity/impala/udfsIn this case, the name of the shared objects file considered as
pepimpala.so. Typically, the name of the shared objects file ispepimpala<xx>RHEL.so, whereis the version of the file, which needs to be considered. Navigate to the
/opt/cloudera/parcels/PTY_BDP/pepimpala/sqlscripts/directory.Note: This directory contains the SQL scripts to install the Protegrity UDFs for the Impala protector.
If you are not using a Kerberos-enabled Hadoop cluster, then execute the
createobjects.sqlscript to install the Protegrity UDFs for the Impala protector.impala-shell -i <IP address of any Impala slave node> -f /opt/cloudera/parcels/PTY_BDP/pepimpala/sqlscripts/createobjects.sqlIf you are using a Kerberos-enabled Hadoop cluster, then execute the
createobjects.sqlscript to load the Protegrity UDFs for the Impala protector.impala-shell -i <IP address of any Impala slave node> -f /opt/cloudera/parcels/PTY_BDP/pepimpala/sqlscripts/createobjects.sql -kNote: For more information about registering the Impala UDFs using the helper script, refer to Registering the Impala UDFs.
3.1.5.2 - Updating the Parcels
3.1.5.2.1 - Updating the Certificate Parcel with a Restart
Before you begin
Perform the steps, mentioned in the section, before executing the configurator script. These steps are required to:
- Export the ESA/PPC IP and port as variables.
- Create a directory to store ESA/PPC certificates.
- Download ESA/PPC certificates.
- Retrieve the Fully Qualified Domain Name for ESA/PPC.
- Add the ESA/PPC FQDN and IP address to the
/etc/hostsfile. - Set the
SSL_CERT_FILEvariable to point to the ESA/PPC certificate.
- To export the variables for ESA/PPC IP and port, run the following command:
export ESA_IP=<ESA_IP_Address> export ESA_PORT=8443 - To create a directory for the certificates, run the following command:
sudo mkdir -p /opt/esa/certs - To download the Server certificate from ESA/PPC, run the following command:
openssl s_client -connect $ESA_IP:$ESA_PORT -servername $ESA_IP -showcerts </dev/null 2>/dev/null \ | sed -n '/-----BEGIN CERTIFICATE-----/,/-----END CERTIFICATE-----/p' \ | sudo tee /opt/esa/certs/ProtegrityCA.pem >/dev/null - To retrieve ESA/PPC FQDN, run the following command:
ESA_FQDN=$(openssl x509 -in /opt/esa/certs/ProtegrityCA.pem -noout -subject \ | grep -oP 'CN\s*=\s*\K[^,]+') echo "ESA FQDN: $ESA_FQDN" - To add the ESA/PPC FQDN and the IP Address to the
/etc/hostsfile, run the following command:echo "$ESA_IP $ESA_FQDN" | sudo tee -a /etc/hosts - Set the
SSL_CERT_FILEvariable on the instance where the configurator script will run. The variable must point to the location of the Server certificate. For example:export SSL_CERT_FILE=<full_path_to_the_server_certificate_file>
Updating the Certificate Parcel
If the ESA contains updated certificates that the Big Data Protector is configured to use, update the Certificates parcel with the new certificates. The updated Certificates parcel must be utilized by all the nodes in the cluster.
To utilize the updated certificates:
Log in to the node, which contains the Big Data Protector configurator script.
To execute the configurator script, run the following command:
./BDPConfigurator_CDP-PVC-Base-<CDP_version>_<BDP_version>.shPress ENTER.
The prompt to continue the configuration of the Big Data Protector appears.***************************************************************************** Welcome to the Big Data Protector Configurator Wizard ***************************************************************************** This will setup the Big Data Protector Installation Files for CDP PVC Base Do you want to continue? [yes or no]:To start configuration of the Big Data Protector, type
yes.Press ENTER.
The prompt to select the type of installation file appears.Big Data Protector Configurator started... Unpacking... Extracting files... Select the type of Installation files you want to generate. [ 1: Create All ] : Creates entire Big Data Protector CSDs and Parcels. [ 2: Update PTY_CERT ] : Creates new PTY_CERT parcel with an incremented patch version. Use this if you have updated the ESA certificates. [ 3: Update PTY_LOGFORWARDER_CONF ] : Creates new PTY_LOGFORWARDER_CONF parcel with an incremented patch version. Use this if you want to set Custom LogForwarder configuration files to forward logs to an External Audit Store. [ 1, 2 or 3 ]:To update the ESA certificates in the
PTY_CERTparcel, type2.Press ENTER.
The prompt to select the operating system for the parcel appears.Select the OS version for Cloudera Manager Parcel. This will be used as the OS Distro suffix in the Parcel name. [ 1: el7 ] : RHEL 7 and clones (CentOS, Scientific Linux, etc) [ 2: el8 ] : RHEL 8 and clones (CentOS, Scientific Linux, etc) [ 3: el9 ] : RHEL 9 and clones (CentOS, Scientific Linux, etc) [ 4: sles12 ] : SuSE Linux Enterprise Server 12.x [ 5: sles15 ] : SuSE Linux Enterprise Server 15.x Enter the no.:Note: Failure to set the value of the SSL_CERT_FILE variable returns the following error:
ERROR: SSL_CERT_FILE is not set or does not point at a valid CA bundle. Secure mode is mandatory for ESA TLS validation. 1. Save the ESA CA cert to a readable path (e.g. /opt/esa/certs/ProtegrityCA.pem). 2. Add '<esa_ip> <esa_cn>' to /etc/hosts so the ESA CN/SAN resolves. 3. export SSL_CERT_FILE=<path-from-step-1> and re-run this configurator. Exiting Configurator Script....Depending on the requirements, type
1,2,3,4, or5to select the operating system version for the Big Data Protector parcels.Press ENTER.
The prompt to enter the Fully Qualified Domain Name (FQDN) for ESA/PPC appears.Secure mode: verifying ESA against CA bundle '/<location_of_certificate>/CA.pem'. Enter ESA Fully Qualified Domain Name (FQDN):Enter Fully Qualified Domain Name (FQDN) for ESA/PPC.
Press ENTER.
The prompt to enter the ESA host listening port appears.Enter ESA host listening port [8443]:To use the default value of the ESA host listening port, which is
8443, then press ENTER.Note: To use PPC, enter the value of the listening port as
25400.In case of an external proxy configuration having connectivity with the ESA/PPC to download the certificates and password binaries from the ESA/PPC, then enter the external Proxy listening port.
Press ENTER.
The prompt to enter the ESA JSON Web Token (JWT) appears.If you have an existing ESA JSON Web Token (JWT) with Export Certificates role, enter it otherwise enter 'no':Note: The script silently reads the user input. Therefore, the user will be unable to see the entered JWT or
no.Enter the JWT token.
a. In case of unavailability of an existing ESA JSON Web Token (JWT), typeno.
b. Press ENTER.
The prompt to enter the ESA user name appears.JWT was not provided. Script will now prompt for ESA username and password. Enter ESA Username with Export Certificates role:c. Enter the ESA username.
d. Press ENTER.
The prompt to enter the password for the ESA appears.Enter Password for username '<user_name>':e. Enter the ESA administrator password.
f. Press ENTER.
The script retrieves the JWT token from the ESA/PPC, downloads the certificates, and generates the installation files. The prompt to enter the activated version of thePTY_CERTparcel appears.Press ENTER.
The script validates the JWT token from the ESA/PPC, downloads the certificates, and generates the installation files. The prompt to enter the activated version of thePTY_CERTparcel appears.Fetching JWT from ESA.... Fetching Certificates from ESA.... % Total % Received % Xferd Average Speed Time Time Time Current Dload Upload Total Spent Left Speed 100 11264 100 11264 0 0 147k 0 --:--:-- --:--:-- --:--:-- 148k ------------------------------------------------------------------------------- Generating Installation files... NOTE: You can verify the version of the activated PTY_CERT parcel from the parcel name, such as PTY_CERT-x.x.x.x_CDPx.x.p<version>-<os>.parcel, where the <version> parameter denotes the patch version of the PTY_CERT parcel. For Example: If the current activated PTY_CERT parcel is PTY_CERT-x.x.x.x_CDPx.x.p0-<os>.parcel, the patch version of the PTY_CERT parcel will be 0. Do NOT include 'p' while specifying the version. Enter the <version> of the current PTY_CERT Parcel as specified in the parcel name [0]:Enter the current activated patch version of the
PTY_CERTparcel.Press ENTER.
The script generates the updated certificates parcel in the/Installation_Files/directory.The updated PTY_CERT parcel 'PTY_CERT-<BDP_version>_CDP<CDP_version>.p1-<operating_system_version>.parcel' is generated in ./Installation_Files/ directory. NOTE: Copy PTY_CERT-<BDP_version>_CDP<CDP_version>.p1-<operating_system_version>.parcel and .sha files to Cloudera Manager local parcel repository.Copy the new Certificate parcel to the local parcel repository of Cloudera Manager.
The default local parcel repository for Cloudera Manager is located in the/opt/cloudera/parcel-repo/directory.Navigate to the local parcel repository directory.
In this case, the local parcel repository is stored in the/opt/cloudera/parcel-repo/directory.To assign the ownership permissions for Cloudera SCM to the new Certificate parcel and checksum file, run the following command:
chown cloudera-scm:cloudera-scm PTY_*Press ENTER.
To set 640 permissions to the parcel files, run the following command:
chmod 640 PTY_*Press ENTER.
The command assigns read and write permissions to the owner, read permissions to the group, and restricts access to all other users.Log in to the Cloudera Manager web interface.
Navigate to the Parcels page.
The Parcels page appears.To fetch the updated parcels, click Check for New Parcels.
Cloudera Manager fetches the updated PTY_CERT parcel.Distribute the new Certificate parcel to the nodes.
Note: For more information about distributing the new Certificate parcel, refer to Distributing the Big Data Protector Parcels to the Nodes.
Activate the new Certificate parcel on the nodes.
Note: For more information about activating the new Certificate parcel, refer to Activating the Big Data Protector Parcels on the Nodes.
Restart the BDP Service.
3.1.5.2.2 - Updating the Certificate Parcel without a Restart
After updating the certificate parcel and distributing it to the nodes, a restart of the BDP service is required. This restart enables Cloudera Manager to ensure the state of BDP service is up to date and links itself with the latest activated PTY_CERT parcel. However, restarting results in a loss of production hours. Therefore, Protegrity has introduced a feature wherein you can update the certificate parcel without restarting the BDP service.
To update the certificate parcel without restarting the BDP service:
Update the certificate parcel as mentioned in the section Updating the certificate parcels.
Using a browser, navigate to the Cloudera Manager page.
Enter the Username.
Enter the Password.
Click Sign In.
The Cloudera Manager Home page appears.From the left pane, click Parcels.
The Cloudera Manager Parcels page appears.To distribute the Certificate parcel, beside the PTY_CERT parcel, click Distribute.
Cloudera Manager distributes the Certificate parcel to all the nodes and enables the Activate button.To activate the certificate parcel without a restart, beside the PTY_CERT parcel, click Activate.
The prompt to activate the certificate parcel appears.Select Activate Only.
Click OK.
Cloudera Manager deactivates the existing certificate parcel from all the nodes and activates the updated certificate parcel on all the nodes. After the activation is complete, Cloudera Manager enables the Deactivate option for the updated PTY_CERT parcel.Navigate to the Cloudera Manager Home page. The Cloudera Manager Home page indicates a stale configuration in the BDP Service because the updated certificate parcel was activated without a restart.
Note: Ignore the stale configuration alert because the certificate udpate feature does not require a restart of the BDP Service.
To view the service page, click BDP Service.
The BDP Service page appears.To update the certificate parcel on all the nodes, select Actions > Rotate certificates for all RP Agents.
The prompt to confirm the action appears.Click Rotate certificates for all RP Agents.
Cloudera Manager executes the rotate certificate command and updates the certificates used by the RPAgent instances on all the nodes in the cluster.Click Close.
The command extracts the certificates from the latest activated PTY_CERT parcel directory/opt/cloudera/parcels/PTY_CERT/data/esacerts.tarto the default RPAgent directory/opt/cloudera/parcels/PTY_BDP/rpagent/data/on each node. The RPAgent will establish a TLS connection, download the policy, and fetch the certificates from therpagent/data/directory every time it polls the ESA. This eliminates the need to restart the service to fetch the updated certificates.Note: The BDP Service in Cloudera Manager will fetch the updated certificate parcel,
PTY_CERT, on the new node whenever a new node is added to an existing cluster.
3.1.5.2.3 - Updating the Log Forwarder Parcel
Before you begin
Perform the steps, mentioned in the section, before executing the configurator script. These steps are required to:
- Export the ESA/PPC IP and port as variables.
- Create a directory to store ESA/PPC certificates.
- Download ESA/PPC certificates.
- Retrieve the Fully Qualified Domain Name for ESA/PPC.
- Add the ESA/PPC FQDN and IP address to the
/etc/hostsfile. - Set the
SSL_CERT_FILEvariable to point to the ESA/PPC certificate.
- To export the variables for ESA/PPC IP and port, run the following command:
export ESA_IP=<ESA_IP_Address> export ESA_PORT=8443 - To create a directory for the certificates, run the following command:
sudo mkdir -p /opt/esa/certs - To download the Server certificate from ESA/PPC, run the following command:
openssl s_client -connect $ESA_IP:$ESA_PORT -servername $ESA_IP -showcerts </dev/null 2>/dev/null \ | sed -n '/-----BEGIN CERTIFICATE-----/,/-----END CERTIFICATE-----/p' \ | sudo tee /opt/esa/certs/ProtegrityCA.pem >/dev/null - To retrieve ESA/PPC FQDN, run the following command:
ESA_FQDN=$(openssl x509 -in /opt/esa/certs/ProtegrityCA.pem -noout -subject \ | grep -oP 'CN\s*=\s*\K[^,]+') echo "ESA FQDN: $ESA_FQDN" - To add the ESA/PPC FQDN and the IP Address to the
/etc/hostsfile, run the following command:echo "$ESA_IP $ESA_FQDN" | sudo tee -a /etc/hosts - Set the
SSL_CERT_FILEvariable on the instance where the configurator script will run. The variable must point to the location of the Server certificate. For example:export SSL_CERT_FILE=<full_path_to_the_server_certificate_file>
Updating the Log Forwarder Parcel
Update, distribute, and activate the PTY_LOGFORWARDER_CONF parcel on all the nodes in the cluster. This is required to use a newer set of custom Log Forwarder configuration files to send the logs to an External Audit Store.
To update the Log Forwarder parcel:
- Log in to the host machine, which contains the Big Data Protector configurator script.
- To execute the configurator script, run the following command:
./BDPConfigurator_CDP-PVC-Base-<CDP_version>_<BDP_version>.sh - Press ENTER.
The prompt to continue the configuration of Big Data Protector appears.***************************************************************************** Welcome to the Big Data Protector Configurator Wizard ***************************************************************************** This will setup the Big Data Protector Installation Files for CDP PVC Base Do you want to continue? [yes or no]: - To start configuration of the Big Data Protector, type
yes. - Press ENTER.
The prompt to select the type of installation file appears.Big Data Protector Configurator started... Unpacking... Extracting files... Select the type of Installation files you want to generate. [ 1: Create All ] : Creates entire Big Data Protector CSDs and Parcels. [ 2: Update PTY_CERT ] : Creates new PTY_CERT parcel with an incremented patch version. Use this if you have updated the ESA certificates. [ 3: Update PTY_LOGFORWARDER_CONF ] : Creates new PTY_LOGFORWARDER_CONF parcel with an incremented patch version. Use this if you want to set Custom LogForwarder configuration files to forward logs to an External Audit Store. [ 1, 2 or 3 ]: - To update the Log Forwarder parcel, type
3. - Press ENTER.
The prompt to select the operating system version appears.Select the OS version for Cloudera Manager Parcel. This will be used as the OS Distro suffix in the Parcel name. [ 1: el7 ] : RHEL 7 and clones (CentOS, Scientific Linux, etc) [ 2: el8 ] : RHEL 8 and clones (CentOS, Scientific Linux, etc) [ 3: el9 ] : RHEL 9 and clones (CentOS, Scientific Linux, etc) [ 4: sles12 ] : SuSE Linux Enterprise Server 12.x [ 5: sles15 ] : SuSE Linux Enterprise Server 15.x Enter the no.:Note: Failure to set the value of the SSL_CERT_FILE variable returns the following error:
ERROR: SSL_CERT_FILE is not set or does not point at a valid CA bundle. Secure mode is mandatory for ESA TLS validation. 1. Save the ESA CA cert to a readable path (e.g. /opt/esa/certs/ProtegrityCA.pem). 2. Add '<esa_ip> <esa_cn>' to /etc/hosts so the ESA CN/SAN resolves. 3. export SSL_CERT_FILE=<path-from-step-1> and re-run this configurator. Exiting Configurator Script.... - Depending on the requirements, type
1,2,3,4, or5to select the operating system version for the Big Data Protector parcels. - Press ENTER.
The prompt to enter the local directory path containing the Log Forwarder configuration files appears.Enter the local directory path on this machine that stores the LogForwarder configuration files for External Audit Store: - Enter the local directory path containing the Log Forwarder configuration files.
- Press ENTER.
The prompt to enter the current version of the Log Forwarder configuration parcel appears.Generating Installation files... NOTE: You can verify the version of the activated PTY_LOGFORWARDER_CONF parcel from the parcel name, such as PTY_LOGFORWARDER_CONF-x.x.x.x_CDPx.x.p<version>-<os>.parcel, where the <version> parameter denotes the patch version of the PTY_LOGFORWARDER_CONF parcel. For Example: If the current activated PTY_LOGFORWARDER_CONF parcel is PTY_LOGFORWARDER_CONF-x.x.x.x_CDPx.x.p0-<os>.parcel, the patch version of the PTY_LOGFORWARDER_CONF parcel will be 0. Do NOT include 'p' while specifying the version. Enter the <version> of the current PTY_LOGFORWARDER_CONF Parcel as specified in the parcel name [0]: - Type the version of the Log Forwarder configuration parcel.
- Press ENTER.
The installer generates the updatedPTY_LOGFORWARDER_CONFparcel in the./Installation_Files/directory.The updated PTY_LOGFORWARDER_CONF parcel 'PTY_LOGFORWARDER_CONF-<BDP_version>_CDP<CDP_version>.p1-<operating_system_version>.parcel' is generated in ./Installation_Files/ directory. NOTE: Copy PTY_LOGFORWARDER_CONF-<BDP_version>_CDP<CDP_version>.p1-<operating_system_version>.parcel and .sha files to Cloudera Manager local parcel repository. - Copy the new
PTY_LOGFORWARDER_CONFparcel to the local parcel repository of Cloudera Manager.
The default local parcel repository for Cloudera Manager is located in the/opt/cloudera/parcel-repo/directory. - Navigate to the local parcel repository directory.
- To assign the ownership permissions for the Cloudera SCM to the new Log Forwarder configuration parcel and checksum file, run the following command:
chown cloudera-scm:cloudera-scm PTY_* - Press ENTER.
- To assign
640permissions to the parcel files, run the following command:chmod 640 PTY_* - Press ENTER.
The command assigns read and write permissions to the owner, read permissions to the group, and restricts access to all other users. - Log in to the Cloudera Manager web interface.
- Navigate to the Parcels page.
The Parcels page appears. - To fetch the updated parcels, click Check for New Parcels.
The Cloudera Manager retrieves the updatedPTY_LOGFORWARDER_CONFparcel. - Distribute the new
PTY_LOGFORWARDER_CONFparcel to the nodes.Note: For more information about distributing the new
PTY_LOGFORWARDER_CONFparcel, refer to Distributing the parcels. - Activate the new
PTY_LOGFORWARDER_CONFparcel on the nodes.Note: For more information about activating the new
PTY_LOGFORWARDER_CONFparcel, refer to Activating the parcels. - Restart the BDP Service.
After the BDP service is restarted, the cluster utilizes the updated Log Forwarder parcel on all the nodes in the cluster.
3.1.5.3 - Updating the Configuration Parameters
Update the configuration parameters for the following roles in the BDP service:
- Gateway Role (corresponds to the
config.inifile) - PTY RPAgent Role
- PTY Log Forwarder Role
3.1.5.3.1 - Setting the Big Data Protector Configuration
After installing the Big Data Protector, set the configuration parameters. These parameters will vary depending on the required CDP-PVC-Base services. Protegrity provides the set_unset_bdp_config.sh script to set the configuration parameters for the required services.
Important: Before uninstalling the Big Data Protector, ensure to roll back the configuration parameters, to their previous values, that were set after installing the Big Data Protector. For more information, refer to Restoring the Big Data Protector configuration
To set the Big Data Protector configuration:
- Log in to the master node of the cluster.
- Navigate to the directory where the configurator script generated the installation files.
- To set the configurations using the helper script, run the following command:
./set_unset_bdp_config.sh - Press ENTER.
The prompt to select the protocol appears.Select the Cloudera Manager URL Protocol: [ 1 ] : http:// [ 2 ] : https:// Enter the number: - Enter the required protocol.
Note: The script will automatically set the default port depending on the protocol. The default ports for
httpandhttpsare7180and7183respectively. - Press ENTER.
The prompt to enter the IP address of the Cloudera Manager server appears.Enter Cloudera Manager Server Node's Hostname/IP Address: - Enter the IP address of the master node.
- Press ENTER.
The prompt to enter the port appears.Enter Cloudera Manager Server's Port No. [<default_port>]:Note: The script will automatically set the default port depending on the protocol. The default ports for
httpandhttpsare7180and7183respectively. - Enter the port number.
- Press ENTER.
The prompt to enter the name of the cluster appears.Enter Cluster's Name: - Enter the name of the cluster.
- Press ENTER.
The prompt to enter the username to access Cloudera Manager appears.Enter Cloudera Manager's Username: - Enter the username.
- Press ENTER.
The prompt to enter the password appears.Enter Cloudera Manager's Password: - Enter the password.
- Press ENTER.
The script verifies the cluster details and the prompt to set or remove the configuration appears.Cluster's existence verified. Do you want to set or unset the BDP configs? [ 1 ] : SET the BDP configs [ 2 ] : UNSET the BDP configs Enter the no.: - To set the configuration for the Big Data Protector, type
1. - Press ENTER.
The script updates the configuration for the Big Data Protector.Checking existence of HBase service with name 'hbase'. Service 'hbase' exists. Setting HBase's config... ###################################################################################################################################### 100.0% HBase's 'hbase_coprocessor_region_classes' config for Role Group 'hbase-REGIONSERVER-BASE' has been updated. ###################################################################################################################################### 100.0% HBase's 'hbase_coprocessor_region_classes' config for Role Group 'hbase-REGIONSERVER-1' has been updated. ###################################################################################################################################### 100.0% HBase's 'hbase_coprocessor_region_classes' config for Role Group 'hbase-REGIONSERVER-2' has been updated. Checking existence of Hive on Tez service with name 'hive_on_tez'. Service 'hive_on_tez' exists. Setting Hive on Tez's config... ###################################################################################################################################### 100.0% Hive on Tez Service wide configs ('HIVE_ON_TEZ_service_env_safety_valve' and 'hive_service_config_safety_valve') have been updated. ###################################################################################################################################### 100.0% Hive on Tez's 'hive_client_env_safety_valve' config for Role Group 'hive_on_tez-GATEWAY-BASE' has been updated. Checking existence of Tez service with name 'tez'. Service 'tez' exists. Setting Tez's config... ###################################################################################################################################### 100.0% Tez Service wide config ('tez.cluster.additional.classpath.prefix') has been updated. Checking existence of Impala service with name 'impala'. Service 'impala' exists. Setting Impala's config... ###################################################################################################################################### 100.0% Impala's 'IMPALAD_role_env_safety_valve' config for Role Group 'impala-IMPALAD-BASE' has been updated. ###################################################################################################################################### 100.0% Impala's 'IMPALAD_role_env_safety_valve' config for Role Group 'impala-IMPALAD-2' has been updated. ###################################################################################################################################### 100.0% Impala's 'IMPALAD_role_env_safety_valve' config for Role Group 'impala-IMPALAD-1' has been updated. Checking existence of Spark on Yarn service with name 'spark_on_yarn'. Service 'spark_on_yarn' exists. Setting Spark on Yarn's config... ###################################################################################################################################### 100.0% Spark on Yarn Service wide config ('spark-conf/spark-env.sh_service_safety_valve') has been updated. Checking existence of Spark3 on Yarn service with name 'spark3_on_yarn'. Service 'spark3_on_yarn' exists. Setting Spark3 on Yarn's config... ###################################################################################################################################### 100.0% Spark3 on Yarn Service wide config ('spark3-conf/spark-env.sh_service_safety_valve') has been updated.
To manually set the configuration parameters for the Big Data Protector, refer to the following table:
Note: From v10.0.0 onwards, the BDP Service jar files will be installed under the
/opt/cloudera/parcels/PTY_BDP/bdp/lib/directory. In addition, the BDP version would be added to the.jarfile names.
| Service | BDP Configuration |
|---|---|
| Hive on Tez | In the Hive on Tez Service Environment Advanced Configuration Snippet (Safety Valve) and Gateway Client Environment Advanced Configuration Snippet (Safety Valve) for hive-env.sh and Gateway Client Environment Advanced Configuration Snippet (Safety Valve) for hive-env.sh:Key: HIVE_CLASSPATHValue: /opt/cloudera/parcels/PTY_BDP/bdp/lib/jcorelite.jar:/opt/cloudera/parcels/PTY_BDP/bdp/lib/pephive-<hive_version>_v<bdp_version>.jar:${HIVE_CLASSPATH}For example: /opt/cloudera/parcels/PTY_BDP/bdp/lib/jcorelite.jar:/opt/cloudera/parcels/PTY_BDP/bdp/lib/pephive-3.1.3000_v10.0.0+4.jar:${HIVE_CLASSPATH}In the Hive on Tez Service Advanced Configuration Snippet (Safety Valve) for hive-site.xml:Name: hive.exec.pre.hooks<br>Value: com.protegrity.hive.PtyHiveUserPreHook |
| Tez | Name: tez.cluster.additional.classpath.prefixValue: /opt/cloudera/parcels/PTY_BDP/bdp/lib/jcorelite.jar:/opt/cloudera/parcels/PTY_BDP/bdp/lib/pephive-<hive_version>_v<bdp_version>.jar |
| HBase | Name: hbase.coprocessor.region.classesValue: com.protegrity.hbase.PTYRegionObserver |
| Spark on Yarn | In Spark Service Advanced Configuration Snippet (Safety Valve) for spark-conf/spark-env.sh:SPARK_DIST_CLASSPATH=/opt/cloudera/parcels/PTY_BDP/bdp/lib/jcorelite.jar:/opt/cloudera/parcels/PTY_BDP/bdp/lib/pepspark-<spark_version>_v<bdp_version>.jar:/opt/cloudera/parcels/PTY_BDP/bdp/lib/pephive-<hive_version>_v<bdp_version>.jar:${SPARK_DIST_CLASSPATH} |
| Spark 3 on Yarn | In Spark 3 Service Advanced Configuration Snippet (Safety Valve) for spark3-conf/spark-env.sh:SPARK_DIST_CLASSPATH=/opt/cloudera/parcels/PTY_BDP/bdp/lib/jcorelite.jar:/opt/cloudera/parcels/PTY_BDP/bdp/lib/pepspark-<spark_version>_v<bdp_version>.jar:/opt/cloudera/parcels/PTY_BDP/bdp/lib/pephive-<hive_version>_v<bdp_version>.jar:${SPARK_DIST_CLASSPATH} |
| Impala | In the Impala Daemon Environment Advanced Configuration Snippet (Safety Valve):Key: PTY_CONFIGPATHValue: /opt/cloudera/parcels/PTY_BDP/bdp/data/config.ini |
Warning: Ensure that you do not override the BDP configurations at the client side. Overriding the configurations can result in the component failure.
Note: After seting the configurations either by using the helper script or setting them manually, restart the services that are in the Stale configuration state on Cloudera Manager. Ensure to Redeploy the client configuration.
3.1.5.3.2 - Updating Parameters in the config.ini File
config.ini parameters after installing the Big Data Protector.To update the configuration parameters in the config.ini file:
- Using a browser, navigate to the Cloudera Manager web UI.
- Enter the Username.
- Enter the Password.
- Click Sign In.
The Cloudera Manager Home page appears. - Click BDP Service.
The BDP Service page appears. - Click the Configuration tab.
The Configuration tab appears. - In the Filters pane, under Scope, click Gateway.
The options related to theconfig.inifile appear. - Update the parameters, as per the descriptions, listed in the following table:
| Parameter | Description |
|---|---|
| Protector Cadence | Determines how often the protector’s sync thread will execute (in seconds). The default is 60 seconds. By default, every 60 seconds the protector attempts to fetch the policy updates. If the cadence is set to ‘0’, then the protector will get the policy only once (per process). The interval is reset when the previous sync is finished. Minimum Value = 0 sec Maximum Value = 86400 sec (i.e. 24 hours) |
| Log Output | Defines the output type for protections logs. Accepted values are: - tcp = (Default) Logs are sent to LogForwarder using tcp - stdout = Logs are sent to stdout. |
| Log Host | Specifies the LogForwarder Host/IP Address where logs will be forwarded from the protector. |
| Log Mode | Determines the approach to handle logs when the connection to the LogForwarder is lost. This setting is only for the protector logs and not application logs. - drop = (Default) Protector throws logs away if connection to the logforwarder is lost. - error = Protector returns error without protecting/unprotecting data if connection to the logforwarder is lost. |
| Deploy Directory | Specifies the directory where the client configs will be deployed. Note: The Gateway Role requires this parameter to stage the temporary files (like the config.ini.properties). The default value is set to /etc/protegrity-bdp/. |
| BDP Service Client Advanced Configuration Snippet (Safety Valve) for bdp-conf/config.ini.properties | For advanced use only, a string to be inserted into the client configuration for bdp-conf/config.ini.properties. |
| Log Port | Specifies the LogForwarder port where logs will be forwarded from the protector. |
Note: Restart all the dependent services to reload the configuration changes after adding or modifying any parameter in the
config.inifile.
3.1.5.3.3 - Updating the RPAgent Parameters
To update the configuration parameters for the RPAgent:
- Using a browser, navigate to the Cloudera Manager page.
- Enter the Username.
- Enter the Password.
- Click Sign In.
The Cloudera Manager Home page appears. - Click BDP Service.
The BDP Service page appears. - Click the Configuration tab.
The Configuration tab appears. - In the Filters pane, under Scope, click PTY RP Agent.
The options related to the RPAgent appear. - Update the parameters, as per the descriptions, listed in the following table:
| Option | Description |
|---|---|
| RPA Sync Interval (Seconds) | Specifies the frequency at which the RPAgent will fetch the policy from ESA/PPC. The minimum value is 1 second and the maximum value is 86400 seconds. |
| RPA Sync Hostname/IP Address | Specifies the hostname/IP Address to the service that provides the resilient packages. |
| RPA Sync Port | Specifies the port to the service that provides the resilient packages. |
| RPA Sync CA Certificate Path | Specfies the path to the CA certificate to validate the server certificate. Note: Do not modify the value of this parameter. |
| RPA Sync Client Certificate Path | Specifies the path to the client certificate. Note: Do not modify the value of this parameter. |
| RPA Sync Client Certificate Key Path | Specifies the path to the client certificate key. Note: Do not modify the value of this parameter. |
| RPA Sync Client Certificate Key Secret File Path | Specifies the path to the secret file used to decrypt the client certificate key. Note: Do not modify the value of this parameter. |
| RPA Log Host | Specifies the LogForwarder Host/IP Address where logs will be forwarded from the RPA. |
| RPA Log Mode | In case that connection to LogForwarder is lost, set how logs are handled. drop = (Default) Protector throws logs away if connection to the logforwarder is lost error = Protector returns error without protecting/unprotecting data if connection to the logforwarder is lost. |
3.1.5.3.4 - Updating the Log Forwarder Parameters
To update the configuration parameters for the Log Forwarder:
- Using a browser, navigate to the Cloudera Manager page.
- Enter the Username.
- Enter the Password.
- Click Sign In.
The Cloudera Manager Home page appears. - Click BDP Service.
The BDP Service page appears. - Click the Configuration tab.
The Configuration tab appears. - In the Filters pane, under Scope, click PTY Log Forwarder.
The options related to the Log Forwarder appear. - Update the parameters, as per the descriptions, listed in the following table:
| Option | Description |
|---|---|
| Audit Store Type | Specifies the type of Audit Store(s) where PTY LogForwarder sends logs to. |
| Protegrity Audit Store List of Hostnames/IP Addresses and/or Ports | Is the comma-delimited List of Protegrity Audit Store appliances’ Hostnames/IP addresses and/or Ports where LogForwarder sends logs. Allowed Syntax: hostname[:port][,hostname[:port],hostname[:port]…] (By default 9200 is set for empty ports) Examples: auditstore-a:9200,auditstore-b:9201,auditstore-c:9202 hostname-a hostname-a,hostname-b,hostname-c hostname-a:9201,hostname-b,hostname-c,hostname-d When using only External Audit Store, set this to NA. |
| LogForwarder Log Level | Specifies the LogForwarder logging verbosity level. |
| Enable Generation of a Log File for Application Logs | Enables the /logforwarder/data/config.d/out_applog_file.conf file to create an Application Log file locally on the Nodes. |
| Application Log File Directory Path | Specifies the directory Path on the Nodes to store Application Log File. This is set as value of ‘Path’ in out_applog_file.conf when enable_applog_file is true. |
| Application Log File Name | Specifies the name of the Application Log File. This is set as value of ‘File’ in out_applog_file.conf when enable_applog_file is true. |
3.1.5.3.5 - Adding a New Configuration Parameter
To add a new configuration parameter in the config.ini file:
- Using a browser, navigate to the Cloudera Manager page.
- Enter the Username.
- Enter the Password.
- Click Sign In.
The Cloudera Manager Home page appears. - Click BDP Service.
The BDP Service page appears. - Click the Configuration tab.
The Configuration tab appears. - In the Filters pane, under Scope, click Gateway.
The options related to theconfig.inifile appear. - To add a new parameter for the
config.inifile, perform the following steps:- Under the BDP Service Client Advanced Configuration Snippet (Safety Valve) for bdp-conf/config.ini.properties box, enter the required parameter and the corresponding value in the
group.key=valueformat. When you enter the parameter in thegroup.key=valueformat, Cloudera Manager appends the parameter in theconfig.inifile on all the nodes in the following format:[group] key = value - Click Save Changes (CTRL+S).
- Under the BDP Service Client Advanced Configuration Snippet (Safety Valve) for bdp-conf/config.ini.properties box, enter the required parameter and the corresponding value in the
- To verify whether the parameter is added to the config.ini file, perform the following steps:
- Login to the Master Node.
- To navigate to the
/opt/cloudera/parcels/PTY_BDP/bdp/data/directory, run the following command:cd /opt/cloudera/parcels/PTY_BDP/bdp/data/ - Press ENTER.
The command changes the working directory to/opt/cloudera/parcels/PTY_BDP/bdp/data/. - To view the contents of the
config.inifile, run the following command:vim config.ini - Press ENTER.
The command displays the contents of theconfig.inifile.[log] host=localhost port=15780 output=tcp mode=drop [protector] cadence=60 [core] emptystring=empty
- Using a browser, login to the Cloudera Manager Home page.
- Click BDP Service.
The BDP Service page appears. - To generate the
config.inifile on the nodes where you have installed the Gateway Role, select Actions » Deploy Client Configuration. The prompt to confirm the action appears. - Click Deploy Client Configuration.
Cloudera Manager generates theconfig.inifile to all the nodes where the Gateway role is installed.Note: Restart all the dependent services to reload the configuration changes after adding or modifying any parameter in the
config.inifile.
3.1.6 - Upgrading the Big Data Protector
Starting from version 10.1, the Big Data Protector provides a feature to seamlessly move to a newer version. This uprade mechanism leverages the Rolling Restart feature provided by Cloudera.
Rolling Restart in Cloudera is a feature that allows services and role instances in a cluster to be restarted sequentially, rather than all at once. This minimizes downtime and ensures high availability during configuration changes or upgrades. By restarting components in controlled batches, Cloudera helps maintain cluster stability and service continuity without disrupting critical workloads.
The overall process of upgrading the Big Data Protector, to a newer version, are listed below.
- Download the installation pacakge for the newer version of the Big Data Protector.
- Extract the contents of the installation package into a separate directory.
Note: For more information, refer to Extracting the installation package.
- Execute the configurator script to generate the required parcels or installation files.
Note: For more information, refer to Running the configurator script.
- Update the
cluster.configfile.Note: For more information, refer to Editing the Cluster Configuration File.
- Execute the smooth upgrade script to switch to a newer version of the Big Data Protector.
Note: For more information, refer to Executing the Upgrade Script.
3.1.6.1 - Editing the Cluster Configuration File
The cluster.config file contains critical parameters required to switch to another version of the Big Data Protector. This file is created after executing the configurator script. The cluster.config file is available in the /Installation_Files/ directory.
To edit the cluster.config file:
- Log in to the Master node.
- Navigate to the directory where the installation files for the new version of the Big Data Protector are extracted.
- To view the cluster_config file, using any compatible text editor, run the following command:
vim cluster.config - Press ENTER.
The command displays the contents of thecluster.configfile. The parameters in the file are categorized into mandatory and optional sections.CM_HOST= # Cloudera Manager server hostname or IP address (e.g., 192.168.123.25 or cm.example.com) CM_PORT= # Cloudera Manager server port (default: 7180 for HTTP, 7183 for HTTPS) CM_USER= # Cloudera Manager admin username (e.g., admin) CM_PASS= # Cloudera Manager admin password (e.g., admin) CLOUDERA_BASE= # Base directory for Cloudera installation (e.g., /opt/cloudera) CLUSTER_NAME= # Name of the cluster as shown in Cloudera Manager (e.g., Cluster1) PREV_INSTALL_FILES_DIR= # Path to previous install files directory (e.g., "/build/10.1.1/Installation_Files") # Rolling restart tuning (optional) ROLLING_BATCH_SIZE="1" # Number of nodes to restart in each batch. A value of 1 ensures strict sequential upgrade—only one node is offline at a time. Increasing this (e.g., to 2 or 5) allows parallel upgrades, which speeds up the process but increases risk and potential downtime. This value depends on cluster size and workload characteristics. Please consult your cluster administrator before modifying. ROLLING_SLEEP_SECONDS="300" # Pause duration (in seconds) between batches. This gives time for services to stabilize and avoids overwhelming cluster. Useful for large clusters or when workload is high. ROLLING_FAIL_COUNT_THRESHOLD="0" # Maximum number of node failures allowed before the rolling restart is aborted. 0 means no limit—restart continues regardless of failures. Set this to a small number (e.g., 2) to enforce safety and halt the process if too many nodes fail. ROLLING_STALE_CONFIGS_ONLY="true" # If true, only roles with stale configuration (i.e., config changes not yet applied) will be restarted. This avoids unnecessary restarts and speeds up the process. If false, all roles are restarted regardless of config state. ROLLING_UNUPGRADED_ONLY="true" # Controls whether the rolling restart targets all roles or only outdated ones. - false: Full rolling restart (all roles restarted, cleanup runs). - true: Retry mode (only outdated roles restarted, cleanup skipped). Useful for resuming interrupted upgrades. ROLLING_TIMEOUT_SECONDS="3600" # Total time (in seconds) allowed for the rolling restart to complete. If the process exceeds this duration, it will be considered failed. Default is 1 hour. This value should be tuned based on the number of nodes, batch size, and expected restart duration per node. Please check with your cluster administrator. ROLLING_EXCLUDE_SERVICES="impala" # Optional. Space-separated list of CM service names to exclude from the rolling restart. For example, excluding impala avoids restarting Impala daemons, which may be critical for ongoing queries. PARCEL_RECOGNITION_TIMEOUT=300 # Seconds to wait after uploading a parcel and restarting Cloudera Manager for it to detect the new parcel. This value depends on CM performance and cluster size. Please confirm with your administrator. STAGE_WAIT_TIMEOUT=900 # Time (in seconds) to wait for a parcel to reach a target stage (e.g., DISTRIBUTED, ACTIVATED). The final expected stage is ACTIVATED. This timeout should be adjusted based on network speed, disk I/O, and number of nodes. Please check with your cluster administrator. BDP_SSH_USER=root # SSH user used for remote commands and safety checks. Defaults to root, but can be changed if CM agents run under a different user. REMOVE_OLD_PARCELS_AFTER_RR=true # If true, old parcels (e.g., 10.1.x) will be removed after a successful rolling restart. Helps free up disk space and avoid confusion. If false, old parcels are retained for rollback. - Edit the parameters as required.
Note: If the password for Cloudera Manager is not provided in the
cluster.configfile, the script will prompt for the password during the upgrade.Enter CM_PASS (Cloudera Manager password): - Save the changes to the
cluster.configfile.
3.1.6.2 - Executing the Upgrade Script
After editing the cluster.config file, execute the smooth upgrade script to upgrade the protector. On all the nodes, the script will:
- Distribute the new parcels.
- Activate the new parcels.
- Removing the old configuration.
- Setting the new configuration.
- Starts the rolling restart to update the required services.
To excute the upgrade script:
- Log in to the Master node.
- Navigate to the directory where the installation files for the new version are extracted.
- To execute the script, run the following command:
./bdp_smooth_upgrade.sh - Press ENTER.
The script upgrades the protector to a newer version using the Rolling Restart feature provided by Cloudera.
'jq' is available. Config loaded: CM_SCHEME = http CM_HOST = <master_node_ip_address> CM_PORT = 7180 CLOUDERA_BASE = /opt/cloudera CLUSTER_NAME = <name_of_the_cluster> BASE_URL = http://<master_node_ip_address>:7180/api CSD_DIR = /opt/cloudera/csd PARCEL_DIR= /opt/cloudera/parcel-repo REMOVE_OLD_PARCELS_AFTER_RR = true REMOVE_PARCEL_STRATEGY = hosts_only Detecting Cloudera Manager API version from http://<master_node_ip_address>:7180/api/version ... Detected API version: v57 CM_URL set to: http://<master_node_ip_address>:7180/api/v57 Checking if cluster '<name_of_the_cluster>' exists in Cloudera Manager... Cluster '<name_of_the_cluster>' exists and is accessible. Checking if cluster-level Rolling Restart is available (non-intrusive)... Rolling Restart appears available (HDFS HA detected: 2xNN, 2xZKFC, 3xJN). Copying files from . to Cloudera directories... Copying JAR files to /opt/cloudera/csd ... Copying parcel files to /opt/cloudera/parcel-repo ... Files copied and permissions set successfully. Extracting parcel versions from .... Detected versions: PTY_BDP : <new_BDP_version>_CDP7.1.p0 PTY_CERT: <new_BDP_version>_CDP7.1.p0 PTY_LOGFORWARDER_CONF: <new_BDP_version>_CDP7.1.p0 Encoded versions: PTY_BDP : <new_BDP_version>_CDP7.1.p0 PTY_CERT: <new_BDP_version>_CDP7.1.p0 PTY_LOGFORWARDER_CONF: <new_BDP_version>_CDP7.1.p0 Pre-upgrade ACTIVE versions from CM: PTY_BDP : <old_BDP_version>_CDP7.1.p0 PTY_CERT : <old_BDP_version>_CDP7.1.p0 PTY_LOGFORWARDER_CONF: <old_BDP_version>_CDP7.1.p0 Restarting Cloudera Manager Server... Cloudera Manager service restart initiated. Waiting for Cloudera Manager API to become available... Cloudera Manager is up and responding. Waiting for PTY_CERT (<new_BDP_version>_CDP7.1.p0) to be recognized by CM ... PTY_CERT recognized. PTY_CERT current stage: ACTIVATED PTY_CERT is already ACTIVATED. Skipping. Waiting for PTY_LOGFORWARDER_CONF (<new_BDP_version>_CDP7.1.p0) to be recognized by CM ... PTY_LOGFORWARDER_CONF recognized. PTY_LOGFORWARDER_CONF current stage: ACTIVATED PTY_LOGFORWARDER_CONF is already ACTIVATED. Skipping. Waiting for PTY_BDP (<new_BDP_version>_CDP7.1.p0) to be recognized by CM ... PTY_BDP recognized. PTY_BDP current stage: ACTIVATED PTY_BDP is already ACTIVATED. Skipping. Running BDP config script (UNSET): /<old_version_dir>/Installation_Files/set_unset_bdp_config.sh Args: --protocol=http:// --cm-server-ip=<master_node_ip_address> --cm-server-port=7180 --cluster-name='<name_of_the_cluster>' --username='<name_of_the_user>' --password=****** --user-choice=UNSET Checking Cluster's existence... Cluster's existence verified. Checking existence of Tez service with name 'tez'. ##O=-# # Service 'tez' exists. Unsetting Tez's config... ##################################################################################### 100.0% Tez Service wide config ('tez.cluster.additional.classpath.prefix') has been updated. Checking existence of Impala service with name 'impala'. Service 'impala' exists. Unsetting Impala's config... ##################################################################################### 100.0% Impala's 'IMPALAD_role_env_safety_valve' config for Role Group 'impala-IMPALAD-2' has been updated. ##O=-# # ##################################################################################### 100.0% Impala's 'IMPALAD_role_env_safety_valve' config for Role Group 'impala-IMPALAD-1' has been updated. ##O=-# # ##################################################################################### 100.0% Impala's 'IMPALAD_role_env_safety_valve' config for Role Group 'impala-IMPALAD-BASE' has been updated. Checking existence of Spark on Yarn service with name 'spark_on_yarn'. Service 'spark_on_yarn' exists. Unsetting Spark on Yarn's config... ##################################################################################### 100.0% Spark on Yarn Service wide config ('spark-conf/spark-env.sh_service_safety_valve') has been updated. Running BDP config script (SET): ./set_unset_bdp_config.sh Args: --protocol=http:// --cm-server-ip=<master_node_ip_address> --cm-server-port=7180 --cluster-name='<name_of_the_cluster>' --username='<name_of_the_user>' --password=****** --user-choice=SET Checking Cluster's existence... Cluster's existence verified. Checking existence of Tez service with name 'tez'. ##O=-# # Service 'tez' exists. Setting Tez's config... ##O=-# # ##################################################################################### 100.0% Tez Service wide config ('tez.cluster.additional.classpath.prefix') has been updated. Checking existence of Impala service with name 'impala'. Service 'impala' exists. Setting Impala's config... ##################################################################################### 100.0% Impala's 'IMPALAD_role_env_safety_valve' config for Role Group 'impala-IMPALAD-2' has been updated. ##################################################################################### 100.0% Impala's 'IMPALAD_role_env_safety_valve' config for Role Group 'impala-IMPALAD-1' has been updated. ##################################################################################### 100.0% Impala's 'IMPALAD_role_env_safety_valve' config for Role Group 'impala-IMPALAD-BASE' has been updated. Checking existence of Spark on Yarn service with name 'spark_on_yarn'. Service 'spark_on_yarn' exists. Setting Spark on Yarn's config... ##################################################################################### 100.0% Spark on Yarn Service wide config ('spark-conf/spark-env.sh_service_safety_valve') has been updated. ROLLING_EXCLUDE_SERVICES is set. Using restartServiceNames API to exclude: impala Waiting for CM command id=<command_ID> to complete ... - RollingRestart progress: 0%, active: ?, success: true Command <command_ID> finished successfully. Rolling restart finished successfully. Evaluating convergence before parcel cleanup ... Warning: Permanently added 'edge.localdomain.com' (ECDSA) to the list of known hosts. Warning: Permanently added 'master.localdomain.com' (ECDSA) to the list of known hosts. Warning: Permanently added 'node1.localdomain.com' (ECDSA) to the list of known hosts. Warning: Permanently added 'node2.localdomain.com' (ECDSA) to the list of known hosts. Warning: Permanently added 'node3.localdomain.com' (ECDSA) to the list of known hosts. Cluster appears converged: all hosts use PTY_BDP <new_BDP_version>_CDP7.1.p0 and no old-parcel processes found. Converged ? cleaning old parcels (REMOVE_OLD_PARCELS_AFTER_RR=true) ... Selected PTY_CERT old version to clean: Discovering previous parcel versions in: <old_version_dir>/Installation_Files Previous PTY_BDP version: <old_BDP_version>_CDP7.1.p0 Previous PTY_CERT version: <old_BDP_version>_CDP7.1.p0 <old_BDP_version>_CDP7.1.p0 Cleaning old parcel PTY_CERT (Discovering previous parcel versions in: <old_version_dir>/Installation_Files Previous PTY_BDP version: <old_BDP_version>_CDP7.1.p0 Previous PTY_CERT version: <old_BDP_version>_CDP7.1.p0 <old_BDP_version>_CDP7.1.p0) ... Current stage: DISTRIBUTED Removing distribution of PTY_CERT Discovering previous parcel versions in: <old_version_dir>/Installation_Files Previous PTY_BDP version: <old_BDP_version>_CDP7.1.p0 Previous PTY_CERT version: <old_BDP_version>_CDP7.1.p0 <old_BDP_version>_CDP7.1.p0 from hosts ... Waiting for PTY_CERT to reach stage: DOWNLOADED Current stage for PTY_CERT: UNDISTRIBUTING Current stage for PTY_CERT: UNDISTRIBUTING Current stage for PTY_CERT: DOWNLOADED Done with PTY_CERT (Discovering previous parcel versions in: <old_version_dir>/Installation_Files Previous PTY_BDP version: <old_BDP_version>_CDP7.1.p0 Previous PTY_CERT version: <old_BDP_version>_CDP7.1.p0 <old_BDP_version>_CDP7.1.p0). Selected PTY_BDP old version to clean: Discovering previous parcel versions in: <old_version_dir>/Installation_Files Previous PTY_BDP version: <old_BDP_version>_CDP7.1.p0 Previous PTY_CERT version: <old_BDP_version>_CDP7.1.p0 <old_BDP_version>_CDP7.1.p0 Cleaning old parcel PTY_BDP (Discovering previous parcel versions in: <old_version_dir>/Installation_Files Previous PTY_BDP version: <old_BDP_version>_CDP7.1.p0 Previous PTY_CERT version: <old_BDP_version>_CDP7.1.p0 <old_BDP_version>_CDP7.1.p0) ... Current stage: DISTRIBUTED Removing distribution of PTY_BDP Discovering previous parcel versions in: <old_version_dir>/Installation_Files Previous PTY_BDP version: <old_BDP_version>_CDP7.1.p0 Previous PTY_CERT version: <old_BDP_version>_CDP7.1.p0 <old_BDP_version>_CDP7.1.p0 from hosts ... Waiting for PTY_BDP to reach stage: DOWNLOADED Current stage for PTY_BDP: UNDISTRIBUTING Current stage for PTY_BDP: UNDISTRIBUTING Current stage for PTY_BDP: DOWNLOADED Done with PTY_BDP (Discovering previous parcel versions in: <old_version_dir>/Installation_Files Previous PTY_BDP version: <old_BDP_version>_CDP7.1.p0 Previous PTY_CERT version: <old_BDP_version>_CDP7.1.p0 <old_BDP_version>_CDP7.1.p0). Old parcels cleanup completed.
3.1.6.3 - Downgrading to an Older Version
To downgrade the Big Data Protector to an older version:
- Edit the
cluster.configfile for the older version to update the following:- Set the value of the
PREV_INSTALL_FILES_DIRparameter to the newer version of the protector. - Set the value of the
ROLLING_STALE_CONFIGS_ONLYparameter toTrue. - Set the value of the
ROLLING_UNUPGRADED_ONLYparameter toTrue.
- Set the value of the
- Execute the
bdp_smooth_upgrade.shscript.
To execute the script:
- Log in to the Master node.
- Navigate to the directory where the installation files for the older version are extracted.
- To execute the script, run the following command:
./bdp_smooth_upgrade.sh - Press ENTER.
The script dowgrades the protector to an older version specified in thecluster.configfile.
3.1.7 - Uninstalling the Big Data Protector
The process of uninstalling the Big Data Protector involves the following steps:
- Uninstalling the Impala UDFs
- Restoring the Big Data Protector-related configurations.
- Removing the Big Data Protector-related services from all the nodes in the cluster.
- Deactivating the Big Data Protector parcels from all the nodes in the cluster.
- Removing the Big Data Protector parcels from all the nodes in the cluster.
- Deleting the Big Data Protector parcels from the local repository of Cloudera Manager.
- Deleting the .jar files from the local repository of Cloudera Manager.
3.1.7.1 - Uninstalling the Impala UDFs
The process to remove the Impala UDFs involves the following steps:
- Drop the Impala UDFs using the helper script.
- Remove the
.sofile from HDFS.
To remove the .so file:
- Login to the master node.
- To delete the .so file from HDFS, run the following command:
sudo -u hdfs hadoop fs -rmr -skipTrash /opt/protegrity/impala/udfs/*
Dropping the Impala user-defined functions
- Log in to the master node with a user account having permissions to create and drop UDFs.
- To navigate to the directory that contains the helper script, run the following command:
cd /opt/cloudera/parcels/PTY_BDP/pepimpala/sqlscripts - To drop the UDFs using the helper script, run the following command:
impala-shell -i node1 -k -f dropobjects.sql - Press ENTER.
The script drops all the user-defined functions for Impala.Starting Impala Shell with Kerberos authentication using Python 2.7.18 Using service name 'impala' Warning: live_progress only applies to interactive shell sessions, and is being skipped for now. Opened TCP connection to node1:21000 Connected to node1:21000 Server version: impalad version 4.0.0.7.1.8.0-801 RELEASE (build a3b56f90d9c31ebfa5ce3c266700284a420db28f) Query: --------------------------------------------------------------------- -- Protegrity DPS User Defined Functions. -- Copyright (c) 2014 Protegrity USA, Inc. All rights reserved -- --------------------------------------------------------------------- DROP FUNCTION pty_getversion() +----------------------------+ | summary | +----------------------------+ | Function has been dropped. | +----------------------------+ Fetched 1 row(s) in 0.15s Query: DROP FUNCTION pty_getversionextended() +----------------------------+ | summary | +----------------------------+ | Function has been dropped. | +----------------------------+ Fetched 1 row(s) in 0.11s Query: DROP FUNCTION pty_whoami() +----------------------------+ | summary | +----------------------------+ | Function has been dropped. | +----------------------------+ Fetched 1 row(s) in 0.12s Query: -- string UDFs ------ DROP FUNCTION pty_stringenc( STRING, STRING ) +----------------------------+ | summary | +----------------------------+ | Function has been dropped. | +----------------------------+ Fetched 1 row(s) in 0.12s Query: DROP FUNCTION pty_stringdec( STRING, STRING ) +----------------------------+ | summary | +----------------------------+ | Function has been dropped. | +----------------------------+ Fetched 1 row(s) in 0.11s Query: DROP FUNCTION pty_stringins( STRING, STRING ) +----------------------------+ | summary | +----------------------------+ | Function has been dropped. | +----------------------------+ Fetched 1 row(s) in 0.11s Query: DROP FUNCTION pty_unicodestringins( STRING, STRING ) +----------------------------+ | summary | +----------------------------+ | Function has been dropped. | +----------------------------+ Fetched 1 row(s) in 0.11s Query: DROP FUNCTION pty_unicodestringfpeins( STRING, STRING ) +----------------------------+ | summary | +----------------------------+ | Function has been dropped. | +----------------------------+ Fetched 1 row(s) in 0.12s Query: DROP FUNCTION pty_stringsel( STRING, STRING ) +----------------------------+ | summary | +----------------------------+ | Function has been dropped. | +----------------------------+ Fetched 1 row(s) in 0.12s Query: DROP FUNCTION pty_unicodestringsel( STRING, STRING ) +----------------------------+ | summary | +----------------------------+ | Function has been dropped. | +----------------------------+ Fetched 1 row(s) in 0.11s Query: DROP FUNCTION pty_unicodestringfpesel( STRING, STRING ) +----------------------------+ | summary | +----------------------------+ | Function has been dropped. | +----------------------------+ Fetched 1 row(s) in 0.11s Query: --- Integer Udfs ----------------------------- DROP FUNCTION pty_integerenc( INTEGER, STRING) +----------------------------+ | summary | +----------------------------+ | Function has been dropped. | +----------------------------+ Fetched 1 row(s) in 0.13s Query: DROP FUNCTION pty_integerdec( STRING, STRING) +----------------------------+ | summary | +----------------------------+ | Function has been dropped. | +----------------------------+ Fetched 1 row(s) in 0.12s Query: DROP FUNCTION pty_integerins( INTEGER, STRING) +----------------------------+ | summary | +----------------------------+ | Function has been dropped. | +----------------------------+ Fetched 1 row(s) in 0.12s Query: DROP FUNCTION pty_integersel( INTEGER, STRING) +----------------------------+ | summary | +----------------------------+ | Function has been dropped. | +----------------------------+ Fetched 1 row(s) in 0.11s Query: --------------double udfs ---------------------- DROP FUNCTION pty_doubleenc( double, string) +----------------------------+ | summary | +----------------------------+ | Function has been dropped. | +----------------------------+ Fetched 1 row(s) in 0.11s Query: DROP FUNCTION pty_doubledec( string, string) +----------------------------+ | summary | +----------------------------+ | Function has been dropped. | +----------------------------+ Fetched 1 row(s) in 0.11s Query: DROP FUNCTION pty_doubleins( double, string) +----------------------------+ | summary | +----------------------------+ | Function has been dropped. | +----------------------------+ Fetched 1 row(s) in 0.12s Query: DROP FUNCTION pty_doublesel( double, string) +----------------------------+ | summary | +----------------------------+ | Function has been dropped. | +----------------------------+ Fetched 1 row(s) in 0.12s Query: -------------float udfs ------------------------- DROP FUNCTION pty_floatenc( float, string) +----------------------------+ | summary | +----------------------------+ | Function has been dropped. | +----------------------------+ Fetched 1 row(s) in 0.12s Query: DROP FUNCTION pty_floatdec( string, string) +----------------------------+ | summary | +----------------------------+ | Function has been dropped. | +----------------------------+ Fetched 1 row(s) in 0.11s Query: DROP FUNCTION pty_floatins( float, string) +----------------------------+ | summary | +----------------------------+ | Function has been dropped. | +----------------------------+ Fetched 1 row(s) in 0.11s Query: DROP FUNCTION pty_floatsel( float, string) +----------------------------+ | summary | +----------------------------+ | Function has been dropped. | +----------------------------+ Fetched 1 row(s) in 0.12s Query: -------------bigint udfs ------------------------ DROP FUNCTION pty_bigintenc( bigint, string) +----------------------------+ | summary | +----------------------------+ | Function has been dropped. | +----------------------------+ Fetched 1 row(s) in 0.12s Query: DROP FUNCTION pty_bigintdec( string, string) +----------------------------+ | summary | +----------------------------+ | Function has been dropped. | +----------------------------+ Fetched 1 row(s) in 0.12s Query: DROP FUNCTION pty_bigintins( bigint, string) +----------------------------+ | summary | +----------------------------+ | Function has been dropped. | +----------------------------+ Fetched 1 row(s) in 0.12s Query: DROP FUNCTION pty_bigintsel( bigint, string) +----------------------------+ | summary | +----------------------------+ | Function has been dropped. | +----------------------------+ Fetched 1 row(s) in 0.12s Query: -------------date udfs -------------------------- DROP FUNCTION pty_dateenc( date, string) +----------------------------+ | summary | +----------------------------+ | Function has been dropped. | +----------------------------+ Fetched 1 row(s) in 0.11s Query: DROP FUNCTION pty_datedec( string, string) +----------------------------+ | summary | +----------------------------+ | Function has been dropped. | +----------------------------+ Fetched 1 row(s) in 0.11s Query: DROP FUNCTION pty_dateins( date, string) +----------------------------+ | summary | +----------------------------+ | Function has been dropped. | +----------------------------+ Fetched 1 row(s) in 0.13s Query: DROP FUNCTION pty_datesel( date, string) +----------------------------+ | summary | +----------------------------+ | Function has been dropped. | +----------------------------+ Fetched 1 row(s) in 0.12s Query: -------------smallint udfs --------------------- DROP FUNCTION pty_smallintenc( smallint, string) +----------------------------+ | summary | +----------------------------+ | Function has been dropped. | +----------------------------+ Fetched 1 row(s) in 0.11s Query: DROP FUNCTION pty_smallintdec( string, string) +----------------------------+ | summary | +----------------------------+ | Function has been dropped. | +----------------------------+ Fetched 1 row(s) in 0.11s Query: DROP FUNCTION pty_smallintins( smallint, string) +----------------------------+ | summary | +----------------------------+ | Function has been dropped. | +----------------------------+ Fetched 1 row(s) in 0.13s Query: DROP FUNCTION pty_smallintsel( smallint, string) +----------------------------+ | summary | +----------------------------+ | Function has been dropped. | +----------------------------+ Fetched 1 row(s) in 0.12s
3.1.7.2 - Restoring the Big Data Protector Configuration
Before uninstalling the Big Data Protector from CDP PVC Base, restore the configuration parameters to their previous values. These parameters will vary depending on the CDP-PVC-Base services that were used. Protegrity provides the set_unset_bdp_config.sh script to restore the configuration parameters.
Note: For more information about manually restoring the configuration parameters, refer to the table in Setting the Big Data Protector configuration.
To restore the Big Data Protector configuration using the helper script:
- Log in to the master node of the cluster.
- Navigate to the directory where the Big Data Protector installation files are generated.
- To restore the configurations using the helper script, run the following command:
./set_unset_bdp_config.sh - Press ENTER.
The prompt to select the protocol appears.Select the Cloudera Manager URL Protocol: [ 1 ] : http:// [ 2 ] : https:// Enter the number: - Enter the required protocol.
Note: The script will automatically set the default port depending on the protocol. The default ports for
httpandhttpsare7180and7183respectively. - Press ENTER.
The prompt to enter the IP address of the Cloudera Manager server appears.Enter Cloudera Manager Server Node's Hostname/IP Address: - Enter the IP address of the master node.
- Press ENTER.
The prompt to enter the port appears.Enter Cloudera Manager Server's Port No. [<default_port>]:Note: The script will automatically set the default port depending on the protocol. The default ports for
httpandhttpsare7180and7183respectively. - Enter the port number.
- Press ENTER.
The prompt to enter the name of the cluster appears.Enter Cluster's Name: - Enter the name of the cluster.
- Press ENTER.
The prompt to enter the username to access Cloudera Manager appears.Enter Cloudera Manager's Username: - Enter the username.
- Press ENTER.
The prompt to enter the password appears.Enter Cloudera Manager's Password: - Enter the password.
- Press ENTER.
The script verifies the cluster details and the prompt to set or remove the configuration appears.Cluster's existence verified. Do you want to set or unset the BDP configs? [ 1 ] : SET the BDP configs [ 2 ] : UNSET the BDP configs Enter the no.: - To remove the configuration for the Big Data Protector, type 2.
- Press ENTER.
The script removes the configuration for the Big Data Protector.Checking existence of HBase service with name 'hbase'. Service 'hbase' exists. Unsetting HBase's config... ###################################################################################################################################### 100.0% HBase's 'hbase_coprocessor_region_classes' config for Role Group 'hbase-REGIONSERVER-BASE' has been updated. ###################################################################################################################################### 100.0% HBase's 'hbase_coprocessor_region_classes' config for Role Group 'hbase-REGIONSERVER-1' has been updated. ###################################################################################################################################### 100.0% HBase's 'hbase_coprocessor_region_classes' config for Role Group 'hbase-REGIONSERVER-2' has been updated. Checking existence of Hive on Tez service with name 'hive_on_tez'. Service 'hive_on_tez' exists. Unsetting Hive on Tez's config... ###################################################################################################################################### 100.0% Hive on Tez Service wide configs ('HIVE_ON_TEZ_service_env_safety_valve' and 'hive_service_config_safety_valve') have been updated. ###################################################################################################################################### 100.0% Hive on Tez's 'hive_client_env_safety_valve' config for Role Group 'hive_on_tez-GATEWAY-BASE' has been updated. Checking existence of Tez service with name 'tez'. Service 'tez' exists. Unsetting Tez's config... ###################################################################################################################################### 100.0% Tez Service wide config ('tez.cluster.additional.classpath.prefix') has been updated. Checking existence of Impala service with name 'impala'. Service 'impala' exists. Unsetting Impala's config... ###################################################################################################################################### 100.0% Impala's 'IMPALAD_role_env_safety_valve' config for Role Group 'impala-IMPALAD-BASE' has been updated. ###################################################################################################################################### 100.0% Impala's 'IMPALAD_role_env_safety_valve' config for Role Group 'impala-IMPALAD-2' has been updated. ###################################################################################################################################### 100.0% Impala's 'IMPALAD_role_env_safety_valve' config for Role Group 'impala-IMPALAD-1' has been updated. Checking existence of Spark on Yarn service with name 'spark_on_yarn'. Service 'spark_on_yarn' exists. Unsetting Spark on Yarn's config... ###################################################################################################################################### 100.0% Spark on Yarn Service wide config ('spark-conf/spark-env.sh_service_safety_valve') has been updated. Checking existence of Spark3 on Yarn service with name 'spark3_on_yarn'. Service 'spark3_on_yarn' exists. Unsetting Spark3 on Yarn's config... ###################################################################################################################################### 100.0% Spark3 on Yarn Service wide config ('spark3-conf/spark-env.sh_service_safety_valve') has been updated.
3.1.7.3 - Removing the Big Data Protector Services
Before deactivating the Big Data Protector parcels from all the nodes in the cluster, stop and remove the Big Data Protector-related services from all the nodes.
To stop and remove the Big Data Protector related services from all the nodes in the cluster:
- On the Cloudera Manager Home page, beside the BDP Service, click the kebab menu icon.
The BDP Service Actions drop-down menu appears. - Select Stop.
The prompt to confirm the termination of the BDP Service appears. - Click Stop.
The BDP Service is terminated. - Click Close.
The BDP Service is stopped and the status is updated on the Home page of the Cloudera Manager. - Beside the BDP Service, click the kebab menu icon.
The BDP Service Actions drop-down list appears. - Select Delete.
The prompt to confirm the deletion of the BDP Service appears. - Click Delete.
The BDP Service is removed from all the nodes in the cluster.
3.1.7.4 - Deactivating the Parcels
After removing the Big Data Protector-related services from all the nodes in the cluster, deactivate the Big Data Protector parcels from all the nodes.
To deactivate the Big Data Protector Parcels from all Nodes in the Cluster:
On the Cloudera Manager Home page, click Parcels.
The Parcels page appears. The following Protegrity parcels appear on the Parcels page:PTY_BDP: Big Data Protector parcelPTY_CERT: Certificates parcelPTY_LOGFORWARDER_CONF: Log Forwarder configuration parcel
Note: The
PTY_LOGFORWARDER_CONFconfiguration parcel will be visible only if you have selected it during installation.To deactivate the Log Forwarder configuration parcel, beside the
PTY_LOGFORWARDER_CONFparcel, click Deactivate.
The prompt to confirm the deactivation of the parcel appears.Click OK.
To deactivate the certificates parcel, beside the PTY_CERT parcel, click Deactivate.
The prompt to confirm the deactivation of the parcel appears.Click OK.
To deactivate the Big Data Protector parcel, beside the PTY_BDP parcel, click Deactivate.
The prompt to confirm the deactivation of the parcel and restart of the dependent services appears.To restart the services, which are dependent on the parcel that needs to be deactivated, select Restart.
Alternatively, to just deactivate the parcel, select Deactivate Only.Note: It is possible to restart the dependent services later also. However, it is recommended to restart the dependent services immediately. This will ensure that the dependent services do not utilize the parcel that is being deactivated.
To deactivate the Big Data Protector parcel, click OK.
Note: Alternatively, to terminate the deactivation, click Abort. The deactivation of the Big Data Protector parcel starts.
To complete the deactivation of the Big Data Protector parcel, click Close.
After you deactivate the PTY_LOGFORWARDER_CONF, PTY_CERT, and PTY_BDP parcels, their status on the Parcels changes to Distributed, and the Activate button appears.
3.1.7.5 - Removing the Parcels
After deactivating the Big Data Protector parcels from the Cloudera Manager, remove the following Big Data Protector parcels from all the nodes:
- PTY_BDP: Big Data Protector parcel
- PTY_CERT: Certificates parcel
- PTY_LOGFORWARDER_CONF: Log Forwarder configuration parcel
To remove the Big Data Protector Parcels from all the Nodes in the Cluster:
- On the Cloudera Manager Parcels page, beside the Big Data Protector parcel, click the dropdown arrow.
The drop-down menu appears. - Select Remove From Hosts.
The prompt to confirm the removal of the Big Data Protector parcel appears. - Click OK.
The Big Data Protector parcel is removed from all the nodes in the cluster. - Beside the PTY_CERT parcel, click the dropdown arrow.
The drop-down menu appears. - Select Remove From Hosts.
The prompt to confirm the removal of the Certificates parcel appears. - Click OK.
The Certificate parcel is removed from all the nodes in the cluster. - Beside the PTY_LOGFORWARDER_CONF parcel, click the dropdown arrow.
The drop-down menu appears. - Select Remove From Hosts. The prompt to confirm the removal of the Log Forwarder configuration parcel appears.
- Click OK.
The Log Forwarder configuration parcel is removed from all the nodes in the cluster.
3.1.7.6 - Deleting the Parcels from the Local Repository
After removing the Big Data Protector parcel from the nodes, delete the following Big Data Protector parcels from the local Cloudera Manager repository:
- PTY_BDP: Big Data Protector parcel
- PTY_CERT: Certificates parcel
- PTY_LOGFORWARDER_CONF: Log Forwarder configuration parcel
To delete the Big Data Protector Parcels from the Local Repository:
On the Cloudera Manager Home page, click Parcels.
The Parcels page appears.Beside the PTY_BDP parcel, click the dropdown arrow. The drop-down menu appears.
Select Delete.
The prompt to confirm the deletion of the Big Data Protector parcel appears.Click OK. The Big Data Protector parcel is deleted from the local repository.
Beside the PTY_CERT parcel, click the dropdown arrow.
The drop-down menu appears.Select Delete.
The prompt to confirm the deletion of the Certificates parcel appears.Click OK. The Certificates parcel is deleted from the local repository.
Beside the PTY_LOGFORWARDER_CONF parcel, click the dropdown arrow.
The drop-down menu appears.Select Delete.
The prompt to confirm the deletion of the Log Forwarder configuration parcel appears.Click OK.
The Log Forwarder configuration parcel is deleted from the local repository.After all the Big Data Protector parcels are deleted from the repository, remove the Big Data Protector related configuration updates from the cluster.
Note: For more information about removing the Big Data Protector configuration updates from the cluster, refer to Restoring the Big Data Protector Configuration.
3.1.7.7 - Deleting the CSD Files
The last step in the uninstall process is to delete the BDP Service-<BDP_Version>.jar file from the local repository of the Cloudera Manager.
To delete the BDP Service.jar file from the local repository of the Cloudera Manager:
- Login to the Master node.
- Navigate to the
/opt/cloudera/csd/directory. - Delete the
BDP_PEP-<BDP_Version>.jarfile. - Restart the Cloudera Manager server.
- After the Cloudera Manager server starts up, restart the Cloudera Management services on the Cloudera Manager web interface.
3.2 - Amazon Elastic MapReduce Protector
The Big Data Protector on Amazon Elastic MapReduce (EMR) is a cloud-based protector that allows users to process data efficiently. The EMR cluster is a collection of Amazon EC2 instances that collaborate to process data using popular Big Data frameworks, such as, Apache Hadoop, Apache Spark, Apache HBase, and others.
The Big Data Protector on EMR utilizes the following components to process and protect data:
- HBase
- Pig
- MapReduce
- Hive
- Spark
- SparkSQL
3.2.1 - Understanding the architecture
3.2.1.1 - Bootstrap installer architecture
The architecture for the EMR distribution of the Big Data Protector is depicted in the image below.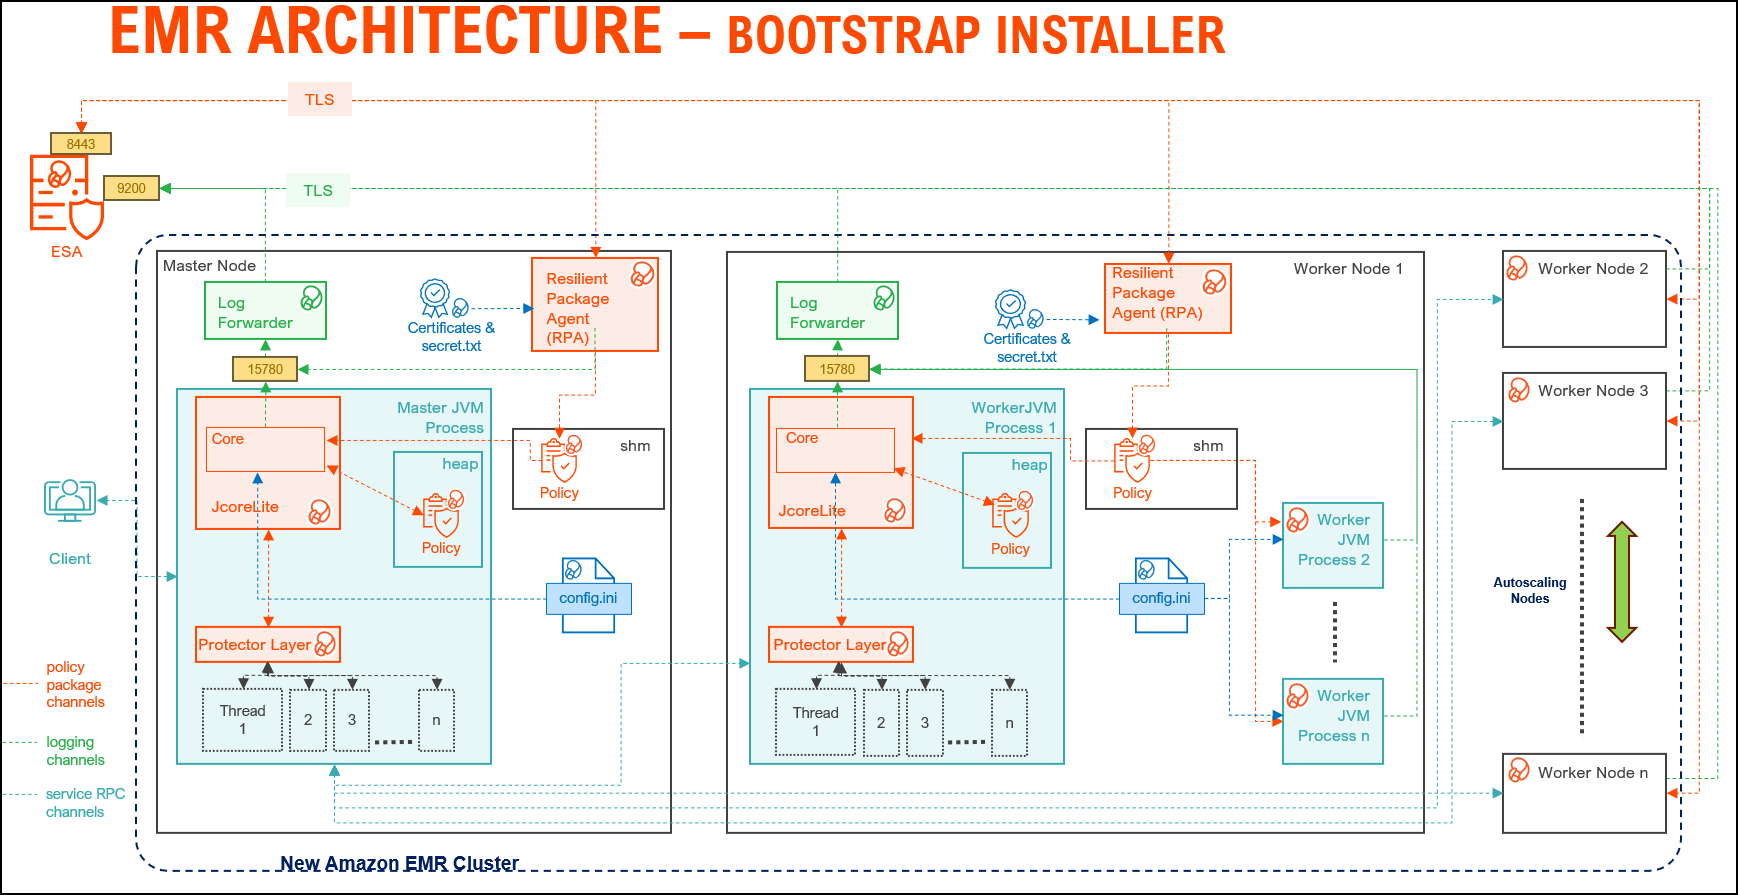
| Component | Description |
|---|---|
| RPAgent | A daemon running on each node that downloads the package from ESA/PPC over a TLS channel using the installed Certificates. |
| Log Forwarder | A daemon running on each node that routes the audit logs and application logs to ESA/Audit Store. |
| config.ini | A file on each node containing the set of configuration parameters to modify the protector behavior. |
| BDP Layer | Contains the Big Data Protector UDFs and APIs executing in CDP service processes. |
| JcoreLite | The JNI library that provides a Java API layer to the Core libraries. |
| Core | The set of various libraries that provide the Protegrity Core functionality. |
3.2.1.2 - Static installer architecture
The architecture for the EMR distribution of the Big Data Protector is depicted in the image below.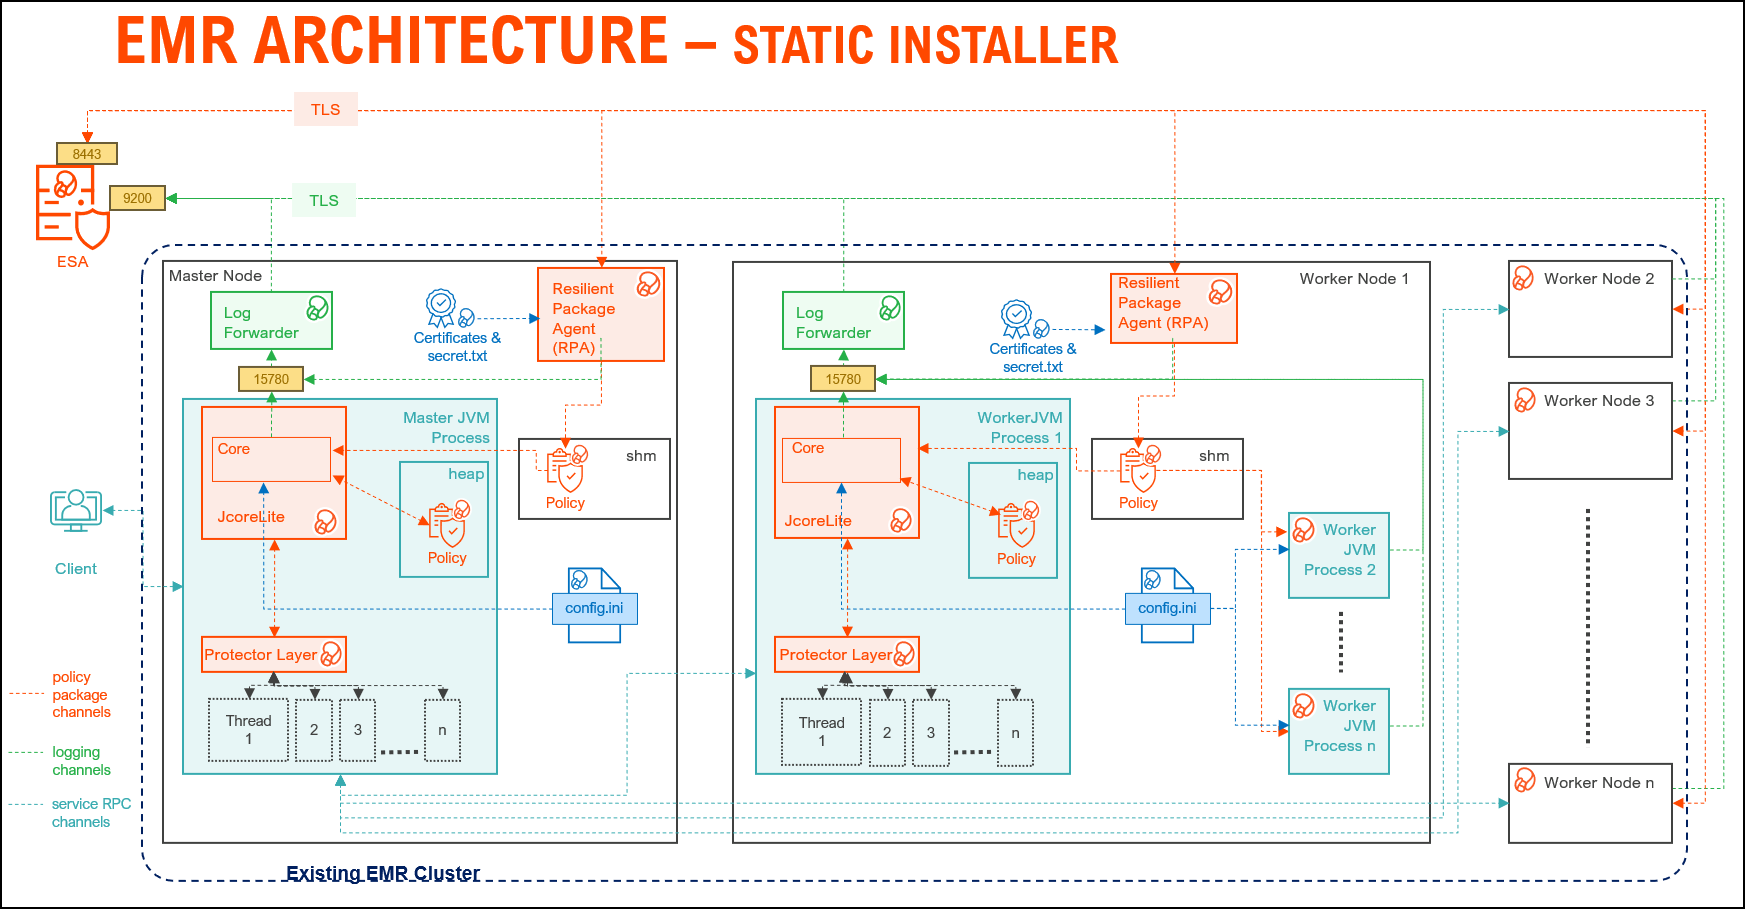
| Component | Description |
|---|---|
| RPAgent | A daemon running on each node that downloads the package from the ESA/PPC over a TLS channel using the installed Certificates. |
| Log Forwarder | A daemon running on each node that routes the audit logs and application logs to the ESA/Audit Store. |
| config.ini | A file on each node containing the set of configuration parameters to modify the protector behavior. |
| BDP Layer | Contains the Big Data Protector UDFs and APIs executing in CDP service processes. |
| JcoreLite | The JNI library that provides a Java API layer to the Core libraries. |
| Core | The set of various libraries that provide the Protegrity Core functionality. |
3.2.1.3 - EMR Serverless architecture
Amazon EMR Serverless is a modern, on-demand data processing architecture designed to eliminate the complexity of managing clusters for big data workloads. Unlike traditional EMR deployments, EMR Serverless dynamically provisions compute resources based on job requirements, enabling cost efficiency and scalability without manual intervention.
At its core, the architecture for EMR Serverless leverages containerized executors to run Spark or Hive applications in an isolated, secure environment. These containers are orchestrated by AWS, ensuring optimal resource utilization and fault tolerance. The design supports Protegrity data protection integration, making it suitable for enterprise-grade deployments where compliance and security are critical.
Key components include:
- Serverless Runtime: Supports Spark and Hive for analytics and ETL.
- Dynamic Scaling: Automatically adjusts resources to workload demands.
- Logging and Monitoring: Driver and executor logs are streamed to CloudWatch, with optional forwarding to external systems via Kinesis and Lambda for near real-time insights.
- Deployment Workflow: Applications are packaged as Docker images, stored in AWS ECR, and executed in EMR Serverless environments for consistent and reproducible runs.
The architecture for the EMR Serverless distribution of the Big Data Protector is depicted in the image below.
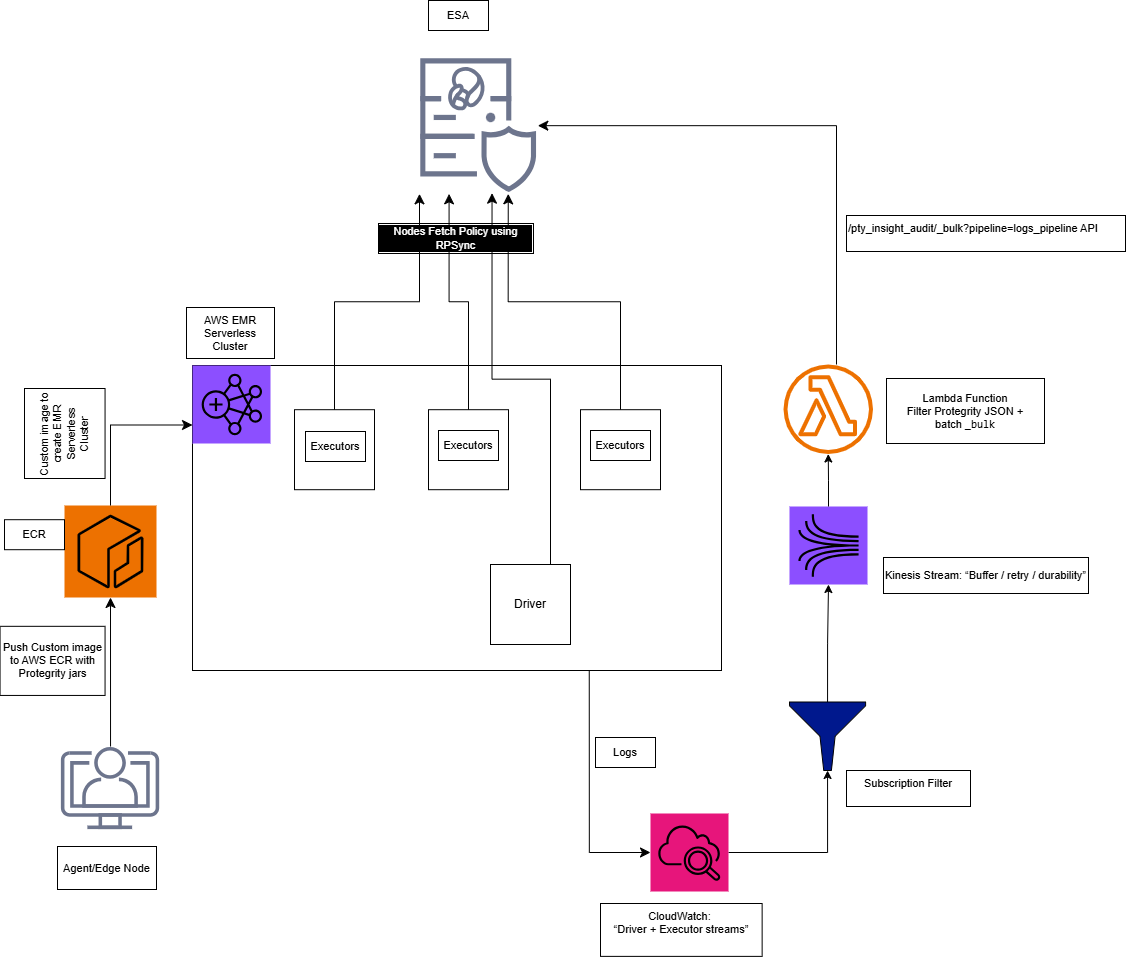
The overall process of installing the Big Data Protector in the EMR Serverless environment is outlined below.
Step 1: Executing the Configurator Script
- Interactive prompt collects all the configuration parameters.
- Input: ESA host/ports, AWS account/region, EMR Serverless application type, and ECR repository names.
- Output:
Installation_Files/directory withconfig.jsonand all the required files. - Files created:
config.json, copied JARs, scripts, and the certificate scripts.
Note: For more information, refer to Executing the Configurator Script.
Step 2: Deploying the BDP Image
python3 emr_serverless_setup_cli.py --config ../config.json deploy
Note: For more information, refer to EMR Serverless Setup CLI
Substep: Validating the Prerequisites
The script:
- Checks Docker, AWS CLI, credentials
- Verifies ECR repository exists
- Confirms all source files present
Substep: Preparing the Assets
The script:
- Reads
config.jsonandconfig.ini.template - Generates
config.iniwith:- [sync] section: ESA policy server connection (host:8443)
- [log] section: output=stdout
- Updates the
GetCertificates.shscript with ESA host/port
Note: After preparing the assets, if required, modify the
config.inifile as per requirements.
Substep: Generating the Dockerfile
The script:
- Generates the Dockerfile using the values from the
config.jsonfile.
Note: After generating the dockerfile, if needed, modify the dockerfile as per requirements.
Substep: Building the Docker Image
The script:
- Prompts for ESA credentials (username/password or JWT token)
- Downloads the certificates from ESA:8443
- Builds the Docker image
Step 3: Pushing the Image to ECR
The script:
- Logs in to ECR using AWS CLI
- Pushes image to ECR repository
The Big Data Protector build provides an automated script to execute the above-mentioned steps. For more information, refer EMR Serverless Setup CLI.
Understanding the Logging Architecture
- The driver/executor logs are written into the CloudWatch Log group.
- The CloudWatch Logs Subscription filter streams the matching log lines into Kinesis Data Streams.
- The Lambda function consumes the Kinesis batches, extracts only the Protegrity audit JSON lines, builds OpenSearch Bulk (_bulk) payload and invokes the ESA endpoint.
Note: For the CloudWatch subscription filter, provide a filter according to the type of logs that are generated.
Note: For more information, refer Setting up the Log Forwarder
3.2.2 - Preparing the environment
3.2.2.1 - Setting up for the Bootstrap Installer
The procedures mentioned in this section are applicable only for the Bootstrap installer approach to prepare the environment for the Big Data Protector.
3.2.2.1.1 - Verifying the prerequisites
The content mentioned in this section is applicable only for the Bootstrap approach to install the Big Data Protector.
Ensure that the following prerequisites are met, before installing the Big Data Protector on an Amazon EMR cluster:
- It is recommended to be familiar with the following parts:
- The Amazon EMR environment
- Storage bucket, used to store the Big Data Protector installation files
- Bootstrap Action, used to invoke the installation of Big Data Protector
- Amazon Virtual Private Cloud (VPC)
- A ESA appliance v10.x.x or PPC is installed and running.
- A host machine on the x86-64 architecture is available to execute the configurator script.
- A host machine on the ARM64 architecture is available to execute the configurator script.
Note: The host machine on the ARM64 architecture is required to install the build on ARM64 architecture.
- EMR instance types supporting the Graviton architecture are available for the master, core, and task nodes. For example, m6g, r6g, or c6g.
- An S3 bucket is available to copy the Big Data Protector installation files, which are created using the Configurator script.
Note: For more information about creating an S3 bucket, refer to Create your first S3 bucket.
- The following table depicts the list of ports that are configured on ESA/PPC and the nodes in the cluster, which will run the Big Data Protector:
| Destination Port | Protocol | Source | Destination | Description |
8443 | TCP | RPAgent on the Big Data Protector cluster node | ESA | The RPAgent communicates with ESA through port
8443 to download a Policy. |
9200 | Log Forwarder on the Big Data Protector cluster node | Protegrity Audit Store appliance | The Log Forwarder sends all the logs to the Protegrity
Audit Store appliance through port
9200. | |
15780 | Protector on the Big Data Protector cluster node | Log Forwarder on the Big Data Protector cluster node | The Big Data Protector writes Audit Logs to localhost
through port 15780. The RPAgent
Application Logs are also written to localhost through port
15780. The Log Forwarder reads the logs from
that socket. | |
25400 | Protector on the Big Data Protector cluster node | PPC | The RPAgent communicates with PPC through port
25400 to download a Policy. |
3.2.2.1.2 - Extracting the Big Data Protector Package
The steps mentioned in this section are applicable only for the Bootstrap approach to install the Big Data Protector.
After receiving the Big Data Protector installation package from Protegrity, copy it to any Amazon EC2 instance or any node that has connectivity to the ESA.
After downloading the Big Data Protector package, extract it to:
- Access the Configurator script and
- Install the Big Data Protector on all the nodes on an Amazon EMR cluster.
To extract the Configurator script from the installation package:
Log in to the CLI on a machine or an Amazon EC2 node that has connectivity to ESA/PPC.
Copy the Big Data Protector package to any directory.
For example,/opt/protegrity/.BigDataProtector_Linux-ALL-64_x86-64_EMR-<EMR_version>-64_<BDP_version>.tgzBigDataProtector_Linux-ALL-64_ARM64_EMR-<EMR_version>-64_<BDP_version>.tgzTo extract the contents of the package, run the following command:
tar -xvf BigDataProtector_Linux-ALL-64_x86-64_EMR-<EMR_version>-64_<BDP_version>.tgztar -xvf BigDataProtector_Linux-ALL-64_ARM64_EMR-<EMR_version>-64_<BDP_version>.tgzPress ENTER.
The command extracts the installer package and the signature files.BigDataProtector_Linux-ALL-64_x86-64_EMR-<EMR_version>-64_<BDP_version>.tgz signatures/ signatures/BigDataProtector_Linux-ALL-64_x86-64_EMR-<EMR_version>-64_<release_version>.tgz_<BDP_version>.sigBigDataProtector_Linux-ALL-64_ARM64_EMR-<EMR_version>-64_<BDP_version>.tgz signatures/ signatures/BigDataProtector_Linux-ALL-64_ARM64_EMR-<EMR_version>-64_<release_version>.tgz_<BDP_version>.sig
Note: Verify the authenticity of the build using the signatures folder. For more information, refer to Verification of Signed Protector Build.
To extract the configurator script, run the following command:
tar –xvf BigDataProtector_Linux-ALL-64_x86-64_EMR-<EMR_version>-64_<BDP_version>.tgztar –xvf BigDataProtector_Linux-ALL-64_ARM64_EMR-<EMR_version>-64_<BDP_version>.tgzPress ENTER.
The command extracts the configurator script.BDP_Configurator_EMR-<EMR_version>_<BDP_version>.sh
3.2.2.1.3 - Executing the Configurator Script
The steps mentioned in this section are applicable only for the Bootstrap approach to install the Big Data Protector.
Execute the configurator script to create the installation files for installing the Big Data Protector on an Amazon EMR cluster. You can install the Big Data Protector on an Amazon EMR cluster in any one of the following methods:
- New EMR cluster: The configurator script will:
- Download the certificates and key encryption files from ESA/PPC.
- Create the Big Data Protector installation files for a new EMR cluster.
- Create the bootstrap installer and classpath configurator script for a new EMR cluster.
- Copy the Big Data Protector installation files, bootstrap installer, and the classpath configurator script to the S3 bucket.
- Existing EMR cluster: The configurator script will generate the installation package to install the Big Data Protector on an existing EMR cluster.
Before you begin
- Log in to the PPC staging instance through SSH.
- To extract the CA certificate, run the following command:
kubectl -n api-gateway get secret ingress-certificate-secret -o jsonpath='{.data.ca\.crt}' | base64 -d > /tmp/ProtegrityCA.pem - Log in to the staging instance having connectivity to PPC.
- To create a folder inside the
/opt/directory, run the following command:mkdir /opt/esa - To create a folder inside the
/opt/esa/directory, run the following command:mkdir /opt/esa/certs - To copy the CA certificate, run the following command:
scp <ppc-staging_instance>:/tmp/ProtegrityCA.pem /opt/esa/certs/ProtegrityCA.pem - To validate the authenticity of the certificate, run the following command:
head -1 /opt/esa/certs/ProtegrityCA.pem - Press ENTER.
The output of the command appears.
Note: Ensure the output starts with
BEGIN CERTIFICATE, as listed below.-----BEGIN CERTIFICATE----- - To fetch the FQDN from the certificate’s SAN, run the following command:
openssl s_client -connect <ppc-ip>:<port> -servername <ppc-ip> </dev/null2> | openssl x509 -noout -ext subjectAltName - To map the IP address with the FQDN in the
/etc/hostsfile, run the following command:echo "<ppc-ip> <fqdn>" | sudo tee -a /etc/hosts - Open the
ProtegrityCA.pemfile. - Encode the
ProtegrityCA.pemwith base64 (single line) and store that value. - To set the environment variable, run the following command:
export SSL_CERT_FILE=/opt/esa/certs/ProtegrityCA.pem - To verify the changes, run the following command:
openssl s_client -connect <fqdn>:<port> -servername <fqdn> -CAfile "$SSL_CERT_FILE" </dev/null2> | grep "Verify return code"
Important:
- Use the
base64 -dencoded value for the certificate. Pasting the raw data returns theCertificate validation failederror message.- Extract the certificates only during installation. A stale certificate returns the
Verify return code: 21error message.- Ensure the output of the command to verify the changes returns
0 (ok).
Execute the Configurator Script
Log in to the staging environment having connectivity to ESA/PPC.
Navigate to the directory that contains the
BDP_Configurator_EMR-<EMR_version>_<BDP_version>.shscript.To execute the configurator script, run the following command:
./BDP_Configurator_EMR-<EMR_version>_<BDP_version>.shPress ENTER.
The prompt to continue the installation of the Big Data Protector appears.*********************************************************************** Welcome to the Big Data Protector Configurator Wizard *********************************************************************** This will create the Big Data Protector Installation files for AWS EMR. Do you want to continue? [yes or no]:To continue, type
yes.Press ENTER.
The prompt to create the Big Data Protector installation package, depending on the EMR cluster, appears.Protegrity Big Data Protector Configurator started... Enter the EMR cluster for which the Big Data Protector installation package needs to be created: [ 1 ] : New EMR Cluster [ 2 ] : Existing EMR cluster [ 1 or 2 ]:Depending on your requirement, select any one of the following options:
- To create the Big Data Protector installation package for a new EMR cluster, type
1. - To generate the Big Data Protector installation package, in a local directory, for an existing EMR cluster, type
2.
For more information about installing the Big Data Protector on an existing EMR cluster, refer Using the Static Installer.
- To create the Big Data Protector installation package for a new EMR cluster, type
To create the Big Data Protector installation package for a new EMR cluster, type
1.Press ENTER.
The prompt to enter the S3 URI to upload the Big Data Protector installation files appears.Generating Big Data Protector for a new EMR cluster...... Enter the S3 URI where the BDP Installation files are to be uploaded. (E.g. s3://examplebucket/folder):Type the path of the S3 storage bucket.
Note: Ensure that the path of the S3 storage bucket is in the following format:
s3://<bucket_name>/<folder_in_the_bucket>Where,
- <bucket_name> - specifies the name of the storage bucket.
- <folder_in_the_bucket> - specifies the directory within the bucket.
Press ENTER.
The prompt to either upload the installation files to the S3 bucket or generate them locally appears.Choose one option among the following for BDP Installation files: [1] -> Upload files to 's3://<bucket_name>/<folder_in_the_bucket>' S3 URI. [2] -> Generate files locally to current working directory. (You would have to manually upload the files to the specified S3 URI) [ 1 or 2 ]:To upload the installation files to the S3 storage bucket, type
1.Press ENTER.
The prompt to select the type of AWS access key appears.Choose the Type of AWS Access Keys from the following options: [1] -> IAM User Access Keys (Permanent access key id & secret access key) [2] -> Temporary Security Credentials (Temporary access key id, secret access key & session token) [ 1 or 2 ]:Depending on the type of AWS Access Keys you want to use, type
1or2. For example, to use the temporary security credentials, type2.Press ENTER.
The prompt to enter the access key ID appears.Enter the Access Key ID:Enter the access key ID.
Press ENTER.
The prompt to enter the secret access key appears.Enter the Secret Access Key:Enter the secret access key.
Press ENTER.
The prompt to enter the security session token appears.Enter the Security Session Token:Enter the Security Session Token.
Press ENTER.
The prompt to enter ESA hostname or IP address appears.Enter the ESA Hostname/IP Address:Enter ESA Hostname (FQDN, e.g. protegrity-esa.example.com):Enter the hostname or the IP address of ESA.
Press ENTER.
The prompt to enter the listening port for ESA appears.Enter ESA host listening port [8443]:Using ESA_IP from environment: <ESA_IP_Address> Enter ESA host listening port:Enter the listening port for ESA.
Alternatively, to use the default listening port, press ENTER.Press ENTER.
The prompt to enter the JWT token appears.If you have an existing ESA JSON Web Token (JWT) with Export Certificates role, enter it otherwise enter 'no':Enter the JWT token.
Press ENTER.
The prompt to select the audit store type appears.Select the Audit Store type where Log Forwarder(s) should send logs to. [ 1 ] : Protegrity Audit Store [ 2 ] : External Audit Store [ 3 ] : Protegrity Audit Store + External Audit Store Enter the no.:Depending on the Audit Store type, select any one of the following options:
Option Description 1To use the default setting using the Protegrity Audit Store appliance, type 1. If you enter1, then the default Fluent Bit configuration files are used, and Fluent Bit will forward the logs to the Protegrity Audit Store appliances.2To use an external audit store, type 2. If you enter2, then the default Fluent Bit configuration files used for the External Audit Store are renamed. Theout.confandupstream.cfgfiles in the/opt/protegrity/fluent-bit/data/config.d/directory are renamed toout.conf.bkpandupstream.cfg.bkprespectively. The renaming ensures these files will not be used by Fluent Bit. Additionally, the custom Fluent Bit configuration files for the external audit store are copied to the/opt/protegrity/fluent-bit/data/config.d/directory.3To use a combination of the default setting with an external audit store, type 3. If you enter3, then the default Fluent Bit configuration files used for the Protegrity Audit Store are not renamed. Theout.confandupstream.cfgfiles in the/opt/protegrity/fluent-bit/data/config.d/directory retain the original name. However, the custom Fluent Bit configuration files for the external audit store are copied to the/opt/protegrity/fluent-bit/data/config.d/directory.Press ENTER.
The prompt to enter the comma separated list of hostname or IP addresses appears.Enter comma-separated list of Hostnames/IP Addresses and/or Ports of Protegrity Audit Store. Allowed Syntax: hostname[:port][,hostname[:port],hostname[:port]...] (Default Value - <ESA_IP_Address>:9200) Enter the list:Enter the comma-separated IP addresses/ports in the correct syntax.
Press ENTER.
The prompt to enter the local directory path that stores the custom Fluent Bit configuration file appears.Enter the local directory path on this node that stores the custom Fluent-Bit configuration files for External Audit Store:Note: The configurator script will display this prompt only if you select option
2or3in step 28. When you select option2or3in step 28, the custom configuration files are copied to the/<installation_directory>/fluent-bit/data/config.d/directory during the execution of bootstrap script on the EMR nodes.Enter the local directory path that stores the custom Fluent Bit configuration files.
Press ENTER.
The prompt to generate the application logs for the RPAgent appears.Do you want RPAgent's log to be generated in a file? [yes or no]:To generate the logs in a file, type
yes.Press ENTER.
The script generates the installation files and uploads them to the specified S3 bucket.RPAgent's log will be generated in a file. ************************************************************************************ Welcome to the RPAgent Setup Wizard. ************************************************************************************ Unpacking................... Extracting files... Unpacked rpagent compressed file... Temporarily setting up rpagent directory structure on current node... Unpacking... Extracting files... Downloading certificates from <ESA_IP_Address>:8443... % Total % Received % Xferd Average Speed Time Time Time Current Dload Upload Total Spent Left Speed 100 11264 100 11264 0 0 163k 0 --:--:-- --:--:-- --:--:-- 164k Extracting certificates... Certificates successfully downloaded and stored in /<installation_dir>/rpagent/data Protegrity RPAgent installed in /<installation_dir>/rpagent. Retrieving the S3 bucket's AWS Region via AWS S3 REST API... Successfully retrieved S3 bucket's AWS region: <AWS_region_name> Started Uploading the generated installation files via AWS S3 REST API...... Uploading bdp_bootstrap_installer.sh to the S3 bucket. File uploaded to s3://<bucket_name>/<folder_in_the_bucket>/bdp_bootstrap_installer.sh Uploading bdp_classpath_configurator.py to the S3 bucket. File uploaded to s3://<bucket_name>/<folder_in_the_bucket>/bdp_classpath_configurator.py Uploading BigDataProtector_Linux-ALL-64_x86-64_EMR-7.9-64_<BDP_version>.tgz to the S3 bucket. File uploaded to s3://<bucket_name>/<folder_in_the_bucket>/BigDataProtector_Linux-ALL-64_x86-64_EMR-<EMR_version>-64_<BDP_version>.tgz Successfully Uploaded BigDataProtector_Linux-ALL-64_x86-64_EMR-<EMR_version>-64_<BDP_version>.tgz, bdp_bootstrap_installer.sh, bdp_classpath_configurator.py to S3 bucket 's3://<bucket_name>/<folder_in_the_bucket>' Successfully Generated installation files at ./Installation_Files/ directory. Successfully configured Big Data Protector for a new EMR cluster..RPAgent's log will be generated in a file. ************************************************************************************ Welcome to the RPAgent Setup Wizard. ************************************************************************************ Unpacking................... Extracting files... Unpacked rpagent compressed file... Temporarily setting up rpagent directory structure on current node... Unpacking... Extracting files... Certificate validation successful. Obtaining token from <ESA_FQDN>:8443... Downloading certificates from <ESA_FQDN>:8443... % Total % Received % Xferd Average Speed Time Time Time Current Dload Upload Total Spent Left Speed 100 11264 100 11264 0 0 163k 0 --:--:-- --:--:-- --:--:-- 164k Extracting certificates... Certificates successfully downloaded and stored in /<installation_dir>/rpagent/data Protegrity RPAgent installed in /<installation_dir>/rpagent. Retrieving the S3 bucket's AWS Region via AWS S3 REST API... Successfully retrieved S3 bucket's AWS region: <AWS_region_name> Started Uploading the generated installation files via AWS S3 REST API...... Uploading bdp_bootstrap_installer.sh to the S3 bucket. File uploaded to s3://<bucket_name>/<folder_in_the_bucket>/bdp_bootstrap_installer.sh Uploading bdp_classpath_configurator.py to the S3 bucket. File uploaded to s3://<bucket_name>/<folder_in_the_bucket>/bdp_classpath_configurator.py Uploading BigDataProtector_Linux-ALL-64_ARM64_EMR-<EMR_version>-64_<BDP_version>.tgz to the S3 bucket. File uploaded to s3://<bucket_name>/<folder_in_the_bucket>/BigDataProtector_Linux-ALL-64_ARM64_EMR-<EMR_version>-64_<BDP_version>.tgz Successfully Uploaded BigDataProtector_Linux-ALL-64_ARM64_EMR-<EMR_version>-64_<BDP_version>.tgz, bdp_bootstrap_installer.sh, bdp_classpath_configurator.py to S3 bucket 's3://<bucket_name>/<folder_in_the_bucket>' Successfully Generated installation files at ./Installation_Files/ directory. Successfully configured Big Data Protector for a new EMR cluster..
3.2.2.2 - Setting up for the Static Installer
The procedures mentioned in this section are applicable only for the Static installer approach to prepare the environment for the Big Data Protector.
3.2.2.2.1 - Verifying the prerequisites for Static Installer
The content mentioned in this section is applicable only for the Static installer approach to install the Big Data Protector.
Ensure that the following prerequisites are met, before installing the Big Data Protector:
The EMR cluster is installed, configured, and running.
A ESA appliance v10.x.x or PPC is installed and running.
A host machine on the x86-64 architecture is available to execute the configurator script.
A host machine on the ARM64 architecture is available to execute the configurator script.
Note: The host machine on the ARM64 architecture is required to install the build on ARM64 architecture.
EMR instance types supporting the Graviton architecture are available for the master, core, and task nodes. For example, m6g, r6g, or c6g.
The static installer for EMR uses utilities, such as, pssh (parallel ssh) and pscp (parallel scp). These utilities require Python to be installed on the Primary node. To verify whether Python is installed on the Primary node, run the following command:
/usr/bin/env python --versionThe command returns the version of Python installed on the system.
If you are unable to detect Python on the Primary node, then ensure that you have a compatible version of Python installed on the lead node (preferably Python 3.x). Ensure that the utilities are able to detect the version of Python using the following command:
/usr/bin/env pythonA
sudoeruser account with privileges to perform the following tasks:- Update the system by modifying the configuration, permissions, or ownership of directories and files.
- Perform third party configuration.
- Create directories and files.
- Modify the permissions and ownership for the created directories and files.
- Set the required permissions to the create directories and files for the Protegrity Service Account.
- Permissions for using the SSH service.
The following user accounts are present to perform the required tasks:
ADMINISTRATOR_USER: The sudoer user account that is responsible for installing and uninstalling the Big Data Protector. on the cluster. This user account must havesudoaccess to install the product.EXECUTOR_USER: A user that has ownership of all Protegrity files, directories, and services.OPERATOR_USER: Responsible for performing tasks, such as, starting or stopping tasks, monitoring services, updating the configuration, and maintaining the cluster while the Big Data Protector is installed. If you want to start, stop, or restart the Protegrity services, then you requiresudoerprivileges for this user to impersonate theEXECUTOR_USER.- Depending on the requirements, a single user on the system may perform multiple roles. If a single user is performing multiple roles, then ensure that the following conditions are met:
- The user has the required permissions and privileges to impersonate the other user accounts, for performing their roles, and perform tasks as the impersonated user.
- The user is assigned the highest set of privileges, from the required roles that it needs to perform, to execute the required tasks. For example, if a single user is performing tasks as
ADMINISTRATOR_USER,EXECUTOR_USER, andOPERATOR_USER, then ensure that the user is assigned the privileges of theADMINISTRATOR_USER.
A Private Key file (.pem file) is available for the
sudoeruser on the Master node. The file is used for enabling key-based authentication, and for communicating with all the nodes in the EMR cluster.Ensure that the
ADMINISTRATOR_USERorOPERATOR_USERhave the value of theNOPASSWDparameter set toALLin the sudoer’s file. This is required for installing and using Big Data Protector on the EMR cluster because a key-based authentication for thesudoeruser is provided.The management scripts provided by the installer in the
cluster_utilsdirectory should be run only by the user (OPERATOR_USER) having privileges to impersonate theEXECUTOR_USER.- If the value of
AUTOCREATE_PROTEGRITY_IT_USRis set toNo, ensure a service group containing a user for running Protegrity services on all the cluster nodes already exists. - If the Hadoop cluster is configured with AD or LDAP, ensure that the
AUTOCREATE_PROTEGRITY_IT_USRparameter, in theBDP.configfile, is set toNo. Ensure the required service account user is created on all the nodes in the cluster.
- If the value of
The table lists the ports required for the EMR cluster.
| Destination Port | Protocol | Source | Destination | Description |
8443 | TCP | RPAgent on the Big Data Protector cluster node | ESA | The RPAgent communicates with ESA through port
8443 to download a Policy. |
9200 | Log Forwarder on the Big Data Protector cluster node | Protegrity Audit Store appliance | The Log Forwarder sends all the logs to the Protegrity
Audit Store appliance through port
9200. | |
15780 | Protector on the Big Data Protector cluster node | Log Forwarder on the Big Data Protector cluster node | The Big Data Protector writes Audit Logs to localhost
through port 15780. The RPAgent
Application Logs are also written to localhost through port
15780. The Log Forwarder reads the logs from
that socket. | |
25400 | Protector on the Big Data Protector cluster node | PPC | The RPAgent communicates with PPC through port
25400 to download a Policy. |
3.2.2.2.2 - Executing the Configurator Script
Before you begin
- Log in to the PPC staging instance through SSH.
- To extract the CA certificate, run the following command:
kubectl -n api-gateway get secret ingress-certificate-secret -o jsonpath='{.data.ca\.crt}' | base64 -d > /tmp/ProtegrityCA.pem - Log in to the staging instance having connectivity to PPC.
- To create a folder inside the
/opt/directory, run the following command:mkdir /opt/esa - To create a folder inside the
/opt/esa/directory, run the following command:mkdir /opt/esa/certs - To copy the CA certificate, run the following command:
scp <ppc-staging_instance>:/tmp/ProtegrityCA.pem /opt/esa/certs/ProtegrityCA.pem - To validate the authenticity of the certificate, run the following command:
head -1 /opt/esa/certs/ProtegrityCA.pem - Press ENTER.
The output of the command appears.
Note: Ensure the output starts with
BEGIN CERTIFICATE, as listed below.-----BEGIN CERTIFICATE----- - To fetch the FQDN from the certificate’s SAN, run the following command:
openssl s_client -connect <ppc-ip>:<port> -servername <ppc-ip> </dev/null2> | openssl x509 -noout -ext subjectAltName
- To map the IP address with the FQDN in the
/etc/hostsfile, run the following command:
echo "<ppc-ip> <fqdn>" | sudo tee -a /etc/hosts
- Open the
ProtegrityCA.pemfile. - Encode the
ProtegrityCA.pemwith base64 (single line) and store that value. - To set the environment variable, run the following command:
export SSL_CERT_FILE=/opt/esa/certs/ProtegrityCA.pem - To verify the changes, run the following command:
openssl s_client -connect <fqdn>:<port> -servername <fqdn> -CAfile "$SSL_CERT_FILE" </dev/null2> | grep "Verify return code"
Important:
- Use the
base64 -dencoded value for the certificate. Pasting the raw data returns theCertificate validation failederror message.- Extract the certificates only during installation. A stale certificate returns the
Verify return code: 21error message.- Ensure the output of the command to verify the changes returns
0 (ok).
Execute the Configurator Script
Log in to the staging environment having connectivity to ESA/PPC.
Note: The instance to execute the configurator script must be on the ARM64 architecture.
Navigate to the directory that contains the
BDP_Configurator_EMR-<EMR_version>_<BDP_version>.shscript.To execute the configurator script, run the following command:
./BDP_Configurator_EMR-<EMR_version>_<BDP_version>.shPress ENTER.
The prompt to continue the installation of the Big Data Protector appears.*********************************************************************** Welcome to the Big Data Protector Configurator Wizard *********************************************************************** This will create the Big Data Protector Installation files for AWS EMR. Do you want to continue? [yes or no]:To continue, type
yes.Press ENTER.
The prompt to create the Big Data Protector installation package, depending on the EMR cluster, appears.Protegrity Big Data Protector Configurator started... Enter the EMR deployment type for Big Data Protector: [ 1 ] : New EMR Cluster (Bootstrap) [ 2 ] : Existing EMR Cluster (Static) [ 3 ] : EMR Serverless (Containerized) [ 1, 2, or 3 ]:To create the Big Data Protector installation package for an existing EMR cluster, type
2.Press ENTER.
The script generates the installation files to install the Big Data Protector on an existing EMR cluster.Generating Big Data Protector for an existing EMR cluster..... Successfully configured Big Data Protector for an existing EMR cluster.. Use the ./Installation_Files/BigDataProtector_Linux-ALL-64_x86-64_EMR-<EMR_version>-64_<BDP_version>.tgz file to continue the installation.Generating Big Data Protector for an existing EMR cluster..... Successfully configured Big Data Protector for an existing EMR cluster.. Use the ./Installation_Files/BigDataProtector_Linux-ALL-64_ARM64_EMR-<EMR_version>-64_<BDP_version>.tgz file to continue the installation.
3.2.2.2.3 - Extracting the Installation Package
The steps mentioned in this section are applicable only for the Static installer approach to install the Big Data Protector.
To extract the files from the installation package:
Ensure that the installation package
BigDataProtector_Linux-ALL-64_<Architecture>_EMR-<emr_version>-64_<BDP_version>.tgzis copied to the Master node on the EMR cluster in any temporary directory, such as/opt/protegrity/.To extract the files from the installation package, run the following command:
tar -xvf BigDataProtector_Linux-ALL-64_x86-64_EMR-<emr_version>-64_<BDP_version>.tgztar -xvf BigDataProtector_Linux-ALL-64_ARM64_EMR-<emr_version>-64_<BDP_version>.tgzPress ENTER.
The command extracts the following files:uninstall.sh ptyLogAnalyzer.sh ptyLog_Consolidator.sh PepHbaseProtector<HBase_version>Setup_Linux_emr-<emr_version>_<BDP_version>.sh bdp_classpath_deconfigurator.py PepSpark<Spark_version>Setup_Linux_emr-<emr_version>_<BDP_version>.sh JcoreLiteSetup_Linux_x64_<JcoreLite_version>.gadcc.release-<BDP_version>.sh PepPig<pig_version>Setup_Linux_emr-<emr_version>_<BDP_version>.sh bdp_common/ bdp_common/bdp.properties.template bdp_common/config.ini.template Logforwarder_Setup_Linux_x64_<core_version>.sh node_uninstall.sh bdp_classpath_configurator.py RPAgent_Setup_Linux_x64_<core_version>.sh PepMapreduce<MapReduce_version>Setup_Linux_emr-<emr_version>_<BDP_version>.sh PepHive<Hive_version>Setup_Linux_emr-<emr_version>_<BDP_version>.sh BDP.config BdpInstallx.x.x_Linux_<BDP_version>.shJcoreLiteSetup_Linux_arm64_<JcoreLite_version>.sh ptyLogAnalyzer.sh bdp_classpath_configurator.py RPAgent_Setup_Linux_arm64_<core_version>.sh PepMapreduce<MapReduce_version>Setup_Linux_emr-<emr_version>_<BDP_version>.sh uninstall.sh bdp_common/ bdp_common/bdp.properties.template bdp_common/config.ini.template Logforwarder_Setup_Linux_arm64_<core_version>.sh node_uninstall.sh ptyLog_Consolidator.sh BDP.config PepSpark<Spark_version>Setup_Linux_emr-<emr_version>_<BDP_version>.sh PepHive<Hive_version>Setup_Linux_emr-<emr_version>_<BDP_version>.sh bdp_classpath_deconfigurator.py PepHbaseProtector<HBase_version>Setup_Linux_emr-<emr_version>_<BDP_version>.sh PepPig<pig_version>Setup_Linux_emr-<emr_version>_<BDP_version>.sh BdpInstallx.x.x_Linux_<BDP_version>.sh
3.2.2.2.4 - Updating the BDP.Config File
BDP.Config File for the Static Installer.The steps mentioned in this section are applicable only for the Static Installer approach to install the Big Data Protector.
Note: Ensure that the
BDP.configfile is updated before the Big Data Protector is installed.
Do not update the BDP.config file when the installation of the Big Data Protector is in progress.
To update the BDP.config file:
Create a
hostsfile containing the IP addresses of all the nodes in the cluster, except the Lead node, and specify them in theBDP.configfile.The installation script uses this file to install the Big Data Protector on the nodes.
Open the
BDP.configfile in any text editor and modify the following parameter values:HADOOP_DIR– is the installation home directory for the Hadoop distribution.PROTEGRITY_DIR– is the directory where the Big Data Protector will be installed.The examples used in this document assume that the Big Data Protector is installed in the
/opt/protegrity/directory.CLUSTERLIST_FILE– This file contains the host name or IP addresses all the nodes in the cluster, except the Lead node, listing one host name and IP address per line.Ensure that you specify the file name with the complete path.
SPARK_PROTECTOR– Specifies one of the following values, as required:Yes– Specifies to install the Spark protector. Set the value of this parameter toYes, to run Hive UDFs with Spark SQL. Alternatively, use the Spark protector samples if theINSTALL_DEMOparameter is set toYes.No– Specifies to skip installing the Spark protector.
AUTOCREATE_PROTEGRITY_IT_USR– Determines the Protegrity service account. The service group and service username specified in thePROTEGRITY_IT_USR_GROUPandPROTEGRITY_IT_USRparameters respectively will be created if this parameter is set toYes. One of the following values can be specified, as required:Yes– Instructs the installer to create the service groupPROTEGRITY_IT_USR_GROUPcontaining the userPROTEGRITY_IT_USRfor executing the Protegrity services on all the nodes in the cluster.If the service group or service user are already present, then the installer exits.
If you uninstall the Big Data Protector, then the service group and the service user are deleted.
No– Instructs the installer to skip creating a service groupPROTEGRITY_IT_USR_GROUPwith the service userPROTEGRITY_IT_USRfor executing the Protegrity services on all the nodes in the cluster.
PROTEGRITY_IT_USR_GROUP– is the service group required for running the Protegrity services on all the nodes in the cluster. All the Protegrity installation directories are owned by this service group.PROTEGRITY_IT_USR– is the service account user required for running the Protegrity services on all the nodes in the cluster and is a part of the groupPROTEGRITY_IT_USR_GROUP. All the Protegrity installation directories are owned by this service user.
3.2.2.3 - Setting up for the EMR Serverless Installer
The procedures mentioned in this section are applicable only for the Serverless approach to prepare the environment for the Big Data Protector.
3.2.2.3.1 - Extracting the Big Data Protector Package
The steps mentioned in this section are applicable only for the Serverless approach to install the Big Data Protector.
After receiving the Big Data Protector installation package from Protegrity, copy it to any Amazon EC2 instance or any node that has connectivity to ESA.
To extract the Configurator script from the installation package:
Log in to the CLI on a machine or an Amazon EC2 node that has connectivity to ESA/PPC.
Copy the Big Data Protector package to any directory.
For example,/opt/protegrity/.BigDataProtector_Linux-ALL-64_x86-64_EMR-<EMR_version>-64_<BDP_version>.tgzBigDataProtector_Linux-ALL-64_ARM64_EMR-<EMR_version>-64_<BDP_version>.tgzTo extract the contents of the package, run the following command:
tar -xvf BigDataProtector_Linux-ALL-64_x86-64_EMR-<EMR_version>-64_<BDP_version>.tgztar -xvf BigDataProtector_Linux-ALL-64_ARM64_EMR-<EMR_version>-64_<BDP_version>.tgzPress ENTER.
The command extracts the installer package and the signature files.BigDataProtector_Linux-ALL-64_x86-64_EMR-<EMR_version>-64_<BDP_version>.tgz signatures/ signatures/BigDataProtector_Linux-ALL-64_x86-64_EMR-<EMR_version>-64_<release_version>.tgz_<BDP_version>.sigBigDataProtector_Linux-ALL-64_ARM64_EMR-<EMR_version>-64_<BDP_version>.tgz signatures/ signatures/BigDataProtector_Linux-ALL-64_ARM64_EMR-<EMR_version>-64_<release_version>.tgz_<BDP_version>.sigNote: Verify the authenticity of the build using the signatures folder. For more information, refer to Verification of Signed Protector Build.
To extract the configurator script, run the following command:
tar –xvf BigDataProtector_Linux-ALL-64_x86-64_EMR-<EMR_version>-64_<BDP_version>.tgztar –xvf BigDataProtector_Linux-ALL-64_ARM64_EMR-<EMR_version>-64_<BDP_version>.tgzPress ENTER.
The command extracts the configurator script.BDP_Configurator_EMR-<EMR_version>_<BDP_version>.sh
3.2.2.3.2 - Executing the Configurator Script
Before you begin
- Log in to the PPC staging instance through SSH.
- To extract the CA certificate, run the following command:
kubectl -n api-gateway get secret ingress-certificate-secret -o jsonpath='{.data.ca\.crt}' | base64 -d > /tmp/ProtegrityCA.pem - Log in to the staging instance having connectivity to PPC.
- To create a folder inside the
/opt/directory, run the following command:mkdir /opt/esa - To create a folder inside the
/opt/esa/directory, run the following command:mkdir /opt/esa/certs - To copy the CA certificate, run the following command:
scp <ppc-staging_instance>:/tmp/ProtegrityCA.pem /opt/esa/certs/ProtegrityCA.pem - To validate the authenticity of the certificate, run the following command:
head -1 /opt/esa/certs/ProtegrityCA.pem - Press ENTER.
The output of the command appears.
Note: Ensure the output starts with
BEGIN CERTIFICATE, as listed below.-----BEGIN CERTIFICATE----- - To fetch the FQDN from the certificate’s SAN, run the following command:
openssl s_client -connect <ppc-ip>:<port> -servername <ppc-ip> </dev/null2> | openssl x509 -noout -ext subjectAltName
- To map the IP address with the FQDN in the
/etc/hostsfile, run the following command:
echo "<ppc-ip> <fqdn>" | sudo tee -a /etc/hosts
- Open the
ProtegrityCA.pemfile. - Encode the
ProtegrityCA.pemwith base64 (single line) and store that value. - To set the environment variable, run the following command:
export SSL_CERT_FILE=/opt/esa/certs/ProtegrityCA.pem - To verify the changes, run the following command:
openssl s_client -connect <fqdn>:<port> -servername <fqdn> -CAfile "$SSL_CERT_FILE" </dev/null2> | grep "Verify return code"
Important:
- Use the
base64 -dencoded value for the certificate. Pasting the raw data returns theCertificate validation failederror message.- Extract the certificates only during installation. A stale certificate returns the
Verify return code: 21error message.- Ensure the output of the command to verify the changes returns
0 (ok).
Execute the Configurator Script
The steps mentioned in this section are applicable only for the Serverless approach to install the Big Data Protector.
The Big Data Protector configurator script:
- Generates the
config.jsonfile. - Generates the EMR Serverless deployment scripts.
- Provides the runtime artifacts and common utilities.
To execute the configurator script:
Log in to the CLI on a machine or an Amazon EC2 node that has connectivity to the ESA/PPC.
Navigate to the directory where the installation files are extracted.
To execute the script, run the following command:
./BDP_Configurator_EMR-<EMR_version>_<BDP_version>.shPress ENTER.
The Big Data Protector Configurator Wizard with the prompt to continue appears.*********************************************************************** Welcome to the Big Data Protector Configurator Wizard *********************************************************************** This will create the Big Data Protector Installation files for AWS EMR. Do you want to continue? [yes or no]:To continue, type
yes.Press ENTER.
The prompt to select the deployment type appears.Protegrity Big Data Protector Configurator started... Enter the EMR deployment type for Big Data Protector: [ 1 ] : New EMR Cluster (Bootstrap) [ 2 ] : Existing EMR Cluster (Static) [ 3 ] : EMR Serverless (Containerized) [ 1, 2, or 3 ]:To install the Big Data Protector using the Serverless approach, type
3.Press ENTER.
The prompt to select the configuration mode appears.Generating Big Data Protector for EMR Serverless...... ================================================================ EMR Serverless - Configuration Setup ================================================================ The EMR Serverless deployment requires configuration values to be stored in a config.json file. This file is used by Python scripts to: - Generate the Dockerfile with BDP components - Build and tag the Docker image - Push the image to AWS ECR - Configure certificate downloads from ESA You have two options to provide this configuration: ================================================================ OPTION 1: Interactive Mode (Recommended) ================================================================ - Guided prompts will collect all required information - Values are validated during input - config.json is automatically generated - Faster and less error-prone ================================================================ OPTION 2: Silent Mode ================================================================ - A template config.json file with placeholders is created - You manually edit the file and replace all placeholders - Useful if you prefer to script or automate configuration - Requires careful attention to JSON syntax ================================================================ Select configuration mode: [ 1 ] : Interactive Mode (Guided prompts) [ 2 ] : Silent Mode (Edit config.json template) Enter your choice [1 or 2]:To use the interactive configuration mode, type
1.Press ENTER.
The prompt to verify the prerequisites appears.[OK] Selected: Interactive Mode ================================================================ EMR Serverless - Prerequisites Checklist ================================================================ Before proceeding, please ensure you have the following information ready: [OK] ESA Configuration: - ESA Server Host/IP - ESA Port (default: 25400) - GetCertificates Port (default: 25400) - ESA Admin Username & Password (prompted during build) [OK] EMR Serverless Configuration: [1/6] EMR Release Label (e.g., emr-6.15.0, emr-7.0.0) [2/6] Runtime Selection (Spark or Hive) [3/6] AWS Account ID (12-digit number) [4/6] AWS Region (e.g., us-east-1, us-west-2) [5/6] ECR Repository Name (where Docker image will be stored) [6/6] Docker Image Tag (e.g., latest, v1.0.0) ================================================================ Do you have all the required information to proceed? [yes/no]:[OK] Selected: Interactive Mode ================================================================ EMR Serverless - Prerequisites Checklist ================================================================ Before proceeding, please ensure you have the following information ready: [OK] ESA Configuration: - ESA Server FQDN (matching cert CN; used to fetch certs on build host) - ESA Server private IP (used as runtime [sync] host inside the image) - ESA Port (default: 8443) - ESA Admin Username & Password (prompted during build) [OK] EMR Serverless Configuration: [1/6] EMR Release Label (e.g., emr-6.15.0, emr-7.0.0) [2/6] Runtime Selection (Spark or Hive) [3/6] AWS Account ID (12-digit number) [4/6] AWS Region (e.g., us-east-1, us-west-2) [5/6] ECR Repository Name (where Docker image will be stored) [6/6] Docker Image Tag (e.g., latest, v1.0.0) ================================================================ Do you have all the required information to proceed? [yes/no]:If all the prerequisites are available, type
yes.Press ENTER.
The prompt to enter the ESA hostname appears.[OK] Proceeding with interactive configuration... Enter the ESA Hostname/IP Address:[OK] Proceeding with interactive configuration... Enter ESA Hostname (FQDN, e.g. protegrity-esa.example.com):For x86-64 architecture, enter the ESA Hostname.
For ARM64 architecture, a prompt to enter ESA IP appears.
Enter the ESA private IP address (used as runtime [sync] host):For ARM64 architecture, enter ESA IP.
Press ENTER.
The prompt to enter the ESA listening port appears.Enter ESA host listening port [25400]:Enter ESA host listening port [8443]:Enter the listening port.
Press ENTER.
The prompt to enter the EMR release label appears.================================================================ EMR Serverless Configuration - Step by Step ================================================================ ESA Server: <ESA_IP_Address>:<ESA_Port> GetCertificates Port: <ESA_Port> [1/6] EMR Release Label ------------------------------------------------------ Specify the EMR release version you want to use. Note: Not all EMR versions have serverless images available. For available versions, visit AWS EMR Serverless documentation. Enter EMR Release Label (e.g., emr-7.12.0):================================================================ EMR Serverless Configuration - Step by Step ================================================================ ESA Server: <ESA_FQDN>:8443 (runtime IP: <ESA_IP_Address>) [1/6] EMR Release Label ------------------------------------------------------ Specify the EMR release version you want to use. Note: Not all EMR versions have serverless images available. For available versions, visit AWS EMR Serverless documentation. Enter EMR Release Label (e.g., emr-7.13.0):Enter the EMR version.
Press ENTER.
The prompt to select the processing engine appears.[2/6] Runtime Selection ------------------------------------------------------ Choose the processing engine for your EMR Serverless application. Spark: For data processing, ETL, and analytics Hive: For SQL queries on large datasets Select Runtime: [ 1 ] : Spark [ 2 ] : Hive Enter your choice [1 or 2]:Depending on the requirements, type
1or2.Press ENTER.
The prompt to enter the AWS Account ID appears.[3/6] AWS Account ID ------------------------------------------------------ Your 12-digit AWS Account ID is required to: • Access AWS ECR (Elastic Container Registry) • Identify your AWS resources Find it at: AWS Console > Account (top-right) > My Account Enter AWS Account ID (12 digits):Enter the AWS Account ID.
Press ENTER.
The prompt to enter the AWS region where the EMR Serverless resources will be deployed appears.[4/6] AWS Region ------------------------------------------------------ Specify the AWS region where your EMR Serverless resources will be deployed (e.g., us-east-1, us-west-2, eu-west-1). Note: • Your ECR repository and EMR Serverless application must be in same region. Enter AWS Region (e.g., us-east-1):Enter the region name.
Press ENTER.
The prompt to enter the ECR Repository Name appears.[5/6] ECR Repository Name ------------------------------------------------------ AWS ECR (Elastic Container Registry) repository where the BDP Docker image will be stored and pulled from. Repository naming rules: • Lowercase letters, numbers, hyphens, underscores, forward slashes • 2-256 characters long Enter ECR Repository Name:Enter the ECR repository name.
Press ENTER.
The prompt to enter the docker image tag appears.[6/6] Docker Image Tag ------------------------------------------------------ Tag for the Docker image in ECR. This helps identify different versions of your BDP image. Enter Docker Image Tag [default: latest]:Enter the docker image tag.
Press ENTER.
The script completes the EMR Serverless configuration.================================================================ [OK] EMR Serverless configuration completed successfully! ================================================================ Generated config.json file successfully at /bdp/build/BigDataProtector/BigDataProtector/Installation_Files/config.json ================================================================ [OK] Successfully configured Big Data Protector for EMR Serverless! ================================================================ Generated Files in ./Installation_Files/ directory: - config.json - EMR Serverless configuration - scripts/ - Python deployment CLIs +-- emr_serverless_setup_cli.py - Main deployment CLI +-- lambda_function.py - Lambda for ESA audit log forwarding - runtime/ - BDP JAR files (Spark/Hive) - common/ - JcoreLite, config.ini, GetCertificates.sh - BigDataProtector_Linux-ALL-64_x86-64_EMR-<EMR_version>-64_<BDP_version>.tgz - Complete package tarball ================================================================ Using emr_serverless_setup_cli.py - Main Deployment Tool ================================================================ This Python CLI provides commands to build and deploy BDP Docker images: AVAILABLE COMMANDS: validate - Check prerequisites (Docker, AWS CLI, config.json) prepare-assets - Update config.ini and GetCertificates.sh with ESA details generate-dockerfile - Create Dockerfile from config.json build - Build Docker image locally (preserves manual edits) push - Push existing image to AWS ECR deploy - Full pipeline: validate -> prepare -> generate -> build -> push USAGE: cd ./Installation_Files/scripts python3 emr_serverless_setup_cli.py --config ../config.json <COMMAND> TYPICAL WORKFLOW: # Option 1: Full automated deployment python3 emr_serverless_setup_cli.py --config ../config.json deploy # Option 2: Step-by-step with manual edits python3 emr_serverless_setup_cli.py --config ../config.json validate python3 emr_serverless_setup_cli.py --config ../config.json prepare-assets python3 emr_serverless_setup_cli.py --config ../config.json generate-dockerfile # Manually edit Dockerfile if needed python3 emr_serverless_setup_cli.py --config ../config.json build python3 emr_serverless_setup_cli.py --config ../config.json push NOTES: - During 'deploy' or 'build', you'll be prompted for ESA credentials - Credentials are used during build only, NOT stored in image layers - ECR authentication is handled automatically by AWS CLI - Use 'build' command to preserve manual Dockerfile edits ================================================================ Audit Logging Configuration ================================================================ IMPORTANT: EMR Serverless uses stdout for audit log output. - All audit logs are written to standard output (stdout) - Logs are automatically captured by AWS CloudWatch Logs - CloudWatch logs are stored in your configured S3 bucket To access audit logs: 1. Via CloudWatch: AWS Console -> CloudWatch -> Log Groups 2. Via S3 Bucket: Check your EMR Serverless application's S3 logs location ================================================================ lambda_function.py - ESA Audit Log Forwarder ================================================================ For centralized audit log forwarding to ESA Audit Store, use the provided lambda_function.py - a ready-to-deploy AWS Lambda function. LOG FLOW: EMR Serverless (stdout) → CloudWatch Logs → Subscription Filter → Kinesis Data Stream → Lambda Function → ESA OpenSearch Endpoint LAMBDA FUNCTION FEATURES: - Triggered by Kinesis Data Stream events - Decodes and parses CloudWatch log data from Kinesis records - Forwards logs to ESA using OpenSearch bulk API - TLS encryption with certificate-based authentication - Automatic batching, retries, and error recovery REQUIRED ENVIRONMENT VARIABLES: ESA_BULK_URL - Full OpenSearch bulk API endpoint Example: https://<ESA_IP_Address>:9200/pty_insight_audit/_bulk?pipeline=logs_pipeline ESA_CA_SECRET_ID - AWS Secrets Manager ARN for CA certificate ESA_CA_SECRET_JSON_KEY- JSON key name in secret (default: ca_pem) HTTP_TIMEOUT_SEC - HTTP timeout in seconds (default: 120) BULK_MAX_BYTES - Max bulk request size (default: 5242880) ONLY_MATCH_SUBSTRING - Filter logs by substring (e.g., "logtype") For detailed deployment steps, refer to the EMR Serverless documentation. ================================================================The directory structure of the artifacts, after executing the configurator script, is listed below.
Installation_Files/ ├── config.json ├── scripts/ │ ├── emr_serverless_setup_cli.py | ├── lambda_function.py ├── runtime/ │ ├── pephive-3.1.3_v<BDP_version>.jar │ └── pepspark-3.5.6_v<BDP_version>.jar ├── common/ │ ├── jcorelite.jar │ ├── jcorelite.plm │ ├── GetCertificates.sh │ ├── config.ini.template └── BigDataProtector_Linux-ALL-64_x86-64_EMR.Serverless-<EMR_version>-64_<BDP_version>.tgzInstallation_Files/ ├── config.json ├── scripts/ │ ├── emr_serverless_setup_cli.py | ├── lambda_function.py ├── runtime/ │ ├── pephive-3.1.3_v<BDP_version>.jar │ └── pepspark-3.5.6_v<BDP_version>.jar ├── common/ │ ├── jcorelite.jar │ ├── jcorelite.plm │ ├── GetCertificates.sh │ ├── config.ini.template └── BigDataProtector_Linux-ALL-64_ARM64_EMR.Serverless-<EMR_version>-64_<BDP_version>.tgzA sample output of the config.json file is listed for reference.
{ "_comment": "EMR Serverless Big Data Protector Configuration - Generated by configurator.sh", "runtime": "spark", "region": "<region_name>", "registryHostname": "<AWS_Account_ID>.dkr.ecr.<region_name>.amazonaws.com", "defaults": { "syncHost": "<ESA_IP>", "syncPort": "25400", "syncProtocol": "https", "syncCAFile": "/opt/esacert/CA.pem", "syncCertFile": "/opt/esacert/cert.pem", "syncKeyFile": "/opt/esacert/cert.key", "syncSecretFile": "/opt/esacert/secret.txt", "syncRequestTimeout": 60, "certResource": "pty/v1/cert", "repositoryName": "protegrity-emr-rest", "imageTag": "sparkv66", "commonCopy": [ { "source": "common/jcorelite.jar", "destSpark": "/usr/lib/spark/jars/jcorelite.jar", "destHive": "/usr/lib/hive/lib/jcorelite.jar" }, { "source": "common/jcorelite.plm", "destSpark": "/usr/lib/spark/jars/jcorelite.plm", "destHive": "/usr/lib/hive/lib/jcorelite.plm" }, { "source": "common/GetCertificates.sh", "destSpark": "/opt/esacert/GetCertificates", "destHive": "/opt/esacert/GetCertificates" }, { "source": "common/config.ini", "destSpark": "/usr/lib/spark/data/config.ini", "destHive": "/usr/lib/hive/data/config.ini" } ] }, "runtimes": { "spark": { "baseImage": "public.ecr.aws/emr-serverless/spark/emr-7.12.0:latest", "contextDir": ".", "yumPackages": ["curl", "vim", "wget", "tar", "gzip"], "copy": [ { "source": "runtime/pepspark-*.jar", "dest": "/usr/lib/spark/jars/" } ], "chown": [ "/usr/lib/spark/jars", "/usr/lib/spark/lib", "/usr/lib/spark/data", "/opt/esacert" ], "user": "hadoop:hadoop" }, "hive": { "baseImage": "public.ecr.aws/emr-serverless/hive/emr-7.12.0:latest", "contextDir": ".", "yumPackages": ["curl", "vim", "wget", "tar", "gzip"], "copy": [ { "source": "runtime/pephive-*.jar", "dest": "/usr/lib/hive/lib/" } ], "chown": [ "/usr/lib/hive/lib", "/usr/lib/hive/data", "/opt/esacert" ], "user": "hadoop:hadoop" } } }For the ARM64 architecture, set the following environment variables:
export AWS_ACCESS_KEY_ID="<AWS_ACCESS_KEY_ID>" export AWS_SECRET_ACCESS_KEY="<AWS_SECRET_ACCESS_KEY>" export AWS_SESSION_TOKEN="<AWS_SESSION_TOKEN>"
3.2.3 - Installing the protector
3.2.3.1 - Using the Bootstrap Installer
The Big Data Protector on Amazon EMR enables cluster creation using a bootstrap action. This action enables:
- Configuration of cluster instances
- Installation of custom and additional software
- Setting up of the environment variables
Bootstrap actions are scripts that run on cluster instances after they are launched. These scripts installs the specified applications during cluster creation and before the cluster nodes start processing data. To create a bootstrap action, can specify the script when creating the cluster in any one of the following methods:
- Amazon EMR console - pass the location of the script in the Bootstrap actions section.
- AWS CLI - pass the location of the script to the
--bootstrap-actionsparameter. - API
In this method of cluster creation, the nodes are automatically scaled depending on the workload. In case of instances where the workloads are minimal for a node, Amazon decommissions the node to balance the workload optimally.
3.2.3.1.1 - Creating a Cluster
The procedures mentioned in this section are applicable only for the Bootstrap approach to install the Big Data Protector.
Perform the following steps to create an EMR cluster on AWS and install Big Data Protector on all the nodes in the EMR cluster.
To install Big Data Protector on a New EMR Cluster:
On the AWS services screen, click EMR under the Analytics section.
The Amazon EMR screen appears.Click Create cluster.
The Create Cluster - Quick Options screen appears.Type the name of the cluster in the Cluster name box.
Depending on the requirements, enter the sum of the master and core nodes in the Number of instances box.
Click Create cluster.
The Software and Steps tab on the Create Cluster - Advanced Options screen appears.Depending on the requirements, select the components under the Software Configuration section.
Click Next.
The Hardware tab on the Create Cluster - Advanced Options screen appears.On the Hardware tab, if required, add or reduce the number of instances of the Master, Core, and Task nodes.
Click Next.
The General Cluster Settings tab on the Create Cluster - Advanced Options screen appears.Type the name of the cluster in the Cluster name box.
Under the Bootstrap Actions area, in the Add bootstrap action drop-down list, click Custom action.
The Add Bootstrap Action dialog box appears.Enter the name of the bootstrap action in the Name box.
To select the location of the bootstrap script, click the icon besides the Script location box.
The Select S3 File dialog box appears.Enter the path of the S3 bucket in the URL box.
The contents of the S3 bucket appear.Select the
bdp_bootstrap_installer.shfile from the S3 bucket.Click Select.
The Big Data Protector bootstrap script file is selected, and the Add Bootstrap Action dialog box appears.To specify the installation directory on the nodes in the cluster, provide the directory path in the Optional arguments box.
If an installation directory for the Big Data Protector is not specified, then/opt/protegrity/is considered as the default directory.Click Add.
The General Cluster Settings tab on the Create Cluster - Advanced Options screen appears and the Bootstrap actions are updated.Click Next.
The Security tab on the Create Cluster - Advanced Options screen appears.Select the required EC2 key pair for the EMR cluster from the EC2 key pair drop-down list.
Click Create Cluster.
The EMR cluster is created, Big Data Protector is installed on all the nodes in the cluster, and the required Big Data Protector parameters are configured.Alternatively, create a new EMR cluster and install Big Data Protector on the nodes using the CLI:
aws emr create-cluster --auto-scaling-role EMR_AutoScaling_DefaultRole --termination-protected --applications Name=Hadoop Name=Hive Name=Pig Name=Hue Name=Spark Name=Tez Name=HBase --bootstrap-actions '[{"Path":"<S3_Path_For_BootstrapInstaller>","Name":"<Script_Name>"}]' --ec2-attributes '{"KeyName":"<KEY_NAME>","InstanceProfile":"EMR_EC2_DefaultRole","EmrManagedSlaveSecurityGroup":"sg-c8ef00de","EmrManagedMasterSecurityGroup":"sg-2deb043b"}' --service-role EMR_DefaultRole --enable-debugging --release-label emr-<EMR_Version> --log-uri 's3n://aws-logs-406396743807-<region_name>/elasticmapreduce/' --name '<Cluster_Name>' --instance-groups '[{"InstanceCount":2,"InstanceGroupType":"CORE","InstanceType":"m3.xlarge","Name":"Core - 2"},{"InstanceCount":1,"InstanceGroupType":"MASTER","InstanceType":"m3.xlarge","Name":"Master - 1"}]' – scale-down-behavior TERMINATE_AT_INSTANCE_HOUR --region <region_name>Where:
S3_Path_For_BootstrapInstaller: Specifies the S3 bucket path containing the Big Data Protector bootstrap installer script.Script_Name: Specifies the name of the Big Data Protector installation script.KEY_NAME: Specifies the Private Key file on the Master node in the EMR cluster, which is used to communicate with the other nodes in the cluster.Cluster_Name: Specifies the name of the new EMR cluster.
3.2.3.1.2 - Managing the Cluster Nodes
The steps mentioned in this section are applicable only for the Bootstrap approach to install the Big Data Protector.
Depending on the workload on the EMR cluster, you can add or remove the Big Data Protector nodes. You can either set the cluster to automatically scale or manually add or remove nodes in the EMR cluster. You can add or remove nodes in the EMR cluster either while you create the cluster or after you have created the cluster. Before you add or remove the nodes from the cluster, ensure that you save all your data to S3, as standard practice, to avoid any data loss.
This section covers the procedure to add or remove nodes from an Amazon EMR cluster after you have created it.
To add or remove nodes from an Amazon EMR cluster:
On the AWS management console, expand Services and click Analytics.
The sub-menu appears.
From the sub-menu, click EMR.
The Amazon EMR page appears.
Click the required cluster.
The Properties tab of the cluster appears.
Click the Instances tab.
To add an instance, perform the following steps:
- Under Instance groups, click Add task instance group. The Add task instance group page appears.
- In the Name box, enter the name to identify the node.
- From the Choose EC2 instance type list, select the required storage type.
- In the Instance group size box, enter the required number of instances.
- Click Add task instance group. The new instance is added to the node and appears on the Instances tab.
To resize an instance, perform the following steps:
- Under Instance groups, select the required instance that you want to resize.
- Click Resize instance group. The Resize page appears.
- In the Instance group size box, enter the required number of instances.
- Click Resize. The instance is resized as per the inputs and appears on the Instances tab.
3.2.3.1.3 - Verifying the Parameters
The content mentioned in this section is applicable only for the Bootstrap approach to install the Big Data Protector.
Before using Big Data Protector, configure the required Protegrity-related parameters in EMR. The Big Data Protector configuration parameters are set for the EMR cluster when it is installed on all the nodes in the cluster.
The following table provides the parameters that are set for the existing Amazon EMR cluster before using the Big Data Protector:
| Component | Configuration File | Updated Classpath Parameter |
|---|---|---|
| MapReduce | /etc/hadoop/conf/mapred-site.xml | mapreduce.application.classpath : /opt/protegrity/pepmapreduce/lib/* /opt/protegrity/pephive/lib/* /opt/protegrity/bdp_version/ mapreduce.admin.user.env : LD_LIBRARY_PATH=/opt/protegrity/jcorelite/lib |
| Hive | /etc/hive/conf/hive-site.xml /etc/tez/conf/tez-site.xml /etc/hive/conf/hive-env.sh | hive.exec.pre.hooks : com.protegrity.hive.PtyHiveUserPreHook tez.cluster.additional.classpath.prefix:/opt/protegrity/pephive/lib/:/opt/protegrity/bdp_version/ tez.am.launch.env: LD_LIBRARY_PATH=/opt/protegrity/jcorelite/lib/ export HIVE_CLASSPATH=${HIVE_CLASSPATH}:/opt/protegrity/pephive/lib/:/opt/protegrity/bdp_version/ export JAVA_LIBRARY_PATH=${JAVA_LIBRARY_PATH}:/opt/protegrity/jcorelite/lib/ |
| Pig | /etc/pig/conf/pig-env.sh | PIG_CLASSPATH="/opt/protegrity/peppig/lib/*:/opt/protegrity/bdp_version/" export JAVA_LIBRARY_PATH=${JAVA_LIBRARY_PATH}:/opt/protegrity/jcorelite/lib/ |
| HBase | /etc/hbase/conf/hbase-site.xml /etc/hbase/conf/hbase-env.sh | hbase.coprocessor.region.classes:com.protegrity.hbase.PTYRegionObserver export HBASE_CLASSPATH=${HBASE_CLASSPATH}:/opt/protegrity/pephbase/lib/*:/opt/protegrity/bdp_version/ export JAVA_LIBRARY_PATH=${JAVA_LIBRARY_PATH}:/opt/protegrity/jcorelite/lib/ |
| Spark | /etc/spark/conf/spark-defaults.conf | spark.driver.extraClassPath=/opt/protegrity/pephive/lib/:/opt/protegrity/pepspark/lib/:/opt/protegrity/bdp_version/ spark.executor.extraClassPath=/opt/protegrity/pephive/lib/:/opt/protegrity/pepspark/lib/:/opt/protegrity/bdp_version/ spark.executor.extraLibraryPath= /opt/protegrity/jcorelite/lib spark.driver.extraLibraryPath= /opt/protegrity/jcorelite/lib |
3.2.3.2 - Using the Static Installer
The static installer method of installation is applicable where the Big Data Protector must be installed on an existing EMR cluster. Using the Static Installer, users can enforce data protection policies at a granular level. This feature helps organizations to define specific rules for data protection based on sensitivity and usage.
The nodes in the cluster created using the static installer are do not have auto-scaling enabled. The nodes must be manually added or decommissioned depending upon the usage. The installation provides additional scripts to monitor and control the cluster behavior. These scripts are available in the <installation_directory>/cluster_utils/ directory after installation.
3.2.3.2.1 - Installing the Protector on all the Nodes
The steps mentioned in this section are applicable only for the Static Installer approach to install the Big Data Protector.
Log in to the Master or Lead node of the EMR cluster.
Navigate to the directory that contains the
BdpInstallx.x.x_Linux_<BDP_version>.shscript.To run the installer, execute the following script:
./BdpInstallx.x.x_Linux_<BDP_version>.shPress ENTER.
The prompt to continue the installation of the Big Data Protector appears.************************************************************************************ Welcome to the Hadoop Big Data Protector Setup Wizard ************************************************************************************ This will install the Hadoop Big Data Protector on your system. This installation requires a Private Key file for communicating with other nodes in the cluster. Do you want to continue? [yes or no]:To continue, type
yes.Press ENTER.
The prompt to enter path of the Private Key file (.pem file) appears.Big Data Protector installation started Enter the path of the Private Key (.PEM) file:Enter the path of the
.PEMfile.Press ENTER.
The prompt to enter the ESA hostname appears.libhadoop.so located in directory '/usr/lib/hadoop/lib/native' Unpacking... Extracting files... Preparing for cluster deploy, Wait... Enter ESA Hostname or IP Address:libhadoop.so located in directory '/usr/lib/hadoop/lib/native' Unpacking... Extracting files... Preparing for cluster deploy, Wait... Enter ESA Hostname (FQDN, e.g. protegrity-esa.example.com):If you have installed a proxy, then enter the IP address of the proxy node. Alternatively, enter the IP Address of ESA.
Press ENTER.
The prompt to enter the listening port for ESA appears.Enter ESA host listening port [8443]:Using ESA_IP from environment: <ESA_IP_Address> Enter ESA host listening port:Enter the port for ESA.
Press ENTER.
The prompt to enter the JWT token appears.If you have an existing ESA JSON Web Token (JWT) with Export Certificates role, enter it otherwise enter 'no':Enter the JWT token.
Press ENTER.
Note: In case of failure to provide a JWT token, the script will prompt to enter the username and password for ESA.
JWT was not provided. Script will now prompt for ESA username and password. Enter ESA Username:Enter the username for ESA.
Press ENTER.
The prompt to enter the password appears.
************************************************************************************ Welcome to the RPAgent Setup Wizard. ************************************************************************************ Unpacking................... Extracting files... Unpacked rpagent compressed file... RPAgent Installing in Lead Node... Please enter the password for downloading certificates[]:Enter the password.
Press ENTER.
The script retrieves the JWT token from ESA, installs the RPAgent, and the prompt to select the Audit Store type appears.
``` Unpacking... Extracting files... Obtaining token from <ESA_IP_Address>:8443... Downloading certificates from <ESA_IP_Address>:8443... % Total % Received % Xferd Average Speed Time Time Time Current Dload Upload Total Spent Left Speed 100 11264 100 11264 0 0 12124 0 --:--:-- --:--:-- --:--:-- 12111 Extracting certificates... Certificates successfully downloaded and stored in /opt/protegrity/rpagent/data Protegrity RPAgent installed in /opt/protegrity/rpagent. RPAgent installed on Lead node at location /opt/protegrity/rpagent. Performing install on other nodes... RPAgent installed on other nodes at location /opt/protegrity/rpagent. Check the status in /opt/protegrity/logs/rpagent_setup.log Select the Audit Store type where Log Forwarder(s) should send logs to. [ 1 ] : Protegrity Audit Store [ 2 ] : External Audit Store [ 3 ] : Protegrity Audit Store + External Audit Store Enter the no.: ```Running RPAgent setup... Running RPAgentSetup against <ESA_FQDN>:8443 ... Unpacking... Extracting files... Certificate validation successful. Obtaining token from <ESA_FQDN>:8443... Downloading certificates from <ESA_FQDN>:8443... % Total % Received % Xferd Average Speed Time Time Time Current Dload Upload Total Spent Left Speed 100 11264 100 11264 0 0 230.4k 0 0 Extracting certificates... Certificates successfully downloaded and stored in /opt/protegrity/rpagent/data Protegrity RPAgent installed in /opt/protegrity/rpagent. ------------------------------------------------------------ RPAgent installed on Lead node at location /opt/protegrity/rpagent. Performing install on other nodes... RPAgent installed on other nodes at location /opt/protegrity/rpagent. Check the status in /opt/protegrity/logs/rpagent_setup.log Select the Audit Store type where Log Forwarder(s) should send logs to. [ 1 ] : Protegrity Audit Store [ 2 ] : External Audit Store [ 3 ] : Protegrity Audit Store + External Audit Store Enter the no.:Depending on the Audit Store type, select any one of the following options:
Option Description 1To use the default setting using the Protegrity Audit Store appliance, type 1. If you enter1, then the default Fluent Bit configuration files are used, and Fluent Bit will forward the logs to the Protegrity Audit Store appliances.2To use an external audit store, type 2. If you enter2, then the default Fluent Bit configuration files used for the External Audit Store are renamed. Theout.confandupstream.cfgfiles in the/opt/protegrity/fluent-bit/data/config.d/directory are renamed toout.conf.bkpandupstream.cfg.bkprespectively. The renaming ensures these files will not be used by Fluent Bit. Additionally, the custom Fluent Bit configuration files for the external audit store are copied to the/opt/protegrity/fluent-bit/data/config.d/directory.3To use a combination of the default setting with an external audit store, type 3. If you enter3, then the default Fluent Bit configuration files used for the Protegrity Audit Store are not renamed. Theout.confandupstream.cfgfiles in the/opt/protegrity/fluent-bit/data/config.d/directory retain the original name. However, the custom Fluent Bit configuration files for the external audit store are copied to the/opt/protegrity/fluent-bit/data/config.d/directory.Press ENTER.
The prompt to enter the comma separated list of hostnames/IP addresses appears.Enter comma-separated list of Hostnames/IP Addresses and/or Ports of Protegrity Audit Store. Allowed Syntax: hostname[:port][,hostname[:port],hostname[:port]...] (Default Value - <ESA_IP_Address>:9200) Enter the list:Enter comma-separated list of Hostnames/IP Addresses and/or Ports of Protegrity Audit Store. Allowed Syntax: hostname[:port][,hostname[:port],hostname[:port]...] (Default Value - <ESA_FQDN>:9200) Enter the list:To use the default value, press ENTER.
The prompt to enter the location of the Fluent Bit configuration file appears.
Enter the local directory path on this node that stores the custom Fluent-Bit configuration files for External Audit Store:Note: The script will display this prompt only if you select option
2in step19. When you select option2in step 19, the custom configuration files are copied to the/<Installation directory>/fluent-bit/data/config.d/directory on all the EMR nodes selected for installation.Enter the path that contains the Fluent Bit configuration file.
Press ENTER.
The prompt to save the RPAgent’s log in a file appears.
Do you want RPAgent's log to be generated in a file? [yes or no]:To generate the logs in a file, type
yes.Press ENTER.
The script installs the protector on all the nodes in the cluster.
RPAgent's log will be generated in a file. ************************************************************************************ Welcome to the LogForwarder Setup Wizard. ************************************************************************************ Unpacking................... Extracting files... Unpacked logforwarder compressed file... Logforwarder Installing in Lead Node... Unpacking... Extracting files... Protegrity Log Forwarder installed in /opt/protegrity/logforwarder. LogForwarder installed on Lead node at location /opt/protegrity/logforwarder. Performing install on other nodes... Logforwarder installed on other nodes at location /opt/protegrity/logforwarder. Check the status in /opt/protegrity/logs/logforwarder_setup.log ************************************************************************************ Welcome to the JcoreLite Setup Wizard. ************************************************************************************ Unpacking................... Extracting files... Unpacked jcorelite compressed file... Installing JcoreLite .... JcoreLite installed on lead node at location /opt/protegrity/bdp/lib. Performing install on other nodes... JcoreLite installed on other nodes at location /opt/protegrity/bdp/lib. Check the status in /opt/protegrity/logs/jcorelite_setup.log ************************************************************************************ Welcome to the Hive Protector Setup Wizard. ************************************************************************************ Unpacking................... Extracting files... Unpacked pephive compressed file... Hive Big Data Protector installed on lead node at location /opt/protegrity/bdp/lib/ and /opt/protegrity/pephive/scripts/. Performing install on other nodes... Hive Big Data Protector installed on other nodes at location /opt/protegrity/bdp/lib/ and /opt/protegrity/pephive/scripts/. Check the status in /opt/protegrity/logs/pephive_setup.log ************************************************************************************ Welcome to the Pig Protector Setup Wizard. ************************************************************************************ Unpacking................... Extracting files... Unpacked peppig compressed file... Pig Big Data Protector installed on lead node at location /opt/protegrity/bdp/lib/ and /opt/protegrity/peppig. Performing install on other nodes... Pig Big Data Protector installed on other nodes at location /opt/protegrity/bdp/lib/ and /opt/protegrity/peppig. Check the status in /opt/protegrity/logs/peppig_setup.log ************************************************************************************ Welcome to the MapReduce Protector Setup Wizard. ************************************************************************************ Unpacking................... Extracting files... Unpacked pepmapreduce compressed file... Mapreduce Big Data Protector installed on lead node at location /opt/protegrity/bdp/lib/. Performing install on other nodes... Mapreduce Big Data Protector installed on other nodes at location /opt/protegrity/bdp/lib/. Check the status in /opt/protegrity/logs/pepmapreduce_setup.log ************************************************************************************ Welcome to the Hbase Protector Setup Wizard. ************************************************************************************ Unpacking................... Extracting files... Unpacked pephbase compressed file... Hbase Big Data Protector installed on lead node at location /opt/protegrity/bdp/lib/. Performing install on other nodes... Hbase Big Data Protector installed on other nodes at location /opt/protegrity/bdp/lib/. Check the status in /opt/protegrity/logs/pephbase_setup.log ************************************************************************************ Welcome to the Spark Protector Setup Wizard. ************************************************************************************ Unpacking................... Extracting files... Unpacked pepspark compressed file... Spark Big Data Protector installed on lead node at location /opt/protegrity/bdp/lib/ and /opt/protegrity/pepspark/scripts/. Performing install on other nodes... Spark Big Data Protector installed on other nodes at location /opt/protegrity/bdp/lib/ and /opt/protegrity/pepspark/scripts/. Check the status in /opt/protegrity/logs/pepspark_setup.log Starting Logforwarder on lead node... Starting Logforwarder on other nodes... Starting RPAgent on lead node... Starting RPAgent on other nodes... Hadoop Big Data Protector installed in /opt/protegrity. Generating Big Data Protector installation status report ... Clearing previous logs files ... Installation Status report generated in /opt/protegrity/cluster_utils/installation_report.txtRPAgent's log will be generated in a file. ************************************************************************************ Welcome to the LogForwarder Setup Wizard. ************************************************************************************ Unpacking................... Extracting files... Unpacked logforwarder compressed file... Logforwarder Installing in Lead Node... Unpacking... Extracting files... Protegrity Log Forwarder installed in /opt/protegrity/logforwarder. LogForwarder installed on Lead node at location /opt/protegrity/logforwarder. Performing install on other nodes... Logforwarder installed on other nodes at location /opt/protegrity/logforwarder. Check the status in /opt/protegrity/logs/logforwarder_setup.log ************************************************************************************ Welcome to the JcoreLite Setup Wizard. ************************************************************************************ Unpacking................... Extracting files... Unpacked jcorelite compressed file... Installing JcoreLite .... JcoreLite installed on lead node at location /opt/protegrity/bdp/lib. Performing install on other nodes... JcoreLite installed on other nodes at location /opt/protegrity/bdp/lib. Check the status in /opt/protegrity/logs/jcorelite_setup.log ************************************************************************************ Welcome to the Hive Protector Setup Wizard. ************************************************************************************ Unpacking................... Extracting files... Unpacked pephive compressed file... Hive Big Data Protector installed on lead node at location /opt/protegrity/bdp/lib/ and /opt/protegrity/pephive/scripts/. Performing install on other nodes... Hive Big Data Protector installed on other nodes at location /opt/protegrity/bdp/lib/ and /opt/protegrity/pephive/scripts/. Check the status in /opt/protegrity/logs/pephive_setup.log ************************************************************************************ Welcome to the Pig Protector Setup Wizard. ************************************************************************************ Unpacking................... Extracting files... Unpacked peppig compressed file... Pig Big Data Protector installed on lead node at location /opt/protegrity/bdp/lib/ and /opt/protegrity/peppig. Performing install on other nodes... Pig Big Data Protector installed on other nodes at location /opt/protegrity/bdp/lib/ and /opt/protegrity/peppig. Check the status in /opt/protegrity/logs/peppig_setup.log ************************************************************************************ Welcome to the MapReduce Protector Setup Wizard. ************************************************************************************ Unpacking................... Extracting files... Unpacked pepmapreduce compressed file... Mapreduce Big Data Protector installed on lead node at location /opt/protegrity/bdp/lib/. Performing install on other nodes... Mapreduce Big Data Protector installed on other nodes at location /opt/protegrity/bdp/lib/. Check the status in /opt/protegrity/logs/pepmapreduce_setup.log ************************************************************************************ Welcome to the Hbase Protector Setup Wizard. ************************************************************************************ Unpacking................... Extracting files... Unpacked pephbase compressed file... Hbase Big Data Protector installed on lead node at location /opt/protegrity/bdp/lib/. Performing install on other nodes... Hbase Big Data Protector installed on other nodes at location /opt/protegrity/bdp/lib/. Check the status in /opt/protegrity/logs/pephbase_setup.log ************************************************************************************ Welcome to the Spark Protector Setup Wizard. ************************************************************************************ Unpacking................... Extracting files... Unpacked pepspark compressed file... Spark Big Data Protector installed on lead node at location /opt/protegrity/bdp/lib/ and /opt/protegrity/pepspark/scripts/. Performing install on other nodes... Spark Big Data Protector installed on other nodes at location /opt/protegrity/bdp/lib/ and /opt/protegrity/pepspark/scripts/. Check the status in /opt/protegrity/logs/pepspark_setup.log Starting Logforwarder on lead node... Starting Logforwarder on other nodes... Starting RPAgent on lead node... Seeding /etc/hosts with <ESA_IP_Address> <ESA_FQDN> on other nodes... Starting RPAgent on other nodes... Hadoop Big Data Protector installed in /opt/protegrity. Generating Big Data Protector installation status report ... Clearing previous logs files ... Installation Status report generated in /opt/protegrity/cluster_utils/installation_report.txt Restarting Hadoop services to apply 'ptyitusrgroup' group membership... Hadoop service restart completed successfully. Starting refreshed shell ('ptyitusrgroup' group active). Type 'exit' to return. EEEEEEEEEEEEEEEEEEEE MMMMMMMM MMMMMMMM RRRRRRRRRRRRRRR E::::::::::::::::::E M:::::::M M:::::::M R::::::::::::::R EE:::::EEEEEEEEE:::E M::::::::M M::::::::M R:::::RRRRRR:::::R E::::E EEEEE M:::::::::M M:::::::::M RR::::R R::::R E::::E M::::::M:::M M:::M::::::M R:::R R::::R E:::::EEEEEEEEEE M:::::M M:::M M:::M M:::::M R:::RRRRRR:::::R E::::::::::::::E M:::::M M:::M:::M M:::::M R:::::::::::RR E:::::EEEEEEEEEE M:::::M M:::::M M:::::M R:::RRRRRR::::R E::::E M:::::M M:::M M:::::M R:::R R::::R E::::E EEEEE M:::::M MMM M:::::M R:::R R::::R EE:::::EEEEEEEE::::E M:::::M M:::::M R:::R R::::R E::::::::::::::::::E M:::::M M:::::M RR::::R R::::R EEEEEEEEEEEEEEEEEEEE MMMMMMM MMMMMMM RRRRRRR RRRRRRRestart the Hadoop, Hive, and HBase service daemon processes to start using the updated configuration.
3.2.3.2.2 - Installing the Protector on Specific Nodes
The steps mentioned in this section are applicable only for the Static Installer approach to install the Big Data Protector.
Protegrity provides the BdpInstallx.x.x_Linux_<arch>_<BDP_version>.sh script to install the Big Data Protector on the new nodes that you add to an existing EMR cluster.
Note: Ensure to install the Big Data Protector from an account having full
sudoerprivileges.
- Log in to the Lead Node on the EMR cluster.
- Navigate to the
<PROTEGRITY_DIR>/cluster_utilsdirectory. - In the
NEW_HOSTS_FILEfile, add an additional entry for each new node in the EMR cluster, on which you want to install the Big Data Protector. The new nodes from theNEW_HOSTS_FILEfile will be appended to theCLUSTERLIST_FILE. - To install the Big Data Protector on the new nodes, run the following command:
./BdpInstallx.x.x_Linux_<arch>_<BDP_version>.sh –a <NEW_HOSTS_FILE> - Press ENTER.
The prompt to enter the path of the Private Key file (.pem file) appears. - Enter the path of the Private Key file.
- Press ENTER.
The script installs the Big Data Protector on the new nodes in the EMR cluster.
3.2.3.2.3 - Verifying the Parameters
The content in this section is applicable only for the Static installer approach to install the Big Data Protector.
Before using the Big Data Protector, configure the required Protegrity-related parameters in EMR. The Big Data Protector configuration parameters are set for the EMR cluster when it is installed on all the nodes in the cluster.
The following table provides the parameters that are set for the existing Amazon EMR cluster before using the Big Data Protector:
| Component | Configuration File | Updated Classpath Parameter |
|---|---|---|
| MapReduce | /etc/hadoop/conf/mapred-site.xml | mapreduce.application.classpath : /opt/protegrity/pepmapreduce/lib/* /opt/protegrity/pephive/lib/* /opt/protegrity/bdp_version/ mapreduce.admin.user.env : LD_LIBRARY_PATH=/opt/protegrity/jcorelite/lib |
| Hive | /etc/hive/conf/hive-site.xml /etc/tez/conf/tez-site.xml /etc/hive/conf/hive-env.sh | hive.exec.pre.hooks : com.protegrity.hive.PtyHiveUserPreHook tez.cluster.additional.classpath.prefix:/opt/protegrity/pephive/lib/:/opt/protegrity/bdp_version/ tez.am.launch.env: LD_LIBRARY_PATH=/opt/protegrity/jcorelite/lib/ export HIVE_CLASSPATH=${HIVE_CLASSPATH}:/opt/protegrity/pephive/lib/:/opt/protegrity/bdp_version/ export JAVA_LIBRARY_PATH=${JAVA_LIBRARY_PATH}:/opt/protegrity/jcorelite/lib/ |
| Pig | /etc/pig/conf/pig-env.sh | PIG_CLASSPATH="/opt/protegrity/peppig/lib/*:/opt/protegrity/bdp_version/" export JAVA_LIBRARY_PATH=${JAVA_LIBRARY_PATH}:/opt/protegrity/jcorelite/lib/ |
| HBase | /etc/hbase/conf/hbase-site.xml /etc/hbase/conf/hbase-env.sh | hbase.coprocessor.region.classes:com.protegrity.hbase.PTYRegionObserver export HBASE_CLASSPATH=${HBASE_CLASSPATH}:/opt/protegrity/pephbase/lib/*:/opt/protegrity/bdp_version/ export JAVA_LIBRARY_PATH=${JAVA_LIBRARY_PATH}:/opt/protegrity/jcorelite/lib/ |
| Spark | /etc/spark/conf/spark-defaults.conf | spark.driver.extraClassPath=/opt/protegrity/pephive/lib/:/opt/protegrity/pepspark/lib/:/opt/protegrity/bdp_version/ spark.executor.extraClassPath=/opt/protegrity/pephive/lib/:/opt/protegrity/pepspark/lib/:/opt/protegrity/bdp_version/ spark.executor.extraLibraryPath= /opt/protegrity/jcorelite/lib spark.driver.extraLibraryPath= /opt/protegrity/jcorelite/lib |
3.2.3.3 - Using the EMR Serverless Installer
The overall process of installing the Big Data Protector are explained in the following sections:
- Installing the EMR Serverless protector
- Setting up the Log Forwarder
3.2.3.3.1 - EMR Serverless Setup CLI
The instructions mentioned in the section are applicable only for the Serverless approach to install the Big Data Protector.
The EMR Serverless Setup CLI automates the complete Docker image build and deployment pipeline for the Big Data Protector. It validates the environment, prepares the configuration files, generates the Docker files, builds images with ESA/PPC certificate injection, and pushes the artifacts to AWS ECR.
To facilitate the installation, the configurator script generates a set of python3 scripts within the ./Installation_Files/ directory. The script and the arguments are listed below.
python3 scripts/emr_serverless_setup_cli.py <argument>
| Argument | Purpose |
|---|---|
validate | Verifies the working directory and config.json schema. Also validates AWS CLI connectivity and docker presence. |
prepare-assets | Updates the config.ini file and the GetCertificates.sh script with ESA/PPC details. |
prefetch-certs | Retrieve ESA/PPC certificates. This step is applicable only for the ARM64 architecture. |
generate-dockerfile | Creates the runtime-specific Dockerfile (Spark/Hive). |
build | Builds the Docker image with ESA/PPC certificate injection. |
push | Pushes the custom image to AWS ECR. |
deploy | Run the full pipeline together from validation to push in a single command, if required. |
Note: Execute the individual commands to accommodate custom modifications at any step.
Validating the Environment
In the Python script, the validate argument:
- Validates the
config.jsonschema and the required parameters. - Verifies the Docker installation and the daemon status.
- Verifies the AWS CLI configuration and credentials.
- Tests ECR repository connectivity.
- Validates the presence of BDP artifacts, such as,
.jarand configuration files. - Tests ESA connectivity on the configured port.
To validate the environment:
Log in to the CLI on a machine or an Amazon EC2 node that has connectivity to ESA/PPC.
Navigate to the directory where the installation files are extracted.
To execute the Python script, run the following command:
python3 scripts/emr_serverless_setup_cli.py validatePress ENTER.
The script performs the required validations, and the status of each step appears.[Validation] ============================================================ [OK] config.json schema valid + docker info + docker buildx version + aws sts get-caller-identity --output json + aws ecr describe-repositories --repository-names <repository_name> --region <region_name> Summary: [OK] Working directory [OK] Config schema [OK] Docker installed [OK] Docker daemon [OK] BuildKit support [OK] AWS CLI installed [OK] AWS credentials [OK] Assets prepared [OK] Dockerfile exists [OK] COPY sources exist [OK] ECR repo exists [VALIDATION PASSED][Validation] ============================================================ [OK] config.json schema valid + docker info + docker buildx version + aws sts get-caller-identity --output json + aws ecr describe-repositories --repository-names <repository_name> --region <region_name> Summary: [OK] Working directory [OK] Host architecture (ARM64) [OK] Config schema [OK] Docker installed [OK] Docker daemon [OK] BuildKit support [OK] AWS CLI installed [OK] AWS credentials [OK] Assets prepared [OK] Dockerfile exists [OK] COPY sources exist [OK] ECR repo exists [VALIDATION PASSED]
Preparing the Assets
In the Python script, the prepare-assets argument:
- Reads the
common/config.initemplate. - Appends the [sync] section in the
config.inifile with ESA/PPC connection settings from theconfig.jsonfile. - Appends the [log] section in the
config.inifile withoutput = stdout. - Updates the
/common/GetCertificates.shfile with the ESA/PPC host/port.
To prepare the assets:
Log in to the CLI on a machine or an Amazon EC2 node that has connectivity to the ESA/PPC.
Navigate to the directory where the installation files are extracted.
To execute the Python script, run the following command:
python3 scripts/emr_serverless_setup_cli.py prepare-assetsPress ENTER.
The script performs the required actions and a confirmation appears.[Phase 1: Prepare Assets] ============================================================ [INFO] Runtime: SPARK [INFO] Log Output: stdout (audit logs will be sent to stdout) [OK] inserted [sync] after [protector] and updated [log] section (output=stdout, mode=drop) -> ../common/config.ini [OK] updated GetCertificates.sh -> ../common/GetCertificates.sh generate-dockerfile console output[INFO] defaults.runtimeHost = 'ESA_IP_Address' [Phase 1: Prepare Assets] ============================================================ [INFO] Runtime: SPARK [INFO] Log Output: stdout (audit logs will be sent to stdout) [OK] updated jni.jcorelite.path in [protector] and inserted [sync] after [protector] and updated [log] section (output=stdout, mode=drop) -> ../common/config.ini [OK] updated GetCertificates.sh -> ../common/GetCertificates.sh
Retrieving the Certificates
In the Python script, the prefetch-certs argument:
- Executes the
GetCertificates.shscript on the build host. - Copies the certificates under the
/common/prefetched_certs/directory.
Note: The instructions to retrieve the certificates apply only for the ARM64 architecture.
To retrieve the certificates:
- Log in to the CLI on a machine or an Amazon EC2 node that has connectivity to ESA/PPC.
- Navigate to the directory where the installation files are extracted.
- To execute the Python script, run the following command:
python3 scripts/emr_serverless_setup_cli.py prefetch-certs - Press ENTER.
The prompt to select the authentication method appears.
============================================================ Pre-fetch ESA certificates on build host ============================================================ ============================================================ ESA Authentication Required ============================================================ Credentials needed to fetch certificates during Docker build. NOT stored in config files or image layers. Passed securely via Docker BuildKit secrets. Authentication Method: [1] Username/Password [2] JWT Token Select authentication method (1 or 2): - To use the credentials, type
1. - Press ENTER.
The prompt to enter username appears.
Enter ESA Username: - Enter the username.
- Press ENTER.
The prompt to enter the password appears.
Enter ESA Password: - Enter the password.
- Press ENTER.
The script downloads the certificates.[prefetch-certs] ESA FQDN : protegrity-esa464.ec2.internal [prefetch-certs] ESA port : 25400 [prefetch-certs] certResource : pty/v1/cert [prefetch-certs] dest dir : /tmp/arm64/Installation_Files/common/prefetched_certs [prefetch-certs] SSL_CERT_FILE: /tmp/arm64/certs/ProtegrityCA.pem [prefetch-certs] esaDeployment: ppc [prefetch-certs] running GetCertificates.sh (credentials redacted) ... + bash /tmp/arm64/Installation_Files/common/GetCertificates.sh -h protegrity-esa464.ec2.internal --port 25400 -r pty/v1/cert -d /tmp/arm64/Installation_Files/common/prefetched_certs -u admin -p *** Obtaining token from protegrity-esa464.ec2.internal:25400... Downloading certificates from protegrity-esa464.ec2.internal:25400... Extracting certificates... Certificates successfully downloaded and stored in /tmp/arm64/Installation_Files/common/prefetched_certs [OK] Pre-fetched certs staged at /tmp/arm64/Installation_Files/common/prefetched_certs (4 files) [NEXT] Run 'generate-dockerfile' / 'build' / 'push' (or 'deploy'). To remove the staged certs from this host: run 'clean-prefetched-certs'.
Generating the Dockerfile
In the Python script, the generate-dockerfile argument:
- Reads the runtime configuration from the
config.jsonfile for the spark or hive application. - Generates multi-stage Dockerfile optimized for EMR Serverless.
- Configures BuildKit secrets for secure ESA credential handling.
- Stores the
config.inifile in both Spark and Hive locations to ensure runtime interoperability. - Sets up certificate fetch during build time and not during runtime.
- Configures the required permissions for the
hadoop:hadoopuser.
To generate the DockerFile:
Log in to the CLI on a machine or an Amazon EC2 node that has connectivity to the ESA/PPC.
Navigate to the directory where the installation files are extracted.
To execute the Python script, run the following command:
python3 scripts/emr_serverless_setup_cli.py generate-dockerfilePress ENTER. The script performs the required actions and a confirmation appears.
[Phase 2: Generate Dockerfile] ============================================================ + which docker 2>/dev/null + docker info 2>/dev/null | grep -i 'docker root dir' || true [INFO] traditional Docker - using BuildKit secrets (secure) [OK] Generated /home/ubuntu/serverless/final_build/spark/Installation_Files/Dockerfile[Phase 2: Generate Dockerfile] ============================================================ [OK] Generated /tmp/arm64/Installation_Files/Dockerfile
Building the Docker Image
In the Python script, the build argument:
- Prompts for ESA credentials, such as, username and password.
- Executes the Docker build with BuildKit secrets.
- Cleans up the temporary credential files immediately after building the image.
To build the docker image:
Log in to the CLI on a machine or an Amazon EC2 node that has connectivity to the ESA/PPC.
Navigate to the directory where the installation files are extracted.
To execute the Python script, run the following command:
python3 scripts/emr_serverless_setup_cli.py buildPress ENTER. The script starts the build process and the prompt to select the authentication method appears.
============================================================ EMR Serverless BDP Image Builder (Build Only) ============================================================ Runtime: spark + docker info + docker buildx version [INFO] Using existing config.ini and Dockerfile [INFO] If you need to regenerate them, use 'prepare-assets' command first ============================================================ ESA Authentication Required ============================================================ Credentials needed to fetch certificates during Docker build. NOT stored in config files or image layers. Passed securely via Docker BuildKit secrets. Authentication Method: [1] Username/Password [2] JWT Token Select authentication method (1 or 2):[INFO] defaults.runtimeHost = 'ESA_IP_Address' ============================================================ EMR Serverless BDP Image Builder (Build Only) ============================================================ Runtime: spark + docker info + docker buildx version [INFO] Using existing config.ini and Dockerfile [INFO] If you need to regenerate them, use 'prepare-assets' command first [Phase 2.5] Staging ESA certs on the build host ... ============================================================ ESA Authentication Required ============================================================ Credentials needed to fetch certificates during Docker build. NOT stored in config files or image layers. Passed securely via Docker BuildKit secrets. Authentication Method: [1] Username/Password [2] JWT Token Select authentication method (1 or 2):To use the credentials, type
1.Press ENTER.
The prompt to enter the ESA username appears.Enter ESA Username:Enter the username.
Press ENTER. The prompt to enter the password appears.
Enter ESA Password:Enter the password.
Press ENTER. The script resumes and completes the build process.
[Phase 3: Build]
============================================================
+ aws ecr describe-repositories --repository-names <repository_name> --region <region_name>
+ aws ecr get-login-password --region <region_name> | docker login --username AWS --password-stdin <Account_ID>.dkr.ecr.<region_name>.amazonaws.com
+ which docker 2>/dev/null
+ docker info 2>/dev/null | grep -i 'docker root dir' || true
[BUILD] traditional Docker - using BuildKit secrets (secure)
+ cd /home/ubuntu/serverless/final_build/spark/Installation_Files && DOCKER_BUILDKIT=1 docker build --secret id=esa_user,src=/tmp/tmpoyvdsake.secret --secret id=esa_password,src=/tmp/tmpq6l9mn8v.secret -t <repository_name>:tag_spark -f Dockerfile .
[OK] Built local image <repository_name>:tag_spark for runtime 'spark'
============================================================
[SUCCESS] Image built locally
Use 'push' command to push to ECR
============================================================
[prefetch-certs] ESA FQDN : <ESA_FQDN>
[prefetch-certs] ESA port : 25400
[prefetch-certs] certResource : pty/v1/cert
[prefetch-certs] dest dir : /tmp/arm64/Installation_Files/common/prefetched_certs
[prefetch-certs] SSL_CERT_FILE: /tmp/arm64/certs/ProtegrityCA.pem
[prefetch-certs] esaDeployment: ppc
[prefetch-certs] running GetCertificates.sh (credentials redacted) ...
+ bash /tmp/arm64/Installation_Files/common/GetCertificates.sh -h <ESA_FQDN> --port 25400 -r pty/v1/cert -d /tmp/arm64/Installation_Files/common/prefetched_certs -u admin -p ***
Obtaining token from <ESA_FQDN>:25400...
Downloading certificates from <ESA_FQDN>:25400...
Extracting certificates...
Certificates successfully downloaded and stored in /tmp/arm64/Installation_Files/common/prefetched_certs
[OK] Pre-fetched certs staged at /tmp/arm64/Installation_Files/common/prefetched_certs (4 files)
[INFO] Re-generating Dockerfile so it picks up the staged certs ...
[Phase 2: Generate Dockerfile]
============================================================
[OK] Generated /tmp/arm64/Installation_Files/Dockerfile
[Phase 3: Build]
============================================================
+ aws ecr describe-repositories --repository-names <repository_name> --region <region_name>
+ aws ecr get-login-password --region <region_name> | docker login --username AWS --password-stdin <Account_ID>.dkr.ecr.<region_name>.amazonaws.com
+ which docker 2>/dev/null
+ docker info 2>/dev/null | grep -i 'docker root dir' || true
[BUILD] traditional Docker (no credentials passed -- certs are pre-fetched)
+ cd /tmp/arm64/Installation_Files && DOCKER_BUILDKIT=1 docker build --platform linux/arm64 -t <repository_name>:sparkarm64123455 -f Dockerfile .
[OK] Built local image <repository_name>:sparkarm64123455 for runtime 'spark'
============================================================
[SUCCESS] Image built locally
Use 'push' command to push to ECR
============================================================
Pushing the Image to ECR
In the Python script, the push argument:
- Authenticates with AWS ECR using aws ecr get-login-password.
- Tags the local image with full ECR URI.
- Pushes all image layers to ECR.
- Verifies the image exists in ECR after push.
To push the image to ECR:
Log in to the CLI on a machine or an Amazon EC2 node that has connectivity to the ESA/PPC.
Navigate to the directory where the installation files are extracted.
To execute the Python script, run the following command:
python3 scripts/emr_serverless_setup_cli.py pushPress ENTER. The script pushes the image to ECR and a confirmation appears.
[Push Image to ECR] ============================================================ + aws sts get-caller-identity --output json + aws ecr describe-repositories --repository-names <repository_name> --region <region_name> + docker info + docker images --format '{{.Repository}}:{{.Tag}}' + aws ecr get-login-password --region <region_name> | docker login --username AWS --password-stdin <Account_ID>.dkr.ecr.<region_name>.amazonaws.com [OK] Logged in to ECR: <Account_ID>.dkr.ecr.<region_name>.amazonaws.com + docker tag <repository_name>:tag_spark <Account_ID>.dkr.ecr.<region_name>.amazonaws.com/<repository_name>:tag_spark [OK] Tagged image <repository_name>:tag_spark -> <Account_ID>.dkr.ecr.<region_name>.amazonaws.com/<repository_name>:tag_spark + docker push <Account_ID>.dkr.ecr.<region_name>.amazonaws.com/<repository_name>:tag_spark [OK] Pushed image <Account_ID>.dkr.ecr.<region_name>.amazonaws.com/<repository_name>:tag_spark [SUCCESS] Image pushed to ECR[Push Image to ECR] ============================================================ + aws sts get-caller-identity --output json + aws ecr describe-repositories --repository-names <repository_name> --region <region_name> + docker info + docker images --format '{{.Repository}}:{{.Tag}}' + aws ecr get-login-password --region <region_name> | docker login --username AWS --password-stdin <Account_ID>.dkr.ecr.<region_name>.amazonaws.com [OK] Logged in to ECR: <Account_ID>.dkr.ecr.<region_name>.amazonaws.com + docker tag <repository_name>:sparkarm64123455 <Account_ID>.dkr.ecr.<region_name>.amazonaws.com/<repository_name>:sparkarm64123455 [OK] Tagged image <repository_name>:sparkarm64123455 -> <Account_ID>.dkr.ecr.<region_name>.amazonaws.com/<repository_name>:sparkarm64123455 + docker push <Account_ID>.dkr.ecr.<region_name>.amazonaws.com/<repository_name>:sparkarm64123455 [OK] Pushed image <Account_ID>.dkr.ecr.<region_name>.amazonaws.com/<repository_name>:sparkarm64123455 [SUCCESS] Image pushed to ECR
Deploying the Image
In the Python script, the deploy argument enables the execution of the complete pipeline starting from validation to deployment in a single command.
Note: This is an optional step.
To deploy the image:
Log in to the CLI on a machine or an Amazon EC2 node that has connectivity to ESA/PPC.
Navigate to the directory where the installation files are extracted.
To execute the Python script, run the following command:
python3 scripts/emr_serverless_setup_cli.py deployPress ENTER.
The script deploys the image and a confirmation appears. For deployment on the ARM64 architecture, the script prompts for the authentication method. Select either the JWT Token or username/password method. Depending on the selection, enter the details on the prompt to proceed with deployment.============================================================ EMR Serverless BDP Image Deployment (Full Pipeline) ============================================================ Runtime: spark + docker info + docker buildx version + aws sts get-caller-identity --output json + aws ecr describe-repositories --repository-names <repository_name> --region <region_name> [Phase 1/3] Preparing assets... [Phase 1: Prepare Assets] ============================================================ [INFO] Runtime: SPARK [INFO] Log Output: stdout (audit logs will be sent to stdout) [OK] replaced [sync] and updated [log] section (output=stdout, mode=drop) -> ../common/config.ini [OK] updated GetCertificates.sh -> ../common/GetCertificates.sh [Phase 2/3] Generating Dockerfile... [Phase 2: Generate Dockerfile] ============================================================ + which docker 2>/dev/null + docker info 2>/dev/null | grep -i 'docker root dir' || true [INFO] traditional Docker - using BuildKit secrets (secure) [OK] Generated /home/ubuntu/serverless/final_build/spark/Installation_Files/Dockerfile [Phase 3/3] Building and pushing image... ============================================================ ESA Authentication Required ============================================================ Credentials needed to fetch certificates during Docker build. NOT stored in config files or image layers. Passed securely via Docker BuildKit secrets. Authentication Method: [1] Username/Password [2] JWT Token Select authentication method (1 or 2): 1 Enter ESA Username: admin Enter ESA Password: [Phase 3: Build] ============================================================ + aws ecr describe-repositories --repository-names <repository_name> --region <region_name> + aws ecr get-login-password --region <region_name> | docker login --username AWS --password-stdin <Account_ID>.dkr.ecr.<region_name>.amazonaws.com + which docker 2>/dev/null + docker info 2>/dev/null | grep -i 'docker root dir' || true [BUILD] traditional Docker - using BuildKit secrets (secure) + cd /home/ubuntu/serverless/final_build/spark/Installation_Files && DOCKER_BUILDKIT=1 docker build --secret id=esa_user,src=/tmp/tmphax6dcg9.secret --secret id=esa_password,src=/tmp/tmpzgrig1jz.secret -t <repository_name>:tag_spark -f Dockerfile . [OK] Built local image <repository_name>:tag_spark for runtime 'spark' + docker tag <repository_name>:tag_spark <Account_ID>.dkr.ecr.<region_name>.amazonaws.com/<repository_name>:tag_spark + docker push <Account_ID>.dkr.ecr.<region_name>.amazonaws.com/<repository_name>:tag_spark [OK] Pushed <Account_ID>.dkr.ecr.<region_name>.amazonaws.com/<repository_name>:tag_spark ============================================================ [SUCCESS] All phases completed ============================================================[INFO] defaults.runtimeHost = '<ESA_IP_Address>' ============================================================ EMR Serverless BDP Image Deployment (Full Pipeline) ============================================================ Runtime: spark + docker info + docker buildx version + aws sts get-caller-identity --output json + aws ecr describe-repositories --repository-names <repository_name> --region <region_name> [Phase 1/3] Preparing assets... [Phase 1: Prepare Assets] ============================================================ [INFO] Runtime: SPARK [INFO] Log Output: stdout (audit logs will be sent to stdout) [OK] updated jni.jcorelite.path in [protector] and inserted [sync] after [protector] and updated [log] section (output=stdout, mode=drop) -> ../common/config.ini [OK] updated GetCertificates.sh -> ../common/GetCertificates.sh [Phase 1.5/3] Staging ESA certs on the build host ... ============================================================ ESA Authentication Required ============================================================ Credentials needed to fetch certificates during Docker build. NOT stored in config files or image layers. Passed securely via Docker BuildKit secrets. Authentication Method: [1] Username/Password [2] JWT Token Select authentication method (1 or 2): Enter ESA Username: Enter ESA Password: [prefetch-certs] ESA FQDN : <ESA_FQDN> [prefetch-certs] getCertPort : 8443 [prefetch-certs] certResource : pty/v1/cert [prefetch-certs] dest dir : /<install_dir>/Installation_Files/common/prefetched_certs [prefetch-certs] SSL_CERT_FILE: /<install_dir>/certs/ProtegrityCA.pem [prefetch-certs] running GetCertificates.sh (credentials redacted) ... + bash /<install_dir>/Installation_Files/common/GetCertificates.sh -h <ESA_FQDN> --port 8443 -r pty/v1/cert -d /<install_dir>/Installation_Files/common/prefetched_certs -u admin -p *** Obtaining token from <ESA_FQDN>:8443... Downloading certificates from <ESA_FQDN>:8443... Extracting certificates... Certificates successfully downloaded and stored in /<install_dir>/Installation_Files/common/prefetched_certs [OK] Pre-fetched certs staged at /<install_dir>/Installation_Files/common/prefetched_certs (4 files) [Phase 2/3] Generating Dockerfile... [Phase 2: Generate Dockerfile] ============================================================ [OK] Generated /<install_dir>/Installation_Files/Dockerfile [Phase 3/3] Building and pushing image... [Phase 3: Build] ============================================================ + aws ecr describe-repositories --repository-names <repository_name> --region <region_name> + aws ecr get-login-password --region <region_name> | docker login --username AWS --password-stdin <AWS_Account_ID>.dkr.ecr.<region_name>.amazonaws.com + which docker 2>/dev/null + docker info 2>/dev/null | grep -i 'docker root dir' || true [BUILD] traditional Docker (no credentials passed -- certs are pre-fetched) + cd /<install_dir>/Installation_Files && DOCKER_BUILDKIT=1 docker build --platform linux/arm64 -t <repository_name>:<image_name> -f Dockerfile . [OK] Built local image <repository_name>:<image_name> for runtime 'spark' + docker tag <repository_name>:<image_name> <AWS_Account_ID>.dkr.ecr.<region_name>.amazonaws.com/<repository_name>:<image_name> + docker push <AWS_Account_ID>.dkr.ecr.<region_name>.amazonaws.com/<repository_name>:<image_name> [OK] Pushed <AWS_Account_ID>.dkr.ecr.<region_name>.amazonaws.com/<repository_name>:<image_name> ============================================================ [SUCCESS] All phases completed ============================================================
3.2.3.3.2 - Setting up the Log Forwarder
The instructions mentioned in the section are applicable only for the Serverless approach to install the Big Data Protector.
In the native EMR setup, Protegrity processes could be managed directly within the cluster nodes. However, in the containerized EMR Serverless environment, this level of control is limited. As a result, logs must be redirected to either Amazon S3 or CloudWatch. Using a CloudWatch Logs subscription filter, relevant log entries are streamed into Amazon Kinesis Data Streams. A Lambda function then processes these Kinesis batches, extracts the Protegrity audit JSON lines, constructs an OpenSearch Bulk (_bulk) payload, and sends it to the ESA/PPC endpoint.
Note: CloudWatch log lines are not always “instant”. Some delay is observed. This is an expected behavior.
Important: The logging functionality will only work when the jobs are submitted using the AWS CLI with
aws emr-serverless start-job-runcommand. A sample command is listed below.
aws emr-serverless start-job-run \
--region <region_name> \
--application-id <application_id> \
--execution-role-arn arn:aws:iam::<Account_ID>:role/EMR-Servlerless-Execution-Role \
--job-driver '{
"sparkSubmit": {
"entryPoint": "s3://<script_path>/<script_name>.py"
}
}' \
--configuration-overrides '{
"monitoringConfiguration": {
"cloudWatchLoggingConfiguration": {
"enabled": true,
"logGroupName": "<log_group_name>",
"logStreamNamePrefix": "emrs",
"logTypes": {
"SPARK_DRIVER": ["STDOUT","STDERR"],
"SPARK_EXECUTOR": ["STDOUT","STDERR"]
}
}
}
}'
Note: Only driver logs will be generated when a job is executed from the AWS Web UI. Therefore, execute the jobs only through the AWS CLI to generate both the driver and the executor logs in the CloudWatch Log group.
Prerequisites
The Lambda function is able to reach ESA/PPC
The ESA/PPC is configured in a private network. Therefore, the Lambda function must run in a VPC/subnet that have network route to that IP (VPN/TGW/peering/inside same network). Ensure the following:
- The Lambda function is attached to the VPC subnet that can route to the ESA/PPC IP address.
- The Security Group egress allows TCP 9200 to the ESA IP address.
- NACLs allow it.
- The TLS CA cert is available to the Lambda function.
The Lambda function is able to access the Kinesis Stream
The Lambda function reading from Kinesis must be able to reach the Kinesis API endpoints. If NAT is available, skip the endpoints.
The Kinesis Stream is able to retrieve the Logs from the CloudWatch Log group
The Kinesis Stream must be able to retrieve the Logs from the CloudWatch Log group.
EMR Serverless is able to send the logs to the CloudWatch Log group
The EMR Serverless cluster must be able to send the logs to the CloudWatch Log group.
Creating the Kinesis Data Stream
Log in to the AWS console.
Navigate to the Amazon Kinesis page.
Click Data streams.
Click Create Data stream.
In the Data stream name box, enter a name to identify the stream.
Under Capacity mode, select the required mode.
Note: In case of Provisioned mode, start with 1 shard. This can be increased later.
Click Create data stream.
After the data stream is created, open the data stream.
Note the ARN.
Note: The default retention period is 24 hours. To increase the retention period, set the required duration in the Retention period box under the Configuration tab.
Creating the IAM Role
CloudWatch requires permissions to write the logs into the Kinesis stream. Create an IAM role that grants the required permissions to CloudWatch for writing the logs into the Kinesis stream.
- To create the role, log in to the AWS console.
- Navigate to IAM > Roles > Create role.
- Set the Trusted entity as AWS service.
- Set the Use case as CloudWatch Events.
- Set a Name for the role.
- Include permissions for the policy. A sample is listed below.
{ "Version": "2012-10-17", "Statement": [ { "Sid": "AllowPutToKinesis", "Effect": "Allow", "Action": [ "kinesis:PutRecord", "kinesis:PutRecords" ], "Resource": "arn:aws:kinesis:<region_name>:<Account_ID>:stream/emr-protegrity-audit-stream" } ] } - Ensure the trust policy allows logs service.
{ "Version": "2012-10-17", "Statement": [ { "Effect": "Allow", "Principal": { "Service": "logs.<region_name>.amazonaws.com" }, "Action": "sts:AssumeRole" } ] }
Creating the CloudWatch Log group
- Log in to the AWS console.
- Navigate to the CloudWatch page.
- Navigate to Logs > Log management.
- Click Create log group.
- In the Log group name box, enter a name to identify the group in the following syntax:
/aws/<log_group_name> - From the Retention setting list, select the required option.
- From the Log class list, select the required option.
- Click Create.
Note: Ensure to assign the required IAM permissions to the Log group. The EMR Serverless application execution role must have permissions to access the above-created CloudWatch Log group.
Creating the CloudWatch Logs Subscription Filter
- Log in to the AWS console.
- Navigate to the CloudWatch page.
- Navigate to Logs > Log management.
- Select the CloudWatch log group name that is created.
- Select Actions > Create subscription filter.
- Select the required Destination account.
- Under Kinesis data stream, select the stream name that is created.
- Under IAM role, select the role that was created for the CloudWatch Log group.
- If the Protegrity JSON lines contain “logtype”, specify the filter pattern as logtype.
Note: If the JSON is embedded in other text, filter on a unique token, such as, correlationid or protection.
- Click Start streaming.
Note: CloudWatch Logs allows only a limited number of subscription filters per log group. The common limit is 2 subscription filters per log group.
Creating the Lambda Function
The Lambda function is responsible for sending the logs from the Kinesis stream to ESA/PPC.
- Log in to the AWS console.
- Navigate to the Lambda page.
- To create a function, click Create function.
- Select the Author from scratch option.
- In the Function name box, enter a name to identify the function.
- From the Runtime list, select the required language, such as Python.
- Under Execution role, select the Create a new role with basic Lambda permissions option.
- Click Create function.
Note: Ensure that the Lambda function must have access to the Kinesis stream, SQS access. The function must also have the
LambdaBasicExecutionRolepermissions andLambdaVPCAccessExecutionRolepermissions.
Attaching a VPC to the Lambda Function
- To edit the function and attach a VPC, on the Lambda page, click the function name.
- Click the Configuration tab.
- From the left pane, click VPC.
- To modify the configuration, click Edit.
- From the VPC list, select the required VPC.
- From the Subnets list, select the required subnet.
Note: Ensure the subnet can connect to the ESA/PPC IP address.
- From the Security groups list, select the group that allows egress to the ESA/PPC IP address.
- To persist the changes, click Save.
Note: Attaching a Lambda function to a VPC without any NAT or endpoints can result in the Lambda function being unable to call the AWS APIs including the Kinesis stream.
Adding a Trigger to the Kinesis Stream
- To add a trigger to the Kinesis stream, click the Triggers tab.
- Click Add trigger.
- From the Trigger configuration list, select the source as Kinesis.
- From the Kinesis stream list, select the required stream.
- In the Batch size box, enter 200.
- In the Batch window box, enter any value between 1 and 5.
- Click Add.
- To configure the retry behavior, navigate to the Lambda page.
- Click Event source mappings.
- Click the required Kinesis trigger.
- Click the Configuration tab.
- Enable the Bisect batch on function error feature.
- Set the Maximum retry attempts to 10 or more.
- Set the Maximum record age to a longer duration.
Providing the CA.pem File to the Lambda Function
The CA.pem file must be provided to the Lambda function. The Curl component requires these certificates for TLS verification. The optimal and secure approach is to store the CA.pem file in the Secrets Manager.
Downloading the CA.pem File
Log in to the ESA through a terminal having the required permissions.
Navigate to the
/etc/ksa/certificates/plug/directory.Download the
CA.pemfile from this directory.After certificate is downloaded, open the PEM file in any text editor.
Replace all new lines with escaped new line: \n.
To escape new lines from command line, use one of the following commands depending on the operating system:
For Linux:
awk 'NF {printf "%s\\n",$0;}' CA.pem > output.txtFor Windows PowerShell:
(Get-Content '.\CA.pem') -join '\n' | Set-Content 'output.txt'
Storing the Certificates
- Log in to the AWS console.
- Navigate to the Secrets Manager page.
- Click Store a new secret.
- Under Secret type, select Other type of secret.
- In the Key box, enter ca_pem.
- In the value box, enter the contents of the
CA.pemfile. - Click Next.
- Enter a name to identify the secret.
- Click Next.
- Click Store.
- Note the Secret ARN.
Setting up the Lambda Function
To set up the Lambda function:
- Log in to the AWS console.
- Navigate to the Lambda page.
- Click the required function.
- Click the Code tab.
- Click the
lambda_function.pyfunction. - Paste the code from the
lambda_function.pyfile that was generated after executing the configurator script. - Click Deploy.
- Click the Configuration tab.
- From the left pane, click Permissions.
- Click the Role name to open the Role page.
- From the Add permissions list, select Create inline policy.
- Under Policy editor, select JSON.
- Paste the following policy:
{ "Version": "2012-10-17", "Statement": [ { "Sid": "AllowGetSpecificSecret", "Effect": "Allow", "Action": [ "secretsmanager:GetSecretValue", "secretsmanager:DescribeSecret" ], "Resource": "arn:aws:secretsmanager:<region_name>:<Account_ID>:secret:<secret_name>" } ] } - Click Next.
- In the Policy name box, enter a name for the policy.
- Click Create.
- Navigate to the Lambda page.
- Click the required function.
- From the left pane, click Environment variables.
- Click Edit and add the following variables in the
key:valueformat:
ESA_BULK_URL = https://<ESA_IP_Address>:9200/pty_insight_audit/_bulk?pipeline=logs_pipeline
ESA_CA_SECRET_ID = <ARN_of_the_Secret_from_Secret_Manager>
ESA_CA_SECRET_JSON_KEY = ca_pem
ONLY_MATCH_SUBSTRING = "logtype" (optional extra filter)
BULK_MAX_BYTES = 5242880 (5MB)
HTTP_TIMEOUT_SEC = 120
- To persist the changes, click Save.
Troubleshooting
Validate each hop before moving to the next. Most issues are isolated to one hop.
Verify logs are reaching CloudWatch (EMR → CloudWatch)
Where to check:
- CloudWatch Logs → Log groups → /aws/<log_group_name>
- Open the latest log stream.
What to check:
- New log events should appear while the EMR Serverless job is running.
- If you do not see new events, the problem is upstream (EMR monitoring config or EMR execution role permissions).
If this fails:
- Confirm the EMR Serverless job run has CloudWatch logging enabled.
- Confirm the execution role attached to the job/application has permissions to write to the log group/streams.
Verify CloudWatch Subscription Filter is configured (CloudWatch → Kinesis)
Where to check:
- CloudWatch Logs → Log groups → /aws/<log_group_name> → Subscription filters
What to check:
- A subscription filter exists.
- Destination is the correct Kinesis Data Stream.
- The filter pattern matches your logs.
Recommended test:
- Temporarily set a permissive filter (for testing):
- Match all: ""
- Or minimal match: “logtype”
- Save and observe whether data begins flowing into Kinesis.
If this fails:
- Most common cause is IAM permissions for CloudWatch Logs to write records into Kinesis (destination access role / resource policy).
Verify Kinesis is receiving events (Kinesis ingestion)
Where to check:
- Kinesis → Data streams → → Monitoring
What to check:
- IncomingRecords should be greater than 0 during active logging.
- IncomingBytes should also increase.
If this fails:
- CloudWatch subscription filter is not delivering. Possible causes can include incorrect stream, incorrect filter pattern, or missing permissions.
Verify Lambda Function is triggered (Kinesis → Lambda)
Where to check:
- Lambda → → Configuration → Triggers
- Lambda → Monitor
What to check:
- Kinesis trigger exists and is Enabled.
- Monitor metrics:
- Invocations should increase.
- Errors should be 0 (or very low).
If this fails:
- Trigger/event source mapping may be disabled, misconfigured, or pointing to the wrong stream.
Validate Lambda processing and payload (Lambda internal validation)
Where to check:
- CloudWatch Logs → Log groups → /aws/lambda/
What to check:
- Confirm Lambda is actually parsing events:
- docs_seen= should be > 0
- bulk_calls= should be >= 1 when data exists
- Confirm outbound calls:
- Log should show ESA HTTP status=200
- ESA bulk response should not show errors:true
Common failure patterns:
- TLS/CA errors
- NO_CERTIFICATE - indicates the
CA.pemfile loaded from Secrets Manager is empty/malformed. - CERTIFICATE_VERIFY_FAILED - indicates incorrect CA chain or wrong certificate for the ESA endpoint.
- NO_CERTIFICATE - indicates the
- Filtering too strict
- If docs_seen=0, your ONLY_MATCH_SUBSTRING or JSON-line parsing is skipping everything.
Validate ESA ingestion (Lambda → ESA)
Where to check:
- Lambda log output for ESA bulk response.
- ESA/OpenSearch logs (if accessible).
- Index / pipeline configuration.
What to check:
- Bulk response should show:
- errors: false
- Successful item status (2xx)
- If errors: true, inspect first error item:
- Strict mapping exceptions indicate you are sending fields that are not allowed by index mapping.
- Pipeline errors indicate ingest pipeline expects different fields or types.
Quick Diagnosis Rules
- CloudWatch log streams have events, but Kinesis IncomingRecords=0 → Subscription filter / IAM permissions / wrong destination stream.
- Kinesis has IncomingRecords>0, but Lambda Invocations=0 → Kinesis trigger (event source mapping) disabled/misconfigured.
- Lambda invokes, but ESA is not receiving logs: → TLS/CA issue, ESA bulk endpoint issue, pipeline/mapping errors, or filter logic dropping events.
3.2.3.3.3 - Performing URP Operations
The instructions mentioned in the section are applicable only for the Serverless approach.
The Big Data Protector on the EMR Serverless architecture provides the following approaches to perform URP operations:
- AWS Web UI - operations using this approach returns only the driver logs.
- AWS CLI - operations using this approach returns both the driver and executor logs.
Creating the EMR Serverless Application for Spark
- Log in to the AWS console.
- Navigate to the EMR page.
- From the left pane, click EMR Serverless.
- Under Manage applications, select the required EMR studio.
- Click Manage applications.
- Click Create application.
- Under Application settings, specify a value for the following:
- Name
- Type
- Release version
- Under Application setup options, select the Use custom settings option.
- Under Custom image settings, select the Use the custom image with this application check box.
- Browse and select the required image from the Elastic Container Repository.
- Under Application logs and metrics, select the Deliver logs to Amazon CloudWatch check box.
- In the Log group name box, enter the name for the CloudWatch Log group. The name must be the same as that of the group created to fetch logs from the application.
- Under Interactive endpoint, select the Enable endpoint for EMR studio check box to analyze data in Jupyter notebooks on EMR Serverless. This is optional.
- Under Network connections, from the Virtual private cloud (VPC) list, select the required VPC.
- Select the required Subnets and the Security groups.
- Under Application behavior, set the required time to stop the application.
- Click Create and start application.
Submitting a Spark Job
- Create a Spark script using Protegrity functions.
- Upload the Spark script to the S3 bucket.
- Using the AWS CLI/CloudShell, submit the job.
A sample command is listed below.
aws emr-serverless start-job-run \ --region <region_name> \ --application-id <application_id> \ --execution-role-arn arn:aws:iam::<Account_ID>:role/EMR-Servlerless-Execution-Role \ --job-driver '{ "sparkSubmit": { "entryPoint": "s3://<script_path>/<script_name>.py" } }' \ --configuration-overrides '{ "monitoringConfiguration": { "cloudWatchLoggingConfiguration": { "enabled": true, "logGroupName": "<log_group_name>", "logStreamNamePrefix": "emrs", "logTypes": { "SPARK_DRIVER": ["STDOUT","STDERR"], "SPARK_EXECUTOR": ["STDOUT","STDERR"] } } } }'
3.2.4 - Configuring the protector
The Big Data Protector provides the following files that contain different parameters to control the protector behavior:
config.ini- provides parameters to control the protector behavior.rpagent.cfg- provides parameters to control the RPAgent behavior.
The procedure to access the configuration files and update the parameters is the same. However, the stage in which the modification is to be done differs between the bootstrap and the static installer.
- Bootstrap installer - modify the parameters after executing the configurator script and before uploading the files to the S3 bucket to create the cluster.
- Static installer - modify the parameters after installing the Big Data Protector.
Updating the parameters for the bootstrap installer
- Log in to the staging server.
- Navigate to the
/Installation_Files/directory, where the files are generated using the configurator script. - To create a directory to store the extracted files, run the following command:
mkdir extraction_dir/ - To extract the contents of the Big Data Protector archive, run the following command:
tar -xf BDP_Package_<version>_<tag>.tgz -C extraction_dir/ - Navigate to the directory that contains the
config.inifile. - Using an editor, open the
config.inifile. - Update the parameters as per requirements.
For more information about the parameters in the config.ini, refer here. - Save the changes to the
config.inifile. - Navigate to the directory that contains the
rpagent.cfgfile. - Using an editor, open the
rpagent.cfgfile. - Update the parameters as per requirements.
For more information about the parameters in the config.ini, refer here. - Save the changes to the
rpagent.cfgfile. - To recreate the Big Data Protector package, run the following command:
tar -zcf BDP_Package_<version>_<tag>.tgz -C extraction_dir/ $(ls extraction_dir) --owner=0 --group=0 - Manually upload the updated installation package to the S3 bucket. This location must be the same from where the cluster will retrieve the artifacts.
Updating the parameters in the config.ini file:
Log in to the master node.
Navigate to the
/opt/protegrity/bdp/datadirectory.To open the
config.inifile, run the following command:vi config.iniPress ENTER.
The command opens the
config.inifile.############################################################################### # Protector configuration ############################################################################### [protector] # Cadence determines how often the protector connects with ESA / proxy to fetch the policy updates in background. # Default is 60 seconds. So by default, every 60 seconds protector tries to fetch the policy updates. # If the cadence is set to "0", then the protector will get the policy only once. # # Default 60. cadence = 60 ############################################################################### # Log Provider Config ############################################################################### [log] # In case that connection to fluent-bit is lost, set how audits/logs are handled # # drop : (default) Protector throws logs away if connection to the fluentbit is lost # error : Protector returns error without protecting/unprotecting # data if connection to the fluentbit is lost mode = drop # Host/IP to fluent-bit where audits/logs will be forwarded from the protector # # Default localhost host = localhostUpdate the parameters, as per the description in the table.
Parameter Description cadenceSpecifies the frequency at which the protector connects to the ESA to fetch the policy. The default value is 60 seconds. If the cadence is set to “0”, then the protector will get the policy only once. modeSpecifies the approach of handling logs when the connection to the Log Forwarder is lost. Save the changes to the
config.inifile.For the static installer, use the
sync_config_ini.shscript to load the changes to the configuration files in all the cluster nodes.For more information about using the helper script, refer Sync Config.ini
Updating the parameters in the rpagent.cfg file:
Log in to the master node.
Navigate to the
/opt/protegrity/rpagent/datadirectory.To open the
rpagent.cfgfile, run the following command:vi rpagent.cfgPress ENTER.
The command opens the rpagent.cfg file.
############################################################################### # Resilient Package Sync Config ############################################################################### [sync] # Protocol to use when communicating with the service providing Resilient Packages. # Use 'https' for ESA or 'shmem' for local shared memory. protocol = https # Host/IP to the service providing Resilient Packages host = <IP_address> port = 8443 # Path to CA certificate ca = /opt/protegrity/rpagent/data/CA.pem # Path to client certificate cert = /opt/protegrity/rpagent/data/cert.pem # Path to client certificate key key = /opt/protegrity/rpagent/data/cert.key # Path to a secret file that is used to decrypt the client certificate key. # When using a custom certificate bundle, the 'secretcommand' can instead be # used to execute an external command that obtains the secret. secretfile = /opt/protegrity/rpagent/data/secret.txt ############################################################################### # Log Provider Config ############################################################################### [log] # In case that connection to fluent-bit is lost, set how audits/logs are handled # # drop : (default) Protector throws logs away if connection to the fluentbit is lost # error : Protector returns error without protecting/unprotecting # data if connection to the fluentbit is lost mode = drop # Host/IP to fluent-bit where audits/logs will be forwarded from the protector # # Default localhost host = localhostUpdate the parameters, as per the description in the table.
Parameter Description interval Specifies the frequency at which the RPAgent will fetch the policy from the ESA. The minimum value is 1 second and the maximum value is 86400 seconds. This is an optional parameter and must be included in the Syncsection of therpagent.cfgfile.protocol Specifies the protocol to use when communicating with the service providing Resilient Packages. host Specifies the hostname to the service providing the Resilient packages. port Specifies the port to the service providing the Resilient packages. ca Specifies the path to the CA certificate. cert Specifies the path to the client certificate. key Specifies the path to the client certificate key. secretfile Specifies the path to the secret file that is used to decrypt the client certificate key. mode Specifies the approach of handling logs when the connection to the Log Forwarder is lost. host Specifies the hostname or the IP address to where the Log Forwarder will forward the audit logs from the protector. Save the changes to the
rpagent.cfgfile.For the static installer, use the
sync_config_ini.shscript to load the changes to the configuration files in all the cluster nodes.For more information about using the helper script, refer Sync RPAgent Configuration.
3.2.5 - Working with Cluster Utilities
The Big Data Protector package provides utility scripts to perform different operations on the EMR cluster. The scripts and their usage is listed in the table.
| Script | Description |
|---|---|
| RPAgent Control | Manages the RPAgent service across the cluster. |
| Log Forwarder Control | Manages the Log Forwarder service across the cluster. |
| Sync Configuration | Updates the configuration from the config.ini file across the nodes in the cluster. |
| RPAgent Configuration | Updates the RPAgent configuration from the rpagent.cfg file across the nodes in the cluster. |
| Log Forwarder Configuration | Updates the Log Forwarder configuration across the nodes in the cluster. |
3.2.5.1 - RPAgent Control Script
The cluster_rpagentctrl.sh script, in the <installation_directory>/cluster_utils directory, manages the RPAgent services on all
the nodes in the cluster that are listed in the BDP hosts file.
The utility provides the following options:
- Start – Starts the RPAgent on all the nodes in the cluster.
- Stop – Stops the RPAgent on all the nodes in the cluster.
- Restart – Restarts the RPAgent on all the nodes in the cluster.
- Status – Reports the status of the RPAgent on all the nodes in the cluster.
Note: While executing the RPAgent Control utility, the script will prompt for the path of the SSH private key file to securely login into the cluster nodes.
Verifying the Status of RPAgent
To verify the status of the RPAgent on all the nodes in the cluster:
Log in to the lead or Primary node.
Navigate to the
<installation_directory>/cluster_utilsdirectory.Run the following command:
./cluster_rpagentctrl.shPress ENTER.
The prompt to enter the path of the private key file appears.
Enter the path of the Private Key (.PEM) file:Enter the location of the Private Key (.PEM) file.
Press ENTER.
The script verifies the connectivity on the cluster nodes and the options appear.
Checking connectivity of cluster nodes... Select option: 1) Start 2) Stop 3) Restart 4) Status Option(1-4):To verify the status of the RPAgent on all the nodes, type
4.Press ENTER.
The script checks the status of the RPAgent on all the nodes and appends the event details to a log file.
Checking status of RPAgent on current node... Checking status of RPAgent on all nodes... The script's logs and operation results are logged in /opt/protegrity/logs/cluster_rpagentctrl.log
Starting the RPAgent
To start the RPAgent on all the nodes in the cluster:
Log in to the lead or Primary node.
Navigate to the
<installation_directory>/cluster_utilsdirectory.Run the following command:
./cluster_rpagentctrl.shPress ENTER.
The prompt to enter the path of the private key file appears.
Enter the path of the Private Key (.PEM) file:Enter the location of the Private Key (.PEM) file.
Press ENTER.
The script verifies the connectivity on the cluster nodes and the options appear.
Checking connectivity of cluster nodes... Select option: 1) Start 2) Stop 3) Restart 4) Status Option(1-4):To start the RPAgent on all the nodes, type
1.Press ENTER.
The script starts the RPAgent on all the nodes and appends the event details to a log file.
Starting RPAgent on current node... RPAgent started on current node Starting RPAgent on all nodes... RPAgent started on all nodes The script's logs and operation results are logged in /opt/protegrity/logs/cluster_rpagentctrl.log
Stopping the RPAgent
To stop the RPAgent on all the nodes in the cluster:
Log in to the lead or Primary node.
Navigate to the
<installation_directory>/cluster_utilsdirectory.Run the following command:
./cluster_rpagentctrl.shPress ENTER.
The prompt to enter the path of the private key file appears.
Enter the path of the Private Key (.PEM) file:Enter the location of the Private Key (.PEM) file.
Press ENTER.
The script verifies the connectivity on the cluster nodes and the options appear.
Checking connectivity of cluster nodes... Select option: 1) Start 2) Stop 3) Restart 4) Status Option(1-4):To stop the RPAgent on all the nodes, type
2.Press ENTER.
The script stops the RPAgent on all the nodes and appends the event details to a log file.
Stopping RPAgent on current node... RPAgent stopped on current node Stopping RPAgent on all nodes... RPAgent stopped on all nodes The script's logs and operation results are logged in /opt/protegrity/logs/cluster_rpagentctrl.log
Restarting the RPAgent
To restart the RPAgent on all the nodes in the cluster:
Log in to the lead or Primary node.
Navigate to the
<installation_directory>/cluster_utilsdirectory.Run the following command:
./cluster_rpagentctrl.shPress ENTER.
The prompt to enter the path of the private key file appears.
Enter the path of the Private Key (.PEM) file:Enter the location of the Private Key (.PEM) file.
Press ENTER.
The script verifies the connectivity on the cluster nodes and the options appear.
Checking connectivity of cluster nodes... Select option: 1) Start 2) Stop 3) Restart 4) Status Option(1-4):To restart the RPAgent on all the nodes, type
3.Press ENTER.
The script restarts the RPAgent on all the nodes and appends the event details to a log file.
Stopping RPAgent on current node... RPAgent stopped on current node Starting RPAgent on current node... RPAgent started on current node Stopping RPAgent on all nodes... RPAgent stopped on all nodes Starting RPAgent on all nodes... RPAgent started on all nodes The script's logs and operation results are logged in /opt/protegrity/logs/cluster_rpagentctrl.log
3.2.5.2 - Log Forwarder Control Script
The cluster_logforwarderctrl.sh script, in the <installation_directory>/cluster_utils directory, manages the Log Forwarder services on all
the nodes in the cluster that are listed in the BDP hosts file.
The utility provides the following options:
- Start – Starts the Log Forwarder on all the nodes in the cluster.
- Stop – Stops the Log Forwarder on all the nodes in the cluster.
- Restart – Restarts the Log Forwarder on all the nodes in the cluster.
- Status – Reports the status of the Log Forwarder on all the nodes in the cluster.
Note: While executing the Log Forwarder Control utility, the script will prompt for the path of the SSH private key file to securely login into the cluster nodes.
Verifying the Status of Log Forwarder
To verify the status of the Log Forwarder on all the nodes in the cluster:
Log in to the lead or Primary node.
Navigate to the
<installation_directory>/cluster_utilsdirectory.Run the following command:
./cluster_logforwarderctrl.shPress ENTER.
The prompt to enter the path of the private key file appears.
Enter the path of the Private Key (.PEM) file:Enter the location of the Private Key (.PEM) file.
Press ENTER.
The script verifies the connectivity on the cluster nodes and the options appear.
Checking connectivity of cluster nodes... Select option: 1) Start 2) Stop 3) Restart 4) Status Option(1-4):To verify the status of the Log Forwarder on all the nodes, type
4.Press ENTER.
The script checks the status of the Log Forwarder on all the nodes and appends the event details to a log file.
Checking status of Logforwarder on current node... Checking status of Logforwarder on all nodes... The script's logs and operation results are logged in /opt/protegrity/logs/cluster_logforwarderctrl.log
Starting the Log Forwarder
To start the Log Forwarder on all the nodes in the cluster:
Log in to the lead or Primary node.
Navigate to the
<installation_directory>/cluster_utilsdirectory.Run the following command:
./cluster_logforwarderctrl.shPress ENTER.
The prompt to enter the path of the private key file appears.
Enter the path of the Private Key (.PEM) file:Enter the location of the Private Key (.PEM) file.
Press ENTER.
The script verifies the connectivity on the cluster nodes and the options appear.
Checking connectivity of cluster nodes... Select option: 1) Start 2) Stop 3) Restart 4) Status Option(1-4):To start the Log Forwarder on all the nodes, type
1.Press ENTER.
The script starts the Log Forwarder on all the nodes and appends the event details to a log file.
Starting Logforwarder on current node... Logforwarder started on current node Starting Logforwarder on all nodes... Logforwarder started on all nodes The script's logs and operation results are logged in /opt/protegrity/logs/cluster_logforwarderctrl.log
Stopping the Log Forwarder
To stop the Log Forwarder on all the nodes in the cluster:
Log in to the lead or Primary node.
Navigate to the
<installation_directory>/cluster_utilsdirectory.Run the following command:
./cluster_logforwarderctrl.shPress ENTER.
The prompt to enter the path of the private key file appears.
Enter the path of the Private Key (.PEM) file:Enter the location of the Private Key (.PEM) file.
Press ENTER.
The script verifies the connectivity on the cluster nodes and the options appear.
Checking connectivity of cluster nodes... Select option: 1) Start 2) Stop 3) Restart 4) Status Option(1-4):To stop the Log Forwarder on all the nodes, type
2.Press ENTER.
The script stops the Log Forwarder on all the nodes and appends the event details to a log file.
Stopping Logforwarder on current node... Logforwarder stopped on current node Stopping Logforwarder on all nodes... Logforwarder stopped on all nodes The script's logs and operation results are logged in /opt/protegrity/logs/cluster_logforwarderctrl.log
Restarting the Log Forwarder
To restart the Log Forwarder on all the nodes in the cluster:
Log in to the lead or Primary node.
Navigate to the
<installation_directory>/cluster_utilsdirectory.Run the following command:
./cluster_logforwarderctrl.shPress ENTER.
The prompt to enter the path of the private key file appears.
Enter the path of the Private Key (.PEM) file:Enter the location of the Private Key (.PEM) file.
Press ENTER.
The script verifies the connectivity on the cluster nodes and the options appear.
Checking connectivity of cluster nodes... Select option: 1) Start 2) Stop 3) Restart 4) Status Option(1-4):To restart the Log Forwarder on all the nodes, type
3.Press ENTER.
The script restarts the Log Forwarder on all the nodes and appends the event details to a log file.
Stopping Logforwarder on current node... Logforwarder stopped on current node Starting Logforwarder on current node... Logforwarder started on current node Stopping Logforwarder on all nodes... Logforwarder stopped on all nodes Starting Logforwarder on all nodes... Logforwarder started on all nodes The script's logs and operation results are logged in /opt/protegrity/logs/cluster_logforwarderctrl.log
3.2.5.3 - Sync Config.ini
The sync_config_ini.sh script in the <installation_directory>/cluster_utils/ directory, updates the config.ini parameters across all the nodes in the cluster.
For example, to make any changes to the config.ini file, make the changes on the Lead node. Use the sync_config_ini.sh script to propagate the change to all the nodes in the cluster.
Log in to the lead or the Primary node.
Navigate to the
<installation_directory>/cluster_utils/directory.To replicate the
config.inifile from the lead node to all the nodes, run the following command:./sync_config_ini.shPress ENTER.
The prompt to continue appears.
******************************************** Welcome to BDP Script for Cloning config.ini ******************************************** This will clone deployed config.ini from lead node to all other nodes. Do you want to continue? [yes or no]:To continue, type
yes.Press ENTER.
The prompt to enter the location of the Private Key file appears.
Big Data Protector config.ini cloning started Enter the path of the Private Key (.PEM) file:Enter the location of the Private Key file.
Press ENTER.
The script creates a backup, updates the configuration, and updates the file permissions on all the nodes.
Checking connectivity of cluster nodes... Big Data Protector config.ini cloning started Creating config.ini backup on all nodes... Creating bdp/data_07-24-2025_07:44:54/ directory on all nodes... Changing ownership of bdp/data_07-24-2025_07:44:54/ directory recursively on all nodes... Changing permission of bdp/data_07-24-2025_07:44:54/ on all nodes... Removing original config.ini from all nodes... Removed config.ini from all nodes Copying current node's config.ini to all other nodes... Changing ownership of bdp/data_07-24-2025_07:44:54/config.ini... Changing permission of bdp/data_07-24-2025_07:44:54/config.ini... Moving bdp/data_07-24-2025_07:44:54/config.ini to bdp/data/... Changing permission of bdp/data/config.ini... Removing bdp/data_07-24-2025_07:44:54/ directory and config.ini backup file... Successfully updated BDP config.ini across all cluster nodes. Please restart Hadoop Service daemons to reload new config.ini. The script's logs and operation results are logged in /opt/protegrity/logs/sync_config_ini.log
3.2.5.4 - Sync Log Forwarder Configuration
The sync_logforwarder.sh script in the <installation_directory>/cluster_utils/ directory, updates the Log Forwarder configuration across the nodes in the cluster.
For example, to update the Log Forwarder configuration, change the configuration on the Lead node. Use the sync_logforwarder.sh script to propagate the change to all the nodes in the cluster.
Log in to the lead or the Primary node.
Navigate to the
<installation_directory>/cluster_utils/directory.To replicate the RPAgent configuration from the lead node to all the nodes, run the following command:
./sync_logforwarder.shPress ENTER.
The prompt to continue appears.
************************************************************ Welcome to BDP Script for Cloning Logforwarder Configuration ************************************************************ This will clone deployed Logforwarder configuration & files from lead node to all other nodes. Do you want to continue? [yes or no]:To continue, type
yes.Press ENTER.
The prompt to enter the location of the Private Key file appears.
Big Data Protector Logforwarder Configuration cloning started Enter the path of the Private Key (.PEM) file:Enter the location of the Private Key file.
Press ENTER.
The script stops the Log Forwarder on all the nodes, creates a backup, updates the configuration, and restarts the Log Forwarder on all the nodes.
Checking connectivity of cluster nodes... Big Data Protector Logforwarder Configuration cloning started Stopping Logforwarder on current node... Stopping Logforwarder on all nodes... Creating logforwarder_old/data_07-24-2025_07:46:51/new_data directory on all nodes... Changing ownership of logforwarder_old/ directory recursively on all nodes... Changing permission of logforwarder_old/ on all nodes... Removing Logforwarder Configuration from all nodes... Removed /opt/protegrity/logforwarder/data/ from all nodes Copying current node's logforwarder/data/ to all other nodes... Changing ownership of logforwarder_old/data_07-24-2025_07:46:51/new_data/data.tgz... Changing permission of logforwarder_old/data_07-24-2025_07:46:51/new_data/data.tgz... Extracting logforwarder_old/data_07-24-2025_07:46:51/new_data/data.tgz to logforwarder/data/... Changing permission of logforwarder/data/... Removing backup directory logforwarder_old/... Starting Logforwarder on current node... Starting Logforwarder on all nodes... Successfully updated Logforwarder Configuration across all cluster nodes The script's logs and operation results are logged in /opt/protegrity/logs/sync_logforwarder.log
3.2.5.5 - Sync RPAgent Configuration
The sync_rpagent.sh script in the <installation_directory>/cluster_utils/ directory, updates the RPAgent configuration and the
certificates across the nodes in the cluster.
For example, to update the RPAgent configuration, change the configuration on the Lead node. Use the sync_rpagent.sh script to propagate the change to all the nodes in the cluster.
Log in to the lead or the Primary node.
Navigate to the
<installation_directory>/cluster_utils/directory.To replicate the RPAgent configuration from the lead node to all the nodes, run the following command:
./sync_rpagent.shPress ENTER.
The prompt to continue appears.
********************************************************************** Welcome to BDP Script for Cloning RPAgent Configuration & Certificates ********************************************************************** This will clone deployed RPAgent configuration & files from lead node to all other nodes. Do you want to continue? [yes or no]:To continue, type
yes.Press ENTER.
The prompt to enter the location of the Private Key file appears.
Big Data Protector RPAgent Configuration & Certificates cloning started Enter the path of the Private Key (.PEM) file:Enter the location of the Private Key file.
Press ENTER.
The script stops the RPAgent on all the nodes, creates a backup, updates the configuration, and restarts the RPAgent on all the nodes.
Checking connectivity of cluster nodes... Big Data Protector RPAgent Configuration & Certificates cloning started Stopping RPAgent on current node... Stopping RPAgent on all nodes... Creating rpagent_old/data_07-24-2025_07:45:43/new_data directory on all nodes... Changing ownership of rpagent_old/ directory recursively on all nodes... Changing permission of rpagent_old/ on all nodes... Removing RPAgent Configuration & Certificates from all nodes... Removed /opt/protegrity/rpagent/data/ from all nodes Copying current node's rpagent/data/ to all other nodes... Changing ownership of rpagent_old/data_07-24-2025_07:45:43/new_data/data.tgz... Changing permission of rpagent_old/data_07-24-2025_07:45:43/new_data/data.tgz... Extracting rpagent_old/data_07-24-2025_07:45:43/new_data/data.tgz to rpagent/data/... Changing permission of rpagent/data/... Removing backup directory rpagent_old/... Starting RPAgent on current node... Starting RPAgent on all nodes... Successfully updated RPAgent Configuration and Certificates across all cluster nodes The script's logs and operation results are logged in /opt/protegrity/logs/sync_rpagent.log
3.2.6 - Uninstalling the protector
3.2.6.1 - Uninstalling the Big Data Protector when Bootstrap is used
Note: This section is applicable only for the Bootstrap installer.
When the Bootstrap installer is used, the cluster auto scales as per the requirement. When the nodes are not required, they are automatically reduced.
3.2.6.2 - Uninstalling the Big Data Protector when Static installer is used
Note: This section is applicable only for the Static installer.
The procedures to uninstall the Big Data Protector from the EMR cluster are listed below. Use any one of the following methods to remove the Big Data Protector from the EMR cluster:
- Uninstalling the Big Data Protector from all the Nodes on the EMR Cluster
- Uninstalling the Big Data Protector from Selective Nodes on the EMR Cluster
3.2.6.2.1 - From all the Nodes
- Log in to the Lead or Primary node as the
sudoeruser. - Navigate to the
<installation_directory>/cluster_utilsdirectory. - To remove the Big Data Protector from all the nodes in the cluster, execute the following script:
./uninstall.sh - Press ENTER.
The prompt to continue the uninstallation of the Big Data Protector appears.************************************************************************************ Welcome to the Hadoop Big Data Protector Uninstallation Wizard ************************************************************************************ This will uninstall the Hadoop Big Data Protector on your system. Do you want to continue? [yes or no]: - To continue with the uninstall, type
yes. - Press ENTER.
The prompt to enter the path of the private key file appears.Big Data Protector uninstallation started Enter the path of the Private Key (.PEM) file: - Enter the path of the Private Key (.PEM) file.
- Press ENTER.
The script starts and completes the uninstallation process.************************************************************************************ Welcome to the RPAgent Setup Wizard. ************************************************************************************ Uninstalling RPAgent... Stopping RPAgent. Please wait... RPAgent uninstalled on Lead node at location /opt/protegrity/rpagent. Performing uninstall on other nodes... RPAgent uninstalled on other nodes at location /opt/protegrity/rpagent. Check the status in /opt/protegrity/logs/rpagent_setup.log ************************************************************************************ Welcome to the LogForwarder Setup Wizard. ************************************************************************************ Uninstalling LogForwarder.... Stopping Logforwarder. Please wait... LogForwarder uninstalled on Lead node at location /opt/protegrity/logforwarder. Performing uninstall on other nodes... Logforwarder uninstalled on other nodes at location /opt/protegrity/logforwarder. Check the status in /opt/protegrity/logs/logforwarder_setup.log ************************************************************************************ Welcome to the JcoreLite Setup Wizard. ************************************************************************************ Uninstalling JcoreLite .... JcoreLite uninstalled on lead node at location /opt/protegrity/bdp/lib. Performing uninstall on other nodes... JcoreLite uninstalled on other nodes at location /opt/protegrity/bdp/lib. Check the status in /opt/protegrity/logs/jcorelite_setup.log ************************************************************************************ Welcome to the Hive Protector Setup Wizard. ************************************************************************************ Uninstalling PepHive .... Hive Big Data Protector uninstalled on lead node at location /opt/protegrity/bdp/lib/ and /opt/protegrity/pephive/scripts/. Performing uninstall on other nodes... Hive Big Data Protector uninstalled on other nodes at location /opt/protegrity/bdp/lib/ and /opt/protegrity/pephive/scripts/. Check the status in /opt/protegrity/logs/pephive_setup.log ************************************************************************************ Welcome to the Pig Protector Setup Wizard. ************************************************************************************ Uninstalling PepPig .... Pig Big Data Protector uninstalled on lead node at location /opt/protegrity/bdp/lib/ and /opt/protegrity/peppig. Performing uninstall on other nodes... Pig Big Data Protector uninstalled on other nodes at location /opt/protegrity/bdp/lib/ and /opt/protegrity/peppig. Check the status in /opt/protegrity/logs/peppig_setup.log ************************************************************************************ Welcome to the MapReduce Protector Setup Wizard. ************************************************************************************ Uninstalling PepMapreduce .... Mapreduce Big Data Protector uninstalled on lead node at location /opt/protegrity/bdp/lib/. Performing uninstall on other nodes... Mapreduce Big Data Protector uninstalled on other nodes at location /opt/protegrity/bdp/lib/. Check the status in /opt/protegrity/logs/pepmapreduce_setup.log ************************************************************************************ Welcome to the Hbase Protector Setup Wizard. ************************************************************************************ Uninstalling PepHbase.... Hbase Big Data Protector uninstalled on lead node at location /opt/protegrity/bdp/lib/. Performing uninstall on other nodes... Hbase Big Data Protector uninstalled on other nodes at location /opt/protegrity/bdp/lib/. Check the status in /opt/protegrity/logs/pephbase_setup.log ************************************************************************************ Welcome to the Spark Protector Setup Wizard. ************************************************************************************ Spark Big Data Protector uninstalled on lead node at location /opt/protegrity/bdp/lib/ and /opt/protegrity/pepspark/scripts/. Performing uninstall on other nodes... Spark Big Data Protector uninstalled on other nodes at location /opt/protegrity/bdp/lib/ and /opt/protegrity/pepspark/scripts/. Check the status in /opt/protegrity/logs/pepspark_setup.log Clearing previous log files ... Uninstallation Status report generated in /opt/protegrity/cluster_utils/uninstallation_report.txt Removing Protegrity service user from all nodes... Uninstallation process done.
3.2.6.2.2 - From Specific Nodes
To uninstall Big Data Protector from selective nodes in the EMR cluster, use the node_uninstall.sh script from the <installation_directory>/cluster_utils/ directory.
Note: Ensure to uninstall the Big Data Protector from an account having full
sudoerprivileges.
Login to the Lead node.
Navigate to the
<installation_directory>/cluster_utils/directory.Create a new hosts file.
For example,
NEW_HOSTS_FILE. TheNEW_HOSTS_FILEfile contains the required nodes in the EMR cluster from where the Big Data Protector must be uninstalled.Add the nodes on the EMR cluster, from which the Big Data Protector needs to be uninstalled in the
NEW_HOSTS_FILE.To remove the Big Data Protector from the nodes that are listed in the new hosts file, run the following command:
./node_uninstall.sh -c NEW_HOSTS_FILEPress ENTER.
The prompt to enter the path of the Private Key file (.pem file) appears.Type the path of the private key file.
Press ENTER.
The Big Data Protector is uninstalled from the nodes in the EMR cluster, which are listed in the new hosts file.Check whether the nodes from which the Big Data Protector is uninstalled in Step 5 are removed from the
CLUSTERLIST_FILEfile.
3.2.6.3 - Uninstalling the Big Data Protector when Serverless is used
The instructions mentioned in the section are applicable only for the EMR Serverless cluster.
To uninstall the Big Data Protector:
- Log in to the AWS console.
- Navigate to the Elastic Container Repository page.
- Click the required repository.
- From the Images page, select the check box against the required image.
- Click Delete.
A prompt to confirm the action appears.
Warning: Before proceeding to delete the image, ensure there are no dependencies linked to the image.
- Click Delete.
3.3 - User Defined Functions and APIs
3.3.1 - MapReduce APIs
This section describes the MapReduce APIs available for protection and unprotection in the Big Data Protector to build secure Big Data applications.
Warning: The Protegrity MapReduce protector only supports bytes converted from the string data type.
If any other data type is directly converted to bytes and passed as input to the API that supports byte as input and provides byte as output, then data corruption might occur.
Caution: If you are using the Protect, or Unprotect, or Reprotect API which accepts byte as input and provides byte as output, then ensure that you pass the charset argument in APIs with the charset used to encode the string input data type.
For example, if the input String was encoded using the UTF-16LE charset, then ensure to pass the “UTF-16LE” charset argument in the ByteIn or ByteOut APIs.
Note: If you perform a security operation on a single data item, then an exception appears in case of any error. Similarly, if you perform a security operation on bulk data, then an exception appears in case of any error except for the error codes 22, 23, and 44. Instead of an error message, the UDFs return an error list for the individual items in the bulk data. For more information about the API error return codes, refer Return Codes for the Big Data Protector.
If you are using the Bulk APIs for the MapReduce protector, then the following two modes for error handling and return codes are available:
Default mode: Starting with the Big Data Protector, version 6.6.4, the Bulk APIs in the MapReduce protector will return the detailed error and return codes instead of
0forfailureand1forsuccess. In addition, the MapReduce jobs involving Bulk APIs will provide error codes instead of throwing exceptions.
For more information about the return codes for the Big Data Protector, refer .Backward compatibility mode: If you need to continue using the error handling capabilities provided with Big Data Protector, version 6.6.3 or lower, that is
0forfailureand1forsuccess, then you can set this mode.
Sample Code Usage
The MapReduce sample program, described in this section, is an example on how to use the Protegrity MapReduce protector APIs. The sample program utilizes the following two Java classes:
ProtectData.java– is the main class that calls the Mapper job.ProtectDataMapper.java– is the Mapper class that contains the logic to fetch the input data and store the protected content as output.
Main Job Class – ProtectData.java
ProtectData.java
package com.protegrity.samples.mapreduce;
import org.apache.hadoop.conf.Configuration;
import org.apache.hadoop.conf.Configured;
import org.apache.hadoop.fs.Path;
import org.apache.hadoop.io.NullWritable;
import org.apache.hadoop.io.Text;
import org.apache.hadoop.mapreduce.Job;
import org.apache.hadoop.mapreduce.lib.input.FileInputFormat;
import org.apache.hadoop.mapreduce.lib.input.TextInputFormat;
import org.apache.hadoop.mapreduce.lib.output.FileOutputFormat;
import org.apache.hadoop.mapreduce.lib.output.TextOutputFormat;
import org.apache.hadoop.util.Tool;
import org.apache.hadoop.util.ToolRunner;
public class ProtectData extends Configured implements Tool {
@Override
public int run(String[] args) throws Exception {
//Create the Job
Job job = new Job(getConf(), "ProtectData");
//Set the output key and value class
job.setOutputKeyClass(NullWritable.class);
job.setOutputValueClass(Text.class);
//Set the output key and value class
job.setMapOutputKeyClass(NullWritable.class);
job.setMapOutputValueClass(Text.class);
//Set the Mapper class which will perform the protect job
job.setMapperClass(ProtectDataMapper.class);
//Set number of reducer task
job.setNumReduceTasks(0);
//Set the input and output Format class
job.setInputFormatClass(TextInputFormat.class);
job.setOutputFormatClass(TextOutputFormat.class);
//Set the jar class
job.setJarByClass(ProtectData.class);
//Store the input path and print the input path
Path input = new Path(args[0]);
System.out.println(input.getName());
//Store the output path and print the output path
Path output = new Path(args[1]);
System.out.println(output.getName());
//Add input and set output path
FileInputFormat.addInputPath(job, new Path(args[0]));
FileOutputFormat.setOutputPath(job, new Path(args[1]));
//Call the job
return job.waitForCompletion(true) ? 0 : 1;
}
public static void main(String args[]) throws Exception {
System.exit(ToolRunner.run(new Configuration(), new ProtectData(), args));
}
}
Mapper Class – ProtectDataMapper.java
ProtectDataMapper.java
package com.protegrity.samples.mapreduce;
import java.io.IOException;
import java.util.StringTokenizer;
import org.apache.hadoop.io.NullWritable;
import org.apache.hadoop.io.Text;
import org.apache.hadoop.mapreduce.Mapper;
//Need to import the ptyMapReduceProtector class to use the Protegrity MapReduce protector
import com.protegrity.hadoop.mapreduce.ptyMapReduceProtector;
//Create the Mapper class i.e. ProtectDataMapper which will extends the Mapper Class
public class ProtectDataMapper extends Mapper<Object, Text, NullWritable, Text> {
//Declare the member variable for the ptyMapReduceProtector class
private ptyMapReduceProtector mapReduceProtector;
//Declare the Array of Data Elements which will be required to do the protection/unprotection
private final String[] data_element_names = { "TOK_NAME", "TOK_PHONE", "TOK_CREDIT_CARD", "TOK_AMOUNT" };
//Initialize the mapreduce protector i.e ptyMapReduceProtector in the default constructor
public ProtectDataMapper() throws Exception {
// Create the new object for the class ptyMapReduceProtector
mapReduceProtector = new ptyMapReduceProtector();
// Open the session using the method " openSession("0") "
int openSessionStatus = mapReduceProtector.openSession("0");
}
//Override the map method to parse the text and process it line by line
//Split the inputs separated by delimiter "," in the line
//Apply the protect/unprotect operation
//Create the output text which will have protected/unprotected outputs separated by delimiter ","
//Write the output text to the context
@Override
public void map(Object key, Text value, Context context) throws IOException,
InterruptedException
{
// Store the line in a variable strOneLine
String strOneLine = value.toString();
// Split the inputs separated by delimiter "," in the line
StringTokenizer st = new StringTokenizer(strOneLine, ",");
// Create the instance of StringBuilder to store the output
StringBuilder sb = new StringBuilder();
// Store the no of inputs in a line
int noOfTokens = st.countTokens();
if (mapReduceProtector != null) {
//Iterate through the string token and apply the protect/unprotect operation
for (int i = 0; st.hasMoreElements(); i++) {
String data = (String)st.nextElement();
if(i == 0) {
sb.append(new String(data));
} else {
//To protect data, call the function protect method with parameters data element and input data in bytes
//mapReduceProtector.protect( <Data Element> , <Data in bytes> )
//Output will be returned in bytes
//To unprotect data, call the function unprotect method with parameters data element and input data in bytes
//mapReduceProtector.unprotect( <Data Element> , <Data in bytes> )
//Output will be returned in bytes
byte[] bResult =
mapReduceProtector.protect(data_element_names[i-1], data.trim().getBytes());
if (bResult != null) {
// Store the result in string and append it to the output sb
sb.append(new String(bResult));
}
else {
// If output will be null, then store the result as "cryptoError" and append it to the output sb
sb.append("cryptoError");
}
}
if(i < noOfTokens -1 ) {
// Append delimiter "," at the end of the processed result
sb.append(",");
} } }
// write the output text to context
context.write(NullWritable.get(), new Text(sb.toString()));
}
//clean up the session and objects
@Override
protected void finalize() throws Throwable {
//Close the session
int closeSessionStatus = mapReduceProtector.closeSession();
mapReduceProtector = null;
super.finalize();
}
}
openSession( )
This method opens a new user session for protect and unprotect operations. It is a good practice to create one session per user thread.
Warning: This API is redundant and will be removed in the future releases.
Signature:
public synchronized int openSession(String parameter)
Parameters:
parameter: An internal API requirement that should be set to 0.
Result:
1: The function returns1if the session is successfully created.
Example:
ptyMapReduceProtector mapReduceProtector = new ptyMapReduceProtector();
int openSessionStatus = mapReduceProtector.openSession("0");
Exception and Error Codes:
The function throws the ptyMapRedProtectorException exception if the session creation fails.
closeSession ()
This function closes the current open user session. Every instance of ptyMapReduceProtector opens only one session, and a session ID is not required to close it.
Warning: This API is redundant and will be removed in the future releases.
Signature:
public synchronized int closeSession()
Parameters:
- None
Result:
The function returns:
1- if the session is successfully closed.0- if the session closure is a failure.
Example
ptyMapReduceProtector mapReduceProtector = new ptyMapReduceProtector();
int openSessionStatus = mapReduceProtector.openSession("0");
int closeSessionStatus = mapReduceProtector.closeSession();
Exception and Error Codes:
- None
getVersion()
The function returns the current version of the protector.
Signature:
public String getVersion()
Parameters:
- None
Result:
- The function returns the current version of the protector.
Example:
ptyMapReduceProtector mapReduceProtector = new ptyMapReduceProtector();
String version = mapReduceProtector.getVersion();
getVersionExtended()
The function returns the extended version information of the protector.
Signature:
public String getVersionExtended()
Parameters:
- None
Result:
The function returns a String in the following format:
"BDP: <1>; JcoreLite: <2>; CORE: <3>;"
where:
- 1 - Current version of Protector
- 2 - Jcorelite library version
- 3 - Core library version
Example:
ptyMapReduceProtector mapReduceProtector = new ptyMapReduceProtector();
String extendedVersion = mapReduceProtector.getVersionExtended();
checkAccess()
The function checks the access of the user for the specified data element(s).
Signature:
public boolean checkAccess(String dataElement, byte bAccessType, String... newDataElement)
Parameters:
dataElement: Specifies the name of the data element. (old data element when checking for reprotect access)bAccessType: Specifies the type of the access of the user for the data element(s).newDataElement: Specifies the name of the new data element when checking for reprotect access.The following are the different values for the bAccessType variable:
Access Value PROTECT 0x06 UNPROTECT 0x07 REPROTECT 0x08
Result:
- The function returns
trueif the user has access to the data element(s) for the specified operation. Else, the function returnsfalse.
Example:
ptyMapReduceProtector mapReduceProtector = new ptyMapReduceProtector();
byte bAccessType = 0x06;
boolean isAccess = mapReduceProtector.checkAccess("DE_PROTECT" , bAccessType );
checkAccess() with Permission enum argument
The function checks the access of the user for the specified data element(s).
Signature:
public boolean checkAccess(String dataElement, Permission permission, String... newDataElement)
Parameters:
dataElement: Specifies the name of the data element. (old data element when checking for reprotect access).permission: Specifies the type of the access using BDPProtector.Permission enum of the user for the data element(s).newDataElement: Specifies the name of the new data element when checking for reprotect access.The following are the different values for the permission variable:
Access Value PROTECT Permission.PROTECT UNPROTECT Permission.UNPROTECT REPROTECT Permission.REPROTECT
Result:
- The function returns
trueif the user has access to the data element(s) for the specified operation. Else, the function returnsfalse.
Example:
import com.protegrity.bdp.protector.BDPProtector.Permission;
String dataElement = "dataelement";
ptyMapReduceProtector protector = new ptyMapReduceProtector();
boolean accessProtectType = protector.checkAccess(dataElement, Permission.PROTECT);
boolean accessReprotectType = protector.checkAccess(dataElement, Permission.REPROTECT,dataElement);
boolean accessUnprotectType = protector.checkAccess(dataElement, Permission.UNPROTECT);
protect() - Byte array data
The function protects the data provided as a byte array. The type of protection applied is defined by the dataElement.
Note: For Date and Datetime type of data elements, the protect API returns an invalid input data error if the input value falls between the non-existent date range from 05-OCT-1582 to 14-OCT-1582 of the Gregorian Calendar.
For more information about the tokenization and de-tokenization of the cutover dates of the Proleptic Gregorian Calendar, refer the section Date and Datetime tokenization in Protection Method Reference.
Signature:
public byte[] protect(String dataElement, byte[] data, String... CharSet)
Parameters:
dataElement: Specifies the name of the data element to protect the data.data: Is the byte array of data to be protected.charset: Specifies the charset of the input data. The applicable charsets are UTF-8 (default), UTF-16LE, and UTF-16BE.
Warning: The Protegrity MapReduce protector only supports bytes converted from the string data type.
If any other data type is directly converted to bytes and passed as input to the API that supports byte as input and provides byte as output, then data corruption might occur.
Note: If you are using the Protect API which accepts byte as input and provides byte as output, then ensure that when unprotecting the data, the Unprotect API, with byte as input and byte as output is utilized. In addition, ensure that the byte data being provided as input to the Protect API has been converted from a string data type only.
Note: When the charset of input byte[] data is UTF-16LE or UTF-16BE, ensure to pass the charset argument.
Result:
- The function returns the byte array of protected data.
Exception:
- The function throws the
ptyMapRedProtectorExceptionin case of a failure to protect the data.
Example:
ptyMapReduceProtector mapReduceProtector = new ptyMapReduceProtector();
byte[] protectedResult = mapReduceProtector.protect("DE_PROTECT", "protegrity".getBytes(), "UTF-8");
Supported Protection Methods:
| Function Name | Tokenization | Encryption | FPE | No Encryption | Masking | Monitoring | HMAC |
| protect() - Byte array data |
|
| FPE (All) | Yes | Yes | Yes | Yes |
protect() - Int data
The function protects the data provided as an int. The type of protection applied is defined by the dataElement.
Signature:
public int protect(String dataElement, int data)
Parameters:
dataElement: Specifies the name of the data element to be protected.data: Specifies the data in theintegerformat to be protected.
Result:
- The function returns the protected
intdata.
Example:
ptyMapReduceProtector mapReduceProtector = new ptyMapReduceProtector();
int bResult = mapReduceProtector.protect("DE_PROTECT",1234);
Exception:
- The function throws the
ptyMapRedProtectorExceptionexception in case of failure to protect the data.
Supported Protection Methods:
| Function Name | Tokenization | Encryption | FPE | No Encryption | Masking | Monitoring |
|---|---|---|---|---|---|---|
| protect() - Int data | Integer (4 Bytes) | No | No | Yes | No | Yes |
protect() - Long data
This function protects the data provided as long. The type of protection applied is defined by dataElement.
Signature:
public long protect(String dataElement, long data)
Parameters:
dataElement: Specifies the name of the data element used to protect the data.data: Specifies the data in thelongformat to be protected.
Result:
- The function returns the protected data in the
longformat.
Example:
ptyMapReduceProtector mapReduceProtector = new ptyMapReduceProtector();
long bResult = mapReduceProtector.protect("DE_PROTECT",123412341234);
Exception:
- The function throws the
ptyMapRedProtectorExceptionexception in case of failure to protect the data.
Supported Protection Methods:
| Function Name | Tokenization | Encryption | FPE | No Encryption | Masking | Monitoring |
|---|---|---|---|---|---|---|
| protect() - Long data | Integer (8 Bytes) | No | No | Yes | No | Yes |
unprotect() - Byte array data
This function returns the data in its original form.
Note: For Date and Datetime type of data elements, the protect API returns an invalid input data error if the input value falls between the non-existent date range from 05-OCT-1582 to 14-OCT-1582 of the Gregorian Calendar.
For more information about the tokenization and de-tokenization of the cutover dates of the Proleptic Gregorian Calendar, refer the section Date and Datetime tokenization in Protection Method Reference.
Signature:
public byte[] unprotect(String dataElement, byte[] data, String... charset)
Parameters:
dataElement: Is the name of data element to be unprotected.data: Is anarrayof data to be unprotected.charset: Specifies the charset of the input data. The applicable charsets are UTF-8 (default), UTF-16LE, and UTF-16BE.
Note: When the charset of input byte[] data is UTF-16LE or UTF-16BE, ensure to pass the charset argument.
Note: The Protegrity MapReduce protector only supports bytes converted from the string data type.
If any other data type is directly converted to bytes and passed as input to the API that supports byte as input and provides byte as output, then data corruption might occur.
Result:
The function returns a byte array of unprotected data.
Example:
ptyMapReduceProtector mapReduceProtector = new ptyMapReduceProtector();
byte[] protectedResult = mapReduceProtector.protect( "DE_PROTECT_UNPROTECT", "protegrity".getBytes(), "UTF-8" );
byte[] unprotectedResult = mapReduceProtector.unprotect( "DE_PROTECT_UNPROTECT", protectedResult, "UTF-8" );
Exception:
- The function throws the
ptyMapRedProtectorExceptionexception in case of a failure to unprotect the data.
Supported Protection Methods:
| Function Name | Tokenization | Encryption | FPE | No Encryption | Masking | Monitoring |
| unprotect() - Byte array data |
|
| FPE (All) | Yes | Yes | Yes |
unprotect() - Int data
This function returns the data in its original form.
Signature:
public int unprotect(String dataElement, int data)
Parameters:
dataElement: Specifies the name of data element to unprotect the data.data: Is the data in theintformat to unprotect.
Result:
- The function returns the unprotected
intdata.
Example:
ptyMapReduceProtector mapReduceProtector = new ptyMapReduceProtector();
int protectedResult = mapReduceProtector.protect( "DE_PROTECT_UNPROTECT",1234);
int unprotectedResult = mapReduceProtector.unprotect("DE_PROTECT_UNPROTECT", protectedResult);
Exception:
The function throws the ptyMapRedProtectorException exception in case of a failure to unprotect the data.
Supported Protection Methods:
| Function Name | Tokenization | Encryption | FPE | No Encryption | Masking | Monitoring |
|---|---|---|---|---|---|---|
| unprotect() - Int data | Integer (4 Bytes) | No | No | Yes | No | Yes |
unprotect() - Long data
This function returns the data in its original form.
Signature:
public long unprotect(String dataElement, long data)
Parameters:
dataElement: Specifies the name of data element to unprotect the data.data: Is the data in thelongformat to unprotect.
Result:
- The function returns the unprotected
longdata.
Example:
ptyMapReduceProtector mapReduceProtector = new ptyMapReduceProtector();
long protectedResult = mapReduceProtector.protect( "DE_PROTECT_UNPROTECT", 123412341234 );
long unprotectedResult = mapReduceProtector.unprotect("DE_PROTECT_UNPROTECT", protectedResult );
Exception:
The function throws the ptyMapRedProtectorException exception in case of a failure to unprotect the data.
Supported Protection Methods:
| Function Name | Tokenization | Encryption | FPE | No Encryption | Masking | Monitoring |
|---|---|---|---|---|---|---|
| unprotect() - Long data | Integer (8 Bytes) | No | No | Yes | No | Yes |
bulkProtect() - Byte array data
This is used when a set of data needs to be protected in a bulk operation. It helps to improve performance.
Note: For Date and Datetime type of data elements, the protect API returns an invalid input data error if the input value falls between the non-existent date range from 05-OCT-1582 to 14-OCT-1582 of the Gregorian Calendar.
For more information about the tokenization and de-tokenization of the cutover dates of the Proleptic Gregorian Calendar, refer the section Date and Datetime tokenization in the Protection Method Reference.
Signature:
public byte[][] bulkProtect(String dataElement, List<Integer> errorIndex, byte[][] inputDataItems, String... charset)
Parameters:
dataElement: Specifies the name of data element used to protect the data.errorIndex: Is a list used to store all the error indices encountered while protecting each data entry ininputDataItems.inputDataItems: Is a two-dimensionalarrayto store the bulk data for protection.charset: Specifies the charset of the input data. The applicable charsets are UTF-8 (default), UTF-16LE, and UTF-16BE.
Result:
- The function returns a two-dimensional byte array of protected data.
- If the Backward Compatibility mode is not set, then the appropriate error code appears. For more information about the return codes, refer
PEP Log Return CodesandPEP Result Codes. - If the Backward Compatibility mode is set, then the Error Index includes one of the following values, per entry in the bulk protect operation:
- 1: The protect operation for the entry is successful.
- 0: The protect operation for the entry is unsuccessful.
For more information about the failed entry, view the logs available in the ESA forensics. - Any other value or garbage return value: The protect operation for the entry is unsuccessful. For more information about the failed entry, view the logs available in ESA forensics.
Example:
ptyMapReduceProtector mapReduceProtector = new ptyMapReduceProtector();
List<Integer> errorIndex = new ArrayList<Integer>();
byte[][] protectData = {"protegrity".getBytes(), "protegrity".getBytes(), "protegrity".getBytes(), "protegrity".getBytes()};
byte[][] protectedData = mapReduceProtector.bulkProtect( "DE_PROTECT", errorIndex, protectData, "UTF-8" );
System.out.print("Protected Data: ");
for(int i = 0; i < protectedData.length; i++)
{
//THIS WILL PRINT THE PROTECTED DATA
System.out.print(protectedData[i] == null ? null : new String(protectedData[i]));
if(i < protectedData.length - 1)
{
System.out.print(",");
}
}
System.out.println("");
System.out.print("Error Index: ");
for(int i = 0; i < errorIndex.size(); i++)
{
System.out.print(errorIndex.get( i ));
if(i < errorIndex.size() - 1)
{
System.out.print(",");
}
}
//ABOVE CODE WILL PRINT THE ERROR INDEXES
Exception:
The function throws the ptyMapRedProtectorException if an error is encountered during bulk protection of the data.
Supported Protection Methods:
| Function Name | Tokenization | Encryption | FPE | No Encryption | Masking | Monitoring | HMAC |
| bulkProtect() - Byte array data |
|
| FPE (All) | Yes | Yes | Yes | Yes |
bulkProtect() - Int data
The function is used when a set of data needs to be protected in a bulk operation. It helps to improve performance.
Signature:
public int[] bulkProtect(String dataElement, List <Integer> errorIndex, int[] inputDataItems)
Parameters:
dataElement: Specifies the name of data element to protect the data..errorIndex: Is a list used to store all the error indices encountered while protecting each data entry in input Data Items.inputDataItems: Is anarrayto store the bulkintdata for protection.
Result:
The function returns the
intarray of protected data.If the Backward Compatibility mode is not set, then the appropriate error code appears. For more information about the return codes, refer PEP Log Return Codes and PEP Result Codes.
If the Backward Compatibility mode is set, then the Error Index includes one of the following values, per entry in the bulk protect operation:
- 1: The protect operation for the entry is successful.
- 0: The protect operation for the entry is unsuccessful.
For more information about the failed entry, view the logs available in the ESA forensics. - Any other value or garbage return value: The protect operation for the entry is unsuccessful.
For more information about the failed entry, view the logs available in ESA forensics.
Example:
ptyMapReduceProtector mapReduceProtector = new ptyMapReduceProtector();
List<Integer> errorIndex = new ArrayList<Integer>();
int[] protectData = {1234, 5678, 9012, 3456};
int[] protectedData = mapReduceProtector.bulkProtect( "DE_PROTECT", errorIndex, protectData );
//CHECK THE ERROR INDEXES FOR ERRORS
System.out.print("Error Index: ");
for(int i = 0; i < errorIndex.size(); i++)
{
System.out.print(errorIndex.get( i ));
if(i < errorIndex.size() - 1)
{
System.out.print(",");
}
}
//ABOVE CODE WILL ONLY PRINT THE ERROR INDEXES
Exception:
The function throws the ptyMapRedProtectorException exception if an error is encountered during bulk protection of the data.
Supported Protection Methods:
| Function Name | Tokenization | Encryption | FPE | No Encryption | Masking | Monitoring |
|---|---|---|---|---|---|---|
| bulkProtect() - Int data | Integer (4 Bytes) | No | No | Yes | No | Yes |
bulkProtect() - Long data
The function is used when a set of data needs to be protected in a bulk operation. It helps to improve performance.
Signature:
public long[] bulkProtect(String dataElement, List <Integer> errorIndex, long[] inputDataItems)
Parameters:
dataElement: Specifies the name of data element to protect the data.errorIndex: Is a list used to store all the error indices encountered while protecting each data entry in input Data Items.inputDataItems: Is the array to store the data for protection.
Result:
- The function returns the long array of protected data.
- If the Backward Compatibility mode is not set, then the appropriate error code appears. For more information about the return codes, refer.
- If the Backward Compatibility mode is set, then the Error Index includes one of the following values, per entry in the bulk protect operation:
- 1: The protect operation for the entry is successful.
- 0: The protect operation for the entry is unsuccessful.
For more information about the failed entry, view the logs available in the ESA forensics. - Any other value or garbage return value: The protect operation for the entry is unsuccessful.
For more information about the failed entry, view the logs available in the ESA forensics.
Example:
ptyMapReduceProtector mapReduceProtector = new ptyMapReduceProtector();
List<Integer> errorIndex = new ArrayList<Integer>();
long[] protectData = {123412341234, 567856785678, 901290129012, 345634563456};
long[] protectedData = mapReduceProtector.bulkProtect( "DE_PROTECT", errorIndex, protectData );
//CHECK THE ERROR INDEXES FOR ERRORS
System.out.print("Error Index: ");
for(int i = 0; i < errorIndex.size(); i++)
{
System.out.print(errorIndex.get( i ));
if(i < errorIndex.size() - 1)
{
System.out.print(",");
}
}
//ABOVE CODE WILL ONLY PRINT THE ERROR INDEXES
Exception:
The function throws the ptyMapRedProtectorException exception if an error is encountered during bulk protection of the data.
Supported Protection Methods:
| Function Name | Tokenization | Encryption | FPE | No Encryption | Masking | Monitoring |
|---|---|---|---|---|---|---|
| bulkProtect() - Long data | Integer (8 Bytes) | No | No | Yes | No | Yes |
bulkUnprotect() - Byte array data
This method unprotects in bulk the inputDataItems with the required data element.
Note: For Date and Datetime type of data elements, the protect API returns an invalid input data error if the input value falls between the non-existent date range from 05-OCT-1582 to 14-OCT-1582 of the Gregorian Calendar. For more information about the tokenization and de-tokenization of the cutover dates of the Proleptic Gregorian Calendar, refer Date and Datetime tokenization.
Signature:
public byte[][] bulkUnprotect(String dataElement, List<Integer> errorIndex, byte[][] inputDataItems, String... charset)
Parameters:
dataElement: Specifies the name of data element to unprotect the data.errorIndex: Is a list of the error indices encountered while unprotecting each data entry ininputDataItems.inputDataItems: Is a two-dimensionalarrayto store the bulk data to unrpotect.charset: Specifies the charset of the input data. The applicable charsets are UTF-8 (default), UTF-16LE, and UTF-16BE.
Result:
The function returns the two-dimensional byte array of unprotected data.
- If the Backward Compatibility mode is not set, then the appropriate error code appears. For more information about the return codes, refer PEP Log Return Codes and PEP Result Codes.
- If the Backward Compatibility mode is set, then the Error Index includes one of the following values, per entry in the bulk unprotect operation:
- 1: The unprotect operation for the entry is successful.
- 0: The unprotect operation for the entry is unsuccessful.
For more information about the failed entry, view the logs available in ESA forensics. - Any other value or garbage return value: The unprotect operation for the entry is unsuccessful.
For more information about the failed entry, view the logs available in ESA forensics.
Example:
ptyMapReduceProtector mapReduceProtector = new ptyMapReduceProtector();
List<Integer> errorIndex = new ArrayList<Integer>();
byte[][] protectData = {"protegrity".getBytes(), "protegrity".getBytes(), "protegrity".getBytes(), "protegrity".getBytes()};
byte[][] protectedData = mapReduceProtector.bulkProtect( "DE_PROTECT", errorIndex, protectData, "UTF-8" );
//THIS WILL PRINT THE PROTECTED DATA
System.out.print("Protected Data: ");
for(int i = 0; i < protectedData.length; i++)
{
System.out.print(protectedData[i] == null ? null : new String(protectedData[i]));
if(i < protectedData.length - 1)
{
System.out.print(",");
}
}
//THIS WILL PRINT THE ERROR INDEX FOR PROTECT OPERATION
System.out.println("");
System.out.print("Error Index: ");
for(int i = 0; i < errorIndex.size(); i++)
{
System.out.print(errorIndex.get( i ));
if(i < errorIndex.size() - 1)
{
System.out.print(",");
}
}
byte[][] unprotectedData = mapReduceProtector.bulkUnprotect( "DE_PROTECT", errorIndex, protectedData, "UTF-8" );
//THIS WILL PRINT THE UNPROTECTED DATA
System.out.print("UnProtected Data: ");
for(int i = 0; i < unprotectedData.length; i++)
{
System.out.print(unprotectedData[i] == null ? null : new String(unprotectedData[i]));
if(i < unprotectedData.length - 1)
{
System.out.print(",");
}
}
//THIS WILL PRINT THE ERROR INDEX FOR UNPROTECT OPERATION
System.out.println("");
System.out.print("Error Index: ");
for(int i = 0; i < errorIndex.size(); i++)
{
System.out.print(errorIndex.get( i ));
if(i < errorIndex.size() - 1)
{
System.out.print(",");
}
}
Exception:
The function throws the ptyMapRedProtectorException exception for errors when unprotecting the data.
Supported Protection Methods:
| MapReduce APIs | Tokenization | Encryption | FPE | No Encryption | Masking | Monitoring |
| bulkUnprotect() - Byte array data |
|
| FPE (All) | Yes | Yes | Yes |
bulkUnprotect() - Int data
This method unprotects in bulk the inputDataItems with the required data element.
Signature:
public int[] bulkUnprotect(String dataElement, List<Integer> errorIndex, int[] inputDataItems)
Parameters:
dataElement: Specifies the name of data element to unprotect the data.errorIndex: Is a list of the error indices encountered while unprotecting each data entry ininputDataItems.inputDataItems: Is theintarray that contains the data to be unprotected.
Result:
- The function returns the unprotected
intarray data. - If the Backward Compatibility mode is not set, then the appropriate error code appears.
For more information about the return codes, refer PEP Log Return Codes and PEP Result Codes. - If the Backward Compatibility mode is set, then the Error Index includes one of the following values, per entry in the bulk unprotect operation:
- 1: The unprotect operation for the entry is successful.
- 0: The unprotect operation for the entry is unsuccessful.
For more information about the failed entry, view the logs available in ESA forensics. - Any other value or garbage return value: The unprotect operation for the entry is unsuccessful. For more information about the failed entry, view the logs available in ESA forensics.
Example:
ptyMapReduceProtector mapReduceProtector = new ptyMapReduceProtector();
List<Integer> errorIndex = new ArrayList<Integer>();
int[] protectData = {1234, 5678,9012,3456 };
int[] protectedData = mapReduceProtector.bulkProtect( "DE_PROTECT", errorIndex, protectData );
//THIS WILL PRINT THE ERROR INDEX FOR PROTECT OPERATION
System.out.println("");
System.out.print("Error Index: ");
for(int i = 0; i < errorIndex.size(); i++)
{
System.out.print(errorIndex.get( i ));
if(i < errorIndex.size() - 1)
{
System.out.print(",");
}
}
int[] unprotectedData = mapReduceProtector.bulkUnprotect( "DE_PROTECT", errorIndex, protectedData );
//THIS WILL PRINT THE ERROR INDEX FOR UNPROTECT OPERATION
System.out.println("");
System.out.print("Error Index: ");
for(int i = 0; i < errorIndex.size(); i++)
{
System.out.print(errorIndex.get( i ));
if(i < errorIndex.size() - 1)
{
System.out.print(",");
}
}
Exception:
The function throws the ptyMapRedProtectorException exception for errors while unprotecting the data.
Supported Protection Methods:
| Function Name | Tokenization | Encryption | FPE | No Encryption | Masking | Monitoring |
|---|---|---|---|---|---|---|
| bulkUnprotect() - Int data | Integer (4 Bytes) | No | No | Yes | No | Yes |
bulkUnprotect() - Long data
This method unprotects in bulk the inputDataItems array with the required data element.
Signature:
public long[] bulkUnprotect(String dataElement, List<Integer> errorIndex, long[] inputDataItems)
Parameters:
dataElement: Specifies the name of data element to unprotect the data.errorIndex: Is a list of the error indices encountered while unprotecting each data entry ininputDataItemsinputDataItems: Is the longarraythat contains the data to unprotect.
Result:
- The function returns the unprotected
longarray data. - If the Backward Compatibility mode is not set, then the appropriate error code appears. For more information about the return codes, refer PEP Log Return Codes and PEP Result Codes.
- If the Backward Compatibility mode is set, then the Error Index includes one of the following values, per entry in the bulk unprotect operation:
- 1: The unprotect operation for the entry is successful.
- 0: The unprotect operation for the entry is unsuccessful.
For more information about the failed entry, view the logs available in the ESA forensics. - Any other value or garbage return value: The unprotect operation for the entry is unsuccessful. For more information about the failed entry, view the logs available in ESA forensics.
Example:
ptyMapReduceProtector mapReduceProtector = new ptyMapReduceProtector();
List<Integer> errorIndex = new ArrayList<Integer>();
long[] protectData = { 123412341234, 567856785678, 901290129012, 345634563456 };
long[] protectedData = mapReduceProtector.bulkProtect( "DE_PROTECT", errorIndex, protectData );
//THIS WILL PRINT THE ERROR INDEX FOR PROTECT OPERATION
System.out.println("");
System.out.print("Error Index: ");
for(int i = 0; i < errorIndex.size(); i++)
{
System.out.print(errorIndex.get( i ));
if(i < errorIndex.size() - 1)
{
System.out.print(",");
}
}
long[] unprotectedData = mapReduceProtector.bulkUnprotect( "DE_PROTECT", errorIndex, protectedData );
//THIS WILL PRINT THE ERROR INDEX FOR UNPROTECT OPERATION
System.out.println("");
System.out.print("Error Index: ");
for(int i = 0; i < errorIndex.size(); i++)
{
System.out.print(errorIndex.get( i ));
if(i < errorIndex.size() - 1)
{
System.out.print(",");
}
}
Exception:
- The function throws the
ptyMapRedProtectorExceptionfor errors when unprotecting data.
Supported Protection Methods:
| Function Name | Tokenization | Encryption | FPE | No Encryption | Masking | Monitoring |
|---|---|---|---|---|---|---|
| bulkUnprotect() - Long data | Integer (8 Bytes) | No | No | Yes | No | Yes |
reprotect() - Byte array data
The function is used to reprotect the data that is protected earlier with a separate data element.
Signature:
public byte[] reprotect(String oldDataElement, String newDataElement, byte[] data, String... charset)
Parameters:
oldDataElement: Specifies the name of data element to protect the data earlier.newDataElement: Specifies the name of new data element to protect the data.data: Is an array that contains the data to be protected.charset: Specifies the charset of the input data. The applicable charsets are UTF-8 (default), UTF-16LE, and UTF-16BE.
Note: If you are using Format Preserving Encryption (FPE) and Byte APIs, then ensure that the encoding, which is used to convert the string input data to bytes, matches the encoding that is selected in the Plaintext Encoding drop-down for the required FPE data element.
Result:
- The function returns the byte array of reprotected data.
Example:
ptyMapReduceProtector mapReduceProtector = new ptyMapReduceProtector();
byte[] protectedResult = mapReduceProtector.protect( "DE_PROTECT_1", "protegrity".getBytes(), "UTF-8" );
byte[] reprotectedResult = mapReduceProtector.reprotect( "DE_PROTECT_1", "DE_PROTECT_2", protectedResult, "UTF-8" );
Exception:
- The function throws the
ptyMapRedProtectorExceptionfor errors while reprotecting the data.
Supported Protection Methods:
| Function Name | Tokenization | Encryption | FPE | No Encryption | Masking | Monitoring |
| reprotect() - Byte array data |
|
| FPE (All) | Yes | Yes | Yes |
reprotect() - Int data
The function is used to protect the data again, that is protected earlier, with a new data element.
Signature:
public int reprotect(String oldDataElement, String newDataElement, int data)
Parameters:
oldDataElement: Specifies the name of data element to protect the data earlier.newDataElement: Specifies the name of new data element to protect the data.data: Is an array that contains the data to be protected.
Result:
- The function returns the reprotected int data.
Example:
ptyMapReduceProtector mapReduceProtector = new ptyMapReduceProtector();
int protectedResult = mapReduceProtector.protect( "DE_PROTECT_1", 1234 );
int reprotectedResult = mapReduceProtector.reprotect( "DE_PROTECT_1", "DE_PROTECT_2", protectedResult );
Exception:
- The function throws the
ptyMapRedProtectorExceptionfor errors while reprotecting the data.
Supported Protection Methods:
| Function Name | Tokenization | Encryption | FPE | No Encryption | Masking | Monitoring |
|---|---|---|---|---|---|---|
| reprotect() - Int data | Integer (4 Bytes) | No | No | Yes | No | Yes |
reprotect() - Long data
The function is used to re-protect the data that has been protected earlier with a separate data element.
Signature:
public long reprotect(String oldDataElement, String newDataElement, long data)
Parameters:
oldDataElement: Specifies the name of data element to protect the data earlier.newDataElement: Specifies the name of new data element to protect the data.data: Is an array that contains the data to be protected.
Result:
- The function returns the reprotected long data.
Example:
ptyMapReduceProtector mapReduceProtector = new ptyMapReduceProtector();
long protectedResult = mapReduceProtector.protect( "DE_PROTECT_1", 123412341234 );
long reprotectedResult = mapReduceProtector.reprotect( "DE_PROTECT_1", "DE_PROTECT_2", protectedResult );
Exception:
- The function throws the
ptyMapRedProtectorExceptionfor errors while reprotecting the data.
Supported Protection Methods:
| Function Name | Tokenization | Encryption | FPE | No Encryption | Masking | Monitoring |
|---|---|---|---|---|---|---|
| reprotect() - Long data | Integer (8 Bytes) | No | No | Yes | No | Yes |
hmac()
Warning: It is recommended to use the HMAC data element with the protect() and bulkProtect() Byte APIs for hashing byte array data, instead of using the hmac() API.
This method performs data hashing using the HMAC operation on a single data item with a data element, which is associated with hmac. It returns hmac value of the given data with the given data element.
Warning: This function is marked for deprecation and will be removed from the future releases.
Signature:
public byte[] hmac(String dataElement, byte[] data)
Parameters:
String dataElement: Specifies the name of the data element to hash the data.byte[] data: Is an array that contains the data to be hashed.
Result:
- The function returns the byte array of HMAC data.
Example:
ptyMapReduceProtector mapReduceProtector = new ptyMapReduceProtector();
byte[] protectedResult = mapReduceProtector.hmac( "HMAC_DE", "protegrity".getBytes() );
Exception:
- The function throws the
ptyMapRedProtectorExceptionif an error occurs while hashing the data.
Supported Protection Methods:
| Function Name | Tokenization | Encryption | FPE | No Encryption | Masking | Monitoring |
|---|---|---|---|---|---|---|
| hmac() | HMAC | No | No | Yes | No | Yes |
3.3.2 - Hive UDFs
Warning: If you are using Ranger or Sentry, then ensure that your policy provides create access permissions to the required UDFs.
This section lists the Hive UDFs available for protection and unprotection in the Big Data Protector.
ptyGetVersion()
This UDF returns the current version of the protector.
ptyGetVersion()
Parameters:
- None
Result:
- The UDF returns the current version of the protector.
Example:
create temporary function ptyGetVersion AS 'com.protegrity.hive.udf.ptyGetVersion';
select ptyGetVersion();
ptyGetVersionExtended()
This UDF returns the extended version information of the protector.
ptyGetVersionExtended();
Parameters:
- None
Result:
The UDF returns a String in the following format:
BDP: <1>; JcoreLite: <2>; CORE: <3>;
where:
- is the current version of the Protector
- is the Jcorelite library version
- is the Core library version
Example:
create temporary function ptyGetVersionExtended AS 'com.protegrity.hive.udf.ptyGetVersionExtended';
select ptyGetVersionExtended();
ptyWhoAmI()
This UDF returns the current logged in user.
ptyWhoAmI()
Parameters:
- None
Result:
- The UDF returns the current logged in user.
Example:
create temporary function ptyWhoAmI AS 'com.protegrity.hive.udf.ptyWhoAmI';
select ptyWhoAmI();
ptyProtectStr()
This UDF protects the string values.
Note: For Date and Datetime type of data elements, the protect API returns an invalid input data error if the input value falls between the non-existent date range from 05-OCT-1582 to 14-OCT-1582 of the Gregorian Calendar. For more information about the tokenization and de-tokenization of the cutover dates of the Proleptic Gregorian Calendar, refer Date and Datetime tokenization.
ptyProtectStr(String input, String dataElement)
Parameters:
String input: Specifies theStringvalue to protect.String dataElement: Is the name of the data element to protect the string value.
Result:
- The UDF returns the protected
stringvalue.
Example:
create temporary function ptyProtectStr AS 'com.protegrity.hive.udf.ptyProtectStr';
drop table if exists test_data_table;
drop table if exists temp_table;
create table temp_table(val string) row format delimited fields terminated by ',' stored as textfile;
create table test_data_table(val string) row format delimited fields terminated by ','stored as textfile;
LOAD DATA LOCAL INPATH 'test_data.csv' OVERWRITE INTO TABLE temp_table;
insert overwrite table test_data_table select (val) from temp_table;
select ptyProtectStr(val, 'Token_alpha') from test_data_table;
Supported Protection Methods:
| Function Name | Tokenization | Encryption | FPE | No Encryption | Masking | Monitoring |
| ptyProtectStr() |
| No | Yes | Yes | Yes | Yes |
ptyUnprotectStr()
The UDF unprotects the protected string value.
Note: For Date and Datetime type of data elements, the protect API returns an invalid input data error if the input value falls between the non-existent date range from 05-OCT-1582 to 14-OCT-1582 of the Gregorian Calendar. For more information about the tokenization and de-tokenization of the cutover dates of the Proleptic Gregorian Calendar, refer Date and Datetime tokenization.
ptyUnprotectStr(String input, String dataElement)
Parameters:
String input: Specifies the protectedStringvalue to uprotect.String dataElement: Is the name of the data element to unprotect the string value.
Result:
- The UDF returns the unprotected
stringvalue.
Example:
create temporary function ptyProtectStr AS 'com.protegrity.hive.udf.ptyProtectStr';
create temporary function ptyUnprotectStr AS 'com.protegrity.hive.udf.ptyUnprotectStr';
drop table if exists test_data_table;
drop table if exists temp_table;
drop table if exists protected_data_table;
create table temp_table(val string) row format delimited fields terminated by ',' stored as textfile;
create table test_data_table(val string) row format delimited fields terminated by ',' stored as textfile;
create table protected_data_table(protectedValue string) row format delimited fields terminated by ',' stored as textfile;
LOAD DATA LOCAL INPATH 'test_data.csv' OVERWRITE INTO TABLE temp_table;
insert overwrite table test_data_table select (val) from temp_table;
insert overwrite table protected_data_table select ptyProtectStr(val, 'Token_alpha') from test_data_table;
select ptyUnprotectStr(protectedValue, 'Token_alpha') from protected_data_table;
Supported Protection Methods:
| Function Name | Tokenization | Encryption | FPE | No Encryption | Masking | Monitoring |
| ptyUnprotectStr() |
| No | Yes | Yes | Yes | Yes |
ptyReprotect() - String Data
The UDF reprotects string format protected data, which was earlier protected using the ptyProtectStr UDF, with a different data element.
ptyReprotect(String input, String oldDataElement, String newDataElement)
Parameters:
String input: Specifies theStringvalue to reprotect.String oldDataElement: Specifies the name of the data element used to protect the data earlier.String newDataElement: Specifies the name of the new data element to reprotect the data.
Result:
- The UDF returns the protected string value.
Example:
create temporary function ptyProtectStr AS 'com.protegrity.hive.udf.ptyProtectStr';
create temporary function ptyReprotect AS 'com.protegrity.hive.udf.ptyReprotect';
drop table if exists test_data_table;
drop table if exists temp_table;
create table temp_table(val string) row format delimited fields terminated by ',' stored as textfile;
create table test_data_table(val string) row format delimited fields terminated by ',' stored as textfile;
create table test_protected_data_table(val string) row format delimited fields terminated by ',' stored as textfile;
LOAD DATA LOCAL INPATH 'test_data.csv' OVERWRITE INTO TABLE temp_table;
insert overwrite table test_data_table select (val) from temp_table;
insert overwrite table test_protected_data_table select ptyProtectStr(val,'Token_alpha') from test_data_table;
create table test_reprotected_data_table(val string) row format delimited fields terminated by ',' stored as textfile;
insert overwrite table test_reprotected_data_table select ptyReprotect(val, 'Token_alpha', 'new_Token_alpha') from test_protected_data_table;
Supported Protection Methods:
| Function Name | Tokenization | Encryption | FPE | No Encryption | Masking | Monitoring |
| ptyReprotect() |
| No | Yes | Yes | Yes | Yes |
ptyProtectUnicode()
The UDF protects string (Unicode) values.
Warning: This UDF should be used only if you want to tokenize the Unicode data in Hive, and migrate the tokenized data from Hive to a Teradata database and detokenize the data using the Protegrity Database Protector. Ensure that you use this UDF with a Unicode tokenization data element only.
Signature:
ptyProtectUnicode(String input, String dataElement)
Parameters:
String input: Specifies thestring (Unicode)value to protect.String dataElement: Specifies the name of the data element to protect thestring (Unicode)value.
Result:
- The UDF returns the protected
stringvalue.
Example:
create temporary function ptyProtectUnicode AS 'com.protegrity.hive.udf.ptyProtectUnicode';
drop table if exists temp_table;
create table temp_table(val string) row format delimited fields terminated by ',' stored as textfile;
LOAD DATA LOCAL INPATH 'test_data.csv' OVERWRITE INTO TABLE temp_table;
select ptyProtectUnicode(val, 'Token_unicode') from temp_table;
Supported Protection Methods:
| Function Name | Tokenization | Encryption | FPE | No Encryption | Masking | Monitoring |
|---|---|---|---|---|---|---|
| ptyProtectUnicode() | - Unicode (Legacy) - Unicode Base64 | No | No | Yes | No | Yes |
ptyUnprotectUnicode()
The UDF unprotects the protected string (Unicode) value.
ptyUnprotectUnicode(String input, String dataElement)
Parameters:
String input: Specifies thestring (Unicode)value to unprotect.String dataElement: Specifies the name of the data element to unprotect thestring (Unicode)value.
Warning: This UDF should be used only if you want to tokenize the Unicode data in Teradata using the Protegrity Database Protector, and migrate the tokenized data from a Teradata database to Hive and detokenize the data using the Protegrity Big Data Protector for Hive. Ensure that you use this UDF with a Unicode tokenization data element only.
Result:
- The UDF returns the unprotected
string (Unicode)value.
Example:
create temporary function ptyProtectUnicode AS 'com.protegrity.hive.udf.ptyProtectUnicode';
create temporary function ptyUnprotectUnicode AS 'com.protegrity.hive.udf.ptyUnprotectUnicode';
drop table if exists temp_table;
drop table if exists protected_data_table;
create table temp_table(val string) row format delimited fields terminated by ',' stored as textfile;
create table protected_data_table(protectedValue string) row format delimited fields terminated by ',' stored as textfile;
LOAD DATA LOCAL INPATH 'test_data.csv' OVERWRITE INTO TABLE temp_table;
insert overwrite table protected_data_table select ptyProtectUnicode(val, 'Token_unicode') from temp_table;
select ptyUnprotectUnicode(protectedValue, 'Token_unicode') from protected_data_table;
Supported Protection Methods:
| Function Name | Tokenization | Encryption | FPE | No Encryption | Masking | Monitoring |
|---|---|---|---|---|---|---|
| ptyUnprotectUnicode() | - Unicode (Legacy) - Unicode Base64 | No | No | Yes | No | Yes |
ptyReprotectUnicode()
The UDF reprotects the string format protected data, which was protected earlier using the ptyProtectUnicode UDF, with a different data element.
Warning: This UDF should be used only if you want to tokenize the Unicode data in Hive, and migrate the tokenized data from Hive to a Teradata database and detokenize the data using the Protegrity Database Protector. Ensure that you use this UDF with a Unicode tokenization data element only.
Signature:
ptyReprotectUnicode(String input, String oldDataElement, String newDataElement)
Parameters:
String input: Specifies theString(Unicode)value to reprotect.String oldDataElement: Specifies the name of the data element used to protect the data earlier.String newDataElement: Specifies the name of the new data element to reprotect the data.
Result:
- The UDF returns the protected
stringvalue.
Example:
create temporary function ptyProtectUnicode AS
'com.protegrity.hive.udf.ptyProtectUnicode';
create temporary function ptyReprotectUnicode AS
'com.protegrity.hive.udf.ptyReprotectUnicode';
drop table if exists test_data_table;
drop table if exists temp_table;
create table temp_table(val string) row format delimited fields terminated by ',' stored as textfile;
create table test_data_table(val string) row format delimited fields terminated by ','
stored as textfile;
create table test_protected_data_table(val string) row format delimited fields terminated by ',' stored as textfile;
LOAD DATA LOCAL INPATH 'test_data.csv' OVERWRITE INTO TABLE temp_table;
insert overwrite table test_data_table select cast(val) from temp_table;
insert overwrite table test_protected_data_table select ptyProtectUnicode(val, 'Unicode_Token') from test_data_table;
create table test_reprotected_data_table(val string) row format delimited fields terminated by ',' stored as textfile;
insert overwrite table test_reprotected_data_table select ptyReprotectUnicode(val, 'Unicode_Token','new_Unicode_Token') from test_data_table;
Supported Protection Methods:
| Function Name | Tokenization | Encryption | FPE | No Encryption | Masking | Monitoring |
|---|---|---|---|---|---|---|
| ptyReprotectUnicode() | - Unicode (Legacy) - Unicode Base64 | No | No | Yes | No | Yes |
ptyProtectShort()
The UDF protects the SmallInt (Short) values.
Signature:
ptyProtectShort(SmallInt input, String dataElement)
Parameters:
SmallInt input: Specifies theSmallIntvalue to protect.String dataElement: Specifies the name of the data element to protect theSmallIntvalue.
Result:
- The UDF returns the protected
SmallIntvalue.
Example:
create temporary function ptyProtectShort AS 'com.protegrity.hive.udf.ptyProtectShort';
drop table if exists test_data_table;
drop table if exists temp_table;
create table temp_table(val string) row format delimited fields terminated by ',' stored as textfile;
create table test_data_table(val smallint) row format delimited fields terminated by ',' stored as textfile;
LOAD DATA LOCAL INPATH 'test_data.csv' OVERWRITE INTO TABLE temp_table;
insert overwrite table test_data_table select cast(val) as smallint from temp_table;
select ptyProtectShort(val, 'Token_Integer_2') from test_data_table;
Supported Protection Methods:
| Function Name | Tokenization | Encryption | FPE | No Encryption | Masking | Monitoring |
|---|---|---|---|---|---|---|
| ptyProtectShort() | Integer 2 Bytes | No | No | Yes | No | Yes |
ptyUnprotectShort()
The UDF unprotects the protected SmallInt (Short) values.
Signature:
ptyUnprotectShort(SmallInt input, String dataElement)
Parameters:
SmallInt input: Specifies the protectedSmallIntvalue to unprotect.String dataElement: Specifies the name of the data element to unprotect theSmallIntvalue.
Result:
- The UDF returns the unprotected
SmallIntvalue.
Example:
create temporary function ptyProtectShort AS 'com.protegrity.hive.udf.ptyProtectShort';
create temporary function ptyUnprotectShort AS 'com.protegrity.hive.udf.ptyUnprotectShort';
drop table if exists test_data_table;
drop table if exists temp_table;
drop table if exists protected_data_table;
create table temp_table(val string) row format delimited fields terminated by ',' stored as textfile;
create table test_data_table(val smallint) row format delimited fields terminated by ',' stored as textfile;
create table protected_data_table(protectedValue smallint) row format delimited fields terminated by ',' stored as textfile;
LOAD DATA LOCAL INPATH 'test_data.csv' OVERWRITE INTO TABLE temp_table;
insert overwrite table test_data_table select cast(val) as smallint from temp_table;
insert overwrite table protected_data_table select ptyProtectShort(val, 'Token_Integer_2') from test_data_table;
select ptyUnprotectShort(protectedValue, 'Token_Integer_2') from protected_data_table;
Supported Protection Methods:
| Function Name | Tokenization | Encryption | FPE | No Encryption | Masking | Monitoring |
|---|---|---|---|---|---|---|
| ptyUnprotectShort() | Integer 2 Bytes | No | No | Yes | No | Yes |
ptyReprotect() - Short Data
The UDF reprotects the protected SmallInt (Short) data with a different data element.
Signature:
ptyReprotect(SmallInt input, String oldDataElement, String newDataElement)
Parameters:
SmallInt input: Specifies the SmallInt value to reprotect.String oldDataElement: Specifies the nName of the data element used to protect the data earlier.String newDataElement: Specifies the name of the new data element used to reprotect the data.
Result
The UDF returns the reprotected SmallInt value.
Example
create temporary function ptyProtectShort AS 'com.protegrity.hive.udf.ptyProtectShort';
create temporary function ptyReprotect AS 'com.protegrity.hive.udf.ptyReprotect';
drop table if exists test_data_table;
drop table if exists temp_table;
create table temp_table(val string) row format delimited fields terminated by ',' stored as textfile;
create table test_data_table(val smallint) row format delimited fields terminated by ',' stored as textfile;
create table test_protected_data_table(val smallint) row format delimited fields terminated by ',' stored as textfile;
LOAD DATA LOCAL INPATH 'test_data.csv' OVERWRITE INTO TABLE temp_table;
insert overwrite table test_data_table select cast(val) as smallint from temp_table;
insert overwrite table test_protected_data_table select ptyProtectShort(val, ' Token_Integer_2') from test_data_table;
create table test_reprotected_data_table(val smallint) row format delimited fields terminated by ',' stored as textfile;
insert overwrite table test_reprotected_data_table select ptyReprotect(val, 'Token_Integer_2', 'new_Token_Integer_2') from test_protected_data_table;
Supported Protection Methods:
| Function Name | Tokenization | Encryption | FPE | No Encryption | Masking | Monitoring |
|---|---|---|---|---|---|---|
| ptyReprotect() | Integer 2 Bytes | No | No | Yes | No | Yes |
ptyProtectInt()
The UDF protects integer values.
Signature:
ptyProtectInt(int input, String dataElement)
Parameters:
int input: Specifies theIntegervalue to protect.String dataElement: Specifies the name of the data element to protect theintegervalue.
Result:
- The UDF returns the protected
integervalue.
Example:
create temporary function ptyProtectInt AS 'com.protegrity.hive.udf.ptyProtectInt';
drop table if exists test_data_table;
drop table if exists temp_table;
create table temp_table(val string) row format delimited fields terminated by ',' stored as textfile;
create table test_data_table(val int) row format delimited fields terminated by ',' stored as textfile;
LOAD DATA LOCAL INPATH 'test_data.csv' OVERWRITE INTO TABLE temp_table;
insert overwrite table test_data_table select cast(val) as int from temp_table;
select ptyProtectInt(val, 'Token_numeric') from test_data_table;
Supported Protection Methods:
| Function Name | Tokenization | Encryption | FPE | No Encryption | Masking | Monitoring |
|---|---|---|---|---|---|---|
| ptyProtectInt() | Integer 4 Bytes | No | No | Yes | No | Yes |
ptyUnprotectInt()
The UDF unprotects the protected integer value.
Signature:
ptyUnprotectInt(int input, String dataElement)
Parameters:
int input: Specifies theIntegervalue to unprotect.String dataElement: Specifies the name of the data element to uprotect theintegervalue.
Result:
- The UDF returns the unprotected
integervalue.
Example:
create temporary function ptyProtectInt AS 'com.protegrity.hive.udf.ptyProtectInt';
create temporary function ptyUnprotectInt AS 'com.protegrity.hive.udf.ptyUnprotectInt';
drop table if exists test_data_table;
drop table if exists temp_table;
drop table if exists protected_data_table;
create table temp_table(val string) row format delimited fields terminated by ',' stored as textfile;
create table test_data_table(val int) row format delimited fields terminated by ',' stored as textfile;
create table protected_data_table(protectedValue int) row format delimited fields terminated by ',' stored as textfile;
LOAD DATA LOCAL INPATH 'test_data.csv' OVERWRITE INTO TABLE temp_table;
insert overwrite table test_data_table select cast(val) as int from temp_table;
insert overwrite table protected_data_table select ptyProtectInt(val, 'Token_numeric') from test_data_table;
select ptyUnprotectInt(protectedValue, 'Token_numeric') from protected_data_table;
Supported Protection Methods:
| Function Name | Tokenization | Encryption | FPE | No Encryption | Masking | Monitoring |
|---|---|---|---|---|---|---|
| ptyUnprotectInt() | Integer 4 Bytes | No | No | Yes | No | Yes |
ptyReprotect() - Int Data
The UDF reprotects the protected integer data with a different data element.
Signature:
ptyReprotect(int input, String oldDataElement, String newDataElement)
Parameters:
int input: Specifies theIntegervalue to unprotect.String olddataElement: Specifies the name of the data element used to protect theintegervalue earlier.String newdataElement: Specifies the name of the new data element to reprotect theintegervalue.
Result:
- The UDF returns the protected
integervalue.
Example:
create temporary function ptyProtectInt AS 'com.protegrity.hive.udf.ptyProtectInt';
create temporary function ptyReprotect AS 'com.protegrity.hive.udf.ptyReprotect';
drop table if exists test_data_table;
drop table if exists temp_table;
create table temp_table(val int) row format delimited fields terminated by ',' stored as textfile;
create table test_data_table(val int) row format delimited fields terminated by ',' stored as textfile;
create table test_protected_data_table(val int) row format delimited fields terminated by ',' stored as textfile;
LOAD DATA LOCAL INPATH 'test_data.csv' OVERWRITE INTO TABLE temp_table;
insert overwrite table test_data_table select cast(val) as int from temp_table;
insert overwrite table test_protected_data_table select ptyProtectInt(val, 'Token_Integer') from test_data_table;
create table test_reprotected_data_table(val int) row format delimited fields terminated by ',' stored as textfile;
insert overwrite table test_reprotected_data_table select ptyReprotect(val, 'Token_Integer', 'new_Token_Integer') from test_protected_data_table;
Supported Protection Methods:
| Function Name | Tokenization | Encryption | FPE | No Encryption | Masking | Monitoring |
|---|---|---|---|---|---|---|
| ptyReprotect() | Integer 4 Bytes | No | No | Yes | No | Yes |
ptyProtectBigInt()
The UDF protects the BigInt value.
Signature:
ptyProtectBigInt(BigInt input, String dataElement)
Parameters:
BigInt input: Specifies theBigIntvalue to protect.String dataElement: Specifies the name of the data element to protect theBigIntvalue.
Result:
- The UDF returns the protected
BigIntvalue.
Example:
create temporary function ptyProtectBigInt as 'com.protegrity.hive.udf.ptyProtectBigInt';
drop table if exists test_data_table;
drop table if exists temp_table;
create table temp_table(val bigint) row format delimited fields terminated by ',' stored as textfile;
create table test_data_table(val bigint) row format delimited fields terminated by ',' stored as textfile;
load data local inpath 'test_data.csv' overwrite into table temp_table;
insert overwrite table test_data_table select cast(val) as bigint from temp_table;
select ptyProtectBigInt(val, 'BIGINT_DE') from test_data_table;
Supported Protection Methods:
| Function Name | Tokenization | Encryption | FPE | No Encryption | Masking | Monitoring |
|---|---|---|---|---|---|---|
| ptyProtectBigInt() | Integer 8 Bytes | No | No | Yes | No | Yes |
ptyUnprotectBigInt()
The UDF unprotects the protected BigInt value.
Signature:
ptyUnprotectBigInt(BigInt input, String dataElement)
Parameters:
BigInt input: Specifies the protectedBigIntvalue to unprotect.String dataElement: Specifies the name of the data element to unprotect theBigIntvalue.
Result:
- The UDF returns the unprotected
BigIntegervalue.
Example:
create temporary function ptyProtectBigInt as 'com.protegrity.hive.udf.ptyProtectBigInt';
create temporary function ptyUnprotectBigInt as 'com.protegrity.hive.udf.ptyUnprotectBigInt';
drop table if exists test_data_table;
drop table if exists temp_table;
drop table if exists protected_data_table;
create table temp_table(val bigint) row format delimited fields terminated by ',' stored as textfile;
create table test_data_table(val bigint) row format delimited fields terminated by ',' stored as textfile;
create table protected_data_table(protectedValue bigint) row format delimited fields terminated by ',' stored as textfile;
load data local inpath 'test_data.csv' overwrite into table temp_table;
insert overwrite table test_data_table select cast(val) as bigint from temp_table;
insert overwrite table protected_data_table select ptyProtectBigInt(val, 'BIGINT_DE') from test_data_table;
select ptyUnprotectBigInt(protectedValue, 'BIGINT_DE') from protected_data_table;
Supported Protection Methods:
| Function Name | Tokenization | Encryption | FPE | No Encryption | Masking | Monitoring |
|---|---|---|---|---|---|---|
| ptyUnprotectBigInt() | Integer 8 Bytes | No | No | Yes | No | Yes |
ptyReprotect() - BigInt Data
The UDF reprotects the protected BigInt format data with a different data element.
Signature:
ptyReprotect(Bigint input, String oldDataElement, String newDataElement)
Parameters:
BigInt input: Specifies theBigIntvalue to unprotect.String olddataElement: Specifies the name of the data element used to protect theBigIntvalue earlier.String newdataElement: Specifies the name of the new data element to reprotect theBigIntvalue.
Result:
- The UDF returns the protected
BigIntvalue.
Example:
create temporary function ptyProtectBigInt AS 'com.protegrity.hive.udf.ptyProtectBigInt';
create temporary function ptyReprotect AS 'com.protegrity.hive.udf.ptyReprotect';
drop table if exists test_data_table;
drop table if exists temp_table;
create table temp_table(val bigint) row format delimited fields terminated by ',' stored as textfile;
create table test_data_table(val bigint) row format delimited fields terminated by ',' stored as textfile;
create table test_protected_data_table(val bigint) row format delimited fields terminated by ',' stored as textfile;
LOAD DATA LOCAL INPATH 'test_data.csv' OVERWRITE INTO TABLE temp_table;
insert overwrite table test_data_table select cast(val) as bigint from temp_table;
insert overwrite table test_protected_data_table select ptyProtectBigInt(val, 'Token_BigInteger') from test_data_table;
create table test_reprotected_data_table(val bigint) row format delimited fields terminated by ',' stored as textfile;
insert overwrite table test_reprotected_data_table select ptyReprotect(val, ' 'BIGINT_DE', 'new_BIGINT_DE') from test_protected_data_table;
Supported Protection Methods:
| Function Name | Tokenization | Encryption | FPE | No Encryption | Masking | Monitoring |
|---|---|---|---|---|---|---|
| ptyReprotect() | Integer 8 Bytes | No | No | Yes | No | Yes |
ptyProtectFloat()
The UDF protects the float value.
Signature:
ptyProtectFloat(Float input, String dataElement)
Parameters:
Float input: Specifies theFloatvalue to protect.String dataElement: Specifies the name of the data element to protect thefloatvalue.
Warning: Ensure that you use the data element with the No Encryption method only. Using any other data element might cause data corruption.
Result:
- The UDF returns the protected
floatvalue.
Example:
create temporary function ptyProtectFloat as 'com.protegrity.hive.udf.ptyProtectFloat';
drop table if exists test_data_table;
drop table if exists temp_table;
create table temp_table(val string) row format delimited fields terminated by ',' stored as textfile;
create table test_data_table(val float) row format delimited fields terminated by ',' stored as textfile;
load data local inpath 'test_data.csv' overwrite into table temp_table;
insert overwrite table test_data_table select cast(val) as float from temp_table;
select ptyProtectFloat(val, 'FLOAT_DE') from test_data_table;
Supported Protection Methods:
| Function Name | Tokenization | Encryption | FPE | No Encryption | Masking | Monitoring |
|---|---|---|---|---|---|---|
| ptyProtectFloat() | No | No | No | Yes | No | Yes |
ptyUnprotectFloat()
The UDF unprotects the protected float value.
Signature:
ptyUnprotectFloat(Float input, String dataElement)
Parameters:
Float input: Specifies theFloatvalue to unprotect.String dataElement: Specifies the name of the data element to unprotect thefloatvalue.
Warning: Ensure that you use the data element with the No Encryption method only. Using any other data element might cause data corruption.
Result:
- The UDF returns the unprotected
floatvalue.
Example:
create temporary function ptyProtectFloat as 'com.protegrity.hive.udf.ptyProtectFloat';
create temporary function ptyUnprotectFloat as 'com.protegrity.hive.udf.ptyUnprotectFloat';
drop table if exists test_data_table;
drop table if exists temp_table;
drop table if exists protected_data_table;
create table temp_table(val string) row format delimited fields terminated by ',' stored as textfile;
create table test_data_table(val float) row format delimited fields terminated by ',' stored as textfile;
create table protected_data_table(protectedValue float) row format delimited fields terminated by ',' stored as textfile;
load data local inpath 'test_data.csv' overwrite into table temp_table;
insert overwrite table test_data_table select cast(val) as float from temp_table;
insert overwrite table protected_data_table select ptyProtectFloat(val, 'FLOAT_DE') from test_data_table;
select ptyUnprotectFloat(protectedValue, 'FLOAT_DE') from protected_data_table;
Supported Protection Methods:
| Function Name | Tokenization | Encryption | FPE | No Encryption | Masking | Monitoring |
|---|---|---|---|---|---|---|
| ptyUnprotectFloat() | No | No | No | Yes | No | Yes |
ptyReprotect() - Float Data
The UDF reprotects the float format protected data with a different data element.
Signature:
ptyReprotect(Float input, String oldDataElement, String newDataElement)
Parameters:
Float input: Specifies theFloatvalue to unprotect.String olddataElement: Specifies the name of the data element used to protect theFloatvalue earlier.String newdataElement: Specifies the name of the new data element to reprotect theFloatvalue.
Warning: Ensure that you use the data element with the No Encryption method only. Using any other data element might cause data corruption.
Result:
- The UDF returns the protected
floatvalue.
Example:
create temporary function ptyProtectFloat AS 'com.protegrity.hive.udf.ptyProtectFloat';
create temporary function ptyReprotect AS 'com.protegrity.hive.udf.ptyReprotect';
drop table if exists test_data_table;
drop table if exists temp_table;
create table temp_table(val float) row format delimited fields terminated by ',' stored as textfile;
create table test_data_table(val float) row format delimited fields terminated by ',' stored as textfile;
create table test_protected_data_table(val float) row format delimited fields terminated by ',' stored as textfile;
LOAD DATA LOCAL INPATH 'test_data.csv' OVERWRITE INTO TABLE temp_table;
insert overwrite table test_data_table select cast(val) as float from temp_table;
insert overwrite table test_protected_data_table select ptyProtectFloat(val, 'NoEncryption') from test_data_table;
create table test_reprotected_data_table(val float) row format delimited fields terminated by ',' stored as textfile;
insert overwrite table test_reprotected_data_table select ptyReprotect(val, 'NoEncryption','NoEncryption') from test_protected_data_table;
Supported Protection Methods:
| Function Name | Tokenization | Encryption | FPE | No Encryption | Masking | Monitoring |
|---|---|---|---|---|---|---|
| ptyReprotect() | No | No | No | Yes | No | Yes |
ptyProtectDouble()
The UDF protects the double value.
Signature:
ptyProtectDouble(Double input, String dataElement)
Parameters:
Double input: Specifies theDoublevalue to protect.String dataElement: Specifies the name of the data element to protect thedoublevalue.
Warning: Ensure that you use the data element with the No Encryption method only. Using any other data element might cause data corruption.
Result:
- The UDF returns the protected
doublevalue.
Example:
create temporary function ptyProtectDouble as 'com.protegrity.hive.udf.ptyProtectDouble';
drop table if exists test_data_table;
drop table if exists temp_table;
create table temp_table(val string) row format delimited fields terminated by ',' stored as textfile;
create table test_data_table(val double) row format delimited fields terminated by ',' stored as textfile;
load data local inpath 'test_data.csv' overwrite into table temp_table;
insert overwrite table test_data_table select cast(val) as double from temp_table;
select ptyProtectDouble(val, 'DOUBLE_DE') from test_data_table;
Supported Protection Methods:
| Function Name | Tokenization | Encryption | FPE | No Encryption | Masking | Monitoring |
|---|---|---|---|---|---|---|
| ptyProtectDouble() | No | No | No | Yes | No | Yes |
ptyUnprotectDouble()
The UDF unprotects the protected double value.
Signature:
ptyUnprotectDouble(Double input, String dataElement)
Parameters:
Double input: Specifies theDoublevalue to uprotect.String dataElement: Specifies the name of the data element to uprotect thedoublevalue.
Warning: Ensure that you use the data element with the No Encryption method only. Using any other data element might cause data corruption.
Result:
- The UDF returns the unprotected
doublevalue.
Example:
create temporary function ptyProtectDouble as 'com.protegrity.hive.udf.ptyProtectDouble';
create temporary function ptyUnprotectDouble as 'com.protegrity.hive.udf.ptyUnprotectDouble';
drop table if exists test_data_table;
drop table if exists temp_table;
drop table if exists protected_data_table;
create table temp_table(val double) row format delimited fields terminated by ',' stored as textfile;
create table test_data_table(val double) row format delimited fields terminated by ',' stored as textfile;
create table protected_data_table(protectedValue double) row format delimited fields terminated by ',' stored as textfile;
load data local inpath 'test_data.csv' overwrite into table temp_table;
insert overwrite table test_data_table select cast(val) as double from temp_table;
insert overwrite table protected_data_table select ptyProtectDouble(val, 'DOUBLE_DE') from test_data_table;
select ptyUnprotectDouble(protectedValue, 'DOUBLE_DE') from protected_data_table;
Supported Protection Methods:
| Function Name | Tokenization | Encryption | FPE | No Encryption | Masking | Monitoring |
|---|---|---|---|---|---|---|
| ptyUnprotectDouble() | No | No | No | Yes | No | Yes |
ptyReprotect() - Double Data
The UDF reprotects the double format protected data with a different data element.
Signature:
ptyReprotect(Double input, String oldDataElement, String newDataElement)
Parameters:
Double input: Specifies thedoublevalue to reprotect.String oldDataElement: Specifies the name of the data element used to protect the data earlier.String newDataElement: Specifies the name of the new data element to reprotect the data.
Warning: Ensure that you use the data element with the No Encryption method only. Using any other data element might cause data corruption.
Result:
- The UDF returns the protected
doublevalue.
Example:
create temporary function ptyProtectDouble AS 'com.protegrity.hive.udf.ptyProtectDouble';
create temporary function ptyReprotect AS 'com.protegrity.hive.udf.ptyReprotect';
drop table if exists test_data_table;
drop table if exists temp_table;
create table temp_table(val double) row format delimited fields terminated by ',' stored as textfile;
create table test_data_table(val double) row format delimited fields terminated by ',' stored as textfile;
create table test_protected_data_table(val double) row format delimited fields terminated by ',' stored as textfile;
LOAD DATA LOCAL INPATH 'test_data.csv' OVERWRITE INTO TABLE temp_table;
insert overwrite table test_data_table select cast(val) as double from temp_table;
insert overwrite table test_protected_data_table select ptyProtectDouble(val,'NoEncryption') from test_data_table;
create table test_reprotected_data_table(val double) row format delimited fields terminated by ',' stored as textfile;
insert overwrite table test_reprotected_data_table select ptyReprotect(val, 'NoEncryption','NoEncryption') from test_protected_data_table;
Supported Protection Methods:
| Function Name | Tokenization | Encryption | FPE | No Encryption | Masking | Monitoring |
|---|---|---|---|---|---|---|
| ptyReprotect() | No | No | No | Yes | No | Yes |
ptyProtectDec()
The UDF protects the decimal value.
Note: This API works only with the CDH 4.3 distribution.
Signature:
ptyProtectDec(Decimal input, String dataElement)
Parameters:
Decimal input: Specifies thedecimalvalue to protect.String dataElement: Specifies the name of the data element to protect thedecimalvalue.
Warning: Ensure that you use the data element with the No Encryption method only. Using any other data element might cause data corruption.
Result:
- The UDF returns the protected
decimalvalue.
Example:
create temporary function ptyProtectDec as 'com.protegrity.hive.udf.ptyProtectDec';
drop table if exists test_data_table;
drop table if exists temp_table;
create table temp_table(val decimal) row format delimited fields terminated by ',' stored as textfile;
create table test_data_table(val decimal) row format delimited fields terminated by ',' stored as textfile;
load data local inpath 'test_data.csv' overwrite into table temp_table;
insert overwrite table test_data_table select cast(val) as decimal from temp_table;
select ptyProtectDec(val, 'BIGDECIMAL_DE') from test_data_table;
Supported Protection Methods:
| Function Name | Tokenization | Encryption | FPE | No Encryption | Masking | Monitoring |
|---|---|---|---|---|---|---|
| ptyProtectDec() | No | No | No | Yes | No | Yes |
ptyUnprotectDec()
The UDF unprotects the protected decimal value.
Note: This API works only with the CDH 4.3 distribution.
Signature:
ptyUnprotectDec(Decimal input, String dataElement)
Parameters:
Decimal input: Specifies thedecimalvalue to unprotect.String dataElement: Specifies the name of the data element to unprotect thedecimalvalue.
Result:
- The UDF returns the unprotected
decimalvalue.
Example:
create temporary function ptyProtectDec as 'com.protegrity.hive.udf.ptyProtectDec';
create temporary function ptyUnprotectDec as 'com.protegrity.hive.udf.ptyUnprotectDec';
drop table if exists test_data_table;
drop table if exists temp_table;
drop table if exists protected_data_table;
create table temp_table(val string) row format delimited fields terminated by ',' stored as textfile;
create table test_data_table(val decimal) row format delimited fields terminated by ',' stored as textfile;
create table protected_data_table(protectedValue decimal) row format delimited fields terminated by ',' stored as textfile;
load data local inpath 'test_data.csv' overwrite into table temp_table;
insert overwrite table test_data_table select cast(val) as decimal from temp_table;
insert overwrite table protected_data_table select ptyProtectDec(val, 'BIGDECIMAL_DE') from test_data_table;
select ptyUnprotectDec(protectedValue, 'BIGDECIMAL_DE') from protected_data_table;
Supported Protection Methods:
| Function Name | Tokenization | Encryption | FPE | No Encryption | Masking | Monitoring |
|---|---|---|---|---|---|---|
| ptyUnprotectDec() | No | No | No | Yes | No | Yes |
ptyProtectHiveDecimal()
The UDF protects the decimal value.
Note: This API works only for distributions which include Hive, Version 0.11 and later.
Signature:
ptyProtectHiveDecimal(Decimal input, String dataElement)
Parameters:
Decimal input: Specifies thedecimalvalue to protect.String dataElement: Specifies the name of the data element to protect thedecimalvalue.
Warning: Ensure that you use the data element with the No Encryption method only. Using any other data element might cause data corruption.
Caution: Before the ptyProtectHiveDecimal() UDF is called, Hive rounds off the decimal value in the table to 18 digits in scale, irrespective of the length of the data.
Result:
- The UDF returns the protected
decimalvalue.
Example:
create temporary function ptyProtectHiveDecimal as
'com.protegrity.hive.udf.ptyProtectHiveDecimal';
drop table if exists test_data_table;
drop table if exists temp_table;
create table temp_table(val string) row format delimited fields terminated by ',' stored as textfile;
create table test_data_table(val decimal) row format delimited fields terminated by ',' stored as textfile;
load data local inpath 'test_data.csv' overwrite into table temp_table;
insert overwrite table test_data_table select cast(val) as decimal from temp_table;
select ptyProtectHiveDecimal(val, 'BIGDECIMAL_DE') from test_data_table;
Supported Protection Methods:
| Function Name | Tokenization | Encryption | FPE | No Encryption | Masking | Monitoring |
|---|---|---|---|---|---|---|
| ptyProtectHiveDecimal() | No | No | No | Yes | No | Yes |
ptyUnprotectHiveDecimal()
The UDF unprotects the protected decimal value.
Note: This API works only for distributions which include Hive, Version 0.11 and later.
Signature:
ptyUnprotectHiveDecimal(Decimal input, String dataElement)
Parameters:
Decimal input: Specifies thedecimalvalue to unprotect.String dataElement: Specifies the name of the data element to unprotect thedecimalvalue.
Result:
- The UDF returns the unprotected
decimalvalue.
Example:
create temporary function ptyProtectHiveDecimal as 'com.protegrity.hive.udf.ptyProtectHiveDecimal';
create temporary function ptyUnprotectHiveDecimal as 'com.protegrity.hive.udf.ptyUnprotectHiveDecimal';
drop table if exists test_data_table;
drop table if exists temp_table;
drop table if exists protected_data_table;
create table temp_table(val string) row format delimited fields terminated by ',' stored as textfile;
create table test_data_table(val decimal) row format delimited fields terminated by ',' stored as textfile;
create table protected_data_table(protectedValue decimal) row format delimited fields terminated by ',' stored as textfile;
load data local inpath 'test_data.csv' overwrite into table temp_table;
insert overwrite table test_data_table select cast(val) as decimal from temp_table;
insert overwrite table protected_data_table select ptyProtectHiveDecimal(val,'BIGDECIMAL_DE') from test_data_table;
select ptyUnprotectHiveDecimal(protectedValue, 'BIGDECIMAL_DE') from protected_data_table;
Supported Protection Methods:
| Function Name | Tokenization | Encryption | FPE | No Encryption | Masking | Monitoring |
|---|---|---|---|---|---|---|
| ptyUnprotectHiveDecimal() | No | No | No | Yes | No | Yes |
ptyReprotect() - Decimal Data
The UDF reprotects the decimal format protected data with a different data element.
Note: This API works only for distributions which include Hive, Version 0.11 and later.
Signature:
ptyReprotect(Decimal input, String oldDataElement, String newDataElement)
Parameters:
Decimal input: Specifies thedecimalvalue to reprotect.String oldDataElement: Specifies the name of the data element used to protect the data earlier.String newDataElement: Specifies the name of the new data element to reprotect the data.
Warning: Ensure that you use the data element with the No Encryption method only. Using any other data element might cause data corruption.
Result:
- The UDF returns the protected
decimalvalue.
Example:
create temporary function ptyProtectHiveDecimal AS 'com.protegrity.hive.udf.ptyProtectHiveDecimal';
create temporary function ptyReprotect AS 'com.protegrity.hive.udf.ptyReprotect';
drop table if exists test_data_table;
drop table if exists temp_table;
create table temp_table(val decimal) row format delimited fields terminated by ',' stored as textfile;
create table test_data_table(val decimal) row format delimited fields terminated by ',' stored as textfile;
create table test_protected_data_table(val decimal) row format delimited fields terminated by ',' stored as textfile;
LOAD DATA LOCAL INPATH 'test_data.csv' OVERWRITE INTO TABLE temp_table;
insert overwrite table test_data_table select cast(val) as decimal from temp_table;
insert overwrite table test_protected_data_table select ptyProtectHiveDecimal(val, 'NoEncryption') from test_data_table;
create table test_reprotected_data_table(val decimal) row format delimited fields terminated by ',' stored as textfile;
insert overwrite table test_reprotected_data_table select ptyReprotect(val, 'NoEncryption','NoEncyption') from test_protected_data_table;
Supported Protection Methods:
| Function Name | Tokenization | Encryption | FPE | No Encryption | Masking | Monitoring |
|---|---|---|---|---|---|---|
| ptyReprotect() | No | No | No | Yes | No | Yes |
ptyProtectDate()
The UDF protects the date format data, which is provided as an input.
Signature:
ptyProtectDate(Date input, String dataElement)
Parameters:
Date input: Specifies thedateformat data to protect.String dataElement: Specifies the name of the data element protect thedateformat data.
Result:
- The UDF returns the protected
dateformat data.
Example:
create temporary function ptyProtectDate AS 'com.protegrity.hive.udf.ptyProtectDate';
drop table if exists test_data_table;
drop table if exists temp_table;
create table temp_table(val date) row format delimited fields terminated by ',' stored as textfile;
create table test_data_table(val date) row format delimited fields terminated by ',' stored as textfile;
LOAD DATA LOCAL INPATH 'test_data.csv' OVERWRITE INTO TABLE temp_table;
insert overwrite table test_data_table select cast(val) as date from temp_table;
select ptyProtectDate(val, 'Token_Date') from test_data_table;
Supported Protection Methods:
| Function Name | Tokenization | Encryption | FPE | No Encryption | Masking | Monitoring |
|---|---|---|---|---|---|---|
| ptyProtectDate() | Date | No | No | Yes | No | Yes |
ptyUnprotectDate()
The UDF unprotects the protected date format data, provided as an input.
Signature:
ptyUnprotectDate(Date input, String dataElement)
Parameters:
Date input: Specifies thedateformat data to unprotect.String dataElement: Specifies the name of the data element unprotect thedateformat data.
Result:
- The UDF returns the unprotected
dateformat data.
Example:
create temporary function ptyProtectDate AS 'com.protegrity.hive.udf.ptyProtectDate';
create temporary function ptyUnprotectDate AS 'com.protegrity.hive.udf.ptyUnprotectDate';
drop table if exists test_data_table;
drop table if exists temp_table;
drop table if exists protected_data_table;
create table temp_table(val date) row format delimited fields terminated by ',' stored as textfile;
create table test_data_table(val date) row format delimited fields terminated by ',' stored as textfile;
create table protected_data_table(protectedValue date) row format delimited fields terminated by ',' stored as textfile;
LOAD DATA LOCAL INPATH 'test_data.csv' OVERWRITE INTO TABLE temp_table;
insert overwrite table test_data_table select cast(val) as date from temp_table;
insert overwrite table protected_data_table select ptyProtectDate(val, 'Token_Date') from test_data_table;
select ptyUnprotectDate(protectedValue, 'Token_Date') from protected_data_table;
Supported Protection Methods:
| Function Name | Tokenization | Encryption | FPE | No Encryption | Masking | Monitoring |
|---|---|---|---|---|---|---|
| ptyUnprotectDate() | Date | No | No | Yes | No | Yes |
ptyReprotect() - Date Data
The UDF reprotects the date format protected data, which was earlier protected using the ptyProtectDate UDF, with a different data element.
Signature:
ptyReprotect(Date input, String oldDataElement, String newDataElement)
Parameters:
Date input: Specifies thedateformat data to reprotect.String oldDataElement: Specifies the name of the data element used to protect the data earlier.String newDataElement: Specifies the name of the new data element to reprotect the data.
Result:
- The UDF returns the protected
dateformat data.
Example:
create temporary function ptyProtectDate AS 'com.protegrity.hive.udf.ptyProtectDate';
create temporary function ptyReprotect AS 'com.protegrity.hive.udf.ptyReprotect';
drop table if exists test_data_table;
drop table if exists temp_table;
create table temp_table(val date) row format delimited fields terminated by ',' stored as textfile;
create table test_data_table(val date) row format delimited fields terminated by ',' stored as textfile;
create table test_protected_data_table(val date) row format delimited fields terminated by ',' stored as textfile;
LOAD DATA LOCAL INPATH 'test_data.csv' OVERWRITE INTO TABLE temp_table;
insert overwrite table test_data_table select cast(val) as date from temp_table;
insert overwrite table test_protected_data_table select ptyProtectDate(val,'Token_Date') from test_data_table;
create table test_reprotected_data_table(val date) row format delimited fields terminated by ',' stored as textfile;
insert overwrite table test_reprotected_data_table select ptyReprotect(val, 'Token_Date', 'new_Token_Date') from test_protected_data_table;
Supported Protection Methods:
| Function Name | Tokenization | Encryption | FPE | No Encryption | Masking | Monitoring |
|---|---|---|---|---|---|---|
| ptyReprotect() | Date | No | No | Yes | No | Yes |
ptyProtectDateTime()
The UDF protects the timestamp format data provided as an input.
Signature:
ptyProtectDateTime(Timestamp input, String dataElement)
Parameters:
Timestamp input: Specifies the data in thetimestampformat to be protect.String dataElement: Specifies the name of the data element to protect thetimestampformat data.
Result:
- The UDF returns the protected
timestampdata.
Example:
create temporary function ptyProtectDateTime AS 'com.protegrity.hive.udf.ptyProtectDateTime';
drop table if exists test_data_table;
drop table if exists temp_table;
create table temp_table(val timestamp) row format delimited fields terminated by ',' stored as textfile;
create table test_data_table(val timestamp) row format delimited fields terminated by ',' stored as textfile;
LOAD DATA LOCAL INPATH 'test_data.csv' OVERWRITE INTO TABLE temp_table;
insert overwrite table test_data_table select cast(val) as timestamp from temp_table;
select ptyProtectDateTime(val, 'Token_Timestamp') from test_data_table;
Supported Protection Methods:
| Function Name | Tokenization | Encryption | FPE | No Encryption | Masking | Monitoring |
|---|---|---|---|---|---|---|
| ptyProtectDateTime() | Datetime | No | No | Yes | No | Yes |
ptyUnprotectDateTime()
The UDF unprotects the protected timestamp format data provided as an input.
Signature:
ptyUnprotectDateTime(Timestamp input, String dataElement)
Parameters:
Timestamp input: Specifies thetimestampformat protected data to unprotect.String dataElement: Specifies the name of the data element to unprotect thetimestampformat data.
Result:
- The UDF returns the unprotected
timestampformat data.
Example:
create temporary function ptyProtectDateTime AS 'com.protegrity.hive.udf.ptyProtectDateTime';
create temporary function ptyUnprotectDateTime AS 'com.protegrity.hive.udf.ptyUnprotectDateTime';
drop table if exists test_data_table;
drop table if exists temp_table;
drop table if exists protected_data_table;
create table temp_table(val timestamp) row format delimited fields terminated by ',' stored as textfile;
create table test_data_table(val timestamp) row format delimited fields terminated by ',' stored as textfile;
create table protected_data_table(protectedValue timestamp) row format delimited fields terminated by ',' stored as textfile;
LOAD DATA LOCAL INPATH 'test_data.csv' OVERWRITE INTO TABLE temp_table;
insert overwrite table test_data_table select cast(val) as timestamp from temp_table;
insert overwrite table protected_data_table select ptyProtectDateTime(val, 'Token_Timestamp') from test_data_table;
select ptyUnprotectDateTime(protectedValue, 'Token_Timestamp') from protected_data_table;
Supported Protection Methods:
| Function Name | Tokenization | Encryption | FPE | No Encryption | Masking | Monitoring |
|---|---|---|---|---|---|---|
| ptyUnprotectDateTime() | Datetime | No | No | Yes | No | Yes |
ptyReprotect() - DateTime Data
The UDF reprotects the timestamp format protected data, which was earlier protected using the ptyProtectDateTime UDF, with a different data element.
Signature:
ptyReprotect(Timestamp input, String oldDataElement, String newDataElement)
Parameters:
Timestamp input: Specifies the data in thetimestampformat to reprotect.String oldDataElement: Specifies the name of the data element that was used to protect the data earlier.String newDataElement: Specifies the name of the new data element to reprotect the data.
Result:
- The UDF returns the protected
timestampformat data.
Example:
create temporary function ptyProtectDateTime AS 'com.protegrity.hive.udf.ptyProtectDateTime';
create temporary function ptyReprotect AS 'com.protegrity.hive.udf.ptyReprotect';
drop table if exists test_data_table;
drop table if exists temp_table;
create table temp_table(val timestamp) row format delimited fields terminated by ',' stored as textfile;
create table test_data_table(val timestamp) row format delimited fields terminated by ',' stored as textfile;
create table test_protected_data_table(val timestamp) row format delimited fields terminated by ',' stored as textfile;
LOAD DATA LOCAL INPATH 'test_data.csv' OVERWRITE INTO TABLE temp_table;
insert overwrite table test_data_table select cast(val) as timestamp from temp_table;
insert overwrite table test_protected_data_table select ptyProtectDateTime(val,‘Token_Timestamp’) from test_data_table;
create table test_reprotected_data_table(val timestamp) row format delimited fields terminated by ',' stored as textfile;
insert overwrite table test_reprotected_data_table select ptyReprotect(val,‘Token_Timestamp’, 'new_Token_Timestamp') from test_protected_data_table;
Supported Protection Methods:
| Function Name | Tokenization | Encryption | FPE | No Encryption | Masking | Monitoring |
|---|---|---|---|---|---|---|
| ptyReprotect() | Datetime | No | No | Yes | No | Yes |
ptyProtectChar()
The UDF protects the char value.
Note: It is recommended to use the String UDFs, such as,
ptyProtectStr(),ptyUnprotectStr(), orptyReprotect()instead of the respective Char UDFs, such as,ptyProtectChar(),ptyUnprotectChar(), orptyReprotect()unless it is required to use the char data type only.
Note: For Date and Datetime type of data elements, the protect API returns an invalid input data error if the input value falls between the non-existent date range from 05-OCT-1582 to 14-OCT-1582 of the Gregorian Calendar.
For more information about the tokenization and de-tokenization of the cutover dates of the Proleptic Gregorian Calendar, refer Date and Datetime tokenization.
Signature:
ptyProtectChar(Char input, String dataElement)
Parameters:
Char input: Specifies thecharvalue to protect.String DataElement: Specifies the name of the data element to protect thecharvalue.
Warning: If you have fixed length data fields and the input data is shorter than the length of the field, then
ensure that you truncate the trailing white spaces and leading white spaces, if applicable, before passing the input to the respective Protect and Unprotect UDFs. The truncation of the white spaces ensures that the results of the protection and unprotection
operations will result in consistent data output across the Protegrity products.
Ensure that the lengths of the Char column in the source and target Hive tables are the same to avoid data corruption, since as per Hive behaviour, characters that exceed the defined Char column size, are truncated.
The UDF only supports Numeric, Alpha, Alpha Numeric, Upper-case Alpha, Upper Alpha-Numeric, and
Email tokenization data elements, and with length preservation selected.
Using any other data elements with this UDF is not supported.
Using non-length preserving data elements with this UDF is not supported.
Result:
- The UDF returns the protected
charvalue.
Example:
create temporary function ptyProtectChar AS 'com.protegrity.hive.udf.ptyProtectChar';
drop table if exists temp_table;
create table temp_table(val char(10)) row format delimited fields terminated by ',' stored as textfile;
LOAD DATA LOCAL INPATH 'test_data.csv' OVERWRITE INTO TABLE temp_table;
select ptyProtectChar(val, 'TOKEN_ELEMENT') from temp_table;
Exception:
ptyHiveProtectorException: 21, Input or Output buffer too smallA non-length preserving data element is provided.
Supported Protection Methods:
| Function Name | Tokenization | Encryption | FPE | No Encryption | Masking | Monitoring |
|---|---|---|---|---|---|---|
| ptyProtectChar() | All length preserving tokens | No | No | Yes | No | Yes |
ptyUnprotectChar()
The UDF unprotects the char value.
Note: It is recommended to use the String UDFs, such as,
ptyProtectStr(),ptyUnprotectStr(), orptyReprotect()instead of the respective Char UDFs, such as,ptyProtectChar(),ptyUnprotectChar(), orptyReprotect()unless it is required to use the char data type only.
Note: For Date and Datetime type of data elements, the protect API returns an invalid input data error if the input value falls between the non-existent date range from 05-OCT-1582 to 14-OCT-1582 of the Gregorian Calendar.
For more information about the tokenization and de-tokenization of the cutover dates of the Proleptic Gregorian Calendar, refer Date and Datetime tokenization.
Signature:
ptyUnprotectChar(Char input, String dataElement)
Parameters:
Char input: Specifies the protectedcharvalue to unprotect.String DataElement: Specifies the name of the data element to unprotect thecharvalue.
Warning: If you have fixed length data fields and the input data is shorter than the length of the field, then
ensure that you truncate the trailing white spaces and leading white spaces, if applicable, before
passing the input to the respective Protect and Unprotect UDFs.
The truncation of the white spaces ensures that the results of the protection and unprotection
operations will result in consistent data output across the Protegrity products.
Ensure that the lengths of the Char column in the source and target Hive tables are the same to avoid
data corruption, since as per Hive behaviour, characters that exceed the defined Char column size, are
truncated.
The UDF only supports Numeric, Alpha, Alpha Numeric, Upper-case Alpha, Upper Alpha-Numeric, and
Email tokenization data elements, and with length preservation selected.
Using any other data elements with this UDF is not supported.
Using non-length preserving data elements with this UDF is not supported.
Result:
- The UDF returns the unprotected
charvalue.
Example:
create temporary function ptyProtectChar AS 'com.protegrity.hive.udf.ptyProtectChar';
create temporary function ptyUnprotectChar AS 'com.protegrity.hive.udf.ptyUnprotectChar';
drop table if exists test_data_table;
drop table if exists protected_data_table;
create table test_data_table(val char(10)) row format delimited fields terminated by ',' stored as textfile;
LOAD DATA LOCAL INPATH 'test_data.csv' OVERWRITE INTO TABLE test_data_table;
create table protected_data_table(protectedValue char(10)) row format delimited fields terminated by ',' stored as textfile;
insert overwrite table protected_data_table select ptyProtectChar(val, 'TOKEN_ELEMENT') from test_data_table;
select ptyUnprotectChar(protectedValue,'TOKEN_ELEMENT') FROM protected_data_table;
Exception:
ptyHiveProtectorException: 21, Input or Output buffer too smallA non-length preserving data element is provided.
Supported Protection Methods:
| Function Name | Tokenization | Encryption | FPE | No Encryption | Masking | Monitoring |
|---|---|---|---|---|---|---|
| ptyUnprotectChar() | All length preserving tokens | No | No | Yes | No | Yes |
ptyReprotect() - Char data
The UDF reprotects char format protected data with a different data element.
Note: It is recommended to use the String UDFs, such as,
ptyProtectStr(),ptyUnprotectStr(), orptyReprotect()instead of the respective Char UDFs, such as,ptyProtectChar(),ptyUnprotectChar(), orptyReprotect()unless it is required to use the char data type only.
Signature:
ptyReprotect(Char input, String oldDataElement, String newDataElement)
Parameters:
Char input: Specifies thecharvalue to reprotect.String oldDataElement: Specifies the name of the data element used to protect thecharvalue.String newDataElement: Specifies the name of the new data element to reprotect thecharvalue.
Warning: If you have fixed length data fields and the input data is shorter than the length of the field, then
ensure that you truncate the trailing white spaces and leading white spaces, if applicable, before
passing the input to the respective Protect and Unprotect UDFs.
The truncation of the white spaces ensures that the results of the protection and unprotection operations will result in consistent data output across the Protegrity products.
Ensure that the lengths of the Char column in the source and target Hive tables are the same to avoid data corruption, since as per Hive behaviour, characters that exceed the defined Char column size, are truncated.
The UDF only supports Numeric, Alpha, Alpha Numeric, Upper-case Alpha, Upper Alpha-Numeric, and Email tokenization data elements with length preservation selected.
Using any other data elements with this UDF is not supported.
Using non-length preserving data elements with this UDF is not supported.
Result:
- The UDF returns the protected
charvalue.
Example:
create temporary function ptyProtectChar AS 'com.protegrity.hive.udf.ptyProtectChar';
create temporary function ptyUnprotectChar AS 'com.protegrity.hive.udf.ptyUnprotectChar';
create temporary function ptyReprotect AS 'com.protegrity.hive.udf.ptyReprotect';
drop table if exists test_data_table;
drop table if exists protected_data_table;
drop table if exists unprotected_data_table;
drop table if exists reprotected_data_table;
create table test_data_table(val char(10)) row format delimited fields terminated by ',' stored as textfile;
LOAD DATA LOCAL INPATH 'test_data.csv' OVERWRITE INTO TABLE test_data_table;
create table protected_data_table(val char(10)) row format delimited fields terminated by ',' stored as textfile;
insert overwrite table protected_data_table select ptyProtectChar(val, 'TOKEN_ELEMENT') from test_data_table;
create table reprotected_data_table(val char(10)) row format delimited fields terminated by ',' stored as textfile;
insert overwrite table reprotected_data_table select ptyReprotect(val,'old_Token_alpha', 'new_Token_alpha') from protected_data_table;
create table unprotected_data_table(val char(10)) row format delimited fields terminated by ',' stored as textfile;
insert overwrite table unprotected_data_table select ptyUnprotectChar(val,'TOKEN_ELEMENT') from reprotected_data_table;
Exception:
ptyHiveProtectorException: 21, Input or Output buffer too smallA non-length preserving data element is provided.
Supported Protection Methods:
| Function Name | Tokenization | Encryption | FPE | No Encryption | Masking | Monitoring |
|---|---|---|---|---|---|---|
| ptyReprotect() - Char data | All length preserving tokens | No | No | Yes | No | Yes |
ptyStringEnc()
The UDF encrypts the string value.
Signature:
ptyStringEnc(String input, String DataElement)
Parameters:
String input: Specifies thestringvalue to encrypt.String DataElement: Specifies the name of the data element to encrypt thestringvalue.
Warning:
- The string encryption UDFs are limited to accept 2 GB data size at maximum as input.
- Ensure that the field size for the protected binary data post the required encoding does not exceed the 2 GB input limit.
- The field size to store the input data is dependent on the encryption algorithm selected, such as, AES-128, AES-256, 3DES, and CUSP, and the encoding type selected, such as No Encoding, Base64, and Hex.
- Ensure that you set the input data size based on the required encryption algorithm and encoding to avoid exceeding the 2 GB input limit.
Result:
- The UDF returns an encrypted
binaryvalue.
Example:
create temporary function ptyStringEnc as 'com.protegrity.hive.udf.ptyStringEnc';
DROP TABLE IF EXISTS stringenc_data;
DROP TABLE IF EXISTS stringenc_data_protect;
CREATE TABLE stringenc_data (stringdata String) row format delimited fields terminated by ',' stored as textfile;
LOAD DATA INPATH '/tmp/stringdata.csv' OVERWRITE INTO TABLE stringenc_data;
CREATE TABLE stringenc_data_protect (stringdata String) stored as textfile;
INSERT OVERWRITE TABLE stringenc_data_protect SELECT base64(ptyStringEnc(stringdata,'AES128')) FROM stringenc_data;
Exception:
ptyHiveProtectorException: INPUT-ERROR: Tokenization or Format Preserving Data Elements are not supported: A data element, which is unsupported, is provided.java.io.IOException: Too many bytes before newline: 2147483648: The length of the input needs to be less than the maximum limit of 2 GB.
Supported Protection Methods:
| Function Name | Tokenization | Encryption | FPE | No Encryption | Masking | Monitoring |
| ptyStringEnc() | No |
| No | Yes | No | Yes |
Guidelines for Estimating Field Size of Data
The encryption algorithm and the field sizes in bytes required by the features, such as, Key ID (KID), Initialization Vector (IV), and Integrity Check (CRC) is listed in the following table.
| Encryption Algorithm | KID (size in Bytes) | IV (size in Bytes) | CRC (size in Bytes) |
|---|---|---|---|
| AES | 16 | 16 | 4 |
| 3DES | 8 | 8 | 4 |
| CUSP_TRDES | 2 | N/A | 4 |
| CUSP_AES | 2 | N/A | 4 |
Note: The number of bytes considered for 1 GB and 2 GB are
1073741824and2147483648respectively.
The byte sizes required by the input file, encoding type selected, and the encryption algorithm with the features selected is listed in the following table:
| Encoding Type | Encryption Algorithm | |||
| AES | 3DES | CUSP_TRDES | CUSP_AES | |
| AES | (Input file size in Bytes) + (Bytes needed by Encryption Algorithm and Features) <= 2147483647 | (Input file size in Bytes) + (Bytes needed by Encryption Algorithm and Features) <= 2147483648 | ||
| 3DES | (Input file size in Bytes) + (Bytes needed by Encryption Algorithm and Features) <= 1073741823 | (Input file size in Bytes) + (Bytes needed by Encryption Algorithm and Features) <= 1073741824 | ||
| CUSP_TRDES | (Input file size in Bytes) + (Bytes needed by Encryption Algorithm and Features) <= 1610612735 | (Input file size in Bytes) + (Bytes needed by Encryption Algorithm and Features) <= 1610612736 | ||
ptyStringDec()
The UDF decrypts the binary value.
Signature:
ptyStringDec(Binary input, String DataElement)
Parameters:
Binary input: Specifies the protectedBinaryvalue to unprotect.String DataElement: Specifies the name of the data element that was used to encrypt thestringvalue, to decrypt thebinaryvalue.
Result:
- The UDF returns the decrypted
stringvalue
Example:
create temporary function ptyStringEnc as 'com.protegrity.hive.udf.ptyStringEnc';
create temporary function ptyStringDec as 'com.protegrity.hive.udf.ptyStringDec';
DROP TABLE IF EXISTS stringenc_data;
DROP TABLE IF EXISTS stringenc_data_protect;
DROP TABLE IF EXISTS stringenc_data_unprotect;
CREATE TABLE stringenc_data (stringdata String) row format delimited fields terminated by ',' stored as textfile;
LOAD DATA INPATH '/tmp/stringdata.csv' OVERWRITE INTO TABLE stringenc_data;
CREATE TABLE stringenc_data_protect (stringdata String) stored as textfile;
INSERT OVERWRITE TABLE stringenc_data_protect SELECT base64(ptyStringEnc(stringdata,'AES128')) FROM stringenc_data;
CREATE TABLE stringenc_data_unprotect (stringdata String) stored as textfile;
INSERT OVERWRITE TABLE stringenc_data_unprotect SELECT
ptyStringDec(unbase64(stringdata),'AES128') FROM stringenc_data_protect;
Exception:
ptyHiveProtectorException: INPUT-ERROR: First argument (Input Data to be unprotected) is not a valid Binary Datatype: The input data, which is not in binary format is provided.ptyHiveProtectorException: INPUT-ERROR: Tokenization or Format Preserving Data Elements are not supported: A data element, which is unsupported, is provided.
Supported Protection Methods:
| Function Name | Tokenization | Encryption | FPE | No Encryption | Masking | Monitoring |
| ptyStringDec() | No |
| No | Yes | No | Yes |
ptyStringReEnc()
The UDF re-encrypts the binary format encrypted data, with a different data element.
Signature:
ptyStringReEnc(Binary input, String oldDataElement, String newDataElement)
Parameters:
Binary input: Specifies thebinaryvalue to reencrypt.String oldDataElement: Specifies the name of the data element used to encrypt the data earlier.String newDataElement: Specifies the name of the new data element to reencrypt the data.
Result:
- The UDF returns the re-encrypted
binarydata.
Example:
create temporary function ptyStringEnc as 'com.protegrity.hive.udf.ptyStringEnc';
create temporary function ptyStringDec as 'com.protegrity.hive.udf.ptyStringDec';
create temporary function ptyStringReEnc as 'com.protegrity.hive.udf.ptyStringReEnc';
DROP TABLE IF EXISTS stringenc_data;
DROP TABLE IF EXISTS stringenc_data_protect;
DROP TABLE IF EXISTS stringenc_data_unprotect;
DROP TABLE IF EXISTS stringenc_data_reprotect;
DROP TABLE IF EXISTS stringenc_data_unprotect_after_reprotect;
CREATE TABLE stringenc_data (stringdata String) row format delimited fields terminated by ',' stored as textfile;
LOAD DATA INPATH '/tmp/stringdata.csv' OVERWRITE INTO TABLE stringenc_data;
CREATE TABLE stringenc_data_protect (stringdata String) stored as textfile;
INSERT OVERWRITE TABLE stringenc_data_protect SELECT base64(ptyStringEnc(stringdata,'AES128')) FROM stringenc_data;
CREATE TABLE stringenc_data_unprotect (stringdata String) stored as textfile;
INSERT OVERWRITE TABLE stringenc_data_unprotect SELECT ptyStringDec(unbase64(stringdata),'AES128') FROM stringenc_data_protect;
CREATE TABLE stringenc_data_reprotect (stringdata String) stored as textfile;
INSERT OVERWRITE TABLE stringenc_data_reprotect SELECT base64(ptyStringReEnc(unbase64(stringdata),'AES128','AES128_KID')) FROM
stringenc_data_protect;
CREATE TABLE stringenc_data_unprotect_after_reprotect (stringdata String) stored as textfile;
INSERT OVERWRITE TABLE stringenc_data_unprotect_after_reprotect SELECT ptyStringDec(unbase64(stringdata),'AES128_KID') FROM stringenc_data_reprotect;
Exception:
ptyHiveProtectorException: INPUT-ERROR: First argument (Input Data to be reprotected) is not a valid Binary Datatype: The input data, which is not in binary format is provided.java.io.IOException: Too many bytes before newline: 2147483648: The length of the input needs to be less than the maximum limit of 2 GB.com.protegrity.hive.udf.ptyHiveProtectorException: 26, Unsupported algorithm or unsupported action for the specific data element: The data element is not supported for this UDF.
Supported Protection Methods:
| Function Name | Tokenization | Encryption | FPE | No Encryption | Masking | Monitoring |
| ptyStringReEnc() | No |
| No | Yes | No | Yes |
3.3.3 - Pig UDFs
ptyGetVersion()
The function returns the current version of the protector.
Signature:
ptyGetVersion()
Parameters:
- None
Result:
- The function returns the version number in a chararray.
Example:
REGISTER </path/to/bdp/lib/>/peppig-<jar_version>.jar;
// register pep pig version
DEFINE ptyGetVersion com.protegrity.pig.udf.ptyGetVersion;
//define UDF
employees = LOAD ‘employee.csv’ using PigStorage(‘,’) AS (eid:chararray,name:chararray, ssn:chararray);
// load employee.csv from HDFS path
version = FOREACH employees GENERATE ptyGetVersion();
DUMP version;
ptyGetVersionExtended()
The function returns the extended version information of the protector.
Signature:
ptyGetVersionExtended()
Parameters:
- None
Result:
- The function returns a chararray in the following format:where,
BDP: <1>; JcoreLite: <2>; CORE: <3>;- is the current version of the Protector
- is the Jcorelite library version
- is the Core library version
Example:
REGISTER </path/to/bdp/lib/>/peppig-<jar_version>.jar;
// register pep pig version
DEFINE ptyGetVersionExtended com.protegrity.pig.udf.ptyGetVersionExtended;
//define UDF
employees = LOAD ‘employee.csv’ using PigStorage(‘,’) AS (eid:chararray,name:chararray, ssn:chararray);
// load employee.csv from HDFS path
version = FOREACH employees GENERATE ptyGetVersionExtended();
DUMP version;
ptyWhoAmI()
The function returns the current logged in user name.
ptyWhoAmI()
Parameters:
None
Result:
- The function returns the User name in a chararray.
Example:
REGISTER </path/to/bdp/lib/>/peppig-<jar_version>.jar;
DEFINE ptyWhoAmI com.protegrity.pig.udf.ptyWhoAmI;
employees = LOAD ‘employee.csv’ using PigStorage(‘,’) AS (eid:chararray, name:chararray, ssn:chararray);
username = FOREACH employees GENERATE ptyWhoAmI();
DUMP username;
ptyProtectInt()
The function returns the protected value for integer data.
ptyProtectInt (int data, chararray dataElement)
Parameters:
int data: Specifies the data to protect.chararray dataElement: Specifies the name of the data element to use for data protection.
Result:
- The function returns the protected value for the given numeric data.
Example:
REGISTER </path/to/bdp/lib/>/peppig-<jar_version>.jar;
DEFINE ptyProtectInt com.protegrity.pig.udf.ptyProtectInt;
employees = LOAD ‘employee.csv’ using PigStorage(‘,’) AS (eid:int, name:chararray, ssn:chararray);
data_p = FOREACH employees GENERATE ptyProtectInt(eid, ‘token_integer’);
DUMP data_p;
Supported Protection Methods:
| Function Name | Tokenization | Encryption | FPE | No Encryption | Masking | Monitoring |
|---|---|---|---|---|---|---|
| ptyProtectInt() | Integer 4 Bytes | No | No | Yes | No | Yes |
ptyUnprotectInt()
The function returns the unprotected value for protected data in the integer format.
ptyUnprotectInt (int data, chararray dataElement)
Parameters:
int data: Is the protected data.chararray dataElement: Specifies the name of the data element to unprotect the data.
Result:
The function returns the unprotected value for the specified protected integer data.
Example:
REGISTER </path/to/bdp/lib/>/peppig-<jar_version>.jar;
DEFINE ptyProtectInt com.protegrity.pig.udf.ptyProtectInt;
DEFINE ptyUnprotectInt com.protegrity.pig.udf.ptyUnProtectInt;
employees = LOAD ‘employee.csv’ using PigStorage(‘,’) AS (eid:int, name:chararray, ssn:chararray);
data_p = FOREACH employees GENERATE ptyProtectInt(eid, ‘token_integer’);
data_u = FOREACH data_p GENERATE ptyUnprotectInt(eid, ‘token_integer’);
DUMP data_u;
Supported Protection Methods:
| Function Name | Tokenization | Encryption | FPE | No Encryption | Masking | Monitoring |
|---|---|---|---|---|---|---|
| ptyUnprotectInt() | Integer 4 Bytes | No | No | Yes | No | Yes |
ptyProtectStr()
The function protects the string value.
Note: For Date and Datetime type of data elements, the protect API returns an invalid input data error if the
input value falls between the non-existent date range from 05-OCT-1582 to 14-OCT-1582 of the Gregorian
Calendar.
For more information about the tokenization and de-tokenization of the cutover dates of the Proleptic
Gregorian Calendar, refer Date and Datetime tokenization.
ptyProtectStr(chararray input, chararray dataElement)
Parameters:
chararray data: Specifies thestringvalue to protect.chararray dataElement: Specifies the name of the data element to protect the string value.
Result:
- The function returns the protected
stringvalue in a chararray.
Example:
REGISTER </path/to/bdp/lib/>/peppig-<jar_version>.jar;
DEFINE ptyProtectStr com.protegrity.pig.udf.ptyProtectStr;
employees = LOAD ‘employee.csv’ using PigStorage(‘,’) AS (eid:chararray, name:chararray, ssn:chararray);
data_p = FOREACH employees GENERATE ptyProtectIntStr(name, ‘token_alphanumeric’);
DUMP data_p
Supported Protection Methods:
| Function Name | Tokenization | Encryption | FPE | No Encryption | Masking | Monitoring |
| ptyProtectStr() |
| No | Yes | Yes | Yes | Yes |
ptyUnprotectStr()
The function unprotects the protected string value.
Note: For Date and Datetime type of data elements, the protect API returns an invalid input data error if the
input value falls between the non-existent date range from 05-OCT-1582 to 14-OCT-1582 of the Gregorian
Calendar.
For more information about the tokenization and de-tokenization of the cutover dates of the Proleptic
Gregorian Calendar, refer Date and Datetime tokenization.
ptyUnprotectStr (chararray input, chararray dataElement)
Parameters:
chararray input: Specifies the protectedstringvalue.chararray dataElement: Specifies the name of the data element to unprotect thestringvalue.
Result:
- The function returns the unprotected value in a chararray.
Example:
REGISTER </path/to/bdp/lib/>/peppig-<jar_version>.jar;
DEFINE ptyProtectInt com.protegrity.pig.udf.ptyProtectStr;
DEFINE ptyUnprotectInt com.protegrity.pig.udf.ptyUnProtectStr;
employees = LOAD ‘employee.csv’ using PigStorage(‘,’) AS (eid:chararray, name:chararray, ssn:chararray);
data_p = FOREACH employees
GENERATE ptyProtectStr(name, ‘token_alphanumeric’) as name:chararray
DUMP data_p;
data_u = FOREACH data_p GENERATE ptyUnprotectStr(ssn, ‘Token_alphanumeric’);
DUMP data_u;
Supported Protection Methods:
| Function Name | Tokenization | Encryption | FPE | No Encryption | Masking | Monitoring |
| ptyUnprotectStr() |
| No | Yes | Yes | Yes | Yes |
3.3.4 - HBase Commands
HBase is a database, which provides random read and write access to tables, consisting of rows and columns, in real-time. HBase is designed to run on commodity servers, to automatically scale as more servers are added, and is fault tolerant as data is divided across servers in the cluster. HBase tables are partitioned into multiple regions. Each region stores a range of rows in the table. Regions contain a datastore in memory and a persistent datastore (HFile). The Name node assigns multiple regions to a region server. The Name node manages the cluster and the region servers store portions of the HBase tables and perform the work on the data.
Overview of the HBase Protector
The Protegrity HBase protector extends the functionality of the data storage framework. It provides transparent data protection and unprotection using coprocessors. These coprocessors provide the functionality to run code directly on the region servers. The Protegrity coprocessor for HBase runs on the region servers and protects the data stored in the servers. All clients which work with HBase are supported. The data is transparently protected or unprotected, as required, utilizing the coprocessor framework.
HBase Protector Usage
The Protegrity HBase protector utilizes the get, put, and scan commands and calls the Protegrity coprocessor for the HBase protector. The Protegrity coprocessor for the HBase protector locates the metadata associated with the requested column qualifier and the current logged in user. If the data element is associated with the column qualifier and the current logged in user, then the HBase protector processes the data in a row based on the data elements defined by the security policy deployed in the Big Data Protector.
Warning: The Protegrity HBase coprocessor only supports bytes converted from the string data type. If any other data type is directly converted to bytes and inserted in an HBase table, which is configured with the Protegrity HBase coprocessor, then data corruption might occur.
Adding Data Elements and Column Qualifier Mappings to a New Table
In an HBase table, every column family of a table stores metadata for that family, which contain the column qualifier and data element mappings. Users need to add metadata to the column families for defining mappings between the data element and column qualifier, when a new HBase table is created. The following command creates a new HBase table with one column family.
create 'table', { NAME => 'column_family_1', METADATA => {'DATA_ELEMENT:credit_card'=>'CC_NUMBER','DATA_ELEMENT:name'=>'TOK_CUSTOMER_NAME' } }
Parameters:
table: Name of the table.column_family_1: Name of the column family.METADATA: Data associated with the column family.DATA_ELEMENT: Contains the column qualifier name. In the example, the column qualifier names credit_card and name, correspond to data elements CC_NUMBER and TOK_CUSTOMER_NAME respectively.
Adding Data Elements and Column Qualifier Mappings to an Existing Table
Users can add data elements and column qualifiers to an existing HBase table. Users need to alter the table to add metadata to the column families for defining mappings between the data element and column qualifier. The following command adds data elements and column qualifier mappings to a column in an existing HBase table.
alter 'table', { NAME => 'column_family_1', METADATA => { 'DATA_ELEMENT:credit_card'=>'CC_NUMBER', 'DATA_ELEMENT:name'=>'TOK_CUSTOMER_NAME' } }
Parameters:
table: Name of the table.column_family_1: Name of the column family.METADATA: Data associated with the column family.DATA_ELEMENT: Contains the column qualifier name. In the example, the column qualifier names credit_card and name, correspond to data elements CC_NUMBER and TOK_CUSTOMER_NAME respectively.
Inserting Protected Data into a Protected Table
Users can ingest protected data into a protected table in HBase using the BYPASS_COPROCESSOR flag. If the BYPASS_COPROCESSOR flag is set while inserting data in the HBase table, then the Protegrity coprocessor for HBase is bypassed. The following command bypasses the Protegrity coprocessor for HBase and ingests protected data into an HBase table.
put 'table', 'row_2', 'column_family:credit_card', '3603144224586181', {ATTRIBUTES => {'BYPASS_COPROCESSOR'=>'1'}}
Parameters:
table: Name of the table.column_family: Name of the column family.METADATA: Data associated with the column family.ATTRIBUTES: Additional parameters to consider when ingesting the protected data. In the example, the flag to bypass the Protegrity coprocessor for HBase is set.
Retrieving Protected Data from a Table
If users need to retrieve protected data from an HBase table, then they need to set the BYPASS_COPROCESSOR flag to retrieve the data. This is necessary to retain the protected data as is since HBase performs protects and unprotects the data transparently. The following command bypasses the Protegrity coprocessor for HBase and retrieves protected data from an HBase table.
scan 'table', { ATTRIBUTES => {'BYPASS_COPROCESSOR'=>'1'}}
Parameters
table: Name of the table.ATTRIBUTES: Additional parameters to consider when ingesting the protected data. In the example, the flag to bypass the Protegrity coprocessor for HBase is set.
Hadoop provides shell commands to ingest, extract, and display the data in an HBase table.
Warning: If you are using the HBase shell, it is not recommended to use Format Preserving Encryption (FPE). If you are using HBase Java API (Byte APIs), then ensure that the encoding, which is used to convert the string input data to bytes is set in the PTY_CHARSET operation attribute as shown in the following sections.
put
This command ingests the data provided by the user in protected form, using the configured data elements, into the required row and column of an HBase table. You can use this command to ingest data into all the columns for the required row of the HBase table.
For Date and Datetime type of data elements, the protect API returns an invalid input data error if the input value falls between the non-existent date range from 05-OCT-1582 to 14-OCT-1582 of the Gregorian Calendar. For more information about the tokenization and de-tokenization of the cutover dates of the Proleptic Gregorian Calendar, refer Date and Datetime tokenization.
put '<table_name>','<row_number>', '<column_family>:<column_name>', '<data>'
If the data bytes are not in UTF-8 encoding, then ensure to set the PTY_CHARSET attribute:
put '<table_name>','<row_number>', '<column_family>:<column_name>', '<data>', {ATTRIBUTES => {'PTY_CHARSET' => '<charset>'}}
The
charsetcan be UTF-8, UTF-16LE or UTF-16BE.
Put put = new Put(inputString.getBytes("<charset>"));
put.setAttribute("PTY_CHARSET", Bytes.toBytes("<charset>"));
// <charset> can be UTF-8, UTF-16LE or UTF-16BE
Parameters:
table_name: Specifies the name of the table.row_number: Specifies the number of the row in the HBase table.column_family: Specifies the name of the column family.
get
This command displays the protected data from the required row and column of an HBase table in the cleartext form. You can use this command to display the data contained in all the columns of the required row of the HBase table.
get '<table_name>','<row_number>', '<column_family>:<column_name>'
If the data bytes are not in the UTF-8 encoding, then ensure to set the PTY_CHARSET attribute:
get '<table_name>', '<row_number>', {COLUMN => '<column_family>:<column_name>', ATTRIBUTES => {'PTY_CHARSET' => '<charset>'}}
The
charsetcan be UTF-8, UTF-16LE or UTF-16BE.
Get get = new Get();
get.setAttribute("PTY_CHARSET", Bytes.toBytes("<charset>"));
// <charset> can be UTF-8, UTF-16LE or UTF-16BE
Parameters:
table_name: Specifies the name of the table.row_number: Specifies the number of the row in the HBase table.column_family: Specifies the name of the column family.
Ensure that the logged in user has the permissions to view the protected data in cleartext form. If the user does not have the permissions to view the protected data, then only the protected data appears.
scan
This command displays the data from the HBase table in the protected or unprotected form.
Scan scan = new Scan();
scan.setAttribute("PTY_CHARSET", Bytes.toBytes("<charset>"));
// <charset> can be UTF-8, UTF-16LE or UTF-16BE
You can use the following commands to view the data:
Protected Data:
scan '<table_name>', { ATTRIBUTES => {'BYPASS_COPROCESSOR'=>'1'}}Unprotected Data:
scan '<table_name>'If the data bytes are not in UTF-8 encoding, then ensure to set the PTY_CHARSET attribute:
scan '<table_name>', {ATTRIBUTES => {'PTY_CHARSET' => '<charset>'}}The
charsetcan be UTF-8, UTF-16LE or UTF-16BE.
Parameters:
table_name: Specifies the name of the table.ATTRIBUTES: Specifies the additional parameters to consider when displaying the protected or unprotected data.
Ensure that the logged in user has the permissions to unprotect the protected data. If the user does not have the permissions to unprotect the protected data, then only the protected data appears.
3.3.5 - Impala UDFs
This section explains the Impala protector, the UDFs provided, and the commands for protecting and unprotecting data in an Impala table.
Overview of the Impala Protector
Impala is an MPP SQL query engine for querying the data stored in a cluster. The Protegrity Impala protector extends the functionality of the Impala query engine and provides UDFs which protect or unprotect the data as it is stored or retrieved.
Impala Protector Usage
The Protegrity Impala protector provides UDFs for protecting data using encryption or tokenization, and unprotecting data by using decryption or detokenization.
Ensure that the /user/impala path exists in HDFS with the Impala supergroup permissions. To verify the path, use the following command:
# hadoop fs –ls /user
Creating the /user/impala path in Impala with Supergroup permissions
If the /user/impala path does not exist or does not have supergroup permissions, then perform the following steps.
To create the
/user/impaladirectory in HDFS, run the following command:# sudo –u hdfs hadoop –mkdir /user/impalaTo assign Impala supergroup permissions to the
/user/impalapath, run the following command:# sudo –u hdfs hadoop –chown –R impala:supergroup /user/impala
Inserting Data from a File into a Table
To insert data from a file into an Impala table, ensure that the required user permissions for the directory path in HDFS are assigned for the Impala table.
Preparing the environment for the basic_sample.csv file
- To assign permissions to the path where data from the
basic_sample.csvfile needs to be copied, run the following command:sudo -u hdfs hadoop fs -chown root:root /tmp/basic_sample/sample/ - To copy the
basic_sample.csvfile into HDFS, run the following command:hdfs dfs -put basic_sample.csv /tmp/basic_sample/sample/ - To verify the presence of the
basic_sample.csvfile in the HDFS path, run the following command:hdfs dfs -ls /tmp/basic_sample/sample/ - To assign permissions for Impala to the path where the
basic_sample.csvfile is located, run the following command:sudo -u hdfs hadoop fs -chown impala:supergroup /path/
Populating the table sample_table from the basic_sample_data.csv file
You can use the following command populate the basic_sample table with the data from the basic_sample_data.csv file:
create table sample_table(colname1 colname1_format, colname2 colname2_format, colname3 colname3_format) row format delimited fields terminated by ',';
LOAD DATA INPATH '/tmp/basic_sample/sample/basic_sample.csv' INTO TABLE sample_table;
Parameters:
sample_table: Name of the Impala table created to load the data from the input CSV file from the required path.colname1, colname2, colname3: Name of the columns.colname1_format, colname2_format, colname3_format: The data types contained in the respective columns. The data types can only be of typesSTRING,INT,DOUBLE, orFLOAT.ATTRIBUTES: Additional parameters to consider when ingesting the data. In the example, the row format is delimited using the ‘,’ character because the row format in the input file is comma separated. If the input file is tab separated, then the the row format is delimited using ‘\t’.
Protecting Existing Data
To protect existing data, you must define the mappings between the columns and their respective data elements in the data security policy. The following commands ingest cleartext data from the basic_sample table to the basic_sample_protected table in protected form using Impala UDFs.
create table basic_sample_protected (colname1 colname1_format, colname2 colname2_format, colname3 colname3_format);
insert into basic_sample_protected(colname1, colname2, colname3) select ID,pty_stringins(colname1, dataElement1),pty_stringins(colname2, dataElement2),pty_stringins(colname3, dataElement3) from basic_sample;
Parameters:
basic_sample_protected: Table to store protected data.colname1, colname2, colname3: Name of the columns.dataElement1, dataElement2, dataElement3: The data elements corresponding to the columns.basic_sample: Table containing the original data in cleartext form.
Unprotecting Protected Data
To unprotect the protected data, you must specify the name of the table which contains the protected data, the table which would store the unprotected data, and the columns and their respective data elements. Ensure that the user performing the task has permissions to unprotect the data as required in the data security policy. The following commands unprotect the protected data in a table and stores the data in cleartext form in to a different table, if the user has the required permissions.
create table table_unprotected (colname1 colname1_format, colname2 colname2_format, colname3 colname3_format);
insert into table_unprotected (colname1, colname2, colname3) select ID,pty_stringsel(colname1,dataElement1), pty_stringsel(colname2, dataElement2),pty_stringsel(colname3, dataElement3) from table_protected;
Parameters:
table_unprotected: Table to store unprotected data.colname1, colname2, colname3: Name of the columns.dataElement1, dataElement2, dataElement3: The data elements corresponding to the columns.table_protected: Table containing protected data.
Retrieving Data from a Table
To retrieve data from a table, you must have access to the table. The following command displays the data contained in the table.
select * from table;
Parameters:
table: Name of the table.
Impala UDFs
pty_GetVersion()
The UDF returns the PepImpala version.
Signature:
pty_getversion()
Parameters:
- None
Result:
- The UDF returns the PepImpala version.
Example:
select pty_GetVersion();
pty_GetVersionExtended()
The UDF returns the extended version information.
Signature:
pty_getversionextended();
Parameters:
- None
Result:
- The UDF returns a string in the following format:where,
Impala: <1>; CORE: <2>;- Is the PepImpala version
- Is the Core library version
Example:
select pty_getversionextended();
pty_WhoAmI()
The UDF returns the logged in user name.
Signature:
pty_WhoAmI()
Parameters:
- None
Result:
- The UDF returns the logged in user name.
Example:
select pty_WhoAmI();
pty_StringEnc()
The UDF returns the encrypted value for a column containing String format data.
Signature:
pty_StringEnc(data string, dataElement string)
Parameters:
data: Specifies the column name of the data to encrypt in the table.dataElement: Specifies the name of the data element to encrypt the string value.
Result:
- The UDF returns the
stringvalue.
Example:
select pty_StringEnc(column_name,'enc_3des') from table_name;
Supported Protection Methods:
| Function Name | Tokenization | Encryption | FPE | No Encryption | Masking | Monitoring |
| pty_StringEnc() | No |
| No | Yes | Yes | Yes |
pty_StringDec()
The UDF returns the decrypted value for a column containing String format data.
Signature:
pty_StringDec(data string, dataElement string)
Parameters:
data: Specifies the column name of the data to decrypt in the table.dataElement: Is the variable specifying the unprotection method.
Result:
- The UDF returns the
stringvalue.
Example:
select pty_StringDec(column_name,'enc_3des') from table_name;
Supported Protection Methods:
| Function Name | Tokenization | Encryption | FPE | No Encryption | Masking | Monitoring |
| pty_StringDec() | No |
| No | Yes | Yes | Yes |
pty_StringIns()
The UDF returns the tokenized value for a column containing String format data.
Note: For Date and Datetime type of data elements, the protect API returns an invalid input data error if the
input value falls between the non-existent date range from 05-OCT-1582 to 14-OCT-1582 of the Gregorian
Calendar.
For more information about the tokenization and de-tokenization of the cutover dates of the Proleptic
Gregorian Calendar, refer to the section Date and Datetime tokenization.
Signature:
pty_StringIns(data string, dataElement string)
Parameters:
data: Specifies the column name of the data to tokenize in the table.dataElement: Specifies the name of the data element to protect the string value.
Result:
- The UDF returns the tokenized
stringvalue.
Example:
select pty_StringIns(column_name, 'TOK_NAME') from table_name;
Supported Protection Methods:
| Function Name | Tokenization | Encryption | FPE | No Encryption | Masking | Monitoring |
| pty_StringIns() |
| No | Yes | Yes | Yes | Yes |
pty_StringSel()
The UDF returns the detokenized value for a column containing String format data.
Note: For Date and Datetime type of data elements, the protect API returns an invalid input data error if the
input value falls between the non-existent date range from 05-OCT-1582 to 14-OCT-1582 of the Gregorian
Calendar.
For more information about the tokenization and de-tokenization of the cutover dates of the Proleptic
Gregorian Calendar, refer Date and Datetime tokenization.
Signature:
pty_StringSel(data string, dataElement string)
Parameters:
data: Specifies the column name of the data to detokenize in the table.dataElement: Specifies the name of the data element to unprotect the string value.
Result:
- The UDF returns the detokenized
stringvalue.
Example:
select pty_StringSel(column_name, 'TOK_NAME') from table_name;
Supported Protection Methods:
| Function Name | Tokenization | Encryption | FPE | No Encryption | Masking | Monitoring |
| pty_StringSel() |
| No | Yes | Yes | Yes | Yes |
pty_UnicodeStringIns()
The UDF returns the tokenized value for a column containing String (Unicode) format data.
Signature:
pty_UnicodeStringIns(data string, dataElement string)
Parameters:
data: Specifies the column name of thestring (Unicode)format data to tokenize in the table.dataElement: Specifies the name of the data element to protect thestring (Unicode)value.
Warning: This UDF should be used only if you want to tokenize Unicode data in Impala, and migrate the tokenized data from Impala to a Teradata database and detokenize the data using the Protegrity Database Protector. Ensure that you use this UDF with a Unicode tokenization data element only.
Result:
- The UDF returns the protected
stringvalue.
Example:
select pty_UnicodeStringIns(column_name, 'Token_unicode') from temp_table;
Supported Protection Methods:
| Function Name | Tokenization | Encryption | FPE | No Encryption | Masking | Monitoring |
|---|---|---|---|---|---|---|
| pty_UnicodeStringIns() | - Unicode (Legacy) - Unicode (Base64) | No | No | Yes | No | Yes |
pty_UnicodeStringSel()
The UDF unprotects the existing protected String value.
Signature:
pty_UnicodeStringSel(data string, dataElement string)
Parameters:
data: Specifies the column name of the string format data to detokenize in the table.varchar dataElement: Specifies the name of data element to unprotect thestringvalue.
Warning: This UDF should be used only if you want to tokenize Unicode data in Teradata using the Protegrity Database Protector, and migrate the tokenized data from a Teradata database to Impala and detokenize the data using the Protegrity Big Data Protector for Impala. Ensure that you use this UDF with a Unicode tokenization data element only.
Result:
- The UDF returns the detokenized
string(Unicode) value.
Example:
select pty_UnicodeStringSel(column_name, 'Token_unicode') from temp_table;
Supported Protection Methods:
| Function Name | Tokenization | Encryption | FPE | No Encryption | Masking | Monitoring |
|---|---|---|---|---|---|---|
| pty_UnicodeStringSel() | - Unicode (Legacy) - Unicode (Base64) | No | No | Yes | No | Yes |
pty_UnicodeStringFPEIns()
The UDF returns the encrypted value for a column containing String (Unicode) format data with Format Preserving Encryption (FPE) as the protection method.
Note: Ensure that you use this UDF with an FPE data element only.
Warning: The pty_UnicodeStringFPEIns() UDF will be deprecated from the future releases. This UDF is retained in this build for backward compatibility purposes only.
Signature:
pty_UnicodeStringFPEIns(data string, dataElement string)
Parameters:
data: Specifies the column name of the data to encrypt in the table.dataElement: Specifies the name of the FPE data element to protect the string value.
Result:
- The UDF returns the
stringvalue.
Example:
SELECT pty_unicodestringfpeins(column_name,'<DataElement>') from table_name;
Supported Protection Methods:
| Function Name | Tokenization | Encryption | FPE | No Encryption | Masking | Monitoring |
|---|---|---|---|---|---|---|
| pty_UnicodeStringFPEIns() | No | No | FPE (All) | Yes | No | Yes |
pty_UnicodeStringFPESel()
The UDF unprotects the existing encrypted String value that was encrypted using the FPE enabled data element.
Note: Ensure that you use this UDF with an FPE data element only.
Warning: The pty_UnicodeStringFPESel() UDF will be deprecated from the future releases. This UDF is retained in this build for backward compatibility purposes only.
Signature:
pty_UnicodeStringFPESel(data string, dataElement string)
Parameters:
data: Specifies the column name of the data to decrypt in the table.varchar dataElement: Is the variable specifying the detokenization method. Note: Ensure that the FPE data element used to tokenize and detokenize the data is same.
Result:
- The UDF returns the decrypted
string(Unicode) value.
Example:
select pty_unicodestringfpesel(NAME,'<DataElement>') from table_name;
Supported Protection Methods:
| Function Name | Tokenization | Encryption | FPE | No Encryption | Masking | Monitoring |
|---|---|---|---|---|---|---|
| pty_UnicodeStringFPESel() | No | No | FPE (All) | Yes | No | Yes |
pty_IntegerEnc()
The UDF returns an encrypted value for a column containing Integer format data.
Signature:
pty_IntegerEnc(data integer, dataElement string)
Parameters:
data: Specifies the column name of the data to encrypt in the table.dataElement: Specifies the name of the data element to encrypt the integer value.
Result:
- The UDF returns a
stringvalue.
Example:
select pty_IntegerEnc(column_name,'enc_3des') from table_name;
Supported Protection Methods:
| Function Name | Tokenization | Encryption | FPE | No Encryption | Masking | Monitoring |
| pty_IntegerEnc() | No |
| No | Yes | No | Yes |
pty_IntegerDec()
The UDF returns the decrypted value for a column containing Integer format data.
Signature:
pty_IntegerDec(data string, dataElement string)
Parameters:
data: Specifies the column name of the data to decrypt in the table.dataElement: Specifies the name of the data element to decrypt the integer value.
Result:
- The UDF returns an
integervalue.
Example:
select pty_IntegerDec(column_name,'enc_3des') from table_name;
Supported Protection Methods:
| Function Name | Tokenization | Encryption | FPE | No Encryption | Masking | Monitoring |
| pty_IntegerDec() | No |
| No | Yes | No | Yes |
pty_IntegerIns()
The UDF returns the tokenized value for a column containing Integer format data.
Signature:
pty_IntegerIns(data integer, dataElement string)
Parameters:
data: Specifies the column name of the data to tokenize in the table.dataElement: Specifies the name of the data element to protect the integer value.
Result:
- The UDF returns the tokenized
integervalue.
Example:
select pty_IntegerIns(column_name,'integer_de') from table_name;
Supported Protection Methods:
| Function Name | Tokenization | Encryption | FPE | No Encryption | Masking | Monitoring |
|---|---|---|---|---|---|---|
| pty_IntegerIns() | Integer (4 Bytes) | No | No | Yes | No | Yes |
pty_IntegerSel()
The UDF returns the detokenized value for a column containing Integer format data.
Signature:
pty_IntegerSel(data integer, dataElement string)
Parameters:
data: Specifies the column name of the data to detokenize in the table.dataElement: Specifies the name of the data element to unprotect the integer value.
Result:
- The UDF returns the detokenized
integervalue.
Example:
select pty_IntegerSel(column_name,'integer_de') from table_name;
Supported Protection Methods:
| Function Name | Tokenization | Encryption | FPE | No Encryption | Masking | Monitoring |
|---|---|---|---|---|---|---|
| pty_IntegerSel() | Integer (4 Bytes) | No | No | Yes | No | Yes |
pty_FloatEnc()
The UDF returns the encrypted value for a column containing Float format data.
Signature:
pty_FloatEnc(data float, dataElement string)
Parameters:
data: Specifies the column name of the data to encrypt in the table.dataElement: Specifies the name of the data element to encrypt the float value.
Result:
- The UDF returns a
stringvalue.
Example:
select pty_FloatEnc(column_name,'enc_3des') from table_name;
Supported Protection Methods:
| Function Name | Tokenization | Encryption | FPE | No Encryption | Masking | Monitoring |
| pty_FloatEnc() | No |
| No | Yes | No | Yes |
pty_FloatDec()
The UDF returns the decrypted value for a column containing Float format data.
Signature:
pty_FloatDec(data string, dataElement string)
Parameters:
data: Specifies the column name of the data to decrypt in the table.dataElement: Specifies the name of the data element to decrypt the float value.
Result:
- The UDF returns a
stringvalue.
Example:
select pty_FloatDec(column_name,'enc_3des') from table_name;
Supported Protection Methods:
| Function Name | Tokenization | Encryption | FPE | No Encryption | Masking | Monitoring |
| pty_FloatDec() | No |
| No | Yes | No | Yes |
pty_FloatIns()
The UDF returns the tokenized value for a column containing Float format data.
Signature:
pty_FloatIns(data float, dataElement string)
Parameters:
data: Specifies the column name of the data to tokenize in the table.dataElement: Specifies the name of the data element to protect the float value.
Result:
- The UDF returns the tokenized
floatvalue.
Example:
select pty_FloatIns(cast(12.3 as float), 'no_enc');
Warning: Ensure that you use the data element with the No Encryption method only. Using any other data element would return an error mentioning that the operation is not supported for that data type. If you want to tokenize the Float column, then load the Float column into a String column and use the pty_StringIns() UDF to tokenize the column. For more information about pty_StringIns() UDF, refer section pty_StringIns().
Supported Protection Methods:
| Function Name | Tokenization | Encryption | FPE | No Encryption | Masking | Monitoring |
|---|---|---|---|---|---|---|
| pty_FloatIns() | No | No | No | Yes | No | Yes |
pty_FloatSel()
The UDF returns the detokenized value for a column containing Float format data.
Signature:
pty_FloatSel(data float, dataElement string)
Parameters:
data: Specifies the column name of the data to detokenize in the table.dataElement: Specifies the name of the data element to unprotect the float value.
Result:
- The UDF returns the detokenized
floatvalue.
Example:
select pty_FloatSel(tokenized_value, 'no_enc');
Warning: Ensure that you use the data element with the No Encryption method only. Using any other data element would return an error mentioning that the operation is not supported for that data type.
Supported Protection Methods:
| Function Name | Tokenization | Encryption | FPE | No Encryption | Masking | Monitoring |
|---|---|---|---|---|---|---|
| pty_FloatSel() | No | No | No | Yes | No | Yes |
pty_DoubleEnc()
The UDF returns the encrypted value for a column containing Double format data.
Signature:
pty_DoubleEnc(data double, dataElement string)
Parameters:
data: Specifies thedoubledata column to encrypt in the table.dataElement: Specifies the name of the data element to encrypt the double value.
Result:
- The UDF returns a
string.
Example:
select pty_DoubleEnc(column_name,'enc_3des') from table_name;
Supported Protection Methods:
| Function Name | Tokenization | Encryption | FPE | No Encryption | Masking | Monitoring |
| pty_DoubleEnc() | No |
| No | Yes | No | Yes |
pty_DoubleDec()
The UDF returns the decrypted value for a column containing Double format data.
Signature:
Pty_DoubleDec(data string, dataElement string)
Parameters:
data: Specifies thedoubledata column to decrypt in the table.dataElement: Specifies the name of the data element to decrypt thedoublevalue.
Result:
- The UDF returns a
doublevalue.
Example:
select pty_DoubleDec(column_name,'enc_3des') from table_name;
Supported Protection Methods:
| Function Name | Tokenization | Encryption | FPE | No Encryption | Masking | Monitoring |
| pty_DoubleDec() | No |
| No | Yes | No | Yes |
pty_DoubleIns()
The UDF returns the tokenized value for a column containing Double format data.
Signature:
pty_DoubleIns(data double, dataElement string)
Parameters:
data: Specifies the column name of the data to tokenize in the table.dataElement: Specifies the name of the data element to protect the double value.
Result:
- The UDF returns the
doublevalue.
Example:
select pty_DoubleIns(cast(1.2 as double), 'no_enc');
Warning: Ensure that you use the data element with the No Encryption method only. Using any other data element would return an error mentioning that the operation is not supported for that data type. If you want to tokenize the Double column, then load the Double column into a String column and use the pty_StringIns() UDF to tokenize the column. For more information about pty_StringIns() UDF, refer pty_StringIns().
Supported Protection Methods:
| Function Name | Tokenization | Encryption | FPE | No Encryption | Masking | Monitoring |
|---|---|---|---|---|---|---|
| pty_DoubleIns() | No | No | No | Yes | No | Yes |
pty_DoubleSel()
The UDF returns the detokenized value for a column containing Double format data.
Signature:
pty_DoubleSel(data double, dataElement string)
Parameters:
data: Specifies the column name of the data to detokenize in the table.dataElement: Specifies the name of the data element to unprotect the double value.
Result:
- The UDF Returns the detokenized
doublevalue.
Example:
select pty_DoubleSel(tokenized_value, 'no_enc');
Warning: Ensure that you use the data element with the No Encryption method only. Using any other data element would return an error mentioning that the operation is not supported for that data type.
Supported Protection Methods:
| Function Name | Tokenization | Encryption | FPE | No Encryption | Masking | Monitoring |
|---|---|---|---|---|---|---|
| pty_DoubleSel() | No | No | No | Yes | No | Yes |
pty_SmallIntEnc()
The UDF returns the encrypted value for a column containing SmallInt format data.
Signature:
pty_SmallIntEnc(data SmallInt, dataElement string)
Parameters:
data: Specifies the column name of the data to encrypt in the table.dataElement: Specifies the name of the data element to encrypt theSmallIntvalue.
Result:
- The UDF returns a
stringvalue.
Example:
select pty_SmallIntEnc(column_name,'enc_3des') from table_name;
Supported Protection Methods:
| Function Name | Tokenization | Encryption | FPE | No Encryption | Masking | Monitoring |
| pty_SmallIntEnc() | No |
| No | Yes | No | Yes |
pty_SmallIntDec()
The UDF returns the decrypted value for a column containing SmallInt format data.
Signature:
pty_SmallIntDec(data string, dataElement string)
Parameters:
data: Specifies the column name of the data, to decrypt, in the table.dataElement: Specifies the name of the data element to decrypt theSmallIntvalue.
Result:
- The UDF returns a
SmallIntvalue.
Example:
select pty_SmallIntDec(column_name,'enc_3des') from table_name;
Supported Protection Methods:
| Function Name | Tokenization | Encryption | FPE | No Encryption | Masking | Monitoring |
| pty_SmallIntDec() | No |
| No | Yes | No | Yes |
pty_SmallIntIns()
The UDF returns the tokenized value for a column containing SmallInt format data.
Signature:
pty_SmallIntIns(data SmallInt, dataElement string)
Parameters:
data: Specifies the column name of the data, to tokenize, in the table.dataElement: Specifies the name of the data element to protect theSmallIntvalue.
Result:
- The UDF returns the tokenized
SmallIntvalue.
Example:
select pty_SmallIntIns(column_name,'integer_de') from table_name;
Supported Protection Methods:
| Function Name | Tokenization | Encryption | FPE | No Encryption | Masking | Monitoring |
|---|---|---|---|---|---|---|
| pty_SmallIntIns() | Integer (2 Bytes) | No | No | Yes | No | Yes |
pty_SmallIntSel()
The UDF the detokenized value for a column containing SmallInt format data.
Signature:
pty_SmallIntSel(data SmallInt, dataElement string)
Parameters:
data: Specifies the column name of the data, to detokenize, in the table.dataElement: Specifies the name of the data element to unprotect theSmallIntvalue.
Result:
- The UDF returns the detokenized
SmallIntvalue.
Example:
select pty_SmallIntSel(column_name,'integer_de') from table_name;
Supported Protection Methods:
| Function Name | Tokenization | Encryption | FPE | No Encryption | Masking | Monitoring |
|---|---|---|---|---|---|---|
| pty_SmallIntSel() | Integer (2 Bytes) | No | No | Yes | No | Yes |
pty_BigIntEnc()
The UDF returns the encrypted value for a column containing BigInt format data.
Signature:
pty_BigIntEnc(data BigInt, dataElement string)
Parameters:
data: Specifies the column name of the data, to encrypt, in the table.dataElement: Specifies the name of the data element to encrypt theBigIntvalue.
Result:
- The UDF returns a
stringvalue.
Example:
select pty_BigIntEnc(column_name,'enc_3des') from table_name;
Supported Protection Methods:
| Function Name | Tokenization | Encryption | FPE | No Encryption | Masking | Monitoring |
| pty_BigIntEnc() | No |
| No | Yes | No | Yes |
pty_BigIntDec()
The UDF returns the decrypted value for a column containing BigInt format data.
Signature:
pty_BigIntDec(data string, dataElement string)
Parameters:
data: Specifies the column name of the data, to decrypt, in the table.dataElement: Specifies the name of the data element to decrypt theBigIntvalue.
Result:
- The UDF returns a
BigIntvalue.
Example:
select pty_BigIntDec(column_name,'enc_3des') from table_name;
Supported Protection Methods:
| Function Name | Tokenization | Encryption | FPE | No Encryption | Masking | Monitoring |
| pty_BigIntDec() | No |
| No | Yes | No | Yes |
pty_BigIntIns()
The UDF returns the tokenized value for a column containing BigInt format data.
Signature:
pty_BigIntIns(data BigInt, dataElement string)
Parameters:
data: Specifies the column name of the data, to tokenize, in the table.dataElement: Specifies the name of the data element to protect theBigIntvalue.
Result:
- The UDF returns the tokenized
BigIntvalue.
Example:
select pty_BigIntIns(column_name,'BigInt_de') from table_name;
Supported Protection Methods:
| Function Name | Tokenization | Encryption | FPE | No Encryption | Masking | Monitoring |
|---|---|---|---|---|---|---|
| pty_BigIntIns() | Integer (8 Bytes) | No | No | Yes | No | Yes |
pty_BigIntSel()
The UDF returns the detokenized value for a column containing BigInt format data.
Signature:
pty_BigIntSel(data BigInt, dataElement string)
Parameters:
data: Specifies the column name of the data, to detokenize, in the table.dataElement: Specifies the name of the data element to unprotect theBigIntvalue.
Result:
- The UDF returns the detokenized
BigIntvalue.
Example:
select pty_BigIntSel(column_name,'BigInt_de') from table_name;
Supported Protection Methods:
| Function Name | Tokenization | Encryption | FPE | No Encryption | Masking | Monitoring |
|---|---|---|---|---|---|---|
| pty_BigIntSel() | Integer (8 Bytes) | No | No | Yes | No | Yes |
pty_DateEnc()
The UDF returns the encrypted value for a column containing Date format data.
Signature:
pty_DateEnc(data Date, dataElement string)
Parameters:
data: Specifies the column name of the data, to encrypt, in the table.dataElement: Specifies the name of the data element to encypt thedatevalue.
Result:
- The UDF returns a
stringvalue.
Example:
select pty_DateEnc(column_name,'enc_3des') from table_name;
Note: For the Date UDFs:
- Impala supports the date range from
0001-01-01to9999-12-31. - Protegrity supports the date range from
0600-01-01to3337-11-27.
Supported Protection Methods:
| Function Name | Tokenization | Encryption | FPE | No Encryption | Masking | Monitoring |
| pty_DateEnc() | No |
| No | Yes | No | Yes |
pty_DateDec()
The UDF returns the decrypted value for a column containing Date format data.
Signature:
pty_DateDec(data string, dataElement string)
Parameters:
data: Specifies the column name of the data, to decrypt, in the table.dataElement: Specifies the name of the data element to decypt thedatevalue.
Result:
- The UDF returns the
Datevalue.
Example:
select pty_DateDec(column_name,'enc_3des') from table_name;
Note: For the Date UDFs:
- Impala supports the date range from
0001-01-01to9999-12-31. - Protegrity supports the date range from
0600-01-01to3337-11-27.
Supported Protection Methods:
| Function Name | Tokenization | Encryption | FPE | No Encryption | Masking | Monitoring |
| pty_DateDec() | No |
| No | Yes | No | Yes |
pty_DateIns()
The UDF returns the tokenized value for a column containing Date format data.
Signature:
pty_DateIns(data Date, dataElement string)
Parameters:
data: Specifies the column name of the data, to tokenize, in the table.dataElement: Specifies the name of the data element to protect thedatevalue.
Result:
- The UDF returns the tokenized
Datevalue
Example:
select pty_DateIns(column_name,'Date_de') from table_name;
Note: For the Date UDFs:
- Impala supports the date range from
0001-01-01to9999-12-31. - Protegrity supports the date range from
0600-01-01to3337-11-27.
Supported Protection Methods:
| Function Name | Tokenization | Encryption | FPE | No Encryption | Masking | Monitoring |
|---|---|---|---|---|---|---|
| pty_DateIns() | Date Data Elements | No | No | Yes | No | Yes |
pty_DateSel()
The UDF returns the detokenized value for a column containing Date format data.
Signature:
pty_DateSel(data Date, dataElement string)
Parameters:
data: Specifies the column name of the data, to detokenize, in the table.dataElement: Specifies the name of the data element to unprotect thedatevalue.
Result:
- The UDF returns the detokenized
Datevalue.
Example:
select pty_DateSel(column_name,'Date_de') from table_name;
Note: For the Date UDFs:
- Impala supports the date range from
0001-01-01to9999-12-31. - Protegrity supports the date range from
0600-01-01to3337-11-27.
Supported Protection Methods:
| Function Name | Tokenization | Encryption | FPE | No Encryption | Masking | Monitoring |
|---|---|---|---|---|---|---|
| pty_DateSel() | Date Data Elements | No | No | Yes | No | Yes |
3.3.6 - Spark Java APIs
All the Spark Java APIs that are available for protection and unprotection in Big Data Protector to build secure Big Data applications are listed here.
Spark is an execution engine that carries out batch processing of jobs in-memory and handles a wider range of computational workloads. In addition to processing a batch of stored data, Spark is capable of manipulating data in real time.
Spark leverages the physical memory of the Hadoop system. It utilizes the Resilient Distributed Datasets (RDDs) to store the data in-memory and lowers latency, if the data fits in the memory size. The data is saved on the hard drive only if required. RDDs being the basic units of abstraction and computation in Spark, you can use the Spark protection and unprotection APIs to perform transformation operations on an RDD.
If you want to use the Spark Protector API in a Spark Java job, then you must implement the function interface as per the Spark Java programming specifications. Subsequently, you can use it in the required transformation of an RDD to tokenize the data.
Overview of the Spark Protector
The Protegrity Spark protector extends the functionality of the Spark engine and provides APIs that protect or unprotect the data as it is stored or retrieved.
Spark Protector Usage
The Protegrity Spark protector provides APIs for protecting and reprotecting the data using encryption or tokenization, and unprotecting data by using decryption or detokenization. Note: Ensure that you configure the Spark protector after installing the Big Data Protector.
Spark Scala
The Protegrity Spark protector (Java) can be used with Scala to protect the data by using encryption or tokenization. You can also use it with Scala to unprotect the data using decryption or detokenization.
Sample Code Usage for Spark (Scala)
The Spark protector sample program, described in this section, is an example on how to use the Protegrity Spark protector APIs with Scala.
The sample program utilizes the following three Scala classes for protecting and unprotecting data:
ProtectData.scala– This main class creates the Spark context object and calls the DataLoader class for reading cleartext data.UnProtectData.scala- This main class creates the Spark Context object and calls the DataLoader class for reading protected data.DataLoader.scala- This loader class fetches the input from the input path, calls the ProtectFunction to protect the data, and stores the protected data as output in the output path. In addition, it fetches the input from the protected path, calls the UnProtectFunction to unprotect the data, and stores the cleartext content as output.
The following functions perform protection for every new line in the input or unprotection for every new line in the output.
ProtectFunction- This class calls the Spark protector for every new line specified in the input to protect data.UnProtectFunction- This class calls the Spark protector for every new line specified in the input to unprotect data.
Main Job Class for Protect Operation – ProtectData.scala
ProtectData.scala
package com.protegrity.samples.spark.scala
import org.apache.spark.SparkConf
import org.apache.spark.SparkContext
object ProtectData {
def main(args: Array[String]) {
// create a SparkContext object, which tells Spark how to access a cluster.
val sparkContext = new SparkContext(new SparkConf())
// create the new object for class DataLoader
val protector = new DataLoader(sparkContext)
// Call writeProtectedData method which read clear data from input Path i.e (args[0]) and
write data in output path after protect operation
protector.writeProtectedData(args(0), args(1), ",")
}
}
Main Job Class for Unprotect Operation – UnProtectData.scala
UnProtectData.scala
package com.protegrity.samples.spark.scala
import org.apache.spark.SparkConf
import org.apache.spark.SparkContext
object UnProtectData {
def main(args: Array[String]) {
val sparkContext = new SparkContext(new SparkConf())
val protector = new DataLoader(sparkContext)
protector.unprotectData(args(0), args(1), ",")
}
}
Utility to call Protect or Unprotect Function – DataLoader.scala
DataLoader.scala
package com.protegrity.samples.spark.scala
import org.apache.log4j.Logger
import org.apache.spark.SparkContext
object DataLoader {
private val logger = Logger.getLogger(classOf[DataLoader])
}
/**
* A Data loader utility for reading & writing protected and un-protected data
*/
class DataLoader(private var sparkContext: SparkContext) {
private var data_element_names: Array[String] = Array("TOK_NAME", "TOK_PHONE",
"TOK_CREDIT_CARD", "TOK_AMOUNT")
private var appid: String = sparkContext.getConf.getAppId
/**
* Writes protected data to the output path delimited by the input delimiter
*
* @param inputPath - path of the input employee info file
* @param outputPath - path where the output should be saved
* @param delim - denotes the delimiter between the fields in the file
*/
def writeProtectedData(inputPath: String, outputPath: String, delim: String) {
// read lines from the input path & create RDD
val rdd = sparkContext.textFile(inputPath)
//import ProtectFunction
import com.protegrity.samples.spark.scala.ProtectFunction._
//call ProtectFunction on rdd
rdd.ProtectFunction(delim, appid, data_element_names, outputPath)
}
/**
* Reads protected data from the input path delimited by the input delimiter
*
* @param protectedInputPath - path of the protected employee data
* @param unprotectedOutputPath - output path where unprotected data should be stored.
* @param delim
*/
def unprotectData(protectedInputPath: String, unprotectedOutputPath: String, delim: String)
{
// read lines from the protectedInputPath & create RDD
val protectedRdd = sparkContext.textFile(protectedInputPath)
//import UnProtectFunction
import com.protegrity.samples.spark.scala.UnProtectFunction._
//call UnprotectFunction on rdd
protectedRdd.UnprotectFunction(delim, appid, data_element_names, unprotectedOutputPath)
}
}
ProtectFunction.scala
package com.protegrity.samples.spark.scala
import java.util.ArrayList
import org.apache.spark.rdd.RDD
import com.protegrity.spark.Protector
import com.protegrity.spark.PtySparkProtector
object ProtectFunction {
/*Defining this class as implicit,so that we can add new functionality to an RDD on the fly.
implicits are lexically bounded i.e If we import this class, then only we can use it's
functions otherwise not*/
implicit class Protect(rdd: RDD[String]) {
def ProtectFunction(delim: String, appid: String, dataElement: Array[String],
protectoutputpath: String) =
{
val protectedRDD = rdd.map { line =>
// splits the input seperated by delimiter in the line
val splits = line.split(delim)
// store first split in protectedString as we are not going to protect first split.
var protectedString = splits(0)
// Initialize input size
val input = Array.ofDim[String](splits.length)
// Initialize output size
val output = Array.ofDim[String](splits.length)
// Initialize errorList
val errorList = new ArrayList[Integer]()
// create the new object for class ptySparkProtector
var protector: Protector = new PtySparkProtector(appid)
// Iterate through the splits and call protect operation
for (i <- 1 until splits.length) {
input(i) = splits(i)
// To protect data, call protect method with parameter dataElement, errorList,
input array and output array.output will be stored in output[]
protector.protect(dataElement(i - 1), errorList, input, output)
//Apppend output with protectedString
protectedString += delim + output(i)
}
protectedString
}
// Save protectedRDD into output path
protectedRDD.saveAsTextFile(protectoutputpath)
}
}
}
UnprotectFunction.scala
package com.protegrity.samples.spark.scala
import java.util.ArrayList
import org.apache.spark.rdd.RDD
import com.protegrity.spark.Protector
import com.protegrity.spark.PtySparkProtector
object UnProtectFunction {
/*Defining this class as implicit,so that we can add new functionality to an RDD on the fly.
implicits are lexically bounded i.e If we import this class, then only we can use it's functions otherwise not*/
implicit class Unprotect(protectedRDD: RDD[String]) {
def UnprotectFunction(delim: String, appid: String, dataElement: Array[String], unprotectoutputpath: String) =
{
val unprotectedRDD = protectedRDD.map { line =>
// splits the input seperated by delimiter in the line
val splits = line.split(delim)
// store first split in unprotectedString
var unprotectedString = splits(0)
// Initialize input size
val input = Array.ofDim[String](splits.length)
// Initialize output size
val output = Array.ofDim[String](splits.length)
// Initialize errorList
val errorList = new ArrayList[Integer]()
// create the object for class ptySparkProtector
var protector: Protector = new PtySparkProtector(appid)
// Iterate through the splits and call unprotect operation
for (i <- 1 until splits.length) {
input(i) = splits(i)
// To unprotect data, call unprotect method with parameter dataElement, errorList, input array and output array.output will be stored in output[]
protector.unprotect(dataElement(i - 1), errorList, input, output)
//Apppend output with protectedString
unprotectedString += delim + output(i)
}
unprotectedString
}
// Save unprotectedRDD into output path
unprotectedRDD.saveAsTextFile(unprotectoutputpath)
}
}
}
Spark APIs and supported protection methods
The following table lists the Spark APIs, the input and output data types, and the supported Protection Methods:
| Operation | Input | Output | Protection Method Supported |
|---|---|---|---|
| Protect | Byte | Byte | Tokenization, Encryption, No Encyption, CUSP |
| Protect | Short | Short | Tokenization, No Encyption |
| Protect | Short | Byte | Encryption, CUSP |
| Protect | Int | Int | Tokenization, No Encyption |
| Protect | Int | Byte | Encryption, CUSP |
| Protect | Long | Long | Tokenization, No Encyption |
| Protect | Long | Byte | Encryption, CUSP |
| Protect | Float | Float | Tokenization, No Encyption |
| Protect | Float | Byte | Encryption, CUSP |
| Protect | Double | Double | Tokenization, No Encyption |
| Protect | Double | Byte | Encryption, CUSP |
| Protect | String | String | Tokenization, No Encyption |
| Protect | String | Byte | Encryption, CUSP |
| Unprotect | Byte | Byte | Tokenization, Encryption, No Encyption, CUSP |
| Unprotect | Short | Short | Tokenization, NoEncyption |
| Unprotect | Byte | Short | Encryption, CUSP |
| Unprotect | Int | Int | Tokenization, No Encyption |
| Unprotect | Byte | Int | Encryption, CUSP |
| Unprotect | Long | Long | Tokenization, No Encyption |
| Unprotect | Byte | Long | Encryption, CUSP |
| Unprotect | Float | Float | Tokenization, No Encyption |
| Unprotect | Byte | Float | Encryption, CUSP |
| Unprotect | Double | Double | Tokenization, No Encyption |
| Unprotect | Byte | Double | Encryption, CUSP |
| Unprotect | String | String | Tokenization, No Encyption |
| Unprotect | Byte | String | Encryption, CUSP |
| Reprotect | Byte | Byte | Tokenization, Encryption, CUSP |
| Reprotect | Short | Short | Tokenization |
| Reprotect | Int | Int | Tokenization |
| Reprotect | Long | Long | Tokenization |
| Reprotect | Float | Float | Tokenization |
| Reprotect | Double | Double | Tokenization |
| Reprotect | String | String | Tokenization |
Note: If a protected value is generated using Byte as both Input and Output, then only Encryption/CUSP is supported.
Loading the Cleartext Data from a File to HDFS
You must first create a sample csv file that contains the cleartext data in comma separated value
format. For example, create the basic_sample_data.csv file with the contents listed below.
| ID | Name | Phone | Credit Card | Amount |
|---|---|---|---|---|
| 928724 | Hultgren Caylor | 9823750987 | 376235139103947 | 6959123 |
| 928725 | Bourne Jose | 9823350487 | 6226600538383292 | 42964354 |
| 928726 | Sorce Hatti | 9824757883 | 6226540862865375 | 7257656 |
| 928727 | Lorie Garvey | 9913730982 | 5464987835837424 | 85447788 |
| 928728 | Belva Beeson | 9948752198 | 5539455602750205 | 59040774 |
| 928729 | Hultgren Caylor | 9823750987 | 376235139103947 | 3245234 |
| 928730 | Bourne Jose | 9823350487 | 6226600538383292 | 2300567 |
| 928731 | Lorie Garvey | 9913730982 | 5464987835837424 | 85447788 |
| 928732 | Bourne Jose | 9823350487 | 6226600538383292 | 3096233 |
| 928733 | Hultgren Caylor | 9823750987 | 376235139103947 | 5167763 |
| 928734 | Lorie Garvey | 9913730982 | 5464987835837424 | 85447788 |
To load the cleartext data from the basic_sample_data.csv file to HDFS, run the following command:
hadoop fs -put <Local_Filesystem_Path>/basic_sample_data.csv <Path_of_Cleartext_data_file>
where,
basic_sample_data.csv: Specifies the name of the file containing cleartext data.<Local_Filesystem_Path>: Specifies the directory path on the local machine where the basic_sample_data.csv file is saved.<Path_of_Cleartext_data_file>: Specifies the HDFS directory path for the file with the cleartext data.
Note: Ensure that the user who is running the command has read and write access to this location.
Protecting the Existing Data
To protect cleartext data, you must specify the name of the file, which contains the cleartext data and the name of the location that contains the file which would store the protected data. The following command reads the cleartext data from the basic_sample_data.csv file and stores it in the basic_sample_protected directory in protected form using the Spark APIs.
./spark-submit --master yarn --class com.protegrity.spark.ProtectData <PROTEGRITY_DIR>/samples/spark/lib/spark_protector_demo.jar
<Path_of_Cleartext_data_file>/basic_sample_data.csv
<Path_of_Protected_data_file>/basic_sample_protected
Note: Ensure that the user performing the task has the permissions to protect the data, as required, in the data security policy.
com.protegrity.spark.ProtectData: Specifies the Spark protector class for protecting the data.spark_protector_demo.jar: Specifies the sample.jarfile utilizing the Spark protector API to protect the data in the.csvfile. You must create this sample.jarfile by compiling the scala class files.<Path_of_Cleartext_data_file>: Specifies the HDFS directory path for the file with cleartext data.<Path_of_Protected_data_file>: Specifies the HDFS directory path for the file with protected data.basic_sample_data: Specifies the name of the file to read cleartext data.
Unprotecting the Protected Data
To unprotect the protected data, you must specify the name of the location that contains the file, which stores the protected data and the name of the location that contains the file to store the unprotected data. To retrieve the protected data from the basic_sample_protected directory and save it in the basic_sample_unprotected directory in unprotected form, use the following command.
./spark-submit --master yarn --class com.protegrity.spark.UnProtectData <PROTEGRITY_DIR>/samples/spark/lib/spark_protector_demo.jar
<Path_of_Protected_data_file>/basic_sample_protected_data <Path_of_Unprotected_data_file>/basic_sample_unprotected_data
Note: Ensure that the user performing the task has the permissions to unprotect the data, as required, in the data security policy.
where,
com.protegrity.spark.UnProtectData: Specifies the Spark protector class for unprotecting the data.spark_protector_demo.jar: Specifies the sample.jarfile utilizing the Spark protector API to unprotect the data in the.csvfile. You must create the sample.jarfile by compiling the scala class files.<Path_of_Protected_data_file>/basic_sample_protected_data: Specifies the HDFS directory path for the file with protected data.<Path_of_Protected_data_file>: Specifies the HDFS directory path for the file with protected data.<Path_of_Unprotected_data_file>/basic_sample_unprotected_data: Specifies the HDFS directory path for the file to store the unprotected data.
Retrieving the Unprotected Data from a File
To retrieve data from a file containing protected data, you must have access to the file. To view the unprotected data contained in the file, use the following command.
hadoop fs -cat <Path_of_Unprotected_data_file> /basic_sample_unprotected_data/part*
where,
<Path_of_Unprotected_data_file>/basic_sample_unprotected_data: Specifies the HDFS directory path for the file that contains the unprotected data.
getVersion()
The function returns the current version of the protector.
Signature:
public String getVersion()
Parameters:
- None
Result:
- The function returns the current version of the protector.
Example:
String applicationId = sparkContext.getConf().getAppId();
Protector protector = new PtySparkProtector(applicationId);
String version = protector.getVersion();
Exception:
- The function throws the
PtySparkProtectorExceptionif it is unable to return the current version of the Spark protector.
getVersionExtended()
The function returns the extended version information of the protector.
Signature:
public String getVersionExtended()
Parameters:
- None
Result:
- The function returns a String in the following format:where,
"BDP: <1>; JcoreLite: <2>; CORE: <3>;"- Is the current version of the Protector
- Is the Jcorelite library version
- Is the Core library version
Example:
String applicationId = sparkContext.getConf().getAppId();
Protector protector = new PtySparkProtector(applicationId);
String version = protector.getVersionExtended();
Exception:
- The function throws the
PtySparkProtectorExceptionif it is unable to return the current version of the Spark protector.
checkAccess()
The function checks the access permissions of the user for the specified data element(s).
Signature:
public boolean checkAccess(String dataElement, Permission permission, String... newDataElement)
Parameters:
dataElement: Specifies the name of the data element. (old data element when checking for reprotect access).Permission: Specifies the type of the access of the user for the data element(s).newDataElement: Specifies the name of the new data element when checking for reprotect access.
Result:
- The function returns the following values:
true: If the user has access to the data element(s).false: If the user does not have access to the data element(s).
Example:
import com.protegrity.bdp.protector.BDPProtector.Permission;
String dataElement = "dataelement";
Protector protector = new PtySparkProtector("protectAppId");
boolean accessProtectType = protector.checkAccess(dataElement, Permission.PROTECT);
boolean accessReprotectType = protector.checkAccess(dataElement, Permission.REPROTECT, dataElement);
boolean accessUnprotectType = protector.checkAccess(dataElement, Permission.UNPROTECT);
Exception:
- The function throws the
PtySparkProtectorExceptionif it is unable to verify the access of the user for the data element(s).
hmac()
Warning: The function is marked for deprecation and will be removed from the future releases.
Warning: It is recommended to use the HMAC data element with the protect() Byte API for hashing byte array data, instead of using the hmac() API.
The function performs hashing of the data using the HMAC operation on a single data item with a data element, which is associated with HMAC. It returns the hmac value of the data with the data element.
Signature:
public byte[] hmac(String dataElement, byte[] input)
Parameters:
dataElement: Specifies the name of the data element for HMAC.data: Specifies the bytearrayof data for HMAC.
Result:
- The function returns the
Byte arrayof HMAC data.
Example:
String applicationId = sparkContext.getConf().getAppId()
Protector protector = new PtySparkProtector(applicationId);
byte[] output = protector.hmac("HMAC-SHA1", "test1".getBytes());
Exception:
- The function throws the
PtySparkProtectorExceptionif it is unable to protect the data.
Supported Protection Methods:
| Function Name | Tokenization | Encryption | FPE | No Encryption | Masking | Monitoring | HMAC |
|---|---|---|---|---|---|---|---|
| hmac() | No | No | No | Yes | No | Yes | Yes |
protect() - Byte array data
The function protects the data provided as an array of a byte array. The type of protection applied is defined by the data element.
Note: For Date and Datetime type of data elements, the protect API returns an invalid input data error if the
input value falls between the non-existent date range from 05-OCT-1582 to 14-OCT-1582 of the Gregorian
Calendar.
For more information about the tokenization and de-tokenization of the cutover dates of the Proleptic
Gregorian Calendar, refer Date and Datetime tokenization.
Signature:
public void protect(String dataElement, List<Integer> errorIndex, byte[][] input, byte[][] output, String... charset)
Parameters:
dataElement: Specifies the name of the data element used for protection.errorIndex: Specifies the list of the Error Index.input: Specifies an array of the byte array type that contains the data to protect.output: Specifies an array of the byte array type that contains the protected data.charset: Specifies the charset of the input data. The applicable charsets are UTF-8 (default), UTF-16LE, and UTF-16BE.
Note: The Protegrity Spark protector only supports bytes converted from the string data type. If any other data type is directly converted to bytes and passed as input to the API that supports byte as input and provides byte as output, then data corruption might occur.
Warning: If you are using the Protect API, which accepts byte as input and provides byte as output, then ensure that when unprotecting the data, the Unprotect API, with byte as input and byte as output is utilized. In addition, ensure that the byte data being provided as input to the Protect API has been converted from a string data type only.
Result:
- The
outputvariable in the method signature contains the protected data.
Example:
String applicationId = sparkContext.getConf().getAppId();
Protector protector = new PtySparkProtector (applicationId);
String dataElement=”Binary”;
byte[][] input = new byte[][]{“test1”.getbytes(),”test2”.getbytes()};
byte[][] output = new byte[input.length][];
List<Integer> errorIndexList = new ArrayList<Integer>();
protector.protect(dataElement, errorIndexList, input, output, "UTF-8");
Exception:
- The function throws the
PtySparkProtectorExceptionif it is unable to protect the data.
Supported Protection Methods:
| Function Name | Tokenization | Encryption | FPE | No Encryption | Masking | Monitoring | HMAC |
| protect() - Byte array data |
|
| FPE (All) | Yes | Yes | Yes | Yes |
protect() - Short array data
The function protects the short format data provided as a short array. The type of protection applied is defined by dataElement.
Signature:
public void protect(String dataElement, List<Integer> errorIndex, short[] input, short[] output)
Parameters:
dataElement: Specifies the name of the data element used for protection.errorIndex: List of the Error Indexinput: Specifies the short array type that contains the data to protect.output: Specifies the short array type that contains the protected data.
Result:
- The
outputvariable in the method signature contains the protected data.
Example:
String applicationId = sparkContext.getConf().getAppId();
Protector protector = new PtySparkProtector (applicationId);
String dataElement=”short”;
short[] input = new short[] {1234, 4545};
short[] output = new short[input.length];
List<Integer> errorIndexList = new ArrayList<Integer>();
protector.protect(dataElement, errorIndexList, input, output);
Exception:
- The function throws the
PtySparkProtectorExceptionif it is unable to protect the data.
Supported Protection Methods:
| Function Name | Tokenization | Encryption | FPE | No Encryption | Masking | Monitoring |
|---|---|---|---|---|---|---|
| protect() - Short array data | Integer (2 Bytes) | No | No | Yes | No | Yes |
protect() - Short array data for encryption
The function encrypts the short format data provided as a short array. The type of encryption applied is defined by dataElement.
Signature:
public void protect(String dataElement, List<Integer> errorIndex, short[] input, byte[][] output)
Parameters:
dataElement: Specifies the name of the data element used for encryption.errorIndex: List of the Error Index.input: Specifies a short array type that contains the data to be encrypted.output: Specifies an encrypted array of byte array that contains the encrypted data.
Result:
- The
outputvariable in the method signature contains the encrypted data.
Example:
String applicationId = sparkContext.getConf().getAppId();
Protector protector = new PtySparkProtector (applicationId);
String dataElement= "AES-256";
short[] input = new short[] {1234, 4545};
byte[][] output = new byte[input.length][];
List<Integer> errorIndexList = new ArrayList<Integer>();
protector.protect(dataElement, errorIndexList, input, output);
Exception:
- The function throws the
PtySparkProtectorExceptionif it is unable to encrypt the data.
Supported Protection Methods:
| Function Name | Tokenization | Encryption | FPE | No Encryption | Masking | Monitoring |
| protect() - Short array data for encryption | No |
| No | Yes | No | Yes |
protect() - Int array
The function protects the data provided as int array. The type of protection applied is defined by the dataElement.
Signature:
public void protect(String dataElement, List<Integer> errorIndex, int[] input, int[] output)
Parameters:
dataElement: Specifies the name of the data element to protect the data.errorIndex: Is the list of the Error Index.input: Is anintarray of data to be protected.output: Is anintarray containing the protected data.
Result:
- The output variable in the method signature contains the protected
intdata.
Example:
String applicationId = sparkContext.getConf().getAppId();
Protector protector = new PtySparkProtector (applicationId);
String dataElement = "int";
int[] input = new int[]{1234, 4545};
int[] output = new int[input.length];
List<Integer> errorIndexList = new ArrayList<Integer>();
protector.protect(dataElement, errorIndexList, input, output);
Supported Protection Methods:
| Function Name | Tokenization | Encryption | FPE | No Encryption | Masking | Monitoring |
|---|---|---|---|---|---|---|
| protect() - Int array | Integer (4 Bytes) | No | No | Yes | No | Yes |
protect() - Int array data for encryption
The function encrypts the data provided as int array. The type of encryption applied is defined by the dataElement.
Signature:
public void protect(String dataElement, List<Integer> errorIndex, int[] input, byte[][] output)
Parameters:
dataElement: Specifies the name of the data element to encrypt the data.errorIndex: Is the list of the Error Index.input: Is anintarray of data to be encrypted.output: Is an array of byte array containing the encrypted data.
Result:
- The output variable in the method signature contains the encrypted data.
Example:
String applicationId = sparkContext.getConf().getAppId();
Protector protector = new PtySparkProtector (applicationId);
String dataElement = "AES-256";
int[] input = new int[]{1234, 4545};
byte[][] output = new byte[input.length][];
List<Integer> errorIndexList = new ArrayList<Integer>();
protector.protect(dataElement, errorIndexList, input, output);
Exception:
- The function throws the
PtySparkProtectorExceptionif it is unable to encrypt the data.
Supported Protection Methods:
| Function Name | Tokenization | Encryption | FPE | No Encryption | Masking | Monitoring |
| protect() - Int array data for encryption | No |
| No | Yes | No | Yes |
protect() - Long array data
The function protects the data provided as long byte array. The type of protection applied is defined by the dataElement.
Signature:
public void protect(String dataElement, List<Integer> errorIndex, long[] input, long[] output)
Parameters:
dataElement: Specifies the name of the data element to protect the data.errorIndex: Is the list of the error index.input: Is thelongarray of data to be protected.output: Is thelongarray containing the protected data.
Result:
- The
outputvariable in the method signature contains the protected data
Example:
String applicationId = sparkContext.getConf().getAppId();
Protector protector = new PtySparkProtector (applicationId);
String dataElement = "long";
long[] input = new long[] {1234, 4545};
long[] output = new long[input.length];
List<Integer> errorIndexList = new ArrayList<Integer>();
protector.protect(dataElement, errorIndexList, input, output);
Exception:
- The function throws the
PtySparkProtectorExceptionif it is unable to protect the data.
Supported Protection Methods:
| Function Name | Tokenization | Encryption | FPE | No Encryption | Masking | Monitoring |
|---|---|---|---|---|---|---|
| protect() - Long array data | Integer (8 Bytes) | No | No | Yes | No | Yes |
protect() - Long array data for encryption
The function encrypts the data provided as long byte array. The type of protection applied is defined by the dataElement.
Signature:
public void protect(String dataElement, List<Integer> errorIndex, long[] input, byte[][] output)
Parameters:
dataElement: Specifies the name of the data element to encrypt the data.errorIndex: Is the list of the error index.input: Is thelongarray of data to be encrypted.output: Is an array of a byte array containing the encrypted data.
Result:
- The
outputvariable in the method signature contains the encrypted data.
Example:
String applicationId = sparkContext.getConf().getAppId();
Protector protector = new PtySparkProtector (applicationId);
String dataElement = "long";
long[] input = new long[] {1234, 4545};
long[] output = new long[input.length];
List<Integer> errorIndexList = new ArrayList<Integer>();
protector.protect(dataElement, errorIndexList, input, output);
Exception:
- The function throws the
PtySparkProtectorExceptionif it is unable to protect the data.
Supported Protection Methods:
| Function Name | Tokenization | Encryption | FPE | No Encryption | Masking | Monitoring |
| protect() - Long array data for encryption | No |
| No | Yes | No | Yes |
protect() - Float array data
The function protects the data provided as a float array. The type of protection applied is defined by the dataElement.
Signature:
public void protect(String dataElement, List<Integer> errorIndex, float[] input, float[] output)
Parameters:
dataElement: Specifies the name of the data element to protect the data.errorIndex: Is the list of the Error Index.input: Specifies thefloatarray of data to be protected.output: Specifies thefloatarray containing the protected data.
Result:
- The
outputvariable in the method signature contains the protectedfloatdata.
Example:
String applicationId = sparkContext.getConf().getAppId();
Protector protector = new PtySparkProtector (applicationId);
String dataElement = "float";
float[] input = new float[] {123.4f, 454.5f};
float[] output = new float[input.length];
List<Integer> errorIndexList = new ArrayList<Integer>();
protector.protect(dataElement, errorIndexList, input, output);
Exception:
- The function throws the
PtySparkProtectorExceptionif it fails to protect the data.
Supported Protection Methods:
| Function Name | Tokenization | Encryption | FPE | No Encryption | Masking | Monitoring |
|---|---|---|---|---|---|---|
| protect() - Float array data | No | No | No | Yes | No | Yes |
protect() - Float array data for encryption
The function encrypts the data provided as a float array. The type of protection applied is defined by the dataElement.
Signature:
public void protect(String dataElement, List<Integer> errorIndex, float[] input, byte[][] output)
Parameters:
dataElement: Specifies the name of the data element to encrypt the data.errorIndex: Is the list of the Error Index.input: Specifies thefloatarray of data to be encrypted.output: Specifies the array of byte array containing the encrypted data.
Result:
- The
outputvariable in the method signature contains the encrypted data.
Example:
String applicationId = sparkContext.getConf().getAppId();
Protector protector = new PtySparkProtector (applicationId);
String dataElement = "AES-256";
float[] input = new float[] {123.4f, 454.5f};
byte[][] output = new byte[input.length][];
List<Integer> errorIndexList = new ArrayList<Integer>();
protector.protect(dataElement, errorIndexList, input, output);
Exception:
- The function throws the
PtySparkProtectorExceptionif it fails to encrypt the data.
Supported Protection Methods:
| Function Name | Tokenization | Encryption | FPE | No Encryption | Masking | Monitoring |
| protect() - Float array data for encryption | No |
| No | Yes | No | Yes |
protect() - Double array data
The function protects the data provided as a double array. The type of protection applied is defined by the dataElement.
Signature:
public void protect(String dataElement, List<Integer> errorIndex, double[] input, double[] output)
Parameters:
dataElement: Specifies the name of the data element to protect the data.errorIndex: Is the list of the error index.input: Is thedoublearray of data to be protected.output: Is thedoublearray containing the protected data.
Warning: Ensure that you use the data element with the No Encryption method only. Using any other data element might cause corruption of data.
Result:
- The output variable in the method signature contains the protected
doubledata.
Example:
String applicationId = sparkContext.getConf().getAppId();
Protector protector = new PtySparkProtector (applicationId);
String dataElement = "double";
double[] input = new double[] {123.4, 454.5};
double[] output = new double[input.length];
List<Integer> errorIndexList = new ArrayList<Integer>();
protector.protect(dataElement, errorIndexList, input, output);
Exception:
- The function throws the
PtySparkProtectorExceptionif it fails to protect the data.
Supported Protection Methods:
| Function Name | Tokenization | Encryption | FPE | No Encryption | Masking | Monitoring |
|---|---|---|---|---|---|---|
| protect() - Double array data | No | No | No | Yes | No | Yes |
protect() - Double array data for encryption
The function encrypts the data provided as a double array. The type of protection applied is defined by the dataElement.
Signature:
public void protect(String dataElement, List<Integer> errorIndex, double[] input, byte[][] output)
Parameters:
dataElement: Specifies the name of the data element to encrypt the data.errorIndex: Is the list of the Error Index.input: Specifies thedoublearray of data to be encrypted.output: Specifies an array of byte array containing the encrypted data.
Result:
- The
outputvariable in the method signature contains the encrypted data.
Example:
String applicationId = sparkContext.getConf().getAppId();
Protector protector = new PtySparkProtector (applicationId);
String dataElement = "AES-256";
double[] input = new double[] {123.4, 454.5};
byte[][] output = new byte[input.length][];
List<Integer> errorIndexList = new ArrayList<Integer>();
protector.protect(dataElement, errorIndexList, input, output);
Exception:
- The function throws the
PtySparkProtectorExceptionif it fails to encrypt the data.
Supported Protection Methods:
| Function Name | Tokenization | Encryption | FPE | No Encryption | Masking | Monitoring |
| protect() - Double array data for encryption | No |
| No | Yes | No | Yes |
protect() - String array data
The function protects the data provided as a string array. The type of protection applied is defined by the dataElement.
Note: For Date and Datetime type of data elements, the protect API returns an invalid input data error if the input value falls between the non-existent date range from 05-OCT-1582 to 14-OCT-1582 of the Gregorian Calendar.
For more information about the tokenization and de-tokenization of the cutover dates of the Proleptic Gregorian Calendar, refer Date and Datetime tokenization.
Signature:
public void protect(String dataElement, List<Integer> errorIndex, String[] input, String[] output)
Parameters:
dataElement: Specifies the name of the data element to protect the data.errorIndex: Is the list of the error index.input: Is theStringarray of data to be protected.output: Is theStringarray containing the protected data.
Result:
- The output variable in the method signature contains the protected
Stringdata.
Example:
String applicationId = sparkContext.getConf().getAppId();
Protector protector = new PtySparkProtector (applicationId);
String dataElement = "AlphaNum";
String[] input = new String[] {"test1", "test2"};
String[] output = new String[input.length];
List<Integer> errorIndexList = new ArrayList<Integer>();
protector.protect(dataElement, errorIndexList, input, output);
Exception:
- The function throws the
PtySparkProtectorExceptionif it fails to protect the data.
Supported Protection Methods:
| Function Name | Tokenization | Encryption | FPE | No Encryption | Masking | Monitoring | HMAC |
| protect() - String array data |
| No | FPE (All) | Yes | Yes | Yes | Yes |
protect() - String array data for encryption
The function encrypts the data provided as a String array. The type of protection applied is defined by the dataElement.
Signature:
public void protect(String dataElement, List<Integer> errorIndex, String[] input, byte[][] output)
Parameters:
dataElement: Specifies the name of the data element to encrypt the data.errorIndex: Is the list of the Error Index.input: Specifies theStringarray of data to be encrypted.output: Specifies the array of byte array containing the encrypted data.
Result:
- The
outputvariable in the method signature contains the encrypted data.
Example:
String applicationId = sparkContext.getConf().getAppId();
Protector protector = new PtySparkProtector (applicationId);
String dataElement = "AES-256";
String[] input = new String[] {"test1", "test2"};
byte[][] output = new byte[input.length][];
List<Integer> errorIndexList = new ArrayList<Integer>();
protector.protect(dataElement, errorIndexList, input, output);
Exception:
- The function throws the
PtySparkProtectorExceptionif it fails to encrypt the data.
Supported Protection Methods:
| Function Name | Tokenization | Encryption | FPE | No Encryption | Masking | Monitoring |
| protect() - String array data for encryption | No |
| No | Yes | No | Yes |
unprotect() - Byte array data
The function unprotects the data provided as an array of a byte array. The type of unprotection applied is defined by the dataElement.
Note: For Date and Datetime type of data elements, the protect API returns an invalid input data error if the input value falls between the non-existent date range from 05-OCT-1582 to 14-OCT-1582 of the Gregorian Calendar.
For more information about the tokenization and de-tokenization of the cutover dates of the Proleptic Gregorian Calendar, refer Date and Datetime tokenization.
Signature:
public void unprotect(String dataElement, List<Integer> errorIndex, byte[][] inputDataItems, byte[][] output, String... charset)
Parameters:
dataElement: Specifies the name of the data element to unprotect the data.errorIndex: Specifies the list of the Error Index.input: Specifies an array of the byte array type that contains the data to unprotect.output: Specifies an array of the byte array type that contains the unprotected data.charset: Specifies the charset of the input data. The applicable charsets are UTF-8 (default), UTF-16LE, and UTF-16BE.
Warning: The Protegrity Spark protector only supports bytes converted from the string data type. If any other data type is directly converted to bytes and passed as input to the API that supports byte as input and provides byte as output, then data corruption might occur.
Result:
- The
outputvariable in the method signature contains the unprotected data.
Example:
String applicationId = sparkContext.getConf().getAppId();
Protector protector = new PtySparkProtector (applicationId);
String dataElement = "Binary";
byte[][] input = new byte[][] {“test1”.getbytes(), ”test2”.getbytes()};
byte[][] output = new byte[input.length][];
List<Integer> errorIndexList = new ArrayList<Integer>();
protector.unprotect(dataElement, errorIndexList, input, output, "UTF-8");
Exception:
- The function throws the
PtySparkProtectorExceptionif it is unable to unprotect the data.
Supported Protection Methods:
| Function Name | Tokenization | Encryption | FPE | No Encryption | Masking | Monitoring |
| unprotect() - Byte array data |
|
| FPE (All) | Yes | Yes | Yes |
unprotect() - Short array data
The function unprotects the short format data provided as a short array. The type of protection applied is defined by the dataElement.
Signature:
public void unprotect(String dataElement, List<Integer> errorIndex, short[] input, short[] output)
Parameters:
dataElement: Specifies the name of the data element used to unprotect the data.errorIndex: List of the Error Indexinput: Specifies the short array type that contains the data to unprotect.output: Specifies the short array type that contains the unprotected data.
Result:
- The
outputvariable in the method signature contains the unprotected data.
Example:
String applicationId = sparkContext.getConf().getAppId();
Protector protector = new PtySparkProtector (applicationId);
String dataElement = "short";
short[] input = new short[]{1234, 4545};
short[] output = new short[input.length];
List<Integer> errorIndexList = new ArrayList<Integer>();
protector.unprotect(dataElement, errorIndexList, input, output);
Exception:
- The function throws the
PtySparkProtectorExceptionif it is unable to unprotect the data.
Supported Protection Methods:
| Function Name | Tokenization | Encryption | FPE | No Encryption | Masking | Monitoring |
|---|---|---|---|---|---|---|
| unprotect() - Short array data | Integer (2 Bytes) | No | No | Yes | No | Yes |
unprotect() - Short array data for decryption
The function decrypts the array of byte array to get short array. The type of encryption applied is defined by the dataElement.
Signature:
public void unprotect(String dataElement, List<Integer> errorIndex, byte[][] input, short[] output)
Parameters:
dataElement: Specifies the name of the data element used to decrypt the data.errorIndex: Is the list of the Error Index.input: Specifies an array of the byte array type that contains the data to be decrypted.output: Specifies theshortarray that contains the decrypted data.
Result:
- The
outputvariable in the method signature contains the decrypted data.
Example:
String applicationId = sparkContext.getConf().getAppId();
Protector protector = new PtySparkProtector (applicationId);
String dataElement = "AES-256";
// here input is encrypted short array created using our below API
// public void protect(String dataElement, List<Integer> errorIndex, short[] input,
byte[][] output) throws PtySparkProtectorException;
byte[][] input = { <encrypted short array> }
short[] output = new short[input.length];
List<Integer> errorIndexList = new ArrayList<Integer>();
protector.unprotect(dataElement, errorIndexList, input, output);
Exception:
- The function throws the
PtySparkProtectorExceptionif it is unable to decrypt the data.
Supported Protection Methods:
| Function Name | Tokenization | Encryption | FPE | No Encryption | Masking | Monitoring |
| unprotect() - Short array data for decryption | No |
| No | Yes | No | Yes |
unprotect() - Int array data
The function unprotects the data provided as int array. The type of unprotection applied is defined by the dataElement.
Signature:
public void protect(String dataElement, List<Integer> errorIndex, int[] input, int[] output)
Parameters:
dataElement: Specifies the name of the data element to unprotect the data.errorIndex: Is the list of the Error Index.input: Is anintarray of data to be unprotected.output: Is anintarray containing the unprotected data.
Result:
- The output variable in the method signature contains the unprotected
intdata.
Example:
String applicationId = sparkContext.getConf().getAppId();
Protector protector = new PtySparkProtector (applicationId);
String dataElement = "int";
int[] input = new int[]{1234, 4545};
int[] output = new int[input.length];
List<Integer> errorIndexList = new ArrayList<Integer>();
protector.unprotect(dataElement, errorIndexList, input, output);
Supported Protection Methods:
| Function Name | Tokenization | Encryption | FPE | No Encryption | Masking | Monitoring |
|---|---|---|---|---|---|---|
| unprotect() - Int array | Integer (4 Bytes) | No | No | Yes | No | Yes |
unprotect() - Int array data for decryption
The function decrypts an array of byte array to get an int array. The type of decryption applied is defined by the dataElement.
Signature:
public void unprotect(String dataElement, List<Integer> errorIndex, byte[][] input, int[] output)
Parameters:
dataElement: Specifies the name of the data element to decrypt the data.errorIndex: Is the list of the Error Indexinput: Is an array of abytearray containing the encrypted data.output: Is anintarray containing the decrypted data.
Result:
- The output variable in the method signature contains the decrypted data.
Example:
String applicationId = sparkContext.getConf().getAppId();
Protector protector = new PtySparkProtector (applicationId);
String dataElement = "AES-256";
// here input is encrypted int array created using our below API
// public void protect(String dataElement, List<Integer> errorIndex, int[] input, byte[]
[] output) throws PtySparkProtectorException;
byte[][] input = {<encrypted int array>};
int[] output = new int[input.length];
List<Integer> errorIndexList = new ArrayList<Integer>();
protector.unprotect(dataElement, errorIndexList, input, output);
Exception:
- The function throws the
PtySparkProtectorExceptionif it is unable to decrypt the data.
Supported Protection Methods:
| Function Name | Tokenization | Encryption | FPE | No Encryption | Masking | Monitoring |
| unprotect() - Int array data for decryption | No |
| No | Yes | No | Yes |
unprotect() - Long array data
The function unprotects the data provided as long array. The type of unprotection applied is defined by the dataElement.
Signature:
public void unprotect(String dataElement, List<Integer> errorIndex, long[] input, long[] output)
Parameters:
dataElement: Specifies the name of the data element to unprotect the data.errorIndex: Is the list of the error index.input: Is thelongarray of data to be unprotected.output: Is thelongarray containing the unprotected data.
Result:
- The
outputvariable in the method signature contains the unprotected data.
Example:
String applicationId = sparkContext.getConf().getAppId();
Protector protector = new PtySparkProtector (applicationId);
String dataElement = "long";
long[] input = new long[] {1234, 4545};
long[] output = new long[input.length];
List<Integer> errorIndexList = new ArrayList<Integer>();
protector.unprotect(dataElement, errorIndexList, input, output);
Exception:
- The function throws the
PtySparkProtectorExceptionif it is unable to unprotect the data.
Supported Protection Methods:
| Function Name | Tokenization | Encryption | FPE | No Encryption | Masking | Monitoring |
|---|---|---|---|---|---|---|
| unprotect() - Long array data | Integer (8 Bytes) | No | No | Yes | No | Yes |
unprotect() - Long array data for decryption
The function decrypts an array of byte array to get a long array. The type of decryption applied is defined by the dataElement.
Signature:
public void unprotect(String dataElement, List<Integer> errorIndex, byte[][] input, long[] output)
Parameters:
dataElement: Specifies the name of the data element to decrypt the data.errorIndex: Is the list of the error index.input: Is an array of byte array of data to be decrypted.output: Is alongarray containing the decrypted data.
Result:
- The
outputvariable in the method signature contains the decrypted data.
Example:
String applicationId = sparkContext.getConf().getAppId();
Protector protector = new PtySparkProtector (applicationId);
String dataElement = "AES-256";
// here input is encrypted long array created using our below API
// public void protect(String dataElement, List<Integer> errorIndex, long[] input,
byte[][] output) throws PtySparkProtectorException;
byte[][] input = { <encrypted long array> };
long[] output = new long[input.length];
List<Integer> errorIndexList = new ArrayList<Integer>();
protector.unprotect(dataElement, errorIndexList, input, output);
Exception:
- The function throws the
PtySparkProtectorExceptionif it is unable to decrypt the data.
Supported Protection Methods:
| Function Name | Tokenization | Encryption | FPE | No Encryption | Masking | Monitoring |
| unprotect() - Long array data for decryption | No |
| No | Yes | No | Yes |
unprotect() - Float array data
The function unprotects the data provided as a float array. The type of unprotection applied is defined by the dataElement.
Signature:
public void unprotect(String dataElement, List<Integer> errorIndex, float[] input, float[] output)
Parameters:
dataElement: Specifies the name of the data element to unprotect the data.errorIndex: Is the list of the Error Index.input: Specifies thefloatarray of data to be unprotected.output: Specifies thefloatarray containing the unprotected data.
Result:
- The
outputvariable in the method signature contains the unprotectedfloatdata.
Warning: Ensure that you use the data element with the No Encryption method only. Using any other data element might cause data corruption.
Example:
String applicationId = sparkContext.getConf().getAppId();
Protector protector = new PtySparkProtector (applicationId);
String dataElement = "float";
float[] input = new float[] {123.4f, 454.5f};
float[] output = new float[input.length];
List<Integer> errorIndexList = new ArrayList<Integer>();
protector.unprotect(dataElement, errorIndexList, input, output);
Exception:
- The function throws the
PtySparkProtectorExceptionif it fails to unprotect the data.
Supported Protection Methods:
| Function Name | Tokenization | Encryption | FPE | No Encryption | Masking | Monitoring |
|---|---|---|---|---|---|---|
| unprotect() - Float array data | No | No | No | Yes | No | Yes |
unprotect() - Float array data for decryption
The function decrypts an array of byte array to get a float array. The type of decryption applied is defined by the dataElement.
Signature:
public void unprotect(String dataElement, List<Integer> errorIndex, byte[][] input, float[] output)
Parameters:
dataElement: Specifies the name of the data element to decrypt the data.errorIndex: Is the list of the Error Index.input: Is an array of abytearray containing the encrypted data.output: Specifies thefloatarray containing the decrypted data.
Warning: Ensure that you use the data element with either the No Encryption method or Encryption data element only. Using any other data element might cause data corruption.
Result:
- The
outputvariable in the method signature contains the decrypted data.
Example:
String applicationId = sparkContext.getConf().getAppId();
Protector protector = new PtySparkProtector (applicationId);
String dataElement = "AES-256";
// here input is encrypted float array created using our below API
// public void protect(String dataElement, List<Integer> errorIndex, float[] input,
byte[][] output) throws PtySparkProtectorException;
byte[][] input = { <encrypted float array> };
float[] output = new float[input.length][];
List<Integer> errorIndexList = new ArrayList<Integer>();
protector.unprotect(dataElement, errorIndexList, input, output);
Exception:
- The function throws the
PtySparkProtectorExceptionif it fails to decrypt the data.
Supported Protection Methods:
| Function Name | Tokenization | Encryption | FPE | No Encryption | Masking | Monitoring |
| unprotect() - Float array data for decryption | No |
| No | Yes | No | Yes |
unprotect() - Double array data
The function unprotects the data provided as a double array. The type of unprotection applied is defined by the dataElement.
Signature:
public void unprotect(String dataElement, List<Integer> errorIndex, double[] input, double[] output)
Parameters:
dataElement: Specifies the name of the data element to unprotect the data.errorIndex: Is the list of the error index.input: Is thedoublearray of data to be unprotected.output: Is thedoublearray containing the unprotected data.
Warning: Ensure that you use the data element with the No Encryption method only. Using any other data element might cause corruption of data.
Result:
- The output variable in the method signature contains the unprotected
doubledata.
Example:
String applicationId = sparkContext.getConf().getAppId();
Protector protector = new PtySparkProtector (applicationId);
String dataElement = "double";
double[] input = new double[] {123.4, 454.5};
double[] output = new double[input.length];
List<Integer> errorIndexList = new ArrayList<Integer>();
protector.unprotect(dataElement, errorIndexList, input, output);
Exception:
- The function throws the
PtySparkProtectorExceptionif it fails to unprotect the data.
Supported Protection Methods:
| Function Name | Tokenization | Encryption | FPE | No Encryption | Masking | Monitoring |
|---|---|---|---|---|---|---|
| unprotect() - Double array data | No | No | No | Yes | No | Yes |
unprotect() - Double array data for decryption
The function decrypts an array of byte array to get a double array. The type of decryption applied is defined by the dataElement.
Signature:
public void protect(String dataElement, List<Integer> errorIndex, byte[][] input, double[] output)
Parameters:
dataElement: Specifies the name of the data element to decrypt the data.errorIndex: Is the list of the Error Index.input: Specifies an array of a byte array containing the encrypted data.output: Specifies thedoublearray containing the decrypted data.
Warning: Ensure that you use the data element with either the No Encryption method or Encryption data element only. Using any other data element might cause data corruption.
Result:
- The
outputvariable in the method signature contains the decrypted data.
Example:
String applicationId = sparkContext.getConf().getAppId();
Protector protector = new PtySparkProtector (applicationId);
String dataElement = "AES-256";
// here input is encrypted double array created using our below API
// public void protect(String dataElement, List<Integer> errorIndex, double[] input,
byte[][] output) throws PtySparkProtectorException;
byte[][] input = { <encrypted double array> };
double[] output = new double[input.length];
List<Integer> errorIndexList = new ArrayList<Integer>();
protector.unprotect(dataElement, errorIndexList, input, output);
Exception:
- The function throws the
PtySparkProtectorExceptionif it fails to decrypt the data.
Supported Protection Methods:
| Function Name | Tokenization | Encryption | FPE | No Encryption | Masking | Monitoring |
| unprotect() - Double array data for decryption | No |
| No | Yes | No | Yes |
unprotect() - String array data
The function unprotects the data provided as a String array. The type of protection applied is defined by the dataElement.
Note: For Date and Datetime type of data elements, the protect API returns an invalid input data error if the input value falls between the non-existent date range from 05-OCT-1582 to 14-OCT-1582 of the Gregorian Calendar.
For more information about the tokenization and de-tokenization of the cutover dates of the Proleptic
Gregorian Calendar, refer Date and Datetime tokenization.
Signature:
public void unprotect(String dataElement, List<Integer> errorIndex, String[] input, String[] output)
Parameters:
dataElement: Specifies the name of the data element to unprotect the data.errorIndex: Is the list of the error index.input: Is theStringarray of data to be unprotected.output: Is theStringarray containing the unprotected data.
Result:
- The output variable in the method signature contains the unprotected data.
Example:
String applicationId = sparkContext.getConf().getAppId();
Protector protector = new PtySparkProtector (applicationId);
String dataElement = "AlphaNum";
String[] input = new String[] {"test1", "test2"};
String[] output = new String[input.length];
List<Integer> errorIndexList = new ArrayList<Integer>();
protector.unprotect(dataElement, errorIndexList, input, output);
Exception:
- The function throws the
PtySparkProtectorExceptionif it fails to unprotect the data.
Supported Protection Methods:
| Function Name | Tokenization | Encryption | FPE | No Encryption | Masking | Monitoring |
| unprotect() - String array data |
| No | FPE (All) | Yes | Yes | Yes |
unprotect() - String array data for decryption
The function decrypts an array of byte array to get a String array. The type of protection applied is defined by the dataElement.
Signature:
public void unprotect(String dataElement, List<Integer> errorIndex, byte[][] input, String[] output)
Parameters:
dataElement: Specifies the name of the data element to decrypt the data.errorIndex: Is the list of the Error Index.input: Specifies the array of byte array containing the encrypted data.output: Specifies theStringarray containing the decrypted data.
Result:
- The
outputvariable in the method signature contains the decrypted data.
Example:
String applicationId = sparkContext.getConf().getAppId();
Protector protector = new PtySparkProtector (applicationId);
String dataElement = "AES-256";
// here input is encrypted String array created using our below API
// public void protect(String dataElement, List<Integer> errorIndex, String[] input,
byte[][] output) throws PtySparkProtectorException;
byte[][] input = { <encrypted string array> };
String[] output = new String[input.length];
List<Integer> errorIndexList = new ArrayList<Integer>();
protector.unprotect(dataElement, errorIndexList, input, output);
Exception:
- The function throws the
PtySparkProtectorExceptionif it fails to encrypt the data.
Supported Protection Methods:
| Function Name | Tokenization | Encryption | FPE | No Encryption | Masking | Monitoring |
| unprotect() - String array data for decryption | No |
| No | Yes | No | Yes |
reprotect() - Byte array data
The function reprotects the array of byte array data, protected earlier, with a different data element.
Signature:
public void reprotect(String oldDataElement, String newDataElement, List<Integer> errorIndex, byte[][] input, byte[][] output, String... charset)
Parameters:
oldDataElement: Specifies the name of the data element with which data was protected earlier.newDataElement: Specifies the name of the new data element to reprotect the data.errorIndex: Specifies the list of the Error Indexinput: Is an array of a byte array that contains the data to be encrypted.output: Is an array of a byte array containing the reprotected data.charset: Specifies the charset of the input data. The applicable charsets are UTF-8 (default), UTF-16LE, and UTF-16BE.
Result:
- The
outputvariable in the method signature contains the reprotected data.
Example:
String applicationId = sparkContext.getConf().getAppId();
Protector protector = new PtySparkProtector (applicationId);
String oldDataElement = "Binary";
String newDataElement = "Binary_1";
byte[][] input = new byte[][] {"test1".getBytes(), "test2".getBytes()};
byte[][] output = new byte[input.length][];
List<Integer> errorIndexList = new ArrayList<Integer>();
protector.reprotect(oldDataElement, newDataElement, errorIndexList, input, output, "UTF-8");
Exception:
- The function throws the
PtySparkProtectorExceptionif it fails to reprotect the data.
Supported Protection Methods:
| Function Name | Tokenization | Encryption | FPE | No Encryption | Masking | Monitoring |
| reprotect() - Byte array data |
|
| FPE (All) | Yes | Yes | Yes |
reprotect() - Short array data
The function reprotects the short array data that was protected earlier with a different data element.
Signature:
public void reprotect(String oldDataElement, String newDataElement, List<Integer> errorIndex, short[] input, short[] output)
Parameters:
oldDataElement: Specifies the name of the data element with which data was protected earlier.newDataElement: Specifies the name of the new data element to reprotect the data.errorIndex: Specifies the list of the Error Indexinput: Specifies theshortarray of data to be reprotected.output: Specifies theshortarray containing the reprotected data.
Result:
- The
outputvariable in the method signature contains the reprotected data.
Example:
String applicationId = sparkContext.getConf().getAppId();
Protector protector = new PtySparkProtector (applicationId);
String oldDataElement = "short";
String newDataElement = "short_1";
short[] input = new short[] {135, 136};
short[] output = new short[input.length];
List<Integer> errorIndexList = new ArrayList<Integer>();
protector.reprotect(oldDataElement, newDataElement, errorIndexList, input, output);
Exception:
- The function throws the
PtySparkProtectorExceptionif it is unable to reprotect the data.
Supported Protection Methods:
| Function Name | Tokenization | Encryption | FPE | No Encryption | Masking | Monitoring |
|---|---|---|---|---|---|---|
| reprotect() - Short array data | Integer (2 Bytes) | No | No | Yes | No | Yes |
reprotect() - Int array data
The function reprotects the int array data that was protected earlier with a different data element.
Signature:
public void reprotect(String oldDataElement, String newDataElement, List<Integer> errorIndex, int[] input, int[] output)
Parameters:
oldDataElement: Specifies the name of the data element with which data was protected earlier.newDataElement: Specifies the name of the new data element to reprotect the data.errorIndex: Specifies the list of the Error Indexinput: Specifies theintarray of data to be reprotected.output: Specifies theintarray containing the reprotected data.
Result:
- The
outputvariable in the method signature contains the reprotected data.
Example:
String applicationId = sparkContext.getConf().getAppId();
Protector protector = new PtySparkProtector (applicationId);
String oldDataElement = "int";
String newDataElement = "int_1";
int[] input = new int[] {234,351};
int[] output = new int[input.length];
List<Integer> errorIndexList = new ArrayList<Integer>();
protector.reprotect(oldDataElement, newDataElement, errorIndexList, input, output);
Exception:
- The function throws the
PtySparkProtectorExceptionif it is unable to reprotect the data.
Supported Protection Methods:
| Function Name | Tokenization | Encryption | FPE | No Encryption | Masking | Monitoring |
|---|---|---|---|---|---|---|
| reprotect() - Int array data | Integer (4 Bytes) | No | No | Yes | No | Yes |
reprotect() - Long array data
The function reprotects the long array data that was protected earlier with a different data element.
Signature:
public void reprotect(String oldDataElement, String newDataElement, List<Integer> errorIndex, long[] input, long[] output)
Parameters:
oldDataElement: Specifies the name of the data element with which data was protected earlier.newDataElement: Specifies the name of the new data element to reprotect the data.errorIndex: Specifies the list of the Error Indexinput: Specifies thelongarray of data to be reprotected.output: Specifies thelongarray containing the reprotected data.
Result:
- The
outputvariable in the method signature contains the reprotected data.
Example:
String applicationId = sparkContext.getConf().getAppId();
Protector protector = new PtySparkProtector (applicationId);
String oldDataElement = "long";
String newDataElement = "long_1";
long[] input = new long[] {1234, 135};
long[] output = new long[input.length];
List<Integer> errorIndexList = new ArrayList<Integer>();
protector.reprotect(oldDataElement, newDataElement, errorIndexList, input, output);
Exception:
- The function throws the
PtySparkProtectorExceptionif it is unable to reprotect the data.
Supported Protection Methods:
| Function Name | Tokenization | Encryption | FPE | No Encryption | Masking | Monitoring |
|---|---|---|---|---|---|---|
| reprotect() - Long array data | Integer (8 Bytes) | No | No | Yes | No | Yes |
reprotect() - Float array data
The function reprotects the float array data that was protected earlier with a different data element.
Signature:
public void reprotect(String oldDataElement, String newDataElement, List<Integer> errorIndex, float[] input, float[] output)
Parameters:
oldDataElement: Specifies the name of the data element with which data was protected earlier.newDataElement: Specifies the name of the new data element to reprotect the data.errorIndex: Specifies the list of the Error Indexinput: Specifies thefloatarray of data to be reprotected.output: Specifies thefloatarray containing the reprotected data.
Warning: Ensure that you use the data element with the No Encryption method only. Using any other data element might cause data corruption.
Result:
- The
outputvariable in the method signature contains the reprotected data.
Example:
String applicationId = sparkContext.getConf().getAppId();
Protector protector = new PtySparkProtector (applicationId);
String oldDataElement = "NoEnc";
String newDataElement = "NoEnc_1";
float[] input = new float[] {23.56f, 26.43f}};
float[] output = new float[input.length];
List<Integer> errorIndexList = new ArrayList<Integer>();
protector.reprotect(oldDataElement, newDataElement, errorIndexList, input, output);
Exception:
- The function throws the
PtySparkProtectorExceptionif it is unable to reprotect the data.
Supported Protection Methods:
| Function Name | Tokenization | Encryption | FPE | No Encryption | Masking | Monitoring |
|---|---|---|---|---|---|---|
| reprotect() - Float array data | No | No | No | Yes | No | Yes |
reprotect() - Double array data
The function reprotects the double array data that was protected earlier with a different data element.
Signature:
public void reprotect(String oldDataElement, String newDataElement, List<Integer> errorIndex, double[] input, double[] output)
Parameters:
oldDataElement: Specifies the name of the data element with which data was protected earlier.newDataElement: Specifies the name of the new data element to reprotect the data.errorIndex: Specifies the list of the Error Indexinput: Specifies thedoublearray of data to be reprotected.output: Specifies thedoublearray containing the reprotected data.
Warning: Ensure that you use the data element with the No Encryption method only. Using any other data element might cause data corruption.
Result:
- The
outputvariable in the method signature contains the reprotected data.
Example:
String applicationId = sparkContext.getConf().getAppId();
Protector protector = new PtySparkProtector (applicationId);
String oldDataElement = "NoEnc";
String newDataElement = "NoEnc_1";
double[] input = new double[] {235.5, 1235.66};
double[] output = new double[input.length];
List<Integer> errorIndexList = new ArrayList<Integer>();
protector.reprotect(oldDataElement, newDataElement, errorIndexList, input, output);
Exception:
- The function throws the
PtySparkProtectorExceptionif it is unable to reprotect the data.
Supported Protection Methods:
| Function Name | Tokenization | Encryption | FPE | No Encryption | Masking | Monitoring |
|---|---|---|---|---|---|---|
| reprotect() - Double array data | No | No | No | Yes | No | Yes |
reprotect() - String array data
The function reprotects the String array data that was protected earlier with a different data element.
Signature:
public void reprotect(String oldDataElement, String newDataElement, List<Integer> errorIndex, String[] input, String[] output)
Parameters:
oldDataElement: Specifies the name of the data element with which data was protected earlier.newDataElement: Specifies the name of the new data element to reprotect the data.errorIndex: Specifies the list of the Error Indexinput: Specifies theStringarray of data to be reprotected.output: Specifies theStringarray containing the reprotected data.
Result:
- The
outputvariable in the method signature contains the reprotected data.
Example:
String applicationId = sparkContext.getConf().getAppId();
Protector protector = new PtySparkProtector (applicationId);
String oldDataElement = "AlphaNum";
String newDataElement = "AlphaNum_1";
String[] input = new String[] {"test1", "test2"};
String[] output = new String[input.length];
List<Integer> errorIndexList = new ArrayList<Integer>();
protector.reprotect(oldDataElement, newDataElement, errorIndexList, input, output);
Exception:
- The function throws the
PtySparkProtectorExceptionif it is unable to reprotect the data.
Supported Protection Methods:
| Function Name | Tokenization | Encryption | FPE | No Encryption | Masking | Monitoring |
| reprotect() - String array data |
| No | FPE (All) | Yes | Yes | Yes |
3.3.7 - Spark SQL UDFs
All the Spark SQL UDFs that are available for protection and unprotection in Big Data Protector to build secure Big Data applications are listed here.
Introduction
The Spark SQL module provides relational data processing capabilities to Spark. The module allows you to run SQL queries with Spark programs. It contains DataFrames, which is an RDD with an associated schema, that provide support for processing structured data in Hive tables.
Spark SQL enables structured data processing and programming of RDDs providing relational and procedural processing through a DataFrame API that integrates with Spark.
Note: The example code snippets provided in this section utilize SQL queries to invoke the UDFs, after they are registered, using the sqlContext.sql() method.
DataFrames
A DataFrame is a distributed collection of data, such as RDDs, with a corresponding schema. DataFrames can be created from a wide array of sources, such as Hive tables, external databases, structured data files, or existing RDDs. It can act as a distributed SQL query engine and is equivalent to a table in a relational database that can be manipulated, similar to RDDs. To optimize execution, DataFrames support relational operations and track their schema.
SQLContext
A SQLContext is a class that is used to initialize Spark SQL. It enables applications to run SQL queries, while running SQL functions, and provides the result as a DataFrame.
HiveContext extends the functionality of SQLContext and provides capabilities to use Hive UDFs, create Hive queries, and access and modify the data in Hive tables.
The Spark SQL CLI is used to run the Hive metastore service in local mode and execute queries. When we run Spark SQL (spark-sql), which is the client for running queries in Spark, it creates a SparkContext defined as sc and HiveContext defined as sqlContext.
Inserting Data from a File into a Table
The following commands create a class named Person with columns to store data.
scala> import sqlContext.implicits._
scala> case class Person(colname1: colname1_format, colname2: colname2_format, colname3: colname3_format)
The following command reads the local sample file basic_sample_data.csv:
scala> val input = sc.textFile("file:///opt/protegrity/samples/data/basic_sample_data.csv")
The following command creates a DataFrame by mapping the RDD to the RDD [Person] object.
scala> val df = input.map(x => x.split(",")).map(p => Person(p(0).toInt, p(1), p(2), p(3))).toDF()
The following command registers the temporary table sample_table.
scala> df.registerTempTable("sample_table")
The following commands save the table sample_table to a Parquet file.
scala> import org.apache.spark.sql.SaveMode
scala> df.write.mode(SaveMode.Ignore).save("sample_table.parquet")
where,
sample_table: Specifies the name of the table created to load the data from the input CSV file from the required path.colname1, colname2, colname3: Specifies the name of the columns.colname1_format, colname2_format, colname3_format: Specifies the data types contained in the respective columns.
Protecting Existing Data
This following command creates a Spark SQL table with the protected data.
"SELECT ID, " +
"ptyProtectStr(colname1, 'dataElement1') as colname1," +
"ptyProtectStr(colname1, 'dataElement2') as colname2," +
"ptyProtectStr(colname3, 'dataElement3') as colname3," + "FROM basic_sample".registerTempTable("basic_sample_protected")
Note: Ensure that the user performing the task has the permissions to protect the data, as required, in the data security policy.
where,
basic_sample_protected: Specifies the table to store the protected data.colname1, colname2, colname3: Specifies the name of the columns.dataElement1, dataElement2, dataElement3: Specifies the data elements corresponding to the columns.basic_sample: Specifies the table containing the original data in the cleartext format.basic_sample_protected: Specifies the table to store the protected data.
Unprotecting and Viewing the Protected Data
To unprotect and view the protected data, you need to specify the name of the table which contains the protected data, and the columns and their respective data elements.
Ensure that the user performing the task has permissions to unprotect the data as required in the data security policy. The following commands unprotect the protected data from the table table_protected.
scala> drop table if exists table_unprotected;
scala> create table table_unprotected (colname1 colname1_format, colname2 colname2_format,
colname3 colname3_format) distributed randomly;
scala> sqlContext.sql(
"SELECT ID," +
"ptyUnprotectStr(colname1, 'dataElement1') as colname1," +
"ptyUnprotectStr(colname2, 'dataElement2') as colname2," +
"ptyUnprotectStr(colname3, 'dataElement3') as colname3," +
"FROM table_protected"
).show(false)
where,
ptyUnprotectStr: Is the Protegrity Spark SQL UDF to unprotect theStringdata.colname1, colname2, colname3: Specifies the names of the columns.dataElement1, dataElement2, dataElement3: Specifies the data elements corresponding to the columns.table_protected: Specifies the table containing the protected data.
Retrieving Data from a Table
To retrieve data from a table, you must have access to the table.
The following command displays the data contained in the table.
scala> sqlContext.sql("SELECT * table").show()
where,
table: Specifies the name of the table.
Calling Spark SQL UDFs from Domain Specific Language (DSL)
You can utilize the functions of the Domain-Specific Langugage (DSL) and call Spark SQL UDFs to protect or unprotect data from the Dataframe APIs. The following sample snippet describes how to call the Spark SQL UDFs from a DSL:
package com.protegrity.spark.dsl
import com.protegrity.spark.PtySparkProtectorException
import org.apache.spark.sql.{Column, DataFrame, UserDefinedFunction}
/**
* DSL API for applying protection on DataFrames implicitly.
*
* e.g
* import sqlContext.implicits._
* import com.protegrity.spark.dsl.PtySparkDSL._
* val df = sc.parallelize(List("hello", "world")).toDF()
* df.protect("_1", "AlphaNum")
* .withColumnRenamed("_1", "protected")
* .show()
*/
object PtySparkDSL {
implicit class PtySparkDSL(dataFrame: DataFrame) {
import org.apache.spark.sql.functions._
private def applyUDFOnColumns(colname: String,
dataElement: String,
func: UserDefinedFunction): Seq[Column] = {
dataFrame.schema.map { field =>
val name = field.name
if (name.equals(colname)) {
func(col(colname), lit(dataElement)).as(colname)
} else {
column(name)
}
}
}
private def applyUDFOnColumns(colname: String, oldDataElement: String, newDataElement: String, func: UserDefinedFunction): Seq[Column] = {
dataFrame.schema.map { field =>
val name = field.name
if (name.equals(colname)) {
func(col(colname), lit(oldDataElement), lit(newDataElement)).as(colname)
} else {
column(name)
}
}
}
/**
* Returns data type of input field from DataFrame
* @param colname
* @return data type of the column
*/
private def getFieldType(colname: String): String = {
try {
dataFrame.schema(colname).dataType.typeName
} catch {
case e: IllegalArgumentException =>
throw new PtySparkProtectorException(e.getMessage)
}
}
def protect(colname: String, dataElement: String): DataFrame = {
val dataType = getFieldType(colname)
val function = dataType match {
case "short" => udf(com.protegrity.spark.udf.ptyProtectShort _)
case "integer" => udf(com.protegrity.spark.udf.ptyProtectInt _)
case "long" => udf(com.protegrity.spark.udf.ptyProtectLong _)
case "float" => udf(com.protegrity.spark.udf.ptyProtectFloat _)
case "double" => udf(com.protegrity.spark.udf.ptyProtectDouble _)
case "decimal(38,18)" =>
udf(com.protegrity.spark.udf.ptyProtectDecimal _)
case "string" => udf(com.protegrity.spark.udf.ptyProtectStr _)
case "date" => udf(com.protegrity.spark.udf.ptyProtectDate _)
case "timestamp" => udf(com.protegrity.spark.udf.ptyProtectDateTime _)
case _ =>
throw new PtySparkProtectorException(
"Error!! DSL API invoked on unsupported column type - " + dataType)
}
val columns = applyUDFOnColumns(colname, dataElement, function)
dataFrame.select(columns: _*)
}
def protectUnicode(colname: String, dataElement: String): DataFrame = {
val function = udf(com.protegrity.spark.udf.ptyProtectUnicode _)
val columns = applyUDFOnColumns(colname, dataElement, function)
dataFrame.select(columns: _*)
}
def unprotect(colname: String, dataElement: String): DataFrame = {
val dataType = getFieldType(colname)
val function = dataType match {
case "short" => udf(com.protegrity.spark.udf.ptyUnprotectShort _)
case "integer" => udf(com.protegrity.spark.udf.ptyUnprotectInt _)
case "long" => udf(com.protegrity.spark.udf.ptyUnprotectLong _)
case "float" => udf(com.protegrity.spark.udf.ptyUnprotectFloat _)
case "double" => udf(com.protegrity.spark.udf.ptyUnprotectDouble _)
case "decimal(38,18)" =>
udf(com.protegrity.spark.udf.ptyUnprotectDecimal _)
case "string" => udf(com.protegrity.spark.udf.ptyUnprotectStr _)
case "date" => udf(com.protegrity.spark.udf.ptyUnprotectDate _)
case "timestamp" =>
udf(com.protegrity.spark.udf.ptyUnprotectDateTime _)
case _ =>
throw new PtySparkProtectorException(
"Error!! DSL API invoked on unsupported column type - " + dataType)
}
val columns = applyUDFOnColumns(colname, dataElement, function)
dataFrame.select(columns: _*)
}
def unprotectUnicode(colname: String, dataElement: String): DataFrame = {
val function = udf(com.protegrity.spark.udf.ptyUnprotectUnicode _)
val columns = applyUDFOnColumns(colname, dataElement, function)
dataFrame.select(columns: _*)
}
def reprotect(colname: String, oldDataElement: String, newDataElement: String): DataFrame = {
val dataType = getFieldType(colname)
val function = dataType match {
case "short" => udf(com.protegrity.spark.udf.ptyReprotectShort _)
case "integer" => udf(com.protegrity.spark.udf.ptyReprotectInt _)
case "long" => udf(com.protegrity.spark.udf.ptyReprotectLong _)
case "float" => udf(com.protegrity.spark.udf.ptyReprotectFloat _)
case "double" => udf(com.protegrity.spark.udf.ptyReprotectDouble _)
case "decimal(38,18)" =>
udf(com.protegrity.spark.udf.ptyReprotectDecimal _)
case "string" => udf(com.protegrity.spark.udf.ptyReprotectStr _)
case "date" =>
udf(com.protegrity.spark.udf.ptyReprotectDate _)
case "timestamp" =>
udf(com.protegrity.spark.udf.ptyReprotectDateTime _)
case _ =>
throw new PtySparkProtectorException(
"Error!! DSL API invoked on unsupported column type - " + dataType)
}
val columns = applyUDFOnColumns(colname, oldDataElement, newDataElement, function)
dataFrame.select(columns: _*)
}
def reprotectUnicode(colname: String, oldDataElement: String, newDataElement: String): DataFrame = {
val function = udf(com.protegrity.spark.udf.ptyReprotectUnicode _)
val columns = applyUDFOnColumns(colname, oldDataElement, newDataElement, function)
dataFrame.select(columns: _*)
}
}
}
ptyGetVersion()
The UDF returns the current version of the protector.
Signature:
ptyGetVersion()
Parameters:
- None
Result:
- The UDF returns the current version of the protector.
Example:
sqlContext.udf.register("ptyGetVersion", com.protegrity.spark.udf.ptyGetVersion _)
sqlContext.sql("select ptyGetVersion()").show()
ptyGetVersionExtended()
The UDF returns the extended version information of the protector.
Signature:
ptyGetVersionExtended()
Parameters:
- None
Result:
The UDF returns a String in the following format:
"BDP: <1>; JcoreLite: <2>; CORE: <3>;"where,
- Is the current Protector version.
- Is the Jcorelite library version.
- Is the Core library version.
Example:
sqlContext.udf.register("ptyGetVersionExtended", com.protegrity.spark.udf.ptyGetVersionExtended _)
sqlContext.sql("select ptyGetVersionExtended()").show()
ptyWhoAmI()
The UDF returns the current logged in user.
Signature:
ptyWhoAmI()
Parameters:
- None
Result:
- The UDF returns the current logged in user.
Example:
sqlContext.udf.register("ptyWhoAmI", com.protegrity.spark.udf.ptyWhoAmI _)
sqlContext.sql("select ptyWhoAmI()").show()
ptyProtectStr()
The UDF protects the string format data that is provided as an input.
Note: For Date and Datetime type of data elements, the protect API returns an invalid input data error if the input value falls between the non-existent date range from 05-OCT-1582 to 14-OCT-1582 of the Gregorian Calendar.
For more information about the tokenization and de-tokenization of the cutover dates of the Proleptic Gregorian Calendar, refer to Date and Datetime tokenization.
Signature:
ptyProtectStr(String colName, String dataElement)
Parameters:
colName: Specifies the column that contains data in thestringformat to be protected.dataElement: Specifies the data element to protect thestringformat data.
Result:
- The UDF returns the protected
stringformat data.
Example:
import sqlContext.implicits._
val df = sc.parallelize(List("hello", "world")).toDF("string_col")
val protectStrUDF = sqlContext.udf
.register("ptyProtectStr", com.protegrity.spark.udf.ptyProtectStr _)
df.registerTempTable("string_test")
sqlContext
.sql( "select ptyProtectStr(string_col, 'Token_Alphanum') as protected from string_test")
.show(false)
Supported Protection Methods:
| Function Name | Tokenization | Encryption | FPE | No Encryption | Masking | Monitoring |
| ptyProtectStr() |
| No | Yes | Yes | Yes | Yes |
ptyProtectUnicode()
The UDF protects the string (Unicode) format data, which is provided as input.
Warning: This UDF should be used only if you want to tokenize the Unicode data in SparkSQL, and migrate the tokenized data from SparkSQL to a Teradata database and detokenize the data using the Protegrity Database Protector. Ensure that you use this UDF with a Unicode tokenization data element only.
Signature:
ptyProtectUnicode(String colName, String dataElement)
Parameters:
colName: Specifies the column that contains the data in theString(Unicode) format to be protected.dataElement: Specifies the data element to protect thestring(Unicode) format data.
Result:
- The UDF returns the protected
stringformat data.
Example:
import sqlContext.implicits._
val df = sc.parallelize(List("瀚聪Marylène", "瀚聪")).toDF("unicode_col")
val protectUnicodeUDF = sqlContext.udf.register(
"ptyProtectUnicode",
com.protegrity.spark.udf.ptyProtectUnicode _)
df.registerTempTable("unicode_test")
sqlContext
.sql(
"select ptyProtectUnicode(unicode_col, 'Token_Unicode') as protected from unicode_test")
.show(false)
Supported Protection Methods:
| Function Name | Tokenization | Encryption | FPE | No Encryption | Masking | Monitoring |
|---|---|---|---|---|---|---|
| ptyProtectUnicode() | - Unicode (Legacy) - Unicode (Base64) | No | No | Yes | No | Yes |
ptyProtectInt()
The UDF protects the integer format data, which is provided as input.
Signature:
ptyProtectInt(Int colName, String dataElement)
Parameters:
colName: Specifies the column that contains the data in theintegerformat to be protected.dataElement: Specifies the data element to protect theintegerformat data.
Result:
- The UDF returns the protected
integerformat data.
Example:
import sqlContext.implicits._
val df = sc.parallelize(List(1234, 2345)).toDF("int_col")
val protectIntUDF = sqlContext.udf.register("ptyProtectInt", com.protegrity.spark.udf.ptyProtectInt _)
df.registerTempTable("int_test")
sqlContext.sql("select ptyProtectInt(int_col, 'Token_Int') as protected from int_test")
.show(false)
Supported Protection Methods:
| Function Name | Tokenization | Encryption | FPE | No Encryption | Masking | Monitoring |
|---|---|---|---|---|---|---|
| ptyProtectInt() | Integer (4 Bytes) | No | No | Yes | No | Yes |
ptyProtectShort()
The UDF protects the short format data, which is provided as input.
Signature:
ptyProtectShort(Short colName, String dataElement)
Parameters:
colName: Specifies the column that contains the data in theshortformat to be protected.dataElement: Specifies the data element to protect theshortformat data.
Result:
- The UDF returns the protected
shortformat data.
Example:
import sqlContext.implicits._
val df = sc.parallelize(List(1234, 2345)).map{x =>
ShortClass(x.toShort)
}.toDF("short_col")
val protectShortUDF = sqlContext.udf.register("ptyProtectShort", com.protegrity.spark.udf.ptyProtectShort _)
df.registerTempTable("short_test")
sqlContext.sql("select ptyProtectShort(short_col, 'Token_Short') as protected from short_test")
.show(false)
Supported Protection Methods:
| Function Name | Tokenization | Encryption | FPE | No Encryption | Masking | Monitoring |
|---|---|---|---|---|---|---|
| ptyProtectShort() | Integer (2 Bytes) | No | No | Yes | No | Yes |
ptyProtectLong()
The UDF protects the long format data, which is provided as input.
Signature:
ptyProtectLong(Long colName, String dataElement)
Parameters:
colName: Specifies the column that contains the data in thelongformat to be protected.dataElement: Specifies the data element to protect thelongformat data.
Result:
- The UDF returns the protected
longformat data.
Example:
import sqlContext.implicits._
val df = sc.parallelize(List(1234l, 2345l)).toDF("long_col")
val protectLongUDF = sqlContext.udf
.register("ptyProtectLong", com.protegrity.spark.udf.ptyProtectLong _)
df.registerTempTable("long_test")
sqlContext
.sql("select ptyProtectLong(long_col, 'Token_Long') as protected from long_test")
.show(false)
Supported Protection Methods:
| Function Name | Tokenization | Encryption | FPE | No Encryption | Masking | Monitoring |
|---|---|---|---|---|---|---|
| ptyProtectLong() | Integer (8 Bytes) | No | No | Yes | No | Yes |
ptyProtectDate()
The UDF protects the date format data, which is provided as input.
Signature:
ptyProtectDate(Date colName, String dataElement)
Parameters:
colName: Specifies the column that contains the data in thedateformat to be protected.dataElement: Specifies the data element to protect thedateformat data.
Result:
- The UDF returns the protected
dateformat data.
Example:
import sqlContext.implicits._
val d1 = Date.valueOf("2016-12-28")
val d2 = Date.valueOf("2016-12-28")
val df = sc.parallelize(Seq((d1, d2))).toDF("date_col1","date_col2")
val protectDateUDF = sqlContext.udf
.register("ptyProtectDate", com.protegrity.spark.udf.ptyProtectDate _)
df.registerTempTable("date_test")
sqlContext
.sql("select ptyProtectDate(date_col1, 'Token_Date') as protected from date_test")
.show(false)
Supported Protection Methods:
| Function Name | Tokenization | Encryption | FPE | No Encryption | Masking | Monitoring |
|---|---|---|---|---|---|---|
| ptyProtectDate() | Date | No | No | Yes | No | Yes |
ptyProtectDateTime()
The UDF protects the timestamp format data, which is provided as input.
Signature:
ptyProtectDateTime(Timestamp colName, String dataElement)
Parameters:
colName: Specifies the column that contains the data in thetimestampformat to be protected.dataElement: Specifies the data element to protect thetimestampformat data.
Result:
- The UDF returns the protected
timestampformat data.
Example:
import sqlContext.implicits._
val d1 = Timestamp.valueOf("2016-12-28 13:09:38.104")
val d2 = Timestamp.valueOf("2016-12-29 12:09:38.104")
val df = sc.parallelize(Seq((d1, d2))).toDF("datetime_col1","datetime_col2")
val protectDateTimeUDF = sqlContext.udf.register(
"ptyProtectDateTime",com.protegrity.spark.udf.ptyProtectDateTime _)
df.registerTempTable("datetime_test")
sqlContext
.sql(
"select ptyProtectDateTime(datetime_col1, 'Token_Datetime') as protected from
datetime_test")
.show(false)
Supported Protection Methods:
| Function Name | Tokenization | Encryption | FPE | No Encryption | Masking | Monitoring |
|---|---|---|---|---|---|---|
| ptyProtectDateTime() | Datetime (YYYY-MM-DD HH:MM:SS) | No | No | Yes | No | Yes |
ptyProtectFloat()
The UDF protects the float format data, which is provided as input.
Signature:
ptyProtectFloat(Float colName, String dataElement)
Parameters:
colName: Specifies the column that contains the data in thefloatformat to be protected.dataElement: Specifies the data element to protect thefloatformat data.
Warning: Ensure that you use the No Encryption data element only. Using any other data element might cause corruption of data.
Result:
- The UDF returns the protected
floatformat data.
Example:
import sqlContext.implicits._
val input = Seq((1234.345f, 1343.3345f))
val df = sc.parallelize(input).toDF("float_col1","float_col2")
val protectFloatUDF = sqlContext.udf
.register("ptyProtectFloat", com.protegrity.spark.udf.ptyProtectFloat _)
df.registerTempTable("float_test")
sqlContext
.sql(
"select ptyProtectFloat(float_col1, 'Token_NoEncryption') as protected from float_test")
.show(false)
Supported Protection Methods:
| Function Name | Tokenization | Encryption | FPE | No Encryption | Masking | Monitoring |
|---|---|---|---|---|---|---|
| ptyProtectFloat() | No | No | No | Yes | No | Yes |
ptyProtectDouble()
The UDF protects the double format data, which is provided as input.
Signature:
ptyProtectDouble(Double colName, String dataElement)
Parameters:
colName: Specifies the column that contains the data in thedoubleformat to be protected.dataElement: Specifies the data element to protect thedoubleformat data.
Warning: Ensure that you use the No Encryption data element only. Using any other data element might cause corruption of data.
Result:
- The UDF returns the protected
doubleformat data.
Example:
import sqlContext.implicits._
val input = Seq((1234.345, 1343.3345))
val df = sc.parallelize(input).toDF("double_col1","double_col2")
val protectDoubleUDF = sqlContext.udf.register(
"ptyProtectDouble",com.protegrity.spark.udf.ptyProtectDouble _)
df.registerTempTable("double_test")
sqlContext.sql("select ptyProtectDouble(double_col1, 'Token_NoEncryption') as protected from double_test")
.show(false)
Supported Protection Methods:
| Function Name | Tokenization | Encryption | FPE | No Encryption | Masking | Monitoring |
|---|---|---|---|---|---|---|
| ptyProtectDouble() | No | No | No | Yes | No | Yes |
ptyProtectDecimal()
The UDF protects the decimal format data, which is provided as input.
Signature:
ptyProtectDecimal(Decimal colName, String dataElement)
Parameters:
colName: Specifies the column that contains the data in theDecimalformat to be protected.dataElement: Specifies the data element to protect theDecimalformat data.
Warning: Ensure that you use the No Encryption data element only. Using any other data element might cause corruption of data.
Result:
- The UDF returns the protected
Decimalformat data.
Example:
import sqlContext.implicits._
val input = Seq((math.BigDecimal.valueOf(1234.345), math.BigDecimal.valueOf(1343.3345)))
val df = sc.parallelize(input).toDF("decimal_col1","decimal_col2")
val protectDecimalUDF = sqlContext.udf.register("ptyProtectDecimal",com.protegrity.spark.udf.ptyProtectDecimal _)
df.registerTempTable("decimal_test")
sqlContext.sql("select ptyProtectDecimal(decimal_col1, 'Token_NoEncryption') as protected from decimal_test").show(false)
Supported Protection Methods:
| Function Name | Tokenization | Encryption | FPE | No Encryption | Masking | Monitoring |
|---|---|---|---|---|---|---|
| ptyProtectDecimal() | No | No | No | Yes | No | Yes |
ptyUnprotectStr()
The UDF unprotects the protected string format data.
Note: For Date and Datetime type of data elements, the protect API returns an invalid input data error if the input value falls between the non-existent date range from 05-OCT-1582 to 14-OCT-1582 of the Gregorian Calendar.
For more information about the tokenization and de-tokenization of the cutover dates of the Proleptic Gregorian Calendar, refer Date and Datetime tokenization.
Signature:
ptyUnprotectStr(String colName, String dataElement)
Parameters:
colName: Specifies the column that contains the data in thestringformat to unprotect.dataElement: Specifies the data element to unprotect thestringformat data.
Result:
- The UDF returns the unprotected
stringformat data.
Example:
import sqlContext.implicits._
val df = sc.parallelize(List("A2yae", "2LbRS")).toDF("string_col")
val unprotectStrUDF = sqlContext.udf
.register("ptyUnprotectStr", com.protegrity.spark.udf.ptyUnprotectStr _)
df.registerTempTable("string_test")
sqlContext
.sql(
"select ptyUnprotectStr(string_col, 'Token_Alphanum') as unprotected from string_test")
.show(false)
Supported Protection Methods:
| Function Name | Tokenization | Encryption | FPE | No Encryption | Masking | Monitoring |
| ptyUnprotectStr() |
| No | Yes | Yes | Yes | Yes |
ptyUnprotectUnicode()
The UDF unprotects the protected string format data.
Warning: This UDF should be used only if you want to tokenize the Unicode data in Teradata using the Protegrity Database Protector,and migrate the tokenized data from a Teradata database to SparkSQL and detokenize the data using the Protegrity Big Data Protector for SparkSQL. Ensure that you use this UDF with a Unicode tokenization data element only.
Signature:
ptyUnprotectUnicode(String colName, String dataElement)
Parameters:
colName: Specifies the column that contains the data in thestringformat to unprotect.dataElement: Specifies the data element to unprotect thestringformat data.
Result:
- The UDF returns the unprotected
string(Unicode) format data.
Example:
import sqlContext.implicits._
val df =
sc.parallelize(List("jmR6Dw4Tqzlw441n5qEMtMEUKsI", "Q1dwK")).toDF("unicode_col")
val unprotectUnicodeUDF = sqlContext.udf.register(
"ptyUnprotectUnicode",
com.protegrity.spark.udf.ptyUnprotectUnicode _)
df.registerTempTable("unicode_test")
sqlContext
.sql(
"select ptyUnprotectUnicode(unicode_col, 'Token_Unicode') as unprotected from
unicode_test")
.show(false)
Supported Protection Methods:
| Function Name | Tokenization | Encryption | FPE | No Encryption | Masking | Monitoring |
|---|---|---|---|---|---|---|
| ptyUnprotectUnicode() | - Unicode (Legacy) - Unicode (Base64) | No | No | Yes | No | Yes |
ptyUnprotectInt()
The UDF unprotects the integer format data, which is provided as input.
Signature:
ptyUnprotectInt(Int colName, String dataElement)
Parameters:
colName: Specifies the column that contains the data, in theintegerformat, to unprotect.dataElement: Specifies the data element to unprotect theintegerformat data.
Caution: If an unauthorized user, with no privileges to unprotect data in the security policy, and the output value set to NULL, attempts to unprotect the protected data of Numeric type data containing Short, Int, Float, Long, Double, and Decimal format values using the respective Spark SQL UDFs, then the output is 0.
Result:
- The UDF returns the unprotected
integerformat data.
Example:
import sqlContext.implicits._
val df = sc.parallelize(List(1234, 2345)).toDF("int_col")
val protectIntUDF = sqlContext.udf.register("ptyProtectInt", com.protegrity.spark.udf.ptyProtectInt _)
df.registerTempTable("int_test")
sqlContext.sql("select ptyProtectInt(int_col, 'Token_Int') as protected from int_test")
.show(false)
Supported Protection Methods:
| Function Name | Tokenization | Encryption | FPE | No Encryption | Masking | Monitoring |
|---|---|---|---|---|---|---|
| ptyUnprotectInt() | Integer (4 Bytes) | No | No | Yes | No | Yes |
ptyUnprotectShort()
The UDF unprotects the short format data, which is provided as input.
Signature:
ptyUnprotectShort(Short colName, String dataElement)
Parameters:
colName: Specifies the column that contains the data, in theshortformat, to unprotect.dataElement: Specifies the data element to unprotect theshortformat data.
Caution: If an unauthorized user, with no privileges to unprotect data in the security policy, and the output value set to NULL, attempts to unprotect the protected data of Numeric type data containing Short, Int, Float, Long, Double, and Decimal format values using the respective Spark SQL UDFs, then the output is 0.
Result:
- The UDF returns the unprotected
shortformat data.
Example:
import sqlContext.implicits._
val df = sc.parallelize(List(-24453, 1827)).map(x =>
ShortClass(x.toShort))toDF("short_col")
val unprotectShortUDF = sqlContext.udf.register("ptyUnprotectShort", com.protegrity.spark.udf.ptyUnprotectShort _)
df.registerTempTable("short_test")
sqlContext.sql("select ptyUnprotectShort(short_col, 'Token_Short') as unprotected from short_test")
.show(false)
Supported Protection Methods:
| Function Name | Tokenization | Encryption | FPE | No Encryption | Masking | Monitoring |
|---|---|---|---|---|---|---|
| ptyUnprotectShort() | Integer (2 Bytes) | No | No | Yes | No | Yes |
ptyUnprotectLong()
The UDF unprotects the long format data, which is provided as input.
Signature:
ptyUnprotectLong(Long colName, String dataElement)
Parameters:
colName: Specifies the column that contains the data, in thelongformat, to unprotect.dataElement: Specifies the data element to unprotect thelongformat data.
Caution: If an unauthorized user, with no privileges to unprotect data in the security policy, and the output value set to NULL, attempts to unprotect the protected data of Numeric type data containing Short, Int, Float, Long, Double, and Decimal format values using the respective Spark SQL UDFs, then the output is 0.
Result:
- The UDF returns the unprotected
longformat data.
Example:
import sqlContext.implicits._
val df = sc.parallelize(List(4960833108022315290l, -1854566784751726548l)).toDF("long_col")
val unprotectLongUDF = sqlContext.udf.register("ptyUnprotectLong", com.protegrity.spark.udf.ptyUnprotectLong _)
df.registerTempTable("long_test")
sqlContext.sql("select ptyUnprotectLong(long_col, 'Token_Long') as unprotected from long_test")
.show(false)
Supported Protection Methods:
| Function Name | Tokenization | Encryption | FPE | No Encryption | Masking | Monitoring |
|---|---|---|---|---|---|---|
| ptyUnprotectLong() | Integer (8 Bytes) | No | No | Yes | No | Yes |
ptyUnprotectDate()
The UDF unprotects the date format data, which is provided as input.
Signature:
ptyUnprotectDate(Date colName, String dataElement)
Parameters:
colName: Specifies the column that contains the data, in thedateformat, to unprotect.dataElement: Specifies the data element to unprotect thedateformat data.
Result:
- The UDF returns the unprotected
dateformat data.
Example:
import sqlContext.implicits._
val d1 = Date.valueOf("1881-04-07") //new Date(System.currentTimeMillis())
val d2 = Date.valueOf("2016-12-28") //new Date(System.currentTimeMillis())
val df = sc.parallelize(Seq((d1, d2))).toDF("date_col1", "date_col2")
val unprotectDateUDF = sqlContext.udf.register("ptyUnprotectDate", com.protegrity.spark.udf.ptyUnprotectDate _)
df.registerTempTable("date_test")
sqlContext.sql("select ptyUnprotectDate(date_col1, 'Token_Date') as unprotected from date_test")
.show(false)
Supported Protection Methods:
| Function Name | Tokenization | Encryption | FPE | No Encryption | Masking | Monitoring |
|---|---|---|---|---|---|---|
| ptyUnprotectDate() | Date | No | No | Yes | No | Yes |
ptyUnprotectDateTime()
The UDF unprotects the timestamp format data, which is provided as input.
Signature:
ptyUnprotectDateTime(Timestamp colName, String dataElement)
Parameters:
colName: Specifies the column that contains the data, in thetimestampformat, to unprotect.dataElement: Specifies the data element to unprotect thetimestampformat data.
Result:
- The UDF returns the unprotected
timestampformat data.
Example:
import sqlContext.implicits._
val d1 = Timestamp.valueOf("1197-02-10 13:09:38.104")
val d2 = Timestamp.valueOf("2016-12-29 12:09:38.104")
val df = sc.parallelize(Seq((d1, d2))).toDF("datetime_col1", "datetime_col2")
val unprotectDateTimeUDF = sqlContext.udf.register("ptyUnprotectDateTime", com.protegrity.spark.udf.ptyUnprotectDateTime _)
df.registerTempTable("datetime_test")
sqlContext.sql("select ptyUnprotectDateTime(datetime_col1, 'Token_Datetime') as unprotected from datetime_test")
.show(false)
Supported Protection Methods:
| Function Name | Tokenization | Encryption | FPE | No Encryption | Masking | Monitoring |
|---|---|---|---|---|---|---|
| ptyUnprotectDateTime() | Datetime (YYYY-MM-DD HH:MM:SS) | No | No | Yes | No | Yes |
ptyUnprotectFloat()
The UDF unprotects the float format data, which is provided as input.
Signature:
ptyUnprotectFloat(Float colName, String dataElement)
Parameters:
colName: Specifies the column that contains the data, in thefloatformat, to unprotect.dataElement: Specifies the data element to unprotect thefloatformat data.
Warning: Ensure that you use the No Encryption data element only. Using any other data element might cause corruption of data.
Caution: If an unauthorized user, with no privileges to unprotect data in the security policy, and the output value set to NULL, attempts to unprotect the protected data of Numeric type data containing Short, Int, Float, Long, Double, and Decimal format values using the respective Spark SQL UDFs, then the output is 0.
Result:
- The UDF returns the unprotected
floatformat data.
Example:
import sqlContext.implicits._
val input = Seq((1234.345f, 1343.3345f))
val df = sc.parallelize(input).toDF("float_col1","float_col2")
val unprotectFloatUDF = sqlContext.udf.register( "ptyUnprotectFloat", com.protegrity.spark.udf.ptyUnprotectFloat _)
df.registerTempTable("float_test")
sqlContext.sql("select ptyUnprotectFloat(float_col1, 'Token_NoEncryption') as unprotected from float_test")
.show(false)
Supported Protection Methods:
| Function Name | Tokenization | Encryption | FPE | No Encryption | Masking | Monitoring |
|---|---|---|---|---|---|---|
| ptyUnprotectFloat() | No | No | No | Yes | No | Yes |
ptyUnprotectDouble()
The UDF unprotects the double format data, which is provided as input.
Signature:
ptyUnprotectDouble(Double colName, String dataElement)
Parameters:
colName: Specifies the column that contains the data, in thedoubleformat, to unprotect.dataElement: Specifies the data element to unprotect thedoubleformat data.
Warning: Ensure that you use the No Encryption data element only. Using any other data element might cause corruption of data.
Caution: If an unauthorized user, with no privileges to unprotect data in the security policy, and the output value set to NULL, attempts to unprotect the protected data of Numeric type data containing Short, Int, Float, Long, Double, and Decimal format values using the respective Spark SQL UDFs, then the output is 0.
Result:
- The UDF returns the unprotected
doubleformat data.
Example:
import sqlContext.implicits._
val input = Seq((1234.345, 1343.3345))
val df = sc.parallelize(input).toDF("double_col1", "double_col2'")
val unprotectDoubleUDF = sqlContext.udf.register("ptyUnprotectDouble", com.protegrity.spark.udf.ptyUnprotectDouble _)
df.registerTempTable("double_test")
sqlContext.sql("select ptyUnprotectDouble(double_col1, 'Token_NoEncryption') as unprotected from double_test")
.show(false)
Supported Protection Methods:
| Function Name | Tokenization | Encryption | FPE | No Encryption | Masking | Monitoring |
|---|---|---|---|---|---|---|
| ptyUnprotectDouble() | No | No | No | Yes | No | Yes |
ptyUnprotectDecimal()
The UDF unprotects the decimal format data, which is provided as input.
Signature:
ptyUnprotectDecimal(Decimal colName, String dataElement)
Parameters:
colName: Specifies the column that contains the data, in theDecimalformat, to unprotect.dataElement: Specifies the data element to unprotect theDecimalformat data.
Warning: Ensure that you use the No Encryption data element only. Using any other data element might cause corruption of data.
Caution: Before the ptyUnprotectDecimal() UDF is called, Spark SQL rounds off the decimal value in the table to 18 digits in scale, irrespective of the length of the data.
Caution: If an unauthorized user, with no privileges to unprotect data in the security policy, and the output value set to NULL, attempts to unprotect the protected data of Numeric type data containing Short, Int, Float, Long, Double, and Decimal format values using the respective Spark SQL UDFs, then the output is 0.
Result:
- The UDF returns the unprotected
Decimalformat data.
Example:
import sqlContext.implicits._
val input = Seq((math.BigDecimal.valueOf(1234.345), math.BigDecimal.valueOf(1343.3345)))
val df = sc.parallelize(input).toDF("decimal_col1","decimal_col2")
val unprotectDecimalUDF = sqlContext.udf.register("ptyUnprotectDecimal",com.protegrity.spark.udf.ptyUnprotectDecimal _)
df.registerTempTable("decimal_test")
sqlContext.sql("select ptyUnprotectDecimal(decimal_col1, 'Token_NoEncryption') as unprotected from decimal_test").show(false)
Supported Protection Methods:
| Function Name | Tokenization | Encryption | FPE | No Encryption | Masking | Monitoring |
|---|---|---|---|---|---|---|
| ptyUnprotectDecimal() | No | No | No | Yes | No | Yes |
ptyReprotectStr()
The UDF reprotects the protected string format data, which was earlier protected using the ptyProtectStr UDF, with a different data element.
Signature:
ptyReprotectStr(String colName, String oldDataElement, String newDataElement)
Parameters:
colName: Specifies the column that contains thestringformat data to reprotect.oldDataElement: Specifies the data element that was used to protect the data earlier.newDataElement: Specifies the new data element that will be used to reprotect the data.
Result:
- The UDF returns the protected
stringformat data.
Example:
import sqlContext.implicits._
val df = sc.parallelize(List("hello", "world")).toDF("string_col")
val reprotectStrUDF = sqlContext.udf
.register("ptyReprotectStr", com.protegrity.spark.udf.ptyReprotectStr _)
df.registerTempTable("string_test")
sqlContext
.sql("select ptyReprotectStr(string_col, 'Token_Alphanum', ' Token_Alphanum_1') as reprotected from string_test")
.show(false)
Supported Protection Methods:
| Function Name | Tokenization | Encryption | FPE | No Encryption | Masking | Monitoring |
| ptyReprotectStr() |
| No | Yes | Yes | Yes | Yes |
ptyReprotectUnicode()
The UDF reprotects the protected string format data, which was earlier protected using the ptyProtectUnicode UDF, with a different data element.
Warning: This UDF should be used only if you want to tokenize the Unicode data in SparkSQL, and migrate the tokenized data from SparkSQL to a Teradata database and detokenize the data using the Protegrity Database Protector. Ensure that you use this UDF with a Unicode tokenization data element only.
Signature:
ptyReprotectUnicode(String colName, String oldDataElement, String newDataElement)
Parameters:
colName: Specifies the column that contains thestringformat data to reprotect.oldDataElement: Specifies the data element that was used to protect the data earlier.newDataElement: Specifies the new data element that will be used to reprotect the data.
Result:
- The UDF returns the protected
stringformat data.
Example:
import sqlContext.implicits._
val df = sc.parallelize(List("##Marylène", "##")).toDF("unicode_col")
val reprotectUnicodeUDF = sqlContext.udf.register( "ptyReprotectUnicode", com.protegrity.spark.udf.ptyReprotectUnicode _)
df.registerTempTable("unicode_test")
sqlContext
.sql("select ptyReprotectUnicode(unicode_col, 'Token_Unicode', 'Token_Unicode_1') as reprotected from unicode_test")
.show(false)
Supported Protection Methods:
| Function Name | Tokenization | Encryption | FPE | No Encryption | Masking | Monitoring |
|---|---|---|---|---|---|---|
| ptyReprotectUnicode() | - Unicode (Legacy) - Unicode (Base64) | No | No | Yes | No | Yes |
ptyReprotectInt()
The UDF reprotects the protected integer format data, which was earlier protected with a different data element.
Signature:
ptyReprotectInt(Int colName, String oldDataElement, String newDataElement)
Parameters:
colName: Specifies the column that contains theIntegerformat data to reprotect.oldDataElement: Specifies the data element that was used to protect the data earlier.newDataElement: Specifies the new data element that will be used to reprotect the data.
Result:
- The UDF returns the protected
Integerformat data.
Example:
import sqlContext.implicits._
val df = sc.parallelize(List(1234, 2345)).toDF("int_col")
val reprotectIntUDF = sqlContext.udf
.register("ptyReprotectInt", com.protegrity.spark.udf.ptyReprotectInt _)
df.registerTempTable("int_test")
sqlContext
.sql("select ptyReprotectInt(int_col, 'Token_Int', ' Token_Int_1') as reprotected from int_test")
.show(false)
Supported Protection Methods:
| Function Name | Tokenization | Encryption | FPE | No Encryption | Masking | Monitoring |
|---|---|---|---|---|---|---|
| ptyReprotectInt() | Integer 4 bytes | No | No | Yes | No | Yes |
ptyReprotectShort()
The UDF reprotects the protected short format data, which was earlier protected with a different data element.
Signature:
ptyReprotectShort(Short colName, String oldDataElement, String newDataElement)
Parameters:
colName: Specifies the column that contains theShortformat data to reprotect.oldDataElement: Specifies the data element that was used to protect the data earlier.newDataElement: Specifies the new data element that will be used to reprotect the data.
Result:
- The UDF returns the protected
Shortformat data.
Example:
import sqlContext.implicits._
val df = sc.parallelize(List(1234, 2345)).map(x =>
ShortClass(x.toShort)).toDF("short_col")
val reprotectShortUDF = sqlContext.udf.register("ptyReprotectShort", com.protegrity.spark.udf.ptyReprotectShort _)
df.registerTempTable("short_test")
sqlContext
.sql("select ptyReprotectShort(short_col, 'Token_Short', ' Token_Short_1') as reprotected from short_test")
.show(false)
Supported Protection Methods:
| Function Name | Tokenization | Encryption | FPE | No Encryption | Masking | Monitoring |
|---|---|---|---|---|---|---|
| ptyReprotectShort() | Integer 2 Bytes | No | No | Yes | No | Yes |
ptyReprotectLong()
The UDF reprotects the protected long format data, which was earlier protected with a different data element.
Signature:
ptyReprotectLong(Long colName, String oldDataElement, String newDataElement)
Parameters:
colName: Specifies the column that contains thelongformat data to reprotect.oldDataElement: Specifies the data element that was used to protect the data earlier.newDataElement: Specifies the new data element that will be used to reprotect the data.
Result:
- The UDF returns the protected
longformat data.
Example:
import sqlContext.implicits._
val df = sc.parallelize(List(1234l, 2345l)).toDF("long_col")
val reprotectLongUDF = sqlContext.udf.register("ptyReprotectLong", com.protegrity.spark.udf.ptyReprotectLong _)
df.registerTempTable("long_test")
sqlContext
.sql("select ptyReprotectLong(long_col, 'Token_Long', 'Token_Long_1') as reprotected from long_test")
.show(false)
Supported Protection Methods:
| Function Name | Tokenization | Encryption | FPE | No Encryption | Masking | Monitoring |
|---|---|---|---|---|---|---|
| ptyReprotectLong() | Integer 8 Bytes | No | No | Yes | No | Yes |
ptyReprotectDate()
The UDF reprotects the protected date format data, which was earlier protected with a different data element.
Signature:
ptyReprotectDate(Date colName, String oldDataElement, String newDataElement)
Parameters:
colName: Specifies the column that contains thedateformat data to reprotect.oldDataElement: Specifies the data element that was used to protect the data earlier.newDataElement: Specifies the new data element that will be used to reprotect the data.
Result:
- The UDF returns the protected
dateformat data.
Example:
import sqlContext.implicits._
val d1 = Date.valueOf("2016-12-28")
val d2 = Date.valueOf("2016-12-28")
val df = sc.parallelize(Seq((d1, d2))).toDF("date_col1", "date_col2")
val reprotectDateUDF = sqlContext.udf.register("ptyReprotectDate", com.protegrity.spark.udf.ptyReprotectDate _)
df.registerTempTable("date_test")
sqlContext.sql("select ptyReprotectDate(date_col1, 'Token_Date', 'Token_Date_1') as reprotected from date_test")
.show(false)
Supported Protection Methods:
| Function Name | Tokenization | Encryption | FPE | No Encryption | Masking | Monitoring |
|---|---|---|---|---|---|---|
| ptyReprotectDate() | Date | No | No | Yes | No | Yes |
ptyReprotectDateTime()
The UDF reprotects the protected timestamp format data, which was earlier protected with a different data element.
Signature:
ptyReprotectDateTime(Timestamp colName, String oldDataElement, String newDataElement)
Parameters:
colName: Specifies the column that contains thetimestampformat data to reprotect.oldDataElement: Specifies the data element that was used to protect the data earlier.newDataElement: Specifies the new data element that will be used to reprotect the data.
Result:
- The UDF returns the protected
timestampformat data.
Example:
import sqlContext.implicits._
val d1 = Timestamp.valueOf("2016-12-28 13:09:38.104")
val d2 = Timestamp.valueOf("2016-12-29 12:09:38.104")
val df = sc.parallelize(Seq((d1, d2))).toDF("datetime_col1", "datetime_col2")
val reprotectDateTimeUDF = sqlContext.udf.register( "ptyReprotectDateTime", com.protegrity.spark.udf.ptyReprotectDateTime _)
df.registerTempTable("datetime_test")
sqlContext
.sql("select ptyReprotectDateTime(datetime_col1, 'Token_Datetime', 'Token_Datetime_1') as reprotected from datetime_test")
.show(false)
Supported Protection Methods:
| Function Name | Tokenization | Encryption | FPE | No Encryption | Masking | Monitoring |
|---|---|---|---|---|---|---|
| ptyReprotectDateTime() | DateTime (YYYY-MM-DD HH:MM:SS) | No | No | Yes | No | Yes |
ptyReprotectFloat()
The UDF reprotects the protected float format data, which was earlier protected with a different data element.
Signature:
ptyReprotectFloat(Float colName, String oldDataElement, String newDataElement)
Parameters:
colName: Specifies the column that contains thefloatformat data to reprotect.oldDataElement: Specifies the data element that was used to protect the data earlier.newDataElement: Specifies the new data element that will be used to reprotect the data.
Warning: Ensure that you use the No Encryption data element only. Using any other data element might cause corruption of data.
Result:
- The UDF returns the protected
floatformat data.
Example:
import sqlContext.implicits._
val input = Seq((1234.345f, 1343.3345f))
val df = sc.parallelize(input).toDF("float_col1", "float_col2")
val reprotectFloatUDF = sqlContext.udf.register("ptyReprotectFloat", com.protegrity.spark.udf.ptyReprotectFloat _)
df.registerTempTable("float_test")
sqlContext
.sql("select ptyReprotectFloat(float_col1, 'Token_NoEncryption', 'Token_NoEncryption') as reprotected from float_test")
.show(false)
Supported Protection Methods:
| Function Name | Tokenization | Encryption | FPE | No Encryption | Masking | Monitoring |
|---|---|---|---|---|---|---|
| ptyReprotectFloat() | No | No | No | Yes | No | Yes |
ptyReprotectDouble()
The UDF reprotects the protected double format data, which was earlier protected with a different data element.
Signature:
ptyReprotectDouble(Double colName, String oldDataElement, String newDataElement)
Parameters:
colName: Specifies the column that contains thedoubleformat data to reprotect.oldDataElement: Specifies the data element that was used to protect the data earlier.newDataElement: Specifies the new data element that will be used to reprotect the data.
Warning: Ensure that you use the No Encryption data element only. Using any other data element might cause corruption of data.
Result:
- The UDF returns the protected
doubleformat data.
Example:
import sqlContext.implicits._
val input = Seq((1234.345, 1343.3345))
val df = sc.parallelize(input).toDF("double_col1", "double_col2")
val reprotectDoubleUDF = sqlContext.udf.register("ptyReprotectDouble", com.protegrity.spark.udf.ptyReprotectDouble _)
df.registerTempTable("double_test")
sqlContext
.sql("select ptyReprotectDouble(double_col1, 'Token_NoEncryption', 'Token_NoEncryption') as reprotected from double_test")
.show(false)
Supported Protection Methods:
| Function Name | Tokenization | Encryption | FPE | No Encryption | Masking | Monitoring |
|---|---|---|---|---|---|---|
| ptyReprotectDouble() | No | No | No | Yes | No | Yes |
ptyReprotectDecimal()
The UDF reprotects the protected decimal format data, which was earlier protected with a different data element.
Signature:
ptyReprotectDecimal(Decimal colName, String oldDataElement, String newDataElement)
Parameters:
colName: Specifies the column that contains theDecimalformat data to reprotect.oldDataElement: Specifies the data element that was used to protect the data earlier.newDataElement: Specifies the new data element that will be used to reprotect the data.
Warning: Ensure that you use the No Encryption data element only. Using any other data element might cause corruption of data.
Caution: Before the ptyReprotectDecimal() UDF is called, Spark SQL rounds off the decimal value in the table to 18 digits in scale, irrespective of the length of the data.
Result:
- The UDF returns the protected
Decimalformat data.
Example:
import sqlContext.implicits._
val input = Seq((math.BigDecimal.valueOf(1234.345), math.BigDecimal.valueOf(1343.3345)))
val df = sc.parallelize(input).toDF("decimal_col1", "decimal_col2")
val reprotectDecimalUDF = sqlContext.udf.register("ptyReprotectDecimal", com.protegrity.spark.udf.ptyReprotectDecimal _)
df.registerTempTable("decimal_test")
sqlContext
.sql("select ptyReprotectDecimal(decimal_col1, 'Token_NoEncryption', 'Token_NoEncryption') as reprotected from decimal_test")
.show(false)
Supported Protection Methods:
| Function Name | Tokenization | Encryption | FPE | No Encryption | Masking | Monitoring |
|---|---|---|---|---|---|---|
| ptyReprotectDecimal() | No | No | No | Yes | No | Yes |
ptyStringEnc()
The UDF encrypts a string value to get binary data.
Signature:
ptyStringEnc(String input, String DataElement)
Parameters:
String input: Specifies thestringvalue to encrypt.String DataElement: Specifies the name of the data element to encrypt thestringvalue.
Result:
- The UDF returns an encrypted
binaryvalue.
Note: To store the binary output of the ptyStringEnc UDF in a string column, use the built-in Base64 Spark SQL function to convert the output encrypted bytes into a Base64 encoded string.
Example:
import org.apache.spark.sql.SQLContext
val sqlContext = new SQLContext(sc)
import sqlContext.implicits._
val protectStrEncUDF = sqlContext.udf.register("ptyStringEnc",com.protegrity.spark.udf.ptyStringEnc _)
val pepTest = sc.parallelize(List("hello", "world")).toDF("col1")
pepTest.registerTempTable("spark_clear_table")
val encr_spark = sqlContext.sql("select base64(ptyStringEnc(col1,'AES128_CRC')) as col1
spark_clear_table").toDF()
encr_spark.show()
encr_spark.registerTempTable("encrypted_spark")
Exception:
java.lang.OutOfMemoryError: Requested array size exceeds VM limit: The length of the input needs to be less than the maximum limit of 512 MB.
Supported Protection Methods:
| Function Name | Tokenization | Encryption | FPE | No Encryption | Masking | Monitoring |
| ptyStringEnc | No |
| No | Yes | No | Yes |
Guidelines to estimate the field size of the data
The encryption algorithm and the field sizes (in bytes) required by the features, such as, Key ID (KID), Initialization Vector (IV), and Integrity Check (CRC) is listed in the following table:
| Encryption Algorithm | KID (size in Bytes) | IV (size in Bytes) | CRC (size in Bytes) |
|---|---|---|---|
| AES | 16 | 16 | 4 |
| 3DES | 8 | 8 | 4 |
| CUSP_TRDES | 2 | N/A | 4 |
| CUSP_AES | 2 | N/A | 4 |
The byte sizes required by the input file and the encryption algorithm with the features selected is listed in the following table:
| Encryption Algorithm | Maximum Input size in bytes eligible for Encryption | Maximum Input size in bytes eligible for Decryption and Re-Encryption |
|---|---|---|
| 3DES | Less than <= 535000000 Approximately 512 MB | Less than <= 715120000 Approximately 682 MB |
| AES-128 | ||
| AES-256 | ||
| CUSP 3DES | ||
| CUSP AES-128 | ||
| CUSP AES-256 |
ptyStringDec()
The UDF decrypts a binary value to get string data.
Signature:
ptyStringDec(Binary input, String DataElement)
Parameters:
Binary input: Specifies the protectedBinaryvalue to unprotect.String DataElement: Specifies the name of the data element that was used to encrypt the string value, to decrypt the binary value.
Result:
- The UDF returns the decrypted
stringvalue.
Note: If you have previously stored the encrypted bytes as a Base64-encoded string, then decode them using the unbase64 Spark SQL built-in function before passing to the ptyStringDec UDF.
Example:
import org.apache.spark.sql.SQLContext
val sqlContext = new SQLContext(sc)
import sqlContext.implicits._
val protectStrDecUDF = sqlContext.udf.register("ptyStringDec",com.protegrity.spark.udf.ptyStringDec _)
val decyrpt_spark = sqlContext.sql("select ptyStringDec(unbase64(col1),'AES128_CRC') as col1 from encrypted_spark").toDF()
decyrpt_spark.show()
Exception:
java.lang.OutOfMemoryError: Requested array size exceeds VM limit: The length of the input needs to be less than the maximum limit of 512 MB.
Supported Protection Methods:
| Function Name | Tokenization | Encryption | FPE | No Encryption | Masking | Monitoring |
| ptyStringDec() | No |
| No | Yes | No | Yes |
ptyStringReEnc()
The UDF re-encrypts the Binary format encrypted data with a different data element to get another binary data.
Signature:
ptyStringReEnc(Binary input, String oldDataElement, String newDataElement)
Parameters:
Binary input: Specifies thebinaryvalue to re-encrypt.String oldDataElement: Specifies the data element that was used to encrypt the data earlier.String newDataElementt: Specifies the new data element to re-encrypt the data.
Result:
- The UDF returns the re-encrypted
binaryformat data.
Note:
- If you have previously stored the encrypted bytes as a Base64 encoded string, then decode them using the unbase64 Spark SQL built-in function before passing to the
ptyStringReEncUDF. - To store the Binary output of the
ptyStringReEncUDF in a String column, use the Base64 Spark SQL built-in function to convert the output re-encrypted bytes into a Base64 encoded string.
Example:
import org.apache.spark.sql.SQLContext
val sqlContext = new SQLContext(sc)
import sqlContext.implicits._
val protectStrReEncUDF = sqlContext.udf.register("ptyStringReEnc",com.protegrity.spark.udf.ptyStringReEnc _)
val reencyrpt_spark = sqlContext.sql("select base64(ptyStringReEnc(unbase64(col1),'AES128_CRC','AES128_CRC')) as col1 from
encrypted_spark").toDF()
reencyrpt_spark.show()
Exception:
java.lang.OutOfMemoryError: Requested array size exceeds VM limit: The length of the input needs to be less than the maximum limit of 512 MB.
Supported Protection Methods:
| Function Name | Tokenization | Encryption | FPE | No Encryption | Masking | Monitoring |
| ptyStringReEnc() | No |
| No | Yes | No | Yes |
3.3.8 - PySpark - Scala Wrapper UDFs
All the Spark Scala Wrapper UDFs that are available for protection and unprotection in Big Data Protector to build secure Big Data applications are listed here.
For each of the Spark SQL UDF in Spark SQL UDFs, a Scala UDF wrapper class is created so that it can be registered in the PySpark and invoked using the spark.sql() method.
ptyGetVersionScalaWrapper()
The UDF returns the current version of the protector.
Signature:
ptyGetVersionScalaWrapper()
Parameters:
- None
Result:
- The UDF returns the current version of the protector.
Example:
spark.udf.registerJavaFunction("ptyGetVersionScalaWrapper", "com.protegrity.spark.wrapper.ptyGetVersion")
spark.sql("select ptyGetVersionScalaWrapper()").show(truncate = False)
ptyGetVersionExtendedScalaWrapper()
The UDF returns the extended version information of the protector.
Signature:
ptyGetVersionExtendedScalaWrapper()
Parameters:
- None
Result:
- The UDF returns a String in the following format:where,
"BDP: <1>; JcoreLite: <2>; CORE: <3>;"- Is the current version of the Protector.
- Is the Jcorelite library version.
- Is the Core library version
Example:
spark.udf.registerJavaFunction("ptyGetVersionExtendedScalaWrapper","com.protegrity.spark.wrapper.ptyGetVersionExtended")
spark.sql("select ptyGetVersionExtendedScalaWrapper()").show(truncate = False)
ptyWhoAmIScalaWrapper()
The UDF returns the current logged in user.
Signature:
ptyWhoAmIScalaWrapper()
Parameters:
- None
Result:
- The UDF returns the current logged in user.
Example:
spark.udf.registerJavaFunction("ptyWhoAmIScalaWrapper", "com.protegrity.spark.wrapper.ptyWhoAmI")
spark.sql("select ptyWhoAmIScalaWrapper()").show(truncate = False)
ptyProtectStrScalaWrapper()
The UDF protects the string format data that is provided as an input.
Note: For Date and Datetime type of data elements, the protect API returns an invalid input data error if the
input value falls between the non-existent date range from 05-OCT-1582 to 14-OCT-1582 of the Gregorian
Calendar.
For more information about the tokenization and de-tokenization of the cutover dates of the Proleptic
Gregorian Calendar, refer Date and Datetime tokenization.
Signature:
ptyProtectStrScalaWrapper(String colName, String dataElement)
Parameters:
colName: Specifies the column that contains the data in thestringformat to protect.dataElement: Specifies the data element to protect thestringformat data.
Result:
- The UDF returns the protected data in the
stringformat.
Example:
from pyspark.sql.types import *
spark.udf.registerJavaFunction("ptyProtectStrScalaWrapper", "com.protegrity.spark.wrapper.ptyProtectStr", StringType())
spark.sql("select ptyProtectStrScalaWrapper(column1, 'Data_Element') from table1;").show(truncate = False)
ptyProtectUnicodeScalaWrapper()
The UDF protects the string (Unicode) format data, which is provided as an input.
Warning: This UDF should be used only if you want to tokenize the Unicode data in PySpark, and migrate the tokenized data from Pyspark to a Teradata database and detokenize the data using the Protegrity Database Protector. Ensure that you use this UDF with a Unicode tokenization data element only.
Signature:
ptyProtectUnicodeScalaWrapper(String colName, String dataElement)
Parameters:
colName: Specifies the column that contains the data in thestring(Unicode) format to protect.dataElement: Specifies the data element to protect thestring(Unicode) format data.
Result:
- The UDF returns the protected data in the
stringformat.
Example:
from pyspark.sql.types import *
spark.udf.registerJavaFunction("ptyProtectUnicodeScalaWrapper", "com.protegrity.spark.wrapper.ptyProtectUnicode", StringType())
spark.sql("select ptyProtectUnicodeScalaWrapper(column1, 'Data_Element') from table1;").show(truncate = False)
ptyProtectIntScalaWrapper()
The UDF protects the integer format data, which is provided as an input.
Signature:
ptyProtectIntScalaWrapper(Int input, String dataElement)
Parameters:
colName: Specifies the column that contains the data in theintegerformat to protect.dataElement: Specifies the data element to protect theintegerformat data.
Result:
- The UDF returns the protected data in the
integerformat.
Example:
from pyspark.sql.types import *
spark.udf.registerJavaFunction("ptyProtectIntScalaWrapper", "com.protegrity.spark.wrapper.ptyProtectInt", IntegerType())
spark.sql("select ptyProtectIntScalaWrapper(column1, 'Data_Element') from table1;").show(truncate = False)
ptyProtectShortScalaWrapper()
The UDF protects the short format data, which is provided as an input.
Signature:
ptyProtectShortScalaWrapper(Short colName, String dataElement)
Parameters:
colName: Specifies the column that contains the data in theshortformat to protect.dataElement: Specifies the data element to protect theshortformat data.
Result:
- The UDF returns the protected data in the
shortformat.
Example:
from pyspark.sql.types import *
spark.udf.registerJavaFunction("ptyProtectShortScalaWrapper", "com.protegrity.spark.wrapper.ptyProtectShort", ShortType())
spark.sql("select ptyProtectShortScalaWrapper(column1, 'Data_Element') from table1;").show(truncate = False)
ptyProtectLongScalaWrapper()
The UDF protects the long format data, which is provided as an input.
Signature:
ptyProtectLongScalaWrapper(Long colName, String dataElement)
Parameters:
colName: Specifies the column that contains the data in thelongformat to protect.dataElement: Specifies the data element to protect thelongformat data.
Result:
- The UDF returns the protected data in the
longformat.
Example:
from pyspark.sql.types import *
spark.udf.registerJavaFunction("ptyProtectLongScalaWrapper", "com.protegrity.spark.wrapper.ptyProtectLong", LongType())
spark.sql("select ptyProtectLongScalaWrapper(column1, 'Data_Element') from table1;").show(truncate = False)
ptyProtectDateScalaWrapper()
The UDF protects the date format data, which is provided as an input.
Signature:
ptyProtectDateScalaWrapper(Date colName, String dataElement)
Parameters:
colName: Specifies the column that contains the data in thedateformat to protect.dataElement: Specifies the data element to protect thedateformat data.
Result:
- The UDF returns the protected data in the
dateformat.
Example:
from pyspark.sql.types import *
spark.udf.registerJavaFunction("ptyProtectDateScalaWrapper", "com.protegrity.spark.wrapper.ptyProtectDate", DateType())
spark.sql("select ptyProtectDateScalaWrapper(column1, 'Data_Element') from table1;").show(truncate = False)
ptyProtectDateTimeScalaWrapper()
The UDF protects the timestamp format data, which is provided as an input.
Signature:
ptyProtectDateTimeScalaWrapper(Timestamp colName, String dataElement)
Parameters:
colName: Specifies the column that contains the data in thetimestampformat to protect.dataElement: Specifies the data element to protect thetimestampformat data.
Result:
- The UDF returns the protected data in the
timestampformat.
Example:
from pyspark.sql.types import *
spark.udf.registerJavaFunction("ptyProtectDateTimeScalaWrapper", "com.protegrity.spark.wrapper.ptyProtectDateTime", TimestampType())
spark.sql("select ptyProtectDateTimeScalaWrapper(column1, 'Data_Element') from table1;").show(truncate = False)
ptyProtectFloatScalaWrapper()
The UDF protects the float format data, which is provided as an input.
Caution: The Float, Double, and Decimal UDFs will be deprecated in a future version of the Big Data Protector and should not be used.
It is recommended not to use the Float or Double or Decimal data type directly in the Float or Double or Decimal UDFs of Protegrity.
If you want to protect the Float data type, then convert the Float data to String data type and pass the Float converted String data type to the ptyProtectStrScalaWrapper() UDF with the Float tokenizer. Ensure that the right precision and scale of input data are maintained during conversion.
If there is a Float datatype UDF with the Float input, then convert the Float to string data type and pass the Float converted string data type to ptyProtectStrScalaWrapper() UDF with the Float tokenizer.
Warning: Protegrity will not be responsible for any type of data conversion error that might occur during conversion.
Signature:
ptyProtectFloatScalaWrapper(Float colName, String dataElement)
Parameters:
colName: Specifies the column that contains the data in thefloatformat to protect.dataElement: Specifies the data element to protect thefloatformat data.
Warning: Ensure that you use the No Encryption data element only. Using any other data element might cause corruption of data.
Result:
- The UDF returns the protected data in the
floatformat.
Example:
from pyspark.sql.types import *
spark.udf.registerJavaFunction("ptyProtectFloatScalaWrapper", "com.protegrity.spark.wrapper.ptyProtectFloat", FloatType())
spark.sql("select ptyProtectFloatScalaWrapper(column1, 'Data_Element') from table1;").show(truncate = False)
ptyProtectDoubleScalaWrapper()
The UDF protects the double format data, which is provided as an input.
Caution: The Float, Double, and Decimal UDFs will be deprecated in a future version of the Big Data Protector and should not be used.
It is recommended not to use the Float or Double or Decimal data type directly in the Float or Double or Decimal UDFs of Protegrity.
If you want to protect the Double data type, then convert the Double data to String data type and pass the Double converted String data type to the ptyProtectStrScalaWrapper() UDF with the Double tokenizer. Ensure that the right precision and scale of input data are maintained during conversion.
If there is a Double datatype UDF with the Double input, then convert the Double to string data type and pass the Double converted string data type to ptyProtectStrScalaWrapper() UDF with the Double tokenizer.
Warning: Protegrity will not be responsible for any type of data conversion error that might occur during conversion.
Signature:
ptyProtectDoubleScalaWrapper(Double colName, String dataElement)
Parameters:
colName: Specifies the column that contains the data in thedoubleformat to protect.dataElement: Specifies the data element to protect thedoubleformat data.
Warning: Ensure that you use the No Encryption data element only. Using any other data element might cause corruption of data.
Result:
- The UDF returns the protected data in the
doubleformat.
Example:
from pyspark.sql.types import *
spark.udf.registerJavaFunction("ptyProtectDoubleScalaWrapper", "com.protegrity.spark.wrapper.ptyProtectDouble", DoubleType())
spark.sql("select ptyProtectDoubleScalaWrapper(column1, 'Data_Element') from table1;").show(truncate = False)
ptyProtectDecimalScalaWrapper()
The UDF protects the decimal format data, which is provided as an input.
Caution: The Float, Double, and Decimal UDFs will be deprecated in a future version of the Big Data Protector and should not be used.
It is recommended not to use the Float or Double or Decimal data type directly in the Float or Double or Decimal UDFs of Protegrity.
If you want to protect the Decimal data type, then convert the Decimal data to String data type and pass the Decimal converted String data type to the ptyProtectStrScalaWrapper() UDF with the Decimal tokenizer. Ensure that the right precision and scale of input data are maintained during conversion.
If there is a Decimal datatype UDF with the Decimal input, then convert the Decimal to string data type and pass the Decimal converted string data type to ptyProtectStrScalaWrapper() UDF with the decimal tokenizer.
Warning: Protegrity will not be responsible for any type of data conversion error that might occur during conversion.
Signature:
ptyProtectDecimalScalaWrapper(Decimal colName, String dataElement)
Parameters:
colName: Specifies the column that contains the data in theDecimalformat to protect.dataElement: Specifies the data element to protect theDecimalformat data.
Warning: Ensure that you use the No Encryption data element only. Using any other data element might cause corruption of data.
Caution: Before the ptyProtectDecimalScalaWrapper() UDF is called, Spark SQL rounds off the decimal value in the table to 18 digits in scale, irrespective of the length of the data.
Result:
- The UDF returns the protected data in the
Decimalformat.
Example:
from pyspark.sql.types import *
spark.udf.registerJavaFunction("ptyProtectDecimalScalaWrapper", "com.protegrity.spark.wrapper.ptyProtectDecimal", DecimalType(precision=10, scale=4))
spark.sql("select ptyProtectDecimalScalaWrapper(column1, 'Data_Element') from table1;").show(truncate = False)
ptyUnprotectStrScalaWrapper()
The UDF unprotects the string format data, which is provided as an input.
Note: For Date and Datetime type of data elements, the protect API returns an invalid input data error if the input value falls between the non-existent date range from 05-OCT-1582 to 14-OCT-1582 of the Gregorian Calendar.
For more information about the tokenization and de-tokenization of the cutover dates of the Proleptic Gregorian Calendar, refer Date and Datetime tokenization.
Signature:
ptyUnprotectStrScalaWrapper(String colName, String dataElement)
Parameters:
colName: Specifies the column that contains the data in thestringformat to unprotect.dataElement: Specifies the data element to protect thestringformat data.
Warning: Ensure that you use the No Encryption data element only. Using any other data element might cause corruption of data.
Result:
- The UDF returns the unprotected data in the
stringformat.
Example:
from pyspark.sql.types import *
spark.udf.registerJavaFunction("ptyUnprotectStrScalaWrapper", "com.protegrity.spark.wrapper.ptyUnprotectStr", StringType())
spark.sql("select ptyUnprotectStrScalaWrapper(column1, 'Data_Element') from table1;").show(truncate = False)
ptyUnprotectUnicodeScalaWrapper()
The UDF unprotects the string (unicode) format data, which is provided as an input.
Warning: This UDF should be used only if you want to tokenize the Unicode data in Teradata using the Protegrity Database Protector, and migrate the tokenized data from a Teradata database to PySpark and detokenize the data using the Protegrity Big Data Protector for PySpark. Ensure that you use this UDF with a Unicode tokenization data element only.
Signature:
ptyUnprotectUnicodeScalaWrapper(String colName, String dataElement)
Parameters:
colName: Specifies the column that contains the data in thestring(unicode) format to unprotect.dataElement: Specifies the data element to protect thestring(unicode) format data.
Warning: Ensure that you use the No Encryption data element only. Using any other data element might cause corruption of data.
Result:
- The UDF returns the unprotected data in the
string(unicode) format.
Example:
from pyspark.sql.types import *
spark.udf.registerJavaFunction("ptyUnprotectUnicodeScalaWrapper", "com.protegrity.spark.wrapper.ptyUnprotectUnicode", StringType())
spark.sql("select ptyUnprotectUnicodeScalaWrapper(column1, 'Data_Element') from table1;").show(truncate = False)
ptyUnprotectIntScalaWrapper()
The UDF unprotects the integer format data, which is provided as an input.
Signature:
ptyUnprotectIntScalaWrapper(Int colName, String dataElement)
Parameters:
colName: Specifies the column that contains the data in theintegerformat to unprotect.dataElement: Specifies the data element to protect theintegerformat data.
Caution: If an unauthorized user, with no privileges to unprotect data in the security policy, and the output value set to NULL, attempts to unprotect the protected data of Numeric type data containing Short, Int, Float, Long, Double, and Decimal format values using the respective Spark SQL UDFs, then the output is 0.
Result:
- The UDF returns the unprotected data in the
integerformat.
Example:
from pyspark.sql.types import *
spark.udf.registerJavaFunction("ptyUnprotectIntScalaWrapper", "com.protegrity.spark.wrapper.ptyUnprotectInt", IntegerType())
spark.sql("select ptyUnprotectIntScalaWrapper(column1, 'Data_Element') from table1;").show(truncate = False)
ptyUnprotectShortScalaWrapper()
The UDF unprotects the short format data, which is provided as an input.
Signature:
ptyUnprotectShortScalaWrapper(Short colName, String dataElement)
Parameters:
colName: Specifies the column that contains the data in theshortformat to unprotect.dataElement: Specifies the data element to protect theshortformat data.
Caution: If an unauthorized user, with no privileges to unprotect data in the security policy, and the output value set to NULL, attempts to unprotect the protected data of Numeric type data containing Short, Int, Float, Long, Double, and Decimal format values using the respective Spark SQL UDFs, then the output is 0.
Result:
- The UDF returns the unprotected data in the
shortformat.
Example:
from pyspark.sql.types import *
spark.udf.registerJavaFunction("ptyUnprotectShortScalaWrapper", "com.protegrity.spark.wrapper.ptyUnprotectShort", ShortType())
spark.sql("select ptyUnprotectShortScalaWrapper(column1, 'Data_Element') from table1;").show(truncate = False)
ptyUnprotectLongScalaWrapper()
The UDF unprotects the long format data, which is provided as an input.
Signature:
ptyUnprotectLongScalaWrapper(Long colName, String dataElement)
Parameters:
colName: Specifies the column that contains the data in thelongformat to unprotect.dataElement: Specifies the data element to protect thelongformat data.
Caution: If an unauthorized user, with no privileges to unprotect data in the security policy, and the output value set to NULL, attempts to unprotect the protected data of Numeric type data containing Short, Int, Float, Long, Double, and Decimal format values using the respective Spark SQL UDFs, then the output is 0.
Result:
- The UDF returns the unprotected data in the
longformat.
Example:
from pyspark.sql.types import *
spark.udf.registerJavaFunction("ptyUnprotectLongScalaWrapper", "com.protegrity.spark.wrapper.ptyUnprotectLong", LongType())
spark.sql("select ptyUnprotectLongScalaWrapper(column1, 'Data_Element') from table1;").show(truncate = False)
ptyUnprotectDateScalaWrapper()
The UDF unprotects the date format data, which is provided as an input.
Signature:
ptyUnprotectDateScalaWrapper(Date colName, String dataElement)
Parameters:
colName: Specifies the column that contains the data in thedateformat to unprotect.dataElement: Specifies the data element to protect thedateformat data.
Result:
- The UDF returns the unprotected data in the
dateformat.
Example:
from pyspark.sql.types import *
spark.udf.registerJavaFunction("ptyUnprotectDateScalaWrapper", "com.protegrity.spark.wrapper.ptyUnprotectDate", DateType())
spark.sql("select ptyUnprotectDateScalaWrapper(column1, 'Data_Element') from table1;").show(truncate = False)
ptyUnprotectDateTimeScalaWrapper()
The UDF unprotects the timestamp format data, which is provided as an input.
Signature:
ptyUnprotectDateTimeScalaWrapper(Timestamp colName, String dataElement)
Parameters:
colName: Specifies the column that contains the data in thetimestampformat to unprotect.dataElement: Specifies the data element to protect thetimestampformat data.
Result:
- The UDF returns the unprotected data in the
timestampformat.
Example:
from pyspark.sql.types import *
spark.udf.registerJavaFunction("ptyUnprotectDateTimeScalaWrapper", "com.protegrity.spark.wrapper.ptyUnprotectDateTime", TimestampType())
spark.sql("select ptyUnprotectDateTimeScalaWrapper(column1, 'Data_Element') from table1;").show(truncate = False)
ptyUnprotectFloatScalaWrapper()
The UDF unprotects the float format data, which is provided as an input.
Caution: The Float, Double, and Decimal UDFs will be deprecated in a future version of the Big Data Protector and should not be used.
It is recommended not to use the Float or Double or Decimal data type directly in the Float or Double or Decimal UDFs of Protegrity.
If you want to protect the Float data type, then convert the Float data to String data type and pass the Float converted String data type to the ptyProtectStrScalaWrapper() UDF with the Float tokenizer. Ensure that the right precision and scale of input data are maintained during conversion.
If there is a Float datatype UDF with the Float input, then convert the Float to string data type and pass the Float converted string data type to ptyProtectStrScalaWrapper() UDF with the Float tokenizer.
Warning: Protegrity will not be responsible for any type of data conversion error that might occur during conversion.
Signature:
ptyUnprotectFloatScalaWrapper(Float colName, String dataElement)
Parameters:
colName: Specifies the column that contains the data in thefloatformat to unprotect.dataElement: Specifies the data element to unprotect thefloatformat data.
Warning: Ensure that you use the No Encryption data element only. Using any other data element might cause corruption of data.
Caution: If an unauthorized user, with no privileges to unprotect data in the security policy, and the output value set to NULL, attempts to unprotect the protected data of Numeric type data containing Short, Int, Float, Long, Double, and Decimal format values using the respective Spark SQL UDFs, then the output is 0.
Result:
- The UDF returns the unprotected data in the
floatformat.
Example:
from pyspark.sql.types import *
spark.udf.registerJavaFunction("ptyUnprotectFloatScalaWrapper", "com.protegrity.spark.wrapper.ptyUnprotectFloat", FloatType())
spark.sql("select ptyUnprotectFloatScalaWrapper(column1, 'Data_Element') from table1;").show(truncate = False)
ptyUnprotectDoubleScalaWrapper()
The UDF unprotects the double format data, which is provided as an input.
Caution: The Float, Double, and Decimal UDFs will be deprecated in a future version of the Big Data Protector and should not be used.
It is recommended not to use the Float or Double or Decimal data type directly in the Float or Double or Decimal UDFs of Protegrity.
If you want to protect the Double data type, then convert the Double data to String data type and pass the Double converted String data type to the ptyProtectStrScalaWrapper() UDF with the Double tokenizer. Ensure that the right precision and scale of input data are maintained during conversion.
If there is a Double datatype UDF with the Double input, then convert the Double to string data type and pass the Double converted string data type to ptyProtectStrScalaWrapper() UDF with the Double tokenizer.
Warning: Protegrity will not be responsible for any type of data conversion error that might occur during conversion.
Signature:
ptyUnprotectDoubleScalaWrapper(Double colName, String dataElement)
Parameters:
colName: Specifies the column that contains the data in thedoubleformat to unprotect.dataElement: Specifies the data element to unprotect thedoubleformat data.
Warning: Ensure that you use the No Encryption data element only. Using any other data element might cause corruption of data.
Result:
- The UDF returns the unprotected data in the
doubleformat.
Example:
from pyspark.sql.types import *
spark.udf.registerJavaFunction("ptyUnprotectDoubleScalaWrapper", "com.protegrity.spark.wrapper.ptyUnprotectDouble", DoubleType())
spark.sql("select ptyUnprotectDoubleScalaWrapper(column1, 'Data_Element') from table1;").show(truncate = False)
ptyUnprotectDecimalScalaWrapper()
The UDF unprotects the decimal format data, which is provided as an input.
Caution: The Float, Double, and Decimal UDFs will be deprecated in a future version of the Big Data Protector and should not be used.
It is recommended not to use the Float or Double or Decimal data type directly in the Float or Double or Decimal UDFs of Protegrity.
If you want to protect the Decimal data type, then convert the Decimal data to String data type and pass the Decimal converted String data type to the ptyProtectStrScalaWrapper() UDF with the Decimal tokenizer. Ensure that the right precision and scale of input data are maintained during conversion.
If there is a Decimal datatype UDF with the Decimal input, then convert the Decimal to string data type and pass the Decimal converted string data type to ptyProtectStrScalaWrapper() UDF with the decimal tokenizer.
Warning: Protegrity will not be responsible for any type of data conversion error that might occur during conversion.
Signature:
ptyUnprotectDecimalScalaWrapper(Decimal colName, String dataElement)
Parameters:
colName: Specifies the column that contains the data in theDecimalformat to unprotect.dataElement: Specifies the data element to unprotect theDecimalformat data.
Warning: Ensure that you use the No Encryption data element only. Using any other data element might cause corruption of data.
Caution: Before the ptyProtectDecimalScalaWrapper() UDF is called, Spark SQL rounds off the decimal value in the table to 18 digits in scale, irrespective of the length of the data.
Caution: If an unauthorized user, with no privileges to unprotect data in the security policy, and the output value set to NULL, attempts to unprotect the protected data of Numeric type data containing Short, Int, Float, Long, Double, and Decimal format values using the respective Spark SQL UDFs, then the output is 0.
Result:
- The UDF returns the unprotected data in the
Decimalformat.
Example:
from pyspark.sql.types import *
spark.udf.registerJavaFunction("ptyUnprotectDecimalScalaWrapper", "com.protegrity.spark.wrapper.ptyUnprotectDecimal", DecimalType(precision=10, scale=4))
spark.sql("select ptyUnprotectDecimalScalaWrapper(column1, 'Data_Element') from table1;").show(truncate = False)
ptyReprotectStrScalaWrapper()
The UDF reprotects the string format protected data that was earlier protected using the ptyProtectStrScalaWrapper UDF, with a different data element.
Signature:
ptyReprotectStrScalaWrapper(String colName, String oldDataElement, String newDataElement)
Parameters:
colName: Specifies the column that contains the data in thestringformat to be reprotected.oldDataElement: Specifies the data element that was used to protect the data earlier.newDataElement: Specifies the new data element that will be used to reprotect the data.
Result:
- The UDF returns the protected
stringformat data.
Example:
from pyspark.sql.types import *
spark.udf.registerJavaFunction("ptyReprotectStrScalaWrapper", "com.protegrity.spark.wrapper.ptyReprotectStr", StringType())
spark.sql("select ptyReprotectStrScalaWrapper(column1, 'Data_Element') from table1;").show(truncate = False)
ptyReprotectUnicodeScalaWrapper()
The UDF reprotects the string format protected data that was earlier protected using the ptyProtectUnicodeScalaWrapper UDF, with a different data element.
Warning: This UDF should be used only if you want to tokenize the Unicode data in PySpark, and migrate the tokenized data from Pyspark to a Teradata database and detokenize the data using the Protegrity Database Protector. Ensure that you use this UDF with a Unicode tokenization data element only.
Signature:
ptyReprotectUnicodeScalaWrapper(String colName, String oldDataElement, String newDataElement)
Parameters:
colName: Specifies the column that contains the data in thestringformat to be reprotected.oldDataElement: Specifies the data element that was used to protect the data earlier.newDataElement: Specifies the new data element that will be used to reprotect the data.
Result:
- The UDF returns the protected
stringformat data.
Example:
from pyspark.sql.types import *
spark.udf.registerJavaFunction("ptyReprotectUnicodeScalaWrapper", "com.protegrity.spark.wrapper.ptyReprotectUnicode", StringType())
spark.sql("select ptyReprotectUnicodeScalaWrapper(column1, 'Data_Element') from table1;").show(truncate = False)
ptyReprotectIntScalaWrapper()
The UDF reprotects the integer format protected data that was earlier protected with a different data element.
Signature:
ptyReprotectIntScalaWrapper(Int colName, String oldDataElement, String newDataElement)
Parameters:
colName: Specifies the column that contains the data in theintegerformat to be reprotected.oldDataElement: Specifies the data element that was used to protect the data earlier.newDataElement: Specifies the new data element that will be used to reprotect the data.
Result:
- The UDF returns the protected
integerformat data.
Example:
from pyspark.sql.types import *
spark.udf.registerJavaFunction("ptyReprotectIntScalaWrapper", "com.protegrity.spark.wrapper.ptyReprotectInt", IntegerType())
spark.sql("select ptyReprotectIntScalaWrapper(column1, 'Data_Element') from table1;").show(truncate = False)
ptyReprotectShortScalaWrapper()
The UDF reprotects the short format protected data that was earlier protected with a different data element.
Signature:
ptyReprotectShortScalaWrapper(Short colName, String oldDataElement, String newDataElement)
Parameters:
colName: Specifies the column that contains the data in theshortformat to be reprotected.oldDataElement: Specifies the data element that was used to protect the data earlier.newDataElement: Specifies the new data element that will be used to reprotect the data.
Result:
- The UDF returns the protected
shortformat data.
Example:
from pyspark.sql.types import *
spark.udf.registerJavaFunction("ptyReprotectShortScalaWrapper", "com.protegrity.spark.wrapper.ptyReprotectShort", ShortType())
spark.sql("select ptyReprotectShortScalaWrapper(column1, 'Data_Element') from table1;").show(truncate = False)
ptyReprotectLongScalaWrapper()
The UDF reprotects the long format protected data that was earlier protected with a different data element.
Signature:
ptyReprotectLongScalaWrapper(Long colName, String oldDataElement, String newDataElement)
Parameters:
colName: Specifies the column that contains the data in thelongformat to be reprotected.oldDataElement: Specifies the data element that was used to protect the data earlier.newDataElement: Specifies the new data element that will be used to reprotect the data.
Result:
- The UDF returns the protected
longformat data.
Example:
from pyspark.sql.types import *
spark.udf.registerJavaFunction("ptyReprotectLongScalaWrapper", "com.protegrity.spark.wrapper.ptyReprotectLong", LongType())
spark.sql("select ptyReprotectLongScalaWrapper(column1, 'Data_Element') from table1;").show(truncate = False)
ptyReprotectDateScalaWrapper()
The UDF reprotects the date format protected data that was earlier protected with a different data element.
Signature:
ptyReprotectDateScalaWrapper(Date colName, String oldDataElement, String newDataElement)
Parameters:
colName: Specifies the column that contains the data in thedateformat to be reprotected.oldDataElement: Specifies the data element that was used to protect the data earlier.newDataElement: Specifies the new data element that will be used to reprotect the data.
Result:
- The UDF returns the protected
dateformat data.
Example:
from pyspark.sql.types import *
spark.udf.registerJavaFunction("ptyReprotectDateScalaWrapper", "com.protegrity.spark.wrapper.ptyReprotectDate", DateType())
spark.sql("select ptyReprotectDateScalaWrapper(column1, 'Data_Element') from table1;").show(truncate = False)
ptyReprotectDateTimeScalaWrapper()
The UDF reprotects the timestamp format protected data that was earlier protected with a different data element.
Signature:
ptyReprotectDateTimeScalaWrapper(Timestamp colName, String oldDataElement, String newDataElement)
Parameters:
colName: Specifies the column that contains the data in thetimestampformat to be reprotected.oldDataElement: Specifies the data element that was used to protect the data earlier.newDataElement: Specifies the new data element that will be used to reprotect the data.
Result:
- The UDF returns the protected
timestampformat data.
Example:
from pyspark.sql.types import *
spark.udf.registerJavaFunction("ptyReprotectDateTimeScalaWrapper", "com.protegrity.spark.wrapper.ptyReprotectDateTime", TimestampType())
spark.sql("select ptyReprotectDateTimeScalaWrapper(column1, 'Data_Element') from table1;").show(truncate = False)
ptyReprotectFloatScalaWrapper()
The UDF reprotects the float format data, which is provided as an input.
Caution: The Float, Double, and Decimal UDFs will be deprecated in a future version of the Big Data Protector and should not be used.
It is recommended not to use the Float or Double or Decimal data type directly in the Float or Double or Decimal UDFs of Protegrity.
If you want to protect the Float data type, then convert the Float data to String data type and pass the Float converted String data type to the ptyProtectStrScalaWrapper() UDF with the Float tokenizer. Ensure that the right precision and scale of input data are maintained during conversion.
If there is a Float datatype UDF with the Float input, then convert the Float to string data type and pass the Float converted string data type to ptyProtectStrScalaWrapper() UDF with the Float tokenizer.
Warning: Protegrity will not be responsible for any type of data conversion error that might occur during conversion.
Signature:
ptyReprotectFloatScalaWrapper(Float colName, String oldDataElement, String newDataElement)
Parameters:
colName: Specifies the column that contains the data in thefloatformat to be reprotected.oldDataElement: Specifies the data element that was used to protect the data earlier.newDataElement: Specifies the new data element that will be used to reprotect the data.
Warning: Ensure that you use the No Encryption data element only. Using any other data element might cause corruption of data.
Result:
- The UDF returns the protected data in the
floatformat.
Example:
from pyspark.sql.types import *
spark.udf.registerJavaFunction("ptyReprotectFloatScalaWrapper", "com.protegrity.spark.wrapper.ptyReprotectFloat", FloatType())
spark.sql("select ptyReprotectFloatScalaWrapper(column1, 'Data_Element') from table1;").show(truncate = False)
ptyReprotectDoubleScalaWrapper()
The UDF reprotects the double format data, which is provided as an input.
Caution: The Float, Double, and Decimal UDFs will be deprecated in a future version of the Big Data Protector and should not be used.
It is recommended not to use the Float or Double or Decimal data type directly in the Float or Double or Decimal UDFs of Protegrity.
If you want to protect the Double data type, then convert the Double data to String data type and pass the Double converted String data type to the ptyProtectStr() UDF with the Double tokenizer. Ensure that the right precision and scale of input data are maintained during conversion.
If there is a Double datatype UDF with the Double input, then convert the Double to string data type and pass the Double converted string data type to ptyProtectStr() UDF with the Double tokenizer.
Warning: Protegrity will not be responsible for any type of data conversion error that might occur during conversion.
Signature:
ptyReprotectDoubleScalaWrapper(Double colName, String oldDataElement, String newDataElement)
Parameters:
colName: Specifies the column that contains the data in thedoubleformat to be reprotected.oldDataElement: Specifies the data element that was used to protect the data earlier.newDataElement: Specifies the new data element that will be used to reprotect the data.
Warning: Ensure that you use the No Encryption data element only. Using any other data element might cause corruption of data.
Result:
- The UDF returns the protected data in the
doubleformat.
Example:
from pyspark.sql.types import *
spark.udf.registerJavaFunction("ptyReprotectDoubleScalaWrapper", "com.protegrity.spark.wrapper.ptyReprotectDouble", DoubleType())
spark.sql("select ptyReprotectDoubleScalaWrapper(column1, 'Data_Element') from table1;").show(truncate = False)
ptyReprotectDecimalScalaWrapper()
The UDF reprotects the decimal format data, which is provided as an input.
Caution: The Float, Double, and Decimal UDFs will be deprecated in a future version of the Big Data Protector and should not be used.
It is recommended not to use the Float or Double or Decimal data type directly in the Float or Double or Decimal UDFs of Protegrity.
If you want to protect the Decimal data type, then convert the Decimal data to String data type and pass the Decimal converted String data type to the ptyProtectStrScalaWrapper() UDF with the Decimal tokenizer. Ensure that the right precision and scale of input data are maintained during conversion.
If there is a Decimal datatype UDF with the Decimal input, then convert the Decimal to string data type and pass the Decimal converted string data type to ptyProtectStrScalaWrapper() UDF with the decimal tokenizer.
Warning: Protegrity will not be responsible for any type of data conversion error that might occur during conversion.
Signature:
ptyReprotectDecimalScalaWrapper(Decimal colName, String oldDataElement, String newDataElement)
Parameters:
colName: Specifies the column that contains the data in theDecimalformat to be reprotected.oldDataElement: Specifies the data element that was used to protect the data earlier.newDataElement: Specifies the new data element that will be used to reprotect the data.
Warning: Ensure that you use the No Encryption data element only. Using any other data element might cause corruption of data.
Caution: Before the ptyReprotectDecimal() UDF is called, Spark SQL rounds off the decimal value in the table to 18 digits in scale, irrespective of the length of the data.
Result:
- The UDF returns the protected data in the
Decimalformat.
Example:
from pyspark.sql.types import *
spark.udf.registerJavaFunction("ptyReprotectDecimalScalaWrapper", "com.protegrity.spark.wrapper.ptyReprotectDecimal", DecimalType(precision=10, scale=4))
spark.sql("select ptyReprotectDecimalScalaWrapper(column1, 'Data_Element') from table1;").show(truncate = False)
ptyStringEncScalaWrapper()
The UDF encrypts the string value, provided as an input, to get binary data.
Signature:
ptyStringEncScalaWrapper(String colName, String dataElement)
Parameters:
colName: Specifies the column that contains data inStringformat to be encrypted.dataElement: The data element in theStringformat that will be used to encrypt the data.
Result:
- The UDF returns the encrypted binary format data.
Example:
from pyspark.sql.types import *
spark.udf.registerJavaFunction("ptyStringEncScalaWrapper", "com.protegrity.spark.wrapper.ptyStringEnc", BinaryType())
spark.sql("select ptyStringEncScalaWrapper (column1, 'Data_Element') from table1;").show(truncate = False)
ptyStringDecScalaWrapper()
The UDF decrypts the binary value, provided as an input, to get string data.
Signature:
ptyStringDecScalaWrapper(Binary colName, String dataElement)
Parameters:
colName: Specifies the column that contains data inbinrayformat to be decrypted.dataElement: The data element in theStringformat that will be used to decrypt the data.
Result:
- The UDF returns the decrypted
stringformat data.
Example:
from pyspark.sql.types import *
spark.udf.registerJavaFunction("ptyStringDecScalaWrapper", "com.protegrity.spark.wrapper.ptyStringDec", StringType())
spark.sql("select ptyStringDecScalaWrapper (column1, 'Data_Element') from table1;").show(truncate = False)
ptyStringReEncScalaWrapper()
The UDF re-encrypts the binary value, provided as an input, to get another binary data.
Signature:
ptyStringReEncScalaWrapper (Binary colName, String oldDataElement, String newDataElement)
Parameters:
colName: Specifies the column that contains data in theBinaryformat to be re-encrypted.oldDataElement: Specifies the data element name in theStringformat that was previously used to encrypt the data.newDataElement: Specifies the name of the new data element in theStringformat to re-encrypt the data.
Result:
- The UDF returns the re-encrypted
binaryformat data.
Example:
from pyspark.sql.types import *
spark.udf.registerJavaFunction("ptyStringReEncScalaWrapper", "com.protegrity.spark.wrapper.ptyStringReEnc", BinaryType())
spark.sql("select ptyStringReEncScalaWrapper (column1, 'Old_Data_Element', 'New_Data_Element' ) from table1;").show(truncate = False)
3.3.9 - Unity Catalog Batch Python UDFs
The UDFs in this section are applicable only to install and configure the Big Data Protector in the Databricks environment.
This version of the build only supports Unity Catalog Batch Python UDFs that use the Application Protector REST and Cloud Protect approaches. The Hive and Spark UDFs and APIs that provide native protection within the cluster nodes are not packaged in this build. To use those features, please use the 9.1.0.0 builds.
pty_who_am_i()
The UDF returns the current user.
Signature:
pty_who_am_i()
Parameters:
| Name | Data Type | Description |
|---|---|---|
input | STRING | Specifies any random string value to be passed to fetch the current user. |
Result:
- The UDF returns the current user.
pty_get_version()
The UDF returns the current version of the protector.
Signature:
pty_get_version()
Parameters:
| Name | Data Type | Description |
|---|---|---|
input | STRING | Specifies any random string value to be passed to fetch the current version. |
Result:
- The UDF returns the current version of the protector.
Example:
select pty_get_version();
pty_get_version_extended()
The UDF returns the extended version information of the protector.
Signature:
pty_get_version_extended();
Parameters:
| Name | Data Type | Description |
|---|---|---|
input | STRING | Specifies any random string value to be passed to fetch the extended version details. |
Result:
The UDF returns a String in the following format:
BDP: <bdp_version>, Application Protector REST: <aprest_version>, Jcore: <jcore_version>, Core: <core_version>;
where:
BDP: is the current version of the ProtectorApplication Protector REST: is the Application Protector REST versionJcore: is the Jcorelite versionCore: is the Core library version
Example:
select pty_get_version_extended();
pty_protect_binary()
The UDF protects the BINARY format data, which is provided as input.
Signature:
pty_protect_binary (input BINARY, data_element STRING)
Parameters:
| Name | Description |
|---|---|
input | Specifies the column that contains data in BINARY format, which needs to be protected. |
data_element | Specifies the data element used to protect the BINARY format data. |
Returns:
The UDF returns the BINARY format data, which is protected.
Example:
SELECT pty_protect_binary(<column_with_binary_data>, "<binary_data_element>");
pty_unprotect_binary()
The UDF unprotects the protected BINARY data, which is provided as an input.
Signature:
pty_unprotect_binary (input BINARY, data_element STRING)
Parameters:
| Name | Description |
|---|---|
input | Specifies the column that contains data in BINARY format, which needs to be unprotected. |
data_element | Specifies the data element used to unprotect the BINARY format data. |
Returns:
The UDF returns the BINARY format data, which is unprotected.
Example:
SELECT pty_unprotect_binary(<column_with_protected_binary_data>, "<binary_data_element>");
pty_protect_date()
The UDF protects the DATE format data, which is provided as input.
Signature:
pty_protect_date (input DATE, data_element STRING)
Note: The supported DATE format is YYYY-MM-DD.
Parameters:
| Name | Description |
|---|---|
input | Specifies the column that contains data in DATE format, which needs to be protected. |
data_element | Specifies the data element used to protect the DATE format data. |
Returns:
The UDF returns the DATE format data, which is protected.
Example:
SELECT pty_protect_date(<column_with_date_data>, "de_datetime");
pty_unprotect_date()
The UDF unprotects the protected DATE data, which is provided as an input.
Signature:
pty_unprotect_date (input DATE, data_element STRING)
Note: The supported DATE format is YYYY-MM-DD.
Parameters:
| Name | Description |
|---|---|
input | Specifies the column that contains data in DATE format, which needs to be unprotected. |
data_element | Specifies the data element used to unprotect the DATE format data. |
Returns:
The UDF returns the DATE format data, which is unprotected.
Example:
SELECT pty_unprotect_date(<column_with_protected_date_data>, "de_datetime");
pty_protect_smallint()
The UDF protects the SMALLINT format data, which is provided as input.
Signature:
pty_protect_smallint (input SMALLINT, data_element STRING)
Parameters:
| Name | Description |
|---|---|
input | Specifies the column that contains data in SMALLINT format, which needs to be protected. |
data_element | Specifies the data element used to protect the SMALLINT format data. |
Returns:
The UDF returns the SMALLINT format data, which is protected.
Example:
SELECT pty_protect_smallint(<column_with_smallint_data>, "de_int2");
pty_unprotect_smallint()
The UDF unprotects the protected SMALLINT data, which is provided as an input.
Signature:
pty_unprotect_smallint (input SMALLINT, data_element STRING)
Parameters:
| Name | Description |
|---|---|
input | Specifies the column that contains data in SMALLINT format, which needs to be unprotected. |
data_element | Specifies the data element used to unprotect the SMALLINT format data. |
Returns:
The UDF returns the SMALLINT format data, which is unprotected.
Example:
SELECT pty_unprotect_smallint(<column_with_protected_smallint_data>, "de_int2");
pty_protect_int()
The UDF protects the INT format data, which is provided as input.
Signature:
pty_protect_int (input INT, data_element STRING)
Parameters:
| Name | Description |
|---|---|
input | Specifies the column that contains data in INT format, which needs to be protected. |
data_element | Specifies the data element used to protect the INT format data. |
Returns:
The UDF returns the INT format data, which is protected.
Example:
SELECT pty_protect_int(<column_with_int_data>, "de_int4");
pty_unprotect_int()
The UDF unprotects the protected INT data, which is provided as an input.
Signature:
pty_unprotect_int (input INT, data_element STRING)
Parameters:
| Name | Description |
|---|---|
input | Specifies the column that contains data in INT format, which needs to be unprotected. |
data_element | Specifies the data element used to unprotect the INT format data. |
Returns:
The UDF returns the INT format data, which is unprotected.
Example:
SELECT pty_unprotect_int(<column_with_protected_int_data>, "de_int4");
pty_protect_string()
The UDF protects the STRING format data, which is provided as input.
For BIGINT, DATETIME, DECIMAL, DOUBLE, and FLOAT data types, it is recommended to use the pty_protect_string() UDF.
For example:
SELECT pty_protect_string(CAST(<column_with_input_data> AS STRING), "<data_element>");
It is recommended to use the following data elements corresponding to their input data type:
- For
BIGINTinput, use an integer data element.SELECT pty_protect_string(CAST(<column_with_bigint_data> AS STRING), "de_int8"); - For DATETIME input, use the datetime data element.
SELECT pty_protect_string(CAST(<column_with_datetime_data> AS STRING), "de_datetime"); - For
DECIMALinput, use a decimal data element.SELECT pty_protect_string(CAST(<column_with_decimal_data> AS STRING), "de_decimal"); - For
DOUBLEinput, either use a decimal, numeric, or a no encryption data element.SELECT pty_protect_string(CAST(<column_with_double_data> AS STRING), "de_decimal");SELECT pty_protect_string(CAST(<column_with_double_data> AS STRING), "de_numeric"); - For
FLOATinput, either use a decimal, numeric, or a no encryption data element.SELECT pty_protect_string(CAST(<column_with_float_data> AS STRING), "de_decimal");SELECT pty_protect_string(CAST(<column_with_float_data> AS STRING), "de_numeric");
Signature:
pty_protect_string (input STRING, data_element STRING)
Note: The UDF accepts a maximum input length of 4081 characters.
Parameters:
| Name | Description |
|---|---|
input | Specifies the column that contains data in STRING format, which needs to be protected. |
data_element | Specifies the data element used to protect the STRING format data. |
Returns:
The UDF returns the STRING format data, which is protected.
Example:
SELECT pty_protect_string(<column_with_string_data>, "de_alphanum");
pty_unprotect_string()
The UDF unprotects the STRING format data, which is provided as input.
For BIGINT, DATETIME, DECIMAL, DOUBLE, and FLOAT data types, it is recommended to use the pty_unprotect_string() UDF.
For example:
SELECT pty_unprotect_string(CAST(<column_with_protected_data> AS STRING), "<data_element>");
It is recommended to use the following data elements corresponding to their input data type:
- For
BIGINTinput, use an integer data element.SELECT pty_unprotect_string(CAST(<column_with_protected_bigint_data> AS STRING), "de_int8"); - For DATETIME input, use the datetime data element.
SELECT pty_unprotect_string(CAST(<column_with_protected_datetime_data> AS STRING), "de_datetime"); - For
DECIMALinput, use a decimal data element.SELECT pty_unprotect_string(CAST(<column_with_protected_decimal_data> AS STRING), "de_decimal"); - For
DOUBLEinput, either use a decimal, numeric, or a no encryption data element.SELECT pty_unprotect_string(CAST(<column_with_protected_double_data> AS STRING), "de_decimal");SELECT pty_unprotect_string(CAST(<column_with_protected_double_data> AS STRING), "de_numeric"); - For
FLOATinput, either use a decimal, numeric, or a no encryption data element.SELECT pty_unprotect_string(CAST(<column_with_protected_float_data> AS STRING), "de_decimal");SELECT pty_unprotect_string(CAST(<column_with_protected_float_data> AS STRING), "de_numeric");
Signature:
pty_unprotect_string (input STRING, data_element STRING)
Parameters:
| Name | Description |
|---|---|
input | Specifies the column that contains data in STRING format, which needs to be unprotected. |
data_element | Specifies the data element used to unprotect the STRING format data. |
Returns:
The UDF returns the STRING format data, which is unprotected.
Example:
SELECT pty_unprotect_string(<column_with_protected_string_data>, "de_alphanum");
pty_encrypt_string()
The UDF encrypts STRING format data, which is provided as input.
Signature:
pty_encrypt_string (input STRING, data_element STRING)
Parameters:
| Name | Description |
|---|---|
input | Specifies the column that contains data in STRING format, which needs to be encrypted. |
data_element | Specifies the data element used to encrypt the STRING format data. |
Returns:
The UDF returns the BINARY format data, which is encrypted.
Example:
SELECT pty_encrypt_string(<column_with_string_data>, "<encryption_data_element>");
pty_decrypt_string()
The UDF decrypts the encrypted BINARY data, which is provided as an input.
Signature:
pty_decrypt_string (input BINARY, data_element STRING)
Parameters:
| Name | Description |
|---|---|
input | Specifies the column that contains the data in the BINARY format, which needs to be decrypted. |
data_element | Specifies the data element used to decrypt the BINARY format data. |
Returns:
The UDF returns the STRING format data, which is decrypted.
Example:
SELECT pty_decrypt_string(<column_with_encrypted_string_data>, "<encryption_data_element>");
pty_protect_string_fpe()
The UDF protects the STRING format data, which is provided as input.
Note: The UDF is compatible only with the Application Protector REST approach.
Signature:
pty_protect_string_fpe (input STRING, data_element STRING, encoding STRING)
Note: The UDF accepts a maximum input length of 4081 characters.
Parameters:
| Name | Description |
|---|---|
input | Specifies the column that contains the data in the STRING format, which needs to be protected. |
data_element | Specifies the data element used to protect the STRING format data. |
encoding | Specifies the encoding to be used for data protection. |
Returns:
The UDF returns the STRING format data, which is protected.
Example:
SELECT pty_protect_string_fpe(<column_with_string_data>, "de_alphanum", "utf_8");
Note: For more information about the supported encoding formats, refer to Standard Encodings
pty_unprotect_string_fpe()
The UDF unprotects the protected STRING format data, which is provided as input.
Note: The UDF is compatible only with the Application Protector REST approach.
Signature:
pty_unprotect_string_fpe (input STRING, data_element STRING, encoding STRING)
Parameters:
| Name | Description |
|---|---|
input | Specifies the column that contains the data in the STRING format, which needs to be unprotected. |
data_element | Specifies the data element used to unprotect the STRING format data. |
encoding | Specifies the encoding to be used for data protection. |
Returns:
The UDF returns the STRING format data, which is unprotected.
Example:
SELECT pty_unprotect_string_fpe(<column_with_protected_string_data>, "de_alphanum", "utf_8");
Note: For more information about the supported encoding formats, refer Standard Encodings
3.4 - Additional Information
3.4.1 - Migrating Tokenized Unicode Data
The procedure to migrate tokenized Unicode data from and to a Teradata database are listed below.
This section is only applicable for Legacy Unicode and Base64 Unicode data element.
This section considers the Teradata database for reference.
In addition to the Teradata database, the Big Data Protector works with other databases, such as Netezza and Greenplum.
Migrating Tokenized Unicode Data from a Teradata Database
This section describes the task to unprotect the tokenized Unicode data in Hive, Impala, or Spark, which was tokenized in the Teradata database using the Protegrity Database Protector and then migrated to Hive, Impala, MapReduce, or Spark.
Ensure that the data elements used in the data security policy, deployed on the Teradata Database Protector and Big Data Protector machines are uniform.
From Teradata Database to Hive or Impala
To migrate Tokenized Unicode data from Teradata database to Hive or Impala and unprotect it using Hive or Impala protector:
- Tokenize the Unicode data in the Teradata database using Protegrity Database Protector.
- Migrate the tokenized Unicode data from the Teradata database to Hive or Impala.
- To unprotect the tokenized Unicode data on Hive or Impala, ensure that the following UDFs are used, as required:
- Hive:
ptyUnprotectUnicode() - Impala:
pty_UnicodeStringSel()
- Hive:
From Teradata database to Hadoop
To migrate Tokenized Unicode data from a Teradata database to Hadoop and unprotect it using MapReduce or Spark protector:
- Migrate the tokenized Unicode data to the Hadoop ecosystem using any data migration utilities.
- To unprotect the tokenized Unicode data using MapReduce or Spark, ensure that the following APIs are used, as required:
- MapReduce: public byte[] unprotect(String dataElement, byte[] data)
- Spark: void unprotect(String dataElement, List
errorIndex, byte[][] input, byte[][] output)
- Convert the protected tokens to bytes using UTF-8 encoding.
- Send the data as input to the Unprotect API in the MapReduce or Spark protector, as required.
- Convert the unprotected output in bytes to String using UTF-16LE encoding. The string data will display the data in cleartext format.
The following sample code snippet describes how to unprotect the Tokenized Unicode data, that is migrated from a Teradata database to Hadoop, using the MapReduce or Spark protector.
private Protector protector = null;
String[] unprotectinput= new String[SIZE] ;
byte[][] inputValueByte = new byte [unprotectinput.length][];
StringBuilder unprotectedString = new StringBuilder();
int x=0;
for (x=0; x< unprotectinput.length; x++)
inputValueByte[x]= unprotectinput[x].getBytes(StandardCharsets.UTF_8); // Point a implementation
protector.unprotect(DATAELEMENT_NAME, errorIndexList, inputValueByte, outputValueByte); //Point b implementation
unprotectedString.apprend(new String(outputValueByte[j],StandardCharsets.UTF_16LE))//Point c implementation
Migrating Tokenized Unicode Data to a Teradata Database
The steps to protect Unicode data in Hive, Impala, MapReduce, or Spark, migrate it to a Teradata database, and then unprotect the tokenized Unicode data using the Protegrity Database Protector are listed below.
Ensure that the data elements used in the data security policy, deployed on the Teradata Database Protector and Big Data Protector machines are uniform.
Migrating Tokenized Unicode data using Hive or Impala
To migrate Tokenized Unicode data using Hive or Impala protector to Teradata database:
- To protect the Unicode data on Hive or Impala, ensure that the following UDFs are used, as required:
- Hive:
ptyProtectUnicode() - Impala:
pty_UnicodeStringIns()
- Hive:
- Migrate the tokenized Unicode data from Hive or Impala to the Teradata database.
- To unprotect the tokenized Unicode data in the Teradata database, use the Protegrity Database Protector.
Migrating Unicode data using MapReduce or Spark protector
To protect Unicode data using MapReduce or Spark protector and migrate it to a Teradata database:
- Convert the cleartext format Unicode data to bytes using UTF-16LE encoding.
- To migrate the tokenized Unicode data using MapReduce or Spark to the Teradata database, ensure that the following APIs are used, as required:
- MapReduce:
public byte[] protect(String dataElement, byte[] data) - Spark:
void protect(String dataElement, List<Integer> errorIndex, byte[][] input, byte[][] output)
- MapReduce:
- Send the data as input to the Protect API in the MapReduce or Spark protector, as required.
- Convert the protected output in bytes to String using UTF-8 encoding. The output is protected tokenized data.
- Migrate the protected data to the Teradata database using any data migration utilities.
The following sample code snippet describes how to protect Unicode data using the MapReduce or Spark protector, and migrating it to a Teradata database.
private Protector protector = null;
String[] clear_data = new String[SIZE] ;
byte[][] inputValueByte = new byte [clear_data.length][];
StringBuilder protectedString = new StringBuilder();
inputValueByte= data.getBytes(StandardCharsets.UTF_16LE); //Point a implementation
protector.protect(DATAELEMENT_NAME, errorIndexList, inputValueByte, outputValueByte); //Point b implementation
int x=0;
for (x=0; x<outputValueByte.length; x++)
protectedString.append(new String(outputValueByte[x],StandardCharsets.UTF_8)); //Point c implementation
3.4.2 - Return Codes for the Big Data Protector
If you are using the Big Data Protector and any failures occur, then the protector throws an exception. The exception consists of an error code and error message. All the possible error codes and error messages are described below.
The following table lists all errors returned from the Core layer that are logged.
| Code | Error | Error Message |
|---|---|---|
| 0 | NONE | |
| 1 | USER_NOT_FOUND | The username could not be found in the policy. |
| 2 | DATA_ELEMENT_NOT_FOUND | The data element could not be found in the policy. |
| 3 | PERMISSION_DENIED | The user does not have the appropriate permissions to perform the requested operation. |
| 4 | TWEAK_NULL | Tweak is null. |
| 5 | INTEGRITY_CHECK_FAILED | Integrity check failed. |
| 6 | PROTECT_SUCCESS | Data protect operation was successful. |
| 7 | PROTECT_FAILED | Data protect operation failed. |
| 8 | UNPROTECT_SUCCESS | Data unprotect operation was successful. |
| 9 | UNPROTECT_FAILED | Data unprotect operation failed. |
| 10 | OK_ACCESS | The user has appropriate permissions to perform the requested operation but no data has been protected/unprotected. |
| 11 | INACTIVE_KEYID_USED | Data unprotect operation was successful with use of an inactive keyid. |
| 12 | INVALID_PARAM | Input is null or not within allowed limits. |
| 13 | INTERNAL_ERROR | Internal error occurring in a function call after the Core Provider has been opened. |
| 14 | LOAD_KEY_FAILED | Failed to load data encryption key. |
| 15 | TWEAK_INPUT_TOO_LONG | Tweak input is too long. |
| 17 | INIT_FAILED | Failed to initialize the CORE - This is a fatal error |
| 19 | UNSUPPORTED_TWEAK | Unsupported tweak action for the specified FPE data element. |
| 20 | OUT_OF_MEMORY | Failed to allocate memory. |
| 21 | BUFFER_TOO_SMALL | Input or output buffer is too small. |
| 22 | INPUT_TOO_SHORT | Data is too short to be protected/unprotected. |
| 23 | INPUT_TOO_LONG | Data is too long to be protected/unprotected. |
| 25 | USERNAME_TOO_LONG | Username too long. |
| 26 | UNSUPPORTED | Unsupported algorithm or unsupported action for the specific data element. |
| 27 | APPLICATION_AUTHORIZED | Application has been authorized. |
| 28 | APPLICATION_NOT_AUTHORIZED | Application has not been authorized. |
| 31 | EMPTY_POLICY | Policy not available. |
| 40 | LICENSE_EXPIRED | No valid license or current date is beyond the license expiration date. |
| 41 | METHOD_RESTRICTED | The use of the protection method is restricted by license. |
| 42 | LICENSE_INVALID | Invalid license or time is before licensestart. |
| 44 | INVALID_FORMAT | The content of the input data is not valid. |
| 49 | LOG_UNSUPPORTED_ENCODING | Unsupported input encoding for the specific data element. |
| 50 | REPROTECT_SUCCESS | Data reprotect operation was successful. |
| 51 | LOG_LOG_UNREACHABLE | Failed to send logs, connection refused. |
The following table lists all the error messages returned from the Core layer that are NOT logged.
| Code | Error | Error Message |
|---|---|---|
| 1 | SUCCESS | The operation was successful. |
| 0 | FAILED | The operation failed. |
| -1 | INVALID_PARAMETER | The parameter is invalid. |
| -2 | EOF | The end of file was reached. |
| -3 | BUSY | The operation is already in progress or object already locked. |
| -4 | TIMEOUT | Time-out waiting for response or operation took too long. |
| -5 | ALREADY_EXISTS | The object, such as file, already exists. |
| -6 | ACCESS_DENIED | The permission to access the object was denied. |
| -7 | PARSE_ERROR | Error when parsing contents, e.g. ini file, or user supplied data. |
| -8 | NOT_FOUND | The search operation was not successful. |
| -9 | NOT_SUPPORTED | The operation is not supported. |
| -10 | CONNECTION_REFUSED | The connection was refused. |
| -11 | DISCONNECTED | The connection was disconnected. |
| -12 | UNREACHABLE | The Internet link is down or the host is not reachable. |
| -13 | ADDRESS_IN_USE | The IP Address or port is already utilized. |
| -14 | OUT_OF_MEMORY | The operation to allocate memory failed. |
| -15 | CRC_ERROR | The CRC check failed. |
| -16 | BUFFER_TOO_SMALL | The buffer size is very small. |
| -17 | BAD_REQUEST | A malformed message request was received. |
| -18 | INVALID_STRING_LENGTH | The input string is too long. |
| -19 | INVALID_TYPE | The wrong type was used. |
| -20 | READONLY_OBJECT | Unable to write to read-only object. |
| -21 | SERVICE_FAILED | The service failed. |
| -22 | ALREADY_CONNECTED | The Administrator is already connected to the server. |
| -23 | INVALID_KEY | The key is invalid. |
| -24 | INTEGRITY_ERROR | The integrity check failed. |
| -25 | LOGIN_FAILED | The attempt to login failed. |
| -26 | NOT_AVAILABLE | The object is not available. |
| -27 | NOT_EXIST | The object does not exist. |
| -28 | SET_FAILED | The Set operation failed. |
| -29 | GET_FAILED | The Get operation failed. |
| -30 | READ_FAILED | The Read operation failed. |
| -31 | WRITE_FAILED | The Write operation failed. |
| -33 | REWRITE_FAILED | The Rewrite operation failed. |
| -34 | DELETE_FAILED | The Delete operation failed. |
| -35 | UPDATE_FAILED | The Update operation failed. |
| -36 | SIGN_FAILED | The Sign operation failed. |
| -37 | VERIFY_FAILED | The Verification failed. |
| -38 | ENCRYPT_FAILED | The Encrypt operation failed. |
| -39 | DECRYPT_FAILED | The Decrypt operation failed. |
| -40 | REENCRYPT_FAILED | The Reencrypt operation failed. |
| -41 | EXPIRED | The object has expired. |
| -42 | REVOKED | The object has been revoked. |
| -43 | INVALID_FORMAT | The format is invalid. |
| -44 | HASH_FAILED | The Hash operation failed. |
| -45 | NOT_DEFINED | The property or setting is not defined. |
| -46 | NOT_INITIALIZED | The service requested or function is performed on an object that is not initialized. |
| -47 | POLICY_LOCKED | The Policy is locked for some reason. |
| -48 | THROW_EXCEPTION | The error message is used to convey that an exception should be thrown during decryption. |
| -49 | USER_AUTHENTICATION_FAILED | The Authentication operation failed. |
| -54 | INVALID_CARD_TYPE | The credit card number provided does not confirm to the required credit card format. |
| -55 | LICENSE_AUDITONLY | The License provided is for the audit functionality and only No Encryption data elements are allowed. |
| -56 | NO_VALID_CIPHERS | No valid ciphers were found. |
| -57 | NO_VALID_PROTOCOLS | No valid protocols were found. |
| -61 | SEND_LOG_FAILED | Failed to send logs to logforwarder. |
| -201 | CRYPT_KEY_DATA_ILLEGAL | The key data specified is invalid. |
| -202 | CRYPT_INTEGRITY_ERROR | The integrity check for the data failed. |
| -203 | CRYPT_DATA_LEN_ILLEGAL | The data length specified is invalid. |
| -204 | CRYPT_LOGIN_FAILURE | The Crypto login failed. |
| -205 | CRYPT_CONTEXT_IN_USE | An attempt to close a key being used is made. |
| -206 | CRYPT_NO_TOKEN | The hardware token is available. |
| -207 | CRYPT_OBJECT_EXISTS | The object to be created already exists. |
| -208 | CRYPT_OBJECT_MISSING | A request for a non-existing object is made. |
| -221 | X509_SET_DATA | The operation to set data in the object failed. |
| -222 | X509_GET_DATA | The operation to get data from the object failed. |
| -223 | X509_SIGN_OBJECT | The operation to sign the object failed. |
| -224 | X509_VERIFY_OBJECT | The verification operation for the object failed. |
| -231 | SSL_CERT_EXPIRED | The certificate has expired. |
| -232 | SSL_CERT_REVOKED | The certificate has been revoked. |
| -233 | SSL_CERT_UNKNOWN | The Trusted certificate was not found. |
| -234 | SSL_CERT_VERIFY_FAILED | The certificate cound not be verified. |
| -235 | SSL_FAILED | A general SSL error occurs. |
| -241 | KEY_ID_FORMAT_ERROR | The format on the Key ID is invalid. |
| -242 | KEY_CLASS_FORMAT_ERROR | The format on the KeyClass is invalid. |
| -243 | KEY_EXPIRED | The key expired. |
| -250 | FIPS_MODE_FAILED | The FIPS mode failed. |
4 - Database Protector
4.1 - Oracle Database Protector
The Oracle Database Protector can be installed by the user with sudoer permissions and the Oracle admin user. This section discusses the installation with a user having the sudoer permissions. Wherever possible, the oracle commands for Oracle admin user would be provided.
To use the Oracle Database Protector, update the environment variables in Oracle.
User Privileges
The Oracle Database Protector installation can be broadly divided into installing the RPAgent and installing the UDFs. The RPAgent installation establishes the connection between the ESA and the Database Protector, while the UDFs use the policies to enforce protection on the data.
User for retrieving users from Oracle Database
For policies to be defined in the ESA, users can be imported from any of the multiple sources such as Active Directory (AD), file, or an Oracle database. To pull users from an Oracle database, a membersource must be created. The following information applies if the users must be pulled from an Oracle database.
To retrieve users from the Member Source Server:
- Either create a functional database user with create session permissions
or
Use an existing user with create session permissions - Grant the following two specific grants:
- Grant select on sys.dba_roles to protegrity
- Grant select on sys.dba_role_privs to protegrity
Where, protegrity is the functional user created.
User for installing and dropping the UDFs
After the RPAgent is installed, the UDFs can be installed on the Oracle Database server. Create a functional database user with the following privilege rights:
- CREATE USER <user_name> IDENTIFIED BY <user_password>;
- GRANT UNLIMITED TABLESPACE to <user_name>;
- GRANT CREATE SESSION to <user_name>;
- GRANT SELECT ANY TABLE to <user_name>;
- GRANT CREATE LIBRARY to <user_name>;
- GRANT CREATE PROCEDURE to <user_name>;
- GRANT DROP PUBLIC SYNONYM to <user_name>;
- GRANT CREATE PUBLIC SYNONYM to <user_name>;
- GRANT CREATE TABLE to <user_name>;
- GRANT CREATE VIEW to <user_name>;
- GRANT CREATE TYPE TO <user_name>;
- GRANT DROP ANY VIEW TO <user_name>;
- GRANT DROP ANY PROCEDURE TO <user_name>;
- GRANT DROP ANY LIBRARY TO <user_name>;
- GRANT DROP ANY TYPE TO <user_name>;
- GRANT DROP PUBLIC SYNONYM TO <user_name>;
Where, <user_name> is the functional user created.
Important: Protegrity manages permissions that are configured within the Protegrity system. Any custom permissions outside of Protegrity’s configuration are not handled by the software.
4.1.1 - Understanding the Architecture
The architecture for the Oracle Database Protector is depicted in the image below.
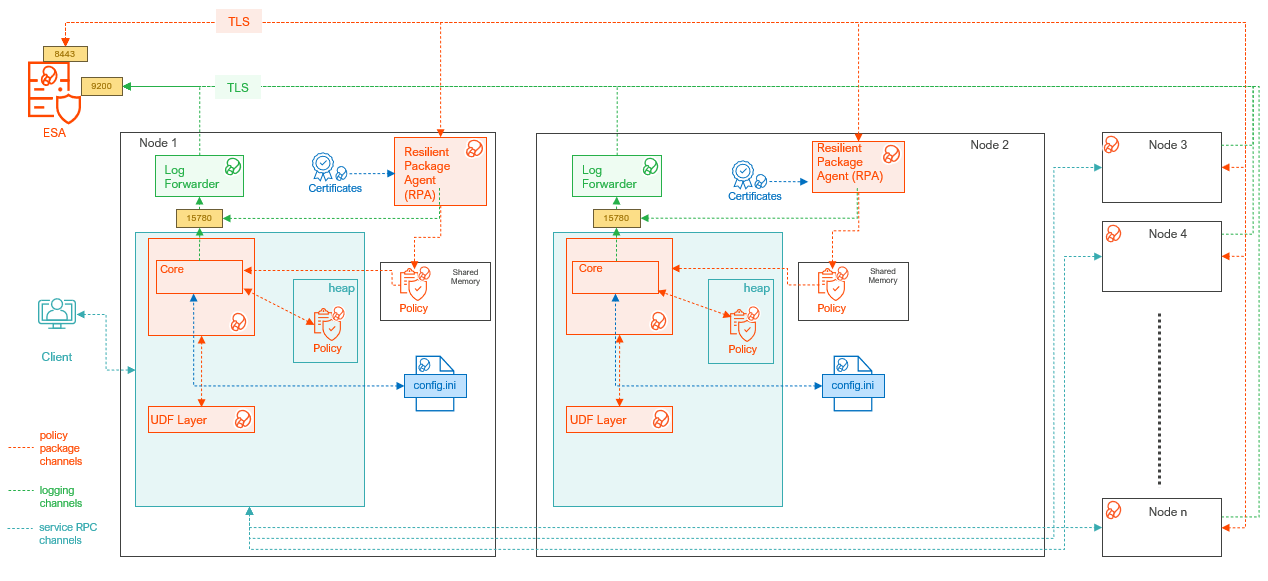
| Component | Description |
|---|---|
| RPAgent | A daemon running on each node that downloads the package from the ESA over a TLS channel using the installed Certificates. |
| Log Forwarder | A daemon running on each node that routes the audit logs and application logs to the ESA/Audit Store. |
| config.ini | A file on each node containing the set of configuration parameters to modify the protector behavior. |
| DBP Layer | Contains the Database Protector UDFs and APIs. |
| Core | The set of various libraries that provide the Protegrity Core functionality. |
4.1.2 - System Requirements
Ensure that the following prerequisites are met:
Note: The following basic requirements apply to both the step-by-step installation of Log Forwarder and RPAgent, as well as when using the master installation script.
- The Oracle Database is installed, configured, and running.
- Enterprise Security Administrator (ESA) version v10.1 is installed, configured, and running.
- The IP address or host name of the ESA is available.
- The Policy Management (PIM) is initialized on ESA (cryptographic keys and policy repository created).
- Download and save the Oracle Database Protector package:
DatabaseProtector_<operating_system>-<arch>_<Oracle_version>-64_<version>.tgz(provided by Protegrity). - The installation directory is granted
755permissions. - It is recommended to create a backup of the database where Oracle Database Protector and UDFs will be installed.
- A soft link is created for the Oracle 23c library. This issue is observed in Oracle 19c or 21c environments.
- Access to the server is available as:
- Oracle instance owner
- User created specifically for Protegrity.
- Access to the Oracle database is available as
sysdbasuperuser.
Additional Requirements
Note: These requirements apply only when performing installation or upgrade using the master installation script.
- For Standalone and RAC setup:
- Sudo privileges to run commands for Oracle directories.
- The
rsyncutility installed on all nodes. - Executable permissions (chmod +x) is available to the script.
- Adequate disk space for backups, temporary files, and upgrade process.
- The Oracle listener(s) and instance(s) must be running during the upgrade.
- Sudo permissions are available to the automation script to perform install, upgrade, or rollback operations across all the components, such as, Log Forwarder, RPAgent, and the Database Protector.
- For RAC setup:
- SSH access to all the RAC nodes from the local node.
- The
olsnodesutility is installed and available on the local node. - No third-party agent or antivirus interferes with file transfer or process execution.
Note: Before initiating the installation or upgrade, verify that all the components, SQL scripts, and the configuration files are consistent and synchronized across all the nodes. Ensure that all the components, such as, RPAgent, Log Forwarder, and the Database Protector are installed in the same location on all the nodes. Ensure that all the services are in the same state.
4.1.3 - Preparing the Environment
The following sub-sections explain how to install each Oracle Database Protector components, Log Forwarder and RPAgent individually. Installing components one by one ensures proper configuration and functionality.
Note: The steps mentioned in the Extracting the Installation Package section is required for both individual component installation and quick installation.
4.1.3.1 - Extracting the Installation Package
This section explains the procedure to extract the Oracle Database Protector installation package. It includes steps for saving the installation package, navigating to the appropriate directory, and extracting the required files. These instructions ensure that all components are ready for installation.
- Log in to the Oracle database server with an account having the required privileges.
- Save the Oracle database protector installation package,
DatabaseProtector_<operating_system>-<arch>_<Oracle_distribution>-x64_<version>.tgz, made available by Protegrity, in any sample directory. For example,/opt/protegrity/ - Navigate to the
/opt/Protegrity/directory. - To extract the contents, run the following command:
tar -xvf DatabaseProtector_Linux-ALL-64_x86-64_Oracle-ALL-64_<DBP_version>.tgz - Press ENTER.
The command extracts the package and the signature files.
DatabaseProtector_Linux-ALL-64_x86-64_Oracle-ALL-64_<DBP_version>.tgz signatures/ signatures/DatabaseProtector_Linux-ALL-64_x86-64_Oracle-ALL-64_<DBP_version>.tgz_<DBP_version>.sig - To extract the contents of the installation package, run the following command:
tar -xvf DatabaseProtector_Linux-ALL-64_x86-64_Oracle-ALL-64_<DBP_version>.tgz - Press ENTER.
The command extracts the files from the package.
LogforwarderSetup_Linux_x64_<DBP_version>.sh RPAgentSetup_Linux_x64_<DBP_version>.sh PepOracleSetup_Linux_x64_<DBP_version>.sh Install_OracleProtector_<Operating System>_x64_<DBP_version>.sh U.S.Patent.No.6,321,201.Legend.txt
Note: To automate the installation process, use the master installation script provided in the build:
Install_OracleProtector_Linux_x64_<DBP_version>.sh
For more information, refer the following sections:
4.1.3.2 - Installing the Log Forwarder
This section provides instructions to manually install the Log Forwarder on the Oracle database server.
Note: To automate the installation process, use the master installation script provided in the build:
Install_OracleProtector_Linux_x64_<DBP_version>.sh
For more information, refer the following sections:
- Log in to the database server as the user that has the permissions to install the Log Forwarder. Usually, this tends to be the instance owner.
- Navigate to the directory where the installation files are extracted.
- To install the Log Forwarder, run the following command:
./LogforwarderSetup_Linux_x64_<DBP_version>.sh - Press ENTER.
The prompt to enter the audit store endpoint appears.
Enter the audit store endpoint (host), alternative (host:port) to use another port than the default port 9200 : - Enter the IP address of the audit store.
- Press ENTER.
The prompt to enter additional endpoint appears.
Audit store endpoints: <Audit_store_IP_address>:9200 Do you want to add another audit store endpoint? [y/n]: - To skip adding additional endpoints, type
no. - Press ENTER.
The prompt to continue the installation appears.
These audit store endpoints will be added: <Audit_store_IP_address>:9200 Type 'y' to accept or 'n' to abort installation: - To continue the installation, type
yes. - Press ENTER.
The script extracts the files and installs the Log Forwarder.
Unpacking... Extracting files... Protegrity Log Forwarder installed in /opt/protegrity/logforwarder.
4.1.3.3 - Installing the RPAgent
This section provides instructions for manually installing the RPAgent on the Oracle database server.
Note: To automate the installation process, use the master installation script provided in the build:
Install_OracleProtector_Linux_x64_<DBP_version>.sh
For more information, refer the following sections:
- Log in to the database server as the user that has permissions to install the RPAgent.
- Navigate to the directory where the installation files are extracted.
- To install the RPAgent, run the following command:
./RPAgentSetup_Linux_x64_<DBP_version>.sh - Press ENTER.
The prompt to enter ESA host name or IP address appears.
Please enter upstream host name or IP address[]: - Enter the IP address of the ESA.
- Press ENTER.
The prompt to enter the username to download the certificates appears.
Please enter the user name for downloading certificates[]: - Enter the username to download the certificates from ESA.
- Press ENTER.
The prompt to enter the password to download the certificates appears.
Please enter the password for downloading certificates[]: - Enter the password.
- Press ENTER.
The script connects to the ESA, retrives the JWT token, extracts the certificates, and installs the RPAgent.
Unpacking... Extracting files... Obtaining token from <ESA_IP_Address>:25400... Downloading certificates from <ESA_IP_Address>:25400... % Total % Received % Xferd Average Speed Time Time Time Current Dload Upload Total Spent Left Speed 100 11264 100 11264 0 0 136k 0 --:--:-- --:--:-- --:--:-- 137k Extracting certificates... Certificates successfully downloaded and stored in /opt/protegrity/rpagent/data Protegrity RPAgent installed in /opt/protegrity/rpagent.
4.1.4 - Installing Oracle Database Protector
This section explains how to automate the installation using the Quick Installation Script included in the build:
Install_OracleProtector_Linux_x64_<DBP_version>.sh
Note: Steps for Installing the Policy Enforcement Point (PEP) and Creating User Defined Functions (UDFs) are applicable only for individual component installation, not for the quick installation process.
4.1.4.1 - Installing the Database Objects
This section provides instructions to install the Policy Enforcement Point for the Oracle Database Protector.
Note:
To automate the installation process, use the master installation script provided in the build:Install_OracleProtector_Linux_x64_<DBP_version>.sh
For more information, refer to the following sections:
- Log in to the node where the installation files are extracted.
- To install the Oracle objects, run the following command:
./PepOracleSetup_Linux_x64_<DBP_version>.sh - Press ENTER.
The prompt to continue appears.
***************************************************** Welcome to the Database Protector Setup Wizard ***************************************************** This will install the oracle objects on your computer Do you want to continue? [yes or no] - To continue, type
yes. - Press ENTER.
The prompt to enter the installation directory appears.
Enter installation directory. A new directory will be created in the installation directory. [/opt/protegrity]: - Enter the location to install the Oracle objects.
- Press ENTER.
The command extracts the files and installs the objects.
Unpacking... Extracting files... oracle objects installed in /opt/protegrity/databaseprotector/oracle.
4.1.4.2 - Installing Oracle Database Protector on Standalone System
The Oracle Database Protector build provides an automated script to manage the installation process on a standalone system. The master script internally calls the scripts to install the components. The master script installs the components in the following order:
- Log Forwarder
- RPAgent
- Policy Enforcement Point (Database Protector)
The installation can also be performed manually by executing the individual scripts to install the different components.
The master script is available in the directory where the installation files are extracted. It provides the following arguments:
install- installs the components in an interactive mode.upgrade- installs a newer version of the protector with minimal downtime.silent- installs the components in a non-interactive mode.install.ini- installs the components as per the parameters provided in the file.help- lists the arguments available for the script.
In addition, the master script will rollback the installation process if any errors are encountered. The script will revert the changes.
Viewing the Arguments for the Script
- Log in to the instance where the installation package is extracted.
- Navigate to the directory containing the installation scripts.
- To view the arguments, run the following command:
./Install_OracleProtector_Linux_x64_<DBP_version>.sh --help - Press ENTER.
The script lists the available arguments.
Options: --install Use this option when installing the solution for the first time on a machine/host. (i.e., there is no previous installation present) --upgrade Use this option when upgrading an existing installation on the machine/host. --install-ini <file> (Optional) Provide a path to an install.ini file for silent or pre-configured installations. This option works with --install only. It must not be used with --upgrade or --silent. You can pass this either as: --install-ini /path/to/install.ini or --install-ini=/path/to/install.ini Refer to the product documentation for details about the configuration options available in install.ini. The documentation describes all supported keys, required fields, and example configurations. --silent (Optional) Runs the installation/upgrade in silent mode with minimum interactive prompts. --help, -h Display this help message and exit.
Installing the Protector using the Interactive Mode
- Log in to the instance where the installation package is extracted.
- Navigate to the directory containing the installation scripts.
- To execute the script, run the following command:
./Install_OracleProtector_Linux_x64_<DBP_version>.sh --install - Press ENTER.
The prompt to select the silent mode of installation appears.
Do you want silent installation? (yes/no) [no]: - To install the components using the interactive mode, type
no. - Press ENTER.
The prompt to install the components in the same directory appears.
Do you want to install the new LogForwarder, RPAgent, and DatabaseProtector together in a single directory? (yes/no) [no]: - To install the components in different directories, type
no. - Press ENTER.
The prompt to enter the installation directory for the Log Forwarder appears.
Enter new LogForwarder installation directory [/opt/protegrity]: - Enter the location to install the Log Forwarder.
- Press ENTER.
The prompt to enter the installation directory for the RPAgent appears.
Enter new RPAgent installation directory [/opt/protegrity]: - Enter the location to install the RPAgent.
- Press ENTER.
The prompt to enter the installation directory for the Database Protector appears.
Enter new DatabaseProtector installation directory [/opt/protegrity]: - Enter the location to install the Database Protector.
Note: To use any directory for the Database Protector, ensure the directory is available. Otherwise, the installation will fail.
- Press ENTER.
The script configures the environment and the prompt to confirm the configuration appears.
2025-12-23 12:05:39 - [INFO] Discovering Grid Infrastructure home dynamically... 2025-12-23 12:05:39 - [INFO] No ASM instance found. This is a standalone system. 2025-12-23 12:05:39 - [INFO] No Grid home found. Treating it as a standalone Oracle. 2025-12-23 12:05:39 - [INFO] Going to configure environment for installation 2025-12-23 12:05:39 - [INFO] Discovered ORACLE_SID=orcl, ORACLE_HOME=/u01/app/oracle/product/19.0.0/dbhome_1 2025-12-23 12:05:39 - [INFO] Oracle environment set: 2025-12-23 12:05:39 - [INFO] ORACLE_HOME=/u01/app/oracle/product/19.0.0/dbhome_1 2025-12-23 12:05:39 - [INFO] ORACLE_SID=orcl 2025-12-23 12:05:39 - [INFO] LD_LIBRARY_PATH=/u01/app/oracle/product/19.0.0/dbhome_1/lib 2025-12-23 12:05:39 - [INFO] PATH=/usr/local/sbin:/usr/local/bin:/usr/sbin:/usr/bin:/root/bin:/u01/app/oracle/product/19.0.0/dbhome_1/bin 2025-12-23 12:05:39 - [INFO] Environment configured successfully... 2025-12-23 12:05:39 - [INFO] ************************************************************************** 2025-12-23 12:05:39 - [INFO] Installation will be done with following configuration: 2025-12-23 12:05:39 - [INFO] Oracle Instance ID: orcl 2025-12-23 12:05:39 - [INFO] Mode: install 2025-12-23 12:05:39 - [INFO] Logforwarder Installation Directory: /opt/protegrity1 2025-12-23 12:05:39 - [INFO] RPAgent Installation Directory: /opt/protegrity1 2025-12-23 12:05:39 - [INFO] DatabaseProtector Installation Directory: /opt/protegrity1 2025-12-23 12:05:39 - [INFO] This is a fresh install. 2025-12-23 12:05:39 - [INFO] Standalone setup detected 2025-12-23 12:05:39 - [INFO] ************************************************************************** 2025-12-23 12:05:39 - [INFO] Please verify the above configuration before proceeding. Do you want to continue? (yes/no) [no]: - To proceed with the configuration, type
yes. - Press ENTER.
The master script invokes the Log Forwarder installation script. The prompt to enter the Audit Store endpoint appears.
2025-12-23 12:05:41 - [INFO] Continuing with installation... 2025-12-23 12:05:41 - [INFO] Installing/Upgrading LOGFORWARDER... 2025-12-23 12:05:41 - [INFO] Executing ./LogforwarderSetup_Linux_x64_<DBP_version>.sh... Enter the audit store endpoint (host), alternative (host:port) to use another port than the default port 9200: - Enter the IP address for the Audit Store.
- Press ENTER.
The script lists the endpoint to be added. The prompt to add additional end point appears.
Audit store endpoints: <IP_Address>:9200 Do you want to add another audit store endpoint? [y/n]: - To provide an additional endpoint, type
yes. - Press ENTER.
The prompt to enter the Audit Store endpoint appears.
Enter the audit store endpoint (host), alternative (host:port) to use another port than the default port 9200: - Enter the IP address for the Audit Store.
- Press ENTER.
The script lists the endpoints that will be added. The prompt to continue the installation appears.
<IP_Address>:9200 <IP_Address>:9200 Type 'y' to accept or 'n' to abort installation: - To add the endpoints, type
yes. - Press ENTER.
The script unpacks the files and installs the Log Forwarder. The prompt to enter the upstream host name or IP address appears.
Unpacking... Extracting files... Protegrity Log Forwarder installed in /opt/protegrity1/logforwarder. 2025-12-23 12:05:59 - [INFO] ./LogforwarderSetup_Linux_x64_<DBP_version>.sh completed successfully. 2025-12-23 12:05:59 - [INFO] Installing/Upgrading RPAGENT... Please enter upstream host name or IP address, alternative (host:port) to use another port than the default port 25400: - Enter the upstream host name or IP address.
- Press ENTER.
The prompt to enter the ESA token appears.
Enter ESA token (leave blank to use username/password): - Enter the JWT token.
Note: To use the username and password, press ENTER.
- Press ENTER.
The script installs the RPAgent and triggers the script to install the Oracle objects. The script installs the objects and the prompt to create the UDFs appears.
2025-12-23 12:06:14 - [INFO] Executing ./RPAgentSetup_Linux_x64_<DBP_version>.sh... Unpacking... Extracting files... Downloading certificates from <IP_Address>:25400... % Total % Received % Xferd Average Speed Time Time Time Current Dload Upload Total Spent Left Speed 100 11264 100 11264 0 0 113k 0 --:--:-- --:--:-- --:--:-- 112k Extracting certificates... tar: CA.pem: time stamp 2025-12-23 12:06:15 is 0.531323771 s in the future tar: cert.pem: time stamp 2025-12-23 12:06:15 is 0.531192197 s in the future tar: cert.key: time stamp 2025-12-23 12:06:15 is 0.531134958 s in the future tar: secret.txt: time stamp 2025-12-23 12:06:15 is 0.531081244 s in the future Certificates successfully downloaded and stored in /opt/protegrity1/rpagent/data Protegrity RPAgent installed in /opt/protegrity1/rpagent. 2025-12-23 12:06:14 - [INFO] ./RPAgentSetup_Linux_x64_<DBP_version>.sh completed successfully. 2025-12-23 12:06:14 - [INFO] Installing/Upgrading DBP... 2025-12-23 12:06:14 - [INFO] Executing ./PepOracleSetup_Linux_x64_<DBP_version>.sh... ***************************************************** Welcome to the Database Protector Setup Wizard ***************************************************** This will install the oracle objects on your computer Do you want to continue? [yes or no]: Enter installation directory. A new directory will be created in the installation directory. [/opt/protegrity]: Unpacking... Extracting files... oracle objects installed in /opt/protegrity1/databaseprotector/oracle. 2025-12-23 12:06:14 - [INFO] ./PepOracleSetup_Linux_x64_<DBP_version>.sh completed successfully. 2025-12-23 12:06:14 - [INFO] Going to launch <DBP_version> version Logforwarder 2025-12-23 12:06:16 - [INFO] Successfully launched <DBP_version> version Logforwarder 2025-12-23 12:06:16 - [INFO] Going to launch <DBP_version> version RPAgent 2025-12-23 12:06:16 - [INFO] Successfully launched <DBP_version> version RPAgent 2025-12-23 12:06:16 - [INFO] Configuring extproc.ora 2025-12-23 12:06:16 - [INFO] Backed up existing /u01/app/oracle/product/19.0.0/dbhome_1/hs/admin/extproc.ora 2025-12-23 12:06:16 - [INFO] /opt/protegrity1/databaseprotector/oracle/lib/peporacle.plm already present in /u01/app/oracle/product/19.0.0/dbhome_1/hs/admin/extproc.ora 2025-12-23 12:06:16 - [INFO] Updated extproc.ora at /u01/app/oracle/product/19.0.0/dbhome_1/hs/admin/extproc.ora 2025-12-23 12:06:16 - [INFO] No separate runtime home detected or runtime home same as ORACLE_HOME; skipping sync. Do you want to continue and create UDFs? To create the UDFs, provide the database credentials (yes/no) [no]: - To create the UDFs, type
yes.Note: If you select
Noto create the UDFs, the script skips creating the UDFs. The installation will complete successfully. However, the database will not contain the required UDFs. To manually create the UDFs, refer to the section Creating the User Defined Functions (UDFs). - Press ENTER.
The prompt to enter the Oracle Database username appears.
Enter Oracle database username: - Enter the username.
- Press ENTER.
The prompt to enter the Oracle Database password appears.
Enter Oracle database user's password: - Enter the password.
- Press ENTER.
The script creates the UDFs and completes the installation.
2025-12-23 12:06:24 - [INFO] Going to create new types and UDFs. 2025-12-23 12:06:24 - [INFO] Using username '<user_name>' for database connection and creating new types and UDFs. 2025-12-23 12:06:24 - [INFO] Running SQL script: Create new types and UDFs (/opt/protegrity1/databaseprotector/oracle/sqlscripts/createobjects.sql) 2025-12-23 12:06:25 - [INFO] sqlplus output: Library created. Type created. Type created. Type created. Type created. Type created. Type created. Type created. Type created. Package created. Package body created. Grant succeeded. Grant succeeded. Synonym created. Synonym created. Grant succeeded. Grant succeeded. Grant succeeded. Grant succeeded. Grant succeeded. Grant succeeded. Grant succeeded. Grant succeeded. Grant succeeded. Grant succeeded. Grant succeeded. Grant succeeded. Grant succeeded. Grant succeeded. Grant succeeded. Grant succeeded. Synonym created. Synonym created. Synonym created. Synonym created. Synonym created. Synonym created. Synonym created. Synonym created. Synonym created. Synonym created. Synonym created. Synonym created. Synonym created. Synonym created. Synonym created. Synonym created. 2025-12-23 12:06:25 - [INFO] Create new types and UDFs executed successfully. 2025-12-23 12:06:25 - [INFO] New types and UDFs created successfully. 2025-12-23 12:06:25 - [INFO] Testing UDFs installation... 2025-12-23 12:06:26 - [INFO] Test UDFs output: <DBP_version> 2025-12-23 12:06:26 - [INFO] UDFs installation tested successfully. 2025-12-23 12:06:26 - [INFO] Removing extproc.ora backup file /u01/app/oracle/product/19.0.0/dbhome_1/hs/admin/extproc.ora.bak_2025-12-23_12:06:16 2025-12-23 12:06:26 - [INFO] Closing SSH master connections... 2025-12-23 12:06:26 - [INFO] Installation successful. 2025-12-23 12:06:26 - [INFO] All components installed successfully.
Installing the Protector using the Silent Mode
- Log in to the instance where the installation package is extracted.
- Navigate to the directory containing the installation scripts.
- To execute the script, run the following command:
./Install_OracleProtector_Linux_x64_<DBP_version>.sh --install - Press ENTER.
The prompt to select the silent mode of installation appears.
Do you want silent installation? (yes/no) [no]: - To install the components using the silent mode, type
yes. - Press ENTER.
The script lists the configuration and a prompt to confirm the configuration appears.
2025-12-23 11:40:10 - [INFO] You have chosen silent mode. Therefore, /opt/protegrity is considered as base directory for new installation. 2025-12-23 11:40:10 - [INFO] Discovering Grid Infrastructure home dynamically... 2025-12-23 11:40:10 - [INFO] No ASM instance found. This is a standalone system. 2025-12-23 11:40:10 - [INFO] No Grid home found. Treating it as a standalone Oracle. 2025-12-23 11:40:10 - [INFO] Going to configure environment for installation 2025-12-23 11:40:10 - [INFO] Discovered ORACLE_SID=orcl, ORACLE_HOME=/u01/app/oracle/product/19.0.0/dbhome_1 2025-12-23 11:40:10 - [INFO] Oracle environment set: 2025-12-23 11:40:10 - [INFO] ORACLE_HOME=/u01/app/oracle/product/19.0.0/dbhome_1 2025-12-23 11:40:10 - [INFO] ORACLE_SID=orcl 2025-12-23 11:40:10 - [INFO] LD_LIBRARY_PATH=/u01/app/oracle/product/19.0.0/dbhome_1/lib 2025-12-23 11:40:10 - [INFO] PATH=/usr/local/sbin:/usr/local/bin:/usr/sbin:/usr/bin:/root/bin:/u01/app/oracle/product/19.0.0/dbhome_1/bin 2025-12-23 11:40:10 - [INFO] Environment configured successfully... 2025-12-23 11:40:10 - [INFO] ************************************************************************** 2025-12-23 11:40:10 - [INFO] Installation will be done with following configuration: 2025-12-23 11:40:10 - [INFO] Oracle Instance ID: orcl 2025-12-23 11:40:10 - [INFO] Mode: install 2025-12-23 11:40:10 - [INFO] Logforwarder Installation Directory: /opt/protegrity 2025-12-23 11:40:10 - [INFO] RPAgent Installation Directory: /opt/protegrity 2025-12-23 11:40:10 - [INFO] DatabaseProtector Installation Directory: /opt/protegrity 2025-12-23 11:40:10 - [INFO] This is a fresh install. 2025-12-23 11:40:10 - [INFO] Standalone setup detected 2025-12-23 11:40:10 - [INFO] ************************************************************************** 2025-12-23 11:40:10 - [INFO] Please verify the above configuration before proceeding. Do you want to continue? (yes/no) [no]: - To proceed with the configuration, type
yes. - Press ENTER.
The scripts starts the Log Forwarder installation and the prompt to enter the Audit Store endpoint appears.
Enter the audit store endpoint (host), alternative (host:port) to use another port than the default port 9200: - Enter the audit store endpoint.
- Press ENTER.
The prompt to enter additional endpoint appears.
Audit store endpoints: <IP_Address>:9200 Do you want to add another audit store endpoint? [y/n]: - To provide another audit store endpoint, type,
yes. - Press ENTER.
The script lists the audit store endpoints. The prompt to enter another endpoint appears.
<IP_Address>:9200 <IP_Address>:9200 Type 'y' to accept or 'n' to abort installation: - To continue, type
yes. - Press ENTER.
The script installs the Log Forwarder. The script starts the RPAgent installation. The prompt to enter the upstream IP address appears.
Unpacking... Extracting files... Protegrity Log Forwarder installed in /opt/protegrity/logforwarder. 2025-12-23 11:44:29 - [INFO] ./LogforwarderSetup_Linux_x64_<DBP_version>.sh completed successfully. 2025-12-23 11:44:29 - [INFO] Installing/Upgrading RPAGENT... Please enter upstream host name or IP address, alternative (host:port) to use another port than the default port 25400: - Enter the IP address.
- Press ENTER.
The prompt to enter the JWT token appears.
Enter ESA token (leave blank to use username/password): - To use the username and password combination, press ENTER.
The prompt to enter the username appears.
Enter ESA username: - Enter the username.
- Press ENTER.
The prompt to enter the password appears.
Enter ESA password: - Enter the password.
- Press ENTER.
The script retrieves the token from ESA, extracts the certificates, and installs the RPAgent. The script completes the installation of the objects and the prompt to create the UDF appears.
Unpacking... Extracting files... Obtaining token from <IP_address>:25400... Downloading certificates from <IP_address>:25400... % Total % Received % Xferd Average Speed Time Time Time Current Dload Upload Total Spent Left Speed 100 11264 100 11264 0 0 152k 0 --:--:-- --:--:-- --:--:-- 152k Extracting certificates... tar: CA.pem: time stamp 2025-12-23 11:50:29 is 0.471443292 s in the future tar: cert.pem: time stamp 2025-12-23 11:50:29 is 0.47131432 s in the future tar: cert.key: time stamp 2025-12-23 11:50:29 is 0.471256437 s in the future tar: secret.txt: time stamp 2025-12-23 11:50:29 is 0.471203322 s in the future Certificates successfully downloaded and stored in /opt/protegrity/rpagent/data Protegrity RPAgent installed in /opt/protegrity/rpagent. 2025-12-23 11:50:28 - [INFO] ./RPAgentSetup_Linux_x64_<DBP_version>.sh completed successfully. 2025-12-23 11:50:28 - [INFO] Installing/Upgrading DBP... 2025-12-23 11:50:28 - [INFO] Executing ./PepOracleSetup_Linux_x64_<DBP_version>.sh... ***************************************************** Welcome to the Database Protector Setup Wizard ***************************************************** This will install the oracle objects on your computer Do you want to continue? [yes or no]: Enter installation directory. A new directory will be created in the installation directory. [/opt/protegrity]: Unpacking... Extracting files... oracle objects installed in /opt/protegrity/databaseprotector/oracle. 2025-12-23 11:50:28 - [INFO] ./PepOracleSetup_Linux_x64_<DBP_version>.sh completed successfully. 2025-12-23 11:50:28 - [INFO] Going to launch <DBP_version> version Logforwarder 2025-12-23 11:50:30 - [INFO] Successfully launched <DBP_version> version Logforwarder 2025-12-23 11:50:30 - [INFO] Going to launch <DBP_version> version RPAgent 2025-12-23 11:50:30 - [INFO] Successfully launched <DBP_version> version RPAgent 2025-12-23 11:50:30 - [INFO] Configuring extproc.ora 2025-12-23 11:50:30 - [INFO] Backed up existing /u01/app/oracle/product/19.0.0/dbhome_1/hs/admin/extproc.ora 2025-12-23 11:50:30 - [INFO] /opt/protegrity/databaseprotector/oracle/lib/peporacle.plm already present in /u01/app/oracle/product/19.0.0/dbhome_1/hs/admin/extproc.ora 2025-12-23 11:50:30 - [INFO] Updated extproc.ora at /u01/app/oracle/product/19.0.0/dbhome_1/hs/admin/extproc.ora 2025-12-23 11:50:30 - [INFO] No separate runtime home detected or runtime home same as ORACLE_HOME; skipping sync. Do you want to continue and create UDFs? To create the UDFs, provide the database credentials (yes/no) [no]: - To create the UDFs, type
yes.Note: If you select
Noto create the UDFs, the script skips creating the UDFs. The installation will complete successfully. However, the database will not contain the required UDFs. To manually create the UDFs, refer to the section Creating the User Defined Functions (UDFs). - Press ENTER.
The prompt to enter the database username appears.
Enter Oracle database username: - Enter the username.
- Press ENTER.
The prompt to enter the database password appears.
Enter Oracle database user's password: - Enter the password.
- Press ENTER.
The script installs the UDFs and completes the installation process.
2025-12-23 11:50:39 - [INFO] Going to create new types and UDFs. 2025-12-23 11:50:39 - [INFO] Using username '<user_name>' for database connection and creating new types and UDFs. 2025-12-23 11:50:39 - [INFO] Running SQL script: Create new types and UDFs (/opt/protegrity/databaseprotector/oracle/sqlscripts/createobjects.sql) 2025-12-23 11:50:40 - [INFO] sqlplus output: Library created. Type created. Type created. Type created. Type created. Type created. Type created. Type created. Type created. Package created. Package body created. Grant succeeded. Grant succeeded. Synonym created. Synonym created. Grant succeeded. Grant succeeded. Grant succeeded. Grant succeeded. Grant succeeded. Grant succeeded. Grant succeeded. Grant succeeded. Grant succeeded. Grant succeeded. Grant succeeded. Grant succeeded. Grant succeeded. Grant succeeded. Grant succeeded. Grant succeeded. Synonym created. Synonym created. Synonym created. Synonym created. Synonym created. Synonym created. Synonym created. Synonym created. Synonym created. Synonym created. Synonym created. Synonym created. Synonym created. Synonym created. Synonym created. Synonym created. 2025-12-23 11:50:40 - [INFO] Create new types and UDFs executed successfully. 2025-12-23 11:50:40 - [INFO] New types and UDFs created successfully. 2025-12-23 11:50:40 - [INFO] Testing UDFs installation... 2025-12-23 11:50:41 - [INFO] Test UDFs output: <DBP_version> 2025-12-23 11:50:41 - [INFO] UDFs installation tested successfully. 2025-12-23 11:50:41 - [INFO] Removing extproc.ora backup file /u01/app/oracle/product/19.0.0/dbhome_1/hs/admin/extproc.ora.bak_2025-12-23_11:50:30 2025-12-23 11:50:41 - [INFO] Closing SSH master connections... 2025-12-23 11:50:41 - [INFO] Installation successful. 2025-12-23 11:50:41 - [INFO] All components installed successfully.
Installing the Protector using the install.ini file
This argument requires the install.ini file to be present and updated with the required parameters. The install.ini files contains the installation directories for the components and the endpoints for the Log Forwarder and RPAgent.
A sample output of the install.ini file is listed below.
[Logforwarder]
INSTALLATION_DIR = </opt/protegrity1>
AUDIT_STORE_ENDPOINTS = <IP_address>:9200 <IP_address>:9200 <IP_address>:9200
[RPAgent]
INSTALLATION_DIR = </opt/protegrity1>
UPSTREAM_HOST_IP_ADDR_PORT = <IP_address>:25400
[DatabaseProtector]
INSTALLATION_DIR = </opt/protegrity1>
Note: To use any directory for the Database Protector, ensure the directory is available. Otherwise, the installation will fail. Note: The default port for the Audit Store endpoint is 9200. The default port for the RPAgent is 25400. To use any other port, replace the value.
To install the protector using the install.ini argument:
- Log in to the instance where the installation package is extracted.
- Navigate to the directory containing the installation scripts.
- To execute the script with the argument, run the following command:
./Install_OracleProtector_Linux_x64_<DBP_version>.sh --install --install-ini <path_to_install.ini_file> - Press ENTER.
The script detects the
install.inifile and the prompt to verify the configuration appears.2025-12-23 12:16:37 - [INFO] install.ini detected: <path_to_install.ini_file> 2025-12-23 12:16:37 - [INFO] Discovering Grid Infrastructure home dynamically... 2025-12-23 12:16:37 - [INFO] No ASM instance found. This is a standalone system. 2025-12-23 12:16:37 - [INFO] No Grid home found. Treating it as a standalone Oracle. 2025-12-23 12:16:37 - [INFO] Going to configure environment for installation 2025-12-23 12:16:37 - [INFO] Discovered ORACLE_SID=orcl, ORACLE_HOME=/u01/app/oracle/product/19.0.0/dbhome_1 2025-12-23 12:16:37 - [INFO] Oracle environment set: 2025-12-23 12:16:37 - [INFO] ORACLE_HOME=/u01/app/oracle/product/19.0.0/dbhome_1 2025-12-23 12:16:37 - [INFO] ORACLE_SID=orcl 2025-12-23 12:16:37 - [INFO] LD_LIBRARY_PATH=/u01/app/oracle/product/19.0.0/dbhome_1/lib 2025-12-23 12:16:37 - [INFO] PATH=/usr/local/sbin:/usr/local/bin:/usr/sbin:/usr/bin:/root/bin:/u01/app/oracle/product/19.0.0/dbhome_1/bin 2025-12-23 12:16:37 - [INFO] Environment configured successfully... 2025-12-23 12:16:37 - [INFO] ************************************************************************** 2025-12-23 12:16:37 - [INFO] Installation will be done with following configuration: 2025-12-23 12:16:37 - [INFO] Oracle Instance ID: orcl 2025-12-23 12:16:37 - [INFO] Mode: install 2025-12-23 12:16:37 - [INFO] Using configuration from install.ini: 2025-12-23 12:16:37 - [INFO] Logforwarder Installation Directory: /opt/protegrity1 2025-12-23 12:16:37 - [INFO] Audit Store Endpoints: <IP_Address>:9200 <IP_Address>:9200 <IP_Address>:9200 2025-12-23 12:16:37 - [INFO] RPAgent Installation Directory: /opt/protegrity1 2025-12-23 12:16:37 - [INFO] Upstream (ESA) IP Address for RPAgent: <IP_Address> 2025-12-23 12:16:37 - [INFO] Upstream (ESA) Port for RPAgent: 25400 2025-12-23 12:16:37 - [INFO] DatabaseProtector Installation Directory: /opt/protegrity1 2025-12-23 12:16:37 - [INFO] This is a fresh install. 2025-12-23 12:16:37 - [INFO] Standalone setup detected 2025-12-23 12:16:37 - [INFO] ************************************************************************** 2025-12-23 12:16:37 - [INFO] Please verify the above configuration before proceeding. Do you want to continue? (yes/no) [no]: - To proceed with the configuration, type
yes. - Press ENTER.
The script installs the Log Forwarder and the prompt to enter the JWT token appears.
2025-12-23 12:16:40 - [INFO] Continuing with installation... 2025-12-23 12:16:40 - [INFO] Installing/Upgrading LOGFORWARDER... 2025-12-23 12:16:40 - [INFO] Executing ./LogforwarderSetup_Linux_x64_<DBP_version>.sh... Unpacking... Extracting files... Protegrity Log Forwarder installed in /opt/protegrity1/logforwarder. 2025-12-23 12:16:40 - [INFO] ./LogforwarderSetup_Linux_x64_<DBP_version>.sh completed successfully. 2025-12-23 12:16:40 - [INFO] Installing/Upgrading RPAGENT... Enter ESA token (leave blank to use username/password): - To use the credentials, press ENTER.
The prompt to enter the ESA username appears.
Enter ESA username: - Enter the username.
- Press ENTER.
The prompt to enter the password appears.
Enter ESA password: - Enter the password.
- Press ENTER.
The script installs the RPAgent and the Oracle objects. The prompt to create the UDF appears.
2025-12-23 12:16:49 - [INFO] Executing ./RPAgentSetup_Linux_x64_<DBP_version>.sh... Unpacking... Extracting files... Obtaining token from <IP_Address>:25400... Downloading certificates from <IP_Address>:25400... % Total % Received % Xferd Average Speed Time Time Time Current Dload Upload Total Spent Left Speed 100 11264 100 11264 0 0 175k 0 --:--:-- --:--:-- --:--:-- 177k Extracting certificates... tar: CA.pem: time stamp 2025-12-23 12:16:51 is 0.430031962 s in the future tar: cert.pem: time stamp 2025-12-23 12:16:51 is 0.42988325 s in the future tar: cert.key: time stamp 2025-12-23 12:16:51 is 0.429822044 s in the future tar: secret.txt: time stamp 2025-12-23 12:16:51 is 0.429768891 s in the future Certificates successfully downloaded and stored in /opt/protegrity1/rpagent/data Protegrity RPAgent installed in /opt/protegrity1/rpagent. 2025-12-23 12:16:50 - [INFO] ./RPAgentSetup_Linux_x64_<DBP_version>.sh completed successfully. 2025-12-23 12:16:50 - [INFO] Installing/Upgrading DBP... 2025-12-23 12:16:50 - [INFO] Executing ./PepOracleSetup_Linux_x64_<DBP_version>.sh... ***************************************************** Welcome to the Database Protector Setup Wizard ***************************************************** This will install the oracle objects on your computer Do you want to continue? [yes or no] Enter installation directory. A new directory will be created in the installation directory. [/opt/protegrity]: Unpacking... Extracting files... oracle objects installed in /opt/protegrity1/databaseprotector/oracle. 2025-12-23 12:16:50 - [INFO] ./PepOracleSetup_Linux_x64_<DBP_version>.sh completed successfully. 2025-12-23 12:16:50 - [INFO] Going to launch <DBP_version> version Logforwarder 2025-12-23 12:16:52 - [INFO] Successfully launched <DBP_version> version Logforwarder 2025-12-23 12:16:52 - [INFO] Going to launch <DBP_version> version RPAgent 2025-12-23 12:16:52 - [INFO] Successfully launched <DBP_version> version RPAgent 2025-12-23 12:16:52 - [INFO] Configuring extproc.ora 2025-12-23 12:16:52 - [INFO] Backed up existing /u01/app/oracle/product/19.0.0/dbhome_1/hs/admin/extproc.ora 2025-12-23 12:16:52 - [INFO] /opt/protegrity1/databaseprotector/oracle/lib/peporacle.plm already present in /u01/app/oracle/product/19.0.0/dbhome_1/hs/admin/extproc.ora 2025-12-23 12:16:52 - [INFO] Updated extproc.ora at /u01/app/oracle/product/19.0.0/dbhome_1/hs/admin/extproc.ora 2025-12-23 12:16:52 - [INFO] No separate runtime home detected or runtime home same as ORACLE_HOME; skipping sync. Do you want to continue and create UDFs? To create the UDFs, provide the database credentials (yes/no) [no]: - To create the UDFs, type
yes.Note: If you select
Noto create the UDFs, the script skips creating the UDFs. The installation will complete successfully. However, the database will not contain the required UDFs. To manually create the UDFs, refer to the section Creating the User Defined Functions (UDFs). - Press ENTER.
The prompt to enter the database username appears.
Enter Oracle database username: - Enter the username.
- Press ENTER.
The prompt to enter the database password appears.
Enter Oracle database user's password: - Enter the password.
- Press ENTER.
The script creates the UDFs and completes the installation.
2025-12-23 12:19:33 - [INFO] Going to create new types and UDFs. 2025-12-23 12:19:33 - [INFO] Using username '<user_name>' for database connection and creating new types and UDFs. 2025-12-23 12:19:33 - [INFO] Running SQL script: Create new types and UDFs (/opt/protegrity1/databaseprotector/oracle/sqlscripts/createobjects.sql) 2025-12-23 12:19:34 - [INFO] sqlplus output: Library created. Type created. Type created. Type created. Type created. Type created. Type created. Type created. Type created. Package created. Package body created. Grant succeeded. Grant succeeded. Synonym created. Synonym created. Grant succeeded. Grant succeeded. Grant succeeded. Grant succeeded. Grant succeeded. Grant succeeded. Grant succeeded. Grant succeeded. Grant succeeded. Grant succeeded. Grant succeeded. Grant succeeded. Grant succeeded. Grant succeeded. Grant succeeded. Grant succeeded. Synonym created. Synonym created. Synonym created. Synonym created. Synonym created. Synonym created. Synonym created. Synonym created. Synonym created. Synonym created. Synonym created. Synonym created. Synonym created. Synonym created. Synonym created. Synonym created. 2025-12-23 12:19:34 - [INFO] Create new types and UDFs executed successfully. 2025-12-23 12:19:34 - [INFO] New types and UDFs created successfully. 2025-12-23 12:19:34 - [INFO] Testing UDFs installation... 2025-12-23 12:19:35 - [INFO] Test UDFs output: <DBP_version> 2025-12-23 12:19:35 - [INFO] UDFs installation tested successfully. 2025-12-23 12:19:35 - [INFO] Removing extproc.ora backup file /u01/app/oracle/product/19.0.0/dbhome_1/hs/admin/extproc.ora.bak_2025-12-23_12:16:52 2025-12-23 12:19:35 - [INFO] Closing SSH master connections... 2025-12-23 12:19:35 - [INFO] Installation successful. 2025-12-23 12:19:35 - [INFO] All components installed successfully.
4.1.4.3 - Installing the Oracle Database Protector on RAC (Multinode) system
The Oracle Database Protector build provides an automated script to manage the installation process on a standalone system. The master script internally calls the scripts to install the components. The master script installs the components in the following order:
- Log Forwarder
- RPAgent
- Policy Enforcement Point (Database Protector)
The installation can also be performed manually by executing the individual scripts to install the different components.
The master script is available in the directory where the installation files are extracted. It provides the following arguments:
install- installs the components in an interactive mode.upgrade- installs a newer version of the protector with minimal downtime.silent- installs the components in a non-interactive mode.install.ini- installs the components as per the parameters provided in the file.help- lists the arguments available for the script.
In addition, the master script will rollback the installation process if any errors are encountered. The script will revert the changes.
Viewing the Arguments for the Script
- Log in to the instance where the installation package is extracted.
- Navigate to the directory containing the installation scripts.
- To view the arguments, run the following command:
./Install_OracleProtector_Linux_x64_<DBP_version>.sh --help - Press ENTER.
The script lists the available arguments.
Options: --install Use this option when installing the solution for the first time on a machine/host. (i.e., there is no previous installation present) --upgrade Use this option when upgrading an existing installation on the machine/host. --install-ini <file> (Optional) Provide a path to an install.ini file for silent or pre-configured installations. This option works with --install only. It must not be used with --upgrade or --silent. You can pass this either as: --install-ini /path/to/install.ini or --install-ini=/path/to/install.ini Refer to the product documentation for details about the configuration options available in install.ini. The documentation describes all supported keys, required fields, and example configurations. --silent (Optional) Runs the installation/upgrade in silent mode with minimum interactive prompts. --help, -h Display this help message and exit.
Installing the Protector using the Interactive Mode
- Log in to the instance where the installation package is extracted.
- Navigate to the directory containing the installation scripts.
- To execute the script, run the following command:
./Install_OracleProtector_Linux_x64_<DBP_version>.sh --install - Press ENTER.
The prompt to select the silent mode of installation appears.
Do you want silent installation? (yes/no) [no]: - To install the components using the interactive mode, type
no. - Press ENTER.
The prompt to install the components in the same directory appears.
Do you want to install the new LogForwarder, RPAgent, and DatabaseProtector together in a single directory? (yes/no) [no]: - To install the components in different directories, type
no. - Press ENTER.
The prompt to enter the installation directory for the Log Forwarder appears.
Enter new LogForwarder installation directory [/opt/protegrity]: - Enter the location to install the Log Forwarder.
- Press ENTER.
The prompt to enter the installation directory for the RPAgent appears.
Enter new RPAgent installation directory [/opt/protegrity]: - Enter the location to install the RPAgent.
- Press ENTER.
The prompt to enter the installation directory for the Database Protector appears.
Enter new DatabaseProtector installation directory [/opt/protegrity]: - Enter the location to install the Database Protector.
Note: To use any directory, ensure the directory is available. Otherwise, the installation will fail.
- Press ENTER.
The script configures the environment and the prompt to confirm the configuration appears.
2025-12-30 06:39:49 - [INFO] Discovering Grid Infrastructure home dynamically... 2025-12-30 06:39:50 - [INFO] Discovered GRID_HOME: /u01/app/21.3.0./grid 2025-12-30 06:39:50 - [INFO] Grid home found: /u01/app/21.3.0./grid 2025-12-30 06:39:50 - [INFO] RAC setup detected 2025-12-30 06:39:50 - [INFO] Current node: <node_name> (<node_name>.localdomain.com) 2025-12-30 06:39:50 - [INFO] Other nodes: <node_name> <node_name> 2025-12-30 06:39:50 - [INFO] Checking for required tools... 2025-12-30 06:39:50 - [INFO] All required tools are available 2025-12-30 06:39:50 - [INFO] Going to configure environment for installation 2025-12-30 06:39:50 - [INFO] Discovered ORACLE_SID=<oracle_system_identifier>, ORACLE_HOME=/u01/app/oracle/product/21.3.0/db_1 2025-12-30 06:39:50 - [INFO] Oracle environment set: 2025-12-30 06:39:50 - [INFO] ORACLE_HOME=/u01/app/oracle/product/21.3.0/db_1 2025-12-30 06:39:50 - [INFO] ORACLE_SID=<oracle_system_identifier> 2025-12-30 06:39:50 - [INFO] LD_LIBRARY_PATH=/u01/app/oracle/product/21.3.0/db_1/lib 2025-12-30 06:39:50 - [INFO] PATH=/u01/app/21.3.0./grid/bin:/sbin:/bin:/usr/sbin:/usr/bin:/u01/app/oracle/product/21.3.0/db_1/bin 2025-12-30 06:39:50 - [INFO] Environment configured successfully... 2025-12-30 06:39:50 - [INFO] ************************************************************************** 2025-12-30 06:39:50 - [INFO] Installation will be done with following configuration: 2025-12-30 06:39:50 - [INFO] Oracle Instance ID: <oracle_instance_ID> 2025-12-30 06:39:50 - [INFO] Mode: install 2025-12-30 06:39:50 - [INFO] Logforwarder Installation Directory: /opt/protegrity1 2025-12-30 06:39:50 - [INFO] RPAgent Installation Directory: /opt/protegrity1 2025-12-30 06:39:50 - [INFO] DatabaseProtector Installation Directory: /opt/protegrity1 2025-12-30 06:39:50 - [INFO] This is a fresh install. 2025-12-30 06:39:50 - [INFO] RAC setup detected with nodes: <node_name> <node_name> <node_name> 2025-12-30 06:39:50 - [INFO] ************************************************************************** 2025-12-30 06:39:50 - [INFO] Please verify the above configuration before proceeding. Do you want to continue? (yes/no) [no]: - To proceed with the configuration, type
yes. - Press ENTER.
The master script invokes the Log Forwarder installation script. The prompt to enter the Audit Store endpoint appears.
2025-12-30 06:40:10 - [INFO] Continuing with installation... 2025-12-30 06:40:10 - [INFO] Installing/Upgrading LOGFORWARDER... 2025-12-30 06:40:10 - [INFO] Executing ./LogforwarderSetup_Linux_x64_<DBP_version>.sh... Enter the audit store endpoint (host), alternative (host:port) to use another port than the default port 9200: - Enter the IP address for the Audit Store.
- Press ENTER.
The script lists the endpoint to be added. The prompt to add additional end point appears.
Audit store endpoints: <IP_Address>:9200 Do you want to add another audit store endpoint? [y/n]: - To provide an additional endpoint, type
yes. - Press ENTER.
The prompt to enter the Audit Store endpoint appears.
Enter the audit store endpoint (host), alternative (host:port) to use another port than the default port 9200: - Enter the IP address for the Audit Store.
- Press ENTER.
The script lists the endpoints that will be added. The prompt to continue the installation appears.
<IP_Address>:9200 <IP_Address>:9200 Type 'y' to accept or 'n' to abort installation: - To add the endpoints, type
yes. - Press ENTER.
The script unpacks the files and installs the Log Forwarder. The prompt to enter the upstream host name or IP address appears.
Unpacking... Extracting files... Protegrity Log Forwarder installed in /opt/protegrity1/logforwarder. 2025-12-30 06:40:10 - [INFO] ./LogforwarderSetup_Linux_x64_<DBP_version>.sh completed successfully. 2025-12-30 06:40:10 - [INFO] Installing/Upgrading RPAGENT... Please enter upstream host name or IP address, alternative (host:port) to use another port than the default port 25400: - Enter the upstream host name or IP address.
- Press ENTER.
The prompt to enter the ESA token appears.
Enter ESA token (leave blank to use username/password):Note: To use the username and password, press ENTER.
- Enter the JWT token.
- Press ENTER.
The script installs the RPAgent and triggers the script to install the Oracle objects. The script verifies the nodes and the prompt to confirm the username for the node appears.
2025-12-30 06:40:24 - [INFO] Executing ./RPAgentSetup_Linux_x64_<DBP_version>.sh... Unpacking... Extracting files... Downloading certificates from <IP_Address>:25400... % Total % Received % Xferd Average Speed Time Time Time Current Dload Upload Total Spent Left Speed 100 11264 100 11264 0 0 55457 0 --:--:-- --:--:-- --:--:-- 55487 Extracting certificates... tar: CA.pem: time stamp 2025-12-30 06:40:25 is 0.061687997 s in the future tar: cert.pem: time stamp 2025-12-30 06:40:25 is 0.061525058 s in the future tar: cert.key: time stamp 2025-12-30 06:40:25 is 0.061482332 s in the future tar: secret.txt: time stamp 2025-12-30 06:40:25 is 0.061448035 s in the future Certificates successfully downloaded and stored in /opt/protegrity1/rpagent/data Protegrity RPAgent installed in /opt/protegrity1/rpagent. 2025-12-30 06:40:24 - [INFO] ./RPAgentSetup_Linux_x64_<DBP_version>.sh completed successfully. 2025-12-30 06:40:24 - [INFO] Installing/Upgrading DBP... 2025-12-30 06:40:24 - [INFO] Executing ./PepOracleSetup_Linux_x64_<DBP_version>.sh... ***************************************************** Welcome to the Database Protector Setup Wizard ***************************************************** This will install the oracle objects on your computer Do you want to continue? [yes or no] Enter installation directory. A new directory will be created in the installation directory. [/opt/protegrity]: Unpacking... Extracting files... oracle objects installed in /opt/protegrity1/databaseprotector/oracle. 2025-12-30 06:40:24 - [INFO] ./PepOracleSetup_Linux_x64_<DBP_version>.sh completed successfully. 2025-12-30 06:40:24 - [INFO] Going to launch <DBP_version> version Logforwarder 2025-12-30 06:40:27 - [INFO] Successfully launched <DBP_version> version Logforwarder 2025-12-30 06:40:27 - [INFO] Going to launch <DBP_version> version RPAgent 2025-12-30 06:40:27 - [INFO] Successfully launched <DBP_version> version RPAgent 2025-12-30 06:40:27 - [INFO] Configuring extproc.ora 2025-12-30 06:40:27 - [INFO] Backed up existing /u01/app/oracle/product/21.3.0/db_1/hs/admin/extproc.ora 2025-12-30 06:40:27 - [INFO] Updated EXTPROC_DLLS in /u01/app/oracle/product/21.3.0/db_1/hs/admin/extproc.ora to only include /opt/protegrity1/databaseprotector/oracle/lib/peporacle.plm 2025-12-30 06:40:27 - [INFO] Updated extproc.ora at /u01/app/oracle/product/21.3.0/db_1/hs/admin/extproc.ora 2025-12-30 06:40:27 - [INFO] Detected separate runtime home: /u01/app/oracle/homes/OraDB21Home1 2025-12-30 06:40:27 - [INFO] Runtime extproc.ora symlink already points to canonical: /u01/app/oracle/homes/OraDB21Home1/hs/admin/extproc.ora -> /u01/app/oracle/product/21.3.0/db_1/hs/admin/extproc.ora 2025-12-30 06:40:27 - [INFO] Synchronized extproc.ora in runtime home /u01/app/oracle/homes/OraDB21Home1/hs/admin 2025-12-30 06:40:27 - [INFO] Configuring RAC nodes... 2025-12-30 06:40:27 - [INFO] Performing pre-check on all RAC nodes before making changes... Do you want to enter one remote username to be used for all nodes? (yes/no) [no]: - To use separate usernames, type
no. - Press ENTER.
The script prompts for the username to access a node.
Enter remote username for node <node_name> (must be in sudoers): - Enter the username to access the node.
- Press ENTER.
The script validates the username and the prompt to enter the password appears.
2025-12-30 06:40:35 - [INFO] Opening SSH connection to <node_name> for precheck... 2025-12-30 06:40:35 - [INFO] Opening SSH master connection to <node_name>... Warning: Permanently added '<node_name>,<node_IP>' (ECDSA) to the list of known hosts. <user_name>@<node_name>'s password: - Enter the password.
- Press ENTER.
The script validates the password. The prompt to enter the username for the next node appears.
2025-12-30 06:40:41 - [INFO] SSH master connection to <node_name> ready 2025-12-30 06:40:41 - [INFO] Checking sudo access for <node_name>... 2025-12-30 06:40:41 - [INFO] Precheck OK for <node_name> Enter remote username for node <node_name> (must be in sudoers): - Enter the username to access the node.
- Press ENTER.
The script validates the username and the prompt to enter the password appears.
2025-12-30 06:40:45 - [INFO] Opening SSH connection to <node_name> for precheck... 2025-12-30 06:40:45 - [INFO] Opening SSH master connection to <node_name>... Warning: Permanently added '<node_name>,<node_IP>' (ECDSA) to the list of known hosts. <user_name>@<node_name>'s password: - Enter the password.
- Press ENTER.
The script validates the password, completes the pre-check, and completes the RAC node configuration. The prompt to create the UDF appears.
2025-12-30 06:40:50 - [INFO] SSH master connection to <node_name> ready 2025-12-30 06:40:50 - [INFO] Checking sudo access for <node_name>... 2025-12-30 06:40:50 - [INFO] Precheck OK for <node_name> 2025-12-30 06:40:50 - [INFO] Precheck complete. Starting RAC node configuration... 2025-12-30 06:40:50 - [INFO] Syncing /opt/protegrity1/logforwarder to <node_name>... 2025-12-30 06:40:54 - [INFO] Starting new Logforwarder on <node_name> 2025-12-30 06:40:56 - [INFO] Syncing /opt/protegrity1/rpagent to <node_name>... 2025-12-30 06:40:57 - [INFO] Starting new RPAgent on <node_name> 2025-12-30 06:40:57 - [INFO] Syncing /opt/protegrity1/databaseprotector to <node_name>... 2025-12-30 06:40:58 - [INFO] Syncing /etc/protegrity to <node_name>... 2025-12-30 06:40:58 - [INFO] Updating extproc.ora on <node_name> 2025-12-30 06:40:58 - [INFO] Updating runtime extproc.ora symlink on <node_name> 2025-12-30 06:40:59 - [INFO] Node <node_name> configured successfully. 2025-12-30 06:40:59 - [INFO] Syncing /opt/protegrity1/logforwarder to <node_name>... 2025-12-30 06:41:02 - [INFO] Starting new Logforwarder on <node_name> 2025-12-30 06:41:04 - [INFO] Syncing /opt/protegrity1/rpagent to <node_name>... 2025-12-30 06:41:06 - [INFO] Starting new RPAgent on <node_name> 2025-12-30 06:41:06 - [INFO] Syncing /opt/protegrity1/databaseprotector to <node_name>... 2025-12-30 06:41:06 - [INFO] Syncing /etc/protegrity to <node_name>... 2025-12-30 06:41:07 - [INFO] Updating extproc.ora on <node_name> 2025-12-30 06:41:07 - [INFO] Updating runtime extproc.ora symlink on <node_name> 2025-12-30 06:41:07 - [INFO] Node <node_name> configured successfully. Do you want to continue and create UDFs? To create the UDFs, provide the database credentials (yes/no) [no]: - To create the UDFs, type
yes.Note: If you select
Noto create the UDFs, the script skips creating the UDFs. The installation will complete successfully. However, the database will not contain the required UDFs. To manually create the UDFs, refer to the section Creating the User Defined Functions (UDFs). - Press ENTER.
The prompt to enter the database username appears.
Enter Oracle database username: - Enter the username.
- Press ENTER.
The prompt to enter the database password appears.
Enter Oracle database user's password: - Enter the password.
- Press ENTER.
The script creates the UDFs and completes the installation.
2025-12-30 06:41:26 - [INFO] Going to create new types and UDFs. 2025-12-30 06:41:26 - [INFO] Using username '<user_name>' for database connection and creating new types and UDFs. 2025-12-30 06:41:26 - [INFO] Running SQL script: Create new types and UDFs (/opt/protegrity1/databaseprotector/oracle/sqlscripts/createobjects.sql) 2025-12-30 06:41:27 - [INFO] sqlplus output: Library created. Type created. Type created. Type created. Type created. Type created. Type created. Type created. Type created. Package created. Package body created. Grant succeeded. Grant succeeded. Synonym created. Synonym created. Grant succeeded. Grant succeeded. Grant succeeded. Grant succeeded. Grant succeeded. Grant succeeded. Grant succeeded. Grant succeeded. Grant succeeded. Grant succeeded. Grant succeeded. Grant succeeded. Grant succeeded. Grant succeeded. Grant succeeded. Grant succeeded. Synonym created. Synonym created. Synonym created. Synonym created. Synonym created. Synonym created. Synonym created. Synonym created. Synonym created. Synonym created. Synonym created. Synonym created. Synonym created. Synonym created. Synonym created. Synonym created. 2025-12-30 06:41:27 - [INFO] Create new types and UDFs executed successfully. 2025-12-30 06:41:27 - [INFO] New types and UDFs created successfully. 2025-12-30 06:41:27 - [INFO] Testing UDFs installation... 2025-12-30 06:41:27 - [INFO] Test UDFs output: <DBP_version> 2025-12-30 06:41:27 - [INFO] UDFs installation tested successfully. 2025-12-30 06:41:27 - [INFO] Removing extproc.ora backup file /u01/app/oracle/product/21.3.0/db_1/hs/admin/extproc.ora.bak_2025-12-30_06:40:27 2025-12-30 06:41:27 - [INFO] Closing SSH master connections... 2025-12-30 06:41:27 - [INFO] Connection to <node_name> closed. 2025-12-30 06:41:27 - [INFO] Connection to <node_name> closed. 2025-12-30 06:41:27 - [INFO] Installation successful. 2025-12-30 06:41:27 - [INFO] All components installed successfully.
Installing the Protector using the Silent Mode
- Log in to the instance where the installation package is extracted.
- Navigate to the directory containing the installation scripts.
- To execute the script, run the following command:
./Install_OracleProtector_Linux_x64_<DBP_version>.sh --install - Press ENTER.
The prompt to select the silent mode of installation appears.
Do you want silent installation? (yes/no) [no]: - To install the components using the silent mode, type
yes. - Press ENTER.
The script lists the configuration and a prompt to confirm the configuration appears.
2025-12-30 06:31:27 - [INFO] You have chosen silent mode. Therefore, /opt/protegrity is considered as base directory for new installation. 2025-12-30 06:31:27 - [INFO] Discovering Grid Infrastructure home dynamically... 2025-12-30 06:31:27 - [INFO] Discovered GRID_HOME: /u01/app/21.3.0./grid 2025-12-30 06:31:27 - [INFO] Grid home found: /u01/app/21.3.0./grid 2025-12-30 06:31:27 - [INFO] RAC setup detected 2025-12-30 06:31:27 - [INFO] Current node: <node_name> (<node_name>.localdomain.com) 2025-12-30 06:31:27 - [INFO] Other nodes: <node_name> <node_name> 2025-12-30 06:31:27 - [INFO] Checking for required tools... 2025-12-30 06:31:27 - [INFO] All required tools are available 2025-12-30 06:31:27 - [INFO] Going to configure environment for installation 2025-12-30 06:31:28 - [INFO] Discovered ORACLE_SID=<oracle_system_identifier>, ORACLE_HOME=/u01/app/oracle/product/21.3.0/db_1 2025-12-30 06:31:28 - [INFO] Oracle environment set: 2025-12-30 06:31:28 - [INFO] ORACLE_HOME=/u01/app/oracle/product/21.3.0/db_1 2025-12-30 06:31:28 - [INFO] ORACLE_SID=<oracle_system_identifier> 2025-12-30 06:31:28 - [INFO] LD_LIBRARY_PATH=/u01/app/oracle/product/21.3.0/db_1/lib 2025-12-30 06:31:28 - [INFO] PATH=/u01/app/21.3.0./grid/bin:/sbin:/bin:/usr/sbin:/usr/bin:/u01/app/oracle/product/21.3.0/db_1/bin 2025-12-30 06:31:28 - [INFO] Environment configured successfully... 2025-12-30 06:31:28 - [INFO] ************************************************************************** 2025-12-30 06:31:28 - [INFO] Installation will be done with following configuration: 2025-12-30 06:31:28 - [INFO] Oracle Instance ID: <oracle_instance_ID> 2025-12-30 06:31:28 - [INFO] Mode: install 2025-12-30 06:31:28 - [INFO] Logforwarder Installation Directory: /opt/protegrity 2025-12-30 06:31:28 - [INFO] RPAgent Installation Directory: /opt/protegrity 2025-12-30 06:31:28 - [INFO] DatabaseProtector Installation Directory: /opt/protegrity 2025-12-30 06:31:28 - [INFO] This is a fresh install. 2025-12-30 06:31:28 - [INFO] RAC setup detected with nodes: <node_name> <node_name> <node_name> 2025-12-30 06:31:28 - [INFO] ************************************************************************** 2025-12-30 06:31:28 - [INFO] Please verify the above configuration before proceeding. Do you want to continue? (yes/no) [no]: - To proceed with the configuration, type
yes. - Press ENTER.
The scripts starts the Log Forwarder installation and the prompt to enter the Audit Store endpoint appears.
2025-12-30 06:31:30 - [INFO] Continuing with installation... 2025-12-30 06:31:30 - [INFO] Installing/Upgrading LOGFORWARDER... 2025-12-30 06:31:30 - [INFO] Executing ./LogforwarderSetup_Linux_x64_<DBP_version>.sh... Enter the audit store endpoint (host), alternative (host:port) to use another port than the default port 9200: - Enter the audit store endpoint.
- Press ENTER.
The prompt to enter additional endpoint appears.
Audit store endpoints: <IP_Address>:9200 Do you want to add another audit store endpoint? [y/n]: - To provide another audit store endpoint, type,
yes. - Press ENTER.
The script lists the audit store endpoints. The prompt to enter another endpoint appears.
<IP_Address>:9200 <IP_Address>:9200 Type 'y' to accept or 'n' to abort installation: - To continue, type
yes. - Press ENTER.
The script installs the Log Forwarder. The script starts the RPAgent installation. The prompt to enter the upstream IP address appears.
Unpacking... Extracting files... Protegrity Log Forwarder installed in /opt/protegrity/logforwarder. 2025-12-30 06:31:45 - [INFO] ./LogforwarderSetup_Linux_x64_<DBP_version>.sh completed successfully. 2025-12-30 06:31:45 - [INFO] Installing/Upgrading RPAGENT... Please enter upstream host name or IP address, alternative (host:port) to use another port than the default port 25400: - Enter the IP address.
- Press ENTER.
The prompt to enter the JWT token appears.
Enter ESA token (leave blank to use username/password): - To use the credentials, press ENTER.
The prompt to enter the username appears.
Enter ESA username: - Enter the username.
- Press ENTER.
The prompt to enter the password appears.
Enter ESA user's password: - Enter the password.
- Press ENTER.
The script installs the RPAgent and the Database Protector. The script starts the RAC node configuration. The prompt to enter the username for the node appears.
2025-12-30 06:31:54 - [INFO] Executing ./RPAgentSetup_Linux_x64_<DBP_version>.sh... Unpacking... Extracting files... Obtaining token from <IP_Address>:25400... Downloading certificates from <IP_Address>:25400... % Total % Received % Xferd Average Speed Time Time Time Current Dload Upload Total Spent Left Speed 100 11264 100 11264 0 0 55596 0 --:--:-- --:--:-- --:--:-- 55762 Extracting certificates... Certificates successfully downloaded and stored in /opt/protegrity/rpagent/data Protegrity RPAgent installed in /opt/protegrity/rpagent. 2025-12-30 06:31:55 - [INFO] ./RPAgentSetup_Linux_x64_<DBP_version>.sh completed successfully. 2025-12-30 06:31:55 - [INFO] Installing/Upgrading DBP... 2025-12-30 06:31:55 - [INFO] Executing ./PepOracleSetup_Linux_x64_<DBP_version>.sh... ***************************************************** Welcome to the Database Protector Setup Wizard ***************************************************** This will install the oracle objects on your computer Do you want to continue? [yes or no] Enter installation directory. A new directory will be created in the installation directory. [/opt/protegrity]: Unpacking... Extracting files... oracle objects installed in /opt/protegrity/databaseprotector/oracle. 2025-12-30 06:31:55 - [INFO] ./PepOracleSetup_Linux_x64_<DBP_version>.sh completed successfully. 2025-12-30 06:31:55 - [INFO] Going to launch <DBP_version> version Logforwarder 2025-12-30 06:31:57 - [INFO] Successfully launched <DBP_version> version Logforwarder 2025-12-30 06:31:57 - [INFO] Going to launch <DBP_version> version RPAgent 2025-12-30 06:31:58 - [INFO] Successfully launched <DBP_version> version RPAgent 2025-12-30 06:31:58 - [INFO] Configuring extproc.ora 2025-12-30 06:31:58 - [INFO] Backed up existing /u01/app/oracle/product/21.3.0/db_1/hs/admin/extproc.ora 2025-12-30 06:31:58 - [INFO] Updated EXTPROC_DLLS in /u01/app/oracle/product/21.3.0/db_1/hs/admin/extproc.ora to only include /opt/protegrity/databaseprotector/oracle/lib/peporacle.plm 2025-12-30 06:31:58 - [INFO] Updated extproc.ora at /u01/app/oracle/product/21.3.0/db_1/hs/admin/extproc.ora 2025-12-30 06:31:58 - [INFO] Detected separate runtime home: /u01/app/oracle/homes/OraDB21Home1 2025-12-30 06:31:58 - [INFO] Runtime extproc.ora symlink already points to canonical: /u01/app/oracle/homes/OraDB21Home1/hs/admin/extproc.ora -> /u01/app/oracle/product/21.3.0/db_1/hs/admin/extproc.ora 2025-12-30 06:31:58 - [INFO] Synchronized extproc.ora in runtime home /u01/app/oracle/homes/OraDB21Home1/hs/admin 2025-12-30 06:31:58 - [INFO] Configuring RAC nodes... 2025-12-30 06:31:58 - [INFO] Performing pre-check on all RAC nodes before making changes... Do you want to enter one remote username to be used for all nodes? (yes/no) [no]: - To use the same credentials for all the nodes, type
yes. - Press ENTER.
The prompt to enter the username appears.
Enter remote username for all nodes (must be in sudoers): - Enter the username to access all the nodes.
- Press ENTER.
The script validates the username. The prompt to enter the password appears.
2025-12-30 06:32:05 - [INFO] Opening SSH connection to <node_name> for precheck... 2025-12-30 06:32:05 - [INFO] Opening SSH master connection to <node_name>... Warning: Permanently added '<node_name>,<node_IP>' (ECDSA) to the list of known hosts. <user_name>@<node_name>'s password: - Enter the password.
- Press ENTER.
The script establishes a connection to the other nodes. The prompt to enter the password appears.
2025-12-30 06:32:10 - [INFO] SSH master connection to <node_name> ready 2025-12-30 06:32:10 - [INFO] Checking sudo access for <node_name>... 2025-12-30 06:32:11 - [INFO] Precheck OK for <node_name> 2025-12-30 06:32:11 - [INFO] Opening SSH connection to <node_name> for precheck... 2025-12-30 06:32:11 - [INFO] Opening SSH master connection to <node_name>... Warning: Permanently added '<node_name>,<node_IP>' (ECDSA) to the list of known hosts. <user_name>@<node_name>'s password: - Enter the password.
- Press ENTER.
The script starts the RAC node configuration. The prompt to create the UDF appears.
2025-12-30 06:32:15 - [INFO] SSH master connection to <node_name> ready 2025-12-30 06:32:15 - [INFO] Checking sudo access for <node_name>... 2025-12-30 06:32:16 - [INFO] Precheck OK for <node_name> 2025-12-30 06:32:16 - [INFO] Precheck complete. Starting RAC node configuration... 2025-12-30 06:32:16 - [INFO] Syncing /opt/protegrity/logforwarder to <node_name>... 2025-12-30 06:32:19 - [INFO] Starting new Logforwarder on <node_name> 2025-12-30 06:32:21 - [INFO] Syncing /opt/protegrity/rpagent to <node_name>... 2025-12-30 06:32:23 - [INFO] Starting new RPAgent on <node_name> 2025-12-30 06:32:23 - [INFO] Syncing /opt/protegrity/databaseprotector to <node_name>... 2025-12-30 06:32:24 - [INFO] Syncing /etc/protegrity to <node_name>... 2025-12-30 06:32:24 - [INFO] Updating extproc.ora on <node_name> 2025-12-30 06:32:24 - [INFO] Updating runtime extproc.ora symlink on <node_name> 2025-12-30 06:32:24 - [INFO] Node <node_name> configured successfully. 2025-12-30 06:32:24 - [INFO] Syncing /opt/protegrity/logforwarder to <node_name>... 2025-12-30 06:32:28 - [INFO] Starting new Logforwarder on <node_name> 2025-12-30 06:32:30 - [INFO] Syncing /opt/protegrity/rpagent to <node_name>... 2025-12-30 06:32:31 - [INFO] Starting new RPAgent on <node_name> 2025-12-30 06:32:31 - [INFO] Syncing /opt/protegrity/databaseprotector to <node_name>... 2025-12-30 06:32:32 - [INFO] Syncing /etc/protegrity to <node_name>... 2025-12-30 06:32:32 - [INFO] Updating extproc.ora on <node_name> 2025-12-30 06:32:33 - [INFO] Updating runtime extproc.ora symlink on <node_name> 2025-12-30 06:32:33 - [INFO] Node <node_name> configured successfully. Do you want to continue and create UDFs? To create the UDFs, provide the database credentials (yes/no) [no]: - To create the UDF, type
yes.Note: If you select
Noto create the UDFs, the script skips creating the UDFs. The installation will complete successfully. However, the database will not contain the required UDFs. To manually create the UDFs, refer to the section Creating the User Defined Functions (UDFs). - Press ENTER.
The prompt to enter the databse username appears.
Enter Oracle database username: - Enter the username.
- Press ENTER.
The prompt to enter the password appears.
Enter Oracle database user's password: - Enter the password.
- Press ENTER.
The script creates the UDFs and completes the installation.
2025-12-30 06:32:41 - [INFO] Going to create new types and UDFs. 2025-12-30 06:32:41 - [INFO] Using username '<user_name>' for database connection and creating new types and UDFs. 2025-12-30 06:32:41 - [INFO] Running SQL script: Create new types and UDFs (/opt/protegrity/databaseprotector/oracle/sqlscripts/createobjects.sql) 2025-12-30 06:32:42 - [INFO] sqlplus output: Library created. Type created. Type created. Type created. Type created. Type created. Type created. Type created. Type created. Package created. Package body created. Grant succeeded. Grant succeeded. Synonym created. Synonym created. Grant succeeded. Grant succeeded. Grant succeeded. Grant succeeded. Grant succeeded. Grant succeeded. Grant succeeded. Grant succeeded. Grant succeeded. Grant succeeded. Grant succeeded. Grant succeeded. Grant succeeded. Grant succeeded. Grant succeeded. Grant succeeded. Synonym created. Synonym created. Synonym created. Synonym created. Synonym created. Synonym created. Synonym created. Synonym created. Synonym created. Synonym created. Synonym created. Synonym created. Synonym created. Synonym created. Synonym created. Synonym created. 2025-12-30 06:32:42 - [INFO] Create new types and UDFs executed successfully. 2025-12-30 06:32:42 - [INFO] New types and UDFs created successfully. 2025-12-30 06:32:42 - [INFO] Testing UDFs installation... 2025-12-30 06:32:42 - [INFO] Test UDFs output: <DBP_version> 2025-12-30 06:32:42 - [INFO] UDFs installation tested successfully. 2025-12-30 06:32:42 - [INFO] Removing extproc.ora backup file /u01/app/oracle/product/21.3.0/db_1/hs/admin/extproc.ora.bak_2025-12-30_06:31:58 2025-12-30 06:32:42 - [INFO] Closing SSH master connections... 2025-12-30 06:32:42 - [INFO] Connection to <node_name> closed. 2025-12-30 06:32:42 - [INFO] Connection to <node_name> closed. 2025-12-30 06:32:42 - [INFO] Installation successful. 2025-12-30 06:32:42 - [INFO] All components installed successfully.
Installing the Protector using the install.ini file
This argument requires the install.ini file to be present and updated with the required parameters. The install.ini files contains the installation directories for the components and the endpoints for the Log Forwarder and RPAgent.
Note: Ensure that the
install.inifile is available on the primary node.
A sample output of the install.ini file is listed below.
[Logforwarder]
INSTALLATION_DIR = </opt/protegrity1>
AUDIT_STORE_ENDPOINTS = <IP_address>:9200 <IP_address>:9200 <IP_address>:9200
[RPAgent]
INSTALLATION_DIR = </opt/protegrity1>
UPSTREAM_HOST_IP_ADDR_PORT = <IP_address>:25400
[DatabaseProtector]
INSTALLATION_DIR = </opt/protegrity1>
Note: To use any directory for the Database Protector, ensure the directory is available. Otherwise, the installation will fail. Note: The default port for the Audit Store endpoint is 9200. The default port for the RPAgent is 25400. To use any other port, replace the value.
To install the protector using the install.ini argument:
- Log in to the instance where the installation package is extracted.
- Navigate to the directory containing the installation scripts.
- To execute the script with the argument, run the following command:
./Install_OracleProtector_Linux_x64_<DBP_version>.sh --install --install-ini <path_to_install.ini_file> - Press ENTER.
The script detects the
install.inifile and the prompt to verify the configuration appears.2025-12-30 06:52:50 - [INFO] install.ini detected: <path_to_install.ini_file> 2025-12-30 06:52:51 - [INFO] Discovering Grid Infrastructure home dynamically... 2025-12-30 06:52:51 - [INFO] Discovered GRID_HOME: /u01/app/21.3.0./grid 2025-12-30 06:52:51 - [INFO] Grid home found: /u01/app/21.3.0./grid 2025-12-30 06:52:51 - [INFO] RAC setup detected 2025-12-30 06:52:51 - [INFO] Current node: <node_name> (<node_name>.localdomain.com) 2025-12-30 06:52:51 - [INFO] Other nodes: <node_name> <node_name> 2025-12-30 06:52:51 - [INFO] Checking for required tools... 2025-12-30 06:52:51 - [INFO] All required tools are available 2025-12-30 06:52:51 - [INFO] Going to configure environment for installation 2025-12-30 06:52:51 - [INFO] Discovered ORACLE_SID=<oracle_system_identifier>, ORACLE_HOME=/u01/app/oracle/product/21.3.0/db_1 2025-12-30 06:52:51 - [INFO] Oracle environment set: 2025-12-30 06:52:51 - [INFO] ORACLE_HOME=/u01/app/oracle/product/21.3.0/db_1 2025-12-30 06:52:51 - [INFO] ORACLE_SID=<oracle_system_identifier> 2025-12-30 06:52:51 - [INFO] LD_LIBRARY_PATH=/u01/app/oracle/product/21.3.0/db_1/lib 2025-12-30 06:52:51 - [INFO] PATH=/u01/app/21.3.0./grid/bin:/sbin:/bin:/usr/sbin:/usr/bin:/u01/app/oracle/product/21.3.0/db_1/bin 2025-12-30 06:52:51 - [INFO] Environment configured successfully... 2025-12-30 06:52:51 - [INFO] ************************************************************************** 2025-12-30 06:52:51 - [INFO] Installation will be done with following configuration: 2025-12-30 06:52:51 - [INFO] Oracle Instance ID: <oracle_instance_ID> 2025-12-30 06:52:51 - [INFO] Mode: install 2025-12-30 06:52:51 - [INFO] Using configuration from install.ini: 2025-12-30 06:52:51 - [INFO] Logforwarder Installation Directory: /opt/protegrity1 2025-12-30 06:52:51 - [INFO] Audit Store Endpoints: <IP_Address>:9200 <IP_Address>:9200 <IP_Address>:9200 2025-12-30 06:52:51 - [INFO] RPAgent Installation Directory: /opt/protegrity1 2025-12-30 06:52:51 - [INFO] Upstream (ESA) IP Address for RPAgent: <IP_Address> 2025-12-30 06:52:51 - [INFO] Upstream (ESA) Port for RPAgent: 25400 2025-12-30 06:52:51 - [INFO] DatabaseProtector Installation Directory: /opt/protegrity1 2025-12-30 06:52:51 - [INFO] This is a fresh install. 2025-12-30 06:52:51 - [INFO] RAC setup detected with nodes: <node_name> <node_name> <node_name> 2025-12-30 06:52:51 - [INFO] ************************************************************************** 2025-12-30 06:52:51 - [INFO] Please verify the above configuration before proceeding. Do you want to continue? (yes/no) [no]: - To proceed with the configuration, type
yes. - Press ENTER.
The script installs the Log Forwarder. The script starts in the RPAgent installation. The prompt to enter the JWT token appears.
2025-12-30 06:52:54 - [INFO] Continuing with installation... 2025-12-30 06:52:54 - [INFO] Installing/Upgrading LOGFORWARDER... 2025-12-30 06:52:54 - [INFO] Executing ./LogforwarderSetup_Linux_x64_<DBP_version>.sh... Unpacking... Extracting files... Protegrity Log Forwarder installed in /opt/protegrity1/logforwarder. 2025-12-30 06:52:54 - [INFO] ./LogforwarderSetup_Linux_x64_<DBP_version>.sh completed successfully. 2025-12-30 06:52:54 - [INFO] Installing/Upgrading RPAGENT... Enter ESA token (leave blank to use username/password): - Enter the JWT token.
Note: To use the username and password, press ENTER.
- Press ENTER.
The script downloads the certificates and completes the installation for the RPAgent and the Database Protector. The prompt to enter the username to access the node appears.
2025-12-30 06:53:06 - [INFO] Executing ./RPAgentSetup_Linux_x64_<DBP_version>.sh... Unpacking... Extracting files... Downloading certificates from <IP_Address>:25400... % Total % Received % Xferd Average Speed Time Time Time Current Dload Upload Total Spent Left Speed 100 11264 100 11264 0 0 55949 0 --:--:-- --:--:-- --:--:-- 56039 Extracting certificates... Certificates successfully downloaded and stored in /opt/protegrity1/rpagent/data Protegrity RPAgent installed in /opt/protegrity1/rpagent. 2025-12-30 06:53:06 - [INFO] ./RPAgentSetup_Linux_x64_<DBP_version>.sh completed successfully. 2025-12-30 06:53:06 - [INFO] Installing/Upgrading DBP... 2025-12-30 06:53:06 - [INFO] Executing ./PepOracleSetup_Linux_x64_<DBP_version>.sh... ***************************************************** Welcome to the Database Protector Setup Wizard ***************************************************** This will install the oracle objects on your computer Do you want to continue? [yes or no] Enter installation directory. A new directory will be created in the installation directory. [/opt/protegrity]: Unpacking... Extracting files... oracle objects installed in /opt/protegrity1/databaseprotector/oracle. 2025-12-30 06:53:06 - [INFO] ./PepOracleSetup_Linux_x64_<DBP_version>.sh completed successfully. 2025-12-30 06:53:06 - [INFO] Going to launch <DBP_version> version Logforwarder 2025-12-30 06:53:08 - [INFO] Successfully launched <DBP_version> version Logforwarder 2025-12-30 06:53:08 - [INFO] Going to launch <DBP_version> version RPAgent 2025-12-30 06:53:08 - [INFO] Successfully launched <DBP_version> version RPAgent 2025-12-30 06:53:08 - [INFO] Configuring extproc.ora 2025-12-30 06:53:08 - [INFO] Backed up existing /u01/app/oracle/product/21.3.0/db_1/hs/admin/extproc.ora 2025-12-30 06:53:08 - [INFO] Updated EXTPROC_DLLS in /u01/app/oracle/product/21.3.0/db_1/hs/admin/extproc.ora to only include /opt/protegrity1/databaseprotector/oracle/lib/peporacle.plm 2025-12-30 06:53:08 - [INFO] Updated extproc.ora at /u01/app/oracle/product/21.3.0/db_1/hs/admin/extproc.ora 2025-12-30 06:53:08 - [INFO] Detected separate runtime home: /u01/app/oracle/homes/OraDB21Home1 2025-12-30 06:53:08 - [INFO] Runtime extproc.ora symlink already points to canonical: /u01/app/oracle/homes/OraDB21Home1/hs/admin/extproc.ora -> /u01/app/oracle/product/21.3.0/db_1/hs/admin/extproc.ora 2025-12-30 06:53:08 - [INFO] Synchronized extproc.ora in runtime home /u01/app/oracle/homes/OraDB21Home1/hs/admin 2025-12-30 06:53:08 - [INFO] Configuring RAC nodes... 2025-12-30 06:53:08 - [INFO] Performing pre-check on all RAC nodes before making changes... Do you want to enter one remote username to be used for all nodes? (yes/no) [no]: - To proceed with the different usernames for the nodes, type
no. - Press ENTER.
The prompt to enter the username appears.
Enter remote username for node <node_name> (must be in sudoers): - Enter the username to connect to the node.
- Press ENTER.
The script validates the username. The prompt to enter the password appears.
2025-12-30 06:53:15 - [INFO] Opening SSH connection to <node_name> for precheck... 2025-12-30 06:53:15 - [INFO] Opening SSH master connection to <node_name>... Warning: Permanently added '<node_name>,<IP_Address>' (ECDSA) to the list of known hosts. <user_name>@<node_name>'s password: - Enter the password to access the node.
- Press ENTER.
The script validates the credentials. The prompt to enter the username for the next node appears.
2025-12-30 06:53:19 - [INFO] SSH master connection to <node_name> ready 2025-12-30 06:53:19 - [INFO] Checking sudo access for <node_name>... 2025-12-30 06:53:19 - [INFO] Precheck OK for <node_name> Enter remote username for node <node_name> (must be in sudoers): - Enter the username to connect to the node.
- Press ENTER.
The script validates the username. The prompt to enter the password appears.
2025-12-30 06:53:23 - [INFO] Opening SSH connection to <node_name> for precheck... 2025-12-30 06:53:23 - [INFO] Opening SSH master connection to <node_name>... Warning: Permanently added '<node_name>,<IP_Address>' (ECDSA) to the list of known hosts. <user_name>@<node_name>'s password: - Enter the password to access the node.
- Press ENTER.
The script validates the credentials, configures the nodes, and the prompt to create the UDF appears.
2025-12-30 06:53:27 - [INFO] SSH master connection to <node_name> ready 2025-12-30 06:53:27 - [INFO] Checking sudo access for <node_name>... 2025-12-30 06:53:27 - [INFO] Precheck OK for <node_name> 2025-12-30 06:53:27 - [INFO] Precheck complete. Starting RAC node configuration... 2025-12-30 06:53:27 - [INFO] Syncing /opt/protegrity1/logforwarder to <node_name>... 2025-12-30 06:53:30 - [INFO] Starting new Logforwarder on <node_name> 2025-12-30 06:53:33 - [INFO] Syncing /opt/protegrity1/rpagent to <node_name>... 2025-12-30 06:53:34 - [INFO] Starting new RPAgent on <node_name> 2025-12-30 06:53:34 - [INFO] Syncing /opt/protegrity1/databaseprotector to <node_name>... 2025-12-30 06:53:35 - [INFO] Syncing /etc/protegrity to <node_name>... 2025-12-30 06:53:35 - [INFO] Updating extproc.ora on <node_name> 2025-12-30 06:53:35 - [INFO] Updating runtime extproc.ora symlink on <node_name> 2025-12-30 06:53:36 - [INFO] Node <node_name> configured successfully. 2025-12-30 06:53:36 - [INFO] Syncing /opt/protegrity1/logforwarder to <node_name>... 2025-12-30 06:53:39 - [INFO] Starting new Logforwarder on <node_name> 2025-12-30 06:53:41 - [INFO] Syncing /opt/protegrity1/rpagent to <node_name>... 2025-12-30 06:53:42 - [INFO] Starting new RPAgent on <node_name> 2025-12-30 06:53:43 - [INFO] Syncing /opt/protegrity1/databaseprotector to <node_name>... 2025-12-30 06:53:43 - [INFO] Syncing /etc/protegrity to <node_name>... 2025-12-30 06:53:44 - [INFO] Updating extproc.ora on <node_name> 2025-12-30 06:53:44 - [INFO] Updating runtime extproc.ora symlink on <node_name> 2025-12-30 06:53:44 - [INFO] Node <node_name> configured successfully. Do you want to continue and create UDFs? To create the UDFs, provide the database credentials (yes/no) [no]: - To create the UDFs, type
yes.Note: If you select
Noto create the UDFs, the script skips creating the UDFs. The installation will complete successfully. However, the database will not contain the required UDFs. To manually create the UDFs, refer to the section Creating the User Defined Functions (UDFs). - Press ENTER.
The prompt to enter the database username appears.
Enter Oracle database username: - Enter the username to connect to the database.
- Press ENTER.
The prompt to enter the password appears.
Enter Oracle database user's password: - Enter the password to connect to the database.
- Press ENTER.
The script creates the UDFs and completes the installation.
2025-12-30 06:53:52 - [INFO] Going to create new types and UDFs. 2025-12-30 06:53:52 - [INFO] Using username '<user_name>' for database connection and creating new types and UDFs. 2025-12-30 06:53:52 - [INFO] Running SQL script: Create new types and UDFs (/opt/protegrity1/databaseprotector/oracle/sqlscripts/createobjects.sql) 2025-12-30 06:53:53 - [INFO] sqlplus output: Library created. Type created. Type created. Type created. Type created. Type created. Type created. Type created. Type created. Package created. Package body created. Grant succeeded. Grant succeeded. Synonym created. Synonym created. Grant succeeded. Grant succeeded. Grant succeeded. Grant succeeded. Grant succeeded. Grant succeeded. Grant succeeded. Grant succeeded. Grant succeeded. Grant succeeded. Grant succeeded. Grant succeeded. Grant succeeded. Grant succeeded. Grant succeeded. Grant succeeded. Synonym created. Synonym created. Synonym created. Synonym created. Synonym created. Synonym created. Synonym created. Synonym created. Synonym created. Synonym created. Synonym created. Synonym created. Synonym created. Synonym created. Synonym created. Synonym created. 2025-12-30 06:53:53 - [INFO] Create new types and UDFs executed successfully. 2025-12-30 06:53:53 - [INFO] New types and UDFs created successfully. 2025-12-30 06:53:53 - [INFO] Testing UDFs installation... 2025-12-30 06:53:53 - [INFO] Test UDFs output: <DBP_version> 2025-12-30 06:53:53 - [INFO] UDFs installation tested successfully. 2025-12-30 06:53:53 - [INFO] Removing extproc.ora backup file /u01/app/oracle/product/21.3.0/db_1/hs/admin/extproc.ora.bak_2025-12-30_06:53:08 2025-12-30 06:53:53 - [INFO] Closing SSH master connections... 2025-12-30 06:53:53 - [INFO] Connection to <node_name> closed. 2025-12-30 06:53:53 - [INFO] Connection to <node_name> closed. 2025-12-30 06:53:53 - [INFO] Installation successful. 2025-12-30 06:53:53 - [INFO] All components installed successfully.
4.1.4.4 - Creating the User Defined Functions (UDFs)
The Oracle Database Protector provides the createobjects.sql script to create or install the UDFs. Before executing the createobjects.sql script, configure the listener.ora, tnsnames.ora, and the extproc.ora configuration files, depending on the version of the Oracle database.
Note:
To automate the installation process, use the quick installation script provided in the build:Install_OracleProtector_Linux_x64_<DBP_version>.sh
For more information, refer the following sections:
Note: This section outline the manual installation process for UDFs in an Oracle database environment.
To install UDFs for the Oracle Database Protector:
Connect to the database as the
oracleuser with the database owner credentials.Navigate to the
/opt/protegrity/databaseprotector/oracle/sqlscripts/directory.To install the UDFs, run the following command:
sqlplus User1/Password1 @createobjects.sqlwhere,
User1andPassword1are the credentials of the database owner. The symbol\is used for Windows and/for UNIX environments.To view the list of all the installed UDFs, run the following command:
select PROCEDURE_NAME from user_procedures order by 1;To verify the successful installation of the UDFs, execute any one of the following queries:
select pty.whoami() from dual;The function returns the name of the user that is logged in to the database.
select pty.getversion() from dual;The function returns the protector version.
4.1.5 - Configuring the Oracle Database Protector
The Oracle Database Protector provides the following files that contain different parameters to control the protector behavior:
config.ini- provides parameters to control the protector behavior.rpagent.cfg- provides parameters to control the RPAgent behavior.
Updating the parameters in the config.ini file:
Log in to the node.
Navigate to the
/opt/protegrity/databaseprotector/oracle/datadirectory.To open the
config.inifile, run the following command:vi config.iniPress ENTER.
The command opens the
config.inifile.############################################################################### # Protector configuration ############################################################################### [protector] # Cadence determines how often the protector connects with ESA / proxy to fetch the policy updates in background. # Default is 60 seconds. So by default, every 60 seconds protector tries to fetch the policy updates. # If the cadence is set to "0", then the protector will get the policy only once. # # Default 60. cadence = 60 ############################################################################### # Log Provider Config ############################################################################### [log] # In case that connection to fluent-bit is lost, set how audits/logs are handled # # drop : (default) Protector throws logs away if connection to the fluentbit is lost # error : Protector returns error without protecting/unprotecting # data if connection to the fluentbit is lost mode = drop # Host/IP to fluent-bit where audits/logs will be forwarded from the protector # # Default localhost host = localhostUpdate the parameters, as per the description in the table.
Parameter Description cadenceSpecifies the frequency at which the protector retrieves the policy. The default value is 60 seconds. If the cadence is set to “0”, then the protector will get the policy only once. modeSpecifies the approach of handling logs when the connection to the Log Forwarder is lost. Save the changes to the
config.inifile.
Updating the parameters in the rpagent.cfg file:
Log in to the required node.
Navigate to the
/opt/protegrity/rpagent/datadirectory.To open the
rpagent.cfgfile, run the following command:vi rpagent.cfgPress ENTER.
The command opens the rpagent.cfg file.
############################################################################### # Resilient Package Sync Config ############################################################################### [sync] # Protocol to use when communicating with the service providing Resilient Packages. # Use 'https' for ESA or 'shmem' for local shared memory. protocol = https # Host/IP to the service providing Resilient Packages host = <IP_address> port = 8443 # Path to CA certificate ca = /opt/protegrity/rpagent/data/CA.pem # Path to client certificate cert = /opt/protegrity/rpagent/data/cert.pem # Path to client certificate key key = /opt/protegrity/rpagent/data/cert.key # Path to a secret file that is used to decrypt the client certificate key. # When using a custom certificate bundle, the 'secretcommand' can instead be # used to execute an external command that obtains the secret. secretfile = /opt/protegrity/rpagent/data/secret.txt ############################################################################### # Log Provider Config ############################################################################### [log] # In case that connection to fluent-bit is lost, set how audits/logs are handled # # drop : (default) Protector throws logs away if connection to the fluentbit is lost # error : Protector returns error without protecting/unprotecting # data if connection to the fluentbit is lost mode = drop # Host/IP to fluent-bit where audits/logs will be forwarded from the protector # # Default localhost host = localhostUpdate the parameters, as per the description in the table.
Parameter Description interval Specifies the frequency at which the RPAgent retrieves the policy. The minimum value is 1 second and the maximum value is 86400 seconds. This is an optional parameter and must be included in the Sync section of the rpagent.cfgfile.protocol Specifies the protocol to use when communicating with the service providing Resilient Packages. host Specifies the hostname to the service providing the Resilient packages. port Specifies the port to the service providing the Resilient packages. ca Specifies the path to the CA certificate. cert Specifies the path to the client certificate. key Specifies the path to the client certificate key. secretfile Specifies the path to the secret file that is used to decrypt the client certificate key. mode Specifies the approach of handling logs when the connection to the Log Forwarder is lost. host Specifies the hostname or the IP address to where the Log Forwarder will forward the audit logs from the protector. Save the changes to the
rpagent.cfgfile.
4.1.5.1 - User Impersonation
This page describes how to impersonate a user in the Oracle database protector. The user impersonation feature enables you to perform operations and access resources on behalf of another user. Service users leverage this feature to impersonate individual users. However, to supply user context to execute a query, upper applications provide the CLIENT_IDENTIFIER. Set the impersonation parameter to YES in the config.ini file, to use the CLIENT_IDENTIFIER parameter of the inbuilt USERENV application context SYS_CONTEXT provided by the Oracle database.
To impersonate a user:
Log in to the node where the Oracle database is installed.
Navigate to the
/opt/protegrity/databaseprotector/oracle/data/directory.To open the
config.inifile, run the following command:vi config.iniPress ENTER.
The command opens the
config.inifile.############################################################################### # Protector configuration ############################################################################### [protector] # Cadence determines how often the protector connects with ESA / proxy to fetch the policy updates in background. # Default is 60 seconds. So by default, every 60 seconds protector tries to fetch the policy updates. # If the cadence is set to "0", then the protector will get the policy only once. # # Default 60. cadence = 60 ############################################################################### # Log Provider Config ############################################################################### [log] # In case that connection to fluent-bit is lost, set how audits/logs are handled # # drop : (default) Protector throws logs away if connection to the fluentbit is lost # error : Protector returns error without protecting/unprotecting # data if connection to the fluentbit is lost mode = drop # Host/IP to fluent-bit where audits/logs will be forwarded from the protector # # Default localhost host = localhostTo include the impersonation parameter and set the value to
YES, add the following code:[userimpersonation] impersonation = yes/no or YES/NONote: The default value of the impersonation parameter is set to
NOorno.Assign 644 permissions to the
config.inifile. This is required only tf the ownership of theconfig.inifile is not set to theoracleuser and theoinstallgroup.Connect to the database session using the service account. For example,
USER1.To set the
CLIENT_IDENTIFIER, execute the following query:EXEC DBMS_SESSION.SET_IDENTIFIER ('USER2');Press ENTER. The query returns the name of the user for whom you set the
CLIENT_IDENTIFIERparameter.USER2To verify the value that is set for the
CLIENT_IDENTIFIERparameter, execute the following query:SQL> select sys_context('USERENV','CLIENT_IDENTIFIER') from dual; SYS_CONTEXT('USERENV','CLIENT_IDENTIFIER')Press ENTER. The query returns the name of the user for whom you set the
CLIENT_IDENTIFIERparameter.USER2Warning: When you set the value of the
impersonationparameter toyes/YES, then set a value for the theCLIENT_IDENTIFIERparameter. The protect/unprotect UDFs will run only after the value for theCLIENT_IDENTIFIERparameter is set. If you set the value of theimpersonationparameter toyes/YES, and fail to set the value for theCLIENT_IDENTIFIERparameter, then the PTY.WHOAMI() UDF will return the username as <no_user>. This will cause the protect/unprotect operations to fail with theFailed to retrieve usererror message.To verify the user who is logged into the database session, execute the following query:
select pty.whoami() from dual;Press ENTER. The query returns the name of the user that is logged into the current database session.
USER2To clear the value set for the
CLIENT_IDENTIFIERparameter, execute the following query:EXEC DBMS_SESSION.CLEAR_IDENTIFIER;
4.1.5.2 - Enterprise User Security (EUS) in the Oracle Database
Enterprise User Security (EUS) is an important component of the Oracle database that allows you to centrally manage the database users across the enterprise. Enterprise users are the users that are defined and managed in a directory. Every enterprise user has a unique identity across the enterprise. The Enterprise User Security relies on the Oracle Identity Management infrastructure, which uses an LDAP-compliant directory service to centrally store and manage the users.
Protegrity supports the following authentication methods:
- Password-based authentication
- SSL-based authentication
- Kerberos-based authentication
In the following list, the type of user is followed by the value returned:
- Password-authenticated enterprise user: nickname (same as the login name)
- Password-authenticated database user: the database username (same as the schema name)
- SSL-authenticated enterprise user: the DN in the user’s PKI certificate
- SSL-authenticated external user: the DN in the user’s PKI certificate
- Kerberos-authenticated enterprise user: Kerberos principal name
- Kerberos-authenticated external user: Kerberos principal name, which is the same as the schema name
The Oracle database protector supports the retrieval of the user information using the AUTHENTICATED_IDENTITY parameter that returns the identity used for the authentication.
Using the EUS Feature
The instructions and examples provided in the section use Kerberos-based authentication.
Note:
- Ensure that the username in the ESA policy contains only the username and does not include the domain name. For example, USER1.
- Currently, only one domain name is supported.
To use the EUS feature:
- To create a Kerberos ticket for the enterprise user, run the following command:
okinit <username> - Press ENTER.
The command prompts for the password of the enterprise user.
[oracle@db ~]$ okinit USER1 Kerberos Utilities for Linux: Version 18.0.0.0.0 - Production on 15-DEC-2021 06:07:06 Copyright (c) 1996, 2017 Oracle. All rights reserved. Configuration file : /u01/app/oracle/product/18.0.0/dbhome_1/network/admin/kerberos/krb5.conf. Password for USER1@TESTLAB.COM: - Enter the password.
- Press ENTER.
- To verify whether the authentication ticket is generated successfully, run the following command:
oklist - Press ENTER.
The command displays the authentication ticket details.
[oracle@db ~]$ oklist Kerberos Utilities for Linux: Version 18.0.0.0.0 - Production on 15-DEC-2021 06:07:37 Copyright (c) 1996, 2017 Oracle. All rights reserved. Configuration file : /u01/app/oracle/product/18.0.0/dbhome_1/network/admin/kerberos/ krb5.conf. Ticket cache: FILE:/tmp/krb5cc_54321 Default principal: USER1@TESTLAB.COM Valid starting Expires Service principal 12/15/21 06:07:06 12/15/21 16:07:06 krbtgt/TESTLAB.COM@TESTLAB.COM renew until 12/16/21 06:07:06 [oracle@db ~]$ - To login to the Oracle database, run the following command:
sqlplus /@<database_name> - Press ENTER. The SQL prompt appears.
- To verify the authentication method, run the following command:
select sys_context('USERENV','AUTHENTICATION_METHOD') from dual; - Press ENTER.
The command displays the authentication method.
select sys_context('USERENV','AUTHENTICATION_METHOD') from dual; SYS_CONTEXT('USERENV','AUTHENTICATION_METHOD') -------------------------------------------------------------------------------- KERBEROS - To view the user, run the following command:
select user from dual; - Execute a sample protect operation.
SQL> select pty.ins_encrypt('AES128', 'Original data', 0) from dual; PTY.INS_ENCRYPT('AES128','ORIGINALDATA',0) -------------------------------------------------------------------------------- 3713D5C1E058701568115B28885707CA SQL> - Execute a sample unprotect operation.
SQL> select pty.sel_decrypt('AES128', pty.ins_encrypt('AES128', 'Protegrity', 0) , 0) from dual; PTY.SEL_DECRYPT('AES128',PTY.INS_ENCRYPT('AES128','PROTEGRITY',0),0) -------------------------------------------------------------------------------- Protegrity SQL>
Retrieving User Information
This section describes how to use the AUTHENTICATED_IDENTITY parameter to retrieve the information of an enterprise user.
To fetch the information of an enterprise user, run the following query:
select sys_context( 'userenv', 'AUTHENTICATED_IDENTITY' ) from dual;
Note: The
AUTHENTICATED_IDENTITYparameter contains the information of the enterprise user and returns the identity that is used in the authentication.
4.1.5.3 - Troubleshooting
This section lists the general configuration steps and the common errors that occur during installation or upgrade.
Resolving the ORA-06520 Error
The following error indicate a missing symlink or an external library:
ORA-06520: PL/SQL: Error loading external library
ORA-06512: at "<user_name>.PTY", line 1022
ORA-06512: at "<user_name>.PTY", line 2633
[ERROR] Failed to test UDFs installation
[ERROR] sqlplus exit code: 1
[ERROR] Installation failed. Rolling back changes...
Note: This error typically occurs in Oracle versions 21 and earlier.
To address runtime/configuration issues, perform the following steps:
- Ensure
libclntsh.so.<version>symlinks tolibclntsh.soin the Oracle library directory. - Run
ln -s libclntsh.so libclntsh.so.23.1.
Configuring the Environment Variables
The Oracle DB Protector can be installed by the sudoer user and Oracle admin user. This section discusses the installation using the sudoer user. Wherever possible, the Oracle commands for the Oracle admin user would be provided as well. To use the Oracle DB Protector, configure environment variables as per the Oracle version being used.
Resolving the ORA-20113 Error
In case of the ORA-20113: Failed to Load configuration error message, ensure to grant 755 permissions to the following directories:
/etc/protegrity/<installaiton_directory>
Resolving the ORA-28575 Error
In the Oracle Database Protector on the AIX platform, if the external procedure fails with the ORA-28575: unable to open RPC connection to external procedure agent error message, then create a soft link for the extproc binary.
To create the soft link for the extproc binary:
- Log in to the Oracle Database server.
- To navigate to the directory that contains the binaries, run the following command:
cd $ORACLE_HOME/rdbms/lib - To create the soft link, run the following command:
make -f ins_rdbms.mk iextproc
Configuring the extproc.ora Environment Variable
The extproc.ora file is available in the $ORACLE_HOME directory.
- To identify the location of the
extproc.orafile, run the following command:find . -name extproc.ora 2>/dev/null - To use the Protegrity UDFs, add the following environment variable in the
extproc.orafile:SET EXTPROC_DLLS=ANY
Recovering a Failed Upgrade
There can be scenarios where an automatic rollback of the Oracle Database Protector UDF solution may complete with errors. This results in the system being in a potentially inconsistent state. In such instances, the installer retains the backup directories of the previously working installation. The system can be manually restored to the previous working installation.
Important:
- Execute the steps using the appropriate system user.
- Ensure the availability of appropriate operating system level and Oracle database privileges.
- Execute the steps in the specified order.
- Commands assume a Linux/Unix environment.
- Use extreme caution when running rsync commands with the
--deleteoption.
When a rollback operation fails, the installer retains the following backup directories (example with timestamp):
<path_to_previous_installation_dir>/logforwarder_<timestamp>
<path_to_previous_installation_dir>/rpagent_<timestamp>
<path_to_previous_installation_dir>/databaseprotector_<timestamp>
/etc/protegrity_<timestamp>
When a component is installed, it is placed under a component-specific subdirectory under the user-provided installation directory:
- Logforwarder →
<installation_dir>/logforwarder - RPAgent →
<installation_dir>/rpagent - Database Protector →
<installation_dir>/databaseprotector
The backup directories contain the contents of these component directories and must be restored into their corresponding target directories.
/etc/protegrity
Verifying the Log Forwarder Status
- To verify the status of the Log Forwarder, run the following command:
<installation_dir>/logforwarder/bin/logforwarderctrl status - Press ENTER. The script returns the status of the Log Forwarder.
- To stop the Log Forwarder, run the following command:
<installation_dir>/logforwarder/bin/logforwarderctrl stop - Press ENTER. The command stops the Log Forwarder.
- To check for any running instances of the Log Forwarder, run the following command:
ps -ef | grep logforwarderNote: This command is useful in scenarios where installation is corrupt and the control command fails to return a valid status.
- Press ENTER. The command lists all the running instances of the Log Forwarder along with the respective process ID.
- To stop the specific instance of the Log Forwarder, run the following command:
kill -9 <logforwarder_process_id> - Press ENTER. The command will stop the specific instance of the Log Forwarder.
Verifying the RPAgent Status
- To verify the status of the RPAgent, run the following command:
<installation_dir>/rpagent/bin/rpagentctrl status - Press ENTER. The script returns the status of the RPAgent.
- To stop the RPAgent, run the following command:
<installation_dir>/rpagent/bin/rpagentctrl stop - Press ENTER. The command stops the RPAgent.
- To check for any running instances of the RPAgent, run the following command:
ps -ef | grep rpagentNote: This command is useful in scenarios where installation is corrupt and the control command fails to return a valid status.
- Press ENTER. The command lists all the running instances of the RPAgent along with the respective process ID.
- To stop the specific instance of the RPAgent, run the following command:
kill -9 <rpagent_process_id> - Press ENTER. The command will stop the specific instance of the RPAgent.
Restoring the Component Directories and User Configuration
Restore the contents of all the Protegrity components and configuration directories using the retained backups.
For each component:
- Identify the installation directory.
- Replace its contents with the corresponding backup directory using a suitable tool such as
rsync,cp, ormv.
Note: The Logforwarder, RPAgent, and Database Protector components may be installed in the same directory or in separate directories, depending on the environment.
Important:
- Ensure all services are stopped before performing this step.
- Do not merge directories manually.
- Always fully replace the target directory contents with the backup contents.
Restoring the Log Forwarder
- To navigate to the backup directory, run the following command:
<path_to_previous_installation_dir>/logforwarder_<timestamp> - To navigate to the installation directory, run the following command:
<installation_dir>/logforwarder - To restore the Log Forwarder, run the following command:
rsync -a --delete <path_to_previous_installation_dir>/logforwarder_<timestamp>/ <installation_dir>/logforwarder/Warning rsync
--deleteoption permanently removes files from the target directory that are not present in the backup. Always verify that the target directory is the correct component directory before executing the command.
Restoring the RPAgent
- To navigate to the backup directory, run the following command:
<path_to_previous_installation_dir>/rpagent_<timestamp> - To navigate to the installation directory, run the following command:
<installation_dir>/rpagent - To restore the RPAgent, run the following command:
rsync -a --delete <path_to_previous_installation_dir>/rpagent_<timestamp>/ <installation_dir>/rpagent/Warning rsync
--deleteoption permanently removes files from the target directory that are not present in the backup. Always verify that the target directory is the correct component directory before executing the command.
Restoring the Database Protector
- To navigate to the backup directory, run the following command:
<path_to_previous_installation_dir>/databaseprotector_<timestamp> - To navigate to the installation directory, run the following command:
<installation_dir>/databaseprotector - To restore the Database Protector, run the following command:
rsync -a --delete <path_to_previous_installation_dir>/databaseprotector_<timestamp>/ <installation_dir>/databaseprotector/Warning rsync
--deleteoption permanently removes files from the target directory that are not present in the backup. Always verify that the target directory is the correct component directory before executing the command.
Restoring the User Configuration
- To navigate to the backup directory, run the following command:
/etc/protegrity - To restore the user configuration, run the following command:
rsync -a --delete /etc/protegrity_<timestamp>/ /etc/protegrity/Note: The
/etc/protegrity/directory location does not change across installations or upgrades. This step ensures that all previous configuration settings are fully restored.
Starting the Services
- To start the Log Forwarder, run the following command:
<installation_dir>/logforwarder/bin/logforwarderctrl start - To start the RPAgent, run the following command:
<installation_dir>/rpagent/bin/rpagentctrl start
Restoring the Oracle Database Protector
Due to the failed rollback, the Oracle Database Protector types and UDFs may be in an invalid or inconsistent state. If database functionality is not correct, re-create the database objects.
- To navigate to the directory containing the scripts, run the following command:
cd <installation_dir>/databaseprotector/oracle/sqlscripts - To drop the existing objects, run the following command, with an Oracle database user that owns the existing types and UDFs, or has sufficient privileges to drop them:
sqlplus <user_name>/<password> @dropobjects.sqlImportant:
- During upgrades, different database users may have been used to create the UDFs.
- If rollback failed part-way, ownership of existing database objects may be unclear.
- Use the database user that owns the existing objects or has sufficient privileges.
- Errors such as “object does not exist” may occur and can be safely ignored depending on the database state.
- To re-create the objects, run the following command, with a database user with the required permissions to create Oracle Database Protector types and UDFs:
sqlplus <user_name>/<password>@dcreateobjects.sql
Note: If issues persist after manual recovery, contact Protegrity Support and provide the installer log and details of the recovery steps performed.
Recovering a Partially Failed Installation
The Oracle Database Protector installation and upgrade processes involves creating and dropping a large number of Oracle database types and UDFs. In some scenarios, the SQL scripts may partially fail, resulting in an inconsistent database state.
The common scenarios include:
- Fresh installation scenario where creation of some types or UDF fails.
- Upgrade process where some new objects are created before a failure occurs.
- Rollback process where the
dropobjects.sqlscript encounters objects that were never created or were already dropped.
In such scenarios, the rollback process may log warnings similar to:
[WARN] IMPORTANT: One or more errors occurred while dropping new or restoring existing types and UDFs during rollback.
[WARN] This may indicate that some SQL script partially failed before and/or during the rollback.
[WARN] For example, you may see errors such as 'already exists' or 'not found'.
[WARN] Please review the current state of the database objects to ensure they match the expected configuration.
[WARN] Manual intervention may be required to fully restore the previous state.
These warnings are informational and do not automatically require action. However, a manual intervention is only required if the following instances are true:
- The installer or rollback logs report SQL-related warnings or errors and
- The current state of Oracle Database Protector types and UDFs is incorrect or inconsistent.
These errors occur because:
- SQL scripts may fail partially because of permission issues, transient database errors, or environmental errors.
- During rollback, the
dropobjects.sqlscript attempts to drop all known objects. - Objects that were never created or were already removed, will generate errors such as:
- object does not exist
- already exists
Such errors are expected in partial-failure scenarios and do not necessarily indicate a fatal problem.
Execute the following steps ONLY when verification indicates that database objects are missing, invalid, or corrupted.
Re-create Database Objects (Only If Required)
To navigate to the directory where the scripts are located, run the following command:
cd <installation_dir>/databaseprotector/oracle/sqlscriptsPress ENTER. The command navigates to the directory containing the scripts.
To drop the UDFs, run the following command as a database user that owns the existing types and UDFs or has sufficient privileges:
sqlplus <user_name>/<password>@dropobjects.sqlWhere:
<user_name>is the database user that owns the existing types and UDFs.- The user must have all required permissions listed in the product documentation.
Note: Errors such as
object does not existare expected in partial-failure scenarios and can be safely ignored.To create the new UDFs, run the following command as a database user having all the required permissions to create Oracle Database Protector types and UDFs:
sqlplus <user_name>/<password> @createobjects.sqlWhere:
<user_name>is the database user that owns the existing types and UDFs.- The user must have all required permissions listed in the product documentation.
Press ENTER. The script recreates the Oracle Database Protector types and UDFs. The database objects are restored to a clean and consistent state. The installation or rollback process is fully recovered from the SQL partial-failure scenario.
Note: If errors persist after re-creating the objects, review the SQL output and contact Protegrity Support with the installer and rollback logs.
4.1.6 - Upgrading the Oracle Database Protector
This section explains procedure to upgrade the Oracle Database Protector. The upgrade process leverages the master installation script Install_OracleProtector_Linux_x64_<DBP_version>.sh from the installation package.
4.1.6.1 - Upgrading the Oracle Database Protector on Standalone system
The Oracle Database Protector build provides an automated script to manage the upgrade process. The master script internally calls the scripts to install and upgrade the components. The master script installs and upgrades the components in the following order:
- Log Forwarder
- RPAgent
- Policy Enforcement Point (Database Protector)
The master script is available in the directory where the installation files are extracted. It provides the following arguments:
install- installs the components in an interactive mode.upgrade- installs a newer version of the protector with minimal downtime.silent- installs the components in a non-interactive mode.install.ini- installs the components as per the parameters provided in the file.help- lists the arguments available for the script.
During the upgrade process, the master script:
- Verifies the existing configuration.
- Creates a backup of the existing configuration.
- Stops the required services.
- Drops the existing UDFs.
- Installs the new version.
- Starts the required services.
- Creates the new UDFs and retains the existing configuration.
In addition, the master script will rollback the upgrade process if any errors are encountered. The script will revert the changes and restore the previous working version of the Oracle Database Protector.
Viewing the Arguments for the Script
- Log in to the instance where the installation package is extracted.
- Navigate to the directory containing the installation scripts.
- To view the arguments, run the following command:
./Install_OracleProtector_Linux_x64_<DBP_version>.sh --help - Press ENTER.
The script lists the available arguments.
Options: --install Use this option when installing the solution for the first time on a machine/host. (i.e., there is no previous installation present) --upgrade Use this option when upgrading an existing installation on the machine/host. --install-ini <file> (Optional) Provide a path to an install.ini file for silent or pre-configured installations. This option works with --install only. It must not be used with --upgrade or --silent. You can pass this either as: --install-ini /path/to/install.ini or --install-ini=/path/to/install.ini Refer to the product documentation for details about the configuration options available in install.ini. The documentation describes all supported keys, required fields, and example configurations. --silent (Optional) Runs the installation/upgrade in silent mode with minimum interactive prompts. --help, -h Display this help message and exit.
Upgrading the Protector using the Interactive Mode
- Log in to the instance where the installation package is extracted.
- Navigate to the directory containing the installation scripts.
- To execute the upgrade script, run the following command:
./Install_OracleProtector_Linux_x64_<DBP_version>.sh --upgrade - Press ENTER.
The prompt to select the silent mode of installation appears.
2025-12-23 12:21:23 - [INFO] If silent mode is selected, the default base directory (/opt/protegrity) will be used as the location of the existing installation for each component (Logforwarder, RPAgent and DatabaseProtector). Do you want silent installation? (yes/no) [no]: - To install the components using the interactive mode, type
no. - Press ENTER.
The prompt to enter the location of the existing installation appears.
Enter existing installation directories: Existing LogForwarder installation directory [/opt/protegrity]: - Enter the directory path where the existing version of the Log Forwarder is installed.
- Press ENTER.
The prompt to enter RPAgent installation directory appears.
Existing RPAgent installation directory [/opt/protegrity]: - Enter the directory path where the existing version of the RPAgent is installed.
- Press ENTER.
The prompt to enter the Database Protector installation directory appears.
Existing DatabaseProtector installation directory [/opt/protegrity]: - Enter the directory path where the existing version of the Database Protector is installed.
- Press ENTER.
The prompt to select a single installation directory for the components appears.
Do you want to install the new LogForwarder, RPAgent, and DatabaseProtector together in a single directory? (yes/no) [no]: - To install the new components in a single directory, type
yes. - Press ENTER.
The prompt to enter the installation directory for the new version appears.
Enter new installation directory [/opt/protegrity]: - Enter the location where the components must be installed.
- Press ENTER.
The script lists the configuration and a prompt to confirm appears.
2025-12-23 12:21:43 - [INFO] Verifying previous installation directories for all components... 2025-12-23 12:21:43 - [INFO] Existing LogForwarder directory: /opt/protegrity1/logforwarder 2025-12-23 12:21:43 - [INFO] Existing RPAgent directory: /opt/protegrity1/rpagent 2025-12-23 12:21:43 - [INFO] Existing DatabaseProtector directory: /opt/protegrity1/databaseprotector 2025-12-23 12:21:43 - [INFO] All existing component directories verified successfully. 2025-12-23 12:21:44 - [INFO] Discovering Grid Infrastructure home dynamically... 2025-12-23 12:21:44 - [INFO] No ASM instance found. This is a standalone system. 2025-12-23 12:21:44 - [INFO] No Grid home found. Treating it as a standalone Oracle. 2025-12-23 12:21:44 - [INFO] Going to configure environment for upgrade 2025-12-23 12:21:44 - [INFO] Discovered ORACLE_SID=orcl, ORACLE_HOME=/u01/app/oracle/product/19.0.0/dbhome_1 2025-12-23 12:21:44 - [INFO] Oracle environment set: 2025-12-23 12:21:44 - [INFO] ORACLE_HOME=/u01/app/oracle/product/19.0.0/dbhome_1 2025-12-23 12:21:44 - [INFO] ORACLE_SID=orcl 2025-12-23 12:21:44 - [INFO] LD_LIBRARY_PATH=/u01/app/oracle/product/19.0.0/dbhome_1/lib 2025-12-23 12:21:44 - [INFO] PATH=/usr/local/sbin:/usr/local/bin:/usr/sbin:/usr/bin:/root/bin:/u01/app/oracle/product/19.0.0/dbhome_1/bin 2025-12-23 12:21:44 - [INFO] Environment configured successfully... 2025-12-23 12:21:44 - [INFO] ************************************************************************** 2025-12-23 12:21:44 - [INFO] Upgrade will be done with following configuration: 2025-12-23 12:21:44 - [INFO] Oracle Instance ID: orcl 2025-12-23 12:21:44 - [INFO] Mode: upgrade 2025-12-23 12:21:44 - [INFO] Existing Logforwarder Installation Directory: /opt/protegrity1 2025-12-23 12:21:44 - [INFO] Existing RPAgent Installation Directory: /opt/protegrity1 2025-12-23 12:21:44 - [INFO] Existing DatabaseProtector Installation Directory: /opt/protegrity1 2025-12-23 12:21:44 - [INFO] New Logforwarder Installation Directory: /opt/protegrity 2025-12-23 12:21:44 - [INFO] New RPAgent Installation Directory: /opt/protegrity 2025-12-23 12:21:44 - [INFO] New DatabaseProtector Installation Directory: /opt/protegrity 2025-12-23 12:21:44 - [INFO] Audit Store Endpoints: <IP_Address>:9200 <IP_Address>:9200 <IP_Address>:9200 2025-12-23 12:21:44 - [INFO] Upstream (ESA) Hostname or IP Address for RPAgent: <IP_Address> 2025-12-23 12:21:44 - [INFO] Upstream (ESA) Port for RPAgent: 25400 (Default) 2025-12-23 12:21:44 - [INFO] This is an upgrade. 2025-12-23 12:21:44 - [INFO] Previous installations will be backed up before upgrade. 2025-12-23 12:21:44 - [INFO] Existing Logforwarder and RPAgent configurations will be retained 2025-12-23 12:21:44 - [INFO] Standalone setup detected 2025-12-23 12:21:44 - [INFO] ************************************************************************** 2025-12-23 12:21:44 - [WARN] ************************************************************************** 2025-12-23 12:21:44 - [WARN] IMPORTANT: Any queries currently running may be impacted during upgrade. 2025-12-23 12:21:44 - [WARN] It is recommended to perform the upgrade during a maintenance window. 2025-12-23 12:21:44 - [WARN] ************************************************************************** 2025-12-23 12:21:44 - [INFO] Please verify the above configuration before proceeding. Do you want to continue? (yes/no) [no]: - To proceed with the upgrade, type
yes. - Press ENTER.
The script creates a backup of the existing configuration, installs the Log Forwarder, RPAgent, and the Oracle objects. The prompt to create the UDF appears.
2025-12-23 12:21:48 - [INFO] Continuing with upgrade... 2025-12-23 12:21:48 - [INFO] Backing up /opt/protegrity1/logforwarder to /opt/protegrity1/logforwarder_backup_20251223122148... 2025-12-23 12:21:48 - [INFO] Backup of /opt/protegrity1/logforwarder completed Successfully... 2025-12-23 12:21:48 - [INFO] Backing up /opt/protegrity1/rpagent to /opt/protegrity1/rpagent_backup_20251223122148... 2025-12-23 12:21:48 - [INFO] Backup of /opt/protegrity1/rpagent completed Successfully... 2025-12-23 12:21:48 - [INFO] Backing up /opt/protegrity1/databaseprotector to /opt/protegrity1/databaseprotector_backup_20251223122148... 2025-12-23 12:21:49 - [INFO] Backup of /opt/protegrity1/databaseprotector completed Successfully... 2025-12-23 12:21:49 - [INFO] Backing up /etc/protegrity to /etc/protegrity_backup_20251223122148... 2025-12-23 12:21:49 - [INFO] Backup of /etc/protegrity completed Successfully... 2025-12-23 12:21:49 - [INFO] Existing Logforwarder is currently running. 2025-12-23 12:21:49 - [INFO] Existing RPAgent is currently running. 2025-12-23 12:21:49 - [INFO] Installing/Upgrading LOGFORWARDER... 2025-12-23 12:21:49 - [INFO] Executing ./LogforwarderSetup_Linux_x64_<DBP_version>.sh... Unpacking... Extracting files... Protegrity Log Forwarder installed in /opt/protegrity/logforwarder. 2025-12-23 12:21:49 - [INFO] Retaining existing Logforwarder configuration... 2025-12-23 12:21:49 - [INFO] Logforwarder configuration retained successfully. 2025-12-23 12:21:49 - [INFO] Updating configuration files in /opt/protegrity/logforwarder/data to use new installation directory. 2025-12-23 12:21:49 - [INFO] ./LogforwarderSetup_Linux_x64_<DBP_version>.sh completed successfully. 2025-12-23 12:21:49 - [INFO] Installing/Upgrading RPAGENT... 2025-12-23 12:21:49 - [INFO] Executing ./RPAgentSetup_Linux_x64_<DBP_version>.sh... Unpacking... Extracting files... Since --nocert was provided certificates are not downloaded automatically. Protegrity RPAgent installed in /opt/protegrity/rpagent. 2025-12-23 12:21:49 - [INFO] Retaining existing RPAgent configuration... 2025-12-23 12:21:49 - [INFO] RPAgent configuration retained successfully. 2025-12-23 12:21:49 - [INFO] Updating configuration files in /opt/protegrity/rpagent/data to use new installation directory. 2025-12-23 12:21:49 - [INFO] ./RPAgentSetup_Linux_x64_<DBP_version>.sh completed successfully. 2025-12-23 12:21:49 - [INFO] Installing/Upgrading DBP... 2025-12-23 12:21:49 - [INFO] Executing ./PepOracleSetup_Linux_x64_<DBP_version>.sh... ***************************************************** Welcome to the Database Protector Setup Wizard ***************************************************** This will install the oracle objects on your computer Do you want to continue? [yes or no] Enter installation directory. A new directory will be created in the installation directory. [/opt/protegrity]: Unpacking... Extracting files... oracle objects installed in /opt/protegrity/databaseprotector/oracle. 2025-12-23 12:21:49 - [INFO] Retaining existing Database Protector configuration... 2025-12-23 12:21:49 - [INFO] Database Protector configuration retained successfully. 2025-12-23 12:21:49 - [INFO] Updating configuration files in /opt/protegrity/databaseprotector/oracle/data to use new installation directory. 2025-12-23 12:21:49 - [INFO] ./PepOracleSetup_Linux_x64_<DBP_version>.sh completed successfully. 2025-12-23 12:21:49 - [INFO] Going to stop existing Logforwarder instance 2025-12-23 12:21:54 - [INFO] Existing Logforwarder successfully stopped 2025-12-23 12:21:54 - [INFO] Going to launch <DBP_version> version Logforwarder 2025-12-23 12:21:56 - [INFO] Successfully launched <DBP_version> version Logforwarder 2025-12-23 12:21:56 - [INFO] Going to stop existing RPAgent instance Stopping rpagent 2025-12-23 12:21:57 - [INFO] Existing RPAgent successfully stopped 2025-12-23 12:21:57 - [INFO] Going to launch <DBP_version> version RPAgent 2025-12-23 12:21:57 - [INFO] Successfully launched <DBP_version> version RPAgent 2025-12-23 12:21:57 - [INFO] Configuring extproc.ora 2025-12-23 12:21:57 - [INFO] Backed up existing /u01/app/oracle/product/19.0.0/dbhome_1/hs/admin/extproc.ora 2025-12-23 12:21:57 - [INFO] /opt/protegrity/databaseprotector/oracle/lib/peporacle.plm already present in /u01/app/oracle/product/19.0.0/dbhome_1/hs/admin/extproc.ora 2025-12-23 12:21:57 - [INFO] Updated extproc.ora at /u01/app/oracle/product/19.0.0/dbhome_1/hs/admin/extproc.ora 2025-12-23 12:21:57 - [INFO] No separate runtime home detected or runtime home same as ORACLE_HOME; skipping sync. Do you want to continue and create UDFs? To create the UDFs, provide the database credentials (yes/no) [no]: - To create the UDFs, type
yes. - Press ENTER.
The prompt to enter the database username appears.
Enter Oracle database username: - Enter the database username.
- Press ENTER.
The prompt to enter the database password appears.
Enter Oracle database user's password: - Enter the database password.
- Press ENTER.
The prompt to confirm the database user appears.
Was a different Oracle database user used for the previous installation's types and UDFs? (yes/no) [no]: - To continue with the existing database username, type
no. - Press ENTER.
The script drops the UDFs from the existing version and installs the UDFs from the new version. The script also performs a cleanup and completes the upgrade.
2025-12-23 12:24:20 - [INFO] Dropping existing types and UDFs 2025-12-23 12:24:20 - [INFO] Using username '' for database connection and dropping existing types and UDFs. 2025-12-23 12:24:20 - [INFO] Running SQL script: Drop existing types and UDFs (/opt/protegrity1/databaseprotector_backup_20251223122148/oracle/sqlscripts/dropobjects.sql) 2025-12-23 12:24:21 - [INFO] sqlplus output: Type dropped. Type dropped. Type dropped. Type dropped. Type dropped. Type dropped. Type dropped. Type dropped. Package body dropped. Package dropped. Library dropped. Synonym dropped. Synonym dropped. Synonym dropped. Synonym dropped. Synonym dropped. Synonym dropped. Synonym dropped. Synonym dropped. Synonym dropped. 2025-12-23 12:24:21 - [INFO] Drop existing types and UDFs executed successfully. 2025-12-23 12:24:21 - [INFO] Existing types and UDFs dropped successfully. 2025-12-23 12:24:21 - [INFO] Going to create new types and UDFs. 2025-12-23 12:24:21 - [INFO] Using username '<user_name>' for database connection and creating new types and UDFs. 2025-12-23 12:24:21 - [INFO] Running SQL script: Create new types and UDFs (/opt/protegrity/databaseprotector/oracle/sqlscripts/createobjects.sql) 2025-12-23 12:24:23 - [INFO] sqlplus output: Library created. Type created. Type created. Type created. Type created. Type created. Type created. Type created. Type created. Package created. Package body created. Grant succeeded. Grant succeeded. Synonym created. Synonym created. Grant succeeded. Grant succeeded. Grant succeeded. Grant succeeded. Grant succeeded. Grant succeeded. Grant succeeded. Grant succeeded. Grant succeeded. Grant succeeded. Grant succeeded. Grant succeeded. Grant succeeded. Grant succeeded. Grant succeeded. Grant succeeded. Synonym created. Synonym created. Synonym created. Synonym created. Synonym created. Synonym created. Synonym created. Synonym created. Synonym created. Synonym created. Synonym created. Synonym created. Synonym created. Synonym created. Synonym created. Synonym created. 2025-12-23 12:24:23 - [INFO] Create new types and UDFs executed successfully. 2025-12-23 12:24:23 - [INFO] New types and UDFs created successfully. 2025-12-23 12:24:23 - [INFO] Testing UDFs installation... 2025-12-23 12:24:24 - [INFO] Test UDFs output: <DBP_version> 2025-12-23 12:24:24 - [INFO] UDFs installation tested successfully. 2025-12-23 12:24:24 - [INFO] Removing previous installation directories. 2025-12-23 12:24:24 - [INFO] Removing previous Logforwarder directory /opt/protegrity1/logforwarder 2025-12-23 12:24:24 - [INFO] Removing previous RPAgent directory /opt/protegrity1/rpagent 2025-12-23 12:24:24 - [INFO] Removing previous DatabaseProtector directory /opt/protegrity1/databaseprotector 2025-12-23 12:24:24 - [INFO] Removing backups... 2025-12-23 12:24:24 - [INFO] Removing Logforwarder backup directory /opt/protegrity1/logforwarder_backup_20251223122148 2025-12-23 12:24:24 - [INFO] Removing RPAgent backup directory /opt/protegrity1/rpagent_backup_20251223122148 2025-12-23 12:24:24 - [INFO] Removing Database Protector backup directory /opt/protegrity1/databaseprotector_backup_20251223122148 2025-12-23 12:24:24 - [INFO] Removing User configuration backup directory /etc/protegrity_backup_20251223122148 2025-12-23 12:24:24 - [INFO] Removing extproc.ora backup file /u01/app/oracle/product/19.0.0/dbhome_1/hs/admin/extproc.ora.bak_2025-12-23_12:21:57 2025-12-23 12:24:24 - [INFO] Closing SSH master connections... 2025-12-23 12:24:24 - [INFO] Upgrade successful. 2025-12-23 12:24:24 - [INFO] All components upgraded successfully.
Upgrading the Protector using the Silent Mode
- Log in to the instance where the installation package is extracted.
- Navigate to the directory containing the installation scripts.
- To execute the upgrade script, run the following command:
./Install_OracleProtector_Linux_x64_<DBP_version>.sh --upgrade - Press ENTER.
The prompt to select the silent mode of installation appears.
2025-12-23 12:21:23 - [INFO] If silent mode is selected, the default base directory (/opt/protegrity) will be used as the location of the existing installation for each component (Logforwarder, RPAgent and DatabaseProtector). Do you want silent installation? (yes/no) [no]: - To install the components using the silent mode, type
yes. - Press ENTER.
The script retrieves the current configuration and a prompt to confirm the configuration appears.
2025-12-23 12:51:34 - [INFO] You have chosen silent mode. Therefore, /opt/protegrity is considered as base directory for new installation. 2025-12-23 12:51:34 - [INFO] This is an upgrade and you have chosen silent mode. Therefore, /opt/protegrity is considered as base directory for existing installation. 2025-12-23 12:51:34 - [INFO] Verifying previous installation directories for all components... 2025-12-23 12:51:34 - [INFO] Existing LogForwarder directory: /opt/protegrity/logforwarder 2025-12-23 12:51:34 - [INFO] Existing RPAgent directory: /opt/protegrity/rpagent 2025-12-23 12:51:34 - [INFO] Existing DatabaseProtector directory: /opt/protegrity/databaseprotector 2025-12-23 12:51:34 - [INFO] All existing component directories verified successfully. 2025-12-23 12:51:34 - [INFO] Discovering Grid Infrastructure home dynamically... 2025-12-23 12:51:34 - [INFO] No ASM instance found. This is a standalone system. 2025-12-23 12:51:34 - [INFO] No Grid home found. Treating it as a standalone Oracle. 2025-12-23 12:51:34 - [INFO] Going to configure environment for upgrade 2025-12-23 12:51:34 - [INFO] Discovered ORACLE_SID=orcl, ORACLE_HOME=/u01/app/oracle/product/19.0.0/dbhome_1 2025-12-23 12:51:34 - [INFO] Oracle environment set: 2025-12-23 12:51:34 - [INFO] ORACLE_HOME=/u01/app/oracle/product/19.0.0/dbhome_1 2025-12-23 12:51:34 - [INFO] ORACLE_SID=orcl 2025-12-23 12:51:34 - [INFO] LD_LIBRARY_PATH=/u01/app/oracle/product/19.0.0/dbhome_1/lib 2025-12-23 12:51:34 - [INFO] PATH=/usr/local/sbin:/usr/local/bin:/usr/sbin:/usr/bin:/root/bin:/u01/app/oracle/product/19.0.0/dbhome_1/bin 2025-12-23 12:51:34 - [INFO] Environment configured successfully... 2025-12-23 12:51:34 - [INFO] ************************************************************************** 2025-12-23 12:51:34 - [INFO] Upgrade will be done with following configuration: 2025-12-23 12:51:34 - [INFO] Oracle Instance ID: orcl 2025-12-23 12:51:34 - [INFO] Mode: upgrade 2025-12-23 12:51:34 - [INFO] Existing Logforwarder Installation Directory: /opt/protegrity 2025-12-23 12:51:34 - [INFO] Existing RPAgent Installation Directory: /opt/protegrity 2025-12-23 12:51:34 - [INFO] Existing DatabaseProtector Installation Directory: /opt/protegrity 2025-12-23 12:51:34 - [INFO] New Logforwarder Installation Directory: /opt/protegrity 2025-12-23 12:51:34 - [INFO] New RPAgent Installation Directory: /opt/protegrity 2025-12-23 12:51:34 - [INFO] New DatabaseProtector Installation Directory: /opt/protegrity 2025-12-23 12:51:34 - [INFO] Audit Store Endpoints: <IP_Address>:9200 <IP_Address>:9200 <IP_Address>:9200 2025-12-23 12:51:34 - [INFO] Upstream (ESA) Hostname or IP Address for RPAgent: <IP_Address> 2025-12-23 12:51:34 - [INFO] Upstream (ESA) Port for RPAgent: 25400 (Default) 2025-12-23 12:51:34 - [INFO] This is an upgrade. 2025-12-23 12:51:34 - [INFO] Previous installations will be backed up before upgrade. 2025-12-23 12:51:34 - [INFO] Existing Logforwarder and RPAgent configurations will be retained 2025-12-23 12:51:34 - [INFO] Standalone setup detected 2025-12-23 12:51:34 - [INFO] ************************************************************************** 2025-12-23 12:51:34 - [WARN] ************************************************************************** 2025-12-23 12:51:34 - [WARN] IMPORTANT: Any queries currently running may be impacted during upgrade. 2025-12-23 12:51:34 - [WARN] It is recommended to perform the upgrade during a maintenance window. 2025-12-23 12:51:34 - [WARN] ************************************************************************** 2025-12-23 12:51:34 - [INFO] Please verify the above configuration before proceeding. Do you want to continue? (yes/no) [no]: - To proceed with the configuration, type
yes. - Press ENTER.
The script upgrades the Log Forwarder, RPAgent, and the Oracle objects. The prompt to create the UDF appears.
2025-12-23 12:51:42 - [INFO] Continuing with upgrade... 2025-12-23 12:51:42 - [INFO] Backing up /opt/protegrity/logforwarder to /opt/protegrity/logforwarder_backup_20251223125142... 2025-12-23 12:51:42 - [INFO] Backup of /opt/protegrity/logforwarder completed Successfully... 2025-12-23 12:51:42 - [INFO] Backing up /opt/protegrity/rpagent to /opt/protegrity/rpagent_backup_20251223125142... 2025-12-23 12:51:42 - [INFO] Backup of /opt/protegrity/rpagent completed Successfully... 2025-12-23 12:51:42 - [INFO] Backing up /opt/protegrity/databaseprotector to /opt/protegrity/databaseprotector_backup_20251223125142... 2025-12-23 12:51:42 - [INFO] Backup of /opt/protegrity/databaseprotector completed Successfully... 2025-12-23 12:51:42 - [INFO] Backing up /etc/protegrity to /etc/protegrity_backup_20251223125142... 2025-12-23 12:51:42 - [INFO] Backup of /etc/protegrity completed Successfully... 2025-12-23 12:51:42 - [INFO] Existing Logforwarder is currently running. 2025-12-23 12:51:42 - [INFO] Existing RPAgent is currently running. 2025-12-23 12:51:42 - [INFO] Installing/Upgrading LOGFORWARDER... 2025-12-23 12:51:42 - [INFO] Executing ./LogforwarderSetup_Linux_x64_<DBP_version>.sh... Unpacking... Extracting files... Protegrity Log Forwarder installed in /opt/protegrity/logforwarder. 2025-12-23 12:51:42 - [INFO] Retaining existing Logforwarder configuration... 2025-12-23 12:51:42 - [INFO] Logforwarder configuration retained successfully. 2025-12-23 12:51:42 - [INFO] ./LogforwarderSetup_Linux_x64_<DBP_version>.sh completed successfully. 2025-12-23 12:51:42 - [INFO] Installing/Upgrading RPAGENT... 2025-12-23 12:51:42 - [INFO] Executing ./RPAgentSetup_Linux_x64_<DBP_version>.sh... Unpacking... Extracting files... Since --nocert was provided certificates are not downloaded automatically. Protegrity RPAgent installed in /opt/protegrity/rpagent. 2025-12-23 12:51:42 - [INFO] Retaining existing RPAgent configuration... 2025-12-23 12:51:42 - [INFO] RPAgent configuration retained successfully. 2025-12-23 12:51:42 - [INFO] ./RPAgentSetup_Linux_x64_<DBP_version>.sh completed successfully. 2025-12-23 12:51:42 - [INFO] Installing/Upgrading DBP... 2025-12-23 12:51:42 - [INFO] Executing ./PepOracleSetup_Linux_x64_<DBP_version>.sh... ***************************************************** Welcome to the Database Protector Setup Wizard ***************************************************** This will install the oracle objects on your computer Do you want to continue? [yes or no] Enter installation directory. A new directory will be created in the installation directory. [/opt/protegrity]: Unpacking... Extracting files... oracle objects installed in /opt/protegrity/databaseprotector/oracle. 2025-12-23 12:51:42 - [INFO] Retaining existing Database Protector configuration... 2025-12-23 12:51:42 - [INFO] Database Protector configuration retained successfully. 2025-12-23 12:51:42 - [INFO] ./PepOracleSetup_Linux_x64_<DBP_version>.sh completed successfully. 2025-12-23 12:51:42 - [INFO] Going to stop existing Logforwarder instance 2025-12-23 12:51:47 - [INFO] Existing Logforwarder successfully stopped 2025-12-23 12:51:47 - [INFO] Going to launch <DBP_version> version Logforwarder 2025-12-23 12:51:49 - [INFO] Successfully launched <DBP_version> version Logforwarder 2025-12-23 12:51:49 - [INFO] Going to stop existing RPAgent instance Stopping rpagent 2025-12-23 12:51:50 - [INFO] Existing RPAgent successfully stopped 2025-12-23 12:51:50 - [INFO] Going to launch <DBP_version> version RPAgent 2025-12-23 12:51:50 - [INFO] Successfully launched <DBP_version> version RPAgent 2025-12-23 12:51:50 - [INFO] Configuring extproc.ora 2025-12-23 12:51:50 - [INFO] Backed up existing /u01/app/oracle/product/19.0.0/dbhome_1/hs/admin/extproc.ora 2025-12-23 12:51:50 - [INFO] /opt/protegrity/databaseprotector/oracle/lib/peporacle.plm already present in /u01/app/oracle/product/19.0.0/dbhome_1/hs/admin/extproc.ora 2025-12-23 12:51:50 - [INFO] Updated extproc.ora at /u01/app/oracle/product/19.0.0/dbhome_1/hs/admin/extproc.ora 2025-12-23 12:51:50 - [INFO] No separate runtime home detected or runtime home same as ORACLE_HOME; skipping sync. Do you want to continue and create UDFs? To create the UDFs, provide the database credentials (yes/no) [no]: - To create the UDFs, type
yes. - Press ENTER.
The prompt to enter the database username appears.
Enter Oracle database username: - Enter the database username.
- Press ENTER.
The prompt to enter the database password appears.
Enter Oracle database user's password: - Enter the database user’s password.
- Press ENTER.
The prompt to confirm the database user appears.
Was a different Oracle database user used for the previous installation's types and UDFs? (yes/no) [no]: - To provide the Oracle user for the previous installation, type
yes. - Press ENTER.
The prompt to enter the database username appears.
Enter previous Oracle database username (for dropping existing types and UDFs): - Enter the database username.
- Press ENTER.
The prompt to enter the database password appears.
Enter previous Oracle database user's password: - Enter the database user’s password.
- Press ENTER.
The script drops the older versions of the UDFs, creates a backup, installs the newer version of the UDFs, and performs a cleanup operation to complete the upgrade.
2025-12-23 12:52:18 - [INFO] Dropping existing types and UDFs 2025-12-23 12:52:18 - [INFO] Using username '<user_name>' for database connection and dropping existing types and UDFs. 2025-12-23 12:52:18 - [INFO] Running SQL script: Drop existing types and UDFs (/opt/protegrity/databaseprotector_backup_20251223125142/oracle/sqlscripts/dropobjects.sql) 2025-12-23 12:52:19 - [INFO] sqlplus output: Type dropped. Type dropped. Type dropped. Type dropped. Type dropped. Type dropped. Type dropped. Type dropped. Package body dropped. Package dropped. Library dropped. Synonym dropped. Synonym dropped. Synonym dropped. Synonym dropped. Synonym dropped. Synonym dropped. Synonym dropped. Synonym dropped. Synonym dropped. 2025-12-23 12:52:19 - [INFO] Drop existing types and UDFs executed successfully. 2025-12-23 12:52:19 - [INFO] Existing types and UDFs dropped successfully. 2025-12-23 12:52:19 - [INFO] Going to create new types and UDFs. 2025-12-23 12:52:19 - [INFO] Using username '<user_name>' for database connection and creating new types and UDFs. 2025-12-23 12:52:19 - [INFO] Running SQL script: Create new types and UDFs (/opt/protegrity/databaseprotector/oracle/sqlscripts/createobjects.sql) 2025-12-23 12:52:20 - [INFO] sqlplus output: Library created. Type created. Type created. Type created. Type created. Type created. Type created. Type created. Type created. Package created. Package body created. Grant succeeded. Grant succeeded. Synonym created. Synonym created. Grant succeeded. Grant succeeded. Grant succeeded. Grant succeeded. Grant succeeded. Grant succeeded. Grant succeeded. Grant succeeded. Grant succeeded. Grant succeeded. Grant succeeded. Grant succeeded. Grant succeeded. Grant succeeded. Grant succeeded. Grant succeeded. Synonym created. Synonym created. Synonym created. Synonym created. Synonym created. Synonym created. Synonym created. Synonym created. Synonym created. Synonym created. Synonym created. Synonym created. Synonym created. Synonym created. Synonym created. Synonym created. 2025-12-23 12:52:20 - [INFO] Create new types and UDFs executed successfully. 2025-12-23 12:52:20 - [INFO] New types and UDFs created successfully. 2025-12-23 12:52:20 - [INFO] Testing UDFs installation... 2025-12-23 12:52:21 - [INFO] Test UDFs output: <DBP_version> 2025-12-23 12:52:21 - [INFO] UDFs installation tested successfully. 2025-12-23 12:52:21 - [INFO] Removing previous installation directories. 2025-12-23 12:52:21 - [INFO] Removing backups... 2025-12-23 12:52:21 - [INFO] Removing Logforwarder backup directory /opt/protegrity/logforwarder_backup_20251223125142 2025-12-23 12:52:21 - [INFO] Removing RPAgent backup directory /opt/protegrity/rpagent_backup_20251223125142 2025-12-23 12:52:21 - [INFO] Removing Database Protector backup directory /opt/protegrity/databaseprotector_backup_20251223125142 2025-12-23 12:52:21 - [INFO] Removing User configuration backup directory /etc/protegrity_backup_20251223125142 2025-12-23 12:52:21 - [INFO] Removing extproc.ora backup file /u01/app/oracle/product/19.0.0/dbhome_1/hs/admin/extproc.ora.bak_2025-12-23_12:51:50 2025-12-23 12:52:21 - [INFO] Closing SSH master connections... 2025-12-23 12:52:21 - [INFO] Upgrade successful. 2025-12-23 12:52:21 - [INFO] All components upgraded successfully.
4.1.6.2 - Creating the UDFs after Upgrade
During the upgrade process, the installer prompts whether to create the UDF or otherwise. If the no option is selected, the installer skips the UDF creation and proceeds to complete the upgrade. In such scenarios:
- The existing types and UDFs remain unchanged in the database.
- The new types and UDFs are not created.
- The previous Database Protector installation directory is retained as a backup.
- Manually intervention is required to drop the old types and UDFs and create the new UDFs.
The version of the SQL scripts to drop the Oracle Database Protector types and UDFs must be the same as the version that was used to create them. This is important because:
- The installer retains the previous Database Protector installation directory.
- The
dropobjects.sqlscript from this retained backup must be used to drop the existing database objects. - The
createobjects.sqlscript from the new installation must be used to create the new objects.
Prerequisites
- Administrator access to the Oracle database is available.
- Database credentials for:
- The user that owns the existing types and UDFs.
- The user that will create the new types and UDFs.
- Access to the retained backup directory (
<path_to_prev_installation_dir>/databaseprotector_<timestamp>–> example with timestamp) - Access to the new Database Protector installation directory is available.
Dropping the Existing UDFs
- To navigate to the directory containing the backup scripts, run the following command:
cd <path_to_prev_installation_dir>/oracle/sqlscripts/ - Press ENTER.
- To drop the existing UDFs, run the following command with the database user that owns the existing types and UDFs with the required permissions:where:
sqlplus <user_name>/<password> @dropobjects.sql<user_name>is the database user that owns the existing types and UDFs. The user must have all required privileges to drop the Oracle Database Protector objects.
Important: During upgrades, the existing types and UDFs may have been created by a different database user than the one you plan to use going forward. Ensure that the user used here owns the existing objects or has sufficient privileges.
Creating the New UDFs
- To navigate to the directory containing the scripts for the new installation, run the following command:
cd <installation_dir>/databaseprotector/oracle/sqlscripts - To create the new UDFs, run the following command with the database user that has all required permissions to create Oracle Database Protector types and UDFs:where:
sqlplus <user_name>/<password> @createobjects.sql<user_name>is the database user that owns the existing types and UDFs. The user account must comply with the requirements listed in the product documentation.
Conclusion
- The old Oracle Database Protector types and UDFs are removed.
- The new types and UDFs are created using the upgraded version.
- The upgrade process is considered complete from a database perspective.
Note: If any issues occur while dropping or creating database objects, review the SQL output and consult the product documentation. Alternatively, contact Protegrity Support.
4.1.6.3 - Upgrading the Oracle Database Protector on RAC system
The Oracle Database Protector build provides an automated script to manage the upgrade process in a multi-node environment. The master script internally calls the scripts to install and upgrade the components. The master script installs and upgrades the components in the following order:
- Log Forwarder
- RPAgent
- Policy Enforcement Point (Database Protector)
The master script is available in the directory where the installation files are extracted. It provides the following arguments:
install- installs the components in an interactive mode.upgrade- installs a newer version of the protector with minimal downtime.silent- installs the components in a non-interactive mode.install.ini- installs the components as per the parameters provided in the file.help- lists the arguments available for the script.
During the upgrade process, the master script:
- Verifies the existing configuration.
- Creates a backup of the existing configuration.
- Stops the required services.
- Drops the existing UDFs.
- Installs the new version.
- Starts the required services.
- Creates the new UDFs and retains the existing configuration.
In addition, the master script will rollback the upgrade process if any errors are encountered. The script will revert the changes and restore the previous working version of the Oracle Database Protector.
Viewing the Arguments for the Script
- Log in to the instance where the installation package is extracted.
- Navigate to the directory containing the installation scripts.
- To view the arguments, run the following command:
./Install_OracleProtector_Linux_x64_<DBP_version>.sh --help - Press ENTER.
The script lists the available arguments.
Options: --install Use this option when installing the solution for the first time on a machine/host. (i.e., there is no previous installation present) --upgrade Use this option when upgrading an existing installation on the machine/host. --install-ini <file> (Optional) Provide a path to an install.ini file for silent or pre-configured installations. This option works with --install only. It must not be used with --upgrade or --silent. You can pass this either as: --install-ini /path/to/install.ini or --install-ini=/path/to/install.ini Refer to the product documentation for details about the configuration options available in install.ini. The documentation describes all supported keys, required fields, and example configurations. --silent (Optional) Runs the installation/upgrade in silent mode with minimum interactive prompts. --help, -h Display this help message and exit.
Upgrading the Protector using the Interactive Mode
- Log in to the instance where the installation package is extracted.
- Navigate to the directory containing the installation scripts.
- To execute the upgrade script, run the following command:
./Install_OracleProtector_Linux_x64_<DBP_version>.sh --upgrade - Press ENTER.
The prompt to select the silent mode of installation appears.
2025-12-30 06:55:19 - [INFO] If silent mode is selected, the default base directory (/opt/protegrity) will be used as the location of the existing installation for each component (Logforwarder, RPAgent and DatabaseProtector). Do you want silent installation? (yes/no) [no]: - To use the interactive mode, type
no. - Press ENTER.
The prompt to enter the location of the existing installation appears.
Enter existing installation directories: Existing LogForwarder installation directory [/opt/protegrity]: - Enter the directory path where the existing version of the Log Forwarder is installed.
- Press ENTER.
The prompt to enter RPAgent installation directory appears.
Existing RPAgent installation directory [/opt/protegrity]: - Enter the directory path where the existing version of the RPAgent is installed.
- Press ENTER.
The prompt to enter the Database Protector installation directory appears.
Existing DatabaseProtector installation directory [/opt/protegrity]: - Enter the directory path where the existing version of the Database Protector is installed.
- Press ENTER.
The prompt to select a single installation directory for the components appears.
Do you want to install the new LogForwarder, RPAgent, and DatabaseProtector together in a single directory? (yes/no) [no]: - To install the new components in a single directory, type
yes. - Press ENTER.
The prompt to enter the installation directory for the new version appears.
Enter new installation directory [/opt/protegrity]: - Enter the location where the components must be installed.
- Press ENTER.
The script detects and lists the configuration and a prompt to confirm appears.
2025-12-30 06:55:48 - [INFO] Verifying previous installation directories for all components... 2025-12-30 06:55:48 - [INFO] Existing LogForwarder directory: /opt/protegrity1/logforwarder 2025-12-30 06:55:48 - [INFO] Existing RPAgent directory: /opt/protegrity1/rpagent 2025-12-30 06:55:48 - [INFO] Existing DatabaseProtector directory: /opt/protegrity1/databaseprotector 2025-12-30 06:55:48 - [INFO] All existing component directories verified successfully. 2025-12-30 06:55:48 - [INFO] Discovering Grid Infrastructure home dynamically... 2025-12-30 06:55:48 - [INFO] Discovered GRID_HOME: /u01/app/21.3.0./grid 2025-12-30 06:55:48 - [INFO] Grid home found: /u01/app/21.3.0./grid 2025-12-30 06:55:48 - [INFO] RAC setup detected 2025-12-30 06:55:48 - [INFO] Current node: <node_name> (<node_name>.localdomain.com) 2025-12-30 06:55:48 - [INFO] Other nodes: <node_name> <node_name> 2025-12-30 06:55:48 - [INFO] Checking for required tools... 2025-12-30 06:55:48 - [INFO] All required tools are available 2025-12-30 06:55:48 - [INFO] Going to configure environment for upgrade 2025-12-30 06:55:48 - [INFO] Discovered ORACLE_SID=orcl1, ORACLE_HOME=/u01/app/oracle/product/21.3.0/db_1 2025-12-30 06:55:48 - [INFO] Oracle environment set: 2025-12-30 06:55:48 - [INFO] ORACLE_HOME=/u01/app/oracle/product/21.3.0/db_1 2025-12-30 06:55:48 - [INFO] ORACLE_SID=orcl1 2025-12-30 06:55:48 - [INFO] LD_LIBRARY_PATH=/u01/app/oracle/product/21.3.0/db_1/lib 2025-12-30 06:55:48 - [INFO] PATH=/u01/app/21.3.0./grid/bin:/sbin:/bin:/usr/sbin:/usr/bin:/u01/app/oracle/product/21.3.0/db_1/bin 2025-12-30 06:55:48 - [INFO] Environment configured successfully... 2025-12-30 06:55:48 - [INFO] ************************************************************************** 2025-12-30 06:55:48 - [INFO] Upgrade will be done with following configuration: 2025-12-30 06:55:48 - [INFO] Oracle Instance ID: orcl1 2025-12-30 06:55:48 - [INFO] Mode: upgrade 2025-12-30 06:55:48 - [INFO] Existing Logforwarder Installation Directory: /opt/protegrity1 2025-12-30 06:55:48 - [INFO] Existing RPAgent Installation Directory: /opt/protegrity1 2025-12-30 06:55:48 - [INFO] Existing DatabaseProtector Installation Directory: /opt/protegrity1 2025-12-30 06:55:48 - [INFO] New Logforwarder Installation Directory: /opt/protegrity 2025-12-30 06:55:48 - [INFO] New RPAgent Installation Directory: /opt/protegrity 2025-12-30 06:55:48 - [INFO] New DatabaseProtector Installation Directory: /opt/protegrity 2025-12-30 06:55:48 - [INFO] Audit Store Endpoints: <IP_Address>:9200 <IP_Address>:9200 <IP_Address>:9200 2025-12-30 06:55:48 - [INFO] Upstream (ESA) Hostname or IP Address for RPAgent: <IP_Address> 2025-12-30 06:55:48 - [INFO] Upstream (ESA) Port for RPAgent: 25400 (Default) 2025-12-30 06:55:48 - [INFO] This is an upgrade. 2025-12-30 06:55:48 - [INFO] Previous installations will be backed up before upgrade. 2025-12-30 06:55:48 - [INFO] Existing Logforwarder and RPAgent configurations will be retained 2025-12-30 06:55:48 - [INFO] RAC setup detected with nodes: <node_name> <node_name> <node_name> 2025-12-30 06:55:48 - [INFO] ************************************************************************** 2025-12-30 06:55:48 - [WARN] ************************************************************************** 2025-12-30 06:55:48 - [WARN] IMPORTANT: Any queries currently running may be impacted during upgrade. 2025-12-30 06:55:48 - [WARN] It is recommended to perform the upgrade during a maintenance window. 2025-12-30 06:55:48 - [WARN] ************************************************************************** 2025-12-30 06:55:48 - [INFO] Please verify the above configuration before proceeding. Do you want to continue? (yes/no) [no]: - To proceed with the upgrade, type
yes. - Press ENTER.
The script creates a backup of the existing configuration, installs the Log Forwarder, RPAgent, and the Oracle objects. The prompt to select a common username for the node appears.
2025-12-30 06:55:50 - [INFO] Continuing with upgrade... 2025-12-30 06:55:50 - [INFO] Backing up /opt/protegrity1/logforwarder to /opt/protegrity1/logforwarder_backup_20251230065550... 2025-12-30 06:55:50 - [INFO] Backup of /opt/protegrity1/logforwarder completed Successfully... 2025-12-30 06:55:50 - [INFO] Backing up /opt/protegrity1/rpagent to /opt/protegrity1/rpagent_backup_20251230065550... 2025-12-30 06:55:50 - [INFO] Backup of /opt/protegrity1/rpagent completed Successfully... 2025-12-30 06:55:50 - [INFO] Backing up /opt/protegrity1/databaseprotector to /opt/protegrity1/databaseprotector_backup_20251230065550... 2025-12-30 06:55:50 - [INFO] Backup of /opt/protegrity1/databaseprotector completed Successfully... 2025-12-30 06:55:50 - [INFO] Backing up /etc/protegrity to /etc/protegrity_backup_20251230065550... 2025-12-30 06:55:50 - [INFO] Backup of /etc/protegrity completed Successfully... 2025-12-30 06:55:50 - [INFO] Existing Logforwarder is currently running. 2025-12-30 06:55:50 - [INFO] Existing RPAgent is currently running. 2025-12-30 06:55:50 - [INFO] Installing/Upgrading LOGFORWARDER... 2025-12-30 06:55:50 - [INFO] Executing ./LogforwarderSetup_Linux_x64_<DBP_version>.sh... Unpacking... Extracting files... Protegrity Log Forwarder installed in /opt/protegrity/logforwarder. 2025-12-30 06:55:51 - [INFO] Retaining existing Logforwarder configuration... 2025-12-30 06:55:51 - [INFO] Logforwarder configuration retained successfully. 2025-12-30 06:55:51 - [INFO] Updating configuration files in /opt/protegrity/logforwarder/data to use new installation directory. 2025-12-30 06:55:51 - [INFO] ./LogforwarderSetup_Linux_x64_<DBP_version>.sh completed successfully. 2025-12-30 06:55:51 - [INFO] Installing/Upgrading RPAGENT... 2025-12-30 06:55:51 - [INFO] Executing ./RPAgentSetup_Linux_x64_<DBP_version>.sh... Unpacking... Extracting files... Since --nocert was provided certificates are not downloaded automatically. Protegrity RPAgent installed in /opt/protegrity/rpagent. 2025-12-30 06:55:51 - [INFO] Retaining existing RPAgent configuration... 2025-12-30 06:55:51 - [INFO] RPAgent configuration retained successfully. 2025-12-30 06:55:51 - [INFO] Updating configuration files in /opt/protegrity/rpagent/data to use new installation directory. 2025-12-30 06:55:51 - [INFO] ./RPAgentSetup_Linux_x64_<DBP_version>.sh completed successfully. 2025-12-30 06:55:51 - [INFO] Installing/Upgrading DBP... 2025-12-30 06:55:51 - [INFO] Executing ./PepOracleSetup_Linux_x64_<DBP_version>.sh... ***************************************************** Welcome to the Database Protector Setup Wizard ***************************************************** This will install the oracle objects on your computer Do you want to continue? [yes or no] Enter installation directory. A new directory will be created in the installation directory. [/opt/protegrity]: Unpacking... Extracting files... oracle objects installed in /opt/protegrity/databaseprotector/oracle. 2025-12-30 06:55:51 - [INFO] Retaining existing Database Protector configuration... 2025-12-30 06:55:51 - [INFO] Database Protector configuration retained successfully. 2025-12-30 06:55:51 - [INFO] Updating configuration files in /opt/protegrity/databaseprotector/oracle/data to use new installation directory. 2025-12-30 06:55:51 - [INFO] ./PepOracleSetup_Linux_x64_<DBP_version>.sh completed successfully. 2025-12-30 06:55:51 - [INFO] Going to stop existing Logforwarder instance 2025-12-30 06:56:01 - [INFO] Existing Logforwarder successfully stopped 2025-12-30 06:56:01 - [INFO] Going to launch <DBP_version> version Logforwarder 2025-12-30 06:56:03 - [INFO] Successfully launched <DBP_version> version Logforwarder 2025-12-30 06:56:03 - [INFO] Going to stop existing RPAgent instance 2025-12-30 06:56:04 - [INFO] Existing RPAgent successfully stopped 2025-12-30 06:56:04 - [INFO] Going to launch <DBP_version> version RPAgent 2025-12-30 06:56:04 - [INFO] Successfully launched <DBP_version> version RPAgent 2025-12-30 06:56:04 - [INFO] Configuring extproc.ora 2025-12-30 06:56:04 - [INFO] Backed up existing /u01/app/oracle/product/21.3.0/db_1/hs/admin/extproc.ora 2025-12-30 06:56:04 - [INFO] Updated EXTPROC_DLLS in /u01/app/oracle/product/21.3.0/db_1/hs/admin/extproc.ora to only include /opt/protegrity/databaseprotector/oracle/lib/peporacle.plm 2025-12-30 06:56:04 - [INFO] Updated extproc.ora at /u01/app/oracle/product/21.3.0/db_1/hs/admin/extproc.ora 2025-12-30 06:56:04 - [INFO] Detected separate runtime home: /u01/app/oracle/homes/OraDB21Home1 2025-12-30 06:56:04 - [INFO] Runtime extproc.ora symlink already points to canonical: /u01/app/oracle/homes/OraDB21Home1/hs/admin/extproc.ora -> /u01/app/oracle/product/21.3.0/db_1/hs/admin/extproc.ora 2025-12-30 06:56:04 - [INFO] Synchronized extproc.ora in runtime home /u01/app/oracle/homes/OraDB21Home1/hs/admin 2025-12-30 06:56:04 - [INFO] Configuring RAC nodes... 2025-12-30 06:56:04 - [INFO] Performing pre-check on all RAC nodes before making changes... Do you want to enter one remote username to be used for all nodes? (yes/no) [no]: - To use the same username for all the nodes, type
yes. - Press ENTER.
The prompt to enter the username appears.
Enter remote username for all nodes (must be in sudoers): - Enter the username.
- Press ENTER.
The script establishes a connection to every node. The prompt to enter the password appears.
2025-12-30 06:56:09 - [INFO] Opening SSH connection to <node_name> for precheck... 2025-12-30 06:56:09 - [INFO] Opening SSH master connection to <node_name>... Warning: Permanently added '<node_name>,<IP_address>' (ECDSA) to the list of known hosts. <user_name>@<node_name>'s password: - Enter the password.
- Press ENTER.
The script validates the credentials. The prompt to enter the password for the next node appears.
2025-12-30 06:56:14 - [INFO] SSH master connection to <node_name> ready 2025-12-30 06:56:14 - [INFO] Checking sudo access for <node_name>... 2025-12-30 06:56:14 - [INFO] Precheck OK for <node_name> 2025-12-30 06:56:14 - [INFO] Opening SSH connection to <node_name> for precheck... 2025-12-30 06:56:14 - [INFO] Opening SSH master connection to <node_name>... Warning: Permanently added '<node_name>,<IP_address>' (ECDSA) to the list of known hosts. <user_name>@<node_name>'s password: - Enter the password.
- Press ENTER.
The script completes the configuration. The prompt to create the UDF appears.
2025-12-30 06:56:18 - [INFO] SSH master connection to <node_name> ready 2025-12-30 06:56:18 - [INFO] Checking sudo access for <node_name>... 2025-12-30 06:56:18 - [INFO] Precheck OK for <node_name> 2025-12-30 06:56:18 - [INFO] Precheck complete. Starting RAC node configuration... 2025-12-30 06:56:18 - [INFO] Stopping existing Logforwarder on <node_name> 2025-12-30 06:56:34 - [INFO] Syncing /opt/protegrity/logforwarder to <node_name>... 2025-12-30 06:56:37 - [INFO] Starting new Logforwarder on <node_name> 2025-12-30 06:56:39 - [INFO] Stopping existing RPAgent on <node_name> 2025-12-30 06:56:40 - [INFO] Syncing /opt/protegrity/rpagent to <node_name>... 2025-12-30 06:56:42 - [INFO] Starting new RPAgent on <node_name> 2025-12-30 06:56:42 - [INFO] Syncing /opt/protegrity/databaseprotector to <node_name>... 2025-12-30 06:56:43 - [INFO] Syncing /etc/protegrity to <node_name>... 2025-12-30 06:56:43 - [INFO] Updating extproc.ora on <node_name> 2025-12-30 06:56:43 - [INFO] Updating runtime extproc.ora symlink on <node_name> 2025-12-30 06:56:43 - [INFO] Node <node_name> configured successfully. 2025-12-30 06:56:43 - [INFO] Stopping existing Logforwarder on <node_name> 2025-12-30 06:56:59 - [INFO] Syncing /opt/protegrity/logforwarder to <node_name>... 2025-12-30 06:57:02 - [INFO] Starting new Logforwarder on <node_name> 2025-12-30 06:57:04 - [INFO] Stopping existing RPAgent on <node_name> 2025-12-30 06:57:06 - [INFO] Syncing /opt/protegrity/rpagent to <node_name>... 2025-12-30 06:57:07 - [INFO] Starting new RPAgent on <node_name> 2025-12-30 06:57:07 - [INFO] Syncing /opt/protegrity/databaseprotector to <node_name>... 2025-12-30 06:57:08 - [INFO] Syncing /etc/protegrity to <node_name>... 2025-12-30 06:57:08 - [INFO] Updating extproc.ora on <node_name> 2025-12-30 06:57:08 - [INFO] Updating runtime extproc.ora symlink on <node_name> 2025-12-30 06:57:08 - [INFO] Node <node_name> configured successfully. Do you want to continue and create UDFs? To create the UDFs, provide the database credentials (yes/no) [no]: - To create the UDFs, type
yes. - Press ENTER.
The prompt to enter the database username appears.
Enter Oracle database username: - Enter the username to connect to the database.
- Press ENTER.
The prompt to enter the database password appears.
Enter Oracle database user's password: - Enter the password.
- Press ENTER.
The prompt to confirm the username appears.
Was a different Oracle database user used for creation of existing UDFs? (yes/no) [no]: - To confirm whether a different user was used to create the existing UDFs, type
yes. - Press ENTER.
The prompt to enter the previous username appears.
Enter previous Oracle database username (for dropping existing UDFs): - Enter the database username that was used to create the existing UDFs.
- Press ENTER.
The prompt to enter the password for the previous username appears.
Enter previous Oracle database user's password: - Enter the password.
- Press ENTER.
The script drops the existing UDFs, creates the new UDFs, and completes the upgrade process.
2025-12-30 06:57:32 - [INFO] Dropping existing types and UDFs 2025-12-30 06:57:32 - [INFO] Using username '<user_name>' for database connection and dropping existing types and UDFs. 2025-12-30 06:57:32 - [INFO] Running SQL script: Drop existing types and UDFs (/opt/protegrity1/databaseprotector_backup_20251230065550/oracle/sqlscripts/dropobjects.sql) 2025-12-30 06:57:33 - [INFO] sqlplus output: Type dropped. Type dropped. Type dropped. Type dropped. Type dropped. Type dropped. Type dropped. Type dropped. Package body dropped. Package dropped. Library dropped. Synonym dropped. Synonym dropped. Synonym dropped. Synonym dropped. Synonym dropped. Synonym dropped. Synonym dropped. Synonym dropped. Synonym dropped. 2025-12-30 06:57:33 - [INFO] Drop existing types and UDFs executed successfully. 2025-12-30 06:57:33 - [INFO] Existing types and UDFs dropped successfully. 2025-12-30 06:57:33 - [INFO] Going to create new types and UDFs. 2025-12-30 06:57:33 - [INFO] Using username '<user_name>' for database connection and creating new types and UDFs. 2025-12-30 06:57:33 - [INFO] Running SQL script: Create new types and UDFs (/opt/protegrity/databaseprotector/oracle/sqlscripts/createobjects.sql) 2025-12-30 06:57:33 - [INFO] sqlplus output: Library created. Type created. Type created. Type created. Type created. Type created. Type created. Type created. Type created. Package created. Package body created. Grant succeeded. Grant succeeded. Synonym created. Synonym created. Grant succeeded. Grant succeeded. Grant succeeded. Grant succeeded. Grant succeeded. Grant succeeded. Grant succeeded. Grant succeeded. Grant succeeded. Grant succeeded. Grant succeeded. Grant succeeded. Grant succeeded. Grant succeeded. Grant succeeded. Grant succeeded. Synonym created. Synonym created. Synonym created. Synonym created. Synonym created. Synonym created. Synonym created. Synonym created. Synonym created. Synonym created. Synonym created. Synonym created. Synonym created. Synonym created. Synonym created. Synonym created. 2025-12-30 06:57:33 - [INFO] Create new types and UDFs executed successfully. 2025-12-30 06:57:33 - [INFO] New types and UDFs created successfully. 2025-12-30 06:57:33 - [INFO] Testing UDFs installation... 2025-12-30 06:57:34 - [INFO] Test UDFs output: <DBP_version> 2025-12-30 06:57:34 - [INFO] UDFs installation tested successfully. 2025-12-30 06:57:34 - [INFO] Removing previous installation directories. 2025-12-30 06:57:34 - [INFO] Removing previous Logforwarder directory /opt/protegrity1/logforwarder 2025-12-30 06:57:34 - [INFO] Removing previous RPAgent directory /opt/protegrity1/rpagent 2025-12-30 06:57:34 - [INFO] Removing previous DatabaseProtector directory /opt/protegrity1/databaseprotector 2025-12-30 06:57:34 - [INFO] Removing previous installation directories on <node_name>. 2025-12-30 06:57:34 - [INFO] Removing previous Logforwarder directory /opt/protegrity1/logforwarder on <node_name> 2025-12-30 06:57:34 - [INFO] Removing previous RPAgent directory /opt/protegrity1/rpagent on <node_name> 2025-12-30 06:57:34 - [INFO] Removing previous DatabaseProtector directory /opt/protegrity1/databaseprotector on <node_name> 2025-12-30 06:57:34 - [INFO] Removing previous installation directories on <node_name>. 2025-12-30 06:57:34 - [INFO] Removing previous Logforwarder directory /opt/protegrity1/logforwarder on <node_name> 2025-12-30 06:57:34 - [INFO] Removing previous RPAgent directory /opt/protegrity1/rpagent on <node_name> 2025-12-30 06:57:34 - [INFO] Removing previous DatabaseProtector directory /opt/protegrity1/databaseprotector on <node_name> 2025-12-30 06:57:34 - [INFO] Removing backups... 2025-12-30 06:57:34 - [INFO] Removing Logforwarder backup directory /opt/protegrity1/logforwarder_backup_20251230065550 2025-12-30 06:57:34 - [INFO] Removing RPAgent backup directory /opt/protegrity1/rpagent_backup_20251230065550 2025-12-30 06:57:34 - [INFO] Removing Database Protector backup directory /opt/protegrity1/databaseprotector_backup_20251230065550 2025-12-30 06:57:34 - [INFO] Removing User configuration backup directory /etc/protegrity_backup_20251230065550 2025-12-30 06:57:34 - [INFO] Removing extproc.ora backup file /u01/app/oracle/product/21.3.0/db_1/hs/admin/extproc.ora.bak_2025-12-30_06:56:04 2025-12-30 06:57:34 - [INFO] Closing SSH master connections... 2025-12-30 06:57:34 - [INFO] Connection to <node_name> closed. 2025-12-30 06:57:34 - [INFO] Connection to <node_name> closed. 2025-12-30 06:57:34 - [INFO] Upgrade successful. 2025-12-30 06:57:34 - [INFO] All components upgraded successfully.
Upgrading the Protector using the Silent Mode
- Log in to the instance where the installation package is extracted.
- Navigate to the directory containing the installation scripts.
- To execute the upgrade script, run the following command:
./Install_OracleProtector_Linux_x64_<DBP_version>.sh --upgrade - Press ENTER.
The prompt to select the silent mode of installation appears.
2025-12-30 06:55:19 - [INFO] If silent mode is selected, the default base directory (/opt/protegrity) will be used as the location of the existing installation for each component (Logforwarder, RPAgent and DatabaseProtector). Do you want silent installation? (yes/no) [no]: - To use the silent mode, type
yes. - Press ENTER.
The script detects and lists the configuration and a prompt to confirm appears.
2025-12-30 06:59:12 - [INFO] You have chosen silent mode. Therefore, /opt/protegrity is considered as base directory for new installation. 2025-12-30 06:59:12 - [INFO] This is an upgrade and you have chosen silent mode. Therefore, /opt/protegrity is considered as base directory for existing installation. 2025-12-30 06:59:12 - [INFO] Verifying previous installation directories for all components... 2025-12-30 06:59:12 - [INFO] Existing LogForwarder directory: /opt/protegrity/logforwarder 2025-12-30 06:59:12 - [INFO] Existing RPAgent directory: /opt/protegrity/rpagent 2025-12-30 06:59:12 - [INFO] Existing DatabaseProtector directory: /opt/protegrity/databaseprotector 2025-12-30 06:59:12 - [INFO] All existing component directories verified successfully. 2025-12-30 06:59:12 - [INFO] Discovering Grid Infrastructure home dynamically... 2025-12-30 06:59:12 - [INFO] Discovered GRID_HOME: /u01/app/21.3.0./grid 2025-12-30 06:59:12 - [INFO] Grid home found: /u01/app/21.3.0./grid 2025-12-30 06:59:12 - [INFO] RAC setup detected 2025-12-30 06:59:12 - [INFO] Current node: <node_name> (<node_name>.localdomain.com) 2025-12-30 06:59:12 - [INFO] Other nodes: <node_name> <node_name> 2025-12-30 06:59:12 - [INFO] Checking for required tools... 2025-12-30 06:59:12 - [INFO] All required tools are available 2025-12-30 06:59:12 - [INFO] Going to configure environment for upgrade 2025-12-30 06:59:12 - [INFO] Discovered ORACLE_SID=orcl1, ORACLE_HOME=/u01/app/oracle/product/21.3.0/db_1 2025-12-30 06:59:12 - [INFO] Oracle environment set: 2025-12-30 06:59:12 - [INFO] ORACLE_HOME=/u01/app/oracle/product/21.3.0/db_1 2025-12-30 06:59:12 - [INFO] ORACLE_SID=orcl1 2025-12-30 06:59:12 - [INFO] LD_LIBRARY_PATH=/u01/app/oracle/product/21.3.0/db_1/lib 2025-12-30 06:59:12 - [INFO] PATH=/u01/app/21.3.0./grid/bin:/sbin:/bin:/usr/sbin:/usr/bin:/u01/app/oracle/product/21.3.0/db_1/bin 2025-12-30 06:59:12 - [INFO] Environment configured successfully... 2025-12-30 06:59:12 - [INFO] ************************************************************************** 2025-12-30 06:59:12 - [INFO] Upgrade will be done with following configuration: 2025-12-30 06:59:12 - [INFO] Oracle Instance ID: orcl1 2025-12-30 06:59:12 - [INFO] Mode: upgrade 2025-12-30 06:59:12 - [INFO] Existing Logforwarder Installation Directory: /opt/protegrity 2025-12-30 06:59:12 - [INFO] Existing RPAgent Installation Directory: /opt/protegrity 2025-12-30 06:59:12 - [INFO] Existing DatabaseProtector Installation Directory: /opt/protegrity 2025-12-30 06:59:12 - [INFO] New Logforwarder Installation Directory: /opt/protegrity 2025-12-30 06:59:12 - [INFO] New RPAgent Installation Directory: /opt/protegrity 2025-12-30 06:59:12 - [INFO] New DatabaseProtector Installation Directory: /opt/protegrity 2025-12-30 06:59:12 - [INFO] Audit Store Endpoints: <IP_Address>:9200 <IP_Address>:9200 <IP_Address>:9200 2025-12-30 06:59:12 - [INFO] Upstream (ESA) Hostname or IP Address for RPAgent: <IP_Address> 2025-12-30 06:59:12 - [INFO] Upstream (ESA) Port for RPAgent: 25400 (Default) 2025-12-30 06:59:12 - [INFO] This is an upgrade. 2025-12-30 06:59:12 - [INFO] Previous installations will be backed up before upgrade. 2025-12-30 06:59:12 - [INFO] Existing Logforwarder and RPAgent configurations will be retained 2025-12-30 06:59:12 - [INFO] RAC setup detected with nodes: <node_name> <node_name> <node_name> 2025-12-30 06:59:12 - [INFO] ************************************************************************** 2025-12-30 06:59:12 - [WARN] ************************************************************************** 2025-12-30 06:59:12 - [WARN] IMPORTANT: Any queries currently running may be impacted during upgrade. 2025-12-30 06:59:12 - [WARN] It is recommended to perform the upgrade during a maintenance window. 2025-12-30 06:59:12 - [WARN] ************************************************************************** 2025-12-30 06:59:12 - [INFO] Please verify the above configuration before proceeding. Do you want to continue? (yes/no) [no]: - To proceed with the configuration, type
yes. - Press ENTER.
The script installs the components. The prompt to enter the username to access the node appears.
2025-12-30 06:59:14 - [INFO] Continuing with upgrade... 2025-12-30 06:59:14 - [INFO] Backing up /opt/protegrity/logforwarder to /opt/protegrity/logforwarder_backup_20251230065914... 2025-12-30 06:59:14 - [INFO] Backup of /opt/protegrity/logforwarder completed Successfully... 2025-12-30 06:59:14 - [INFO] Backing up /opt/protegrity/rpagent to /opt/protegrity/rpagent_backup_20251230065914... 2025-12-30 06:59:14 - [INFO] Backup of /opt/protegrity/rpagent completed Successfully... 2025-12-30 06:59:14 - [INFO] Backing up /opt/protegrity/databaseprotector to /opt/protegrity/databaseprotector_backup_20251230065914... 2025-12-30 06:59:14 - [INFO] Backup of /opt/protegrity/databaseprotector completed Successfully... 2025-12-30 06:59:14 - [INFO] Backing up /etc/protegrity to /etc/protegrity_backup_20251230065914... 2025-12-30 06:59:14 - [INFO] Backup of /etc/protegrity completed Successfully... 2025-12-30 06:59:14 - [INFO] Existing Logforwarder is currently running. 2025-12-30 06:59:14 - [INFO] Existing RPAgent is currently running. 2025-12-30 06:59:14 - [INFO] Installing/Upgrading LOGFORWARDER... 2025-12-30 06:59:14 - [INFO] Executing ./LogforwarderSetup_Linux_x64_<DBP_version>.sh... Unpacking... Extracting files... Protegrity Log Forwarder installed in /opt/protegrity/logforwarder. 2025-12-30 06:59:14 - [INFO] Retaining existing Logforwarder configuration... 2025-12-30 06:59:14 - [INFO] Logforwarder configuration retained successfully. 2025-12-30 06:59:14 - [INFO] ./LogforwarderSetup_Linux_x64_<DBP_version>.sh completed successfully. 2025-12-30 06:59:14 - [INFO] Installing/Upgrading RPAGENT... 2025-12-30 06:59:14 - [INFO] Executing ./RPAgentSetup_Linux_x64_<DBP_version>.sh... Unpacking... Extracting files... Since --nocert was provided certificates are not downloaded automatically. Protegrity RPAgent installed in /opt/protegrity/rpagent. 2025-12-30 06:59:14 - [INFO] Retaining existing RPAgent configuration... 2025-12-30 06:59:14 - [INFO] RPAgent configuration retained successfully. 2025-12-30 06:59:14 - [INFO] ./RPAgentSetup_Linux_x64_<DBP_version>.sh completed successfully. 2025-12-30 06:59:14 - [INFO] Installing/Upgrading DBP... 2025-12-30 06:59:14 - [INFO] Executing ./PepOracleSetup_Linux_x64_<DBP_version>.sh... ***************************************************** Welcome to the Database Protector Setup Wizard ***************************************************** This will install the oracle objects on your computer Do you want to continue? [yes or no] Enter installation directory. A new directory will be created in the installation directory. [/opt/protegrity]: Unpacking... Extracting files... oracle objects installed in /opt/protegrity/databaseprotector/oracle. 2025-12-30 06:59:14 - [INFO] Retaining existing Database Protector configuration... 2025-12-30 06:59:14 - [INFO] Database Protector configuration retained successfully. 2025-12-30 06:59:14 - [INFO] ./PepOracleSetup_Linux_x64_<DBP_version>.sh completed successfully. 2025-12-30 06:59:14 - [INFO] Going to stop existing Logforwarder instance 2025-12-30 06:59:30 - [INFO] Existing Logforwarder successfully stopped 2025-12-30 06:59:30 - [INFO] Going to launch <DBP_version> version Logforwarder 2025-12-30 06:59:32 - [INFO] Successfully launched <DBP_version> version Logforwarder 2025-12-30 06:59:32 - [INFO] Going to stop existing RPAgent instance 2025-12-30 06:59:33 - [INFO] Existing RPAgent successfully stopped 2025-12-30 06:59:33 - [INFO] Going to launch <DBP_version> version RPAgent 2025-12-30 06:59:33 - [INFO] Successfully launched <DBP_version> version RPAgent 2025-12-30 06:59:33 - [INFO] Configuring extproc.ora 2025-12-30 06:59:33 - [INFO] Backed up existing /u01/app/oracle/product/21.3.0/db_1/hs/admin/extproc.ora 2025-12-30 06:59:33 - [INFO] Updated EXTPROC_DLLS in /u01/app/oracle/product/21.3.0/db_1/hs/admin/extproc.ora to only include /opt/protegrity/databaseprotector/oracle/lib/peporacle.plm 2025-12-30 06:59:33 - [INFO] Updated extproc.ora at /u01/app/oracle/product/21.3.0/db_1/hs/admin/extproc.ora 2025-12-30 06:59:33 - [INFO] Detected separate runtime home: /u01/app/oracle/homes/OraDB21Home1 2025-12-30 06:59:33 - [INFO] Runtime extproc.ora symlink already points to canonical: /u01/app/oracle/homes/OraDB21Home1/hs/admin/extproc.ora -> /u01/app/oracle/product/21.3.0/db_1/hs/admin/extproc.ora 2025-12-30 06:59:33 - [INFO] Synchronized extproc.ora in runtime home /u01/app/oracle/homes/OraDB21Home1/hs/admin 2025-12-30 06:59:33 - [INFO] Configuring RAC nodes... 2025-12-30 06:59:33 - [INFO] Performing pre-check on all RAC nodes before making changes... Do you want to enter one remote username to be used for all nodes? (yes/no) [no]: - To use different usernames for each of the nodes, type
no. - Press ENTER.
The prompt to enter the username for the node appears.
Enter remote username for node <node_name> (must be in sudoers): - Enter the username.
- Press ENTER.
The script validates the username and the prompt to enter the password appears.
2025-12-30 06:59:55 - [INFO] Opening SSH connection to <node_name> for precheck... 2025-12-30 06:59:55 - [INFO] Opening SSH master connection to <node_name>... Warning: Permanently added '<node_name>,<IP_Address>' (ECDSA) to the list of known hosts. root@<node_name>'s password: - Enter the password.
- Press ENTER.
The script validates the credentials and the prompt to enter the username for the next node appears.
2025-12-30 06:59:59 - [INFO] SSH master connection to <node_name> ready 2025-12-30 06:59:59 - [INFO] Checking sudo access for <node_name>... 2025-12-30 06:59:59 - [INFO] Precheck OK for <node_name> Enter remote username for node <node_name> (must be in sudoers): - Enter the username.
- Press ENTER.
The script validates the username and the prompt to enter the password appears.
2025-12-30 07:00:01 - [INFO] Opening SSH connection to <node_name> for precheck... 2025-12-30 07:00:01 - [INFO] Opening SSH master connection to <node_name>... Warning: Permanently added '<node_name>,<IP_Address>' (ECDSA) to the list of known hosts. root@<node_name>'s password: - Enter the password.
- Press ENTER.
The script validates the credentials, performs the required actions, and the prompt to create the UDF appears.
2025-12-30 07:00:05 - [INFO] SSH master connection to <node_name> ready 2025-12-30 07:00:05 - [INFO] Checking sudo access for <node_name>... 2025-12-30 07:00:05 - [INFO] Precheck OK for <node_name> 2025-12-30 07:00:05 - [INFO] Precheck complete. Starting RAC node configuration... 2025-12-30 07:00:05 - [INFO] Stopping existing Logforwarder on <node_name> 2025-12-30 07:00:15 - [INFO] Syncing /opt/protegrity/logforwarder to <node_name>... 2025-12-30 07:00:16 - [INFO] Starting new Logforwarder on <node_name> 2025-12-30 07:00:18 - [INFO] Stopping existing RPAgent on <node_name> 2025-12-30 07:00:19 - [INFO] Syncing /opt/protegrity/rpagent to <node_name>... 2025-12-30 07:00:19 - [INFO] Starting new RPAgent on <node_name> 2025-12-30 07:00:19 - [INFO] Syncing /opt/protegrity/databaseprotector to <node_name>... 2025-12-30 07:00:20 - [INFO] Syncing /etc/protegrity to <node_name>... 2025-12-30 07:00:20 - [INFO] Updating extproc.ora on <node_name> 2025-12-30 07:00:20 - [INFO] Updating runtime extproc.ora symlink on <node_name> 2025-12-30 07:00:20 - [INFO] Node <node_name> configured successfully. 2025-12-30 07:00:20 - [INFO] Stopping existing Logforwarder on <node_name> 2025-12-30 07:00:36 - [INFO] Syncing /opt/protegrity/logforwarder to <node_name>... 2025-12-30 07:00:36 - [INFO] Starting new Logforwarder on <node_name> 2025-12-30 07:00:38 - [INFO] Stopping existing RPAgent on <node_name> 2025-12-30 07:00:39 - [INFO] Syncing /opt/protegrity/rpagent to <node_name>... 2025-12-30 07:00:39 - [INFO] Starting new RPAgent on <node_name> 2025-12-30 07:00:40 - [INFO] Syncing /opt/protegrity/databaseprotector to <node_name>... 2025-12-30 07:00:40 - [INFO] Syncing /etc/protegrity to <node_name>... 2025-12-30 07:00:40 - [INFO] Updating extproc.ora on <node_name> 2025-12-30 07:00:40 - [INFO] Updating runtime extproc.ora symlink on <node_name> 2025-12-30 07:00:40 - [INFO] Node <node_name> configured successfully. Do you want to continue and create UDFs? To create the UDFs, provide the database credentials (yes/no) [no]: - To create the UDFs, type
yes. - Press ENTER.
The prompt to enter the database username appears.
Enter Oracle database username: - Enter the username.
- Press ENTER.
The prompt to enter the database password appears.
Enter Oracle database user's password: - Enter the password.
- Press ENTER.
The prompt to confirm the username appears.
Was a different Oracle database user used for creation of existing UDFs? (yes/no) [no]: - To confirm the usage of a different user, type
yes. - Press ENTER.
The prompt to enter the previous username appears.
Enter previous Oracle database username (for dropping existing UDFs): - Enter the username.
- Press ENTER.
The prompt to enter the password for the previous username appears.
Enter previous Oracle database user's password: - Enter the password.
- Press ENTER.
The script drops the existing UDFs, upgrades the protector, and completes the upgrade process.
2025-12-30 07:00:59 - [INFO] Dropping existing types and UDFs 2025-12-30 07:00:59 - [INFO] Using username '<user_name>' for database connection and dropping existing types and UDFs. 2025-12-30 07:00:59 - [INFO] Running SQL script: Drop existing types and UDFs (/opt/protegrity/databaseprotector_backup_20251230065914/oracle/sqlscripts/dropobjects.sql) 2025-12-30 07:01:00 - [INFO] sqlplus output: Type dropped. Type dropped. Type dropped. Type dropped. Type dropped. Type dropped. Type dropped. Type dropped. Package body dropped. Package dropped. Library dropped. Synonym dropped. Synonym dropped. Synonym dropped. Synonym dropped. Synonym dropped. Synonym dropped. Synonym dropped. Synonym dropped. Synonym dropped. 2025-12-30 07:01:00 - [INFO] Drop existing types and UDFs executed successfully. 2025-12-30 07:01:00 - [INFO] Existing types and UDFs dropped successfully. 2025-12-30 07:01:00 - [INFO] Going to create new types and UDFs. 2025-12-30 07:01:00 - [INFO] Using username '<user_name>' for database connection and creating new types and UDFs. 2025-12-30 07:01:00 - [INFO] Running SQL script: Create new types and UDFs (/opt/protegrity/databaseprotector/oracle/sqlscripts/createobjects.sql) 2025-12-30 07:01:01 - [INFO] sqlplus output: Library created. Type created. Type created. Type created. Type created. Type created. Type created. Type created. Type created. Package created. Package body created. Grant succeeded. Grant succeeded. Synonym created. Synonym created. Grant succeeded. Grant succeeded. Grant succeeded. Grant succeeded. Grant succeeded. Grant succeeded. Grant succeeded. Grant succeeded. Grant succeeded. Grant succeeded. Grant succeeded. Grant succeeded. Grant succeeded. Grant succeeded. Grant succeeded. Grant succeeded. Synonym created. Synonym created. Synonym created. Synonym created. Synonym created. Synonym created. Synonym created. Synonym created. Synonym created. Synonym created. Synonym created. Synonym created. Synonym created. Synonym created. Synonym created. Synonym created. 2025-12-30 07:01:01 - [INFO] Create new types and UDFs executed successfully. 2025-12-30 07:01:01 - [INFO] New types and UDFs created successfully. 2025-12-30 07:01:01 - [INFO] Testing UDFs installation... 2025-12-30 07:01:01 - [INFO] Test UDFs output: <DBP_version> 2025-12-30 07:01:01 - [INFO] UDFs installation tested successfully. 2025-12-30 07:01:01 - [INFO] Removing previous installation directories. 2025-12-30 07:01:01 - [INFO] Removing previous installation directories on <node_name>. 2025-12-30 07:01:01 - [INFO] Removing previous installation directories on <node_name>. 2025-12-30 07:01:01 - [INFO] Removing backups... 2025-12-30 07:01:01 - [INFO] Removing Logforwarder backup directory /opt/protegrity/logforwarder_backup_20251230065914 2025-12-30 07:01:01 - [INFO] Removing RPAgent backup directory /opt/protegrity/rpagent_backup_20251230065914 2025-12-30 07:01:01 - [INFO] Removing Database Protector backup directory /opt/protegrity/databaseprotector_backup_20251230065914 2025-12-30 07:01:01 - [INFO] Removing User configuration backup directory /etc/protegrity_backup_20251230065914 2025-12-30 07:01:01 - [INFO] Removing extproc.ora backup file /u01/app/oracle/product/21.3.0/db_1/hs/admin/extproc.ora.bak_2025-12-30_06:59:33 2025-12-30 07:01:01 - [INFO] Closing SSH master connections... 2025-12-30 07:01:01 - [INFO] Connection to <node_name> closed. 2025-12-30 07:01:01 - [INFO] Connection to <node_name> closed. 2025-12-30 07:01:01 - [INFO] Upgrade successful. 2025-12-30 07:01:01 - [INFO] All components upgraded successfully.
4.1.7 - Uninstalling the Oracle Database Protector
The process to uninstall the Oracle Database Protector involves the following steps:
4.1.7.1 - Dropping User Defined Functions
Dropping the User Defined Functions
- Log in to the Oracle Database server using the same account used to create the UDFs.
- Navigate to the
/opt/protegrity/databaseprotector/oracle/sqlscripts/directory. - Run the following command using the database user with requirerd permission:
sqlplus <user_name>/<password> @dropobjects.sql
4.1.7.2 - Uninstalling the RPAgent
Uninstalling the RPAgent
Before uninstalling the RPAgent, Protegrity recommends creating a backup.
- Log in to the Oracle Database server.
- Navigate to the
/opt/protegrity/rpagent/bindirectory. - To stop the RPAgent, run the following command:
rpagentctrl stop - Delete the
rpagentdirectory.
4.1.7.3 - Uninstalling the Log Forwarder
Uninstalling the Log Forwarder
Before uninstalling the Log Forwarder, Protegrity recommends creating a backup.
- Log in to the Oracle Database server.
- Navigate to the
/opt/protegrity/logforwarder/bindirectory. - To stop the RPAgent, run the following command:
logforwarderctrl stop - Delete the
logforwarderdirectory.
4.2 - User Defined Functions and APIs
4.2.1 - Oracle User Defined Functions and APIs
4.2.1.1 - General UDFs
This section includes the general UDFs that can be used to retrieve the Oracle Protector version and the current user.
pty.whoami
The UDF returns the name of the user who is currently logged in to the database.
Signature:
pty.whoami()
Parameters:
None
Returns:
This UDF returns the name of the user as the VARCHAR2 string.
Exception:
None
Example:
select pty.whoami() ”Test of WhoAmI” from dual;
Test of WhoAmI
---
USER1
pty.getversion
This UDF returns the version of the protector.
Signature:
pty.getversion()
Parameters:
None
Returns:
This UDF returns the version of the protector as the VARCHAR2 string.
Example:
select pty.getversion() ”Test of GetVersion” from dual;
Test of GetVersion
---
x.x.x.x
4.2.1.2 - Access Check Procedures
The procedures listed here check whether the user is granted access permissions to the data element. The procedures will pass if the user has access. Otherwise, it casts an exception with the reason for failure.
The permissions for protect, unprotect, and reprotect are defined based on the roles assigned to the user. For more information about how to grant these permissions and assign roles, refer to Policy Management.
pty.ins_check
This procedure determines if the user has insert(protect) access to the data element.
Signature:
pty.ins_check(dataelement VARCHAR)
Parameters:
| Name | Type | Description |
|---|---|---|
dataelement | VARCHAR | Specifies the name of the data element. |
Returns:
The procedure returns the value as Success, if the user can insert data.
Example:
declare
begin
dbms_output.put_line('Test of INSERT check procedure');
dbms_output.put_line('------------------------------');
pty.ins_check('DE_AES256');
end;
pty.sel_check
The procedure determines whether the user has select(unprotect) access to a data element.
Signature:
pty.sel_check(dataelement VARCHAR)
Parameters:
| Name | Type | Description |
|---|---|---|
dataelement | VARCHAR | Specifies the name of the data element. |
Returns:
The procedure returns the value as success, if the user has access.
Example:
declare
begin
dbms_output.put_line('Test of SELECT check procedure');
dbms_output.put_line('------------------------------');
pty.sel_check('DE_AES256');
end;
pty.upd_check
This procedure determines if the user has update(reprotect) access to the data element.
Signature:
pty.upd_check(dataelement VARCHAR)
Parameters:
| Name | Type | Description |
|---|---|---|
dataelement | VARCHAR | Specifies the name of the data element. |
Returns:
The procedure returns the value as Success, if the user has update permissions.
Example:
declare
begin
dbms_output.put_line('Test of UPDATE check procedure');
dbms_output.put_line('------------------------------');
pty.upd_check('DE_AES256');
end;
4.2.1.3 - Insert Encryption UDFs
These UDFs encrypt the data.
Note: The permissions for protect, unprotect, and reprotect are defined based on the roles assigned to the user. For more information about how to grant these permissions and assign roles, refer to Policy Management.
pty.ins_encrypt
This UDF encrypts data with a data element for encryption.
Signature:
pty.ins_encrypt (dataelement CHAR, inval CHAR, scid BINARY_INTEGER)
Parameters:
| Name | Type | Description |
|---|---|---|
dataelement | CHAR | Specifies the name of the data element. |
inval | CHAR | Specifies the input data. |
scid | BINARY_INTEGER | Specifies the security co-ordinate ID. Set the value of the parameter to zero. Note: This parameter is no longer used and is retained for compatibility purposes only. |
Returns:
This UDF returns the encrypted value as RAW data.
Exception:
If the user does not have protect access rights in the policy, then the UDF terminates with an error message explaining what went wrong.
Example:
select pty.ins_encrypt('DE_AES256', 'Original data', 0) "Test of INSERT encrypt func" from dual;
pty.ins_encrypt_char
This UDF encrypts the CHAR data with a data element for encryption.
Signature:
pty.ins_encrypt_char (dataelement CHAR, inval CHAR, scid BINARY_INTEGER)
Parameters:
| Name | Type | Description |
|---|---|---|
dataelement | CHAR | Specifies the name of the data element. |
inval | CHAR | Specifies the input data. |
scid | BINARY_INTEGER | Specifies the security co-ordinate ID. Set the value of the parameter to zero. Note: This parameter is no longer used and is retained for compatibility purposes only. |
Returns:
This UDF returns the encrypted value as RAW data.
Exception:
If the user does not have protect access rights in the policy, then the UDF terminates with an error message explaining what went wrong.
Example:
select pty.ins_encrypt_char('DE_AES256', 'Original data', 0) "Test of INSERT enc CHAR func" from dual;
pty.ins_encrypt_varchar2
This UDF encrypts the VARCHAR2 data with a data element for encryption.
Note:
- Maximum length supported is 3992 bytes.
- In Oracle,
LONG RAWsupports up to 2000 bytes in SQL expression and ~32 KB in PL/SQL. For data larger than 2000 bytes, execute the UDF within a PL/SQL block.
Signature:
pty.ins_encrypt_varchar2(dataelement CHAR, inval VARCHAR2, scid1 BINARY_INTEGER)
Parameters:
| Name | Type | Description |
|---|---|---|
dataelement | CHAR | Specifies the name of the data element. |
inval | VARCHAR2 | Specifies the input data. |
scid | BINARY_INTEGER | Specifies the security co-ordinate ID. Set the value of the parameter to zero. Note: This parameter is no longer used and is retained for compatibility purposes only. |
Returns:
This UDF returns the encrypted values as the LONG RAW data.
Exception:
If the user does not have protect access rights in the policy, then the UDF terminates with an error message explaining what went wrong.
Example:
select pty.ins_encrypt_varchar2('DE_AES256', 'Original data', 0) "Test INSERT enc VARCHAR2 func" from dual;
pty.ins_encrypt_date
This UDF encrypts the DATE data with a data element for encryption.
Note: To protect the Oracle input data type
DATE, use the UDFs as described in Oracle Input Data Type to UDF Mapping to identify the appropriate UDF as per requirements.
Signature:
pty.ins_encrypt_date(dataelement CHAR, inval DATE, scid BINARY_INTEGER)
Parameters:
| Name | Type | Description |
|---|---|---|
dataelement | CHAR | Specifies the name of the data element. |
inval | DATE | Specifies the input data. |
scid | BINARY_INTEGER | Specifies the security co-ordinate ID. Set the value of the parameter to zero. Note: This parameter is no longer used and is retained for compatibility purposes only. |
Returns:
This UDF returns the encrypted values as the RAW data.
Exception:
If the user does not have protect access rights in the policy, then the UDF terminates with an error message explaining what went wrong.
Example:
select pty.ins_encrypt_date('DE_AES256', '23-OCT-14', 0) "Test of INSERT enc DATE func" from dual;
pty.ins_encrypt_integer
This UDF encrypts the INTEGER data with a data element for encryption.
Signature:
pty.ins_encrypt_integer (dataelement CHAR, inval INTEGER, scid BINARY_INTEGER)
Parameters:
| Name | Type | Description |
|---|---|---|
dataelement | CHAR | Specifies the name of the data element. |
inval | INTEGER | Specifies the input data. |
scid | BINARY_INTEGER | Specifies the security co-ordinate ID. Set the value of the parameter to zero. Note: This parameter is no longer used and is retained for compatibility purposes only. |
Returns:
This UDF returns the encrypted values as the RAW data.
Exception:
If the user does not have protect access rights in the policy, then the UDF terminates with an error message explaining what went wrong.
Example:
select PTY.ins_encrypt_integer('DE_AES256', 12345, 0) "Test of INSERT enc INT func" from dual;
pty.ins_encrypt_real
This UDF encrypts the REAL data with a data element for encryption.
Signature:
pty.ins_encrypt_real (dataelement CHAR, inval REAL, scid BINARY_INTEGER)
Parameters:
| Name | Type | Description |
|---|---|---|
dataelement | CHAR | Specifies the name of the data element. |
inval | REAL | Specifies the input data. |
scid | BINARY_INTEGER | Specifies the security co-ordinate ID. Set the value of the parameter to zero. Note: This parameter is no longer used and is retained for compatibility purposes only. |
Returns:
This UDF returns the encrypted values as the RAW data.
Exception:
If the user does not have protect access rights in the policy, then the UDF terminates with an error message explaining what went wrong.
Example:
select pty.ins_encrypt_real('DE_AES256', 1234.1234, 0) "Test of INSERT enc REAL func" from dual;
pty.ins_encrypt_float
This UDF encrypts the FLOAT data with a data element for encryption.
Signature:
pty.ins_encrypt_float (dataelement CHAR, inval FLOAT, scid BINARY_INTEGER)
Parameters:
| Name | Type | Description |
|---|---|---|
dataelement | CHAR | Specifies the name of the data element. |
inval | FLOAT | Specifies the input data. |
scid | BINARY_INTEGER | Specifies the security co-ordinate ID. Set the value of the parameter to zero. Note: This parameter is no longer used and is retained for compatibility purposes only. |
Returns:
This UDF returns the encrypted values as the RAW data.
Exception:
If the user does not have protect access rights in the policy, then the UDF terminates with an error message explaining what went wrong.
Example:
select PTY.ins_encrypt_float('DE_AES256', 1234.1234, 0) "Test of INSERT enc FLOAT func" from dual;
pty.ins_encrypt_number
This UDF encrypts the NUMBER data with a data element for encryption.
Signature:
pty.ins_encrypt_number (dataelement CHAR, inval NUMBER, scid BINARY_INTEGER)
Parameters:
| Name | Type | Description |
|---|---|---|
dataelement | CHAR | Specifies the name of the data element. |
inval | NUMBER | Specifies the input data. |
scid | BINARY_INTEGER | Specifies the security co-ordinate ID. Set the value of the parameter to zero. Note: This parameter is no longer used and is retained for compatibility purposes only. |
Returns:
This UDF returns the encrypted values as the RAW data.
Exception:
If the user does not have protect access rights in the policy, then the UDF terminates with an error message explaining what went wrong.
Example:
select PTY.ins_encrypt_number('DE_AES256', 12345, 0) "Test of INSERT enc NUMBER func" from dual;
pty.ins_encrypt_raw
This UDF encrypts the RAW data, which is variable length binary data of maximum size 2000 bytes, with a data element for encryption.
Signature:
pty.ins_encrypt_raw(dataelement CHAR, inval RAW, scid BINARY_INTEGER)
Parameters:
| Name | Type | Description |
|---|---|---|
dataelement | CHAR | Specifies the name of the data element. |
inval | RAW | Specifies the input data. |
scid | BINARY_INTEGER | Specifies the security co-ordinate ID. Set the value of the parameter to zero. Note: This parameter is no longer used and is retained for compatibility purposes only. |
Returns:
This UDF returns the encrypted values as the RAW data.
Exception:
If the user does not have protect access rights in the policy, then the UDF terminates with an error message explaining what went wrong.
Example:
select PTY.ins_encrypt_raw('DE_AES256', 'FFDD12345', 0) "Test of INSERT enc RAW func" from dual;
4.2.1.4 - Insert No-Encryption, Token, and FPE UDFs
These UDFs are used with Tokenization, Format Preserving Encryption (FPE) and, No Encryption data elements.
pty.ins_char
This UDF protects the CHAR data with tokenization and No Encryption data elements.
Note: This UDF supports masking.
Signature:
pty.ins_char (dataelement CHAR, inval CHAR, scid BINARY_INTEGER)
Parameters:
| Name | Type | Description |
|---|---|---|
dataelement | CHAR | Specifies the name of the data element. |
inval | CHAR | Specifies the input data. |
scid | BINARY_INTEGER | Specifies the security co-ordinate ID. Set the value of the parameter to zero. Note: This parameter is no longer used and is retained for compatibility purposes only. |
Returns:
This UDF returns the protected value as the CHAR data type.
Exception:
If the user does not have protect access rights in the policy, then the UDF terminates with an error message explaining what went wrong.
Example:
select PTY.ins_char('DE_CHAR', 'Original data', 0) "Test of INSERT CHAR func" from dual;
pty.ins_varchar2
This UDF protects the VARCHAR data with tokenization and No Encryption data elements.
Note: This UDF supports masking.
CAUTION: For Date type of data elements, the
pty.ins_varchar2UDF returns an invalid date format error if the input value falls between the non-existent date range from 05-OCT-1582 to 14-OCT-1582 of the Gregorian Calendar. For more information about the tokenization and de-tokenization of the cutover dates of the Proleptic Gregorian Calendar, refer to the section Date Tokenization for cutover Dates of the Proleptic Gregorian Calendar in Protection Methods Reference.
Signature:
pty.ins_varchar2 (dataelement CHAR, inval VARCHAR2, scid BINARY_INTEGER)
Parameters:
| Name | Type | Description |
|---|---|---|
dataelement | CHAR | Specifies the name of the data element. |
inval | VARCHAR2 | Specifies the input data. |
scid | BINARY_INTEGER | Specifies the security co-ordinate ID. Set the value of the parameter to zero. Note: This parameter is no longer used and is retained for compatibility purposes only. |
Returns:
This UDF returns the protected value as the VARCHAR2 data type.
Exception:
If the user does not have protect access rights in the policy, then the UDF terminates with an error message explaining what went wrong.
Example:
select PTY.ins_varchar2('DE_VARCHAR2', 'Original data', 0) "Test of INSERT VARCHAR2 func" from dual;
pty.ins_unicodenvarchar2
This UDF encrypts data with a data element.
Note: This UDF does not support masking.
Signature:
pty.ins_unicodenvarchar2 (dataelement CHAR, inval CHAR, scid BINARY_INTEGER)
Parameters:
| Name | Type | Description |
|---|---|---|
dataelement | CHAR | Specifies the name of the data element. |
inval | CHAR | Specifies the input data. |
scid | BINARY_INTEGER | Specifies the security co-ordinate ID. Set the value of the parameter to zero. Note: This parameter is no longer used and is retained for compatibility purposes only. |
Returns:
This UDF returns the protected value as the NVARCHAR2 datatype.
Exception:
If the user does not have protect access rights in the policy, then the UDF terminates with an error message that explains what went wrong.
>Note: Ensure to use the supported data element only. Using an unsupported data element might result in successful protection without returning any error, but corruption of data can occur.
Example:
select pty.ins_unicodenvarchar2('fpe_unicode', 'Original data', 0) "Test of INSERT encrypt func" from dual;
pty.ins_unicodevarchar2_tok
This UDF protects the VARCHAR2 data with a Unicode Gen2 data element.
Note: This UDF does not support masking.
Signature:
pty.ins_unicodevarchar2_tok(dataelement IN CHAR, inval IN VARCHAR2, SCID IN BINARY_INTEGER)
Parameters:
| Name | Type | Description |
|---|---|---|
dataelement | CHAR | Specifies the name of the data element. |
inval | VARCHAR2 | Specifies the input data. |
scid | BINARY_INTEGER | Specifies the security co-ordinate ID. Set the value of the parameter to zero. Note: This parameter is no longer used and is retained for compatibility purposes only. |
Returns:
This UDF returns the protected value as the VARCHAR2 datatype.
Exception:
If the user does not have protect access rights in the policy, then the UDF terminates with an error message that explains what went wrong.
>Note: Ensure to use the supported data element only. Using an unsupported data element might result in successful protection without returning any error, but corruption of data can occur.
Example for Unicode Gen2:
```
select pty.ins_unicodevarchar2_tok('TE_UG2_UTF16LE_LL1AN_SLT13_L2R0_ASTYES',N'xyzÀÁÂÃÄÅÆÇÈÉÊ',0) from dual;
```
```
select pty.ins_unicodevarchar2_tok('TE_UG2_SLTX1_L2R2_N_IPA_Greek_Coptic_UTF16LE',N'ϠϡϢϣϥϦ',0) from dual;
```
pty.ins_unicodenvarchar2_tok
This UDF protects the NVARCHAR2 data with a Unicode Gen2 data element.
Note: This UDF does not support masking.
Signature:
pty.ins_unicodenvarchar2_tok(dataelement IN CHAR, inval IN NVARCHAR2, SCID IN BINARY_INTEGER)
Parameters:
| Name | Type | Description |
|---|---|---|
dataelement | CHAR | Specifies the name of the data element. |
inval | NVARCHAR2 | Specifies the input data. |
scid | BINARY_INTEGER | Specifies the security co-ordinate ID. Set the value of the parameter to zero. Note: This parameter is no longer used and is retained for compatibility purposes only. |
Returns:
This UDF returns the protected value as the NVARCHAR2 data type.
Exception:
If the user does not have protect access rights in the policy, then the UDF terminates with an error message that explains what went wrong.
>Note: Ensure to use the supported data element only. Using an unsupported data element might result in successful protection without returning any error, but corruption of data can occur.
Example for Unicode Gen2:select pty.ins_unicodenvarchar2_tok('TE_UG2_UTF16LE_LL1AN_SLT13_L2R0_ASTYES',N'xyzÀÁÂÃÄÅÆÇÈÉÊ',0) from dual;
```
select pty.ins_unicodenvarchar2_tok('TE_UG2_SLTX1_L2R2_N_IPA_Greek_Coptic_UTF16LE',N'ϠϡϢϣϥϦ',0) from dual;
```
pty.ins_date
This UDF protects the DATE data with a tokenization and No Encryption data element.
Signature:
pty.ins_date (dataelement CHAR, inval DATE, scid BINARY_INTEGER)
Parameters:
| Name | Type | Description |
|---|---|---|
dataelement | CHAR | Specifies the name of the data element. |
inval | DATE | Specifies the input data. |
scid | BINARY_INTEGER | Specifies the security co-ordinate ID. Set the value of the parameter to zero. Note: This parameter is no longer used and is retained for compatibility purposes only. |
Returns:
- This UDF returns the unprotected DATE value, when No Encryption data element is used.
- This UDF returns the protected DATE value, when a tokenization data element is used and if the data element date format and the
NLS_DATE_FORMATenvironment variable for an Oracle session is the same as mentioned in the note above.
Exception:
- No Encryption Date Element: If the user does not have protect access rights in the policy, then the UDF terminates with an error message explaining what went wrong.
- Tokenization Date Element: Tokenization fails and the UDF terminates with an error message explaining what went wrong.
Example for No Encryption:
select PTY.ins_date('DE_NoEnc', '10-23-2014', 0) "Test of INSERT DATE func" from dual;
Example for Tokenization:
select PTY.ins_date('DE_DATE', '10-23-2014', 0) "Test of INSERT DATE func" from dual;
pty.ins_integer
This UDF protects the INTEGER data with a tokenization and No Encryption data element.
Signature:
pty.ins_integer(dataelement CHAR, inval INTEGER, scid BINARY_INTEGER)
Parameters:
| Name | Type | Description |
|---|---|---|
dataelement | CHAR | Specifies the name of the data element. |
inval | INTEGER | Specifies the input data. |
scid | BINARY_INTEGER | Specifies the security co-ordinate ID. Set the value of the parameter to zero. Note: This parameter is no longer used and is retained for compatibility purposes only. |
Returns:
This UDF returns the protected value as the INTEGER datatype.
Exception:
If the user does not have protect access rights in the policy, then the UDF terminates with an error message explaining what went wrong.
Example:
select PTY.ins_integer('DE_Integer', 12345, 0) "Test of INSERT INT func" from dual;
pty.ins_real
This UDF protects the REAL data with a No Encryption data element.
Note: Data corruption occurs when the input length exceeds 10 decimal digits in the
REALdatatype.
Signature:
pty.ins_real(dataelement CHAR, inval REAL, scid BINARY_INTEGER)
Parameters:
| Name | Type | Description |
|---|---|---|
dataelement | CHAR | Specifies the name of the data element. |
inval | REAL | Specifies the input data. |
scid | BINARY_INTEGER | Specifies the security co-ordinate ID. Set the value of the parameter to zero. Note: This parameter is no longer used and is retained for compatibility purposes only. |
Returns:
This UDF returns the unprotected value as the REAL datatype.
Exception:
If the user does not have protect access rights in the policy, then the UDF terminates with an error message explaining what went wrong.
>Note: Ensure to use the supported data element only. If an unsupported data element is passed, then the UDF returns the following error:character to number conversion error
Example:
select PTY.ins_real('DE_NoEnc', 1234.1234, 0) "Test of INSERT REAL func" from dual;
pty.ins_float
This UDF protects the FLOAT data with a No Encryption data element.
Signature:
pty.ins_float (dataelement CHAR, inval FLOAT, scid BINARY_INTEGER)
Parameters:
| Name | Type | Description |
|---|---|---|
dataelement | CHAR | Specifies the name of the data element. |
inval | FLOAT | Specifies the input data. |
scid | BINARY_INTEGER | Specifies the security co-ordinate ID. Set the value of the parameter to zero. Note: This parameter is no longer used and is retained for compatibility purposes only. |
Returns:
This UDF returns the unprotected value as the FLOAT datatype.
Exception:
If the user does not have protect access rights in the policy, then the UDF terminates with an error message explaining what went wrong.
>Note: Ensure to use the supported data element only. If an unsupported data element is passed, then the UDF returns the following error:character to number conversion error
Example:
select PTY.ins_float('DE_NoEnc', 1234.1234, 0) "Test of INSERT FLOAT func" from dual;
pty.ins_number
This UDF protects the NUMBER data with tokenization and No Encryption data elements.
Note: Data corruption occurs when the input length exceeds 10 decimal digits in the
NUMBERdatatype.
Signature:
pty.ins_number (dataelement CHAR, inval NUMBER, scid BINARY_INTEGER)
Parameters:
| Name | Type | Description |
|---|---|---|
dataelement | CHAR | Specifies the name of the data element. |
inval | NUMBER | Specifies the input data. |
scid | BINARY_INTEGER | Specifies the security co-ordinate ID. Set the value of the parameter to zero. Note: This parameter is no longer used and is retained for compatibility purposes only. |
Returns:
This UDF returns the unprotected value as the NUMBER datatype.
Exception:
If the user does not have protect access rights in the policy, then the UDF terminates with an error message explaining what went wrong.
>Note: Ensure to use the supported data element only. If an unsupported data element is passed, then the UDF returns the following error:character to number conversion error
Example:
select PTY.ins_number('DE_Integer', 12345, 0) "Test of INSERT NUMBER func" from dual;
pty.ins_raw
This UDF protects the RAW data with a No Encryption data element.
Signature:
pty.ins_raw (dataelement CHAR, inval RAW, scid BINARY_INTEGER\)
Parameters:
| Name | Type | Description |
|---|---|---|
dataelement | CHAR | Specifies the name of the data element. |
inval | RAW | Specifies the input data. |
scid | BINARY_INTEGER | Specifies the security co-ordinate ID. Set the value of the parameter to zero. Note: This parameter is no longer used and is retained for compatibility purposes only. |
Returns:
This UDF returns the unprotected value as RAW data.
Exception:
If the user does not have protect access rights in the policy, then the UDF terminates with an error message explaining what went wrong.
>Note: Ensure to use the supported data element only. If an unsupported data element is passed, then the UDF returns the following error:character to number conversion error
Example:
select PTY.ins_raw('DE_NoEnc', 'FFDD12345', 0) "Test of INSERT RAW func" from dual;
4.2.1.5 - Multiple Insert Encryption Procedures
These procedures encrypt one to four values of data with one procedure call. The user must be granted Protect access for the data element that will be used to execute these procedures. You can use the ins_check procedure to check whether the user has Protect access.
Note: These UDFs are marked for deprecation and will be removed from the future releases. Protegrity recommends to use the standard Insert or Protect UDFs.
pty.encInsert
This procedure encrypts one value of VARCHAR2 data with one data element for encryption.
Signature:
pty.encInsert(dataelement VARCHAR2, cdata VARCHAR2, rdata RAW, scid BINARY_INTEGER)
Parameters:
| Name | Type | Description |
|---|---|---|
dataelement | VARCHAR2 | Specifies the name of the data element. |
cdata | VARCHAR2 | Specifies the input data |
rdata | RAW | Specifies the encrypted output data |
scid | BINARY_INTEGER | Specifies the security co-ordinate ID. Set the value of the parameter to zero. Note: This parameter is no longer used and is retained for compatibility purposes only. |
Returns:
This procedure returns the encrypted value as RAW data.
Exception:
If you configure an exception in the policy and the user does not have Protect access rights in the policy, then the procedure terminates with an error message explaining what went wrong.
Example:
declare
raw_out raw(2000);
begin
dbms_output.put_line('Test of INSERT multi encryption procedure for 1
COLUMN');
dbms_output.put_line('----------------------------------------------');
pty.encInsert('DE_AES256', 'ASFGFGghg5577fFFyu', raw_out, 0);
DBMS_OUTPUT.PUT_LINE('Encrypted data: ' || raw_out);
end;
pty.ins_encryptx2
This procedure encrypts two values of VARCHAR2 data with two data elements for encryption.
Signature:
pty.ins_encryptx2 (dataelement1 VARCHAR2, cdata1 VARCHAR2, rdata1 RAW, scid1 BINARY_INTEGER, dataelement2 VARCHAR2, cdata2 VARCHAR2, rdata2 RAW, scid2 BINARY_INTEGER)
Parameters:
| Name | Type | Description |
|---|---|---|
dataelement1 | VARCHAR2 | Speicifies the name of the data element. |
cdata1 | VARCHAR2 | Specifies the input data. |
rdata1 | RAW | Specifies the encrypted output data. |
scid1 | BINARY_INTEGER | Specifies the security co-ordinate ID. Set the value of the parameter to zero. Note: This parameter is no longer used and is retained for compatibility purposes only. |
dataelement2 | VARCHAR2 | Speicifies the name of the data element. |
cdata2 | VARCHAR2 | Specifies the input data. |
rdata2 | RAW | Specifies the encrypted output data. |
scid2 | BINARY_INTEGER | Specifies the security co-ordinate ID. Set the value of the parameter to zero. Note: This parameter is no longer used and is retained for compatibility purposes only. |
Returns:
This procedure returns the encrypted values as RAW data.
Exception:
If you configure an exception in the policy and the user does not have Protect access rights in the policy, then the procedure terminates with an error message explaining what went wrong.
Example:
Encrypted values are the output parameters
declare
raw_out1 raw(2000);
raw_out2 raw(2000);
begin
dbms_output.put_line('Test of INSERT multi encryption procedure for 2
COLUMNS');
dbms_output.put_line('---------------------------------------------');
pty.ins_encryptx2('DE_AES256', 'ASFGFGghg5577fFFyu', raw_out1, 0,
'DE_AES256', 'IyutGGg76hg8h1', raw_out2, 0);
DBMS_OUTPUT.PUT_LINE('Encrypted data1: ' || raw_out1);
DBMS_OUTPUT.PUT_LINE('Encrypted data2: ' || raw_out2);
end;
pty.ins_encryptx3
This procedure encrypts three values of VARCHAR2 data with three data elements for encryption.
Signature:
pty.ins_encryptx3(dataelement1 VARCHAR2, cdata1 VARCHAR2, rdata1 RAW, scid1 BINARY_INTEGER, dataelement2 VARCHAR2, cdata2 VARCHAR2, rdata2 RAW, scid2 BINARY_INTEGER, dataelement3 VARCHAR2, cdata3 VARCHAR2, rdata3 RAW, scid3 BINARY_INTEGER)
Parameters:
| Name | Type | Description |
|---|---|---|
dataelement1 | VARCHAR2 | Specifies the name of the data element. |
cdata1 | VARCHAR2 | Specifies the input data |
rdata1 | RAW | Specifies the encrypted output data |
scid1 | BINARY_INTEGER | Specifies the security co-ordinate ID. Set the value of the parameter to zero. Note: This parameter is no longer used and is retained for compatibility purposes only. |
dataelement2 | VARCHAR2 | Specifies the name of the data element. |
cdata2 | VARCHAR2 | Specifies the input data |
rdata2 | RAW | Specifies the encrypted output data |
scid2 | BINARY_INTEGER | Specifies the security co-ordinate ID. Set the value of the parameter to zero. Note: This parameter is no longer used and is retained for compatibility purposes only. |
dataelement3 | VARCHAR3 | Specifies the name of the data element. |
cdata3 | VARCHAR3 | Specifies the input data |
rdata3 | RAW | Specifies the encrypted output data |
scid3 | BINARY_INTEGER | Specifies the security co-ordinate ID. Set the value of the parameter to zero. Note: This parameter is no longer used and is retained for compatibility purposes only. |
Returns:
This procedure returns the encrypted values as RAW data.
Exception:
If you configure an exception in the policy and the user does not have Protect access rights in the policy, then the procedure terminates with an error message explaining what went wrong.
Example:
declare
raw_out1 raw(2000);
raw_out2 raw(2000);
raw_out3 raw(2000);
begin
dbms_output.put_line('Test of INSERT multi encryption procedure for 3
COLUMNS');
dbms_output.put_line('---------------------------------------------');
pty.ins_encryptx3('DE_AES256', 'ASFGFGghg5577fFFyu', raw_out1, 0,
'DE_AES256', 'IyutGGg76hg8h1', raw_out2, 0, 'DE_AES256', 'AAaazzZZ1199',
raw_out3, 0);
DBMS_OUTPUT.PUT_LINE('Encrypted data1: ' || raw_out1);
DBMS_OUTPUT.PUT_LINE('Encrypted data2: ' || raw_out2);
DBMS_OUTPUT.PUT_LINE('Encrypted data3: ' || raw_out3);
end;
pty.ins_encryptx4
This procedure encrypts four values of VARCHAR2 data with four data elements for encryption.
Signature:
pty.ins_encryptx4(dataelement1 VARCHAR2, cdata1 VARCHAR2, rdata1 RAW, scid1 BINARY_INTEGER, dataelement2 VARCHAR2, cdata2 VARCHAR2, rdata2 RAW, scid2 BINARY_INTEGER, dataelement3 VARCHAR2, cdata3 VARCHAR2, rdata3 RAW, scid3 BINARY_INTEGER, dataelement4 VARCHAR2, cdata4 VARCHAR2, rdata4 RAW, scid4 BINARY_INTEGER)
Parameters:
| Name | Type | Description |
|---|---|---|
dataelement1 | VARCHAR2 | Specifies the name of the data element. |
cdata1 | VARCHAR2 | Specifies the input data |
rdata1 | RAW | Specifies the encrypted output data |
scid1 | BINARY_INTEGER | Specifies the security co-ordinate ID. Set the value of the parameter to zero. Note: This parameter is no longer used and is retained for compatibility purposes only. |
dataelement2 | VARCHAR2 | Specifies the name of the data element. |
cdata2 | VARCHAR2 | Specifies the input data |
rdata2 | RAW | Specifies the encrypted output data |
scid2 | BINARY_INTEGER | Specifies the security co-ordinate ID. Set the value of the parameter to zero. Note: This parameter is no longer used and is retained for compatibility purposes only. |
dataelement3 | VARCHAR3 | Specifies the name of the data element. |
cdata3 | VARCHAR3 | Specifies the input data |
rdata3 | RAW | Specifies the encrypted output data |
scid3 | BINARY_INTEGER | Specifies the security co-ordinate ID. Set the value of the parameter to zero. Note: This parameter is no longer used and is retained for compatibility purposes only. |
dataelement4 | VARCHAR2 | Specifies the name of the data element. |
cdata4 | VARCHAR2 | Specifies the input data. |
rdata4 | RAW | Specifies the encrypted output data. |
scid4 | BINARY_INTEGER | Specifies the security co-ordinate ID. Set the value of the parameter to zero. Note: This parameter is no longer used and is retained for compatibility purposes only. |
Returns:
This procedure returns the encrypted value as RAW data.
Exception:
If you configure an exception in the policy and the user does not have Protect access rights in the policy, then the procedure terminates with an error message explaining what went wrong.
Example:
declare
raw_out1 raw(2000);
raw_out2 raw(2000);
raw_out3 raw(2000);
raw_out4 raw(2000);
begin
dbms_output.put_line('Test of INSERT multi encryption procedure for 4
COLUMNS');
dbms_output.put_line('---------------------------------------------');
pty.ins_encryptx4('DE_AES256', 'ASFGFGghg5577fFFyu', raw_out1, 0,
'DE_AES256', 'IyutGGg76hg8h1', raw_out2, 0, 'DE_AES256', 'AAaazzZZ1199',
raw_out3, 0, 'DE_AES256', 'fhgdADGHSJddeg', raw_out4, 0);
DBMS_OUTPUT.PUT_LINE('Encrypted data1: ' || raw_out1);
DBMS_OUTPUT.PUT_LINE('Encrypted data2: ' || raw_out2);
DBMS_OUTPUT.PUT_LINE('Encrypted data3: ' || raw_out3);
DBMS_OUTPUT.PUT_LINE('Encrypted data3: ' || raw_out4);
end;
4.2.1.6 - Select Decryption UDFs
The UDFs in this section decrypt the encrypted data. Unprotect access is required to use these procedures.
pty.sel_decrypt
This UDF decrypts the RAW data with an encryption data element.
Signature:
pty.sel_decrypt(dataelement CHAR, inval RAW, scid BINARY_INTEGER)
Parameters:
| Name | Type | Description |
|---|---|---|
dataelement | CHAR | Specifies the name of the data element. |
inval | RAW | Specifies the input data. |
scid | BINARY_INTEGER | Specifies the security co-ordinate ID. Set the value of the parameter to zero. Note: This parameter is no longer used and is retained for compatibility purposes only. |
Returns:
- This UDF returns the unprotected value as the CHAR2 datatype.
- This UDF returns the unprotected value as the NULL, when the user has no access to data in the policy.
Exception:
If configured in policy and user does not have access, then the UDF terminates with an error message explaining what went wrong.
Example:
select PTY.sel_decrypt('DE_AES256', PTY.ins_encrypt('DE_AES256', 'Original data', 0),0) "Test of SELECT dec func" from dual;
pty.sel_decrypt_char
This UDF decrypts the CHAR data with an encryption data element.
Signature:
pty.sel_decrypt_char(dataelement CHAR, inval RAW, scid BINARY_INTEGER)
Parameters:
| Name | Type | Description |
|---|---|---|
dataelement | CHAR | Specifies the name of the data element. |
inval | RAW | Specifies the input data. |
scid | BINARY_INTEGER | Specifies the security co-ordinate ID. Set the value of the parameter to zero. Note: This parameter is no longer used and is retained for compatibility purposes only. |
Returns:
- This UDF returns the unprotected value as the CHAR2 datatype.
- This UDF returns the unprotected value as the NULL, when the user has no access to data in the policy.
Exception:
If configured in policy and user does not have access, then the UDF terminates with an error message explaining what went wrong.
Example:
select PTY.sel_decrypt_char('AES256', PTY.ins_encrypt_char('AES256', 'Original data', 0),0) "Test of SELECT dec CHAR func" from dual;
pty.sel_decrypt_varchar2
This UDF decrypts the VARCHAR2 data with an encryption data element.
Signature:
pty.sel_decrypt_varchar2(dataelement CHAR, inval LONG RAW, scid BINARY_INTEGER)
Parameters:
| Name | Type | Description |
|---|---|---|
dataelement | CHAR | Specifies the name of the data element. |
inval | LONG RAW | Specifies the input data. |
scid | BINARY_INTEGER | Specifies the security co-ordinate ID. Set the value of the parameter to zero. Note: This parameter is no longer used and is retained for compatibility purposes only. |
Returns:
- This UDF returns the unprotected value as the VARCHAR2 datatype.
- This UDF returns the unprotected value as the NULL, when the user has no access to data in the policy.
Exception:
If configured in policy and user does not have access, then the UDF terminates with an error message explaining what went wrong.
Example:
select PTY.sel_decrypt_varchar2('AES256', PTY.ins_encrypt_varchar2('AES256','Original data', 0),0) "Test of SELECT dec VARCHAR2 func" from dual;
pty.sel_decrypt_date
This UDF decrypts the DATE data with an encryption data element.
Signature:
pty.sel_decrypt_date(dataelement CHAR, inval RAW, scid BINARY_INTEGER)
Parameters:
| Name | Type | Description |
|---|---|---|
dataelement | CHAR | Specifies the name of the data element. |
inval | RAW | Specifies the input data. |
scid | BINARY_INTEGER | Specifies the security co-ordinate ID. Set the value of the parameter to zero. Note: This parameter is no longer used and is retained for compatibility purposes only. |
Returns:
- This UDF returns the unprotected value as the DATE datatype.
- This UDF returns the unprotected value as the NULL, when the user has no access to data in the policy.
Exception:
If configured in policy and user does not have access, then the UDF terminates with an error message explaining what went wrong.
Example:
select PTY.sel_decrypt_date('DE_AES256', PTY.ins_encrypt_date('DE_AES256', '23-OCT-14', 0),0) "Test of SELECT dec DATE func" from dual;
pty.sel_decrypt_integer
This UDF decrypts the INTEGER data with an encryption data element.
Signature:
pty.sel_decrypt_integer(dataelement CHAR, inval RAW, scid BINARY_INTEGER)
Parameters:
| Name | Type | Description |
|---|---|---|
dataelement | CHAR | Specifies the name of the data element. |
inval | RAW | Specifies the input data. |
scid | BINARY_INTEGER | Specifies the security co-ordinate ID. Set the value of the parameter to zero. Note: This parameter is no longer used and is retained for compatibility purposes only. |
Returns:
- This UDF returns the unprotected value as the INTEGER datatype.
- This UDF returns the unprotected value as the NULL, when the user has no access to data in the policy.
Exception:
If configured in policy and user does not have access, then the UDF terminates with an error message explaining what went wrong.
Example:
select PTY.sel_decrypt_integer('DE_AES256', PTY.ins_encrypt_integer('DE_AES256', 12345, 0),0) "Test of SELECT dec INT func" from dual;
pty.sel_decrypt_real
This UDF decrypts the REAL data with an encryption data element.
Signature:
pty.sel_decrypt_real(dataelement CHAR, inval RAW, scid BINARY_INTEGER)
Parameters:
| Name | Type | Description |
|---|---|---|
dataelement | CHAR | Specifies the name of the data element. |
inval | RAW | Specifies the input data. |
scid | BINARY_INTEGER | Specifies the security co-ordinate ID. Set the value of the parameter to zero. Note: This parameter is no longer used and is retained for compatibility purposes only. |
Returns:
- This UDF returns the unprotected value as the REAL datatype.
- This UDF returns the unprotected value as the NULL, when the user has no access to data in the policy.
Exception:
If configured in policy and user does not have access, then the UDF terminates with an error message explaining what went wrong.
Example:
select PTY.sel_decrypt_real('AES256', PTY.ins_encrypt_real('AES256',1234.1234,0),0) “Test of SELECT dec REAL func” from dual;
pty.sel_decrypt_float
This UDF decrypts the FLOAT data with an encryption data element.
Signature:
pty.sel_decrypt_float(dataelement CHAR, inval RAW, scid BINARY_INTEGER)
Parameters:
| Name | Type | Description |
|---|---|---|
dataelement | CHAR | Specifies the name of the data element. |
inval | RAW | Specifies the input data. |
scid | BINARY_INTEGER | Specifies the security co-ordinate ID. Set the value of the parameter to zero. Note: This parameter is no longer used and is retained for compatibility purposes only. |
Returns:
- This UDF returns the unprotected value as the FLOAT datatype.
- This UDF returns the unprotected value as the NULL, when the user has no access to data in the policy.
Exception:
If configured in policy and user does not have access, then the UDF terminates with an error message explaining what went wrong.
Example:
select PTY.sel_decrypt_float('DE_AES256', PTY.ins_encrypt_float('DE_AES256', 1234.1234, 0),0) "Test of SELECT dec FLOAT func" from dual;
pty.sel_decrypt_number
This UDF decrypts the NUMBER data with an encryption data element.
Signature:
pty.sel_decrypt_number(dataelement CHAR, inval RAW, scid BINARY_INTEGER)
Parameters:
| Name | Type | Description |
|---|---|---|
dataelement | CHAR | Specifies the name of the data element. |
inval | RAW | Specifies the input data. |
scid | BINARY_INTEGER | Specifies the security co-ordinate ID. Set the value of the parameter to zero. Note: This parameter is no longer used and is retained for compatibility purposes only. |
Returns:
- This UDF returns the unprotected value as the NUMBER datatype.
- This UDF returns the unprotected value as the NULL, when the user has no access to data in the policy.
Exception:
If configured in policy and user does not have access, then the UDF terminates with an error message explaining what went wrong.
Example:
select PTY.sel_decrypt_number('DE_AES256', PTY.ins_encrypt_number('DE_AES256', 12345, 0),0) "Test of SELECT dec NUMBER func" from dual;
pty.sel_decrypt_raw
This UDF decrypts the RAW data with an encryption data element.
Signature:
pty.sel_decrypt_raw(dataelement CHAR, inval RAW, scid BINARY_INTEGER)
Parameters:
| Name | Type | Description |
|---|---|---|
dataelement | CHAR | Specifies the name of the data element. |
inval | RAW | Specifies the input data. |
scid | BINARY_INTEGER | Specifies the security co-ordinate ID. Set the value of the parameter to zero. Note: This parameter is no longer used and is retained for compatibility purposes only. |
Returns:
- This UDF returns the unprotected value as the RAW data.
- This UDF returns the unprotected value as the NULL, when the user has no access to data in the policy.
Exception:
If configured in policy and user does not have access, then the UDF terminates with an error message explaining what went wrong.
Example:
select PTY.sel_decrypt_raw('AES256', PTY.ins_encrypt_raw('AES256', 'FFDD12345', 0),0) "Test of SELECT dec RAW func" from dual;
4.2.1.7 - Select No-Encryption, Token, and FPE UDFs
These UDFs unprotect the protected data. Unprotect access is required to use these UDFs.
pty.sel_char
This UDF unprotects the CHAR data with tokenization and No Encryption data elements.
Note: This UDF supports masking.
Signature:
pty.sel_char(dataelement CHAR, inval CHAR, scid BINARY_INTEGER)
Parameters:
| Name | Type | Description |
|---|---|---|
dataelement | CHAR | Specifies the name of the data element. |
inval | CHAR | Specifies the input data. |
scid | BINARY_INTEGER | Specifies the security co-ordinate ID. Set the value of the parameter to zero. Note: This parameter is no longer used and is retained for compatibility purposes only. |
Returns:
- This UDF returns the unprotected value as the CHAR datatype.
- This UDF returns the protected value, if this option is configured in the policy and user does not have access to data.
- This UDF returns the unprotected value as NULL, when the user has no access to data in the policy.
- This UDF returns the unprotected value as NULL, when the user is not specified in the policy.
Exception:
If configured in policy and user does not have unprotect access rights, then the UDF terminates with an error message explaining what went wrong.
Example:
select PTY.sel_char('DE_DTP2_AES256_AN', PTY.ins_char('DE_DTP2_AES256_AN', 'Original data', 0),0) "Test of SELECT CHAR func" from dual;
pty.sel_varchar2
This UDF unprotects the VARCHAR2 data with tokenization and No Encryption data elements.
Note: This UDF supports masking.
Signature:
pty.sel_varchar2(dataelement CHAR, inval VARCHAR2, scid BINARY_INTEGER)
Parameters:
| Name | Type | Description |
|---|---|---|
dataelement | CHAR | Specifies the name of the data element. |
inval | VARCHAR2 | Specifies the input data. |
scid | BINARY_INTEGER | Specifies the security co-ordinate ID. Set the value of the parameter to zero. Note: This parameter is no longer used and is retained for compatibility purposes only. |
Returns:
- This UDF returns the unprotected value as the VARCHAR2 datatype.
- This UDF returns the protected value, if this option is configured in the policy and user does not have access to data.
- This UDF returns the unprotected value as NULL, when the user has no access to data in the policy.
- This UDF returns the unprotected value as NULL, when the user is not specified in the policy.
Exception:
If configured in policy and user does not have unprotect access rights, then the UDF terminates with an error message explaining what went wrong.
Example:
select PTY.sel_varchar2('DE_DTP2_AES256_AN', PTY.ins_varchar2('DE_DTP2_AES256_AN', 'Original data', 0),0) "Test of SELECT VARCHAR2 func" from dual;
pty.sel_unicodenvarchar2
This UDF unprotects the protected NVARCHAR data.
Note: This UDF does not support masking.
Signature:
pty.sel_unicodenvarchar2(dataelement CHAR, inval NVARCHAR2, scid BINARY_INTEGER)
Parameters:
| Name | Type | Description |
|---|---|---|
dataelement | CHAR | Specifies the name of the data element. |
inval | NVARCHAR2 | Specifies the input data. |
scid | BINARY_INTEGER | Specifies the security co-ordinate ID. Set the value of the parameter to zero. Note: This parameter is no longer used and is retained for compatibility purposes only. |
Returns:
- This UDF returns the unprotected value as the NVARCHAR2 datatype.
- This UDF returns the protected value, if this option is configured in the policy and user does not have access to data.
- This UDF returns the unprotected value as NULL, when the user has no access to data in the policy.
- This UDF returns the unprotected value as NULL, when the user is not specified in the policy.
Exception:
If configured in policy and user does not have unprotect access rights, then the UDF terminates with an error message explaining what went wrong.
>Note: Ensure to use the supported data element only. Using an unsupported data element might result in successful unprotection without returning any error, but corruption of data can occur.
Example:
select pty.sel_unicodenvarchar2('fpe_unicode', PTY.ins_unicodenvarchar2('fpe_unicode', 'Original data', 0),0) "Test of SELECT NVARCHAR2 func" from dual;
pty.sel_unicodevarchar2_tok
This UDF unprotects the VARCHAR2 data protected by a Unicode Base64 and Unicode Gen2 data element.
Note: This UDF does not support masking.
Signature:
pty.sel_unicodevarchar2_tok(dataelement IN CHAR, inval IN VARCHAR2, SCID IN BINARY_INTEGER)
Parameters:
| Name | Type | Description |
|---|---|---|
dataelement | CHAR | Specifies the name of the data element. |
inval | VARCHAR2 | Specifies the input data. |
scid | BINARY_INTEGER | Specifies the security co-ordinate ID. Set the value of the parameter to zero. Note: This parameter is no longer used and is retained for compatibility purposes only. |
Returns:
This UDF returns the unprotected value as VARCHAR2.
Exception:
If configured in policy and user does not have unprotect access rights, then the UDF terminates with an error message explaining what went wrong.
>Note: Ensure to use the supported data element only. Using an unsupported data element might result in successful unprotection without returning any error, but corruption of data can occur.
Example for Unicode Base64:
select pty.sel_unicodevarchar2_tok('TE_UNICODE_BASE64_SLT13_ASTYES', pty.ins_unicodevarchar2_tok('TE_UNICODE_BASE64_SLT13_ASTYES', 'Protegrity123',0),0) from dual;
Example for Unicode Gen2:select pty.sel_unicodevarchar2_tok('TE_UG2_UTF16LE_LL1AN_SLT13_L2R0_ASTYES',pty.ins_unicodevarchar2_tok('TE_UG2_UTF16LE_LL1AN_SLT13_L2R0_ASTYES',N'xyzÀÁÂÃÄÅÆÇÈÉÊ',0),0) from dual;
select pty.sel_unicodevarchar2_tok('TE_UG2_SLTX1_L2R2_N_IPA_Greek_Coptic_UTF16LE',pty.ins_unicodevarchar2_tok('TE_UG2_SLTX1_L2R2_N_IPA_Greek_Coptic_UTF16LE',N'ϠϡϢϣϥϦ',0),0) from dual;
pty.sel_unicodenvarchar2_tok
This UDF unprotects the NVARCHAR2 data protected by a Unicode Gen2 data element.
Note: This UDF does not support masking.
Signature:
pty.sel_unicodenvarchar2_tok(dataelement IN CHAR, inval IN NVARCHAR2, SCID IN BINARY_INTEGER)
Parameters:
| Name | Type | Description |
|---|---|---|
dataelement | CHAR | Specifies the name of the data element. |
inval | NVARCHAR2 | Specifies the input data. |
scid | BINARY_INTEGER | Specifies the security co-ordinate ID. Set the value of the parameter to zero. Note: This parameter is no longer used and is retained for compatibility purposes only. |
Returns:
This UDF returns the unprotected value as NVARCHAR2.
Exception:
If configured in policy and user does not have unprotect access rights, then the UDF terminates with an error message explaining what went wrong.
>Note: Ensure to use the supported data element only. Using an unsupported data element might result in successful unprotection without returning any error, but corruption of data can occur.
Example for Unicode Gen2:select pty.sel_unicodenvarchar2_tok('TE_UG2_UTF16LE_LL1AN_SLT13_L2R0_ASTYES',pty.ins_unicodenvarchar2_tok('TE_UG2_UTF16LE_LL1AN_SLT13_L2R0_ASTYES',N'xyzÀÁÂÃÄÅÆÇÈÉÊ',0),0) from dual;
```
select
pty.sel_unicodenvarchar2_tok('TE_UG2_SLTX1_L2R2_N_IPA_Greek_Coptic_UTF16LE',pty.ins_unicodenvarchar2_tok('TE_UG2_SLTX1_L2R2_N_IPA_Greek_Coptic_UTF16LE',N'ϠϡϢϣϥϦ',0),0) from dual;
```
pty.sel_date
This UDF unprotects the DATE data with a No Encryption data element.
Signature:
pty.sel_date(dataelement CHAR, inval DATE, scid BINARY_INTEGER)
Parameters:
| Name | Type | Description |
|---|---|---|
dataelement | CHAR | Specifies the name of the data element. |
inval | DATE | Specifies the input data. |
scid | BINARY_INTEGER | Specifies the security co-ordinate ID. Set the value of the parameter to zero. Note: This parameter is no longer used and is retained for compatibility purposes only. |
Returns:
- This UDF returns the unprotected value as the DATE datatype.
- This UDF returns the unprotected value as NULL, when the user has no access to data in the policy.
- This UDF returns the unprotected value as NULL, when the user is not specified in the policy.
Exception:
If configured in policy and user does not have unprotect access rights, then the UDF terminates with an error message explaining what went wrong.
Example:
select PTY.sel_date('DE_NoEnc', PTY.ins_date('DE_NoEnc', '23-OCT-14', 0),0) "Test of SELECT DATE func" from dual;
pty.sel_integer
This UDF unprotects the INTEGER data with tokenization and No Encryption data elements.
Signature:
pty.sel_integer(dataelement CHAR, inval INTEGER, scid BINARY_INTEGER)
Parameters:
| Name | Type | Description |
|---|---|---|
dataelement | CHAR | Specifies the name of the data element. |
inval | INTEGER | Specifies the input data. |
scid | BINARY_INTEGER | Specifies the security co-ordinate ID. Set the value of the parameter to zero. Note: This parameter is no longer used and is retained for compatibility purposes only. |
Returns:
- This UDF returns the unprotected value as the INTEGER datatype.
- This UDF returns the protected value, if this option is configured in the policy and user does not have access to data.
- This UDF returns the unprotected value as NULL, when the user has no access to data in the policy.
- This UDF returns the unprotected value as NULL, when the user is not specified in the policy.
Exception:
If configured in policy and user does not have unprotect access rights, then the UDF terminates with an error message explaining what went wrong.
Example:
select PTY.sel_integer('Integer4',PTY.ins_integer('integer',12344567,0),0) “Test of SELECT INT func” from dual;
pty.sel_real
This UDF unprotects the REAL data with a No Encryption data element.
Signature:
pty.sel_real(dataelement CHAR, inval REAL, scid BINARY_INTEGER)
Parameters:
| Name | Type | Description |
|---|---|---|
dataelement | CHAR | Specifies the name of the data element. |
inval | REAL | Specifies the input data. |
scid | BINARY_INTEGER | Specifies the security co-ordinate ID. Set the value of the parameter to zero. Note: This parameter is no longer used and is retained for compatibility purposes only. |
Returns:
- This UDF returns the unprotected value as the REAL datatype.
- This UDF returns the unprotected value as NULL, when the user has no access to data in the policy.
- This UDF returns the unprotected value as NULL, when the user is not specified in the policy.
Exception:
If configured in policy and user does not have unprotect access rights, then the UDF terminates with an error message explaining what went wrong.
>Note: Ensure to use the supported data element only. If an unsupported data element is passed, the following error is returned: character to number conversion error.
Example:
select PTY.sel_real('DE_NoEnc', PTY.ins_real('DE_NoEnc', 1234.1234, 0),0) "Test of SELECT REAL func" from dual;
pty.sel_float
This UDF unprotects the FLOAT data with a No Encryption data element.
Signature:
pty.sel_float(dataelement CHAR, inval FLOAT, scid BINARY_INTEGER)
Parameters:
| Name | Type | Description |
|---|---|---|
dataelement | CHAR | Specifies the name of the data element. |
inval | FLOAT | Specifies the input data. |
scid | BINARY_INTEGER | Specifies the security co-ordinate ID. Set the value of the parameter to zero. Note: This parameter is no longer used and is retained for compatibility purposes only. |
Returns:
- This UDF returns the unprotected value as the FLOAT datatype.
- This UDF returns the unprotected value as NULL, when the user has no access to data in the policy.
- This UDF returns the unprotected value as NULL, when the user is not specified in the policy.
Exception:
If configured in policy and user does not have unprotect access rights, then the UDF terminates with an error message explaining what went wrong.
>Note: Ensure to use the supported data element only. If an unsupported data element is passed, the following error is returned: character to number conversion error.
Example:
select PTY.sel_float('DE_NoEnc', PTY.ins_float('DE_NoEnc', 1234.1234, 0),0) "Test of SELECT FLOAT func" from dual;
pty.sel_number
This UDF unprotects the NUMBER data with tokenization and No Encryption data elements.
Signature:
pty.sel_number(dataelement CHAR, inval NUMBER, scid BINARY_INTEGER)
Parameters:
| Name | Type | Description |
|---|---|---|
dataelement | CHAR | Specifies the name of the data element. |
inval | NUMBER | Specifies the input data. |
scid | BINARY_INTEGER | Specifies the security co-ordinate ID. Set the value of the parameter to zero. Note: This parameter is no longer used and is retained for compatibility purposes only. |
Returns:
- This UDF returns the unprotected value as the NUMBER datatype.
- This UDF returns the protected value, if this option is configured in the policy and user does not have access to data.
- This UDF returns the unprotected value as NULL, when the user has no access to data in the policy.
- This UDF returns the unprotected value as NULL, when the user is not specified in the policy.
Exception:
If configured in policy and user does not have unprotect access rights, then the UDF terminates with an error message explaining what went wrong.
>Note: Ensure to use the supported data element only. If an unsupported data element is passed, the following error is returned: character to number conversion error.
Example:
select PTY.sel_number('DE_Integer', PTY.ins_number('DE_Integer', 123455667, 0),0) "Test of SELECT NUMBER func" from dual;
pty.sel_raw
This UDF unprotects the RAW data with a No Encryption data element.
Signature:
pty.sel_raw(dataelement CHAR, inval RAW, scid BINARY_INTEGER)
Parameters:
| Name | Type | Description |
|---|---|---|
dataelement | CHAR | Specifies the name of the data element. |
inval | RAW | Specifies the input data. |
scid | BINARY_INTEGER | Specifies the security co-ordinate ID. Set the value of the parameter to zero. Note: This parameter is no longer used and is retained for compatibility purposes only. |
Returns:
- This UDF returns the unprotected value as the RAW data.
- This UDF returns the unprotected value as NULL, when the user has no access to data in the policy.
- This UDF returns the unprotected value as NULL, when the user is not specified in the policy.
Exception:
If configured in policy and user does not have unprotect access rights, then the UDF terminates with an error message explaining what went wrong.
>Note: Ensure to use the supported data element only. If an unsupported data element is passed, the following error is returned: character to number conversion error.
Example:
select PTY.sel_raw('DE_NoEnc', PTY.ins_raw('DE_NoEnc', 'FFDD12345', 0),0) "Test of SELECT RAW func" from dual;
4.2.1.8 - Update Encryption UDFs
These UDFs update the data. Protect access is required to use these functions.
Note: These UDFs are marked for deprecation and will be removed from the future releases. Protegrity recommends to use the standard Insert or Protect UDFs.
pty.encUpdate
This procedure updates and encrypts one value of the VARCHAR2 data with one data element for encryption.
Signature:
pty.encUpdate(dataelement VARCHAR2, cdata VARCHAR2, rdata RAW, scid INTEGER)
Parameters:
| Name | Type | Description |
|---|---|---|
dataelement | VARCHAR2 | Specifies the name of the data element. |
cdata | VARCHAR2 | Specifies the input data. |
rdata | RAW | Specifies the encrypted output data. |
scid | INTEGER | Specifies the security co-ordinate ID. Set the value of the parameter to zero. Note: This parameter is no longer used and is retained for compatibility purposes only. |
Returns:
This UDF returns the encrypted value as RAW data.
Exception:
If the user does not have reprotect access rights in the policy, then the procedure terminates with an error message explaining what went wrong.
Example:
declare
raw_out raw(2000);
begin
dbms_output.put_line('Test of UPDATE multi encryption procedure for 1
COLUMN');
dbms_output.put_line('------------------------------------------------
------');
pty.encUpdate('DE_AES256', 'ASFGFGghg5577fFFyu', raw_out, 0);
DBMS_OUTPUT.PUT_LINE('Encrypted data: ' || raw_out);
end;
pty.upd_encrypt_char
This UDF re-encrypts the CHAR protected data that has been updated, with a data element for encryption.
Signature:
pty.upd_encrypt_char(dataelement CHAR, inval CHAR, scid INTEGER)
Parameters:
| Name | Type | Description |
|---|---|---|
dataelement | CHAR | Specifies the name of the data element. |
inval | CHAR | Specifies the input data. |
scid | INTEGER | Specifies the security co-ordinate ID. Set the value of the parameter to zero. Note: This parameter is no longer used and is retained for compatibility purposes only. |
Returns:
This UDF returns the encrypted value as RAW data.
Exception:
If the user does not have reprotect access rights in the policy, then the UDF terminates with an error message explaining what went wrong.
Example:
select PTY.upd_encrypt_char('DE_AES256', 'Original data', 0) "Test of UPDATE enc CHAR func" from dual;
pty.upd_encrypt_varchar2
This UDF re-encrypts the VARCHAR2 data that has been updated, with a data element for encryption.
Signature:
pty.upd_encrypt_varchar2(dataelement CHAR, inval VARCHAR2, scid INTEGER)
Parameters:
| Name | Type | Description |
|---|---|---|
dataelement | CHAR | Specifies the name of the data element. |
inval | VARCHAR2 | Specifies the input data. |
scid | INTEGER | Specifies the security co-ordinate ID. Set the value of the parameter to zero. Note: This parameter is no longer used and is retained for compatibility purposes only. |
Returns:
This UDF returns the encrypted value as RAW data.
Exception:
If the user does not have reprotect access rights in the policy, then the UDF terminates with an error message explaining what went wrong.
Example:
select PTY.upd_encrypt_varchar2('DE_AES256', 'Original data', 0) "Test of UPDATE enc VARCHAR2 func" from dual;
pty.upd_encrypt_date
This UDF re-encrypts the DATE data that has been updated, with a data element for encryption.
Note: When you use the
pty.ins_encrypt_dateUDF to protect date, the data is not protected. If you want to protect the Oracle input data typeDATE, you must use the UDFs as described in Oracle Input Data Type to UDF Mapping to identify the appropriate UDF as per your requirement.
Signature:
pty.upd_encrypt_date(dataelement CHAR, inval DATE, scid INTEGER)
Parameters:
| Name | Type | Description |
|---|---|---|
dataelement | CHAR | Specifies the name of the data element. |
inval | DATE | Specifies the input data. |
scid | INTEGER | Specifies the security co-ordinate ID. Set the value of the parameter to zero. Note: This parameter is no longer used and is retained for compatibility purposes only. |
Returns:
This UDF returns the encrypted value as RAW data.
Exception:
If the user does not have reprotect access rights in the policy, then the UDF terminates with an error message explaining what went wrong.
Example:
select PTY.upd_encrypt_date('DE_AES256', '23-OCT-14', 0) "Test of UPDATE enc DATE func" from dual;
pty.upd_encrypt_integer
This UDF re-encrypts the INTEGER data that has been updated, with a data element for encryption.
Signature:
pty.upd_encrypt_integer(dataelement CHAR, inval INTEGER, scid INTEGER)
Parameters:
| Name | Type | Description |
|---|---|---|
dataelement | CHAR | Specifies the name of the data element. |
inval | INTEGER | Specifies the input data. |
scid | INTEGER | Specifies the security co-ordinate ID. Set the value of the parameter to zero. Note: This parameter is no longer used and is retained for compatibility purposes only. |
Returns:
This UDF returns the encrypted value as RAW data.
Exception:
If the user does not have reprotect access rights in the policy, then the UDF terminates with an error message explaining what went wrong.
Example:
select PTY.upd_encrypt_integer('DE_AES256', 12345, 0) "Test of UPDATE enc INT func" from dual;
pty.upd_encrypt_real
This UDF re-encrypts the REAL data that has been updated, with a data element for encryption.
Signature:
pty.upd_encrypt_real(dataelement CHAR, inval REAL, scid INTEGER)
Parameters:
| Name | Type | Description |
|---|---|---|
dataelement | CHAR | Specifies the name of the data element. |
inval | REAL | Specifies the input data. |
scid | INTEGER | Specifies the security co-ordinate ID. Set the value of the parameter to zero. Note: This parameter is no longer used and is retained for compatibility purposes only. |
Returns:
This UDF returns the encrypted value as RAW data.
Exception:
If the user does not have reprotect access rights in the policy, then the UDF terminates with an error message explaining what went wrong.
Example:
select PTY.upd_encrypt_real('DE_AES256', 1234.1234, 0) "Test of UPDATE enc REAL func" from dual;
pty.upd_encrypt_float
This UDF re-encrypts the FLOAT data that has been updated, with a data element for encryption.
Signature:
pty.upd_encrypt_float(dataelement CHAR, inval FLOAT, scid INTEGER)
Parameters:
| Name | Type | Description |
|---|---|---|
dataelement | CHAR | Specifies the name of the data element. |
inval | FLOAT | Specifies the input data. |
scid | INTEGER | Specifies the security co-ordinate ID. Set the value of the parameter to zero. Note: This parameter is no longer used and is retained for compatibility purposes only. |
Returns:
This UDF returns the encrypted value as RAW data.
Exception:
If the user does not have reprotect access rights in the policy, then the UDF terminates with an error message explaining what went wrong.
Example:
select PTY.upd_encrypt_float('DE_AES256', 1234.1234, 0) "Test of UPDATE enc FLOAT func" from dual;
pty.upd_encrypt_number
This UDF re-encrypts the NUMBER data that has been updated, with a data element in encryption.
Signature:
pty.upd_encrypt_number(dataelement CHAR, inval NUMBER, scid INTEGER)
Parameters:
| Name | Type | Description |
|---|---|---|
dataelement | CHAR | Specifies the name of the data element. |
inval | NUMBER | Specifies the input data. |
scid | INTEGER | Specifies the security co-ordinate ID. Set the value of the parameter to zero. Note: This parameter is no longer used and is retained for compatibility purposes only. |
Returns:
This UDF returns the encrypted value as RAW data.
Exception:
If the user does not have reprotect access rights in the policy, then the UDF terminates with an error message explaining what went wrong.
Example:
select PTY.upd_encrypt_number('DE_AES256', 12345, 0) "Test of UPDATE enc NUMBER func" from dual;
pty.upd_encrypt_raw
This UDF re-encrypts the RAW data that has been updated, with a data element for encryption.
Signature:
pty.upd_encrypt_raw(dataelement CHAR, inval RAW, scid INTEGER)
Parameters:
| Name | Type | Description |
|---|---|---|
dataelement | CHAR | Specifies the name of the data element. |
inval | RAW | Specifies the input data. |
scid | INTEGER | Specifies the security co-ordinate ID. Set the value of the parameter to zero. Note: This parameter is no longer used and is retained for compatibility purposes only. |
Returns:
This UDF returns the encrypted value as RAW data.
Exception:
If the user does not have reprotect access rights in the policy, then the UDF terminates with an error message explaining what went wrong.
Example:
select PTY.upd_encrypt_raw('DE_AES256', 'FFDD12345', 0) "Test of UPDATE enc RAW func" from dual;
4.2.1.9 - Update No-Encryption, Token, and FPE UDFs
These UDFs are used to update the data for tokenization and Format Preserving Encryption (FPE). The user must have Protect access to use these procedures.
Note: For reprotect operations, the Audit logs are generated as Protect Logs instead of Reprotect Logs.
Note: These UDFs are marked for deprecation and will be removed from the future releases. Protegrity recommends to use the standard Insert or Protect UDFs.
pty.upd_char
This UDF re-protects the CHAR data with tokenization and No Encryption data elements.
Signature:
pty.upd_char(dataelement CHAR, inval CHAR, scid BINARY_INTEGER)
Parameters:
| Name | Type | Description |
|---|---|---|
dataelement | CHAR | Specifies the name of the data element. |
inval | CHAR | Specifies the input data. |
scid | BINARY_INTEGER | Specifies the security co-ordinate ID. Set the value of the parameter to zero. Note: This parameter is no longer used and is retained for compatibility purposes only. |
Returns:
This UDF returns the output value as the CHAR datatype.
Exception:
If the user does not have reprotect access rights in the policy, then the UDF terminates with an error message explaining what went wrong.
Example:
select PTY.upd_char('DE_DTP2_AES256_AN', 'Original data', 0) "Test of UPDATE CHAR func" from dual;
pty.upd_varchar2
This UDF reprotects the VARCHAR2 data with tokenization and No Encryption data elements.
Signature:
pty.upd_varchar2(dataelement CHAR, inval VARCHAR2, scid BINARY_INTEGER)
Parameters:
| Name | Type | Description |
|---|---|---|
dataelement | CHAR | Specifies the name of the data element. |
inval | VARCHAR2 | Specifies the input data. |
scid | BINARY_INTEGER | Specifies the security co-ordinate ID. Set the value of the parameter to zero. Note: This parameter is no longer used and is retained for compatibility purposes only. |
Returns:
This UDF returns the output value as the VARCHAR2 datatype.
Exception:
If the user does not have reprotect access rights in the policy, then the UDF terminates with an error message explaining what went wrong.
Example:
select PTY.upd_varchar2('DE_DTP2_AES256_AN', 'Original data', 0) "Test of UPDATE VARCHAR2 func" from dual;
pty.upd_unicodenvarchar2
This UDF re-encrypts the NVARCHAR2 data that has been updated, with a data element.
Signature:
pty.upd_unicodenvarchar2(dataelement CHAR, inval NVARCHAR2, scid BINARY_INTEGER)
Parameters:
| Name | Type | Description |
|---|---|---|
dataelement | CHAR | Specifies the name of the data element. |
inval | NVARCHAR2 | Specifies the input data. |
scid | BINARY_INTEGER | Specifies the security co-ordinate ID. Set the value of the parameter to zero. Note: This parameter is no longer used and is retained for compatibility purposes only. |
Returns:
This UDF returns the encrypted value as the NVARCHAR2 data.
Exception:
If the user does not have reprotect access rights in the policy, then the UDF terminates with an error message explaining what went wrong.
>Note: Ensure to use the supported data element only. Using an unsupported data element might result in successful reprotection without returning any error, but corruption of data can occur.
Example:
select PTY.upd_unicodenvarchar2('fpe_unicode', 'Original data', 0) "Test of UPDATE encrypt NVARCHAR2 func" from dual;
pty.upd_unicodevarchar2_tok
This UDF re-encrypts the VARCHAR2 data that has been updated with a Unicode Base64 and Unicode Gen2 data element.
Signature:
pty.upd_unicodevarchar2_tok (dataelement IN CHAR, inval IN VARCHAR2, SCID IN BINARY_INTEGER)
Parameters:
| Name | Type | Description |
|---|---|---|
dataelement | CHAR | Specifies the name of the data element. |
inval | VARCHAR2 | Specifies the input data. |
scid | BINARY_INTEGER | Specifies the security co-ordinate ID. Set the value of the parameter to zero. Note: This parameter is no longer used and is retained for compatibility purposes only. |
Returns:
This UDF returns the encrypted value as VARCHAR2 data.
Exception:
If the user does not have reprotect access rights in the policy, then the UDF terminates with an error message explaining what went wrong.
>Note: Ensure to use the supported data element only. Using an unsupported data element might result in successful reprotection without returning any error, but corruption of data can occur.
Example:
select pty.upd_unicodevarchar2_tok('TE_UG2_S13_PL_N_BASCYR_AN_UTF8','защита данных',0) from dual;
pty.upd_unicodenvarchar2_tok
This UDF re-encrypts the NVARCHAR2 data that has been updated with a Unicode Base64 and Unicode Gen2 data element.
Signature:
pty.upd_unicodenvarchar2_tok(dataelement IN CHAR, inval IN NVARCHAR2, SCID IN BINARY_INTEGER)
Parameters:
| Name | Type | Description |
|---|---|---|
dataelement | CHAR | Specifies the name of the data element. |
inval | NVARCHAR2 | Specifies the input data. |
scid | BINARY_INTEGER | Specifies the security co-ordinate ID. Set the value of the parameter to zero. Note: This parameter is no longer used and is retained for compatibility purposes only. |
Returns:
This UDF returns an encrypted value as NVARCHAR2 data.
Exception:
If the user does not have reprotect access rights in the policy, then the UDF terminates with an error message explaining what went wrong.
>Note: Ensure to use the supported data element only. Using an unsupported data element might result in successful reprotection without returning any error, but corruption of data can occur.
Example:
select pty.upd_unicodenvarchar2_tok('TE_UG2_S13_PL_N_BASCYR_AN_UTF8','защита данных',0) from dual;
pty.upd_date
This UDF reprotects the DATE data with a No Encryption data element.
Note: When you use the
pty.ins_encrypt_dateUDF to protect date, the data is not protected. If you want to protect the Oracle input data typeDATE, you must use the UDFs as described in Oracle Input Data Type to UDF Mapping to identify the appropriate UDF as per your requirement.
Signature:
pty.upd_date (dataelement CHAR, inval DATE, scid BINARY_INTEGER)
Parameters:
| Name | Type | Description |
|---|---|---|
dataelement | CHAR | Specifies the name of the data element. |
inval | DATE | Specifies the input data. |
scid | BINARY_INTEGER | Specifies the security co-ordinate ID. Set the value of the parameter to zero. Note: This parameter is no longer used and is retained for compatibility purposes only. |
Returns:
The UDF returns the original value as DATE.
Exception:
If the user does not have reprotect access rights in the policy, then the UDF terminates with an error message explaining what went wrong.
Example:
select PTY.upd_date('DE_NoEnc', '23-OCT-14', 0) "Test of UPDATE DATE func" from dual;
pty.upd_integer
This UDF re-protects the INTEGER data with tokenization and No Encryption data elements.
Signature:
pty.upd_integer(dataelement CHAR, inval INTEGER, scid BINARY_INTEGER)
Parameters:
| Name | Type | Description |
|---|---|---|
dataelement | CHAR | Specifies the name of the data element. |
inval | INTEGER | Specifies the input data. |
scid | BINARY_INTEGER | Specifies the security co-ordinate ID. Set the value of the parameter to zero. Note: This parameter is no longer used and is retained for compatibility purposes only. |
Returns:
This UDF returns the original value as the INTEGER datatype.
Exception:
If the user does not have reprotect access rights in the policy, then the UDF terminates with an error message explaining what went wrong.
Example:
select PTY.upd_integer('DE_Integer', 12345, 0) "Test of UPDATE INT func" from dual;
pty.upd_real
This UDF reprotects the REAL data with a No Encryption data element.
Note: Data corruption occurs when the input length exceeds 10 decimal digits in the
REALdatatype.
Signature:
pty.upd_real(dataelement CHAR, inval REAL, scid BINARY_INTEGER)
Parameters:
| Name | Type | Description |
|---|---|---|
dataelement | CHAR | Specifies the name of the data element. |
inval | REAL | Specifies the input data. |
scid | BINARY_INTEGER | Specifies the security co-ordinate ID. Set the value of the parameter to zero. Note: This parameter is no longer used and is retained for compatibility purposes only. |
Returns:
This UDF returns the original value as the REAL datatype.
Exception:
If the user does not have reprotect access rights in the policy, then the UDF terminates with an error message explaining what went wrong.
>Note: Ensure to use the supported data element only. If an unsupported data element is passed, the following error is returned: character to number conversion error.
Example:
select PTY.upd_real('DE_NoEnc', 1234.1234, 0) "Test of UPDATE REAL func" from dual;
pty.upd_float
This UDF reprotects the FLOAT data with a No Encryption data element.
Signature:
pty.upd_float(dataelement CHAR, inval FLOAT, scid BINARY_INTEGER)
Parameters:
| Name | Type | Description |
|---|---|---|
dataelement | CHAR | Specifies the name of the data element. |
inval | FLOAT | Specifies the input data. |
scid | BINARY_INTEGER | Specifies the security co-ordinate ID. Set the value of the parameter to zero. Note: This parameter is no longer used and is retained for compatibility purposes only. |
Returns:
This UDF returns the original value as the FLOAT datatype.
Exception:
If the user does not have reprotect access rights in the policy, then the UDF terminates with an error message explaining what went wrong.
>Note: Ensure that you use the supported data element only. If an unsupported data element is passed, the following error is returned: character to number conversion error.
Example:
select PTY.upd_float('DE_NoEnc', 1234.1234, 0) "Test of UPDATE FLOAT func" from dual;
pty.upd_number
This UDF reprotects the NUMBER data with tokenization and No Encryption data elements.
Note: Data corruption occurs when the input length exceeds 10 decimal digits in the
NUMBERdatatype.
Signature:
pty.upd_number(dataelement CHAR, inval NUMBER, scid BINARY_INTEGER)
Parameters:
| Name | Type | Description |
|---|---|---|
dataelement | CHAR | Specifies the name of the data element. |
inval | NUMBER | Specifies the input data. |
scid | BINARY_INTEGER | Specifies the security co-ordinate ID. Set the value of the parameter to zero. Note: This parameter is no longer used and is retained for compatibility purposes only. |
Returns:
This UDF returns the original value as the NUMBER datatype.
Exception:
If the user does not have reprotect access rights in the policy, then the UDF terminates with an error message explaining what went wrong.
>Note: Ensure that you use the supported data element only. If an unsupported data element is passed, the following error is returned: character to number conversion error.
Example:
select PTY.upd_number('DE_Integer', 12345, 0) "Test of UPDATE NUMBER func" from dual;
pty.upd_raw
This UDF re-protects the RAW data with a No Encryption data element.
Signature:
pty.upd_raw(dataelement CHAR, inval RAW, scid BINARY_INTEGER)
Parameters:
| Name | Type | Description |
|---|---|---|
dataelement | CHAR | Specifies the name of the data element. |
inval | RAW | Specifies the input data. |
scid | BINARY_INTEGER | Specifies the security co-ordinate ID. Set the value of the parameter to zero. Note: This parameter is no longer used and is retained for compatibility purposes only. |
Returns:
This UDF returns the original value as the RAW data.
Exception:
If the user does not have reprotect access rights in the policy, then the UDF terminates with an error message explaining what went wrong.
>Note: Ensure to use the supported data element only. If an unsupported data element is passed, the following error is returned: character to number conversion error.
Example:
select PTY.upd_raw('DE_NoEnc', 'FFDD12345', 0) "Test of UPDATE RAW func" from dual;
4.2.1.10 - Multiple Update Encryption Procedures
These procedures encrypt one to four values of data with one procedure call. The user must be granted Protect access for the data element that will be used to execute these procedures. You can use the upd_check procedure to check whether the user has Protect access.
Note: These UDFs are marked for deprecation and will be removed from the future releases. Protegrity recommends to use the standard Insert or Protect UDFs.
pty.encUpdate
This procedure updates and encrypts one value of the VARCHAR2 data with one data element for encryption.
Signature:
pty.encUpdate (dataelement VARCHAR2, cdata VARCHAR2, rdata RAW, scid BINARY_INTEGER)
Parameters:
| Name | Type | Description |
|---|---|---|
dataelement | VARCHAR2 | Specifies the name of the data element. |
cdata | VARCHAR2 | Specifies the input data |
rdata | RAW | Specifies the encrypted output data |
scid | BINARY_INTEGER | Specifies the security co-ordinate ID. Set the value of the parameter to zero. Note: This parameter is no longer used and is retained for compatibility purposes only. |
Returns:
This procedure returns the encrypted value as RAW data.
Exception:
If you configure an exception in the policy and the user does not have Protect access rights in the policy, then the procedure terminates with an error message explaining what went wrong.
Example:
declare
raw_out raw(2000);
begin
dbms_output.put_line('Test of UPDATE multi encryption procedure for 1
COLUMN');
dbms_output.put_line('------------------------------------------------
------');
pty.encUpdate('DE_AES256', 'ASFGFGghg5577fFFyu', raw_out, 0);
DBMS_OUTPUT.PUT_LINE('Encrypted data: ' || raw_out);
end;
pty.upd_encryptx2
This procedure updates and encrypts two values of VARCHAR2 data with two data elements for encryption.
Signature:
pty.upd_encryptx2(dataelement1 VARCHAR2, cdata1 VARCHAR2, rdata1 RAW, scid1 BINARY_INTEGER, dataelement2 VARCHAR2, cdata2 VARCHAR2, rdata2 RAW, scid2 BINARY_INTEGER)
Parameters:
| Name | Type | Description |
|---|---|---|
dataelement | VARCHAR2 | Specifies the name of the data element. |
cdata | VARCHAR2 | Specifies the input data |
rdata | RAW | Specifies the encrypted output data |
scid | BINARY_INTEGER | Specifies the security co-ordinate ID. Set the value of the parameter to zero. Note: This parameter is no longer used and is retained for compatibility purposes only. |
dataelement2 | VARCHAR2 | Speicifies the name of the data element. |
cdata2 | VARCHAR2 | Specifies the input data. |
rdata2 | RAW | Specifies the encrypted output data. |
scid2 | BINARY_INTEGER | Specifies the security co-ordinate ID. Set the value of the parameter to zero. Note: This parameter is no longer used and is retained for compatibility purposes only. |
Returns:
This procedure returns the encrypted value as RAW data.
Exception:
If you configure an exception in the policy and the user does not have Protect access rights in the policy, then the procedure terminates with an error message explaining what went wrong.
Example:
begin
dbms_output.put_line('Test of UPDATE multi encryption procedure for 2
COLUMNS');
dbms_output.put_line('------------------------------------------------
-------');
pty.upd_encryptx2('DE_AES256', 'ASFGFGghg5577fFFyu', raw_out1, 0,
'DE_AES256', 'IyutGGg76hg8h1', raw_out2, 0);
DBMS_OUTPUT.PUT_LINE('Encrypted data1: ' || raw_out1);
DBMS_OUTPUT.PUT_LINE('Encrypted data2: ' || raw_out2);
end;
pty.upd_encryptx3
This procedure updates and encrypts three values of VARCHAR2 data with three data elements for encryption.
Signature:
pty.upd_encryptx3 (dataelement1 VARCHAR2, cdata1 VARCHAR2, rdata1 RAW, scid1 BINARY_INTEGER, dataelement2 VARCHAR2, cdata2 VARCHAR2, rdata2 RAW, scid2 BINARY_INTEGER, dataelement3 VARCHAR2, cdata3 VARCHAR2, rdata3 RAW, scid3 BINARY_INTEGER)
Parameters:
| Name | Type | Description |
|---|---|---|
dataelement1 | VARCHAR2 | Specifies the name of the data element. |
cdata1 | VARCHAR2 | Specifies the input data |
rdata1 | RAW | Specifies the encrypted output data |
scid1 | BINARY_INTEGER | Specifies the security co-ordinate ID. Set the value of the parameter to zero. Note: This parameter is no longer used and is retained for compatibility purposes only. |
dataelement2 | VARCHAR2 | Specifies the name of the data element. |
cdata2 | VARCHAR2 | Specifies the input data |
rdata2 | RAW | Specifies the encrypted output data |
scid2 | BINARY_INTEGER | Specifies the security co-ordinate ID. Set the value of the parameter to zero. Note: This parameter is no longer used and is retained for compatibility purposes only. |
dataelement3 | VARCHAR2 | Specifies the name of the data element. |
cdata3 | VARCHAR2 | Specifies the input data |
rdata3 | RAW | Specifies the encrypted output data |
scid3 | BINARY_INTEGER | Specifies the security co-ordinate ID. Set the value of the parameter to zero. Note: This parameter is no longer used and is retained for compatibility purposes only. |
Returns:
This procedure returns the encrypted value as RAW data.
Exception:
If you configure an exception in the policy and the user does not have Protect access rights in the policy, then the procedure terminates with an error message explaining what went wrong.
Example:
begin
dbms_output.put_line('Test of UPDATE multi encryption procedure for 3
COLUMNS');
dbms_output.put_line('-----------------------------------------------
--------');
pty.upd_encryptx3('DE_AES256', 'ASFGFGghg5577fFFyu', raw_out1, 0,
'DE_AES256', 'IyutGGg76hg8h1', raw_out2, 0, 'DE_AES256', 'AAaazzZZ1199',
raw_out3, 0);
DBMS_OUTPUT.PUT_LINE('Encrypted data1: ' || raw_out1);
DBMS_OUTPUT.PUT_LINE('Encrypted data2: ' || raw_out2);
DBMS_OUTPUT.PUT_LINE('Encrypted data3: ' || raw_out3);
end;
pty.upd_encryptx4
This procedure updates and encrypts four values of VARCHAR2 data with four data elements for encryption.
Signature:
pty.upd_encryptx4 (dataelement1 VARCHAR2, cdata1 VARCHAR2, rdata1 RAW, scid1 BINARY_INTEGER, dataelement2 VARCHAR2, cdata2 VARCHAR2, rdata2 RAW, scid2 BINARY_INTEGER, dataelement3 VARCHAR2, cdata3 VARCHAR2, rdata3 RAW, scid3 BINARY_INTEGER, dataelement4 VARCHAR2, cdata4 VARCHAR2, rdata4 RAW, scid4 BINARY_INTEGER)
Parameters:
| Name | Type | Description |
|---|---|---|
dataelement1 | VARCHAR2 | Specifies the name of the data element. |
cdata1 | VARCHAR2 | Specifies the input data |
rdata1 | RAW | Specifies the encrypted output data |
scid1 | BINARY_INTEGER | Specifies the security co-ordinate ID. Set the value of the parameter to zero. Note: This parameter is no longer used and is retained for compatibility purposes only. |
dataelement2 | VARCHAR2 | Specifies the name of the data element. |
cdata2 | VARCHAR2 | Specifies the input data |
rdata2 | RAW | Specifies the encrypted output data |
scid2 | BINARY_INTEGER | Specifies the security co-ordinate ID. Set the value of the parameter to zero. Note: This parameter is no longer used and is retained for compatibility purposes only. |
dataelement3 | VARCHAR2 | Specifies the name of the data element. |
cdata3 | VARCHAR2 | Specifies the input data |
rdata3 | RAW | Specifies the encrypted output data |
scid3 | BINARY_INTEGER | Specifies the security co-ordinate ID. Set the value of the parameter to zero. Note: This parameter is no longer used and is retained for compatibility purposes only. |
dataelement4 | VARCHAR2 | Specifies the name of the data element. |
cdata4 | VARCHAR2 | Specifies the input data. |
rdata4 | RAW | Specifies the encrypted output data. |
scid4 | BINARY_INTEGER | Specifies the security co-ordinate ID. Set the value of the parameter to zero. Note: This parameter is no longer used and is retained for compatibility purposes only. |
Returns:
This procedure returns the encrypted value as RAW data.
Exception:
If you configure an exception in the policy and the user does not have Protect access rights in the policy, then the procedure terminates with an error message explaining what went wrong.
Example:
begin
dbms_output.put_line('Test of UPDATE multi encryption procedure for 4
COLUMNS');
dbms_output.put_line('------------------------------------------------
-------');
pty.upd_encryptx4('DE_AES256', 'ASFGFGghg5577fFFyu', raw_out1, 0,
'DE_AES256', 'IyutGGg76hg8h1', raw_out2, 0, 'DE_AES256', 'AAaazzZZ1199',
raw_out3, 0 , 'DE_AES256', ' ASFGFGghg5577fFFyu; AblnQEWsw0129NGku;
BINKUcrc8749lLLnx; CAESYwiw0098mMMns; FEORLkjk2323kKKmn;
LAENILmcm6677kBBop; MOIRNAzlz9876lMMyu; MUBMIARAR6087kUUmn;
NIASAlziz2398hTTuv; PATRHXuru9898hFFns; ROYNESgog7802gMMus;
SIRSHAuna9049kKKjn; TOTALSlol7843mWWqa; TUSFAVopo8080tTTnx;
TUHSRAknk8108mKKdw; VAENSAJJBJ6712fFFGH; VEPSIMdsd9898kSDnm;
URDPLAghg7676LLyu; UNBAKERkik2233lLLmu; YANMRAlsl9090fFFyu;
YASTURhom0123hHHmn; XAOILDghg0987fFFmn; ZABCDEmom5577bHHyy;
ZOHRASghg5297nNNcd ', raw_out4, 0);
DBMS_OUTPUT.PUT_LINE('Encrypted data1: ' || raw_out1);
DBMS_OUTPUT.PUT_LINE('Encrypted data2: ' || raw_out2);
DBMS_OUTPUT.PUT_LINE('Encrypted data3: ' || raw_out3);
DBMS_OUTPUT.PUT_LINE('Encrypted data4: ' || raw_out4);
end;
4.2.1.11 - Hash UDFs
These UDFs protect the data as a hash value.
pty.ins_hash_varchar2
This UDF uses the hash function to protect the VARCHAR data with a data element for hashing to return a protected value.
Signature:
pty.ins_hash_varchar2(dataelement CHAR, cdata VARCHAR2, scid BINARY_INTEGER)
Parameters:
| Name | Type | Description |
|---|---|---|
dataelement | CHAR | Specifies the name of the data element. |
cdata | VARCHAR2 | Specifies the input data. |
scid | BINARY_INTEGER | Specifies the security co-ordinate ID. Set the value of the parameter to zero. Note: This parameter is no longer used and is retained for compatibility purposes only. |
Returns:
- This UDF returns the Hash value as the RAW data.
- This UDF returns the unprotected value as NULL, when the user has no access to data in the policy.
Exception:
If configured in policy and user does not have unprotect access rights, then the UDF terminates with an error message explaining what went wrong.
Example:
SELECT PTY.ins_hash_varchar2('DE_Hash', ' ASertcv2013; CUxdcs3675; ccNNddfF9084; hjMjCS0123',0) "Test of INSERT HASH function" from dual;
pty.upd_hash_varchar2
This UDF uses the hash function to protect the VARCHAR data with a data element for hashing to return a protected value.
Signature:
pty.upd_hash_varchar2(dataelement CHAR, inval VARCHAR2, scid BINARY_INTEGER)
Parameters:
| Name | Type | Description |
|---|---|---|
dataelement | CHAR | Specifies the name of the data element. |
cdata | VARCHAR2 | Specifies the input data. |
scid | BINARY_INTEGER | Specifies the security co-ordinate ID. Set the value of the parameter to zero. Note: This parameter is no longer used and is retained for compatibility purposes only. |
Returns:
- This UDF returns the Hash value as the RAW data.
- This UDF returns the unprotected value as NULL, when the user has no access to data in the policy.
Exception:
If configured in policy and user does not have unprotect access rights, then the UDF terminates with an error message explaining what went wrong.
Example:
SELECT PTY.upd_hash_varchar2('DE_Hash', 'ASertcv2013; CUxdcs3675; ccNNddfF9084; hjMjCS0123;',0) "Test of UPDATE HASH function" from dual;
4.2.1.12 - Blob UDFs
These UDFs can be used to encrypt and decrypt the data stored in the BLOB data type.
pty.ins_encrypt_blob
This function is used to encrypt the data stored in a BLOB with an encryption data element.
Signature:
pty.ins_encrypt_blob(dataelement CHAR, input_data BLOB , scid INTEGER)
Parameters:
| Name | Type | Description |
|---|---|---|
dataelement | CHAR | Specifies the name of the data element. |
input_data | BLOB | Specifies the input data. |
scid | BINARY_INTEGER | Specifies the security co-ordinate ID. Set the value of the parameter to zero. Note: This parameter is no longer used and is retained for compatibility purposes only. |
Returns:
This UDF returns the encrypted value as the BLOB data.
> Note: If you perform a protect operation with the input data as null or empty, then the output will be an empty_blob.
Exception:
If the user does not have protect privileges in the policy, then the UDF terminates with an error message explaining what went wrong.
Example:
select pty.ins_encrypt_blob('AES256',TO_BLOB('691F89CD2BCBF055EFD4F3B51470AEF6'),0) from dual;
Caution: A maximum of 1.5 GB of input data can be protected using the
pty.ins_encrypt_blobUDF. Thepty.ins_encrypt_blobUDF will return an unexpected behaviour if you exceed the maximum input data limit of 1.5 GB. For example:ORA-28579: network error during callback from external procedure agent.
pty.sel_decrypt_blob
This function is used to decrypt the encrypted data stored in a BLOB with an encryption data element.
Signature:
pty.sel_decrypt_blob (dataelement CHAR, input_data BLOB, scid INTEGER)
Parameters:
| Name | Type | Description |
|---|---|---|
dataelement | CHAR | Specifies the name of the data element. |
input_data | BLOB | Specifies the input data. |
scid | BINARY_INTEGER | Specifies the security co-ordinate ID. Set the value of the parameter to zero. Note: This parameter is no longer used and is retained for compatibility purposes only. |
Returns:
- This UDF returns the decrypted value as the BLOB data.
- This UDF returns the decrypted value as an EMPTY_BLOB, when the user has no access to the database.
Note: If you perform a protect operation with the input data as null or empty, then the output will be an
empty_blob.
Exception:
If the user does not have unprotect access rights in the policy, then the UDF terminates with an error message explaining what went wrong.
Example:
select pty.sel_decrypt_blob('AES256',pty.ins_encrypt_blob('AES256',TO_BLOB('691F89CD2BCBF055EFD4F3B51470AEF6'),0),0) from dual;
4.2.1.13 - Clob UDFs
These UDFs can be used to encrypt and decrypt the data stored in the CLOB data type.
pty.ins_encrypt_clob
This function is used to encrypt the data stored in a CLOB with an encryption data element.
Signature:
pty.ins_encrypt_clob(dataelement CHAR, input_data CLOB, scid INTEGER)
CAUTION: Ensure that the input data stored in the CLOB data type does not contain multibyte characters. If you pass data containing multibyte characters to the CLOB UDF, then an unexpected behaviour is observed.
For example: An error'ORA-28579: network error during callback from external procedure agent'is returned or the input data is corrupted. For more information about CLOB data type, refer to the Oracle Help Center.
Parameters:
| Name | Type | Description |
|---|---|---|
dataelement | CHAR | Specifies the name of the data element. |
input_data | CLOB | Specifies the input data. |
scid | INTEGER | Specifies the security co-ordinate ID. Set the value of the parameter to zero. Note: This parameter is no longer used and is retained for compatibility purposes only. |
Returns:
This UDF returns the encrypted value as the CLOB data.
>Note: If you perform a protect operation with the input data as null or empty, then the output will be an empty_blob.
Exception:
If the user does not have protect access rights in the policy, then the UDF terminates with an error message explaining what went wrong.
Example:
select pty.ins_encrypt_clob('AES256','John',0) from dual;
Note: A maximum of 500 MB of input data can be protected using the pty.ins_encrypt_clob UDF.
pty.sel_decrypt_clob
This function is used to decrypt the encrypted data stored in a BLOB with an encryption data element.
Signature:
pty.sel_decrypt_clob(dataelement CHAR, input_data BLOB, scid INTEGER)
Parameters:
| Name | Type | Description |
|---|---|---|
dataelement | CHAR | Specifies the name of the data element. |
input_data | BLOB | Specifies the input data. |
scid | INTEGER | Specifies the security co-ordinate ID. Set the value of the parameter to zero. Note: This parameter is no longer used and is retained for compatibility purposes only. |
Returns:
- This UDF returns the decrypted value as the
CLOBdata. - This UDF returns the decrypted value as an
EMPTY_CLOB, when the user has no access to the database.Note: If you perform a unprotect operation with the input data as null or empty, then the output will be an
EMPTY_CLOB.
Exception:
If the user does not have unprotect access rights in the policy, then the UDF terminates with an error message explaining what went wrong.
Example:
select pty.sel_decrypt_clob('AES256',pty.ins_encrypt_clob('AES256','John',0),0) from dual;
4.2.1.14 - Bulk UDFs
Bulk User-Defined Functions (UDFs) in Oracle are designed to process multiple rows in a single call, rather than operating on one row at a time like scalar UDFs. They are typically used for batch operations such as tokenization, encryption, or transformation of large datasets. In Oracle v10.0.0, bulk UDFs are implemented to improve efficiency when working with large tables or columns containing sensitive data.
The features of the bulk UDFs are listed below.
- Accept table name, source column(s), and data element name as arguments.
- Read multiple records, prepare batches, and process them collectively.
- Return results for all rows in one execution cycle.
The advantages of bulk UDFs over scalar UDFs are listed below.
| Feature | Bulk UDFs | Scalar UDFs |
|---|---|---|
| Processing | Batch processing (multiple rows at once) | Row-by-row |
| Performance | High throughput, reduced overhead | Slower for large datasets |
| Error Handling | Stops on first error | Returns an aggregated error list per batch |
| Maintainability | Centralized logic, easier to maintain | Repetitive calls, harder to audit |
| Network Overhead | Minimal due to fewer function calls | High due to multiple calls |
Note: When ‘NULL’ is passed as a column name, it will be treated a standard SQL term and be processed appropriately. For example, the following query will return
NULLunder the result column.
select * from pty.ins_varchar2_bulk('tbl_tok_varchar_bulk_positive','NULL','cid','TE_A_S13_L0R0_ASTYES',NULL,0);
Note: In case of an error in executing the bulk UDFs, it is observed that failed queries return the audit log count based on the internal batch size. The range for the batch size ranges from a minimum of 1 to a maximum of 1000 entries.
Note: The source and primary key column names in the tables will be processed and executed as per SQL’s standard behavior.
pty.ins_encrypt_varchar2_bulk
This function is used to encrypt a column of VARCHAR2 data in bulk, returning a table of results with the primary key and encrypted value.
Note: The
column_namedata must be in thevarcharformat.
Signature:
pty.ins_encrypt_varchar2_bulk(
source_table_name IN VARCHAR2,
column_name IN VARCHAR2,
pk_column_name IN VARCHAR2,
dataelement IN CHAR,
where_clause IN VARCHAR2,
SCID IN BINARY_INTEGER
)
Parameters:
| Name | Type | Description |
|---|---|---|
source_table_name | VARCHAR2 | Specifies the name of the source table containing the data to encrypt. Quoted identifiers with spaces are supported. |
column_name | VARCHAR2 | Specifies the name of the column to encrypt. Quoted identifiers with spaces are supported. |
pk_column_name | VARCHAR2 | Specifies the name of the primary key column. Quoted identifiers with spaces are supported. |
dataelement | CHAR | Specifies the name of the data element for encryption. |
where_clause | VARCHAR2 | Specifies the clause to filter rows. SQL injection is checked and unsafe clauses are blocked. Note: The WHERE clause is processed and executed as per SQL’s standard behavior. |
SCID | BINARY_INTEGER | Specifies the security co-ordinate ID. Set the value of the parameter to zero. Note: This parameter is no longer used and is retained for compatibility purposes only. |
Returns:
This UDF returns a pipelined table of type raw_4000_table, where each row contains the primary key and the encrypted value for the column. If the input data is null or empty, the output will be NULL.
Example:
SELECT * FROM TABLE(
pty.ins_encrypt_varchar2_bulk(
'<table_name>',
'<input_column>',
'ID',
'AES256',
'WHERE status = ''ACTIVE''',
0
)
);
pty.sel_decrypt_varchar2_bulk
This function is used to decrypt a column of RAW (encrypted VARCHAR2) data in bulk, returning a table of results with the primary key and decrypted value.
Note: The source column data must be in the
RAWformat.
Signature:
pty.sel_decrypt_varchar2_bulk(
source_table_name IN VARCHAR2,
column_name IN VARCHAR2,
pk_column_name IN VARCHAR2,
dataelement IN CHAR,
where_clause IN VARCHAR2,
SCID IN BINARY_INTEGER
)
Parameters:
| Name | Type | Description |
|---|---|---|
source_table_name | VARCHAR2 | Specifies the name of the source table containing the data to decrypt. Quoted identifiers with spaces are supported. |
column_name | VARCHAR2 | Specifies the name of the column to decrypt. Quoted identifiers with spaces are supported. |
pk_column_name | VARCHAR2 | Specifies the name of the primary key column. Quoted identifiers with spaces are supported. |
dataelement | CHAR | Specifies the name of the data element for decryption. |
where_clause | VARCHAR2 | Specifies the clause to filter rows. SQL injection is checked and unsafe clauses are blocked. Note: The WHERE clause is processed and executed as per SQL’s standard behavior. |
SCID | BINARY_INTEGER | Specifies the security co-ordinate ID. Set the value of the parameter to zero. Note: This parameter is no longer used and is retained for compatibility purposes only. |
Returns:
This UDF returns a pipelined table of type result_table_type, where each row contains the primary key and the decrypted value for the column. If the input data is null or empty, the output will be NULL.
Example:
SELECT * FROM TABLE(
pty.sel_decrypt_varchar2_bulk(
'<table_name>',
'<input_column>',
'ID',
'AES256',
'WHERE status = ''ACTIVE''',
0
)
);
pty.ins_varchar2_bulk
This function is used to tokenize (protect) a column of VARCHAR2 data in bulk, returning a table of results with primary key and tokenized value.
Note: The
column_namedata must be in thevarcharformat.
Signature:
pty.ins_varchar2_bulk(
source_table_name IN VARCHAR2,
column_name IN VARCHAR2,
pk_column_name IN VARCHAR2,
dataelement IN CHAR,
where_clause IN VARCHAR2,
SCID IN BINARY_INTEGER
)
Parameters:
| Name | Type | Description |
|---|---|---|
source_table_name | VARCHAR2 | Specifies the name of the source table containing the data to tokenize. Quoted identifiers with spaces are supported. |
column_name | VARCHAR2 | Specifies the name of the column to tokenize. Quoted identifiers with spaces are supported. |
pk_column_name | VARCHAR2 | Specifies the name of the primary key column. Quoted identifiers with spaces are supported. |
dataelement | CHAR | Specifies the name of the data element for encryption/tokenization. |
where_clause | VARCHAR2 | Specifies the clause to filter rows. SQL injection is checked and unsafe clauses are blocked. Note: The WHERE clause is processed and executed as per SQL’s standard behavior. |
SCID | BINARY_INTEGER | Specifies the security co-ordinate ID. Set the value of the parameter to zero. Note: This parameter is no longer used and is retained for compatibility purposes only. |
Returns:
This UDF returns a pipelined table of type result_table_type, where each row contains the primary key and the tokenized value for the column. If the input data is null or empty, the output will NULL.
Example:
SELECT * FROM TABLE(
pty.ins_varchar2_bulk(
'<table_name>',
'<input_column>',
'id',
'TE_A_S13_L1R2_Y',
'WHERE status = ''ACTIVE''',
0
)
);
Example of table to table insert with Bulk UDF:
insert into <target_table>(col1,col2,col3,col4,col5)
select p.pk_value,e.col2,e.col3,e.col4,p.result
from <source_table> e join table(pty.ins_varchar2_bulk('<source_table>','col5','col1','de_TokName',NULL,0))
on e.col1 = p.pk_value;
pty.sel_varchar2_bulk
This function is used to detokenize (unprotect) a column of VARCHAR2 data in bulk, returning a table of results with primary key and detokenized value.
Note: The
column_namedata must be in theVARCHAR2format.
Signature:
pty.sel_varchar2_bulk(
source_table_name IN VARCHAR2,
column_name IN VARCHAR2,
pk_column_name IN VARCHAR2,
dataelement IN CHAR,
where_clause IN VARCHAR2,
SCID IN BINARY_INTEGER
)
Parameters:
| Name | Type | Description |
|---|---|---|
source_table_name | VARCHAR2 | Specifies the name of the source table containing the data to detokenize. Quoted identifiers with spaces are supported. |
column_name | VARCHAR2 | Specifies the name of the column to detokenize. Quoted identifiers with spaces are supported. |
pk_column_name | VARCHAR2 | Specifies the name of the primary key column. Quoted identifiers with spaces are supported. |
dataelement | CHAR | Specifies the name of the data element for decryption/detokenization. |
where_clause | VARCHAR2 | Specifies the clause to filter rows. SQL injection is checked and unsafe clauses are blocked. Note: The WHERE clause is processed and executed as per SQL’s standard behavior. |
SCID | BINARY_INTEGER | Specifies the security co-ordinate ID. Set the value of the parameter to zero. Note: This parameter is no longer used and is retained for compatibility purposes only. |
Returns:
This UDF returns a pipelined table of type result_table_type, where each row contains the primary key and the detokenized value for the column. If the input data is null or empty, the output will NULL.
Example:
SELECT * FROM TABLE(
pty.sel_varchar2_bulk(
'<table_name>',
'<input_column>',
'id',
'TE_A_S13_L1R2_Y',
'WHERE status = ''ACTIVE''',
0
)
);
4.2.1.15 - Oracle Input Datatype to UDF Mapping
This section provides tables with the Oracle input data type to the appropriate UDF mapping. It also provides the data element information that must be considered when creating a policy.
CAUTION: Starting from version 10.0.0, the 3DES, CUSP 3DES, and HMAC-SHA1 protection methods have been deprecated based on NIST recommendations around weak ciphers. It is recommended to use the following protection methods instead of the deprecated methods:
| Deprecated Protection Methods | Recommended Protection Methods |
|---|---|
| 3DES | AES-128 and AES-256 |
| CUSP 3DES | CUSP AES-128 and CUSP AES-256 |
| HMAC-SHA1 | HMAC-SHA256 |
For assistance in switching to a different protection method, contact Protegrity.
CAUTION: Starting from version 10.0.0, the Date YYYY-MM-DD, Date DD/MM/YYYY, Date MM/DD/YYYY, Printable, Unicode, and Unicode Base64 tokenization types have been deprecated. It is recommended to use the following tokenization types instead of the deprecated tokenization types:
| Deprecated Tokenization Types | Recommended Tokenization Types |
|---|---|
| Date YYYY-MM-DD | Datetime (YYYY-MM-DD HH:MM:SS MMM) |
| Date DD/MM/YYYY | Datetime (YYYY-MM-DD HH:MM:SS MMM) |
| Date MM/DD/YYYY | Datetime (YYYY-MM-DD HH:MM:SS MMM) |
| Printable | Unicode Gen2 |
| Unicode | Unicode Gen2 |
| Unicode Base64 | Unicode Gen2 |
For assistance in switching to a different tokenization type, contact Protegrity.
| Oracle UDF - Insert | Oracle UDF - Update | Oracle Input Type | Output Type | Data Element Type |
|---|---|---|---|---|
| pty.ins_encrypt_char/pty.ins_encrypt | pty.upd_encrypt_char/pty.upd_encrypt | CHAR | RAW | 3DES, AES-128, AES-256 |
| pty.ins_encrypt | pty.upd_encrypt | CHAR | RAW | CUSP 3DES, CUSP AES 128, CUSP AES 156 |
| pty.ins_char | pty.upd_char | CHAR | CHAR | TOKENS-Numeric(0-9) |
| pty.ins_char | pty.upd_char | CHAR | CHAR | TOKENS-Alpha(a-z,A-Z) |
| pty.ins_char | pty.upd_char | CHAR | CHAR | TOKENS-Uppercase Alpha(A-Z) |
| pty.ins_char | pty.upd_char | CHAR | CHAR | TOKENS-Alpha(a-z,A-Z) |
| pty.ins_char | pty.upd_char | CHAR | CHAR | TOKENS-Alpha-Numeric (0-9,a-z,A-Z) |
| pty.ins_char | pty.upd_char | CHAR | CHAR | TOKENS-Uppercase Alpha-Numeric(0-9,A-Z) |
| pty.ins_char | pty.upd_char | CHAR | CHAR | TOKENS-Printable |
| pty.ins_char | pty.upd_char | CHAR | CHAR | TOKENS-Credit card(0-9) |
| pty.ins_char | pty.upd_char | CHAR | CHAR | TOKENS-Lower ASCII (lower part of ASCII table) |
| pty.ins_char | pty.upd_char | CHAR | CHAR | TOKENS-Email |
| pty.ins_varchar2 | pty.ins_varchar2 | VARCHAR2 | VARCHAR2 | No Encryption |
| pty.ins_encrypt_varchar2 | pty.upd_encrypt_varchar2 | VARCHAR2 | RAW | 3DES, AES-128, AES-256 |
| pty.ins_encrypt_varchar2 | pty.upd_encrypt_varchar2 | VARCHAR2 | RAW | CUSP 3DES, CUSP AES 128, CUSP AES 156 |
| pty.ins_varchar2 | pty.upd_varchar2 | VARCHAR2 | VARCHAR2 | TOKENS-Numeric(0-9) |
| pty.ins_varchar2 | pty.upd_varchar2 | VARCHAR2 | VARCHAR2 | TOKENS-Alpha(a-z,A-Z) |
| pty.ins_varchar2 | pty.upd_varchar2 | VARCHAR2 | VARCHAR2 | TOKENS-Uppercase Alpha(A-Z) |
| pty.ins_varchar2 | pty.upd_varchar2 | VARCHAR2 | VARCHAR2 | TOKENS-Alpha(a-z,A-Z) |
| pty.ins_varchar2 | pty.upd_varchar2 | VARCHAR2 | VARCHAR2 | TOKENS-Alpha-Numeric (0-9,a-z,A-Z) |
| pty.ins_varchar2 | pty.upd_varchar2 | VARCHAR2 | VARCHAR2 | TOKENS-Uppercase Alpha-Numeric(0-9,A-Z) |
| pty.ins_varchar2 | pty.upd_varchar2 | VARCHAR2 | VARCHAR2 | TOKENS-Printable |
| pty.ins_varchar2 | pty.upd_varchar2 | VARCHAR2 | VARCHAR2 | TOKENS-Credit card(0-9) |
| pty.ins_varchar2 | pty.upd_varchar2 | VARCHAR2 | VARCHAR2 | TOKENS-Lower ASCII (lower part of ASCII table) |
| pty.ins_varchar2 | pty.upd_varchar2 | VARCHAR2 | VARCHAR2 | TOKENS-Email |
| pty.ins_date | pty.upd_date | DATE | DATE | No Encryption |
| pty.ins_encrypt_date | pty.upd_encrypt_date | DATE | RAW | Encryption-AES-256 |
| pty.ins_varchar2 | pty.upd_varchar2 | DATE | DATE | TOKENS-Date(YYYY-MM-DD) |
| pty.ins_varchar2 | pty.upd_varchar2 | DATE | DATE | TOKENS-Date(DD/MM/YYYY) |
| pty.ins_varchar2 | pty.upd_varchar2 | DATE | DATE | TOKENS-Date(MM/DD/YYYY) |
| pty.ins_varchar2 | pty.upd_varchar2 | DATE | DATE | TOKENS-Datetime(YYYY-MM-DD HH:MM:SS MMM) |
| pty.ins_integer | pty.upd_integer | INTEGER | INTEGER | No Encryption |
| pty.ins_encrypt_integer | pty.upd_encrypt_integer | INTEGER | RAW | Encryption-AES-256 |
| pty.ins_integer | pty.upd_integer | INTEGER | INTEGER | TOKENS-INTEGER |
| pty.ins_number | pty.upd_number | NUMBER | NUMBER | No Encryption |
| pty.ins_encrypt_number | pty.upd_encrypt_number | NUMBER | RAW | Encryption-AES-256 |
| pty.ins_number | pty.upd_number | NUMBER | NUMBER | TOKENS-Decimal (numeric with decimal point and sign) |
| pty.ins_real | pty.upd_real | REAL | REAL | No Encryption |
| pty.ins_encrypt_real | pty.upd_encrypt_real | REAL | RAW | Encryption-AES-256 |
| pty.ins_float | pty.upd_float | FLOAT | FLOAT | No Encryption |
| pty.ins_encrypt_float | pty.upd_encrypt_float | FLOAT | RAW | Encryption-AES-256 |
| pty.ins_raw | pty.upd_raw | RAW | RAW | No Encryption |
| pty.ins_encrypt_raw | pty.upd_encrypt_raw | RAW | RAW | Encryption-AES-256 |
| BINARY | Tokenization is not supported for BINARY for ORACLE | |||
| UNICODE | Tokenization is not supported for UNICODE for ORACLE |
| Oracle UDF - Insert | Oracle UDF - Select | Oracle Input Type | Output Type | Data Element Type |
|---|---|---|---|---|
| pty.ins_encrypt_clob | pty.sel_decrypt_clob | CLOB | CLOB | 3DES, AES-128, AES-256 |
5 - Data Warehouse Protectors
This page discusses about the Protegrity Data Warehouse Protector. It also provides detailed information, features, deployment process, and architecture for the Protegrity Data Warehouse Protector.
The Protegrity Data Warehouse Protector is an advanced security solution designed to protect sensitive data at the column level. This enables you to secure your data, while still permitting access to authorized users. Additionally, the Data Warehouse Protector integrates seamlessly with existing database systems using the User-Defined Functions for an enhanced security.
Protegrity provides Data Warehouse Protector support for the Teradata Data Warehouse platform.
Features of the Data Warehouse Protector
The Protegrity Data Warehouse Protector uses vaultless tokenization and central policy control for access management and secures sensitive data at rest in data warehouses like Teradata, Exadata etc.
The data is protected from internal and external threats, and users and business processes can continue to utilize the secured data.
Protegrity protects the data using encryption and tokenization methods. In tokenization, the data is converted to similar looking inert data known as tokens where the data format and type can be preserved. These tokens can be detokenized back to the original values whenever required. Depending on the user access rights and the policies set using Policy Management in ESA, this data is unprotected.
The Protegrity Data Warehouse Protector provides the following features:
Provides fine grained field-level protection using role-based administration with a centralized security policy.
Provides Protegrity Format Preserving Encryption (FPE) method for structured data. The following data types are supported:
Numeric (0-9)
Alpha (a-z, A-Z)
Alpha-Numeric (0-9, a-z, A-Z)
Credit Card (0-9)
Unicode Basic Latin and Latin-1 Supplement Alpha
Unicode Basic Latin and Latin-1 Supplement Alpha-Numeric
Provides logging and viewing data access activities and real-time alerts with a centralized monitoring system.
Ensures minimal overhead for processing secured data, with minimal consumption of resources, threads and processes, and network bandwidth.
Deploying the Data Warehouse Protectors
Deploying the Protegrity Data Warehouse Protector involves the following key steps:
- The customer installs and initializes the required Data Warehouse Protector.
- The configurations that are required for the initialization process, are passed to the protector by using the
config.inifile. - The RP Agent synchronizes with the RP Proxy or ESA at regular intervals and checks for any changes in the policy. If there is a change in policy, then the RP Agent downloads the updated policy package over a TLS channel and stores in the shared memory.
- The protector synchronizes with the shared memory using the
cadencevalue set in theconfig.inifile. Any updates in the policy are fetched in the policy package. The policy is available in the shared memory and the policy package is available in the process memory. The updated policy package is read from the process memory and is used to perform the data security operations, such as, protect and unprotect. - The Audit logs from the Data Warehouse Protector are forwarded to the Audit Store using the Log Forwarder. The Audit logs generated by the RP Agent are forwarded to the Audit Store using the Log Forwarder.
The following are the two main components of Data Warehouse Protector:
Log Forwarder
The Log Forwarder is a log processing tool that collects the data security operation logs from the Data Warehouse Protector and forwards them to the Audit Store (Insight) in the ESA.
Resilient Package Agent
The RPAgent synchronizes with the RPProxy or ESA at regular intervals of 60 seconds and checks for any changes in the policy. If there is a change in policy, then it downloads the updated policy package over a TLS channel and stores in the shared memory.
5.1 - Teradata Data Warehouse Protector
The Protegrity Teradata Data Warehouse Protector has been optimized to work with the fast, parallel, and multi-node Teradata systems. This protector is the fastest protection point available on the market for Teradata databases.
The sections describe the Teradata Data Warehouse Protector architecture, components, and the protector usage in detail.
5.1.1 - Understanding the Teradata Architecture
The architecture for the Teradata distribution of the Data Warehouse Protector is depicted in the image below.
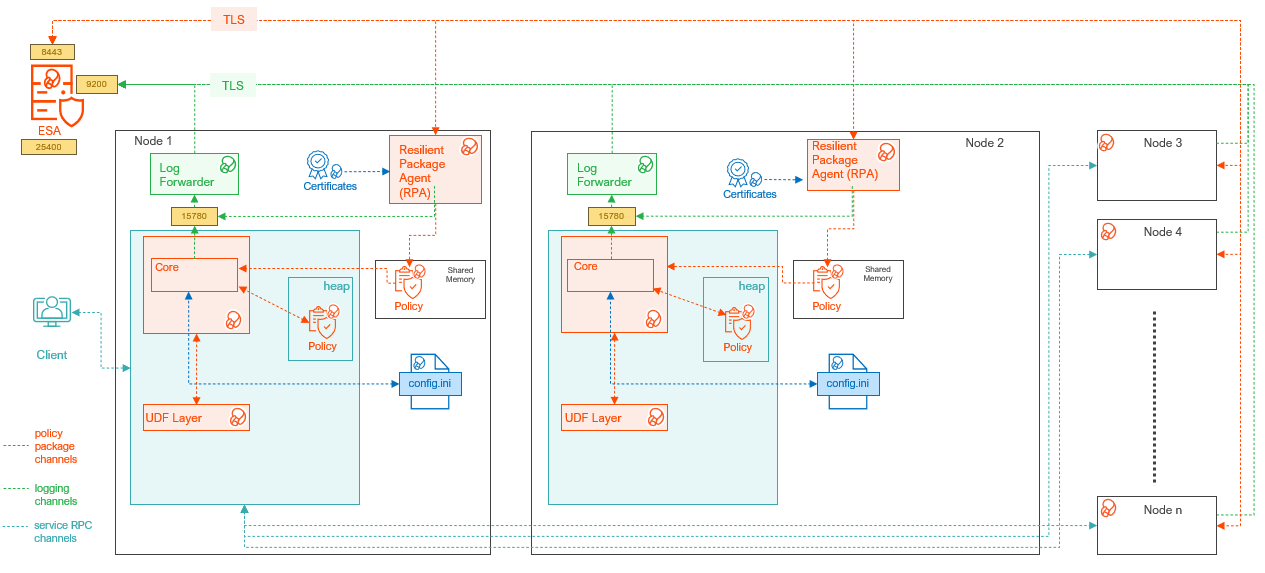
| Component Name | Description |
|---|---|
| Access Module Processor | Stores and retrieves all the protector data. It is also called as the Virtual Processor (vproc). |
| config.ini | Contains the set of configuration parameters to modify the protector behavior. |
| Core | Is the set of various libraries that provide the Protegrity Core functionality. |
| Log Forwarder | Forwards the protector logs to Insight. |
| Node | Serves as a central processing unit where the database operations are executed using a single operating system. |
| Resilient Package (RP) Agent | Is a daemon running on each node that downloads the Policy from the ESA over a TLS channel using the installed Certificates. |
| UDF Layer | Contains the Data Warehouse Protector UDFs and APIs executing in the Teradata service process. |
5.1.2 - System Requirements
Ensure that the following prerequisites are met, before installing the Teradata Data Warehouse Protector:
- The ESA appliance, v10.x or higher, is installed, configured, and running.
- The ports that are configured on the ESA and the nodes in the cluster, which will run the Data Warehouse Protector, are listed in the following table:
| Destination Port | Protocol | Source | Destination | Description |
|---|---|---|---|---|
| 25400 | TCP | RPAgent on the Data Warehouse Protector node | ESA | The RPAgent communicates with the ESA through this port to download a policy. |
| 9200 | TCP | Log Forwarder on the Data Warehouse Protector node | Protegrity Audit Store appliance | The Log Forwarder sends all the logs to the Protegrity Audit Appliance through port 9200. |
| 15780 and 15781 | TCP | Protector on the Data Warehouse Protector node | Log Forwarder on the Data Warehouse Protector node | The Data Warehouse Protector writes Audit Logs to localhost through this port. The Application Logs are also written to localhost through this port. The Log Forwarder reads the logs from that socket. |
- Additional requirements for each of the Teradata node:
- The pcl and rpsync utitlies are installed.
- Approximately 30% of free hard drive space is available.
- Network connectivity is available on every node.
- DBA rights on the Teradata database is available.
- Sudo access on the operating system is available.
- The Database Server is up and running.
- The C-compiler is installed. It is required to install the UDFs in the Teradata database.
Note: For more information about configuring access roles to execute the DBA queries, refer to Additional references for the Teradata Protector.
Note: If the Teradata Parallel Upgrade Tool (PUT) is unavailable, then the Data Warehouse Protector packages must be manually transferred and installed on each node.
Supported Data Warehouse Protectors Matrix
The below table lists the Data Warehouse protectors with the supported Data Warehouse version and platform details:
| Protector | Supported Data Warehouse Version | Supported Platforms |
|---|---|---|
| Teradata Data Warehouse Protector | Teradata 17.05 | SLES 12 |
| Teradata 17.10 | SLES 12 | |
| Teradata 17.20 | SLES 12 | |
| Teradata 20.00 | SLES 15 |
5.1.3 - Preparing the Environment
The following sub-sections explain how to install each of Teradata Data Warehouse Protector components, Log Forwarder, and the RPAgent individually. Installing components one by one ensures proper configuration and functionality.
5.1.3.1 - Extracting the Installation Package
Extract the installation package to access the scripts required to install the components and the protector.
To extract the files from the installation package:
Login to the database server as the user with the required permissions.
Navigate to the directory where the installation package is downloaded.
For example,/opt/protegrity/.To extract the contents of the installation package, run the following command:
tar -xvf DatabaseProtector_SLES-ALL-64_x86-64_Teradata-ALL-64_<DBP_version>.tgzPress ENTER.
The commands extracts the signature files from the package.DatabaseProtector_SLES-ALL-64_x86-64_Teradata-ALL-64_<DBP_version>.tgz signatures/DatabaseProtector_SLES-ALL-64_x86-64_Teradata-ALL-64_<DBP_version>.sigNote: For more information about the steps to verify the signed Teradata Data Warehouse protector build, refer to Verification of Signed Protector Build.
To extract the contents of the installation package, run the following command:
tar -xvf DatabaseProtector_SLES-ALL-64_x86-64_Teradata-ALL-64_<DBP_version>.tgzPress ENTER.
The commands extracts the following files:Install_TeradataProtector_Linux_x64_<DBP_version>.sh LogforwarderSetup_Linux_x64_<DBP_version>.sh RPAgentSetup_Linux_x64_<DBP_version>.sh PepTeradataSetup_Linux_x64_<DBP_version>.sh PepTeradata_UDTSetup_Linux_x64_<DBP_version>.sh U.S.Patent.No.6,321,201.Legend.txt
5.1.3.2 - Installing the Log Forwarder
This section provides instructions to manually install the Log Forwarder on the Teradata database server.
Note: To automate the installation process, use the master installation script provided in the build:
Install_TeradataProtector_Linux_x64_<DBP_version>.shFor more information, refer to the following sections:
To install the Log Forwarder:
Log in to the server as the user with the required permissions.
Navigate to the directory where the installation files are extracted.
For example,
/opt/protegrity/.To install the Log Forwarder, run the following command:
./LogforwarderSetup_Linux_x64_<DBP_version>.shPress ENTER. The prompt to enter the audit store endpoint appears.
Enter the audit store endpoint (host), alternative (host:port) to use another port than the default port 9200 :Enter the IP address of the audit store.
Press ENTER. The prompt to enter additional endpoint appears.
Audit store endpoints: <Audit_store_IP_address>:9200 Do you want to add another audit store endpoint? [y/n]:To skip adding additional endpoints, type
no.Press ENTER. The prompt to continue the installation appears.
These audit store endpoints will be added: <Audit_store_IP_address>:9200 Type 'y' to accept or 'n' to abort installation:To continue the installation, type
yes.Press ENTER. The script extracts the files and installs the Log Forwarder.
Unpacking... Extracting files... Protegrity Log Forwarder installed in /opt/protegrity/logforwarder.Note: For manual installation, the script will install the component under the specified directory only.
Navigate to the
/opt/protegrity/logforwarder/bin/directory.To start the Log Forwarder, run the following command:
./logforwarderctrl startPress ENTER.
The command starts the Log Forwarder.[ info] switching to background mode (PID=8329) Logforwarder started, PID (<process_ID>) written to PID file /opt/protegrity/logforwarder/ bin/fluent-bit.pid
5.1.3.3 - Installing the Resilient Package Agent
This section provides instructions to manually install the RPAgent on the Teradata database server.
Note: To automate the installation process, use the master installation script provided in the build:
Install_TeradataProtector_Linux_x64_<DBP_version>.sh
For more information, refer to the following sections:
The Resilient Package (RP) Agent downloads the certificates. These certificates are further used to authenticate the login credentials, public or private keys, and certify the code reliability.
Prerequsites: The core libraries integrated with the build uses the secure mode to validate and download the certificates from ESA. To enable the secure mode:
- Before proceeding with the RPA installation in secure mode, ensure that the required CA certificate is available and trusted on the system.
- Download the certificate from ESA.
Note: For more information about downloading certificates from ESA, refer to Manage Certificates.
- After obtaining the certificate, configure the environment variable
Variable Value SSL_CERT_FILEIs the full path to the certificate file. - Ensure to include ESA hostname or IP address in ESA TLS certificate (CN or SAN).
- Ensure the ESA hostname or IP addres is resolvable from the RPAgent host.
To install the RPAgent:
Log in to the server as the user with the required permissions.
Navigate to the directory where the installation files are extracted. For example,
/opt/protegrity/.To install the RP Agent, run the following command:
./RPAgentSetup_Linux_x64_<DBP_version>.shPress ENTER.
The prompt to enter the host name or the IP address of the ESA appears.Please enter upstream host name or IP address[]:Enter the hostname for ESA.
Note: Failure to specify the hostname will use the insecure mode to validate the certificates. Protegrity does not recommend using the insecure mode to validate and download the certificates from ESA.
Press ENTER.
The prompt to enter the username for downloading the certificate appears.Please enter the user name for downloading certificates[]:Enter the username to download the certificates.
Press ENTER.
The prompt to enter the password for downloading the certificate appears.Please enter the password for downloading certificates []:Enter the password to download the certificates.
Press ENTER.
The installer extracts the files and downloads the certificates.Unpacking... Extracting files... Certificate validation successful. Obtaining token from <ESA_Hostname>:25400... Downloading certificates from <ESA_Hostname>:25400... % Total % Received % Xferd Average Speed Time Time Time Current Dload Upload Total Spent Left Speed 100 11264 100 11264 0 0 51225 0 0 Extracting certificates... Certificates successfully downloaded and stored in /opt/protegrity/rpagent/data Protegrity RPAgent installed in /opt/protegrity/rpagent.Note: If the JWT token is not specified while downloading the certificates, the RPAgent automatically retrieves the token from ESA. Note: For manual installation, the script will install the component under the specified directory only.
Navigate to the
/opt/protegrity/rpagent/bin/directory.To start the RPAgent, run the following command:
./rpagentctrl startPress ENTER.
The command starts the RPAgent successfully and a confirmation message appears.Starting rpagentTo verify the status of the RPAgent, run the following command:
./rpagentctrl statusPress ENTER.
The status of the RPAgent service appears.rpagent is running (pid=<process_ID>)
5.1.4 - Installing the Teradata Data Warehouse Protector
This section outlines the installation process for the Protegrity Teradata Data Warehouse Protector.
5.1.4.1 - Installing the Objects
Log in to the server as the user with the required permissions.
Navigate to the
/opt/protegrity/directory.To install the Teradata objects, run the following command:
./PepTeradataSetup_Linux_x64_<DBP_version>.shPress ENTER.
The prompt to continue installing the Teradata objects appears.***************************************************** Welcome to the Database Protector Setup Wizard ***************************************************** This will install the teradata objects on your computer Do you want to continue? [yes or no]To proceed with the installation of the Teradata objects, type
yes.Press ENTER.
The prompt to enter the name of the database to install the UDFs appears.Enter name of database where the UDFs will be installed.Enter the database name.
Press ENTER.
The prompt to mention the maximum size of the VARCHAR allocated by the UDFs appears.Enter the maximum size of the VARCHAR to be allocated by the UDFs.
Note: The default value is 500 characters. Modify the default value in this step, as per requirements, for maximum character length. The mentioned VARCHAR size is the maximum value allocated by the UDFs for UNICODE character set.
Press ENTER.
The script installs the Teradata objects in the/opt/protegrity/databaseprotector/teradata/directory.[500]: 1000 ***********BUFFER LENGTH INITIALIZATION************** UDF VARCHAR MAX INPUT BUFFER LENGTH (TOKENIZATION) : 1000 Latin characters UDF VARCHAR MAX OUTPUT BUFFER LENGTH (TOKENIZATION) : 1351 Latin characters UDF VARCHAR MAX INPUT BUFFER LENGTH (ENCRYPTION) : 1000 Latin characters UDF VARCHAR MAX OUTPUT BUFFER LENGTH (ENCRYPTION) : 1038 Bytes UDF VARCHAR_UNICODE MAX INPUT BUFFER LENGTH (TOKENIZATION) : 1000 UNICODE characters UDF VARCHAR_UNICODE MAX OUTPUT BUFFER LENGTH (TOKENIZATION) : 2706 UNICODE characters UDF VARCHAR_UNICODE MAX INPUT BUFFER LENGTH (ENCRYPTION) : 1000 UNICODE characters UDF VARCHAR_UNICODE MAX OUTPUT BUFFER LENGTH (ENCRYPTION) : 2038 Bytes teradata objects installed in /opt/protegrity/databaseprotector/teradata. Permission for /opt/protegrity/databaseprotector is successfully set.Note: For manual installation, the script will install the database objects under the specified directory only. Important: By default, all the configurations provided for the UDFs are stored in the
dbpuserconf.inifile within the/etc/protegrity/directory. The Teradata Data Warehouse Protector uses thedbpuserconf.inifile for internal purposes only.
5.1.4.2 - Installing the Protector on Single Node
The Teradata Data Warehouse Protector build provides an automated script to manage the installation process on a standalone system. The master script internally calls the scripts to install the components. The master script installs the components in the following order:
- Log Forwarder
- RPAgent
- Policy Enforcement Point (Database Protector)
The installation can also be performed manually by executing the individual scripts to install the different components.
The master script is available in the directory where the installation files are extracted. It provides the following arguments:
install- installs the components in an interactive mode.upgrade- installs a newer version of the protector with minimal downtime.silent- installs the components in a non-interactive mode.install.ini- installs the components as per the parameters provided in the file.help- lists the arguments available for the script.
In addition, the master script will rollback the installation process if any errors are encountered. The script will revert the changes.
Viewing the Arguments for the Script
- Log in to the server as the user with the required permissions.
- Navigate to the directory containing the extracted files and the installation scripts.
- To view the arguments, run the following command:
./Install_TeradataProtector_Linux_x64_<DBP_version>.sh --help - Press ENTER.
The script lists the available arguments.
Options: --install Use this option when installing the solution for the first time on a machine/host. (i.e., there is no previous installation present) --upgrade Use this option when upgrading an existing installation on the machine/host. --install-ini <file> (Optional) Provide a path to an install.ini file for silent or pre-configured installations. This option works with --install only. It must not be used with --upgrade or --silent. You can pass this either as: --install-ini /path/to/install.ini or --install-ini=/path/to/install.ini Refer to the product documentation for details about the configuration options available in install.ini. The documentation describes all supported keys, required fields, and example configurations. --silent (Optional) Runs the installation/upgrade in silent mode with minimum interactive prompts. --help, -h Display this help message and exit.
Installing the Protector using the Interactive Mode
Note: For installation/upgrade using the automation script, the components will be installed within a <DBP_version> folder under the specified directory.
- Log in to the server as the user with the required permissions.
- Navigate to the directory containing the extracted files and the installation scripts.
- To execute the script, run the following command:
./Install_TeradataProtector_Linux_x64_<DBP_version>.sh --install - Press ENTER.
The script executes pre-checks and the prompt to select the silent mode of installation appears.
2026-04-30 08:32:43 - [INFO] ======================================================================== 2026-04-30 08:32:43 - [INFO] Starting environment pre-checks before installation/upgrade 2026-04-30 08:32:43 - [INFO] ======================================================================== 2026-04-30 08:32:43 - [INFO] Prerequisites check passed: pcl and bteq commands are available on current/running node 2026-04-30 08:32:43 - [INFO] Checking Teradata PDE state on running node... 2026-04-30 08:32:43 - [INFO] PDE state check passed on running node: PDE state is RUN/STARTED 2026-04-30 08:32:43 - [INFO] Checking accessibility of all Teradata nodes... 2026-04-30 08:32:43 - [INFO] IMPORTANT: ALL nodes must be accessible - if even 1 node is down, installation will be aborted 2026-04-30 08:32:43 - [INFO] ========================================== 2026-04-30 08:32:43 - [INFO] Node accessibility check PASSED 2026-04-30 08:32:43 - [INFO] All 1 node(s) have connected <--------------------- localhost --------------------------------> td20sles15 2026-04-30 08:32:43 - [INFO] ========================================== 2026-04-30 08:32:43 - [INFO] ======================================================================== 2026-04-30 08:32:43 - [INFO] All environment pre-checks PASSED - proceeding with installation 2026-04-30 08:32:43 - [INFO] ======================================================================== Do you want silent installation? (yes/no) [no]: - To proceed with interactive mode of installation, type
no. - Press ENTER.
The prompt to specify the installation directory for the components appears.Do you want to install the new LogForwarder, RPAgent, and DatabaseProtector together in a single directory? (yes/no) [no]: - To install the components under a same directory, type
yes. - Press ENTER.
The prompt to enter the installation directory appears.Enter new installation directory [/opt/protegrity]: - To use the default directory, press ENTER.
The prompt to provide credentials to create the UDFs appears.Do you want to continue and create UDFs? To create the UDFs, provide the database credentials (yes/no) [no]: - To create the UDFs, type
yes.Note: Skipping creation of the UDFs terminates the installation script.
- Press ENTER.
The prompt to enter the database user name appears.Enter Teradata database username: - Enter the username to login to the database.
- Press ENTER.
The prompt to enter the database password appears.Enter Teradata database user's password: - Enter the password.
- Press ENTER.
The prompt to specify the database to install the UDF appears.Enter name of database where the UDFs will be installed [PROTEGRITY]: - Enter the database name to install the UDFs.
- Press ENTER.
The prompt to specify the maximum size of varchar to be allocated by the UDFs appears.Enter the maximum size of varchar to be allocated by the UDFs [500]: - Enter the maximum size of varchar to be allocated by the UDFs.
- Press ENTER.
The script validates the database and the prompt to verify the configuration appears.2026-04-30 08:33:06 - [INFO] Validating database ... 2026-04-30 08:33:26 - [INFO] Database validated successfully 2026-04-30 08:33:26 - [INFO] ************************************************************************** 2026-04-30 08:33:26 - [INFO] Installation will be done with following configuration: 2026-04-30 08:33:26 - [INFO] Mode: install 2026-04-30 08:33:26 - [INFO] Logforwarder Installation Directory: /opt/protegrity/<DBP_version> 2026-04-30 08:33:26 - [INFO] RPAgent Installation Directory: /opt/protegrity/<DBP_version> 2026-04-30 08:33:26 - [INFO] DatabaseProtector Installation Directory: /opt/protegrity/<DBP_version> 2026-04-30 08:33:26 - [INFO] This is a fresh install. 2026-04-30 08:33:26 - [INFO] ************************************************************************** 2026-04-30 08:33:26 - [INFO] Please verify the above configuration before proceeding. Do you want to continue? (yes/no) [no]: - To continue, type
yes. - Press ENTER.
The script proceeds with the installation and triggers the Log Forwarder installation script. The prompt to enter the Audit Store endpoint appears.2026-04-30 08:33:31 - [INFO] Continuing with installation... 2026-04-30 08:33:31 - [INFO] Installing/Upgrading LOGFORWARDER... 2026-04-30 08:33:31 - [INFO] Executing ./LogforwarderSetup_Linux_x64_<DBP_version>.sh... Enter the audit store endpoint (host), alternative (host:port) to use another port than the default port 9200: - Enter the audit store endpoint.
- Press ENTER.
The prompt to enter additional audit store endpoint appears.Audit store endpoints: <ESA_IP_Address>:9200 Do you want to add another audit store endpoint? [y/n]: - To specify additional endpoints, type
yes. - Press ENTER.
The prompt to enter the Audit Store endpoint appears.Enter the audit store endpoint (host), alternative (host:port) to use another port than the default port 9200: - Enter the audit store endpoint.
- Press ENTER.
The script lists the endpoints that will be added. The prompt to accept and continue the installation appears.------------------------------------------- These audit store endpoints will be added: <ESA_IP_Address>:9200 <ESA_IP_Address>:9200 <ESA_IP_Address>:9200 Type 'y' to accept or 'n' to abort installation: - To accept the endpoints and proceed, type
yes. - Press ENTER.
The script installs the log forwarder. The script then triggers the RPAgent installation script. The prompt to enter the upstream host name or IP address appears.Unpacking... Extracting files... Protegrity Log Forwarder installed in /opt/protegrity/<DBP_version>/logforwarder. 2026-04-30 08:33:58 - [INFO] ./LogforwarderSetup_Linux_x64_<DBP_version>.sh completed successfully. 2026-04-30 08:33:58 - [INFO] Installing/Upgrading RPAGENT... Please enter upstream host name or IP address, alternative (host:port) to use another port than the default port 25400: - Enter the ESA hostname.
- Press ENTER.
The prompt to enter ESA token appears.Enter ESA token (leave blank to use username/password): - To specify the username/password, press ENTER.
The prompt to enter ESA username appears.
Enter ESA username: - Enter the username to connect to ESA.
- Press ENTER.
The prompt to enter ESA password appears.Enter ESA user's password: - Enter the password to connect to ESA.
- Press ENTER.
The script:- validates and downloads the certificates from ESA
- installs the RPAgent
- copies the Log Forwarder and RPAgent to all the nodes in the Teradata cluster
- creates installation directories
- starts the new Log Forwarder on all the nodes
- triggers the script to install the database objects
- installs the database objects
- copies the objects to all the nodes in the cluster
- starts the new RPAgent on all the nodes
- creates the new UDFs
The prompt to create the varcharunicode UDFs appears.
2026-04-30 08:34:16 - [INFO] Executing ./RPAgentSetup_Linux_x64_<DBP_version>.sh... Unpacking... Extracting files... Certificate validation successful. Obtaining token from <ESA_Hostname>:25400... Downloading certificates from <ESA_Hostname>:25400... % Total % Received % Xferd Average Speed Time Time Time Current Dload Upload Total Spent Left Speed 100 11264 100 11264 0 0 63570 0 0 Extracting certificates... Certificates successfully downloaded and stored in /opt/protegrity/<DBP_version>/rpagent/data Protegrity RPAgent installed in /opt/protegrity/<DBP_version>/rpagent. 2026-04-30 08:34:18 - [INFO] ./RPAgentSetup_Linux_x64_<DBP_version>.sh completed successfully. 2026-04-30 08:34:18 - [INFO] Copying Logforwarder and RPAgent to all nodes in the Teradata cluster 2026-04-30 08:34:18 - [INFO] Copying Logforwarder and RPAgent components to all nodes 2026-04-30 08:34:18 - [INFO] Creating installation directories on all nodes if not present All 1 node(s) have connected All 1 node(s) have connected All 1 node(s) have connected All 1 node(s) have connected 2026-04-30 08:34:19 - [INFO] Copying Logforwarder directory /opt/protegrity/<DBP_version>/logforwarder to all nodes All 1 node(s) have connected localhost:1022: send completed: 57934195 bytes received (9 files/5 directories) All 1 node(s) have connected All 1 node(s) have connected 2026-04-30 08:34:20 - [INFO] Logforwarder successfully copied to all nodes 2026-04-30 08:34:20 - [INFO] Copying RPAgent directory /opt/protegrity/<DBP_version>/rpagent to all nodes All 1 node(s) have connected localhost:1022: send completed: 14787376 bytes received (9 files/3 directories) All 1 node(s) have connected All 1 node(s) have connected 2026-04-30 08:34:21 - [INFO] RPAgent successfully copied to all nodes 2026-04-30 08:34:21 - [INFO] Logforwarder and RPAgent successfully copied to all nodes 2026-04-30 08:34:21 - [INFO] Starting new Logforwarder on all nodes All 1 node(s) have connected <--------------------- localhost --------------------------------> Fluent Bit v4.2.2-1.5.1+0.gdfa6.fb-4.2 * Copyright (C) 2015-2025 The Fluent Bit Authors * Fluent Bit is a CNCF graduated project under the Fluent organization * https://fluentbit.io ______ _ _ ______ _ _ ___ _____ | ___| | | | | ___ (_) | / | / __ \ | |_ | |_ _ ___ _ __ | |_ | |_/ /_| |_ __ __/ /| | `' / /' | _| | | | | |/ _ \ '_ \| __| | ___ \ | __| \ \ / / /_| | / / | | | | |_| | __/ | | | |_ | |_/ / | |_ \ V /\___ |_./ /___ \_| |_|\__,_|\___|_| |_|\__| \____/|_|\__| \_/ |_(_)_____/ Fluent Bit v4.2 Direct Routes Ahead Celebrating 10 Years of Open, Fluent Innovation! [2026/04/30 08:34:22.133493631] [ info] switching to background mode (PID=28685) Log Forwarder was not started successfully 2026-04-30 08:34:24 - [INFO] Preparing Database Protector installation... 2026-04-30 08:34:24 - [INFO] Installing/Upgrading DBP... 2026-04-30 08:34:24 - [INFO] Executing ./PepTeradataSetup_Linux_x64_<DBP_version>.sh... ***************************************************** Welcome to the Database Protector Setup Wizard ***************************************************** This will install the teradata objects on your computer Do you want to continue? [yes or no] Enter installation directory. A new directory will be created in the installation directory. [/opt/protegrity]: Unpacking... Extracting files... Enter name of database where the UDFs will be installed. [PROTEGRITY]: Enter maxmimum size of varchar to be allocated by the UDFs. NOTE: This is the maximum varchar size allocated by the UDFs for latin as well as unicode character set. Larger size will affect the performance !!! Some applications can also have issues with larger size, such as BTEQ, SQL Assistant. [500]: ***********BUFFER LENGTH INITIALIZATION************** UDF VARCHAR MAX INPUT BUFFER LENGTH (TOKENIZATION) : 500 Latin characters UDF VARCHAR MAX OUTPUT BUFFER LENGTH (TOKENIZATION) : 676 Latin characters UDF VARCHAR MAX INPUT BUFFER LENGTH (ENCRYPTION) : 500 Latin characters UDF VARCHAR MAX OUTPUT BUFFER LENGTH (ENCRYPTION) : 538 Bytes UDF VARCHAR_UNICODE MAX INPUT BUFFER LENGTH (TOKENIZATION) : 500 UNICODE characters UDF VARCHAR_UNICODE MAX OUTPUT BUFFER LENGTH (TOKENIZATION) : 1356 UNICODE characters UDF VARCHAR_UNICODE MAX INPUT BUFFER LENGTH (ENCRYPTION) : 500 UNICODE characters UDF VARCHAR_UNICODE MAX OUTPUT BUFFER LENGTH (ENCRYPTION) : 1038 Bytes teradata objects installed in /opt/protegrity/<DBP_version>/databaseprotector/teradata. 2026-04-30 08:34:25 - [INFO] ./PepTeradataSetup_Linux_x64_<DBP_version>.sh completed successfully. 2026-04-30 08:34:25 - [INFO] Copying DatabaseProtector to all nodes All 1 node(s) have connected localhost:1022: send completed: 8926075 bytes received (16 files/5 directories) All 1 node(s) have connected All 1 node(s) have connected 2026-04-30 08:34:26 - [INFO] Setting DatabaseProtector ownership (tdatuser:tdtrusted) on all nodes All 1 node(s) have connected 2026-04-30 08:34:26 - [INFO] DatabaseProtector successfully copied to all nodes 2026-04-30 08:34:26 - [INFO] Synchronizing /etc/protegrity to all nodes All 1 node(s) have connected All 1 node(s) have connected localhost:1022: send completed: 1157 bytes received (1 files/1 directories) All 1 node(s) have connected All 1 node(s) have connected All 1 node(s) have connected 2026-04-30 08:34:27 - [INFO] User configuration directory successfully synchronized to all nodes 2026-04-30 08:34:27 - [INFO] Starting new RPAgent on all nodes Starting rpagent 2026-04-30 08:34:27 - [INFO] Successfully launched new RPAgent on all nodes 2026-04-30 08:34:27 - [INFO] Creating new UDFs (database operation on current node only - shared across all nodes) BTEQ 20.00.00.05 (64-bit) Thu Apr 30 08:34:27 2026 PID: 30406 +---------+---------+---------+---------+---------+---------+---------+---- .SET EXITONDELAY ON MAXREQTIME 300 RC 12 +---------+---------+---------+---------+---------+---------+---------+---- .logon localhost/<database_user_name>, *** Logon successfully completed. *** Teradata Database Release is 20.00.22.31 *** Teradata Database Version is 20.00.22.31 *** Transaction Semantics are BTET. *** Session Character Set Name is 'ASCII'. *** Total elapsed time was 21 seconds. +---------+---------+---------+---------+---------+---------+---------+---- database <database_name>; *** New default database accepted. *** Total elapsed time was 1 second. +---------+---------+---------+---------+---------+---------+---------+---- .IF ERRORCODE <> 0 THEN .QUIT 12; +---------+---------+---------+---------+---------+---------+---------+---- .run file /opt/protegrity/<DBP_version>/databaseprotector/teradata/sqlscripts/c reateobjects.sql; +---------+---------+---------+---------+---------+---------+---------+---- Do you want to create the varcharunicode UDFs? (yes/no) [no]: - To create the varcharunicode UDFs, type
yes. - Press ENTER.
The script creates the varchar unicode UDFs and completes the installation.
2026-04-30 08:35:25 - [INFO] Creating varcharunicode UDFs BTEQ 20.00.00.05 (64-bit) Thu Apr 30 08:35:25 2026 PID: 31403 +---------+---------+---------+---------+---------+---------+---------+---- .SET EXITONDELAY ON MAXREQTIME 300 RC 12 +---------+---------+---------+---------+---------+---------+---------+---- .logon localhost/<database_user_name>, *** Logon successfully completed. *** Teradata Database Release is 20.00.22.31 *** Teradata Database Version is 20.00.22.31 *** Transaction Semantics are BTET. *** Session Character Set Name is 'ASCII'. *** Total elapsed time was 20 seconds. +---------+---------+---------+---------+---------+---------+---------+---- database <database_name>; *** New default database accepted. *** Total elapsed time was 1 second. +---------+---------+---------+---------+---------+---------+---------+---- .IF ERRORCODE <> 0 THEN .QUIT 12; +---------+---------+---------+---------+---------+---------+---------+---- .run file /opt/protegrity/<DBP_version>/databaseprotector/teradata/sqlscripts/c reatevarcharunicode.sql; +---------+---------+---------+---------+---------+---------+---------+---- 2026-04-30 08:35:49 - [INFO] Varcharunicode UDFs created successfully 2026-04-30 08:35:49 - [INFO] Testing UDFs BTEQ 20.00.00.05 (64-bit) Thu Apr 30 08:35:49 2026 PID: 31505 +---------+---------+---------+---------+---------+---------+---------+---- .SET EXITONDELAY ON MAXREQTIME 300 RC 12 +---------+---------+---------+---------+---------+---------+---------+---- .logon localhost/<database_user_name>, *** Logon successfully completed. *** Teradata Database Release is 20.00.22.31 *** Teradata Database Version is 20.00.22.31 *** Transaction Semantics are BTET. *** Session Character Set Name is 'ASCII'. *** Total elapsed time was 20 seconds. +---------+---------+---------+---------+---------+---------+---------+---- database <database_name>; *** New default database accepted. *** Total elapsed time was 1 second. +---------+---------+---------+---------+---------+---------+---------+---- .IF ERRORCODE <> 0 THEN .QUIT 12; +---------+---------+---------+---------+---------+---------+---------+---- select pty_getversion(); *** Query completed. One row found. One column returned. *** Total elapsed time was 1 second. pty_getversion() --------------------------------------------------------------------------- <DBP_version> +---------+---------+---------+---------+---------+---------+---------+---- .logoff *** You are now logged off from the <database_user_name>. +---------+---------+---------+---------+---------+---------+---------+---- .quit *** Exiting BTEQ... *** RC (return code) = 0 2026-04-30 08:36:09 - [INFO] Installation successful. 2026-04-30 08:36:09 - [INFO] All components installed successfully. 2026-04-30 08:36:09 - [INFO] IMPORTANT: Protegrity UDT installation must be handled manually. Refer to product documentation. 2026-04-30 08:36:09 - [INFO] IMPORTANT: Protegrity Decimal UDF objects installation must be handled manually. Refer to product documentation.
Installing the Protector using the Silent Mode
Note: For installation/upgrade using the automation script, the components will be installed within a <DBP_version> folder under the specified directory.
- Log in to the server as the user with the required permissions.
- Navigate to the directory containing the extracted files and the installation scripts.
- To execute the script, run the following command:
./Install_TeradataProtector_Linux_x64_<DBP_version>.sh --install - Press ENTER.
The script executes pre-checks and the prompt to select the silent mode of installation appears.2026-04-30 08:32:43 - [INFO] ======================================================================== 2026-04-30 08:32:43 - [INFO] Starting environment pre-checks before installation/upgrade 2026-04-30 08:32:43 - [INFO] ======================================================================== 2026-04-30 08:32:43 - [INFO] Prerequisites check passed: pcl and bteq commands are available on current/running node 2026-04-30 08:32:43 - [INFO] Checking Teradata PDE state on running node... 2026-04-30 08:32:43 - [INFO] PDE state check passed on running node: PDE state is RUN/STARTED 2026-04-30 08:32:43 - [INFO] Checking accessibility of all Teradata nodes... 2026-04-30 08:32:43 - [INFO] IMPORTANT: ALL nodes must be accessible - if even 1 node is down, installation will be aborted 2026-04-30 08:32:43 - [INFO] ========================================== 2026-04-30 08:32:43 - [INFO] Node accessibility check PASSED 2026-04-30 08:32:43 - [INFO] All 1 node(s) have connected <--------------------- localhost --------------------------------> td20sles15 2026-04-30 08:32:43 - [INFO] ========================================== 2026-04-30 08:32:43 - [INFO] ======================================================================== 2026-04-30 08:32:43 - [INFO] All environment pre-checks PASSED - proceeding with installation 2026-04-30 08:32:43 - [INFO] ======================================================================== Do you want silent installation? (yes/no) [no]: - To proceed with silent mode of installation, type
yes. - Press ENTER.
The script uses the default installation directory, /opt/protegrity/, for silent installation. The prompt to create UDFs and provide database credentials appears.2026-04-30 08:08:27 - [INFO] You have chosen silent mode. Therefore, /opt/protegrity is considered as base directory for new installation. Do you want to continue and create UDFs? To create the UDFs, provide the database credentials (yes/no) [no]: - To create the UDFs, type
yes.Note: Skipping creation of the UDFs terminates the installation script.
- Press ENTER.
The prompt to enter the database username appears.Enter Teradata database username: - Enter the username.
- Press ENTER.
The prompt to enter the password appears.Enter Teradata database user's password: - Enter the password.
- Press ENTER.
The prompt to enter the database name appears.Enter name of database where the UDFs will be installed [PROTEGRITY]: - Enter the database name to install the UDFs.
- Press ENTER.
The prompt to specify the maximum size of varchar to be allocated by the UDFs appears.Enter the maximum size of varchar to be allocated by the UDFs [500]: - Enter the maximum size of varchar to be allocated by the UDFs.
- Press ENTER.
The script validates the database. The script lists the configuration and the prompt to continue appears.2026-04-30 08:08:53 - [INFO] Validating database ... 2026-04-30 08:09:13 - [INFO] Database validated successfully 2026-04-30 08:09:13 - [INFO] ************************************************************************** 2026-04-30 08:09:13 - [INFO] Installation will be done with following configuration: 2026-04-30 08:09:13 - [INFO] Mode: install 2026-04-30 08:09:13 - [INFO] Logforwarder Installation Directory: /opt/protegrity/<DBP_version> 2026-04-30 08:09:13 - [INFO] RPAgent Installation Directory: /opt/protegrity/<DBP_version> 2026-04-30 08:09:13 - [INFO] DatabaseProtector Installation Directory: /opt/protegrity/<DBP_version> 2026-04-30 08:09:13 - [INFO] This is a fresh install. 2026-04-30 08:09:13 - [INFO] ************************************************************************** 2026-04-30 08:09:13 - [INFO] Please verify the above configuration before proceeding. Do you want to continue? (yes/no) [no]: - To proceed with the configuration, type
yes. - Press ENTER.
The script proceeds with the installation and triggers the Log Forwarder installation script. The prompt to enter the Audit Store endpoint appears.2026-04-30 08:33:31 - [INFO] Continuing with installation... 2026-04-30 08:33:31 - [INFO] Installing/Upgrading LOGFORWARDER... 2026-04-30 08:33:31 - [INFO] Executing ./LogforwarderSetup_Linux_x64_<DBP_version>.sh... Enter the audit store endpoint (host), alternative (host:port) to use another port than the default port 9200: - Enter the audit store endpoint.
- Press ENTER.
The prompt to enter additional audit store endpoint appears.Audit store endpoints: <ESA_IP_Address>:9200 Do you want to add another audit store endpoint? [y/n]: - To specify additional endpoints, type
yes. - Press ENTER.
The prompt to enter the Audit Store endpoint appears.Enter the audit store endpoint (host), alternative (host:port) to use another port than the default port 9200: - Enter the audit store endpoint.
- Press ENTER.
The script lists the endpoints that will be added. The prompt to accept and continue the installation appears.------------------------------------------- These audit store endpoints will be added: <ESA_IP_Address>:9200 <ESA_IP_Address>:9200 <ESA_IP_Address>:9200 Type 'y' to accept or 'n' to abort installation: - To accept the endpoints and proceed, type
yes. - Press ENTER.
The script installs the log forwarder. The script then triggers the RPAgent installation script. The prompt to enter the upstream host name or IP address appears.Unpacking... Extracting files... Protegrity Log Forwarder installed in /opt/protegrity/<DBP_version>/logforwarder. 2026-04-30 08:33:58 - [INFO] ./LogforwarderSetup_Linux_x64_<DBP_version>.sh completed successfully. 2026-04-30 08:33:58 - [INFO] Installing/Upgrading RPAGENT... Please enter upstream host name or IP address, alternative (host:port) to use another port than the default port 25400: - Enter the ESA hostname.
- Press ENTER.
The prompt to enter ESA token appears.Enter ESA token (leave blank to use username/password): - To specify the username/password, press ENTER.
The prompt to enter ESA username appears.Enter ESA username: - Enter the username to connect to ESA.
- Press ENTER.
The prompt to enter ESA password appears.Enter ESA user's password: - Enter the password to connect to ESA.
- Press ENTER.
The script:- validates and downloads the certificates from ESA
- installs the RPAgent
- copies the Log Forwarder and RPAgent to all the nodes in the Teradata cluster
- creates installation directories
- starts the new Log Forwarder on all the nodes
- triggers the script to install the database objects
- installs the database objects
- copies the objects to all the nodes in the cluster
- starts the new RPAgent on all the nodes
- creates the new UDFs The prompt to create the varcharunicode UDFs appears.
2026-04-30 08:34:16 - [INFO] Executing ./RPAgentSetup_Linux_x64_<DBP_version>.sh... Unpacking... Extracting files... Certificate validation successful. Obtaining token from <ESA_Hostname>:25400... Downloading certificates from <ESA_Hostname>:25400... % Total % Received % Xferd Average Speed Time Time Time Current Dload Upload Total Spent Left Speed 100 11264 100 11264 0 0 63570 0 0 Extracting certificates... Certificates successfully downloaded and stored in /opt/protegrity/<DBP_version>/rpagent/data Protegrity RPAgent installed in /opt/protegrity/<DBP_version>/rpagent. 2026-04-30 08:34:18 - [INFO] ./RPAgentSetup_Linux_x64_<DBP_version>.sh completed successfully. 2026-04-30 08:34:18 - [INFO] Copying Logforwarder and RPAgent to all nodes in the Teradata cluster 2026-04-30 08:34:18 - [INFO] Copying Logforwarder and RPAgent components to all nodes 2026-04-30 08:34:18 - [INFO] Creating installation directories on all nodes if not present All 1 node(s) have connected All 1 node(s) have connected All 1 node(s) have connected All 1 node(s) have connected 2026-04-30 08:34:19 - [INFO] Copying Logforwarder directory /opt/protegrity/<DBP_version>/logforwarder to all nodes All 1 node(s) have connected localhost:1022: send completed: 57934195 bytes received (9 files/5 directories) All 1 node(s) have connected All 1 node(s) have connected 2026-04-30 08:34:20 - [INFO] Logforwarder successfully copied to all nodes 2026-04-30 08:34:20 - [INFO] Copying RPAgent directory /opt/protegrity/<DBP_version>/rpagent to all nodes All 1 node(s) have connected localhost:1022: send completed: 14787376 bytes received (9 files/3 directories) All 1 node(s) have connected All 1 node(s) have connected 2026-04-30 08:34:21 - [INFO] RPAgent successfully copied to all nodes 2026-04-30 08:34:21 - [INFO] Logforwarder and RPAgent successfully copied to all nodes 2026-04-30 08:34:21 - [INFO] Starting new Logforwarder on all nodes All 1 node(s) have connected <--------------------- localhost --------------------------------> Fluent Bit v4.2.2-1.5.1+0.gdfa6.fb-4.2 * Copyright (C) 2015-2025 The Fluent Bit Authors * Fluent Bit is a CNCF graduated project under the Fluent organization * https://fluentbit.io ______ _ _ ______ _ _ ___ _____ | ___| | | | | ___ (_) | / | / __ \ | |_ | |_ _ ___ _ __ | |_ | |_/ /_| |_ __ __/ /| | `' / /' | _| | | | | |/ _ \ '_ \| __| | ___ \ | __| \ \ / / /_| | / / | | | | |_| | __/ | | | |_ | |_/ / | |_ \ V /\___ |_./ /___ \_| |_|\__,_|\___|_| |_|\__| \____/|_|\__| \_/ |_(_)_____/ Fluent Bit v4.2 Direct Routes Ahead Celebrating 10 Years of Open, Fluent Innovation! [2026/04/30 08:34:22.133493631] [ info] switching to background mode (PID=28685) Log Forwarder was not started successfully 2026-04-30 08:34:24 - [INFO] Preparing Database Protector installation... 2026-04-30 08:34:24 - [INFO] Installing/Upgrading DBP... 2026-04-30 08:34:24 - [INFO] Executing ./PepTeradataSetup_Linux_x64_<DBP_version>.sh... ***************************************************** Welcome to the Database Protector Setup Wizard ***************************************************** This will install the teradata objects on your computer Do you want to continue? [yes or no] Enter installation directory. A new directory will be created in the installation directory. [/opt/protegrity]: Unpacking... Extracting files... Enter name of database where the UDFs will be installed. [PROTEGRITY]: Enter maxmimum size of varchar to be allocated by the UDFs. NOTE: This is the maximum varchar size allocated by the UDFs for latin as well as unicode character set. Larger size will affect the performance !!! Some applications can also have issues with larger size, such as BTEQ, SQL Assistant. [500]: ***********BUFFER LENGTH INITIALIZATION************** UDF VARCHAR MAX INPUT BUFFER LENGTH (TOKENIZATION) : 500 Latin characters UDF VARCHAR MAX OUTPUT BUFFER LENGTH (TOKENIZATION) : 676 Latin characters UDF VARCHAR MAX INPUT BUFFER LENGTH (ENCRYPTION) : 500 Latin characters UDF VARCHAR MAX OUTPUT BUFFER LENGTH (ENCRYPTION) : 538 Bytes UDF VARCHAR_UNICODE MAX INPUT BUFFER LENGTH (TOKENIZATION) : 500 UNICODE characters UDF VARCHAR_UNICODE MAX OUTPUT BUFFER LENGTH (TOKENIZATION) : 1356 UNICODE characters UDF VARCHAR_UNICODE MAX INPUT BUFFER LENGTH (ENCRYPTION) : 500 UNICODE characters UDF VARCHAR_UNICODE MAX OUTPUT BUFFER LENGTH (ENCRYPTION) : 1038 Bytes teradata objects installed in /opt/protegrity/<DBP_version>/databaseprotector/teradata. 2026-04-30 08:34:25 - [INFO] ./PepTeradataSetup_Linux_x64_<DBP_version>.sh completed successfully. 2026-04-30 08:34:25 - [INFO] Copying DatabaseProtector to all nodes All 1 node(s) have connected localhost:1022: send completed: 8926075 bytes received (16 files/5 directories) All 1 node(s) have connected All 1 node(s) have connected 2026-04-30 08:34:26 - [INFO] Setting DatabaseProtector ownership (tdatuser:tdtrusted) on all nodes All 1 node(s) have connected 2026-04-30 08:34:26 - [INFO] DatabaseProtector successfully copied to all nodes 2026-04-30 08:34:26 - [INFO] Synchronizing /etc/protegrity to all nodes All 1 node(s) have connected All 1 node(s) have connected localhost:1022: send completed: 1157 bytes received (1 files/1 directories) All 1 node(s) have connected All 1 node(s) have connected All 1 node(s) have connected 2026-04-30 08:34:27 - [INFO] User configuration directory successfully synchronized to all nodes 2026-04-30 08:34:27 - [INFO] Starting new RPAgent on all nodes Starting rpagent 2026-04-30 08:34:27 - [INFO] Successfully launched new RPAgent on all nodes 2026-04-30 08:34:27 - [INFO] Creating new UDFs (database operation on current node only - shared across all nodes) BTEQ 20.00.00.05 (64-bit) Thu Apr 30 08:34:27 2026 PID: 30406 +---------+---------+---------+---------+---------+---------+---------+---- .SET EXITONDELAY ON MAXREQTIME 300 RC 12 +---------+---------+---------+---------+---------+---------+---------+---- .logon localhost/<database_user_name>, *** Logon successfully completed. *** Teradata Database Release is 20.00.22.31 *** Teradata Database Version is 20.00.22.31 *** Transaction Semantics are BTET. *** Session Character Set Name is 'ASCII'. *** Total elapsed time was 21 seconds. +---------+---------+---------+---------+---------+---------+---------+---- database <database_name>; *** New default database accepted. *** Total elapsed time was 1 second. +---------+---------+---------+---------+---------+---------+---------+---- .IF ERRORCODE <> 0 THEN .QUIT 12; +---------+---------+---------+---------+---------+---------+---------+---- .run file /opt/protegrity/<DBP_version>/databaseprotector/teradata/sqlscripts/c reateobjects.sql; +---------+---------+---------+---------+---------+---------+---------+---- Do you want to create the varcharunicode UDFs? (yes/no) [no]: - To create the varcharunicode UDFs, type
yes. - Press ENTER.
The script creates the varcharunicode UDFs and completes the installation.2026-04-30 08:11:30 - [INFO] Creating varcharunicode UDFs BTEQ 20.00.00.05 (64-bit) Thu Apr 30 08:11:31 2026 PID: 24930 +---------+---------+---------+---------+---------+---------+---------+---- .SET EXITONDELAY ON MAXREQTIME 300 RC 12 +---------+---------+---------+---------+---------+---------+---------+---- .logon localhost/<database_user_name>, *** Logon successfully completed. *** Teradata Database Release is 20.00.22.31 *** Teradata Database Version is 20.00.22.31 *** Transaction Semantics are BTET. *** Session Character Set Name is 'ASCII'. *** Total elapsed time was 20 seconds. +---------+---------+---------+---------+---------+---------+---------+---- database <database_name>; *** New default database accepted. *** Total elapsed time was 1 second. +---------+---------+---------+---------+---------+---------+---------+---- .IF ERRORCODE <> 0 THEN .QUIT 12; +---------+---------+---------+---------+---------+---------+---------+---- .run file /opt/protegrity/<DBP_version>/databaseprotector/teradata/sqlscripts/c reatevarcharunicode.sql; +---------+---------+---------+---------+---------+---------+---------+---- 2026-04-30 08:11:55 - [INFO] Varcharunicode UDFs created successfully 2026-04-30 08:11:55 - [INFO] Testing UDFs BTEQ 20.00.00.05 (64-bit) Thu Apr 30 08:11:55 2026 PID: 25033 +---------+---------+---------+---------+---------+---------+---------+---- .SET EXITONDELAY ON MAXREQTIME 300 RC 12 +---------+---------+---------+---------+---------+---------+---------+---- .logon localhost/<database_user_name>, *** Logon successfully completed. *** Teradata Database Release is 20.00.22.31 *** Teradata Database Version is 20.00.22.31 *** Transaction Semantics are BTET. *** Session Character Set Name is 'ASCII'. *** Total elapsed time was 20 seconds. +---------+---------+---------+---------+---------+---------+---------+---- database <database_name>; *** New default database accepted. *** Total elapsed time was 1 second. +---------+---------+---------+---------+---------+---------+---------+---- .IF ERRORCODE <> 0 THEN .QUIT 12; +---------+---------+---------+---------+---------+---------+---------+---- select pty_getversion(); *** Query completed. One row found. One column returned. *** Total elapsed time was 1 second. pty_getversion() --------------------------------------------------------------------------- <DBP_version> +---------+---------+---------+---------+---------+---------+---------+---- .logoff *** You are now logged off from the <database_user_name>. +---------+---------+---------+---------+---------+---------+---------+---- .quit *** Exiting BTEQ... *** RC (return code) = 0 2026-04-30 08:12:15 - [INFO] Installation successful. 2026-04-30 08:12:15 - [INFO] All components installed successfully. 2026-04-30 08:12:15 - [INFO] IMPORTANT: Protegrity UDT installation must be handled manually. Refer to product documentation. 2026-04-30 08:12:15 - [INFO] IMPORTANT: Protegrity Decimal UDF objects installation must be handled manually. Refer to product documentation.
Installing the Protector using the install.ini file
This argument requires the install.ini file to be present and updated with the required parameters. The install.ini files contains the installation directories for the components and the endpoints for the Log Forwarder and RPAgent.
A sample output of the install.ini file is listed below.
; =============================================================================
; install.ini - Sample configuration file for Database Protector installation
; =============================================================================
;
; Usage:
; ./install_pep_teradata_v2.sh --install --install-ini /path/to/install.ini
;
; Notes:
; - This file is only supported with --install mode (not --upgrade or --silent).
; - Lines starting with ; or # are treated as comments.
; - All fields listed below are REQUIRED unless noted otherwise.
; - Section names and keys are case-insensitive during parsing.
; - The installer will automatically append the component subdirectory
; (e.g., /logforwarder, /rpagent, /databaseprotector) under each
; INSTALLATION_DIR path.
;
; =============================================================================
[Logforwarder]
; Base directory where LogForwarder will be installed.
; The installer will create a "logforwarder" subdirectory under this path.
INSTALLATION_DIR = /opt/protegrity
; Space-separated list of audit store endpoint(s) in host:port format.
; Multiple endpoints can be specified for redundancy.
AUDIT_STORE_ENDPOINTS = <Audit_Store_Endpoint>:9200 <Audit_Store_Endpoint>:9200
[RPAgent]
; Base directory where RPAgent will be installed.
; The installer will create an "rpagent" subdirectory under this path.
INSTALLATION_DIR = /opt/protegrity
; Upstream ESA (Enterprise Security Administrator) host and port.
; Format: <ip_or_hostname>:<port>
; If the port is omitted, the default port 25400 is used.
UPSTREAM_HOST_IP_ADDR_PORT = <ESA_Hostname>:25400
[DatabaseProtector]
; Base directory where DatabaseProtector will be installed.
; The installer will create a "databaseprotector" subdirectory under this path.
INSTALLATION_DIR = /opt/protegrity
; Teradata database name used for creating UDF objects.
DATABASE_NAME = <Database_name_to_install_UDFs>
; Maximum size of VARCHAR to be allocated by the UDFs.
; Must be a positive integer.
MAX_VARCHAR_SIZE = 500
Note: To use any directory for the Database Protector, ensure the directory is available. Otherwise, the installation will fail. Note: The default port for the Audit Store endpoint is 9200. The default port for the RPAgent is 25400. To use any other port, replace the value. Note: For installation/upgrade using the automation script, the components will be installed within a <DBP_version> folder under the specified directory.
To install the protector using the install.ini argument:
- Log in to the server as the user with the required permissions.
- Navigate to the directory containing the extracted files and the installation scripts.
- To execute the script with the argument, run the following command:
./Install_TeradataProtector_Linux_x64_<DBP_version>.sh --install --install-ini <path_to_install.ini_file> - Press ENTER.
The script performs a pre-check, detects theinstall.inifile and the prompt to create the UDF appears.2026-05-04 03:41:36 - [INFO] ======================================================================== 2026-05-04 03:41:36 - [INFO] Starting environment pre-checks before installation/upgrade 2026-05-04 03:41:36 - [INFO] ======================================================================== 2026-05-04 03:41:36 - [INFO] Prerequisites check passed: pcl and bteq commands are available on current/running node 2026-05-04 03:41:36 - [INFO] Checking Teradata PDE state on running node... 2026-05-04 03:41:36 - [INFO] PDE state check passed on running node: PDE state is RUN/STARTED 2026-05-04 03:41:36 - [INFO] Checking accessibility of all Teradata nodes... 2026-05-04 03:41:36 - [INFO] IMPORTANT: ALL nodes must be accessible - if even 1 node is down, installation will be aborted 2026-05-04 03:41:36 - [INFO] ========================================== 2026-05-04 03:41:36 - [INFO] Node accessibility check PASSED 2026-05-04 03:41:36 - [INFO] All 1 node(s) have connected <--------------------- localhost --------------------------------> td20sles15 2026-05-04 03:41:36 - [INFO] ========================================== 2026-05-04 03:41:36 - [INFO] ======================================================================== 2026-05-04 03:41:36 - [INFO] All environment pre-checks PASSED - proceeding with installation 2026-05-04 03:41:36 - [INFO] ======================================================================== 2026-05-04 03:41:36 - [INFO] install.ini detected: /<path_to_install.ini_file>/install.ini Do you want to continue and create UDFs? To create the UDFs, provide the database credentials (yes/no) [no]: - To create the UDFs, type
yes.Note: Skipping creation of the UDFs terminates the installation script.
- Press ENTER.
The prompt to enter the database username appears.Enter Teradata database username: - Enter the username.
- Press ENTER.
The prompt to enter the database password appears.Enter Teradata database user's password: - Enter the password.
- Press ENTER.
The script validates the database and lists the configuration. The prompt to verify the configuration appears.2026-05-04 03:41:43 - [INFO] Validating database ... 2026-05-04 03:42:04 - [INFO] Database validated successfully 2026-05-04 03:42:04 - [INFO] ************************************************************************** 2026-05-04 03:42:04 - [INFO] Installation will be done with following configuration: 2026-05-04 03:42:04 - [INFO] Mode: install 2026-05-04 03:42:04 - [INFO] Using configuration from install.ini: 2026-05-04 03:42:04 - [INFO] Logforwarder Installation Directory: /opt/protegrity/<DBP_version> 2026-05-04 03:42:04 - [INFO] Audit Store Endpoints: <IP_Address>:9200 <IP_Address>:9200 2026-05-04 03:42:04 - [INFO] RPAgent Installation Directory: /opt/protegrity/<DBP_version> 2026-05-04 03:42:04 - [INFO] Upstream (ESA) IP Address for RPAgent: <ESA_Hostname> 2026-05-04 03:42:04 - [INFO] Upstream (ESA) Port for RPAgent: 25400 2026-05-04 03:42:04 - [INFO] DatabaseProtector Installation Directory: /opt/protegrity/<DBP_version> 2026-05-04 03:42:04 - [INFO] This is a fresh install. 2026-05-04 03:42:04 - [INFO] ************************************************************************** 2026-05-04 03:42:04 - [INFO] Please verify the above configuration before proceeding. Do you want to continue? (yes/no) [no]: - To proceed with the configuration, type
yes. - Press ENTER.
The script installs the log forwarder. The script then triggers the RPAgent installation script. The prompt to enter ESA token appears.2026-05-04 03:42:08 - [INFO] Continuing with installation... 2026-05-04 03:42:08 - [INFO] Installing/Upgrading LOGFORWARDER... 2026-05-04 03:42:08 - [INFO] Executing ./LogforwarderSetup_Linux_x64_<DBP_version>.sh... Unpacking... Extracting files... Protegrity Log Forwarder installed in /opt/protegrity/<DBP_version>/logforwarder. 2026-05-04 03:42:09 - [INFO] ./LogforwarderSetup_Linux_x64_<DBP_version>.sh completed successfully. 2026-05-04 03:42:09 - [INFO] Installing/Upgrading RPAGENT... Enter ESA token (leave blank to use username/password): - To use the credentials for ESA, press ENTER.
The prompt to enter the username appears.
Enter ESA username: - Enter the username.
- Press ENTER.
The prompt to enter the password appears.Enter ESA user's password: - Enter the password.
- Press ENTER.
The script:- validates and downloads the certificates from ESA
- installs the RPAgent
- copies the Log Forwarder and RPAgent to all the nodes in the Teradata cluster
- creates installation directories
- starts the new Log Forwarder on all the nodes
- triggers the script to install the database objects
- installs the database objects
- copies the objects to all the nodes in the cluster
- starts the new RPAgent on all the nodes
- creates the new UDFs The prompt to create the varcharunicode UDFs appears.
2026-05-04 03:42:16 - [INFO] Executing ./RPAgentSetup_Linux_x64_<DBP_version>.sh... Unpacking... Extracting files... Certificate validation successful. Obtaining token from <ESA_Hostname>:25400... Downloading certificates from <ESA_Hostname>:25400... % Total % Received % Xferd Average Speed Time Time Time Current Dload Upload Total Spent Left Speed 100 11264 100 11264 0 0 54891 0 0 Extracting certificates... Certificates successfully downloaded and stored in /opt/protegrity/<DBP_version>/rpagent/data Protegrity RPAgent installed in /opt/protegrity/<DBP_version>/rpagent. 2026-05-04 03:42:18 - [INFO] ./RPAgentSetup_Linux_x64_<DBP_version>.sh completed successfully. 2026-05-04 03:42:18 - [INFO] Copying Logforwarder and RPAgent to all nodes in the Teradata cluster 2026-05-04 03:42:18 - [INFO] Copying Logforwarder and RPAgent components to all nodes 2026-05-04 03:42:18 - [INFO] Creating installation directories on all nodes if not present All 1 node(s) have connected All 1 node(s) have connected All 1 node(s) have connected All 1 node(s) have connected 2026-05-04 03:42:19 - [INFO] Copying Logforwarder directory /opt/protegrity/<DBP_version>/logforwarder to all nodes All 1 node(s) have connected localhost:1022: send completed: 57934052 bytes received (9 files/5 directories) All 1 node(s) have connected All 1 node(s) have connected 2026-05-04 03:42:21 - [INFO] Logforwarder successfully copied to all nodes 2026-05-04 03:42:21 - [INFO] Copying RPAgent directory /opt/protegrity/<DBP_version>/rpagent to all nodes All 1 node(s) have connected localhost:1022: send completed: 14787376 bytes received (9 files/3 directories) All 1 node(s) have connected All 1 node(s) have connected 2026-05-04 03:42:22 - [INFO] RPAgent successfully copied to all nodes 2026-05-04 03:42:22 - [INFO] Logforwarder and RPAgent successfully copied to all nodes 2026-05-04 03:42:22 - [INFO] Starting new Logforwarder on all nodes All 1 node(s) have connected <--------------------- localhost --------------------------------> Fluent Bit v4.2.2-1.5.1+0.gdfa6.fb-4.2 * Copyright (C) 2015-2025 The Fluent Bit Authors * Fluent Bit is a CNCF graduated project under the Fluent organization * https://fluentbit.io ______ _ _ ______ _ _ ___ _____ | ___| | | | | ___ (_) | / | / __ \ | |_ | |_ _ ___ _ __ | |_ | |_/ /_| |_ __ __/ /| | `' / /' | _| | | | | |/ _ \ '_ \| __| | ___ \ | __| \ \ / / /_| | / / | | | | |_| | __/ | | | |_ | |_/ / | |_ \ V /\___ |_./ /___ \_| |_|\__,_|\___|_| |_|\__| \____/|_|\__| \_/ |_(_)_____/ Fluent Bit v4.2 Direct Routes Ahead Celebrating 10 Years of Open, Fluent Innovation! [2026/05/04 03:42:22.850815473] [ info] switching to background mode (PID=2801) Log Forwarder was not started successfully 2026-05-04 03:42:24 - [INFO] Preparing Database Protector installation... 2026-05-04 03:42:24 - [INFO] Installing/Upgrading DBP... 2026-05-04 03:42:24 - [INFO] Executing ./PepTeradataSetup_Linux_x64_<DBP_version>.sh... ***************************************************** Welcome to the Database Protector Setup Wizard ***************************************************** This will install the teradata objects on your computer Do you want to continue? [yes or no] Enter installation directory. A new directory will be created in the installation directory. [/opt/protegrity]: Unpacking... Extracting files... Enter name of database where the UDFs will be installed. [PROTEGRITY]: Enter maxmimum size of varchar to be allocated by the UDFs. NOTE: This is the maximum varchar size allocated by the UDFs for latin as well as unicode character set. Larger size will affect the performance !!! Some applications can also have issues with larger size, such as BTEQ, SQL Assistant. [500]: ***********BUFFER LENGTH INITIALIZATION************** UDF VARCHAR MAX INPUT BUFFER LENGTH (TOKENIZATION) : 500 Latin characters UDF VARCHAR MAX OUTPUT BUFFER LENGTH (TOKENIZATION) : 676 Latin characters UDF VARCHAR MAX INPUT BUFFER LENGTH (ENCRYPTION) : 500 Latin characters UDF VARCHAR MAX OUTPUT BUFFER LENGTH (ENCRYPTION) : 538 Bytes UDF VARCHAR_UNICODE MAX INPUT BUFFER LENGTH (TOKENIZATION) : 500 UNICODE characters UDF VARCHAR_UNICODE MAX OUTPUT BUFFER LENGTH (TOKENIZATION) : 1356 UNICODE characters UDF VARCHAR_UNICODE MAX INPUT BUFFER LENGTH (ENCRYPTION) : 500 UNICODE characters UDF VARCHAR_UNICODE MAX OUTPUT BUFFER LENGTH (ENCRYPTION) : 1038 Bytes teradata objects installed in /opt/protegrity/<DBP_version>/databaseprotector/teradata. 2026-05-04 03:42:26 - [INFO] ./PepTeradataSetup_Linux_x64_<DBP_version>.sh completed successfully. 2026-05-04 03:42:26 - [INFO] Copying DatabaseProtector to all nodes All 1 node(s) have connected localhost:1022: send completed: 8926075 bytes received (16 files/5 directories) All 1 node(s) have connected All 1 node(s) have connected 2026-05-04 03:42:27 - [INFO] Setting DatabaseProtector ownership (tdatuser:tdtrusted) on all nodes All 1 node(s) have connected 2026-05-04 03:42:27 - [INFO] DatabaseProtector successfully copied to all nodes 2026-05-04 03:42:27 - [INFO] Synchronizing /etc/protegrity to all nodes All 1 node(s) have connected All 1 node(s) have connected localhost:1022: send completed: 1157 bytes received (1 files/1 directories) All 1 node(s) have connected All 1 node(s) have connected All 1 node(s) have connected 2026-05-04 03:42:28 - [INFO] User configuration directory successfully synchronized to all nodes 2026-05-04 03:42:28 - [INFO] Starting new RPAgent on all nodes Starting rpagent 2026-05-04 03:42:28 - [INFO] Successfully launched new RPAgent on all nodes 2026-05-04 03:42:28 - [INFO] Creating new UDFs (database operation on current node only - shared across all nodes) BTEQ 20.00.00.05 (64-bit) Mon May 4 03:42:28 2026 PID: 4564 +---------+---------+---------+---------+---------+---------+---------+---- .SET EXITONDELAY ON MAXREQTIME 300 RC 12 +---------+---------+---------+---------+---------+---------+---------+---- .logon localhost/<database_user_name>, *** Logon successfully completed. *** Teradata Database Release is 20.00.22.31 *** Teradata Database Version is 20.00.22.31 *** Transaction Semantics are BTET. *** Session Character Set Name is 'ASCII'. *** Total elapsed time was 20 seconds. +---------+---------+---------+---------+---------+---------+---------+---- database <database_name>; *** New default database accepted. *** Total elapsed time was 1 second. +---------+---------+---------+---------+---------+---------+---------+---- .IF ERRORCODE <> 0 THEN .QUIT 12; +---------+---------+---------+---------+---------+---------+---------+---- .run file /opt/protegrity/<DBP_version>/databaseprotector/teradata/sqlscripts/c reateobjects.sql; +---------+---------+---------+---------+---------+---------+---------+---- Do you want to create the varcharunicode UDFs? (yes/no) [no]: - To create the varcharunicode UDFs, type
yes. - Press ENTER.
The script creates the varcharunicode UDFs and completes the installation.2026-05-04 03:43:27 - [INFO] Creating varcharunicode UDFs BTEQ 20.00.00.05 (64-bit) Mon May 4 03:43:27 2026 PID: 5313 +---------+---------+---------+---------+---------+---------+---------+---- .SET EXITONDELAY ON MAXREQTIME 300 RC 12 +---------+---------+---------+---------+---------+---------+---------+---- .logon localhost/<database_user_name>, *** Logon successfully completed. *** Teradata Database Release is 20.00.22.31 *** Teradata Database Version is 20.00.22.31 *** Transaction Semantics are BTET. *** Session Character Set Name is 'ASCII'. *** Total elapsed time was 20 seconds. +---------+---------+---------+---------+---------+---------+---------+---- database <database_name>; *** New default database accepted. *** Total elapsed time was 1 second. +---------+---------+---------+---------+---------+---------+---------+---- .IF ERRORCODE <> 0 THEN .QUIT 12; +---------+---------+---------+---------+---------+---------+---------+---- .run file /opt/protegrity/<DBP_version>/databaseprotector/teradata/sqlscripts/c reatevarcharunicode.sql; +---------+---------+---------+---------+---------+---------+---------+---- 2026-05-04 03:43:50 - [INFO] Varcharunicode UDFs created successfully 2026-05-04 03:43:50 - [INFO] Testing UDFs BTEQ 20.00.00.05 (64-bit) Mon May 4 03:43:51 2026 PID: 5411 +---------+---------+---------+---------+---------+---------+---------+---- .SET EXITONDELAY ON MAXREQTIME 300 RC 12 +---------+---------+---------+---------+---------+---------+---------+---- .logon localhost/<database_user_name>, *** Logon successfully completed. *** Teradata Database Release is 20.00.22.31 *** Teradata Database Version is 20.00.22.31 *** Transaction Semantics are BTET. *** Session Character Set Name is 'ASCII'. *** Total elapsed time was 20 seconds. +---------+---------+---------+---------+---------+---------+---------+---- database <database_name>; *** New default database accepted. *** Total elapsed time was 1 second. +---------+---------+---------+---------+---------+---------+---------+---- .IF ERRORCODE <> 0 THEN .QUIT 12; +---------+---------+---------+---------+---------+---------+---------+---- select pty_getversion(); *** Query completed. One row found. One column returned. *** Total elapsed time was 1 second. pty_getversion() --------------------------------------------------------------------------- <DBP_version> +---------+---------+---------+---------+---------+---------+---------+---- .logoff *** You are now logged off from the <database_user_name>. +---------+---------+---------+---------+---------+---------+---------+---- .quit *** Exiting BTEQ... *** RC (return code) = 0 2026-05-04 03:44:11 - [INFO] Installation successful. 2026-05-04 03:44:11 - [INFO] All components installed successfully. 2026-05-04 03:44:11 - [INFO] IMPORTANT: Protegrity UDT installation must be handled manually. Refer to product documentation. 2026-05-04 03:44:11 - [INFO] IMPORTANT: Protegrity Decimal UDF objects installation must be handled manually. Refer to product documentation.
5.1.4.3 - Installing the Protector on Multi Node
The Teradata Data Warehouse Protector build provides an automated script to manage the installation process on a standalone system. The master script internally calls the scripts to install the components. The master script installs the components in the following order:
- Log Forwarder
- RPAgent
- Policy Enforcement Point (Database Protector)
The installation can also be performed manually by executing the individual scripts to install the different components.
The master script is available in the directory where the installation files are extracted. It provides the following arguments:
install- installs the components in an interactive mode.upgrade- installs a newer version of the protector with minimal downtime.silent- installs the components in a non-interactive mode.install.ini- installs the components as per the parameters provided in the file.help- lists the arguments available for the script.
In addition, the master script will rollback the installation process if any errors are encountered. The script will revert the changes.
Viewing the Arguments for the Script
- Log in to the server as the user with the required permissions.
- Navigate to the directory containing the extracted files and the installation scripts.
- To view the arguments, run the following command:
./Install_TeradataProtector_Linux_x64_<DBP_version>.sh --help - Press ENTER.
The script lists the available arguments.
Options: --install Use this option when installing the solution for the first time on a machine/host. (i.e., there is no previous installation present) --upgrade Use this option when upgrading an existing installation on the machine/host. --install-ini <file> (Optional) Provide a path to an install.ini file for silent or pre-configured installations. This option works with --install only. It must not be used with --upgrade or --silent. You can pass this either as: --install-ini /path/to/install.ini or --install-ini=/path/to/install.ini Refer to the product documentation for details about the configuration options available in install.ini. The documentation describes all supported keys, required fields, and example configurations. --silent (Optional) Runs the installation/upgrade in silent mode with minimum interactive prompts. --help, -h Display this help message and exit.
Installing the Protector using the Interactive Mode
- Log in to the server as the user with the required permissions.
- Navigate to the directory containing the extracted files and the installation scripts.
- To execute the script, run the following command:
./Install_TeradataProtector_Linux_x64_<DBP_version>.sh --install - Press ENTER.
The script executes pre-checks and the prompt to select the silent mode of installation appears.2026-05-04 03:43:56 - [INFO] ======================================================================== 2026-05-04 03:43:56 - [INFO] Starting environment pre-checks before installation/upgrade 2026-05-04 03:43:56 - [INFO] ======================================================================== 2026-05-04 03:43:56 - [INFO] Prerequisites check passed: pcl and bteq commands are available on current/running node 2026-05-04 03:43:56 - [INFO] Checking Teradata PDE state on running node... 2026-05-04 03:43:56 - [INFO] PDE state check passed on running node: PDE state is RUN/STARTED 2026-05-04 03:43:56 - [INFO] Checking accessibility of all Teradata nodes... 2026-05-04 03:43:56 - [INFO] IMPORTANT: ALL nodes must be accessible - if even 1 node is down, installation will be aborted 2026-05-04 03:43:56 - [INFO] ========================================== 2026-05-04 03:43:56 - [INFO] Node accessibility check PASSED 2026-05-04 03:43:56 - [INFO] All 4 node(s) have connected <--------------------- <node_name> --------------------------------> abyss2 <--------------------- <node_name> --------------------------------> abyss4 <--------------------- <node_name> --------------------------------> abyss3 <--------------------- <node_name> --------------------------------> abyss1 2026-05-04 03:43:56 - [INFO] ========================================== 2026-05-04 03:43:57 - [INFO] ======================================================================== 2026-05-04 03:43:57 - [INFO] All environment pre-checks PASSED - proceeding with installation 2026-05-04 03:43:57 - [INFO] ======================================================================== Do you want silent installation? (yes/no) [no]: - To proceed with interactive mode of installation, type
no. - Press ENTER.
The prompt to specify the installation directory for the components appears.Do you want to install the new LogForwarder, RPAgent, and DatabaseProtector together in a single directory? (yes/no) [no]: - To install the components under a same directory, type
yes. - Press ENTER.
The prompt to enter the installation directory appears.Enter new installation directory [/opt/protegrity]: - To use the default directory, press ENTER.
The prompt to provide credentials to create the UDFs appears.
Do you want to continue and create UDFs? To create the UDFs, provide the database credentials (yes/no) [no]: - To create the UDFs, type
yes.Note: Skipping creation of the UDFs terminates the upgrade script.
- Press ENTER.
The prompt to enter the database user name appears.Enter Teradata database username: - Enter the username to login to the database.
- Press ENTER.
The prompt to enter the database password appears.Enter Teradata database user's password: - Enter the password.
- Press ENTER.
The prompt to specify the database to install the UDF appears.Enter name of database where the UDFs will be installed [PROTEGRITY]: - Enter the database name to install the UDFs.
- Press ENTER.
The prompt to specify the maximum size of varchar to be allocated by the UDFs appears.Enter the maximum size of varchar to be allocated by the UDFs [500]: - Enter the maximum size of varchar to be allocated by the UDFs.
- Press ENTER.
The script validates the database and the prompt to verify the configuration appears.2026-05-04 03:43:56 - [INFO] Validating database ... 2026-05-04 03:43:56 - [INFO] Database validated successfully 2026-05-04 03:43:56 - [INFO] ************************************************************************** 2026-05-04 03:43:56 - [INFO] Installation will be done with following configuration: 2026-05-04 03:43:56 - [INFO] Mode: install 2026-05-04 03:43:56 - [INFO] Logforwarder Installation Directory: /opt/protegrity/<DBP_version> 2026-05-04 03:43:56 - [INFO] RPAgent Installation Directory: /opt/protegrity/<DBP_version> 2026-05-04 03:43:56 - [INFO] DatabaseProtector Installation Directory: /opt/protegrity/<DBP_version> 2026-05-04 03:43:56 - [INFO] This is a fresh install. 2026-05-04 03:43:56 - [INFO] ************************************************************************** 2026-05-04 03:43:56 - [INFO] Please verify the above configuration before proceeding. Do you want to continue? (yes/no) [no]: - To continue, type
yes. - Press ENTER.
The script proceeds with the installation and triggers the Log Forwarder installation script. The prompt to enter the Audit Store endpoint appears.2026-05-04 03:43:56 - [INFO] Continuing with installation... 2026-05-04 03:43:56 - [INFO] Installing/Upgrading LOGFORWARDER... 2026-05-04 03:43:56 - [INFO] Executing ./LogforwarderSetup_Linux_x64_<DBP_version>.sh... Enter the audit store endpoint (host), alternative (host:port) to use another port than the default port 9200: - Enter the audit store endpoint.
- Press ENTER.
The prompt to enter additional audit store endpoint appears.Audit store endpoints: <ESA_IP_Address>:9200 Do you want to add another audit store endpoint? [y/n]: - To specify additional endpoints, type
yes. - Press ENTER.
The prompt to enter the Audit Store endpoint appears.Enter the audit store endpoint (host), alternative (host:port) to use another port than the default port 9200: - Enter the audit store endpoint.
- Press ENTER.
The script lists the endpoints that will be added. The prompt to accept and continue the installation appears.------------------------------------------- These audit store endpoints will be added: <ESA_IP_Address>:9200 <ESA_IP_Address>:9200 <ESA_IP_Address>:9200 Type 'y' to accept or 'n' to abort installation: - To accept the endpoints and proceed, type
yes. - Press ENTER.
The script installs the log forwarder. The script then triggers the RPAgent installation script. The prompt to enter the upstream host name or IP address appears.Unpacking... Extracting files... Protegrity Log Forwarder installed in /opt/protegrity/<DBP_version>/logforwarder. 2026-05-04 03:43:56 - [INFO] ./LogforwarderSetup_Linux_x64_<DBP_version>.sh completed successfully. 2026-05-04 03:43:56 - [INFO] Installing/Upgrading RPAGENT... Please enter upstream host name or IP address, alternative (host:port) to use another port than the default port 25400: - Enter the ESA host name.
- Press ENTER.
The prompt to enter ESA token appears.Enter ESA token (leave blank to use username/password): - To specify the username/password, press ENTER.
The prompt to enter ESA username appears.Enter ESA username: - Enter the username to connect to ESA.
- Press ENTER.
The prompt to enter ESA password appears.Enter ESA user's password: - Enter the password to connect to ESA.
- Press ENTER.
The script:- validates and downloads the certificates from ESA
- installs the RPAgent
- copies the Log Forwarder and RPAgent to all the nodes in the Teradata cluster
- creates installation directories
- starts the new Log Forwarder on all the nodes
- triggers the script to install the database objects
- creates the UDFs The prompt to install the varcharunicode UDF appears.
2026-05-04 03:43:56 - [INFO] Executing ./RPAgentSetup_Linux_x64_<DBP_version>.sh... Unpacking... Extracting files... Certificate validation successful. Obtaining token from <ESA_Hostname>:25400... Downloading certificates from <ESA_Hostname>:25400... % Total % Received % Xferd Average Speed Time Time Time Current Dload Upload Total Spent Left Speed 100 11264 100 11264 0 0 63570 0 0 Extracting certificates... Certificates successfully downloaded and stored in /opt/protegrity/<DBP_version>/rpagent/data Protegrity RPAgent installed in /opt/protegrity/<DBP_version>/rpagent. 2026-05-04 03:43:56 - [INFO] ./RPAgentSetup_Linux_x64_<DBP_version>.sh completed successfully. 2026-05-04 03:43:56 - [INFO] Copying Logforwarder and RPAgent to all nodes in the Teradata cluster 2026-05-04 03:43:56 - [INFO] Copying Logforwarder and RPAgent components to all nodes 2026-05-04 03:43:56 - [INFO] Creating installation directories on all nodes if not present All 4 node(s) have connected All 4 node(s) have connected All 4 node(s) have connected All 4 node(s) have connected 2026-05-04 03:43:56 - [INFO] Copying Logforwarder directory /opt/protegrity/<DBP_version>/logforwarder to all nodes All 4 node(s) have connected <node_name>: send completed: 57933910 bytes received (9 files/5 directories) <node_name>: send completed: 57933910 bytes received (9 files/5 directories) <node_name>: send completed: 57933910 bytes received (9 files/5 directories) <node_name>: send completed: 57933910 bytes received (9 files/5 directories) localhost:1022: send completed: 57934195 bytes received (9 files/5 directories) All 4 node(s) have connected All 4 node(s) have connected 2026-05-04 03:43:56 - [INFO] Logforwarder successfully copied to all nodes 2026-05-04 03:43:56 - [INFO] Copying RPAgent directory /opt/protegrity/<DBP_version>/rpagent to all nodes All 4 node(s) have connected <node_name>: send completed: 14787336 bytes received (9 files/3 directories) <node_name>: send completed: 14787336 bytes received (9 files/3 directories) <node_name>: send completed: 14787336 bytes received (9 files/3 directories) <node_name>: send completed: 14787336 bytes received (9 files/3 directories) All 4 node(s) have connected All 4 node(s) have connected 2026-05-04 03:43:56 - [INFO] RPAgent successfully copied to all nodes 2026-05-04 03:43:56 - [INFO] Logforwarder and RPAgent successfully copied to all nodes 2026-05-04 03:43:56 - [INFO] Starting new Logforwarder on all nodes 2026-05-04 03:45:39 - [INFO] Preparing Database Protector installation... 2026-05-04 03:45:39 - [INFO] Installing/Upgrading DBP... 2026-05-04 03:45:39 - [INFO] Executing ./PepTeradataSetup_Linux_x64_<DBP_version>.sh... 2026-05-04 03:45:40 - [INFO] ./PepTeradataSetup_Linux_x64_<DBP_version>.sh completed successfully. 2026-05-04 03:45:40 - [INFO] Copying DatabaseProtector to all nodes All 4 node(s) have connected <node_name>: send completed: 8926081 bytes received (16 files/5 directories) <node_name>: send completed: 8926081 bytes received (16 files/5 directories) <node_name>: send completed: 8926081 bytes received (16 files/5 directories) <node_name>: send completed: 8926081 bytes received (16 files/5 directories) All 4 node(s) have connected All 4 node(s) have connected 2026-05-04 03:45:41 - [INFO] Setting DatabaseProtector ownership (tdatuser:tdtrusted) on all nodes All 4 node(s) have connected 2026-05-04 03:45:41 - [INFO] DatabaseProtector successfully copied to all nodes 2026-05-04 03:45:41 - [INFO] Synchronizing /etc/protegrity to all nodes All 4 node(s) have connected All 4 node(s) have connected <node_name>: send completed: 1157 bytes received (1 files/1 directories) <node_name>: send completed: 1157 bytes received (1 files/1 directories) <node_name>: send completed: 1157 bytes received (1 files/1 directories) <node_name>: send completed: 1157 bytes received (1 files/1 directories) All 4 node(s) have connected All 4 node(s) have connected All 4 node(s) have connected 2026-05-04 03:45:42 - [INFO] User configuration directory successfully synchronized to all nodes 2026-05-04 03:45:42 - [INFO] Starting new RPAgent on all nodes 2026-05-04 03:45:42 - [INFO] Successfully launched new RPAgent on all nodes 2026-05-04 03:45:42 - [INFO] Creating new UDFs (database operation on current node only - shared across all nodes) BTEQ 17.20.00.08 (64-bit) Mon May 4 03:45:42 2026 PID: 130808 +---------+---------+---------+---------+---------+---------+---------+---- .SET EXITONDELAY ON MAXREQTIME 300 RC 12 +---------+---------+---------+---------+---------+---------+---------+---- .logon localhost/<database_user_name>, *** Logon successfully completed. *** Teradata Database Release is 17.20.03.18 *** Teradata Database Version is 17.20.03.18 *** Transaction Semantics are BTET. *** Session Character Set Name is 'ASCII'. *** Total elapsed time was 1 second. +---------+---------+---------+---------+---------+---------+---------+---- database <database_name>; *** New default database accepted. *** Total elapsed time was 1 second. +---------+---------+---------+---------+---------+---------+---------+---- .IF ERRORCODE <> 0 THEN .QUIT 12; +---------+---------+---------+---------+---------+---------+---------+---- .run file /opt/protegrity/<DBP_version>/databaseprotector/teradata/sqlscripts/c reateobjects.sql; +---------+---------+---------+---------+---------+---------+---------+---- Do you want to create the varcharunicode UDFs? (yes/no) [no]: - To create the varcharunicode UDFs, type
yes. - Press ENTER.
The script creates the varcharunicode UDFs and completes the installation.2026-05-04 03:46:03 - [INFO] Creating varcharunicode UDFs BTEQ 17.20.00.08 (64-bit) Mon May 4 03:46:03 2026 PID: 131563 +---------+---------+---------+---------+---------+---------+---------+---- .SET EXITONDELAY ON MAXREQTIME 300 RC 12 +---------+---------+---------+---------+---------+---------+---------+---- .logon localhost/<database_user_name>, *** Logon successfully completed. *** Teradata Database Release is 17.20.03.18 *** Teradata Database Version is 17.20.03.18 *** Transaction Semantics are BTET. *** Session Character Set Name is 'ASCII'. *** Total elapsed time was 1 second. +---------+---------+---------+---------+---------+---------+---------+---- database <database_name>; *** New default database accepted. *** Total elapsed time was 1 second. +---------+---------+---------+---------+---------+---------+---------+---- .IF ERRORCODE <> 0 THEN .QUIT 12; +---------+---------+---------+---------+---------+---------+---------+---- .run file /opt/protegrity/<DBP_version>/databaseprotector/teradata/sqlscripts/c reatevarcharunicode.sql; +---------+---------+---------+---------+---------+---------+---------+---- 2026-05-04 03:46:05 - [INFO] Varcharunicode UDFs created successfully 2026-05-04 03:46:05 - [INFO] Testing UDFs BTEQ 17.20.00.08 (64-bit) Mon May 4 03:46:05 2026 PID: 131653 +---------+---------+---------+---------+---------+---------+---------+---- .SET EXITONDELAY ON MAXREQTIME 300 RC 12 +---------+---------+---------+---------+---------+---------+---------+---- .logon localhost/<database_user_name>, *** Logon successfully completed. *** Teradata Database Release is 17.20.03.18 *** Teradata Database Version is 17.20.03.18 *** Transaction Semantics are BTET. *** Session Character Set Name is 'ASCII'. *** Total elapsed time was 1 second. +---------+---------+---------+---------+---------+---------+---------+---- database <database_name>; *** New default database accepted. *** Total elapsed time was 1 second. +---------+---------+---------+---------+---------+---------+---------+---- .IF ERRORCODE <> 0 THEN .QUIT 12; +---------+---------+---------+---------+---------+---------+---------+---- select pty_getversion(); *** Query completed. One row found. One column returned. *** Total elapsed time was 1 second. pty_getversion() --------------------------------------------------------------------------- <DBP_version> +---------+---------+---------+---------+---------+---------+---------+---- .logoff *** You are now logged off from the <database_user_name>. +---------+---------+---------+---------+---------+---------+---------+---- .quit *** Exiting BTEQ... *** RC (return code) = 0 2026-05-04 03:46:05 - [INFO] Installation successful. 2026-05-04 03:46:05 - [INFO] All components installed successfully. 2026-05-04 03:46:05 - [INFO] IMPORTANT: Protegrity UDT installation must be handled manually. Refer to product documentation. 2026-05-04 03:46:05 - [INFO] IMPORTANT: Protegrity Decimal UDF objects installation must be handled manually. Refer to product documentation.
Installing the Protector using the Silent Mode
- Log in to the server as the user with the required permissions.
- Navigate to the directory containing the extracted files and the installation scripts.
- To execute the script, run the following command:
./Install_TeradataProtector_Linux_x64_<DBP_version>.sh --install - Press ENTER.
The script executes pre-checks and the prompt to select the silent mode of installation appears.2026-05-04 03:54:36 - [INFO] ======================================================================== 2026-05-04 03:54:36 - [INFO] Starting environment pre-checks before installation/upgrade 2026-05-04 03:54:36 - [INFO] ======================================================================== 2026-05-04 03:54:36 - [INFO] Prerequisites check passed: pcl and bteq commands are available on current/running node 2026-05-04 03:54:36 - [INFO] Checking Teradata PDE state on running node... 2026-05-04 03:54:36 - [INFO] PDE state check passed on running node: PDE state is RUN/STARTED 2026-05-04 03:54:36 - [INFO] Checking accessibility of all Teradata nodes... 2026-05-04 03:54:36 - [INFO] IMPORTANT: ALL nodes must be accessible - if even 1 node is down, installation will be aborted 2026-05-04 03:54:36 - [INFO] ========================================== 2026-05-04 03:54:36 - [INFO] Node accessibility check PASSED 2026-05-04 03:54:36 - [INFO] All 4 node(s) have connected <--------------------- <node_name> --------------------------------> abyss4 <--------------------- <node_name> --------------------------------> abyss2 <--------------------- <node_name> --------------------------------> abyss3 <--------------------- <node_name> --------------------------------> abyss1 2026-05-04 03:54:36 - [INFO] ========================================== 2026-05-04 03:54:36 - [INFO] ======================================================================== 2026-05-04 03:54:36 - [INFO] All environment pre-checks PASSED - proceeding with installation 2026-05-04 03:54:36 - [INFO] ======================================================================== Do you want silent installation? (yes/no) [no]: - To proceed with silent mode of installation, type
yes. - Press ENTER.
The script uses the default installation directory,/opt/protegrity/, for silent installation. The prompt to create UDFs and provide database credentials appears.2026-05-04 03:54:39 - [INFO] You have chosen silent mode. Therefore, /opt/protegrity is considered as base directory for new installation. Do you want to continue and create UDFs? To create the UDFs, provide the database credentials (yes/no) [no]: - To create the UDFs, type
yes.Note: Skipping creation of the UDFs terminates the upgrade script.
- Press ENTER.
The prompt to enter the database username appears.Enter Teradata database username: - Enter the username.
- Press ENTER.
The prompt to enter the password appears.Enter Teradata database user's password: - Enter the password.
- Press ENTER.
The prompt to enter the database name appears.Enter name of database where the UDFs will be installed [PROTEGRITY]: - Enter the database name to install the UDFs.
- Press ENTER.
The prompt to specify the maximum size of varchar to be allocated by the UDFs appears.Enter the maximum size of varchar to be allocated by the UDFs [500]: - Enter the maximum size of varchar to be allocated by the UDFs.
- Press ENTER.
The script validates the database. The script lists the configuration and the prompt to continue appears.2026-05-04 03:54:55 - [INFO] Validating database ... 2026-05-04 03:54:55 - [INFO] Database validated successfully 2026-05-04 03:54:55 - [INFO] ************************************************************************** 2026-05-04 03:54:55 - [INFO] Installation will be done with following configuration: 2026-05-04 03:54:55 - [INFO] Mode: install 2026-05-04 03:54:55 - [INFO] Logforwarder Installation Directory: /opt/protegrity/<DBP_version> 2026-05-04 03:54:55 - [INFO] RPAgent Installation Directory: /opt/protegrity/<DBP_version> 2026-05-04 03:54:55 - [INFO] DatabaseProtector Installation Directory: /opt/protegrity/<DBP_version> 2026-05-04 03:54:55 - [INFO] This is a fresh install. 2026-05-04 03:54:55 - [INFO] ************************************************************************** 2026-05-04 03:54:55 - [INFO] Please verify the above configuration before proceeding. Do you want to continue? (yes/no) [no]: - To proceed with the configuration, type
yes. - Press ENTER.
The script proceeds with the installation and completes the Log Forwarder installation. The prompt to enter the upstream host name or IP address appears.2026-05-04 03:55:03 - [INFO] Continuing with installation... 2026-05-04 03:55:03 - [INFO] Installing/Upgrading LOGFORWARDER... 2026-05-04 03:55:03 - [INFO] Executing ./LogforwarderSetup_Linux_x64_<DBP_version>.sh... 2026-05-04 03:55:23 - [INFO] ./LogforwarderSetup_Linux_x64_<DBP_version>.sh completed successfully. 2026-05-04 03:55:23 - [INFO] Installing/Upgrading RPAGENT... Please enter upstream host name or IP address, alternative (host:port) to use another port than the default port 25400: - Enter the ESA hostname.
- Press ENTER.
The prompt to enter ESA token appears.Enter ESA token (leave blank to use username/password): - To specify the username/password, press ENTER.
The prompt to enter ESA username appears.Enter ESA username: - Enter the username to connect to ESA.
- Press ENTER.
The prompt to enter ESA password appears.Enter ESA user's password: - Enter the password to connect to ESA.
- Press ENTER.
The script:- validates and downloads the certificates from ESA
- installs the RPAgent
- copies the Log Forwarder and RPAgent to all the nodes in the Teradata cluster
- creates installation directories
- starts the new Log Forwarder on all the nodes
- triggers the script to install the database objects
- installs the database objects
- copies the objects to all the nodes in the cluster
- starts the new RPAgent on all the nodes
- creates the new UDFs The prompt to create the varcharunicode UDFs appears.
2026-05-04 03:55:43 - [INFO] Executing ./RPAgentSetup_Linux_x64_<DBP_version>.sh... Unpacking... Extracting files... Certificate validation successful. Obtaining token from <ESA_Hostname>:25400... Downloading certificates from <ESA_Hostname>:25400... % Total % Received % Xferd Average Speed Time Time Time Current Dload Upload Total Spent Left Speed 100 11264 100 11264 0 0 63570 0 0 Extracting certificates... Certificates successfully downloaded and stored in /opt/protegrity/<DBP_version>/rpagent/data Protegrity RPAgent installed in /opt/protegrity/<DBP_version>/rpagent. 2026-05-04 03:55:51 - [INFO] ./RPAgentSetup_Linux_x64_<DBP_version>.sh completed successfully. 2026-05-04 03:55:51 - [INFO] Copying Logforwarder and RPAgent to all nodes in the Teradata cluster 2026-05-04 03:55:51 - [INFO] Copying Logforwarder and RPAgent components to all nodes 2026-05-04 03:55:51 - [INFO] Creating installation directories on all nodes if not present All 4 node(s) have connected All 4 node(s) have connected All 4 node(s) have connected All 4 node(s) have connected 2026-05-04 03:55:52 - [INFO] Copying Logforwarder directory /opt/protegrity/<DBP_version>/logforwarder to all nodes All 4 node(s) have connected <node_name>: send completed: 57933910 bytes received (9 files/5 directories) <node_name>: send completed: 57933910 bytes received (9 files/5 directories) <node_name>: send completed: 57933910 bytes received (9 files/5 directories) <node_name>: send completed: 57933910 bytes received (9 files/5 directories) All 4 node(s) have connected All 4 node(s) have connected 2026-05-04 03:55:53 - [INFO] Logforwarder successfully copied to all nodes 2026-05-04 03:55:53 - [INFO] Copying RPAgent directory /opt/protegrity/<DBP_version>/rpagent to all nodes All 4 node(s) have connected <node_name>: send completed: 14787336 bytes received (9 files/3 directories) <node_name>: send completed: 14787336 bytes received (9 files/3 directories) <node_name>: send completed: 14787336 bytes received (9 files/3 directories) <node_name>: send completed: 14787336 bytes received (9 files/3 directories) All 4 node(s) have connected All 4 node(s) have connected 2026-05-04 03:55:54 - [INFO] RPAgent successfully copied to all nodes 2026-05-04 03:55:54 - [INFO] Logforwarder and RPAgent successfully copied to all nodes 2026-05-04 03:55:54 - [INFO] Starting new Logforwarder on all nodes 2026-05-04 03:55:56 - [INFO] Preparing Database Protector installation... 2026-05-04 03:55:56 - [INFO] Installing/Upgrading DBP... 2026-05-04 03:55:56 - [INFO] Executing ./PepTeradataSetup_Linux_x64_<DBP_version>.sh... 2026-05-04 03:55:57 - [INFO] ./PepTeradataSetup_Linux_x64_<DBP_version>.sh completed successfully. 2026-05-04 03:55:57 - [INFO] Copying DatabaseProtector to all nodes All 4 node(s) have connected <node_name>: send completed: 8926081 bytes received (16 files/5 directories) <node_name>: send completed: 8926081 bytes received (16 files/5 directories) <node_name>: send completed: 8926081 bytes received (16 files/5 directories) <node_name>: send completed: 8926081 bytes received (16 files/5 directories) All 4 node(s) have connected All 4 node(s) have connected 2026-05-04 03:55:57 - [INFO] Setting DatabaseProtector ownership (tdatuser:tdtrusted) on all nodes All 4 node(s) have connected 2026-05-04 03:55:57 - [INFO] DatabaseProtector successfully copied to all nodes 2026-05-04 03:55:57 - [INFO] Synchronizing /etc/protegrity to all nodes All 4 node(s) have connected All 4 node(s) have connected <node_name>: send completed: 1157 bytes received (1 files/1 directories) <node_name>: send completed: 1157 bytes received (1 files/1 directories) <node_name>: send completed: 1157 bytes received (1 files/1 directories) <node_name>: send completed: 1157 bytes received (1 files/1 directories) All 4 node(s) have connected All 4 node(s) have connected All 4 node(s) have connected 2026-05-04 03:55:58 - [INFO] User configuration directory successfully synchronized to all nodes 2026-05-04 03:55:58 - [INFO] Starting new RPAgent on all nodes 2026-05-04 03:55:58 - [INFO] Successfully launched new RPAgent on all nodes 2026-05-04 03:55:58 - [INFO] Creating new UDFs (database operation on current node only - shared across all nodes) BTEQ 17.20.00.08 (64-bit) Mon May 4 03:55:58 2026 PID: 138943 +---------+---------+---------+---------+---------+---------+---------+---- .SET EXITONDELAY ON MAXREQTIME 300 RC 12 +---------+---------+---------+---------+---------+---------+---------+---- .logon localhost/<database_user_name>, *** Logon successfully completed. *** Teradata Database Release is 17.20.03.18 *** Teradata Database Version is 17.20.03.18 *** Transaction Semantics are BTET. *** Session Character Set Name is 'ASCII'. *** Total elapsed time was 1 second. +---------+---------+---------+---------+---------+---------+---------+---- database <database_name>; *** New default database accepted. *** Total elapsed time was 1 second. +---------+---------+---------+---------+---------+---------+---------+---- .IF ERRORCODE <> 0 THEN .QUIT 12; +---------+---------+---------+---------+---------+---------+---------+---- .run file /opt/protegrity/<DBP_version>/databaseprotector/teradata/sqlscripts/c reateobjects.sql; +---------+---------+---------+---------+---------+---------+---------+---- Do you want to create the varcharunicode UDFs? (yes/no) [no]: - To create the varcharunicode UDFs, type
yes. - Press ENTER.
The script installs the varcharunicode UDFs and completes the installation.2026-05-04 03:58:43 - [INFO] Creating varcharunicode UDFs BTEQ 17.20.00.08 (64-bit) Mon May 4 03:58:43 2026 PID: 140061 +---------+---------+---------+---------+---------+---------+---------+---- .SET EXITONDELAY ON MAXREQTIME 300 RC 12 +---------+---------+---------+---------+---------+---------+---------+---- .logon localhost/<database_user_name>, *** Logon successfully completed. *** Teradata Database Release is 17.20.03.18 *** Teradata Database Version is 17.20.03.18 *** Transaction Semantics are BTET. *** Session Character Set Name is 'ASCII'. *** Total elapsed time was 1 second. +---------+---------+---------+---------+---------+---------+---------+---- database <database_name>; *** New default database accepted. *** Total elapsed time was 1 second. +---------+---------+---------+---------+---------+---------+---------+---- .IF ERRORCODE <> 0 THEN .QUIT 12; +---------+---------+---------+---------+---------+---------+---------+---- .run file /opt/protegrity/<DBP_version>/databaseprotector/teradata/sqlscripts/c reatevarcharunicode.sql; +---------+---------+---------+---------+---------+---------+---------+---- 2026-05-04 03:58:45 - [INFO] Varcharunicode UDFs created successfully 2026-05-04 03:58:45 - [INFO] Testing UDFs BTEQ 17.20.00.08 (64-bit) Mon May 4 03:58:45 2026 PID: 140151 +---------+---------+---------+---------+---------+---------+---------+---- .SET EXITONDELAY ON MAXREQTIME 300 RC 12 +---------+---------+---------+---------+---------+---------+---------+---- .logon localhost/<database_user_name>, *** Logon successfully completed. *** Teradata Database Release is 17.20.03.18 *** Teradata Database Version is 17.20.03.18 *** Transaction Semantics are BTET. *** Session Character Set Name is 'ASCII'. *** Total elapsed time was 1 second. +---------+---------+---------+---------+---------+---------+---------+---- database <database_name>; *** New default database accepted. *** Total elapsed time was 1 second. +---------+---------+---------+---------+---------+---------+---------+---- .IF ERRORCODE <> 0 THEN .QUIT 12; +---------+---------+---------+---------+---------+---------+---------+---- select pty_getversion(); *** Query completed. One row found. One column returned. *** Total elapsed time was 1 second. pty_getversion() --------------------------------------------------------------------------- <DBP_version> +---------+---------+---------+---------+---------+---------+---------+---- .logoff *** You are now logged off from the <database_user_name>. +---------+---------+---------+---------+---------+---------+---------+---- .quit *** Exiting BTEQ... *** RC (return code) = 0 2026-05-04 03:58:45 - [INFO] Installation successful. 2026-05-04 03:58:45 - [INFO] All components installed successfully. 2026-05-04 03:58:45 - [INFO] IMPORTANT: Protegrity UDT installation must be handled manually. Refer to product documentation. 2026-05-04 03:58:45 - [INFO] IMPORTANT: Protegrity Decimal UDF objects installation must be handled manually. Refer to product documentation.
Installing the Protector using the install.ini file
This argument requires the install.ini file to be present and updated with the required parameters. The install.ini files contains the installation directories for the components and the endpoints for the Log Forwarder and RPAgent.
A sample output of the install.ini file is listed below.
; =============================================================================
; install.ini - Sample configuration file for Database Protector installation
; =============================================================================
;
; Usage:
; ./install_pep_teradata_v2.sh --install --install-ini /path/to/install.ini
;
; Notes:
; - This file is only supported with --install mode (not --upgrade or --silent).
; - Lines starting with ; or # are treated as comments.
; - All fields listed below are REQUIRED unless noted otherwise.
; - Section names and keys are case-insensitive during parsing.
; - The installer will automatically append the component subdirectory
; (e.g., /logforwarder, /rpagent, /databaseprotector) under each
; INSTALLATION_DIR path.
;
; =============================================================================
[Logforwarder]
; Base directory where LogForwarder will be installed.
; The installer will create a "logforwarder" subdirectory under this path.
INSTALLATION_DIR = /opt/protegrity
; Space-separated list of audit store endpoint(s) in host:port format.
; Multiple endpoints can be specified for redundancy.
AUDIT_STORE_ENDPOINTS = <Audit_Store_Endpoint>:9200 <Audit_Store_Endpoint>:9200
[RPAgent]
; Base directory where RPAgent will be installed.
; The installer will create an "rpagent" subdirectory under this path.
INSTALLATION_DIR = /opt/protegrity
; Upstream ESA (Enterprise Security Administrator) host and port.
; Format: <ip_or_hostname>:<port>
; If the port is omitted, the default port 25400 is used.
UPSTREAM_HOST_IP_ADDR_PORT = <ESA_Hostname>:25400
[DatabaseProtector]
; Base directory where DatabaseProtector will be installed.
; The installer will create a "databaseprotector" subdirectory under this path.
INSTALLATION_DIR = /opt/protegrity
; Teradata database name used for creating UDF objects.
DATABASE_NAME = <Database_name_to_install_UDFs>
; Maximum size of VARCHAR to be allocated by the UDFs.
; Must be a positive integer.
MAX_VARCHAR_SIZE = 500
Note: To use any directory for the Database Protector, ensure the directory is available. Otherwise, the installation will fail. Note: The default port for the Audit Store endpoint is 9200. The default port for the RPAgent is 25400. To use any other port, replace the value.
To install the protector using the install.ini argument:
- Log in to the server as the user with the required permissions.
- Navigate to the directory containing the extracted files and the installation scripts.
- To execute the script with the argument, run the following command:
./Install_TeradataProtector_Linux_x64_<DBP_version>.sh --install --install-ini <path_to_install.ini_file> - Press ENTER.
The script performs a pre-check, detects theinstall.inifile and the prompt to create the UDF appears.2026-05-04 04:11:01 - [INFO] ======================================================================== 2026-05-04 04:11:01 - [INFO] Starting environment pre-checks before installation/upgrade 2026-05-04 04:11:01 - [INFO] ======================================================================== 2026-05-04 04:11:01 - [INFO] Prerequisites check passed: pcl and bteq commands are available on current/running node 2026-05-04 04:11:01 - [INFO] Checking Teradata PDE state on running node... 2026-05-04 04:11:01 - [INFO] PDE state check passed on running node: PDE state is RUN/STARTED 2026-05-04 04:11:01 - [INFO] Checking accessibility of all Teradata nodes... 2026-05-04 04:11:01 - [INFO] IMPORTANT: ALL nodes must be accessible - if even 1 node is down, installation will be aborted 2026-05-04 04:11:01 - [INFO] ========================================== 2026-05-04 04:11:01 - [INFO] Node accessibility check PASSED 2026-05-04 04:11:01 - [INFO] All 4 node(s) have connected <--------------------- <node_name> --------------------------------> abyss4 <--------------------- <node_name> --------------------------------> abyss3 <--------------------- <node_name> --------------------------------> abyss2 <--------------------- <node_name> --------------------------------> abyss1 2026-05-04 04:11:01 - [INFO] ========================================== 2026-05-04 04:11:01 - [INFO] ======================================================================== 2026-05-04 04:11:01 - [INFO] All environment pre-checks PASSED - proceeding with installation 2026-05-04 04:11:01 - [INFO] ======================================================================== 2026-05-04 04:11:01 - [INFO] install.ini detected: /<path_to_install.ini_file>/install.ini Do you want to continue and create UDFs? To create the UDFs, provide the database credentials (yes/no) [no]: - To create the UDFs, type
yes. - Press ENTER.
The prompt to enter the database username appears.Enter Teradata database username: - Enter the username.
- Press ENTER.
The prompt to enter the database password appears.Enter Teradata database user's password: - Enter the password.
- Press ENTER.
The script validates the database and lists the configuration. The prompt to verify the configuration appears.2026-05-04 04:11:12 - [INFO] Validating database ... 2026-05-04 04:11:12 - [INFO] Database validated successfully 2026-05-04 04:11:12 - [INFO] ************************************************************************** 2026-05-04 04:11:12 - [INFO] Installation will be done with following configuration: 2026-05-04 04:11:12 - [INFO] Mode: install 2026-05-04 04:11:12 - [INFO] Using configuration from install.ini: 2026-05-04 04:11:12 - [INFO] Logforwarder Installation Directory: /home/<DBP_version> 2026-05-04 04:11:12 - [INFO] Audit Store Endpoints: 10.25.61.133:9443 10.25.61.135:9443 10.25.61.136:9443 2026-05-04 04:11:12 - [INFO] RPAgent Installation Directory: /home/<DBP_version> 2026-05-04 04:11:12 - [INFO] Upstream (ESA) IP Address for RPAgent: 10.25.61.135 2026-05-04 04:11:12 - [INFO] Upstream (ESA) Port for RPAgent: 25400 2026-05-04 04:11:12 - [INFO] DatabaseProtector Installation Directory: /home/<DBP_version> 2026-05-04 04:11:12 - [INFO] This is a fresh install. 2026-05-04 04:11:12 - [INFO] ************************************************************************** 2026-05-04 04:11:12 - [INFO] Please verify the above configuration before proceeding. Do you want to continue? (yes/no) [no]: - To proceed with the configuration, type
yes. - Press ENTER.
The script installs the log forwarder. The script then triggers the RPAgent installation script. The prompt to enter ESA token appears.2026-05-04 04:11:46 - [INFO] Continuing with installation... 2026-05-04 04:11:46 - [INFO] Installing/Upgrading LOGFORWARDER... 2026-05-04 04:11:46 - [INFO] Executing ./LogforwarderSetup_Linux_x64_<DBP_version>.sh... 2026-05-04 04:11:47 - [INFO] ./LogforwarderSetup_Linux_x64_<DBP_version>.sh completed successfully. 2026-05-04 04:11:47 - [INFO] Installing/Upgrading RPAGENT... Enter ESA token (leave blank to use username/password): - To use the credentials for ESA, press ENTER.
The prompt to enter the username appears.Enter ESA username: - Enter the username.
- Press ENTER.
The prompt to enter the password appears.Enter ESA user's password: - Enter the password.
- Press ENTER.
The script:- validates and downloads the certificates from ESA
- installs the RPAgent
- copies the Log Forwarder and RPAgent to all the nodes in the Teradata cluster
- creates installation directories
- starts the new Log Forwarder on all the nodes
- triggers the script to install the database objects
- creates the UDFs The prompt to install the varcharunicode UDF appears.
2026-05-04 04:12:08 - [INFO] Executing ./RPAgentSetup_Linux_x64_<DBP_version>.sh... Unpacking... Extracting files... Certificate validation successful. Obtaining token from <ESA_Hostname>:25400... Downloading certificates from <ESA_Hostname>:25400... % Total % Received % Xferd Average Speed Time Time Time Current Dload Upload Total Spent Left Speed 100 11264 100 11264 0 0 54891 0 0 Extracting certificates... Certificates successfully downloaded and stored in /opt/protegrity/<DBP_version>/rpagent/data Protegrity RPAgent installed in /opt/protegrity/<DBP_version>/rpagent. 2026-05-04 04:12:14 - [INFO] ./RPAgentSetup_Linux_x64_<DBP_version>.sh completed successfully. 2026-05-04 04:12:14 - [INFO] Copying Logforwarder and RPAgent to all nodes in the Teradata cluster 2026-05-04 04:12:14 - [INFO] Copying Logforwarder and RPAgent components to all nodes 2026-05-04 04:12:14 - [INFO] Creating installation directories on all nodes if not present All 4 node(s) have connected All 4 node(s) have connected All 4 node(s) have connected All 4 node(s) have connected 2026-05-04 04:12:14 - [INFO] Copying Logforwarder directory /home/<DBP_version>/logforwarder to all nodes All 4 node(s) have connected <node_name>: send completed: 57934078 bytes received (9 files/5 directories) <node_name>: send completed: 57934078 bytes received (9 files/5 directories) <node_name>: send completed: 57934078 bytes received (9 files/5 directories) <node_name>: send completed: 57934078 bytes received (9 files/5 directories) All 4 node(s) have connected All 4 node(s) have connected 2026-05-04 04:12:15 - [INFO] Logforwarder successfully copied to all nodes 2026-05-04 04:12:15 - [INFO] Copying RPAgent directory /opt/protegrity/<DBP_version>/rpagent to all nodes All 4 node(s) have connected <node_name>: send completed: 14787256 bytes received (9 files/3 directories) <node_name>: send completed: 14787256 bytes received (9 files/3 directories) <node_name>: send completed: 14787256 bytes received (9 files/3 directories) <node_name>: send completed: 14787256 bytes received (9 files/3 directories) All 4 node(s) have connected All 4 node(s) have connected 2026-05-04 04:12:16 - [INFO] RPAgent successfully copied to all nodes 2026-05-04 04:12:16 - [INFO] Logforwarder and RPAgent successfully copied to all nodes 2026-05-04 04:12:16 - [INFO] Starting new Logforwarder on all nodes 2026-05-04 04:12:19 - [INFO] Preparing Database Protector installation... 2026-05-04 04:12:19 - [INFO] Installing/Upgrading DBP... 2026-05-04 04:12:19 - [INFO] Executing ./PepTeradataSetup_Linux_x64_<DBP_version>.sh... 2026-05-04 04:12:19 - [INFO] ./PepTeradataSetup_Linux_x64_<DBP_version>.sh completed successfully. 2026-05-04 04:12:19 - [INFO] Copying DatabaseProtector to all nodes All 4 node(s) have connected <node_name>: send completed: 8924920 bytes received (16 files/5 directories) <node_name>: send completed: 8924920 bytes received (16 files/5 directories) <node_name>: send completed: 8924920 bytes received (16 files/5 directories) <node_name>: send completed: 8924920 bytes received (16 files/5 directories) All 4 node(s) have connected All 4 node(s) have connected 2026-05-04 04:12:20 - [INFO] Setting DatabaseProtector ownership (tdatuser:tdtrusted) on all nodes All 4 node(s) have connected 2026-05-04 04:12:20 - [INFO] DatabaseProtector successfully copied to all nodes 2026-05-04 04:12:20 - [INFO] Synchronizing /etc/protegrity to all nodes All 4 node(s) have connected All 4 node(s) have connected <node_name>: send completed: 1157 bytes received (1 files/1 directories) <node_name>: send completed: 1157 bytes received (1 files/1 directories) <node_name>: send completed: 1157 bytes received (1 files/1 directories) <node_name>: send completed: 1157 bytes received (1 files/1 directories) All 4 node(s) have connected All 4 node(s) have connected All 4 node(s) have connected 2026-05-04 04:12:21 - [INFO] User configuration directory successfully synchronized to all nodes 2026-05-04 04:12:21 - [INFO] Starting new RPAgent on all nodes 2026-05-04 04:12:21 - [INFO] Successfully launched new RPAgent on all nodes 2026-05-04 04:12:21 - [INFO] Creating new UDFs (database operation on current node only - shared across all nodes) BTEQ 17.20.00.08 (64-bit) Mon May 4 04:12:21 2026 PID: 143569 +---------+---------+---------+---------+---------+---------+---------+---- .SET EXITONDELAY ON MAXREQTIME 300 RC 12 +---------+---------+---------+---------+---------+---------+---------+---- .logon localhost/<database_name>, *** Logon successfully completed. *** Teradata Database Release is 17.20.03.18 *** Teradata Database Version is 17.20.03.18 *** Transaction Semantics are BTET. *** Session Character Set Name is 'ASCII'. *** Total elapsed time was 1 second. +---------+---------+---------+---------+---------+---------+---------+---- database testdb; *** New default database accepted. *** Total elapsed time was 1 second. +---------+---------+---------+---------+---------+---------+---------+---- .IF ERRORCODE <> 0 THEN .QUIT 12; +---------+---------+---------+---------+---------+---------+---------+---- .run file /home/<DBP_version>/databaseprotector/teradata/sqlscripts/createobjec ts.sql; +---------+---------+---------+---------+---------+---------+---------+---- Do you want to create the varcharunicode UDFs? (yes/no) [no]: - To create the varcharunicode UDFs, type
yes. - Press ENTER.
The script creates the varcharunicode UDFs and completes the installation.2026-05-04 04:12:44 - [INFO] Creating varcharunicode UDFs BTEQ 17.20.00.08 (64-bit) Mon May 4 04:12:44 2026 PID: 144325 +---------+---------+---------+---------+---------+---------+---------+---- .SET EXITONDELAY ON MAXREQTIME 300 RC 12 +---------+---------+---------+---------+---------+---------+---------+---- .logon localhost/<database_name>, *** Logon successfully completed. *** Teradata Database Release is 17.20.03.18 *** Teradata Database Version is 17.20.03.18 *** Transaction Semantics are BTET. *** Session Character Set Name is 'ASCII'. *** Total elapsed time was 1 second. +---------+---------+---------+---------+---------+---------+---------+---- database testdb; *** New default database accepted. *** Total elapsed time was 1 second. +---------+---------+---------+---------+---------+---------+---------+---- .IF ERRORCODE <> 0 THEN .QUIT 12; +---------+---------+---------+---------+---------+---------+---------+---- .run file /home/<DBP_version>/databaseprotector/teradata/sqlscripts/createvarch arunicode.sql; +---------+---------+---------+---------+---------+---------+---------+---- 2026-05-04 04:12:46 - [INFO] Varcharunicode UDFs created successfully 2026-05-04 04:12:46 - [INFO] Testing UDFs BTEQ 17.20.00.08 (64-bit) Mon May 4 04:12:46 2026 PID: 144416 +---------+---------+---------+---------+---------+---------+---------+---- .SET EXITONDELAY ON MAXREQTIME 300 RC 12 +---------+---------+---------+---------+---------+---------+---------+---- .logon localhost/<database_name>, *** Logon successfully completed. *** Teradata Database Release is 17.20.03.18 *** Teradata Database Version is 17.20.03.18 *** Transaction Semantics are BTET. *** Session Character Set Name is 'ASCII'. *** Total elapsed time was 1 second. +---------+---------+---------+---------+---------+---------+---------+---- database testdb; *** New default database accepted. *** Total elapsed time was 1 second. +---------+---------+---------+---------+---------+---------+---------+---- .IF ERRORCODE <> 0 THEN .QUIT 12; +---------+---------+---------+---------+---------+---------+---------+---- select pty_getversion(); *** Query completed. One row found. One column returned. *** Total elapsed time was 1 second. pty_getversion() --------------------------------------------------------------------------- <DBP_version> +---------+---------+---------+---------+---------+---------+---------+---- .logoff *** You are now logged off from the <database_name>. +---------+---------+---------+---------+---------+---------+---------+---- .quit *** Exiting BTEQ... *** RC (return code) = 0 2026-05-04 04:12:46 - [INFO] Installation successful. 2026-05-04 04:12:46 - [INFO] All components installed successfully. 2026-05-04 04:12:46 - [INFO] IMPORTANT: Protegrity UDT installation must be handled manually. Refer to product documentation. 2026-05-04 04:12:46 - [INFO] IMPORTANT: Protegrity Decimal UDF objects installation must be handled manually. Refer to product documentation.
5.1.4.4 - Creating the User Defined Functions
Before creating the UDFs, ensure that the following prerequisites are met:
The Teradata Data Warehouse Protector is installed on all the nodes.
When installing the Teradata objects, ensure to specify the maximum data size to be allocated by the UDFs. This value should not exceed 500 MB.
- While calculating the data size, ensure to consider the space for the overheads.
For example:- For the data that would be tokenized using non-length preserving tokens, add an overhead of approximately 6% to the original data size.
- For the AES-encrypted data, with the blocks of 16 bytes, add an overhead of an additional 16 bytes to include CRC or IV.
- While calculating the data size, ensure to consider the space for the overheads.
The database user that installs the UDFs must have the following privileges:
GRANT CREATE FUNCTION ON PROTEGRITY to USER1;GRANT ALTER FUNCTION ON PROTEGRITY to USER1;
where, - USER1 is the database user who install the UDFs. - PROTEGRITY is the name of the database where the UDFs are installed. - ROLE1 is the group to which the USER1 belongs.
Ensure that the database user who installs the UDFs is part of the ROLE1 group.To grant privileges to a database user to perform database administration functions, run the following query:
GRANT EXECUTE, SELECT, INSERT, UPDATE, DELETE, STATISTICS, DUMP, RESTORE, CHECKPOINT, SHOW, EXECUTE PROCEDURE, ALTER PROCEDURE, EXECUTE FUNCTION, ALTER FUNCTION, ALTER EXTERNAL PROCEDURE, CREATE OWNER PROCEDURE, CREATE TABLE, CREATE VIEW, CREATE MACRO, CREATE TRIGGER, CREATE PROCEDURE, CREATE FUNCTION, DROP TABLE, DROP VIEW, DROP MACRO, DROP TRIGGER, DROP PROCEDURE, DROP FUNCTION ON TESTDB TO ROLE1;To distribute the installation on all the nodes while installing the UDF in a multi-node environment, execute either of the following commands:
- UNIX commands:
psh mkdir /opt/protegrity/ - PUT utility:
pcl -send /opt/protegrity/* /opt/protegrity/
- UNIX commands:
To create the UDFs for Teradata:
Log in to the database server as the user with the required permissions.
Navigate to the
/opt/protegrity/databaseprotector/teradata/sqlscripts/directory.To view the
.sqlqueries, run the following command:/opt/protegrity/databaseprotector/teradata/sqlscripts/ # ls -ltrPress ENTER.
The list of available queries in the.sqlfile format appears.total 164 -rw-r----- 1 tdatuser tdtrusted 8939 createdecimalobjects.sql -rw-r----- 1 tdatuser tdtrusted 2560 dropobjects.sql -rw-r----- 1 tdatuser tdtrusted 781 dropvarcharunicode.sql -rw-r----- 1 tdatuser tdtrusted 67128 createobjects.sql -rw-r----- 1 tdatuser tdtrusted 10294 createvarcharunicode.sql -rw-r----- 1 tdatuser tdtrusted 8401 createdecimalobjects_a.sql -rw-r----- 1 tdatuser tdtrusted 793 dropvarcharunicode_a.sql -rw-r----- 1 tdatuser tdtrusted 1875 dropobjects_a.sql -rw-r----- 1 tdatuser tdtrusted 19643 createobjects_a.sql -rw-r----- 1 tdatuser tdtrusted 5078 createvarcharunicode_a.sql -rw-r----- 1 tdatuser tdtrusted 5300 testscript.sql -rw-r----- 1 tdatuser tdtrusted 3558 sample_tok.sql -rw-r----- 1 tdatuser tdtrusted 3324 sample_enc.sqlTo start the
btequtility, run the following command:/opt/protegrity/databaseprotector/teradata/sqlscripts/ # bteqPress ENTER.
The prompt to log in to the database appears.Enter your logon or BTEQ command:To log in to the database, run the following command:
.logon < username >Press ENTER.
The prompt to enter the database password appears.Password:Enter the database password.
Press ENTER.
The connection to the Teradata database is established successfully.*** Logon successfully completed.To create the UDFs, execute the following query:
.run file=createobjects.sqlPress ENTER.
The script creates the UDFs and the following message for each of the created UDF appears.*** Function has been created. *** Warning: 5607 Check output for possible warnings encountered in compiling and/or linking UDF/XSP/UDM/UDT. *** Total elapsed time was 1 second.To create the Varchar Unicode UDFs, execute the following query:
.run file=createvarcharunicode.sqlPress ENTER.
The script creates the UDFs and the following message for each of the created UDF appears.*** Function has been created. *** Warning: 5607 Check output for possible warnings encountered in compiling and/or linking UDF/XSP/UDM/UDT. *** Total elapsed time was 1 second.To create the Decimal UDFs, execute the following query:
.run file=createdecimal.sqlPress ENTER.
The script creates the Decimal UDFs and the following message for each of the created UDF appears.*** Function has been created. *** Warning: 5607 Check output for possible warnings encountered in compiling and/or linking UDF/XSP/UDM/UDT. *** Total elapsed time was 1 second.Note: For more information about the User Defined Functions (UDFs) for Teradata, refer to User Defined Functions and API.
5.1.4.5 - User Defined Types
Installing the User Defined Types
The UDTs support the creation of data-types that can be used as pre-defined data-types.
To install the UDT for Teradata:
- Log in to the database server as the user with the required permissions.
- Navigate to the
/opt/protegrity/directory. - To install the UDT for Teradata, run the following command:
./PepTeradata_UDTSetup_Linux_x64_<DBP_version>.sh - Press ENTER.
The prompt to continue the installation appears.***************************************************** Welcome to the Database Protector Setup Wizard ***************************************************** This will install the teradata user defined types on your computer Do you want to continue? [yes or no] - To proceed, type
yes. - Press ENTER.
The script extracts the files and installs the data types in the default directory. The script also sets the permissions for the data types.
[/opt/protegrity]: Unpacking... To get started with UDTs, please run /opt/protegrity/databaseprotector/teradata generate_udt_scripts.sh. Teradata UDTs installed in /opt/protegrity/databaseprotector/teradata. Permission for /opt/protegrity/databaseprotector/teradata is successfully set.
Creating the User Defined Types
The Teradata Data Warehouse Protector automatically creates the To-SQL and From-SQL transform, the ordering, and the necessary casts for a distinct UDT once the CREATE TYPE statement is issued.
On the Data Warehouse Protector installation, the /databaseprotector/teradata/udt/ directory is created with the following files:
generate_udt_scripts.shis an executable file that generates UDT scriptspepteradataudt.plmis a library that contains protect and unprotect functions for UDT usage.
The generate_udt_scripts.sh script generates UDT scripts using the following command:
/opt/protegrity/databaseprotector/teradata/udt # ./generate_udt_scripts.sh --help
Protegrity Data Security Platform - Teradata UDT Scripts
Usage: generate_udt_scripts udtname dataelement scid dbtype
udtname : UDT Name
dataelement: Data Element
scid : Security Coordinate ID
dbtype : Database data type, must be one of: bigint,date,float,integer,varchar
The following are some limitations for the UDT arguments:
- Udtname – any applicable name
- Dataelement – DE deployed
- Scid – applicable security coordinate (0 by default)
- Dbtype – one of the data types bigint, date, float, integer, varchar.
Important: The scid parameter is no longer used and is retained for compatibility purpose only.
To create the User Defined Types:
Log in to the server as the user with the required permissions.
Navigate to the
/opt/protegrity/databaseprotector/teradata/udt/directory.To view the files and directories in the
../udt/directory, run the following command:/opt/protegrity/databaseprotector/udt # lsPress ENTER. The list of available content appears.
/opt/protegrity/databaseprotector/teradata/udt # ls generate_udt_scripts.sh pepteradataudt.plm sqlscriptsTo generate the UDT scripts required for creating the UDTs, run the following command:
./generate_udt_scripts.sh <udtname> <dataelement> <scid> <dbtype>For example:
./generate_udt_scripts.sh UDT_VARCHAR AES128 0 varcharPress ENTER. The script generates the following
.sqlqueries for the UDTs in the/opt/protegrity/databaseprotector/teradata/udtdirectory.create_UDT_VARCHAR.sql drop_UDT_VARCHAR.sqlNote: It is recommended to use the data element names in the upper-case.
Note: Modify the
.sqlqueries using thebtequtility for error handling.To start the
btequtility, run the following command:/opt/protegrity/databaseprotector/teradata/sqlscripts # bteqPress ENTER. The prompt to log in to the database appears.
Enter your logon or BTEQ command:To log in to the database, run the following command:
.logon <username>Press ENTER. The prompt to enter the database password appears.
Password:Enter the database password.
Press ENTER. The connection to the Teradata Data Warehouse is established successfully.
*** Logon successfully completed.To create the UDTs, run the following query:
.run file=create_UDT_VARCHAR.sqlPress ENTER. The query creates the UDTs and the following message for each of the created UDT appears.
*** Function has been created. *** Warning: 5607 Check output for possible warnings encountered in compiling and/or linking UDF/XSP/UDM/UDT. *** Total elapsed time was 1 second.Note: It is recommended to create only one UDT for each data type.
Creating an additional UDT, with a basic data type that is used by an existing UDT, results in a linked error.To grant the access permissions to the UDTs, execute the following SQL statements using the bteq utility.
To provide the
executeaccess to the UDTs, run the following command:chmod 755 create_UDT_VARCHAR.sqlPress ENTER.
To provide the
UDTUSAGEaccess for the UDTs to public with aGRANToption, run the following query:GRANT UDTUSAGE ON SYSUDTLIB TO PUBLIC WITH GRANT OPTION;Press ENTER.
To provide the
executefunction for all the UDTs to public with aGRANToption, run the following query:GRANT ALL ON TYPE SYSUDTLIB.UDT_VARCHAR TO PUBLIC WITH GRANT OPTION;The protect/unprotect operations for the UDTs must be executed using the
btequtility.Press ENTER. The script creates the UDTs and grants access permissions using the SQL statements.
5.1.5 - Configuring the Teradata Data Warehouse Protector
This section outlines the configuration process for the Protegrity Teradata Data Warehouse Protector.
5.1.5.1 - Updating the Config.ini File
Log in to the server as the user with the required permissions.
Navigate to the directory where you have downloaded the installation package.
To view the contents within the directory, run the following command:
/opt/protegrity/databaseprotector/teradata/data # ls -ltrPress ENTER.
The list of available configurable files appears.total 4 -rw-r----- 1 tdatuser tdtrusted 1058 Oct 14 01:27 config.iniTo open the
config.inifile, run the following command:/opt/protegrity/databaseprotector/teradata/data # vim config.iniPress ENTER.
The contents of theconfig.inifile appears.############################################################################### # Log Provider Config ############################################################################### [log] # In case that connection to fluent-bit is lost, set how audits/logs are handled # # drop : (default) Protector throws logs away if connection to the fluentbit is lost # error : Protector returns error without protecting/unprotecting # data if connection to the fluentbit is lost mode = drop # Host/IP to fluent-bit where audits/logs will be forwarded from the protector # # Default localhost host = localhost ############################################################################### # Protector Config ############################################################################### [protector] # cadence is used to decide whether deployment is dynamic or immutable. # # '0' is used for immutable deployment. # Non-negative values other than '0' is used as policy sync interval for dynamic deployment. # default cadence value is '60'. cadence = 60Update the parameters as mentioned in the table.
The following table consists of the
config.iniparameters along with the descriptions:Configuration Component Parameter Description Log mode Specifies how the protector logs are handled by the Log Forwarder. If the connection to the Log Forwarder host is lost, you can set the connection mode to one of the following types:
- drop: Specifies the logs that the protector fails to record when the connection to the Log Forwarder is lost. By default, the Log Forwarder is configured to operate in the drop mode.
- error: Stops all the data security operations and throws an error when the connection to the Log Forwarder is lost.
Syntax: Parameter = Value
Example: mode = errorhost Specifies the Log Forwarder hostname or the IP address where the logs are forwarded from the protector. The default host for the Log Forwarder is localhost.
Syntax: Parameter = Value
Example: host = <Hostname or IP Address>Protector cadence Specifies the time interval at which the protector synchronizes with the shared memory for fetching the policy package. The default value for the cadence parameter is 60 seconds. The minimum and maximum values that can be set for the cadence parameter are 0 seconds and 86400 seconds (24 hours) respectively.
Important: If the cadence parameter value is set to 0 seconds, then the policy is fetched only once at the time of initialization. After initialization, the protector does not fetch for the new policy changes as a result of immutable deployment.
Syntax: Parameter = Value
Example: cadence = <time interval in seconds>Save the changes to the
config.inifile.Important: Restart the Teradata Database to reflect any changes made to the
config.inifile.
5.1.5.2 - Updating the Output Buffer
This page discusses the process to update the output buffer length for the Varchar Unicode UDFs.
By default, the value of the output buffer length is 500 characters. This value can be modified during the installation of the Teradata objects.
After completing the installation process, you may need to manually update the output buffer length values if necessary. For instance, if you need to protect strings longer than 500 bytes, adjust the buffer length to accommodate the largest string size. Be aware that a big buffer size slows the overall performance. Additionally, each protection method has a size limitations. For example, tokenization has a maximum size limit of 4096 bytes.
The output buffer sizes for all the UDFs are stored in both, the dbpuserconf.ini and createvarcharunicode.sql files.
Updating the createvarcharunicode.sql file
- Log in to the server as the user with the required permissions.
- Navigate to the
/opt/protegrity/databaseprotector/teradata/sqlscripts/directory. - To update the output buffer length in the
createvarcharunicode.sqlfile, run the following command:vim createvarcharunicode.sql - Press ENTER.
The contents of thecreatevarcharunicode.sqlfile appears.Ensure to update the value of the output buffer length for the PTY_VARCHARUNICODEINS, PTY_VARCHARUNICODESEL, and PTY_VARCHARUNICODESELEX UDFs as per requirements.
- Save the changes to the
createvarcharunicode.sqlfile:Important: To reflect any changes made to the
createvarcharunicodefile, restart the Teradata Database.
Updating the dbpuserconf.ini file
- Log in to the server as the user with the required permissions.
- Navigate to the directory where you have downloaded the
dbpuserconf.inifile.
For example,/etc/protegrity/ - To view the contents within the directory, run the following command:
/etc/protegrity/ # ls -ltr - Press ENTER.
The list of available configurable files appears.total 4 -rw-r----- 1 tdatuser tdtrusted 1058 Jan 28 01:27 dbpuserconf.ini - Open the
dbpuserconf.inifile in any text editor.############################################################################### # Config ini ############################################################################### [config_ini] # path points to database protector installation directory path = /opt/protegrity/databaseprotector/teradata/data/config.ini ############################################################################### # Protector Varchar Sizes (set by user during installation) ############################################################################### [varchar_sizes] UDF_VARCHAR_MAX = 500 UDF_VARCHAR_OVERHEADMAX = 500 VARCHAR_MAX_IN_BUF_LEN_TOKEN_LATIN = 500 VARCHAR_MAX_OUT_BUF_LEN_TOKEN_LATIN = 676 VARCHAR_MAX_IN_BUF_LEN_ENC_LATIN = 500 VARCHAR_MAX_OUT_BUF_LEN_ENC_BYTES = 538 VARCHAR_MAX_IN_BUF_LEN_TOKEN_UNICODE = 500 VARCHAR_MAX_OUT_BUF_LEN_TOKEN_UNICODE = 1356 VARCHAR_MAX_IN_BUF_LEN_ENC_UNICODE = 500 VARCHAR_UNICODE_MAX_OUT_BUF_LEN_ENC_BYTES = 1038 TdvmDev2:/etc/protegrity/ #Important: Update the
VARCHAR_MAX_OUT_BUF_LEN_TOKEN_UNICODEparameter with the required output buffer length. - Update the parameters as per requirements.
- Save the changes to the
dbpuserconf.inifile.
5.1.5.3 - Troubleshooting
This section lists the general configuration steps and the common errors that occur during installation or upgrade.
Recovering a Failed Upgrade
There can be scenarios where an automatic rollback of the Teradata Data Warehouse Protector UDF solution may complete with errors. This results in the system being in a potentially inconsistent state. In such instances, the installer retains the backup directories of the previously working installation. The system can be manually restored to the previous working installation.
Important:
- Execute the steps using the appropriate system user.
- Ensure the availability of appropriate operating system level and Teradata database privileges.
- Execute the steps in the specified order.
- Commands assume a Linux/Unix environment.
- Use extreme caution when running rsync commands with the
--deleteoption.
When a rollback operation fails, the installer retains the following backup directories (example with timestamp):
<path_to_previous_installation_dir>/logforwarder_<timestamp>
<path_to_previous_installation_dir>/rpagent_<timestamp>
<path_to_previous_installation_dir>/databaseprotector_<timestamp>
/etc/protegrity_<timestamp>
When a component is installed by manually executing the script, it is installed under a component-specific subdirectory within the user-provided installation directory:
- Logforwarder →
<installation_dir>/logforwarder/ - RPAgent →
<installation_dir>/rpagent/ - Database Protector →
<installation_dir>/databaseprotector/
However, the automation script will install the components and the protector in version-specific directories under the installation directory. For example, the components will be installed in the following structure:
<installation_dir>/<DBP_version>/<logforwarder>
<installation_dir>/<DBP_version>/<rpagent>
<installation_dir>/<DBP_version>/<databaseprotector>
The backup directories will also follow the similar structure while upgrading from v10.1.x onwards. In this structure, the current timestamp will also be appended to the directory name. The backup directories include the installation files of these component directories and must be restored into their corresponding target directories.
Verifying the Log Forwarder Status
- To verify the status of the Log Forwarder, run the following command:
<installation_dir>/<DBP_version>/logforwarder/bin/logforwarderctrl status - Press ENTER. The script returns the status of the Log Forwarder.
- To stop the Log Forwarder, run the following command:
<installation_dir>/<DBP_version>/logforwarder/bin/logforwarderctrl stop - Press ENTER. The command stops the Log Forwarder.
- To check for any running instances of the Log Forwarder, run the following command:
ps -ef | grep logforwarderNote: This command is useful in scenarios where installation is corrupt and the control command fails to return a valid status.
- Press ENTER. The command lists all the running instances of the Log Forwarder along with the respective process ID.
- To stop the specific instance of the Log Forwarder, run the following command:
kill -9 <logforwarder_process_id> - Press ENTER. The command will stop the specific instance of the Log Forwarder.
Verifying the RPAgent Status
- To verify the status of the RPAgent, run the following command:
<installation_dir>/<DBP_version>/rpagent/bin/rpagentctrl status - Press ENTER. The script returns the status of the RPAgent.
- To stop the RPAgent, run the following command:
<installation_dir>/<DBP_version>/rpagent/bin/rpagentctrl stop - Press ENTER. The command stops the RPAgent.
- To check for any running instances of the RPAgent, run the following command:
ps -ef | grep rpagentNote: This command is useful in scenarios where installation is corrupt and the control command fails to return a valid status.
- Press ENTER. The command lists all the running instances of the RPAgent along with the respective process ID.
- To stop the specific instance of the RPAgent, run the following command:
kill -9 <rpagent_process_id> - Press ENTER. The command will stop the specific instance of the RPAgent.
Performing a Clean-up
Due to the failed rollback, the UDFs and types may be present in the database. Remove them before proceeding with the restoration.
To remove the UDFs and the types:
- To navigate to the directory containing the scripts, run the following command:
cd <installation_dir>/<DBP_version>/databaseprotector/teradata/sqlscripts - Log in to bteq.
- To drop the existing objects, run the following command, with a database user that owns the UDFs, or has sufficient privileges to drop them:
.run file dropobjects.sqlImportant: Errors such as “object does not exist” or “Function does not exist” may occur and can be safely ignored depending on the database state.
- To drop the varcharunicode UDFs, run the following command as a database user that owns the existing types and UDFs or has sufficient privileges:
.run file dropvarcharunicode.sqlImportant: Errors such as “object does not exist” or “Function does not exist” may occur and can be safely ignored depending on the database state.
Restoring the Component Directories and User Configuration
Restore the contents of all the Protegrity components and configuration directories using the retained backups.
For each component:
- Identify the installation directory.
- Replace its contents with the corresponding backup directory using a suitable tool such as
rsync,cp, ormv.
Note: The Logforwarder, RPAgent, and Database Protector components may be installed in the same directory or in separate directories, depending on the environment.
Important:
- Ensure all services are stopped before performing this step.
- Do not merge directories manually.
- Always fully replace the target directory contents with the backup contents.
Restoring the Log Forwarder for v10.0.x
- To navigate to the backup directory, run the following command:
<path_to_previous_installation_dir>/logforwarder_<timestamp> - To navigate to the installation directory, run the following command:
<installation_dir>/logforwarder - To restore the Log Forwarder, run the following command:
rsync -a --delete <path_to_previous_installation_dir>/logforwarder_<timestamp>/ <installation_dir>/logforwarder/Warning rsync
--deleteoption permanently removes files from the target directory that are not present in the backup. Always verify that the target directory is the correct component directory before executing the command.
Restoring the Log Forwarder for v10.1.x
- To navigate to the backup directory, run the following command:
<path_to_previous_installation_dir>/<DBP_version>/logforwarder_<timestamp> - To navigate to the installation directory, run the following command:
<installation_dir>/<DBP_version>/logforwarder - To restore the Log Forwarder, run the following command:
rsync -a --delete <path_to_previous_installation_dir>/<DBP_version>/logforwarder_<timestamp>/ <installation_dir>/logforwarder/Warning rsync
--deleteoption permanently removes files from the target directory that are not present in the backup. Always verify that the target directory is the correct component directory before executing the command.
Restoring the RPAgent for v10.0.x
- To navigate to the backup directory, run the following command:
<path_to_previous_installation_dir>/rpagent_<timestamp> - To navigate to the installation directory, run the following command:
<installation_dir>/rpagent - To restore the RPAgent, run the following command:
rsync -a --delete <path_to_previous_installation_dir>/rpagent_<timestamp>/ <installation_dir>/rpagent/Warning rsync
--deleteoption permanently removes files from the target directory that are not present in the backup. Always verify that the target directory is the correct component directory before executing the command.
Restoring the RPAgent for v10.1.x
- To navigate to the backup directory, run the following command:
<path_to_previous_installation_dir>/<DBP_version>/rpagent_<timestamp> - To navigate to the installation directory, run the following command:
<installation_dir>/<DBP_version>/rpagent - To restore the RPAgent, run the following command:
rsync -a --delete <path_to_previous_installation_dir>/<DBP_version>/rpagent_<timestamp>/ <installation_dir>/rpagent/Warning rsync
--deleteoption permanently removes files from the target directory that are not present in the backup. Always verify that the target directory is the correct component directory before executing the command.
Restoring the Teradata Data Warehouse Protector for v10.0.x
- To navigate to the backup directory, run the following command:
<path_to_previous_installation_dir>/databaseprotector_<timestamp> - To navigate to the installation directory, run the following command:
<installation_dir>/databaseprotector - To restore the Teradata Data Warehouse Protector, run the following command:
rsync -a --delete <path_to_previous_installation_dir>/databaseprotector_<timestamp>/ <installation_dir>/databaseprotector/Warning rsync
--deleteoption permanently removes files from the target directory that are not present in the backup. Verify that the target directory is the correct component directory before executing the command.
Restoring the Teradata Data Warehouse Protector for v10.1.x
- To navigate to the backup directory, run the following command:
<path_to_previous_installation_dir>/<DBP_version>/databaseprotector_<timestamp> - To navigate to the installation directory, run the following command:
<installation_dir>/<DBP_version>/databaseprotector - To restore the Teradata Data Warehouse Protector, run the following command:
rsync -a --delete <path_to_previous_installation_dir>/<DBP_version>/databaseprotector_<timestamp>/ <installation_dir>/databaseprotector/Warning rsync
--deleteoption permanently removes files from the target directory that are not present in the backup. Verify that the target directory is the correct component directory before executing the command.
Restoring the User Configuration
- To navigate to the backup directory, run the following command:
/etc/protegrity - To restore the user configuration, run the following command:
rsync -a --delete /etc/protegrity_<timestamp>/ /etc/protegrity/Note: The
/etc/protegrity/directory location does not change across installations or upgrades. This step ensures that all previous configuration settings are fully restored.
Starting the Services for v10.0.x
- To start the Log Forwarder, run the following command:
<installation_dir>/logforwarder/bin/logforwarderctrl start - To start the RPAgent, run the following command:
<installation_dir>/rpagent/bin/rpagentctrl start
Starting the Services for v10.1.x
- To start the Log Forwarder, run the following command:
<installation_dir>/<DBP_version>/logforwarder/bin/logforwarderctrl start - To start the RPAgent, run the following command:
<installation_dir>/<DBP_version>/rpagent/bin/rpagentctrl start
Recreating the Database Objects for v10.0.x
Due to the failed rollback, the Teradata Data Warehouse Protector types and UDFs may be in an invalid or inconsistent state. If database functionality is not correct, re-create the database objects.
- To navigate to the directory containing the scripts, run the following command:
cd <installation_dir>/databaseprotector/teradata/sqlscripts - Log in to bteq.
- To drop the existing objects, run the following command, with a Teradata database user that owns the UDFs, or has sufficient privileges to drop them:
.run file dropobjects.sqlImportant: Errors such as “object does not exist” or “Function does not exist” may occur and can be safely ignored depending on the database state.
- To drop the varcharunicode UDFs, run the following command as a database user that owns the existing types and UDFs or has sufficient privileges:
.run file dropvarcharunicode.sqlImportant: Errors such as “object does not exist” or “Function does not exist” may occur and can be safely ignored depending on the database state.
- To create the new UDFs, run the following command as a database user having all the required permissions to create the UDFs:
.run file=createobjects.sql - To create the varcharunicode UDFs, run the following command as a database user having all the required permissions to create the UDFs:
.run file=createvarcharunicode.sql
These scripts recreate the Teradata Data Warehouse Protector types and UDFs. The database objects are restored to a clean and consistent state. The installation or rollback process is fully recovered from the SQL partial-failure scenario.
Note: If issues persist after manual recovery, contact Protegrity Support and provide the installer log and details of the recovery steps performed.
Recreating the Database Objects for v10.1.x
Due to the failed rollback, the Teradata Data Warehouse Protector types and UDFs may be in an invalid or inconsistent state. If database functionality is not correct, re-create the database objects.
- To navigate to the directory containing the scripts, run the following command:
cd <installation_dir>/<DBP_version>/databaseprotector/teradata/sqlscripts - Log in to bteq.
- To drop the existing objects, run the following command, with a Teradata database user that owns the UDFs, or has sufficient privileges to drop them:
.run file dropobjects.sqlImportant: Errors such as “object does not exist” or “Function does not exist” may occur and can be safely ignored depending on the database state.
- To drop the varcharunicode UDFs, run the following command as a database user that owns the existing types and UDFs or has sufficient privileges:
.run file dropvarcharunicode.sqlImportant: Errors such as “object does not exist” or “Function does not exist” may occur and can be safely ignored depending on the database state.
- To create the new UDFs, run the following command as a database user having all the required permissions to create the UDFs:
.run file=createobjects.sql - To create the varcharunicode UDFs, run the following command as a database user having all the required permissions to create the UDFs:
.run file=createvarcharunicode.sql
These scripts recreate the Teradata Data Warehouse Protector types and UDFs. The database objects are restored to a clean and consistent state. The installation or rollback process is fully recovered from the SQL partial-failure scenario.
Note: If issues persist after manual recovery, contact Protegrity Support and provide the installer log and details of the recovery steps performed.
Recovering a Partially Failed Installation
The Teradata Data Warehouse Protector installation and upgrade processes involves creating and dropping a large number of Teradata database types and UDFs. In some scenarios, the SQL scripts can partially fail and may result in an inconsistent database state.
The common scenarios include:
- Fresh installation scenario where creation of some types or UDF fails.
- Upgrade process where some new objects are created before a failure occurs.
- Rollback process where the
dropobjects.sqlordropvarcharunicode.sqlscript encounters objects that were never created or were already dropped.
In such scenarios, the rollback process may log warnings similar to:
[WARN] **************************************************************************
[WARN] IMPORTANT: One or more errors occurred while dropping new or restoring existing types and UDFs during rollback.
[WARN] The database may be in an inconsistent state with respect to UDFs.
[WARN] Manual DBA intervention is required to verify and restore UDF state.
[WARN]
[WARN] The new Database Protector directory has been PRESERVED for manual cleanup:
[WARN] Location: <new_databaseprotector_dir> (preserved on master AND all nodes)
[WARN] Backup of previous Database Protector: <backup_databaseprotector_dir>
[WARN] Refer to the product documentation for manual recovery steps.
[ERROR] IMPORTANT: Rollback completed with some errors. Please check the log <log_file_name> for details
[ERROR] Manual intervention may be required to complete the rollback.
[WARN] Previous installation may be in an inconsistent state.
[INFO] Backup directories have been retained for manual recovery:
[INFO] Logforwarder backup: <BACKUP_LOGFORWARDER_DIR>
[INFO] RPAgent backup: <BACKUP_RPAGENT_DIR>
[INFO] DatabaseProtector backup: <BACKUP_DBP_DIR>
[INFO] User configuration backup: <BACKUP_USER_CONF_DIR>
[INFO] You can use these backup directories to manually restore the previous working installation if needed.
[INFO] Refer to the product documentation for manual recovery steps using the backup directories.
These warnings are informational and do not automatically require action. However, a manual intervention is only required if the following instances are true:
- The installer or rollback logs report SQL-related warnings or errors and
- The current state of Teradata Data Warehouse Protector types and UDFs is incorrect or inconsistent.
These errors occur because:
- SQL scripts may fail partially because of permission issues, transient database errors, or environmental errors.
- During rollback, the
dropobjects.sqlordropvarcharunicode.sqlscript attempts to drop all known objects. - Objects that were never created or were already removed, will generate errors such as:
- object does not exist
- already exists
Such errors are expected in partial-failure scenarios and do not necessarily indicate a fatal problem.
Perform a restore operation ONLY in the following scenarios:
- when the verification indicates that database objects are missing, invalid, or corrupted
- when the verification indicates that components such as Log Forwarder and RPAgent are missing, invalid, or corrupted
To perform a restore operation, follow the instructions mentioned in Recovering a Failed Upgrade.
5.1.6 - Upgrading the Teradata Data Warehouse Protector
This section outlines the upgrade process for the Protegrity Teradata Data Warehouse Protector.
5.1.6.1 - Upgrading the Protector on Single Node
The Teradata Data Warehouse Protector build provides an automated script to manage the upgrade process. The master script internally calls the scripts to install and upgrade the components. The master script installs and upgrades the components in the following order:
- Log Forwarder
- RPAgent
- Policy Enforcement Point (Database Protector)
The master script is available in the directory where the installation files are extracted. It provides the following arguments:
install- installs the components in an interactive mode.upgrade- installs a newer version of the protector with minimal downtime.silent- installs the components in a non-interactive mode.install.ini- installs the components as per the parameters provided in the file.help- lists the arguments available for the script.
During the upgrade process, the master script:
- Verifies the existing configuration.
- Creates a backup of the existing configuration.
- Stops the required services.
- Drops the existing UDFs.
- Installs the new version.
- Starts the required services.
- Creates the new UDFs and retains the existing configuration.
In addition, the master script will rollback the upgrade process if any errors are encountered. The script will revert the changes and restore the previous working version of the Teradata Data Warehouse Protector.
Important: The automation script will be unable to handle the UDTs and Decimal objects. If UDTs and Decimal objects are present in the database, these must be handled manually.
Viewing the Arguments for the Script
- Log in to the server as the user with the required permissions.
- Navigate to the directory containing the extracted files and the installation scripts.
- To view the arguments, run the following command:
./Install_TeradataProtector_Linux_x64_<DBP_version>.sh --help - Press ENTER.
The script lists the available arguments.
Usage: ./Install_TeradataProtector_Linux_x64_<DBP_version>.sh [--install | --upgrade] [--silent] [--install-ini <file>] [--help] Options: --install Use this option when installing the solution for the first time on a machine/host. (i.e., there is no previous installation present) --upgrade Use this option when upgrading an existing installation on the machine/host. --install-ini <file> (Optional) Provide a path to an install.ini file for silent or pre-configured installations. This option works with --install only. It must not be used with --upgrade or --silent. You can pass this either as: --install-ini /path/to/install.ini or --install-ini=/path/to/install.ini Refer to the product documentation for details about the configuration options available in install.ini. The documentation describes all supported keys, required fields, and example configurations. --silent (Optional) Runs the installation/upgrade in silent mode with minimum interactive prompts. --help, -h Display this help message and exit.
Upgrading the Protector using the Interactive Mode
Note: For installation/upgrade using the automation script, the component will be installed/upgraded within a <DBP_version> folder under the specified directory.
- Log in to the server as the user with the required permissions.
- Navigate to the directory containing the extracted files and the installation scripts.
- To upgrade the protector, run the following command:
./Install_TeradataProtector_Linux_x64_<DBP_version>.sh --upgrade - Press ENTER.
The script performs pre-checks before starting the upgrade. The prompt to select the silent mode of installation appears.
2026-05-04 03:45:05 - [INFO] ======================================================================== 2026-05-04 03:45:05 - [INFO] Starting environment pre-checks before installation/upgrade 2026-05-04 03:45:05 - [INFO] ======================================================================== 2026-05-04 03:45:05 - [INFO] Prerequisites check passed: pcl and bteq commands are available on current/running node 2026-05-04 03:45:05 - [INFO] Checking Teradata PDE state on running node... 2026-05-04 03:45:05 - [INFO] PDE state check passed on running node: PDE state is RUN/STARTED 2026-05-04 03:45:05 - [INFO] Checking accessibility of all Teradata nodes... 2026-05-04 03:45:05 - [INFO] IMPORTANT: ALL nodes must be accessible - if even 1 node is down, installation will be aborted 2026-05-04 03:45:05 - [INFO] ========================================== 2026-05-04 03:45:05 - [INFO] Node accessibility check PASSED 2026-05-04 03:45:05 - [INFO] All 1 node(s) have connected <--------------------- localhost --------------------------------> td20sles15 2026-05-04 03:45:05 - [INFO] ========================================== 2026-05-04 03:45:05 - [INFO] ======================================================================== 2026-05-04 03:45:05 - [INFO] All environment pre-checks PASSED - proceeding with installation 2026-05-04 03:45:05 - [INFO] ======================================================================== 2026-05-04 03:45:05 - [INFO] If silent mode is selected, the default base directory (/opt/protegrity) will be used as the location of the existing installation for each component (Logforwarder, RPAgent and DatabaseProtector). Do you want silent installation? (yes/no) [no]: - To install the components using the interactive mode, type
no. - Press ENTER.
The prompt to enter the location of the existing installation appears.
Enter existing installation directories: Existing LogForwarder installation directory [/opt/protegrity]: - Enter the directory path where the existing version of the Log Forwarder is installed.
- Press ENTER.
The prompt to enter RPAgent installation directory appears.
Existing RPAgent installation directory [/opt/protegrity]: - Enter the directory path where the existing version of the RPAgent is installed.
- Press ENTER.
The prompt to enter the Database Protector installation directory appears.
Existing DatabaseProtector installation directory [/opt/protegrity]: - Enter the directory path where the existing version of the Database Protector is installed.
- Press ENTER.
The prompt to select a single installation directory for the components appears.
Do you want to install the new LogForwarder, RPAgent, and DatabaseProtector together in a single directory? (yes/no) [no]: - To install the new components in a single directory, type
yes. - Press ENTER.
The prompt to enter the new installation directory appears.
Enter new installation directory [/opt/protegrity]: - Enter the location to install the components.
- Press ENTER.
The prompt to confirm the presence of decimal UDFs appears.
2026-05-04 03:45:23 - [INFO] Verifying previous installation directories for all components... 2026-05-04 03:45:23 - [INFO] Existing LogForwarder directory: /opt/protegrity/<DBP_version>/logforwarder 2026-05-04 03:45:23 - [INFO] Existing RPAgent directory: /opt/protegrity/<DBP_version>/rpagent 2026-05-04 03:45:23 - [INFO] Existing DatabaseProtector directory: /opt/protegrity/<DBP_version>/databaseprotector 2026-05-04 03:45:23 - [INFO] All existing component directories verified successfully. 2026-05-04 03:45:40 - [INFO] Checking for Protegrity UDT in previous installation... 2026-05-04 03:45:40 - [INFO] No UDT PLM file found at expected path. Checking Teradata libraries... 2026-05-04 03:45:40 - [INFO] No Teradata library links to pepteradataudt. UDT not active. 2026-05-04 03:45:40 - [INFO] No active Protegrity UDT detected. Proceeding with upgrade. 2026-05-04 03:45:40 - [INFO] Protegrity Decimal UDF objects are not supported by this script Have you created Protegrity Decimal UDF objects in your previous installation? (yes/no) [no]: - To confirm that the previous installation does not contain any decimal UDF, type
no. - Press ENTER.
The script prompts to create the UDFs. The prompt to enter the database credentials appears.
2026-05-04 03:45:47 - [INFO] No Protegrity Decimal UDF objects present. Proceeding with upgrade. Do you want to continue and create UDFs? To create the UDFs, provide the database credentials (yes/no) [no]: - To create the UDFs, type
yes. - Press ENTER.
The prompt to enter the database username appears.
Enter Teradata database username: - Enter the username.
- Press ENTER.
The prompt to enter the database password appears.
Enter Teradata database user's password: - Enter the password.
- Press ENTER.
The prompt to enter the database name to install the UDF appears.
Enter name of database where the UDFs will be installed [PROTEGRITY]: - Enter the database name to install the UDFs.
- Press ENTER.
The prompt to specify the maximum size of varchar to be allocated by the UDFs appears.
Enter the maximum size of varchar to be allocated by the UDFs [500]: - Enter the maximum size of varchar to be allocated by the UDFs.
- Press ENTER.
The script validates the database and lists the configuration. The prompt to verify the configuration appears.
2026-05-04 03:46:02 - [INFO] Validating database ... 2026-05-04 03:46:23 - [INFO] Database validated successfully 2026-05-04 03:46:23 - [INFO] ************************************************************************** 2026-05-04 03:46:23 - [INFO] Upgrade will be done with following configuration: 2026-05-04 03:46:23 - [INFO] Mode: upgrade 2026-05-04 03:46:23 - [INFO] Existing Logforwarder Installation Directory: /opt/protegrity/<DBP_version> 2026-05-04 03:46:23 - [INFO] Existing RPAgent Installation Directory: /opt/protegrity/<DBP_version> 2026-05-04 03:46:23 - [INFO] Existing DatabaseProtector Installation Directory: /opt/protegrity/<DBP_version> 2026-05-04 03:46:23 - [INFO] New Logforwarder Installation Directory: /opt/protegrity/<DBP_version> 2026-05-04 03:46:23 - [INFO] New RPAgent Installation Directory: /opt/protegrity/<DBP_version> 2026-05-04 03:46:23 - [INFO] New DatabaseProtector Installation Directory: /opt/protegrity/<DBP_version> 2026-05-04 03:46:23 - [INFO] Audit Store Endpoints: <IP_Address>:9200 <IP_Address>:9200 2026-05-04 03:46:23 - [INFO] Upstream (ESA) Hostname or IP Address for RPAgent: <ESA_Hostname> 2026-05-04 03:46:23 - [INFO] Upstream (ESA) Port for RPAgent: 25400 (Default) 2026-05-04 03:46:23 - [INFO] This is an upgrade. 2026-05-04 03:46:23 - [INFO] Previous installations will be backed up before upgrade. 2026-05-04 03:46:23 - [INFO] Existing Logforwarder and RPAgent configurations will be retained 2026-05-04 03:46:23 - [INFO] ************************************************************************** 2026-05-04 03:46:23 - [WARN] ************************************************************************** 2026-05-04 03:46:23 - [WARN] IMPORTANT: Any queries currently running may be impacted during upgrade. 2026-05-04 03:46:23 - [WARN] It is recommended to perform the upgrade during a maintenance window. 2026-05-04 03:46:23 - [WARN] ************************************************************************** 2026-05-04 03:46:23 - [INFO] Please verify the above configuration before proceeding. Do you want to continue? (yes/no) [no]: - To proceed with the configuration, type
yes. - Press ENTER.
The script drops the existing UDFs, creates the new ones, and completes the upgrade.
2026-05-04 03:46:28 - [INFO] Continuing with upgrade... 2026-05-04 03:46:28 - [INFO] Backing up /opt/protegrity/<DBP_version>/logforwarder to /opt/protegrity/<DBP_version>/logforwarder_backup_<Timestamp>... 2026-05-04 03:46:29 - [INFO] Backup of /opt/protegrity/<DBP_version>/logforwarder completed successfully 2026-05-04 03:46:29 - [INFO] Backing up /opt/protegrity/<DBP_version>/rpagent to /opt/protegrity/<DBP_version>/rpagent_backup_<Timestamp>... 2026-05-04 03:46:29 - [INFO] Backup of /opt/protegrity/<DBP_version>/rpagent completed successfully 2026-05-04 03:46:29 - [INFO] Backing up /opt/protegrity/<DBP_version>/databaseprotector to /opt/protegrity/<DBP_version>/databaseprotector_backup_<Timestamp>... 2026-05-04 03:46:29 - [INFO] Backup of /opt/protegrity/<DBP_version>/databaseprotector completed successfully 2026-05-04 03:46:29 - [INFO] Backing up /etc/protegrity to /etc/protegrity_backup_<Timestamp>... 2026-05-04 03:46:29 - [INFO] Backup of /etc/protegrity completed successfully 2026-05-04 03:46:29 - [INFO] Installing/Upgrading LOGFORWARDER... 2026-05-04 03:46:29 - [INFO] Executing ./LogforwarderSetup_Linux_x64_<DBP_version>.sh... Unpacking... Extracting files... Protegrity Log Forwarder installed in /opt/protegrity/<DBP_version>/logforwarder. 2026-05-04 03:46:30 - [INFO] Retaining existing Logforwarder configuration... 2026-05-04 03:46:30 - [INFO] Logforwarder configuration retained successfully. 2026-05-04 03:46:30 - [INFO] ./LogforwarderSetup_Linux_x64_<DBP_version>.sh completed successfully. 2026-05-04 03:46:30 - [INFO] Installing/Upgrading RPAGENT... 2026-05-04 03:46:30 - [INFO] Executing ./RPAgentSetup_Linux_x64_<DBP_version>.sh... Unpacking... Extracting files... Since --nocert was provided certificates are not downloaded automatically. Protegrity RPAgent installed in /opt/protegrity/<DBP_version>/rpagent. 2026-05-04 03:46:30 - [INFO] Retaining existing RPAgent configuration... 2026-05-04 03:46:30 - [INFO] RPAgent configuration retained successfully. 2026-05-04 03:46:30 - [INFO] ./RPAgentSetup_Linux_x64_<DBP_version>.sh completed successfully. 2026-05-04 03:46:30 - [INFO] Old Logforwarder port: 15780 ? New Logforwarder port: 15781 2026-05-04 03:46:30 - [INFO] Configuring new Logforwarder to listen on port 15781 2026-05-04 03:46:30 - [INFO] Logforwarder listen port updated to 15781 in /opt/protegrity/<DBP_version>/logforwarder/data/config.d/in_tcp.conf 2026-05-04 03:46:30 - [INFO] Configuring RPAgent to send logs to Logforwarder port 15781 2026-05-04 03:46:30 - [INFO] RPAgent rpagent.cfg updated to use Logforwarder port 15781 2026-05-04 03:46:30 - [INFO] Copying Logforwarder and RPAgent to all nodes in the Teradata cluster 2026-05-04 03:46:30 - [INFO] Copying Logforwarder and RPAgent components to all nodes 2026-05-04 03:46:30 - [INFO] Creating installation directories on all nodes if not present All 1 node(s) have connected All 1 node(s) have connected All 1 node(s) have connected All 1 node(s) have connected 2026-05-04 03:46:31 - [INFO] Copying Logforwarder directory /opt/protegrity/<DBP_version>/logforwarder to all nodes All 1 node(s) have connected localhost:1022: send completed: 57934861 bytes received (10 files/7 directories) All 1 node(s) have connected All 1 node(s) have connected 2026-05-04 03:46:34 - [INFO] Logforwarder successfully copied to all nodes 2026-05-04 03:46:34 - [INFO] Copying RPAgent directory /opt/protegrity/<DBP_version>/rpagent to all nodes All 1 node(s) have connected localhost:1022: send completed: 14787481 bytes received (10 files/3 directories) All 1 node(s) have connected All 1 node(s) have connected 2026-05-04 03:46:34 - [INFO] RPAgent successfully copied to all nodes 2026-05-04 03:46:34 - [INFO] Logforwarder and RPAgent successfully copied to all nodes 2026-05-04 03:46:34 - [INFO] Starting new Logforwarder on all nodes All 1 node(s) have connected <--------------------- localhost --------------------------------> Fluent Bit v4.2.2-1.5.1+0.gdfa6.fb-4.2 * Copyright (C) 2015-2025 The Fluent Bit Authors * Fluent Bit is a CNCF graduated project under the Fluent organization * https://fluentbit.io ______ _ _ ______ _ _ ___ _____ | ___| | | | | ___ (_) | / | / __ \ | |_ | |_ _ ___ _ __ | |_ | |_/ /_| |_ __ __/ /| | `' / /' | _| | | | | |/ _ \ '_ \| __| | ___ \ | __| \ \ / / /_| | / / | | | | |_| | __/ | | | |_ | |_/ / | |_ \ V /\___ |_./ /___ \_| |_|\__,_|\___|_| |_|\__| \____/|_|\__| \_/ |_(_)_____/ Fluent Bit v4.2 Direct Routes Ahead Celebrating 10 Years of Open, Fluent Innovation! [2026/05/04 03:46:35.331405405] [ info] switching to background mode (PID=6571) Log Forwarder started, PID (6571) written to PID file /opt/protegrity/<DBP_version>/logforwarder/bin/fluent-bit.pid 2026-05-04 03:46:37 - [INFO] Preparing Database Protector installation... 2026-05-04 03:46:37 - [INFO] In-place upgrade detected - backup at /opt/protegrity/<DBP_version>/databaseprotector_backup_<Timestamp> will be used for SQL scripts if needed 2026-05-04 03:46:37 - [INFO] Installing/Upgrading DBP... 2026-05-04 03:46:37 - [INFO] Executing ./PepTeradataSetup_Linux_x64_<DBP_version>.sh... ***************************************************** Welcome to the Database Protector Setup Wizard ***************************************************** This will install the teradata objects on your computer Do you want to continue? [yes or no] Enter installation directory. A new directory will be created in the installation directory. [/opt/protegrity]: Unpacking... Extracting files... Enter name of database where the UDFs will be installed. [PROTEGRITY]: Enter maxmimum size of varchar to be allocated by the UDFs. NOTE: This is the maximum varchar size allocated by the UDFs for latin as well as unicode character set. Larger size will affect the performance !!! Some applications can also have issues with larger size, such as BTEQ, SQL Assistant. [500]: ***********BUFFER LENGTH INITIALIZATION************** UDF VARCHAR MAX INPUT BUFFER LENGTH (TOKENIZATION) : 500 Latin characters UDF VARCHAR MAX OUTPUT BUFFER LENGTH (TOKENIZATION) : 676 Latin characters UDF VARCHAR MAX INPUT BUFFER LENGTH (ENCRYPTION) : 500 Latin characters UDF VARCHAR MAX OUTPUT BUFFER LENGTH (ENCRYPTION) : 538 Bytes UDF VARCHAR_UNICODE MAX INPUT BUFFER LENGTH (TOKENIZATION) : 500 UNICODE characters UDF VARCHAR_UNICODE MAX OUTPUT BUFFER LENGTH (TOKENIZATION) : 1356 UNICODE characters UDF VARCHAR_UNICODE MAX INPUT BUFFER LENGTH (ENCRYPTION) : 500 UNICODE characters UDF VARCHAR_UNICODE MAX OUTPUT BUFFER LENGTH (ENCRYPTION) : 1038 Bytes teradata objects installed in /opt/protegrity/<DBP_version>/databaseprotector/teradata. 2026-05-04 03:46:38 - [INFO] Retaining existing Database Protector configuration... 2026-05-04 03:46:39 - [INFO] Database Protector configuration retained successfully. 2026-05-04 03:46:39 - [INFO] ./PepTeradataSetup_Linux_x64_<DBP_version>.sh completed successfully. 2026-05-04 03:46:39 - [INFO] Configuring DBP to send logs to Logforwarder port 15781 2026-05-04 03:46:39 - [INFO] DBP config.ini updated to use Logforwarder port 15781 2026-05-04 03:46:39 - [INFO] Copying DatabaseProtector to all nodes All 1 node(s) have connected localhost:1022: send completed: 8926088 bytes received (16 files/5 directories) All 1 node(s) have connected All 1 node(s) have connected 2026-05-04 03:46:40 - [INFO] Setting DatabaseProtector ownership (tdatuser:tdtrusted) on all nodes All 1 node(s) have connected 2026-05-04 03:46:40 - [INFO] DatabaseProtector successfully copied to all nodes 2026-05-04 03:46:40 - [INFO] Synchronizing /etc/protegrity to all nodes All 1 node(s) have connected All 1 node(s) have connected localhost:1022: send completed: 1157 bytes received (1 files/1 directories) All 1 node(s) have connected All 1 node(s) have connected All 1 node(s) have connected 2026-05-04 03:46:41 - [INFO] User configuration directory successfully synchronized to all nodes 2026-05-04 03:46:41 - [INFO] Dropping existing UDFs (database operation on current node only - shared across all nodes) 2026-05-04 03:46:41 - [INFO] In-place upgrade: Using SQL scripts from backup: /opt/protegrity/<DBP_version>/databaseprotector_backup_<Timestamp>/teradata/sqlscripts BTEQ 20.00.00.05 (64-bit) Mon May 4 03:47:02 2026 PID: 9325 +---------+---------+---------+---------+---------+---------+---------+---- .SET EXITONDELAY ON MAXREQTIME 300 RC 12 +---------+---------+---------+---------+---------+---------+---------+---- .logon localhost/<database_user_name>, *** Logon successfully completed. *** Teradata Database Release is 20.00.22.31 *** Teradata Database Version is 20.00.22.31 *** Transaction Semantics are BTET. *** Session Character Set Name is 'ASCII'. *** Total elapsed time was 20 seconds. +---------+---------+---------+---------+---------+---------+---------+---- database <database_name>; *** New default database accepted. *** Total elapsed time was 1 second. +---------+---------+---------+---------+---------+---------+---------+---- .IF ERRORCODE <> 0 THEN .QUIT 12; +---------+---------+---------+---------+---------+---------+---------+---- .run file /opt/protegrity/<DBP_version>/databaseprotector_backup_<Timestamp> /teradata/sqlscripts/dropobjects.sql; +---------+---------+---------+---------+---------+---------+---------+---- 2026-05-04 03:47:48 - [INFO] Main UDFs dropped successfully BTEQ 20.00.00.05 (64-bit) Mon May 4 03:47:48 2026 PID: 9877 +---------+---------+---------+---------+---------+---------+---------+---- .SET EXITONDELAY ON MAXREQTIME 300 RC 12 +---------+---------+---------+---------+---------+---------+---------+---- .logon localhost/<database_user_name>, *** Logon successfully completed. *** Teradata Database Release is 20.00.22.31 *** Teradata Database Version is 20.00.22.31 *** Transaction Semantics are BTET. *** Session Character Set Name is 'ASCII'. *** Total elapsed time was 20 seconds. +---------+---------+---------+---------+---------+---------+---------+---- database <database_name>; *** New default database accepted. *** Total elapsed time was 1 second. +---------+---------+---------+---------+---------+---------+---------+---- .run file /opt/protegrity/<DBP_version>/databaseprotector_backup_<Timestamp> /teradata/sqlscripts/dropvarcharunicode.sql; +---------+---------+---------+---------+---------+---------+---------+---- 2026-05-04 03:48:10 - [INFO] Varchar unicode UDFs dropped successfully 2026-05-04 03:48:11 - [INFO] Stopping existing RPAgent on all nodes Stopping rpagent 2026-05-04 03:48:12 - [INFO] Starting new RPAgent on all nodes Starting rpagent 2026-05-04 03:48:12 - [INFO] Successfully launched new RPAgent on all nodes 2026-05-04 03:48:12 - [INFO] Creating new UDFs (database operation on current node only - shared across all nodes) BTEQ 20.00.00.05 (64-bit) Mon May 4 03:48:12 2026 PID: 9988 +---------+---------+---------+---------+---------+---------+---------+---- .SET EXITONDELAY ON MAXREQTIME 300 RC 12 +---------+---------+---------+---------+---------+---------+---------+---- .logon localhost/<database_user_name>, *** Logon successfully completed. *** Teradata Database Release is 20.00.22.31 *** Teradata Database Version is 20.00.22.31 *** Transaction Semantics are BTET. *** Session Character Set Name is 'ASCII'. *** Total elapsed time was 20 seconds. +---------+---------+---------+---------+---------+---------+---------+---- database <database_name>; *** New default database accepted. *** Total elapsed time was 1 second. +---------+---------+---------+---------+---------+---------+---------+---- .IF ERRORCODE <> 0 THEN .QUIT 12; +---------+---------+---------+---------+---------+---------+---------+---- .run file /opt/protegrity/<DBP_version>/databaseprotector/teradata/sqlscripts/c reateobjects.sql; +---------+---------+---------+---------+---------+---------+---------+---- 2026-05-04 03:49:04 - [INFO] Creating varcharunicode UDFs BTEQ 20.00.00.05 (64-bit) Mon May 4 03:49:04 2026 PID: 10724 2026-05-04 03:49:28 - [INFO] Varcharunicode UDFs created successfully 2026-05-04 03:49:28 - [INFO] Testing UDFs BTEQ 20.00.00.05 (64-bit) Mon May 4 03:49:28 2026 PID: 10805 +---------+---------+---------+---------+---------+---------+---------+---- .SET EXITONDELAY ON MAXREQTIME 300 RC 12 +---------+---------+---------+---------+---------+---------+---------+---- .logon localhost/<database_user_name>, *** Logon successfully completed. *** Teradata Database Release is 20.00.22.31 *** Teradata Database Version is 20.00.22.31 *** Transaction Semantics are BTET. *** Session Character Set Name is 'ASCII'. *** Total elapsed time was 20 seconds. +---------+---------+---------+---------+---------+---------+---------+---- database <database_name>; *** New default database accepted. *** Total elapsed time was 1 second. +---------+---------+---------+---------+---------+---------+---------+---- .IF ERRORCODE <> 0 THEN .QUIT 12; +---------+---------+---------+---------+---------+---------+---------+---- select pty_getversion(); *** Query completed. One row found. One column returned. *** Total elapsed time was 1 second. pty_getversion() --------------------------------------------------------------------------- <DBP_version> +---------+---------+---------+---------+---------+---------+---------+---- .logoff *** You are now logged off from the <database_user_name>. +---------+---------+---------+---------+---------+---------+---------+---- .quit *** Exiting BTEQ... *** RC (return code) = 0 2026-05-04 03:49:49 - [INFO] Stopping existing Logforwarder on all nodes All 1 node(s) have connected <--------------------- localhost --------------------------------> Stopping Log Forwarder with PID: 6571 Please Wait 2026-05-04 03:49:54 - [INFO] Removing previous installation directories 2026-05-04 03:49:54 - [INFO] Pruning old Teradata library versions on all nodes 2026-05-04 03:49:54 - [WARN] Installed version directory not found: /opt/protegrity/<DBP_version>/databaseprotector/teradata/lib/<DBP_version> 2026-05-04 03:49:54 - [INFO] Synchronizing pruned Database Protector directory to all nodes All 1 node(s) have connected localhost:1022: send completed: 8926088 bytes received (16 files/5 directories) All 1 node(s) have connected All 1 node(s) have connected 2026-05-04 03:49:55 - [INFO] User configuration backup removed: /etc/protegrity_backup_<Timestamp> 2026-05-04 03:49:55 - [INFO] Upgrade successful. 2026-05-04 03:49:55 - [INFO] All components upgraded successfully. 2026-05-04 03:49:55 - [INFO] IMPORTANT: This script doesn't handle Protegrity UDT, it must be handled manually. Refer to product documentation. 2026-05-04 03:49:55 - [INFO] IMPORTANT: This script doesn't handle Protegrity Decimal UDF objects, it must be handled manually. Refer to product documentation.
Upgrading the Protector using the Silent Mode
Note: For installation/upgrade using the automation script, the component will be installed/upgraded within a <DBP_version> folder under the specified directory.
- Log in to the server as the user with the required permissions.
- Navigate to the directory containing the extracted files and the installation scripts.
- To upgrade the protector, run the following command:
./Install_TeradataProtector_Linux_x64_<DBP_version>.sh --upgrade - Press ENTER.
The script performs pre-checks before starting the upgrade. The prompt to select the silent mode of installation appears.
2026-05-04 05:09:26 - [INFO] ======================================================================== 2026-05-04 05:09:26 - [INFO] Starting environment pre-checks before installation/upgrade 2026-05-04 05:09:26 - [INFO] ======================================================================== 2026-05-04 05:09:26 - [INFO] Prerequisites check passed: pcl and bteq commands are available on current/running node 2026-05-04 05:09:26 - [INFO] Checking Teradata PDE state on running node... 2026-05-04 05:09:26 - [INFO] PDE state check passed on running node: PDE state is RUN/STARTED 2026-05-04 05:09:26 - [INFO] Checking accessibility of all Teradata nodes... 2026-05-04 05:09:26 - [INFO] IMPORTANT: ALL nodes must be accessible - if even 1 node is down, installation will be aborted 2026-05-04 05:09:26 - [INFO] ========================================== 2026-05-04 05:09:26 - [INFO] Node accessibility check PASSED 2026-05-04 05:09:26 - [INFO] All 1 node(s) have connected <--------------------- localhost --------------------------------> td20sles15 2026-05-04 05:09:26 - [INFO] ========================================== 2026-05-04 05:09:27 - [INFO] ======================================================================== 2026-05-04 05:09:27 - [INFO] All environment pre-checks PASSED - proceeding with installation 2026-05-04 05:09:27 - [INFO] ======================================================================== 2026-05-04 05:09:27 - [INFO] If silent mode is selected, the default base directory (/opt/protegrity) will be used as the location of the existing installation for each component (Logforwarder, RPAgent and DatabaseProtector). Do you want silent installation? (yes/no) [no]: - To install the components using the silent mode, type
yes. - Press ENTER.
The prompt to confirm the presence of decimal UDF installation appears.
2026-05-04 05:09:30 - [INFO] You have chosen silent mode. Therefore, /opt/protegrity is considered as base directory for new installation. 2026-05-04 05:09:31 - [INFO] This is an upgrade and you have chosen silent mode. Therefore, /opt/protegrity is considered as base directory for existing installation. 2026-05-04 05:09:31 - [INFO] Verifying previous installation directories for all components... 2026-05-04 05:09:31 - [INFO] Existing LogForwarder directory: /opt/protegrity/<DBP_version>/logforwarder 2026-05-04 05:09:31 - [INFO] Existing RPAgent directory: /opt/protegrity/<DBP_version>/rpagent 2026-05-04 05:09:31 - [INFO] Existing DatabaseProtector directory: /opt/protegrity/<DBP_version>/databaseprotector 2026-05-04 05:09:31 - [INFO] All existing component directories verified successfully. 2026-05-04 05:09:31 - [INFO] Checking for Protegrity UDT in previous installation... 2026-05-04 05:09:31 - [INFO] No UDT PLM file found at expected path. Checking Teradata libraries... 2026-05-04 05:09:31 - [INFO] No Teradata library links to pepteradataudt. UDT not active. 2026-05-04 05:09:31 - [INFO] No active Protegrity UDT detected. Proceeding with upgrade. 2026-05-04 05:09:31 - [INFO] Protegrity Decimal UDF objects are not supported by this script Have you created Protegrity Decimal UDF objects in your previous installation? (yes/no) [no]: - To confirm that the previous installation does not contain decimal UDFs, type
no. - Press ENTER.
The script prompts to create the UDFs. The prompt to enter the database credentials appears.
2026-05-04 05:09:35 - [INFO] No Protegrity Decimal UDF objects present. Proceeding with upgrade. Do you want to continue and create UDFs? To create the UDFs, provide the database credentials (yes/no) [no]: - To create the UDFs, type
yes. - Press ENTER.
The prompt to enter the database username appears.
Enter Teradata database username: - Enter the username.
- Press ENTER.
The prompt to enter the database password appears.
Enter Teradata database user's password: - Enter the password.
The script lists the current configuration and the prompt to proceed with the configuration appears.
2026-05-04 05:09:44 - [INFO] Silent upgrade: Using previous database name to install the UDFs: <database_name> 2026-05-04 05:09:44 - [INFO] Silent upgrade: Using previous maximum size of varchar to be allocated by the UDFs: 500 2026-05-04 05:09:44 - [INFO] Validating database ... 2026-05-04 05:10:04 - [INFO] Database validated successfully 2026-05-04 05:10:04 - [INFO] ************************************************************************** 2026-05-04 05:10:04 - [INFO] Upgrade will be done with following configuration: 2026-05-04 05:10:04 - [INFO] Mode: upgrade 2026-05-04 05:10:04 - [INFO] Existing Logforwarder Installation Directory: /opt/protegrity/<DBP_version> 2026-05-04 05:10:04 - [INFO] Existing RPAgent Installation Directory: /opt/protegrity/<DBP_version> 2026-05-04 05:10:04 - [INFO] Existing DatabaseProtector Installation Directory: /opt/protegrity/<DBP_version> 2026-05-04 05:10:04 - [INFO] New Logforwarder Installation Directory: /opt/protegrity/<DBP_version> 2026-05-04 05:10:04 - [INFO] New RPAgent Installation Directory: /opt/protegrity/<DBP_version> 2026-05-04 05:10:04 - [INFO] New DatabaseProtector Installation Directory: /opt/protegrity/<DBP_version> 2026-05-04 05:10:04 - [INFO] Audit Store Endpoints: <IP_Address>:9200 <IP_Address>:9200 2026-05-04 05:10:04 - [INFO] Upstream (ESA) Hostname or IP Address for RPAgent: <ESA_Hostname> 2026-05-04 05:10:04 - [INFO] Upstream (ESA) Port for RPAgent: 25400 (Default) 2026-05-04 05:10:04 - [INFO] This is an upgrade. 2026-05-04 05:10:04 - [INFO] Previous installations will be backed up before upgrade. 2026-05-04 05:10:04 - [INFO] Existing Logforwarder and RPAgent configurations will be retained 2026-05-04 05:10:04 - [INFO] ************************************************************************** 2026-05-04 05:10:04 - [WARN] ************************************************************************** 2026-05-04 05:10:04 - [WARN] IMPORTANT: Any queries currently running may be impacted during upgrade. 2026-05-04 05:10:04 - [WARN] It is recommended to perform the upgrade during a maintenance window. 2026-05-04 05:10:04 - [WARN] ************************************************************************** 2026-05-04 05:10:04 - [INFO] Please verify the above configuration before proceeding. Do you want to continue? (yes/no) [no]: - To upgrade the protector using the configuration, type
yes. - Press ENTER.
The script upgrades the Log Forwarder, RPAgent, the protector, and the UDFs and completes the installation.
2026-05-04 05:10:13 - [INFO] Continuing with upgrade... 2026-05-04 05:10:13 - [INFO] Backing up /opt/protegrity/<DBP_version>/logforwarder to /opt/protegrity/<DBP_version>/logforwarder_backup_<timestamp>... 2026-05-04 05:10:14 - [INFO] Backup of /opt/protegrity/<DBP_version>/logforwarder completed successfully 2026-05-04 05:10:14 - [INFO] Backing up /opt/protegrity/<DBP_version>/rpagent to /opt/protegrity/<DBP_version>/rpagent_backup_<timestamp>... 2026-05-04 05:10:14 - [INFO] Backup of /opt/protegrity/<DBP_version>/rpagent completed successfully 2026-05-04 05:10:14 - [INFO] Backing up /opt/protegrity/<DBP_version>/databaseprotector to /opt/protegrity/<DBP_version>/databaseprotector_backup_<timestamp>... 2026-05-04 05:10:14 - [INFO] Backup of /opt/protegrity/<DBP_version>/databaseprotector completed successfully 2026-05-04 05:10:14 - [INFO] Backing up /etc/protegrity to /etc/protegrity_backup_<timestamp>... 2026-05-04 05:10:14 - [INFO] Backup of /etc/protegrity completed successfully 2026-05-04 05:10:14 - [INFO] Installing/Upgrading LOGFORWARDER... 2026-05-04 05:10:14 - [INFO] Executing ./LogforwarderSetup_Linux_x64_<DBP_version>.sh... Unpacking... Extracting files... Protegrity Log Forwarder installed in /opt/protegrity/<DBP_version>/logforwarder. 2026-05-04 05:10:15 - [INFO] Retaining existing Logforwarder configuration... 2026-05-04 05:10:15 - [INFO] Logforwarder configuration retained successfully. 2026-05-04 05:10:15 - [INFO] ./LogforwarderSetup_Linux_x64_<DBP_version>.sh completed successfully. 2026-05-04 05:10:15 - [INFO] Installing/Upgrading RPAGENT... 2026-05-04 05:10:15 - [INFO] Executing ./RPAgentSetup_Linux_x64_<DBP_version>.sh... Unpacking... Extracting files... Since --nocert was provided certificates are not downloaded automatically. Protegrity RPAgent installed in /opt/protegrity/<DBP_version>/rpagent. 2026-05-04 05:10:15 - [INFO] Retaining existing RPAgent configuration... 2026-05-04 05:10:15 - [INFO] RPAgent configuration retained successfully. 2026-05-04 05:10:15 - [INFO] ./RPAgentSetup_Linux_x64_<DBP_version>.sh completed successfully. 2026-05-04 05:10:15 - [INFO] Old Logforwarder port: 15780 ? New Logforwarder port: 15781 2026-05-04 05:10:15 - [INFO] Configuring new Logforwarder to listen on port 15781 2026-05-04 05:10:15 - [INFO] Logforwarder listen port updated to 15781 in /opt/protegrity/<DBP_version>/logforwarder/data/config.d/in_tcp.conf 2026-05-04 05:10:15 - [INFO] Configuring RPAgent to send logs to Logforwarder port 15781 2026-05-04 05:10:15 - [INFO] RPAgent rpagent.cfg updated to use Logforwarder port 15781 2026-05-04 05:10:15 - [INFO] Copying Logforwarder and RPAgent to all nodes in the Teradata cluster 2026-05-04 05:10:15 - [INFO] Copying Logforwarder and RPAgent components to all nodes 2026-05-04 05:10:15 - [INFO] Creating installation directories on all nodes if not present All 1 node(s) have connected All 1 node(s) have connected All 1 node(s) have connected All 1 node(s) have connected 2026-05-04 05:10:16 - [INFO] Copying Logforwarder directory /opt/protegrity/<DBP_version>/logforwarder to all nodes All 1 node(s) have connected localhost:1022: send completed: 57934861 bytes received (10 files/7 directories) All 1 node(s) have connected All 1 node(s) have connected 2026-05-04 05:10:18 - [INFO] Logforwarder successfully copied to all nodes 2026-05-04 05:10:18 - [INFO] Copying RPAgent directory /opt/protegrity/<DBP_version>/rpagent to all nodes All 1 node(s) have connected localhost:1022: send completed: 14787482 bytes received (10 files/3 directories) All 1 node(s) have connected All 1 node(s) have connected 2026-05-04 05:10:19 - [INFO] RPAgent successfully copied to all nodes 2026-05-04 05:10:19 - [INFO] Logforwarder and RPAgent successfully copied to all nodes 2026-05-04 05:10:19 - [INFO] Starting new Logforwarder on all nodes All 1 node(s) have connected <--------------------- localhost --------------------------------> Fluent Bit v4.2.2-1.5.1+0.gdfa6.fb-4.2 * Copyright (C) 2015-2025 The Fluent Bit Authors * Fluent Bit is a CNCF graduated project under the Fluent organization * https://fluentbit.io ______ _ _ ______ _ _ ___ _____ | ___| | | | | ___ (_) | / | / __ \ | |_ | |_ _ ___ _ __ | |_ | |_/ /_| |_ __ __/ /| | `' / /' | _| | | | | |/ _ \ '_ \| __| | ___ \ | __| \ \ / / /_| | / / | | | | |_| | __/ | | | |_ | |_/ / | |_ \ V /\___ |_./ /___ \_| |_|\__,_|\___|_| |_|\__| \____/|_|\__| \_/ |_(_)_____/ Fluent Bit v4.2 Direct Routes Ahead Celebrating 10 Years of Open, Fluent Innovation! [2026/05/04 05:10:19.748329868] [ info] switching to background mode (PID=23737) Log Forwarder started, PID (23737) written to PID file /opt/protegrity/<DBP_version>/logforwarder/bin/fluent-bit.pid 2026-05-04 05:10:21 - [INFO] Preparing Database Protector installation... 2026-05-04 05:10:21 - [INFO] In-place upgrade detected - backup at /opt/protegrity/<DBP_version>/databaseprotector_backup_<timestamp> will be used for SQL scripts if needed 2026-05-04 05:10:21 - [INFO] Installing/Upgrading DBP... 2026-05-04 05:10:21 - [INFO] Executing ./PepTeradataSetup_Linux_x64_<DBP_version>.sh... ***************************************************** Welcome to the Database Protector Setup Wizard ***************************************************** This will install the teradata objects on your computer Do you want to continue? [yes or no] Enter installation directory. A new directory will be created in the installation directory. [/opt/protegrity]: Unpacking... Extracting files... Enter name of database where the UDFs will be installed. [PROTEGRITY]: Enter maxmimum size of varchar to be allocated by the UDFs. NOTE: This is the maximum varchar size allocated by the UDFs for latin as well as unicode character set. Larger size will affect the performance !!! Some applications can also have issues with larger size, such as BTEQ, SQL Assistant. [500]: ***********BUFFER LENGTH INITIALIZATION************** UDF VARCHAR MAX INPUT BUFFER LENGTH (TOKENIZATION) : 500 Latin characters UDF VARCHAR MAX OUTPUT BUFFER LENGTH (TOKENIZATION) : 676 Latin characters UDF VARCHAR MAX INPUT BUFFER LENGTH (ENCRYPTION) : 500 Latin characters UDF VARCHAR MAX OUTPUT BUFFER LENGTH (ENCRYPTION) : 538 Bytes UDF VARCHAR_UNICODE MAX INPUT BUFFER LENGTH (TOKENIZATION) : 500 UNICODE characters UDF VARCHAR_UNICODE MAX OUTPUT BUFFER LENGTH (TOKENIZATION) : 1356 UNICODE characters UDF VARCHAR_UNICODE MAX INPUT BUFFER LENGTH (ENCRYPTION) : 500 UNICODE characters UDF VARCHAR_UNICODE MAX OUTPUT BUFFER LENGTH (ENCRYPTION) : 1038 Bytes teradata objects installed in /opt/protegrity/<DBP_version>/databaseprotector/teradata. 2026-05-04 05:10:23 - [INFO] Retaining existing Database Protector configuration... 2026-05-04 05:10:23 - [INFO] Database Protector configuration retained successfully. 2026-05-04 05:10:23 - [INFO] ./PepTeradataSetup_Linux_x64_<DBP_version>.sh completed successfully. 2026-05-04 05:10:23 - [INFO] Configuring DBP to send logs to Logforwarder port 15781 2026-05-04 05:10:23 - [INFO] DBP config.ini updated to use Logforwarder port 15781 2026-05-04 05:10:23 - [INFO] Copying DatabaseProtector to all nodes All 1 node(s) have connected localhost:1022: send completed: 8926088 bytes received (16 files/5 directories) All 1 node(s) have connected All 1 node(s) have connected 2026-05-04 05:10:24 - [INFO] Setting DatabaseProtector ownership (tdatuser:tdtrusted) on all nodes All 1 node(s) have connected 2026-05-04 05:10:24 - [INFO] DatabaseProtector successfully copied to all nodes 2026-05-04 05:10:24 - [INFO] Synchronizing /etc/protegrity to all nodes All 1 node(s) have connected All 1 node(s) have connected localhost:1022: send completed: 1157 bytes received (1 files/1 directories) All 1 node(s) have connected All 1 node(s) have connected All 1 node(s) have connected 2026-05-04 05:10:25 - [INFO] User configuration directory successfully synchronized to all nodes 2026-05-04 05:10:25 - [INFO] Dropping existing UDFs (database operation on current node only - shared across all nodes) 2026-05-04 05:10:25 - [INFO] In-place upgrade: Using SQL scripts from backup: /opt/protegrity/<DBP_version>/databaseprotector_backup_<timestamp>/teradata/sqlscripts BTEQ 20.00.00.05 (64-bit) Mon May 4 05:10:46 2026 PID: 25486 +---------+---------+---------+---------+---------+---------+---------+---- .SET EXITONDELAY ON MAXREQTIME 300 RC 12 +---------+---------+---------+---------+---------+---------+---------+---- .logon localhost/<database_user_name>, *** Logon successfully completed. *** Teradata Database Release is 20.00.22.31 *** Teradata Database Version is 20.00.22.31 *** Transaction Semantics are BTET. *** Session Character Set Name is 'ASCII'. *** Total elapsed time was 20 seconds. +---------+---------+---------+---------+---------+---------+---------+---- database <database_name>; *** New default database accepted. *** Total elapsed time was 1 second. +---------+---------+---------+---------+---------+---------+---------+---- .IF ERRORCODE <> 0 THEN .QUIT 12; +---------+---------+---------+---------+---------+---------+---------+---- .run file /opt/protegrity/<DBP_version>/databaseprotector_backup_<timestamp> /teradata/sqlscripts/dropobjects.sql; +---------+---------+---------+---------+---------+---------+---------+---- +---------+---------+---------+---------+---------+---------+---------+---- .run file /opt/protegrity/<DBP_version>/databaseprotector_backup_<timestamp> /teradata/sqlscripts/dropvarcharunicode.sql; +---------+---------+---------+---------+---------+---------+---------+---- +---------+---------+---------+---------+---------+---------+---------+---- .IF ERRORCODE <> 0 THEN .QUIT 12; +---------+---------+---------+---------+---------+---------+---------+---- .run file /opt/protegrity/<DBP_version>/databaseprotector/teradata/sqlscripts/c reateobjects.sql; +---------+---------+---------+---------+---------+---------+---------+---- --------------------------------------------------------------------- -- Protegrity User Defined Functions. -- Copyright (c) 2026 Protegrity USA, Inc. All rights reserved -- -- This script should be run in BTEQ --------------------------------------------------------------------- DATABASE <database_name>; *** New default database accepted. *** Total elapsed time was 1 second. +---------+---------+---------+---------+---------+---------+---------+---- .IF ERRORCODE != 0 THEN .QUIT 99 +---------+---------+---------+---------+---------+---------+---------+---- --------------------------------------------------------------------- -- Create/replace Protegrity UDF functions --------------------------------------------------------------------- -- Create/replace varchar latin encryption function. -- -- * First parameter is the input string to be encrypted. -- * Second parameter is the name of the data elements. -- * Third parameter is the length of the result, -- look at the RETURNS statement. -- * Fourth parameter indicates which id of communication to use, -- "0" is default. -- -- Return value is the encrypted data. -- -- See UDF manual for syntax when creating functions. -- -- Notes: There is a possibility to expand the input up to 63962 -- and output up to 64000 which is maximum for varchar. -- But the larger definition of input/output size, -- the more it will affect performance !!! -- Some applications can also have issues with UDF functions -- with long varchar input, like BTEQ, SQL Assistant. --------------------------------------------------------------------- BT; *** Begin transaction accepted. *** Total elapsed time was 1 second. 2026-05-04 05:12:51 - [INFO] Creating varcharunicode UDFs BTEQ 20.00.00.05 (64-bit) Mon May 4 05:12:51 2026 PID: 26865 +---------+---------+---------+---------+---------+---------+---------+---- .SET EXITONDELAY ON MAXREQTIME 300 RC 12 +---------+---------+---------+---------+---------+---------+---------+---- .logon localhost/<database_user_name>, *** Logon successfully completed. *** Teradata Database Release is 20.00.22.31 *** Teradata Database Version is 20.00.22.31 *** Transaction Semantics are BTET. *** Session Character Set Name is 'ASCII'. *** Total elapsed time was 20 seconds. +---------+---------+---------+---------+---------+---------+---------+---- database <database_name>; *** New default database accepted. *** Total elapsed time was 1 second. +---------+---------+---------+---------+---------+---------+---------+---- .IF ERRORCODE <> 0 THEN .QUIT 12; +---------+---------+---------+---------+---------+---------+---------+---- .run file /opt/protegrity/<DBP_version>/databaseprotector/teradata/sqlscripts/c reatevarcharunicode.sql; +---------+---------+---------+---------+---------+---------+---------+---- 2026-05-04 05:13:15 - [INFO] Varcharunicode UDFs created successfully 2026-05-04 05:13:15 - [INFO] Testing UDFs BTEQ 20.00.00.05 (64-bit) Mon May 4 05:13:15 2026 PID: 26951 +---------+---------+---------+---------+---------+---------+---------+---- .SET EXITONDELAY ON MAXREQTIME 300 RC 12 +---------+---------+---------+---------+---------+---------+---------+---- .logon localhost/<database_user_name>, *** Logon successfully completed. *** Teradata Database Release is 20.00.22.31 *** Teradata Database Version is 20.00.22.31 *** Transaction Semantics are BTET. *** Session Character Set Name is 'ASCII'. *** Total elapsed time was 20 seconds. +---------+---------+---------+---------+---------+---------+---------+---- database <database_name>; *** New default database accepted. *** Total elapsed time was 1 second. +---------+---------+---------+---------+---------+---------+---------+---- .IF ERRORCODE <> 0 THEN .QUIT 12; +---------+---------+---------+---------+---------+---------+---------+---- select pty_getversion(); *** Query completed. One row found. One column returned. *** Total elapsed time was 1 second. pty_getversion() --------------------------------------------------------------------------- <DBP_version> +---------+---------+---------+---------+---------+---------+---------+---- .logoff *** You are now logged off from the <database_user_name>. +---------+---------+---------+---------+---------+---------+---------+---- .quit *** Exiting BTEQ... *** RC (return code) = 0 2026-05-04 05:13:36 - [INFO] Stopping existing Logforwarder on all nodes All 1 node(s) have connected <--------------------- localhost --------------------------------> Stopping Log Forwarder with PID: 23737 Please Wait 2026-05-04 05:13:41 - [INFO] Removing previous installation directories 2026-05-04 05:13:41 - [INFO] Pruning old Teradata library versions on all nodes 2026-05-04 05:13:41 - [WARN] Installed version directory not found: /opt/protegrity/<DBP_version>/databaseprotector/teradata/lib/<DBP_version> 2026-05-04 05:13:41 - [INFO] Synchronizing pruned Database Protector directory to all nodes All 1 node(s) have connected localhost:1022: send completed: 8926088 bytes received (16 files/5 directories) All 1 node(s) have connected All 1 node(s) have connected 2026-05-04 05:13:42 - [INFO] User configuration backup removed: /etc/protegrity_backup_<timestamp> 2026-05-04 05:13:42 - [INFO] Upgrade successful. 2026-05-04 05:13:42 - [INFO] All components upgraded successfully. 2026-05-04 05:13:42 - [INFO] IMPORTANT: This script doesn't handle Protegrity UDT, it must be handled manually. Refer to product documentation. 2026-05-04 05:13:42 - [INFO] IMPORTANT: This script doesn't handle Protegrity Decimal UDF objects, it must be handled manually. Refer to product documentation.
5.1.6.2 - Upgrading the Protector on Multi Node
The Teradata Data Warehouse Protector build provides an automated script to manage the upgrade process. The master script internally calls the scripts to install and upgrade the components. The master script installs and upgrades the components in the following order:
- Log Forwarder
- RPAgent
- Policy Enforcement Point (Database Protector)
The master script is available in the directory where the installation files are extracted. It provides the following arguments:
install- installs the components in an interactive mode.upgrade- installs a newer version of the protector with minimal downtime.silent- installs the components in a non-interactive mode.install.ini- installs the components as per the parameters provided in the file.help- lists the arguments available for the script.
During the upgrade process, the master script:
- Verifies the existing configuration.
- Creates a backup of the existing configuration.
- Stops the required services.
- Drops the existing UDFs.
- Installs the new version.
- Starts the required services.
- Creates the new UDFs and retains the existing configuration.
In addition, the master script will rollback the upgrade process if any errors are encountered. The script will revert the changes and restore the previous working version of the Teradata Data Warehouse Protector.
Important: The automation script will be unable to handle the UDTs and Decimal objects. If UDTs and Decimal objects are present in the database, these must be handled manually.
Viewing the Arguments for the Script
- Log in to the server as the user with the required permissions.
- Navigate to the directory containing the extracted files and the installation scripts.
- To view the arguments, run the following command:
./Install_TeradataProtector_Linux_x64_<DBP_version>.sh --help - Press ENTER.
The script lists the available arguments.
Usage: ./Install_TeradataProtector_Linux_x64_<DBP_version>.sh [--install | --upgrade] [--silent] [--install-ini <file>] [--help] Options: --install Use this option when installing the solution for the first time on a machine/host. (i.e., there is no previous installation present) --upgrade Use this option when upgrading an existing installation on the machine/host. --install-ini <file> (Optional) Provide a path to an install.ini file for silent or pre-configured installations. This option works with --install only. It must not be used with --upgrade or --silent. You can pass this either as: --install-ini /path/to/install.ini or --install-ini=/path/to/install.ini Refer to the product documentation for details about the configuration options available in install.ini. The documentation describes all supported keys, required fields, and example configurations. --silent (Optional) Runs the installation/upgrade in silent mode with minimum interactive prompts. --help, -h Display this help message and exit.
Upgrading the Protector using the Interactive Mode
Note: For installation/upgrade using the automation script, the component will be installed/upgraded within a <DBP_version> folder under the specified directory.
- Log in to the server as the user with the required permissions.
- Navigate to the directory containing the extracted files and the installation scripts.
- To upgrade the protector, run the following command:
./Install_TeradataProtector_Linux_x64_<DBP_version>.sh --upgrade - Press ENTER.
The script performs pre-checks before starting the upgrade. The prompt to select the silent mode of installation appears.
2026-05-04 04:31:43 - [INFO] ======================================================================== 2026-05-04 04:31:43 - [INFO] Starting environment pre-checks before installation/upgrade 2026-05-04 04:31:43 - [INFO] ======================================================================== 2026-05-04 04:31:43 - [INFO] Prerequisites check passed: pcl and bteq commands are available on current/running node 2026-05-04 04:31:43 - [INFO] Checking Teradata PDE state on running node... 2026-05-04 04:31:43 - [INFO] PDE state check passed on running node: PDE state is RUN/STARTED 2026-05-04 04:31:43 - [INFO] Checking accessibility of all Teradata nodes... 2026-05-04 04:31:43 - [INFO] IMPORTANT: ALL nodes must be accessible - if even 1 node is down, installation will be aborted 2026-05-04 04:31:43 - [INFO] ========================================== 2026-05-04 04:31:43 - [INFO] Node accessibility check PASSED 2026-05-04 04:31:43 - [INFO] All 4 node(s) have connected <--------------------- <node_name> --------------------------------> abyss4 <--------------------- <node_name> --------------------------------> abyss3 <--------------------- <node_name> --------------------------------> abyss2 <--------------------- <node_name> --------------------------------> abyss1 2026-05-04 04:31:43 - [INFO] ========================================== 2026-05-04 04:31:43 - [INFO] ======================================================================== 2026-05-04 04:31:43 - [INFO] All environment pre-checks PASSED - proceeding with installation 2026-05-04 04:31:43 - [INFO] ======================================================================== 2026-05-04 04:31:43 - [INFO] If silent mode is selected, the default base directory (/opt/protegrity) will be used as the location of the existing installation for each component (Logforwarder, RPAgent and DatabaseProtector). Do you want silent installation? (yes/no) [no]: - To install the components using the interactive mode, type
no. - Press ENTER.
The prompt to enter the location of the existing installation appears.
Enter existing installation directories: Existing LogForwarder installation directory [/opt/protegrity]: - Enter the directory path where the existing version of the Log Forwarder is installed.
- Press ENTER.
The prompt to enter RPAgent installation directory appears.
Existing RPAgent installation directory [/opt/protegrity]: - Enter the directory path where the existing version of the RPAgent is installed.
- Press ENTER.
The prompt to enter the Database Protector installation directory appears.
Existing DatabaseProtector installation directory [/opt/protegrity]: - Enter the directory path where the existing version of the Database Protector is installed.
- Press ENTER.
The prompt to select a single installation directory for the components appears.
Do you want to install the new LogForwarder, RPAgent, and DatabaseProtector together in a single directory? (yes/no) [no]: - To install the new components in a single directory, type
yes. - Press ENTER.
The prompt to enter the new installation directory appears.
Enter new installation directory [/opt/protegrity]: - Enter the location to install the components.
- Press ENTER.
The prompt to confirm the presence of decimal UDFs appears.
2026-05-04 04:32:12 - [INFO] Verifying previous installation directories for all components... 2026-05-04 04:32:12 - [INFO] Existing LogForwarder directory: /opt/protegrity/logforwarder 2026-05-04 04:32:12 - [INFO] Existing RPAgent directory: /opt/protegrity/rpagent 2026-05-04 04:32:12 - [INFO] Existing DatabaseProtector directory: /opt/protegrity/databaseprotector 2026-05-04 04:32:12 - [INFO] All existing component directories verified successfully. 2026-05-04 04:32:12 - [INFO] Checking for Protegrity UDT in previous installation... 2026-05-04 04:32:12 - [INFO] No UDT PLM file found at expected path. Checking Teradata libraries... 2026-05-04 04:32:14 - [INFO] No Teradata library links to pepteradataudt. UDT not active. 2026-05-04 04:32:14 - [INFO] No active Protegrity UDT detected. Proceeding with upgrade. 2026-05-04 04:32:14 - [INFO] Protegrity Decimal UDF objects are not supported by this script Have you created Protegrity Decimal UDF objects in your previous installation? (yes/no) [no]: - To confirm that the previous installation does not contain any decimal UDF, type
no. - Press ENTER.
The script prompts to create the UDFs. The prompt to enter the database credentials appears.
2026-05-04 04:32:32 - [INFO] No Protegrity Decimal UDF objects present. Proceeding with upgrade. Do you want to continue and create UDFs? To create the UDFs, provide the database credentials (yes/no) [no]: - To create the UDFs, type
yes. - Press ENTER.
The prompt to enter the database username appears.
Enter Teradata database username: - Enter the username.
- Press ENTER.
The prompt to enter the database password appears.
Enter Teradata database user's password: - Enter the password.
- Press ENTER.
The prompt to enter the database name to install the UDF appears.
Enter name of database where the UDFs will be installed [PROTEGRITY]: - Enter the database name to install the UDFs.
- Press ENTER.
The prompt to specify the maximum size of varchar to be allocated by the UDFs appears.
Enter the maximum size of varchar to be allocated by the UDFs [500]: - Enter the maximum size of varchar to be allocated by the UDFs.
- Press ENTER.
The script validates the database and lists the configuration. The prompt to verify the configuration appears.
2026-05-04 03:46:02 - [INFO] Validating database ... 2026-05-04 03:46:23 - [INFO] Database validated successfully 2026-05-04 03:46:23 - [INFO] ************************************************************************** 2026-05-04 03:46:23 - [INFO] Upgrade will be done with following configuration: 2026-05-04 03:46:23 - [INFO] Mode: upgrade 2026-05-04 03:46:23 - [INFO] Existing Logforwarder Installation Directory: /opt/protegrity/<DBP_version> 2026-05-04 03:46:23 - [INFO] Existing RPAgent Installation Directory: /opt/protegrity/<DBP_version> 2026-05-04 03:46:23 - [INFO] Existing DatabaseProtector Installation Directory: /opt/protegrity/<DBP_version> 2026-05-04 03:46:23 - [INFO] New Logforwarder Installation Directory: /opt/protegrity/<DBP_version> 2026-05-04 03:46:23 - [INFO] New RPAgent Installation Directory: /opt/protegrity/<DBP_version> 2026-05-04 03:46:23 - [INFO] New DatabaseProtector Installation Directory: /opt/protegrity/<DBP_version> 2026-05-04 03:46:23 - [INFO] Audit Store Endpoints: <IP_Address>:9200 <IP_Address>:9200 2026-05-04 03:46:23 - [INFO] Upstream (ESA) Hostname or IP Address for RPAgent: <ESA_Hostname> 2026-05-04 03:46:23 - [INFO] Upstream (ESA) Port for RPAgent: 25400 (Default) 2026-05-04 03:46:23 - [INFO] This is an upgrade. 2026-05-04 03:46:23 - [INFO] Previous installations will be backed up before upgrade. 2026-05-04 03:46:23 - [INFO] Existing Logforwarder and RPAgent configurations will be retained 2026-05-04 03:46:23 - [INFO] ************************************************************************** 2026-05-04 03:46:23 - [WARN] ************************************************************************** 2026-05-04 03:46:23 - [WARN] IMPORTANT: Any queries currently running may be impacted during upgrade. 2026-05-04 03:46:23 - [WARN] It is recommended to perform the upgrade during a maintenance window. 2026-05-04 03:46:23 - [WARN] ************************************************************************** 2026-05-04 03:46:23 - [INFO] Please verify the above configuration before proceeding. Do you want to continue? (yes/no) [no]: - To proceed with the configuration, type
yes. - Press ENTER.
The script drops the existing UDFs, creates the new ones, and completes the upgrade.
2026-05-04 04:32:56 - [INFO] Continuing with upgrade... 2026-05-04 04:32:56 - [INFO] Backing up /opt/protegrity/logforwarder to /opt/protegrity/logforwarder_backup_<Timestamp>... 2026-05-04 04:32:56 - [INFO] Backup of /opt/protegrity/logforwarder completed successfully 2026-05-04 04:32:56 - [INFO] Backing up /opt/protegrity/rpagent to /opt/protegrity/rpagent_backup_<Timestamp>... 2026-05-04 04:32:56 - [INFO] Backup of /opt/protegrity/rpagent completed successfully 2026-05-04 04:32:56 - [INFO] Backing up /opt/protegrity/databaseprotector to /opt/protegrity/databaseprotector_backup_<Timestamp>... 2026-05-04 04:32:56 - [INFO] Backup of /opt/protegrity/databaseprotector completed successfully 2026-05-04 04:32:56 - [INFO] Backing up /etc/protegrity to /etc/protegrity_backup_<Timestamp>... 2026-05-04 04:32:57 - [INFO] Backup of /etc/protegrity completed successfully 2026-05-04 04:32:57 - [INFO] Installing/Upgrading LOGFORWARDER... 2026-05-04 04:32:57 - [INFO] Executing ./LogforwarderSetup_Linux_x64_<DBP_version>.sh... 2026-05-04 04:32:57 - [INFO] Retaining existing Logforwarder configuration... 2026-05-04 04:32:57 - [INFO] Logforwarder configuration retained successfully. 2026-05-04 04:32:57 - [INFO] Updating configuration files in /opt/protegrity/<DBP_version>/logforwarder/data to use new installation directory. 2026-05-04 04:32:57 - [INFO] ./LogforwarderSetup_Linux_x64_<DBP_version>.sh completed successfully. 2026-05-04 04:32:57 - [INFO] Installing/Upgrading RPAGENT... 2026-05-04 04:32:57 - [INFO] Executing ./RPAgentSetup_Linux_x64_<DBP_version>.sh... 2026-05-04 04:32:57 - [INFO] Retaining existing RPAgent configuration... 2026-05-04 04:32:57 - [INFO] RPAgent configuration retained successfully. 2026-05-04 04:32:57 - [INFO] Updating configuration files in /opt/protegrity/<DBP_version>/rpagent/data to use new installation directory. 2026-05-04 04:32:57 - [INFO] ./RPAgentSetup_Linux_x64_<DBP_version>.sh completed successfully. 2026-05-04 04:32:57 - [INFO] Old Logforwarder port: 15780 → New Logforwarder port: 15781 2026-05-04 04:32:57 - [INFO] Configuring new Logforwarder to listen on port 15781 2026-05-04 04:32:57 - [INFO] Logforwarder listen port updated to 15781 in /opt/protegrity/<DBP_version>/logforwarder/data/config.d/in_tcp.conf 2026-05-04 04:32:57 - [INFO] Configuring RPAgent to send logs to Logforwarder port 15781 2026-05-04 04:32:57 - [INFO] RPAgent rpagent.cfg updated to use Logforwarder port 15781 2026-05-04 04:32:57 - [INFO] Copying Logforwarder and RPAgent to all nodes in the Teradata cluster 2026-05-04 04:32:57 - [INFO] Copying Logforwarder and RPAgent components to all nodes 2026-05-04 04:32:57 - [INFO] Creating installation directories on all nodes if not present All 4 node(s) have connected All 4 node(s) have connected All 4 node(s) have connected All 4 node(s) have connected 2026-05-04 04:32:57 - [INFO] Copying Logforwarder directory /opt/protegrity/<DBP_version>/logforwarder to all nodes All 4 node(s) have connected <node_name>:1023: send completed: 57942717 bytes received (10 files/7 directories) <node_name>:1022: send completed: 57942717 bytes received (10 files/7 directories) <node_name>:1023: send completed: 57942717 bytes received (10 files/7 directories) <node_name>:1023: send completed: 57942717 bytes received (10 files/7 directories) All 4 node(s) have connected All 4 node(s) have connected 2026-05-04 04:32:59 - [INFO] Logforwarder successfully copied to all nodes 2026-05-04 04:32:59 - [INFO] Copying RPAgent directory /opt/protegrity/<DBP_version>/rpagent to all nodes All 4 node(s) have connected <node_name>:1022: send completed: 14787819 bytes received (9 files/3 directories) <node_name>:1023: send completed: 14787819 bytes received (9 files/3 directories) <node_name>:1023: send completed: 14787819 bytes received (9 files/3 directories) <node_name>:1023: send completed: 14787819 bytes received (9 files/3 directories) All 4 node(s) have connected All 4 node(s) have connected 2026-05-04 04:33:00 - [INFO] RPAgent successfully copied to all nodes 2026-05-04 04:33:00 - [INFO] Logforwarder and RPAgent successfully copied to all nodes 2026-05-04 04:33:00 - [INFO] Starting new Logforwarder on all nodes 2026-05-04 04:33:02 - [INFO] Preparing Database Protector installation... 2026-05-04 04:33:02 - [INFO] Installing/Upgrading DBP... 2026-05-04 04:33:02 - [INFO] Executing ./PepTeradataSetup_Linux_x64_<DBP_version>.sh... 2026-05-04 04:33:03 - [INFO] Retaining existing Database Protector configuration... 2026-05-04 04:33:03 - [INFO] Database Protector configuration retained successfully. 2026-05-04 04:33:03 - [INFO] Updating configuration files in /opt/protegrity/<DBP_version>/databaseprotector/teradata/data to use new installation directory. 2026-05-04 04:33:03 - [INFO] ./PepTeradataSetup_Linux_x64_<DBP_version>.sh completed successfully. 2026-05-04 04:33:03 - [INFO] Configuring DBP to send logs to Logforwarder port 15781 2026-05-04 04:33:03 - [INFO] DBP config.ini updated to use Logforwarder port 15781 2026-05-04 04:33:03 - [INFO] Copying DatabaseProtector to all nodes All 4 node(s) have connected <node_name>:1023: send completed: 8926094 bytes received (16 files/5 directories) <node_name>:1023: send completed: 8926094 bytes received (16 files/5 directories) <node_name>:1023: send completed: 8926094 bytes received (16 files/5 directories) <node_name>:1022: send completed: 8926094 bytes received (16 files/5 directories) All 4 node(s) have connected All 4 node(s) have connected 2026-05-04 04:33:04 - [INFO] Setting DatabaseProtector ownership (tdatuser:tdtrusted) on all nodes All 4 node(s) have connected 2026-05-04 04:33:04 - [INFO] DatabaseProtector successfully copied to all nodes 2026-05-04 04:33:04 - [INFO] Synchronizing /etc/protegrity to all nodes All 4 node(s) have connected All 4 node(s) have connected <node_name>:1022: send completed: 1157 bytes received (1 files/1 directories) <node_name>:1023: send completed: 1157 bytes received (1 files/1 directories) <node_name>:1023: send completed: 1157 bytes received (1 files/1 directories) <node_name>:1023: send completed: 1157 bytes received (1 files/1 directories) All 4 node(s) have connected All 4 node(s) have connected All 4 node(s) have connected 2026-05-04 04:33:04 - [INFO] User configuration directory successfully synchronized to all nodes 2026-05-04 04:33:04 - [INFO] Dropping existing UDFs (database operation on current node only - shared across all nodes) 2026-05-04 04:33:04 - [INFO] Side-by-side upgrade: Using SQL scripts from previous installation: /opt/protegrity/databaseprotector/teradata/sqlscripts BTEQ 17.20.00.08 (64-bit) Mon May 4 04:33:05 2026 PID: 152827 +---------+---------+---------+---------+---------+---------+---------+---- .SET EXITONDELAY ON MAXREQTIME 300 RC 12 +---------+---------+---------+---------+---------+---------+---------+---- .logon localhost/dbc, *** Logon successfully completed. *** Teradata Database Release is 17.20.03.18 *** Teradata Database Version is 17.20.03.18 *** Transaction Semantics are BTET. *** Session Character Set Name is 'ASCII'. *** Total elapsed time was 1 second. +---------+---------+---------+---------+---------+---------+---------+---- database <database_name>; *** New default database accepted. *** Total elapsed time was 1 second. +---------+---------+---------+---------+---------+---------+---------+---- .IF ERRORCODE <> 0 THEN .QUIT 12; +---------+---------+---------+---------+---------+---------+---------+---- .run file /opt/protegrity/databaseprotector/teradata/sqlscripts/dropobjects .sql; +---------+---------+---------+---------+---------+---------+---------+---- 2026-05-04 04:33:18 - [INFO] Main UDFs dropped successfully BTEQ 17.20.00.08 (64-bit) Mon May 4 04:33:19 2026 PID: 153405 +---------+---------+---------+---------+---------+---------+---------+---- .SET EXITONDELAY ON MAXREQTIME 300 RC 12 +---------+---------+---------+---------+---------+---------+---------+---- .logon localhost/dbc, *** Logon successfully completed. *** Teradata Database Release is 17.20.03.18 *** Teradata Database Version is 17.20.03.18 *** Transaction Semantics are BTET. *** Session Character Set Name is 'ASCII'. *** Total elapsed time was 1 second. +---------+---------+---------+---------+---------+---------+---------+---- database <database_name>; *** New default database accepted. *** Total elapsed time was 1 second. +---------+---------+---------+---------+---------+---------+---------+---- .run file /opt/protegrity/databaseprotector/teradata/sqlscripts/dropvarchar unicode.sql; +---------+---------+---------+---------+---------+---------+---------+---- 2026-05-04 04:33:20 - [INFO] Varchar unicode UDFs dropped successfully 2026-05-04 04:33:20 - [INFO] Stopping existing RPAgent on all nodes All 4 node(s) have connected <--------------------- <node_name> --------------------------------> Stopping rpagent <--------------------- <node_name> --------------------------------> Stopping rpagent <--------------------- <node_name> --------------------------------> Stopping rpagent <--------------------- <node_name> --------------------------------> Stopping rpagent 2026-05-04 04:33:21 - [INFO] Starting new RPAgent on all nodes 2026-05-04 04:33:21 - [INFO] Successfully launched new RPAgent on all nodes 2026-05-04 04:33:21 - [INFO] Creating new UDFs (database operation on current node only - shared across all nodes) BTEQ 17.20.00.08 (64-bit) Mon May 4 04:33:21 2026 PID: 153511 +---------+---------+---------+---------+---------+---------+---------+---- .SET EXITONDELAY ON MAXREQTIME 300 RC 12 +---------+---------+---------+---------+---------+---------+---------+---- .logon localhost/dbc, *** Logon successfully completed. *** Teradata Database Release is 17.20.03.18 *** Teradata Database Version is 17.20.03.18 *** Transaction Semantics are BTET. *** Session Character Set Name is 'ASCII'. *** Total elapsed time was 1 second. +---------+---------+---------+---------+---------+---------+---------+---- database <database_name>; *** New default database accepted. *** Total elapsed time was 1 second. +---------+---------+---------+---------+---------+---------+---------+---- .IF ERRORCODE <> 0 THEN .QUIT 12; +---------+---------+---------+---------+---------+---------+---------+---- .run file /opt/protegrity/<DBP_version>/databaseprotector/teradata/sqlscripts/c reateobjects.sql; +---------+---------+---------+---------+---------+---------+---------+---- 2026-05-04 04:33:38 - [INFO] Creating varcharunicode UDFs BTEQ 17.20.00.08 (64-bit) Mon May 4 04:33:38 2026 PID: 154263 +---------+---------+---------+---------+---------+---------+---------+---- .SET EXITONDELAY ON MAXREQTIME 300 RC 12 +---------+---------+---------+---------+---------+---------+---------+---- .logon localhost/dbc, *** Logon successfully completed. *** Teradata Database Release is 17.20.03.18 *** Teradata Database Version is 17.20.03.18 *** Transaction Semantics are BTET. *** Session Character Set Name is 'ASCII'. *** Total elapsed time was 1 second. +---------+---------+---------+---------+---------+---------+---------+---- database <database_name>; *** New default database accepted. *** Total elapsed time was 1 second. +---------+---------+---------+---------+---------+---------+---------+---- .IF ERRORCODE <> 0 THEN .QUIT 12; +---------+---------+---------+---------+---------+---------+---------+---- .run file /opt/protegrity/<DBP_version>/databaseprotector/teradata/sqlscripts/c reatevarcharunicode.sql; +---------+---------+---------+---------+---------+---------+---------+---- 2026-05-04 04:33:40 - [INFO] Varcharunicode UDFs created successfully 2026-05-04 04:33:40 - [INFO] Testing UDFs BTEQ 17.20.00.08 (64-bit) Mon May 4 04:33:40 2026 PID: 154353 +---------+---------+---------+---------+---------+---------+---------+---- .SET EXITONDELAY ON MAXREQTIME 300 RC 12 +---------+---------+---------+---------+---------+---------+---------+---- .logon localhost/dbc, *** Logon successfully completed. *** Teradata Database Release is 17.20.03.18 *** Teradata Database Version is 17.20.03.18 *** Transaction Semantics are BTET. *** Session Character Set Name is 'ASCII'. *** Total elapsed time was 1 second. +---------+---------+---------+---------+---------+---------+---------+---- database <database_name>; *** New default database accepted. *** Total elapsed time was 1 second. +---------+---------+---------+---------+---------+---------+---------+---- .IF ERRORCODE <> 0 THEN .QUIT 12; +---------+---------+---------+---------+---------+---------+---------+---- select pty_getversion(); *** Query completed. One row found. One column returned. *** Total elapsed time was 1 second. pty_getversion() --------------------------------------------------------------------------- <DBP_version> +---------+---------+---------+---------+---------+---------+---------+---- .logoff *** You are now logged off from the DBC. +---------+---------+---------+---------+---------+---------+---------+---- .quit *** Exiting BTEQ... *** RC (return code) = 0 2026-05-04 04:33:40 - [INFO] Stopping existing Logforwarder on all nodes All 4 node(s) have connected <--------------------- <node_name> --------------------------------> Stopping Log Forwarder with PID: 226940 Please Wait <--------------------- <node_name> --------------------------------> Stopping Log Forwarder with PID: 146408 Please Wait <--------------------- <node_name> --------------------------------> Stopping Log Forwarder with PID: 209497 Please Wait <--------------------- <node_name> --------------------------------> Stopping Log Forwarder with PID: 85225 Please Wait 2026-05-04 04:33:45 - [INFO] Removing previous installation directories 2026-05-04 04:33:45 - [INFO] Removing previous Logforwarder directory from all nodes: /opt/protegrity/logforwarder All 4 node(s) have connected 2026-05-04 04:33:46 - [INFO] Removing previous RPAgent directory from all nodes: /opt/protegrity/rpagent All 4 node(s) have connected 2026-05-04 04:33:46 - [INFO] Removing previous DatabaseProtector directory from all nodes: /opt/protegrity/databaseprotector All 4 node(s) have connected 2026-05-04 04:33:46 - [INFO] User configuration backup removed: /etc/protegrity_backup_<Timestamp> 2026-05-04 04:33:46 - [INFO] Upgrade successful. 2026-05-04 04:33:46 - [INFO] All components upgraded successfully. 2026-05-04 04:33:46 - [INFO] IMPORTANT: This script doesn't handle Protegrity UDT, it must be handled manually. Refer to product documentation. 2026-05-04 04:33:46 - [INFO] IMPORTANT: This script doesn't handle Protegrity Decimal UDF objects, it must be handled manually. Refer to product documentation.
Upgrading the Protector using the Silent Mode
Note: For installation/upgrade using the automation script, the component will be installed/upgraded within a <DBP_version> folder under the specified directory.
- Log in to the server as the user with the required permissions.
- Navigate to the directory containing the extracted files and the installation scripts.
- To upgrade the protector, run the following command:
./Install_TeradataProtector_Linux_x64_<DBP_version>.sh --upgrade - Press ENTER.
The script performs pre-checks before starting the upgrade. The prompt to select the silent mode of installation appears.
2026-05-04 04:40:50 - [INFO] ======================================================================== 2026-05-04 04:40:50 - [INFO] Starting environment pre-checks before installation/upgrade 2026-05-04 04:40:50 - [INFO] ======================================================================== 2026-05-04 04:40:50 - [INFO] Prerequisites check passed: pcl and bteq commands are available on current/running node 2026-05-04 04:40:50 - [INFO] Checking Teradata PDE state on running node... 2026-05-04 04:40:50 - [INFO] PDE state check passed on running node: PDE state is RUN/STARTED 2026-05-04 04:40:50 - [INFO] Checking accessibility of all Teradata nodes... 2026-05-04 04:40:50 - [INFO] IMPORTANT: ALL nodes must be accessible - if even 1 node is down, installation will be aborted 2026-05-04 04:40:50 - [INFO] ========================================== 2026-05-04 04:40:50 - [INFO] Node accessibility check PASSED 2026-05-04 04:40:50 - [INFO] All 4 node(s) have connected <--------------------- <node_name> --------------------------------> abyss3 <--------------------- <node_name> --------------------------------> abyss4 <--------------------- <node_name> --------------------------------> abyss2 <--------------------- <node_name> --------------------------------> abyss1 2026-05-04 04:40:50 - [INFO] ========================================== 2026-05-04 04:40:50 - [INFO] ======================================================================== 2026-05-04 04:40:50 - [INFO] All environment pre-checks PASSED - proceeding with installation 2026-05-04 04:40:50 - [INFO] ======================================================================== 2026-05-04 04:40:50 - [INFO] If silent mode is selected, the default base directory (/opt/protegrity) will be used as the location of the existing installation for each component (Logforwarder, RPAgent and DatabaseProtector). Do you want silent installation? (yes/no) [no]: - To install the components using the silent mode, type
yes. - Press ENTER.
The prompt to confirm the presence of decimal UDF installation appears.
2026-05-04 04:40:54 - [INFO] You have chosen silent mode. Therefore, /opt/protegrity is considered as base directory for new installation. 2026-05-04 04:40:54 - [INFO] This is an upgrade and you have chosen silent mode. Therefore, /opt/protegrity is considered as base directory for existing installation. 2026-05-04 04:40:54 - [INFO] Verifying previous installation directories for all components... 2026-05-04 04:40:54 - [INFO] Existing LogForwarder directory: /opt/protegrity/logforwarder 2026-05-04 04:40:54 - [INFO] Existing RPAgent directory: /opt/protegrity/rpagent 2026-05-04 04:40:54 - [INFO] Existing DatabaseProtector directory: /opt/protegrity/databaseprotector 2026-05-04 04:40:54 - [INFO] All existing component directories verified successfully. 2026-05-04 04:40:54 - [INFO] Checking for Protegrity UDT in previous installation... 2026-05-04 04:40:54 - [INFO] No UDT PLM file found at expected path. Checking Teradata libraries... 2026-05-04 04:40:56 - [INFO] No Teradata library links to pepteradataudt. UDT not active. 2026-05-04 04:40:56 - [INFO] No active Protegrity UDT detected. Proceeding with upgrade. 2026-05-04 04:40:56 - [INFO] Protegrity Decimal UDF objects are not supported by this script Have you created Protegrity Decimal UDF objects in your previous installation? (yes/no) [no]: - To confirm that the previous installation does not contain decimal UDFs, type
no. - Press ENTER.
The script prompts to create the UDFs. The prompt to enter the database credentials appears.
2026-05-04 04:41:01 - [INFO] No Protegrity Decimal UDF objects present. Proceeding with upgrade. Do you want to continue and create UDFs? To create the UDFs, provide the database credentials (yes/no) [no]: - To create the UDFs, type
yes. - Press ENTER.
The prompt to enter the database username appears.
Enter Teradata database username: - Enter the username.
- Press ENTER.
The prompt to enter the database password appears.
Enter Teradata database user's password: - Enter the password.
The script lists the current configuration and the prompt to proceed with the configuration appears.
2026-05-04 04:41:11 - [INFO] Silent upgrade: Using previous database name to install the UDFs: <database_name> 2026-05-04 04:41:12 - [INFO] Silent upgrade: Using previous maximum size of varchar to be allocated by the UDFs: 500 2026-05-04 04:41:12 - [INFO] Validating database ... 2026-05-04 04:41:12 - [INFO] Database validated successfully 2026-05-04 04:41:12 - [INFO] ************************************************************************** 2026-05-04 04:41:12 - [INFO] Upgrade will be done with following configuration: 2026-05-04 04:41:12 - [INFO] Mode: upgrade 2026-05-04 04:41:12 - [INFO] Existing Logforwarder Installation Directory: /opt/protegrity 2026-05-04 04:41:12 - [INFO] Existing RPAgent Installation Directory: /opt/protegrity 2026-05-04 04:41:12 - [INFO] Existing DatabaseProtector Installation Directory: /opt/protegrity 2026-05-04 04:41:12 - [INFO] New Logforwarder Installation Directory: /opt/protegrity/<DBP_version> 2026-05-04 04:41:12 - [INFO] New RPAgent Installation Directory: /opt/protegrity/<DBP_version> 2026-05-04 04:41:12 - [INFO] New DatabaseProtector Installation Directory: /opt/protegrity/<DBP_version> 2026-05-04 04:41:12 - [INFO] Audit Store Endpoints: <Audit_Store_Endpoint>:9200 2026-05-04 04:41:12 - [INFO] Upstream (ESA) Hostname or IP Address for RPAgent: <ESA_Hostname> 2026-05-04 04:41:12 - [INFO] Upstream (ESA) Port for RPAgent: 25400 (Default) 2026-05-04 04:41:12 - [INFO] This is an upgrade. 2026-05-04 04:41:12 - [INFO] Previous installations will be backed up before upgrade. 2026-05-04 04:41:12 - [INFO] Existing Logforwarder and RPAgent configurations will be retained 2026-05-04 04:41:12 - [INFO] ************************************************************************** 2026-05-04 04:41:12 - [WARN] ************************************************************************** 2026-05-04 04:41:12 - [WARN] IMPORTANT: Any queries currently running may be impacted during upgrade. 2026-05-04 04:41:12 - [WARN] It is recommended to perform the upgrade during a maintenance window. 2026-05-04 04:41:12 - [WARN] ************************************************************************** 2026-05-04 04:41:12 - [INFO] Please verify the above configuration before proceeding. Do you want to continue? (yes/no) [no]: - To upgrade the protector using the configuration, type
yes. - Press ENTER.
The script upgrades the Log Forwarder, RPAgent, the protector, and the UDFs and completes the installation.
2026-05-04 04:41:27 - [INFO] Continuing with upgrade... 2026-05-04 04:41:27 - [INFO] Backing up /opt/protegrity/logforwarder to /opt/protegrity/logforwarder_backup_<Timestamp>... 2026-05-04 04:41:27 - [INFO] Backup of /opt/protegrity/logforwarder completed successfully 2026-05-04 04:41:27 - [INFO] Backing up /opt/protegrity/rpagent to /opt/protegrity/rpagent_backup_<Timestamp>... 2026-05-04 04:41:27 - [INFO] Backup of /opt/protegrity/rpagent completed successfully 2026-05-04 04:41:27 - [INFO] Backing up /opt/protegrity/databaseprotector to /opt/protegrity/databaseprotector_backup_<Timestamp>... 2026-05-04 04:41:27 - [INFO] Backup of /opt/protegrity/databaseprotector completed successfully 2026-05-04 04:41:27 - [INFO] Backing up /etc/protegrity to /etc/protegrity_backup_<Timestamp>... 2026-05-04 04:41:28 - [INFO] Backup of /etc/protegrity completed successfully 2026-05-04 04:41:28 - [INFO] Installing/Upgrading LOGFORWARDER... 2026-05-04 04:41:28 - [INFO] Executing ./LogforwarderSetup_Linux_x64_<DBP_version>.sh... 2026-05-04 04:41:28 - [INFO] Retaining existing Logforwarder configuration... 2026-05-04 04:41:28 - [INFO] Logforwarder configuration retained successfully. 2026-05-04 04:41:28 - [INFO] Updating configuration files in /opt/protegrity/<DBP_version>/logforwarder/data to use new installation directory. 2026-05-04 04:41:28 - [INFO] ./LogforwarderSetup_Linux_x64_<DBP_version>.sh completed successfully. 2026-05-04 04:41:28 - [INFO] Installing/Upgrading RPAGENT... 2026-05-04 04:41:28 - [INFO] Executing ./RPAgentSetup_Linux_x64_<DBP_version>.sh... 2026-05-04 04:41:28 - [INFO] Retaining existing RPAgent configuration... 2026-05-04 04:41:28 - [INFO] RPAgent configuration retained successfully. 2026-05-04 04:41:28 - [INFO] Updating configuration files in /opt/protegrity/<DBP_version>/rpagent/data to use new installation directory. 2026-05-04 04:41:28 - [INFO] ./RPAgentSetup_Linux_x64_<DBP_version>.sh completed successfully. 2026-05-04 04:41:28 - [INFO] Old Logforwarder port: 15781 → New Logforwarder port: 15780 2026-05-04 04:41:28 - [INFO] Configuring new Logforwarder to listen on port 15780 2026-05-04 04:41:28 - [INFO] Logforwarder listen port updated to 15780 in /opt/protegrity/<DBP_version>/logforwarder/data/config.d/in_tcp.conf 2026-05-04 04:41:28 - [INFO] Configuring RPAgent to send logs to Logforwarder port 15780 2026-05-04 04:41:28 - [INFO] RPAgent rpagent.cfg updated to use Logforwarder port 15780 2026-05-04 04:41:28 - [INFO] Copying Logforwarder and RPAgent to all nodes in the Teradata cluster 2026-05-04 04:41:28 - [INFO] Copying Logforwarder and RPAgent components to all nodes 2026-05-04 04:41:28 - [INFO] Creating installation directories on all nodes if not present All 4 node(s) have connected All 4 node(s) have connected All 4 node(s) have connected All 4 node(s) have connected 2026-05-04 04:41:29 - [INFO] Copying Logforwarder directory /opt/protegrity/<DBP_version>/logforwarder to all nodes All 4 node(s) have connected <node_name>:1023: send completed: 57975783 bytes received (11 files/7 directories) <node_name>:1023: send completed: 57975783 bytes received (11 files/7 directories) <node_name>:1022: send completed: 57975783 bytes received (11 files/7 directories) <node_name>:1023: send completed: 57975783 bytes received (11 files/7 directories) All 4 node(s) have connected All 4 node(s) have connected 2026-05-04 04:41:30 - [INFO] Logforwarder successfully copied to all nodes 2026-05-04 04:41:30 - [INFO] Copying RPAgent directory /opt/protegrity/<DBP_version>/rpagent to all nodes All 4 node(s) have connected <node_name>:1023: send completed: 14787819 bytes received (9 files/3 directories) <node_name>:1023: send completed: 14787819 bytes received (9 files/3 directories) <node_name>:1022: send completed: 14787819 bytes received (9 files/3 directories) <node_name>:1023: send completed: 14787819 bytes received (9 files/3 directories) All 4 node(s) have connected All 4 node(s) have connected 2026-05-04 04:41:31 - [INFO] RPAgent successfully copied to all nodes 2026-05-04 04:41:31 - [INFO] Logforwarder and RPAgent successfully copied to all nodes 2026-05-04 04:41:31 - [INFO] Starting new Logforwarder on all nodes 2026-05-04 04:41:33 - [INFO] Preparing Database Protector installation... 2026-05-04 04:41:33 - [INFO] Installing/Upgrading DBP... 2026-05-04 04:41:33 - [INFO] Executing ./PepTeradataSetup_Linux_x64_<DBP_version>.sh... 2026-05-04 04:41:34 - [INFO] Retaining existing Database Protector configuration... 2026-05-04 04:41:34 - [INFO] Database Protector configuration retained successfully. 2026-05-04 04:41:34 - [INFO] Updating configuration files in /opt/protegrity/<DBP_version>/databaseprotector/teradata/data to use new installation directory. 2026-05-04 04:41:34 - [INFO] ./PepTeradataSetup_Linux_x64_<DBP_version>.sh completed successfully. 2026-05-04 04:41:34 - [INFO] Configuring DBP to send logs to Logforwarder port 15780 2026-05-04 04:41:34 - [INFO] DBP config.ini updated to use Logforwarder port 15780 2026-05-04 04:41:34 - [INFO] Copying DatabaseProtector to all nodes All 4 node(s) have connected <node_name>:1022: send completed: 8926094 bytes received (16 files/5 directories) <node_name>:1023: send completed: 8926094 bytes received (16 files/5 directories) <node_name>:1023: send completed: 8926094 bytes received (16 files/5 directories) <node_name>:1023: send completed: 8926094 bytes received (16 files/5 directories) All 4 node(s) have connected All 4 node(s) have connected 2026-05-04 04:41:35 - [INFO] Setting DatabaseProtector ownership (tdatuser:tdtrusted) on all nodes All 4 node(s) have connected 2026-05-04 04:41:35 - [INFO] DatabaseProtector successfully copied to all nodes 2026-05-04 04:41:35 - [INFO] Synchronizing /etc/protegrity to all nodes All 4 node(s) have connected All 4 node(s) have connected <node_name>:1022: send completed: 1157 bytes received (1 files/1 directories) <node_name>:1023: send completed: 1157 bytes received (1 files/1 directories) <node_name>:1023: send completed: 1157 bytes received (1 files/1 directories) <node_name>:1023: send completed: 1157 bytes received (1 files/1 directories) All 4 node(s) have connected All 4 node(s) have connected All 4 node(s) have connected 2026-05-04 04:41:36 - [INFO] User configuration directory successfully synchronized to all nodes 2026-05-04 04:41:36 - [INFO] Dropping existing UDFs (database operation on current node only - shared across all nodes) 2026-05-04 04:41:36 - [INFO] Side-by-side upgrade: Using SQL scripts from previous installation: /opt/protegrity/databaseprotector/teradata/sqlscripts BTEQ 17.20.00.08 (64-bit) Mon May 4 04:41:36 2026 PID: 162646 +---------+---------+---------+---------+---------+---------+---------+---- .SET EXITONDELAY ON MAXREQTIME 300 RC 12 +---------+---------+---------+---------+---------+---------+---------+---- .logon localhost/<database_user_name>, *** Logon successfully completed. *** Teradata Database Release is 17.20.03.18 *** Teradata Database Version is 17.20.03.18 *** Transaction Semantics are BTET. *** Session Character Set Name is 'ASCII'. *** Total elapsed time was 1 second. +---------+---------+---------+---------+---------+---------+---------+---- database <database_name>; *** New default database accepted. *** Total elapsed time was 1 second. +---------+---------+---------+---------+---------+---------+---------+---- .IF ERRORCODE <> 0 THEN .QUIT 12; +---------+---------+---------+---------+---------+---------+---------+---- .run file /opt/protegrity/databaseprotector/teradata/sqlscripts/dropobjects .sql; +---------+---------+---------+---------+---------+---------+---------+---- 2026-05-04 04:41:49 - [INFO] Main UDFs dropped successfully BTEQ 17.20.00.08 (64-bit) Mon May 4 04:41:49 2026 PID: 163223 +---------+---------+---------+---------+---------+---------+---------+---- .SET EXITONDELAY ON MAXREQTIME 300 RC 12 +---------+---------+---------+---------+---------+---------+---------+---- .logon localhost/<database_user_name>, *** Logon successfully completed. *** Teradata Database Release is 17.20.03.18 *** Teradata Database Version is 17.20.03.18 *** Transaction Semantics are BTET. *** Session Character Set Name is 'ASCII'. *** Total elapsed time was 1 second. +---------+---------+---------+---------+---------+---------+---------+---- database <database_name>; *** New default database accepted. *** Total elapsed time was 1 second. +---------+---------+---------+---------+---------+---------+---------+---- .run file /opt/protegrity/databaseprotector/teradata/sqlscripts/dropvarchar unicode.sql; +---------+---------+---------+---------+---------+---------+---------+---- 2026-05-04 04:41:51 - [INFO] Varchar unicode UDFs dropped successfully 2026-05-04 04:41:51 - [INFO] Stopping existing RPAgent on all nodes All 4 node(s) have connected <--------------------- <node_name> --------------------------------> Stopping rpagent <--------------------- <node_name> --------------------------------> Stopping rpagent <--------------------- <node_name> --------------------------------> Stopping rpagent <--------------------- <node_name> --------------------------------> Stopping rpagent 2026-05-04 04:41:52 - [INFO] Starting new RPAgent on all nodes 2026-05-04 04:41:52 - [INFO] Successfully launched new RPAgent on all nodes 2026-05-04 04:41:52 - [INFO] Creating new UDFs (database operation on current node only - shared across all nodes) BTEQ 17.20.00.08 (64-bit) Mon May 4 04:41:52 2026 PID: 163329 +---------+---------+---------+---------+---------+---------+---------+---- .SET EXITONDELAY ON MAXREQTIME 300 RC 12 +---------+---------+---------+---------+---------+---------+---------+---- .logon localhost/<database_user_name>, *** Logon successfully completed. *** Teradata Database Release is 17.20.03.18 *** Teradata Database Version is 17.20.03.18 *** Transaction Semantics are BTET. *** Session Character Set Name is 'ASCII'. *** Total elapsed time was 1 second. +---------+---------+---------+---------+---------+---------+---------+---- database <database_name>; *** New default database accepted. *** Total elapsed time was 1 second. +---------+---------+---------+---------+---------+---------+---------+---- .IF ERRORCODE <> 0 THEN .QUIT 12; +---------+---------+---------+---------+---------+---------+---------+---- .run file /opt/protegrity/<DBP_version>/databaseprotector/teradata/sqlscripts/c reateobjects.sql; +---------+---------+---------+---------+---------+---------+---------+---- 2026-05-04 04:42:09 - [INFO] Creating varcharunicode UDFs BTEQ 17.20.00.08 (64-bit) Mon May 4 04:42:09 2026 PID: 164081 +---------+---------+---------+---------+---------+---------+---------+---- .SET EXITONDELAY ON MAXREQTIME 300 RC 12 +---------+---------+---------+---------+---------+---------+---------+---- .logon localhost/<database_user_name>, *** Logon successfully completed. *** Teradata Database Release is 17.20.03.18 *** Teradata Database Version is 17.20.03.18 *** Transaction Semantics are BTET. *** Session Character Set Name is 'ASCII'. *** Total elapsed time was 1 second. +---------+---------+---------+---------+---------+---------+---------+---- database <database_name>; *** New default database accepted. *** Total elapsed time was 1 second. +---------+---------+---------+---------+---------+---------+---------+---- .IF ERRORCODE <> 0 THEN .QUIT 12; +---------+---------+---------+---------+---------+---------+---------+---- .run file /opt/protegrity/<DBP_version>/databaseprotector/teradata/sqlscripts/c reatevarcharunicode.sql; +---------+---------+---------+---------+---------+---------+---------+---- 2026-05-04 04:42:11 - [INFO] Varcharunicode UDFs created successfully 2026-05-04 04:42:11 - [INFO] Testing UDFs BTEQ 17.20.00.08 (64-bit) Mon May 4 04:42:11 2026 PID: 164171 +---------+---------+---------+---------+---------+---------+---------+---- .SET EXITONDELAY ON MAXREQTIME 300 RC 12 +---------+---------+---------+---------+---------+---------+---------+---- .logon localhost/<database_user_name>, *** Logon successfully completed. *** Teradata Database Release is 17.20.03.18 *** Teradata Database Version is 17.20.03.18 *** Transaction Semantics are BTET. *** Session Character Set Name is 'ASCII'. *** Total elapsed time was 1 second. +---------+---------+---------+---------+---------+---------+---------+---- database <database_name>; *** New default database accepted. *** Total elapsed time was 1 second. +---------+---------+---------+---------+---------+---------+---------+---- .IF ERRORCODE <> 0 THEN .QUIT 12; +---------+---------+---------+---------+---------+---------+---------+---- select pty_getversion(); *** Query completed. One row found. One column returned. *** Total elapsed time was 1 second. pty_getversion() --------------------------------------------------------------------------- <DBP_version> +---------+---------+---------+---------+---------+---------+---------+---- .logoff *** You are now logged off from the <database_user_name>. +---------+---------+---------+---------+---------+---------+---------+---- .quit *** Exiting BTEQ... *** RC (return code) = 0 2026-05-04 04:42:11 - [INFO] Stopping existing Logforwarder on all nodes All 4 node(s) have connected <--------------------- <node_name> --------------------------------> Stopping Log Forwarder with PID: 227791 Please Wait <--------------------- <node_name> --------------------------------> Stopping Log Forwarder with PID: 155218 Please Wait <--------------------- <node_name> --------------------------------> Stopping Log Forwarder with PID: 210287 Please Wait <--------------------- <node_name> --------------------------------> Stopping Log Forwarder with PID: 86042 Please Wait 2026-05-04 04:42:17 - [INFO] Removing previous installation directories 2026-05-04 04:42:17 - [INFO] Removing previous Logforwarder directory from all nodes: /opt/protegrity/logforwarder All 4 node(s) have connected 2026-05-04 04:42:17 - [INFO] Removing previous RPAgent directory from all nodes: /opt/protegrity/rpagent All 4 node(s) have connected 2026-05-04 04:42:17 - [INFO] Removing previous DatabaseProtector directory from all nodes: /opt/protegrity/databaseprotector All 4 node(s) have connected 2026-05-04 04:42:17 - [INFO] User configuration backup removed: /etc/protegrity_backup_<Timestamp> 2026-05-04 04:42:17 - [INFO] Upgrade successful. 2026-05-04 04:42:17 - [INFO] All components upgraded successfully. 2026-05-04 04:42:17 - [INFO] IMPORTANT: This script doesn't handle Protegrity UDT, it must be handled manually. Refer to product documentation. 2026-05-04 04:42:17 - [INFO] IMPORTANT: This script doesn't handle Protegrity Decimal UDF objects, it must be handled manually. Refer to product documentation.
5.1.7 - Uninstalling the Teradata Data Warehouse Protector
This section outlines the uninstall process for the Protegrity Teradata Data Warehouse Protector.
5.1.7.1 - Uninstalling the Log Forwarder
Before uninstalling the Log Forwarder, Protegrity recommends creating a backup.
- Log in to the database server as the user with the required permissions.
- Navigate to the
/opt/protegrity/<DBP_version>/logforwarder/bin/directory. - To stop the Log Forwarder, run the following command:
./logforwarderctrl stop - Press ENTER.
The command stops the Log Forwarder.Stopping Logforwarder with PID: 20658 Please Wait - To verify the status of Log Forwarder, run the following command:
./logforwarderctrl status - Press ENTER.
The status of the Log Forwarder appears.Logforwarder is not running - Navigate to the
/opt/protegritydirectory. - To remove the
/<DBP_version>/logforwarder/directory, run the following command.rmdir /<DBP_version>/logforwarder - Press ENTER.
The command deletes the/logforwarder/directory and completes the uninstallation for the Log Forwarder.
5.1.7.2 - Uninstalling the RPAgent
Before uninstalling the RPAgent, Protegrity recommends creating a backup.
- Log in to the server as the user with the required permissions.
- Navigate to the
/opt/protegrity/<DBP_version>/rpagent/bin/directory. - To stop the RPAgent, run the following command:
./rpagentctrl stop - Press ENTER.
The command stops the RPAgent.Stopping RP Agent (PID: 10856) Please Wait - To verify the status of RPAgent, run the following command:
./rpagentctrl status - Press ENTER.
The status of the RPAgent appears.RP Agent is not running - Navigate to the
/opt/protegrity/directory. - To remove the
/<DBP_version>/rpagent/directory, run the following command:rmdir /<DBP_version>/rpagent - Press ENTER.
The command deletes the/<DBP_version>/rpagent/directory and completes the uninstallation for the RPAgent.
5.1.7.3 - Dropping the User Defined Functions
Log in to the server as the user with the required permissions.
Navigate to the
/opt/protegrity/<DBP_version>/databaseprotector/teradata/sqlscripts/directory.To start the
btequtility, run the following command:/opt/protegrity/databaseprotector/teradata/sqlscripts/ # bteqPress ENTER.
The prompt to log in to the database appears.Enter your logon or BTEQ command:To log in to the database, run the following command:
.logon <username>Press ENTER.
The prompt to enter the database password appears.Enter the database password.
Press ENTER.
The connection to the Teradata database is established successfully.*** Logon successfully completed.To remove the installed UDFs from the database, run the following query:
.run file=dropobjects.sqlPress ENTER.
The script removes each of the UDFs and the following message for each of the removed UDF appears.*** Function has been dropped. *** Warning: 5607 Check output for possible warnings encountered in compiling and/or linking UDF/XSP/UDM/UDT. *** Total elapsed time was 1 second.To remove the Varchar Unicode UDFs from the database, run the following query:
.run file=dropvarcharunicode.sqlPress ENTER.
The script removes each of the UDFs and the following message for each of the removed UDF appears.*** Function has been dropped. *** Warning: 5607 Check output for possible warnings encountered in compiling and/or linking UDF/XSP/UDM/UDT. *** Total elapsed time was 1 second.To remove the Decimal UDFs from the database, run the following query:
.run file=dropdecimalobjects.sqlPress ENTER.
The script removes each of the UDFs and the following message for each of the removed UDF appears.*** Function has been dropped. *** Warning: 5607 Check output for possible warnings encountered in compiling and/or linking UDF/XSP/UDM/UDT. *** Total elapsed time was 1 second.
5.1.7.4 - Removing the Installation Directory
Deleting the installation directory is the final stage in the process of uninstalling the Teradata Data Warehouse Protector.
To remove the installation directory:
- Log in to the database server as the user with the required permissions.
- Navigate to the
/opt/protegrity/directory. - To delete the installation directory, run the following command:
rm -rf /<DBP_version>/databaseprotector/ - Press ENTER.
The command deletes the files and the sub-directories within the specified directory.
5.1.8 - Appendix
This page consists of the the additional references for the Teradata Data Warehouse Protector.
Teradata Query Bands and Trusted Sessions
When a middle-tier application is used together with the Teradata database, it typically logs on to the database as a permanent database user (application user) and establishes a connection pool. End-users that access the database through the middle-tier application are given all authorized database privileges and are audited based on that single application user.
For the sites that require users to be individually identified, authorized, and audited, the middle-tier application can be configured to offer trusted sessions. Application users that access the database through a trusted session must be set up as proxy users and assigned one or more database roles, which determine their access rights in the database. When a proxy user requests database access, the application forwards the user identity and applicable role information to the database.
For more information about Teradata trusted sessions, refer to https://docs.teradata.com/r/Enterprise_IntelliFlex_VMware/Security-Administration/Introduction-to-Security-Administration.
The system uses a proxy user if the query band contains the reserved name PROXYUSER. In order for the proxy user to access sensitive data, UDFs and UDTs need to know the requestor of the data. They obtain this information from the query band parameters.
For more information about query bands, refer to https://docs.teradata.com/r/Teradata-VantageCloud-Lake/SQL-Reference/SQL-Data-Definition-Language
If a proxy user is found among the query band parameters, then it is used in the authorization process instead of the regular data user (which could be a different user). This means that only the proxy user’s permissions apply. This is similar to how the Teradata permissions work for trusted sessions. The database permissions for the proxy user are used, and not the application user’s permissions.
Before such a user can access the database, a Grant Connect through Access right should be given by the database administrator to the user. The following example provides the query to ensure that the user ‘JSMITH’ can connect through.
The application My_App is confiured to connect to Teradata with a service account My_App_User that is not part of the Protegrity security policy. However, in case the app user JSMITH which does not exist in Teradata needs to see the data in the clear. Then, the database administrator must first Grant Connect access to the user, JSMITH.
GRANT CONNECT THROUGH My_App_User
TO JSMITH
WITH ROLE AppRole;
The user JSMITH can now access the database. However, since JSMITH does not exist in the database, Teradata needs to know what role it needs to inherit. This can be any role already configured within Teradata.
Then, every time JSMITH wants to run a SQL command through My_App, the following query band statement needs to be executed first: SET QUERY_BAND=‘PROXYUSER=JSMITH;’ FOR SESSION;
The UDF getqueryband is provided by Teradata.
select getqueryband();
*** Query completed. One row found. One column returned.
*** Total elapsed time was 1 second.
getqueryband()
---------------------------------------------------------------------------
select pty_varcharlatinenc('abcd','AES',123,0,0);
*** Query completed. One row found. One column returned.
*** Total elapsed time was 1 second.
pty_varcharlatinenc('abcd','AES',123,0,0)
---------------------------------------------------------------------------
E3AE49B5C44E4CE64CC7AB3A20F82325
SET QUERY_BAND='PROXYUSER=JSMITH;' FOR SESSION;
*** Set QUERY_BAND accepted.
*** Total elapsed time was 1 second.
select getqueryband();
*** Query completed. One row found. One column returned.
*** Total elapsed time was 1 second.
getqueryband()
---------------------------------------------------------------------------
=S> PROXYUSER=JSMITH;
select pty_varcharlatinenc('abcd','AES',123,0,0);
*** Failure 7504 in UDF/XSP/UDM SYSLIB.pty_varcharlatinenc: SQLSTATE U0001:
No such user
Statement# 1, Info =0
*** Total elapsed time was 1 second.
AUDIT TRACE:
Thu Dec 30 01:21:53.530 2010 JSMITH AES 0 1 0 0 Insert, unknown user dbp 1
SET QUERY_BAND=NONE FOR SESSION;
*** Set QUERY_BAND accepted.
*** Total elapsed time was 1 second.
select pty_varcharlatinenc('abcd','AES',123,0,0);
*** Query completed. One row found. One column returned.
*** Total elapsed time was 1 second.
pty_varcharlatinenc('abcd','AES',123,0,0)
---------------------------------------------------------------------------
E3AE49B5C44E4CE64CC7AB3A20F82325
Important: The Data Warehouse Protector supports user names that are up to 255 characters in length. However, the Teradata platform supports user name lengths of 128 characters only. Hence, the user name is limited to the value supported by the Teradata platform.
Configuring access to execute queries
When configuring a Teradata Member Source in ESA, the following grants must be given to the user that will be connecting to the database. This is required in order to retrieve policy users and groups.
The following is a list of privilege rights that are required for the access configuration:
- Select access to DBC.DBASE
- Select access to DBC.ROLEINFO
- Select access to DBC.RoleMembers
The privilege rights must be granted in the member source configuration on the ESA when you are defining a database user with the roles.
There are three basic types of queries performed in Teradata:
Retrieving the database users
SELECT DBASE.DatabaseNameI FROM DBC.DBASE DBASE WHERE DBASE.ROWTYPE = 'U' ORDER BY 1;Retrieving the database roles/groups
SELECT RoleName,UPPER(GRANTEE) FROM DBC.RoleMembers ORDER BY RoleName;Retrieving the database users that are members of a role/group
SELECT UPPER(GRANTEE) FROM DBC.RoleMembers ORDER BY GRANTEE;
Return Codes for Data Warehouse Protectors
This section includes the list of return codes for the Data Warehouse Protectors.
| Return Code | Description |
|---|---|
| 1 | The username could not be found in the policy |
| 2 | The data element could not be found in the policy |
| 3 | The user does not have the appropriate permissions to perform the requested operation |
| 4 | Tweak is null |
| 5 | Integrity check failed |
| 6 | Data protect operation was successful |
| 7 | Data protect operation failed |
| 8 | Data unprotect operation was successful |
| 9 | Data unprotect operation failed |
| 10 | The user has appropriate permissions to perform the requested operation but no data has been protected/unprotected |
| 11 | Data unprotect operation was successful with use of an inactive keyid |
| 12 | Input is null or not within allowed limits |
| 13 | Internal error occurring in a function call after the provider has been opened |
| 14 | Failed to load data encryption key |
| 15 | Tweak input is too long |
| 19 | Unsupported tweak action for the specified fpe data element |
| 20 | Failed to allocate memory |
| 21 | Input or output buffer is too small |
| 22 | Data is too short to be protected/unprotected |
| 23 | Data is too long to be protected/unprotected |
| 26 | Unsupported algorithm or unsupported action for the specific data element |
| 31 | Policy not available |
| 44 | The content of the input data is not valid |
| 49 | Unsupported input encoding for the specific data element |
| 50 | Data reprotect operation was successful |
| 51 | Failed to send logs, connection refused |
5.1.8.1 - Additional references for the Protectors
This page consists of the the additional references for all the Data Warehouse Protectors v10.x.
5.1.8.1.1 - Additional references for the Teradata Protector
This page consists of the the additional references for the Teradata Data Warehouse Protector.
5.1.8.1.1.1 - Configuring access to execute queries
When configuring a Teradata Member Source in ESA, the following grants must be given to the user that will be connecting to the database. This is required in order to retrieve policy users and groups.
The following is a list of privilege rights that are required for the access configuration:
- Select access to DBC.DBASE
- Select access to DBC.ROLEINFO
- Select access to DBC.RoleMembers
The privilege rights must be granted in the member source configuration on the ESA when you are defining a database user with the roles.
There are three basic types of queries performed in Teradata:
Retrieving the database users
SELECT DBASE.DatabaseNameI FROM DBC.DBASE DBASE WHERE DBASE.ROWTYPE = 'U' ORDER BY 1;For more information about fetching the users, refer to Additional References for Teradata.
Retrieving the database roles/groups
SELECT RoleName,UPPER(GRANTEE) FROM DBC.RoleMembers ORDER BY RoleName;Retrieving the database users that are members of a role/group
SELECT UPPER(GRANTEE) FROM DBC.RoleMembers ORDER BY GRANTEE;
5.1.8.1.1.2 - Teradata Query Bands and Trusted Sessions
When a middle-tier application is used together with the Teradata database, it typically logs on to the database as a permanent database user (application user) and establishes a connection pool. End-users that access the database through the middle-tier application are given all authorized database privileges and are audited based on that single application user.
For the sites that require users to be individually identified, authorized, and audited, the middle-tier application can be configured to offer trusted sessions. Application users that access the database through a trusted session must be set up as proxy users and assigned one or more database roles, which determine their access rights in the database. When a proxy user requests database access, the application forwards the user identity and applicable role information to the database.
For more information about Teradata trusted sessions, refer to https://docs.teradata.com/r/Enterprise_IntelliFlex_VMware/Security-Administration/Introduction-to-Security-Administration.
The system uses a proxy user if the query band contains the reserved name PROXYUSER. In order for the proxy user to access sensitive data, UDFs and UDTs need to know the requestor of the data. They obtain this information from the query band parameters.
For more information about query bands, refer to https://docs.teradata.com/r/Teradata-VantageCloud-Lake/SQL-Reference/SQL-Data-Definition-Language
If a proxy user is found among the query band parameters, then it is used in the authorization process instead of the regular data user (which could be a different user). This means that only the proxy user’s permissions apply. This is similar to how the Teradata permissions work for trusted sessions. The database permissions for the proxy user are used, and not the application user’s permissions.
Before such a user can access the database, a Grant Connect through Access right should be given by the database administrator to the user. The following example provides the query to ensure that the user ‘JSMITH’ can connect through.
The application My_App is confiured to connect to Teradata with a service account My_App_User that is not part of the Protegrity security policy. However, in case the app user JSMITH which does not exist in Teradata needs to see the data in the clear. Then, the database administrator must first Grant Connect access to the user, JSMITH.
GRANT CONNECT THROUGH My_App_User
TO JSMITH
WITH ROLE AppRole;
The user JSMITH can now access the database. However, since JSMITH does not exist in the database, Teradata needs to know what role it needs to inherit. This can be any role already configured within Teradata.
Then, every time JSMITH wants to run a SQL command through My_App, the following query band statement needs to be executed first: SET QUERY_BAND=‘PROXYUSER=JSMITH;’ FOR SESSION;
The UDF getqueryband is provided by Teradata.
select getqueryband();
*** Query completed. One row found. One column returned.
*** Total elapsed time was 1 second.
getqueryband()
---------------------------------------------------------------------------
select pty_varcharlatinenc('abcd','AES',123,0,0);
*** Query completed. One row found. One column returned.
*** Total elapsed time was 1 second.
pty_varcharlatinenc('abcd','AES',123,0,0)
---------------------------------------------------------------------------
E3AE49B5C44E4CE64CC7AB3A20F82325
SET QUERY_BAND='PROXYUSER=JSMITH;' FOR SESSION;
*** Set QUERY_BAND accepted.
*** Total elapsed time was 1 second.
select getqueryband();
*** Query completed. One row found. One column returned.
*** Total elapsed time was 1 second.
getqueryband()
---------------------------------------------------------------------------
=S> PROXYUSER=JSMITH;
select pty_varcharlatinenc('abcd','AES',123,0,0);
*** Failure 7504 in UDF/XSP/UDM SYSLIB.pty_varcharlatinenc: SQLSTATE U0001:
No such user
Statement# 1, Info =0
*** Total elapsed time was 1 second.
AUDIT TRACE:
Thu Dec 30 01:21:53.530 2010 JSMITH AES 0 1 0 0 Insert, unknown user dbp 1
SET QUERY_BAND=NONE FOR SESSION;
*** Set QUERY_BAND accepted.
*** Total elapsed time was 1 second.
select pty_varcharlatinenc('abcd','AES',123,0,0);
*** Query completed. One row found. One column returned.
*** Total elapsed time was 1 second.
pty_varcharlatinenc('abcd','AES',123,0,0)
---------------------------------------------------------------------------
E3AE49B5C44E4CE64CC7AB3A20F82325
Important: The Data Warehouse Protector supports user names that are up to 255 characters in length. However, the Teradata platform supports user name lengths of 128 characters only. Hence, the user name is limited to the value supported by the Teradata platform.
5.1.8.2 - Data Warehouse Sample Scripts
This page provides sample scripts for the operations performed using the Data Warehouse Protectors.
5.1.8.2.1 - Teradata Database Data Warehouse Sample Scripts
This page consists of the sample scripts for encryption and tokenization by the Teradata Data Warehouse Protector. It is recommended to view them and replace the values if required.
The following sample scripts are also included in the installation package.
Encryption sample script
Tokenization sample script
Encryption sample script
---------------------------------------------------------------------
-- Protegrity User Defined Functions sample script.
--
-- NOTE: Please change the following 'tags' before executing the script:
-- - REPLACE_DATABASE- Specify the testdatabase.
-- - <data element1> - dataelement used for protecting varchar
-- - <data element2> - dataelement used for protecting integer
-- - <data element3> - dataelement used for protecting date
--
-- This script should be run in BTEQ.
--
-- Copyright (c) 2025 Protegrity USA, Inc. All rights reserved
--
---------------------------------------------------------------------
DATABASE REPLACE_DATABASE;
.IF ERRORCODE != 0 THEN .QUIT 99
BT;
DROP TABLE SAMPLE1_BAK;
ET;
BT;
DROP TABLE SAMPLE1_PTY;
ET;
DROP VIEW SAMPLE1;
-----------------------------------------------------------------------
--
-- SAMPLE1: Table with no protection. Contains sample data.
--
-----------------------------------------------------------------------
BT;
CREATE MULTISET TABLE SAMPLE1 (
CCN VARCHAR(32) NOT NULL,
LNAM VARCHAR(32) NOT NULL,
RATING INTEGER NOT NULL,
REFN INTEGER NOT NULL,
BIRT DATE FORMAT 'YYYY/MM/DD' NOT NULL,
LUPD DATE FORMAT 'YYYY/MM/DD' NOT NULL
);
ET;
BT;
INSERT INTO SAMPLE1 ('4000567834561233', 'PTY_IVP_FPRTEST_LNAME', 123456789, 987654321, CAST( '2013/02/15' AS DATE ), CAST( '2013/02/15' AS DATE ));
ET;
BT;
RENAME TABLE SAMPLE1 to SAMPLE1_BAK;
ET;
-----------------------------------------------------------------------
--
-- SAMPLE1_PTY: This table is similar to SAMPLE1 will contain protected data.
-- The 'LNAM','REFN', and 'LUPD' columns now are of type VARBYTE.
-- Data is migrated from the 'SAMPLE1_BAK' table using UDF calls.
--
-----------------------------------------------------------------------
BT;
CREATE MULTISET TABLE SAMPLE1_PTY (
CCN VARCHAR(32) NOT NULL,
LNAM VARBYTE(48) NOT NULL,
RATING INTEGER NOT NULL,
REFN VARBYTE(16) NOT NULL,
BIRT DATE FORMAT 'YYYY/MM/DD' NOT NULL,
LUPD VARBYTE(16) NOT NULL
);
ET;
BT;
INSERT INTO SAMPLE1_PTY("CCN", "LNAM", "RATING", "REFN", "BIRT", "LUPD") SELECT
"CCN",
TESTDB.PTY_VARCHARLATINENC("LNAM",'<data element1>',50,0,0),
"RATING",
TESTDB.PTY_INTEGERENC("REFN",'<data element2>',34,0,0),
"BIRT",
TESTDB.PTY_DATEENC("LUPD",'<data element3>',34,0,0)
FROM SAMPLE1_BAK;
ET;
-----------------------------------------------------------------------
--
-- SAMPLE1: This is a view that shows how data is unprotected using the UDFs.
-- Data is selected from the 'SAMPLE1_PTY' table.
-- The name of this view is the same as the original table
--
-----------------------------------------------------------------------
BT;
CREATE VIEW SAMPLE1 ("CCN", "LNAM", "RATING", "REFN", "BIRT", "LUPD") AS SELECT
"CCN",
CAST(TESTDB.PTY_VARCHARLATINDEC("LNAM",'<data element1>',32,0,0) AS VARCHAR(32)),
"RATING",
CAST(TESTDB.PTY_INTEGERDEC("REFN",'<data element2>',0,0) AS INTEGER),
"BIRT"
,
CAST(TESTDB.PTY_DATEDEC("LUPD",'<data element3>',0,0) AS DATE)
FROM SAMPLE1_PTY;
ET;
Tokenization sample script
---------------------------------------------------------------------
-- Protegrity User Defined Functions.
-- Copyright (c) 2025 Protegrity USA, Inc. All rights reserved
--
-- This script should be run in BTEQ
--
-- NOTE: Please change the following 'tags' before executing the script:
-- - TESTDB - database where the protegrity UDF's are installed
-- - REPLACEDB - Database where you have testdata
-- - <data element1> - dataelement used for protecting varchar
-- - <data element2> - dataelement used for protecting integer
-- - <data element3> - dataelement used for protecting date
--NOTE: Use datetime dataelement to protect and unprotect YMD date data
---------------------------------------------------------------------
DATABASE REPLACE_DATABASE;
.IF ERRORCODE != 0 THEN .QUIT 99
-----------------------------------------------------------------------
--
-- SAMPLE - Two tables and one view is created as follows:
--
-- Run the sample_tok.sql job to verify protect / unprotect of datatypes
-- VARCHAR, DATE and INTEGER.
--
-----------------------------------------------------------------------
BT;
DROP TABLE SAMPLE1_BAK;
ET;
BT;
DROP TABLE SAMPLE1_PTY;
ET;
DROP VIEW SAMPLE1;
-----------------------------------------------------------------------
--
-- SAMPLE1 Base table with no protection
--
-----------------------------------------------------------------------
BT;
CREATE MULTISET TABLE SAMPLE1 (
CCN VARCHAR(32) NOT NULL,
LNAM VARCHAR(32) NOT NULL,
RATING INTEGER NOT NULL,
REFN INTEGER NOT NULL,
BIRT DATE FORMAT 'yyyy-mm-dd' NOT NULL,
LUPD DATE FORMAT 'yyyy-mm-dd' NOT NULL
);
ET;
BT;
INSERT INTO SAMPLE1 ('4000567834561233', 'PTY_IVP_FPRTEST_LNAME', 123456789, 987654321, CAST( '2013/02/15' AS DATE ), CAST( '2013/02/15' AS DATE ));
ET;
BT;
RENAME TABLE SAMPLE1 to SAMPLE1_BAK;
ET;
-----------------------------------------------------------------------
--
-- SAMPLE1_PTY Same as SAMPLE1 but with protection added fo
-- columns, which are encrypted / tokenized when the
-- table is loaded from SAMPLE1_BAK.
--
-----------------------------------------------------------------------
BT;
CREATE MULTISET TABLE SAMPLE1_PTY (
CCN VARCHAR(32) NOT NULL,
LNAM VARCHAR(32) NOT NULL,
RATING INTEGER NOT NULL,
REFN INTEGER NOT NULL,
BIRT DATE FORMAT 'yyyy-mm-dd' NOT NULL,
LUPD DATE FORMAT 'yyyy-mm-dd' NOT NULL
);
ET;
BT;
INSERT INTO SAMPLE1_PTY("CCN", "LNAM", "RATING", "REFN", "BIRT", "LUPD") SELECT
TESTDB.PTY_VARCHARLATININS("CCN",'<data element1>',32,0,0),
"LNAM",
TESTDB.PTY_INTEGERINS("RATING",'<data element2>',32,0,0),
"REFN",
CAST(TESTDB.PTY_VARCHARLATININS(CAST("BIRT" AS VARCHAR(32)),'<data element3>',32,0,0) AS DATE),
"LUPD"
FROM SAMPLE1_BAK;
ET;
-----------------------------------------------------------------------
--
-- SAMPLE1 Same as SAMPLE1_PTY. But data is decrypted /detokenized
-- when SAMPLE1 is loaded from SAMPLE1_PTY.
--
-----------------------------------------------------------------------
BT;
CREATE VIEW SAMPLE1 ("CCN", "LNAM", "RATING", "REFN", "BIRT", "LUPD") AS SELECT
TESTDB.PTY_VARCHARLATINSEL("CCN",'<data element1>',32,0,0),
"LNAM",
TESTDB.PTY_INTEGERSEL ("RATING",'<data element2>',0,0),
"REFN",
CAST(TESTDB.PTY_VARCHARLATINSEL(CAST("BIRT" AS VARCHAR(32)),'<data element3>',32,0,0) AS DATE),
"LUPD"
FROM SAMPLE1_PTY;
ET;
5.2 - User Defined Functions and APIs
The Data Warehouse Protector contains User Defined Functions (UDF), which perform the following:
- Fetches the policy related information from the shared memory
- Applies the access control settings that are derived on the basis of policy settings
- Encrypts or tokenizes the data based on the policy settings
- Generates Audit logs
To avoid any performance issues resulting due to casting of the data, a general best practice is to protect the data and present the decryption related API/UDFs/commands, as applicable, in the tables as views to authorized users only. This eliminates the unauthorized user’s access to the decryption API/UDFs/commands by limiting the access to the protected data only.
The decryption process is limited to authorized users and thus, does not cause any performance impact as the API/UDFs/commands are executed restrictively.
Warning: With the Data Warehouse protector, you cannot use different data elements for different rows in the same query because of the caching feature. The caching feature will cache the data element that you pass and it will use the same data element for protect or unprotect actions in the column.
5.2.1 - Teradata UDFs
This page provides a detailed list of User Defined Functions (UDFs) for general information, protection, and unprotection of data with different data types.
It is recommended to run the sample queries in BTEQ (Basic Teradata Query). For more information, refer to Sample Scripts provided in the Teradata Data Warehouse Protector package at the default location,
/opt/protegrity/databaseprotector/teradata/sqlscripts/.
Protegrity UDFs can support the JSON format for protection and unprotection. It is not possible to mask data stored in XML or JSON (JavaScript Object Notation) formats. While executing the Unprotect UDFs for these formats, clear data is returned with an error message. Masking is supported only with the Varchar UDFs.
Teradata UDFs for Protection
This section provides a detailed list of User Defined Functions (UDFs) for general information, and protection, unprotection, and tokenization of data with different data types.
Teradata UDFs - Deterministic and Non-deterministic clauses
Teradata supports the following two optional clauses to categorize if the UDF returns identical results for identical inputs or not.
- DETERMINISTIC - specifies that the UDF function returns the same results for identical inputs. The de-tokenization and decryption UDFs are defined with the DETERMINISTIC clause.
- NOT DETERMINISTIC - specifies that the UDF function returns non-identical results for identical inputs. This is the default option. The tokenization and encryption UDFs are defined with the NOT DETERMINISTIC clause.
Risk
In case of a query with constant arguments to the DETERMINISTIC UDF call, Teradata may cache the result of the evaluated UDF, as designed. During subsequent query execution, the results may be fetched from the Teradata internal cache without evaluating the UDF.
This is a risk because it can cause unauthorized access to the protected data due to lack of authorization check during the UDF execution. In addition, altering the clause to NOT DETERMINISTIC may cause performance issues as the UDFs defined with the DETERMINISTIC clause execute faster in comparison to the UDFs defined with the NOT DETERMINISTIC clause.
As per usage, if you are not using any constants in the UDF call, then you can recreate the UDF with the DETERMINISTIC clause to ensure faster performance.
Important: For all the Teradata UDFs, the communicationid and scid parameters are no longer used and are retained for compatibility purposes only. It is recommended to set the values for these parameters as zero.
- General UDFs
- Access Check UDFs
- Varchar Latin UDFs
- Varchar Unicode UDF
- Float UDFs
- Small Integer UDFs
- Integer UDFs
- Big Integer UDFs
- Date UDFs
- 8-Byte AND 16-Byte Decimal UDFs
- JSON UDFs
- XML UDFs
Teradata UDFs for No Encryption
This section provides a list of User Defined Functions (UDFs) that can be used with No Encryption data elements.
- Float UDFs for No Encryption
- Date UDFs for No Encryption
- 8-Byte and 16-Byte Decimal UDFs for No Encryption
5.2.1.1 - General UDFs
This section includes the general UDFs that can be used to retrieve the Teradata Protector version and the current user.
pty_whoami
This UDF returns the name of the user who is currently logged in.
Signature:
pty_whoami()
Parameters:
None
Returns:
The function returns the name of user logged in to the database.
Example:
select pty_whoami();
pty_getversion
This UDF returns the version of the installed Teradata Data Warehouse Protector.
Signature:
pty_getversion()
Parameters:
None
Returns:
The function returns the version of the product as a string
Example:
select pty_getversion();
pty_getdbsinfo
This UDF returns the Teradata session, statement, and request numbers. These parameters are captured in audit logs and can be cross-referenced in the ESA Forensics View.
Signature:
pty_getdbsinfo
Parameters:
None
Returns:
The function returns the following parameters in a string.
| Name | Type | Description |
|---|---|---|
session | STRING | Specifies the Teradata session number. |
request | STRING | Specifies the Teradata request number |
statement | STRING | Specifies the Teradata statement identifier. |
Example:
select pty_getdbsinfo();
5.2.1.2 - Access Check UDFs
This section includes list of UDFs that can be used to check select access-related information.
pty_checkselaccess
This UDF checks whether a database user has unprotect access for a set of data elements. To run this UDF, the database user should be granted access rights for protection.
Signature:
pty_checkselaccess(dataelement<n> VARCHAR, resultlen INTEGER, communicationid INTEGER)
Parameters:
| Name | Type | Description |
|---|---|---|
dataelement1 | VARCHAR | Specifies the name of the data element to check. |
dataelement2 | VARCHAR | Specifies the name of the data element to check. |
dataelement3 | VARCHAR | Specifies the name of the data element to check. |
resultlen | INTEGER | Specifies the length of the buffer to hold the result. |
communicationid | INTEGER | Specify the value as 0. This parameter is deprecated. |
Returns:
The function returns a 3-CHARACTER string.
- Position 1: Value 1 indicates select permissions on dataelement1, value 0 indicates no select permissions
- Position 2: Value 1 indicates select permissions on dataelement2, value 0 indicates no select permissions
- Position 3: Value 1 indicates select permissions on dataelement3, value 0 indicates no select permissions
Exception:
None
Example:
select pty_checkselaccess('AES256', 'AES128', 'AES128_IV_CRC_KID', 3, 0);
5.2.1.3 - Varchar Latin UDFs
The Varchar Latin UDFs accept the string data encoded in the Latin character set.
Important: Do not exceed the maximum output buffer length when using the result length parameter (
resultlen) in the Varchar Latin UDFs.
For more information about the maximum output buffer length, for each Varchar Latin UDF, refer to Installing the Teradata Objects.
pty_varcharlatinenc
This UDF protects the string data using an Encryption data element.
Signature:
pty_varcharlatinenc(col VARCHAR, dataelement VARCHAR, resultlen INTEGER, communicationid INTEGER, scid INTEGER)
Parameters:
| Name | Type | Description |
|---|---|---|
col | VARCHAR | Specifies the data to protect. |
dataelement | VARCHAR | Specifies the name of the data element. |
resultlen | INTEGER | Specifies the length of the buffer to hold the result. |
communicationid | INTEGER | Specify the value as 0. This parameter is deprecated. |
scid | INTEGER | Specify the value as 0. This parameter is deprecated. |
Returns:
The function returns the protected VARBYTE value.
Exception:
If the user does not have protect access rights in the policy, then the UDF terminates with an error message explaining what went wrong.
Example:
select pty_varcharlatinenc ('Any character value! ', 'AES256',500,0,0);
pty_varcharlatindec
This UDF unprotects the protected string data.
Signature:
pty_varcharlatindec(col VARBYTE, dataelement VARCHAR, resultlen INTEGER, communicationid INTEGER, scid INTEGER)
Parameters:
| Name | Type | Description |
|---|---|---|
col | VARBYTE | Specifies the data to unprotect. |
dataelement | VARCHAR | Specifies the name of the data element. |
resultlen | INTEGER | Specifies the length of the buffer to hold the result. |
communicationid | INTEGER | Specify the value as 0. This parameter is deprecated. |
scid | INTEGER | Specify the value as 0. This parameter is deprecated. |
Returns:
- The function returns an unprotected character value.
- The function returns NULL when the user has no access to the data in the policy.
Exception:
If you configure an exception in the policy and the user does not have access, then the UDF terminates with an error message explaining what went wrong.
Example:
select pty_varcharlatindec(pty_varcharlatinenc('Any character value! ', 'dataelement',500,0,0 ), 'dataelement',500,0,0 );
pty_varcharlatindecex
This UDF unprotects the protected string data.
Signature:
pty_varcharlatindecex(col VARCHAR, dataelement VARCHAR, resultlen INTEGER, communicationid INTEGER, scid INTEGER)
Parameters:
| Name | Type | Description |
|---|---|---|
col | VARCHAR | Specifies the data to unprotect. |
dataelement | VARCHAR | Specifies the name of the data element to check. |
resultlen | INTEGER | Specifies the length of the buffer to hold the result. |
communicationid | INTEGER | Specify the value as 0. This parameter is deprecated. |
scid | INTEGER | Specify the value as 0. This parameter is deprecated. |
Returns:
- The function returns an unprotected character value.
- The function returns an error instead of NULL, if the user does not have access rights.
Exception:
If the user does not have access rights in the policy, then the UDF terminates with an error message explaining what went wrong.
Example:
select pty_varcharlatindecex(PTY_VARCHARLATINENC('ProtegrityProt', 'AES256',100,0,0 ), 'AES256',100,0,0 );
pty_varcharlatinins
This UDF protects the string data using type-preserving data elements, such as, tokens, and No Encryption for access control.
Signature:
pty_varcharlatinins(col VARCHAR, dataelement VARCHAR, resultlen INTEGER, communicationid INTEGER, scid INTEGER)
Parameters:
| Name | Type | Description |
|---|---|---|
col | VARCHAR | Specifies the data to protect. |
dataelement | VARCHAR | Specifies the name of the data element. |
resultlen | INTEGER | Specifies the length of the buffer to hold the result. |
communicationid | INTEGER | Specify the value as 0. This parameter is deprecated. |
scid | INTEGER | Specify the value as 0. This parameter is deprecated. |
Returns:
- The function returns the protected VARCHAR value.
- The function returns NULL when user has no access to the data in the policy.
Exception:
If the user does not have access rights in the policy, then the UDF terminates with an error message explaining what went wrong.
Example:
SELECT pty_varcharlatinins('Any character value! ', 'dataelement',500,0,0 );
Email Tokenization:
This UDF can be used to tokenize email input type.
In the following example, email is a token element created in the ESA of email type.pty_varcharlatinins('email@protegrity.com','email',32,0,0);Timestamp Tokenization:
This UDF can be used to tokenize timestamp data.
The following example displays a sample of timestamp tokenization:select pty_varcharlatinins(cast('22-09-1990' as varchar(32)),'alphanum',64,0,0);
pty_varcharlatinsel
This UDF unprotects the protected string data.
Signature:
pty_varcharlatinsel(col VARCHAR, dataelement VARCHAR, resultlen INTEGER, communicationid INTEGER, scid INTEGER)
Parameters:
| Name | Type | Description |
|---|---|---|
col | VARCHAR | Specifies the data to unprotect. |
dataelement | VARCHAR | Specifies the name of the data element. |
resultlen | INTEGER | Specifies the length of the buffer to hold the result. |
communicationid | INTEGER | Specify the value as 0. This parameter is deprecated. |
scid | INTEGER | Specify the value as 0. This parameter is deprecated. |
Returns:
- The function returns an unprotected character value.
- The function returns the protected value if this option is configured in the policy and the user does not have access to data.
- The function returns NULL when user has no access to the data in the policy.
Exception:
If the user does not have access rights in the policy, then the UDF terminates with an error message explaining what went wrong.
Note: If the input data length exceeds the given output buffer length, then the audit logs are blocked and the following error message appears:
Input or output buffer is too small
Example:
SELECT pty_varcharlatinsel(pty_varcharlatinins('Any character value! ', 'dataelement',500,0,0 ), 'dataelement',500,0,0 );
Email De-tokenization:
This UDF can be used to de-tokenize email input type tokenized using the PTY_VARCHARLATININS UDF.
In the following example, email is a token element created in the ESA of email type.pty_varcharlatinsel('F00CJ@protegrity.com','email',32,0,0);Timestamp Data De-tokenization:
This UDF can be used to de-tokenize timestamp data tokenized using the PTY_VARCHARLATININS UDF. The following example displays a sample of timestamp data de-tokenization.sel cast(pty_varcharlatinsel(pty_varcharlatinins(cast('2019-04-14 08:30:41-04:00' as varchar(64)),'TE_N_S16_L3R1_ASTYES',64,0,0),'TE_N_S16_L3R1_ASTYES',64,0,0) AS TIMESTAMP(0));
pty_varcharlatinselex
This UDF unprotects the protected string data.
Signature:
pty_varcharlatinselex(col VARCHAR, dataelement VARCHAR, resultlen INTEGER, communicationid INTEGER, scid INTEGER)
Parameters:
| Name | Type | Description |
|---|---|---|
col | VARCHAR | Specifies the data to unprotect. |
dataelement | VARCHAR | Specifies the name of the data element. |
resultlen | INTEGER | Specifies the length of the buffer to hold the result. |
communicationid | INTEGER | Specify the value as 0. This parameter is deprecated. |
scid | INTEGER | Specify the value as 0. This parameter is deprecated. |
Returns:
- The function returns an unprotected character value.
- The function returns the protected value if this option is configured in the policy and the user does not have access to the data.
- The function returns an error instead of NULL if the user does not have access.
Exception:
If the user does not have access rights in the policy, then the UDF terminates with an error message explaining what went wrong.
Note: If the input data length exceeds the given output buffer length, then the audit logs are blocked and the following error message appears:
Input or output buffer is too small.
Example:
SELECT pty_varcharlatinselex(pty_varcharlatinins('Any character value! ', 'dataelement',500,0,0 ), 'dataelement',500,0,0 );
pty_varcharlatinhash
This UDF calculates the hash value of a string data.
Attention: This is a one-way function and you cannot unprotect the data.
Signature:
pty_varcharlatinhash(col VARCHAR, dataelement VARCHAR, resultlen INTEGER, communicationid INTEGER, scid INTEGER)
Parameters:
| Name | Type | Description |
|---|---|---|
col | VARCHAR | Specifies the data to protect. |
dataelement | VARCHAR | Specifies the name of the data element. |
resultlen | INTEGER | Specifies the length of the buffer to hold the result. |
communicationid | INTEGER | Specify the value as 0. This parameter is deprecated. |
scid | INTEGER | Specify the value as 0. This parameter is deprecated. |
Returns:
The function returns the hash value.
Exception:
If the user does not have protect access rights in the policy, then the UDF terminates with an error message explaining what went wrong.
Caution: Starting from the version 10.0.x, the HMAC-SHA1 protection method is deprecated.
It is recommended to use the HMAC-SHA256 protection method instead of the HMAC-SHA1 protection method.
For assistance in switching to a different protection method, contact Protegrity Support.
Example:
SELECT pty_varcharlatinhash ('ProtegrityProt', 'HMAC_SHA256', 100,0,0);
5.2.1.4 - Varchar Unicode UDFs
The Varchar Unicode UDFs accept the string data encoded in the UNICODE character set.
Important: Do not exceed the maximum output buffer length when using the result length parameter (
resultlen) in the Varchar Unicode UDFs.
For more information about the maximum output buffer length, for each Varchar Unicode UDF, refer to Installing the Teradata Objects.
pty_varcharunicodeenc
This UDF protects the Unicode string using an Encryption data element for encryption.
Signature:
pty_varcharunicodeenc(col VARCHAR, dataelement VARCHAR, resultlen INTEGER, communicationid INTEGER, scid INTEGER)
Parameters:
| Name | Type | Description |
|---|---|---|
col | VARCHAR | Specifies the data to protect. |
dataelement | VARCHAR | Specifies the name of the data element. |
resultlen | INTEGER | Specifies the length of the buffer to hold the result. |
communicationid | INTEGER | Specify the value as 0. This parameter is deprecated. |
scid | INTEGER | Specify the value as 0. This parameter is deprecated. |
Returns:
The function returns the protected VARBYTE value.
Exception:
If the user does not have protect access rights in the policy, then the UDF terminates with an error message explaining what went wrong.
Example:
SELECT pty_varcharunicodeenc (TRANSLATE(CAST('ProtegrityProt' AS VARCHAR(50)) USING LATIN_TO_UNICODE), 'AES_128',100,0,0 );
pty_varcharunicodedec
This UDF unprotects the protected Unicode string data.
Signature:
pty_varcharunicodedec(col VARBYTE, dataelement VARCHAR, resultlen INTEGER, communicationid INTEGER, scid INTEGER)
Parameters:
| Name | Type | Description |
|---|---|---|
col | VARBYTE | Specifies the data to unprotect. |
dataelement | VARCHAR | Specifies the name of the data element. |
resultlen | INTEGER | Specifies the length of the buffer to hold the result. |
communicationid | INTEGER | Specify the value as 0. This parameter is deprecated. |
scid | INTEGER | Specify the value as 0. This parameter is deprecated. |
Returns:
- The function returns an unprotected Unicode character value.
- The function returns NULL when user has no access to the data in the policy.
Exception:
If you configure an exception in the policy and the user does not have access, then the UDF terminates with an error message explaining what went wrong.
Example:
SELECT pty_varcharunicodedec(pty_varcharunicodeenc(TRANSLATE(CAST ('ProtegrityProt' AS VARCHAR(50)) USING LATIN_TO_UNICODE, 'AES256',100,0,0), 'AES256',100,0,0 ));
pty_varcharunicodedecex
This UDF unprotects the protected Unicode string data.
Signature:
pty_varcharunicodedecex(col VARBYTE, dataelement VARCHAR, resultlen INTEGER, communicationid INTEGER, scid INTEGER)
Parameters:
| Name | Type | Description |
|---|---|---|
col | VARBYTE | Specifies the data to unprotect. |
dataelement | VARCHAR | Specifies the name of the data element. |
resultlen | INTEGER | Specifies the length of the buffer to hold the result. |
communicationid | INTEGER | Specify the value as 0. This parameter is deprecated. |
scid | INTEGER | Specify the value as 0. This parameter is deprecated. |
Returns:
- The function returns an unprotected character value.
- The function returns an error instead of NULL if the user does not have access.
Exception:
If you configure an exception in the policy and the user does not have access, then the UDF terminates with an error message explaining what went wrong.
Example:
SELECT pty_varcharunicodedecex(pty_varcharunicodeenc(TRANSLATE(CAST ('ProtegrityProt' AS VARCHAR(50)) USING LATIN_TO_UNICODE), 'AES256', 100, 0,0), 'AES256', 100, 0,0);
pty_varcharunicodeins
This UDF protects Unicode string data using type-preserving data elements, such as, tokens, Format Preserving Encryption (FPE) data elements, and No Encryption for access control.
Signature:
pty_varcharunicodeins(col VARCHAR, dataelement VARCHAR, resultlen INTEGER, communicationid INTEGER, scid INTEGER)
Parameters:
| Name | Type | Description |
|---|---|---|
col | VARCHAR | Specifies the data to protect. |
dataelement | VARCHAR | Specifies the name of the data element. |
resultlen | INTEGER | Specifies the length of the buffer to hold the result. |
communicationid | INTEGER | Specify the value as 0. This parameter is deprecated. |
scid | INTEGER | Specify the value as 0. This parameter is deprecated. |
Note: For pty_varcharunicodeins, set the
resultlenparameter to four times the input buffer length for optimal results.
If the calculated value (four times the input buffer length) exceeds the maximum configured output buffer length, then it is recommended to use the maximum allowed output buffer length.
For more information about the maximum output buffer length, for each Varchar Unicode UDF, refer to Installing the Teradata Objects.
Returns:
The function returns the protected VARCHAR value.
Exception:
If the user does not have protect access rights in the policy, then the UDF terminates with an error message explaining what went wrong.
Example for Unicode Gen2:
The Unicode Gen2 data elements supports the newly introduced SLT_X_1 tokenizer along with the existing SLT_1_3 tokenizer.
For more information about the Unicode Gen2 data elements, refer to Unicode Gen2.
SELECT pty_varcharunicodeins(TRANSLATE(CAST ('ProtegrityProt' AS VARCHAR(50)) USINGLATIN_TO_UNICODE), 'TE_UG2_SLT_13_L2R2_Y_BasicLatin', 100, 0,0);
SELECT pty_varcharunicodeins(TRANSLATE(CAST ('ϠϡϢϣϥϦ' AS VARCHAR(1000)) USINGLATIN_TO_UNICODE), 'TE_UG2_SLTX1_L2R2_N_IPA_Greek_Coptic_UTF16LE', 1000, 0,0);
pty_varcharunicodesel
This UDF unprotects Unicode string data protected by data elements, such as, tokens, Format Preserving Encryption (FPE) data elements, and No Encryption for access control.
Warning: This UDF does not support masking.
Signature:
pty_varcharunicodesel(col VARCHAR, dataelement VARCHAR, resultlen INTEGER, communicationid INTEGER, scid INTEGER)
Parameters:
| Name | Type | Description |
|---|---|---|
col | VARCHAR | Specifies the data to unprotect. |
dataelement | VARCHAR | Specifies the name of the data element. |
resultlen | INTEGER | Specifies the length of the buffer to hold the result. |
communicationid | INTEGER | Specify the value as 0. This parameter is deprecated. |
scid | INTEGER | Specify the value as 0. This parameter is deprecated. |
For pty_varcharunicodesel, you must set the
resultlenparameter to four times the input buffer length for optimal results.
If the calculated value (four times the input buffer length) exceeds the maximum configured output buffer length, then it is recommended to use the maximum allowed output buffer length.
For more information about the maximum output buffer length, for each Varchar Unicode UDF, refer to Installing the Teradata Objects.
Returns:
- The function returns an unprotected character value.
- The function returns a protected value if this option is configured in the policy and the user does not have access to data.
- The function returns NULL when the user has no access to data in the policy.
Exception:
- If you configure an exception in the policy and the user does not have access, then the UDF terminates with an error message explaining what went wrong.
If the input data length exceeds the given output buffer length, then the audit logs are blocked and the following error message appears:
Input or output buffer is too small
Example for Unicode Gen2:
The Unicode Gen2 data elements support the newly introduced SLT_X_1 tokenizer along with the existing SLT_1_3 tokenizer.
For more information about the Unicode Gen2 data elements, refer to Unicode Gen2.
select pty_varcharunicodesel(pty_varcharunicodeins(TRANSLATE(CAST ('ProtegrityProt' AS VARCHAR(50)) USING LATIN_TO_UNICODE),'TE_UG2_SLT_13_L2R2_Y_BasicLatin', 100, 0,0),'TE_UG2_SLT_13_L2R2_Y_BasicLatin', 100, 0,0);
select pty_varcharunicodesel(pty_varcharunicodeins(TRANSLATE(CAST ('ϠϡϢϣϥϦ' AS VARCHAR(1000)) USINGLATIN_TO_UNICODE), 'TE_UG2_SLTX1_L2R2_N_IPA_Greek_Coptic_UTF16LE', 1000, 0,0), 'TE_UG2_SLTX1_L2R2_N_IPA_Greek_Coptic_UTF16LE', 1000, 0,0);
pty_varcharunicodeselex
This UDF unprotects Unicode string data protected by data elements, such as, tokens, Format Preserving Encryption (FPE) data elements, and No Encryption for access control.
Warning: This UDF does not support masking.
Signature:
pty_varcharunicodeselex(col VARCHAR, dataelement VARCHAR, resultlen INTEGER, communicationid INTEGER, scid INTEGER)
Parameters:
| Name | Type | Description |
|---|---|---|
col | VARCHAR | Specifies the data to unprotect. |
dataelement | VARCHAR | Specifies the name of the data element. |
resultlen | INTEGER | Specifies the length of the buffer to hold the result. |
communicationid | INTEGER | Specify the value as 0. This parameter is deprecated. |
scid | INTEGER | Specify the value as 0. This parameter is deprecated. |
For pty_varcharunicodeselex, set the
resultlenparameter to four times the input buffer length for optimal results.
If the calculated value (four times the input buffer length) exceeds the maximum configured output buffer length, then it is recommended to use the maximum allowed output buffer length.
For more information about the maximum output buffer length, for each Varchar Unicode UDF, refer to Installing the Teradata Objects.
Returns:
- The function returns an unprotected character value.
- The function returns the protected value if this option is configured in the policy and the user does not have access to the data.
- The function returns an error instead of NULL if the user does not have access.
Exception:
If you configure an exception in the policy and the user does not have access, then the UDF terminates with an error message explaining what went wrong.
If the input data length exceeds the given output buffer length, then the audit logs are blocked and the following error message appears:
Input or output buffer is too small.
Example:
select pty_varcharunicodeselex(pty_varcharunicodeins(TRANSLATE(CAST ('ProtegrityProt' AS VARCHAR(50)) USING LATIN_TO_UNICODE), 'NoEncryption', 100, 0,0), 'NoEncryption', 100, 0,0);
5.2.1.5 - Float UDFs
pty_floatenc
This UDF protects the float value using an Encryption data element.
Signature:
pty_floatenc(col FLOAT, dataelement VARCHAR, resultlen INTEGER, communicationid INTEGER, scid INTEGER)
Parameters:
| Name | Type | Description |
|---|---|---|
col | FLOAT | Specifies the data to protect. |
dataelement | VARCHAR | Specifies the name of the data element. |
resultlen | INTEGER | Specifies the length of the buffer to hold the result. |
communicationid | INTEGER | Specify the value as 0. This parameter is deprecated. |
scid | INTEGER | Specify the value as 0. This parameter is deprecated. |
Returns:
The function returns the protected VARBYTE value.
Exception:
If the user does not have protect access rights in the policy, then the UDF terminates with an error message explaining what went wrong.
Example:
select pty_floatenc(26656.0, 'AES256', 100, 0,0);
pty_floatdec
This UDF unprotects the protected float value.
Signature:
pty_floatdec(col VARBYTE, dataelement VARCHAR, communicationid INTEGER, scid INTEGER)
Parameters:
| Name | Type | Description |
|---|---|---|
col | VARBYTE | Specifies the data to unprotect. |
dataelement | VARCHAR | Specifies the name of the data element. |
communicationid | INTEGER | Specify the value as 0. This parameter is deprecated. |
scid | INTEGER | Specify the value as 0. This parameter is deprecated. |
Returns:
- The function returns an unprotected FLOAT value.
- The function returns NULL when the user has no access to the data in the policy.
Exception:
If you configure an exception in the policy and the user does not have access, then the UDF terminates with an error message explaining what went wrong.
Example:
select pty_floatdec(pty_floatenc(26656.0, 'AES256', 100, 0,0), 'AES256', 0,0);
pty_floatdecex
This UDF unprotects the protected float value.
Signature:
pty_floatdecex(col VARBYTE, dataelement VARCHAR, communicationid INTEGER, scid INTEGER)
Parameters:
| Name | Type | Description |
|---|---|---|
col | VARBYTE | Specifies the data to unprotect. |
dataelement | VARCHAR | Specifies the name of the data element. |
communicationid | INTEGER | Specify the value as 0. This parameter is deprecated. |
scid | INTEGER | Specify the value as 0. This parameter is deprecated. |
Returns:
- The function returns an unprotected FLOAT value.
- The function returns an error instead of NULL if the user does not have access
Exception:
If you configure an exception in the policy and the user does not have access, then the UDF terminates with an error message explaining what went wrong.
Example:
select pty_floatdecex(pty_floatenc(26656.0, 'AES256', 100, 0,0), 'AES256', 0,0);
pty_floathash
This UDF calculates the hash value for a float value.
Attention: This is a one-way function and you cannot unprotect the data.
Signature:
pty_floathash(col FLOAT, dataelement VARCHAR, resultlen INTEGER, communicationid INTEGER, scid INTEGER)
Parameters:
| Name | Type | Description |
|---|---|---|
col | FLOAT | Specifies the data to unprotect. |
dataelement | VARCHAR | Specifies the name of the data element. |
resultlen | INTEGER | Specifies the length of the buffer to hold the result. |
communicationid | INTEGER | Specify the value as 0. This parameter is deprecated. |
scid | INTEGER | Specify the value as 0. This parameter is deprecated. |
Returns:
The function returns the hash value.
Exception:
If you configure an exception in the policy and the user does not have access, then the UDF terminates with an error message explaining what went wrong.
Caution: Starting from the version 10.0.x, the HMAC-SHA1 protection method is deprecated.
It is recommended to use the HMAC-SHA256 protection method instead of the HMAC-SHA1 protection method.
For assistance in switching to a different protection method, contact Protegrity Support.
Example:
select pty_floathash(26656.0, 'HMAC_SHA256', 100, 0,0);
5.2.1.6 - Small Integer UDFs
pty_smallintenc
This UDF protects the small integer value using an Encryption data element.
Signature:
pty_smallintenc(col SMALLINT, dataelement VARCHAR, resultlen INTEGER, communicationidINTEGER, scid INTEGER)
Parameters:
| Name | Type | Description |
|---|---|---|
col | SMALLINT | Specifies the data to protect. |
dataelement | VARCHAR | Specifies the name of the data element. |
resultlen | INTEGER | Specifies the length of the buffer to hold the result. |
communicationid | INTEGER | Specify the value as 0. This parameter is deprecated. |
scid | INTEGER | Specify the value as 0. This parameter is deprecated. |
Returns:
The function returns the protected VARBYTE value.
Exception:
If the user does not have protect access rights in the policy, then the UDF terminates with an error message explaining what went wrong.
Example:
select pty_smallintenc(12345,'AES256',100,0,0);
pty_smallintdec
This UDF unprotects the small integer value.
Signature:
pty_smallintdec(col VARBYTE, dataelement VARCHAR, communicationid INTEGER, scid INTEGER)
Parameters:
| Name | Type | Description |
|---|---|---|
col | VARBYTE | Specifies the data to unprotect. |
dataelement | VARCHAR | Specifies the name of the data element. |
communicationid | INTEGER | Specify the value as 0. This parameter is deprecated. |
scid | INTEGER | Specify the value as 0. This parameter is deprecated. |
Returns:
- The function returns an unprotected SMALLINT value.
- The function returns NULL when the user has no access to the data in the policy.
Exception:
If you configure an exception in the policy and the user does not have access, then the UDF terminates with an error message explaining what went wrong.
Example:
select pty_smallintdec(pty_smallintenc(12345,'AES256',100,0,0),'AES256',0,0);
pty_smallintdecex
This UDF unprotects the protected small integer value.
Signature:
pty_smallintdecex(col VARBYTE, dataelement VARCHAR, communicationid INTEGER, scid INTEGER)
Parameters:
| Name | Type | Description |
|---|---|---|
col | VARBYTE | Specifies the data to unprotect. |
dataelement | VARCHAR | Specifies the name of the data element. |
communicationid | INTEGER | Specify the value as 0. This parameter is deprecated. |
scid | INTEGER | Specify the value as 0. This parameter is deprecated. |
Returns:
- The function returns an unprotected SMALLINT value.
- The function returns an error instead of NULL if the user does not have access
Exception:
If you configure an exception in the policy and the user does not have access, then the UDF terminates with an error message explaining what went wrong.
Example:
select pty_smallintdecex(pty_smallintenc(12345,'AES256',100,0,0),'AES256',0,0);
pty_smallintins
This UDF protects the small integer value using type-preserving data elements, such as, tokens and No Encryption for access control.
Signature:
pty_smallintins(col SMALLINT, dataelement VARCHAR, resultlen INTEGER, communicationid INTEGER, scid INTEGER)
Parameters:
| Name | Type | Description |
|---|---|---|
col | SMALLINT | Specifies the data to protect. |
dataelement | VARCHAR | Specifies the name of the data element. |
resultlen | INTEGER | Specifies the length of the buffer to hold the result. |
communicationid | INTEGER | Specify the value as 0. This parameter is deprecated. |
scid | INTEGER | Specify the value as 0. This parameter is deprecated. |
Returns:
The function returns the protected SMALLINT value.
Exception:
If you configure an exception in the policy and the user does not have access, then the UDF terminates with an error message explaining what went wrong.
Example:
select pty_smallintins(12345, 'TE_INT_2', 100, 0,0);
pty_smallintsel
This UDF unprotects the small integer value using type-preserving data elements, such as, tokens and No Encryption for access control.
Signature:
pty_smallintsel(col SMALLINT, dataelement VARCHAR, communicationid INTEGER, scid INTEGER)
Parameters:
| Name | Type | Description |
|---|---|---|
col | SMALLINT | Specifies the data to unprotect. |
dataelement | VARCHAR | Specifies the name of the data element. |
communicationid | INTEGER | Specify the value as 0. This parameter is deprecated. |
scid | INTEGER | Specify the value as 0. This parameter is deprecated. |
Returns:
- The function returns the unprotected SMALLINT value.
- The function returns the protected value if this option is configured in the policy and the user does not have access to the data.
- The function returns NULL when the user has no access to the data in the policy.
Exception:
If you configure an exception in the policy and the user does not have access, then the UDF terminates with an error message explaining what went wrong.
Example:
select pty_smallintsel(pty_smallintins(12345, 'TE_INT_2', 100, 0,0), 'TE_INT_2',0,0);
pty_smallintselex
This UDF unprotects the protected small integer value.
Signature:
pty_smallintselex(col SMALLINT, dataelement VARCHAR, communicationid INTEGER, scid INTEGER)
Parameters:
| Name | Type | Description |
|---|---|---|
col | SMALLINT | Specifies the data to unprotect. |
dataelement | VARCHAR | Specifies the name of the data element. |
communicationid | INTEGER | Specify the value as 0. This parameter is deprecated. |
scid | INTEGER | Specify the value as 0. This parameter is deprecated. |
Returns:
- The function returns the SMALLINT value.
- The function returns the protected value if this option is configured in the policy and the user does not have access to the data.
Exception:
If you configure an exception in the policy and the user does not have access, then the UDF terminates with an error message explaining what went wrong.
Example:
select pty_smallintselex(pty_smallintins(12345, 'TE_INT_2', 100, 0,0), 'TE_INT_2',0,0);
pty_smallinthash
This UDF calculates the hash value for a SMALLINT value. This is a one-way function and you cannot unprotect the data.
Signature:
pty_smallinthash(col SMALLINT, dataelement VARCHAR, resultlen INTEGER, communicationid INTEGER, scid INTEGER)
Parameters:
| Name | Type | Description |
|---|---|---|
col | SMALLINT | Specifies the data to protect. |
dataelement | VARCHAR | Specifies the name of the data element. |
resultlen | INTEGER | Specifies the length of the buffer to hold the result. |
communicationid | INTEGER | Set the value of the parameter to zero. Note: This parameter is no longer used and is retained for compatibility purposes only. |
scid | INTEGER | Specifies the security co-ordinate ID. Set the value of the parameter to zero. Note: This parameter is no longer used and is retained for compatibility purposes only. |
Returns:
The function returns the hash value.
Exception:
If you configure an exception in the policy and the user does not have access rights, then the UDF terminates with an error message explaining what went wrong.
Example:
select PTY_SMALLINTHASH(1234, 'HMAC_SHA256', 100, 0,0);
5.2.1.7 - Integer UDFs
pty_integerenc
This UDF protects integer value using an Encryption data element.
Signature:
pty_integerenc(col INTEGER, dataelement VARCHAR, resultlen INTEGER, communicationid INTEGER, scid INTEGER)
Parameters:
| Name | Type | Description |
|---|---|---|
col | INTEGER | Specifies the data to protect. |
dataelement | VARCHAR | Specifies the name of the data element. |
resultlen | INTEGER | Specifies the length of the buffer to hold the result. |
communicationid | INTEGER | Specify the value as 0. This parameter is deprecated. |
scid | INTEGER | Specify the value as 0. This parameter is deprecated. |
Returns:
The function returns the protected VARBYTE value.
Exception:
If the user does not have protect access rights in the policy, then the UDF terminates with an error message explaining what went wrong.
Example:
select pty_integerenc(1234, 'AES256', 100, 0,0);
pty_integerdec
This UDF unprotects the protected integer value.
Signature:
pty_integerdec(col VARBYTE, dataelement VARCHAR, communicationid INTEGER, scid INTEGER)
Parameters:
| Name | Type | Description |
|---|---|---|
col | VARBYTE | Specifies the data to unprotect. |
dataelement | VARCHAR | Specifies the name of the data element. |
communicationid | INTEGER | Specify the value as 0. This parameter is deprecated. |
scid | INTEGER | Specify the value as 0. This parameter is deprecated. |
Returns:
- The function returns the unprotected INTEGER value.
- The function returns NULL when the user has no access to the data in the policy.
Exception:
If you configure an exception in the policy and the user does not have access, then the UDF terminates with an error message explaining what went wrong.
Example:
select pty_integerdec(pty_integerenc(1234, 'AES256', 100, 0,0), 'AES256', 0,0);
pty_integerdecex
This UDF unprotects the protected integer value.
Signature:
pty_integerdecex(col VARBYTE, dataelement VARCHAR, communicationid INTEGER, scid INTEGER)
Parameters:
| Name | Type | Description |
|---|---|---|
col | VARBYTE | Specifies the data to unprotect. |
dataelement | VARCHAR | Specifies the name of the data element. |
communicationid | INTEGER | Specify the value as 0. This parameter is deprecated. |
scid | INTEGER | Specify the value as 0. This parameter is deprecated. |
Returns:
The function returns the unprotected INTEGER value.
Exception:
If the user does not have access rights in the policy, then the UDF terminates with an error message.
Example:
select pty_integerdecex(pty_integerenc(1234, 'AES256', 100, 0,0), 'AES256', 0,0);
pty_integerins
This UDF protects the integer value using type-preserving data elements, such as, tokens and No Encryption for access control.
Signature:
pty_integerins(col INTEGER, dataelement VARCHAR, resultlen INTEGER, communicationid INTEGER, scid INTEGER)
Parameters:
| Name | Type | Description |
|---|---|---|
col | INTEGER | Specifies the data to protect. |
dataelement | VARCHAR | Specifies the name of the data element. |
resultlen | INTEGER | Specifies the length of the buffer to hold the result. |
communicationid | INTEGER | Specify the value as 0. This parameter is deprecated. |
scid | INTEGER | Specify the value as 0. This parameter is deprecated. |
Returns:
The function returns the protected INTEGER value.
Exception:
If the user does not have protect access rights in the policy, then the UDF terminates with an error message explaining what went wrong.
Example:
select pty_integerins(1234, 'TE_INT_4', 100, 0,0);
pty_integersel
This UDF unprotects the protected integer value.
Signature:
pty_integersel(col INTEGER, dataelement VARCHAR, communicationid INTEGER, scid INTEGER)
Parameters:
| Name | Type | Description |
|---|---|---|
col | INTEGER | Specifies the data to protect. |
dataelement | VARCHAR | Specifies the name of the data element. |
communicationid | INTEGER | Specify the value as 0. This parameter is deprecated. |
scid | INTEGER | Specify the value as 0. This parameter is deprecated. |
Returns:
- The function returns the unprotected INTEGER value.
- The function returns the protected value if this option is configured in the policy and the user does not have access to the data.
- The function returns NULL when the user has no access to the data in the policy.
Exception:
If the user does not have protect access rights in the policy, then the UDF terminates with an error message explaining what went wrong.
Example:
select pty_integersel(pty_integerins(1234, 'TE_INT_4', 100, 0,0), 'TE_INT_4', 0,0);
pty_integerselex
This UDF unprotects the protected integer value.
Signature:
pty_integerselex(col INTEGER, dataelement VARCHAR, communicationid INTEGER, scid INTEGER)
Parameters:
| Name | Type | Description |
|---|---|---|
col | INTEGER | Specifies the data to unprotect. |
dataelement | VARCHAR | Specifies the name of the data element. |
communicationid | INTEGER | Specify the value as 0. This parameter is deprecated. |
scid | INTEGER | Specify the value as 0. This parameter is deprecated. |
Returns:
- The function returns the unprotected INTEGER value.
- The function returns the protected value if this option is configured in the policy and the user does not have access to the data.
Exception:
If you configure an exception in the policy and the user does not have the access rights in the policy, then the UDF terminates with an error message.
Example:
select pty_integerselex(pty_integerins(1234, 'TE_INT_4', 100, 0,0), 'TE_INT_4', 0,0);
pty_integerhash
This UDF calculates the hash value for integer value.
Attention: This is a one-way function and you cannot unprotect the data.
Signature:
pty_integerhash(col INTEGER, dataelement VARCHAR, resultlen INTEGER, communicationid INTEGER, scid INTEGER)
Parameters:
| Name | Type | Description |
|---|---|---|
col | INTEGER | Specifies the data to protect. |
dataelement | VARCHAR | Specifies the name of the data element. |
resultlen | INTEGER | Specifies the length of the buffer to hold the result. |
communicationid | INTEGER | Specify the value as 0. This parameter is deprecated. |
scid | INTEGER | Specify the value as 0. This parameter is deprecated. |
Returns:
- The function returns the hash value.
- The function returns NULL when the user has no access to the data in the policy.
Exception:
If the user does not have protect access rights in the policy, then the UDF terminates with an error message explaining what went wrong.
Example:
select pty_integerhash(1234, 'HMAC_SHA256', 100, 0,0);
Caution: Starting from the version 10.0.x, the HMAC-SHA1 protection method is deprecated.
It is recommended to use the HMAC-SHA256 protection method instead of the HMAC-SHA1 protection method.
For assistance in switching to a different protection method, contact Protegrity Support.
5.2.1.8 - Big Integer UDFs
pty_bigintenc
This UDF protects the Big Integer value using a data element for encryption.
Signature:
pty_bigintenc(col BIGINT, dataelement VARCHAR, resultlen INTEGER, communicationid INTEGER, scid INTEGER)
Parameters:
| Name | Type | Description |
|---|---|---|
col | VARBYTE | Specifies the data to unprotect. |
dataelement | VARCHAR | Specifies the name of the data element. |
resultlen | INTEGER | Specifies the length of the buffer to hold the result. |
communicationid | INTEGER | Specify the value as 0. This parameter is deprecated. |
scid | INTEGER | Specify the value as 0. This parameter is deprecated. |
Returns:
The function returns the protected VARBYTE value.
Exception:
If you configure an exception in the policy and the user does not have access, then the UDF terminates with an error message explaining what went wrong.
Example:
select pty_bigintenc(12345678,'AES256',100,0,0);
pty_bigintdec
This UDF unprotects the Big Integer value.
Signature:
select pty_bigintdec(col VARBYTE, dataelement VARCHAR, communicationid INTEGER, scid INTEGER)
Parameters:
| Name | Type | Description |
|---|---|---|
col | VARBYTE | Specifies the data to unprotect. |
dataelement | VARCHAR | Specifies the name of the data element. |
communicationid | INTEGER | Specify the value as 0. This parameter is deprecated. |
scid | INTEGER | Specify the value as 0. This parameter is deprecated. |
Returns:
- The function returns the unprotected BIGINT value.
- The function returns NULL when the user has no access to the data in the policy.
Exception:
If you configure an exception in the policy and the user does not have access, then the UDF terminates with an error message explaining what went wrong.
Example:
select pty_bigintdec(pty_bigintenc(12345678,'AES256',100,0,0),'AES256',0,0);
pty_bigintdecex
This UDF unprotects the protected Big Integer value.
Signature:
pty_bigintdec(col VARBYTE, dataelement VARCHAR, communicationid INTEGER, scid INTEGER)
Parameters:
| Name | Type | Description |
|---|---|---|
col | VARBYTE | Specifies the data to unprotect. |
dataelement | VARCHAR | Specifies the name of the data element. |
communicationid | INTEGER | Specify the value as 0. This parameter is deprecated. |
scid | INTEGER | Specify the value as 0. This parameter is deprecated. |
Returns:
The function returns the unprotected BIGINT value.
Exception:
If the user does not have access rights in the policy, then the UDF terminates with an error message.
Example:
select pty_bigintdec(pty_bigintenc(12345678,'AES256',100,0,0),'AES256',0,0);
pty_bigintins
This UDF protects the Big Integer value using type-preserving data elements, such as, tokens and No Encryption for access control.
Signature:
pty_bigintins(col BIGINT, dataelement VARCHAR, resultlen INTEGER, communicationid INTEGER, scid INTEGER)
Parameters:
| Name | Type | Description |
|---|---|---|
col | BIGINT | Specifies the data to protect. |
dataelement | VARCHAR | Specifies the name of the data element. |
resultlen | INTEGER | Specifies the length of the buffer to hold the result. |
communicationid | INTEGER | Specify the value as 0. This parameter is deprecated. |
scid | INTEGER | Specify the value as 0. This parameter is deprecated. |
Returns:
The function returns the protected BIGINT value.
Exception:
If the user does not have protect access rights in the policy, then the UDF terminates with an error message explaining what went wrong.
Example:
select pty_bigintins(12345678, 'TE_INT_8', 100, 0,0);
pty_bigintsel
This UDF unprotects the Big Integer value.
Signature:
pty_bigintsel(col BIGINT, dataelement VARCHAR, communicationid INTEGER, scid INTEGER)
Parameters:
| Name | Type | Description |
|---|---|---|
col | BIGINT | Specifies the data to unprotect. |
dataelement | VARCHAR | Specifies the name of the data element. |
communicationid | INTEGER | Specify the value as 0. This parameter is deprecated. |
scid | INTEGER | Specify the value as 0. This parameter is deprecated. |
Returns:
- The function returns the unprotected BIGINT value.
- The function returns the protected value if this option is configured in the policy and the user does not have access to the data.
- The function returns NULL when the user has no access to the data in the policy.
Exception:
If you configure an exception in the policy and the user does not have access, then the UDF terminates with an error message explaining what went wrong.
Example:
select pty_bigintsel(pty_bigintins(12345678, 'TE_INT_8', 100, 0,0), 'TE_INT_8',0,0);
pty_bigintselex
This UDF unprotects the protected Big Integer value and returns an error instead of NULL if user does not have access.
Signature:
pty_bigintselex(col BIGINT, dataelement VARCHAR, communicationid INTEGER, scid INTEGER)
Parameters:
| Name | Type | Description |
|---|---|---|
col | BIGINT | Specifies the data to unprotect. |
dataelement | VARCHAR | Specifies the name of the data element. |
communicationid | INTEGER | Specify the value as 0. This parameter is deprecated. |
scid | INTEGER | Specify the value as 0. This parameter is deprecated. |
Returns:
- The function returns the unprotected BIGINT value.
- The function returns the protected value if this option is configured in the policy and the user does not have access to the data.
Exception:
If the user user does not have access rights in the policy, then the UDF terminates with an error message explaining what went wrong.
Example:
select pty_bigintselex(PTY_BIGINTINS(12345678, 'TE_INT_8', 100, 0,0), 'TE_INT_8',0,0);
5.2.1.9 - Date UDFs
The dates can be protected using encryption and tokenization as the data protection method. The native UDFs, such as, pty_dateenc and pty_datedec, can be used for encryption and decryption respectively. To tokenize the date formats using the date data element, the data must be cast to VARCHAR type and then protected/unprotected with PTY_VARCHARLATININS/PTY_VARCHARLATINSEL UDFs.
To avoid any performance issues resulting due to casting of the data, a general best practice is to protect the data and present the decryption-related UDFs in the tables as views to authorized users only. This eliminates the unauthorized user’s access to the decryption UDFs and has the protected data only. The decryption process is limited to authorized users and thus, doesn’t cause any performance impact as the UDFs are executed restrictively.
pty_dateenc
This UDF protects the date value using an Encrytion data element.
Signature:
pty_dateenc(col DATE, dataelement VARCHAR, resultlen INTEGER, communicationid INTEGER, scid INTEGER)
Parameters:
| Name | Type | Description |
|---|---|---|
col | DATE | Specifies the data to protect. |
dataelement | VARCHAR | Specifies the name of the data element. |
resultlen | INTEGER | Specifies the length of the buffer to hold the result. |
communicationid | INTEGER | Specify the value as 0. This parameter is deprecated. |
scid | INTEGER | Specify the value as 0. This parameter is deprecated. |
Returns:
The function returns the protected VARBYTE value.
Exception:
If the user does not have protect access rights in the policy, then the UDF terminates with an error message explaining what went wrong.
Example:
select pty_dateenc('1990-11-22', 'AES256', 100, 0,0);
pty_datedec
This UDF unprotects the protected date value.
Signature:
pty_datedec(col VARBYTE, dataelement VARCHAR, communicationid INTEGER, scid INTEGER)
Parameters:
| Name | Type | Description |
|---|---|---|
col | VARBYTE | Specifies the data to unprotect. |
dataelement | VARCHAR | Specifies the name of the data element. |
communicationid | INTEGER | Specify the value as 0. This parameter is deprecated. |
scid | INTEGER | Specify the value as 0. This parameter is deprecated. |
Returns:
- The function returns the unprotected DATE value.
The function returns the output as per the system date format.
- The function returns NULL when the user has no access to the data in the policy.
Exception:
If you configure an exception in the policy and the user does not have access, then the UDF will terminate with an error message explaining what went wrong.
Example:
select pty_datedec(pty_dateenc('1990-10-22', 'AES256', 100, 0,0), 'AES256', 0,0);
pty_datedecex
This UDF unprotects the protected date value and returns an error instead of NULL if the user does not have access.
Signature:
pty_datedecexex(col VARBYTE, dataelement VARCHAR, communicationid INTEGER, scid INTEGER)
Parameters:
| Name | Type | Description |
|---|---|---|
col | VARBYTE | Specifies the data to unprotect. |
dataelement | VARCHAR | Specifies the name of the data element. |
communicationid | INTEGER | Specify the value as 0. This parameter is deprecated. |
scid | INTEGER | Specify the value as 0. This parameter is deprecated. |
Returns:
The function returns the unprotected DATE value.
Exception:
If the user does not have access rights in the policy, then the UDF terminates with an error message explaining what went wrong.
Example:
select pty_datedecex(pty_dateenc(CAST ('22 Sep 90' AS DATE FORMAT 'DD-MMM-YY'), 'AES256', 100, 0,0), 'AES256', 0,0);
5.2.1.10 - 8-Byte and 16-Byte Decimal UDFs
These UDFs work on the Decimal data types that are either 8 or 16 bytes in size. The 8-byte Decimal data types have a precision between 10 and 18 digits, while the 16-byte Decimals have a precision between 19 and 38 digits.
Note: Only one set of Decimal UDFs can be created for each range. The user must provide the UDF name. It is recommended that you replace
with, for example, 10_2 if the target data type is Decimal(10,2) to get a function pty_decimal_10_2enc, or 22_3 if the target data type is Decimal(22,3) to get pty_decimal_22_3enc.
pty_decimalenc
This UDF protects the decimal value with a data element for encryption.
Signature:
pty_decimal<n>enc(col DECIMAL<n>, dataelement VARCHAR, resultlen INTEGER, communicationid INTEGER, scid INTEGER)
Parameters:
| Name | Type | Description |
|---|---|---|
col | DECIMAL(m,n) | Specifies the data to protect. |
dataelement | VARCHAR | Specifies the name of the data element. |
resultlen | INTEGER | Specifies the length of the buffer to hold the result. |
communicationid | INTEGER | Specify the value as 0. This parameter is deprecated. |
scid | INTEGER | Specify the value as 0. This parameter is deprecated. |
Returns:
The function returns the protected VARBYTE value.
Exception:
If the user does not have protect access rights in the policy, then the UDF terminates with an error message explaining what went wrong.
Example:
select pty_decimal37_1enc(26656.0, 'AES256', 100, 0,0);
pty_decimaldec
This UDF unprotects the protected decimal value.
Signature:
pty_decimal<n>dec(col VARBYTE, dataelement VARCHAR, communicationid INTEGER, scid INTEGER)
Parameters:
| Name | Type | Description |
|---|---|---|
col | VARBYTE | Specifies the data to unprotect. |
dataelement | VARCHAR | Specifies the name of the data element. |
communicationid | INTEGER | Specify the value as 0. This parameter is deprecated. |
scid | INTEGER | Specify the value as 0. This parameter is deprecated. |
Returns:
- The function returns the unprotected DECIMAL value.
- The function returns NULL when the user has no access to the data in the policy.
Exception:
If you configure an exception in the policy and the user does not have access, then the UDF terminates with an error message explaining what went wrong.
Example:
select pty_decimal37_1dec(pty_decimal37_1enc(26656.0, 'AES256', 100, 0,0), 'AES256', 0,0);
pty_decimaldecex
This UDF unprotects the protected decimal value and returns an error instead of NULL if the user does not have access.
Signature:
pty_decimal<n>decex(col VARBYTE, dataelement VARCHAR, communicationid INTEGER, scid INTEGER)
Parameters:
| Name | Type | Description |
|---|---|---|
col | VARBYTE | Specifies the data to unprotect. |
dataelement | VARCHAR | Specifies the name of the data element. |
communicationid | INTEGER | Specify the value as 0. This parameter is deprecated. |
scid | INTEGER | Specify the value as 0. This parameter is deprecated. |
Returns:
The function returns the unprotected DECIMAL value.
Exception:
If you configure an exception in the policy and the user does not have access, then the UDF terminates with an error message explaining what went wrong.
Example:
select pty_decimal37_1decex(pty_decimal37_1enc(26656.0, 'AES256', 100, 0,0), 'AES256', 0,0);
5.2.1.11 - JSON UDFs
These UDFs are used to protect and unprotect data for JSON data type. These UDFs have been introduced to support LOB or Large Objects that can be loaded to or extracted from the Teradata Database tables. Depending on the data element chosen, the data is tokenized or encrypted. The data in JSON are protected as CLOBs.
The examples provided for protection and unprotection are for single queries.
pty_jsonins
This UDF protects the JSON value using the type-preserving data elements, such as, token and No Encryption data element for access control.
Signature:
pty_jsonins(col JSON, dataelement VARCHAR, resultlen INTEGER, communicationid INTEGER, scid INTEGER)
Parameters:
| Name | Type | Description |
|---|---|---|
col or data | JSON | Specifies the JSON data to protect. |
dataelement | VARCHAR | Specifies the name of the data element. |
resultlen | INTEGER | Specifies the length of the buffer to hold the result. |
communicationid | INTEGER | Specify the value as 0. This parameter is deprecated. |
scid | INTEGER | Specify the value as 0. This parameter is deprecated. |
Returns:
The function returns the protected JSON CLOB (Character Large Objects) value.
Exception:
If the user does not have protect access rights in the policy, then the UDF terminates with an error message explaining what went wrong.
Note: Tokenizing a JSON format data with a Printable tokenization data element will not return a valid JSON format output.
Example:
SELECT pty_jsonins(NEW JSON('{"emp_name" : "John Doe", "emp_address" : "Stamford 1"}'), 'TE_A_N_S23_L2R2_Y', 500, 0, 0);
pty_jsonsel
This UDF unprotects the protected JSON CLOBs.
Signature:
pty_jsonsel(col CLOB, dataelement VARCHAR, resultlen INTEGER, communicationid INTEGER, scid INTEGER)
Parameters:
| Name | Type | Description |
|---|---|---|
col or data | CLOB | Specifies the CLOB data to unprotect. |
dataelement | VARCHAR | Specifies the name of the data element. |
resultlen | INTEGER | Specifies the length of the buffer to hold the result. |
communicationid | INTEGER | Specify the value as 0. This parameter is deprecated. |
scid | INTEGER | Specify the value as 0. This parameter is deprecated. |
Returns:
- The function returns the unprotected JSON values.
- The function returns the protected value if this option is configured in the policy and the user does not have access to the data.
- The function returns NULL when the user has no access to the data in the policy.
Exception:
If you configure an exception in the policy and the user does not have access, then the UDF terminates with an error message explaining what went wrong.
Example:
SELECT pty_jsonsel(pty_jsonins(NEW JSON('{"emp_name" : "John Doe", "emp_address" : "Stamford 1"}'), 'TE_A_N_S23_L2R2_Y', 500, 0, 0), 'TE_A_N_S23_L2R2_Y', 500, 0, 0);
pty_jsonselex
This UDF unprotects the JSON CLOBs that are protected using a tokenization data element.
Signature:
pty_jsonselex(col CLOB, dataelement VARCHAR, resultlen INTEGER, communicationid INTEGER, scid INTEGER)
Parameters:
| Name | Type | Description |
|---|---|---|
col or data | CLOB | Specifies the CLOB data to unprotect. |
dataelement | VARCHAR | Specifies the name of the data element. |
resultlen | INTEGER | Specifies the length of the buffer to hold the result. |
communicationid | INTEGER | Specify the value as 0. This parameter is deprecated. |
scid | INTEGER | Specify the value as 0. This parameter is deprecated. |
Returns:
- The function returns the unprotected JSON values.
- The function returns the protected value if this option is configured in the policy and the user does not have access to the data.
Exception:
If the user does not have access rights in the policy, then the UDF terminates with an error explaining what went wrong.
Example:
SELECT pty_jsonselex(pty_jsonins(NEW JSON('{"emp_name" : "John Doe", "emp_address" : "Stamford 1"}'), 'TE_A_N_S23_L2R2_Y', 500, 0, 0), 'TE_A_N_S23_L2R2_Y', 500, 0, 0);
pty_jsonenc
This UDF protects the JSON value using an encrytion data element.
Signature:
pty_jsonenc(col JSON, dataelement VARCHAR, resultlen INTEGER, communicationid INTEGER, scid INTEGER)
Parameters:
| Name | Type | Description |
|---|---|---|
col or data | JSON | Specifies the JSON data to protect. |
dataelement | VARCHAR | Specifies the name of the data element. |
resultlen | INTEGER | Specifies the length of the buffer to hold the result. |
communicationid | INTEGER | Specify the value as 0. This parameter is deprecated. |
scid | INTEGER | Specify the value as 0. This parameter is deprecated. |
Returns:
The function returns the protected JSON CLOB (Character Large Objects) value.
Exception:
If the user does not have protect access rights in the policy, then the UDF terminates with an error message explaining what went wrong.
Example:
SELECT pty_jsonenc(pty_jsonenc(NEW JSON('{"emp_name" : "John Doe", "emp_address" : "Stamford 1"}'), 'AES256', 500, 0, 0), 'AES256', 500, 0, 0);
pty_jsondec
This UDF unprotects the CLOB value that are protected using an encryption data element.
Signature:
pty_jsondec(col CLOB, dataelement VARCHAR, resultlen INTEGER, communicationid INTEGER, scid INTEGER)
Parameters:
| Name | Type | Description |
|---|---|---|
col or data | CLOB | Specifies the CLOB data to unprotect. |
dataelement | VARCHAR | Specifies the name of the data element. |
resultlen | INTEGER | Specifies the length of the buffer to hold the result. |
communicationid | INTEGER | Specify the value as 0. This parameter is deprecated. |
scid | INTEGER | Specify the value as 0. This parameter is deprecated. |
Returns:
- The function returns the unprotected JSON values.
- The function returns NULL when the user has no access to the data in the policy.
Exception:
If you configure an exception in the policy and the user does not have access, then the UDF terminates with an error message explaining what went wrong.
Example:
SELECT pty_jsondec(pty_jsonenc(NEW JSON('{"emp_name" : "John Doe", "emp_address" : "Stamford 1"}'), 'AES256', 500, 0, 0), 'AES256', 500, 0, 0);
5.2.1.12 - XML UDFs
These UDFs support the XML data type. The XML content is stored in compact binary form or CLOBs that preserve the information set of the XML document. These UDFs have been introduced to support the XML files that can be loaded to or extracted from the Teradata Database tables. Depending on the data element chosen, the data is either tokenized or encrypted.
pty_xmlins
This UDF protects the XML value using type-preserving data elements, such as, token and No Encryption for access control.
Signature:
pty_xmlins(col XML, dataelement VARCHAR, resultlen INTEGER, communicationid INTEGER, scid INTEGER)
Parameters:
| Name | Type | Description |
|---|---|---|
col | XML | Specifies the XML data to protect. |
dataelement | VARCHAR | Specifies the name of the data element. |
resultlen | INTEGER | Specifies the length of the buffer to hold the result. |
communicationid | INTEGER | Specify the value as 0. This parameter is deprecated. |
scid | INTEGER | Specify the value as 0. This parameter is deprecated. |
Returns:
The function returns the protected CLOB value.
Exception:
If the user does not have protect access rights in the policy, then the UDF terminates with an error message explaining what went wrong.
Caution: Tokenizing XML data with Printable tokenization does not return a valid XML format output.
Example:
select pty_xmlins(CREATEXML('<?xml version="1.0" encoding="UTF-8"?>
<Customer ID="C00-10101">
<Name>John Hancock</Name>
<Address>100 1st Street, San Francisco, CA 94118</Address>
<Phone1>(858)555-1234</Phone1>
<Phone2>(858)555-9876</Phone2>
<Fax>(858)555-9999</Fax>
<Email>John@somecompany.com</Email>
<Order Number="NW-01-16366" Date="2012-02-28">
<Contact>Mary Jane</Contact>
<Phone>(987)654-3210</Phone>
<ShipTo>Some company, 2467 Pioneer Road, San Francisco, CA - 94117</ShipTo>
<SubTotal>434.99</SubTotal>
<Tax>32.55</Tax>
<Total>467.54</Total>
<Item ID="001">
<Quantity>10</Quantity>
<PartNumber>F54709</PartNumber>
<Description>Motorola S10-HD Bluetooth Stereo Headphones</Description>
<UnitPrice>29.50</UnitPrice>
<Price>295.00</Price>
</Item>
<Item ID="101">
<Quantity>1</Quantity>
<PartNumber>Z19743</PartNumber>
<Description>Motorola Milestone XT800 Cell Phone</Description>
<UnitPrice>139.99</UnitPrice>
<Price>139.99</Price>
</Item>
</Order>
</Customer>'),'TE_A_N_S23_L2R2_Y',1500,0,0) "Protected Data";
pty_xmlsel
This UDF unprotects the protected CLOB value.
Signature:
pty_xmlsel(col CLOB, dataelement VARCHAR, resultlen INTEGER, communicationid INTEGER, scid INTEGER)
Parameters:
| Name | Type | Description |
|---|---|---|
col | CLOB | Specifies the CLOB data to unprotect. |
dataelement | VARCHAR | Specifies the name of the data element. |
resultlen | INTEGER | Specifies the length of the buffer to hold the result. |
communicationid | INTEGER | Specify the value as 0. This parameter is deprecated. |
scid | INTEGER | Specify the value as 0. This parameter is deprecated. |
Returns:
- The function returns the unprotected XML values.
- The function returns the protected value if this option is configured in the policy and the user does not have access to the data.
- The function returns NULL when the user has no access to the data in the policy.
Exception:
If you configure an exception in the policy and the user does not have access, then the UDF terminates with an error message explaining what went wrong.
Example:
sel
pty_xmlsel(
pty_xmlins(CREATEXML('<?xml version="1.0" encoding="UTF-8"?>
<Customer ID="C00-10101">
<Name>John Hancock</Name>
<Address>100 1st Street, San Francisco, CA 94118</Address>
<Phone1>(858)555-1234</Phone1>
<Phone2>(858)555-9876</Phone2>
<Fax>(858)555-9999</Fax>
<Email>John@somecompany.com</Email>
<Order Number="NW-01-16366" Date="2012-02-28">
<Contact>Mary Jane</Contact>
<Phone>(987)654-3210</Phone>
<ShipTo>Some company, 2467 Pioneer Road, San Francisco, CA - 94117</ShipTo>
<SubTotal>434.99</SubTotal>
<Tax>32.55</Tax>
<Total>467.54</Total>
<Item ID="001">
<Quantity>10</Quantity>
<PartNumber>F54709</PartNumber>
<Description>Motorola S10-HD Bluetooth Stereo Headphones</Description>
<UnitPrice>29.50</UnitPrice>
<Price>295.00</Price>
</Item>
<Item ID="101">
<Quantity>1</Quantity>
<PartNumber>Z19743</PartNumber>
<Description>Motorola Milestone XT800 Cell Phone</Description>
<UnitPrice>139.99</UnitPrice>
<Price>139.99</Price>
</Item>
</Order>
</Customer>'),'TE_A_N_S23_L2R2_Y',1500,0,0),'TE_A_N_S23_L2R2_Y',1500,0,0) "UnProtected Data";
pty_xmlselex
This UDF unprotects the protected CLOB value with strong encryption.
Signature:
pty_xmlselex(col CLOB, dataelement VARCHAR, resultlen INTEGER, communicationid INTEGER, scid INTEGER)
Parameters:
| Name | Type | Description |
|---|---|---|
col | CLOB | Specifies the CLOB data to unprotect. |
dataelement | VARCHAR | Specifies the name of the data element. |
resultlen | INTEGER | Specifies the length of the buffer to hold the result. |
communicationid | INTEGER | Specify the value as 0. This parameter is deprecated. |
scid | INTEGER | Specify the value as 0. This parameter is deprecated. |
Returns:
- The function returns the unprotected XML values.
- The function returns the protected value if this option is configured in the policy and the user does not have access to the data.
Exception:
If the user does not have access rights in the policy, then the UDF terminates with an error message explaining what went wrong.
Example:
sel
pty_xmlselex(
pty_xmlins(CREATEXML('<?xml version="1.0" encoding="UTF-8"?>
<Customer ID="C00-10101">
<Name>John Hancock</Name>
<Address>100 1st Street, San Francisco, CA 94118</Address>
<Phone1>(858)555-1234</Phone1>
<Phone2>(858)555-9876</Phone2>
<Fax>(858)555-9999</Fax>
<Email>John@somecompany.com</Email>
<Order Number="NW-01-16366" Date="2012-02-28">
<Contact>Mary Jane</Contact>
<Phone>(987)654-3210</Phone>
<ShipTo>Some company, 2467 Pioneer Road, San Francisco, CA - 94117</ShipTo>
<SubTotal>434.99</SubTotal>
<Tax>32.55</Tax>
<Total>467.54</Total>
<Item ID="001">
<Quantity>10</Quantity>
<PartNumber>F54709</PartNumber>
<Description>Motorola S10-HD Bluetooth Stereo Headphones</Description>
<UnitPrice>29.50</UnitPrice>
<Price>295.00</Price>
</Item>
<Item ID="101">
<Quantity>1</Quantity>
<PartNumber>Z19743</PartNumber>
<Description>Motorola Milestone XT800 Cell Phone</Description>
<UnitPrice>139.99</UnitPrice>
<Price>139.99</Price>
</Item>
</Order>
</Customer>'),'TE_A_N_S23_L2R2_Y',1500,0,0),'TE_A_N_S23_L2R2_Y',1500,0,0) "UnProtected Data";
pty_xmlenc
This UDF protects the XML data using an Encryption data element.
Signature:
pty_xmlenc(col XML, dataelement VARCHAR, resultlen INTEGER, communicationid INTEGER, scid INTEGER)
Parameters:
| Name | Type | Description |
|---|---|---|
col | XML | Specifies the XML data to protect. |
| dataelemen | VARCHAR | Specifies the name of the data element. |
resultlen | INTEGER | Specifies the length of the buffer to hold the result. |
communicationid | INTEGER | Specify the value as 0. This parameter is deprecated. |
scid | INTEGER | Specify the value as 0. This parameter is deprecated. |
Returns:
The function returns the protected CLOB value.
Exception:
If the user does not have protect access rights in the policy, UDF terminates with an error message explaining what went wrong.
Example:
sel
pty_xmlenc(CREATEXML('<?xml version="1.0" encoding="UTF-8"?>
<Customer ID="C00-10101">
<Name>John Hancock</Name>
<Address>100 1st Street, San Francisco, CA 94118</Address>
<Phone1>(858)555-1234</Phone1>
<Phone2>(858)555-9876</Phone2>
<Fax>(858)555-9999</Fax>
<Email>John@somecompany.com</Email>
<Order Number="NW-01-16366" Date="2012-02-28">
<Contact>Mary Jane</Contact>
<Phone>(987)654-3210</Phone>
<ShipTo>Some company, 2467 Pioneer Road, San Francisco, CA - 94117</ShipTo>
<SubTotal>434.99</SubTotal>
<Tax>32.55</Tax>
<Total>467.54</Total>
<Item ID="001">
<Quantity>10</Quantity>
<PartNumber>F54709</PartNumber>
<Description>Motorola S10-HD Bluetooth Stereo Headphones</Description>
<UnitPrice>29.50</UnitPrice>
<Price>295.00</Price>
</Item>
<Item ID="101">
<Quantity>1</Quantity>
<PartNumber>Z19743</PartNumber>
<Description>Motorola Milestone XT800 Cell Phone</Description>
<UnitPrice>139.99</UnitPrice>
<Price>139.99</Price>
</Item>
</Order>
</Customer>'),'AES256',1500,0,0) "Protected Data";
pty_xmldec
This UDF unprotects the protected CLOB values.
Signature:
pty_xmldec(col CLOB, dataelement VARCHAR, resultlen INTEGER, communicationid INTEGER, scid INTEGER)
Parameters:
| Name | Type | Description |
|---|---|---|
col | CLOB | Specifies the CLOB data to unprotect. |
dataelement | VARCHAR | Specifies the name of the data element. |
resultlen | INTEGER | Specifies the length of the buffer to hold the result. |
communicationid | INTEGER | Specify the value as 0. This parameter is deprecated. |
scid | INTEGER | Specify the value as 0. This parameter is deprecated. |
Returns:
- The function returns the unprotected XML value.
- The function returns NULL when the user has no access to the data in the policy.
Exception:
If the user does not have access rights in the policy, then the UDF terminates with an error message explaining what went wrong.
Example:
select
pty_xmldec(
pty_xmlenc(CREATEXML('<?xml version="1.0" encoding="UTF-8"?>
<Customer ID="C00-10101">
<Name>John Hancock</Name>
<Address>100 1st Street, San Francisco, CA 94118</Address>
<Phone1>(858)555-1234</Phone1>
<Phone2>(858)555-9876</Phone2>
<Fax>(858)555-9999</Fax>
<Email>John@somecompany.com</Email>
<Order Number="NW-01-16366" Date="2012-02-28">
<Contact>Mary Jane</Contact>
<Phone>(987)654-3210</Phone>
<ShipTo>Some company, 2467 Pioneer Road, San Francisco, CA - 94117</ShipTo>
<SubTotal>434.99</SubTotal>
<Tax>32.55</Tax>
<Total>467.54</Total>
<Item ID="001">
<Quantity>10</Quantity>
<PartNumber>F54709</PartNumber>
<Description>Motorola S10-HD Bluetooth Stereo Headphones</Description>
<UnitPrice>29.50</UnitPrice>
<Price>295.00</Price>
</Item>
<Item ID="101">
<Quantity>1</Quantity>
<PartNumber>Z19743</PartNumber>
<Description>Motorola Milestone XT800 Cell Phone</Description>
<UnitPrice>139.99</UnitPrice>
<Price>139.99</Price>
</Item>
</Order>
</Customer>'),'AES256',1500,0,0),'AES256',1500,0,0) "UnProtected Data";
pty_xmldecex
This UDF unprotects the protected CLOB value with strong encryption.
Signature:
pty_xmldecex(col CLOB, dataelement VARCHAR, resultlen INTEGER, communicationid INTEGER, scid INTEGER)
Parameters:
| Name | Type | Description |
|---|---|---|
col | CLOB | Specifies the CLOB data to protect. |
dataelement | VARCHAR | Specifies the name of the data element. |
resultlen | INTEGER | Specifies the length of the buffer to hold the result. |
communicationid | INTEGER | Specify the value as 0. This parameter is deprecated. |
scid | INTEGER | Specify the value as 0. This parameter is deprecated. |
Returns:
The function returns the unprotected XML value.
Exception:
If the user does not have protect access rights in the policy, then the UDF terminates with an error message explaining what went wrong.
Example:
select
pty_xmldecex(
pty_xmlenc(CREATEXML('<?xml version="1.0" encoding="UTF-8"?>
<Customer ID="C00-10101">
<Name>John Hancock</Name>
<Address>100 1st Street, San Francisco, CA 94118</Address>
<Phone1>(858)555-1234</Phone1>
<Phone2>(858)555-9876</Phone2>
<Fax>(858)555-9999</Fax>
<Email>John@somecompany.com</Email>
<Order Number="NW-01-16366" Date="2012-02-28">
<Contact>Mary Jane</Contact>
<Phone>(987)654-3210</Phone>
<ShipTo>Some company, 2467 Pioneer Road, San Francisco, CA - 94117</ShipTo>
<SubTotal>434.99</SubTotal>
<Tax>32.55</Tax>
<Total>467.54</Total>
<Item ID="001">
<Quantity>10</Quantity>
<PartNumber>F54709</PartNumber>
<Description>Motorola S10-HD Bluetooth Stereo Headphones</Description>
<UnitPrice>29.50</UnitPrice>
<Price>295.00</Price>
</Item>
<Item ID="101">
<Quantity>1</Quantity>
<PartNumber>Z19743</PartNumber>
<Description>Motorola Milestone XT800 Cell Phone</Description>
<UnitPrice>139.99</UnitPrice>
<Price>139.99</Price>
</Item>
</Order>
</Customer>'),'AES256',1500,0,0),'AES256',1500,0,0) "UnProtected Data";
5.2.1.13 - Float UDFs for No Encryption
pty_floatins
This UDF can be used only with the No Encryption data element.
Signature:
pty_floatins(col FLOAT, dataelement VARCHAR, resultlen INTEGER, communicationid INTEGER, scid INTEGER)
Parameters:
| Name | Type | Description |
|---|---|---|
col | FLOAT | Specifies the data to protect. |
dataelement | VARCHAR | Specifies the name of the data element. |
resultlen | INTEGER | Specifies the length of the buffer to hold the result. |
communicationid | INTEGER | Specify the value as 0. This parameter is deprecated. |
scid | INTEGER | Specify the value as 0. This parameter is deprecated. |
Returns:
The function returns the input value as it is.
Exception:
If the user does not have protect access rights in the policy, then the UDF terminates with an error message explaining what went wrong.
Example:
select pty_floatins(26656.0, 'NoEncryption', 100, 0,0);
pty_floatsel
This UDF unprotects the float value for a No Encryption data element.
Signature:
pty_floatsel(col FLOAT, dataelement VARCHAR, communicationid INTEGER, scid INTEGER)
Parameters:
| Name | Type | Description |
|---|---|---|
col | FLOAT | Specifies the data to unprotect. |
dataelement | VARCHAR | Specifies the name of the data element. |
resultlen | INTEGER | Specifies the length of the buffer to hold the result. |
communicationid | INTEGER | Specify the value as 0. This parameter is deprecated. |
scid | INTEGER | Specify the value as 0. This parameter is deprecated. |
Returns:
- The function returns the input value as it is.
- The function returns the protected value if this option is configured in the policy and the user does not have access to the data.
- The function returns NULL when the user has no access to the data in the policy.
Exception:
If you configure an exception in the policy and the user does not have access, then the UDF terminates with an error message explaining what went wrong.
Example:
select pty_floatsel(pty_floatins(26656.0, 'NoEncryption', 100, 0,0), 'NoEncryption', 0,0);
pty_floatselex
This UDF unprotects the float value protected with a No Encryption data element.
Signature:
pty_floatselex(col FLOAT, dataelement VARCHAR, communicationid INTEGER, scid INTEGER)
Parameters:
| Name | Type | Description |
|---|---|---|
col | FLOAT | Specifies the data to unprotect. |
dataelement | VARCHAR | Specifies the name of the data element. |
communicationid | INTEGER | Specify the value as 0. This parameter is deprecated. |
scid | INTEGER | Specify the value as 0. This parameter is deprecated. |
Returns:
- The function returns the input value as it is.
- The function returns the protected value if this option is configured in the policy and the user does not have access to the data.
- The function returns an error instead of NULL if the user does not have access.
Exception:
If the user does not have access rights in the policy, then the UDF terminates with an error message explaining what went wrong.
Example:
select pty_floatselex(pty_floatins(26656.0, 'NoEncryption', 100, 0,0), 'NoEncryption', 0,0);
5.2.1.14 - Date UDFs for No Encryption
This section provides DATE UDFs that are applicable for No Encryption data elements.
pty_dateins
This UDF protects a date value with a No Encryption data element to impose access control.
Signature:
pty_dateins(col DATE, dataelement VARCHAR, resultlen INTEGER, communicationid INTEGER, scid INTEGER)
Parameters:
| Name | Type | Description |
|---|---|---|
col | DATE | Specifies the data to protect. |
dataelement | VARCHAR | Specifies the name of the data element. |
resultlen | INTEGER | Specifies the length of the buffer to hold the result. |
communicationid | INTEGER | Specify the value as 0. This parameter is deprecated. |
scid | INTEGER | Specify the value as 0. This parameter is deprecated. |
Returns:
The function returns the input value as is.
The function returns the output as per the system date format.
Exception:
If the user does not have protect access rights in the policy, then the UDF terminates with an error message explaining what went wrong.
Example:
select pty_dateins(CAST ('22-09-1990' AS DATE FORMAT 'DD-MM-YYYY'), 'NoEncryption', 100, 0,0);
pty_datesel
This UDF unprotects the date value that is protected using a No Encryption data element.
Signature:
pty_datesel(col DATE, dataelement VARCHAR, communicationid INTEGER, scid INTEGER)
Parameters:
| Name | Type | Description |
|---|---|---|
col | DATE | Specifies the data to unprotect. |
dataelement | VARCHAR | Specifies the name of the data element. |
communicationid | INTEGER | Specify the value as 0. This parameter is deprecated. |
scid | INTEGER | Specify the value as 0. This parameter is deprecated. |
Returns:
- The function returns the input value as is.
- The function returns the protected value if this option is configured in the policy and the user does not have access to the data.
- The function returns NULL when the user has no access to the data in the policy.
Exception:
If you configure an exception in the policy and the user does not have access, then the UDF terminates with an error message explaining what went wrong.
Example:
select pty_datesel(pty_dateins(CAST ('22-09-1990' AS DATE FORMAT 'DD-MM-YYYY'), 'NoEncryption', 100, 0,0), 'NoEncryption', 0,0);
pty_dateselex
This UDF unprotects the date value that is protected with a No Encryption data element and returns an error instead of NULL if the user does not have access.
Signature:
pty_dateselex(col DATE, dataelement VARCHAR, communicationid INTEGER, scid INTEGER)
Parameters:
| Name | Type | Description |
|---|---|---|
col | DATE | Specifies the data to unprotect. |
dataelement | VARCHAR | Specifies the name of the data element. |
communicationid | INTEGER | Specify the value as 0. This parameter is deprecated. |
scid | INTEGER | Specify the value as 0. This parameter is deprecated. |
Returns:
- The function returns the input value as is.
- The function returns the protected value if this option is configured in the policy and the user does not have access to the data.
Exception:
If the user does not have protect access rights in the policy, then the UDF terminates with an error message.
Example:
select pty_dateselex(pty_dateins(CAST ('22-09-1990' AS DATE FORMAT 'DD-MM-YYYY'), 'NoEncryption', 100, 0,0), 'NoEncryption', 0,0);
5.2.1.15 - 8-Byte AND 16-Byte Decimal UDFs for No Encryption
These UDFs work on the Decimal data types that are either 8 or 16 bytes in size. The 8-byte Decimals have a precision between 10 and 18 digits, while the 16-byte Decimals have a precision between 19 and 38 digits. These UDFs apply to the No Encryption data elements only.
pty_decimalins
This UDF protects the decimal value using a No Encryption data element.
Signature:
pty_decimal<n>ins(col DECIMAL<M,N>, dataelement VARCHAR, resultlen INTEGER, communicationid INTEGER, scid INTEGER)
Parameters:
| Name | Type | Description |
|---|---|---|
col | DECIMAL(m,n) | Specifies the data to protect. |
dataelement | VARCHAR | Specifies the name of the data element. |
resultlen | INTEGER | Specifies the length of the buffer to hold the result. |
communicationid | INTEGER | Specify the value as 0. This parameter is deprecated. |
scid | INTEGER | Specify the value as 0. This parameter is deprecated. |
Returns:
The function returns the input value as is.
Exception:
If the user does not have protect access rights in the policy, then the UDF terminates with an error message explaining what went wrong.
Example:
select pty_decimal37_1ins(26656.0, 'NoEncryption', 100, 0,0);
pty_decimalsel
This UDF unprotects the decimal value that is protected using a No Encryption data element.
Signature:
pty_decimal<n>sel(col DECIMAL<M,N>, dataelement VARCHAR, communicationid INTEGER, SCID INTEGER)
Parameters:
| Name | Type | Description |
|---|---|---|
col | DECIMAL(m,n) | Specifies the data to unprotect. |
dataelement | VARCHAR | Specifies the name of the data element. |
communicationid | INTEGER | Specify the value as 0. This parameter is deprecated. |
scid | INTEGER | Specify the value as 0. This parameter is deprecated. |
Returns:
- The function returns the input value as is.
- The function returns the protected value if this option is configured in the policy and the user does not have access to the data.
- The function returns NULL when the user has no access to the data in the policy.
Exception:
If you configure an exception in the policy and the user does not have access, then the UDF terminates with an error message explaining what went wrong.
Example:
select pty_decimal37_1sel(pty_decimal37_1ins(26656.0, 'NoEncryption', 100, 0,0), 'NoEncryption', 0,0);
pty_decimalselex
This UDF unprotects the decimal value that is protected using a No Encryption data element.
Signature:
pty_decimal<n>selex(col DECIMAL(m,n), dataelement VARCHAR, communicationid INTEGER, scid INTEGER)
Parameters:
| Name | Type | Description |
|---|---|---|
col | DECIMAL(m,n) | Specifies the data to unprotect. |
dataelement | VARCHAR | Specifies the name of the data element. |
communicationid | INTEGER | Specify the value as 0. This parameter is deprecated. |
scid | INTEGER | Specify the value as 0. This parameter is deprecated. |
Returns:
- The function returns the input value as is.
- The function returns the protected value if this option is configured in the policy and the user does not have access to the data.
Exception:
If the user does not have protect access rights in the policy, then the UDF terminates with an error message explaining what went wrong.
Example:
select pty_decimal37_1selex(pty_decimal37_1ins(26656.0, 'NoEncryption', 100, 0,0),'NoEncryption', 0,0);
6 - REST Container
The following sections outline the business problems faced by customers in protecting their data in a native cloud environment. It then lists the Protegrity solution to this business problem using REST APIs in a Kubernetes cluster.
Business Problem
A company faces the following problems in protecting data in a native cloud environment:
- Protegrity customers are moving to the cloud. This includes data and workloads in support of transactional application and analytical systems.
- It is impossible to keep up with the continual change in workloads by provisioning Protegrity products manually.
- Native Cloud capabilities can be used to solve this problem and deliver the agility and scalability required to keep up with the customers’ business.
- Kubernetes can be configured with Protegrity data security components that can leverage the autoscaling capabilities of Kubernetes to scale.
Protegrity Solution
The Protegrity REST Container provides a robust and scalable REST API designed to simplify integration of Protegrity functions across your systems. Whether you are building custom applications, streamlining workflows, or enabling third-party access, our API offers secure, reliable, and well-documented endpoints to help you achieve your goals efficiently. With support for standard HTTP methods and JSON payloads, developers can quickly get started.
The Protegrity REST Container has the following characteristics:
- Cloud standard form factor:
- The delivery form factor for cloud deployments is an SDK and a supporting Dockerfile. Customers can use this Dockerfile to build the REST Container, which is based on the Application Protector form factor that Protegrity have been delivering for several years.
- The REST Container is a standard Docker Container that is familiar and expected in cloud deployments.
- The REST Container form factor makes the container a lightweight deployment of Application Protector REST.
- Support for Dynamic and Static deployment:
- Dynamic deployment: The dynamic term refers to runtime updates to policy changes are applied to the cluster. Dynamic updates are managed by the Resilient Protector Proxy (RPProxy or RPP). The RPP is connected to the ESA and applies the policy changes to REST containers.
- Static deployment: This deployment is suitable where a fixed policy configuration is required for the REST container. A secure policy package is created using the ESA API. The policy package is secured using Cloud-based Key Management Solution (KMS). The same policy package is applied to all the REST containers in the cluster.
6.1 - Understanding the Architecture
The Protegrity REST Container can be deployed using one of the following deployment methods:
- Using dynamic-based deployment
- Using static-based deployment
6.1.1 - Architecture and Components using Dynamic-based Deployment
Key features of an dynamic-based deployment include:
- The deployments can be used in use cases where policy updates need to be available on the cluster continuously.
- The RPP component is synchronized with the ESA for policy updates at a predefined rate.
- The dynamic deployment requires the ESA to be always connected to support the policy updates.
For more information about package deployment approaches, refer to Resilient Package Deployment.
The following figure represents the architecture for deploying the REST Container with RPP on a Kubernetes cluster.
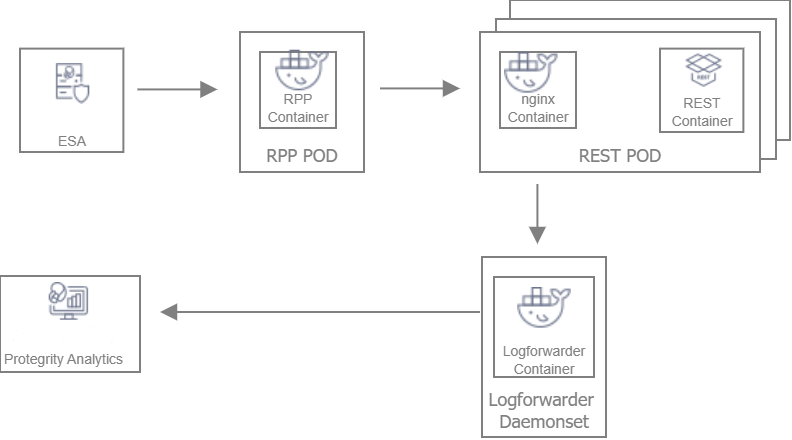
Deployment Steps:
Create the ESA with the policy and datastore.
Deploy the Resilient Package Proxy (RPP) instances with mTLS certificates to communicate with the ESA and to host the proxy endpoint for protectors.
Deploy the REST protector with mTLS certificates to communicate with the RPP. The communication between the RPP and the protector is secured using mTLS.
After the protector instance starts as part of the application POD, the protector sends a request to the RPP instance to retrieve the policy package.
At periodic intervals, the protector tries to pull the new policy package from RPP instance. If the package present on the RPP instance has expired due to cache invalidation policy, the RPP pulls the new package from an upstream RPP or the ESA.
6.1.2 - Architecture and Components using Static Deployment
Key features of a Static-based deployment include:
- The deployments can be used in use cases where a fixed policy package is required.
- The policy updates need to be triggered through automation using ConfigMap updates.
For more information about package deployment approaches, refer to Resilient Package Deployment.
The following figure represents the architecture for deploying the REST Container with static deployment on a Kubernetes cluster.
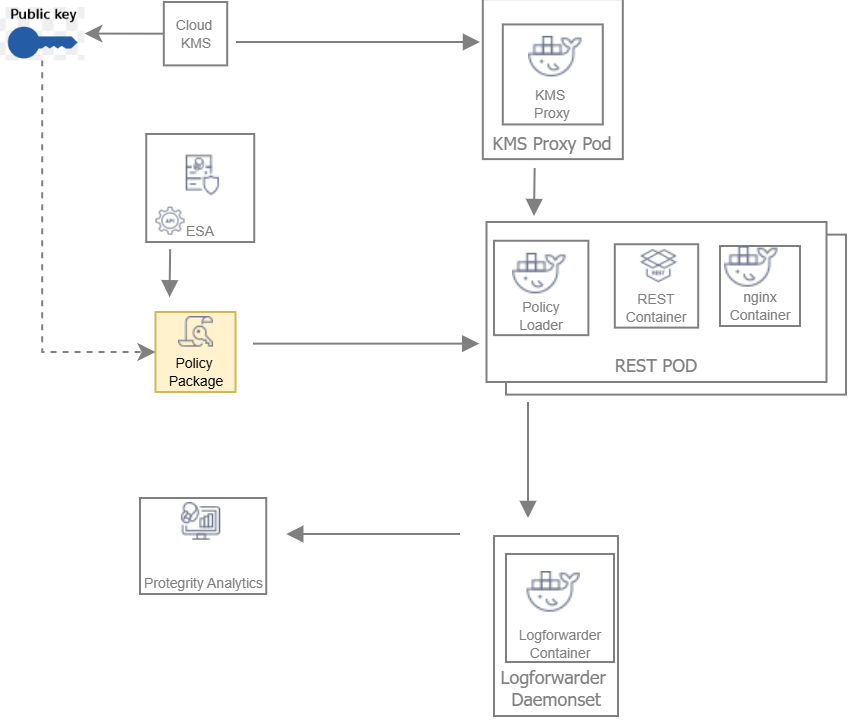
Deployment Steps:
The ESA administrator user pulls the policy package from the ESA and stores it to an Object Store or a Volume Mount.
The Policy Loader sidecar container reads the internal configmap for policy updates.
The sidecar container retrieves the policy package from the Object Store or Volume Mount.
The sidecar container then stores the policy package in the tmpfs directory.
The REST protector reads the policy package from the tmpfs directory.
Based on the values specified in the internal config.ini file, the protector initates the RP Callback REST.
The RP Callback decrypts the Data Encryption Key (DEK) using the KMS Proxy container.
The KMS Proxy container reads the decrypted DEK from the cache, if present.
If the DEK is not present in the cache, the KMS Proxy container uses the KMS Backend to retrieve the DEK from the Cloud KMS and store the decrypted DEK in the cache.
The Protector decrypts the policy package using the DEK and initializes its internal library.
6.2 - System Requirements
This section provides an overview of the software and hardware requirements required for deploying the REST Container.
6.2.1 - Software Requirements
Ensure that the following prerequisites are met for deploying the REST Protector package REST_RHUBI-9-64_x86-64_K8S_<Version>.tgz.
ESA prerequisites for EKS, AKS, and OpenShift deployment
Policy – Ensure that you have defined the security policy in the ESA. For more information about defining a security policy, refer to the section Policy Management.
Datastore - Attach the policy to the default datastore in the ESA or to a range of allowed servers that are added to a datastore.
The IP address range of the allowed servers must be the same as that of the nodes in the Kubernetes cluster where the AP-REST containers have been deployed.
For more information about datastores, refer to the section Data Stores.
ESA user - Create an ESA user that will be used to invoke the RPS REST API for retrieving the security policy and the certificates from the ESA. Ensure that the user is assigned the Export Resilient Package role. This user is used to export the policy in a static-based deployment.
For more information about assigning roles, refer to the section Managing Roles.
Software Requirements for EKS Deployment
The following prerequisites are required for deploying the REST Container on Amazon EKS.
Jump Box Configuration
The Linux instance or the Jump Box can be used to communicate with the Kubernetes cluster. This instance can be on-premise or on AWS. The Jump Box instance is used to execute all the deployment related commands.
Ensure that the following prerequisites are installed on the Jump Box:
- Helm, which is used as the package manager for all the applications.
- Docker to communicate with the Container Registry, where you want to upload the Docker images.
- Kubectl, which is a CLI tool to connect with the Kubernetes cluster.
- eksctl, which is a CLI utility to communicate with Amazon EKS. This is required if you want to install the REST Protector on Amazon EKS.
Cloud or AWS prerequisites
You need access to an AWS account. You also need access to the following AWS resources.
- AWS Elastic File System (EFS), if you want to upload the policy package to AWS EFS instead of AWS S3. You require both read and write permissions. This is required for static-based deployment.
- Install the latest version of the EFS-CSI driver, which is required if you are using AWS EFS as the persistent volume. This is required for statci-based deployment.
For more information about installing the EFS-CSI driver, refer to the Amazon EFS CSI driver documentation.
AWS S3, if you want to use AWS S3 for storing the policy snapshot, instead of AWS EFS. You require both read and write permissions. This is required for static-based deployment.
For more information about the AWS S3-specific permissions, refer to the API Reference document for AWS S3.
IAM User - Required to create the Kubernetes cluster. This user requires the following permissions:
AmazonEC2FullAccess - This is a managed policy by AWS
AmazonEKSClusterPolicy - This is a managed policy by AWS
AmazonEKSServicePolicy - This is a managed policy by AWS
AWSCloudFormationFullAccess - This is a managed policy by AWS
Custom policy that allows the user to perform the following actions:
- Create a new role and an instance profile.
- Retrieve information about a role and an instance profile.
- Attach a policy to the specified IAM role.
The following actions must be permitted on the IAM service:
- GetInstanceProfile
- GetRole
- AddRoleToInstanceProfile
- CreateInstanceProfile
- CreateRole
- PassRole
- AttachRolePolicy
Custom policy that allows the user to perform the following actions:
- Delete a role and an instance profile.
- Detach a policy from a specified role.
- Delete a policy from the specified role.
- Remove an IAM role from the specified EC2 instance profile.
The following actions must be permitted on the IAM service:
- GetOpenIDConnectProvider
- CreateOpenIDConnectProvider
- DeleteInstanceProfile
- DeleteRole
- RemoveRoleFromInstanceProfile
- DeleteRolePolicy
- DetachRolePolicy
- PutRolePolicy
Custom policy that allows the user to manage EKS clusters. The following actions must be permitted on the EKS service:
- ListClusters
- ListNodegroups
- ListTagsForResource
- ListUpdates
- DescribeCluster
- DescribeNodegroup
- DescribeUpdate
- CreateCluster
- CreateNodegroup
- DeleteCluster
- DeleteNodegroup
- UpdateClusterConfig
- UpdateClusterVersion
- UpdateNodegroupConfig
- UpdateNodegroupVersion
For more information about creating an IAM user, refer to the section Creating an IAM User in Your AWS Account in the AWS documentation. Contact your system administrator for creating the IAM users.
For more information about the EKS-specific permissions, refer to the API Reference document for Amazon EKS.
Access to AWS Elastic Container Registry (ECR) to upload the Container images.
Access to Route53 for mapping the hostname of the Elastic Load Balancer to a DNS entry in the Amazon Route53 service. This is required if you are terminating the TLS connection from the client application on the Load Balancer.
Access to AWS KMS. This is required for static-based deployment.
Software requirements for AKS deployment
The following prerequisites are required for deploying the REST Container on Azure AKS.
Jump Box Configuration
The Linux instance or the Jump Box can be used to communicate with the Kubernetes cluster. This instance can be on-premise or on Azure. The Jump Box instance is used to execute all the deployment-related commands.
Ensure that the following prerequisites are installed on the Jump Box:
- Helm, which is used as the package manager for all the applications.
- Docker to communicate with the Container Registry, where you want to upload the Docker images.
- Kubectl, which is a CLI tool to connect with the Kubernetes cluster.
- Azure CLI, which is a CLI utility to communicate with Azure AKS.
Azure prerequisites
You need access to an Azure subscription and a valid Azure Active Directory user for creating the following Azure services:
- Resource Group - Used to organize resources. All the remaining Azure services are created within a Resource Group.
- Azure Storage Account for creating the Azure Storage Container, where the policy package is stored. This is required for static-based deployment.
- Storage Container - Used to store the policy package. This is required for static-based deployment.
- Access to Azure Kubernetes Service (AKS) to create a Kubernetes cluster.
- Access to Azure Container Registry to upload the container images.
Software requirements for OpenShift deployment
The following prerequisites are required for deploying the REST Container on OpenShift.
Jump Box Configuration
The Linux instance or the Jump Box can be used to communicate with the Kubernetes cluster. This instance can be on-premise or on AWS. The Jump Box instance is used to execute all the deployment related commands.
Ensure that the following prerequisites are installed on the Jump Box:
- Helm, which is used as the package manager for all the applications.
- Docker to communicate with the Container Registry, where you want to upload the Docker images.
- oc, which is the OpenShift binary. This is the OpenShift CLI utility to communicate with the OpenShift cluster. This is required if you want to install the REST Container on an OpenShift cluster on AWS.
OpenShift on AWS prerequisites
- Ensure that you have a valid OpenShift account and the following information:
- Login URL for the OpenShift account.
- Authentication credentials for the OpenShift account.
- Ensure that you have access to an AWS account as the OpenShift cluster is deployed on AWS. You also need access to the following AWS resources.
- AWS Elastic File System (EFS), if you want to upload the policy package to AWS EFS instead of AWS S3. You require both read and write permissions. This is required for static-based deployment.
- Install the latest version of the EFS-CSI driver, which is required if you are using AWS EFS as the persistent volume. This is required for static-based deployment. For more information about installing the EFS-CSI driver, refer to the Amazon EFS CSI driver documentation.
- AWS S3, if you want to use AWS S3 for storing the policy snapshot, instead of AWS EFS. You require both read and write permissions. This is required for static-based deployment. For more information about the AWS S3-specific permissions, refer to the API Reference document for AWS S3.
- Access to AWS Elastic Container Registry (ECR) to upload the Container images.
- Access to AWS KMS. This is required for static-based deployment.
- Access to Azure Key Vault. This is required for static-based deployment.
6.2.2 - Hardware Requirements
The following table lists the minimum hardware configuration for each pod where the REST Container is deployed.
| Hardware Components | Configuration |
|---|---|
| CPU | Depends on the application. By default, the value is set to:
For more information about the CPU requirements for each container, refer to the values.yaml file for the corresponding container. |
| RAM | Depends on the workload. By default, the value is set to:
For more information about the memory requirements for each container, refer to the values.yaml file for the corresponding container. |
The instance type used for the cluster node is t3.2xlarge. The minimum CPU requirement for the node is 8 vCPU and the minimum memory capacity is 32 GiB.
Note: The package size of a policy with 70 thousand users and 26 data elements is 257447563 bytes.
6.3 - Preparing the Environment
This section provides an overview of the steps required to prepare the environment for deploying the REST Container product.
6.3.1 - Initializing the Jump Box
The Linux instance should be connected to the Kubernetes cluster. The following is the minimum system requirements to be configured for a Linux instance.
| Software and Files Required for the Linux instance | Purpose | Link |
|---|---|---|
| Docker | Load the images into the repository | Install Docker Engine |
| Helm | Install Helm Charts | Install Helm |
| Kubectl | Connect to the Kubernetes cluster | Kubectl reference |
| AWS CLI | Manage AWS services. This is required for deploying the protector on EKS. | AWS Command Line Interface |
| Azure CLI | Manage Azure services. This is required for deploying the protector on AKS. | Azure Command Line Interface |
| OpenShift CLI | Manage OpenShift services. This is required for deploying the protector on OpenShift. | OpenShift Command Line Interface |
6.3.2 - Extracting the Installation Package
This section describes the steps to download and extract the installation package for the REST protector.
To download the installation package:
Download the REST_RHUBI-9-64_x86-64_K8S_<Version>.tgz file on the Linux instance.
Run the following command to extract the files from the REST_RHUBI-9-64_x86-64_K8S_<Version>.tgz file.
tar -xvf REST_RHUBI-9-64_x86-64_K8S_<Version>.tgzThe signatures directory and the REST_RHUBI-9-64_x86-64_K8S_<Version>.tgz fileare extracted.
Run the following command to extract the files from the REST_RHUBI-9-64_x86-64_K8S_<Version>.tgz file.
tar -xvf REST_RHUBI-9-64_x86-64_K8S_<Version>.tgzThe following directories and files are extracted:
- devops - Helm charts, Dockerfiles, and container images to deploy the REST Container using the Static policy.
- protector - Dockerfiles and container images to create the REST Container.
- dynamic - Helm charts, Dockerfiles, and container images to deploy the REST Container using the Dynamic method.
- common - Helm charts, Dockerfiles, and container images to deploy the Log Forwarder.
- certs - Create certificates required for secure communication.
- HOW-TO-BUILD-DOCKER-IMAGES - Text file specifying how to build the Docker images.
- manifest.json - Metadata file specifying the product version and component names.
The following shows a list of the Helm charts and container images.
| Package Name | Description | Directory |
|---|---|---|
| REST_DYNAMIC-HELM_ALL-ALL-ALL_x86-64_K8S_<Version>.tgz | Package containing the Helm chart used to deploy the REST Container. | dynamic |
| RPPROXY_RHUBI-9-64_x86-64_K8S_<Version>.tar.gz | Used to set up the RPProxy container. | dynamic |
| RPPROXY_SRC_<Version>.tgz | Package containing the Dockerfile that can be used to create a custom image for the RPProxy container. | dynamic |
| RPPROXY-HELM_ALL-ALL-ALL_x86-64_K8S_<Version>.tgz | Package containing the Helm chart used to deploy the RPProxy container. | dynamic |
| KMSPROXY_RHUBI-9-64_x86-64_K8S_<Version>.tar.gz | Used to create the KMSProxy container. | devops |
| KMSPROXY_SRC_<Version>.tgz | Package containing the Dockerfile that can be used to create a custom image for the KMSProxy container and the associated binary files. | devops |
| KMSPROXY-HELM_ALL-ALL-ALL_x86-64_K8S_<Version>.tgz | Package containg the Helm chart used to deploy the KMSProxy container. | devops |
| POLICY-LOADER_RHUBI-9-64_x86-64_K8S_<Version>.tar.gz | Used to create the Policy Loader container. | devops |
| POLICY-LOADER_SRC_<Version>.tgz | Package containing the Dockerfile that can be used to create a custom image for the Policy Loader container and the associated binary files. | devops |
| REST_DEVOPS-HELM_ALL-ALL-ALL_x86-64_K8S_<Version>.0.tgz | Package containing the Helm chart used to deploy the REST Container. | devops |
| REST_RHUBI-9-64_x86-64_K8S_<Version>.tar.gz | Used to create the REST Container. | protector |
| REST-Samples_Linux-ALL-ALL_x86-64_<Version>.tgz | Package containing the sample application for testing the REST Containers with sample data. | protector. |
| REST-SRC_<Version>.tgz | Package containg the Dockerfile that can be used to create a custom image for the REST Container and the associate binary files. | protector |
| LOGFORWARDER_RHUBI-9-64_x86-64_K8S_<Version>.tar.gz | Used to create the Log Forwarder container. | common |
| LOGFORWARDER_SRC_<Version>.tgz | Package containg the Dockerfile that can be used to create a custom image for the Log Forwarder container and the associated binary files. | common |
| LOGFORWARDER-HELM_ALL-ALL-ALL_x86-64_K8S_<Version>.tgz | Package containing the Helm chart used to deploy the Log Forwarder container. | common |
6.3.3 - Creating Certificates
This section describes the steps to create certificates required for secure communication. These certificates are for secure communication between:
- ESA and the RPP.
- RPP and the protector.
- KMSProxy and the protector.
- REST protector and the curl client.
To download the installation package:
Navigate to the directory where you have extracted the installation package.
Navigate to the certs directory. The following files are available:
- CertificatesSetup_Linux_x64_<Version>tgz - Download the certificates from the ESA. You can use them as the common certificates in the dynamic deployment between the RPProxy and the ESA, and between the RPProxy and the protector. You can also use these certificates separately as the upstream certificate between the ESA and RPProxy in the dynamic deployment.
- CreateCertificate_Linux_x64_<Version>.tgz - Generate self-signed client and server certificates. In the Dynamic method, these certificates are used for communication between RPProxy and the protector, and the REST protector and the curl client. In the Static policy method, these certificates are used for communication between KMSProxy and the protector, and the REST protector and the curl client. Customers can choose to use their own certificates.
Extract both the packages using the following command.
tar -xvf CertificatesSetup_Linux_x64_<Version>.tgz tar -xvf CreateCertificate_Linux_x64_<Version>.tgzThe following files are extracted:
- CertificatesSetup_Linux_x64_<Version>.sh
- CreateCertificate_Linux_x64_<Version>.sh
Certificates for communication between the ESA and the RPP
- Run the following command to create ESA certificates for establishing a secure communication between the ESA and the RPP.
./CertificatesSetup_Linux_x64_<Version>.sh (-u <username> -p <password>) [-h <hostname>] [--port <port>] [-d <directory>]
Options:
-u User with the Export Certificates role
-p Password for user with the Export Certificates role
-h Host or IP address of the ESA
--port Port number of the ESA
-d local directory where certificates are stored
For more information about the command, use the –help parameter as shown in the following command.
./CertificatesSetup_Linux_x64_<Version>.sh --help
The output displays all the options that can be used with the command. It also provides usage examples.
Certificates for client and server communication between RPP and Protector, and KMS-Proxy and Protector
- Run the following command to create server-side certificates.
./CreateCertificate_Linux_x64_<Version>.sh (client | server ) --name <common name> [--dir <directory> ] [--dns <dnsname>] [--ip <ip address>]
Options:
client Generate client certificate
server Generate server certificate
--name Certificate common name.
--dns Specify domain names. To specify multiple DNS names, repeat the --dns flag.
--ip Specify IP addresses. To specify multiple IP address, repeat the --ip flag.
--noenc The certificate key file is not encrypted. No secret.txt file created.
--dir Output base directory for certificates.
--print Prints OpenSSL configuration files used to generate certificates.
--help Print help message.
This command is used to create the certificates for both the Dynamic and Static-based deployments.
For more information about the command, use the –help parameter as shown in the following command.
./CreateCertificate_Linux_x64_<Version>.sh --help
The output displays all the options that can be used with the command. It also provides usage examples.
6.3.4 - Uploading the Images to the Container Repository
Before you begin, ensure that you have set up your Container Registry.
To upload the images to the Container Repository:
Install Docker on the Linux instance.
For more information about installing Docker on a Linux machine, refer to the Docker documentation.
Run the following command to authenticate your Docker client to the Container registry.
In case of AWS ECR, run the following command.
aws ecr get-login-password --region <Name of ECR region where you want to upload the container image> | docker login --username AWS --password-stdin <aws_account_id>.dkr.ecr.<Name of ECR region where you want to upload the container image>.amazonaws.com
For more information about authenticating your Docker client to Amazon ECR, refer to the AWS CLI Command Reference documentation.
In case of Azure, run the following command:
docker login <Container Registry Name>.azurecr.io
Extract the installation package.
The AP-REST, RPProxy, Policy Loader, and KMSProxy container images are extracted.
For more information about extracting the installation package, refer to the section Extracting the Installation Package.
Perform the following steps to upload the AP-REST container image to the Container registry.
a. Run the following command to load the AP-REST container image into Docker.
docker load -i REST_RHUBI-9-64_x86-64_K8S_<Version>.tar.gzb. Run the following command to list the AP-REST container image.
docker imagesc. Tag the image to the Container registry by running the following command.
docker tag <Container image>:<Tag> <Container registry path>/<Container image>:<Tag>For example for AWS ECR:
docker tag ap-rest:AWS <aws_account_id>.dkr.ecr.us-east-1.amazonaws.com/ap-rest:AWSFor more information regarding tagging an image, refer to the section Pushing an image in the AWS documentation.
For example for Azure:
docker tag ap-rest:AZURE <Container Registry Name>.azurecr.io/ap-rest:AZUREd. Push the tagged image to the Container registry by running the following command.
docker push <Container registry path>/<Container image>:<Tag>For example for AWS:
docker push <aws_account_id>.dkr.ecr.us-east-1.amazonaws.com/ap-rest:AWSFor example for Azure:
docker push <Container Registry Name>.azurecr.io/ap-rest:AZUREFor more information about creating custom images, refer to the section Using Dockerfiles to Build Custom Images.
Navigate to the directory where you have extracted the Helm charts packages for the AP-REST containers.
In the values.yaml file, update the appropriate path for the iaprestImage setting, along with the tag.
Repeat steps 1 to 6 for uploading the respective images for RPProxy, Policy Loader, and KMSProxy.
6.3.5 - Creating the AWS Environment
This section describes how to create the AWS runtime environment.
Prerequisites
Before creating the runtime environment on AWS, ensure that you have a valid AWS account and the following information:
- Login URL for the AWS account
- Authentication credentials for the AWS account
Audience
It is recommended that you have working knowledge of AWS and knowledge of the following concepts:
- Introduction to AWS S3
- Introduction to AWS Cloud Security
- Introduction to AWS EKS
6.3.5.1 - Creating the AWS Setup for Static Mode
This section describes how to create the following AWS resources for static mode:
- Data Encryption Key
- AWS S3 bucket
- AWS EFS
6.3.5.1.1 - Creating an Data Encryption Key (DEK)
To create a Data Encryption Key:
- Log in to the AWS environment.
Navigate to Services.
A list of AWS services appears.
In Security, Identity, & Compliance, click Key Management Service.
The AWS Key Management Service (KMS) console opens. By default, the Customer managed keys screen appears.
Click Create key.
The Configure key screen appears.
In the Key type section, select the Asymmetric option to create a single customer master key that will be used to perform the encrypt and decrypt operations.
In the Key usage section, select the Encrypt and decrypt option.
In the Key spec section, select one option.
For example, select RSA_4096.
In the Advanced options section, select the Single-Region Key option.
Click Next.
The Add labels screen appears.
In the Alias field, specify the display name for the key, and then click Next.
The Review and edit key policy screen appears.
Click Finish.
The Customer managed keys screen appears, displaying the newly created customer master key.
Click the key alias.
A screen specifying the configuration for the selected key appears.
In the General Configuration section, copy the value specified in the ARN field, and save it on your local machine.
You need to attach the key to the KMSDecryptAccess policy. You also need to specify this ARN value in the command for creating a Kubernetes secret for the key.
Navigate to Services > IAM.
Click Policies.
The Policies screen appears.
Select the KMSDecryptAccess policy.
The Permissions tab appears.
Click Edit policy to edit the policy in JSON format.
Modify the policy to add the ARN of the key that you have copied in step 13 to the Resource parameter.
{ "Version": "2012-10-17", "Statement": [ { "Sid": "VisualEditor0", "Effect": "Allow", "Action": "kms:Decrypt", "Resource": [ "<ARN of the AWS Customer Master Key>" ] } ] }Click Review policy, and then click Save changes to save the changes to the policy.
6.3.5.1.2 - Creating an AWS S3 Bucket
Important: This procedure is optional, and is required only if you want to use AWS S3 for storing the policy snapshot during static deployment, instead of the persistent volume.
To create an AWS S3 bucket:
- Login to the AWS environment.
Navigate to Services.
A list of AWS services appears.
In Storage, click S3.
The S3 buckets screen appears.
Click Create bucket.
The Create bucket screen appears.
In the General configuration screen, specify the following details.
In the Bucket name field, enter a unique name for the bucket.
In the AWS Region field, choose the same region in which you want to create your EC2 instance.
If you want to configure your bucket or set any specific permissions, then you can specify the required values in the remaining sections of the screen. Otherwise, you can directly go to the next step to create a bucket.
Click Create bucket.
The bucket is created.
6.3.5.1.3 - Creating an AWS EFS
Important: This procedure is optional, and is required only if you want to use AWS EFS for storing the policy package during static deployment, instead of AWS S3.
To create an AWS EFS:
- Login to the AWS environment.
Navigate to Services.
A list of AWS services appears.
In Storage, click EFS.
The File Systems screen appears.
Click Create file system.
The Configure network access screen appears.
In the VPC list, select the VPC where you will be creating the Kubernetes cluster.
Click Next Step.
The Configure file system settings screen appears.
Click Next Step.
The Configure client access screen appears.
Click Next Step.
The Review and create screen appears.
Click Create File System.
The file system is created.
Note the value in the File System ID column. You need to specify this value as the value of the volumeHandle parameter in the pv.yaml file in step 10c.
Perform the following steps if you want to use a persistent volume for storing the policy package instead of the AWS S3 bucket.
a. Create a file named storage_class.yaml for creating an AWS EFS storage class.
The following snippet shows the contents of the storage_class.yaml file.
kind: StorageClass apiVersion: storage.k8s.io/v1 metadata: name: efs-sc provisioner: efs.csi.aws.comImportant: If you want to copy the contents of the storage_class.yaml file, then ensure that you indent the file as per YAML requirements.
b. Run the following command to provision the AWS EFS using the storage_class.yaml file.
kubectl apply -f storage_class.yamlAn AWS EFS storage class is provisioned.
c. Create a file named pv.yaml for creating a persistent volume resource.
The following snippet shows the contents of the pv.yaml file.
apiVersion: v1 kind: PersistentVolume metadata: name: efs-pv1 labels: purpose: policy-store spec: capacity: storage: 1Gi volumeMode: Filesystem accessModes: - ReadWriteMany persistentVolumeReclaimPolicy: Retain storageClassName: **efs-sc** csi: driver: efs.csi.aws.com volumeHandle: **fs-618248e2:**/Important: If you want to copy the contents of the pv.yaml file, then ensure that you indent the file as per YAML requirements.
This persistent volume resource is associated with the AWS EFS storage class that you have created in step 10b.
In the storageClassName parameter, ensure that you specify the same name for the storage class that you specified in the storage_class.yaml file in step 10a.
For example, specify efs-sc as the value of the storageClassName parameter.
d. Run the following command to create the persistent volume resource.
kubectl apply -f pv.yamlA persistent volume resource is created.
e. Create a file named pvc.yaml for creating a claim on the persistent volume that you have created in step 10d.
The following snippet shows the contents of the pvc.yaml file.
apiVersion: v1 kind: PersistentVolumeClaim metadata: name: efs-claim1 spec: selector: matchLabels: purpose: "policy-store" accessModes: - ReadWriteMany storageClassName: **efs-sc** resources: requests: storage: 1GiImportant: If you want to copy the contents of the pvc.yaml file, then ensure that you indent the file as per YAML requirements.
This persistent volume claim is associated with the AWS EFS storage class that you have created in step 10b. The value of the storage parameter in the pvc.yaml defines the storage that is available for saving the policy dump.
In the storageClassName parameter, ensure that you specify the same name for the storage class that you specified in the storage_class.yaml file in step 10a.
For example, specify efs-sc as the value of the storageClassName parameter.
f. Run the following command to create the persistent volume claim.
kubectl apply -f pvc.yaml -n <Namespace>For example:
kubectl apply -f pvc.yaml -n iap-restA persistent volume claim is created. In this example, iap-rest is the namespace where the REST protector will be deployed.
g. On the Linux instance, create a mount point for the AWS EFS by running the following command.
mkdir /efsThis command creates a mount point efs on the file system.
h. Install the Amazon EFS client using the following command.
sudo yum install -y amazon-efs-utilsFor more information about installing the EFS client, refer to the section Manually installing the Amazon EFS client in the Amazon Elastic File System User Guide.
i. Run the following mount command to mount the AWS EFS on the directory created in step 10g.
sudo mount -t nfs -o nfsvers=4.1,rsize=1048576,wsize=1048576,hard,timeo=600,retrans=2,noresvport <file-system-id>.efs.<aws-region>.amazonaws.com:/ /efsFor example:
sudo mount -t nfs -o nfsvers=4.1,rsize=1048576,wsize=1048576,hard,timeo=600,retrans=2,noresvport fs-618248e2.efs.<aws-region>.amazonaws.com:/ /efsEnsure that you set the value of the <file-system-id> parameter to the value of the volumeHandle parameter, as specified in the pv.yaml file in step 10c.
For more information about the permissions required for mounting an AWS EFS, refer to the section Working with Users, Groups, and Permissions at the Network File System (NFS) Level in the AWS documentation.
6.3.5.2 - Creating a Kubernetes Cluster
Note: The steps listed in this section for creating a Kubernetes cluster are for reference use. If you have an existing Kubernetes cluster or want to create a Kubernetes cluster based on your own requirements, then you can directly navigate to step 4 to connect your Kubernetes cluster and the Linux instance. However, you must ensure that your ingress port is enabled on the Network Security group of your VPC.
Important: If you have an existing Kubernetes cluster or want to create a Kubernetes cluster using a different method, then you must install the Kubernetes Metrics Server and Cluster Autoscaler before deploying the Release.
To create a Kubernetes cluster:
Create a key pair for the EC2 instance on which you want to create the Kubernetes cluster.
For more information on creating the key pair, refer to the section Create a key pair for your Amazon EC2 instance in the Amazon EC2 documentation.
After the key pair is created, you need to specify the key pair name in the publicKeyName field of the createCluster.yaml file, for creating a Kubernetes cluster.
Login to the Linux instance, and create a file named createCluster.yaml to specify the configurations for creating the Kubernetes cluster.
The following snippet displays the contents of the createCluster.yaml file.
apiVersion: eksctl.io/v1alpha5 kind: ClusterConfig metadata: name: <Name of your Kubernetes cluster> region: <Region where you want to deploy your Kubernetes cluster> version: "<Kubernetes version>" vpc: id: "<ID of the VPC where you want to deploy the Kubernetes cluster>" subnets: #In this section specify the subnet region and subnet id accordingly private: <Availability zone for the region where you want to deploy your Kubernetes cluster>: id: "<Subnet ID>" <Availability zone for the region where you want to deploy your Kubernetes cluster> id: "<Subnet ID>" nodeGroups: - name: <Name of your Node Group> instanceType: m5.large minSize: 1 maxSize: 3 tags: k8s.io/cluster-autoscaler/enabled: "true" k8s.io/cluster-autoscaler/<Name of your Kubernetes cluster>: "owned" privateNetworking: true securityGroups: withShared: true withLocal: true attachIDs: ['<Security group linked to your VPC>'] ssh: publicKeyName: '<EC2 keypair>' iam: attachPolicyARNs: - "arn:aws:iam::aws:policy/AmazonEKS_CNI_Policy" withAddonPolicies: autoScaler: trueImportant: If you want to copy the contents of the createCluster.yaml file, then ensure that you indent the file as per YAML requirements.
For more information about the sample configuration file used to create a Kubernetes cluster, refer to the section Create cluster using config file in the eksctl documentation.
In the ssh/publicKeyName parameter, you must specify the value of the key pair that you have created in step 1.
In the iam/attachPolicyARNs parameter, you must specify the following policy ARNs:
ARN of the AmazonEKS_CNI_Policy policy - This is a default AWS policy that enables the Amazon VPC CNI Plugin to modify the IP address configuration on your EKS nodes.
For more information about this policy, refer to the AWS documentation.
You need to sign in to your AWS account to access the AWS documentation for this policy.
The content snippet displays the reference configuration required to create a Kubernetes cluster using a private VPC. If you want to use a different configuration for creating your Kubernetes cluster, then you need to refer to the section Creating and managing clusters in the eksctl documentation.
For more information about creating a configuration file to create a Kubernetes cluster, refer to the section Creating and managing clusters in the eksctl documentation.
Run the following command to create a Kubernetes cluster.
eksctl create cluster -f ./createCluster.yamlImportant: IAM User 1, who creates the Kubernetes cluster, is automatically assigned the cluster-admin role in Kubernetes.
Run the following command to connect your Linux instance to the Kubernetes cluster.
aws eks update-kubeconfig --name <Name of Kubernetes cluster>Validate whether the cluster is up by running the following command.
kubectl get nodesThe command lists the Kubernetes nodes available in your cluster.
Deploy the Cluster Autoscaler component to enable the autoscaling of nodes in the EKS cluster.
This step is required only if the Cluster Autoscaler component is not installed.
For more information about deploying the Cluster Autoscaler, refer to the section Deploy the Cluster Autoscaler in the Amazon EKS documentation.
Install the Metrics Server to enable the horizontal autoscaling of pods in the Kubernetes cluster.
This step is required only if the Metric Server is not installed.
For more information about installing the Metrics Server, refer to the section Horizontal Pod Autoscaler in the Amazon EKS documentation.
After you have created the Kubernetes cluster, you can deploy the AP-REST container using dynamic or static mode of deployment.
Run following commands to tag the cluster subnets to ensure that the Elastic load balancer can discover them.
aws ec2 create-tags --tags Key=kubernetes.io/cluster/<Cluster Name>,Value=shared --resources <Subnet ID>aws ec2 create-tags --tags Key=kubernetes.io/role/internal-elb,Value=1 --resources <Subnet ID>aws ec2 create-tags --tags Key=kubernetes.io/role/elb,Value=1 --resources <Subnet ID>
Repeat this step for all the cluster subnets.
6.3.6 - Creating the OpenShift Environment
This section describes how to create the OpenShift runtime environment.
Prerequisites
Before creating the runtime environment on OpenShift, ensure that you have a valid OpenShift account and the following information:
- Login URL for the OpenShift account
- Authentication credentials for the OpenShift account
Audience
It is recommended that you have working knowledge of OpenShift.
Logging in to the OpenShift environment
This section describes how you can login to the OpenShift environment.
To log in to the OpenShift environment:
Access OpenShift at the following URL:
https://<OpenShift Console URL>/dashboardsClick Sign In to the Console. The Sign in screen appears.
Enter the following details:
- User name
- Password
Click Log In. After successful authentication, the Dashboard screen appears.
Creating secrets
This section describes how to create the Kubernetes secretes required for the OpenShift deployment.
On the Linux instance, navigate to the location where you have extracted the Helm charts.
Run the following command to create a Kubernetes secret for accessing the image registry using existing Docker credentials.
oc create secret generic regcred --from-file=.dockerconfigjson=<PATH_TO_DOCKER_CONF
IG>/config.json --type=kubernetes.io/dockerconfigjson --namespace <NAMESPACE>
For example:
oc create secret generic regcred --from-file=.dockerconfigjson=<PATH_TO_DOCKER_CONF
IG>/config.json --type=kubernetes.io/dockerconfigjson --namespace iap-rest
- Create a credentials file using the following format and ensure that you specify the required values for accessing the AWS.
[default]
aws_access_key_id = <AWS_ACCESS_KEY_ID>
aws_secret_access_key = <AWS_SECRET_ACCESS_KEY>
aws_session_token = <AWS_SESSION_TOKEN>
region = us-east-1
- Create the Kubernetes secret for accessing the AWS KMS using the credentials file created in step 3.
oc -n <NAMESPACE> create secret generic pty-aws-credentials --from-file=credentials=./credentials
6.3.7 - Creating the Azure Environment
This section describes how to create the Azure runtime environment.
Prerequisites
Before creating the runtime environment on Azure, ensure that you have a valid Azure account and the following information:
- Login URL for the Azure account
- Authentication credentials for the Azure account
Audience
It is recommended that you have working knowledge of Azure and knowledge of the following concepts:
- Introduction to Azure Storage Container and Azure Storage Blob
- Introduction to Azure Cloud Security
- Introduction to Azure AKS
- Introduction to Azure Key Vault
6.3.7.1 - Creating the Azure Setup for Static Mode
This section describes how to create the following Azure resources for static mode:
- Data Encryption Key
- Azure Storage Container
6.3.7.1.1 - Creating an Azure Key
Create an Azure Key using the Azure Portal
This section describes how to create an Azure Key using the Azure portal.
To create an Azure Key:
Login to the Azure environment.
Click the Portal menu icon.
The Portal menu appears.
Navigate to All services.
The All services screen appears.
Select Key vaults under the SECURITY section.
The Key vaults screen appears.
Click Add.
The Create key vault screen appears.
On the Basics tab, enter the following details:
Field Description Subscription By default, Azure Cloud Platform is selected. Resource group Select the required resource group. Key vault name Enter a name for your key vault. Region Select a region where the key vault will be created. Pricing tier Select a pricing tier. For example, Standard or Premium. Click Next to navigate to the Access policy tab.
The Access policy tab appears.
Click Next to navigate to the Virtual network tab.
Click Next to navigate to the Tags tab.
Add tags to the key vault, if required.
Tags are name-value pairs for categorizing the key vault resource.
Click Review + create to validate the key vault configuration.
Azure validates the information that you have entered.
Click Create to create the required key vault.
The key vault is created and the following screen appears.
Click Go to resource.
The Overview screen appears displaying information about the key vault that you have created.
On the left pane, under the Settings section, click Keys.
The Keys screen appears.
Click Generate/Import to create a key.
The Create a key screen appears.
Enter the following details for the key.
Field Description Options Select Generate to generate the key. Name Enter the name for your Azure key. Key Type Specify the key type. Select RSA. RSA Key Size Specify the key size for RSA. Select the value as 3072. Enabled Select Yes to enable the key. Click Create.
The key is created.
Click the key name.
The Versions screen for the key appears. It lists all the versions for the key.
Click the specific key version.
The Key Version screen appears. This screen displays the properties and settings for the specific key version.
Click the icon next to the Key Identifier field to copy the field value to the clipboard.
A message appears informing that the identifier has been copied.
The following is an example of an Azure key identifier:
https://<Key_Vault_Name>.vault.azure.net/keys/<Key_Name>/0a5e4ea190a24707983ffd0efcc03c8a
You need to paste this identifier as the value of the public key label for encrypting the policy.
For more information about using the public key for encrypting the policy, refer to the section [Retrieving the Policy from the ESA](/docs/rest_container/iap_rest_installation/iap_rest_aws_azure_installation/iap_rest_using_devops/iap_rest_retrieving_package_from_esa/).
- In the Permitted operations section, select the Decrypt check box and clear all the remaining check boxes.
This ensures that only the **Decrypt** operation is permitted for the Azure key.
- Click Save to save the changes.
Creating an Azure Key using the CLI
This section describes how to create an Azure Key using the CLI.
- Run the following command to create the Azure Key Vault.
az keyvault create -g $RG -n $VAULT -l $LOC --enable-rbac-authorization true
In this command:
RG: Environment variable for the Azure Resource Group.VAULT: Environment variable for the Azure Key Vault.LOC: Environment variable for the account default region.
- Run the following command to create the Azure key to be used for encrypting the policy package.
az keyvault key create --vault-name $VAULT --name $KEY --kty RSA --size 2048 --ops decrypt encrypt
- Run the following command to generate the public key.
az keyvault key download \
--vault-name pty-kv-dev-01 \
--name pty-kek \
--file pub.pem
awk 'BEGIN{ORS="\\n"}1' pub.pem
The output displays the Key ID of the public key and the value of the public key in JSON format.
For more information about using the public key for encrypting the policy, refer to the section Retrieving the Policy from the ESA.
6.3.7.1.2 - Creating an Azure Storage container
Important: This procedure is optional and is required only if you want to use Azure Storage Container for storing the policy snapshot during static deployment.
To create an Azure Storage Container:
Login to the Azure environment.
Click the Portal menu icon.
The Portal menu appears.
Click Storage accounts.
The Storage accounts screen appears.
Click Create.
The Create storage account screen appears. By default, the Basics tab appears.
In the Basics tab, enter the following mandatory details.
| Field | Description |
|---|---|
| Subscription | By default, this value is set to Azure Cloud Platform. |
| Resource group | Select the required resource group. |
| Region | Select a region where the Azure storage account will be created. For example, select (US) US East 2. |
Note: Retain the default values for all the remaining tabs on the Create storage account screen.
Click Review + create to validate the entered information.
Azure validates the information that you have entered.
Click Create to create the storage account.
The storage account is created and the following screen appears.
Click Go to resource.
The Overview screen appears, displaying the details of your storage account.
Perform the following steps to create a storage container.
On the left pane, click Data storage > Containers.
The Containers screen appears.
Click Container.
The New Container screen appears.
Specify a name for the container in the Name field.
Retain the default value for the Anonymous access level list.
The default value is set to Private (no anonymous access).
Click OK to create the container.
6.3.7.2 - Creating a Kubernetes Cluster
This section describes how to create a Kubernetes Cluster on Azure.
Note: The steps listed in this procedure for creating a Kubernetes cluster are for reference use. If you have an existing Kubernetes cluster or want to create a Kubernetes cluster based on your requirements, then you can directly navigate to step 9 to connect your Kubernetes cluster and the Linux instance. However, you must ensure that your ingress port is enabled on the Network Security group of your VPC.
To create a Kubernetes cluster:
Login to the Azure environment.
Click the Portal menu icon
The Portal menu appears.
Navigate to All Services > Containers > Kubernetes services.
The Kubernetes services screen appears.
Click Add.
The Create Kubernetes cluster screen appears.
In the Resource group field, select the required resource group.
In the Kubernetes cluster name field, specify a name for your Kubernetes cluster.
Retain the default values for the remaining settings.
Click Review + create to validate the configuration.
Click Create to create the Kubernetes cluster.
The Kubernetes cluster is created.
9. Login to the Linux instance, and run the following command to connect your Linux instance to the Kubernetes cluster.
`az aks get-credentials --resource-group <Name of Resource Group> --name <Name of Kubernetes Cluster>`
The Linux instance is now connected with the Kubernetes cluster. You can now run commands using the Kubernetes command line interface \(kubectl\) to control the nodes on the Kubernetes cluster.
Validate whether the cluster is up by running the following command.
kubectl get nodesThe command lists the Kubernetes nodes available in your cluster.
Run the
exportcommand to export the following environment variables.
export RG=<Resource Group Name>
export AKS=<AKS cluster Name>
export NS=<Namespace where protector is deployed>
export LOC=eastus (account default region)
export VAULT=<Azure Key Vault name>
export KEY=<Azure Key Name>
- Run the following commands to enable the OpenID Connect (OIDC) and workload identity on the AKS cluster.
az aks update -g $RG -n $AKS --enable-oidc-issuer --enable-workload-identity
export OIDC=$(az aks show -g $RG -n $AKS --query oidcIssuerProfile.issuerUrl -o tsv)
6.4 - Installing the Protector
This section provides an overview of the steps required to install the REST Container using either the Static or the Dynamic method.
6.4.1 - Installing the Protector on Amazon EKS or Azure AKS
This section provides an overview of the steps required to install the REST Container on Amazon EKS or Azure AKS using either the Static or the Dynamic method.
6.4.1.1 - Deploying REST Container for Dynamic Method
This section describes how to deploy the REST Container integrated with RPP. Deploy in the following order:
- Log Forwarder
- RPP
- REST Container
6.4.1.1.1 - Deploying Log Forwarder
The Log Forwarder is deployed as a DaemonSet. The following steps describe how to deploy Log Forwarder.
On the Linux instance, run the following command to create the namespace required for Helm deployment.
kubectl create namespace <Namespace name>For example:
kubectl create namespace iap-restOn the Linux instance, navigate to the location where you have extracted the Helm charts to deploy the Log Forwarder.
For more information about the extracted Helm charts, refer to the section Extracting the Installation Package.
The logforwarder > values.yaml file contains the default configuration values for deploying the Log Forwarder container on the Kubernetes cluster. The following content shows an extract of the values.yaml file.
... # - Protegrity PSU(Protegrity Storage Unit)/ESA configuration. # Logforwarder will send audit records to below specified hosts/ip. # User can specify multiple PSU/ESA distribute the audit records and avoid downtime. opensearch: # -- specify a given name to uniquely identify PSU/ESA in the deployment. - name: # -- hostname/ip address of PSU/ESA host: # -- port address of ESA/PSU port: 9200 # - name: node-2 # host: test-insight # port: 9200 # -- Kubernetes service configuration, represents a TCP endpoint to receive audit records # from the protectors. service: # -- Configure service type: ClusterIP for Logforwarder endpoint. type: ClusterIP # -- port to accept incoming audit records from the protector port: 15780 ...Modify the default values in the values.yaml file as required.
| Field | Description |
|---|---|
| opensearch/name | Specify the unique name for the ESA. |
| opensearch/host | Specify the host name or IP address of the ESA. |
| opensearch/port | Specify the port number of the ESA. The default value is 9200. |
| service/type | Specify the service type for the Log Forwarder. The default value is ClusterIP. |
| service/port | Specify the service port of the Log Forwarder, which receives the audit logs from the protectors. The default value is 15780. |
- Run the following command to deploy the Log Forwarder on the Kubernetes cluster.
helm install <Release_Name> --namespace <Namespace where you want to deploy the RPP container> <Location of the directory that contains the Helm charts>
For example:
helm install log1 --namespace iap-rest <Custom_path>/commonlogforwarder/
<Custom_path> is the directory where you have extracted the installation package.
- Run the following command to check the status of the pods.
kubectl get pods -n <Namespace>
For example:
kubectl get pods -n iap-rest
NAME READY STATUS RESTARTS AGE
log1-logforwarder-f6gvj 1/1 Running 0 11h
log1-logforwarder-ls4hn 1/1 Running 0 11h
log1-logforwarder-phk4t 1/1 Running 0 11h
log1-logforwarder-z2mz7 1/1 Running 0 11h
As the Log Forwarder is deployed as a DaemonSet, one instance of Log Forwarder is deployed on each node. In this example, one Log Forwarder pod is deployed per node.
For information about configuring the Log Forwarder, refer to the section Configuration Parameters for Forwarding Audits and Logs.
6.4.1.1.2 - Deploying Resilient Package Proxy (RPP)
The following steps describe how to deploy RPP.
Note: Ensure that you have deployed the Log Forwarder before deploying the RPP. For more information about deploying the Log Forwarder, refer to the section Deploying the Log Forwarder.
- Run the following command on the Jump box to generate the common certificate from the ESA certificates.
CertificatesSetup_Linux_x64_<Version>.sh -u <User> -p <Password> -h <Hostname or IP address of ESA> --port <Port number of ESA> -d <Directory>
For example:
CertificatesSetup_Linux_x64_<Version>.sh -u admin -p admin12345 -h 10.10.10.10 --port 8443 -d rpproxy
For more information about generating the ESA certificates, refer to the section Creating Certificates.
The following files are created:
- CA.pem
- cert.key
- cert.pem
- secret.txt
2. Run the following command to create a Kubernetes secret using the common certificate generated in step 1.
kubectl -n <Namespace> create secret generic common-cert --from-file=CA.pem=./CA.pem --from-file=cert.key=./cert.key --from-file=cert.pem=./cert.pem --from-file=secret.txt=./secret.txt
Specify this secret as the value of the commonCertSecrets parameter in the values.yaml file. In this case, this secret is used in the following ways:
- RPP uses the certificate as an upstream server certificate to download the policy packages from the ESA.
- The protector uses the certificate as a client certificate to download the policy packages from the RPP.
If you do not specify any value for the commonCertSecrets parameter, then you need to specify separate values for the rpp/upstream/certificateSecret and service/certificateSecret parameters.
3. Run the following command on the Jump box to generate the upstream certificate between the ESA and the RPP.
CertificatesSetup_Linux_x64_<Version>.sh -u <User> -p <Password> -h <Hostname or IP address of ESA> --port <Port number of ESA> -d <Directory>
For example:
CertificatesSetup_Linux_x64_<Version>.sh -u admin -p admin12345 -h 10.10.10.10 --port 8443 -d rpproxy
For more information about generating the ESA certificates, refer to the section Creating Certificates.
The following files are created:
- CA.pem
- cert.key
- cert.pem
- secret.txt
Note: This certificate is created only if you are not using the common certificate.
4. Run the following command to create a Kubernetes secret using the upstream certificate generated in step 3.
kubectl -n <Namespace> create secret generic upstream-cert --from-file=CA.pem=./CA.pem --from-file=cert.key=./cert.key --from-file=cert.pem=./cert.pem --from-file=secret.txt=./secret.txt
Note: This secret is created only if you are not using the common certificate.
Specify this secret as the value of the rpp/upstream/certificateSecret parameter in the values.yaml file.
5. Run the following command to generate the service TLS certificate.
CreateCertificate_Linux_x64_<Version>.sh server --name <Directory> --dns <Release_Name>.<namespace>.svc
For example:
CreateCertificate_Linux_x64_<Version>.sh server --name rpproxy --dns rpp.iap-rest.svc
For more information about generating the server certificates, refer to the section Creating Certificates.
The following client certificates files are created in the rpproxy folder:
- cert.pem
- cert.key
- CA.pem
- secret.txt
This certificate is used by the protector as a server certificate to authenticate the RPP to download policy packages.
Ensure that the namespace and release name that you specify in this command are the same names that you specify in step 7 while deploying the RPP Helm chart.
Note: This certificate is created only if you are not using the common certificate.
6. Run the following command to generate the secret for the service TLS certificate.
kubectl -n <Namespace> create secret generic service-certs --from-file=CA.pem=<path-to-CA.pem> --from-file=cert.key=<path-to-cert.key> --from-file=cert.pem=<path-to-cert.pem> --from-file=secret.txt=<path-to-secret.txt>
For more information about generating the client certificates, refer to the section Creating Certificates.
Note: This secret is created only if you are not using the common certificate.
Specify this secret as the value of the service/certificateSecret parameter in the values.yaml file.
7. On the Linux instance, navigate to the location where you have extracted the Helm charts to deploy the RPP.
For more information about the extracted Helm charts, refer to the section Initializing the Linux instance.
The rp-proxy > values.yaml file contains the default configuration values for deploying the RPP container on the Kubernetes cluster.
...
podSecurityContext:
fsGroup: 1000
...
#-- k8s secret for storing common certificates
# eg. kubectl command:
# kubectl -n $RPP_NAMESPACE create secret generic common-certs \
# --from-literal=CA.pem=<path-to-CA.pem> --from-literal=cert.key=<path-to-cert.key> \
# --from-literal=cert.pem=<path-to-cert.pem> --from-literal=secret.txt=<path-to-secret.txt>
commonCertSecrets:
rpp:
#-- upstream configuration
# host: Upstream host to connect
# port: Upstream port to connect
upstream:
host:
port: 25400
#-- certificateSecret : k8s secret for storing upstream tls certificates
# NOTE : Only to be set when not using common certificate secret
# eg. kubectl command:
# kubectl -n $RPP_NAMESPACE create secret generic upstream-certs \
# --from-literal=CA.pem=<path-to-CA.pem> --from-literal=cert.key=<path-to-cert.key> \
# --from-literal=cert.pem=<path-to-cert.pem> --from-literal=secret.txt=<path-to-secret.txt>
certificateSecret:
#-- logging configuration
# logLevel: Specifies the logging level for rpproxy
# INFO (default)
# ERROR
# WARN
# DEBUG
# TRACE
# logHost: Host to forward the logs (Default : 127.0.0.1)
# logPort: Port to forward the logs (Default : 15780)
logging:
logLevel: "INFO"
logHost: "127.0.0.1"
logPort: 15780
#-- service configuration
# certificateSecret : k8s secret for storing service tls certificates
# NOTE : Only to be set when not using common certificate secret
# eg. kubectl command:
# kubectl -n $RPP_NAMESPACE create secret generic service-certs \
# --from-literal=CA.pem=<path-to-CA.pem> --from-literal=cert.key=<path-to-cert.key> \
# --from-literal=cert.pem=<path-to-cert.pem> --from-literal=secret.txt=<path-to-secret.txt>
# cacheTTL:
# TTL sets the duration (in seconds) of which a cached item is considered fresh.
# When a cached item's TTL expires, the item will be revalidated.
service:
certificateSecret:
cacheTTL: 60
...
- Modify the default values in the values.yaml file as required.
| Field | Description |
|---|---|
| podSecurityContext | Specify the privilege and access control settings for the pod. The default values are set as follows:
Ensure that you uncomment the field. |
| commonCertSecrets | Specify the Kubernetes secret, which you have created in step 2, for storing the common certificates. If you specify the value of this parameter, then do not specify the values for the rpp/upstream/certificateSecret and service/certificateSecret parameters. The same common certificate will be used by RPP to download the policy packages from the ESA and by the protector to download the policy packages from the RPP. |
| rpp/upstream/host | Specify the host name or IP address of the upstream server that is providing the policy packages. The upstream server can be another RPP or the ESA. |
| rpp/upstream/port | Specify the port number of the upstream server that is providing the policy packages. The default value is 25400. |
| rpp/upstream/certificateSecret | Specify the Kubernetes secret, which you have created in step 4, that contains the certificate used to authenticate the ESA. Note: This certificate is set only if you are not using the commonCertSecrets parameter. |
| logging/logLevel | Specify the details about the application log level during runtime. You can set one of the following values:
The default value is INFO. |
| logging/logHost | Specify the service hostname of the Log Forwarder, where the logs are forwarded. The default value is <Helm_Installation_Name>-<Helm_Chart_Name>.<Namespace>.svc.For example, iaplog-logforwarder.iaprest.svc. |
| logging/logPort | Specify the service port of the Log Forwarder, where the logs are forwarded. The default value is 15780. |
| service/certificateSecret | Specify the Kubernetes secret, which you have created in step 6, that enables the protector to authenticate the RPP. Note: This certificate is set only if you are not using the commonCertSecrets parameter. |
| service/cacheTTL | Specify the duration to refresh the cache. When a cache TTL expires, the cache has to be revalidated or updated. This interval controls the refresh time of the policy. The default value in seconds is 60. |
- Run the following command to deploy the RPP on the Kubernetes cluster.
helm install <Release_Name> --namespace <Namespace where you want to deploy the RPP container> <Location of the directory that contains the Helm charts>
For example:
helm install rpp --namespace iap-rest rpproxy/
Ensure that you specify the same release name and namespace that you have used while creating the service TLS certificate in step 5.
- Run the following command to check the status of the pods.
kubectl get pods -n <Namespace>
For example:
kubectl get pods -n iap-rest
NAME READY STATUS RESTARTS AGE
rpp-rpproxy-5fd7d859b6-p9544 1/1 Running 0 11h
6.4.1.1.3 - Deploying the REST Container with Dynamic Method
The following steps describe how to deploy the REST Container.
- Run the following command to generate the client certificate for connecting to the RPP.
CreateCertificate_Linux_x64_<Version>.sh client --name <Directory> --dns <Release_Name>.<namespace>.svc
For example:
CreateCertificate_Linux_x64_<Version>.sh client --name rpproxy-client --dns rpp.iap-rest.svc
For more information about generating the client certificates, refer to the section Creating Certificates.
The following client certificates files are created in the rpproxy-client folder:
- cert.pem
- cert.key
- CA.pem
- secret.txt
This certificate is used by the protector as a client certificate to authenticate the RPP to download policy packages.
Ensure that the namespace and release name that you specify in this command are the same names that you specify in step 7 while deploying the RPP Helm chart.
2. Run the following command to generate the secret for the RPP client certificate created in step 1.
kubectl -n <RPP_Namespace> create secret generic rpp-client-certs --from-file=CA.pem=<path-to-CA.pem> --from-file=cert.key=<path-to-cert.key> --from-file=cert.pem=<path-to-cert.pem> --from-file=secret.txt=<path-to-secret.txt>
For more information about generating the client certificates, refer to the section Creating Certificates.
Specify this secret as the value of the protector/policy/certificates parameter in the values.yaml file.
3. Run the following command to generate the TLS certificate for the server that hosts the REST Container endpoint.
CreateCertificate_Linux_x64_<Version>.sh server --name <Directory> --dns <DNS_Name> --noenc
CreateCertificate_Linux_x64_<Version>.sh server --name rest-server --dns test-sampleapp-10-v1.example.com --noenc
The following server certificates files are created in the rest-server folder:
- cert.pem
- cert.key
- CA.pem
For more information about generating the certificates, refer to step 6 in section Creating Certificates.
4. Run the following command to generate a secret using the server certificate for the REST Container endpoint.
kubectl -n <Namespace> create secret generic pty-rest-server-secret --from-file=CA.pem=<path-to-CA.pem> --from-file=cert.key=<path-to-cert.key> --from-file=cert.pem=<path-to-cert.pem>
For more information about generating the server certificates, refer to the section Creating Certificates.
Specify this secret as the value of the service/certificates parameter in the values.yaml file.
- Run the following command to generate the client certificate for accessing the REST Container endpoint.
CreateCertificate_Linux_x64_<Version>.sh client --name <Directory> --dns <Namespace_name> --noenc
CreateCertificate_Linux_x64_<Version>.sh client --name rest-client --dns test-sampleapp-10-v1.example.com --noenc
The following client certificates files are created in the rest-client folder:
- cert.pem
- cert.key
- CA.pem
These certificates are used in the curl command for invoking the REST APIs.
For more information about generating the certificates, refer to step 6 in section Creating Certificates
On the Linux instance, navigate to the location where you have extracted the Helm charts to deploy the REST Container.
The dynamic > values.yaml file contains the default configuration values for deploying the RPP container on the Kubernetes cluster.
# specify the image registry credential secret name
# in case if the registry is accessible without any credentials,
# uncomment the square brackets and comment name field.
imagePullSecrets: []
# - name: regcred
nameOverride: ""
fullnameOverride: ""
# REST protector image configuration
iaprestImage:
# -- rest protector image registry address
repository:
# -- rest protector image tag name
tag:
# -- The pullPolicy for a container and the tag of the image affect
# when the kubelet attempts to pull (download) the specified image.
pullPolicy: IfNotPresent
# Docker Hub Image (Root User): docker.io/nginx:stable
# To use nginx image that runs with non-root permissions
# Ref. https://hub.docker.com/r/nginxinc/nginx-unprivileged
nginxImage:
# -- nginx image registry address
repository:
# -- nginx image tag name
tag:
# -- The pullPolicy for a container and the tag of the image affect
# when the kubelet attempts to pull (download) the specified image.
pullPolicy: IfNotPresent
# specify CPU and memory requirement of REST protector container
iaprestResources:
limits:
cpu: 1000m
memory: 3000Mi
requests:
cpu: 500m
memory: 800Mi
# specify CPU and memory requirement of nginx proxy container
nginxResources:
limits:
cpu: 500m
memory: 512Mi
requests:
cpu: 200m
memory: 200Mi
...
## -- pod service account to be used
## leave the field empty if not applicable
serviceAccount:
# The name of the service account to use.
name:
# Specify any additional annotation to be associated with pod
podAnnotations:
checksum/nginx-config: '{{ include (print $.Template.BasePath "/nginx-configmap.yaml") . | sha256sum }}'
checksum/rest-config: '{{ include (print $.Template.BasePath "/rest-configmap.yaml") . | sha256sum }}'
## set the Pod's security context object
## leave the field empty if not applicable
#---Uncomment the fsGroup setting if deploying on AWS EKS
podSecurityContext:
#fsGroup: 1000
## set the iapRest Container's security context object
## leave the field empty if not applicable
iaprestContainerSecurityContext:
capabilities:
drop:
- ALL
allowPrivilegeEscalation: false
privileged : false
runAsNonRoot : true
readOnlyRootFilesystem: true
seccompProfile:
type: RuntimeDefault
## set the nginx Container's security context object
## leave the field empty if not applicable
nginxContainerSecurityContext:
capabilities:
drop:
- ALL
allowPrivilegeEscalation: false
privileged : false
runAsNonRoot : true
readOnlyRootFilesystem: true
seccompProfile:
type: RuntimeDefault
# protector configuration
protector:
# Policy information for the protector initialization
policy:
# Cadence determines how often the protector connects with ESA / proxy to
# fetch the policy updates in background. Default is 60 seconds.
# So by default, every 60 seconds protector tries to fetch the policy updates.
# If the cadence is set to "0", then the protector will get the policy only
# once, which is not recommended.
#
# Default 60.
cadence: 60
# -- Host/IP to the service providing Resilient Packages either rpproxy
# service or ESA.
host:
# -- certificates used to communicate with service providing Resilient packages.
# specify certificate secret name.
# -- TLS certificate rp-proxy service.
# kubectl -n $NAMESPACE create secret generic pty-rpp-tls \
# --from-file=cert.pem=./certs/cert.pem \
# --from-file=cert.key=./certs/cert.key \
# --from-file=CA.pem=./ca/CA.pem \
# --from-file=secret.txt=./certs/secret.txt
certificates:
# Logforwarder configuration
logs:
# -- In case that connection to fluent-bit is lost, set how audits/logs are handled
#
# drop : Protector throws logs away if connection to the fluentbit is lost.
# error : (default) Protector returns error without protecting/unprotecting
# data if connection to the fluentbit is lost.
mode: error
# -- Host/IP to fluent-bit where audits/logs will be forwarded from the protector
#
# Default localhost
host:
# nginx configuration
nginx:
# configure audit records generate by nginx service.
# The generated records are sent to stdout.
# Error logs are enabled by default.
logs:
# -- configure http client request access logs, by default the records
# are sent to stdout
request_logs: false
# -- configure kubelet health check probe access logs, by default the records
# are sent to stdout.
probe_logs: false
# -- specify the initial no. of rest Pod replicas
replicaCount: 1
# HPA configuration
autoScaling:
# -- lower limit on the number of replicas to which the autoscaler
# can scale down to.
minReplicas: 1
# -- upper limit on the number of replicas to which
# the autoscaler can scale up. It cannot be less that minReplicas.
maxReplicas: 10
# -- CPU utilization threshold which triggers the autoscaler
targetCPU: 70
# Kubernetes service configuration, represents a HTTP service to host
# REST protector endpoint.
service:
# -- Configure service type: LoadBalancer or ClusterIP for rest protector
# endpoint
type: ClusterIP
port: 443
# -- secret name containing server TLS certificates to host
# rest protector endpoint.
# kubectl -n $NAMESPACE create secret generic pty-rest-tls \
# --from-file=cert.pem=./certs/cert.pem \
# --from-file=cert.key=./certs/cert.key \
# --from-file=CA.pem=./ca/CA.pem
certificates:
# -- Specify k8s service related annotations
# annotation can configure internal load balancer
# AWS internal load balancer
#service.beta.kubernetes.io/aws-load-balancer-internal: "true"
# AZURE internal load balancer
#service.beta.kubernetes.io/azure-load-balancer-internal: "true"
# GCP internal load balancer
#networking.gke.io/load-balancer-type: "Internal"
annotations:
#service.beta.kubernetes.io/aws-load-balancer-internal: "true"
#service.beta.kubernetes.io/azure-load-balancer-internal: "true"
#networking.gke.io/load-balancer-type: "Internal"
- Modify the default values in the values.yaml file as required.
| Field | Description |
|---|---|
| iaprestImage | Specify the repository and tag details for the REST Container image. |
| nginxImage | Specify the repository and tag details for the NGINX image. For example:
|
| iaprestResources | Specify the CPU and memory requirements for the REST Container. |
| nginxResources | Specify the CPU and memory requirements for the NGINIX container. |
| serviceAccount/name | Specify the name of the pod service account. Leave the field empty if it is not applicable. |
| podSecurityContext | Specify the privilege and access control settings for the pod. The default values are set as follows:
Ensure that you uncomment the field. |
Container Security Context:
| Specify the privilege and access control settings for the REST Container and the NGINX containers respectively. |
| protector/policy/cadence | Specify the time interval in seconds after which the protector connects with the RPProxy to retrieve the policy package. By default, the value is set to 60. Ensure that the value is note set to 0. Else, the protector will retrieve the policy only once. |
| protector/policy/host | Specify the host name or IP address of the RPProxy. |
| protector/policy/certificates | Specify the name of the secret for the certificate, which you have created in step 2 that is used to authenticate the RPProxy for downloading the policy package. |
| protector/logs/mode | Specify one of the following options in case the connection to the Log Forwarder is lost:
By default, the value is set to error. |
| protector/logs/host | Specify the service hostname of the Log Forwarder, where the logs are forwarded. The default value is <Helm_Installation_Name>-<Helm_Chart_Name>.<Namespace>.svc. For example, iaplog-logforwarder.iaprest.svc. |
| nginx/logs/request_logs | Specify whether to enable or disable the HTTP client request access logs. By default, the value is set to False. |
| nginx/logs/probe_logs | Specify whether to enable or disable the Kubelet health check probe access logs. By default, the value is set to False. |
| replicaCount | Specify the initial number of the REST pod replicas. |
| autoScaling | Specify the configurations required for the Horizontal Pod Autoscaling. |
| service/type | Specify the service type for the REST Container. By default, this value is set to ClusterIP. Change this value to LoadBalancer to send an HTTPS request to the REST Container pod from outside the cluster. |
| service/port | Specify the service port number for the REST container. By default, the value is set to 443. |
| service/certificates | Specify the name of the secret, which you have created in step 4 that contains the server TLS certificates to the host the REST protector endpoint. |
| service/annotations | Specify the annotations for the respective Cloud platforms if you want to use the internal load balancer instead of the NGINX ingress. By default, this value is left blank. |
- Run the following command to deploy the REST Container on the Kubernetes cluster.
helm install <Release_Name> --namespace <Namespace where you want to deploy the REST container> <Location of the directory that contains the Helm charts>
For example:
helm install iap-rest-dynamic --namespace iap-rest dynamic/
- Run the following command to check the status of the pods.
kubectl get pods -n <Namespace>
For example:
kubectl get pods -n iap-rest
NAME READY STATUS RESTARTS AGE
iap-rest-iap-rest-dynamic-7b97d5dff7-grqph 2/2 Running 0 11h
log1-logforwarder-f6gvj 1/1 Running 0 11h
log1-logforwarder-ls4hn 1/1 Running 0 11h
log1-logforwarder-phk4t 1/1 Running 0 11h
log1-logforwarder-z2mz7 1/1 Running 0 11h
rpp-rpproxy-5fd7d859b6-p9544 1/1 Running 0 11h
6.4.1.1.4 - Uninstalling the Protector in Dynamic Method
To uninstall the Protector:
- Run the following command to uninstall the Log Forwarder from the Kubernetes cluster.
helm uninstall <Release_Name> --namespace <Namespace where the Log Forwarder is deployed>
For example:
helm uninstall log1 --namespace iap-rest
- Run the following command to uninstall the RPP from the Kubernetes cluster.
helm uninstall <Release_Name> --namespace <Namespace where RPP is deployed>
For example:
helm uninstall rpp --namespace iap-rest
- Run the following command to uninstall the REST Container from the Kubernetes cluster.
helm uninstall <Release_Name> --namespace <Namespace where the REST Container is deployed>
For example:
helm uninstall iap-rest-dynamic --namespace iap-rest
- Run the following command to delete the Kubernetes secrets.
kubectl delete secret <Secret_Name> --namespace <Namespace where the REST Container is deployed>
For example:
kubectl delete secret common-cert --namespace iap-rest
Repeat this step to delete all the secrets that you have created while deploying the RPP and the REST Container:
- common-cert
- upstream-cert
- service-certs
- rpp-client-certs
- pty-rest-server-secret
- regcred
- Run the following command to delete the Kubernetes namespace.
helm delete namespace <Namespace where the REST Container is deployed>
For example:
helm delete namespace iap-rest
6.4.1.2 - Deploying REST Container in Static Mode
This section describes how to deploy the REST Container in static mode.
6.4.1.2.1 - Retrieving the Policy Package from the ESA
This section describes how to invoke the RPS APIs to retrieve the policy package using the ESA.
Note: Ensure that the Export Resilient Package permission is granted to the role that is assigned to the user exporting the package from the ESA.
Warning: Do not modify the package that has been exported using the RPS Service API.
To retrieve the policy package from the ESA:
Download the policy package from the ESA and encrypt the policy package using a KMS with the RPS API.
If you are using 10.1 ESA, then refer to the section Using the Encrypted Resilient Package REST APIs for more information about the RPS API.
If you are using 10.2 ESA, then refer to the section Using the Encrypted Resilient Package REST APIs for more information about the RPS API.
If you are using Protegrity Provisioned Cluster, then navigate to Protegrity Product Documentation. Then, navigate to Edition > AI Team Edition > Infrastructure > Protegrity REST APIs > Using the Encrypted Resilient Package REST APIs for more information about the RPS API.
The policy package is downloaded to your machine.
Copy the policy package file to an AWS S3 bucket or AWS EFS, as required.
6.4.1.2.2 - Deploying Log Forwarder
The Log Forwarder is deployed as a DaemonSet. The following steps describe how to deploy Log Forwarder.
On the Linux instance, run the following command to create the namespace required for Helm deployment.
kubectl create namespace <Namespace name>For example:
kubectl create namespace iap-restOn the Linux instance, navigate to the location where you have extracted the Helm charts to deploy the Log Forwarder.
For more information about the extracted Helm charts, refer to the section Extracting the Installation Package.
The logforwarder > values.yaml file contains the default configuration values for deploying the Log Forwarder container on the Kubernetes cluster. The following content shows an extract of the values.yaml file.
... # - Protegrity PSU(Protegrity Storage Unit)/ESA configuration. # Logforwarder will send audit records to below specified hosts/ip. # User can specify multiple PSU/ESA distribute the audit records and avoid downtime. opensearch: # -- specify a given name to uniquely identify PSU/ESA in the deployment. - name: # -- hostname/ip address of PSU/ESA host: # -- port address of ESA/PSU port: 9200 # - name: node-2 # host: test-insight # port: 9200 # -- Kubernetes service configuration, represents a TCP endpoint to receive audit records # from the protectors. service: # -- Configure service type: ClusterIP for Logforwarder endpoint. type: ClusterIP # -- port to accept incoming audit records from the protector port: 15780 ...Modify the default values in the values.yaml file as required.
| Field | Description |
|---|---|
| opensearch/name | Specify the unique name for the ESA. |
| opensearch/host | Specify the host name or IP address of the ESA. |
| opensearch/port | Specify the port number of the ESA. The default value is 9200. |
| service/type | Specify the service type for the Log Forwarder. The default value is ClusterIP. |
| service/port | Specify the service port of the Log Forwarder, which receives the audit logs from the protectors. The default value is 15780. |
- Run the following command to deploy the Log Forwarder on the Kubernetes cluster.
helm install <Release_Name> --namespace <Namespace where you want to deploy the RPP container> <Location of the directory that contains the Helm charts>
For example:
helm install log1 --namespace iap-rest <Custom_path>/commonlogforwarder/
<Custom_path> is the directory where you have extracted the installation package.
- Run the following command to check the status of the pods.
kubectl get pods -n <Namespace>
For example:
kubectl get pods -n iap-rest
NAME READY STATUS RESTARTS AGE
log1-logforwarder-f6gvj 1/1 Running 0 11h
log1-logforwarder-ls4hn 1/1 Running 0 11h
log1-logforwarder-phk4t 1/1 Running 0 11h
log1-logforwarder-z2mz7 1/1 Running 0 11h
As the Log Forwarder is deployed as a DaemonSet, one instance of Log Forwarder is deployed on each node. In this example, one Log Forwarder pod is deployed per node.
For information about configuring the Log Forwarder, refer to the section Configuration Parameters for Forwarding Audits and Logs.
6.4.1.2.3 - Deploying KMSProxy Container
Prerequisites for AWS deployment
Note: This section is applicable only if you are deploying the KMSProxy Container to AWS EKS.
Perform the following steps to ensure that the KMSProxy pods have access to the AWS KMS to access the keys created in the AWS KMS.
- Run the following command to create an IAM OpenID Connect (OIDC) provider for your cluster.
eksctl utils associate-iam-oidc-provider --cluster <Name of EKS Cluster> --approve
- Run the following command to create a service account that will provide the KMSProxy pods access to the AWS KMS.
eksctl create iamserviceaccount --name <Name of service account> --namespace <Namespace where the protector is deployed> --cluster <Name of EKS Cluster> --attach-policy-arn arn:aws:iam::<aws_account_id>:policy/KMSDecryptAccess --approve
Specify the name of the service account as the value of the serviceAccount/name parameter in step 4 of the section Deploy KMSProxy Container.
Prerequisites for Azure deployment
Note: This section is applicable only if you are deploying the KMSProxy Container to Azure AKS.
Perform the following steps to ensure that the KMSProxy pods have access to the Azure Key Vault to access the keys created in the Key Vault.
- Run the following command to create a user-assigned identity, and then grant the identity access to the Azure Key Vault.
az identity create -g $RG -n pty-kms-mi
export MI_CLIENT_ID=$(az identity show -g $RG -n pty-kms-mi --query clientId -o tsv)
az role assignment create --assignee $MI_CLIENT_ID --role "Key Vault Crypto User" --scope $VAULT_ID
- Run the following command to federate the user-assigned identity to a service account.
az identity federated-credential create --name pty-kms-fed --identity-name pty-kms-mi -g $RG \
--issuer $(az aks show -g $RG -n $AKS --query oidcIssuerProfile.issuerUrl -o tsv) \
--subject system:serviceaccount:$NS:<Name of service account> --audience api://AzureADTokenExchange
Specify the name of the service account as the value of the serviceAccount/name parameter in step 4 of the section Deploy KMSProxy Container.
In this command:
- RG: Environment variable for the Resource Group Name.
- AKS: Environment variable for AKS cluster name.
- NS: Environment variable for the Namespace where the protector is deployed.
- Run the following command to create and annotate the Kubernetes service account.
kubectl -n $NS create serviceaccount <Name of service account>
kubectl -n $NS annotate serviceaccount <Name of service account> azure.workload.identity/client-id=$MI_CLIENT_ID
Deploy KMSProxy Container
The following steps describe how to deploy the KMSProxy container.
- Run the following command to generate the TLS server certificate for the KMS-Proxy service.
CreateCertificate_Linux_x64_<Version>.sh server --name <Directory> --dns <Release_Name>.<namespace>.svc
For example:
CreateCertificate_Linux_x64_<Version>.sh server --name kms-proxy-server --dns kms-proxy.<namespace>.svc
For more information about generating the client certificates, refer to the section Creating Certificates.
The following server certificates files are created in the kms-proxy-server folder:
- cert.pem
- cert.key
- CA.pem
- secret.txt
These certificates are used by the protector as a server certificate to authenticate the KMS-Proxy service.
Ensure that the namespace and release name that you specify in this command are the same names that you specify in step 5 while deploying the KMS-Proxy Helm chart.
For more information about the data encryption key used in the AWS KMS, refer to the section Creating an Data Encryption Key (DEK).
2. Run the following command to generate the secret for the KMS-Proxy server certificate.
kubectl -n <KMS-Proxy_Namespace> create secret generic service-certs --from-file=CA.pem=<path-to-CA.pem> --from-file=cert.key=<path-to-cert.key> --from-file=cert.pem=<path-to-cert.pem> --from-file=secret.txt=<path-to-secret.txt>
For more information about generating the client certificates, refer to the section Creating Certificates.
Specify this secret as the value of the service/certificateSecret parameter in the values.yaml file.
On the Linux instance, navigate to the location where you have extracted the Helm charts to deploy the KMSProxy container.
For more information about the extracted Helm charts, refer to the section Extracting the Installation Package.The kms-proxy > values.yaml file contains the default configuration values for deploying the RPP container on the Kubernetes cluster.
...
# -- service account must be linked to a cloud role to access appropriate KMS keyid.
# the cloud role must have decrypt permission on keyid
serviceAccount:
# The name of the service account to use.
name:
# Specify any additional annotation to be associated with pod
podAnnotations:
checksum/kmsproxy-config: '{{ include (print $.Template.BasePath "/configmap.yaml") . | sha256sum }}'
# -- Specify any additional labels to be associated with the pod.
# Cloud agnostic: leave empty for AWS/GCP.
# For Azure Workload Identity (secret-less access to Azure Key Vault), set:
# azure.workload.identity/use: "true"
# and set serviceAccount.name to the workload-identity annotated service account
# (leave kms.credentials empty so no client-secret file is mounted).
podLabels: {}
#azure.workload.identity/use: "true"
## set the Pod's security context object
#---Uncomment the fsGroup setting if deploying on AWS EKS or Azure AKS
podSecurityContext:
#fsGroup: 1000
## set the Container's security context object
#---Uncomment the runAsUser setting if deploying on AWS EKS
securityContext:
capabilities:
drop:
- ALL
readOnlyRootFilesystem: true
runAsNonRoot: true
#runAsUser: 1000
allowPrivilegeEscalation: false
seccompProfile:
type: RuntimeDefault
#-- cloud kms related configuration
kms:
# -- Specify Cloud KMS vendor
# expected values are: AWS, AZURE
vendor: ""
# -- Use the below setting when deploying on Openshift platform.
# -- specify the credentials secret name to access cloud KMS.
# kubectl -n $NAMESPACE create secret generic pty-kms-credentials \
# --from-file=credentials=./credentials
credentials:
#--- specify identifier for RSA key hosted by the cloud KMS.
# In case of AWS identifier is the key ARN (Amazon resource identifier)
# In case of AZURE identifier is the Key Vault key URL, for example:
# https://<vault-name>.vault.azure.net/keys/<key-name>/<key-version>
# The key version is optional; omit it to use the latest version.
keyid: ""
# kms-proxy service configuration
application:
# -- The cache will keep the content(decrypted KEK) for the specified TTL(time to live)
# duration in seconds. Once the TTL expires the value from the cache is cleared.
# Based on amount of time require to update/install the protector deployment, update
# the ttl. Default is 1200 seconds(20 minutes)
ttl: 1200
# -- By default, log level for the application is set to INFO.
# available logging levels ares INFO, DEBUG, TRACE
# to enable http access log set the logLevel to TRACE
logLevel: INFO
# Kubernetes service configuration, represents a HTTP service to host
# kms proxy endpoint.
service:
# -- Configure service type: ClusterIP for kms-proxy endpoint
type: ClusterIP
port: 443
# -- TLS certificate of kms-proxy service.
# kubectl -n $NAMESPACE create secret generic pty-kms-proxy-tls \
# --from-file=cert.pem=./certs/cert.pem \
# --from-file=cert.key=./certs/cert.key \
# --from-file=CA.pem=./ca/CA.pem \
# --from-file=secret.txt=./certs/secret.txt
certificates:
- Modify the default values in the values.yaml file as required.
| Field | Description |
|---|---|
| serviceAccount/name |
|
| podLabels | Enable Azure Workload Identity. Delete the curly braces and uncomment the value of the podLabel parameter. Set the value to azure.workload.identity/use: “true”. This parameter is applicable only if you are deploying the KMSProxy Container to Azure AKS. |
| podSecurityContext | Specify the privilege and access control settings for the pod. The default values are set as follows:
Ensure that you uncomment the field. |
| Container Security Context | Specify the privilege and access control settings for the KMS Container. The default values are set as follows:
Ensure that you uncomment the field. |
| kms/vendor | Specify the cloud vendor. For example, AWS, Azure, or GCP. |
| kms/keyid |
|
| application/ttl | Specify the time to live in seconds till which the KMSProxy cache retains the decrypted KEK. The default value is 1200, which equals 20 minutes. |
| application/logLevel | Specify the log level for the application. The following values are applicable:
Set this value to TRACE to enable HTTP access log. |
| service/type | Specify the HTTP service type to host the KMSProxy endpoint. The default value is ClusterIP. |
| service/port | Specify the port number for the KMSProxy end point. The default value is 443. |
| service/certificates | Specify the secret value of the TLS certificate for the KMS Proxy service that you have created in step 2. |
5. Run the following command to deploy the KMSProxy container on the Kubernetes cluster.
helm install <Release_Name> --namespace <Namespace to deploy KMSProxy container> <Location of the directory containing Helm charts>
For example:
helm install kmsproxy --namespace iap-rest kms-proxy/
- Run the following command to check the status of the pods.
kubectl get pods -n <Namespace>
For example:
kubectl get pods -n iap-rest
NAME READY STATUS RESTARTS AGE
kms-10-v1-kms-proxy-7b97d5dff7-grqph 2/2 Running 0 11h
log1-logforwarder-f6gvj 1/1 Running 0 11h
log1-logforwarder-ls4hn 1/1 Running 0 11h
log1-logforwarder-phk4t 1/1 Running 0 11h
log1-logforwarder-z2mz7 1/1 Running 0 11h
Troubleshooting
KMSProxy Pod unable to connect to the Azure Key Vault
Issue: The Azure Key Vault is inaccessible to the KMSProxy pod.
Workaround: Add a network rule to the cluster subnet using the following command.
az keyvault network-rule add \
--subscription <Azure subscription> \
-n <Azure Key Vault name> -g <Resource_Group> \
--subnet /subscriptions/<Azure_subscription>/resourceGroups/IT-RESOURCE-GROUP/providers/Microsoft.Network/virtualNetworks/<Azure_Virtual_network>/subnets/kubernetes
6.4.1.2.4 - Deploying REST Container Using Static Method
Prerequisites for AWS deployment
Note: This section is applicable only if you are deploying the protector to AWS EKS.
Perform the following steps to ensure that the policy loader pods have access to the cloud storage to download the policy package.
- Run the following command to create an IAM OpenID Connect (OIDC) provider for your cluster. Ignore this step if you have already run this command earlier while deploying the KMSProxy pod.
eksctl utils associate-iam-oidc-provider --cluster <Name of EKS Cluster> --approve
- Run the following command to create a service account that will provide the Policy Loader pods access to the object storage for downloading the policy package.
eksctl create iamserviceaccount --name <Name of service account> --namespace <Namespace where the protector is deployed> --cluster <Name of EKS Cluster> --attach-policy-arn arn:aws:iam::aws:policy/AmazonS3ReadOnlyAccess --approve
Prerequisites for Azure Deployment
Note: This section is applicable only if you are deploying the protector to Azure AKS.
Perform the following steps to ensure that the policy loader pods have access to the Azure Store Blob to download the policy package.
- Run the following command to create a user-assigned identity for the policy loader pod.
az identity create -g $RG -n pty-policy-loader-mi
export MI_CLIENT_ID=$(az identity show -g $RG -n pty-policy-loader-mi --query clientId -o tsv)
- Run the following command to grant the user-assigned identity, which was created in step 1, the read access on the Azure Storage Blob containing the policy package.
az role assignment create \
--assignee $MI_CLIENT_ID \
--role "Storage Blob Data Reader" \
--scope "/subscriptions/$SUB/resourceGroups/$RG/providers/Microsoft.Storage/storageAccounts/$ACCT"
- Run the following command to federate the user-assigned identity to a service account.
az identity federated-credential create \
--name pty-policy-loader-fed \
--identity-name pty-policy-loader-mi -g $RG \
--issuer $OIDC \
--subject system:serviceaccount:$NS:pty-policy-loader \
--audience api://AzureADTokenExchange
Specify the name of the service account as the value of the serviceAccount/name parameter in step 7 of the section Deploy REST Container.
- Run the following command to create and annotate the Kubernetes service account.
kubectl -n $NS create serviceaccount pty-policy-loader
kubectl -n $NS annotate serviceaccount pty-policy-loader azure.workload.identity/client-id=$MI_CLIENT_ID
Deploy REST Container
The following steps describe how to deploy the REST Container.
- Run the following command to generate the client certificate to authenticate with the KMS-Proxy service.
CreateCertificate_Linux_x64_<Version>.sh client --name <Directory> --dns <Release_Name>.<namespace>.svc
For example:
CreateCertificate_Linux_x64_<Version>.sh client --name kms-client --dns kms-proxy.<namespace>.svc
For more information about generating the client certificates, refer to the section Creating Certificates.
The following client certificates files are created in the kms-client folder:
- cert.pem
- cert.key
- CA.pem
- secret.txt
This certificate is used by the protector as a client certificate to authenticate the protector with the KMS-Proxy service.
Ensure that the namespace and release name that you specify in this command are the same names that you specify in step 5 while deploying the KMS-Proxy Helm chart.
2. Run the following command to generate the secret for the KMS-Proxy client certificate created in step 1.
kubectl -n <KMS-Proxy_Namespace> create secret generic service-certs --from-file=CA.pem=<path-to-CA.pem> --from-file=cert.key=<path-to-cert.key> --from-file=cert.pem=<path-to-cert.pem> --from-file=secret.txt=<path-to-secret.txt>
For more information about generating the client certificates, refer to the section Creating Certificates.
Specify this secret as the value of the kms/certificates parameter in the values.yaml file.
- Run the following command to generate the TLS certificate for the server that hosts the REST Container endpoint.
CreateCertificate_Linux_x64_<Version>.sh server --name <Directory> --dns <DNS_Name> --noenc
CreateCertificate_Linux_x64_<Version>.sh server --name rest-server --dns test-sampleapp-10-v1.example.com --noenc
The following server certificates files are created in the rest-server folder:
- cert.pem
- cert.key
- CA.pem
For more information about generating the certificates, refer to the section Creating Certificates.
4. Run the following command to generate a secret using the server certificate for the REST Container endpoint.
kubectl -n <Namespace> create secret generic pty-rest-server-secret --from-file=CA.pem=<path-to-CA.pem> --from-file=cert.key=<path-to-cert.key> --from-file=cert.pem=<path-to-cert.pem>
For more information about generating the server certificates, refer to the section Creating Certificates.
Specify this secret as the value of the service/certificates parameter in the values.yaml file.
- Run the following command to generate the client secret for accessing the REST Container endpoint.
CreateCertificate_Linux_x64_<Version>.sh client --name <Directory> --dns <Namespace_name> --noenc
CreateCertificate_Linux_x64_<Version>.sh client --name rest-client --dns test-sampleapp-10-v1.example.com --noenc
The following client certificates files are created in the rest-client folder:
- cert.pem
- cert.key
- CA.pem
These certificates are used in the curl command for invoking the REST APIs.
For more information about generating the certificates, refer to the section Creating Certificates.
On the Linux instance, navigate to the location where you have extracted the Helm charts to deploy the REST Container.
The devops > values.yaml file contains the default configuration values for deploying the RPP container on the Kubernetes cluster.
## -- create image pull secrets and specify the name here.
## remove the [] after 'imagePullSecrets:' once you specify the secrets
imagePullSecrets: []
# - name: regcred
nameOverride: ""
fullnameOverride: ""
# REST protector image configuration
iaprestImage:
# -- rest protector image registry address
repository:
# -- rest protector image tag name
tag:
# -- The pullPolicy for a container and the tag of the image affect
# when the kubelet attempts to pull (download) the specified image.
pullPolicy: IfNotPresent
# policy loader sidecar image configuration
policyLoaderImage:
# -- policy loader sidecar container image registry address
repository:
# -- policy loader sidecar container image tag name
tag:
# -- The pullPolicy for a container and the tag of the image affect
# when the kubelet attempts to pull (download) the specified image.
pullPolicy: IfNotPresent
# Docker Hub Image (Root User): docker.io/nginx:stable
# To use nginx image that runs with non-root permissions
# Ref. https://hub.docker.com/r/nginxinc/nginx-unprivileged
nginxImage:
# -- nginx image registry address
repository:
# -- nginx image tag name
tag:
# -- The pullPolicy for a container and the tag of the image affect
# when the kubelet attempts to pull (download) the specified image.
pullPolicy: IfNotPresent
# specify CPU and memory requirement of REST protector container
iaprestResources:
limits:
cpu: 1000m
memory: 3000Mi
requests:
cpu: 500m
memory: 800Mi
# specify CPU and memory requirement of policy loader container
policyLoaderResources:
limits:
cpu: 200m
memory: 512Mi
requests:
cpu: 100m
memory: 200Mi
# specify CPU and memory requirement of nginx proxy container
nginxResources:
limits:
cpu: 500m
memory: 512Mi
requests:
cpu: 200m
memory: 200Mi
...
# -- pod service account to be used.
# A k8s service account can be linked to cloud identity to allow pod to access
# cloud services like Object storage solutions.
serviceAccount:
# The name of the service account to use.
name:
# Specify any additional annotation to be associated with pod
podAnnotations:
checksum/nginx-config: '{{ include (print $.Template.BasePath "/nginx-configmap.yaml") . | sha256sum }}'
checksum/rest-config: '{{ include (print $.Template.BasePath "/rest-configmap.yaml") . | sha256sum }}'
# -- Specify any additional labels to be associated with the pod.
# Cloud agnostic: leave empty for AWS/GCP.
# For Azure Workload Identity (secret-less policy fetch from Azure Blob), set:
# azure.workload.identity/use: "true"
# and set serviceAccount.name to the workload-identity annotated service account
# (leave policyPuller.credentials empty so no client-secret file is mounted).
podLabels: {}
#azure.workload.identity/use: "true"
# set the Pod's security context object.
#---Uncomment the runAsUser,runAsGroup,fsGroup setting if deploying on AWS EKS or Azure AKS
podSecurityContext:
#runAsUser: 1000
#runAsGroup: 1000
#fsGroup: 1000
# set the iapRest Container's security context object
iaprestContainerSecurityContext:
capabilities:
drop:
- ALL
readOnlyRootFilesystem: true
runAsNonRoot: true
allowPrivilegeEscalation: false
privileged : false
seccompProfile:
type: RuntimeDefault
# -- set the policy loader sidecar Container's security context object
# leave the field empty if not applicable
policyLoaderContainerSecurityContext:
capabilities:
drop:
- ALL
readOnlyRootFilesystem: true
runAsNonRoot: true
allowPrivilegeEscalation: false
privileged : false
seccompProfile:
type: RuntimeDefault
# -- set the nginx Container's security context object.
# leave the field empty if not applicable
nginxContainerSecurityContext:
capabilities:
drop:
- ALL
readOnlyRootFilesystem: true
runAsNonRoot: true
allowPrivilegeEscalation: false
privileged : false
seccompProfile:
type: RuntimeDefault
# protector configuration
protector:
# Policy information for the protector initialization
# Note: Policy update is control by policy puller sidecar, Below configuration
# are for protector to refresh policy once it is updated by policy puller sidecar.
policy:
# -- Cadence determines how often the protector connects local filesystem
# to fetch the policy updates in background. Default is 60 seconds.
# So by default, every 60 seconds protector tries to fetch the policy updates.
# If the cadence is set to "0", then the protector will get the policy only
# once, which is not recommended.
cadence: 60
# KMS proxy service configuration
kms:
# -- kms proxy service hostname.
# kms proxy service helps protector to decrypt resilient policy package.
host:
# -- certificates to authenticate with kms proxy service.
# Specify certificate secret name.
# kubectl -n $NAMESPACE create secret generic pty-kms-proxy-tls \
# --from-file=cert.pem=./certs/cert.pem \
# --from-file=cert.key=./certs/cert.key \
# --from-file=CA.pem=./ca/CA.pem \
# --from-file=secret.txt=./certs/secret.txt
certificates:
# Logforwarder configuration
logs:
# -- specify log levels.
# In case that connection to fluent-bit is lost, set how audits/logs are handled
#
# drop : Protector throws logs away if connection to the fluentbit is lost
# error : (default) Protector returns error without protecting/unprotecting
# data if connection to the fluentbit is lost
mode: error
# -- Host/IP of Logforwarder service where audits/logs are forwarded by the
# REST protector
host:
# nginx configuration
nginx:
# control audit records generate by nginx proxy.
# the generated records are sent to stdout.
# error logs are enabled by default.
logs:
# -- configure http client request access logs, by default the records
# are sent to stdout
request_logs: false
# -- configure kubelet health check probe access logs, by default the records
# are sent to stdout.
probe_logs: false
# policy puller sidecar configuration
policyPuller:
# -- Use the below setting when deploying on Openshift platform.
# -- specify the credentials secret name to access cloud KMS.
# kubectl -n $NAMESPACE create secret generic pty-kms-credentials \
# --from-file=credentials=./credentials
credentials:
policy:
# -- Control how often the sidecar application will read the configuration
# file for policy update information.
# Interval is reset when previous pull operation is completed.
# IMPORTANT: do not set interval to 0.
interval: 30
# -- If using VolumeMount as storage destination for policy package
# specify the persistent volume claim name to be used to mount the volume.
pvcName:
# -- Path to KMS encrypted Resilient policy package. Specify an URL encoded
# path to package file. Here are few examples,
# If stored in S3 then, s3://[s3 bucket name]/[to]/<[policy]>/<[package]>
# If stored in Azure Blob storage then, https://[storage account].blob.core.windows.net/[to]/<[policy]>/<[package]>
# If stored in GCS then, gs://[bucket name]/[to]/<[policy]>/<[package]>
# If stored in local filesystem (VolumeMount) then, [to]/<[policy]>/<[package]>
# Important: updating it will not trigger pod restart.
path:
logs:
# -- control policy puller log level
# logs are forwarded to stdout
# Supported Values
# INFO - default
# DEBUG
level: INFO
# -- specify the initial no. of rest Pod replicas
replicaCount: 1
# HPA configuration
autoScaling:
# -- lower limit on the number of replicas to which the autoscaler
# can scale down to.
minReplicas: 1
# -- upper limit on the number of replicas to which
# the autoscaler can scale up. It cannot be less that minReplicas.
maxReplicas: 10
# -- CPU utilization threshold which triggers the autoscaler
targetCPU: 70
# specify service type for rest container.
service:
# -- Configure service type: LoadBalancer or ClusterIP for rest protector
# endpoint
type: ClusterIP
port: 443
# -- secret name containing server TLS certificates to host
# rest protector endpoint.
# kubectl -n $NAMESPACE create secret generic pty-rest-tls \
# --from-file=cert.pem=./certs/cert.pem \
# --from-file=cert.key=./certs/cert.key \
# --from-file=CA.pem=./ca/CA.pem
certificates:
# -- Specify k8s service related annotations
# annotation can configure internal load balancer
# AWS internal load balancer
#service.beta.kubernetes.io/aws-load-balancer-internal: "true"
# AZURE internal load balancer
#service.beta.kubernetes.io/azure-load-balancer-internal: "true"
# GCP internal load balancer
#networking.gke.io/load-balancer-type: "Internal"
annotations:
#service.beta.kubernetes.io/aws-load-balancer-internal: "true"
#service.beta.kubernetes.io/azure-load-balancer-internal: "true"
#networking.gke.io/load-balancer-type: "Internal"
- Modify the default values in the values.yaml file as required.
| Field | Description |
|---|---|
| iaprestImage | Specify the repository and tag details for the REST Container image. |
| policyLoaderImage | Specify the repository and tag details for the Policy Loader image. |
| nginxImage | Specify the repository and tag details for the NGINX image. |
| iaprestResources | Specify the CPU and memory requirements for the REST Container. |
| policyLoaderResources | Specify the CPU and memory requirements for the Policy Loader container. |
| nginxResources | Specify the CPU and memory requirements for the NGINIX container. |
| serviceAccount/name |
|
| podLabels | Enable Azure Workload Identity. Delete the curly braces and uncomment the value of the podLabel parameter. Set the value to azure.workload.identity/use: “true”. This parameter is applicable only if you are deploying the KMSProxy Container to Azure AKS. |
| podSecurityContext | Specify the privilege and access control settings for the pod. The default values are set as follows:
Ensure that you uncomment the values. |
Container Security Context:
| Specify the privilege and access control settings for the REST Container, Policy Loader container, and the NGINX containers respectively. Ensure that you uncomment the field. |
| protector/policy/cadence | Specify the time interval in seconds after which the protector retrieves the policy that has been updated by the Policy Loader container. By default, the value is set to 60. Ensure that the value is not set to 0. Else, the protector will retrieve the policy only once. |
| protector/kms/host | Specify the host name of the KMS Proxy service that is used to decrypt the policy package. |
| protector/kms/certificates | Specify the name of the secret for the certificate that is used to authenticate with the KMS Proxy service, which you have created in step 2. |
| protector/logs/mode | Specify one of the following options in case the connection to the Log Forwarder is lost:
By default, the value is set to error. |
| protector/logs/host | Specify the service hostname of the Log Forwarder, where the logs are forwarded. The default value is <Helm_Installation_Name>-<Helm_Chart_Name>. For example, iaplog-logforwarder.iaprest.svc. |
| nginx/logs/request_logs | Specify whether to enable or disable the HTTP client request access logs. By default, the value is set to False. |
| nginx/logs/probe_logs | Specify whether to enable or disable the Kubelet health check probe access logs. By default, the value is set to False. |
| policyPuller/policy/interval | Specify the time interval in seconds after which the Policy Loader sidecar container will retrieve the policy package from the specified path. By default, the value is set to 30. Ensure that the interval is not set to 0. Else, the Policy Loader container will not retrieve the updated policy package. |
| policyPuller/path | Specify the path where the encrypted policy package has been uploaded. For example, if the package is stored in an AWS S3 bucket, then you need to specify the following path: s3://[s3 bucket name]/[to]/<[policy]>/<[package].If the package is stored in a Azure Storage Container, then you need to specify the following path: https://[storage account].blob.core.windows.net/[to]/<[policy]>/<[package]>.If the package is stored in local filesystem VolumeMount, then you need to specify the following path: [to]/<[policy]>/<[package]>. |
| policyPuller/logs/level | Specify the log level of the Policy Loader container. By default, the value is set to INFO. |
| replicaCount | Specify the initial number of the REST pod replicas. |
| autoScaling | Specify the configurations required for the Horizontal Pod Autoscaling. |
| service/type | Specify the service type for the REST Container. By default, this value is set to ClusterIP. Change this value to LoadBalancer to send an HTTPS request to the REST Container pod from outside the cluster. |
| service/port | Specify the service port number for the REST container. By default, the value is set to 443. |
| service/certificates | Specify the name of the secret that contains the server TLS certificates to the host the REST protector endpoint, which you have created in step 4. |
| service/annotations | Specify the annotations for the respective Cloud platforms if you want to use the internal load balancer instead of the NGINX ingress. By default, this value is left blank. |
- Run the following command to deploy the REST Container on the Kubernetes cluster.
helm install <Release_Name> --namespace <Namespace where you want to deploy the REST container> <Location of the directory that contains the Helm charts>
For example:
helm install iap-rest-devops --namespace iap-rest devops/
- Run the following command to check the status of the pods.
kubectl get pods -n <Namespace>
For example:
kubectl get pods -n iap-rest
NAME READY STATUS RESTARTS AGE
kms-10-v1-kms-proxy-7b97d5dff7-grqph 2/2 Running 0 11h
log1-logforwarder-f6gvj 1/1 Running 0 11h
log1-logforwarder-ls4hn 1/1 Running 0 11h
log1-logforwarder-phk4t 1/1 Running 0 11h
log1-logforwarder-z2mz7 1/1 Running 0 11h
iap-rest-iap-rest-devops-5fd7d859b6-p9544 1/1 Running 0 11h
Alternatively, if you do not want to modify the values.yaml file, you can use set arguments to update the values during runtime.
For more information about deploying containers using set arguments, refer to the section Appendix - Deploying the Helm Charts by Using the Set Argument.
The test user can run the REST version API to verify the version of the REST protector.
6.4.1.2.5 - Updating the Policy Package
The following steps describe how to update the policy or the policy path.
Modify the policy or the location where the policy has been uploaded.
Run the
helm upgradecommand to update the policy package or the policy package path.
For example, the line --set policyPuller.policy.path="s3://restcontainer/static-iap-rest-rel-a/try/Sample_App_Policy.tgz" in the following code block indicates that the path where the policy package is stored has changed.
helm -n devops-10-v2 upgrade test-sampleapp-10-v1 iap-rest-devops/ \
--set imagePullSecrets[0].name="regcred" \
--set iaprestImage.repository="<Account_ID>.dkr.ecr.<region_name>.amazonaws.com/container" \
--set iaprestImage.tag="REST_RHUBI-9-64_x86-64_K8S_10.0.0.16.6a3a67.tgz" \
--set policyLoaderImage.repository="<Account_ID>.dkr.ecr.<region_name>.amazonaws.com/container" \
--set policyLoaderImage.tag="POLICY-LOADER_RHUBI-9-64_x86-64_K8S_1.0.0.11.bc1967.tgz" \
--set nginxImage.repository="nginxinc/nginx-unprivileged" \
--set nginxImage.tag="1.25.2" \
--set serviceAccount.name="s3-v1-sa" \
--set protector.kms.host="test-kms-10-v1-kms-proxy.devops-10-v2.svc" \
--set protector.kms.certificates="pty-certs-cli-secret" \
--set protector.logs.mode="error" \
--set protector.logs.host="test-devops-logforwarder10-v1.devops-10-v2.svc" \
--set nginx.logs.request_logs="false" \
--set nginx.logs.probe_logs="false" \
--set policyPuller.policy.interval="30" \
--set policyPuller.logs.level="DEBUG" \
--set protector.policy.cadence="60"\
--set policyPuller.policy.path="s3://restcontainer/static-iap-rest-rel-a/try/Sample_App_Policy.tgz" \
--set service.certificates="pty-rest-devops-secret"
For more information about using set arguments to deploy the Protector, refer to the section Appendix - Deploying the Helm Charts by Using the Set Argument.
- Run the following command to check the status of the pods.
kubectl get pods -n <Namespace>
For example:
kubectl get pods -n iap-rest
NAME READY STATUS RESTARTS AGE
test-devops-logforwarder10-v1-2m49b 1/1 Running 0 163m
test-devops-logforwarder10-v1-wwjzh 1/1 Running 0 165m
test-kms-10-v1-kms-proxy-687657cff9-dlzdz 1/1 Running 0 161m
test-sampleapp-10-v1-iap-rest-devops-54668997cf-kw628 3/3 Running 0 5m11s
- Run the following command to check the logs.
kubectl logs <Pod_name> -n <Namespace> -f
For example:
kubectl logs test-sampleapp-10-v1-iap-rest-devops-54668997cf-kw628 -n iap-rest -f
The following logs appear on the console output. The line [INFO ] 2025/10/29 11:47:19.335550 runner.go:226: New Policy source path s3://restcontainers/new-10-49-7-212/new/policy-sample-app-10-49-7-212-v1.json indicates that the policy package path has been updated.
Defaulted container "policy-loader" out of: policy-loader, iap-rest-devops, nginx
[INFO ] 2025/10/29 11:45:16.090634 runner.go:104: starting policy loader with version: 1.0.0+13.e0beab
Starting Health Server.
[INFO ] 2025/10/29 11:45:16.090811 runner.go:187: fetching policy from storage media, AWS_S3
[INFO ] 2025/10/29 11:45:16.313683 runner.go:196: Loading policy from source path s3://restcontainers/new-10-49-7-212/policy-v1-10-49-7-212.json
[root@ip-10-49-5-222 ~]# kubectl logs test-sampleapp-10-v1-iap-rest-devops-7f4f9b9cc4-zbbkg -n devops-10-v6 -f
Defaulted container "policy-loader" out of: policy-loader, iap-rest-devops, nginx
[INFO ] 2025/10/29 11:45:16.090634 runner.go:104: starting policy loader with version: 1.0.0+13.e0beab
Starting Health Server.
[INFO ] 2025/10/29 11:45:16.090811 runner.go:187: fetching policy from storage media, AWS_S3
[INFO ] 2025/10/29 11:45:16.313683 runner.go:196: Loading policy from source path s3://restcontainers/new-10-49-7-212/policy-v1-10-49-7-212.json
[INFO ] 2025/10/29 11:45:48.914901 runner.go:220: fetching policy from storage media, AWS_S3
[INFO ] 2025/10/29 11:45:48.914935 runner.go:242: Policy source path is same. Checking based on timestamp.
[INFO ] 2025/10/29 11:45:49.057011 runner.go:250: Policy source is not modified since last fetch. Skipping policy load operation.
[INFO ] 2025/10/29 11:46:19.057887 runner.go:220: fetching policy from storage media, AWS_S3
[INFO ] 2025/10/29 11:46:19.057916 runner.go:242: Policy source path is same. Checking based on timestamp.
[INFO ] 2025/10/29 11:46:19.201224 runner.go:250: Policy source is not modified since last fetch. Skipping policy load operation.
[INFO ] 2025/10/29 11:46:49.201456 runner.go:220: fetching policy from storage media, AWS_S3
[INFO ] 2025/10/29 11:46:49.201485 runner.go:242: Policy source path is same. Checking based on timestamp.
[INFO ] 2025/10/29 11:46:49.335206 runner.go:250: Policy source is not modified since last fetch. Skipping policy load operation.
[INFO ] 2025/10/29 11:47:19.335501 runner.go:220: fetching policy from storage media, AWS_S3
[INFO ] 2025/10/29 11:47:19.335536 runner.go:224: Policy source path is modified. Triggering policy load operation.
[INFO ] 2025/10/29 11:47:19.335545 runner.go:225: Old Policy source path s3://restcontainers/new-10-49-7-212/policy-v1-10-49-7-212.json.
[INFO ] 2025/10/29 11:47:19.335550 runner.go:226: New Policy source path s3://restcontainers/new-10-49-7-212/new/policy-sample-app-10-49-7-212-v1.json
6.4.1.2.6 - Uninstalling the Protector in Static Method
To uninstall the Protector:
- Run the following command to uninstall the Log Forwarder from the Kubernetes cluster.
helm uninstall <Release_Name> --namespace <Namespace where the Log Forwarder is deployed>
For example:
helm uninstall log1 --namespace iap-rest
- Run the following command to uninstall the KMSProxy container from the Kubernetes cluster.
helm uninstall <Release_Name> --namespace <Namespace where KMSProxy container is deployed>
For example:
helm uninstall kmsproxy --namespace iap-rest
- Run the following command to uninstall the REST Container from the Kubernetes cluster.
helm uninstall <Release_Name> --namespace <Namespace where the REST Container is deployed>
For example:
helm uninstall iap-rest-devops --namespace iap-rest
- Run the following command to delete the Kubernetes secrets.
kubectl delete secret <Secret_Name> --namespace <Namespace where the REST Container is deployed>
For example:
kubectl delete secret service-certs --namespace iap-rest
Repeat this step to delete all the secrets that you have created while deploying the KMSProxy container and the REST Container:
- service-certs
- regcred
- Run the following command to delete the Kubernetes namespace.
helm delete namespace <Namespace where the REST Container is deployed>
For example:
helm delete namespace iap-rest
6.4.2 - Installing the Protector on OpenShift
This section provides an overview of the steps required to install the REST Container on OpenShift using either the Static or the Dynamic method.
6.4.2.1 - Deploying REST Container for Dynamic Method
This section describes how to deploy the REST Container integrated with RPP. Deploy in the following order:
- Log Forwarder
- RPP
- REST Container
6.4.2.1.1 - Deploying Log Forwarder
The Log Forwarder is deployed as a DaemonSet. The following steps describe how to deploy Log Forwarder.
On the Linux instance, run the following command to create the namespace required for Helm deployment.
kubectl create namespace <Namespace name>For example:
kubectl create namespace iap-restOn the Linux instance, navigate to the location where you have extracted the Helm charts to deploy the Log Forwarder.
For more information about the extracted Helm charts, refer to the section Extracting the Installation Package.
The logforwarder > values.yaml file contains the default configuration values for deploying the Log Forwarder container on the Kubernetes cluster. The following content shows an extract of the values.yaml file.
## create image pull secrets and specify the name here. ## remove the [] after 'imagePullSecrets:' once you specify the secrets imagePullSecrets: - name: regcred ... ... # - Protegrity PSU(Protegrity Storage Unit)/ESA configuration. # Logforwarder will send audit records to below specified hosts/ip. # User can specify multiple PSU/ESA distribute the audit records and avoid downtime. opensearch: # -- specify a given name to uniquely identify PSU/ESA in the deployment. - name: # -- hostname/ip address of PSU/ESA host: # -- port address of ESA/PSU port: 9200 # - name: node-2 # host: test-insight # port: 9200 # -- Kubernetes service configuration, represents a TCP endpoint to receive audit records # from the protectors. service: # -- Configure service type: ClusterIP for Logforwarder endpoint. type: ClusterIP # -- port to accept incoming audit records from the protector port: 15780 ...Modify the default values in the values.yaml file as required.
| Field | Description |
|---|---|
| imagePullSecrets/regred | Specify the Kubernetes secret for accessing the image registry. The registry credential secret is created using existing Docker credentials. |
| opensearch/name | Specify the unique name for the ESA. |
| opensearch/host | Specify the host name or IP address of the ESA. |
| opensearch/port | Specify the port number of the ESA. The default value is 9200. |
| service/type | Specify the service type for the Log Forwarder. The default value is ClusterIP. |
| service/port | Specify the service port of the Log Forwarder, which receives the audit logs from the protectors. The default value is 15780. |
- Run the following command to deploy the Log Forwarder on the Kubernetes cluster.
helm install <Release_Name> --namespace <Namespace where you want to deploy the RPP container> <Location of the directory that contains the Helm charts>
For example:
helm install log1 --namespace iap-rest <Custom_path>/commonlogforwarder/
<Custom_path> is the directory where you have extracted the installation package.
- Run the following command to check the status of the pods.
oc get pods -n <Namespace>
For example:
oc get pods -n iap-rest
NAME READY STATUS RESTARTS AGE
log1-logforwarder-f6gvj 1/1 Running 0 11h
log1-logforwarder-ls4hn 1/1 Running 0 11h
log1-logforwarder-phk4t 1/1 Running 0 11h
log1-logforwarder-z2mz7 1/1 Running 0 11h
As the Log Forwarder is deployed as a DaemonSet, one instance of Log Forwarder is deployed on each node. In this example, one Log Forwarder pod is deployed per node.
For information about configuring the Log Forwarder, refer to the section Configuration Parameters for Forwarding Audits and Logs.
6.4.2.1.2 - Deploying Resilient Package Proxy (RPP)
The following steps describe how to deploy RPP.
Note: Ensure that you have deployed the Log Forwarder before deploying the RPP. For more information about deploying the Log Forwarder, refer to the section Deploying the Log Forwarder.
- Run the following command on the Jump box to generate the common certificate from the ESA certificates.
CertificatesSetup_Linux_x64_<Version>.sh -u <User> -p <Password> -h <Hostname or IP address of ESA> --port <Port number of ESA> -d <Directory>
For example:
CertificatesSetup_Linux_x64_<Version>.sh -u admin -p admin12345 -h 10.10.10.10 --port 8443 -d rpproxy
For more information about generating the ESA certificates, refer to the section Creating Certificates.
The following files are created:
- CA.pem
- cert.key
- cert.pem
- secret.txt
2. Run the following command to create a Kubernetes secret using the common certificate generated in step 1.
oc -n <Namespace> create secret generic common-cert --from-file=CA.pem=./CA.pem --from-file=cert.key=./cert.key --from-file=cert.pem=./cert.pem --from-file=secret.txt=./secret.txt
Specify this secret as the value of the commonCertSecrets parameter in the values.yaml file. In this case, this secret is used in the following ways:
- RPP uses the certificate as an upstream server certificate to download the policy packages from the ESA.
- The protector uses the certificate as a client certificate to download the policy packages from the RPP.
If you do not specify any value for the commonCertSecrets parameter, then you need to specify separate values for the rpp/upstream/certificateSecret and service/certificateSecret parameters.
3. Run the following command on the Jump box to generate the upstream certificate between the ESA and the RPP.
CertificatesSetup_Linux_x64_<Version>.sh -u <User> -p <Password> -h <Hostname or IP address of ESA> --port <Port number of ESA> -d <Directory>
For example:
CertificatesSetup_Linux_x64_<Version>.sh -u admin -p admin12345 -h 10.10.10.10 --port 8443 -d rpproxy
For more information about generating the ESA certificates, refer to the section Creating Certificates.
The following files are created:
- CA.pem
- cert.key
- cert.pem
- secret.txt
Note: This certificate is created only if you are not using the common certificate.
4. Run the following command to create a Kubernetes secret using the upstream certificate generated in step 3.
oc -n <Namespace> create secret generic upstream-cert --from-file=CA.pem=./CA.pem --from-file=cert.key=./cert.key --from-file=cert.pem=./cert.pem --from-file=secret.txt=./secret.txt
Note: This secret is created only if you are not using the common certificate.
Specify this secret as the value of the rpp/upstream/certificateSecret parameter in the values.yaml file.
5. Run the following command to generate the service TLS certificate.
CreateCertificate_Linux_x64_<Version>.sh server --name <Directory> --dns <Release_Name>.<namespace>.svc
For example:
CreateCertificate_Linux_x64_<Version>.sh server --name rpproxy --dns rpp.iap-rest.svc
For more information about generating the server certificates, refer to the section Creating Certificates.
The following client certificates files are created in the rpproxy folder:
- cert.pem
- cert.key
- CA.pem
- secret.txt
These certificate is used by the protector as a server certificate to authenticate the RPP to download policy packages.
Ensure that the namespace and release name that you specify in this command are the same names that you specify in step 7 while deploying the RPP Helm chart.
Note: This certificate is created only if you are not using the common certificate.
6. Run the following command to generate the secret for the service TLS certificate.
oc -n <Namespace> create secret generic service-certs --from-file=CA.pem=<path-to-CA.pem> --from-file=cert.key=<path-to-cert.key> --from-file=cert.pem=<path-to-cert.pem> --from-file=secret.txt=<path-to-secret.txt>
For more information about generating the client certificates, refer to the section Creating Certificates.
Note: This secret is created only if you are not using the common certificate.
Specify this secret as the value of the service/certificateSecret parameter in the values.yaml file.
7. On the Linux instance, navigate to the location where you have extracted the Helm charts to deploy the RPP.
For more information about the extracted Helm charts, refer to the section Initializing the Linux instance.
The rp-proxy > values.yaml file contains the default configuration values for deploying the RPP container on the Kubernetes cluster.
...
podSecurityContext:
fsGroup: 1000
...
#-- k8s secret for storing common certificates
# eg. kubectl command:
# kubectl -n $RPP_NAMESPACE create secret generic common-certs \
# --from-literal=CA.pem=<path-to-CA.pem> --from-literal=cert.key=<path-to-cert.key> \
# --from-literal=cert.pem=<path-to-cert.pem> --from-literal=secret.txt=<path-to-secret.txt>
commonCertSecrets:
rpp:
#-- upstream configuration
# host: Upstream host to connect
# port: Upstream port to connect
upstream:
host:
port: 25400
#-- certificateSecret : k8s secret for storing upstream tls certificates
# NOTE : Only to be set when not using common certificate secret
# eg. kubectl command:
# kubectl -n $RPP_NAMESPACE create secret generic upstream-certs \
# --from-literal=CA.pem=<path-to-CA.pem> --from-literal=cert.key=<path-to-cert.key> \
# --from-literal=cert.pem=<path-to-cert.pem> --from-literal=secret.txt=<path-to-secret.txt>
certificateSecret:
#-- logging configuration
# logLevel: Specifies the logging level for rpproxy
# INFO (default)
# ERROR
# WARN
# DEBUG
# TRACE
# logHost: Host to forward the logs (Default : 127.0.0.1)
# logPort: Port to forward the logs (Default : 15780)
logging:
logLevel: "INFO"
logHost: "127.0.0.1"
logPort: 15780
#-- service configuration
# certificateSecret : k8s secret for storing service tls certificates
# NOTE : Only to be set when not using common certificate secret
# eg. kubectl command:
# kubectl -n $RPP_NAMESPACE create secret generic service-certs \
# --from-literal=CA.pem=<path-to-CA.pem> --from-literal=cert.key=<path-to-cert.key> \
# --from-literal=cert.pem=<path-to-cert.pem> --from-literal=secret.txt=<path-to-secret.txt>
# cacheTTL:
# TTL sets the duration (in seconds) of which a cached item is considered fresh.
# When a cached item's TTL expires, the item will be revalidated.
service:
certificateSecret:
cacheTTL: 60
...
- Modify the default values in the values.yaml file as required.
| Field | Description |
|---|---|
| imagePullSecrets/regred | Specify the Kubernetes secret for accessing the image registry. The registry credential secret is created using existing Docker credentials. |
| commonCertSecrets | Specify the Kubernetes secret, which you have created in step 2, for storing the common certificates. If you specify the value of this parameter, then do not specify the values for the rpp/upstream/certificateSecret and service/certificateSecret parameters. The same common certificate will be used by RPP to download the policy packages from the ESA and by the protector to download the policy packages from the RPP. |
| rpp/upstream/host | Specify the host name or IP address of the upstream server that is providing the policy packages. The upstream server can be another RPP or the ESA. |
| rpp/upstream/port | Specify the port number of the upstream server that is providing the policy packages. The default value is 25400. |
| rpp/upstream/certificateSecret | Specify the Kubernetes secret, which you have created in step 4, that contains the certificate used to authenticate the ESA. Note: This certificate is set only if you are not using the commonCertSecrets parameter. |
| logging/logLevel | Specify the details about the application log level during runtime. You can set one of the following values:
The default value is INFO. |
| logging/logHost | Specify the service hostname of the Log Forwarder, where the logs are forwarded. The default value is <Helm_Installation_Name>-<Helm_Chart_Name>.<Namespace>.svc.For example, iaplog-logforwarder.iaprest.svc. |
| logging/logPort | Specify the service port of the Log Forwarder, where the logs are forwarded. The default value is 15780. |
| service/certificateSecret | Specify the Kubernetes secret, which you have created in step 6, that enables the protector to authenticate the RPP. Note: This certificate is set only if you are not using the commonCertSecrets parameter. |
| service/cacheTTL | Specify the duration to refresh the cache. When a cache TTL expires, the cache has to be revalidated or updated. This interval controls the refresh time of the policy. The default value in seconds is 60. |
- Run the following command to deploy the RPP on the Kubernetes cluster.
helm install <Release_Name> --namespace <Namespace where you want to deploy the RPP container> <Location of the directory that contains the Helm charts>
For example:
helm install rpp --namespace iap-rest rpproxy/
Ensure that you specify the same release name and namespace that you have used while creating the service TLS certificate in step 5.
- Run the following command to check the status of the pods.
oc get pods -n <Namespace>
For example:
oc get pods -n iap-rest
NAME READY STATUS RESTARTS AGE
rpp-rpproxy-5fd7d859b6-p9544 1/1 Running 0 11h
6.4.2.1.3 - Deploying the REST Container with Dynamic Method
The following steps describe how to deploy the REST Container.
- Run the following command to generate the client certificate for connecting to the RPP.
CreateCertificate_Linux_x64_<Version>.sh client --name <Directory> --dns <Release_Name>.<namespace>.svc
For example:
CreateCertificate_Linux_x64_<Version>.sh client --name rpproxy-client --dns rpp.iap-rest.svc
For more information about generating the client certificates, refer to the section Creating Certificates.
The following client certificates files are created in the rpproxy-client folder:
- cert.pem
- cert.key
- CA.pem
- secret.txt
This certificate is used by the protector as a client certificate to authenticate the RPP to download policy packages.
Ensure that the namespace and release name that you specify in this command are the same names that you specify in step 7 while deploying the RPP Helm chart.
2. Run the following command to generate the secret for the RPP client certificate created in step 1.
oc -n <RPP_Namespace> create secret generic rpp-client-certs --from-file=CA.pem=<path-to-CA.pem> --from-file=cert.key=<path-to-cert.key> --from-file=cert.pem=<path-to-cert.pem> --from-file=secret.txt=<path-to-secret.txt>
For more information about generating the client certificates, refer to the section Creating Certificates.
Specify this secret as the value of the protector/policy/certificates parameter in the values.yaml file.
3. Run the following command to generate the TLS certificate for the server that hosts the REST Container endpoint.
CreateCertificate_Linux_x64_<Version>.sh server --name <Directory> --dns <DNS_Name> --noenc
CreateCertificate_Linux_x64_<Version>.sh server --name rest-server --dns test-sampleapp-10-v1.example.com --noenc
The following server certificates files are created in the rest-server folder:
- cert.pem
- cert.key
- CA.pem
For more information about generating the certificates, refer to step 6 in section Creating Certificates.
4. Run the following command to generate a secret using the server certificate for the REST Container endpoint.
oc -n <Namespace> create secret generic pty-rest-server-secret --from-file=CA.pem=<path-to-CA.pem> --from-file=cert.key=<path-to-cert.key> --from-file=cert.pem=<path-to-cert.pem>
For more information about generating the server certificates, refer to the section Creating Certificates.
Specify this secret as the value of the service/certificates parameter in the values.yaml file.
- Run the following command to generate the client certificate for accessing the REST Container endpoint.
CreateCertificate_Linux_x64_<Version>.sh client --name <Directory> --dns <Namespace_name> --noenc
CreateCertificate_Linux_x64_<Version>.sh client --name rest-client --dns test-sampleapp-10-v1.example.com --noenc
The following client certificates files are created in the rest-client folder:
- cert.pem
- cert.key
- CA.pem
These certificates are used in the curl command for invoking the REST APIs.
For more information about generating the certificates, refer to step 6 in section Creating Certificates.
On the Linux instance, navigate to the location where you have extracted the Helm charts to deploy the REST Container.
The dynamic > values.yaml file contains the default configuration values for deploying the RPP container on the Kubernetes cluster.
# -- create image pull secrets and specify the name here.
# remove the [] after 'imagePullSecrets:' once you specify the secrets
imagePullSecrets:
- name: regcred
nameOverride: ""
fullnameOverride: ""
# REST protector image configuration
iaprestImage:
# -- rest protector image registry address
repository:
# -- rest protector image tag name
tag:
# -- The pullPolicy for a container and the tag of the image affect
# when the kubelet attempts to pull (download) the specified image.
pullPolicy: IfNotPresent
# Docker Hub Image (Root User): docker.io/nginx:stable
# To use nginx image that runs with non-root permissions
# Ref. https://hub.docker.com/r/nginxinc/nginx-unprivileged
nginxImage:
# -- nginx image registry address
repository:
# -- nginx image tag name
tag:
# -- The pullPolicy for a container and the tag of the image affect
# when the kubelet attempts to pull (download) the specified image.
pullPolicy: IfNotPresent
# specify CPU and memory requirement of REST protector container
iaprestResources:
limits:
cpu: 1000m
memory: 3000Mi
requests:
cpu: 500m
memory: 800Mi
# specify CPU and memory requirement of nginx proxy container
nginxResources:
limits:
cpu: 500m
memory: 512Mi
requests:
cpu: 200m
memory: 200Mi
...
## -- pod service account to be used
## leave the field empty if not applicable
serviceAccount:
# The name of the service account to use.
name:
# Specify any additional annotation to be associated with pod
podAnnotations:
checksum/nginx-config: '{{ include (print $.Template.BasePath "/nginx-configmap.yaml") . | sha256sum }}'
checksum/rest-config: '{{ include (print $.Template.BasePath "/rest-configmap.yaml") . | sha256sum }}'
## set the Pod's security context object
## leave the field empty if not applicable
podSecurityContext:
fsGroup: 1000
## set the iapRest Container's security context object
## leave the field empty if not applicable
iaprestContainerSecurityContext:
capabilities:
drop:
- ALL
allowPrivilegeEscalation: false
privileged : false
runAsNonRoot : true
readOnlyRootFilesystem: true
seccompProfile:
type: RuntimeDefault
## set the nginx Container's security context object
## leave the field empty if not applicable
nginxContainerSecurityContext:
capabilities:
drop:
- ALL
allowPrivilegeEscalation: false
privileged : false
runAsNonRoot : true
readOnlyRootFilesystem: true
seccompProfile:
type: RuntimeDefault
# protector configuration
protector:
# Policy information for the protector initialization
policy:
# Cadence determines how often the protector connects with ESA / proxy to
# fetch the policy updates in background. Default is 60 seconds.
# So by default, every 60 seconds protector tries to fetch the policy updates.
# If the cadence is set to "0", then the protector will get the policy only
# once, which is not recommended.
#
# Default 60.
cadence: 60
# -- Host/IP to the service providing Resilient Packages either rpproxy
# service or ESA.
host:
# -- certificates used to communicate with service providing Resilient packages.
# specify certificate secret name.
# -- TLS certificate rp-proxy service.
# kubectl -n $NAMESPACE create secret generic pty-rpp-tls \
# --from-file=cert.pem=./certs/cert.pem \
# --from-file=cert.key=./certs/cert.key \
# --from-file=CA.pem=./ca/CA.pem \
# --from-file=secret.txt=./certs/secret.txt
certificates:
# Logforwarder configuration
logs:
# -- In case that connection to fluent-bit is lost, set how audits/logs are handled
#
# drop : Protector throws logs away if connection to the fluentbit is lost.
# error : (default) Protector returns error without protecting/unprotecting
# data if connection to the fluentbit is lost.
mode: error
# -- Host/IP to fluent-bit where audits/logs will be forwarded from the protector
#
# Default localhost
host:
# nginx configuration
nginx:
# configure audit records generate by nginx service.
# The generated records are sent to stdout.
# Error logs are enabled by default.
logs:
# -- configure http client request access logs, by default the records
# are sent to stdout
request_logs: false
# -- configure kubelet health check probe access logs, by default the records
# are sent to stdout.
probe_logs: false
# -- specify the initial no. of rest Pod replicas
replicaCount: 1
# HPA configuration
autoScaling:
# -- lower limit on the number of replicas to which the autoscaler
# can scale down to.
minReplicas: 1
# -- upper limit on the number of replicas to which
# the autoscaler can scale up. It cannot be less that minReplicas.
maxReplicas: 10
# -- CPU utilization threshold which triggers the autoscaler
targetCPU: 70
# Kubernetes service configuration, represents a HTTP service to host
# REST protector endpoint.
service:
# -- Configure service type: LoadBalancer or ClusterIP for rest protector
# endpoint
type: ClusterIP
port: 443
# -- secret name containing server TLS certificates to host
# rest protector endpoint.
# kubectl -n $NAMESPACE create secret generic pty-rest-tls \
# --from-file=cert.pem=./certs/cert.pem \
# --from-file=cert.key=./certs/cert.key \
# --from-file=CA.pem=./ca/CA.pem
certificates:
# -- Specify k8s service related annotations
# annotation can configure internal load balancer
# AWS internal load balancer
#service.beta.kubernetes.io/aws-load-balancer-internal: "true"
# AZURE internal load balancer
#service.beta.kubernetes.io/azure-load-balancer-internal: "true"
# GCP internal load balancer
#networking.gke.io/load-balancer-type: "Internal"
annotations:
#service.beta.kubernetes.io/aws-load-balancer-internal: "true"
#service.beta.kubernetes.io/azure-load-balancer-internal: "true"
#networking.gke.io/load-balancer-type: "Internal"
- Modify the default values in the values.yaml file as required.
| Field | Description |
|---|---|
| imagePullSecrets/regred | Specify the Kubernetes secret for accessing the image registry. The registry credential secret is created using existing Docker credentials. |
| iaprestImage | Specify the repository and tag details for the REST Container image. |
| nginxImage | Specify the repository and tag details for the NGINX image. For example:
|
| iaprestResources | Specify the CPU and memory requirements for the REST Container. |
| nginxResources | Specify the CPU and memory requirements for the NGINIX container. |
| serviceAccount/name | Specify the name of the pod service account. Leave the field empty if it is not applicable. |
| podSecurityContext | Specify the privilege and access control settings for the pod. The default values are set as follows:
|
Container Security Context:
| Specify the privilege and access control settings for the REST Container and the NGINX containers respectively. |
| protector/policy/cadence | Specify the time interval in seconds after which the protector connects with the RPProxy to retrieve the policy package. By default, the value is set to 60. Ensure that the value is note set to 0. Else, the protector will retrieve the policy only once. |
| protector/policy/host | Specify the host name or IP address of the RPProxy. |
| protector/policy/certificates | Specify the name of the secret for the certificate, which you have created in step 2 that is used to authenticate the RPProxy for downloading the policy package. |
| protector/logs/mode | Specify one of the following options in case the connection to the Log Forwarder is lost:
By default, the value is set to error. |
| protector/logs/host | Specify the service hostname of the Log Forwarder, where the logs are forwarded. The default value is <Helm_Installation_Name>-<Helm_Chart_Name>.<Namespace>.svc. For example, iaplog-logforwarder.iaprest.svc. |
| nginx/logs/request_logs | Specify whether to enable or disable the HTTP client request access logs. By default, the value is set to False. |
| nginx/logs/probe_logs | Specify whether to enable or disable the Kubelet health check probe access logs. By default, the value is set to False. |
| replicaCount | Specify the initial number of the REST pod replicas. |
| autoScaling | Specify the configurations required for the Horizontal Pod Autoscaling. |
| service/type | Specify the service type for the REST Container. By default, this value is set to ClusterIP. Change this value to LoadBalancer to send an HTTPS request to the REST Container pod from outside the cluster. |
| service/port | Specify the service port number for the REST container. By default, the value is set to 443. |
| service/certificates | Specify the name of the secret, which you have created in step 4 that contains the server TLS certificates to the host the REST protector endpoint. |
| service/annotations | Specify the annotations for the respective Cloud platforms if you want to use the internal load balancer instead of the NGINX ingress. By default, this value is left blank. |
- Run the following command to deploy the REST Container on the Kubernetes cluster.
helm install <Release_Name> --namespace <Namespace where you want to deploy the REST container> <Location of the directory that contains the Helm charts>
For example:
helm install iap-rest-dynamic --namespace iap-rest dynamic/
- Run the following command to check the status of the pods.
oc get pods -n <Namespace>
For example:
oc get pods -n iap-rest
NAME READY STATUS RESTARTS AGE
iap-rest-iap-rest-dynamic-7b97d5dff7-grqph 2/2 Running 0 11h
log1-logforwarder-f6gvj 1/1 Running 0 11h
log1-logforwarder-ls4hn 1/1 Running 0 11h
log1-logforwarder-phk4t 1/1 Running 0 11h
log1-logforwarder-z2mz7 1/1 Running 0 11h
rpp-rpproxy-5fd7d859b6-p9544 1/1 Running 0 11h
6.4.2.1.4 - Uninstalling the Protector in Dynamic Method
To uninstall the Protector:
- Run the following command to uninstall the Log Forwarder from the Kubernetes cluster.
helm uninstall <Release_Name> --namespace <Namespace where the Log Forwarder is deployed>
For example:
helm uninstall log1 --namespace iap-rest
- Run the following command to uninstall the RPP from the Kubernetes cluster.
helm uninstall <Release_Name> --namespace <Namespace where RPP is deployed>
For example:
helm uninstall rpp --namespace iap-rest
- Run the following command to uninstall the REST Container from the Kubernetes cluster.
helm uninstall <Release_Name> --namespace <Namespace where the REST Container is deployed>
For example:
helm uninstall iap-rest-dynamic --namespace iap-rest
- Run the following command to delete the Kubernetes secrets.
oc delete secret <Secret_Name> --namespace <Namespace where the REST Container is deployed>
For example:
oc delete secret common-cert --namespace iap-rest
Repeat this step to delete all the secrets that you have created while deploying the RPP and the REST Container:
- common-cert
- upstream-cert
- service-certs
- rpp-client-certs
- regcred
- Run the following command to delete the Kubernetes namespace.
helm delete namespace <Namespace where the REST Container is deployed>
For example:
helm delete namespace iap-rest
6.4.2.2 - Deploying REST Container in Static Mode
This section describes how to deploy the REST Container in static mode.
6.4.2.2.1 - Retrieving the Policy Package from the ESA
This section describes how to invoke the RPS APIs to retrieve the policy package using the ESA.
Note: Ensure that the Export Resilient Package permission is granted to the role that is assigned to the user exporting the package from the ESA.
Warning: Do not modify the package that has been exported using the RPS Service API.
To retrieve the policy package from the ESA:
Download the policy package from the ESA and encrypt the policy package using a KMS with the RPS API.
If you are using 10.1 ESA, then refer to the section Using the Encrypted Resilient Package REST APIs for more information about the RPS API.
If you are using 10.2 ESA, then refer to the section Using the Encrypted Resilient Package REST APIs for more information about the RPS API.
If you are using Protegrity Provisioned Cluster, then navigate to Protegrity Product Documentation. Then, navigate to Edition > AI Team Edition > Infrastructure > Protegrity REST APIs > Using the Encrypted Resilient Package REST APIs for more information about the RPS API.
The policy package is downloaded to your machine.
Copy the policy package file to an AWS S3 bucket or AWS EFS, as required.
6.4.2.2.2 - Deploying Log Forwarder
The Log Forwarder is deployed as a DaemonSet. The following steps describe how to deploy Log Forwarder.
On the Linux instance, run the following command to create the namespace required for Helm deployment.
kubectl create namespace <Namespace name>For example:
kubectl create namespace iap-restOn the Linux instance, navigate to the location where you have extracted the Helm charts to deploy the Log Forwarder.
For more information about the extracted Helm charts, refer to the section Extracting the Installation Package.
The logforwarder > values.yaml file contains the default configuration values for deploying the Log Forwarder container on the Kubernetes cluster. The following content shows an extract of the values.yaml file.
## create image pull secrets and specify the name here. ## remove the [] after 'imagePullSecrets:' once you specify the secrets imagePullSecrets: - name: regcred ... ... # - Protegrity PSU(Protegrity Storage Unit)/ESA configuration. # Logforwarder will send audit records to below specified hosts/ip. # User can specify multiple PSU/ESA distribute the audit records and avoid downtime. opensearch: # -- specify a given name to uniquely identify PSU/ESA in the deployment. - name: # -- hostname/ip address of PSU/ESA host: # -- port address of ESA/PSU port: 9200 # - name: node-2 # host: test-insight # port: 9200 # -- Kubernetes service configuration, represents a TCP endpoint to receive audit records # from the protectors. service: # -- Configure service type: ClusterIP for Logforwarder endpoint. type: ClusterIP # -- port to accept incoming audit records from the protector port: 15780 ...Modify the default values in the values.yaml file as required.
| Field | Description |
|---|---|
| imagePullSecrets/regred | Specify the Kubernetes secret for accessing the image registry. The registry credential secret is created using existing Docker credentials. |
| opensearch/name | Specify the unique name for the ESA. |
| opensearch/host | Specify the host name or IP address of the ESA. |
| opensearch/port | Specify the port number of the ESA. The default value is 9200. |
| service/type | Specify the service type for the Log Forwarder. The default value is ClusterIP. |
| service/port | Specify the service port of the Log Forwarder, which receives the audit logs from the protectors. The default value is 15780. |
- Run the following command to deploy the Log Forwarder on the Kubernetes cluster.
helm install <Release_Name> --namespace <Namespace where you want to deploy the RPP container> <Location of the directory that contains the Helm charts>
For example:
helm install log1 --namespace iap-rest <Custom_path>/commonlogforwarder/
<Custom_path> is the directory where you have extracted the installation package.
- Run the following command to check the status of the pods.
oc get pods -n <Namespace>
For example:
oc get pods -n iap-rest
NAME READY STATUS RESTARTS AGE
log1-logforwarder-f6gvj 1/1 Running 0 11h
log1-logforwarder-ls4hn 1/1 Running 0 11h
log1-logforwarder-phk4t 1/1 Running 0 11h
log1-logforwarder-z2mz7 1/1 Running 0 11h
As the Log Forwarder is deployed as a DaemonSet, one instance of Log Forwarder is deployed on each node. In this example, one Log Forwarder pod is deployed per node.
For information about configuring the Log Forwarder, refer to the section Configuration Parameters for Forwarding Audits and Logs.
6.4.2.2.3 - Deploying KMSProxy Container
The following steps describe how to deploy the KMSProxy container.
- Run the following command to generate the TLS server certificate for the KMS-Proxy service.
CreateCertificate_Linux_x64_<Version>.sh server --name <Directory> --dns <Release_Name>.<namespace>.svc
For example:
CreateCertificate_Linux_x64_<Version>.sh server --name kms-proxy-server --dns kms-proxy.<namespace>.svc
For more information about generating the client certificates, refer to the section Creating Certificates.
The following server certificates files are created in the kms-proxy-server folder:
- cert.pem
- cert.key
- CA.pem
- secret.txt
These certificates are used by the protector as a server certificate to authenticate the KMS-Proxy service.
Ensure that the namespace and release name that you specify in this command are the same names that you specify in step 5 while deploying the KMS-Proxy Helm chart.
For more information about the data encryption key used in the AWS KMS, refer to the section Creating an Data Encryption Key (DEK).
2. Run the following command to generate the secret for the KMS-Proxy server certificate.
oc -n <KMS-Proxy_Namespace> create secret generic service-certs --from-file=CA.pem=<path-to-CA.pem> --from-file=cert.key=<path-to-cert.key> --from-file=cert.pem=<path-to-cert.pem> --from-file=secret.txt=<path-to-secret.txt>
For more information about generating the client certificates, refer to the section Creating Certificates.
Specify this secret as the value of the service/certificateSecret parameter in the values.yaml file.
On the Linux instance, navigate to the location where you have extracted the Helm charts to deploy the KMSProxy container.
For more information about the extracted Helm charts, refer to the section Extracting the Installation Package.The kms-proxy > values.yaml file contains the default configuration values for deploying the RPP container on the Kubernetes cluster.
# -- create image pull secrets and specify the name here.
# remove the [] after 'imagePullSecrets:' once you specify the secrets
imagePullSecrets:
- name: regcred
...
...
# -- service account must be linked to a cloud role to access appropriate KMS keyid.
# the cloud role must have decrypt permission on keyid
serviceAccount:
# The name of the service account to use.
name:
# Specify any additional annotation to be associated with pod
podAnnotations:
checksum/kmsproxy-config: '{{ include (print $.Template.BasePath "/configmap.yaml") . | sha256sum }}'
## set the Pod's security context object
#---Uncomment the fsGroup setting if deploying on AWS EKS
podSecurityContext:
#fsGroup: 1000
## set the Container's security context object
#---Uncomment the runAsUser setting if deploying on AWS EKS
securityContext:
capabilities:
drop:
- ALL
readOnlyRootFilesystem: true
runAsNonRoot: true
#runAsUser: 1000
allowPrivilegeEscalation: false
seccompProfile:
type: RuntimeDefault
#-- cloud kms related configuration
kms:
# -- Specify Cloud KMS vendor
# expected values are: AWS
vendor: ""
# -- Use the below setting when deploying on Openshift platform.
# -- specify the credentials secret name to access cloud KMS.
# kubectl -n $NAMESPACE create secret generic pty-kms-credentials \
# --from-file=credentials=./credentials
credentials:
#--- specify identifier for RSA key hosted by the cloud KMS.
# In case of AWS identifier is the key ARN (Amazon resource identifier)
keyid: ""
# kms-proxy service configuration
application:
# -- The cache will keep the content(decrypted KEK) for the specified TTL(time to live)
# duration in seconds. Once the TTL expires the value from the cache is cleared.
# Based on amount of time require to update/install the protector deployment, update
# the ttl. Default is 1200 seconds(20 minutes)
ttl: 1200
# -- By default, log level for the application is set to INFO.
# available logging levels ares INFO, DEBUG, TRACE
# to enable http access log set the logLevel to TRACE
logLevel: INFO
# Kubernetes service configuration, represents a HTTP service to host
# kms proxy endpoint.
service:
# -- Configure service type: ClusterIP for kms-proxy endpoint
type: ClusterIP
port: 443
# -- TLS certificate of kms-proxy service.
# kubectl -n $NAMESPACE create secret generic pty-kms-proxy-tls \
# --from-file=cert.pem=./certs/cert.pem \
# --from-file=cert.key=./certs/cert.key \
# --from-file=CA.pem=./ca/CA.pem \
# --from-file=secret.txt=./certs/secret.txt
certificates:
- Modify the default values in the values.yaml file as required.
| Field | Description |
|---|---|
| imagePullSecrets/regred | Specify the Kubernetes secret for accessing the image registry. The registry credential secret is created using existing Docker credentials. |
| serviceAccount/name | Specify the name of the service account that is linked to a role having access to the Key ID of the respective cloud. Ensure that the role has decrypt permissions on the Key ID. |
| kms/vendor | Specify the cloud vendor. For example, AWS, Azure, or GCP. |
| kms/credentials | Specify the credentials secret name to access the cloud KMS. |
| kms/keyid | Specify the key Amazon Resource Name (ARN) for AWS. |
| application/ttl | Specify the time to live in seconds till which the KMSProxy cache retains the decrypted KEK. The default value is 1200, which equals 20 minutes. |
| application/logLevel | Specify the log level for the application. The following values are applicable:
Set this value to TRACE to enable HTTP access log. |
| service/type | Specify the HTTP service type to host the KMSProxy endpoint. The default value is ClusterIP. |
| service/port | Specify the port number for the KMSProxy end point. The default value is 443. |
| service/certificates | Specify the secret value of the TLS certificate for the KMS Proxy service that you have created in step 2. |
5. Run the following command to deploy the KMSProxy container on the Kubernetes cluster.
helm install <Release_Name> --namespace <Namespace to deploy KMSProxy container> <Location of the directory containing Helm charts>
For example:
helm install kmsproxy --namespace iap-rest kms-proxy/
- Run the following command to check the status of the pods.
oc get pods -n <Namespace>
For example:
oc get pods -n iap-rest
NAME READY STATUS RESTARTS AGE
kms-10-v1-kms-proxy-7b97d5dff7-grqph 2/2 Running 0 11h
log1-logforwarder-f6gvj 1/1 Running 0 11h
log1-logforwarder-ls4hn 1/1 Running 0 11h
log1-logforwarder-phk4t 1/1 Running 0 11h
log1-logforwarder-z2mz7 1/1 Running 0 11h
6.4.2.2.4 - Deploying REST Container Using Static Method
The following steps describe how to deploy the REST Container.
- Run the following command to generate the client certificate to authenticate with the KMS-Proxy service.
CreateCertificate_Linux_x64_<Version>.sh client --name <Directory> --dns <Release_Name>.<namespace>.svc
For example:
CreateCertificate_Linux_x64_<Version>.sh client --name kms-client --dns kms-proxy.<namespace>.svc
For more information about generating the client certificates, refer to the section Creating Certificates.
The following client certificates files are created in the kms-client folder:
- cert.pem
- cert.key
- CA.pem
- secret.txt
This certificate is used by the protector as a client certificate to authenticate the protector with the KMS-Proxy service.
Ensure that the namespace and release name that you specify in this command are the same names that you specify in step 5 while deploying the KMS-Proxy Helm chart.
2. Run the following command to generate the secret for the KMS-Proxy client certificate created in step 1.
oc -n <KMS-Proxy_Namespace> create secret generic service-certs --from-file=CA.pem=<path-to-CA.pem> --from-file=cert.key=<path-to-cert.key> --from-file=cert.pem=<path-to-cert.pem> --from-file=secret.txt=<path-to-secret.txt>
For more information about generating the client certificates, refer to the section Creating Certificates.
Specify this secret as the value of the kms/certificates parameter in the values.yaml file.
- Run the following command to generate the TLS certificate for the server that hosts the REST Container endpoint.
CreateCertificate_Linux_x64_<Version>.sh server --name <Directory> --dns <DNS_Name> --noenc
CreateCertificate_Linux_x64_<Version>.sh server --name rest-server --dns test-sampleapp-10-v1.example.com --noenc
The following server certificates files are created in the rest-server folder:
- cert.pem
- cert.key
- CA.pem
For more information about generating the certificates, refer to the section Creating Certificates
4. Run the following command to generate a secret using the server certificate for the REST Container endpoint.
oc -n <Namespace> create secret generic pty-rest-server-secret --from-file=CA.pem=<path-to-CA.pem> --from-file=cert.key=<path-to-cert.key> --from-file=cert.pem=<path-to-cert.pem>
For more information about generating the server certificates, refer to the section Creating Certificates.
Specify this secret as the value of the service/certificates parameter in the values.yaml file.
- Run the following command to generate the client secret for accessing the REST Container endpoint.
CreateCertificate_Linux_x64_<Version>.sh client --name <Directory> --dns <Namespace_name> --noenc
CreateCertificate_Linux_x64_<Version>.sh client --name rest-client --dns test-sampleapp-10-v1.example.com --noenc
The following client certificates files are created in the rest-client folder:
- cert.pem
- cert.key
- CA.pem
These certificates are used in the curl command for invoking the REST APIs.
For more information about generating the certificates, refer to the section Creating Certificates.
On the Linux instance, navigate to the location where you have extracted the Helm charts to deploy the REST Container.
The devops > values.yaml file contains the default configuration values for deploying the RPP container on the Kubernetes cluster.
## -- create image pull secrets and specify the name here.
## remove the [] after 'imagePullSecrets:' once you specify the secrets
imagePullSecrets: []
# - name: regcred
nameOverride: ""
fullnameOverride: ""
# REST protector image configuration
iaprestImage:
# -- rest protector image registry address
repository:
# -- rest protector image tag name
tag:
# -- The pullPolicy for a container and the tag of the image affect
# when the kubelet attempts to pull (download) the specified image.
pullPolicy: IfNotPresent
# policy loader sidecar image configuration
policyLoaderImage:
# -- policy loader sidecar container image registry address
repository:
# -- policy loader sidecar container image tag name
tag:
# -- The pullPolicy for a container and the tag of the image affect
# when the kubelet attempts to pull (download) the specified image.
pullPolicy: IfNotPresent
# Docker Hub Image (Root User): docker.io/nginx:stable
# To use nginx image that runs with non-root permissions
# Ref. https://hub.docker.com/r/nginxinc/nginx-unprivileged
nginxImage:
# -- nginx image registry address
repository:
# -- nginx image tag name
tag:
# -- The pullPolicy for a container and the tag of the image affect
# when the kubelet attempts to pull (download) the specified image.
pullPolicy: IfNotPresent
# specify CPU and memory requirement of REST protector container
iaprestResources:
limits:
cpu: 1000m
memory: 3000Mi
requests:
cpu: 500m
memory: 800Mi
# specify CPU and memory requirement of policy loader container
policyLoaderResources:
limits:
cpu: 200m
memory: 512Mi
requests:
cpu: 100m
memory: 200Mi
# specify CPU and memory requirement of nginx proxy container
nginxResources:
limits:
cpu: 500m
memory: 512Mi
requests:
cpu: 200m
memory: 200Mi
...
# -- pod service account to be used.
# A k8s service account can be linked to cloud identity to allow pod to access
# cloud services like Object storage solutions.
serviceAccount:
# The name of the service account to use.
name:
# Specify any additional annotation to be associated with pod
podAnnotations:
checksum/nginx-config: '{{ include (print $.Template.BasePath "/nginx-configmap.yaml") . | sha256sum }}'
checksum/rest-config: '{{ include (print $.Template.BasePath "/rest-configmap.yaml") . | sha256sum }}'
# set the Pod's security context object.
#---Uncomment the runAsUser,runAsGroup,fsGroup setting if deploying on AWS EKS
podSecurityContext:
#runAsUser: 1000
#runAsGroup: 1000
#fsGroup: 1000
# set the iapRest Container's security context object
iaprestContainerSecurityContext:
capabilities:
drop:
- ALL
readOnlyRootFilesystem: true
runAsNonRoot: true
allowPrivilegeEscalation: false
privileged : false
seccompProfile:
type: RuntimeDefault
# -- set the policy loader sidecar Container's security context object
# leave the field empty if not applicable
policyLoaderContainerSecurityContext:
capabilities:
drop:
- ALL
readOnlyRootFilesystem: true
runAsNonRoot: true
allowPrivilegeEscalation: false
privileged : false
seccompProfile:
type: RuntimeDefault
# -- set the nginx Container's security context object.
# leave the field empty if not applicable
nginxContainerSecurityContext:
capabilities:
drop:
- ALL
readOnlyRootFilesystem: true
runAsNonRoot: true
allowPrivilegeEscalation: false
privileged : false
seccompProfile:
type: RuntimeDefault
# protector configuration
protector:
# Policy information for the protector initialization
# Note: Policy update is control by policy puller sidecar, Below configuration
# are for protector to refresh policy once it is updated by policy puller sidecar.
policy:
# -- Cadence determines how often the protector connects local filesystem
# to fetch the policy updates in background. Default is 60 seconds.
# So by default, every 60 seconds protector tries to fetch the policy updates.
# If the cadence is set to "0", then the protector will get the policy only
# once, which is not recommended.
cadence: 60
# KMS proxy service configuration
kms:
# -- kms proxy service hostname.
# kms proxy service helps protector to decrypt resilient policy package.
host:
# -- certificates to authenticate with kms proxy service.
# Specify certificate secret name.
# kubectl -n $NAMESPACE create secret generic pty-kms-proxy-tls \
# --from-file=cert.pem=./certs/cert.pem \
# --from-file=cert.key=./certs/cert.key \
# --from-file=CA.pem=./ca/CA.pem \
# --from-file=secret.txt=./certs/secret.txt
certificates:
# Logforwarder configuration
logs:
# -- specify log levels.
# In case that connection to fluent-bit is lost, set how audits/logs are handled
#
# drop : Protector throws logs away if connection to the fluentbit is lost
# error : (default) Protector returns error without protecting/unprotecting
# data if connection to the fluentbit is lost
mode: error
# -- Host/IP of Logforwarder service where audits/logs are forwarded by the
# REST protector
host:
# nginx configuration
nginx:
# control audit records generate by nginx proxy.
# the generated records are sent to stdout.
# error logs are enabled by default.
logs:
# -- configure http client request access logs, by default the records
# are sent to stdout
request_logs: false
# -- configure kubelet health check probe access logs, by default the records
# are sent to stdout.
probe_logs: false
# policy puller sidecar configuration
policyPuller:
# -- Use the below setting when deploying on Openshift platform.
# -- specify the credentials secret name to access cloud KMS.
# kubectl -n $NAMESPACE create secret generic pty-kms-credentials \
# --from-file=credentials=./credentials
credentials:
policy:
# -- Control how often the sidecar application will read the configuration
# file for policy update information.
# Interval is reset when previous pull operation is completed.
# IMPORTANT: do not set interval to 0.
interval: 30
# -- If using VolumeMount as storage destination for policy package
# specify the persistent volume claim name to be used to mount the volume.
pvcName:
# -- Path to KMS encrypted Resilient policy package. Specify an URL encoded
# path to package file. Here are few examples,
# If stored in S3 then, s3://[s3 bucket name]/[to]/<[policy]>/<[package]>
# If stored in Azure Blob storage then, https://[storage account].blob.core.windows.net/[to]/<[policy]>/<[package]>
# If stored in GCS then, gs://[bucket name]/[to]/<[policy]>/<[package]>
# If stored in local filesystem (VolumeMount) then, [to]/<[policy]>/<[package]>
# Important: updating it will not trigger pod restart.
path:
logs:
# -- control policy puller log level
# logs are forwarded to stdout
# Supported Values
# INFO - default
# DEBUG
level: INFO
# -- specify the initial no. of rest Pod replicas
replicaCount: 1
# HPA configuration
autoScaling:
# -- lower limit on the number of replicas to which the autoscaler
# can scale down to.
minReplicas: 1
# -- upper limit on the number of replicas to which
# the autoscaler can scale up. It cannot be less that minReplicas.
maxReplicas: 10
# -- CPU utilization threshold which triggers the autoscaler
targetCPU: 70
# specify service type for rest container.
service:
# -- Configure service type: LoadBalancer or ClusterIP for rest protector
# endpoint
type: ClusterIP
port: 443
# -- secret name containing server TLS certificates to host
# rest protector endpoint.
# kubectl -n $NAMESPACE create secret generic pty-rest-tls \
# --from-file=cert.pem=./certs/cert.pem \
# --from-file=cert.key=./certs/cert.key \
# --from-file=CA.pem=./ca/CA.pem
certificates:
# -- Specify k8s service related annotations
# annotation can configure internal load balancer
# AWS internal load balancer
#service.beta.kubernetes.io/aws-load-balancer-internal: "true"
# AZURE internal load balancer
#service.beta.kubernetes.io/azure-load-balancer-internal: "true"
# GCP internal load balancer
#networking.gke.io/load-balancer-type: "Internal"
annotations:
#service.beta.kubernetes.io/aws-load-balancer-internal: "true"
#service.beta.kubernetes.io/azure-load-balancer-internal: "true"
#networking.gke.io/load-balancer-type: "Internal"
- Modify the default values in the values.yaml file as required.
| Field | Description |
|---|---|
| imagePullSecrets/regred | Specify the Kubernetes secret for accessing the image registry. The registry credential secret is created using existing Docker credentials. |
| iaprestImage | Specify the repository and tag details for the REST Container image. |
| policyLoaderImage | Specify the repository and tag details for the Policy Loader image. |
| nginxImage | Specify the repository and tag details for the NGINX image. |
| iaprestResources | Specify the CPU and memory requirements for the REST Container. |
| policyLoaderResources | Specify the CPU and memory requirements for the Policy Loader container. |
| nginxResources | Specify the CPU and memory requirements for the NGINIX container. |
| serviceAccount/name | Specify the name of the service account that enables you to access the Object storage solutions of the Cloud service. |
Container Security Context:
| Specify the privilege and access control settings for the REST Container, Policy Loader container, and the NGINX containers respectively. |
| protector/policy/cadence | Specify the time interval in seconds after which the protector retrieves the policy that has been updated by the Policy Loader container. By default, the value is set to 60. Ensure that the value is not set to 0. Else, the protector will retrieve the policy only once. |
| protector/kms/host | Specify the host name of the KMS Proxy service that is used to decrypt the policy package. |
| protector/kms/certificates | Specify the name of the secret for the certificate that is used to authenticate with the KMS Proxy service, which you have created in step 2. |
| protector/logs/mode | Specify one of the following options in case the connection to the Log Forwarder is lost:
By default, the value is set to error. |
| protector/logs/host | Specify the service hostname of the Log Forwarder, where the logs are forwarded. The default value is <Helm_Installation_Name>-<Helm_Chart_Name>. For example, iaplog-logforwarder.iaprest.svc. |
| nginx/logs/request_logs | Specify whether to enable or disable the HTTP client request access logs. By default, the value is set to False. |
| nginx/logs/probe_logs | Specify whether to enable or disable the Kubelet health check probe access logs. By default, the value is set to False. |
| policyPuller/credentials | Specify the credentials secret name to access the cloud KMS. |
| policyPuller/policy/interval | Specify the time interval in seconds after which the Policy Loader sidecar container will retrieve the policy package from the specified path. By default, the value is set to 30. Ensure that the interval is not set to 0. Else, the Policy Loader container will not retrieve the updated policy package. |
| policyPuller/path | Specify the path where the encrypted policy package has been uploaded. For example, if the package is stored in an AWS S3 bucket, then you need to specify the following path: s3://[s3 bucket name]/[to]/<[policy]>/<[package].If the package is stored in local filesystem VolumeMount, then you need to specify the following path: [to]/<[policy]>/<[package]>. |
| policyPuller/logs/level | Specify the log level of the Policy Loader container. By default, the value is set to INFO. |
| replicaCount | Specify the initial number of the REST pod replicas. |
| autoScaling | Specify the configurations required for the Horizontal Pod Autoscaling. |
| service/type | Specify the service type for the REST Container. By default, this value is set to ClusterIP. Change this value to LoadBalancer to send an HTTPS request to the REST Container pod from outside the cluster. |
| service/port | Specify the service port number for the REST container. By default, the value is set to 443. |
| service/certificates | Specify the name of the secret that contains the server TLS certificates to the host the REST protector endpoint, which you have created in step 4. |
| service/annotations | Specify the annotations for the respective Cloud platforms if you want to use the internal load balancer instead of the NGINX ingress. By default, this value is left blank. |
- Run the following command to deploy the REST Container on the Kubernetes cluster.
helm install <Release_Name> --namespace <Namespace where you want to deploy the REST container> <Location of the directory that contains the Helm charts>
For example:
helm install iap-rest-devops --namespace iap-rest devops/
- Run the following command to check the status of the pods.
oc get pods -n <Namespace>
For example:
oc get pods -n iap-rest
NAME READY STATUS RESTARTS AGE
kms-10-v1-kms-proxy-7b97d5dff7-grqph 2/2 Running 0 11h
log1-logforwarder-f6gvj 1/1 Running 0 11h
log1-logforwarder-ls4hn 1/1 Running 0 11h
log1-logforwarder-phk4t 1/1 Running 0 11h
log1-logforwarder-z2mz7 1/1 Running 0 11h
iap-rest-iap-rest-devops-5fd7d859b6-p9544 1/1 Running 0 11h
Alternatively, if you do not want to modify the values.yaml file, you can use set arguments to update the values during runtime.
For more information about deploying containers using set arguments, refer to the section Appendix - Deploying the Helm Charts by Using the Set Argument.
The test user can run the REST version API to verify the version of the REST protector.
6.4.2.2.5 - Updating the Policy Package
The following steps describe how to update the policy or the policy path.
Modify the policy or the location where the policy has been uploaded.
Run the
helm upgradecommand to update the policy package or the policy package path.
For example, the line --set policyPuller.policy.path="s3://restcontainer/static-iap-rest-rel-a/try/Sample_App_Policy.tgz" in the following code block indicates that the path where the policy package is stored has changed.
helm -n devops-10-v2 upgrade test-sampleapp-10-v1 iap-rest-devops/ \
--set imagePullSecrets[0].name="regcred" \
--set iaprestImage.repository="<Account_ID>.dkr.ecr.<region_name>.amazonaws.com/container" \
--set iaprestImage.tag="REST_RHUBI-9-64_x86-64_K8S_10.0.0.16.6a3a67.tgz" \
--set policyLoaderImage.repository="<Account_ID>.dkr.ecr.<region_name>.amazonaws.com/container" \
--set policyLoaderImage.tag="POLICY-LOADER_RHUBI-9-64_x86-64_K8S_1.0.0.11.bc1967.tgz" \
--set nginxImage.repository="nginxinc/nginx-unprivileged" \
--set nginxImage.tag="1.25.2" \
--set serviceAccount.name="s3-v1-sa" \
--set protector.kms.host="test-kms-10-v1-kms-proxy.devops-10-v2.svc" \
--set protector.kms.certificates="pty-certs-cli-secret" \
--set protector.logs.mode="error" \
--set protector.logs.host="test-devops-logforwarder10-v1.devops-10-v2.svc" \
--set nginx.logs.request_logs="false" \
--set nginx.logs.probe_logs="false" \
--set policyPuller.policy.interval="30" \
--set policyPuller.logs.level="DEBUG" \
--set protector.policy.cadence="60"\
--set policyPuller.policy.path="s3://restcontainer/static-iap-rest-rel-a/try/Sample_App_Policy.tgz" \
--set service.certificates="pty-rest-devops-secret"
For more information about using set arguments to deploy the Protector, refer to the section Appendix - Deploying the Helm Charts by Using the Set Argument.
- Run the following command to check the status of the pods.
oc get pods -n <Namespace>
For example:
oc get pods -n iap-rest
NAME READY STATUS RESTARTS AGE
test-devops-logforwarder10-v1-2m49b 1/1 Running 0 163m
test-devops-logforwarder10-v1-wwjzh 1/1 Running 0 165m
test-kms-10-v1-kms-proxy-687657cff9-dlzdz 1/1 Running 0 161m
test-sampleapp-10-v1-iap-rest-devops-54668997cf-kw628 3/3 Running 0 5m11s
- Run the following command to check the logs.
oc logs <Pod_name> -n <Namespace> -f
For example:
oc logs test-sampleapp-10-v1-iap-rest-devops-54668997cf-kw628 -n iap-rest -f
The following logs appear on the console output. The line [INFO ] 2025/10/29 11:47:19.335550 runner.go:226: New Policy source path s3://restcontainers/new-10-49-7-212/new/policy-sample-app-10-49-7-212-v1.json indicates that the policy package path has been updated.
Defaulted container "policy-loader" out of: policy-loader, iap-rest-devops, nginx
[INFO ] 2025/10/29 11:45:16.090634 runner.go:104: starting policy loader with version: 1.0.0+13.e0beab
Starting Health Server.
[INFO ] 2025/10/29 11:45:16.090811 runner.go:187: fetching policy from storage media, AWS_S3
[INFO ] 2025/10/29 11:45:16.313683 runner.go:196: Loading policy from source path s3://restcontainers/new-10-49-7-212/policy-v1-10-49-7-212.json
[root@ip-10-49-5-222 ~]# oc logs test-sampleapp-10-v1-iap-rest-devops-7f4f9b9cc4-zbbkg -n devops-10-v6 -f
Defaulted container "policy-loader" out of: policy-loader, iap-rest-devops, nginx
[INFO ] 2025/10/29 11:45:16.090634 runner.go:104: starting policy loader with version: 1.0.0+13.e0beab
Starting Health Server.
[INFO ] 2025/10/29 11:45:16.090811 runner.go:187: fetching policy from storage media, AWS_S3
[INFO ] 2025/10/29 11:45:16.313683 runner.go:196: Loading policy from source path s3://restcontainers/new-10-49-7-212/policy-v1-10-49-7-212.json
[INFO ] 2025/10/29 11:45:48.914901 runner.go:220: fetching policy from storage media, AWS_S3
[INFO ] 2025/10/29 11:45:48.914935 runner.go:242: Policy source path is same. Checking based on timestamp.
[INFO ] 2025/10/29 11:45:49.057011 runner.go:250: Policy source is not modified since last fetch. Skipping policy load operation.
[INFO ] 2025/10/29 11:46:19.057887 runner.go:220: fetching policy from storage media, AWS_S3
[INFO ] 2025/10/29 11:46:19.057916 runner.go:242: Policy source path is same. Checking based on timestamp.
[INFO ] 2025/10/29 11:46:19.201224 runner.go:250: Policy source is not modified since last fetch. Skipping policy load operation.
[INFO ] 2025/10/29 11:46:49.201456 runner.go:220: fetching policy from storage media, AWS_S3
[INFO ] 2025/10/29 11:46:49.201485 runner.go:242: Policy source path is same. Checking based on timestamp.
[INFO ] 2025/10/29 11:46:49.335206 runner.go:250: Policy source is not modified since last fetch. Skipping policy load operation.
[INFO ] 2025/10/29 11:47:19.335501 runner.go:220: fetching policy from storage media, AWS_S3
[INFO ] 2025/10/29 11:47:19.335536 runner.go:224: Policy source path is modified. Triggering policy load operation.
[INFO ] 2025/10/29 11:47:19.335545 runner.go:225: Old Policy source path s3://restcontainers/new-10-49-7-212/policy-v1-10-49-7-212.json.
[INFO ] 2025/10/29 11:47:19.335550 runner.go:226: New Policy source path s3://restcontainers/new-10-49-7-212/new/policy-sample-app-10-49-7-212-v1.json
6.4.2.2.6 - Uninstalling the Protector in Static Method
To uninstall the Protector:
- Run the following command to uninstall the Log Forwarder from the Kubernetes cluster.
helm uninstall <Release_Name> --namespace <Namespace where the Log Forwarder is deployed>
For example:
helm uninstall log1 --namespace iap-rest
- Run the following command to uninstall the KMSProxy container from the Kubernetes cluster.
helm uninstall <Release_Name> --namespace <Namespace where RPP is deployed>
For example:
helm uninstall kmsproxy --namespace iap-rest
- Run the following command to uninstall the REST Container from the Kubernetes cluster.
helm uninstall <Release_Name> --namespace <Namespace where the REST Container is deployed>
For example:
helm uninstall iap-rest-devops --namespace iap-rest
- Run the following command to delete the Kubernetes secrets.
oc delete secret <Secret_Name> --namespace <Namespace where the REST Container is deployed>
For example:
oc delete secret service-certs --namespace iap-rest
Repeat this step to delete all the secrets that you have created while deploying the KMSProxy container and the REST Container:
- service-certs
- regcred
- Run the following command to delete the Kubernetes namespace.
helm delete namespace <Namespace where the REST Container is deployed>
For example:
helm delete namespace iap-rest
6.5 - Application Protector API on REST
This section describes the AP REST APIs available for protection and unprotection of data:
- Version 4 API specification
- Version 1 API specification
6.5.1 - Version 4 (V4) Application Protector API on REST
6.5.1.1 - List of REST APIs
This section describes the AP REST APIs available for protection and unprotection of data.
6.5.1.1.1 - HTTP GET version
- URI
https://hostname/v4/version- Method
- GET
- Parameters
- Hostname: Host name of the endpoint, as defined in the AP-REST deployment
Resource: The resource to be used, which is /v4/version
- Result
- This function returns the current version of the AP REST protector API.
Response
| Status | Response |
|---|---|
| 200 | {"version":"10.0.0+25.4af059","components":{"jcoreVersion":"10.0.1+12.g0eb7","coreVersion":"2.1.1+20.g78ac6ac.2.1"}} |
Example
$ curl 'https://<HostName>/v4/version' --cacert iap-rest-ca.crt --cert iap-rest-client.crt --key iap-rest-client.key
6.5.1.1.2 - HTTP POST protect
- URI
https://hostname/v4/protect- Method
- POST
- Parameters
- Hostname: Host name of the endpoint, as defined in the AP-REST deployment.
Resource: The resource to be used, which is /v4/protect.
Request Body
- User: Name of the user executing the API. The user must be present in the policy.
- Payload:
- dataElement: Name of the data element used to protect the data. This field is mandatory.
- data: Data to be protected. This field is mandatory.
- externalIv: External Initialization Vector (IV) used for protecting the data.
- externaltweak: External tweak used for protecting the data.
- Result
- This API returns protected data.
Example 1
Without external IV and external tweak
$ curl --location --request POST 'https://<hostname>/v4/protect' \
--header 'Content-Type: application/json' \
--header 'X-Correlation-ID: k81d1fae-7dec-41g0-a765-90a0c31e6wf5' \
--data '{"payload":[{"id":1,"dataElement":"TE_A_N_S13_L0R0_Y_ST","data":["bG9jaGFu"],"encoding":"base64"}],"user":"user1"}'
--cacert iap-rest-ca.crt --cert iap-rest-client.crt --key iap-rest-client.key
Response 1
Without external IV and external tweak
The following response appears for the status code 200, if the API is invoked successfully.
{
"errorCount": 0,
"results": [
{
"id": 1,
"encoding": "base64",
"data": [
"cEJPM2pF"
],
"returnCode": 6
}
]
}
Example 2
With external IV
$ curl --location --request POST 'https://<hostname>/v4/protect' \
--header 'Content-Type: application/json' \
--header 'X-Correlation-ID: k81d1fae-7dec-41g0-a765-90a0c31e6wf5' \
--data '{"payload":[{"id":1,"dataElement":"TE_A_N_S13_L0R0_Y_ST","data":["bG9jaGFu"],"externalIv":"cHJvdGVncml0eQ==","encoding":"base64"}],"user":"user1"}'
--cacert iap-rest-ca.crt --cert iap-rest-client.crt --key iap-rest-client.key
Response 2
With external IV
The following response appears for the status code 200, if the API is invoked successfully.
{
"errorCount": 0,
"results": [
{
"id": 1,
"encoding": "base64",
"data": [
"b2Rnb1ky"
],
"returnCode": 6
}
]
}
Example 3
With external tweak
$ curl --location --request POST 'https://<hostname>/v4/protect' \
--header 'Content-Type: application/json' \
--header 'X-Correlation-ID: k81d1fae-7dec-41g0-a765-90a0c31e6wf5' \
--data '{"payload":[{"id":1,"dataElement":"FPE_FF1_LA_APIP_L0R0_ASTNI_M2.UTF8","data":["bG9jaGFu"],"external_tweak_":"eIvJdGKncnl8eS==","encoding":"base64"}],"user":"user1"}'
--cacert iap-rest-ca.crt --cert iap-rest-client.crt --key iap-rest-client.key
Response 3
With external tweak
The following response appears for the status code 200, if the API is invoked successfully.
{
"errorCount": 0,
"results": [
{
"id": 1,
"encoding": "base64",
"data": [
"b2Rnb1ky"
],
"returnCode": 6
}
]
}
6.5.1.1.3 - HTTP POST unprotect
- URI
https://hostname/v4/unprotect- Method
- POST
- Parameters
- Hostname: Host name of the endpoint, as defined in the AP-REST deployment.
Resource: The resource to be used, which is /v4/unprotect.
Request Body
- User: Name of the user executing the API.
- Payload:
- dataElement: Name of the data element used to unprotect the data. This field is mandatory.
- data: Data to be unprotected. This field is mandatory.
- externalIv: External Initialization Vector (IV) used for unprotecting the data.
- externaltweak: External tweak used for unprotecting the data.
- Result
- This API returns unprotected data.
Example 1
Without external IV and external tweak
$ curl --location --request POST 'https://<hostname>/v4/unprotect' \
--header 'Content-Type: application/json' \
--header 'X-Correlation-ID: k81d1fae-7dec-41g0-a765-90a0c31e6wf5' \
--data '{"payload":[{"id":1,"dataElement":"TE_A_N_S13_L0R0_Y_ST","data":["cEJPM2pF"],"encoding":"base64"}],"user":"user1"}'
--cacert iap-rest-ca.crt --cert iap-rest-client.crt --key iap-rest-client.key
Response 1
Without external IV and external tweak
The following response appears for the status code 200, if the API is invoked successfully.
{
"errorCount": 0,
"results": [
{
"id": 1,
"encoding": "base64",
"data": [
"bG9jaGFu"
],
"returnCode": 8
}
]
}
Example 2
With external IV
$ curl --location --request POST 'https://<hostname>/v4/unprotect' \
--header 'Content-Type: application/json' \
--header 'X-Correlation-ID: k81d1fae-7dec-41g0-a765-90a0c31e6wf5' \
--data '{"payload":[{"id":1,"dataElement":"TE_A_N_S13_L0R0_Y_ST","data":["b2Rnb1ky"],"externalIv":"cHJvdGVncml0eQ==","encoding":"base64"}],"user":"user1"}'
--cacert iap-rest-ca.crt --cert iap-rest-client.crt --key iap-rest-client.key
Response 2
With external IV
The following response appears for the status code 200, if the API is invoked successfully.
{
"errorCount": 0,
"results": [
{
"id": 1,
"encoding": "base64",
"data": [
"bG9jaGFu"
],
"returnCode": 8
}
]
}
Example 3
With external tweak
$ curl --location --request POST 'https://<hostname>/v4/unprotect' \
--header 'Content-Type: application/json' \
--header 'X-Correlation-ID: k81d1fae-7dec-41g0-a765-90a0c31e6wf5' \
--data '{"payload":[{"id":1,"dataElement":"FPE_FF1_LA_APIP_L0R0_ASTNI_M2.UTF8","data":["b2Rnb1ky"],"external_tweak_":"eIvJdGKncnl8eS==","encoding":"base64"}],"user":"user1"}'
--cacert iap-rest-ca.crt --cert iap-rest-client.crt --key iap-rest-client.key
Response 3
With external tweak
The following response appears for the status code 200, if the API is invoked successfully.
{
"errorCount": 0,
"results": [
{
"id": 1,
"encoding": "base64",
"data": [
"bG9jaGFu"
],
"returnCode": 8
}
]
}
6.5.1.1.4 - HTTP POST reprotect
- URI
https://hostname/v4/reprotect- Method
- POST
- Parameters
- Hostname: Host name of the endpoint, as defined in the AP-REST deployment.
Resource: The resource to be used, which is /v4/reprotect.
Request Body
- User: Name of the user executing the API.
- Payload:
- dataElement: Name of the data element used to initially protect the data. This field is mandatory.
- newDataElement: Name of the data element used to reprotect the data. This field is mandatory.
- data: Data to be protected. This field is mandatory.
- externalIv: External Initialization Vector (IV) used for initially protecting the data.
- newExternalIv: External IV used for reprotecting the data.
- externaltweak: External tweak used for initially protecting the data.
- newExternaltweak: External tweak used for reprotecting the data.
- Result
- This API reprotects the data.
Example 1
Without external IV and external tweak
$ curl --location --request POST 'https://<hostname>/v4/reprotect' \
--header 'Content-Type: application/json' \
--header 'X-Correlation-ID: k81d1fae-7dec-41g0-a765-90a0c31e6wf5' \
--data '{"payload":[{"id":1,"dataElement":"TE_A_N_S13_L0R0_Y_ST",newDataElement: TE_A_N_S13_L1R3_N,"data":["cEJPM2pF"],"encoding":"base64"}],"user":"user1"}'
--cacert iap-rest-ca.crt --cert iap-rest-client.crt --key iap-rest-client.key
Response 1
Without external IV and external tweak
The following response appears for the status code 200, if the API is invoked successfully.
{
"errorCount": 0,
"results": [
{
"id": 1,
"encoding": "base64",
"data": [
"bDlrdGhhbg=="
],
"returnCode": 50
}
]
}
Example 2
With external IV
$ curl --location --request POST 'https://<hostname>/v4/reprotect' \
--header 'Content-Type: application/json' \
--header 'X-Correlation-ID: k81d1fae-7dec-41g0-a765-90a0c31e6wf5' \
--data '{"payload":[{"id":1,"dataElement":"TE_A_N_S13_L0R0_Y_ST",newDataElement: TE_A_N_S13_L1R3_N,"data":["cEJPM2pF"],"externalIv":"cHJvdGVncml0eQ==","newExternalIv":"dJvKdGWndnM0eP==","encoding":"base64"}],"user":"user1"}'
--cacert iap-rest-ca.crt --cert iap-rest-client.crt --key iap-rest-client.key
Response 2
With external IV
The following response appears for the status code 200, if the API is invoked successfully.
{
"errorCount": 0,
"results": [
{
"id": 1,
"encoding": "base64",
"data": [
"c2Snd1mz"
],
"returnCode": 50
}
]
}
Example 3
With external tweak
$ curl --location --request POST 'https://<hostname>/v4/reprotect' \
--header 'Content-Type: application/json' \
--header 'X-Correlation-ID: k81d1fae-7dec-41g0-a765-90a0c31e6wf5' \
--data '{"payload":[{"id":1,"dataElement":"FPE_FF1_LA_APIP_L0R0_ASTNI_M2.UTF8",newDataElement: FPE_FF1_LA_APIP_L1R1_ASTNI_M2.UTF8,"data":["cEJPM2pF"],"externaltweak":"eIvJdGKncnl8eS==","newExternaltweak_":"eKwLeHXoepN0fQ==","encoding":"base64"}],"user":"user1"}'
--cacert iap-rest-ca.crt --cert iap-rest-client.crt --key iap-rest-client.key
Response 3
With external tweak
The following response appears for the status code 200, if the API is invoked successfully.
{
"errorCount": 0,
"results": [
{
"id": 1,
"encoding": "base64",
"data": [
"d2Tmd1nz"
],
"returnCode": 50
}
]
}
6.5.1.1.5 - HTTP GET doc
- URI
https://hostname/v4/doc- Method
- GET
- Parameters
- Hostname: Host name of the endpoint, as defined in the AP-REST deployment.
Resource: The resource to be used, which is /v4/doc.
- Result
- This API returns the document specification.
Example
$ curl --location --request GET 'https://<hostname>/v4/doc' \
--header 'Content-Type: application/json' \
--header 'X-Correlation-ID: k81d1fae-7dec-41g0-a765-90a0c31e6wf5' \
--cacert iap-rest-ca.crt --cert iap-rest-client.crt --key iap-rest-client.key
Response
The API returns the OpenAPI specifications YAML file.
6.5.1.1.6 - HTTP Headers
The client should send the required HTTP headers to the server to specify the type of data being sent in the payload. The content type also specifies the type of result being sent by the server to the client.
To send a JSON request and get a JSON response, specify the following HTTP header:
Content-Type: application/json
Only the
Content-Type: application/jsonvalue is supported. It is mandatory to specify this value in the HTTP header.
To uniquely identify each HTTP request, specify the correlation ID in the HTTP header:
X-Correlation-ID: <Correlation ID>
Correlation ID is used in audit logs. This is an optional value.
6.5.1.2 - V4 AP REST HTTP Response Codes
| Error Messages | Operation | Audit Code in Logs | HTTP Response Code |
|---|---|---|---|
| Failed to decode Base64 |
| No audit code generated | 400 |
| The content of the input data is not valid |
| 44 | 400 |
| Unsupported algorithm or unsupported action for the specific data element |
| 26 | 400 |
| Data is too long to be protected/unprotected |
| 23 | 400 |
| Data is too short to be protected/unprotected |
| 22 | 400 |
| The user does not have the appropriate permissions to perform the requested operation |
| 3 | 400 |
| The data element could not be found in the policy |
| 1 | 401 |
| The username could not be found in the policy |
| 2 | 400 |
| Data unprotect operation failed. with correlationId <CorrelationID> | Unprotect | 9 | 400 |
| Tweak input is too long. with correlationId <Correlation ID> |
| 15 | 200 |
| Failed to send logs, connection refused ! with correlationId <Correlation ID> |
| 51 | 400 |
| Policy not available with correlationId <Correlation ID> |
| 31 | 400 |
The Correlation ID appears in the error message only if it has been specified in the HTTP header.
6.5.2 - Version 1 (V1) Application Protector API on REST
6.5.2.1 - List of REST APIs
This section describes the AP REST APIs available for protection and unprotection of data.
6.5.2.1.1 - HTTP GET version
- URI
https://hostname/rest-v1/version- Method
- GET
- Parameters
- Hostname: Host name of the endpoint, as defined in the AP-REST deployment
Resource: The resource to be used, which is /rest-v1/version
- Result
- This function returns the current version of the AP REST protector API.
Response
| Status | Response |
|---|---|
| 200 | {"version":"10.0.0.0.13","components":{"jpepVersion":"10.0.0.0.15","coreVersion":"1.1.0+76.ge82e5.1.1"}} |
Example
$ curl 'https://<HostName>/rest-v1/version' --cacert iap-rest-ca.crt --cert iap-rest-client.crt --key iap-rest-client.key
6.5.2.1.2 - HTTP POST protect
- URI
https://hostname/rest-v1/protect- Method
- POST
- Parameters
- Hostname: Host name of the endpoint, as defined in the AP-REST deployment
Resource: The resource to be used, which is /rest-v1/protect
- Result
- This API returns protected data.
The input data must always be Base64 encoded.
Example 1 - without external IV and external tweak
$ curl --location --request POST 'https://<hostname>/rest-v1/protect' \
--connect-to "<hostname>:443:<AWS LoadBalancer>:443" \
--header 'Content-Type: application/json' \
--cacert iap-rest-ca.crt --cert iap-rest-client.crt --key iap-rest-client.key --data '{
"protect": {
"policyusername": "Uername",
"dataelementname": "DataElement1",
"bulk":{
"id": 1,
"data": [
{
"id": 1,
"content": "AFAAcgBvAHQAZQBnAHIAaQB0AHkAMQAyADMANA=="
},
{
"id": 2,
"content": "AFAAcgBvAHQAZQBnAHIAaQB0AHkAMQAyADMANA=="
}
]
}
}
}'
- Response 1 - without external IV and external tweak
- The following response appears for the status code 200, if the API is invoked successfully.
{ "protect":{ "bulk":{ "id":1, "returntype":"success", "data":[ { "id":1, "returncode":"/rest-v1/returncodes/id/6", "returntype":"success", "content":"AGoAZABzAHIAdQBlAGMAagBaAEMAMQAyADMANA==" }, { "id":2, "returncode":"/rest-v1/returncodes/id/6", "returntype":"success", "content":"AGoAZABzAHIAdQBlAGMAagBaAEMAMQAyADMANA==" } ] } } }
Example 2 - with external IV
$ curl --location --request POST 'https://<hostname>/rest-v1/protect' \
--connect-to "<hostname>:443:<AWS LoadBalancer>:443" \
--header 'Content-Type: application/json' \
--cacert iap-rest-ca.crt --cert iap-rest-client.crt --key iap-rest-client.key --data '{
"protect": {
"policyusername": "Uername",
"dataelementname": "DataElement1",
"externaliv": "ZXh0ZXJuYWpdg=="
"bulk":{
"id": 1,
"data": [
{
"id": 1,
"content": "RW5eEN2RGZZaw=="
},
{
"id": 2,
"content": "cmZBcnJTRg=="
}
]
}
}
}'
- Response 2 - with external IV
- The following response appears for the status code 200, if the API is invoked successfully.
{ "protect":{ "bulk":{ "id":1, "returntype":"success", "data":[ { "id":1, "returncode":"/rest-v1/returncodes/id/6", "returntype":"success", "content":"OG8xZW0QlQ3MQ==" }, { "id":2, "returncode":"/rest-v1/returncodes/id/6", "returntype":"success", "content":"blg2Qm5Ddg==" } ] } } }
Example 3 - with external tweak
$ curl --location --request POST 'https://<hostname>/rest-v1/protect' \
--connect-to "<hostname>:443:<AWS LoadBalancer>:443" \
--header 'Content-Type: application/json' \
--cacert iap-rest-ca.crt --cert iap-rest-client.crt --key iap-rest-client.key --data '{
"protect": {
"policyusername": "Uername",
"dataelementname": "DataElement2_FPE",
"externaltweak": "ZXh0ZXJuYWpdg=="
"bulk":{
"id": 1,
"data": [
{
"id": 1,
"content": "RW5eEN2RGZZaw=="
},
{
"id": 2,
"content": "cmZBcnJTRg=="
}
]
}
}
}'
- Response 3 - with external tweak
- The following response appears for the status code 200, if the API is invoked successfully.
{ "protect":{ "bulk":{ "id":1, "returntype":"success", "data":[ { "id":1, "returncode":"/rest-v1/returncodes/id/6", "returntype":"success", "content":"MHM4OVpsRndIbA==" }, { "id":2, "returncode":"/rest-v1/returncodes/id/6", "returntype":"success", "content":"VzFsNmd1Ng==" } ] } } }
6.5.2.1.3 - HTTP POST unprotect
- URI
https://hostname/rest-v1/unprotect- Method
- POST
- Parameters
- Hostname: Host name of the endpoint, as defined in the AP-REST deployment
Resource: The resource to be used, which is /rest-v1/unprotect
- Result
- This API returns unprotected data.
The input data must always be Base64 encoded.
Example 1 - without external IV and external tweak
$ curl --request POST 'https://<hostname>/rest-v1/unprotect' \
--connect-to "<hostname>:443:<AWS LoadBalancer>:443" \
--header 'Content-Type: application/json' \
--cacert iap-rest-ca.crt --cert iap-rest-client.crt --key iap-rest-client.key --data '{
"unprotect": {
"policyusername": "UserName",
"dataelementname": "DataElement1",
"bulk":{
"id": 1,
"data": [
{
"id": 1,
"content": "AFAAcgBvAHQAZQBnAHIAaQB0AHkAMQAyADMANA=="
},
{
"id": 2,
"content": "AFAAcgBvAHQAZQBnAHIAaQB0AHkAMQAyADMANA=="
}
]
}
}
}'
- Response 1 - without external IV and external tweak
- The following response appears for the status code 200, if the API is invoked successfully.
{ "unprotect":{ "bulk":{ "id":1, "returntype":"success", "data":[ { "id":1, "returncode":"/rest-v1/returncodes/id/8", "returntype":"success", "content":"AGwATgBWAEwATAByAFIAUAB2AGcAMQAyADMANA==" }, { "id":2, "returncode":"/rest-v1/returncodes/id/8", "returntype":"success", "content":"AGwATgBWAEwATAByAFIAUAB2AGcAMQAyADMANA==" } ] } } }
Example 2 - with external IV
$ curl --request POST 'https://<hostname>/rest-v1/unprotect' \
--connect-to "<hostname>:443:<AWS LoadBalancer>:443" \
--header 'Content-Type: application/json' \
--cacert iap-rest-ca.crt --cert iap-rest-client.crt --key iap-rest-client.key --data '{
"unprotect": {
"policyusername": "UserName",
"dataelementname": "DataElement1",
"externaliv": "ZXh0ZXJuYWpdg=="
"bulk":{
"id": 1,
"data": [
{
"id": 1,
"content": "OG8xZW0QlQ3MQ=="
},
{
"id": 2,
"content": "blg2Qm5Ddg=="
}
]
}
}
}'
- Response 2 - with external IV
- The following response appears for the status code 200, if the API is invoked successfully.
{ "unprotect":{ "bulk":{ "id":1, "returntype":"success", "data":[ { "id":1, "returncode":"/rest-v1/returncodes/id/8", "returntype":"success", "content":"RW5eEN2RGZZaw==" }, { "id":2, "returncode":"/rest-v1/returncodes/id/8", "returntype":"success", "content":"cmZBcnJTRg==" } ] } } }
Example 3 - with external tweak
$ curl --request POST 'https://<hostname>/rest-v1/unprotect' \
--connect-to "<hostname>:443:<AWS LoadBalancer>:443" \
--header 'Content-Type: application/json' \
--cacert iap-rest-ca.crt --cert iap-rest-client.crt --key iap-rest-client.key --data '{
"unprotect": {
"policyusername": "UserName",
"dataelementname": "DataElement2_FPE",
"externaltweak": "ZXh0ZXJuYWpdg=="
"bulk":{
"id": 1,
"data": [
{
"id": 1,
"content": "MHM4OVpsRndIbA=="
},
{
"id": 2,
"content": "VzFsNmd1Ng=="
}
]
}
}
}'
- Response - with external tweak
- The following response appears for the status code 200, if the API is invoked successfully.
{ "unprotect":{ "bulk":{ "id":1, "returntype":"success", "data":[ { "id":1, "returncode":"/rest-v1/returncodes/id/8", "returntype":"success", "content":"RW5eEN2RGZZaw==" }, { "id":2, "returncode":"/rest-v1/returncodes/id/8", "returntype":"success", "content":"cmZBcnJTRg==" } ] } } }
6.5.2.1.4 - HTTP POST reprotect
- URI
https://hostname/rest-v1/reprotect- Method
- POST
- Parameters
- Hostname: Host name of the endpoint, as defined in the AP-REST deployment
Resource: The resource to be used, which is /rest-v1/reprotect
- Result
- This API reprotects the data.
The input data must always be Base64 encoded.
Example 1 - without external IV and external tweak
$ curl --request POST 'https://<hostname>/rest-v1/reprotect' \
--connect-to "<hostname>:443:<AWS LoadBalancer>:443" \
--header 'Content-Type: application/json' \
--cacert iap-rest-ca.crt --cert iap-rest-client.crt --key iap-rest-client.key --data '{
"reprotect": {
"policyusername": "UserName",
"olddataelementname": "DataElement1", "newdataelementname": "DataElement2",
"bulk":{
"id": 1,
"data": [
{
"id": 1,
"content": "AFAAcgBvAHQAZQBnAHIAaQB0AHkAMQAyADMANA=="
},
{
"id": 2,
"content": "AFAAcgBvAHQAZQBnAHIAaQB0AHkAMQAyADMANA=="
}
]
}
}
}'
- Response 1 - without external IV and external tweak
- The following response appears for the status code 200, if the API is invoked successfully.
{ "reprotect":{ "bulk":{ "id":1, "returntype":"success", "data":[ { "id":1, "returncode":"/rest-v1/returncodes/id/6", "returntype":"success", "content":"AFAAcgBvAHQAZQBnAHIAaQB0AHkAMQAyADMANA==" }, { "id":2, "returncode":"/rest-v1/returncodes/id/6", "returntype":"success", "content":"AFAAcgBvAHQAZQBnAHIAaQB0AHkAMQAyADMANA==" } ] } } }
Example 2 - with external IV
curl --location --request POST 'https://<hostname>/rest-v1/reprotect' \
--connect-to "<hostname>:443:<AWS LoadBalancer>:443" \
--header 'Content-Type: application/json' \
--cacert iap-rest-ca.crt --cert iap-rest-client.crt --key iap-rest-client.key --data '{
"reprotect": {
"policyusername": "UserName",
"olddataelementname": "DataElement1",
"newdataelementname": "DataElement2","oldexternaliv":"MTIzNDVhYmNzIyQlXiM2Nzg5MFMrTlNBQkNTRA=","newexternaliv":"MTIzNDVhYmNzIyQlXiM2Nzg5MFMrTlNBQkNTRA="
"bulk":{
"id": 1,
"data": [
{
"id": 1,
"content": "MTA1MTYwNTk1MjE5OTY3OTU="
},
{
"id": 2,
"content": "MTA1MTYwNTk1MjE5OTY3OTU="
}
]
}
}
}'
- Response 2 - with external IV
- The following response appears for the status code 200, if the API is invoked successfully.
{ "reprotect":{ "bulk":{ "id":1, "returntype":"success", "data":[ { "id":1, "returncode":"/rest-v1/returncodes/id/6", "returntype":"success", "content":"Q09udGFpbmVyVGVhbTEyMzQ1Njc=" }, { "id":2, "returncode":"/rest-v1/returncodes/id/6", "returntype":"success", "content":"AFAAcgBvAHQAZQBnAHIAaQB0AHkAMQAyADMANAA1" } ] } } }
Example 3 - with external tweak
curl --location --request POST 'https://<hostname>/rest-v1/reprotect' \
--header 'Host: <hostname>' \
--connect-to "<hostname>:443:<AWS LoadBalancer>:443" \
--header 'Content-Type: application/json' \
--cacert iap-rest-ca.crt --cert iap-rest-client.crt --key iap-rest-client.key --data '{
"reprotect": {
"policyusername": "UserName",
"olddataelementname": "DataElement1",
"newdataelementname": "DataElement2","oldexternaltweak":"MTIzNDVhYmNzIyQlXiM2Nzg5MFMrTlNBQkNTRA=","newexternaltweak":"MTIzNDVhYmNzIyQlXiM2Nzg5MFMrTlNBQkNTRA="
"bulk":{
"id": 1,
"data": [
{
"id": 1,
"content": "MTA1MTYwNTk1MjE5OTY3OTU="
},
{
"id": 2,
"content": "MTA1MTYwNTk1MjE5OTY3OTU="
}
]
}
}
}'
- Response 3 - with external tweak
- The following response appears for the status code 200, if the API is invoked successfully.
{ "reprotect":{ "bulk":{ "id":1, "returntype":"success", "data":[ { "id":1, "returncode":"/rest-v1/returncodes/id/6", "returntype":"success", "content":"AFAAYQByAGgAbQBoAFAAawBMAGcAZQBaAFgAaABtAGEAcg" }, { "id":2, "returncode":"/rest-v1/returncodes/id/6", "returntype":"success", "content":"ADEAMgAzADQANQA2ADcAOAA5ADA" } ] } } }
6.5.2.1.5 - HTTP Headers
The client should send the required HTTP headers to the server to specify the type of data being sent in the payload. The content type also specifies the type of result being sent by the server to the client.
To send a JSON request and get a JSON response, specify the following HTTP header:
Content-Type: application/json
6.5.2.2 - Error Handling for v1 API
The following table lists the record error handling status codes, which are sent from the server to the client.
| Status Code | Responses |
| Success | |
| Success, with warning | |
| Error type of log return code | |
| Error type of log return code (different) | |
For more information about the Log Return codes, refer to the section Log return codes.
6.5.2.3 - V1 AP REST HTTP Response Codes
| Error Messages | Operation | Audit Code in Logs | HTTP Response Code |
|---|---|---|---|
| Failed to decode Base64 |
| No audit code generated | 400 |
| The content of the input data is not valid |
| 44 | 400 |
| Unsupported algorithm or unsupported action for the specific data element |
| 26 | 400 |
| Data is too long to be protected/unprotected |
| 23 | 400 |
| Data is too short to be protected/unprotected |
| 22 | 400 |
| The user does not have the appropriate permissions to perform the requested operation |
| 3 | 400 |
| The data element could not be found in the policy |
| 1 | 401 |
| The username could not be found in the policy |
| 2 | 400 |
| Data unprotect operation failed. with correlationId <CorrelationID> | Unprotect | 9 | 400 |
| Tweak input is too long. with correlationId <Correlation ID> |
| 15 | 200 |
| Failed to send logs, connection refused ! with correlationId <Correlation ID> |
| 51 | 400 |
| Policy not available with correlationId <Correlation ID> |
| 31 | 400 |
6.6 - Using Samples
Protegrity delivers a sample application as part of the REST Container installation package. The sample application consists of the following items:
- Policy package.
- Sample Postman collection (to test AP-REST Container Pods serving deployed IMP).
- Autoscaling script (to push more load to the Kubernetes cluster to force autoscaling of the AP-REST Container Pods).
Run this sample application end-to-end, as a sanity test. This will enable them to confirm that the installation was completed accurately. In this section are details on the exact steps a customer must follow to run the sample application end-to-end. Those details explain usage of the components included in REST-Samples_Linux-ALL-ALL_x86-64_<AP-REST_version>.tgz archive.
The following components are included in the REST-Samples_Linux-ALL-ALL_x86-64_<AP-REST_version>.tgz archive.
- Policy Sample: Sample_App_Policy.tgz. This component consists of the sample policy that can be imported on the ESA 10.0.x for getting started with the AP-REST Containers use case. The following are the details for the policy.
Policy Name - Sample_policy
| Token Type | Data Element Name |
|---|---|
| Alphanumeric | Alphanum |
| Alphanumeric | Alphanum1 |
Autoscaling Script: Sample_App_autoscale.sh Script for making 10,000 REST calls to AP-REST. This script can be triggered to test the autoscaling of the pods.
PostMan Collection: Sample_App_PostMan_Collection_V4.json
This collection can be used to make v4 REST calls to AP-REST for protecting the data. The JSON file contains the following collections:
- Release 10 protect request
- Release 10 unprotect request
- Release 10 reprotect request
Release 10 protect request
Post Request Path: - https://{{host}}/v4/protect
Release 10 unprotect request
Post Request Path: - https://{{host}}/v4/unprotect
Release 10 protect request
Post Request Path: - https://{{host}}/v4/reprotect
Ensure that you create the host environment variable and specify the value of the hostname in the variable.
- PostMan Collection: Sample_App_PostMan_Collection.json
This collection can be used to make v1 REST calls to AP-REST for protecting the data. The JSON file contains the following collections:
- Release 1 protect request
- Release 1 unprotect request
- Release 1 reprotect request
Release 1 protect request
Post Request Path: - https://{{host}}/rest-v1/protect
Release 1 unprotect request
Post Request Path: - https://{{host}}/rest-v1/unprotect
Release 1 protect request
Post Request Path: - https://{{host}}/rest-v1/reprotect
Ensure that you create the host environment variable and specify the value of the hostname in the variable.
Running the Samples
- Ensure that the prerequisites mentioned in the section Software Requirements are followed.
- A Kubernetes environment is created. For more information about creating the cloud runtime environment, refer to the section Creating the AWS Environment.
The user must perform the following tasks.
Importing Certificates to the Postman Client
This section describes the steps to import the CA certificate, the client certificates, and keys to the Postman client, if you want to ensure secure communication between the Postman client and the NGINX container using TLS.Running the Postman Collection
This section describes the steps for protecting data for Release 1 and Release 2.Running the Autoscaling Script
This section provides an overview on the Autoscaling script.
Importing Policy Sample on the ESA
The user needs to perform the following steps to import the Sample_App_Policy.tgz file on the ESA.
To import policy sample on the ESA:
Login to the ESA as admin.
Navigate to Settings > Network > Web Settings.
In the General Settings section, change the Max File Upload Size value to the maximum value.
In the Session Management section, change the Session Timeout value to the maximum value.
Click Update.
Navigate to Settings > System > File Upload.
Click Choose File to select the Sample_App_Policy.tgz file that you want to upload.
Enter the administrator password and click Import.
After successful import, the Sample_policy should be available in the Policies section.
Importing Certificates to the Postman Client
This section describes the steps to import the CA certificate, the client certificates, and keys to the Postman client, if you want to ensure secure communication between the Postman client and the NGINX container using TLS.
To import certificates to the Postman client:
Open the Postman client.
In the header of the Postman client, click the Wrench icon, and then select Settings.
The SETTINGS dialog box appears.
Navigate to the Certificates tab.
In the CA Certificates section, click Select File and browse for the iap-ca.crt file in the iap-certs directory that you have created in the section Creating Certificates.
In the Client Certificates section, click Add Certificate.
The Add Certificate screen appears.
In the Host field, specify the value as prod.example.com.
You need to specify the ingress port number, which is 8443 by default.
In the CRT file field, click Select File to browse for the iap-client.crt file in the iap-certs directory.
In the KEY file field, click Select File to browse for the iap-client.key file in the iap-certs directory.
Click Add to add the client certificate and key to the Postman client.
Repeat steps 5 to 9 for adding client certificates for the host staging.example.com.
Running the Postman Collection
This section describes the steps for protecting data using the following Postman collections:
- Sample_App_PostMan_Collection_V4.json: Protecting data with v4 REST APIs.
- Sample_App_PostMan_Collection.json: Protecting data with v1 REST APIs.
The component consists of the Postman JSON file to generate the REST request for protecting data.
For protecting data with v4 REST APIs
Import the Postman collection Sample_App_PostMan_Collection_V4.json.
After import, the following four collections should be available:
- Release 10 protect request
- Release 10 unprotect request
- Release 10 reprotect request
Select Release 10 protect request in AP_REST SAMPLE and click Send.
The user should get response as successful 200 OK and receive protected data.
Select Release 10 unprotect request in AP_REST SAMPLE and click Send.
The user should get response as successful 200 OK and receive unprotected data.
Select Release 10 reprotect request in AP_REST SAMPLE and click Send.
The user should get response as successful 200 OK and receive reprotected data.
For protecting data with v1 REST APIs
Import the Postman collection Sample_App_PostMan_Collection.json.
After import, the following four collections should be available:
- Release 1 protect request
- Release 1 unprotect request
- Release 1 reprotect request
In the Postman collections, the name of the policy user has been incorrectly specified as policyuser. Change the name of the policy user to user1 before executing the collection.
In the Postman collections, the name of the reprotect data element has been incorrectly specified as Alphanum1. Change the name of the reprotect data element to Alphanum_1 before executing the collection.
Select Release 1 protect request in AP_REST SAMPLE and click Send.
The user should get response as successful 200 OK and receive protected data.
Select Release 1 unprotect request in AP_REST SAMPLE and click Send.
The user should get response as successful 200 OK and receive unprotected data.
Select Release 1 reprotect request in AP_REST SAMPLE and click Send.
The user should get response as successful 200 OK and receive reprotected data.
6.7 - Running the Autoscaling Script
The Autoscaling script is used to issue continuous requests on the AP-REST containers. When the number of REST requests hitting the container are increased, with Horizontal Pod Autoscaling, Kubernetes automatically scales the number of pods based on the CPU utilization observed.
The user can run the autoscaling script from any Linux node, which can connect the external IP for the deployment.
Usage
./Sample_App_autoscale.sh <Ingress address> <CA certificate path> <Client certificate path> <Client key path> <version_endpoint>
After running this script, the user can observe that new pods are created to handle to the incoming traffic.
6.8 - Upgrading the Protector from Version 9.x to 10.x
This section explains the steps and procedure to upgrade the REST Container protector from version 9.x to 10.x. This method is used for a major release upgrade. For example, this upgrade procedure is used in case of architectural changes.
Upgrade Approach
The 9.x and 10.x versions include different components and resource requirements as part of the deployment. As a result, the approach uses the following steps:
- Create a 10.x setup in a different namespace.
- Run test traffic to the 10.x setup to verify that the security operations are working.
- Stop the traffic to the 9.x setup and make changes to point the traffic to the 10.x setup.
- Switch the production traffic from the 9.x deployment to the 10.x deployment.
Before you begin
- Ensure that you have access to the Kubernetes cluster with appropriate permissions. For more information about the required permissions, refer to the section Software Requirements.
- Ensure that you have a separate directory structure for the 9.x and 10.x deployments.
- Ensure that your container logs are accessible. These can be used to verify the deployment.
- Ensure that the Container images for 10.x version are uploaded in the Container registry.
- Ensure that the protector pods for the 9.x version are running and are in a healthy state.
- Ensure that the required security policy is available on the 10.x ESA.
Upgrading the Protector in Dynamic Mode
Perform the following steps to upgrade the protector from 9.x to 10.x in dynamic mode.
- Install 10.x Log Forwarder.
helm -n test-v1 install test-rpp-logforwarder-v1 logforwarder/ \
--set imagePullSecrets[0].name="regcred" \
--set image.repository="<AWS_ID>.dkr.ecr.us-east-1.amazonaws.com/container" \
--set image.tag="LOGFORWARDER_RHUBI-9-64_x86-64_K8S_10.0.1.6.019e32.tgz" \
--set service.port=15780 \
--set opensearch[0].name="node-1" \
--set opensearch[0].host="10.49.7.212" \
--set opensearch[0].port="9200"
Ensure that the set image.tag and set image.repository fields are assigned the appropriate values.
For more information about installing Log Forwarder, refer to the section Installing the Protector.
- Install 10.x RPP.
helm -n rpp-v1 install test-rpp-v1 rpproxy/ \
--set imagePullSecrets[0].name="regcred" \
--set image.repository="<AWS_ID >.dkr.ecr.us-east-1.amazonaws.com/container" \
--set image.tag="RPPROXY_RHUBI-9-64_x86-64_K8S_1.8.1.8.0bba4b.tgz" \
--set commonCertSecrets="common-certs-v1" \
--set rpp.upstream.host="10.49.7.212" \
--set rpp.upstream.port="25400" \
--set rpp.logging.logLevel="DEBUG" \
--set rpp.logging.logHost="test-rpp-logforwarder-v1.rpp-v1.svc" \
--set rpp.logging.logPort="15780" \
--set rpp.service.cacheTTL="60"
Ensure that the set image.tag and set image.repository fields are assigned the appropriate values.
For more information about installing RPP, refer to the section Installing the Protector.
Validate the RPP pod details on the ESA after installation.
a. Log in to the ESA and navigate to Audit Store > Dashboard.
b. Navigate to Logs > Eventexplorer.
c. Change the logs search to
DQLand change the filter topty_insights_analytics*troubleshooting_*.d. Search for <RPP pod name>.
The origin IP mentioned should be updated to the latest pod after the pod upgrade.
e. To get the pod IP , run the following command.
kubectl get pods -n <namespace> -o wideInstall 10.x Protector using the following command.
helm -n rpp-v1 install test-dynamic-10-v1 iap-rest-dynamic/ \
--set iaprestImage.repository="<AWS_ID>.dkr.ecr.us-east-1.amazonaws.com/container" \
--set iaprestImage.tag="REST_RHUBI-9-64_x86-64_K8S_10.0.0.34.22f868.tgz" \
--set nginxImage.repository="<AWS_ID>.dkr.ecr.us-east-1.amazonaws.com/container" \
--set nginxImage.tag="nginx-unprivileged-1.28" \
--set protector.policy.cadence="60" \
--set protector.policy.host="test-rpp-v1-rpproxy.rpp-v1.svc" \
--set protector.policy.certificates="common-certs-v1" \
--set protector.logs.mode="error" \
--set protector.logs.host="test-rpp-logforwarder-v1.rpp-v1.svc" \
--set service.certificates="pty-secret" \
--set service.type="LoadBalancer" \
--set service.port="443" \
--set service.annotations."service\.beta\.kubernetes\.io\/aws-load-balancer-internal"=\"true\"
- Run the following command to check the status of the pods.
kubectl get pods -n <Namespace>
For example:
kubectl get pods -n iap-rest
The following output appears.
NAME READY STATUS RESTARTS AGE
iap-rest-dynamic-7b97d5dff7-grqph 2/2 Running 0 11h
log1-logforwarder-f6gvj 1/1 Running 0 11h
log1-logforwarder-ls4hn 1/1 Running 0 11h
log1-logforwarder-phk4t 1/1 Running 0 11h
log1-logforwarder-z2mz7 1/1 Running 0 11h
rpp-rpproxy-5fd7d859b6-p9544 1/1 Running 0 11h
- Run the following command to obtain the service details.
kubectl get svc -n <Namespace>
For example:
kubectl get svc -n iap-rest
The following output appears.
NAME TYPE CLUSTER-IP EXTERNAL-IP PORT(S) AGE
logforwarder ClusterIP 172.20.14.88 <none> 15780/TCP 2m37s
rpproxy ClusterIP 172.20.181.92 <none> 25400/TCP 113s
iap-rest-dynamic LoadBalancer 172.20.60.61 internal-a70jkfsdf98908.us-east-1.elb.amazonaws.com 8080:30746/TCP 24s
Use the DNS name of the load balancer that appears in the EXTERNAL-IP column while running the security operations.
For more information about running security operations, refer to the section Application Protector API on REST.
Run the following command to obtain the IP address of the Load Balancer.
ping <DNS of Load Balancer>For example:
ping internal-b70jkfs23423jg8.us-east-1.elb.amazonaws.comThe following output appears that displays the IP address of the Load Balancer.
PING internal-b70jkfs23423jg8.us-east-1.elb.amazonaws.com (10.49.5.152) 56(84) bytes of data. 64 bytes from ip-10-49-5-152.ec2.internal (10.49.5.152): icmp_seq=1 ttl=255 time=0.831 ms 64 bytes from ip-10-49-5-152.ec2.internal (10.49.5.152): icmp_seq=2 ttl=255 time=0.262 msUse this IP address while running the security operations.
Validate the service of pod as mentioned below
kubectl get endpoints <service-name> -n <namespace>
For example:
kubectl get endpoints test-sampleapp-10-v1-iap-rest -n 10-v2
Warning: v1 Endpoints is deprecated in v1.33+; use discovery.k8s.io/v1 EndpointSlice
NAME ENDPOINTS AGE
test-sampleapp-10-v1-iap-rest 10.49.6.229:8443 9m7s
Verify that the IP address mentioned in the output is the same one that you get after running the kubectl get pods command.
- Run test protect and unprotect operations and verify functionality.
For more information about running security operations, refer to the section Application Protector API on REST.
- Validate the Audit logs on the ESA.
a. Login to ESA and navigate to Audit Store > Dashboard.
b. Navigate to Logs > Eventexplorer.
c. Change the logs search to DQL.
d. Refresh the page to sync up the logs.
e. Verify that the logs for the security operations performed in step 10 are displayed.
- If the 10.x deployment is working, then switch the production traffic to 10.x and monitor the traffic and scaling pods. If everything is working, then bring down the 9.x deployment.
Upgrading the Protector in Static Mode
Perform the following steps to upgrade the protector from 9.x to 10.x in static mode.
- Install 10.x Log Forwarder.
helm -n test-v1 install test-rpp-logforwarder-v1 logforwarder/ \
--set imagePullSecrets[0].name="regcred" \
--set image.repository="<AWS_ID>.dkr.ecr.us-east-1.amazonaws.com/container" \
--set image.tag="LOGFORWARDER_RHUBI-9-64_x86-64_K8S_10.0.1.6.019e32.tgz" \
--set service.port=15780 \
--set opensearch[0].name="node-1" \
--set opensearch[0].host="10.49.7.212" \
--set opensearch[0].port="9200"
Ensure that the set image.tag and set image.repository fields are assigned the appropriate values.
For more information about installing Log Forwarder, refer to the section Installing the Protector.
- Install the KMS Pod using the following command.
helm -n devops-10-v2 install test-kms-10-v1 kms-proxy/ \
--set imagePullSecrets[0].name="regcred" \
--set image.repository="<AWS_ID>.dkr.ecr.us-east-1.amazonaws.com/container" \
--set image.tag="KMSPROXY_RHUBI-9-64_x86-64_K8S_1.0.0.11.31d6f0.tgz" \
--set serviceAccount.name="kms-v1-sa" \
--set kms.vendor="AWS" \
--set kms.keyid="arn:aws:kms:us-east-1:<AWS_ID>:key/c4be5e1a-fbdd-4a8e-aed6-0202d806274f" \
--set kms.ttl="1200" \
--set application.logLevel="INFO" \
--set service.certificates="pty-certs-secret
For more information about installing the KMS Proxy Container, refer to the section Installing the Protector.
- Install 10.x Protector using the following command.
helm -n v1 install test-dynamic-10-v1 iap-rest-dynamic/ \
--set iaprestImage.repository="<AWS_ID>.dkr.ecr.us-east-1.amazonaws.com/container" \
--set iaprestImage.tag="REST_RHUBI-9-64_x86-64_K8S_10.0.0.34.22f868.tgz" \
--set nginxImage.repository="<AWS_ID>.dkr.ecr.us-east-1.amazonaws.com/container" \
--set nginxImage.tag="nginx-unprivileged-1.28" \
--set protector.policy.cadence="60" \
--set protector.policy.host="test-rpp-v1-rpproxy.rpp-v1.svc" \
--set protector.policy.certificates="common-certs-v1" \
--set protector.logs.mode="error" \
--set protector.logs.host="test-rpp-logforwarder-v1.rpp-v1.svc" \
--set service.certificates="pty-secret" \
--set service.type="LoadBalancer" \
--set service.port="443" \
--set service.annotations."service\.beta\.kubernetes\.io\/aws-load-balancer-internal"=\"true\"
- Run the following command to check the status of the pods.
kubectl get pods -n <Namespace>
For example:
kubectl get pods -n iap-rest
NAME READY STATUS RESTARTS AGE
iap-rest-static-7b97d5dff7-grqph 2/2 Running 0 11h
log1-logforwarder-f6gvj 1/1 Running 0 11h
log1-logforwarder-ls4hn 1/1 Running 0 11h
log1-logforwarder-phk4t 1/1 Running 0 11h
log1-logforwarder-z2mz7 1/1 Running 0 11h
kms-proxy-5fd7d859b6-p9544 1/1 Running 0 11h
- Run the following command to obtain the service details.
kubectl get svc -n <Namespace>
For example:
kubectl get svc -n iap-rest
The following output appears.
NAME TYPE CLUSTER-IP EXTERNAL-IP PORT(S) AGE
logforwarder ClusterIP 172.20.14.88 <none> 15780/TCP 2m37s
kms-proxy ClusterIP 172.20.181.92 <none> 443/TCP 113s
iap-rest-dynamic LoadBalancer 172.20.60.61 internal-a70jkfsdf98908.us-east-1.elb.amazonaws.com 8080:30746/TCP 24s
Use the DNS name of the load balancer that appears in the EXTERNAL-IP column while running the security operations.
For more information about running security operations, refer to the section Application Protector API on REST.
Run the following command to obtain the IP address of the Load Balancer.
ping <DNS of Load Balancer>For example:
ping internal-b70jkfs23423jg8.us-east-1.elb.amazonaws.comThe following output appears and displays the IP address of the Load Balancer.
PING internal-b70jkfs23423jg8.us-east-1.elb.amazonaws.com (10.49.5.152) 56(84) bytes of data. 64 bytes from ip-10-49-5-152.ec2.internal (10.49.5.152): icmp_seq=1 ttl=255 time=0.831 ms 64 bytes from ip-10-49-5-152.ec2.internal (10.49.5.152): icmp_seq=2 ttl=255 time=0.262 msUse this IP address while running the security operations.
Run the following command to validate the service of the pod.
kubectl get endpoints <service-name> -n <namespace>
For example:
kubectl get endpoints test-rest-10-v1-iap-rest -n 10-v2
The following output appears.
Warning: v1 Endpoints is deprecated in v1.33+; use discovery.k8s.io/v1 EndpointSlice
NAME ENDPOINTS AGE
test-rest-10-v1-iap-rest 10.49.6.229:8443 9m7s
Verify that the IP address mentioned in the output is the same one that you get after running the kubectl get pods command.
- Run test protect and unprotect operations and verify functionality.
For more information about running security operations, refer to the section Application Protector API on REST.
- Validate the Audit logs on the ESA.
a. Login to ESA and navigate to Audit Store > Dashboard.
b. Navigate to Logs > Eventexplorer.
c. Change the logs search to DQL.
d. Refresh the page to sync up the logs.
e. Verify that the logs for the security operations performed in step 10 are displayed.
- If the 10.x deployment is working, then switch the production traffic to 10.x and monitor the traffic and scaling pods. If everything is working, then bring down the 9.x deployment.
Rolling Back the Upgrade Procedure
Perform the following steps to roll back any failed upgrade procedure:
Ensure the 9.x deployment is running succesfully.
Ensure that the IP address of the 9.x service is updated in the hosts file or the Client configuration and switch the traffic back to 9.x.
Delete the failing 10.x deployment.
6.9 - Upgrading the Protector from Version 10.x to 10.y
This section explains the steps and procedure for performing a rolling upgrade and roll back on a Kubernetes deployment consisting of pods. This method is useful for maintenance releases such as bug fixes and CVE updates. In this method, the protector is upgraded from version 10.x to version 10.y.
Before you begin
- Ensure that you have access to the Kubernetes cluster with appropriate permissions. For more information about the required permissions, refer to the section Software Requirements.
- Ensure that you have a separate directory structure for the 10.x and 10.y deployments.
- Ensure that your container logs are accessible. These can be used to verify the deployment.
- Ensure that the Container images for 10.y version are uploaded in the Container registry.
- Ensure that the protector pods for the 10.x version are running and are in a healthy state.
- Ensure that the required security policy is available on the 10.y ESA.
Rolling Upgrade Steps for Dynamic Deployment
This section explains how to perform a rolling upgrade for dynamic deployment.
Perform the following steps to upgrade the Log Forwarder.
i. Run the following command to check the 10.x Log Forwarder pods running on each node.
kubectl get pods
ii. Navigate to the 10.y directory and run the following command to upgrade the Log Forwarder pod.
helm -n v1 upgrade test-logforwarder-v1 logforwarder/ \
--atomic --timeout 2m \
--set imagePullSecrets[0].name="regcred" \
--set image.repository="<aws_account_id>.dkr.ecr.us-east-1.amazonaws.com/container" \
--set image.tag="LOGFORWARDER_RHUBI-9-64_x86-64_K8S_10.0.1.6.019e32.tgz" \
--set service.port=15780 \
--set opensearch[0].name="node-1" \
--set opensearch[0].host="10.49.7.212" \
--set opensearch[0].port="9200"
Ensure that the fields image.tag and image.repository are assigned appropriate values.
iii. Run the following command to get the daemonset value.
kubectl get daemonset -n v1
The following output appears.
NAME DESIRED CURRENT READY UP-TO-DATE AVAILABLE NODE SELECTOR AGE
test-logforwarder-v1 2 2 2 2 2 <none> 5h27m
iv. Run the following command to verify the rollout status.
kubectl rollout status daemonset test-logforwarder-v1 -n v1
The following output appears.
daemon set "test-logforwarder-v1" successfully rolled out
v. Run the following command to validate the pod status.
kubectl get pods -n <namespace>
The following output appears.
NAME READY STATUS RESTARTS AGE
test-logforwarder-v1-6nc8m 1/1 Running 0 8h
test-logforwarder-v1-pms6f 1/1 Running 0 8h
Additionally, you can run kubectl describe pod to check the version from the latest image. After the upgrade is completed, validate that the logs are appearing on the Audit Store in the ESA.
Perform the following steps to upgrade the RPP pod.
i. Run the following command to upgrade the RPP pod.
helm -n v1 upgrade test-rpp-v1 rpproxy/ \
--atomic --timeout 2m \
--set imagePullSecrets[0].name="regcred" \
--set image.repository="<aws_account_id>.dkr.ecr.us-east-1.amazonaws.com/container" \
--set image.tag="RPPROXY_RHUBI-9-64_x86-64_K8S_1.8.1.8.0bba4b.tgz" \
--set commonCertSecrets="common-certs-v1" \
--set rpp.upstream.host="10.49.7.212" \
--set rpp.upstream.port="25400" \
--set rpp.logging.logLevel="DEBUG" \
--set rpp.logging.logHost="test-rpp-logforwarder-v1.v1.svc" \
--set rpp.logging.logPort="15780" \
--set rpp.service.cacheTTL="60"
Ensure that the fields image.tag and image.repository are assigned appropriate values.
ii. Run the following command to get the deployment value.
For example:
kubectl get deployment -n v1
The following output appears.
NAME READY UP-TO-DATE AVAILABLE AGE
test-rpp-v1-rpproxy 1/1 1 1 25h\
iii. Run the following command to verify the rollout status.
kubectl rollout status deployment test-rest-dynamic-10-v1-iap-rest-dynamic -n v1
The following output appears.
deployment "test-rest-dynamic-10-v1-iap-rest-dynamic" successfully rolled out
iv. Run the following command to get the pod details.
kubectl get pods -n <namespace>
The following output appears.
NAME READY STATUS RESTARTS AGE
test-rpp-logforwarder-v1-6nc8m 1/1 Running 0 8h
test-rpp-logforwarder-v1-pms6f 1/1 Running 0 8h
test-rpp-v1-rpproxy-5f78d4f9f4-dnndb 1/1 Running 0 8h
v. Run the following command to validate the RPP pod details on the ESA after the upgrade procedure.
a. Log in to the ESA and navigate to Audit Store > Dashboard.
b. Navigate to Logs > Eventexplorer.
c. Change the logs search to DQL and change the filter to pty_insights_analytics*troubleshooting_*.
d. Search for <RPP Pod name>.
The origin IP mentioned should be updated to the latest pod after pod upgrade.
e. To get the pod IP, run the following command.
kubectl get pods -n <namespace> -o wide
Perform the following steps to upgrade the Protector pod.
i. Run the following command to upgrade the Protector pod.
helm -n v1 upgrade test-dynamic-10-v1 iap-rest-dynamic/ \
--atomic --timeout 2m \
--set iaprestImage.repository="<AWS_ID>.dkr.ecr.us-east-1.amazonaws.com/container" \
--set iaprestImage.tag="REST_RHUBI-9-64_x86-64_Generic.K8S.JRE-1.8_10.1.0+4.2e1243.tgz" \
--set protector.policy.cadence="60" \
--set protector.policy.host="test-rpp-v1-rpproxy.v1.svc" \
--set protector.policy.certificates="common-certs-v1" \
--set protector.logs.mode="error" \
--set protector.logs.host="test-rpp-logforwarder-v1.svc" \
--set service.type="LoadBalancer" \
--set iaprestService.type="LoadBalancer"
--set iaprestService.annotations."service\.beta\.kubernetes\.io\/aws-load-balancer-internal"=\"true\"
ii. Run the following command to get the deployment details.
kubectl get deployment -n v1
The following output appears.
NAME READY UP-TO-DATE AVAILABLE AGE
test-dynamic-10-v1-iap-rest-dynamic 1/1 1 1 25h
test-rpp-v1-rpproxy 1/1 1 1 25h
iii. Run the following command to get the rollout status.
kubectl rollout status deployment test-dynamic-10-v1-iap-rest-dynamic -n v1
The following output appears.
deployment "test-dynamic-10-v1-iap-rest-dynamic" successfully rolled out
iv. Run the following command to get the pod details.
kubectl get pods -n <namespace>
The following output appears.
NAME READY STATUS RESTARTS AGE
test-dynamic-10-v1-iap-rest-dynamic-6dcfd46c8d-dgqfv 2/2 Running 0 8h
test-logforwarder-v1-6nc8m 1/1 Running 0 8h
test-logforwarder-v1-pms6f 1/1 Running 0 8h
test-v1-rpproxy-5f78d4f9f4-dnndb 1/1 Running 0 8h
Perform the following steps to verify the rollout upgrade.
i. Run the following command to verify that all the pods are running the new version.
kubectl get pods -n <namespace>
The following output appears.
NAME READY STATUS RESTARTS AGE
test-dynamic-10-v1-iap-rest-dynamic-6dcfd46c8d-dgqfv 2/2 Running 0 8h
test-logforwarder-v1-6nc8m 1/1 Running 0 8h
test-logforwarder-v1-pms6f 1/1 Running 0 8h
test-v1-rpproxy-5f78d4f9f4-dnndb 1/1 Running 0 8h
ii. Run the following command to verify the updated image tag.
kubectl describe pod <pod name> -n <namespace>
The following output appears.
Type Reason Age From Message
---- ------ ---- ---- -------
Normal Scheduled 46m default-scheduler Successfully assigned rpp-v1/test-rpp-v1-rpproxy-5f78d4f9f4-cphhh to ip-10-49-5-188.ec2.internal
Normal Pulling 46m kubelet Pulling image "<AWS_ID>.dkr.ecr.us-east-1.amazonaws.com/container:RPPROXY_RHUBI-9-64_x86-64_K8S_1.9.3.8.ec81ce.tgz"
Normal Pulled 46m kubelet Successfully pulled image "<AWS_ID>.dkr.ecr.us-east-1.amazonaws.com/container:RPPROXY_RHUBI-9-64_x86-64_K8S_1.9.3.8.ec81ce.tgz" in 3.612s (3.612s including waiting). Image size: 40588092 bytes.
Normal Created 46m kubelet Created container: pty-rpproxy
Normal Started 46m kubelet Started container pty-rpproxy
iii. Run the following command to view the rollout history.
helm history <deploymentname> -n <namespace>
The following output appears.
REVISION UPDATED STATUS CHART APP VERSION DESCRIPTION
1 Mon Dec 1 09:58:30 2025 superseded rpproxy-1.0.0 1.9.3.8.xxxxxx Install complete
2 Mon Dec 1 10:15:01 2025 deployed rpproxy-1.0.0 1.9.3.8.xxxxxx Upgrade complete
iv. Run the following command to get the service details.
kubectl get svc -n <Namespace>
For example:
kubectl get svc -n iap-rest
The following output appears.
NAME TYPE CLUSTER-IP EXTERNAL-IP PORT(S) AGE
logforwarder ClusterIP 172.20.14.88 <none> 15780/TCP 2m37s
rpproxy ClusterIP 172.20.181.92 <none> 443/TCP 113s
test-rest-10-v1-iap-rest LoadBalancer 172.20.60.61 internal-a70jkfsdf98908.us-east-1.elb.amazonaws.com 8080:30746/TCP 24s
v. Run the following command to validate the service of the pod.
kubectl get endpoints <service-name> -n <namespace>
For example:
kubectl get endpoints test-rest-10-v1-iap-rest -n 10-v2
The following output appears.
NAME ENDPOINTS AGE
test-rest-10-v1-iap-rest 10.49.10.xxx:9080 22h
Rolling Upgrade Steps for Static Deployment
This section explains how to perform rolling upgrade for static deployment.
Perform the following steps to upgrade the Log Forwarder.
i. Run the following command to check the Log Forwarder pods running on each node.
kubectl get pods
ii. Run the following command to upgrade the Log Forwarder pod.
helm -n v1 upgrade test-logforwarder-v1 logforwarder/ \
--atomic --timeout 2m \
--set imagePullSecrets[0].name="regcred" \
--set image.repository="<aws_account_id>.dkr.ecr.us-east-1.amazonaws.com/container" \
--set image.tag="LOGFORWARDER_RHUBI-9-64_x86-64_K8S_10.0.1.6.019e32.tgz" \
--set service.port=15780 \
--set opensearch[0].name="node-1" \
--set opensearch[0].host="10.49.7.212" \
--set opensearch[0].port="9200"
Ensure that the fields image.tag and image.repository are assigned appropriate values.
iii. Run the following command to get the daemonset value.
kubectl get daemonset -n v1
The following output appears.
NAME DESIRED CURRENT READY UP-TO-DATE AVAILABLE NODE SELECTOR AGE
test-logforwarder-v1 2 2 2 2 2 <none> 5h27m
iv. Run the following command to verify the rollout status.
kubectl rollout status daemonset test-logforwarder-v1 -n v1
The following output appears.
daemon set "test-logforwarder-v1" successfully rolled out
v. Run the following command to validate the pod status.
kubectl get pods -n <namespace>
The following output appears.
NAME READY STATUS RESTARTS AGE
test-logforwarder-v1-6nc8m 1/1 Running 0 8h
test-logforwarder-v1-pms6f 1/1 Running 0 8h
Additionally, you can run kubectl describe pod to check the version from the latest image. After the upgrade is completed, validate that the logs are appearing on the Audit Store in the ESA.
Perform the following steps to upgrade the KMS-Proxy pod.
i. Run the following command to upgrade the KMS-Proxy pod.
helm -n devops-10-v2 upgrade test-kms-10-v1 kms-proxy/ \
--atomic --timeout 2m \
--set imagePullSecrets[0].name="regcred" \
--set image.repository="<AWS_ID>.dkr.ecr.us-east-1.amazonaws.com/container" \
--set image.tag="KMSPROXY_RHUBI-9-64_x86-64_K8S_1.0.0.11.31d6f0.tgz" \
--set serviceAccount.name="kms-v1-sa" \
--set kms.vendor="AWS" \
--set kms.keyid="arn:aws:kms:us-east-1:<AWS_ID>:key/c4be5e1a-fbdd-4a8e-aed6-0202d806274f" \
--set kms.ttl="1200" \
--set application.logLevel="INFO" \
--set service.certificates="pty-certs-secret"
Ensure that the fields image.tag and image.repository are assigned appropriate values.
ii. Run the following command to get the deployment details.
kubectl get deployment -n 10-v1
The following output appears.
NAME READY UP-TO-DATE AVAILABLE AGE
test-kms-10-v1-kms-proxy 1/1 1 1 18d
iii. Run the following command to check the rollout status.
kubectl rollout status deployment test-kms-10-v1-kms-proxy -n 10-v1
The following output appears.
deployment "test-kms-10-v1-kms-proxy" successfully rolled out
iv. Run the following command to validate the pod status.
kubectl get pods -n <namespace>
Perform the following steps to upgrade the Protector pod.
i. Run the following command to upgrade the Protector pod.
helm -n v1 upgrade test-static-10-v1 iap-rest-static/ \
--atomic --timeout 2m \
--set iaprestImage.repository="<AWS_ID>.dkr.ecr.us-east-1.amazonaws.com/container" \
--set iaprestImage.tag="REST_RHUBI-9-64_x86-64_Generic.K8S.JRE-1.8_10.1.0+4.2e1243.tgz" \
--set protector.policy.cadence="60" \
--set protector.policy.host="test-kms-v1-kmsproxy.v1.svc" \
--set protector.policy.certificates="common-certs-v1" \
--set protector.logs.mode="error" \
--set protector.logs.host="test-kms-logforwarder-v1.v1.svc" \
--set service.type="LoadBalancer" \
--set iaprestService.type="LoadBalancer"
--set iaprestService.annotations."service\.beta\.kubernetes\.io\/aws-load-balancer-internal"=\"true\"
ii. Run the following command to get the deployment details.
kubectl get deployment -n v1
The following output appears.
NAME READY UP-TO-DATE AVAILABLE AGE
test-static-10-v1-iap-rest-static 1/1 1 1 25h
test-kms-v1-kmsproxy 1/1 1 1 25h
iii. Run the following command to get the rollout status.
kubectl rollout status deployment test-dynamic-10-v1-iap-rest-dynamic -n v1
The following output appears.
deployment "test-static-10-v1-iap-rest-static" successfully rolled out
iv. Run the following command to get the pod details.
kubectl get pods -n <namespace>
The following output appears.
NAME READY STATUS RESTARTS AGE
test-static-10-v1-iap-rest-static-6dcfd46c8d-dgqfv 2/2 Running 0 8h
test-logforwarder-v1-6nc8m 1/1 Running 0 8h
test-logforwarder-v1-pms6f 1/1 Running 0 8h
test-v1-kmsproxy-5f78d4f9f4-dnndb 1/1 Running 0 8h
Perform the following steps to verify the rollout upgrade.
i. Run the following command to verify that all the pods are running the new version.
kubectl get pods -n <namespace>
The following output appears.
NAME READY STATUS RESTARTS AGE
test-static-10-v1-iap-rest-static-6dcfd46c8d-dgqfv 2/2 Running 0 8h
test-logforwarder-v1-6nc8m 1/1 Running 0 8h
test-logforwarder-v1-pms6f 1/1 Running 0 8h
test-v1-kmsproxy-5f78d4f9f4-dnndb 1/1 Running 0 8h
ii. Run the following command to verify the updated image tag.
kubectl describe pod <pod name> -n <namespace>
The following output appears.
Type Reason Age From Message
---- ------ ---- ---- -------
Normal Scheduled 46m default-scheduler Successfully assigned v1/test-kms-v1-kmsproxy-5f78d4f9f4-cphhh to ip-10-49-5-188.ec2.internal
Normal Pulling 46m kubelet Pulling image "<AWS_ID>.dkr.ecr.us-east-1.amazonaws.com/container:KMSPROXY_RHUBI-9-64_x86-64_K8S_1.9.3.8.ec81ce.tgz"
Normal Pulled 46m kubelet Successfully pulled image "<AWS_ID>.dkr.ecr.us-east-1.amazonaws.com/container:KMSPROXY_RHUBI-9-64_x86-64_K8S_1.9.3.8.ec81ce.tgz" in 3.612s (3.612s including waiting). Image size: 40588092 bytes.
Normal Created 46m kubelet Created container: pty-kmsproxy
Normal Started 46m kubelet Started container pty-kmsproxy
iii. Run the following command to view the rollout history.
helm history <deploymentname> -n <namespace>
The following output appears.
REVISION UPDATED STATUS CHART APP VERSION DESCRIPTION
1 Mon Dec 1 09:58:30 2025 superseded kmsproxy-1.0.0 1.9.3.8.xxxxxx Install complete
2 Mon Dec 1 10:15:01 2025 deployed kmsproxy-1.0.0 1.9.3.8.xxxxxx Upgrade complete
iv. Run the following command to get the service details.
kubectl get svc -n <Namespace>
For example:
kubectl get svc -n iap-rest
The following output appears.
NAME TYPE CLUSTER-IP EXTERNAL-IP PORT(S) AGE
logforwarder ClusterIP 172.20.14.88 <none> 15780/TCP 2m37s
kmsproxy ClusterIP 172.20.181.92 <none> 443/TCP 113s
test-static-10-v1-iap-rest-static LoadBalancer 172.20.60.61 internal-a70jkfsdf98908.us-east-1.elb.amazonaws.com 8080:30746/TCP 24s
v. Run the following command to validate the service of the pod.
kubectl get endpoints <service-name> -n <namespace>
For example:
kubectl get endpoints test-static-10-v1-iap-rest-static -n 10-v2
The following output appears.
NAME ENDPOINTS AGE
test-static-10-v1-iap-rest-static 10.49.10.xxx:9080 22h
Rollback Steps
This section explains how to roll back the upgrade.
Order of Rollback
This section explains the order of rolling back an upgrade in case of dynamic and static deployments.
Roll back the Dynamic Deployment
Perform the following steps to roll back a dynamic deployment.
Roll back the Protector deployment.
Roll back the RPP deployment.
Roll back the Log Forwarder deployment.
Roll back the Static Deployment
Perform the following steps to roll back a static deployment.
Roll back the Protector deployment.
Roll back the KMS-Proxy deployment.
Roll back the Log Forwarder deployment.
Rolling Back a Deployment
If any deployment fails during the upgrade process, then the --atomic flag ensures that the deployment is automatically rolled back to the previous deployment.
If the deployment is successful but you still want to rollback, then perform the following steps to roll back the deployment. You can use these steps to roll back the Protector, RPP, KMS-Proxy, and Log Forwarder deployments.
- Run the following command to obtain the revision number of the deployment to which you want to roll back your current deployment.
helm history <deployment name> -n <namespace>
The following output appears.
REVISION UPDATED STATUS CHART APP VERSION DESCRIPTION
1 Mon Dec 1 09:58:30 2025 superseded rpproxy-1.0.0 1.9.3.8.xxxxxx Install complete
2 Mon Dec 1 10:15:01 2025 deployed rpproxy-1.0.0 1.9.3.8.xxxxxx Upgrade complete
Note down the revision number of the deployment to which you want to roll back.
- Run the following command to roll back to the specific revision number.
helm rollback <deployment name> <revision-number> -n <namespace>
- Run the following command to verify that the deployment has been rolled back to the specified revision number.
helm history <deploymentname> -n <namespace>
The following output appears.
REVISION UPDATED STATUS CHART APP VERSION DESCRIPTION
1 Mon Dec 1 09:58:30 2025 superseded rpproxy-1.0.0 1.9.3.8.xxxxxx Install complete
2 Mon Dec 1 10:15:01 2025 superseded rpproxy-1.0.0 1.9.3.8.xxxxxx Upgrade complete
3 Tue Dec 2 12:04:43 2025 deployed rpproxy-1.0.0 1.9.3.8.xxxxxx Rollback to 1
Perform the following steps to verify the deployment after rollback.
i. Run the following command to ensure that all the pods are running the previous stable version.
kubectl get pods -n <namespace>
The following output appears for the dynamic deployment.
NAME READY STATUS RESTARTS AGE
test-dynamic-10-v1-iap-rest-dynamic-6dcfd46c8d-dgqfv 2/2 Running 0 8h
test-logforwarder-v1-6nc8m 1/1 Running 0 8h
test-logforwarder-v1-pms6f 1/1 Running 0 8h
test-v1-rpproxy-5f78d4f9f4-dnndb 1/1 Running 0 8h
The following output appears for the static deployment.
NAME READY STATUS RESTARTS AGE
test-static-10-v1-iap-rest-static-6dcfd46c8d-dgqfv 2/2 Running 0 8h
test-logforwarder-v1-6nc8m 1/1 Running 0 8h
test-logforwarder-v1-pms6f 1/1 Running 0 8h
test-v1-kmsproxy-5f78d4f9f4-dnndb 1/1 Running 0 8h
ii. Run the following command to verify the pod details.
kubectl describe pod <pod name> -n <namespace>
The following output appears if you run the kubectl describe pod command for dynamic deployment.
iaprest-dynamic:
Container ID: containerd://37855b0e6dc0387215b03d3aeac6676479225cbb1b5a84556c41e160743145eb
Image: <aws_account_id>.dkr.ecr.us-east-1.amazonaws.com/container:REST_RHUBI-10-v10-1-5
The following output appears if you run the kubectl describe pod command for static deployment.
iaprest-devops:
Container ID: containerd://37855b0e6dc0387215b03d3aeac6676479225cbb1b5a84556c41e160743145eb
Image: <aws_account_id>.dkr.ecr.us-east-1.amazonaws.com/container:REST_RHUBI-10-v10-1-5
6.10 - Using Dockerfiles to Build Custom Images
Protegrity base images use the default RHEL Universal Base Image. Using Dockerfiles, you can use a base image of your choice.
To create custom image:
Download the installation package.
For more information about downloading the installation package, refer to the section Extracting the Installation Package.
Important: The dependency packages required for building the Docker images are specified in the HOW-TO-BUILD file, which is a part of the installation package. You must ensure that these dependency packages can be downloaded either from the Internet or from your internal repository.
Perform the following steps to build a Docker image for the REST container.
Run the following command to extract the files from the REST-SRC_<version_number>.tgz file to a directory.
tar -C <dir> REST-SRC_<version_number>.tgz
The following files are extracted:
- ImmutableApplicationProtectorRESTLinux_x64_<version_number>.tgz
- REST_RHUBI_DOCKERFILE_<version_number>
- docker-entrypoint.sh
- Run the following command in the directory where you have extracted the contents of the REST-SRC_<version_number>.tgz file.
docker build --build-arg BUILDER_IMAGE=<Repository location of rhel ubi 9 base image> \
--build-arg BASE_MICRO_IMAGE=<Repository location of rhel ubi 9 micro base image> \
-t <image-name>:<image-tag> -f REST_RHUBI_DOCKERFILE_<version_number> .
For more information the Docker build command, refer to the Docker documentation.
For more information about tagging an image, refer to the AWS documentation.
- Run the following command to list the REST container image.
docker images
- Push the REST container image to your preferred Container Repository.
For more information about pushing an image to the repository, refer to the section Uploading the Images to the Container Repository.
- Repeat step 2 - 6 for creating custom images for the RPProxy, KMSProxy, and Log Forwarder containers.
Each extracted source package contains the corresponding Dockerfile. The steps to create custom images using the Dockerfile are same for all the images.
6.11 - Appendix - Deploying the Helm Charts by Using the Set Argument
To deploy Helm charts using the set argument:
- Navigate to the directory where you have stored the values.yaml file for deploying the corresponding Helm chart.
- Deploy the Helm chart using the following command.
helm install <name for this helm deployment> <Location of the directory that contains the Helm chart> -n <Namespace>
--set <tag 1>="Value 1"
--set <tag 2>="Value 2"
--set <tag 3>="Value 3"
--set <tag 4>="Value 4"
For example:
helm -n devops-10-v2 install test-sampleapp-10-v1 iap-rest-devops/
--set imagePullSecrets[0].name="regcred"
--set iaprestImage.repository="<AWS_ID>.dkr.ecr.us-east-1.amazonaws.com/container"
--set iaprestImage.tag="REST_RHUBI-9-64_x86-64_K8S_10.0.0.18.6a3a67.tgz"
--set policyLoaderImage.repository="<AWS_ID>.dkr.ecr.us-east-1.amazonaws.com/container"
--set policyLoaderImage.tag="POLICY-LOADER_RHUBI-9-64_x86-64_K8S_1.0.0.11.bc1967.tgz"
--set nginxImage.repository="nginxinc/nginx-unprivileged"
--set nginxImage.tag="1.25.2" --set serviceAccount.name="s3-v1-sa"
--set protector.kms.host="test-kms-10-v1-kms-proxy.devops-10-v2.svc"
--set protector.kms.certificates="pty-certs-cli-secret"
--set protector.logs.mode="error"
--set protector.logs.host="test-devops-logforwarder10-v1.devops-10-v2.svc"
--set nginx.logs.request_logs="false"
--set nginx.logs.probe_logs="false"
--set policyPuller.policy.interval="30"
--set policyPuller.logs.level="DEBUG"
--set protector.policy.cadence="60"
--set policyPuller.policy.path="s3://restcontainer/devops-iap-rest-rel-a/new-esa-10.1.0-2467/policy-py-10.1.0-2467-v1.json"
--set service.certificates="pty-rest-devops-secret"
Use the set arguments for deploying any Helm chart.
7 - Application Protector Java Container
The following sections outline the business problems faced by customers in protecting their data in a native cloud environment. It then lists the Protegrity solution to this business problem using Application Protector Java APIs in a Kubernetes cluster.
Business Problem
As more use cases are moving to the Cloud, a solution is required that can protect data in a native cloud environment:
- Protegrity customers are moving to the cloud. This includes data and workloads in support of transactional application and analytical systems.
- Native Cloud capabilities can be used to solve this problem and deliver the agility and scalability required to keep up with the customers’ business.
- Kubernetes can be configured with Protegrity data security components that can leverage the autoscaling capabilities of Kubernetes to scale.
Protegrity Solution
The Protegrity Application Protector Java Container provides a robust and scalable APIs designed to simplify integration of Protegrity functions across your systems. Whether you are building custom applications, streamlining workflows, or enabling third-party access, our API offers secure, reliable, and well-documented interface.
The Protegrity Application Protector Java Container has the following characteristics:
- Cloud standard form factor:
- The delivery form factor for cloud deployments is an SDK and a supporting Dockerfile. Customers can use this Dockerfile to build the Application Protector Java Container, which is based on the Application Protector form factor that Protegrity has been delivering for several years.
- The Application Protector Java Container is a standard Docker Container that is familiar and expected in cloud deployments.
- The Application Protector Java Container form factor makes the container a lightweight deployment of Application Protector Java.
- Support for Dynamic and Static deployment:
- Dynamic deployment: The dynamic term refers to runtime updates to policy changes that are applied to the cluster. Dynamic updates are managed by the Resilient Package Proxy (RPProxy or RPP). The RPP is connected to the ESA and applies the policy changes to the Application Protector Java Containers.
- Static deployment: This deployment is suitable where a fixed policy configuration is required for the Application Protector Java Container. A secure policy package is created using the ESA API. The policy package is secured using Cloud-based Key Management Solution (KMS). The same policy package is applied to all the Application Protector Java Containers in the cluster.
For more information about the Application Java Protector, refer to the section Application Protector Java.
7.1 - Understanding the Architecture
The Protegrity Application Protector Java Container can be deployed using one of the following deployment methods:
- Using dynamic-based deployment
- Using static-based deployment
7.1.1 - Architecture and Components using Dynamic-based Deployment
Key features of a dynamic-based deployment include:
- The deployments can be used in use cases where policy updates need to be available on the cluster continuously.
- The RPP component is synchronized with the ESA for policy updates at a predefined rate.
- The dynamic deployment requires the ESA to be always connected to support the policy updates.
For more information about package deployment approaches, refer to Resilient Package Deployment.
The following figure represents the architecture for deploying the Application Protector Java Container with RPP on a Kubernetes cluster.
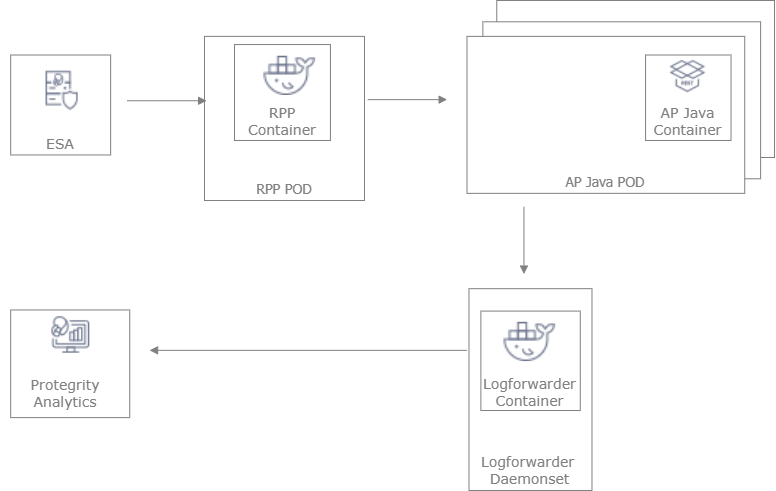
Deployment Steps:
Create the ESA with the policy and datastore.
Deploy the Resilient Package Proxy (RPP) instances with mTLS certificates to communicate with the ESA and to host the proxy endpoint for protectors.
Deploy the Application Protector Java Container protector with mTLS certificates to communicate with the RPP. The communication between the RPP and the protector is secured using mTLS.
After the protector instance starts as part of the application POD, the protector sends a request to the RPP instance to retrieve the policy package.
At periodic intervals, the protector tries to pull the new policy package from RPP instance. If the package present on the RPP instance has expired due to cache invalidation policy, the RPP pulls the new package from an upstream RPP or the ESA.
7.1.2 - Architecture and Components using Static Deployment
Key features of a Static-based deployment include:
- The deployments can be used in use cases where a fixed policy package is required.
- The policy updates need to be triggered through automation using ConfigMap updates.
For more information about package deployment approaches, refer to Resilient Package Deployment.
The following figure represents the architecture for deploying the Application Protector Java Container with static deployment on a Kubernetes cluster.
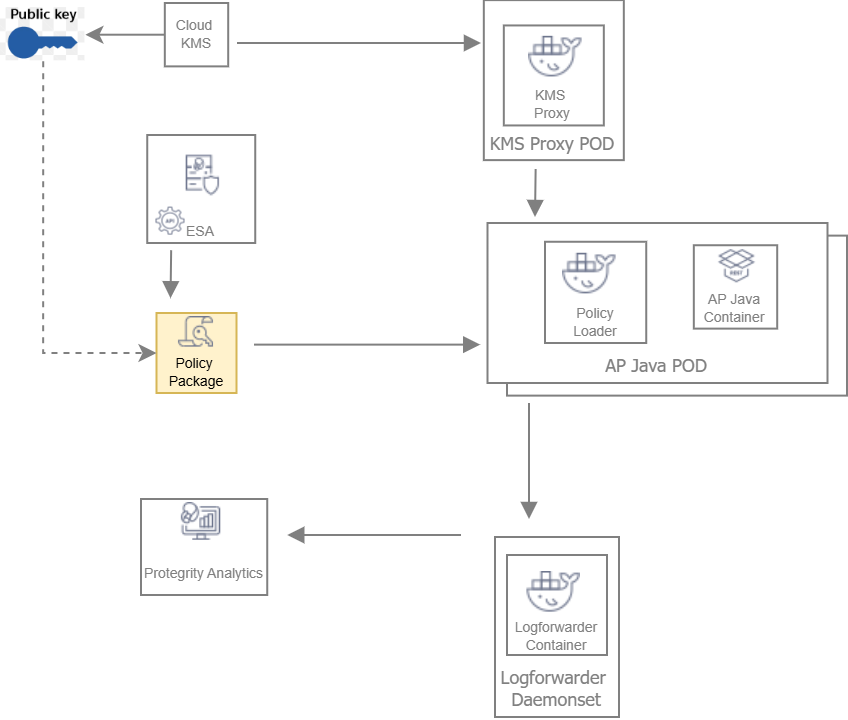
Deployment Steps:
The ESA administrator user pulls the policy package from the ESA and stores it to an Object Store or a Volume Mount.
The Policy Loader sidecar container reads the internal configmap for policy updates.
The sidecar container retrieves the policy package from the Object Store or Volume Mount.
The sidecar container then stores the policy package in the tmpfs directory.
The Application Protector Java Container protector reads the policy package from the tmpfs directory.
Based on the values specified in the internal config.ini file, the protector initiates the RP Callback.
The RP Callback decrypts the Data Encryption Key (DEK) using the KMS Proxy container.
The KMS Proxy container reads the decrypted DEK from the cache, if present.
If the DEK is not present in the cache, the KMS Proxy container uses the KMS Backend to retrieve the DEK from the Cloud KMS. The KMS Proxy container then stores the decrypted DEK in the cache.
The Protector decrypts the policy package using the DEK and initializes its internal library.
7.2 - System Requirements
This section provides an overview of the software and hardware requirements required for deploying the Application Protector Java Container.
7.2.1 - Software Requirements
Ensure that the following prerequisites are met for deploying the Application Protector Java Container package ApplicationProtector_RHUBI-9-64_x86-64_Generic.K8S.JRE-<JRE_Version>_<Version>.tgz.
Software requirements for EKS deployment
The following prerequisites are required for deploying the Application Protector Java Container on Amazon EKS.
ESA prerequisites
Policy – Ensure that you have defined the security policy in the ESA. For more information about defining a security policy, refer to the section Policy Management.
Datastore - Attach the policy to the default datastore in the ESA or to a range of allowed servers that are added to a datastore.
The IP address range of the allowed servers must be the same as that of the nodes in the Kubernetes cluster where the Application Protector Java Containers are deployed.
For more information about datastores, refer to the section Data Stores.
ESA user - Create an ESA user that will be used to invoke the RPS REST API for retrieving the security policy and the certificates from the ESA. Ensure that the user is assigned the Export Resilient Package role. This user is used to export the policy in a static-based deployment.
For more information about assigning roles, refer to the section Managing Roles.
Jump Box Configuration
The Linux instance or the Jump Box can be used to communicate with the Kubernetes cluster. This instance can be on-premise or on AWS. The Jump Box instance is used to execute all the deployment-related commands.
Ensure that the following prerequisites are installed on the Jump Box:
- Helm, which is used as the package manager for all the applications.
- Docker to communicate with the Container Registry, where you want to upload the Docker images.
- Kubectl, which is a CLI tool to connect with the Kubernetes cluster.
- eksctl, which is a CLI utility to communicate with Amazon EKS.
AWS prerequisites
You need access to an AWS account. You also need access to the following AWS resources.
- AWS Elastic File System (EFS) - if you want to upload the policy package to AWS EFS instead of AWS S3. You require both read and write permissions. This is required for static-based deployment.
- Install the latest version of the EFS-CSI driver, which is required if you are using AWS EFS as the persistent volume. This is required for static-based deployment.
For more information about installing the EFS-CSI driver, refer to the Amazon EFS CSI driver documentation.
AWS S3 - if you want to use AWS S3 for storing the policy snapshot, instead of AWS EFS. You require both read and write permissions. This is required for static-based deployment.
For more information about the AWS S3-specific permissions, refer to the API Reference document for AWS S3.
IAM User - Required to create the Kubernetes cluster. This user requires the following permissions:
AmazonEC2FullAccess - This is a managed policy by AWS
AmazonEKSClusterPolicy - This is a managed policy by AWS
AmazonEKSServicePolicy - This is a managed policy by AWS
AWSCloudFormationFullAccess - This is a managed policy by AWS
Custom policy that allows the user to perform the following actions:
- Create a new role and an instance profile.
- Retrieve information about a role and an instance profile.
- Attach a policy to the specified IAM role.
The following actions must be permitted on the IAM service:
- GetInstanceProfile
- GetRole
- AddRoleToInstanceProfile
- CreateInstanceProfile
- CreateRole
- PassRole
- AttachRolePolicy
Custom policy that allows the user to perform the following actions:
- Delete a role and an instance profile.
- Detach a policy from a specified role.
- Delete a policy from the specified role.
- Remove an IAM role from the specified EC2 instance profile.
The following actions must be permitted on the IAM service:
- GetOpenIDConnectProvider
- CreateOpenIDConnectProvider
- DeleteInstanceProfile
- DeleteRole
- RemoveRoleFromInstanceProfile
- DeleteRolePolicy
- DetachRolePolicy
- PutRolePolicy
Custom policy that allows the user to manage EKS clusters. The following actions must be permitted on the EKS service:
- ListClusters
- ListNodegroups
- ListTagsForResource
- ListUpdates
- DescribeCluster
- DescribeNodegroup
- DescribeUpdate
- CreateCluster
- CreateNodegroup
- DeleteCluster
- DeleteNodegroup
- UpdateClusterConfig
- UpdateClusterVersion
- UpdateNodegroupConfig
- UpdateNodegroupVersion
For more information about creating an IAM user, refer to the section Creating an IAM User in Your AWS Account in the AWS documentation. Contact your system administrator for creating the IAM users.
For more information about the EKS-specific permissions, refer to the API Reference document for Amazon EKS.
Access to AWS Elastic Container Registry (ECR) to upload the Container images.
Access to Route53 for mapping the hostname of the Elastic Load Balancer to a DNS entry in the Amazon Route53 service. This is required if you are terminating the TLS connection from the client application on the Load Balancer.
Access to AWS KMS. This is required for static-based deployment.
Software requirements for AKS deployment
The following prerequisites are required for deploying the Application Protector Java Container on Azure AKS.
ESA prerequisites
Policy – Ensure that you have defined the security policy in the ESA. For more information about defining a security policy, refer to the section Policy Management.
Datastore - Attach the policy to the default datastore in the ESA or to a range of allowed servers that are added to a datastore.
The IP address range of the allowed servers must be the same as that of the nodes in the Kubernetes cluster where the Application Protector Java Containers are deployed.
For more information about datastores, refer to the section Data Stores.
ESA user - Create an ESA user that will be used to invoke the RPS REST API for retrieving the security policy and the certificates from the ESA. Ensure that the user is assigned the Export Resilient Package role. This user is used to export the policy in a static-based deployment.
For more information about assigning roles, refer to the section Managing Roles.
Jump Box Configuration
The Linux instance or the Jump Box can be used to communicate with the Kubernetes cluster. This instance can be on-premise or on Azure. The Jump Box instance is used to execute all the deployment-related commands.
Ensure that the following prerequisites are installed on the Jump Box:
- Helm, which is used as the package manager for all the applications.
- Docker to communicate with the Container Registry, where you want to upload the Docker images.
- Kubectl, which is a CLI tool to connect with the Kubernetes cluster.
- Azure CLI, which is a CLI utility to communicate with Azure AKS.
Azure prerequisites
You need access to an Azure subscription and a valid Azure Active Directory user for creating the following Azure services:
- Resource Group - Used to organize resources. All the remaining Azure services are created within a Resource Group.
- Azure Storage Account for creating the Azure Storage Container, where the policy package is stored. This is required for static-based deployment.
- Storage Container - Used to store the policy package. This is required for static-based deployment.
- Access to Azure Kubernetes Service (AKS) to create a Kubernetes cluster.
- Access to Azure Container Registry to upload the container images.
Software requirements for OpenShift deployment
The following prerequisites are required for deploying the Application Protector Java Container on OpenShift.
ESA prerequisites
Policy – Ensure that you have defined the security policy in the ESA. For more information about defining a security policy, refer to the section Policy Management.
Datastore - Attach the policy to the default datastore in the ESA or to a range of allowed servers that are added to a datastore.
The IP address range of the allowed servers must be the same as that of the nodes in the Kubernetes cluster where the AP-REST containers have been deployed.
For more information about datastores, refer to the section Data Stores.
ESA user - Create an ESA user that will be used to invoke the RPS REST API for retrieving the security policy and the certificates from the ESA. Ensure that the user is assigned the Export Resilient Package role. This user is used to export the policy in a static-based deployment.
For more information about assigning roles, refer to the section Managing Roles.
Jump Box Configuration
The Linux instance or the Jump Box can be used to communicate with the Kubernetes cluster. This instance can be on-premise or on AWS. The Jump Box instance is used to execute all the deployment related commands.
Ensure that the following prerequisites are installed on the Jump Box:
- Helm, which is used as the package manager for all the applications.
- Docker to communicate with the Container Registry, where you want to upload the Docker images.
- oc, which is the OpenShift binary. This is the OpenShift CLI utility to communicate with the OpenShift cluster. This is required if you want to install the Application Protector Java Container on an OpenShift cluster on AWS.
OpenShift on AWS prerequisites
- Ensure that you have a valid OpenShift account and the following information:
- Login URL for the OpenShift account.
- Authentication credentials for the OpenShift account.
- Ensure that you have access to an AWS account as the OpenShift cluster is deployed on AWS. You also need access to the following AWS resources.
- AWS Elastic File System (EFS), if you want to upload the policy package to AWS EFS instead of AWS S3. You require both read and write permissions. This is required for static-based deployment.
- Install the latest version of the EFS-CSI driver, which is required if you are using AWS EFS as the persistent volume. This is required for static-based deployment. For more information about installing the EFS-CSI driver, refer to the Amazon EFS CSI driver documentation.
- AWS S3, if you want to use AWS S3 for storing the policy snapshot, instead of AWS EFS. You require both read and write permissions. This is required for static-based deployment. For more information about the AWS S3-specific permissions, refer to the API Reference document for AWS S3.
- Access to AWS Elastic Container Registry (ECR) to upload the Container images.
- Access to AWS KMS. This is required for static-based deployment.
- Access to Azure Key Vault. This is required for static-based deployment.
7.2.2 - Hardware Requirements
The following table lists the minimum hardware configuration for each pod where the Application Protector Java Container is deployed.
| Hardware Components | Configuration |
|---|---|
| CPU | Depends on the application. By default, the value is set to:
For more information about the CPU requirements for each container, refer to the values.yaml file for the corresponding container. |
| RAM | Depends on the workload. By default, the value is set to:
For more information about the memory requirements for each container, refer to the values.yaml file for the corresponding container. |
The instance type used for the cluster node is t3.2xlarge. The minimum CPU requirement for the node is 8 vCPU and the minimum memory capacity is 32 GiB.
Note: The package size of a policy with 70 thousand users and 26 data elements is 257447563 bytes.
7.3 - Preparing the Environment
This section provides an overview of the steps required to prepare the environment for deploying the Application Protector Java Container product.
7.3.1 - Initializing the Jump Box
The Linux instance should be connected to the Kubernetes cluster. The following is the minimum system requirements to be configured for a Linux instance.
| Software and Files Required for the Linux instance | Purpose | Link |
|---|---|---|
| Docker | Load the images into the repository | Install Docker Engine |
| Helm | Install Helm Charts | Install Helm |
| Kubectl | Connect to the Kubernetes cluster | Kubectl reference |
| AWS CLI | Manage AWS services. This is required for deploying the protector on EKS. | AWS Command Line Interface |
| Azure CLI | Manage Azure services. This is required for deploying the protector on AKS. | Azure Command Line Interface |
| OpenShift CLI | Manage OpenShift services. This is required for deploying the protector on OpenShift. | OpenShift Command Line Interface |
7.3.2 - Extracting the Installation Package
This section describes the steps to download and extract the installation package for the Application Protector Java Container.
To download the installation package:
Download the ApplicationProtector_RHUBI-9-64_x86-64_Generic.K8S.JRE-<JRE_Version>_<Version>.tgz file on the Linux instance.
Run the following command to extract the files from the ApplicationProtector_RHUBI-9-64_x86-64_Generic.K8S.JRE-<JRE_Version>_<Version>.tgz file.
tar -xvf ApplicationProtector_RHUBI-9-64_x86-64_Generic.K8S.JRE-<JRE_Version>_<Version>.tgzThe signatures directory and the ApplicationProtector_RHUBI-9-64_x86-64_Generic.K8S.JRE-<JRE_Version>_<Version>.tgzfileare extracted.
Run the following command to extract the files from the ApplicationProtector_RHUBI-9-64_x86-64_Generic.K8S.JRE-<JRE_Version>_<Version>.tgz file.
tar -xvf ApplicationProtector_RHUBI-9-64_x86-64_Generic.K8S.JRE-<JRE_Version>_<Version>.tgzThe following directories and files are extracted:
- devops - Helm charts, Dockerfiles, and container images to deploy the Application Protector Java Container using the Static policy.
- protector - Dockerfiles and container images to create the Application Protector Java Container.
- dynamic - Helm charts, Dockerfiles, and container images to deploy the Application Protector Java Container using the Dynamic method.
- common - Helm charts, Dockerfiles, and container images to deploy the Log Forwarder.
- certs - Create certificates required for secure communication.
- HOW-TO-BUILD-DOCKER-IMAGES - Text file specifying how to build the Docker images.
- manifest.json - Metadata file specifying the product version and component names.
The following shows a list of the Helm charts and container images.
| Package Name | Description | Directory |
|---|---|---|
| ApplicationProtector-SAMPLE-APP_DYNAMIC-HELM_ALL-ALL-ALL_x86-64_K8S_<Version>.tgz | Package containing the Helm chart used to deploy the Sample Application Container. | dynamic |
| RPPROXY_RHUBI-9-64_x86-64_K8S_<Version>.tar.gz | Used to set up the RPProxy container. | dynamic |
| RPPROXY_SRC_<Version>.tgz | Package containing the Dockerfile that can be used to create a custom image for the RPProxy container. | dynamic |
| RPPROXY-HELM_ALL-ALL-ALL_x86-64_K8S_<Version>.tgz | Package containing the Helm chart used to deploy the RPProxy container. | dynamic |
| KMSPROXY_RHUBI-9-64_x86-64_K8S_<Version>.tar.gz | Used to create the KMSProxy container. | devops |
| KMSPROXY_SRC_<Version>.tgz | Package containing the Dockerfile that can be used to create a custom image for the KMSProxy container and the associated binary files. | devops |
| KMSPROXY-HELM_ALL-ALL-ALL_x86-64_K8S_<Version>.tgz | Package containing the Helm chart used to deploy the KMSProxy container. | devops |
| POLICY-LOADER_RHUBI-9-64_x86-64_K8S_<Version>.tar.gz | Used to create the Policy Loader container. | devops |
| POLICY-LOADER_SRC_<Version>.tgz | Package containing the Dockerfile that can be used to create a custom image for the Policy Loader container and the associated binary files. | devops |
| ApplicationProtector-SAMPLE-APP_DEVOPS-HELM_ALL-ALL-ALL_x86-64_K8S_<Version>.0.tgz | Package containing the Helm chart used to deploy the Sample Application Container. | devops |
| ApplicationProtector-SAMPLE-APP_SRC_<Version>.tgz | Package containing the Dockerfile that can be used to create a custom image for the Sample Application Container and the associate binary files. | protector |
| LOGFORWARDER_RHUBI-9-64_x86-64_K8S_<Version>.tar.gz | Used to create the Log Forwarder container. | common |
| LOGFORWARDER_SRC_<Version>.tgz | Package containing the Dockerfile that can be used to create a custom image for the Log Forwarder container and the associated binary files. | common |
| LOGFORWARDER-HELM_ALL-ALL-ALL_x86-64_K8S_<Version>.tgz | Package containing the Helm chart used to deploy the Log Forwarder container. | common |
7.3.3 - Creating Certificates
This section describes the steps to create certificates required for secure communication. These certificates are for secure communication between:
- ESA and the RPP.
- RPP and the protector.
- KMSProxy and the protector.
To download the installation package:
Navigate to the directory where you have extracted the installation package.
Navigate to the certs directory. The following files are available:
- CertificatesSetup_Linux_x64_<Version>tgz - Download the certificates from the ESA. You can use them as the common certificates in the dynamic deployment between the RPProxy and the ESA, and between the RPProxy and the protector. You can also use these certificates separately as the upstream certificate between the ESA and RPProxy in the dynamic deployment.
- CreateCertificate_Linux_x64_<Version>.tgz - Generate self-signed client and server certificates. In the Dynamic method, these certificates are used for communication between RPProxy and the protector. In the Static policy method, these certificates are used for communication between KMSProxy and the protector. Customers can choose to use their own certificates.
Extract both the packages using the following command.
tar -xvf CertificatesSetup_Linux_x64_<Version>.tgz tar -xvf CreateCertificate_Linux_x64_<Version>.tgzThe following files are extracted:
- CertificatesSetup_Linux_x64_<Version>.sh
- CreateCertificate_Linux_x64_<Version>.sh
Certificates for communication between the ESA and the RPP
- Run the following command to create ESA certificates for establishing a secure communication between the ESA and the RPP.
./CertificatesSetup_Linux_x64_<Version>.sh (-u <username> -p <password>) [-h <hostname>] [--port <port>] [-d <directory>]
Options:
-u User with the Export Certificates role
-p Password for user with the Export Certificates role
-h Host or IP address of the ESA
--port Port number of the ESA
-d local directory where certificates are stored
For more information about the command, use the –help parameter as shown in the following command.
./CertificatesSetup_Linux_x64_<Version>.sh --help
The output displays all the options that can be used with the command. It also provides usage examples.
Certificates for client and server communication between RPP and Protector, and KMS-Proxy and Protector
- Run the following command to create server-side certificates.
./CreateCertificate_Linux_x64_<Version>.sh (client | server ) --name <common name> [--dir <directory> ] [--dns <dnsname>] [--ip <ip address>]
Options:
client Generate client certificate
server Generate server certificate
--name Certificate common name.
--dns Specify domain names. To specify multiple DNS names, repeat the --dns flag.
--ip Specify IP addresses. To specify multiple IP address, repeat the --ip flag.
--noenc The certificate key file is not encrypted. No secret.txt file created.
--dir Output base directory for certificates.
--print Prints OpenSSL configuration files used to generate certificates.
--help Print help message.
This command is used to create the certificates for both the Dynamic and Static-based deployments.
For more information about the command, use the –help parameter as shown in the following command.
./CreateCertificate_Linux_x64_<Version>.sh --help
The output displays all the options that can be used with the command. It also provides usage examples.
7.3.4 - Uploading the Images to the Container Repository
Before you begin, ensure that you have set up your Container Registry.
To upload the images to the Container Repository:
Install Docker on the Linux instance.
For more information about installing Docker on a Linux machine, refer to the Docker documentation.
Run the following command to authenticate your Docker client to the Container registry.
In case of AWS ECR, run the following command.
aws ecr get-login-password --region <Name of ECR region where you want to upload the container image> | docker login --username AWS --password-stdin <aws_account_id>.dkr.ecr.<Name of ECR region where you want to upload the container image>.amazonaws.com
For more information about authenticating your Docker client to Amazon ECR, refer to the AWS CLI Command Reference documentation.
In case of Azure, run the following command:
docker login <Container Registry Name>.azurecr.io
Extract the installation package.
The RPProxy, Policy Loader, and KMSProxy container images are extracted.
For more information about extracting the installation package, refer to the section Extracting the Installation Package.
Perform the following steps to upload the AP Java container image to the Container registry.
a. Build a custom image for the AP Java container.
For more information about creating custom images, refer to the section Using Dockerfiles to Build Custom Images.
Note: This step is not required for the RPProxy, Policy Loader, and KMSProxy containers as the container images are available in the installation package.
b. Run the following command to load the AP Java container image into Docker.
docker load -i APJAVA_RHUBI-9-64_x86-64_K8S_<Version>.tar.gzc. Run the following command to list the AP Java container image.
docker imagesd. Tag the image to the Container registry by running the following command.
docker tag <Container image>:<Tag> <Container registry path>/<Container image>:<Tag>For example for AWS ECR:
docker tag apjava:AWS <aws_account_id>.dkr.ecr.us-east-1.amazonaws.com/apjava:AWSFor more information regarding tagging an image, refer to the section Pushing an image in the AWS documentation.
For example for Azure:
docker tag apjava:AZURE <Container Registry Name>.azurecr.io/apjava:AZUREe. Push the tagged image to the Container registry by running the following command.
docker push <Container registry path>/<Container image>:<Tag>For example for AWS:
docker push <aws_account_id>.dkr.ecr.us-east-1.amazonaws.com/apjava:AWSFor example for Azure:
docker push <Container Registry Name>.azurecr.io/ap-rest:AZURENavigate to the directory where you have extracted the Helm charts packages for the AP Java containers.
In the values.yaml file, update the appropriate path for the springappImage setting, along with the tag.
Repeat steps 1 to 6 for uploading the respective images for RPProxy, Policy Loader, and KMSProxy.
7.3.5 - Creating the AWS Environment
This section describes how to create the AWS runtime environment.
Prerequisites
Before creating the runtime environment on AWS, ensure that you have a valid AWS account and the following information:
- Login URL for the AWS account
- Authentication credentials for the AWS account
Audience
It is recommended that you have working knowledge of AWS and knowledge of the following concepts:
- Introduction to AWS S3
- Introduction to AWS Cloud Security
- Introduction to AWS EKS
7.3.5.1 - Creating the AWS Setup for Static Mode
This section describes how to create the following AWS resources for static mode:
- Data Encryption Key
- AWS S3 bucket
- AWS EFS
7.3.5.1.1 - Creating a Data Encryption Key (DEK)
To create a Data Encryption Key:
- Log in to the AWS environment.
Navigate to Services.
A list of AWS services appears.
In Security, Identity, & Compliance, click Key Management Service.
The AWS Key Management Service (KMS) console opens. By default, the Customer managed keys screen appears.
Click Create key.
The Configure key screen appears.
In the Key type section, select the Asymmetric option to create a single customer master key that will be used to perform the encrypt and decrypt operations.
In the Key usage section, select the Encrypt and decrypt option.
In the Key spec section, select one option.
For example, select RSA_4096.
In the Advanced options section, select the Single-Region Key option.
Click Next.
The Add labels screen appears.
In the Alias field, specify the display name for the key, and then click Next.
The Review and edit key policy screen appears.
Click Finish.
The Customer managed keys screen appears, displaying the newly created customer master key.
Click the key alias.
A screen specifying the configuration for the selected key appears.
In the General Configuration section, copy the value specified in the ARN field, and save it on your local machine.
You need to attach the key to the KMSDecryptAccess policy. You also need to specify this ARN value in the command for creating a Kubernetes secret for the key.
Navigate to Services > IAM.
Click Policies.
The Policies screen appears.
Select the KMSDecryptAccess policy.
The Permissions tab appears.
Click Edit policy to edit the policy in JSON format.
Modify the policy to add the ARN of the key that you have copied in step 13 to the Resource parameter.
{ "Version": "2012-10-17", "Statement": [ { "Sid": "VisualEditor0", "Effect": "Allow", "Action": "kms:Decrypt", "Resource": [ "<ARN of the AWS Customer Master Key>" ] } ] }Click Review policy, and then click Save changes to save the changes to the policy.
7.3.5.1.2 - Creating an AWS S3 Bucket
Important: This procedure is optional and is required only if you want to use AWS S3 for storing the policy snapshot during static deployment, instead of the persistent volume.
To create an AWS S3 bucket:
- Login to the AWS environment.
Navigate to Services.
A list of AWS services appears.
In Storage, click S3.
The S3 buckets screen appears.
Click Create bucket.
The Create bucket screen appears.
In the General configuration screen, specify the following details.
In the Bucket name field, enter a unique name for the bucket.
In the AWS Region field, choose the same region in which you want to create your EC2 instance.
If you want to configure your bucket or set any specific permissions, then you can specify the required values in the remaining sections of the screen. Otherwise, you can go directly to the next step to create a bucket.
Click Create bucket.
The bucket is created.
7.3.5.1.3 - Creating an AWS EFS
Important: This procedure is optional and is required only if you want to use AWS EFS for storing the policy package during static deployment, instead of AWS S3.
To create an AWS EFS:
- Login to the AWS environment.
Navigate to Services.
A list of AWS services appears.
In Storage, click EFS.
The File Systems screen appears.
Click Create file system.
The Configure network access screen appears.
In the VPC list, select the VPC where you will be creating the Kubernetes cluster.
Click Next Step.
The Configure file system settings screen appears.
Click Next Step.
The Configure client access screen appears.
Click Next Step.
The Review and create screen appears.
Click Create File System.
The file system is created.
Note the value in the File System ID column. You need to specify this value as the value of the volumeHandle parameter in the pv.yaml file in step 10c.
Perform the following steps if you want to use a persistent volume for storing the policy package instead of the AWS S3 bucket.
a. Create a file named storage_class.yaml for creating an AWS EFS storage class.
The following snippet shows the contents of the storage_class.yaml file.
kind: StorageClass apiVersion: storage.k8s.io/v1 metadata: name: efs-sc provisioner: efs.csi.aws.comImportant: If you want to copy the contents of the storage_class.yaml file, then ensure that you indent the file as per YAML requirements.
b. Run the following command to provision the AWS EFS using the storage_class.yaml file.
kubectl apply -f storage_class.yamlAn AWS EFS storage class is provisioned.
c. Create a file named pv.yaml for creating a persistent volume resource.
The following snippet shows the contents of the pv.yaml file.
apiVersion: v1 kind: PersistentVolume metadata: name: efs-pv1 labels: purpose: policy-store spec: capacity: storage: 1Gi volumeMode: Filesystem accessModes: - ReadWriteMany persistentVolumeReclaimPolicy: Retain storageClassName: **efs-sc** csi: driver: efs.csi.aws.com volumeHandle: **fs-618248e2:**/Important: If you want to copy the contents of the pv.yaml file, then ensure that you indent the file as per YAML requirements.
This persistent volume resource is associated with the AWS EFS storage class that you have created in step 10b.
In the storageClassName parameter, ensure that you specify the same name for the storage class that you specified in the storage_class.yaml file in step 10a.
For example, specify efs-sc as the value of the storageClassName parameter.
d. Run the following command to create the persistent volume resource.
kubectl apply -f pv.yamlA persistent volume resource is created.
e. Create a file named pvc.yaml for creating a claim on the persistent volume that you have created in step 10d.
The following snippet shows the contents of the pvc.yaml file.
apiVersion: v1 kind: PersistentVolumeClaim metadata: name: efs-claim1 spec: selector: matchLabels: purpose: "policy-store" accessModes: - ReadWriteMany storageClassName: **efs-sc** resources: requests: storage: 1GiImportant: If you want to copy the contents of the pvc.yaml file, then ensure that you indent the file as per YAML requirements.
This persistent volume claim is associated with the AWS EFS storage class that you have created in step 10b. The value of the storage parameter in the pvc.yaml defines the storage that is available for saving the policy dump.
In the storageClassName parameter, ensure that you specify the same name for the storage class that you specified in the storage_class.yaml file in step 10a.
For example, specify efs-sc as the value of the storageClassName parameter.
f. Run the following command to create the persistent volume claim.
kubectl apply -f pvc.yaml -n <Namespace>For example:
kubectl apply -f pvc.yaml -n iap-javaA persistent volume claim is created. In this example, iap-java is the namespace where the Application Protector Java Container will be deployed.
g. On the Linux instance, create a mount point for the AWS EFS by running the following command.
mkdir /efsThis command creates a mount point efs on the file system.
h. Install the Amazon EFS client using the following command.
sudo yum install -y amazon-efs-utilsFor more information about installing the EFS client, refer to the section Manually installing the Amazon EFS client in the Amazon Elastic File System User Guide.
i. Run the following mount command to mount the AWS EFS on the directory created in step 10g.
sudo mount -t nfs -o nfsvers=4.1,rsize=1048576,wsize=1048576,hard,timeo=600,retrans=2,noresvport <file-system-id>.efs.<aws-region>.amazonaws.com:/ /efsFor example:
sudo mount -t nfs -o nfsvers=4.1,rsize=1048576,wsize=1048576,hard,timeo=600,retrans=2,noresvport fs-618248e2.efs.<aws-region>.amazonaws.com:/ /efsEnsure that you set the value of the <file-system-id> parameter to the value of the volumeHandle parameter, as specified in the pv.yaml file in step 10c.
For more information about the permissions required for mounting an AWS EFS, refer to the section Working with Users, Groups, and Permissions at the Network File System (NFS) Level in the AWS documentation.
7.3.5.2 - Creating a Kubernetes Cluster
Note: The steps listed in this section for creating a Kubernetes cluster are for reference use. If you have a Kubernetes cluster or want to create a cluster based on custom requirements, then navigate to step 4 to connect your cluster and the Linux instance. However, you must ensure that your ingress port is enabled on the Network Security group of your VPC.
Important: Ensure that the Kubernetes Metrics Server and Cluster Autoscaler are already deployed.
To create a Kubernetes cluster:
Create a key pair for the EC2 instances that will be launched as part of your Kubernetes cluster.
For more information on creating the key pair, refer to the section Create a key pair for your Amazon EC2 instance in the Amazon EC2 documentation.
After the key pair is created, you need to specify the key pair name in the publicKeyName field of the createCluster.yaml file, for creating a Kubernetes cluster.
Log in to the Linux instance and create a file named createCluster.yaml to specify the configurations for creating the Kubernetes cluster.
The following snippet displays the contents of the createCluster.yaml file.
apiVersion: eksctl.io/v1alpha5 kind: ClusterConfig metadata: name: <Name of your Kubernetes cluster> region: <Region where you want to deploy your Kubernetes cluster> version: "<Kubernetes version>" vpc: id: "<ID of the VPC where you want to deploy the Kubernetes cluster>" subnets: #In this section specify the subnet region and subnet id accordingly private: <Availability zone for the region where you want to deploy your Kubernetes cluster>: id: "<Subnet ID>" <Availability zone for the region where you want to deploy your Kubernetes cluster> id: "<Subnet ID>" nodeGroups: - name: <Name of your Node Group> instanceType: m5.large minSize: 1 maxSize: 3 tags: k8s.io/cluster-autoscaler/enabled: "true" k8s.io/cluster-autoscaler/<Name of your Kubernetes cluster>: "owned" privateNetworking: true securityGroups: withShared: true withLocal: true attachIDs: ['<Security group linked to your VPC>'] ssh: publicKeyName: '<EC2 keypair>' iam: attachPolicyARNs: - "arn:aws:iam::aws:policy/AmazonEKS_CNI_Policy" withAddonPolicies: autoScaler: trueImportant: If you want to copy the contents of the createCluster.yaml file, then ensure that you indent the file as per YAML requirements.
For more information about the sample configuration file used to create a Kubernetes cluster, refer to the section Create cluster using config file in the eksctl documentation.
In the ssh/publicKeyName parameter, you must specify the value of the key pair that you have created in step 1.
In the iam/attachPolicyARNs parameter, you must specify the following policy ARNs:
ARN of the AmazonEKS_CNI_Policy policy - This is a default AWS policy that enables the Amazon VPC CNI Plugin to modify the IP address configuration on your EKS nodes.
For more information about this policy, refer to the AWS documentation.
You need to sign in to your AWS account to access the AWS documentation for this policy.
The content snippet displays the reference configuration required to create a Kubernetes cluster using a private VPC. If you want to use a different configuration for creating your Kubernetes cluster, then you need to refer to the section Creating and managing clusters in the eksctl documentation.
For more information about creating a configuration file to create a Kubernetes cluster, refer to the section Creating and managing clusters in the eksctl documentation.
Run the following command to create a Kubernetes cluster.
eksctl create cluster -f ./createCluster.yamlImportant: IAM User 1, who creates the Kubernetes cluster, is automatically assigned the cluster-admin role in Kubernetes.
Run the following command to connect your Linux instance to the Kubernetes cluster.
aws eks update-kubeconfig --name <Name of Kubernetes cluster>Validate whether the cluster is up by running the following command.
kubectl get nodesThe command lists the Kubernetes nodes available in your cluster.
Deploy the Cluster Autoscaler component to enable the autoscaling of nodes in the EKS cluster.
This step is required only if the Cluster Autoscaler component is not installed.
For more information about deploying the Cluster Autoscaler, refer to the section Deploy the Cluster Autoscaler in the Amazon EKS documentation.
Install the Metrics Server to enable the horizontal autoscaling of pods in the Kubernetes cluster.
This step is required only if the Metric Server is not installed.
For more information about installing the Metrics Server, refer to the section Horizontal Pod Autoscaler in the Amazon EKS documentation.
After you have created the Kubernetes cluster, you can deploy the Application Protector Java Container using dynamic or static mode of deployment.
Run following commands to tag the cluster subnets to ensure that the Elastic load balancer can discover them.
aws ec2 create-tags --tags Key=kubernetes.io/cluster/<Cluster Name>,Value=shared --resources <Subnet ID>aws ec2 create-tags --tags Key=kubernetes.io/role/internal-elb,Value=1 --resources <Subnet ID>aws ec2 create-tags --tags Key=kubernetes.io/role/elb,Value=1 --resources <Subnet ID>
Repeat this step for all the cluster subnets.
7.3.6 - Creating the OpenShift Environment
This section describes how to create the OpenShift runtime environment.
Prerequisites
Before creating the runtime environment on OpenShift, ensure that you have a valid OpenShift account and the following information:
- Login URL for the OpenShift account
- Authentication credentials for the OpenShift account
Audience
It is recommended that you have working knowledge of OpenShift.
Logging in to the OpenShift environment
This section describes how you can login to the OpenShift environment.
To log in to the OpenShift environment:
Access OpenShift at the following URL:
https://<OpenShift Console URL>/dashboardsClick Sign In to the Console. The Sign in screen appears.
Enter the following details:
- User name
- Password
Click Log In. After successful authentication, the Dashboard screen appears.
Creating secrets
This section describes how to create the Kubernetes secretes required for the OpenShift deployment.
On the Linux instance, navigate to the location where you have extracted the Helm charts.
Run the following command to create a Kubernetes secret for accessing the image registry using existing Docker credentials.
oc create secret generic regcred --from-file=.dockerconfigjson=<PATH_TO_DOCKER_CONF
IG>/config.json --type=kubernetes.io/dockerconfigjson --namespace <NAMESPACE>
For example:
oc create secret generic regcred --from-file=.dockerconfigjson=<PATH_TO_DOCKER_CONF
IG>/config.json --type=kubernetes.io/dockerconfigjson --namespace iap-rest
- Create a credentials file using the following format and ensure that you specify the required values for accessing the AWS.
[default]
aws_access_key_id = <AWS_ACCESS_KEY_ID>
aws_secret_access_key = <AWS_SECRET_ACCESS_KEY>
aws_session_token = <AWS_SESSION_TOKEN>
region = us-east-1
- Create the Kubernetes secret for accessing the AWS KMS using the credentials file created in step 3.
oc -n <NAMESPACE> create secret generic pty-aws-credentials --from-file=credentials=./credentials
7.3.7 - Creating the Azure Environment
This section describes how to create the Azure runtime environment.
Prerequisites
Before creating the runtime environment on Azure, ensure that you have a valid Azure account and the following information:
- Login URL for the Azure account.
- Authentication credentials for the Azure account.
Audience
It is recommended that you have working knowledge of Azure and knowledge of the following concepts:
- Introduction to Azure Storage Container and Azure Storage Blob
- Introduction to Azure Cloud Security
- Introduction to Azure AKS
- Introduction to Azure Key Vault
7.3.7.1 - Creating the Azure Setup for Static Mode
This section describes how to create the following Azure resources for static mode:
- Data Encryption Key
- Azure Storage Container
7.3.7.1.1 - Creating an Azure Key
Create an Azure Key using the Azure Portal
This section describes how to create an Azure Key using the Azure portal.
To create an Azure Key:
Login to the Azure environment.
Click the Portal menu icon.
The Portal menu appears.
Navigate to All services.
The All services screen appears.
Select Key vaults under the SECURITY section.
The Key vaults screen appears.
Click Add.
The Create key vault screen appears.
On the Basics tab, enter the following details:
Field Description Subscription By default, Azure Cloud Platform is selected. Resource group Select the required resource group. Key vault name Enter a name for your key vault. Region Select a region where the key vault will be created. Pricing tier Select a pricing tier. For example, Standard or Premium. Click Next to navigate to the Access policy tab.
The Access policy tab appears.
Click Next to navigate to the Virtual network tab.
Click Next to navigate to the Tags tab.
Add tags to the key vault, if required.
Tags are name-value pairs for categorizing the key vault resource.
Click Review + create to validate the key vault configuration.
Azure validates the information that you have entered.
Click Create to create the required key vault.
The key vault is created and the following screen appears.
Click Go to resource.
The Overview screen appears displaying information about the key vault that you have created.
On the left pane, under the Settings section, click Keys.
The Keys screen appears.
Click Generate/Import to create a key.
The Create a key screen appears.
Enter the following details for the key.
Field Description Options Select Generate to generate the key. Name Enter the name for your Azure key. Key Type Specify the key type. Select RSA. RSA Key Size Specify the key size for RSA. Select the value as 3072. Enabled Select Yes to enable the key. Click Create.
The key is created.
Click the key name.
The Versions screen for the key appears. It lists all the versions for the key.
Click the specific key version.
The Key Version screen appears. This screen displays the properties and settings for the specific key version.
Click the icon next to the Key Identifier field to copy the field value to the clipboard.
A message appears informing that the identifier has been copied.
The following is an example of an Azure key identifier:
https://<Key_Vault_Name>.vault.azure.net/keys/<Key_Name>/0a5e4ea190a24707983ffd0efcc03c8a
You need to paste this identifier as the value of the public key label for encrypting the policy.
For more information about using the public key for encrypting the policy, refer to the section [Retrieving the Policy from the ESA](/docs/rest_container/iap_rest_installation/iap_rest_aws_azure_installation/iap_rest_using_devops/iap_rest_retrieving_package_from_esa/).
- In the Permitted operations section, select the Decrypt check box and clear all the remaining check boxes.
This ensures that only the **Decrypt** operation is permitted for the Azure key.
- Click Save to save the changes.
Creating an Azure Key using the CLI
This section describes how to create an Azure Key using the CLI.
- Run the following command to create the Azure Key Vault.
az keyvault create -g $RG -n $VAULT -l $LOC --enable-rbac-authorization true
In this command:
RG: Environment variable for the Azure Resource Group.VAULT: Environment variable for the Azure Key Vault.LOC: Environment variable for the account default region.
- Run the following command to create the Azure key to be used for encrypting the policy package.
az keyvault key create --vault-name $VAULT --name $KEY --kty RSA --size 2048 --ops decrypt encrypt
- Run the following command to generate the public key.
az keyvault key download \
--vault-name pty-kv-dev-01 \
--name pty-kek \
--file pub.pem
awk 'BEGIN{ORS="\\n"}1' pub.pem
The output displays the Key ID of the public key and the value of the public key in JSON format.
For more information about using the public key for encrypting the policy, refer to the section Retrieving the Policy from the ESA.
7.3.7.1.2 - Creating an Azure Storage container
Important: This procedure is optional and is required only if you want to use Azure Storage Container for storing the policy snapshot during static deployment.
To create an Azure Storage Container:
Login to the Azure environment.
Click the Portal menu icon.
The Portal menu appears.
Click Storage accounts.
The Storage accounts screen appears.
Click Create.
The Create storage account screen appears. By default, the Basics tab appears.
In the Basics tab, enter the following mandatory details.
| Field | Description |
|---|---|
| Subscription | By default, this value is set to Azure Cloud Platform. |
| Resource group | Select the required resource group. |
| Region | Select a region where the Azure storage account will be created. For example, select (US) US East 2. |
Note: Retain the default values for all the remaining tabs on the Create storage account screen.
Click Review + create to validate the entered information.
Azure validates the information that you have entered.
Click Create to create the storage account.
The storage account is created and the following screen appears.
Click Go to resource.
The Overview screen appears, displaying the details of your storage account.
Perform the following steps to create a storage container.
On the left pane, click Data storage > Containers.
The Containers screen appears.
Click Container.
The New Container screen appears.
Specify a name for the container in the Name field.
Retain the default value for the Anonymous access level list.
The default value is set to Private (no anonymous access).
Click OK to create the container.
7.3.7.2 - Creating a Kubernetes Cluster
This section describes how to create a Kubernetes Cluster on Azure.
Note: The steps listed in this procedure for creating a Kubernetes cluster are for reference use. If you have an existing Kubernetes cluster or want to create a Kubernetes cluster based on your requirements, then you can directly navigate to step 9 to connect your Kubernetes cluster and the Linux instance. However, you must ensure that your ingress port is enabled on the Network Security group of your VPC.
To create a Kubernetes cluster:
Login to the Azure environment.
Click the Portal menu icon
The Portal menu appears.
Navigate to All Services > Containers > Kubernetes services.
The Kubernetes services screen appears.
Click Add.
The Create Kubernetes cluster screen appears.
In the Resource group field, select the required resource group.
In the Kubernetes cluster name field, specify a name for your Kubernetes cluster.
Retain the default values for the remaining settings.
Click Review + create to validate the configuration.
Click Create to create the Kubernetes cluster.
The Kubernetes cluster is created.
9. Login to the Linux instance, and run the following command to connect your Linux instance to the Kubernetes cluster.
`az aks get-credentials --resource-group <Name of Resource Group> --name <Name of Kubernetes Cluster>`
The Linux instance is now connected with the Kubernetes cluster. You can now run commands using the Kubernetes command line interface \(kubectl\) to control the nodes on the Kubernetes cluster.
Validate whether the cluster is up by running the following command.
kubectl get nodesThe command lists the Kubernetes nodes available in your cluster.
Run the
exportcommand to export the following environment variables.
export RG=<Resource Group Name>
export AKS=<AKS cluster Name>
export NS=<Namespace where protector is deployed>
export LOC=eastus (account default region)
export VAULT=<Azure Key Vault name>
export KEY=<Azure Key Name>
- Run the following commands to enable the OpenID Connect (OIDC) and workload identity on the AKS cluster.
az aks update -g $RG -n $AKS --enable-oidc-issuer --enable-workload-identity
export OIDC=$(az aks show -g $RG -n $AKS --query oidcIssuerProfile.issuerUrl -o tsv)
7.4 - Installing the Protector
This section provides an overview of the steps required to install the Application Protector Java Container using either the Static or the Dynamic method.
7.4.1 - Installing the Protector on Amazon EKS or Azure AKS
This section provides an overview of the steps required to install the Application Protector Java Container on Amazon EKS or Azure AKS using either the Static or the Dynamic method.
7.4.1.1 - Deploying AP Java Container for Dynamic Method
This section describes how to deploy the Application Protector Java Container integrated with RPP. Deploy in the following order:
- Log Forwarder
- RPP
- Application Protector Java Container
7.4.1.1.1 - Deploying Log Forwarder
The Log Forwarder is deployed as a DaemonSet. The following steps describe how to deploy Log Forwarder.
On the Linux instance, run the following command to create the namespace required for Helm deployment.
kubectl create namespace <Namespace name>For example:
kubectl create namespace iap-javaOn the Linux instance, navigate to the location where you have extracted the Helm charts to deploy the Log Forwarder.
For more information about the extracted Helm charts, refer to the section Extracting the Installation Package.
The logforwarder > values.yaml file contains the default configuration values for deploying the Log Forwarder container on the Kubernetes cluster. The following content shows an extract of the values.yaml file.
... # - Protegrity PSU(Protegrity Storage Unit)/ESA configuration. # Logforwarder will send audit records to below specified hosts/ip. # User can specify multiple PSU/ESA distribute the audit records and avoid downtime. opensearch: # -- specify a given name to uniquely identify PSU/ESA in the deployment. - name: # -- hostname/ip address of PSU/ESA host: # -- port address of ESA/PSU port: 9200 # - name: node-2 # host: test-insight # port: 9200 # -- Kubernetes service configuration, represents a TCP endpoint to receive audit records # from the protectors. service: # -- Configure service type: ClusterIP for Logforwarder endpoint. type: ClusterIP # -- port to accept incoming audit records from the protector port: 15780 ...Modify the default values in the values.yaml file as required.
| Field | Description |
|---|---|
| opensearch/name | Specify the unique name for the ESA. |
| opensearch/host | Specify the host name or IP address of the ESA. |
| opensearch/port | Specify the port number of the ESA. The default value is 9200. |
| service/type | Specify the service type for the Log Forwarder. The default value is ClusterIP. |
| service/port | Specify the service port of the Log Forwarder, which receives the audit logs from the protectors. The default value is 15780. |
- Run the following command to deploy the Log Forwarder on the Kubernetes cluster.
helm install <Release_Name> --namespace <Namespace where you want to deploy the RPP container> <Location of the directory that contains the Helm charts>
For example:
helm install log1 --namespace iap-java <Custom_path>/common/logforwarder/
<Custom_path> is the directory where you have extracted the installation package.
- Run the following command to check the status of the pods.
kubectl get pods -n <Namespace>
For example:
kubectl get pods -n iap-java
NAME READY STATUS RESTARTS AGE
log1-logforwarder-f6gvj 1/1 Running 0 11h
log1-logforwarder-ls4hn 1/1 Running 0 11h
log1-logforwarder-phk4t 1/1 Running 0 11h
log1-logforwarder-z2mz7 1/1 Running 0 11h
As the Log Forwarder is deployed as a DaemonSet, one instance of Log Forwarder is deployed on each node. In this example, one Log Forwarder pod is deployed per node.
For information about configuring the Log Forwarder, refer to the section Configuration Parameters for Forwarding Audits and Logs.
7.4.1.1.2 - Deploying Resilient Package Proxy (RPP)
The following steps describe how to deploy RPP.
Note: Ensure that you have deployed the Log Forwarder before deploying the RPP. For more information about deploying the Log Forwarder, refer to the section Deploying the Log Forwarder.
- Run the following command on the Jump box to generate the common certificate from the ESA certificates.
CertificatesSetup_Linux_x64_<Version>.sh -u <User> -p <Password> -h <Hostname or IP address of ESA> --port <Port number of ESA> -d <Directory>
For example:
CertificatesSetup_Linux_x64_<Version>.sh -u admin -p admin12345 -h 10.10.10.10 --port 8443 -d rpproxy
For more information about generating the ESA certificates, refer to the section Creating Certificates.
The following files are created:
- CA.pem
- cert.key
- cert.pem
- secret.txt
2. Run the following command to create a Kubernetes secret using the common certificate generated in step 1.
kubectl -n <Namespace> create secret generic common-cert --from-file=CA.pem=./CA.pem --from-file=cert.key=./cert.key --from-file=cert.pem=./cert.pem --from-file=secret.txt=./secret.txt
Specify this secret as the value of the commonCertSecrets parameter in the values.yaml file. In this case, this secret is used in the following ways:
- RPP uses the certificate as an upstream server certificate to download the policy packages from the ESA.
- The protector uses the certificate as a client certificate to download the policy packages from the RPP.
If you do not specify any value for the commonCertSecrets parameter, then you need to specify separate values for the rpp/upstream/certificateSecret and service/certificateSecret parameters.
3. Run the following command on the Jump box to generate the upstream certificate between the ESA and the RPP.
CertificatesSetup_Linux_x64_<Version>.sh -u <User> -p <Password> -h <Hostname or IP address of ESA> --port <Port number of ESA> -d <Directory>
For example:
CertificatesSetup_Linux_x64_<Version>.sh -u admin -p admin12345 -h 10.10.10.10 --port 8443 -d <Full_Path>/rpproxy
For more information about generating the ESA certificates, refer to the section Creating Certificates.
The following files are created:
- CA.pem
- cert.key
- cert.pem
- secret.txt
Note: This certificate is created only if you are not using the common certificate.
4. Run the following command to create a Kubernetes secret using the upstream certificate generated in step 3.
kubectl -n <Namespace> create secret generic upstream-cert --from-file=CA.pem=./CA.pem --from-file=cert.key=./cert.key --from-file=cert.pem=./cert.pem --from-file=secret.txt=./secret.txt
Note: This secret is created only if you are not using the common certificate.
Specify this secret as the value of the rpp/upstream/certificateSecret parameter in the values.yaml file.
5. Run the following command to generate the service TLS certificate.
CreateCertificate_Linux_x64_<Version>.sh server --name <Directory> --dns <Release_Name>.<namespace>.svc
For example:
CreateCertificate_Linux_x64_<Version>.sh server --name rpproxy --dns rpp.iap-java.svc
For more information about generating the server certificates, refer to the section Creating Certificates.
The following client certificates files are created in the rpproxy folder:
- cert.pem
- cert.key
- CA.pem
- secret.txt
These certificates are used by the protector as a server certificate to authenticate the RPP to download policy packages.
Ensure that the namespace and release name that you specify in this command are the same names that you specify in step 7 while deploying the RPP Helm chart.
Note: This certificate is created only if you are not using the common certificate.
6. Run the following command to generate the secret for the service TLS certificate.
kubectl -n <Namespace> create secret generic service-certs --from-file=CA.pem=<path-to-CA.pem> --from-file=cert.key=<path-to-cert.key> --from-file=cert.pem=<path-to-cert.pem> --from-file=secret.txt=<path-to-secret.txt>
For more information about generating the client certificates, refer to the section Creating Certificates.
Note: This secret is created only if you are not using the common certificate.
Specify this secret as the value of the service/certificateSecret parameter in the values.yaml file.
7. On the Linux instance, navigate to the location where you have extracted the Helm charts to deploy the RPP.
For more information about the extracted Helm charts, refer to the section Initializing the Linux instance.
The rp-proxy > values.yaml file contains the default configuration values for deploying the RPP container on the Kubernetes cluster.
...
podSecurityContext:
fsGroup: 1000
...
#-- k8s secret for storing common certificates
# eg. kubectl command:
# kubectl -n $RPP_NAMESPACE create secret generic common-certs \
# --from-literal=CA.pem=<path-to-CA.pem> --from-literal=cert.key=<path-to-cert.key> \
# --from-literal=cert.pem=<path-to-cert.pem> --from-literal=secret.txt=<path-to-secret.txt>
commonCertSecrets:
rpp:
#-- upstream configuration
# host: Upstream host to connect
# port: Upstream port to connect
upstream:
host:
port: 25400
#-- certificateSecret : k8s secret for storing upstream tls certificates
# NOTE : Only to be set when not using common certificate secret
# eg. kubectl command:
# kubectl -n $RPP_NAMESPACE create secret generic upstream-certs \
# --from-literal=CA.pem=<path-to-CA.pem> --from-literal=cert.key=<path-to-cert.key> \
# --from-literal=cert.pem=<path-to-cert.pem> --from-literal=secret.txt=<path-to-secret.txt>
certificateSecret:
#-- logging configuration
# logLevel: Specifies the logging level for rpproxy
# INFO (default)
# ERROR
# WARN
# DEBUG
# TRACE
# logHost: Host to forward the logs (Default : 127.0.0.1)
# logPort: Port to forward the logs (Default : 15780)
logging:
logLevel: "INFO"
logHost: "127.0.0.1"
logPort: 15780
#-- service configuration
# certificateSecret : k8s secret for storing service tls certificates
# NOTE : Only to be set when not using common certificate secret
# eg. kubectl command:
# kubectl -n $RPP_NAMESPACE create secret generic service-certs \
# --from-literal=CA.pem=<path-to-CA.pem> --from-literal=cert.key=<path-to-cert.key> \
# --from-literal=cert.pem=<path-to-cert.pem> --from-literal=secret.txt=<path-to-secret.txt>
# cacheTTL:
# TTL sets the duration (in seconds) of which a cached item is considered fresh.
# When a cached item's TTL expires, the item will be revalidated.
service:
certificateSecret:
cacheTTL: 60
...
- Modify the default values in the values.yaml file as required.
| Field | Description |
|---|---|
| podSecurityContext | Specify the privilege and access control settings for the pod. The default values are set as follows:
|
| commonCertSecrets | Specify the Kubernetes secret, which you have created in step 2, for storing the common certificates. If you specify the value of this parameter, then do not specify the values for the rpp/upstream/certificateSecret and service/certificateSecret parameters. The same common certificate will be used by RPP to download the policy packages from the ESA and by the protector to download the policy packages from the RPP. |
| rpp/upstream/host | Specify the host name or IP address of the upstream server that is providing the policy packages. The upstream server can be another RPP or the ESA. |
| rpp/upstream/port | Specify the port number of the upstream server that is providing the policy packages. The default value is 25400. |
| rpp/upstream/certificateSecret | Specify the Kubernetes secret, which you have created in step 4, that contains the certificate used to authenticate the ESA. Note: This certificate is set only if you are not using the commonCertSecrets parameter. |
| logging/logLevel | Specify the details about the application log level during runtime. You can set one of the following values:
The default value is INFO. |
| logging/logHost | Specify the service hostname of the Log Forwarder, where the logs are forwarded. The default value is <Helm_Installation_Name>-<Helm_Chart_Name>.<Namespace>.svc.For example, iaplog-logforwarder.iap-java.svc. |
| logging/logPort | Specify the service port of the Log Forwarder, where the logs are forwarded. The default value is 15780. |
| service/certificateSecret | Specify the Kubernetes secret, which you have created in step 6, that enables the protector to authenticate the RPP. Note: This certificate is set only if you are not using the commonCertSecrets parameter. |
| service/cacheTTL | Specify the duration to refresh the cache. When a cache TTL expires, the cache has to be revalidated or updated. This interval controls the refresh time of the policy. The default value in seconds is 60. |
- Run the following command to deploy the RPP on the Kubernetes cluster.
helm install <Release_Name> --namespace <Namespace where you want to deploy the RPP container> <Location of the directory that contains the Helm charts>
For example:
helm install rpp --namespace iap-java >Custom_path>/spring-apjava-dynamic/rpproxy/
<Custom_path> is the directory where you have extracted the installation package.
Ensure that you specify the same release name and namespace that you have used while creating the service TLS certificate in step 5.
- Run the following command to check the status of the pods.
kubectl get pods -n <Namespace>
For example:
kubectl get pods -n iap-java
NAME READY STATUS RESTARTS AGE
rpp-rpproxy-5fd7d859b6-p9544 1/1 Running 0 11h
7.4.1.1.3 - Deploying the AP Java Container with Dynamic Method
The following steps describe how to deploy the Application Protector Java Container.
- Run the following command to generate the client certificate for connecting to the RPP.
CreateCertificate_Linux_x64_<Version>.sh client --name <Directory> --dns <Release_Name>.<namespace>.svc
For example:
CreateCertificate_Linux_x64_<Version>.sh client --name rpproxy-client --dns rpp.iap-java.svc
For more information about generating the client certificates, refer to the section Creating Certificates.
The following client certificates files are created in the rpproxy-client folder:
- cert.pem
- cert.key
- CA.pem
- secret.txt
This certificate is used by the protector as a client certificate to authenticate the RPP to download policy packages.
Ensure that the namespace and release name that you specify in this command are the same names that you specify in step 7 while deploying the RPP Helm chart.
Note: This certificate is created only if you are not using the common certificate.
2. Run the following command to generate the secret for the RPP client certificate created in step 1.
kubectl -n <RPP_Namespace> create secret generic rpp-client-certs --from-file=CA.pem=<path-to-CA.pem> --from-file=cert.key=<path-to-cert.key> --from-file=cert.pem=<path-to-cert.pem> --from-file=secret.txt=<path-to-secret.txt>
For more information about generating the client certificates, refer to the section Creating Certificates.
Specify this secret as the value of the protector/policy/certificates parameter in the values.yaml file.
On the Linux instance, navigate to the location where you have extracted the Helm charts to deploy the Application Protector Java Container.
The spring-apjava-dynamic > values.yaml file contains the default configuration values for deploying the RPP container on the Kubernetes cluster.
# -- create image pull secrets and specify the name here.
# remove the [] after 'imagePullSecrets:' once you specify the secrets
imagePullSecrets: []
# - name: regcred
nameOverride: ""
fullnameOverride: ""
# Sample springapp protector image configuration
springappImage:
# -- sample springapp protector image registry address
repository:
# -- sample springapp protector image tag name
tag:
# -- The pullPolicy for a container and the tag of the image affect
# when the kubelet attempts to pull (download) the specified image.
pullPolicy: IfNotPresent
# specify CPU and memory requirement of sample springapp protector container
springappContainerResources:
limits:
cpu: 1500m
memory: 3000Mi
requests:
cpu: 1200m
memory: 1000Mi
...
...
## -- pod service account to be used
## leave the field empty if not applicable
serviceAccount:
# The name of the service account to use.
name:
# Specify any additional annotation to be associated with pod
podAnnotations:
checksum/sdk-config: '{{ include (print $.Template.BasePath "/sdk-configmap.yaml") . | sha256sum }}'
## set the Pod's security context object
## leave the field empty if not applicable
podSecurityContext:
fsGroup: 1000
## set the Spring App Container's security context object
## leave the field empty if not applicable
springappContainerSecurityContext:
capabilities:
drop:
- ALL
allowPrivilegeEscalation: false
privileged : false
runAsNonRoot : true
readOnlyRootFilesystem: true
seccompProfile:
type: RuntimeDefault
# protector configuration
protector:
# Session information
session:
# Session timeout in minutes. Default is 15 minutes.
sessiontimeout: 15
# Policy information for the protector initialization
policy:
# Cadence determines how often the protector connects with ESA / proxy to
# fetch the policy updates in background. Default is 60 seconds.
# So by default, every 60 seconds protector tries to fetch the policy updates.
# If the cadence is set to "0", then the protector will get the policy only
# once, which is not recommended.
#
# Default 60.
cadence: 60
# -- Host/IP to the service providing Resilient Packages either rpproxy
# service or ESA.
host:
# -- certificates used to communicate with service providing Resilient packages.
# specify certificate secret name.
# -- TLS certificate rp-proxy service.
# kubectl -n $NAMESPACE create secret generic pty-rpp-tls \
# --from-file=cert.pem=./certs/cert.pem \
# --from-file=cert.key=./certs/cert.key \
# --from-file=CA.pem=./ca/CA.pem \
# --from-file=secret.txt=./certs/secret.txt
certificates:
# Logforwarder configuration
logs:
# -- In case that connection to fluent-bit is lost, set how audits/logs are handled
#
# drop : Protector throws logs away if connection to the fluentbit is lost.
# error : (default) Protector returns error without protecting/unprotecting
# data if connection to the fluentbit is lost.
mode: error
# -- Host/IP to fluent-bit where audits/logs will be forwarded from the protector
#
# Default localhost
host:
# -- specify the initial no. of sample protector Pod replicas
replicaCount: 1
# HPA configuration
autoScaling:
# -- lower limit on the number of replicas to which the autoscaler
# can scale down to.
minReplicas: 1
# -- upper limit on the number of replicas to which
# the autoscaler can scale up. It cannot be less that minReplicas.
maxReplicas: 10
# -- CPU utilization threshold which triggers the autoscaler
targetCPU: 70
## specify the ports exposed in your springapp configurations where,
## name - distinguishes between different ports.
## port - the port on which you wan't to expose the service externally.
## targetPort - the port no. configured while creating Tunnel.
springappService:
# allows you to configure service type: LoadBalancer or ClusterIP
type: LoadBalancer
# Specify service related annotations here
annotations:
##AWS
#service.beta.kubernetes.io/aws-load-balancer-internal: "true"
##AZURE
#service.beta.kubernetes.io/azure-load-balancer-internal: "true"
##GCP
#networking.gke.io/load-balancer-type: "Internal"
name: "restapi"
port: 8080
targetPort: 8080
- Modify the default values in the values.yaml file as required.
| Field | Description |
|---|---|
| springappImage | Specify the repository and tag details for the Sample Application Protector Java Container image. |
| springappContainerResources | Specify the CPU and memory requirements for the Sample Application Protector Java Container. |
| serviceAccount/name | Specify the name of the pod service account. Leave the field empty if it is not applicable. |
| podSecurityContext | Specify the privilege and access control settings for the pod. The default values are set as follows:
|
Container Security Context:
| Specify the privilege and access control settings for the Sample Application Protector Java Container. |
| protector/session/sessiontimeout | Specify the time during which a session object is valid. By default, the value is set to 15. The session timeout is measured in minutes. |
| protector/policy/cadence | Specify the time interval in seconds after which the protector connects with the RPProxy to retrieve the policy package. By default, the value is set to 60. Ensure that the value is not set to 0. Else, the protector will retrieve the policy only once. |
| protector/policy/host | Specify the host name or IP address of the RPProxy. |
| protector/policy/certificates | Specify the name of the secret for the certificate, which you have created in step 2 that is used to authenticate the RPProxy for downloading the policy package. |
| protector/logs/mode | Specify one of the following options in case the connection to the Log Forwarder is lost:
By default, the value is set to error. |
| protector/logs/host | Specify the service hostname of the Log Forwarder, where the logs are forwarded. The default value is <Helm_Installation_Name>-<Helm_Chart_Name>.<Namespace>.svc. For example, iaplog-logforwarder.iapjava.svc. |
| replicaCount | Specify the initial number of the Application Protector Java Container pod replicas. |
| autoScaling | Specify the configurations required for the Horizontal Pod Autoscaling. |
| springappService/type | Specify the service type for the Sample Application Protector Java Container. By default, this value is set to LoadBalancer. |
| springappService/annotations | Specify the annotations for the respective Cloud platforms if you want to use the internal load balancer. By default, this value is left blank. |
| springappService/name | Specify a name for the tunnel to distinguish between ports. By default, the value is set to restapi. |
| springappService/port | Specify the port number on which you want to expose the Kubernetes service externally. By default, the value is set to 8080. |
| springappService/targetport | Specify the port on which the Sample application is running inside the Docker container. By default, the value is set to 8080. |
- Run the following command to deploy the Application Protector Java Container on the Kubernetes cluster.
helm install <Release_Name> --namespace <Namespace where you want to deploy the AP Java container> <Location of the directory that contains the Helm charts>
For example:
helm install iap-java-dynamic --namespace iap-java <Custom_path>/spring-apjava-dynamic/
<Custom_path> is the directory where you have extracted the installation package.
- Run the following command to check the status of the pods.
kubectl get pods -n <Namespace>
For example:
kubectl get pods -n iap-java
NAME READY STATUS RESTARTS AGE
iap-java-dynamic-7b97d5dff7-grqph 2/2 Running 0 11h
log1-logforwarder-f6gvj 1/1 Running 0 11h
log1-logforwarder-ls4hn 1/1 Running 0 11h
log1-logforwarder-phk4t 1/1 Running 0 11h
log1-logforwarder-z2mz7 1/1 Running 0 11h
rpp-rpproxy-5fd7d859b6-p9544 1/1 Running 0 11h
- Run the following command to obtain the service details.
kubectl get svc -n <Namespace>
For example:
kubectl get svc -n iap-java
NAME TYPE CLUSTER-IP EXTERNAL-IP PORT(S) AGE
logforwarder ClusterIP 172.20.14.88 <none> 15780/TCP 2m37s
rpproxy ClusterIP 172.20.181.92 <none> 25400/TCP 113s
iap-java-dynamic LoadBalancer 172.20.60.61 internal-a70jkfsdf98908.us-east-1.elb.amazonaws.com 8080:30746/TCP 24s
Use the DNS name of the load balancer that appears in the EXTERNAL-IP column while running the security operations.
For more information about running security operations, refer to the section Running Security Operations.
Run the following command to obtain the IP address of the Load Balancer.
ping <DNS of Load Balancer>For example:
ping internal-b70jkfs23423jg8.us-east-1.elb.amazonaws.comThe following output appears that displays the IP address of the Load Balancer.
PING internal-b70jkfs23423jg8.us-east-1.elb.amazonaws.com (10.49.5.152) 56(84) bytes of data. 64 bytes from ip-10-49-5-152.ec2.internal (10.49.5.152): icmp_seq=1 ttl=255 time=0.831 ms 64 bytes from ip-10-49-5-152.ec2.internal (10.49.5.152): icmp_seq=2 ttl=255 time=0.262 msUse this IP address while running the security operations.
Navigate to the Amazon EC2 Console and edit inbound rules of the Load Balancer security group to ensure that it can receive requests on the
8080port number.For more information about editing inbound rules for a security group, refer to the section Configure security group rules.
7.4.1.1.4 - Uninstalling the Protector in Dynamic Method
To uninstall the Protector:
- Run the following command to uninstall the Log Forwarder from the Kubernetes cluster.
helm uninstall <Release_Name> --namespace <Namespace where the Log Forwarder is deployed>
For example:
helm uninstall log1 --namespace iap-java
- Run the following command to uninstall the RPP from the Kubernetes cluster.
helm uninstall <Release_Name> --namespace <Namespace where RPP is deployed>
For example:
helm uninstall rpp --namespace iap-java
- Run the following command to uninstall the Application Protector Java Container from the Kubernetes cluster.
helm uninstall <Release_Name> --namespace <Namespace where the AP Java Container is deployed>
For example:
helm uninstall iap-java-dynamic --namespace iap-java
- Run the following command to delete the Kubernetes secrets.
kubectl delete secret <Secret_Name> --namespace <Namespace where the AP Java Container is deployed>
For example:
kubectl delete secret common-cert --namespace iap-java
Repeat this step to delete all the secrets that you have created while deploying the RPP and the Application Protector Java Container:
- common-cert
- upstream-cert
- service-certs
- rpp-client-certs
- regcred
- Run the following command to delete the Kubernetes namespace.
helm delete namespace <Namespace where the AP Java Container is deployed>
For example:
helm delete namespace iap-java
7.4.1.2 - Deploying AP Java Container in Static Mode
This section describes how to deploy the Application Protector Java Container in static mode.
7.4.1.2.1 - Retrieving the Policy Package from the ESA
This section describes how to invoke the RPS APIs to retrieve the policy package using the ESA.
Note: Ensure that the Export Resilient Package permission is granted to the role that is assigned to the user exporting the package from the ESA.
Warning: Do not modify the package that has been exported using the RPS Service API.
To retrieve the policy package from the ESA:
Download the policy package from the ESA and encrypt the policy package using a KMS with the RPS API.
If you are using 10.1 ESA, then refer to the section Using the Encrypted Resilient Package REST APIs for more information about the RPS API.
If you are using 10.2 ESA, then refer to the section Using the Encrypted Resilient Package REST APIs for more information about the RPS API.
If you are using Protegrity Provisioned Cluster, then navigate to Protegrity Product Documentation. Then, navigate to Edition > AI Team Edition > Infrastructure > Protegrity REST APIs > Using the Encrypted Resilient Package REST APIs for more information about the RPS API.
The policy package is downloaded to your machine.
Copy the policy package file to cloud storage, as required.
7.4.1.2.2 - Deploying Log Forwarder
The Log Forwarder is deployed as a DaemonSet. The following steps describe how to deploy Log Forwarder.
On the Linux instance, run the following command to create the namespace required for Helm deployment.
kubectl create namespace <Namespace name>For example:
kubectl create namespace iap-javaOn the Linux instance, navigate to the location where you have extracted the Helm charts to deploy the Log Forwarder.
For more information about the extracted Helm charts, refer to the section Extracting the Installation Package.
The logforwarder > values.yaml file contains the default configuration values for deploying the Log Forwarder container on the Kubernetes cluster. The following content shows an extract of the values.yaml file.
... # - Protegrity PSU(Protegrity Storage Unit)/ESA configuration. # Logforwarder will send audit records to below specified hosts/ip. # User can specify multiple PSU/ESA distribute the audit records and avoid downtime. opensearch: # -- specify a given name to uniquely identify PSU/ESA in the deployment. - name: # -- hostname/ip address of PSU/ESA host: # -- port address of ESA/PSU port: 9200 # - name: node-2 # host: test-insight # port: 9200 # -- Kubernetes service configuration, represents a TCP endpoint to receive audit records # from the protectors. service: # -- Configure service type: ClusterIP for Logforwarder endpoint. type: ClusterIP # -- port to accept incoming audit records from the protector port: 15780 ...Modify the default values in the values.yaml file as required.
| Field | Description |
|---|---|
| opensearch/name | Specify the unique name for the ESA. |
| opensearch/host | Specify the host name or IP address of the ESA. |
| opensearch/port | Specify the port number of the ESA. The default value is 9200. |
| service/type | Specify the service type for the Log Forwarder. The default value is ClusterIP. |
| service/port | Specify the service port of the Log Forwarder, which receives the audit logs from the protectors. The default value is 15780. |
- Run the following command to deploy the Log Forwarder on the Kubernetes cluster.
helm install <Release_Name> --namespace <Namespace where you want to deploy the RPP container> <Location of the directory that contains the Helm charts>
For example:
helm install log1 --namespace iap-java <Custom_path>/common/logforwarder/
<Custom_path> is the directory where you have extracted the installation package.
- Run the following command to check the status of the pods.
kubectl get pods -n <Namespace>
For example:
kubectl get pods -n iap-java
NAME READY STATUS RESTARTS AGE
log1-logforwarder-f6gvj 1/1 Running 0 11h
log1-logforwarder-ls4hn 1/1 Running 0 11h
log1-logforwarder-phk4t 1/1 Running 0 11h
log1-logforwarder-z2mz7 1/1 Running 0 11h
As the Log Forwarder is deployed as a DaemonSet, one instance of Log Forwarder is deployed on each node. In this example, one Log Forwarder pod is deployed per node.
For information about configuring the Log Forwarder, refer to the section Configuration Parameters for Forwarding Audits and Logs.
7.4.1.2.3 - Deploying KMSProxy Container
Prerequisites for AWS deployment
Note: This section is applicable only if you are deploying the KMSProxy Container to AWS EKS.
Perform the following steps to ensure that the KMSProxy pods have access to the AWS KMS to access the keys created in the AWS KMS.
- Run the following command to create an IAM OpenID Connect (OIDC) provider for your cluster.
eksctl utils associate-iam-oidc-provider --cluster <Name of EKS Cluster> --approve
- Run the following command to create a service account that will provide the KMSProxy pods access to the AWS KMS.
eksctl create iamserviceaccount --name <Name of service account> --namespace <Namespace where the protector is deployed> --cluster <Name of EKS Cluster> --attach-policy-arn arn:aws:iam::<aws_account_id>:policy/KMSDecryptAccess --approve
Specify the name of the service account as the value of the serviceAccount/name parameter in step 4 of the section Deploy KMSProxy Container.
Prerequisites for Azure deployment
Note: This section is applicable only if you are deploying the KMSProxy Container to Azure AKS.
Perform the following steps to ensure that the KMSProxy pods have access to the Azure Key Vault to access the keys created in the Key Vault.
- Run the following command to create a user-assigned identity, and then grant the identity access to the Azure Key Vault.
az identity create -g $RG -n pty-kms-mi
export MI_CLIENT_ID=$(az identity show -g $RG -n pty-kms-mi --query clientId -o tsv)
az role assignment create --assignee $MI_CLIENT_ID --role "Key Vault Crypto User" --scope $VAULT_ID
- Run the following command to federate the user-assigned identity to a service account.
az identity federated-credential create --name pty-kms-fed --identity-name pty-kms-mi -g $RG \
--issuer $(az aks show -g $RG -n $AKS --query oidcIssuerProfile.issuerUrl -o tsv) \
--subject system:serviceaccount:$NS:<Name of service account> --audience api://AzureADTokenExchange
Specify the name of the service account as the value of the serviceAccount/name parameter in step 4 of the section Deploy KMSProxy Container.
In this command:
- RG: Environment variable for the Resource Group Name.
- AKS: Environment variable for AKS cluster name.
- NS: Environment variable for the Namespace where the protector is deployed.
- Run the following command to create and annotate the Kubernetes service account.
kubectl -n $NS create serviceaccount <Name of service account>
kubectl -n $NS annotate serviceaccount <Name of service account> azure.workload.identity/client-id=$MI_CLIENT_ID
Deploy KMSProxy Container
The following steps describe how to deploy the KMSProxy container.
- Run the following command to generate the TLS server certificate for the KMS-Proxy service.
CreateCertificate_Linux_x64_<Version>.sh server --name <Directory> --dns <Release_Name>.<namespace>.svc
For example:
CreateCertificate_Linux_x64_<Version>.sh server --name kms-proxy-server --dns kms-proxy.<namespace>.svc
For more information about generating the client certificates, refer to the section Creating Certificates.
The following server certificates files are created in the kms-proxy-server folder:
- cert.pem
- cert.key
- CA.pem
- secret.txt
These certificates are used by the protector as a server certificate to authenticate the KMS-Proxy service.
Ensure that the namespace and release name that you specify in this command are the same names that you specify in step 5 while deploying the KMS-Proxy Helm chart.
For more information about the data encryption key used in the AWS KMS, refer to the section Creating an Data Encryption Key (DEK).
2. Run the following command to generate the secret for the KMS-Proxy server certificate.
kubectl -n <KMS-Proxy_Namespace> create secret generic service-certs --from-file=CA.pem=<path-to-CA.pem> --from-file=cert.key=<path-to-cert.key> --from-file=cert.pem=<path-to-cert.pem> --from-file=secret.txt=<path-to-secret.txt>
For more information about generating the client certificates, refer to the section Creating Certificates.
Specify this secret as the value of the service/certificateSecret parameter in the values.yaml file.
On the Linux instance, navigate to the location where you have extracted the Helm charts to deploy the KMSProxy container.
For more information about the extracted Helm charts, refer to the section Extracting the Installation Package.The kms-proxy > values.yaml file contains the default configuration values for deploying the RPP container on the Kubernetes cluster.
...
# -- service account must be linked to a cloud role to access appropriate KMS keyid.
# the cloud role must have decrypt permission on keyid
serviceAccount:
# The name of the service account to use.
name:
# Specify any additional annotation to be associated with pod
podAnnotations:
checksum/kmsproxy-config: '{{ include (print $.Template.BasePath "/configmap.yaml") . | sha256sum }}'
# -- Specify any additional labels to be associated with the pod.
# Cloud agnostic: leave empty for AWS/GCP.
# For Azure Workload Identity (secret-less access to Azure Key Vault), set:
# azure.workload.identity/use: "true"
# and set serviceAccount.name to the workload-identity annotated service account
# (leave kms.credentials empty so no client-secret file is mounted).
podLabels: {}
#azure.workload.identity/use: "true"
## set the Pod's security context object
#---Uncomment the fsGroup setting if deploying on AWS EKS or Azure AKS
podSecurityContext:
#fsGroup: 1000
## set the Container's security context object
#---Uncomment the runAsUser setting if deploying on AWS EKS
securityContext:
capabilities:
drop:
- ALL
readOnlyRootFilesystem: true
runAsNonRoot: true
#runAsUser: 1000
allowPrivilegeEscalation: false
seccompProfile:
type: RuntimeDefault
#-- cloud kms related configuration
kms:
# -- Specify Cloud KMS vendor
# expected values are: AWS, AZURE
vendor: ""
# -- Use the below setting when deploying on Openshift platform.
# -- specify the credentials secret name to access cloud KMS.
# kubectl -n $NAMESPACE create secret generic pty-kms-credentials \
# --from-file=credentials=./credentials
credentials:
#--- specify identifier for RSA key hosted by the cloud KMS.
# In case of AWS identifier is the key ARN (Amazon resource identifier)
# In case of AZURE identifier is the Key Vault key URL, for example:
# https://<vault-name>.vault.azure.net/keys/<key-name>/<key-version>
# The key version is optional; omit it to use the latest version.
keyid: ""
# kms-proxy service configuration
application:
# -- The cache will keep the content(decrypted KEK) for the specified TTL(time to live)
# duration in seconds. Once the TTL expires the value from the cache is cleared.
# Based on amount of time require to update/install the protector deployment, update
# the ttl. Default is 1200 seconds(20 minutes)
ttl: 1200
# -- By default, log level for the application is set to INFO.
# available logging levels ares INFO, DEBUG, TRACE
# to enable http access log set the logLevel to TRACE
logLevel: INFO
# Kubernetes service configuration, represents a HTTP service to host
# kms proxy endpoint.
service:
# -- Configure service type: ClusterIP for kms-proxy endpoint
type: ClusterIP
port: 443
# -- TLS certificate of kms-proxy service.
# kubectl -n $NAMESPACE create secret generic pty-kms-proxy-tls \
# --from-file=cert.pem=./certs/cert.pem \
# --from-file=cert.key=./certs/cert.key \
# --from-file=CA.pem=./ca/CA.pem \
# --from-file=secret.txt=./certs/secret.txt
certificates:
- Modify the default values in the values.yaml file as required.
| Field | Description |
|---|---|
| serviceAccount/name |
|
| podLabels | Enable Azure Workload Identity. Delete the curly braces and uncomment the value of the podLabel parameter. Set the value to azure.workload.identity/use: “true”. This parameter is applicable only if you are deploying the KMSProxy Container to Azure AKS. |
| podSecurityContext | Specify the privilege and access control settings for the pod. The default values are set as follows:
|
| kms/vendor | Specify the cloud vendor. For example, AWS, Azure, or GCP. |
| kms/keyid |
|
| application/ttl | Specify the time to live in seconds till which the KMSProxy cache retains the decrypted KEK. The default value is 1200, which equals 20 minutes. |
| application/logLevel | Specify the log level for the application. The following values are applicable:
Set this value to TRACE to enable HTTP access log. |
| service/type | Specify the HTTP service type to host the KMSProxy endpoint. The default value is ClusterIP. |
| service/port | Specify the port number for the KMSProxy end point. The default value is 443. |
| service/certificates | Specify the secret value of the TLS certificate for the KMS Proxy service that you have created in step 2. |
5. Run the following command to deploy the KMSProxy container on the Kubernetes cluster.
helm install <Release_Name> --namespace <Namespace to deploy KMSProxy container> <Location of the directory containing Helm charts>
For example:
helm install kmsproxy --namespace iap-java <Custom_path>/spring-apjava-devops/kms-proxy/
<Custom_path> is the directory where you have extracted the installation package.
- Run the following command to check the status of the pods.
kubectl get pods -n <Namespace>
For example:
kubectl get pods -n iap-java
NAME READY STATUS RESTARTS AGE
kms-10-v1-kms-proxy-7b97d5dff7-grqph 2/2 Running 0 11h
log1-logforwarder-f6gvj 1/1 Running 0 11h
log1-logforwarder-ls4hn 1/1 Running 0 11h
log1-logforwarder-phk4t 1/1 Running 0 11h
log1-logforwarder-z2mz7 1/1 Running 0 11h
Troubleshooting
KMSProxy Pod unable to connect to the Azure Key Vault
Issue: The Azure Key Vault is inaccessible to the KMSProxy pod.
Workaround: Add a network rule to the cluster subnet using the following command.
az keyvault network-rule add \
--subscription <Azure subscription> \
-n <Azure Key Vault name> -g <Resource_Group> \
--subnet /subscriptions/<Azure_subscription>/resourceGroups/IT-RESOURCE-GROUP/providers/Microsoft.Network/virtualNetworks/<Azure_Virtual_network>/subnets/kubernetes
7.4.1.2.4 - Deploying AP Java Container Using Static Method
Prerequisites for AWS deployment
Note: This section is applicable only if you are deploying the protector to AWS EKS.
Perform the following steps to ensure that the policy loader pods have access to the cloud storage to download the policy package.
- Run the following command to create an IAM OpenID Connect (OIDC) provider for your cluster. Ignore this step if you have already run this command earlier while deploying the KMSProxy pod.
eksctl utils associate-iam-oidc-provider --cluster <Name of EKS Cluster> --approve
- Run the following command to create a service account that will provide the Policy Loader pods access to the object storage for downloading the policy package.
eksctl create iamserviceaccount --name <Name of service account> --namespace <Namespace where the protector is deployed> --cluster <Name of EKS Cluster> --attach-policy-arn arn:aws:iam::aws:policy/AmazonS3ReadOnlyAccess --approve
Prerequisites for Azure
Note: This section is applicable only if you are deploying the protector to Azure AKS.
Perform the following steps to ensure that the policy loader pods have access to the Azure Store Blob to download the policy package.
- Run the following command to create a user-assigned identity for the policy loader pod.
az identity create -g $RG -n pty-policy-loader-mi
export MI_CLIENT_ID=$(az identity show -g $RG -n pty-policy-loader-mi --query clientId -o tsv)
- Run the following command to grant the user-assigned identity, which was created in step 1, the read access on the Azure Storage Blob containing the policy package.
az role assignment create \
--assignee $MI_CLIENT_ID \
--role "Storage Blob Data Reader" \
--scope "/subscriptions/$SUB/resourceGroups/$RG/providers/Microsoft.Storage/storageAccounts/$ACCT"
- Run the following command to federate the user-assigned identity to a service account.
az identity federated-credential create \
--name pty-policy-loader-fed \
--identity-name pty-policy-loader-mi -g $RG \
--issuer $OIDC \
--subject system:serviceaccount:$NS:pty-policy-loader \
--audience api://AzureADTokenExchange
Specify the name of the service account as the value of the serviceAccount/name parameter in step 4 of the section Deploy AP Java Container.
- Run the following command to create and annotate the Kubernetes service account.
kubectl -n $NS create serviceaccount pty-policy-loader
kubectl -n $NS annotate serviceaccount pty-policy-loader azure.workload.identity/client-id=$MI_CLIENT_ID
Deploy AP Java Container
The following steps describe how to deploy the Application Protector Java Container.
- Run the following command to generate the client certificate to authenticate with the KMS-Proxy service.
CreateCertificate_Linux_x64_<Version>.sh client --name <Directory> --dns <Release_Name>.<namespace>.svc
For example:
CreateCertificate_Linux_x64_<Version>.sh client --name kms-client --dns kms-proxy.<namespace>.svc
For more information about generating the client certificates, refer to the section Creating Certificates.
The following client certificates files are created in the kms-client folder:
- cert.pem
- cert.key
- CA.pem
- secret.txt
This certificate is used by the protector as a client certificate to authenticate the protector with the KMS-Proxy service.
Ensure that the namespace and release name that you specify in this command are the same names that you specify in step 5 while deploying the KMS-Proxy Helm chart.
2. Run the following command to generate the secret for the KMS-Proxy client certificate created in step 1.
kubectl -n <KMS-Proxy_Namespace> create secret generic service-certs --from-file=CA.pem=<path-to-CA.pem> --from-file=cert.key=<path-to-cert.key> --from-file=cert.pem=<path-to-cert.pem> --from-file=secret.txt=<path-to-secret.txt>
For more information about generating the client certificates, refer to the section Creating Certificates.
Specify this secret as the value of the kms/certificates parameter in the values.yaml file.
On the Linux instance, navigate to the location where you have extracted the Helm charts to deploy the Sample Application Protector Java Container.
The spring-apjava-devops > values.yaml file contains the default configuration values for deploying the Sample Application Protector Java Container on the Kubernetes cluster.
## -- create image pull secrets and specify the name here.
## remove the [] after 'imagePullSecrets:' once you specify the secrets
imagePullSecrets: []
# - name: regcred
nameOverride: ""
fullnameOverride: ""
# Sample protector image configuration
springappImage:
# -- sample protector image registry address
repository:
# -- sample protector image tag name
tag:
# -- The pullPolicy for a container and the tag of the image affect
# when the kubelet attempts to pull (download) the specified image.
pullPolicy: IfNotPresent
# policy loader sidecar image configuration
policyLoaderImage:
# -- policy loader sidecar container image registry address
repository:
# -- policy loader sidecar container image tag name
tag:
# -- The pullPolicy for a container and the tag of the image affect
# when the kubelet attempts to pull (download) the specified image.
pullPolicy: IfNotPresent
# specify CPU and memory requirement of Sample springapp protector container
springappContainerResources:
limits:
cpu: 1500m
memory: 3000Mi
requests:
cpu: 1200m
memory: 1000Mi
# specify CPU and memory requirement of policy loader container
policyLoaderResources:
limits:
cpu: 200m
memory: 512Mi
requests:
cpu: 100m
memory: 200Mi
...
...
# -- pod service account to be used.
# A k8s service account can be linked to cloud identity to allow pod to access
# cloud services like Object storage solutions.
serviceAccount:
# The name of the service account to use.
name:
# Specify any additional annotation to be associated with pod
podAnnotations:
checksum/sdk-config: '{{ include (print $.Template.BasePath "/sdk-configmap.yaml") . | sha256sum }}'
# -- Specify any additional labels to be associated with the pod.
# Cloud agnostic: leave empty for AWS/GCP.
# For Azure Workload Identity (secret-less policy fetch from Azure Blob), set:
# azure.workload.identity/use: "true"
# and set serviceAccount.name to the workload-identity annotated service account
# (leave policyPuller.credentials empty so no client-secret file is mounted).
podLabels: {}
#azure.workload.identity/use: "true"
# set the Pod's security context object.
podSecurityContext:
runAsUser: 1000
runAsGroup: 1000
fsGroup: 1000
## set the Spring App Container's security context object
## leave the field empty if not applicable
springappContainerSecurityContext:
capabilities:
drop:
- ALL
allowPrivilegeEscalation: false
privileged : false
runAsNonRoot : true
readOnlyRootFilesystem: true
seccompProfile:
type: RuntimeDefault
# -- set the policy loader sidecar Container's security context object
# leave the field empty if not applicable
policyLoaderContainerSecurityContext:
capabilities:
drop:
- ALL
readOnlyRootFilesystem: true
runAsNonRoot: true
allowPrivilegeEscalation: false
privileged : false
seccompProfile:
type: RuntimeDefault
# protector configuration
protector:
# Session information
session:
# Session timeout in minutes. Default is 15 minutes.
sessiontimeout: 15
# Policy information for the protector initialization
# Note: Policy update is control by policy puller sidecar, Below configuration
# are for protector to refresh policy once it is updated by policy puller sidecar.
policy:
# -- Cadence determines how often the protector connects local filesystem
# to fetch the policy updates in background. Default is 60 seconds.
# So by default, every 60 seconds protector tries to fetch the policy updates.
# If the cadence is set to "0", then the protector will get the policy only
# once, which is not recommended.
cadence: 60
# KMS proxy service configuration
kms:
# -- kms proxy service hostname.
# kms proxy service helps protector to decrypt resilient policy package.
host:
# -- certificates to authenticate with kms proxy service.
# Specify certificate secret name.
# kubectl -n $NAMESPACE create secret generic pty-kms-proxy-tls \
# --from-file=cert.pem=./certs/cert.pem \
# --from-file=cert.key=./certs/cert.key \
# --from-file=CA.pem=./ca/CA.pem \
# --from-file=secret.txt=./certs/secret.txt
certificates:
# Logforwarder configuration
logs:
# -- specify log levels.
# In case that connection to fluent-bit is lost, set how audits/logs are handled
#
# drop : Protector throws logs away if connection to the fluentbit is lost
# error : (default) Protector returns error without protecting/unprotecting
# data if connection to the fluentbit is lost
mode: error
# -- Host/IP of Logforwarder service where audits/logs are forwarded by the
# sample protector
host:
# policy puller sidecar configuration
policyPuller:
policy:
# -- Control how often the sidecar application will read the configuration
# file for policy update information.
# Interval is reset when previous pull operation is completed.
# IMPORTANT: do not set interval to 0.
interval: 30
# -- If using VolumeMount as storage destination for policy package
# specify the persistent volume claim name to be used to mount the volume.
pvcName:
# -- Path to KMS encrypted Resilient policy package. Specify an URL encoded
# path to package file. Here are few examples,
# If stored in S3 then, s3://[s3 bucket name]/[to]/<[policy]>/<[package]>
# If stored in GC then, gc://<[path]>/<[to]>/<[policy]>/<[package]>
# If stored in Azure blob, "https://<[account name]>.blob.core.windows.net/<[container name]>/<[path to file]>"
# Important: updating it will not trigger pod restart.
path:
logs:
# -- control policy puller log level
# logs are forwarded to stdout
# Supported Values
# INFO - default
# DEBUG
level: INFO
# -- specify the initial no. of sample protector Pod replicas
replicaCount: 1
# HPA configuration
autoScaling:
# -- lower limit on the number of replicas to which the autoscaler
# can scale down to.
minReplicas: 1
# -- upper limit on the number of replicas to which
# the autoscaler can scale up. It cannot be less that minReplicas.
maxReplicas: 10
# -- CPU utilization threshold which triggers the autoscaler
targetCPU: 70
## specify the ports exposed in your springapp configurations where,
## name - distinguishes between different ports.
## port - the port on which you wan't to expose the service externally.
## targetPort - the port no. configured while creating Tunnel.
springappService:
# allows you to configure service type: LoadBalancer or ClusterIP
type: LoadBalancer
# Specify service related annotations here
annotations:
##AWS
#service.beta.kubernetes.io/aws-load-balancer-internal: "true"
##AZURE
#service.beta.kubernetes.io/azure-load-balancer-internal: "true"
##GCP
#networking.gke.io/load-balancer-type: "Internal"
name: "restapi"
port: 8080
targetPort: 8080
- Modify the default values in the values.yaml file as required.
| Field | Description |
|---|---|
| springappImage | Specify the repository and tag details for the Application Protector Java Container image. |
| policyLoaderImage | Specify the repository and tag details for the Policy Loader image. |
| springappContainerResources | Specify the CPU and memory requirements for the Application Protector Java Container. |
| policyLoaderResources | Specify the CPU and memory requirements for the Policy Loader container. |
| serviceAccount/name | Specify the name of the service account that enables you to access the Object storage solutions of the Cloud service. |
| serviceAccount/name |
|
| podLabels | Enable Azure Workload Identity. Delete the curly braces and uncomment the value of the podLabel parameter. Set the value to azure.workload.identity/use: “true”. This parameter is applicable only if you are deploying the KMSProxy Container to Azure AKS. |
| podSecurityContext | Specify the privilege and access control settings for the pod. The default values are set as follows:
|
Container Security Context:
| Specify the privilege and access control settings for the Application Protector Java Container and the Policy Loader containers, respectively. |
| protector/session/sessiontimeout | Specify the time during which a session object is valid. By default, the value is set to 15. The session timeout is measured in minutes. |
| protector/policy/cadence | Specify the time interval in seconds after which the protector retrieves the policy that has been updated by the Policy Loader container. By default, the value is set to 60. Ensure that the value is not set to 0. Else, the protector will retrieve the policy only once. |
| protector/kms/host | Specify the host name of the KMS Proxy service that is used to decrypt the policy package. |
| protector/kms/certificates | Specify the name of the secret for the certificate that is used to authenticate with the KMS Proxy service, which you have created in step 2. |
| protector/logs/mode | Specify one of the following options in case the connection to the Log Forwarder is lost:
By default, the value is set to error. |
| protector/logs/host | Specify the service hostname of the Log Forwarder, where the logs are forwarded. The default value is <Helm_Installation_Name>-<Helm_Chart_Name>. For example, iaplog-logforwarder.iapjava.svc. |
| policyPuller/policy/interval | Specify the time interval in seconds after which the Policy Loader sidecar container will retrieve the policy package from the specified path. By default, the value is set to 30. Ensure that the interval is not set to 0. Else, the Policy Loader container will not retrieve the updated policy package. |
| policyPuller/path | Specify the path where the encrypted policy package has been uploaded. For example, if the package is stored in an AWS S3 bucket, then you need to specify the following path: s3://[s3 bucket name]/[to]/<[policy]>/<[package].If the package is stored in a Azure Storage Container, then you need to specify the following path: https://[storage account].blob.core.windows.net/[to]/<[policy]>/<[package]>.If the package is stored in local filesystem VolumeMount, then you need to specify the following path: [to]/<[policy]>/<[package]>. |
| policyPuller/logs/level | Specify the log level of the Policy Loader container. By default, the value is set to INFO. |
| replicaCount | Specify the initial number of the Application Protector Java Container pod replicas. |
| autoScaling | Specify the configurations required for the Horizontal Pod Autoscaling. |
| springappService/type | Specify the service type for the Application Protector Java Container. By default, this value is set to LoadBalancer. |
| springappService/annotations | Specify the annotations for the respective Cloud platforms if you want to use the internal load balancer. By default, this value is left blank. |
| springappService/name | Specify a name for the tunnel to distinguish between ports. By default, the value is set to restapi. |
| springappService/port | Specify the port number on which you want to expose the Kubernetes service externally. By default, the value is set to 8080. |
| springappService/targetport | Specify the port on which the Sample application is running inside the Docker container. By default, the value is set to 8080. |
- Run the following command to deploy the Application Protector Java Container on the Kubernetes cluster.
helm install <Release_Name> --namespace <Namespace where you want to deploy the Application Java Container> <Location of the directory that contains the Helm charts>
For example:
helm install iap-java-devops --namespace iap-java <Custom_path>/spring-apjava-devops/
<Custom_path> is the directory where you have extracted the installation package.
- Run the following command to check the status of the pods.
kubectl get pods -n <Namespace>
For example:
kubectl get pods -n iap-java
NAME READY STATUS RESTARTS AGE
kms-10-v1-kms-proxy-7b97d5dff7-grqph 2/2 Running 0 11h
log1-logforwarder-f6gvj 1/1 Running 0 11h
log1-logforwarder-ls4hn 1/1 Running 0 11h
log1-logforwarder-phk4t 1/1 Running 0 11h
log1-logforwarder-z2mz7 1/1 Running 0 11h
iap-java-devops-5fd7d859b6-p9544 1/1 Running 0 11h
Alternatively, if you do not want to modify the values.yaml file, you can use set arguments to update the values during runtime.
For more information about deploying containers using set arguments, refer to the section Appendix - Deploying the Helm Charts by Using the Set Argument.
The test user can run the getVersion API to verify the version of the Application Protector Java Container.
- Run the following command to obtain the service details.
kubectl get svc -n <Namespace>
For example:
kubectl get svc -n iap-java
NAME TYPE CLUSTER-IP EXTERNAL-IP PORT(S) AGE
logforwarder ClusterIP 172.20.14.88 <none> 15780/TCP 2m37s
kmsproxy ClusterIP 172.20.181.92 <none> 25400/TCP 113s
iap-java-devops LoadBalancer 172.20.60.61 internal-b70jkfs23423jg8.us-east-1.elb.amazonaws.com 8080:30746/TCP 24s
Use the DNS name of the load balancer that appears in the EXTERNAL-IP column while running the security operations.
For more information about running security operations, refer to the section Running Security Operations.
Run the following command to obtain the IP address of the Load Balancer.
ping <DNS of Load Balancer>For example:
ping internal-b70jkfs23423jg8.us-east-1.elb.amazonaws.comThe following output appears that displays the IP address of the Load Balancer.
PING internal-b70jkfs23423jg8.us-east-1.elb.amazonaws.com (10.49.5.152) 56(84) bytes of data. 64 bytes from ip-10-49-5-152.ec2.internal (10.49.5.152): icmp_seq=1 ttl=255 time=0.831 ms 64 bytes from ip-10-49-5-152.ec2.internal (10.49.5.152): icmp_seq=2 ttl=255 time=0.262 msUse this IP address while running the security operations.
Navigate to the Amazon EC2 Console and edit the inbound rules of the security group of the Load Balancer to ensure that it can receive requests on the
8080port number.
For more information about editing inbound rules for a security group, refer to the section Configure security group rules.
7.4.1.2.5 - Updating the Policy Package
The following steps describe how to update the policy or the policy path.
Modify the policy or the location where the policy has been uploaded.
Run the
helm upgradecommand to update the policy package or the policy package path.
For example, the line --set policyPuller.policy.path="s3://apjavacontainers/static-iap-java-rel-a/try/Sample_App_Policy.tgz" in the following code block indicates that the path where the policy package is stored has changed.
helm -n devops-10-v5 upgrade test-sampleapp-10-v1 spring-apjava-devops/ \
--set imagePullSecrets[0].name="regcred" \
--set springappImage.repository="<Account_ID>.dkr.ecr.<region_name>.amazonaws.com/containers" \
--set springappImage.tag="APJAVA_RHUBI_SAMPLE-10-v14-v1" \
--set policyLoaderImage.repository="<Account_ID>.dkr.ecr.<region_name>.amazonaws.com/containers" \
--set policyLoaderImage.tag="POLICY-LOADER_RHUBI-9-64_x86-64_K8S_1.0.0.13.e0beab.tgz" \
--set protector.kms.host="test-kms-10-v1-kms-proxy.devops-10-v5.svc" \
--set protector.kms.certificates="pty-certs-cli-secret" \
--set protector.logs.host="test-logforwarder10-v1.devops-10-v5.svc" \
**--set policyPuller.policy.path="s3://apjavacontainer/new-10-49-7-212/iap-java-policy-core-big-10-49-7-212.json"**
For more information about using set arguments to deploy the Protector, refer to the section Appendix - Deploying the Helm Charts by Using the Set Argument.
- Run the following command to check the status of the pods.
kubectl get pods -n <Namespace>
For example:
kubectl get pods -n iap-java
NAME READY STATUS RESTARTS AGE
test-devops-logforwarder10-v1-2m49b 1/1 Running 0 163m
test-devops-logforwarder10-v1-wwjzh 1/1 Running 0 165m
test-kms-10-v1-kms-proxy-687657cff9-dlzdz 1/1 Running 0 161m
test-sampleapp-10-v1-iap-java-devops-54668997cf-kw628 3/3 Running 0 5m11s
- Run the following command to check the logs.
kubectl logs <Pod_name> -n <Namespace> -f
For example:
kubectl logs test-sampleapp-10-v1-iap-java-devops-54668997cf-kw628 -n iap-java -f
The following logs appear on the console output. The line [INFO ] 2025/10/29 11:47:19.335550 runner.go:226: New Policy source path s3://apjavacontainers/new-10-49-7-212/new/policy-sample-app-10-49-7-212-v1.json indicates that the policy package path has been updated.
Defaulted container "policy-loader" out of: policy-loader, iap-java-devops
[INFO ] 2025/10/29 11:45:16.090634 runner.go:104: starting policy loader with version: 1.0.0+13.e0beab
Starting Health Server.
[INFO ] 2025/10/29 11:45:16.090811 runner.go:187: fetching policy from storage media, AWS_S3
[INFO ] 2025/10/29 11:45:16.313683 runner.go:196: Loading policy from source path s3://apjavacontainers/new-10-49-7-212/policy-v1-10-49-7-212.json
[root@ip-10-49-5-222 ~]# kubectl logs test-sampleapp-10-v1-iap-java-devops-7f4f9b9cc4-zbbkg -n devops-10-v6 -f
Defaulted container "policy-loader" out of: policy-loader, iap-java-devops
[INFO ] 2025/10/29 11:45:16.090634 runner.go:104: starting policy loader with version: 1.0.0+13.e0beab
Starting Health Server.
[INFO ] 2025/10/29 11:45:16.090811 runner.go:187: fetching policy from storage media, AWS_S3
[INFO ] 2025/10/29 11:45:16.313683 runner.go:196: Loading policy from source path s3://apjavacontainers/new-10-49-7-212/policy-v1-10-49-7-212.json
[INFO ] 2025/10/29 11:45:48.914901 runner.go:220: fetching policy from storage media, AWS_S3
[INFO ] 2025/10/29 11:45:48.914935 runner.go:242: Policy source path is same. Checking based on timestamp.
[INFO ] 2025/10/29 11:45:49.057011 runner.go:250: Policy source is not modified since last fetch. Skipping policy load operation.
[INFO ] 2025/10/29 11:46:19.057887 runner.go:220: fetching policy from storage media, AWS_S3
[INFO ] 2025/10/29 11:46:19.057916 runner.go:242: Policy source path is same. Checking based on timestamp.
[INFO ] 2025/10/29 11:46:19.201224 runner.go:250: Policy source is not modified since last fetch. Skipping policy load operation.
[INFO ] 2025/10/29 11:46:49.201456 runner.go:220: fetching policy from storage media, AWS_S3
[INFO ] 2025/10/29 11:46:49.201485 runner.go:242: Policy source path is same. Checking based on timestamp.
[INFO ] 2025/10/29 11:46:49.335206 runner.go:250: Policy source is not modified since last fetch. Skipping policy load operation.
[INFO ] 2025/10/29 11:47:19.335501 runner.go:220: fetching policy from storage media, AWS_S3
[INFO ] 2025/10/29 11:47:19.335536 runner.go:224: Policy source path is modified. Triggering policy load operation.
[INFO ] 2025/10/29 11:47:19.335545 runner.go:225: Old Policy source path s3://apjavacontainers/new-10-49-7-212/policy-v1-10-49-7-212.json.
[INFO ] 2025/10/29 11:47:19.335550 runner.go:226: New Policy source path s3://apjavacontainers/new-10-49-7-212/new/policy-sample-app-10-49-7-212-v1.json
7.4.1.2.6 - Uninstalling the Protector in Static Method
To uninstall the Protector:
- Run the following command to uninstall the Log Forwarder from the Kubernetes cluster.
helm uninstall <Release_Name> --namespace <Namespace where the Log Forwarder is deployed>
For example:
helm uninstall log1 --namespace iap-java
- Run the following command to uninstall the KMSProxy container from the Kubernetes cluster.
helm uninstall <Release_Name> --namespace <Namespace where KMSProxy container is deployed>
For example:
helm uninstall kmsproxy --namespace iap-java
- Run the following command to uninstall the Application Protector Java Container from the Kubernetes cluster.
helm uninstall <Release_Name> --namespace <Namespace where the AP Java Container is deployed>
For example:
helm uninstall iap-java-devops --namespace iap-java
- Run the following command to delete the Kubernetes secrets.
kubectl delete secret <Secret_Name> --namespace <Namespace where the AP Java Container is deployed>
For example:
kubectl delete secret service-certs --namespace iap-java
Repeat this step to delete all the secrets that you have created while deploying the KMSProxy container and the Application Protector Java Container:
- service-certs
- regcred
- Run the following command to delete the Kubernetes namespace.
helm delete namespace <Namespace where the AP Java Container is deployed>
For example:
helm delete namespace iap-java
7.4.2 - Installing the Protector on OpenShift
This section provides an overview of the steps required to install the Application Protector Java Container on OpenShift using either the Static or the Dynamic method.
7.4.2.1 - Deploying AP Java Container for Dynamic Method
This section describes how to deploy the Application Protector Java Container integrated with RPP. Deploy in the following order:
- Log Forwarder
- RPP
- Application Protector Java Container
7.4.2.1.1 - Deploying Log Forwarder
The Log Forwarder is deployed as a DaemonSet. The following steps describe how to deploy Log Forwarder.
On the Linux instance, run the following command to create the namespace required for Helm deployment.
kubectl create namespace <Namespace name>For example:
kubectl create namespace iap-javaOn the Linux instance, navigate to the location where you have extracted the Helm charts to deploy the Log Forwarder.
For more information about the extracted Helm charts, refer to the section Extracting the Installation Package.
The logforwarder > values.yaml file contains the default configuration values for deploying the Log Forwarder container on the Kubernetes cluster. The following content shows an extract of the values.yaml file.
... # - Protegrity PSU(Protegrity Storage Unit)/ESA configuration. # Logforwarder will send audit records to below specified hosts/ip. # User can specify multiple PSU/ESA distribute the audit records and avoid downtime. opensearch: # -- specify a given name to uniquely identify PSU/ESA in the deployment. - name: # -- hostname/ip address of PSU/ESA host: # -- port address of ESA/PSU port: 9200 # - name: node-2 # host: test-insight # port: 9200 # -- Kubernetes service configuration, represents a TCP endpoint to receive audit records # from the protectors. service: # -- Configure service type: ClusterIP for Logforwarder endpoint. type: ClusterIP # -- port to accept incoming audit records from the protector port: 15780 ...Modify the default values in the values.yaml file as required.
| Field | Description |
|---|---|
| opensearch/name | Specify the unique name for the ESA. |
| opensearch/host | Specify the host name or IP address of the ESA. |
| opensearch/port | Specify the port number of the ESA. The default value is 9200. |
| service/type | Specify the service type for the Log Forwarder. The default value is ClusterIP. |
| service/port | Specify the service port of the Log Forwarder, which receives the audit logs from the protectors. The default value is 15780. |
- Run the following command to deploy the Log Forwarder on the Kubernetes cluster.
helm install <Release_Name> --namespace <Namespace where you want to deploy the RPP container> <Location of the directory that contains the Helm charts>
For example:
helm install log1 --namespace iap-java <Custom_path>/common/logforwarder/
<Custom_path> is the directory where you have extracted the installation package.
- Run the following command to check the status of the pods.
kubectl get pods -n <Namespace>
For example:
kubectl get pods -n iap-java
NAME READY STATUS RESTARTS AGE
log1-logforwarder-f6gvj 1/1 Running 0 11h
log1-logforwarder-ls4hn 1/1 Running 0 11h
log1-logforwarder-phk4t 1/1 Running 0 11h
log1-logforwarder-z2mz7 1/1 Running 0 11h
As the Log Forwarder is deployed as a DaemonSet, one instance of Log Forwarder is deployed on each node. In this example, one Log Forwarder pod is deployed per node.
For information about configuring the Log Forwarder, refer to the section Configuration Parameters for Forwarding Audits and Logs.
7.4.2.1.2 - Deploying Resilient Package Proxy (RPP)
The following steps describe how to deploy RPP.
Note: Ensure that you have deployed the Log Forwarder before deploying the RPP. For more information about deploying the Log Forwarder, refer to the section Deploying the Log Forwarder.
- Run the following command on the Jump box to generate the common certificate from the ESA certificates.
CertificatesSetup_Linux_x64_<Version>.sh -u <User> -p <Password> -h <Hostname or IP address of ESA> --port <Port number of ESA> -d <Directory>
For example:
CertificatesSetup_Linux_x64_<Version>.sh -u admin -p admin12345 -h 10.10.10.10 --port 8443 -d rpproxy
For more information about generating the ESA certificates, refer to the section Creating Certificates.
The following files are created:
- CA.pem
- cert.key
- cert.pem
- secret.txt
2. Run the following command to create a Kubernetes secret using the common certificate generated in step 1.
oc -n <Namespace> create secret generic common-cert --from-file=CA.pem=./CA.pem --from-file=cert.key=./cert.key --from-file=cert.pem=./cert.pem --from-file=secret.txt=./secret.txt
Specify this secret as the value of the commonCertSecrets parameter in the values.yaml file. In this case, this secret is used in the following ways:
- RPP uses the certificate as an upstream server certificate to download the policy packages from the ESA.
- The protector uses the certificate as a client certificate to download the policy packages from the RPP.
If you do not specify any value for the commonCertSecrets parameter, then you need to specify separate values for the rpp/upstream/certificateSecret and service/certificateSecret parameters.
3. Run the following command on the Jump box to generate the upstream certificate between the ESA and the RPP.
CertificatesSetup_Linux_x64_<Version>.sh -u <User> -p <Password> -h <Hostname or IP address of ESA> --port <Port number of ESA> -d <Directory>
For example:
CertificatesSetup_Linux_x64_<Version>.sh -u admin -p admin12345 -h 10.10.10.10 --port 8443 -d <Full_Path>/rpproxy
For more information about generating the ESA certificates, refer to the section Creating Certificates.
The following files are created:
- CA.pem
- cert.key
- cert.pem
- secret.txt
Note: This certificate is created only if you are not using the common certificate.
4. Run the following command to create a Kubernetes secret using the upstream certificate generated in step 3.
oc -n <Namespace> create secret generic upstream-cert --from-file=CA.pem=./CA.pem --from-file=cert.key=./cert.key --from-file=cert.pem=./cert.pem --from-file=secret.txt=./secret.txt
Note: This secret is created only if you are not using the common certificate.
Specify this secret as the value of the rpp/upstream/certificateSecret parameter in the values.yaml file.
5. Run the following command to generate the service TLS certificate.
CreateCertificate_Linux_x64_<Version>.sh server --name <Directory> --dns <Release_Name>.<namespace>.svc
For example:
CreateCertificate_Linux_x64_<Version>.sh server --name rpproxy --dns rpp.iap-java.svc
For more information about generating the server certificates, refer to the section Creating Certificates.
The following client certificates files are created in the rpproxy folder:
- cert.pem
- cert.key
- CA.pem
- secret.txt
These certificates are used by the protector as a server certificate to authenticate the RPP to download policy packages.
Ensure that the namespace and release name that you specify in this command are the same names that you specify in step 7 while deploying the RPP Helm chart.
Note: This certificate is created only if you are not using the common certificate.
6. Run the following command to generate the secret for the service TLS certificate.
oc -n <Namespace> create secret generic service-certs --from-file=CA.pem=<path-to-CA.pem> --from-file=cert.key=<path-to-cert.key> --from-file=cert.pem=<path-to-cert.pem> --from-file=secret.txt=<path-to-secret.txt>
For more information about generating the client certificates, refer to the section Creating Certificates.
Note: This secret is created only if you are not using the common certificate.
Specify this secret as the value of the service/certificateSecret parameter in the values.yaml file.
7. On the Linux instance, navigate to the location where you have extracted the Helm charts to deploy the RPP.
For more information about the extracted Helm charts, refer to the section Initializing the Linux instance.
The rp-proxy > values.yaml file contains the default configuration values for deploying the RPP container on the Kubernetes cluster.
...
podSecurityContext:
fsGroup: 1000
...
#-- k8s secret for storing common certificates
# eg. kubectl command:
# kubectl -n $RPP_NAMESPACE create secret generic common-certs \
# --from-literal=CA.pem=<path-to-CA.pem> --from-literal=cert.key=<path-to-cert.key> \
# --from-literal=cert.pem=<path-to-cert.pem> --from-literal=secret.txt=<path-to-secret.txt>
commonCertSecrets:
rpp:
#-- upstream configuration
# host: Upstream host to connect
# port: Upstream port to connect
upstream:
host:
port: 25400
#-- certificateSecret : k8s secret for storing upstream tls certificates
# NOTE : Only to be set when not using common certificate secret
# eg. kubectl command:
# kubectl -n $RPP_NAMESPACE create secret generic upstream-certs \
# --from-literal=CA.pem=<path-to-CA.pem> --from-literal=cert.key=<path-to-cert.key> \
# --from-literal=cert.pem=<path-to-cert.pem> --from-literal=secret.txt=<path-to-secret.txt>
certificateSecret:
#-- logging configuration
# logLevel: Specifies the logging level for rpproxy
# INFO (default)
# ERROR
# WARN
# DEBUG
# TRACE
# logHost: Host to forward the logs (Default : 127.0.0.1)
# logPort: Port to forward the logs (Default : 15780)
logging:
logLevel: "INFO"
logHost: "127.0.0.1"
logPort: 15780
#-- service configuration
# certificateSecret : k8s secret for storing service tls certificates
# NOTE : Only to be set when not using common certificate secret
# eg. kubectl command:
# kubectl -n $RPP_NAMESPACE create secret generic service-certs \
# --from-literal=CA.pem=<path-to-CA.pem> --from-literal=cert.key=<path-to-cert.key> \
# --from-literal=cert.pem=<path-to-cert.pem> --from-literal=secret.txt=<path-to-secret.txt>
# cacheTTL:
# TTL sets the duration (in seconds) of which a cached item is considered fresh.
# When a cached item's TTL expires, the item will be revalidated.
service:
certificateSecret:
cacheTTL: 60
...
- Modify the default values in the values.yaml file as required.
| Field | Description |
|---|---|
| podSecurityContext | Specify the privilege and access control settings for the pod. The default values are set as follows:
|
| commonCertSecrets | Specify the Kubernetes secret, which you have created in step 2, for storing the common certificates. If you specify the value of this parameter, then do not specify the values for the rpp/upstream/certificateSecret and service/certificateSecret parameters. The same common certificate will be used by RPP to download the policy packages from the ESA and by the protector to download the policy packages from the RPP. |
| rpp/upstream/host | Specify the host name or IP address of the upstream server that is providing the policy packages. The upstream server can be another RPP or the ESA. |
| rpp/upstream/port | Specify the port number of the upstream server that is providing the policy packages. The default value is 25400. |
| rpp/upstream/certificateSecret | Specify the Kubernetes secret, which you have created in step 4, that contains the certificate used to authenticate the ESA. Note: This certificate is set only if you are not using the commonCertSecrets parameter. |
| logging/logLevel | Specify the details about the application log level during runtime. You can set one of the following values:
The default value is INFO. |
| logging/logHost | Specify the service hostname of the Log Forwarder, where the logs are forwarded. The default value is <Helm_Installation_Name>-<Helm_Chart_Name>.<Namespace>.svc.For example, iaplog-logforwarder.iap-java.svc. |
| logging/logPort | Specify the service port of the Log Forwarder, where the logs are forwarded. The default value is 15780. |
| service/certificateSecret | Specify the Kubernetes secret, which you have created in step 6, that enables the protector to authenticate the RPP. Note: This certificate is set only if you are not using the commonCertSecrets parameter. |
| service/cacheTTL | Specify the duration to refresh the cache. When a cache TTL expires, the cache has to be revalidated or updated. This interval controls the refresh time of the policy. The default value in seconds is 60. |
- Run the following command to deploy the RPP on the Kubernetes cluster.
helm install <Release_Name> --namespace <Namespace where you want to deploy the RPP container> <Location of the directory that contains the Helm charts>
For example:
helm install rpp --namespace iap-java >Custom_path>/spring-apjava-dynamic/rpproxy/
<Custom_path> is the directory where you have extracted the installation package.
Ensure that you specify the same release name and namespace that you have used while creating the service TLS certificate in step 5.
- Run the following command to check the status of the pods.
oc get pods -n <Namespace>
For example:
oc get pods -n iap-java
NAME READY STATUS RESTARTS AGE
rpp-rpproxy-5fd7d859b6-p9544 1/1 Running 0 11h
7.4.2.1.3 - Deploying the AP Java Container with Dynamic Method
The following steps describe how to deploy the Application Protector Java Container.
- Run the following command to generate the client certificate for connecting to the RPP.
CreateCertificate_Linux_x64_<Version>.sh client --name <Directory> --dns <Release_Name>.<namespace>.svc
For example:
CreateCertificate_Linux_x64_<Version>.sh client --name rpproxy-client --dns rpp.iap-java.svc
For more information about generating the client certificates, refer to the section Creating Certificates.
The following client certificates files are created in the rpproxy-client folder:
- cert.pem
- cert.key
- CA.pem
- secret.txt
This certificate is used by the protector as a client certificate to authenticate the RPP to download policy packages.
Ensure that the namespace and release name that you specify in this command are the same names that you specify in step 7 while deploying the RPP Helm chart.
Note: This certificate is created only if you are not using the common certificate.
2. Run the following command to generate the secret for the RPP client certificate created in step 1.
oc -n <RPP_Namespace> create secret generic rpp-client-certs --from-file=CA.pem=<path-to-CA.pem> --from-file=cert.key=<path-to-cert.key> --from-file=cert.pem=<path-to-cert.pem> --from-file=secret.txt=<path-to-secret.txt>
For more information about generating the client certificates, refer to the section Creating Certificates.
Specify this secret as the value of the protector/policy/certificates parameter in the values.yaml file.
On the Linux instance, navigate to the location where you have extracted the Helm charts to deploy the Application Protector Java Container.
The spring-apjava-dynamic > values.yaml file contains the default configuration values for deploying the RPP container on the Kubernetes cluster.
# -- create image pull secrets and specify the name here.
# remove the [] after 'imagePullSecrets:' once you specify the secrets
imagePullSecrets: []
# - name: regcred
nameOverride: ""
fullnameOverride: ""
# Sample springapp protector image configuration
springappImage:
# -- sample springapp protector image registry address
repository:
# -- sample springapp protector image tag name
tag:
# -- The pullPolicy for a container and the tag of the image affect
# when the kubelet attempts to pull (download) the specified image.
pullPolicy: IfNotPresent
# specify CPU and memory requirement of sample springapp protector container
springappContainerResources:
limits:
cpu: 1500m
memory: 3000Mi
requests:
cpu: 1200m
memory: 1000Mi
...
...
## -- pod service account to be used
## leave the field empty if not applicable
serviceAccount:
# The name of the service account to use.
name:
# Specify any additional annotation to be associated with pod
podAnnotations:
checksum/sdk-config: '{{ include (print $.Template.BasePath "/sdk-configmap.yaml") . | sha256sum }}'
## set the Pod's security context object
## leave the field empty if not applicable
podSecurityContext:
fsGroup: 1000
## set the Spring App Container's security context object
## leave the field empty if not applicable
springappContainerSecurityContext:
capabilities:
drop:
- ALL
allowPrivilegeEscalation: false
privileged : false
runAsNonRoot : true
readOnlyRootFilesystem: true
seccompProfile:
type: RuntimeDefault
# protector configuration
protector:
# Session information
session:
# Session timeout in minutes. Default is 15 minutes.
sessiontimeout: 15
# Policy information for the protector initialization
policy:
# Cadence determines how often the protector connects with ESA / proxy to
# fetch the policy updates in background. Default is 60 seconds.
# So by default, every 60 seconds protector tries to fetch the policy updates.
# If the cadence is set to "0", then the protector will get the policy only
# once, which is not recommended.
#
# Default 60.
cadence: 60
# -- Host/IP to the service providing Resilient Packages either rpproxy
# service or ESA.
host:
# -- certificates used to communicate with service providing Resilient packages.
# specify certificate secret name.
# -- TLS certificate rp-proxy service.
# kubectl -n $NAMESPACE create secret generic pty-rpp-tls \
# --from-file=cert.pem=./certs/cert.pem \
# --from-file=cert.key=./certs/cert.key \
# --from-file=CA.pem=./ca/CA.pem \
# --from-file=secret.txt=./certs/secret.txt
certificates:
# Logforwarder configuration
logs:
# -- In case that connection to fluent-bit is lost, set how audits/logs are handled
#
# drop : Protector throws logs away if connection to the fluentbit is lost.
# error : (default) Protector returns error without protecting/unprotecting
# data if connection to the fluentbit is lost.
mode: error
# -- Host/IP to fluent-bit where audits/logs will be forwarded from the protector
#
# Default localhost
host:
# -- specify the initial no. of sample protector Pod replicas
replicaCount: 1
# HPA configuration
autoScaling:
# -- lower limit on the number of replicas to which the autoscaler
# can scale down to.
minReplicas: 1
# -- upper limit on the number of replicas to which
# the autoscaler can scale up. It cannot be less that minReplicas.
maxReplicas: 10
# -- CPU utilization threshold which triggers the autoscaler
targetCPU: 70
## specify the ports exposed in your springapp configurations where,
## name - distinguishes between different ports.
## port - the port on which you wan't to expose the service externally.
## targetPort - the port no. configured while creating Tunnel.
springappService:
# allows you to configure service type: LoadBalancer or ClusterIP
type: LoadBalancer
# Specify service related annotations here
annotations:
##AWS
#service.beta.kubernetes.io/aws-load-balancer-internal: "true"
##AZURE
#service.beta.kubernetes.io/azure-load-balancer-internal: "true"
##GCP
#networking.gke.io/load-balancer-type: "Internal"
name: "restapi"
port: 8080
targetPort: 8080
- Modify the default values in the values.yaml file as required.
| Field | Description |
|---|---|
| springappImage | Specify the repository and tag details for the Sample Application Protector Java Container image. |
| springappContainerResources | Specify the CPU and memory requirements for the Sample Application Protector Java Container. |
| serviceAccount/name | Specify the name of the pod service account. Leave the field empty if it is not applicable. |
| podSecurityContext | Specify the privilege and access control settings for the pod. The default values are set as follows:
|
Container Security Context:
| Specify the privilege and access control settings for the Sample Application Protector Java Container. |
| protector/session/sessiontimeout | Specify the time during which a session object is valid. By default, the value is set to 15. The session timeout is measured in minutes. |
| protector/policy/cadence | Specify the time interval in seconds after which the protector connects with the RPProxy to retrieve the policy package. By default, the value is set to 60. Ensure that the value is not set to 0. Else, the protector will retrieve the policy only once. |
| protector/policy/host | Specify the host name or IP address of the RPProxy. |
| protector/policy/certificates | Specify the name of the secret for the certificate, which you have created in step 2 that is used to authenticate the RPProxy for downloading the policy package. |
| protector/logs/mode | Specify one of the following options in case the connection to the Log Forwarder is lost:
By default, the value is set to error. |
| protector/logs/host | Specify the service hostname of the Log Forwarder, where the logs are forwarded. The default value is <Helm_Installation_Name>-<Helm_Chart_Name>.<Namespace>.svc. For example, iaplog-logforwarder.iapjava.svc. |
| replicaCount | Specify the initial number of the Application Protector Java Container pod replicas. |
| autoScaling | Specify the configurations required for the Horizontal Pod Autoscaling. |
| springappService/type | Specify the service type for the Sample Application Protector Java Container. By default, this value is set to LoadBalancer. |
| springappService/annotations | Specify the annotations for the respective Cloud platforms if you want to use the internal load balancer. By default, this value is left blank. |
| springappService/name | Specify a name for the tunnel to distinguish between ports. By default, the value is set to restapi. |
| springappService/port | Specify the port number on which you want to expose the Kubernetes service externally. By default, the value is set to 8080. |
| springappService/targetport | Specify the port on which the Sample application is running inside the Docker container. By default, the value is set to 8080. |
- Run the following command to deploy the Application Protector Java Container on the Kubernetes cluster.
helm install <Release_Name> --namespace <Namespace where you want to deploy the AP Java container> <Location of the directory that contains the Helm charts>
For example:
helm install iap-java-dynamic --namespace iap-java <Custom_path>/spring-apjava-dynamic/
<Custom_path> is the directory where you have extracted the installation package.
- Run the following command to check the status of the pods.
oc get pods -n <Namespace>
For example:
oc get pods -n iap-java
NAME READY STATUS RESTARTS AGE
iap-java-dynamic-7b97d5dff7-grqph 2/2 Running 0 11h
log1-logforwarder-f6gvj 1/1 Running 0 11h
log1-logforwarder-ls4hn 1/1 Running 0 11h
log1-logforwarder-phk4t 1/1 Running 0 11h
log1-logforwarder-z2mz7 1/1 Running 0 11h
rpp-rpproxy-5fd7d859b6-p9544 1/1 Running 0 11h
- Run the following command to obtain the service details.
oc get svc -n <Namespace>
For example:
oc get svc -n iap-java
NAME TYPE CLUSTER-IP EXTERNAL-IP PORT(S) AGE
logforwarder ClusterIP 172.20.14.88 <none> 15780/TCP 2m37s
rpproxy ClusterIP 172.20.181.92 <none> 25400/TCP 113s
iap-java-dynamic LoadBalancer 172.20.60.61 internal-a70jkfsdf98908.us-east-1.elb.amazonaws.com 8080:30746/TCP 24s
Use the DNS name of the load balancer that appears in the EXTERNAL-IP column while running the security operations.
For more information about running security operations, refer to the section Running Security Operations.
Run the following command to obtain the IP address of the Load Balancer.
ping <DNS of Load Balancer>For example:
ping internal-b70jkfs23423jg8.us-east-1.elb.amazonaws.comThe following output appears that displays the IP address of the Load Balancer.
PING internal-b70jkfs23423jg8.us-east-1.elb.amazonaws.com (10.49.5.152) 56(84) bytes of data. 64 bytes from ip-10-49-5-152.ec2.internal (10.49.5.152): icmp_seq=1 ttl=255 time=0.831 ms 64 bytes from ip-10-49-5-152.ec2.internal (10.49.5.152): icmp_seq=2 ttl=255 time=0.262 msUse this IP address while running the security operations.
Navigate to the Amazon EC2 Console and edit inbound rules of the Load Balancer security group to ensure that it can receive requests on the
8080port number.For more information about editing inbound rules for a security group, refer to the section Configure security group rules.
7.4.2.1.4 - Uninstalling the Protector in Dynamic Method
To uninstall the Protector:
- Run the following command to uninstall the Log Forwarder from the Kubernetes cluster.
helm uninstall <Release_Name> --namespace <Namespace where the Log Forwarder is deployed>
For example:
helm uninstall log1 --namespace iap-java
- Run the following command to uninstall the RPP from the Kubernetes cluster.
helm uninstall <Release_Name> --namespace <Namespace where RPP is deployed>
For example:
helm uninstall rpp --namespace iap-java
- Run the following command to uninstall the Application Protector Java Container from the Kubernetes cluster.
helm uninstall <Release_Name> --namespace <Namespace where the AP Java Container is deployed>
For example:
helm uninstall iap-java-dynamic --namespace iap-java
- Run the following command to delete the Kubernetes secrets.
oc delete secret <Secret_Name> --namespace <Namespace where the AP Java Container is deployed>
For example:
oc delete secret common-cert --namespace iap-java
Repeat this step to delete all the secrets that you have created while deploying the RPP and the Application Protector Java Container:
- common-cert
- upstream-cert
- service-certs
- rpp-client-certs
- regcred
- Run the following command to delete the Kubernetes namespace.
helm delete namespace <Namespace where the AP Java Container is deployed>
For example:
helm delete namespace iap-java
7.4.2.2 - Deploying AP Java Container in Static Mode
This section describes how to deploy the Application Protector Java Container in static mode.
7.4.2.2.1 - Retrieving the Policy Package from the ESA
This section describes how to invoke the RPS APIs to retrieve the policy package using the ESA.
Note: Ensure that the Export Resilient Package permission is granted to the role that is assigned to the user exporting the package from the ESA.
Warning: Do not modify the package that has been exported using the RPS Service API.
To retrieve the policy package from the ESA:
Download the policy package from the ESA and encrypt the policy package using a KMS with the RPS API.
If you are using 10.1 ESA, then refer to the section Using the Encrypted Resilient Package REST APIs for more information about the RPS API.
If you are using 10.2 ESA, then refer to the section Using the Encrypted Resilient Package REST APIs for more information about the RPS API.
If you are using Protegrity Provisioned Cluster, then navigate to Protegrity Product Documentation. Then, navigate to Edition > AI Team Edition > Infrastructure > Protegrity REST APIs > Using the Encrypted Resilient Package REST APIs for more information about the RPS API.
The policy package is downloaded to your machine.
Copy the policy package file to cloud storage, as required.
7.4.2.2.2 - Deploying Log Forwarder
The Log Forwarder is deployed as a DaemonSet. The following steps describe how to deploy Log Forwarder.
On the Linux instance, run the following command to create the namespace required for Helm deployment.
kubectl create namespace <Namespace name>For example:
kubectl create namespace iap-javaOn the Linux instance, navigate to the location where you have extracted the Helm charts to deploy the Log Forwarder.
For more information about the extracted Helm charts, refer to the section Extracting the Installation Package.
The logforwarder > values.yaml file contains the default configuration values for deploying the Log Forwarder container on the Kubernetes cluster. The following content shows an extract of the values.yaml file.
... # - Protegrity PSU(Protegrity Storage Unit)/ESA configuration. # Logforwarder will send audit records to below specified hosts/ip. # User can specify multiple PSU/ESA distribute the audit records and avoid downtime. opensearch: # -- specify a given name to uniquely identify PSU/ESA in the deployment. - name: # -- hostname/ip address of PSU/ESA host: # -- port address of ESA/PSU port: 9200 # - name: node-2 # host: test-insight # port: 9200 # -- Kubernetes service configuration, represents a TCP endpoint to receive audit records # from the protectors. service: # -- Configure service type: ClusterIP for Logforwarder endpoint. type: ClusterIP # -- port to accept incoming audit records from the protector port: 15780 ...Modify the default values in the values.yaml file as required.
| Field | Description |
|---|---|
| opensearch/name | Specify the unique name for the ESA. |
| opensearch/host | Specify the host name or IP address of the ESA. |
| opensearch/port | Specify the port number of the ESA. The default value is 9200. |
| service/type | Specify the service type for the Log Forwarder. The default value is ClusterIP. |
| service/port | Specify the service port of the Log Forwarder, which receives the audit logs from the protectors. The default value is 15780. |
- Run the following command to deploy the Log Forwarder on the Kubernetes cluster.
helm install <Release_Name> --namespace <Namespace where you want to deploy the RPP container> <Location of the directory that contains the Helm charts>
For example:
helm install log1 --namespace iap-java <Custom_path>/common/logforwarder/
<Custom_path> is the directory where you have extracted the installation package.
- Run the following command to check the status of the pods.
kubectl get pods -n <Namespace>
For example:
kubectl get pods -n iap-java
NAME READY STATUS RESTARTS AGE
log1-logforwarder-f6gvj 1/1 Running 0 11h
log1-logforwarder-ls4hn 1/1 Running 0 11h
log1-logforwarder-phk4t 1/1 Running 0 11h
log1-logforwarder-z2mz7 1/1 Running 0 11h
As the Log Forwarder is deployed as a DaemonSet, one instance of Log Forwarder is deployed on each node. In this example, one Log Forwarder pod is deployed per node.
For information about configuring the Log Forwarder, refer to the section Configuration Parameters for Forwarding Audits and Logs.
7.4.2.2.3 - Deploying KMSProxy Container
Deploy KMSProxy Container
The following steps describe how to deploy the KMSProxy container.
- Run the following command to generate the TLS server certificate for the KMS-Proxy service.
CreateCertificate_Linux_x64_<Version>.sh server --name <Directory> --dns <Release_Name>.<namespace>.svc
For example:
CreateCertificate_Linux_x64_<Version>.sh server --name kms-proxy-server --dns kms-proxy.<namespace>.svc
For more information about generating the client certificates, refer to the section Creating Certificates.
The following server certificates files are created in the kms-proxy-server folder:
- cert.pem
- cert.key
- CA.pem
- secret.txt
These certificates are used by the protector as a server certificate to authenticate the KMS-Proxy service.
Ensure that the namespace and release name that you specify in this command are the same names that you specify in step 5 while deploying the KMS-Proxy Helm chart.
For more information about the data encryption key used in the AWS KMS, refer to the section Creating an Data Encryption Key (DEK).
2. Run the following command to generate the secret for the KMS-Proxy server certificate.
kubectl -n <KMS-Proxy_Namespace> create secret generic service-certs --from-file=CA.pem=<path-to-CA.pem> --from-file=cert.key=<path-to-cert.key> --from-file=cert.pem=<path-to-cert.pem> --from-file=secret.txt=<path-to-secret.txt>
For more information about generating the client certificates, refer to the section Creating Certificates.
Specify this secret as the value of the service/certificateSecret parameter in the values.yaml file.
On the Linux instance, navigate to the location where you have extracted the Helm charts to deploy the KMSProxy container.
For more information about the extracted Helm charts, refer to the section Extracting the Installation Package.The kms-proxy > values.yaml file contains the default configuration values for deploying the RPP container on the Kubernetes cluster.
...
# -- service account must be linked to a cloud role to access appropriate KMS keyid.
# the cloud role must have decrypt permission on keyid
serviceAccount:
# The name of the service account to use.
name:
# Specify any additional annotation to be associated with pod
podAnnotations:
checksum/kmsproxy-config: '{{ include (print $.Template.BasePath "/configmap.yaml") . | sha256sum }}'
# -- Specify any additional labels to be associated with the pod.
# Cloud agnostic: leave empty for AWS/GCP.
# For Azure Workload Identity (secret-less access to Azure Key Vault), set:
# azure.workload.identity/use: "true"
# and set serviceAccount.name to the workload-identity annotated service account
# (leave kms.credentials empty so no client-secret file is mounted).
podLabels: {}
#azure.workload.identity/use: "true"
## set the Pod's security context object
#---Uncomment the fsGroup setting if deploying on AWS EKS or Azure AKS
podSecurityContext:
#fsGroup: 1000
## set the Container's security context object
#---Uncomment the runAsUser setting if deploying on AWS EKS
securityContext:
capabilities:
drop:
- ALL
readOnlyRootFilesystem: true
runAsNonRoot: true
#runAsUser: 1000
allowPrivilegeEscalation: false
seccompProfile:
type: RuntimeDefault
#-- cloud kms related configuration
kms:
# -- Specify Cloud KMS vendor
# expected values are: AWS, AZURE
vendor: ""
# -- Use the below setting when deploying on Openshift platform.
# -- specify the credentials secret name to access cloud KMS.
# kubectl -n $NAMESPACE create secret generic pty-kms-credentials \
# --from-file=credentials=./credentials
credentials:
#--- specify identifier for RSA key hosted by the cloud KMS.
# In case of AWS identifier is the key ARN (Amazon resource identifier)
# In case of AZURE identifier is the Key Vault key URL, for example:
# https://<vault-name>.vault.azure.net/keys/<key-name>/<key-version>
# The key version is optional; omit it to use the latest version.
keyid: ""
# kms-proxy service configuration
application:
# -- The cache will keep the content(decrypted KEK) for the specified TTL(time to live)
# duration in seconds. Once the TTL expires the value from the cache is cleared.
# Based on amount of time require to update/install the protector deployment, update
# the ttl. Default is 1200 seconds(20 minutes)
ttl: 1200
# -- By default, log level for the application is set to INFO.
# available logging levels ares INFO, DEBUG, TRACE
# to enable http access log set the logLevel to TRACE
logLevel: INFO
# Kubernetes service configuration, represents a HTTP service to host
# kms proxy endpoint.
service:
# -- Configure service type: ClusterIP for kms-proxy endpoint
type: ClusterIP
port: 443
# -- TLS certificate of kms-proxy service.
# kubectl -n $NAMESPACE create secret generic pty-kms-proxy-tls \
# --from-file=cert.pem=./certs/cert.pem \
# --from-file=cert.key=./certs/cert.key \
# --from-file=CA.pem=./ca/CA.pem \
# --from-file=secret.txt=./certs/secret.txt
certificates:
- Modify the default values in the values.yaml file as required.
| Field | Description |
|---|---|
| serviceAccount/name |
|
| podLabels | Enable Azure Workload Identity. Delete the curly braces and uncomment the value of the podLabel parameter. Set the value to azure.workload.identity/use: “true”. This parameter is applicable only if you are deploying the KMSProxy Container to Azure AKS. |
| podSecurityContext | Specify the privilege and access control settings for the pod. The default values are set as follows:
|
| kms/vendor | Specify the cloud vendor. For example, AWS, Azure, or GCP. |
| kms/credentials | Specify the credentials secret name to access the cloud KMS. |
| application/ttl | Specify the time to live in seconds till which the KMSProxy cache retains the decrypted KEK. The default value is 1200, which equals 20 minutes. |
| application/logLevel | Specify the log level for the application. The following values are applicable:
Set this value to TRACE to enable HTTP access log. |
| service/type | Specify the HTTP service type to host the KMSProxy endpoint. The default value is ClusterIP. |
| service/port | Specify the port number for the KMSProxy end point. The default value is 443. |
| service/certificates | Specify the secret value of the TLS certificate for the KMS Proxy service that you have created in step 2. |
5. Run the following command to deploy the KMSProxy container on the Kubernetes cluster.
helm install <Release_Name> --namespace <Namespace to deploy KMSProxy container> <Location of the directory containing Helm charts>
For example:
helm install kmsproxy --namespace iap-java <Custom_path>/spring-apjava-devops/kms-proxy/
<Custom_path> is the directory where you have extracted the installation package.
- Run the following command to check the status of the pods.
oc get pods -n <Namespace>
For example:
oc get pods -n iap-java
NAME READY STATUS RESTARTS AGE
kms-10-v1-kms-proxy-7b97d5dff7-grqph 2/2 Running 0 11h
log1-logforwarder-f6gvj 1/1 Running 0 11h
log1-logforwarder-ls4hn 1/1 Running 0 11h
log1-logforwarder-phk4t 1/1 Running 0 11h
log1-logforwarder-z2mz7 1/1 Running 0 11h
7.4.2.2.4 - Deploying AP Java Container Using Static Method
Prerequisites
Note: This section is applicable only if you are deploying the protector to Azure AKS.
Perform the following steps to ensure that the policy loader pods have access to the Azure Store Blob to download the policy package.
- Run the following command to create a user-assigned identity for the policy loader pod.
az identity create -g $RG -n pty-policy-loader-mi
export MI_CLIENT_ID=$(az identity show -g $RG -n pty-policy-loader-mi --query clientId -o tsv)
- Run the following command grant the user-assigned identity, which was created in step 1, the read access on the Azure Storage Blob containing the policy package.
az role assignment create \
--assignee $MI_CLIENT_ID \
--role "Storage Blob Data Reader" \
--scope "/subscriptions/$SUB/resourceGroups/$RG/providers/Microsoft.Storage/storageAccounts/$ACCT"
- Run the following command to federate the user-assigned identity to a service account.
az identity federated-credential create \
--name pty-policy-loader-fed \
--identity-name pty-policy-loader-mi -g $RG \
--issuer $OIDC \
--subject system:serviceaccount:$NS:pty-policy-loader \
--audience api://AzureADTokenExchange
- Run the following command to create and annotate the Kubernetes service account.
oc -n $NS create serviceaccount pty-policy-loader
oc -n $NS annotate serviceaccount pty-policy-loader azure.workload.identity/client-id=$MI_CLIENT_ID
Deploy AP Java Container
The following steps describe how to deploy the Application Protector Java Container.
- Run the following command to generate the client certificate to authenticate with the KMS-Proxy service.
CreateCertificate_Linux_x64_<Version>.sh client --name <Directory> --dns <Release_Name>.<namespace>.svc
For example:
CreateCertificate_Linux_x64_<Version>.sh client --name kms-client --dns kms-proxy.<namespace>.svc
For more information about generating the client certificates, refer to the section Creating Certificates.
The following client certificates files are created in the kms-client folder:
- cert.pem
- cert.key
- CA.pem
- secret.txt
This certificate is used by the protector as a client certificate to authenticate the protector with the KMS-Proxy service.
Ensure that the namespace and release name that you specify in this command are the same names that you specify in step 5 while deploying the KMS-Proxy Helm chart.
2. Run the following command to generate the secret for the KMS-Proxy client certificate created in step 1.
oc -n <KMS-Proxy_Namespace> create secret generic service-certs --from-file=CA.pem=<path-to-CA.pem> --from-file=cert.key=<path-to-cert.key> --from-file=cert.pem=<path-to-cert.pem> --from-file=secret.txt=<path-to-secret.txt>
For more information about generating the client certificates, refer to the section Creating Certificates.
Specify this secret as the value of the kms/certificates parameter in the values.yaml file.
On the Linux instance, navigate to the location where you have extracted the Helm charts to deploy the Sample Application Protector Java Container.
The spring-apjava-devops > values.yaml file contains the default configuration values for deploying the Sample Application Protector Java Container on the Kubernetes cluster.
## -- create image pull secrets and specify the name here.
## remove the [] after 'imagePullSecrets:' once you specify the secrets
imagePullSecrets: []
# - name: regcred
nameOverride: ""
fullnameOverride: ""
# Sample protector image configuration
springappImage:
# -- sample protector image registry address
repository:
# -- sample protector image tag name
tag:
# -- The pullPolicy for a container and the tag of the image affect
# when the kubelet attempts to pull (download) the specified image.
pullPolicy: IfNotPresent
# policy loader sidecar image configuration
policyLoaderImage:
# -- policy loader sidecar container image registry address
repository:
# -- policy loader sidecar container image tag name
tag:
# -- The pullPolicy for a container and the tag of the image affect
# when the kubelet attempts to pull (download) the specified image.
pullPolicy: IfNotPresent
# specify CPU and memory requirement of Sample springapp protector container
springappContainerResources:
limits:
cpu: 1500m
memory: 3000Mi
requests:
cpu: 1200m
memory: 1000Mi
# specify CPU and memory requirement of policy loader container
policyLoaderResources:
limits:
cpu: 200m
memory: 512Mi
requests:
cpu: 100m
memory: 200Mi
...
...
# -- pod service account to be used.
# A k8s service account can be linked to cloud identity to allow pod to access
# cloud services like Object storage solutions.
serviceAccount:
# The name of the service account to use.
name:
# Specify any additional annotation to be associated with pod
podAnnotations:
checksum/sdk-config: '{{ include (print $.Template.BasePath "/sdk-configmap.yaml") . | sha256sum }}'
# -- Specify any additional labels to be associated with the pod.
# Cloud agnostic: leave empty for AWS/GCP.
# For Azure Workload Identity (secret-less policy fetch from Azure Blob), set:
# azure.workload.identity/use: "true"
# and set serviceAccount.name to the workload-identity annotated service account
# (leave policyPuller.credentials empty so no client-secret file is mounted).
podLabels: {}
#azure.workload.identity/use: "true"
# set the Pod's security context object.
podSecurityContext:
runAsUser: 1000
runAsGroup: 1000
fsGroup: 1000
## set the Spring App Container's security context object
## leave the field empty if not applicable
springappContainerSecurityContext:
capabilities:
drop:
- ALL
allowPrivilegeEscalation: false
privileged : false
runAsNonRoot : true
readOnlyRootFilesystem: true
seccompProfile:
type: RuntimeDefault
# -- set the policy loader sidecar Container's security context object
# leave the field empty if not applicable
policyLoaderContainerSecurityContext:
capabilities:
drop:
- ALL
readOnlyRootFilesystem: true
runAsNonRoot: true
allowPrivilegeEscalation: false
privileged : false
seccompProfile:
type: RuntimeDefault
# protector configuration
protector:
# Session information
session:
# Session timeout in minutes. Default is 15 minutes.
sessiontimeout: 15
# Policy information for the protector initialization
# Note: Policy update is control by policy puller sidecar, Below configuration
# are for protector to refresh policy once it is updated by policy puller sidecar.
policy:
# -- Cadence determines how often the protector connects local filesystem
# to fetch the policy updates in background. Default is 60 seconds.
# So by default, every 60 seconds protector tries to fetch the policy updates.
# If the cadence is set to "0", then the protector will get the policy only
# once, which is not recommended.
cadence: 60
# KMS proxy service configuration
kms:
# -- kms proxy service hostname.
# kms proxy service helps protector to decrypt resilient policy package.
host:
# -- certificates to authenticate with kms proxy service.
# Specify certificate secret name.
# kubectl -n $NAMESPACE create secret generic pty-kms-proxy-tls \
# --from-file=cert.pem=./certs/cert.pem \
# --from-file=cert.key=./certs/cert.key \
# --from-file=CA.pem=./ca/CA.pem \
# --from-file=secret.txt=./certs/secret.txt
certificates:
# Logforwarder configuration
logs:
# -- specify log levels.
# In case that connection to fluent-bit is lost, set how audits/logs are handled
#
# drop : Protector throws logs away if connection to the fluentbit is lost
# error : (default) Protector returns error without protecting/unprotecting
# data if connection to the fluentbit is lost
mode: error
# -- Host/IP of Logforwarder service where audits/logs are forwarded by the
# sample protector
host:
# policy puller sidecar configuration
policyPuller:
# -- Use the below setting when deploying on Openshift platform.
# -- specify the credentials secret name to access cloud KMS.
# kubectl -n $NAMESPACE create secret generic pty-kms-credentials \
# --from-file=credentials=./credentials
credentials:
policy:
# -- Control how often the sidecar application will read the configuration
# file for policy update information.
# Interval is reset when previous pull operation is completed.
# IMPORTANT: do not set interval to 0.
interval: 30
# -- If using VolumeMount as storage destination for policy package
# specify the persistent volume claim name to be used to mount the volume.
pvcName:
# -- Path to KMS encrypted Resilient policy package. Specify an URL encoded
# path to package file. Here are few examples,
# If stored in S3 then, s3://[s3 bucket name]/[to]/<[policy]>/<[package]>
# If stored in GC then, gc://<[path]>/<[to]>/<[policy]>/<[package]>
# If stored in Azure blob, "https://<[account name]>.blob.core.windows.net/<[container name]>/<[path to file]>"
# Important: updating it will not trigger pod restart.
path:
logs:
# -- control policy puller log level
# logs are forwarded to stdout
# Supported Values
# INFO - default
# DEBUG
level: INFO
# -- specify the initial no. of sample protector Pod replicas
replicaCount: 1
# HPA configuration
autoScaling:
# -- lower limit on the number of replicas to which the autoscaler
# can scale down to.
minReplicas: 1
# -- upper limit on the number of replicas to which
# the autoscaler can scale up. It cannot be less that minReplicas.
maxReplicas: 10
# -- CPU utilization threshold which triggers the autoscaler
targetCPU: 70
## specify the ports exposed in your springapp configurations where,
## name - distinguishes between different ports.
## port - the port on which you wan't to expose the service externally.
## targetPort - the port no. configured while creating Tunnel.
springappService:
# allows you to configure service type: LoadBalancer or ClusterIP
type: LoadBalancer
# Specify service related annotations here
annotations:
##AWS
#service.beta.kubernetes.io/aws-load-balancer-internal: "true"
##AZURE
#service.beta.kubernetes.io/azure-load-balancer-internal: "true"
##GCP
#networking.gke.io/load-balancer-type: "Internal"
name: "restapi"
port: 8080
targetPort: 8080
- Modify the default values in the values.yaml file as required.
| Field | Description |
|---|---|
| springappImage | Specify the repository and tag details for the Application Protector Java Container image. |
| policyLoaderImage | Specify the repository and tag details for the Policy Loader image. |
| springappContainerResources | Specify the CPU and memory requirements for the Application Protector Java Container. |
| policyLoaderResources | Specify the CPU and memory requirements for the Policy Loader container. |
| serviceAccount/name | Specify the name of the service account that enables you to access the Object storage solutions of the Cloud service. |
| podLabels | Enable Azure Workload Identity. Delete the curly braces and uncomment the value of the podLabel parameter. Set the value to azure.workload.identity/use: “true”. This parameter is applicable only if you are deploying the KMSProxy Container to Azure AKS. |
| podSecurityContext | Specify the privilege and access control settings for the pod. The default values are set as follows:
|
Container Security Context:
| Specify the privilege and access control settings for the Application Protector Java Container and the Policy Loader containers, respectively. |
| protector/session/sessiontimeout | Specify the time during which a session object is valid. By default, the value is set to 15. The session timeout is measured in minutes. |
| protector/policy/cadence | Specify the time interval in seconds after which the protector retrieves the policy that has been updated by the Policy Loader container. By default, the value is set to 60. Ensure that the value is not set to 0. Else, the protector will retrieve the policy only once. |
| protector/kms/host | Specify the host name of the KMS Proxy service that is used to decrypt the policy package. |
| protector/kms/certificates | Specify the name of the secret for the certificate that is used to authenticate with the KMS Proxy service, which you have created in step 2. |
| protector/logs/mode | Specify one of the following options in case the connection to the Log Forwarder is lost:
By default, the value is set to error. |
| protector/logs/host | Specify the service hostname of the Log Forwarder, where the logs are forwarded. The default value is <Helm_Installation_Name>-<Helm_Chart_Name>. For example, iaplog-logforwarder.iapjava.svc. |
| policyPuller/credentials | Specify the credentials secret name to access the cloud KMS. |
| policyPuller/policy/interval | Specify the time interval in seconds after which the Policy Loader sidecar container will retrieve the policy package from the specified path. By default, the value is set to 30. Ensure that the interval is not set to 0. Else, the Policy Loader container will not retrieve the updated policy package. |
| policyPuller/path | Specify the path where the encrypted policy package has been uploaded. For example, if the package is stored in an AWS S3 bucket, then you need to specify the following path: s3://[s3 bucket name]/[to]/<[policy]>/<[package].If the package is stored in local filesystem VolumeMount, then you need to specify the following path: [to]/<[policy]>/<[package]>. |
| policyPuller/logs/level | Specify the log level of the Policy Loader container. By default, the value is set to INFO. |
| replicaCount | Specify the initial number of the Application Protector Java Container pod replicas. |
| autoScaling | Specify the configurations required for the Horizontal Pod Autoscaling. |
| springappService/type | Specify the service type for the Application Protector Java Container. By default, this value is set to LoadBalancer. |
| springappService/annotations | Specify the annotations for the respective Cloud platforms if you want to use the internal load balancer. By default, this value is left blank. |
| springappService/name | Specify a name for the tunnel to distinguish between ports. By default, the value is set to restapi. |
| springappService/port | Specify the port number on which you want to expose the Kubernetes service externally. By default, the value is set to 8080. |
| springappService/targetport | Specify the port on which the Sample application is running inside the Docker container. By default, the value is set to 8080. |
- Run the following command to deploy the Application Protector Java Container on the Kubernetes cluster.
helm install <Release_Name> --namespace <Namespace where you want to deploy the Application Java Container> <Location of the directory that contains the Helm charts>
For example:
helm install iap-java-devops --namespace iap-java <Custom_path>/spring-apjava-devops/
<Custom_path> is the directory where you have extracted the installation package.
- Run the following command to check the status of the pods.
oc get pods -n <Namespace>
For example:
oc get pods -n iap-java
NAME READY STATUS RESTARTS AGE
kms-10-v1-kms-proxy-7b97d5dff7-grqph 2/2 Running 0 11h
log1-logforwarder-f6gvj 1/1 Running 0 11h
log1-logforwarder-ls4hn 1/1 Running 0 11h
log1-logforwarder-phk4t 1/1 Running 0 11h
log1-logforwarder-z2mz7 1/1 Running 0 11h
iap-java-devops-5fd7d859b6-p9544 1/1 Running 0 11h
Alternatively, if you do not want to modify the values.yaml file, you can use set arguments to update the values during runtime.
For more information about deploying containers using set arguments, refer to the section Appendix - Deploying the Helm Charts by Using the Set Argument.
The test user can run the getVersion API to verify the version of the Application Protector Java Container.
- Run the following command to obtain the service details.
oc get svc -n <Namespace>
For example:
oc get svc -n iap-java
NAME TYPE CLUSTER-IP EXTERNAL-IP PORT(S) AGE
logforwarder ClusterIP 172.20.14.88 <none> 15780/TCP 2m37s
kmsproxy ClusterIP 172.20.181.92 <none> 25400/TCP 113s
iap-java-devops LoadBalancer 172.20.60.61 internal-b70jkfs23423jg8.us-east-1.elb.amazonaws.com 8080:30746/TCP 24s
Use the DNS name of the load balancer that appears in the EXTERNAL-IP column while running the security operations.
For more information about running security operations, refer to the section Running Security Operations.
Run the following command to obtain the IP address of the Load Balancer.
ping <DNS of Load Balancer>For example:
ping internal-b70jkfs23423jg8.us-east-1.elb.amazonaws.comThe following output appears that displays the IP address of the Load Balancer.
PING internal-b70jkfs23423jg8.us-east-1.elb.amazonaws.com (10.49.5.152) 56(84) bytes of data. 64 bytes from ip-10-49-5-152.ec2.internal (10.49.5.152): icmp_seq=1 ttl=255 time=0.831 ms 64 bytes from ip-10-49-5-152.ec2.internal (10.49.5.152): icmp_seq=2 ttl=255 time=0.262 msUse this IP address while running the security operations.
Navigate to the Amazon EC2 Console and edit the inbound rules of the security group of the Load Balancer to ensure that it can receive requests on the
8080port number.
For more information about editing inbound rules for a security group, refer to the section Configure security group rules.
7.4.2.2.5 - Updating the Policy Package
The following steps describe how to update the policy or the policy path.
Modify the policy or the location where the policy has been uploaded.
Run the
helm upgradecommand to update the policy package or the policy package path.
For example, the line --set policyPuller.policy.path="s3://apjavacontainers/static-iap-java-rel-a/try/Sample_App_Policy.tgz" in the following code block indicates that the path where the policy package is stored has changed.
helm -n devops-10-v5 upgrade test-sampleapp-10-v1 spring-apjava-devops/ \
--set imagePullSecrets[0].name="regcred" \
--set springappImage.repository="<Account_ID>.dkr.ecr.<region_name>.amazonaws.com/containers" \
--set springappImage.tag="APJAVA_RHUBI_SAMPLE-10-v14-v1" \
--set policyLoaderImage.repository="<Account_ID>.dkr.ecr.<region_name>.amazonaws.com/containers" \
--set policyLoaderImage.tag="POLICY-LOADER_RHUBI-9-64_x86-64_K8S_1.0.0.13.e0beab.tgz" \
--set protector.kms.host="test-kms-10-v1-kms-proxy.devops-10-v5.svc" \
--set protector.kms.certificates="pty-certs-cli-secret" \
--set protector.logs.host="test-logforwarder10-v1.devops-10-v5.svc" \
**--set policyPuller.policy.path="s3://apjavacontainer/new-10-49-7-212/iap-java-policy-core-big-10-49-7-212.json"**
For more information about using set arguments to deploy the Protector, refer to the section Appendix - Deploying the Helm Charts by Using the Set Argument.
- Run the following command to check the status of the pods.
oc get pods -n <Namespace>
For example:
oc get pods -n iap-java
NAME READY STATUS RESTARTS AGE
test-devops-logforwarder10-v1-2m49b 1/1 Running 0 163m
test-devops-logforwarder10-v1-wwjzh 1/1 Running 0 165m
test-kms-10-v1-kms-proxy-687657cff9-dlzdz 1/1 Running 0 161m
test-sampleapp-10-v1-iap-java-devops-54668997cf-kw628 3/3 Running 0 5m11s
- Run the following command to check the logs.
oc logs <Pod_name> -n <Namespace> -f
For example:
oc logs test-sampleapp-10-v1-iap-java-devops-54668997cf-kw628 -n iap-java -f
The following logs appear on the console output. The line [INFO ] 2025/10/29 11:47:19.335550 runner.go:226: New Policy source path s3://apjavacontainers/new-10-49-7-212/new/policy-sample-app-10-49-7-212-v1.json indicates that the policy package path has been updated.
Defaulted container "policy-loader" out of: policy-loader, iap-java-devops
[INFO ] 2025/10/29 11:45:16.090634 runner.go:104: starting policy loader with version: 1.0.0+13.e0beab
Starting Health Server.
[INFO ] 2025/10/29 11:45:16.090811 runner.go:187: fetching policy from storage media, AWS_S3
[INFO ] 2025/10/29 11:45:16.313683 runner.go:196: Loading policy from source path s3://apjavacontainers/new-10-49-7-212/policy-v1-10-49-7-212.json
[root@ip-10-49-5-222 ~]# oc logs test-sampleapp-10-v1-iap-java-devops-7f4f9b9cc4-zbbkg -n devops-10-v6 -f
Defaulted container "policy-loader" out of: policy-loader, iap-java-devops
[INFO ] 2025/10/29 11:45:16.090634 runner.go:104: starting policy loader with version: 1.0.0+13.e0beab
Starting Health Server.
[INFO ] 2025/10/29 11:45:16.090811 runner.go:187: fetching policy from storage media, AWS_S3
[INFO ] 2025/10/29 11:45:16.313683 runner.go:196: Loading policy from source path s3://apjavacontainers/new-10-49-7-212/policy-v1-10-49-7-212.json
[INFO ] 2025/10/29 11:45:48.914901 runner.go:220: fetching policy from storage media, AWS_S3
[INFO ] 2025/10/29 11:45:48.914935 runner.go:242: Policy source path is same. Checking based on timestamp.
[INFO ] 2025/10/29 11:45:49.057011 runner.go:250: Policy source is not modified since last fetch. Skipping policy load operation.
[INFO ] 2025/10/29 11:46:19.057887 runner.go:220: fetching policy from storage media, AWS_S3
[INFO ] 2025/10/29 11:46:19.057916 runner.go:242: Policy source path is same. Checking based on timestamp.
[INFO ] 2025/10/29 11:46:19.201224 runner.go:250: Policy source is not modified since last fetch. Skipping policy load operation.
[INFO ] 2025/10/29 11:46:49.201456 runner.go:220: fetching policy from storage media, AWS_S3
[INFO ] 2025/10/29 11:46:49.201485 runner.go:242: Policy source path is same. Checking based on timestamp.
[INFO ] 2025/10/29 11:46:49.335206 runner.go:250: Policy source is not modified since last fetch. Skipping policy load operation.
[INFO ] 2025/10/29 11:47:19.335501 runner.go:220: fetching policy from storage media, AWS_S3
[INFO ] 2025/10/29 11:47:19.335536 runner.go:224: Policy source path is modified. Triggering policy load operation.
[INFO ] 2025/10/29 11:47:19.335545 runner.go:225: Old Policy source path s3://apjavacontainers/new-10-49-7-212/policy-v1-10-49-7-212.json.
[INFO ] 2025/10/29 11:47:19.335550 runner.go:226: New Policy source path s3://apjavacontainers/new-10-49-7-212/new/policy-sample-app-10-49-7-212-v1.json
7.4.2.2.6 - Uninstalling the Protector in Static Method
To uninstall the Protector:
- Run the following command to uninstall the Log Forwarder from the Kubernetes cluster.
helm uninstall <Release_Name> --namespace <Namespace where the Log Forwarder is deployed>
For example:
helm uninstall log1 --namespace iap-java
- Run the following command to uninstall the KMSProxy container from the Kubernetes cluster.
helm uninstall <Release_Name> --namespace <Namespace where KMSProxy container is deployed>
For example:
helm uninstall kmsproxy --namespace iap-java
- Run the following command to uninstall the Application Protector Java Container from the Kubernetes cluster.
helm uninstall <Release_Name> --namespace <Namespace where the AP Java Container is deployed>
For example:
helm uninstall iap-java-devops --namespace iap-java
- Run the following command to delete the Kubernetes secrets.
oc delete secret <Secret_Name> --namespace <Namespace where the AP Java Container is deployed>
For example:
oc delete secret service-certs --namespace iap-java
Repeat this step to delete all the secrets that you have created while deploying the KMSProxy container and the Application Protector Java Container:
- service-certs
- regcred
- Run the following command to delete the Kubernetes namespace.
helm delete namespace <Namespace where the AP Java Container is deployed>
For example:
helm delete namespace iap-java
7.5 - Running Security Operations
This section describes how you can use the Sample Application instances running on the Kubernetes cluster to protect the data that is sent by a REST API client.
To run security operations:
- Send the following CURL request from the Linux instance.
curl --location --request POST 'http://<DNS name or IP address of the Load Balancer>:8080/protect' --header 'Content-Type: application/json' --header 'X-Correlation-ID: k81d1fae-7dec-41g0-a765-90a0c31e6wf5' --data-raw '{ "dataElement": "Alphanum", "policyUser": "user1", "input": [ "protegrity1234","helloworld" ] }' -v
The Application Protector Java Container instance returns the following protected output.
{"output":["pLAvXYIAbp5234","hCkp7o0rld"],"errorMsg":"None"}
If you want to unprotect the data, then you can run the following command.
curl --location --request POST 'http://<DNS name or IP address of the Load Balancer>:8080/unprotect' --header 'Content-Type: application/json' --header 'X-Correlation-ID: k81d1fae-7dec-41g0-a765-90a0c31e6wf5' --data-raw '{ "dataElement": "TE_A_N_S13_L0R0_Y_ST", "policyUser": "user1", "input": [ "pLAvXYIAbp5234","hCkp7o0rld" ] }' -v
The Application Protector Java Container instance returns the following protected output.
{"output":["protegrity1234","helloworld"],"errorMsg":"None"}
If you want to reprotect the data, then you can run the following command.
curl --location --request POST 'http://<DNS name or IP address of the Load Balancer>:8080/reprotect' --header 'Content-Type: application/json' --header 'X-Correlation-ID: k81d1fae-7dec-41g0-a765-90a0c31e6wf5' --data-raw '{ "dataElement": "TE_A_N_S13_L0R0_Y_ST", "newDataElement": "TE_A_N_S13_L1R3_N", "policyUser": "user1", "input": [ "iaDDNBdH6EI8U","9jB7cRSuk98B" ] }' -v
{"output":["pXvJPSIPAbp5689","hDl83ns2d"],"errorMsg":"None"}
For more information about the AP Java APIs, refer to the following section Application Protector Java APIs.
For more information about the AP Java API return codes, refer to the section Application Protector API Return Codes.
Access the audit logs from the Insights Dashboard.
For more information about accessing the audit logs, refer to the section Working with Discover.
7.6 - Upgrading the Protector from Version 9.x to 10.x
This section explains the steps and procedure to upgrade the Application Java Container protector from version 9.x to 10.x. This method is used for a major release upgrade. For example, this upgrade procedure is used in case of architectural changes.
Upgrade Approach
The 9.x and 10.x versions include different components and resource requirements as part of the deployment. As a result, the approach uses the following steps:
- Create a 10.x setup in a different namespace.
- Run test traffic to the 10.x setup to verify that the security operations are working.
- Stop the traffic to the 9.x setup and make changes to point the traffic to the 10.x setup.
- Switch the production traffic from the 9.x deployment to the 10.x deployment.
Before you begin
- Ensure that you have access to the Kubernetes cluster with appropriate permissions. For more information about the required permissions, refer to the section Software Requirements.
- Ensure that you have a separate directory structure for the 9.x and 10.x deployments.
- Ensure that your container logs are accessible. These can be used to verify the deployment.
- Ensure that the Container images for 10.x version are uploaded in the Container registry.
- Ensure that the protector pods for the 9.x version are running and are in a healthy state.
- Ensure that the required security policy is available on the 10.x ESA.
Upgrading the Protector in Dynamic Mode
Perform the following steps to upgrade the protector from 9.x to 10.x in dynamic mode.
- Install 10.x Log Forwarder.
helm -n test-v1 install test-rpp-logforwarder-v1 logforwarder/ \
--set imagePullSecrets[0].name="regcred" \
--set image.repository="<AWS_ID>.dkr.ecr.us-east-1.amazonaws.com/container" \
--set image.tag="LOGFORWARDER_RHUBI-9-64_x86-64_K8S_10.0.1.6.019e32.tgz" \
--set service.port=15780 \
--set opensearch[0].name="node-1" \
--set opensearch[0].host="10.49.7.212" \
--set opensearch[0].port="9200"
Ensure that the set image.tag and set image.repository fields are assigned the appropriate values.
For more information about installing Log Forwarder, refer to the section Installing the Protector.
- Install 10.x RPP.
helm -n rpp-v1 install test-rpp-v1 rpproxy/ \
--set imagePullSecrets[0].name="regcred" \
--set image.repository="<AWS_ID >.dkr.ecr.us-east-1.amazonaws.com/container" \
--set image.tag="RPPROXY_RHUBI-9-64_x86-64_K8S_1.8.1.8.0bba4b.tgz" \
--set commonCertSecrets="common-certs-v1" \
--set rpp.upstream.host="10.49.7.212" \
--set rpp.upstream.port="25400" \
--set rpp.logging.logLevel="DEBUG" \
--set rpp.logging.logHost="test-rpp-logforwarder-v1.rpp-v1.svc" \
--set rpp.logging.logPort="15780" \
--set rpp.service.cacheTTL="60"
Ensure that the set image.tag and set image.repository fields are assigned the appropriate values.
For more information about installing RPP, refer to the section Installing the Protector.
Validate the RPP pod details on the ESA after installation.
a. Log in to the ESA and navigate to Audit Store > Dashboard.
b. Navigate to Logs > Eventexplorer.
c. Change the logs search to
DQLand change the filter topty_insights_analytics*troubleshooting_*.d. Search for <RPP pod name>.
The origin IP mentioned should be updated to the latest pod after the pod upgrade.
e. To get the pod IP , run the following command.
kubectl get pods -n <namespace> -o wideInstall 10.x Protector using the following command.
helm -n rpp-v1 install test-dynamic-10-v1 iap-java-dynamic/ \
--set springappImage.repository="<AWS_ID>.dkr.ecr.us-east-1.amazonaws.com/container" \
--set springappImage.tag="ApplicationProtector_RHUBI-9-64_x86-64_K8S_10.0.0.34.22f868.tgz" \
--set nginxImage.repository="<AWS_ID>.dkr.ecr.us-east-1.amazonaws.com/container" \
--set nginxImage.tag="nginx-unprivileged-1.28" \
--set protector.policy.cadence="60" \
--set protector.policy.host="test-rpp-v1-rpproxy.rpp-v1.svc" \
--set protector.policy.certificates="common-certs-v1" \
--set protector.logs.mode="error" \
--set protector.logs.host="test-rpp-logforwarder-v1.rpp-v1.svc" \
--set service.certificates="pty-secret" \
--set service.type="LoadBalancer" \
--set service.port="443" \
--set service.annotations."service\.beta\.kubernetes\.io\/aws-load-balancer-internal"=\"true\"
- Run the following command to check the status of the pods.
kubectl get pods -n <Namespace>
For example:
kubectl get pods -n iap-java
The following output appears.
NAME READY STATUS RESTARTS AGE
iap-java-dynamic-7b97d5dff7-grqph 2/2 Running 0 11h
log1-logforwarder-f6gvj 1/1 Running 0 11h
log1-logforwarder-ls4hn 1/1 Running 0 11h
log1-logforwarder-phk4t 1/1 Running 0 11h
log1-logforwarder-z2mz7 1/1 Running 0 11h
rpp-rpproxy-5fd7d859b6-p9544 1/1 Running 0 11h
- Run the following command to obtain the service details.
kubectl get svc -n <Namespace>
For example:
kubectl get svc -n iap-java
The following output appears.
NAME TYPE CLUSTER-IP EXTERNAL-IP PORT(S) AGE
logforwarder ClusterIP 172.20.14.88 <none> 15780/TCP 2m37s
rpproxy ClusterIP 172.20.181.92 <none> 25400/TCP 113s
iap-java-dynamic LoadBalancer 172.20.60.61 internal-a70jkfsdf98908.us-east-1.elb.amazonaws.com 8080:30746/TCP 24s
Use the DNS name of the load balancer that appears in the EXTERNAL-IP column while running the security operations.
For more information about running security operations, refer to the section Running Security Operations.
Run the following command to obtain the IP address of the Load Balancer.
ping <DNS of Load Balancer>For example:
ping internal-b70jkfs23423jg8.us-east-1.elb.amazonaws.comThe following output appears and displays the IP address of the Load Balancer.
PING internal-b70jkfs23423jg8.us-east-1.elb.amazonaws.com (10.49.5.152) 56(84) bytes of data. 64 bytes from ip-10-49-5-152.ec2.internal (10.49.5.152): icmp_seq=1 ttl=255 time=0.831 ms 64 bytes from ip-10-49-5-152.ec2.internal (10.49.5.152): icmp_seq=2 ttl=255 time=0.262 msUse this IP address while running the security operations.
Navigate to the Amazon EC2 Console and edit inbound rules of the Load Balancer security group to ensure that it can receive requests on port number
8080.For more information about editing inbound rules for a security group, refer to the section Configure security group rules.
Validate the service of pod as mentioned below
kubectl get endpoints <service-name> -n <namespace>
For example:
kubectl get endpoints test-sampleapp-10-v1-iap-java -n 10-v2
Warning: v1 Endpoints is deprecated in v1.33+; use discovery.k8s.io/v1 EndpointSlice
NAME ENDPOINTS AGE
test-sampleapp-10-v1-iap-java 10.49.6.229:8443 9m7s
Verify that the IP address mentioned in the output is the same one that you get after running the kubectl get pods command.
- Run test protect and unprotect operations and verify functionality.
For more information about running security operations, refer to the section Running Security Operations.
Validate the Audit logs on the ESA.
a. Login to ESA and navigate to Audit Store > Dashboard.
b. Navigate to Logs > Eventexplorer.
c. Change the logs search to
DQL.d. Refresh the page to sync up the logs.
e. Verify that the logs for the security operations performed in step 10 are displayed.
If the 10.x deployment is working, then switch the production traffic to 10.x and monitor the traffic and scaling pods. If everything is working, then bring down the 9.x deployment.
Upgrading the Protector in Static Mode
Perform the following steps to upgrade the protector from 9.x to 10.x in static mode.
- Install 10.x Log Forwarder.
helm -n test-v1 install test-logforwarder-v1 logforwarder/ \
--set imagePullSecrets[0].name="regcred" \
--set image.repository="<AWS_ID>.dkr.ecr.us-east-1.amazonaws.com/container" \
--set image.tag="LOGFORWARDER_RHUBI-9-64_x86-64_K8S_10.0.1.6.019e32.tgz" \
--set service.port=15780 \
--set opensearch[0].name="node-1" \
--set opensearch[0].host="10.49.7.212" \
--set opensearch[0].port="9200"
Ensure that the set image.tag and set image.repository fields are assigned the appropriate values.
For more information about installing Log Forwarder, refer to the section Installing the Protector.
- Install the KMS Pod using the following command.
helm -n devops-10-v2 install test-kms-10-v1 kms-proxy/ \
--set imagePullSecrets[0].name="regcred" \
--set image.repository="<AWS_ID>.dkr.ecr.us-east-1.amazonaws.com/container" \
--set image.tag="KMSPROXY_RHUBI-9-64_x86-64_K8S_1.0.0.11.31d6f0.tgz" \
--set serviceAccount.name="kms-v1-sa" \
--set kms.vendor="AWS" \
--set kms.keyid="arn:aws:kms:us-east-1:<AWS_ID>:key/c4be5e1a-fbdd-4a8e-aed6-0202d806274f" \
--set kms.ttl="1200" \
--set application.logLevel="INFO" \
--set service.certificates="pty-certs-secret
For more information about installing the KMS Proxy Container, refer to the section Installing the Protector.
- Install 10.x Protector using the following command.
helm -n v1 install test-static-10-v1 iap-java-static/ \
--set springappImage.repository="<AWS_ID>.dkr.ecr.us-east-1.amazonaws.com/container" \
--set springappImage.tag="ApplicationProtector_RHUBI-9-64_x86-64_K8S_10.0.0.34.22f868.tgz" \
--set nginxImage.repository="<AWS_ID>.dkr.ecr.us-east-1.amazonaws.com/container" \
--set nginxImage.tag="nginx-unprivileged-1.28" \
--set protector.policy.cadence="60" \
--set protector.policy.host="test-kms-v1-kmsproxy.v1.svc" \
--set protector.policy.certificates="common-certs-v1" \
--set protector.logs.mode="error" \
--set protector.logs.host="test-rpp-logforwarder-v1.v1.svc" \
--set service.certificates="pty-secret" \
--set service.type="LoadBalancer" \
--set service.port="443" \
--set service.annotations."service\.beta\.kubernetes\.io\/aws-load-balancer-internal"=\"true\"
- Run the following command to check the status of the pods.
kubectl get pods -n <Namespace>
For example:
kubectl get pods -n iap-java
NAME READY STATUS RESTARTS AGE
iap-java-static-7b97d5dff7-grqph 2/2 Running 0 11h
log1-logforwarder-f6gvj 1/1 Running 0 11h
log1-logforwarder-ls4hn 1/1 Running 0 11h
log1-logforwarder-phk4t 1/1 Running 0 11h
log1-logforwarder-z2mz7 1/1 Running 0 11h
kms-proxy-5fd7d859b6-p9544 1/1 Running 0 11h
- Run the following command to obtain the service details.
kubectl get svc -n <Namespace>
For example:
kubectl get svc -n iap-java
The following output appears.
NAME TYPE CLUSTER-IP EXTERNAL-IP PORT(S) AGE
logforwarder ClusterIP 172.20.14.88 <none> 15780/TCP 2m37s
kms-proxy ClusterIP 172.20.181.92 <none> 443/TCP 113s
iap-java-static LoadBalancer 172.20.60.61 internal-a70jkfsdf98908.us-east-1.elb.amazonaws.com 8080:30746/TCP 24s
Use the DNS name of the load balancer that appears in the EXTERNAL-IP column while running the security operations.
For more information about running security operations, refer to the section Running Security Operations.
Run the following command to obtain the IP address of the Load Balancer.
ping <DNS of Load Balancer>For example:
ping internal-b70jkfs23423jg8.us-east-1.elb.amazonaws.comThe following output appears and displays the IP address of the Load Balancer.
PING internal-b70jkfs23423jg8.us-east-1.elb.amazonaws.com (10.49.5.152) 56(84) bytes of data. 64 bytes from ip-10-49-5-152.ec2.internal (10.49.5.152): icmp_seq=1 ttl=255 time=0.831 ms 64 bytes from ip-10-49-5-152.ec2.internal (10.49.5.152): icmp_seq=2 ttl=255 time=0.262 msUse this IP address while running the security operations.
Navigate to the Amazon EC2 Console and edit inbound rules of the Load Balancer security group to ensure that it can receive requests on port number
8080.For more information about editing inbound rules for a security group, refer to the section Configure security group rules.
Run the following command to validate the service of the pod.
kubectl get endpoints <service-name> -n <namespace>
For example:
kubectl get endpoints test-sampleapp-10-v1-iap-java -n 10-v2
The following output appears.
Warning: v1 Endpoints is deprecated in v1.33+; use discovery.k8s.io/v1 EndpointSlice
NAME ENDPOINTS AGE
test-sampleapp-10-v1-iap-java 10.49.6.229:8443 9m7s
Verify that the IP address mentioned in the output is the same one that you get after running the kubectl get pods command.
- Run test protect and unprotect operations and verify functionality.
For more information about running security operations, refer to the section Running Security Operations.
Validate the Audit logs on the ESA.
a. Login to ESA and navigate to Audit Store > Dashboard.
b. Navigate to Logs > Eventexplorer.
c. Change the logs search to
DQL.d. Refresh the page to sync up the logs.
e. Verify that the logs for the security operations performed in step 10 are displayed.
If the 10.x deployment is working, then switch the production traffic to 10.x and monitor the traffic and scaling pods. If everything is working, then bring down the 9.x deployment.
Rolling Back the Upgrade Procedure
Perform the following steps to roll back any failed upgrade procedure:
Ensure the 9.x deployment is running succesfully.
Ensure that the IP address of the 9.x service is updated in the hosts file or the Client configuration and switch traffic back to 9.x.
Delete the failing 10.x deployment.
7.7 - Upgrading the Protector from Version 10.x to 10.y
This section explains the steps and procedure for performing a rolling upgrade and roll back on a Kubernetes deployment consisting of pods. This method is useful for maintenance releases such as bug fixes and CVE updates. In this method, the protector is upgraded from version 10.x to version 10.y.
Before you begin
- Ensure that you have access to the Kubernetes cluster with appropriate permissions. For more information about the required permissions, refer to the section Software Requirements.
- Ensure that you have a separate directory structure for the 10.x and 10.y deployments.
- Ensure that your container logs are accessible. These can be used to verify the deployment.
- Ensure that the Container images for 10.y version are uploaded in the Container registry.
- Ensure that the protector pods for the 10.x version are running and are in a healthy state.
- Ensure that the required security policy is available on the 10.y ESA.
Rolling Upgrade Steps for Dynamic Deployment
This section explains how to perform a rolling upgrade for dynamic deployment.
Perform the following steps to upgrade the Log Forwarder.
i. Run the following command to check the Log Forwarder pods running on each node.
kubectl get pods
ii. Run the following command to upgrade the Log Forwarder pod.
helm -n v1 upgrade test-logforwarder-v1 logforwarder/ \
--atomic --timeout 2m \
--set imagePullSecrets[0].name="regcred" \
--set image.repository="<aws_account_id>.dkr.ecr.us-east-1.amazonaws.com/container" \
--set image.tag="LOGFORWARDER_RHUBI-9-64_x86-64_K8S_10.0.1.6.019e32.tgz" \
--set service.port=15780 \
--set opensearch[0].name="node-1" \
--set opensearch[0].host="10.49.7.212" \
--set opensearch[0].port="9200"
Ensure that the fields image.tag and image.repository are assigned appropriate values.
iii. Run the following command to get the daemonset value.
kubectl get daemonset -n v1
The following output appears.
NAME DESIRED CURRENT READY UP-TO-DATE AVAILABLE NODE SELECTOR AGE
test-logforwarder-v1 2 2 2 2 2 <none> 5h27m
iv. Run the following command to verify the rollout status.
kubectl rollout status daemonset test-logforwarder-v1 -n v1
The following output appears.
daemon set "test-logforwarder-v1" successfully rolled out
v. Run the following command to validate the pod status.
kubectl get pods -n <namespace>
The following output appears.
NAME READY STATUS RESTARTS AGE
test-logforwarder-v1-6nc8m 1/1 Running 0 8h
test-logforwarder-v1-pms6f 1/1 Running 0 8h
Additionally, you can run kubectl describe pod to check the version from the latest image. After the upgrade is completed, validate that the logs are appearing on the Audit Store in the ESA.
Perform the following steps to upgrade the RPP pod.
i. Run the following command to upgrade the RPP pod.
helm -n v1 upgrade test-rpp-v1 rpproxy/ \
--atomic --timeout 2m \
--set imagePullSecrets[0].name="regcred" \
--set image.repository="<aws_account_id>.dkr.ecr.us-east-1.amazonaws.com/container" \
--set image.tag="RPPROXY_RHUBI-9-64_x86-64_K8S_1.8.1.8.0bba4b.tgz" \
--set commonCertSecrets="common-certs-v1" \
--set rpp.upstream.host="10.49.7.212" \
--set rpp.upstream.port="25400" \
--set rpp.logging.logLevel="DEBUG" \
--set rpp.logging.logHost="test-rpp-logforwarder-v1.v1.svc" \
--set rpp.logging.logPort="15780" \
--set rpp.service.cacheTTL="60"
Ensure that the fields image.tag and image.repository are assigned appropriate values.
ii. Run the following command to get the deployment value.
For example:
kubectl get deployment -n v1
The following output appears.
NAME READY UP-TO-DATE AVAILABLE AGE
test-rpp-v1-rpproxy 1/1 1 1 25h\
iii. Run the following command to verify the rollout status.
kubectl rollout status deployment test-java-dynamic-10-v1-iap-java-dynamic -n v1
The following output appears.
deployment "test-java-dynamic-10-v1-iap-java-dynamic" successfully rolled out
iv. Run the following command to get the pod details.
kubectl get pods -n <namespace>
The following output appears.
NAME READY STATUS RESTARTS AGE
test-rpp-logforwarder-v1-6nc8m 1/1 Running 0 8h
test-rpp-logforwarder-v1-pms6f 1/1 Running 0 8h
test-rpp-v1-rpproxy-5f78d4f9f4-dnndb 1/1 Running 0 8h
v. Run the following command to validate the RPP pod details on the ESA after the upgrade procedure.
a. Log in to the ESA and navigate to Audit Store > Dashboard.
b. Navigate to Logs > Eventexplorer.
c. Change the logs search to DQL and change the filter to pty_insights_analytics*troubleshooting_*.
d. Search for <RPP Pod name>.
The origin IP mentioned should be updated to the latest pod after pod upgrade.
e. To get the pod IP, run the following command.
kubectl get pods -n <namespace> -o wide
Perform the following steps to upgrade the Protector pod.
i. Run the following command to upgrade the Protector pod.
helm -n v1 upgrade test-dynamic-10-v1 iap-java-dynamic/ \
--atomic --timeout 2m \
--set springappImage.repository="<AWS_ID>.dkr.ecr.us-east-1.amazonaws.com/container" \
--set springappImage.tag="ApplicationProtector_RHUBI-9-64_x86-64_Generic.K8S.JRE-1.8_10.1.0+4.2e1243.tgz" \
--set protector.policy.cadence="60" \
--set protector.policy.host="test-rpp-v1-rpproxy.v1.svc" \
--set protector.policy.certificates="common-certs-v1" \
--set protector.logs.mode="error" \
--set protector.logs.host="test-rpp-logforwarder-v1.svc" \
--set service.type="LoadBalancer" \
--set springappService.type="LoadBalancer"
--set springappService.annotations."service\.beta\.kubernetes\.io\/aws-load-balancer-internal"=\"true\"
ii. Run the following command to get the deployment details.
kubectl get deployment -n v1
The following output appears.
NAME READY UP-TO-DATE AVAILABLE AGE
test-dynamic-10-v1-iap-java-dynamic 1/1 1 1 25h
test-rpp-v1-rpproxy 1/1 1 1 25h
iii. Run the following command to get the rollout status.
kubectl rollout status deployment test-dynamic-10-v1-iap-java-dynamic -n v1
The following output appears.
deployment "test-dynamic-10-v1-iap-java-dynamic" successfully rolled out
iv. Run the following command to get the pod details.
kubectl get pods -n <namespace>
The following output appears.
NAME READY STATUS RESTARTS AGE
test-dynamic-10-v1-iap-java-dynamic-6dcfd46c8d-dgqfv 2/2 Running 0 8h
test-logforwarder-v1-6nc8m 1/1 Running 0 8h
test-logforwarder-v1-pms6f 1/1 Running 0 8h
test-v1-rpproxy-5f78d4f9f4-dnndb 1/1 Running 0 8h
Perform the following steps to verify the rollout upgrade.
i. Run the following command to verify that all the pods are running the new version.
kubectl get pods -n <namespace>
The following output appears.
NAME READY STATUS RESTARTS AGE
test-dynamic-10-v1-iap-java-dynamic-6dcfd46c8d-dgqfv 2/2 Running 0 8h
test-logforwarder-v1-6nc8m 1/1 Running 0 8h
test-logforwarder-v1-pms6f 1/1 Running 0 8h
test-v1-rpproxy-5f78d4f9f4-dnndb 1/1 Running 0 8h
ii. Run the following command to verify the updated image tag.
kubectl describe pod <pod name> -n <namespace>
The following output appears.
Type Reason Age From Message
---- ------ ---- ---- -------
Normal Scheduled 46m default-scheduler Successfully assigned rpp-v1/test-rpp-v1-rpproxy-5f78d4f9f4-cphhh to ip-10-49-5-188.ec2.internal
Normal Pulling 46m kubelet Pulling image "<AWS_ID>.dkr.ecr.us-east-1.amazonaws.com/container:RPPROXY_RHUBI-9-64_x86-64_K8S_1.9.3.8.ec81ce.tgz"
Normal Pulled 46m kubelet Successfully pulled image "<AWS_ID>.dkr.ecr.us-east-1.amazonaws.com/container:RPPROXY_RHUBI-9-64_x86-64_K8S_1.9.3.8.ec81ce.tgz" in 3.612s (3.612s including waiting). Image size: 40588092 bytes.
Normal Created 46m kubelet Created container: pty-rpproxy
Normal Started 46m kubelet Started container pty-rpproxy
iii. Run the following command to view the rollout history.
helm history <deploymentname> -n <namespace>
The following output appears.
REVISION UPDATED STATUS CHART APP VERSION DESCRIPTION
1 Mon Dec 1 09:58:30 2025 superseded rpproxy-1.0.0 1.9.3.8.xxxxxx Install complete
2 Mon Dec 1 10:15:01 2025 deployed rpproxy-1.0.0 1.9.3.8.xxxxxx Upgrade complete
iv. Run the following command to get the service details.
kubectl get svc -n <Namespace>
For example:
kubectl get svc -n iap-java
The following output appears.
NAME TYPE CLUSTER-IP EXTERNAL-IP PORT(S) AGE
logforwarder ClusterIP 172.20.14.88 <none> 15780/TCP 2m37s
rpproxy ClusterIP 172.20.181.92 <none> 443/TCP 113s
test-sampleapp-10-v1-iap-java LoadBalancer 172.20.60.61 internal-a70jkfsdf98908.us-east-1.elb.amazonaws.com 8080:30746/TCP 24s
v. Run the following command to validate the service of the pod.
kubectl get endpoints <service-name> -n <namespace>
For example:
kubectl get endpoints test-sampleapp-10-v1-iap-java -n 10-v2
The following output appears.
NAME ENDPOINTS AGE
test-sampleapp-10-v1-iap-java 10.49.10.xxx:9080 22h
Rolling Upgrade Steps for Static Deployment
This section explains how to perform rolling upgrade for static deployment.
Perform the following steps to upgrade the Log Forwarder.
i. Run the following command to check the Log Forwarder pods running on each node.
kubectl get pods
ii. Run the following command to upgrade the Log Forwarder pod.
helm -n v1 upgrade test-logforwarder-v1 logforwarder/ \
--atomic --timeout 2m \
--set imagePullSecrets[0].name="regcred" \
--set image.repository="<aws_account_id>.dkr.ecr.us-east-1.amazonaws.com/container" \
--set image.tag="LOGFORWARDER_RHUBI-9-64_x86-64_K8S_10.0.1.6.019e32.tgz" \
--set service.port=15780 \
--set opensearch[0].name="node-1" \
--set opensearch[0].host="10.49.7.212" \
--set opensearch[0].port="9200"
Ensure that the fields image.tag and image.repository are assigned appropriate values.
iii. Run the following command to get the daemonset value.
kubectl get daemonset -n v1
The following output appears.
NAME DESIRED CURRENT READY UP-TO-DATE AVAILABLE NODE SELECTOR AGE
test-logforwarder-v1 2 2 2 2 2 <none> 5h27m
iv. Run the following command to verify the rollout status.
kubectl rollout status daemonset test-logforwarder-v1 -n v1
The following output appears.
daemon set "test-logforwarder-v1" successfully rolled out
v. Run the following command to validate the pod status.
kubectl get pods -n <namespace>
The following output appears.
NAME READY STATUS RESTARTS AGE
test-logforwarder-v1-6nc8m 1/1 Running 0 8h
test-logforwarder-v1-pms6f 1/1 Running 0 8h
Additionally, you can run kubectl describe pod to check the version from the latest image. After the upgrade is completed, validate that the logs are appearing on the Audit Store in the ESA.
Perform the following steps to upgrade the KMS-Proxy pod.
i. Run the following command to upgrade the KMS-Proxy pod.
helm -n devops-10-v2 upgrade test-kms-10-v1 kms-proxy/ \
--atomic --timeout 2m \
--set imagePullSecrets[0].name="regcred" \
--set image.repository="<AWS_ID>.dkr.ecr.us-east-1.amazonaws.com/container" \
--set image.tag="KMSPROXY_RHUBI-9-64_x86-64_K8S_1.0.0.11.31d6f0.tgz" \
--set serviceAccount.name="kms-v1-sa" \
--set kms.vendor="AWS" \
--set kms.keyid="arn:aws:kms:us-east-1:<AWS_ID>:key/c4be5e1a-fbdd-4a8e-aed6-0202d806274f" \
--set kms.ttl="1200" \
--set application.logLevel="INFO" \
--set service.certificates="pty-certs-secret"
Ensure that the fields image.tag and image.repository are assigned appropriate values.
ii. Run the following command to get the deployment details.
kubectl get deployment -n 10-v1
The following output appears.
NAME READY UP-TO-DATE AVAILABLE AGE
test-kms-10-v1-kms-proxy 1/1 1 1 18d
iii. Run the following command to check the rollout status.
kubectl rollout status deployment test-kms-10-v1-kms-proxy -n 10-v1
The following output appears.
deployment "test-kms-10-v1-kms-proxy" successfully rolled out
iv. Run the following command to validate the pod status.
kubectl get pods -n <namespace>
Perform the following steps to upgrade the Protector pod.
i. Run the following command to upgrade the Protector pod.
helm -n v1 upgrade test-static-10-v1 iap-java-static/ \
--atomic --timeout 2m \
--set springappImage.repository="<AWS_ID>.dkr.ecr.us-east-1.amazonaws.com/container" \
--set springappImage.tag="ApplicationProtector_RHUBI-9-64_x86-64_Generic.K8S.JRE-1.8_10.1.0+4.2e1243.tgz" \
--set protector.policy.cadence="60" \
--set protector.policy.host="test-kms-v1-kmsproxy.v1.svc" \
--set protector.policy.certificates="common-certs-v1" \
--set protector.logs.mode="error" \
--set protector.logs.host="test-logforwarder-v1.v1.svc" \
--set service.type="LoadBalancer" \
--set springappService.type="LoadBalancer"
--set springappService.annotations."service\.beta\.kubernetes\.io\/aws-load-balancer-internal"=\"true\"
ii. Run the following command to get the deployment details.
kubectl get deployment -n v1
The following output appears.
NAME READY UP-TO-DATE AVAILABLE AGE
test-static-10-v1-iap-java-static 1/1 1 1 25h
test-kms-v1-kmsproxy 1/1 1 1 25h
iii. Run the following command to get the rollout status.
kubectl rollout status deployment test-static-10-v1-iap-java-static -n v1
The following output appears.
deployment "test-static-10-v1-iap-java-static" successfully rolled out
iv. Run the following command to get the pod details.
kubectl get pods -n <namespace>
The following output appears.
NAME READY STATUS RESTARTS AGE
test-static-10-v1-iap-java-static-6dcfd46c8d-dgqfv 2/2 Running 0 8h
test-logforwarder-v1-6nc8m 1/1 Running 0 8h
test-logforwarder-v1-pms6f 1/1 Running 0 8h
test-v1-kmsproxy-5f78d4f9f4-dnndb 1/1 Running 0 8h
Perform the following steps to verify the rollout upgrade.
i. Run the following command to verify that all the pods are running the new version.
kubectl get pods -n <namespace>
The following output appears.
NAME READY STATUS RESTARTS AGE
test-static-10-v1-iap-java-static-6dcfd46c8d-dgqfv 2/2 Running 0 8h
test-logforwarder-v1-6nc8m 1/1 Running 0 8h
test-logforwarder-v1-pms6f 1/1 Running 0 8h
test-v1-kmsproxy-5f78d4f9f4-dnndb 1/1 Running 0 8h
ii. Run the following command to verify the updated image tag.
kubectl describe pod <pod name> -n <namespace>
The following output appears.
Type Reason Age From Message
---- ------ ---- ---- -------
Normal Scheduled 46m default-scheduler Successfully assigned kms-v1/test-kms-v1-kmsproxy-5f78d4f9f4-cphhh to ip-10-49-5-188.ec2.internal
Normal Pulling 46m kubelet Pulling image "<AWS_ID>.dkr.ecr.us-east-1.amazonaws.com/container:KMSPROXY_RHUBI-9-64_x86-64_K8S_1.9.3.8.ec81ce.tgz"
Normal Pulled 46m kubelet Successfully pulled image "<AWS_ID>.dkr.ecr.us-east-1.amazonaws.com/container:KMSPROXY_RHUBI-9-64_x86-64_K8S_1.9.3.8.ec81ce.tgz" in 3.612s (3.612s including waiting). Image size: 40588092 bytes.
Normal Created 46m kubelet Created container: pty-kmsproxy
Normal Started 46m kubelet Started container pty-kmsproxy
iii. Run the following command to view the rollout history.
helm history <deploymentname> -n <namespace>
The following output appears.
REVISION UPDATED STATUS CHART APP VERSION DESCRIPTION
1 Mon Dec 1 09:58:30 2025 superseded kmsproxy-1.0.0 1.9.3.8.xxxxxx Install complete
2 Mon Dec 1 10:15:01 2025 deployed kmsproxy-1.0.0 1.9.3.8.xxxxxx Upgrade complete
iv. Run the following command to get the service details.
kubectl get svc -n <Namespace>
For example:
kubectl get svc -n iap-java
The following output appears.
NAME TYPE CLUSTER-IP EXTERNAL-IP PORT(S) AGE
logforwarder ClusterIP 172.20.14.88 <none> 15780/TCP 2m37s
kmsproxy ClusterIP 172.20.181.92 <none> 443/TCP 113s
test-static-10-v1-iap-java-static LoadBalancer 172.20.60.61 internal-a70jkfsdf98908.us-east-1.elb.amazonaws.com 8080:30746/TCP 24s
v. Run the following command to validate the service of the pod.
kubectl get endpoints <service-name> -n <namespace>
For example:
kubectl get endpoints test-static-10-v1-iap-java-static -n 10-v2
The following output appears.
NAME ENDPOINTS AGE
test-static-10-v1-iap-java-static 10.49.10.xxx:9080 22h
Rollback Steps
This section explains how to roll back the upgrade.
Order of Rollback
This section explains the order of rolling back an upgrade in case of dynamic and static deployments.
Roll back the Dynamic Deployment
Perform the following steps to roll back a dynamic deployment.
Roll back the Protector deployment.
Roll back the RPP deployment.
Roll back the Log Forwarder deployment.
Roll back the Static Deployment
Perform the following steps to roll back a static deployment.
Roll back the Protector deployment.
Roll back the KMS-Proxy deployment.
Roll back the Log Forwarder deployment.
Rolling Back a Deployment
If any deployment fails during the upgrade process, then the --atomic flag ensures that the deployment is automatically rolled back to the previous deployment.
If the deployment is successful, then perform the following steps to roll back the deployment. You can use these steps to roll back the Protector, RPP, KMS-Proxy, and Log Forwarder deployments.
- Run the following command to obtain the revision number of the deployment to which you want to roll back your current deployment.
helm history <deployment name> -n <namespace>
The following output appears.
REVISION UPDATED STATUS CHART APP VERSION DESCRIPTION
1 Mon Dec 1 09:58:30 2025 superseded rpproxy-1.0.0 1.9.3.8.xxxxxx Install complete
2 Mon Dec 1 10:15:01 2025 deployed rpproxy-1.0.0 1.9.3.8.xxxxxx Upgrade complete
Note down the revision number of the deployment to which you want to roll back.
- Run the following command to roll back to the specific revision number.
helm rollback <deployment name> <revision-number> -n <namespace>
- Run the following command to verify that the deployment has been rolled back to the specified revision number.
helm history <deploymentname> -n <namespace>
The following output appears.
REVISION UPDATED STATUS CHART APP VERSION DESCRIPTION
1 Mon Dec 1 09:58:30 2025 superseded rpproxy-1.0.0 1.9.3.8.xxxxxx Install complete
2 Mon Dec 1 10:15:01 2025 superseded rpproxy-1.0.0 1.9.3.8.xxxxxx Upgrade complete
3 Tue Dec 2 12:04:43 2025 deployed rpproxy-1.0.0 1.9.3.8.xxxxxx Rollback to 1
Perform the following steps to verify the deployment after rollback.
i. Run the following command to ensure that all the pods are running the previous stable version.
kubectl get pods -n <namespace>
The following output appears for the dynamic deployment.
NAME READY STATUS RESTARTS AGE
test-dynamic-10-v1-iap-java-dynamic-6dcfd46c8d-dgqfv 2/2 Running 0 8h
test-logforwarder-v1-6nc8m 1/1 Running 0 8h
test-logforwarder-v1-pms6f 1/1 Running 0 8h
test-v1-rpproxy-5f78d4f9f4-dnndb 1/1 Running 0 8h
The following output appears for the static deployment.
NAME READY STATUS RESTARTS AGE
test-static-10-v1-iap-java-static-6dcfd46c8d-dgqfv 2/2 Running 0 8h
test-logforwarder-v1-6nc8m 1/1 Running 0 8h
test-logforwarder-v1-pms6f 1/1 Running 0 8h
test-v1-kmsproxy-5f78d4f9f4-dnndb 1/1 Running 0 8h
ii. Run the following command to verify the pod details.
kubectl describe pod <pod name> -n <namespace>
The following output appears if you run the kubectl describe pod command for dynamic deployment.
spring-apjava-dynamic:
Container ID: containerd://37855b0e6dc0387215b03d3aeac6676479225cbb1b5a84556c41e160743145eb
Image: <aws_account_id>.dkr.ecr.us-east-1.amazonaws.com/container:APJAVA_RHUBI_SAMPLE-10-v10-1-5
The following output appears if you run the kubectl describe pod command for static deployment.
spring-apjava-devops:
Container ID: containerd://37855b0e6dc0387215b03d3aeac6676479225cbb1b5a84556c41e160743145eb
Image: <aws_account_id>.dkr.ecr.us-east-1.amazonaws.com/container:APJAVA_RHUBI_SAMPLE-10-v10-1-5
7.8 - Using Dockerfiles to Build Custom Images
Protegrity base images use the default RHEL Universal Base Image. Using Dockerfiles, you can use a base image of your choice.
To create custom image:
Download the installation package.
For more information about downloading the installation package, refer to the section Extracting the Installation Package.
Important: The dependency packages required for building the Docker images are specified in the HOW-TO-BUILD file, which is a part of the installation package. You must ensure that these dependency packages can be downloaded either from the Internet or from your internal repository.
Perform the following steps to build a Docker image for the Sample Application container.
Run the following command to extract the files from the ApplicationProtector-SAMPLE-APP_SRC_<version_number>.tgz file to a directory.
tar -C <dir> ApplicationProtector-SAMPLE-APP_SRC_<version_number>.tgz
The following files are extracted:
- APJAVA_RHUBI_SAMPLE-APP_DOCKERFILE
- APJavaSetup_Linux_x64_<version_number>.tgz
- docker-entrypoint.sh
- passwd.template
- pom.xml
- libs directory - Contains the
ApplicationProtectorJava.jarfile. - src directory - Contains the source files for the Sample Application.
Perform the following steps to create an application from the source file.
- Install Maven 3.2 or later.
- Execute the following command to build the Spring application.
mvn clean install
The
apjava-springboot-0.1.0.jaris created in the./targetdirectory.Run the following command in the directory where you have extracted the contents of the ApplicationProtector-SAMPLE-APP_SRC_<version_number>.tgz file.
docker build --build-arg BUILDER_IMAGE=<Repository location of rhel ubi 9 base image> \
--build-arg BASE_MICRO_IMAGE=<Repository location of rhel ubi 9 micro base image> \
-t <image-name>:<image-tag> -f APJAVA_RHUBI_DOCKERFILE_<version_number> .
For more information the Docker build command, refer to the Docker documentation.
For more information about tagging an image, refer to the AWS documentation.
- Run the following command to list the Sample Application container image.
docker images
- Push the Sample Application container image to your preferred Container Repository.
For more information about pushing an image to the repository, refer to the section Uploading the Images to the Container Repository.
- Repeat step 2 - 3 and 5 - 7 for creating custom images for RPProxy, KMSProxy, and Log Forwarder containers and extracting the source package of the respective component.
Each extracted source package contains the corresponding Dockerfile. The steps to create custom images using the Dockerfile are same for all the images. Step 4 is not required.
7.9 - Appendix - Deploying the Helm Charts by Using the Set Argument
To deploy Helm charts using the set argument:
- Navigate to the directory where you have stored the values.yaml file for deploying the corresponding Helm chart.
- Deploy the Helm chart using the following command.
helm install <name for this helm deployment> <Location of the directory that contains the Helm chart> -n <Namespace>
--set <tag 1>="Value 1"
--set <tag 2>="Value 2"
--set <tag 3>="Value 3"
--set <tag 4>="Value 4"
For example:
helm -n devops-10-v2 install test-sampleapp-10-v1 spring-apjava-devops/
--set imagePullSecrets[0].name="regcred"
--set springappImage.repository="<AWS_ID>.dkr.ecr.us-east-1.amazonaws.com/container"
--set springappImage.tag="ApplicationProtector_RHUBI-9-64_x86-64_K8S_10.0.0.18.6a3a67.tgz"
--set policyLoaderImage.repository="<AWS_ID>.dkr.ecr.us-east-1.amazonaws.com/container"
--set policyLoaderImage.tag="POLICY-LOADER_RHUBI-9-64_x86-64_K8S_1.0.0.11.bc1967.tgz"
--set protector.kms.host="test-kms-10-v1-kms-proxy.devops-10-v2.svc"
--set protector.kms.certificates="pty-certs-cli-secret"
--set protector.logs.mode="error"
--set protector.logs.host="test-devops-logforwarder10-v1.devops-10-v2.svc"
--set policyPuller.policy.interval="30"
--set policyPuller.logs.level="DEBUG"
--set protector.policy.cadence="60"
--set policyPuller.policy.path="s3://apjavacontainer/devops-iap-java-rel-a/new-esa-10.1.0-2467/policy-py-10.1.0-2467-v1.json"
--set springappService.type="LoadBalancer"
--set springappService.annotations."service\.beta\.kubernetes\.io\/aws-load-balancer-internal"=\"true\"
Use the set arguments for deploying any Helm chart.